

Page 1
TECHNISCHES HANDBUCH
TECHNISCHES HANDBUCH
TECHNISCHES HANDBUCHTECHNISCHES HANDBUCH
TECHNICAL MANUAL
TECHNICAL MANUAL
TECHNICAL MANUALTECHNICAL MANUAL
SYSTEMBAUGRUPPE
SYSTEMBAUGRUPPE D1230
SYSTEMBAUGRUPPESYSTEMBAUGRUPPE
SYSTEM BOARD D1230
SYSTEM BOARD D1230
SYSTEM BOARD D1230SYSTEM BOARD D1230
D1230
D1230 D1230
Page 2

Sie haben ...
... technische Fragen oder Probleme?
Wenden Sie sich bitte an:
• unsere Hotline:
Mo-Fr: 9 - 18 Uhr
Sa: 9 - 14 Uhr
Tel.: ++49 (0) 180 3777 000
• Ihren zuständigen Vertriebspartner
• Ihre Verkaufsstelle
Weitere Informationen finden Sie im Handbuch "Sicherheit, Garantie und Ergonomie".
Aktuelle Informationen zu unseren Produkten, Tipps, Updates usw. finden Sie im Internet:
http://www.fujitsu-siemens.com
Are there ...
... any technical problems or other questions you need clarified?
Please contact:
• your sales partner
• your sales outlet
You will find further information in the manual "Safety, Warranty and Ergonomics".
The latest information on our products, tips, updates, etc., can be found on the Internet under:
http://www.fujitsu-siemens.com
Page 3

Page 4
Dieses Handbuch wurde auf Recycling-Papier gedruckt.
This manual has been printed on recycled paper.
Ce manuel est imprimé sur du papier recyclé.
Este manual ha sido impreso sobre papel reciclado.
Questo manuale è stato stampato su carta da riciclaggio.
Denna handbok är tryckt på recyclingpapper.
Dit handboek werd op recycling-papier gedrukt.
A26361-D1230-Z120-2-7419
Bestell-Nr./Order No.:
Printed in the Federal Republic of Germany
AG 0401 04/01
A26361-D1230-Z120-2-7419
A26361-D1230-Z120-2-7419A26361-D1230-Z120-2-7419
A26361-D1230-Z120-1-7419
Page 5

Contents
Introduction........................................................................................................................................1
Notational conventions ..............................................................................................................1
Important notes .................................................................................................................................1
Information about boards...........................................................................................................2
Features............................................................................................................................................3
Interfaces and connectors .........................................................................................................4
Temperature / System monitoring..............................................................................................5
LAN connector...........................................................................................................................6
PCI bus resources ..................................................................................................................... 7
PCI slots............................................................................................................................7
PCI IRQ line x - Assignment of the PCI interrupts..............................................................7
Screen resolution.......................................................................................................................8
Settings with switches ...............................................................................................................9
RecoveringSystem BIOS - switch 2..........................................................................................9
Write protection for floppy disks - switch 3.................................................................................9
WriteprotectionforFlashBIOS-switch4.................................................................................9
Processor's clock speed............................................................................................................9
Add-on modules ..............................................................................................................................10
Slot sequence..........................................................................................................................11
Upgrading main memory..........................................................................................................11
Replacing the lithium battery....................................................................................................13
Glossary ..........................................................................................................................................14
A26361-D1230-Z120-1-7419
Page 6

Page 7
Introduction
This Technical Manual describes the system board D1230, which can be equipped with up to four
Intel processors.
You will find further information in the "BIOS Setup" description.
Further information about drivers is provided in the readme files on the hard disk, on the supplied
drivers diskettes, on the "Drivers & Utilities" or on the "ServerStart" CD.
Notational conventions
The meanings of the symbols and fonts used in this manual are as follows:
Pay particular attention to text marked with this symbol. Failure to observe this warning
endangers your life, destroys the device, or may lead to loss of data.
!
Supplementary information, remarks, and tips follow this symbol.
i
Ê Text which follows this symbol describes activities that must be performed in the order shown.
Ë This symbol indicates that you must enter a blank space (press the Space Bar) at this point.
Ú
Ú This symbol indicates that you must press the Enter key.
ÚÚ
Text in this typeface indicates screen outputs.
Text in this bold typeface indicates the entries you make via the keyboard.
Text in italics indicates commands or menu items.
"Quotation marks" indicate names of chapters or terms.
Important notes
Store this manual close to the device. If you pass the device on to third parties, you should pass this
manual on with it.
Be sure to read this page carefully and note the information before you open the device.
!
You cannot access the system board components without first opening the device. How
to dismantle and reassemble the device is described in the Operating Manual
accompanying the device.
Please note the information provided in the "Safety" chapter in the device's Operating
manual.
Incorrect replacement of the lithium battery may lead to a risk of explosion. It is therefore
essential to observe the instructions in the "Add-on modules"-"Replacing the lithium
battery" section.
A26361-D1230-Z120-1-7419 English - 1
Page 8

Important notes
The shipped version of this board complies with the requirements of the EEC
directive 89/336/EEC "Electromagnetic compatibility".
Compliance was tested in a typical PC configuration.
When installing the board, refer to the specific installation information in the
Operating Manual or Technical Manual of the receiving device.
Connecting cables for peripherals must be adequately shielded to avoid interference.
Components can become very hot during operation. Ensure you do not touch
components when making extensions to the system board. There is a danger of burns!
!
The warranty is invalidated if the device is damaged during the installation or
replacement of system expansions. Information on which system expansions you can
i
use is available from your sales outlet or the customer service centre.
Information about boards
To prevent damage to the system board or the components and conductors on it, please take great
care when you insert or remove boards. Take great care to ensure that extension boards are slotted
in straight, without damaging components or conductors on the system board, or any other
components, for example EMI spring contacts.
Be especially careful with the locking mechanisms (catches, centring pins etc.) when you replace
the system board or components on it, for example memory modules or processors.
Never use sharp objects (screwdrivers) for leverage.
Boards with electrostatic sensitive devices (ESD) are identifiable by the
label shown.
When you handle boards fitted with ESDs, you must, under all
circumstances, observe the following points:
• You must always discharge static build up (e.g. by touching a grounded
object) before working.
• The equipment and tools you use must be free of static charges.
• Remove the power plug from the mains supply before inserting or
removing boards containing ESDs.
• Always hold boards with ESDs by their edges.
• Never touch pins or conductors on boards fitted with ESDs.
2 - English A26361-D1230-Z120-1-7419
Page 9

Features
Features
• two processor slots for Pentium III processors with up to 1 GHz and 100 / 133 MHz Front Side
Bus
512 Kbyte second level cache
• two 64 bit PCI slots with 66 MHz
• two 64 bit PCI slots with 33 MHz
• two 32 bit PCI slots with 33 MHz
• four DIMM slots (PC133) for up to 4 Gbyte main memory (SDRAM memory modules)
• onboard SCSI controller Ultra 160 connected to 64 bit/66MHz PCI bus with LVDS (Low Voltage
Differential) SCSI interface
• Screen controller ATI Rage XL VGA with 24 bit and 230 MHz RAMDAC
• Intel 82559GM Ethernet LAN controller with 10/100 Mbit/s
• IDE hard disk controller connected to PCI bus
ultra DMA33 mode capable, supports PIO modes 0-4
• Floppy disk drive controller (possible formats: 720 KB, 1.44 MB, 2.88 MB)
• Server management onboard with Scylla
• system monitoring
• Security functions:
− Chipcard reader interface (SmartCard reader interface)
− Cover monitoring: cover monitoring reports when the cover has been opened without
authorisation.
− Simple error detection and correction in the main memory with an ECC (only for memory
modules with ECC)
− System, Setup and Keyboard password
− parallel and serial ports can be deactivated
− Write protection for floppy disk drive
− Boot hard disk virus warning function
− Flash BIOS and EEPROMs (on the memory modules) virus protection function.
• one external parallel interface (ECP- and EPP-compatible)
• two external serial ports (COM1 and COM2)
• 1 internal chipcard reader interface (SmartCard reader interface). This interface can also be
used as a second serial port (16C550 compatible with FIFO).
• two external and one internal USB port (USB = Universal Serial Bus)
• 1 internal WOL interface
• two external PS/2 interfaces for keyboard and mouse
• Real-time clock/calendar with integrated battery backup
A26361-D1230-Z120-1-7419 English - 3
Page 10
Features
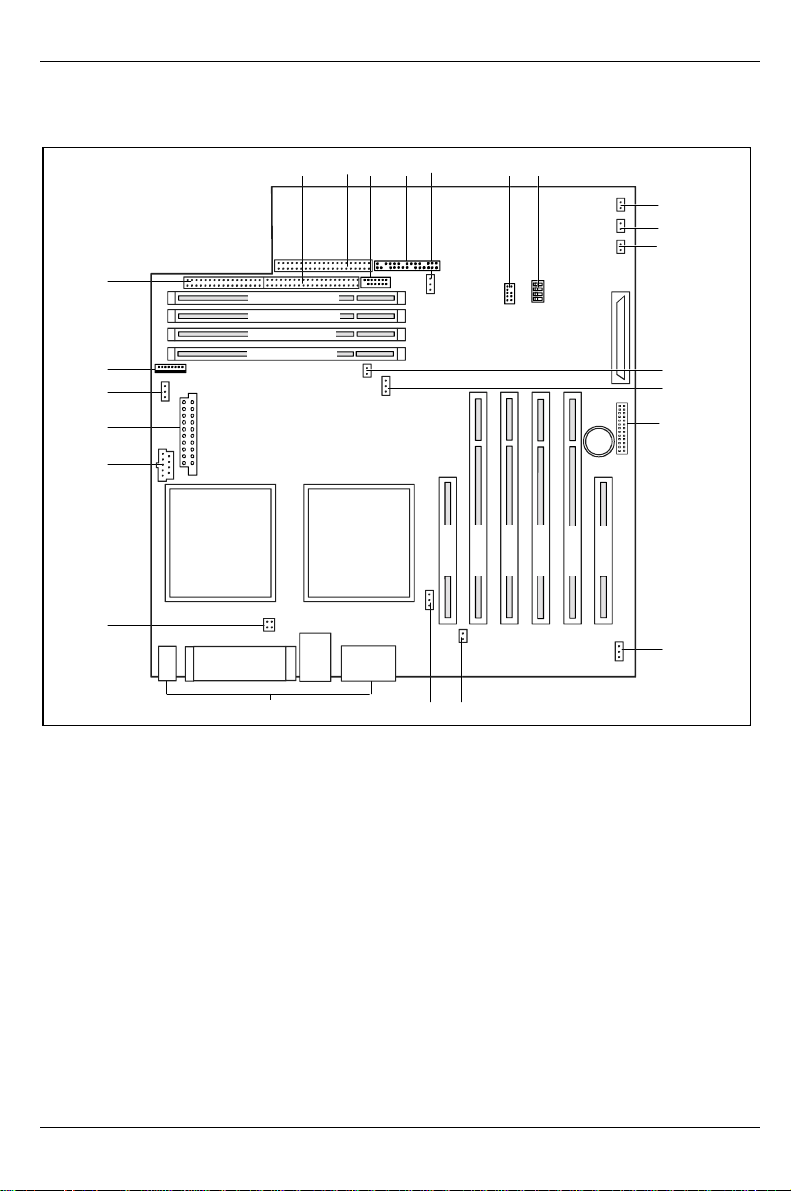
Interfaces and connectors
1234 67
23
DIMM Module 1B
DIMM Module 0B
DIMM Module 1A
DIMM Module 0A
22
21
20
19
Pentium III
CPU 0
18
17
1 = IDE drives (primary)
2 = IDE drives (primary)
3 = Serial chipcard reader (SmartCard
reader) or COM2
4 = Control panel
5= Fan(AUX)
6 = USB port
7 = Switch block
8 = Cover monitoring
9 = SMB Primary
10 = SMB Secondary
11 = NMI
12 = Fan (CPU 1)
5
PentiumIII
CPU 1
PCI Bus 6
PCI Bus 4
PCI Bus 3
PCI Bus 2
PCI Bus 5
PCI Bus 1
1516
13 = Connector for RSB (Remote Service Board)
14 = Wake On LAN (WOL)
15 = Power supply RSB
16 = Fan (system)
17 = External ports
18 = Power supply (ATX 12 V)
19 = Power supply (ATX 3,3 V)
20 = Power supply (ATX)
21 = Fan (CPU 0)
22 = Power supply monitoring
23 = Port for floppy disk drive
8
9
10
11
12
13
14
4 - English A26361-D1230-Z120-1-7419
Page 11
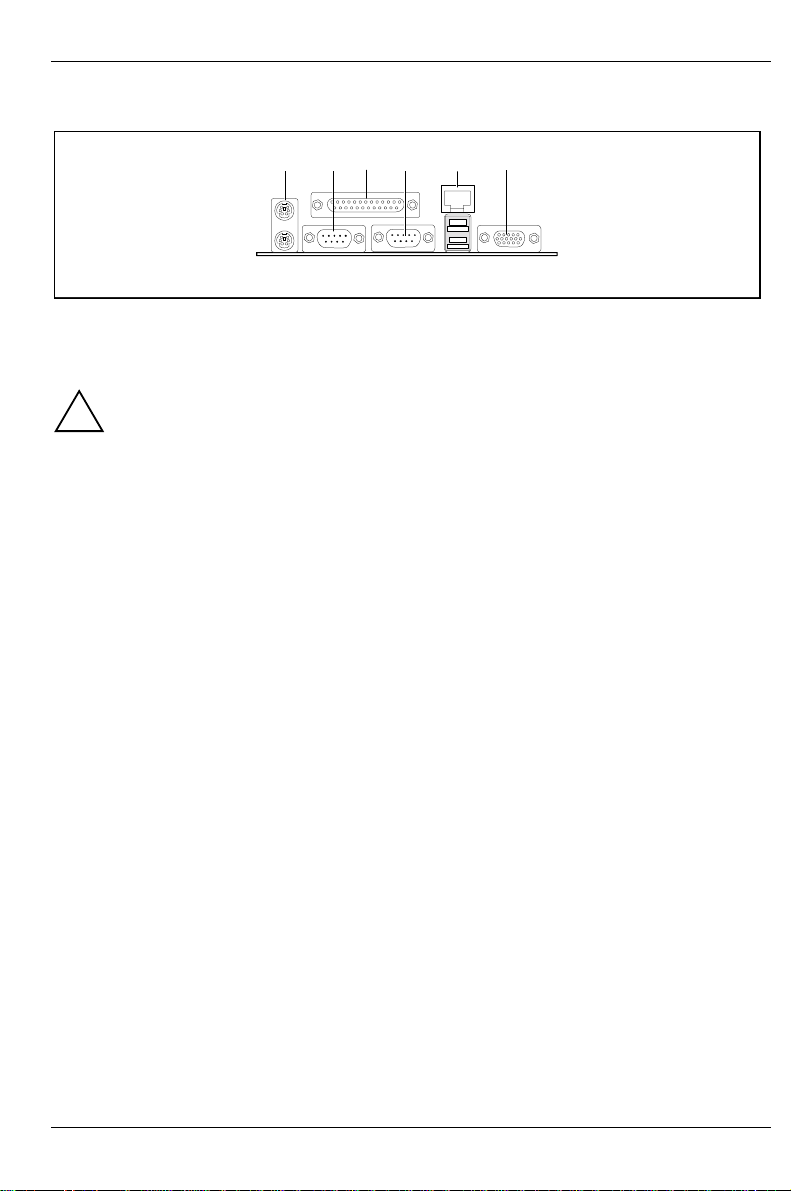
External ports
Features
1 23 4 5 6
78
1 = PS/2 mouse port
2 = Serial interface COM1
3 = Parallel port
4 = Serial port COM2
If a chipcard reader (SmartCard reader) is installed, no device may be connected to serial
interface 2 (COM2).
!
Please use the current driver from the supplied driver disk for the chipcard reader
(SmartCard reader).
5 = LAN connector
6 = VGA port
7 = USB port 1 and 2
8 = PS/2 keyboard port
Temperature / System monitoring
Temperatureand system monitoring aim to reliably protect the computer hardwareagainst damage
caused by overheating. In addition, any unnecessary noise is also prevented by reducing the fan
speed, and information is provided about the system status. Cover monitoring protects the system
from unauthorised opening.
The temperature and system monitoring are controlled by an onboard controller developed by
Fujitsu Siemens.
The following functions are supported:
Temperature monitoring:
Measurement of the processor temperature, measurement of the system temperature with an
onboard temperature sensor, measurement of the ambient temperature with an optional temperature
sensor.
Fan monitoring:
Fans that are no longer available, blocked or sticky fans are detected. Blocked or sticky fans are
operated with 12 V pulse voltage. Fans removed while the system is switched off are signaled by
the Display news LED when the system is switched on again and processed by the BIOS or the
application.
Fan control:
The fans are regulated according to temperature (exception: auxiliary fan (AUX)).
Sensor monitoring:
The removal of, or a fault in, a temperature sensor is detected. Should this happen all fans
monitored by this sensor run at maximum speed, to achieve the greatest possible protection of the
hardware. Temperature sensors removed while the system is switched off are signaled by the
Display news LED and processed by the BIOS or the application.
A26361-D1230-Z120-1-7419 English - 5
Page 12
Features
Cover monitoring:
Unauthorised opening of the cover is detected, even when the system is switched off. However, this
will only be indicated when the system is switched on again.
LAN connector
This system board has an optional Intel 82559 LAN controller. The LAN controller is equipped with a
3 KB transmission and receiving buffer (FIFO) and supports WOL function through Magic Packetä.
It is also possible to boot a device without its own boot hard disk via LAN. Here Bootix LAN BootP
and Intel PXE are supported.
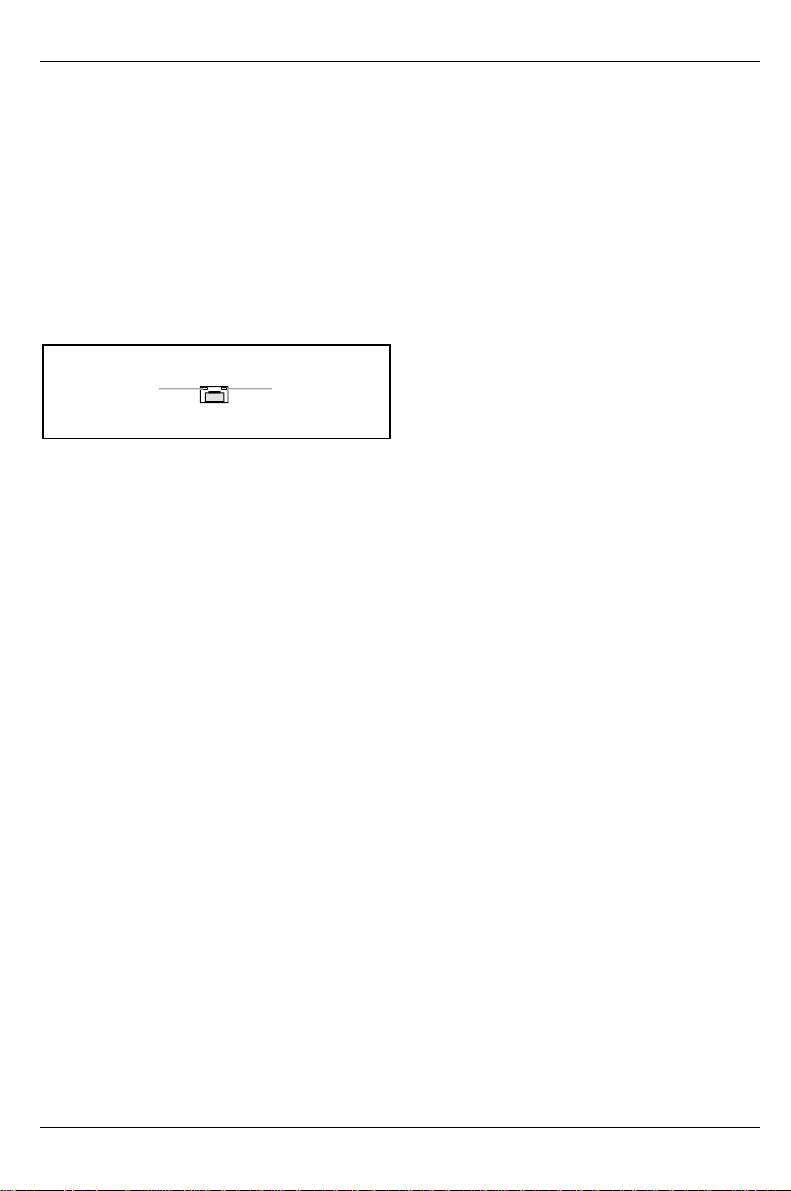
The LAN RJ45 connector is equipped with a yellow and a green LED (light emitting diode).
1 = Yellow indicator
12
Green a connection exists (e.g. to a hub).
Yellow Link Mode: the LAN connection is active.
WOL mode: a Magic Packet
2 = Green indicator
TM
is being received.
6 - English A26361-D1230-Z120-1-7419
Page 13
Features
PCI bus resources
PCI slots
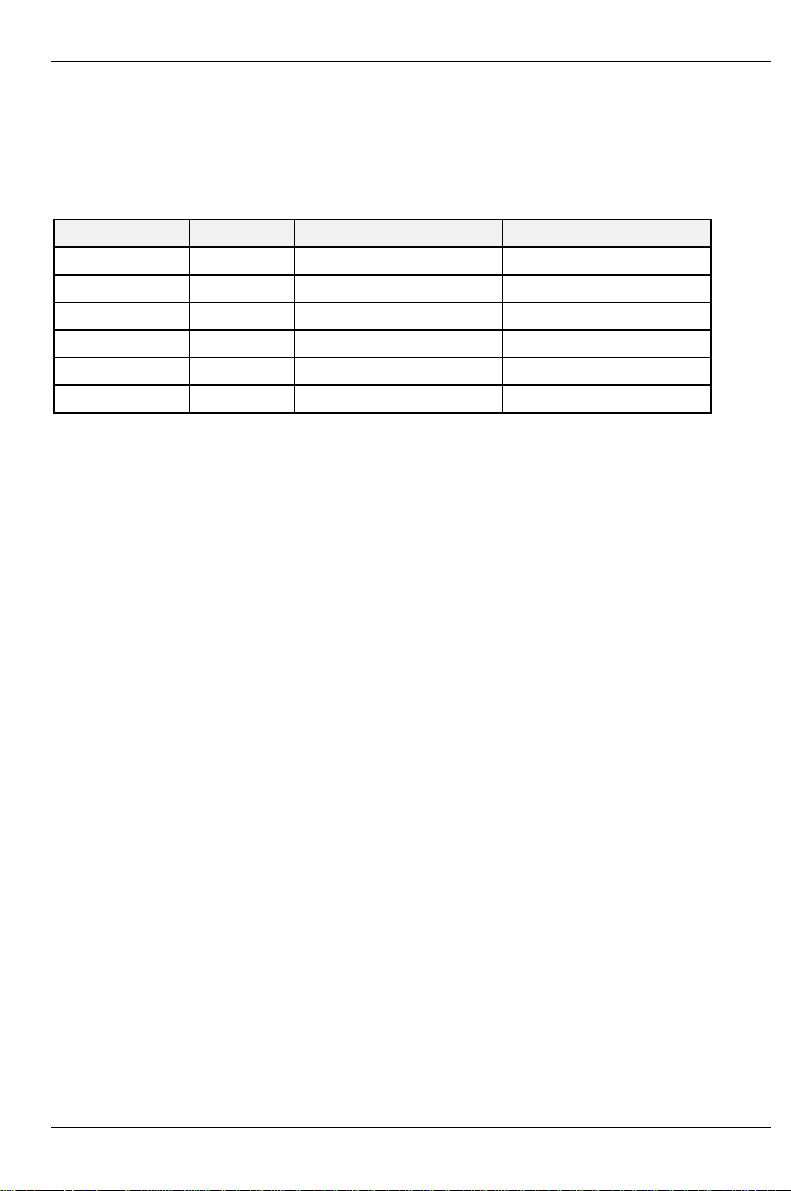
The following table shows an overview of the PCI slots:
PCI slot 64bit/32bit Description Bus frequency
6 32 bit 32 bit PCI bus slot 33 MHz / 5 V
5 64 bit 64 bit PCI bus slot 33 MHz / 5 V
4 64 bit 64 bit PCI bus slot 33 MHz / 5 V
3 64 bit 64 bit PCI bus slot 66 MHz / 3.3 V
2 64 bit 64 bit PCI bus slot 66 MHz / 3.3 V
1 32 bit 32 bit PCI bus slot 33 MHz / 5 V
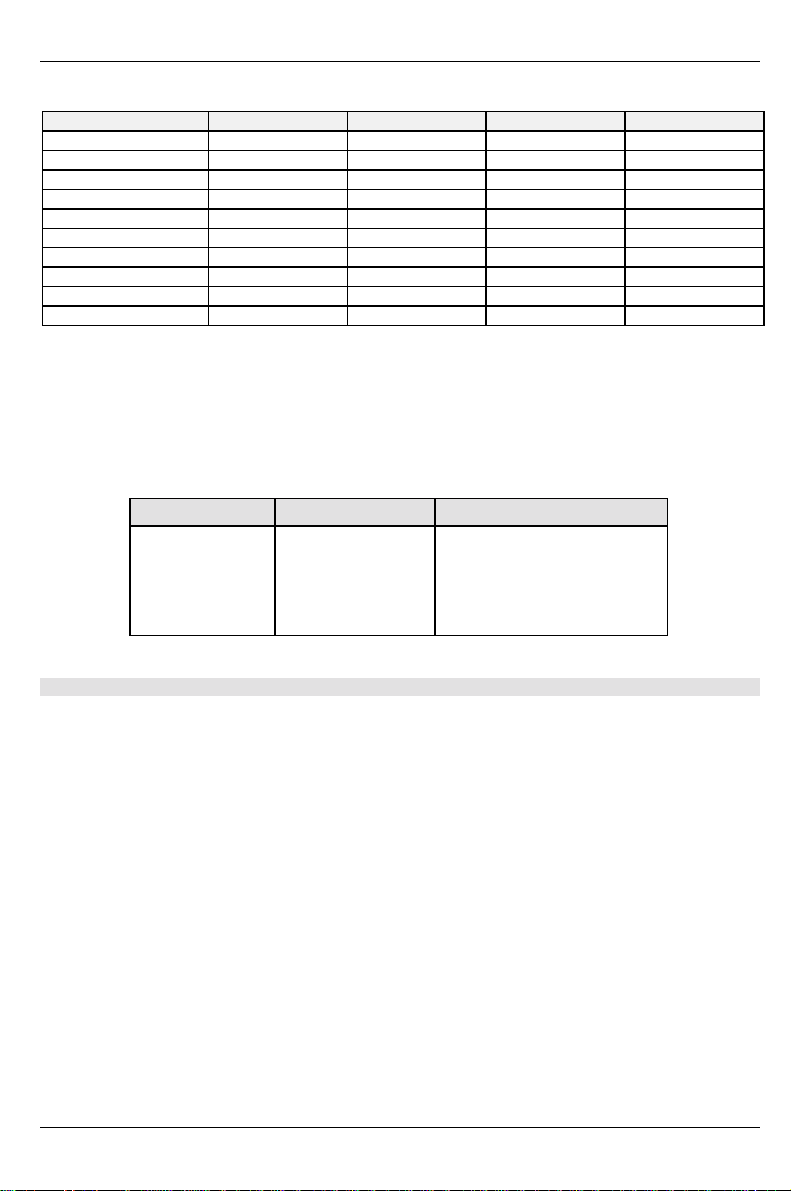
PCI IRQ line x - Assignment of the PCI interrupts
PCI IRQ Line x defines which ISA interrupts are used for the separate PCI slots.
If you select Auto in the BIOS setup, the interrupts are assigned automatically and no further
settings are required.
Multifunctional PCI boards or boards with an integrated PCI-to-PCI bridge can use several PCI
interrupts (INTA#, INTB#, INTC#, INTD#). Monofunctional PCI boards (default) only use one PCI
interrupt (INTA#) per PCI slot.
The PCI interrupts INTA#, INTB#, INTC# and INTD# are available for every PCI slot.
The same interrupt can be assigned simultaneously to several PCI boards. You should avoid this
condition due to reduced performance.
If you use a setting other than Auto, the Plug&Play functionality of the system BIOS for the
corresponding PCI boards is deactivated.
Auto The PCI interrupts are assigned automatically in accordance with the Plug&Play
Disabled No ISA interrupt is assigned to the PCI interrupt.
3, 4, 5, 7, 10, 11, 12, 14, 15
guidelines.
The selected ISA interrupt is assigned to the PCI interrupt. You may not select an
ISA interrupt that is used by a component on the system board (e.g. controller) or an
ISA board.
A26361-D1230-Z120-1-7419 English - 7
Page 14
Features
Slot 1 PCI IRQ line 0 PCI IRQ line 1 PCI IRQ line 2 PCI IRQ line 3
Slot 2 PCI IRQ line 4 PCI IRQ line 5 PCI IRQ line 6 PCI IRQ line 7
Slot 3 PCI IRQ line 6 PCI IRQ line 7 PCI IRQ line 4 PCI IRQ line 5
Slot 4 PCI IRQ line 8 PCI IRQ line 9 PCI IRQ line 10 PCI IRQ line 11
Slot 5 PCI IRQ line 10 PCI IRQ line 11 PCI IRQ line 8 PCI IRQ line 9
Slot 6 PCI IRQ line 2 PCI IRQ line 3 PCI IRQ line 0 PCI IRQ line 1
VGA PCI IRQ line 12 - - SCSI PCI IRQ line 13 - - LAN PCI IRQ line 14 - - USB PCI IRQ line 12 - - -
A..D = Interrupt output of the PCI controller
A B C D
Screen resolution
Depending on the operating system used, the screen resolutions in the following table refer to the
system board screen controller. If you are using an external screen controller, you will find details of
supported screen resolutions in the Operating Manual or Technical Manual supplied with the
controller.
Screen resolution Refresh rate (Hz) Max. number of colours
640x480 200 16.7 mio.
800x600 200 16.7 mio.
1024x768 150 16.7 mio.
1057x864 120 16.7 mio.
1280x1024 100 16.7 mio.
1600x1200 75 16.7 mio.
** Horizontal values tolerance ±0.3 kHz.
Shaded screen resolutions are not supported by LCD monitors (TFT).
8 - English A26361-D1230-Z120-1-7419
Page 15
Features
Settings with switches
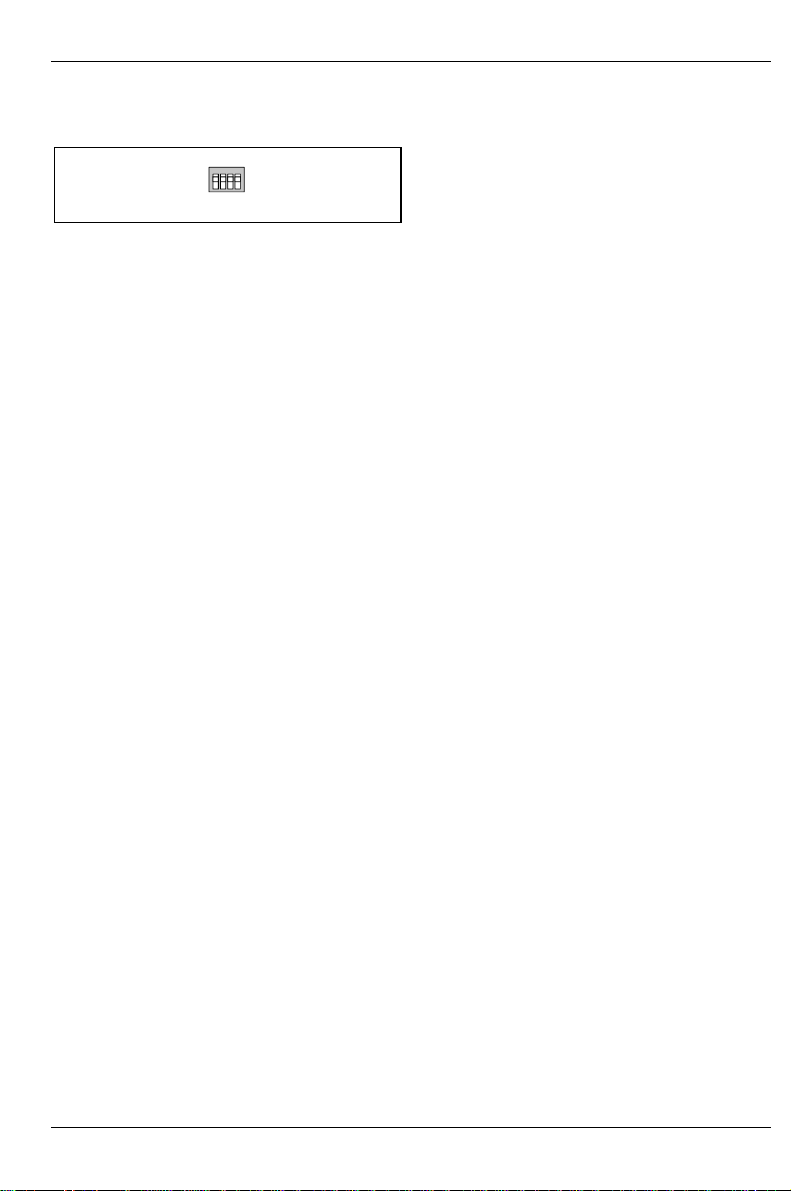
1234
ON
Switch 1 = must always be set to off
Switch 2 = System BIOS recovery
Switch 3 = Write-protection for floppy disk
Switch 4 = Write-protection for Flash BIOS
Recovering System BIOS - switch 2
Switch 2 enables recovery of the old system BIOS after an attempt to update has failed. To restore
the old system BIOS you need a Flash BIOS Diskette (please call our customer service centre).
on The system boots from the "Flash BIOS floppy disk" from Drive A and reprogrammes
off TheSystem BIOS is started with the system BIOS from the system board (default
the system BIOS on the board.
setting).
Write protection for floppy disks - switch 3
Switch 3 is used to define whether floppy disks can be written or deleted in the floppy disk drive. To
write and delete floppy disks, the write-protectionin BIOS Setup must be disabled (in menu Security,
the field Diskette Write must be set to Enabled).
on The floppy disk drive is write-protected.
off Floppy disks can be read, written and deleted (default setting).
Write protection for Flash BIOS - switch 4
Switch 7 is used to define whether the System BIOS is write protected or not.
on The System BIOS can neither be written to nor deleted. Flash-BIOS update from
off The System BIOS can be written or deleted. Flash-BIOS update from floppy disk is
floppy disk is not possible (default setting).
possible
Processor's clock speed
The clock frequency of the processor is set automatically. It cannot be changed manually. If both
processors have different Front Side Bus frequences the system hangs.
A26361-D1230-Z120-1-7419 English - 9
Page 16
Add-on modules
Add-on modules
For all steps described in this chapter pull the power plug out of the mains outlet!
!
6
5
4
3
DIMM Module 1B
DIMM Module 0B
DIMM Module 1A
DIMM Module 0A
7
8
2
Pentium III
CPU 0
1
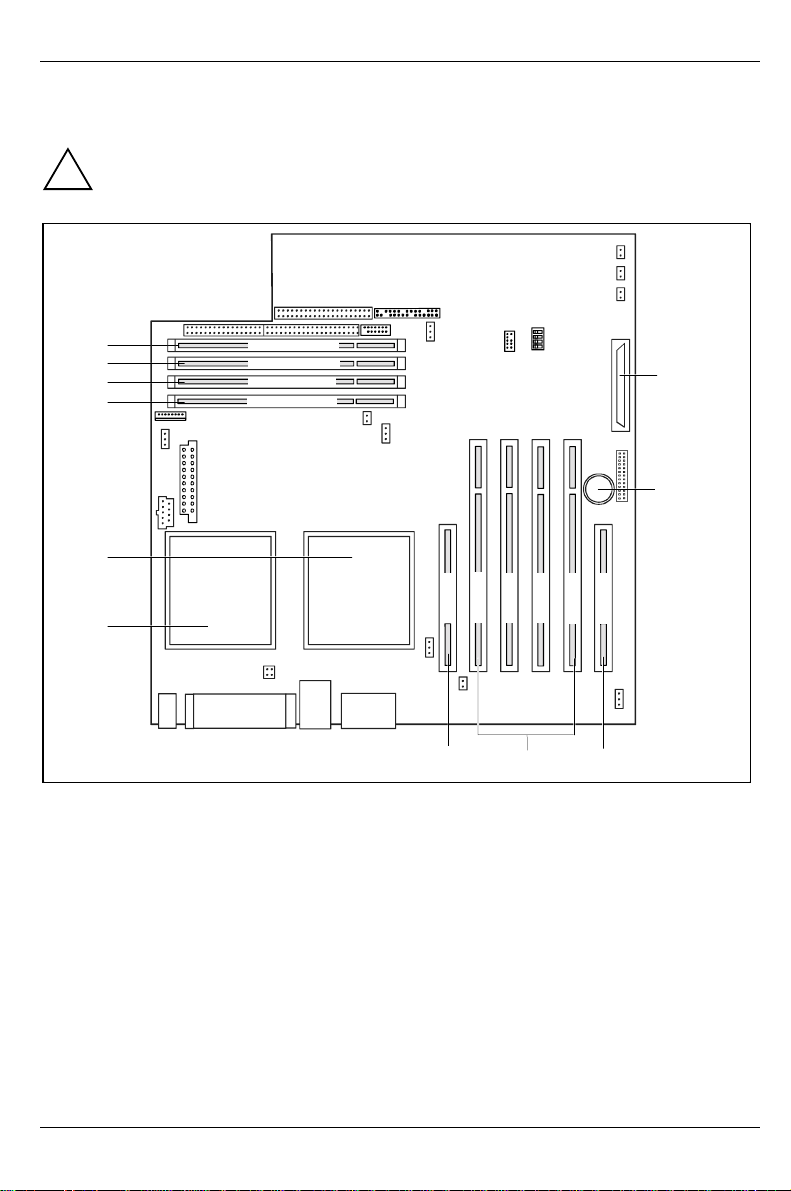
1 = Socket for processor 1 (CPU 0)
2 = Socket for processor 2 (CPU 1)
3 = Location 0A for main memory (bank 0)
4 = Location 1A for main memory (bank 1)
5 = Location 0B for main memory (bank 0)
PentiumIII
CPU 1
PCI Bus 6
PCI Bus 4
PCI Bus 5
10
7 = SCSI connection
8 = Lithium battery
9= PCIslot1
10 = PCI slots 2 -5
11 = PCI slot 6
PCI Bus 3
PCI Bus 2
PCI Bus 1
911
6 = Location 1B for main memory (bank 1)
PCI slots PCI 2 and PCI 3 support 3.3 V operation and auxiliary voltages. PCI slots PCI 1, PCI 4,
PCI 5, PCI 6 and PCI 7 support 5 V operating voltage.
10 - English A26361-D1230-Z120-1-7419
Page 17
Add-on modules
Slot sequence
• Insert 64 bit / 66 MHz adapter preferably into PCI slots 2, 3.
• Insert 64 bit / 33 MHz adapter preferably into PCI slots 4, 5.
• Insert 32 bit / 33 MHz adapter preferably into PCI slots 1, 6.
Take special care to the coding of the PCI slot and the adapter when you select a PCI
slot.
!
Upgrading main memory
These slots are suitable for DIMM format 256, 64, 128, 512 and 1024 MB SDRAM memory
modules. The board supports a maximum of 4 Gbytes.
In other words, you fit the first pair to bank 0, and the second pair in bank 1. One memory bank
must always be fully equipped with memory modules of the same type.
You may only use buffered 3.3V memory modules. Unbuffered memory modules are not
permitted. You may only use unstacked modules.
!
SDRAM memory modules must be designed for a clock frequency of 100 / 133 MHz
(meets PC133 specification).
Installing a memory module
2
2
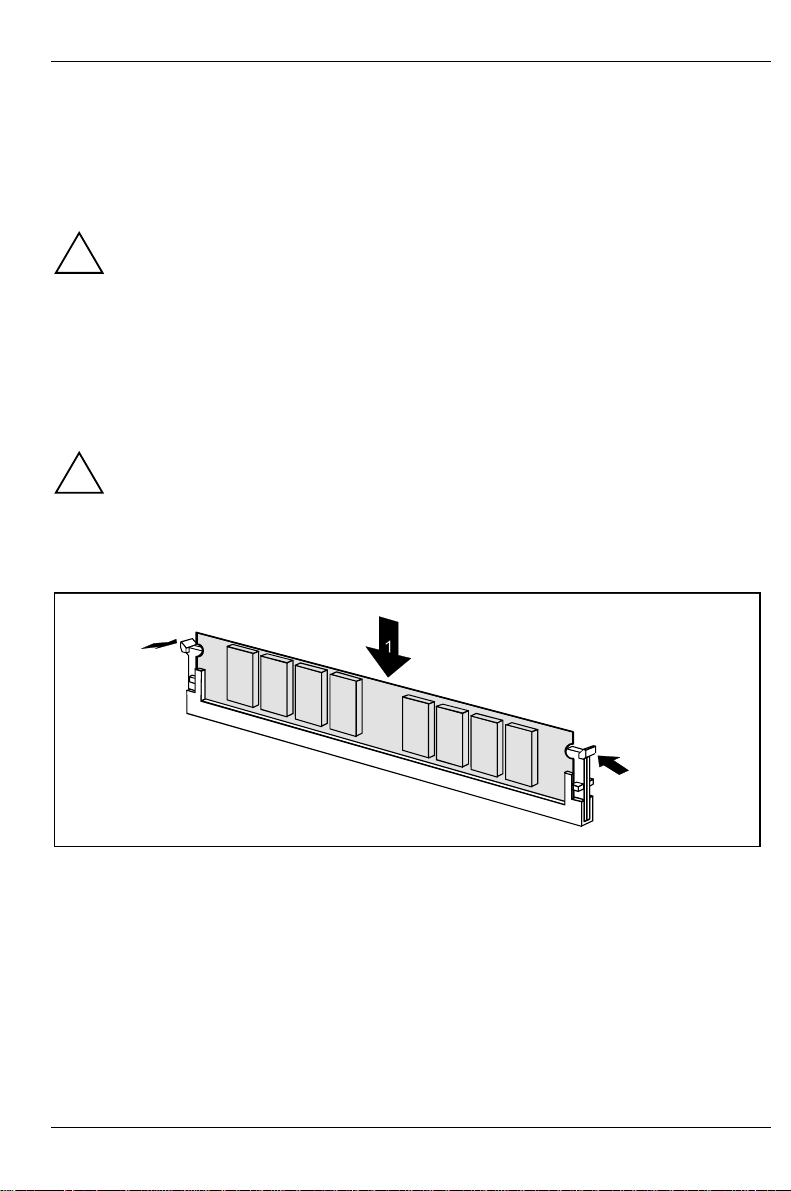
Ê Push the holders on each side of the memory compartment outwards.
Ê Insert the memory module in the slot while folding the side holders up until the memory module
engages (2).
A26361-D1230-Z120-1-7419 English - 11
Page 18
Add-on modules
Removing a memory module
1
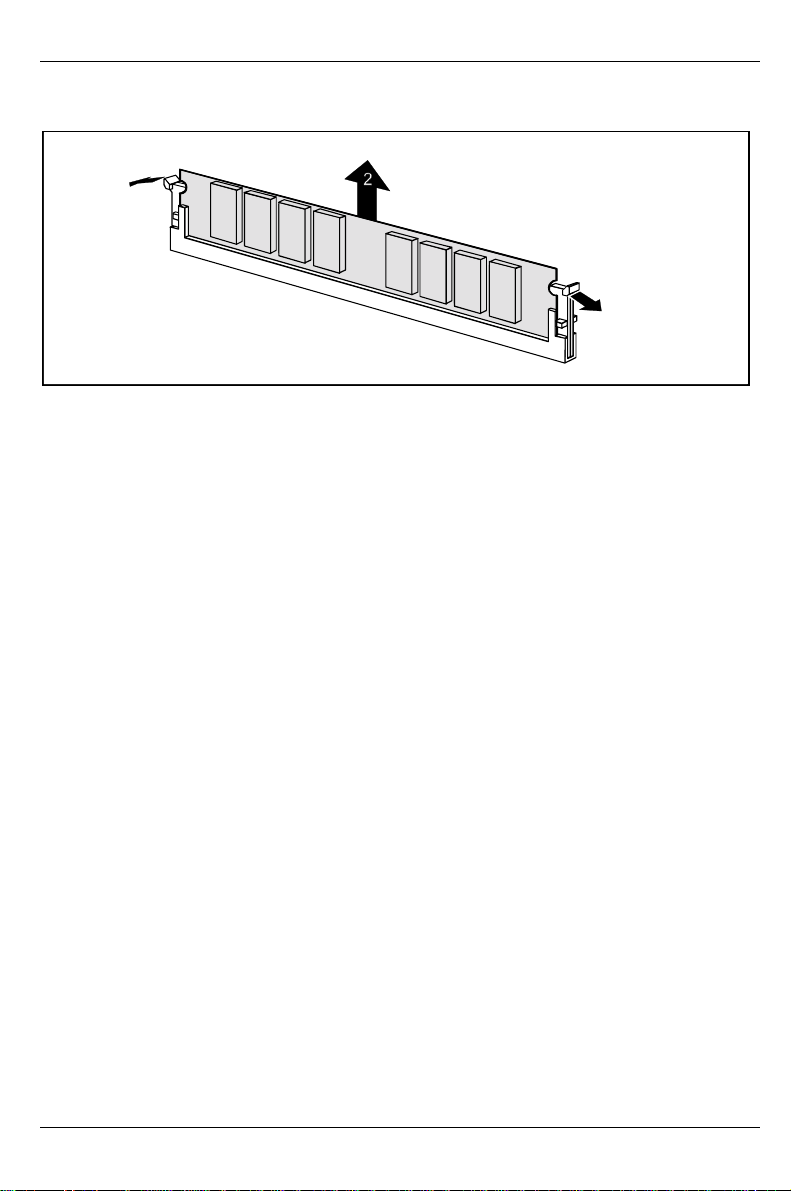
Ê Push the clips on the right and left of the compartment outward (1).
Ê Carefully remove the memory module from the compartment (2).
1
12 - English A26361-D1230-Z120-1-7419
Page 19
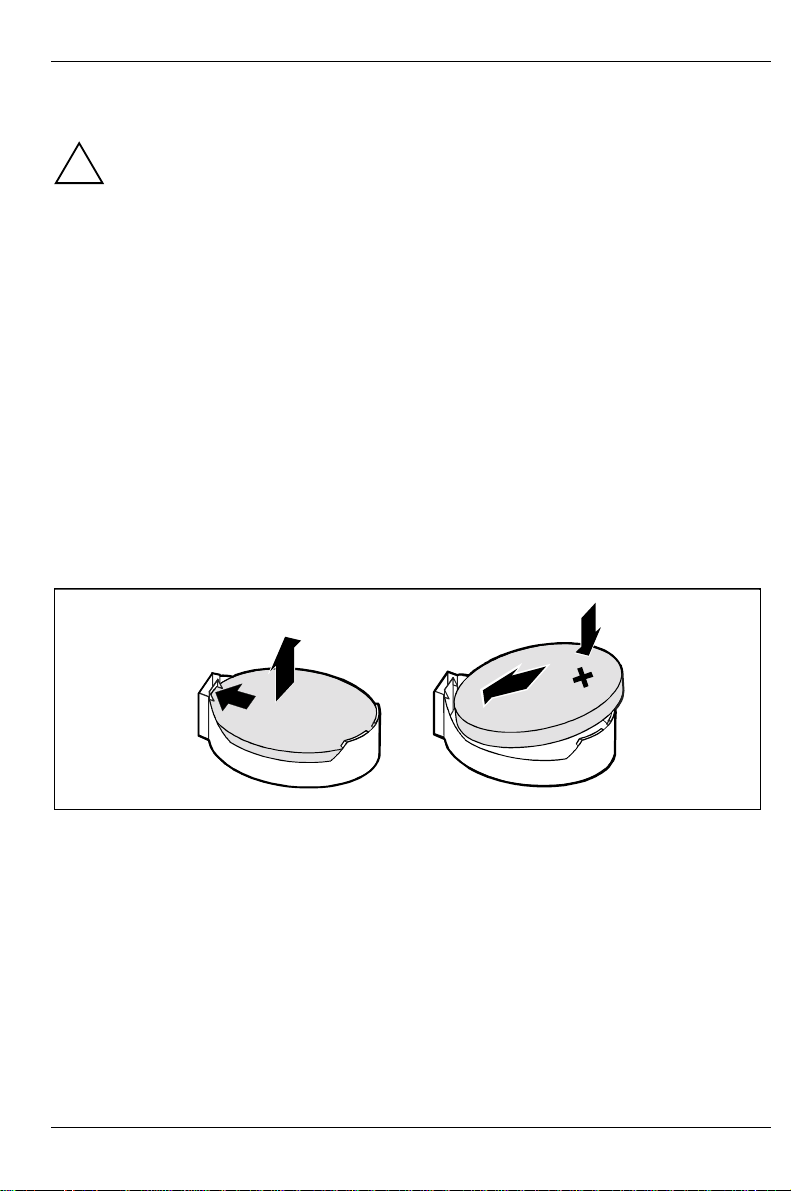
Replacing the lithium battery
Incorrect replacement of the lithium battery may lead to a risk of explosion.
!
The lithium battery must be replaced with an identical battery or a battery type
recommended by the manufacturer (CR2032).
Do not throw lithium batteries into the household waste. They must be disposed of in
accordance with local regulations concerning special waste.
Ensure that you insert the battery the right way round. The plus pole must be on the top!
• VAROITUS
Paristo voi räjähtää, jos se on virheellisesti asennettu. Vaihda paristo ainoastaan
laitevalmistajan suosittelemaan tyyppiin. Hävitä käytetty paristo valmistajan ohjeiden
mukaisesti.
• VARNING
Explosionsfara vid felaktigt batteribyte. Använd samma batterityp eller en ekvivalent
typ som rekommenderas av apparattillverkaren. Kassera använt batteri enligt
fabrikantens instruktion.
• ADVARSEL
Lithiumbatteri - Explosionsfare ved fejlagtig håndtering. Udskiftning må kun ske med
batteri af samme fabrikat og type. Lever det brugte batteri tilbage til leverandøren.
• ADVARSEL
Explosionsfare ved feilaktig skifte av batteri. Benytt samme batteritype eller en
tilsvarende type anbefalt av apparatfabrikanten. Brukte batterier kasseres i henhold
til fabrikantens instruksjoner.
Add-on modules
4
2
1
3
+
Ê Lift the contact (1) a few millimetres and remove the lithium battery from its socket (2).
Ê Insert a new lithium battery of the same type into the socket (3).
A26361-D1230-Z120-1-7419 English - 13
Page 20
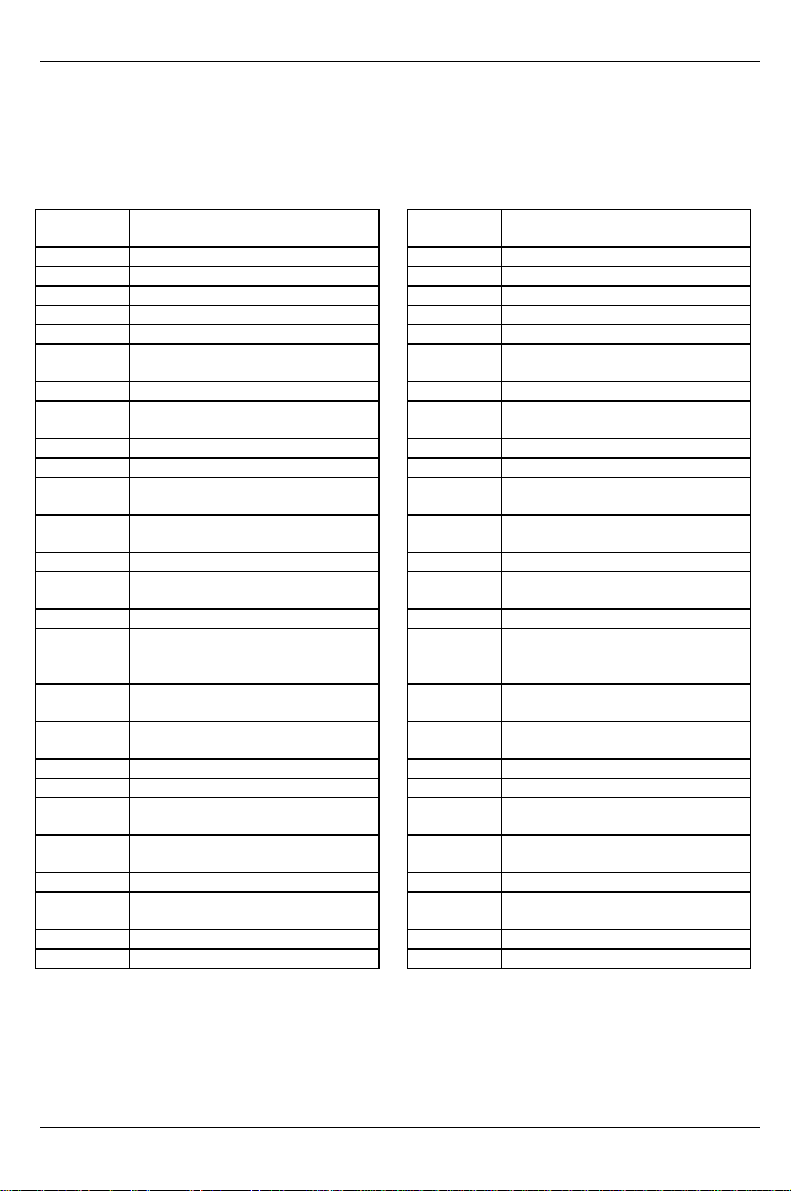
Glossary
Glossary
The technical terms and abbreviations given below represent only a selection of the full list of
common technical terms and abbreviations.
Not all technical terms and abbreviations listed here are valid for the described system board.
ACPI Advanced Configuration and
Power Management Interface
AC'97 Audio Codec '97 ISA Industrial Standard Architecture
AGP Accelerated Graphics Port LAN Local Area Network
AMR Audio Modem Riser LSA LAN Desk Service Agent
AOL Alert On LAN MCH Memory Controller Hub
APM Advanced Power Management MMX MultiMedia eXtension
ATA Advanced Technology
Attachment
BIOS Basic Input Output System P64H PCI64 Hub
CAN Controller Area Network PCI Peripheral Component
CPU Central Processing Unit PXE Preboot eXecution Environment
CNR Communication Network Riser RAM Random Access Memory
C-RIMM Continuity Rambus Inline
Memory Module
DDR Double Data Rate RDRAM Rambus Dynamic Random
DIMM Dual Inline Memory Module RIMM Rambus Inline Memory Module
DRAM Dynamic Random Access
Memory
ECC Error Correcting Code SB Soundblaster
EEPROM Electrical Erasable
Programmable Read Only
Memory
FDC Floppy Disk Controller SGRAM Synchronous Graphic Random
FIFO First-In First-Out SIMD Streaming Mode Instruction
FSB Front Side Bus SMBus System Management Bus
FWH Firmware Hub SVGA Super Video Graphic Adapter
GMCH Graphics and Memory Controller
Hub
GPA Graphics Performance
Accelerator
I2C Inter Integrated Circuit WOL Wake On LAN
IAPC Instantly Available Power
Managed Desktop PC Design
ICH I/O Controller Hub
IDE Intelligent Drive Electronics
IPSEC Internet Protocol Security
NIC Networking Interface Card
Interconnect
RAMDAC Random Access Memory Digital
Analogue Converter
Access Memory
RTC Real Time Clock
SDRAM Synchronous Dynamic Random
Access Memory
Access Memory
(Single Instruction Multiple Data)
USB Universal Serial Bus
VGA Video Graphic Adapter
14 - English A26361-D1230-Z120-1-7419
 Loading...