

Page 1

FUJITSU SEMICONDUCTOR
CONTROLLER MANUAL
S
OFTUNE
C CHECKER MANUAL
CM81-00304-5E
FR/F2MC FAMILY
for V3
Page 2

Page 3

S
OFTUNE
FR/F2MC FAMILY
C CHECKER MANUAL
for V3
FUJITSU LIMITED
Page 4

Page 5

PREFACE
■ Objectives
Thank you for purchasing the C checker, Softune C Checker.
The C checker, Softune C Checker (referred to as the C Checker in the remainder of this
manual), is a built-in development support tool that accepts source programs written in C as
input and points out coding errors as well as lines where performance can be improved.
The Softune C Checker runs on Windows XP, Windows Me, Windows 2000, Windows 98 and
Windows NT 4.0.
This manual is written for those who wish to use this system to check C source programs.
This system can check those C source programs that conform to the "American National
Standard for Information System Programming Language C, X3.159-1989" (referred to as the
ANSI standard in the remainder of this manual).
Readers of this manual require familiarity with the basic operation of Windows XP, Windows Me,
Windows 2000, Windows 98 or Windows NT 4.0 as well as the basic knowledge of the C
language specifications.
For an explanation of the C language specifications, see the "Programming Language C JIS X
3010-1993" or any other book on C conforming to the ANSI standard.
■ Trademarks
SOFTUNE is a trademark of FUJITSU LIMITED.
Microsoft, Windows, and Windows NT are registered trademarks of Microsoft Corporation in the
U.S. and other countries.
The names of products and systems appearing in this manual are trademarks or registered
trademarks of their respective companies.
■ Configuration of this manual
To get an overview of this system, read Chapter 1, "Overview."
To learn how to use this system to check a source program, read Chapter 2, "Checking
Procedures."
To learn how to set the check conditions for the source program to be checked, read Chapter 3,
"Setting up Check Options."
To learn how to handle the source program file to be checked, read Chapter 4, "File," Chapter 5,
"Edit," and Chapter 6, "Search."
To learn how to display and manipulate windows, read Chapter 7, "View" and Chapter 12,
"Window."
To learn how to manage source program projects, read Chapter 8, "Project."
To learn how to display and manipulate diagnostic messages, read Chapter 9, "Message."
To learn how to compile source programs, read Chapter 10, "Compile."
To learn how to set the compiler environment, read Chapter 11, “Setup.”
To learn how to manipulate help files, read Chapter 13, "Help."
i
Page 6

This manual consists of the following twelve chapters:
Chapter 1 Overview
This chapter provides an overview of using the C Checker to check C source programs.
Chapter 2 Checking Procedures
This chapter explains the procedures required to use the C Checker to check a C source
program.
Chapter 3 Setting up Check Options
This chapter explains how to set up check conditions.
Chapter 4 File
This chapter explains how to manipulate files.
Chapter 5 Edit
This chapter explains how to use the Edit menu.
Chapter 6 Search
This chapter explains how to use the Search menu.
Chapter 7 View
This chapter explains the View menu.
Chapter 8 Project
This chapter explains how to create and manipulate projects.
Chapter 9 Message
This chapter explains how to display and manipulate diagnostic messages.
Chapter 10 Compile
This chapter explains how to compile programs.
Chapter 11 Setup
This chapter explains the setup operation.
Chapter 12 Window
This chapter explains how to display and manipulate windows.
Chapter 13 Help
This chapter explains how to display and manipulate help files.
Chapter 14 Sorting of the Diagnostic Message
This chapter explains how to sort and manipulate diagnostic message.
ii
Page 7

■ Related manual
When using this system, refer to the following manual as required:
• “FR/F
2
MC Family Softune C Compiler Manual”
The contents of this document are subject to change without notice. Customers are advised to consult
•
with FUJITSU sales representatives before ordering.
The information and circuit diagrams in this document are presented as examples of semiconductor
•
device applications, and are not intended to be incorporated in devices for actual use. Also, FUJITSU is
unable to assume responsibility for infringement of any patent rights or other rights of third parties arising
from the use of this information or circuit diagrams.
The products described in this document are designed, developed and manufactured as contemplated
•
for general use, including without limitation, ordinary industrial use, general office use, personal use, and
household use, but are not designed, developed and manufactured as contemplated (1) for use
accompanying fatal risks or dangers that, unless extremely high safety is secured, could have a serious
effect to the public, and could lead directly to death, personal injury, severe physical damage or other
loss (i.e., nuclear reaction control in nuclear facility, aircraft flight control, air traffic control, mass
transport control, medical life support system, missile launch control in weapon system), or (2) for use
requiring extremely high reliability (i.e., submersible repeater and artificial satellite).
Please note that Fujitsu will not be liable against you and/or any third party for any claims or damages
•
arising in connection with above-mentioned uses of the products.
Any semiconductor devices have an inherent chance of failure. You must protect against injury, damage
•
or loss from such failures by incorporating safety design measures into your facility and equipment such
as redundancy, fire protection, and prevention of over-current levels and other abnormal operating
conditions.
If any products described in this document represent goods or technologies subject to certain restrictions
•
on export under the Foreign Exchange and Foreign Trade Law of Japan, the prior authorization by
Japanese government will be required for export of those products from Japan.
2002 FUJITSU LIMITED Printed in Japan
iii
Page 8

Reading This Manual
■ Product name abbreviation
In this manual and this product, product names are designated as follows:
SOFTUNE is designated as Softune.
2
F
MC is designated as FFMC.
®
The Microsoft
The Microsoft
The Microsoft
the Microsoft
Windows NT 4.0.
The Microsoft
the Microsoft
the Microsoft
the Microsoft
Windows 2000.
The Microsoft
the Microsoft
Windows® 98 operating system is abbreviated to Windows 98.
®
Windows® Millennium Edition operating system is abbreviated to Windows Me.
®
Windows NT® Workstation operating system Version 4.0 and
®
Windows NT® Server network operating system Version 4.0 are abbreviated to
®
Windows® 2000 Professional operating system,
®
Windows® 2000 Server operating system,
®
Windows® 2000 Advanced Server operating system and
®
Windows® 2000 Datacenter Server operating system are abbreviated to
®
Windows® XP Professional operating system and
®
Windows® XP Home Edition operating system are abbreviated to Windows XP.
■ Note on descriptions
The figures and screen examples presented in this manual are those that appear when
Windows 98 is used. Depending on the OS, environment, machine type, and resolution, your
screen may look slightly different.
iv
Page 9

CONTENTS
CHAPTER 1 Overview ...........................................................................................................1
1.1 Softune C Checker .................................................................................................................................2
1.2 Function Outlines ....................................................................................................................................3
1.2.1 Check ................................................................................................................................................5
1.2.2 Set check conditions ..........................................................................................................................7
1.2.3 Files ...................................................................................................................................................9
1.2.4 Edit ..................................................................................................................................................11
1.2.5 Search .............................................................................................................................................12
1.2.6 View .................................................................................................................................................13
1.2.7 Project management .......................................................................................................................14
1.2.8 Diagnostic message ........................................................................................................................15
1.2.9 Compile ...........................................................................................................................................17
1.2.10 Setup ...............................................................................................................................................19
1.2.11 Window ............................................................................................................................................20
1.2.12 Help .................................................................................................................................................22
CHAPTER 2 Checking Procedures ....................................................................................23
2.1 Starting the C Checker .........................................................................................................................24
2.2 Selection of a Source File .....................................................................................................................25
2.3 Setting up Check Options .....................................................................................................................30
2.4 Starting a Check ...................................................................................................................................31
2.5 Aborting a Check ..................................................................................................................................36
2.6 Exiting from the C Checker ...................................................................................................................37
CHAPTER 3 Setting up Check Options .............................................................................39
3.1 General .................................................................................................................................................40
3.2 Include Paths ........................................................................................................................................43
3.3 Macro Definitions ..................................................................................................................................46
3.4 Suppressing Messages ........................................................................................................................49
CHAPTER 4 File ...................................................................................................................51
4.1 File Menu ..............................................................................................................................................52
4.2 Dialog Box of the [Open] Command .....................................................................................................54
4.3 Dialog Box of the [Save as] Command .................................................................................................55
4.4 Dialog Box of the [Print Set] Command ................................................................................................56
CHAPTER 5 Edit ..................................................................................................................59
5.1 Edit Menu .............................................................................................................................................60
CHAPTER 6 Search .............................................................................................................61
6.1 Search Menu ........................................................................................................................................62
6.2 Dialog Box of the [Find in Current File] Command ...............................................................................64
6.3 Dialog Box of the [Replace] Command .................................................................................................65
6.4 Dialog Box of the [Find in Files] Command ..........................................................................................66
6.5 Dialog Box of the [List Tag] Command .................................................................................................67
v
Page 10

CHAPTER 7 View ................................................................................................................69
7.1 View Menu ........................................................................................................................................... 70
7.2 Tool Bars .............................................................................................................................................. 72
7.3 Status Bar ............................................................................................................................................ 73
7.4 Project Management ............................................................................................................................ 74
7.5 Diagnostic Messages ........................................................................................................................... 76
7.6 Detailed Messages .............................................................................................................................. 78
7.7 Check Log ............................................................................................................................................ 80
7.8 Customize ............................................................................................................................................ 81
CHAPTER 8 Project ............................................................................................................ 85
8.1 Project Menu ........................................................................................................................................ 86
8.2 Creating a New Project ........................................................................................................................ 88
8.3 Renaming Projects ............................................................................................................................... 90
8.4 Loads a File into Project ...................................................................................................................... 91
CHAPTER 9 Message .........................................................................................................93
9.1 Message Menu .................................................................................................................................... 94
9.2 Detailed Messages .............................................................................................................................. 95
CHAPTER 10 Compile ........................................................................................................97
10.1 Compile Menu ...................................................................................................................................... 98
10.2 Setting up fcc911s Compiler Options ................................................................................................... 99
10.2.1 Detailed options for the fcc911s preprocessor ............................................................................. 102
10.2.2 Detailed options related to the fcc911s language specifications .................................................. 106
10.2.3 Detailed optimization options of the fcc911s compiler .................................................................. 108
10.2.4 Detailed options related to fcc911s output .................................................................................... 111
10.3 Setting up fcc907s Compiler Options ................................................................................................. 112
10.3.1 Detailed options for the fcc907s preprocessor ............................................................................. 115
10.3.2 Detailed options related to the fcc907s language specifications .................................................. 119
10.3.3 Detailed optimization options of the fcc907s compiler .................................................................. 121
10.3.4 Detailed options related to fcc907s output .................................................................................... 123
10.4 Setting up fcc896s Compiler Options ................................................................................................. 125
10.4.1 Detailed options for the fcc896s preprocessor ............................................................................. 128
10.4.2 Detailed options related to the fcc896s language specifications .................................................. 132
10.4.3 Detailed optimization options of the fcc896s compiler .................................................................. 134
10.4.4 Detailed options related to fcc896s output .................................................................................... 136
10.5 Setting up ANSI Compiler Options ..................................................................................................... 138
10.5.1 Detailed options for the ANSI preprocessor ................................................................................. 140
CHAPTER 11 Setup ..........................................................................................................145
11.1 Setup Menu ....................................................................................................................................... 146
11.2 Editor Customization .......................................................................................................................... 147
11.3 Environment of Compiler ................................................................................................................... 149
CHAPTER 12 Window .......................................................................................................151
12.1 Window Menu .................................................................................................................................... 152
vi
Page 11

CHAPTER 13 Help .............................................................................................................153
13.1 Help Menu ..........................................................................................................................................154
CHAPTER 14 Sorting of the diagnostic message ..........................................................155
14.1 Pop-up menu of the diagnostic message ...........................................................................................156
14.2 Sorting of the diagnostic message ......................................................................................................157
APPENDIX........................................................................................................................... 161
APPENDIX A Troubleshooting....................................................................................................................162
INDEX ...................................................................................................................................167
vii
Page 12

viii
Page 13

CHAPTER 1 Overview
This chapter provides an overview of using the C Checker to check C source
programs.
1.1 Softune C Checker
1.2 Function Outlines
1
Page 14

CHAPTER 1 Overview
1.1 Softune C Checker
The Softune C Checker is a tool that accepts source programs written in C as input to
point out the lines where quality and performance can be improved and to display and
to print diagnostic messages useful in software development. This tool offers
information effective for improving the efficiency of program development and object
code. This tool supports the built-in functions of C compilers for FUJITSU
microcontrollers.
■ Effects of using the Softune C Checker
The C Checker assists in meeting the following needs:
• Removes coding mistakes in early stages.
• Gives new programs a thorough review in a short time.
• Writes high-quality code (even for novices in C).
• Writes high-performance code.
• Allows non-FUJITSU CPU software resources to be used with FUJITSU CPUs.
• Understands the features of FUJITSU C compilers
2
Page 15

1.2 Function Outlines
1.2 Function Outlines
The functions provided by the C Checker are largely divided into the following groups.
This section briefly explains these groups, in the indicated order.
• Check
• Set check conditions
• File
•Edit
•Search
•View
• Project management
• Diagnostic message
• Compile
•Setup
• Window
•Help
■ Check
Contains functions for pointing out the lines with a problem found in a source program.
■ Set checking conditions
Contains functions for setting check conditions according to the purpose.
■ File
Contains functions for creating, displaying, saving, and printing files.
■ Edit
Contains functions assisting in editing a source program to reflect diagnostic results.
■ Search
Contains functions for searching for a character string through the file being edited.
■ View
Contains functions used to display a variety of windows.
■ Project management
Contains functions for managing the source programs to be checked.
■ Diagnostic message
Contains functions used to display the messages for the lines with a problem found.
■ Compile
Contains functions for compiling a source program in which diagnostic results have been
reflected.
3
Page 16

CHAPTER 1 Overview
■ Setup
Contains functions for customizing the internal editor and for setting the environment of the
compiler which has already been installed.
■ Window
Contains functions for changing the state of a window.
■ Help
Contains functions for displaying, searching for, and printing function outlines and operating
instructions.
4
Page 17

1.2 Function Outlines
1.2.1 Check
The check functions are for outputting messages calling the user's attention to the
problem lines in a source program. It contains the functions for selecting the file to be
checked and for setting up check options. These functions enable the user to easily
view the problem lines in a program, according to the purpose.
■ Files that can be checked
The C Checker can check C source files.
■ Selecting the file to be checked
Select the source file to be checked by the C Checker. A source file can be selected as
described below. A file can also be selected by using the corresponding buttons located in the
check tool bar.
❍ File being edited
A check can be performed on the active window of the file opened by the editor.
❍ Selected file in a project
A check can be performed on the file selected in the project management window.
In the project management window, select a file as described below:
• To select a single file: Click it with the left mouse button.
• To select multiple files: Press and hold down the Control key and click them with the
left mouse button; or press and hold down the Shift key and click them with the left
mouse button.
❍ All files in a project
A check can be performed on all files in a project.
5
Page 18

CHAPTER 1 Overview
■ Setting up check options
The following conditions can be set:
❍ Check mode
• Target compiler
• Chip classification
• Target MCU
❍ Language
❍ Quality
• Portability
• Extended specification
• Possibility of coding mistake
• Maintainability
• Porting mode
❍ Performance
• Architecture independent
• Architecture dependent
❍ Other options
• Include path
• Macro definition
• Suppressing messages
6
Page 19

1.2 Function Outlines
1.2.2 Set check conditions
The functions in this group are for setting check conditions. Choosing the [Set up
check options] command from the [Check] menu displays the [Set up check options]
dialog box, in which check conditions can be selected. These functions enable the user
to specify check conditions appropriate to the purpose.
■ Check mode
Select the target compiler and target MCU to be used by the C Checker.
Items that can be set are as follows:
• Target compiler (fcc911s, fcc907s, fcc896s, ANSI)
• Chip classification
• Target MCU
■ Language
The language by which the diagnostic message is displayed is shown.
The language which can be selected is only English:
■ Check classification
Select the desired check items. The following items can be selected:
• Quality (portability, extended specification, possibility of coding mistake,
maintainability, and conversion mode)
• Performance (architecture independent, architecture dependent)
■ Check option information file
The options set up in the [Set up check options] dialog box can be saved in a file by using the
[Save information file] button.
An existing check option information file can be opened by using the [Open information file]
button.
This is very useful because it enables multiple check option patterns to be stored.
The file identifier of a check option information file is “.cif.”
7
Page 20

CHAPTER 1 Overview
■ Include paths
Set up the include path of the header file used with the source file to be checked by the C
Checker.
To register an include path, enter the include path name directly in the column. Alternatively,
click the [Browse] button to display the folder browse dialog box and enter the include path.
Click the [Add] button to register the entered include path.
Registered include paths are used, starting from the uppermost one, to search for the files to be
included.
It is possible to change the order in which paths are registered and to delete registered paths.
■ Macro definitions
Set up the macro definitions used in the source file to be checked by the C Checker. To register
a macro definition, enter the macro name directly in the column. Click the [Add] button to register
the entered macro name. Registered macros are defined starting from the uppermost one. It is
possible to change the order in which the macro names are registered and to delete registered
names. If macro definitions with the same name are registered, the macro definition registered
last takes precedence.
■ Suppressing messages
Set the numbers of the messages that the C Checker is to suppress.
To suppress the message number, the check box of the number which wants to be suppressed
id checked. If the icon + in front of the check box is clicked, the suppress of a more detailed
message becomes possible.
8
Page 21

1.2 Function Outlines
1.2.3 Files
The functions in this group are for manipulating source program files. These functions
enable the user to save and print corrected source program files.
■ New
Creates a new file.
A file with no title is opened on the editor.
■ Open
Opens an existing file.
Choosing the [Open] command from the [File] menu displays the dialog box for opening a file.
From this dialog box, select the file to be opened and click the [Open] button, and the file is
opened.
Either the “*.c” or “*.*” file type can be selected so that files of that file type can be displayed.
By default, files with the “.c” file identifier are displayed.
■ Close
■ Overwrite
■ Save as
■ Print
Closes an open file.
If the open file has been modified, a confirmation message dialog box appears asking whether
the contents of the file should be saved.
Saves an open file, overwriting its previous contents. If the open file is a newly created one, the
Save as dialog box appears.
Saves an open file with a name.
In the Save as dialog box, the locations in which the file can be saved are displayed as well as
the directories and files saved in them.
Either the “*.c” or “*.*” file type can be selected so that files of that file type can be displayed.
By default, files with the “.c” file identifier are displayed.
Prints an open file.
Selecting the [Print] command from the [File] menu displays the [Print] dialog box.
In the dialog box, specify the printer to be used, printing range, number of copies, and other
detailed printing information. Then click the [OK] button, to begin printing.
■ Print preview
Displays what is to be printed in a window.
Printing can be started by selecting the [Print] dialog box from this window.
9
Page 22

CHAPTER 1 Overview
■ Recent File
Stores the names of up to five previously opened files.
If more than five files are opened, the excess names are removed from the list, beginning with
the oldest one.
■ Exit SOFTUNE C checker
Exits from the C Checker.
If any open file has not been saved, a conformation message dialog box appears asking whether
the contents of the file should be saved.
10
Page 23

1.2 Function Outlines
1.2.4 Edit
The functions in this group are for editing source programs. The cutting and pasting
operations can be performed on the file being edited. These functions enable the user
to efficiently correct the lines in the source program that require attention as indicated
by the check function.
■ Undo
Undoes the immediately preceding editing operation.
■ Redo
Redoes the immediately preceding undo operation.
■ Cut
Cuts a selected portion and copies it to the clipboard.
■ Copy
Copies a selected portion to the clipboard.
■ Paste
■ Delete
■ Select all
Pastes the contents of the clipboard to the cursor position.
Deletes a selected portion.
Selects all files.
11
Page 24

CHAPTER 1 Overview
1.2.5 Search
The functions in this group are for searching for a character string through the source
program opened on the editor. They include the functions for specifying search
conditions, setting tags during search, and jumping to tags. These functions enable
the user to efficiently search for the desired character string on the editor.
■ Search
Searches for a character string through the file being edited.
If Search is chosen, the search dialog box appears.
■ Replace
Replaces a character string in the file being edited.
If Replace is chosen, the replace dialog box appears.
■ Find in Files
Search a string on some file in the target directory.
■ Tag
■ Jump
For a search from a file, the [Find in Files] dialog box is displayed.
The following tag operations can be performed in the file being edited:
❍ Jump Tag Next (Down)
Jumps to the next tag.
❍ Jump Tag Next (Up)
Jumps to the previous tag.
❍ Add Tag (or Delete Tag)
Adds tags to or deletes tags from the line on which the cursor is positioned.
❍ Delete Tag All
Deletes all tags.
❍ List Tag
Displays a list of tags.
Note: To delete diagnostic message jump tags, use [Delete all tags].
Allows the user to select the line to jump to, from among a specified line, last line, and first line.
12
Page 25

1.2 Function Outlines
1.2.6 View
The view functions are for turning tool bars and windows on or off and for customizing
a variety of windows and the editor. These functions enable the user to change screen
settings freely.
■ Tool bars
Turns the following tool bars on or off.
• Standard tool bar
• Check tool bar
• Window state changing tool bar
• Find tool bar
■ Status bar
Turns the status bar on or off.
■ Window
■ Customize
Turns the following windows on or off:
• Project management window
• Diagnostic message window
• Check log display window
Allows customization of font type and size for the following windows. It also provides a function
which allows all windows to be reset to their standard settings.
• Project management window
• Diagnostic message window
• Check log display window
• Standard built-in editor
In addition, the editor can be customized as follows:
• Show the New Line
• Show the EOF
• Show the Ruler
• Show the Line Number
• Automatic Indent
• Show double-byte blank
• Show the Tab and Number of Tabs
• Highlighting the keywords
13
Page 26

CHAPTER 1 Overview
1.2.7 Project management
The project management functions are for managing the source program to be
checked. They include the following functions:
• Create a new project
• Use an existing project
• Create a project from Softune Workbench project file
These functions enable the user to manage source programs for all projects.
■ Project files
The file identifier for project files is “.cpj”.
■ Create a project
Creates a new project or Creates a project from Softune Workbench project file.
In the dialog box, specify the desired project name and project file folder name.
The folder browse dialog box can be displayed to specify the desired project file folder.
The dialog box for allocating networked drives can also be displayed.
In the dialog box, the name of the drive to which a networked drive is to be allocated can be
specified and an actual path can be selected.
In addition, reconnection at logon can be set.
In a project file folder, the “Summary” folder, the “Output” folder and the option files (extension is
.opt) are created. The “Summary” folder will contain summary information for each file. The
“Output” folder will contain output files that make by C compiler. The option files are used by the
project.
■ Select a project
To select an existing project, choose the [Open] command from the [Project] menu. The [Open]
dialog box appears. From this box, select the desired project file.
■ Save a project
Saves the contents of a project.
If the project contains a file that has been edited, a confirmation message dialog box appears
asking whether the contents of the file should be saved.
The project can be renamed before being saved.
■ Load a file into a project
Loads a file into an open project to register the file.
14
To load a file, specify the file name in the dialog box. The file names with identifiers “.” and “.h”
can be specified.
Page 27

1.2 Function Outlines
1.2.8 Diagnostic message
The diagnostic message functions are used to display information about the lines that
have been checked. Display information includes file names, line numbers with a
problem found, message numbers, simple messages, and file path names. Doubleclicking the file name at the beginning of a diagnostic message or another item causes
a jump to the line with a problem found in the source program. These functions enable
the user to find problem lines in the source program quickly. By choosing Detailed
message from the popup menu, which is displayed by clicking the right mouse button,
a detailed message displayed and diagnostic message can be sorted.
■ Diagnostic messages
The check results are displayed in the diagnostic message window.
The messages displayed in the diagnostic message window are in the following format.
The diagnostic message format is as follows:
Figure 1.2-a The diagnostic message format
The diagnostic message functions are as follows:
❍ Open
Reads a diagnostic message file to display the diagnostic messages in the diagnostic
message window.
❍ Close
Closes the displayed diagnostic message file.
❍ Save
Saves the displayed diagnostic messages into a file.
❍ Save as
Saves the displayed diagnostic messages with another name.
❍ Print
Prints the displayed diagnostic messages.
The three commands, [Open], [Save], [Save as], and [Print] are effective only when diagnostic
messages are displayed.
15
Page 28

CHAPTER 1 Overview
■ Format for detailed messages
Detailed messages are displayed in help format. These messages contain the following items.
A “program example,” “program correction example,” and “hint” can be displayed in a popup
window by clicking their respective buttons with the left mouse button.
❍ Detailed explanation of what problem was found in the line
Explains what problem was found in the line and how to correct it.
❍ Sample program
Shows a program example that could be output messages for a problem found.
❍ Program correction plan
Proposes an example of correcting the line with a problem found in the checked program.
❍ Key advice
Shows a hint etc. for coding.
❍ Related items
Displays a list of similar items. Other detailed messages can be retrieved and displayed
from the list.
16
Page 29

1.2 Function Outlines
1.2.9 Compile
The compile functions are for compiling a source program. The following compilers
can be selected:
• fcc911s (compiler for the FR Family)
• fcc907s (compiler for the F2MC-16 Family)
• fcc896s (compiler for the F2MC-8L Family)
• ANCI (ANSI compiler)
These functions enable the user to translate and verify a source program in which the
lines with a problem found by a check have been corrected. To use the Compile
functions, either compiler must be installed.
■ File to be compiled
Select the file to be compiled. The following files can be selected.
A file can also be selected using the Compile button in the check tool bar.
• File being edited
■ Select the compiler
Select the compiler used with the C Checker.
The following compilers can be selected:
• File selected in a project
• All files in a project
• fcc911s (compiler for the FR Family)
2
• fcc907s (compiler for the F
• fcc896s (compiler for the F
• ANSI (ANSI compiler)
MC-16 Family)
2
MC-8L Family)
17
Page 30

CHAPTER 1 Overview
■ Compile options
This function allows the user to set up the options for the selected compiler. The following
options can be set up. The options that have been set up can be verified.
❍ Target compiler
❍ Language
❍ Chip classification
❍ Optimization level
❍ Warning level
Select the target C compiler.
Select the language of message which the compiler outputs.
Select the chip classification.
Set the optimization level for the compiler.
Set the warning level for the compiler.
❍ Translation control
Select the range in which translation is to be executed.
❍ Memory model
Specify the memory model of target CPU. (fcc907s only)
❍ Target MCU
Specify the target MCU.
❍ Output the debug information
Specify whether to output the debug information.
❍ Suppress reading of default option file
Specify whether to suppress the reading of the default option file.
❍ Output the used stack information
Specify whether to output used stack information.
❍ Position the const variables on RAM
Specify whether to position the const variables on RAM. (fcc907s only)
❍ Details of options
• Preprocessor: Set up the detailed options for the preprocessor.
18
• Language specification: Set up the detailed options for the language specifications.
• Optimization: Set up the detailed options for optimization.
• Output object: Set up the detailed options for output.
❍ Other options
Sets up the other options specifiable for the compiler directly.
Page 31

1.2 Function Outlines
1.2.10 Setup
The setup functions are for setting the internal editor and an installation environment
for the compilers.
■ Editor Customize
The Editor Customize function permits the user to specify the editor (internal editor or your own
editor) to be used for editing.
■ Compilation environment
Set the path in which the environment is installed for the compiler used.
If the compiler is not installed, a dialog box opens to indicate the compiler is not installed.
19
Page 32

CHAPTER 1 Overview
1.2.11 Window
The main window contains the following:
• Menu bar
• Tool bars
•Status bar
• Project management window
• Diagnostic message management window
• Check log display window
• Detailed message window
•Editor
These components enable the user to obtain information required for a check.
■ Menu bar
From the menu bar, the following can be selected.
• File
■ Tool bars
• Edit
• Search
• View
• Project
• Check
• Message
• Compile
• Window
• Setup
• Help
The following tool bars can be displayed:
Instead of the buttons in the tool bars, the corresponding menu commands can also be used.
Positioning the mouse pointer on a button displays the tips for the tool.
• Standard tool bar
• Check tool bar
■ Status bar
20
• Window state changing tool bar
• Find tool bar
The status bar displays an explanation of a command, the keyboard status, and other
information.
Page 33

■ Project management window
The project management window displays the files contained in a project and summary
information for every file checked.
■ Diagnostic message display window
The diagnostic message display window displays the check results.
The following items are displayed.
Double-clicking the name of a checked file in this window with the left mouse button displays the
edit screen for the checked file.
• Name of the checked file
• Number of the lines with a problem found
• Message number
• Simple message
• File path name
■ Check log display window
1.2 Function Outlines
The check log display window displays the execution log information collected during a check.
In this window, the checked files, the check status, and other information can be referenced.
■ Detailed message window
The detailed message window displays the detailed information related to a diagnostic message,
in help format.
Display information includes an explanation of diagnostic, sample program, program correction
plan, key advice, and related items.
When this window is displayed, the user can correct the lines with a problem found in the source
program by looking at program examples and correction examples.
Technical terms are explained in a popup window.
■ Editor
On the edit screen, the user can edit the source program by using the correction examples
displayed in the detailed message window for reference.
■ Operations on windows
The Window functions can perform the following operations on displayed windows:
• Overlap a window.
• Arrange windows horizontally.
• Arrange windows vertically.
• Arrange multiple icons on the display when individual windows are minimized.
21
Page 34

CHAPTER 1 Overview
1.2.12 Help
The help functions include the function used to display the help files containing the
function outlines and operating instructions for the C Checker. They also include the
functions for printing help files and searching for keywords. These functions enable
the user to view the operating instructions for this tool and the information about the
check items.
■ Tip of the day
Displays the convenient uses of the C Checker and other information.
Such information can also be displayed when the C Checker is started.
■ Help topics
Displays the contents of the help files of the C Checker as well as keywords.
■ About SOFTUNE C Checker
Displays C Checker version information.
22
Page 35

CHAPTER 2 Checking Procedures
This chapter explains the procedures required to use the C Checker to check a C
source program.
2.1 Starting the C Checker
2.2 Selection of a Source File
2.3 Setting up Check Options
2.4 Starting a Check
2.5 Aborting a Check
2.6 Exiting from the C Checker
23
Page 36

CHAPTER 2 Checking Procedures
2.1 Starting the C Checker
To start the C Checker, click the C Checker icon registered in the system. (See Figure
2.1-a.)
When this tool is started, the starting window of the C Checker is displayed. (See
Figure 2.1-b.)
■ Starting the C Checker
To start the C Checker, click the C Checker icon registered in the system. (See Figure 2.1-a.)
Alternatively, choose [Program]-[Softune C Checker]-[Softune C Checker] from the Start menu.
Figure 2.1-a C Checker icon
24
Figure 2.1-b Starting window of the C Checker
Page 37

2.2 Selection of a Source File
2.2 Selection of a Source File
To check a source program using the C Checker, select the source program file to be
checked.
• [Open] command from the [Files] menu
• [New] command from the [Project] menu
• [Open] command from the [Project] menu
Execute one in the above-mentioned command.
■ [Open File]
Choose the [Open] command from the [Files] menu, and the [Open] dialog box, shown in Figure
2.2-a, appears. Select a file with the “.c” file identifier, and the file is opened on the built-in editor.
(See Figure 2.2-b.)
Figure 2.2-a [Open] dialog box
25
Page 38

CHAPTER 2 Checking Procedures
26
Figure 2.2-b Window of the file opened on the built-in editor
Page 39
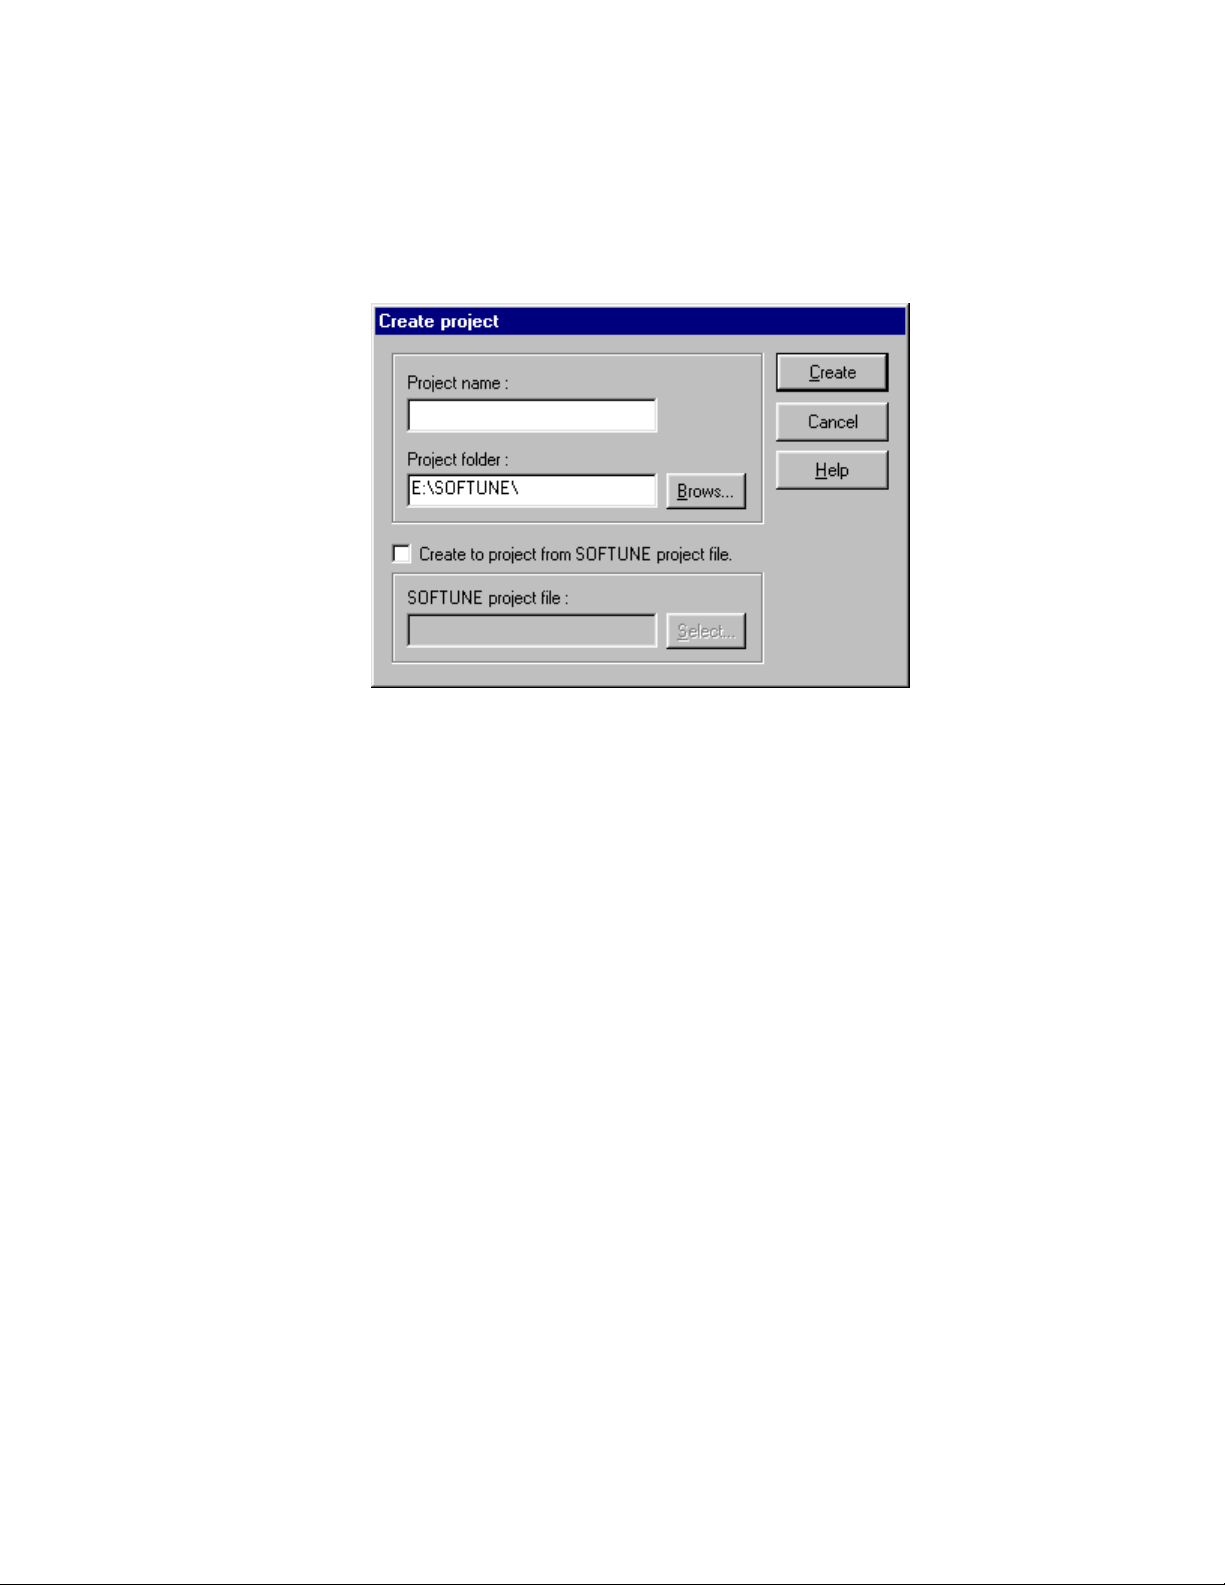
■ [Create Project]
Choose the [New] command from the [Project] menu, and the [Create Project] dialog box, shown
in Figure 2.2-c, appears. Create a new project file.
2.2 Selection of a Source File
Figure 2.2-c [Create Project] dialog box
27
Page 40

CHAPTER 2 Checking Procedures
Choose the [Import File...] command from the [Project] menu, and the [Import] dialog box, shown
in Figure 2.2-d, appears. Select a file with the “.c” file identifier, and the selected files are
registered in the project. (See Figure 2.2-e)
Figure 2.2-d [Import] dialog box
28
Figure 2.2-e Window of the file registered in project
Page 41

■ [Open Project]
Choose the [Open] command from the [Project] menu, and the [Open] dialog box, shown in
Figure 2.2-f, appears. Select a file with the “.cpj” file identifier, and the project file made before is
opened.
2.2 Selection of a Source File
Figure 2.2-f [Open Project] dialog box
29
Page 42

CHAPTER 2 Checking Procedures
2.3 Setting up Check Options
Before using the C Checker to check a source program, set up the required options.
■ Setting up check options
Choose the [Check Option] command from the [Check] menu, and the [Check Option] dialog
box, shown in Figure 2.3-a, appears.
Figure 2.3-a shows the initial values that the check options assume when the C Checker is
started.
Select the check item according to the purpose.
30
Figure 2.3-a Initial values of the check options
Page 43

2.4 Starting a Check
2.4 Starting a Check
To start a check using the C Checker, choose the [Active Document] command from
the [Check] menu. Alternatively, click the [Active Document] button in the check tool
bar.
■ Starting a check
To start a check, choose the one command from the [Check] menu. ([Active Document]
command or [Selected Files] command or [All Files] command.) (See Figure 2.4-a.)
The check is begun immediately after the selection.
It is necessary to open project file to select [Selected Files] command and [All Files] command.
Figure 2.4-a [Check] menu
31
Page 44

CHAPTER 2 Checking Procedures
■ Diagnostic messages
Upon completion of a check, diagnostic messages are displayed on the screen, as shown in
Figure 2.4-b.
32
Figure 2.4-b Diagnostic messages
Page 45

■ Jumping to the lines with a problem found
In the diagnostic message window, double-click a warning line with the left mouse button, and
the cursor jumps to the corresponding line on the edit screen. (See Figure 2.4-c.)
2.4 Starting a Check
Figure 2.4-c Jumping to the line with a problem found
33
Page 46

CHAPTER 2 Checking Procedures
■ Sorting of the diagnostic message
The diagnostic message can be sorted by selecting [All Message], [Hide Message] command
from pop-up menu displayed when mouse’s right button is clicked on diagnostic message
window.
34
Figure 2.4-d Sorting of the diagnostic message
Page 47

■ Displaying detailed messages
Choose the [Detailed message] command from the [Diagnostic message] menu, or [Detail
Message] command in the pop-up menu displayed when mouse’s right button is clicked, the
detailed explanation of the diagnostic message is displayed. (See Figure 2.4-d.)
2.4 Starting a Check
Figure 2.4-e Detailed message
35
Page 48

CHAPTER 2 Checking Procedures
2.5 Aborting a Check
To abort a check before it terminates, choose the [Stop] command from the [Check]
menu. Alternatively, click the [Stop] button in the check tool bar.
■ Aborting a check
Choose the [Stop] command from the [Check] menu, and the check aborts.
Figure 2.5-a [Stop] menu
36
Page 49

2.6 Exiting from the C Checker
2.6 Exiting from the C Checker
To exit from the C Checker, click the [Exit] command from the [Files] menu. (See Figure
2.6-a.) This causes the system to terminate normally.
■ Exiting from the C Checker
Choose the [EXIT SOFTUNE C Checker] command from the [Files] menu, and the C Checker is
ended.
Figure 2.6-a [Files] menu
37
Page 50

CHAPTER 2 Checking Procedures
38
Page 51

CHAPTER 3 Setting up Check Options
This chapter explains how to set up check conditions.
3.1 General
3.2 Include Paths
3.3 Macro Definitions
3.4 Suppressing Messages
39
Page 52

CHAPTER 3 Setting up Check Options
3.1 General
Set up the general options to be passed to the C Checker.
■ Dialog box for setting up check options
Choose [Check Option] command from the [Check] menu or [Check Option] command from the
pop-up menu in the project management window (See Figure 3.1-a), the [Check Option] dialog
box is displayed. Figure 3.2-a shows the dialog box for setting up check options when select
[General] tab which exists in the [Check Option] dialog box.
40
Figure 3.1-a Dialog box for setting up check options
Page 53

■ Check mode
Set the operation mode for checking.
❍ Target compiler
Select the target compiler used for a check.
fcc911s compiler
Target compiler
❍ Chip classification
Select the chip type of the target to be checked.
The chip type that can be selected depends on the compiler type.
❍ Target MCU
Specify the target MCU to be checked.
fcc907s compiler
fcc896s compiler
ANSI C compiler
3.1 General
■ Language
■ How to check
The language of the message displayed in the diagnostic message window is shown.
Language English
Specify the check mode.
Select one of the following check modes.
• Use to selected items (Check only the selected check items.)
• Use to all items (Check all check items.)
41
Page 54

CHAPTER 3 Setting up Check Options
■ Check classification
Check classification is divided into quality and performance items, so that a detailed check can
be performed for both types of items.
Portability
Extended specification
Possibility of coding mistake
Maintainability
Quality
Porting mode
Performance
Architecture independent
Architecture dependent
Port to fcc911s from
fcc907s
*1
Port to fcc911s from c907a
Port to fcc907s from
fcc896s
*1
Port to fcc907s from c907a
Port to fcc907s from c96
Port to fcc896s from c96
*1
*1
*1
*1
*1: These options become effective only when porting mode
■ [Standard] button
Recovers all the settings to default value.
■ [Open] button
Reads the settings of the options from an information file.
■ [Save] button
Saves all the settings into a file.
If the settings of any check options have been changed, a confirmation dialog box appears
asking whether the changes should be saved before the options are saved into the information
file.
To cancel the changes, click the [Yes] button in the dialog box.
To save the changes, click the [No] button in the dialog box. Then, click the [Apply] button and
click the [Save] button again.
is effective.
42
Page 55

3.2 Include Paths
Set up the include paths to be passed to the C Checker.
■ Dialog box for setting up include paths
Figure 3.2-a shows the dialog box for setting up include paths when select [Include Path] tab
which exists in the [Check Option] dialog box.
3.2 Include Paths
Figure 3.2-a Dialog box for setting up include paths
43
Page 56

CHAPTER 3 Setting up Check Options
■ Explanation
The dialog box for setting up include paths contains the following:
❍ Include path name field
In this field, enter the include path to be registered.
❍ Include path list
The registered include paths are displayed.
❍ [Browse] button
This button displays the dialog box for browsing include paths.
From this dialog box, an include path can be selected and entered in the include path
entry field.
❍ [Add] button
This button adds the include path entered in the include path entry field to the include path
register list.
❍ [Delete] button
This button deletes an include path from the include path register list.
To delete an include path, click the include path in the register list with the left mouse
button and click this button.
❍ [Up] button
This button moves an include path registered in the include path register list in the upward
direction.
The C Checker searches for the files to be included through the registered include paths,
starting from the uppermost path.
❍ [Down] button
This button moves an include path registered in the include path register list in the
downward direction.
❍ [Standard] button
Recovers all the settings to default value.
❍ [Open] button
Reads the settings of the options from an information file.
❍ [Save] button
Saves all the settings into a file.
44
If the settings of any check options have been changed, a confirmation dialog box
appears asking whether the changes should be saved before the options are saved into
the information file.
To cancel the changes, click the [Yes] button in the dialog box.
To save the changes, click the [No] button in the dialog box. Then, click the [Apply] button
and click the [Save] button again.
Page 57

■ Entry procedure
Set up an include path with the following procedure:
1) In the include path name field, enter an include path. (An include path can also be entered
2) If it is correct, add the path to the register list shown below the field, using the [Add] button.
3) To change the position of the include path in the register list, use the [Up] and [Down]
4) Delete the unnecessary include paths using the [Delete] button, if any.
3.2 Include Paths
❍ [Help] button
This button displays a help file.
using the [Browse] button.)
buttons as appropriate.
45
Page 58

CHAPTER 3 Setting up Check Options
3.3 Macro Definitions
Set up the macro definitions to be passed to the C Checker.
■ Dialog box for setting up macro definitions
Figure 3.3-a shows the dialog box for setting up macro definitions when select [Macro definition]
tab which exists in the [Check Option] dialog box.
46
Figure 3.3-a Dialog box for setting up macro definitions
Page 59

■ Explanation
3.3 Macro Definitions
The dialog box for setting up macro definitions contains the following:
❍ Macro name field
In this field, enter the macro to be registered.
❍ Macro value field
In this field, enter the value of macro.
❍ Macros list
The registered macros are displayed.
❍ [Add] button
This button adds the macro entered in the macro entry field to the macro register list.
❍ [Delete] button
This button deletes a macro from the macro register list.
To delete a macro, click the macro in the register list with the left mouse button and click
this button.
❍ [Up] button
This button moves a macro registered in the macro register list in the upward direction.
The C Checker defines the macros in the order in which they are registered.
❍ [Down] button
This button moves a macro registered in the macro register down one place in the macro
register list.
❍ [Standard] button
Recovers all the settings to default value.
❍ [Open] button
Reads the settings of the options from an information file.
❍ [Save] button
Saves all the settings into a file.
If the settings of any check options have been changed, a confirmation dialog box
appears asking whether the changes should be saved before the options are saved into
the information file.
To cancel the changes, click the [Yes] button in the dialog box.
To save the changes, click the [No] button in the dialog box. Then, click the [Apply] button
and click the [Save] button again.
❍ [Help] button
This button displays a help file.
47
Page 60

CHAPTER 3 Setting up Check Options
■ Entry procedure
Set up a macro with the following procedure:
1) In the macro name field, enter a macro.
2) If it is correct, add the macro to the register list shown below the field, using the [Add]
button.
3) To change the position of the macro in the register list, use the [Up] and [Down] buttons as
appropriate.
4) Delete the unnecessary macros using the [Delete] button, if any.
48
Page 61

3.4 Suppressing Messages
Diagnostic messages can be suppressed.
■ Dialog box for suppressing messages
Figure 3.4-a shows the dialog box for suppressing messages when select [Suppressing
messages] tab which exists in the [Check Option] dialog box.
3.4 Suppressing Messages
Figure 3.4-a Dialog box for suppressing messages
49
Page 62

CHAPTER 3 Setting up Check Options
■ Explanation
The dialog box for suppressing messages contains the following:
❍ Check box of suppressing category and number
In this check box, check the category or number of the message to be suppressed.
❍ [Standard] button
Recovers all the settings to default value.
❍ [Open] button
Reads the settings of the options from an information file.
❍ [Save] button
Saves all the settings into a file.
If the settings of any check options have been changed, a confirmation dialog box
appears asking whether the changes should be saved before the options are saved into
the information file.
To cancel the changes, click the [Yes] button in the dialog box.
■ Entry procedure
Set the number of the message to be suppressed, with the following procedure:
1) When the category is suppressed, the check box of the category is checked.
2) When each number is suppressed, the check box of each number is displayed clicking the
To save the changes, click the [No] button in the dialog box. Then, click the [Apply] button
and click the [Save] button again.
icon of + in front of the check box of the category.
50
Page 63

CHAPTER 4 File
This chapter explains how to manipulate files.
4.1 File Menu
4.2 Dialog Box of the [Open] Command
4.3 Dialog Box of the [Save as] Command
4.4 Dialog Box of the [Print Set] Command
51
Page 64

CHAPTER 4 File
4.1 File Menu
The commands on the File menu can be used to create a new file and to open, close,
save, and print a file.
The File menu provides the following commands:
• [New] command
• [Open] command
• [Close] command
• [Save] command
• [Save as] command
• [Print] command
• [Print preview] command
• [Recent file] command
• [Exit SOFTUNE C Checker] command
■ File menu
❍ [New] command
Creates a new file. Choosing this command opens a new file with no title on the edit
screen.
To open an existing file, use the [Open] command.
❍ [Open] command
Opens an existing file.
Choosing this command displays the [Open] dialog box. In this dialog box, files of all types
can be displayed. By default, however, only C source files “*.c” are displayed.
Multiple files can be opened at one time. To switch from one file to another, use the
window list in the [Window] menu.
To create a new file, use the [New] command.
52
Page 65

4.1 File Menu
❍ [Close] command
Closes a currently open window. If the file has been modified, a confirmation dialog box
appears asking whether the file should be saved before it is closed. If the file is closed
without being saved, all the modifications made after the file was last saved are lost. If this
command is chosen for a file without a name, the [Save as] dialog box appears.
In the file name box in the dialog box, enter the appropriate file name for the file. A file can
also be closed by double-clicking the control box in the window of the file.
❍ [Save] command
Saves the active file without changing the file name or the location it is saved. If a newly
created file is to be saved for the first time, the [Save as] dialog box appears, allowing the
user to save the active file with an appropriate file name. To save a file by changing the
file name or the location it is saved, use the [Save as] command.
❍ [Save as] command
Saves the active file by assigning a file name for it. Choosing this command displays the
[Save as] dialog box, allowing the user to save the file by assigning an appropriate file
name for it.
To save the active file without changing the file name or the location it is saved, use the
[Overwrite] command.
❍ [Print] command
Prints the contents of the active file. Choosing this command displays the [Print] dialog
box. In this box, set the desired printing attributes to print the file.
❍ [Print preview] command
Displays what is to be printed in the [Preview] window.
The [Preview] window contains the following functions:
• [Print] button]: Displays the [Print] dialog box.
• [Set up printing] button: Sets the printing format. Choosing this button displays the [Set
up printing] dialog box, allowing the user to set the detailed printing format.
• [Next page] button: Displays a preview of the next page.
• [Previous page] button: Displays a preview of the previous page.
• [Zoom in] button: Displays an enlarged preview.
• [Zoom out] button: Displays a reduced preview.
• [Close] button: Exits from the preview function.
❍ [Recent files] command
Stores the names of up to five previously opened files.
If more than five files are opened, the excess names are removed from the list, starting
from the oldest one.
❍ [Exit from SOFTUNE C Checker] command
Exits from the C Checker.
53
Page 66

CHAPTER 4 File
4.2 Dialog Box of the [Open] Command
The [Open] dialog box allows the user to set the following:
• File name
• Files of type
• Look in
■ Dialog box of the [Open] command
Choose the [Open] command from the [Files] menu, and the [Open] dialog box, shown in Figure
4.2-a, appears.
Figure 4.2-a [Open] dialog box
❍ File name
Enter or select the name of the file to be opened. In the list box, the files with the identifier
corresponding to the file type selected from the [File type] box are listed.
❍ Files of type
Select the file type of the files to be displayed.
In the list box, files of all types can be displayed. By default, however, only C source files
“*.c” and header files “*.h” are displayed.
❍ Look in
Select the place with the opened file.
54
Page 67

4.3 Dialog Box of the [Save as] Command
4.3 Dialog Box of the [Save as] Command
The [Save as] dialog box allows the user to set the following, such as a file name and
the location where a file is to be saved:
• File name
• Save as type
• Save in
■ Dialog box of the [Save as] command
Choose the [Save as] command from the [Files] menu, and the [Save as] dialog box, shown in
Figure 4.3-a, appears.
Figure 4.3-a [Save as] dialog box
❍ File name
Enter a file name different from the old one.
❍ Save as type
Select the file type of the files to be displayed.
In the list box, files of all types can be displayed.
By default, however, C source files “*.c” and header files “*.h” are displayed.
❍ Save in
Select the place where the file is saved.
55
Page 68

CHAPTER 4 File
4.4 Dialog Box of the [Print Set] Command
The [Print Setup] dialog box allows the user to set the details of the printing format:
• Columns
• Header printing
• Footer printing
• Line number printing
• Keyword highlighting
• Top margin
• Left margin
■ Dialog box of the [Print Set] command
Choose the [Print PreView] command from the [File] menu, and the PreView window is
displayed.
Choose the [Print Set] command in the PreView window, and the [Print Setup] dialog box, shown
in Figure 4.4-a, appears.
56
Figure 4.4-a [Print Setup] dialog box
❍ Rows
Set the number of columns. One of one, two, three, and four columns can be selected.
The default is one column.
Page 69

4.4 Dialog Box of the [Print Set] Command
❍ Header
Specify whether a header is to be printed. As a header, a file name, page number, and
date and time can be set.
The default is no header.
❍ Footer
Specify whether a footer is to be printed. As a footer, a file name, page number, and date
and time can be set.
The default is no footer.
❍ Line number
Specify whether to print line numbers.
The default is no line numbers.
❍ Print keyword
This option highlights the keyword.
Make “Stretch specified keyword” effective, and select the keyword which wants to
highlight.
The default is no highlighting.
The keyword which can be selected is as follows.
• C keyword
• ASM keyword
• Extension keyword
• User-defined keyword
❍ Top margin
Set the top margin.
❍ Left margin
Set the left margin.
57
Page 70

CHAPTER 4 File
58
Page 71

CHAPTER 5 Edit
This chapter explains how to use the Edit menu.
5.1 Edit Menu
59
Page 72

CHAPTER 5 Edit
5.1 Edit Menu
The Edit menu provides the following:
• [Undo] command
• [Redo] command
• [Cut] command
• [Copy] command
• [Paste] command
• [Delete] command
• [Select all] command
■ Edit menu
❍ [Undo] command
Cancels the immediately preceding editing operation and restores the file to the previous
state.
❍ [Redo] command
Cancels the immediately preceding undo operation and restores the file to the previous
state.
❍ [Cut] command
Cuts the currently selected data from the file and saves it into the clipboard. If no data has
been selected, this command cannot be used.
When data is cut and saved into the clipboard, it replaces the data previously saved in the
clipboard.
❍ [Copy] command
Copies the selected data in the file to the clipboard. If no data has been selected, this
command cannot be used.
When data is copied to the clipboard, it replaces the data previously saved in the
clipboard.
❍ [Paste] command
Inserts the contents of the clipboard into the cursor position.
If nothing is saved in the clipboard, this command cannot be used.
❍ [Delete] command
Deletes the currently selected data from the file. The deleted data is not saved into the
clipboard.
60
❍ [Select all] command
Selects all data in the file.
Page 73

CHAPTER 6 Search
This chapter explains how to use the Search menu.
6.1 Search Menu
6.2 Dialog Box of the [Current file search] Command
6.3 Dialog Box of the [Replace] Command
6.4 Dialog Box of the [Find in Files] Command
6.5 Dialog Box of the [Tag list] Command
61
Page 74

CHAPTER 6 Search
6.1 Search Menu
To search for a character string, choose the [Search] command from the [Search]
menu. Choosing the [Search] command displays the [Current file search] dialog box. In
the dialog box, enter the desired character string in the [Character string to search for]
box, specify the search direction and the search start position, and click the [Next]
button. Search starts in the specified direction.
The search menu provides the following commands:
• [Find] command
• [Find Next (Down)] command
• [Find Next (Up)] command
• [Replace] command
• [Find in Files] command
• [Jump Tag Next (Down)] command
• [Jump Tag Next (Up)] command
• [Add Tag (or Delete Tag)] command
• [List Tag] command
• [Jump to Line] command
• [Jump to Bottom] command
• [Jump to Top] command
■ Search menu
❍ [Find] command
Searches for a character string through the edit screen.
Choosing this command displays the [Find in Current File] dialog box. In this box, enter
the character string to search for.
❍ [Find Next (Down)] command
Searches for a character string through the edit screen in the forward direction, starting
from the cursor position.
The command searches for the character string entered in the [Find in Current File] dialog
box. Once this command is selected, the search can be repeated without opening the
[Find in Current File] dialog box.
❍ [Find Next (Up)] command
Searches for a character string through the edit screen in the backward direction, starting
from the cursor position.
The command searches for the character string entered in the [Find in Current File] dialog
box. Once this command is selected, the search can be repeated without opening the
[Find in Current File] dialog box.
62
Page 75

6.1 Search Menu
❍ [Replace] command
Replaces a character string on the edit screen with another string.
Choosing this command displays the [Replace] dialog box. In this box, enter the character
string to be replaced.
❍ [Find in Files] command
Search a string in the files within the target directory.
If this command is selected, [Find in Files] dialog box appears. Then, enter the string to
be searched and the target directory.
❍ [Jump Tag Next (Down)] command
Jumps from the current cursor position on the edit screen to the next tag. Tags can be
added using the [Add Tag (or Delete Tag)] command.
❍ [Jump Tag Next (Up)] command
Jumps from the current cursor position on the edit screen to the previous tag. Tags can be
added using the [Add Tag (or Delete Tag)] command.
❍ [Add Tag (Delete Tag)] command
Adds a tag to the current cursor position on the edit screen.
If a tag has already been set at the cursor position, this command deletes the tag.
❍ [Delete Tag All] command
Deletes all tags from the edit screen.
❍ [List Tag] command
Lists the tags existing on the edit screen.
Choosing this command displays the [Tag list] dialog box, allowing the user to reference
and delete the existing tags.
❍ [Jump to Line] command
Jumps to a specified line on the edit screen.
Choosing this command displays the [Jump to Target Line] dialog box. In the box, enter
the line to jump to.
❍ [Jump to Bottom] command
Jumps to the last line on the edit screen.
❍ [Jump to Top] command
Jumps to the first line on the edit screen.
63
Page 76

CHAPTER 6 Search
6.2 Dialog Box of the [Find in Current File] Command
The [Current file search] dialog box allows the user to search for a character string
through the edit screen.
■ Dialog box of the [Find in Current File] command
Choose the [Find] command from the [Search] menu, and the [Find in Current File] dialog box,
shown in Figure 6.2-a, appears.
Figure 6.2-a [Find in Current File] dialog box
In the [Find in Current File] dialog box, the following can be set:
❍ Find string
❍ Search for whole word
❍ Case sensitivity
❍ Normal representation
❍ Search for uncertain string
❍ Direction
❍ Position
Note: Upon completion of search, a message box appears indicating the number of
occurrences of the character string that were found.
64
Page 77

6.3 Dialog Box of the [Replace] Command
6.3 Dialog Box of the [Replace] Command
The [Replace] dialog box allows the user to replace a character string on the edit
screen with another string.
■ Dialog box of the [Replace] command
Choose the [Replace] command from the [Search] menu, and the [Replace] dialog box, shown in
Figure 6.3-a, appears.
Figure 6.3-a [Replace] dialog box
In the [Replace] dialog box, the following can be set:
❍ Find string
❍ Exchange string
❍ Search for whole word
❍ Case sensitivity
❍ Normal representation
❍ Search for uncertain string
❍ Direction
❍ Position
65
Page 78

CHAPTER 6 Search
6.4 Dialog Box of the [Find in Files] Command
Use the [Find in Files] dialog box to search for a string from the target file in the target
directory.
■ Dialog box of the [Find in Files] command
Choose the [Find in Files] command from the [Search] menu, and the [Find in Files] dialog box,
shown in Figure 6.4-a, appears.
Figure 6.4-a [Find in Files] dialog box
In the [Find in Files] dialog box, the following can be set:
❍ Find string
❍ Search target file
❍ Search target directory
❍ Search in words
❍ Case sensitive
Note: When the search operation is completed, the search result is displayed on the log
window.
66
Page 79

6.5 Dialog Box of the [List Tag] Command
The [Tag list] dialog box lists the tags existing on the edit screen.
■ Dialog box of the [List Tag] command
Choose the [List Tag] command from the [Search] menu, and the [Tag list] dialog box, shown in
Figure 6.5-a, appears.
CHAPTER 6 Search
Figure 6.5-a [Tag List] dialog box
The [Tag List] dialog box contains the following:
❍ [Tags] list box
Displays the tags existing on the edit screen, together with the numbers of the lines where
they are located.
❍ [Release] button
Deletes a tag from the [Tags] list box. Click the tag to be deleted with the left mouse
button, then select this button.
❍ [Release all] button
Deletes all tags from the edit screen.
67
Page 80

CHAPTER 6 Search
68
Page 81

CHAPTER 7 View
This chapter explains the View menu.
7.1 View Menu
7.2 Tool Bars
7.3 Status Bar
7.4 Project Management
7.5 Diagnostic Messages
7.6 Detailed Messages
7.7 Check Log
7.8 Customize
69
Page 82

CHAPTER 7 View
7.1 View Menu
The commands on the View menu turn on or off the tool bars, status bar, project
management, diagnostic messages, and others.
The View menu provides the following commands:
• [Tool bars] command
• [Status bar] command
• [Project management] command
• [Diagnostic message] command
• [Check log] command
• [Customize…] command
■ View menu
❍ [Tool bars] command
Turns the tool bars on or off.
The C Checker provides the following four tool bars:
• Standard tool bar: Contains function buttons which operate as the most frequently
used commands such as [Open…].
• Check tool bar: Contains the buttons having the functions corresponding to the
commands on the [Check] and other menus.
• Window tool bar: Docks subwindows and turns them on or off.
• Find tool bar: Contains the buttons having the functions corresponding to the
commands on the [Find] and other menus.
When each tool bar is displayed, a check mark appears next to the name of this
command.
See Section 7.2, “Tool Bars” for details.
❍ [Status bar] command
Turns the status bar on or off. The status bar displays a brief explanation of a menu
command or tool bar button when that command or button is chosen, the ON/OFF states
of the special keys on the keyboard, and other information. When the status bar is
displayed, a check mark appears next to the name of this command.
See Section 7.3, “Status Bar” for details.
❍ [Project management] command
Turns the project management window on or off.
70
When the project management window is displayed, a check mark appears next to the
name of this command.
See Section 7.4, “Project Management” for details.
Page 83

7.1 View Menu
❍ [Diagnostic message] command
Turns the diagnostic message display window on or off.
When the diagnostic message display window is displayed, a check mark appears next to
the name of this command.
See Section 7.5, “Diagnostic Messages” for details.
❍ [Check log] command
Turns the check log display window on or off.
When the check log display window is displayed, a check mark appears next to the name
of this command.
See Section 7.7, “Check Log” for details.
❍ [Customize…] command
Displays the customize dialog box for setting the display attributes of a window.
Choosing this command displays the [Customize] dialog box. In the box, enter the desired
settings.
See Section 7.8, “Customize” for details.
71
Page 84

CHAPTER 7 View
7.2 Tool Bars
A tool bar is displayed at an upper position in the application window, directly below
the menu bar. It contains the tools frequently used in the C Checker, which can be
operated by clicking them with the left mouse button.
■ Tool bar
Figure 7.2-a shows a tool bar example.
Figure 7.2-a Tool bar example
72
Page 85

7.3 Status Bar
7.3 Status Bar
The status bar is displayed at the bottom of the C Checker window.
To turn the status bar on or off, choose the [Status bar] command from the [View]
menu.
■ Status bar
The figure below shows a status bar example.
Figure 7.3-a Status bar example
In the left portion of the status bar, a brief explanation of a menu command is displayed when
that command is chosen. Similarly, a brief explanation of a tool bar button is displayed when that
button is clicked. To cancel the tool bar button after reading the explanation, move the mouse
pointer to a position other than that of the tool bar button and release the mouse button.
In the right portion of the status bar, the ON/OFF states of the keys given in Table 7.3-a are
displayed.
Table 7.3-a ON/OFF states of keys that are displayed in the status bar
Indication Description
Line1,1 Cursor position
CAP The [Caps Lock] key is ON.
NUM The [Num Lock] key is ON.
73
Page 86

CHAPTER 7 View
7.4 Project Management
The project management window manage the source and include files loaded into
projects.
It also manages summary files in which the check status and other information are
recorded.
■ Project management window
Figure 7.4-a shows an example of the project management window displaying source files.
Figure 7.4-b shows an example of the project management window displaying summary files.
74
Figure 7.4-a Project management window (source files)
Figure 7.4-b Project management window (summary files)
Page 87

7.4 Project Management
As shown by Figures 7.4-a and 7.4-b, the project management window is divided into two pages:
❍ Source file management page
Used to manage source and include files.
❍ Summary file management page
Used to manage summary files.
Summary file is displayed by double clicking the left mouse button on the file name in the
window of by selecting the Summary command (Figure 7.4-c)
Figure 7.4-c Summary dialog box
This window also provides the following:
❍ Popup menu
The popup menu is displayed by clicking the right mouse button within the window.
The popup menu allows the following operations to be performed quickly:
• Dock: Connects a subwindow to the bottom of its parent window or disconnects it.
• Hide: Turns the window off.
❍ Popup menu on file
The popup menu on file is displayed by double clicking the right mouse button on the file
name is the window.
The popup menu allows the following operations to be performed quickly:
• Open: The selected file is opened in the editor.
• Check: The selected file is checked.
• Compile: The selected file is compiled.
• Delete: The selected file is deleted from the project.
• Property: The file information on the selected file is displayed.
The editor can be started by double clicking the left mouse button on the file name in the
window.
75
Page 88

CHAPTER 7 View
7.5 Diagnostic Messages
The diagnostic message window displays simple diagnostic messages.
■ Diagnostic message window
After completion of a check, the diagnostic message window displays simple diagnostic
messages. Each diagnostic message contains a file name, line number, message code, simple
message, and the directory containing the file, in this order. Figure 7.5-a shows the diagnostic
message window.
Figure 7.5-a Diagnostic message window
The diagnostic message window not only displays simple messages but provides the following
functions:
❍ Jump to the line with a problem found
Jumps to the line with a problem found.
[Procedure]
If the file containing the line is not opened, the file is opened to jump to the line.
Double-click a file name with the left mouse button.
❍ Display a detailed message
Displays the detailed message window for displaying a detailed diagnostic message.
[Procedures]
Procedure No. 1: Click a diagnostic message with the right mouse button and select the
[Detailed message] menu.
Procedure No. 2: Double-click a diagnostic message with the left mouse button and then
choose from the check tool bar.
76
Page 89

7.5 Diagnostic Messages
❍ Popup menu
Displays the popup menu to allow the following operations to be performed quickly:
Figure 7.5-b Pop-up menu of the diagnostic message window
• Open: Open the diagnostic message file.
• Save: Save the diagnostic message into file.
• Save as: Save the diagnostic message with another name.
• Close: Close the diagnostic message.
• Print: Print the diagnostic message.
• All Message: All diagnostic message are displayed.
• Select Message: Only the message of the same message code as the code of the
selected diagnostic message is displayed.
• Hide Message: All of the message which has been [Hide Message] and all of the
message of the same message code as the code of the selected
diagnostic message are made non-display.
• Detail message: Displayed a detailed message.
• Dock / Float: Connects a subwindow to the bottom of its parent window or
disconnects it.
• Hide: Turns the window off.
[Procedure]
Click the right mouse button within the window.
77
Page 90

CHAPTER 7 View
7.6 Detailed Messages
The detailed message window displays detailed diagnostic messages.
■ Detailed message window
The detailed message window displays the detailed message corresponding to a message
displayed in the diagnostic message window. Figure 7.6-a shows the detailed message window.
78
Figure 7.6-a Detailed message window
Page 91

7.6 Detailed Messages
The detailed message window uses the help window.
Besides the help functions, the detailed message window provides the following:
❍ [Sample program] button
Introduces an incorrect program example that could be output messages for a problem
found.
❍ [Program correction plan] button
Introduces an example of correcting the incorrect program example.
Note: The example is merely an example. There may be other ways to correct the
program example.
❍ [Key advice] button
This button is provided to introduce the information related to the diagnostic message.
Not all detailed messages have this button.
❍ [Related item] button (related to …)
Introduces the other items related to the diagnostic message.
79
Page 92

CHAPTER 7 View
7.7 Check Log
The check log window displays the log information collected during a check.
■ Check log window
The check log window displays the status of the current check or compilation. Figure 7.7-a
shows the check log window.
Figure 7.7-a Check log window
The check log window provides the following:
❍ Popup menu for performing operations quickly
Hide (turns the window off)
Dock / Float (connects a subwindow to the bottom of its parent window or disconnects it)
Save (Save a check log into a file)
Clear (Delete a check log)
[Procedure]
Click the right mouse button within the window.
80
Page 93

7.8 Customize
The [Customize] dialog box allows the user to set the following:
• Screen front and font size
• Display attribute of the editor
■ [Customize] dialog box
❍ Screen font and font size
Figure 7.8-a shows the font tag of the [Customize] dialog box. This dialog box provides
the following:
• Category: Select the window for which the font is to be changed.
• Font name: Select a font name.
• Size: Change the font size.
• Reset All: Resets all windows to the standard font and size.
• The standard font and size are MS Gothic and 9 points in Japanese.
7.8 Customize
• The standard font and size are MS Sans Serif and 8 points in English.
• Sample: Gives a preview of the selected font.
Figure 7.8-a [Customize] dialog box (font tag)
81
Page 94

CHAPTER 7 View
❍ Display attributes of the editor
Figure 7.8-b shows the editor tag of the [Customize] dialog box. This dialog box provides
the following:
• Highlight the Comment: Turns the comment highlighting on or off on the edit screen.
• Show the New Line: Turns the line feed characters on or off on the edit screen.
• Show the EOF: Turns the EOF symbol on or off on the edit screen.
• Show the Ruler: Turns the ruler on or off on the edit screen.
• Show the Line Number: Turns the line numbers on or off on the edit screen.
• Use of the auto indent: Turns automatic indent on or off on the edit screen.
• Show the Tab: Turns the tabs on or off on the edit screen.
• Number of Tabs: Set the number of tabs on the edit screen.
• The default is 4. One of 2, 4, and 8 tabs can be set.
• Key word decoration: Set the keyword highlighting.
• In default, all are not high lighted.
• The file can be specified about the user-defined function.
(The keyword preserved in the specified file is only a user-defined function
keyword.)
If the file of the keyword of the REALOS is specified, the system call function can
be set in the keyword.
• Colors: Set the color of keywords.
82
Page 95

7.8 Customize
Figure 7.8-b [Customize] dialog box (editor tag)
83
Page 96

CHAPTER 7 View
❍ Setting up Key word
Choose the [Key word] command from the [Customize] dialog box (Figure 7.8-b), and the
[Key words] dialog box, shown in Figure 7.8-c, appears.
In the [Key words] dialog box, the following can be set:
• Add: A new key word is registered.
• Modify: The selected key word is changed to the input key word.
• Delete: The selected key word is deleted.
Figure 7.8-c [Key word] dialog box
84
Page 97

CHAPTER 8 Project
This chapter explains how to create and manipulate projects.
8.1 Project Menu
8.2 Creating a New Project
8.3 Renaming Projects
8.4 Loads a File into Project
85
Page 98

CHAPTER 8 Project
8.1 Project Menu
The Project menu allows the user to create a new project, manipulate and save files,
and perform other operations.
The Project menu provides the following commands:
• [New] command
• [Open] command
• [Close] command
• [Save] command
• [Rename] command
• [Import File] command
■ Project menu
❍ [New] command
Creates a new project.
Choosing this command displays the [New Project] dialog box. In the box, enter the
desired project name and the name of the directory where the new project file is to be
saved.
After “Create to project from SOFTUNE project file.” check box is checked when Softune
C Checker’s project file is made from SOFTUNE Workbench’s project file, SOFTUNE
Workbench’s project file is specified for the box under that.
❍ [Open] command
Opens an existing project.
Choosing this command displays the [Open] dialog box. In the box, specify a project file
that has been created using the [New] command to open the project file.
Project files have the “.cpj” identifier.
❍ [Close] command
Closes the currently opened project file.
If the project contains a file that has been edited, choosing this command opens a
confirmation dialog box asking whether the file should be saved before the project file is
closed.
❍ [Save] command
Saves the contents of the currently opened project file, overwriting the previous contents.
Choosing this command does not close the project file.
To close the project file, choose the [Close] button.
86
Page 99

8.1 Project Menu
❍ [Rename] command
Renames the currently opened project file.
Choosing this command displays the [Rename project] dialog box. In the box, enter a new
project name.
When the project is renamed, the project file is also renamed.
❍ [Import file] command
Loads a file into a project.
C source and header files can be loaded.
Choosing this command displays the [Load file] dialog box. In this box, specify the name
of the file to be loaded.
Multiple files can be loaded.
87
Page 100
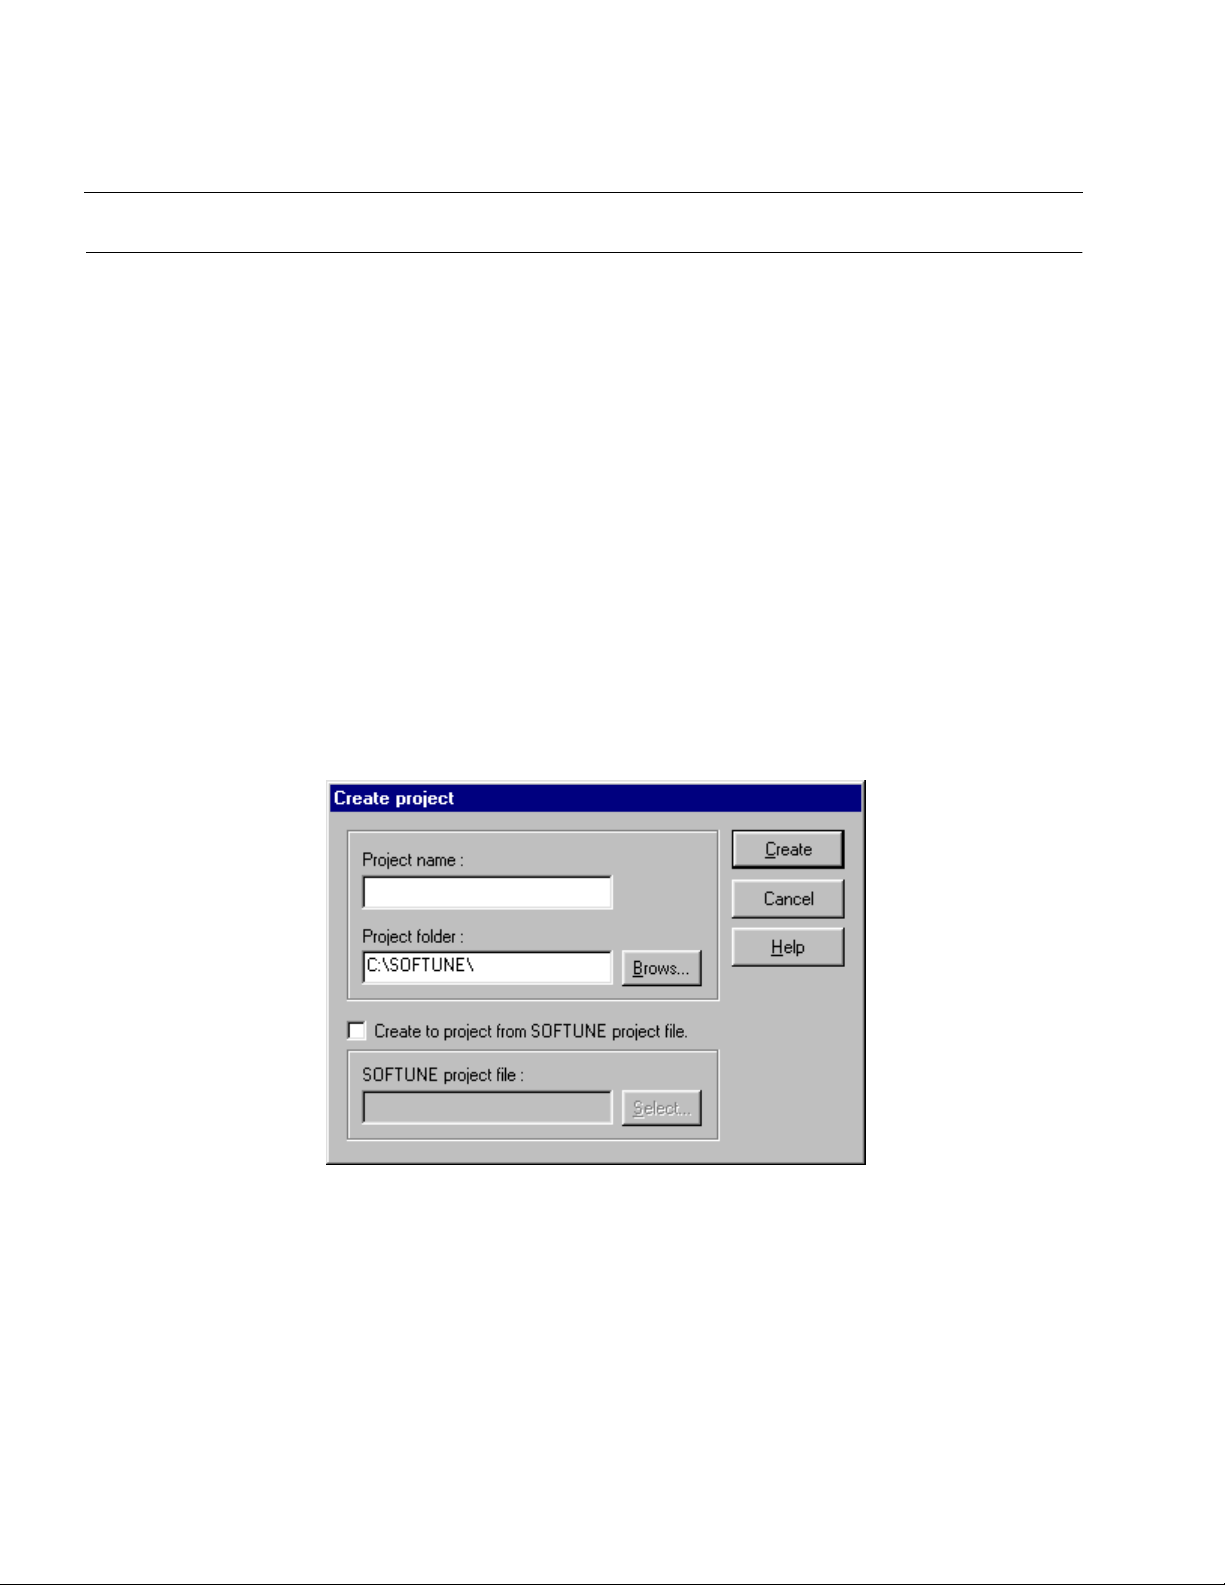
CHAPTER 8 Project
8.2 Creating a New Project
To create a new project, choose the [New] command from the Project menu.
■ Creating a new project
Choose the [New] command from the Project menu, and the [New Project] dialog box appears.
In this box, enter the desired project name and the name of the directory the directory where the
new project file is to be saved.
When a new project is created, a file “project-name.cpj” is created in the specified directory.
To open the same project again, specify the created project file, using the [Open] command.
■ [New Project] dialog box
This dialog box is used to create a new project. (See Figure 8.2-a.) It provides the following:
• Project name: Enter a new project name.
• Project folder: Specify the folder to contain the project file.
• Browse button: Displays the [Folder browse] dialog box.
• Create to project from SOFTUNE project file.: Check the create to project from
SOFTUNE project file.
• SOFTUNE project file.: Specify the SOFTUNE project file.
Figure 8.2-a New Project dialog box
Note: If the project name is null or contains characters that cannot be used in a project or
file name, a message box appears indicating this error.
88
 Loading...