


Operating Manual
FUJITSU Workstation CELSIUS
W570 / W570power / W570power+
W580 / W580power / W580power+
System

Thank you for buying an inno
vative product from Fujitsu.
Latest information abo
on our website: "
You c a n find driver upda
Should you have any te
• our Hotline/Service
• Your sales partner
• Your sales office
We hope you enjoy using your new Fujitsu system!
ut our products, useful tips, updates etc. is available
//www.fujitsu.com/fts/"
http:
tes at: "
http://support.ts.fujitsu.com/download"
chnical questions, please contact:
Desk ("
http://support.ts.fujitsu.com/contact/serv icedesk")


Published by / Contact address in the EU
chnology Solutions GmbH
Fujitsu Te
Mies-van-der-Rohe-Straße 8
80807 Munich, Germany
www.fujitsu.com/fts/"
http://
"
Copyright
u Technology Solutions GmbH 2.018. All rights reserved.
©Fujits
Publication Date
07/2018
Order No.: A26361-K1446-Z320-1-7619, edition 2

FUJITSU Workstation CELSIUS
W570 / W570power / W570power+
W580 / W580power / W580power+
Operating Manual
Your CELSIUS... 7
Ports and Operating Elements 9
Important notes 11
Getting started 13
Operation 22
Troubleshooting and tips 29
System expansions 33
Technical data 82
Index 83

Remarks
Notes on the product description are consistent with Fujitsu´s design specifications and
are made available for comparison purposes. The actual results may differ due to several
factors. Technical data is subject to change without notification. Fu jitsu does not accept
any responsibility for technical or editorial errors nor for omissions.
Trademarks
Fujitsu, the Fujitsu logo and CELSIUS are registered trademarks of Fujitsu Limited
or its subsidiaries in the USA and other countries.
Kensington and MicroSaver are registered trademarks of ACCO Brands.
USB Type-C™ and USB-C™ are trademarks of the USB Implementers Forum
in the USA and other countries.
Microsoft and Windows are trademarks or registered trademarks of Microsoft
Corporation in the U S A and/or oth er countries.
All other trademarks mentioned here are the property of their particular owner.
Copyright
No part of this publication may be copied, reproduced or translated without
prior written permission from Fujitsu.
No part of this publication may be stored or transmitted in any electronic manner
without written permission from Fujitsu.

Contents
Contents
Your CELSIUS... ....................................................................... 7
Notational conventions .................................................................. 8
ValidityoftheReferenceManual ......................................................... 8
Ports and Operating Elemen
Front ................................................................................... 9
Rear ................................................................................... 10
Important notes ........................................................................ 11
Safetyinformation ....................................................................... 11
Transportingthedevice .................................................................. 11
Cleaning thedevice ..................................................................... 12
Energysaving,disposaland recycling .................................................... 12
Gettingstarted ......................................................................... 13
Unpacking and chec
Steps for initial s
Setting up the dev
Connecting the de
Connecting exter
Ports on the devi
Connecting a mon
Connecting the
Connecting th
Connecting ex
Connecting ex
Switching on
Switch on the
Installing t
Operation .............................................................................. 22
Switchthedeviceon .................................................................... 22
Switching off thedevice ................................................................. 22
Procedure in an emergency . . . ....................................................... 22
Indicators onthedevice ................................................................. 23
Keyboard ............................................................................... 24
Important keys and keyboard shortcuts . . . . ............................................ 24
Settings inBIOS Setup .................................................................. 25
Property and data protection . . ........................................................... 26
Anti-theft protection and lead-sealing . . . . . . ............................................ 26
Mechanical casing lock (optional) . . ................................................... 27
BIOSsetupsecurityfunctions ........................................................ 28
Accessauthorisation via SmartCard .................................................. 28
Operating the SmartCard reader (optional) ............................................ 28
bleshooting and tips ..............................................................
Trou
ifproblemsoccur ...................................................................
Help
bleshooting .........................................................................
Trou
er-onindicatorremainsunlit after you have switched onyourdevice .................
Pow
device cannot be switched off with the On/Off switch. . .............................
The
itorremainsblank ...............................................................
Mon
mousepointerdisplayed onthescreen ............................................
No
kingthe delivery .....................................................
etup ....................................................................
ice ....................................................................
viceto the mainssupply ................................................
naldevices .............................................................
ce ..................................................................
mouse ...............................................................
e keyboard . ...........................................................
ternaldevicesto the parallel orserialinterface(optional) ..................
ternaldevicesto the USBports .........................................
for the firsttime:installingthesoftware .......................................
monitorandthemachine ...............................................
hesoftware ...............................................................
ts .........................................................
itor ................................................................
13
13
14
15
16
17
18
19
19
19
20
20
21
21
29
29
29
29
30
30
31
9
Fujitsu 3

Contents
Time and/or date is not correct . . . . . . ................................................. 31
Errormessageson thescreen ........................................................ 31
Installing new software .................................................................. 31
Tips .................................................................................... 32
Systemexpansions .................................................................... 33
Information about boards ................................................................ 34
Opening the casing . . ................................................................... 35
Closingthecasing ...................................................................... 36
Open and close the drive cage (only for the mode l FUJITSU Workstation CELSIUS W 57 0power+
/W580power+) ......................................................................... 37
Openthe drive cage ................................................................. 38
Pullthe drive cage outofthecasing. .................................................. 39
Slidethe drive cage into thehousing. ................................................. 40
Closethe drive cage ................................................................. 41
Overview ofthe drive bays anddrivesin your device ....................................... 42
Installandremovethe slim-linedrive ..................................................... 42
Installing anaccessible drive ......................................................... 42
Removing anaccessibledrive ........................................................ 43
Installing and removing the accessible 5
Fitting the drive cover for the 5
1
/4inchdrive ...................................... 45
1
/4inchdrive ........................................... 45
Installing anaccessible drive ......................................................... 46
Removing anaccessibledrive ........................................................ 47
Overview ofthe hard disk drives ......................................................... 48
Removing and installing hard disks in the lower part of the device (variants: FUJITSU
Workstation CELSIUS W570 / W570power / W580 / W580power) . .......................... 53
Removing thehard diskdrive ........................................................ 54
Installing aharddiskdrive ........................................................... 55
Removing and installing hard disks in the lower part of the device (variant: FUJITSU Workstation
CELSIUS W570power+, cold plug) . . . . . . ................................................. 56
Removing thehard diskdrive ........................................................ 56
Installing aharddiskdrive ........................................................... 58
Removing and installing 2
CELSIUS W570 / W570power and W580 / W580power: according to the operable 5
drive, FUJITSU Workstation CELSIUS W570power+ / W580power+: on the drive frame) . . .... 59
Removing the hard disk drive (size: 2
Install a hard disk, size 2
Removing and installing 3
1
/2inch hard disks or Solid State Discs (SSD) (FUJITSU Workstation
1
1
/2inchesor aSolidState Disk (SSD) ......................... 61
1
/2inch hard disks in the drive cage (only for the model FUJITSU
/2inchesor a Solid State Disc (SSD)) ............. 60
1
/4inch
Workstation CELSIUS W570 power+ with installation kit 1 (standard)) . . . . ................... 62
Removing thehard diskdrive ........................................................ 62
Installing aharddiskdrive ........................................................... 63
Removing and installing 2
1
/2inch hard disks in the drive cage (only for the model FUJITSU
Desktop CELSIUS W570power+, with both installation kits) . . . .............................. 65
Installing the harddiskdrive .......................................................... 65
Removing ahard disk drive .......................................................... 67
Removing and fittingthe front fan ........................................................ 69
Removing thefrontfan .............................................................. 69
Installing the frontfan ................................................................ 70
Installing and removing a board . . ........................................................ 71
Installing a board .. . . ................................................................ 71
Removing a board . . . ................................................................ 73
Installing and removing an M.2 module . . ................................................. 75
Installing an M.2 module . ............................................................ 75
4 Fujitsu

Contents
Removing anM.2 module ............................................................ 76
Installing and removing WLAN antennas . . . . . . ............................................ 77
Installing external WLAN antennas . ................................................... 77
Removing external WLAN antennas . . . . . . ............................................ 78
Installing and removing heat sinks ........................................................ 78
Removing theheatsink .............................................................. 78
Installing the heatsink ............................................................... 79
Mainboard expansions .................................................................. 80
Upgrading mainmemory ............................................................. 80
Replacing theprocessor ............................................................. 80
Replacing thelithiumbattery ......................................................... 81
Technicaldata ......................................................................... 82
Index .................................................................................. 83
Fujitsu 5

Contents
6 Fujitsu

Your CELSIUS...
Your CELSIUS...
Overview
... is available with various configuration levels which differ in terms of hardware and software
equipment. You can install accessible drives (e.g. DVD drives) a nd other modules.
This manual tells you how to start using your device and how to operate it in daily u se.
This manual applies for all c onfiguration levels. Depending on the chosen configuration
level, some of the hardware components d escribed may not be available on your PC .
Please also read the notes about your operating system.
Depending on the configuration selected, the operating s ystem is preinstalled
on your hard disk (e.g. Windows).
Further information on this device is also provided:
• in the "Q uick Start Guide" poster
• in the "Safety/regul
• in the "Warranty" manual
• in the BIOS manual f
• in the operating manual for the monitor
• in the manual for t
• in the documentation for your operating system
• in the informati
ations" manual
or your device
he mainboard
on files (e.g. *.PDF, *.HTML, *.DOC, *.CHM, *.TXT, *.HLP)
Fujitsu 7
Your CELSIUS...
Notational conventions
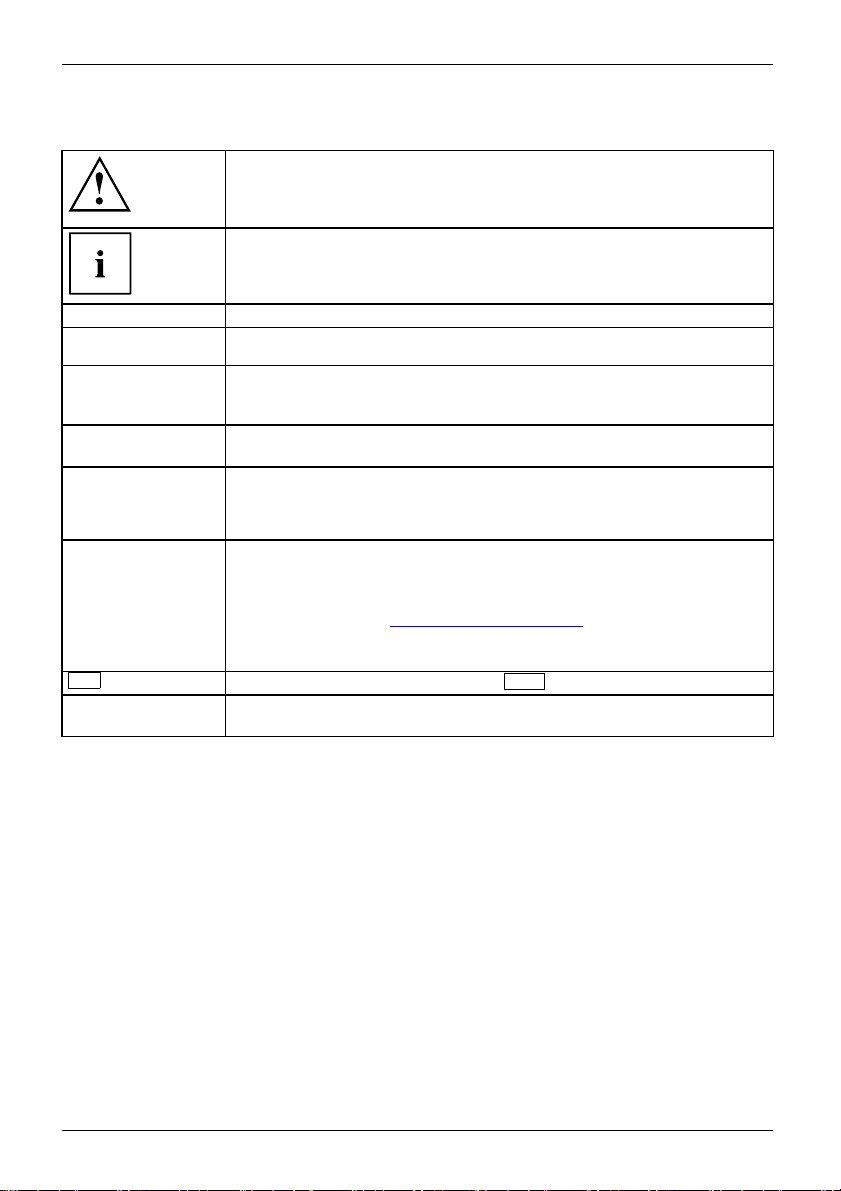
Pay particular attention to text marked with this symbol. Failure to observe
these warnings could pose a risk to health, damage the device or lead
to loss of data. T he warranty will be invalidated if the device becomes
defective through failure to observe these warnings.
Indicates important informa
tion for the proper use of the device.
►
This font
This font
This font
"This font"
Key
This font
Indicates an activity that must be performed
Indicates a result
indicates data entered
the command line, e.g.
start a program (star
indicates information that is displayed on the screen by a program, e.g.:
Installation is complete.
indicates
• terms and texts used in a software interface, e.g.: Click on Save
• names of programs or files, e.g. Windows or setup.exe.
indicates
• cross-references to another section, e .g. "Safety information"
• cross-references to an external s ource , e.g. a web address: For more
information, go to "
• Names of CDs, DVDs and titles or designations for other materials,
e.g.: "CD/DVD Drivers & Utilities" or "Safety/Regulations" manual
indicates a key on the keyboard, e.g:
indicates terms and texts that a re emphasised or highlighted, e.g.: Do
not switch off the device
using the keyboard in a program dialogue or at
your password (Name123) or a command used to
t.exe)
http://www.fujitsu.com/fts/"
Validity of the Reference Manual
ference Manual is valid for the following systems:
This Re
•FUJITS
• FUJITSU Workstation CELSIUS W570power
•FUJIT
• FUJITSU Workstation CELSIUS W580
•FUJI
• FUJITSU Workstation CELSIUS W580power+
U Workstation CELSIUS W570
SU Workstation CELSIUS W570power+
TSU Workstation CELSIUS W580power
F10
8 Fujitsu
Ports and Operating Elem ents
Ports and Operating Elements
Ports
This chapter presents the individual hardware components of your device. This will provide
you with an overview of the ports and operating elements on the device. Please familiarise
yourself with these components before you start to work with the device.
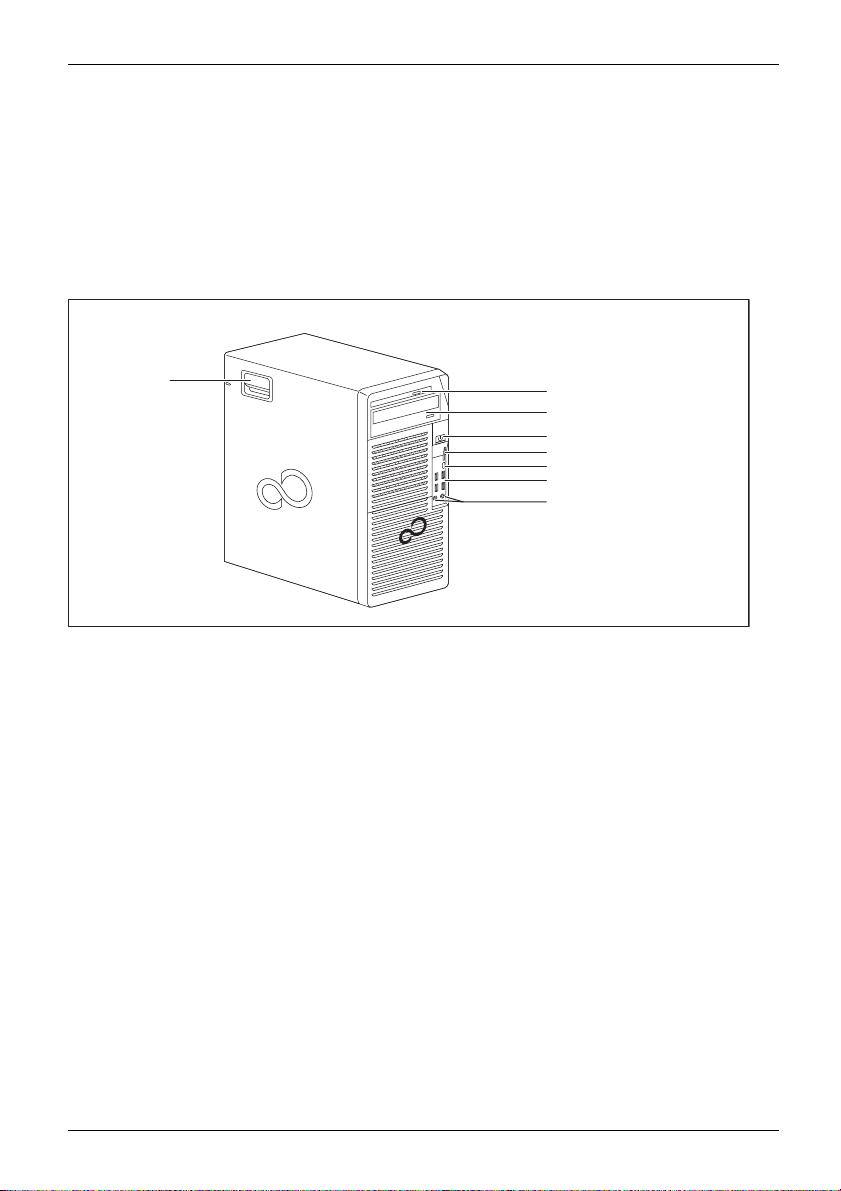
Front
8
1 = Slim-line drive
2 = Module bay for a 5
3 = ON/OFF switch
4 = Slot fo r memory cards (format: SD
Secure Digital card)
5 = USB connection 3.1 with a charging
function (USB Type-C™)
1
/4-inch drive
1
2
3
4
5
6
7
6 = USB ports
7 = Microphone connection (right), headphone
connection (left).
In order to use a headset, connect the
headset with both connections.
8 = Latch with optional casing lock
Fujitsu 9
Ports and Operating Elements
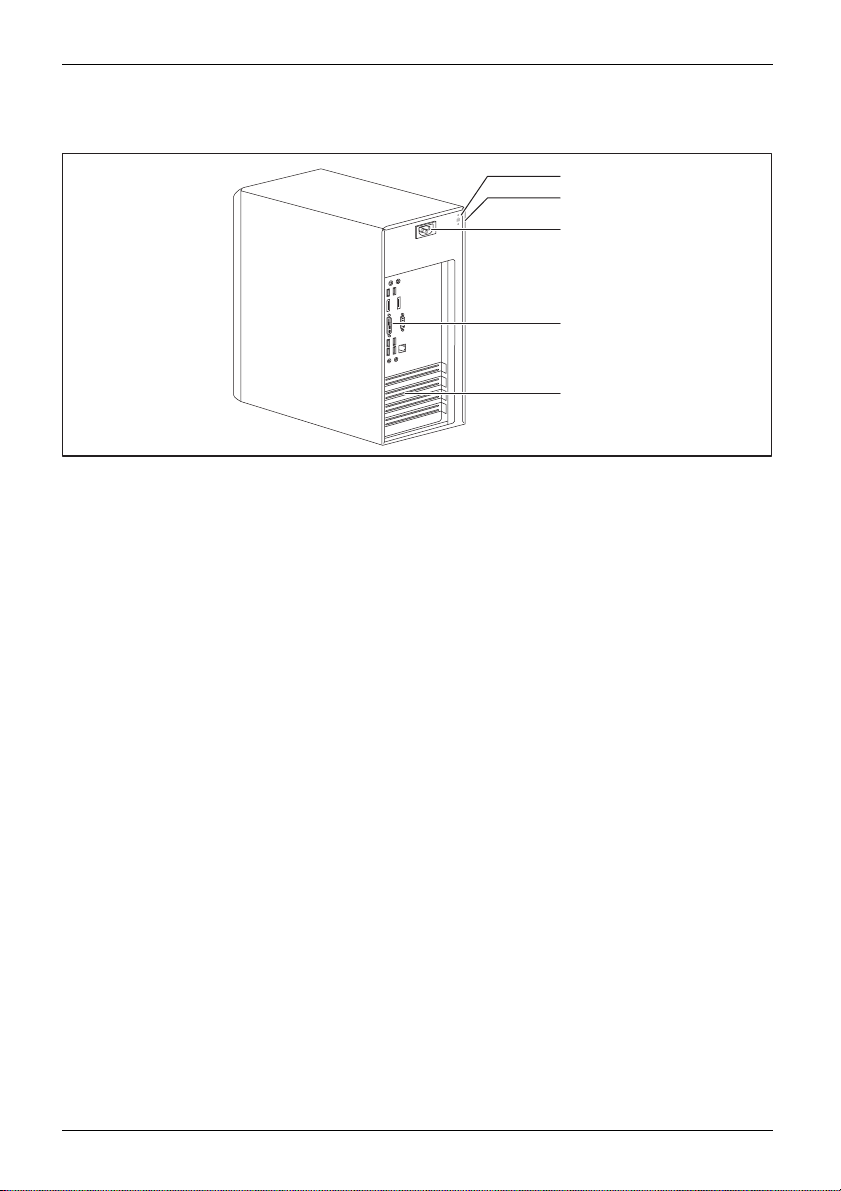
Rear
1
2
K
3
4
5
1 = Device for a Securi
2 = Holes for a padlock
3=Alternatingvolt
age socket (AC IN)
ty Lock
4 = Ports for external
(device-dependen
5 = Slot covers
devices
t)
10 Fujitsu

Important notes
ImportantnotesNotes
In this chapter you will find information regarding safety which it is essential to
take note of when working with your device.
Safety information
SafetyinformationNote
Please note the inform at
and in the following safe
When installing and ope
environmental conditi
the instructions in Cha
When setting up the dev
thecasingreceives
cover the ventil ati
You must only opera
device is set to the
The main switch (if
device from the ma
voltage, remove t
Only operate th
Replace the lit
in "
Replacing t
Caution, comp
The activiti
performed wi
Repairs to th
Incorrect r
to the equi
e device with the casing closed.
hium battery on the mainboard in accordance with the instructions
he lithium battery", Page 81.
onents in the system can get very hot.
es described in these instructions must always be
th the greatest care.
e device must only be performed by qualified technicians.
epairs could put the user at great risk or cause serious damage
pment (electric shock, risk of fire).
ion provided in the "Safety/regulations" manual
ty notes.
rating the device, please observe the no tes on
ons in Chapter "
pter "
Getting start ed", Page 13.
Technical data", Page 82 as well as
ice, make sure there is clearance all around it so that
enough ventilation. I n order to avoid overheating, do not
on areas of the monitor or the device.
te th e device if the rated voltage used by the
local mains voltage.
present) and the ON/OFF switch do not disconnect the
ins voltage. To completely disconnect from the mains
he power plug from the power socket.
Important notes
Transpor
rtation
portation
Device,Transpo
Retrans
ting the device
Transport all parts separately in their original packaging or in a packaging which
protects them from knocks and jolts, to the new site.
Do not unpack them until all transportation manoeuvres are completed.
If the device is brought from a cold environment into the room where it will be used,
condensation may occur. Before operating the device, wait until it is absolutely dry
and has reached approximately the same temperature as the installation site.
Fujitsu 11

Important notes
Cleaning the device
Device,TransportationRetransportationSystem unit,seeDevice
Turn off all power and equipm ent switches and disconnect the power
plug from the m ains outlet.
Do not clean any interior parts yourself, leave this job to a service technician.
Do not use any cleaning agents that contain abrasives or ma y corrode
plastic (alcohol, thinner or acetone).
Never clean the device with water! Water entering into the device could
present a serious risk to users (e.g. electric shock).
Ensure that no liquid enters the system.
The surface can be clea
moistened in mild dome
Use disinfectant wi
ned with a dry cloth. If particularly dirty, use a cloth that has been
stic detergent and then carefully w rung out.
pes to clean the keyboard and the mouse.
Energy saving, disposal and recycling
DisposalEnergysavingRecycling
You c an findinformationonthesesubjectsinthe"Environment and Energy Information" manual
or on our website ("
http://www.fujitsu.com/fts/about/fts/environment-care/").
12 Fujitsu

Getting started
Getting started
Gettingstarted
Unpacking and checking the delivery
It is recommended not to throw away the original packaging material! It may be
required for reshipment at some later date.
PackagingContentsofdeliveryPackaging,
► Unpack all the individual parts.
► Check the contents of the package for any visible damage caused during transport.
► Check whether the delivery conforms to th e details in the delivery note.
► Should you discover that the delivery does not correspond to the delivery
Steps for initial setup
Preparingforfirstuse,overvie wPreparingforuse,
Only a few steps are necessary to put your new device into operation for the first time:
• Select a location for device and set up device
• Connect external devices such as mouse, keyboard and monitor
• Check the voltage at the mains outlet and connect the device to an electrical outlet
• Switch the device on
You will learn more about the individual steps in the following sections.
Please observe the safety information in the "Importa nt notes", Page 11 chapter.
note, notify your local sales outlet immediately.
External devices
If you have received other external devices in addition to your own device (e.g.
a printer), do not connect these until after the initial installation. The following
sections describe how to connect these exte rnal devices.
Drives and boards
If you have received drives or boards with your device, please do not install
them until after first-time setup. How to install drives an d boards is described
System expansions", Page 33 chapter.
in the "
Fujitsu 13

Getting started
Setting up the device
WorkstationErgonomicDevice
When installing your device, please read the recommendations and safety
notes in the "Safety/regulations" manual.
We recommend that you place your device on a surface which is not slippery. In
view of the many different finishes and varnishes used on furniture, it is possible
that the rubber feet will mark the surface they stand on.
Depending on the location of your device, bothersome vibrations and noises may
occur. To prevent this, a distance of at least 10 mm / 0.39 in should be m aintained
from other devices on casing sides w ithout ventilation surfaces.
In order to avoid overheating, do not cover the ventilation areas
of the monitor or the device.
A minim um distance of 200 mm / 7.87 in from the device must be
observed for ventilation areas.
Do not stack several devices on top of each other.
Do not expose the device to extreme ambient conditions (see "
section "Ambient conditions"). Protect the device against dust, humidity and heat.
Technical data", Page 82,
14 Fujitsu

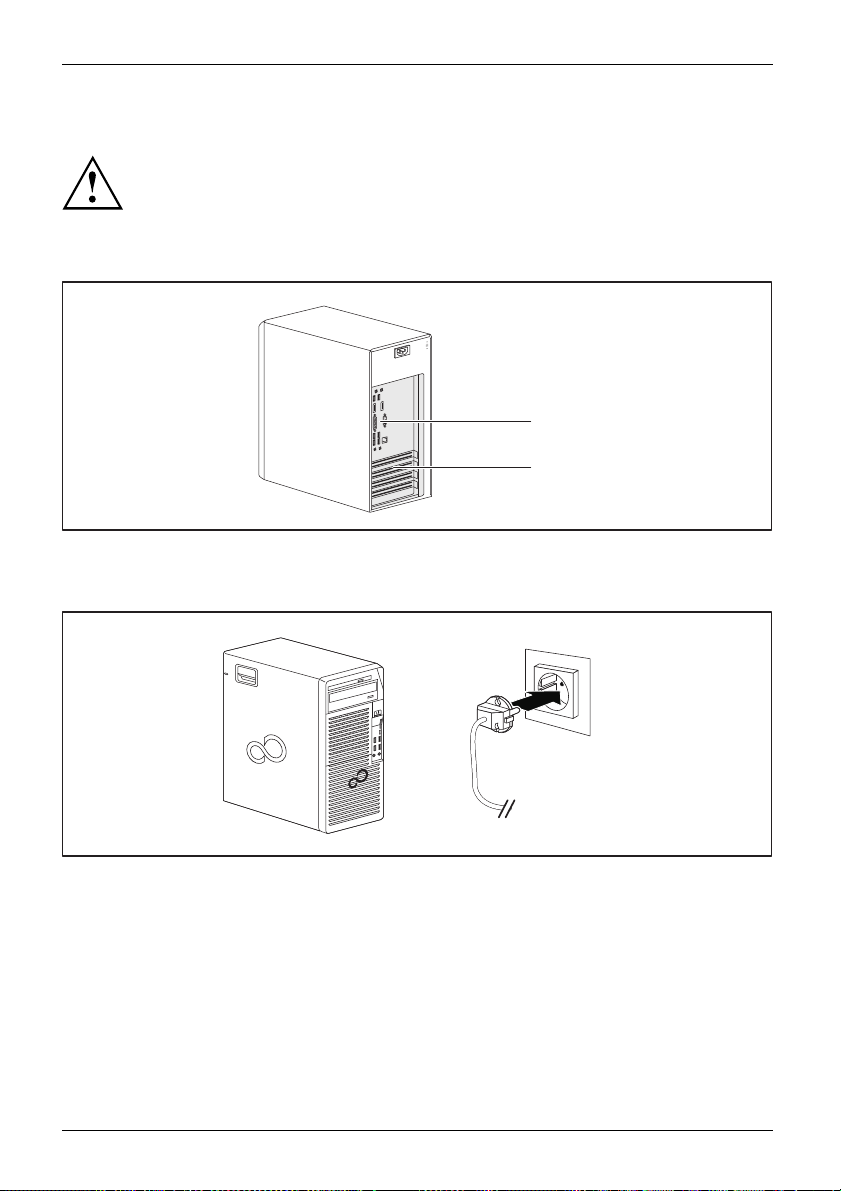
Connecting the device to the mains supply
Mainsadapter
Use the following table to check which mains plug applies for your country. The
following illustration may be different from your co untry variant.
1
2
Getting started
► Connect the pow
er cable to the device (1).
► Plug the power plug into a grounded mains outlet (2).
Power connection
Country
USA, Canada, Mexico, parts of South America,
Japan, Korea, the Philippines, Taiwan
Russia and the Co mmonwealth of Independent
States (CIS), large parts of Europe, parts of
South America, the Middle East, parts of Africa,
Hong Kong, India, large parts of South Asia.
UK, Ireland, Malaysia, Singapore, parts of Africa
China, Australia, New Zealand
Fujitsu 15

Getting started
Connecting external devices
Read the documentation on the external device before connecting it.
With th e exception of USB devices, always remove all power plugs
before connecting external devices!
Do not connect or disconnect cables during a th understorm.
Always take hold of the actual plug when disconnecting a cable. Never pu ll the cable!
To ensure that your device works properly, use only the supplied connection
cable or only use a high-quality connection cable.
16 Fujitsu

Getting started
LAN
Ports on the device
PortsExternaldevicesDevice
The ports are located on the front and back of the device. The ports available on your
device depend on the configuration level you have selected. The standard ports are
marked with the symbols shown below (or similar). Detailed information on the location
of the ports is provided in the m anua l for the mainboard.
PS/2 keyboard port, purple
Keyboardport
PS/2 mouse port, g reen
MouseportPS/2mouseport
1
Serial port 1, turquoise
Serialport
2
Headphones, light g reen (back
of device) or black (front of
device)
Headphones
Audio output (Line out), light
green
AudiooutputLineou t
Parallel port/printer (optional)
ParallelportPrinter
USB 3.1 - Universal Serial Bus,
type A: blue, type C
UniversalSerialBus
TM
:black
Serial port 2, turquoise
Serialport
Microphone port, pink (back of
device) or black (front of device)
Microphonejack
Audio input (Line in), light blue
AudioinputLinein
LAN port
LANport
USB type 2.0 - Universal S eri al
Bus, black
USB 3.1 G en2 - Universal Serial
Bus, type A: blue, type C: black
VGA monitor connection, blue
Monitorport
DVI-I monitor port
DP DisplayPort
SD Card (slot for memory cards
in the format Secure Digital
Card)
Some of the connected devices require special software (e.g. drivers) (refe r to the
documentation for the connected device a nd operating system).
Fujitsu 17
Getting started
Connecting a monitor
Only connect the screen to your device w hen it is switched off.
Depending on requirements, you can use the monitor ports of the mainboard (1) or the monitor ports
of an optional display adapter in one of the board slots (2) to connect a monitor to your device.
K
1
2
► Follow the instructions contained in the monitor m anual to prepare the monitor
for operation (e.g. connecting cables).
► Connect the data cable to a suitable monitor port of the device (VGA, DVI-I, DisplayPort).
1
► Depending on the connector and configuration level of your device, plug the
monitor power cable into an earthed mains outlet (1).
18 Fujitsu

Getting started
Connecting the mouse
You can connect a USB mouse or a PS/2 mouse to your device.
Mouse,Connecting,
Connecting a USB mouse
► Connect the USB m ouse to one of the USB ports on the device.
USBport,USBport
Connecting a PS/2 mouse
► Connect the PS/2 mouse to the PS/2 mouse port of the device.
PS/2mouse,Connecting,PS/2mouse,
Connecting the keyboard
Depending on the equipme
a USB keyboard or a PS/2 k
Keyboard,Connecting,
Connecting a USB keyboa
Use the supplied keyboard cable only.
USBport,Connecting,
► Plug the rectangular connector of the keyboard cable into the rectangular socket
on the underside or on the rear of the keyboard.
► Plug the flat rectang
USBport
Connecting a PS/2 keyboard
Use the supplied ke
ConnectingaPS/2keyboardConnecting,
► Plug the rectang
on the underside
► Plug the round connector of the keyboard c able into a keyboard port of the device.
Keyboard,
nt level selected, your device will be supplied with
eyboard.
rd
ular USB connector of the keyboard cable into a USB port of the device.
yboard cable only.
ular connector of the keyboard cable into the rectangular socket
or on the rear of the keyboard.
Connecting external devices to the parallel or serial interface (optional)
ParallelportSerialportParallelportSerialportExternaldevicesDevices
External devices can be connected to the parallel or serial port (e.g. a printer or a scanner).
► Connect the data cable to the external device.
► Depending on the device, connect the data cable to the parallel port or the serial port.
For an exact description of how to connect external devices to the corresponding
port, please refer to the documentation of the external device.
Port settings
ParallelportSerialport,
You can change the port settings (e.g. address, interrupt) in the BIOS Setup.
Fujitsu 19

Getting started
Device drivers
DevicedriversDevice drivers,
The devices connected to the para llel or serial port require drivers. Your operating
system already includes many drivers. If the required drive is missing, install it. Current
drivers are usually available on the Internet or will be supplied on a data carrier.
Connecting external devices to the USB ports
USBdevices,USBport,Externaldevices,De vices,
You can connect a wide rang
printer, scanner, mouse o
e of external devices to the USB ports (e.g.
r keyboard).
USB devices are hot-plug
USB cables while your dev
Additional informatio
gable. This means you can connect and disconnect
ice is switched on.
n can be found in the documentation for the USB devices.
► Connect the data cable to the external device.
► Connect the data c able to one of the USB ports on your device.
Device drivers
External USB devices which you connect to one of the USB ports don’t usually
need their own drivers because the software required is already included in
the operating system. If the device requires separate software, please follow
the instructions in the manufacturer ’s documentation.
Switching on for the first time: installing the software
Installing,Software,Installing,
Once the installation has been started the device must not be switched
off, unless the installation has been completed.
During installation, the device may only be rebooted when you are re quested to do so!
The installation will otherwise not be carried out correctly and the contents
of the hard disk must be completely restored.
If the device is integrated into a network, the user and server details as well as
the network protocol are required during the software installation.
Contact your network administrator if you have a ny questions about these s ettings.
When you switch on the device for the first time, the supplied software
is installed and configured. Plan a reasonable amount of time for this,
as this process must not be interrupted.
20 Fujitsu

Switch on the monitor and the machine
In order to avoid overheating, do not cover the ventilation areas
on the monitor or the device.
► Switch on the monitor (see operating instructions for the monitor).
Getting started
► Press the on/off
The operational display will light up and the machine will start.
button on the front of the machine.
Installing the software
► During installation, follow the on-screen instructions.
Software,Installing,
► If anything is unclear regarding the data you are asked to input, read the
online Help in your operating system.
You will find more information on the system, as well as drivers, utilities
and updates on the optional "Drivers & Utilities" DVD and on the
Internet at "
You c a n find information and help on the Windows operating system functions
on the Internet at "
http://www.fujitsu.com/fts/support".
http://windows.microsoft.com".
Fujitsu 21

Operation
Operation
Switch the device on
► If necessary, switch the monitor on (see the operating manual for the monitor).
DeviceMonitor
► Press the ON/OFF switch on t
The power indicator glows and the device is started.
Switching off the device
Switching the device o
disconnect the mains
► Shut down the operating system in the proper way.
DeviceMonitor
The devices switches to power saving m ode automatically and switches off.
he front of the device.
ff does not disconnect it from the mains voltage. To completely
voltage, remove the power plug from the power socke t.
Procedureinane
If the device cann ot be switched off, you can force a shutdown by
using the following emergency procedure.
Warning, this could lead to a loss of data!
► Press the ON/O F F switch for at least 4 seconds.
The device will switch off.
When you next restart the device, error messages may be displayed
due to the improper shutdown.
mergency
22 Fujitsu

Operation
Indicators on the device
The indicators are o n the front of the casing. Which indicators are available on your
device depends on the configuration level you have selected.
1
2
3
4
No. indicator Description
1, 2 Drive indicators
3 Power-on indicator Warning: In the energy saving mode, the device must not be
4 Hard disk indicator
The indicators light up when the Slim-Line drive or CD-ROM or
DVD drive of the device is accessed. You must never under any
circumstances remove the CD/DVD while the indicator light is on.
disconnected from the mains, as this can result in a loss of data.
• Indicator is illuminated:
The device is switched on.
• The indicator flashes (depending on device type):
The device is in energy-saving mode. After being switched on
with the ON/OFF switch, the device powers up or returns to the
state it was in be fore it entered energy-saving mode.
• The indicator is not illuminated:
The device is switched off or disconnected from the mains. If
the device is ready for operation, it can be switched on with
the ON/OFF switch.
The indicator lights up wh en the hard disk drive of the device is
accessed.
Fujitsu 23
 Loading...