

Page 1
TM
Փ⫼䇈ᯢк
˄ㅔᯧ˅
UTY-RNRY
UTY-RNRG
OPERATING MANUAL
WIRED REMOTE CONTROLLER
Keep this manual for future reference.
BEDIENUNGSANLEITUNG
KABEL-FERNBEDIENUNG
Bewahren Sie dieses Handbuch für eine spätere Bezugnahme auf.
MODE D’EMPLOI
TÉLÉCOMMANDE FILAIRE
Conservez ce manuel pour pour toute référence ultérieure.
MANUAL DE FUNCIONAMIENTO
MANDO A DISTANCIA CON CABLE
Conserve este manual para posibles consultas futuras.
MANUALE DI ISTRUZIONI
UNITÀ DI CONTROLLO A FILO
Conservare questo manuale per consultazione futura.
(simple)
EnglishDeutsch
(Einfach)
(simple)
Français
(simple)
Español
(semplice)
Italiano
ΕΓΧΕΙΡΙΔΙΟ ΛΕΙΤΟΥΡΓΙΑΣ
ΕΝΣΥΡΜΑΤΟ ΤΗΛΕΧΕΙΡΙΣΤΗΡΙΟ
Διατηρήστε το παρόν εγχειρίδιο για μελλοντική αναφορά.
MANUAL DE FUNCIONAMENTO
CONTROLO REMOTO COM FIOS
Guarde este manual para consulta futura.
РУКОВОДСТВО ПО ЭКСПЛУАТАЦИИ
ПРОВОДНОЙ ПУЛЬТ ДИСТАНЦИОННОГО УПРАВЛЕНИЯ
Сохраните данное руководство для последующего использования.
KULLANIM KILAVUZU
KABLOLU UZAKTAN KUMANDA
Bu kılavuzu ileride başvurmak üzere saklayın.
Փ⫼䇈ᯢк
Փ⫼ѻકࠡ䇋Ҩ㒚䯙䇏ᴀՓ⫼䇈ᯢк
䇋ֱ⬭ᴀ䇈ᯢкҹկҞৢখ㗗
(απλό)
(simples)
(простой)
(basit)
˄ㅔᯧ˅
᳝㒓䘹఼
EλληvIkά
Português
Русский
Türkçe
中 文
PART NO. 9373329237-02
Page 2

OPERATING MANUAL (Simple)
PART NO. 9373329237-02
WIRED REMOTE CONTROLLER
CONTENTS
■
SAFETY PRECAUTIONS .............................................. 1
■
NAME OF PARTS .......................................................... 2
1 MONITOR
1-1 Monitor .................................................................... 2
1-1-1 Monitor Mode Screen ............................................... 2
2 CONTROL
2-1 On and Off ............................................................... 3
2-2 Operation Settings ................................................. 3
2-2-1 Set the Operation Mode ........................................... 3
2-2-2 Set the Temperature ................................................. 3
2-2-3 Set the Fan Speed ................................................... 3
3 SETTING
3-1 Select the Setting Items ........................................ 4
3-2 Air Flow Direction Setting ..................................... 4
3-2-1 VT Air Flow Direction ................................................ 4
3-2-2 HZ Air Flow Direction ............................................... 4
3-3 Timer Setting .......................................................... 5
3-3-1 On Timer .................................................................. 5
3-3-2 Off Timer................................................................... 5
3-3-3 Auto Off Timer .......................................................... 6
3-4 Special Setting ....................................................... 7
3-4-1 Economy .................................................................. 7
Settings and specifi cations not given in this manual are
described in the OPERATING MANUAL on the CD-ROM
supplied with this unit. Managers are recommended to
refer to that manual as needed.
■
SAFETY PRECAUTIONS
• The “SAFETY PRECAUTIONS” indicated in the manual
contain important information pertaining to your safety. Be
sure to observe them.
• For details of the operation methods, refer to the manual.
• Request the user to keep the manual on hand for future
use, such as for relocating or repairing the unit.
This mark indicates procedures
WARNING
In the event of a malfunction (burning smell, etc.), immediately stop operation, turn off the electrical breaker, and
consult authorized service personnel.
Do not repair or modify any damaged cable by yourself. Let
the authorized service personnel to do it. Improper work
will cause an electric shock or a fi re.
When moving, consult authorized service personnel for
uninstallation and installation of this unit.
Do not touch with wet hands. It may cause an electric
shock.
If children may approach the unit, take preventive measures so that they cannot reach the unit.
Do not repair or modify by yourself. It may cause a fault or
accident.
Do not use fl ammable gases near the unit. It may cause a
fi re from leaking gas.
CAUTION
Do not set vessels containing a liquid on this unit.
Doing so will cause heating, fi re or electric shock.
Do not expose this unit directly to water. Doing so will
cause trouble, electric shock or heating.
Dispose of the packing materials safely. Tear and dispose
of the plastic packing bags so that children cannot play with
them. There is the danger of suffocation if children play
with the original plastic bags.
Do not place electrical devices within 1 m (40 in.) of this
unit. It may cause malfunction or failure.
Do not use fi re near this unit or place a heating apparatus
nearby. It may cause malfunction.
Do not touch the switches with sharp objects. Doing so will
cause injury, trouble, or electric shock.
This appliance is not intended for use by persons (including
children) with reduced physical, sensory or mental capabilities, or lack of experience and knowledge, unless they
have been given supervision or instruction concerning use
of the appliance by a person responsible for their safety.
Children should be supervised to ensure that they do not
play with the appliance.
which, if improperly performed,
might lead to the death or serious
injury of the user.
This mark indicates procedures
which, if improperly performed,
might possibly result in personal
harm to the user or damage to
property.
En-1
Page 3
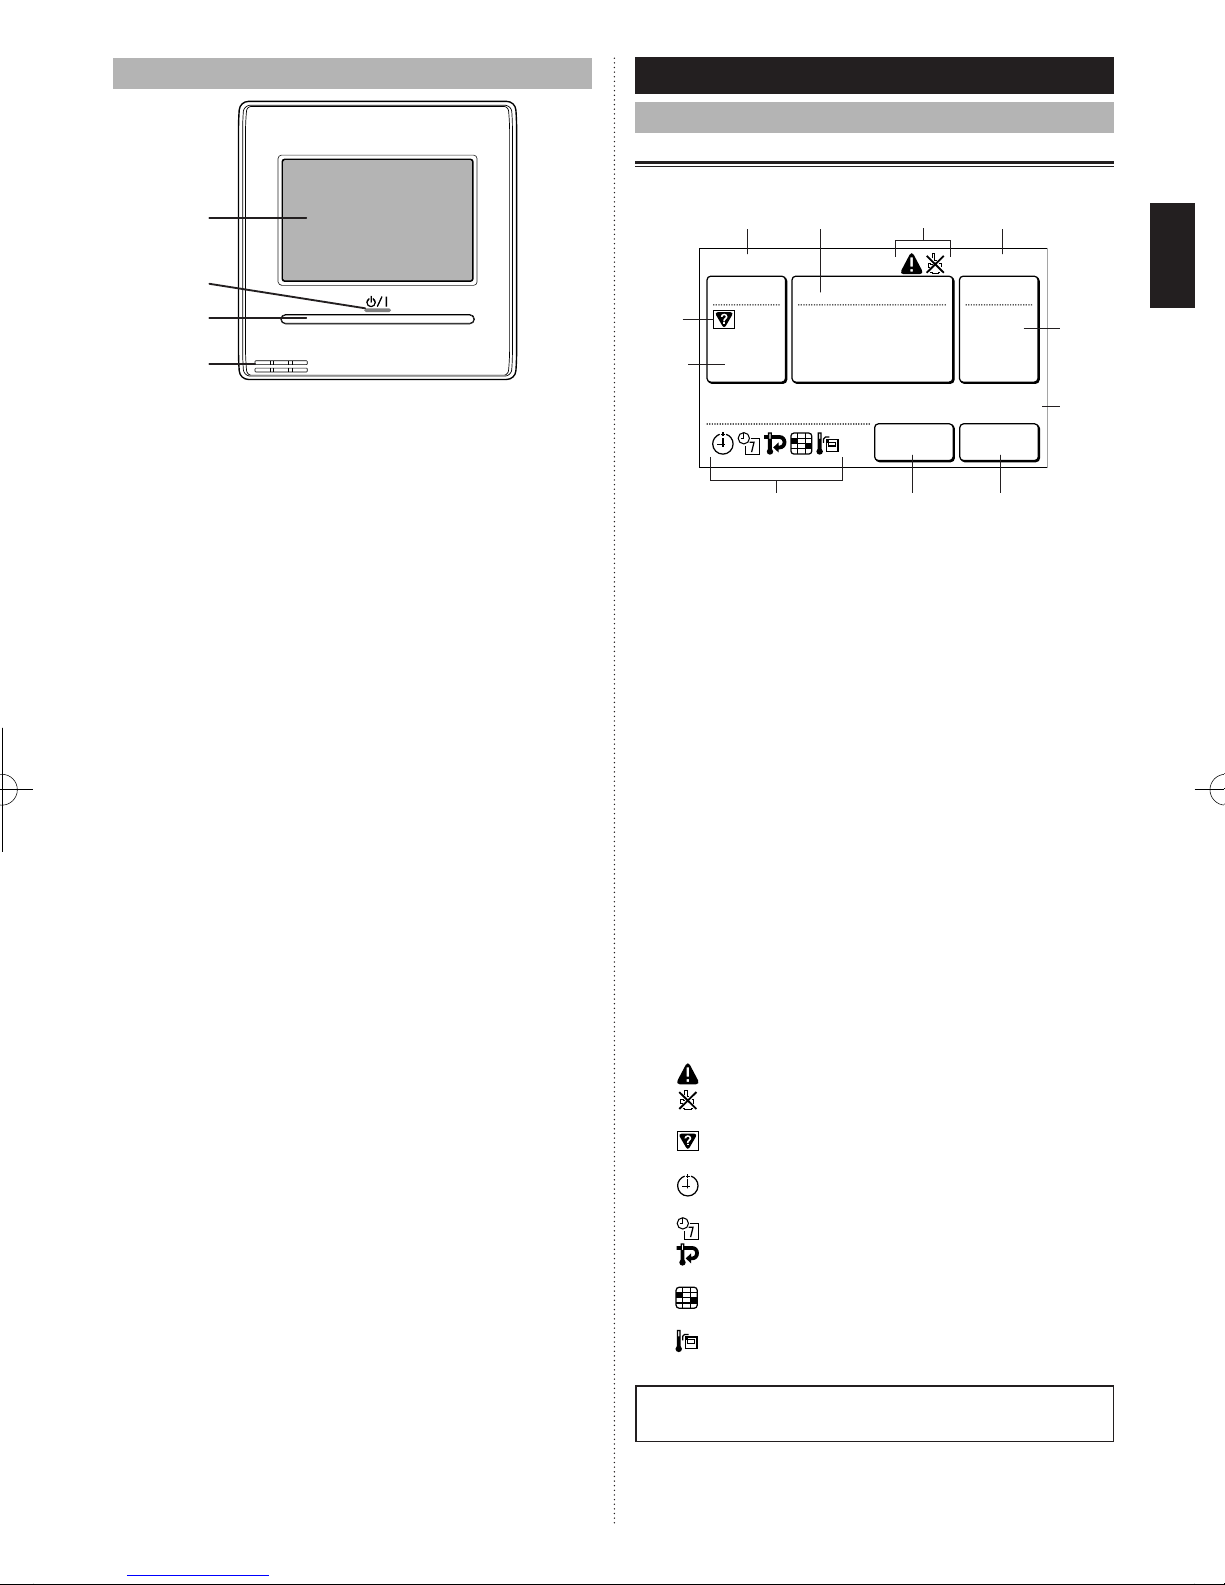
■
26.0
°C
26.0°C
NAME OF PARTS
(a)
1 MONITOR
1-1 Monitor
1-1-1 Monitor Mode Screen
Monitor Mode Screen is home screen of this unit.
(d)(a) (i)
(b)
(b)
(c)
(d)
(a) Touch panel display
• When the screen is touched or the On/Off button is
pressed while backlight is set to Enable, backlight
lights. Backlight goes off 30 or 60 seconds after the
last operation. When backlight is set to Disable, it does
not light.
• Lightly touch the touch panel with your fi nger tips. A
commercially available stylus pen can also be used.
If pushed with too much force or operated with a
rod, pencil, or ballpoint pen, etc., the display may be
scratched or damaged.
• Do not touch 2 or more places simultaneously. Correct
operation cannot be performed.
• When cleaning, do not use detergent or alcohol, paint
thinner, etc. It will cause accidents or loss of appearance.
(b) LED lamp (Power Indicator)
Lights while the indoor unit is operating. Blinks when an
error is generated.
(c) On/Off button
(d) Room temperature sensor (Inside)
(i)
(c)
Office
Mode
Cool
Set Temp.
26.0
Room Temp.
Fri 10:00AM
Fan
Auto
°C
26.0°C
MenuStatus
(i) (g)(h)
(a) R.C. group name:
Name of the remote controller group to which this unit is
connected.
(b) Clock:
(c) Mode:
When this is touched, the display switches to the "Mode"
screen. Refer to [2 CONTROL] → [2-2 Operation Set-
tings] → [2-2-1 Set the Operation Mode].
(d) Set temp.:
When this is touched, the display switches to the tem-
perature setting screen. Refer to [2 CONTROL] → [2-2
Operation Settings] → [2-2-2 Set the Temperature].
(e) Fan:
When this is touched, the display switches the fan speed
setting screen. Refer to [2 CONTROL] → [2-2 Operation
Settings] → [2-2-3 Set the Fan Speed].
(f) Room Temp.:
This unit ambient temperature sensed by this unit is
displayed.
(g) Menu:
When this is touched, the display switches to the "Menu”
screen. Refer to [3 SETTING].
(h) Status: (for manager)
(i) Status icons:
The error occurred. (for manager)
Operation from this unit is prohibited by the Central
Controller. (for manager).
Mode mismatch. The mode which cannot operate
simultaneously is selected. (for manager)
The On Timer, Off Timer, or Auto Off Timer is set.
Refer to [3 SETTING] → [3-3 Timer Setting].
The weekly timer is set. (for manager)
The set temperature automatic return setting is set.
(for manager)
It shows that it is time to clean the fi lter. (for man-
ager)
The temperature sensor of this unit is used. (for
manager)
(e)
(f)
This product uses a Bitmap font made and developed by
Ricoh Co.,Ltd.
En-2
Page 4

2 CONTROL
26.0
°C
26.0
°C
26.0
°C
26.0
°C
26.0
°C
2-1 On and Off
(1) Press the [On/Off] button.
Set Temp.
Mode
Cool
On/Off button
26.0
°C
Fri 10:00AM
Fan
Auto
MenuStatus
LED lamp
2-2-2 Set the Temperature
(1) Touch the [Set Temp.] on the Monitor Mode Screen.
°C
Fri 10:00AM
Fan
Auto
MenuStatus
Mode
Cool
Set Temp.
26.0
(2) “Set Temp.” screen is displayed. Adjust the room tem-
perature with the [ ] or [ ].
Set Temp.
°C
26.0
Cancel OK
The LED lamp remains lit while the indoor unit is operating.
Note
The On/OFF button cannot be operated at screens other
than the Monitor Mode Screen.
2-2 Operation Settings
2-2-1 Set the Operation Mode
(1) Touch the [Mode] on the Monitor Mode Screen.
Fan
°C
Fri 10:00AM
Auto
MenuStatus
OK
Fri 10:00AM
Auto
Fan
Fan
Set Temp.
Mode
Cool
26.0
(2) “Mode” screen is displayed. Select the operation mode.
Mode
Cool Dry Heat
Auto
Cancel
Notes
• Only selectable modes are displayed. The selectable
modes may be different depending on the system confi guration and operation status. Refer to [4.OPERATION
TIPS]→[4-1 Selectable modes].
• When the [Fan] was set, the temperature cannot be set.
Set Temp.
Mode
Fan
Notes
• The settable temperature range is different depending
on the operation mode and indoor unit settings.
• When set temperature range is set, conforms to the setting.
(3) When the [OK] is touched, the display returns to the
Monitor Mode Screen.
2-2-3 Set the Fan Speed
(1) Touch the [Fan] on the Monitor Mode Screen.
°C
Fri 10:00AM
Fan
Auto
MenuStatus
Mode
Cool
Set Temp.
26.0
(2) “Fan” screen is displayed. Select the fan speed.
Fan
High Med Low
Auto
Cancel
OK
(3) When the [OK] is touched, the display returns to the
Monitor Mode Screen.
MenuStatus
• When “Auto” is selected at “Master Indoor Unit”, “(Auto)”
is displayed at the Monitor Mode Screen of Slave Indoor
Unit.
• When the operation mode is switched in a heat recovery
system, operation preparations may take some time, but
this is not a malfunction.
(3) When the [OK] is touched, the display returns to the
Monitor Mode Screen.
En-3
Page 5

3 SETTING
26.0
°C
3-1 Select the Setting Items
(1) Touch the [Menu] on the Monitor Mode Screen.
Set Temp.
Mode
Cool
26.0
(2) “Main Menu” screen is displayed.
The screen has 2 pages which are switched by touching
the [Next Page] or [Previous Page].
Main Manu
Air Flow Direction
Setting
Weekly Timer
Setting
Monitor
Page 1/ 2
Timer Setting
Special Setting
Next
Page
When the item to be set is touched, each setting screen
is displayed. Refer to the description of each item for
details. When each setting is complete or canceled,
the display returns to this screen. When [Monitor]
is touched, the display returns to the Monitor Mode
Screen.
3-2 Air Flow Direction Setting
(1) Touch the [Air Flow Direction Setting] on the “Main
Menu” screen.
Main Manu
Air Flow Direction
Setting
Weekly Timer
Setting
Monitor
Note
When an air fl ow direction adjustment function is not
provided such as a duct type indoor unit, etc., a "No
Function" message screen is displayed. When [Close] is
touched, the display returns to the "Main Menu" screen.
Fri 10:00AM
Fan
Auto
°C
MenuStatus
Main Manu
Summer Time
Setting
Initial Setting Maintenance
Previous
Monitor
Page
Page 1/ 2
Timer Setting
Special Setting
Next
Page
Page 2/ 2
Preference
3-2-1 VT Air Flow Direction
(1) Touch the [VT Setting] on the “Air Flow Direction Set-
ting” screen.
Air Flow Direction Setting
VT Setting HZ Setting
1
3
Back
(2) "VT Air Flow Direction Setting" screen is displayed.
Touch [ ] or [ ] and set the air fl ow direction or the
[Swing].
VT Air Flow Direction Setting
1
4
1
Cancel OK
(3) When the [OK] is touched after setting, the data is
transmitted to the indoor unit and the display returns to
the "Air Flow Direction Setting" screen.
3-2-2 HZ Air Flow Direction
(1) Touch the [HZ Setting] on the “Air Flow Direction Set-
ting” screen.
Air Flow Direction Setting
VT Setting HZ Setting
1
3
Back
(2) "HZ Air Flow Direction Setting" screen is displayed.
Touch [ ] or [ ] and set the air fl ow direction or the
[Swing].
HZ Air Flow Direction Setting
135
Cancel OK
(2) "Air Flow Direction Setting" screen is displayed. When
the [VT Setting] or [HZ Setting] is touched, each setting
screen is displayed.
Air Flow Direction Setting
VT Setting HZ Setting
1
3
Back
When the [OK] or [Cancel] is touched at each setting
screen, the display returns to this screen. When [Back]
is touched, the display returns to the “Main Menu”
screen.
Note
When the indoor unit does not have a horizontal air fl ow
direction adjustment function, [HZ] is not displayed and
the air fl ow direction cannot be set.
(3) When the [OK] is touched, after the data is transmitted
to the indoor unit, the display returns to the "Air Flow
Direction Setting" screen.
En-4
Page 6

3-3 Timer Setting
(1) Touch the [Timer Setting] on the “Main Menu” screen.
Main Manu
Air Flow Direction
Setting
Weekly Timer
Setting
Monitor
Page 1/ 2
Timer Setting
Special Setting
Next
Page
• Set the Operation Start Time
(4) Touch the [Operation Start time] on the “On Timer”
screen. “Operation Start time” screen is displayed.
On Timer
Enable/Disable [Enable]
Operation Start Time [in 0.5 hr]
Cancel OK
Fri 10:00AM
(2) “Timer Setting” screen is displayed.
Timer Setting
On Timer [Disable]
Off Timer
Auto Off Timer
[Disable]
[Disable]
Back
The following timer settings are possible:
• On Timer:
The stopped indoor unit starts to operate after the set
time.
• Off Timer:
The operating indoor unit stops to operate after the set
time.
• Auto Off Timer:
When indoor unit operation is started by the On/Off
b
tton of this unit, operation stops after the set time.
u
When the item to be set is touched, the display switches
to e
ach setting screen. When each setting is complete
or canceled, the display returns to this screen. When
[Back] is touched, the display returns to the “Main
Menu” screen.
3-3-1 On Timer
(1) Touch the [On Timer] on the "Timer Setting" screen.
When the "Password Verifi cation" screen was displayed,
enter the password and touch [OK].
Timer Setting
On Timer [Disable]
Off Timer
Auto Off Timer
[Disable]
[Disable]
Back
• Enable the On Timer.
(2) “On Timer” screen is displayed. Touch the [Enable/Dis-
able] on the “On Timer” screen.
On Timer
Enable/Disable [Disable]
Operation Start Time [in 0.5 hr]
Cancel OK
Fri 10:00AM
(3) “Enable/Disable” screen is displayed. Touch the [En-
able].
Enable/Disable
Enable
Disable
Cancel OK
When the [OK] is touched, the display returns to the “On
Timer” screen.
(5) Set the time by touching [ ] or [ ].
Operation Start Time
in
0.5
hr
Cancel OK
Fri 10:00AM
When the [OK] is touched, the display returns to the “On
Timer” screen.
Note
Up to 24 hours can be set.
• Apply the setting.
(6) Touch the [OK] on the "On Timer" screen. After the set-
ting change screen was displayed, the display returns to
the "Timer Setting" screen.
On Timer
Enable/Disable [Enable]
Operation Start Time [in 0.5 hr]
Cancel OK
Fri 10:00AM
3-3-2 Off Timer
(1) Touch the [Off Timer] on the "Timer Setting" screen.
When the "Password Verifi cation" screen was displayed,
enter the password and touch [OK].
Timer Setting
On Timer [Disable]
Off Timer
Auto Off Timer
[Disable]
[Disable]
Back
• Enable the Off Timer.
(2) “Off Timer” screen is displayed. Touch the [Enable/Dis-
able].
Off Timer
Enable/Disable [Disable]
Operation Stop Time [in 0.5 hr]
Cancel OK
Fri 10:00AM
(3) “Enable/Disable” screen is displayed. Touch the [En-
able].
Enable/Disable
Enable
Disable
Cancel OK
When the [OK] is touched, the display returns to the “Off
Timer” screen.
En-5
Page 7

• Set the Operation Stop Time
(4) Touch the [Operation Stop time] on the "Off Timer”
screen. “Operation Stop Time” screen is displayed.
Off Timer
Enable/Disable [Enable]
Operation Stop Time [in 0.5 hr]
Cancel OK
Fri 10:00AM
(5) Set the time by touching [ ] or [ ].
Operation Stop Time
in
0.5
hr
Cancel OK
Fri 10:00AM
When [OK] is touched, the display returns to the “Off
Timer” screen.
Note
Up to 24 hours can be set.
• Apply the setting.
(6) Touch the [OK] on the "Off Timer" screen. After the set-
ting change screen is displayed, the display returns to
the "Timer Setting" screen.
Off Timer
Enable/Disable [Enable]
Fri 10:00AM
(3) “Enable/Disable” screen is displayed. Touch the [En-
able].
Enable/Disable
Enable
Disable
Cancel OK
When the [OK] is touched, the display returns to the
“Auto Off Timer” screen.
• Set the Operation Stop Time
(4) Touch the [Operation Stop time] on the “Auto Off Timer”
screen.
Auto Off Timer
Enable /Disable [Enable]
Operation Stop Time
Time Range Setting
Cancel OK
Fri 10:00AM
[in 30 min.]
[ – ]
(5) The "Operation Stop" time screen is displayed. Set the
time with [ ] or [ ]. The time can be set within the 30
to 240 min. range in 10 min. units.
Operation Stop Time
After the Manual Operation
in
30
min.
Cancel OK
Fri 10:00AM
Operation Stop Time [in 0.5 hr]
Cancel OK
3-3-3 Auto Off Timer
(1) Touch the [Auto Off Timer] on the "Timer Setting"
screen. When the "Password Verifi cation" screen was
displayed, enter the password and touch [OK].
Timer Setting
On Timer [Disable]
Off Timer
Auto Off Timer
[Disable]
[Disable]
Back
• Enable the Auto Off Timer.
(2) “Auto Off Timer” screen is displayed. Touch the [Enable/
Disable] on the “Auto Off Timer” screen.
Auto Off Timer
Enable /Disable [Dnable]
Operation Stop Time
Time Range Setting
Cancel OK
Fri 10:00AM
[in 30 min.]
[ – ]
When the [OK] is touched, the display returns to the
“Auto Off Timer” screen.
• Set the time range of Auto Off Timer
(6) Touch the [Time Range Setting] on the “Auto Off Timer”
screen.
Auto Off Timer
Enable /Disable [Enable]
Operation Stop Time
Time Range Setting
Cancel OK
Fri 10:00AM
[in 30 min.]
[ – ]
(7) “Time Range Setting” screen is displayed. Touch the
[Time Range] .
Time Range Setting
Time Range [Continuous]
Start Time
End Time
Cancel OK
Fri 10:00AM
[
--:--
]
--:--
]
[
(8) "Time Range" is displayed. When specifying the "Auto
Off Timer" enabled time range, touch [Range Spec.]
and when setting all day enable, touch [Continuous].
Time Range
Range Spec.
Continuous
Cancel OK
When the [OK] is touched, the display returns to the
“Time Range Setting” screen. When the [Continuous]
was selected, go to (14).
En-6
Page 8

(9) Touch the [Start Time] on the “Time Range Setting”
screen.
Time Range Setting
Time Range [Range Spec.]
Start Time
End Time
Cancel OK
Fri 10:00AM
[
--:--
]
--:--
]
[
(10) “Start Time” screen is displayed. Set the Start Time by
touching [ ] or [ ] on the “Start Time” screen.
Start Time
hour
min.
08
40
Cancel OK
Fri 10:00AM
AM
3-4 Special Setting
(1) Touch the [Special Setting] on the “Main Menu” screen.
Main Manu
Air Flow Direction
Setting
Weekly Timer
Setting
Monitor
(2) “Special Setting” screen is displayed.
Special Setting
Economy
Set Temp.
Range Setting
Back
Page 1/ 2
Timer Setting
Special Setting
Next
Page
Set Temp.
Auto Return
Anti Freeze
When the [OK] is touched, the display returns to the
“Time Range Setting” screen.
Note
The screen corresponding to the time display format setting is displayed.
(11) Touch the [End Time] on the “Time Range Setting”
screen.
Time Range Setting
Time Range [Range Spec.]
Start Time
End Time
Cancel OK
(12) “End Time” screen is displayed. Set the End Time by
touching [ ] or [ ].
End Time
hour
min.
05
40
Cancel OK
When the [OK] is touched, the display returns to the
“Time Range Setting” screen.
(13) Touch the [OK] on the “Time Range Setting” screen.
The display returns to the “Auto Off Timer” screen.
Time Range Setting
Time Range [Range Spec.]
Start Time
End Time
Cancel OK
• Apply the setting.
(14) Touch the [OK] on the “Auto Off Timer” screen. After
the setting change screen was displayed, the display
returns to the “Timer Setting” screen.
Auto Off Timer
Enable /Disable [Enable]
Operation Stop Time
Time Range Setting
Cancel OK
Fri 10:00AM
[08:40AM]
--:--
[
Fri 10:00AM
PM
Fri 10:00AM
[08:40AM]
[05:40PM]
Fri 10:00AM
[In 30 min.]
[08:40AM–05:40PM]
]
The following contents are set:
• Economy:
The temperature setting is offset automatically over a
certain period of time. Heating: Max. -4°C (-8°F), Cooling: Max. +2°C (+4°F)
• Set Temp. Auto Return: (for manager)
• Set Temp. Range Setting: (for manager)
• Anti Freeze: (for manager)
When the item to be set is touched, the display switches
to each setting screen. When each setting is complete
or canceled, the display returns to this screen. When
[Back] is touched, the display returns to the “Main
Menu” screen.
3-4-1 Economy
• On/Off of the Economy
(1) Touch the [Economy] on the “Special Setting” screen.
Special Setting
Economy
Set Temp.
Range Setting
Back
Set Temp.
Auto Return
Anti Freeze
(2) “Economy” screen is displayed. Touch the [On] or [Off]
on the “Economy” screen.
Economy
On
Off
Cancel OK
When you touch the [OK], the data is transmitted to
the indoor unit , and then it returns to “Special Setting”
screen.
En-7
Page 9

Page 10

1116, Suenaga, Takatsu-ku, Kawasaki 213-8502, Japan
 Loading...