

Page 1

P oint 510
Pen Tablet
User’s Guide
Page 2

Fujitsu Personal Systems, Inc. has made every effort to ensure the accuracy and
completeness of this document; however, because ongoing development efforts are
continually improving the capabilities o f our products, we cannot guarantee the
accuracy of the contents of this document. We disclaim liability for errors, om issions,
or future changes herein.
Point 510 is a trademark of Fujitsu Personal Systems, Inc.
IBM, IBM PC AT, and IBM PS/2 are registered trademarks of IBM Corporation.
MS, MS-DOS, and Microsoft are registered trademarks of Microsoft C orporation.
Windows for W ork gro ups , Windows 95, and Windows for Pen Computing are trademarks
of Microsoft Corporation.
Kensington is a registered trademark of Kensington Microware Limited.
PCMCIA is a trademark of the Personal Computer Memory Card International
Association.
All other products are trademarks or registered trademarks of their respective companies.
Copyright 1997
Fujitsu Personal Systems, Inc.
No part of this publicati on ma y b e copied, re produced , or tra nslated, without the prior written c onsent
of Fujitsu Personal Systems, Inc. No part of this publication may be stored or transmitted in any
electronic form without the prior written consent of Fujitsu Personal Systems, Inc.
Page 3

Agency Compli ance
UL Notice
Caution
For continued protection against the risk of fire, replace only with the same type and
rating of fuse.
Caution
The battery pack and batteries inside the Pen Computer are not user replaceable.
Please contact Fujitsu Personal Systems, Inc. Service Center for replacement of all
batteries.
Caution
Danger of e xplosion if CMOS batt ery is incorrectly re placed. Re place only with the s ame
or equivalent type recommended by the manufacturer. Dispose of used batteries
according to manufacturer's instructions.
Warning
CMOS battery may e xplode if mis treated. Do not recha rge, disas sembl e or dispose of in
fire.
Caution
The battery used inside the battery pack may present a fire or chemical burn hazard if
mistreated. Do not disassemble, heat above 100 degrees C (212 F) or incinerate. The
battery used inside the batte ry pack mu st be re place d at Fu jitsu Personal Systems Inc.’ s
Service Center only. Dispose of used battery promptly. Keep away from children. If
swallowed, contact a physician at once.
Caution
Overcharging, short circuiting, reverse charging, mutilation or incineration of the cells
must be avoided to prevent one or more of the following occurrences: release of toxic
materials, release of hydrogen and/or oxygen gas, rise in surface temperature. If a cell
has leaked or vented, it should be replaced immediately using protective gloves. If and
when necessary, these cells must be replaced with identical new ones from the same
manufacturer.
If a cell to be repl aced i s con nected w ith oth er cell s in s eries , it is recomm ended that th e
other cells be replaced with the new ones at the same time.
Page 4

FCC Notice
This equipment has been tested and found to comply with the limits for a Class B
digital device, pursuant to Part 15 of the FCC rules. These limits are desig ned to
provide reasonable protection against harmful interference in a re sidential
installation. This equipment generates, uses, and can radiate radio frequency energy
and, if not installed and used in accordance with the instructions, may cause harmful
interference to radio communications; however, there is no guarantee that
interference will not occur in a particular installation. If this equipment does cause
harmful interference to radio or television reception, which can be determined by
turning the equipment off and on, the user is encouraged to try and correct the
interference by one or more of the following measures:
• Reorient or relocate the receiving antenna.
• Increase the separation between the equipment and receiver.
• Connect the equipment into an outlet on a circuit different from that to which the
receiver is connected.
• Consult the dealer or an experienced radio/TV technician for help.
Shielded interconnect cables must be employed with this equipment to ensure
compliance with the pertinent RF emission limits governing this device.
Changes or modifications not expressly approved by Fujitsu Personal Systems, Inc.,
could void the user’s authority to operate the equipment.
FCC Notice for Systems With Built-In Wireless LAN Adapter
To comply with the FCC regulations on intentional radiator (47 CFR, 15, Subpart C),
do not change or replace the antenna provided with the unit in any way. Any
attempt to do so will constitute a violation of the FCC regulations.
Caution
Do not come into contact with the antenna during operation.
iv
Page 5

Canadian DOC Comp lian ce
This digital apparatus does not exceed the Class B limits for radio noise emis sions
from digital apparatus as set out in the radio interference regula tions of th e Canadian
Department of Communications.
Le présent appareil numérique n’émet pas de bruits radioélectriques dépassant les
limites applicables aux appareils numériques de classe B prescrites dans le règlem e nt
sur le brouillage radioélectrique édicté par le Ministère des Communications du
Canada.
v
Page 6

vi
Page 7

Table of Contents
Chapter 1
Getting Started.................................................................................. 1-1
System Features and Controls................................................................... 1-2
Status Lights ................................................................................................ 1-5
Point 510 Accessories..... .... ............................................ ................. 1-7
Accessories Included with the Point 510 Pen Tablet................. 1-7
Optional Accessories............................... ... .................................... 1-7
Chapter 2
Using the Point 510 Pen Tablet ...................................................... 2-1
Power............................................................................................................ 2-1
Power States..................................................................................... 2-2
Starting the Pen Tablet ............................................................................... 2-2
Using the Power Butt on as a Suspend/Resume Button ........... 2-2
Using the Power Butt on as an On/Off Button ........................... 2-3
Using the Pen............................................................................................... 2-3
Ensuring Pen Accuracy.................................. .... ... ......................... 2-4
Using Hotpads............................................................................................. 2-5
Suspending and Resuming Operation..................................................... 2-6
Entering Suspend Mode – Suspend/Resume Power Button... 2-6
Entering Suspend Mode – On/Off Power Button ..................... 2-7
Resuming Operation...................................................................... 2-7
Other Suspend/Resume Issues..................................................... 2-8
Charging the Battery Pack ......................................................................... 2-8
Removing and Installing the Battery Pack.............................................. 2-10
Conserving Battery Power......................................................................... 2-11
Using Connectors and Peripheral Interfaces .......................................... 2-11
Optional Wireless RF LAN Transceiver............................. ..................... 2-13
Shutting Down the Point 51 0 Pen Tabl et............. .................................... 2-14
Chapter 3
Care and Maintenance..................................................................... 3-1
Protecting the Display Screen ................................................................... 3-1
Storing the Point 510 Pen Tablet............................................................... 3-1
Protecting the Point 510 Pen Tablet in Harsh Environments ............... 3-2
Cleaning the Display Screen...................................................................... 3-2
Taking Care of the Pen............................................................................... 3-2
Calibrating the Point 510 Display Screen................................................ 3-3
Determining When to Perform Pen Calibration......................... 3-3
Performing Pen Calibration........................................................... 3-3
Solving Problems........................................................................................ 3-4
vii
Page 8

Suspended Pen Tablet Will Not Resume..................................... 3-4
Display Screen Is Blank or Difficult to Read............................... 3-5
Infrared Data Transfer is Not Working ....................................... 3-5
Wireless LAN Signal is Interrupted............................................. 3-6
Cursor Is Not Tracking Pen........................................................... 3-6
Audio Volume Too Low............... ... .... .... ... ................................... 3-6
viii
Page 9
Chapter 1
Getting Started
The Point 510TM pen tablet is an easy to use, high-performance personal computer that
you can run by touching the screen with a supplied “pen,” sometimes called a
“stylus.” The Point 510 pen tablet runs the popular Windows for Workgroups or
Windows 95 software. This chapter gives an overview of the Point 510 pen tablet’s
features and explains basic use.
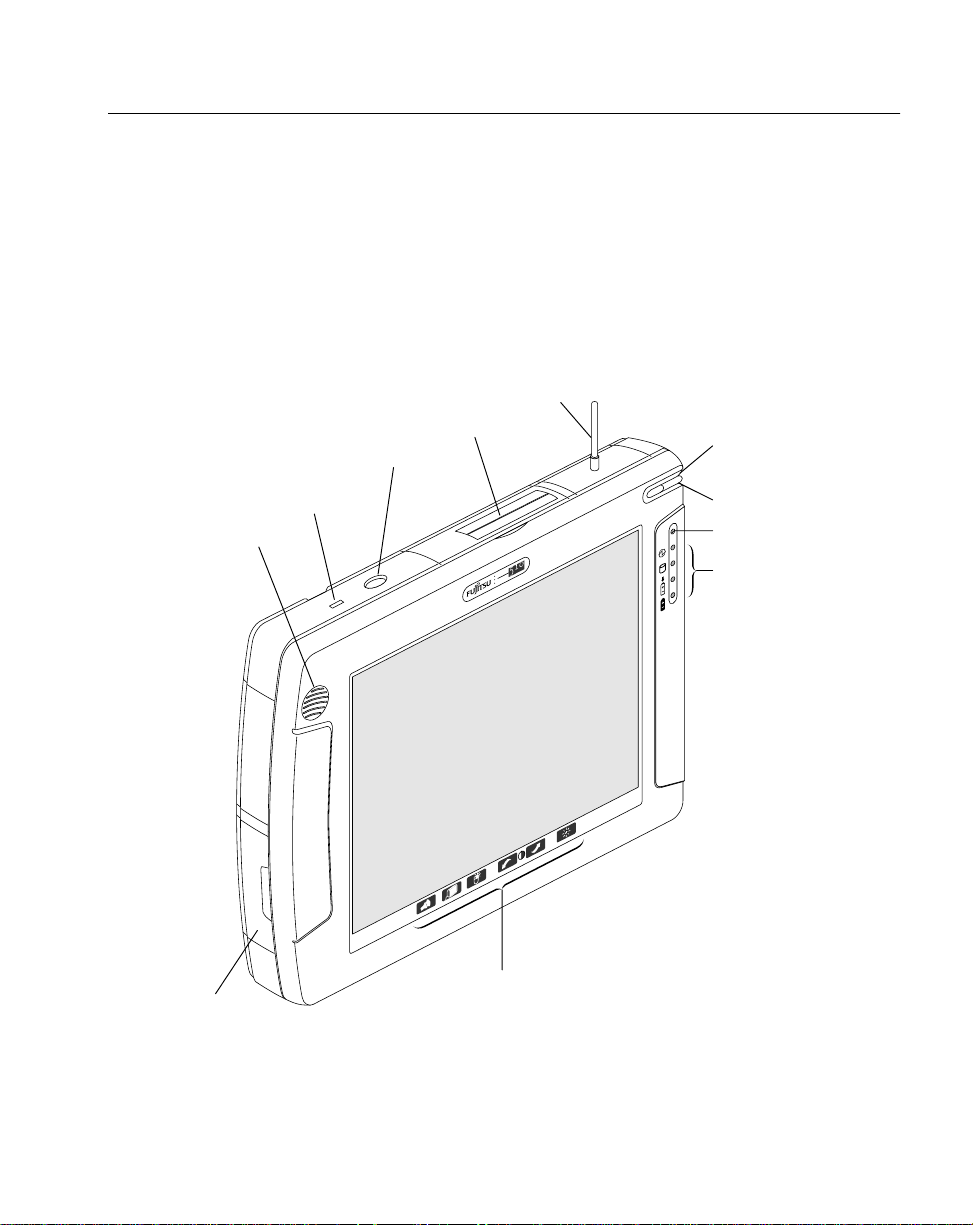
Antenna
(Optional)
PC Card Door
Power Button
Kensington Lock
Attachment Point
Speaker
POINT
MIC
Pen
Holder
Pen
Microphone
Status Lights
Battery
Pack
Hotpads
Point 510 Pen Tablet Features – Front
1-1
Page 10
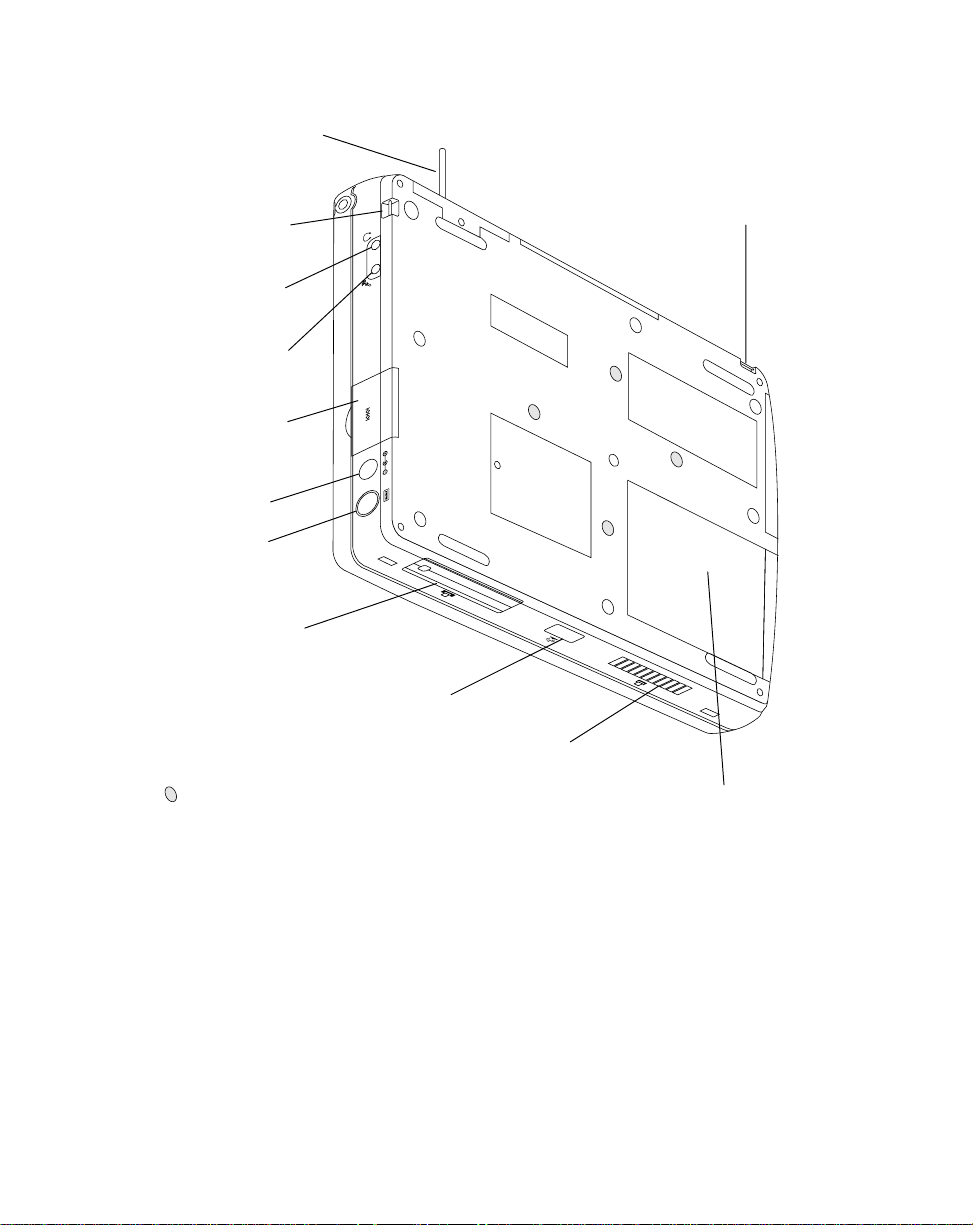
Antenna
(Optional)
Pen T ether
Attachment Point
External Stereo
Headphone Jack
External Mono
Microphone Jack
Serial
Communications
Port
DC Power Port
Keyboard Port
System Interface
Connector Door
Pen T ether
Attachment Point
IrDA Port
High-Usage Contacts
Hand Strap Mounting Points
Battery Pack
Point 510 Pen Tablet Features – Back
System F eatu res an d Contr ols 1
Before you use the Point 510 pen tablet, familiarize yourself with its basic operation.
The main features and controls that you use to operate the Point 510 pen tablet are
described briefly below. These items are described in detail later in this manual.
• Power Button
Button that either allows you to turn the Point 510 pen tablet power on and off, or
to suspend operation and “save your place” on your pen tablet, depending on
how the pen tablet is set up.
1-2
Getting Started
Page 11

• PC Card Door
Shuttered door that allows you to gain access to the PC Card, if one is installed in
the PC Card slot.
• Antenna (Optional)
If installed, an antenna that helps you send and receive data on a wireless local
area network (LAN).
• Pen
The main input device that you use to enter data and run pr ograms. The pen h as a
hole for attaching the pen tether.
• Pen Holder
A slot built into the corner of the pen tablet fo r storing the Point 510 pen.
• Microphone
A built-in microphone that allows you to record audio information with the Point
510 pen tablet.
• Status Lights
LEDs that indicate power usage, battery charge, and hard disk drive usage.
• Hotpads
Tappable areas at the edge of the screen that allow you to adjust alarm beep
volume, display contrast and brightness, and to right-tap (l ike right-clicking a
mouse).
• Battery Pack
Rechargeable power source for the Point 510 pen tablet.
®
• Kensington
Lock
Attachment point built into the Point 510 pen tablet. This is designed for use with
a Kensington security lock that enables you to attach the pen tablet to a stationary
object such as a desk.
• Speaker
Built-in speaker that allows you to listen to audio files on the Point 510 pen tablet.
• Pen Tether Attachment Points
Bars built into the Point 510 case for attaching the pen tether to the tablet. The
other end of the tether fits the corresponding hole in the end of the Point 510 pen.
• External Stereo Headphone Jack
Jack for external stereo headphones.
System Features and Controls
1-3
Page 12

• External Mono Microphone Jack
Jack for an external mono microphone.
• Serial Communications Port
Port that allows you to connect a serial device, such as a modem.
• DC Power Port
Port for attaching external DC power to the Point 510 pen tablet.
• Keyboard Por t
Port for attaching a keyboard to the Point 510 pen tablet.
• System Interface Connector Door
Protective cover for the Point 510 System Interface connector, which lets you use
your Point 510 pen tablet with other equipment, such as a printer.
• IrDA Port
Infrared interface that allows wireless communication with other devices that are
equipped with an IrDA port.
• High-Usage Contacts
Metal contacts that correspond to connectors on a Point 510 cradle, one of several
peripheral holder/charger/connector units available for the Point 510 pen tablet.
• Hand Strap Mounting Points
Four screw fittings that allow you to attach the optional hand strap.
1-4
Getting Started
Page 13

Status Light s 1
The status lights are LEDs that give you information about sys tem power, hard disk
drive use, and battery charge. The following figure shows the status lights on the front
of the Point 510 pen tablet.
MIC
Built-in
Microphone
Power
HDD Access
Charge Status
Low Battery
Status Lights on the Point 510 Pen Tablet
These status lights are described in the table that follows.
Status Lig hts
1-5
Page 14

The following table shows the name and symbol for each status light, and what the
lights mean when they are on, off, or flashing.
Power Indicates power usage.
Light on continuously: Pen tablet is
Light flashing:
Light off: Pen tablet is
HDD Access Indicates when the pen tablet is reading or writing on the internal
hard disk drive (HDD).
Suspend mode
Fully On
Fully Off
(running).
(flashes every 4 seconds).
(not running).
Charge
Status
Low Battery Amber LED that indicates low battery conditions.
*
External power can come fro m an AC adapt er, auto adapter , or a P oint 510 cr adle that supplies
power.
Green LED that indicates power source and charge status.
On continuously: Fast charge (0 to 89% of capacity).
Flashing: Slow charge (90-99% of capacity).
On once: External power attached.*
Off: Battery charged or on exter nal power.
On continuously: Critically low battery.
Flashing quickly: 1/2 second on, 1/2 second off - very low
battery.
Flashing slowly: One second on, one second off – low battery.
Very slow flash: Flashing every 4 seconds – very low battery
during Suspend mode.
Off: Adequate power.
For details on the Fully On, Suspend mode, and Fully Off power sta tes shown by the
Power light, see “Power” on page 2-1. For more informa tion about battery use and
maintenance, see “Charging the Battery Pack” on page 2-8.
1-6
Getting Started
Page 15

P o int 5 10 Acce ssories 1
Several accessories can be used with the Point 510 pen tablet. R efer to the instructions
provided with these accessories for details on their use.
Accessories Included with the Point 510 Pen Tablet 1
The following items are included with the Point 510 pen tablet:
• AC adapter
• Point 510 pen
• Two screen protectors
• Point 510 battery pack, installed in the pen tablet
• The user’s guide for the operating system installed on the pen tablet, with a
certificate of authenticity for operating the system software
Optional Accessories 1
The following items are optional accessories for the Point 510 pen tablet:
• Slip case
• Pen tether
• Hand strap
• Auto adapter
• Bar code reader
• Spare Point 510 battery pack
• Keyboard combo case
• Point 510 external battery charger
• Fujitsu low-power keyboard
• Folding desk stand
• Portable port expander
• Port replicator
• High-usage cradle
• Charge-only cradle
• Wall-mount cradle
• High-connectivity cradle
Status Lig hts
1-7
Page 16

1-8
Getting Started
Page 17

Chapter 2
Using the P oint 510 P en Tablet
This chapter covers the fundamental operations that you need to be familiar with to
use the Point 510 pen tablet:
• Starting the pen tablet
• Using the pen
• Charging the battery pack
• Connecting to oth er equipment
• Shutting down the pen tablet
Power 2
Before you start using the Point 510 pen tablet, familiarize yourself with the various
ways your pen tablet can use and conserve power. Understanding this aspect of the
pen tablet may keep you from losing data you have entered into the pen tablet.
This chapter contains information for two different uses of the Power button,
depending on how the Point 510 pen tablet has been set up. Being familiar with these
power states can help you determine how specific power information in this chapter
applies to your pen tablet.
Your Point 510 pen tablet will be set up to do one of two things when you press the
Power button:
• Suspend or resume system opera tion without turning power off.
• Turn power on or off.
Caution
• Ask the computer professiona l at your site whether the
Power button on your pen tablet is set up to control
Suspend/Resume
possible loss of data under certain conditions when you
press the Power button.
or
Po wer On/Off
. This ma y hel p p r event
Power
2-1
Page 18

Power States 2
The Point 510 pen tablet behaves differently depending on its power state. The pen
tablet can be Fully On, partially on (Idle, Standby, Suspended), or Fully Off. The pen
tablet’s behavior for each power state is as follows:
• Fully On
The pen tablet is running and the display screen is on. The pen tablet responds to
the pen and other input. Power usage is at the normal rate.
• Idle and Standby
A low-power state. Some functions are off or regulated to conserve power. When
the pen tablet detects pen or other input, it returns to the Fully On state.
• Suspend Mode
A low-power state. Operation is suspended and the pen t ablet is in low power
usage. Most functions are off to conserve power, and the pen tablet does not
respond t o the pe n or other input. D ata in pro grams tha t wer e r unning is sto red i n
random access memory (RAM) and power is provided to RAM to keep from
losing the data.
• Fully Off
All functions are turned off. The pen tablet does not respond to the pen or other
input. Power usage is stopped.
Your Point 510 pen tablet might be set up to enter a low-power state auto matically
after a period of inactivity, to conserve battery power.
Starting the Pen Tablet 2
Start the Point 510 pen tablet by pressing the Power button once. The Point 510 pen
tablet will start Windows for Workgroups or Windows 95.
Caution
•
Press the Power button only once
tablet. Pressing the Power button again after the start-up
process begins could cause system problems.
Using the Power Button as a Suspend/Resume Button 2
If the Point 510 pen tablet has the Power button set up for Suspend/Resume operation,
then after the pen tablet starts, pressing the Power button switches between the
Suspend mode and Fully On power states.
2-2
Using the Point 510 Pen Tablet
when you start the pen
Page 19

Using the Power Button as an On/Off Button 2
If the Point 510 pen tablet has the Power button set up for power on/off operatio n,
when you press the Power button the pen tablet switches between the Fully On and
Fully Off power states.
If you want to suspend operation on a pen tablet set up for On/Off, use the pow e r
management software installed on your pen tablet. When you have suspended pen
tablet operation, press the Power button once to resume operation; the pen tablet
returns to the fully on state. After you press the Power button once to resume
operation, the Power button returns to operating as an O n/Off Power button.
Using the Pen 2
You can use the supplied Point 510 pen to select items and run programs on the Point
510 pen tablet much like you would use a mouse on a desktop computer. The pen can
be used like the buttons on a two-button mouse. Program s that support handwriting
recognition allow you to write characters directly on the screen with the pen.
Caution
• Do not use a ball-poin t pen or an y sh arp object on the pen
tablet. This can mar or scratch the screen surface.
Here are some hints on how to use the pen as you would a conventional mouse:
• To “left-tap” the pen, tap the pen tip against the screen once. This functions like a
left mouse click.
• To “double-tap” the pen, tap the pen tip against the screen twice quickly. This
functions like a double-click of the left mouse button.
• To “right-tap” the pen, tap the pen tip on the Right Mouse hotpad once, then tap
the pen on the screen. This functions like a right mouse click. (The hotpads are
described on page 2-5.)
• To move the cursor, hold the pen tip against the scre en and move the pen. You can
also lift the pen (the cursor will stop moving) and then tap the screen where you
want the cursor to appear (the cursor will instantly appear in that area).
• To select an object, tap the pen tip on the object’s icon once (“left-tap”).
• To start a pr ogram, tap the pen tip twice rapidly (“double-tap”) on the program
icon. (Some programs re quire only one tap to start.)
Using the Pen
2-3
Page 20

• To move something on the screen, place the pen tip directly over the object, then
as you press and hold the pen tip against the display screen, move the pen.
The pen can be attached to the tablet with an optional pen tether. The pen tablet has
attachment points on the right and left sides to accommodate left-handed and
right-handed users.
Pen T ether
(Sold Separately)
Point 510 Pen and Tether
Ensuring Pen Accuracy 2
The Point 510 pen tablet comes from the factory already calibrated so that it interprets
pen taps correctly. If the cursor is not displayed directly under the pen tip when you
touch the screen, then you should re-calibrate the Point 510 pen tablet . For more
information, see “Calibrating the Point 510 Display Screen” on page 3-3.
2-4
Using the Point 510 Pen Tablet
Page 21

Using Hotpads 2
The hotpads are controls along the edge of the Point 510 screen that let you use
functions and make adjustments on the Point 510 pen tablet. You do this by tapping
the hotpads with the Point 510 pen.
Speaker V olume
Display-Select
Right Mouse Button
Contrast Down
Contrast Up
Brightness
The table below shows each hotpad icon and how to use it.
Speaker Volume
Display-Se lect Choose between the internal LCD monitor or an
Right Mouse
Button
Contrast Down
Contrast Up
This hotpad controls the speaker volume. Tap
the hotpad to cycle through the low, medium,
high, and off settings. (Note that the sound level
may also be controlled by settings in your
application or operating system software.)
external VGA monitor, if any. Tap the hotpad to
toggle between i nte rnal LCD and external VGA.
Enables you to p erform functions that require a
right mouse click. Tap the hotpad once to
activate the right-tap, then tap the screen. Tap
the hotpad once before each right-tap.
These hotpads control the screen contrast (the
difference between the brightest and darkest
parts of the screen).
Brightness
Brightness
is the overall lightness or darkness
of the entire screen regardless of the contrast.
This has two settings, bright and dim. Tap the
brightness hotpad once to switch between a
brighter and dimmer screen.
Using Hotpads
2-5
Page 22

Suspending and Resuming Operation 2
The Point 510 pen tablet allows you to suspend and resume system operation without
exiting the programs you are using. Suspend mode conserves battery power while
saving your recent work. A fully charged battery pack will maintain the pen ta blet in
suspend mode for approximately ten (10) days.
The Power button on the Point 510 pen tablet can be set up as a Suspend/Resume
Power button or as an On/Off Power button.
Caution
• Do not press the Power button more than
operation. The Point 510 pen tablet will take several
seconds to reload information before it resume s operat ion,
and pressing the b utton again du ring the resuming pr ocess
could produce unpredictable results.
once
to resume
How you use the Suspend/Resume function depends on how your pen tablet is set up.
If you are not sure, refer to “Power” on page 2-1, a nd see the computer professiona l at
your site who maintains the Point 510 pen tablets. The procedures are outlined briefly
in the following table:
Point 510 Pen Tablet Setup Suspend and Resume Procedure
Suspend/Resume To suspend, press the Power button once.
To resume, press the Power button once.
On/Off To suspend, use power management software to select Suspend
mode (do not press the Power button).
To resume, press the Power button once.
Entering Suspend Mode – Suspend/Resume Power Button 2
If your Point 510 pen tablet is set up so that the Power button suspends and resumes
operation you can take the following steps to put the pen tablet in Suspend mode:
1. Press the Power button once. The Point 510 pen tablet emits a double beep (if the
speaker is on). Note that your system may take a few seconds to suspend
operation depending on how it is configured. If the pen tablet does not appear to
be responding, do not press the button repeatedly or more firmly.
2-6
Using the Point 510 Pen Tablet
Page 23

Any programs you are running are stopped, data is preserved, and the system
enters a low-power state, called Suspend mode. For more information, see “Power
States” on page 2-2.
2. Observe the Power light. When the light is blinking once every 4 seconds, the
Point 510 pen tablet is in suspend mode. You can press the Power button once to
resume the Fully On state.
Entering Suspend Mode – On/Off Power Button 2
If your Point 510 pen tablet Power button is set up to turn the pen tablet on or off, then
to suspend operation you must use a suspend/resume software program d esigned for
this purpose. Ask the computer professional at your site who mainta ins the Point 510
pen tablets about what software to use. To suspend operation:
1. Run the suspend command from a power management program on your Point 510
pen tablet. The Point 510 pen tablet emits a double beep (if the speaker is on).
Any programs you are running are stopped, data is preserved, and the system
enters a low-power state, called suspend mode. For more information, see “Power
States” on page 2-2.
2. Observe the Power status light. When the light is blinking once every 4 seconds,
the Point 510 pen tablet is in suspend mode.
The Power button temporarily serves as a Suspend/Re sume button. Press it once
to resume the Fully On state.
Resuming Operati on 2
Resuming operation on your Point 510 pen tablet is the same whether your pen tablet
is set up to suspend using the Power button or using a so ft ware program. To resume
operation:
• Press the Power button only once. (Be careful to avoid pressing the Power button
again during the resume process.)
The Point 510 pen tablet returns to the Fully On st ate and operation resumes. The
screen might flicker during the resume proces s. Resuming might take several
seconds as data is read back in.
You can continue using the pen tablet as soon as operation resumes. All programs
resume at the same point that they stopped when operation was suspended.
Suspending and Resuming Operation
2-7
Page 24

Other Suspend/Resume Issues 2
Other issues you should consider when suspending or resuming pen tablet operation
are as follows:
• When the Point 510 pen tablet is in suspend mode, data stops going to and from
the pen tablet. Some programs might temporarily keep the Point 510 pen tablet in
the Fully On state to prevent interrupting processes like data transfer until the data
is completely transferred. This preserves the quality and completeness of the data.
• Your system may be set up to suspend operation automatically if you do not use
the system for some period.
• If the battery charge drops below the critically low charge level (the amber Low
Battery light is flashing quickly), the system is forced into suspend mode and will
not resume until a charged battery pack is installed or external power is attached.
• The Point 510 Power button is not pressure sensitive. If the pen tablet does not go
into Suspend mode (or Fully Off) within a few seconds, do not press the button
harder. Pressing the button harder may damage the pen tablet.
• When the Point 510 pen tablet shuts down, it emits a beep (if the speaker is on).
This lets you know that it is going in to the Fully Off state.
Charging the Ba ttery P a c k 2
The Point 510 battery pack can be charged while it is installed in the Point 510 pen
tablet. You can use the pen tablet, or press the Power button to suspend or turn off the
pen tablet, without interrupting the charging process.
2-8
Using the Point 510 Pen Tablet
Page 25

The following table shows how battery lights show battery status:
The green Charge Status light indicates the power source and charge status.
On continuou sly: Fast charge (0 to 89% of capacity)
Flashing: Slow charge (90-99% of capacity). Flashes faster at 90%, slower at 99%.
One second on: External power is attached.
is 100% charged, the light comes on for a few seconds, then turns off.
Off: Battery is not being charged.
The amber Low Battery light indicates low battery conditions.
On continuou sly: Critically low bat tery.
Flashing quickly: 1/2 second on, 1/2 second off – very low battery.
One second on, one second off – low battery.
Very slow flash: Flashing every 4 seconds – very low battery during Suspend mode
(flashing synchronized with the Power light).
Off: Battery power is adequate, or exter nal power is attached.
*
External power can come from an AC adapter, auto adapter, or a Point 510 cradle that supplies
power.
*
When external power is attached and the battery
To charge the battery pack:
1. With the Point 510 pen tablet disconnected from external power sources, look at the
amber Low Battery light to determine the battery charge level. The lower the
battery level, the longer the battery pack will require for recharging.
2. Connect the Point 510 pen tablet to a power adapter or a Point 510 pen tabl et
cradle that provides power. If the battery pack charge level is below 90% when
external power is initially connected, the green Charge Status light comes on and the
battery begins charging. When the Charge Status light turns off, the battery is
100% charged.
Note: If battery power is less than 90% capacity when external power is attached (green
Charge Status light on continuously), the battery starts charging automatically until
100% charge is reached or external power is disconnect ed. If ba ttery pow er is 90%
or more when external power is attached (Charge Status light flashes once), the
battery does not charge. Charging begins only when battery power is less than 90%
at the time that external power is connected, and from that point, charging proceeds
until 100% charge is reached or external power is disconnected.
As long as external power remains connected to the pen tablet, the charging process
continues until the battery pack reaches 100% charge.
Charging the Battery Pack
2-9
Page 26

Removing an d Instal li ng the B attery P ack 2
The battery pack can be removed from the Point 510 pen tablet and replaced with a
charged battery pack. You can then charge the removed battery pack in the optional
external battery charger. You can remove or install the battery pack while the system
is Fully Off or in Suspend mode.
To remove and install a battery pack on the Point 510 pen tablet:
1. Save a ny important files and information in programs that you are using.
2. Put your pen tablet in Fully Off or Suspend mode. For more informati on, see
“Suspending and Resuming Operation” on page 2-6.
3. Slide the battery latch on the battery pack in the pen tablet open as shown in the
following illustration.
4. Slide the battery pack out of the pen tablet.
Slide battery pack
out to remove.
Battery Pack Battery Latch
Slide latch to open.
Removing the Battery Pack
5. On the charged battery pack, slide the latch open. Slide the charged battery pack
into the system unit until it fits snugly. Slide the latch forward into the closed
position.
2-10
Using the Point 510 Pen Tablet
Page 27

6. Press the Power button to power on or resume operation. When the pen tablet
returns to the Fully On state, you can continue usin g it.
Conserving Battery P o w er 2
A fully charged battery pack can run the Point 510 pen ta blet continuously for up to
five (5) hours. Your results may vary depending on how the pen tablet is set up. You
can extend the life of your battery pack by conserving battery power.
Here are some suggestions for conserving battery power:
• If you will not be using the Point 510 pen tablet for a few minutes, susp end
operation by putting the pen tablet in Suspend mode (see “Suspending and
Resuming Operation” on page 2-6).
• If you will not be using the Point 510 pen tablet for an extended period of time,
such as at the end of your work day, turn the system Fully Off.
• Select the low Brightness setting for the screen by tapping the Brightness hotpad
(see “Using Hotpads” on page 2-5).
Using Connectors and Peripheral Interfaces 2
Connectors and peripheral interfaces on the Point 510 pen tablet a llow you to conn ect
a variety of equipment to the Point 510 pen tablet, such as a microphone, headphones,
keyboard, or printer. You can also connect your Point 510 pen tablet to one of several
cradles or portable connectivity peripherals.
Cradles and connectivity peripherals for various work environments have been
designed for use with the Point 510 pen tablet. These products enable you to easily
connect your Point 510 pen tablet to stationary hardware. For more information about
the cradle for your pen tablet, if any, refer to the Point 510 Connectivity Periphe rals User
Guide or contact your local help desk.
Conserving Battery Power
2-11
Page 28

The connectors and interfaces on the Point 510 pen tablet are loca ted along three sides
of the pen tablet, as shown:
PC Card Slot
Eject Button
Reset Button
Antenna (Optional)
Point 510 Pen Tablet Connectors - Top
Port
DC PowerKeyboard
Point 510 Pen Tablet Connectors- Right
High-Usage
Contacts
PC Card Door
9 Pin Serial
Communications
Port
IrDA Port System Interface
External
Microphone
Port
Power Button
External Stereo
Headphone
Connector
Port
2-12
Point 510 Pen Tablet Connectors - Bottom
Using the Point 510 Pen Tablet
Page 29

Here is a description of each connector on the Point 510 pen tablet:
PC Card slot Allows you to use a PC Card with the Point 510 pen tablet.
To remove a PC Card, press th e eject b utton inside the PC
Card door.
Keyboard port Allows you to connect a Fujitsu low-power 3.3-volt
keyboard, and most other PS/2-style 5-volt keyboards.
9-pin serial port This is a fully functional RS232-C serial port. Allows you to
connect a modem, or any other external device with a
serial interface.
External
headphones
External
microphone
High-usage
contacts
IrDA port
(serial port B)
System interface
connector
Stereo mini-jack for headphones.
Mono mini-jack for a microphone.
Eleven metal contacts that correspond to “pogo pins”
(springy metal con nectors) on certain cradles . These allow
for quic k, reliab l e conn ect and disc onnec t of the Point 510
pen tablet many times during the work day.
Infrared serial port (IrDA1.0 s tandard) located between th e
High-Usage contac ts and the System Inte rfa ce conn ector .
An infrared tran sceiver b uilt into the s ystem unit allo ws you
to communicate wi th another device such as a printer
equipped with an IrDA po rt. The effectiv e range for infr ared
communication is about 3 feet (1meter). To transmit and
receive data using this port, you must provide a clear,
line-of-sight path between the Point 510 pen tablet IrDA
port and the IrDA transceiver on the other device.
A 120-pin connector that allows you to connect the Point
510 pen tablet to a peripheral cradle when quick connect
and disconnect is not necessary. The pins provide
connections to equipment such as printers.
Optional Wireless RF LAN Transceiver 2
The Point 510 pen tablet can be equipped with an op tional radio frequency (RF)
transceiver and antenna that allow you to send and receive data from a centralized
computer on a wireless, local area network (LAN). Point 510 pen tablets equipped
with the wireless RF LAN transceiver have an RF antenna mounted on the pen tablet
to transmit and receive the signals (antenna shown on page 2-12).
Optional Wireless RF LAN Transceiver
2-13
Page 30

The RF LAN transceiver allows you to transmit and receive data using your Point 510
pen tablet in your facility. Access points can be statio ned throughout your facility to
carry the signals between your Point 510 pen tablet and the wired LAN and help
maintain a reliable connection.
Consult the computer professional at your site who maintains the Point 510 pen tablets
for details on the wireless LAN and the use of the RF LAN transceiver.
Shutting Do wn th e Point 510 Pen Tablet 2
Your Point 510 pen tablet Power button may be set up to suspend operation without
exiting programs (saving your place), or it may be set up to shut down completely.
If the Power button is set up to suspend operation, find out if the computer
professionals who manag e the Point 510 pen tablets at your site allow users to sh ut
down the units themselves. If so, follow the procedure specified by the computer
professional at your site to shut down the pen tablet.
If your Point 510 pen tablet is set up to shut down completely using the Power button,
you can press that button once to shut down the pen tablet completely.
If the Point 510 pen tablet does not respond immediately when you press the Power button, do
not press the button again. Wait a few seconds. The pen tablet finishes tasks before going
into the Fully Off state. The pen tablet should begin its shutdown procedure as soon as
it has completed any pending tas ks.
To shut down the Point 510 pen tablet, first save your data. The pen tablet does not
automatically save data when you shut it down. After saving your data, use the
shutdown function of the operating system to shut down the pen tablet:
1. If system operation is suspended, resume system operation.
2. Save your work and close all running programs.
3. Do one of the following:
• Windows for Workgroups users: Close Program Manager and choose Power
Down from the Exit Windows dialog box.
• Windows 95 users: Choose Shut Down fro m the Start menu and carry out the
Shut Down command.
The system is now shut down and fully powered off.
2-14
Using the Point 510 Pen Tablet
Page 31

Chapter 3
Care and Maintenance
This chapter gives you pointers on how to take care of and maintain your Point 510
pen tablet.
Protecting the Di spl a y S creen 3
To protect the display screen, use the screen protector provided with the Point 510 pen
tablet. The pen tip is made of a softer material than the display screen to reduce the
likelihood of scratching the screen; however, normal wear or particles of dirt caught
between the pen tip and the screen surface could mar or scratch the screen if you use
the Point 510 pen tablet without the screen protector installed.
The Point 510 screen protector is a clear plastic sheet that you can apply to the screen
surface. You can use the pen tablet as usual with the screen protector installed; it does
not affect the performance or usability of the pen tablet or the pen. When the screen
protector becomes worn, you can easily replace it with a new one. For details on how
to install or replace the screen protector, refer to the installation instructions provided
with the screen protector.
Storing the Point 510 Pen Tablet 3
Store the Point 510 pen tablet in the Fully Off state with a charged battery pack
installed. The Point 510 battery pack provides power to some of the pen tablet’s
internal components even when the pen tablet is fully off. You can store the pen tablet
for about 30 days with a fully charged battery pack installed. After 30 days, you should
recharge the battery pack or replace it with a fully charged battery pack.
3-1
Page 32

Protecting the Point 510 Pen Tablet in Harsh Environments 3
The Point 510 pen tablet is designed for use in protected environments where there is
no direct exposure to rain, mists, or sprays. Avoid exposing the pen tablet to these
conditions.
Cleaning the Disp lay Screen 3
To clean the Point 510 display screen, wipe the screen surface gently using a soft cotton
cloth dampened with water or a mild solution of water and liquid detergent.
Caution
The Point 510 pen tablet is n ot waterproof. Do not pour l iqu ids
on the pen tab let or wash the pen tablet with a heavily soaked
cloth.
Taking Care of the Pen 3
The Point 510 pen tip is made of a soft plastic material that is designed to minimize
scratching of the display screen. With use, the pen tip may become worn or may pick
up particles of dust or dirt that can scratch the display screen. Using a damaged or
warped pen tip on the Point 510 pen tablet may cause unpredictable results. If your
pen exhibits problems, replace the pen with another Point 510 pen. Replacement pens
are available in packets of five pens.
3-2
Care and Maintenance
Page 33

Calibrating the Point 510 Display Screen 3
Each time you tap the Point 510 screen, the Point 510 pen tablet determines where you
tapped it in order to perform the function you requested. Calibration helps the Point
510 pen tablet accurately determine what you are tapping.
Determining When to P erform P en Calibration 3
The Point 510 pen tablet comes from the factory alrea dy calibrated so that it interprets
the pen location correctly. If the cursor is not displayed under the pen tip when you
touch the screen, you should re-calibrate the Point 510 pen tablet.
Pen calibration may be required in the following situations:
• The previous user of the Point 510 pen tablet writes with the opposite hand and
has calibrated the pen tablet.
• The Point 510 pen tablet has been in use for some time without being re-calibrated.
• You have rotated the screen from landscape (wide) to portrait (tall) orientatio n, or
from portrait to landscape orientation. (Note that rotating the screen does not
affect pen calibration, however , changing the screen orientation may cause you to
hold the pen tablet and pen in a slightly different position.)
Performing Pen Calibration 3
Calibrating the pen tablet display screen is simple, although you should try to keep
your hand steady to get the best calibration reading. To calibrate the pen, do the
following:
1. If you are using Windows 95: From the Start menu, select Settings, then select
Control Panel, then double-tap Handwriter icon. Tap the General property sheet.
On the General property sheet, tap the Pen Calibration button.
If you are using Windows for Workgroups: From the Start menu, select Settings, then
select Control Panel, then double-tap the Calibrate icon.
The screen shows the instructions for Pen Calibration.
2. Position the Point 510 pen tablet as you normally do during use. Be sure to hold
the pen at the angle that you regularly use.
Calibrating the Point 510 Display Screen
3-3
Page 34

3. Perform the calibration steps according to the instructions on the screen. The
calibration utility displays cross-hairs in each corner of the screen, one at a time.
Tap the center of each cross-hair as it appears, holding the pen the same way you
would hold it while using the pen tablet.
4. After you have tapped all of the cross-hairs, a box appears with three buttons. T ap
one of these buttons to accept, cancel, or retry your cali bration settings. If you
don’t tap any of the buttons within 20 seconds, the Point 510 pen tablet goes back
to the previous calibration settings. The buttons are:
OK: If you are satisfied that you tapped the cros s-hairs accurately, tap OK. Your
taps are then used to calibrate the screen.
Cancel: If you do not want to use your taps to calibrate the scr een, tap Cancel. Your
taps are not used and the previous settings are used.
Recalibrate: If you want to try again, tap Recalibrate. The calibration instructions
reappear.
Solving Problems 3
Solutions to some common problems are described in this section. If you are
experiencing a problem with your Point 510 pen tablet that you cannot solve by taking
the actions described, contact the computer professional at your site who maintains
the Point 510 pen tablets.
Suspended Pen Tablet Will Not Resume 3
If the Point 510 pen tablet will not resume operation after operatio n was suspended,
check the following possible causes:
• The Point 510 battery pack might be defective, or discharged to the critically low
level. When the battery pack cannot supply adequate power, the pen tablet is
forced into suspend mode to avoid a total power failure. To correct this problem,
either connect an external power supply (such as the AC adapter or charging
cradle) or install a charged battery pack in the Point 510 pen tablet.
• The pen tablet might be too hot. To avoid damage to heat-sensitive components,
the pen tablet enters suspend mode if it gets too hot. The Point 510 pen tablet
cannot resume operation until it cools off to a predetermined temperature. Move
the pen tablet to a cooler location and prevent direct sunlight from shining on it.
3-4
Care and Maintenance
Page 35

Display Screen Is B lank or Difficult to Re ad 3
The display screen can be adjusted using the hotpads. For details on using these
controls, see “Using Hotpads” on page 2-5. If the display screen on your Point 510 pen
tablet is blank, confirm that the pen tablet is running (the Power light is on
continuously) and check the following:
• The display contrast setting may be set to extreme high or low levels, causing the
screen to appear blank. Try adjusting the contrast using the hotpads.
• The ambient temperature can affect the display contrast. You may need to adjust
the display contrast periodically, using the hotpads, to compensate for changes in
temperature.
• The Point 510 pen tablet might be set up to use an external monitor. Tap the
Display-Select hotpad to determine if the Point 510 display screen is selected.
Infrared Data Transfer is Not Working 3
If you are experiencing problems transferring data over the Point 510 pen tablet’s
infrared interface (IrDA), check the following:
• Can the IrDA port on the Point 510 pen tablet “see” the IrDA port on the other
device? There must be a direct line-of-sight path between the IrDA port on the
Point 510 pen tablet and the IrDA port on the other device.
• Be sure you are pointing the IrDA port on the Point 510 pen tablet at the port
on the other device. The viewing angle from the IrDA port on the Point 510
pen tablet must not be more than 15° from center.
• Be sure the Point 510 pen tablet is close enough to the other device. The
distance between the two devices must be no more than approximately 3 feet
(1 meter).
• The device that you are trying to communicate with must be compliant with the
IrDA Standard Revision 1.1 or lower. If you are unsure, contact the computer
professional who maintains the Point 510 pen tablets at your site.
• Your system must be properly configured before the IrDA port can be used.
Contact the computer professional who maintains the Point 510 pen tablets at your
site for assistance if necessary.
Solving Problems
3-5
Page 36

Wireless LAN Signal is Interrupted 3
The Point 510 pen tablet RF transceiver is designed to send and receive a reliable signal
under most conditions. Occasionally, the signal is interrupted. This could happen
when the Point 510 pen tablet is too far from an access point, or the signal is physically
obstructed by factors such as the material in the structure of the building.
If the pen tablet pauses transmission and does not appear to be resuming transmission,
try moving the pen tablet away from the immediate area until the signal resumes. If
moving the pen tablet does not solve the transmiss ion problem, or if this problem
typically occurs in a specific location, contact the co mputer professional who
maintains the Point 510 pen tablets at yo ur site.
Cursor Is Not Tracking Pen 3
If the cursor on the screen is not accurately tracking the pen or appears to be
misaligned with the pen, calibrate the pen. See “Calibrating the Pen” earlier in this
chapter for details.
Audio Volume Too Low 3
If the audio volume on your pen tablet speaker or external headphones is too low,
check the following:
• Ensure that the volume level set with the Speaker Volume hotpad is set to an
audible level.
• Ensure that any volume control in your audio program software is set to an
audible level.
3-6
Care and Maintenance
Page 37

Index
A
accuracy, pen
See calibration
amber light, see also Low Battery light, 1-6, 2-9
antenna
description, 1-3
location, 2-12
wireless RF LAN transceiver, 2-13
audio, adjusting
See hotpads
B
battery pack
charging, 2-8
conserving power, 2-11
description, 1-3
installing, removing, 2-10
recharging, 2-8
replacing, 2-10
beep volume
See hotpads
brightness, adjusting
See hotpads
C
calibration, 3-3
steps, 3-3
when, 3-3
care of the pen tablet, 3-1
Charge Status light, 1-5–1-6, 2-9
charging the batter y pack, 2-8–2-9
connectors
connector door, description, 1-4
peripheral interfaces, 2-11
contrast
See hotpads
cursor doesn’t follow pen
See calibration
cursor not trackin g pe n, 3-6
D
data transfer
IrDA problems, 3-5
wireless LAN problems, 3-6
DC power
charging the batte ry using, 2-8
port, 1-4, 2-12
display, choosing
See hotpads
double-click with pen, 2-3
E
eject button, PC Card, 2-12
F
fully off state, 2-2
fully on state, 2-2
G
green light, 1-6, 2-9
H
hand strap mounting points, 1-4
harsh environments, 3-2
HDD
access light, 1-6
headphones, external, 2-13
headphones, external jack, 2-12
high-usage contacts, 2-12–2-13
hotpads
adjusting video, audio, 2-5
description, 1-3
right-click mouse, 2-3
selecting display, 2-5
Index-1
Page 38

I
idle power state, 2-2
IrDA port
about, 2-13
description, 1-4
location, 2-12
problems with, 3-5
J
jacks, external headphone and microphone,
1-3–1-4
K
keyboard port, 1-4, 2-12–2-13
L
left-click with pen, 2-3
lights, about, 1-5
Low Battery light, 1-6, 2-9
low battery, recharging, 2-9
M
maintaining the pen tablet, 3-1
microphone
built-in, 1-3
external jack , 1-4, 2-12–2-13
P
PC Card
door, 2-12
eject button, 2-12
slot, 2-12–2-13
PC Card door
description, 1-3
pen
calibrating display screen, 3-3
description, 1-3
double-click, 2-3
left-click, 2-3
replacing tip, 3-2
tether attachment point, 1-3
using, 2-3
See also calibration
pen tablet
features and controls, 1-2–1-4
power, 1-6
starting and running, 2-2
suspending and resuming, 2-6
peripheral contacts, 1-4
peripheral interfaces, 2-11
power
conserving battery, 2-11
Power button setup, 2-1
power states, 2-2
starting the pen tablet, 2-2
status light, 1-6
using, conserving, 2-1
power button
considerations, 2-1
description, 1-2
location, 2-12
problems, solving, 3-4
R
reset button, 2-12
resume
about, 2-6
power button, 1-2
problems with, 3-4
right-click
using hotpad, 2-5
right-tap
how to, 2-3
right-mouse hotpad, 2-5
S
screen
blank display, 3-5
cleaning, 3-2
screen contrast, adjusting, 2-5
screen protector, 3-1
Select, 2-5
serial port, 1-4, 2-12–2-13
solving problems, 3-4
speaker
beep volume, adjusting, 2-5
Index-2
Page 39

external headphone jack, 1-3
internal, 1-3
standby power state, 2-2
status lights, 1-3, 1-5
description, ??–1-6
stylus
See pen
suspend
about, 2-6
power button, 1-2
suspend mode, 2-2
using software to, 2-3
system
See pen tablet
system interface connector, 2-12–2-13
T
troubleshooting, 3-4
V
video, adjusting
See hotpads
W
wireless LAN
interrupted transmission, 3-6
using with pen tablet, 2-13
Index-3
Page 40

Index-4
 Loading...