

Page 1

Before Reading This Manual
Thank you for purchasing the PRIMERGY 4Gbit/s FC I/O Module (hereinafter referred to as this
product).
This manual explains the 4Gbit/s FC I/O Modules and the Fibre Channel driver (for Windows). Read
this manual carefully to handle the product correctly.
For details about the Fibre Channel driver, refer to manuals supplied with the server blade or the
Fujitsu PRIMERGY website:
(http://primergy.fujitsu.com)
September, 2007
For Your Safety
This manual contains important information, required to operate this product safely.
Thoroughly review the information in this manual before using this product. Especially note the points under "Safety",
and only operate this product with a complete understanding of the material provided.
This manual should be kept in an easy-to-access location for quick reference when using this product.
High Safety
The Products are designed, developed and manufactured as contemplated for general use, including without limitation,
general office use, personal use, household use, and ordinary industrial use, but are not designed, developed and
manufactured as contemplated for use accompanying fatal risks or dangers that, unless extremely high safety is secured,
could lead directly to death, personal injury, severe physical damage, or other loss (hereinafter "High Safety Required
Use"), including without limitation, nuclear reaction control in nuclear facility, aircraft flight control, air traffic control,
mass transport control, medical life support system, missile launch control in weapon sy stem. You shall not use this
Product without securing the sufficient safety required for the High Safety Required Use. If you wish to use this Product
for High Safety Required Use, please consult with our sales representatives in charge before such use.
This product is a Class 1 laser device.
39
E
Page 2
Remarks
Warning Descriptions
Various symbols are used throughout this manual. These are provided to emphasize important points
for your safety and that of others. The symbols and their meanings are as follows. Be sure to fully
understand these before reading this manual.
WAR NIN G
CAUTION
The following symbols are used to indicate the type of warning or cautions being described.
Ignoring this symbol could be potentially lethal.
Ignoring this symbol may lead to injury and/or damage the device or hardware
options.
A triangle mark emphasizes the urgency of the WARNING and CAUTION.
Details are described next to the triangle.
A barred circle ( ) warns against certain actions (Do Not). Details are
described next to the circle.
A black circle indicates actions that must be taken. Details are described next to
the black circle.
Symbols
The following are symbols used throughout this manual.
Symbols Meaning
These sections explain prohibited actions and points to note when using this
device. Make sure to read these sections.
These sections explain information needed to operate the hardware and
software properly. Make sure to read these sections.
→ This mark indicates reference pages or manuals.
Key Descriptions / Operations
Keys are described by their representative characters instead of their exact key face
appearance, as show below.
E.g.: [Ctrl] key, [Enter] key, [→] key, etc.
The following indicate pressing several keys at once:
E.g.: [Ctrl] + [F3] key, [Shift] + [↑] key, etc.
Entering Commands (Keys)
CD-ROM drive names are shown as [CD-ROM drive]. Enter your drive name according to your
environment.
[CD-ROM drive]:\setup.exe
40
Page 3
Abbreviations
The following expressions and abbreviations are used to describe the product names used in this
manual.
Product names Expressions and abbreviations
4Gbit/s FC I/O Module (PG-FCD201) This product
PRIMERGY BX620 S3 Server Blade
PRIMERGY BX620 S4 Server Blade
Microsoft
Microsoft
Microsoft
Microsoft
®
Windows Server® 2003 R2, Standard Edition
®
Windows Server® 2003 R2, Enterprise Edition
®
Windows Server® 2003, Standard Edition
®
Windows Server® 2003, Enterprise Edition
BX620 S3
Server Blade
BX620 S4
Server Blade
Windows Server 2003
Server Blade
Safety
For your safety and that of others, follow the guidelines provided on the following pages concerning
the use of this product.
Handling this product
WARN ING
• Do not remodel this product. Doing so may cause an electric shock or fire.
• If electrical storms are occurring nearby, unplug the power cable of the server
and external connection cables of this product. Failure to do so may cause the
device to be damaged by lightening and cause a fire.
• Before installing or removing this product to/from the server, to ensure safety, turn
off the server and any other connected devices and unplug the power cable from
the outlet. When they are turned on, installing or removing this product may
cause a device failure, smoke, or electric shock.
• When moving the device, be sure to disconnect all the cables connected to
external device (including the cables connected to this product). Failure to do so
may damage cables and cause a fire or electric shock, or injury resulted from
fallen device.
CAUTION
• Since this product is delicate, avoid using it under extreme conditions such as
high/low temperature, high humidity, direct sunlight, etc. Do not bend, damage, or
severely shock this product. Doing so may cause a device failure or fire.
• If you are not using this product, leave it in its package (bag) provided with the
product in order to protect it from static electricity.
E
41
Page 4

Checking the Items Supplied
Check that the following items are supplied before using this product.
Please contact an office listed in "Appendix B Contact Information" (
missing.
• 4Gbit/s FC I/O Module (this product)
• Driver Disk × 1 (CD-ROM)
- 4Gbit/s FC I/O Module (PG-FCD201) Drivers CD
• User's Guide (this document)
• Screw (3 screws)
pg.75) if any parts are
42
Microsoft, Windows, Windows Server are registered trademarks or trademarks of the Microsoft
Corporation in the USA and other countries.
Other product names used are trademarks or registered trademarks of their respective manufacturers.
Other products are copyrights of their respective manufacturers.
All Rights Reserved, Copyright© FUJITSU LIMITED 2007
Page 5

Contents
1 4Gbit/s FC I/O Module . . . . . . . . . . . . . . . . . . . . . . . . . . . . . . . 45
1.1 Overview . . . . . . . . . . . . . . . . . . . . . . . . . . . . . . . . . . . . . . . . . . . . . . 45
1.2 Specifications . . . . . . . . . . . . . . . . . . . . . . . . . . . . . . . . . . . . . . . . . . . 46
1.3 How to Check the Driver Version . . . . . . . . . . . . . . . . . . . . . . . . . . . . 47
1.4 4Gbit/s FC I/O Module to ETERNUS Connections . . . . . . . . . . . . . . 48
1.5 Notes on Replacing the 4Gbit/s FC I/O Module . . . . . . . . . . . . . . . . 48
1.6 Points to Note When Using This Driver . . . . . . . . . . . . . . . . . . . . . . . 48
2 Installing the 4Gbit/s FC I/O Module . . . . . . . . . . . . . . . . . . . 49
2.1 Installing in a Server Blade . . . . . . . . . . . . . . . . . . . . . . . . . . . . . . . . 49
3 Connecting Cables . . . . . . . . . . . . . . . . . . . . . . . . . . . . . . . . . 52
4 Installing Drivers and Utilities . . . . . . . . . . . . . . . . . . . . . . . . 53
4.1 Automatic Installation . . . . . . . . . . . . . . . . . . . . . . . . . . . . . . . . . . . . . 53
4.2 Manual Installation . . . . . . . . . . . . . . . . . . . . . . . . . . . . . . . . . . . . . . . 55
4.3 Checking and Updating Firmware /BootBIOS . . . . . . . . . . . . . . . . . . 58
4.4 Uninstalling HBAnyware . . . . . . . . . . . . . . . . . . . . . . . . . . . . . . . . . . 61
4.5 Uninstalling AutoPilot Installer . . . . . . . . . . . . . . . . . . . . . . . . . . . . . . 61
5 4Gbit/s FC I/O Module Details Setting . . . . . . . . . . . . . . . . . . 62
5.1 4Gbit/s FC I/O Module Setting . . . . . . . . . . . . . . . . . . . . . . . . . . . . . . 63
5.2 Registry Setting . . . . . . . . . . . . . . . . . . . . . . . . . . . . . . . . . . . . . . . . . 71
6 Troubleshooting . . . . . . . . . . . . . . . . . . . . . . . . . . . . . . . . . . . . 72
6.1 Checking the Link Status . . . . . . . . . . . . . . . . . . . . . . . . . . . . . . . . . . 72
6.2 Troubleshooting . . . . . . . . . . . . . . . . . . . . . . . . . . . . . . . . . . . . . . . . . 73
Appendix A How to Identify the Adapter . . . . . . . . . . . . . . . . 74
Appendix B Contact Information . . . . . . . . . . . . . . . . . . . . . . . 75
43
E
Page 6

44
Page 7
1
4Gbit/s FC I/O Module
This chapter explains the features and specifications of this product.
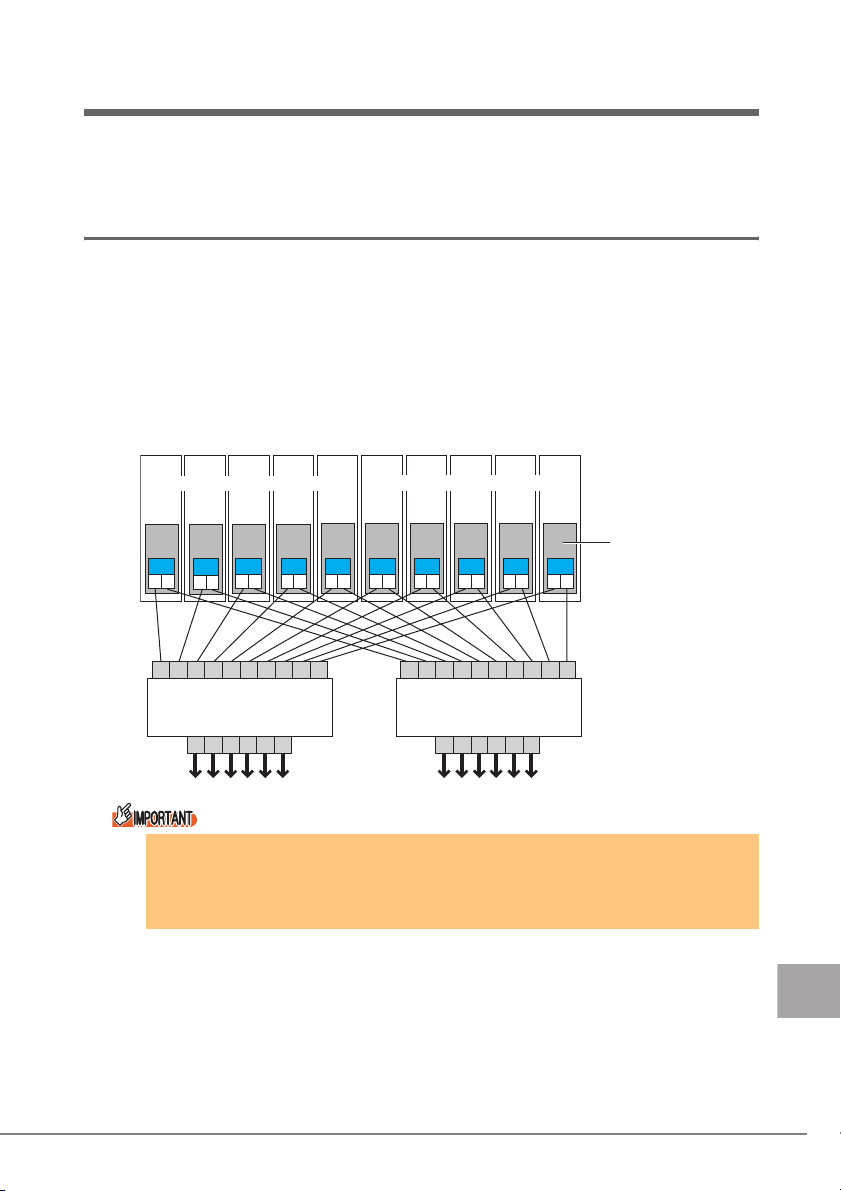
1.1 Overview
This product is a Fibre Channel expansion board for use exclusively with BX620 S3 and BX620 S4
server blades. This product is configured with one dual port (2 ports) Fibre Channel controller, it is
supplied to connect to external storage Fibre Channels. Use only the FC Switch Blade connected to
network blade slots 3 or network blade slots 4 (NET 3 or NET4) to access the external storage.
The following diagram shows a configuration example with 5 BX620 S3 server blades (slot 1-5) and
BX620 S4 server blades (slots 6-10) installed in a BX600 S3 chassis. In this example, in order to
explain the Fibre Channel connection between each 4Gbit/s FC I/O Module and network blade, a
4Gbit/s FC I/O Module is installed in all server blades, it is not necessary to install a 4Gbit/s FC I/O
Module in every server blade.
1 2 3 4 5 6 7 8 9 10
PRIMERGY BX620 S3 Server Blade
A B A B
AB
0
123456789
PRIMERGY BX600
FC Switch Blade (NET3)
11 12 13
14
10
Mixed loading of a server blade with a 4Gbit/s FC I/O Module and server blade with a
1Gbit/s Ethernet I/O Module in the same chassis is not possible.
If a FC Switch Blade is installed in network blade slot 3 or network blade slot 4 (NET
3 or NET4), it cannot be installed at the same time as the switch blade.
AB AB AB AB AB AB
AB
15
PRIMERGY BX620 S4 Server Blade
0
123456789
PRIMERGY BX600
FC Switch Blade (NET4)
15
11 12 13
14
10
4Gbit/s
FC I/O Module
E
1 4Gbit/s FC I/O Module 45
Page 8

1.2 Specifications
This product is an expansion board used in order to install fiber channel interface on the server blade.
This product has the following features:
• Capable of high-speed data transfer at a maximum rate of 4Gbps.
• You can place the connected device away from the server.
• Uses thin and light cables so they can be easily connected.
The following shows the specifications of this product:
Item Functions and Specifications
Product name 4Gbit/s FC I/O Module
Product ID PG-FCD201
Function Fabric/FC-AL (Arbitrated Loop)
Number of channels (ports) 1 channel (2 ports)
Host bus interface PCI-Express 1.0a
External interface 1/2/4Gbps (Automatic recognition)
Fibre channel (Optical cable)
LC connector/non-OFC/multimode
46
Page 9

1.3 How to Check the Driver Version
The following explains the procedure to check the driver version.
1 Click the "Start" button → "Settings" → "Control Panel" →
"Administrative Tools" → "Computer Management" in this order.
2 Click "Device Manager".
3 Double-click "SCSI and RAID controllers".
4 Double-click the driver to be checked (Emulex Lightpulse
********* Storport Miniport Driver).
5 Click the [Driver] tab.
•For 32Bit
5-1.30.9
•For 64Bit
7-1.30.9
6 Click the [Driver Details].
7 Check the file version of "***DRIVERS\*****.sys" in "Driver files".
•For 32Bit
5-1.30A9 03/18/2007 WS2k3 32 bit build by:
•For 64Bit
7-1.30A9 03/18/2007 WS2k3 64 bit x64 built by:
8 Double-click the driver to be checked (ElxPlus or Emulex PLUS in
Emulex PLUS).
9 Click the [Driver] tab.
The driver version "5.1.0.14" or "7.1.0.14" appears.
10 Click the [Driver Details].
11 Check the file version of "***\elxplus.sys" in "Driver files".
•For 32Bit
5-1.00A14 03/19/2007 WS2K3 32 bit build by:
•For 64Bit
7-1.00A14 03/19/2007 WS2K3 64 bit x64 build by:
For details about the drivers for the other operating systems, refer to the website for Fujitsu
PRIMERGY (http://primergy.fujitsu.com).
1 4Gbit/s FC I/O Module 47
E
Page 10

1.4 4Gbit/s FC I/O Module to ETERNUS
Connections
This section explains the connection of the 4Gbit/s FC I/O Module and ETERNUS.
Fabric connection
Connect to the ETERNUS via FC Switch Blade.
BX600 S3 chassis
PRIMERGY BX620 S3/BX620 S4
PG-FCD201
FC Switch Blade (PG-FCS103)
FC Switch Blade (PG-FCS103)
ETERNUS3000/
ETERNUS6000
1.5 Notes on Replacing the 4Gbit/s FC I/O Module
When an operating 4Gbit/s FC I/O Module has been replaced with a new 4Gbit/s FC I/O Module, it
may be necessary to change the storage and FC Switch Blade settings because the WWN of the
4Gbit/s FC I/O Module will change.
1.6 Points to Note When Using This Driver
Event log
When the system is started using this driver, the following logs are stored in the event viewer system
log. They can be ignored.
5QWTEGGNZRNWU
'XGPV+&
6[RG+PHQTOCVKQP
&GUETKRVKQP
6JGFGUETKRVKQPHQT'XGPV+&=?KP5QWTEG=GNZRNWU?ECPPQVDGHQWPF
6JGNQECNEQORWVGTOC[PQVJCXGVJGPGEGUUCT[TGIKUVT[KPHQTOCVKQPQT
OGUUCIG&..HKNGUVQFKURNC[OGUUCIGUHTQOCTGOQVGEQORWVGT;QWOC[
DGCDNGVQWUGVJG#7:5174%'HNCIVQTGVTKXGVJKUFGUETKRVKQPUGG
*GNRCPF5WRRQTVHQTFGVCKNU6JGHQNNQYKPIKPHQTOCVKQPKURCTVQHVJGGXGPV
48
Page 11
2
Installing the 4Gbit/s FC I/O
Module
This chapter explains the installation procedure in the server blade.
WARN ING
• When installing or removing this product, make sure to remove the server blade
from the chassis. Failure to do so may cause electric shock.
For details on how to remove the server blade from the chassis, refer to "Blade
Server System Unit Hardware Guide".
CAUTION
• The circuit boards and soldered parts of internal options are exposed. They can
be damaged by static electricity. Before handling them, first touch a metal part of
the server to discharge static electricity from your body.
• Do not touch the circuitry on boards or soldered parts. Hold the metallic areas or
the edges of the circuit boards.
• These products are susceptible to static electricity. Place them on conductive
pads or keep them in their packaging as long as they are not necessary.
2.1 Installing in a Server Blade
Installing a FC Network Blade on chassis network blade slot 3 or network blade slot 4 is
necessary in order to connect this product to the external FC-SW (device) or storage
device.
When installing a server blade in the BX600 S2 chassis, this product cannot be
installed in the server blade.
2 Installing the 4Gbit/s FC I/O Module 49
E
Page 12
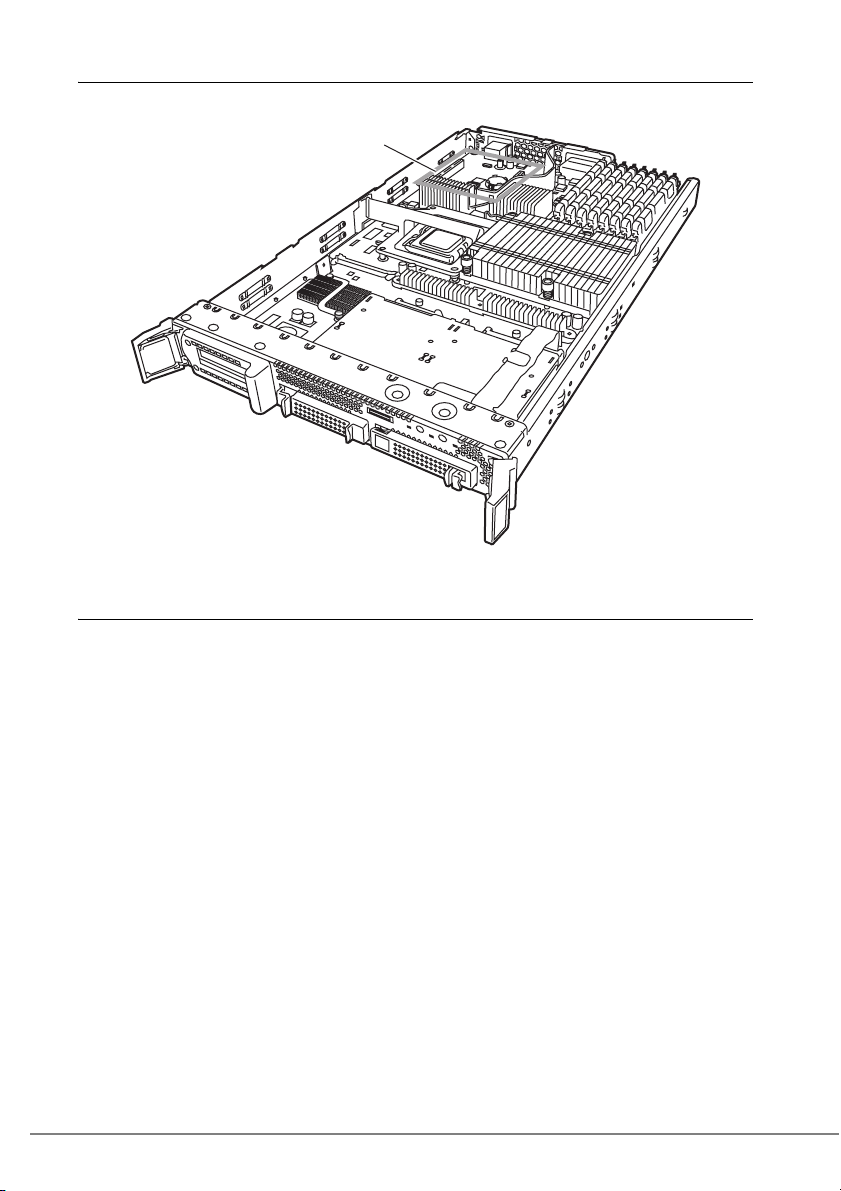
2.1.1 Installation Position of the 4Gbit/s FC I/O Module
The 4Gbit/s FC I/O Module is installed in the server blade expansion board slot.
Expansion board slot
2.1.2 Installation Procedure for the 4Gbit/s FC I/O
Module
50
1 Turn off the server blade where the 4Gbit/s FC I/O Module will be
installed.
→
"3.3 Turning Off the Server" in "Blade Server System Unit Hardware Guide"
2 Touch a metal part of the chassis to discharge static electricity
from your body.
3 Remove the server blade from the chassis.
→"4.2 Installing Server Blades" in "Blade Server System Unit Hardware Guide"
4 Remove the top cover.
→"7.2 Removing and Attaching the Top Cover" in "Server Blade User's Guide"
Page 13

5 Install the 4Gbit/s FC I/O Module.
Make sure the 4Gbit/s FC I/O Module is securely on the slot.
[Rear]
4Gbit/s
FC I/O Module
Expansion board slot
6 Secure the 4Gbit/s FC I/O Module with the screws.
Secure the 4Gbit/s FC I/O Module with three screws included with this product.
Screws
7 Attach the top cover.
→"7.2 Removing and Attaching the Top Cover" in "Server Blade User's Guide"
8 Install the server blade in the chassis.
→"4.2 Installing Server Blades" in "Blade Server System Unit Hardware Guide"
2 Installing the 4Gbit/s FC I/O Module 51
E
Page 14

3
Connecting Cables
This chapter explains points to note when connecting cables.
Connect the cable to the FC Network Blade installed in the BX600 S3 chassis, or the
port used by the FC Network Blade.
Each cable connector has a protrusion which determines the inserting direction of the
connector. When connecting the cable, check this protrusion to make sure of the
inserting direction of the connector, and then push the connector as far as it will go.
CAUTION
• Push each connector as far as it will go.
The connector may cause the system to malfunction, if it is not inserted
properly.
• To disconnect the cable, always pull the connector not the cable.
Pulling the cable may cause system failure.
• Since this product uses light for communication, be careful not to dirty the ends of
its cable.
• Do not put any heavy objects on top of the cable, or bend it by force.
Doing so may cause failure or malfunction.
For details on how to connect the cables, refer to "SilkWorm 4016 Hardware Reference Manual" and
"SilkWorm 4016 QuickStart Guide".
52
Page 15

4
Installing Drivers and Utilities
This chapter explains the procedure for installing drivers and utilities.
When installing drivers, logon using administrator privileges.
• For installing drivers and utility (HBAnyware) at the same time.
"4.1 Automatic Installation"(pg.53)
• For installing drivers and utility (HBAnyware) manually.
"4.2 Manual Installation"(pg.55)
4.1 Automatic Installation
The following shows the procedures for installing drivers and HBAnyware, using "AutoPilot
Installer" that enables automatic installation.
If [Welcome to the Found New Hardware Wizard] appears during startup, click [Cancel].
1 Insert the driver disk (CD-ROM) into the CD-ROM drive.
2 Execute "EMCStorportMiniportKit_1-30a9-1b.exe" in the driver
disk.
3 Click [Next].
4 Click [Install].
When the "EMC Storport Miniport Driver Kit 1.30a9-1b" window appears, click [OK].
5 Confirm that "Start AutoPilot Installer" is checked, and then click
[Finish].
"AutoPilot Installer" starts.
6 Click [Next].
When the "Autopilot Installer Warning" window appears, click [Yes] or [OK] (This
window may appear multiple times).
Installation process starts.
When the "Monitoring the Installation" window appears, click [Next].
When the "Welcome to the Found New Hardware Wizard" window appears, install as follows
(this window may appear after restart).
4 Installing Drivers and Utilities 53
E
Page 16

1. Click [Next].
2. Select "Find the best driver for the device", and click [Next].
3. Check only "CD-ROM drive", and then click [Next].
4. Click [Next].
5. Click [Finish].
7 Click [Finish].
When "System Settings Change" appears, click [Yes] to restart the system.
8 Refer to "1.3 How to Check the Driver Version" (pg.47) to check
the driver version.
When automatic installation finishes, perform "4.3 Checking and Updating Firmware /BootBIOS"
(
pg.58).
For details about the uninstallation procedure, refer to "4.4 Uninstalling HBAnyware" (
"4.5 Uninstalling AutoPilot Installer" (
pg.61).
pg.61) and
54
Page 17

4.2 Manual Installation
Drivers and utilities can be manually installed using the following procedures.
4.2.1 For Installation on Windows Server 2003
When "Welcome to the Found New Hardware Wizard" appears during startup, click
[Cancel].
Installing Emulex PLUS
Click the "Start" button → "Control Panel" → "Add Hardware" in this
1
order.
2 Click [Next].
3 Check "Yes, I have already connected the hardware", and click
[Next].
4 From "Installed hardware", select "Add a new hardware device",
and click [Next].
5 Check "Install the hardware that I manually select from a list", and
click [Next].
6 From "Common hardware types", select "Show All Devices", and
click [Next].
7 Click [Have Disk].
8 Insert the driver disk (CD-ROM) into the CD-ROM drive.
9 Specify the following folder in the CD-ROM drive for "File copy
source of the manufacturer", and click [OK].
•For 32Bit
[CD-ROM drive]: \v1.30a9\AutoPilot Installer\Drivers\Sporport\x86
•For 64Bit
[CD-ROM drive]: \v1.30a9\AutoPilot Installer\Drivers\Sporport\x64
10 Select "Emulex PLUS", and click [Next].
11 Click [Next].
12 Click [Finish].
4 Installing Drivers and Utilities 55
E
Page 18

Installing *****port Miniport Driver
Click the "Start" button → "Administrative Tools" → "Computer
1
Management" in this order.
2 Click [Device Manager].
3 Select "Emulex **********" in the "SCSI and RAID controllers" or
"Other devices" list and double-click it.
If the displayed name is "Emulex LightPulse ***** Storport Miniport Driver" and the
driver version is "5.1.30.9" or "7.1.30.9" , the driver will be installed, please close
the properties screen.
4 Click the [Driver] tab and click [Update Driver].
"Welcome to the Hardware Update Wizard" starts.
If the "Can Windows connect to Windows Update to search for software?" window appears,
select "No, not this time" and click [Next].
5 Check "Install from a list or specific location", and click [Next].
6 Select "Don't search, I will choose the driver to install", and click
[Next].
When the [Hardware type] screen appears, select [SCSI and RAID controllers] and click
[Next].
7 Click [Have Disk].
56
8 Insert the driver disk (CD-ROM) into the CD-ROM drive.
9 Specify the following folder in the CD-ROM drive for "File copy
source of the manufacturer", and click [OK].
•For 32Bit
[CD-ROM drive]: \v1.30a9\AutoPilot Installer\Drivers\Sporport\x86
•For 64Bit
[CD-ROM drive]: \v1.30a9\AutoPilot Installer\Drivers\Sporport\x64
The "Display compatible hardware" window appears.
10 Select "Emulex LightPulse HBA - Storport Miniport Driver", and
click [Next].
Installation starts.
11 Click [Finish].
Page 19

12 Check the driver version.
•For 32Bit
5.1.30.9
•For 64Bit
7.1.30.9
13 Close the board property window.
When installation finishes, perform "4.2.2 Installing HBAnyware" (pg.57).
4.2.2 Installing HBAnyware
1 Insert the driver disk (CD-ROM) into the CD-ROM drive, and
execute "setupapps.exe" in the driver disk.
[CD-ROM drive]: \v1.30a9\AutoPilot Installer\Utilities\setupapps.exe
2 Click [Next].
3 Select "Full Management", check "Allow users to change
management mode from utility.", and click [OK].
4 Click [Finish].
When installation finishes, proceed to "4.3 Checking and Updating Firmware /BootBIOS" (pg.58).
For details about the uninstallation procedure, refer to "4.4 Uninstalling HBAnyware" (
pg.61).
4 Installing Drivers and Utilities 57
E
Page 20

4.3 Checking and Updating Firmware /
BootBIOS
There are two methods to check and update Firmware/BootBIOS. The results will bring no
difference.
"4.3.1 Using LightPulse Utility / NT"(pg.58)
"4.3.2 Using HBAnyware Utility"(pg.60)
4.3.1 Using LightPulse Utility / NT
This product name displayed in LightPulse Utility/NT is "Adapter * - BX600-FC42E * Port *".
1 Click the "Start" button → "Programs" or "All Programs" →
"Emulex" → "lpUtilNT" in this order.
2 Select "Firmware Maintenance" in the "Category" field.
58
For PG-FCD201, Adapter 0 and 1 are displayed.
3 For the firmware version, check the "Revision" value in "Functional
Firmware".
• When the version is "2.70x6", proceed to Step 7.
• When the version is other than "2.70x6", proceed to Step 4.
4 Click [Download].
Although the warning window appears, click [OK].
5 Insert the driver disk (CD-ROM) into the CD-ROM drive, select the
Firmware file in the CD-ROM drive, and click [Open].
[CD-ROM drive]:\FirmBIOS\zf2.70x6.all
Firmware update starts.
6 Check the "Revision" value in "Functional Firmware" is "2.70x6".
Page 21

7 For the BootBIOS version, check the "Revision" value in "Boot Bios
Firmware".
• When the version is "1.70a3", proceed to Step 11.
• When the version is other than "1.70a3", proceed to Step 8.
8 Click the [Download] button.
Although the warning window appears, click [OK].
9 Insert the driver disk (CD-ROM) into the CD-ROM drive, select the
BootBIOS file in the CD-ROM drive, and click [Open].
[CD-ROM drive]:\FirmBIOS\ZB170A3.PRG
BootBIOS update starts.
10 Check that the "Revision" value in "Boot Bios Firmware" became
"1.70a3".
For PG-FCD201, perform procedures as above to all adapter.
11 After checking versions of all adapters, restart the server blade to
enable the settings, and proceed to "5 4Gbit/s FC I/O Module
Details Setting" (
When replacing this product, perform "4.3 Checking and Updating Firmware /
BootBIOS" (
pg.62).
pg.58) again as necessary.
4 Installing Drivers and Utilities 59
E
Page 22

4.3.2 Using HBAnyware Utility
This product name displayed in HBAnyware Utility is "BX600-FC42E - 10:00:**:**:**:**:**:**".
The "**:**:**:**:**:**" shows the IEEE address of the 4Gbit/s FC I/O Module. Each 4Gbit/s FC I/
O Module has a unique IEEE address, which is written on the sticker on each 4Gbit/s FC I/O Module.
1 Click the "Start" button → "Programs" or "All Programs" →
"Emulex"
2 Select the target 4Gbit/s FC I/O Module, and click the "Firmware"
tab.
→ "HBAnyware" in this order.
60
For PG-FCD201, two BX600-FC42E are displayed.
3 For the firmware version, check the "Current Firmware Version:"
value in "Firmware".
• When the version is "2.70x6", proceed to Step 8.
• When the version is other than "2.70x6", proceed to Step 4.
4 Click "Update Firmware..." in "Firmware".
When the confirmation dialog appears, click [Yes].
5 Insert the driver disk (CD-ROM) into the CD-ROM drive, select the
Firmware file in the CD-ROM drive, and click [Start Download].
[CD-ROM drive]:\FirmBIOS\zf2.70x6.all
6 When the Firmware update is completed, click [Close].
7 Check that the "Current Firmware Version:" value in "Firmware" is
"2.70x6".
Page 23

8 For the BootBIOS version, check the "BootBIOS" value in "Boot
BIOS".
• When the version is "1.70a3", proceed to Step 13.
• When the version is other than "1.70a3", proceed to Step 9.
9 Click the "Update Firmware..." in "Firmware".
When the confirmation dialog appears, click [Yes].
10 Insert the driver disk (CD-ROM) into the CD-ROM drive, select the
BootBIOS file in the CD-ROM drive, and click [Start Download].
[CD-ROM drive]:\FirmBIOS\ZB170A3.PRG
11 When the Firmware update is completed, click [Close].
12 Check that the "BootBIOS" value in "BootBIOS" is "1.70a3".
For PG-FCD201, perform the above procedures for all adapters.
13 After checking versions of all 4Gbit/s FC I/O Module, restart the
server blade to enable the settings, and proceed to "5 4Gbit/s FC I/
O Module Details Setting" (
Perform the above procedures for each 4Gbit/s FC I/O Module.
When replacing this product, perform "4.3 Checking and Updating Firmware /
BootBIOS" (
pg.58) again as necessary.
pg.62).
4.4 Uninstalling HBAnyware
1 Click the "Start" menu → "Settings" → "Control Panel" → "Add or
Remove Programs" or "Add/Remove Programs" in this order.
2 Select "Emulex Fibre Channel HBAnyware Version 3.1a8", and click
[Change/Remove] or [Remove].
3 Follow the displayed instructions to uninstall.
4.5 Uninstalling AutoPilot Installer
1 Click the "Start" menu → "Settings" → "Control Panel" → "Add or
Remove Programs" or "Add/Remove Programs" in this order.
2 Select "Emulex *****port Miniport Driver Package ******-1b", and
click [Change/Remove] or [Remove].
3 Follow the displayed instructions to uninstall.
4 Installing Drivers and Utilities 61
E
Page 24

5
4Gbit/s FC I/O Module Details
Setting
This chapter explains the 4Gbit/s FC I/O Module details settings.
When performing this product details settings, log on with administrative privileges.
When the connected device to this product is ETERNUS SX300, refer to the User’s
Guide, etc. for ETERNUS SX300.
The setting effects are the same between the settings set by double-clicking [Device] of
[key] after selecting [Registry] with the radio button in the LightPulse Utility/NT settings, and
the settings set by the Global setting (checking [Global]) for all boards as described in this
document.
62
For PG-FCD201, Adapter 0 and 1 are displayed.
Page 25

5.1 4Gbit/s FC I/O Module Setting
There are two methods for this product setting. The results will bring no difference.
"5.1.1 Using LightPulse Utility / NT"(pg.63)
"5.1.2 Using HBAnyware Utility"(pg.68)
5.1.1 Using LightPulse Utility / NT
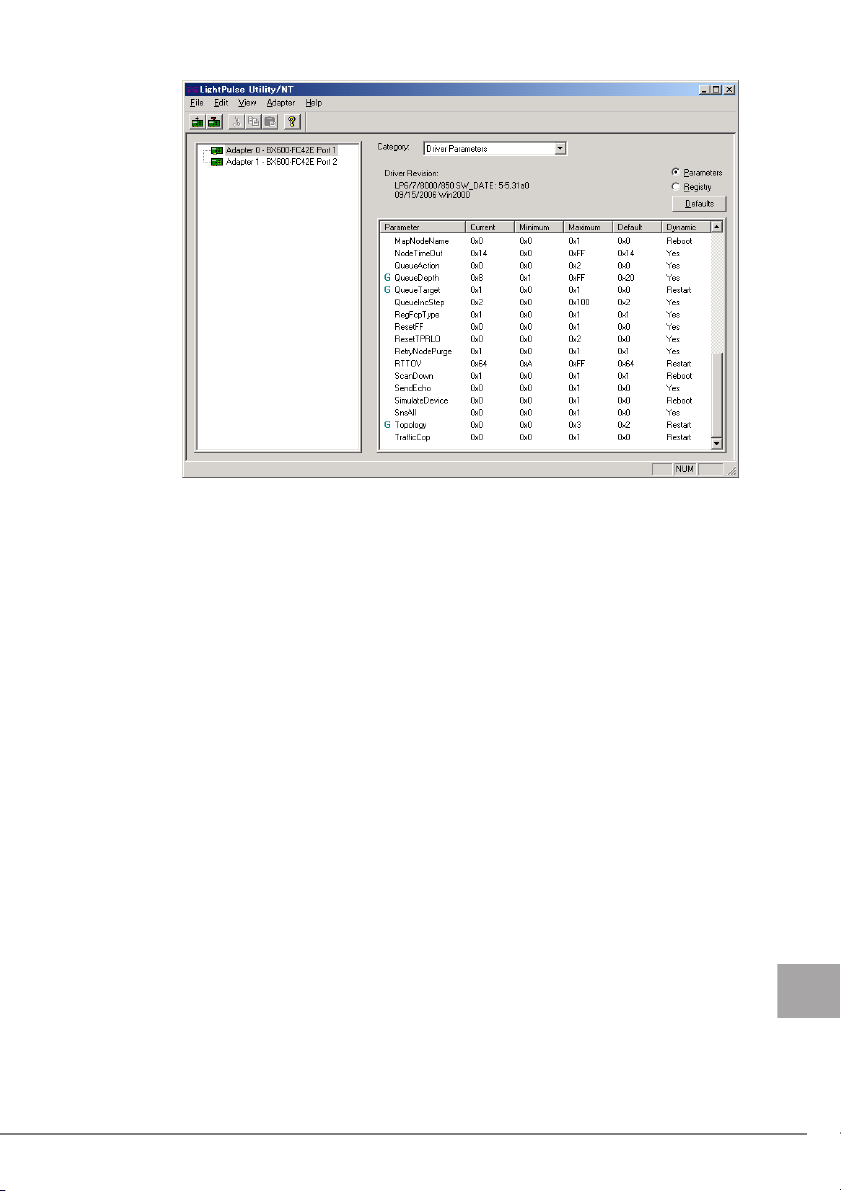
This product name displayed in LightPulse Utility/NT is "Adapter * -BX600FC42E -* Port *".
To identify the 4Gbit/s FC I/O Module from LightPulse Utility/NT in an environment where multiple
4Gbit/s FC I/O Module are installed, refer to "Appendix A How to Identify the Adapter" (
1 Click the "Start" button → "Programs" or "All Programs" →
"Emulex"
2 Select "Driver Parameters" in the "Category" field.
3 Select "Parameters".
The following parameter data are displayed.
→ "lpUtilNT" in this order.
When adding this product after installation, the settings for the existing product
may be changed. Therefore, after adding this product or driver, check the detailed
settings and correct them if necessary.
pg.74).
For PG-FCD201, Adapter 0 and 1are displayed.
E
5 4Gbit/s FC I/O Module Details Setting 63
Page 26
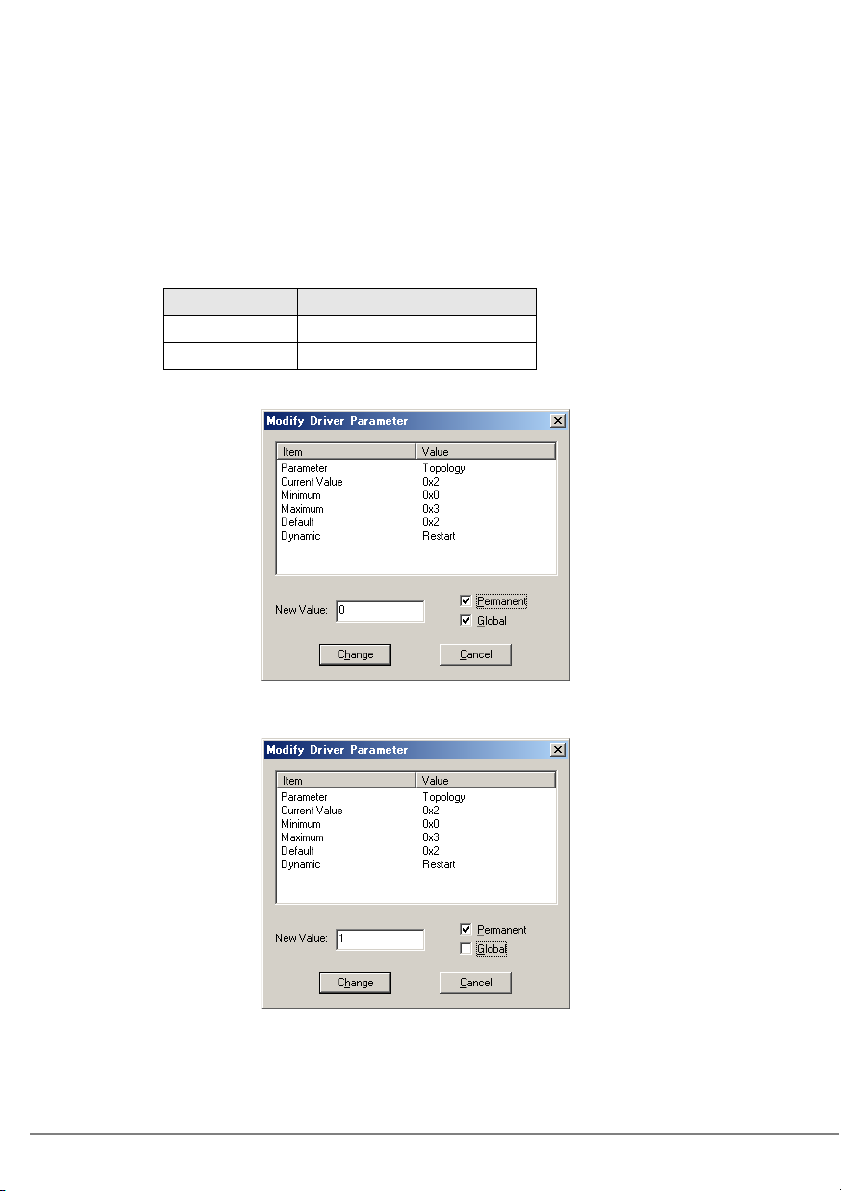
4 Select the adapter for which settings are changed from the
adapter list on the left of the window, and double-click "Topology"
in "Parameters".
When there are two or more adapters, refer to "Appendix A How to Identify the Adapter"
(
pg.74).
5 Set a value for "New Value" depending on the connection type,
check "Permanent", and click [Change].
When the connection type varies for each adapter, remove the check from the "Global"
checkbox.
Connection type New Value
FC-AL 0
Fabric 1
• When all the installed adapters are FC-AL connection:
64
• When only the adapter under setting is Fabric connection:
6 Double-click "QueueDepth" in "Parameters".
Page 27

7 Set a value in "New Value", check "Permanent", and click [Change].
When the settings vary for each adapter, remove the check on the "Global".
The setting value is calculated as follows:
For ETERNUS3000 model 50/GR710/GR720/GR730/GR740/GR820/GR840
• For cluster (MSCS/SynfinityCluster): "8"
• For other than cluster (MSCS/SynfinityCluster)
• When one HBA is connected to one FC-CA (FC port): "16"
• When two HBAs are connected to one FC-CA (FC port): "8"
For ETERNUS3000 model 80/100/200/300/400/500/600/700 and
ETERNUS4000 model 80/100
Setting value (rounding down decimals) = 40/ (number of 4Gbit/s FC I/O Module connected
to one CA port)
When the calculated value is 8 or less, specify "8".
For ETERNUS6000 model 400/500/600/700/800/900/1000/1100
Specify "40".
For ETERNUS4000 model 300/500 and ETERNUS8000
Specify "255".
• When the setting value for all the installed adapters is "8":
• When the setting value for only the adapter under setting is "40":
5 4Gbit/s FC I/O Module Details Setting 65
E
Page 28

8 Double-click "QueueTarget" in "Parameters".
9 Set "1" (fixed value) in "New Value", check "Permanent", and click
[Change].
10 Double-click "LinkSpeed" in "Parameter".
11 Set a value in "New Value", check "Permanent", and click [Change].
For the setting values, refer to the ETERNUS Server Connection Guide, etc.
• When setting to "1Gb", set "1" to "New Value".
• When setting to "2Gb", set "2" to "New Value".
• When setting to "4Gb", set "4" to "New Value".
• When unnecessary, set "0"(default: Auto-select) to "New Value".
When the setting value for each adapter differs, uncheck "Global".
For the setting values, refer to the ETERNUS Server Connection Guide, etc.
When there are two or more adapters, and the value for each adapter will be changed
separately, perform the procedures from Step 4 to 11 for each adapter separately.
66
12 Check the parameters that have been set.
The set values are displayed in "Current" field as a hexadecimal number (when "40" was set,
the displayed value is "0x28").
The meanings of the letters displayed at the left of "Parameter" field are as follows:
• "G": Global settings are shared by all the adapters
• "L": Local settings are specified for each adapter separately
• "GL": There are both Global settings and Local settings
When "GL" is displayed, the Local settings are enabled.
Page 29
• When Topology is 0, QueueDepth is 8, and QueueTarget is 1 for all the adapters:
13 When the settings for all adapters finishes, select "Exit" from "File"
menu, and exit LightPulse Utility/NT.
After exiting LightPulse Utility/NT perform "5.2 Registry Setting" (pg.71).
5 4Gbit/s FC I/O Module Details Setting 67
E
Page 30

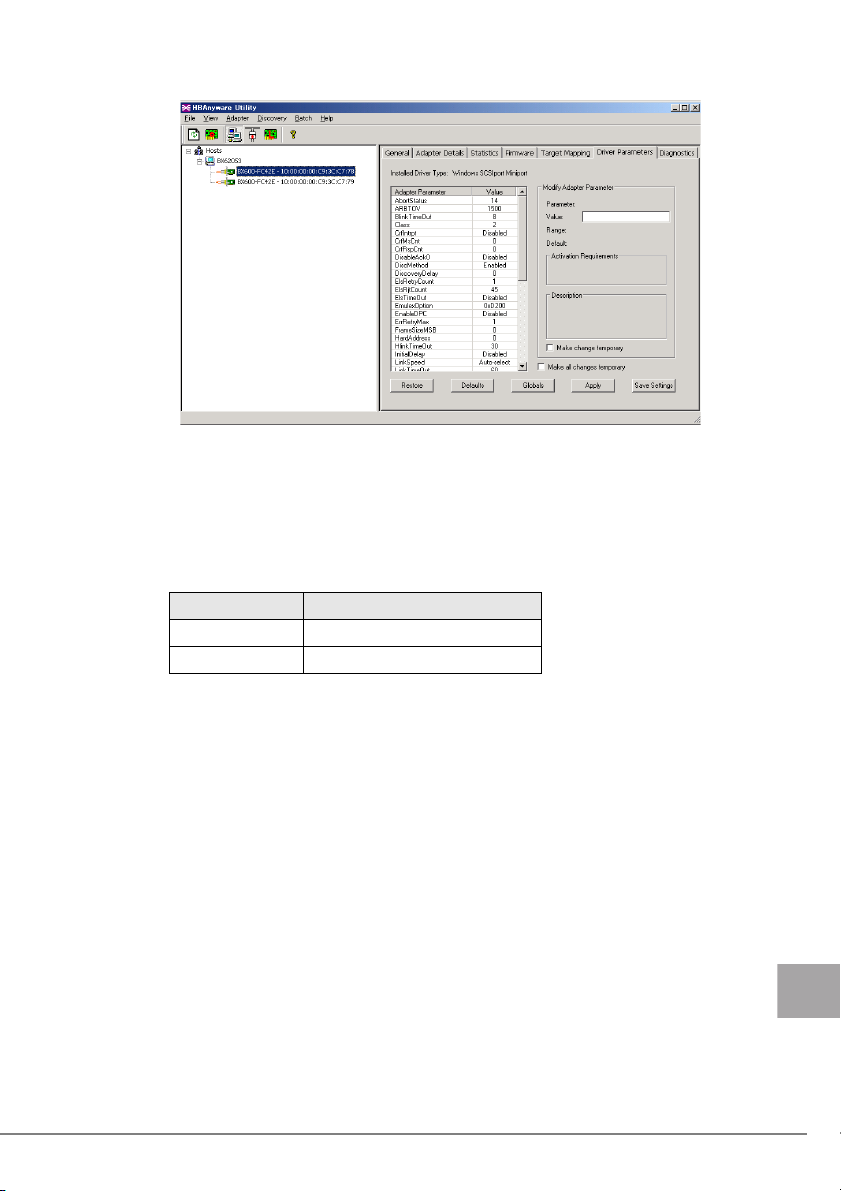
5.1.2 Using HBAnyware Utility
This product name displayed in HBAnyware Utility/NT is "BX600FC42E - 10:00:**:**:**:**:**:**".
The "**:**:**:**:**:**" shows the IEEE address of the 4Gbit/s FC I/O Module. Each 4Gbit/s FC I/
O Module has a unique IEEE address, which is written on the sticker on each 4Gbit/s FC I/O Module.
For PG-FCD201, there are two adapters and two IEEE Addresses. Due to this there are two IEEE
address labels.
1 Click the "Start" button → "Programs" or "All Programs" →
"Emulex"
2 Select the local server, and click the "Driver Parameters" tab.
If the setting value varies for each adapter, select the adapter to be set, and click [Driver
Parameters].
• When selected the local server and "Driver Parameters" (common setting for all adapters)
→ "HBAnyware" in this order.
When adding this product after installation, the settings for the existing product
may be changed. Therefore, after adding this product or driver, check the detailed
settings and correct them if necessary.
68
For PG-FCD201, two BX600-FC42E are displayed.
Page 31
• When selected the adapter to be set and "Driver Parameters" (Individual setting for each
adapter)
In the above diagram, "BX620 S3" represents a local server, and "BX600-FC42E 10:00:00:00:C9:48:FE:0C" represents an installed 4Gbit/s FC I/O Module.
3 Click [Topology] in "Adapter Parameter".
4 Select a value representing the connection type from the list box
to "Value" in "Modify Adapter Parameter", and click [Apply].
Connection type Val ue
FC-AL 0
Fabric 1
5 Click [QueueDepth] in "Adapter Parameters".
6 Set a value in "Value" in "Modify Adapter Parameter", and click
[Apply].
The setting value is calculated as follows:
For ETERNUS3000 model 50/GR710/GR720/GR730/GR740/GR820/GR840
• For cluster (MSCS/SynfinityCluster): "8"
• For other than cluster (MSCS/SynfinityCluster)
• When one HBA is connected to one FC-CA (FC port): "16"
• When two HBAs are connected to one FC-CA (FC port): "8"
For ETERNUS3000 model 80/100/200/300/400/500/600/700 and
ETERNUS4000 model 80/100
Setting value (rounding down decimals) = 40/ (number of 4Gbit/s FC I/O Module connected
to one CA port)
When the calculated value is 8 or less, specify "8".
For ETERNUS6000 model 400/500/600/700/800/900/1000/1100
Specify "40".
5 4Gbit/s FC I/O Module Details Setting 69
E
Page 32

For ETERNUS4000 model 300/500 and ETERNUS8000
Specify "255".
7 Double-click "QueueTarget" in "Adapter Parameters".
8 Set "1" (fixed value) in "Value" in "Modify Adapter Parameter", and
click [Apply].
9 Click "LinkSpeed" in "Adapter Parameters".
10 Select the value from the list box to "Value" in "Modify Adapter
Parameter", and click [Apply].
For the setting values, refer to the ETERNUS Server Connection Guide, etc.
• Setting value "1": Select "1Gb"
• Setting value "2": Select "2Gb"
• Setting value "4": Select "4Gb"
• No setting is necessary: Select "Auto-select" (Default)
When there are two or more adapters, and the setting for each adapter will be changed
separately, perform the procedures from Step 2 to 10 for each adapter.
11 Check the parameters that have been set.
The set values are displayed in "Value".
If the parameter is displayed in red, the setting is not applied. Click [Apply].
• When Topology: 0, QueueDepth: 8, QueueTarget: 1 for all the adapters
70
12 When the settings for all the adapter finishes, select "Exit" from
"File" menu, and exit HBAnyware Utility.
After exiting HBAnyware Utility, perform "5.2 Registry Setting" (pg.71).
Page 33

5.2 Registry Setting
1 Click the "Start" button → "Run..." in this order.
2 Enter a name in "Name" as follows, and click [OK].
regedit
The registry editor starts.
3 Follow the paths below.
\HKEY_LOCAL_MACHINE
\SYSTEM
\CurrentControlSet
\Services
\Disk
4 Check that the key name "TimeOutValue" values have the relations
described in the table below.
If there is no value in the "TimeOutValue", add it as follows:
- Data type : REG_DWORD (DWORD type)
- The name of the value : TimeOutValue
- The data of the value : (Refer to the following table)
- Base : Hexadecimal
Table: values in the "TimeOutValue"
Product names
Windows Server 2003 3c (hexadecimal) 3c (hexadecimal)
Single connection Cluster configuration
Connection configuration
5 After finishing all the settings, restart the server blade.
After configuring the cluster, recheck these settings. If the settings are incorrect,
perform the setting again.
5 4Gbit/s FC I/O Module Details Setting 71
E
Page 34

6
Troubleshooting
This chapter explains the troubleshooting methods when this product is not
running properly or when error messages are displayed.
6.1 Checking the Link Status
The link status connection can be checked upon system start by starting the Light Pulse BIOS Utility.
How to start the Light Pulse BIOS Utility
When this product is installed, the following message appears at the system startup.
!!! BX600-FC42E BIOS, Copyright (c) 2005 Emulex !!! Version 1.70a3
Press <ALT E> to go to Emulex BIOS Utility
Press <s> to skip Emulex BIOS
While the above message is displayed, pressing [Alt] + [E] keys makes the Light Pulse BIOS Utility
start, and the following message appears.
Emulex Light Pulse BIOS Utility, ZB1.70A3
Copyright (c) 2006 Emulex Design & Manufacturing Corp
Emulex Adapters in the System:
1. BX600-FC42E: PCI Bus #:** PCI Device #:**
2. BX600-FC42E: PCI Bus #:** PCI Device #:**
Enter a Selection:
Enter <x> to Exit
72
To return from the Light Pulse BIOS Utility, press the [X] key.
Change the set value of the Light Pulse Bios Utility if necessary.
If the expansion ROM initialization value where this product is installed is
"Disable" the "!!! BX600-FC42E BIOS, ***" message will not be displayed at
system startup, and the BIOS cannot be started.
If starting this product's BIOS is necessary, set the ROM (Option ROM SCAN)
settings in this servers BIOS to "Enabled".
Page 35

6.2 Troubleshooting
Check the applicable items listed below if this product does not operate correctly.
If the problem is not resolved even after taking the following measures, contact an
office listed in "Appendix B Contact Information" (
Symptoms Items to be checked Remedies
This product is not
recognized by the
server.
The device
connected to this
product cannot be
recognized.
This product does
not operate
properly.
*: If the expansion ROM initialization value where this product is installed is "Disable" the "!!!
BX600-FC42E BIOS, ***" message will not be displayed at system startup. If starting this products
BIOS is necessary, set the ROM (Option ROM SCAN) setting in this servers BIOS to "Enable".
Is the "!!! BX600-FC42E
BIOS, ***" message
displayed at the startup of
the server?
Is "Emulex *****"
displayed in the Device
Manager when performing
the system from the
Control Panel?
Is the connected device to
the board supplied with
power?
Are all cables connected
correctly?
Is the connected device to
the board set up correctly?
Are all cables connected
correctly?
Is the connected device to
the board set up correctly?
Is this product set up
correctly?
Is the server set up
correctly?
*
pg.75).
If the message is not displayed, turn off the
server, open the cover, and check that the
4Gbit/s FC I/O Module is inserted properly in
an expansion board slot.
"2 Installing the 4Gbit/s FC I/O
Module"(pg.49)
If the message is not displayed, check that the
driver is correctly installed.
"4 Installing Drivers and Utilities"(pg.53)
Turn on the connected device to the board
first, and then turn on the server after
connected device to the board has started up.
Check that all connectors are engaged
securely.
Check the settings according to the manual for
connected device to the board.
Check that all connectors are engaged
securely.
Check the settings according to the manual for
connected device to the board.
Check the settings, using LightPulse Utility/
NT or HBAnyware Utility.
"5 4Gbit/s FC I/O Module Details
Setting"(pg.62)
Check the settings according to the "User’s
Guide" provided with the server.
6 Troubleshooting 73
E
Page 36

Appendix A
How to Identify the
Adapter
This chapter explains how to identify the adapter.
Each 4Gbit/s FC I/O Module has an IEEE Address. The IEEE Address is on a sticker on the front or
rear of this product. For PG-FCD201, there are two adapters and two IEEE Addresses. Due to this
there are two IEEE address labels. The IEEE Address value mentioned indicates the IEEE Address
**********. In the following diagram the IEEE Address is "0000C93CC778".
IEEE ADDRESS 0000C93CC778
The procedures to check the IEEE Address on LightPulse Utility/NT are as follows:
1 Click the "Start" button → "Programs" or "All Programs" →
"Emulex"
2 Select the 4Gbit/s FC I/O Module to check the IEEE Address from
the list on the left of the window, select "Adapter Revision Levels"
in the "Category" field.
→ "lpUtilNT" in this order.
74
The value of "IEEE Address" (Revision) in "Component" is the IEEE Address of the 4Gbit/s FC I/O
Module. In the above example, the IEEE Address is "00-00-C9-3C-C7-78".
In the diagram above, if the IEEE Address applied to this product is "00-00-C9-3C-C7-78",
the adapter name displayed on LightPulse Utility /NT is "Adapter 0 -BX 600-FC42E Port1".
Page 37

Appendix B
• Australia:
Fujitsu Australia Limited
Tel: +61-2-9776-4555
Fax: +61-2-9776-4556
Address: 2 Julius Avenue (Cnr Delhi Road) North Ryde, Australia N.S.W. 2113
• China:
Fujitsu (China) Holdings Co., Ltd.
Tel: +86-21-5292-9889
Fax: +86-21-5292-9566
Address: 18F, Citic Square, 1168 West Nanjing Road Shanghai, China 200041
• Hong Kong:
Fujitsu Hong Kong Limited
Tel: +852-2827-5780
Fax: +852-2827-4724
Address: 10/F., Lincoln House, 979 King's Road Taikoo Place, Island East, Hong Kong
• Indonesia:
PT. Fujitsu Systems Indonesia Offices Headquarters
Tel: +62-21-570-9330 (Hunting)
Fax: +62-21-573-5150
Address: Wisma Kyoei Prince 10th Floor Jl. Jend. Sudirman Kav 3-4 Jakarta,
Indonesia 10220
• Korea:
Fujitsu Korea Ltd.
Tel: +82-2-3787-6000
Fax: +82-2-3787-6066
Address: Susong Tower Building, 83-1 Susong-Dong Jongno-Gu, Seoul,
Republic of Korea 110-140
• Malaysia:
Fujitsu (Malaysia) Sdn. Bhd.
Tel: +60-3-8318-3700
Fax: +60-3-8318-8700
Address: 1st Floor, No.3505 Jalan Technokrat 5 63000 Cyberjaya, Selangor Darul Ehsan Malaysia
• Philippines:
Fujitsu Philippines, Inc.
Tel: +63-2-812-4001
Fax: +63-2-817-7576
Address: 2nd Floor, United Life Building, A. Arnaiz Legaspi Village, Makati, Metro
Manila Philippines
Contact Information
Appendix B Contact Information 75
E
Page 38

• Singapore:
Fujitsu Asia Pte. Ltd.
Tel: +65-6777-6577
Fax: +65-6771-5502
Address: 20, Science Park Road, #03-01 TeleTech Park, Singapore Science Park II,
Singapore 117674
•Taiwan:
Fujitsu Taiwan Limited
Tel: +886-2-2311-2255
Fax: +886-2-2311-2277
Address: 19F, No.39, Section 1, Chung hwa Road Taipei, Taiwan
• Thailand:
Fujitsu Systems Business (Thailand) Ltd.
Tel: +66-2-500-1500
Fax: +66-2-500-1555
Address: 12th Floor, Olympia Thai Tower, 444 Rachadapisek Road Samsennok, Huaykwang,
Bangkok, Thailand 10310
• Vietnam:
Fujitsu Vietnam Limited
Tel: +84-4-831-3895
Fax: +84-4-831-3898
Address: Unit 802-8th floor, Fortuna Tower Hanoi 6B Lang ha Street, Ba dinh District, Hanoi
Socialist Republic of Vietnam
• United States:
Fujitsu Computer Systems Corporation
Tel: +1-800-831-3183
Fax: +1-408-496-0575
Address: 1250 East Arques Avenue, Sunnyvale, CA USA 94088-3470
76
For the latest information, refer to the Fujitsu PRIMERGY website (http://primergy.fujitsu.com).
Page 39

PRIMERGY
ファイバーチャネル拡張ボード
(PG-FCD201)
取扱説明書
4Gbit/s FC I/O Module
(PG-FCD201)
User’s Guide
B7FY-2211-01-00
発 行 日
発行責任
Issued on
Issued by
●本書の内容は、改善のため事前連絡なしに変更することがあります。
●本書に記載されたデータの使用に起因する、第三者の特許権およびその他の
権利の侵害については、当社はその責を負いません。
●無断転載を禁じます。
●落丁、乱丁本は、お取り替えいたします。
• The contents of this manual may be revised without prior notice.
• Fujitsu assumes no liability for damages to third party copyrights or other rights
arising from the use of any information in this manual.
• No part of this manual may be reproduced in any form without the prior written
permission of Fujitsu.
• Any manual which has missing pages or which is incorrectly collated will be
replaced.
2007 年 9 月
富士通株式会社
September, 2007
FUJITSU LIMITED
Printed in Japan
P
Page 40

このマ ニ ュ ア ルは再生紙を 使用 し 、 リ サ イ ク ルに配慮 し て製本されて いま す。
不要にな っ た際は、 回収 ・ リ サイ ク ルに出 し て く だ さ い。
 Loading...