

Page 1

Page 2

Page 3

This guide discusses procedures and safeguards relating to the use of ETERNUSmgr to configure
ETERNUS8000, ETERNUS4000, ETERNUS2000, ETERNUS6000, ETERNUS3000, GR series devices,
as well as details of how to conduct maintenance on, display the status of, and monitor these devices.
This document is specifically written for ETERNUSmgr administrators and operators.
Knowledge of UNIX, Linux or Windows® system administration and Web server administration are
required by this document.
Structure of this Manual
This guide consists of the following 6 chapters.
● Chapter 1 About ETERNUSmgr
This chapter explains the functions of ETERNUSmgr, its structure, and what other software is required
to operate it.
● Chapter 2 Setup
This chapter explains how to configure ETERNUSmgr and additionally explains how to monitor multiple machines with ETERNUSmgr.
Preface
August 2007
● Chapter 3 Startup and Shutdown
This chapter discusses how to startup and shutdown ETERNUSmgr.
● Chapter 4 Control Interfaces (Top Menu)
This chapter explains the screens used by ETERNUSmgr.
● Chapter 5 Cautions
This chapter explains important points to keep in mind when using ETERNUSmgr.
● Chapter 6 Messages
This chapter explains the various messages displayed when setting up and using ETERNUSmgr.
P2X0-0202-01EN ETERNUSmgr User Guide -Introduction-
All Rights Reserved, Copy r i ght © FUJITSU LIMITED 2007
i
Page 4

Preface
Related Material
The following are related materials:
• ETERNUS2000 ETERNUSmgr User Guide -Settings/Maintenance- for models 100 and
200
• ETERNUS3000 ETERNUSmgr User Guide -Settings/Maintenance- for model 50
• ETERNUS3000 ETERNUSmgr User Guide -Settings/Maintenance- for models 80, 100,
200, 300, 400, 500, 600, and 700
• ETERNUS6000 ETERNUSmgr User Guide -Settings/Maintenance-
• ETERNUS8000, ETERNUS4000 ETERNUSmgr User Guide -Settings/Maintenance-
• ETERNUS4000 models 80 and 100 ETERNUSmgr User Guide -Settings/Maintenance-
• ETERNUS GR740, GR820, GR840 GRmgr User Guide -Settings/Maintenance-
• ETERNUS GR710 GRmgr User Guide -Settings/Maintenance-
• ETERNUS8000, ETERNUS4000, ETERNUS2000, ETERNUS6000, ETERNUS3000
ETERNUSmgr Install Guide for Solaris™ Operating System
• ETERNUS8000, ETERNUS4000, ETERNUS2000, ETERNUS6000, ETERNUS3000
ETERNUSmgr Install Guide for Windows®
• ETERNUS8000, ETERNUS4000, ETERNUS2000, ETERNUS6000, ETERNUS3000
ETERNUSmgr Install Guide for Linux
• ETERNUS2000 storage system User Guide for models 100 and 200
• ETERNUS3000 storage system User Guide for model 50
• ETERNUS3000 storage system User Guide for model 80
• ETERNUS3000 storage system User Guide for model 100
• ETERNUS3000 storage system User Guide for models 200, 400, and 600
• ETERNUS3000 storage system User Guide for models 300, 500, and 700
• ETERNUS6000 storage system User Guide
• ETERNUS8000 storage system User Guide for models 700, 900, 1100, and 2100
• ETERNUS4000 storage system User Guide for models 300 and 500
• ETERNUS4000 storage system User Guide for model 100
• ETERNUS4000 storage system User Guide for model 80
ii
All Rights Reserved, Copy r i ght © FUJITSU LIMITED 2007
ETERNUSmgr User Guide -Introduction- P2X0-0202-01EN
Page 5

Acknowledgments
• Microsoft, Windows, and Windows Server are either registered trademarks or trademarks
of Microsoft Corporation in the USA and/or other countries.
• UNIX is a registered trademark of The Open Group in the USA and other countries.
• Java and all Java-related trademarks, and logos are trademarks and registered trademarks of Sun Microsystems, Inc. in the USA and other countries.
• Sun, Sun Microsystems, Sun logo, Solaris, and all Solaris-related trademarks, and logos
are trademarks and registered trademarks of Sun Microsystems, Inc. in the USA and
other countries and are used under license from Sun Microsystems Inc.
• Linux is a registered trademark of Linus Torvalds in the USA and other countries.
• SUSE is a registered trademark of SUSE Linux AG., a subsidiary of Novell, Inc.
• Red Hat, RPM, and all Red Hat-based trademarks and logos are trademarks or registered
trademarks of Red Hat, Inc. in the USA and other countries.
• Netscape and Netscape Communicator are registered trademarks of Netscape Communications Corporation in the USA and other countries.
• Mozilla and Firefox are registered trademarks of Mozilla Foundation.
• Adobe Acrobat is a trademark of Adobe Systems Incorporated.
• Other company names and their products are trademarks or registered trademarks of
their respective companies.
Preface
1
Abbreviations
The following products will be represented throughout this manual in the following abbreviations.
• Microsoft® Windows® 2000 Server operating system, Microsoft® Windows® 2000
Advanced Server operating system, and Microsoft® Windows® 2000 Datacenter Server
operating system are abbreviated as Windows® 2000.
• Microsoft® Windows Server® 2003, Standard Edition, and Microsoft® Windows Server®
2003, Enterprise Edition are abbreviated as Windows Server® 2003.
• Microsoft® Windows Server® 2003 R2, Standard Edition, and Microsoft® Windows
Server® 2003 R2, Enterprise Edition are abbreviated as Windows Server® 2003 R2.
• Windows® refers to all of the Windows products listed here: Windows® 2000, Windows
Server® 2003, and Windows Server® 2003 R2.
• Solaris™ Operating System is abbreviated as Solaris OS.
Screen shot(s) reprinted with permission from Microsoft Corporation.
All Rights Reserved, Copyright © FUJITSU LIMITED 2007
P2X0-0202-01EN ETERNUSmgr User Guide -Introduction-
All Rights Reserved, Copy r i ght © FUJITSU LIMITED 2007
iii
Page 6

Preface
This page is intentionally left blank.
iv
ETERNUSmgr User Guide -Introduction- P2X0-0202-01EN
All Rights Reserved, Copy r i ght © FUJITSU LIMITED 2007
Page 7

Contents
Chapter 1 About ETERNUSmgr..............................................1
1.1 ETERNUSmgr Outline ...................................................................1
1.2 ETERNUSmgr Functions ...............................................................4
1.3 Required Software and Hardware .................................................6
Chapter 2 Setup.......................................................................9
2.1 Setup files ......................................................................................9
2.2 Modifying the ETERNUSmgr Setup ............................................11
2.2.1 ETERNUSmgr for Solaris OS and Linux Procedure .......................................................11
2.2.2 For Windows® ................................................................................................................12
2.3 Setting Items ...............................................................................12
2.3.1 Target Device Settings ..................................................... .................................... ... ........12
2.3.2 E-mail Notification Settings .............................................................................................15
2.3.3 Alarm History File Settings ..............................................................................................17
2.3.4 Alarm Text File Settings ...................................................... .. ..................................... ... ..19
2.3.5 Log File Settings .............................................................................................................20
2.4 Modifying the ETERNUSmgr Top Menu System .........................22
2.4.1 Copying/Modifying the Top Menu Files ................................................................... ... ... ..23
2.4.2 Editing Top Menu file (menu.htm) ...................................................................................24
2.5 Monitoring Multiple Target Devices .............................................27
2.5.1 Setup File Cautions .........................................................................................................27
2.5.2 Creating a Setup File for Each Target Device .................................................................27
2.5.3 Adding the Extra Target Devices to the Top Menu File ..................................................29
1
2
3
4
5
6
Chapter 3 Startup and Shutdown.........................................31
3.1 ETERNUSmgr for Solaris OS and Linux .....................................31
3.1.1 Starting Up ETERNUSmgr ..............................................................................................31
3.1.2 Shutting Down ETERNUSmgr ........................................................................................33
3.1.3 Setting the ETERNUSmgr Daemon for Automatic Startup .............................................33
3.2 ETERNUSmgr for Windows® ......................................................34
3.2.1 Starting Up ETERNUSmgr ..............................................................................................34
3.2.2 Shutting Down ETERNUSmgr ........................................................................................37
3.2.3 Registering the ETERNUSmgr Service for Automatic Startup ........................................37
P2X0-0202-01EN ETERNUSmgr User Guide -Introduction-
All Rights Reserved, Copy r i ght © FUJITSU LIMITED 2007
v
Page 8

Contents
Chapter 4 Control Interfaces (Top Menu)............................39
Chapter 5 Cautions................................................................41
Chapter 6 Messages..............................................................45
6.1 Alarm History Messages ..............................................................45
6.2 Alarm Text Files ...........................................................................46
6.3 E-mail Messages .........................................................................47
6.4 Log Messages .............................................................................49
Index ......................................................................................55
vi
ETERNUSmgr User Guide -Introduction- P2X0-0202-01EN
All Rights Reserved, Copy r i ght © FUJITSU LIMITED 2007
Page 9

Chapter 1
About ETERNUSmgr
The ETERNUSmgr provides functions for administrators to manage the ETERNUS8000,
ETERNUS4000, ETERNUS2000, ETERNUS6000, ETERNUS3000, and GR series storage systems (hereafter, storage system). There are two parts that support the management facilities, the ETERNUSmgr frontend and ETERNUSmgr backend programs. The ETERNUSmgr frontend is installed in a Managing (or
Management) Server to provide specific functions across one or more storage systems. The ETERNUSmgr
backend programs are part of the firmware within each of the storage systems, which are used to display
the status and perform settings and maintenance of each respective storage system.
This guide explains the installation and operation of the ETERNUSmgr frontend.
The ETERNUSmgr frontend provides three specific optional functions: 1) a portal for access to each of
several storage systems, 2) customer e-mail notification of events, and 3) event and log recording and display. The ETERNUSmgr firmware on each storage system can provide SNMP Traps. A central monitoring
system is required. However, if the customer has a central monitoring system, which fields SNMP Traps
(For example SOFTEK Storage Cruiser), and does not need to directly receive e-mail notification of
events, then the ETERNUSmgr frontend and the Management Server are not necessary. When service
actions are necessary, direct logon to the specific storage system, using the Web browser, can be used to
access the ETERNUSmgr backend programs. When events occur in a storage system, REMCS (REMote
Customer Support system) e-mail services provide notice to the Fujitsu Global Support Center, whi ch in
turn can notify the customer.
1.1 ETERNUSmgr Outline
ETERNUSmgr can be installed on any server (hereafter referred to as "ETERNUSmgr server") with a
Windows® 2000, Windows Server® 2003, Windows Server® 2003 R2 , Solaris OS, or Linux operating
system installed.
The ETERNUSmgr server connects to the target devices through a Local Area Network (LAN).
An administrator can determine the state of the target devices or perform maintenance procedures from
any computer with a Web browser installed.
Administrators can be notified by E-mail of the details of hardware failures detected by ETERNUSmgr. It
is possible to disable mail notification in ETERNUSmgr.
The illustration below shows a sample connection setup for the ETERNUSmgr.
1
P2X0-0202-01EN ETERNUSmgr User Guide -Introduction-
All Rights Reserved, Copy r i ght © FUJITSU LIMITED 2007
1
Page 10
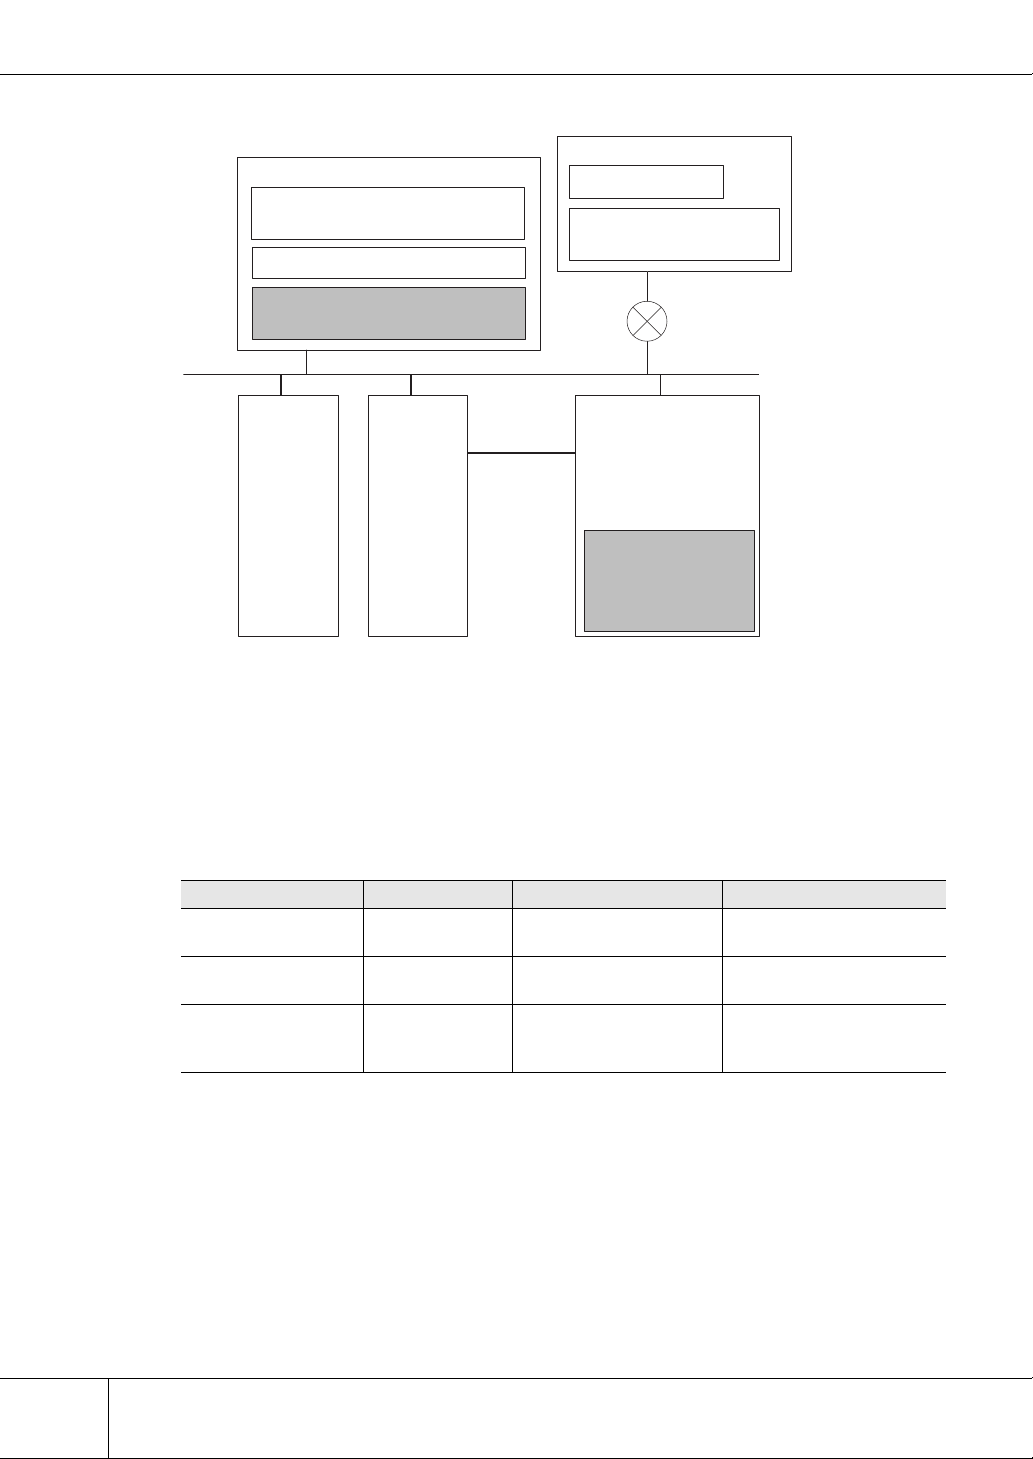
1.1 ETERNUSmgr Outline
ETERNUSmgr System Configuration
Managing Server
Windows/Solaris OS/Linux
Mail Server
(Windows version excluded)
Web Server program
Frontend
- Status monitoring and
mail notification
LAN
Mail Server
(Windows
version Only)
Work Server
Fibre
Channel
Client
Web Browser
Java Runtime Environment
(for ETERNUS2000)
WAN
ETERNUS GR series,
ETERNUS8000,
ETERNUS4000,
ETERNUS2000,
ETERNUS6000,
ETERNUS3000
Backend
- Status display
- Configuration display
and change
- Setup and
maintenance
The ETERNUSmgr server and work server may be collocated on the same physical server.
The management server must be running when ETERNUSmgr is used to perform maintenance tasks.
■ Network Requirements
When setting up the firewall between the server, client, and target device, the following port numbers must
be set to allow the subsequent transmission to pass the firewall.
● Client communication
Communication target Port No./Protocol Communication direction Function
Managing Server 80/tcp (*1) Client → Managing Server Display top menu
Target Device
(ETERNUS2000)
Target Device
(Other than
ETERNUS2000)
*1: Depends on Web Server program settings
*2: Port number can be changed for ETERNUS8000, ETERNUS4000 models 300, 500, and 700
80/tcp or 443/tcp Client → Target Device Display device configuration
80/tcp (*2) Client → Target Device Display device configuration
Display alarm history files
Setup and maintenance
Setup and maintenance
2
All Rights Reserved, Copy r i ght © FUJITSU LIMITED 2007
ETERNUSmgr User Guide -Introduction- P2X0-0202-01EN
Page 11

Chapter 1 About ETERNUSmgr
● Managing Server communication
Communication target Port No./Protocol Communication dir ection Function
Target Device
(ETERNUS2000)
Target Device
(Other than
ETERNUS2000)
Mail Server
(Windows version
only)
*1: Port number can be changed for ETERNUS8000, ETERNUS4000 models 300, 500, and 700
*2: Default value (port number can be changed depending on the mail server program)
80/tcp Managing Server → Tar-
get Device
80/tcp (*1) Managing Server → Tar-
get Device
25/tcp (*2) Managing Server → Mail
Server
Device monitoring
Device monitoring
Mail notification
Set firewall as necessary when E-mails are to be relayed between servers.
1
P2X0-0202-01EN ETERNUSmgr User Guide -Introduction-
All Rights Reserved, Copy r i ght © FUJITSU LIMITED 2007
3
Page 12

1.2 ETERNUSmgr Functions
1.2 ETERNUSmgr Functions
ETERNUSmgr provides the following three functions.
• Target Device Configuration Browser
• Target Device Monitoring and Failure Notification
• Target Device Setup and Maintenance
■ Target Device Configuration Browser
This displays the hardware structure of the target devices.
■ Target Device Monitoring and Failure Notification
Target device failure is monitored for. When a failure occurs, a history of the fault is saved as an HTML
file (called an "alarm history file" from here on), and the administrator is notified by E-mail of the file's
location and content. As the alarm history file is kept for a fixed period of time, the administrator can
browse the failure history later, as time permits.
The error monitoring function records the enclosure number where the error occurred. The error monitoring function can detect only the error location in terms of drive enclosures, controller enclosures, and battery enclosures, not detailed error location such as hard disk, CPU, etc. To obtain detailed location once an
error is detected, please use ETERNUSmgr's [Device Status Display] window (the window in whic h the
entire device is displayed).
Specifically, when an error has been detected, the red warning lamp for an enclosure (Drive Enclosure,
Controller Enclosure, Battery Enclosure) on the [Device Status Display] window is activated. For details
on the [Device Status Display] window, see "ETERNUSmgr User Guide -Setting s/ Maintenance-".
The extent to which a device can be monitored depends on its model number. Components that can be
monitored for each type of target device are shown in the following list.
4
All Rights Reserved, Copy r i ght © FUJITSU LIMITED 2007
ETERNUSmgr User Guide -Introduction- P2X0-0202-01EN
Page 13

List of components that can be monitored for each target device
Chapter 1 About ETERNUSmgr
Component
Controller
enclosure
Drive
enclosure
Battery
enclosure
FC cable No Yes Yes
RCI cable No Yes Yes
DEI cableNoNoNo
PANELNoNoNo
Battery unit No No No
Battery charger
unit
Component
model 50
Controller
enclosure
Drive
enclosure
Battery
enclosure
FC cable No Yes Yes No Yes Yes
RCI cable No Yes Yes No Yes No
DEI cable No No No No No Yes
PANEL No No No No No Yes
Battery unit No No No No No Yes
Battery
charger unit
Yes Yes Yes Yes Yes Yes
No Yes Yes Yes Yes Yes
No No Yes No (*1) No No
No No No No No Yes
GR710 GR720, GR730 GR740, GR820, GR840
Yes Yes Yes
No Yes Yes
No No No
No No No
ETERNUS3000
models
models 80
and100
200, 300,
400, 500,
600, and
700
Device model
Device model
ETERNUS2000
ETERNUS4000
models 80 and
100
ETERNUS8000
,
ETERNUS4000
,
ETERNUS6000
1
(Yes: Can be monitored, No: Cannot be monitored)
*1: Battery is installed in the controller enclosure
Besides being able to detect a change in a target device's condition from normal to faulty operation and
vice-versa, the device monitoring function is also able to detect changes in the type of problem encountered (such as the change from Offline to Alarm).
■ Target Device Setup and Maintenance
This allows the target device to be setup and maintained. This is done by means of the following functions:
• Target Device Settings
• Collecting the Log Information of the Target Device
P2X0-0202-01EN ETERNUSmgr User Guide -Introduction-
All Rights Reserved, Copy r i ght © FUJITSU LIMITED 2007
5
Page 14

1.3 Required Software and Hardware
1.3 Required Software and Hardware
The following software and hardware are necessary for ETERNUSmgr:
See the operation connection configuration diagram "ETERNUSmgr System Configuration" (page 2).
List of required software and hardware
Hardware Software Solaris OS/Linux Windows
ETERNUSmgr
Server
Mail Server Mail server program No Yes/No
PC Web browser Yes Yes
■ ETERNUSmgr Server
The following software is also needed on the ETERNUSmgr server.
Use the mail server program included with ETERNUSmgr if the OS is Solaris OS or Linux.
● Web server program
By installing or enabling a Web server program on the ETERNUSmgr Server, user can browse alarm
history and ETERNUSmgr portal page linking multiple ETERNUS systems ("Chapte r 4 Control
Interfaces (Top Menu)" (page 39)). Web server program is not required if neither feature is required.
We do not specify which Web server to use as long as it has the capability to show a list of directory
contents, as this is required to list the alarm history files.
Web server program Yes/No
Mail server program Yes/No
(Yes: Necessary, Yes/No: Necessary in some cases, No: Not necessary)
Yes/No
● Mail server program (ETERNUSmgr for Solaris OS and Linux)
ETERNUSmgr supports a function to notify administrators of alarms by E-mail. This function requires
a mail server program.
ETERNUSmgr for Solaris OS and Linux uses Sendmail, which should come with each OS, and this
must be setup on the ETERNUSmgr server.
The mail server is not required if the E-mail notification function is not used.
■ Mail Server (ETERNUSmgr for Windows®)
ETERNUSmgr supports a function to notify administrators of alarms by E-mail. A mail serv er is n ecessary
to send E-mails.
[Suitable mail servers]
• UNIX server with Sendmail that supports the SMTP protocol (including Linux server)
• Windows® 2000 Server, Windows® 2003 Server, or Windows® 2003 Server R2 that supports the SMTP service (standard feature)
If the ETERNUSmgr server is a Windows® 2000 Server, Windows® 2003 Server, or Windows® 2003
Server R2 that supports the SMTP service (standard feature), then a different mail server is not needed.
The mail server is not required if the E-mail notification function is not used.
6
All Rights Reserved, Copy r i ght © FUJITSU LIMITED 2007
ETERNUSmgr User Guide -Introduction- P2X0-0202-01EN
Page 15

Chapter 1 About ETERNUSmgr
■ Client
Device settings and maintenance can be performed from an external client, providing it has a Web browser
installed. Java Runtime Environment (JRE) may be necessary for some devices.
● Web browser
The alarm history files from ETERNUSmgr are generated in HTML format. Also, device settings and
maintenance are performed using CGI scripts or Java applets, which also require a Web browser.
Operation windows used by ETERNUSmgr are supported by the following browsers:
• For ETERNUS GR series, ETERNUS3000 model 50
[Web Browsers]
- Microsoft® Internet Explorer 5.5 + Service Pack 2 or later
- Netscape Communicator 4.5 or later
• For ETERNUS2000
[Web Browsers]
- Microsoft® Internet Explorer 6.0
- Mozilla Firefox™ 1.5.0.10
• For ETERNUS300 model 80 or higher, ETERNUS4000 models 80 and 100
[Web Browsers]
- Microsoft® Internet Explorer 6.0 + Service Pack 1 or later
- Netscape 6.0 or later (Windows® environment)
• For ETERNUS4000 model 300 or higher, ETERNUS8000
[Web Browsers]
- Microsoft® Internet Explorer 6.0 + Service Pack 2
- Netscape 6.0 or later (Windows® environment)
• For ETERNUS6000
[Web Browsers]
- Microsoft® Internet Explorer 6.0 or later
- Netscape 6.0 or later (Windows® environment)
1
Caution:
W e b browsers older than or other than those shown above may not display the window correctly.
● Java Runtime Environment
Java Runtime Environment must be installed to perform settings and maintenance of the following
device.
• For ETERNUS2000
[Required Software]
- Java Runtime Environment 5.0 Update 11 or later
P2X0-0202-01EN ETERNUSmgr User Guide -Introduction-
All Rights Reserved, Copy r i ght © FUJITSU LIMITED 2007
7
Page 16

1.3 Required Software and Hardware
This page is intentionally left blank.
8
All Rights Reserved, Copy r i ght © FUJITSU LIMITED 2007
ETERNUSmgr User Guide -Introduction- P2X0-0202-01EN
Page 17

Chapter 2
Setup
This chapter explains how to setup ETERNUSmgr.
Setup must be performed with administrator privilege.
2.1 Setup files
An ETERNUSmgr setup file is used to setup ETERNUSmgr to monitor a target device. The initial setup
files are generated automatically in the installation directory when ETERNUSmgr is installed. See the
"ETERNUS8000, ETERNUS4000, ETERNUS2000, ETERNUS6000, ETERNUS3000 ETERNUSmgr
Install Guide" of each OS for details of installing ETERNUSmgr.
The parameters in each setup file must be adjusted to match the target device. After making the necessary
settings, shutdown and re-start the ETERNUSmgr to enable the new settings. Refer to "Chapter 3 Startup
and Shutdown" (page 31) for details on starting up and shutting down the system.
It is recommended that you make a backup of the current setup files before making any changes. Keep this
backup until you have verified that the new setup files operate normally.
Caution:
You can edit only the setup file parameters described in this guide. Do not delete comments or
blank lines from any setup files, and do not add anything other than parameters. Failure to follow
these instructions may hinder performance and/or cause problems during future upgrades.
Setup file names must be in the following format:
STX-.INI
If the file name is other than as specified above, ETERNUSmgr will not be able to detect the file.
The only place setup files should be saved is the installation directory. If a setup file is saved in another
directory, ETERNUSmgr will not be able to find it.
2
The following setup file parameters must be set:
• Target Address (See → page 12
• Target Type (See → page 13
• Target Flag (See → page 14
• Alarm History Files Directory (See → page 17
The setup file parameters required will vary according to the operating system and target device type.
The following list shows parameter types in the setup file and setting items for each OS.
P2X0-0202-01EN ETERNUSmgr User Guide -Introduction-
All Rights Reserved, Copy r i ght © FUJITSU LIMITED 2007
)
)
)
)
9
Page 18

2.1 Setup files
Setting Items and Parameters Required by each OS
Setting item Parameter
Target Address
Polling Interval POLLING_TIME Yes/No Yes/No
Admin Mail Address ADMIN_MAIL Yes/No (*1) Yes/No (*1)
Alarm Mailing Interval MAIL_SEND_TIME Yes/No (*1) Yes/No (*1)
Alarm History File Directory HTML_ALARMFILE_PATH Yes Yes
Alarm History Index URL HTML_ALARMFILE_URL Yes/No (*1)(*2) Yes/No (*1)(*2)
Number of Days Alarm History Files
are Kept
Log Files Directory LOGFILE_PATH Yes/No Yes/No
Number of Days Log Files are Kept LOGFILE_DAY Yes/No Yes/No
Output Log Files LOGFILE_MODE Yes/No Yes/No
Target Device TARGET_TYPE Yes Yes
Target Flag TARGET_FLAG Yes Yes
Detect Offline Targets DETECT_OFFLINE Yes/No Yes/No
Mail Server Address ADMIN_MAILSV — Yes/No (*1)(*2)
Mail Server SMTP Port SMTP_PORT — Yes/No (*1)
Sender Mail Address MAIL_FROM Yes/No (*4) Yes/No (*4)
Busy Target Detection Time BUSY_TIME Yes/No (*4) Yes/No (*4)
Alarm Text Files Directory TEXT_ALARMFILE_NAME Yes/No (*3)(*4) Yes/No (*3)(*4)
Number of Days Alarm Text Files
are Kept
TARGET_ADDR Yes Yes
TARGET_PORT Yes/No Yes/No
HTML_ALARMFILE_DAY Yes/No Yes/No
TEXT_ALARMFILE_DAY Yes/No (*3)(*4) Yes/No (*3)(*4)
Solaris OS
and Linux
Windows®
(Yes: Must be set, Yes/No: Optional (can be omitted), -: No applicable setting)
*1: If the Admin Mail Address (ADMIN_MAIL) is omitted, the Alarm Mailing Interval (MAIL_SEND_T IME ) a nd
the Alarm History Index URL (HTML_ALARMFILE_URL) are ignored even if specifie d. These are va lid only
when the Admin Mail Address (ADMIN_MAIL) has been specified. In the Windows® version, in addition to
this, the Mail Server Address (ADMIN_MAILSV) and Mail Server SMTP Port (SMTP_PORT) are enabled only
when the Admin Mail Address (ADMIN_MAIL) has been specified.
*2: If the Admin Mail Address (ADMIN_MAIL) has been specified, the Alarm History Index URL
(HTML_ALARMFILE_URL) may not be omitted. The Alarm History Index URL
(HTML_ALARMFILE_URL) can be omitted only when the Admin Mail Address (ADMIN_MAIL) has been
omitted. In the Windows® version, in addition to this, the Mail Server Address (ADMIN_MAILSV) cannot be
omitted.
*3: If the Alarm Text Files Directory (TEXT_ALARMFILE_NAME) is omitted, the Number of Days Alarm Text
Files are Kept (TEXT_ALARMFILE_DAY) is ignored. The Number of Days Alarm Text Files are Kept is only
enabled when the Alarm Text Files Directory has been specified.
*4: Alarm Text Files Directory (TEXT_ALARMFILE_NAME), Number of Days Alarm Text Files are Kept
(TEXT_ALARMFILE_DAY), the Busy Target Detection Time (BUSY_TIME), and Sender Mail Address
(MAIL_FROM) are not described in the initial setup file. Add if necessary.
10
ETERNUSmgr User Guide -Introduction- P2X0-0202-01EN
All Rights Reserved, Copy r i ght © FUJITSU LIMITED 2007
Page 19

Device Specific Setup Parameters (differences only)
P
Setting item Parameter
Target Device
(may be changed)
Target Flag (cannot be changed)
TARGET_TYPE
TARGET_FLAG Fixed at "1" Fixed at "2" Fixed at "4"
ETERNUS
GR710, GR720,
GR730,
ETERNUS3000
Default setting is
"GR710",
"GR720",
"GR730", or
"ETERNUS3000"
GR740, GR820,
ETERNUS6000
Default setting is
"GR740",
"GR820",
"GR840", or
"ETERNUS6000"
2.2 Modifying the ETERNUSmgr Setup
This section explains how to change the setup of ETERNUSmgr for Solaris OS, Linux, or Windows®.
Use a text editor to modify the setup file. Any text editor can be used as none has been specified.
Target Type
ETERNUS
GR840,
Chapter 2 Setup
ETERNUS8000,
ETERNUS4000,
ETERNUS2000
Default setting is
"ETERNUS8000",
"ETERNUS4000",
or
"ETERNUS2000"
2
2.2.1 ETERNUSmgr for Solaris OS and Linux Procedure
This section explains what to do for the Solaris OS and Linux versions of ETERNUSmgr.
The procedure shown is for changing the settings that were set during installation.
This explanation uses ETERNUSmgr's default installation directory "/opt/FJSVgrmgr/" as an example.
rocedure
1 Confirm the contents of the installation directory.
Make sure that the necessary files and directories (stxchk, _STXPOLL.INI, STXPOLL_1.INI, stxpoll, stxpolld, www/) have all been installed.
# ls /opt/FVSVgrmgr/
stxchk _STXPOLL.INI STXPOLL_1.INI stxpoll stxpolld www/
2 Edit the STXPOLL_1.INI file.
Vi editor is used here.
# vi /opt/FJSVgrmgr/STXPOLL_1.INI
When setting up multiple target devices, copy an existing setup file to make the setup easier. For details on
how to do this, see "2.5 Monitoring Multiple Target Devices" (page 27)
.
P2X0-0202-01EN ETERNUSmgr User Guide -Introduction-
All Rights Reserved, Copy r i ght © FUJITSU LIMITED 2007
11
Page 20

2.3 Setting Items
P
2.2.2 For Windows®
The following describes how to edit a setup file for ETERNUSmgr for Windows®.
The procedure shown is for changing the settings that were set during installation.
rocedure
1 Confirm the contents of the installation directory using Explorer, etc.
Make sure the following files and folder have been installed in the installation directory:
_stxpoll.ini, STXPOLL.exe, STXPOLL_1.INI, stxpolld.exe, stxsmail.exe, and \www (\www is a
folder).
2 Edit the STXPOLL_1.INI file.
Edit the STXPOLL_1.INI file using a text editor (Notepad, etc.).
2.3 Setting Items
This section explains the setting items (parameter s) in the setup files.
2.3.1 Target Device Settings
This section explains the settings that allow ETERNUSmgr to monito r a target device.
■ Target Address
The target address parameter is used to set the IP address or host name assigned to the target device.
The target port number does not need to be changed (the default number is normally used).
Target address cannot be omitted. ETERNUSmgr will not start if this parameter has not been set.
Specify SVP IP address if the ETERNUS6000 is using SVP.
[Default value]
TARGET_PORT = 80
(TARGET_ADDR must be set. There is no default.)
[Parameter]
T A RGET_ADDR (up to 64 characters)
TARGET_PORT (0-65535)
[Example]
TARGET_ADDR=127.0.0.1 or TARGET_ADDR=host-name.domain-name.com
TARGET_PORT=80
Caution:
• As the default port number is normally used, the target port parameter is initially commented out.
• If the target address is changed, the target address must also be changed in the top
menu ("menu.htm").
12
ETERNUSmgr User Guide -Introduction- P2X0-0202-01EN
All Rights Reserved, Copy r i ght © FUJITSU LIMITED 2007
Page 21

■ Polling Interval
This parameter is used to control polling (periodically checking the status) of a target device.
Set the polling interval in units of seconds within the range of 1 ~ 65535.
[Default value]
300
[Parameter]
POLLING_TIME (1-65535)
Chapter 2 Setup
[Example]
POLLING_TIME=300
This specifies the Polling Interval (time between the start of one poll to the next).
Due to network or device load the actual polling time may exceed the set time. In such cases, the start of
the next polling time is delayed until the previous polling finishes:
When the actual polling finishes within the scheduled polling time:
Scheduled polling
interval
Actual polling
interval
Per schedule
300 sec 300 sec300 sec300 sec
150 sec
Scheduled start OK
Per schedulePer schedule
150 sec150 sec200 sec
When the actual polling exceeds the scheduled polling time:
Scheduled polling
interval
Actual polling
interval
Schedule
recalculated
300 sec 300 sec300 sec300 sec
400 sec
Scheduled
start NG
Holding
Delayed start
Schedule
recalculated
150 sec450 sec
Per schedule
150 sec
2
Caution:
Unless there is some special reason to change this parameter, it is recommended to keep the
default. For this reason the parameter is initially commented out.
■ Target Type
Sets the target device type. Two parameters are provided: TARGET_TYPE and TARGET_FLAG
These parameters cannot be omitted. ETERNUSmgr will not start if these parameter have not been set.
[Parameter]
TARGET_TYPE (up to 256 characters)
[Example]
Any character string can be used to describe the target device type.
When the type of target device is ETERNUS3000:
TARGET_TYPE=ETERNUS3000
P2X0-0202-01EN ETERNUSmgr User Guide -Introduction-
All Rights Reserved, Copy r i ght © FUJITSU LIMITED 2007
13
Page 22

2.3 Setting Items
■ Target Flag
Caution:
• Note that even if the TARGET_TYPE and the TARGET_FLAG settings are different,
ETERNUSmgr operations are not affected.
• Although any character string can be set in TARGET_TYPE, it is recommended to set
one of the correct target device types ("ETERNUS8000", "ETERNUS4000",
"ETERNUS2000", "ETERNUS6000", "ETERNUS3000", "GR710", "GR720", "GR730",
"GR740", "GR820", or "GR840"). The character string in TARGET_TYPE is used
when the administrator is notified by E-mail, and in the alarm history files.
Set to either 1, 2 or 4 according to the Target Type being monitored.
[Parameter]
TARGET_FLAG (1, 2 or 4)
1: ETERNUS3000, ETERNUS GR710, GR720, GR730
2: ETERNUS6000, ETERNUS GR740, GR820, GR840
4: ETERNUS8000, ETERNUS4000, ETERNUS2000
[Example]
When the type of target device is ETERNUS3000:
TARGET_FLAG=1
Caution:
• The TARGET_FLAG p arameter must be set to the correct Target Type. ETERNUSmgr
will be unable to monitor the target device properly if this setting is wrong.
• Note that even if the TARGET_TYPE and the TARGET_FLAG settings are different,
ETERNUSmgr operations are not affected.
■ Detect Offline Targets
This parameter determines whether or not notification is sent when a device goes offline.
The "Offline" condition is entered when ETERNUSmgr cannot monitor a target device due to a machine
problem (e.g. device is turned off, busy, etc.), or problem with the communication link between the ETERNUSmgr server and the target device (e.g. bad connection, timeouts due to network overload).
If this happens, the ETERNUSmgr Top Menu ("menu.htm") will show the target device status as being
"(*Offline*)" in a similar manner to the detection of machine failures, and E-mail notification (if enabled)
will be sent.
ETERNUSmgr does not provide for notification of "Offline" status if this parameter is omitted.
This parameter is enabled in its setup file immediately after insta lla tion.
Set "TRUE" to detect the offline status.
Omit setting to disable this parameter.
[Parameter]
DETECT_OFFLINE
[Example]
Detect the offline status, set as below:
14
DETECT_OFFLINE=TRUE
ETERNUSmgr User Guide -Introduction- P2X0-0202-01EN
All Rights Reserved, Copy r i ght © FUJITSU LIMITED 2007
Page 23

■ Busy Target Detection Time
This parameter is used to set the "target device busy" status detection time. Units are seconds.
Depending on what the ETERNUS device is doing, its device status can sometimes temporarily become
"busy".
In particular, the device cannot respond while it is booting.
Busy status is temporary, it does not mean device abnormality.
When device busy status is detected, ETERNUSmgr inhibits notification with logs or mails of device
abnormality for a set period of time.
When the busy status exceeds that definite period of time, ETERNUSmgr notifies of a device abnormality.
Chapter 2 Setup
[Default value]
1800 (seconds)
[Parameter]
BUSY_TIME (0-65535)
[Example]
BUSY_TIME=1800
Caution:
This setting is not described in the initial setup file. Add if necessary.
This setting needs not be changed.
2.3.2 E-mail Notification Settings
This section explains how to setup the E-mail notification function. See "6.3 E-mail Messages" (page 47)
for the content of E-mail messages provided by this function.
■ Admin Mail Address
This parameter is used to specify an address to which to send the E-mail generated in the event of change
in the target device status. Usually this is the address of the target device administrator.
The E-mail notification function is disabled if this parameter is omitted.
2
[Parameter]
ADMIN_MAIL (up to 64 characters)
[Example]
ADMIN_MAIL=admin@domain-name.com
To set multiple E-mail addresses, use a comma with no spaces between each address.
ADMIN_MAIL=admin1@domain-name.com,admin2@domain-name.com
■ Alarm Mailing Interval
This parameter is used to specify the interval for sending generated E-mail in the event of a failure or
abnormality in the machine. Units are seconds.
Set the interval in units of seconds within the range of 1 ~ 65535. Set this parameter only if you wish to
send E-mail with timing different from the specified Polling Interval. For example, by setting this parameter, you can set a short Polling Interval and long Alarm Mailing Interval. This will allow any device errors
that may have occurred over this interval to be collected and sent together with other E-mail messages.
P2X0-0202-01EN ETERNUSmgr User Guide -Introduction-
All Rights Reserved, Copy r i ght © FUJITSU LIMITED 2007
15
Page 24

2.3 Setting Items
This parameter is not a required setting. If omitted, the default value will be the same as the Polling Interval.
[Parameter]
MAIL_SEND_TIME (1-65535)
[Example]
MAIL_SEND_TIME=300
This specifies the Alarm Mailing Interval (time between the send ing of one notification E-mail message to
the next) for sending E-mail.
Due to network or device load the time to send the E-mail may exceed the expected time. In such cases, the
E-mail sending times are recalculated the same way as for the polling time.
Caution:
Unless there is some special reason to change this parameter, it is recommended to keep the
default. For this reason the parameter is initially commented out.
When the Polling Interval and the Alarm Mailing Interval are different:
(Example) Polling Interval: 300 sec. (5 min.) Alarm Mailing Interval: 1200 sec. (20 min.)
300 sec 1200 sec0 sec 600 sec 900 sec
Polling time
Get
information
Send mail
Mail contents
1st time
Activate
information
1st time
Activate
information
second
time
third time
fault 1
defecled
fourth
time
fault 2
defecled
fifth time
second
time
fault 1
defecled
fault 2
defecled
16
■ Mail Server Address (ETERNUSmgr for Windows® only)
This parameter is used to specify the address of the mail server th at will receive the E -mail notifications
from ETERNUSmgr.
E-mail notification is then routed to the specified Admin Mail Address by the mail server specified here.
[Parameter]
ADMIN_MAILSV
[Example]
When the Mail Server Address is "mailsv.domain-name.com".
ADMIN_MAILSV=mailsv.domain-name.com
■ Mail Server SMTP Port (ETERNUSmgr for Windows only)
This parameter is used to specify a SMTP port No. for the mail server (ADMINS_MAILSV) when the
ETERNUSmgr server is running on Windows®.
[Parameter]
SMTP_PORT (1-65535)
ETERNUSmgr User Guide -Introduction- P2X0-0202-01EN
All Rights Reserved, Copy r i ght © FUJITSU LIMITED 2007
Page 25

Caution:
• This parameter is initially commented out.
• Normally, the SMTP port is 25. However, if the SMTP port for the mail server is other
than 25 for some reason, correct this parameter to match.
■ Sender Mail Address
This parameter is used to change the address from which mail is sent when an error is detected in the storage system.
[Default value]
ETERNUSmgr@HTTP.polling.engine
[Parameter]
MAIL_FROM (Up to 64 characters)
[Example]
To change the sender address to "from@domain-name.co.jp"
MAIL_FROM=from@domain-name.co.jp
Caution:
This parameter is not described in the initial setup file. Add if necessary.
Chapter 2 Setup
2
2.3.3 Alarm History File Settings
This section explains the alarm history file settings. See "6.1 Alarm History Messages" (page 45) for
details of the alarm history files.
■ Alarm History File Directory
Each time an abnormality is detected in a machine, a copy of the alarm window that details the occurrence
of the abnormality is saved as an HTML file. The directory in which these Alarm History Files are saved
must be specified as an absolute path.
This is a required parameter. ETERNUSmgr will not start if this parameter has not been set.
The default setting is the "html_1" directory under the "www" Top Menu directory specified during installation (specifically "/opt/FJSVgrmgr/www/html_1/" for the Solaris OS and Linux versions, and "C:\Program Files\FUJITSU\ETERNUSmgr\www\html_1\" for the Windows® version, if the normal installation
defaults are accepted.). However, if this is likely to overload the file system, consult with the server adm inistrator and change it to a more suitable directory (e.g. "/var/FJSVgrmgr/www/html_1/" for Solaris OS and
Linux, or "D:\ETERNUSmgr\www\html_1\" for Windows®).
[Parameter]
HTML_ALARMFILE_PATH (up to 64 characters)
[Example]
• Changing the Solaris OS and Linux version settings to
"/var/FJSVgrmgr/www/html_1/"
HTML_ALARMFILE_P ATH=/var/FJSVgrmgr/www/html_1/
• Changing the Windows® version settings to "D:\ETERNUSmgr\html_1\"
HTML_ALARMFILE_P ATH=D:\ETERNUSmgr\html_1\
P2X0-0202-01EN ETERNUSmgr User Guide -Introduction-
All Rights Reserved, Copy r i ght © FUJITSU LIMITED 2007
17
Page 26

2.3 Setting Items
■ Alarm History Index URL
Caution:
• The alarm history files must be saved in a directory immediately under the directory in
which the ETERNUSmgr Top Menu is installed. When changing the location of the
alarm history file directory, ensure that all the files (index.htm, menu.htm, fujitsu.gif,
eternus.gif) in the parent directory (ETERNUSmgr Top Menu directory) are also
moved to the new parent directory . If using multiple setup files, ensure that any modifications are consistently applied to each setup file. Setup the parent directory of the
alarm history file directory (i.e. the ETERNUSmgr Top Menu directory) as a public
directory on the Web server.
• When monitoring multiple machines, the alarm history files for each should be saved
in a different directory (speci fy di fferent absolute paths in each setup file).
Refer to "2.5 Monitoring Multiple Target Devices" (page 27)
itor multiple target devices.
• When this parameter is changed, it is also necessary to change the alarm file URL in
the top menu file ("menu.htm").
For details on how to make changes to the top menu file, refer to "2.3.1 Target Device
Settings" (page 12).
• If the specified Alarm History Files Directory does not exist, it will automatically be created. It is not necessary to create the directo r y ma nu a l ly.
Specify a URL for HTTP browsing of the Alarm History Files Directory setup in "Alarm History File
Directory" (page 17). The administrator is notified of this URL via E-mail, allowing the alarm history files
to be checked with a Web browser.
This parameter may not be omitted when the E-mail notification function is used (i.e. ADMIN_MAIL
parameter has been set). In this case ETERNUSmgr will not start unless this parameter is set. This parameter may be omitted if the E-mail notification function is not used (i.e. ADMIN_MAIL parameter has not
been set).
for details on how to mon-
[Parameter]
HTML_ALARMFILE_URL (up to 64 characters)
[Example]
When the Alarm History Files Directory is accessible as "http://host-name/eternuslog/"
HTML_ALARMFILE_URL= http://host-name/eternuslog/
Caution:
- When monitoring multiple target devices, set a dif ferent Alarm History Index URL for each
device’s Alarm History Files Directory.
Refer to "2.5 Monitoring Multiple Target Devices" (page 27) for details on how to monitor
multiple target devices.
- "HTML_ALARMFILE_P ATH" and "HTML_ALARMFILE_URL" must be linked in the W eb
server settings.
■ Number of Days Alarm History Files are Kept
This parameter specifies how long the Alarm History files are kept. Setting the number of days to "0"
means that the files are not deleted.
[Default value]
7
18
ETERNUSmgr User Guide -Introduction- P2X0-0202-01EN
All Rights Reserved, Copy r i ght © FUJITSU LIMITED 2007
Page 27

[Parameter]
HTML_ALARMFILE_DAY (0-65535 days)
[Example]
To store seven full days worth of Alarm History files (current day is not included):
HTML_ALARMFILE_DAY=7
Caution:
For this parameter, if there is no need for any special setting, it is recommended not to enter any
value. This parameter is initially commented ou t in the defaul t setup file av ailable aft er installatio n.
2.3.4 Alarm Text File Settings
Alarm text files are categorized into the following types:
• Alarm Text Date Files
On any given day, each alarm history message issued for a target device is also added to that day's
alarm text date file. The alarm text date fi les use a stxgrYYYYMMDD.log naming format (e.g.
"stxgr20030101.log").
• Alarm Text Fixed File
A copy of the most recent alarm text date file may also be given an arbitrary name.
Chapter 2 Setup
2
■ Alarm Text Files Directory
Alarm text files are created when this parameter is set.
If only alarm text date files are required, specify an absolute path to the directory in which the alarm text
date files are to be created.
If an alarm text fixed file is also required, specify its name as an absolute path. The alarm text data files
will then be created in the same directory as the alarm text fixed file.
[Parameter]
HTML_ALARMFILE_NAME (up to 64 characters)
[Example]
• Only alarm text date files are to be created in "/opt/FJSVgrmgr/txt_1/":
TEXT_ALARMFILE_NAME = /opt/FJSVgrmgr/txt_1/
• Both the alarm text date files and an alarm text fi xed file named "ETERNUSfix.log" are to
be created in "/opt/FJSVgrmgr/txt_1/":
TEXT_ALARMFILE_NAME = /opt/FJSVgrmgr/txt_1/ETERNUSfix.log
Caution:
• When monitoring and generating alarm text files for multiple target devices, set different directories for each device’s alarm text files. See "2.5 Monitoring Multiple Target
Devices" (page 27) for information on how to monitor multiple target devices.
• If the specified Alarm History Files Directory does not exist, it will automatically be created. It is not necessary to create the directo r y ma nu a l ly.
• This setting is not included in the default setup file available after installation.
Add if necessary.
P2X0-0202-01EN ETERNUSmgr User Guide -Introduction-
All Rights Reserved, Copy r i ght © FUJITSU LIMITED 2007
19
Page 28

2.3 Setting Items
■ Number of Days Alarm Text Date Files are Kept
This parameter specifies how long the alarm text date files are kept. Setting the number of days to "0"
means that the files are not deleted.
[Default value]
7
[Parameter]
TEXT_ALARMFILE_DAY
[Example]
To save seven days worth of alarm text files:
TEXT_ALARMFILE_DAY = 7
Caution:
• This parameter is only enabled if the TEXT_ALARMFILE_NAME parameter has been
specified.
• This setting is not included in the default setup file available after installation.
Add if necessary.
2.3.5 Log File Settings
Both ETERNUSmgr and the target devices output information relating to operations and errors in the form
of log files. ETERNUSmgr log files are saved in text format.
This section explains the ETERNUSmgr log settings. Refer to "ETERNUSmgr User Guide -Settings/
Maintenance-" for details on how to collect and view the target device log information.
The following messages are output to the ETERNUSmgr log file. For details on individual log messages,
refer to "6.4 Log Messages" (page 49)
• Startup messages (LOGFILE_MODE=1,2)
Indicates that ETERNUSmgr has started up.
• Parameter information (LOGFILE_MODE=1,2)
Lists the parameters used at startup. Check this section to ensure that ETERNUSmgr is starting up
with the correct parameters from the setup files.
• Polling information (only LOGFILE_MODE=2)
Messages are output each time the system conducts polling. These outputs are logged even if there
are no abnormalities and can be used to check whether the polling operation is working properly or
not.
• Error information (LOGFILE_MODE=1,2)
Information related to any errors that occur in ETERNUSmgr.
Log files can be viewed with a text editor, etc.
The log files are located in the directory specified by the "LOGFILE_ PATH" parameter in the setup file.
The log file names are represented by the character string consisting of "stxpe" + Date + ".log" (e.g.
"stxpe20030101.log"), making it easy to find the log file for a specific date.
.
20
■ Log Files Directory
This parameter specifies as an absolute path the directory where the log files are to be kept.
The default if there is no setting is the directory from which the execution control script is started for the
Solaris OS and Linux version and "C:\WINNT\SYSTEM32\" for the Windows® version.
ETERNUSmgr User Guide -Introduction- P2X0-0202-01EN
All Rights Reserved, Copy r i ght © FUJITSU LIMITED 2007
Page 29

Chapter 2 Setup
Initially, immediately after ETERNUSmgr installation, the setup file should contain a parameter that is set
to the "log_1" directory under the ETERNUSmgr installation directory specified at installation (specifically, "/opt/FJSVgrmgr/log_1/" for the Solaris OS and Linux versions, and "C:\Program
Files\FUJITSU\ETERNUSmgr\log_1" for the Windows® version if the normal installation defaults are
accepted). However, if this is likely to overload the file system, consult with the server administrator and
change it to a more suitable directory (e.g. "/var/FJSVgrmgr/log_1/" for Solaris OS and Linux, or
"D:\ETERNUSmgr\log_1\" for Windows®).
[Parameter]
LOGFILE_PATH (up to 64 characters)
[Example]
• Changing the Solaris OS and Linux version setting to
"var/FJSVgrmgr/log_1":
LOGFILE_PATH=/var/FJSVgrmgr/log_1/
• Changing the Windows® version setting to "D:\ETERNUSmgr\log_1\":
LOGFILE_PATH=D:\ETERNUSmgr\log_1\
Caution:
• When monitoring multiple target devices, set a different log file directory for each of
the different targ ets.
Refer to "2.5 Monitoring Multiple Target Devices" (page 27)
itor multiple target devices.
• If the specified log files directory does not exist, it will automatically be created. The
directory does not need to be created manually.
for details on how to mon-
■ Number of Days Log Files are Kept
This parameter specifies how long the log files are kept. Setting the number of days to "0" means that the
files are not deleted.
[Default value]
7
2
[Parameter]
LOGFILE_DAY (0 ~ 65535 days)
[Example]
To store seven days worth of log files
LOGFILE_DAY=7
Caution:
For this parameter, if there is no need for any special setting, it is recommended not to enter any
value. This parameter is commented out in the default setup file available aft er inst allation.
P2X0-0202-01EN ETERNUSmgr User Guide -Introduction-
All Rights Reserved, Copy r i ght © FUJITSU LIMITED 2007
21
Page 30

2.4 Modifying the ETERNUSmgr Top Menu System
■ Output Log File
The output log file setting has the following modes:
• No log output (LOGFILE_MODE=0)
No logs are output.
In the case where a machine frequently has errors and the source of these errors is clear, a large
number of similar system log events, none of which require any follow-up, can be generated. In
such a case use the "no log" mode to allow the system to run without having to generate the useless
log files.
• Output startup and error information (LOGFILE_MODE=1)
This outputs logs only when ETERNUSmgr starts up and in the event of an error. Use this mode
when space in the log area is restricted.
• Output all log information (LOGFILE_MODE=2)
This mode outputs all possible log information from the startup of ETERNUSmgr. Regardless of
its eventual success or failure, at least one log is generated by each polling event. It is recommended that the system normally be run in this mode.
The output mode is set by modifying the "LOGFILE_MODE" parameter in the setup file ("STX~.INI").
[Default value]
2
[Parameter]
LOGFILE_MODE(0-2)
Caution:
For this parameter, if there is no need for any special setting, it is recommended not to enter any
value. This parameter is commented out in the default setup file available aft er installation.
2.4 Modifying the ETERNUSmgr Top Menu System
The ETERNUSmgr Top Menu files are generated automatically when ETERNUSmgr is installed. See the
"ETERNUS8000, ETERNUS4000, ETERNUS2000, ETERNUS6000, ETERNUS3000 ETERNUSmgr
Install Guide" of each OS for details of installing ETERNUSmgr.
The ETERNUSmgr Top Menu is written as a typical HTML file, and can easily be edited using a text editor.
Perform the following procedures if the Web server URL and alias set during the installation or the Top
Menu Settings directory need to be changed.
There is no need to copy the files when using the directory specified during the installation as the Top
Menu Settings directory. However, in such case, be sure to make a backup copy of the top menu file
("menu.htm") before editing the original.
Caution:
• ETERNUSmgr reads the Top Menu File ("menu.htm") in, and reoutputs it after adding
the target device status information to it. Therefore, always stop ETERNUSmgr before
making any changes to the base "menu.htm" file.
• The "menu.htm" file must be set to be writable.
22
ETERNUSmgr User Guide -Introduction- P2X0-0202-01EN
All Rights Reserved, Copy r i ght © FUJITSU LIMITED 2007
Page 31

2.4.1 Copying/Modifying the Top Menu Files
P
P
This section explains how to copy and edit the top menu files.
2.4.1.1 ETERNUSmgr for Solaris OS and Linux Procedure
This section explains what to do for the Solaris OS and Linux versions of ETERNUSmgr. This procedure
shows how to change the top menu directory and then edit "menu.htm". If you are not going to change the
top menu directory, start from Step 4
.
Chapter 2 Setup
rocedure
1 Confirm the current Top Menu directory (specified during installation).
Make sure that all the necessary files (fujitsu.gif, index.htm, menu.htm, eternus.gif) have been
installed.
#ls /(current Top Menu directory)/www/
fujitsu.gif index.htm menu.htm eternus.gif
2 Copy all the Top Menu files to the new Top Menu directory.
#cp /(current Top Menu directory)/www/* /(new Top Menu directory)/
3 Confirm the copy results.
# ls /(new Top Menu directory)/
fujitsu.gif index.htm menu.htm eternus.gif
4 Edit the copied Top Menu file.
# vi /(new Top Menu directory)/menu.htm
2.4.1.2 ETERNUSmgr for Windows® Procedure
This section explains what to do for the Windows® versions of ETERNUSmgr. This procedure shows how
to change the top menu directory and then edit "menu.htm". If you are not going to change the top menu
directory, start from Step 4
.
2
rocedure
1 Check the current Top Menu directory (specified during installation) with
Explorer.
Make sure that all the necessary files (fujitsu.gif, index.htm, menu.htm, eternus.gif) have been
installed.
P2X0-0202-01EN ETERNUSmgr User Guide -Introduction-
All Rights Reserved, Copy r i ght © FUJITSU LIMITED 2007
23
Page 32

2.4 Modifying the ETERNUSmgr Top Menu System
2 Copy all the Top Menu files to the new Top Menu directory.
3 Confirm the copy results using Expl orer.
4 Edit the copied Top Menu file. Use a text editor such as Note Pad.
2.4.2 Editing Top Menu file (menu.htm)
Describing how to add a link to the Alarm History files and a matching target device explanation to the
Top Menu file.
■ Setting the Link to the Alarm History Files
Following the normal syntax rules for HTML, simply add the link address between the <a href=""> quotation marks to complete the setup.
■ Installation Location (Machine Name)
Add the target device name, etc. after <a href="">. The character string may be changed as you like.
For example, immediately after installation of ETERNUSmgr to ETERNUS3000 the top menu includes
the following line containing links to the target device login.
• ETERNUS2000
<LI><a href="http://000.000.000.00 0:8 0/" targ et="_ blank" >ETER NUS 2000 #1< /a>
The above line is for HTTP communication between the client and the target device. Change
"http:" to "https:" and ":80" to ":443" to use HTTPS.
• Storage systems other than ETERNUS2000
(Example: ETERNUS3000)
<LI><a href="http://000.000.000.000:80/login.htm" target="_blank">ETERNUS3000
#1</a>
The link to "login.htm" noted above displays the login screen for the English version.
Change this to login_jp.htm to display the device login screen in Japanese.
See "ETERNUSmgr User Guide -Settings/Maintenance-" for details of machine login.
24
ETERNUSmgr User Guide -Introduction- P2X0-0202-01EN
All Rights Reserved, Copy r i ght © FUJITSU LIMITED 2007
Page 33

[Example]
The following example is for monitoring an ETERNUS3000 device.
Change the link in the Top Menu file, and add an explanation of the location.
• Target Address = 000.000.000.000
• Old Alarm History Index URL=http://domain-name/eternus-mgr/html_1/
• New Alarm History Index URL=http://domain-name/eternus-mgr/alarm/
Specify the same value of "HTML_ALARMFILE_URL" specified in the setup file
(STX~.INI) to the new Alarm History Index URL.
Chapter 2 Setup
2
P2X0-0202-01EN ETERNUSmgr User Guide -Introduction-
All Rights Reserved, Copy r i ght © FUJITSU LIMITED 2007
25
Page 34

2.4 Modifying the ETERNUSmgr Top Menu System
<HTML>
(omission)
<H2>Select RAID Device</H2>
<TABLE><TR><TD>
<OL>
<LI>
<a href="http://000.000.000.000:80/login.htm" target="_blank">ETERNUS3000
#1</a>
</OL>
</TD></TR></TABLE>
<HR>
<H2>Show hardware error detect log list</H2>
<TABLE><TR><TD>
<OL>
<LI>
<a href="http://domain-name/eternus-mgr/html_1" target="_blank">ETERNUS3000
#1</a>
<!-- Status of 000.000.000.000 --><font color="red">(*Offline*)</font>
</OL>
</TD></TR></TABLE>
(omission)
</HTML>
↓ Becomes
<HTML>
(omission)
<H2>Select RAID Device</H2>
<TABLE><TR><TD>
<OL>
<LI>
<a href="http://000.000.000.000:80/login.htm" target="_blank">ETERNUS3000
#1</a>
</OL>
</TD></TR></TABLE>
<HR>
<H2>Show hardware error detect log list</H2>
<TABLE><TR><TD>
<OL>
<LI>
<a href="http://domain-name/eternus-mgr/alarm/" target="_blank">ETERNUS3000
#1</a>
<!-- Status of 000.000.000.000 --><font color="red">(*Offline*)</font>
</OL>
</TD></TR></TABLE>
(omission)
</HTML>
26
ETERNUSmgr User Guide -Introduction- P2X0-0202-01EN
All Rights Reserved, Copy r i ght © FUJITSU LIMITED 2007
Page 35

Caution:
• Bold text indicates the portions that have been changed.
• ETERNUSmgr is able to indicate the current status of each target device in the top
menu. This is done using the following line after the link to the Alarm History Files
Directory. When the device IP address is changed, also change this line. If status display is not performed, delete this li n e.
<!-- Status of 000.000.000.000 -- <font color="red">(*Offline*)</font>
"The "<font color="red">(*Offline*)</font>" portion of this line is overwritten
by either one of the following.
Normal <font color="black">(Normal)</font>
Offline <font color="red">(*Offline*)</font>
ATTENTION <font color="red"><b>(*ATTENTION*)</b></font>
BUSY <font color="red">(*BUSY*)</font>
Chapter 2 Setup
2
See "Chapter 4 Control Interfaces (Top Menu)" (page 39)
for Top Menu details.
2.5 Monitoring Multiple Target Devices
This chapter explains how to monitor multiple target devices by creating new setup files and editing the
top menu.
2.5.1 Setup File Cautions
To monitor multiple target devices, a new setup file must be created for each target device that is to be
monitored:
The following naming format must be used for the setup files.
Format: STX-.INI
If the file name is other than as specified above, ETERNUSmgr will not be able to detect the file.
The only place setup files should be saved is the installation directory. If a setup file is saved in another
directory, ETERNUSmgr will not be able to find it.
The next time the ETERNUSmgr starts, monitoring of the new target devices will start. To begin monitoring immediately, manually reboot ETERNUSmgr.
2.5.2 Creating a Setup File for Each Target Device
For each additional device that is to be monitored, save a renamed copy of the sample setup file (created by
the installation procedure in the Installation Directory) and edit the parameters as necessary for the given
target.
The following example procedures assume that the setup file for device 1 already exists and just creates a
new setup file for device 2.
Caution:
No special text editor is required to edit a setup file.
P2X0-0202-01EN ETERNUSmgr User Guide -Introduction-
All Rights Reserved, Copy r i ght © FUJITSU LIMITED 2007
27
Page 36

2.5 Monitoring Multiple Target Devices
P
P
2.5.2.1 ETERNUSmgr for Solaris OS and Linux
When adding extra machines, it is easiest to just copy and edit an existing setup file.
rocedure
1 Confirm the contents of the installation directory.
Make sure that the necessary files and directories (stxchk, _STXPOLL.INI, STXPOLL_1.INI, stxpoll, stxpolld, www/) have all been installed.
# ls /opt/FJSVgrmgr/
stxchk _STXPOLL.INI STXPOLL_1.INI stxpoll stxpolld www/
2 Copy an existing setup file.
File name starts with "STX" and ends with ".INI".
# cp /opt/FJSVgrmgr/STXPOLL_1.INI /opt/FJSVgrmgr/STXPOLL_2.INI
3 Confirm the copy results.
# ls /opt/FJSVgrmgr/
stxchk _STXPOLL.INI STXPOLL_1.I NI STXPOLL_2.INI stxpoll s txpolld
www/
4 Edit the copied file. (The STXPOLL_2.INI file is used here.)
Vi editor is used here.
Refer to "2.3 Setting Items" (page 12)
in the new setup file.
for details of how and which parameters should be changed
# vi /opt/FJSVgrmgr/STXPOLL_2.INI
Caution:
"_STXPOLL.INI" is provided as a model file. If you copy this file to make a new setup file, be
sure to keep the original file as is.
2.5.2.2 ETERNUSmgr for Window s®
When adding extra machines, it is easiest to just copy and edit an existing setup file.
rocedure
1 Confirm the contents of the installation directory using Explorer, etc.
Make sure the following files and folder have been installed in the installation directory: _stxpoll.ini,
STXPOLL.exe, STXPOLL_1.INI, stxpolld.exe, stxsmail.exe, and \www (\www is a folder).
2 Copy an existing setup file.
Example: STXPOLL_1.INI
3 Change the name of the copied file.
Setup file names must start with "STX" and end with ".INI".
Example: STXPOLL_2.INI
4 Edit the copied file. (The STXPOLL_2.INI file is used here.)
Use a text editor such as Note Pad to edit the copied files.
Refer to "2.3 Setting Items" (page 12)
in the new setup file.
for details of how and which parameters should be changed
28
ETERNUSmgr User Guide -Introduction- P2X0-0202-01EN
All Rights Reserved, Copy r i ght © FUJITSU LIMITED 2007
Page 37

Caution:
"_stxpoll.ini" is provided as a model file. If you copy this file to make a new setup file, be sure to
keep the original file as is.
2.5.3 Adding the Extra Target Devices to the Top Menu File
When monitoring multiple target devices, edit the Top Menu file as follows.
Note that if the target device is other than ETERNUS2000, each target address must have either
"/login.htm" or "/login_jp.htm" added to the end.
The following example uses a configuration with two ETERNUS3000s and one ETERNUS2000 to show
how the top menu file should be edited to allow all three devices to be monitored. The top menu file should
be edited in the same way when monitoring other devices.
[Example]
• 1st Target Device (ETERNUS3000 #1)
Target Address = http://000.000.000.001
Alarm History Files URL = domain-name/eternusmgr/ETERNUS3000_1
• 2nd Target Device (ETERNUS2000#1)
Target Address = http://000.000.000.002
Alarm History Files URL = domain-name/eternusmgr/ETERNUS2000_1
• 3rd Target Device (ETERNUS3000#2)
Target Address = http://000.000.000.003
Alarm History Files URL = domain-name/eternusmgr/ETERNUS3000_2
Chapter 2 Setup
2
<HTML>
(omission)
<H2>Select RAID Device</H2>
<TABLE><TR><TD>
<OL>
<LI>
<a href="http://000.000.000.001:80/login.htm" target="_blank">ETERNUS3000
#1</a>
</OL>
</TD></TR></TABLE>
<HR>
<H2>Show hardware error detect log list</H2>
<TABLE><TR><TD>
<OL>
<LI>
<a href="http://domain-name/eternusmgr/ETERNUS3000_1" target="_blank">
ETERNUS3000 #1</a>
<!-- Status of 000.000.000.001 --><font color="red">(*Offline*)</font>
</OL>
</TD></TR></TABLE>
(omission)
</HTML>
↓ Becomes
P2X0-0202-01EN ETERNUSmgr User Guide -Introduction-
All Rights Reserved, Copy r i ght © FUJITSU LIMITED 2007
29
Page 38

2.5 Monitoring Multiple Target Devices
<HTML>
(omission)
<H2>Select RAID Device</H2>
<TABLE><TR><TD>
<OL>
<LI>
<a href="http://000.000.000.001:80/login.htm" target="_blank">ETERNUS3000
#1</a>
<LI>
<a href="http://000.000.000.002:80/login.htm" target="_blank">ETERNUS2000
#1</a>
<LI>
<a href="http://000.000.000.003:80/login.htm" target="_blank">ETERNUS3000
#2</a>
</OL>
</TD></TR></TABLE>
<HR>
<H2>Show hardware error detect log list</H2>
<TABLE><TR><TD>
<OL>
<LI>
<a href="http://domain-name/eternusmgr/ETERNUS3000_1/" target="_blank">
ETERNUS3000 #1</a>
<!-- Status of 000.000.000.001 --><font color="red">(*Offline*)</font>
<a href="http://domain-name/eternusmgr/ETERNUS2000_1/" target="_blank">
ETERNUS2000 #1</a>
<!-- Status of 000.000.000.002 --><font color="red">(*Offline*)</font>
<a href="http://domain-name/eternusmgr/ETERNUS3000_2/" target="_blank">
ETERNUS3000 #2</a>
<!-- Status of 000.000.000.003 --><font color="red">(*Offline*)</font>
</OL>
</TD></TR></TABLE>
(omission)
</HTML>
Caution:
• Underlined text is displayed on screen.
• Bold text indicates the portions that have been changed.
• ETERNUSmgr is able to indicate the current status of each target device in the top
menu. This is done using the lines after link to the Alarm History Files Directory. These
lines should not be edited, but may be deleted if target status display is not required.
<!-- Status of 000.000.000.000 -- ><font color="red">(*Offline*)</font>
The "<font color="red">(*Offline*)</font>" portion is dynamically changed
to one of the following by ETERNUSmgr:
Normal <font color="black">(Normal)</font>
Offline <font color="red">(*Offline*)</font>
ATTENTION <font color="red"><b>(*ATTENTION*)</b></font>
BUSY <font color="red">(*BUSY*)</font>
See "Chapter 4 Control Interfaces (Top Menu)" (page 39)
for Top Menu details.
30
ETERNUSmgr User Guide -Introduction- P2X0-0202-01EN
All Rights Reserved, Copy r i ght © FUJITSU LIMITED 2007
Page 39

Chapter 3
P
Startup and Shutdown
This chapter explains how to startup and shutdown ETERNUSmgr.
3.1 ETERNUSmgr for Solaris OS and Linux
This section explains how to manually startup and shutdown ETERNUSmgr, for Solaris OS and Linux as
well as how to set ETERNUSmgr for automatic startup.
3.1.1 Starting Up ETERNUSmgr
Perform the following to start ETERNUSmgr for Solaris OS and Linux:
rocedure
1 Become the superuser.
# su
2 Execute the execution control script with the sta rt option:
# /opt/FJSVgrmgr/stxpoll start
3 Confirm the daemon is running:
# ps -e | grep stxpolld
999 ? 0:00 stxpolld
After ETERNUSmgr has started up, you need to view the log file to confirm whether or not ETERNUSmgr is in communication with the target device. If using the E-mail notification function, also check
that E-mail notification of ETERNUSmgr startup and changes in the target device states is received.
ETERNUSmgr startup can be confirmed by:
3
• Use the ps command to check that the service is activated.
• Checking the log, and making sure that communication with the target device is normal.
• Checking E-mails, and making sure that communication with the target device is normal
(if the E-mail notification function is used).
When monitoring multiple target devices, you must check each target device separately. For example, if
monitoring three devices, issue the ps command to check that all three devices are activated, and then
browse each of the three logs to make sure that communications with all are normal.
The following message appears when you try to startup ETERNUSmgr by the above procedure and ETERNUSmgr is running already. ETERNUSmgr must be shutdown before it can be started up. For instructions
on how to shut down ETERNUSmgr, refer to "3.1.2 Shutting Down ETERNUSmgr" (page 33)
/opt/FJSVgrmgr/stxpoll: Already running.
*** stxpoll could not start. ***
P2X0-0202-01EN ETERNUSmgr User Guide -Introduction-
All Rights Reserved, Copy r i ght © FUJITSU LIMITED 2007
.
31
Page 40

3.1 ETERNUSmgr for Solaris OS and Linux
As explained in "2.1 Setup files" (page 9) ETERNUSmgr treats any file that conforms to the "STX~.INI"
format as a setup file and loads it accordingly. If ETERNUSmgr detects multiple setup files (for multiple
devices), it will load all of them.
ETERNUSmgr automatically reads the setup file( s) at startup. If it fails to l ocate or read any setu p files, the
following message is displayed and startup is terminated.
stxchk: ETERNUSmgr could not start.
Error detail: No INI file.
*** stxpoll could not start. ***
ETERNUSmgr determines the device that is to be monitored according to the "TARGET_ADDR" parameter specified in the setup file and accesses it accordingly. If a "TARGET_ADDR" parameter is not specified, or if it is incorrect, the following message is displayed and startup is terminated.
stxchk: ETERNUSmgr could not start.
Error detail: Invalid host name was defined at "STXPOLL_1.INI".
Please check "TARGET_ADDR" parameter in this file.
*** stxpoll could not start. ***
Note:
"STXPOLL_1.INI" indicates the name of the setup file in which the error was actually detected.
If ETERNUSmgr detects the "TARGET_ADDR" parameter to be missing, incorrect, or duplicated in multiple setup files, the following message is displayed and startup is terminated.
stxchk: ETERNUSmgr could not start.
Error detail: Invalid host name were defined at following INI files.
Please check "TARGET_ADDR" parameter in these files.
STXPOLL_1.INI
STXPOLL_2.INI
*** stxpoll could not start. ***
Note:
"STXPOLL_1.INI" and "STXPOLL_2.INI" indicate the name of the setup files in which the error
was actually detected.
If any such messages are displayed on the screen when ETERNUSmgr is starting up, check that a setup file
exists and all parameter settings are correct.
In addition, the contents of all the displayed messages are logged in the "stxchk.sts" file stored in the directory in which ETERNUSmgr is installed (this file will be empty if ETERNUSmgr has started up normally).
32
ETERNUSmgr User Guide -Introduction- P2X0-0202-01EN
All Rights Reserved, Copy r i ght © FUJITSU LIMITED 2007
Page 41

3.1.2 Shutting Down ETERNUSmgr
P
P
Perform the following to shutdown ETERNUSmgr for Solaris OS and Linux:
rocedure
1 Become the superuser.
# su
2 Execute the execution control script with the sta rt option:
# /opt/FJSVgrmgr/stxpoll stop
Chapter 3 Startup and Shutdown
3 Confirm the daemon is no longer running:
# ps -e | grep stxpolld
(No display)
If you do not have authorization to become the superuser, consult with the server administrator.
3.1.3 Setting the ETERNUSmgr Daemon for Automatic Startup
The example below shows how to register the daemon for a Solaris OS insta lled ser ver. The daemon registration location and registration method may vary according to the settings of each server (registration
location will vary according to the run level in use). Therefore, refer to "1.7 Daemon Registration" in the
"ETERNUSmgr Install Guide for Linux" when using Linux operating environments.
Consult with the server administrator before registering the daemon.
■ Solaris OE example
rocedure
1 Become the superuser.
# su
2 Copy the execution control script to the /etc/init.d/ directory:
# cp /opt/FJSVgrmgr/stxpoll /etc/init.d/
3
3 Create a link to the appropriate rc*.d directory:
# ln -s /etc/init.d/stxpoll /etc/rc2.d/Snnstxpoll (nn is a number.)
nn in Snnstxpoll shows the order of priority. Set the priority sequence. Consult with the server administrator before making this setting.
[Example]
# ln -s /etc/init.d/stxpoll /etc/rc2.d/S98stxpoll
From the next startup of Solaris OS and Linux the ETERNUSmgr daemon will start automatically. Refer
to "3.1.2 Shutting Down ETERNUSmgr" (page 33)
NUSmgr.
P2X0-0202-01EN ETERNUSmgr User Guide -Introduction-
All Rights Reserved, Copy r i ght © FUJITSU LIMITED 2007
for details on how to manually shut down ETER-
33
Page 42

3.2 ETERNUSmgr for Windows®
P
Check the log files to see if ETERNUSmgr for Solaris OS and Linux is communicating with the target
devices after automatic startup.
3.2 ETERNUSmgr for Windows®
Once installed, ETERNUSmgr for Windows® is registered as a service with the following conditions:
• Service Name: STXPOLL
• Condition: not displayed (=shutdown)
• Startup: automatic
This service will start up automatically the next time the server is started
After installation, certain parameters must be set before you can use ETERNUSmgr. See "Chapter 2
Setup" (page 9) for details on how to perform these settings.
Once the necessary parameters have been set, follow the instructions in "3.2.1 Starting Up ETERNUSmgr"
(page 34) to startup ETERNUSmgr manually.
3.2.1 Starting Up ETERNUSmgr
Perform the following to manually startup ETERNUSmgr for Windows®:
rocedure
1 Select the [STXPOLL] service from [Services] under [Administrative Tools] on
the [Control Panel], and click the [Start] button.
After ETERNUSmgr has started up, you need to view the log file to confirm whether or not ETERNUSmgr is in communication with the target device. If using the E-mail notification function, also check
that E-mail notification of ETERNUSmgr startup and changes in the target device states is received.
ETERNUSmgr startup can be confirmed by:
• In the control panel or in management tool services, make sure that "STXPOLL" is activated.
• Checking the log, and making sure that communication with the target device is normal.
• Checking any E-mails, and making sure that communication with the target device is normal (if the E-mail notification function is used).
When monitoring multiple target devices, you must check each target separately. For example, if monitoring three devices, browse each of the three logs to make sure that communications with all are normal.
ETERNUSmgr treats any file that conforms to the "STX~.INI" format as a setup file, and loads it accordingly. If ETERNUSmgr detects multiple setup files (for multiple devices) , it will loa d all of them . See "2.1
Setup files" (page 9) for information about setup files.
The setup files are read automatically when ETERNUSmgr is started, but processing stops when the following messages appear.
34
ETERNUSmgr User Guide -Introduction- P2X0-0202-01EN
All Rights Reserved, Copy r i ght © FUJITSU LIMITED 2007
Page 43

Chapter 3 Startup and Shutdown
• When no setup files exist, or none can be read:
• When a "TARGET_ADDR" is not specified in a setup file, or is incorrect:
Note:
• "TARGET_ADDR" is the parameter that specifies the address of the target
device.
• "STXPOLL_1.INI" indicates the name of the setup file in which the error was
actually detected.
3
• When a "TARGET_ADDR" is missing, incorrect, or duplicated in multiple setup files:
Note:
"STXPOLL_1.INI" and "STXPOLL_2.INI" indicate the name of the setup files in which
the error was actually detected.
If ETERNUSmgr detects more than 10 faulty setup files, the first 10 will be listed along with the total
number of faulty files.
P2X0-0202-01EN ETERNUSmgr User Guide -Introduction-
All Rights Reserved, Copy r i ght © FUJITSU LIMITED 2007
35
Page 44

3.2 ETERNUSmgr for Windows®
After clicking the [OK] button on any of the above dialog, Windows® may also display a message similar
to the one shown below. This is not a problem, and will not affect future opera tion, so feel free to click the
[OK] button. If such messages are displayed on the screen when ETERNUSmgr is starting up, check that a
setup file exists and all parameter settings are correct.
● For Windows® 2000
● For Windows Server® 2003 or Windows Server® 2003 R2
If you do not click the [OK] button when the above dialogs are displayed, Windows® may display a message similar to the one shown below.
In such a case, close the [Services] window ([Computer Manager] window for Windows® 2000), check
the ETERNUSmgr settings, and retry the procedure from the beginning.
● For Windows® 2000
36
ETERNUSmgr User Guide -Introduction- P2X0-0202-01EN
All Rights Reserved, Copy r i ght © FUJITSU LIMITED 2007
Page 45

● For Windows Server® 2003 or Windows Server® 2003 R2
P
P
3.2.2 Shutting Down ETERNUSmgr
Perform the following to manually shutdown ETERNUSmgr for Windows®:
Chapter 3 Startup and Shutdown
rocedure
1 Select the [STXPOLL] service from [Services] on the [Administrative T ools] of the
[Control Panel], and click the [Stop] button.
3.2.3 Registering the ETERNUSmgr Service for Automatic Startup
After installation is completed, ETERNUSmgr for Windows® is already registered as an automatic startup
service that will become active the next time the server is rebooted, so there is no need to manually set
ETERNUSmgr for automatic startup.
If, for any reason, the ETERNUSmgr automatic startup setting is disabled, do the following to rest ore it.
This setting will be enabled at the next server reboot.
rocedure
1 Select the [STXPOLL] service from [Services] on the [Administrative T ools] of the
[Control Panel], then set the startup method to: [Automatic].
To disable automatic startup of ETERNUSmgr, set the startup method to [Manual] in the above
procedure.
3
P2X0-0202-01EN ETERNUSmgr User Guide -Introduction-
All Rights Reserved, Copy r i ght © FUJITSU LIMITED 2007
37
Page 46

3.2 ETERNUSmgr for Windows®
This page is intentionally left blank.
38
ETERNUSmgr User Guide -Introduction- P2X0-0202-01EN
All Rights Reserved, Copy r i ght © FUJITSU LIMITED 2007
Page 47

Chapter 4
Control Interfaces (Top Menu)
This chapter discusses the ETERNUSmgr Top Menu.
The following shows the [ETERNUSmgr Top Menu] screen.
4
Note:
The window is based on the example given in "2.5.3 Adding the Extra Target Devices to the Top
Menu File" (page 29).
● Select RAID Device menu
Click the name of a target device listed in the [Select RAID Device] menu to access the device’s login
screen. For details on how to login, and operation after login, see "ETERNUSmgr User Guide -Settings/Maintenance-".
P2X0-0202-01EN ETERNUSmgr User Guide -Introduction-
All Rights Reserved, Copy r i ght © FUJITSU LIMITED 2007
39
Page 48

● Show hardware error detect log list menu
Click the name of a target device listed in the [Show hardware error detect log list] menu to get a listing of the target device’s error logs (alarm history files). This will require use of the Web server’s list
display function. Refer to the User's Guide for the Web server being used for more details.
The status of the selected target device appears to the right of its alarm history files link. The various
statuses are described below.
Normal (Black).
Indicates that the machine is operating without any errors.
*Offline* (Red).
Indicates that monitoring of the target device is not possible for one of the
following reasons: the ETERNUSmgr monitoring function is not active (e.g.
immediately after ETERNUSmgr installation), a problem has occurred with
the target device (e.g. power supply shutdown, no response), a problem has
occurred with the communication link between the ETERNUSmgr server
and the target device (e.g. broken wiring, severe delays due to network overload).
The target device status will also be set to "Offline" if the Target Address
(TARGET_ADDR/TARGET_PORT) specified in the setup file is incorrect.
Check that the target device is operating normally, there is no problem with
the network connection, and that the setup file details are correct.
This status will only be detected if a DETECT_OFFLINE=TRUE line is
present in the setup file. If this setting is not present, the machine will not
transition from "Normal" or "ATTENTION" to "Offline".
*ATTENTION* (Red).
Indicates that one or more errors have been detected in the machine.
Login to the machine and check the location of the fault.
*BUSY* (Red).
For ETERNUS4000 models 80 and 100, and ETERNUS3000
Indicates that one of the controllers in the controller enclosure cannot
boot up and needs to be serviced.
For ETERNUS8000, ETERNUS4000 models 300 and 500, ETERNUS2000,
and ETERNUS6000
Indicates that the target device cannot respond due to device stop sta-
tus, abnormality of the communication link between the device and SVP ,
or device boot processing. Check that the target device is operating nor-
mally, and that there is no problem with the communication link between
the device and SVP.
Caution:
The statuses displayed on the top menu reflect the most recent information available at the point of
last reload of the top menu by the Web browser. The actual current status of the target device may
therefore not be displayed until the top menu is reloaded. Always reload the top menu to check the
current target device status. Note that some Web browsers may display a previously cached page
even after the top menu is reloaded. See the manual or online help for your Web browser for
details.
Note that, depending on the browser being used, "Reload" may be expressed as "Refresh," etc.
40
ETERNUSmgr User Guide -Introduction- P2X0-0202-01EN
All Rights Reserved, Copy r i ght © FUJITSU LIMITED 2007
Page 49

Chapter 5
Cautions
This chapter discusses cautions that should be observed when using ETERNUSmgr.
■ Solaris OS, Linux, and Windows® Version Cautions
● Failure Notification
• When the administrator is informed by ETERNUSmgr of a failure in a target device, use
the ETERNUSmgr [Device Status Display] screen to find and confirm the status of the
failed component. After confirmation, contact your Fujitsu engineer and pass along this
information.
• Whenever necessary, ETERNUSmgr outputs history HTML files and log files for each
Alarm. If the number of days to keep these files is set too high, or set to "0" (= "do not
delete"), a large number of files may build up over an extended period of use. Have the
administrator decide the appropriate number of days to keep these files.
● Network environment
• Polling and sending of E-mail may be impossible during a network failure on the ETERNUSmgr server due to LAN drop-out and failure of communications equipment (e.g. hubs,
routers). During such failures, the target devices are not monitored, and if the Detect
Offline Targets ("DETECT_OFFLINE") flag is not set, the administrator may be unaware
of the failure. Enable the Detect Offline Targets parameter as necessary, and periodically
check the ETERNUSmgr log file (only for the log acquisition setting).
• ETERNUSmgr may not be able to respond to an event due to a target device or network
overload caused by a device failure. In such a case, refer to "Chapter 3 Startup and
Shutdown" (page 31) and manually restart ETERNUSmgr. Before restarting, make sure
that the network environment is free from any problem.
• If the ETERNUSmgr server’s network settings are not correct, or th ere are hardware failures (LAN omissions, communications device failures, etc.) on the LAN path, it can take
an overly long time to execute polling or send E-mail, making periodic monitoring of target
devices impossible. In particular, in cases where a host name is specif ied for the t a rget
device to be monitored rather than an IP address, and multiple DNS servers are registered for the network, frequent inquiries must be made to the external network to resolve
the host name. This can take from several minutes to tens of minutes when the network is
not working well.
• When it takes an overly long time to execute polling or send E-mail, check that the network devices are operating normally, and that the network settings are correct.
• After rebooting a target device following a failure, etc., make sure that polling is successfully being conducted by checking the log file. If polling is unsuccessful after the target
device has been rebooted (log information is not being output to the log file), refer to
"Chapter 3 Startup and Shutdown" (page 31)
Even after ETERNUSmgr is rebooted, ETERNUSmgr polling requests may still not be
received by the target device (log information indicating polling failure is kept to be output
to the log file). In this case, the ETERNUSmgr monitoring function may not be working
due to network failure. Contact your Fujitsu engineer.
5
and manually reboot ETERNUSmgr.
P2X0-0202-01EN ETERNUSmgr User Guide -Introduction-
All Rights Reserved, Copy r i ght © FUJITSU LIMITED 2007
41
Page 50

● Target devi ce monitoring
• When starting up or rebooting a target device with the ETERNUSmgr already activated
and monitoring the device status, during the first few minutes until the target device is up
and running, ETERNUSmgr will output alarm history messages and E-mails related to the
addition/removal of target device components. These particular messages are output at
startup as the target device tries to recognize its own configuration, and are not error messages.
- An example of a message indicating the addition of a drive enclosure is:
"Increase Drive Enclosure # 12"
- An example of a message indicating the removal of a drive enclosure is:
"Decrease Drive Enclosure # 34"
• If, when monitoring multiple target devices, there is a specification error, such as duplication of information between the multiple setup files, ETERNUSmgr may try to monitor the
same target device using the settings from different setup files and end up displaying an
error message and terminating the process. When th is happens, either delete one of the
duplicate setup files or correct the error in the settings of the files. When looking for errors
in the settings, in addition to verifying the address of the device that is being monitored
("TARGET_ADDR" parameter), make sure that you also check that the Alarm History
Files Directory ("HTML_ALARMFILE_PATH" parameter) and Log Files Directory
("LOGFILE_PATH" parameter) are not duplicated in different setup files. If the values of
these parameters are duplicated in different setup files, ETERNUSmgr will try to create
conflicting log data in the same directory or file.
Refer to "Chapter 2
"ETERNUSmgr User Guide -Settings/Maintenance-" for information on ETERNUSmgr
error messages and the procedures to use when they appear.
• Configuring multiple ETERNUSmgr instances to monitor the same target device may burden the device and overload the connection, resulting in operational errors on the target
device. Be careful not to start up multiple ETERNUSmgr instances to monitor the same
target device (Excluding situations where ETERNUSmgr is installed into both nodes in a
cluster system).
• ETERNUSmgr sends a message to the administrator every time an abnormality is
detected. Be aware that if the Alarm Mailing Interval is too short, an excessive number of
E-mail messages may be sent to the administrator.
Setup" (page 9) for information on how to modify the setup files, and
42
● ETERNUSmgr compatibility with GRmgr
• ETERNUSmgr compatibility with GRmgr versions V10L20 and earlier
- The operating logic, data files and log files for GRmgr versions V10L20 or earlier are not compatible with ETERNUSmgr. When upgrading GRmgr version V10L20 or earlier to ETERNUSmgr, uninstall the old GRmgr version before installing ETERNUSmgr. Also, use the new
setup files ("STX - .INI") that are generated when ETERNUSmgr is installed.
- The setup files of V10L20 and earlier are not compatible with ETERNUSmgr, and cannot be
used.
Using these files will cause a "Bad parameter (CODE 913)" error to occur, and targ et device
monitoring stops.
• ETERNUSmgr compatibility with GRmgr versions V10L30 and later (V10L30, V10L40,
V10L50, V10L60)
- ETERNUSmgr is compatible with the operating logic, data files and log files of GRmgr versions V10L30 and later.
- It is possible to use setup files ("STX - .INI") from GRmgr versions V10L30 and later, but the
following procedure must be followed:
1 Move the GRmgr V10L30 (or later) setup files to a temporary location.
2 Uninstall V10L30 (or later) GRmgr.
3 Install ETERNUSmgr.
ETERNUSmgr User Guide -Introduction- P2X0-0202-01EN
All Rights Reserved, Copy r i ght © FUJITSU LIMITED 2007
Page 51

Chapter 5 Cautions
4 Delete the setup files from the ETERNUSmgr directory created by the installation
process.
5 Move the GRmgr V10L30 (or later) setup files from their temporary location (step
1) into the ETERNUSmgr directory.
Note that ETERNUSmgr must be installed in the same directory as was used by the previous
version of GRmgr (V10L30, V10L40, V10L50, V10L60). Similarly, the new www files must
be installed in the old www directory, and if the old top menu file ("menu.htm") has been
edited, it should be backed up and used to replace the new version.
- When using a GRmgr V10L30 setup file, append the following Detect Offline Tar gets parameter description to the setup file if you wish to use the offline detection function (available from
GRmgr V10L40 onward).
# Detect Offline status
DETECT_OFFLINE = TRUE
- This flag does not need to be added to the GRmgr V10L30 setup file if the offline detection
function (available from GRmgr V10L40 onward) is not going to be used.
Detect Offline Targets" (page 14) for details of the Detect Offline Targets parameter.
See "
● Setup files
• Always ensure that the ETERNUSmgr setup file’s TARGET_FLAG parameter is correct
for the monitored device type. ETERNUSmgr will be unable to monitor the target device if
this setting is wrong. Note that even if the TARGET_TYPE and the TARGET_FLAG settings are different, ETERNUSmgr operations are not affected.
Any character string may be set in TARGET_TYPE, however it is recommended that the
correct device type ("ETERNUS8000", "ETERNUS4000", "ETERNUS2000",
"ETERNUS6000", "ETERNUS3000", "GR710", "GR720", "GR730", "GR740", "GR820", or
"GR840") be set. The character string in TARGET_TYPE is used when the administrator
is notified by E-mail, and in the alarm history files.
• Edit only the parameters in the ETERNUSmgr setup file which are explained in this docu ment. Do not delete comments or blank lines from the default setup files provided, and do
not add anything other than allowed parameters. Failure to follow these requirements may
result in problems, and prevent future upgrades of ETERNUSmgr. See "Chapter 2
(page 9) for details.
5
Setup"
● Install/Uninstall
See the "ETERNUS8000, ETERNUS4000, ETERNUS2000, ETERNUS6000, ETERNUS3000
ETERNUSmgr Install Guide" for details of installing and uninstalling ETERNUSmgr.
P2X0-0202-01EN ETERNUSmgr User Guide -Introduction-
All Rights Reserved, Copy r i ght © FUJITSU LIMITED 2007
43
Page 52

■ Windows® only cautions
● Uninstall
• Uninstallation deletes only those files created and copied during installation. Files (folders, setup files, log files) created after installation by the user and/or ETERNUSmgr are
not deleted. After uninstalling ETERNUSmgr, any remaining files and folders should be
deleted manually. Be careful not to delete folders and files necessary for other software.
• After uninstalling ETERNUSmgr, if you delete or change the name of the original installation directory, a "This may have an effect on the registered application. Are you sure you
want to continue?" message will appear. If uninstallation has completed normally, this will
not be a problem.
● Va rious settings
• Windows® 2000, Windows Server® 2003, and Windows Server® 2003 R2 have an
energy saving mode, but since the ETERNUSmgr monitoring functions are inoperative
when the OS is suspended or sleeping, use of this mode should be avoided.
• With a GRmgr V10L30 or V10L40 setup file, the following parameter descriptions must be
added before the E-mail notification function (available from GRmgr V10L50) can be used
by ETERNUSmgr:
- # Admin Mail Address
ADMIN_MAIL = (Admin Mail Address)
- # Mail Server Address
ADMIN_MAILSV = (Mail Server Address)
- # Mail Server SMTP Port
SMTP_PORT = (Mail Server SMTP Port)
These additions are not necessary if the E-mail notification function is not used.
For details on the above parameters, see "
Address (ETERNUSmgr for Windows® only)" (page 16).
• The Mail Server SMTP Port description must be added when the SMTP port No. is other
than the default (25). For details on the above parameters, see "
(ETERNUSmgr for Windows“ only)" (page 16).
Admin Mail Address" (page 15) and "Mail Server
Mail Server SMTP Port
44
ETERNUSmgr User Guide -Introduction- P2X0-0202-01EN
All Rights Reserved, Copy r i ght © FUJITSU LIMITED 2007
Page 53

Chapter 6
Messages
This chapter explains the messages and message files of ETERNUSmgr.
Messages are categorized into the following types:
• Alarm History Messages
• Alarm Text Files
• E-mail Messages
• Log Messages
6.1 Alarm History Messages
This section explains the alarm history messages generated by ETERNUSmgr.
If, after ETERNUSmgr polls a target device, the current status of the target device differs from the status at
the previous polling operation (i.e. the status of the target device has changed), an ETERNUSmgr alarm
history message is issued and saved in an alarm history file. If ETERNUSmgr detects that the target device
is offline, an alarm history file is not created.
The alarm history file is saved using the following file naming convention in the directory specified in the
setup file. See "Alarm History File Directory" (page 17)
6
for more information about the setup files.
YYYYMMDDHHmmSSn.html
YYYY : Year
MM : Month
DD : Day
HH : Hour
mm : Minute
SS : Second
n : Sequence number
For example, the alarm history file "200301011020300.htm" was created on January 1st 2003 at 10:20:30.
The sequence number is normally 0, but is used to number files sequentially if multiple files are created
within the same second.
An alarm history file is created when a change in the target device status is detected while ETERNUSmgr
is polling the target device. Alarm history files are automatically deleted when they are older than the limit
specified in the setup file. See "
mation about the setup files.
Alarm history files are in HTML format for viewing in a Web browser.
Alarm history files are displayed as follows in the Web browser.
Example Alarm History File
The following alarm history file was created on January 1st 2003 for an ETERNUS3000 with the target address 10.20.30.40.
Number of Days Alarm History Files are Kept" (page 18) for more infor-
P2X0-0202-01EN ETERNUSmgr User Guide -Introduction-
All Rights Reserved, Copy r i ght © FUJITSU LIMITED 2007
45
Page 54

6.2 Alarm Text Files
ETERNUS3000 Hardware Status List
Date:1/1/2003
ETERNUS3000 Address:10.20.30.40
ControllerEnclosure#0001:ALARM
ControllerEnclosure#0002:BTU-CAUTION
ControllerEnclosure#0003:ALARM&BTU-CAUTION
DriveEnclosure#0003:ALARM
ETERNUSmgr(stxpoll) V20L20
Header
(title, date, address of the target device)
Alarm List
Footer
(ETERNUSmgr V ersion)
The "alarm history messages" shown above indicate the status results obtained from the target device.
The following message is output when all components of the target device are normal.
"No hardware error detected."
If target device monitoring does not work properly (due to LAN drop-out, failure on the network path, or
incorrect target address setting, etc.), and the Detect Offline Targets parameter has been set, the following
message will be output.
"No hardware report detected. (Offline)"
See "6.3 E-mail Messages" (page 47), "Hardware Status was changed. See below ..." for details of the messages displayed in the alarm history file.
Note that "Hardware Status was changed. See below ..." is not an actual alarm history message.
6.2 Alarm Text Files
This section explains the alarm text files that are generated by ETERNUSmgr.
Alarm text files are a compilation of the alarm history messages for a single day in a text format. See "6.1
Alarm History Messages" (page 45) for more information on the alarm history messages.
Alarm text files are categorized into the following types:
• Alarm Text Date Files
Contains the individual alarm history messages that record the ongoing status of the target device, collected on a day-by-day basis.
• Alarm Text Fixed File
Contains the same alarm history messages as the latest alarm text date file, saved under
a settable name.
■ Alarm Text Date Files
The alarm text date file is saved in the directory specified in the setup file using the following file naming
convention. See "2.3.4
stxgrYYYYMMDD.log
YYYY : Year
MM : Month
DD : Day
Alarm Text File Settings" (page 19) for more information about the setup files.
46
For example, "stxgr20030101.log" indicates an alarm text date file that was created on January 1, 2003.
Alarm text date files are created/updated when an alarm history file is created. Alarm text date files are created/updated when an alarm history file is created.
ETERNUSmgr User Guide -Introduction- P2X0-0202-01EN
All Rights Reserved, Copy r i ght © FUJITSU LIMITED 2007
Page 55

Chapter 6 Messages
Alarm text date files are automatically dele ted when the y are older t han the li mit spe cifie d in the setup fi le.
Number of Days Alarm Text Date Files are Kept" (page 20) for more information about the setup
See "
files.
■ Alarm Text Fixed File
This is stored in the same directory as the alarm text date files using whatever name is specified in t he
setup file. See "2.3.4
When an alarm history file is created, a line formatted as "Year, Month, Day, Hour, Minutes, Seconds,
Machine Address, and Machine Status as Recorded in the Alarm History File" is added to the alarm text
file.
An example of an alarm text is shown below.
20030101130100 10.20.30.40 No hardware error detected.
20030101130600 10.20.30.40 ControllerEnclosure#00:ALARM
20030101144100 10.20.30.40 No hardware error detected.
Alarm Text File Settings" (page 19) for more information about the setup files.
See "6.1 Alarm History Messages" (page 45)
on the target device status output to the alarm text file s.
6.3 E-mail Messages
The administrator can be sent E-mail messages that contain notices of ETERNUSmgr startup and changes
in the target device status. These messages indicating changes in the target device status are identical in
format to the alarm history messages.
This section explains the E-mail messages sent by ETERNUSmgr and how to respond to them.
ETERNUSmgr VxxLxx - HTTP Polling engine was started.
[Explanation] The polling engine has started.
[Response] None
Hardware Status was changed. See below...
[Explanation] There has been a change in the target device’s status.
[Response] If the component that caused the problem is displayed after this message, login to
the target device and check the status of that component.
When "No hardware error detected." is displayed, there is no need to do anything.
Detection of offline status is indicated when "No hardware report detected.
(Offline)" is displayed. In this case, check for problems with the target device, failures in the communications route, and errors in the setup file.
When "An error has occurred in controller enclosure. (BUSY)" is displayed, perform the following:
For ETERNUS3000
It has been detected that one of the controllers in the controller enclosure cannot
start up. The controller needs to be serviced.
For ETERNUS6000
Indicates that the target device cannot respond due to device stop status, abnormality of the communication link between the device and SVP, or device boot processing. Check that the target device is ope rating normally, and that there is no problem
with the communication link between the device and SVP.
For ETERNUS8000, ETERNUS4000, and ETERNUS2000
Indicates that the target device cannot respond due to device stop status or device
boot processing. Check that the target device is operating normally.
and "6.3 E-mail Messages" (page 47) for more information
6
P2X0-0202-01EN ETERNUSmgr User Guide -Introduction-
All Rights Reserved, Copy r i ght © FUJITSU LIMITED 2007
47
Page 56

6.3 E-mail Messages
When "Hardware Status was changed. See below..." is displayed, the following message may also be displayed to indicate the location and status of the affected component.
When "SYSYTEMERR(XXXXXXXX)" (XXXXXXXX is an error code) is displayed, contact your maintenance engineer.
"When a message such as "<Component>#<Serial Number>:<Status>" is displayed, it indicates a device component and the status. Check the details, and contact your maintenance engineer.
<Component>#<Serial Number>:<Status>
• Component
Indicates the relevant component of the target device. Components vary depending on Target Type,
however they are generally as follows:
- ControllerEnclosure
- DriveEnclosure
- BatteryEnclosure
-FCCable
- RCICable
- DEICable
- PANEL
- BatteryUnit
- BatteryChargerUnit
Caution:
See "1.2 ETERNUSmgr Functions" (page 4) for details of which components of each
device are monitored.
• Serial number
Indicates the index number of the component. This may differ according to the type of target
device, however it is generally in the form of "#nn" or "#nnnn". Some components have no serial
numbers, and some always return "#00" or "#0000".
•Status
The following component status conditions are possible:
- ALARM A failure has occurred (all components)
- WARNING Warning (all components)
- BTU-CAUTION Battery replacement limit exceeded (Controller Enclosure, and
Battery Enclosure)
- BTU-WARNING Less than six months to battery replacement limit (Controller
Enclosure, Battery Enclosure, and Battery Unit)
Caution:
FC cables of ETERNUS3000, ETERNUS GR710, GR720, and GR730 have no WARNING status.
48
ETERNUSmgr User Guide -Introduction- P2X0-0202-01EN
All Rights Reserved, Copy r i ght © FUJITSU LIMITED 2007
Page 57

Multiple statuses for a component are output joined by "&" symbols.
[Example]
ControllerEnclosure#00:ALARM&BTU-WARNING
DriveEnclosure#00:ALARM
DriveEnclosure#10:WARNING
BatteryEnclosure#00:ALARM
The following message is output when all components of the target device are normal.
"No hardware error detected."
Depending on the Target Type or version of firmware used, actual format and contents of messages may
differ slightly from the above.
6.4 Log Messages
This section describes the messages output by ETERNUSmgr to the log files and how to respond to them.
ETERNUSmgr's log files are saved in text format.
■ Regular Messages (CODE 0XX)
Chapter 6 Messages
stxpoll Service Started (CODE 001)
[Explanation] stxpoll service has started.
[Response] None
Get Status Success "server:port/status" (CODE 004)
[Explanation] Current status was successfully obtained from the target device.
[Response] None
Send Mail "name@server" (CODE 005)
[Explanation] An E-mail was sent.
[Response] None
Initialize "parameter" (CODE 006)
[Explanation] The values set at start-up are displayed.
[Response] None
Create File "file name" (CODE 007)
[Explanation] A file was created.
[Response] None
Erase File "file name" (CODE 008)
[Explanation] A file was deleted.
[Response] None
6
P2X0-0202-01EN ETERNUSmgr User Guide -Introduction-
All Rights Reserved, Copy r i ght © FUJITSU LIMITED 2007
49
Page 58

6.4 Log Messages
■ Warning Messages for Parameter Settings (CODE 1XX)
Server Status Change (CODE 012)
[Explanation] There has been a change in the target device’s status.
[Response] If the component that caused the problem is included in the message, login to the
target device and check the status of that component.
When "No hardware error detected." is displayed, there is no need to do anything.
Detection of the offline status is indicated when "No hardware report detect ed.
(Offline)" is displayed. In this case, check for problems with the target device, failures in the communications route, and errors in the setup file.
Work files create to "temp directory" (CODE 014)
[Explanation] ETERNUSmgr has created a work file in the directory indicated in this message.
[Response] None
Bad Parameter "parameter" (CODE 102)
[Explanation] This parameter setting is invalid.
[Response] Correct the parameter setting.
Undefined Parameter "parameter" (CODE 103)
[Explanation] This parameter setting is not recognized.
[Response] Correct the parameter setting.
Parameter too long "parameter" (CODE 104)
[Explanation] Too many characters are used in this parameter setting.
[Response] Correct the parameter setting.
Not NULL Parameter "parameter" (CODE 105)
[Explanation] NULL is not allowed for this parameter setting.
[Response] Set the parameter.
Directory Name too long "directory name" (CODE 106)
[Explanation] The directory name is too long.
[Response] Set a shor ter directory name.
■ Warning Messages (CODE 3XX)
Can't Connect Server "server:port" (CODE 301)
[Explanation] Failed to connect to the machine.
[Response] Check the network environment (IP address, etc.).
Can't Send Mail "name@server" (CODE 304)
[Explanation] Failed to send an E-mail.
[Response] Check the mail server is operating.
50
ETERNUSmgr User Guide -Introduction- P2X0-0202-01EN
All Rights Reserved, Copy r i ght © FUJITSU LIMITED 2007
Page 59

Can't Erase File "file name" (CODE 305)
[Explanation] Failed to delete a file.
[Response] Confirm your access permissions to the file and its directory. If the file you wish to
erase does not exist, there is no problem.
Get Status Failed "server:port/path" (CODE 306)
[Explanation] Failed to obtain the machine status.
[Response] Check the target device operating status, LAN connection, and LAN status.
Send Data Failed "server:port/path" (CODE 307)
[Explanation] Failed to communicate with the target device
(ETERNUSmgr → target).
[Response] Check the target device operating status, LAN connection, and LAN status.
Receive Data Failed "server:port/path" (CODE 308)
[Explanation] Failed to communicate with the target device (target → ETERNUSmgr)
[Response] Check the target device operating status, LAN connection, and LAN status.
Can't update hardware status (CODE 309)
[Explanation] ETERNUSmgr failed to write the status of the target device onto "menu.htm".
[Response] Check your access permissions to "menu.htm".
Check to see if "menu.htm" is being edited while ETERNUSmgr is in operation.
Chapter 6 Messages
■ Fatal Error Messages (CODE 9XX)
Can't Create File "file name" (CODE 901)
[Explanation] Failed to create a new file.
[Response] Confirm your access permissions to the directory in which the file is to be created.
Check to see if there is enough space to save the file.
Can't Open File "file name" (CODE 902)
[Explanation] Failed to open a file.
[Response] Confirm your access permissions to the file.
Can't Get File Status "file name" (CODE 903)
[Explanation] Cannot acquire file status.
[Response] Confirm your access permissions to the file and its directory.
Can't Create Socket (CODE 904)
[Explanation] Failed to create a socket.
[Response] Confirm system resources.
6
P2X0-0202-01EN ETERNUSmgr User Guide -Introduction-
All Rights Reserved, Copy r i ght © FUJITSU LIMITED 2007
51
Page 60

6.4 Log Messages
Can't Allocate Memory (CODE 905)
[Explanation] Failed to reserve an open area in memory.
[Response] Allocate the necessary memory.
Bad IP Address "host name or IP address" (CODE 906)
[Explanation] The specified target IP address is invalid.
[Response] Set the correct IP address.
Can't Create Directory "path" (CODE 908)
[Explanation] Failed to create a directory.
[Response] Confirm your access permissions to the directory.
Confirm that the name of the specified directory is correct.
Not NULL Parameter "parameter" (CODE 909)
[Explanation] NULL is not allowed for this parameter setting.
[Response] Set the parameter.
Not Find Parameter "parameter" (CODE 910)
[Explanation] This parameter setting cannot be found.
[Response] Set the parameter.
Parameter too long "parameter" (CODE 911)
[Explanation] Too many characters are used in this parameter setting.
[Response] Correct the parameter setting.
Directory Name too long "directory name" (CODE 912)
[Explanation] The directory name is too long.
[Response] Set a shor ter directory name.
Bad Parameter (CODE 913)
[Explanation] The "TARGET_FLAG" parameter is either incorrect or not set.
[Response] Correct the "TARGET_FLAG" parameter.
52
ETERNUSmgr User Guide -Introduction- P2X0-0202-01EN
All Rights Reserved, Copy r i ght © FUJITSU LIMITED 2007
Page 61

Chapter 6 Messages
An example of log message output is shown below.
ETERNUSmgr(stxpoll) V20L20 (build 63211)
===============================================================================
MESSAGE [001]:STXPOLL_1.INI 20:45:41 >> Service Started (*1)
===============================================================================
MESSAGE [006]:STXPOLL_1.INI 20:45:41 >> Initialize TARGET_TYPE=E3000 (*2)
MESSAGE [006]:STXPOLL_1.INI 20:45:41 >> Initialize TARGET_FLAG=1
MESSAGE [006]:STXPOLL_1.INI 20:45:41 >> Initialize TARGET_ADDR=10.20.30.40
MESSAGE [006]:STXPOLL_1.INI 20:45:41 >> Initialize TARGET_PORT=80
MESSAGE [006]:STXPOLL_1.INI 20:45:41 >> Initialize POLLING_GET=cgi_bs_alarm.cgi/eventcode=2
MESSAGE [006]:STXPOLL_1.INI 20:45:41 >> Initialize POLLING_TIME=300
MESSAGE [006]:STXPOLL_1.INI 20:45:41 >> Initialize HTML_ALARMFILE_URL=http://domain-name
/ETERNUSmgr/html_1/
MESSAGE [006]:STXPOLL_1.INI 20:45:41 >> Initialize HTML_ALARMFILE_PATH=C:?inetpub
?wwwroot?eternusmgr?html_1?
MESSAGE [006]:STXPOLL_1.INI 20:45:41 >> Initialize HTML_ALARMFILE_DAY=7
MESSAGE [006]:STXPOLL_1.INI 20:45:42 >> Initialize LOGFILE_PATH=C:?Program Files?FUJITSU
?ETERNUSmgr?log_1?
MESSAGE [006]:STXPOLL_1.INI 20:45:42 >> Initialize LOGFILE_DAY=7
MESSAGE [006]:STXPOLL_1.INI 20:45:42 >> Initialize LOGFILE_MODE=2
MESSAGE [006]:STXPOLL_1.INI 20:45:42 >> Initialize ADMIN_MAIL=adomin@foo.bar.com
MESSAGE [006]:STXPOLL_1.INI 20:45:42 >> Initialize MAIL_SEND_TIME=300
MESSAGE [006]:STXPOLL_1.INI 20:45:42 >> Initialize ADMIN_MAILSV=mailsv.foo.bar.com
MESSAGE [006]:STXPOLL_1.INI 20:45:42 >> Initialize SMTP_PORT=25
MESSAGE [006]:STXPOLL_1.INI 20:45:42 >> Initialize DETECT_OFFLINE=TRUE
MESSAGE [006]:STXPOLL_1.INI 20:45:42 >> Initialize BUSY_TIME=1800
MESSAGE [004]:10.20.30.40 20:45:42 >> Get Status Success 10.20.30.40:80/cgi_bs_alarm.cgi
/eventcode=2 (*3)
MESSAGE [012]:10.20.30.40 20:45:42 >> Server Status Change (*4)
MESSAGE [007]:10.20.30.40 20:45:42 >> Create File C:?inetpub?wwwroot?eternusmgr?
html_1?200210072045420.html (*5)
6
*1: ETERNUSmgr boot message
*2: Checking the setup file (Initialization)
*3: Result of a target device status inquiry (Success)
*4: A change was detected in the target device since the last inquiry (a change is always detected at each reboot)
*5: An HTML alarm history file was created
P2X0-0202-01EN ETERNUSmgr User Guide -Introduction-
All Rights Reserved, Copy r i ght © FUJITSU LIMITED 2007
53
Page 62

6.4 Log Messages
This page is intentionally left blank.
54
ETERNUSmgr User Guide -Introduction- P2X0-0202-01EN
All Rights Reserved, Copy r i ght © FUJITSU LIMITED 2007
Page 63

Index
A
About ETERNUSmgr............................... 1
Admin Mail Address
ADMIN_MAIL
ADMIN_MAILSV ................................. 16
Alarm History File
Alarm history file
Alarm History File Directory...................... 17
Alarm History Index URL
Alarm History Messages........................... 45
Alarm Mailing Interval............................. 15
Alarm Text Date Files
Alarm Text File ..................................... 19
Alarm Text File Directory......................... 19
Alarm Text Files
Alarm Text Fixed File......................... 19, 47
............................... 15
..................................... 15
.................................. 17
........................... 4, 40, 45
......................... 18
......................... 19, 46
.................................... 46
B
Busy Target Detection Time ...................... 15
BUSY_TIME
........................................ 15
ETERNUSmgr Functions
........................... 4
F
Failure Notification.............................. 4, 41
Fatal Error Messages ............................... 51
File name (setup file)
................................ 9
H
Hardware.............................................. 6
Hardware structure................................... 4
HTML_ALARMFILE_DAY
HTML_ALARMFILE_NAME ................... 19
HTML_ALARMFILE_PATH .................... 17
HTML_ALARMFILE_URL
...................... 19
...................... 18
I
Installation .................................... 2, 9, 43
Internet Explorer ..................................... 7
C
Cautions.............................................. 41
Windows ........................................ 44
Compatibility
Component............................................ 5
Condition............................................. 34
........................................ 42
D
Detect Offline Targets.............................. 14
DETECT_OFFLINE ............................... 14
Device settings
Device Status Display window
...................................... 12
..................... 4
E
Editing Top Menu file (menu.htm)............... 24
E-mail Messages
E-mail notification setting
Error information
.................................... 47
......................... 15
................................... 20
L
Linux.................................. 1, 6, 11, 23, 31
Log File .............................................. 20
log file ........................................... 20, 49
Log Files Directory
Log Messages
Log Messages (example)
LOGFILE_DAY
LOGFILE_MODE.................................. 22
LOGFILE_PATH
................................. 20
....................................... 49
........................... 53
.................................... 21
.............................. 20, 21
M
Mail Server Address................................ 16
Mail Server SMTP Port
MAIL_SEND_TIME
Maintenance
menu.htm
Messages
Monitoring Multiple Target Devices
.......................................... 5
............................................. 22
............................................. 45
............................ 16
............................... 16
............. 27
P2X0-0202-01EN ETERNUSmgr User Guide -Introduction-
All Rights Reserved, Copy r i ght © FUJITSU LIMITED 2007
55
Page 64

Index
Mozilla Firefox....................................... 7
N
Netscape............................................... 7
Netscape Communicator............................ 7
Network environment .............................. 41
Number of Days Alarm History Files
are Kept
Number of Days Alarm Text Date Files
are Kept
Number of Days Log Files are Kept ............. 21
............................................ 18
............................................ 20
O
Output Log Files .................................... 22
P
Parameter ............................................. 9
Polling Interval................................. 13, 16
POLLING_TIME
ps command ......................................... 31
................................... 13
R
Registering the ETERNUSmgr Service.......... 37
Regular Messages
................................... 49
S
SMTP_PORT
Software
Solaris OS............................ 1, 6, 11, 23, 31
Startup................................................ 31
Status display
stxgrYYYYMMDD.log............................ 19
STXPOLL............................................ 34
Superuser
........................................ 16
............................................... 6
................................... 27, 40
........................................ 31, 33
T
Target Address ...................................... 12
Target Device Monitoring .......................... 4
Target Flag
Target Type.......................................... 13
TARGET_ADDR................................... 12
TARGET_FLAG
TARGET_PORT
TARGET_TYPE
TEXT_ALARMFILE_DAY
Top Menu ............................................ 39
Top Menu File Setup ............................... 22
........................................... 14
.................................... 14
.................................... 12
.................................... 13
...................... 20
U
Uninstallation........................................ 43
W
Warning Messages.................................. 50
Warning Messages (parameter settings)
Web Browsers ........................................ 7
Windows ................................ 1, 12, 23, 34
......... 50
56
Sample connection................................... 1
Select RAID Device menu
Sender Mail Address
sendmail
Service
Setting item (differences)
Setting parameters
Setting the ETERNUSmgr Daemon
Setting up the Top Menu File
Setup
Setup files......................................... 9, 42
Show hardware error detect log list menu
Shutdown
SMTP protocol
SMTP service......................................... 6
............................................... 6
................................................ 31
for Automatic Startup
(when monitoring multiple target devices)
................................................... 9
............................................ 31
....................................... 6
......................... 39
............................... 17
.......................... 11
.................................. 10
............................ 33
.... 29
....... 40
All Rights Reserved, Copy r i ght © FUJITSU LIMITED 2007
ETERNUSmgr User Guide -Introduction- P2X0-0202-01EN
Page 65

ETERNUSmgr User Guide -Introduction-
P2X0-0202-01EN
Date of issuance: August 2007
Issuance responsibility: FUJITSU LIMITED
● The contents of this manual are liable to being updated without notice.
● While the contents of this manual are the product of all due care and diligence, no responsibility
can be accepted for operational problems arising from any errors or missing information, or other
use of the information contained in this manual.
● Fujitsu assumes no liability for damages to third party copyrights or other rights arising from the
use of any information in this manual.
● Contents of this manual are not to be reproduced without permission from Fujitsu.
Page 66

 Loading...