

Page 1

PenCentra 200
Handheld PC Pro
User’s Guide
Page 2

Fujitsu PC Corporation has made every effort to ensure the accuracy and completeness
of this document; however, because ongoing development ef f orts a r e made to
continually improve the capabilities of our products, we cannot guarantee the accuracy
of the contents of this document. We disclaim liability for errors, omissions, or future
changes herein.
Fujitsu
PenCentra
CalliGrapher
® is a registered trademark of Fujitsu, Ltd.
™ 200 and Working Mobility™ are trademarks of Fujitsu PC Corporation
® and ParaGraph® are registered trademarks of ParaGraph, a division of
VADEM.
Jot® and Handwriter® are registered trademarks of Communication Intelligence Corporation .
ActiveSync™, ActiveX®, Microsoft®, Microsoft InkWriter®, Microsoft Outlook™,
Microsoft P ower Poin t®, M icr os of t Windows®, Micr os oft Windows NT®, MSN™, Visual
Basic®, Visual C++®, and the Windows logo are either registered trademarks or trademarks of Microsoft Corporation in the United States and/or other countries. Microsoft
products are licensed to OEMs by Microsoft Licensing, Inc., a wholly owned subsidiary
of Microsoft Corporation.
Insignia
® is a registered trademark and Jeode™ is a trademark of Insignia Solutions.
All other products are trademarks or registered trademarks of their respective
companies.
Copyright 2001
Fujitsu PC Corporation
No part of this pu blicatio n may be c opied, re produced, or translated , witho ut the prio r written c onsent
of Fujitsu PC Corporation. No part of this publication may be stored or transmitted in any electronic
form without the prior consent of Fujitsu PC Corporation.
PenCentra 200 User’s Guide - FPC58-0545-01
Page 3

Agency Comp lian ce
UL Notices
• For continued protection against the risk of fire, replace
only with the same type and rating of fuse.
• Changes or modifications not expressly approved by
Fujitsu PC Corporation could void this user’s authority to
operate the equipment.
• For a spare battery pack, order only Fujitsu Model
FMW51BP1.
• To charge the battery pack FMW51BP1 externally, use
only a PenCentra external battery charger FMW51BC1.
WARNING
CAUTIONS
NOTE
This product is intended to be supplied by a Listed Power
Unit marked “Class 2” and rated 16 Vdc, 2.7A to 3.36A.
+
Output Polarity
i
Page 4

FCC Notices
DECLARATION OF CONFORMITY
according to FCC Part 15
Responsible Party Name: Fujitsu PC Corporation
Address: 5200 Patrick Henry Drive
Santa Clara, CA 95054
Telephone: 408-982-9500
Declares that product: Model: PenCentra 200
Complies with Part 15 of the FCC Rules
This device complies with Part 15 of the FCC rules. Operation is subject to
the following two conditions: (1) This device may not cause harmful
interference, and (2) This device must accept any interference received,
including interference that may cause undesired operation.
Note: For more detailed information about the FCC rules and their applicability to the
PenCentra 200 pen tablet, refer to Appendix D of this document. The following
table provides the p art numbers for each of the PenCentra 200 configurations.
ii
Page 5

Table of Contents
Before You Get Started ................................................................... vii
Welcome....................................................................................................... vii
About this Guide......................................................................................... vii
Where to Find Information............................. .... .................................... ... ix
Chapter 1
Introducing the PenCentra 200 H/PC Pro .................................... 1
Included with the PenCentra 200 ............................................................. 1
....................................................................................................................... 1
Options Available for the PenCentra 200................................................ 2
PenCentra 200 Hard wa re Fea tures........................................................... 3
Front / Left / Top Features........................................................... 3
Rear / Right / Bottom Features:................................................... 5
Status Indicators.............................................................................. 7
Connectors and Peripheral Interfaces.......................................... 8
PenCentra 200 Softwar e...................................... ... .... ................................ 10
Windows CE Applications............................................................ 10
Common Applications............................................................ ... 10
Windows CE 2.11 Applications ................................................ 11
Microsoft H/PC 2000 Applications.......................................... 12
Handwriting Recognition Applications ...................................... 12
Windows CE 2.11 Systems......................................................... 12
Microsoft H/PC 2000 Systems.................................................. 12
Chapter 2
Using the PenCentra 200 ................................................................. 15
Before Setting Up the PenCentr a 20 0...................................... ... .............. 15
Setting Up the PenCentra 200 ................................................................... 15
Turning the device off and on (suspending/resuming)........... 15
Resetting the system....................................................................... 16
Using the Pen............................................................................................... 17
Calibrating the pen......................................................................... 17
Replacing the Pen............................................................................ 18
Inserting/Removing PC Cards................................................................. 19
Powering the PenCentra 200..................................................................... 20
Removing and Installing a Battery Pack ..................................... 20
Charging the Battery Pack............................................................. 21
Conserving Power / Optimizing Power Management............. 21
Using a Keyboard or Mouse with the PenCentra 200............... 21
Attaching a Keyboard or Mouse............................................... 22
Using the Keyboard Function Keys ......................................... 22
Using the Hotpads...................................................................................... 23
iii
Page 6

Chapter 3
Using Microsoft CE Applications ................................................. 25
Windows CE Applications........................................................................ 25
Microsoft Pocket Office.................................................................. 25
Pocket Word: Creating Documents.............................................. 26
Taking notes using Pocket Word .............................................. 27
Pocket Excel: Creating Workbooks .............................................. 28
To log expenses using Pocket Excel:........................................ 28
Pocket Access: Viewing and Creating Data................................ 30
To create a new database and table on your PenCentra 200: 31
Pocket PowerPoint: Showi ng Pr esen ta ti ons............................. .. 32
To show a presentation: ............................................................. 32
Voice Recorder and InkWriter ...................................................... 34
Voice Recorder: Capturing Ideas and Thoughts.................... 34
InkWriter: Creating Notes and Drawings................................... 36
To create an InkWriter document:............................................ 36
Microsoft Pocket Outlook.......................................................................... 37
Calendar: Scheduling Meetings and Appointments.................. 38
To create a new appointment:................................................... 39
To create a meeting request:...................................................... 40
Contacts: Tracking Friends and Colleagues................................ 41
To create a new contact:............................................................. 41
Tasks: Keeping a To Do List.......................................................... 42
To create a new task: .................................................................. 43
Inbox: Sending and Receiving E-mail Messages........................ 44
Connecting to a mail server.................... .... ............................... 45
Setting up Inbox for connecting to a mail server ................... 45
Downloading messages..................................... .... .................... 46
Disconnecting from the server.................................................. 46
Managing messages and folders............................................... 46
ActiveSync: Synchronizing E-mail............................................... 48
Downloading messages..................................... .... .................... 48
Managing messages and folders............................................... 49
Sending a message.......................................................................... 49
To send a message:..................................................................... 49
Getting Connected Remotely.......................... .... ...................................... 50
Connecting to an ISP..................... ... .............................................. 51
To create a dial-up connection to an ISP: ................................ 51
Connecting to Your Network............................ ............................ 52
To create a dial-up connection to a network:.......................... 52
To create a network (Ethernet) connection: ............................ 52
Connecting to Your Desktop to Synchronize Remotely............ 53
To create a dial-up connection to a desktop modem............. 55
Getting Help on Connecting Remot ely.. .................................... .. 55
Microsoft Windows CE Services............................................................... 56
iv
Page 7

Installing Windows CE Services and Setting up a Partnership 56
Synchronizing Files and File Conv ers ion.......................... .... ...... 57
Remote Synchronization................................................................ 58
Getting Help on Windows CE Services................................. ... ... 58
Chapter 4
Using the Handwriting Recognition Utilities ............................ 59
What is CalliGrapher?................................................................................ 59
Getting started............................................................................................. 60
The Two Icons Explained.............................................................. 61
Basic writing and corrections.................................................................... 63
What is displayed in the Correction Window? .......................... 67
Gestures and spell checking...................................................................... 67
Text Editing Using CalliGrapher.............................................................. 72
How to Select Text Using Pen (Stylus) ........................................ 80
Screen Drawing........................................................................................... 80
Screen Orientation...................................................................................... 82
Calculator..................................................................................................... 82
Configuration Tips...................................................... ................................ 83
Multiple User Dictionaries............................ ................................ 83
Taskbar Customization .................................................................. 83
More Pleasant vs. More Detailed Inking..................................... 84
If You Aren’t a Cursive Writer...................................................... 84
Quick Note Taking............. .... ... ...................................................... 84
Fine-tuning the Handwriting Features.................................................... 85
Using Handwriter for HPC 2000 .............................................................. 87
General tab....................................................................................... 87
Appearance tab ............................................................................... 87
Time-Outs tab....................................... .... ... .................................... 88
Advanced tab................................................................................... 88
About tab.......................................................................................... 88
Chapter 5
Care and Maintenance of the PenCentra 200 .............................. 89
Protecting the Display Screen ................................................................... 89
Installing a Screen Protector.......................................................... 89
Storing the PenCentra 200 ......................................................................... 90
Protecting the PenCentra 200 Pen Tablet in Harsh Environments...... 91
Avoiding Overheating............................................................................... 91
Cleaning the Display Screen...................................................................... 91
Chapter 6
Troubleshooting the PenCentra 200 ............................................. 93
System Will Not Resume Operation ............................................ 93
Display Screen Is Blank or Difficult to Read............................... 93
v
Page 8

Infrared Data Transfer Is Not Working....................................... 94
Pen Tablet Is Not Responding to the Pen.................................... 94
Pen Tablet is Not Responding to the Keyboard......................... 94
Pen Not Calibrated ......................................................................... 95
Audio Volume Too Low.......................................................... .... .. 95
Remote connection problems.................................................................... 95
Can’t dial out with the device modem ........................................ 95
Can dial out but can’t make a proper connection...................... 96
The connection is unreliable .......................................................... 96
Network connection is not listed in the ActiveSync dialog box 96
PenCentra 200 H/PC Pro Hardware Specifications .................... 97
Digitizer Technology Notice .......................................................... 101
Additional Display Information............................................................... 101
Glossary ............................................................................................. 103
Agency Notices ................................................................................. 109
FCC Notices........................................ ..................................... .................... 109
Notice to Users of Radios and Television.................................... 109
Notice to Users of the US Telephone Network........................... 109
DOC (Industry Canada) Compliance Not ice s.................... ... .... ............. 111
Notice to Users of Radios and Television.................................... 111
Notice to Users of the Canadian Telephone Network............... 111
Avis Aux Utilisateurs Du Réseau Téléphonique Canadien...... 112
vi
Page 9

Before Y ou Get Started
Welcome 0
Congratulations on purchasing a PenCentra 200 Handheld Personal Computer Pro
(H/PC Pro) powered by the Microsoft® Windows® CE operating system. This
enterprise-level pen computer provides a rugged ergonomic design, high
performance, and minimal weight. The PenCentra 200 delivers Working Mobility
by putting the power of information in the palm of your hand.
About this Guide 0
This guide provides an introduction to your PenCentra 200, the Microsoft Windows
CE operating system, and the installed applications. The following chapters a re
contained in this document:
Chapter 1: Introducing the PenCentra 200
This chapter introduces you to the features of your PenCentra 200. Included are
descriptions of the material included with your system and optional peripherals
specially designed for the PenCentra 200.
Chapter 2: Using the PenCentra 200
This chapter provides steps for the initial setup of your system, as well as a brief
description of the software loaded on the system. Also included are instructions for a
variety of procedures, such as printing and customizing your PenCentra 200.
TM
Chapter 3: Using Microsoft CE Applications
This chapter offers details on the various Windows CE applications, such as Pocket
Word, Pocket Access, and Pocket Excel. Included are instructions for setting up the
Windows CE Services software on your desktop or laptop computer to allow
synchronization of data between the PenCentra 200 and your desktop or laptop.
Chapter 4: Using the Handwriting Recognition Utilities
This chapter provides instructions on using the CalliGrapher® programs from
ParaGraph
Chapter 5: Care and Maintenance of the PenCentra 200
This chapter instructs you in the proper care and maintenance of your system.
TM
. The program delivers highly-efficient, easy-to-use applications.
Welcome vii
Page 10

Chapter 6: Troubleshooting the PenCentra 200
This chapter offers troubleshooting tips and techniques in the event you run into a
problem when operating your pen tablet.
Appendix A: Hardware Specifications
This appendix contains detailed information about your PenCentra 200
specifications.
Appendix B: Digitizer Notice
This appendix contains notices concerning the formation of air bubbles in the
digitizer.
Appendix C: Glossary
The Glossary contains a description of Microsoft and Fujitsu PC Corporation terms
used throughout this guide.
Appendix D: Agency Notices
This appendix contains notices required by th e Fed e ral Communications
Commission.
viii Before You Get Started
Page 11

Where to Find In form ati on 0
This guide describes your PenCentra 200 hardware, provides an overview of the
programs included, and describes how to set up communications between your
PenCentra 200, your desktop computer, and the Internet. The following table is a
guide to the different types of information available to help you use yo ur PenCentra
200. For more information, see the comprehensive on-line Help for each program.
For Information On... Use This Reference...
PenCentra 200 H/PC Pro
Hardware
Windows CE Programs This User’s Guide
ParaGraph CalliGrapher
Jot and Handwriter for HPC
2000
Insignia Jeode Insignia Jeode web site:
Synchronizing and
exchanging files with a
desktop computer (includi ng
information on connecting
while traveling)
5.3.6 This User’s Guide
This User’s Guide
Fujitsu PC Corporation web site:
http://www.fujitsupc.com/
On-line Help on your device. Select Start and
then Help for each program.
On-line Help on your device. Select CalliGrapher
Help from the Programs | CalliGrapher menu.
CalliGrapher web site: www.paragraph.com
CIC web site: www.cic.com
http://www.insignia.com/
This User’s Guide
On-line Help on your device. Select Start and
then Help.
Windows CE Services on-line Help on your
desktop computer. In the Mobile Devices window,
click Help, then Windows CE Services Help
Topics. For additional information, go to
www.microsoft.com/windowsce.
Toolbar buttons Tap or click and hold on a toolbar button to see its
name. Drag off the toolbar button before lifting to
avoid activating the button.
Where to Find Information ix
Page 12

For Information On... Use This Reference...
Troubleshooting information
on connections
Up-to-date information on
Windows CE-based devices
Information on this release of
Windows CE
The Communications Troubleshooter on your
desktop computer. In the Mobile Devices window,
click Help, then Communications
Troubleshooter.
Microsoft Windows CE web site:
http://www.microsoft.com/windowsce/
Microsoft Handheld PC site:
http://www.microsoft.com/mobile/handheldpc/
Readme.doc file (located in the Windows CE
Services folder on your desktop computer).
x Before You Get Started
Page 13

Chapter 1
Introducing the PenCentra 200 H/PC Pro
The PenCentra 200 is a high-performance, pen-based computer designed to support
the Microsoft Windows CE operating system. This chapter provides an overview of
the PenCentra and its features.
Included with the PenCentra 200 1
The following items are included with your PenCentra 200:
• Lithium ion battery pack
• AC Adapter
• Microsoft Windows CE Services CD-ROM
• Screen Protectors (quantity: 2)
• PenCentra 200 Pen
• Internal 56 Kbps* fax/modem (V.90)
* Actual speeds over U.S. telephone lines vary, and are less than 56Kbps due to the current
FCC regulations and line conditions.
The internal modems on all Fujitsu pen tablets from Fujitsu PC Corporation are only
qualified for use with telephone systems in selected countries, including the United States
and Canada. For a full list of certified countries, check www.fujitsupc.com/modems.
1
1
Page 14

Options Available for the PenCentra 200 1
The following optional peripherals and accessories items are available to support
your PenCentra 200:
• Auto Adapter (FMWCB2)
• Spare Pen (FMW 51PN1)
• Pen Tether (FMW51ST1)
• Docking Station (FMW51DS1)
• 16MB RAM Expansion Module (FMW51EM16)
• 32MB RAM Expansion Module (FMW51EM32)
• Harsh Environment Case (FMWCC36)
• Spare Battery Pack (FMW51BP1)
• External Battery Charger (FMW51BC1)
• Handstrap (FMWHS3)
• Screen Protectors, 12-pack (FMWSP6)
• Compact Folding Deskstand (FMWDS4)
• System Holster (FMWCC34)
• Harsh Environment Case Holster ( FMWCC37)
• Slipcase (FMWCC33)
• Portfolio Case (FMWCC35)
• USB Keyboard:
• US (FMWKB5A)
• UK (FMWKB5B)
• France (FMWKB5F)
• Germany (FMWKB5D)
2 Introducing the PenCentra 200 H/PC Pro
Page 15

PenCentra 200 Ha rdware Fe ature s 1
Features and controls that you use to operate the PenCentra 200 are described below
and illustrated in Figures 1-1 and 1-2. Additional details on using these features and
controls are provided later in this manual.
Front / Left / Top Features 1
• Screen
The screen is the area in which your applications and data are displayed. The screen
is also the area in which you enter data with the pen.
• Status Indicators
There are three status indicators that provide event notification and power status.
• Pen/Pen Ho lder
The pen -- or stylus -- is the main pointing device used for nav igation and entering
data. When not in use, it should be stored in the PenCentra 200 pen holder or
optional carrying case.
• Record Button
The Record button is used to initiate recording of sound on the system via the
microphone.
• Microphone
The microphone allows you to record sound files, such as voice memos.
• Hotpads
Hotpads allow you to change settings for the display, sound, and mouse button
emulation. Three programmable hotpads are also avail able for customization.
• IrDA Port
Provides an infrared interface for communication with devices compliant with IrDA
Standard Revision 1.1.
• Suspend/Resume Button
Allows you to suspend and resume sys tem operation in order to extend battery life.
• Modem Jack*
Allows you to connect a standard telephone plug to the PenCentra’s internal 56
Kbps modem.
** The internal modems on all Fujitsu pen tablets from Fujitsu PC Corporation are
only qualified for use with telephone syst ems in selected countries, including the
United States and Canada. For a full list of certified countries, check
www.fujitsupc.com/modems.
PenCentra 200 Hardware Features 3
Page 16
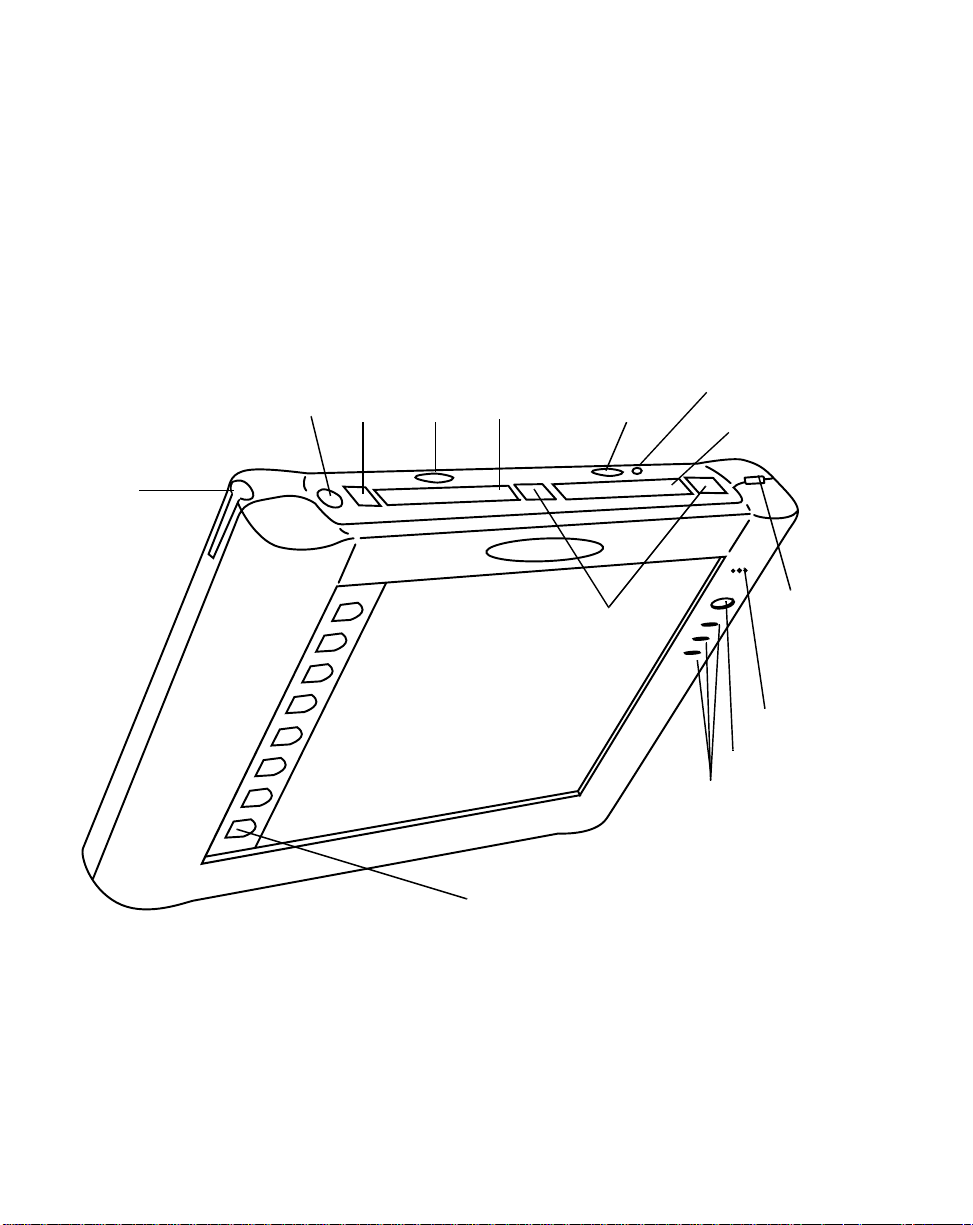
• Reset Button
The Reset button restarts the PenCentra 200.
• PC Card Slots
These doors allow you to access the PC Cards installed in the PC Card slots.
TM
• Kensington
Lock Attachment Point
The lock attachment point lets you attach an optio na l Kensington-type security
cable.
• Notification Button
The Notification button is used to acknowledge a notification from the system, such
as a meeting reminder.
Pen
Holder
Suspend/
Resume
Button
Modem
Jack*
IrDA
Port
PC Card
Slot 1
Ejector
Buttons
Hotpads (8 places)
Figure 1-1 PenCentra Front/Left/Top View
Button
Reset Button Notification
PC Card Slot 2
Kensington
Lock Port
Microphone
Record Button
Status Indicators
** The internal modems on all Fujitsu pen tablets from Fujitsu PC Corpora tion are
only qualified for use with telephone systems in selected countries, including the
United States and Canada. For a full list of certified countries, check
www.fujitsupc.com/modems.
4 Introducing the PenCentra 200 H/PC Pro
Page 17

Rear / Right / Bottom Features: 1
• Removable Battery Pack
The battery pack can be removed for replacement or charging in an optional
external charger.
• Battery Pack Latch
Secures the removable batt ery in position.
• Pen T ethe r Attachment Slo t
The pen tether slots allow you to attach an optional pen tether.
• Handstrap Attachment Points
These are used to attach an optional handstrap.
• Speaker
The built-in speaker allows you to play back audio f iles without external hardware.
• Memory Access Door
Allows you to gain access to the RAM, ROM, and flash memory modules inside
your PenCentra.
• Microphone Jack
Allows you to connect an external microphone
• Headphone Jack
Allows you to connect headphones to your PenCentra 200.
• Serial Port
This port is used for connecting the synchronization cable between your PenCentra
200 and a desktop computer. This port can also be used as a standard serial port.
• USB Port
Allows you to connect Universal Serial Bus-compliant devices to the PenCentra 200.
• DC Input
Allows you to connect the AC Adapter or an optiona l A uto Adapter.
• PS/2-Style Keyboard/Mouse Port
The PS/2-style port lets you attach a PS/2-style keyboard or mouse. This port only
supports a 5V keyboard or mouse.
•High-Usage Docking Contacts
These contacts allow you to use the pen tablet in an optional docking station.
PenCentra 200 Hardware Features 5
Page 18
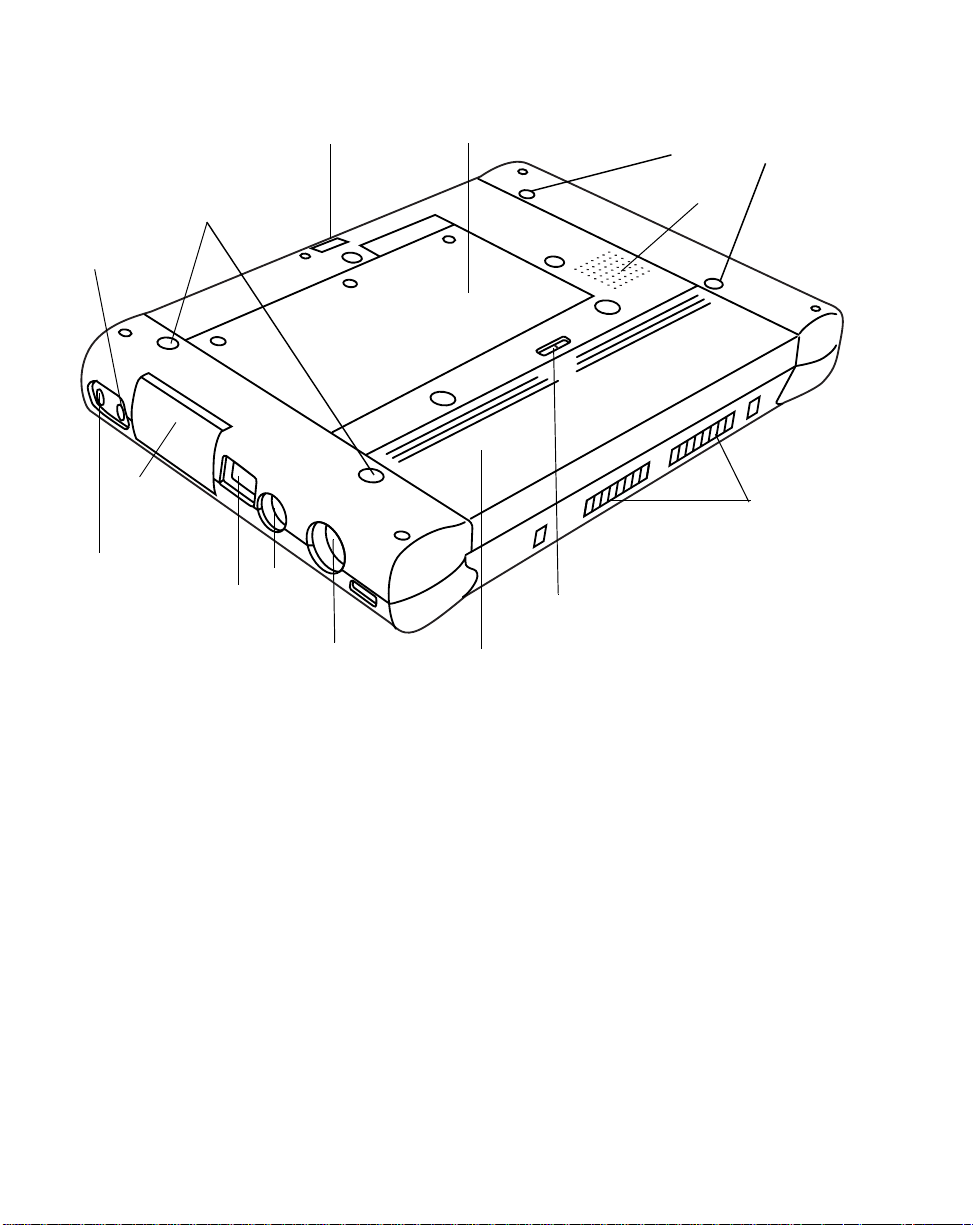
Headphone
Jack
Serial
Port
Door
Microphone
Jack
Handstrap
Attachment
Points
DC
USB
Input
Port
PS/2-style
Keyboard/Mouse Port
Pen Tether Slot
Memory Access Door
Battery Pack Latch
Removable Battery Pack
Handstrap
Attachment Points
Speaker
High-Usage
Docking
Contacts
Figure 1-2 PenCentra Rear/Right/Bottom View
6 Introducing the PenCentra 200 H/PC Pro
Page 19
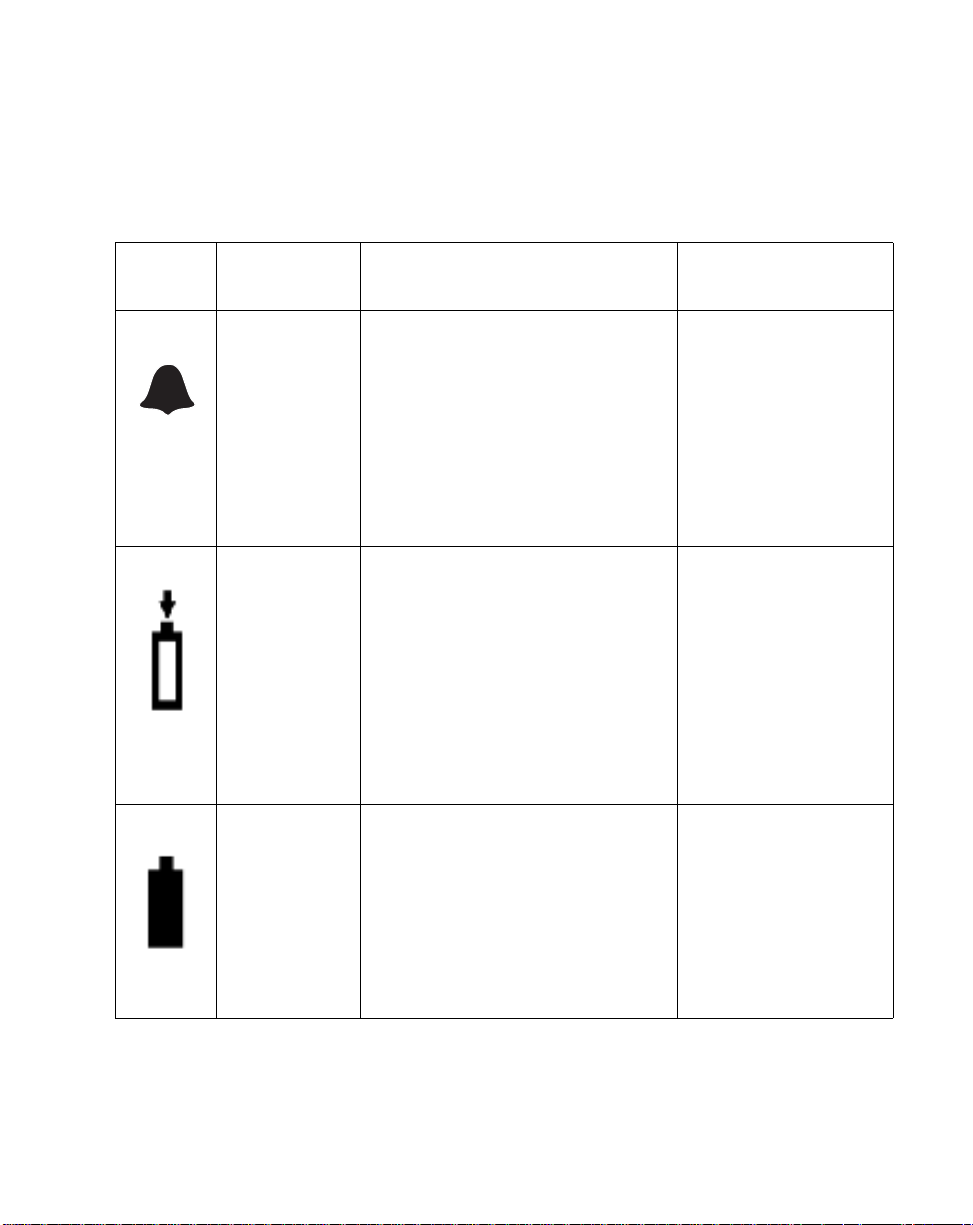
Status Indicators 1
There are three status indicators located on the front of the system, adjacent to the
right-hand side of the screen. These lights indica te the information about system
status:
Table 1-1 System Status Indicators
Display
Icon
Name LED State (Significance) Description
Notification
Indicator
DC Input Off
Battery Off
Orange
(Notification of event)
(No battery, no DC Input)
Orange
(Charging)
Green
(Charge complete)
Yellow
(Thermal Alarm)
(Battery is between 20% and 100%
charged)
The notification
indicator flashes when a
pre-determined event is
detected by the system
(such as a meeting
reminder). The
notification indicator is
reset by pressing the
notification button on
the top of the system.
When this indicator is lit,
the system is running
on external DC power.
This LED indicates low
battery conditions.
Orange, blink (every 2-4 seconds)
(Between 5% and 20%)
Orange, no blink
(Between 0% and 5%)
PenCentra 200 Hardware Features 7
Page 20
Connectors and Pe rip her a l Inte r face s 1
The connectors and peripheral interfaces on the PenCentra 200 can accommodate a
variety of different devices. Figures 1-1 and 1-2 show the locations of the co nnectors
and interfaces on the PenCentra 200, as described in Table 1-2.
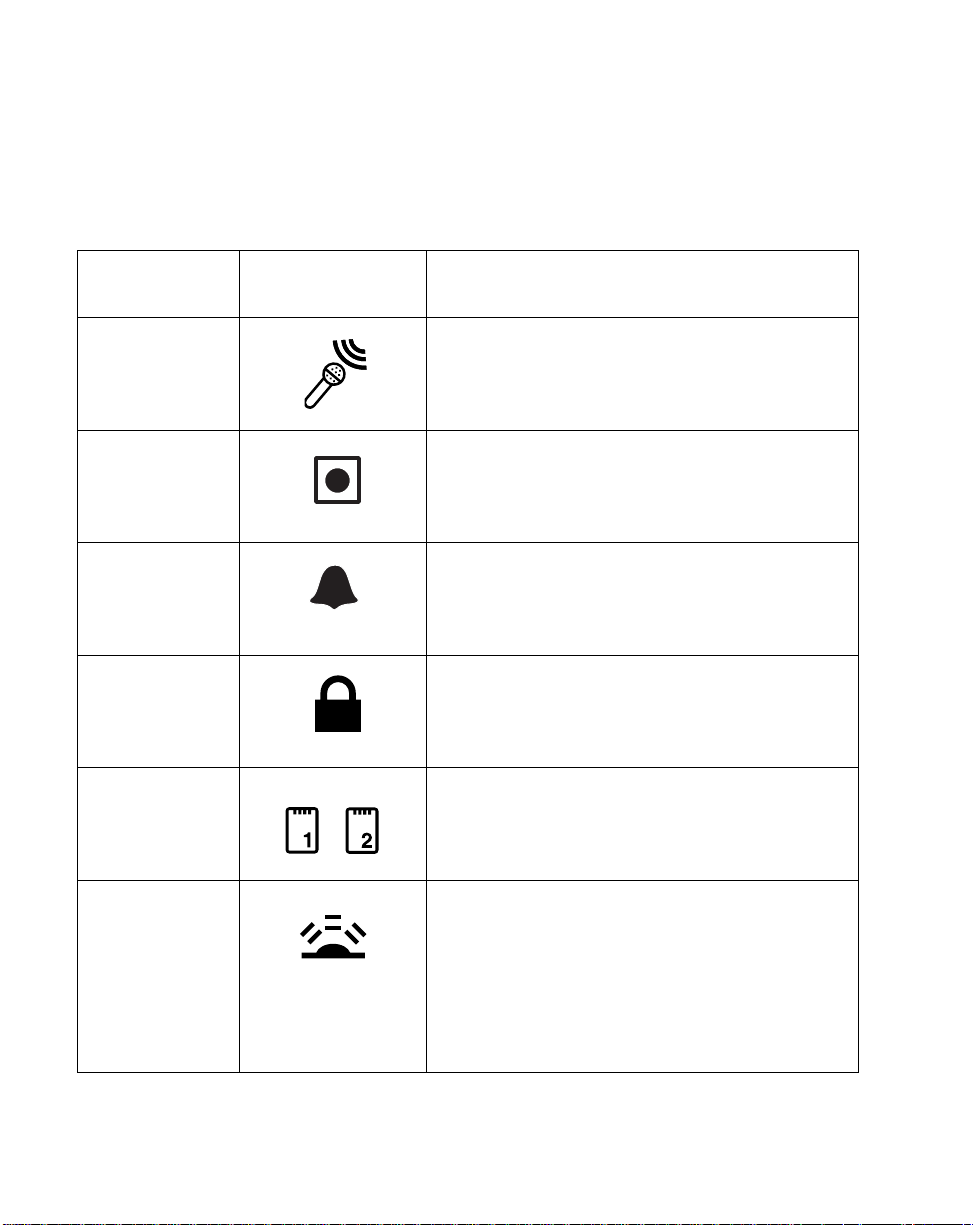
Table 1-2 Peripheral Connectors
Connector/
Peripheral
Microphone Jack Connect an external microphone. The internal
Record Button Initiates the recording of audio files (such as voice
Notification
Button
Kensington Lock
PC Cards Install one or two Type II PCMCIA Cards. If only
PenCentra 200
Icons
Purpose
microphone is disabled when you plug in an
external microphone.
memos) on the PenCentra.
The notification button is used to turn off the
notification indicator, and launch the message that
generated the notification.
TM
The Kensington
you to secure the PenCentra using
Kensington-compatible locking devices.
one card is installed, either slot can be used.
Microsaver security slot allows
IrDA Port The infrared transceiver built into the PenCentra
allows you to communicate with other devices that
are compliant with IrDA Standard Revision 1.0 or
1.1. Effective range for infrared communication is
about three feet, and within 15 degrees off of
center. A clear line-of-sight path must exist between
the IrDA port on the PenCentra and the IrDA
transceiv er on the other device.
8 Introducing the PenCentra 200 H/PC Pro
Page 21
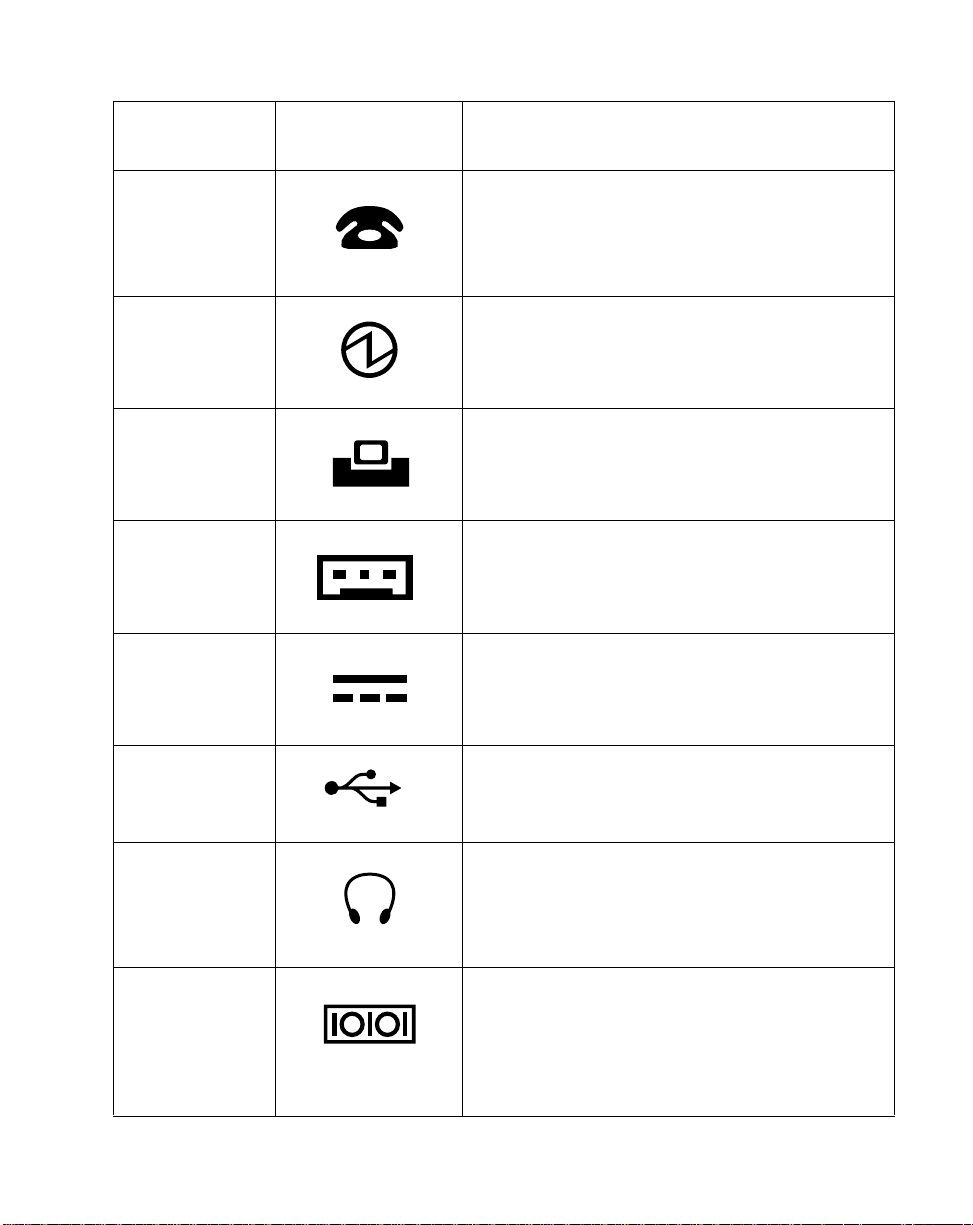
Table 1-2 Peripheral Connectors (Continued)
Connector/
Peripheral
Modem Jack Connect a telephone line to the internal
Suspend/
Resume Button
High-Usage
Contacts
PS/2-Style Port Allows the connection of a 5-volt PS/2-style
DC Input Connect an external power source such as the AC
PenCentra 200
Icons
Purpose
international software modem using a standard
RJ-11 telephone plug. The modem is only certified
on North American, French, German, and United
Kingdom models of the PenCentra 200.
Allows you to suspend and resume system
operation.
Used when the PenCentra is installed in an
approved optional docking device. The contacts
allow system access via PS/2 keyboard, USB-Host,
RS-232C serial input, and DC input.
keyboard, mouse, or barcode reader. Note that the
system must be suspended prior to installing a
device to this port.
Adapter or the optional Auto Adapter.
USB Port Connect Universal Serial Bus-compliant devices
Headphone Jack Connect mono headphones or powered external
speakers. The internal speaker is disabled when
you plug in external headphones or speakers.
Serial Port Connect an external device with a serial interface.
Primarily used to conn ect the synchro nization ca ble
between the PenCentra 200 and your desktop
system. (Note that this icon appears on the inside
of the serial port door). Pin 9 of the serial port
supports 5-volt, 500 mA maximum current.
PenCentra 200 Hardware Features 9
Page 22
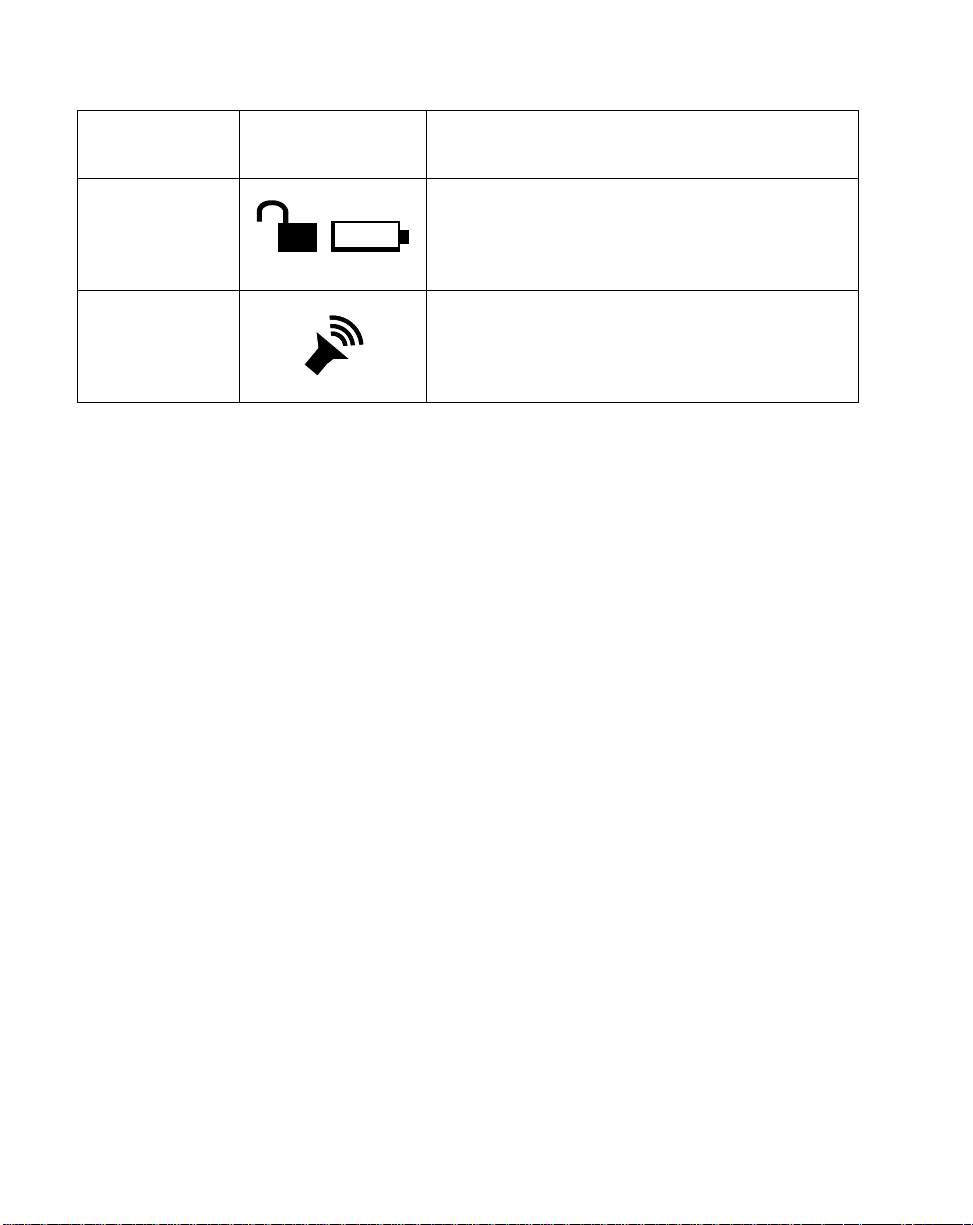
Table 1-2 Peripheral Connectors (Continued)
Connector/
Peripheral
Battery Latch This spring-loaded latch/switch secures the
Speaker Allows you to hear audio files.
PenCentra 200
Icons
Purpose
removable battery in its slot.
PenCentra 200 Software 1
The PenCentra 200 contains a number of Microsoft Windows CE and third-party
applications. A summarized description of each is provided below. Detailed
information about these programs is located in Chapter 3 of this manual.
Windows CE Applications 1
The PenCentra 200 is a Microsoft Windows CE H/PC 3.0 Pro-compliant system.
Windows CE consists of two general elements: the Microsoft Windows CE operating
system and Windows CE Services with ActiveSync. A suite of applications called
Microsoft Windows CE Pocket Office is also included with Windows CE.
Note: The PenCentra 200 system is delivered with one of two software configurations:
Windows CE 2.11 or Microsoft Windows CE H/PC 2000. Many of the software
applications used by the two configurations are the same. The applications are
listed below as either common or exclusive to one of the configurations.
Common Applications 1
1. Windows CE Operating System. The operating system installed on your
PenCentra 200.
2. Microsoft Windows CE Pocket Office, consisting of:
• Microsoft Pocket Access
View ODBC databases and create Access information.
10 Introducing the PenCentra 200 H/PC Pro
Page 23

• Microsoft Pocket Excel
Create and view Excel documents.
• Microsoft Pocket PowerPoint
Allows you to present PowerPoint presentations.
• Microsoft Pocket Word
Lets you create and view Word documents.
• Microsoft Pocket Outlook
Pocket Outlook consists of the Calendar, Contacts, Tasks, and Inbox
applications. These help you to manage your day-to-day information,
including appointments, email, and persona l d ata.
• Microsoft Pocket Internet Explorer
Allows you to set up connections with other computers or the Internet.
• Microsoft InkWriter
Lets you create handwritten or typed notes and drawings.
• Microsoft Voice Recorder
Records your spoken words.
• World Clock
Sets the date, time, and alarm for your home city and the city you are
visiting.
• Calculator
Lets you perform calculations
• Microsoft Windows CE Services with Activ eSync is included on CD-ROM
for installation on your desktop s ystem. Windows CE Services allows you
to synchronize your data between the PenCentra 200 and your desktop.
Windows CE 2.11 Applications 1
• PC Link
Initiates a connection with your desktop computer.
• Terminal
Lets you view and download files from a bulletin boar d or send and receive
E-mail.
• Insignia Jeode software is included to securely load and run Java
applications and applets on your sys tem.
PenCentra 200 Software 11
Page 24

Microsoft H/PC 2000 Applications 1
• Terminal Server Client
Allows you to log on to a Windows NT server that has Terminal Server software
installed and to use all the programs on the NT s ystem.
• Application Launcher
Allows you to determine which applications are launched with the system
hotpads.
Handwriting Reco gniti o n A ppl ic a ti ons 1
Windows CE 2.11 Systems 1
Along with the Microsoft Windows® CE applica tions, FPC has included the
ParaGraph
TM
CalliGrapher® application. CalliGrapher is a full-featured technology
that recognizes all handwriting styles: cursive, print, or mixed. The following list lists
some of the features of the CalliGrapher program:
• Optimized to work with color Windows CE-based device.
• Reliably recognizes cursive, printed, and mixed handwriti ng from a wide range
of handwriting styles
• Integrates with all Windows CE applications
• Includes vocabulary checker and spell-checker with a user dictionary
• On-screen pop-up keyboard
Microsoft H/PC 2000 Systems 1
The H/PC 2000 systems include two handwriting recognizers from Communic ation
Intelligence Corporation: Jot and Handwriter for HPC 2000. Jot offers single character
recognition, providing immediate user feedback. Hand writer provides full context
natural character recognition with complete macro and gesture support. The
following list describes some of the features of the program:
• Data input is more natural. No special symbols or cha r acters to memorize. Jot
allows users to input text by using standard upper and lower case printed letters that
offer ready-to-go recognition of printed characters without requiring any training.
• Full-Screen Support. Jot enables users to input text on the full screen or in the
input panel area. Jot supports writing in place so that you can write one letter on
top of another and never run out of screen space.
12 Introducing the PenCentra 200 H/PC Pro
Page 25

• Simple User-Interface. Jot uses mode marks to divide the input area in to different
regions so where you write determines if the character will be read as upper case,
lower case, numeric or a symbol. Jot enables you to use the center area of the
screen to get capital letters.
• See Your Writing in Ink. Jot helps users improve their recognition accuracy by
enabling characters to be viewed in ink as they are written.
• International Character Support. Jot supports recognition of Roman-based
Western Europe an languages and ac cent marks.
• T utorial. Jot provides an extensive tutorial demonstrating how to write letters and
symbols.
• Macro Editor: You can define frequently used phrases (such as name and E-mail address)
or actions (such as copy or paste) for quicker text entry and editing.
PenCentra 200 Software 13
Page 26

14 Introducing the PenCentra 200 H/PC Pro
Page 27

Chapter 2
Using the PenCentr a 200
This chapter covers the fundamental concepts, basic system operation and use, and
system functions of your PenCentra 200. You should familiarize yourself with this
information before you attempt to operate the system.
Before Setting Up the PenCentra 200 2
Before you set up your PenCentra 200, there are two very important steps to perform:
• The display screen can be damaged with improper use. Be sure to install one of
the included screen protectors on your system. Reference the installation
instructions that accompany the screen protector.
• The system should be charged for a full 48 hours prior to first using it. The
48-hour period ensures that the main battery pack and the backup battery are
fully charged.
Setting Up t he Pe nCen tra 2 00 2
Turni n g t he device off and on (s u spen di n g/r esu m ing) 2
The suspend/resume button is used to stop and start th e operation of your
PenCentra 200. Suspending system operation with this button does not shut the
system down, it simply “puts it to sleep” until you’re ready to use it.
To resume system operation, press the suspend/resume button on the top of the
system (see Figure 2-1). When you press the button, the system immediately “wakes
up” and resumes at the same point as when you suspended operation.
Before Setting Up the PenCentra 200 15
Page 28
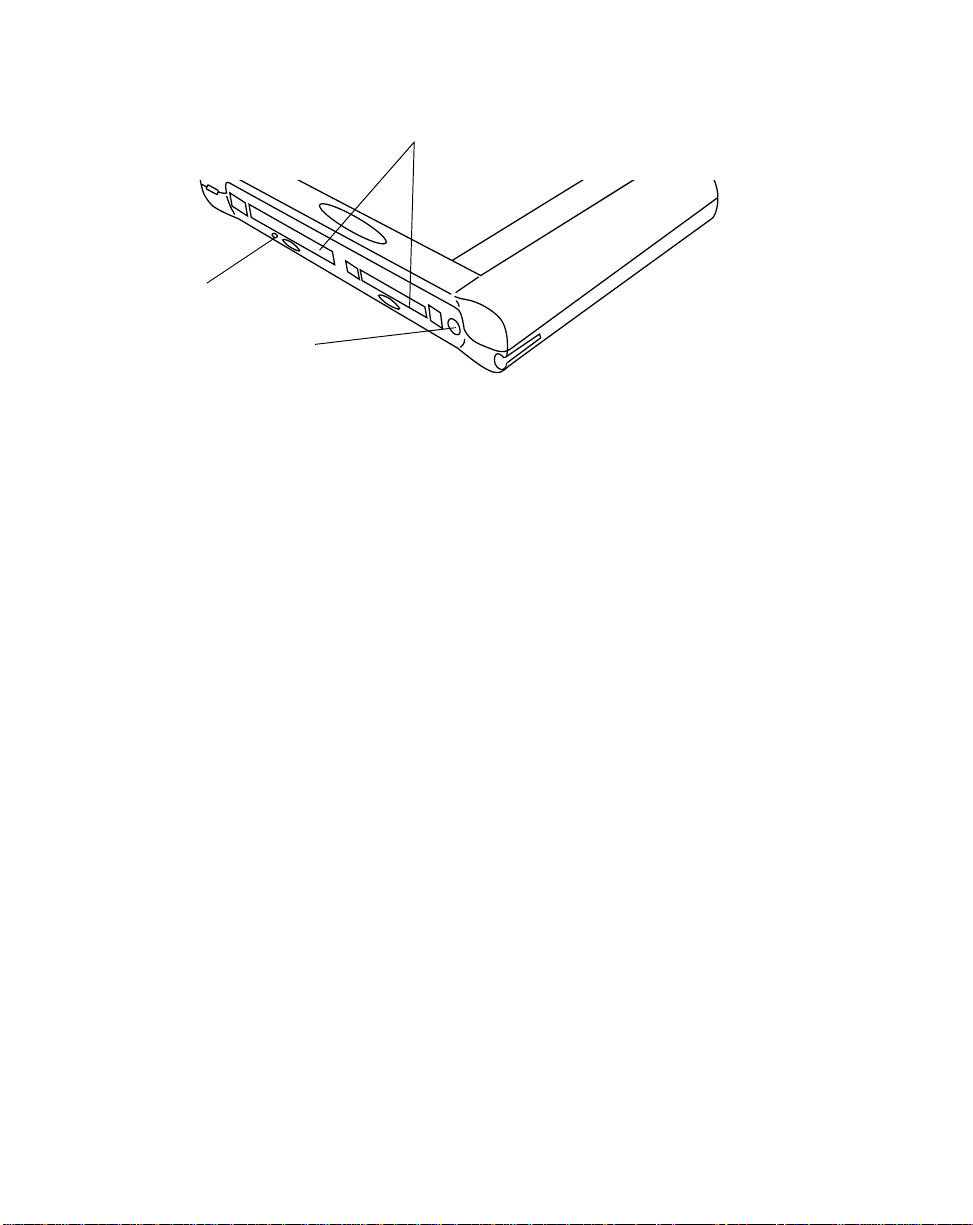
PC Card Slots
Reset Button
Suspend/Resume Button
Figure 2-1 Location of Suspend/Resume Button
When you have finished working with your PenCentra, or when you will not be
using it for an extended period, you should suspend operation to conserve battery
power. There are two ways to suspend the system:
Note: It is good practice to always save your active data befor e suspending the system.
Doing so ensures tha t no data is lost in the event o f power interruptio n.
• Save your work, then press the suspend/resume button. The system operation
will immediately suspend. When you resume operation, the system will resume
at the point at which you suspended operation, or,
• Save your work, then click the Start icon on your desktop. Click on Suspend from
the Start menu. The system operation will im med ia tely suspend. When you
resume operation, the system will resume at the point at which you suspended
operation.
Resetting the system 2
Note: • Pressing the reset button while there is active data on your screen will result in
that data being lost.
• It is not necessary to use excessive pressure when depressing the reset butto n.
Excessive pressure could result in damage to the system.
In the event your system freezes up and does not respond to pen taps or keystrokes,
it may become necessary to reset the system. To reset the system, lightly press the
reset button (see Figure 2-1) using the tip of your PenCentra pen. When the reset
button is pressed, the system reboots.
16 Using the PenCentra 200
Page 29

Using the Pen 2
You can use the PenCentra pen to generate and capture electronic “ink”, to sele ct
items, and to navigate through programs on the pen tablet. The pen can be used like
a two button mouse when used in conjunction with the right-mouse button hotpad.
Programs that support handwriting recognition allow you to write characters
directly on the screen with the pen.
Caution
• Ensure that a screen protector is installed on the pen
tablet screen before you use the pen. The warranty does
not cover a screen that is sc ratched as a resu lt of not using
a screen protector.
• Do not use a ballpoint pen or any sharp object on the pen
tablet. Doing so can mar or scratch the screen surface.
Here are some hints on using the pen like a two-button mouse on a desktop system:
• To select an object, tap the mouse tip on the object once. This functions like a
mouse button click with the left mouse butto n.
• To “double-click” an object, tap twice on the object quickly.
• To “right-click”, tap the pen tip once on the right-mouse button hotpad, then tap
the desired object. (Hotpads are described in the section of this chapter entitled
“Using the Hotpads”). The right mouse function is only valid for a single tap.
• To move, or “drag”, an object on the screen, place the pen tip directly over the
object, then as you hold the pen tip against the screen, move the pen.
Calibrating the pen 2
You calibrate the pen to adjust the distance error between where the pen actually
touches the screen and where the sy ste m “thinks” the pen is touching position on the
screen relative to the position of the pen tip. If the event you wish to invoke is not
displayed under the pen tip when you use the pen, you should calibrate the pen.
Pen calibration may be required due to the following situations:
• The pen is being used for the first time.
• The previous user of the PenCentra 200 pen tablet writes with the opposite hand
or at a different pen angle.
Using the Pen 17
Page 30

• The system has been in use for some time and the pen has not been recalibrated.
• The system has not been used for a long time and all stored information is lost
due to loss of battery power.
To Calibrate the Pen 2
1. Open the Control Panel from the Start menu, and double-tap the Stylus icon.
Select the Calibration property sheet, then click on Recalibrate.
2. Position the PenCentra 200 pen tablet as you normally would during use. Be sure
to hold the pen at the angle that you regularly use. Touch the screen only with the
pen tip; if you inadvertently touch the screen with your finger or hand during the
calibration process, faulty calibration may result.
3. Perform the calibration steps according to the instructions on the screen. The
calibration utility displays a cross-hair symbol in the middle and corners of the
screen, one corner at a time. Hold the pen as you normally would while using the
system and, as accurately as possible, tap the center of each crosshair as it is
displayed.
A dialog box is displayed after you tap the last of the four cross-hair symbols. Tap
the screen within 30 seconds if you wish to save your new calibration settings. If
you don’t tap the screen within 30 seconds, the default calibration settings will be
used.
4. When the Stylus Properties window reappears, choose one of the following steps.
• If you are satisfied that you tapped the cross-hairs accurately, tap OK. The
taps that you performed in step 3 are then used to calibrate the screen.
• If you do not want to use the new calibration, tap the cancel box (X).
• If you want to enter a new calibration, tap Recalibrate. The calibration
instructions reappear.
If you have successfully performed the procedure above, the pen is now calibrated,
and you can use the system as you normally would.
Replacing the Pen 2
With use, the pen tip may become worn or may pick up abrasive particles that can
scratch the screen. A damaged or warped tip may not move freely, causing
unpredictable results when using the pen. If your pen exhibits these problems,
replace the pen.
18 Using the PenCentra 200
Page 31

Inserting/Removing PC Ca rds 2
There are two PC Card slots in your PenCentra 200 to support Type I or Type II PC
Cards. Ensure that the card is PC Card 2.1-compliant and that the proper CE drivers
are available to support the card.
With the system display facing you, slot 1 is located on the left and slot 2 is on the
right (see Figure 2-2). To install a PC Card, insert it into the selected slot with the
label with an arrowhead facing towards the screen. The shutter covering the slot
folds into the system as you insert the card. Ensure that the card is pro perly seated by
firmly pushing it in until it stops. When the card is properly seated, the ejector button
rises to be flush with the system surfa ce.
To remove a PC Card, first ensure that it is not running. Using the back end of your
PenCentra pen, press the ejector button for the card you are removing. When the
button is pressed, the PC Card is ejected from the slot. Gently pull the card from the
slot.
Ejector
Button
PC Card Slot 2
Ejector
Button
PC Card
Slot 1
Figure 2-2 Inserting/Removing PC Cards
Inserting/Removing PC Cards 19
Page 32

Powering the Pe nCentr a 200 2
The PenCentra 200 can be powered by either its rechargeable battery pack or by AC
power adapter.
Removing and Installing a Battery Pack 2
To remove the PenCentra 200 battery pack, perform the following steps:
1. Save any active data and suspend your system.
2. Hold the system face down, with the arrow on the battery compartment pointing
towards you (see Figure 2-3).
Battery Pack
Latch
PS/2-style
Port
Figure 2-3 Removing/Installing the Battery Pack
3. Using the back end of the system pen (not the tip), push the spring-loaded battery
latch to the left.
4. While the battery latch is pushed to the left, sli d e the battery pack out of the
battery tray by pulling it towards you. When the battery is clear of the latch
mechanism, release the battery latch.
5. Res u me system operat ion.
20 Using the PenCentra 200
Battery Pack
Page 33

To install a new or recharged battery pack, slide it into the battery tray and firmly
push it in until the latch clicks into place.
Charging the Battery Pack 2
There are two ways to charge your battery pack: whi le it is in stalled in the system or
with an optional battery charger (FPC part number FMW51BC1). To use the optional
external battery charger, refer to the literature included with the unit.
Note: An installed battery can be recharged while the system is running o r suspended.
To recharge the battery pack while it is installed in the system, plug the AC adap ter
into the DC input jack on the right side of the system. Insert the AC adapter’s
electrical plug into a wall socket. When DC power is connected to the system, the DC
Input LED on the front of the system is lit (reference the “Status Indicators” section of
Chapter 1 for more information).
Conserving Power / O pti m izing Power Management 2
You can extend the charge life of your battery pack by conserving battery power. A
fully charged battery pack can run the system under normal use for approximately 8
hours. Your results may vary, depending upon the applications you use. Here are
some suggestions to help you conserve battery power:
Note: Certain power optimization features ma y have been disabled by your resel ler when
the pen tablet was customized.
• Open the Power Properties screen fr om the Control Panel. Click on the Power Off
tab, and set the length of idle time before you want the system to automatically
suspend. The shorter the period, the longer your battery will remain charged.
• Use an external power source such as the AC adapter to power the system
whenever possible.
• Reduce the backlight brightness using the backl ight brightness hotpad (reference
the section of this chapter entitled “Using the Hotpads”).
• When you know you won’t be using the system for a long period of time,
manually suspend the pen tablet by pressing the suspend/resume button.
Using a Keyboard or Mouse with the PenCe nt ra 20 0 2
Although the pen, on-screen keyboard, and handwriting recognition applications
allow you to enter any type of data into your PenCentra 200, there may be occasions
when you prefer to use a mouse or an optional PenCentra 200 keyboard.
Powering the PenCentra 200 21
Page 34

Attaching a Keyboard or Mouse 2
1. Before attaching a keyboard or mouse to your PenCentra 200, suspend system
operation by either pressing the suspend/resume button, or clicking on Start/
Suspend.
2. Plug the keyboard or mouse plug into the PS/2-style or USB port on the
right-hand side of the pen tablet (see Figure 2-3 for the port locations).
Note: When a mouse is installed, the mouse icon on the control pa nel appears in the place
of the Stylus icon. When a mouse is not installed, the Stylus icon appears. When a
mouse is installed, the stylus is still functional.
3. Res u me system operat ion.
Using the Keyboard Function Keys 2
When a PenCentra 200 keyboard is attached to your pen tablet, you can use the
function keys as shortcut keys to the most commonly-used Windows CE
applications. The following table lists the function keys and the application that is
invoked when you press the key.
Table 2-1 Default Application Shortcut Keys
Function Key Application Shortcut
F1 Inbox
F2 Microsoft Internet Explorer
F3 Calendar
F4 Contacts
F5 Tasks
F6 Microsoft Pocket Word
F7 Microsoft Pocket Excel
F8 Microsoft Pocket PowerPoint
F9 Microsoft Pocket Access
F10 Calculator
F11 World Clock
F12 Connecting to Port
22 Using the PenCentra 200
Page 35

Using the Hotpads 2
The PenCentra 200 hotpads are arranged vertically on the left-hand side of the
screen. The following table identifies each hotpad on the PenCentra 200, and offers a
description of its use.
Table 2-2 PenCentra 200 Hotpads
Icon Name Description
This hotpad changes the LCD backlight brightness by
cycling through the following states:
Color Reflective LCD (outdoor/indoor display):
Backlight
Brightness
Hotpad
Low ->Medium ->High ->Off -> Low...
Color Transmissive LCD (indoor display):
Very Low -> Low -> Medium -> High -> Very Low...
The hotpad defaults to whatever level was set when the
system was suspended. This hotpad does not repeat if
held down.
Increase
Contrast
Hotpad
Decrease
Contrast
Hotpad
Right Mouse
Button Hotpad
Volume
Hotpad
When tapped, LCD contrast becomes lighter by one
step. The contrast range is 16 steps.
This hotpad repeats if held down.
When tapped, LCD contrast becomes darker by one
step. The contrast range is 16 steps.
This hotpad repeats if held down.
Tapping this hotpad causes the next pen tap to be
interpret ed by the system as a right-mouse click. All
subsequent taps are interpreted as left-m ouse cli ck s,
unless preceded by a tap of this hotpad.
This hotpad adjusts the volume of the signal fed to the
internal speaker and the headphone jack. This hotpad
cycles through the following states:
High -> Medium -> Low -> Off -> High...
This hotpad does not repeat if held down.
Using the Hotpads 23
Page 36

Table 2-2 PenCentra 200 Hotpads (Continued)
Icon Name Description
When one of the programmable hotpads is tapped, it
causes an associated application to be launched. If the
associated application is already running when the
hotpad is pressed, that application is brought to the
foreground (a second instance of the application is not
Programmable
Hotpads
#1, 2, and 3
started).
You can define which application will be launched by
configuring the Ap pl ica tio n Launcher utility located i n the
Control Panel. Each programm able hotpad can represent
up to five different programs.
These hotpads do not repeat; pressing them more than
once has the same effect as pressing them once.
24 Using the PenCentra 200
Page 37

Chapter 3
Using Microsoft CE Applicati ons
The wide variety of programs delivered with the PenCentra 200 can be divided into
three general categories: Windows CE applications, Windows CE Services, and
Productivity Package applications. The Windows CE applications and CE Services
are covered in this chapter; the handwriting recogn ition applications are covered in
Chapter 4.
Note: Some of the applications covered in this chapter may not be applicable, depending
upon the customization performed by your reseller or IS department.
Windows CE A ppl ic atio ns 3
Microsoft Pocket Office 3
The Microsoft Office companion programs consist of Microsoft Pocket Word,
Microsoft Pocket Excel, Microsoft Pocket Access, and Microsoft Pocket PowerPoint.
These programs work with the Windows versions of the same programs on your
desktop computer to give you easy access to up-to-date copies of your documents.
You can create or edit Excel and Word files, PowerPoint presentation notes, and
Access databases and tables on your PenCentra 200. Word and Excel templates are
available to help you quickly create documents. Once you have created or edited a
document on your PenCentra 200, synchronize it with your desktop computer to
copy the new document to your desktop computer. For more information on
synchronization, see the section of this chapter entitled “Sychronizing Files and File
Conversion”.
To access the Office companion programs, select Start, Programs, Office, and then
the program you want to open.
Note: More information on the procedures described in this chapter, as well as
information on additional procedures, can be found in on-line Help on your
PenCentra 200. Select Start, Help, and then the program on which you want
information. Because Windows CE programs work si milarly to their cou nterparts
on the desktop computer, on-line Help covers basic procedures and the differences
between the companion programs and desktop programs. If you need more
information on using an Office program, see the documentation that came with the
desktop version of the prog ram .
Windows CE Applications 25
Page 38

Pocket Word : Cr ea ti ng D ocu me nts 3
You use Pocket Word to create documents, such as letters, meeting minutes, and
reports. You can also use Pocket Word to open and edit documents created in the
desktop version of Word. When you are ready to save a document you created or
edited, you can save it in a variety of formats, including Pocket Word (.pwd), Rich
Text Format (.rtf), and Word (.doc). If you plan to send the document through e-mail
to someone who will be using Word, not Pocket Word, be sure to save it in the Word
(.doc) format.
There are three ways to enter text in Pocket Word
• Using the on-screen keyboard. To open the on-screen keyboard, double-click on
the on-screen keyboard icon at the bottom of the display screen. Enter data with
the on-screen keyboard as you would with a regular keyboard.
• Using a keyboard. Install a PS/2-style keyboard to the system’s PS/2 plug, and
enter data using that device.
• Using Handwriting Recognition. Refer to the section of Chapter 4 entitled
“Using the Handwriting Reco gnition Utilities” for details on using the
handwriter recognition software supplied with your PenCentra 200.
You can type text in either Outline view (see Figure 3-1) or Normal view, and you
can easily switch from one view to the other, using the View menu. Work in Outline
view when taking notes in meetings; use headings to highlight the main points and
body text to add details.
26 Using Microsoft CE Applications
Page 39

Figure 3-1 Pocket Word Outline View
Taking notes using Pock et Word 3
1. Select File, New, and then Document from Template.
2. Select Meeting Notes and then OK.
3. Select File and then Save.
4. Enter a name, choose a storage location, and then select OK.
5. Replace the text in the Template.
Note: To see more of your document, select Full Screen on the View menu.
Windows CE Applications 27
Page 40

Pocket Excel: Creat in g Workbooks 3
You can use Pocket Excel to create workbooks, such as expense reports (see Figure
3-2) and mileage logs. You can also use Pocket Excel to open and edit workbooks
created in the desktop version of Excel. When you are ready to save a workbook you
created or edited, you can save it in a variety of formats, including Pocket Excel (.pxl)
and Excel (.xls). If you plan to send the document through e-mail to someone who
will be using Excel, not Pocket Excel, be sure to save it in the Excel (.xls) format.
Pocket Excel provides fundamental spreadsheet tools, such as formulas, functions,
sorting, and filtering. You can split panes to easily view different areas of a large
worksheet. You can also “freeze” the top and left-most panes in a worksheet to keep
row and column labels or other data visible as you scroll through a sheet.
To log expenses using Pocket Excel: 3
1.Select File, New, and then Workbook from Template.
2.Select Expense Report and then OK.
3.Select File and then Save.
4.Enter a name, choose a storage location, and then select OK.
5.Replace the text in the template.
28 Using Microsoft CE Applications
Page 41

Figure 3-2 Pocket Excel Spreadsheet
Windows CE Applications 29
Page 42

Pocket Access: Viewing and Creating Data 3
Use Pocket Access to view and update data derived from Microsoft Access, Microsoft
SQL Server, and other ODBC databases you have created on the desktop computer.
Simply create the database on your desktop computer and then transfer the data to
your PenCentra 200. For example, a sales organization might use Access on the
desktop computer to create a master database of products and order forms (see
Figure 3-3). The sales force can synchronize their PenCentra 200s with the master
database to get up-to-date product information and to upload completed client order
information. For more information on sy nchronizing, see the section of this chapter
entitled “Microsoft Windows CE Services.”
You can also use Pocket Access to create new databases, tables, and SQL procedures
directly on your PenCentra 200.
Figure 3-3 Pocket Access Database
30 Using Microsoft CE Applications
Page 43

To create a new database and table on your PenCentra 200: 3
1. Select Start, Programs, Office, and then Microsoft Pocket Access. If Access is
already running, select File and then Open/New Database. If you do not see
this command on the menu, select View and then Database View.
2. Enter a name for the database and select OK.
3. Double-tap or double-click the Create a new table icon.
4. In the Field Name box, enter a name.
5. From the Dat a Type list, select a data type. A field’s data type cannot be
changed after the table is saved.
6. Text boxes have a size limit of 255 characters. To enter longer notes, select the
Memo data type.
7. To enter numbers with decimal points, select the Float data type.
8. To ente r numbers between -32,768 and +32,767, select the Integer data type.
9. To enter smaller numbers, select the Small Integer data type.
10. To set the size limit of a field, enter an amount in the Field Size box. A field’s
size cannot be changed after the table is saved.
11. To index the field, select Yes from the Indexed list. Indexing a field allows
Pocket Access to find and sort information faster for that field.
12. Repeat these steps until you have created all the fields you want for your table.
13. Select File and then Save Table.
Note: If you have tables that you don’t want to keep updated on your PenCentra 200,
mark them as read-only when transferring them from the desktop to save time
during future synchronizatio n sessions. Windows CE Servi ces will not check for
updates the next time you synchronize.
Windows CE Applications 31
Page 44

Pocket PowerPoint: S how i n g P res en tati o ns 3
Use Pocket PowerPoint to quickly and easily deliver a professional presentation on
your PenCentra 200 (for one-on-one presentations). Simply create the presentation in
Microsoft PowerPoint on your desktop computer and then transfer the presentation
to your PenCentra 200. Your Pocket PowerPoint file will include the text, pictures,
notes, and layout position of the original Microsoft PowerPoint presentation, but will
not include animations or slide transitions.
Figure 3-4 Pocket Power Point Display
To show a presentation: 3
1. Using Windows CE Services, copy the presentation from your desktop computer to your PenCentra 200. For more information, see the section of this chapter entitled “Microsoft Windows CE Services.”
2. Select Start, Programs, Office, and then Microsoft Pocket PowerPoint.
3. In the Open Presen tation dialog box, select the presentation you want to show,
and then OK.
32 Using Microsoft CE Applications
Page 45

4. To change the presentation display and slide advance opti ons, select Tools and
then Set Up Show.
5. To start the show, select View and then View Show. If you chose Manual in
step 4, use the Previous and Next buttons to control the slides.
6. You can tailor a presentation while on the road by adding a new title slide to
your presentation. To do so, select Tools and then Title Slide.
Windows CE Applications 33
Page 46

V oi ce R eco rd er a nd InkWriter 3
Voice Recorder and InkWriter are programs for quickly capturing your ideas, notes,
and thoughts. With Voice Recorder, you can record reminders and ideas. With
InkWriter, you can take handwritten and typed notes and create drawings.
Note: More information on the procedures described in this chapter, as well as
information on additional procedures, can be found in on-line Help on your
PenCentra 200. Select Start, Help, and then the program on which you want
information.
Voice Recorder: Capturing Ideas and Thoughts 3
You can quickly capture ideas, reminders, and phone numbers with Voice Recorder.
Record button
Stop button
Play/pause button
Figure 3-5 Voice Recorder Player
34 Using Microsoft CE Applications
Page 47

To record and play a recording:
1. Select Start, Programs, Accessories, and then Microsoft Voice Recorder.
2. Hold your PenCentra 200’s microphone near your mo uth or other sound
source.
3. Select the Record button. You’ll hear a beep when recording begins.
4. To stop recording, select t he Stop button. The new recording appears in the
recording list.
5. To play a recording, double-tap or double-click it in the recording list. To pause
playback, select the Play/Pause button. Select Play/Pause again to resume
playback.
Note: You can play all of your recordings, one after another. Select the recording you
want to play first, select Control and then Play Sequential. The selected
recording and following recordings will be played. A short beep will sound between
recordings.
Windows CE Applications 35
Page 48

InkWriter: Creating Notes and Drawings 3
InkWriter, a text, graphics, and ink processor with Rich Ink technology, makes it easy
to write and draw the way you do on paper, but with the benefit of being able to edit
and format what you’ve written and drawn. With InkWriter, you can enter
information in the way that’s easiest for you. You can type using the keyboard, or
you can write and draw directly on the screen usin g your stylus or pointing device.
Writing button
Select button
Insert/Remove Space
Typed text
Drawing
Written Text
Figure 3-6 Using InkWriter to Create Drawings
To create an InkWriter document: 3
1. Select Start, Programs, Accessories, and then InkWriter.
2. Create your document:
36 Using Microsoft CE Applications
Page 49

• To write, select View and then Writing and use the stylus like a pen. If you are
using a pointing device, click and drag to write on the screen.
• To type, select View and then Typing and use the keyboard.
• To draw, select View and then Drawing and use the stylus like a pen. If you
are using a pointing device, click and drag to draw on the screen. You can also
create a drawing in Writing view by crossing three of the ruled lines on the
first str oke of the drawing.
3. When you are finished, select File and then Save.
Note: InkWriter can help you draw perfect circles, rectangles , triangles, and lines. In
Drawing view, draw the shape you want a nd use the Select tool to select it. Then,
tap on the shape. When the four-headed arrow appears, click on it. Select Choose
Shapes, and select the shape you want to co nvert the shape to.
Microsoft Pocket Outlook 3
The Microsoft Pocket Outlook program incl udes Calendar, Contacts, Tasks, and
Inbox. Using Windows CE Services, you can syn c hronize information in Microsoft
Outlook
with your PenCentra 200. Each time you synchronize, Windows CE Services
compares the changes you made on your PenCentra 200 and desktop computer and
updates both computers. For more information, see the section of this chapter
entitled “Microsoft Windows CE Services.”
, Microsoft Schedule+, or Mic rosoft Exchange on your desktop computer
Calendar, Contacts, and Tasks each consists of a card view and list view. The card
view is where you enter or view the details for each entry. The list view is where you
view all entries. With Inbox, you can send and receive e-mail messages, either
through synchronization with Outlook or Exchange on your desk top computer or by
connecting directly to your mail server through an Internet or network account.
You can access Pocket Outlook by selecting Start, Programs, Pocket Outlook, and
then the tool you are interested in.
Note: More information on the procedures described in this chapter, as well as
information on additional procedures, can be found in on-line Help on your
PenCentra 200. Select Start, Help, and then the program you want information
on.
Microsoft Pocket Outlook 37
Page 50

Calendar: Scheduling Meetings and Appoi ntm en ts 3
Use Calendar to schedule appointments, meetings, and other events. You can check
your appointments in one of several views (Day, Week, Month, Year, and Agenda)
and easily switch among the vie ws by selecting the corresponding toolbar button.
New Appointment Button View Buttons
Figure 3-7 Pocket Outlook Calendar (Weekly View)
38 Using Microsoft CE Applications
Page 51

To create a new appointment: 3
1. From any view, select the New Appointment button.
2. Enter a description and a location.
3. Select the time and date.
Notes Button
Categories Button
Attendees Button
Notes Area
Figure 3-8 Pocket Outlook Appointment Screen
4. To add notes, select the Notes button, and then select the notes area. Enter your
notes.
5. To assign the appointment to a category, select the Categories button and select
a category from the list.
6. Select other desired options and then OK when finished.
Note: To quickly add an appointment in Day or Week view, select the time and type the
description and location. Enter the location in parentheses if you want Calendar to
recognize it as the location. Fo r example, “Lunch (Cafeteria).”
Microsoft Pocket Outlook 39
Page 52

If you need to schedule a meeting with people who use Outlook, Pocket Outlook, or
Schedule+, you can use Calendar to schedule the meeting. When attendees receive a
meeting request, they can choose to accept or decline the meeting. If they accept, the
meeting is automatically added to their schedule. In addition, their response is
automatically sent back to yo u, and your calendar is updated.
Before you can send a meeting request, you will need to enter e-mail addresses in
Contacts and set up Inbox to send and receive messages. For informatio n on using
Contacts and Inbox, see “Contacts: Tracking Friends and Colleagues” and “Inbox:
Sending and Receiving E-mail Messages” later in this chapter.
To create a meeting request: 3
1. Select Tools, Options, and then choose a mail transport. If you send and receive
messages using synchronization, select ActiveSync. If you connect to an ISP or
network, select the service you set up in Inbox.
2. Select File and then Make Meeting.
3. Enter the meeting information.
4. Select the contacts you want to invite.
5. Select other desired options and then OK.
Inbox automatically creates a meeting request and sends it to the attendees the ne xt
time you connect to your mail server or synchronize with your desktop computer.
Note: Your PenCentra 200 will remind you about your appointments and meetings by
sounding an alarm, flashing the notification light, or displaying a message on the
screen. To chang e h o w your are notified, select Tools and then Options. Select the
Alarm button and then Reminder Options.
40 Using Microsoft CE Applications
Page 53

Contacts: Tracking Friends and Colleag ues 3
Contacts maintains a list of your friends and colleagues so that you can easily find
the information you’re looking for, wheth e r you’re at home or on the road. Using the
PenCentra 200’s infrared port, you can also quickly share Contacts information with
other Windows CE-based mobile device users.
Figure 3-9 Pocket Outlook Contacts Screen
To create a new contact: 3
1. Select File, then New Contact.
2. Enter a name.
3. Select the Business or Personal button and enter information in the appropriate
fields. Supply an e-mail address if you want to send meeting requests and
e-mail messages to this contact.
4. To add a note or assign the contact to a category, select the Notes/Categories
button. Then select the notes area and enter your notes, or select a category
from the list.
Note:
Microsoft Pocket Outlook 41
Page 54

Notes/Categories Button
Personal Button
Business Button
Figure 3-10 Adding a New Contact
Tasks: Keeping a To Do List 3
Use Tasks to keep track of what you have to do. Overdue tasks are displayed in bold
(and in red on color devices).
New Task Button
Double-tap or double-click to
display or edit a task card.
Figure 3-11 Keeping a To Do List
42 Using Microsoft CE Applications
Page 55

To create a new task: 3
1. Select the New Task button.
2. Enter a description.
3. Select the start date, due date, and other information.
4. To add notes, select the Notes button and then the notes area. Enter your notes.
5. To assign the task to a category, select the Categories but t on and select a
category from the list.
6. Select other desired options and then OK.
Note: To mark a task as complete, in the task list, select the check box in the Status
column. To delete all completed tasks, select Edit and then Delete Completed
Tasks.
Notes Button
Categories Button
Notes Area
Figure 3-12 Creating a New Task
Microsoft Pocket Outlook 43
Page 56

Inbox: Sending and Receiv ing E-ma il Messag es 3
Use Inbox to send and receive e-mail messages. You can access your e-mail by
connecting to a mail server through an Internet or network account or by
synchronizing with your deskto p computer.
E-mail messages you send and receive
through synchronization are stored here.
When you set up the Inbox, a service is added
to the Inbox window. Mail folders are stored
under the s ervice name.
The double-arrow icon marks off-line
folders. Messages in these folders
can be viewed even when you are
not connected.
Connect Button
Figure 3-13 Sending and Receiving E-mail
44 Using Microsoft CE Applications
Page 57

Connecting to a mail server 3
You can send and receive messages by connecting directly to your mail server. Use a
modem to connect to your Internet service provider (ISP), or use a modem or
Ethernet card to connect to the local area network that your mail server is connected
to. In addition to creating a connection to your ISP or network, you must give Inbox
the information it needs to communicate with your mail server.
Note:
Inbox does not currently support connecting with proprietary mail protocols such
as AOL
® and MSN. However, yo u can still gain access to the Internet through
these services. There may be third-party programs available that would enable you
to send and receive mail through proprietary protocols. Try searching the Internet
on the keyword “Windows CE” to find third-party programs for your PenCentra
200.
Setting up Inbox for connecting to a mail server 3
1. Get the following informatio n from your ISP or network administrator: POP3
or IMAP4 server name, SMTP host name, user name, password, and domain
name (for network connections only ).
2. Select Start, Programs, Pocket Outlook, and then Inbox.
3. Select Services and then Options.
4. On the Services tab, se lect Add.
5. Choose IMAP4 Mail or POP3 Mail, enter a name for the connection, and then
select OK.
6. In the Mail Service Definition dialog box, enter the information from step 1. In
Connection, choose the remote connection you want to use. (If you are
receiving e-mail through a network connection, Select Network Connection.) If
you have not created a connection, select Create new connection, double-tap or
double-c lic k t h e Make N ew Connection ic on, a nd f oll o w th e i nst r uc tio ns in th e
wizard. When finished, select Inbox in the Taskbar and continue setting up
Inbox. For more information, see “Chapter 6: Getting Connected Remotely.”
7. In the Mail General Preferences dialog box, select desired options.
8. In the Mail Inbox Preferences dialog box, select desired options.
• In When Getting Messages, choose how you want messages downloaded by
default. Choosing Get full copy of messages will take up more storage space
on your PenCentra 200. Choosing Only synchronize Inbox folder hierarchy
(IMAP4 only) will speed up the time it takes to download your messages.
Microsoft Pocket Outlook 45
Page 58

• In When Getting Full Copy, choose whether you want to download file
attachments and meeting requests when you get full copies of messages. This
setting applies whether you have chosen to download full copies of messages
by default, or if you selectively download full copies of messages by opening
the message and selecting the Get Full Copy button. In addition, if you want
to receive meeting requests, your Exchange Server administrator must enable
support for Rich T ext Format for your account. Ask your administrator if this
feature is enabled for you.
Downloading messages 3
To send and receive e-mail, select the Services menu and make sure that the service
you want to use is selected (the selected service has a bullet next to it.) Then, select
the Connect button. When you connect to the mail server, the messages on your
PenCentra 200 and mail server are synchronized: new messages are downloaded to
the PenCentra 200 Inbox folder, messages in the Outbox folder are sent, and
messages that have been deleted on the server are removed from the Inbox. These
folders are stored under the service you created when setting up Inbox. Double-tap
or double-click a message in the message list to open it. If you read a message and
decide that you need the full copy, select the Get Full Copy button.
Disconnecting from the server 3
To disconnect Inbox from your mail server, select the Connect button again. You also
need to disconnect your dial-up connection by double-tapping or double-clicking the
icon in the status bar and selecting Disconnect.
Managing messages and folders 3
By default, messages are displayed in one of four folders in the service you created:
Inbox, Deleted (local), Outbox, an d Sent. The Dele ted (local ) folder contains mes sages
that have been deleted on the PenCentra 200. If you are using IMAP4, you may see a
Deleted Items folder. This folder is for deleted messages on the server. The behavior
of the Deleted and Sent folders depends on the Inbox options you have chosen.
If you want to organize messages into additional folders, select File, Folder, and then
New Folder. Then, drag messages into the folder you created. The behavior of the
folders you create depends on whether you are using POP3 or IMAP4.
46 Using Microsoft CE Applications
Page 59

Show Attachments Button
Select the Get Full Copy button to download
the rest of the message the next time you connect.
Double-tap or double-click an attachment to mark it
for downloading the next time you connect. If it has
already been downloaded, double-tap or doubleclick it to open it.
Figure 3-14 Downloading E-mail Messages
If you are using POP3, when you drag messages to a folder you created, the link is
broken between the messages and their copies on the mail server. The next time you
connect, the mail server will see that the messages are missing from the PenCentra
200 Inbox and delete them from the server. This prevents you from having duplicate
copies of a message, but it also means that you will no longer have access to the
messages you move to the folders you create from anywhere except your PenCentra
200.
If you are using IMAP4, the folders you create and the messages you move are
mirrored on the server. For example, if you move two messages from the Inbox
folder to a folder called Family, the server will create a copy of the Family folder and
copy the messages into that folder. Therefore, messages are available to you anytime
you connect to your mail server, whether it is from your PenCentra 200, laptop
Microsoft Pocket Outlook 47
Page 60

computer, or desktop computer. This synchronization of folders occurs when you
create a new folder, move messages into a folder, exit the Inbox program, or select
Synchronize Folders on the Services menu. If you want to view the messages in a
folder while disconnected from your mail server, select the folder and then Off-line
Folder on the Services menu.
ActiveSync: Synchronizing E-mail 3
Another way to access your e-mail is by synchronizing your PenCentra 200 and
desktop computer. Using Windows CE Services on your desktop computer, you can
send and receive e-mail messages by exchanging informa tion between Inbox on your
PenCentra 200 and Inbox in either Outlook or Exchange on your desktop computer.
When you synchronize, any changes made on either computer are transferred to the
other. If you have received new messages in Inbox on your desktop computer, the
messages are copied to your PenCentra 200. If you delete a message on the
PenCentra 200, it is deleted from the desktop the next time you synchronize. If you
compose and send new e-mail messages on your PenCentra 200, the m essages are
moved to the desktop computer and sent the next time you synchronize. In addition,
changes you’ve made to Calendar, Contacts, and Tasks are updated.
If you are receiving e-mail by synchronizing with your desktop computer, the
PenCentra 200 Inbox is set up by default. However, because e-mail messages are not
synchronized by default, you will need to set up Windows CE Services on your
desktop computer to include e-mail messages when synchronizing. To do so, select
your PenCentra 200 icon in the Mobile Devices folder on the desktop and then click
ActiveSync Options on the Tools menu. Click the Options button to set o pti o ns su ch
as how much of a message to download and wh e t her you want attachments
included. You will not be able to change these settings from your P enCentra 200. For
specific instructions on setting up and using synchronization, see “Chapter 7:
Microsoft Windows CE Services.”
Downloading messages 3
To send and receive e-mail, connect to your desktop computer and initiate
synchronization. The way you in itiate synchronization depends on how you are
connected to your desktop computer and the settings you have chosen in Windows
CE Services. For more information, see “Chapter 7: Microsoft Windows CE Services.”
When you synchronize, the first 50 lines of new messages in Inbox on the desktop
computer are copied to the Inbox folder on your PenCentra 200, and messages in the
Outbox folder are sent. These folders are stored under the ActiveSync service in
Inbox. Double-tap or double-click a message in the message list to open it.
48 Using Microsoft CE Applications
Page 61

Managing messages and folders 3
Messages are stored in one of four folders in the ActiveSync service: Inbox, Deleted
(local), Outbox, and Sent. The behavior of the Deleted and Sent folders depends on
the Inbox options you have chosen.
If you want to store messages in a folder other than Inbox, select File, Folder, and
then New Folder. Create the folder and then drag messages into it. Doing so breaks
the link between these messages and their copies on the desktop computer. When
you synchronize next, the messages in the fol der you created will not be
synchronized. In addition, the desktop computer will see that the messages are
missing from the PenCentra 200 Inbox folder and delete them from the Inbox folder
on the desktop so that both Inbox folders match. This prevents you from getting
duplicate copies of a message, but it also means that you will no longer have access
to the messages you move out of Inbox except from your PenCentra 200.
Sending a message 3
To send a message: 3
1. Select Compose and then New Message.
2. Select the To field and enter the address of one or more recipients, or select
Address Book to select addresses from the Contacts list or an address service.
3. Select the Subject field and enter a title for the message.
4. Select the message body and type your message.
5. To attach a file, select the Add Attachment button.
6. Select the Send button.
If you are not connected to your mail server, the message is moved to the Outbox
folder and will be sent the next time you connect or synchronize.
Microsoft Pocket Outlook 49
Page 62

Send Button
Add Attachments Button
Address Book Button
Figure 3-15 Sending an E-mail Message
Getting Connected Remotely 3
If you want to use your PenCentra 200 to connect to your desktop computer, a
network, or the Internet while away from your office, you must create a dial-up
connection. This is called remote networking. You have the following remote
networking options:
• Connect to your Internet service provider (ISP). Once connected, you can send
and receive e-mail messages and view Web pages. If this is the method you want
to use, see “Connecting to an ISP.”
• Connect to the network at your company or organization. Once connected, you
can send and receive e-mail message s, view intranet Web pages, and access files
on the network. If this is the method you want to use, see “Connecting to Your
Network.”
50 Using Microsoft CE Applications
Page 63

• Connect to your desktop computer to synchronize remotely. Once connected, you
can synchronize information such as yo ur Pocket Outlook data. If this is the
method you want to use, see “Connecting to Your Desktop Computer to
Synchronize Remotely .” For more information on synchronization, see “Windows
CE Services.”
Connecting to an ISP 3
You can connect to your ISP by creating a dial-up connection. Once connected, you
can send and receive e-mail messages and view Web pages.
To create a dial-up connection to an ISP: 3
1. If your PenCentra 200 does not have a built-in modem, install a modem card.
2. Get the following information from your ISP: ISP dial-up access telephone
number, user name, and password.
3. Select Start, Programs, Communications, and then Remote Networking.
4. Double-tap or double-click the Make New Connection icon.
5. Enter a name for the connection, such as “ISP Dial-Up,” select D ial-Up
Connection, and then select Next.
6. Select your modem type.
7. You should not need to change any settings in the Configure or TCP/IP
Settings dialog boxes. Most ISPs now use server-assigned addresses. If the ISP
you are connecting to does not use server-assigned addresses, enter the
addresses in the TCP/IP Settings dialog box. When finished, select Next.
8. Enter the access phone number and select Finish.
Once you have created the dial-up connection, you simply double-tap or
double-click the connection, enter your user name and password, and select
Connect any time you want to connect. Once connected, you can use Pocket
Internet Explorer to visit Web pages or Inbox to send and receive e-mail. Before
you can use Inbox, you need to provide the information it need s to communicate
with the mail server. For specific instructions, see “Inbox: Sending and Receiving
E-mail Messages” in Chapter 5.
Getting Connected Remotely 51
Page 64

Connecting to Your Network 3
If you have access to a network, you can send e-mail, access file servers, view
intranet pages, and possibly access the Internet. You can connect to your network in
one of two ways:
• Create a dial-up connection using a RAS account. Before you can create this
dial-up connection, your network administrator will need to set up a RAS account
for you. If this is the method you want to use, see “To create a dial-up connection
to a network.”
• Use an Ethernet card and a net tap to connect to the network. If this is the method
you want to use, see “To create a network (Ethernet) connection.”
To create a dial-up connection to a network: 3
1. If your PenCentra 200 does not have a built-in modem, install a modem card.
2. Get the following information from your network administrator: corporate
dial-up access telephone number, user name, password, and domain name.
3. Select Start, Programs, Communications, and then Remote Networking.
4. Double-tap or double-click the Make New Connection icon.
5. Enter a name for the connection, such as “Corporate Dial-Up,” select Dial-Up
Connection, and then select Next.
6. Select your modem type. You should not need to change settings in the
Configure or TCP/IP Settings dialog boxes. When finished, select Next.
7. Enter the access phone number and select Finish.
Once you have created the dial-up connection, you simply double-tap or
double-click the connection, enter your user name, password, and domain, and
select Connect any time you want to connect. Once connected, you can use Pocket
Internet Explorer to visit intranet Web pages and Inbox to send and receive
e-mail. Before you can use Inbox, you need to provide the information it needs to
communicate with the mail server. For specific instructions, see “Inbox: Sending
and Receiving E-mail Messages” earlier in this chapter.
To create a network (Ethernet) connection: 3
You do not need to create a new connection in Remote Networking on your
PenCentra 200 for a network connection. Instead, you must install and configure an
52 Using Microsoft CE Applications
Page 65

Ethernet card. You must have an NE2000-compatible Ethernet card. The drivers for
the card already exist on your PenCentra 200.
1. Insert the Ethernet card into your PenCentra 200 and connect it to your network
cable.
2. You may see a message warning about battery power. If you have an A/C
Adapter, plug it into your PenCentra 200.
3. Perform one of the following steps, depending upon whether the Settings
dialog box opens au tomatically.
• If the Settings dialog box is displayed automatically, enter the information
for your server . S ee your network administrator if you need a ssistance. You
should not have to change these settings.
• If the Settings dialog box is not displayed automatically, go to Start,
Settings, Control Panel, and double-tap or double-click Network. Select
your Ethernet driver and select Properties.
4. Select Start, Settings, Control Panel, and double-tap or double-click Network.
In the Identification tab, enter your name, password, and domain.
Once connected, you can use Pocket Internet Explorer to visit intranet Web pages
and Inbox to send and receive e-mail. Before you can use Inbox, you need to
provide the information it needs to communicate with the mail server. For specific
instructions, see “Inbox: Sending and Receiving E -mail Messages” in Chapter 5.
Connecting to Your Desktop to Synchronize Remotely 3
To synchronize remotely, the following conditions must be met:
• You must first establish a partnership between your PenCentra 200 and desktop
computer while at your desktop computer.
• The desktop computer must be turned on and you must be logged in. Schedule+,
Exchange, or Outlook must be running with your user profile.
• In the lower-right corner of the Mobile Devices window, the connection status
must show Waiting for mobile device to connect.
• In the ActiveSync Options dialog box in Windows CE Services, synchronization
must be enabled. (Or you can select Automatically synchronize if data is
out-of-date.)
Getting Connected Remotely 53
Page 66

• If you are communicating through a modem connected to the desktop computer,
the modem must be turned on. Also, the Auto Connect should be set to At all
times in Windows CE Services. Otherwise, a Mobile Devices window must be
open.
• If you are communicating with the desktop computer through a dial-up or
network connection, you must be logged o n to the network on the desktop
computer . Bef ore you leave, select Enable a network connection in the Windows
CE Services Properties dialog box.
If your computer must be turned off while you are away from your office, you
cannot synchronize remotely. However, you can dial in directly to your network to
receive your e-mail. For more information, see “Connecting to Your Network.”
If the above conditions are met, you can syn chronize with your desktop computer
while away from the office in one of three ways:
• Create a dial-up connection using a RAS account. Before you can create this
dial-up connection, your network administrator will need to set up a RAS account
for you. Once connected to the network, your PenCentra 20 0 will find your
desktop computer and initiate synchronization. If this is th e me thod you want to
use, see “To create a dial-up connection to a network.” Once the connection has
been created and you are connected, select Start, Programs, Communications,
and then ActiveSync on your PenCentra 200. In the ActiveSync dialog box, select
the dial-up connection you created as the method to connect and the name of the
computer you want to connect to.
• Use an Ethernet card to connect to the network. Once connected to the network,
your PenCentra 200 will find your desktop computer and initiate
synchronization. If this is the method you want to use, see “To create a network
(E,nInco6(In)-6.2(.)]TJ/F4 1 Tf-9.9575 0 TD0 Tc0 Tw(”)Tj/F7 1 Tf0.509 0 TD0.0062 Tc0.0045 Tw[( O58.4(n)-5.8(ce )12tm)-8.8he co68.4(n)-5.8nection-6.3(hn)-5.8rasb(e)1173(en)-5.8( cr)24.1(eated )12a(n-6.3d yo)-7.7co68.4(u ar)24.1(k )]TJ-10.0177 -1.2049 TD0.0015 Tc0.0015 Tw[ connected, e(lect )]TJ/F14 1 Tf-7.1612 0 TD0.004 Tc0 Tw[(Sta)10(r)-4.6(t)]TJ/F7 1 Tf2.1808 0 TD0.003 Tc(, )Tj/F14 1 Tf0.494 0 TD0.0311 Tc[Praa, Communices n een Actvna964(Se)-012(y)-6.9(n)-012nc
54 Using Microsoft CE Applications
Page 67

To create a dial-up connection to a desktop modem 3
Note: If you are a Windows 95 user, you will need to install the Dial-Up Networking
Upgrade 1.2 and create a user account if User Level Access is enabled in Dial-Up
Networking. If you are a Windows 98 user, you will need to add a second dial-u p
adapter. For more information, see Windows CE Serv ices Help.
1. Follow the modem manufacturer’s directions to install a modem on your desk-
top computer.
2. Note the telephone number for your desktop computer modem.
3. On your desktop computer, open the Mobile Device folder. Click File and then
Communications.
4. Under Device Connections via Serial Port, click your modem in the Ports list.
5. Click Enable mobile device connection.
6. Click Enabled in both Device Connections via Serial Port and Device
Connections via Network.
7. Follow the steps in “To create a dial-up connection to an ISP” to create the
connection. Substitute the phone number you noted in step 2 for the ISP dial-in
number.
Getting Help on Connecting Remote ly 3
More information on the procedures described here, as well as information on
additional procedures, can be found in the following locations:
•“Inbox: Sending and Receiving E-mail Messages” in this chapter.
•“Microsoft Windows CE Services” in this chapter.
• On-line Help on your PenCentra 200. Select Start, Help, and then Inbox, Remote
Connections, or Synchronization.
• Windows CE Services online Help on the desktop computer. Open the Mobile
Devices folder and then click Windows CE Services Help Topics on the Help
menu. Troubleshooting information is also contained here.
Getting Connected Remotely 55
Page 68

Microsoft Windows CE Ser vices 3
Microsoft Windows CE Services with ActiveSync ena b les you to synchronize th e
information on your desktop computer with the information on your PenCentra 200.
Synchronization is the process of comparing the data on your PenCentra 200 with
your desktop computer and updating both computers with the most recent
information. For example:
• Keep Pocket Outlook data up-to-date by sy nchronizing your PenCentra 200 with
your choice of Microsoft Outlook (Inbox synchronization with Outlook Express is
not currently supported), Microsoft Schedule+, or Mic rosoft Exchange on your
desktop computer.
• Synchronize Word and Excel documents, Access and other ODBC databases and
tables, and InkWriter documents between yo ur PenCentra 200 and desktop
computer. Your files are automatically converted to the correct format.
• With Windows CE Services, you can also:
• Back up and restore your PenCentra 200 data.
• Add and remove programs on your PenCentra 200.
• Copy (rather t ha n synchronize) f il e s b et w e en your PenCentra 200 and your
desktop computer.
Installing Window s C E S erv ic es a nd Se tting up a Partnership 3
1. If you want to upgrade to Microsoft Outlook 98, install it first.
2. Use a stand ard serial cable to connect your PenCentra 200 to your desktop
computer.
3. Insert the Desktop Software for Microsoft Windows CE CD-ROM into your
CD-ROM drive.
4. The Windows CE Services Setup Wizar d should start automatically. If it doesn’t,
click the Start button, then select Run. In the Open box, type d:\setup, where d
is your CD-ROM drive. Click the OK button.
5. Follow the directions on your screen.
Once installation is complete, a wiz ard will instruct you to connect your PenCentra
200 and desktop computer and guide you through setting up a partnership and
performing your first synchronization. Some items, such as messages, are not
synchronized by default. To change the type of items that get synchronized after
56 Using Microsoft CE Applications
Page 69

you’ve completed the wizard, select your device icon in the Mobile Devices fold er
and then click ActiveSync Options on the Tools menu.
If you are synchronizing with a co mputer running Windows 95/98, you can also use
an infrared connection to synchronize. For more information, see Windows CE
Services Help.
Note: Regularly back up your PenCentra 200 data on your desktop computer u sing
Windows CE Services in case information on your PenCentra 200 is ever
corrupted or lost. Connect your PenCentra 200 and then click Backup/Restore on
the Tools menu in th e Mobile Devices folder on your desktop computer. You r first
back up may take some time, depending on how much information you have on
your PenCentra 200. Subsequent backups will be faster if you select Incremental.
Synchronizing File s an d Fi le C onve r sio n 3
One way to move documents to your PenCentra 200 is to simply connect your device
and desktop computer, open your device icon in the Mobile Devices folder, and drag
the files. Copies of the files will be placed on your PenCentra 200, and files will be
automatically converted to a format that the PenCentra 200 can read. However, if
you have documents that you update frequently on both your PenCentra 200 and
desktop computer, you may want to synchronize the copy on your desktop computer
with the one on your PenCentra 200 so that you always have an up-to-date copy on
both computers. To do so, store the files you want to synchronize in the
Synchronized Files folder on the PenCentra 200 and desktop computer. During
synchronization, files are updated in both locations.
Note: On the PenCentra 200, the Synchronized Files folder is in the My Documents
folder. On the desktop computer, the Synchronized Files folder is called “device
Synchronized Files”, where “device” is the name of your PenCentra 200. If you are
using Windows 95/98, the folder is located in the My D o cuments folder (c:\My
Documents\device Synchronized Files). If you are using Windows NT, the folder
is located in the Personal folder (c:\Winnt\Profiles\your
username\Personal\device Synchronized Files).
When you transfer a file from your desktop computer to your PenCentra 200, the file
is converted to a format that the PenCentra 200 can read. During file conversion,
some of the file’s attributes may be changed or removed, and the file extension is
changed. For example, when you transfer a Microsoft Word file to your PenCentra
200, some of the file’s formatting may be removed or changed, and the file extension
is changed to.pwd (Pocket Word). When this file is transferred back to the desktop
computer, the file extension is converted back to .doc, but any changed or removed
formatting will still be lost. Therefore, if you are usin g the Synchronized Files folder
to transfer files and you want to preserve all formatting in the original document,
Microsoft Windows CE Services 57
Page 70

keep a copy of the original file in another folder. See Windows CE Servi c es Help f or
specific information on how file attributes are affected during conversion.
Note: If you have password protection on an Excel or Word file on your PenCentra 200,
you must first turn off the password protection before the file is synchronized with
the desktop computer. To do so, open the file, select File, select Password, and
clear the Password field
Remote Synchronization 3
Note: Be sure to log out of CE Se rvices prior to removin g the serial cable. If y o u do not
log out, CE Services will continue to look for a connection when the cable is not
installed.
You can synchronize with your desktop computer while away from the office by
connecting to your network or directly to your computer via a modem attached to
your computer. For more information, see “Connecting to Your Desktop Computer
to Synchronize Remotely” earlier in this chapter.
Getting Help on Windows CE Services 3
For additional setup, usage, and troubleshooting information, see online Help on the
desktop computer by choosing Windows CE Services Help Topics on the Help
menu in the Mobile Devices folder.
58 Using Microsoft CE Applications
Page 71

Chapter 4
Using the Handwriting Recog nition Util ities
This chapter contains informati on about the handwriting utilities on your PenCentra
200.
• CalliGrapher® handwriting recognition utilities are included with PenCentra 200
pen tablets that have Windows CE 2.11 installed.
• Systems with Microsoft H/PC 2000 installed use Handwriter for HPC 2000 -including Jot -- as a handwriting recognition utility.
The Windows CE-based programs that are loaded on your PenCentra 200 are
discussed in Chapter 3.
What is CalliGrapher? 4
CalliGrapher version 5.3 from ParaGra ph adds natural handwriting recognition
capability to your PenCentra 200 fo r all handwriting styles -- cursive, print or m ixed .
CalliGrapher analyzes pen strokes written in any application window, converts the
pen strokes into text and sends the recognized text to a target application. Employing
advanced fuzzy logic and neural net techniques, Ca lliGrapher recognizes arbitrary
alphanumeric strings as well as words from its integrated dictionary.
CalliGrapher also offers a comprehensive spell checker for all Windows® CE 2.11
applications.
CalliGrapher for Windows CE gives you the fr eedom to enter information quickly
and efficiently into your PenCentra 200.
(Portions of this chapter relating to ParaGraph and CalliGrapher are copyright (C) 1998-2000 ParaGraph,
a business unit of Vadem. ParaGraph and CalliGrapher are registered trademarks of ParaGraph).
What is CalliGrapher? 59
Page 72

Getting started 4
Do you see a pen image on the taskbar? It would look like one of these pictures:
The pen image indicates that CalliGrapher is already running. Note that switching
your system on and off does not close CalliGrapher. CalliGrapher will produce an
error message indicating that it cannot load a DLL if you didn’t reset the system
when you were asked to do so by the installation program.
Start CalliGrapher (if it is not already running). To do this, find the CalliGrapher icon
on your PenCentra 200 desktop. It looks like this:
Double-tap on it (or tap once and then press "Enter").
After CalliGrapher starts, you’ll see the pen and the marker images in the taskbar
tray (in the bottom right corner of the screen).
Press your pen tip on either of those images and keep it pressed for a while (until
you hear a "click") to activate the CalliGrapher menu.
Note: In CalliGrapher, the operations done by tapping on something and by pressing the
pen and waiting for a "click" are often different.
60 Using the Handwriting Recognition Utilities
Page 73

A check mark appears next to the "Pen" menu item. This confirms that now you can
write on the screen:
If you tap on "Pen", the ability to use the pen will be turned off, and your stylus will
operate as if CalliGrapher is not running.
When the pen is turned off, the pen image in the taskbar tray looks like this:
To turn the pen back on, just tap on the pen image.
The Two Icons Explained 4
By default, CalliGrapher displays only one icon on the taskbar - the pen icon. If you
ever select the drawing mode, the second one - the marker icon - will be added. You
can do it by selecting "ScreenDraw" in the CalliGrapher menu.
Any of those may be highlighted, or none at all, like this:
Pen highlighted
(Recognition mode)
In the Recognition mode, CalliGrapher translates your handwriting into text and
pastes in into the active window. This is the mode we’ll be discussing here.
Marker highlighted
(ScreenDraw mode)
No highli ght
(CalliGrapher off)
Getting started 61
Page 74

In the ScreenDraw mode, you can just draw sketches on top of the screen. This mode
will be explained later.
In any mode you still can use the pen for its regular tasks. For exam ple,
double-tapping on the desktop icons or tapp ing on the dialog box buttons will work
as usual.
You can switch between modes either by tapping on the appropriate taskbar icon or
by selecting the corresponding menu item from the CalliGrapher menu.
Tapping on the icon of the currently selected mode turns CalliGrapher off. Tap on
any CalliGrapher taskbar icon to turn it back to the desired mode.
You can select "Options..." from menu to set what icons are shown on a taskbar (tap
on the "Icons" tab in the "Options" dialog box).
In all of the following examples we assume that the pen is turned on.
Now start an application such as Pocket Word. Your screen should look like this:
Now you are ready to use CalliGrapher’s recognition and spell-checking features.
62 Using the Handwriting Recognition Utilities
Page 75

Basic writing and corrections 4
CalliGrapher recognizes whole words and phrases. Here is the whole phrase "The
quick brown fox" written while running Microsoft’s Pocket Word:
After a short pause, the writing is recognized. Suppose CalliGrapher produces the
following:
Basic writing and corrections 63
Page 76

It should be "brown", not "frown". Use the correction gesture to change the text:
Note that the direction of the gesture is signif icant.
The gesture should be written from left to right, and the right part sh ould be at least
twice as long as the left one, like this:
Now the Correction Window appears:
64 Using the Handwriting Recognition Utilities
Page 77

Tap on the word "frown" in the Correction Window. The caret appears under the
letter you tapped on. It indicates the place where the changes will be m ade:
Tap on the caret (or double-tap on the word "frown"). The pop-up menu appears:
Basic writing and corrections 65
Page 78

In the top portion of the menu, CalliGrapher gives suggestions for this word, and the
word "brown" is among them. When you tap on it "frown" is replaced with "brown"
in the Correction Window:
All you have to do now is to tap on the "OK" button in the upper right corner of the
Correction Window. The text in Pocket Word changes automatically:
66 Using the Handwriting Recognition Utilities
Page 79

If the right word didn’t appear in the menu, simply write the desired letter above the
wrong one to correct it:
What is displayed in the Correction Win dow? 4
How does CalliGrapher know what do you want to correct when you make a
correction gesture?
First, if you made a correction gesture just after writing something, and didn’t select
any text after that, CalliGrapher assumes you want to correct your last written phrase
and displays it in the Correction Window.
If you have selected any text in your current application (i.e. Pocket Word), that text
would be displayed in the Correction Window.
Finally, if you make the correction ge sture and don’t lift the pen tip until the
correction window is displayed, the whole text in your current application would be
selected and displayed in the Correction Window. This is j ust a shortcut for two
actions: selecting all text and then making the correction gesture.
Gestures and spell checking 4
Spell checking works for all text, whether or not it was originally entered with a pen.
Let’s take the phrase from our previous recognition example, "The quick brown fox"
and turn it into the complete sentence by adding "jumps over a lazy dog". Change the
Gestures and spell checking 67
Page 80

68 Ug the H20606andw20606r R20606ec60eognitinUs
Page 81

CalliGrapher spell checker for the word "broun" (whereas the earlier correction
example used recognition alternatives). Note that the word "brown" is one of them.
Now select the correct word from the menu, and it replaces the wrong one in the
Correction Window:
Gestures and spell checking 69
Page 82

Press the "OK" button.The text in Pocket Word is correct again:
To erase a word, first cross it out with a single horizon tal line (from left to right):
70 Using the Handwriting Recognition Utilities
Page 83

It will become selected:
Now just draw the erase gesture (horizontal line from right to left):
Here is the result:
Gestures and spell checking 71
Page 84

To capitalize a letter with a single gesture, start at the base of the letter you want to
change and write a vertical line upwards:
The result:
Close the Correction Window without accepting the edits by tapp ing the button with
an "X" on it in the upper right of the window. It is to the right of the "OK" button.
Text Editing Using CalliGrap her 4
Up to this point, you have been editing through the correction window. You can also
edit text directly within your document.
You can quickly erase text using the Erase gesture, which is one single horizontal line
drawn from right to left. This gesture’s effect is similar to that of the Back Space key.
72 Using the Handwriting Recognition Utilities
Page 85

If no text is selected in the window, the symbol or space immediately to the left of the
cursor will be erased and the cursor will reposition itself one space to the left. In the
following example several words are selected, and will be erased with the gesture.
The selected text has been erased:
Text Editing Using CalliGrapher 73
Page 86

To insert a carriage return at the cursor position use the Carriage Return gesture,
which resembles a reversed upper case "L". Be sure to extend the length of the base
horizontal portion of the stroke to at least twice the down stroke portion.
Note that the cursor has moved to the line below the text:
Now use the Erase gesture (horizontal line from right to left) to erase the carriage
return and bring the cursor back to the end of the phrase.
Tap on the word "brown" between the "r" and the "o". The cursor will move between
the letters. Use the Insert Space gesture to insert a blank space at the cursor position:
74 Using the Handwriting Recognition Utilities
Page 87

The space is inserted:
Use the Erase gesture again to remove the unneeded space. As you have learned
earlier you can change the case of letters in the Correction Window by using the Case
Changing gesture. It is simply an upward vertical stroke while the letter is selected.
The same gesture can be used to similarly edit text in any window. First select the
characters (individual letters, whole words or groups of words). Use the Case
Changing gesture to change the case of the selection:
Text Editing Using CalliGrapher 75
Page 88

And the word "quick" becomes "QUICK":
To reverse the action just completed use the Undo gesture to return the text to lower
case (this is identical to pressing the Alt and Z keys on the keyboard). No te that the
two ’legs’ of the gesture have the same length:
76 Using the Handwriting Recognition Utilities
Page 89

The text reverts to lower case:
You may use your stylus to change letters and words. For example, to change the
first letter in the word "brown" to "c", select the letter you wish to change, then
simply write the substitute letter:
Text Editing Using CalliGrapher 77
Page 90

The recognized letter "c" replaces the selected "b":
78 Using the Handwriting Recognition Utilities
Page 91

You can select and overwrite an entire word. For example, the word "quick" can be
changed to "red":
Here is the resulting word substitution:
You can see these and other gestures in the CalliGrapher Help:
Text Editing Using CalliGrapher 79
Page 92

How to Select Te xt Usi ng Pen (Stylus) 4
You can select text with your pen just as you would in the standard mode by
pressing on your system display with the stylus and waiting for a "click" sound. With
the stylus still pressed to the screen, drag it across the text you wish to select. Lifting
the stylus ends the selection, leaving the text highlighted and ready for editing.
If you proceed with dragging the stylus before the "click" occurs, you can prevent
CalliGrapher from interpreting this as a gesture or handwritten entry by maintaining
the stylus position against the screen (do not lift up). Eventually CalliGrapher will
"click" and select the text along the line you have drawn.
There is another method of selection. You can use it when all you need is to select a
single word, or a few words on a single line. Just draw a horizontal line from left to
right covering the words you wish to select. It works the same way as in the
appropriate correction window example.
Screen Drawing 4
In CalliGrapher, you can not only write on the screen your text notes, but you can
just draw on the screen, too. And your drawings can be saved for future use.
You may use this feature, for example, to show someone how one can get to your
office:
80 Using the Handwriting Recognition Utilities
Page 93

Or you may wish to jot down some ideas that came to your mind during lunch (so as
not to forget them afterwards):
To use this feature, switch CalliGrapher to the ScreenDraw mode. This may be done
either by selecting "ScreenDraw mode" from the CalliGrapher menu or by tapping on
the marker icon on a taskbar so that it becomes highlighted, like this:
Now you can draw on top of everything that is on the screen.
Open CalliGrapher menu (as usual, by letting the pen tip rest for a while on any of
the CalliGrapher icons in the tray). As you see, it is somewhat different from the
Recognition mode menu:
Screen Drawing 81
Page 94

The new menu items are more or less self-explanatory - you can clear everything
you’ve drawn, save or load your drawing, or force CalliGrapher to recognize your
drawing as a handwritten text.
You can delete separate strokes in your drawin g as well. Just cross the unwanted
strokes with a new one and don’t lift the pen until the "click" sounds - the crossed out
strokes will be deleted.
Screen Orient atio n 4
With CalliGrapher, you can choose the orientation of the handwritten text. This way
you can turn your PenCentra 200 upside down or sideways.
To change the orientation, you need to have the "Orientation" icon in the tray. Open
the CalliGrapher menu. Select "Options...". Press on the "Icons" tab in the
"CalliGrapher Options" dialog box. Make sure the "Orientation" option is checked,
like this:
If it is not checked, tap on the check box below the arrow.
Press "OK" to close the "CalliGrapher Options" dialog box.
Now you should see the "Orientation" icon on a ta skbar. It looks like an arrow
pointing to the "up" direction for writing:
To change the writing orientation, tap on this arrow.
You may set orientation to 45 and 90 degrees directions. Tap on the arrow a few
times to see what is available.
Calculator 4
CalliGrapher’s RiteCalc feature makes it easy to perform simple mathematical
operations just by writing a formula, such as 23*7.5= or 3.23+2.57=.
82 Using the Handwriting Recognition Utilities
Page 95

Calculations are performed on numbers with up to two digits after the decimal point
and seven digits before it. The result is limited to the same range. Allowed operations
symbols are +, -, ×, *, ÷, :, /, %.
The command to perform a calculation is the equa l sign (=) at the end of the formula.
A formula (including the final "=") must be written as one sentence.
Configuration Tips 4
This section contains some additional things you may do with CalliGrapher using its
various configuration settings.
To see and/or set the CalliGrapher configuration sett ings, open the CalliGrapher
menu and choose "Options..." in it.
The options dialog will show up:
Now you are ready to follow the discussions in this part of Quick Start Guide.
Multiple User Dictionaries 4
When you add words to dictionary (using the local menu in the correction window),
they go to your current User Dictionary.
You may have more than one user dictionary. For example, you could produce one
user dictionary for special terms of your profession - to write technical notes, another
one - for chess or bridge terms - to make notes during play, etc.
You may set the current user dictionary (or disable any) in the "Configure" tab in the
options dialog.
Taskbar Customization 4
You may speed up some actions in CalliGrapher by putting the buttons for them on a
Windows CE taskbar.
For example, if writing the correction gesture creates some difficulties for you, you
may use the taskbar button for this purpose.
Configuration Tips 83
Page 96

Conversely, if you always use CalliGrapher in one and the same mode and feel
confident using gestures for editing, you may wish to unclutter the taskbar. In this
case, remove the unwanted buttons/icons from it.
You may use the "Icons" tab in the options dialog to do the job.
More Pleasant vs. More Detailed Inking 4
The "Ink" tab in the options dialog allows you to set the width and the color of the
ink. The ink trajectory looks most pleasing to eyes when it’s width is set to 2 or 3
pixels. This is why 3 pixels is used as a default width.
You may wish, however, to see the fine details in the ink. In this case, set the ink
width to 1.
Conversely, for the big display with fine resolutio n you may choose to increase ink
visibility by increasing it’s width.
If You Aren’t a Cursive Writer... 4
If you never actually write cursive, you may prevent CalliGraph er from trying to
interpret your letters as cursively written words. This should i ncreas e b oth
recognition accuracy and the speed.
The appropriate control may be found in the "Recognizer" tab in the options dialog. It
is called "Separate Letters Mode".
Quick Note Taking 4
With the CalliGrapher screen drawing, you can actually use your PenCentra 200 as a
substitute of those small yellow sticky pieces of paper that get lost so easily.
You may configure the "Icons" and "Notes" options so that you’d be able to save your
note (a.k.a. screen drawing) and clear the screen for the next one simply by a click of
a button.
First, in "Icons" tab of the options dialog, make sure the "Save Scre enDraw Ink" action
is checked:
84 Using the Handwriting Recognition Utilities
Page 97

Second, check the option "Save without prompt" in the "Notes" tab in the options
dialog box:
A button looking like a small diskette appears on the taskbar:
In the Screen Draw mode, write the note (like "Jim’s phone - 111-22-33"). Tap on the
diskette button, and your note will be saved and the screen cleaned for the next one!
The note will be saved as a file in the "Default folder"; the file name will be "File
Prefix for Auto Naming" plus the time stamp (both are the options in the "Notes" tab
in the options dial og box (shown above ).
Fine-tuning th e Hand writin g Featu res 4
Look at this word:
Can you tell whether the first letter is the capital "F" or the small "f"?
The problem is, some people write both letters like this and diff erentia te them only
by their size (and in our example, the size is ambiguous). Other people write only the
capital "F" this way, and for them this example should read "F", not "f", regardless of
the actual letter size.
You may instruct CalliGrapher about what is your way of writing. If, for example,
you only write the capital "F" like this, it wouldn’t be recognized as "f".
Fine-tuning the Handwriting Fe atures 85
Page 98

To do this, open the CalliGrapher menu and select "Letter Shape Se lector". You will
see then something like this:
Here CalliGrapher shows you many common w ays of writing characters. And you
may tell it which of those you never use, or use rarely .
Tap on various parts of this display to see the effect. Don’t worry: if you occasionally
mess up the settings, you may always select "File / Use Original Settings " from the
menu in the top left corner of the application wi ndow.
Tap on the currently selected letter shape (the one surrounded by the rounded
rectangle). You will see the dynamics of that character writing.
The last note: there are two sets of letter shapes’ settings, called Master and Guest.
You may, for example, customize the "Master" set for yourself, the "Guest" set for
someone who borrows your PenCentra 200 for a while. The currently used set is
selected from the menu in the top left corner of the application window.
86 Using the Handwriting Recognition Utilities
Page 99

Using Handwriter for HPC 2000 4
The H/PC 2000 systems include two handw r iting recognizers from CIC: Jot and
Handwriter for HPC 2000. Jot offers single character recognition, provid ing
immediate user feedback. Handwriter provides full context natural character
recognition with complete macro and gesture support.
The Handwriter for HPC 2000 application provid es tutorials for learning each of the
utilities. Going through the tutorial exercises is strongly recommended in order to
become comfortable with Handwriter for HPC 2000.
To access Handwriter, click on the Start button, then select Setting > Control Panel.
Double-click on the Recognizer icon. The Recognizer Properties window consists of
five tabs:
General tab 4
The General tab allows you to select the type of character set you wo uld like the
system to recognize. Select one of the three radio buttons:
• Jot - Character set that uses natural character shapes.
• Jot - Simplified uppercase characters
• Handwriter - Full character set
If you have selected either of the Jot buttons, the Tutorial button is available on the
General tabs screen. Click on the Tutorial button to learn more about Jot and for an
animated demo of the characters.
Appearance tab 4
The Appearance tab lets you customize the appearance of the on-screen “ink” created
by choosing a line width and color.
You can also change the position and orientation of the mode mark in this window.
The mode mark is a triangular shape that appears on the top or right edge of the
screen when the recognizer software is active. When you write to the left (or bottom)
of the mode mark, the characters appear as lowercase. When you write to the right
(or top) of the mode mark, the characters appear as numbers. When you write in the
center of the screen, straddling the mode mark, the characters appear as capitalized
letters.
Using Handwriter for HPC 2000 87
Page 100

On the Appearance tab window, you can change the size and orientation of the mode
mark, and determine whether you want it to be visible.
Note that when Handwriter is selected, the mode mark options are not available.
This is because Handwriter recognizes all characters as written. For example, if a
lowercase “e” is written, a lower-case “e” will appear. If an upper-case “E” is writte n,
an upper-case “E” will appear. To “train” Handwriter to recognize your writing
style, click on the HRS Advanced tab, and select the Trainer.
Time-Outs tab 4
When one of the Jot buttons is selected, the Time-outs tab allows you to determine
two speeds:
• How long you must hold down the pen to switch from inking to text selection or
drag-and-drop.
• How long you have to write the next stroke of a multi-stroke chara cter.
If Handwriter is selected, the following two choices are available:
• How long you wish to allow before recognition occurs after you finish writing.
• How long before the pen switches from ink to text selection or drag-and-drop.
Advanced tab 4
The Advanced tab provides you with three buttons:
• Macro Editor: The Macro Editor lets you create shortcuts for phrases and actions.
• Trainer: If “Jot - Character set that uses natural character shapes” is selected in the
General window, the Trainer allows you to customize the Natural Character Set
by enabling or disabling character shapes. If “Jot - Simplified uppercase
characters” is selected, the Trainer is disabled. If Handwriter is selected, the
Trainer allows you to customize the full character set.
• Reset: The Rest button returns the settings of the Appearance and Time-out tabs
to their default settings.
The Advanced tab for Handwriter additionally allows you to enable or disable the
Recognition Dictionary, and to automatically insert a space after a pause when
writing complete words.
About tab 4
The About tab provides version, copyright and patent information about Handwriter
for HPC 2000.
88 Using the Handwriting Recognition Utilities
 Loading...