

Page 1

Entertainment devices
Operating Manual
SCALEO Home Server
Deutsch
English
Français
Español
Italiano
Page 2

Copyright
© Fujitsu Siemens Computers 2008
SAP: 10601046275
FSP: 440000400
Published by
Fujitsu Siemens Computers GmbH
Mies-van-der-Rohe-Straße 8
80807 München, Germany
Contact
www.fujitsu-siemens.com/support
All rights reserved, including intellectual property rights.
Technical data subject to modifications and delivery subject
to availability. Any liability that the data and illustrations are
complete, actual or correct is excluded. Designations may be
trademarks and/or copyrights of the respective manufacturer,
the use of which by third parties for their own purposes may
infringe the rights of such owner. For further information see
http://www.fujitsu-siemens.com/terms_of_use.html
10 60 10 46 27 5
Page 3

SCALEO Home Server
Betriebsanleitung
Deutsch
English
Français
Español
Italiano
Page 4

Die Informationen in diesem Handbuch können ohne vorherige Ankündigung geändert
werden. Trotz sorgfältigster Ausarbeitung kann nicht ausgeschlossen werden, dass Fehler
oder Unvollständigkeiten in diesem Handbuch enthalten sind. Es wird kein erlei Haftung
für Fehler oder Datenverlust als Folge hieraus übernommen.
Für Datenverluste, die auf ungeeignete Trägermedien zurückzuführen sind,
übernimmt Fujitsu Siemens Computers keine Haftung.
Vor Erstinbetriebnahme des SCALEO Ho me Server empfehlen wir, die in diesem
Handbuch beschrieben en Verfahren zu lesen.
Die verwendeten Warenzeichen sind durch die jeweiligen Inhaberfirmen gesetzlich geschützt.
Alle anderen Warenzeichen sind Warenzeichen oder eingetragene Warenzeichen der
jeweiligen Inhaber und werden als geschützt anerkannt.
Copyright © Fujitsu Siemens Computers GmbH 2009
Alle Rechte vorb ehalten, insbesondere (auch auszugsweise) die der Übersetzung, des
Nachdrucks, der Wiedergabe durch Kopieren oder ähnliche Verfahren.
Zuwiderhandlungen verpflichten zu Schadenersatz.
Alle Rechte vorbehalten, insbesondere für den Fall der Patenterteilung oder GM-Eintragung.
Liefermöglichkeiten und technische Änderungen vorbehalten.
Page 5

Inhalt
Deutsch
Inhalt
IhrSCALEOHome Server... ............................................................ 1
Darstellungsmittel ....................................................................... 2
WichtigeHinweise ..................................................................... 3
Sicherheitshinweise ..................................................................... 3
Gerättransportieren ..................................................................... 3
Gerätreinigen .......................................................................... 4
Energie sparen, Entsorg
Rücknahme von Altgeräte
CE-Kennzeichnung . . . .................................................................. 5
FCC Class B Compliance S
Anschlüsseund Bedienelemente ...................................................... 6
Geräteübersicht . . . ...................................................................... 6
Vorderseite ......................................................................... 6
Rückseite ........................................................................... 7
Anzeigenam Gerät ..................................................................... 8
Inbetriebnahme ........................................................................ 10
Lieferinhalt ausp
Schritte der Ers
Gerät aufstelle
Senkrechte Betr
Waagerechte Be
Externe Geräte
Leitungen ansc
Leitungen lös
Externe SATA-
Externe Gerät
Gerät an die N
Erstinstal
Erstinbetr
Installati
Konfigurat
Bedienung ............................................................................. 19
Geräteinschalten ....................................................................... 19
Gerätausschalten ...................................................................... 19
Konfiguration mit der W indow s Home Server-Konsole . . .................................... 19
SCALEO Power Management . ....................................................... 20
Hardware Überwachung . . ........................................................... 23
PacketVideo ........................................................................ 24
Recove
r in den R ecovery-Modus versetzen und Betriebssyste m wiederherstellen ..............
Serve
eryeinesClients durchführen ......................................................
Recov
Problemlösungen undTipps ........................................................... 28
Betriebsanzeige leuchtet gelb ............................................................ 28
tinbetriebnahme . . . .......................................................
n .........................................................................
etzspannung anschließen . . . .. . ............................................
lation ..........................................................................
iebnahme SCALEO Home Server . . . ........................................
onaufden Clients ...........................................................
iondesServers ............................................................
rydesSCALEO Home Servers ..................................................
ungundRecycling ................................................
n ..........................................................
tatement .....................................................
acken und überprüfen . ...................................................
iebslage .............................................................
triebslage ...........................................................
anschließen .............................................................
hließen ...............................................................
en .....................................................................
Festplatte (eSATA) anschließen .........................................
eandie USB-Anschlüsse anschließen ...................................
10
10
11
12
13
14
14
14
15
16
16
17
17
18
18
25
25
27
4
4
5
10601046275, Ausgabe 2 Deutsch
Page 6

Inhalt
EinederStatusanzeigenderFestplattenleuchtetgelb ..................................... 29
Weitere Fehlermeldungen bei Einrichten der Windows Home Server-Connector-Softwa re . .... 29
Systemerweiterungen .................................................................. 30
Abdeckungentfernen .................................................................... 31
Abdeckungbefestigen ................................................................... 32
Festplattenlaufwerk ein- und ausbauen . . ................................................. 33
Festplattenreihenfolge . . . ............................................................ 33
Festplattenlaufwerk einbauen ........................................................ 34
Festplattenlaufwerk ausbauen ........................................................ 36
Lithium-Batterie tauschen ................................................................ 39
TechnischeDaten ...................................................................... 40
Deutsch 10601046275, Ausgabe 2
Page 7
Ihr SCALEO Home Server...
Ihr SCALEO Home Server...
Übersicht
... ist ein Intel-basierter Server für Arbeitsgruppen u nd kleine Netzwerke.
Ihr Gerät bietet ein hohes Maß an Datensicherheit und Verfügbarkeit durch hoch
entwickelte Hardware- und Software-Komponenten.
Er unterstützt folgend e Betriebssysteme auf den angeschlossenen Clients im Netzwerk:
• Microsoft Windows XP ab Service Pack 2 sowie
• Microsoft Windows Vista auf 32-
(Ausnahme: Windows Vista Start
Sie können bis zu vier 3,5”-Festplattenlaufwerke in Ihr Gerät einbauen. Je nach Ausbaustufe
wird das Gerät mit bis zu vier vorinstallierten Festplatten ausgeliefert.
Außerdem verfügt das Gerät über zwei eSATA-Anschlüsse und vier USB-Anschlüsse
für den Betrieb weiterer Festplatten.
Dieses Handbuch zeigt Ihnen, wie Sie das Gerät in Betrieb nehmen und bedienen. Das
Handbuch bezieht sich auf alle Ausbaustufen. Je nach gewählter A usbaustufe kann es
vorkommen, dass in Ihrem Gerät nicht alle dargestellten Hardware-Komponenten verfügbar
sind. Beachten Sie bitte auch die Hinweise zu Ihrem Betriebssystem.
Weitere Informationen zu diesem Gerät finden Sie auch:
• in der Kurzanleitung "Getting Started"
• im Handbuch "Sicherheit"
• im Handbuch "Garantie"
• in der Dokumentation zu Ihrem
• in den Informationsdateien (z. B. *.PDF, *.HTML, *.DOC, *.CHM, *.TXT, *.HLP)
• auf den nummerierten Datenträg
• Nr. 1 "SCALEO Home Server - Client Connector"
• Nr. 2 "SCALEO Home Server - Client
• Nr. 3 "SCALEO Home Server - Server Recovery and Documentation"
Bit-Systemen in allen Ausprägungen
er)
Betriebssystem
ern:
Recovery"
Um PDF-Dateien zu öffnen, benötigen Sie das Programm Adobe Reader.Siefinden das
Programm im Internet zum k ost enlosen Download unter "
10601046275, Ausgabe 2 Deutsch - 1
www.adobe.com".
Page 8
Ihr SCALEO Home Server...
Darstellungsmittel
kennzeichnet Hinweise, bei der
Funktionsfähigkeit Ihres Gerä
sind. Die Gewährleistung erli
Hinweise Defekte am Gerät veru
kennzeichnet wichtige Informationen für den sachgerechten Umgang mit
dem Gerät
en Nichtbeachtung Ihre Gesundheit, die
ts oder die Sicherheit Ihrer Daten gefährdet
scht, wenn Sie durch Nichtbeacht ung dieser
rsachen
►
Diese Schrift
Diese Schrift
Diese Schrift
"Diese Schrift"
Abc
Diese Schrift kennzeichnet Begriffe und Texte, die betont oder hervorgehoben werden,
kennzeichnet einen Arbeitsschritt, den Sie ausführen müssen
kennzeichnet ein Resultat
kennzeichnet Eingaben, die Sie mit der Tastatur in einem Programm -Dialog
oder in einer K ommandozeile vornehmen, z. B. Ihr Passwort (Name123)
oder einen Befehl, um ein Programm zu starten (start.exe)
kennzeichnet Information
ausgegeben werden, z. B.:
kennzeichnet
• Begriffe und Texte in einer
Speichern.
• Namen von Programmen oder Dateien, z. B. Windows oder setup.exe.
kennzeichnet
• Querverweise auf einen anderen Abschnitt z. B. "Sicherheitshinweise"
• Querverweise auf eine exte
Sie weiter auf "
• Namen von CDs, DVD s sowie Bezeichnungen und Titel von an deren
Materialien, z. B.: "CD/DVD Drivers & Utilities" oder Handbuch
"Sicherheit"
kennzeichnet eine Taste auf der Tastatur, z. B:
z. B.: Gerät nicht ausschalten
en, die von einem Programm am Bildschirm
Die Installation ist abgeschlossen!
Softwareoberfläche, z. B.: Klicken Sie auf
rne Quelle, z. B. eine Webadresse: Lesen
www.fujit
su-siemens.com"
F10
2 - Deutsch 10601046275, Ausgabe 2
Page 9

Wichtige Hinweise
WichtigeHinweiseHinweise
In diesem Kapitel finden Sie unter anderem Sicherheitshinweise, die Sie beim
Umgang mit Ihrem Gerät unbedingt beachten müssen.
Sicherheitshinweise
SicherheitshinweiseHinweis
Beachten Sie außerdem die Hinwei
CD "SCALEO Home Server - Server R
Beachten Sie beim Aufstellen und
für die Umgebungsbedingungen im
das Kapitel "
Inbetriebnahme",
Sie dürfen das Gerät nur betreibe
mit der örtlichen Netzspannun
Der Ein-/Ausschalter trennt d
vollständigen Trennung von de
aus der geerdeten Schutzkont
Tauschen Sie die Lithium Batte
Angaben im Kapitel "
Lithium-
Achtung, Bauteile im System kö
Die in dieser Anleitung besch
besonderer Sorgfalt durchg
Reparaturen am Gerät dürfen n
Durch unsachgemäße Reparat
Schlag, Energiegefahr, Bra
Bewahren Sie das Gerät, Akku
auf (z. B. einer Heizung, Kam
Akkus und Netzadapter in B
Verwenden Sie keine beschä
blanke Drähte). Durch ein
elektrischen Schlags ode
e schadhafte Leitung besteht die Gefahr eines
r Brandgefahr.
se im Handbuch "Sicherheit" auf der mitgelieferten
ecovery and Documentation".
beim Betrieb des Geräts die Hinweise
Kapitel "Technische Daten" und
Seite 10.
n, wenn die Nennspannung des Geräts
g übereinstimmt.
as Gerät nicht von der Netzspannung. Zur
r Netzspannung müssen Sie den Netzstecker
akt-Steckdose ziehen.
rie auf dem Mainboard nur entsprechend den
Batterie tauschen", Seite 39.
nnen hohe Temperaturen annehmen.
riebenen Tätigkeiten dürfen nur mit
eführt werden.
ur von autorisiertem Fachpersonal durchgeführt werden.
uren können Gefah ren für den Ben utzer (elektrischer
ndgefahr) bzw. Sachschäden am Gerät entste hen.
s und Netzadapter nicht in der Nähe einer Wä rmeque lle
in). Bei übermäßiger Erhitzung können Gerät,
rand geraten oder explodieren.
digten Leitungen (beschädigte Isolierung,
Wichtige Hinweise
Gerät transportieren
ransport
GerätTransportWiedert
10601046275, Ausgabe 2 Deutsch - 3
Transportieren Sie alle Geräte einzeln und nur in ihrer Originalverpackung oder in einer
anderen geeigneten Verpackung, die Schutz gegen Stoß und Schlag gewährt.
Packen Sie die G eräte erst am Aufstellungsort aus.
Wenn das Gerät aus kalter Umgebung in den Betriebsraum gebracht wird, kann
sich Kondenswasser bilden. Warten Sie, bis das Gerät temperaturangeglichen
und absolut trocken ist, bevor Sie es in Betrieb nehmen.
Page 10
Wichtige Hinweise
Gerät reinigen
GerätTransportWiedertransportS yst emeinheit,sieheGerät
Schalten Sie das Gerät und alle daran angeschlossenen Geräte aus und ziehen
Sie den Netzstecker aus der geerdeten Schut zkontakt-Ste ckdose.
Der Gehäuseinnenraum des Geräts darf nur von autorisiertem
Fachpersonal gereinigt w erden .
Verwenden Sie für die Reinigung kein Scheuerpulver und keine
Kunststoff lösenden Reinigungsmittel.
Auf keinen Fall das Gerät nass reinigen! Durch eindringendes Wasser können
erhebliche Gefahren für den Anwender entstehen (z. B. Stromschlag).
Achten Sie d arauf, dass keine Flüssigkeit in das Innere der Geräte gelangt.
Die Gehäuseoberfläche können Sie m
Verschmutzung können Sie ein feuc
Spülmittel getaucht und gut aus
it einem trockenen Tuch reinigen. Bei starker
htes Tuch benutzen, das Sie in Wasser mit mildem
gewrungen haben.
Energie sparen, Entsorgung und Recycling
EntsorgungEnergiesparenRecyclingDVDDrivers&UtilitiesDVDUserDocumentation
Um Energie zu sparen ist ihr Home Server mit Power-Mana gement-Funktionen ausgestattet.
Lesen Sie dazu das Kapitel "
Wie Sie die Lithium-Batterie auswechseln lesen Sie im Kapitel "
Rücknahme von Altg eräte n
Rücknahme
Die Rücknahme und Recyclingfähigkeit unserer Syste m e ist in unserem nach DIN EN
ISO 14001 zertifizierten Umweltmanagement geregelt und garantiert. Unsere Geräte sind
weitestgehend aus Materialien hergestellt, die einem fachgerechten Recycling zugeführt
werden können. Nach seinem Gebrauch wird das Gerät zurückgenommen, um es einer
Wiederverwendung bzw. wertstofflichen Verwertung zuzuführen, soweit es in einem
Zustand zurückgegeben wird, der dem bestimmungsgemäßen Gebrau ch entspricht.
Nicht verwertbare Geräteteile werden sachgemäß entsorgt.
Zur Rückgabe eines Gerätes nutzen Sie bitte die in Ihrem Land vorhandenen
Recycling- und Entsorgungsmöglichkeiten.
Weitere Informationen über die länderspezifischen Recycling- und Entsorgungsmöglichkeiten
finden Sie im Internet unter: "
Wenn Sie darüber hinaus Fragen zur Entsorgung haben, wenden Sie sich bitte
an Ihre Verkaufsstelle oder unseren Help Desk.
SCALEO Power Management", Seite 20.
Lithium-Batterie tauschen", Seite 39.
www.fujitsu-siemens.com".
4 - Deutsch 10601046275, Ausgabe 2
Page 11
Wichtige Hinweise
CE-Kennzeichnung
CE-Kennzeichnung für ausgelieferte Geräte ohne Funkkomponente
CE-KennzeichnungCE -Z eichnenHinweiseElektromagnetischeVerträglichkeitNiederspannungsrichtlinie
Dieses Gerät erfüllt in der ausgelieferten Ausführung die Anforderungen
der EG-Richtlinien 2004/108/EG "Elektromagnetische Verträglichkeit" und
2006/95/EG "Niederspannungsrichtlinie".
Alle weiteren Geräte, die an das v orliegende Produkt angeschlossen
werden, müssen ebenfalls die obigen Richtlinien erfüllen.
FCC Class B Compliance Statement
The following statement applies to the products covered in this manual, unless otherwise specified
herein. The statement for other products will appear in the accompanying documentation.
NOTE:
This equipment has been teste d and found to comply with the limits for a "Class B" digital
device, pursuant to Part 15 of the FCC rules and meets all requirements of the Canadian
Interference-Causing Equipment Standard ICES-003 for digital apparatus. These limits are
designed to provide reasonable protection against harmful interference in a residential installation.
This equipment generates, uses and can radiate radio frequency energy and, if not installed
and used in strict accordance with the instructions, may cause harmful interference to radio
communications. However, there is no guarantee that interference will not occur in a particular
installation. If this equipment does cause harmful interference to radio or television reception,
which can be determined by turning the equipment off and on, the user is encouraged to
try to correct the interference by one or more of the following measures:
• Reorient or relocate the receiving antenna.
• Increase the separation be
• Connect the equipment into an outlet on a circuit different from that to
which the receiver is connected.
• Consult the dealer or an exp
Fujitsu Siemens Computers GmbH is not responsible for any radio or television interference
caused by unauthorized modifications of this equipmen t or the substitution or attachment
of connecting cables and equipment other than those specified by Fujitsu Siemens
Computers GmbH. The correction of interferences caused by such unauthorized modification,
substitution or attachment will be the responsibility of the user.
The use of shielded I/O cables is required when connecting this equipment to any and all optional
peripheral or host devices. Failure to do so may violate FCC and ICES rules.
tween equipment and the receiver.
erienced radio/TV technician for help.
10601046275, Ausgabe 2 Deutsch - 5
Page 12
Anschlüsse und Bedienelemente
Anschlüsse und Bedienelement
Anschlüsse
In diesem Kapitel werden die einzelnen Hardware-Komponenten Ihres Geräts vorgestellt. Sie
erhalten eine Übersicht über die Anschlüsse und Bedienelemente des Geräts. Machen Sie
sich mit diesen Elementen vertraut, bevor Sie mit dem Gerät arbeiten.
e
Geräteübersicht
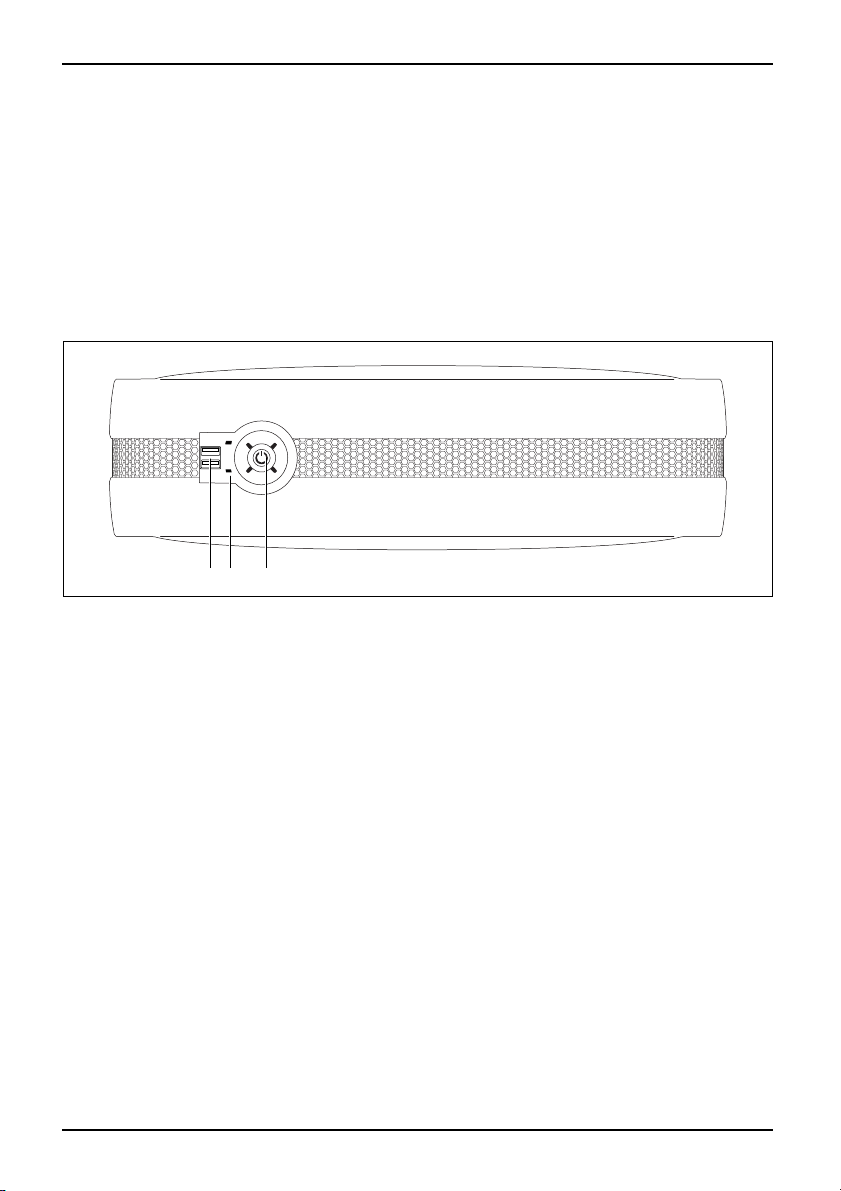
Vorderseite
AnsichtVorderseite
1
2
3
1 = USB-Anschlüsse
2 = Statusanzeigen
3 = Ein-/Ausschalter mi
t Statusanzeigen
6 - Deutsch 10601046275, Ausgabe 2
Page 13
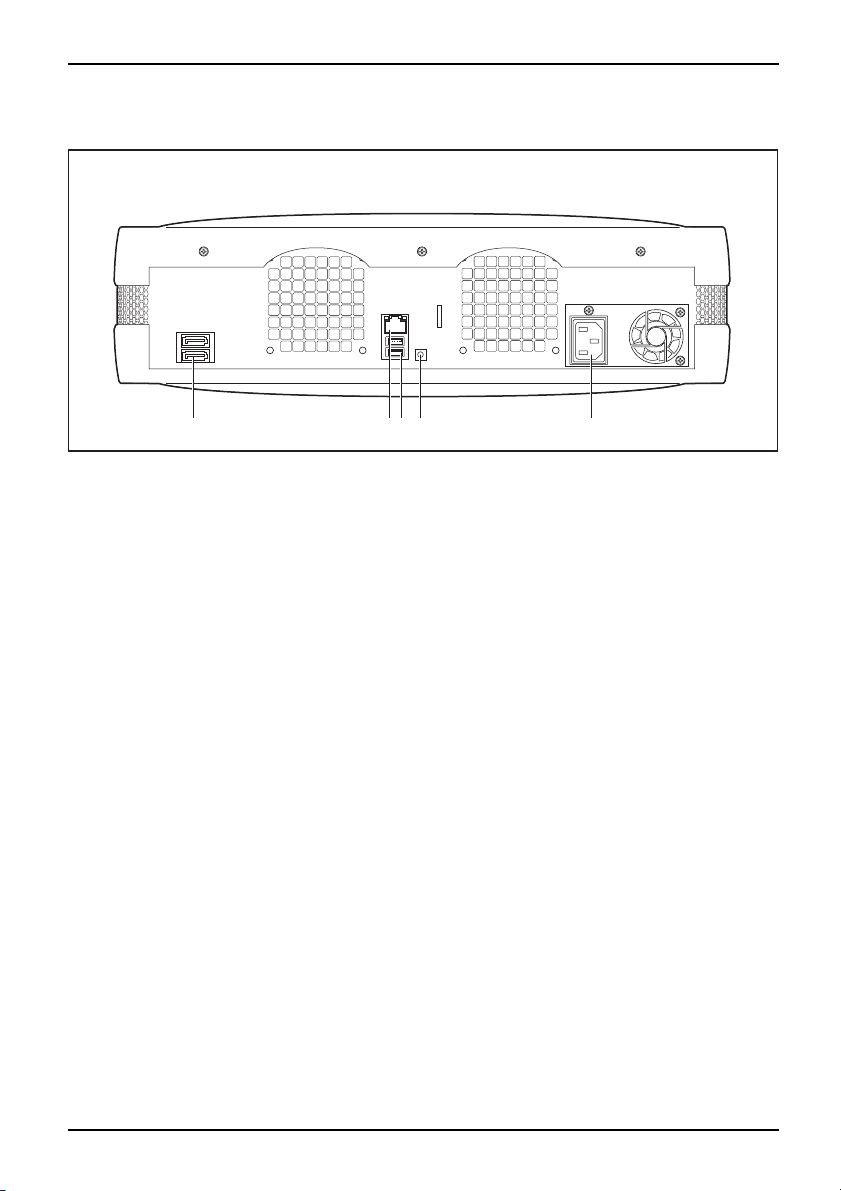
Rückseite
AnsichtRückseit e
Anschlüsse und Bedienelemente
12
1 = eSATA-Anschlüsse
2 = LAN-Anschluss
3 = USB-Anschlüsse
34 5
4 = Recovery-Taste
5 = Netzanschlussbuchse
10601046275, Ausgabe 2 Deutsch - 7
Page 14
Anschlüsse und Bedienelemente
Anzeigen am Gerät
AnzeigenGerät
Die Anzeigen finden Sie an der Vorderseite des Gehäuses.
7
1
2
1 = Festplattenanzeige (allgemein)
2 = Netzwerkanzeige
3 = Statusanzeige Festplatte 1
6
5
3
4
5 = Statusanzeige Festplatte 3
6 = Statusanzeige Festplatte 4
7 = Betriebsanzeige am Ein-/Ausschalter
4 = Statusanzeige Festplatte 2
Festplattenanzeige (1)
Festplattenanzeige
Die Anzeige leuchtet blau, wenn auf eines oder mehrere Festplattenlaufwerke des Geräts zugegriffen
wird.
Netzwerkanzeige (2)
kanzeige
Netzwer
• Die Anzeige leuchtet blau:
Es besteht eine Netzwerkverbindung.
• Die Anzeige blinkt blau:
Es werden Daten über das Netzwerk übertragen.
Statusanzeigen der einzelnen Festplatten (3, 4, 5, 6)
Statusanzeigen
Diese Anzeigen geben Auskunft über den Status der einzelnen Festplatten (1 bis 4):
• Die Anzeige leuchtet blau:
Die Festplatte ist betriebsbereit.
• Die Anzeige leuchtet gelb:
Es ist ein schwerwiegender Fehler aufgetreten.
8 - Deutsch 10601046275, Ausgabe 2
Page 15

Anschlüsse und Bedienelemente
• Die Anzeige blinkt gelb:
Die Festplatte wird wiederhergestellt.
• Die Anzeige leuchtet nicht:
Es ist keine entsprechende Festplatte eingebaut.
Betriebsanzeige (7)
Betriebsanzeige
• Die Anzeige leuchtet blau:
Das Gerät ist eingeschaltet und betriebsbereit.
• Die Anzeige blinkt blau:
Das Gerät wird h ochgefahren.
• Die Anzeige leuchtet orange:
Ein schwerwiegender Fehler ist aufgetreten oder das Gerät befindet sich im Recovery-Modus.
• Die Anzeige leuchtet nicht:
Das Gerät ist ausgeschaltet und vom Netz getrennt.
10601046275, Ausgabe 2 Deutsch - 9
Page 16
Inbetriebnahme
Inbetriebnahme
Inbetriebnahme
Lieferinhalt auspacken und überprüfen
Die Originalverpackung der Ge räte sollten Sie für einen eventuellen Transport aufbewahren.
VerpackungLieferinhaltVerpa ckung
► Packen Sie alle Teile aus.
► Prüfen Sie den Verpackungsinhalt a
► Prüfen Sie, ob die Lieferung mit den Angaben auf dem Lieferschein übereinstimmt.
► Wenn Sie Transportschäden oder Unst
Schritte der Erstinbetriebnahme
Erstinbetriebnahme,ÜbersichtInbetriebnahme
Es sind nur wenige Schritte nötig, um Ihr neues Gerät das erste Mal in Betrieb zu nehmen:
• Stellplatz für das Gerät wählen und Gerät aufstellen
• Externe Geräte anschließen
• Gerät an das Netzwerk anschließen
• Nennspannung überprüfen und Gerät a
• Gerät einschalten
• Software auf Clients installieren un
Mehr zu den einzelnen Schritten erfa hren Sie in den folg enden Abschnitten.
Beachten Sie die Sicherheitshinweise im Kapitel "Wichtige Hinweise", Seite 3.
uf sichtbare Transportschäden.
und Lieferschein feststellen, in
Kapitel "
Problemlösungen und Ti
formieren Sie unverzüglich Ihre Verkaufsstelle, wie in
immigkeiten zwischen Verpackungsinhalt
pps", Seite 28 beschrieben!
n das Stromnetz anschließen
d Server konfigurieren
10 - Deutsch 10601046275, Ausgabe 2
Page 17
Gerät aufstellen
BildschirmarbeitsplatzErgonomischGerät
Berücksichtigen Sie beim Aufstellen des Geräts die Empfehlungen und
Sicherheitshinweise im Handbuch "Sicherheit".
Stellen Sie das Gerät nur in den dafür vorgesehenen Betriebslagen auf.
Wir empfehlen Ihnen, das Gerät auf eine rutschfeste Unterlage zu stellen. Bei
der Vielfalt der bei Möbeln verwendeten Beschichtungen und Lacke ist e s nicht
auszuschließen, dass die Gerätefüße Schäden auf der Stellfläche verursachen.
Setzen Sie das Gerät keinen extremen Umgebungsbedingungen aus (siehe "
Daten", Seite 40). Schützen Sie das Gerät vor Staub, Feuchtigkeit und Hitze.
Achten Sie darauf, dass das Gerät ausreichend belüftet w ird.
Stellen Sie nicht mehrere Geräte übereinander.
Abhängig vom Standort Ihres Geräts kann es zu störenden Vibrationen und Geräuschen
kommen. Um dies zu vermeiden, sollte bei Gehäuseseiten ohne Lüft ungs flächen ein
Mindestabstand von 3 mm zu anderen Geräten oder Gegenständen eingehalten werden.
Inbetriebnahme
Technische
Sie können das Gerät in senkrech
ter oder waagerechter Betrie bslage verwenden.
10601046275, Ausgabe 2 Deutsch - 11
Page 18
Inbetriebnahme
Senkrechte Betriebslage
Benutzen Sie die mitgelieferten Aufstellfüße, wenn Sie das Gerät in
senkrechter Betriebslage verwenden wollen.
Gehen Sie wie folgt vor, um das Gerät in senkrechter Betriebslage zu verwenden:
SenkrechteBetriebslageBetriebslagesenkrechtAufstellfüßeSeitenteil
► Lösen Sie gegebenfalls die Leitungen.
► Befestigen Sie die Aufstellfüße wie abgebildet am Gerät.
Die Aufstellfüße können nur in einer Richtung montiert werden.
► Stellen Sie das Gerät auf die Aufstellfüße.
► Stecken Sie gegebenenfalls die zuvor gelösten Leitungen wieder.
12 - Deutsch 10601046275, Ausgabe 2
Page 19
Waagerechte Betriebslage
Benutzen Sie die mitgelieferten Aufstellfüße, wenn Sie das Gerät in
waagrechter Betriebslage verwenden.
Gehen Sie wie folgt vor, um das Gerät in waagrechter Betriebslage zu verwenden:
WaagrechteBetriebslageBetriebslagewaagrechtAufstellfüße
► Lösen Sie gegebenfalls die Leitungen.
Inbetriebnahme
► Befestigen Sie die Aufstellfüße wie abgebildet am Gerät.
Die Aufstellfüße könn en nur in einer Richtung montiert werden.
► Stecken Sie geg
ebenenfalls die zuvor gelösten Leitungen wieder.
10601046275, Ausgabe 2 Deutsch - 13
Page 20
Inbetriebnahme
Externe Geräte anschließen
Lesen Sie die Dokumentation zum externen Gerät, bevor Sie es anschließen.
Außer bei USB-Geräten und eSATA-Festplatten müssen die Netzstecker
gezogen sein, wenn Sie externe Geräte anschließen!
Bei Gewitter dürfen S ie Leitungen weder stecken noch lösen.
Fassen Sie beim Lösen einer Leitung immer am Stecker an. Ziehen
Sie nicht an der Leitung!
Halten Sie beim Anschließen oder Lö sen von Leitungen die nachfolgend
beschriebene Reihenfolge ein.
Leitungen anschließen
► Alle betroffenen Geräte ausschalten.
KabelLeitung
► Die Netzstecker aller betroffenen Geräte aus den Schutzkontakt-Steckdosen ziehen .
► Alle Leitungen am Gerät und an den Peripheriegeräten stecken. Beachten Sie auf jeden
Fall die Sicherheitshinweise im Kapitel "
► Alle Datenübertragungsleitungen in die vorgesehenen Steckvorrichtungen
der Daten-/Fernmeldenetze stecken.
► Alle Netzstecker in die geerdeten Schutzkontakt-Steckdosen stecken.
Leitungen lösen
► Alle betroffenen Geräte ausschalten.
Leitung
► Die Netzstecker aller betroffenen Geräte aus den Schutzkontakt-Steckdosen ziehen .
► Alle Datenübertragungsleitungen aus den Steckvorrichtungen der Daten-/Fernmeldenetze
ziehen.
► Alle Leitungen am Gerät u nd an den Peripheriegeräten lösen.
Wichtige Hinweise", Seite 3.
14 - Deutsch 10601046275, Ausgabe 2
Page 21
Externe SATA-Festplatte (eSATA) anschließen
An den eSATA-Anschluss können Sie eine externe SATA-Festplatte anschließen.
Mit dieser kön nen Sie die Festplattenkapazität de s Geräts erweitern. Verwenden
Sie eine Festplatte mit stabilem Gehäuse.
Die maximale eSATA-Leitungslänge darf 2 Meter nicht überschreiten.
SATA-Leitungen können wegen der unterschiedlichen Steckerbelegung nicht
verwendet werden. Die Leitung ist nicht im Lieferumfang enthalten. Diese
können Sie über den Fachhandel erwerben.
Die Datentransferrate beträgt bis zu 2.400 Mbit/s.
► Schließen Sie die Datenleitung an das
externe Gerät an.
eSATA
Gerätetreiber
Die eSATA-Festplatte wird automatisch von Ihrem Betriebssystem erkannt und installiert.
► Schließen Sie die Datenleitung an den
eSATA-Anschluss des Rechners an.
Inbetriebnahme
Weitere Informationen finden Sie in der Dokumentation zu der externen
SATA-Festplatte und zum Betriebssystem.
10601046275, Ausgabe 2 Deutsch - 15
Page 22

Inbetriebnahme
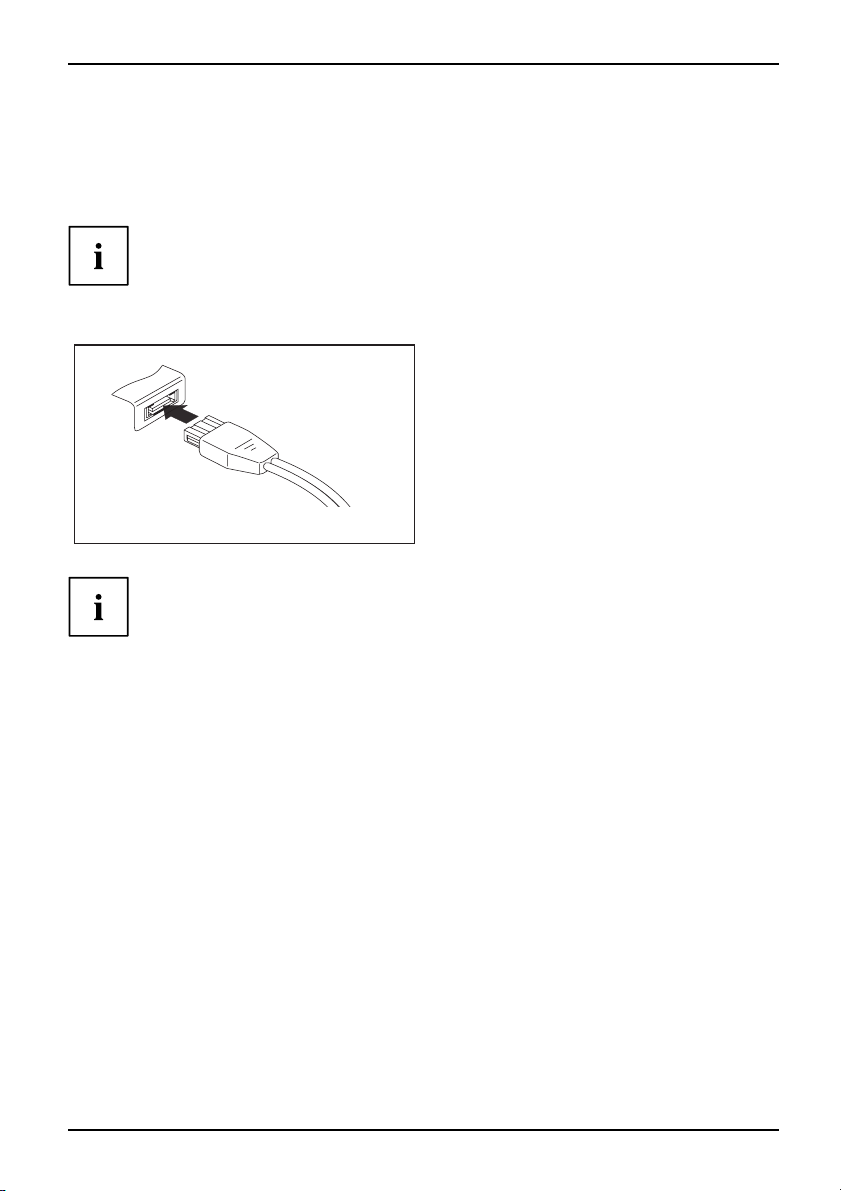
Externe Geräte an die USB-Anschlüsse anschließen
USB-GeräteUSB-AnschlussExterneGeräteGeräte
An die USB-Anschlüsse können Sie externe Geräte anschließen.
USB-Geräte sind hot-plug-fähig. Die Leitungen dieser G eräte können in
eingeschaltetem Zustand angeschlossen und gelöst werden.
Weitere Informationen finden Sie in der Dokumentation zu den USB-Geräten.
► Schließen Sie die Datenleitung an das externe Ge
rät an.
► Schließen Sie die Datenleitung an den entsprechenden Anschluss Ihres
SCALEO Home Servers an.
Vom USB-Anschluss Ihres G eräts zum externen USB-Gerät darf nur eine maximal
3 m lange Leitung verwendet werden, um USB 2.0 zu gewährleisten.
Gerät an die Netzspannung anschließen
GerätAnschließenGerät
Die Nennspannung des Geräts muss mit der örtlich
► Prüfen Sie die eingestellte Nennspannung.
2
1
► Schließen Sie die Netzleitung am
► Stecken Sie den N etzstecker in eine
en Nennspannung übereinstimmen.
Gerät an (1).
geerdete Schutzkontakt-Steckdose (2).
16 - Deutsch 10601046275, Ausgabe 2
Page 23
Inbetriebnahme
D
S
L
Erstinstallation
Installation
Mindestvoraussetzungen für ein Home Server-Netzwerk:
• der SCALEO Home Server
• ein Client
• der Netzwerk-Router (empfohlen)
Wenn Sie den SCALEO Home Server zum ersten Mal einschalten, wird die vorinstallierte S o ftware
gestartet. Planen Sie etwas Zeit dafür ein, denn dieser Vorgang darf nicht unterbrochen werden.
Nach dem Beginn der Installation darf das Gerät nicht ausgeschaltet
werden, bis die Installation abgeschlossen ist!
Während der Installation darf das Gerät nur bei Aufforderung neu gestartet werden!
Die Installation wird sonst nicht korrekt durchgeführt und der Festp latteninh alt
muss vollständig wiederhergestellt werden.
Mit dem SCALEO Home Server können maximal 10 Clients in einem
Netzwerk verwaltet werden.
L
S
D
Erstinbetriebnahme SCALEO Home Server
► Starten Sie den SCALEO Home Server, indem Sie den Ein-/Ausschalter drücken.
Die Betriebsanzeige am Ein-/Ausschalter blinkt.
Nach ca. 5 Minuten ist die Installation beendet. Die Betriebsanzeige
am Ein-/Ausschalter leuchtet dauerhaft.
10601046275, Ausgabe 2 Deutsch - 17
Page 24
Inbetriebnahme
Installation auf den Clients
Der Windows Home Server-Connector verbindet die Clients mit dem Server.
Führen Sie die nachfolgenden Schritte auf allen Clients durch, die in
das Netzwerk integriert werden sollen.
Zusätzliche Informationen finden Sie in der Dokumentation zum Windows Home Server.
► Legen Sie den Datenträger mit der Nr. 1 ("SCALEO Home Server – Client Connector
and Documentation") in das CD/DVD-Laufwerk des ersten Clients.
Der Installationsassistent wird gestartet.
► Folgen Sie den Anweisungen am Bildschirm.
Nach erfolgreicher Installation des ersten Clients wird automatisch das
Windows Home Server-Setup gestartet.
Diese Konfiguration und Installation wird nur einmalig auf dem ersten Client gestartet.
Konfiguration des Servers
Die Erstkonfiguration des Se
auf dem die Connector-Sof
Zusätzliche Information
rvers erfolgt einmalig auf dem ersten Client,
tware installiert wurde.
en finden Sie in der Dokumentation zum Windows Home Server.
► Folgen Sie den Anweisungen
► Geben Sie unter ande rem einen Servernamen und ein Serverkennwort ein.
Nach erfolgreicher Erstkon
und den Server weiter konfig
► Um weitere Einstellungen vorzunehmen, starten Sie die Home Server-Konsole, indem Sie im
System-Menü auf das entsprechende Symbol klicken. Weitere Hinweise zur Konfiguration
finden Sie im Kapitel "
18 - Deutsch 10601046275, Ausgabe 2
Konfiguration mit der Windows Home Server-Konsole", Seite 19.
am Bildschirm.
figuration des Servers können Sie die Home Server-Konsole starten
urieren. Ihr SCALEO Home Server i st jetzt betriebsbereit.
Page 25
Bedienung
Gerät einschalten
► Drücken Sie den Ein-/Ausschalter an der Vorderseite des Geräts.
GerätBildschirm
Die Betriebsanzeige blinkt blau, d
Gerät ausschalten
Ein-/Ausschalter trennen das Gerät nicht von der Netzspannung. Zur vollständigen
Trennung von der Netzspannung müssen Sie den Netzstecker aus der Steckdose ziehen.
as Gerät startet.
Bedienung
► Fahren Sie das Gerät über die W
GerätBildschirm
Das Gerät verbraucht keine Energie mehr.
Sie können genaue Betriebszeiten definieren, nach deren Ablauf das Gerät
automatisch in den Ruhezustand versetzt wird.
Weitere Informationen finden Sie im Kapitel "Power Management".
indows Home Server-Konsole herunter.
Konfiguration mit der Windows Home Server-Konsole
Die Windows Home Server-Konsole dient der Verwaltung Ihres Netzwerks, des SCALEO
Home Servers sowie der angeschlossenen Clients.
Sie ermöglicht Ihnen die Verwaltung von Benutzerkonten, Benutzerrechten, freigegebenen
Ordnern und von Backups der angeschlossenen Clients.
Informationen zur Bedienung der Windows Home Server-Konsole finden Sie im Handbuch zum Windows
Home Server und im Internet unter:
http://www.microsoft.com/windo ws/products/winfamily/windowshomeserver/support.mspx".
"
Zusätzlich integriert sind folgende Anwendungen:
• SCALEO Power Management, siehe Kapitel "
apitel "
• Hardware Monitoring, siehe K
• PacketVideo, siehe Kapitel "PacketVideo", Seite 24.
Hardware Überwachung", Seite 23
SCALEO Power Management", Seite 20
10601046275, Ausgabe 2 Deutsch - 19
Page 26
Bedienung
SCALEO Power Management
Das SCALEO Power Management ermöglicht es Ihnen, einen Dauerbetrieb Ihres Servers
zu vermeiden und dabei Ihre Energiekosten zu reduzieren. Wird der Server nicht benötigt,
kann er in den Ruhezustand versetzt werden. Dabei ist das Gerät dennoch hochverfügbar
und kann jederzeit „aufgeweckt“ werden (Wake on LAN).
Anhand einer Kalenderfunktion, die mit Microsoft Outlook vergleichbar ist, können feste und
variable Betriebszeiten für den Home Server definiert werden. Außerhalb der Betriebszeiten wird
das Gerät in den Ruhezustand versetzt, z. B. tagsüber, wenn Sie außer Haus sind.
Der Server wird erst dann in den Ruhezustand versetzt, wenn alle Prozesse abgelaufen
sind. Das garantiert Ihnen höchste Daten-Sicherheit.
SCALEO Power Management aktivieren
Um das SCALEO Power Management nutzen zu können, muss die Power-Ma nagement-Fun ktion
zunächst aktiviert werden:
► Melden Sie sich an der Windows Home Server-Konsole an.
► Öffnen Sie die Se rver-Einstellungen.
► Wählen Sie den Eintrag Power-Management.
► Aktivieren Sie das Power Management.
Das System wird automatisch für den Ruhezustands-Betrieb konfiguriert.
Wenn Sie bei aktiviertem SCALEO Power Management den Ein-Ausschalter
betätigen, wird der Server in den Ruhezustand versetzt. Der Server kann von der
Kalenderfunktion oder von einem Client aufgeweckt werden. Dabei wird der Inhalt
des Arb eitsspeichers auf die Festplatte gesch rieben. Alle Systemkomponenten
werden ausgeschaltet. Beim Einschalten des Rechners wird das auf der Festplatte
gespeicherte Abbild wieder in den Arbeitsspeicher (RAM) geladen.
Sie können den Server mit der in den "Server-Einstellungen" verfügbaren
Option "Ausschalten" herunterfahren.
Server-Betriebszeiten festlegen
Sie können Betriebszeite
Betriebszeiten (z. B. wäh
unterschiedliche Zeite
20 - Deutsch 10601046275, Ausgabe 2
n für den Server definieren. Es wird dabei zwischen einmaligen
rend eines Urlaubs) sowie wiederke hrenden Terminen (z. B. fixe,
n für Werktage und Wochenende/n unterschieden.
Page 27
Bedienung
Sie können zwischen folgenden Ansichten wählen:
• Ta gesansicht
• Monatsansicht
• eine Arbeitswoche (nur Werktage)
• eine Kalenderwo
Der Zeitabstand
Zustand – Ruhez
Zustand" muss j
ordnungsgemäß
che (Werktage und Wochenende)
bei einem Wechsel zwischen "Ruhezustand – aktiver
ustand" bzw. "aktiver Zustand – Ruhezustand – aktiver
eweils mindestens 10 Minuten betragen, sodass der Server
hoch- oder heruntergefahren werden kann.
Einmalige Betriebszeit definieren
► Starten Sie die Windows Home Server-Konsole.
► Wählen Sie SCALEO Power Management und die gewünschte Ansicht.
► Wählen Sie Neue Betriebszeit.
► Wählen Sie einen Zeitraum für die einmalige Betriebszeit.
► Tragen Sie unter Betreff und im Te xtfeld beliebige Notizen zur Betriebszeit ein .
► Speichern Sie Ihre Einstellungen.
Ihr SCALEO Home Server wird in den festgelegten Zeiträumen in Betrieb gehen.
10601046275, Ausgabe 2 Deutsch - 21
Page 28
Bedienung
Wiederkehrende Ereignisse (Serie) definieren
► Wählen Sie Neue Betriebszeit.
► Wählen Sie Serie.
► Wählen Sie einen Zeitraum für die Betriebszeit.
► Wählen Sie ein Serienmuster aus, z. B. wöchentlich am Montag und Dienstag.
► Wählen Sie einen Beginn und ggf. ein Ende der Serie u nd bestätigen Sie mit OK.
► Tragen Sie unter Betreff und im Textfeld beliebige Notizen zur Serie ein.
► Speichern Sie Ihre Einstellungen.
Ihr SCALEO Home Server wird in den festgelegten Zeiträumen in Betrieb gehen.
Sicherungstermine definieren
Der Home Server ermöglicht eine regelmäßige Sicherung der angeschlossene n Clients. Befindet
sich der Server vor einem Sicherungstermin noch im Ruhezustand, wird er kurz vor dem
Termin hochgefahren, so dass die Sicherungen durchgeführt werden können.
Die Sicherung der einzelnen Clients wird n ach einander durchgeführt. Überschneiden sich Sicherung
und Ende der Betriebszeit, wird erst die aktuell durchgeführte Sicherung vollständig abgeschlossen,
bevor der Server in den Ruhezustand versetzt wird. Je nach Datenmenge kann die Sicherung längere
Zeit in Anspruch nehmen, sodass sich das Versetzen in den Ruhezustand deutlich verzögern kann.
► Wählen Sie in der Windows Home Server-Konsole Einstellungen.
► Wählen Sie Sicherung.
► Wählen Sie Startzeit, Endzeit sowie die Aufbewahrungszeiten der Sicherungsdaten.
Die Daten der Clients in Ihre m Netzwerk werden zu den angegeb en Zeiten gesichert.
Start- und Endzeit der Sicherung sind standardmäßig auf 0 Uhr bzw. 6
Uhr voreingestellt. Weitere Informationen finden Sie im Handbuch des
Windows Home Server-Betriebssystems.
Ruhezustand manuell beenden
Gehen Sie wie folgt vor, um den SCALEO Home Server außerhalb der definierten
Betriebszeiten manuell aus dem Ruhezustand aufzuwe cken (Wake on LAN). Dieser Vorgang
kann von jedem Client im Netzwerk aus durchgeführt we rden.
Wenn Sie auf dem Client eine andere Firewall als die Windows Firewa ll benutzen,
muss dort die Anwendung "SCALEO Wake up" freigeschaltet werden.
► Klicken Sie in der Taskleiste eines Clients auf das Wecker-Symbol.
► Wählen Sie den Namen des Servers, der aufgeweckt werden soll.
Der ausgewählte SCALEO Home Server wird aus dem Ruhezustand in
den aktiven Zustand versetzt.
22 - Deutsch 10601046275, Ausgabe 2
Page 29
Hardware Überwachung
Das System verfügt über verschiedene Sensoren zur Ü b erwachun g der
Hardwarekomponenten Ihres Home Servers.
• Funktionsfähigkeit und Lüfterdrehzahl der verschiedenen Lüfter
• Betriebstemperatur
• Betriebsspannung
• Im SCALEO Home Server eingebaute Festplatten
Wenn die Prozessortemperatur 70 °C überschreitet, wird der SCALEO Home
Server zum Selbstschutz automatisch herunte rgefah ren.
Hardware Überwachung anzeigen
► Starten Sie die Windows Home Server-Konsole.
► Wählen Sie Hardware Überwachung.
Bedienung
► Prüfen Sie die I
10601046275, Ausgabe 2 Deutsch - 23
nformationen zur Hardware.
Page 30
Bedienung
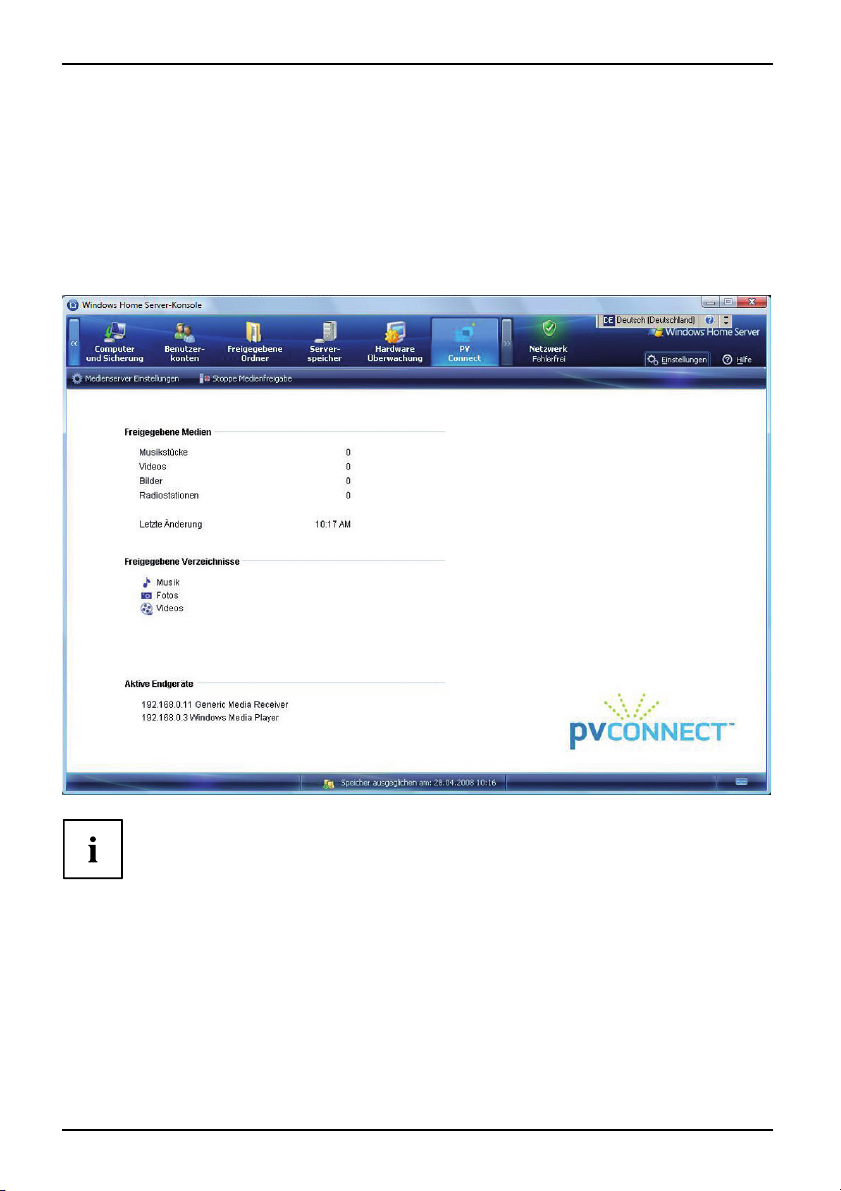
PacketVideo
PacketVideo ist eine Multimedia-Streaming-Software, die Ihren SCALEO Home Server zum
Multimedia-Server mit UPnP-Funktionalität macht. Internet-Radiosender werden unterstützt.
UPnP-kompatible Receiver können die auf dem SCALEO Home Server gespeicherten Bilder,
Musikstücke und Videos z. B. auf einem angeschlossen TV-Gerät wiedergeben.
PacketVideo ergänzt den im Windows Hom e Server-Betriebssystem enthaltenen
Windows Media Connect Streaming Server 2.0 durch erweiterte Funktionalität und
umfangreichere Unterstützung der verschiedenen UPnP-Receiver.
Universal Plug and Play (UPnP) dient zur herstellerübergreifenden Ansteuerung
von Geräten (z. B.Stereoanlagen, Router, Drucker, Haussteuerungen)
über ein IP-basierendes Netzwerk.
24 - Deutsch 10601046275, Ausgabe 2
Page 31

Recovery des SCALEO Home Servers
D
S
L
Recovery des SCALEO Home Serve
rs
Im Falle von technischen Problemen können Sie sowohl Server als auch Clients wiederherstellen.
Server in den Recovery-Modus
versetzen und
Betriebssystem wiederherstellen
Der Server ist mit einem sep
installiert ist. Im Recove
Starten des Servers vom Mo
Diese Vorgehensweise ist d
Betriebssystem installi
Wenn nur das Betriebssy
nicht defekt ist, bleib
Wird dagegen die komple
Seite 33) ausgetauscht, a
gehen alle Daten auf de
Die Wiederherstellung erfolgt von einem angeschlossenen, betriebsbereiten Client im Netzwerk:
araten Speichermodul ausgestattet, auf dem ein Notbetriebssystem
ry-Modus wird die Bootsequenz des Servers geändert, sodass beim
dul m it dem Notbetriebssystem gebootet wird.
ann erforderlich, wenn das Festplattenlaufwerk, auf dem das
ert war, ausgetauscht wurde oder defekt ist oder der Server nicht mehr reagiert.
stem wiederhergestellt wird, das Festplattenlaufwerk selbst aber
en in der Regel alle anderen Inhalte auf der Hauptfestplatte erhalten.
tte Festplatte Nr. 1 (siehe "
Festplattenreihen folge",
uf der das Betriebssystem installiert ist,
m Server verloren.
L
S
D
10601046275, Ausgabe 2 Deutsch - 25
Page 32

Recovery des SCALEO Home Servers
Voraussetzung:
• Ein Netzwerk-Client ist angeschlossen und betriebsbereit.
1
► Deinstallieren Sie auf dem Client, von dem aus Sie die Wiederherstellung des SCALEO
Home Servers v ornehmen wollen, mit Start - Systemsteuerung - Software - Programm entfernen
die Anw endunge n SCALEO Wake-up und Windows Home Server Connector.
► Fahre n Sie alle anderen PCs in Ihrem Netzwerk herunter.
► Drücken Sie an Ihrem SCALEO Home Server mit einem Stift oder einem Draht (z. B.
Büroklammer) fest in die Ö ffnung der Recovery-Taste (1) und halten Sie diese gedrückt.
► Drücken Sie auf den Ein-/Ausschalter an der Vorderseite des Geräts.
Das Gerät wird in den Recovery-Modus versetzt.
Die Betriebsanzeige am Ein-/Ausschalter leuchtet orange.
► Starten Sie auf dem noch laufenden Client im Netzwerk den Datenträger Nr.
3 ("SCALEO Home Server – Server Recovery").
Die Recovery-Software sucht den Server im Netzwerk.
► Folgen Sie den Anweisungen am Bildschirm und wählen Sie eine der folgenden Optionen:
- nur die Systempartition C:\ der ersten Festplatte wiederherstellen (alle Daten bleiben erhalten)
- nur die erste Festplatte wiederherstellen (alle redundanten Daten bleiben e rhalten)
- Auslieferungszustand wiederherstellen (alle Daten werden gelöscht)
Auf dem Server wird das Betriebssystem Windows Home Server wiederhergestellt.
Die zuvor entfernten Anwendungen SCALEO Wake-up und Windows Home
Server Connector werden neu installiert.
26 - Deutsch 10601046275, Ausgabe 2
Page 33

Recovery des SCALEO Home Servers
D
S
L
Recovery eines Clients durchführen
L
S
D
Voraussetzungen:
• Die notwendigen Treiber für den wiederherzustellenden Client sind verfügbar.
Diese werden im Rahmen einer Datensiche rung auf dem Server abgelegt ( siehe
Kapitel "
Ablage der Treiber auf dem Server oder auf externen Datenträgern finden Sie
in der Dokumentation zum Windows Home Server.
► Starten Sie auf dem wiederherzustellenden Client den Datenträger Nr. 2
("SCALEO Home Server - Client Recovery").
► Halten Sie die Treiber des Clients auf einem Datenträger m it USB-Anschluss bereit.
► Folgen Sie den Anweisungen am Bildschirm.
Der Client wird wiederhergestellt.
Sicherungstermine definieren", Seite 22). Weitere Informationen zur
Möglicherweise müssen Sie im BIOS Ihres Clients die Boot-Reihenfolge ändern.
10601046275, Ausgabe 2 Deutsch - 27
Page 34

Problemlösungen und Tipps
Problemlösungen und Tipps
Beachten Sie die Sicherheitshinweise im Handbuch "Sich erheit" und das Kapitel
Inbetriebnahme", Seite 10, wenn Sie Leitungen lösen oder anschließen.
"
Wenn eine Störung auftritt, versuchen Sie diese entsprechend den Maßnahmen zu
beheben, die in den folgenden Dokumenten beschrieben sind:
• in diesem Kapitel
• in der Dokumentation zu de n angeschlossenen Geräten
• in der Hilfe zu den einzelnen Programmen
• in der Dokumentation zum verwendeten Betriebssystem.
Wenn Sie die Störung nicht beheben können, gehen Sie wie folgt vor:
► Schalten Sie das Gerät aus.
► Notieren Sie die ausgeführten Schritte und den Zustand, der bei Auftreten des Fehlers aktiv war.
► Notieren Sie eine eventuell angezeigte Fehlermeldung.
► Notieren Sie die Identnummer Ihres Geräts. Sie finden die Identnummer auf dem
Typenleistungsschild an der Rückseite des Gehäuses.
► Setzen Sie sich mit Ihrer Verkaufsstelle oder mit unserem Service in Verbindung (siehe
mitgelieferte Help Desk-Liste oder im Internet unter "
http://www.fujitsu-siemens.com/ support/".
Betriebsanzeige leuchtet g
Ursache Fehlerbehebung
Spannungsversorgung ist fe
oder
Das Gerät ist überhitzt.
28 - Deutsch 10601046275, Ausgabe 2
hlerhaft.
elb
► Prüfen Sie, ob die Netzleitu
ordnungsgemäß am Gerät und a
einer geerdeten Schutzkon
angeschlossen ist.
► Prüfen Sie den Zustand des Systems mit
dem Hardware Monitoring, siehe Kapitel
"
Hardware Überwachung", Seite 23.
► Prüfen Sie, ob ggf. Luftei
-auslassöffnungen des Ge
► Ziehen S ie d en Netzstecker des Geräts aus
der geerdeten Schutzkontakt-Steckdose.
► Warten Sie einen kurzen M
► Stecken Sie den Netzstecker wieder in eine
geerdete Schutzkontakt-Steckdose.
► Schalten Sie das Gerät ein
► Reduzieren Sie die Umgebungstempe ratur.
ng
n
takt-Steckdose
nlass- und
räts blockiert sind.
oment.
.
Page 35

Problemlösungen und Tipps
Eine der Statusanzeigen der Festplatten leuchtet gelb
Ursache Fehlerbehebung
Festplatte fehlerhaft ► Versuchen Sie, die Festplatte
wiederherzustellen (siehe Kapitel "
des SCALEO Home Servers", Seite 25).
► Tauschen Sie ggf. die Festplatte aus
(siehe Kapitel "
ausbauen", Seite 33).
Festplattenlaufwerk ein- und
Recovery
Weitere Fehlermeldungen bei Einrichten der
Windows Home Server-Connector-Software
Unter folgender Internet-Adresse finden Sie weitere Informationen wenn
einer der Fehler "Unbekannter Netzwerkfehler", "F ehler beim Konfigurieren
der Computersicherung" oder eine andere Fehlermeldung angezeigt wird:
http://www.microsoft.com/windo ws/products/winfamily/windowshomeserver/support.mspx".
"
10601046275, Ausgabe 2 Deutsch - 29
Page 36

Systemerweiterungen
Systemerweiterungen
ErweiterungenGerätSystemerweiterung
In diesem Kapitel werden alle T ätigkeiten beschrieben, die Sie ausführen müssen, wenn Sie in
Ihrem Gerät Hardware-Änderungen (z. B. Laufwerke einbauen) durchführen möchten.
Bevor Sie neue Laufwerke einbauen, lesen Sie die mitgelieferte D okumentation.
Es kann sinnvoll sein, wenn Sie sich einige Te ile dieses Kapitels ausdrucken, da das
Gerät beim Ein-/Ausbau von Systemerweiterungen ausgeschaltet sein muss.
Achten Sie beim Einbauen von Komponenten mit großer Wärmeentwicklung darauf,
dass die maxima l zulässige Temperatur nicht überschritten wird.
Das Gerät muss beim Ein-/Ausbau von Systemerweiterungen ausgeschaltet
sein und darf sich nicht im Ruhezustand befinden.
Ziehen Sie den Netzstecker, bevor Sie das Gerät öffnen.
30 - Deutsch 10601046275, Ausgabe 2
Page 37

Systemerweiterungen
Abdeckung entfernen
AbdeckungGerät
► Scha lten Sie das Gerät aus. Das Gerät darf sich nicht im Ruhezustand befinden!
Beachten Sie die Sicherheitshinweise im Kapitel "Wichtige Hinweise", Seite 3.
Ziehen Sie den Netzstecker aus der Steckdose.
Stecken Sie den Netzstecker erst wieder an, wenn Sie das Gehäuse geschlossen haben.
► Entfern en Sie störende, gesteckte Leitungen.
1
2
1
3
► Lösen Sie die beiden Rändelschrauben auf der Rückseite des Geräts (1).
► Schieben Sie die Abdeckung leicht in Pfeilrichtung (2).
► Heben Sie die Abdeckung vom Gerät ab (3).
10601046275, Ausgabe 2 Deutsch - 31
Page 38

Systemerweiterungen
Abdeckung befestigen
3
3
2
1
► Setzen Sie die Abdeckung auf das Gerät auf und achten Sie darauf, dass die
Rastnasen der Abdeckung richtig ausgerichtet sind (1).
gbefestigen
Abdeckun
Gerät
► Schieben Sie
der Abdeckun
► Befestigen Sie die beiden Rändelschrauben auf der Rü ckseite des Geräts (3).
► Schließen Si
32 - Deutsch 10601046275, Ausgabe 2
die Abdeckung in Pfeilrichtung (2), so dass die Rastnasen
g einrasten (2).
e die zuvor gelösten Leitungen wieder an.
Page 39

Systemerweiterungen
Festplattenlaufwerk ein- und ausbauen
Bauen Sie nur fabrikneue bzw. komplett neu formatierte Festplattenlaufwerke ein.
FestplattenlaufwerkFestplattenl aufwerkFestplattenlaufwerk
Festplattenreihenfolge
Nachfolgend ist die Reihenfolge abgebildet, in der die Festplattenlaufwerke im Gehäuse angeordnet
sind. Diese entspricht auch der Nummerierung der Statusanzeigen der einzelnen Festplatten.
2
1
3
4
10601046275, Ausgabe 2 Deutsch - 33
Page 40

Systemerweiterungen
Festplattenlaufwerk einbauen
► Entfernen Sie die Abdeckung (siehe "Abdeckung entfernen", Seite 31).
Festplattenlaufwerk
► Nehmen Sie das neue Festplattenlaufwerk aus der Verpackung.
► Befestigen Sie die mit I
am neuen Festplattenla
hrem Gerät mitgelieferten Lagerungsschrauben
ufwerk.
2
1
► Lösen Sie die Rändelsch raube an der Fe stp latte nhalterung (1).
► Klappen Sie die Festplattenhalterung in Pfeilrichtung (2).
► Stecken Sie die Leitungen (Datenleitung, Stromversorgung) an das Laufwerk.
34 - Deutsch 10601046275, Ausgabe 2
Page 41

Systemerweiterungen
► Legen Sie das Festplattenlaufwerk so in den Einbaupla tz, dass die Lagerungsschrauben
in den zugehören Aussparungen zu liegen kommen.
2
1
► Klappen Sie die Festplattenhalterung in Pfe ilrichtung (1).
► Befestigen Sie die Rändelschraube (2).
► Befestigen Sie die Abdeckung (siehe "
10601046275, Ausgabe 2 Deutsch - 35
Abdeckung befestigen", Seite 32).
Page 42

Systemerweiterungen
Festplattenlaufwerk ausbauen
► Entfernen Sie die Abdeckung (siehe "Abdeckung entfernen", Seite 31).
Festplattenlaufwerk
► Entfernen Sie alle gesteckten Leitungen (Datenleitung, Stromversorgung) vom Laufwerk.
2
1
1
► Lösen Sie die Rändelsch raube an der Fe stp latte nhalterung (1).
► Klappen Sie die Festplattenhalterung in Pfeilrichtung (2).
36 - Deutsch 10601046275, Ausgabe 2
Page 43

► Heben Sie die Festplatte aus dem Gehäuse.
Systemerweiterungen
► Lösen Sie die Lage rungsschrauben vom Festplattenlaufwerk.
10601046275, Ausgabe 2 Deutsch - 37
Page 44

Systemerweiterungen
2
► Klappen Sie die Festplattenhalterung in Pfeilrichtung (1).
► Befestigen Sie die Rändelschra ube (2).
► Befestigen Sie die Abdeckung (siehe "
Abdeckung befestigen", Seite 32).
1
38 - Deutsch 10601046275, Ausgabe 2
Page 45

Systemerweiterungen
Lithium-Batterie tauschen
Bei unsachgemäßem Austausch der Lithium-Batterie besteht Explosionsgefahr!
Die Lithium-Batterie darf nur durch identische oder vom Hersteller
empfohlene Typen ersetzt werden.
Die Lithium-Batterie gehört nicht in den Hausmüll. Sie wird vom Hersteller,
Händler oder deren Beauftragten kostenlos zurückgenommen, um sie
einer Verwertung oder Entsorgung zuzuführen.
Achten Sie beim Austausch unbedingt auf die richtige Polung der
Lithium-Batterie, siehe Abbildung.
Lithium-BatterieTauschenWechselnAustauschen,Lithium-BatterieBatterie
Die Halterung der Lithium-Batterie gibt es in verschiedenen Ausführungen, die
sich in ihrer Funktionsweise nicht unterscheiden.
1
2
► Drücken Sie die Rastnase in Pfeilrichtung (1).
Die Batterie springt etwas aus der Halterung heraus.
► Entfern en Sie die Batterie (2).
► Schieben Sie die neue Lithium-Batterie des identischen Typs in die Halterung (3)
und drücken Sie sie nach unten, bis sie einrastet.
► Befestigen Sie die Rastnase (4).
3
4
10601046275, Ausgabe 2 Deutsch - 39
Page 46

Technische Daten
Technische Daten
TechnischeDaten
Elektrische Daten
Eingehaltene Sicherheitsstandards IEC 60950-1, EN 60950-1 , UL 60950CSA 22.2
Schutzklasse
Nennfrequenz
Nennstrom maximal
Abmessungen
Breite x Tiefe x Höhe
Gewicht
im Grundausbau: • ca. 7 kg (Gehäuse ohne Festplatten)
Anschlüsse
USB-Anschlüsse 4 x USB 2.0
eSATA-Anschlüsse
LAN-Anschluss Buchse, RJ45
Umgebungsbedingungen
Klimaklasse 3K2
Klimaklasse 2K2
Temperatur:
Betrieb (3K2) 15 °C ... 35 °C
Transport (2K2) -25 °C ... 70 °C
Betauung ist im Betrieb nicht zu
lässig!
No.60950-1
I
50Hz–60Hz
200 V - 240 V / 2,0 A
100 V - 127 V / 3,5 A
406 mm x 336 mm x 122 mm
• ca. 9 kg (maximale Ausbaustufe mit
4 Festplatten
2x
DIN IEC 721 Teil 3-3
DIN IEC 721 Teil 3-2
Das Datenblatt zu diesem Gerät bietet we itere technische Daten. Sie finden
das Datenblatt im Internet unter "
40 - Deutsch 10601046275, Ausgabe 2
www.fujitsu-siemens.com".
Page 47

SCALEO Home Server
Operating Manual
Deutsch
English
Français
Español
Italiano
Page 48

The information in this manual may be changed without prior announcement. In spite of the
most careful processing, this manual may still contain errors or be incomplete in some areas.
No liability whatsoever w ill be assumed for errors or data loss as a result of this.
Fujitsu Siemens Computers shall not be held liable for any data loss caused
by the use of unsuitable data carriers.
Before performing the initial setup of the SCALEO Home Server, we recommend
that you re ad the procedures described in this manual.
The trademarks used are legally protected by the respective companies which own them.
All other trademarks referenced are trademarks or registered trademarks of their
respective owners, whose protected rights are acknowledged.
Copyright © Fujitsu Siemens Computers GmbH2009
All rights reserved, including rights of translation, reproduction by printing, copying
or similar methods, in part or in whole.
In the event of violations, perpetrators will be liable to prosecution for damages.
All rights reserved, including rights created by patent grant or registration of a utility model or design.
Subject to availability and technical modifications.
Page 49

Contents
English
Contents
Your SCALEO Home Server... .......................................................... 1
Notational conventions .................................................................. 2
Importantnotes ........................................................................ 3
Safetynotes ............................................................................ 3
Transporting the device .................................................................. 3
Cleaningthe device ..................................................................... 4
Energy saving, disposal
Acceptance of old equipm
CEmarking ............................................................................ 4
FCC Class B Compliance S
Portsand operating elements ......................................................... 6
Equipmentoverview ..................................................................... 6
Front ............................................................................... 6
Rear ............................................................................... 7
Indicators onthe device ................................................................. 8
Gettingstarted ......................................................................... 10
Unpacking and chec
Steps for initia
Setting up the de
Vertical operat
Horizontal ope
Connecting ext
Connecting cab
Cable disconn
Connecting an
Connecting ex
Connecting t
First-time
Starting up
Installati
Configurat
Operation .............................................................................. 19
Switchingthe device on ................................................................. 19
Switchingoff the device ................................................................. 19
Configuration with theWindows Home Server console ..................................... 19
SCALEO Power Management . ....................................................... 20
Hardwaremonitoring ................................................................ 23
PacketVideo ........................................................................ 24
Recove
ng the server to recovery mode and restoring the operating system .....................
Setti
rmingthe recovery of aclient .......................................................
Perfo
Troubleshootingandtips .............................................................. 28
Power-onindicator lightsupyellow ....................................................... 28
lsetup ....................................................................
ernaldevices .............................................................
hedevice tothe mains voltage ...............................................
installation ....................................................................
your SCALEO Home Server for the first time ................................
ononthe clients .............................................................
ionofthe server ...........................................................
ryofthe SCALEO HomeServer .................................................
andrecycling ....................................................
ent .........................................................
tatement .....................................................
kingthedelivery .....................................................
vice ....................................................................
ingposition ............................................................
ratingposition .........................................................
les ..................................................................
ecting .................................................................
externalSATA hard disk (eSATA) .......................................
ternaldevices to the USB ports .........................................
10
10
11
12
13
14
14
14
15
16
16
17
17
18
18
25
25
27
4
4
5
10601046275, edition 2 English
Page 50

Contents
Oneofthe status indicators for the hard disks is lit up yellow ............................... 29
Further error messages during setup of the Windows Home Server Connector software . . .... 29
Systemupgrades ...................................................................... 30
Removingthe cover .................................................................... 31
Attachingthe cover ..................................................................... 32
Installing andremoving the hard disk drive ................................................ 33
Hard disk sequence . ................................................................ 33
Installing thehard disk drive ......................................................... 34
Removingthe hard disk drive ........................................................ 36
Replacingthe lithium battery ............................................................. 39
Technicaldata ......................................................................... 40
English 10601046275, edition 2
Page 51

Your SCALEO Home Server...
Your SCALEO Home Server...
Overview
... is an Intel-based server for workgroups and small ne tworks.
Your device offers a high level of data security and availability thanks to
sophisticated hardware and software components.
It supports the following operating systems on the connected clients in the network:
• Microsoft Windows XP from Service Pack 2 and
• Microsoft Windows Vista on 32 an
(exception: Windows Vista Star
You can install up t o four 3.5’ hard disk drives in your device. Depending on the configura tion
level, the device is supplied with up to four pre-installed hard disks.
In addition, the device is equipped w ith two eSATA ports and four USB ports which
can be used to operate additional hard disks.
This manual tells you how to start using you r device and how to operate it in daily use.
This manual applies for all configuration levels. Depending on the chosen configuration
level, some of the hardware components described may not be available on your PC.
Please also read the notes about your operating system.
Further information on t his device is provided:
• in the "Getting Started" guide
• in the "Safety" manual
• in the "Warranty" manual
• in the documentation for your
• in the information files (e.g. *.PDF, *.HTML, *.DOC, *.CHM, *.TXT, *.HLP)
• on the numbered data carriers:
• No. 1 " SCALEO Home Server - Client Connector"
• No. 2 "SCALEO Home Server - Client
• No. 3 "SCALEO Home Server - Server Recovery a nd Documentation"
d64bitsystemsinallspecifications
ter)
operating system
Recovery"
You will need the Adobe Reader program to open PDF files. The program is available
on the Internet as a free download under "
10601046275, edition 2 English - 1
www.adobe.com".
Page 52

Your SCALEO Home Server...
Notational conventions
Pay particular attention to text marked with this symbol. Failure to observe
this warning will endanger your life, will damage the device or lead to loss
of data. The warranty will be invalidated if you cause defects in the device
through failure to take notice of this warning
indicates important informat
ion that is req uired to use the device properly.
►
This style
This style
This style
"This style"
Abc
This style
indicates an activity that must be performed in the order shown
indicates a result
flags data entered using the keyboard in a program dialog o r command
line, e.g. your password (Name123) or a command to launch a p rogram
(start.exe)
refers to information displayed by a program on the screen, e.g.:
Installation is completed
is for
• terms and texts in a softwar
• names of programs or files, e.g. Windows or setup.exe.
is for
• cross-references to another section, e.g. "Safety information"
• cross-references to an external source, e.g. a web address: For more
information, go to "
• indicates names of CDs and DVDs as well as names and titles of other
materials, e.g.: "CD/DVD Drivers & Utilities" or "Safety" manual
refers to a key on the keyboard, e.g.:
flags concepts and text that are emphasised or highlighted, e.g.: Do not
switch off device
www.fujitsu-siemens.com"
e user interface, e.g.: Click Save.
F10
2 - English 10601046275, edition 2
Page 53

Important notes
ImportantnotesNotes
In this chapter you will find information regarding safety which it is essential to
take note of when working with your device.
Safety notes
SafetynotesNote
In addition, follow the instruct
Home Server - Server Recovery an
During installation and while op
on environmental conditions in t
instructions in th e ""
Getting s
You may only operate the device if
the s ame as the local mains volt
The ON/OFF switch does not disc
voltage. To completely discon
power plug from the grounded m
Replace the lithium battery on
instructions in the "
Replaci
Caution, components in the sys
The activities described in t
performed with the greatest
Only qualified technicians sh
put the user at great risk (el
of fire) or cause serious dama
Do not store the device, batt
(e.g. a heater or fireplace).
batteries or mains adapte
Do not use damaged cab les (d
cables can cause electric
ions in the "Safety" manual on the supplied "SCALEO
d Documentation" CD.
erating the device, please observe the instructions
he "Technical data" chapter as well as the
tarted", Page 10" chapter.
the rated voltage of the device is
age.
onnect the device from the mains
nect from the mains voltage, remove the
ains outlet.
the mainboard exactly in accordance with the
ng the lithium battery", Page 39 chapter.
tem can get very hot.
hese instructions must always be
care.
ould repair the device. Incorrect repairs could
ectric shock, hazardous energy emissions, risk
ge to the equipment.
eries or mains adapter near a heat source
Excessive heating up can cause the device,
rtocatchfire or explode.
amaged insulation, bare wires). Damaged
shocks and are a fire risk.
Important notes
Transporting the device
rtation
portation
Device,Tran spo
Retrans
10601046275, edition 2 English - 3
Transport all parts separately in their original pa ckaging or in a packaging which
protects them from knocks and jolts, t o the new site.
Do not unpack them until all transportation manoeuvres are completed.
If the device is brought from a cold environment into the room where it will b e used,
condensation may occur. Before operating the device, wait until it is absolutely dry
and has reached approximately the same temperature as the installation site.
Page 54

Important notes
Cleaning the device
Device,Trans portationRetransportationSystemunit,see Device
Turn off all power and equipment switches and remove the power
plug from the mains supply.
Do not clean any interior parts yourself, leave this job to a service technician.
Do not use any cleaning agents that contain abrasives or may corrode plastic.
Never clean the device with water! Water entering into the device could
present a serious risk to users (e.g. electric shock).
Ensure that no liquid enters the system.
The surface can be cleaned with a dry
moistened in mild domestic deterge
cloth. If particularly dirty, use a cloth that has been
nt and then carefully wrung out.
Energy saving, disposal and recycling
DisposalEnergysavingRecyclingDrivers&UtilitiesDVDUserDocumentationDVD
Your Home Server is equipped with power management functions to help save energy. P lease refer
to the chapter entitled "
SCALEO Power Management", Page 20 for m ore information on this topic.
For information on how to change the lithium battery, please refer to the chapter
"
Replacing the lithium battery", Page 39.
Acceptance of old equipment
Acceptanceofreturnedgoods
The capability to take back and recycle our systems is controlled and guaranteed in our environmental
management which has DIN EN ISO 14001 certification. Our devices are mostly produced of
materials that can be delivered for proper re cycling. The device may be taken back aft er use to be
recycled or to be re-used as a material, provided that it is returned in a condition that reflects normal
use. Any components not reclaimed will be disposed of in an environmentally acceptable manner.
To dispose of devices, please contact your local District Council for advice.
Further information about country-specific disposal and recycling options can be
found on the Internet under: "
www.fujitsu-siemens.com".
If you have any additional questions on disposal, please contact your local
sales outlet or our Help Desk.
CE marking
CE marking for devices without wireless component
CEmarkingCEmarkingNotesElectromagneticcompatibilityLowvoltagedirective
The shipped version of this device complies with the requirements of EEC
directives 2004/108/EC "Electromagnetic compatibility" and 2006/95/EC
"Low voltage directive".
All other devices connected to this product must likewise satisfy the
above directives.
4 - English 10601046275, edition 2
Page 55

Important notes
FCC Class B Compliance Statement
The following statement applies to the products covered in this manual, unless otherwise specified
herein. The statement for other products will appear in the accompanying documentation.
NOTE:
This equipment has been teste d and found to comply with the limits for a "Class B" digital
device, pursuant to Part 15 of the FCC rules and meets all requirements of the Canadian
Interference-Causing Equipment Standard ICES-003 for digital apparatus. These limits are
designed to provide reasonable protection against harmful interference in a residential installation.
This equipment generates, uses and can radiate radio frequency energy and, if not installed
and used in strict accordance with the instructions, may cause harmful interference to radio
communications. However, there is no guarantee that interference will not occur in a particular
installation. If this equipment does cause harmful interference to radio or television reception,
which can be determined by turning the equipment off and on, the user is encouraged to
try to correct the interference by one or more of the following measures:
• Reorient or relocate the receiving antenna.
• Increase the separation between equipment and the receiver.
• Connect the equipment into an outlet on a circuit different from that to
which the receiver is connected.
• Consult the dealer or an experienced radio/T V technician for help.
Fujitsu Siemens Computers GmbH is not responsible for any radio or television interference
caused by unauthorized modifications of this equipmen t or the substitution or attachment
of connecting cables and equipment other than those specified by Fujitsu Siemens
Computers GmbH. The correction of interferences caused by such unauthorized modification,
substitution or attachment will be the responsibility of the user.
The use of shielded I/O cables is required when connecting this equipment to any and all optional
peripheral or host devices. Failure to do so may violate FCC and ICES rules.
10601046275, edition 2 English - 5
Page 56

Ports and operating elements
Ports and operating elements
Ports
This chapter presents the individual hardware components of y our device. This will provide
you with an o verview of the ports and operating elements on the device. Please familiarise
yourself with these components before starting to work with your device.
Equipment overview
Front
ViewFro nt
1
2
3
1 = USB ports
2 = Status indicators
6 - English 10601046275, edition 2
3 = ON/OFF switch with sta
tus indicators
Page 57

Rear
ViewRear
Ports and operating elements
1 = eSATA ports
2 = LAN port
3=USBports
12
34 5
4 = Recovery button
5 = Mains socket
10601046275, edition 2 English - 7
Page 58

Ports and operating elements
Indicators on the device
Indicators,Device
The indicators are located on the front of the casing.
7
1
1 = Hard disk indicato
2 = Network indicator
3 = Status indicator
2
r (general)
for h ard disk 1
6
5
3
4
5 = Status indicator f
or hard disk 3
6 = Status indicator for hard disk 4
7 = Powerindicatoro
n the ON/OFF switch
4 = Status indicator for hard disk 2
Hard disk indicator (1)
Harddiskindicator
The indicator lights up when one or more of the hard disk drives of the device are accessed.
Network indicator (2)
ndicator
Networki
• The indicator lights up blue when a network connection exists.
• The indicator flashe
Status indicators
Statusindicators
This indicators info
s blue when data are being transmitted over the network.
of the individual hard disks (3, 4, 5, 6)
rm abo ut the status of the individual hard disks (1 to 4):
• Indicator is blue:
Hard disk is ready.
• Indicator is yellow:
A serious error has occurred.
8 - English 10601046275, edition 2
Page 59

Ports and operating elements
• Indicator flashes yellow:
The hard disk is being restored.
• Indicator not lit up:
No corresponding hard disk fitted.
Power-on indicator (7)
Power-onindicator
• Indicator lights up blue: The device is switched on and ready.
• Indicator flashes blue: The device is booting up.
• The indicator glows orange: A serious error has occurred or the device is in recovery mode.
• Indicator does not light up: Device is switched off and disconnected from the power supply.
10601046275, edition 2 English - 9
Page 60

Getting started
Getting started
Gettingstarted
Unpacking and checking the delivery
It is recommended not to throw away the original packaging material! It may be
required for reshipment at some later date.
PackagingContentso fdeliveryPackaging,
► Unpack all the individual parts.
► Check the contents of the package f
► Check whether the delivery conforms to the details in the delivery note.
► If the delivery does not correspo
Steps for initial setup
Preparingforfirstuse,overvie wPreparingforuse,
Only a few steps are necessary to put your new device into operation for the first time:
• Select a location for device and set up device
• Connecting external devices
• Connecting the device to the network
• Check the voltage at the mains outle
• Switch the device on
• Installing software on clients and c
You will learn more about the individual steps in the following sections.
Please observe the safety information in the "Important notes", Page 3 chapter.
or any visible damage caused during transport.
nd to the delivery note or if any part of the
delivery is damaged, please noti
"
Troubleshooting and tips", Pa
fy your local sales outlet immediately - refer to
ge 28 for more information.
t and co nnect the device to an electrical outlet
onfiguring servers
10 - English 10601046275, edition 2
Page 61

Settingupthedevice
WorkstationErgonomicDevice
When installing your device, please r ead the reco mmendations and
safety notes in the "Safety" manual.
Only install the device in the operating positions for which it is intended.
We recommend that you place your device on a surface which is not slip pery. In
view of the multitude of different finishes and varnishes used on furniture, it is
possible that the feet of the device will mark the surface they stand on.
Do not expose the device to extreme environmental conditions (see "
data", Page 40). Protect the device against dust, humidity and heat.
Make sure that the device is adequately ventilated.
Do not stack several devices on top of each other.
Depending on the location of your device, bothersome vibrations and noises may
occur. To prevent this, a distance of at least 3 mm should be maintained from
other devices on casing sides without ventilation surfaces.
Getting started
Technical
You can use the device in a vertic
al or horizontal operating position.
10601046275, edition 2 English - 11
Page 62

Getting started
Vertical operating position
Use the base feet supp lied when you wish to use the device in a vertical ope rating position.
Proceed as follows to use the device in the vertical operating position:
VerticaloperatingpositionOperatingposition,verticalBasefeetSidecover
► Disconnect the cables if required.
► Attach the base feet to the device as s how n.
The base feet can only be attached one way.
► Place the device on
the base feet.
► If necessary, reconnect an y cables that were previously disconnected.
12 - English 10601046275, edition 2
Page 63

Horizontal operating position
Use the base feet supplied when you use the device in a horizontal operating position.
Proceed as follows to use the device in the horizontal operating position:
HorizontaloperatingpositionOperatingposition,ho rizontalBasefeet
► Disconnect the cables if required.
Getting started
► Attach the base feet to the d evic e as sh own.
The base feet can only be atta che d one way.
► If necessary, reconnect any cables that were previously disconnected.
10601046275, edition 2 English - 13
Page 64

Getting started
Connecting external d evices
Read the documentation on the external device before connecting it.
With the exception of USB devices and eSATA hard drives, always remove
all mains plugs before connecting external devices.
Do not connect or disconnect cables during a thunderstorm.
Always take hold of the actual plug. Never unplug a cable by pulling the cable itself.
Connect a nd disconnect the cables in the order described below.
Connecting cables
► Switch off all affected devices.
CordCable
► Remove all power plugs from the groun ded mains outlets.
► Plug all cables into the device and peripherals. Please make sure that you always
observe the safety notes provided in "
► Plug all data communication cables into the sockets provided for the data
/ telecommunication networks.
► Plug all power cables into the grounded mains outlets.
Cable disconnecting
► Switch off all affected devices.
Cable,
► Remove all power plugs from the groun ded mains outlets.
► Unplug all data communication cables from the utility sockets.
► Unplug all cables from the device and peripherals.
Important notes", Page 3.
14 - English 10601046275, edition 2
Page 65

Getting started
Connecting an external S ATA hard disk (eSATA)
An external SATA hard disk can be connected at the eSATA port. This allows you to expand
the hard disk capacity of the device. Use a hard disk with a sturdy casing.
The length of the eSATA cable must not exceed 2 metres. SATA cables cannot
be u sed because the pin occupancy is different. The cable is not included in
the delivery scope. It can be obtained through your retailer.
The data transfer rate is up to 2,400 Mbit/s.
► Connect the data cable to the external
device.
eSATA
Device driver Th e eSATA hard disk is automatically recognised by
your operating system and installed.
► Connect the data cable to the eSATA port
of the computer.
You wil l find more information in the documentation for the external SATA
hard disk and the operating system.
10601046275, edition 2 English - 15
Page 66

Getting started
Connecting external devices to the USB ports
USBdevices,USBportExternaldevicesDevices
External devices can be connected to the USB ports.
USB devices are hot-pluggable . This means that the cables of these devices
can be connected o r disconnected wh ile switched on.
Additional information can be found in t he documentation for the USB devices.
► Connect the data cable to the external device.
► Connect the data cable to the corresponding connection of your SCALEO Home Server.
To ensure compliance with USB 2.0, the length of the cable used between
the front USB port of your device and the external USB device must
not exceed a maximum length of 3 m.
Connecting the device to the mains voltage
DeviceConnectingDevice
The rated voltage of the device must match the loc
► Check the voltage setting.
► Connect th e power cable to the device (1).
2
► Plug the power plug into a grounded
1
16 - English 10601046275, edition 2
al mains v oltage rating.
mains outlet (2).
Page 67

Getting started
D
S
L
First-time installation
Installing,
Minimum requirements for a Home Server network:
• the SCALEO Home Server
• one client
• the network router (recommended)
When you switch on the SCALEO Home Server for the first time the preinstalled software is
launched. Plan a reasonable amount of time for this, as this process must not be interrupted.
Once the installation has been started the device must not be switched
off, unless the installation has been completed.
During installation, t he device must only be rebooted when you are requested to do so.
Otherwise the installation will not be carried out correctly and the contents
of the hard disk will have to be completely restored.
You can manage a maximum of 10 clients in a netw ork with the SCALEO Home Server.
L
S
D
Starting up your SCALEO Home Server for the first time
► Press the ON/OF F button to start the SCALEO Home Server.
The power indicator on the ON/OFF switch flashes.
The installation takes around 5 minutes. The power indicator on the
ON/OFF switch lights up continuously.
10601046275, edition 2 English - 17
Page 68

Getting started
Installation on the clients
The Windows Home Server Connector connects the clients with the server.
Perform the next steps on all of the clients w hich are to be integrated in the network.
You will find additional information in the Windows Home Server documentation.
► Insert the data carrier labelled no. 1 ("SCALEO Home Server – Client Connector
and Documentation") into the CD/DVD drive of the first client.
The installation wizard starts.
► Follow the instructions on the screen.
Once the installation of the first client has been successfully completed the system
will automatically launch the Windows Home Server Setup tool.
This configuration and installation will be started only once, on the first client.
Configuration of the server
The initial configuration of
client on which the Connec
You will find additional in
the server is performed a single time on the first
tor software was installed.
formationintheWindows Home Server documentation.
► Follow the instructions on
► Among other things you will need to enter a server name and a server password.
Once initial configuration o
Server Console and further
► To mak e further settings, start the Windows Home Server Console by clicking on the appropriate
symbol in the system menu. Fu rther information on configuration can be found in the
chapter ""
18 - English 10601046275, edition 2
Configuration with the Windows Home Server console", Pag e 19".
the screen.
f the server has been performed, you can start the Windows Home
configure the server. Your SCALEO Home Server is now ready to use.
Page 69

Operation
Switching the device on
► Press the ON/OFF switch on the front of the device.
DeviceMonitor
The power-on indicator flashes blu
Switching off the device
ON/OFF switches do not disconnect the device from the mains voltage. To completely
disconnect the mains voltage, remove the power plug from the power socket.
e and the device starts up.
Operation
► Shut down the device using the
DeviceMonitor
The device no longer uses any power.
You can define exact operating times after whose elapse the device
will be transferred into hibernate mode.
Further information can be found in "Power Management".
Windows Home Server Console.
Configuration with the Windows Home Server console
The Windows Home Server Console is used for management of your network, of the
SCALEO Home Server and the connected clients.
It allows you to manage user accou nts, user rights, authorized folders and
backups of the conne cted clients.
For further information on operating the Windows Home Server Console,
please refer to theWindows Home Server manual or the Internet under:
http://www.microsoft.com/windo ws/products/winfamily/windowshomeserver/support.mspx".
"
The additional applications are also integrated:
• SCALEO Power Management, see "
• Hardware Monitoring, see "Ha
• PacketVideo, see chapter "PacketVideo", Page 24.
SCALEO Power Management", Page 20
rdware monitoring", Page 23
10601046275, edition 2 English - 19
Page 70

Operation
SCALEO Power Management
SCALEO Power Management allows you to avoid continuous operation of your servo and save
energy costs in the process. The server can be put into Hibernate mode whenever it is not required.
Despite this, the device remains highly available and can be „wo ken up“ at any time (Wake on LAN).
With the aid of a calendar function which is comparable to Microsoft Outlook, it is possible to
define fixed and variable uptimes for the Home Server. Outside these uptimes the device is
set to Hibernate mode - e.g. during the daytime, when you are not at home.
The server is not set to Hibernate mode until all processes have completed. This
guarantees the highest level of data security for you.
Activating the SCALEO Power Management
In order to use the SCALEO Power Management, it is first necessary to
activate the Power Management function:
► LogontotheWindows Home Server Console.
► Open the Server Settings.
► Select the item Power Management.
► Activate the Power Management.
The system is automatically configured to operate in hibernate mode.
If, with SCALEO Power Management activated, you press the ON/OFF switch the server
will be set to Hibernate mode. The server can be woken up by the calendar function or
by a client. In the process, the contents of the working memory are written to the hard
disk. All system components are switched off. When the computer is switched on the
image saved on the hard drive is loaded back into the working memory (RAM).
You can shut down those servers which have the "Shut down" option
available in "Server se ttings".
Defining server uptimes
You c an de fine the operating
one-off operating times (
regular different times f
20 - English 10601046275, edition 2
times for the server. A distinction is made here between
e.g. during a holiday) and recurring operating times (e.g.
or working days and weekend(s)).
Page 71

Operation
You can choose between the following views:
• Day view
• Month view
• Single working week (working days only)
• Calendar week (w
Thewaittimefor
mode" or betwee
minutes each ti
Defining a single
► Start the Windows Home Server Console.
► Select SCALEO Po
► Select New Uptime.
► Select a period fo
► Under Subject and in the text box you can add any notes you would like to for the uptime.
► Save your settings
You SCALEO Home S erver will go into operation during the specified periods.
10601046275, edition 2 English - 21
eekdays and weekends)
changes between "Hibernate mode – Active state – Hibernate
n "Active state – H ibernate mode – Active state" must be at least 10
me, so that the server can be correctly started or shut down.
operating period
wer Management and your preferred view.
r the one-off uptime.
..
Page 72

Operation
Defining recurring events (Recurrence)
► Select New Uptime.
► Select Recurrence.
► Selectaperiodfortheuptime.
► Select a Recurrence Template, e.g. wee kly on Mondays and Tuesdays.
► Choose a Start and if required an End for the recurrence and click on OK to confirm.
► Under Subject and in the text box you can add any notes you would like to for the recurrence.
► Save your settings..
You SCALEO Home Server will go into operation during the specified periods.
Defining backup times
The Home Server permits a regular backup of the connected clients. If the server is
still in hibernate mode before a scheduled backup, it will be started shortly before the
scheduled time, so that the backup can b e performed.
The backup of the individual clients is performed one after the other. If the backup overruns
the end of the operating time, the backup currently running will be fully completed before the
server is put into hibernate mode. Depending on the volume of data, the backup can take a
long time time, so that the transfer into hibernate mode can be considerably de layed.
► In the Windows Home Server Console, select Settings.
► Select Backup.
► Select Start Time, End Time and the length of time the backed up data are to be retained.
The data from the clients in your netwo rk will be backed up at the appointed times.
The default start and end backup times are set to 00:00 and 06:00. Please refer to
the Windows Home Server operating system manual for further information.
Manually exiting Hibernate mode
Proceed as follows if you would like to manually wake up the SCALEO Home Server outside th e
defined uptimes (Wake on LAN). This process can be carried out by any client in the network.
If the client uses a different firewall to Windows Firewall then the application
"SCALEO Wake up" will need to be enabled there.
► Click on the alarm clock symbol in the task bar of a client.
► Select the name of the server you wish to wake up.
The selected SCALEO H ome Server is woken up fro m Hibernate mode and put into active mod e.
22 - English 10601046275, edition 2
Page 73

Hardware monitoring
The system is equipped with different sensors for monitoring the hardware
components of your Home Server.
• Integrity and speed of the various fans
• Operating temperature
• Operating voltage
• Hard disks installed in the SC ALEO Home Server
If th e processor temperature exceeds 70 °C then the SCALEO Home Server
is automatically shut down in order to p rotect itself.
Displaying hardware monitoring
► Start the Windows Home Server Console.
► Select Hardware Monitoring.
Operation
► Check the hardware information.
10601046275, edition 2 English - 23
Page 74

Operation
PacketVideo
PacketVideo is a multimedia streaming software product which turns your SCALEO Home
Server into a multimedia s erver with UPnP functionality. Internet radio transmitters are
supported. Images, pieces of music and videos stored on the SCALEO Home Server can be
reproduced by UPnP compatible receivers, for instance on a connected TV.
PacketVideo adds to the Windows Media Connect Streaming Server 2.0 provided in
the Windows Home Server operating system, through extended functionality and more
comprehensive support of the various UPnP receivers.
Universal Plug and Play (UPnP) is a standard which is used for manufacturer-independent
actuation of devices (e.g. music systems, routers, printers, house
control systems) via an IP-based network.
24 - English 10601046275, edition 2
Page 75

Recovery of the SCALEO Home Server
D
S
L
Recovery of the SCALEO Home Ser
ver
In the event of technical problems you can perform a recovery of both the server and the clients.
Setting the server to recover
y mode and
restoring the operating system
The server is equipped with
system is installed. In rec
the server is booted from t
This procedure is required
installed is replaced or d
If only the operating sy
then all of the remainin
In contrast, if the comp
changed, on which the op
The recovery process is perfo rmed from a connected and ready client in the network.
a separate memory module on which an emergency operating
overy mode, the booting sequence of the server is changed so that
he module with the emergency o perating system.
if the hard disk drive on which the operating s ystem was
efective, or if the server no longer responds.
stem is being restored but the hard disk drive itself is not defective
g contents of the main hard disk generally remain intact.
lete hard disk No. 1 (see "
Hard disk sequence", Page 33)is
erating system is installed, then all the data on the serve r is lost.
L
S
D
10601046275, edition 2 English - 25
Page 76

Recovery of the SCALEO Home Server
Requirements:
• On network client is conne cted and ready for operation.
1
► Use Start - Control Panel - Software - Remove Program to remove the applications
SCALEO Wake-up and Windows Home Server Connector on the client from w hich
you wish to recreate the SCALEO Home Server.
► Shut down all the other PCs in your network.
► Press firmly into the opening of the recovery button (1) on your SCALEO Home Server
using a pen or a wire (e.g. a pap er clip) and hold it pressed.
► Press the ON/OFF switch on the front of the device.
The device transfers into recovery mode.
The power-on indicator at the ON/OFF switch glows orange.
► On the client which is still running in the network, start the data carrier no. 3
("SCALEO Home Server – Server Recovery").
The recovery software searches for the server in the n etwork.
► Follow the instructions on the screen and select one of the following options:
- only restore the system partition C:\ of the first hard disk (all data is retained)
- only restore the first hard disk (all redundant data is retained)
- restore the device to the delivery state (all data will be deleted)
The Windows Home Server operating system is restored on the server.
The SCALEO Wake-up and Windows Home Server Connector applications which
were removed earlier will be installed again.
26 - English 10601046275, edition 2
Page 77

Recovery of the SCALEO Home Server
D
S
L
Performing the recovery of a client
L
S
D
Requirements:
• The necessary drivers are available for the client which is to be restored.
These will be s tored on the server during a data backup (see chapter "
times", Page 22). For further information on storing the drivers on the server or on external
data carriers, please refer to the Windows Home Server documentation.
► Start the data carrier no. 2 ("SCALEO Home Server - Client Recovery")
on the client which is to be restored.
► Have the client drivers rea dy on a data carrier with a USB connection.
► Follow the instructions on the screen.
The client is being restored.
It may be necessary for you to change the boot sequence in the BIOS of your client.
Defining backup
10601046275, edition 2 English - 27
Page 78

Troubleshooting and tips
Troubleshooting and tips
Refer to the safe ty notes in the "Safety" manual and in the "Getting started",
Page 10 chapter when connecting or disconnecting cables.
If a fault occurs, try to correct it as described in the following documentation:
• in this chapter
• in the documentation for the connected devices
• in the help systems of the software used
• in the documentation for your operating system
If you fail to correct the problem, proceed as follows:
► Switch the device off.
► Make a note of the steps and the circumstances that led to the fault.
► Make a note of any error messages displayed.
► Note the ID number of your device. The ID number can be found on the
type rating plate on the back of the casing.
► Please contact your sales outlet or our service department (refer to the enclosed Help
Desk List or go to "
http://www.fujitsu-siemens.com/ support/").
Power-on indicator lights up
Cause
Voltage supply is faulty
or
The device is over-heated.
28 - English 10601046275, edition 2
yellow
Troubleshooting
► Check whether the power cable is plugged
properly into the device and a grounded
mains outlet.
► Check the status of your system with
the Hardware Monitoring function, see
Hardware monitoring", Page 23.
"
► Check whether the air inlet and air outlet
openings of the device are blocked.
► Disconnect the mains plug of the device
from of the grounded mains outlet.
► Wait for a moment.
► Plug the power plug into a properly grounded
mains outlet again.
► Switch the device on.
► Reduce the ambient temperature.
Page 79

Troubleshooting and tips
One of the status indicators for the hard disks is lit up yellow
Cause
Defectiveharddisk ► Try to run the recovery function for the hard
Troubleshooting
disk (see "
Server", Page 25).
► If necessary, replace the hard disk (see
Installing and removing the hard disk drive",
"
Page 33).
Recovery of the SCALEO Home
Further error messages during setup of the Windows
Home Server Connector software
Please refer to the following Internet address for further information if one of the errors "Unrecognized
network error", "Error while configuring t he computer backup" or another error message is displayed:
http://www.microsoft.com/windo ws/products/winfamily/windowshomeserver/support.mspx".
"
10601046275, edition 2 English - 29
Page 80

System upgrades
System upgrades
Upgrades,DeviceSystemexpansion
This chapter describes all the activities you will need to carry out when you want to make
changes to the hardware of your device (e.g. installing drives).
Read the supplied documentation before insta lling new drives.
As the device has to be shut down in order to install/uninstall system h ardw are
components, it is a good idea to print out the relevant sections of this chapter.
When installing components that become very hot, make sure that the
maximum permissible temperature is not exceeded.
The device must be switched off when installing/removing the system
expansions and must not be in Hibernate mode.
Disconnect the mains plug before opening the device .
30 - English 10601046275, edition 2
Page 81

Removing the cover
CoverDevice,
► Switch the device off. The device must not be in Hibernate mode!
Please observe the safety information in "Important notes", Page 3.
Disconnect the mains plug from the mains outlet.
Only insert the mains plug after you have closed the casing.
► Remove any connected wires which are in the way.
1
2
System upgrades
1
3
► Undo both knurled screws on the back of the device (1).
► Lightly slide th
► Lift the cover off the device (3).
10601046275, edition 2 English - 31
e cover in the direction of the arrow (2).
Page 82

System upgrades
Attaching the cover
3
3
2
1
► Place the cover on the device and make sure that the catches on the
cover are correctly a ligned (1).
stening
Cover,fa
Device
► Slide the cover in the direction of the arrow (2) so that the catches engage in the cover (2).
► Fasten both knurled screws on the back of the device (3).
► Reconnect the cables that you disconnected previously.
32 - English 10601046275, edition 2
Page 83

System upgrades
Installing and removing the har
Only fit brand new or comp letely formatted hard disk drives.
Harddiskdrive,Harddiskdrive,Harddiskdrive,
ddiskdrive
Hard disk sequence
The illustration below shows the sequence of the hard disk drives in the casing. This also
corresponds to the numbering of the status displays for the individual hard disks.
2
1
3
4
10601046275, edition 2 English - 33
Page 84

System upgrades
Installing the hard disk drive
► Remove the cover (see "Removing the cover ", Page 31).
Harddiskdrive
► Take the new hard disk d rive out of its packaging.
► Fasten the bearing scre
ws supplied with your device to the new hard disk drive.
2
1
► Loose n the knurled screws of the hard disk carrier (1).
► Fold the hard disk carrier in the direction of the arrow (2).
► Connect the cables (data cable, power supply) to the drive..
34 - English 10601046275, edition 2
Page 85

System upgrades
► Insert the hard disk drive into the installation position s o that the bearing screws
come to rest in the corresponding recesses.
2
1
► Fold the hard disk carrier in the direction of the arrow (1).
► Se cure the knurled screw (2).
► Fasten the cover (see "
10601046275, edition 2 English - 35
Attaching the cover", Page 32).
Page 86

System upgrades
Removing the hard disk drive
► Remove the cover (see "Removing the cover ", Page 31).
Harddiskdrive
► Disconnect all cables connected to the drive (data cable, power supply cable).
2
1
1
► Loose n the knurled screws of the hard disk carrier (1).
► Fold the hard disk carrier in the direction of the arrow (2).
36 - English 10601046275, edition 2
Page 87

► Lift the hard disk out of the housing.
System upgrades
► Loosen the bearing screws from the hard disk drive.
10601046275, edition 2 English - 37
Page 88

System upgrades
2
► Fold the hard disk carrier in the direction of the arrow (1).
► Secure the knurled screw (2).
► Fasten the cover (see "
Attaching the cover", Page 32).
1
38 - English 10601046275, edition 2
Page 89

System upgrades
Replacing the lithium battery
Incorrect replacement of the lithium battery may lead to a risk of explosion!
The lithium battery may be replaced only with an identical battery or with
a type recommended by the manufacturer.
Do not dispose of lithium batteries with household waste. They must be disposed
of in accordance with local regulations concerning special waste.
When replacing the Lithium battery, make sure that you insert it the
right way round, see diagram.
Lithiumbattery,Replacing,Replacing,Replacing,lithiumbatteryBattery
The lithium battery holder exists in different designs that function in the same way.
1
2
► Press the catch in the direction of the arrow (1).
The battery jumps out of the holder slightly.
► Remove the battery (2).
► Push the new lithium battery of the identical type into the holder (3) and
press it down until it engages.
► Fasten the catch (4).
3
4
10601046275, edition 2 English - 39
Page 90

Technical data
Technical data
Technicaldata
Electrical data
Safety standards complied with IEC 60950-1, EN 60950-1 , UL 60950CSA 22.2
Protection class I
Rated frequency
Max. rated current
Dimensions
Width x depth x height 406 mm x 336 mm x 122 mm
Weight
in basic configuration: • approx. 7 kg (casing without hard disks)
Ports
USB ports 4 x USB 2.0
eSATA ports
LAN port
Ambient conditions
Environment class (3K2) DIN IEC 721 part 3-3
Environment class 2K2
Temperature:
Operation (3K2) 15 °C ... 35 °C
Transportation (2K2) -25 °C ... 70 °C
Condensation must be avoided during operation.
No.60950-1
50Hz–60Hz
200 V - 240 V / 2.0 A
100 V - 127 V / 3.5 A
• approx. 9 kg (maximum configuration level
with4harddisks)
2x
Socket, RJ45
DIN IEC 721 part 3-2
The data sheet of the device c
can be found on our website a
40 - English 10601046275, edition 2
ontains further technical data. The data sheet
t "
www.fujitsu-siemens.com".
Page 91

SCALEO Home Server
Manuel d’utilisation
Deutsch
English
Français
Español
Italiano
Page 92

Les informations contenues dans le présent manuel sont susceptibles d’être modifiées sans
préavis. M algré le plus grand soin apporté à la réalisation du présent manuel, des erreurs ou
des oublis ne peuvent être exclus. Aucune responsabilité ne po urra être invoquée à l’encontre
du fabricant pour des erreurs ou pertes de données qui en résulteraient.
Fujitsu Siemens Computers n’assume aucune responsabilité pour la perte de données
due à l’utilisation de supports de données inadaptés.
Avant la première mise en marche du SCALEO Home Server, il est recommandé
de lire les procédures décrites dans ce manuel.
Les marques commerciales utilisées sont les m arques déposées des sociétés
propriétaires respectives et sont protégées comme telles.
Toutes les autres marques commerciales citées sont des marques commerciales ou des marques
déposées par leurs propriétaires respectifs et son t protégées comme telles.
Copyright © Fujitsu Siemens Computers GmbH 2009
Tous droits réservés, y compris ce lui de traduction, de reproduction, de duplication
(même partielles) par photocopie ou procédé analogue.
Tout manquement à cette règle expose son auteur au versement de dommages et intérêts.
Tous droits réservés, notamment en cas d’octroi de brevet ou d’enregistrement comme modèle
d’utilité.
Sous réserve de disponibilité et de modifications techniques.
Page 93

Sommaire
Français
Sommaire
Votre SCALEO Home Server... .......................................................... 1
Symboles .............................................................................. 2
Remarquesimportantes ............................................................... 3
Consignesde sécurité ................................................................... 3
Transporter l’appareil . . .................................................................. 3
Nettoyer l’appareil . ...................................................................... 4
Economie d’énergie, éli
Reprise des appareils us
Marquage CE . .......................................................................... 4
Déclaration de conform
Portset élémentsde commande ....................................................... 6
Vue d’ensemble de l’appareil . . ........................................................... 6
Faceavant ......................................................................... 6
Facearrière ........................................................................ 7
Voyants de l’appareil . . .................................................................. 8
Miseenservice ........................................................................ 10
Déballage et contr
Etapes de la prem
Mise en place de l
Position vertic
Position horiz
Raccordement d
Branchement de
Débranchemen
Raccorder un d
Raccordement
Raccordemen
Première in
Première mi
Installati
Configurat
Utilisation .. . .......................................................................... 19
Mise sous tension de l’appareil ........................................................... 19
Mise hors ten sion de l’appareil ........................................................... 19
Configuration à l’aide de la console Windows Home Server . . . ............................. 19
Gestion d’énergie SCALEO . . . ....................................................... 20
Matérielde surveillance .............................................................. 23
PacketVideo ........................................................................ 24
Récupé
Mette
Exécu
Analysedes problèmes et conseils ..................................................... 28
Le voyant Marche s’allume en jaune . . . ................................................... 28
t de l’appareil à la tension de secteur ........................................
stallation ....................................................................
onsurles Clients ............................................................
ionduserveur .............................................................
rationdu SCALEO HomeServer ................................................
z le serveur en mode Recovery (récupération) et réinitialisez le système d’exploitation . . . .
tiond’une récupérationdeClient ...................................................
minationet recyclage ..............................................
agés . .......................................................
itéà lanorme FCC Classe B .......................................
ôleducontenu de la livraison ...........................................
ièremiseen service ....................................................
’appareil ...............................................................
ale ....................................................................
ontale .................................................................
e périphériques . . . .......................................................
scâbles .............................................................
tdescâbles ..........................................................
isquedur SATA externe (eSATA) .......................................
de périphériques aux ports USB ........................................
seenservice du SCALEO Home Server ...................................
10
10
11
12
13
14
14
14
15
16
16
17
17
18
18
25
25
27
4
4
5
10601046275, édition 2 Français
Page 94

Sommaire
L’un des voyants d’état des disques durs s’allume en jaune . . . .............................. 29
Autres messages d’erreur lors de l’installation du logiciel Windows Home Server Connector .... 29
Extensionssystème ................................................................... 30
Retirerle cache ......................................................................... 31
Fixerle cache .......................................................................... 32
Monteret démonter un lecteur de disque dur .............................................. 33
Ordre de disques durs . . . ............................................................ 33
Montaged’un lecteur de disque dur ................................................... 34
Démontaged’un lecteur de disque dur ................................................ 36
Remplacementde lapile au lithium ....................................................... 39
Caractéristiques techniques ........................................................... 40
Français 10601046275, édition 2
Page 95

Votre SCALEO Home Server...
Votre SCALEO Home Server...
Aperçu
... est un serveur basé Intel pour groupes de travail et petits réseaux.
Votre appareil offre une grande sécurité des données et une disponibilité optimale grâce
à des composants matériels et logiciels hautement développés.
Il supporte les systèmes d’exploitation suivants sur les Clients connectés sur le réseau :
• Microsoft Windows XP à partir du Service Pa ck 2 et
• Microsoft Windows Vista sur sys
versions (sa uf : Windows Vista S
Vous pouvez monter jusqu’à quatre lecteurs de disque dur 3,5” dans votre appareil. Selon la
configuration, l’appareil est livré avec jusqu’à quatre disques durs préinstallés.
En outre, l’appareil dispose de deux ports eSATA et de qua tre ports USB pour le
fonctionnement de disques durs supplémentaires.
Ce manuel vous montre comment mettre en marche et utiliser l’appareil. Le manuel convient
pour toutes les configurations. Selon la configuration choisie, il se peut que tous les
composants matériels présentés ne soient pas installés dans votre appareil. Lisez aussi
attentivement les remarques relatives à votre système d’exploitation.
Vous trouverez plus d’informations sur cet appareil :
• dans le guide succinct "G etting Started"
• dans le manuel "Sécurité"
• dans le manuel "Garantie"
• dans la documentation de votr
• dans les fichiers d’informations (par exemple : *.PDF, *.H TML, *.DOC, *.CHM, *.TXT, *.HLP)
• sur les supports de données numé
• N°1 "SCALEO Home Server - Client Connector"
• N°2 "SCALEO Home Server - Client R
• N°3 "SCALEO Home Server - Server Recovery and Documentation"
tèmes 32 et 64 bits, dans toutes les
tarter)
e système d’exploitation
rotés :
ecovery"
Pour ouvrir des fichiers PDF, vous devez utiliser le programme Adobe Reader.Vous
pouvez le télécharger gratuitement sur le site "
10601046275, édition 2 Français - 1
www.adobe.com".
Page 96

Votre SCALEO Home Server...
Symboles
signale des instructions à res
sécurité, celle de votre appa
s’éteint dès l’instant où vou
pas ces consignes.
signale des informations importantes pour l’utilisation correcte de l’appareil
pecter impérativement pour votre propre
reil et celle de vos données. La garan tie
s endommagez l’appareil en ne respectant
►
Cette police
Cette police
Cette police
"Cette police"
Abc
Cette police
signale une opération que vous devez exécuter.
indique un résultat
signale des données que vous devez saisir sur le clavier dan s une fenêtre
de dialogue de programme ou dans une ligne de commande, p. ex. votre
mot de passe (Nom123) ou une instruction pour démarrer un programme
(start.exe)
signale des informations affichées à l’écran par un programme, par ex. :
L’installation est terminée !
signale
• des concepts et des textes dans une surface logicielle, par ex. : C liquez
sur Enregistrer.
• Noms de programmes ou fichiers, p. ex. Windows ou setup.exe.
signale
• des renvois à d’autres sections, par ex. "Consignes de sécurité"
• Liens vers une source externe, p. ex. une adresse web : Lisez les
informations sur "www.fujitsu-siemens.com"
• des noms de CD, de DVD ainsi que des désignations et des titres
d’autres matériels, p. ex. : "CD/DVD Drivers & Utilities" ou Manuel
"Sécurité"
indique une touche du clavier, par ex. :
signale des concepts et des passage de texte que l’on souhaite souligner ou
mettre en évidence, par exemple : Nepasmettrel’appareilhorstension
F10
2 - Français 10601046275, édition 2
Page 97

Remarques importantes
Remarques importantes
RemarquesimportantesRemarques
Ce chapitre contient des instructions de sécurité que vous devez respecter
impérativement en utilisant votre appareil.
Consignes de sécurité
ConsignesdesécuritéConsigne
Veuillez également observer les
sur le CD "SCALEO Home Server - Se
Pour le choix de l’emplacement et
les consignes relatives aux cond
"Caractéristiques techniques
L’appareil ne doit être utilisé q
à la tension de secteur locale.
L’interrupteur Marche/Arrêt
Pour réaliser une isolation co
secteur de la prise avec terre
Remplacez la pile au lithium su
du chapitre "
Remplacement de
Attention : certains composan
Les opérations décrites dans
être effectuées avec le plus
Cet appareil ne doit être répa
intervention inadaptée pré
de transfert d’énergie, ris
Ne conservez pas l’appareil
d’une source de chaleur (p. e
les accumulateurs et l’ad
N’utilisez pas des câbles a
abîmé peut présenter un ri
consignes données dans le manuel "Sécurité" figurant
rver Recovery and Documentation" fourni.
l’utilisation de l’appareil, veuillez suivre
itions ambiantes données dans les chapitres
"et"
Mise en service", Page 10.
ue si sa tension nominale correspond
n’isole pas l’appareil de la tension de secteur.
mplète, vous devez débrancher la fiche
de protection.
r la carte mère en su ivant strictement les indications
la pile au lithium", Page 39.
ts du système peuvent atteindre des températures élevées.
le présent manuel d’utilisation doivent
grand soin.
ré que par un personnel spécialisé et autorisé. Toute
sente des risques pour l’utilisateur (électrocution, risque
que d’incendie) ou de dommages à l’appareil.
, les accumulateurs et l’adaptateur d’alimentation à proximité
x. chauffage, fe u o uvert). En ca s de surchauffe, l’appareil,
aptateur d’alimentation risquent de prendre feu ou d’exploser.
bîmés (gaihe endommagée, fils dénudés). Un câble
sque d’électrocution ou d’incendie.
Transporter l’appareil
rtrépété
AppareilTransportTranspo
10601046275, édition 2 Français - 3
Transportez tous les appareils séparément et seulement dans leur
emballage d’origine ou dans un autre emballage approprié qui garantit
une protection contre les chocs et les coups.
Ne déballez les appareils que sur leur site d’installation.
Si l’appareil que vous utilisez provient d’un environnement froid, une formation de
condensation est possible. Dans ce cas, avant de mettre l’appareil en service,
attendez qu’il soit à la température ambiante et totalement sec.
Page 98

Remarques importantes
Nettoyer l’appareil
AppareilTransportTransportrépétéUnité logique,voirAppareil
Vous pouvez nettoyer la surface du boîtier avec un chiffon sec. S’il est très sale, vous pouvez utiliser
un chiffon humide, trempé dans un mélange d’eau et détergent délicat pour vaisselle et bien essoré.
Mettez hors tension tous les équipements concernés et déconnectez la fiche
secteur de la prise de courant avec terre de protection.
Le nettoyage de l’intérieur de l’appareil ne doit être effectué que
par des techniciens autorisés.
N’utilisez pas de poudre abrasive ni de solvant attaquant les matières plastiques.
Ne lavez en aucun cas l’appareil à l’eau ! Toute infiltration peut entraîner
des dangers pour l’utilisateur (p. ex. électrocution).
Evitez toute infiltration de liquide à l’intérieur de l’appareil.
Economie d’énergie, élimination et recyclage
EliminationEconomied’énergieR ecyclageDVDPilotesetutilitairesDVDDocumentationutilisateur
Pour économiser de l’énergie, votre serveur Home Server est équipé de fonctions de gestion
de l’énergie. Lisez à ce sujet le chapitre "
Pour la méthode de remplacement de la batterie lithium, reportez-vous au chapitre
"
Remplacement de la pile au lithium", Page 39.
Reprise des appareils usagés
Reprise
La reprise et la recyclabilité de nos sy
gestion de l’environnement certifiéIS
pouvant faire l’objet d’un recyclage
constructeur, qui le recycle ou en réc
état approprié. Les composants non ré
Pour retourner un appareil, nous vo
recyclage et d’élimination propos
ées dans votre pays.
Vous trouverez de plus amples infor
vigueur dans votre pays sur interne
Si vous avez des questions à ce sujet
ou à notre groupe d’assistance (Hel
Gestion d’énergie SCALEO", Page 20.
stèmes sont définies et garanties par notre système de
O 14001. Nos appareils utilisent très largement des matières
dans les règles. Après utilisation, l’appareil est repris par le
upère les matières pour autant qu’il soit retourné dans un
cupérables sont éliminés de manière appropriée.
us remercions de recourir aux solutions de
mations sur les solutions de recyclage et d’élimination en
t à l’adresse : "
www.fujitsu-siemens.com".
, adressez-les à votre point de vente
p Des k).
Marquage CE
Marquage CE pour appareils livrés sans composants radio
MarquageCESigleCERemarquesCompatibilitéélectromagnétiqueDirectivebassetension
4 - Français 10601046275, édition 2
Tel qu’il est livré, cet appareil est conforme aux directives CE 2004/108/CE
"Compatibilité électromagnétique" et 2006/95/CE "Basse tension".
Tous les autres appareils branchés au présent produit doivent également
être conformes aux directives ci-dessus.
Page 99

Remarques importantes
DéclarationdeconformitéàlanormeFCCClasseB
La déclaration ci-dessous concerne les produits dont question dans le présent manuel
sauf stipulation contraire. La déclaration concernant les autres appareils figure
dans la documentation des appareils en question.
Remarque :
Cet équipement a fait l’objet de tests et a été déclaré conforme aux limites auxquelles sont
soumis les appareils numériques de "Classe B", conformément à la section 15 des règles FCC
et respecte to utes les exigences de la norme ICES-003 (appareils numériques) sur le matériel
brouilleur du Canada. Ces limites ont été fixées afin d’apporter une protection raisonnable
contre les perturbations survenant sur une installation résidentielle. Cet équipement produit,
utilise et peut émettre de l’énergie radioélectrique et, s’il n’est pas installé et utilisé en parfaite
concordance avec les instructions, il peut perturber les radiocommunications. Cependant, il ne
peut pas être garanti qu’une installation particulière ne souffrira de parasitage. Si cet équipement
provoque une perturbation de la réception des radiocommunications et des émissions télévisuelles,
vérifiable en mettant l’équipement hors puis sous tension, l’utilisateur est invité à prendre une
ou plusieurs des mesures suivantes pour tenter de supp rimer le parasitage :
• réorienter ou déplacer l’antenne réceptrice.
• augmenter la distance qui sépare l’équipement du récepteur.
• brancher l’équipement dans une prise de courant d’un circuit différent de
celui sur lequel le récepteur est branché.
• demander l’aide du revendeur ou d’un technicien radio/TV expérimenté.
Fujitsu Siemens Computers GmbH ne peut être tenu pour responsable des perturbations
radioélectriques ou télévisuelles consécutives à des changements non autorisés apportés
à cet équipement ou au remplacement ou au branchement de câbles de raccordement
et d’équipements autres que ceux qui sont mentionnés par Fujitsu Siemens Computers
GmbH L’élimination des perturbations provoquées par d e tels changement, substitution ou
raccordement non autorisés relèvera de la seule responsab ilité de l’utilisateur.
L’utilisation de câbles E/S blindés est indispensable s i cet équipement est raccordé
à un ou tous les périphériques ou hôtes en option. A défaut, l’installation est
susceptible de violer les règles FCC et les règles ICES.
10601046275, édition 2 Français - 5
Page 100

Portsetélémentsdecommande
Ports et éléments de commande
Ports
Dans ce chapitre seront présentés les différents composants matériels de votre appareil. Vous
obtiendrez un aperçu des ports et des éléments de commande de l’appareil. Familiarisez-vous
avec ces différents éléments avant de travailler avec l’appareil.
Vue d’ensemble de l’appareil
Face avant
VueFaceavant
1
2
3
1 = Ports USB
2 = Voyants d’état
6 - Français 10601046275, édition 2
3 = Interrupteurs March
voyants d’état
e/Arrêt avec
 Loading...