

Fujistu HEAT AND COOL User Manual

OPERATING MANUAL
BEDIENUNGSANLEITUNG
MODE D’EMPLOI
MANUAL DE FUNCIONAMIENTO
MANUALE DI ISTRUZIONI
ΕΓXΕΙΡΙΔΙO ΛΕΙΤOΥΡΓΙΑΣ
MANUAL DE INSTRUÇÕES
РУКОВОДСТВО ПО ЭКСПЛУАТАЦИИ
KULLANMA KiTABI
使用說明書
KEEP THIS MANUAL FOR FUTURE REFERENCE
DIESE ANLEITUNG BITTE SORGFÄLTIG AUFBEWAHREN
CONSERVEZ CE MODE D’EMPLOI AFIN DE POUVOIR VOUS Y RÉFÉRER ULTÉRIEUREMENT
GUARDE ESTE MANUAL PARA PODERLO CONSULTAR EN EL FUTURO
CONSERVARE QUESTO MANUALE PER OGNI EVENTUALE FUTURO RIFERIMENTO
ΚΡΑΤΗΣΤΕ ΤO ΕΓXΕΙΡΙΔIO ΓΙΑ ΜΕΛΛOΝΤΙΚΗ ΑΝΑΦOΡΑ
GUARDE ESTE MANUAL PARA CONSULTA POSTERIOR
СОХРАНИТЕ НАСТОЯЩЕЕ РУКОВОДСТВО ДЛЯ БУДУЩИХ ССЫЛОК
BU KILAVUZU, DAHA SONRA BAŞVURMAK ÜZERE SAKLAYIN
請保存本說明書以供日後參考
P/N9373329206-04
EλληvIkά Italiano Español Français Deutsch English
Português
РусскийTürkçe
中國語

OPERATING MANUAL
CONTENTS
SAFETY PRECAUTIONS ................................................ 1
NAME OF PARTS ........................................................... 2
PREPARATORY OPERATION ......................................... 3
OPERATION .................................................................... 4
TIMER FUNCTIONS ....................................................... 6
ON/OFF TIMER ............................................................... 6
WEEKLY TIMER .............................................................. 7
TEMPERATURE SET BACK TIMER ............................... 9
ADJUSTING THE DIRECTION OF AIR CIRCULATION
FILTER LAMP RESET.....................................................10
ERROR CODE DISPLAY .................................................10
OPERATING TIPS ........................................................... 11
TROUBLESHOOTING................................................... 12
P/N9373329206-04
.....10
SAFETY PRECAUTIONS
● Before using the appliance, read these “SAFETY PRECAUTIONS” thoroughly and operate in the correct way.
● The instructions in this section all relate to safety; be sure to maintain safe operating conditions.
● “WARNING” and “CAUTION” have the following meanings in these instructions:
WARNING
● Do not attempt to install this controller by yourself.
●
This controller contains no user-serviceable parts. Always consult authorized service personnel for repairs.
● When moving, consult authorized service personnel for disconnection and installation of the controller.
● If a problem (burning smell, etc.) occurs, turn off the electrical breaker immediately to stop operation, and
then consult authorized service personnel.
CAUTION
● Do not expose the controller directly to water.
● Do not operate the controller with wet hands.
● Do not touch the switches with sharp objects.
● Always turn off the electrical breaker whenever cleaning the air conditioner or changing the air fi lter.
● Check the condition of the installation stand for damage.
● Ensure that any electronic equipment is at least 1 m away from the controller.
● Avoid installing the controller near a fi replace or other heating apparatus.
● When installing the controller, take precautions to prevent access by infants.
● Do not use infl ammable gases near the controller.
● This appliance is not intended for use by persons (including children) with reduced physical, sensory or
mental capabilities, or lack of experience and knowledge, unless they have been given supervision or
instruction concerning use of the appliance by a person responsible for their safety. Children should be
supervised to ensure that they do not play with the appliance.
This mark indicates procedures which, if improperly performed, might lead to the death or
serious injury of the user.
This mark indicates procedures which, if improperly performed, might possibly result in
personal harm to the user or damage to property.
En-1

NAME OF PARTS
●
With cover open
Display panel
1
15
8
●
Display panel
20
2
3
4
5
6
7
19
16 17
18
9
10
11
12
13
14
21
25
22
23
24
26
27 28
MAINTENANCE / FILTER RESET”
1 “ SET TEMP. ”, “ SET TEMP. ”
(Set Temperature Button)
2 “
TIMER MODE / CLOCK ADJUST”
(Timer Mode/Clock Adjust Button)
3 “DAY / DAY OFF” (Day/Day OFF Button)
4 “
SET BACK” (Set Back Button)
5 “
6 “TIMER DELETE” (Timer Delete Button)
7 “TIMER SET” (Timer Set Button)
8 “START / STOP” (Start/Stop Button)
9 “
0 “
A “
B “
C “ECONOMY /
Depending on the indoor unit model, some buttons on this remote controller cannot be used and some functions are restricted.
Refer to the operation manual on the indoor unit.
”, “ ” (Set Time Button)
MODE” (Mode Button)
FAN” (Fan Control Button)
” (Horizontal airfl ow direction and swing Button)
” (Vertical airfl ow direction and swing Button)
THERMO SENSOR”
(Economy/Thermo Sensor Button)
D “
(Maintenance/Filter Reset Button)
E Operation Lamp
F Day Display
G Operation Lock Display
H Temperature Display
I Fan Speed Display
J Timer Mode Display
K Operation Mode Display
L Timer and Clock Display
M Filter Display
N Economy Display
O Thermo Sensor Display
P Vertical Swing Display
Q Horizontal Swing Display
R Defrost Display
En-2

PREPARATORY OPERATION
Set the current day and time
1
Press the “ TIMER MODE / CLOCK
ADJUST” button for 2 seconds or more.
The time display on the remote controller will fl ash.
Decrement Increment
3
3
4
SET BACK
SUMOTUWETH FR
Press the “ ” button or “ ” button to set the current time.
Press repeatedly to adjust the current time in 1-minute increments.
Press and hold to adjust the current time in 10-minute increments.
Press the “
12- and 24-hour time displays.
SA
2
SU MO TU WE TH FR SA
SUMOTUWETH FR
ex. Monday PM11:00
SA
SET BACK” button to switch between the
Press the “DAY / DAY OFF” button and select the current
day.
A
SUMOTUWETH FR
appears around the selected day.
SA
5
En-3
Press the “
TIMER MODE / CLOCK ADJUST” button again to end.
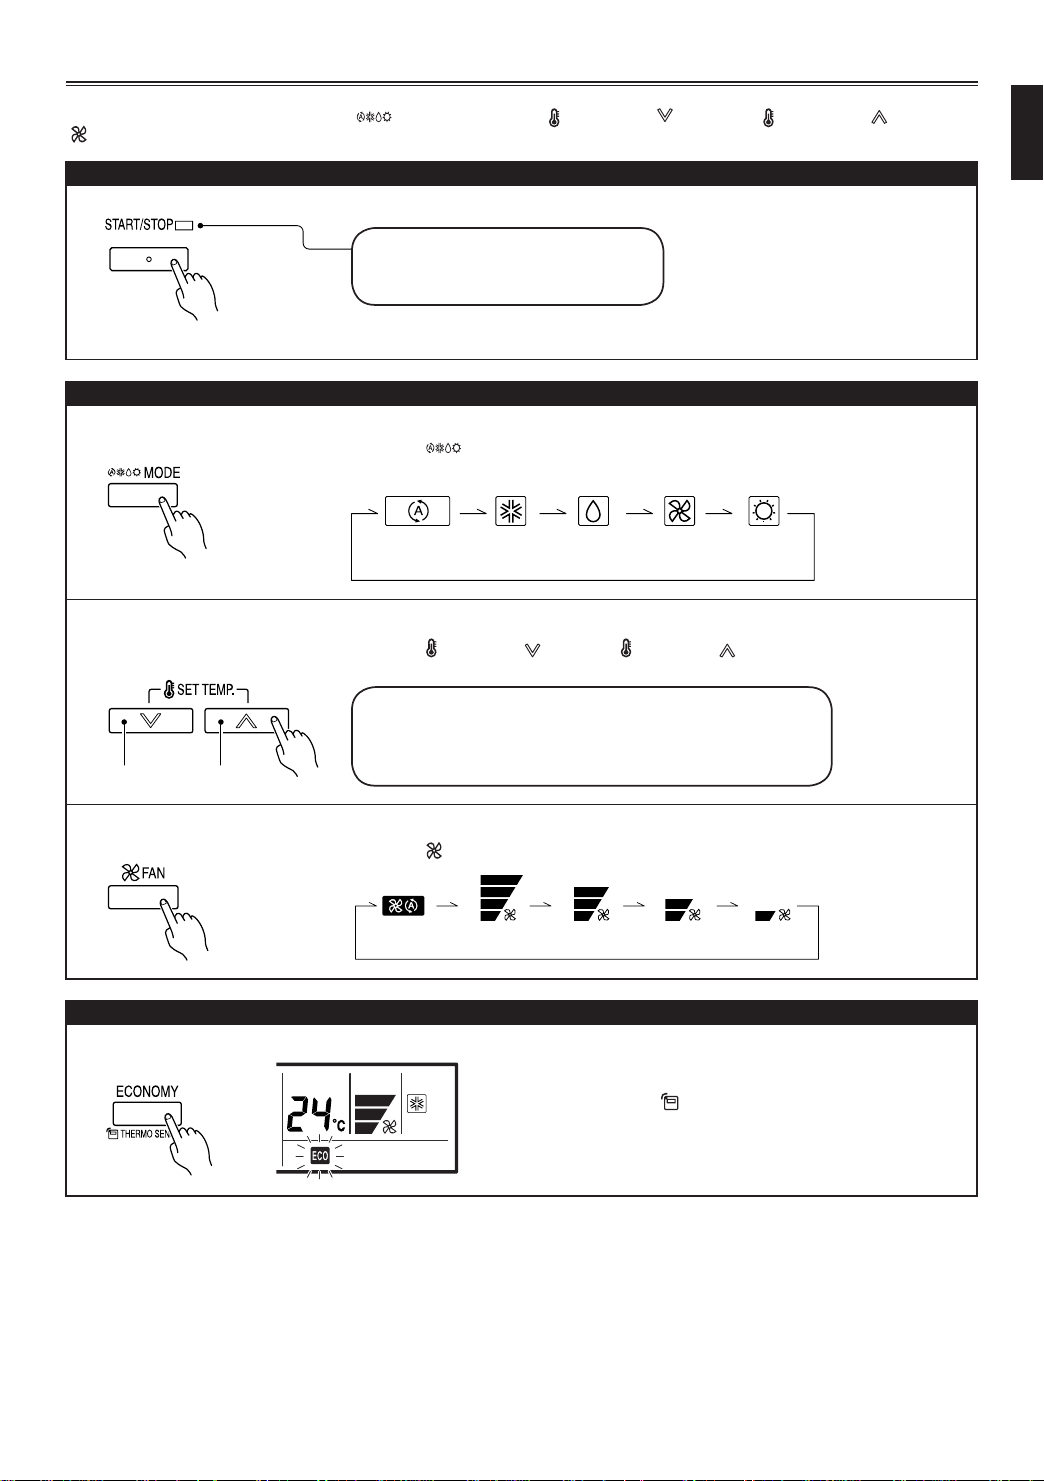
OPERATION
Instructions relating to heating are applicable only to “HEAT & COOL MODEL” (Reverse Cycle).
Preset values are displayed when the “
“
FAN” button is pressed while stopping.
To start/stop operation
To set the operation mode
● Operation mode setting
● Room temperature setting
MODE” button, the “ SET TEMP. ” button or “ SET TEMP. ” button, the
Press the “START / STOP” button.
Operation lamp
Air conditioner ON: Lit brightly
Air conditioner OFF: Not lit
Blinking of START/STOP LED means occurrence of an error. Please refer to “ERROR
CODE DISPLAY” in the manual.
Press the “
If DRY is selected, the fan speed will be set to AUTO.
MODE” button to set the operation mode.
AUTO COOL DRY HEATFAN
Press the “
ture.
SET TEMP. ” button or “ SET TEMP. ” button to set the room tempera-
Lower Rise
● Fan speed setting
ECONOMY OPERATION
● Economy setting
Temperature setting range
AUTO ................................................18 to 30°C
COOL/DRY ....................................... 18 to 30°C
HEAT ................................................ 16 to 30°C
Press the “
AUTO MEDHIGH LOW QUIET
FAN” button to select the fan speed.
Press the “ECONOMY / THERMO SENSOR” button to start or
stop ECONOMY OPERATION.
For details on the function, refer to page 11.
En-4
 Loading...