

Page 1

CONTENTS
Contents . . . . . . . . . . . . . . . . . . . . . . . . . 1
Safety Precautions . . . . . . . . . . . . . . . . . 2
Air Control Valve & Diaphragm . . . . . . . 3
Spray pattern . . . . . . . . . . . . . . . . . . . . . . 4
Distance & Pressure Tube. . . . . . . . . . . . . 5
Spraying techniques . . . . . . . . . . . . . . . . 6
Aircap selection . . . . . . . . . . . . . . . . . . . 7
Latex & Viscosity . . . . . . . . . . . . . . . .8 - 9
Viscosity guide . . . . . . . . . . . . . . . . . . . . 9
Cleaning . . . . . . . . . . . . . . . . . . . . . . . 9 -10
Pressure pot use . . . . . . . . . . . . . . . . . .10
Finish Problems . . . . . . . . . . . . . . . . . . 11
Spray Gun Problems . . . . . . . . . . . . . 12 -13
Needle Packing & Seals. . . . . . . . . . . . 14
Parts disassembly . .. . . . . . . . . . . . . . . 15
Turbine problems . . . . . . . . . . . . . . . . . 15
Parts diagrams. . . . . . . . . . . . . . . . . . 16 -18
Service information. . . . . . . . . . . . . . . . 19
Warranty information . . . . . . . . . . . . . . 20
CE Declaration . . . . . . . . . . . Back Cover
20
Limited 2 Year Warranty
Fuji Industrial Spray Equipment Ltd. issues a 24
month limited warranty to the purchaser effective from
the date of purchase against defects in materials or
workmanship. This warranty does not cover abuse,
accidental damage, misuse, normal wear parts, motor
brush replacement, or spray gun maintenance and
clean-up. Warranty is void if repairs are made or
attempted by unauthorized persons. At our option,
Fuji Spray will repair or replace defective parts
without charge provided the purchaser return parts
prepaid to the nearest authorized service center or to
the factory.
Factory returns must first receive a Return Material
Authorization. In North America, please call 800650-0930 to obtain an authorization number. In other
countries, please call the company where you purchased the product.
This unit is designed to be used for spray painting and
similar operations only. Fuji will not be held liable if
equipment is not used solely for the purpose it was
designed. Warranty will become void through improper installation or operation. Any modifications to
the equipment or deviations from recommended
procedures, accidental damage or any related action
that impairs or abuses normal wear and care of Fuji
spray equipment will also void warranty and liability.
Page 2

19
Please read these instructions carefully before using the equipment
ELECTRICAL
The turbine is powered by a 3-stage or 4-stage (depending on the model)
single speed, bypass, air turbine. This turbine must be connected to the
correct voltage. Please check the label on the base for voltage rating.
ELECTRICAL CONNECTION
For your safety and protection, we have equipped your Fuji turbine with a
three-pronged grounding plug on the service cord. This must be plugged
into a properly grounded 3-pronged receptacle. (For some countries this
may be a 2-pin grounded plug).
SAFETY WARNINGS:
THE TURBINE MUST NOT BE USED IN AN AREA CONTAMINATED BY
VOLATILE OR FLAMMABLE MATERIALS SINCE SPARKING CAN BE
EXPECTED IN THE NORMAL OPERATION OF THE MOTOR. THIS COULD
IGNITE THE CONTAMINANTS CAUSING A DANGEROUS EXPLOSION. KEEP
THE TURBINE AT LEAST 18 FEET (5.5 METERS) AWAY FROM THE SPRAYING AREA. FOR HEALTH REASONS, ALWAYS WEAR A RESPIRATOR.
PLEASE CHECK WITH THE LOCAL JURISDICTION.
THE SPRAYGUN MUST NEVER BE POINTED AT SOMEONE’S FACE.
THE OPERATOR MUST WEAR SHOES AND THE FLOOR MUST NOT BE
WET.
FILTER(S)
The Q-Series turbines and Super models use just ONE large filter. The
turbine case does not need to be taken apart to replace the filter. To
remove, simply turn the turbine on its side and pull the filter out. Wash in
solvent and dry before replacing. All Fuji filters are a friction fit. When
replacing, push the filter in by hand and finish up by using a screwdriver
through the square holes to lever the filter into position. The filter must fill
the entire filter enclosure and always be FLUSH with the base of the
turbine case.The Mini-Mite Turbines use 2 filters, one fine and one coarse.
Looking from the front of the turbine please insert the fine filter to the left
side (near the ‘F’ of Fuji) and the coarse to the right side. It is important to
keep the turbine as far away as possible from the spraying area (and
workshop dust). If the filters become badly clogged, cooling air will be
restricted - this may cause serious damage to the motor.
THE TURBINE MUST NOT BE PLACED UP HIGH. PLACE ON THE FLOOR - .
THIS PREVENTS BLOWBACK INTO THE MOTOR FROM THE BENT HOSE.
2
For SERVICE & PARTS
USA
Fuji Spray
Phone: 800-650-0930 Online: www.hvlp.net
Phelps Refinishing
Phone: 800-377-5662 Online: www.phelpsrefinishing.net
CANADA
Fuji Spray
Phone: 800-650-0930 Local: 416-650-1430
UNITED KINGDOM
Axminster Power Tool Centre. Axminster, Devon, England
Phone: 01297 33656
Rutlands Limited. Bakewell, Derbyshire, England
Phone: 01629 815518
AUSTRALIA & NZ
apSM Tecni Pty Ltd. Campbellfield, Victoria 3061
Phone: 3-9359-5000
PUERTO RICO
Eagle Tools Mfg. Corp San Lorenzo, Puerto Rico, 00754
Phone: 787-736-0444
Fra-Marson Warehouse Distributors. San Juan PR, 00926
Phone: 787-761-4810
SOUTH KOREA
E-Woo Painting Technology. Seoul, Korea
Phone: 82-2-2103-1477 Fax: 82-2-2103-1488
Copyright © 2010 Fuji Spray® Toronto. Canada
Page 3
3
18
AIR CONTROL VALVE
The air control valve 2032 is located on the hose next to the brass quickconnect. It provides you with a means of controlling the air flow through the
gun. It offers you fingertip control when you need it to reduce bounceback
and overspray. There is one thing to remember about the air control valve - it
is the ‘last in the chain’ of operations after...
1) Thinning the paint
2) Adjusting the shape and size of the spray pattern
3) Adjusting the flow of paint through the gun.
After performing these operations, you should spray a few passes onto a
scrap piece of plywood or cardboard. This will allow you to determine if the
paint (generic word for any type of coating) levels nicely. If there is ‘orangepeel’ then you must thin the product more. Once the gun is producing a
perfect finish with full air, you may then experiment with turning the air down
until bounceback is reduced to a mininum. However, if orange-peel results,
you have no option but to turn the air up again a slight amount. With heavier
paints (such as latex) spraying may be done with the valve fully open (or even
removed).
PLASTIC DIAPHRAGM
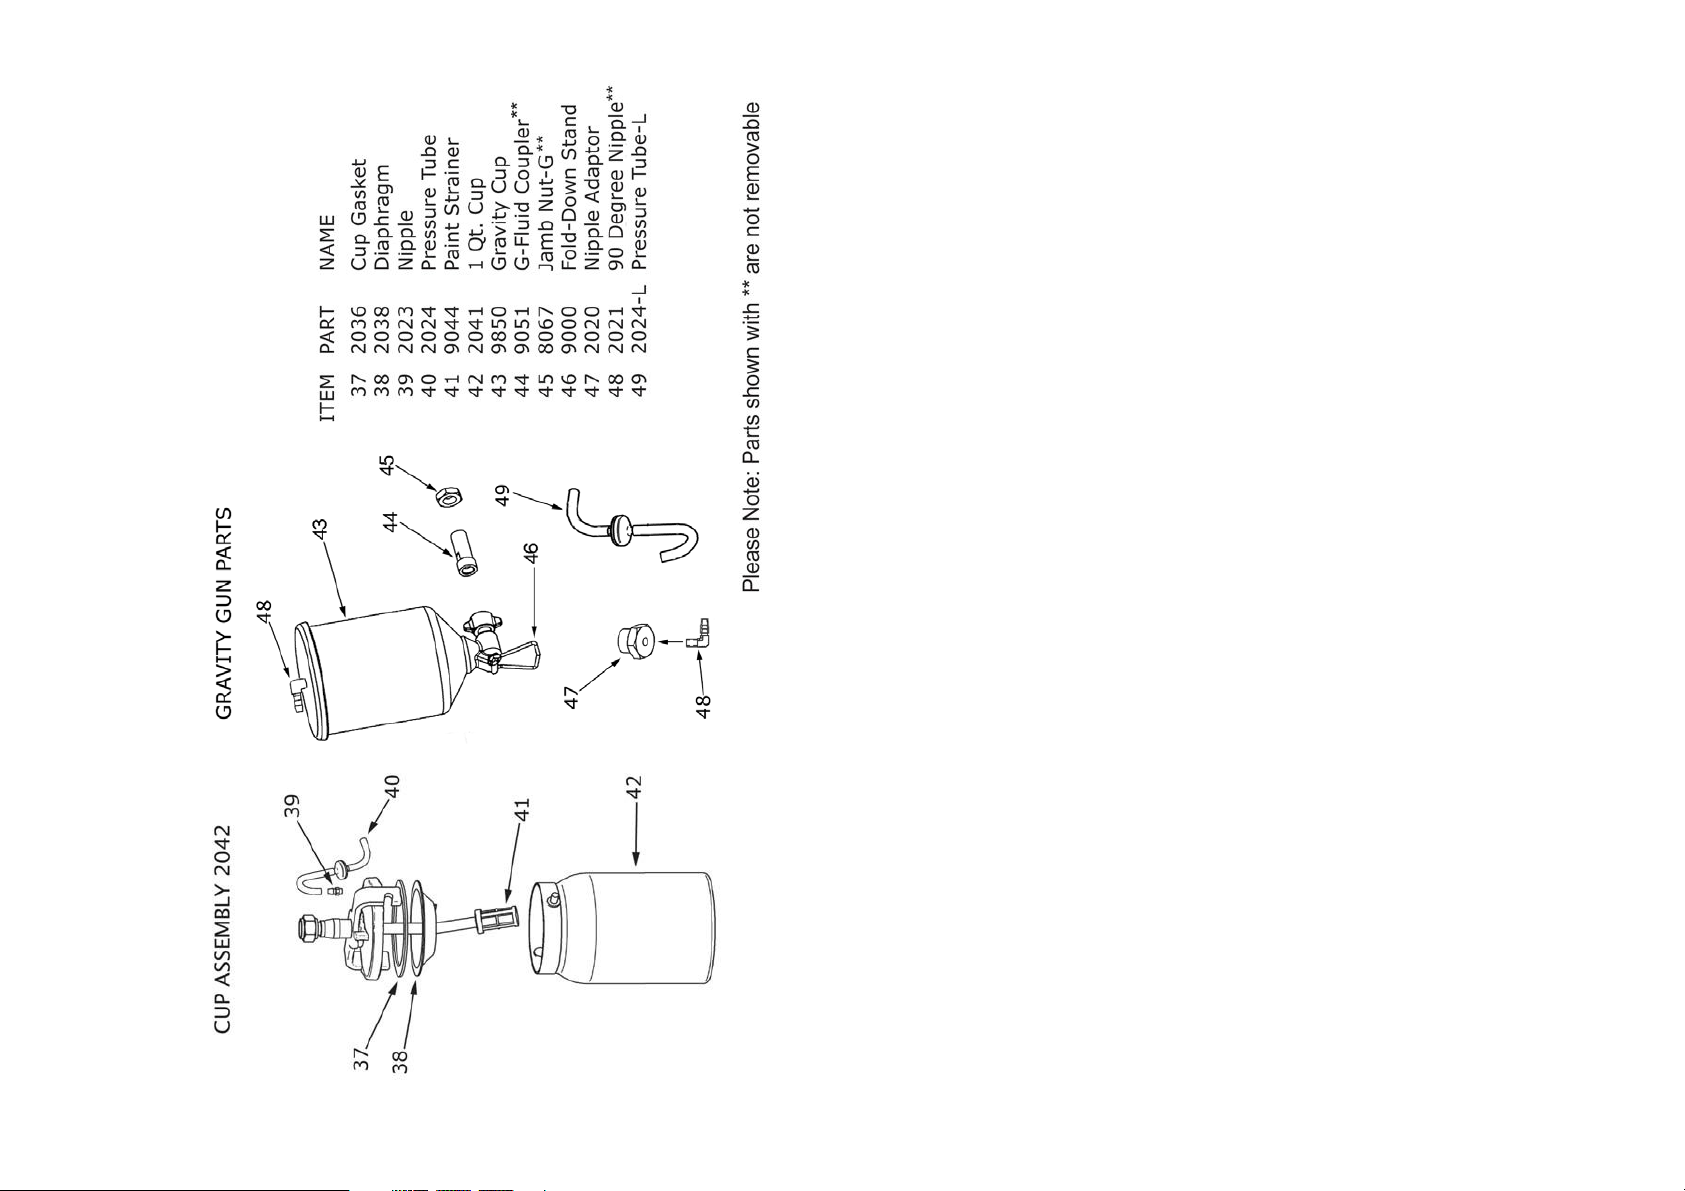
The 1 Quart pressurized cup has a plastic diaphragm 2038 (not found in the
Gravity Spraygun). This diaphragm prevents paint from entering the pressure
tube 2024. The small air hole in the diaphragm should not be placed directy
below the air hole in the nipple. Position the diaphragm hole to the rear of
the cup. The spraygun can be turned to different angles when spraying,
however the cup should never be higher than the gun (above horizontal). To
remove the diaphragm for cleaning, grab the small tab and slide it gently
down the metal fluid tube. The diaphragm can be washed in thinner. Note:
There is no diaphragm on the Fuji Gravity Cup.
HOSE CONNECTION
Connect the hex nut at the end of the hose (female connector) to the turbine
air outlet. It is not necessary to use a wrench to tighten this hex nut.
Overturning could cause the manifold to rotate and break the internal seal
to the motor.
GETTING STARTED
Your Fuji Spraygun has been adjusted at the factory and is ready for spraying.
To clean out any impurities that may have accumulated during assembly or
shipping, we recommend spraying a small quantity of clean paint thinner
through the gun. Before tackling any serious spraying, experiment with the
gun on a scrap piece of wood until you become familiar with all the controls.
Page 4
4
17
CHANGING THE SHAPE OF THE FAN
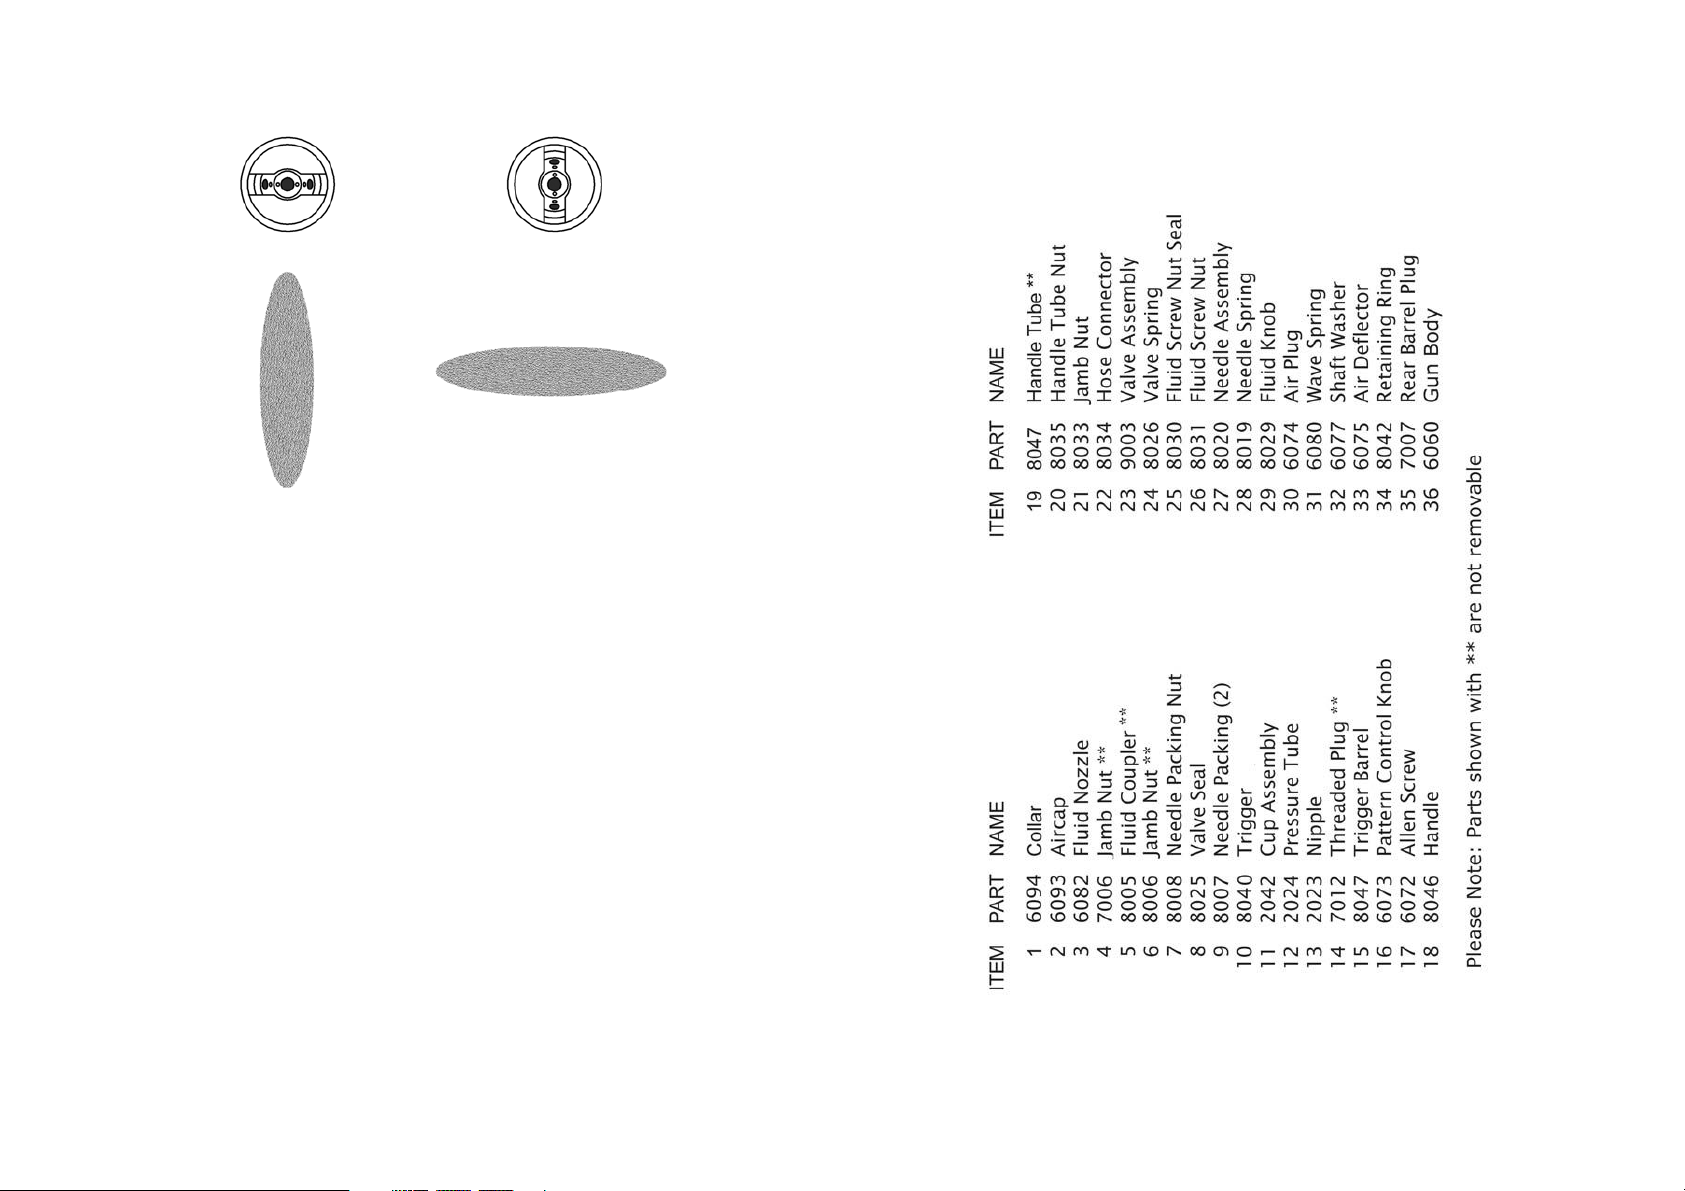
A) Loosen the collar 6094. Turn the air cap 6093 to the horizontal
position then re-tighten to collar to lock it into place. This setting produces
a vertical spray pattern. This pattern is used more than any other by
experienced spray painters.
B) Setting the air cap in a vertical position produces a horizontal
spray pattern. The horizontal fan pattern is the most useful for painting
vertically such as a doorframe.
CHANGING THE SIZE OF THE FAN
To produce a smaller fan pattern, turn the pattern control knob
6073 counter-clockwise. Because the spray pattern size is now much
smaller, you must turn down the amount of paint spraying through the
nozzle (fluid knob 8029). If you do not do this, you will get runs.
To set the fluid output, simply turn the fluid knob 8029 clockwise for more
‘paint’ and counter-clockwise for less. Once you set the fluid to your liking,
you can leave it in this position - unless of course, you change the size of
the fan pattern.
For the very smallest pattern (less than about 1 1/2”), you must move the
gun closer to the workpiece - but don’t forget to reduce the amount of
paint at the fluid knob (rear of gun) when you do this.
Page 5
516
SPRAY GUN DISTANCE
The spray pattern is fan-shaped, so for a larger sized fan you do not have
much choice - you will be at or close to the maximum 8" distance. It's
impossible to produce a large spray pattern if you hold the spraygun too
close to the object - there is no room for the fan pattern to expand.
As you move closer with the gun, the fan will become a smaller size. So for
instance, what was 10" wide at a distance of 8" becomes about 2" fan at 2"
distance.
When you want to paint something that is, let's say, 2" across and 6ft long you will find it much easier to follow the object if you move the gun closer.
This will give you the ability to control your pass from side to side properly
without wandering all over the place. Plus it will reduce overspray. Imagine
spraying 1/2 chair spindles from 8" away with a spraygun when you don't
have bristles (as you do with a brush) to help guide you - it's very difficult. So
simply adjust the pattern to be smaller and cleaner (pattern control knob
6073) and move in close until the fan is the exact same size as the spindles.
Once you are close, you will be able to guide the spraygun easily and it will
not be as important to have a completely steady hand.
As an aside - it is usually not possible to bring the sprayhead close to the
object with other methods of spraying (high-pressure for instance). Doing so
would produce bounceback. The pressure is much less with turbine HVLP
so this is not a problem.
THE PRESSURE TUBE
When spraying, never turn the gun upside down. The cup should never be
higher than horizontal. The 1 Quart cup must always be lower than the gun.
(On the gravity gun, it’s the opposite, the cup must be higher than the gun - at
least no lower than horizontal).
Upon stopping spraying for any reason, first turn off the turbine.
Disconnect the hose and then carefully open the cup to release pressure.
It’s best to hang up the gun - use any type of hook or rod for this.
Do not stand the gun on a bench or even the floor because it will always be
prone to falling over which could damage the spraygun and cause paint to
flow up the pressure tube and into the spraygun.
Any paint in the pressure tube 2024 or nipples 2023 the tube is attached to,
causes reduced amounts of paint through the gun. This is because the cup
pressure is too low. Air is being restricted through the nipples by the paint.
blockage. The symptom will be little or no paint and the reason will always
be the nipples or pressure tube being clogged with dried paint. We suggest
always having extra pressure tubes on hand.
FUJI Xpc SPRAY GUN
Page 6
6 15
ACTUAL SPRAYING TECHNIQUES.
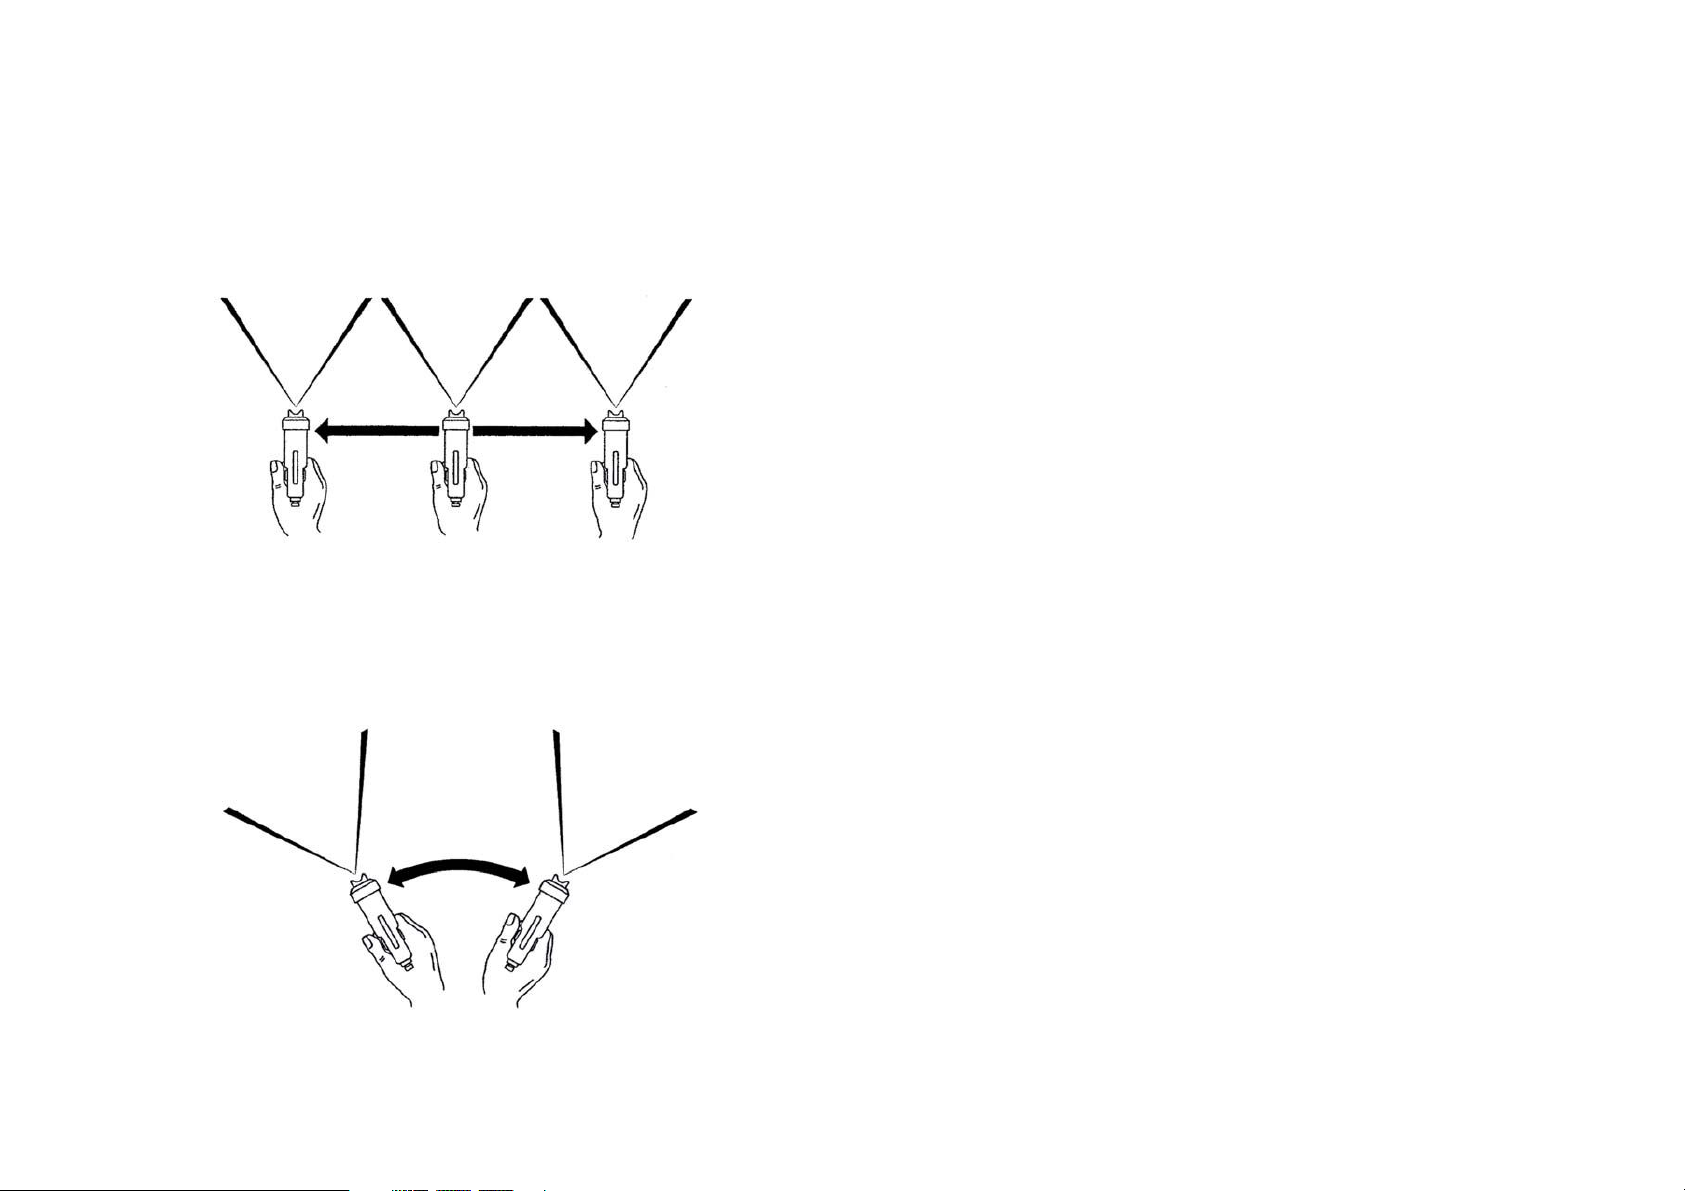
The spraygun should be held perpendicular to the surface at all times.
HOLD THE GUN NO MORE THAN 8” (20cm) AWAY FROM THE SURFACE
TO BE PAINTED. But closer is ok.
CORRECT METHOD
Start moving the spraygun in the direction you want to spray and press the
trigger. Between each successive pass, overlap by about a quarter.
INCORRECT METHOD
SETTING DIRECTION OF NIPPLE ON HANDLE
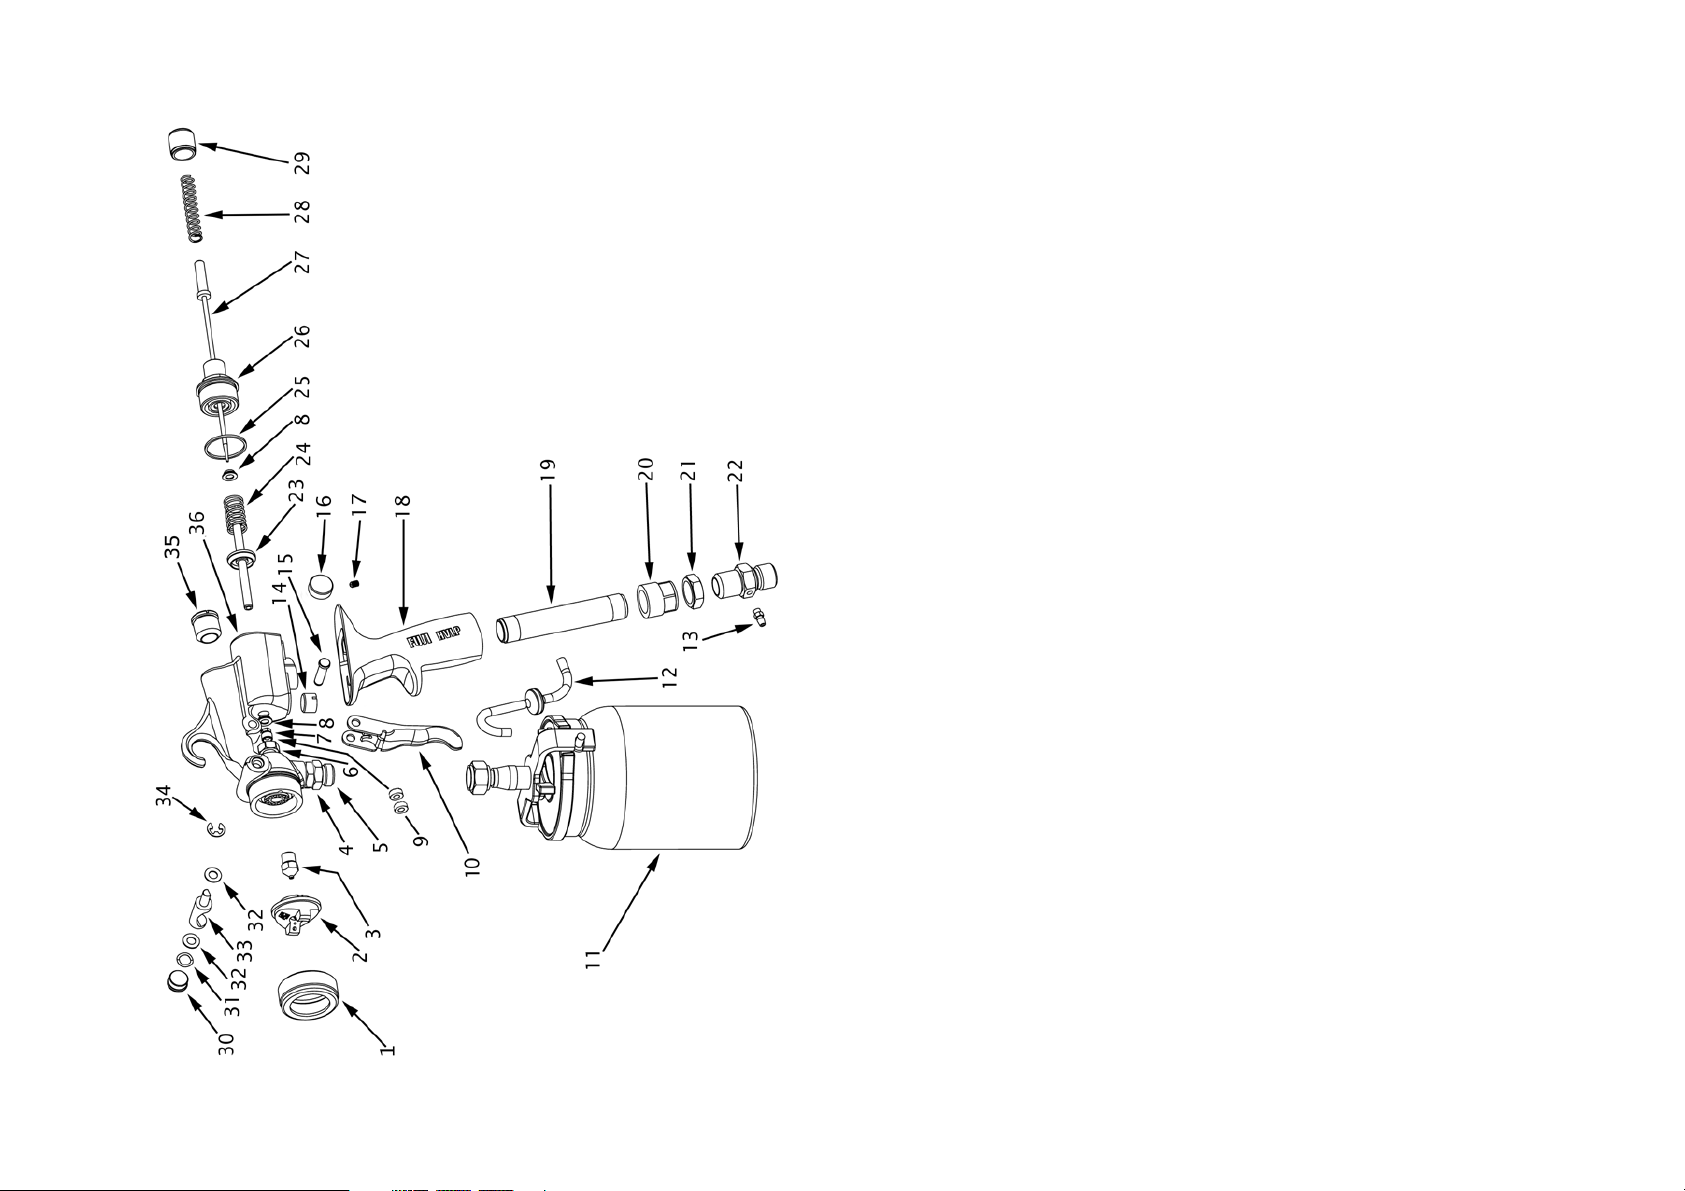
If for some reason you remove the hose connector 8034 you will have to
re-set the direction of the nipple. The direction of the nipple at the air hose
connector (base of handle) should be facing towards the nipple on the
cup lid. To re-adjust, loosen jamb nut 8033, then turn the hose connector
8034 to the correct position and tighten jamb nut 8033. The aluminum
tube handle 8047 is NOT removable.
CLEANING FLUID COMPONENTS
All Fuji fluid components in the spray gun are manufactured from stainless steel. To clean, flush solvent through the spraygun while the paint is
still wet inside the gun.
For a more thorough cleaning, remove all parts at the front of the barrel.
(collar, aircap, fluid nozzle etc.) Also remove the needle (from the rear of
the gun). Please note* the parts behind the nozzle are not removable. The
fluid coupler (where the cup assembly attaches) is not removable.
If necessary, use the supplied cleaning brush 9045 wetted with solvent to
remove paint particles from inside the fluid coupler and from the area
where the nozzle was installed. Please do not soak the whole gun in
solvent, this should never be necessary and it could damage the valve
assembly and valve seals.
The cup assembly can also be removed by loosening the swivel nut at the
top of the fluid tube. Upon re-installation, please do not overtighten the
swivel nut - it is basically a hollow nut. If you apply extreme torque, you can
cause damage to the nut.
TURBINE PROBLEMS
NO POWER - Check your power outlet. Also, try re-setting the breaker on
the back of the turbine by pressing it once.
PLEASE DO NOT TRY TO SERVICE THE TURBINE YOURSELF.
CONTACT US FOR TECHNICAL ASSISTANCE.
In an emergency, where you cannot have any ‘down time’ you could take
the turbine unit to any Vacuum Repair Store. They are very familiar with the
turbine motor and can check the electrical components very easily. The
problem is most likely a loose electrical connection.
Never, for any reason, point the spraygun directly at the face, or head of
a person.
Page 7
7
14
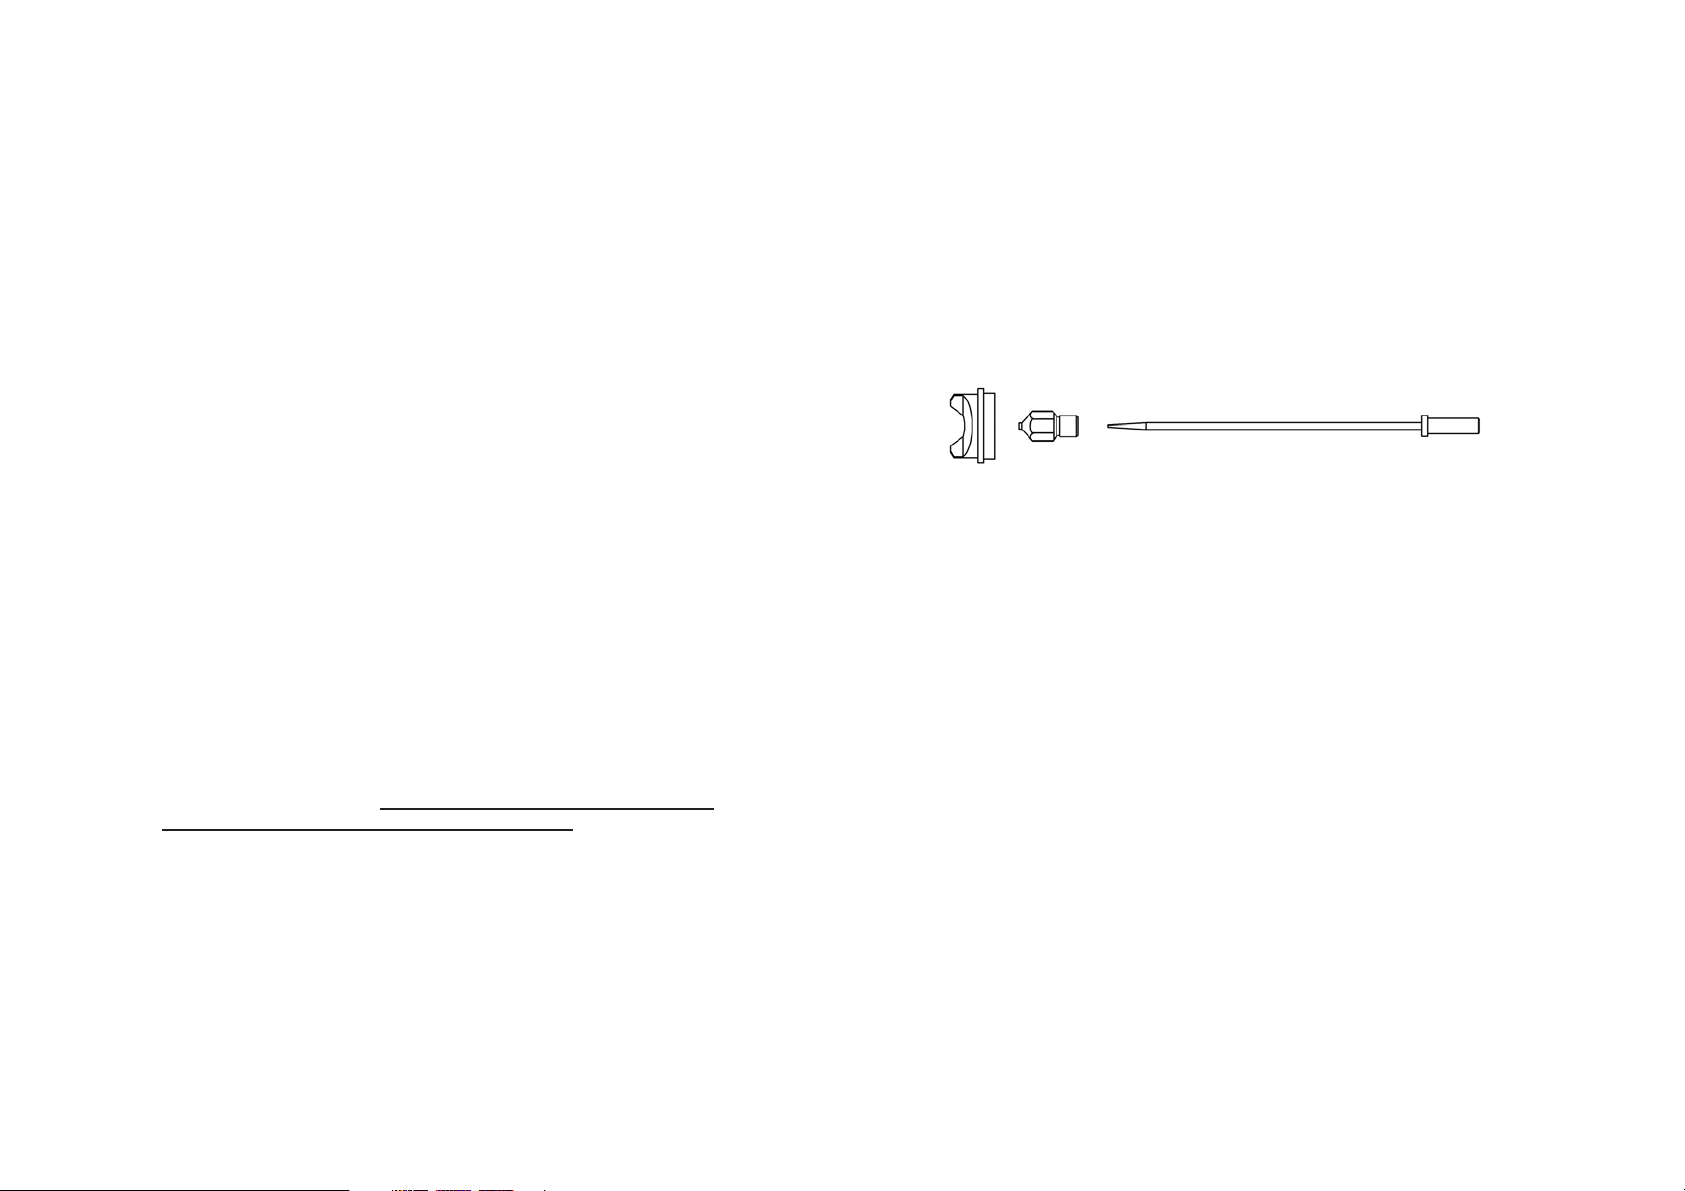
AIRCAP SET SELECTION
The fluid nozzle 6082 and needle 8020 MUST always match exactly. Size
No.4 is standard with all Fuji sprayguns. No. 3 or No. 4 can be used for
any type of fine-finishing application. The difference between the two is that
the #4 allows for more fluid output. This is desirable when spraying fast
drying lacquers. It allows you to spray faster and wetter to obtain better
leveling of the finish. 4 additional setups are available as accessories.
Generally speaking, the quality of atomization and finish suffers as you go
to the larger size setups (No.5 and 6).
If you do not intend on spraying walls & ceilings then the only two
setups you would ever need would be the #3 Fine and Standard #4.
No. 2 (Part 8050-2) .7mm (.027") FINE OUTPUT
SHADING, STAINS,
No. 3 (Part 8050-3) 1mm (.039") FINE OUTPUT
WATER-BASED LACQUERS, ACRYLICS, POLYURETHANE, STAINS.
No. 4 (Part 8050-4) 1.4mm (.055") MEDIUM OUTPUT - STANDARD
Similar to No. 3 but more coverage. Best for AUTOMOTIVE ENAMELS,
NITROCELLULOSE LACQUER and LATEX for a finer finish. Also ideal for
VARNISHES, PRIMERS, OIL-BASED PAINTS and STAINS.
No. 5 (Part 8050-5) 1.8mm (.070") HIGH OUTPUT
Larger surfaces, thick layers, spotted effects. SEALERS, VARNISH,
POLYURETHANE, OIL BASED PAINTS, ENAMELS, EPOXY, PLASTIC,
ADHESIVES, FLOOR PAVING PAINTS, LATEX , ETC.
No. 6 (Part 8050-6) 2.2mm (.086") EXTRA HIGH OUTPUT
Very heavy flows, fast coverage. STONE FINISH PAINTS, TEXTURE
COATING, INDUSTRIAL PRIMERS, MULTI-FLECK PAINTS, LATEX (on
walls, ceilings) ETC.
ADJUSTING THE NEEDLE PACKING
The needle packing must be tight enough to prevent any leakage of paint
material. It should however, allow the needle to glide smoothly through it. If
the packing is too loose, you will see a small amount of paint where the
needle passes through the small needle packing nut 8008. Using the
supplied wrench, gently tighten the nut. This is a good time to apply a spot
of oil to the needle where it passes through the packing nut.
The needle packing 8007 is made from long-lasting teflon and should
never need replacing. But, if necessary, it can be replaced by removing the
needle 8020, then the needle packing nut 8008. Using a sharp tool, pry out
the needle packing. Be careful not to damage any threads. Drop in the
replacement needle packing and re-assemble.
Like all spraygun manufacturers, we use ‘stock’ stainless steel rod for the
needle. This rod can differ in diameter slightly with each production run. So
if you change a No. 3 for a No. 4 needle, one could be a slightly oversized
diameter and one slightly undersized. This may necessitate adjusting the
needle packing.
THE SPINDLE VALVE ASSEMBLY
The spindle valve assembly 9003 can be removed as follows.
1) Remove the fluid knob 8029, spring 8019, and gently pull out
the needle assembly 8020.
2) Turn out the fluid screw nut 8031 (a socket is preferable to a wrench).
3) Remove the spring 8026 and gently pull out the spindle valve
assembly 9003.
To replace, reverse the procedure being careful to center the spring 8026
onto the spindle valve 8021.
Also, before tightening in the fluid screw nut
please ensure that the spindle is centered in the seal. The end of the
spindle is visible through the hole in the fluid screw nut.
THE SPINDLE VALVE SEALS
Removal and replacement of the spindle valve seals is simple. Any thin,
flat tool such as a screwdriver can gently pry out the seal. To replace, firmly
push the seal into place. Small leaks of air are not important and will have
absolutely no effect whatsoever on the atomization process.
The seals are designed to be durable and long-lasting under normal
working conditions. We do not recommend the practice of dunking the
whole spraygun into a container of solvent. This may damage the valve
and valve seals.
AIRCAP SET - Part 8050
Page 8

138
A WORD ABOUT LATEX
Although latex paint was never originally intended to be sprayed, a
professional finish can be achieved by following a few simple rules.
(Please do not confuse latex with the newer water-based coatings). For
work such as cabinetry or trim, our equipment can be used successfully
with latex paint. The latex will have to be thinned with WATER - approxi-
mately 20-30% depending on the brand of paint. And to improve the
finish even more, you can use an additive that will slow down the drying
process so that the paint levels out nicely. One product available is
FLOETROL from the FLOOD Company in Ohio. In the USA Call 1-800321-3444 for your nearest supplier. (In the U.K. 0845-0618899).
The ideal Aircap size setup is the #4 for household trim, louver doors etc.
The Latex paint should be ‘finish-quality’ and not a cheaper grade.
When spraying Latex, please adjust the fluid knob to limit the paint to a
finer spray. This will increase the ratio of air to paint and result in better
atomization and a beautiful finish. (Factually speaking, it doesn’t
increase the ratio of air to paint but does the opposite - it allows the air
atomizing power to work on less paint thereby improving the quality of
atomization). Also, it is usually helpful to remove the air control valve so
that more air passes through the spraygun. Finally, adjust the pattern to
a maximum size of 8” - 9” (20cm) - smaller is ok.
Although it is possible to use our equipment for house painting (walls),
and many end users do, we feel that an airless gun or power roller is
better suited for that kind of job. However, if you decide to do this kind of
work, you will need the #6 Aircap set.
VISCOSITY
Follow the viscosity guide chart. You will eventually learn to thin the
material by experience. Traditionally, lacquers were thinned 50/50 even
for high pressure spraying but this much thinning is not necessary.
However, coatings manufacturers are reformulating constantly so it is
always advisable to check with them. Thinning a product excessively
causes more overspray as well as runs. Stringent air quality controls in
some geographic locations may prohibit reducing by more than a certain
percentage. Please check with the local jurisdiction in this matter.
Remember, when you buy a can of paint, lacquer, polyurethane, varnish
etc. over the counter, it will most likely be formulated for brushing. That
means, it will be too viscous (thick) and will require thinning to spray
successfully. This is especially true if there is no mention of spraying on
the instructions on the can. Check with the manufacturer of the coating to
obtain advice on thinning their product.
THE TRIGGER IS SLUGGISH
• The needle packing is too tight - see ADJUSTING THE NEEDLE
PACKING. Page 14
• Bent needle
• The valve seal 8025 is damaged - replace
POOR SPRAY PATTERN
• Damaged needle or nozzle
• Nozzle is clogged
• Air holes in air cap clogged
• Aircap screwed in too tight
• Gun too far from surface (max. 8” - 20cm)
PAINT AT THE AIR NOZZLE HOLES
• The fluid nozzle is loose and material is leaking around it tighten with a adjustable wrench or 7/16” socket.
• Paint is entering the gun via the pressure tube (very rare) and
being blown through the barrel to the aircap - see HOW TO
PREVENT PAINT ENTERING THE PRESSURE TUBE. Page 4
GUN SPRAYS IN A PULSATING MANNER
• The needle packing has worn a little or is loose. Tighten
• The cup is almost empty
• The cup lid is not tight - air is escaping
• The clear plastic pressure tube is leaking air. Replace
• The pressure tube and/or nipple is clogged. Clear or replace
• Gravity gun - turn the collar IN to alleviate back-pressure
EXCESSIVE OVERSPRAY
• The spray pattern size is too large for the item you are spraying
• The gun is being held too far away - should be 8” max. (20cm)
• Trigger on and off as you pass over the edges of the item
• The product is too thin - try thinning less
• Reduce the air by turning the air control valve to the point where
overspray is minimized but the finish still looks good
• For ideal and comfortable spraying conditions, you should install
an extraction fan.* If you are spraying a flammable, combustible
product such as nitrocellulose lacquer, you must install an
explosion-proof fan (and explosion-proof lighting and switches)
* Please check with the local jurisdiction on this matter.
Page 9

12
9
VISCOSITY GUIDE
To test the viscosity of the paint material, fill the viscosity cup to the brim
and time how long it takes for the liquid to empty out through the hole. We
recommend you experiment to find the ideal viscosity for your application
and record the information for the next time.
Always check with the manufacturer of the coating for assistance in
thinning for spraying. If their product is only designed to be brushed, they
may not be too helpful. But remember that any type of coating can be
sprayed if it is thinned correctly and you have installed the ideal aircap set.
The chart below is only an approximate guide denoting how many
SECONDS it takes for the material to flow out of the viscosity cup.
Auto Cellulose 18 - 20 Primers 30 - 40
Lacquers 18 - 20 Sanding Sealers 20 - 22
Enamels 20 - 25 Stains Undiluted
Latex 20 - 30 Creosote Undiluted
Oil-based 20 - 25 Polyurethanes 20 - 25
We suggest thinning around 25% to begin with but this may contravene the
air quality control laws for your location. The solvent used for thinning is
usually the solvent mentioned on the can (instructions for ‘cleaning the
brushes’). However, please check with the coatings manufacturer.
HVLP spraying is more friendly to the environment than most methods of
spraying. It reduces appreciably the amount of unnecessary misting and
fogging (overspray) associated with high-pressure spraying. Spraying with
Nitrocellulose lacquer can be hazardous. The lacquer, fumes and
overspray are toxic, flammable and explosive. If spraying must be done
inside an enclosed area, ventilate well. Spray close to an open window or
door and situate a fan to draw out the fumes (an explosion-proof motor and
explosion proof lighting will be necessary). PLEASE CHECK WITH THE
LOCAL AUTHORITY HAVING JURISDICTION ON THIS MATTER.
CLEANING
To clean the gun after each use, empty all paint from the cup. Use a solvent
soaked rag to clean the residue in the cup. Then, spray some clean
solvent through the gun into a clean rag (to avoid filling the room with
unnecessary spray) or a bucket. Repeat until the inside of the fluid passages in the gun, metal fluid tube etc. are clean. Use the wet rag to wipe off
the aircap and tip of the fluid nozzle. The Aircap can be soaked in thinner.
Back-flushing is not necessary. Do not restrict the fluid nozzle when
cleaning - this will drive thinned paint up the pressure tube and into the
spraygun which is undersirable.
SPRAYGUN PROBLEMS
NO PAINT (OR VERY LITTLE PAINT)
THIS IS THE MOST COMMON PROBLEM ENCOUNTERED -
The air passing through the plastic tube 2024 to pressurize the cup is
blocked. This means that either the tube itself, the check valve, or one of
the two nipples 2023 is blocked. A pipe cleaner can be used for cleaning
the hole in the nipple. Please see more info on the pressure tube’ - Page 5
• Pressurizing tube and/or nipples are blocked
• The cup is not tightened down sufficiently by the quick-release
lever or the cup gasket 2037 is worn and leaking air
• The cup is empty
• The metal fluid tube is blocked with paint - rare
• The fluid coupler is blocked with paint - rare
UNEVEN SPRAY PATTERN
One of the holes in the aircap may be blocked. Or, the paint could be dirty
and is partially blocking the fluid nozzle. Remove the aircap and clean by
soaking in solvent and using the soft bristle brush or a rag. NEVER use
metal objects to clean holes in the aircap.
LEAKAGE
If paint material comes out of the fluid nozzle without pulling the trigger...
• The needle is not seating in the fluid nozzle properly
• The needle packing may be too tight preventing the needle from
moving
• Foreign matter could be trapped between the needle and fluid
nozzle
• The needle or fluid nozzle could be damaged or worn
• Loose fluid nozzle
• Wrong nozzle size installed
CUP LEAKS
• Oil above and below the lever to smooth the lever action
• Change gasket/diaphragm - oil lever first to check
• Leak around nipple - use Loctite to seal
• Leak around side pins - use Loctite to seal
• Leak through lid - remove nut under lid - use Loctite
Page 10

10 11
If this type of cleaning is done while the paint is still wet in the gun, it
should be all that is necessary to keep the gun clean enough for next time.
Do not leave liquids in the cup overnight or for long periods. The Gravity
Gun can be cleaned without hooking up to the hose. Simply wind out the
fluid knob all the way and pull the trigger - the thinner (solvent) will
stream out of the fluid nozzle. Repeat until clean.
PLEASE DO NOT USE A WIRE BRUSH OR ANYTHING METAL TO CLEAN
THE GUN OR CUP AS THIS WILL CAUSE DAMAGE.
DO NOT dissassemble the cup assembly - threads in your cup have
been sealed at the factory to prevent leakage under pressure.
The standard 1 quart (1000cc) cup can be used with most coatings
(including water-based). Also available as an accessory is our 2041T
teflon-coated cup.
CAUTION: Never soak the complete spraygun in solvent as this removes
the grease from the parts and distributes thinned paints throughout the air
passages. It could also damage internal parts such as the spindle valve
8021 or valve seals 8025. It may however, be necessary sometimes to
soak the aircap 6093 and nozzle 6082. You may soak only the metal parts
in solvent and clean with the soft bristle cleaning brush 9045. To reassemble, first oil or grease all moving and threaded parts.
CAUTION: Do not store the gun with the cup clamped down hard as this
will cause the gasket to flatten out. Do not lay the gun down on its side
with liquid material in it.
PRESSURE POT USE
To use the gun with a pressure pot, remove the cup assembly 2042 and
the pressurizing tube 2024. Connect your material line (fluid hose) to the
fluid coupler 8005 on the gun. Because you are using air from the turbine,
you must block off the air that would normally go from the pressure pot to
the gun. This can be capped with a brass threaded cap or the coupler can
be removed and a threaded brass plug inserted. The hose connector at
the base of the handle must be switched to 8065 hose connector. The
8065 does not have the 2023 pressurizing nipple.
A COMPRESSOR IS NEEDED TO PRESSURIZE THE POT.
Set the compressor to between 6-8 PSI. This is enough to push the paint
material up to the gun. For spraying at greater heights (over 8 feet), more
fluid pressure may be necessary. The fluid pressure should never be set at
more than 20 PSI. If you find a higher pressure is needed, we advise you to
check the material hose for paint blockage.
FINISH PROBLEMS
ORANGE PEEL - If the finish is rough and resembles orange peel then the
material is too thick. (Or perhaps you have the air control valve turned down
- please check that it is fully open). The ‘paint’ will not atomize properly and
the surface will be spotty. To remedy this, add more thinner (or appropriate
solvent). For fast drying products such as lacquers, you may also want to
add a lacquer retarder. This will slow the drying time allowing the material
to flow out and level nicely.
Retarders are available for other coatings too, such as Penetrol for oilbased paints or Floetrol for latex house paints. These products go under
different names such as Flow-Out Additives etc. Please check with the
coatings manufacturer.
NOTE: With the newer water-based materials ‘orange peel’ is usually a
result of spraying on too thick a film. Try spraying an extremely THIN FILM,
but still WET coat. With most other coatings, orange peel is caused by
material being too thick or not enough atomizing power. This is why we
suggest leaving the air control valve fully open when experimenting with a
new coating material, otherwise it will cause confusion. If the the air control
valve is fully open (or perhaps removed for Latex spraying) then orange
peel can only be one cause - the material is too thick and must be thinned.
GRITTY FINISH - If the material is too thin, it is likely to run or be overatomized, producing a rough gritty finish. Try thinning the product less and
spraying a wetter coat.
BLUSHING - Blushing is the common term used when the finish looks
cloudy and white (sometimes also called blooming). It is caused by
moisture and is especially a problem when operating high pressure spray
equipment. The moisture comes from the compressor. This problem does
not usually occur when using the Fuji turbine because the air from the
turbine is warm, dry and uncontaminated. However, it is possible on very
humid days to encounter slight blushing. Using a retarder will often allow
moisture to escape, preventing the milky look.
FISH EYES - If you are refinishing furniture or pianos, fish eyes could
become a problem. The cause is usually silicone or oil from polish which
has been liquified by the paint stripper that has now soaked into the bare
wood. This silicone prevents the lacquer from adhering to the wood. One
way to sometimes correct this is to seal in the silicone by misting on two or
three light coats of lacquer. Then spray on a regular wet coat. We do not
recommend the use of a product known as ‘Fish-Eye Drops’ which is
essentially liquid silicone. Silicone will only contaminate the gun even
further. Anything that comes into contact with the silicone becomes
contaminated - such as; rags, aprons, bench tops, gloves.
 Loading...