

Page 1

Quick User Guide
Quick User Guide
FeaturesCopy
D
D
ocu
ocu
entre--
C
entre
C
II C3000
II C3000
Fax
Scan
Print
This User Guide is printed on FUJI XEROX Office Color Capable Products.
Paper Jams
Consumables
Online Support
Page 2

01
01
Features Content
Features Content
Thank you for selecting the Fuji Xerox DocuCentre-II C3000.
This quick user guide provides the fundamental Copy / Fax / Scan / Print operating
procedures for ease use of the machine.
Quick User Guide Organization
Quick User Guide Organization
♣ Features Content ……………………………………………… Page 01 - 02
Describes the content of this guide and overview of the machine.
♣ Copy ……………………………………………………………. Page 03 - 13
Describes the copy features and operations.
♣ Fax ………….……………………………………………….….. Page 14 - 19
Describes the fax features and operations.
♣ Scan …………………………….………….…………………… Page 20 - 25
Describes the scan features and operations.
♣ Print …………………………….………………………………. Page 26 - 33
Describes the print features and operations from computer.
♣ Paper Jams …………………………….…….….……………… Page 34 - 36
Describes procedures to clear paper jams when error message displays.
♣ Consumables …………………………….…….….…………… Page 37 - 40
Describes procedures to replace consumables
(Toners/Drum/Waste Bottle/Staples)
♣ Online Support Assistance ………….…….….……………… Page 41 - 42
Describes measures to acquire online help solutions
and / or submit a Service & Support Request online.
IMPORTANT :
The screen images in this guide solely used for illustration and are based on the standard machine
configurations. Some features mentioned may not be used depending on the machine
configurations. Unsupported features will not be displayed on the screen. Abnormal features will
be grayed out on the screen.
This Quick User Guide may not be copied or modified without the written consent of the
publisher.
Parts of this user guide are subject to change without prior notice.
We welcome any comments on ambiguities, errors, omissions or missing pages.
Contact Fuji Xerox Customer Training Department for more information.
Page 3

Overview
Overview
Powering On / Off the machine
Power Saver button
-Press to exit power
saver mode.
Log In/Out button
-Press to enter User
ID & Passcode
Power Switch
Turn ON
Machine
02
02
Turn OFF
machine
To Login to User Account, press Log In/Out button & enter user details
as follow. ( Note: Press Log In/Out button again to Logout. )
Page 4

03
03
COPY FEATURES
COPY FEATURES
Reduce/Enlarge Page 04
To make a reduced or an enlarge output
size.
Copy
Book Copying Page 06
To copy bound documents using platen
glass on to 2 separate sheets
2-Sided Copying Page 05
To make copies single or double sided output.
Mixed Sized Originals Page 07
To scan different size documents
simultaneously and copies onto matching
paper size.
A
A
A
5
4
A
3
A
5
A
4
3
Multiple-Up Page 08
To copy multiple documents onto a single
sheet of paper
Edge Erase / Image Shift Page 10
To erase unwanted marks along the edges /
To shift image copy position
[Before]
[After]
Copy Output / Sorting Page 09
To make copies collated (stapled & punched)
[Collated]
1,2,3…1,2.3…
[Uncollated]
1,1...2,2...3,3...
Booklet Creation Page 11
To copy multiple sheets of documents in
page order to make a booklet
6
5
4
3
2
1
Repeat Image Page 12
Image to be print repeatedly on one sheet of
paper
ID Card Copying* Page 13
To copy both sides of ID card onto one side
of paper
Page 5

Making reduced or enlarged copies from the original
You can make copies with scaling by selecting desired copy size ratio.
04
04
Original A4
Output A3
Copy
1 Select [Copy]
2 Select [Reduce /
Enlarge] for desired
ratio; select [More] for
other presets.
3 Select [Paper Supply] for
tray selection.
4 Enter number of copies
(1 to 999) using numeric
keypad.
5 Press <Start> button
Note
User Guide P.52
Page 6

05
05
Copy
Making copies Single Sided / Double Sided
You can make copies an d output as single-sided / double-sided.
1 Select [Copy]
2 Select [Layout
Adjustment]
Select [2-Sided Copying]
Note
Head to Head – both sides of the
paper are at the same orientation.
Head to Toe – one si de of the paper
are at rotated orientation
3 Select an option and
select [Save]
1 Î 1 Sided copy 1-sided
document onto 1 side of paper
1 Î 2 Sided copy 1-sided
document onto 2 sides of paper
2 Î 2 Sided copy 2-sided
document onto 2 sides of paper
2 Î 1Sided copy 2-sided
document on 1 side of the paper
4 Enter number of copies
(1 to 999) using numeric
keypad.
5 Press <Start> button
Note
User Guide P.65
Page 7

Making a copy from a bound document (Book Copying)
You can make copies from bound document into separate sheets of
paper using platen glass.
1 Select [Copy]
2 Select [Layout
Adjustment] tab – Choose
[Book Copying]
06
06
Copy
Note
Both Pages – to copy both
pages of the book
Left Only/Right Only
selected side of the book
– copy
3 Select an option and
Select [Save];
Left Page then Right
Right Page then Left
Top Page then Bottom
Select Both Pages (for
scanning left & right page)
4 Select [Save] and Press
<Start> button
Note
User Guide P.66
Page 8

07
07
Making copy of different sized document (Mixed Size)
You can make copy of different sizes documents and copies onto
matching paper size.
Copy
A
A
5
4
A
3
A
5
A
4
A
3
1 Select [Copy]
2 Select [Layout
Adjustment] tab Select
[Mixed Sized Originals]
and Select [ON]
3 Select “Auto%” on [Copy]
and Select Paper Size
required. [Auto Paper Tray]
4 Select [Save] and Press
<Start> button
Note
User Guide P.69
Page 9

Making copy of multiple sheets onto 1 sheet paper
You can make copies from multiple sheets of documents onto single
sheet of paper using Multiple-Up.
1 Select [Copy]
2 Select [Output Format]
tab.
08
08
Copy
Note
[Auto %] is automatically
selected to make copies fit
into paper selection.
3 Select [Multiple-Up]
1 Page Up - Multiple Up is not
applied.
2 Pages Up – 2 documents
copied into 1 sheet of paper
4 Pages Up – 4 documents
copied into 1 sheet of paper
8 Pages Up – 8 documents
copied into 1 sheet of paper
4 Select ‘Reading Order’ for
document layout and
Press <Start> button
Note
User Guide P.80
Page 10

09
09
Making multiple copies from the original [sorting]
To make copies output collated. Output can be stapled / hole punched.
Copy
[Collated] 1,2,3…1,2.3…
[Uncollated] 1,1...2,2...3,3...
[Finishing]
Stapled / Hole Punch
1 Select [Copy]
2 Select [Copy Output] in
[Copy] tab; or select
[Output Format] tab,
select [Copy Output /
Stapling].
3 Select [Collated], and
select Finishing (if
available). Select Staple
/ Punch Positions,
Select [Save]
4 Enter number of sets
using numeric keypad
and press <Start>
button
Note
Collated - arranged in page
order per sets.
Uncollated - arranged in total
copies and sort sheets by page
Note
User Guide P.75
Page 11

Making copies with edge erased / image shifted
To make copies with edge erased / image shifted
1 Select [Copy]
2 Select [Layout
10
10
Copy
Adjustment] tab; Select
Edge Erase or Image
Shift (where applicable)
3 Edge Erase – set area to
erase using arrow keys at
1mm increments each.
Image Shift – set margin
to shift using arrow keys
at 1mm increments each.
Select [Save]
4 Enter number of sets
using numeric keypad
and Press <Start> button
Note
User Guide P.70
Page 12

11
11
Copy
Making a copy into a booklet format (Booklet Creation)
You can make copies from multiple sheets of documents onto both
sides of the paper in page order to make a booklet
5
4
3
2
1
Optional feature:
Folding & Staple
1 Select [Copy]
2 Select A4 Landscape
under Paper Supply
Note
3 Select [Output Format]
tab
4 Select [Booklet
Creation] and choose
option “Left Bind/Top
Bind” or “Right Bind”
and Select [Save]
Optional:
Finishing (Folding + Stapling)
5 Select [Save] and
Press <Start> button
Printed Covers The first
page of the document is
copied on the cover
Note
User Guide P.77
Page 13

Making an image printed repeatedly (Repeat Image)
Make copy of a document / image onto 1 sheet of paper repeatedly.
1 Select [Copy]
2 Select [Output Format]
tab. Select [Repeat
Image]
1 Page Up – Image not
repeated
Auto Repeat – Auto repeat
according to original
document size, paper size
and copy ratio.
Variable Repeat –User
defined number of times to
repeat copy image
Select [Save]
12
12
Copy
3 Select [Layout Adjustment]
tab – Select Original Size to
enter width (X) & height (Y) at
1mm increments -
Select [Save]
4 Press <Start> button
Note
User Guide P.82 Repeat Image
User Guide P.68 Original S i ze
Page 14

13
13
Copy
Making copies of ID Card
To make copy of ID card both sides on the same page of paper
1 Select [Copy]
2 Select [Output Format] tab;
Select [Multiple-Up] : 2 Up
Select [Save]
3 Select [Layout Adjustment]
tab; Select [Original Size]
Enter the ID Card size
(X=90 / Y=60) Select [Save]
4 Load ID Card at the top left
corner on the platen glass
and Press <Start> button
5 Turn over ID Card on place
it at the same position;
Press <Start> button. The
ID Card will then be printed.
Page 15

FAX FEATURES
FAX FEATURES
14
14
Numeric Keypads Page 15
To fax document using numeric keypads to a
specific location
Speed Dial/One Touch Page 15
To fax document using Speed Dial/One
Touch Dial
On-Hook Dialing Page 15
Use this feature to send or receive fax
manually. Select {Manual Send} to send or
[Exit (Line Cut)] to exit on-hook
Broadcast Send Page 15
To fax document to multiple locations.
Fax
Address Book/Index Page 16
To fax documents using pre-registered
numbers from the address book
Transmission Report Page 18
To print a transmission report automatically
after each fax complete successfully /
unsuccessfully
Transmission Report–
ASDFG
EWTEt
dfrewtry
2-Sided Originals Page 17
To enable scan both sides of a document
then transmits automatically
1-Sided: Scans 1-sided documents to
transmit.
2-Sided (H to T): Scans 2-sided (head to
toe) documents to transmit.
2-Sided (H to H): Scans 2-sided (head to
head) documents to transmit.
Cancel Fax Job
To cancel a fax job, press [Job Status] button.
Select fax job and press [Stop] / [cancel].
01 78822984 12:45 CP
Page 16
15
15
Fax
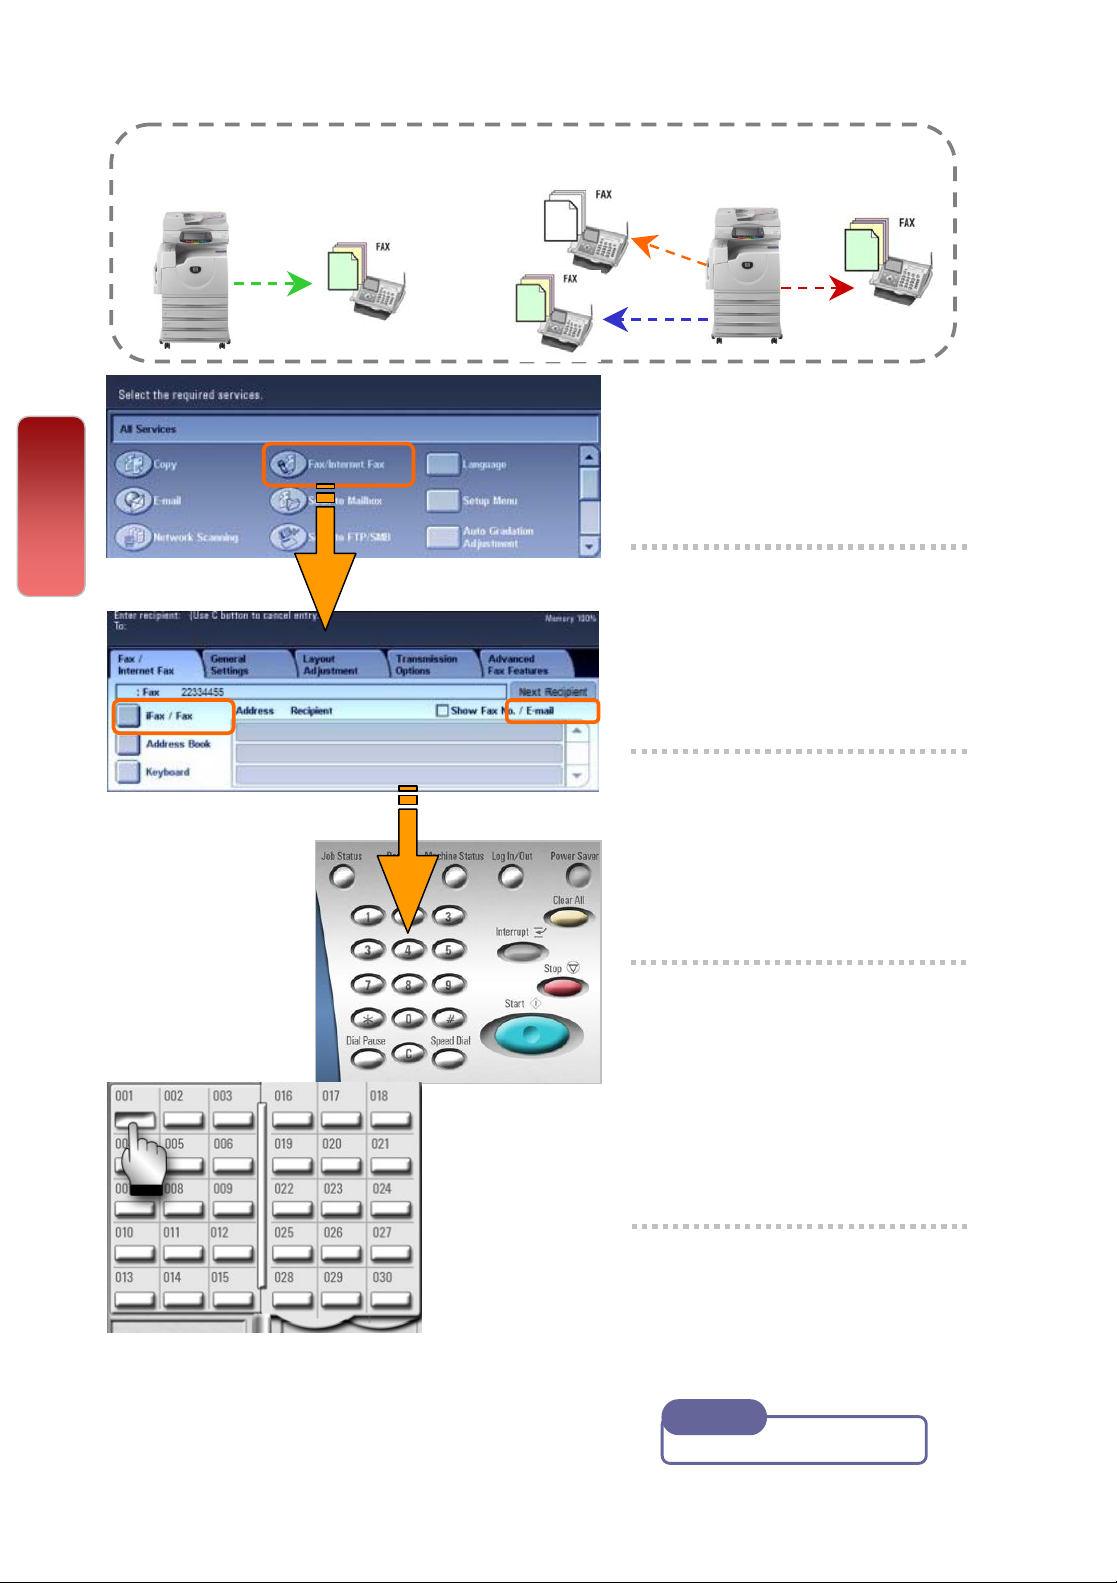
Fax transmission to a single / multiple location(s)
You can select fax feature on [Fax] screen to send document to single
or multiple recipient(s).
1 Select [Fax]
2 Enter recipient(s) fax
number using numeric
keypad.
3 Select [Next Recipient]
button to enter multiple
recipients’ fax number.
4 If multiple location fax
is programmed, select
[Yes] on confirmation
screen to start fax
transmission
5 Press the <Start> button
Note
User Guide P.102
Page 17
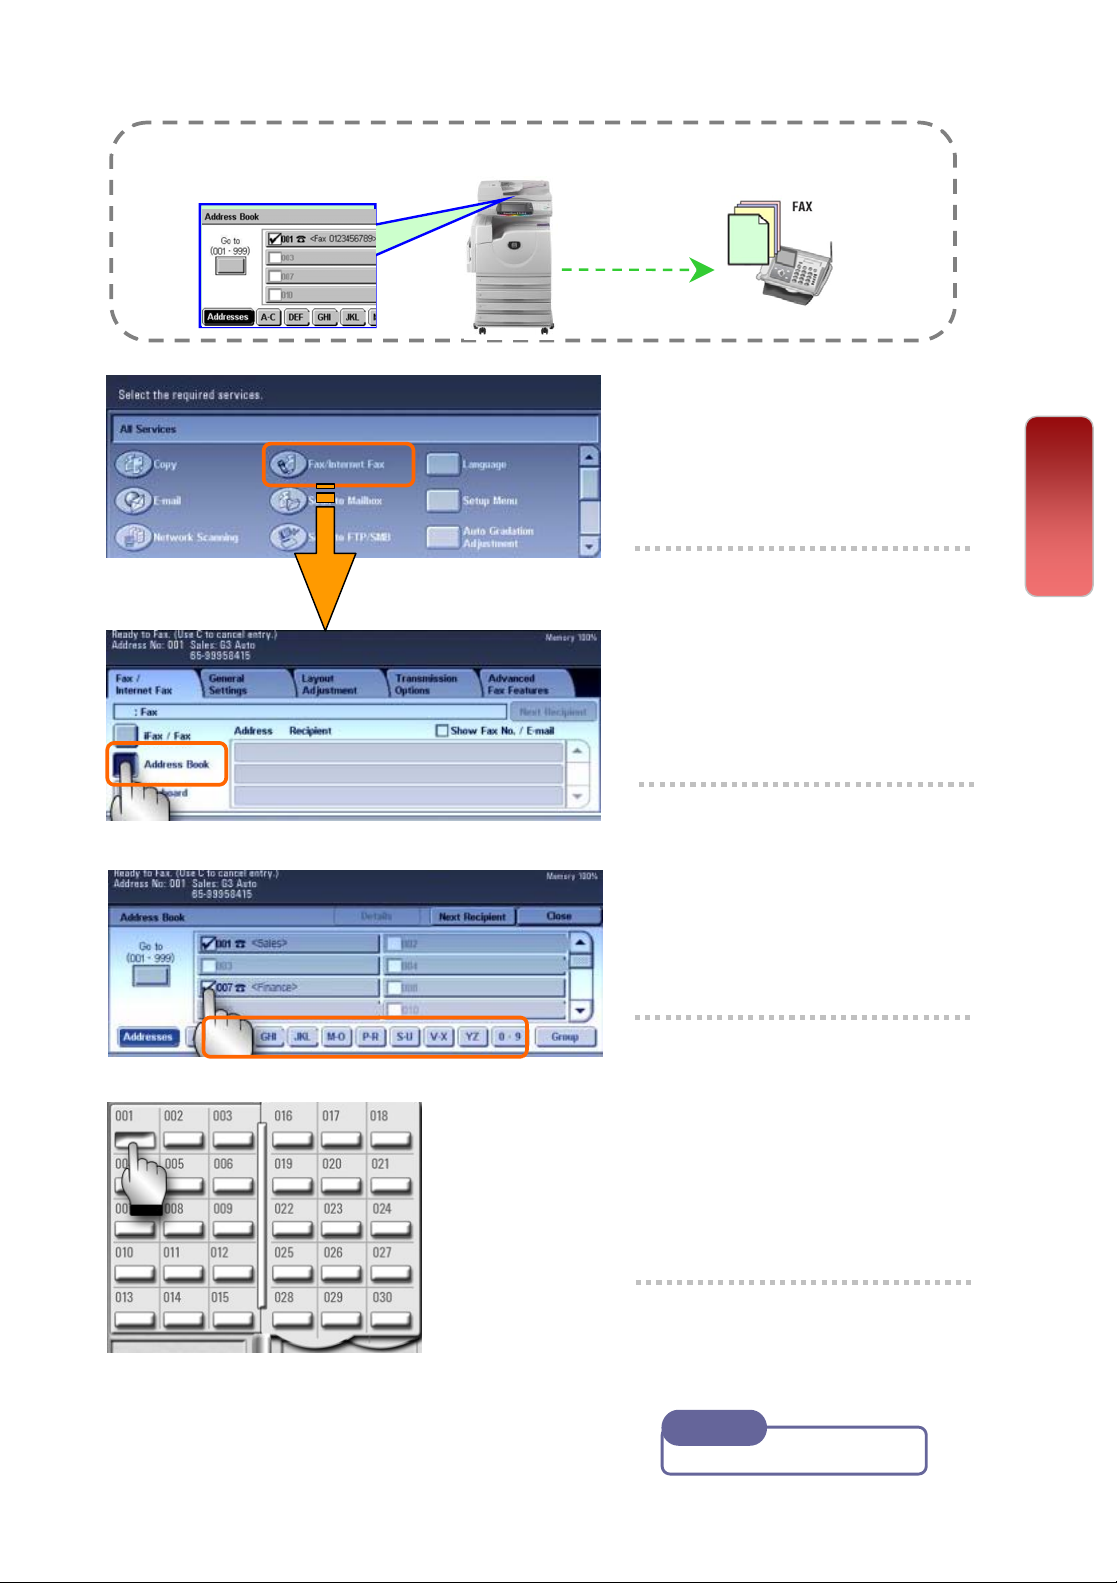
Making a fax transmission using Address Book Entries
You can specify fax recipients from pre-registered Address Book
1 Select [Fax]
2 Select [Address Book]
button to select
recipients from the
registered entries.
16
16
Fax
3 Select [ABC] [DEF]
button to search
Recipients by Index
Search.
4 Or select recipients’ fax
number from the One
Touch Dial (001 – 070)
or using Numeric
Keypad
5 Press the <Start> button
Note
User Guide P.113
Page 18
17
17
Fax
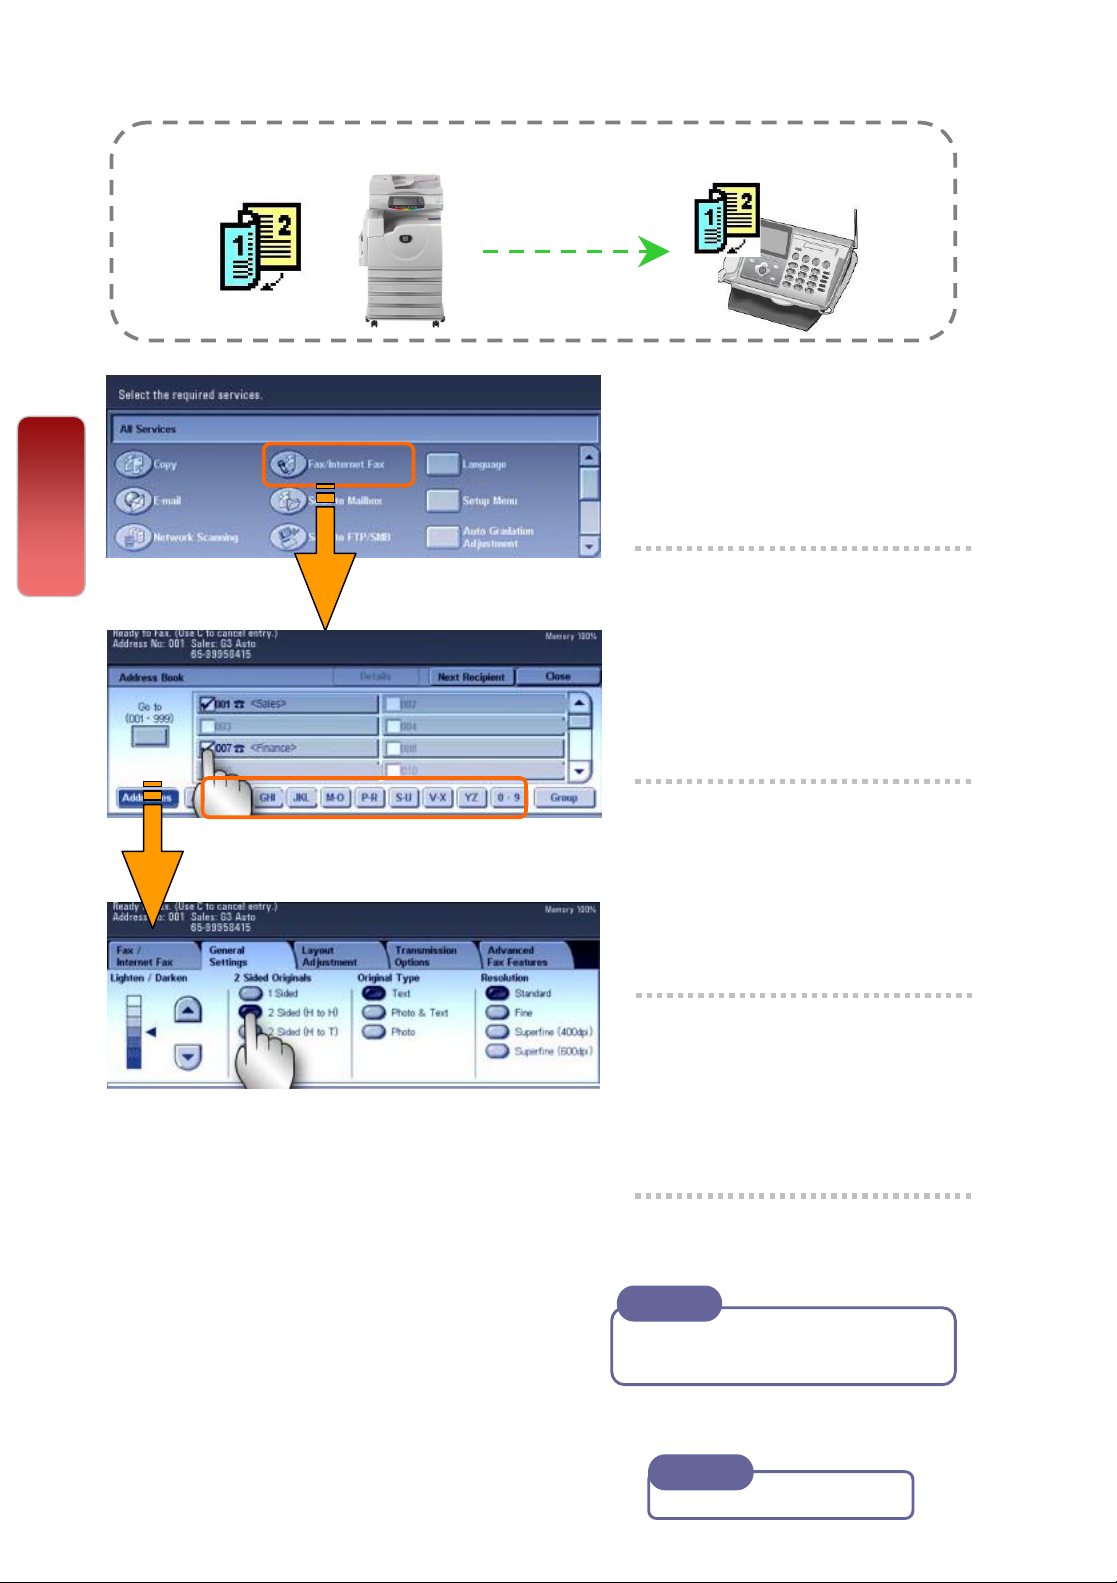
Making a 2-sided fax transmission
You can scan a 2 sided document and send in a single operation.
1 Select [Fax]
2 Select [Address Book]
button to select recipients
or enter Fax number using
Numeric Keypad
3 Or select recipients’ fax
number from the One
Touch Dial (001 – 070).
4 Select 2 Sided Originals
- 2 Sided (Head to Head) or
- 2 Sided (Head to Toe)
5 Press the <Start> button.
Note
Recipients’ fax number will be
displayed on the Address list
Note
User Guide P.117
Page 19
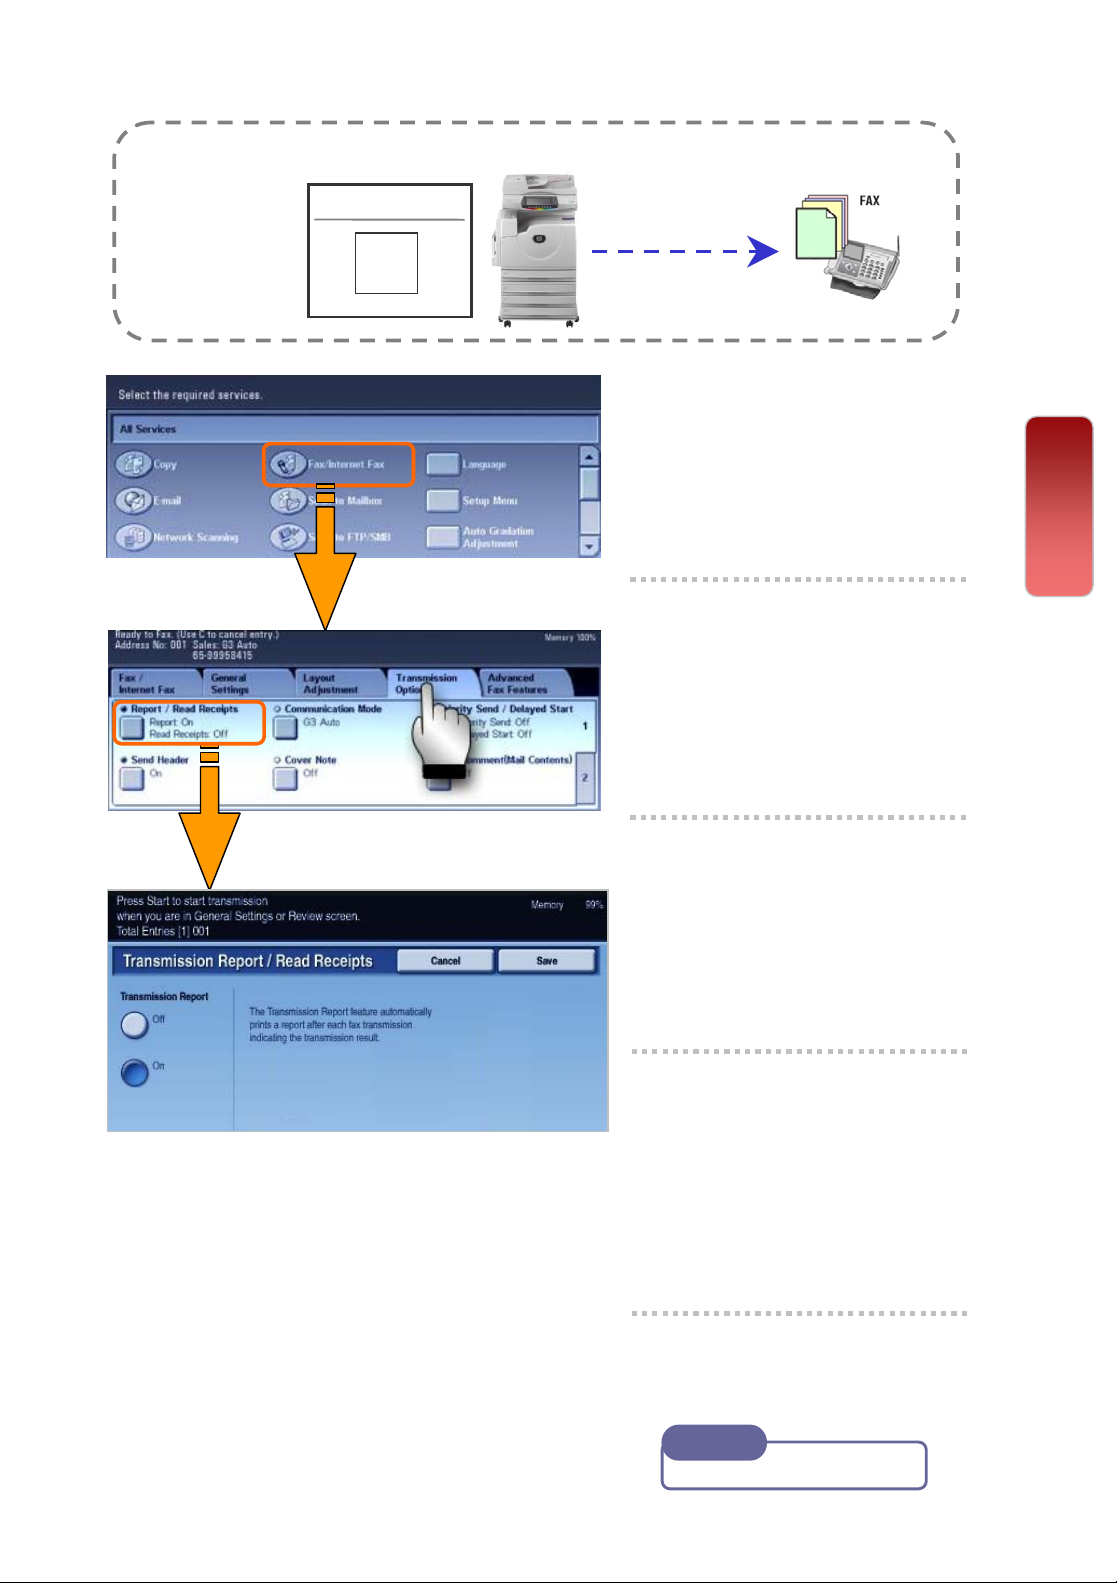
Making a fax with a transmission report printed
Fax transmission results can be printed automatically after each fax
transmission.
Transmission Report–
ASDFG
EWTEt
1 Select [Fax]
2 Select [Transmission
Options] tab – Select
Transmission Report
18
18
Fax
3 On the Transmission
Report Screen, Select
“ON”
4 Select [Address Book]
button to select recipients
or enter Fax number using
Numeric Keypad
5 Press the <Start> button.
Note
User Guide P.132
Page 20

19
19
To register Fax Address and Group Send
To store Fax addresses in the address book [up to 500 entries]
To Register Fax
Address
1 All Services screen
Fax
2 Select [Setup Menu] - Select
[Address Book]
3 Select an address e.g. 001 (not
in use) - Press [Create/Delete]
4 Address Type: Select [Change
Settings] Select - FAX – Save -
To Group Pre-
Registered Fax
Address
1 All Services screen
2 Select [Setup Menu] – Select
[Group Send]
3 Select any group no. (e.g #01)
and press [Create/Delete]
4 Enter the pre-registered
address no. by using numeric
keypads (e.g. 001) Press [ADD]
5 Fax Number: Select [Change
Settings] enter recipient fax no.
6 Recipient Name: Select [Change
Settings] Enter Recipient’s
Name / Company Name
7 Index: Select [Change Settings]
Enter 1 alphanumeric character
(e.g. Fuji Xerox = F)
8 Save and Close; Repeat steps 3-
7 to continue or Press [Close] to
Exit Setup Menu.
5 Repeat step 4 to continue
registering fax no. to the same
group
6 Select [Save] and Close to Exit
[Setup Menu].
Note
Max 50 Groups can be created
Max 20 Fax Addresses per group
Note
User Guide P.336
Note
User Guide P.342
Page 21
SCAN FEATURES
SCAN FEATURES
20
20
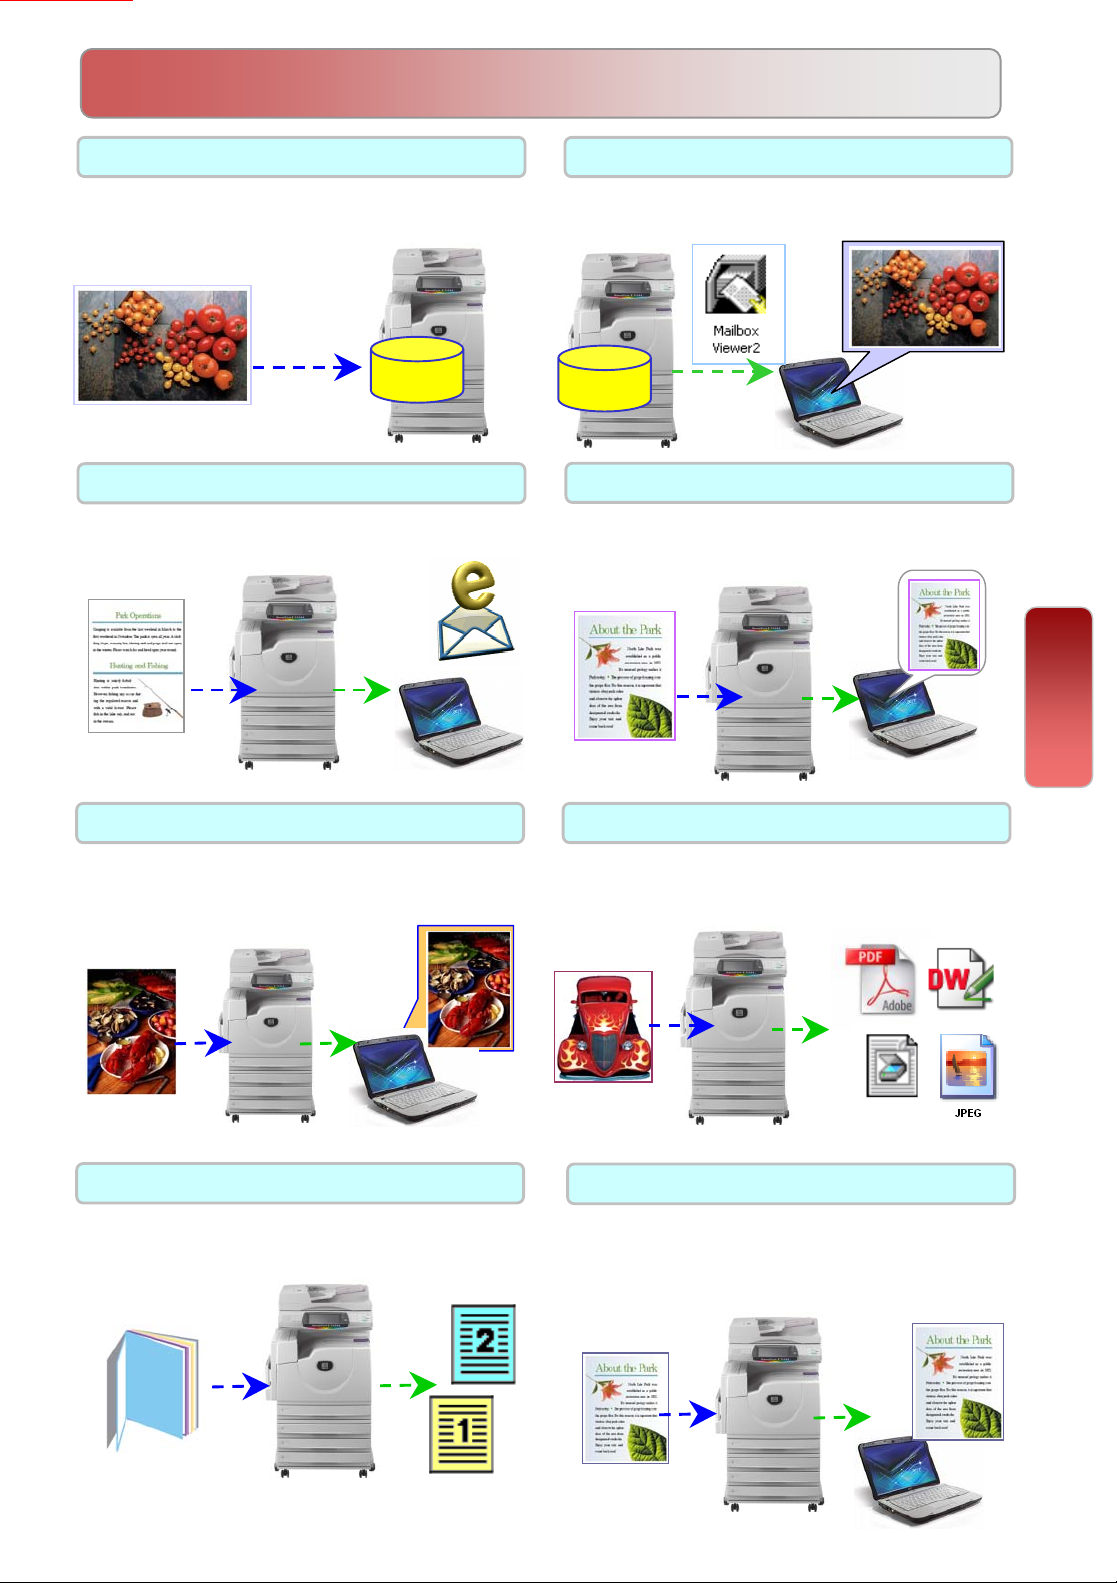
Scan to Mailbox Page 21
To scan documents and save the scanned
data to a mailbox located at the machine.
Mailbox
Scan to Email Page 23
To scan documents and send the scanned
data as an e-mail attachment
Importing Mailbox data Page 22
You can import scanned data to your
computer using Mailbox Viewer program.
Mailbox
Scan to PC [SMB] Page 24
To scan documents and send the data to a
computer on the network.
Scan
Output Color/dpi Page 24
Set scanning color & output resolution for the
documents (up to 600dpi).
Book Scanning Page 25
The feature scans a bounded documents onto
separate sheets of paper using platen glass.
Output Format * Page 25
Document can be scanned to the supported
format. [JPEG, TIFF, PDF, DW]
File Name Page 25
The default file name is "img-xxx-yyy.zzz"
(where xxx is the date and time, yyy is the
page number, and zzz is the extension).
Page 22
21
21
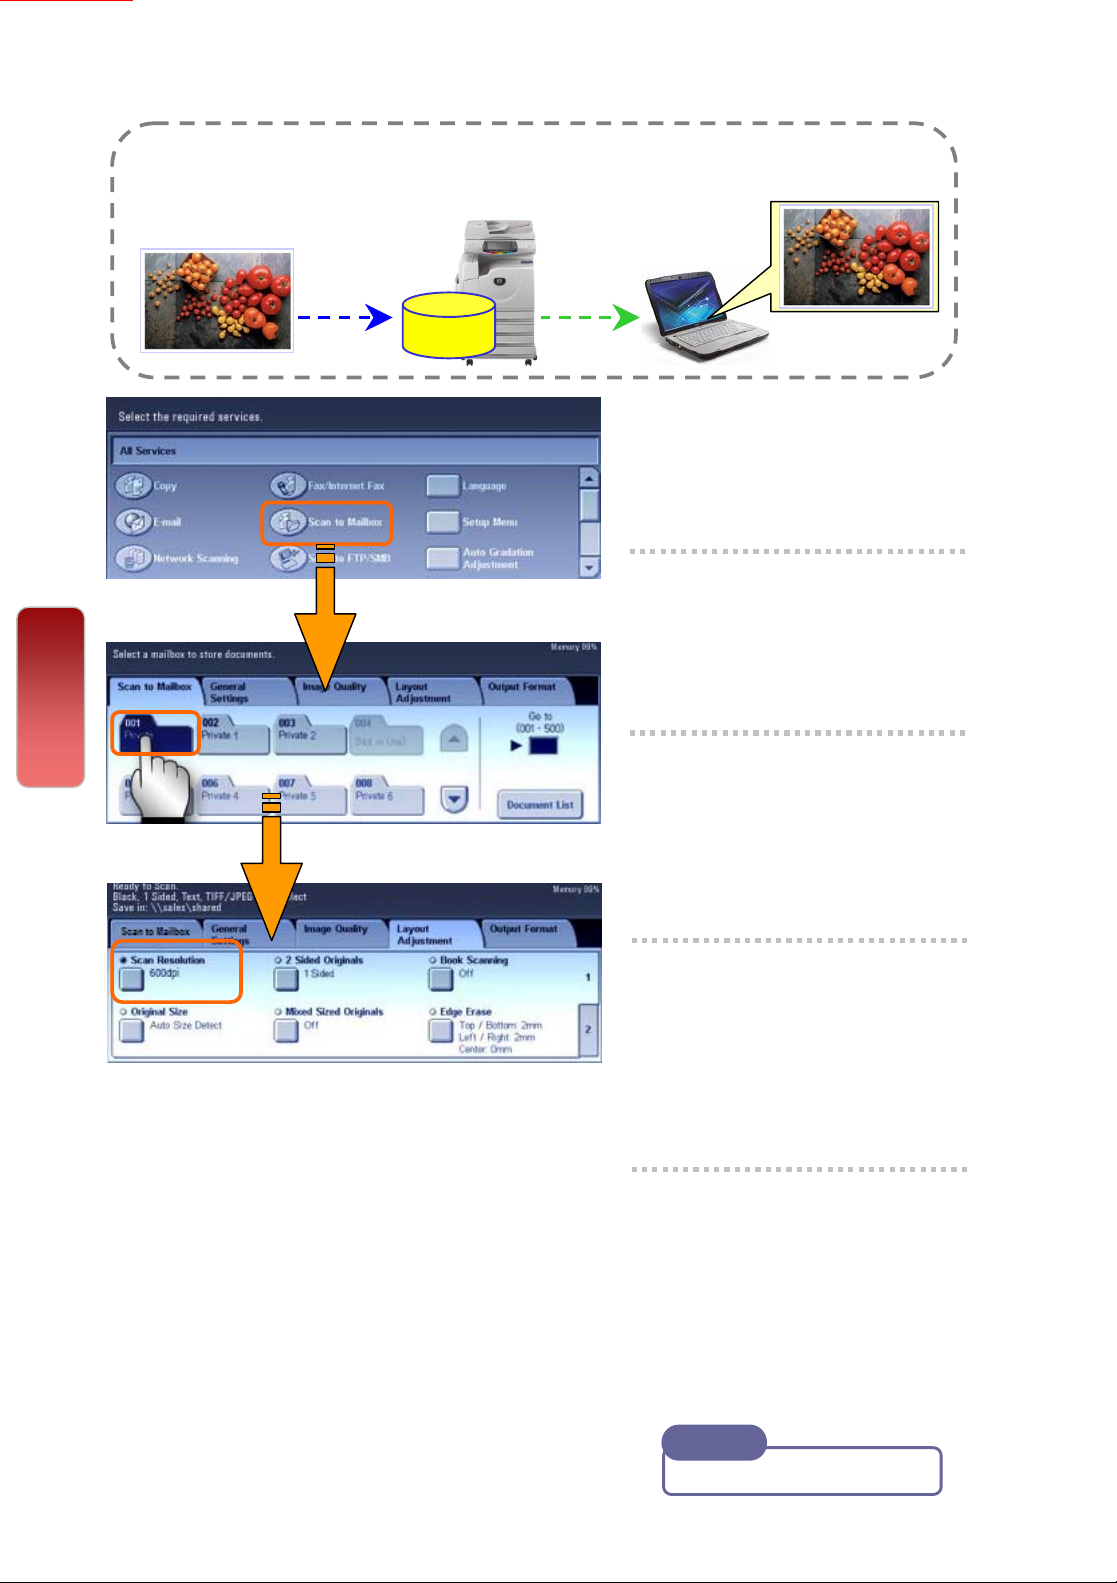
To Scan document to Mailbox
You can scan and save the scanned data to a pre-registered mailbox
and import to the computer using Mailbox Viewer application.
Mailbox
1 Select [Scan to Mailbox]
2 Select required mailbox.
* Enter password if any
Scan
3 Select ‘Scanning color’
Select ‘2 Sided Original’ if
necessary.
4 On the [Layout
Adjustment] tab, select
‘Scan Resolution’ if
necessary.
5 Press the <Start> button.
Documents are scanned
and stored at the selected
mailbox.
Note
User Guide P.171 / 187
Page 23
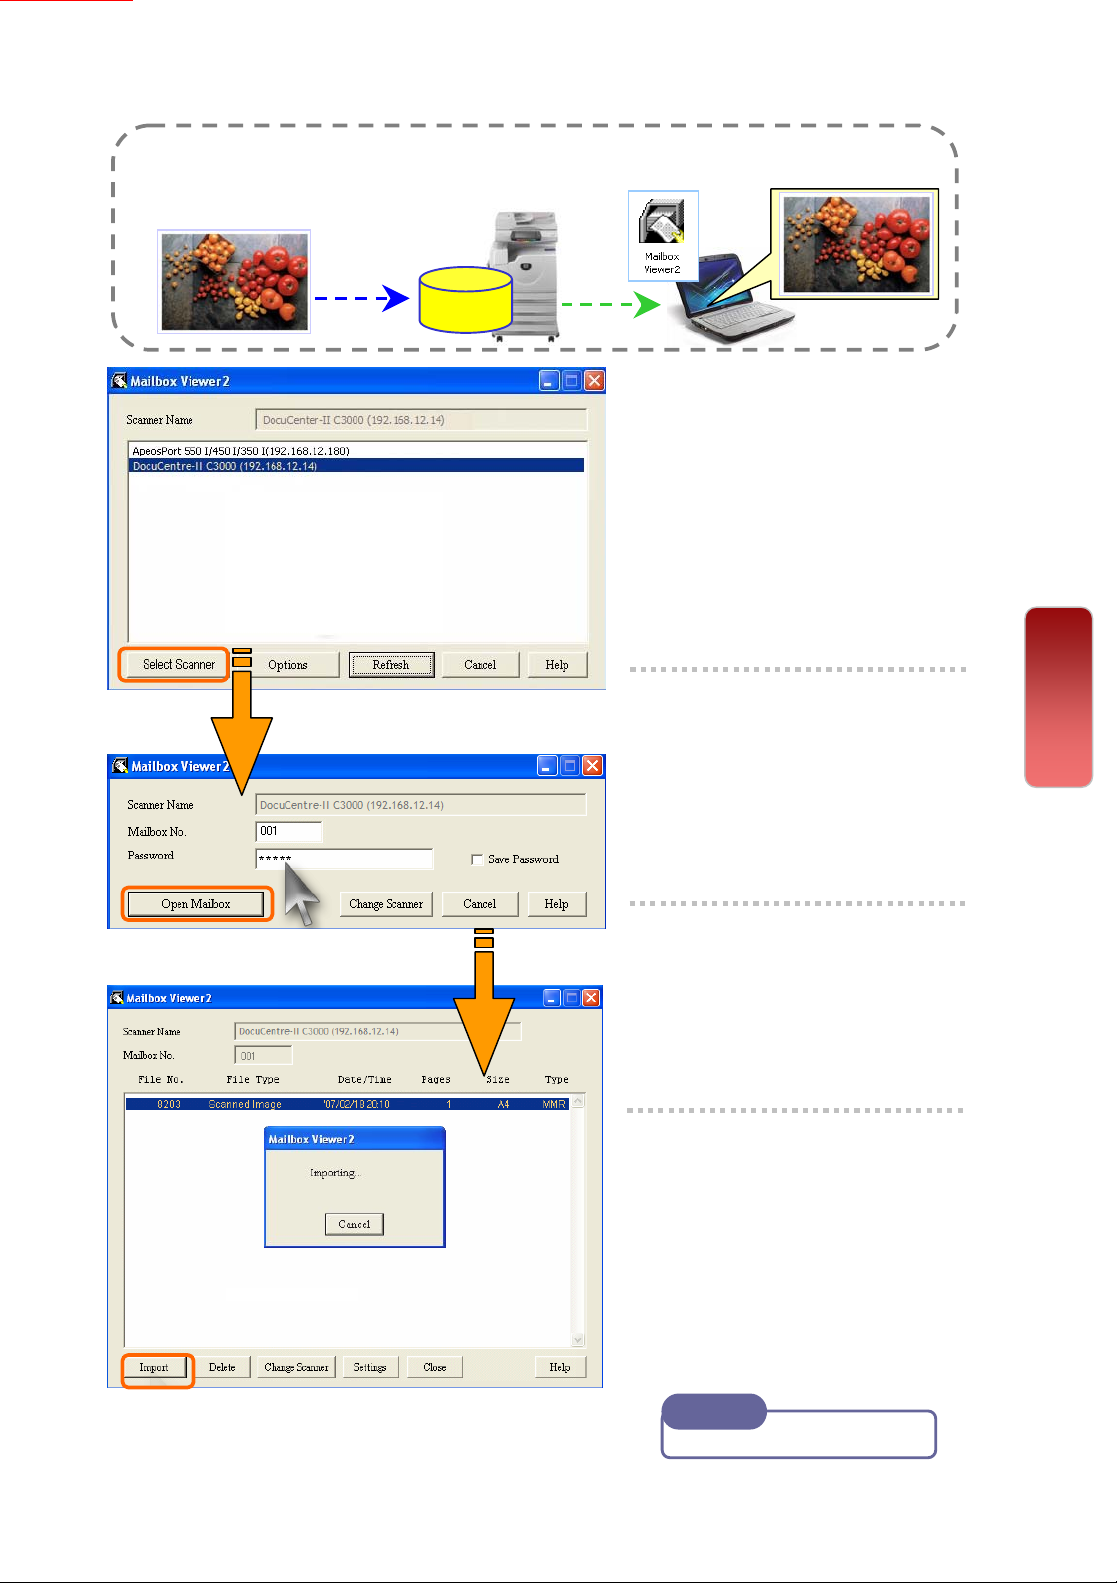
To Import Mailbox data into personal computer
You can import scanned documents / data from mailbox to the
computer using mailbox viewer program.
Mailbox
1 From computer, Select
[Start] > All Programs >
Fuji Xerox > Network
Scanner Utility2 > Mailbox
Viewer2
22
22
2 Select required scanner;
* e.g. DocuCentre-II C3000
(192.168.0.14) – Click
[Select Scanner] button
3 Enter Mailbox No and
Password - Click [Open
Mailbox] button
4 Select required file and
click [Import] to computer.
Default file location at
C:\My Document\Fuji
Xerox\Network Scan\
Scan
Note
User Guide P.231
Page 24
23
23
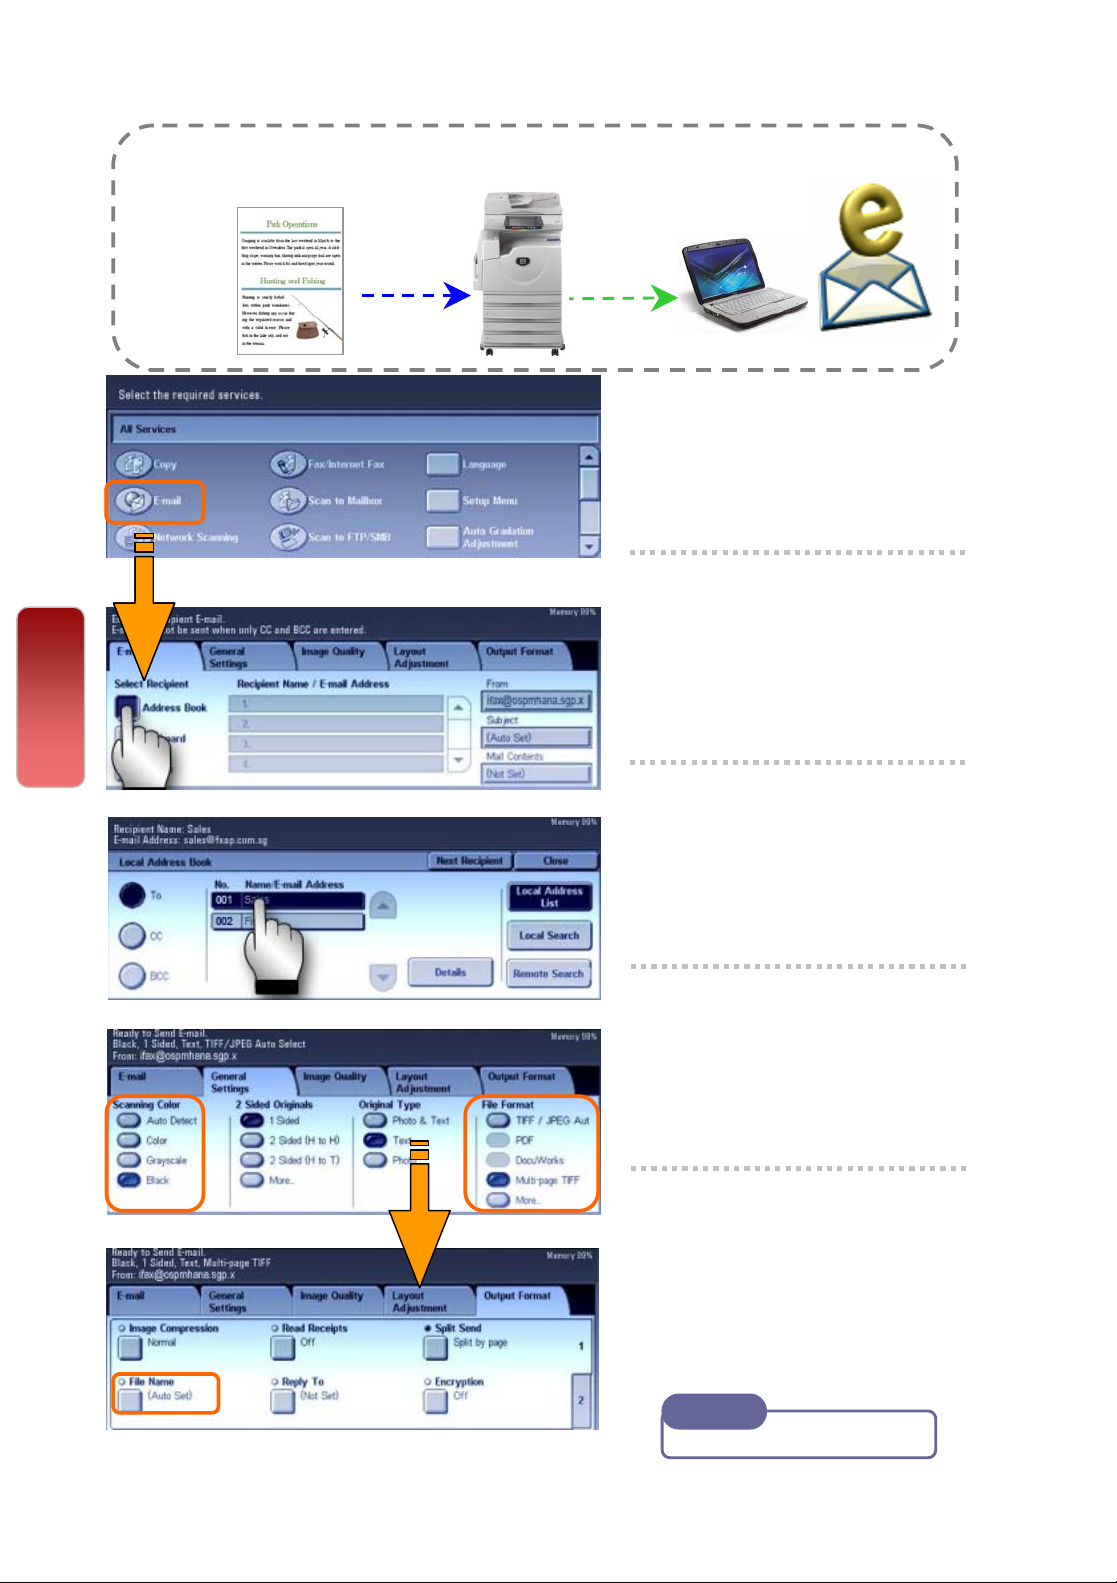
To Scan document and transfer via Email
You can scan & send the scanned data to selected recipients as e-mail
attachment(s).
1 Select [Email]
2 Select [Address Book] or
use [Keyboard] to enter
email address(s)
Scan
3 Select ‘Scanning Color’,
select required file format if
necessary.
4 Select [Layout Adjustment]
tab - ‘Scan Resolution’ if
necessary.
5 On the [Output Format] tab,
select ‘File Name’ or ‘Split
Send’ if necessary.
Press the <Start> button.
Note
User Guide P.165
Page 25
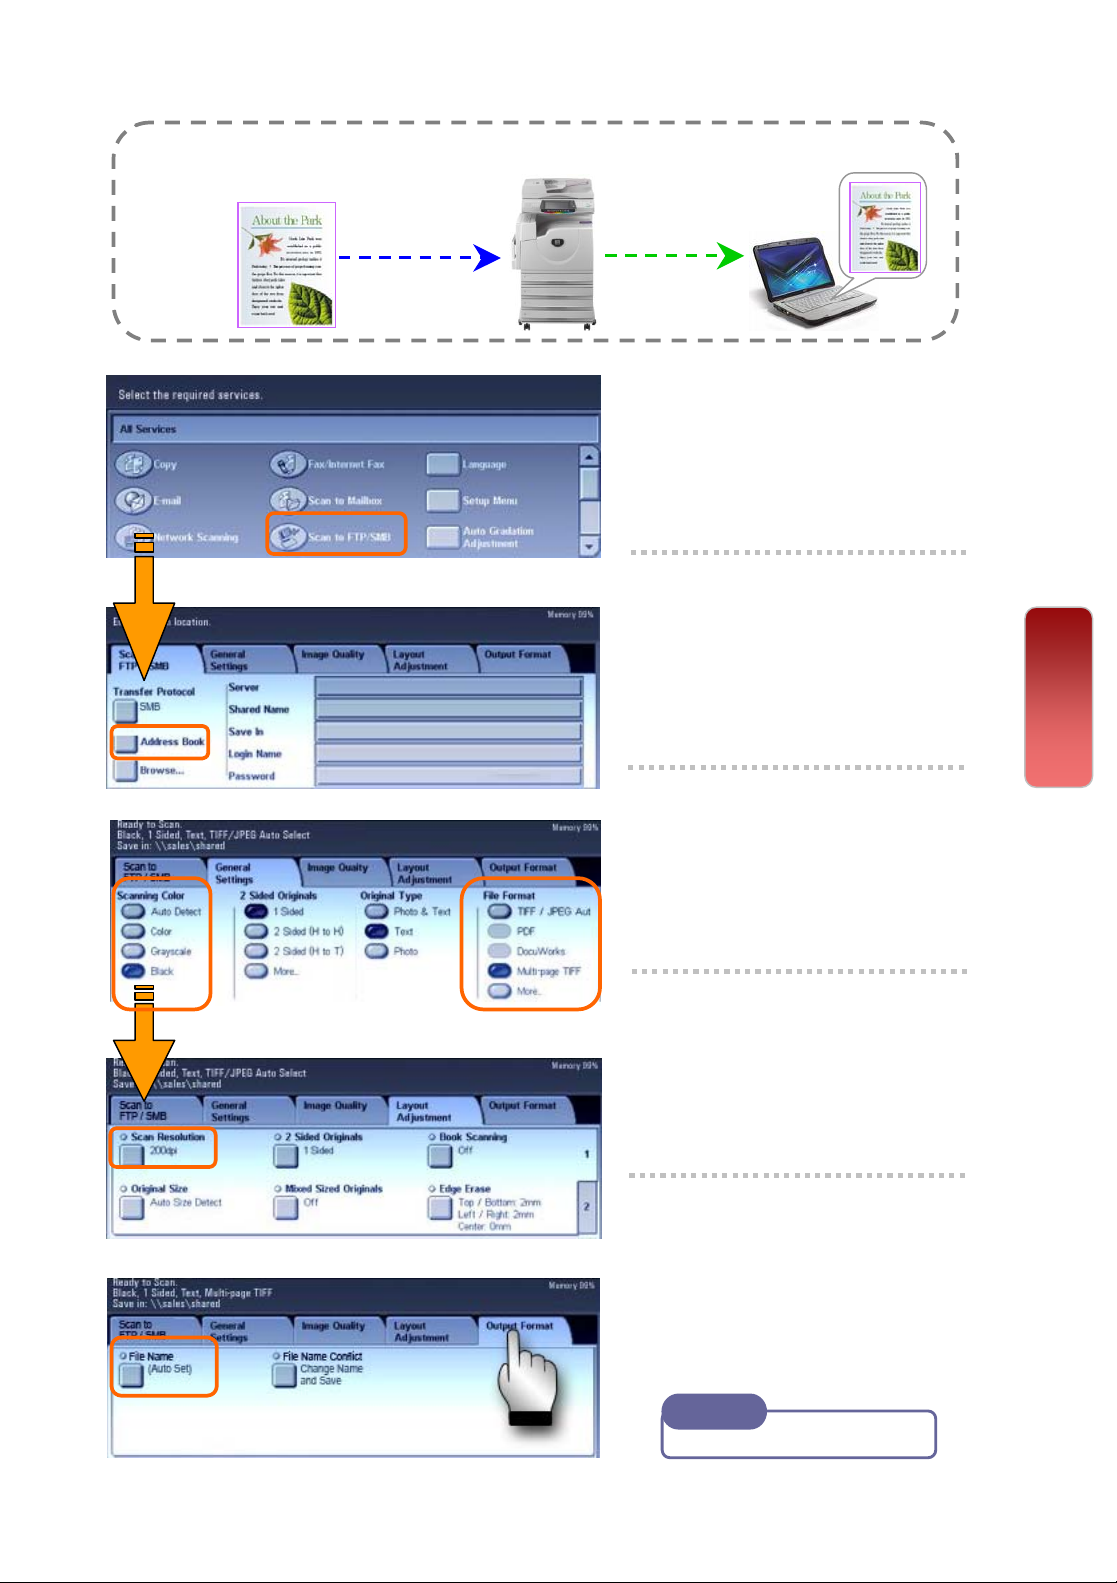
To Scan document and transfer to PC (SMB)
You can scan and transfer the scanned documents to a computer
on the network.
1 Select [Scan to FTP/SMB]
2 Select [Address Book] or
select [Browse] to search
location
24
24
3 Select ‘Scanning color’, 2
Sided Original’ and ‘file
format’ if necessary.
4 Select [Layout Adjustment]
tab - ‘Scan Resolution’ if
necessary.
5 On the [Output Format] tab,
select ‘File Name’.
Press the <Start> button.
Scan
Note
User Guide P.173
Page 26
25
25
Scan
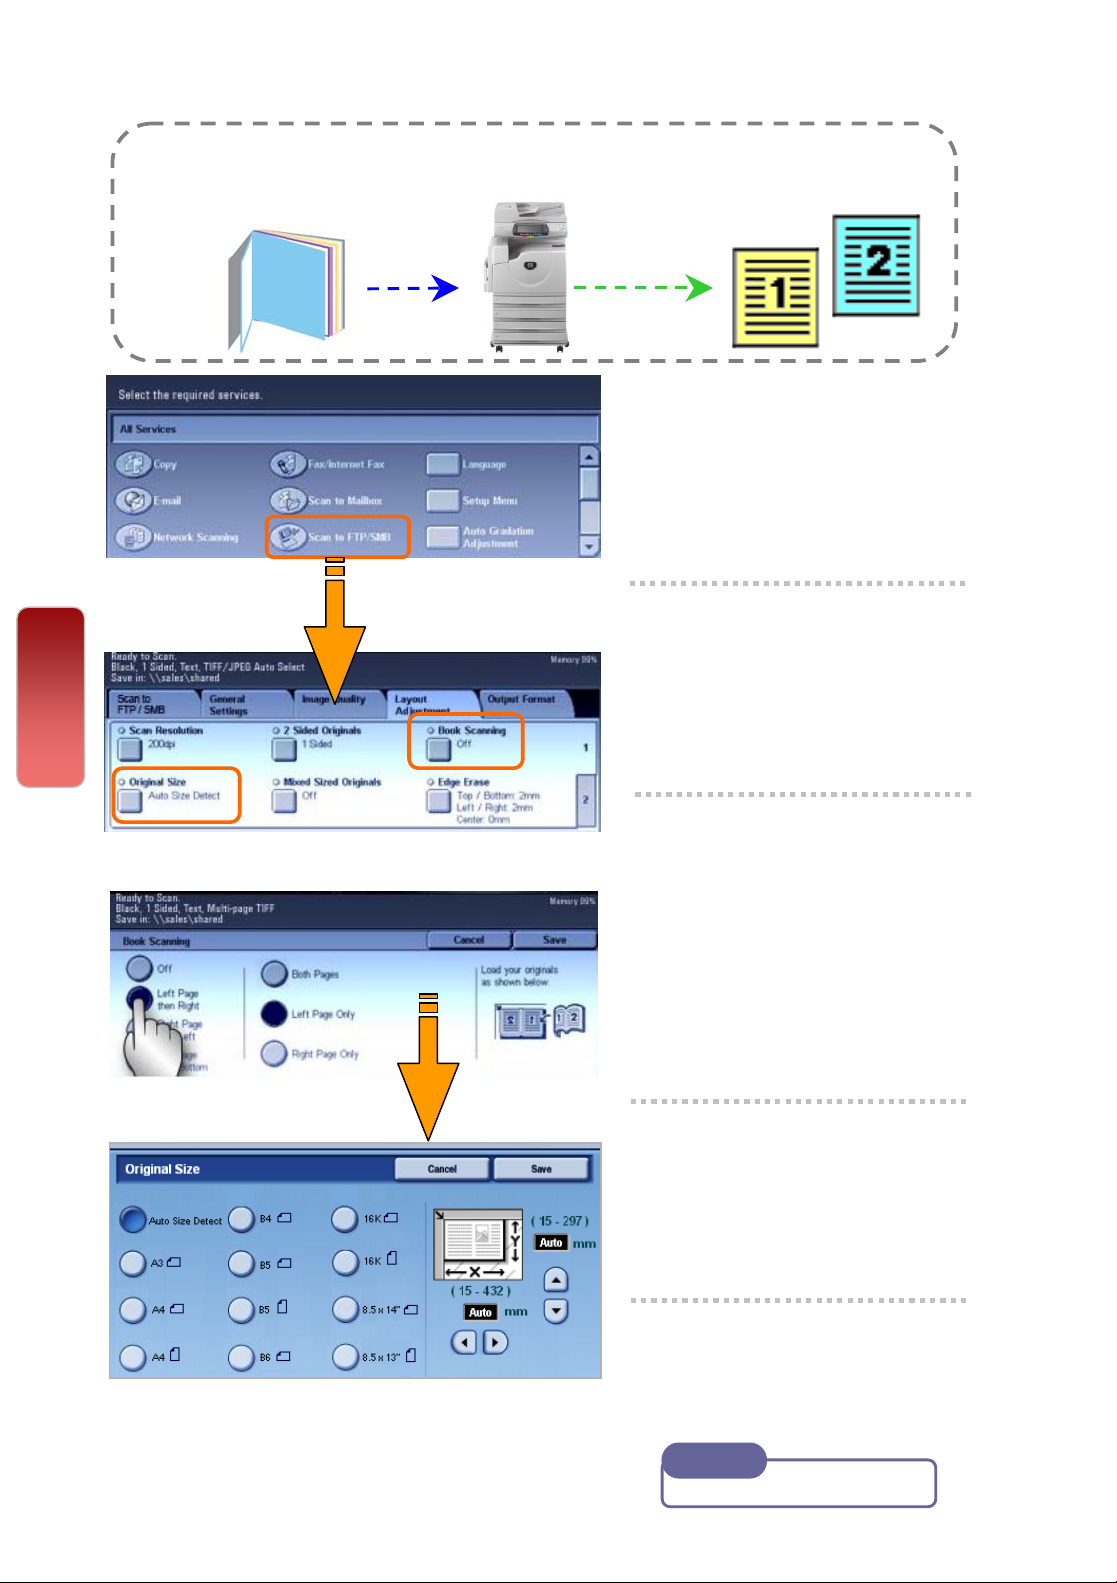
To scan a bound document (Book Scanning)
Book Scanning allows you to scan a book onto separate sheets of paper
in page order and transfer via any scanning method [Mailbox/Email/SMB]
1 Select preferred scan
method e.g. Scan to PC
2 Select File Format (e.g. PDF)
[Layout Adjustment] tab –
Choose [Book Scanning]
3 Select an option and Select
[Save];
Left Page then Right
Right Page then Left
Top Page then Bottom
Select Both Pages (for
scanning left & right page)
4 Select [Original Size] to
enter document size or
select from the Presets.
5 On the [Output Format] tab,
select ‘File Name’. Press the
<Start> button.
Note
User Guide P.188/ P.189
Page 27
PRINTING FEATURES
PRINTING FEATURES
26
26
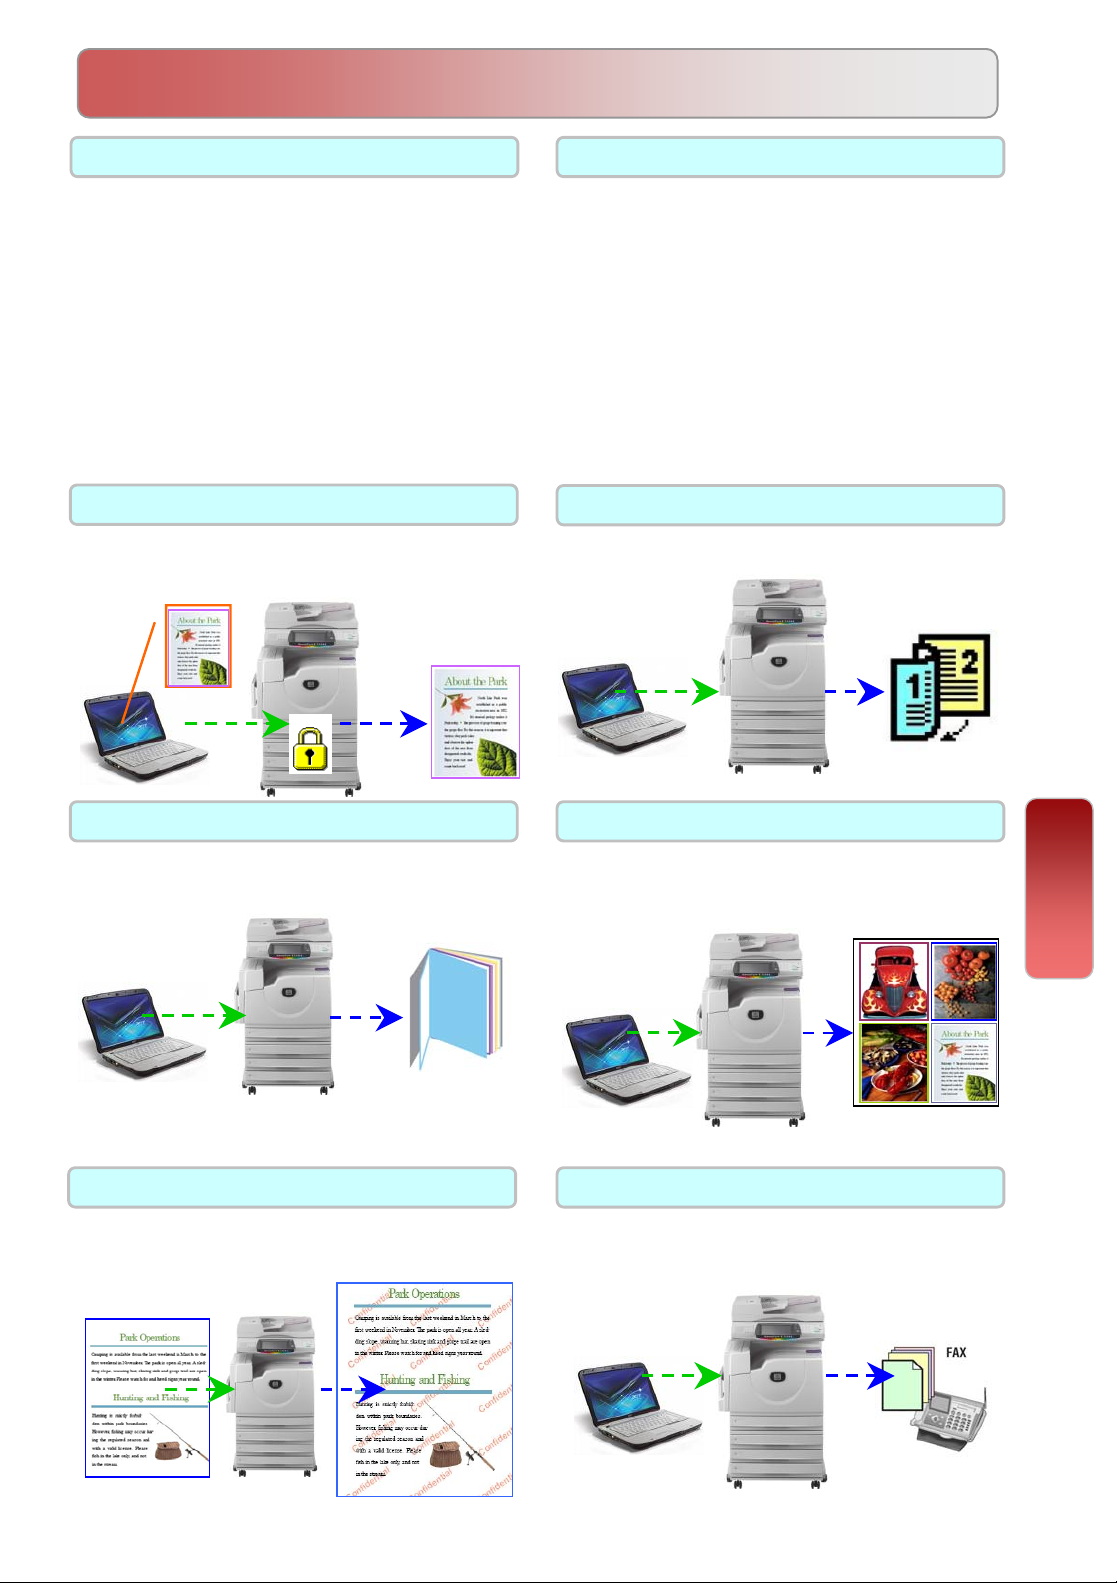
Printing Job Types Page 27
Normal Print – prints as normal print
Secure Print – stores print jobs on the
machine and prints when UserID & password
entered
Sample Set – prints a trial copy
Delayed Print – Temporarily stores print
jobs on the machine to print it at specified
time.
Save to Mailbox – stores print job at
registered mailbox and print upon required.
Fax – PC Faxing.
Secure Print Page 28
Temporarily stores print jobs on the machine
and prints when UserID & password entered.
Paper Tray Selection Page 27
To specify paper tray for printing. Optional:
Finishing Stapled / Hole Punched.
Default Paper Tray - Auto Tray Select
If Tray 5 [Bypass] is selected, paper type
can be specified according to paper loaded
on Tray 5.
Default Finishing Output – Collated
If Finishing is selected, hole punching and
stapling can be applied to the printed copies.
2 Sided Printing Page 29
You can send file and prints on both sides of
paper.
Booklet Printing Page 30
To print multi-page file into a booklet format
and double sided.
Watermarks Page 32
To print files with a pre-fixed text such as
‘Urgent’ or ‘Confidential’ over the printout.
Multiple Up Printing Page 31
To print multi-page files onto single sheet of
paper [from 2 Up and up to 32 Up]
PC Faxing Page 33
To send files and fax directly from computer
without printing out hardcopies.
Print
Page 28
27
27
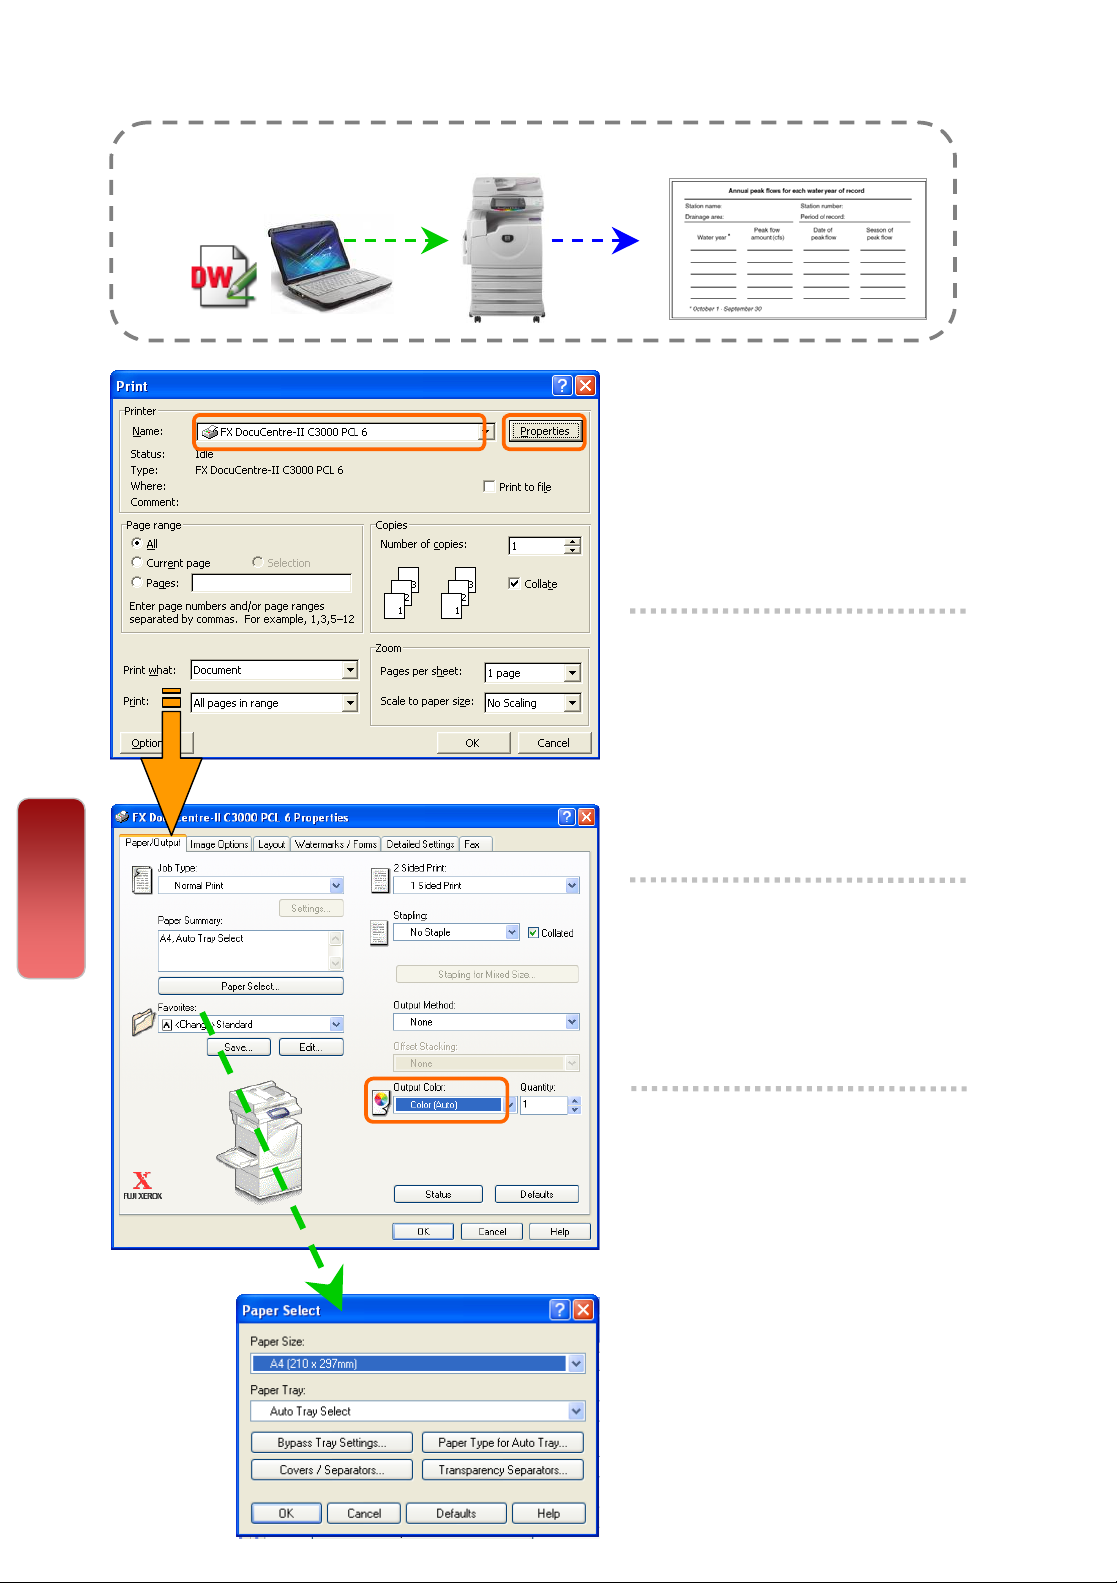
Making a Direct Print from computer
From your application, you can print directly from computer.
1 From application, Select
Printer – [Properties]
2 On the [Paper/Output] tab,
select <Paper Select> to
select required paper tray.
Click [OK]
Print
3 Select <Output Color> as
COLOR or BLACK
4 Select [OK] on all open
windows to print.
Page 29
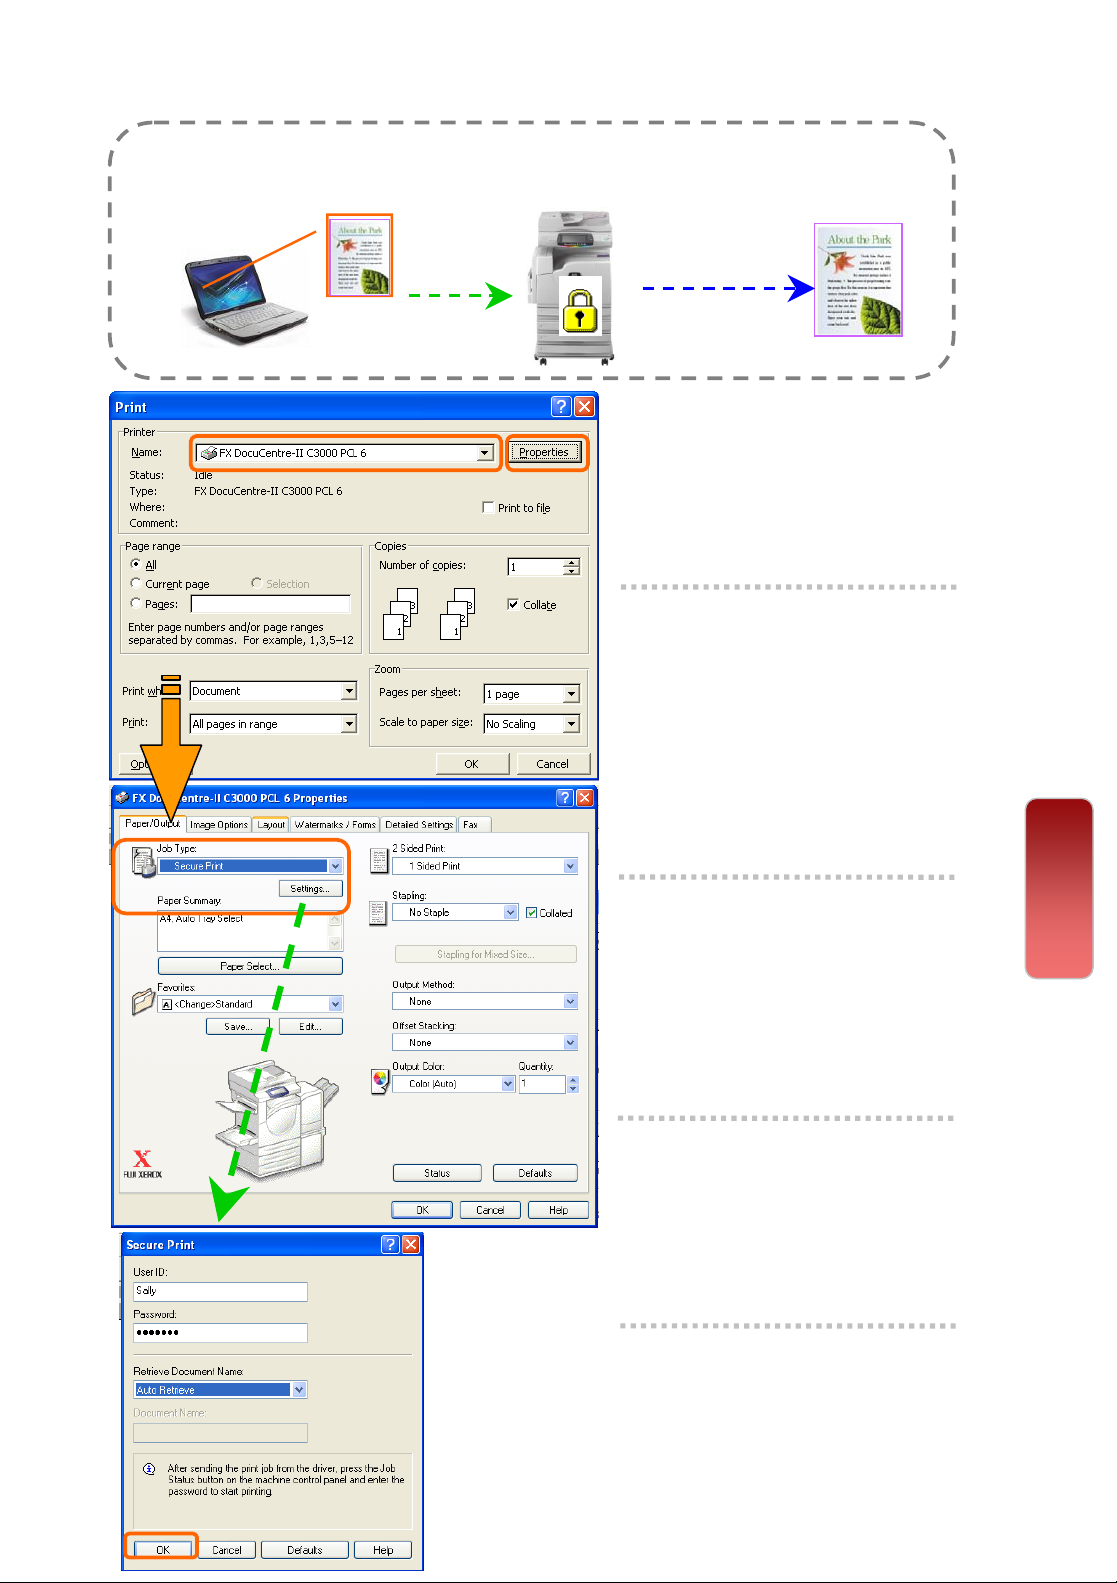
Making a Secure Printing from computer
Allows to set a password to a print job and temporarily stores print
memory on the machine, and print upon entering password.
1 From application, Select
Printer – [Properties]
2 On the [Paper/Output] tab,
select <Job Type> Secure
Print - click <Settings> to
enter User ID & Passcode.
Click [OK] on all open
window.
28
28
3 From machine, Press [Job
Status] button - Select
<Stored Documents> tab.
Select [Secure Print]
4 Select UserID - [Document
List] button. Enter Passcode
and press Confirm.
5 Select file and select [Print]
A message displayed –
Select your preference – the
job will be printed.
Print
Page 30
29
29
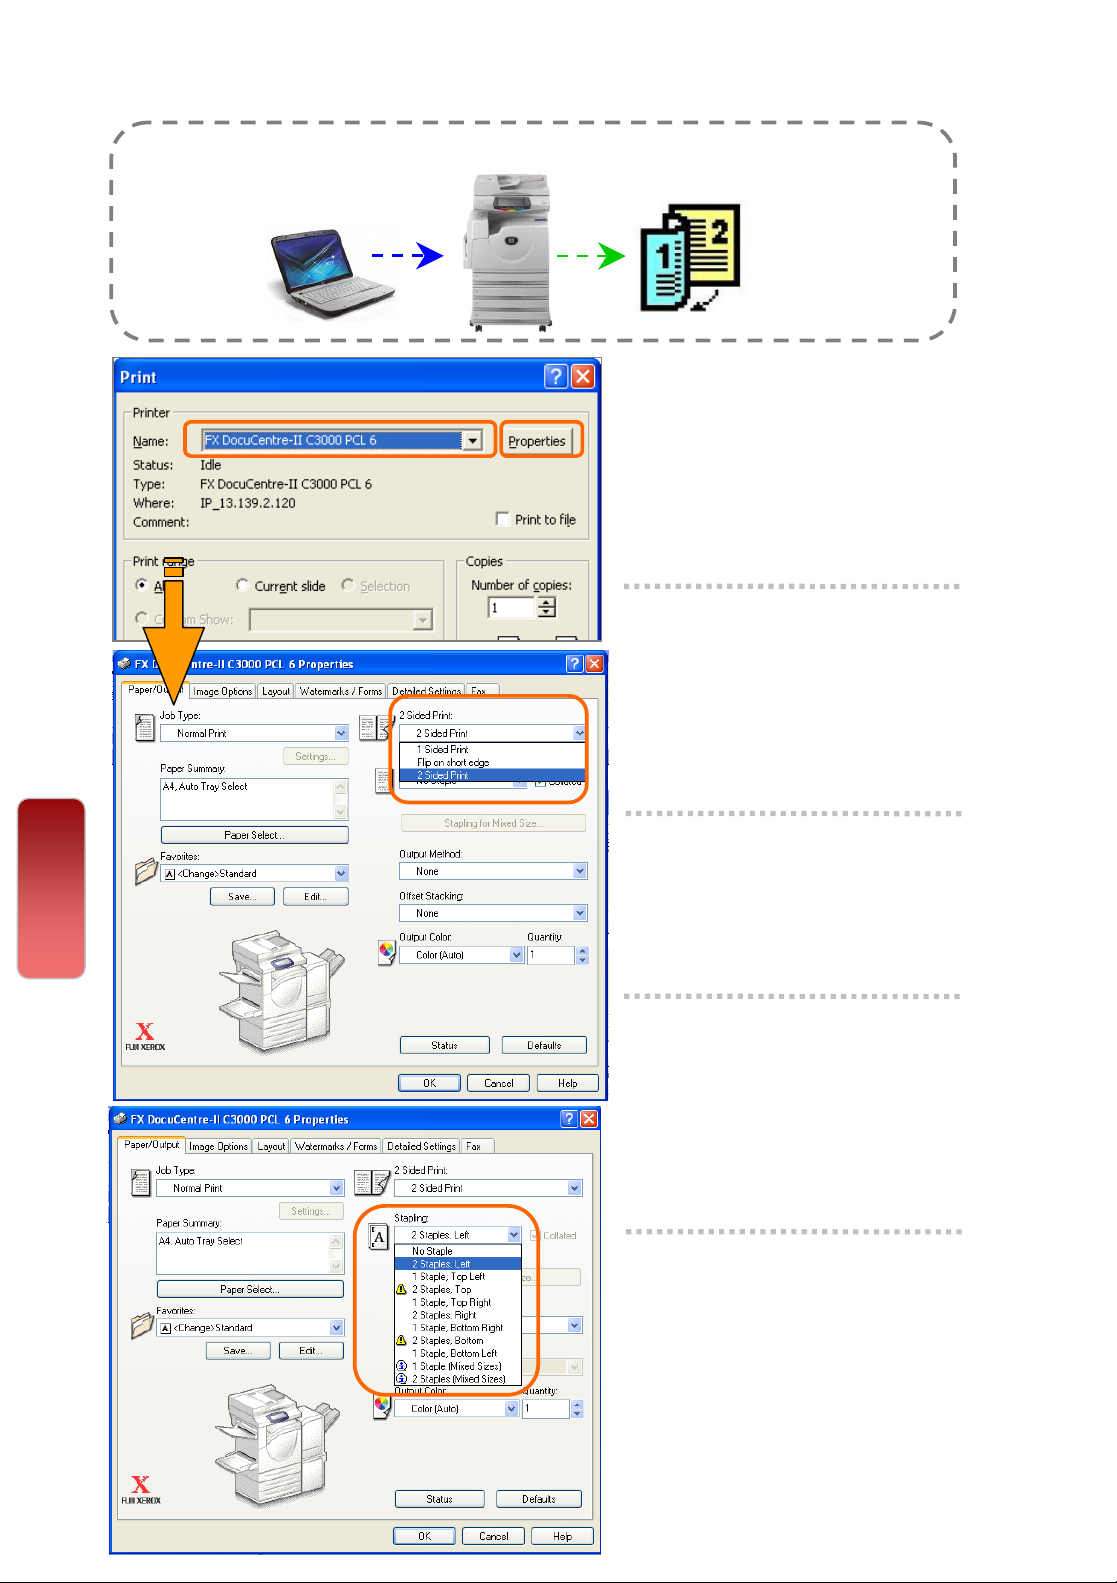
Making a 2-sided print (optional - Finishing)
Files can be printed into 2 sided format with 2 sided flip on long edge or
flip on short edge.
1 From application, Select
Printer – [Properties]
2 On the [Paper/Output] tab,
select <2 Sided Print>
- 2 Sided Print
- Flip on Short Edge
3 Select <Output Color> as
Print
COLOR or BLACK
4 *Optional Feature
Select <Stapling> to enable
Stapling. Set
stapling position.
required
5 Select [OK] on all open
windows to print.
Page 31
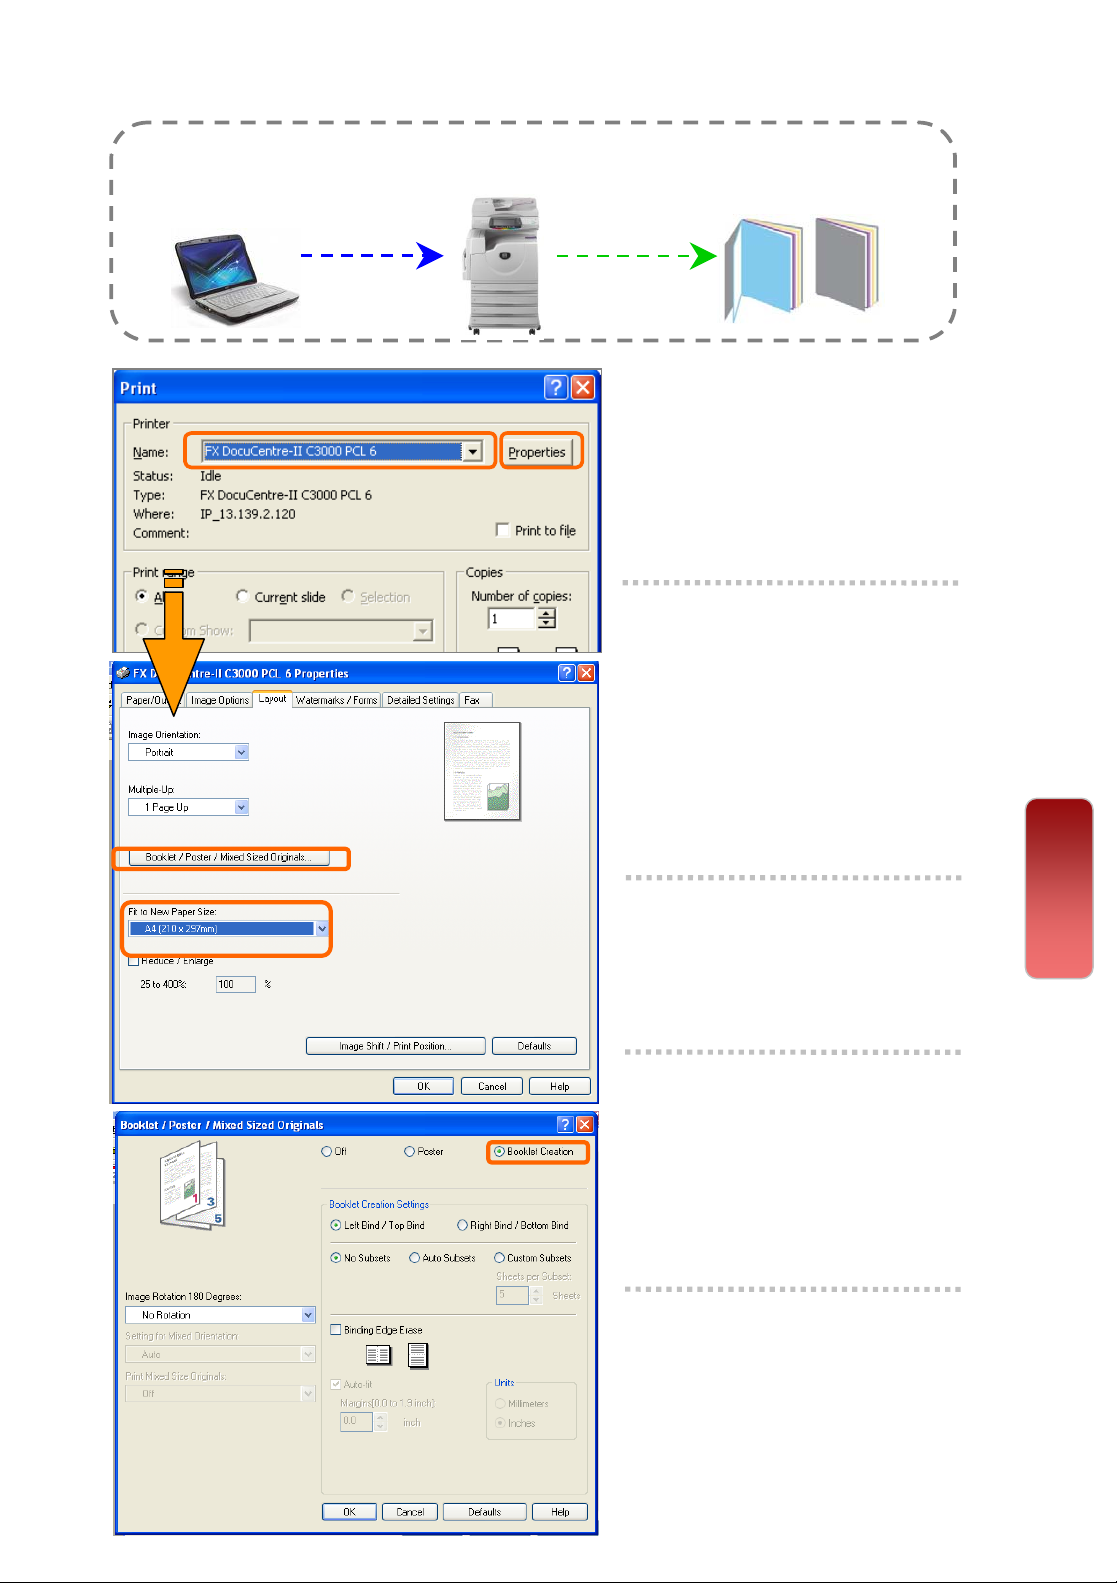
Making a booklet print from computer
Booklet printing enables multi-page files printed 2-sided booklet format
arranged in ascending order, and fold to form a booklet.
1 From application, Select
Printer – [Properties]
2 On the [Layout] tab, select
<Booklet/Poster> Select
Booklet Creation
Choose Binding [Left / Right]
* Optional: Fold & Staple
Select [OK]
30
30
3 A popup window displays
the changes. Select [OK]
4 Select ‘Fit to New Paper
Size’ – Set any preferred
paper size or select A4
(210mm x 297mm)
5 Select [OK] on all open
windows to print.
Print
Page 32
31
31
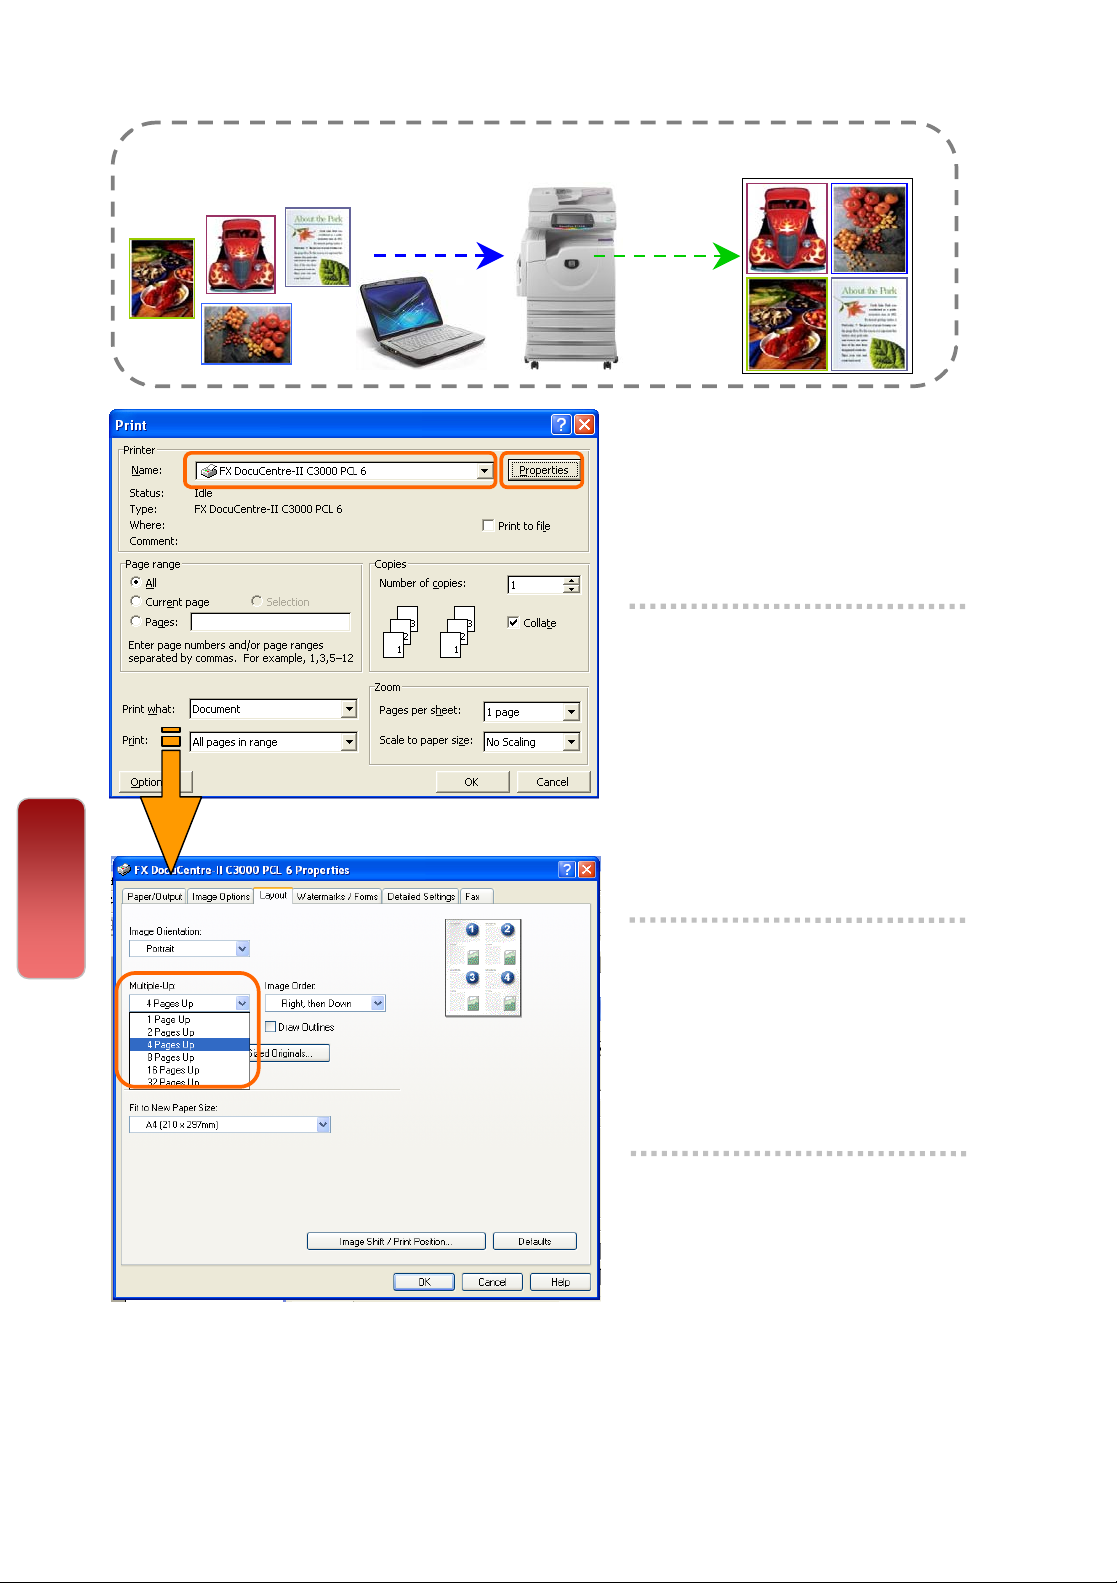
Prints multi pages in single sheet of paper
You can print a multi-page files into a single print using Multiple-Up
(from 2 Up to 32 Ups)
1 From application, Select
Printer – [Properties]
2 On the [Layout] tab, select
<Multiple-Up>
Choose from 1 Page Up to 32
Pages Up.
Select ‘Image Order’ if required
Select ‘Draw Outlines’ to insert
borders after each page.
Print
3 Select ‘Fit to New Paper
Size’ - Set any preferred
paper size or select A4
(210mm x 297mm)
4 Select [OK] on all open
windows to print.
Page 33
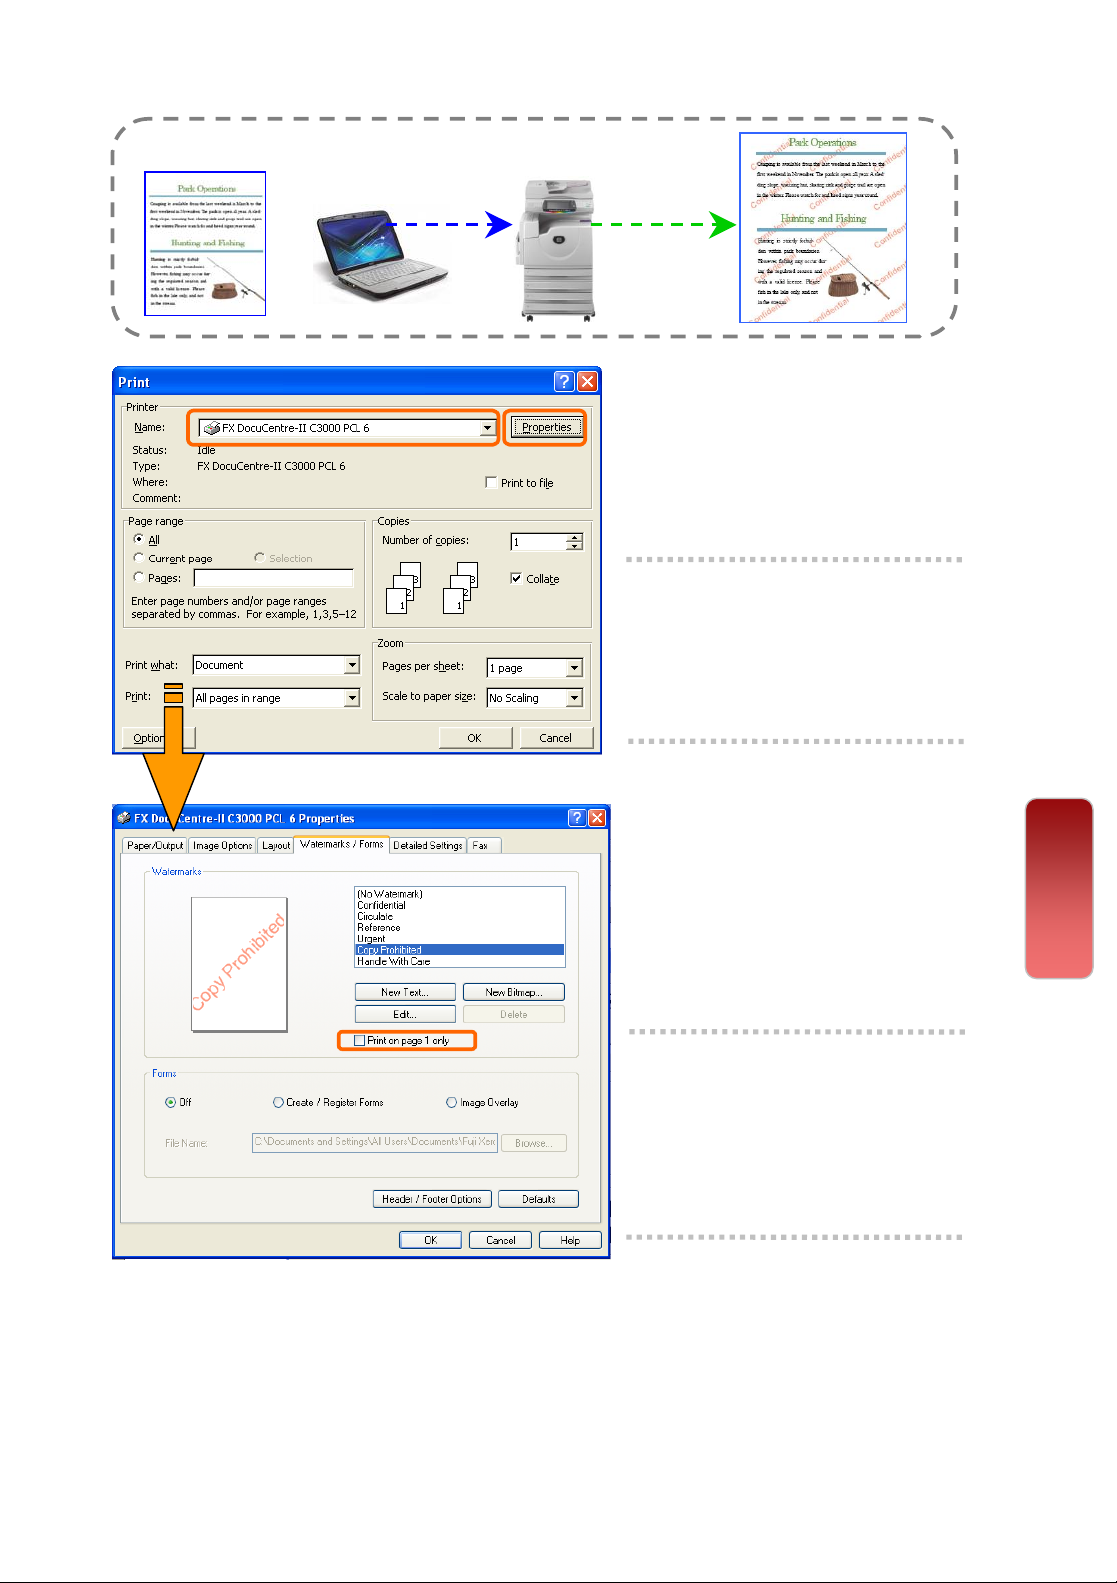
Making a printout with Watermarks
From your application, you can insert watermark.
1 From application, Select
2 Select <Output Color> as
Printer – [Properties]
COLOR or BLACK
32
32
3 On the [Watermarks] tab,
select watermark
Confidential, Urgent, etc.) or
Select [New Text] to create
Select [Edit Watermark] to
edit any watermark.
(e.g.
4 Select [Print on Page 1
Only] to print watermark
on first page, if necessary.
5 Select [OK] on all open
windows to print.
Print
Page 34
33
33
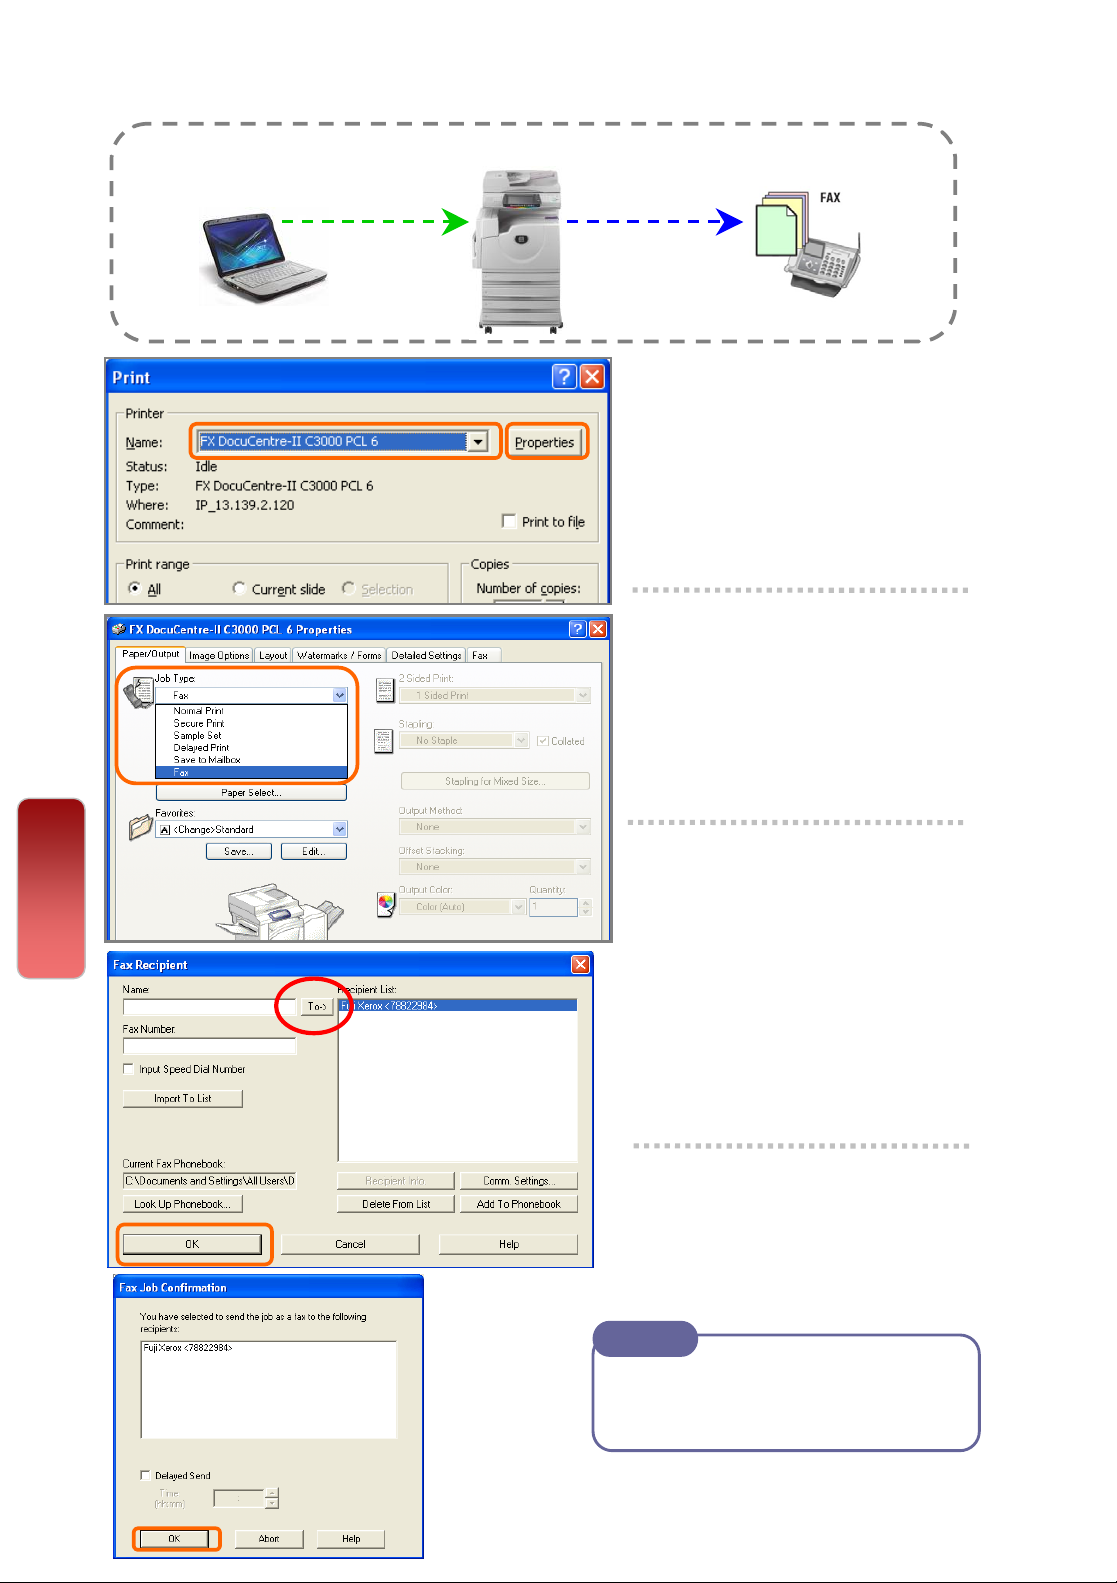
Making direct fax from computer
You can perform PC Faxing from your application.
1 From application, Select
Printer – [Properties]
2 On the [Paper/Output] tab,
select [Job Type List] –
Select ‘FAX’ and Click
‘OK’ on all open windows.
3 The ‘Fax Recipient’
Print
window displayed. Enter
recipient name and fax
number on the text box
and click [To>>] button.
(Repeat step to add more than
one recipient)
4 Select [OK] on all open
windows to proceed.
Note
To cancel Fax, go to [J ob Status ]
on the machine panel, select the
fax job – Press [Cancel]
Page 35
MAINTENANCE
MAINTENANCE
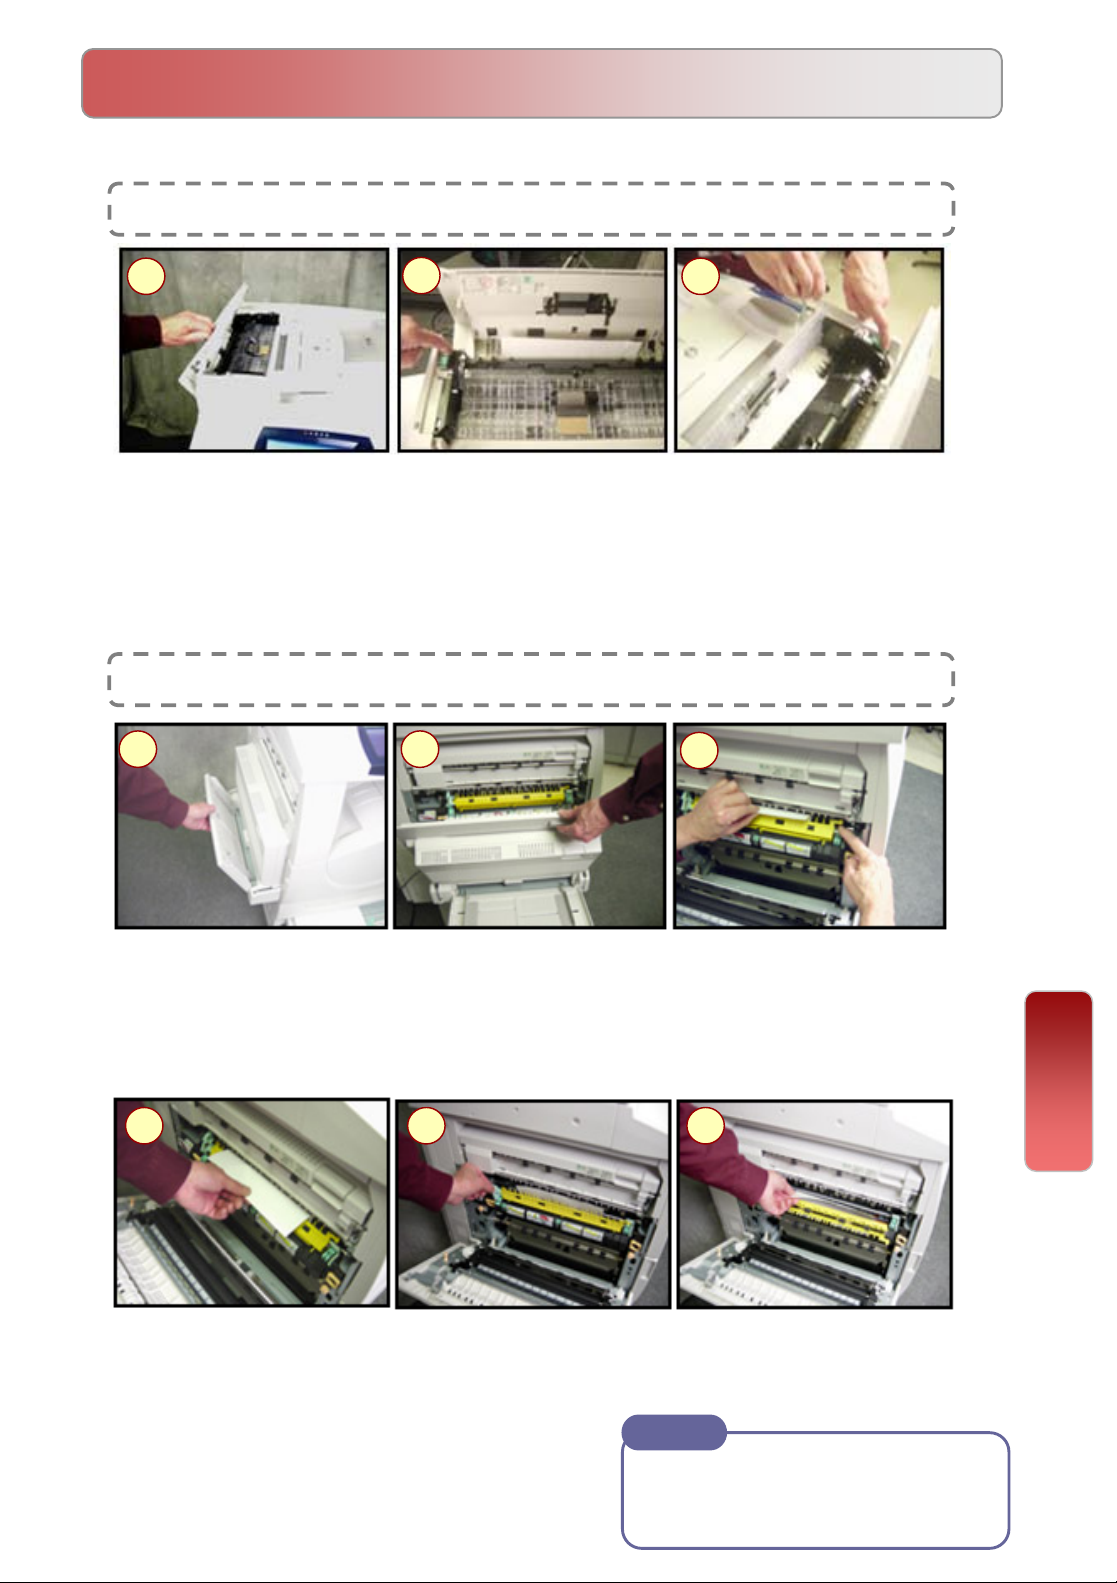
Clearing Paper Jams
Paper Jams in the Document Feeder
34
34
1
1. Open the DADF Cover.
2. Remove the jammed paper. If necessary, turn the green wheel to feed the
jammed paper out of the DADF.
3. If a document is jammed underneath the inner cover, open the cover and turn
the green wheel to remove the jammed paper. Close the inner cover, and then
close the DADF Cover.
Paper Jam Behind Cover A
1 2
2
3
3
1-2. Open Paper Tray 5 (Bypass Tray), which is located on the left side of the machine.
Lift up on the Cover A, release lever to open the cover.
3. If the jammed paper protrudes from behind the Fuser Unit, rotate the lever on the right
side in the direction of the arrow to feed the paper.
4. Pull out the paper from the machine in the direction of the arrow.
64 5
4-5. If the jammed paper is inside the Fuser Unit, lift the lever on the left side to open
the Fuser Unit Cover.
6. Hold the lever, carefully remove the paper from the machine, and then lower the
lever. Close Cover A.
WARNING: The Fuser Unit may be hot!
Be careful not to touch the unit.
Note
If paper is torn, make sure to
remove any torn pieces of paper
inside the machine.
Paper Jams
Page 36
35
35
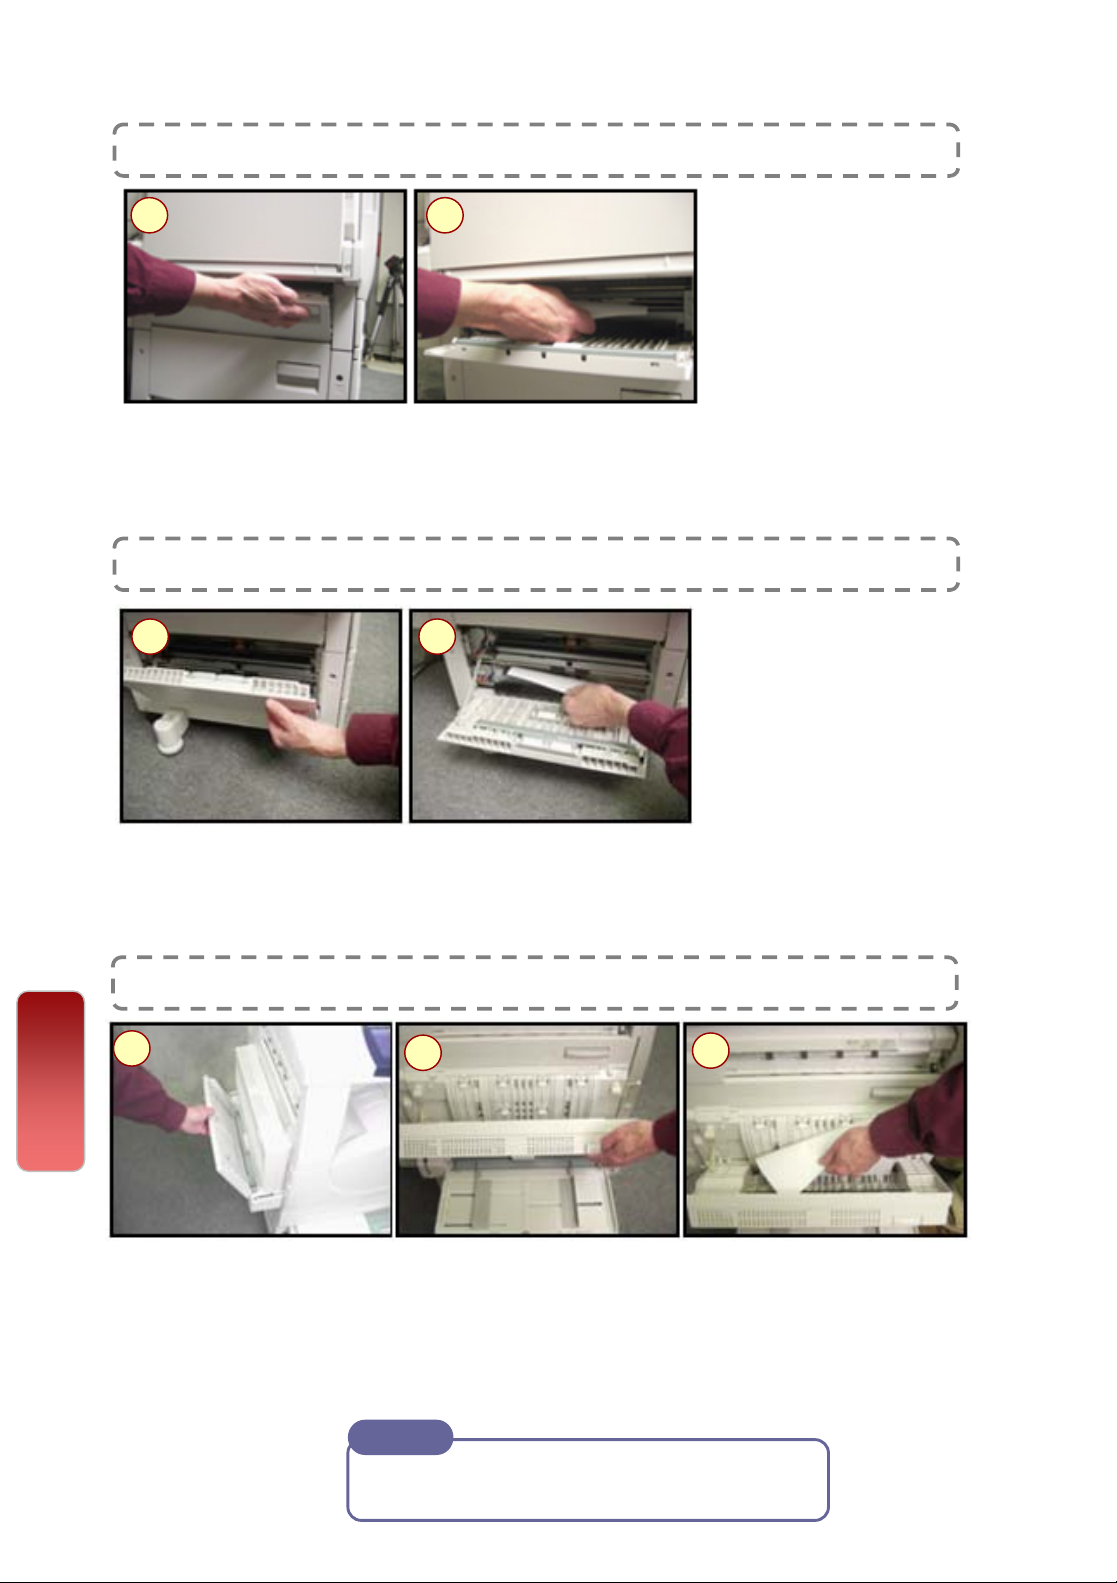
Clearing Paper Jams
Paper Jams Behind Cover B
1 2
1. Lift up on the Cover B release lever to open the cover. The cover is located on the
lower, left side of the machine.
2. Remove the jammed paper. Close the cover and make sure it latches into place
Paper Jams Behind Cover C
1 2
1. Lift up on the Cover C release lever to open the cover. The cover is located on
the lower, left side of the machine.
2. Remove the jammed paper. Close the cover and make sure it latches into place.
Paper Jams Behind Cover D
1
Paper Jams
1. Open Paper Tray 5 (Bypass Tray), which is located on the left side of the
machine.
2. Lift up on the Duplex Module Cover D release lever to open the cover.
3. Remove the jammed paper inside the Duplex Module. Close the cover and make
sure it latches into place. Close Paper Tray 5 (Bypass Tray).
2
3
Note
If paper is torn, make sure to remove any
torn pieces of paper inside the machine.
Page 37

Clearing Paper Jams
Paper Jam Behind Cover E
36
36
1
1. Open Paper Tray 5 (Bypass Tray), which is located on the left side of the
machine.
2. Lift up on the Cover A release lever to open the cover.
3. Lift up on the Cover E release lever to open the cover.
4. Remove the jammed paper. Close Cover E and A. Make sure the covers latch
into place. Close Paper Tray 5 (Bypass Tray).
Paper Jam in Paper Tray 1, 2, 3, or 4
1 2
2
3
1. Gen tly pull out paper tray and
remove any jammed paper.
2. If paper torn, try to remove
any torn pieces inside the
machine. Gently push in the
tray.
4
Paper Jam in B Finisher Unit * Optional Feature
Press the button on the top cover
of the finisher.
The top cover opens.
Remove the jammed paper.
Close the top cover.
Paper Jams
Page 38
37
37
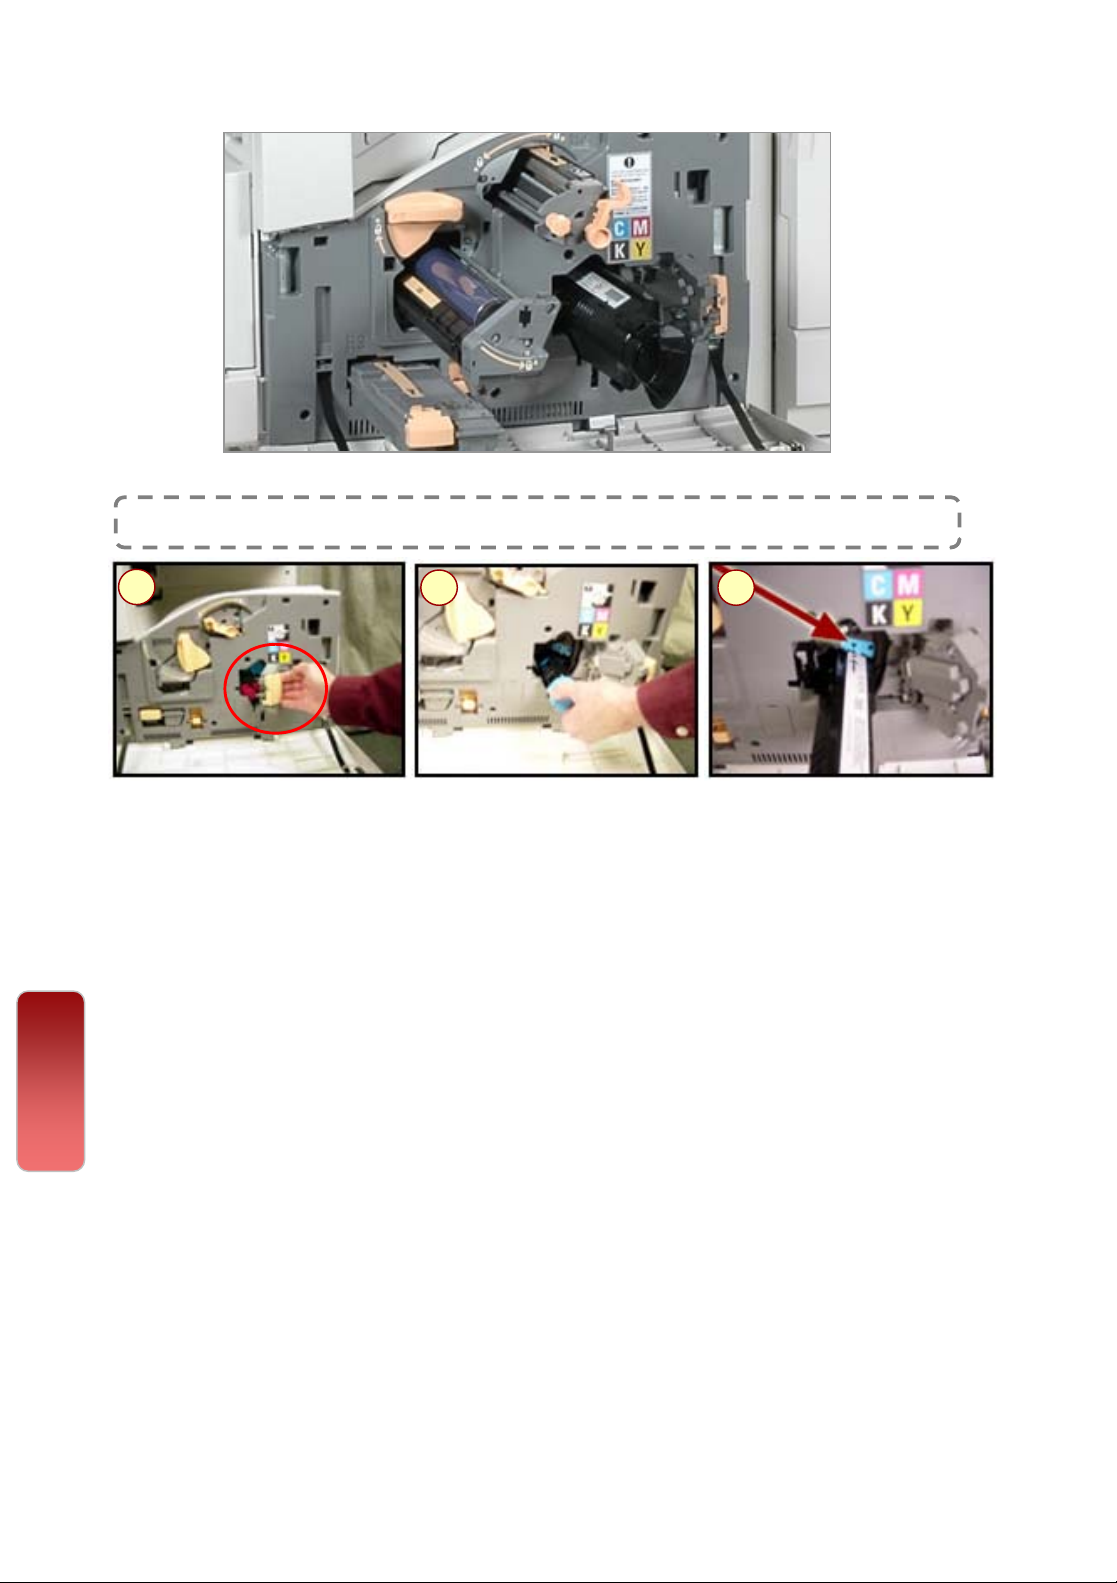
Replacing Consumables
Replacing Toner Cartridge
1
Important - before replacing new toner cartridge:
i) Press [Machine Status] button on the Control Panel.
ii) Select [Supplies] tab. Select the Toner Cartridge to be replaced
iii) Select [Replace Cartridge] button.
iv) The Toner Cartridge rotor will automatically rotate toner into the position required.
v) The ‘Replace Cartridge’ screen will be displayed.
1. Ensure machine is idle before opening Front Cover. Open the Toner Cartridge Door
2. Gently remove the used toner cartridge. Remove new toner cartridge from its box
and gently shake cartridge 3 - 4 times from side to side.
3. Align the arrow on the cartridge with the arrow on the machine, and gently push the
Paper Jams
cartridge all the way into the machine unti l it locks into position. Close the Toner
Cartridge Door. Close the Front Cover
2 3
Page 39
Replacing Consumables
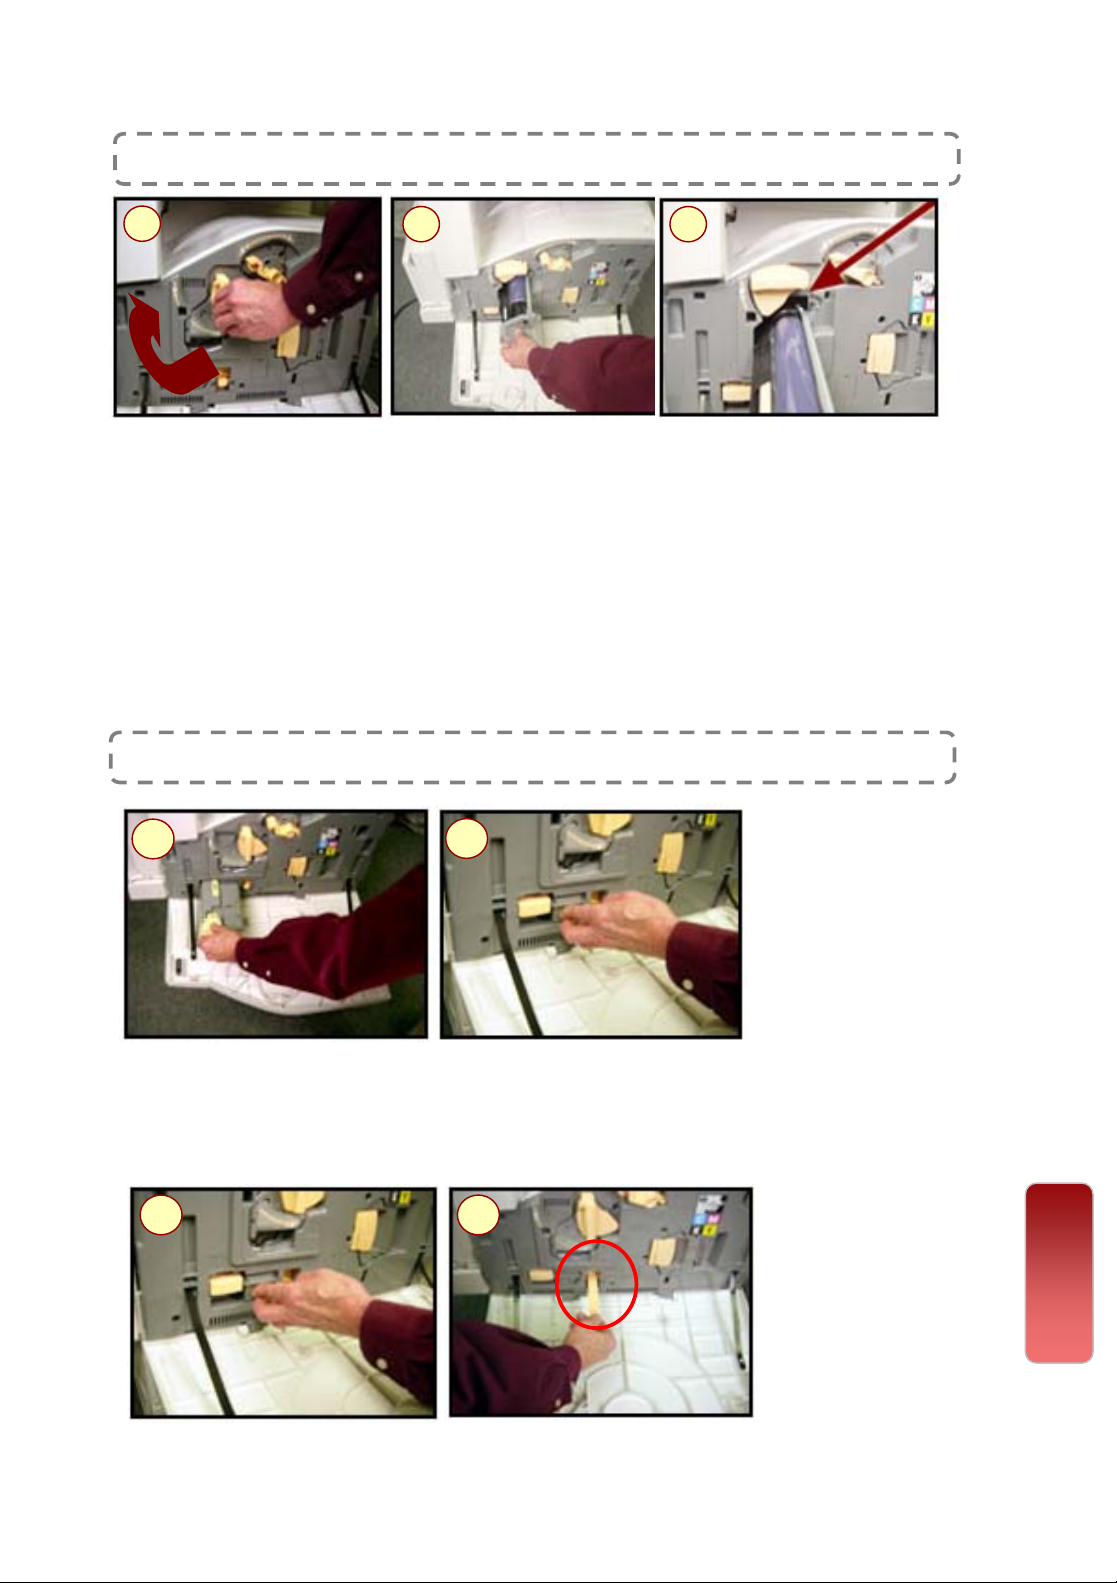
Replacing Drum Cartridge
38
38
1
1-2. Gently pull out the used drum cartridge from the machine and place it on a few
sheets of paper on a flat surface. Remove the new cartridge from its packaging.
3. Carefully pull on the protective sheet to remove the sheet from the cartridge.
Align the guides on the cartridge with the machine, and then push the slider on the top
edge all the way to the end marker to insert the cartridge into the machine.
Rotate the Drum Cartridge R1 release lever to the left to lock the cartridge.
WARNING! Do not expose the Drum Cartridge to the direct sunlight or strong indoor
fluorescent lighting. Do not touch or scratch the surface of the Drum.
Replacing Waste Toner Bottle
2 3
1
1. Ensure machine is idle before opening the Front Cover. Open the Front Cover and
remove the Waste Toner Container [R3] from the machine.
2. Remove the new Waste Toner Container from its box. Insert the new Waste Toner
Container into the machine and push until it locks into position. Close the Front Cover.
3 4
2
Consumables
3. Completely remove the old ROS cleaner, which is located below the Drum
Cartridge and is labeled R4, from the machine.
4. Insert the new ROS cleaner into the machine. Close the Front Cover.
Page 40
39
39
Replacing Consumables
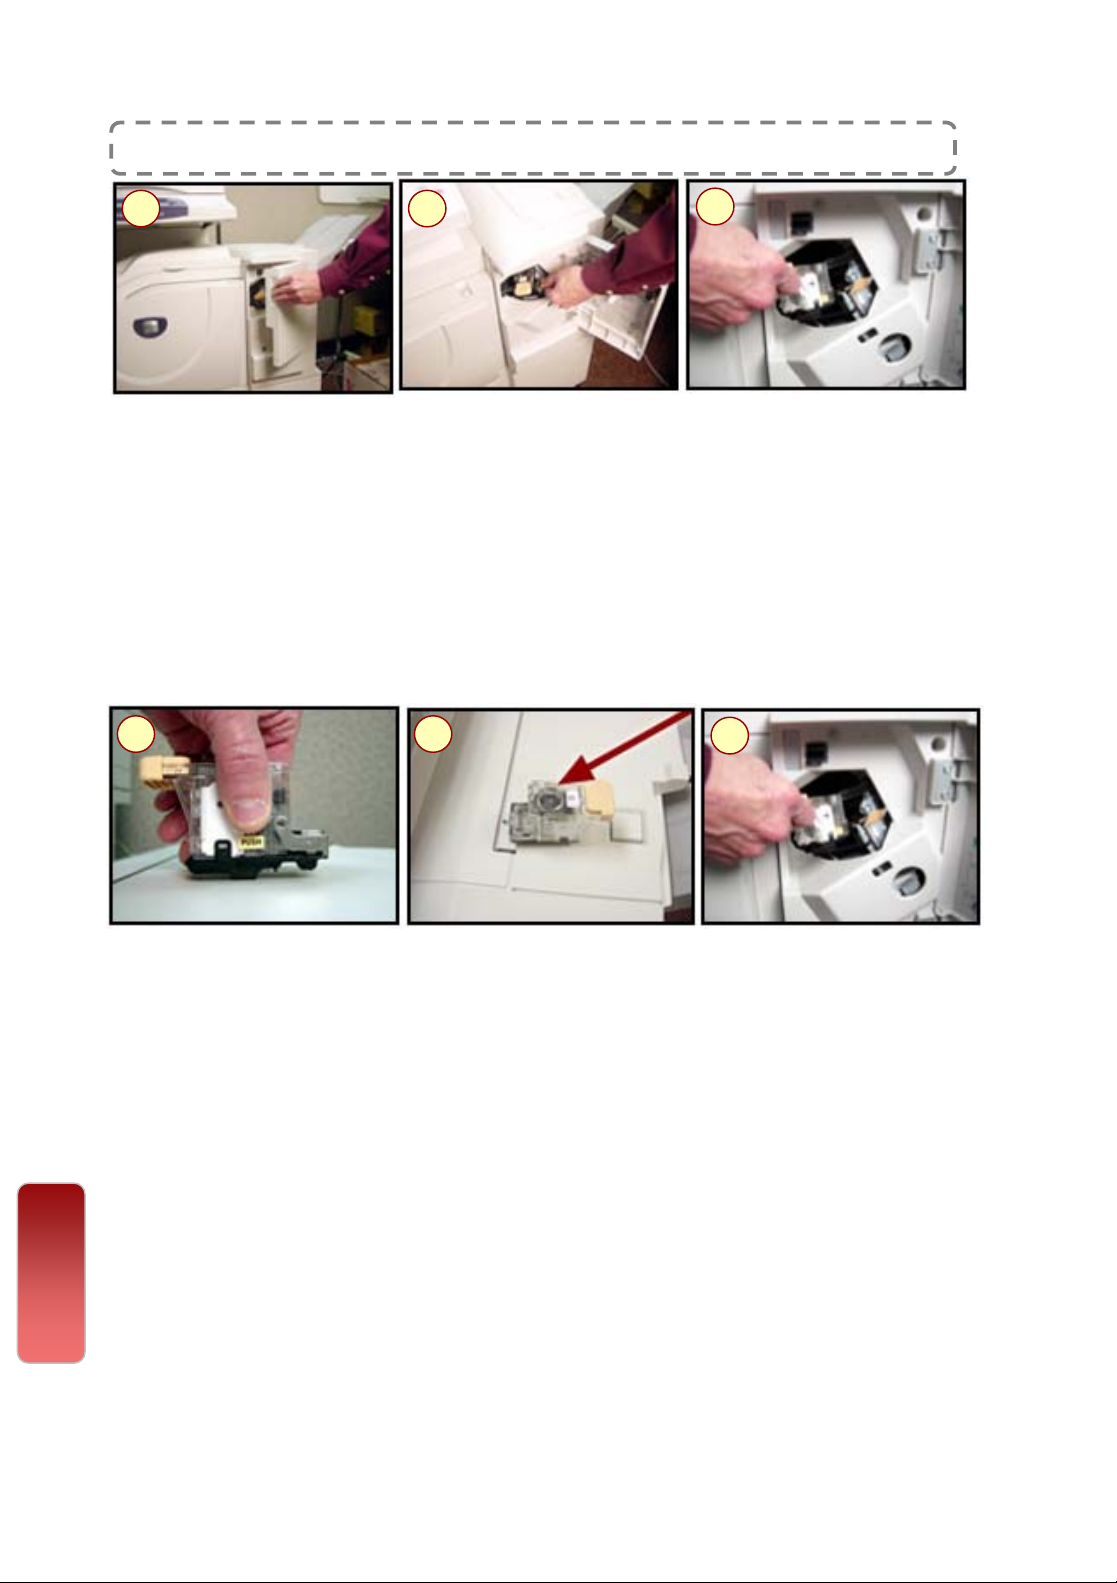
Replacing Staple Cartridge (Finisher)
1 2
NOTE: The staple case contains approximately 5,000 staples. A message will be
displayed on the Touch Screen when the machine runs out of staples. Make sure to
have a replacement staple case available.
1. Open the Finisher Front Door.
2. Grasp the Staple Cartridge lever, move the cartridge to the right
3. Lift up to remove the cartridge from the machine.
NOTE: If there are staples inside the staple case, the cartridge case will not raise.
All staples in the staple case must be used before the staple case can be replaced..
4 5
3
6
4. Press on both sides of the Staple Cartridge marked 'Push' so that the cartridge
case will raise.
5. Inser t your fingertip into the round section on the Staple Cartridge to remove the
staple case and Push a new staple case into the Staple Cartridge. Pu sh the top of
the Staple Cartridge down. Remove the tab from the n ew staple case.
6. Place the Staple Cartridge into the machine, and then push the cartridge down
until it locks into place. Close the Finisher Front Door.
Consumables
Page 41
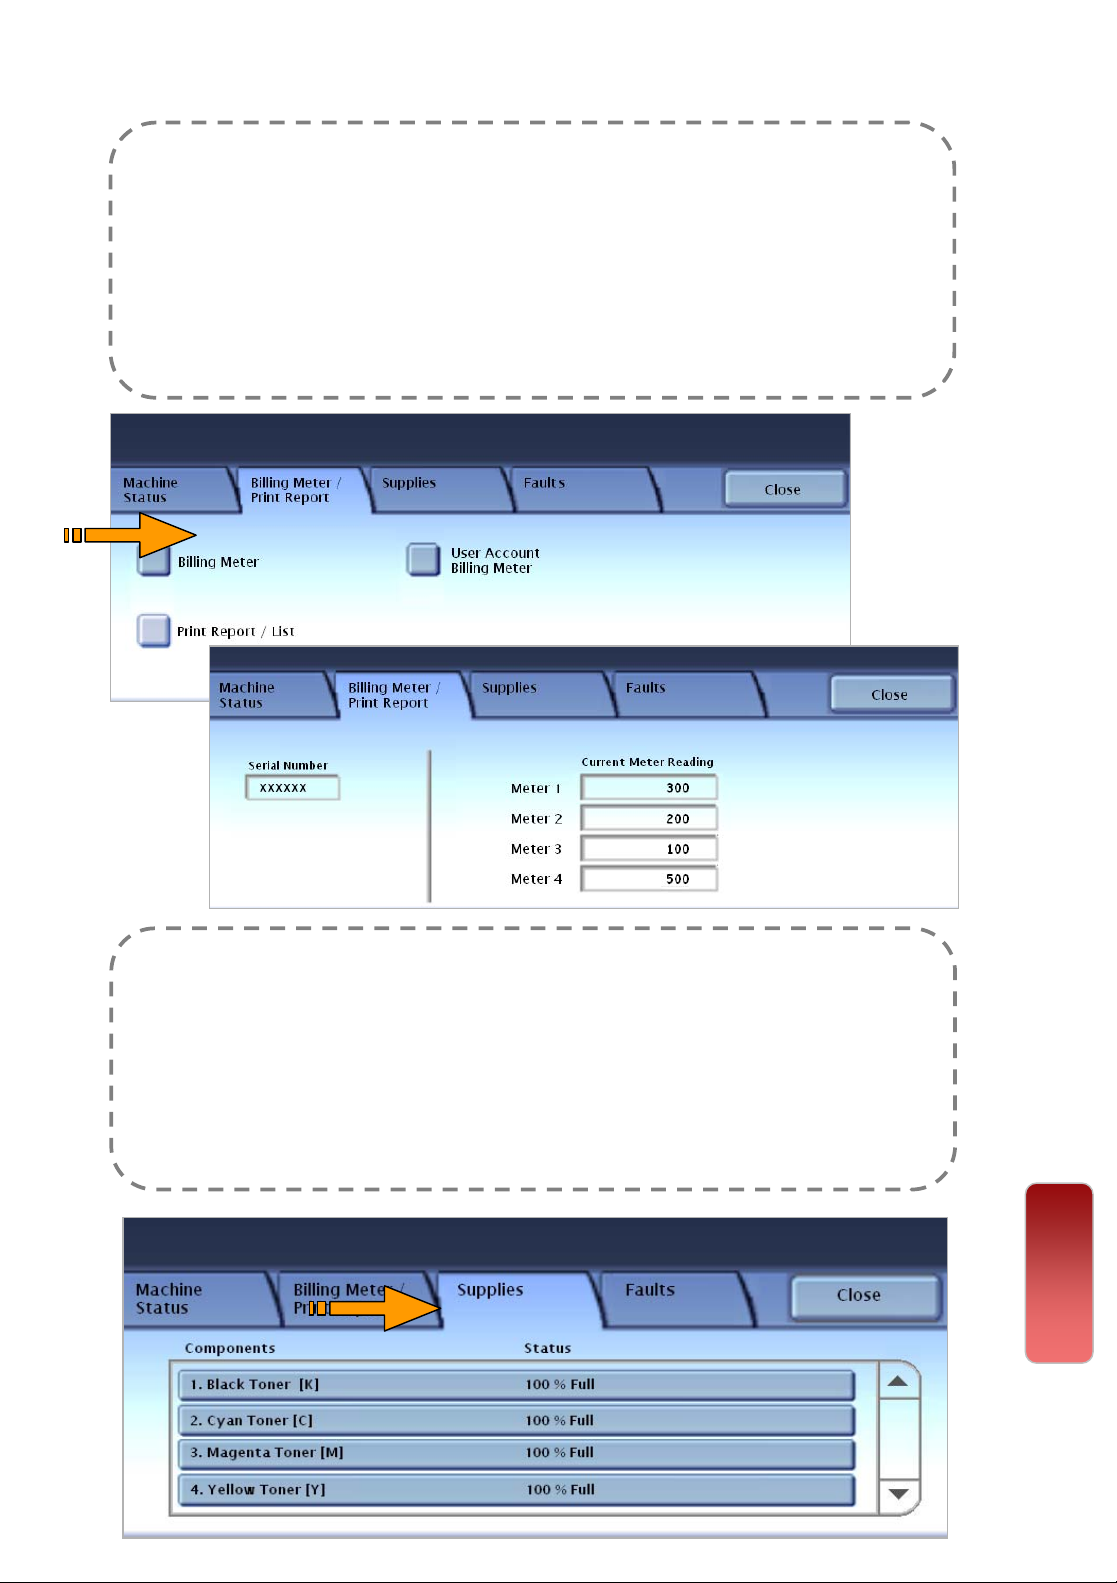
Checking Billing Meter / Supplies Status (Consumables)
BILLING METER
On the Machine Panel, press <Machine Status> button.
Select [Billing Meter / Print Report] tab - Select Billing Meter
METER 1 : Number of full color (Copies + Prints)
METER 2 : Number of B/W (Copies + Prints + Faxes)
METER 3 : Number of large-size full color (Copies + Prints)
METER 4 : Total of Meter 1 + Meter 2
40
40
SUPPLIES / CONSUMABLES
On the Machine Panel, press <Machine Status> button.
Select [Supplies] tab
The status of consumables is shown as:
“OK”, “Replace Soon (Order Now)”, or “Replace Now”
For toner, the amount is shown in percentage (0 to 100%).
Consumables
Page 42
41
41
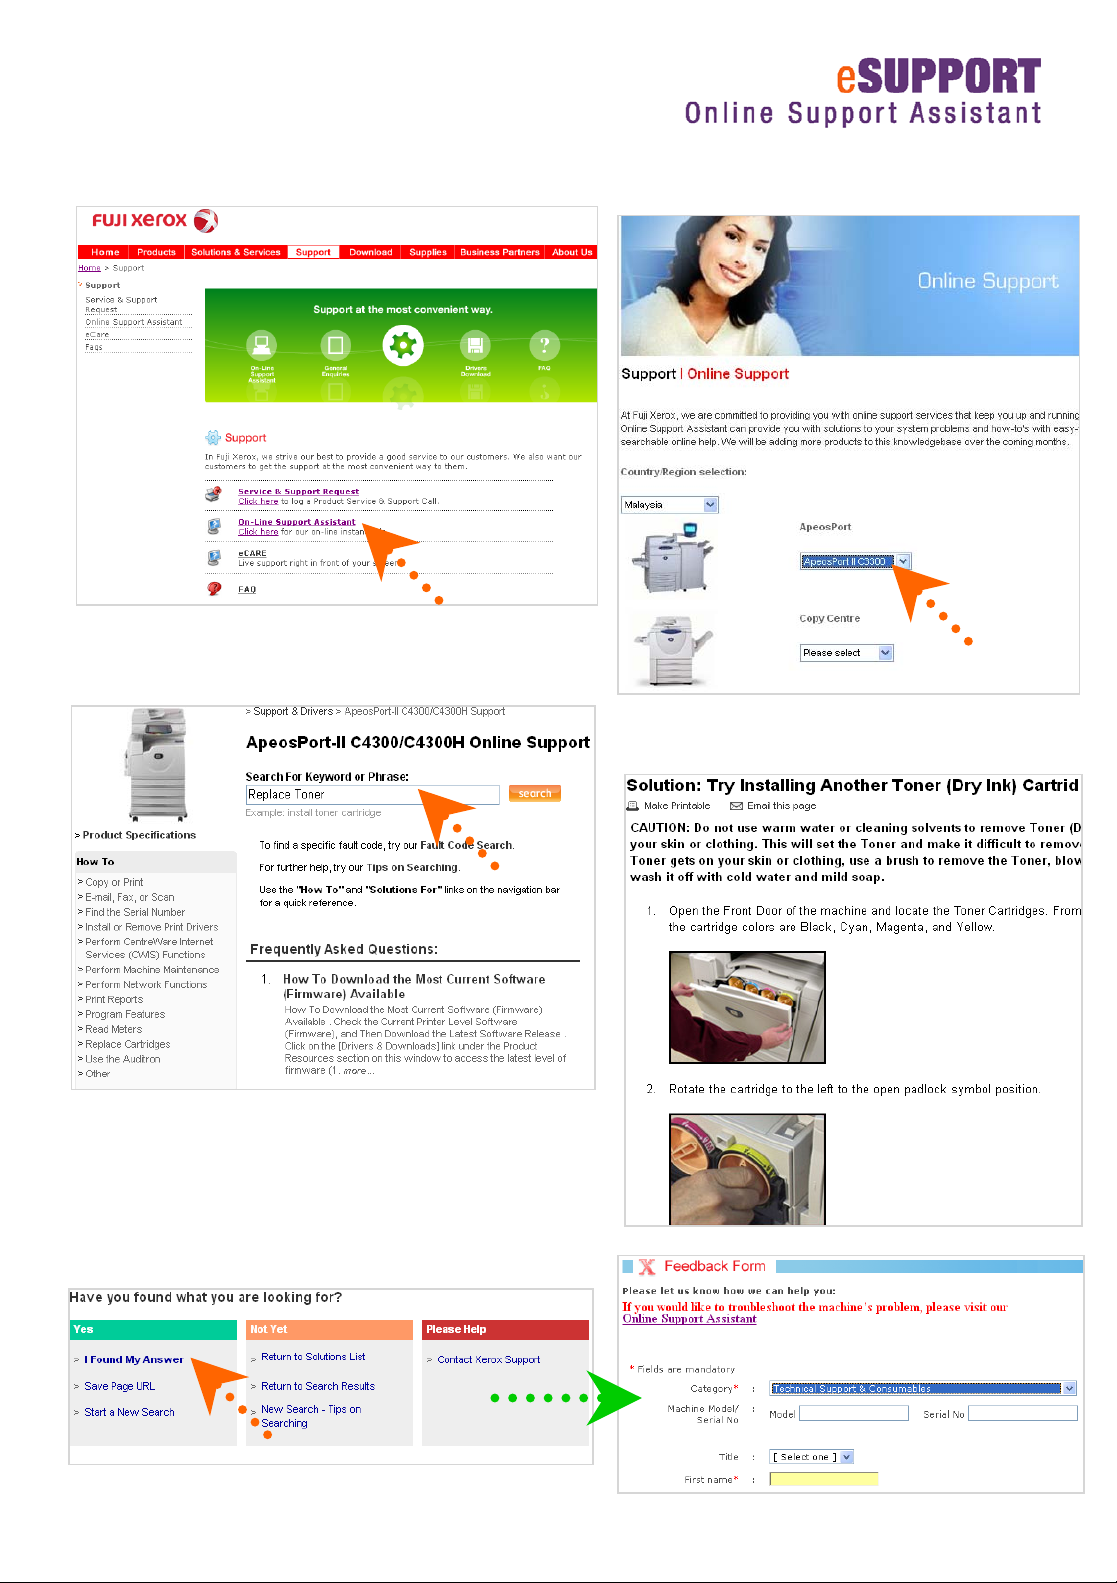
Logon to
www.fujixerox.com.my/support
1 Click on [Online Support Assistant]
3 Select FAQ or enter keyword to Search
2 Select Product / Model
4 You’ve got the Solution!
5 Problem Solved? We need your
Feedback!
Click Yes > I Found My Answer
Or report your problem to us Online!
Page 43
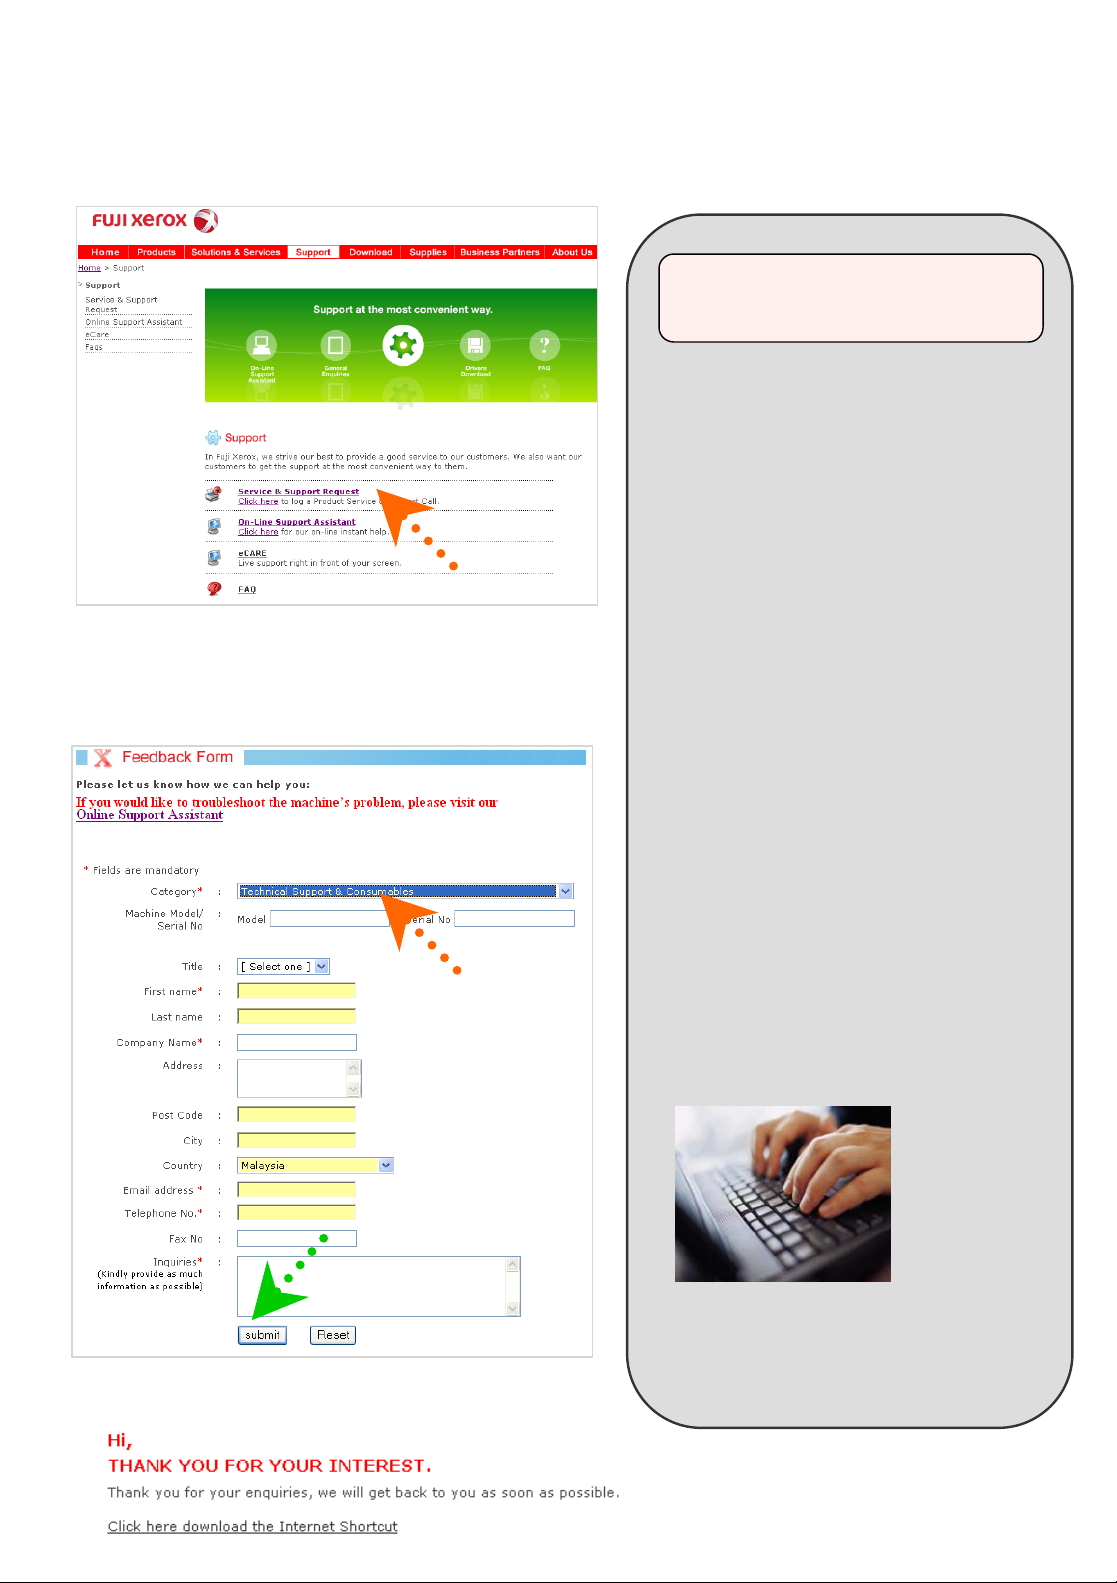
Logon to
www.fujixerox.com.my/support
1 Click on [Service & Support Request]
2 Select [Technical Support &
Online Service &
42
Support Request
Another service to bring us
Another service to bring us
closer to you
closer to you
Upon receiving your request by
FXM Call Center, the request
will be logged into our system
and you will be notified through
e-mail with a report number.
42
Consumables]
Complete the form & Click on [Submit]
Benefits :
1. No phone call is
require
2. No more waiting /
holding on the phone
line
3. Your call will be
logged into our service
system on time
3 Request submitted!
Fuji Xerox Asia Pacific Pte. Ltd.
Page 44

This Quick User Guide is printed on FUJI XEROX Office Color Products.
Copyright Reserved © 2008 by Customer Training Department
Printed in Malaysia
Contact Fuji Xerox Customer Training Department for more information.
tel : +603 7882 2888
e-mail: [email protected]
June 2008 Edition 2.0 Varenne User Guide
 Loading...