

1
TW50 Instructions guide
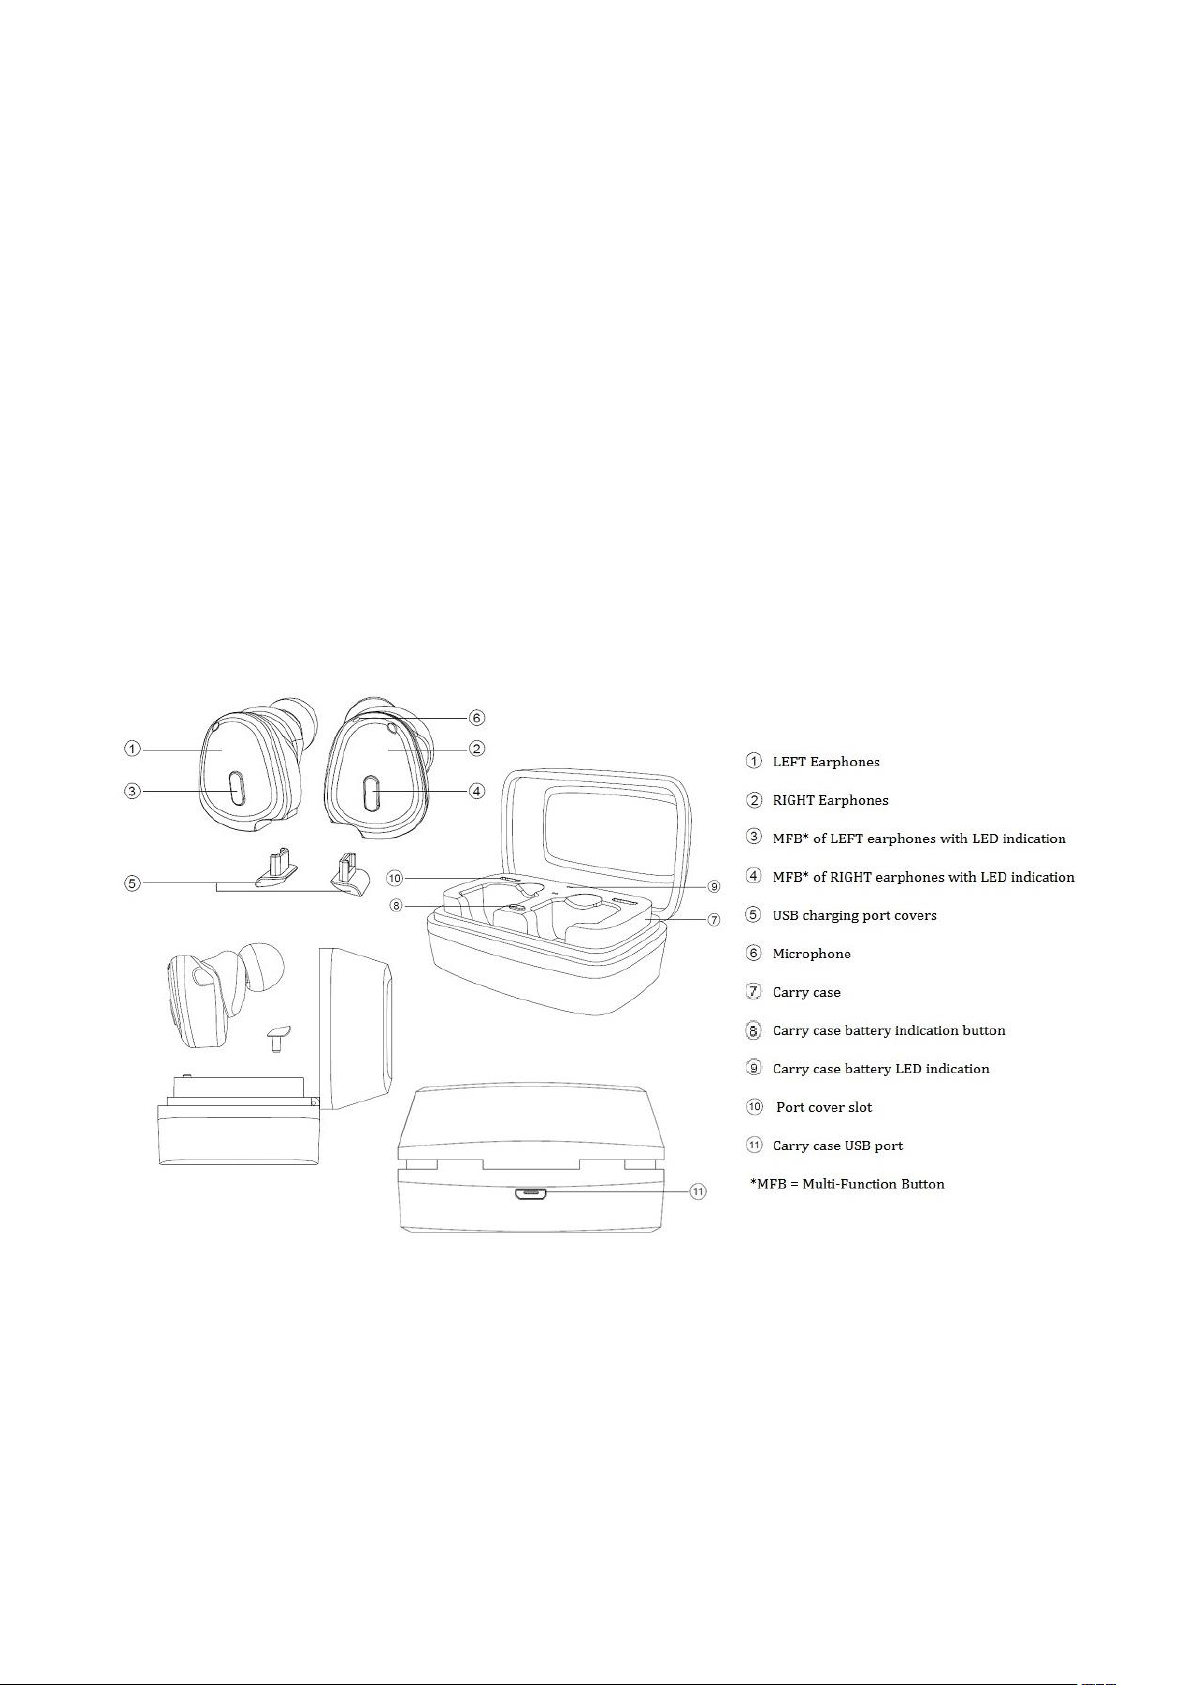
Keys and parts
The headset contains several technological features to improve the experience of the user.
The following section is an overview of the parts:

2
Before using the earphones, you must fully charge the battery and connect the headset to
your respective Bluetooth device.
HOW TO CHARGE THE BATTERY
3 ways to charge the earphones
#1: Charging the carry case and the earphones simultaneously
While the earphones are put in properly into the carry case, plug the charging cable to the
carry case mini-USB port. The carry case battery LED indicator will show a constant RED light
when charging. The RED light will turn off when it has been fully charged. This also charges up
the LEFT and RIGHT earphones, as well as the carry case battery simultaneously. The case
battery will last for 2 full charges for the earphones.
#2: Charging the earphones with the case
With the carry case that has already been charged up previously, put the earphones into the
carry case appropriately, the LEFT and RIGHT earphones will then begin to charge, their LED
indicators will show a red light fading in and out. Once the earphones are fully charged, the
LED light will show BLUE for a minute and then off.
#3: Charging each earphone piece individually
Remove the charging cover on the LEFT/RIGHT earphone to expose the micro-USB port. Plug
the USB cable into the earphone and the charging source to begin charging. The LED indicator
will show a red light fading in and out when charging. Once the battery is fully charged, the
LED light will show BLUE for a minute and then off.
When the earphones are on and battery is low, the LED will show a constant RED light.
The headset contains a battery capable of up to 4 hours of usage.
When the Bluetooth headset is charging, it cannot be turned on for operation.

3
When press the Carry Case Battery Level Indication button, Battery level of the carry case will
show as:
RED : Battery level is high
Blue: Battery level is low
No LED: The battery power was fully drained.
TO TURN ON/OFF EARPHONES
First, on the RIGHT earphone press and hold the MFB for 2 seconds until the LED light comes
on and a voice prompt “Power on” is also played. RED light will flash 2 times every 5 seconds.
Then, turn on the LEFT earphone by pressing and holding the MFB for 2 seconds until the LED
light comes on and a voice prompt “Power on”. LEFT and RIGHT earphones will then connect
automatically, both the LEFT and RIGHT earphones’ LED indicator will then change to BLUE
light flashing 3 times every 5 seconds and a voice prompt “True Wireless stereo connected”.
If you wish to turn off the earphones, press the RIGHT earphone’s MFB and hold for 5 seconds
until the LED indicator light turns off; there will also be voice prompt “Power off”. Let go of
the button and the device is now turned off. (Note: LEFT earphone will turn off automatically
when RIGHT side is turned off, but not vice versa.)
CONNECT WITH BLUETOOTH DEVICE
To pair the earphones with a Bluetooth device, ensure that the respective device is turned on
and the Bluetooth function is active.
**Note: ONLY the RIGHT earphone is able to pair with Bluetooth devices. When it is in pairing
mode, LEFT and RIGHT earphones will be disconnected temporarily until it is out of pairing
mode**
When setting the earphones for pairing mode, make sure both LEFT and RIGHT earphones are
off. Press and hold the RIGHT earphone’s MFB for more than 5 seconds until the headset is
turned on and get into pairing mode. The LED will then be flashing blue and red color
alternatively and a voice prompt “Pairing”, it is now ready to pair with the Bluetooth device.

4
Once the RIGHT earphone pairs with the Bluetooth device successfully, there will be a voice
prompt “Paired, your headset is connected”, also the LED indicator will flash BLUE light every
5 seconds. Now you could turn on the LEFT earphone and the two earphones will connect
automatically.
Some devices require a passcode to connect with a newly established Bluetooth apparatus.
Enter passcode: 0000 if necessary.
DISCONNECT THE HEADSET
If you wish to disconnect the established connection between the headset and your respective
device, simply enter the Bluetooth function on your Bluetooth device and shut down the
connection or switch off the headset.

5
CONTROL OF RIGHT EARPHONES
Function
Action
Turn on/off
Press and hold MFB (2 sec).
Play/Pause music
Press MFB once.
Answer/End call
Press MFB once.
Reject call
Press and hold MFB (1 sec) when there is incoming call.
Adjust volume up
Press the MFB twice. **
**When the LEFT and RIGHT earphones are not connected, the volume will
be in cyclic change: once volume reaches maximum, it will level down until it
gets to minimum volume, and back up again.
Adjust volume down
Press the MFB twice on the LEFT earphone.
Skip track forward
Press and hold MFB (1 sec) in music play mode.
Skip track back
Press and hold MFB (1 sec) on the LEFT earphone in
music play mode.
Voice dialing
Press the MFB twice when mobile phone is at idle.
To hold current call and
accept incoming call
Press the MFB once when there is a second incoming call.
Transfer call between
Bluetooth headsets and
mobile phone
Press and hold MFB (1 sec) when mobile phone is on an
active call.
LEFT EARPHONES
Function
Action
Turn on/off
Press and hold MFB (2 sec).
Play/Pause music
Press MFB once.
Adjust volume down
Press the MFB twice.
Skip track back
Press and hold MFB (1 sec) in music play mode.

6
The following section contains information regarding safety warnings, requirements and
statements. Please read and understand thoroughly before using the headset.
Safety requirements
Heed all warnings
Keep and follow all instructions.
The operating temperature range in user manual: from 0 degree Celsius to 45 degree Celsius.
DO NOT use this apparatus near water
Clean only with dry cloth
DO NOT disassemble or replace the battery. If you suspect there is something wrong with the battery, please carry the unit to the
service center for help.
CAUTION: RISK OF EXPLOSION IF BATTRY IS REPLACED BY AN UNCORRECT TYPE. DISPOSE OF USED BATTERIES ACCORDING TO
THE INSTRUCTIONS
The battery should not be disposed together with other waste. The battery has to be disposed at an authorized place for recycling of
electrical and electronic appliances. By collecting and recycling waste, you help save natural resources, and make sure the product is
disposed in an environmental friendly and healthy way.
Unplug this apparatus during lightning storms or when unused for long periods of time
DO NOT install near any heat sources such as radiators, heat registers, stoves, or other apparatus (including amplifiers) that produce
heat
Only use accessories specified by the manufacturer
Refer all servicing to qualified service personnel. Servicing is required when the apparatus has been damaged in any way, such as
liquid has been spilled or objects have fallen into the apparatus, the apparatus has been exposed to rain or moisture, does not operate
normally, or has been dropped.
If at any time in the future you should need to dispose of this product please note that: Waste electrical products should not be
disposed of with household waste. Please recycle where facilities exist. Check with your Local Authority or retailer for recycling advice.
(Waste Electrical and Electronic Equipment Directive)
EMC/RF requirements
Europe—EU Declaration of Conformity:
The equipment complies according to the Radio Equipment and Telecommunications Terminal Equipment Directive 1999/5/EC. This equipment
meets the following conformance standards:
Safety : EN 60950-1:2006+A11:2009+A1:2010+A12:2011+A2:2013
Health: EN 62479: 2010
EMC : EN 301 489-1 V1.9.2
EN 301 489-17 V2.2.1
EN 55032:2015,
EN 55024:2010,
Radio: EN 300 328 V1.9.1

7
FCC requirements
FCC ID: TTC-TW50R (Right Ear)
FCC ID: TTC-TW50L (Left Ear)
This equipment has been tested and found to comply with the limits for a Class B digital device, pursuant to part 15 of the FCC Rules. These
limits are designed to provide reasonable protection against harmful interference in a residential installation. This equipment generates,
uses and can radiate radio frequency energy and, if not installed and used in accordance with the instructions, may cause harmful
interference to radio communications. However, there is no guarantee that interference will not occur in a particular installation. If this
equipment does cause harmful interference to radio or television reception, which can be determined by turning the equipment off and on,
the user is encouraged to try to correct the interference by one or more of the following measures:
Reorient or relocate the receiving antenna.
Increase the separation between the equipment and receiver.
Connect the equipment into an outlet on a circuit different from that to which the receiver is connected.
Consult the dealer or an experienced radio/TV technician for help.
CAUTION: To comply with the limits of the Class B digital device, pursuant to Part 15 of the FCC Rules, this device is comply with Class B
limits. All peripherals must be shielded and grounded. Operation with non-certified peripherals or non-shielded cables may results in
interference to radio or reception.
MODIFICATION: Any changes or modifications not expressly approved by the grantee of this device could void the user’s authority to operate
the device.
This device complies with part 15 of the FCC Rules. Operation is subject to the following two conditions:
(1) This device may not cause harmful interference, and
(2) This device must accept any interference received, including interference that may cause undesired operation.
Manufacturer's name and address
Fujikon Industrial Co. Ltd.
16/F, Tower 1, Grand Central Plaza, 138 Shatin Rural Committee Road, Shatin, N.T., Hong Kong
 Loading...