

FujiFilm Zoom Date 60W Owner's Manual
202B10264670
OWNER’S MANUAL
MANUAL DE INSTRUCCIONES
d
Fujinon 28-60mm Auto Focus Zoom Lens
d
Automatic Exposure and Automatic Flash Operation
d
Self-timer
d
Red-eye Reduction Flash
d
Date/Time Stamping
2
ENGLISH
Contents
Features...................................................................................... 2
Part Names ................................................................................. 4
Liquid Crystal Display................................................................ 7
Date/Time Display..................................................................... 8
Viewfinder Lamp ....................................................................... 9
Viewfinder ................................................................................10
1. FIRST STEPS
PUTTING ON THE STRAP ........................................................11
LOADING THE BATTERY ..........................................................12
TURNING ON THE CAMERA ....................................................14
CHECKING THE BATTERY .......................................................15
SETTING THE DATE .................................................................16
SELECTING THE DATE MODE .................................................19
2. USING THE CAMERA
LOADING THE FILM ................................................................. 20
TAKING PHOTOS ..................................................................... 24
USING THE AUTO-FOCUS LOCK............................................ 29
TAKI N G O UT T H E F IL M OR
TAKING OUT FILM IN MID-ROLL ..............................................31
3. USING THE SPECIAL FEATURES
SELECTING THE MODE .......................................................... 35
Effective Flash Range ............................................................. 37
USING THE RED-EYE REDUCTION MODE..............................41
USING THE SELF-TIMER MODE ............................................. 44
Troubleshooting......................................................................... 46
Common Sense Camera Care .................................................. 50
Specifications............................................................................ 52
Important Safety Notice............................................................. 56
Features
d
Fujinon 28-60mm Auto Focus Zoom Lens
d
Automatic Exposure and Automatic Flash Operation
d
Self-timer
d
Red-eye Reduction Flash
d
Date/Time Stamping
The “CE” mark certifies that this product satisfies the
re quire ments of the EU (European Union) regarding
safety, public health, environment and consumer protection (“CE” is the abbreviation of Conformité Européenne).
This product is in conformity with Directive 89/336/EEC.

3
ESPAÑOL
Índice
Características ........................................................................... 3
Nombre de las partes ................................................................. 4
Panel de cristal líquido (LCD)................................................... 7
Visualización de la fecha/hora.................................................. 8
Piloto del visor .......................................................................... 9
Visor ....................................................................................... 10
1. OPERACIONES PRELIMINARES
COLOCACIÓN DE LA CORREA.............................................. 11
COLOCACIÓN DE LA PILA ..................................................... 12
PARA ACTIVAR/DESACTIVAR LA CÁMARA........................... 14
COMPROBACIÓN DE LA PILA................................................ 15
AJUSTE DE LA FECHA ........................................................... 16
SELECCIÓN DEL MODO FECHA ........................................... 19
2. UTILIZACIÓN DE LA CÁMARA
COLOCACIÓN DE LA PELÍCULA............................................ 20
UTILIZACIÓN DE LA CÁMARA ............................................... 24
USO DEL BLOQUEO AF (ENFOQUE AUTOMÁTICO)............ 29
EXTRACCIÓN DE LA PELÍCULA/EXTRACCIÓN DE
LA PELÍCULA A MITAD DE ROLLO ........................................ 31
3. OPERACIONES AVANZADAS
SELECCIÓN DEL MODO......................................................... 35
Gama de alcance del flash..................................................... 37
USO DEL MODO REDUCCIÓN DEL EFECTO “OJOS ROJOS”.....41
USO DEL MODO DISPARADOR AUTOMÁTICO..................... 44
Fallos, causas posibles y soluciones........................................ 48
Conservación de la cámara y precauciones............................. 51
Características técnicas ........................................................... 54
Advertencias y precauciones ................................................... 58
Características
d
Objetivo autofocus Fujinon con zoom de 28-60mm
d
Exposición y flash automáticos
d
Disparador automático
d
Reducción del efecto “ojos rojos”
d
Impresión de fecha/hora
La marca “CE” certifica que este producto cumple los
requisitos de la UE (Unión Europea) en lo que se re fie re a la seguridad, la salud pública y la pro tec ción del
medio ambiente y del consumidor (“CE” es la abre via tu ra de Conformité Européenne).
Producto conforme con la Normativa 89/336/EEC.
4
ENGLISH ESPAÑOL
i
j
(p.14)
f
(p.41,45)
a
(p.26)
b
(p.11)
c
(p.7)
h
(p.35)
d
(p.33)
e
g
a
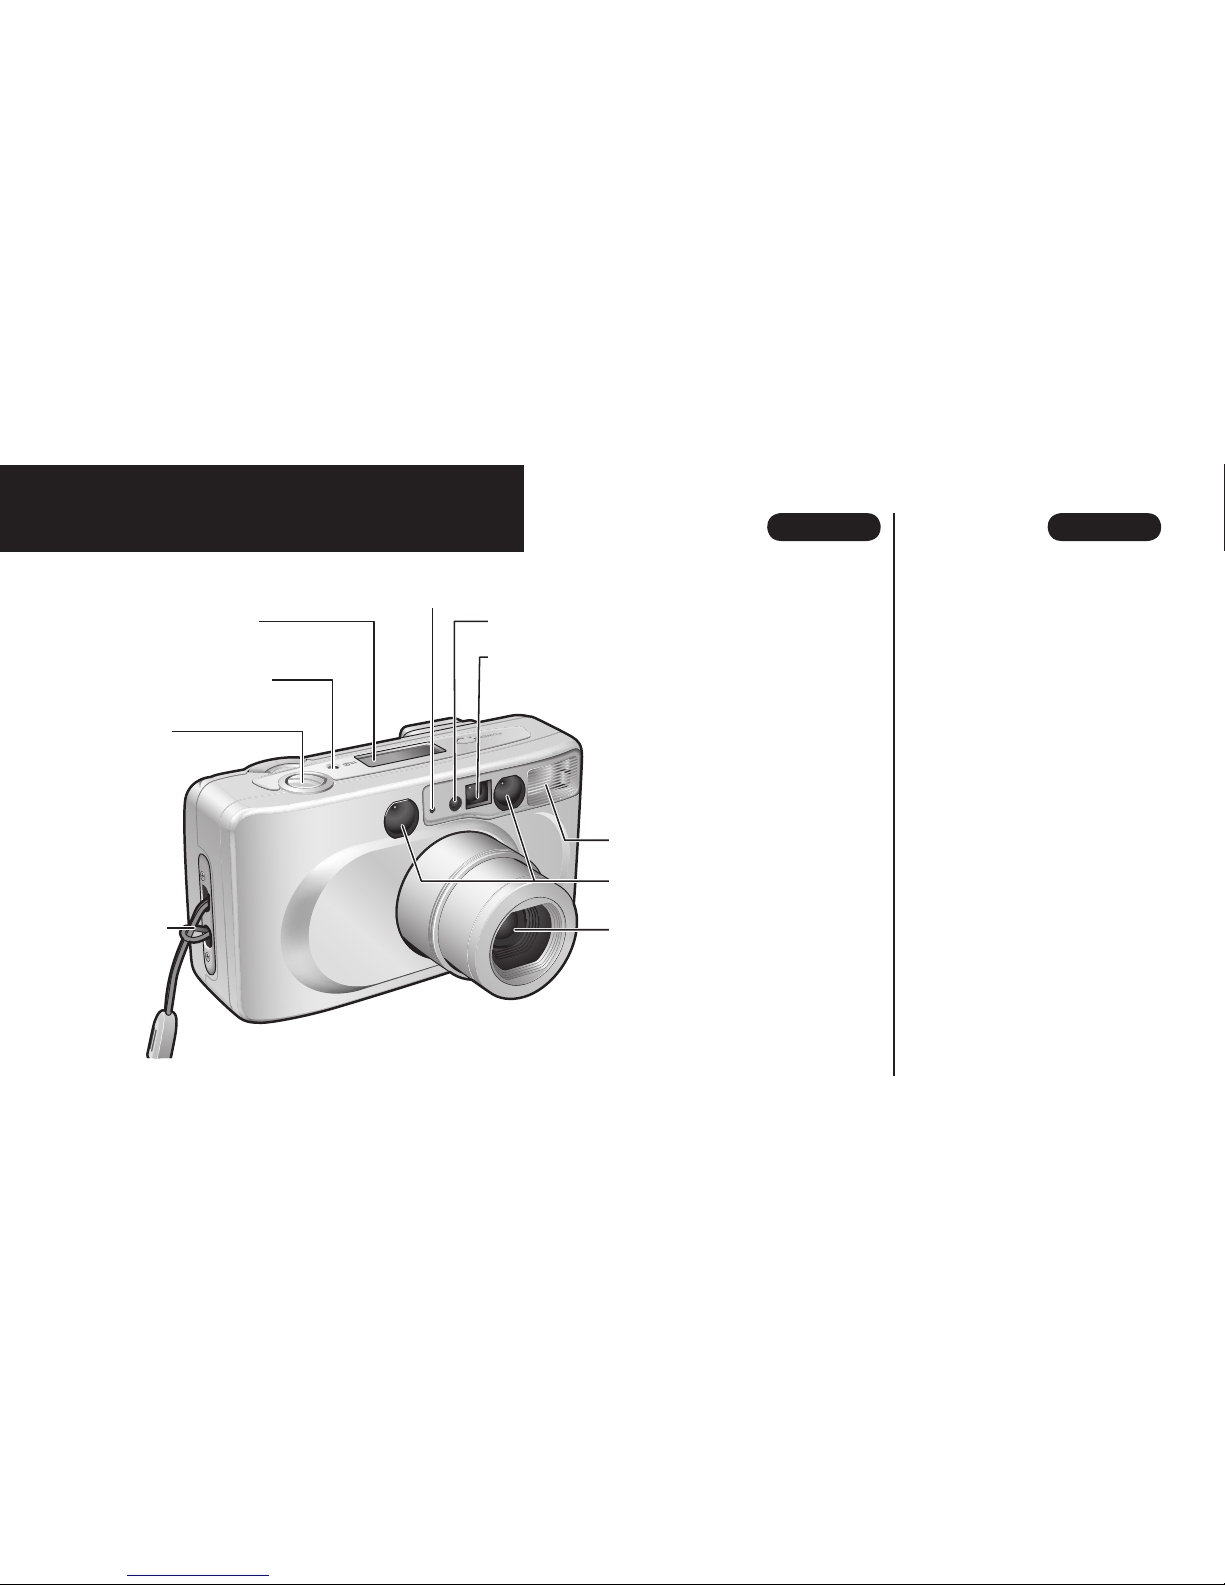
Shutter Button
b
Strap Lug
c
Liquid Crystal Display
d
Mid-roll Rewind Button
e
AE Light Sensor
f
Red-eye Reduction/
Self-timer Lamp
g
Viewfinder Window
h
Flash
i
AF (Auto-focus) Window
j
Fujinon Lens/Lens Cover
Part Names/Nombre de las partes
a
Disparador
b
Anclaje de Ia correa
c
Panel de cristal líquido
(LCD)
d
Botón de rebobinado a
mitad de rollo
e
Fotosensor de exposición
automática
f
Piloto de reducción del
efecto “ojos rojos”/
Disparador auto mático
g
Ventanilla del visor
h
Flash
i
Ventanilla AF (enfoque
automático)
j
Objetivo Fujinon/Tapa del
objetivo
5
ENGLISH ESPAÑOL
n
(p.22)
l
(p.9)
o
k
(p.10)
p
s
r
(p.21,32)
t
(p.12)
q
(p.21)
m
(p.22)
u
(p.12)
k
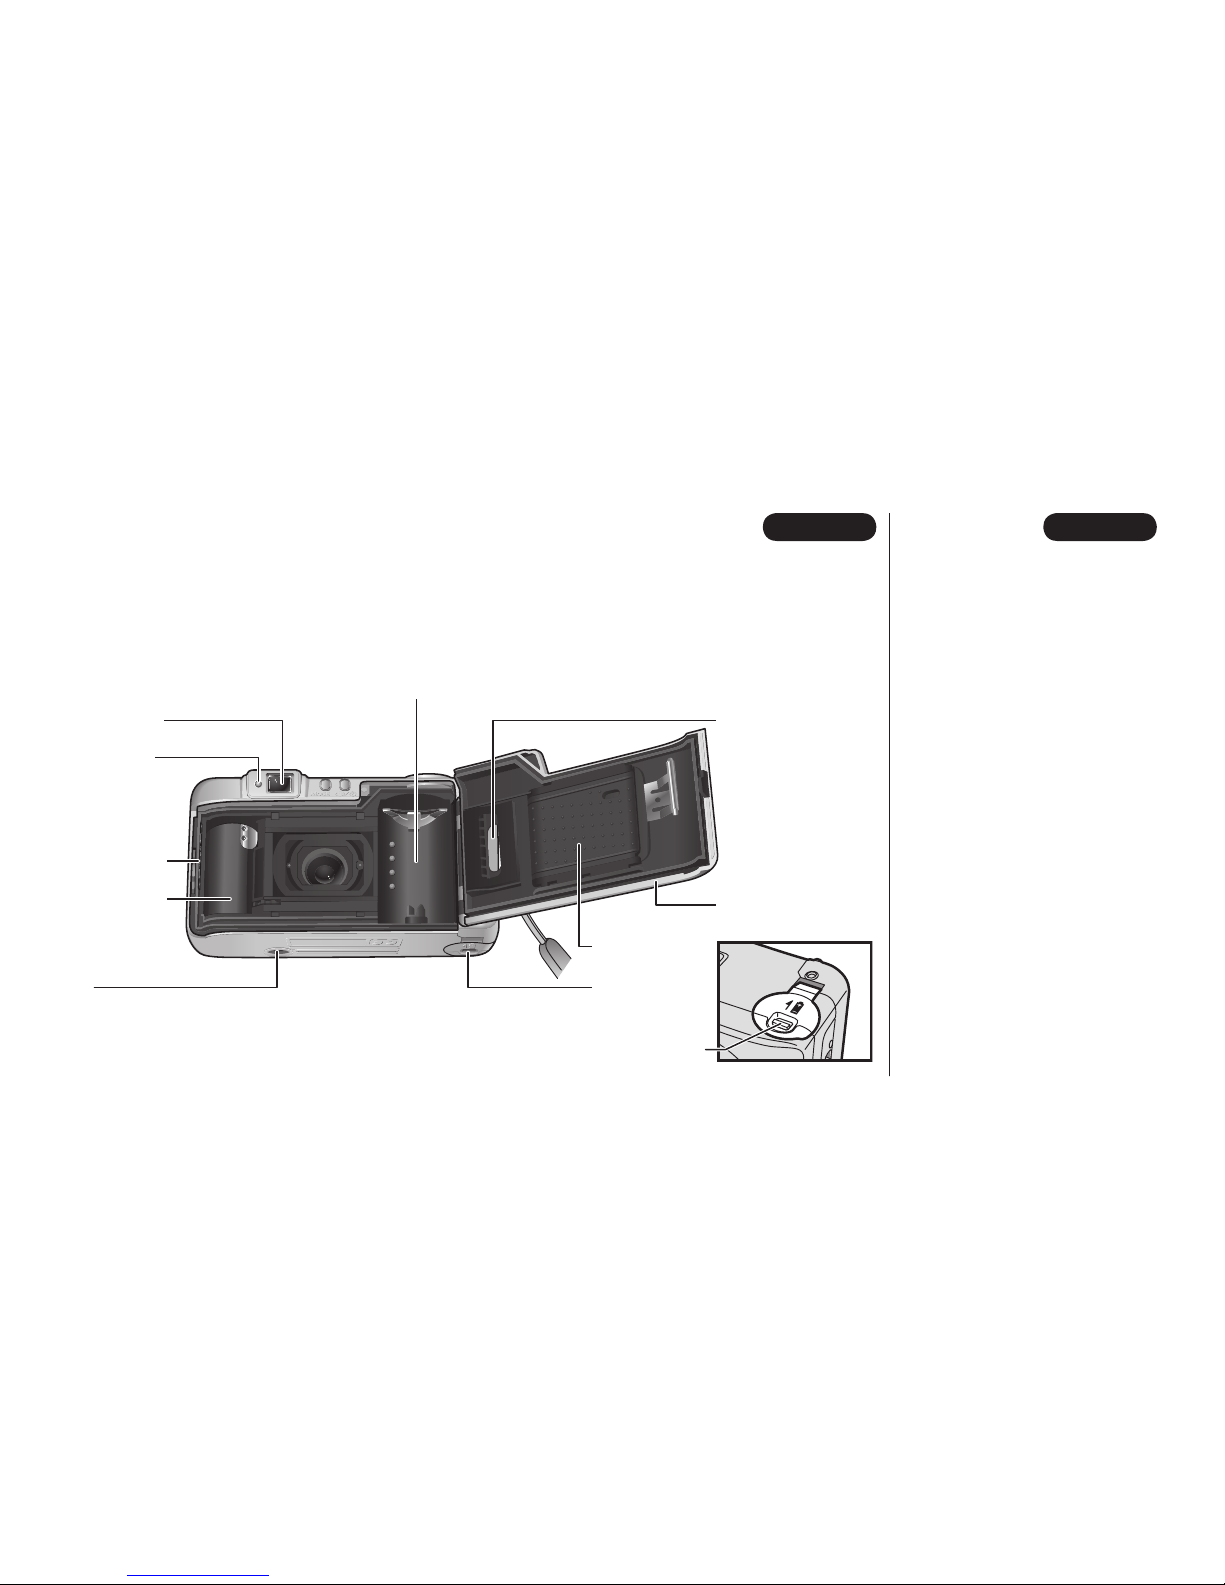
Viewfinder Eye-piece
l
Viewfinder Lamp (red)
m
FILM TIP Mark
n
Film Take-up Spool
o
Tri pod Soc ke t
k
Ocular del visor
l
Piloto del visor (rojo)
m
Marca del extremo de la
película
n
Bobina de recogida de la
película
o
Zapata para trípode
p
Compartimento de la
película
q
Ventanilla de verificación
de la película
r
Tap a pos ter ior de la
cámara
s
Placa de presión de la
película
t
Tapa del compartimento
de la pila
u
Botón para abrir la tapa
del compartimento de la
pila
p
Film Compartment
q
Film Confirmation Win dow
r
Camera Back
s
Film Pressure Plate
t
Battery Cover
u
Battery Cover Release
Knob

6
ENGLISH ESPAÑOL
y
(p.21,32)
x
(p.10)
w
(p.9)
C
(p.35)
A
(p.25)
B
(p.41,44)
z
(p.8)
D
(p.21)
v
(p.14)
v
Power Button
w
Viewfinder Lamp (red)
x
Viewfinder Eye-piece
y
Camera Back Lock
z
Date/Time Display
v
Botón de alimentación
w
Piloto del visor (rojo)
x
Ocular del visor
y
Cierre de la tapa pos te rior
de la cámara
z
Visualización de la
fecha/hora
A
Botón del zoom
B
Botón de modo reducción
del efecto “ojos rojos”
/Disparador automático
C
Botón MODE
D
Ventanilla de verificación
de la película
A
Zoom Button
B
Red-eye
Reduction/Self-timer
Mode Button
C
MODE Button
D
Film Confirmation Win dow
7
ENGLISH ESPAÑOL
H
(p.39)
G
(p.38)
J
(p.40)
F
(p.41)
E
(p.40)
O
(p.23)
N
(p.23)
M
(p.15)
L
(p.39)
K
(p.44)
I
(p.38)
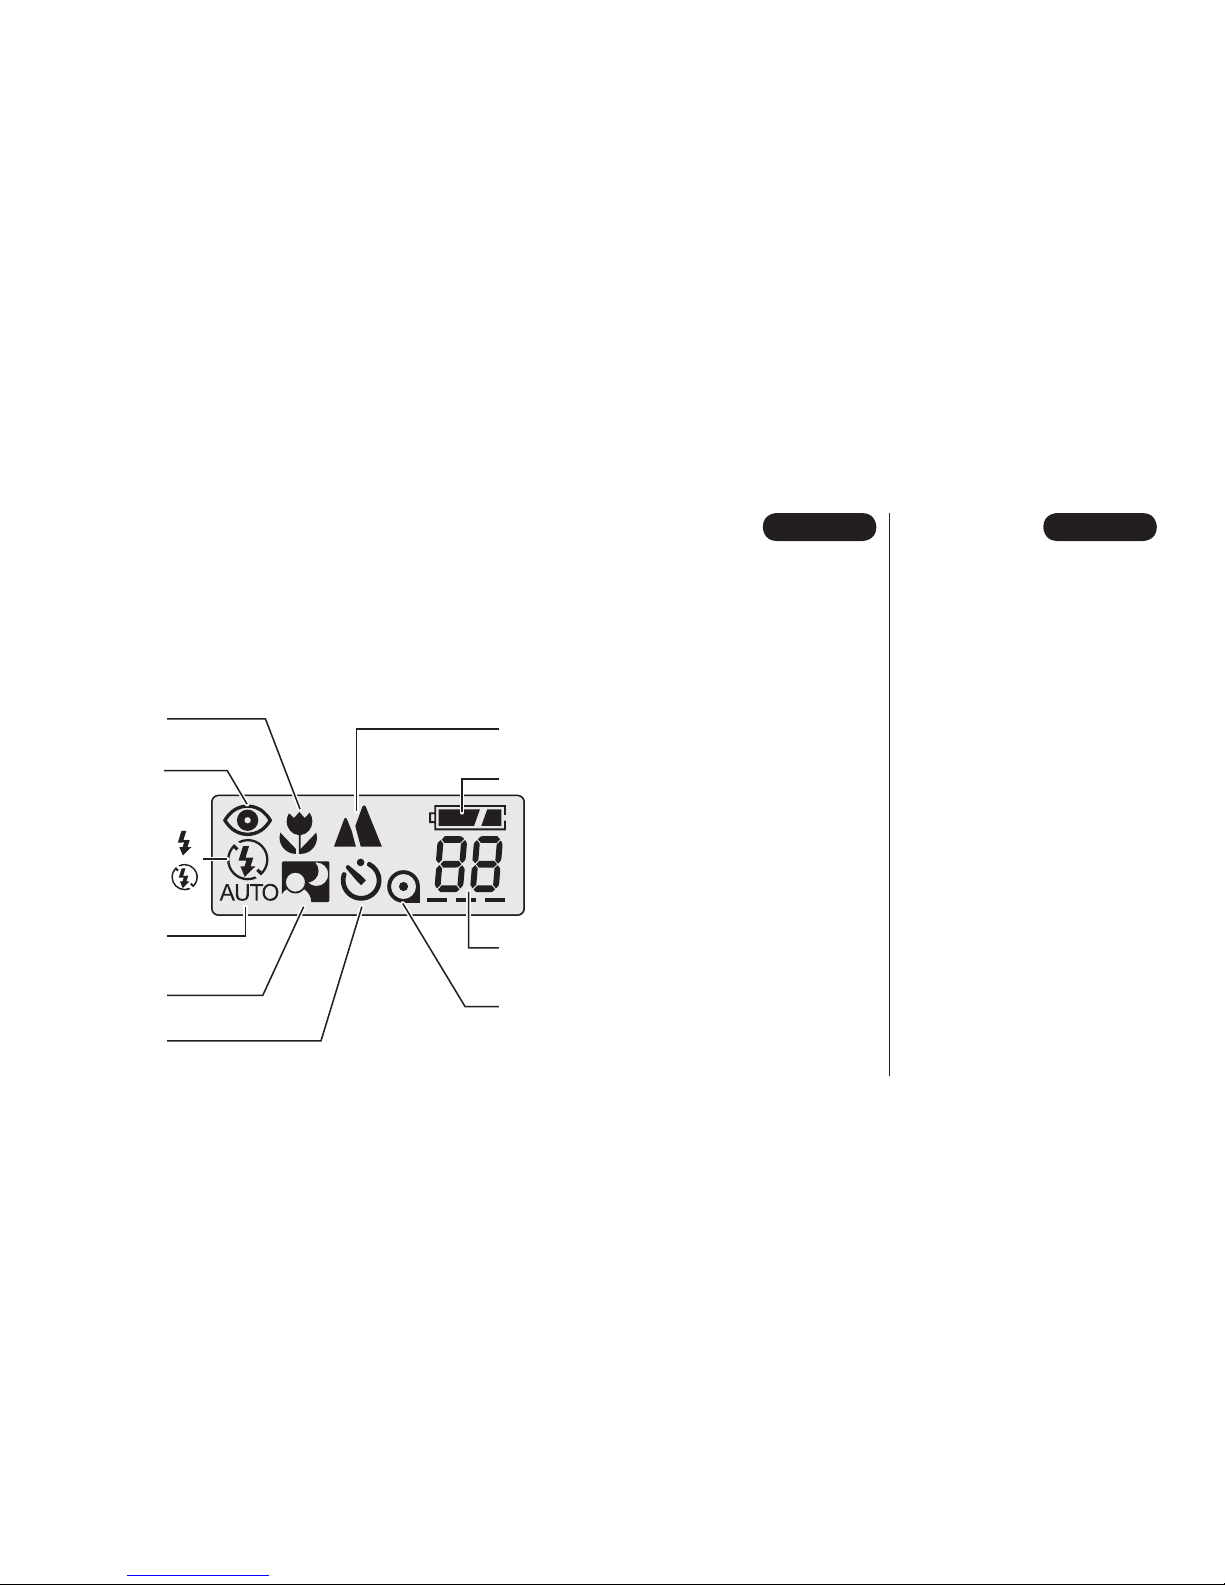
E
Macro Mode
F
Red-eye Reduction Mode
G
Fill-in Flash Mode
H
Flash-off Mode
I
Automatic Flash at Low
Brightness Mode
J
Night (Slow Sync) Mode
K
Self-timer Mode
L
Landscape Mode
M
Battery Status
N
Picture Counter
O
Film Mark
E
Modo macro
F
Modo reducción del efecto
“ojos rojos”
G
Modo flash de relleno
H
Modo flash desactivado
I
Flash automático en el
modo de baja iluminación
J
Modo nocturno
(sincronización lenta)
K
Modo disparador
automático
L
Modo paisajes
M
Indicador de capacidad de
la pila
N
Contador de exposiciones
O
Indicador de la película
Liquid Crystal Display/
Panel de cristal líquido (LCD)

8
ENGLISH ESPAÑOL
Q
(p.16,19)
R
(p.19)
S
(p.16,19)
T
(p.17)
U
(p.17)
P
(p.16,19)
P
Botón MODE
Q
Visualización del mes
R
Impresión de la fecha/hora
S
Visualización de la fecha
T
Botón ADJ.
U
Botón SEL
P
MODE Button
Q
Month Display
R
Date/Time Printing
S
Date Display
T
ADJ. Button
U
SEL Button
Date/Time Display
Visualización de la fecha/hora
c
The diagram shows all crystal display in the “on” state.
c
La ilustración muestra todas las informaciones en activo.

9
ENGLISH ESPAÑOL
Viewfinder Lamp/Piloto del visor
Lit : Picture taking is possible
Blinks : Flash charg ing
c
When the viewfinder lamp is blink ing, the shut ter button can not be pressed.
Iluminado : La fotografía es posible.
Parpadea : Flash cargándose
c
Cuando el piloto del visor parpadea, el obturador no se puede disparar.
c
When the shutter but ton is pressed down
half way.
c
Cuando se pulsa el disparador hasta la mitad.

10
ENGLISH ESPAÑOL
: Framing area
: Área de encuadre
Compose the picture within this area.
: AF (Auto-focus) frame
Position this frame over the main sub ject in your picture.
: Parallax correction guides
When taking pictures at close distances (closer than 1.3m/4.3ft.), use these
guides to compose the pic ture (씮p.27).
Componga la imagen dentro de esta
zona.
: Recuadro AF (en fo que automático)
Coloque este recuadro sobre el sujeto
principal de la fotografía.
: Marcas de corrección de paralaje
Cuando se toma una fo to gra fía de un
primer plano, utilice estas marcas como
una guía para componer la imagen (
씮
pág.27).
Viewfinder/Visor
11
ENGLISH ESPAÑOL
1
2
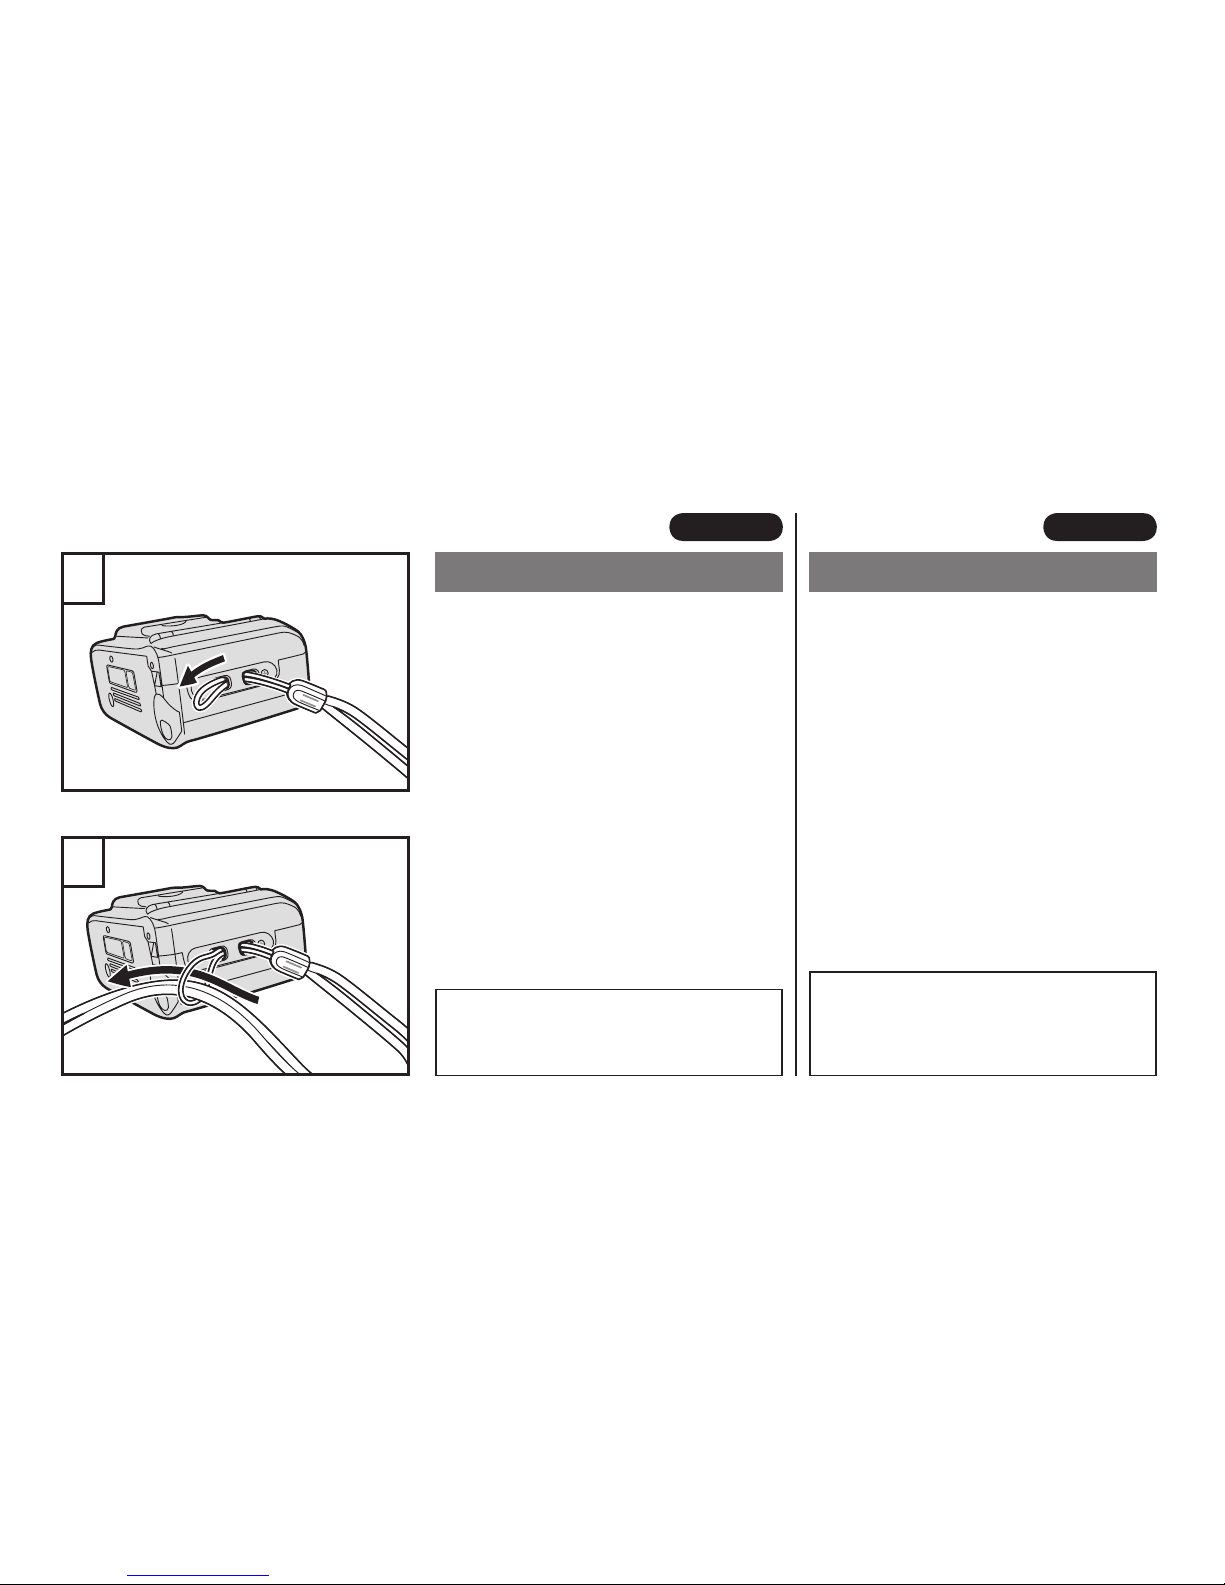
1. FIRST STEPS
PUTTING ON THE STRAP
Slip the thin piece of the camera strap
through the small hole on the left side of
the camera and leave a loop. Slide the
thick part of the strap through this loop
and pull tight. Take up any slack to make
sure the strap is secured tightly to the
cam era.
Do not use a strap made for cellular phones
or other prod ucts. These straps are usually
too weak to hold your cam era se cure ly. For
safety, use only straps made for cameras.
1.
OPERACIONES PRE LI MI NA RES
COLOCACIÓN DE LA CORREA
Pase el extremo de la correa por el ojal
situado en el lateral de la cámara y su jé te lo como indica la ilustración.
Al usar una correa de tipo convencional, confirme que está en buenas con di cio nes y comprue be su resistencia. Tenga mucho cuidado
al utilizarla porque generalmente son usadas
para artículos de bajo peso.

12
ENGLISH ESPAÑOL
1
2
b
a
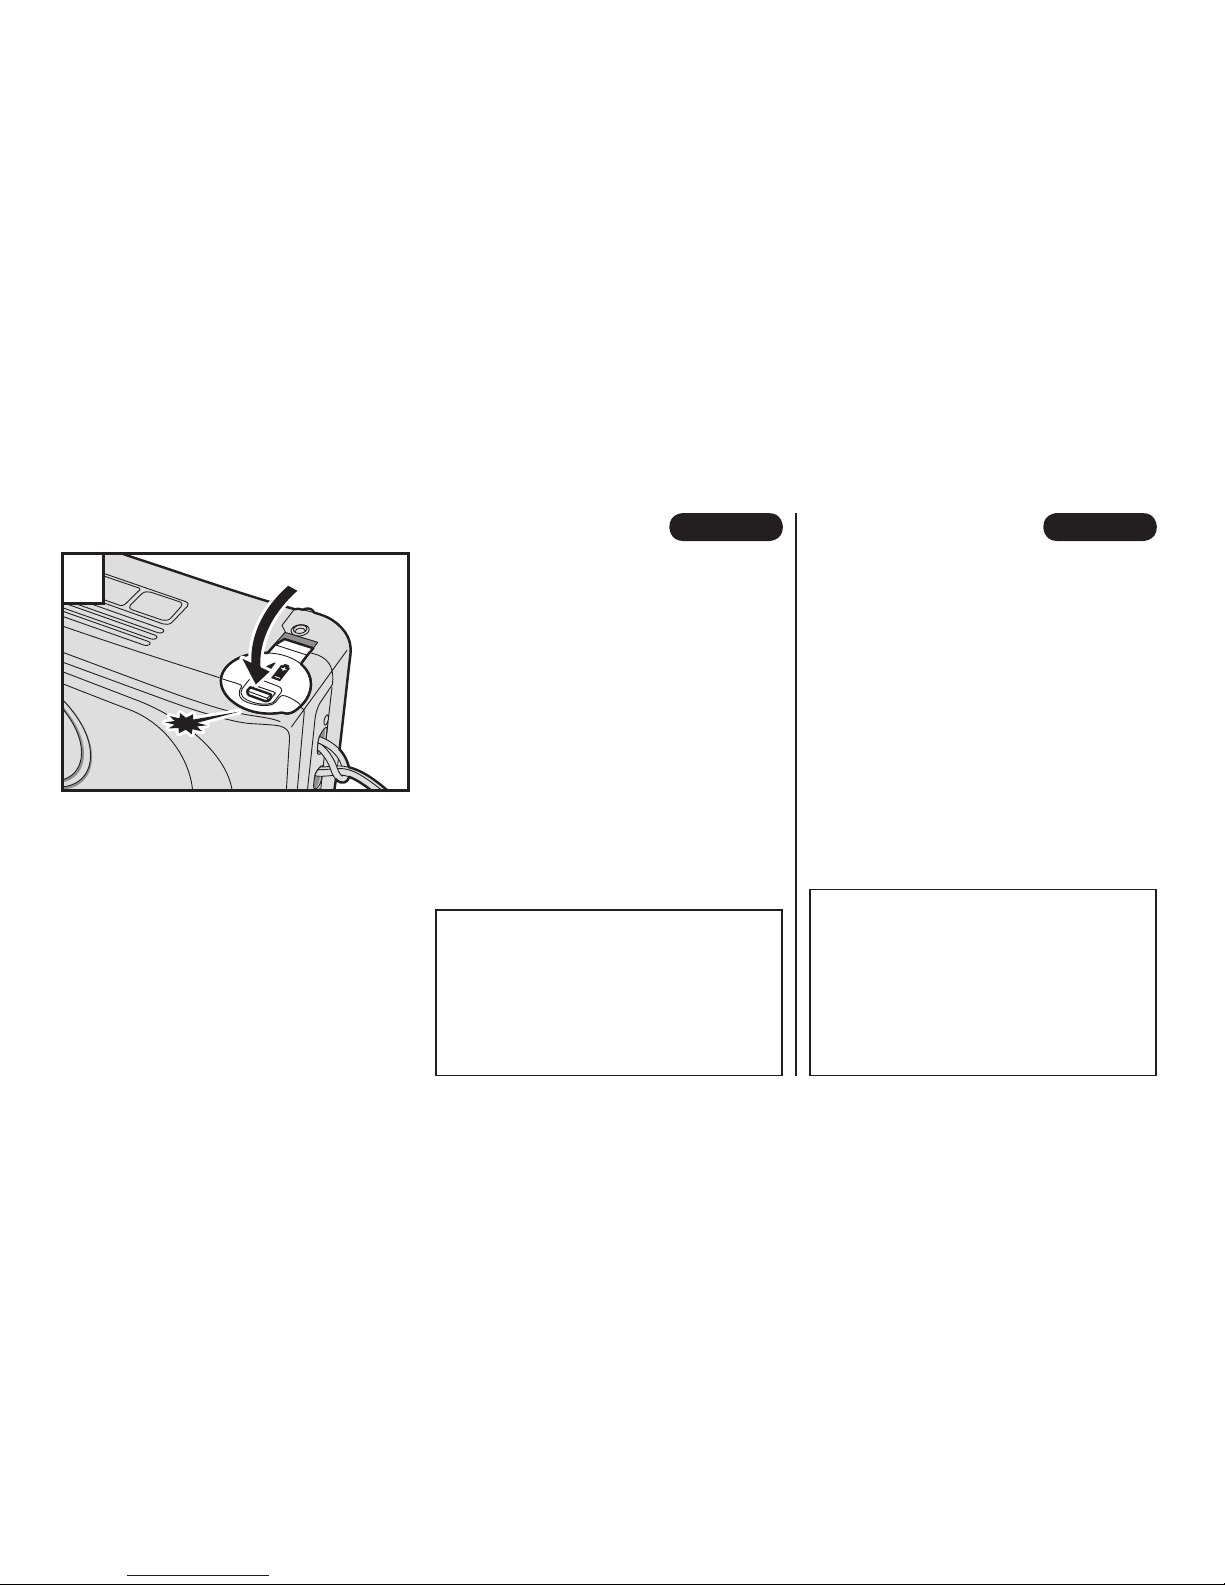
LOADING THE BATTERY
Your camera requires one CR123A/
DL 123A lith i um bat tery.
a
Move the battery cover release knob
in the direction of the arrow.
b
Flip open the battery cov er.
Load the battery taking care to observe
the polarity (+ and -).
COLOCACIÓN DE LA PILA
Su cámara utiliza una pila de litio
CR123A/DL 123A.
a
Deslice el botón para abrir la tapa de
compartimento de la pila en el sentido indicado por la flecha.
b
Abra la tapa del compartimento de la
pila.
Introduzca la pila, prestando especial
atención a la po si ción de los polos + y
-
.
13
ENGLISH ESPAÑOL
3
c
Do not apply force to battery cover.
c
One new lithium battery should be enough
for about 300 pictures (based on our tests).
c
When traveling, take extra batteries in the
event the batteries stop working. This is important if you visit areas where new batteries
may be difficult to get.
c
Check the battery power level be fore you use
the camera (p.15).
c
After replacing the battery, reset the date to
get the right date/time (p.16).
c
No aplique fuerza innecesaria en la tapa del
compartimento de la pila.
c
Una pila de litio nueva es suficiente para rea li zar 300 fotografías aproximadamente (dato
ba sa do en nuestras condiciones de prue ba).
c
Si se utilizan muchas películas, por ejemplo
al realizar un viaje, se re co mien da llevar pi las
de reserva (es pe cial men te en zonas en las
que podría ser difícil adquirirlas).
c
Compruebe el indicador de capacidad de la
pila antes de utilizar la cámara (pág.15).
c
Después de cambiar la pila, vuel va a fijar la
fecha (pág.16).
Cierre la tapa del com par ti men to de la
pila de modo que quede bien tra ba da.
Close the bat tery cover until snaps into
place.
Load the battery before loading the film.
c
If the battery is loaded after loading a new
film, the camera will not detect the film and
will not al low you to take pictures with that
film (the “R” is not displayed, the counter
re mains the “`” and does not go forward).
In this case, open the back and close it
again.
Inserte la pila antes cargar de película.
c
Si se inserta la pila inmediatamente después de cargar una nueva película, la cámara podría no detectar la película y no se
podrán sacar fotografías con esa película
(no se visualiza “R”, el contador de exposiciones permanece en “`” y no avanza). En
este caso, abra la tapa posterior de la cámara y vuelva a cerrarla.
14
ENGLISH ESPAÑOL
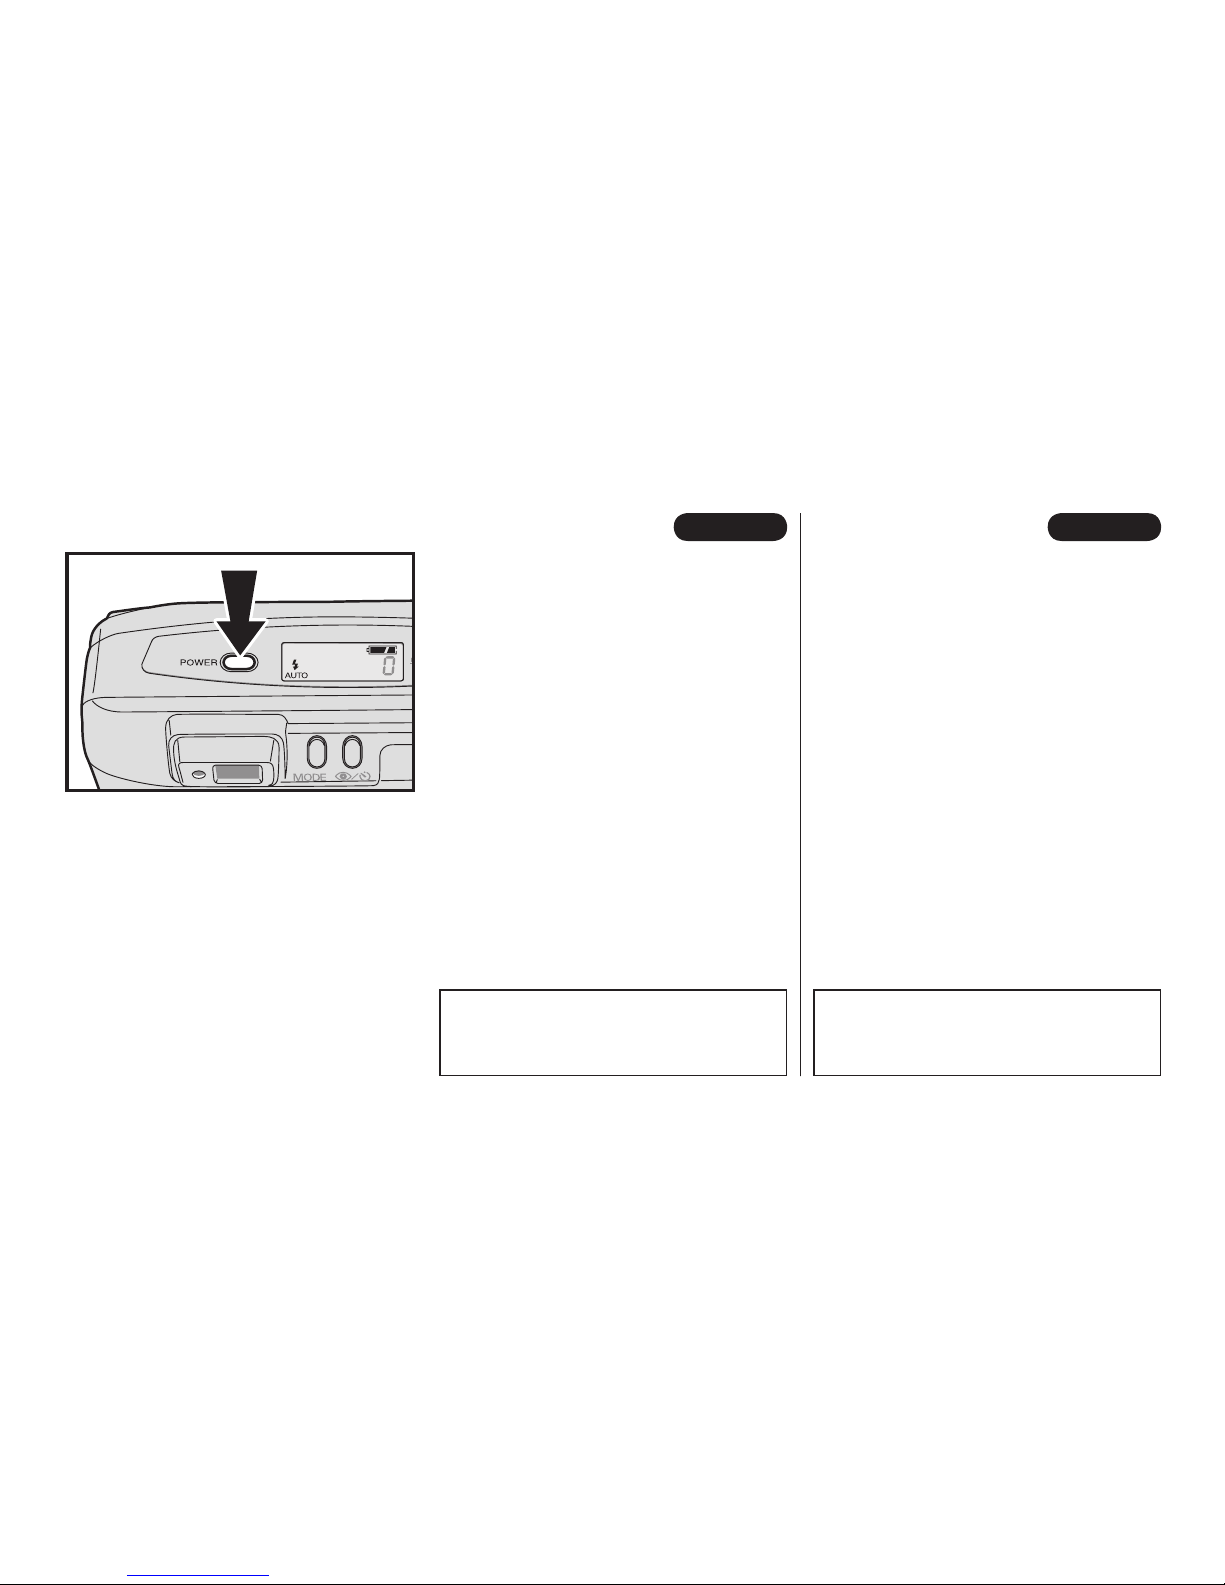
TURNING ON THE CAMERA
Before using the camera, you must turn
the pow er on. First press the POWER
button to turn the pow er on. Pressing
this button a second time will turn the
power off.
\
When you turn your camera on, the lens
cov er opens and the display appears on the
LCD.
PARA AC TIVAR/D ESACTI VAR
LA CÁMARA
Pulse el botón de ali men ta ción para ac ti var la cámara y vuélvalo a pulsar para
desactivarla.
\
Cuando se activa la cámara, la tapa del ob je ti vo se abre y en el panel LCD apa re cen
las indicaciones de inicio.
c
Si la cámara permanece ac ti va da sin uti li zar se durante más de 3 minutos, se desactivará de forma automática.
c
When you are finished using the cam era, turn
the power off to keep the battery working longer. If the power supply is left on for more than
3 minutes without the camera being used,
the camera will turn it self off.
Before you turn the camera on, make sure
that the lens is not blocked by anything that
would keep the lens from moving into its pic ture-taking position.
Antes de activar la cámara, asegúrese de
que el objetivo no esté obstuido para facilitar
así su extensión a la posición de toma de fo to gra fías.
15
ENGLISH ESPAÑOL
b
a
c
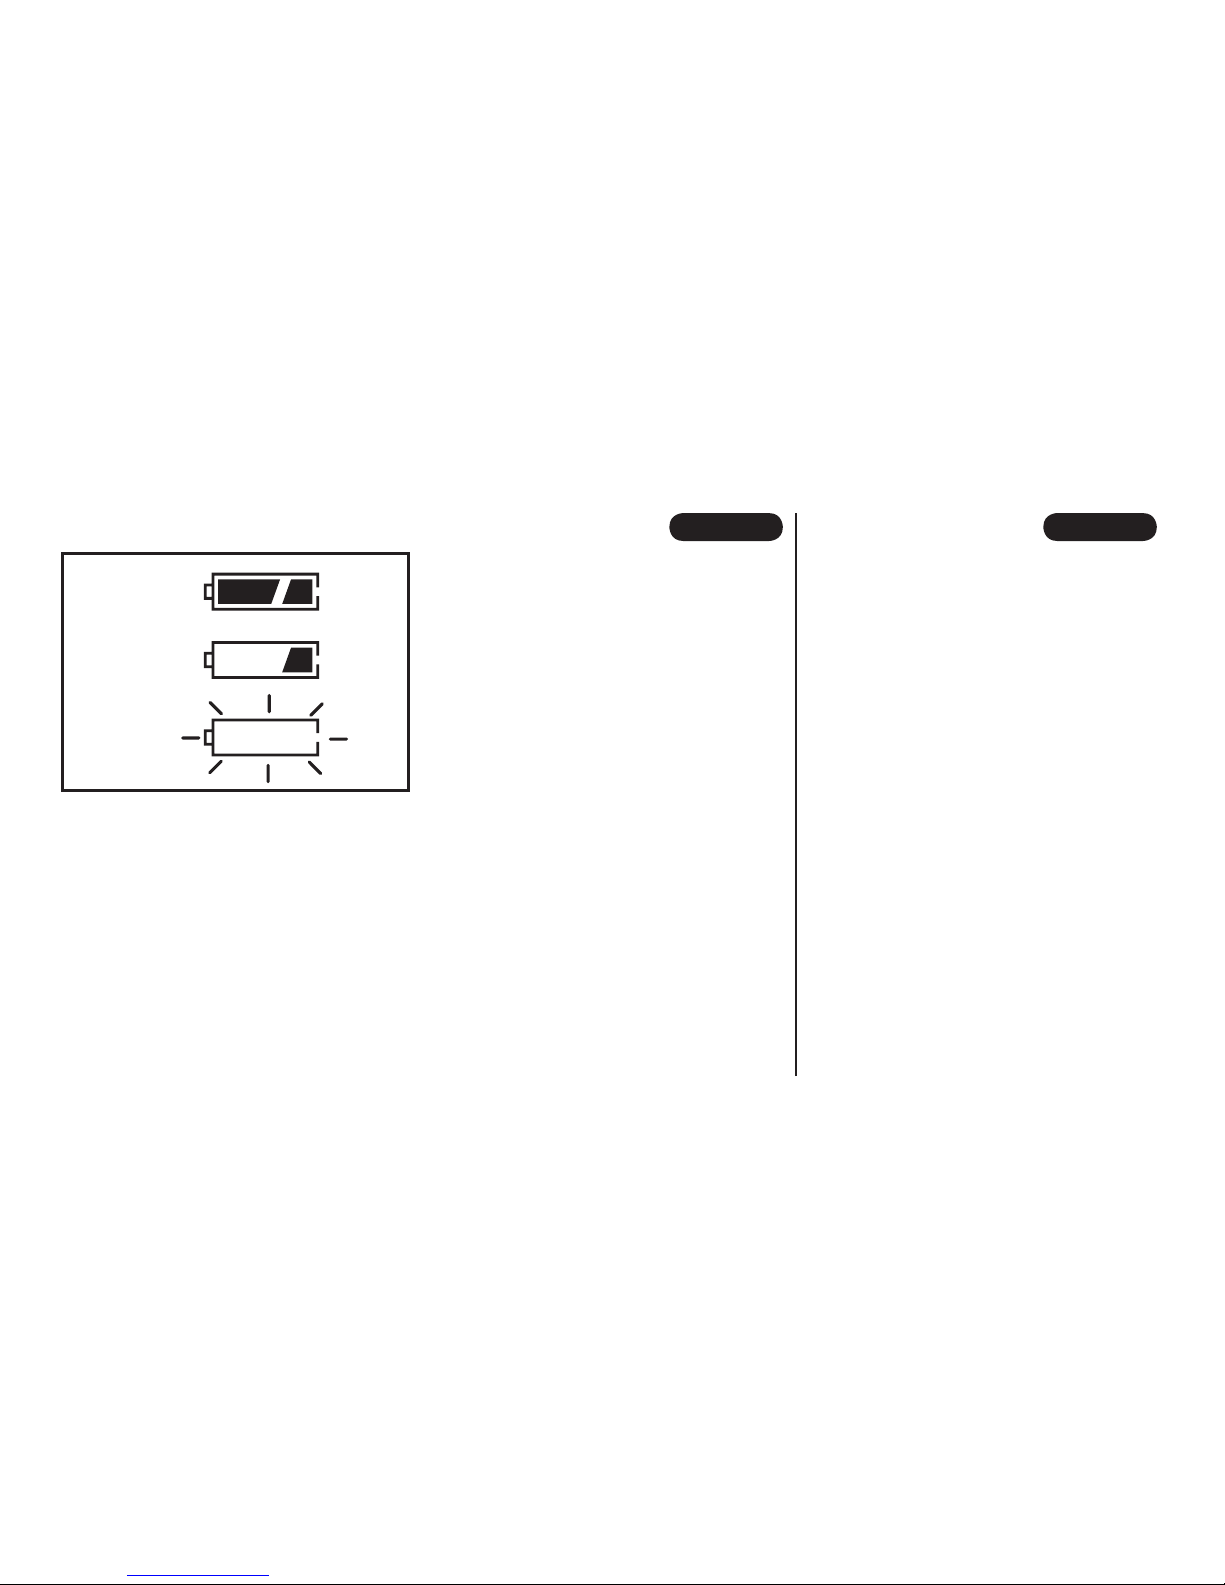
CHECKING THE BATTERY
To determine the amount of bat tery left
to use in the camera, turn the camera
on and check the bat tery status on the
LCD pan el.
a
Lit : Battery is OK.
b
Lit : Battery is low. Re place the
bat tery.
c
Blinks : The camera cannot take a pic-
ture be cause battery is dead.
Replace the battery.
c
Check the battery power level before you use
the camera.
c
The battery can be replaced even while the
partly used film is loaded in the camera.
COMPROBACIÓN DE LA PILA
Active la cámara y compruebe el in di ca dor de capacidad de la pila en el panel LCD.
a
Iluminado : La carga de la pila es co-
rrecta.
b
Iluminado : La carga de la pila es in-
suficiente. Coloque una
pila nue va.
c
Par p a d ea : E l o b tu ra dor no se puede
dispara por que la pila está
ago ta da. Sustitúyala.
c
Compruebe el indicador de capacidad de la
pila antes de utilizar la cámara.
c
La pila se puede sustituir aunque si hay cargada una película a mitad de rollo.
16
ENGLISH ESPAÑOL
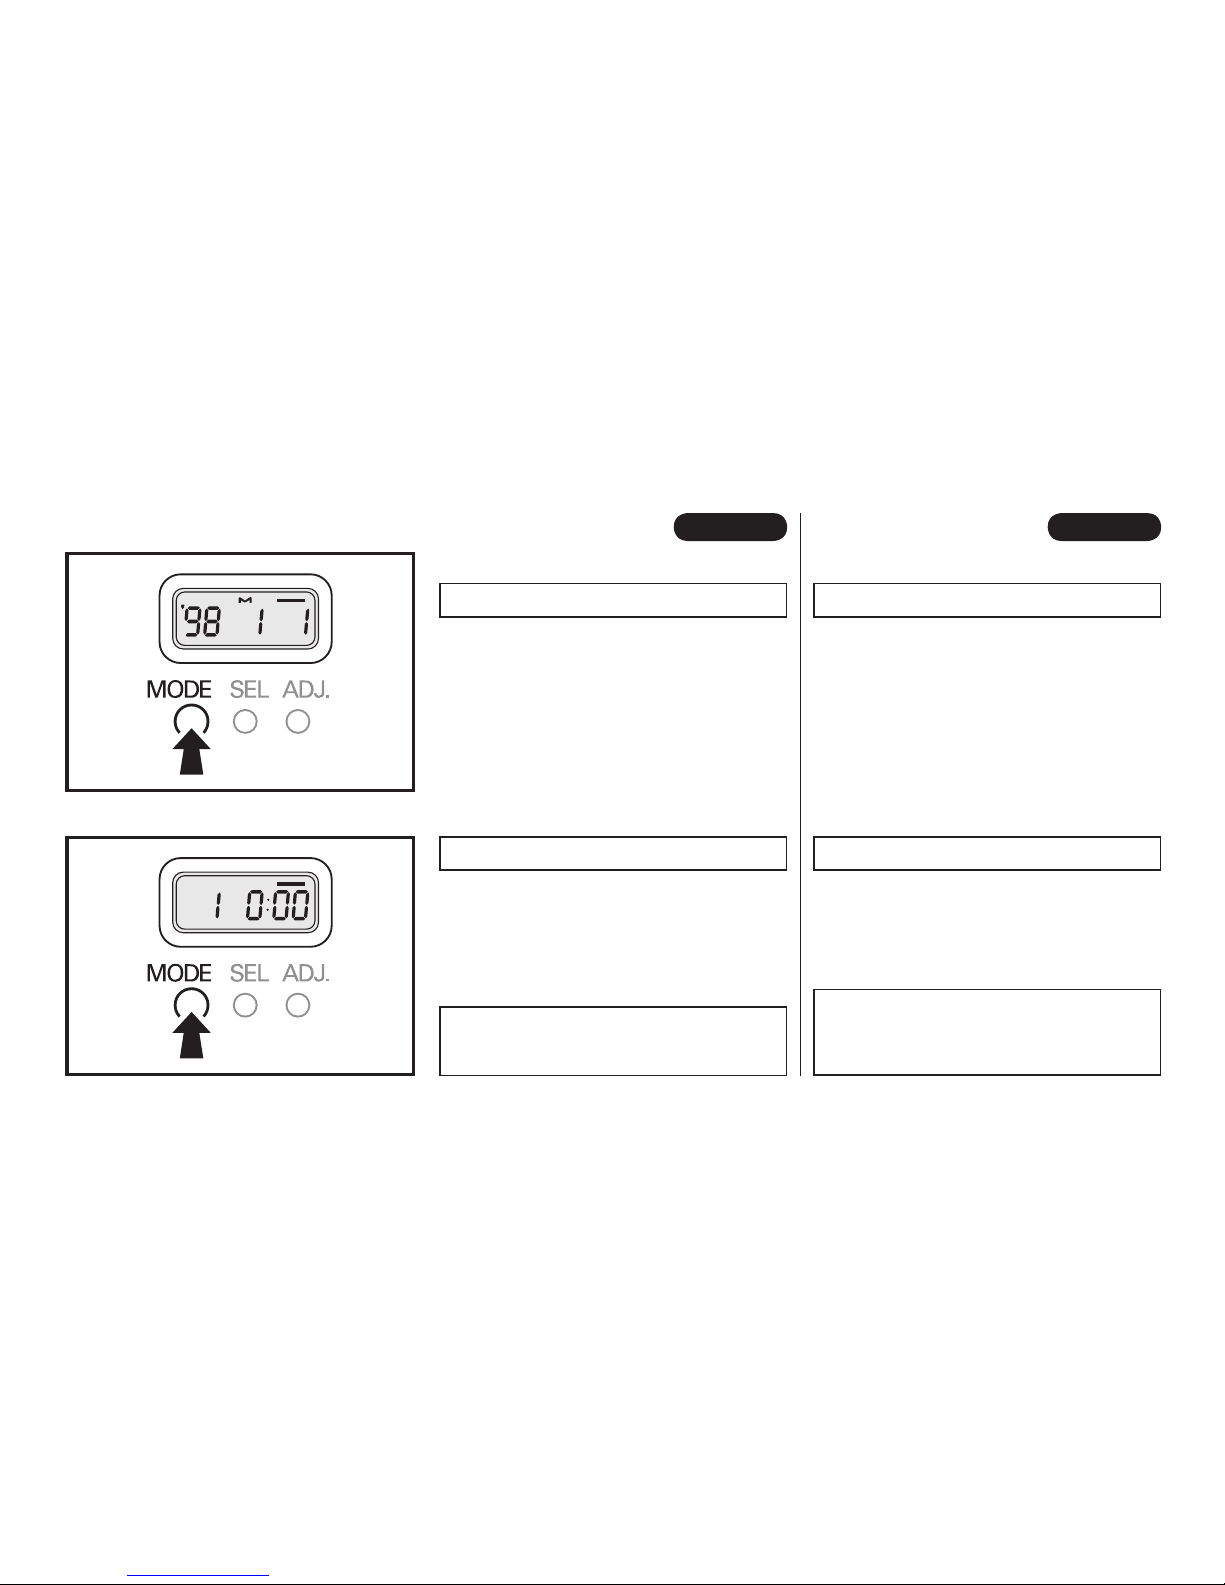
SETTING THE DATE
The year, month and day will change to geth er
with the hour and minute. To display both cor rect ly, set the date and time together.
AJUSTE DE LA FECHA
El año, el mes y el día cambian conjuntamente en función de la hora y de los minutos.
Para visualizar ambos correctamente, ajústelos al mismo tiempo.
If you want to set the date Si quiere poner la fecha
Press the MODE but ton to display the
hour and min utes.
Pulse el botón MODE para visualizar la
hora y los minutos.
If you want to set the time
Si quiere poner la hora
c
The numeral under the “S” in the display
area shows the month.
c
El número que aparece debajo de la “S” en
la pantalla indica el mes.
c
The date cannot be changed at this stage.
c
No puede cambiarse la fecha en esta fase.
Press the MODE but ton to display “S”
and the year, month and day.
Pulse el botón MODE para visualizar “S”
y el año, mes y día.
17
ENGLISH ESPAÑOL
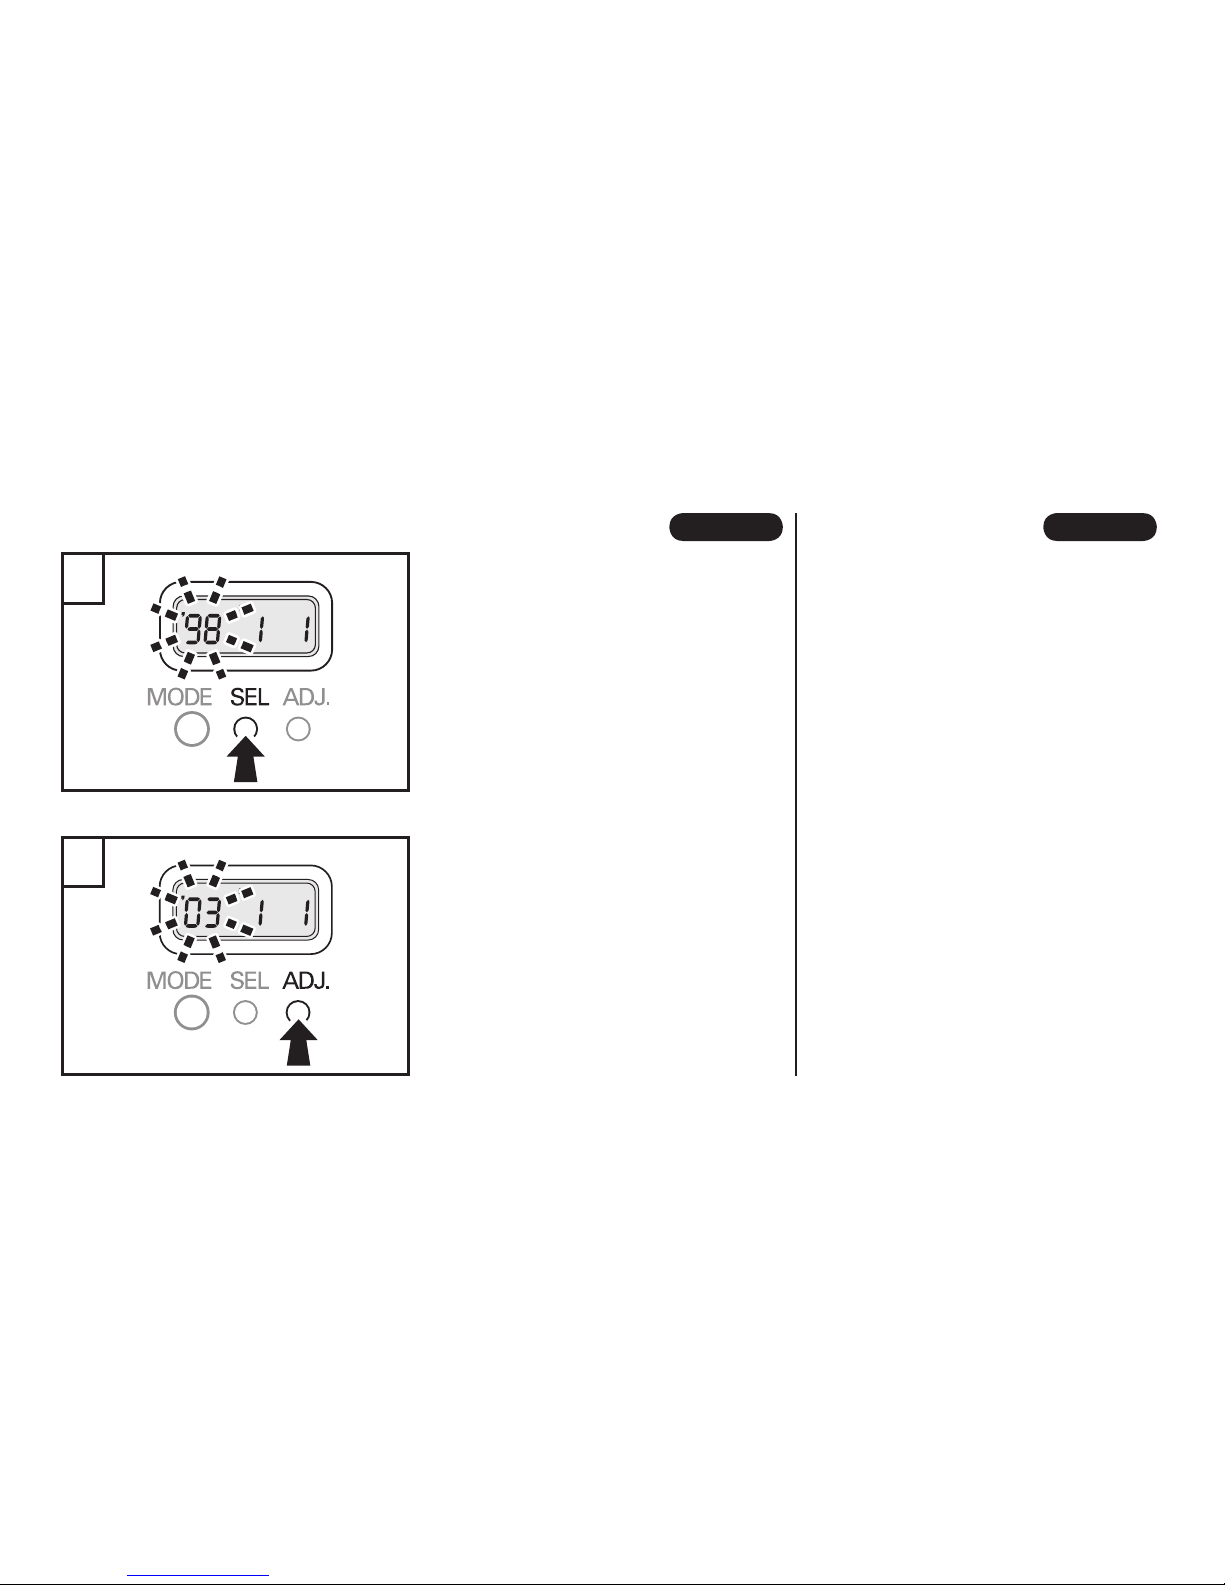
1
2
Press the SEL button. Pulse el botón SEL.
Press the ADJ. but ton to change the
numbers that are blinking.
Pulse el botón ADJ. para modificar los
números que parpadeen.
d
You can set :
Year : ’98 to ’49 (1998 to 2049)
Month : 1 to 12
Day : 1 to 31
Time : 0 to 23 hours ; 00 to 59 min utes
d
Ajuste
Año : ’98 a ’49 (1998 a 2049)
Mes : 1 a 12
Día : 1 a 31
Horas : 0 a 23
Minutos : 00 a 59
18
ENGLISH ESPAÑOL
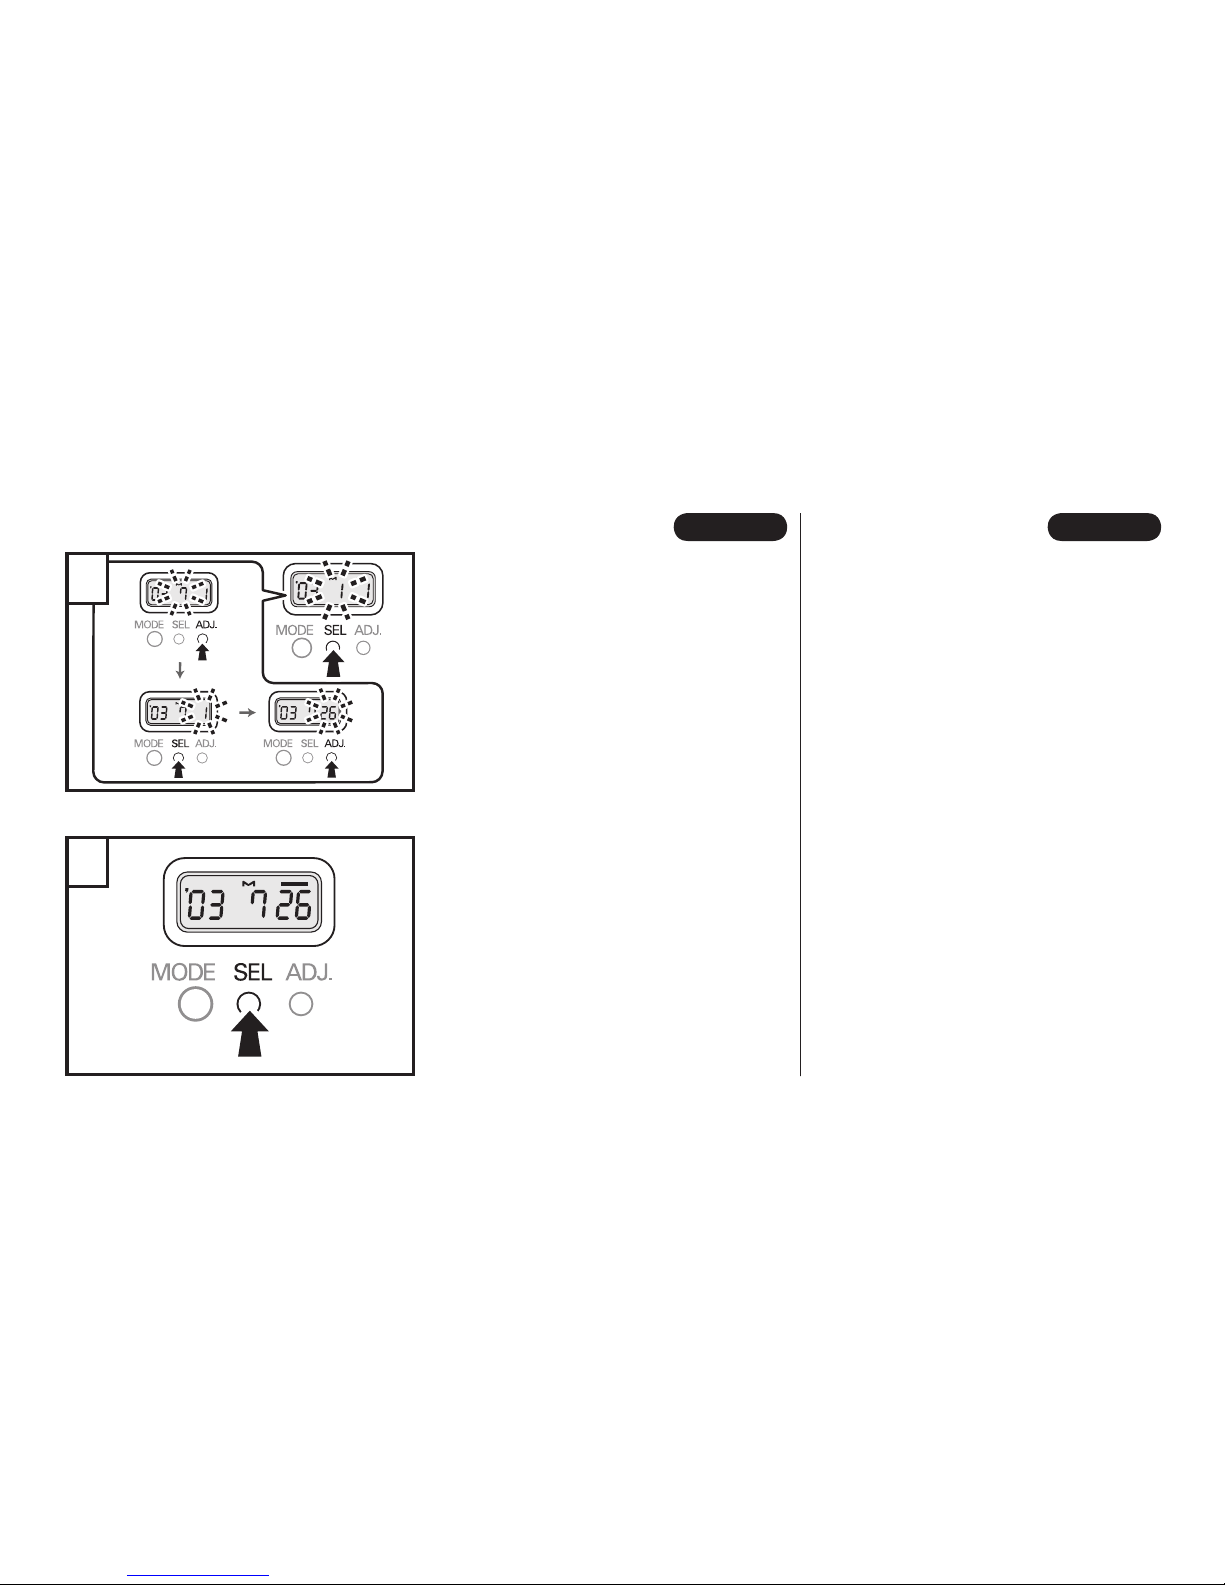
3
4
Press the SEL button to select the next
part of the date/time.
Pulse el botón SEL para seleccionar el
siguiente elemento de la fecha u hora.
Once the date or time is set, press the
SEL button and setting will stop.
\
To set the time (hour or minute) set the correct time using the time setting mode, and
press the SEL button when the time signal
shows zero.
Una vez ajustada la fecha o la hora, pulse el botón SEL y se detendrá el ajuste.
\
Para ajustar la hora o los minutos según la
radio, ajuste la hora mediante el modo ajuste de la hora y pulse el botón SEL cuando la
señal horaria anuncie cero.
 Loading...