

Page 1
FF200002
Owner’s Manual
BL00005102-202
EN
Page 2
Introduction
Thank you for your purchase of this product. Be sure that
you have read this manual and understood its contents before using the camera. Keep the manual where it will be
read by all who use the product.
For the Latest Information
The latest versions of the manuals are available from:
http://fujifilm-dsc.com/en/manual/
The site can be accessed not only from your
computer but also from smartphones and
tablets. It also contains information on the
software license.
For information on rmware updates, visit:
https://fujifilm-x.com/support/download/firmware/cameras/
ii
Page 3
Chapter Index
P
Menu List
1 Before You Begin
2 First Steps
3 Basic Photography and Playback
4 Movie Recording and Playback
5 Taking Photographs
6 The Shooting Menus
7 Playback and the Playback Menu
8 The Setup Menus
9 Shortcuts
iv
1
27
41
47
55
103
181
207
243
10 Peripherals and Optional Accessories
11 Connections
12 Technical Notes
259
281
297
iii
Page 4
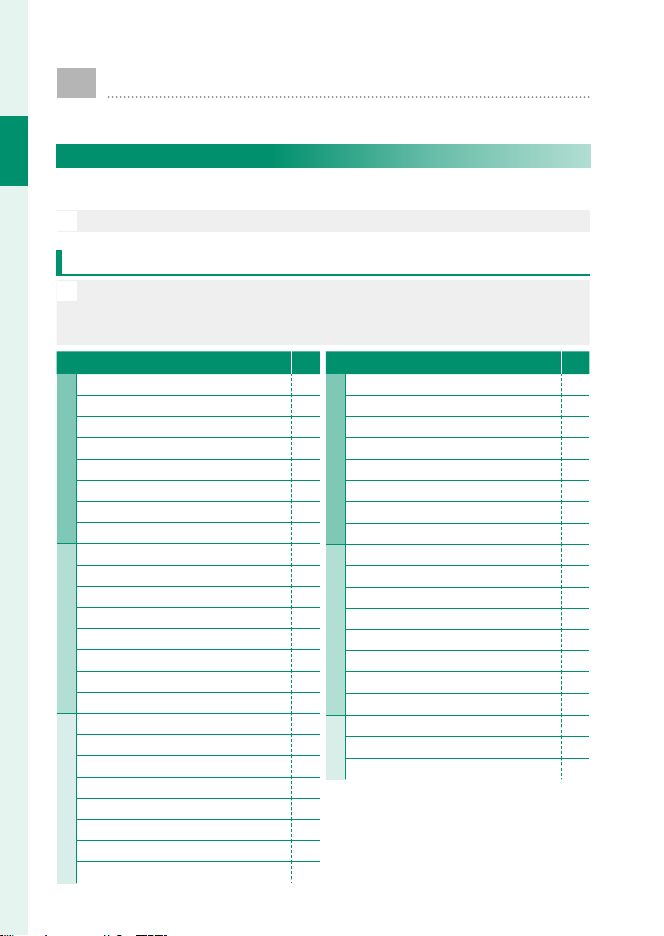
Menu List
Camera menu options are listed below.
Shooting Menus
Adjust settings when shooting photos or movies.
Menu List
See page 103 for details.
N
Photo Menus
Items marked with both x and F icons are available in both the still
N
photography and movie shooting menus. Changes to these items in
either menu also apply to the item in the remaining menu.
P
H IMAGE QUALITY SETTING
IMAGE SIZE 104
IMAGE QUALITY 105
RAW RECORDING 106
FILM SIMULATION 106
1⁄1⁄
MONOCHROMATIC COLOR
GRAIN EFFECT 108
COLOR CHROME EFFECT 108
COLOR CHROME FX BLUE 109
WHITE BALANCE 109
DYNAMIC RANGE 113
D RANGE PRIORITY
TONE CURVE 114
2⁄2⁄
COLOR 115
SHARPNESS 115
HIGH ISO NR 115
CLARITY 116
LONG EXPOSURE NR 116
LENS MODULATION OPTIMIZER 116
COLOR SPACE 117
PIXEL MAPPING 117
3⁄3⁄
SELECT CUSTOM SETTING 118
EDIT/SAVE CUSTOM SETTING 118
AUTO UPDATE CUSTOM SETTING 122
xF MOUNT ADAPTOR SETTING
iv
G AF/MF SETTING
FOCUS AREA 125
FOCUS MODE 125
AF MODE 125
AF-C CUSTOM SETTINGS
1⁄1⁄
STORE AF MODE BY ORIENTATION 130
108
AF POINT DISPLAY yz
NUMBER OF FOCUS POINTS 130
PRE-AF 131
xF AF ILLUMINATOR
FACE/EYE DETECTION SETTING 132
114
AF+MF 134
MF ASSIST 135
2⁄2⁄
FOCUS CHECK 135
INTERLOCK SPOT AE & FOCUS AREA 136
xF INSTANT AF SETTING
xF DEPTH-OF-FIELD SCALE
RELEASE/FOCUS PRIORITY 137
3⁄3⁄
xF AF RANGE LIMITER
xF TOUCH SCREEN MODE
123
P
126
130
131
136
136
137
138
Page 5
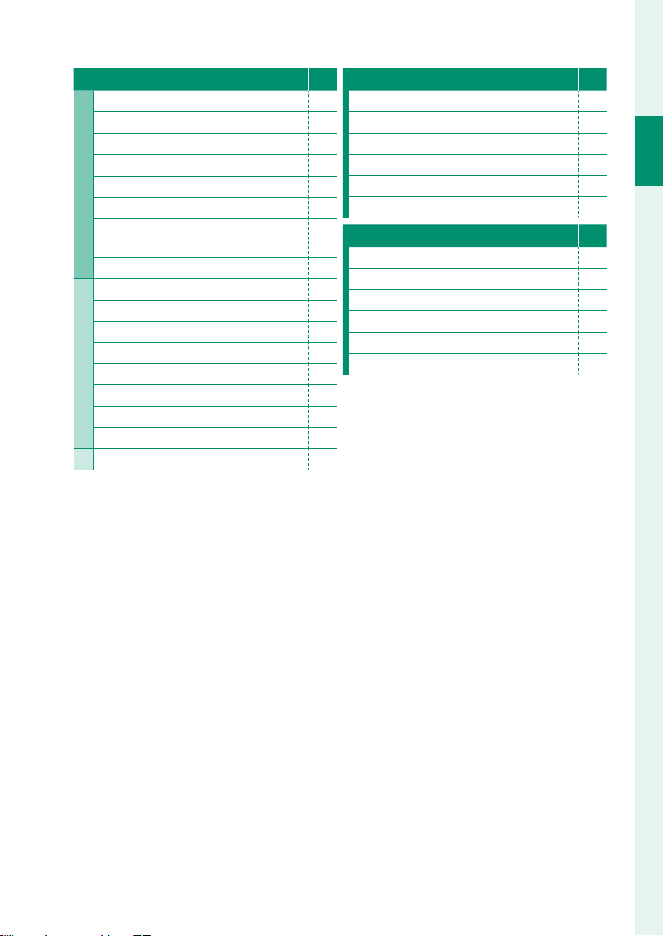
Menu List
A SHOOTING SETTING
SPORTS FINDER MODE 140
PRE-SHOT sJ
SELF-TIMER 141
SAVE SELF-TIMER SETTING 142
1⁄1⁄
SELF-TIMER LAMP 142
INTERVAL TIMER SHOOTING 143
INTERVAL TIMER SHOOTING
EXPOSURE SMOOTHING
AE BKT SETTING 144
FILM SIMULATION BKT 145
FOCUS BKT SETTING 145
MULTIPLE EXPOSURE CTRL 145
PHOTOMETRY 145
2⁄2⁄
SHUTTER TYPE 146
FLICKER REDUCTION 147
IS MODE 147
ISO 148
3⁄3⁄
WIRELESS COMMUNICATION
xF
P
F FLASH SETTING
FLASH FUNCTION SETTING 149
RED EYE REMOVAL 149
141
TTL-LOCK MODE 150
LED LIGHT SETTING
COMMANDER SETTING 151
CH SETTING 151
B MOVIE SETTING
144
MOVIE MODE 152
FILE FORMAT 152
FULL HD HIGH SPEED REC 152
F IS MODE
AUDIO SETTING 153
MIC/REMOTE RELEASE 154
148
P
150
Menu List
P
152
v
Page 6
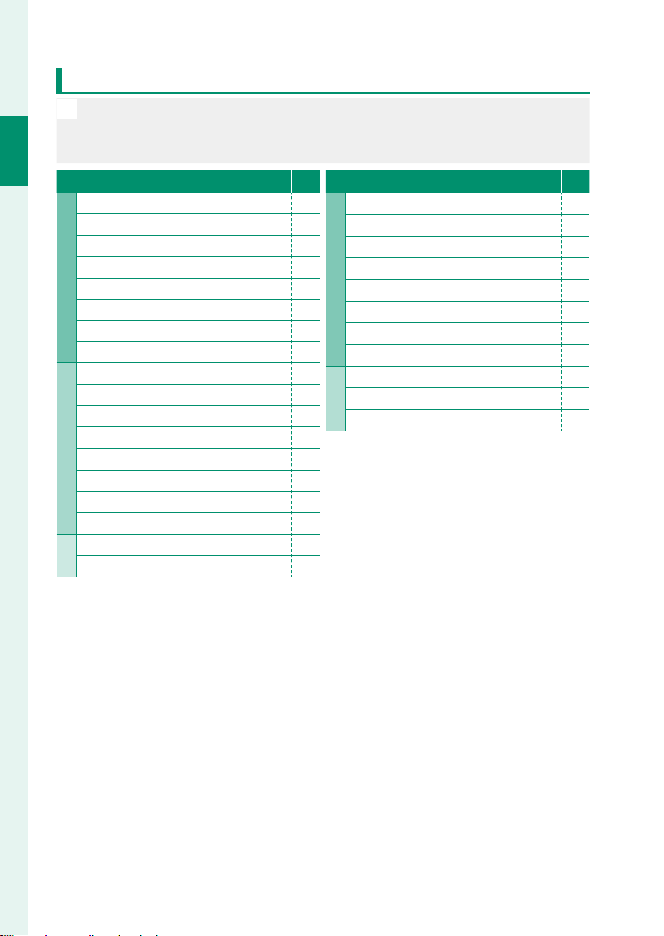
Movie Menus
N
B MOVIE SETTING
Menu List
1⁄1⁄
2⁄2⁄
3⁄3⁄
Items marked with both x and F icons are available in both the still
photography and movie shooting menus. Changes to these items in
either menu also apply to the item in the remaining menu.
P
H IMAGE QUALITY SETTING
MOVIE MODE 155
FILE FORMAT
FULL HD HIGH SPEED REC
FIX MOVIE CROP MAGNIFICATION
F-Log RECORDING
4K MOVIE OUTPUT
FULL HD MOVIE OUTPUT
HDMI OUTPUT INFO DISPLAY
4K HDMI STANDBY QUALITY
HDMI REC CONTROL
F PHOTOMETRY
F IS MODE
F ISO
ZEBRA SETTING
ZEBRA LEVEL
MOVIE OPTIMIZED CONTROL oL
TALLY LIGHT
WIRELESS COMMUNICATION
xF
C
F FILM SIMULATION
156
F MONOCHROMATIC COLOR
157
F WHITE BALANCE
158
F DYNAMIC RANGE
1⁄1⁄
158
F TONE CURVE
159
F COLOR
159
F SHARPNESS
160
F HIGH ISO NR
160
V INTERFRAME NR
160
2⁄2⁄
F
160
161
161
162
162
162
163
163
PERIPHERAL LIGHT CORRECTION
xF MOUNT ADAPTOR SETTING
P
164
164
164
165
165
165
166
166
166
167
167
vi
Page 7
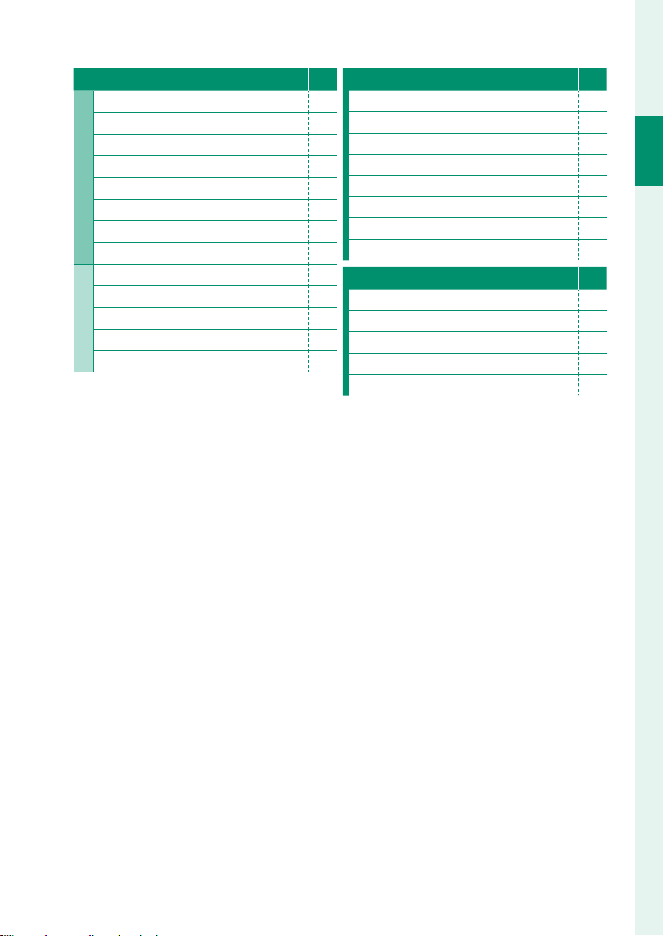
Menu List
G AF/MF SETTING
F FOCUS AREA
F FOCUS MODE
F AF MODE
F AF-C CUSTOM SETTING
1⁄1⁄
xF AF ILLUMINATOR
F FACE/EYE DETECTION SETTING
F MF ASSIST
F FOCUS CHECK
xF INSTANT AF SETTING
xF DEPTH-OF-FIELD SCALE
2⁄2⁄
xF AF RANGE LIMITER
xF TOUCH SCREEN MODE
FOCUS CHECK LOCK 174
P
P AUDIO SETTING
INTERNAL MIC LEVEL ADJUSTMENT 175
168
EXTERNAL MIC LEVEL ADJUSTMENT 175
168
MIC JACK SETTING 176
168
MIC LEVEL LIMITER
169
WIND FILTER 176
169
LOW CUT FILTER 176
170
HEADPHONES VOLUME 177
170
MIC/REMOTE RELEASE 177
171
171
Q TIME CODE SETTING
171
TIME CODE DISPLAY 178
171
START TIME SETTING 178
172
COUNT UP SETTING 178
DROP FRAME
HDMI TIME CODE OUTPUT 179
P
176
Menu List
P
179
vii
Page 8
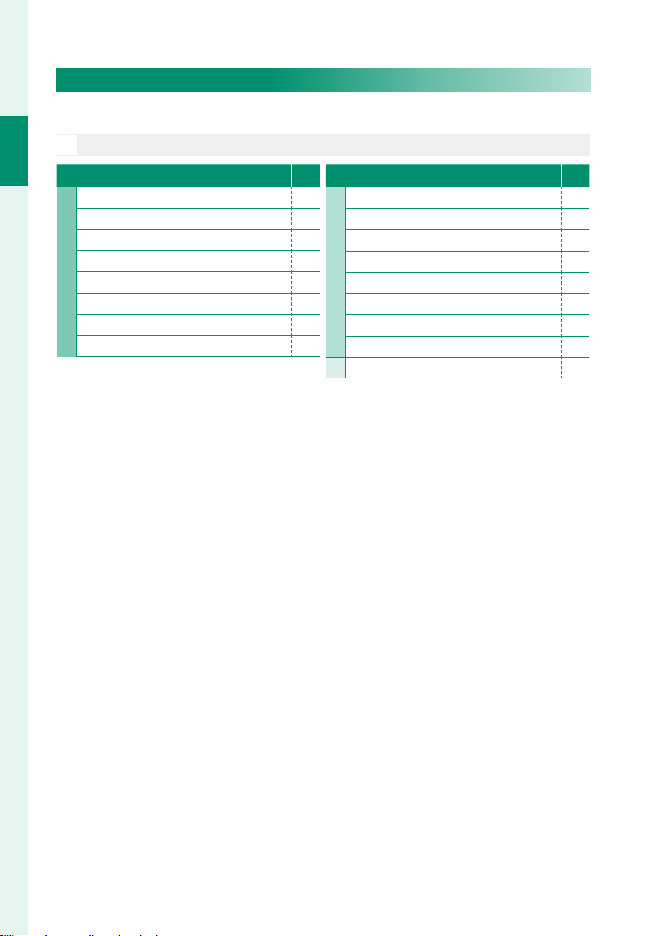
The Playback Menu
Adjust playback settings.
See page 187 for details.
N
C PLAY BACK MENU
Menu List
RAW CONVERSION 187
ERASE 190
CROP 192
RESIZE 193
1⁄1⁄
PROTECT 194
IMAGE ROTATE 195
RED EYE REMOVAL 196
VOICE MEMO SETTING 197
P
C PLAY BACK MENU
RATING 198
IMAGE TRANSFER ORDER 199
WIRELESS COMMUNICATION
xF
SLIDE SHOW
2⁄2⁄
PHOTOBOOK ASSIST 201
PC AUTO SAVE
PRINT ORDER (DPOF) 203
instax PRINTER PRINT 204
3⁄3⁄ DISP ASPECT 205
P
200
200
202
viii
Page 9
Setup Menus
Adjust basic camera settings.
See page 207 for details.
N
D USER SETTING
FORMAT 208
DATE/TIME 209
TIME DIFFERENCE 209
Q a
1⁄1⁄
x MY MENU SETTING
F MY MENU SETTING
SENSOR CLEANING 211
SOUND & FLASH 211
RESET 212
2⁄2⁄
REGULATORY 212
D SOUND SETTING
AF BEEP VOL. 213
SELF-TIMER BEEP VOL. 213
OPERATION VOL. 214
SHUTTER VOLUME 214
SHUTTER SOUND 214
PLAYBACK VOLUME 214
P
D SCREEN SETTING
VIEW MODE SETTING 215
EVF BRIGHTNESS 215
EVF COLOR 215
EVF COLOR ADJUSTMENT 216
210
1⁄1⁄
LCD BRIGHTNESS 216
210
LCD COLOR 216
210
LCD COLOR ADJUSTMENT 216
IMAGE DISP. 217
AUTOROTATE DISPLAYS 217
PREVIEW EXP./WB IN MANUAL MODE
NATURAL LIVE VIEW 218
P
F-Log VIEW ASSIST 219
2⁄2⁄
FRAMING GUIDELINE 219
AUTOROTATE PB 220
FOCUS SCALE UNITS 220
APERTURE UNIT FOR CINEMA LENS
DISP. CUSTOM SETTING 220
LARGE INDICATORS MODE(EVF) 221
LARGE INDICATORS MODE(LCD) 221
LARGE INDICATORS DISP. SETTING 222
3⁄3⁄
INFORMATION CONTRAST ADJ.
Q MENU BACKGROUND
x
F
Q MENU BACKGROUND
Menu List
P
218
220
222
223
223
Menu List
ix
Page 10
Menu List
D BUTTON/DIAL SETTING
FOCUS LEVER SETTING 224
x EDIT/SAVE QUICK MENU
F EDIT/SAVE QUICK MENU
Menu List
COMMAND DIAL SETTING 226
FUNCTION (Fn) SETTING 225
1⁄1⁄
SHUTTER AF 227
SHUTTER AE 227
SHOOT WITHOUT LENS 227
SHOOT WITHOUT CARD 228
FOCUS RING 228
FOCUS RING OPERATION
AE/AF-LOCK MODE 229
2⁄2⁄
AWB-LOCK MODE
APERTURE RING SETTING (A)
APERTURE SETTING 230
TOUCH SCREEN SETTING 230
D POWER MANAGEMENT
AUTO POWER OFF 232
PERFORMANCE
BOOST SETTING 233
P
D SAVE DATA SETTING
FRAME NO. 234
SAVE ORG IMAGE 235
225
EDIT FILE NAME 235
225
SELECT FOLDER 236
COPYRIGHT INFO 236
D CONNECTION SETTING
Bluetooth SETTINGS 237
PC AUTO SAVE
instax PRINTER CONNECTION SETTING
CONNECTION MODE 240
228
USB POWER SUPPLY SETTING 241
GENERAL SETTINGS 242
229
INFORMATION 242
229
RESET WIRELESS SETTING 242
P
233
P
P
238
239
x
Page 11

Table of Contents
P
Introduction ....................................................................................................ii
For the Latest Information ................................................................................... ii
Menu List .........................................................................................................iv
Shooting Menus ........................................................................................................iv
The Playback Menu ...............................................................................................viii
Setup Menus ...............................................................................................................ix
Supplied Accessories .............................................................................xxiii
About This Manual ..................................................................................xxiv
Symbols and Conventions .............................................................................xxiv
Terminology ............................................................................................................xxiv
Before You Begin 1Before You Begin 1
1
Parts of the Camera ......................................................................................2
The Shutter Speed Dial .......................................................................................... 4
The Exposure Compensation Dial ...................................................................4
The Focus Stick (Focus Lever) .............................................................................5
The DRIVE/DELETE Button ...................................................................................5
The Command Dial ..................................................................................................6
The Indicator Lamp .................................................................................................. 7
The LCD Monitor ........................................................................................................8
Focusing the View nder........................................................................................9
Camera Displays..........................................................................................10
The Electronic View nder .................................................................................. 10
The LCD Monitor ..................................................................................................... 12
Adjusting Display Brightness ...........................................................................14
Display Rotation ......................................................................................................14
Choosing a Display Mode ................................................................................. 14
The DISP/BACK Button ........................................................................................ 16
Customizing the Standard Display .............................................................. 17
Using the Menus ......................................................................................... 19
The Menus ..................................................................................................................19
Selecting a Menu Tab ........................................................................................... 20
Touch Screen Mode ................................................................................... 21
Shooting Touch Controls ................................................................................... 21
Playback Touch Controls ....................................................................................25
xi
Page 12

First Steps 27First Steps 27
2
Attaching the Strap ...................................................................................28
Attaching a Lens ......................................................................................... 29
Inserting the Battery and a Memory Card ......................................... 30
Compatible Memory Cards .............................................................................. 32
Charging the Battery ................................................................................. 33
Turning the Camera On and O ............................................................ 35
Checking the Battery Level ..................................................................... 36
Basic Setup.................................................................................................... 37
Choosing a Di erent Language ....................................................................39
Changing the Time and Date ..........................................................................39
Basic Photography and Playback 41Basic Photography and Playback 41
3
Taking Photographs (Mode P) ............................................................... 42
Viewing Pictures .........................................................................................45
Deleting Pictures ........................................................................................46
Movie Recording and Playback 47Movie Recording and Playback 47
4
Recording Movies ....................................................................................... 48
Recording Movies ................................................................................................... 48
Adjusting Movie Settings ..................................................................................51
Viewing Movies ........................................................................................... 52
Taking Photographs 55Taking Photographs 55
5
P, S, A, and M Modes .................................................................................. 56
Mode P: Program AE ............................................................................................. 56
Mode S: Shutter-Priority AE .............................................................................. 59
Mode A: Aperture-Priority AE ..........................................................................63
Mode M: Manual Exposure ...............................................................................65
Front Command Dial Roles by Mode .........................................................67
Autofocus ...................................................................................................... 68
Focus Mode ................................................................................................................69
Autofocus Options (AF Mode) ........................................................................71
Focus-Point Selection .......................................................................................... 73
Manual Focus ............................................................................................... 77
Checking Focus........................................................................................................78
xii
Page 13

Table of Contents
Exposure Compensation .........................................................................80
C (Custom) .................................................................................................................. 81
Sensitivity ...................................................................................................... 82
Auto Sensitivity (A) .................................................................................................83
Metering ........................................................................................................ 84
Focus/Exposure Lock ................................................................................85
Other Controls ..........................................................................................................86
Bracketing ..................................................................................................... 87
W ISO BKT .................................................................................................................. 88
V WHITE BALANCE BKT.................................................................................... 88
s Bracketing ............................................................................................................ 89
Continuous Shooting (Burst Mode) ..................................................... 92
HDR ..................................................................................................................93
Panoramas .................................................................................................... 95
Multiple Exposures ....................................................................................98
Filters .............................................................................................................100
Self-Portraits (Sel es) ..............................................................................101
The Shooting Menus 103The Shooting Menus 103
6
IMAGE QUALITY SETTING (Still Photography) ................................104
IMAGE SIZE ............................................................................................................... 104
IMAGE QUALITY .................................................................................................... 105
RAW RECORDING ................................................................................................. 106
FILM SIMULATION ................................................................................................ 106
MONOCHROMATIC COLOR ........................................................................... 108
GRAIN EFFECT ........................................................................................................ 108
COLOR CHROME EFFECT ................................................................................ 108
COLOR CHROME FX BLUE ............................................................................... 109
WHITE BALANCE ................................................................................................... 109
DYNAMIC RANGE ................................................................................................. 113
D RANGE PRIORITY.............................................................................................. 114
TONE CURVE ........................................................................................................... 114
COLOR.........................................................................................................................115
SHARPNESS .............................................................................................................. 115
HIGH ISO NR ............................................................................................................ 115
xiii
Page 14

CLARITY ...................................................................................................................... 116
LONG EXPOSURE NR .......................................................................................... 116
LENS MODULATION OPTIMIZER ................................................................. 116
COLOR SPACE ......................................................................................................... 117
PIXEL MAPPING ..................................................................................................... 117
SELECT CUSTOM SETTING ............................................................................. 118
EDIT/SAVE CUSTOM SETTING ....................................................................... 118
AUTO UPDATE CUSTOM SETTING ............................................................. 122
xF MOUNT ADAPTER SETTING ............................................................. 123
AF/MF SETTING (Still Photography) ...................................................125
FOCUS AREA ........................................................................................................... 125
FOCUS MODE ......................................................................................................... 125
AF MODE ................................................................................................................... 125
AF-C CUSTOM SETTINGS ................................................................................ 126
STORE AF MODE BY ORIENTATION ............................................................ 130
AF POINT DISPLAY yz ................................................................................ 130
NUMBER OF FOCUS POINTS ......................................................................... 130
PRE-AF......................................................................................................................... 131
xF AF ILLUMINATOR .................................................................................... 131
FACE/EYE DETECTION SETTING .................................................................. 132
AF+MF ........................................................................................................................ 134
MF ASSIST ................................................................................................................. 135
FOCUS CHECK ........................................................................................................ 135
INTERLOCK SPOT AE & FOCUS AREA ....................................................... 136
xF INSTANT AF SETTING ........................................................................... 136
xF DEPTH-OF-FIELD SCALE .................................................................... 136
RELEASE/FOCUS PRIORITY ............................................................................. 137
xF AF RANGE LIMITER ................................................................................ 137
xF TOUCH SCREEN MODE ....................................................................... 138
SHOOTING SETTING (Still Photography) ..........................................140
SPORTS FINDER MODE ..................................................................................... 140
PRE-SHOT sJ .................................................................................................... 141
SELF-TIMER ............................................................................................................... 141
SAVE SELF-TIMER SETTING .............................................................................142
SELF-TIMER LAMP ................................................................................................ 142
xiv
Page 15

Table of Contents
INTERVAL TIMER SHOOTING .......................................................................... 143
INTERVAL TIMER SHOOTING EXPOSURE SMOOTHING ................. 144
AE BKT SETTING .................................................................................................... 144
FILM SIMULATION BKT ...................................................................................... 145
FOCUS BKT SETTING .......................................................................................... 145
MULTIPLE EXPOSURE CTRL ............................................................................ 145
PHOTOMETRY ........................................................................................................ 145
SHUTTER TYPE .......................................................................................................146
FLICKER REDUCTION ......................................................................................... 147
IS MODE ..................................................................................................................... 147
ISO ................................................................................................................................. 148
xF WIRELESS COMMUNICATION ......................................................... 148
FLASH SETTING (Still Photography) ...................................................149
FLASH FUNCTION SETTING ........................................................................... 149
RED EYE REMOVAL .............................................................................................. 149
TTL-LOCK MODE ................................................................................................... 150
LED LIGHT SETTING ............................................................................................ 150
COMMANDER SETTING .................................................................................... 151
CH SETTING ............................................................................................................. 151
MOVIE SETTING (Still Photography) ..................................................152
MOVIE MODE.......................................................................................................... 152
FILE FORMAT ........................................................................................................... 152
FULL HD HIGH SPEED REC ............................................................................. 152
F IS MODE .............................................................................................................. 152
AUDIO SETTING ....................................................................................................153
MIC/REMOTE RELEASE ...................................................................................... 154
MOVIE SETTING (Movie Recording) ...................................................155
MOVIE MODE.......................................................................................................... 155
FILE FORMAT ........................................................................................................... 156
FULL HD HIGH SPEED REC ............................................................................. 157
FIX MOVIE CROP MAGNIFICATION C .................................................. 158
F-Log RECORDING ............................................................................................... 158
4K MOVIE OUTPUT .............................................................................................. 159
FULL HD MOVIE OUTPUT ................................................................................ 159
HDMI OUTPUT INFO DISPLAY ...................................................................... 160
xv
Page 16

4K HDMI STANDBY QUALITY ......................................................................... 160
HDMI REC CONTROL.......................................................................................... 160
F PHOTOMETRY ................................................................................................. 160
F IS MODE .............................................................................................................. 161
F ISO .......................................................................................................................... 161
ZEBRA SETTING ..................................................................................................... 162
ZEBRA LEVEL ........................................................................................................... 162
MOVIE OPTIMIZED CONTROL oL ......................................................... 162
TALLY LIGHT ............................................................................................................. 163
xF WIRELESS COMMUNICATION ......................................................... 163
IMAGE QUALITY SETTING (Movie Recording) ................................164
F FILM SIMULATION ........................................................................................ 164
F MONOCHROMATIC COLOR .................................................................... 164
F WHITE BALANCE ............................................................................................ 164
F DYNAMIC RANGE.......................................................................................... 165
F TONE CURVE .................................................................................................... 165
F COLOR ................................................................................................................. 165
F SHARPNESS ...................................................................................................... 166
F HIGH ISO NR ..................................................................................................... 166
V INTERFRAME NR........................................................................................... 166
F PERIPHERAL LIGHT CORRECTION ....................................................... 167
xF MOUNT ADAPTER SETTING ............................................................. 167
AF/MF SETTING (Movie Recording) ...................................................168
F FOCUS AREA .................................................................................................... 168
F FOCUS MODE ................................................................................................. 168
F AF MODE ........................................................................................................... 168
F AF-C CUSTOM SETTING ............................................................................ 169
xF AF ILLUMINATOR .................................................................................... 169
F FACE/EYE DETECTION SETTING ........................................................... 170
F MF ASSIST .......................................................................................................... 170
F FOCUS CHECK ................................................................................................ 171
xF INSTANT AF SETTING ........................................................................... 171
xF DEPTH-OF-FIELD SCALE .................................................................... 171
xF AF RANGE LIMITER ................................................................................ 171
xF TOUCH SCREEN MODE ....................................................................... 172
FOCUS CHECK LOCK .......................................................................................... 174
xvi
Page 17

Table of Contents
AUDIO SETTING (Movie Recording) ...................................................175
INTERNAL MIC LEVEL ADJUSTMENT ........................................................ 175
EXTERNAL MIC LEVEL ADJUSTMENT ....................................................... 175
MIC JACK SETTING ..............................................................................................176
MIC LEVEL LIMITER .............................................................................................. 176
WIND FILTER ............................................................................................................ 176
LOW CUT FILTER ...................................................................................................176
HEADPHONES VOLUME ................................................................................... 177
MIC/REMOTE RELEASE ...................................................................................... 177
TIME CODE SETTING (Movie Recording) ..........................................178
TIME CODE DISPLAY ........................................................................................... 178
START TIME SETTING .......................................................................................... 178
COUNT UP SETTING ...........................................................................................178
DROP FRAME .......................................................................................................... 179
HDMI TIME CODE OUTPUT ............................................................................ 179
Playback and the Playback Menu 181Playback and the Playback Menu 181
7
The Playback Display ...............................................................................182
The DISP/BACK Button ..................................................................................... 183
Viewing Pictures .......................................................................................185
Playback Zoom ...................................................................................................... 186
Multi-Frame Playback ........................................................................................ 186
Viewing Other Pictures .................................................................................... 186
The Playback Menu ..................................................................................187
RAW CONVERSION .............................................................................................. 187
ERASE .......................................................................................................................... 190
CROP ............................................................................................................................ 192
RESIZE ......................................................................................................................... 193
PROTECT .................................................................................................................... 194
IMAGE ROTATE ....................................................................................................... 195
RED EYE REMOVAL .............................................................................................. 196
VOICE MEMO SETTING .....................................................................................197
RATING ........................................................................................................................ 198
IMAGE TRANSFER ORDER ................................................................................ 199
xF WIRELESS COMMUNICATION ......................................................... 200
xvii
Page 18

SLIDE SHOW ............................................................................................................ 200
PHOTOBOOK ASSIST .......................................................................................... 201
PC AUTO SAVE ....................................................................................................... 202
PRINT ORDER (DPOF) ......................................................................................... 203
instax PRINTER PRINT ......................................................................................... 204
DISP ASPECT ...........................................................................................................205
The Setup Menus 207The Setup Menus 207
8
USER SETTING ............................................................................................208
FORMAT ..................................................................................................................... 208
DATE/TIME ................................................................................................................ 209
TIME DIFFERENCE ................................................................................................ 209
Qa ......................................................................................................... 210
x MY MENU SETTING .....................................................................................210
F MY MENU SETTING ...................................................................................... 210
SENSOR CLEANING ............................................................................................. 211
SOUND & FLASH ................................................................................................... 211
RESET ........................................................................................................................... 212
REGULATORY .......................................................................................................... 212
SOUND SETTING .......................................................................................213
AF BEEP VOL. ........................................................................................................... 213
SELF-TIMER BEEP VOL. ....................................................................................... 213
OPERATION VOL. ................................................................................................... 214
SHUTTER VOLUME ............................................................................................... 214
SHUTTER SOUND ................................................................................................. 214
PLAYBACK VOLUME ............................................................................................ 214
SCREEN SETTING.......................................................................................215
VIEW MODE SETTING ........................................................................................ 215
EVF BRIGHTNESS................................................................................................... 215
EVF COLOR ............................................................................................................... 215
EVF COLOR ADJUSTMENT .............................................................................. 216
LCD BRIGHTNESS..................................................................................................216
LCD COLOR .............................................................................................................. 216
LCD COLOR ADJUSTMENT .............................................................................216
IMAGE DISP. .............................................................................................................. 217
xviii
Page 19

Table of Contents
AUTOROTATE DISPLAYS ...................................................................................217
PREVIEW EXP./WB IN MANUAL MODE ..................................................... 218
NATURAL LIVE VIEW ............................................................................................ 218
F-Log VIEW ASSIST............................................................................................... 219
FRAMING GUIDELINE ......................................................................................... 219
AUTOROTATE PB ................................................................................................... 220
FOCUS SCALE UNITS .......................................................................................... 220
APERTURE UNIT FOR CINEMA LENS ......................................................... 220
DISP. CUSTOM SETTING.................................................................................... 220
LARGE INDICATORS MODE(EVF) ................................................................. 221
LARGE INDICATORS MODE(LCD) ................................................................ 221
LARGE INDICATORS DISP. SETTING ............................................................ 222
INFORMATION CONTRAST ADJ. ..................................................................222
x Q MENU BACKGROUND ........................................................................... 223
F Q MENU BACKGROUND ........................................................................... 223
BUTTON/DIAL SETTING ..........................................................................224
FOCUS LEVER SETTING ..................................................................................... 224
x EDIT/SAVE QUICK MENU .......................................................................... 225
F EDIT/SAVE QUICK MENU .......................................................................... 225
FUNCTION (Fn) SETTING ................................................................................. 225
COMMAND DIAL SETTING ............................................................................. 226
SHUTTER AF ............................................................................................................227
SHUTTER AE ............................................................................................................227
SHOOT WITHOUT LENS .................................................................................... 227
SHOOT WITHOUT CARD ..................................................................................228
FOCUS RING ............................................................................................................ 228
FOCUS RING OPERATION ............................................................................... 228
AE/AF-LOCK MODE ............................................................................................. 229
AWB-LOCK MODE ................................................................................................ 229
APERTURE RING SETTING (A) ........................................................................ 229
APERTURE SETTING ............................................................................................ 230
TOUCH SCREEN SETTING ................................................................................ 230
POWER MANAGEMENT ..........................................................................232
AUTO POWER OFF ............................................................................................... 232
PERFORMANCE ..................................................................................................... 233
BOOST SETTING .................................................................................................... 233
xix
Page 20

SAVE DATA SETTING ................................................................................234
FRAME NO. ............................................................................................................... 234
SAVE ORG IMAGE ................................................................................................. 235
EDIT FILE NAME ..................................................................................................... 235
SELECT FOLDER ....................................................................................................236
COPYRIGHT INFO ................................................................................................. 236
CONNECTION SETTING ..........................................................................237
Bluetooth SETTINGS........................................................................................... 237
PC AUTO SAVE ....................................................................................................... 238
instax PRINTER CONNECTION SETTING ................................................. 239
CONNECTION MODE ......................................................................................... 240
USB POWER SUPPLY SETTING ......................................................................241
GENERAL SETTINGS ............................................................................................ 242
INFORMATION ........................................................................................................ 242
RESET WIRELESS SETTING ............................................................................... 242
Shortcuts 243Shortcuts 243
9
Shortcut Options ......................................................................................244
MY MENU ....................................................................................................245
MY MENU SETTING ............................................................................................. 245
The Quick Menu ........................................................................................247
The Quick Menu Display ................................................................................. 247
Viewing and Changing Settings................................................................. 249
Editing the Quick Menu ................................................................................... 250
Function Controls .....................................................................................253
The Function Buttons ........................................................................................ 253
Touch-Function Gestures ............................................................................... 256
xx
Page 21

Table of Contents
Peripherals and Optional Accessories 259Peripherals and Optional Accessories 259
10
Lenses ...........................................................................................................260
Lens Parts .................................................................................................................. 260
Removing Lens Caps ......................................................................................... 261
Attaching Lens Hoods ...................................................................................... 261
Lenses with Aperture Rings ..........................................................................262
Lenses with No Aperture Rings ..................................................................263
Lenses with O.I.S. Switches ............................................................................ 263
Manual Focus Lenses ........................................................................................ 264
Lens Care ................................................................................................................... 265
External Flash Units .................................................................................266
Using an External Flash .................................................................................... 267
EF-X8 ............................................................................................................................ 268
SYNC TERMINAL .................................................................................................... 270
SHOE MOUNT FLASH ........................................................................................ 271
COMMANDER(OPTICAL) ..................................................................................274
Handgrips ....................................................................................................278
Thumb Rests ...............................................................................................279
Connections 281Connections 281
11
HDMI Output..............................................................................................282
Connecting to HDMI Devices ...................................................................... 282
Shooting .................................................................................................................... 283
Playback ..................................................................................................................... 283
Wireless Connections (Bluetooth®, Wireless LAN/Wi-Fi) ............284
Smartphones and Tablets: FUJIFILM Camera Remote .................. 284
Copying Pictures to a Computer: PC AutoSave ................................ 286
Connecting via USB .................................................................................287
Connecting to Computers ............................................................................. 287
Copying Pictures to a Computer ............................................................... 290
Using Your Camera as a Webcam (FUJIFILM X Webcam) ...........290
Converting RAW Images: FUJIFILM X RAW STUDIO ....................... 291
Backing up and Restoring Camera Settings
(FUJIFILM X Acquire) ....................................................................................... 291
Connecting to Smartphones .......................................................................292
xxi
Page 22

Table of Contents
instax SHARE Printers ..............................................................................295
Establishing a Connection ............................................................................. 295
Printing Pictures....................................................................................................296
Technical Notes 297Technical Notes 297
12
Accessories from Fuji lm .......................................................................298
Software for Use with Your Camera ...................................................301
FUJIFILM Camera Remote .............................................................................. 301
FUJIFILM PC AutoSave ...................................................................................... 301
RAW FILE CONVERTER EX powered by SILKYPIX .............................. 301
Capture One Express Fuji lm .......................................................................301
Capture One Pro Fuji lm ................................................................................. 302
FUJIFILM X Acquire ............................................................................................. 302
FUJIFILM X RAW STUDIO ................................................................................. 302
FUJIFILM X Webcam .......................................................................................... 302
For Your Safety ...........................................................................................303
Product Care ...............................................................................................312
Cleaning the Image Sensor ...................................................................313
Firmware Updates ....................................................................................314
Checking the Firmware Version .................................................................. 314
Troubleshooting .......................................................................................315
Warning Messages and Displays .........................................................324
Memory Card Capacity ...........................................................................328
Speci cations .............................................................................................329
xxii
Page 23

Supplied Accessories
The following are included with the camera:
NP-W126S rechargeable battery
•
Body cap (comes attached to camera)
•
USB cable
•
Headphone adapter
•
Shoulder strap
•
Basic Manual
•
The battery is not charged at shipment. Charge the battery before use
O
(P 33).
• If you purchased a lens kit, check that a lens is included.
N
Purchasers of the accessory kit should con rm that it includes a hand
•
grip and thumb rest.
The supplied headphone adapter converts USB Type-C connectors to
•
⌀3.5 mm headphone jacks.
For information on compatible computer software, see “Software for
•
Use with Your Camera” (P 301).
xxiii
Page 24

About This Manual
This manual contains instructions for your FUJIFILM X-E4
digital camera. Be sure you have read and understood its
contents before proceeding.
Symbols and Conventions
The following symbols are used in this manual:
Information that should be read to prevent damage to the
O
product.
Additional information that may be helpful when using the
N
product.
Pages on which related information may be found.
P
Menus and other text in the displays are shown in bold. Illustrations
are for explanatory purposes only; drawings may be simpli ed,
while photographs are not necessarily taken with the model of
camera described in this manual.
Terminology
The optional SD, SDHC, and SDXC memory cards the camera uses
to store pictures are referred to as “memory cards”. The electronic
view nder may be referred to as the “EVF” and the LCD monitor
as the “LCD”.
xxiv
Page 25

Before You Begin
1
Page 26
Parts of the Camera
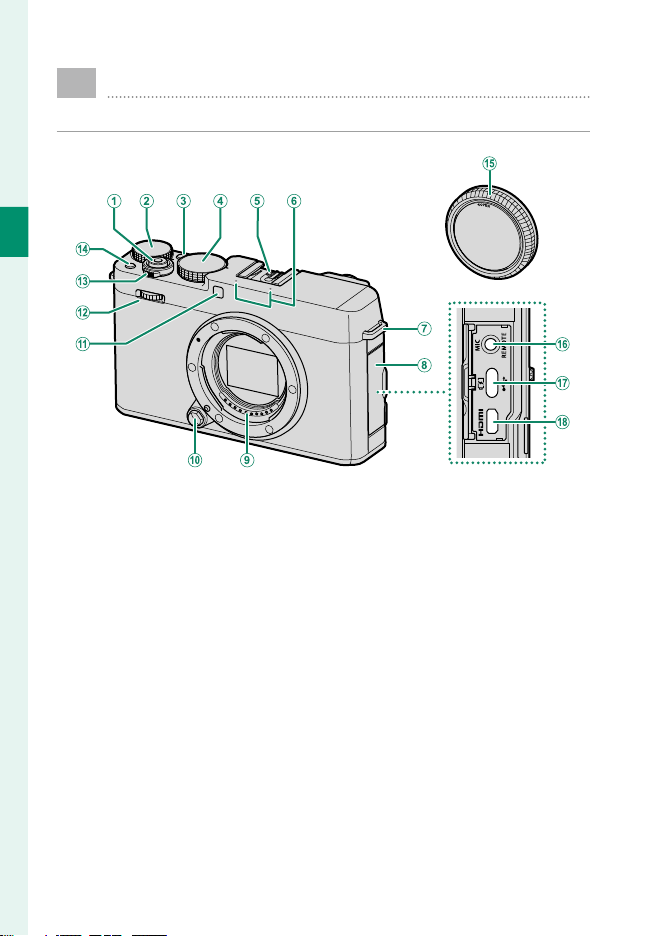
The parts of the camera are listed below.
1
Before You Begin
Shutter button .................................................44
A
Exposure compensation dial .................. 4, 80
B
Q (quick menu) button ............................... 247
C
Shutter speed dial
D
.................................................4, 56, 59, 63, 65
Hot shoe .........................................................267
E
Microphone ............................................ 50, 175
F
Strap eyelet .......................................................28
G
Connector cover
H
Lens signal contacts
I
Lens release button ........................................29
J
2
AF-assist illuminator................................... 131
K
Self-timer lamp ............................................ 141
Tally light ........................................................ 163
Front command dial ........................................ 6
L
ON/OFF switch .................................................35
M
Fn button........................................................ 253
N
Body cap ............................................................29
O
Microphone/remote release connector
P
(⌀3.5mm) .......................................3, 50, 154
USB connector (Type-C) ...............33, 50, 287
Q
HDMI Micro connector (Type D) .............282
R
Page 27
Parts of the Camera
1
Before You Begin
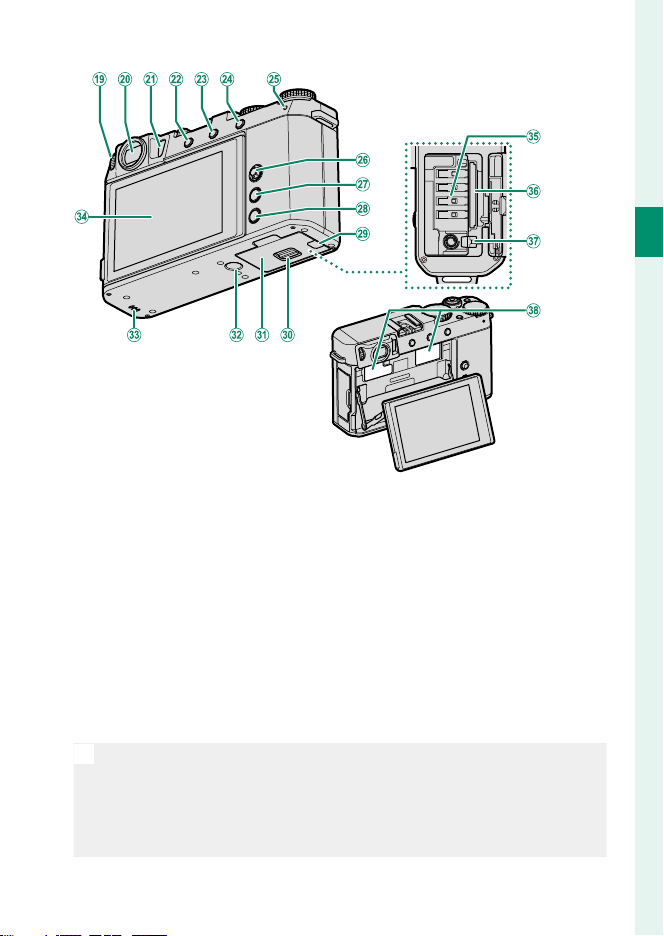
Diopter adjustment control ........................... 9
S
Electronic viewfi nder (EVF)
T
.....................................................10, 14, 16, 21
Eye sensor ..........................................................15
U
DRIVE/DELETE button ........................5, 46, 87
V
PLAY (playback) button ................................45
W
AEL (exposure lock)/AFL (focus lock) button
X
................................................................ 86, 253
Indicator lamp ..........................................7, 163
Y
Tally light ........................................................ 163
Focus stick (focus lever)...................5, 74, 224
Z
MENU/OK button .............................................19
a
O
Use of an optional RR-100 remote release requires a third-party
P
DISP (display)/BACK button ............... 16, 183
b
Cable channel cover for DC coupler ....... 298
c
Battery-chamber cover latch ......................30
d
Battery-chamber cover .................................30
e
Tripod mount
f
Speaker .................................................... 52, 214
g
LCD monitor ......................................... 8, 12, 14
h
Touch screen ................................. 21, 138, 230
Battery chamber .............................................30
i
Memory card slot ............................................30
j
Battery latch .....................................................31
k
Serial number plate......................... see below
l
adapter to convert the female three-pin, ⌀2.5 mm connector to a
male three-pin, ⌀3.5 mm connector.
Do not remove the serial number plate, which provides the CMIITID,
l
serial number, and other important information.
3
Page 28
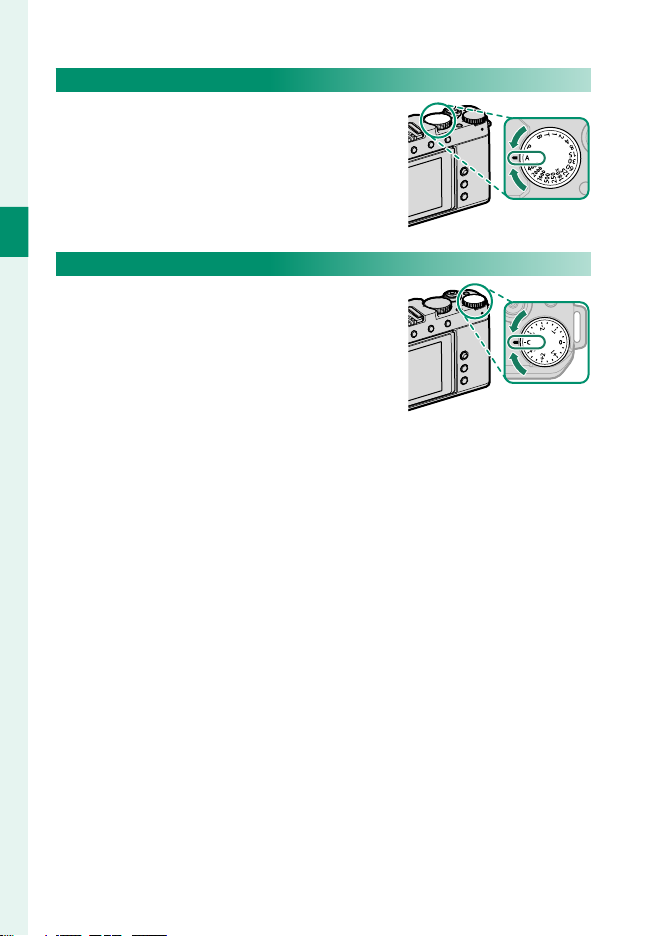
The Shutter Speed Dial
Rotate the shutter speed dial to choose
the shutter speed (P 56).
1
Before You Begin
The Exposure Compensation Dial
Rotate the dial to choose an exposure
compensation amount (P 80).
4
Page 29
Parts of the Camera
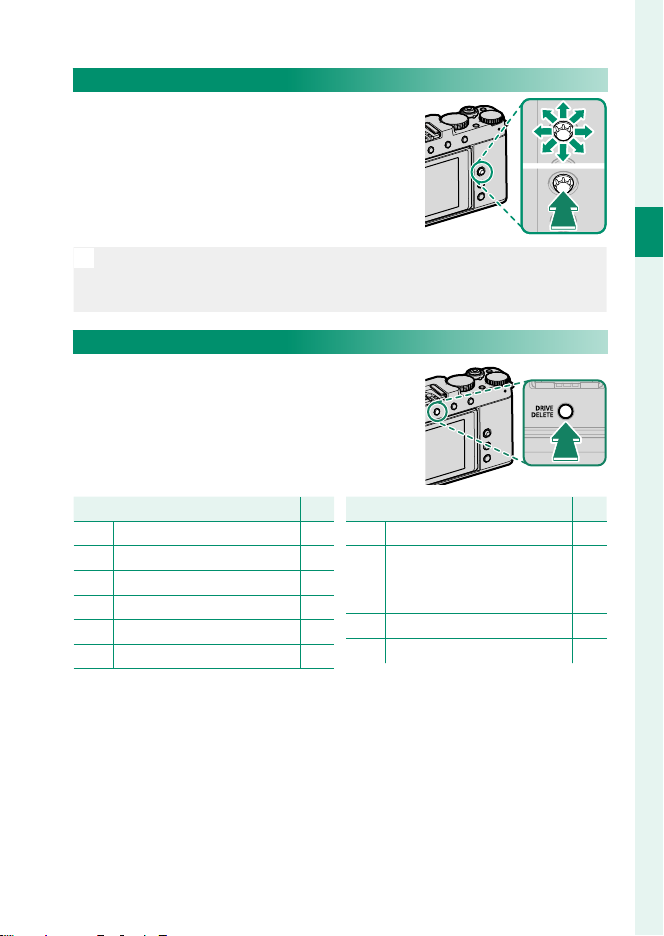
The Focus Stick (Focus Lever)
Tilt or press the focus stick to select the focus area. The focus stick can also be used
to navigate the menus.
To choose the role played by the focus stick, press and hold the center
N
of the stick or use D BUTTON/DIAL SETTING> FOCUS LEVER SETTING (P 224).
The DRIVE/DELETE Button
Pressing the DRIVE/DELETE button displays
drive-mode menu, where you can choose
from the following the drive modes.
1
Before You Begin
ModeMode
Single frame 42
B
High-speed burst 92
J
Low-speed burst 92
O
ISO BKT 88
W
WHITE BALANCE BKT 88
V
BKT Bracketing 89
PP
ModeMode
HDR 93
h
Adv. MODE
Adv.
u Panorama
•
j Multiple Exposure
•
Filter 100
Y
Movie 48
F
PP
95
98
5
Page 30
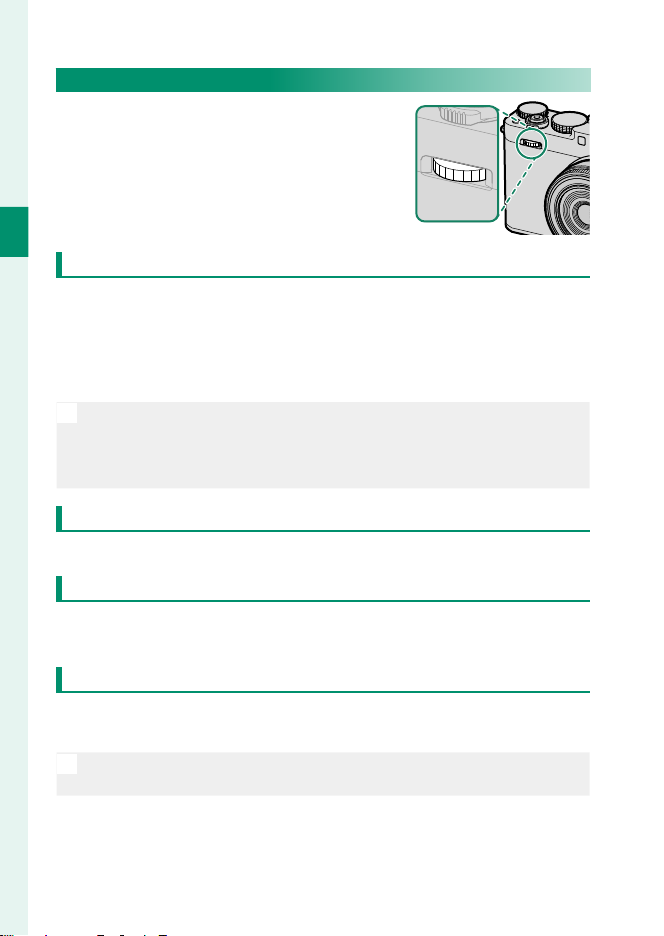
The Command Dial
The front command dial is used for the
operations below.
1
Before You Begin
Shooting
Choose the desired combination of shutter speed and aperture (program shift).
•
Choose a shutter speed.
•
Adjust aperture.
•
Adjust exposure compensation.
•
Adjust sensitivity.
•
• During shooting, the role of the front command dial changes each
N
time the center of the dial is pressed.
For information on the roles performed by the dials during shooting,
•
see “Front Command Dial Roles by Mode” (P 67).
Menus
Rotate the dial to select menu tabs or page through menus.
Q Menu
Rotate the dial to change settings in the quick menu and press the center of the
dial to select.
Playback
View other pictures.
•
Zoom in or out during full- or multi-frame playback.
•
Press the center of the front command dial to switch between the two
N
roles.
6
Page 31
Parts of the Camera
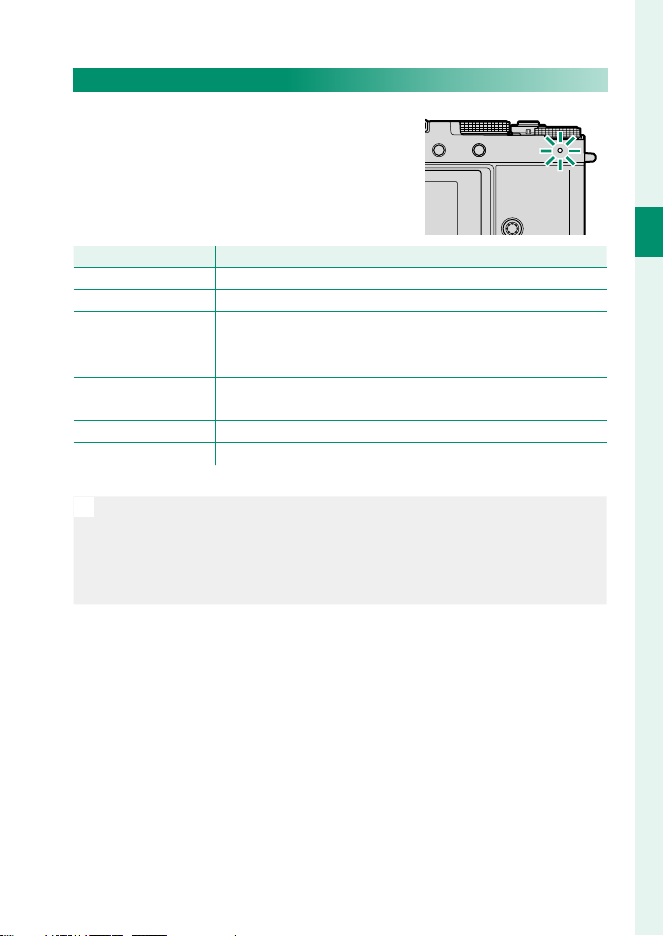
The Indicator Lamp
Camera status is shown by the indicator
lamp.
Indicator lampIndicator lamp Camera statusCamera status
Glows green Focus locked.
Blinks green Focus or slow shutter speed warning. Pictures can be taken.
Camera on: Recording pictures. Additional pictures can be
Blinks green and
orange
Glows orange
Blinks orange Flash charging; fl ash will not fi re when picture is taken.
Blinks red Lens or memory error.
* Displayed only if pictures are selected for upload.
• Warnings may also appear in the display.
N
The indicator lamp remains o while your eye is to the view nder.
•
The B MOVIE SETTING> TALLY LIGHT option can be used to
•
choose the lamp (indicator or AF-assist) that lights during movie recording and whether the lamp blinks or remains steady.
•
taken.
Camera o : Uploading pictures to a smartphone or tablet.
•
Recording pictures. No additional pictures can be taken at
this time.
1
Before You Begin
*
7
Page 32
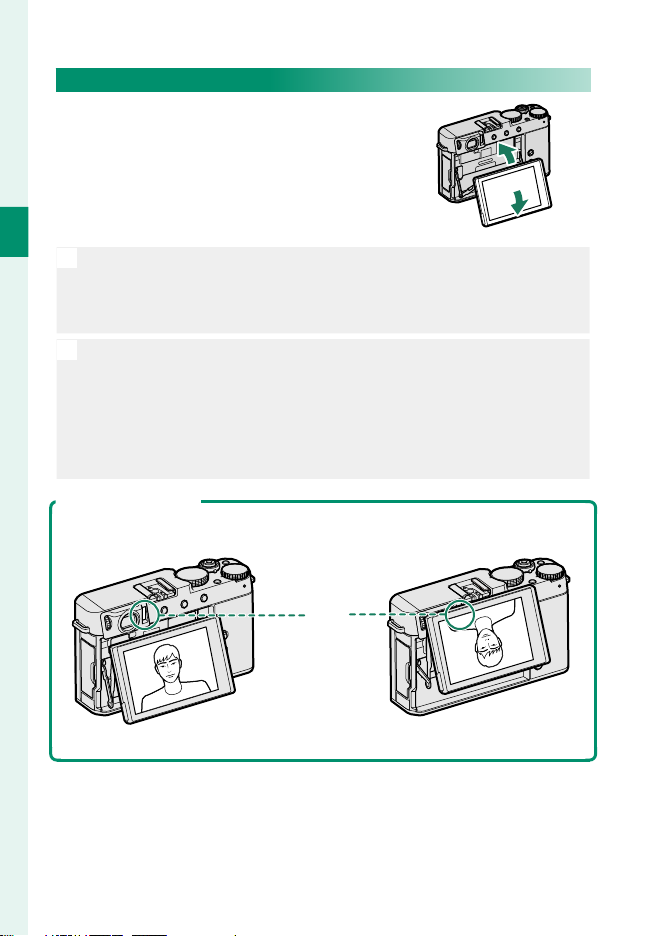
The LCD Monitor
You can adjust the angle of the LCD monitor when framing shots, but be careful not
to trap your ngers or other objects.
1
Before You Begin
• Do not apply excessive force to the hinge when rotating the LCD
O
monitor, as this could damage the hinge.
Be careful that the corners of the monitor do not contact the camera
•
body, as this could leave marks.
The LCD monitor also functions as a touch screen that can be used for:
N
Touch photography (P 22)
•
Focus area selection (P 21)
•
Function selection (P 24)
•
Movie optimized control oL (P 23)
•
Playback (P 25)
•
Tilting the LCD Monitor
Be sure the LCD monitor doesn’t block the eye sensor during shooting, as
this will cause the display to ip.
Eye sensor
Normal display Display ipped
8
Page 33
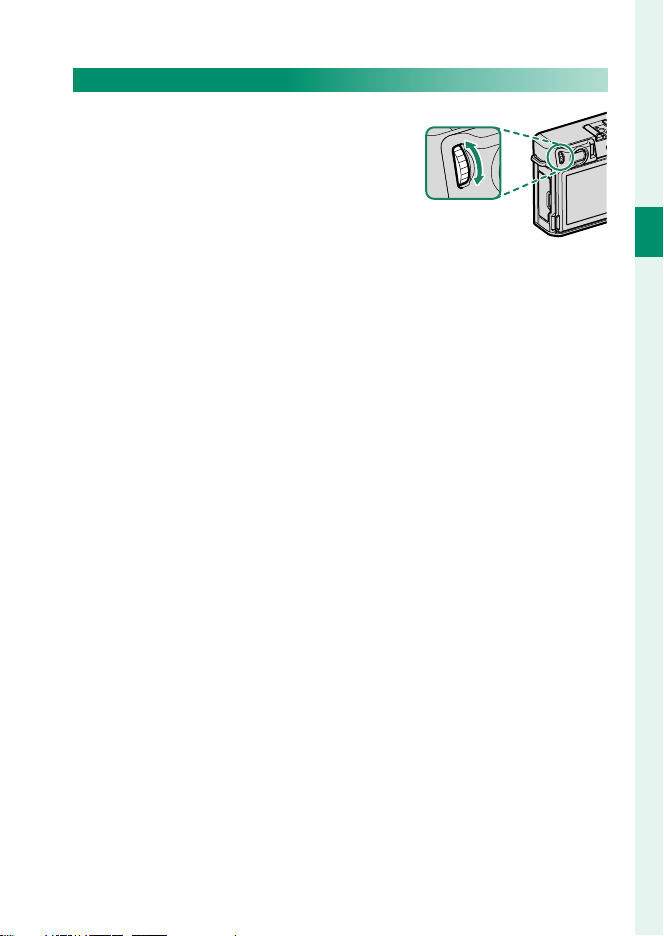
Focusing the View nder
If the indicators displayed in the view nder are blurred, put your eye to the
view nder and rotate the diopter adjustment control until the display is in sharp
focus.
Parts of the Camera
1
Before You Begin
9
Page 34
Camera Displays
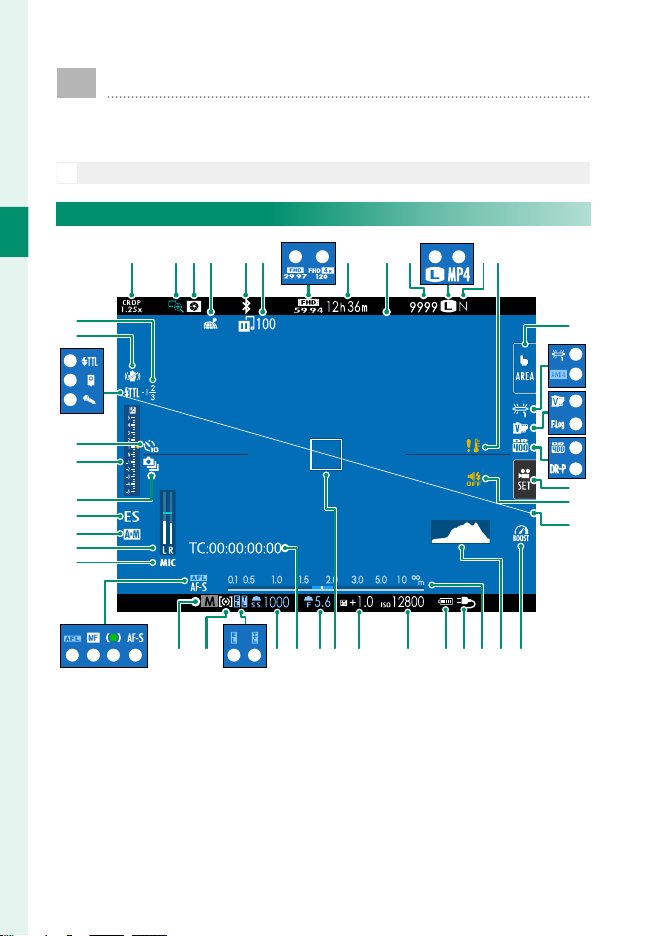
This section lists the indicators that may be displayed
during shooting.
For illustrative purposes, displays are shown with all indicators lit.
O
The Electronic View nder
1
Before You Begin
GA B C E F JI K NOD H
LM
3
2
1
0
z
y
x
w
v
u
t
s
n m h fg e d c a Zbkl ij
opqr
12/31/2020 12:10 AM
P
Q
R
S
T
U
V
W
X
Y
10
Page 35

Camera Displays
Crop factor ..................................................... 140
A
Focus check ............................................78, 135
B
Depth-of-fi eld preview ........................... 64, 78
C
Location data download status ..... 242, 284
D
Bluetooth ON/OFF ....................................... 237
E
Image transfer status ........................237, 284
F
Movie mode ........................................... 48, 155
G
Full HD high-speed recording .................. 157
H
Recording time available/
I
elapsed recording time ..............................48
Date and time ..................................37, 39, 209
J
Number of available frames
K
Image size ...................................................... 104
L
File format ...................................................... 156
M
Image quality................................................ 105
N
Temperature warning ................................327
O
Touch screen mode .............................. 21, 138
P
White balance ..............................................109
Q
AWB lock ........................................................229
R
Film simulation ............................................106
S
F-Log recording ............................................ 158
T
Dynamic range ............................................113
U
D-range priority ...........................................114
V
Movie optimized control ..............................23
W
Sound and fl ash indicator ........................211
X
Virtual horizon .................................................18
Y
Boost mode ...................................................233
Z
Histogram .........................................................18
a
Distance indicator
b
1 Shows “9999” if there is space for over 9999 frames.
2 Not displayed when ON is selected for D SCREEN SET-UP> LARGE INDICATORS
MODE(EVF).
1
................... 328
2
........................................78
Power supply ....................................................34
c
Battery level ......................................................36
d
Sensitivity ..........................................................82
e
Exposure compensation ...............................80
f
Focus frame ...............................................73, 85
g
Aperture ............................................... 58, 63, 65
h
Time code ....................................................... 178
i
Shutter speed .....................................58, 59, 65
j
TTL lock ..................................................150, 255
k
AE lock ...................................................... 86, 229
l
Metering ............................................................84
m
Shooting mode ...............................................56
n
Focus mode
o
Focus indicator
p
Manual focus indicator
q
AF lock ...................................................... 86, 229
r
Mic jack setting ............................................176
s
Recording level
t
AF+MF indicator
u
Shutter type ................................................... 146
v
Continuous mode ...........................................92
w
Exposure indicator ..........................................65
x
Self-timer indicator .....................................141
y
Microphone ......................................................50
z
Remote release ................................................62
0
Flash (TTL) mode .........................................271
1
IS mode
2
Flash compensation ................................... 271
3
2
....................................................69
2
..............................................70
2
.......................69, 77
2
........................................... 175
2
....................................... 134
2
......................................................... 147
1
Before You Begin
11
Page 36
The LCD Monitor
H I M N
A BC E F G J K L O P Q
2
1
1
0
Before You Begin
z
y
x
w
v
u
t
s
D
12/31/2020 12 :10
R
S
T
U
V
W
X
Y
12800
Zacd befghijmn
klopqr
12
Page 37

Camera Displays
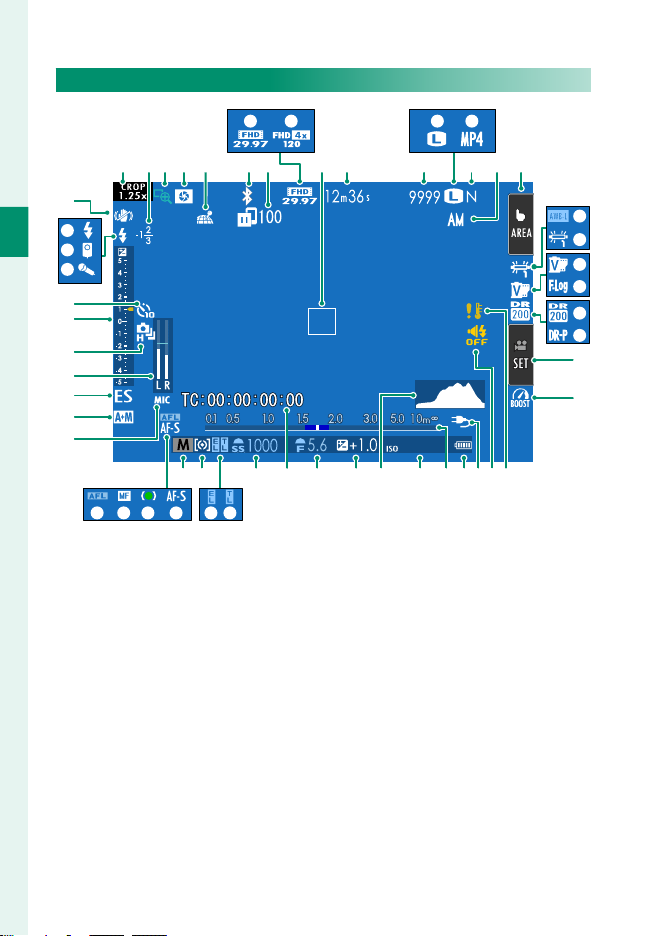
Crop factor ..................................................... 140
A
Flash compensation ................................... 271
B
Focus check ............................................78, 135
C
Depth-of-fi eld preview ........................... 64, 78
D
Location data download status ..... 242, 284
E
Bluetooth ON/OFF ....................................... 237
F
Image transfer status ........................237, 284
G
Movie mode ........................................... 48, 155
H
Full HD high-speed recording .................. 157
I
Focus frame ...............................................73, 85
J
Recording time available/
K
elapsed recording time ..............................48
Number of available frames
L
Image size ...................................................... 104
M
File format ...................................................... 156
N
Image quality................................................ 105
O
Date and time ..................................37, 39, 209
P
Touch screen mode .............................. 21, 138
Q
AWB lock ........................................................229
R
White balance ..............................................109
S
Film simulation ............................................106
T
F-Log recording ............................................ 158
U
Dynamic range ............................................113
V
D-range priority ...........................................114
W
Movie optimized control ..............................23
X
Boost mode ...................................................233
Y
Temperature warning ................................327
Z
Sound and fl ash indicator ........................211
a
1 Shows “9999” if there is space for over 9999 frames.
2 Not displayed when ON is selected for D SCREEN SET-UP> LARGE INDICATORS
MODE(LCD).
1
................... 328
Power supply ....................................................34
b
Battery level ......................................................36
c
Distance indicator
d
Sensitivity ..........................................................82
e
Histogram .........................................................18
f
Exposure compensation ...............................80
g
Aperture ............................................... 58, 63, 65
h
Time code ....................................................... 178
i
Shutter speed .....................................58, 59, 65
j
TTL lock ..................................................150, 255
k
AE lock ...................................................... 86, 229
l
Metering ............................................................84
m
Shooting mode ...............................................56
n
Focus mode
o
Focus indicator
p
Manual focus indicator
q
AF lock ...................................................... 86, 229
r
Mic jack setting ............................................176
s
AF+MF indicator
t
Shutter type ................................................... 146
u
Recording level
v
Continuous mode ...........................................92
w
Exposure indicator ..........................................65
x
Self-timer indicator .....................................141
y
Microphone ......................................................50
z
Remote release ................................................62
0
Flash (TTL) mode .........................................271
1
IS mode
2
2
........................................78
2
....................................................69
2
..............................................70
2
.......................69, 77
2
....................................... 134
2
........................................... 175
2
......................................................... 147
1
Before You Begin
13
Page 38

Adjusting Display Brightness
The brightness and hue of the view nder and LCD monitor can
be adjusted using the items in the D SCREEN SET-UP menu.
Choose EVF BRIGHTNESS or EVF COLOR to adjust view nder
brightness or hue, LCD BRIGHTNESS or LCD COLOR to do the
same for the LCD monitor.
1
Display Rotation
Before You Begin
When ON is selected for D SCREEN SET-UP> AUTOROTATE
DISPLAYS, the indicators in the view nder and LCD monitor automatically rotate to match camera orientation.
Choosing a Display Mode
Use D SCREEN SET-UP> VIEW MODE SETTING to choose from
the following display modes. You can choose separate display
modes for shooting and playback.
SHOOTING
OptionOption DescriptionDescription
Putting your eye to the viewfi nder turns the viewfi nder
EE EYE SENSOR EYE SENSOR
QQ EVF ONLY EVF ONLY
rr LCD ONLY LCD ONLY
QQ EVF ONLY + EVF ONLY + EE
tt EYE SENSOR + EYE SENSOR +
LCD IMAGE DISP.LCD IMAGE DISP.
on and the LCD monitor off ; taking your eye away turns
the viewfi nder off and LCD monitor on.
Viewfi nder on, LCD monitor off .
LCD monitor on, viewfi nder off .
Putting your eye to the viewfi nder turns the viewfi nder
on; taking it away turns the viewfi nder off . The LCD monitor remains off .
Putting your eye to the viewfi nder during shooting
turns the viewfi nder on, but the LCD monitor is used for
the display of images once you remove your eye from
the viewfi nder after shooting. The options selected for
D SCREEN SET-UP> IMAGE DISP. apply to display
in the LCD monitor.
14
Page 39
PLAYBACK
OptionOption DescriptionDescription
Putting your eye to the viewfi nder turns the viewfi nder
EE EYE SENSOR EYE SENSOR
QQ EVF ONLY EVF ONLY
rr LCD ONLY LCD ONLY
The Eye Sensor
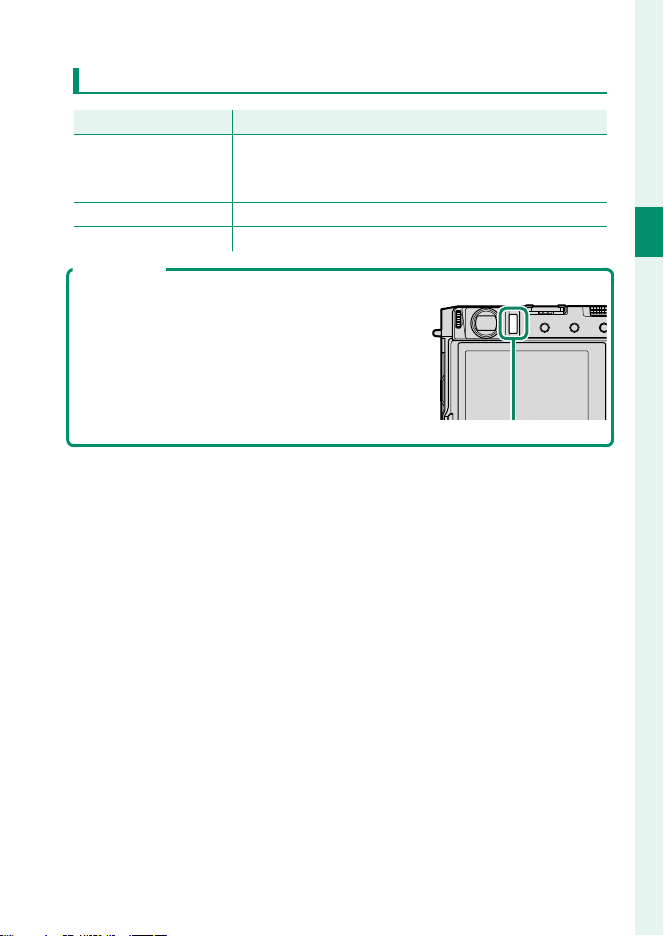
The eye sensor may respond to objects other
than your eye or to light shining directly on the
sensor.
on and the LCD monitor off ; taking your eye away turns
the viewfi nder off and LCD monitor on.
Viewfi nder on, LCD monitor off .
LCD monitor on, viewfi nder off .
Camera Displays
1
Before You Begin
Eye sensor
15
Page 40
The DISP/BACK Button
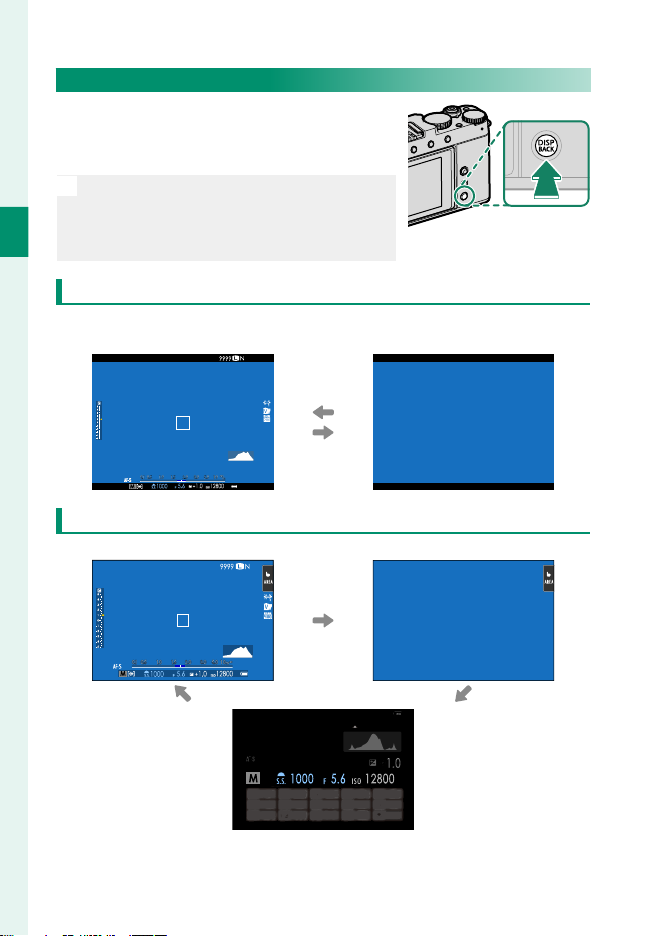
The DISP/BACK button controls the display
of indicators in the view nder and LCD
monitor.
Indicators for the EVF and LCD must be
N
selected separately. To choose the EVF
1
Before You Begin
display, place your eye to the view nder
while using the DISP/BACK button.
Viewfi nder (EVF)
Standard indicators
LCD Monitor
Standard indicators No indicators
Full screen
(no indicators)
16
Info display (still photography only)
Page 41
Camera Displays
Customizing the Standard Display
To choose the items shown in the standard indicator display:
Display standard indicators.
1
Use the DISP/BACK button to display standard indicators.
Select DISP. CUSTOM SETTING.
2
Select D SCREEN SET-UP> DISP. CUSTOM SETTING in the
setup menu.
Choose items.
3
Highlight items and press MENU/OK to select or deselect.
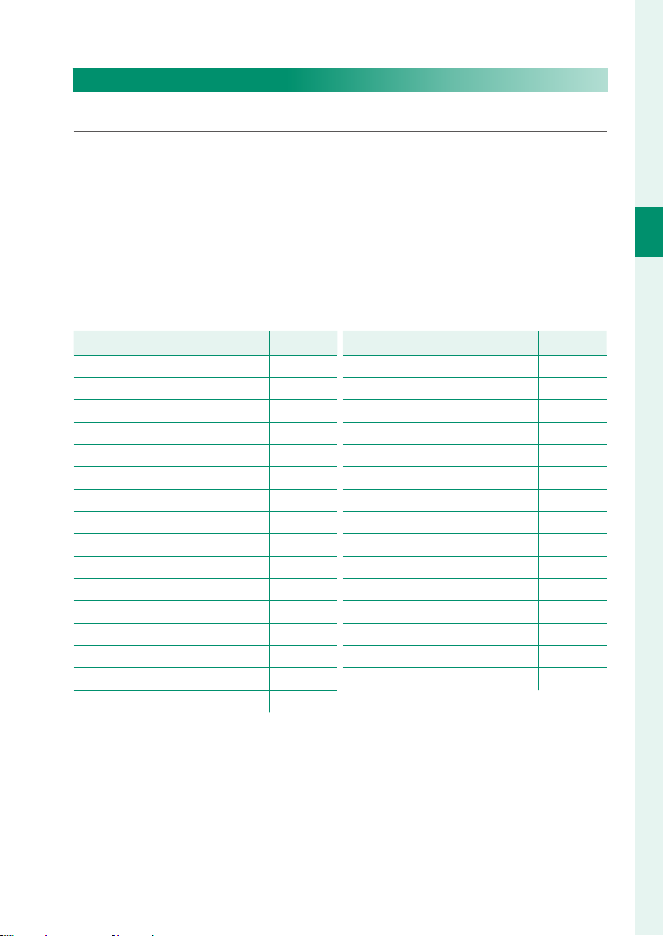
ItemItem DefaultDefault
FRAMING GUIDELINE
ELECTRONIC LEVEL
FOCUS FRAME
AF DISTANCE INDICATOR
MF DISTANCE INDICATOR
HISTOGRAM
LIVE VIEW HIGHLIGHT ALERT
SHOOTING MODE
APERTURE/S-SPEED/ISO
INFORMATION BACKGROUND
Expo. Comp. (Digit)
Expo. Comp. (Scale)
FOCUS MODE
PHOTOMETRY
SHUTTER TYPE
FLASH
CONTINUOUS MODE
R
DUAL IS MODE
R
TOUCH SCREEN MODE
R
WHITE BALANCE
R
FILM SIMULATION
R
DYNAMIC RANGE
R
BOOST MODE
R
FRAMES REMAINING
R
IMAGE SIZE/QUALITY
R
MOVIE MODE & REC. TIME
R
IMAGE TRANSFER ORDER
R
MIC LEVEL
R
GUIDANCE MESSAGE
R
BATTERY LEVEL
R
FRAMING OUTLINE
R
R
ItemItem DefaultDefault
1
Before You Begin
R
R
R
R
R
R
R
R
R
R
R
R
R
R
R
Press DISP/BACK to save changes.
4
Press DISP/BACK as needed to exit the menus and return to the
5
shooting display.
17
Page 42
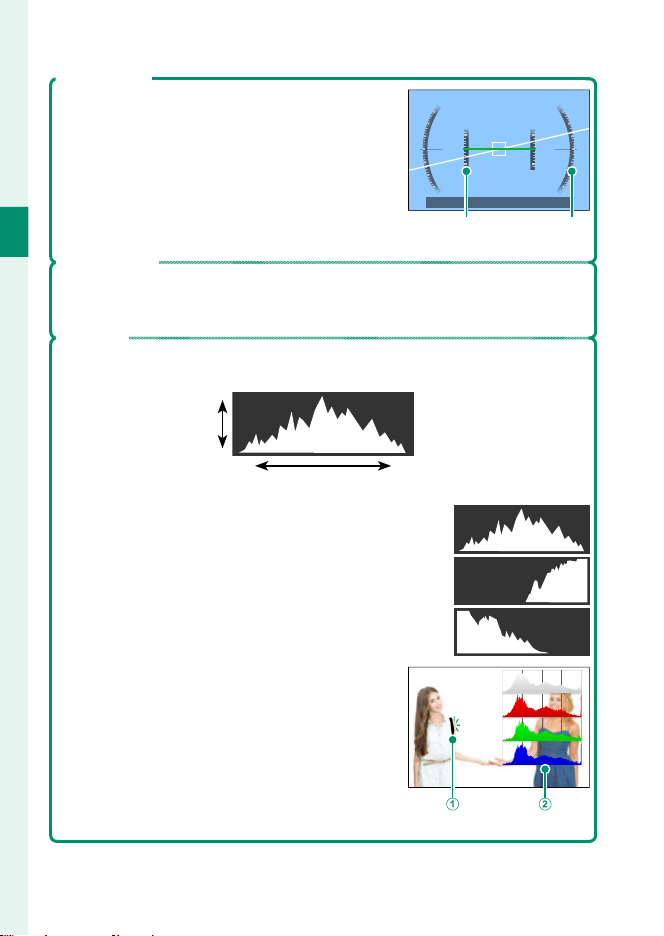
Camera Displays
Virtual Horizon
Selecting ELECTRONIC LEVEL displays a virtu-
al horizon. The camera is level when the two
lines overlap. Note that the virtual horizon may
not be displayed if the camera lens is pointed
up or down. For a 3D display (shown), press the
function button to which ELECTRONIC LEVEL
is assigned (P 253).
1
Before You Begin
Framing Outline
Enable FRAMING OUTLINE to make the borders of the frame easier to see
against dark backgrounds.
Histograms
Histograms show the distribution of tones in the image. Brightness is
shown by the horizontal axis, the number of pixels by the vertical axis.
Number of pixels
Pitch Roll
Shadows Highlights
Optimal exposure: Pixels are distributed in an even curve
•
throughout the tone range.
Overexposed: Pixels are clustered on the right side of
•
the graph.
Underexposed: Pixels are clustered on the left side of
•
the graph.
To view separate RGB histograms and a display showing areas of the frame that will be
overexposed at current settings superimposed
on the view through the lens, press the function button to which HISTOGRAM is assigned
(P 253).
Overexposed areas blink
A
RGB histograms
B
Pixel brightness
18
Page 43
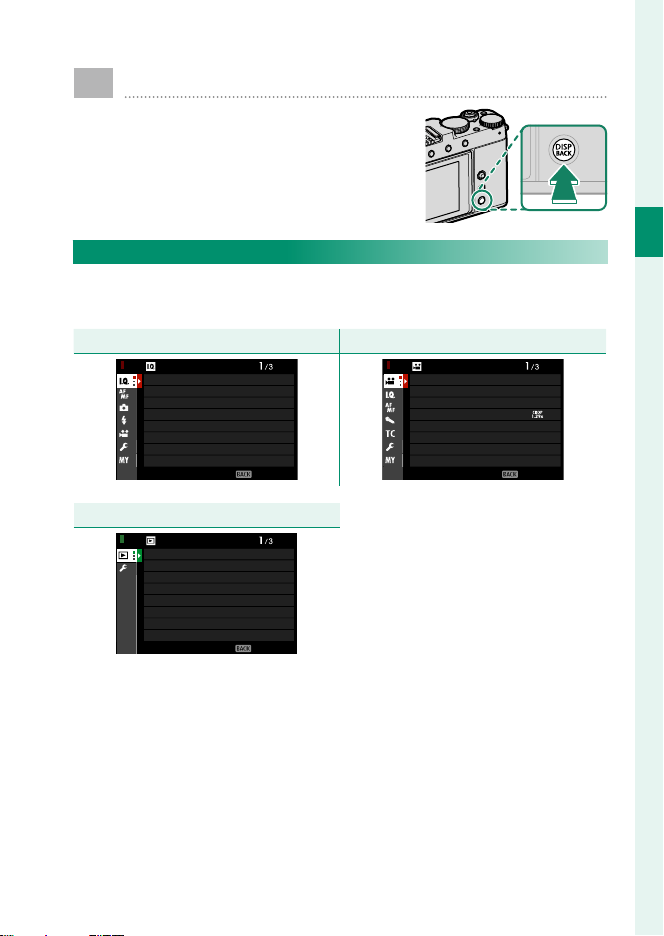
Using the Menus
To display the menus, press MENU/OK.
The Menus
Di erent menus are displayed during still photography, movie
recording, and playback.
Still photographyStill photography Movie recordingMovie recording
IMAGE QUALITY SETTING
IMAGE SIZE
IMAGE QUALITY
RAW RECORDING
FILM SIMULATION
MONOCHROMATIC COLOR
GRAIN EFFECT
COLOR CHROME EFFECT
COLOR CHROME FX BLUE
PlaybackPlayback
PLAY BACK MENU
RAW CONVERSION
ERASE
CROP
RESIZE
PROTECT
IMAGE ROTATE
RED EYE REMOVAL
VOICE MEMO SETTING
EXIT
EXIT
MOVIE SETTING
MOVIE MODE
FILE FORMAT
FULL HD HIGH SPEED REC
FIX MOVIE CROP MAGNIFICATION
F-Log RECORDING
4K MOVIE OUTPUT
FULL HD MOVIE OUTPUT
HDMI OUTPUT INFO DISPLAY
EXIT
1
Before You Begin
19
Page 44
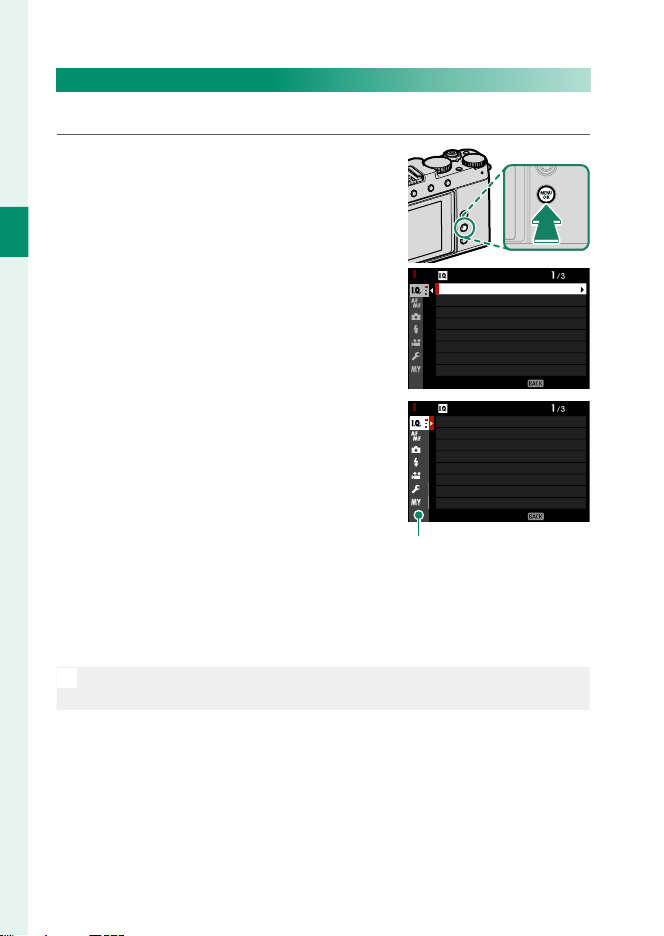
Selecting a Menu Tab
To navigate the menus:
Press MENU/OK to display the menus.
1
1
Before You Begin
Press the focus stick (focus lever)
2
left to highlight the tab for the current menu.
Press the focus stick up or down to highlight the tab contain-
3
ing the desired item.
IMAGE QUALITY SETTING
IMAGE SIZE
IMAGE QUALITY
RAW RECORDING
FILM SIMULATION
MONOCHROMATIC COLOR
GRAIN EFFECT
COLOR CHROME EFFECT
COLOR CHROME FX BLUE
IMAGE QUALITY SETTING
IMAGE SIZE
IMAGE QUALITY
RAW RECORDING
FILM SIMULATION
MONOCHROMATIC COLOR
GRAIN EFFECT
COLOR CHROME EFFECT
COLOR CHROME FX BLUE
Ta b
Using the Menus
EXIT
EXIT
Press the focus stick right to place the cursor in the menu.
4
The front command dial can be used to highlight items when menus
N
are displayed.
20
Page 45
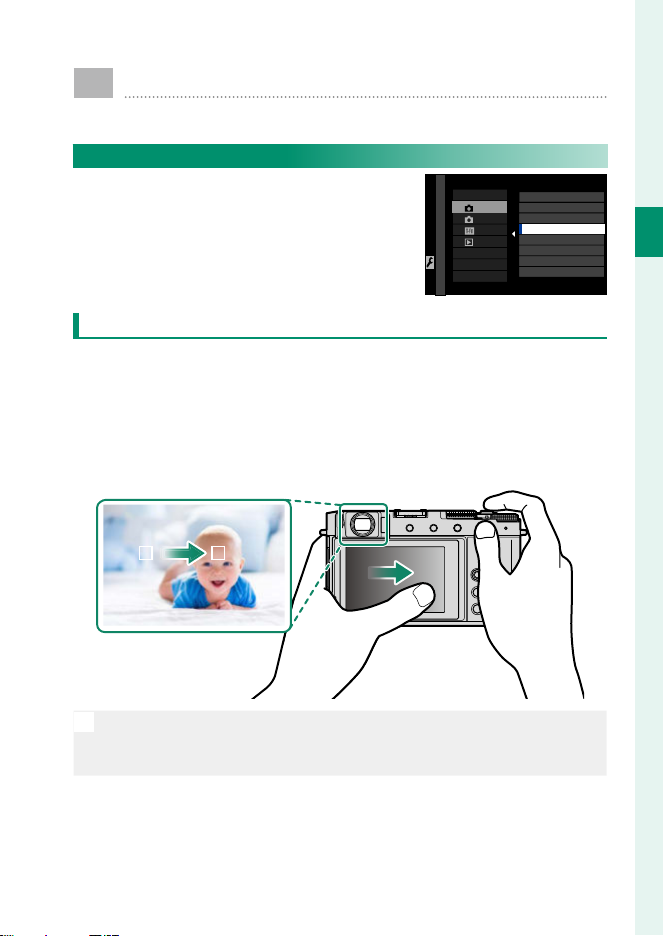
Touch Screen Mode
The LCD monitor also functions as a touch screen.
Shooting Touch Controls
To enable touch controls, select ON for
D BUTTON/DIAL SETTING> TOUCH
SCREEN SETTING> x TOUCH SCREEN
SETTING.
EVF
The LCD monitor can be used to select the focus area while pictures are being framed in the electronic view nder (EVF). Use
D BUTTON/DIAL SETTING> TOUCH SCREEN SETTING> EVF
TOUCH SCREEN AREA SETTINGS to choose the area of the mon-
itor employed for touch controls.
TOUCH SCREEN SETTINGS
TOUCH SCREEN SETTING
DOUBLE TAP SETTING
ON
TOUCH FUNCTION
OFF
TOUCH SCREEN SETTING
EVF TOUCH SCREEN AREA SETTINGS
1
Before You Begin
When FACE DETECTION ON is selected for G AF/MF SETTING>
N
FACE/EYE DETECTION SETTING, you can choose the face used for
focus.
21
Page 46
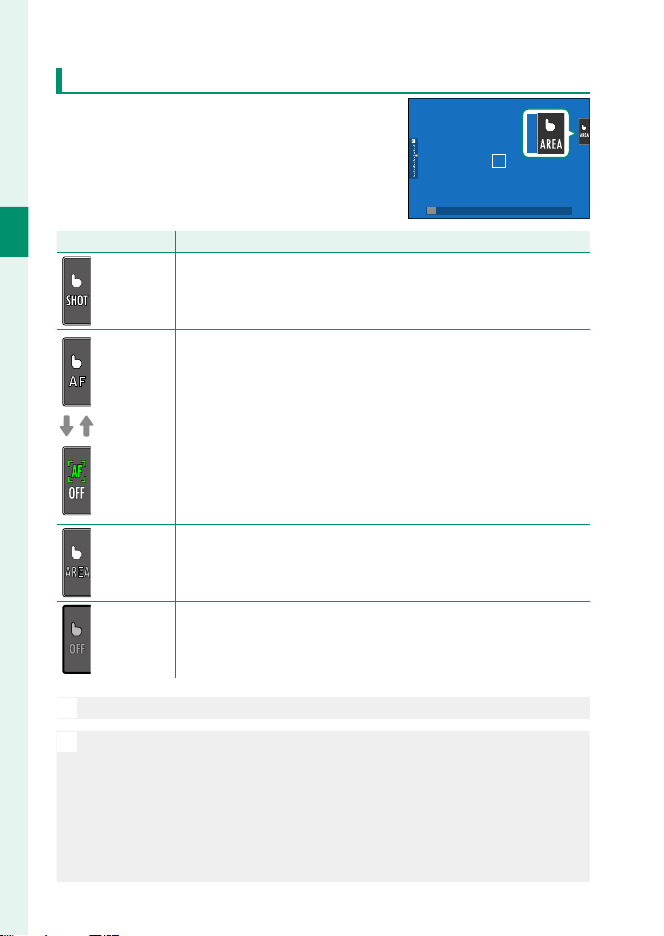
LCD Monitor
The operation performed can be selected
by tapping the touch screen mode indicator in the display. Touch controls can be
used for the following operations:
1
Before You Begin
ModeMode DescriptionDescription
TOUCH TOUCH
SHOOTINGSHOOTING
AF
AFOFF
AREAAREA
OFFOFF
Di erent touch controls are used during focus zoom (P139).
O
To disable touch controls and hide the touch screen mode indica-
•
N
tor, select OFF for DBUTTON/DIAL SETTING> TOUCH SCREEN
SETTING> x TOUCH SCREEN SETTING.
Touch control settings can be adjusted using G AF/MF SETTING>
•
xF TOUCH SCREEN MODE. For information on the touch
controls available during movie recording, see “Movie Recording
(xF TOUCH SCREEN MODE; P 172)”.
Tap your subject in the display to focus and release the shutter.
In burst mode, pictures will be taken while you keep your fi nger
on the display.
If SINGLE AF is selected for focus mode, the camera will fo-
•
cus when you tap your subject in the display. Focus locks at
the current distance until you tap the AFOFF icon.
If CONTINUOUS AF is selected for focus mode, the camera
•
will initiate focus when you tap your subject in the display.
The camera will continue to adjust focus for changes in the
distance to the subject until you tap the AFOFF icon.
When MANUAL FOCUS is selected for focus mode, you can
•
tap the display to focus on the selected subject using autofocus.
Tap to select a point for focus or zoom. The focus frame will
move to the selected point.
Touch controls disabled.
22
Page 47
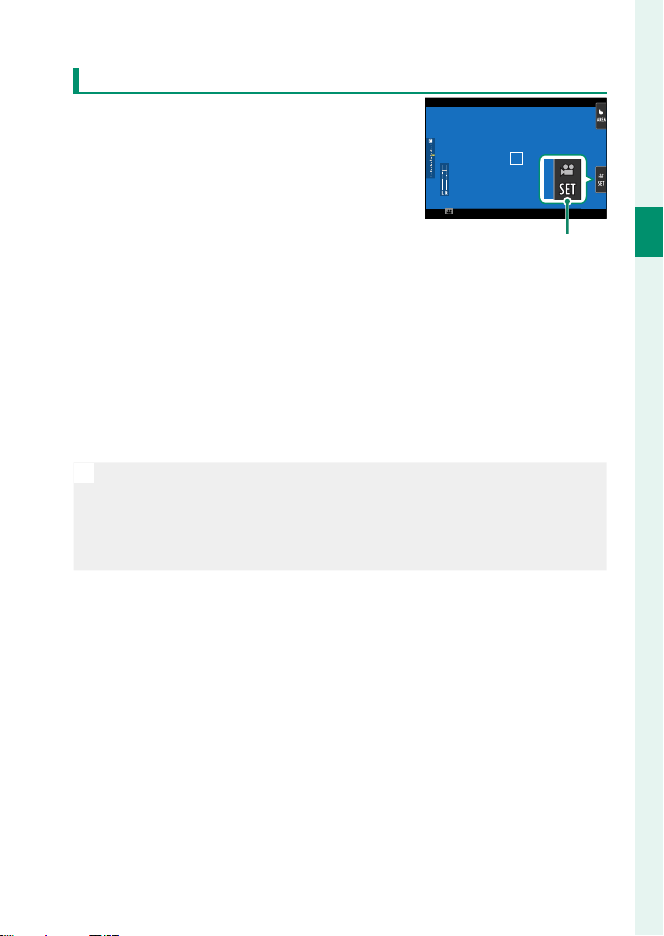
Touch Screen Mode
MOVIE OPTIMIZED CONTROL oL
Selecting ON for B MOVIE SETTING>
MOVIE OPTIMIZED CONTROLoL or
tapping the movie-optimized mode button in the shooting display optimizes the
command dials and touch controls for
movie recording. This can be used to prevent camera sounds being recorded with
movie footage.
SHUTTER SPEED
•
APERTURE
•
EXPOSURE COMPENSATION
•
ISO
•
INTERNAL MIC LEVEL
•
ADJUSTMENT/EXTERNAL MIC
LEVEL ADJUSTMENT
Enabling movie-optimized controls disables the shutter speed and
•
N
exposure compensation dials and aperture ring.
When movie-optimized control is enabled, the movie-optimized
•
mode button can be used to change shooting settings or disable
movie-optimized control.
WIND FILTER
•
HEADPHONES VOLUME
•
F FILM SIMULATION
•
F WHITE BALANCE
•
F FOCUS MODE
•
Movie-optimized
mode button
1
Before You Begin
23
Page 48
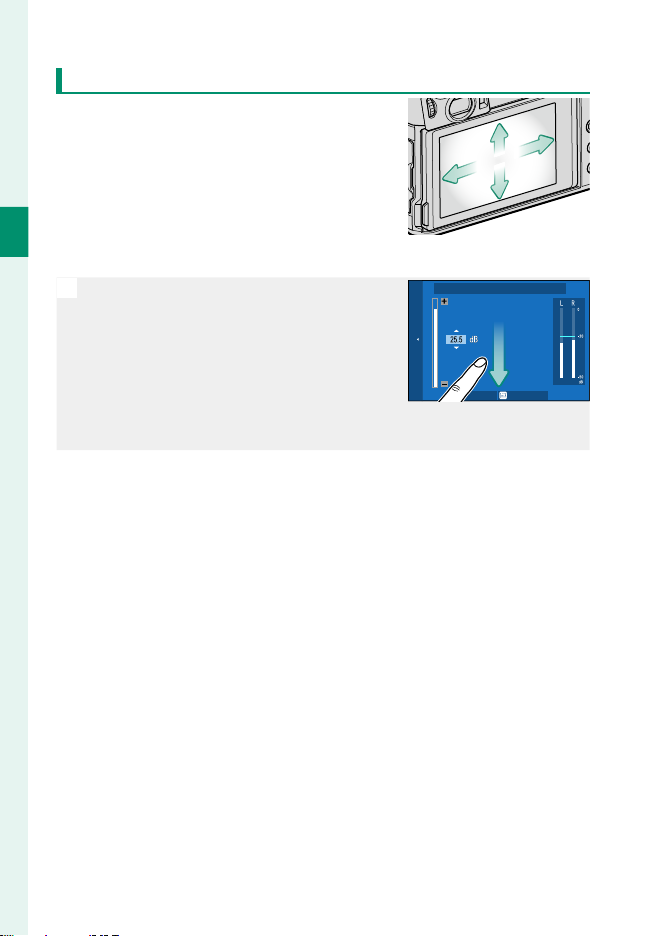
Touch Function
Functions can be assigned to the following ick gestures in much the same way
as function buttons (P 256):
Flick up: T-Fn 1
•
Flick left: T-Fn 2
•
Flick right: T-Fn 3
•
1
Flick down: T-Fn4
•
Before You Begin
In some cases, touch-function ick ges-
•
N
tures display a menu; tap to select the
desired option.
Touch-function gestures are disabled by
•
default. To enable touch-function gestures, select ON for DBUTTON/DIAL
SETTING> TOUCH SCREEN SETTING>
c TOUCH FUNCTION.
INTERNAL MIC LEVEL ADJUSTMENT
SET CANCEL
24
Page 49
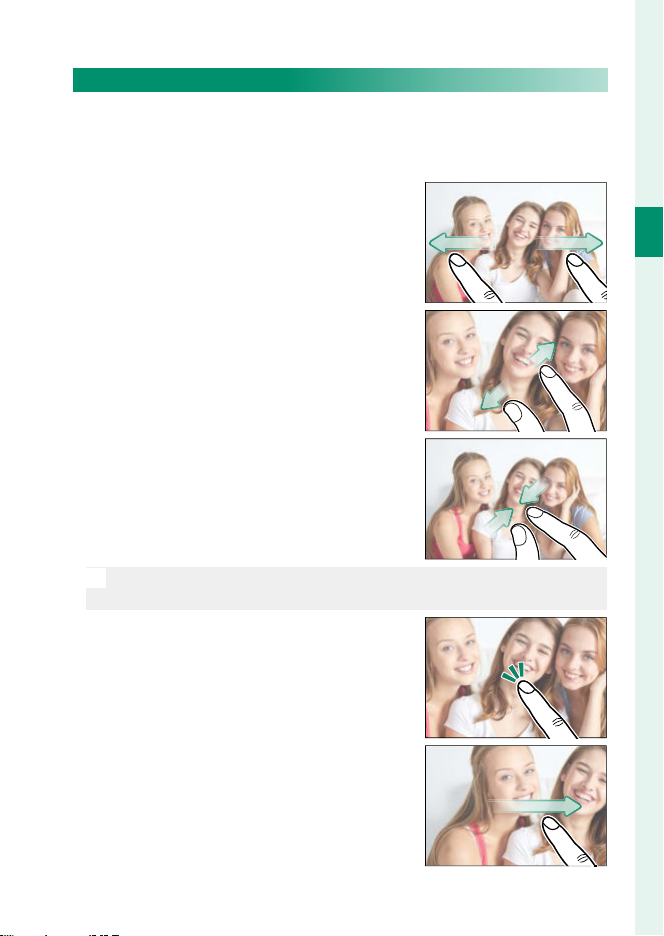
Touch Screen Mode
Playback Touch Controls
When ON is selected for D BUTTON/DIAL SET TING > TOUCH
SCREEN SETTING> a TOUCH SCREEN SETTING, touch controls
can be used for the following playback operations:
Swipe: Swipe a nger across the display
•
to view other images.
Pinch-out: Place two ngers on the dis-
•
play and spread them apart to zoom in.
Pinch-in: Place two ngers on the display
•
and slide them together to zoom out.
Pictures can be zoomed out until the entire image is visible but no
N
further.
Double-tap: Tap the display twice to zoom
•
in on the focus point.
1
Before You Begin
Drag: View other areas of the image
•
during playback zoom.
25
Page 50

MEMO
26
Page 51

First Steps
27
Page 52
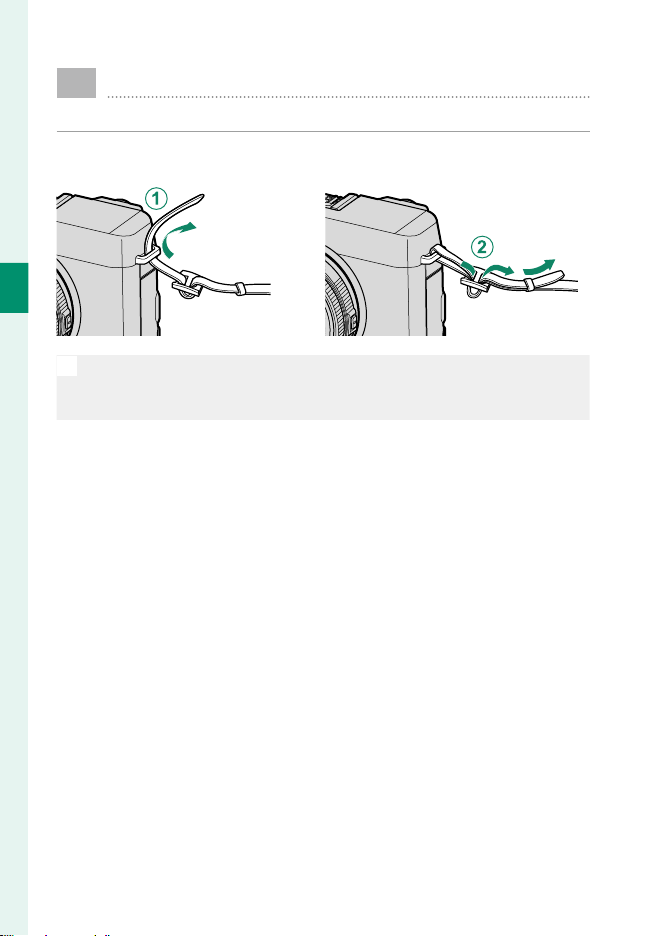
Attaching the Strap
Attach the strap.
Attach the strap to the two strap eyelets as shown below.
2
First Steps
• To avoid dropping the camera, be sure the strap is correctly secured.
O
Do not attach the strap buckles to the strap eyelets. Failure to observe
•
this precaution could deform or break the strap eyelets.
28
Page 53
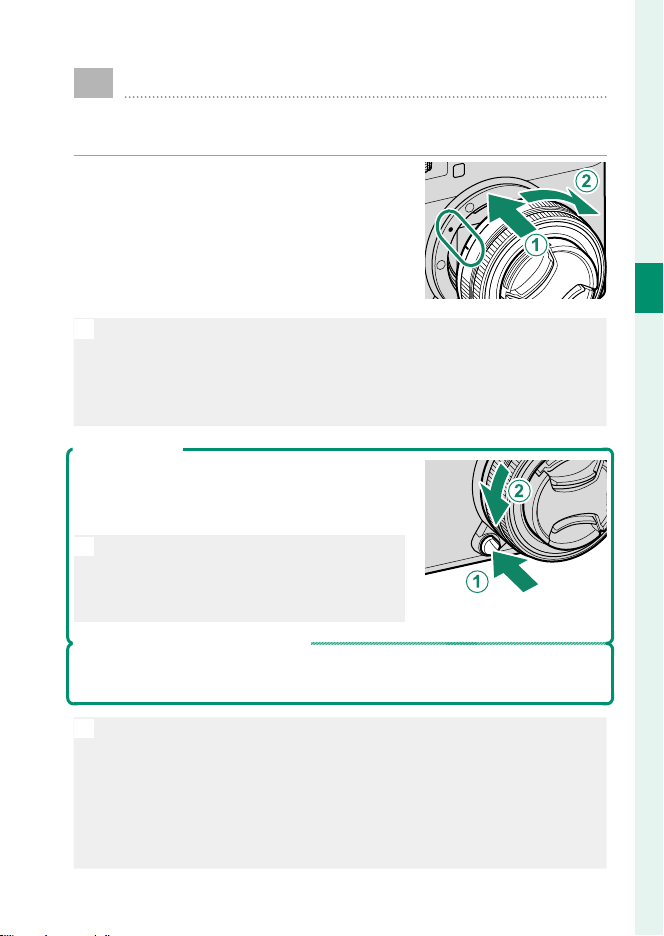
Attaching a Lens
The camera can be used with lenses for the FUJIFILM
X-mount.
Remove the body cap from the camera
and the rear cap from the lens. Place the
lens on mount, keeping the marks on the
lens and camera aligned (A), and then
rotate the lens until it clicks into place
(B).
When attaching lenses, ensure that dust or other foreign matter does
•
O
not enter the camera.
Be careful not to touch the camera’s internal parts.
•
Rotate the lens until it clicks securely into place.
•
Do not press the lens release button while attaching the lens.
•
Removing Lenses
To remove the lens, turn the camera o , then
press the lens release button (A) and rotate the
lens as shown (B).
To prevent dust accumulating on the lens
O
or inside the camera, replace the lens caps
and camera body cap when the lens is not
attached.
Lenses and Other Optional Accessories
The camera can be used with lenses and accessories for the FUJIFILM
X-mount.
2
First Steps
Observe the following precautions when attaching or removing (ex-
O
changing) lenses.
Check that the lenses are free of dust and other foreign matter.
•
Do not change lenses in direct sunlight or under another bright light
•
source. Light focused into the interior of the camera could cause it to
malfunction.
Attach the lens caps before exchanging lenses.
•
29
Page 54
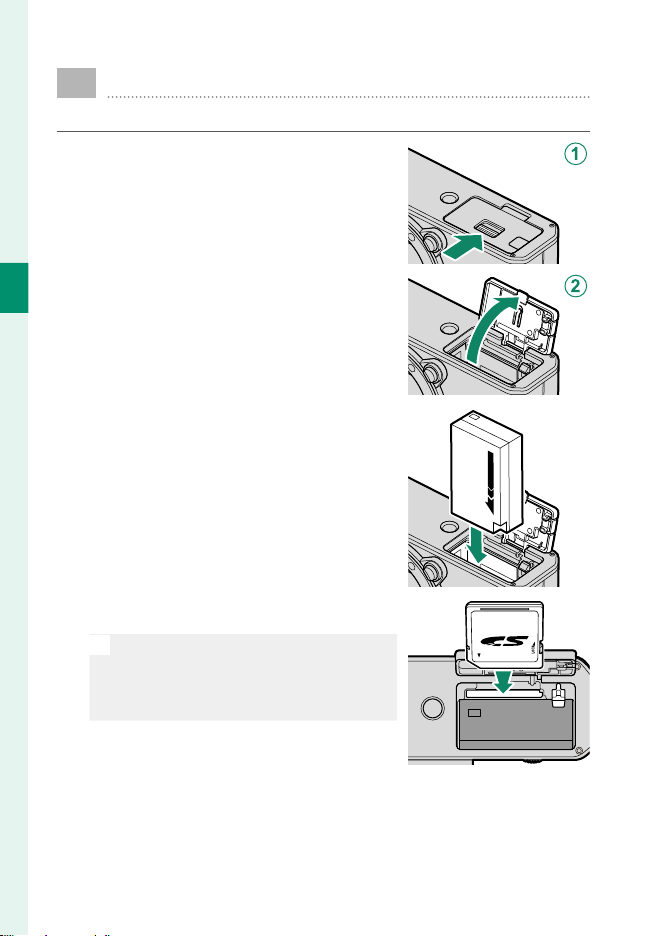
First Steps
Inserting the Battery and a Memory Card
Insert the battery and memory card as described below.
Slide the battery-chamber cover latch
1
as shown and open the battery-chamber cover.
2
Insert the battery.
2
Using the battery to keep the battery latch pressed to one side, insert the battery contacts rst in the
direction shown by the arrow.
Insert the memory card.
3
The optional SD, SDHC, and SDXC
N
memory cards the camera uses to store
pictures are referred to as “memory
cards”.
Close the battery-chamber cover and slide the battery-cham-
4
ber cover latch closed.
30
Page 55
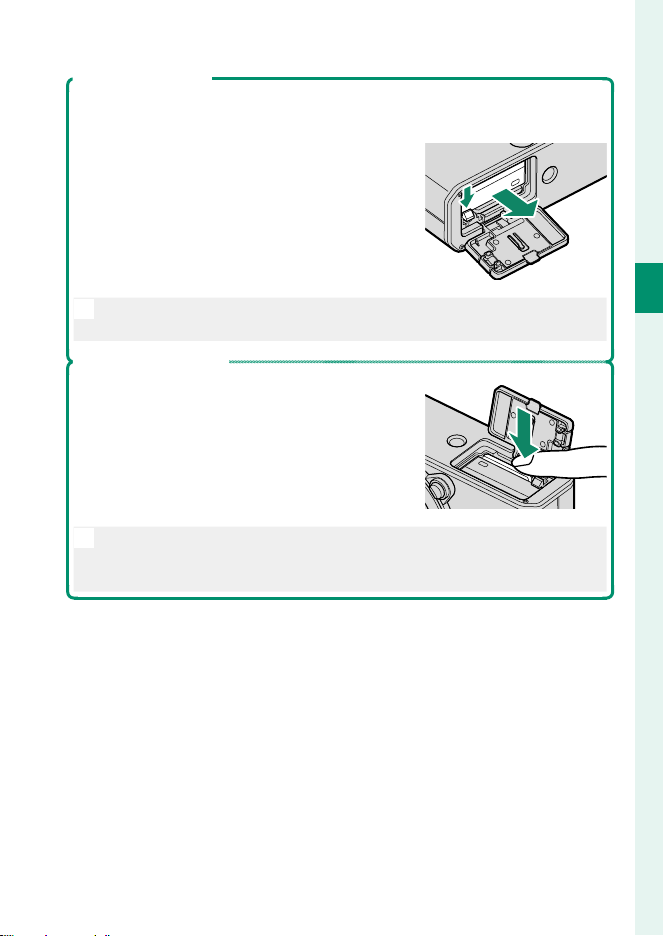
Inserting the Battery and a Memory Card
Removing the Battery
Before removing the battery or memory card, turn the camera o and open
the battery-chamber cover.
To remove the battery, press the battery latch to
the side, and slide the battery out of the camera
as shown.
The battery may become hot when used in high-temperature environ-
O
ments. Observe caution when removing the battery.
Removing Memory Cards
To remove the memory card, press it in and release it slowly. The card can then be removed
by hand.
• Press the center of the card when ejecting it.
O
When a memory card is removed, the card could be ejected too
•
quickly. Use your nger to hold it and gently release the card.
2
First Steps
31
Page 56
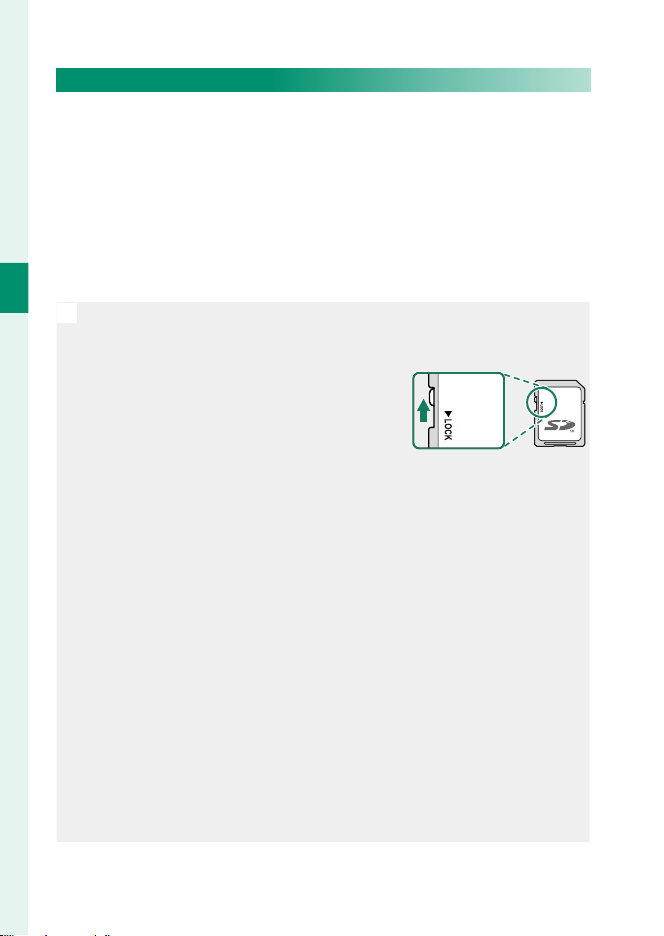
Inserting the Battery and a Memory Card
Compatible Memory Cards
The camera can be used with SD, SDHC, and SDXC memory
•
cards.
The camera supports UHS-I memory cards.
•
To record movies, use cards with a UHS speed class of 3 or better
•
or a video speed class of V30 or better.
A list of supported memory cards is available on the Fuji lm
•
website. For details, visit:
https://fujifilm-x.com/support/compatibility/cameras/
2
First Steps
• Do not turn the camera o or remove the memory card while the memo-
O
ry card is being formatted or data are being recorded to or deleted from
the card. Failure to observe this precaution could damage the card.
Memory cards can be locked, making it
•
impossible to format the card or to record
or delete images. Before inserting a memory card, slide the write-protect switch to
the unlocked position.
Memory cards are small and can be swallowed; keep out of reach of
•
children. If a child swallows a memory card, seek medical assistance
immediately.
miniSD or microSD adapters that are larger or smaller than memory
•
cards may not eject normally; if the card does not eject, take the camera to an authorized service representative. Do not forcibly remove
the card.
Do not a x labels or other objects to memory cards. Peeling labels
•
can cause camera malfunction.
Movie recording may be interrupted with some types of memory card.
•
Formatting a memory card in the camera creates a folder in which
•
pictures are stored. Do not rename or delete this folder or use a computer or other device to edit, delete, or rename image les. Always
use the camera to delete pictures; before editing or renaming les,
copy them to a computer and edit or rename the copies, not the
originals. Renaming the les on the camera can cause problems
during playback.
.
32
Page 57
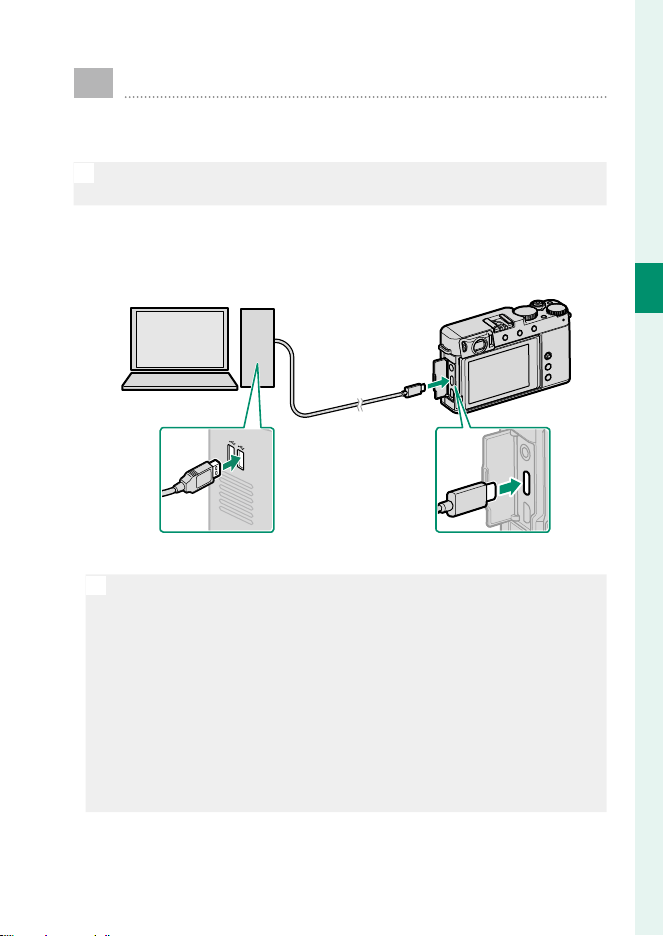
Charging the Battery
The battery is not charged at shipment. Charge the battery
before use.
• An NP-W126S rechargeable battery is supplied with the camera.
O
Turn the camera o for charging.
•
The camera can be charged via USB. USB charging is available
•
with computers with a manufacturer-approved operating system and USB interface.
Leave the computer on during charging.
• The battery will not charge while the camera is on.
O
Connect the supplied USB cable.
•
Connect the camera directly to the computer; do not use a USB hub
•
or keyboard.
Charging stops if the computer enters sleep mode. To resume
•
charging, activate the computer and disconnect and reconnect the
USB cable.
Charging may not be supported depending on the model of com-
•
puter, computer settings, and the computer’s current state.
The battery takes about 5 hours to charge with a charging input of
•
5 V/500 mA.
2
First Steps
To charge the battery from a household AC power outlet, use a
•
BC-W126S battery charger (available separately).
33
Page 58
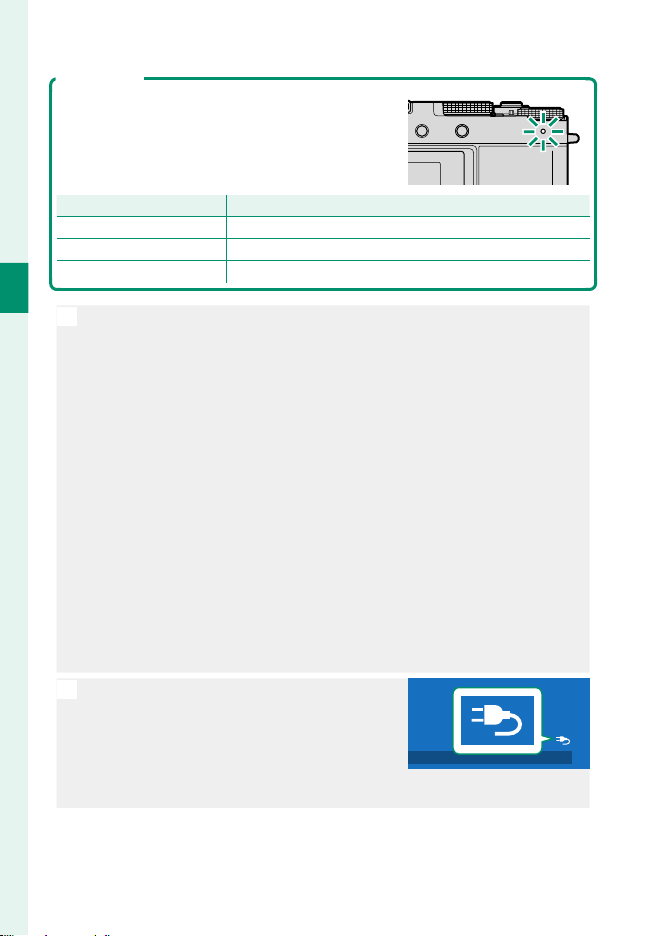
Charge Status
The indicator lamp shows battery charge status
as follows:
Indicator lampIndicator lamp Battery statusBattery status
On Battery charging.
Off Charging complete.
Blinks Charging error.
2
First Steps
Do not a x labels or other objects to the battery. Failure to observe
•
O
this precaution could make it impossible to remove the battery from
the camera.
Do not short the battery terminals. The battery could overheat.
•
Read the cautions in “The Battery and Power Supply”.
•
Use only genuine Fuji lm rechargeable batteries designated for use
•
in this camera. Failure to observe this precaution could result in product malfunction.
Do not remove the labels from the battery or attempt to split or peel
•
the outer casing.
The battery gradually loses its charge when not in use. Charge the
•
battery one or two days before use.
If the battery fails to hold a charge, it has reached the end of its
•
charging life and must be replaced.
Remove dirt from the battery terminals with a clean, dry cloth. Failure
•
to observe this precaution could prevent the battery from charging.
Note that charging times increase at low or high temperatures.
•
If the camera is turned on during charging,
•
N
charging will end and the USB connection
will instead be used to power the camera.
The battery level will begin to gradually
decline (P 241).
The camera will display a “power supply” icon when powered via USB.
•
Charging the Battery
34
Page 59
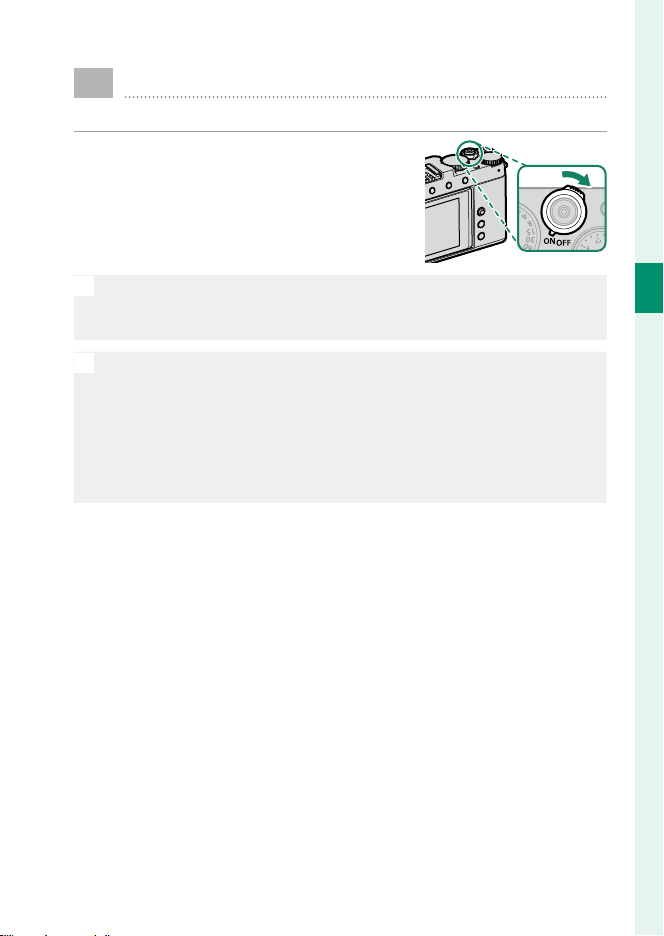
Turning the Camera On and O
Use the ON/OFF switch to turn the camera on and o .
Slide the switch to ON to turn the camera
on, or to OFF to turn the camera o .
Fingerprints and other marks on the lens or view nder can a ect pic-
O
tures or the view through the view nder. Keep the lens and view nder clean.
• Pressing the PLAY button during shooting starts playback.
N
Press the shutter button halfway to return to shooting mode.
•
The camera will turn o automatically if no operations are performed
•
for the length of time selected for D POWER MANAGEMENT>
AUTO POWER OFF. To reactivate the camera after it has turned o
automatically, press the shutter button halfway or turn the ON/OFF
switch to OFF and then back to ON.
2
First Steps
35
Page 60
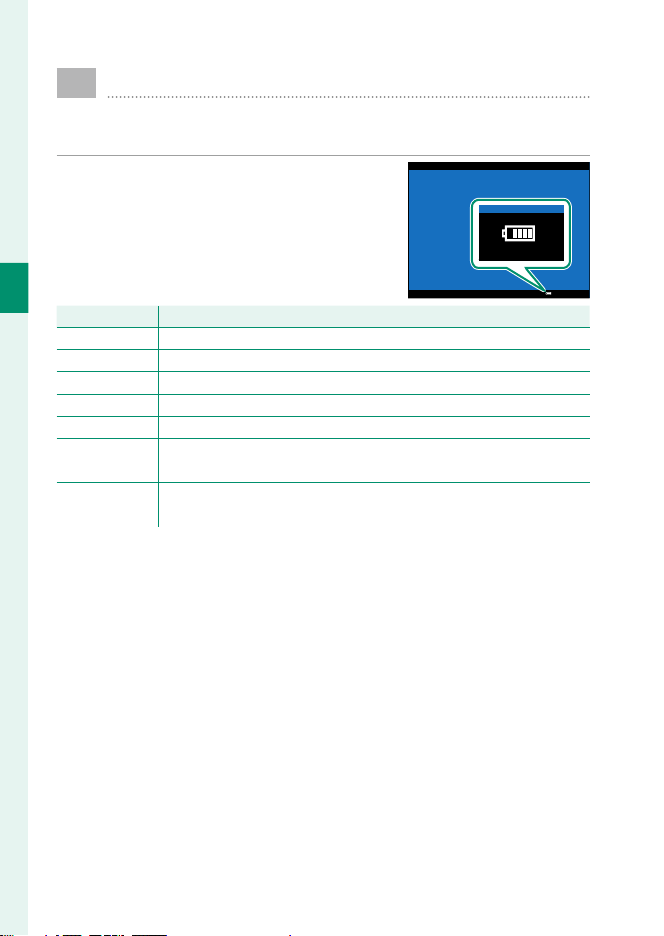
Checking the Battery Level
After turning the camera on, check the battery level in the
display.
Battery level is shown as follows:
2
First Steps
IndicatorIndicator DescriptionDescription
e
f
g
h
i
i
(red)
j
(blinks red)
Battery partially discharged.
Battery about 80% full.
Battery about 60% full.
Battery about 40% full.
Battery about 20% full.
Low battery. Charge as soon as possible.
Battery exhausted. Turn camera off and recharge battery.
36
Page 61
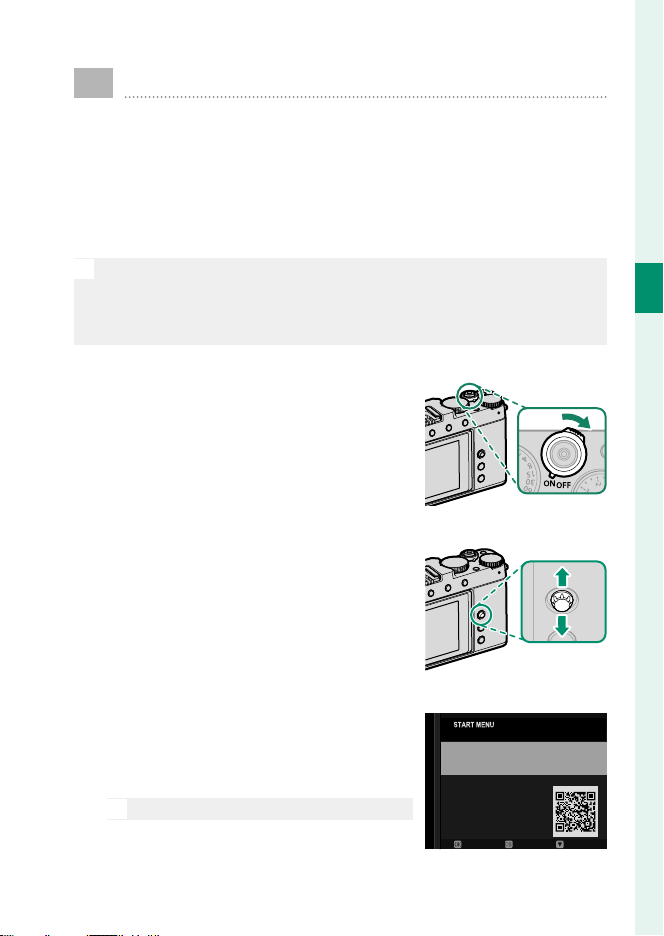
Basic Setup
When you turn the camera on for the rst time, you can
choose a language and set the camera clock. At default
settings, you can also pair the camera with a smartphone
or tablet so that you can later synchronize the clocks or
download pictures. Follow the steps below when turning
the camera on for the rst time.
If you intend to pair the camera with a smartphone or tablet, install
N
and launch the latest version of the FUJIFILM Camera Remote App on
the smart device before proceeding. For more information, visit:
http://app.fujifilm-dsc.com/en/camera_remote/
Turn the camera on.
1
A language-selection dialog will be
displayed.
Choose a language.
2
Highlight a language and press
MENU/OK.
2
First Steps
Pair the camera with the smartphone or tablet.
3
Press MENU/OK to pair the camera with
a smartphone or tablet running the
FUJIFILM Camera Remote app.
To skip pairing, press DISP/BACK.
N
PAIRING REGISTRATION
PAIR WITH SMARTPHONE?
IMAGES CAN BE EASILY TRANSFERRED
TO SMARTPHONE BY PAIRING
SCAN QR CODE OR SEARCH FOR "FUJIFILM
Camera Remote" APP ON THE WEB
SKIP HELPSET
37
Page 62
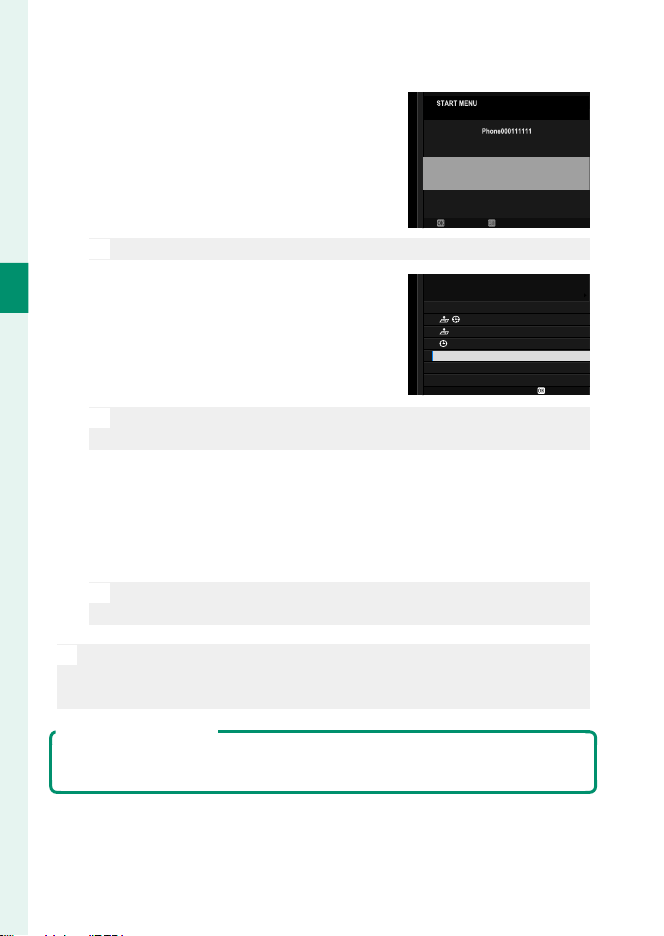
Check the time.
4
When pairing is complete, you will be
prompted to set the camera clock to
the time reported by the smartphone
or tablet. Check that the time is cor-
PAIRING REGISTRATION
PAIRING COMPLETE
12/31/2020 12:10 AM
SET DATE/TIME FROM SMARTPHONE?
rect.
To set the clock manually, press DISP/BACK (P 39).
N
START MENU
SMARTPHONE SYNC. SETTING
LOCATION&TIME
LOCATION
TIME
OFF
First Steps
2
Synchronize the camera settings with
5
the settings confi gured on your smartphone or tablet.
The option selected can be changed at any time using
N
D CONNECTION SETTING> Bluetooth SETTINGS.
Set the clock.
6
Press MENU/OK to set the camera clock to the time reported by
the smartphone or tablet and exit to shooting mode.
Format the memory card (P 208).
7
Format memory cards before rst use, and be sure to reformat all
O
memory cards after using them in a computer or other device.
If the battery is removed for an extended period, the camera clock will
N
be reset and the language-selection dialog will be displayed when the
camera is turned on.
Skipping the Current Step
If you skip a step, a con rmation dialog will be displayed; select NO to avoid
repeating any steps you skipped the next time the camera is turned on.
CANCELSET
SET
38
Page 63

Choosing a Di erent Language
To change the language:
Display language options.
1
Select D USER SETTING> Qa.
Choose a language.
2
Highlight the desired option and press MENU/OK.
Basic Setup
Changing the Time and Date
To set the camera clock:
Display DATE/TIME options.
1
Select D USER SETTING> DATE/TIME.
Set the clock.
2
Press the focus stick (focus lever) left or right to highlight the
year, month, day, hour, or minute and press up or down to
change. Press MENU/OK to set the clock.
2
First Steps
39
Page 64

MEMO
40
Page 65

Basic Photography and
Playback
41
Page 66
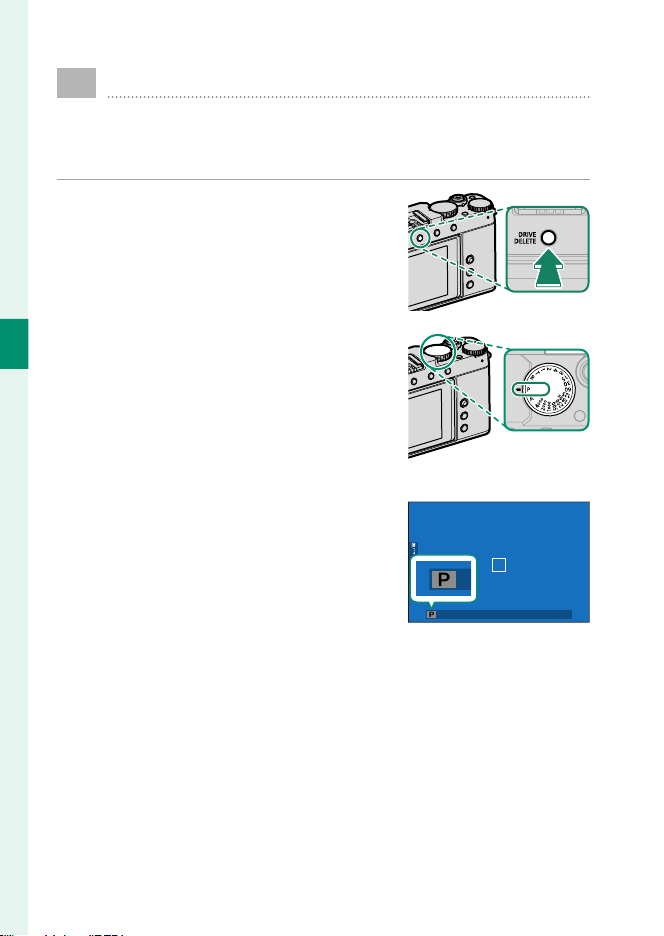
3
Basic Photography and Playback
Taking Photographs (Mode P)
This section describes how to take pictures using program
AE (mode P). See pages 56–65 for information on S, A,
and M modes.
Press the DRIVE/DELETE button and se-
1
lect STILL IMAGE in the drive-mode
menu.
Rotate the shutter-speed dial to P
2
and con rm that the camera displays
shooting information for program AE.
Check the shooting mode.
3
Con rm that P appears in the display.
42
Page 67
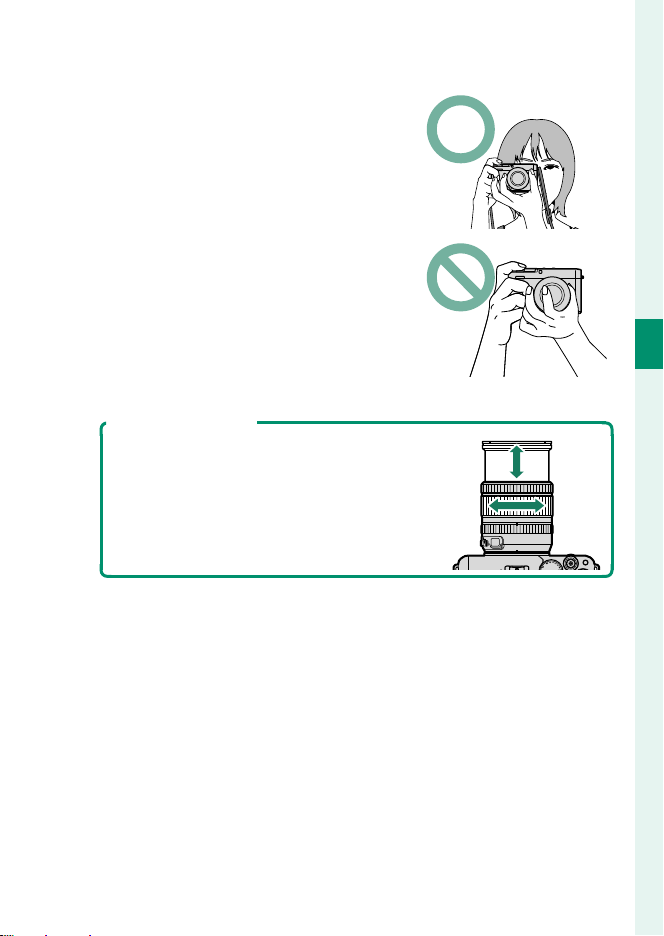
Ready the camera.
4
Hold the camera steady with both
•
hands—shaking or unsteady hands
can blur your shots.
To prevent pictures that are out of
•
focus or too dark (underexposed),
keep your ngers and other objects
away from the lens and AF-assist illuminator.
Frame the picture.
5
Lenses with Zoom Rings
Use the zoom ring to frame the picture in
the display. Rotate the ring left to zoom
out, right to zoom in.
Taking Photographs (Mode P)
3
Basic Photography and Playback
A
43
Page 68
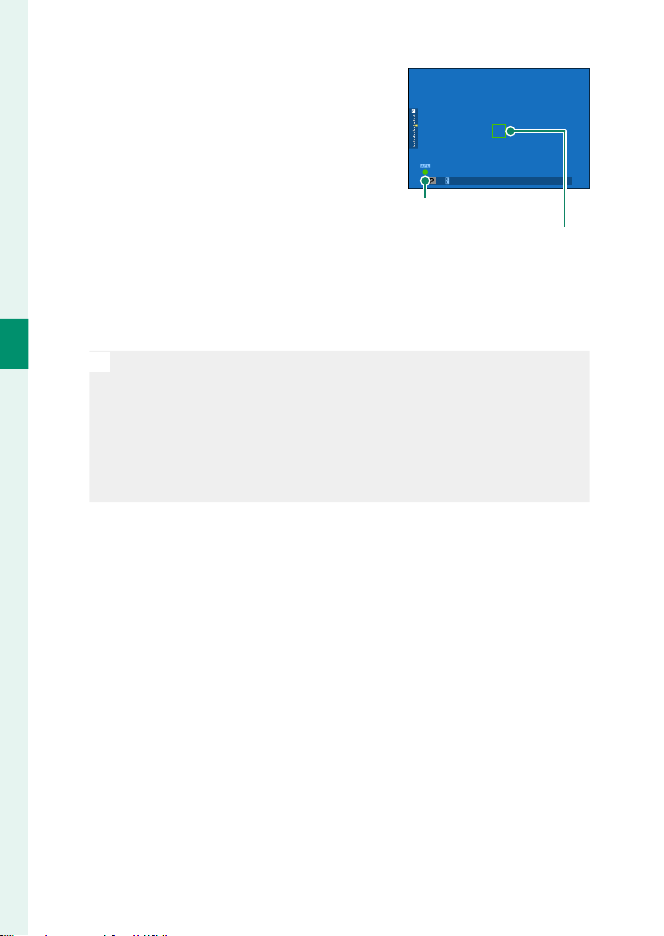
3
Basic Photography and Playback
Press the shutter button halfway to
6
set focus and exposure.
Focus indicator
Focus frame
If the camera is able to focus, the focus frame and focus indica-
•
tor will glow green.
If the camera is unable to focus, the focus frame will turn red, s
•
will be displayed, and the focus indicator will blink white.
If the subject is poorly lit, the AF-assist illuminator may light to
•
N
assist the focus operation.
Focus and exposure will lock when the shutter button is pressed
•
halfway. Focus and exposure remain locked while the button is
kept in this position (AF/AE lock).
The camera will focus on subjects at any distance in the macro
•
and standard focus ranges for the lens.
Smoothly press the shutter button the rest of the way down
7
to take the picture.
44
Page 69
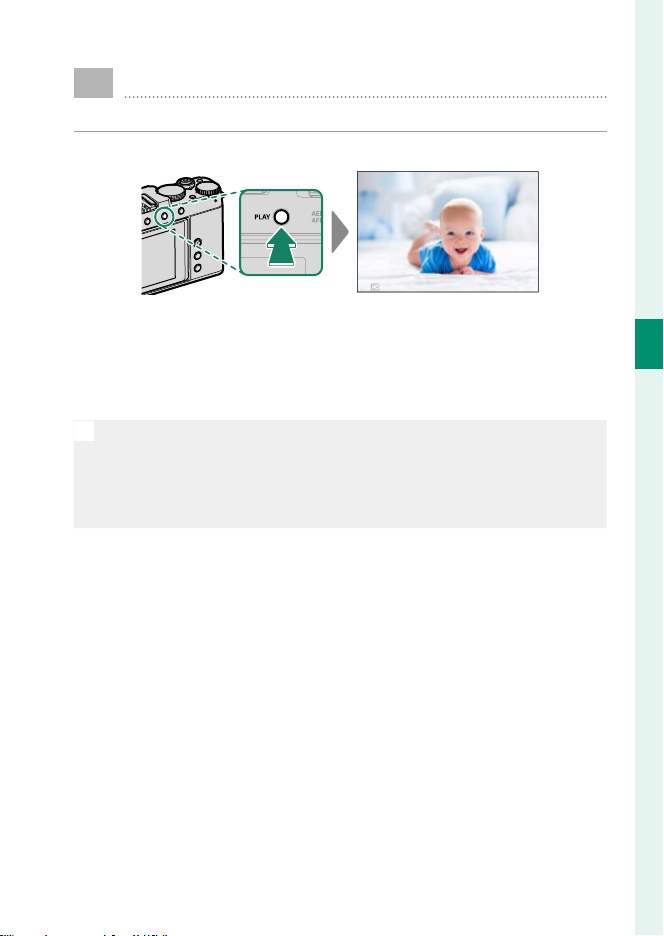
Viewing Pictures
Pictures can be viewed in the view nder or LCD monitor.
To view pictures full frame, press the PLAY button.
100-0001
Press the focus stick (focus lever) left to page through pictures in
reverse order. Press it right to page through pictures in the order
recorded. Keep the stick pressed to scroll rapidly to the desired
frame.
• To page through pictures, press and then rotate the front command
N
dial (P 6). You can also use swipe gestures.
Pictures taken using other cameras are marked with a m (“gift im-
•
age”) icon to warn that they may not display correctly and that playback zoom may not be available.
45
3
Basic Photography and Playback
Page 70
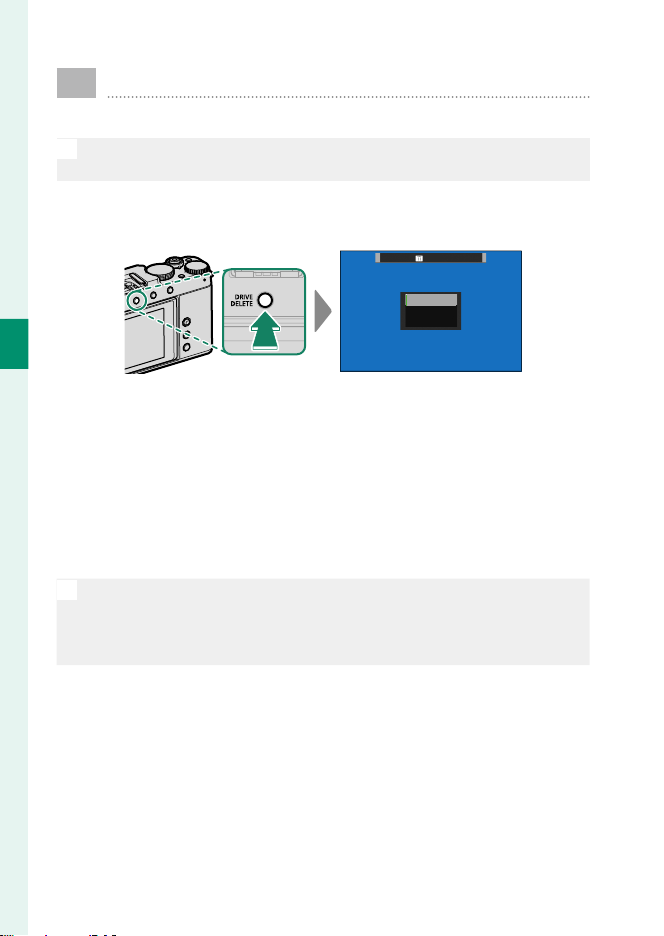
3
Basic Photography and Playback
Deleting Pictures
Use the DRIVE/DELETE button to delete pictures.
Deleted pictures cannot be recovered. Protect important pictures or
O
copy them to a computer or other storage device before proceeding.
With a picture displayed full frame, press the DRIVE/DELETE but-
1
ton and select FRAME.
ERASE
FRAME
SELECTED FRAMES
ALL FRAMES
Choose a picture and press MENU/OK to delete it.
2
The picture will be deleted when the MENU/OK button is
•
pressed; a con rmation dialog is not displayed. Be careful
not to accidentally delete pictures you wish to keep.
Additional pictures can be deleted using the MENU/OK but-
•
ton. Display the desired pictures and press MENU/OK to delete them one by one.
• Protected pictures cannot be deleted. Remove protection from any
N
pictures you wish to delete (P 194).
Pictures can also be deleted from the menus using the C PLAY BACK
•
MENU> ERASE option (P 190).
46
Page 71

Movie Recording and
Playback
47
Page 72
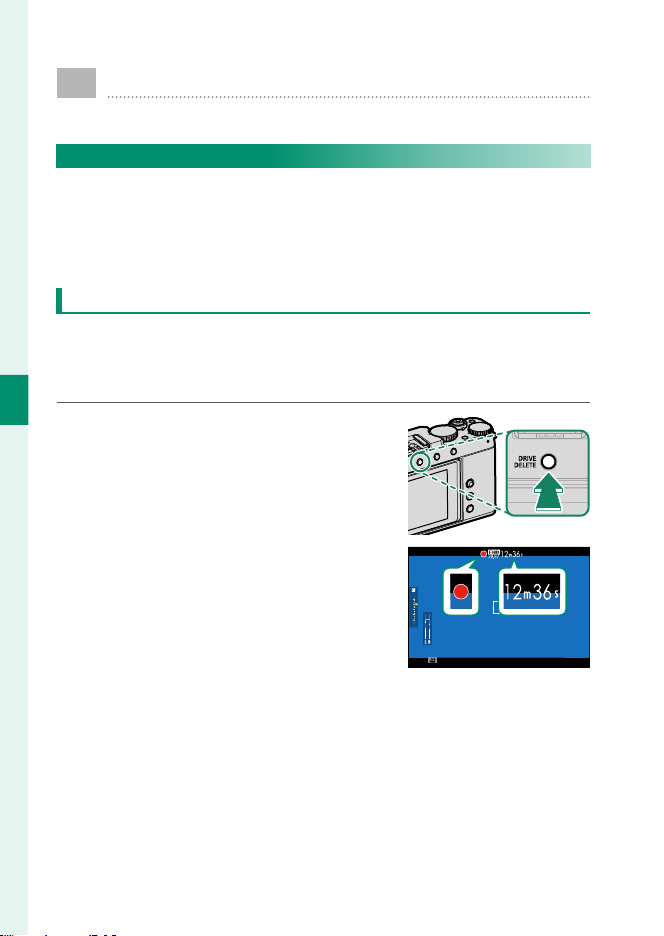
Recording Movies
Record movies with sound.
Recording Movies
Movies can be recorded by pressing the shutter button when
F(movie) is selected in the drive-mode menu or by pressing
the function button to which MOVIE RECORDING RELEASE is
assigned.
The Drive-Mode Menu (F Movie)
Selecting F (movie) in the drive-mode menu and recording
movies using the shutter button gives you control over a variety
of camera settings.
4
Movie Recording and Playback
Press the DRIVE/DELETE button and se-
1
lect MOVIE in the drive-mode menu.
Press the shutter button all the way
2
down.
Recording will start.
A recording indicator (V) is dis-
•
played while recording is in progress.
The display shows the elapsed re-
•
cording time.
Press the shutter button again to end recording.
3
Recording ends automatically when the movie reaches
29minutes 59seconds or the memory card is full.
48
Page 73
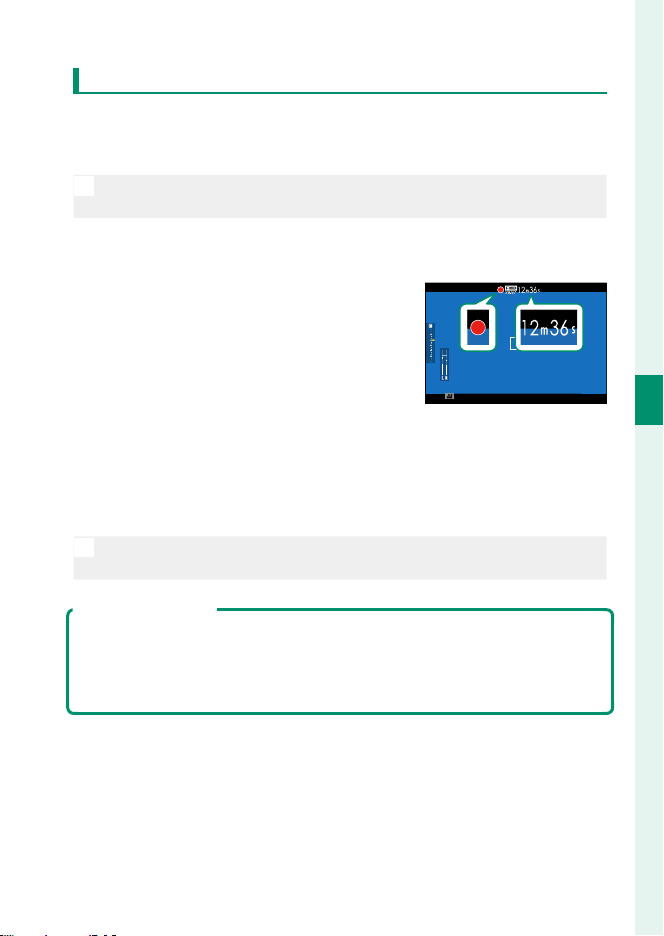
Recording Movies
Using a Function Button (MOVIE RECORDING RELEASE)
Use the function button to which MOVIE RECORDING RELEASE
is assigned to quickly and easily record movies while in still photography mode.
The camera automatically enables autoexposure and selects
N
CONTINUOUS AF for focus mode.
Assign MOVIE RECORDING RELEASE to a function button
1
(P 253).
Press the selected button to start
2
recording.
A recording indicator (V) is dis-
•
played while recording is in progress.
The display shows the elapsed re-
•
cording time.
Press the button again to end recording.
3
Recording ends automatically when the movie reaches
29minutes 59seconds or the memory card is full.
The movie recording release option is intended for point-and-shoot
N
movie recording; camera settings cannot be adjusted.
Temperature Warnings
The camera automatically turns o to protect itself when its temperature or
the temperature of the battery rises. If a temperature warning is displayed,
image noise may increase. Turn the camera o and wait for it to cool before
turning it on again (P 327).
4
Movie Recording and Playback
49
Page 74
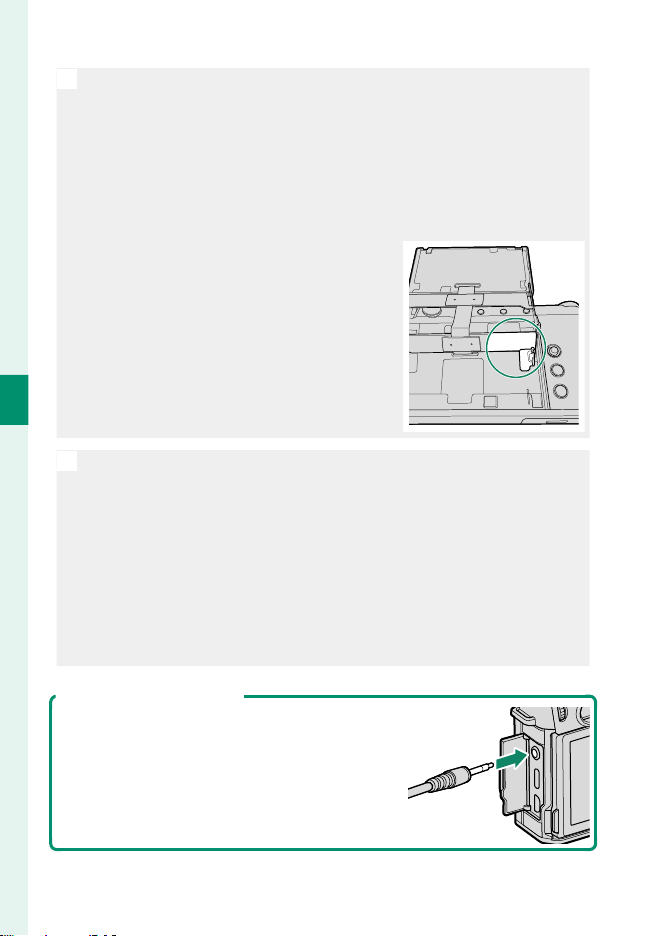
4
Movie Recording and Playback
• Use a memory card with a UHS speed class of 3 or better when re-
O
cording movies.
Sound is recorded via the built-in microphone or an optional external
•
microphone. Do not cover the microphone during recording.
Note that the microphone may pick up lens noise and other sounds
•
made by the camera during recording.
Vertical or horizontal streaks may appear in movies containing very
•
bright subjects. This is normal and does not indicate a malfunction.
The temperature of the camera may rise
•
depending on ambient temperature and
length of use. The back of the camera
and the area around the back of the LCD
monitor in particular may become hot
when the monitor is tilted; precaution is
advised.
• The indicator lamp lights while recording is in progress.
N
In the case of zoom lenses, zoom can be adjusted during recording
•
using the zoom ring (if available).
Exposure compensation can be adjusted during recording, but only
•
by a maximum of ±2 EV.
Recording may be unavailable at some settings, while in other cases
•
settings may not apply during recording.
Headphones connected via USB can be used to monitor audio during
•
movie recording. Use the supplied headphone adapter to convert
the USB connector to a plug for a headphone jack.
Using an External Microphone
Sound can be recorded with external microphones that connect using jacks 3.5mm in diameter; microphones that require plug-in power cannot be used. See the microphone manual
for details.
50
Page 75
Recording Movies
Adjusting Movie Settings
Movie settings can be adjusted from the movie menus or using
the B MOVIE SETTING item in the photo menus (P 19).
A simpli ed menu of movie settings can be accessed via the
•
B MOVIE SETTING item in the photo menus (P 152).
The movie menus contain options for use when recording mov-
•
ies via the shutter button with MOVIE selected in the drivemode menu (P 155).
Changes made using the B MOVIE SETTING item in the photo menus
O
also apply to the movie menus. Changes made in one set of menus
automatically apply in the other.
Depth of Field
To soften backgrounds, set aperture as wide as possible. Aperture can be
adjusted directly in modes A (aperture-priority AE) and M (manual).
4
Movie Recording and Playback
51
Page 76
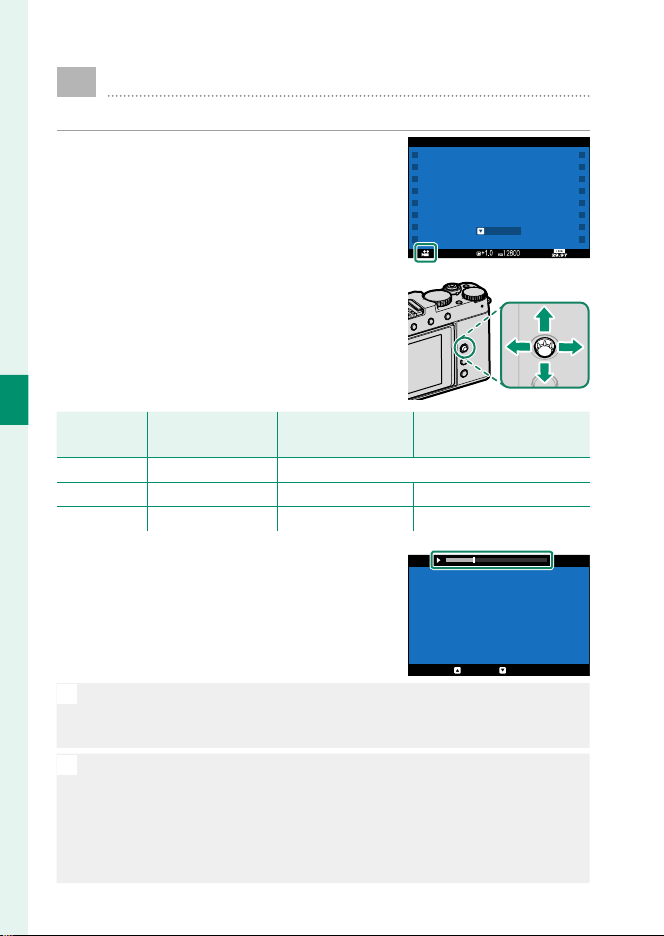
Viewing Movies
View movies on the camera.
In full-frame playback, movies are identi ed by a W icon. Press the focus stick (focus lever) down to start movie playback.
The following operations can be performed while a movie is displayed:
4
Focus stick Focus stick
Movie Recording and Playback
(focus lever)(focus lever)
Up — End playback
Down Start playback Pause playback Start/resume playback
Left/right View other pictures Adjust speed
Full-frame Full-frame
playbackplayback
Playback in progress Playback in progress
((xx))
PLAYPLAY
Playback paused Playback paused
((yy))
Single frame rewind/advance
Progress is shown in the display during
playback.
PAUSESTOP
• Do not cover the speaker during playback.
O
Sound is not played back if OFF is selected for D USER SETTING>
•
SOUND & FLASH.
• Press MENU/OK to pause playback and display volume controls. Press
N
the focus stick (focus lever) up or down to adjust the volume; press
MENU/OK again to resume playback. Volume can also be adjusted using D SOUND SET-UP> PLAYBACK VOLUME.
Audio can be played back over headphones or other devices con-
•
nected via USB using the supplied headphone adapter.
52
29m59s
Page 77

Viewing Movies
Playback Speed
Press the focus stick (focus lever) left or right to
adjust playback speed during playback. Speed
is shown by the number of arrows (M or N).
29m59s
Arrows
4
Movie Recording and Playback
53
Page 78

MEMO
54
Page 79

Taking Photographs
55
Page 80
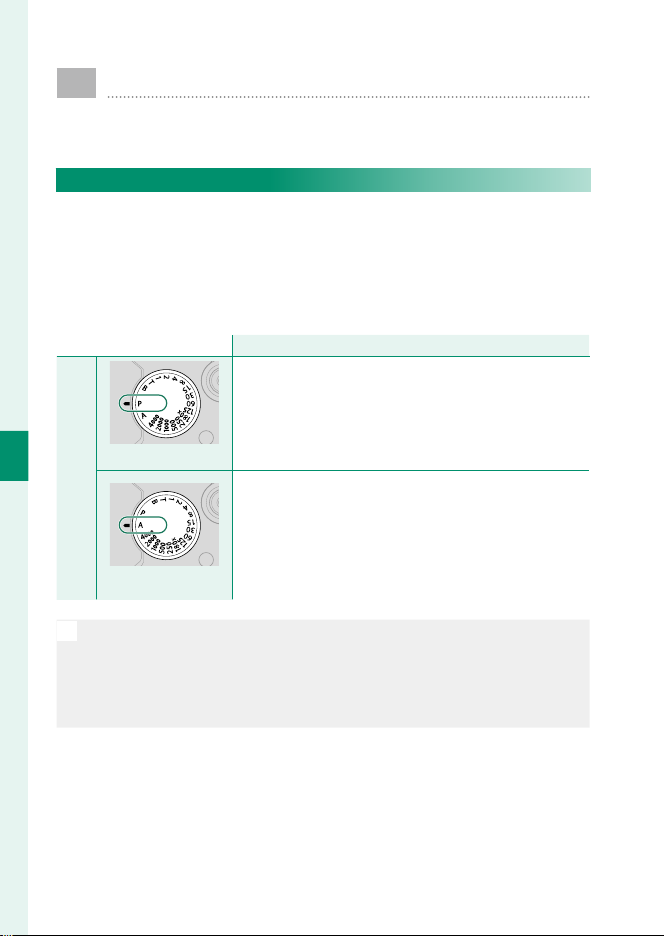
P, S, A, and M Modes
P, S, A, and M modes give you varying degrees of control
over shutter speed and aperture.
Mode P: Program AE
Let the camera choose shutter speed and aperture for optimal
exposure. Other values that produce the same exposure can be
selected with program shift.
The camera functions in mode P (program AE) when the shutter
speed dial is rotated to A or P. Aperture is set as follows.
ApertureAperture
5
Taking Photographs
Shutter speed dialShutter speed dial
P (P (PP 57) 57)
A (A (PP 57) 57)
• The method for adjusting aperture when using a lens without an
O
aperture ring can be chosen using D BUTTON/DIAL SETTING>
APERTURE SETTING (P 230).
Front command dial settings can be adjusted using D BUTTON/
•
DIAL SETTING> COMMAND DIAL SETTING (P 67, 226).
The camera functions in mode P regardless of the
option selected for aperture (P 42).
Lenses with aperture rings: Mode P can be selected by
•
rotating the ring to A (auto).
Lenses without aperture rings: Mode P can be selected
•
by pressing the center of the front command dial to
cycle to APERTURE and then rotating the dial to
choose A (auto).
56
Page 81
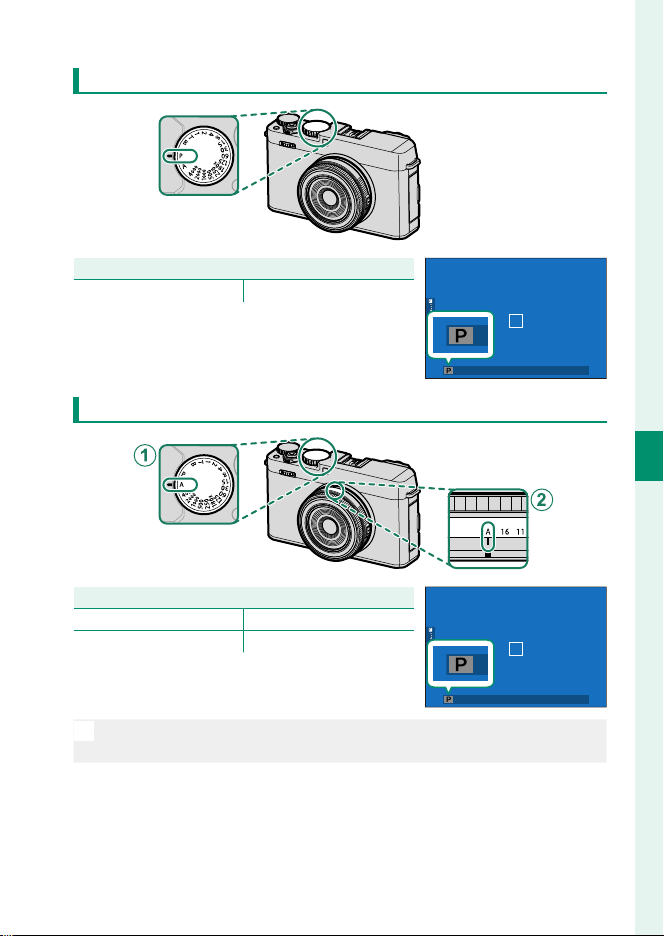
Shutter Speed Dial: P
SettingSetting
Shutter speedShutter speed P (program)
Con rm that P appears in the display.
Shutter Speed Dial: A
SettingSetting
Shutter speed A (auto)
A
Aperture A (auto)
B
Con rm that P appears in the display.
P, S, A, and M Modes
5
Taking Photographs
If the subject is outside the metering range of the camera, the shutter
O
speed and aperture displays will show “– – –”.
57
Page 82
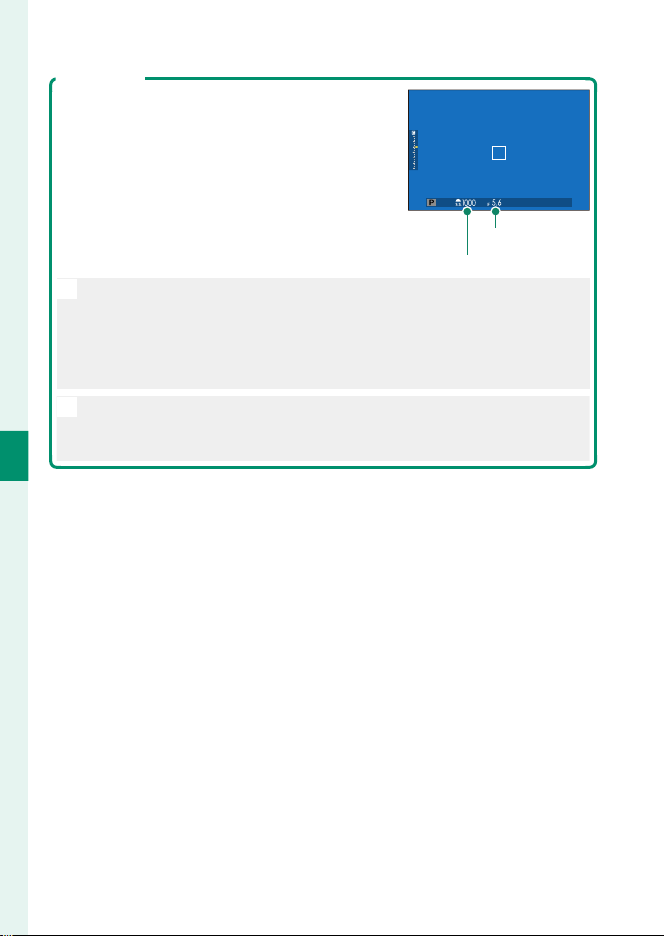
Program Shift
Rotate the front command dial to choose the
desired combination of shutter speed and aperture (program shift).
Program shift is not available in any of the following circumstances:
O
With ash units that support TTL auto
•
When an auto option is selected for H IMAGE QUALITY SETTING>
•
DYNAMIC RANGE
In movie mode
•
To cancel program shift, turn the camera o .
•
N
Front command dial settings can be adjusted using DBUTTON/
•
5
Taking Photographs
DIAL SETTING> COMMAND DIAL SETTING (P 67, 226).
Aperture
Shutter speed
58
Page 83
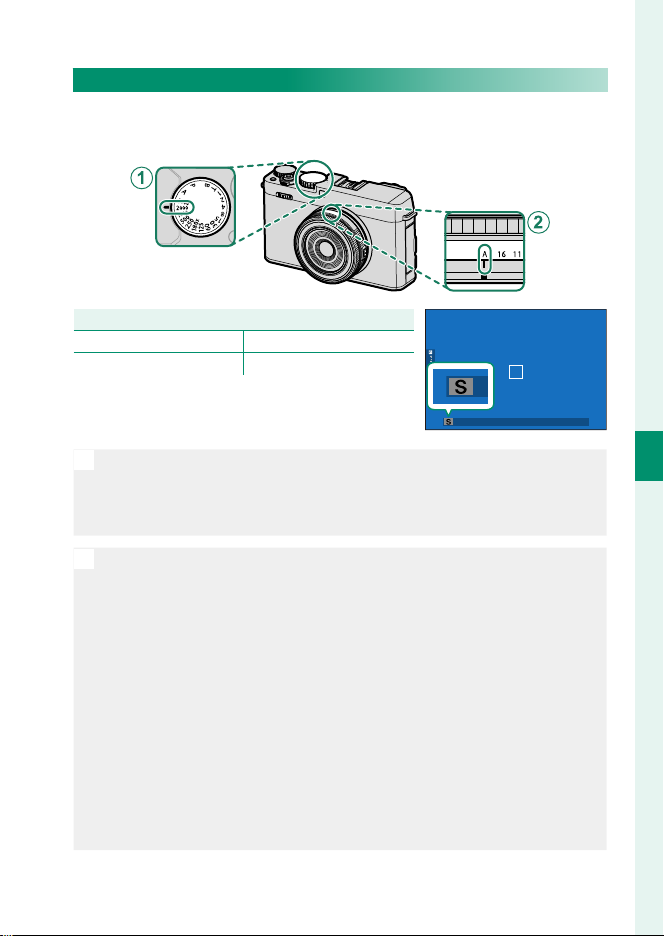
P, S, A, and M Modes
Mode S: Shutter-Priority AE
Choose a shutter speed and let the camera adjust aperture for
optimal exposure.
SettingSetting
Shutter speed User-selected
A
Aperture A (auto)
B
Con rm that S appears in the display.
If the correct exposure cannot be achieved at the selected shutter
•
O
speed, aperture will be displayed in red.
If the subject is outside the metering range of the camera, the aper-
•
ture display will show “– – –”.
Shutter speed can also be adjusted in increments of ⁄EV by rotating
•
N
the front command dial.
For faster shutter speeds, enable the electronic shutter, set the shut-
•
ter speed dial to 4000 or T, and rotate the front command dial.
If you are using a lens with an aperture ring, rotate the ring to A (auto).
•
If you are using a lens without an aperture ring, rst select AUTO or
AUTO + MANUAL for D BUTTON/DIAL SETTING> APERTURE
SETTING, then press the center of the front command dial to cycle
to APERTURE and rotate the dial until the aperture value is displayed
in white.
Front command dial settings can be adjusted using DBUTTON/
•
DIAL SETTING> COMMAND DIAL SETTING (P 67, 226).
Shutter speed can be adjusted while the shutter button is pressed
•
halfway.
5
Taking Photographs
59
Page 84
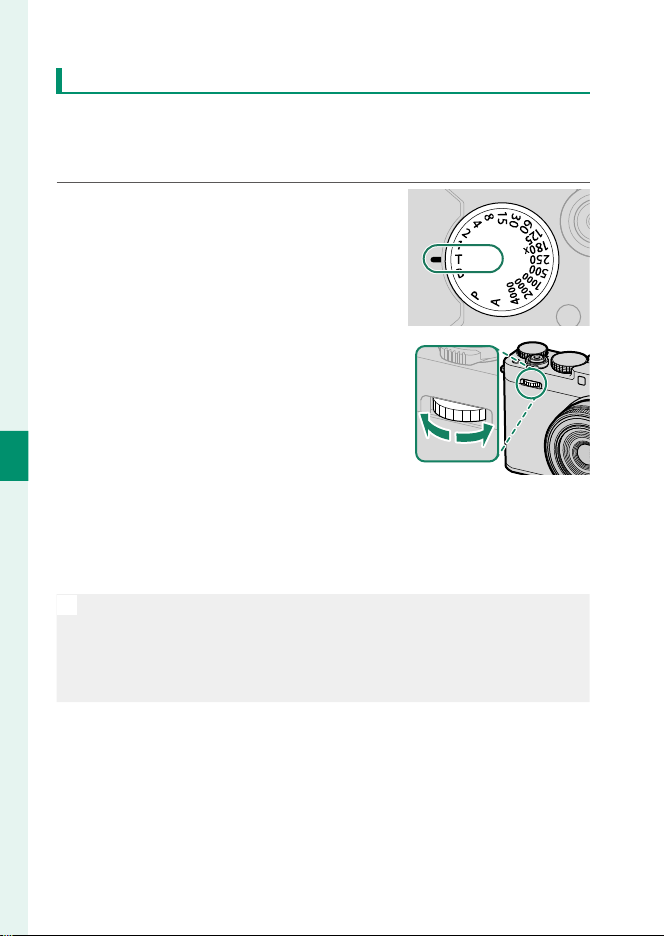
Time (T)
Choose a shutter speed of T (time) for long time-exposures.
Use of a tripod is recommended to prevent the camera moving
during the exposure.
Set shutter speed to T.
1
Rotate the front command dial to
2
choose a shutter speed.
5
Taking Photographs
Press the shutter button all the way down to take a picture
3
at the selected shutter speed. At speeds of 1 s or slower, a
count-down timer will be displayed while the exposure is in
progress.
• To reduce “noise” (mottling) in long time-exposures, select ON for
N
H IMAGE QUALITY SETTING> LONG EXPOSURE NR. Note that
this may increase the time needed to record images after shooting.
Front command dial settings can be adjusted using D BUTTON/
•
DIAL SETTING> COMMAND DIAL SETTING (P 67, 226).
60
Page 85
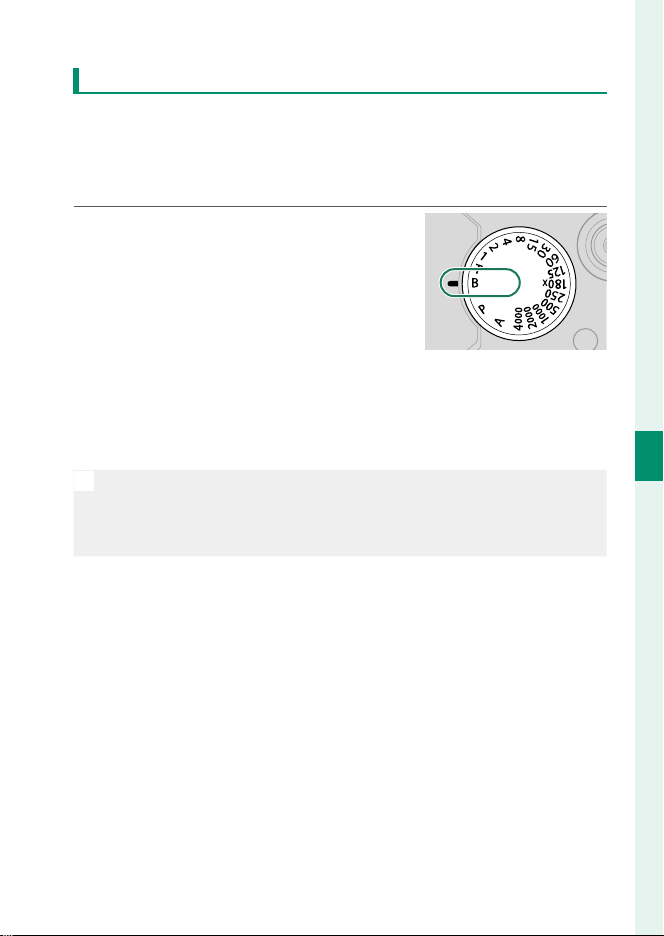
P, S, A, and M Modes
Bulb (B)
Choose a shutter speed of B (bulb) for long time-exposures in
which you open and close the shutter manually. Use of a tripod
is recommended to prevent the camera moving during the exposure.
Set shutter speed to B.
1
Press the shutter button all the way down. The shutter will
2
remain open for up to 60 minutes while the shutter button
is pressed; the display shows the time elapsed since the exposure started.
• Selecting an aperture of A xes shutter speed at 30 s.
N
To reduce “noise” (mottling) in long time-exposures, select ON for
•
H IMAGE QUALITY SETTING> LONG EXPOSURE NR. Note that
this may increase the time needed to record images after shooting.
5
Taking Photographs
61
Page 86
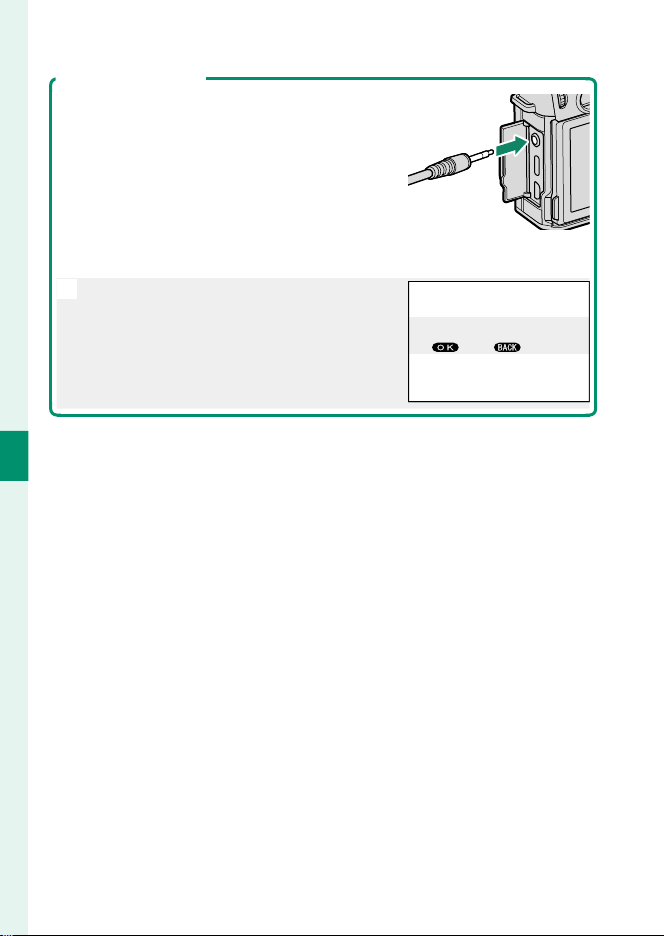
Using a Remote Release
A remote release can be used for long time-exposures. When using an optional RR-100 remote release or an electronic release from
third-party suppliers, connect it to the camera’s
microphone/remote release connector via a
third-party adapter that converts the female
three-pin, ⌀2.5 mm connector to a male threepin, ⌀3.5 mm connector.
A con rmation dialog will be displayed
N
when a remote release is connected; press
MENU/OK and select n REMOTE for MIC/
REMOTE RELEASE.
5
Taking Photographs
CHECK MIC/REMOTE RELEASE
SETTING
SET
SKIP
62
Page 87
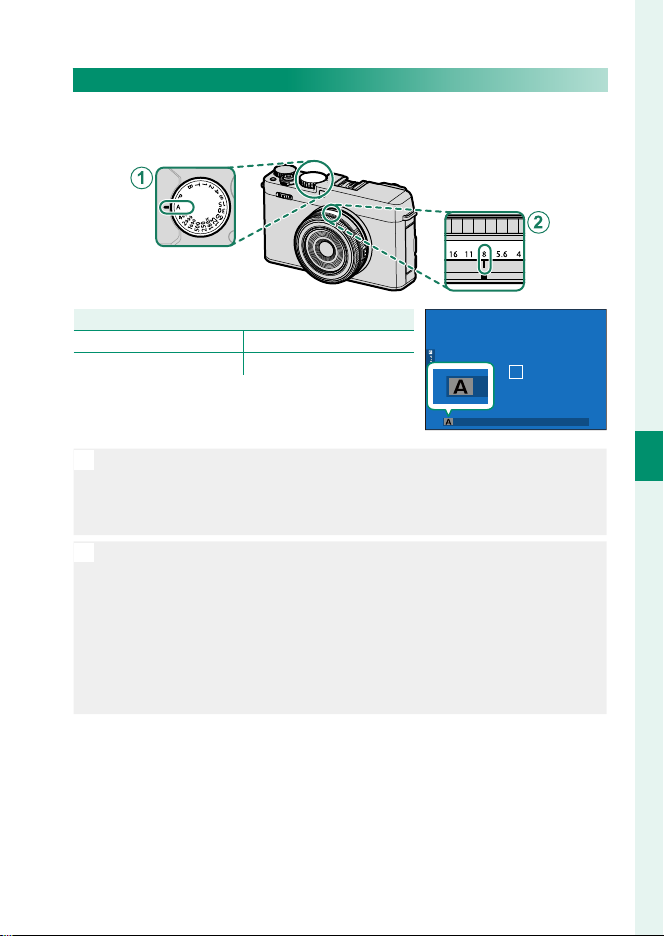
P, S, A, and M Modes
Mode A: Aperture-Priority AE
Choose an aperture and let the camera adjust shutter speed for
optimal exposure.
SettingSetting
Shutter speed A (auto)
A
Aperture User-selected
B
Con rm that A appears in the display.
If the correct exposure cannot be achieved at the selected aperture,
•
O
shutter speed will be displayed in red.
If the subject is outside the metering range of the camera, the shutter
•
speed display will show “– – –”.
If the lens is equipped with a aperture ring, aperture can be adjusted
•
N
by rotating the ring. If you are using a lens without an aperture ring,
press the center of the front command dial to cycle to APERTURE
and then rotate the dial to choose a value.
Front command dial settings can be adjusted using DBUTTON/
•
DIAL SETTING> COMMAND DIAL SETTING (P 67, 226).
Aperture can be adjusted even while the shutter button is pressed
•
halfway.
5
Taking Photographs
63
Page 88
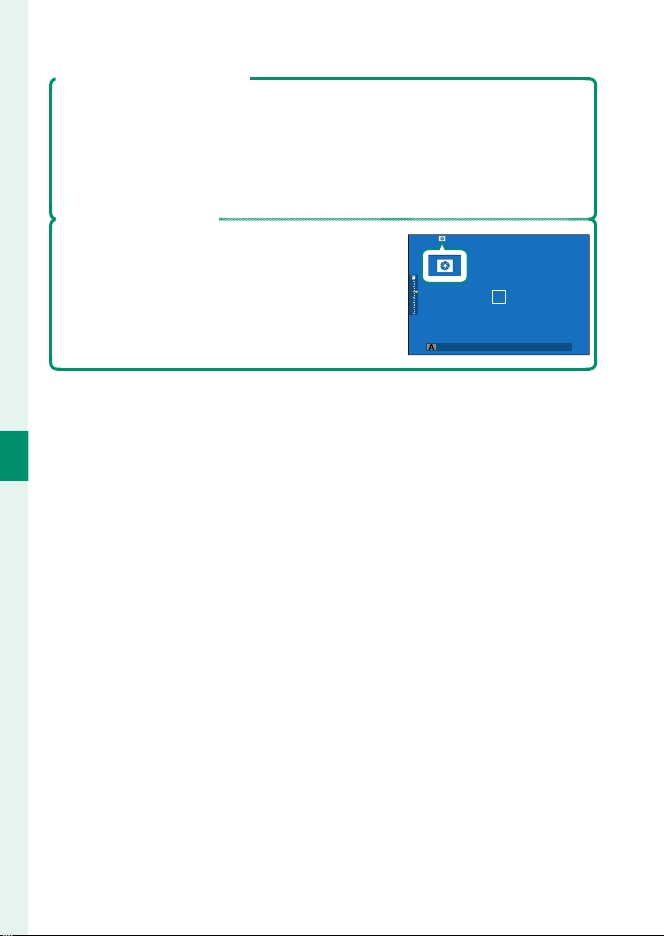
Lenses Without Aperture Rings
Users of lenses with no aperture ring can rotate the command dial past
minimum aperture to select A (auto), then press the center of the dial to
cycle to S.S. (PROGRAM SHIFT) and use program shift to choose other
combinations of shutter speed and aperture that will produce the same
exposure.
Previewing Depth of Field
When PREVIEW DEPTH OF FIELD is assigned
to a function button, pressing the button displays a L icon and stops aperture down to the
selected setting, allowing depth of eld to be
previewed in the display (P 253).
5
Taking Photographs
64
Page 89
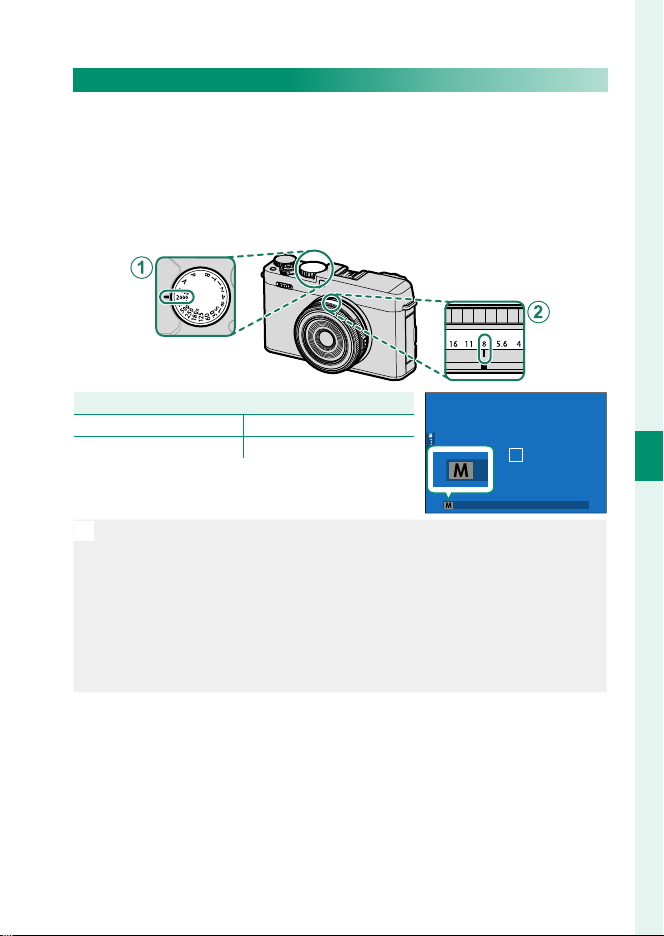
P, S, A, and M Modes
Mode M: Manual Exposure
In manual mode, the user controls both shutter speed and aperture.
Shots can be deliberately overexposed (brighter) or underexposed
(darker), opening the door for a variety of individual creative expression. The amount the picture would be under- or over-exposed
at current settings is shown by the exposure indicator; adjust shutter speed and aperture until the desired exposure is reached.
SettingSetting
Shutter speed User-selected
A
Aperture User-selected
B
Con rm that M appears in the display.
If the lens is equipped with a aperture ring, aperture can be adjusted
•
N
by rotating the ring. If you are using a lens without an aperture ring,
press the center of the front command dial to cycle to APERTURE
and then rotate the dial to choose a value.
When set to S.S. (PROGRAM SHIFT), the front command dial can be
•
rotated to adjust shutter speed in increments of ⁄EV.
Front command dial settings can be adjusted using DBUTTON/
•
DIAL SETTING> COMMAND DIAL SETTING (P 67, 226).
5
Taking Photographs
65
Page 90
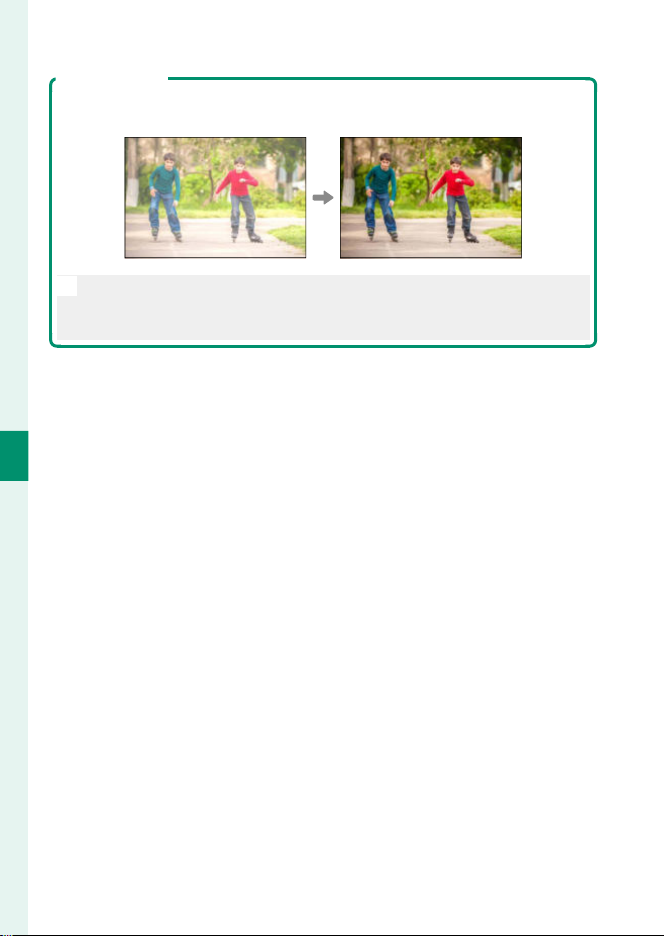
Exposure Preview
To preview exposure in the LCD monitor, select PREVIEW EXP./WB for
D SCREEN SET-UP> PREVIEW EXP./WB IN MANUAL MODE.
Select an option other than PREVIEW EXP./WB when using the ash
N
or on other occasions on which exposure may change when the picture is taken.
5
Taking Photographs
66
Page 91
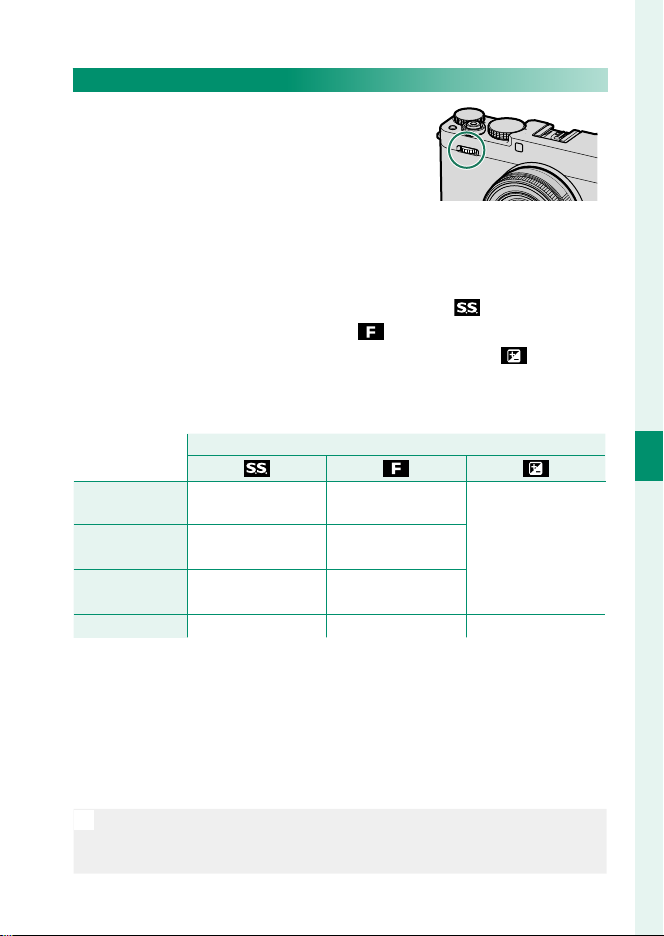
P, S, A, and M Modes
Front Command Dial Roles by Mode
The roles that can be performed by the
front command dial in each mode are
listed below.
The roles assigned to the front command dial during shooting
can be chosen using D BUTTON/DIAL SETTING> COMMAND
DIAL SETTING (P 226). At default settings, the dial can be used
in the following three roles:
FRONT COMMAND DIAL 1: S.S. (PROGRAM SHIFT) ( )
•
FRONT COMMAND DIAL 2: APERTURE ( )
•
FRONT COMMAND DIAL 3: EXPOSURE COMPENSATION ( )
•
Press the center of the front command dial to cycle through roles
1, 2, and 3.
Role assigned to front command dialRole assigned to front command dial
P (PROGRAM AE) Program shift
S (SHUTTER
PRIORITY AE)
A (APERTURE
PRIORITY AE)
M (MANUAL) Shutter speed Aperture None
1 Shutter speed dial set to P.
2 Shutter speed dial set to A.
3 Lens with no aperture ring, or lens equipped with an aperture ring set to
A (auto) with COMMAND selected for D BUTTON/DIAL SETTING>
APERTURE RING SETTING (A). Aperture adjustment via front command dial
not otherwise available.
4 Exposure compensation dial rotated to C.
Shutter speed Aperture
None None
Program shift
Aperture
Exposure
compensation
5
Taking Photographs
To adjust sensitivity using the front command dial, assign ISO to any
N
of the front command dial roles 1 through 3 using D BUTTON/DIAL
SETTING> COMMAND DIAL SETTING (P 226).
67
Page 92

5
Taking Photographs
Autofocus
Take pictures using autofocus.
Use G AF/MF SETTING> FOCUS MODE to choose SINGLE
1
AF or CONTINUOUS AF (P 69).
Use G AF/MF SETTING> AF MODE to choose an AF mode
2
(P 71).
Select G AF/MF SETTING> FOCUS AREA and choose the
3
position and size of the focus frame (P 73).
Take pictures.
4
68
Page 93
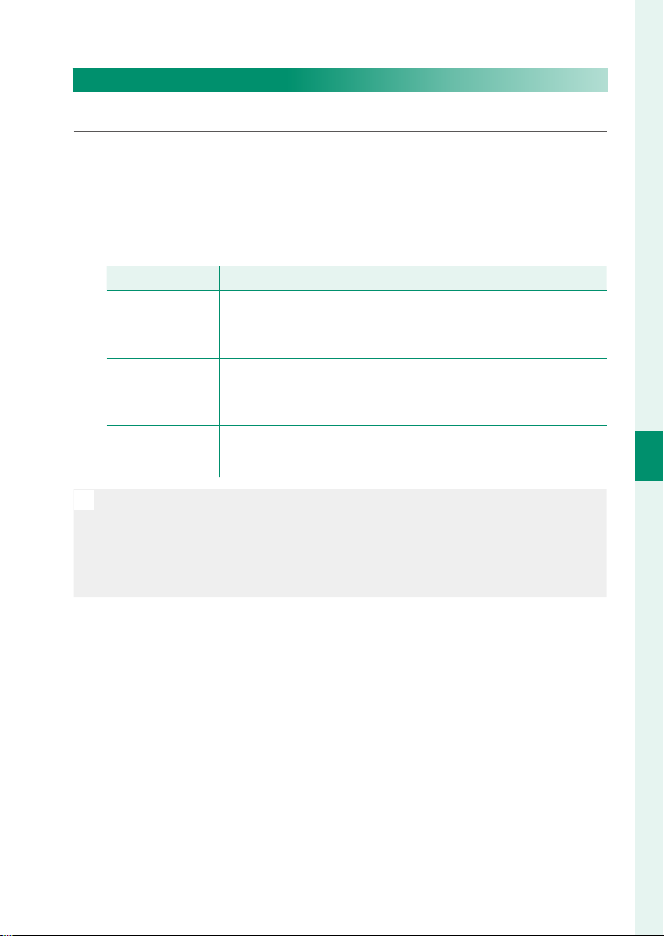
Autofocus
Focus Mode
Choose how the camera focuses.
Press MENU/OK to display the menus.
1
Select G AF/MF SETTING> FOCUS MODE in the shooting
2
menu.
Choose from the following options:
3
ModeMode DescriptionDescription
p
MANUAL FOCUS
k
CONTINUOUS AF
l
SINGLE AF
• Regardless of the option selected, manual focus will be used when
N
the lens is in manual focus mode.
If ON is selected for G AF/MF SETTING> PRE-AF, focus will be ad-
•
justed continuously in modes l and k even when the shutter button is not pressed.
Focus manually using the lens focus ring. Choose for manual control of focus or in situations in which the camera is
unable to focus using autofocus (P 77).
Focus is continually adjusted to refl ect changes in the distance to the subject while the shutter button is pressed
halfway. Use for subjects that are in motion.
Focus locks while the shutter button is pressed halfway.
Choose for stationary subjects.
5
Taking Photographs
69
Page 94
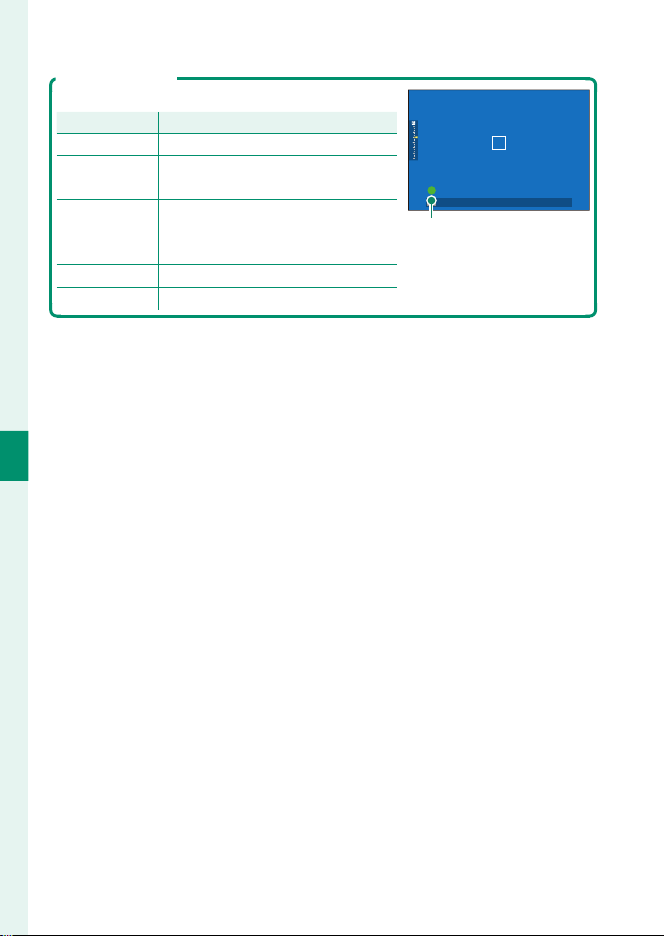
The Focus Indicator
Focus status is shown by the focus indicator.
Focus indicatorFocus indicator Focus statusFocus status
( ) Camera focusing.
z (lights green)
(z) (lights green)
A (blinks white)
j Manual focus (focus mode p).
Subject in focus; focus locked (focus
mode l).
Subject in focus (focus mode k).
Focus is automatically adjusted for
changes in distance to subject.
Camera unable to focus.
5
Taking Photographs
Focus indicator
70
Page 95
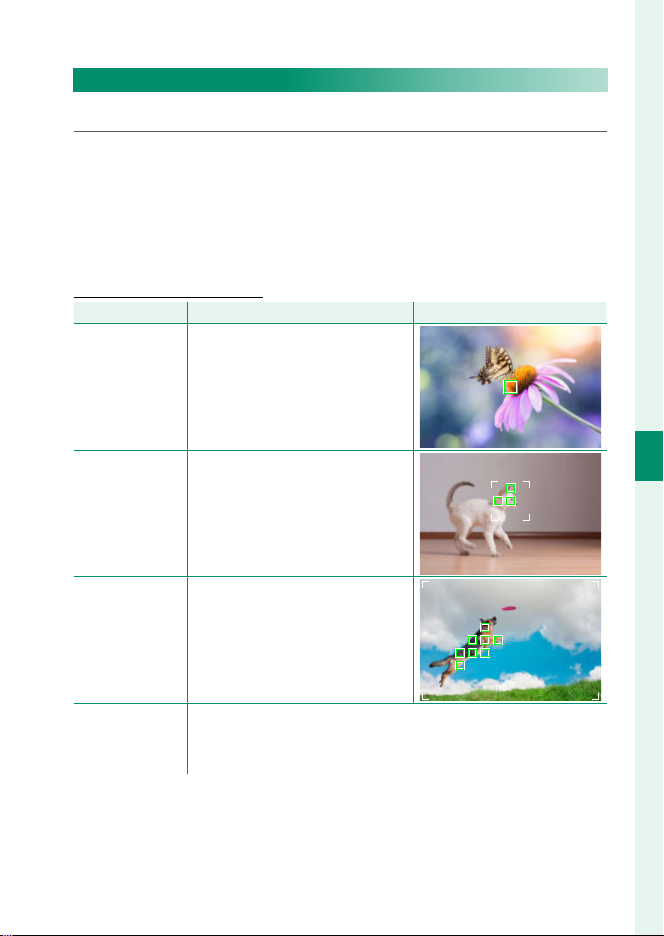
Autofocus Options (AF Mode)
Choose how the camera focuses in modes l and k.
Press MENU/OK and go to the shooting menu.
1
Select G AF/MF SETTING> AF MODE.
2
Choose an AF mode.
3
How the camera focuses depends on the focus mode.
Focus Mode Focus Mode ll (SINGLE AF) (SINGLE AF)
OptionOption DescriptionDescription Sample imageSample image
Autofocus
r
SINGLE POINT
y
ZONE
z
WIDE
j
ALL
Camera focuses on subject in
selected focus point. Use for pinpoint focus on selected subject.
Camera focuses on subject in selected focus zone. Focus zones include multiple focus points, making it easier to focus on subjects in
motion.
Camera focuses automatically on
high-contrast subjects; display
shows areas in focus.
Rotate the front command dial in the focus-point selection display (P 74, 75) to cycle through AF modes in the following
order: r SINGLE POINT, y ZONE, and z WIDE.
71
5
Taking Photographs
Page 96
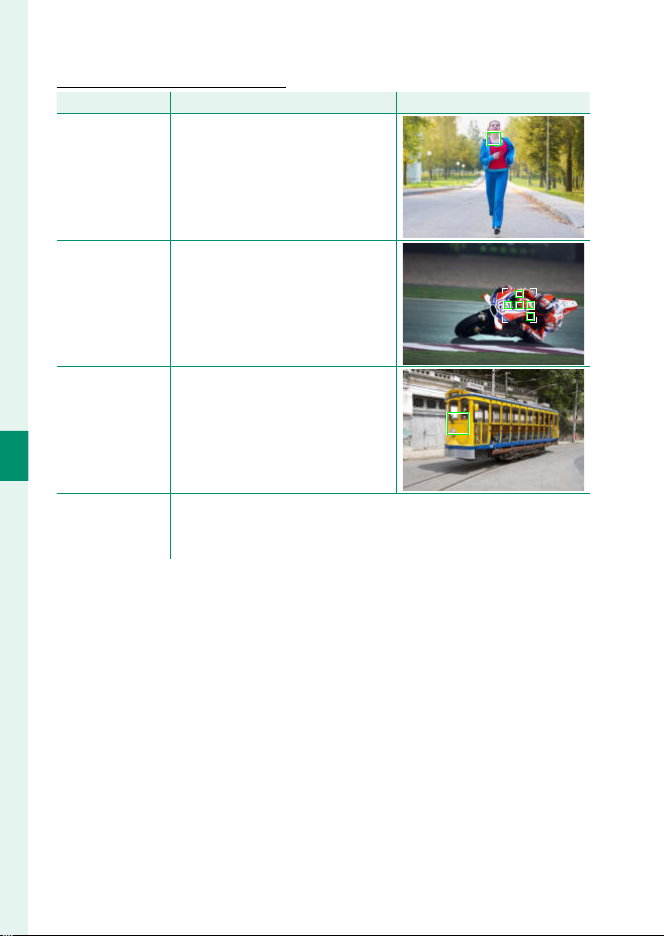
Focus Mode Focus Mode kk (CONTINUOUS AF) (CONTINUOUS AF)
OptionOption DescriptionDescription Sample imageSample image
5
Taking Photographs
r
SINGLE POINT
y
ZONE
z
TRACKING
j
ALL
Focus tracks subject at selected focus point. Use for subjects moving
toward or away from camera.
Focus tracks subject in selected focus zone. Use for subjects that are
moving fairly predictably.
Focus tracks subjects moving
through wide area of frame.
Rotate the front command dial in the focus-point selection display (P 74, 75) to cycle through AF modes in the following
order: r SINGLE POINT, y ZONE, and z TRACKING.
72
Page 97

Focus-Point Selection
Choose a focus point for autofocus.
Viewing the Focus-Point Display
Press MENU/OK and go to the shooting menu.
1
Select G AF/MF SETTING> FOCUS AREA to view the fo-
2
cus-point display.
Use the focus stick (focus lever) and front command dial to
3
choose a focus area.
The focus point can also be selected using touch controls (P 21).
N
Autofocus
5
Taking Photographs
73
Page 98
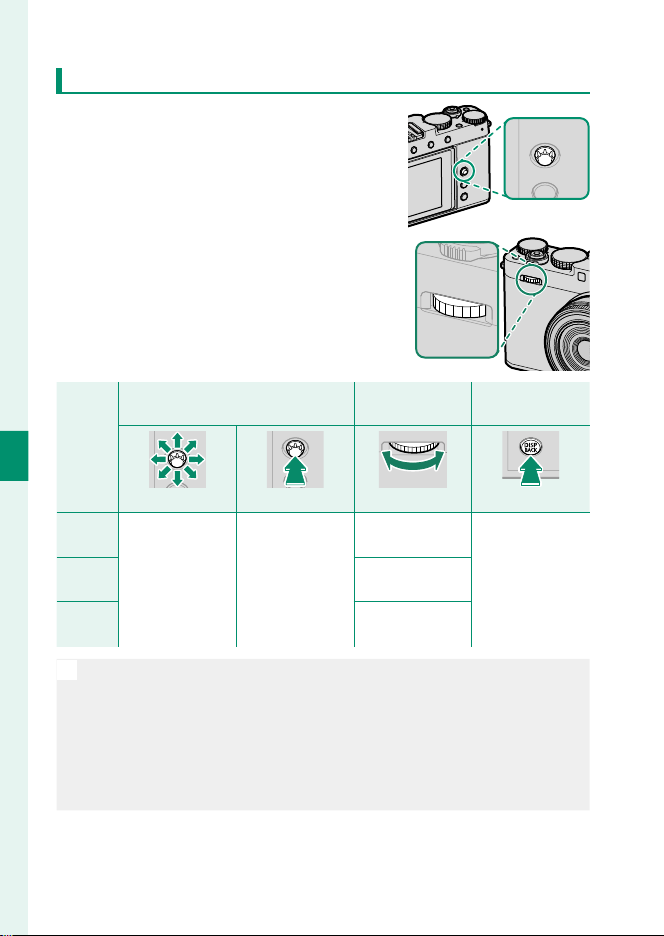
Selecting a Focus Point
Use the focus stick (focus lever) to choose
the focus point and the front command
dial to choose the size of the focus frame.
The procedure varies with the option selected for AF mode.
5
Taking Photographs
Focus stickFocus stick
AF modeAF mode
TiltTilt PressPress RotateRotate PressPress
rr
yy
Highlight focus
point
Select highlighted
focus point
zz
Manual focus-point selection is not available when z WIDE/
•
N
TRACKING is selected in focus mode l.
If j ALL is selected for AF mode, you can rotate the front command
•
dial in the focus-point selection display to cycle through AF modes
in the following order: r SINGLE POINT (6 frame sizes), y ZONE
(3 frame sizes), and either z WIDE (focus mode l) or z TRACKING
(focus mode k).
Front command Front command
dialdial
Choose from 6
frame sizes
Choose from 3
frame sizes
—
Select center
focus point
74
DISP/BACK DISP/BACK
buttonbutton
Page 99
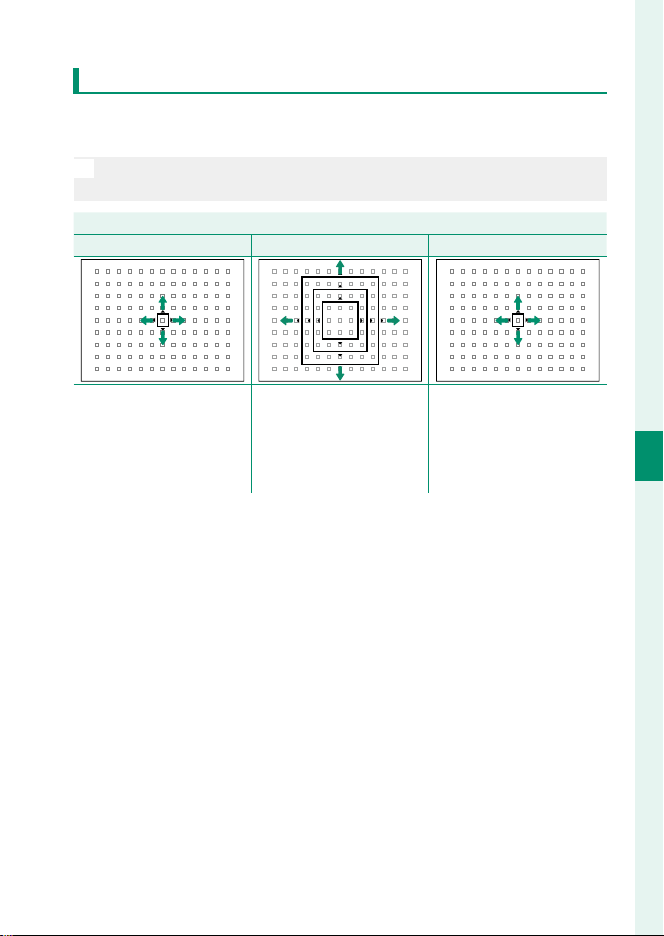
Autofocus
The Focus-Point Display
The focus-point display varies with the option selected for AF
mode.
Focus frames are shown by small squares (), focus zones by the large
N
squares.
AF modeAF mode
rr SINGLE POINT SINGLE POINT yy ZONE ZONE zz TRACKING TRACKING
Number of points available can be selected using
G AF/MF SETTING>
NUMBER OF FOCUS
POINTS.
Choose from zones with
7 × 7, 5 × 5, or 3 × 3 focus
points.
Position focus frame over
subject you want to track.
5
Taking Photographs
75
Page 100
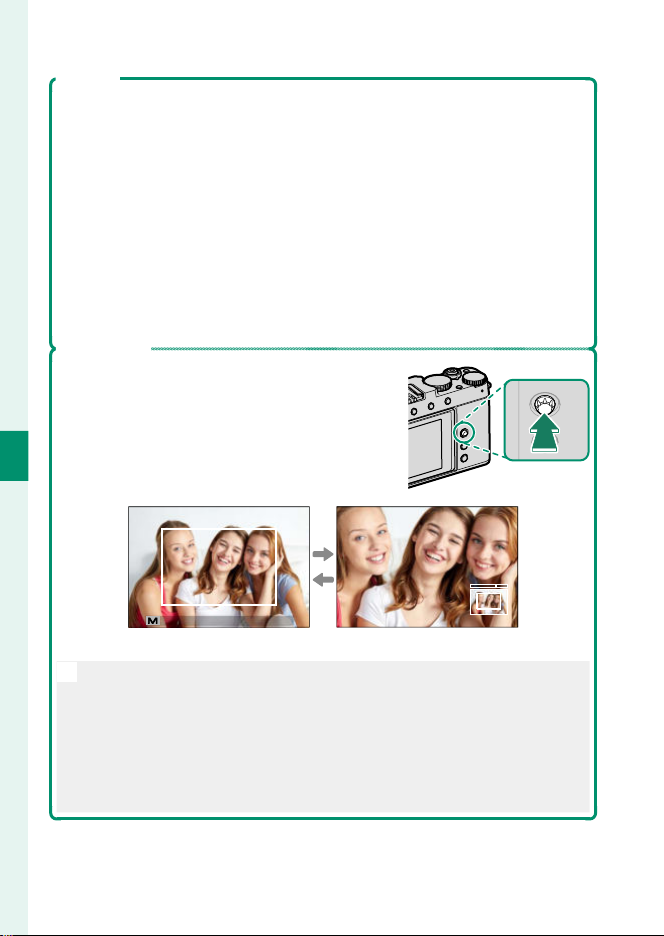
Autofocus
Although the camera boasts a high-precision autofocus system, it may be
unable to focus on the subjects listed below.
Very shiny subjects such as mirrors or car bodies.
•
Subjects photographed through a window or other re ective object.
•
Dark subjects and subjects that absorb rather than re ect light, such as
•
hair or fur.
Insubstantial subjects, such as smoke or ame.
•
Subjects that show little contrast with the background.
•
Subjects positioned in front of or behind a high-contrast object that is
•
also in the focus frame (for example, a subject photographed against a
backdrop of highly contrasting elements).
Checking Focus
To zoom the current focus area in by a factor of
6 for precise focus, press the center of the focus
stick (focus lever). Press again to cancel zoom.
5
Taking Photographs
Autofocus
Normal display Focus zoom
In focus mode l, select SINGLE POINT for AF MODE.
•
N
Focus zoom is not available in focus mode k or when GAF/MF
•
SETTING> PRE-AF is on.
Use D BUTTON/DIAL SETTING> FOCUS LEVER SETTING to
•
change the function performed by the center of the focus stick (focus
lever). D BUTTON/DIAL SETTING> FUNCTION (Fn) SETTING can
also be used to assign focus zoom to other controls (P 253).
76
 Loading...