

FujiFilm PICTOGRAPHY 3500 User Manual

INSTRUCTION MANUAL
Third Edition
DIGITAL IMAGE PRINTER
PICTROGRAPHY 3500
PRINTER DRIVER SOFTWARE
PP3-B482E3

LICENSING AGREEMENT
1. Copyright
The copyright for this software is owned by Fuji Photo Film Co., Ltd. (“FUJI”).
2. Prohibitions
You may not (1) copy, modify or adapt any or all parts of this software; (2) provide this software
to a third party in the from of a copy, loan or gift; or (3) reverse engineer this software.
3. After-Sale Service
Should the software fail to function properly due to a defect in the medium within 7 (seven)
days after the date of purchase, please return the software to the place of purchase for a
replacement.
4. Exemptions
(1) FUJI does not guarantee that this software will achieve the results intended by the purchaser.
(2) FUJI is not liable for problems that arise from the quality or performance of this software.
(3) FUJI is not liable for damages incurred directly or indirectly by the purchaser or a third party
through the use of this software.

INTRODUCTION
● This manual gives procedures for installing and using the PICTROGRAPHY 3500 printer driver, as well as
several precautions.
● This software requires a SCSI adapter. Before installation, check that a functioning SCSI adapter has been
installed in your computer.
● For issues directly involving Windows, Macintosh, or other operating systems, please refer to the manual
provided with the particular operating system.
● The functions and screen contents presented in this manual are subject to change as software may be
upgraded at any time. Screen contents and set-up procedures may differ according to the operating environ-
ment which is employed (e.g. type of the OS or SCSI adapter).
● This manual may not be copied or transcribed in whole or in part without prior approval from the publisher.
● Adobe Photoshop is a trademark of Adobe Systems Inc. in several nations.
● Microsoft, Windows, and Windows NT are registered trademarks of Microsoft Corp. in the US and other countries.
● Macintosh, Mac OS, and AppleTalk are registered trademarks of Apple Computer Inc.
● PICTROGRAPHY is a registered trademark of Fuji Photo Film.
● Other product and company names are registered trademarks of the respective companies.
1

CONTENTS
1. PRINTER DRIVER ........................................................................................................... 4
1.1 Outline .......................................................................................................................................... 4
1.2 Features........................................................................................................................................4
1.3 Operating Environment ................................................................................................................. 4
2. PRECAUTIONS FOR USING THE PRINTER DRIVER................................................... 5
2.1 Windows .......................................................................................................................................5
2.1.1 Setting up the PICTROGRAPHY.......................................................................................5
2.1.2 Installing the ASPI Manager ..............................................................................................5
2.1.3 Network setup (for network printing)..................................................................................5
2.1.3.1 Setting up a PC to function as a server ............................................................................... 5
2.1.3.2 Setting up a PC as a network client .................................................................................... 5
2.2 Macintosh (Mac OS 9 or earlier) ................................................................................................... 5
2.2.1 Setting up AppleTalk (to enable network printing) ............................................................. 5
2.2.2 Setup for file sharing (to enable network printing) ............................................................. 5
2.3 Macintosh (Mac OS X)..................................................................................................................5
3. INSTALLATION ................................................................................................................ 6
3.1 Windows 95 ..................................................................................................................................6
3.1.1 Connecting the PICTROGRAPHY 3500 for the first time .................................................. 6
3.1.2 For Local Printing .............................................................................................................. 7
3.1.3 For Network Printing .......................................................................................................... 8
3.1.3.1 Installing to the server ......................................................................................................... 8
3.1.3.2 Installing to client computers ............................................................................................... 9
3.1.4 Uninstall ........................................................................................................................... 11
3.2 Windows 98 ................................................................................................................................ 11
3.2.1 Connecting the PICTROGRAPHY 3500 for the first time ................................................ 11
3.2.2 For Local Printing ............................................................................................................ 12
3.2.3 For Network Printing ........................................................................................................ 13
3.2.3.1 Installing to the server ....................................................................................................... 13
3.2.3.2 Installing to client computers ............................................................................................. 14
3.2.4 Uninstall ........................................................................................................................... 16
3.3 Windows NT 4.0 ......................................................................................................................... 16
3.3.1 For Local Printing ............................................................................................................ 16
3.3.2 For Network Printing ........................................................................................................ 19
3.3.2.1 Installing to the server ....................................................................................................... 19
3.3.2.2 Installing to client computers ............................................................................................. 19
3.3.3 Uninstall ........................................................................................................................... 20
3.4 Windows 2000 ............................................................................................................................20
3.4.1 For Local Printing ............................................................................................................ 20
3.4.2 For Network Printing ........................................................................................................ 24
3.4.2.1 Installing to the server ....................................................................................................... 24
3.4.2.2 Installing to client computers ............................................................................................. 25
3.4.3. Uninstall ...........................................................................................................................26
3.5 Windows XP ............................................................................................................................... 26
3.5.1 For Local Printing ............................................................................................................ 27
3.5.2 For Network Printing ........................................................................................................ 30
3.5.2.1 Installing to the server ....................................................................................................... 31
3.5.2.2 Installing to client computers ............................................................................................. 31
3.5.3. Uninstall ...........................................................................................................................33
2

3.6 Macintosh (Mac OS 9 or earlier) .................................................................................................33
3.6.1 For Local Printing ............................................................................................................ 33
3.6.2 For Network Printing ........................................................................................................ 33
3.6.2.1 Installing to the server ....................................................................................................... 33
3.6.2.2 Installing to client computers ............................................................................................. 34
3.6.3 Uninstall ........................................................................................................................... 35
3.7 Macintosh (Mac OS X)................................................................................................................35
3.7.1 For Local Printing ............................................................................................................ 35
3.7.2 For Network Printing ........................................................................................................ 38
3.7.2.1 Installing to the server ....................................................................................................... 38
3.7.2.2 Installing to client computers ............................................................................................. 39
3.7.3 Uninstall ........................................................................................................................... 40
4. USING THE PRINTER DRIVER .................................................................................... 41
4.1 Windows .....................................................................................................................................41
4.1.1 Work flow through printing ............................................................................................... 41
4.1.2 Print setup and printing....................................................................................................41
4.1.3 Message Monitor ............................................................................................................. 43
4.1.4 Spooler ............................................................................................................................43
4.1.5 Printer folder .................................................................................................................... 44
4.1.5.1 Windows 95/98 .................................................................................................................. 44
4.1.5.2 Windows NT 4.0 ................................................................................................................ 46
4.1.5.3 Windows 2000 ................................................................................................................... 47
4.1.5.4 Windows XP ...................................................................................................................... 48
4.1.6 ICM .................................................................................................................................. 49
4.2 Macintosh (Mac OS 9 or earlier) .................................................................................................49
4.2.1 Work flow through printing ............................................................................................... 49
4.2.2 Print setup and printing....................................................................................................49
4.2.3 Different printing methods ............................................................................................... 51
4.2.4 Print Monitor ....................................................................................................................51
4.2.5 ColorSync ........................................................................................................................ 52
4.3 Macintosh (Mac OS X)................................................................................................................52
4.3.1 Work flow through printing ............................................................................................... 52
4.3.2 Print setup and printing....................................................................................................52
4.3.3 Print Center ..................................................................................................................... 54
4.3.3.1 Print Center Outline ........................................................................................................... 54
4.3.3.2 Checking the print status ................................................................................................... 54
4.3.3.3 Cancelling printing ............................................................................................................. 54
5. ERROR MESSAGES .....................................................................................................56
6. RESTRICTIONS ............................................................................................................ 58
6.1 Windows .....................................................................................................................................58
6.2 Macintosh ................................................................................................................................... 58
6.3 Others ......................................................................................................................................... 60
3

1. PRINTER DRIVER
1.1 Outline
The PICTROGRAPHY 3500 is capable of delivering ultrahigh,
image-quality prints having a near-photograph appearance coupled
with rich expressive power. Resolution is a high 400 dpi (max.)
and 16,700,000 colors are available, all implemented by a
laser-exposed thermal development transfer system (the silver
halide photographic system). As the PICTROGRAPHY 3500
is designed as environmentally-friendly, it does not require a
processing solution though it is the photographic system.
The PICTROGRAPHY 3500 Printer Driver is a driver software compatible with such diverse computer environments as Macintosh, Windows 95/98, Windows NT 4.0, Windows 2000 and Windows XP
among others.
1.2 Features
The PICTROGRAPHY 3500 Printer Driver has the following features:
• Supports a variety of OSes.
Allows output of prints from diverse OS environments including
Macintosh, Windows 95/98, Windows NT 4.0, Windows 2000 and
Windows XP, etc.
• Easy-to-use user interfaces
Comes with user interfaces matched to varying OS environments
and allows the user to make fine adjustments to color outputs on
the driver.
Software
[Windows]
• ASPI Manager (ASPI Manager needs to be compatible with the
selected SCSI adapter) Ver. 4.01 or higher recommended
•OS
Windows 95: Some versions impose restrictions
Windows 98: With Service Pack 1 installed or second edition or
later.
Windows NT 4.0: With Service Pack 5 or later installed
Windows 2000
Windows XP
[Macintosh]
•OS
Mac OS 7.6.1
Mac OS 8.1
Mac OS 8.6
Mac OS 9 (With some restrictions)
Mac OS X 10.2.1 or later
1.3 Operating Environment
The PICTROGRAPHY 3500 Printer Driver runs in the personal computer operating environments detailed below:
Hardware
[Windows]
• Model: IBM PC/AT-compatible personal computer
• CPU: Pentium 133 MHz or newer
• Memory: 64MB or more
• HDD: 96MB or more of available space
• SCSI adapter: Adapter made by ADAPTEC (AHA-2910C, AHA2920C, AHA-2940AU, AHA-2940UW, AHA-1540CP, Slim SCSI1460D)
[Macintosh]
• Model: Power Macintosh or greater
• Memory: 5MB or more of available space
• HDD: 64MB or more of available space
• SCSI adapter: SCSI port provided standard on the main body
Adapter made by ADAPTEC (Power Domain 2940UW, Power
Domain 2930U, SCSIConnect2906).
4

2. PRECAUTIONS FOR USING THE PRINTER DRIVER
This section explains various items that need to be set up before you can
use the printer driver.
2.1 Windows
2.1.1 Setting up the PICTROGRAPHY
The PICTROGRAPHY 3500 is shipped from the factory with its
device type set to [Printer]. To use the printer with Windows 95 (Version 4.00.950 or 4.00.950a), the device type setting on the
PICTROGRAPHY 3500 primary unit must be changed to [Proces-
sor]. Notice that, if you attempt to use the printer without changing
this setting, Windows 95 will not operate properly.
For information on setting this parameter, see the PICTROGRAPHY
3500 instruction manual.
2.1.2 Installing the ASPI Manager
The printer driver requires a SCSI connection between the
PICTROGRAPHY 3500 and your computer. In turn, the SCSI interface requires installation of the ASPI Manager software in addition
to the SCSI driver.
For information on installing the ASPI Manager, see the instruction
manual supplied with your SCSI interface adapter.
*With Windows 95 or Windows 98, ASPI Manager is automati-
cally installed along with system software. Note that ASPI Manager is not automatically installed with Windows NT 4.0, Windows 2000 or Windows XP. Even with Windows 95/98, we recommend manually installing the latest version of ASPI Manager
to improve software reliability.
* Use ASPI Manager Version 4.01 or later.
* If you are currently running Windows 2000 or Windows XP, in-
stall ASPI Manager Version 4.70 or later.
2.1.3 Network setup (for network printing)
2.2 Macintosh (Mac OS 9 or earlier)
2.2.1 Setting up AppleTalk (to enable network printing)
You need to set up AppleTalk to enable network (Ethernet) printing.
Set up both the server and client computers for AppleTalk, specifying [Ethernet] for the output path (port to be used).
For information on setting this parameter, refer to the Macintosh instruction manual.
2.2.2 Setup for file sharing (to enable network printing)
Make the appropriate settings for file sharing if you plan to print
across a network (Ethernet).
These settings should permit client computers to access files on the
server. For these settings, refer to your Macintosh instruction manual.
2.3 Macintosh (Mac OS X)
You need to set up TCP/IP to enable network (Ethernet) printing.
Perform setup so as to permit the use of TCP/IP.
If you plan to print across a network, you need to make the appropriate network settings on your computer. This subsection covers only
the setup items required to this end. For information on setting these
parameters, see the instruction manual supplied with your copy of
Windows.
2.1.3.1 Setting up a PC to function as a server
•Windows 95/98:
Install a network protocol compatible with your network environment (e.g. TCP/IP).
To allow printer sharing, install the Microsoft network sharing services and make the appropriate settings. Click [File and Printer
Sharing] in the [Network] dialog displayed when you double-click
the [Network] icon on the [Control Panel]. Check [Enable Printer
Sharing] and click [OK].
•Windows NT 4.0:
Install a protocol compatible with your network environment (e.g.
TCP/IP).
•Windows 2000
Install a network protocol compatible with your network environment (e.g. TCP/IP).
•Windows XP
Install a network protocol compatible with your network environment (e.g. TCP/IP).
2.1.3.2 Setting up a PC as a network client
Install the same protocol installed on the server.
5
3. INSTALLATION
3.1 Windows 95
3.1.1 Connecting the PICTROGRAPHY 3500 for the first time
Unless the printer driver is already installed, when you start your
computer with PICTROGRAPHY 3500 for the first time, one of the
following windows is displayed as Windows 95 starts, depending on
your specific version of Windows 95.
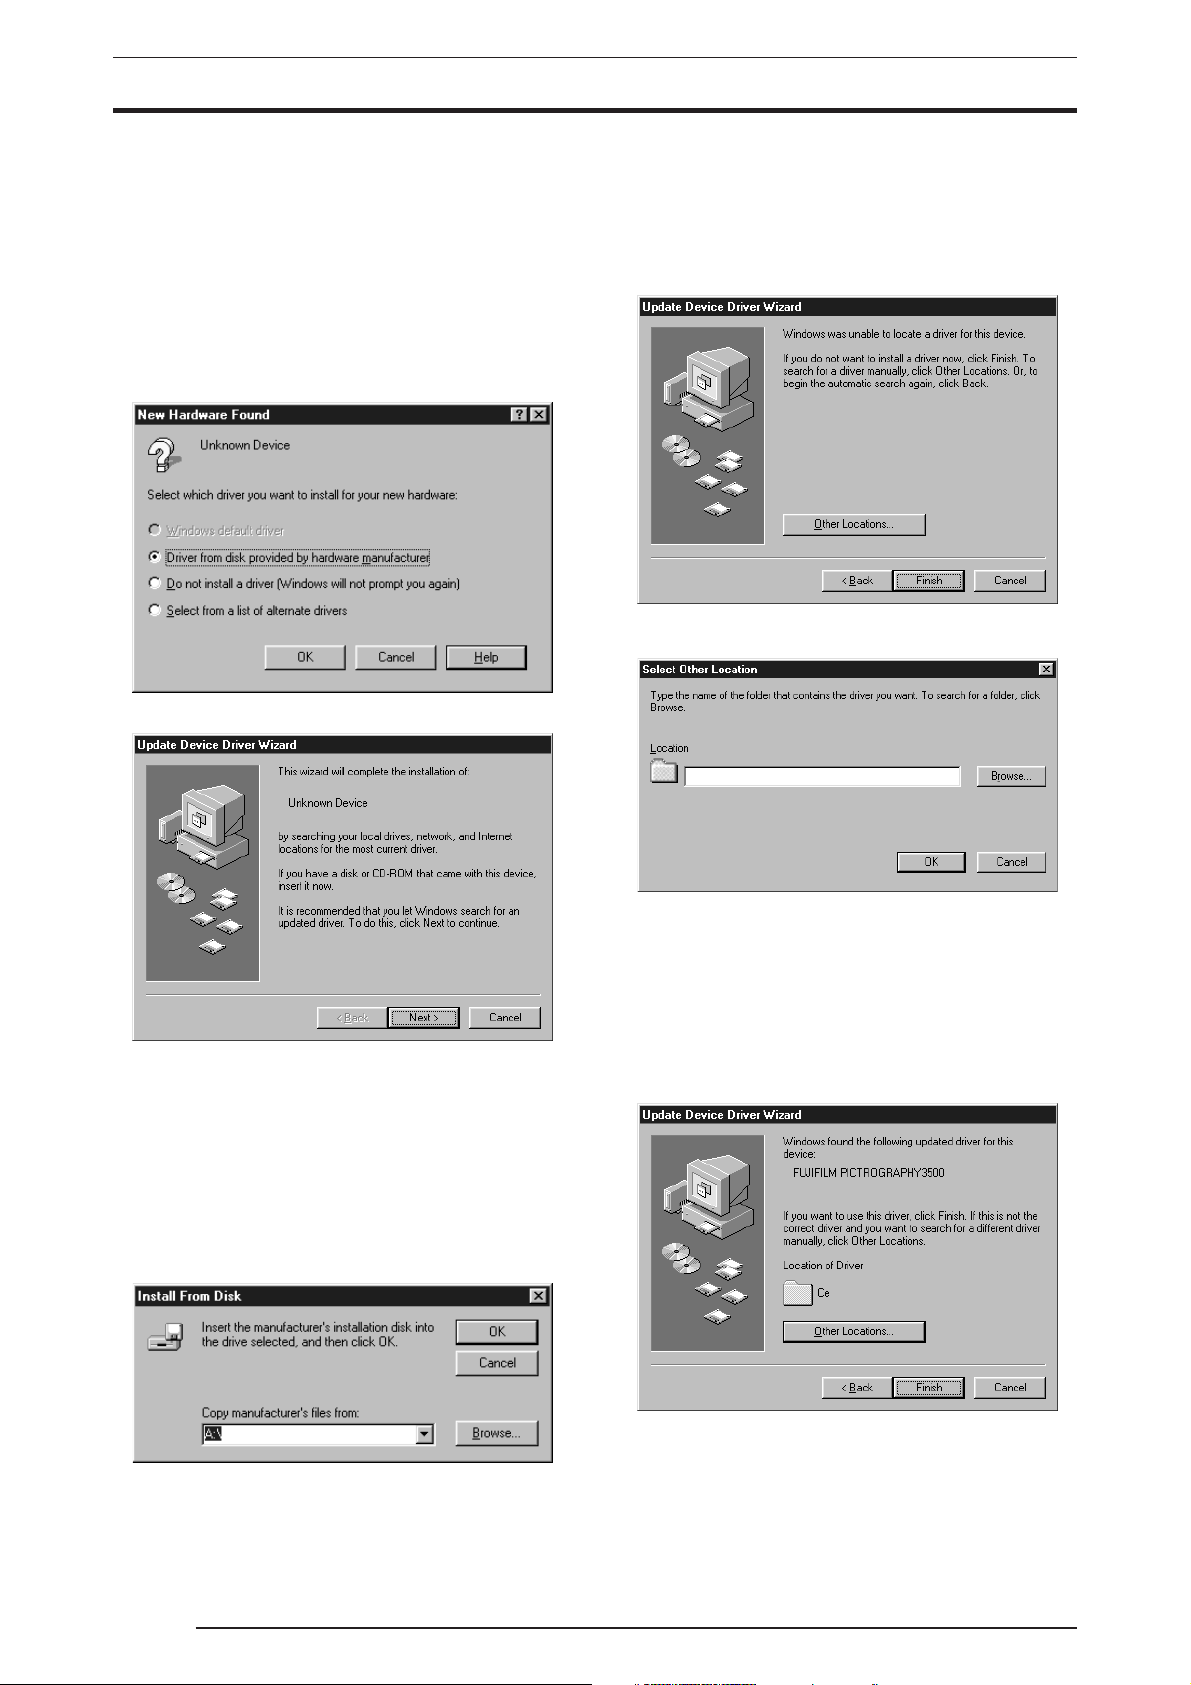
• Screen (1)
• Screen (2)
• If Screen (2) appears:
1. Insert the PICTROGRAPHY3500 Printer Driver CD-ROM into
the PC.
2. Click the [Next] button.
The following appears:
3. Click the [Other Locations...] button.
The [Select Other Location] dialog box is displayed.
In this case, install the printer driver as explained below. If you would
rather install the printer driver at some later time, click the [Cancel]
button.
• If Screen (1) appears:
1. Insert the PICTROGRAPHY3500 Printer Driver CD-ROM into
the PC.
2. Select [Driver Provided by Hardware Manufacturer] and click
the [OK] button.
The [Install From Disk] dialog box is displayed.
3. For the remainder of the installation procedure, skip to step 7 in
"3.1.2 For Local Printing".
4. Enter the following location in the [Location] field.
For CE Type:
E:\Win95_98English\CE (*If your CD-ROM drive is E: drive)
For UC Type:
E:\Win95_98English\UC (*If your CD-ROM drive is E: drive)
5. Click the [OK] button.
The following appears:
for CE type
6
3. INSTALLATION
for UC type
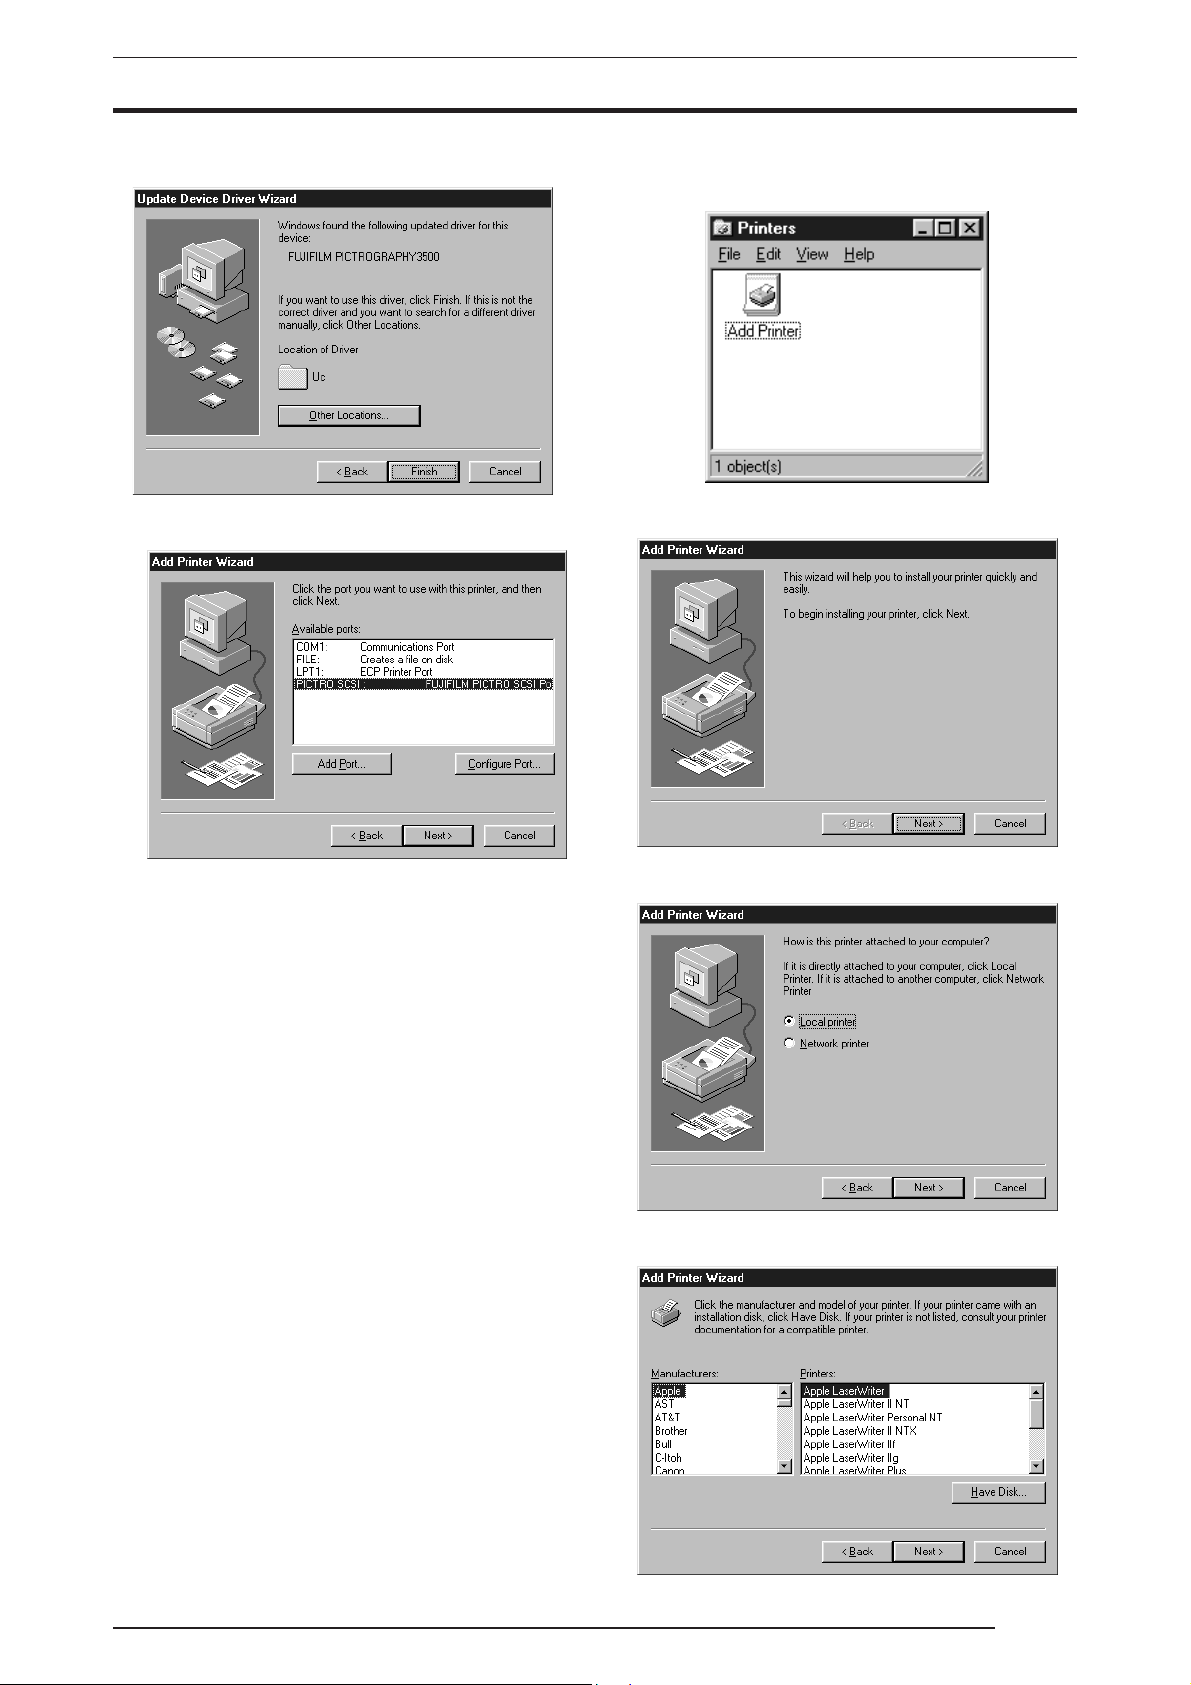
6. Click the [Finish] button.
The following is displayed when the file is copied:
2. Select [Setting] > [Printer] from the [Start] menu.
The [Printers] folder window appears.
3. Double-click the [Add Printer] icon.
The [Add Printer Wizard] dialog box is displayed.
In certain cases, the following prompt may be displayed when
you copy the file: [The file ‘PG35. DRV’ on Windows 95 CD-
ROM could not be found. Insert Windows 95 CD-ROM
into the drive selected below, and click OK. ].
If you see this message, enter the following location and press
the [OK] button:
For CE Type:
E:\Win95_98English\CE (*If your CD-ROM drive is E: drive)
For UC Type:
E:\Win95_98English\UC (*If your CD-ROM drive is E: drive)
7. For the remainder of the installation procedure, skip to step 10
in "3.1.2 For Local Printing".
3.1.2 For Local Printing
To enable local printing, install the printer driver as follows.
1. Insert the PICTROGRAPHY3500 Printer Driver CD-ROM into
the PC.
4. Click the [Next] button.
The following appears:
5. Select [Local printer] and click the [Next] button.
The following appears:
7
3. INSTALLATION
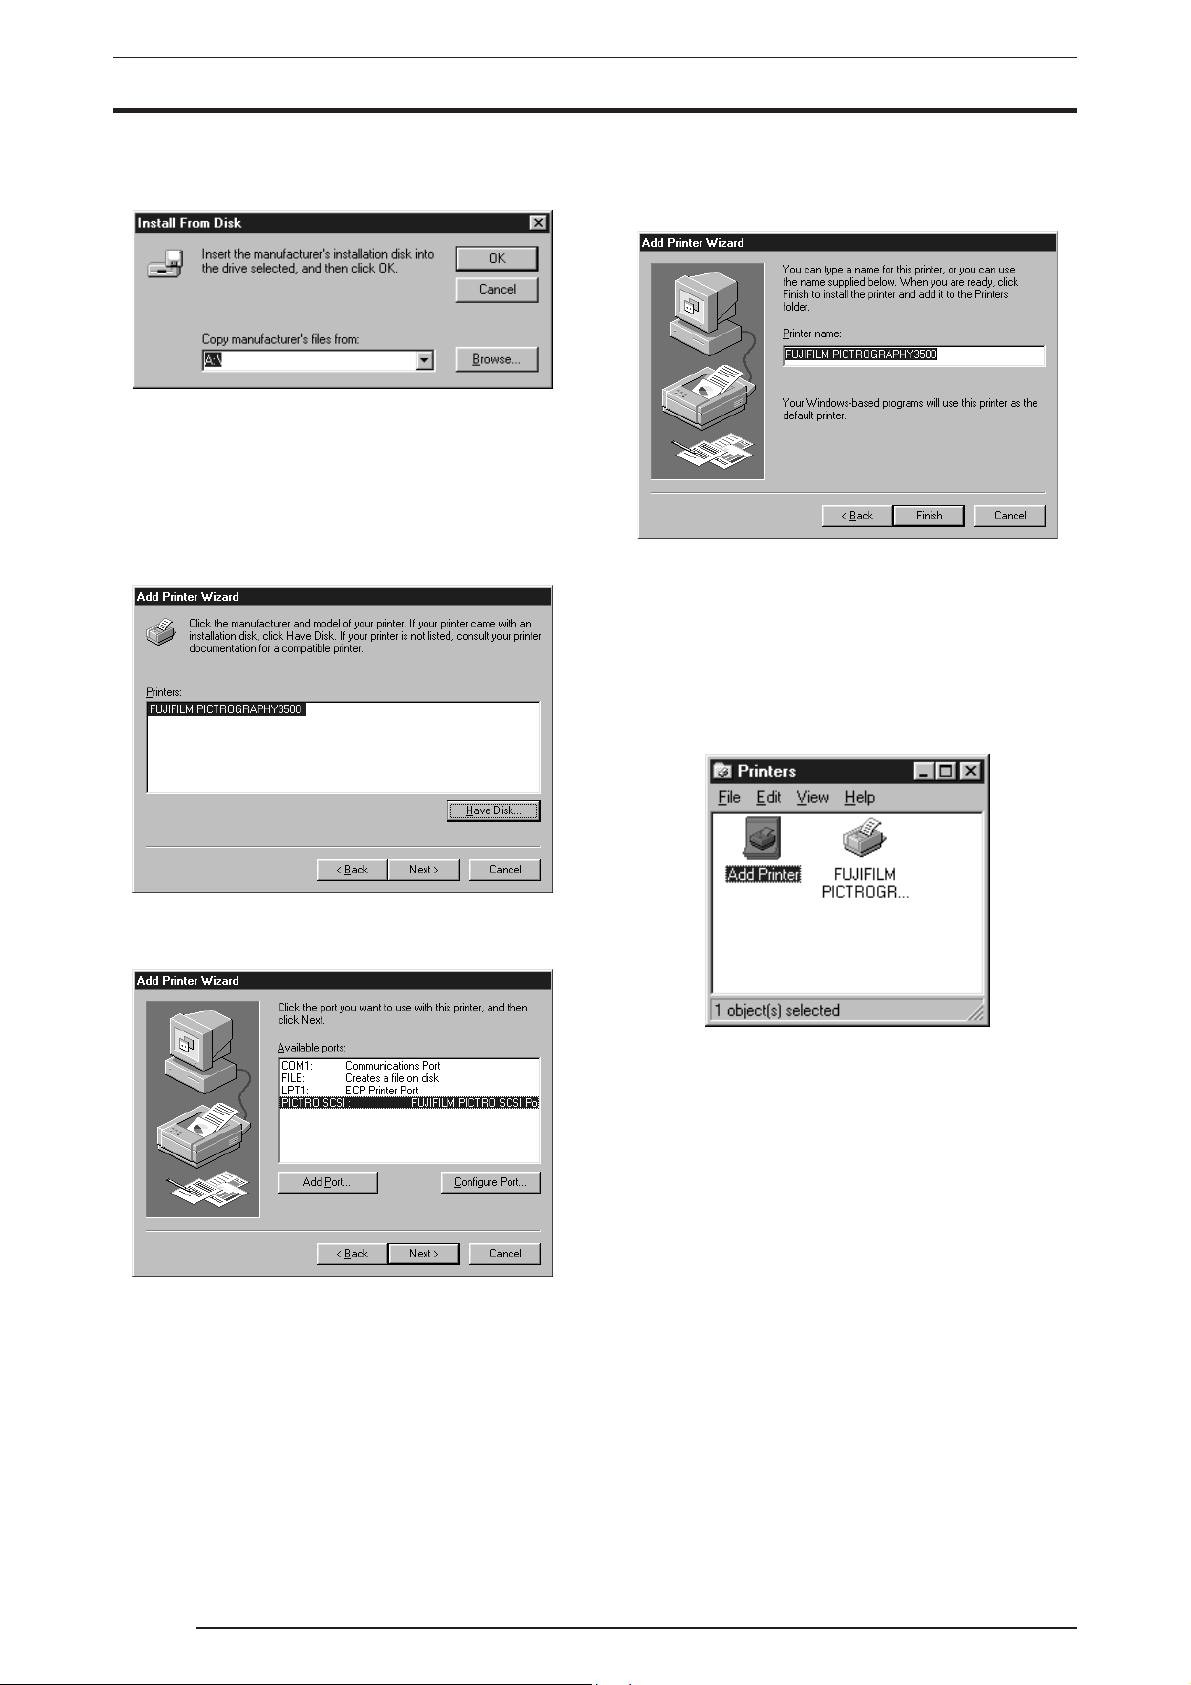
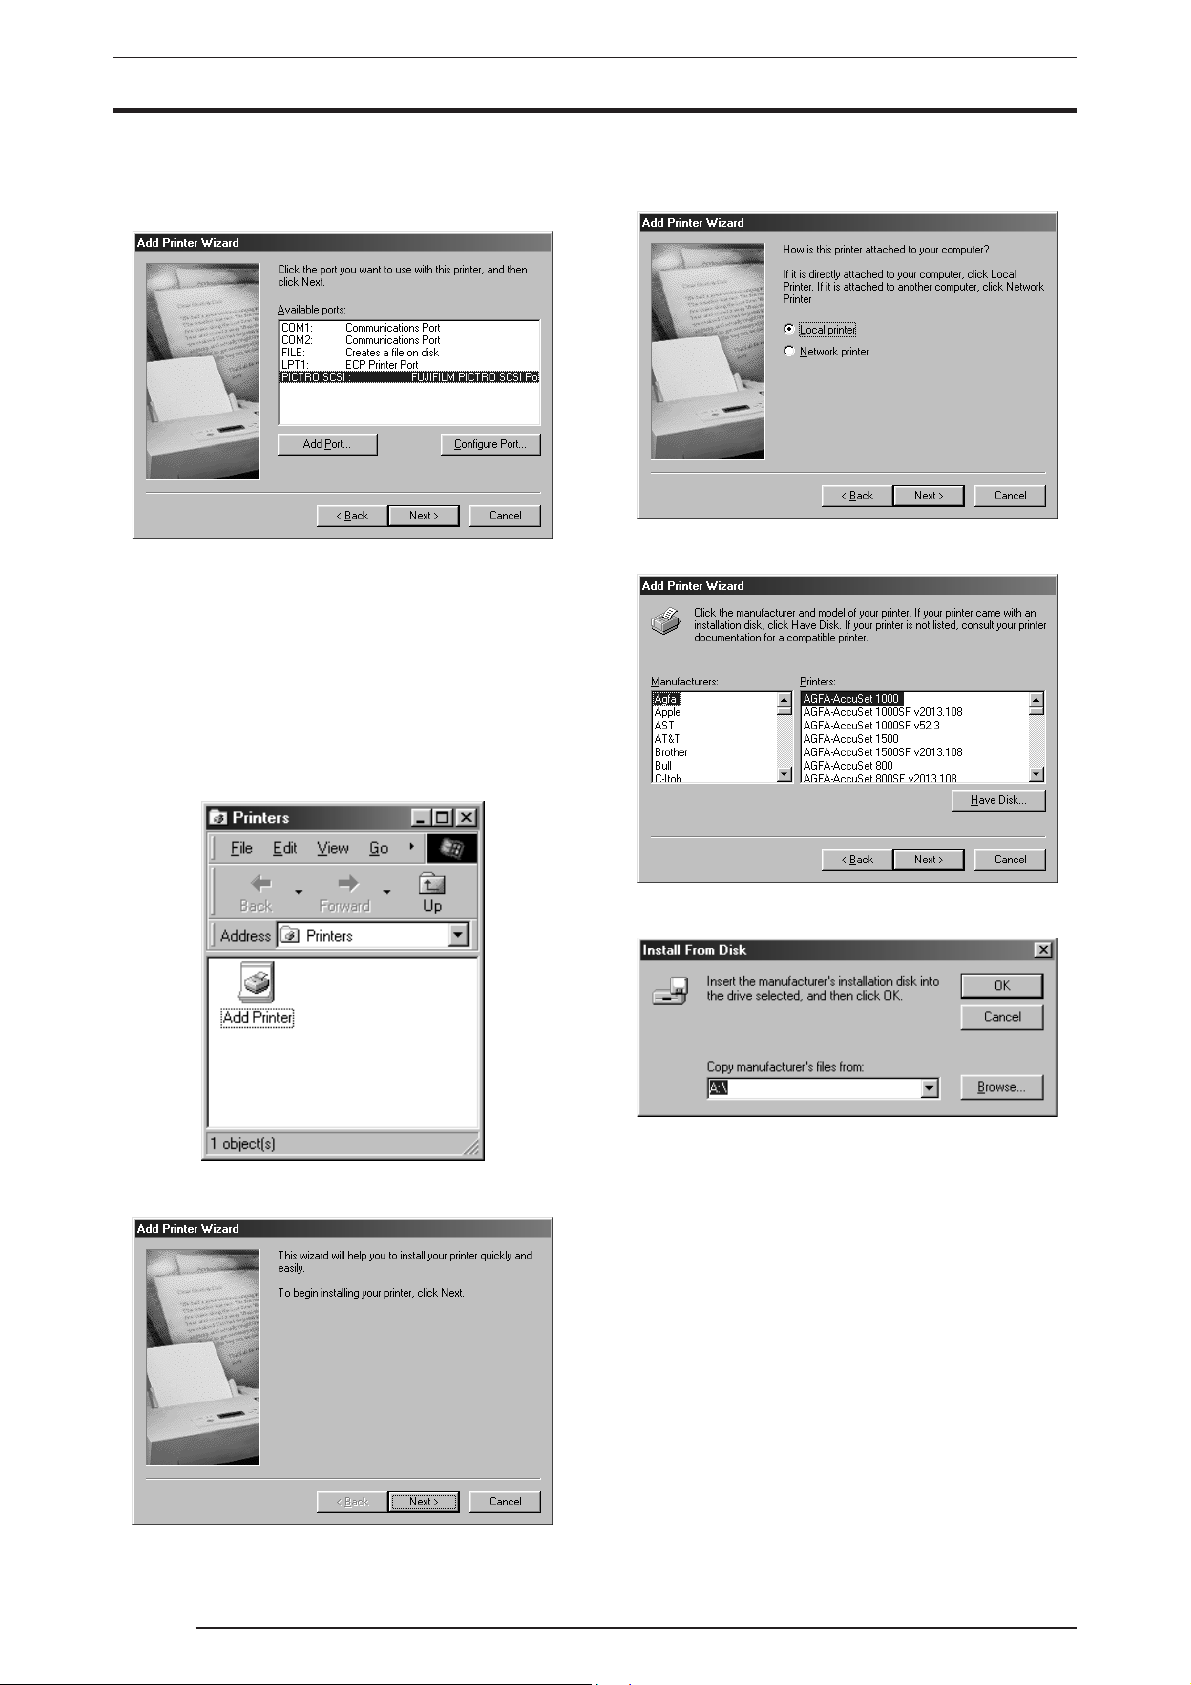
6. Click the [Have Disk] button.
The [Install From Disk] screen appears.
7. Enter the following location in the [Copy manufacturer’s files
from:] field.
For CE Type:
E:\Win95_98English\CE (*If your CD-ROM drive is E: drive)
For UC Type:
E:\Win95_98English\UC (*If your CD-ROM drive is E: drive)
8. Click the [OK] button.
The following appears:
10. Select [PICTRO SCSI: FUJIFILM PICTRO SCSI Port ] in
[Available ports:] and click the [Next] button.
The following appears:
11. Specify a printer name in the field currently displaying the name
of the default printer. You may select any printer in place of the
default printer.
If another printer is already installed, you will be prompted as
follows: "Use this printer as the default printer?" Select [Yes] or
[No].
After completing printer selection, click the [Finish] button.
12. If installation of the printer driver is complete, the icon for the
new printer will appear in the [Printers] folder, as shown below.
9. Confirm that "FUJIFILM PICTROGRAPHY3500" appears in
the [Printers:] field and click the [Next] button.
The following is displayed when the file is copied:
13. Restart the computer.
3.1.3 For Network Printing
For network printing, install printer drivers in both the server and
client computers by the respective procedures described below.
3.1.3.1 Installing to the server
1. To install the printer driver, follow steps 1. through 12. in "3.1.2
For Local Printing".
2. Select [Setting] > [Printer] from the [Start] menu.
The [Printers] folder window appears.
8
3. INSTALLATION
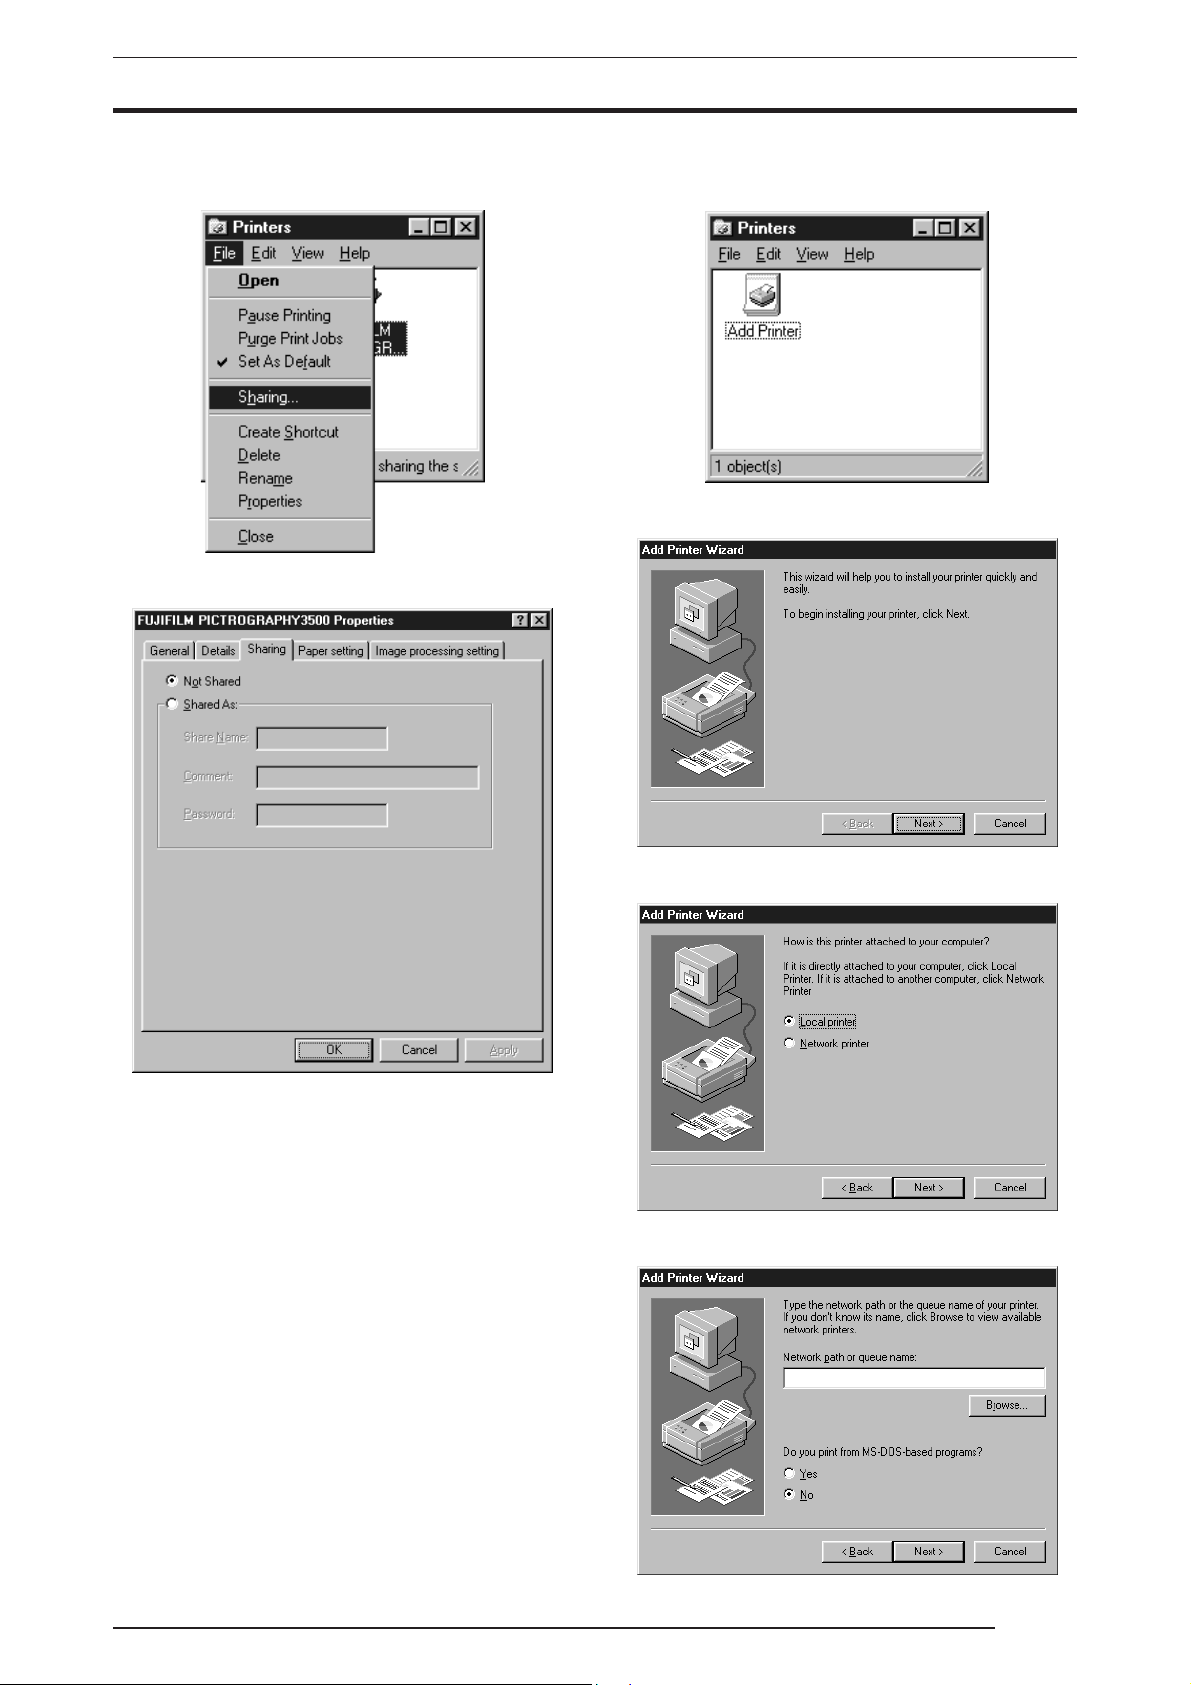
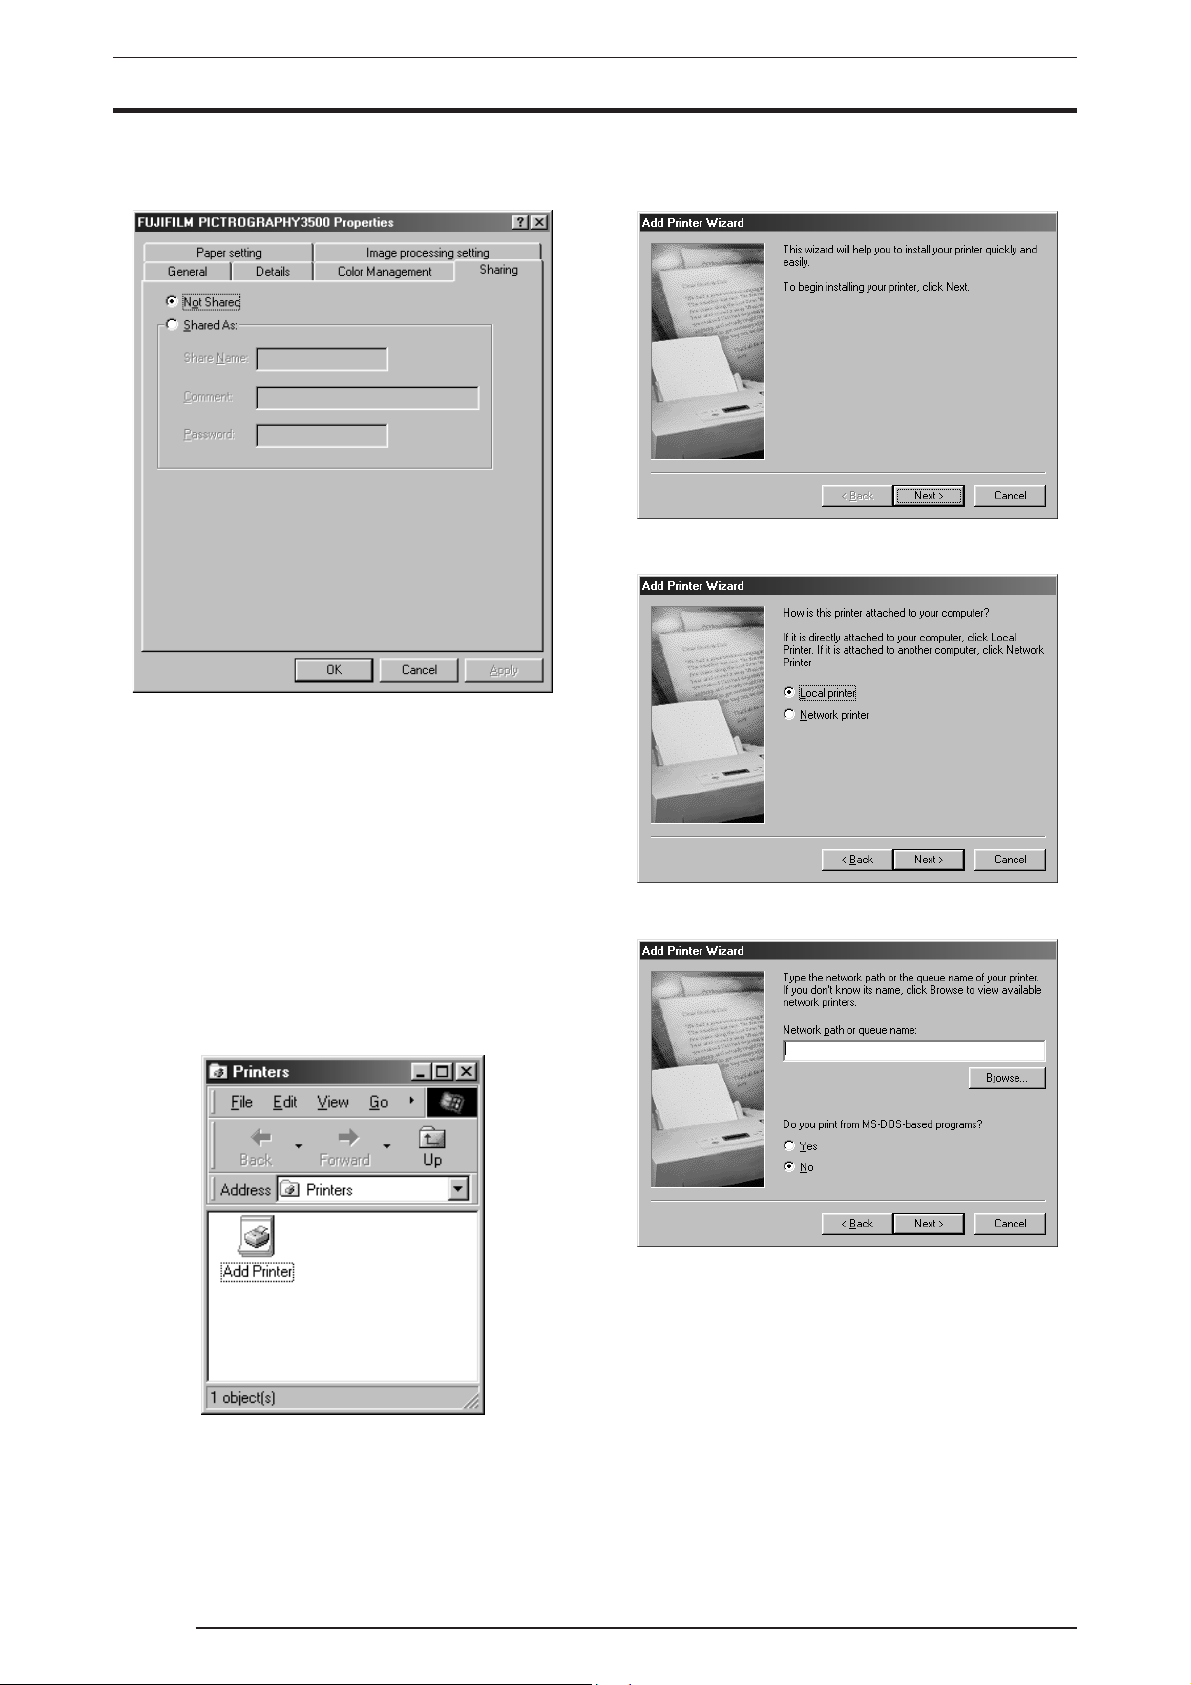
3. Click the [FUJIFILM PICTROGRAPHY3500] icon and click
[Sharing...] on the [File] menu.
4. The [FUJIFILM PICTROGRAPHY3500 Properties] dialog
box is displayed.
2. Select [Setting] > [Printer] from the [Start] menu.
The [Printers] folder window appears.
3. Double-click the [Add Printer] icon.
The [Add Printer Wizard] dialog box is displayed.
5. Select [Shared As:].
6. Set a Share Name. The default Share Name is currently displayed
on the screen. You may select any printer in place of the default
printer. Enter the comment and password, if required.
After defining a Share Name, click the [OK] button.
7. Restart the computer.
3.1.3.2 Installing to client computers
1. The server should be started beforehand.
The printer driver must be installed in the server, and the server
and client should be linked across a network.
4. Click the [Next] button.
The following appears:
5. Select [Network printer] and click the [Next] button.
The following appears:
9
3. INSTALLATION
6. Make the appropriate setting in [Network path or queue
name:].
Specify the server name to which the PICTROGRAPHY 3500
is connected on the network and its Share Name. For example,
if the computer name for the server is SERVER and the Share
Name for the PICTROGRAPHY 3500 connected to the server
is PG3500, enter the following:
\\SERVER\PG3500
You can also interactively select the printer by clicking the
[Browse...] button.
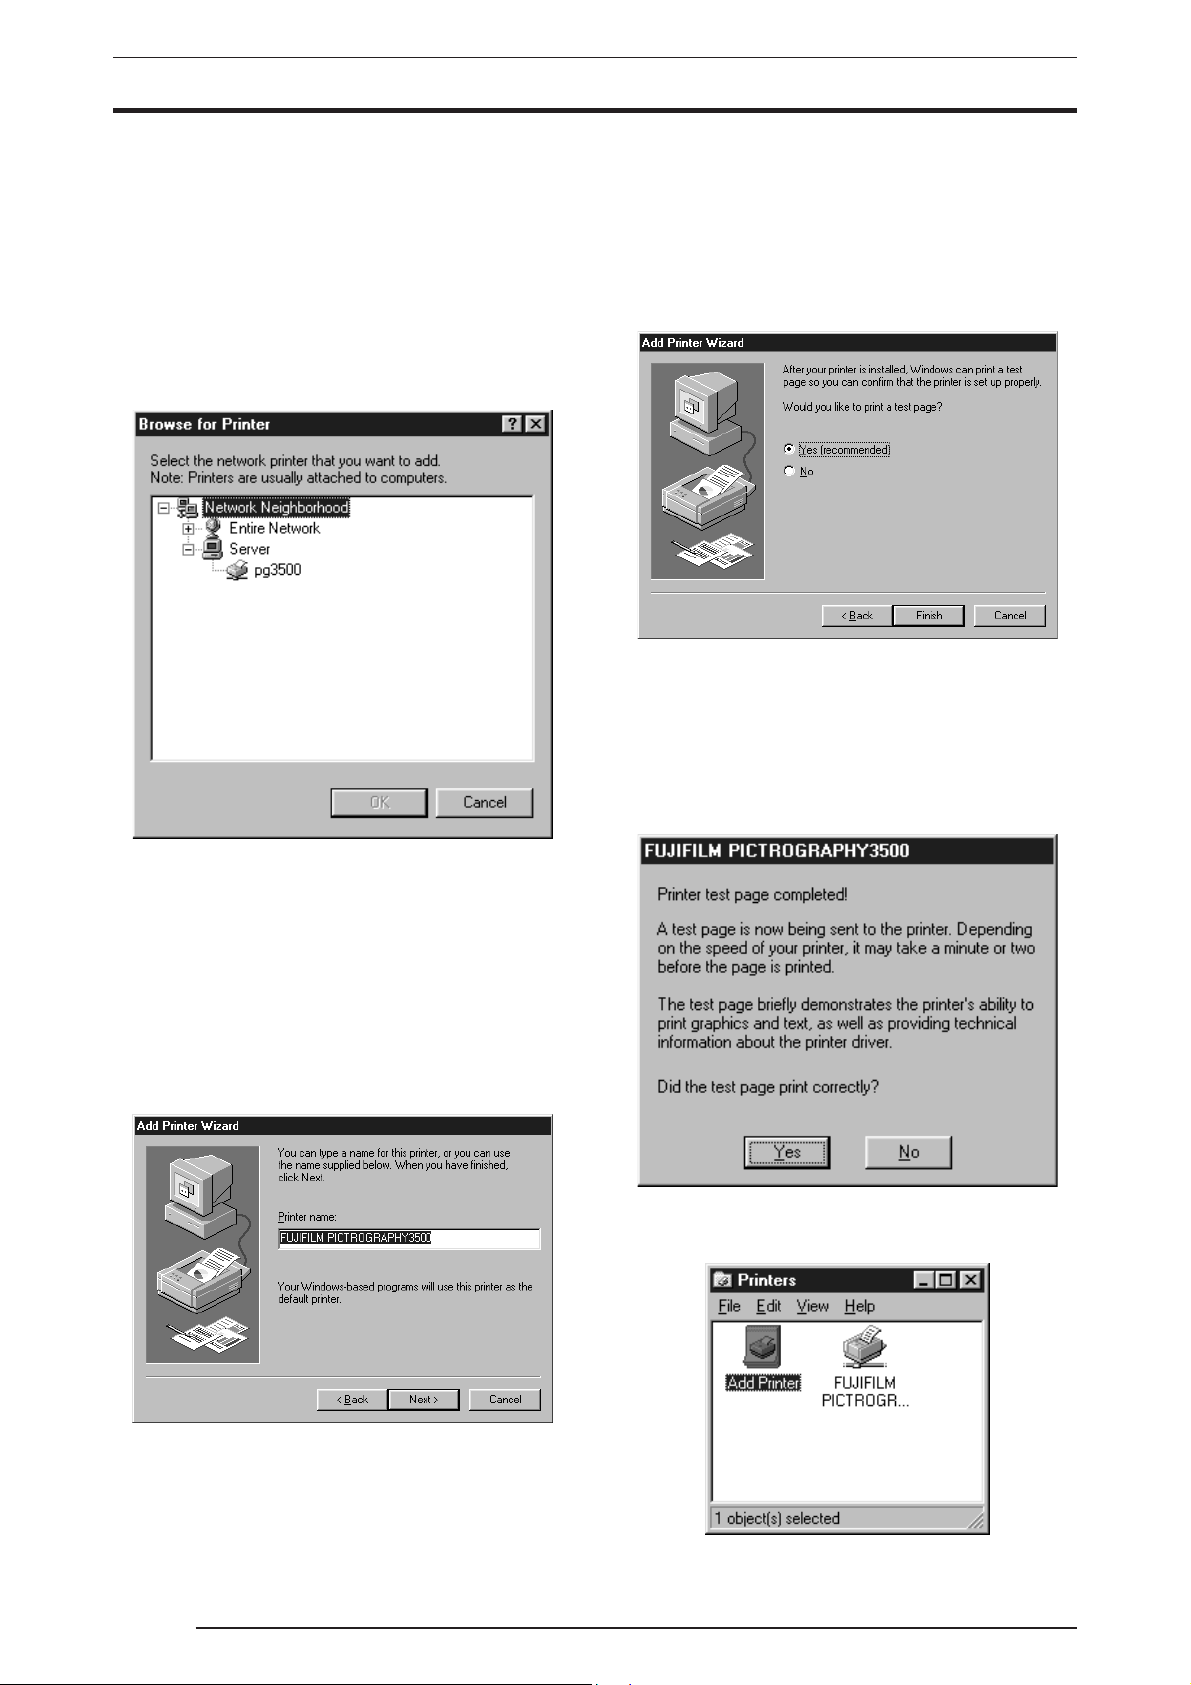
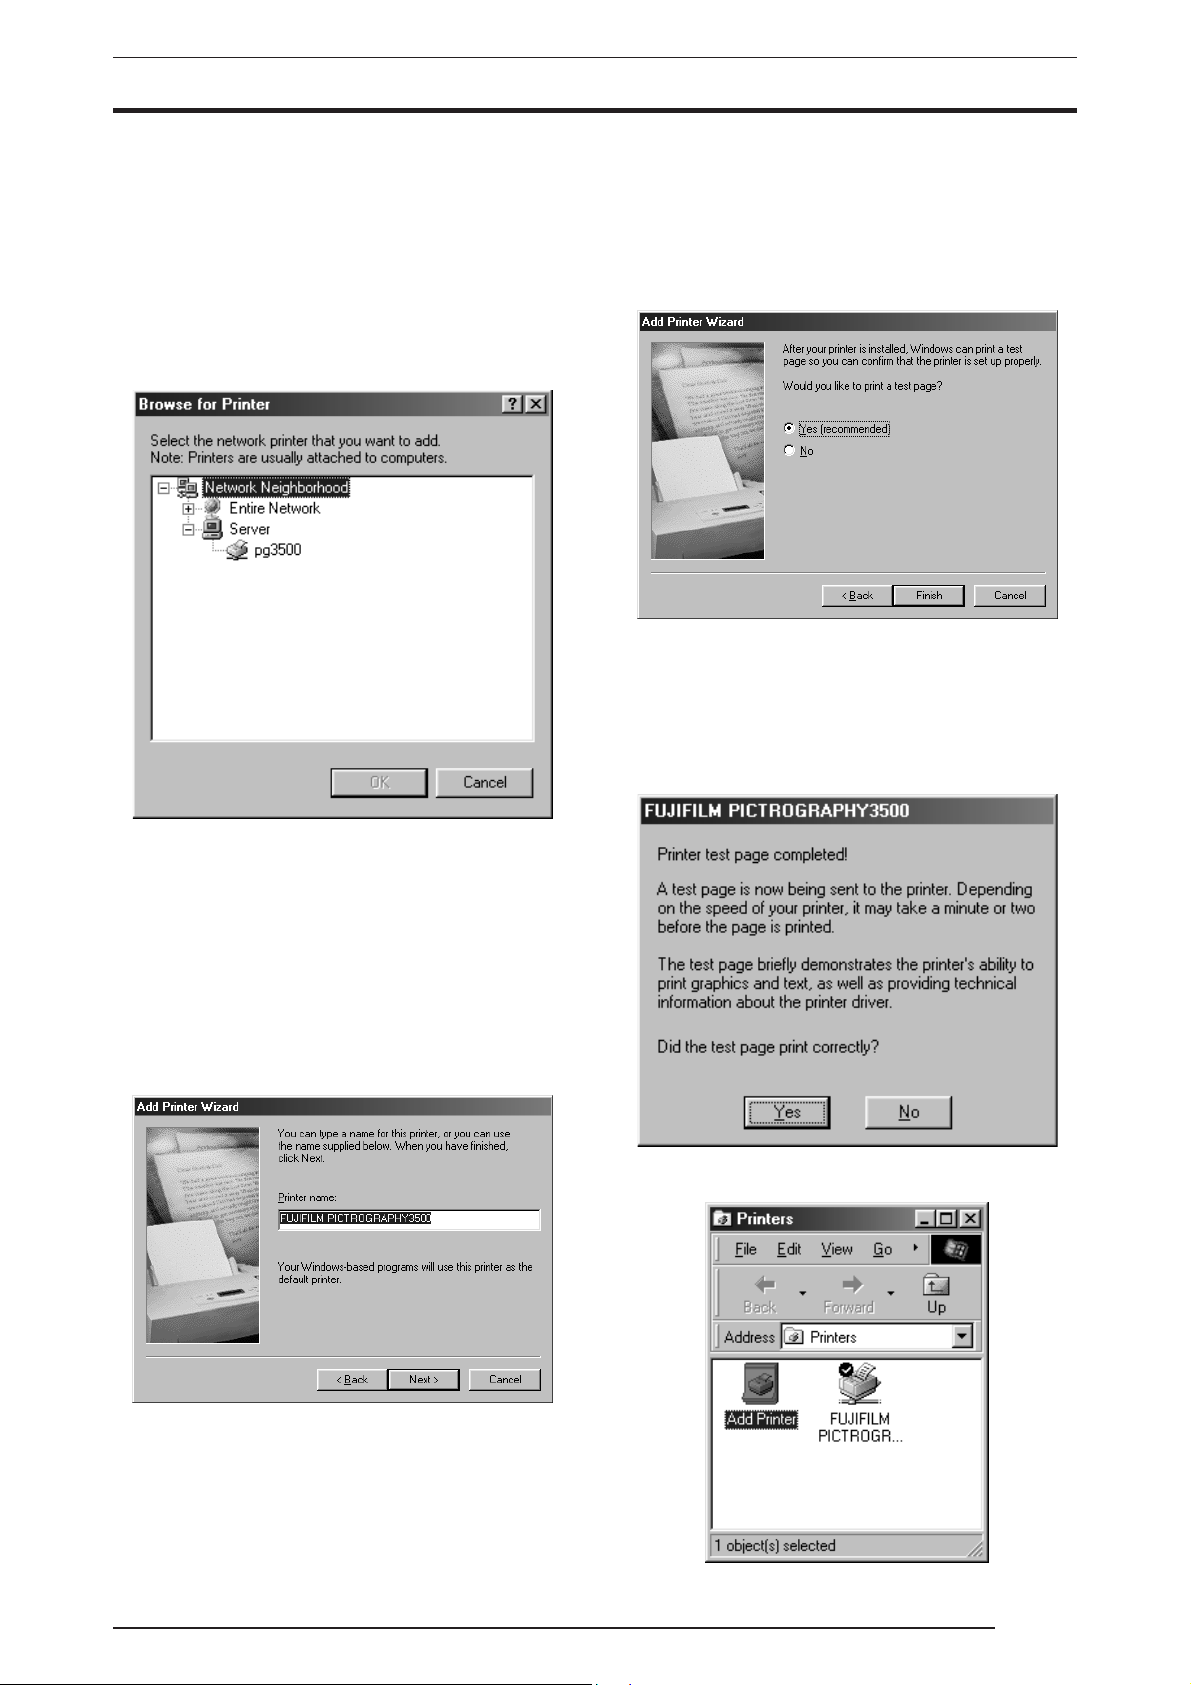
Clicking the [Browse...] opens the [Browse for Printer] window.
9. Specify a printer name in the field currently displaying the name
of the default printer. You may select any printer in place of the
default printer.
If another printer is already installed, you will be prompted as
follows: "Use this printer as the default printer?" Select [Yes] or
[No].
After completing printer selection, click the [Next] button.
The following appears:
10. Following installation of the printer driver, select whether or
not to print a test page. Make your selection and click the [Fin-
ish] button.
11. If you selected to print the test page in step 10. above, the following screen appears. If the test page prints without problems,
click the [Yes] button. Otherwise, click the [No] button and per-
form troubleshooting, following the instructions provided onscreen.
7. When the [Browse for Printer] window opens and the network
computer names appear, double-click to open the computer name
for the server linked to the PICTROGRAPHY 3500 and select a
sharing name for the printer.
Once you have selected the sharing name for the printer, click
the [OK] button.
You will be returned to the screen in step 5. The selected Share
Name for the printer will appear in the [Network path or queue
name:] field.
8. After entering the [Network path or queue name:], click the
[Next] button.
The following appears:
12. If installation of the printer driver is complete, the icon for the
new printer will appear in the [Printers] folder window, as shown
below:
10
13. Restart the computer.
3. INSTALLATION
3.1.4 Uninstall
The printer driver uninstall procedure is described below:
1. Select [Setting] > [Printer] from the [Start] menu. The [Print-
ers] folder window appears.
2. Click the [FUJIFILM PICTROGRAPHY3500] icon, then click
[Delete] from the [File] menu.
You will be prompted to confirm the delete. Click the [Yes] but-
ton.
3. You may also be prompted as follows: "These files are no longer
needed. Delete?" If so, click the [Yes] button.
4. This completes the uninstall.
3.2 Windows 98
3.2.1 Connecting the PICTROGRAPHY 3500 for the first time
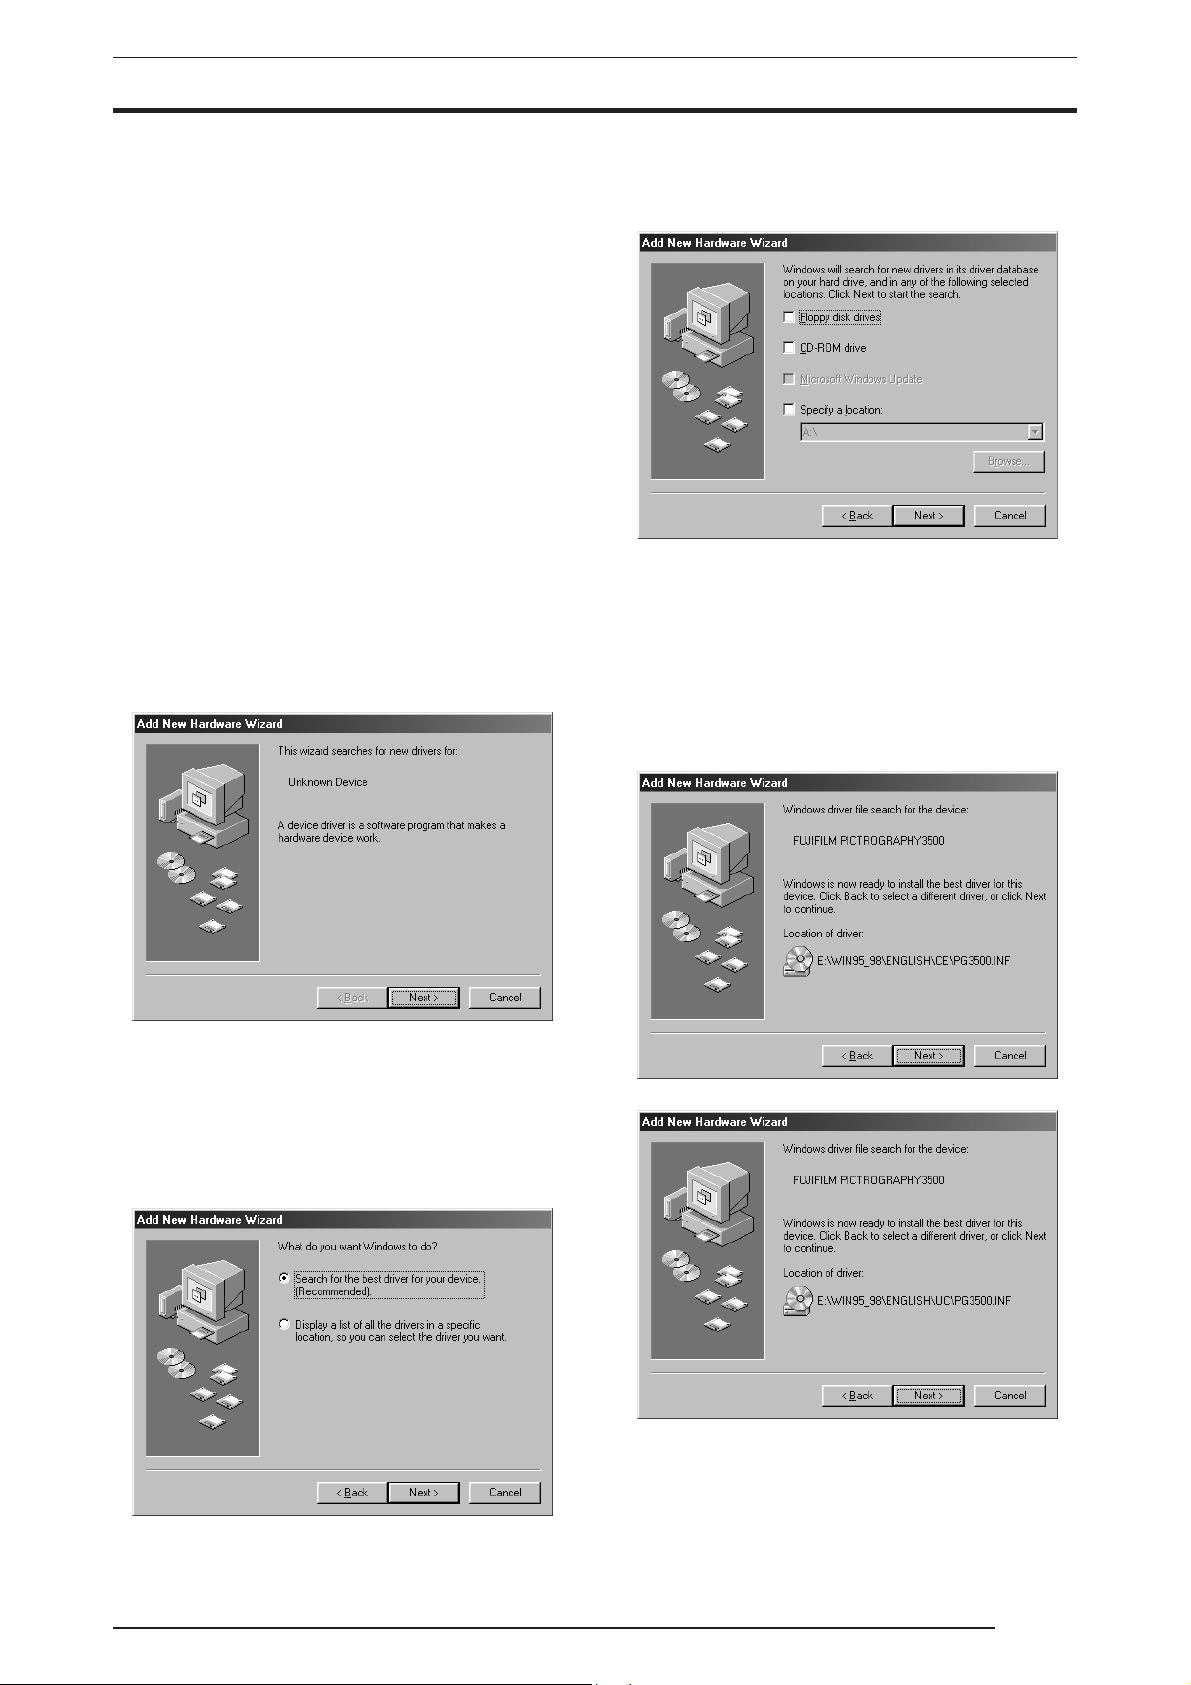
Unless the printer driver is already installed, when you start up your
computer with the PICTROGRAPHY 3500 connected for the first
time, the following screen is displayed when Windows 98 starts.
3. Select [Search for best driver for your device [Recommended]
and click the [Next] button.
The following appears:
4. Check [Specify a location] and enter the following location in
the field where the search location is specified.
For CE Type:
E:\Win95_98English\CE (*If your CD-ROM drive is E: drive)
For UC Type:
E:\Win95_98English\UC (*If your CD-ROM drive is E: drive)
5. Click the [Next] button.
The following appears:
You can install the printer driver by the procedure described below.
If you would rather install the printer driver at some later time, click
the [Cancel] button.
1. Insert the PICTROGRAPHY3500 Printer Driver CD-ROM into
the PC.
2. Click the [Next] button.
The following appears:
for CE type
for UC type
11
3. INSTALLATION
6. Confirm that the FUJIFILM PICTROGRAPHY3500 driver file
has been detected. Click the [Next] button.
The following is displayed when the file is copied:
7. For the remainder of the installation procedure, skip to step 10
in "3.2.2 For Local Printing".
3.2.2 For Local Printing
To enable local printing, install the printer driver as follows.
1. Insert the PICTROGRAPHY3500 Printer Driver CD-ROM into
the PC.
4. Click the [Next] button.
The following appears:
5. Select [Local printer] and click the [Next] button.
The following appears:
2. Select [Setting] > [Printer] from the [Start] menu.
The [Printers] folder window appears.
3. Double-click the [Add Printer] icon.
The [Add Printer Wizard] dialog box is displayed.
6. Click the [Have Disk] button.
The [Install From Disk] dialog box is displayed.
7. Enter the following location in the [Copy manufacturer’s files
from:] field.
For CE Type:
E:\Win95_98English\CE (*If your CD-ROM drive is E: drive)
For UC Type:
E:\Win95_98English\UC (*If your CD-ROM drive is E: drive)
12

3. INSTALLATION
8. Click the [OK] button.
The following appears:
9. Confirm that "FUJIFILM PICTROGRAPHY3500" appears in
the [Printers:] field and click the [Next] button.
The following is displayed when the file is copied:
12. If installation of the printer driver is complete, the icon for the
new printer appears in the [Printers] folder window.
13. Restart the computer.
3.2.3 For Network Printing
For network printing, install printer drivers in both the server and
client computers by the respective procedures described below.
10. Select [PICTRO SCSI: FUJIFILM PICTRO SCSI Port] in
[Available ports:] and click the [Next] button.
The following appears:
11. Specify a printer name in the field currently displaying the name
of the default printer. You may select any printer in place of the
default printer.
If another printer is already installed, you will be prompted as
follows: "Use this printer as the default printer?" Select [Yes] or
[No].
After completing printer selection, click the [Finish] button.
3.2.3.1 Installing to the server
1. To install the printer driver, follow steps 1. through 12. in "3.2.2
For Local Printing".
2. Select [Setting] > [Printer] from the [Start] menu.
The [Printers] folder window appears.
3. Click the [FUJIFILM PICTROGRAPHY3500] icon and click
[Sharing...] on the [File] menu.
13
3. INSTALLATION
4. The [FUJIFILM PICTROGRAPHY3500 Properties] dialog
box is displayed.
5. Select [Shared As:].
6. Set a Share Name. The current default Share Name is displayed.
You may select any printer in place of the default printer. Enter
the comment and password, if required.
After defining the Share Name, click the [OK] button.
3. Double-click the [Add Printer] icon.
The [Add Printer Wizard] dialog box is displayed.
4. Click the [Next] button.
The following appears:
7. Restart the computer.
3.2.3.2 Installing to client computers
1. Start the server computer.
The printer driver should already be installed in the server, and
the server and client should be linked across a network.
2. Select [Setting] > [Printer] from the [Start] menu.
The [Printers] folder window appears.
5. Select [Network printer] and click the [Next] button.
The following appears:
14
3. INSTALLATION
6. Make the appropriate setting in [Network path or queue name:].
Specify the server to which the PICTROGRAPHY 3500 is connected on the network and its sharing name. For example, if the
computer name for the server is SERVER and the Share Name
for the PICTROGRAPHY 3500 connected to the server is
PG3500, enter the following:
\\SERVER\PG3500
You can also interactively select the printer by clicking the
[Browse...] button.
Clicking the [Browse...] opens the [Browse for Printer] window.
9. Specify a printer name in the field currently displaying the name
of the default printer. You may select any printer in place of the
default printer.
If another printer is already installed, you will be prompted as follows: "Use this printer as the default printer?" Select [Yes] or [No].
After completing printer selection, click the [Next] button.
The following appears:
10. Following installation of the printer driver, select whether or
not to print a test page. Make your selection and click the [Fin-
ish] button.
11. If you selected to print the test page in step 10. above, the following screen appears. If the test page prints without problems,
click the [Yes] button. Otherwise, click the [No] button and per-
form troubleshooting as instructed on-screen.
7. When the [Browse for Printer] window opens and the network
computer names appear, double-click to open the computer name
for the server connected to the PICTROGRAPHY 3500, and
select the Share Name for the printer.
Once you have selected the Share Name for the printer, click the
[OK] button.
You will be returned to the screen in step 5. The selected sharing
name for the printer is displayed in the [Network path or queue
name:] field.
8. After entering the [Network path or queue name:], click the
[Next] button.
The following appears:
12.
If installation of the printer driver is complete, the icon for the new
printer will appear in the [Printers] folder window, as shown below:
13. Restart the computer.
15
3. INSTALLATION
3.2.4 Uninstall
The printer driver uninstall procedure is described below:
1. Select [Setting] > [Printer] from the [Start] menu. The [Print-
ers] folder window is displayed.
2. Click the [FUJIFILM PICTROGRAPHY3500] icon, then click
[Delete] from the [File] menu.
You will be prompted to confirm the delete. Click the [Yes] but-
ton.
3. You may also be prompted as follows: "These files are no longer
needed. Delete?" If so, click the [Yes] button.
4. This completes the uninstall.
3.3 Windows NT 4.0
Installing printer drivers in Windows NT 4.0 must be performed by a
user assigned to the Administrators' Group.
3.3.1 For Local Printing
To enable local printing, install the printer driver as follows.
1. Insert the PICTROGRAPHY3500 Printer Driver CD-ROM into
the PC.
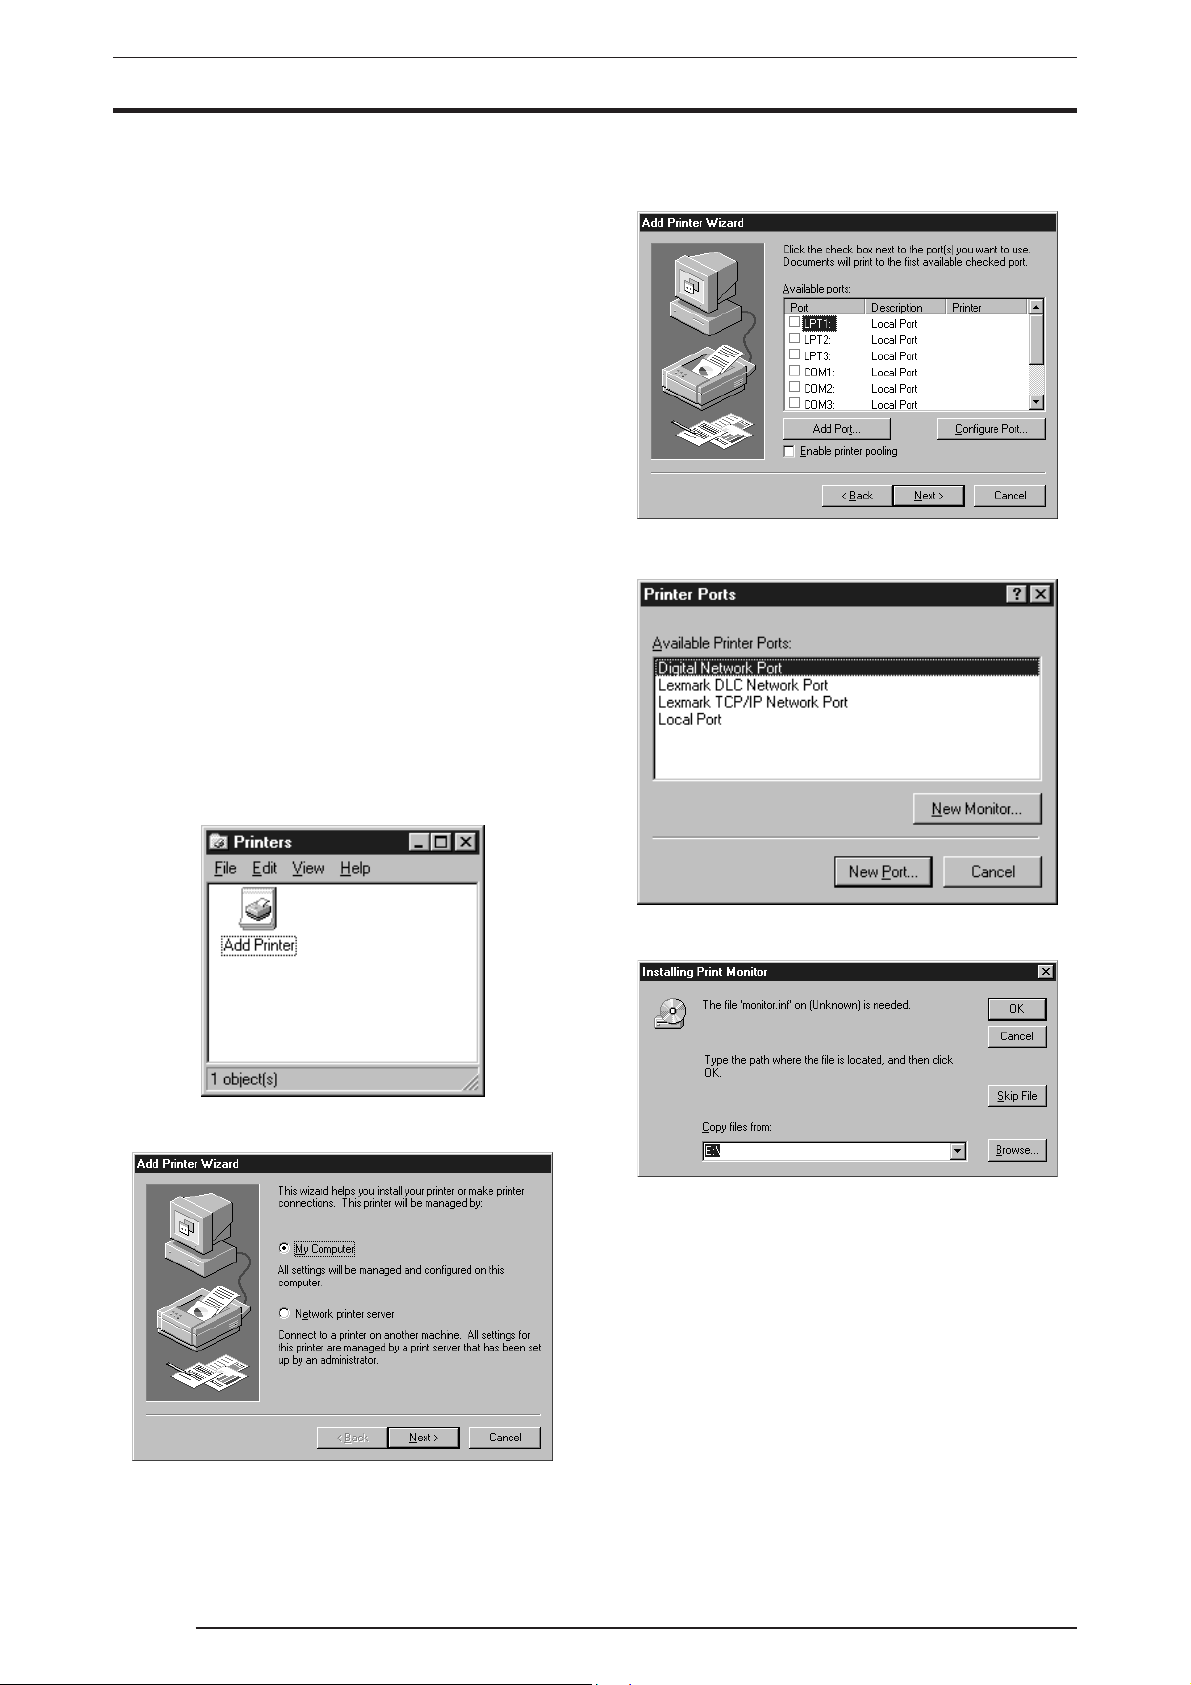
4. Select [My Computer] and click the [Next] button.
The following appears:
5. Click the [Add Port...] button.
The [Printer Ports] dialog box appears:
2. Select [Setting] > [Printer] from the [Start] menu.
The [Printers] folder window is displayed.
3. Double-click the [Add Printer] icon.
The [Add Printer Wizard] dialog box is displayed.
6. Click the [New Monitor...] button.
The [Installing Print Monitor] dialog box is displayed.
16
3. INSTALLATION
7. Enter the following location in the [Copy manufacturer’s files
from:] field.
For CE Type:
E:\Win95_98English\CE (*If your CD-ROM drive is E: drive)
For UC Type:
E:\Win95_98English\UC (*If your CD-ROM drive is E: drive)
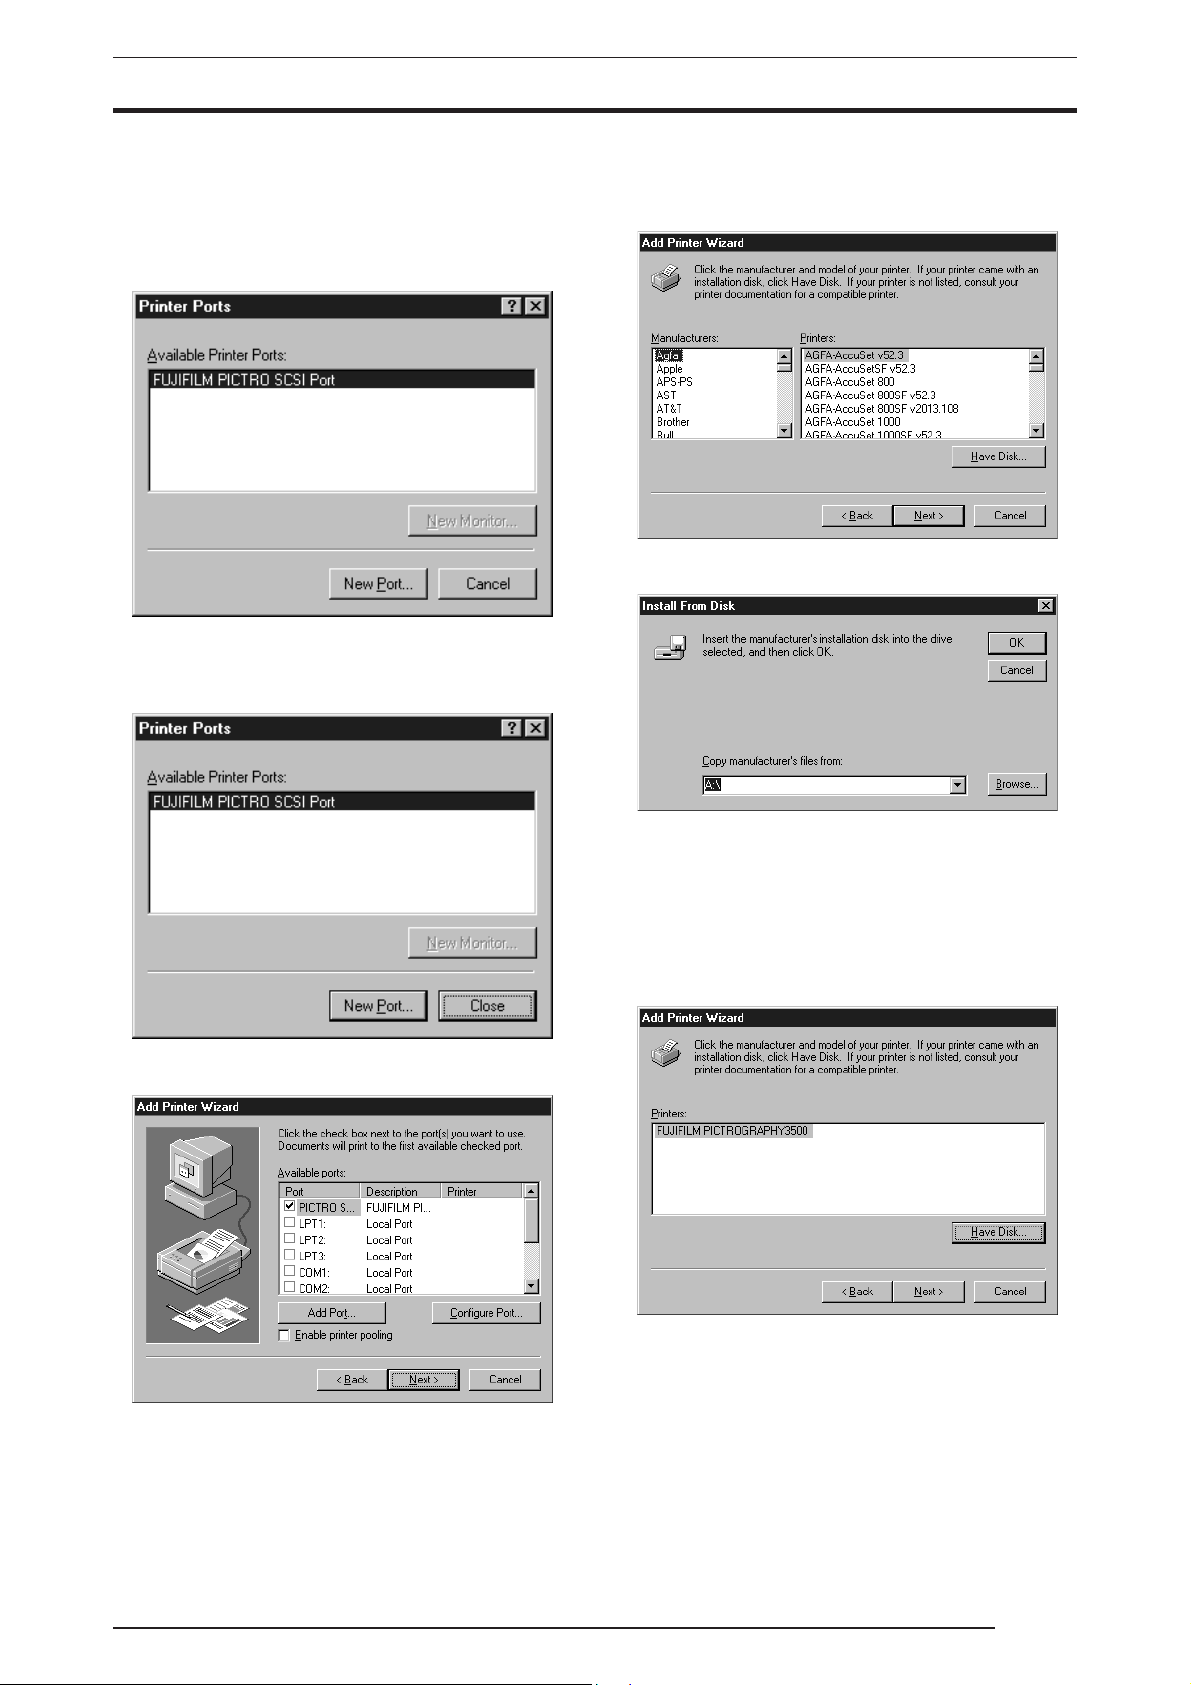
8. Confirm that [FUJIFILM PICTRO SCSI Port] appears in the
[Available Printer Ports:] field and click the [New Port...] but-
ton.
The following appears when the file is copied.
10. Confirm that [PICTRO SCSI:] in [Available ports:] is checked
and click the [Next] button.
The following appears:
11. Click the [Have Disk] button.
The [Install From Disk] dialog box is displayed.
9. Click the [Close] button.
The following appears:
12. Enter the following location in the [Copy manufacturer’s files
from:] field.
For CE Type:
E:\Win95_98English\CE (*If your CD-ROM drive is E: drive)
For UC Type:
E:\Win95_98English\UC (*If your CD-ROM drive is E: drive)
13. Click the [OK] button.
The following appears:
17
 Loading...