

FujiFilm PANORAMA GX617 Professional Owner's Manual
PANORAMA
Professional
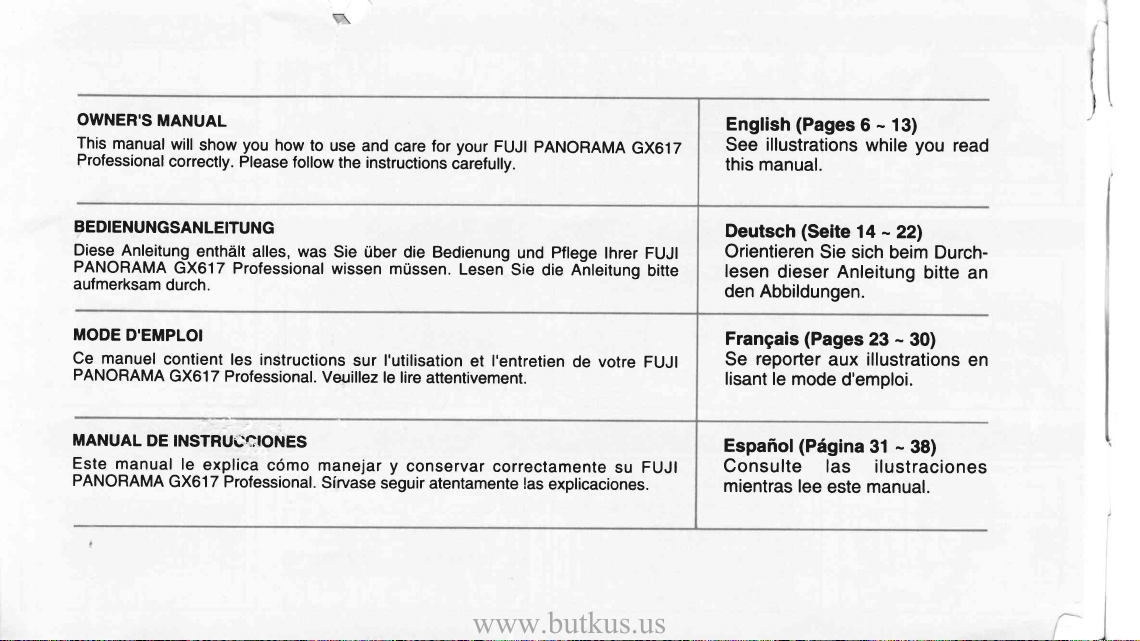
OWNER'S MANUAL
BEDIENUNGSANLEITUNG
MODE D'EMPLOI
MANUAL DE INSTRUCCIONES
OWNER'S
www.butkus.us
This
Professional
MANUAL
manual
will
show
correctly.
you
how
Please
to
use
follow
the instructions
and
care for
your
FUJI
iarefully.
PANORAMA
GX617
English
See
(Pages
illustrations
this manual.
-
13)
6
while
you
read
BEDIENUNGSANLEITUNG
Diese
Anleitung
PANORAMA
aufmerksam
MODE
Ce manuel
PANORAMA
MANUAL
Este
PANORAMA
GX617
durch.
D'EMPLOI
contient
GX617 Protessional.
DE INSTRUCCIONES
manual
GX617
enthdlt
les
le
explica
Prolessional.
alles, was
Professional
instructions
c6mo
Veuillez
manejar
Sirva6e
Sie
Uber die Bedienung
wissen
mussen.
sur l'utilisation
le
lire
attentivement.
y
conservar
s6guir
atentamente las
und
Lesen
Sie
die Anleitung
l'entretien
et
correctamente
Pflege
lhrer
FUJI
de votre
explicaciones.
FUJI
su FUJI
bitte
Deutsch
Orientieren
lesen
(Seite
14
Sie sich
dieser Anleitung
den Abbildungen.
Frangais
Se
lisant
Espafrol
Consulte
mientras
(Pages
reporter
le
mode
aux
(Prigina
las
lee
este manual.
d'emploi.
-
221
beim
Durch-
bitte
an
-
23
30)
illustrations
-
31
en
38)
ilustraciones
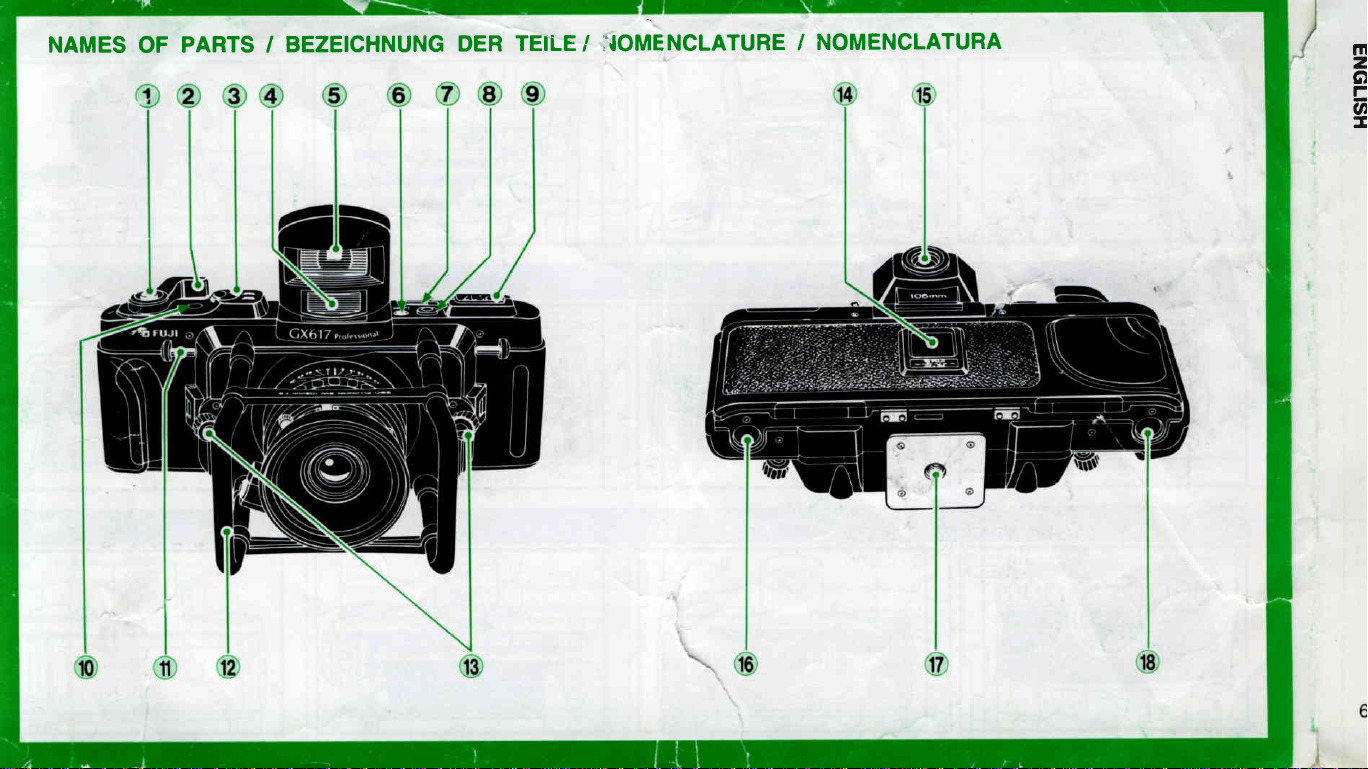
NAMES
OF
PARTS I
BEZEICHNUNG
DER TEILE /
I{OMENCLATURE
/
NOMENCLATURA
m
z
o
E
u
-
c:l
www.butkus.us
C=\
I
*iI..I
p
o?eQ
#
c00
t
'
€
Fil,fifi,ffi
l=
l-l
l,*^ I
tf-lt
I F:::l I
FryI
A
l;
L_---,-

Je
/:-
(e)
,4
U,l
m
z
o
\-/(D
-al-tir
\c
tr
U'
-
o
#i$11ril'$
\r,
'#ig.,'tl# l
I
rn
r-B
I
|a
lffi
rjl
ccocoo000
m
www.butkus.us
CONTENTS
z
o
r
NAMES
@
SPECIFICATIONS
T
HOW
READYING
LOADING
2.
3. Loading
4. Positioning
5. Winding
SETTING
1.
2. Viewfinder
3. Focusing
4.
5.
6.
7.
8. Taking
9.
10. Taking
CAMERA
1.
2.
3.
OF PARTS..
TO
USE
1.
2.
3. Attaching
4.
5. Attaching
6. Loading
1 .
THE
Mounting
Mounting
Mounting
the
THE
Opening
the
Using 120
the
the
AND
Using
the
the lens
Using
the focusing
Setting the
Cocking
the
Shooting with
multiple-exposure
Unloading
flash
CARE AND
Checking
Cleaning
the lens
Precautions...
....
CAMERA
and
dismounting
the filter
the lens
hood
and
dismounting
and
detaching
batteries .
FILM
camera
or 22O roll
ADJUSTING
spirit level
field
shutter
the film
the
back
take-up
spool
the film
start mark
positioning
film
and
view
of
screen
speed
shutter
and
the
shutter
.
pictures
MAINTENANCE
camera
lens
the
the vieMinder
the vievyfinder
film
.
film
and
it for
THE
CAMERA
parallax
and
(an
extra-cost
ring
and
winding
the
ring
speed
shots
before
shooting
eyepiece
the first
CONTROLS..
.
accessory) .
aperture
film
set to B
shot
selector
(Bulb)
NAMES
6
6
7
7
7
I
8
8
I
8
8
8
8
9
I
I
10
10
10
10
10
10
...
11
11
11
''t
11
12
12
12
13
1
Shutter Release
O
Film Advance
@
Film
@
Viev,rfinder
@
Viewfinder
@
VieMinder
@
Camera Back Lock
@
Spirit Level
@
(Q
Battery
Exposure
@
Strap
@
Lens
@
Lens
@
Film
@
(t
Viewfinder
Film
@
Tripod
@
Take-up
@
SPECIFICATIONS
Description
O
lnterchangeable
Film
O
120
Picture
O
56 x 168
Lens
O
special
mounting
PARTS
OF
Selector
Bright
Objective Lens
Lock
Compartment
Counter
Lug
Protector
Securing
Reminder
Eyepiece
Loading Knob
Socket
Spool Knob
roll
(4
film
exposures)
Size
mm
mounting
for
inserting
Lever
Frame Window
Cover
Screws
Slot
lens,
x 17
6
system
pins,
panorama-format
cm
and 2zo roll
consisting
andZ
securing
film
of
(8
4
screws.
camera.
exposures).
pins
rens
on
and
4
holes
I
i
il
I
I
in
F5.6/90 mm - 89" diagonal
m nearest focusing
2.0
77 mm.
F8/105 mm * 80.3' diagonal
1.2 m nearest focusing distance, 80 mm
diameter.
F6.7/180 mm
2.7 m nearest focusing distance, 80
diameter.
Shutter
O
Copal
release
shutter
release
Viewfinder
O
Interchangeable
bright
mm - 0.5X
90
105 mm
180mm
Visibility:
cost accessory).
Film Transport
O
One-touch spoolloading system,
frame),
film
roll
knob.
Focusing
O
Eye
estimation and
Others
O
Tripod
Back cover: Up and down
side),
-
52.4' diagonal
No. 0 interlens
for 1 - 1/500-sec.
release, mechanical
lever, X-contact for
frame,
-
0.5X
-0.74X
-1
built-in auto-reset exposure counter,
by turning over.
socket:
2-action
shutter,
using camera's shoe,
cross-hair
magnif ication
magnification
magnification,92/95%
(visibility-adjustable
diop.
manual
318-in, 1 l4-in.
opening
picture
distance,
lens
picture
B, 1 - 1/500 sec., manual cocking,
shutter speeds
release for B
all-shutter-speed
marker, focal distance
,91/92%
,91194%
pressure plate
the film
setting.
(adapter
type
opening and closing
and
closing
F45 minimum aperture,
angle,
front
diameter 80
angle, F45
lens front
picture
mm lens front
provided
film
advance
type).
lever,
F45 minimum aperture,
angle,
pressing
by
(Bulb)
synchronization.
with lock, reverse
indicator.
(V/H)
field
(V/H)
of
field of
(V/H)fieldof
eyepiece available as an
via
changeover
by
provided
mm, filter
minimum
diameter,
diameter,
shots shutter-side
view.
view.
view.
lever
means of a
with rod catches
diameter
aperture,
77 mm
mm filter
77
magnetic
down body-side
Galilean
"
(4
strokes
for 120
ot
lockable
(hinge
on bottom
filter
extra-
per
22O
for
mounting focusing screen.
level: oval type built-into the camera's top side.
Spirit
Power
O
O
O
O
Note: Speci{ications and external design are
HOW TO
READYING THE
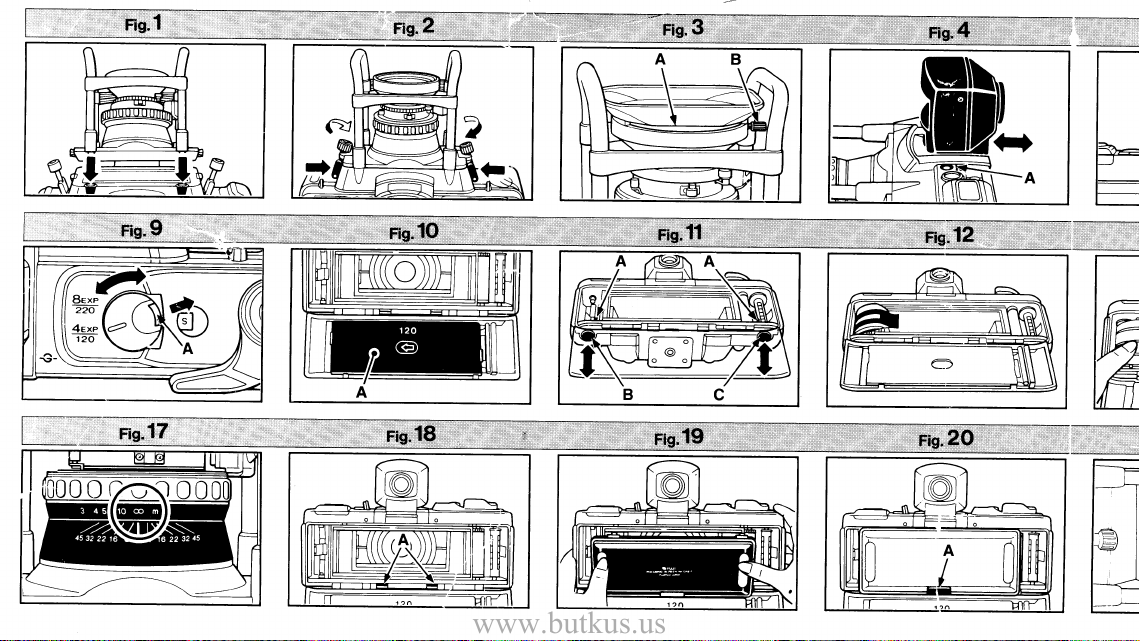
1. Mounting and dismounting the lens
O
O
@
Source
Two
release
Dimensions
Body
lncluding 90 mm
Weight
Body:
90
105 mm
180 mm lens: 1
Viewfinder: 100
Extra-cost Accessories
Focusing Screen
Center filter
Center
lithium
3-volt
(CR
alone:
1
,27O
mm lens: 1,050
lens: 1
filter for 90 mm
notice.
batteries
123A).
279W x
lens
g. (without
,060
,200
(Viewfinderfor
g.
for 105 mm lens
and
g.
g.
g.
USE
CAMERA
After loading
you
lens. lf
Fit
the
lens mount
fitting in
After
film
the
you
do,
lens four
and oush the
the
will
guide pins
lens,
powering
for
x 114H
92D
viewf inder: 279W X
batteries).
;
lens
if there is film in the camera, do not change the
or
expose the
lens in.
screw
the camera's
(mm).
180 mm lens: 90
(Figs.
film to light and spoil it.
into the four holes in the camera's
in
Lens
the
magnetic shutter
188D X 171H
subject to change
1 & 2)
Securing Screws
(mm).
g.)
'
without
while
t
I
a
o
z
ul
*.:ii::1.,:ii
*'lh.
ir
m
www.butkus.us
z
o
tr
(t,
-
pressing
tightened evenly.
Note
Make
lf
up.
2. Mounting the
Glass
are screwed into the lens front. The
Extra-cost
Dedicated
there is a noticeable
sky, with a wideangle lens.
Aftaching
3.
The Lens Hood is
holding
Hood for
Filter
Fixing
4. Mounting
To
O
To dismount, while
@
out toward the
VieMinder
Attaching
5.
Just screw it into
The
O
normal
you
lf
the
GW690 III Series
them
sure the lens is mounted
lens
the
is mounted
filters,
such as the
accessories
center
the
75 x75 mm
90 and
Pocket
Screw
and
mount, insert the viewfinder
Lock
and detaching the viewfinder
eyepiece
eyesight.
cannot
see
against their
filter
camera's dedicated
filters for
drop
lens
hood
screwed into the lens
(3
x
3-in.) sheet filters.
105
mm lenses,
(Fig.
3-A)
(Fig.3-B)
dismounting the viewfinder
pressing
camera back.
(Fig.
the eyepiece socket.
(-1
diopter)
the viewfinder
cameras. lt is adjustable to
guiding
with the name
top side down, the
filter-screw
the camera's
in
edge light when
(Fig.3)
4-A)
90 and 105 mm lenses.
front. lt is
and special hood for 180 mm lens.
into the
in
Viewfinder
the
your
on
camera is
image
clearly, use the
grooves.
shutter
shoe
Make
sure they
and distance scale
won't
UV, skylight, and center filters,
diameter is 77 mm.
taking subjects,
provided
(Fig.
4)
provided
Lock,
eyepiece
designed for
eyepiece designed
your
side
trip.
Use these if
such as a blue
pocket
with
a
the
on
camera top.
the Viewfinder
slide
(Fig.
5)
people
visiqn and is inter-
are
facino
for
with
for
changeable
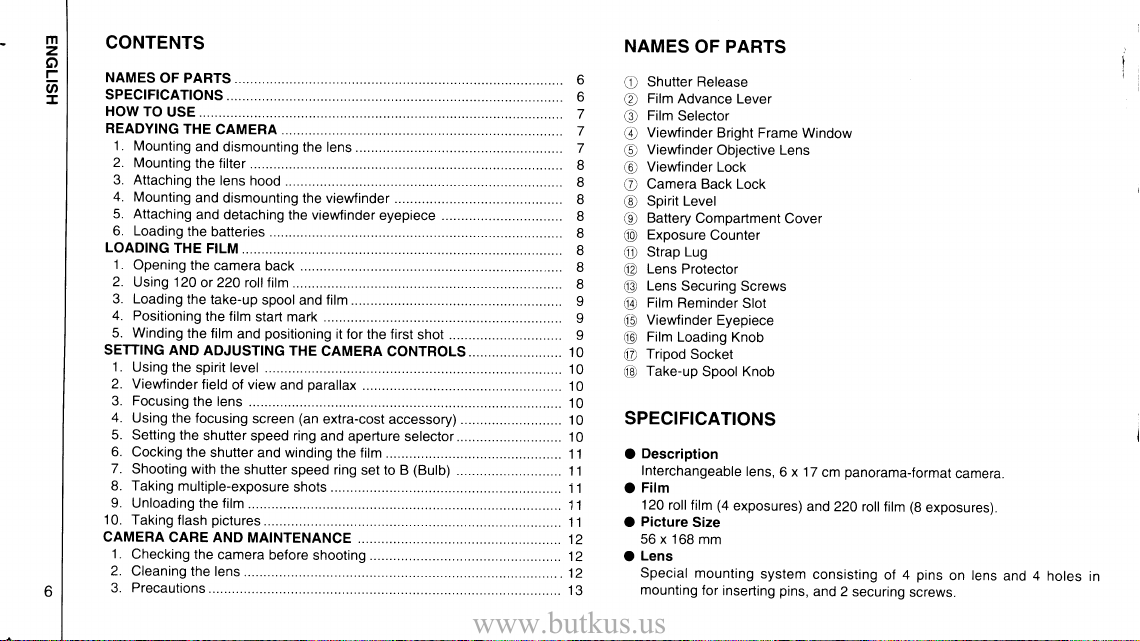
6.
@
@
O
O
with the GX617's eyepiece.
Loading the batteries
Open the Battery Compartment Cover by
Back.
Insert two
then close the cover.
The lens-side
changed,
Its
Your
temperature, a
3-volt
it can
power
source
GX617 camera does
(Figs.6
lithium
batteries
release is
shutter
be activated
pair
is
a
pair
new
of
&
operated
pressing
by
of 3-volt
not have a battery checker, but in normal
batteries
LOADING THE FILM
1. Opening the
To
open, erect the Camera
To
close
snao the
The
O
2.
Using
You'll have to set the film
<
12Ol22O film selector
Film
pulling
While
you
are using as
220 roll film .....
120 roll film .....4
(
Pressure
Pressure
you
lf
are using
it, keep
lock
down.
camera
120
or
Selector
the
8 exposures
plate
Plate
camera
lock
the
back won't
22lroll film
Lock
Film
Selector Lock, turn and set the Film Selector
follows:
exposures
)
(Fig.
120 roll film,
(Fig.
back
Back Lock
press
erect,
close unless
(Figs.
selector and
)
(Fig.
9-A)
10-A)
you'll
have
7)
pushing
it
toward the Camera
(CR
123A) into the Battery Comparlment
magnetically. Even if the lens is
in the body-side shutter
lithium
batteries.
provide
will
8)
push
and
the camera back against
10)
9 &
pressure plate
to use
more than 20,000 shots.
it toward the viewfinder.
the camera back lock is erect.
for the f ilm
the
side of
the body, then
you
for
the Pressure Plate
release.
are using.
the film
."r;'ia$td,ifq"ata,
marked "'l20" and
"220".
marked
To turn over
Be sure
O
you
you
lf
precisely
focal
(120
but such
film. The thickness
the
keeping the
Caution
you
ll
switch
the counter
such cases,
back and
Loading
3.
Spool
Film
Take-up Spool
Pop out
O
Buttons
Take out the
@
the same
Spool
Load the
@
battery
The take-up
O
(camera
pressure plate,
the
to set
are uslng.
don't use
focused
plane.
is attached
rollfilm
paper
plane
focal
film flat on
film
the
may not reset as
the camera
the film selector
reset
the take-up
Release
Knob
Loading
the spool
(small
side as the
Knob.
film in the
compartment),
top) side
you
il
are using
the film selector
the
pictures
is used only
and
selector
Knob
Knob
red
empty spool,
spool and
just
correct
because
to an opaque
the backing
of
pressure
the
the focal
after
it should or
function
spool and
Buttons
(Fig.
11-B)
(Fig.11-C)
knobs by
in the
buttons
film advance
film chamber
then
film
first.
to the correct
press
roll film,
220
push
it
toward
pressure plate
and
pressure
of the
side
on
loading the
will return
(Fig.
fit
roll can be
film will not
the
backing
the leading and
paper
causes
plate
adjusts
plane
at one and
film,
film may
the
to normal
position.
(Figs.
film
11-A)
pressing
supply
it into the take-up
in the Spool
and
lever), then
(located
film loading
in the
loaded easier by
you'll
have to use
the arrow
paper
caution
11 &
take-up sides).
on
and
film
for the
plate, you
move
its entire
over
ends of
trailing
in the
a shift
difference
for this
the same
is required because
not wind
you
if
open
12)
Knob Release
chamber
press
in the
the same
knob.
fitting
the side
it
lift
out.
(120
220)
or
get
won't
into the exact
length,
roll
22O
position
while
time.)
properly.
the camera
(located
on
Take-up
as the
side
in the top
of
In
Positioning
4.
Pull out the
the slot of
into
the film advance
with
winding
Stop
the arrow
camera
(
O
O
(
O
5.
After
switch
Tear
camera
mark I on
back.
Avoiding
prevent
To
supply side
advance
prevent
To
is being closed,
you
until
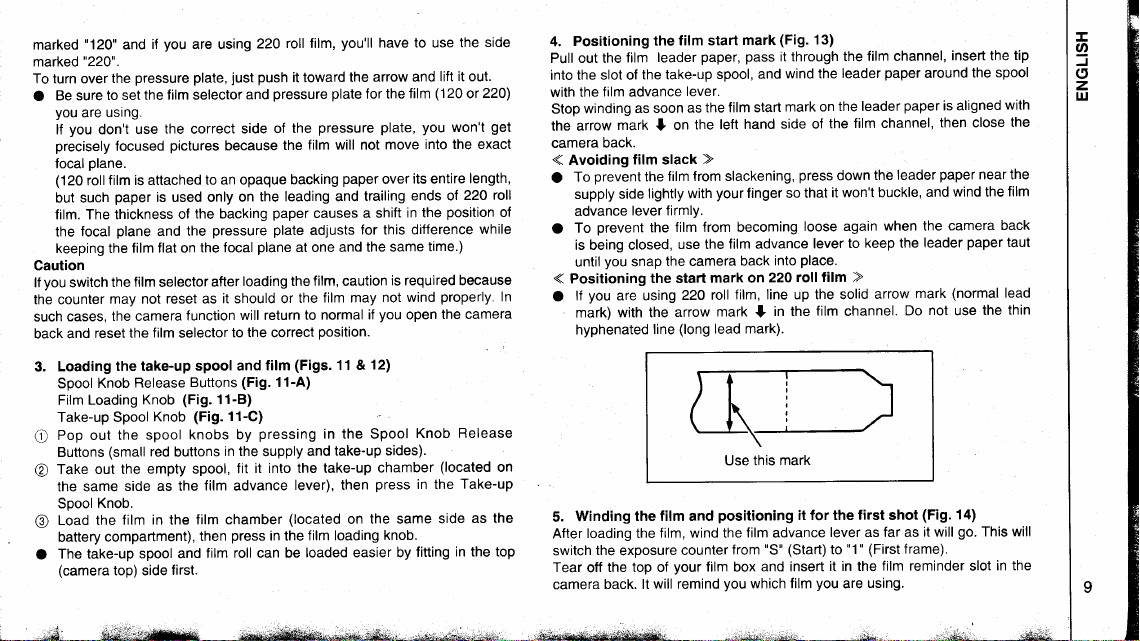
Positioning
you
lf
are using
with the
mark)
hyphenated
Winding
loading the
the
the top of
off
back. lt
film start
the
leader
film
the take-up
lever.
as
as soon
the
film slack
film from slackening,
the
lightly with
lever firmly.
film {rom becoming
the
use the
the camera
snap
the start
220
arrow
(long
line
the film and
film, wind the
exposure
counter
your
will remind
paper,
spool,
the film start
)
your
mark on
roll
mark
lead mark).
positioning
film box
it through the
wind the
and
mark on
side of
left hand
finger so
film advance
into
back
220 roll
film, line up the solid
in the
I
mark
Use this
film
advance
"S" (Staft)
from
and insert
you
which film
(Fig.
mark
pass
13)
leader
the leader
film channel,
the
press
down
it won't buckle,
that
loose again
to
lever
place.
)
film
film
channel.
first
it for the
lever as far as
"1" (First
to
it in the
you
are
around
paper
leader
and
leader
mark
not
Do
(Fig.
it will
f rame).
insert the
is aligned
then close
paper
wind the
(normal
use
film channel,
paper
the
when the camera
keep the
arrow
shot
film reminder slot
using.
the
paper
14)
go.
tip
spool
with
the
near the
film
back
taut
lead
thin
the
will
This
in the
I
I
(5
z
UJ
@i*ar#a;t;;a1
m
www.butkus.us
z
o
tr
@
I
10
SETTING AND
1.
Using the spirit
The
camera is
O
Spirit Level
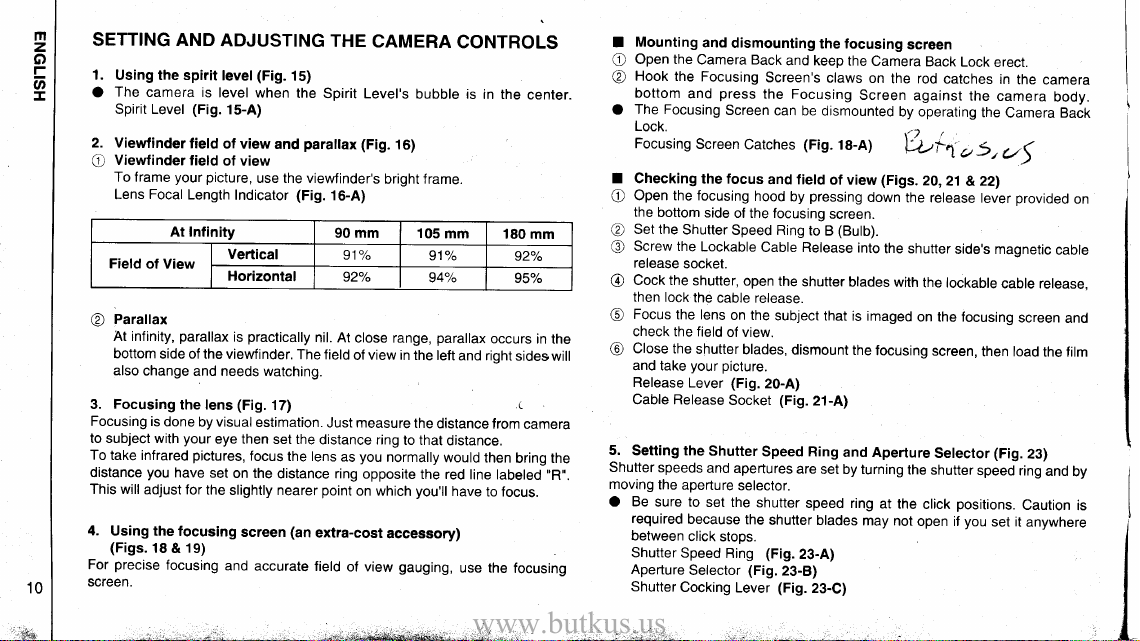
2. Viewfinder
Viewfinder
@
To frame
Lens
Field
Parallax
@
At infinity,
bottom
also
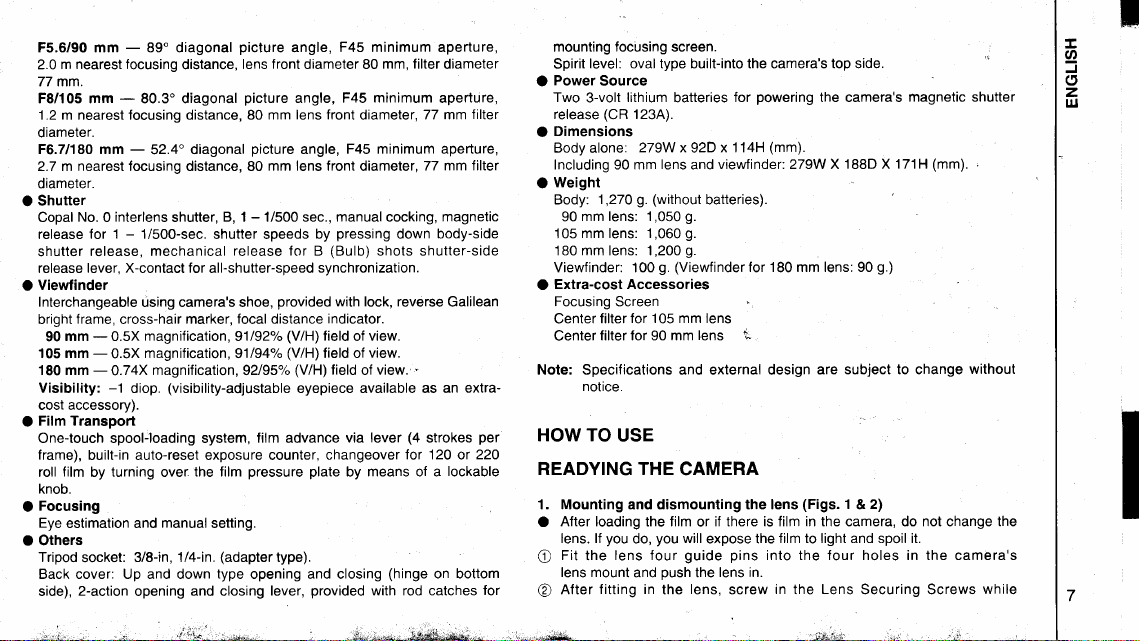
Focusing
3.
Focusing is
to subject with
To
take infrared
distance
This will
4.
Using
(Figs.
precise
For
screen.
(Fig.
field
field
your picture,
Focal
Length
At Infinity
of View
parallax
side of the
change
and needs watching.
the lens (Fig.
done
by visual
your
pictures,
you
have
adjust for
the focusing
18 & 1s)
focusing
ADJUSTING
(Fig.
level
level
15-A)
of view
of view
Vertical
Horizontal
viewfinder.
eye then
set
the
slightly nearer
and
15)
when
the
and
use the viewfinder's
practically
17)
estimation.
set the
focus
the lens
distance ring
(an
screen
accurate
(Fig.
The f ield
Indicator
is
on the
THE
Spirit Level's
parattax
(Fig.
16-A)
mm
90
91"/o
92/"
nil. At
close range,
of
Just measure
distance ring
you
as
opposite
point
on which
extra-cost
field
of view
CAMERA
bubble is
16)
frame.
bright
105
91"/"
94"/"
view
parallax
in the left
the
distance
to that
normally
the red
you'll
accessory)
gauging,
CONTROLS
in the
mm
180
92%
95%
occurs
and right
sides
(
from
distance.
would
then
bring the
line labeled
have
to focus.
use the
focusing
center.
mm
in the
will
camera
',R',.
Mounting
T
Open the
o
O)
Hook
bottom
The Focusing
o
Lock.
Focusing
T
Checking
Open the focusing
o
the
(
Set the
/'a)
screw the
v
release
cock the
@
then
Focus
@
check the field
close
@
and take
Release
Cable Release
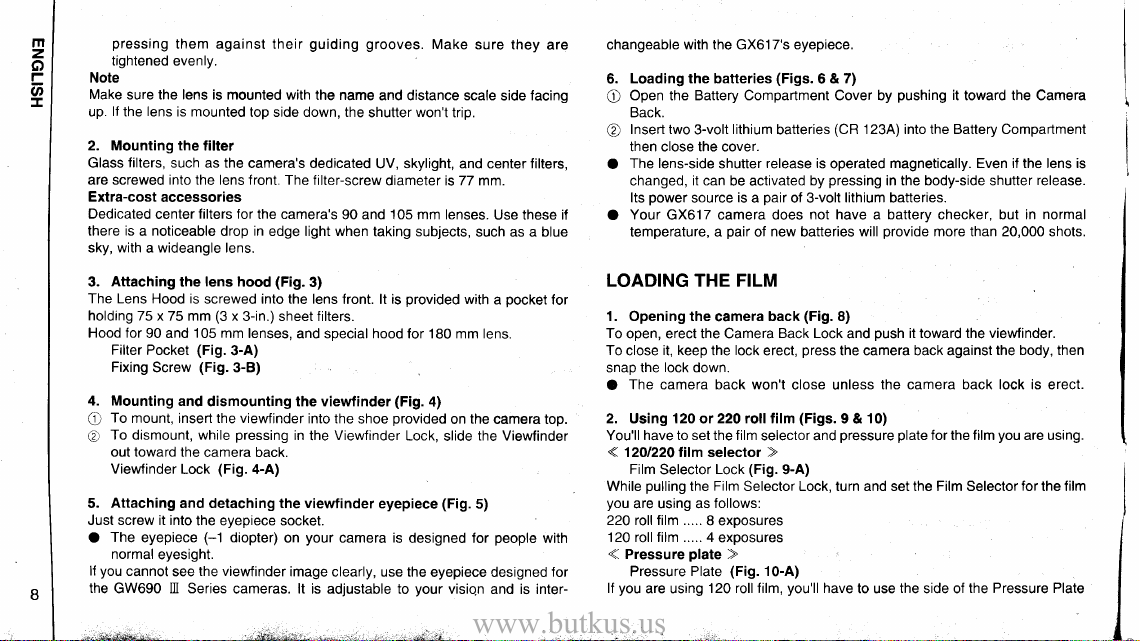
5.
Setting the
shutter
moving
Be
o
required
between
Shutter
Aperture
Shutter
Camera Back
the
and
Screen
bottom
Shutter
socket.
shutter,
lock
the
the lens
the
shutter
your picture.
Lever
speeds
the apefture
sure to
because
click
Speed
Selector
Cocking
and
dismounting
Focusing
the focus
side
Lockable
Screen's
press
the Focusing
Screen
can be
Catches
and field
hood
of the focusing
Speed Ring
cable Release
open
on the
of view.
blades,
(Fig.
Socket
selector.
the
stoos.
Ring
(Fig.
Lever
the
subject
20-A)
(Fig.21-A)
Speed Ring
shutter
shutter blades
(Fig.
23-B)
(Fig.
cable release.
Shutter
and apertures
set the
the focusing
and keep
claws
dismounted
(Fig.
of view
pressing
by
screen.
to B
shutter
that is imaged
dismount
are
set by turning
speed ring
23-A)
23-C)
Camera
on
Screen
(Figs.
down
into
the shutter
blades
the
focusing
at the
may
screen
the rod
by operating
Vrr,
the release
with
the shutter
not
the
18-A)
(Butb).
and Aperture
Back
Lock
erect.
catches
against
20,
the lockable
on the focusing
screen,
Setector
click
open if
in
the
camera
the
s,,
a
us
21 & 22)
lever
side's magnetic
cable release,
then load
(Fig.
speed ring
positions.
you
set
the
camera
body.
Camera Back
provided
on
cable
screen
and
the film
23)
and
by
caution
it
is
anywhere
I
.,1,,?
I
Cocking the shutter
6.
to make
Check
push
the shutter-cocking
the number
sure
is set anywhere between
when the
close
just
wind
the next
to
film
the
number
body-side
advance
itself .
by
Note
lf the
Shutter Speed
the body-side shutter
7.
Shooting
Your GX617 camera
will turn on
long
making
the
shutter
Ring
release.
with the shutter speed
has a magnetic
when
the shutter
exposures
is designed so that
release.
After
@
Screw the cable
@
trip the shutter
you
lf
O
provided
To wind the
@
side shutter
Shutter
the shutter, set the Shutter Speed
cocking
release into the shutter-side
with it.
have
don't
a cable
under the shutter casing.
film, release
release
Release Lever
Note
The
body-side shutter
When
stopper.
shutter-side
release,
then advance the
release can also be
you
the camera to B
set
just
film with the film
and winding the
"1"
lever
to the
1
1i500
and
shutter
lever
3 or
is
set to
film
is
showing
left
far as it will
as
second,
release is
pressed
4 times. The exposure counter
(Bulb),
B
the shutter cannot be
ring
set
release. lt means the magnet and
blades are opened.
with the Shutter Speed
it
cannot be
operated
release, trip the shutter
film advance stopper by
the
down then
deeply
(Fig.24-A)
used to
(Bulb)
press
the body-side shutter
advance
lever.
in the exposure counter
go.
lf
the shutter speed
the shutter blades
down.
will
open
To wind the film,
will move
tripped with
to B
To
Ring
prevent
(Bulb) (Fig.
to B
set
with the
Ring to B
24)
battery drain
(Bulb),
therefore,
body-side
(Bulb).
magnetic release socket and
with the release lever
pressing
wind the film
release
your picture
take
and
release
advance
film
the
deeply
the body-
advance
then
and
power
when
shutter
lever.
with
the
down
Taking multiple-exposure shots
8.
As in
between 1 and
times as
photography,
bulb
1/500 second,
you
want without advancing the
use the shutter side
you
can open and close
film.
release. lf
Caution
Preventing
l{
the advance
you press
cocking the shutter, the
film will
be advanced
shutter blades do
release,
shutter
of empty frames
the body-side shuttei
film
advance stopper
when the film advance
not
open and close
just
cock
the
when
shutter and
release
will
lever
you press
trip it with the shutter-side shutter
release.
9. Unloading
After
film
advance
has left its
five
strokes to
Next, open the camera back, take out the exposed
prevent
to
The empty spool
O
the film
you
complete exposing a
lever. A sudden release of tension
wind
that winding
film
the
completely.
spool and
it from unwinding.
is
transferred to the take-up side
roll
film, wind it
of
has
been completed.
will
roll of film.
Taking flash
10.
you
lf
are using a
pictures
flash,
connect the cord to the sync
barrel.
Your
camera
has
X-contact, that is, electronic flashes will synchronize
an
all shutter soeeds.
the shutter
the
shutter as
deeply down
released
be
is
and
wound. Therefore, if
down the body-side
to the very end
up
you
that the trailing
tell
lt will
take about
roll
film
of
and seal
for
taking up
terminal
is
set
many
without
unexposed
the
with
the
end
four
the end
the next
the lens
on
with
T
L
J
o
z
IJJ
or
11
.esr-'
j,i*-l
.e*
 Loading...