

Page 1

User's Guide
This User's Guide contains the instructions for using the FinePixViewer
and DP Editor software. Read this manual carefully before using these
programs.
FinePixViewer
DP Editor
Page 2

FinePixViewer/DP Editor
2
IMPORTANT
Be sure to read this page before using the Software Set.
Notes on the Software and User's Guide
(1) Unauthorized transfer or duplication of all or any part of the enclosed
software or User's Guide is forbidden.
(2) The enclosed software and User's Guide can be used with only one device.
(3) We accept no liability whatsoever for any loss or injury incurred by the
owner or any third party while using a device with the enclosed software or
User's Guide.
(4) Every effort has been made to ensure that the product is flawless. If any
defect is found that is due to a fault on the part of the manufacturer, the
product will be replaced free of charge, at our discretion. No responsibility is
accepted for defects not caused by the manufacturer.
(5) The contents of the enclosed software and User's Guide are subject to
change without notice.
• Microsoft, Windows are trademarks of the Microsoft Corporation of the U.S.
registered in the U.S. and other countries.
• Macintosh and QuickTime™ are registered trademarks of Apple Computer,Inc.
• Windows is an abbreviated term referring to the Microsoft Windows Operating
System.
• Adobe Photoshop and PhotoDeluxe are trademarks of Adobe Systems Incorporated
of the U.S.
• SmartMedia™ is a trademark of Toshiba Corpration.
• All other company or product names are trademarks or registered trademarks of the
respective companies.
Do not attempt to play the CD-ROM enclosed with this
product on an audio CD player.
Doing so could damage your hearing or could damage
your speakers or headphones.
Page 3

FinePixViewer/DP Editor
3
This User's Guide describes how to use the FinePixViewer and DP Editor software.
In this Guide, it is assumed that the reader has a basic grasp of how to use a personal
computer (PC). For information on how to use your PC, refer to the manuals supplied
with the PC.
The screens and menus shown in this Guide differ slightly in the Windows and
Macintosh versions. Where "(Windows)" or "(Macintosh)" is shown in the Guide, refer to
the relevant description for your type of PC.
Introduction
Page 4

IMPORTANT ...................................................................... 2
Introduction.......................................................................3
Contents ........................................................................... 4
Using FinePixViewer
Starting Up FinePixViewer.................................................7
FinePixViewer Main Window and Menus........................................8
Main Window Configuration...........................................................9
Pop-up Menus............................................................................10
Viewing Images ................................................................11
Selecting the folder....................................................................11
Viewing image file information ....................................................11
File information ..........................................................................11
Viewing the file information.........................................................12
Viewing images..........................................................................12
Enlarging and reducing the displayed image................................13
Scrolling around the image display..............................................13
Playing back movies...................................................................13
To save a movie frame................................................................14
Playing back sound files .............................................................14
Using the folder selection history................................................14
Using bookmarks .......................................................................15
Registering a folder in the bookmarks ..........................................15
Browsing the bookmarks .............................................................15
Editing the bookmarks ................................................................15
Changing the thumbnail display mode.........................................16
To change the thumbnail display sequence..................................16
To change the thumbnail size ......................................................16
To change the thumbnail frame and background design................16
Viewing slide shows...................................................................17
Slide show playback ...................................................................18
Working with Files ...........................................................19
Selecting files............................................................................19
To select a single file ..................................................................19
To select multiple files ................................................................19
To select all the files...................................................................19
FinePixViewer/DP Editor
4
Contents
Page 5

FinePixViewer/DP Editor
5
Moving and copying files ............................................................19
Selecting folders........................................................................19
Moving and Copying folders........................................................20
Renaming files and folders .........................................................20
Creating folders .........................................................................20
Deleting files and folders ............................................................20
Sending images as e-mail attachments .......................................21
Sending E-mail Mesages.............................................................21
Editing Images.................................................................22
Image windows ..........................................................................22
Cropping (Trimming) the image...................................................23
Copying the image to the clipboard.............................................23
Resizing the image.....................................................................24
(1) Resizing the image....................................................................24
(2) Resizing multiple files at once ...................................................25
Superimposing text on images....................................................26
Moving the Superimposed Characters onto the Image ..................26
Rotating the image .....................................................................27
(1) Rotating the image ....................................................................27
(2) Rotating multiple images at once ...............................................27
Saving the image .......................................................................27
Editing the image file information ................................................28
Specifying the settings for automatic image taking.......................29
Registering other applications.....................................................30
Printing the Image............................................................31
Page setup ................................................................................31
Printing images ..........................................................................31
Printing an index ........................................................................33
Exiting FinePixViewer......................................................35
Ordering Prints (Using DP Editor)
Starting Up DP Editor.......................................................36
Selecting the Media..........................................................37
Registering Ordering Information....................................38
Main Window .............................................................................38
Registering Images ....................................................................39
Selecting images ........................................................................39
Specifying the number of prints ...................................................39
Page 6

FinePixViewer/DP Editor
6
Editing Index Print Information....................................................40
Index window .............................................................................40
Adding images............................................................................40
Undo Image Registration............................................................41
Confirming an Order (Saving an Order).......................................41
Displaying Registered Images.....................................................42
Image window ............................................................................42
Enlarging / Reducing the displayed image....................................42
Scrolling around the image display ..............................................42
Trimming a Registered Image.....................................................43
Setting the rotation for a registered image ...................................43
Setting the print information for a registered image ......................44
Exiting DP Editor........................................................................45
DPOF.........................................................................................45
When Problems Arise
Troubleshooting.............................................................. 46
Problems with FinePixViewer ..................................................... 46
Problems with DP Editor ............................................................ 49
Common Problems .................................................................... 50
Appendix
Glossary.......................................................................... 51
Page 7
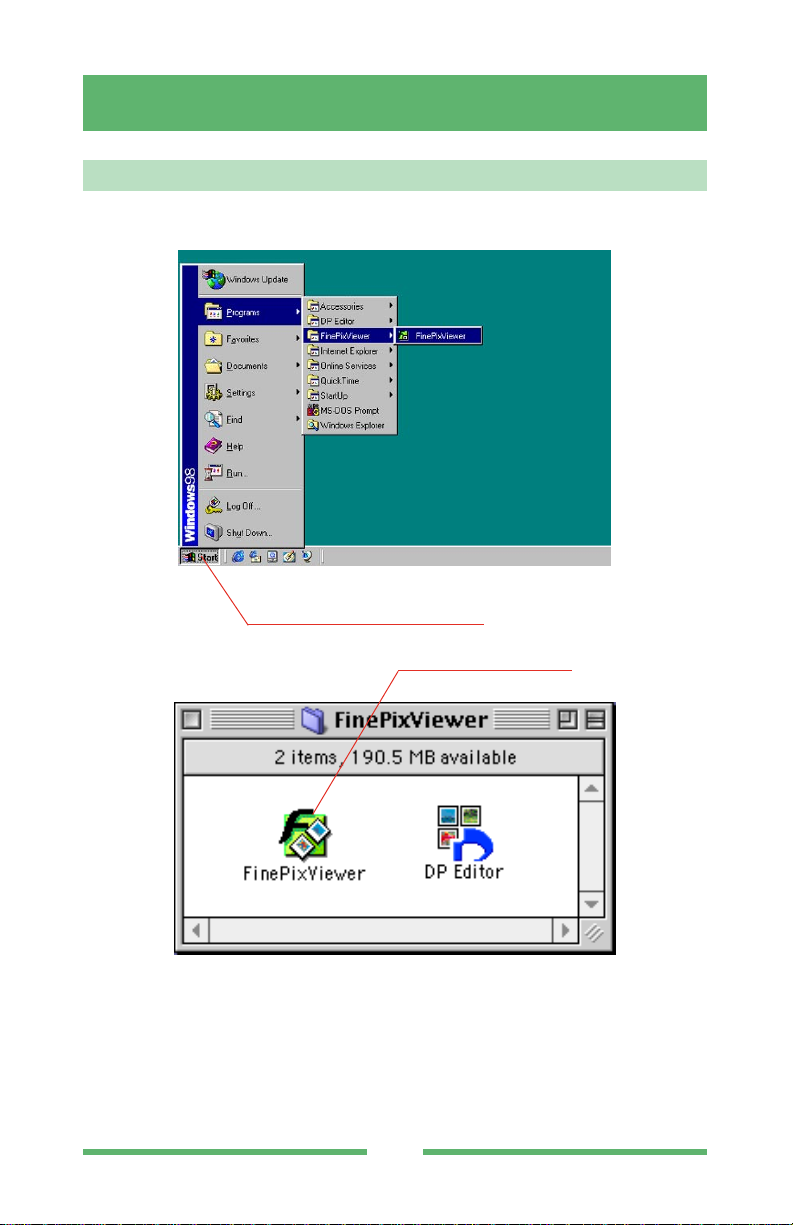
Screen at startup
From the Start menu, select [Programs][FinePixViewer].
7
Using FinePixViewer
Starting Up FinePixViewer
Macintosh
Windows
Double-click [FinePixViewer].
Page 8
FinePixViewer Main Window and Menus
When you launch FinePixViewer, the window shown below appears.
Main Window
NOTE: FinePixViewer supports the following file formats: Exif-JPEG, Exif-TIFF, JPEG,
BMP (Windows), PICT (Macintosh), FlashPix, AVI, QuickTime Movie, WAV.
TIP: If you can no longer open FinePixViewer on your Macintosh, the Preferences
file is probably corrupted. Open the "Preferences" folder in the "System Folder"
on the startup disk and move the "FinePixViewer Prefs" file to the Trash. Then
empty the Trash and start up FinePixViewer again.
Folder tree display area:
FinePixViewer
8
Macintosh
Internet link
display area:
Windows
Picture playback application display area:
Movie playback application display area:
Sound playback application display area:
Thumbnail display area:
Page 9

Main Window Configuration
Folder tree display area:
Displays a list of the drives and folders.
Registered application display area:
To use another application to play back or edit still images, movies or sound files, register
the application in this area. (➠ P.30)
Thumbnail display area:
Displays thumbnails of the images contained in the selected folder.
Internet link display area:
Displays buttons that link to sites for print services, software downloading, etc.
Show/Hide Folder Tree button:
Clicking this button alternately shows and hides the folder tree display
area and registered application display area.
Show/Hide Playback Pane button:
Clicking this button alternately shows and hides the playback pane
between the folder tree display area and the Internet display area.
Back button:
Click this button to redisplay the folder selected last. (➠ P.14)
Forward button:
After you have used the Back button to move to the last selected folder,
click the Forward button to return to the original folder. (➠ P.14)
Stop button:
Click this button to cancel thumbnail display.
Refresh button:
Click this button to bring the displayed information up to date.
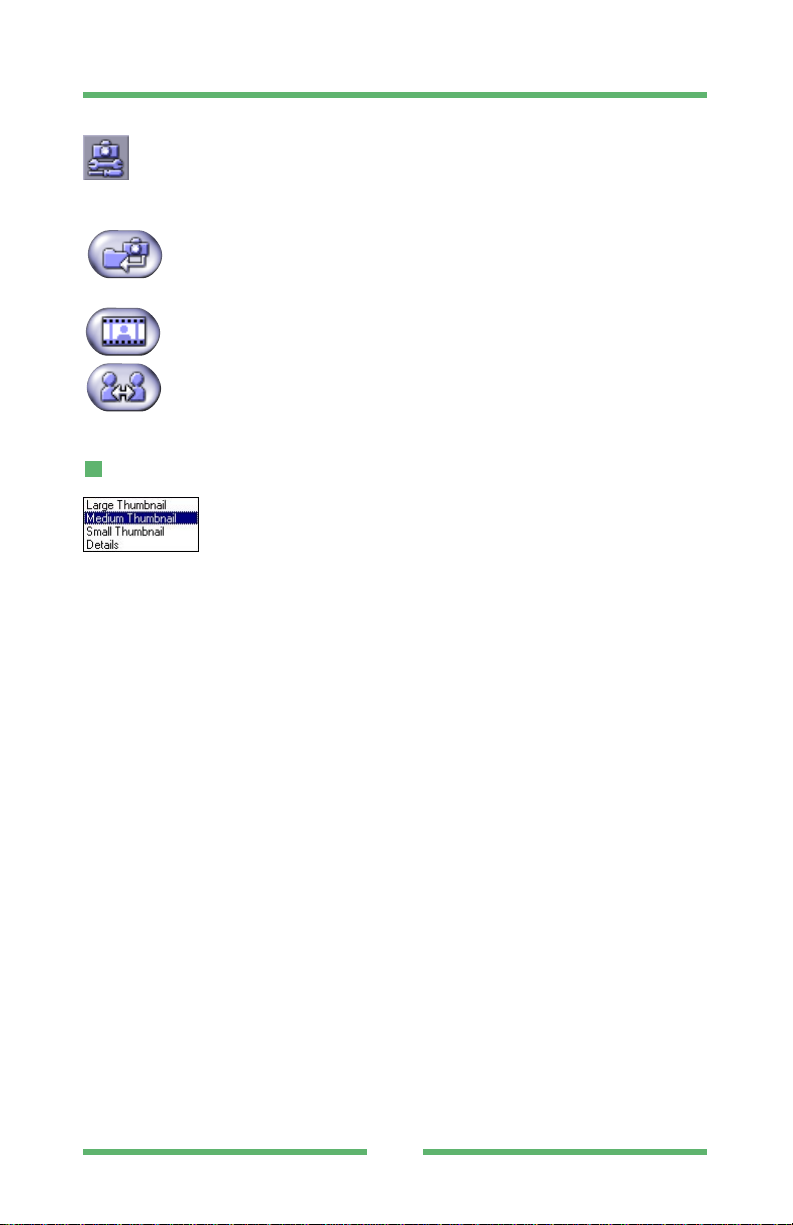
Print button:
Click this button to open the Print dialog box and print an image. (➠ P.31)
Print Order button:
Click this button to launch DP Editor and specify print orders. (➠ P.36)
Batch Rotation button:
Clicking this button opens the Batch Rotation dialog box and allows you
to rotate all the selected images at once. (➠ P.27)
FinePixViewer
9
Page 10
FinePixViewer
10
Camera Settings button* (not shown in initial state):
Clicking on this button opens the Camera Settings dialog box. From this
window you can specify the camera function settings.
* To use this function, you must obtain the setup application.
Automatic Taking button:
When you click this button, files are copied as specified in the Automatic
Taking settings. (➠ P.29)
Slide Show button:
Click this button to view a slide show. (➠ P.17)
Videoconference button (Windows only):
Click this button to open the Videoconference window and take part in
videoconferencing sessions.
Pop-up Menus
Display Mode pop-up menus:
Click these buttons to change the size of the thumbnail images and to
change the way the detailed information is displayed. (➠ P.12)
Page 11
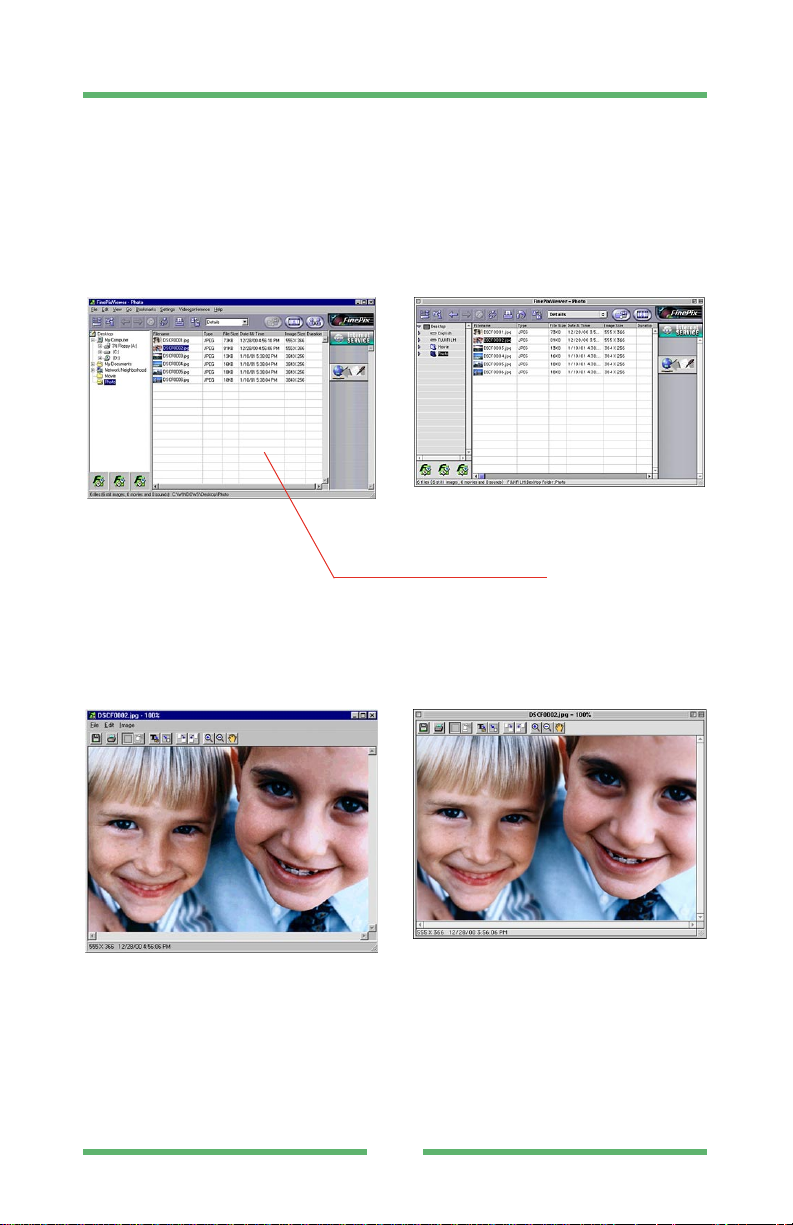
Selecting the folder
Select the desired folder by clicking it in the folder tree display area in the Main Window. The
images in that folder are then displayed.
Clicking the [ ] (Windows) or [ ] (Macintosh) to the left of the folder shows a drop-down
display of the folders contained in the selected folder.
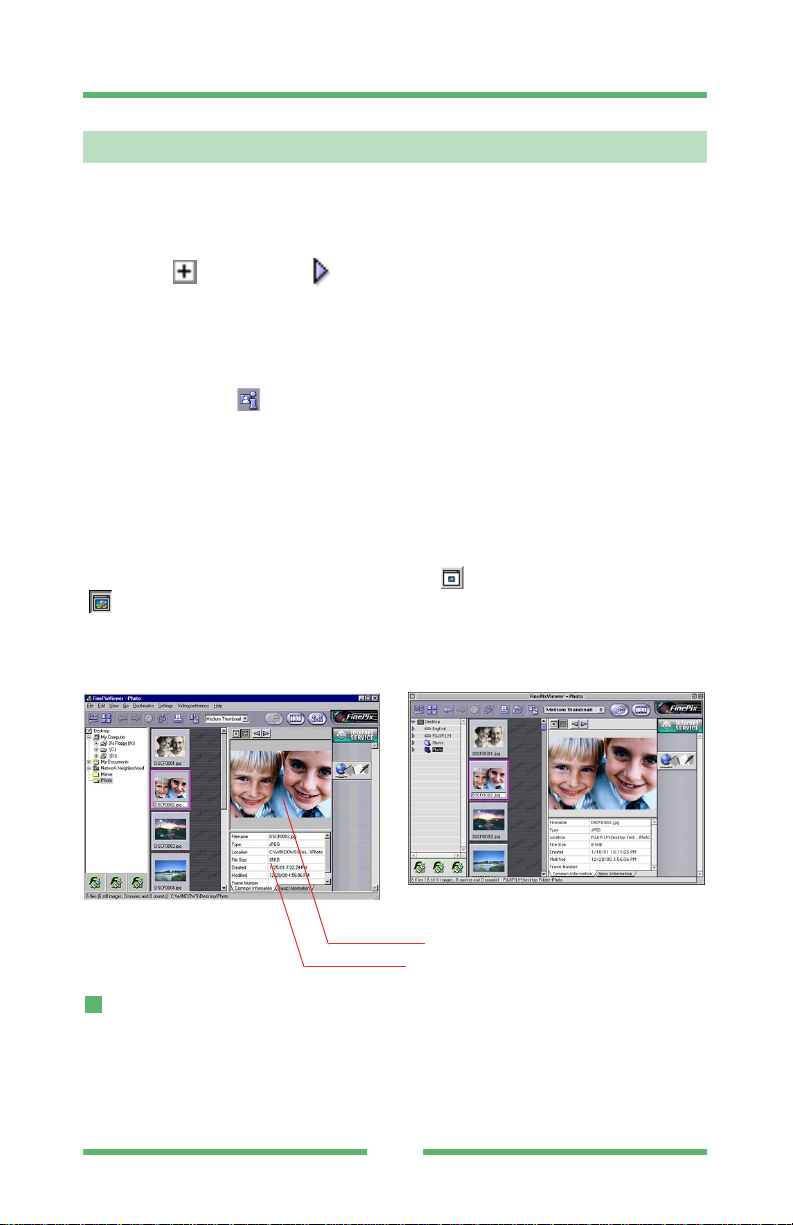
Viewing image file information
When you click the " [ ] " button, the playback pane (information display frame) appears
between thumbnail display area and the Internet display area. This pane displays information
for the selected image.
The playback pane shows the image along with the file and photography information.
There are two ways to display images in the playback pane:
A. Displayed as thumbnails (160 x 120 pixels)
B. Fit to the size of the display area in the playback pane
(This is useful when you want to view the image enlarged.)
You can select the display mode by clicking on the " [ ] (Display thumbnail)" button or the "
[ ] (Auto Size)" button.
When a movie or sound file is selected, the movie or sound recording is played back.
Main Window Showing Playback Pane
File information
Click the tabs along the bottom of the file information window to select the information
displayed. The information shown differs depending on the image file format.
FinePixViewer
11
Viewing Images
Playback pane
File information
Windows
Macintosh
Page 12
FinePixViewer
12
Viewing the file information
Using either of the following methods, the file information details shown in the figure below
can be displayed in the thumbnail display area:
A. Select "Details" in the "Display Mode" pop-up menu.
B. In the "View" menu, select "View mode" → "Details".
Main Window Showing Image File Details
Viewing images
To display an image in a new window, double-click the thumbnail in the Main window directly
or select a thumbnail and select "Open" from the "File" menu.
Image Window
Windows
Macintosh
Windows
Thumbnail display area switched
to detail display mode:
Macintosh
Page 13

FinePixViewer
13
Enlarging and reducing the displayed image
To enlarge or reduce the image displayed, switch to enlarged or reduced display mode by
clicking the [ ] or [ ]button in the Toolbar or by selecting [Zoom In Tool] or [Zoom Out
Tool] from the [Image] menu. Clicking the mouse on the image then enlarges or reduces the
image using the clicked point as the center of the image.
Scrolling around the image display
You can use the scroll bars in the Image Window to scroll to different parts of the image.
Also, by clicking the [ ] button in the Toolbar or selecting [Hand tool] from the [Image] menu,
you can switch to the free scroll mode which allows you to move the image around inside the
window by dragging it around with the mouse.
Playing back movies
You can open a movie playback window and play a movie by either double clicking directly on
a thumbnail marked with the movie icon , or by selecting the thumbnail and selecting
"Open" from the "File" menu.
Movie Playback Window
Macintosh
Windows
[Frame advance] button:
Advances or rewinds the movie one frame at a time.
[Playback progress] button:
Shows the playback progress. Playback can be started at
any point by dragging the button to the desired frame.
[Playback] button
Starts playback.
[Volume] button
Adjusts the sound volume.
Page 14
To save a movie frame
When movie playback is paused, you can save the currently displayed frame as a still
image by selecting [Save As] from the [File] menu.
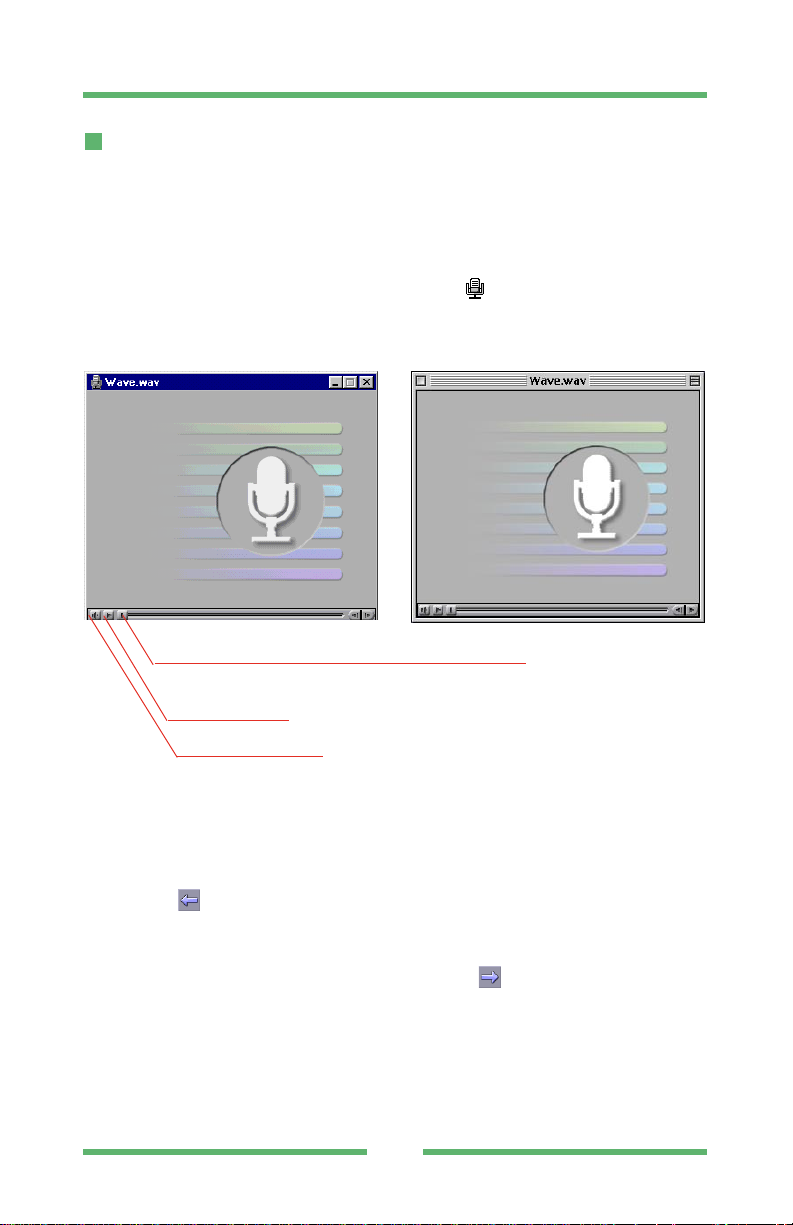
Playing back sound files
You can open a sound playback window and play a sound file by either double clicking
directly on a thumbnail marked with the sound icon [ ] , or by selecting the thumbnail
and selecting "Open" from the "File" menu.
Sound Playback Window
Using the folder selection history
Up to 20 recently selected folder names are automatically recorded. When you select a
recorded folder name from the [Go] menu, the images in the selected folder are displayed.
Clicking the [ ] button or selecting [Back] from the [Go] menu displays the last folder
selected before the current folder. When there is no previously selected folder, this button or
menu is grayed out.
If you have gone back to the previous folder, clicking the [ ] button or selecting [Forward]
from the [Go] menu displays the next folder after the folder currently displayed. If there is no
next folder, this button or menu is grayed out.
FinePixViewer
14
Windows
Macintosh
Volume control button
Playback button:
Starts playback.
Playback progress button:
Indicates the playback progress. You can play back the file from
a different point by dragging this button to the desired position.
Page 15
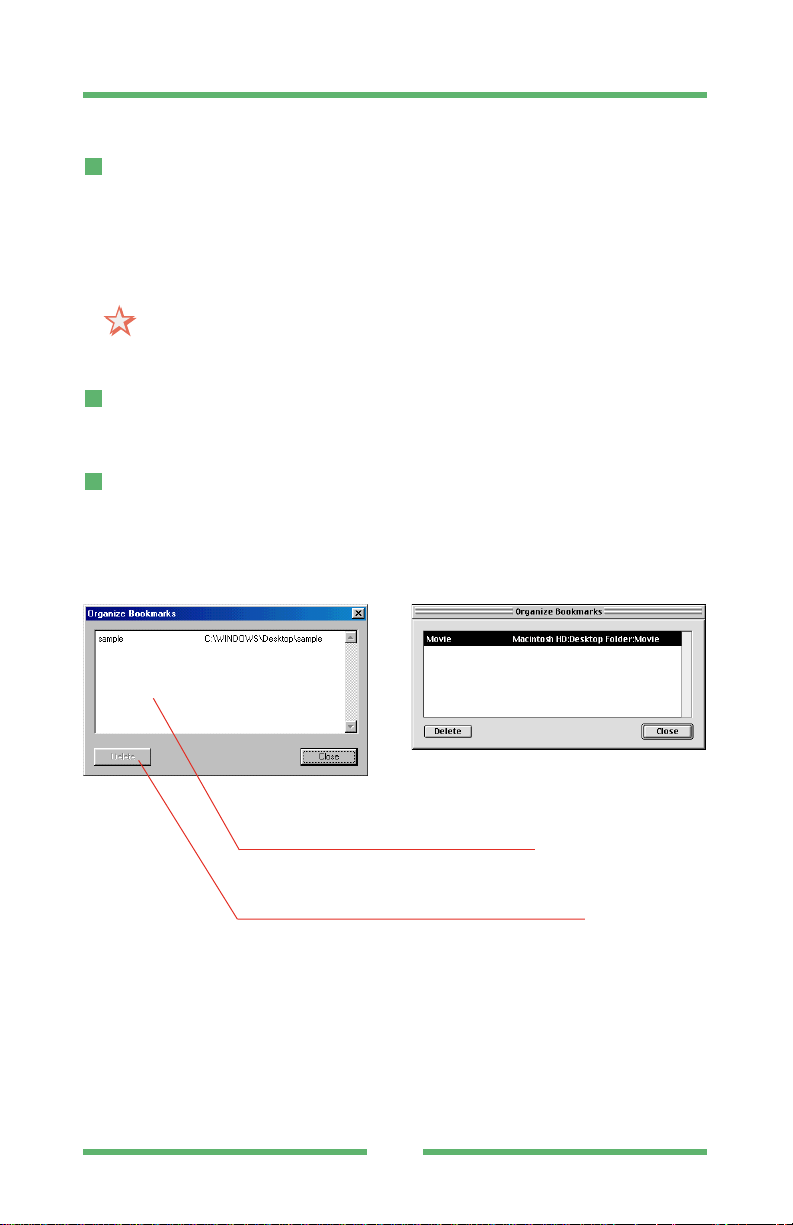
Using bookmarks
Registering a folder in the bookmarks
Selecting [Add to Bookmarks] from the [Bookmarks] menu registers the currently selected
folder as one of the bookmarks.
The name of the registered folder is used as the title.
Up to 100 bookmarks may be registered.
NOTE: Once 100 bookmarks have been registered, the [Add to Bookmarks] menu will
be grayed out and cannot be used.
Browsing the bookmarks
When you select the title from the [Bookmarks] menu, the images in the folder with the
corresponding title are displayed.
Editing the bookmarks
To edit the bookmarks, open the Bookmarks dialog box by selecting [Organize Bookmarks]
from the [Bookmarks] menu.
Bookmarks dialog box
FinePixViewer
15
Macintosh
Windows
Title / path display:
Displays the title and folder path.
The title name can be modified by clicking the title.
[Delete] button:
Click the [Delete] button or press the Delete key (Windows)
to delete the selected bookmark.
Page 16
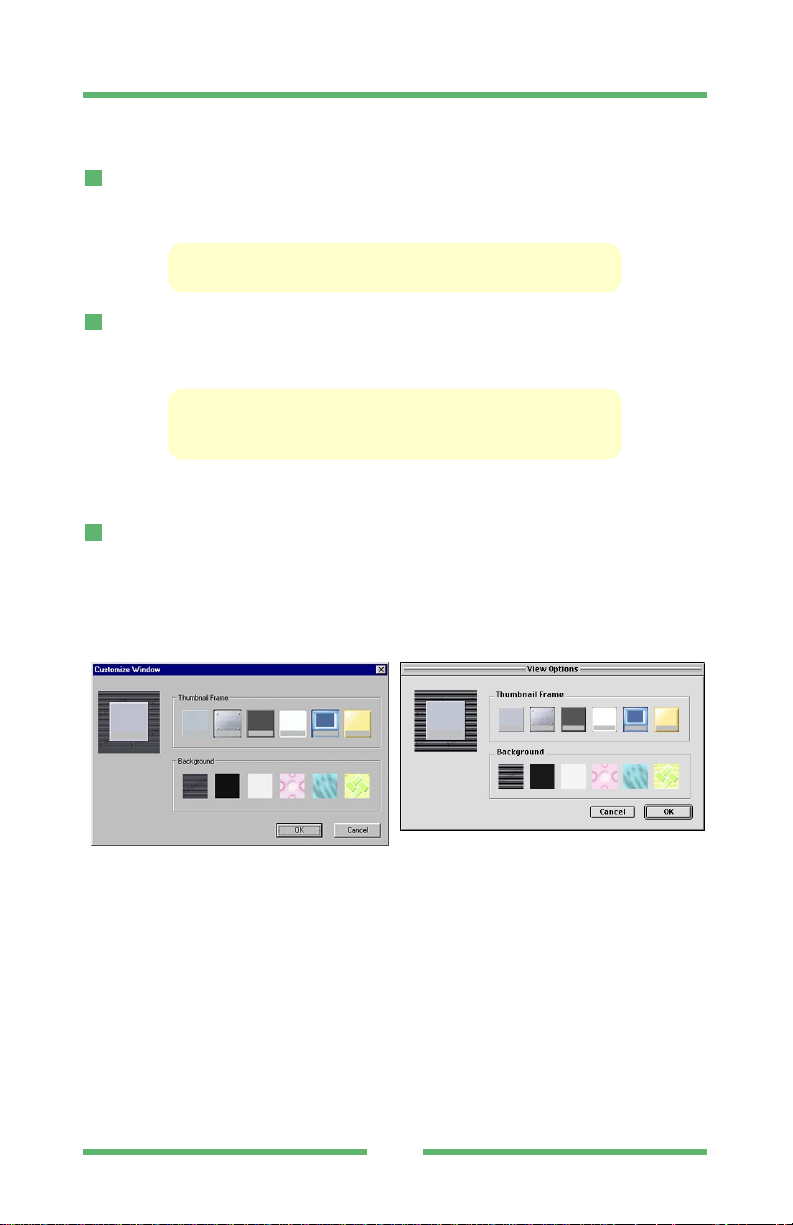
Changing the thumbnail display mode
To change the thumbnail display sequence
By selecting "Arrange" in the "View" menu, you can specify any of the following thumbnail
display sequences:
by Name/by Type/by File Size/by Date&Time/by Image
Size/by Duration
To change the thumbnail size
Select [Display Mode] from the [View] menu or [Display Mode] pop-up menu and specify
one of the following as the thumbnail display size.
Large Thumbnail (160 x 120 pixels)
Medium Thumbnail (80 x 60 pixels)
Small Thumbnail (40 x 30 pixels)
To change the thumbnail frame and background design
By selecting [Customize Window] (Windows) or [View Options] (Macintosh) from the [View]
menu, you can open the [Customize Window] dialog box and change the design of the
thumbnail frame or Main Window background.
[Customize Window] dialog box
FinePixViewer
16
Macintosh
Windows
Page 17

FinePixViewer
17
Viewing slide shows
You can view the images as a slide show by clicking "[ ]" button.
The files shown in a slide show are as follows:
· When no thumbnails are selected, all files are shown.
· When only one thumbnail is selected, all files are shown beginning with the selected file.
· When more than one file is selected, all the selected files are shown.
When you select "Slide Show" from the "File" menu, the Slide Show Setting dialog box opens
and you can view your as a slide show.
Slide Show Setting dialog box
Macintosh
Windows
Playback interval input field:
Sets the interval for file playback (in seconds). This
setting is valid when automatic playback is
selected.
Playback button:
Starts the slide show.
Cancel button:
Click this button to cancel the settings
and close the dialog box.
Play back Automatically checkbox:
Tick this checkbox to play back images
automatically.
Play back repeatedly checkbox:
Tick this checkbox to play back images
repeatedly.
Page 18

Slide show playback
You can use the right arrow ("→"), spacebar, left arrow ("←"), or the backspace key
(Windows only) to display the next file or previous image during a slide show.
TIP: If you click the mouse or press the "Return"/"Enter" key during a slide show, the
dialog box shown below appears and you can delete a file currently being
displayed or played back.
Dialog Box
To end the slide show, press the "ESC" key (Windows) or "Command" key + ".(period)"
key (Macintosh).
FinePixViewer
18
Exit slide show button:
Delete this file button:
Continue slide show button:
Macintosh
Windows
Page 19

FinePixViewer
19
Working with Files
Selecting files
To select a single file
Click a file to select that file.
A. You can use the cursor movement keys to select a file. When you press the cursor
key the selection moves in the direction of the arrow.
B. You can also use the space bar. Pressing the space bar moves the selection to
the right.
C. You can also use the backspace key (Windows only). Pressing the backspace key
moves the selection to the left.
To select multiple files
A. You can select multiple consecutive files by holding down the "Ctrl" key (Windows)
or "Shift" key (Macintosh) as you select the files.
B. You can also select multiple files by dragging the mouse button to select an area
of the screen that contains the desired files.
To select all the files
You can select all the files in the thumbnail display area by selecting "Select All" in the
"Edit" menu.
Moving and copying files
Use any of the following methods to move a file from one location to another on the same
drive (Windows) or disk (Macintosh).
A. Drag the thumbnail from the thumbnail display area in the FinePixViewer and drop
it onto the desktop.
B. Drag the thumbnail image from the thumbnail display area in the FinePixViewer
and drop it onto the folder tree display area.
C. Drag the file from the desktop and drop it onto the FinePixViewer window.
If the file is dragged to a location on a different drive (Windows) or disk (Macintosh), the file
copied to that drive.
* With some camera models, it is not possible to copy files from your computer to a
SmartMedia loaded in the camera. Refer to the camera owner's manual for details.
Selecting folders
Click a folder to select it.
Page 20

FinePixViewer
20
Moving and copying folders
You can move folders from one location to another on the same drive (Windows) or volume
(Macintosh) in any of the following ways:
A. Drag the folder from the folder tree display area in FinePixViewer and drop it onto
the desktop.
B. Drag the folder from one location to another inside the folder tree display area in
FinePixViewer .
C. Drag the folder from the desktop and drop it into the folder tree display area in
FinePixViewer .
When you drag a folder to another drive (Windows) or volume (Macintosh), the folder is
copied.
Renaming files and folders
To overwrite a file or folder name, click inside the folder name display box or file name display
box for the thumbnail.
If you select an image (or multiple images) to be renamed and then select "Automatic
Rename" from the "File" menu, the Automatic Rename dialog box appears and you can
rename multiple files at once.
Creating folders
If you select "New" → "Folder" (Windows) or "New folder" (Macintosh) from the "File" menu, a
new folder is created below the currently selected folder in the folder tree display area.
Deleting files and folders
You can delete a file by dragging its thumbnail from the desktop to the Recycle Bin (Windows)
or Trash (Macintosh) or by selecting "Delete" from the "File" menu.
You can delete a folder by dragging it from the desktop to the Recycle Bin (Windows) or
Trash (Macintosh), or by selecting "Delete" (Windows) or "Delete Folder" (Macintosh) from the
"File" menu.
Page 21

FinePixViewer
21
Sending images as e-mail attachments
If you select "Mail Sending Setting" from the "Setting" menu, the Mail Sending Setting dialog
box opens. In this dialog box you can specify the procedure used for sending images as email attachments.
Mail Sending Setting dialog box
* This dialog is only valid for still images.
Sending E-mail Messages
If you select a thumbnail and then select "Mail Sending" from the "File" menu, the standard
e-mailer application (Outlook Express) starts up and the image data is attached to a new email message. The attached image is resized and its format is converted as specified in
the Mail Sending Setting dialog box.
NOTE: If you quit FinePixViewer before sending the e-mail message, your e-mailer
software may no longer be able to send the attached image. Do not quit
FinePixViewer until you have sent your e-mail messages.
File Format Conversion checkbox:
Tick this checkbox to convert the image file format.
File Format Conversion pop-up menu*:
When the File Format Conversion checkbox is ticked, you can use
this menu to select the format of files attached to e-mails.
Resize checkbox:
Tick this checkbox to resize the image.
Macintosh
Windows
Page 22

Image windows
To edit an image, begin by opening the image you want to edit. (➠ P.12)
If you have registered an application for viewing still images, the image can be opened and
edited in the registered application. If not, you can use FinePixViewer to open and edit the
image.
Image Window
Image Window (still image with sound)
FinePixViewer
22
Editing Images
Windows
Windows
Macintosh
Window frame:
Displays basic information for the image.
Image display area:
Playback progress button:
Macintosh
Page 23

FinePixViewer
23
Cropping (Trimming) the image
You can specify a selected portion of the image to be cropped by clicking the [ ] button in
the Toolbar or by selecting [Marquee tool] from the [Image] menu. You can then use the
mouse to move, enlarge or reduce the trimming frame that appears on the image. When you
have selected the desired section of the image, click the [ ] button in the Toolbar or select
[Crop] from the [Image] menu to trim the selection.
TIP: You can cancel the last trimming operation performed by selecting [Undo]
from the [Edit] menu.
Copying the image to the clipboard
By selecting [Copy] from the [Edit] menu, you can copy the selected section of the image to
the clipboard.
Page 24

Resizing the image
(1)Resizing the image
When you click the [ ] button in the Toolbar or select "Image Size" from the "Image"
menu, the "Image Size" dialog box opens. You can use this dialog box to resize the image
from 160 x 120 pixels up to 4,096 x 4,096 pixels.
Image Size dialog box
TIP: You can cancel the last image size change performed by selecting "Undo" in
the "Edit" menu.
FinePixViewer
24
Unit pop-up menu:
When "Arbitrary" is selected in the "size" radio buttons, you can
use this menu to select pixels or percentage (%) as the unit.
Size radio buttons:
Use this button to select "Arbitrary", "640 x 480 (VGA)" or "320 x
240 (QVGA)" as the image size after conversion.
"OK" button:
Changes the image size according to the
specified values.
Width and Height input fields:
When "Arbitrary" is selected in the "size" radio buttons, enter the
image width and height in these boxes, using the units selected in the
"Unit" pop-up menu. When you enter a value in one box, the value in
the other box changes to maintain the aspect ratio of the image.
Windows
Macintosh
Page 25

FinePixViewer
25
(2)Resizing multiple files at once
If you select multiple thumbnails (➠ P.19) and then select "Batch Resize" from the "File"
menu, the Batch Resize dialog box appears and you can resize all the selected images in
a single operation.
Batch Resize dialog box
NOTE: FinePixViewer can save the following file formats: Exif-JPEG, Exif-TIFF,
BMP (Windows version), PICT (Macintosh version).
File Type pop-up menu:
Use this menu to select the file format after conversion.
Browse button:
Clicking the browse button opens the folder selection
dialog box and allows you to specify the folder in
which the image is saved.
Folder Name pop-up menu:
When the Create Folder checkbox is ticked, you
can use this menu to enter the folder name and
specify how the folder name is added.
Delete the Original File checkbox:
If you tick this checkbox, the original file is deleted after a
resized image has been created.
Overwrite checkbox:
If you tick this checkbox and a file with the same name exists in
the save destination, the file is overwritten without a
confirmation dialog box being displayed.
Create Folder checkbox:
Tick this checkbox to create a new folder in the save destination.
File Type checkbox:
Tick this checkbox to convert the file format.
Windows
Macintosh
Page 26

FinePixViewer
26
Superimposing text on images
If you click the [ ] button in the toolbar or select "Type tool" from the "Image" menu, the
Character Input dialog box opens. You can use this dialog box to combine images and text.
Character Input dialog box
Moving the Superimposed Characters onto the Image
To move the superimposed characters to the image, click the [ ] button in the toolbar or
select “Marquee Tool” from the image menu and drag the text to the desired position.
To delete the characters, press the "Delete" key.
To change the character settings, double-click the characters to open the Character Input
dialog box and then change the settings.
Windows
Macintosh
Effect Color Sample:
When you want to add color to the text, click this button to
display a sample palette from which you can select a color.
Font Style menu:
Use this menu to select the character typeface.
Font Name menu:
Use this menu to select the font to be used for character
synthesis from the fonts installed in your operating system.
Character Input field:
Date & Time button:
Clicking this button displays the date and time included in the file
information in the character input field.
Effect Underline checkbox:
Tick this checkbox to underline the text.
Size menu:
Use this menu to select the character size.
Page 27

Rotating the image
(1)Rotating the image
You can rotate the image 90oleft or right by clicking the [ / ] button in the Toolbar
or by selecting [Rotate Left / Rotate Right] from the [Image] menu.
(2)Rotating multiple images at once
By selecting multiple thumbnails (➠ P.19) and then clicking the [ ] button in the toolbar
or selecting "Batch Rotation" from the "File" menu to open the Batch Rotation dialog box,
you can rotate all the selected images at once.
Batch Rotation dialog box
Saving the image
When you click the [ ] button or select [Save As] from the [File] menu, the [Save As] dialog
box appears. Use this dialog box to specify the file format and destination folder before saving
the image.
[Save As] Dialog Box
NOTE: FinePixViewer can save the following file formats: Exif-JPEG, Exif-TIFF,
BMP (Windows version), PICT (Macintosh version).
FinePixViewer
27
Macintosh
Windows
Windows
Macintosh
Make Folder checkbox:
Rotation pop-up menu:
Use this menu to select the angle of image rotation.
File Type checkbox:
Browse button:
Page 28

FinePixViewer
28
Editing the image file information
You can edit the file information by selecting an image and then choosing "Batch Edit of
Information" from the "File" menu.
Batch Edit of Information dialog box
NOTE: File information can only be edited for files with the Exif-JPEG or Exif-TIFF
format.
Macintosh
Windows
by Date & Time checkbox:
Use this checkbox to edit the photography date and time information.
by Time Difference checkbox:
Ticking this checkbox allows you to specify the value by which
the photography date and time is increased or decreased.
Comment/Copyright 1/Copyright 2 checkboxes:
Ticking these checkboxes allows you to enter text in
the respective input fields.
by Date & Time input field:
Page 29

FinePixViewer
29
Specifying the settings for automatic image taking
When you select "Automatic Taking Setting" from the "Setting" menu, the Automatic Taking
Setting dialog box opens. You can use this dialog box to specify changes to the image size
and image file name during automatic taking.
Automatic Taking Setting dialog box
When you click the [ ] button or select "Automatic Taking" from the "File" menu, the
images in the selected folder are copied as specified in the "Automatic Taking Settings" dialog
box.
Macintosh
Windows
Rename checkbox:
Make Folder checkbox:
"OK" button:
Click this button to save the settings.
Resize checkbox:
Page 30

FinePixViewer
30
Registering other applications
When you open a file using the default software settings, FinePixViewer displays images and
plays back movies and sound files.
To use another application, drag the application's file icon or its shortcut (Windows) or alias
(Macintosh) and drop it in the registered application display area (➠ P.9). The application then
becomes the registered application for viewing images and playing movies and sound files.
From that point on, the registered application is used to display the file when you open a
thumbnail.
Multiple applications can be registered in each area.
To switch to another registered application, right-click (Windows), or position the mouse
pointer over the icon and hold down the mouse button or hold down the "Control" key and
click (Macintosh) the icon in the respective area. Then use the pull-down menu to switch
applications.
Window Showing Menu
To remove a registered application, drag the application icon outside the FinePixViewer
window.
Macintosh
Windows
Page 31

Page setup
When you select [Page Setup] from the [File] menu, the standard [Page Setup] dialog box
appears. You can use this dialog box to specify parameters such as the paper size and
orientation.
Printing images
When you select an image and click the [ ] button or select "Print" from the "File" menu,
the standard "Print" dialog box for the currently connected printer appears. You can then print
the image from this dialog box.
Print dialog box
* The [Print] dialog box displayed by the [Properties] button differs depending on the printer driver you
are using. (Windows)
* Items other than the [Center Image] check box, [Date imprinting] check box, [Adjust to paper size]
check box and option buttons, the [Preview] button and the [Margins Setting] all vary depending on
the printer driver you are using.
[Center Image] check box:
Click this box to position the printed image in
the center of the paper. When this box is not
checked, the image is printed in the top left
corner of the page.
[Adjust to paper size] check box:
Click this check box to print the image so that
it fills the page. When this box is not checked,
the image is printed using the original image
dimensions.
[Adjust to paper size] option buttons:
These options are available when the
[Adjust to paper size] check box is
checked.
• Print entire image at maximum size
(margins added)
This option prints the image enlarged or
reduced with the aspect ratio maintained
so that none of the image overlaps the
page. The image is not trimmed.
•
Print entire printable area (image cropped)
This option prints the image enlarged or
reduced so that it fills the printable area on the
page, while maintaining the aspect ratio of the
image. Portions of the image that overlap the
page are trimmed off.
[Date imprinting] checkbox:
Click this checkbox to imprint the
date on your image.
FinePixViewer
31
Printing the Image
Windows
Macintosh
Page 32

Margins Setting button:
Clicking this button opens the Margins Setting dialog box and
allows you to set the size of the top, bottom, left and right
margins.
[Preview] button:
Click this button to see a preview of the image to be printed.
[Cancel] button:
Click this button to stop printing and close the [Print] dialog box.
[OK] button (Windows) or [Print] button (Macintosh):
Click this button to start printing using the currently selected
settings.
TIP: (Macintosh) If you are imprinting the date using Mac OS 8.5 or later, you can
change the font used for imprinting by opening the "Appearance" Control Panel
and changing the "Large System Font" setting in the "Fonts" tab.
Margins Setting dialog box
FinePixViewer
32
Macintosh
Windows
Margin
Page 33

Printing an index
If you select several images and then select "Index Print" from the "File" menu, the "Index
Print" dialog box for the connected printer opens. You can then use this dialog box to print an
index of the images.
Index Print dialog box
*The [Print] dialog box displayed by the [Properties] button differs depending on the printer driver you are
using. (Windows)
[Number of Frames]:
Specifies the number of frames vertically and horizontally.
Click the [ ] and [ ] buttons to change the number of
frames printed.
Detailed Settings button:
Clicking this button opens the Detailed Settings dialog box and
allows you to specify whether the filename, date & time and
comment are printed in the index print.
FinePixViewer
33
Macintosh
Windows
Page 34

Margins Setting button:
Clicking this button opens the Margins Setting dialog box and
allows you to set the size of the top, bottom, left and right
margins.
[Preview] button:
Click this button to see a preview of the images to be printed.
[Cancel] button:
Click this button to stop printing and close the [Index Print] dialog
box.
[OK] button (Windows) or [Print] button (Macintosh):
Click this button to start printing using the currently selected
settings.
Detailed Settings button:
Clicking this button opens the Detailed Settings dialog box and
allows you to specify whether the filename, date & time and
comment are printed in the index print.
Detailed Setting dialog box
TIP: (Macintosh) If you are printing an index, you can change the font used for
printing the text by opening the "Appearance" Control Panel and changing the
"Large System Font" setting in the "Fonts" tab.
FinePixViewer
34
MacintoshWindows
Text on/off for Index print checkbox:
When you tick this checkbox, the items selected using the print items
radio buttons are printed in the index print.
Print Items radio buttons:
Use these to select the filename, photography date and time,
or comment as the items to be printed.
Page 35

FinePixViewer
35
Exiting FinePixViewer
To exit FinePixViewer, select [Exif] (Windows) or [Quit] (Macintosh) from the [File] menu or
click the [Close] button (Windows) or [Close] box (Macintosh) in the Main Window.
Page 36

A. Startup using the Windows Start menu
Startup using the DP Editor icon on a Macintosh
Screen at startup
B. Startup from FinePixViewer
Select [Print Order] from the FinePixViewer [File] menu or click the [ ] button.
NOTE:
•
Because the [Select Media] dialog box is displayed when the DP Editor starts
up, load the media on which the ordering information is to be recorded
(SmartMedia, floppy disk, MO disk, etc.) into the appropriate drive before you
start up DP Editor.
• Remove any write protection from the media used by DP Editor.
From the Start menu, select [Programs][DP Editor]-[DP Editor].
Double-click [DP Editor].
36
Ordering Prints (Using DP Editor)
Starting Up DP Editor
Macintosh
Windows
Page 37

The [Select Media] dialog box is displayed immediately after DP Editor starts up and when
you select [Select Media] from the [File] menu. Use this dialog box to select the media on
which the ordering information is to be recorded.
[Select Media] dialog box
[OK] button:
Select a media and click this button. The Main window then
appears.
[Cancel] button:
Click this button to cancel media selection. The [Select Media]
dialog box closes. If you click this button immediately after DP
Editor starts up, DP Editor quits.
DP Editor
37
Media display area:
Displays all the drives currently connected to the PC. (Windows)
Displays all the disks currently connected to the PC. (Macintosh)
Selecting the Media
Macintosh
Windows
Page 38

Main Window
Once you select a media the Main window appears.
Main window
NOTE: If DPOF information is already recorded on the selected media, the index
icons and thumbnails will appear in the window.
DP Editor
38
Open button:
Save Button:
Print Quantity Field:
Registering Ordering Information
Windows
Macintosh
Page 39

DP Editor
39
Registering Images
Selecting images
A. To register an image, drag the thumbnail image from the desktop or the Exif
Viewer thumbnail display area and drop it in the Main window.
B. Select [Set Print Order] from the [Order] menu to open the [Open] dialog
box.Specify the images from this dialog box.
NOTE: The images that can be registered are in the Exif-JPEG, Exif-TIFF or
JPEG file format and measure at least 640 x 480 pixels. Images in other
formats cannot be registered.
*
Selecting images
Use the procedures below to select images in the Main window or Index window.
To select one image:
Click the thumbnail to select the image.
To select all the images:
You can select all the images in the Main window or Index window (➠ P.33) by selecting
[Select All] from the [Edit] menu.
To select multiple images using the keyboard:
You can select several images by holding down the [Ctrl] key (Windows) or [Shift] key
(Macintosh) as you click the images one after the other.
To select multiple images using the mouse:
When you drag the mouse over the thumbnails, all the images in the drag box are
selected.
Specifying the number of prints
If you select a registered image and click the [ ] button, you can specify the number of
prints for the selected image.
You can also select multiple registered images (including combinations of thumbnails and
index icons) and specify the number of prints.
NOTE: Values from 1 to 999 can be specified as the number of prints. To cancel the
request for prints, select the thumbnail or index icon and then select [Cancel
Print Order] from the [Order] menu.
TIP: You can also specify the number of prints by entering a number in the
[Number of prints] field.
Page 40

Editing Index Print Information
Index window
To open a new Index window, select [New Index] from the [Order] menu.
Index window
Use the Index window to register images for which you want index prints.
Adding images
To add an image for which you want an index print:
A. To register an image, drag the thumbnail image from the desktop or the Exif
Viewer thumbnail display area and drop it in the Index window.
B. Select [Set Print Order] from the [Order] menu to open the [Open] dialog box.
Specify the images from this dialog box.
NOTE: The images that can be registered are in the Exif-JPEG, Exif-TIFF or
JPEG file format and measure at least 640 x 480 pixels. Images in other
formats cannot be registered.
DP Editor
40
Windows
Macintosh
Page 41

Undo Image Registration
To undo a registered image, select the thumbnail or index icon and then select [Cancel Print
Order] from the [Order] menu.
Confirming an Order (Saving an Order)
When you click the [ ] button or select [Save] from the [File] menu, the [Confirmation of
Order] dialog box appears. Check the order details and then click the [OK] button to record
the order information.
The registered information is then recorded on the media selected in the [Select Media] dialog
box.
[Confirmation of Order] dialog box
In standard printing, one picture will be printed on each page. In index printing, multiple
images are printed onto one page.
[OK] button:
Click this button to record the order information on the selected
media.
[Cancel] button:
Click this button to close the [Confirmation of Order] dialog box
without saving the order.
NOTE: Once you have saved the order information to a media, do not move, delete
or otherwise modify any files on the media before actually ordering the prints as
this will prevent the prints from being ordered as specified.
DP Editor
41
Windows
Macintosh
Page 42

Displaying Registered Images
Image window
Image Window
Enlarging / Reducing the displayed image
To enlarge or reduce the image displayed, switch to the enlarged or reduced display mode
by clicking the [ ] or [ ] button in the Toolbar or by selecting [Zoom In Tool] or [Zoom
Out Tool] from the [Image] menu. Clicking the mouse on the image then enlarges or
reduces the image using the clicked point as the center of the image.
Scrolling around the image display
You can use the scroll bars in the Image window to scroll to different parts of the image.
Also, by clicking the [ ] button in the Toolbar or selecting [Hand tool] from the [Image]
menu, you can switch to free scroll mode which allows you to move the image around
inside the window by dragging it around with the mouse.
Image display area:
Displays the image.The zoom scale for the display is shown in the title.
A trimming frame are shown on the image.
Window frame:
Displays the trimming range, rotation angle and description
settings.
DP Editor
42
Windows
Macintosh
Page 43

Trimming a Registered Image
You can specify a selected portion of the image to be trimmed by clicking the [ ] button in
the Toolbar or by selecting [Marquee Tool] from the [Image] menu. You can then use the
mouse to move, enlarge or reduce the Cropping frame that appears on the image.
NOTE: The trimming frame measures 640 x 480 pixels. Smaller frames cannot be
specified.
Setting the rotation for a registered image
When you click the [ ] button in the Toolbar or select [Rotation Setting] from the [Image]
menu, the [Rotation Setting] dialog box appears. Use this dialog box to specify the rotation
angle.
[Rotation Setting] dialog box
[Rotation Angle] pop-up menu:
Use this menu to select the rotation angle. The available rotation
settings are 0
o
, 90o, 180oand 270o.
[OK] button:
Click this button to record the rotation angle setting for the
image.
[Cancel] button:
Click this button to cancel the rotation angle setting and close
the [Rotation Setting] dialog box.
NOTE: Merely setting the rotation angle does not rotate the displayed image.
DP Editor
43
Macintosh
Windows
Check box:
Clicking this box allows you to set the rotation angle.
Page 44

Setting the print information for a registered image
When you click the [ ] button in the Toolbar or select [Description Setting] from the
[Image] menu, the [Description Setting] dialog box appears. Use this dialog box to set the
printing information for a registered image.
[Description Setting] dialog box
To print the date...
1) Click the [Date] check box.
2) To print a different date, enter the date in the [Date] input field.
To print the frame number or filename
1) Click the [Frame Number / Filename] check box.
2) Enter the frame number or filename in the [Frame Number / Filename] input field.
Specify the frame number or filename using no more than 12 ASCII characters.
To print a comment or title...
1) Click the [Comment / Title] check box.
2) Enter the comment or title in the [Comment / Title] input field. Specify the comment or
title using no more than 12 ASCII characters.
[OK] button:
Decide the print details and then click this button to record the
print information.
[Cancel] button:
Click this button to discard the print settings and close the
[Description Setting] dialog box.
[Frame Number / Filename] input field:
Use this field to enter the frame number or filename.
DP Editor
44
Windows
Macintosh
[Date] input field:
Enter the date in this field.
[Comment / Title] input field:
Use this field to enter a comment or title.
Page 45

DP Editor
45
Exiting DP Editor
To exit DP Editor, select [Exif] (Windows) or [Quit] (Macintosh) from the [File] menu or click
the [Close] button (Windows) or [Close] box (Macintosh) in the Main window.
DPOF
DPOF (Digital Print Order Format) is a data format used for recording information
specifying which images are to be printed along with the number of prints, and then
recording that information on storage media. If DPOF information is supplied to a
DPOF-compatible printer, the printer automatically prints only the specified number of
prints of the specified images.
Page 46

Message Cause Solution
46
When Problems Arise
Troubleshooting
Problems with FinePixViewer
Folder not found.
"Filename" not found.
This file format cannot
be used.
The file with the same
name as "filename"
already exists.Overwrite?
The folder with the
same name as
"filename (folder
name)" already exists.
Disk or folder is writeprotected.
Insufficient disk
capacity. Process
aborted.
You were working with a
folder on a removable disk
and the disk has been
removed.
The folder you were working
with has been deleted or
moved.
You were working with a file
on a removable disk and the
disk has been removed.
A file with a format not
supported by FinePixViewer
was accessed.
The folder on which you
dropped the file already
contains another file with the
same name.
The folder on which you
dropped the file (folder)
already contains a folder with
the same name.
The folder or disk to which
you attempted to write the file
is write-protected.
Some digital camera models
do not have a Write function.
There is not enough
available disk space.
Re-insert the disk.
Use the [Refresh] menu.
Re-insert the disk.
Use a file format supported
by FinePixViewer.
To avoid overwriting the
existing file, rename the file
being dropped or rename the
file in the target folder.
Rename the file (folder) being
dropped or rename the folder
in the target folder.
Remove the write-protection
from the disk or folder.
Specify another writable disk
as the save destination for
the image data. Alternatively,
copy the image data in the
camera to another writable
disk and then process the
copied data.
Switch to a new disk, or
create space by deleting
some unneeded files on the
disk.
Page 47

Message Cause Solution
When Problems Arise Troubleshooting
47
Remove the write-protection
from the disk.
Quit the application that is
using the file.
Quit the application that is
using the file.
Change the name or number
of the file being written.
Open the file properties and
uncheck the [Read-only]
attribute (Windows) or use
the [Get Info] command to
uncheck the [Locked] check
box (Macintosh).
This file is not supported by
FinePixViewer and cannot be
used.
To open the images in a
window, select no more than
20 images.
Delete the illegal character.
To avoid duplicating an
existing file (folder) name,
use a different file name.
Save the image as a BMP or
PICT file.
Reduce the number of files
processed by the Automatic
Rename function.
Print using the [Adjust to
paper size] option.
The file (folder) you
attempted to move is on a
write-protected disk.
The file you attempted to
move is being used by
another application.
The selected file is being
used by another application.
A file with the same file name
or file number already exists
in the write destination.
An attempt was made to
modify a write-protected file.
The attempt to read the file
failed.
No more than 20 windows
can be opened.
The file (folder) name
contains a character that
cannot be used ("\", "/". "?",
etc.).
A file (folder) exists with the
filename you entered.
This image size cannot be
saved in the Exif format.
Too many files were selected
and file name duplication
could not be prevented.
The image in the file being
printed is bigger than the
paper size.
Cannot move "file
(folder) name". Copy?
"Filename" is in use.
The files may not be
used correctly. OK?
File is locked.
"Filename" is broken or
not in the usable
format.
Window cannot be
opened any more.
File (Folder) name
includes an illegal
character. (Windows)
The file or the folder
with the same name
already exists.
Image size is smaller
than the specified size.
Automatic rename
failed. Process
aborted.
Part of "filename" will
be cropped because
the image is larger than
the printer output size.
Page 48

Message Cause Solution
When Problems Arise Troubleshooting
48
Registered application
not found.
Could not execute the
registered application.
Could not create a
temporary file. Process
aborted.
Could not execute the
order application.
Printer not found.
Mail Transmission
failed.
The registered application
has been deleted or moved.
The application is damaged.
Insufficient memory.
(Macintosh)
A temporary file could not be
created when an Exif-TIFFYC file was opened as there
was insufficient disk space.
DP Editor could not be found
or is damaged.
No printer is selected.
No e-mailer application
found.
No registered e-mailer
application.
Re-register the application.
Re-install the application or
register another application.
Quit any other applications
that are running.
Increase the amount of space
available on the disk on which
FinePixViewer is installed.
Install DP Editor.
Specify the printer in the
[Settings] - [Printers] menu.
(Windows)
Select the printer in the
Chooser. (Macintosh)
Install Outlook Express.
(Windows) Open the "Internet
Options" control panel and
register Outlook Express in
the "E-mail" field in
"Programs".
(Macintosh) Open the
"Internet" control panel and
register Outlook Express as
the "Default E-mail
Application".
An error message appears when trying to open multiple images at once
when FinePixViewer is used with Photo Deluxe HE 3.0.
Solution: Open the images one at a time.
Page 49

Message Cause Solution
When Problems Arise Troubleshooting
49
Insert an order media.
Existing DPOF file
cannot be used.
Existing DPOF file
contains an error.
These orders will be
ignored.
"Filename" not found.
"Filename" is broken or
not an usablefile.
Window cannot be
opened any more.
Order media is write
protected.
Insufficient order media
capacity.
Cannot create an order
folder.
The number of orders
is full. Cannot order
any more.
The order media is not
inserted in the drive.
The media is not formatted.
The existing DPOF file
contains an error.
The settings in the existing
DPOF file contain an error.
You were working with a file
on a removable disk and the
disk has been removed.
The file being used has been
deleted or moved.
The file is corrupted or is in a
format that is not supported.
Alternatively, the image size
is smaller than 640 x 480.
No more than 20 windows
can be opened.
The media is write protected.
Some digital camera models
do not have a Write function.
There is not enough space
available on the media.
The DCIM folder on the order
media already contains a
folder numbered 999.
There are too many
registered standard prints
and index prints.
Load the media into the drive.
Format the media.
Create a new DPOF file.
The erroneous settings are
ignored.
Re-insert the disk.
Cancel the print order for the
file.
Use a file format supported
by DP Editor (Exif-JPEG,
Exif-TIFF or JPEG) and an
image size no smaller than
640 x 480.
To open the Image windows
and the Index windows,
select no more than 20
thumbnails and index icons.
Remove the write protection
from the media.
To create an order file on a
SmartMedia, disconnect the
camera and use the Image
Memory Card Reader SM-R2
or PC Card Reader PC-AD3.
Use a media with sufficient
free space as the order
media.
Use a new media.
Register using a new media.
Problems with DP Editor
Page 50

Message Cause Solution
When Problems Arise Troubleshooting
50
Common Problems
This application
requires Windows 98
or later.
This application
requires Mac OS 8.6 or
later.
Not enough memory.
Process aborted.
I/O error occurred.
Process aborted.
The application will not run
because your version of
Windows is too old.
The application will not run
because your version of the
Macintosh system software is
too old.
There was not enough
memory.
Fault in the drive unit or disk.
Upgrade to Windows 98 or
later.
Upgrade to Mac OS 8.6 or
later.
Quit any other software
programs that are running.
Alternatively, set virtual
memory in the [System]
control panel. (Windows)
Select the FinePixViewer/DP
Editor program file and use
the [Get Info] command to
increase the "Preferred Size"
setting in the memory
requirements. (Macintosh)
Check for problems in the
drive unit, or use an error-free
disk.
Page 51

51
Appendix
Glossary
AVI
Acronym for Audio Video Interleaved. An movie format.
BMP (bitmap)
Standard format for image data in Windows. The file extension for bitmap files is ".bmp".
DPOF
A format used for recording information specifying the images to be printed on a media.
Exif
A full-color image format for digital still cameras. This format is compatible with TIFF
and JPEG and is supported by most image processing software. This format stipulates
the recording method for thumbnail images and camera information.
JPEG
The standardization of still image compression technology, or the standard itself. JPEG
allows effective image compression. However, because some of the original image data
is lost during compression, the image generated from the expanded data is not
precisely the same as the original image, though the degree of variance differs
depending on the compression ratio. Compression ratios vary from 10:1 to 100:1.
Mac OS
The basic system software (operating system) used on Apple Macintosh computers.
PICT
Standard format for image data on Macintosh computers.
TIFF-YC
A TIFF recording format.
Application software
Software used for a specific purpose, such as word processing, spreadsheets or
graphics.
Install
The process of setting up software on a PC. In most cases, software installation
comprises the copying of the software from floppy disks or CD-ROM to the hard disk in
a PC.
Clipboard
A location used to temporarily store cut or copied data. Data in the clipboard can be
pasted into other applications. However, the data cannot be pasted into applications
that do not support the data format.
Page 52

Appendix Glossary
52
Grayed out
A status used for menu items and buttons that are displayed in pale gray and cannot be
selected.
Thumbnail
A small copy of an image.
Scroll bar
Bars that allow you to move an image up, down, left and right in small increments so
that portions not shown in the window can be viewed.
Dialog box
A window used for specifying settings.
Drive
A peripheral device used by PCs to store files.
Drag
The action of moving the mouse with the mouse button held down.
Drag and drop
The process of clicking the mouse on an icon or thumbnail, holding the mouse button
down as the mouse is moved to another location, and then releasing the mouse button
to "drop" the icon or thumbnail. This procedure can be used to move or copy files.
Cropping (Trimming)
The action of cutting off unwanted portions of an image.
Pixel
Equivalent to picture element or dot. The minimum unit used in computer graphics.
File number
The final 4 digits used in the filenames for images shot on DCF-compliant digital
cameras. DCF is a standard image format for digital cameras. This format allows image
files to be exchanged easily among DCF-compliant cameras and printers.
Folder tree
An hierarchical structure for folders containing files.
Preview
An image displayed as it will be printed.
Pop-up menu
A type of menu. When clicked, it displays a list of selections.
Removable disk
Media that can be removed, including floppy disks, MO disks and Zip cartridges.
Page 53

FGS-103102
 Loading...