

Fujifilm FINEPIX S1 PRO Software Guide

User's Guide
This manual describes how to use the Camera Shooting Software
photography application for the FUJIFILM Digital Camera FinePix S1 Pro.
Read it carefully to ensure that you use this product correctly.
Camera Shooting Software
for FinePix S1 Pro
Camera Shooting Software
2
IMPORTANT
Be sure to read this page before using the Software Set.
Notes on the Software and User's Guide
(1) Unauthorized transfer or duplication of all or any part of the enclosed
software or User's Guide is forbidden.
(2) The enclosed software and User's Guide can be used with only one device.
(3) We accept no liability whatsoever for any loss or injury incurred by the
owner or any third party while using a device with the enclosed software or
User's Guide.
(4) Every effort has been made to ensure that the product is flawless. If any
defect is found that is due to a fault on the part of the manufacturer, the
product will be replaced free of charge, at our discretion. No responsibility is
accepted for defects not caused by the manufacturer.
(5) The contents of the enclosed software and User's Guide are subject to
change without notice.
• Microsoft, MS-DOS and Windows are trademarks of the Microsoft Corporation of the
U.S. registered in the U.S. and other countries.Windows is an abbreviated term
referring to the Microsoft Windows Operating System.
• Macintosh, iMac and Mac OS are registered trademarks of Apple Computer,Inc.
• IBM PC/AT is a registered trademark of the IBM corporation of the U.S.
• Adobe Acrobat is a trademark of Adobe Systems Incorporated of the U.S.
• SmartMedia™ is a trademark of Toshiba Corpration.
• All other company or product names are trademarks or registered trademarks of the
respective companies.
Do not attempt to play the CD-ROM enclosed with this
product on an audio CD player.
Doing so could damage your hearing or could damage
your speakers or headphones.

Camera Shooting Software
3
IMPORTANT .............................................................................. 2
Preface ...................................................................................... 4
Using the Camera Shooting Software ........................................5
Connecting the Camera and PC ....................................................5
Launching the Camera Shooting Software ....................................6
Shooting Window Details ...............................................................7
Large Preview Window Details ......................................................9
Specifying the Photography Settings ...........................................10
Setting the Image Display Orientation .........................................13
Taking Pictures ............................................................................14
Selecting Images .........................................................................15
Checking the Image Histogram ...................................................16
Setting the File Format and Image Size for Saved Files .............17
Importing Images (Save files as...)...............................................18
Importing Images (Save) ..............................................................19
Erasing Images ............................................................................21
Using Time-lapse Photography ...................................................22
Exiting the Camera Shooting Software ........................................25
Contents

Camera Shooting Software
4
Thank you for purchasing this FUJIFILM product.
This User's Guide describes how to use the Camera Shooting Software for FinePix S1
Pro (referred to hereafter as the Camera Shooting Software). The Camera Shooting
Software allows you to control your Digital Camera FinePix S1 Pro (referred to hereafter
simply as the camera), take pictures and specify the photography settings from a
personal computer. You can also use this software to import the images you have shot
into your PC and save them on your hard disk.
Preface
* The examples used in these descriptions are for Windows 98. The screens
shown on Macintosh computers are different, but the procedures are the same.
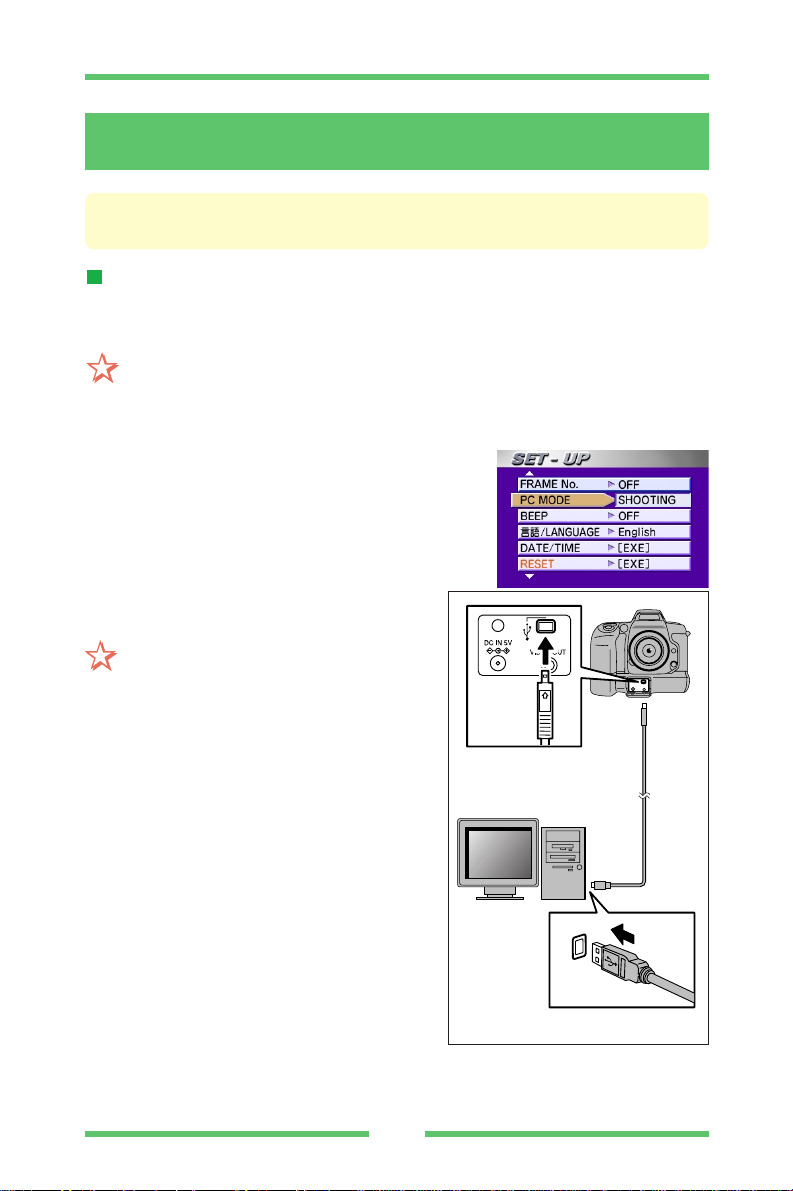
Connecting the Camera and PC
Refer to the Owner's Manual supplied with your camera for information on using the
camera.
CAUTION Do not connect the camera to your PC until you have installed the Camera
Shooting Software. Refer to the Camera Shooting Software Quick Start
Guide for information on installing the software.
1. Switch on your PC.
2. Connect the AC power adapter to the camera
and switch the camera on. In the Setup screen,
select "PC Mode > Shoot" and then close the
Setup screen.
3. Connect the camera to your PC using a
USB cable.
CAUTION • Only one camera can be
connected to the PC.
Successful operation is not
guaranteed if multiple
cameras are connected all at
once.
• Connect the camera and PC
using a direct USB cable
connection. Successful
operation is not guaranteed if
the camera is connected
through a USB hub.
• If you are using Windows
2000, the "Digital Signature
Not Found" message appears
the first time you connect the
camera after installing the
Camera Shooting Software. Click [Yes] and continue with the installation.
Camera Shooting Software
5
Using the Camera Shooting Software

Camera Shooting Software
6
Launching the Camera Shooting Software
1. Click the [Start] button and select [Programs] - [Camera Shooting Software for
FinePix S1 Pro] - [Camera Shooting Software for FinePix S1 Pro].
On a Macintosh computer, double-click the [S1 Pro Shooting] icon.
2. After the opening flash screen, the Shooting window and Large Preview window
appears.
Camera Shooting Software
7
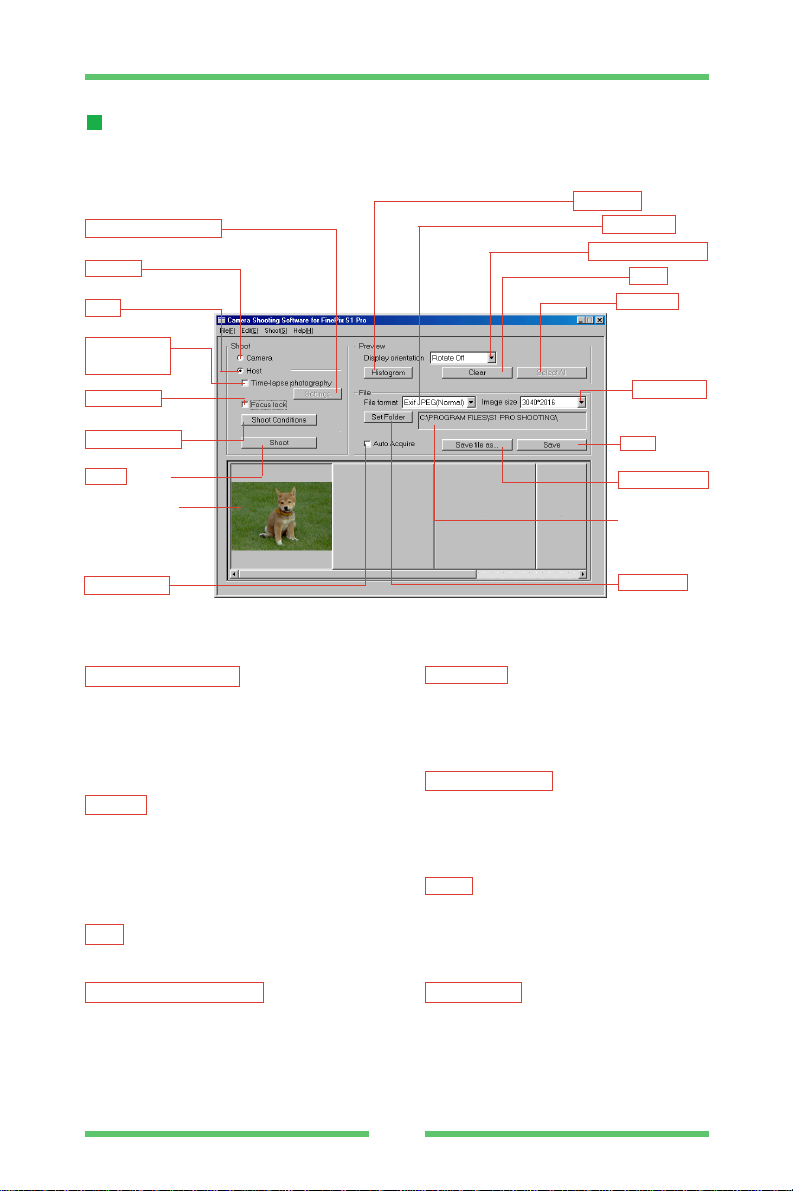
Shooting Window Details
When you launch the Camera Shooting Software, the Shooting window appears.
(Time-lapse) settings button
Opens the " Time-lapse settings" dialog
box. This button can only be clicked
when the "Time-lapse photography"
checkbox is selected.
Camera option button
Switches to shooting from the camera.
When this button is selected, the
[Shoot] and [Shoot Settings] buttons
are disabled.
Host option button
Switches to shooting from the PC.
Time-lapse photography checkbox
Switches to "Time-lapse Photography"
mode. This mode cannot be selected
when the [Camera] option button is
selected.
Focus lock checkbox
Locks the camera focus. This option is
disabled when the camera's focusing
mode is in "M(Manual)".
Shoot Conditions button
Opens the "Shoot Conditions" dialog
box. This button is disabled when the
[Camera] option button is selected.
Shoot button
Takes a picture on the camera from the
PC. This button is disabled when the
[Camera] option button is selected
Auto Acquire checkbox
Automatically imports the photographed
image onto the PC and saves it on your
hard disk.
(Time-lapse) settings
button
Focus Lock
checkbox
Host
option button
Shoot button
Time-lapse
photography
checkbox
Camera
option button
Display orientation box
Scroll preview
Shoot Settings
button
Histogram button
Save file as...
button
Save button
Edit folder display
Clear button
Select All button
Set Folder button
File format box
Image size
box
< Shooting window >
Auto Acquire
checkbox

Camera Shooting Software
8
Histogram button
Opens the "Histogram" dialog box. This
button is disabled if no image is
selected or if multiple images are
selected.
File format box and Image size box
Use these boxes to select the file
format and the image size when you
use the "Save" or "Save file as.."
function.
Display orientation box
Sets the orientation in which the
photographed image is displayed.
Clear button
Erases an image selected using scroll
preview from the camera's memory.
This button is disabled if no image is
selected.
Select All button
Selects all the images shown in the
scroll preview. This button is disabled if
there are no images in the scroll
preview.
Save button
Imports the image selected in the scroll
preview from the camera and saves it
to a file in the folder displayed in the
"Edit folder display" box. This button is
disabled if no image is selected.
Save file as... button
Imports the image selected in the scroll
preview from the camera and saves it
as a file on your PC. This button is
disabled if no image is selected.
Set Folder button
Opens the "Set Folder" dialog box.
Scroll preview
Shows previews of the images shot
using the camera or the images saved
in the camera memory.
Edit folder display
Shows the name of the folder to which
images are saved when you click the
[Save] button.
 Loading...