

Fujifilm FINEPIX REAL 3D V1 User Manual

BL00969-200
EN
DIGITAL VIEWER
Owner’s Manual
Thank you for your purchase of this product. This
manual describes how to use your FUJIFILM FinePix
REAL 3D V1 digital viewer and the supplied software.
Be sure that you have read and understood its contents before using the viewer.
Before You Begin
First Steps
Viewing Pictures
More Menu Options
Connections
Tro ubl esh oot ing
Appendix
For information on related products, visit our website at
http://www.fujifilm.com/products/index.html

For Your Safety
Instal lation
Antenn as
Use
Servic e
• Read Instructions: All the safety
and operating instructions
should be read before the appliance is operated.
• Retain Instructions: The safety
and operating instructions
should be retained for future
reference.
• Heed Warnings: All warnings on
the appliance and in the op erating instructions should
be adhered to.
• Follow Instructions: All operating and use ins tructions
should be followed.
Installation
Power Sou rces: This video product should be operated only
from the type of power source
indicated on the marking label.
If you are not sure of the type
of power supply to your home,
consult your appliance dealer
or local power company. For
video products intended to
operate from battery power, or
other sources, refer to the operating instructions.
Grounding or Polarization: This
video product is equipped with
a polarized alternating-current
line plug (a plug having one
blade wider than the other).
This plug will t into the power
outlet only one way. This is a
safety feat ure. If you are unable
to insert the plug fully into the
outlet, tr y reversing the plug. I f
the plug should still fail to t,
contact your electrician to replace your obsolete outlet. Do
not defeat the safety purpose
of the polarized plug.
Alternate Warnings: This video
product is equipped with a
three-wire grounding-t ype
plug, a plug having a third
(grounding) pin. This plug will
only t into a grounding-t ype
power outlet. This is a safety
feature. If you are unable to
insert the plug into the outlet,
contact your electrician to replace your obsolete outlet. Do
not defeat the safety purpose
of the grounding type plug.
Overloading: Do not overload
wall outlets and extension
cords as this can result in a risk
of re or electric sho ck.
Venti lation: Slots and openings
in the cabinet are provided for
ventilation, to ensure reliable
operatio n of the video product
IMPORTANT SAFETY INSTRUCTIONS
and to protect it from overheating, and thes e openings mus t
not be blocked or covered.
The openings should never be
blocked by placing the video
product o n a bed, sof a, rug, or
other similar sur face.
This video product should not
be placed in a built-in installation such as a bookcase or rack
unless proper ventilation is provided or the manufacturer’s instructions have been adhered
to. This vide o product should
never be placed near or over a
radiator or heat register.
Attachme nts: Do not use att achments not recommended by
the video p roduct manufac turer as they may cause hazards.
Water and Moistu re: Do not use
this video product near water—for example, near a bath
tub, wash bowl, kitchen sink , or
laundr y tub, in a wet basement,
or near a swimming pool, and
the like.
Power-Cord Protection: Powersupply cords should be routed
so that they are not likely to be
walked on or pinched by items
placed upon or against them,
paying particular attention to
cords at plugs, convenience receptacles, and the point where
they exit from the appliance.
Accessories : Do not place this
video product on an unstable
cart, stand, trip od, bracket, or
table. The video product may
fall, causing serious injury to a
child or adult, and serious damage to the appliance. Use only
with a car t, stand, trip od, bracket, or table re commended by
the manufacturer, or sold with
the video product. Any mounting of the appliance should follow the manuf acturer’s instr uctions, and should use a
mounting accessory recommended by the manufac turer.
An appliance
and cart
combination should
be moved
with care.
Quick stops,
excessive force, and uneven
surfaces may cause the appliance and car t combination to
overturn.
Antennas
Outdoor Antenna Grou nding: If an
outside antenna or cable s ystem is connected to the vide o
product, be sure the antenna
or cable system is grounded
so as to provide some protection against v oltage surges and
bu ilt- up s tati c ch arge s. S ec tion
810 of the National Electrical
Code, ANSI/NFPA No. 70, pro vides information with respect
to proper grounding of the
mast and supporting structure,
grounding of the lead-in wire
to an antenna discharge unit,
size of grounding conductors,
location of antenna discharge
unit, connection to grounding
electrodes, and requirements
for the grounding electrode.
EXAMPLE OF AN TENNA GROUNDING AS
PER NATIONAL ELECTRICAL CODE
Ground
Clamp
Electric
Service
Equipment
Ground
Clamps
Power Service G rounding
Electrode System (NEC
ART 250. PART H)
Power Lin es: An outsid e antenna
system sh ould not be loc ated in
the vicinity of overhead power
lines or other electric light or
power circuits, or where it can
fall into such power lines or circuits. When installing an outside antenna system, extreme
care should be taken to keep
from touching such power
lines or circuits as contac t with
them might be f atal.
Use
Cleaning: Unplug this video
product from the wall outlet before cleaning. Do not
use liquid cleaners or aerosol
cleaners. Use a damp cloth for
cleaning.
Objec t and Liquid Ent ry: Never
push objects of any kind into
this video product through
openings as they may touch
dangerous voltage points or
short out parts that could result in a re or electric shock.
Never spill li quid of any kind on
the video product.
Lightning: For adde d protection
for this video product receiver
during a lightning storm, or
Antenna Lead
in Wire
Antenna
Discharge
Unit (NEC
SECTION
810-20 )
Grounding
Conducto rs
(NEC SECTION
810-21)
when it is left unattended and
unused for long periods of
time, unplug it from the wall
outlet and disconnect the antenna or cabl e system. This will
prevent damage to the video
product due to lightning and
power-line surges.
Service
Servicing: Do not at tempt to service this video product yourself
as opening or removing covers
may expose you to dangerous
voltage or other hazards. Refer
all servicing to quali ed service
personnel.
Damage Requiring Service: Unplug
this video product from the wall
outlet and refer servicing to
quali ed service personnel under the following conditions:
• When the power-supply cord
or plug is damaged.
• If liquid has been spilled, or
objects have fallen into the
video product.
• If the video p roduct has been
expose d to rain or water.
• If the video p roduct has been
dropped or the cabinet has
been damaged.
If the video product does not
operate normally follow the
operating instructions. Adjust only those controls that
are covered by the operating
instructions as an improper adjustment of other controls may
result in damage and will often
require extensive work by a
quali ed technician to restore
the video p roduct to its norm al
operation.
When the video produc t exhibits a distinct change in
performance—this indicates a
need for service.
Replacement Parts: When replacement par ts are required,
be sure the ser vice technician
has used replacement part s
speci ed by the manufacturer
or have the same characteristics as the original par t. Unauthorized substitutions may
result in re, electric shock or
other hazards.
Safety Check: Upon completion
of any service or repairs to this
video product, ask the service
technician to perfor m safety
checks to determine that the
video product is in proper operating condition.
ii
For Your Safety
WARNING
WARNING
CAUTION
Be sure to read these notes before use
Safety Notes
• Make sure that you use your viewer correctly. Read these safety notes and your Owner’s Manual carefully before use.
• After reading these safet y notes, store them in a safe place.
The icons sho wn below are used in th is document to indicate th e
About t he Icons
severity of the injury or damage that ca n result if the information
indicated by the icon is ignore d and the product is used incorrectly as a result.
This icon indicates that death or serious injury can result if the
information is ignored.
WARNING
This icon indicates that personal injury or material damage can
result if the i nformation is ignore d.
CAUTION
The icons shown below are used to indicate the nature of the
instruc tions which are to be observed.
Triangular icons tell you that this information requires attention
(“Important” ).
Circular icons w ith a diagona l bar tell you that t he action i ndicated is prohibited (“Prohibited”).
Filled circles with an exclamation mark indicate an action that
must be per formed (“Re quired”).
If a problem arises, turn the device o and d isconnect and u nplug the AC
power ada pter. Continued use of th e device when i t is emitting
smoke, is emitting any unusual odor, or is in any other abnormal
Unplug from
state can cause a re or electric shock. Contact your FUJIFILM
power socket
dealer.
Do not all ow water or f oreign ob jects t o enter the d evice. If wate r or
foreign obj ects get i nside the dev ice, turn the dev ice o and
disconnec t and unplug th e AC power adapter. Cont inued use
of the device c an cause a re or elec tric shock . Contact yo ur
FUJIFILM dealer.
Do not use th e device in the ba throom or show er. This can cause a re
Do not use in
or electric shock.
the bathroom
or shower
Never at tempt to chan ge or take apar t the device. (N ever open the c asing.)
Do not use th e device when it ha s been dropped o r the casing is da maged.
This can caus e a re or electric sh ock. Conta ct your FUJIFIL M
Do not
dealer.
disassemble
Do not cha nge, heat or un duly twist or p ull the conne ction cord an d do not
place hea vy objec ts on the conn ection cor d. These act ions could dam -
age the cord and c ause a re or e lectric sho ck. If the cord is damaged, contac t your FUJIFILM dealer.
Do not plac e the device on a n unstable su rface. This c an cause the de vice to fall or ti p over and cause injur y.
Never at tempt to view p ictures w hile in moti on. Do not use the d evice
while you are w alking or driving a ve hicle. This can result in yo u
falling do wn or being involved i n a tra c accide nt.
WARNIN G
Do not touc h any meta l parts o f the devi ce durin g a thunde rstorm. T his can
cause an ele ctric shock du e to induced current f rom the lightning
discharge.
Do not use th e battery e xcept as spe ci ed. Load the bat tery as shown
by the indicator.
Do not heat, change or take apart the battery. Do not drop or subject the
batter y to impacts . Do not store the ba ttery with m etallic prod ucts. Any
of these ac tions can cause th e battery to burs t or leak and cause
re or inj ury as a result.
Use only th e AC power ada pters spe ci ed for us e with this de vice. Do not u se
voltage s other than th e power supply v oltage shown . The use of other
power source s can cause a re.
If the bat tery lea ks and uid g ets in cont act with yo ur eyes, ski n or cloth ing,
u s h t h e a e cted ar ea with cl ean wat er and se ek medi cal att ention o r call an
emergency number right away.
When carr ying the batter y, install i t in the remote contr ol or keep i t in a
plastic c ase. When stori ng the batter y, keep it in a plast ic case. When di scardin g, cover the bat tery termi nals with ins ulation tap e. Contact with
other metal lic objec ts or bat teries could c ause the bat tery to
ignite or burst.
Keep memo ry cards ou t of the reac h of small ch ildren. Because memory
cards are small, they can be swallowed by children. Be sure to
store memor y cards out of the reach of s mall children. If a child
swallows a m emory card, see k medical attenti on or call an emergency num ber.
Do not use this device in locations a ecte d by oil fumes , steam, hum idity or
dust. This can caus e a re or electric sho ck.
Do not leave this device in places subject to extremely high temperatures.
Do not leave the d evice in location s such as a sealed vehicl e or in
direct sun light. This can cause a re.
Keep out of the reach of small children. This produc t could cause i njury in the h ands of a child.
Do not pla ce heavy o bjects o n the devic e. This can caus e the heavy object to tip o ver or fall and cause inju ry.
Do not move t he device while the A C power adapter is s till connecte d. Do
not pull o n the connecti on cord to disconn ect the AC power ad apter. This
can damage th e power cord or cable s and cause a re or e lectric
shock.
Do not cove r or wrap the devic e or the AC power ad apter in a cloth o r blanket. This can cau se heat to build up a nd distor t the casing or
cause a re.
When you ar e cleanin g the device or y ou do not plan t o use the devic e for an
exten ded period , disconnec t and unplu g the AC power ad apter. Failure to
do so can caus e a re or electric sho ck.
When a memo ry card is removed, t he card could come ou t of the slot t oo
quickly. U se your nge r to hold it a nd gently re lease th e card.
Reques t regular in ternal test ing and clea ning for the d evice. Build -up of
dust in the dev ice can cause a re or electr ic shock. Contac t your
FUJIFILM deale r to request inter nal cleaning e very two ye ars.
Please note that th is service is not fre e of charge.
WARNIN G
CAUTION
iii

For Your Safety
For Custom ers in the U.S .A.
For Custom ers in Canad a
The following describes the proper use of the battery and how
to prolong it s life. Incorrect use can shorten b attery life or cause
leakage, overheating, re, or explosion.
Cauti ons: Handl ing the Bat tery
• Do not transport or store with metal objects such as necklaces
or hairpins.
• Do not expose to ame or heat.
• Do not disassemb le or modify.
• Dispose of used batteries promp tly.
• Do not drop or subject to strong physical shocks.
• Do not expose to water.
• Keep the terminals clean.
• The batter y and remote control may become w arm to the
touch after extended use. This is normal.
AC Power Adap ters
Use only FUJIFIL M AC power adapters desi gnated for use with this
device. Oth er adapters could damage the device.
• The AC p ower adapter is for indo or use only.
• Be sure the DC plug is securely connected to the device.
• Turn the device o before disconnecting the adapter. Disconnect
the adapter by t he plug, not the cable.
• Do not use with other devices.
• Do not disassemble.
• Do not expose to high heat and humidity.
• Do not subject to s trong physical shock s.
• The AC power adapter may hum or become hot to the touch
during use. This is normal.
• If the AC power adapter causes radio interference, reorient or
relocate the receiving antenna.
The Bat tery and Pow er Supply
Electrical Interference
This device may interfere with hospital or aviation equipment.
Consult with hospital or airline sta before using the device in a
hospital or on an aircraft.
Liquid Crystal
In the event that the monitor is damaged, care should be taken
to avoid contac t with liquid crystal. Take the urgent action indicated should any of the following situations arise:
• If liquid c rysta l comes in co ntact wi th your sk in, clean the area wit h a
cloth and then wash thoroughly with so ap and running water.
• If liquid c rystal en ters your eye s, ush the a ec ted eye with clean
water for at least 15 minutes and then seek medical assistance.
• If liquid c ryst al is swallowed, rinse your mouth thoroughly with
water. Drink large quantities of water and induce vomiting,
then seek medical assistance.
Using t he Device
NOTICES
To prevent re or shock hazard, do n ot expose the unit to ra in or moisture.
Please read th e “Safety Not es” (pages iii– iv) and make sure you und erstand them bef ore using the device.
Perchlorate M aterial—speci al handling may ap ply. See http://www.dtsc.ca.gov/hazardouswaste/perchlorate.
For Custom ers in the U.S .A.
Tested To Com ply Wit h FCC Standar ds
FOR HOME OR OFFI CE USE
FCC Statement
This device co mplies with Part 15 of the FCC Rules . Operation is subje ct to the followin g two conditions: (1) This device may n ot cause
harmful interference, and (2) this device must accept any interference receive d, including interference that may cause undesired
operation.
CAUTION
This equip ment has been tested and f ound to comply with the lim its for a Class B digital de vice, pursuant to Part 15 of the FCC Rules.
These limi ts are designed to provid e reasonable protecti on against harmful inte rference in a residential i nstallation. This eq uipment
generates , uses, and can radiate r adio frequenc y energy and, if not ins talled and used in acco rdance with the instr uctions, may cause
harmful interference to r adio communications. H owever, there is no guarantee that interference will not occur in a pa rticular installation. If this equipment does cause harmful interference to radio or television reception, which can be determined by turning the
equipment o and on, the user is encou raged to try to corre ct the interferen ce by one or more of the follo wing measures:
• Reorient or relo cate the receiving antenna.
• Increase the separation bet ween the equipment and re ceiver.
• Connect the equipment into an outlet on a circuit di erent f rom that to which the receiver is connected.
• Consul t the dealer or an exp erienced radio/ TV technic ian for help.
You are cautioned that any changes or modi cations not expressly approved in this manual could void the user’s authority to operate the equipment.
Notes on the Grant
To comply with Part 15 of the FCC Rules, this product must be use d with a FUJIFILM-sp eci ed ferrite-core A/V cable, USB cable, and
DC supply cord.
For Custom ers in Canad a
CAUTION: This Class B digital apparatus complies with Canadian ICES-003.
iv

For Your Safety
EC Decla ration of Con formity
Dispos al of Elect rical and El ectroni c Equipmen t in Private Hou seholds
Notes on Co pyright
Tradema rk Informat ion
EC Decla ration of Con formity
We
Name: FUJIFILM Elec tronic Imaging Europe GmbH
Address: Benzstrasse 2, 47533 Kleve, Germany
declare that the product
Product Name: FUJIFILM DIGI TAL VIEWER RE AL 3D V1
Manufacturer’s Name: FUJIFILM Corporation
Manufacturer’s Address: 7-3, AKASAKA 9-CHOME, MINATO-KU, TOKYO 107-0052 JAPAN
conforms to the following Standards:
Safety: EN60950-1: 2006 + A11: 2009
EMC: EN55022: 1998 + A1: 20 00 + A2: 2003 Class B
following the provision of the EMC Directive (2004/108/EC) and Low Voltage Directive (2006/95/EC).
Kleve, Germany August 1, 2009
Place Date Signature, Managing Director
Disposal of Electrical and Electronic Equipment in Private Households
Dispo sal of Used E lectric al and Elec tronic E quipmen t (Applica ble in the Eu ropean Un ion, Norw ay, Iceland an d Liechten stein)
The rec ycling of materials will hel p to conserve natural re sources. For more detai led information abo ut recycling this pro duct, please
contact your local cit y o ce, your household waste dispos al service or the shop where you purchased the product.
In Count ries Outs ide the Eur opean Uni on, Norway, Ic eland and L iechtens tein
If you wish to disc ard this produc t, including the bat teries or accumulators, please contact your local authorities and ask for the
correct w ay of disposal.
Notes on Co pyright
Unle ss inten ded so lely fo r perso nal use , images displa yed on yo ur digi tal vie wer can not be us ed in wa ys that i nfrin ge copyr ight laws
without the consent of the o wner. Note that some restric tions apply to the photographing o f stage perfor mances, entertainments,
and exhibi ts, even when intende d purely for personal u se. Users are also asked to note th at the transfer of memo ry cards containing
images or data protected under copyright laws is only permissible within the restrictio ns imposed by those copyright laws.
Tradema rk Informat ion
xD-Picture Card is a trademark of FUJIFILM Corp oration. Microsof t, Windows, the Windows logo, Windows Vist a and the Windows
Vista lo go are trademarks o r registered trademar ks of Microsof t Corporation in the Uni ted States and/or other countri es. “Windows”
is an abbreviat ion used in reference to the Mic rosoft Windows o perating system. A dobe and Adobe Read er are either trademark s or
registered tr ademarks o f Adobe System s Incorporated in th e U.S.A. an d/or other count ries. The SD HC logo is a tra demark. All other
trade names mentioned in this manual are the trademark s or registered trademarks of their respective owners.
Note: The “Designed for Microsoft® Windows® XP” and “
hardware driver.
EN55024: 1998 + A1: 2001 + A2: 2003
EN61000-3-2: 2006
EN61000-3-3: 1995 + A1: 2001 + A2: 2005
This symb ol on the product, o r in the manual and in the war ranty, and/or on its pack aging indicates that this p roduct shall not be treated as household waste. Instead it should be taken to an applicable collection point for the
recycling of electrical and electronic e quipment.
By ensuring this product is disposed of correctly, you will help prevent potential negative consequences to the environment and human health, which could other wise be caused by inappro priate waste handling of this product.
This symbol on the bat teries or accumulators indicates that those batteries shall not be treated as household
waste.
If your equipment contains easy removable batteries or accumulators please dispose these separately according
to your local re quirements.
CERTIFIED FOR Windows Vista™” logos apply only to the viewer and viewer
v

Viewer Q & A
Viewing Pictures
Question
Key phrase
See page
Other Operations
Question
Key phrase
See page
Find items by task.
Viewing Pictures
Question
How do I view C pictures?
How do I adjust parallax?
How do I view a lot of pictures at once? Multi-frame playback 16
How do I nd pictures?
Can I view my pictures in a slide show? Slide show 12
Can I choose how long each slide is displayed? Slide show time/frame 22
Can I select just one picture for display? Single image 14
Can I enlarge part of a picture for display?
How do I display pictures at their original size?
Can I rotate pictures? Orientation 22
Can I display the time or date? Clock/calendar 19
Other Operations
Question
What are the parts of the viewer and remote control called? Parts 3
How do I delete pictures? Erase 20
How do I set the clock? Date/time 10
How do I restore factory settings? Reset 22
Can I copy pictures from a camera or other device via infrared? Infrared (IR) 23
Can I connect to a computer and copy pictures via USB?
How do I change viewer settings? Setup 21
Key phrase
Viewing C images
Multi-frame playback 16
Image search 18
Playback zoom 15Can I choose the area displayed?
Key phrase
Connecting to
a computer
See page
17
See page
24
vi

Table of Contents
Before You Begin
First Steps
Viewing Pictures
More Menu Options
Connections
Troubleshooting
For Your Safety ..................................................................................................................................................... ii
IMPORTANT SAFETY INSTRUCTIONS .......................................................................................................... ii
Safety Notes ........................................................................................................................................................ iii
NOTICES ...............................................................................................................................................................iv
Viewer Q & A .........................................................................................................................................................vi
Viewing Pictures .............................................................................................................................................vi
Other Operations ...........................................................................................................................................vi
Before You Begin
Viewing 3D Images ............................................................................................................................................1
Getting Started .................................................................................................................................................... 2
Symbols and Conventions ..............................................................................................................................2
Package Contents ..............................................................................................................................................2
Parts of the Viewer and Remote Control ..................................................................................................3
First Steps
Readying the Remote Control.......................................................................................................................5
Replacing the Battery ......................................................................................................................................6
Attaching the Stand .......................................................................................................................................... 7
Inserting Memory Cards ..................................................................................................................................8
Turning the Viewer On ..................................................................................................................................... 9
Basic Setup ...........................................................................................................................................................10
Viewing Pictures
Slide Shows ..........................................................................................................................................................12
Choosing a Slide Show Type........................................................................................................................12
Displaying Selected Images .........................................................................................................................14
Playback Zoom .................................................................................................................................................15
Multi-Frame Playback ....................................................................................................................................16
Viewing C Images ..........................................................................................................................................17
More Menu Options
IMAGE SEARCH ...................................................................................................................................................18
CLOCK/CALENDAR ...........................................................................................................................................19
ERASE .....................................................................................................................................................................20
SET-UP ....................................................................................................................................................................21
Setup Menu Options ..................................................................................................................................... 22
Connections
Copying Pictures via Infrared ..................................................................................................................... 23
Connecting to a Computer ...........................................................................................................................24
Installing FinePixViewer ................................................................................................................................24
Copying Pictures to the Viewer ................................................................................................................. 25
Tro ub les ho otin g
Tro ub lesh oo tin g................................................................................................................................................26
vii

Table of Contents
Appendix
Appendix
Glossary .................................................................................................................................................................28
Memory Cards ....................................................................................................................................................29
Speci cations .................................................................................................................................................... 30
FUJIFILM Worldwide Network ....................................................................................................................31
viii
Viewing 3D Images
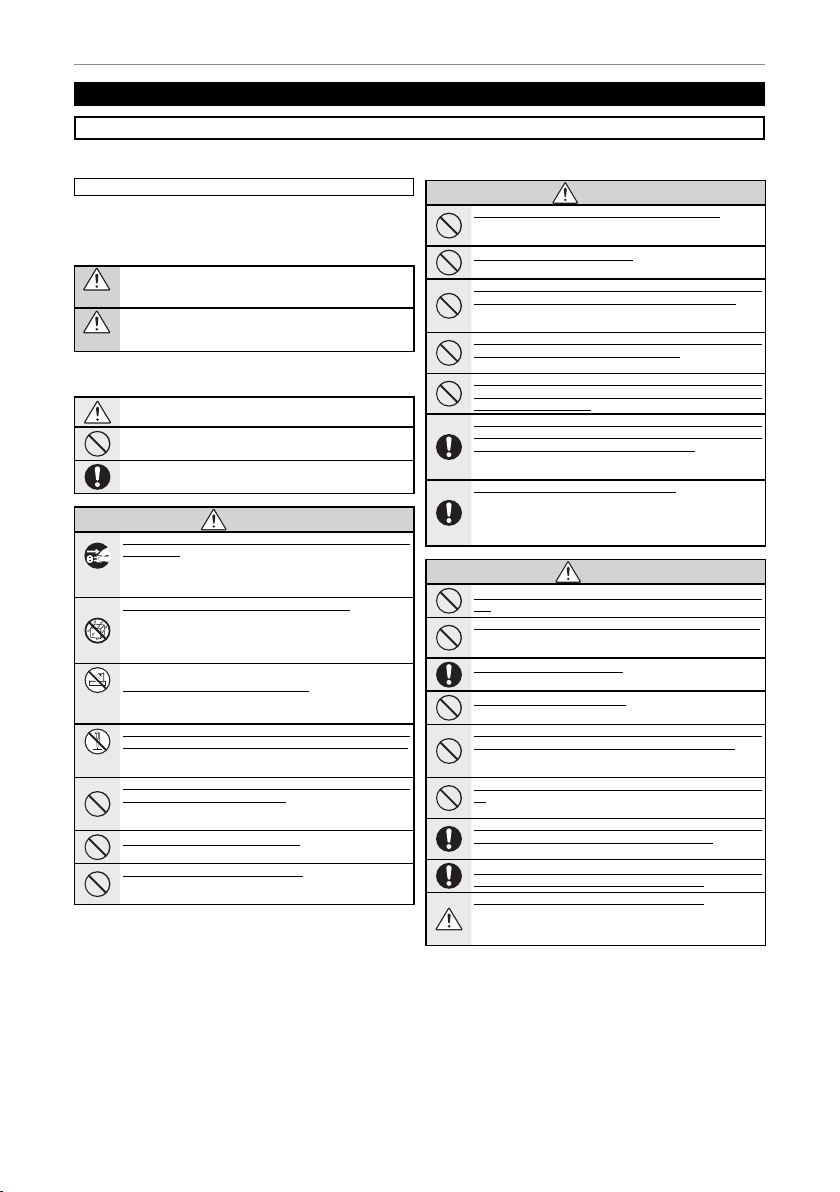
The FinePix REAL 3D V1 displays C photographs taken
with cameras such as the FinePix REAL 3D W1 (pg. 17). C
images are best viewed from a position directly in front of
the screen (or, if more than one person is present, slightly
to one side) at a distance of about 60 cm (2 ft.).
C Display
The FinePix REAL 3D V1 uses a parallax barrier consisting of a
series of slits placed over a pair of images with di erent parallax displayed in a series of alternating strips, allowing each
eye to see a di erent image and creating the illusion of depth
when the screen is viewed at the proper angle and distance. A
consequence of this is that the C e ect is only visible from
certain angles.
Before You Begin
Parallax
barrier
3 Caution: Using the FinePix REAL 3D V1
D display is recommended for young children (up to the age of about six) whose visual system
is still maturing and for individuals with notable di erences in vision between their two eyes, who
may nd it di cult or impossible to observe the C e ect. The C e ect is only visible from
certain angles and may not be visible at high magni cations. Should you experience fatigue or
discomfort while viewing C images, cease use immediately. A ten-minute break is recommended about once every half hour. Switch to D immediately if C images still appear double after
you have adjusted parallax. Individuals with a history of photosensitive epilepsy or heart disease
or who are unwell or su ering from fatigue, insomnia, or the e ects of alcohol should refrain from
viewing C images. Viewing C images while in motion may cause fatigue or discomfort.
Slit
1

✔✔ Viewer Q & A (pg. vi)
✔✔ Table of Contents (pg. vii)
✔✔ Troubleshooting (pg. 26)
✔✔ Glossary (pg. 28)
Symbols and Conventions
Package Contents
Getting Started
Before using the FinePix REAL 3D V1 digital viewer, read the warnings on pages ii–v and
take a few minutes to familiarize yourself with the terms and conventions used in this
manual. For information on speci c topics, consult the sources below.
Viewer Q & A (pg. vi)
Know what you want to do but don’t
know the name for it? Find the answer in
“Viewer Q & A.”
Troubleshooting (pg. 26)
Having a speci c problem with the digital
viewer? Find the answer here.
Symbols and Conventions
The following symbols are used in this manual:
3 Caution: This information should be read before use to ensure correct operation.
1 Note: Points to note when using the device.
2 Tip: Additional information that may be helpful when using the device.
Menus and other text in the display are shown in bold. In the illustrations in this manual,
the display may be simpli ed for explanatory purposes.
Package Contents
Before using the viewer, con rm that the package contains these items:
Table of Contents (pg. vii)
The “Table of Contents” gives an overview
of the entire manual. The principal digital
viewer operations are listed here.
Glossary (pg. 28)
The meanings of some technical terms
may be found here.
ER
POW
D
2
/
D
3
SLIDE SHOW
MENU
/OK
DISP
/BACK
VOLUME
PARALLAX
FinePix REAL 3D V1
digital viewer
Remote control
(ships with battery installed)
Stand
• USB cable
• Warranty
• Owner’s Manual (this manual)
AC power adapter Software CD
Memory Cards
This product supports xD-Picture Card, and SD and SDHC memory cards. In this manual, these
are referred to as “memory cards.” For more information, see page 29.
2

Introduction
Parts of the Viewer and Remote Control
No.
Viewer (fr ont view)
Remote co ntrol
Page
Parts of the Viewer and Remote Control
The same numbers are used for controls that appear both on the viewer and the remote. Unless otherwise noted, the controls on the remote perform the same functions
as those on the viewer; the descriptions in this manual generally refer to the remote.
POWER
3
MENU
/OK
D / 2D
Page
17
17
12
10
—
SLIDE SHOW
DISP
/BACK
VOLUME
PARALLAX
No.
Viewer (front view)
Remote control
1 Infrared receiver (for remote control) — 5
2 Infrared data port (for data transfer) — 23
3 Display — —
4
g (3D/2D) button g 3D/2D button
5
Q (parallax) button Q PARA LLAX (+/–) buttons
6
I (slide show) button I SLIDE SHOW button
7MENU/OK button MENU/OK button 10
8DISP/BACK button DISP/BACK button 15
9
6 button 6 button
10
7 button 7 button
11
Touch bar (left/right)
12
13 —
8 button
9 button
VOLUME (e/b) buttons
14 (See back view) POWER button 9
15 —Battery holder 6
Before You Begin
3

Introduction
No.
Viewer (b ack view)
Page
OPEN
No.
1 Memory card slot cover 8
2 Stereo speakers —
3
T (power) button
4 Tripod mount 7
5 Hole for stand 7
6 USB host connector —
7 Connector for AC power adapter 9
8 Mini-B USB connector 25
9 Memory card slot 8
Viewer (back view)
Page
9
4
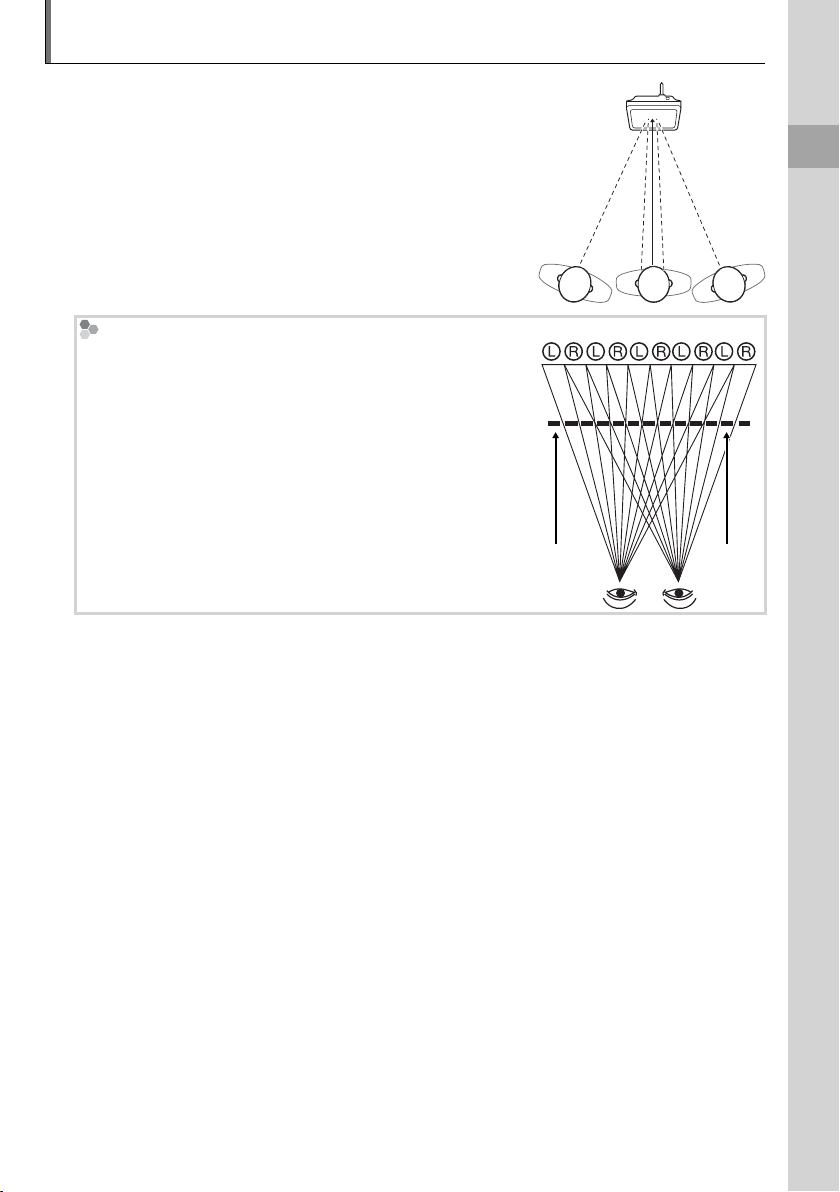
Readying the Remote Control
A battery is inserted in the remote control at shipment.
Before using the remote control, remove the plastic insulating sheet from the battery chamber.
1 Note
The battery supplied with the remote control is intended for
trial use only. Replace the battery as described on page 6 if the
remote control does not function as expected.
Using the Remote
Point the remote at the infrared receiver on the digital viewer.
Infrared receiver
Approx. 3 m (9.8 ft.)
or less
Maximum vertical and
horizontal angle approx. 30 °
Insulating sheet
First Steps
3 Caution
Do not place stickers or other obstructions over the infrared receiver.
5

Readying the Remote Control
Replacing the Battery
Replacing the Battery
If the remote control does not function as expected, replace the battery with a fresh
CR2025 battery (available separately from third-party suppliers).
Turn the remote control over and remove the battery holder.
1
Remove battery
holder, keeping latch
pressed to right
Remove the old battery from the holder and insert a fresh battery as shown, with the
2
“+” indicator uppermost.
3 Caution
Insert the battery in the correct orientation.
Slide the holder into the remote control until the latch clicks into place.
3
6
 Loading...