

Page 1
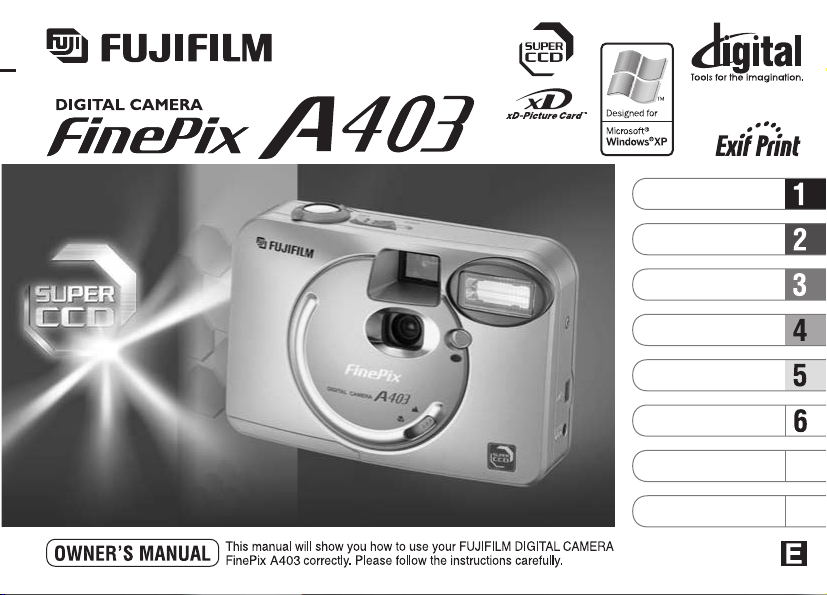
BL00282-100(1)
7
8
Getting Ready
Camera Connection
Using FinePixViewer
Basic Photography
Advanced Features
Photography
Advanced Features
Playback
Software Installation
Settings
Page 2
Please read the Safety Notes
using the camera.
➡
(
P.118)and make sure you understand them before
EC Declaration of Conformity
We
:
Name
:
Address
declare that the product
Product Name : FUJIFILM DIGITAL CAMERA FinePix A403
Manufacture’s Name : Fuji Photo Film Co., Ltd.
Manufacture’s Address : 26-30, Nishiazabu 2-chome, Minato-ku,
is in conformity with the following Standards
following the provision of the EMC Directive (89/336/EEC, 92/31/EEC and
93/68/EEC)and Low Voltage Directive (73/23/EEC).
Safety :EN60950
EMC :EN55022 :1998 Classe B
Fuji Photo Film (Europe)G.m.b.H.
Heesenstrasse 31
40549 Dusseldorf, Germany
Tokyo 106-8620, Japan
EN55024 :1998
EN61000-3-2 :1995 +A1:1998 +A2:1998
Dusseldorf, Germany April 1, 2003
Place Date Signature/Managing Director
Bij dit produkt zijn batterijen geleverd. Wanneer deze leeg zijn, moet u
ze niet weggooien maar inleveren als KCA
32
Page 3
Contents
EC Declaration of Conformity
.........................................................................
Preface
Accessories included
Nomenclature/Attaching the strap
.......................................
....................................................
................................
3
6
7
8
Fast Forwarding Images
MULTI-FRAME PLAYBACK
PLAYBACK ZOOM
ERASING SINGLE FRAME
3 Advanced Features Photography
ABOUT THE BATTERIES
Compatible batteries
AA-size Ni-MH batteries
Procedure for discharging rechargeable Ni-MH batteries
1 Getting Ready
LOADING THE BATTERIES AND xD-Picture Card
SWITCHING ON AND OFF
SETTING THE DATE AND TIME
Changing the date and time
To change the date display format
2 Basic Photography
BASIC OPERATION GUIDE
QMODE
TAKING PICTURES (A AUTO MODE)
Number of Available Frames
■ Standard number of shots per xD-Picture Card
FRAMING GUIDELINE FUNCTION
DIGITAL ZOOM
E MACRO (CLOSE-UP) PHOTOGRAPHY
wMODE
4 5
VIEWING YOUR IMAGES (PLAYBACK)
...............................................................
...........................................
................................................
..........................................
........
.............................................
....................................
......................................
............................
...........................................
.......................
.....................................
................................
..................
........................
11
11
12
..
13
...
QMODE
SELECTING A AUTO OR S MANUAL
PHOTOGRAPHY MENU OPERATION
PHOTOGRAPHY AND MOVIE MENU OPTIONS
PHOTOGRAPHY MENU
y SETTING THE QUALITY
15
c FLASH
17
18
19
19
= SELF-TIMER PHOTOGRAPHY
21
d EV (EXPOSURE COMPENSATION)
a
23
TMODE
26
T MOVIE
26
27
28
29
30
.......................................................................
AUTO
Auto Flash Mode
n Red-Eye Reduction
c Forced Flash
b Suppressed Flash
v Slow Synchro
WHITE BALANCE (SELECTING THE LIGHT SOURCE)
.......................................................................
■ xD-Picture Card recording time
Quality settings for movies
...........................................
............................................
..........................................................
............................................
....................
...........................
..........
..........................................
..............................................
..........................................
....................................................
............................................
...................................................
................................
........................
...........................
........................................
30
31
32
33
35
36
37
38
39
39
40
40
41
41
42
44
...
45
46
46
49
4 Advanced Features Playback
wMODE
PLAYING BACK MOVIES
■ Playing back movies
PLAYBACK MENU
p
ERASING SINGLE ALL FRAMES/FORMATTING
kPROTECTING IMAGES FRAME/ALL
i
HOW TO SPECIFY PRINT OPTIONS (DPOF)
i DPOF SET FRAME
...............................................
..............................................
....................
...................................................
5 Settings
gADJUSTING THE MONITOR BRIGHTNESS
gUSING SET–UP
■ List of settings
■ SET–UP Menu Options
SET–UP
gPOWER SAVE
........................................................
.......................................................
.........................................
..........................................................
6 Software Installation
6.1 The Software Components
6.2 Pre-installation checklist
6.2.1 Hardware and software requirements
6.3 Installation on a Windows PC
6.3.1 Load the CD-ROM into your PC
6.3.2 From FinePixViewer installation to restart
6.4 Installation on a Mac OS 8.6 to 9.2
6.4.1 Pre-installation Checklist
6.4.2 Check the system software settings
........................................
............................................
....................................
.......................
...........................
..................................
.........
...........
..............
........
.................
50
51
..
52
56
60
61
65
66
67
67
68
69
70
70
72
72
73
77
77
78
6.4.3 From FinePixViewer installation to restart
6.5 Installation on a Mac OS X
6.5.1 Pre-installation Checklist
6.5.2 From FinePixViewer installation to restart
........................................
..................................
7 Camera Connection
7.1 Using the optional AC Power adapter
7.2 Use at DSC mode
7.3 Disconnecting the Camera
.....................................................
........................................
8 Using FinePixViewer
8.1 Saving Images on Your Computer
8.2 Making a FinePix CD Album
8.3 Using the FinePix Internet Service
8.4 User Registration
8.5 Mastering FinePixViewer
8.6 Uninstalling the Software
System Expansion Options
Accessories Guide
Notes on Using Your Camera Correctly
Notes on the Power Supply
Applicable Batteries
Notes on the Batteries
AC Power Adapter
Notes on the xD-Picture Card™
Warning Displays
Troubleshooting
Explanation of Terms
Specifications
Safety Notes
.......................................................
....................................................
............................................
.........................................
..............................................
......................................................
........................................................
................................................
............................................................
.............................................................
............................
.....................................
............................
...........................................
...........................................
.......................................
......................................
..............................
........
........
.......................
...................
101
102
104
105
105
105
107
108
110
112
115
116
118
78
81
81
83
86
87
90
92
93
94
94
98
99
1
1
2
2
3
3
4
4
5
5
6
6
7
7
8
8
Page 4
Preface
Accessories included
■
Test Shots Prior to Photography
For particularly important photographs (such as weddings and
overseas trips), always take a test photograph and view the
image to make sure that the camera is functioning normally.
h Fuji Photo Film Co., Ltd. cannot accept liability for any
incidental losses (such as the costs of photography or the
loss of income from photography) incurred as a result of
faults with this product.
■
Notes on Copyright
Images recorded using your digital camera system cannot be
used in ways that infringe copyright laws without the consent
of the owner, unless intended only for personal use. Note that
some restrictions apply to the photographing of stage
performances, entertainments and exhibits, even when
intended purely for personal use. Users are also asked to note
that the transfer of xD-Picture Card containing images or
data protected under copyright laws is only permissible within
the restrictions imposed by those copyright laws.
■
Liquid Crystal
If the LCD monitor or display panel is damaged, take particular
care with the liquid crystal in the monitor or panel. If any of the
following situations arise, take the urgent action indicated.
h If liquid crystal comes in contact with your skin
Wipe the area with a cloth and then wash thoroughly with
running water and soap.
h If liquid crystal gets into your eye
Flush the affected eye with clean water for at least
15 minutes and then seek medical assistance.
h If liquid crystal is swallowed
Flush your mouth thoroughly with water. Drink large quantities
of water and induce vomiting. Then seek medical assistance.
■
Notes on Electrical Interference
If the camera is to be used in hospitals or aircrafts, please
note that this camera may cause interference to other
equipment in the hospital or aircraft. For details, please
check with the applicable regulations.
■
Handling Your Digital Camera
This camera contains precision electronic components. To
ensure that images are recorded correctly, do not subject the
camera to impact or shock while an image is being recorded.
■
Trademark Information
h and xD-Picture Card™ are trademarks of Fuji
Photo Film Co., Ltd.
h IBM PC/AT is a registered trademark of International
Business Machines Corp. of the U.S.A.
h Macintosh, Power Macintosh, iMac, PowreBook, iBook
and Mac OS are trademarks of Apple Computer, Inc.,
registered in the U.S. and other countries.
h QuickTime and the QuickTime logo are trademarks used
under license. The QuickTime logo is registered in the
U.S. and other countries.
h Adobe Acrobat
Systems Incorporated of the U.S.
h Microsoft, Windows, and the Windows logo are
trademarks, or registered trademarks of Microsoft
Corporation in the United States and/or other countries.
Windows is an abbreviated term referring to the
Microsoft
✽ The “Designed for Microsoft
to the camera and the driver only.
h Other company or product names are trademarks or
registered trademarks of the respective companies.
■ Exif Print (Exif ver. 2.2)
Exif Print Format is a newly revised digital camera file format that
contains a variety of shooting information for optimal printing.
®
Reader®is a trademark of Adobe
®
Windows®Operating System.
®
Windows®XP” logo refers
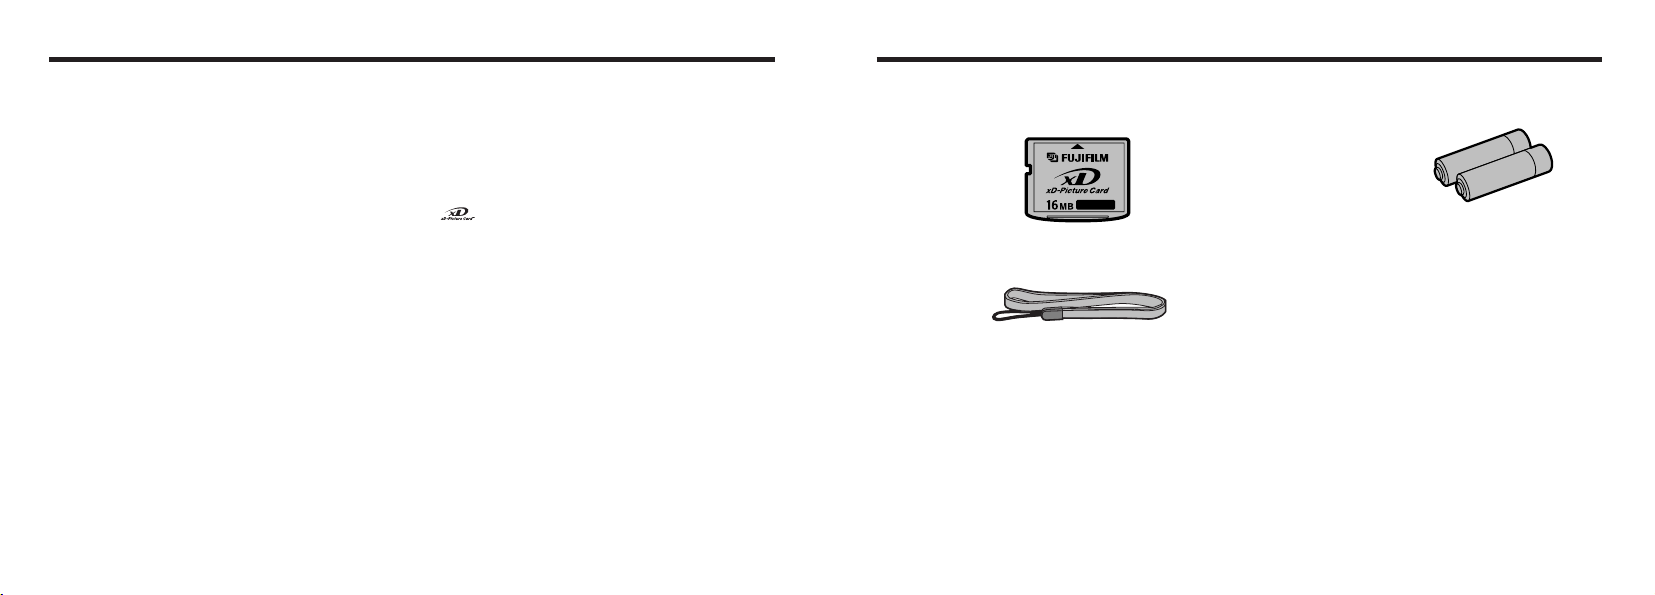
h16 MB, xD-Picture Card (1)
Supplied with: Anti-static case (1)
hStrap (1)
hLR6 AA-size alkaline Batteries (2)
hUSB Interface Set (1
• CD-ROM: Software for FinePix SX (1)
• Special USB cable with Noise Suppression core (1)
hOwner’s Manual (this manual)(1
)
)
76
Page 5
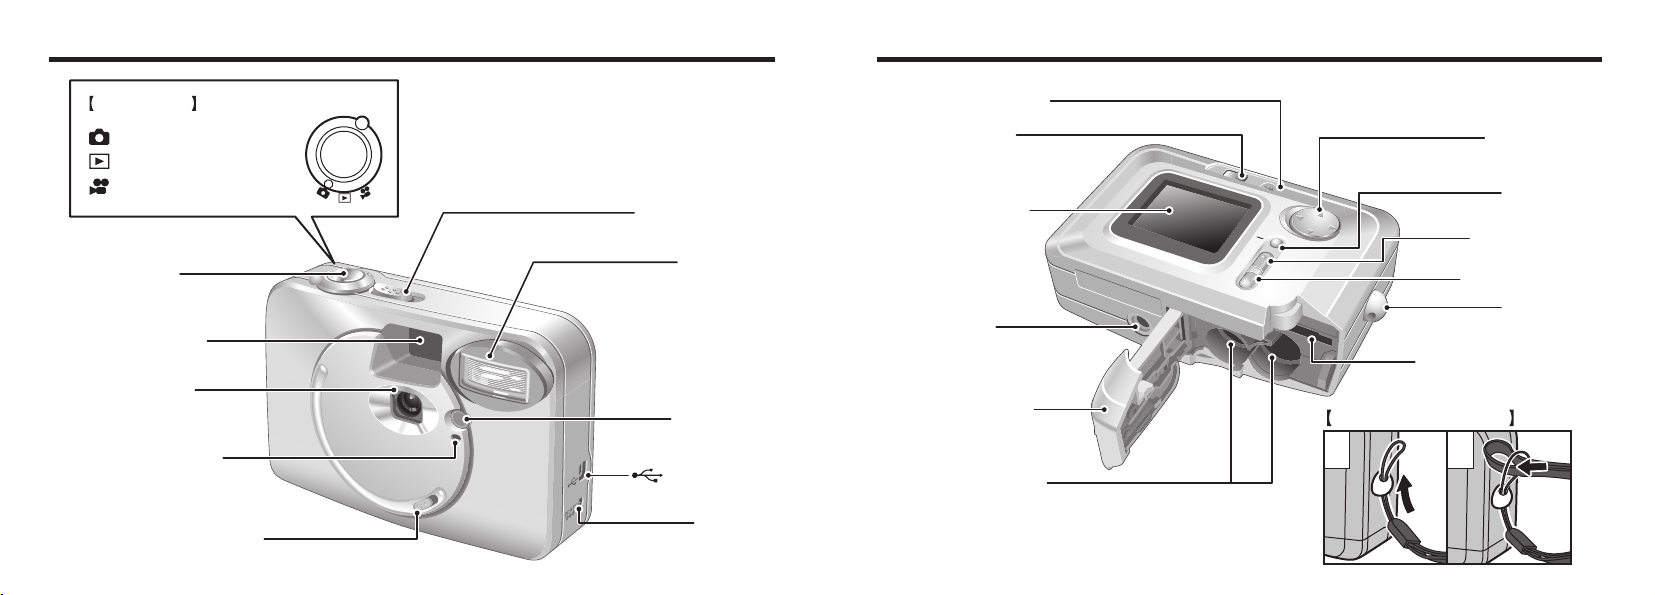
Nomenclature ✽ Refer to the pages in parentheses for information on using the camera features.
Mode switch
Still photography mode (P.23)
Playback mode (P.30)
Movie mode (P.46)
Shutter button
Viewfinder window
Lens/Lens cover
Self-timer lamp (P.43)
Macro selector switch
(P.29)
Power switch (P.17)
(P.39)
Flash
Flash control
sensor
(Special USB)
socket
(P.87)
DC IN 3V
(Power input)
socket
(P.86)
Viewfinder lamp (P.25)
Viewfinder (P.24)
LCD monitor (P.24)
Tripod mount
Battery cover
Battery compartment
(P.15)
abdc button
DISP button
(P.21, 27, 31)
MENU/OK button
(P.19)
BACK button (P.21)
Strap mount
xD-Picture Card slot (P.16)
Attaching the strap
1 2
98
Page 6
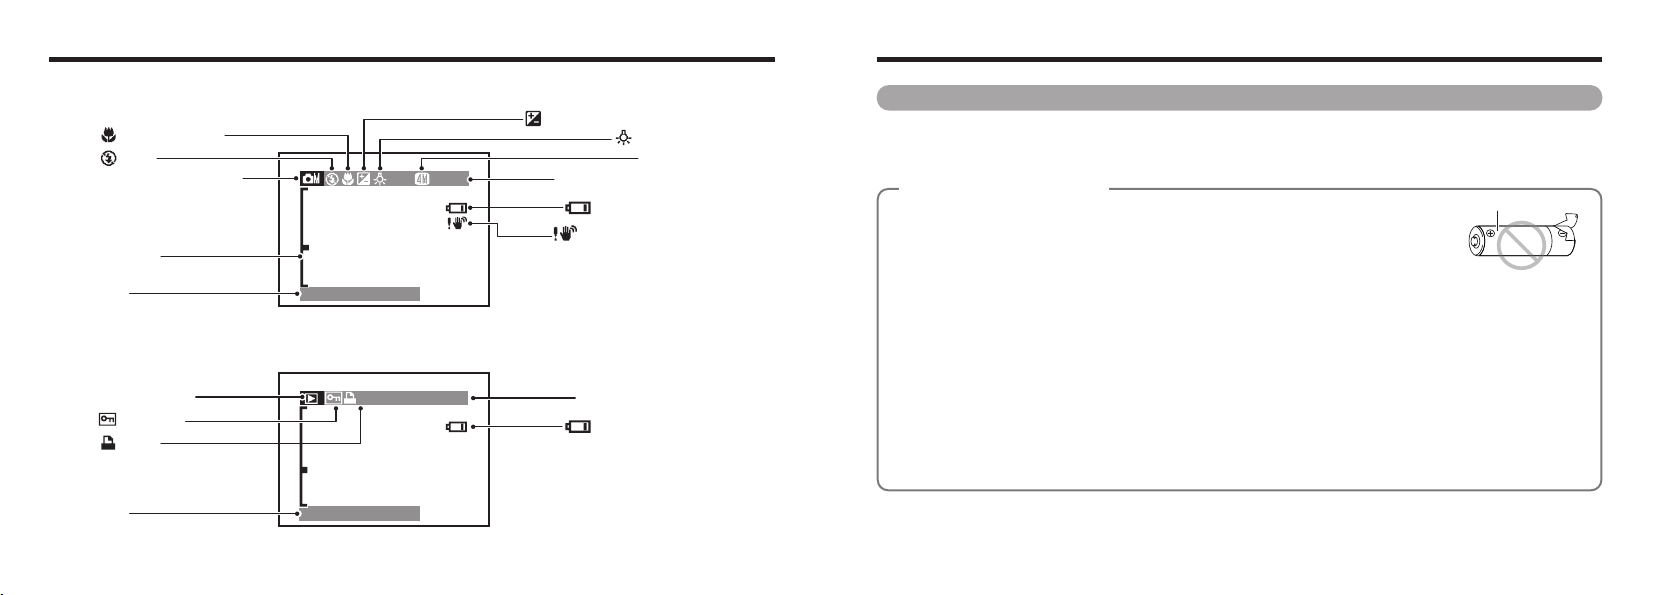
Nomenclature (Sample display
49
20. 4.2003
20. 4.2003
100ー0001
Outer casing
)
ABOUT THE BATTERIES
Example of LCD Monitor Text Display: Still photography mode
Macro(close-up)
Flash
Still photography mode
Zoom bar
Date
20. 4.2003
49
Example of LCD Monitor Text Display: Playback mode
100ー0001
Playback mode
Protection
DPOF
Date
20. 4.2003
10
EV (exposure compensation)
White balance
Quality mode
Number of remaining shots
Battery level warning
Camera shake warning
Playback frame number
Battery level warning
Compatible batteries
h AA-size alkaline batteries (2) or optional AA-size Ni-MH batteries (2).
!
We recommend that the AA-size alkaline batteries used be the same brand as those supplied with the camera.
●
About the batteries
◆
h Never use the following types of battery, as this could cause serious problems
such as battery fluid leakage or overheating:
1. Batteries with split or peeling outer casings
2. Combinations of different types of batteries or new and used batteries
together
h Do not use lithium, manganese or Ni-Cd batteries.
h Soiling such as fingermarks on the poles of the batteries can significantly reduce the amount of
time for which the batteries can be used.
h The time for which AA-size alkaline batteries (referred to hereafter simply as alkaline batteries)
can be used varies depending on the brand, and some alkaline batteries may stop providing
power more quickly than those supplied with the camera. Note also that due to their nature, the
time for which alkaline batteries can be used decreases in cold conditions (0°C to 10°C). The use
of AA-size Ni-MH batteries is recommended for this reason.
h You will need the optional charger (➡P.102) to recharge Ni-MH batteries.
h See P.105, 106 for other notes on using batteries.
◆
11
Page 7
AUTOAUTO
LCD BRIGHTNESSLCD BRIGHTNESS
SET−UPSET−UP
MANUALMANUAL
OPTIONSOPTIONS
ABOUT THE BATTERIES
AA-size Ni-MH batteries
◆
h When used as a power source for a digital camera, AA-size Ni-MH batteries are superior to
alkaline batteries in that they allow more shots to be taken. However, to retain the original
performance characteristics of Ni-MH batteries, care must be taken in the way they are used.
h Ni-MH batteries left unused in storage for long periods can become “deactivated”. Also,
repeatedly charging Ni-MH batteries that are only partially discharged can cause them to suffer
from the “memory effect”.
Ni-MH batteries that are “deactivated” or affected by “memory” suffer from the problem of only
providing power for a short time after being charged. To prevent this problem, discharge and
recharge them several times using the camera’s “Discharging rechargeable batteries” function.
By repeating this cycle several times, the temporary reduction in performance caused by
“memory” or “deactivation” can be remedied and the batteries can be restored to their original
performance levels.
See P.13 for the procedure for “Discharging rechargeable batteries”.
Deactivation and memory are specific to Ni-MH batteries and are not in fact battery faults.
!
Do not use the “Discharging rechargeable batteries” function when alkaline batteries are being used.
●
!
Ni-MH batteries will deteriorate rapidly if overdischarged. Use the “Discharging rechargeable batteries”
●
function provided in the camera to discharge batteries. Discharging batteries such as in a flashlight can result
in impaired battery performance because of overdischarging.
!
Ni-MH batteries are not fully charged when purchased. They may also be “deactivated”. Accordingly, you
●
should discharge them once using the camera's “Discharging rechargeable batteries” function, and then
charge them fully again before using them in the camera.
!
Ni-MH batteries have a limited service life. If a battery can only be used for a short time even after repeated
●
discharge-charge cycles, it may have reached the end of its service life.
!
When using the “Discharging rechargeable batteries” function, do not connect the AC power adapter to the
●
camera.
12 13
◆
Procedure for discharging rechargeable Ni-MH batteries
Only use the “Discharging rechargeable
batteries” function with Ni-MH batteries
(rechargeable batteries).
The “Discharging rechargeable batteries”
function should not be used with alkaline
batteries as it will completely drain the
battery charge.
Use the “Discharging rechargeable batteries”
function in the following situations:
i When the batteries can only be used for a
short time after being charged normally
i When the batteries have not been used for a
long period
i When you purchase new Ni-MH batteries
Do not use the “Discharging rechargeable
batteries” function when you are using the AC
power adapter. In these situations, the Ni-MH
batteries will not be discharged due to the
external power supply.
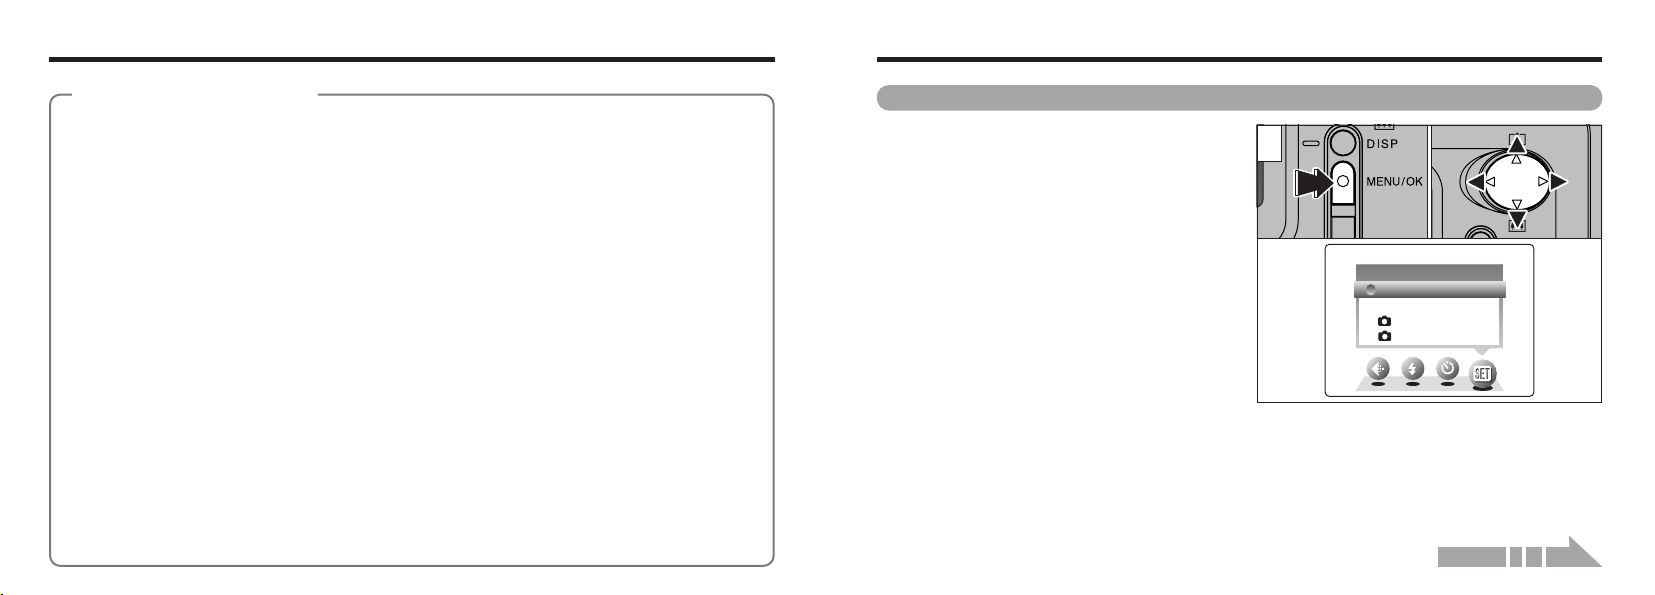
1
1 Press the “MENU/OK” button.
2 Press “d” or “c” to select “g” OPTIONS
and then press “a ” or “b ” to select
“SET–UP”.
3Press the “MENU/OK” button.
!
Do not use the procedure for discharging
●
rechargeable batteries with alkaline batteries.
0301 02
Continued on next page...
Page 8
ABOUT THE BATTERIES
DISCHARGE OK?DISCHARGE OK?
IT MAY TAKE AIT MAY TAKE A
WHILE FORWHILE FOR
DISCHARGINGDISCHARGING
DISCHARGEDISCHARGE
CANCELCANCELOKOK
OKOK
SETSET
SETーUPSETーUP
OKOK
BACKBACK
DISCHAREDISCHARE OKOK
OKOKRESET ALLRESET ALL
2/22/2
1 Getting Ready
LOADING THE BATTERIES AND xD-Picture Card™
2
3
0201
01 02
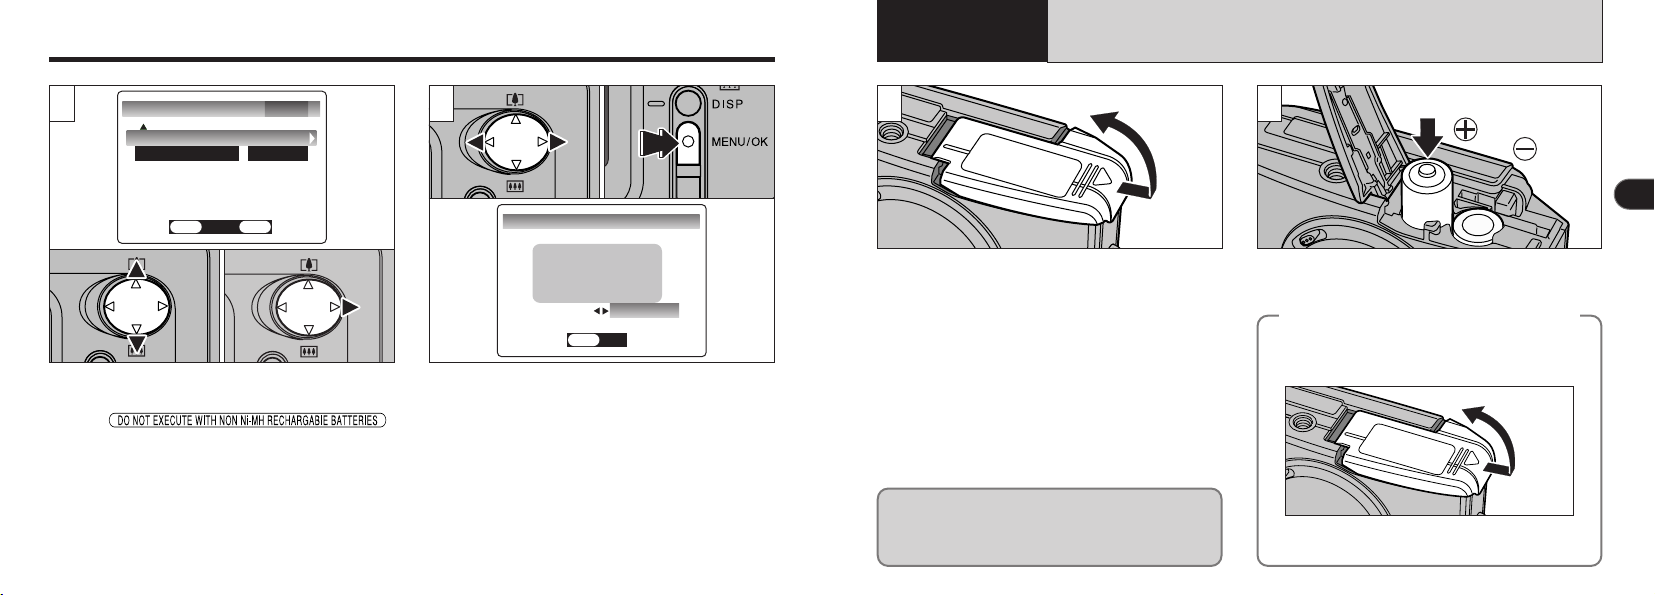
1 Press “a” or “b” to select “DISCHARGE”.
2 Press “c”.
The “ ”
message is displayed.
14 15
1 Press “d” or “c” to select “OK”.
2 Press the “MENU/OK” button.
The LCD monitor changes and discharging
begins.
When the red battery low indicator starts
flashing and discharging ends, the camera
switches off.
!
To cancel discharging, press the “BACK” button.
●
1 2
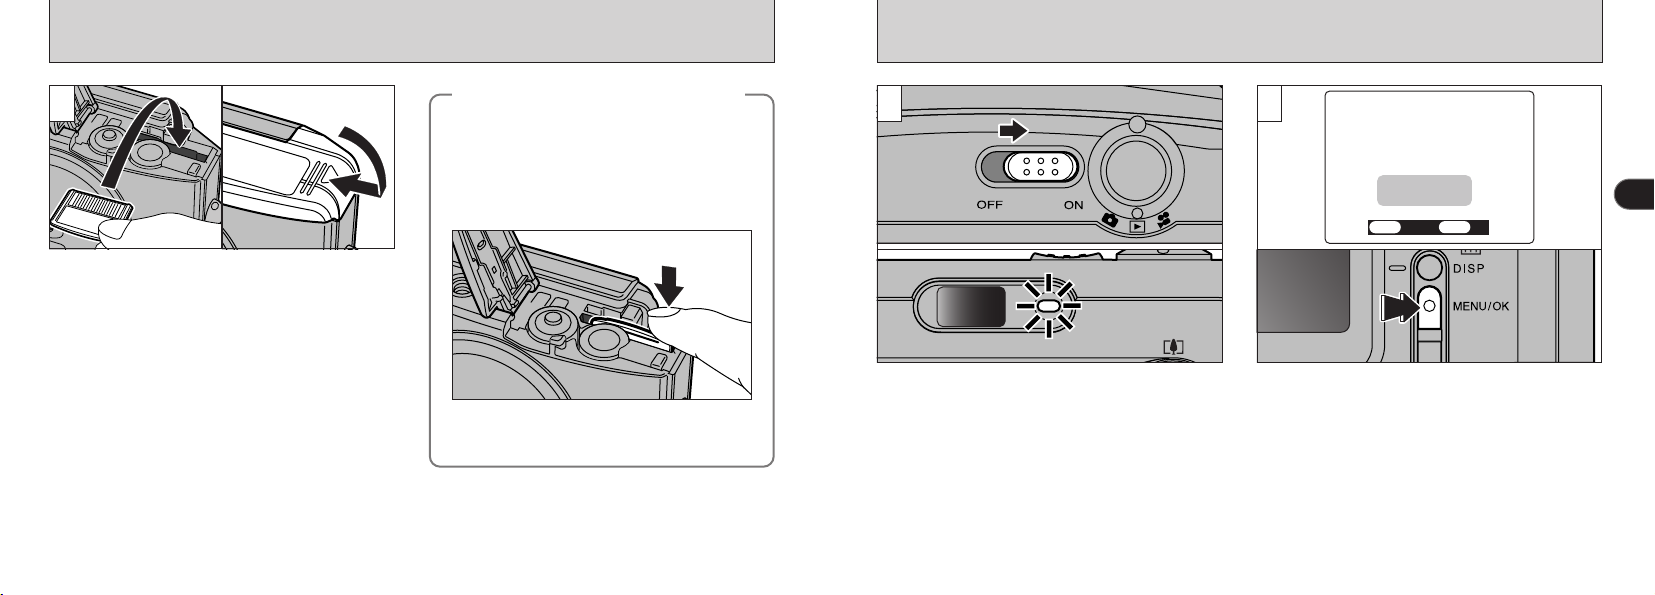
Slide the battery cover out and lift it open. Load the batteries correctly as indicated by the
!
Do not apply excessive force to the battery cover.
●
!
Carry a spare set of batteries (sold separately) when
●
taking pictures.
Do not open the battery cover while the camera
is still switched on as this could corrupt the
image files on the xD-Picture Card or damage
the xD-Picture Card itself.
polarity icons.
When you want to replace the battery
◆
Check that the camera is switched off, open
the battery cover and then remove the
battery.
!
Take care not to drop the battery when opening
●
and closing the battery cover.
◆
1
Page 9
LOADING THE BATTERIES AND xD-Picture Card™
DATE/TIMEDATE/TIME
NOT SETNOT SET
OKOK
BACKBACK
SETSET NONO
Replacing an xD-Picture Card
3
1 Push the xD-Picture Card firmly into the
xD-Picture Card slot as far as it will go.
2 Close the battery cover.
01 02
◆
When you push the xD-Picture Card into the
slot and then slowly remove your finger, the
lock is released and the xD-Picture Card is
pushed out.
You can then pull the xD-Picture Card the
rest of the way out.
◆
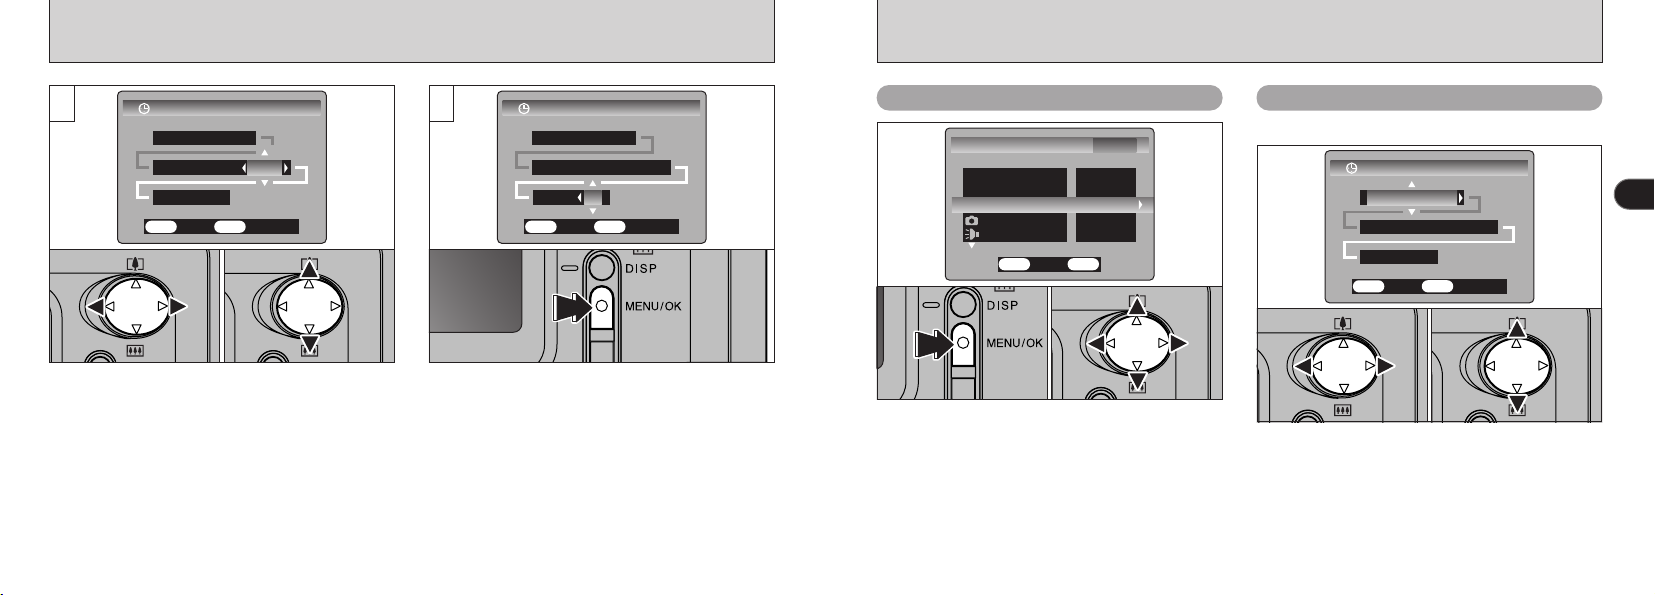
SWITCHING ON AND OFF
21
1
!
If you open the battery cover while the camera is still
●
switched on, the camera is automatically switched
off to protect the xD-Picture Card.
!
The xD-Picture Card will not slide fully into the slot if
●
it is inserted facing the wrong way. Be careful not to
apply undue force to the xD-Picture Card.
!
When storing xD-Picture Card, always use the anti-
●
static case provided.
16
!
Take care not to remove your finger too quickly
●
after the lock is released, as the card may
spring completely out of the slot.
To switch the camera on and off, slide the power
switch sideways. When you switch the camera
on, the viewfinder lamp lights (green).
!
Take care not to touch the lens when you switch the
●
camera on as the lens cover opens when the
camera is switched on.
When you first switch the camera on, the date is
cleared. Press the “MENU/OK” button to set the
date and time.
!
To set the date and time later, press the “BACK”
●
button.
!
If you do not set the date and time, this confirmation
●
screen will appear each time you switch the camera on.
17
Page 10
SETTING THE DATE AND TIME
AMAM
DATE/TIMEDATE/TIME
1 1 . 1 1 . 2003 2003
OKOK
BACKBACK
SETSET
CANCELCANCEL
12 : : 0000
DDDD.MM.YYYYYYYY
PMPM
DATE/TIMEDATE/TIME
20 . 4 . 200320 . 4 . 2003
OKOK
BACKBACK
SETSET
CANCELCANCEL
11 : 59 : 59
DD.DD.MM.MM.YYYYYYYY
SETーUPSETーUP 1/2/2
IMAGE DISP.IMAGE DISP.
ONON
ONON
POWER SAVEPOWER SAVE
DATE/TIMEDATE/TIME
SETSET
LCDLCD
ONON
BEEPBEEP
LOWLOW
OKOK
BACKBACK
AAM
DATE/TIMEDATE/TIME
20 . 4 . 200320 . 4 . 2003
OKOK
BACKBACK
SETSET
CANCELCANCEL
11 : 59 : 59
DD.DD.MM.MM.YYYYYYYY
3
01 02
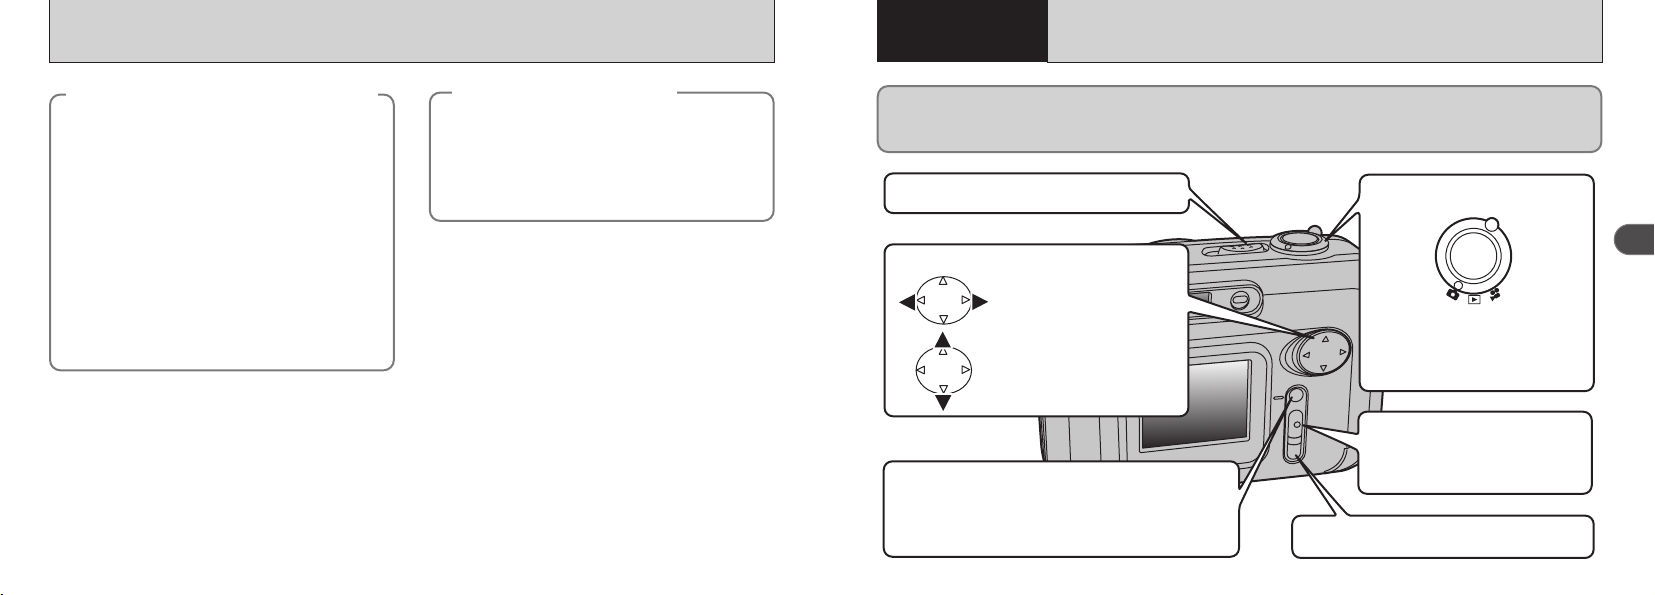
1 Press “d” or “c” to select Year, Month, Day,
Hour or Minute. You can select your preferred
date format.
2 Press “a” or “b” to set the number.
!
If you hold down “a” or “b”, the numbers change
●
continuously.
!
When the time displayed passes “12:00”, the AM/PM
●
setting automatically switches.
18
4
Once you have set the date and time, press the
“MENU/OK” button. Pressing the “MENU/OK”
button switches the camera to Photography or
Playback mode.
!
To set the time precisely, press the “MENU/OK”
●
button when the time is at zero seconds.
!
If the camera is left for 30 minutes or longer with the
●
batteries removed and the AC power adapter
disconnected, the date and time settings may revert
to the factory default settings. If this occurs, reset the
date and time.
Changing the date and time
0103 0402
1 Press the “MENU/OK” button.
2 Press “d” or “c” to select “g” OPTIONS and
then press “a” or “b” to select “SET–UP”.
3 Press the “MENU/OK” button.
4 Select “DATE/TIME” and press “c”.
See P.18 for information on setting the date and
time.
To change the date display format
You can select your preferred date format.
1
01 02
1 Press “d” or “c” to select the date format.
2 Press “a” or “b” to set the format. Refer to
the table below for details of the settings.
19
Page 11
Change frame in playback.
Digital zoom, Playback zoom.
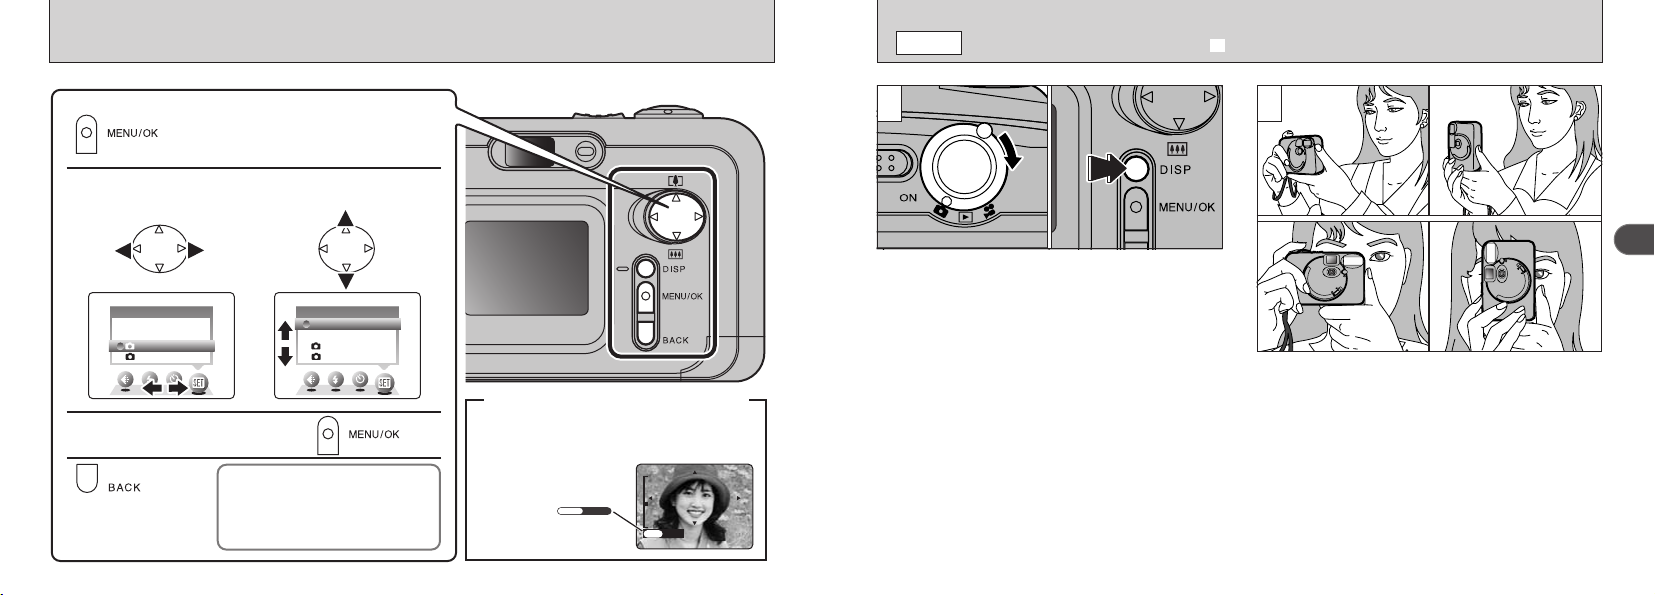
●Main actions performed by a, b, dand c
●DISP button
You can use this button to select the LCD monitor display.
When shooting: Switches the LCD monitor on and off or displays
the framing guides.
During playback: Switches text display on and off or selects multi-
frame playback.
●Power switch
Slide this switch to turn the camera on and off.
●MENU/OK button
Displays the menu screen when you are
shooting or playing back images. You also
press this button to confirm a menu
selection.
●BACK button
Press this button to stop a procedure midway through.
●
Switching between still photography,
playback and movies
Q
Still photography: For recording still
images.
w
Playback: For playing back recorded
data.
T
Movie: For recording movies (P.46).
SETTING THE DATE AND TIME
Basic
2
Photography
BASIC OPERATION GUIDE
Checking the remaining battery charge
◆
Switch the camera on and check that no battery
level warning (
LCD monitor. If no icon is displayed, there is
ample charge left in the batteries.
i
Z Lit red:
Battery charge low. Replace or recharge the
battery as it will run out shortly.
i
X Blinking red:
The batteries are exhausted. The display will
shortly go blank and the camera will stop
working. Replace or recharge the batteries.
!
The above estimates are for the Still photography
●
modes. In Playback mode, the transition from
Z” to “X” may take less time.
“
20
Z or X) is displayed on the
◆
Power Save Function
◆
◆
If the camera is not used for 2 minutes, this
function automatically switches it off.
When this function is enabled, the LCD
monitor switches off to conserve battery
power if the camera is not used in any way
for 30 seconds (See P.68 for details).
You’ve read the chapter on getting ready and the camera is now set up and ready to take pictures.
The Basic Photography section explains the three basic steps of “taking pictures”, “viewing pictures” and
“erasing pictures”. Master the basic steps by actually trying them out on the camera as you go.
2
21
Page 12
BASIC OPERATION GUIDE
●Using the Menus
1
Display the menu.
Press the “MENU/OK” button.
2
Select a menu option.
Press the “d” or “c”.
Press this button to stop
a procedure midway
through.
Help messages are displayed at the bottom of
the screen to show you the next step to take.
Press the button indicated.
Press the “DISP” button
to use the zoom.
In the Owner’s Manual, black triangles
are used to indicate up, down, left
and right. “a” and “b” is used to indicate
up/down. Left and right are indicated
by “d” and “c” respectively.
3
Select a setting.
Press the “a” or “b”.
◆◆
Displaying the On-screen Help
◆
4
Confirm your selection.
Press the “MENU/OK” button.
AUTOAUTO
LCD BRIGHTNESSLCD BRIGHTNESS
SET−UPSET−UP
MANUALMANUAL
OPTIONSOPTIONS
AUTOAUTO
LCD BRIGHTNESSLCD BRIGHTNESS
SET−UPSET−UP
MANUALMANUAL
OPTIONSOPTIONS
DISPDISP
ZOOMZOOM
ZOOM
DISP
Q
MODE
TAKING PICTURES
(
A
AUTO MODE
21
)
22
DISP
ZOOM
Set the Mode switch to “
Q”.
When you are taking shots using the viewfinder,
you can make the batteries last longer by
pressing the “DISP” button to switch the LCD
monitor off. (Note that you cannot switch the
LCD monitor off in Macro mode.)
hFocus distance: Approx. 80 cm (2.6 ft.) to infinity
!
If the “∂”, “ƒ”, “å”
●
˙ ” message appears, see
or “
P.110, 111.
Brace your elbows against your sides and hold
the camera with both hands. Position the thumb
of your right hand so that it is handy for using
the zoom.
!
For close-up shots, use the Macro setting (➡P.29).
●
!
You should use the viewfinder to take pictures
●
(switch the LCD monitor off) to make the batteries
last longer.
!
Use a tripod to avoid camera shake, particularly for
●
shots is dark situations when the flash is set to
Suppressed Flash mode (➡P.39).
2
23
Page 13
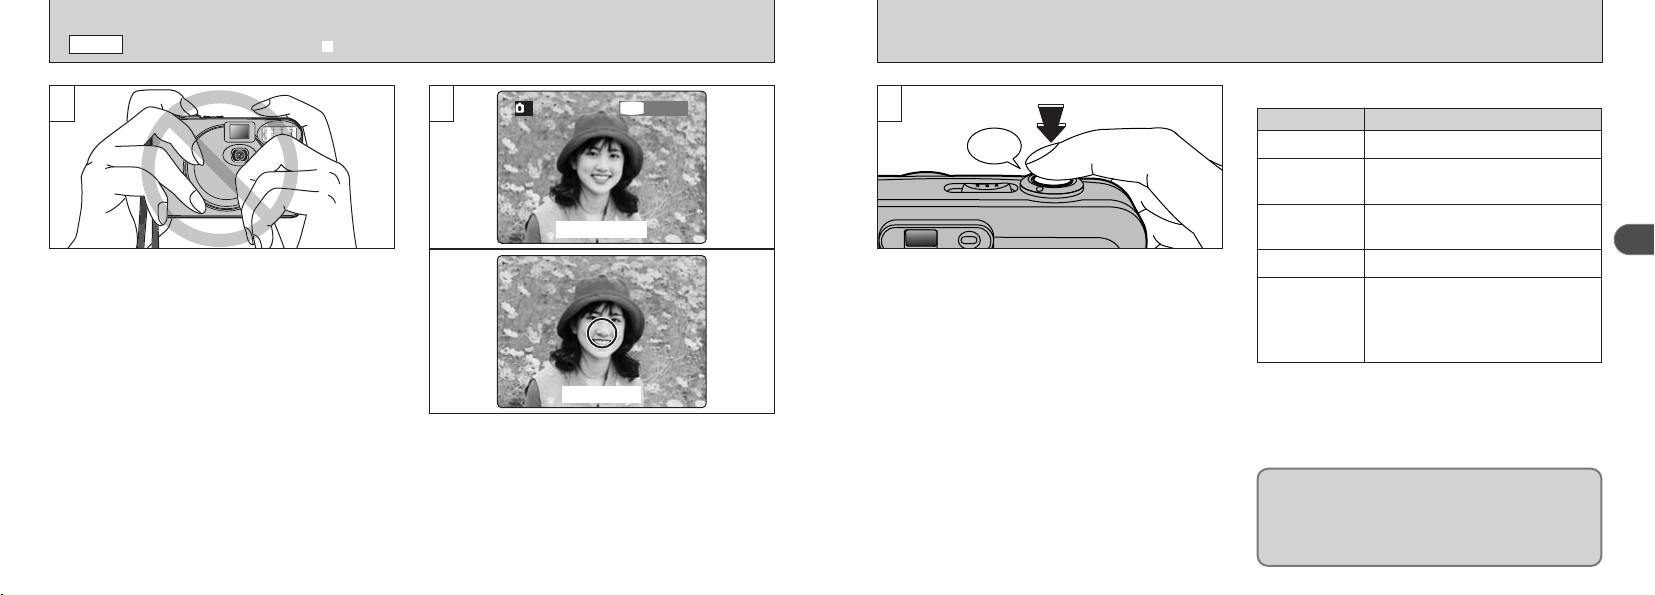
Beep
4949
1M1M
A
Q
MODE
TAKING PICTURES
(
A AUTO MODE
3
Take care to hold the camera so that your
fingers or the strap do not cover the lens, flash
or flash control sensor. If the lens, flash or flash
control sensor is obscured by your fingers or the
camera strap, you may not be able to obtain the
correct brightness (exposure) for your shot.
!
There may be some unevenness in the brightness at
●
the lower edge of the LCD monitor. This is normal
and does not indicate a fault. This does not affect
the photographed image.
24
!
●
!
●
Check that the lens is clean. If it is dirty, clean the
lens as described on P.104.
If you use the flash in very dusty conditions or when
it is snowing, white dots may appear in the image
due to the flash reflecting off the dust particles or
snowflakes. Try taking the shot with the flash
switched off.
)
4
LCD monitor
Viewfinder
Use the LCD monitor or viewfinder to locate your
subject in the frame.
!
To frame your shot precisely, you should take the
●
picture using the LCD monitor.
!
In some conditions it may be difficult to see your
●
subject clearly on the LCD monitor. (Such as in
sunny weather outdoors or when you are shooting
dimly lit scenes.) In such situations, use the
viewfinder to take the shot.
5
When you press the shutter button, the camera
emits a short beep and takes the picture. The
data is then recorded.
!
When you press the shutter button, there is a very
●
short delay before the picture is actually taken.
!
The viewfinder lamp flashes orange while the flash is
●
charging. If the LCD monitor is switched on, the
screen may go dark for a moment. This is normal
and does not indicate a fault.
!
The flash charging time may increase when the battery
●
charge gets lower.
!
See P.110, 111 for information on the warning
●
displays.
Viewfinder lamp display
■
Display Status
Lit green Ready to shoot.
Blinking green and
orange alternately
Lit orange
Blinking orange Charging the flash (flash will not fire).
Blinking red
✽ Detailed warning messages are displayed on the
LCD monitor (➡P.110, 111).
During image recording, the viewfinder lamp
lights orange and you cannot take pictures. Note
also that switching the camera off or opening the
battery cover during image recording could
corrupt the image files.
Recording data to the xD-Picture Card
(ready to shoot).
Recording data to the xD-Picture Card
(not ready to shoot).
ixD-Picture Card-related warning.
The xD-Picture Card is not inserted, is
not formatted, is incorrectly formatted.
xD-Picture Card full. xD-Picture Card
fault.
2
25
Page 14
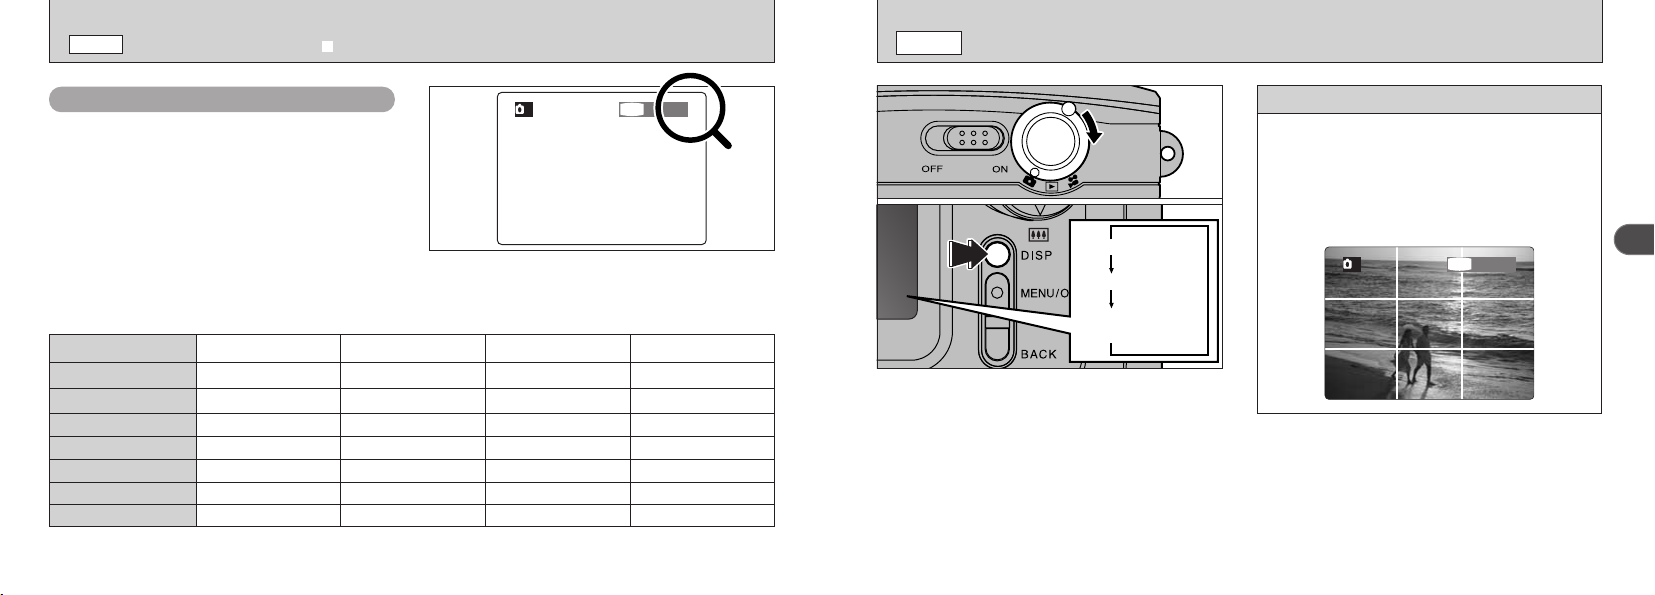
LCD monitor OFF
LCD monitor ON
Framing guideline
displayed
4949
1M1M
A
Q
4949
1M1M
A
MODE
TAKING PICTURES
(
A AUTO MODE
Q
)
MODE
FRAMING GUIDELINE FUNCTION
Number of Available Frames
The number of available shots is displayed on
the LCD monitor.
!
See P.38 for information on changing the quality.
●
!
The default quality setting “y” set at shipment is
●
1.
■ Standard number of shots per xD-Picture Card
Because the amount of data recorded varies depending on the subject, the number of available shots may not decrease
when recording ends, or may decrease by 2 frames. The discrepancy between the standard number of available shots
and the actual number of available shots increases in proportion to the capacity of the xD-Picture Card.
Quality
Number of recorded pixels
Image Data Size
DPC-16 (16 MB)
DPC-32 (32 MB)
DPC-64 (64 MB)
DPC-128 (128 MB)
DPC-256 (256 MB) 319 638 798 1997
✽ Number of available shots displayed on the camera for a new xD-Picture Card formatted in the camera.
26
4 4M 2 2M
2304 × 1728 1600 × 1200 640 × 480
Approx. 790 KB Approx. 390 KB
19
39
79
159
39
79
159
319
1 1M ` 0.3M
1280 × 960
Approx. 320 KB Approx. 130 KB
49
99
198
398
122
247
497
997
You can select the framing guide function in “Q”
Still photography mode. The mode shown on the
LCD monitor switches each time you press the
“DISP” button. Press the “DISP” button to
display the framing guideline.
!
The framing guideline is not recorded on the image.
●
!
The lines in the scene frame roughly divide the
●
recorded pixels into three parts horizontally and
vertically. When the image is printed, the resulting
print may be shifted slightly from the scene frame.
Scene
Use this frame when you want to position your
main subject in the center of the frame or when
you want to align your shot with the horizon.
This feature provides a clear guide to the
subject size and the overall balance of the shot
so that you get exactly the shot you want.
2
27
Page 15
4949
1M1M
A
Q
4949
1M1M
A
MODE
DIGITAL ZOOM
Q
MODE
E MACRO
(
CLOSE-UP)PHOTOGRAPHY
1
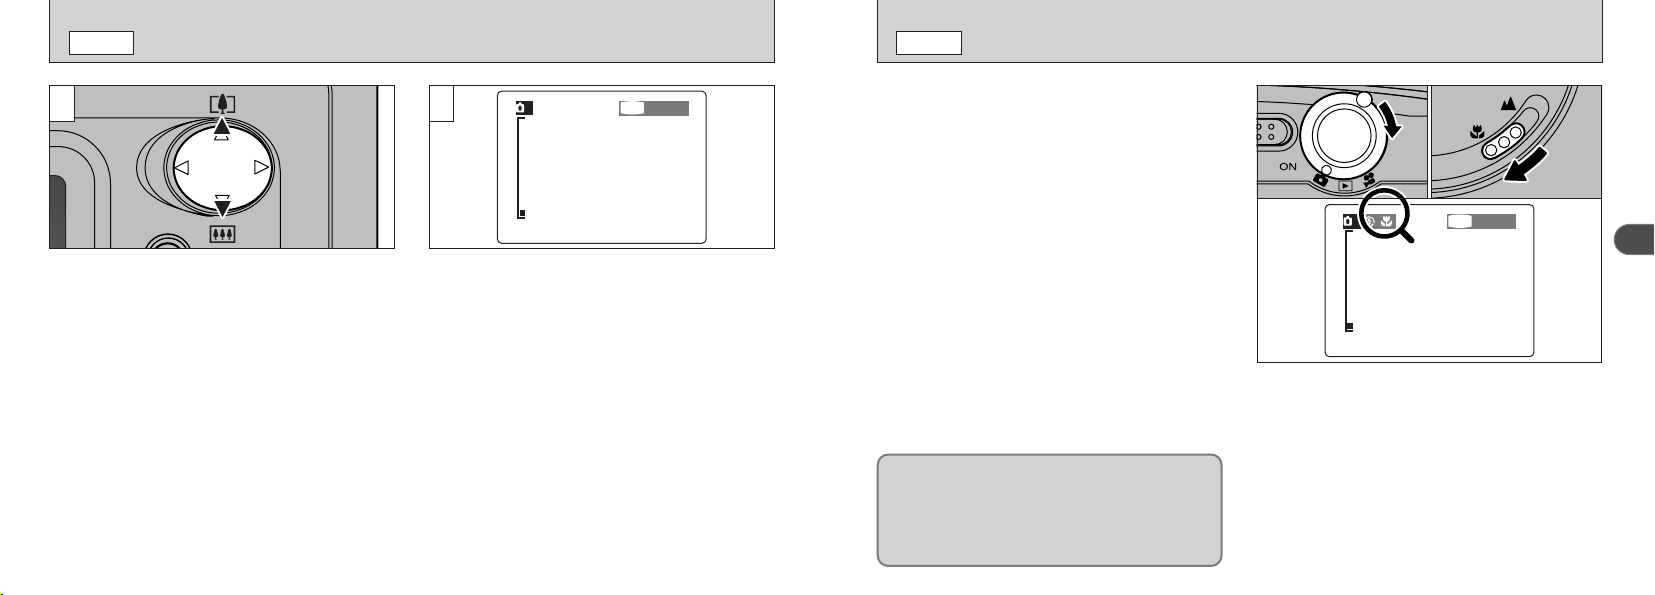
You can use the digital zoom function for only
“1” “`” quality settings. Note that the digital
zoom only functions when you use the LCD
monitor to take shots.
To zoom in on your subject, press “a ”
(}TELE). To zoom out, press “b” ({WIDE).
28
!
●
!
●
You cannot use the digital zoom for “4”
See P.38 for information on changing the quality
setting.
2
A “zoom bar” appears on the LCD monitor.
hDigital zoom focal length (35 mm camera
equivalent)
2: Equivalent to approx. 36 mm to 51 mm
Max. zoom scale: 1.44×
1: Equivalent to approx. 36 mm to 65 mm
Max. zoom scale: 1.8×
`: Equivalent to approx. 36 mm to 97 mm
Max. zoom scale: 2.7×
Selecting Macro mode allows you to take closeup shots. If the flash is set to “AUTO” or “n”
Red-eye Reduction mode, it is automatically set
to “b” Suppressed Flash mode.
●
Focus distance:
Approx. 8 cm to 13 cm (3.1 in. to 5.1 in.).
!
Using the camera width (about 10 cm or 4 in.) as a
●
guide, ensure that the distance to the subject is
between 8 cm and 13 cm (3.1 in to 5.1 in.). The camera
will not focus on subjects outside this focal range.
!
To use the flash, select the “c” Forced Flash or “v”
●
Slow Synchro setting in the menu screen (➡P.40,
41). However, you may not be able to obtain the
correct brightness (exposure) for your shot.
!
When shooting in dark conditions, use a tripod to
●
prevent camera shake.
!
The LCD monitor automatically switches on.
●
!
You cannot switch the LCD monitor off.
●
If you use the viewfinder to take a picture in
Macro mode, the field visible through the
viewfinder does not match the field actually
photographed because the viewfinder and lens
are in different positions. Accordingly use the
LCD monitor to take pictures in Macro mode.
0201
1Set the Mode switch to “Q”.
2To switch to Macro mode, slide the Macro
selector switch towards the Macro icon until it
stops.
“E” : The “E” icon appears on the LCD monitor
and you can take close-up shots.
“,” : Macro mode is cancelled and the camera
is ready for normal shooting (➡P.23).
!
When you cancel Macro mode, the LCD monitor
●
remains on.
2
29
Page 16
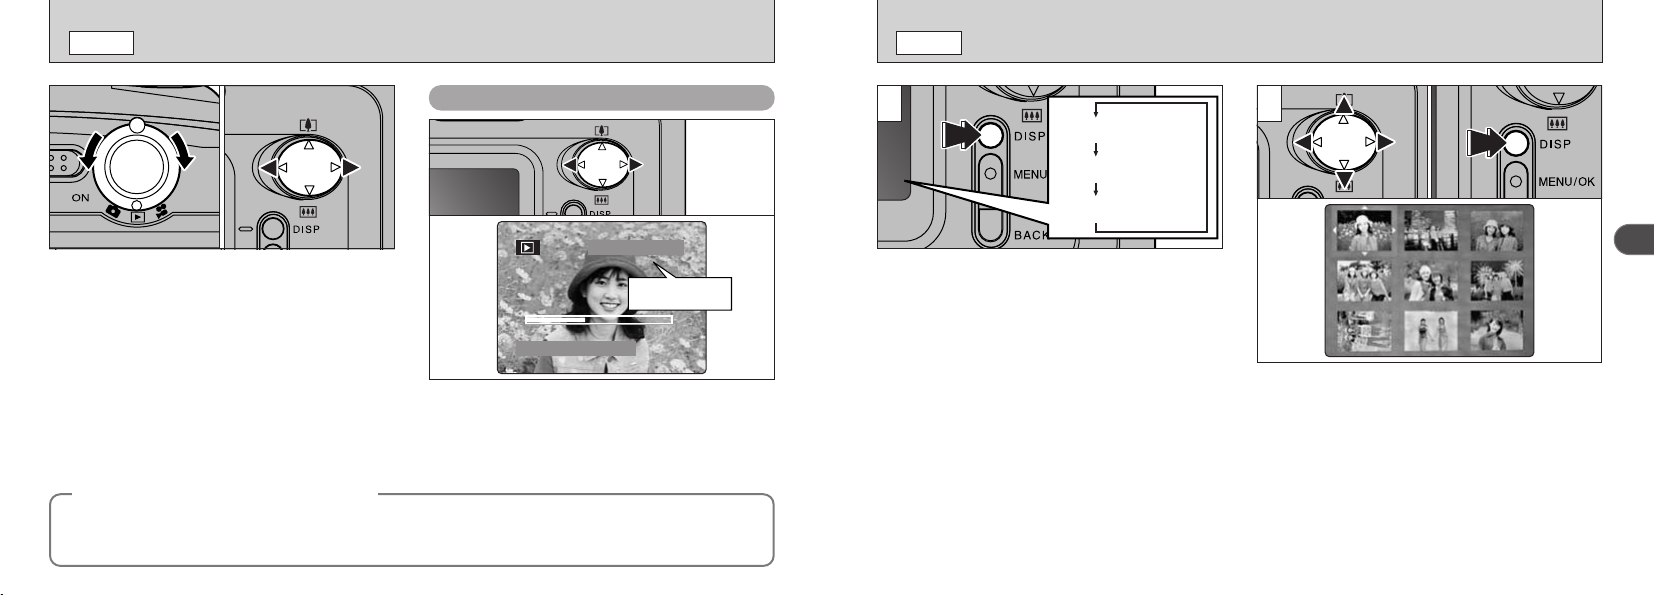
20. 4.200320. 4.2003
100−0009100−0009
No text displayed
Multi-frame playback
Normal playback
w
Playback frame
number
MODE
VIEWING YOUR IMAGES (PLAYBACK
w
)
MODE
MULTI-FRAME PLAYBACK
01 02
1Set the Mode switch to “
2Press “d ” or “c ” to move forward and
backward respectively through your images.
!
When you set the Mode switch to “w”, the last
●
image shot is displayed.
Still images that can be viewed
◆
You can use this camera to view still images recorded on the FinePix A403 or still images
(excluding some uncompressed images) recorded on a FUJIFILM digital camera that supports xD-
Picture Cards.
30
w”.
◆
Fast Forwarding Images
During playback, you can skip backwards or
forwards through the images (the frame number
increases or decreases) by holding down “d” or
“c” for approximately 1 second.
1 2
In playback mode, the display shown on the
LCD monitor switches each time you press the
“DISP” button. Press the “DISP” button until the
multi-frame playback screen (9 frames) appears.
You cannot display text during multi-frame
playback.
!
Do not use multi-frame playback while a menu is
●
displayed.
!
Playback zoom cannot be used with multi-frame
●
playback.
01 02
2
1 Select a frame by pressing “d”, “c”, “a” or
“b” to move the cursor (the orange box) to
the desired frame. Press the “a ” or “b ”
several times to switch to the previous page
or the next page.
2 Enlarge the selected image by pressing the
“DISP” button again.
31
Page 17
ALL FRAMESALL FRAMES
FORMATFORMAT
FRAMEFRAME
BACKBACK
ERASEERASE
ALL FRAMESALL FRAMES
FORMATFORMAT
FRAMEFRAME
BACKBACK
ERASEERASE
DISPDISP
ZOOMZOOM
DISPDISP
PANNINGPANNING
w
MODE
PLAYBACK ZOOM
w
MODE
ERASING SINGLE FRAME
1 2
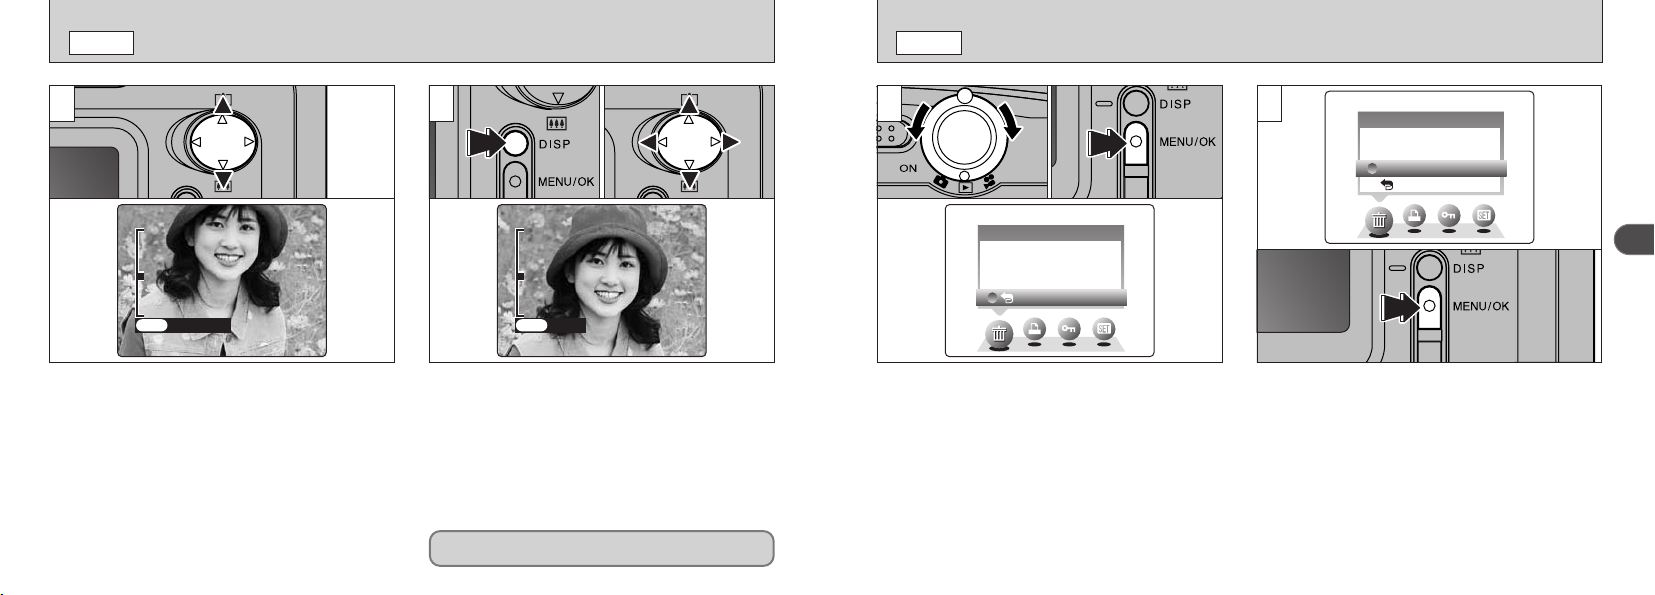
Pressing “a” or “b” during single-frame playback
zooms in (enlarges) or out on a still image. When
you use this function, a zoom bar is displayed.
hZoom scales:
4 2304 ×1728 pixel images: Max 7.2×
2 1600 ×1200 pixel images: Max 5×
1 1280 × 960 pixel images: Max 4×
` 640 × 480 pixel images: Max 2×
!
Pressing “d” or “c” during zooming cancels zooming
●
and moves to the next image.
!
Multi-frame playback cannot be used with Playback zoom.
32
●
020301
After you have zoomed in on your image,
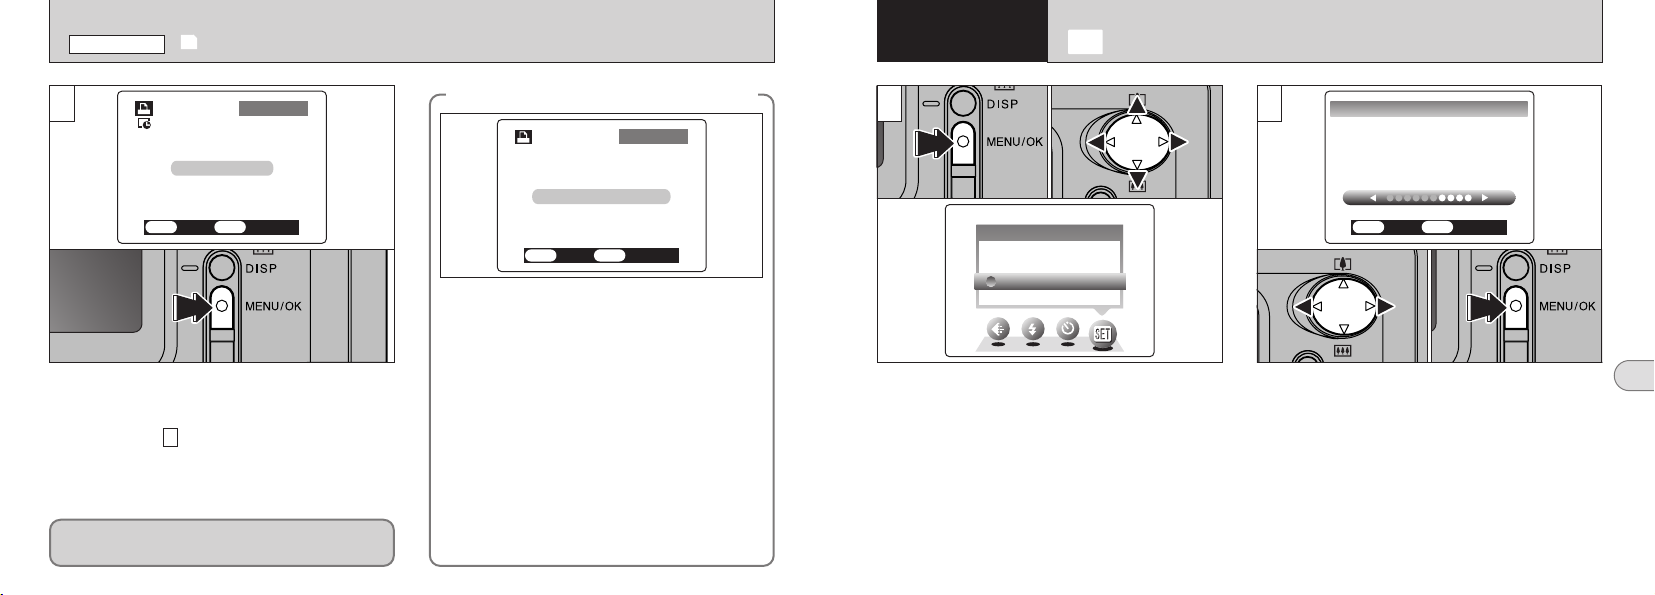
1Press the “DISP” button.
2Press “a”, “b”, “d” or “c” to zoom in on different
parts of the image.
3Press the “DISP” button again to revert to
zoomed display.
!
You may not be able to use playback zoom for some
●
images shot on other camera models.
!
Press the “BACK” button to return to normal unscaled
●
display.
This is useful for such things as checking the focus
after you take a shot.
1 2
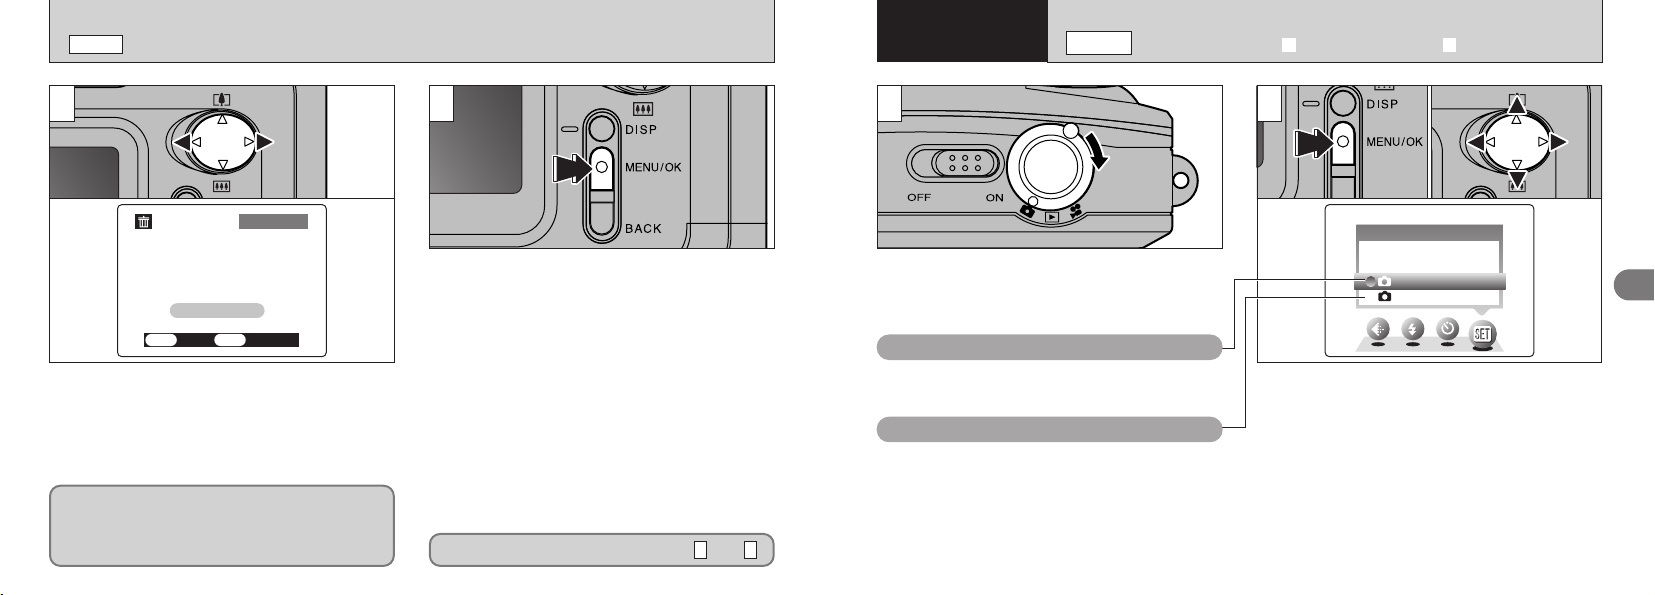
1 Set the Mode switch to “w”.
2 Press the “MENU/OK” button to display the
Menu screen on the LCD monitor.
!
To revert to image playback without erasing the
●
image, select “BACK” and press the “MENU/OK”
button.
01 02
Select “FRAME” in the “
press the “MENU/OK” button.
See P.52 for more information on “ALL FRAMES”
and “FORMAT”.
p” ERASE menu and
2
33
Page 18
AUTOAUTO
LCD BRIGHTNESSLCD BRIGHTNESS
SET−UPSET−UP
MANUALMANUAL
OPTIONSOPTIONS
FRAMEFRAME
ERASE OK?ERASE OK?
OKOK
BACKBACK
SETSET
CANCELCANCEL
100−0020100−0020
w
MODE
ERASING SINGLE FRAME
Advanced Features
3
Photography
Q
MODE
SELECTING
A
AUTO OR
S
MANUAL
Press “d” or “c” to view the frame (selected file)
you want to erase.
!
●
Note that mistakenly erased images cannot be
recovered. You should copy important files that
you do not want to be erased to your computer
or another media.
34
Press the “BACK” button to cancel frame erasing.
43
Pressing the “MENU/OK” button erases the
frame (selected file) displayed. When erasing is
complete, the next image appears and the
“§” message is displayed.
To erase another frame, repeat steps and .
43
1
Set the Mode switch to “Q”.
!
See P.46 for information on shooting movies.
●
Q
AUTO
This is the easiest mode for taking pictures and
can be used in a wide range of conditions.
Q
MANUAL
This mode allows you to specify your own
brightness and white balance settings.
2
1 Press the “MENU/OK” button to display the
menu.
2 Press “d” or “c” to select “g” OPTIONS and
then press “a” or “b” to select “Q AUTO” or
“Q MANUAL”.
3Press the “MENU/OK” button to confirm the
selection.
0301 02
3
35
Page 19
PHOTOGRAPHY MENU OPERATION
20. 4.200320. 4.2003
4949
1M1M
A
QUALITYQUALITY
4M4M
2M
1M
19
19
3939
122122
4949
0.3.3M
FRAMESFRAMES
EVEV
−
0.30.3
0
+
0.30.3
+
0.60.6
QUALITYQUALITY
320320
160160
160160×120120
320320×240240
PHOTOGRAPHY AND MOVIE MENU OPTIONS
1
0301 02
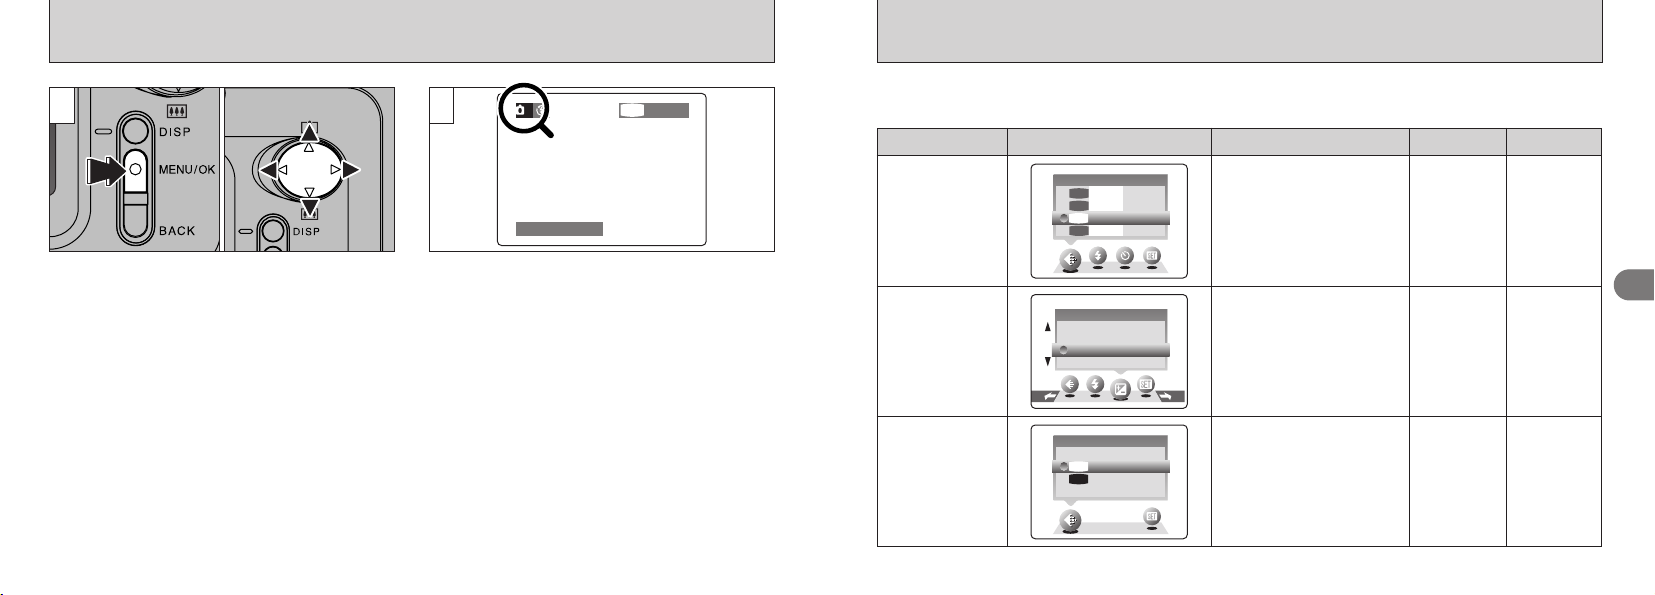
1Press the “MENU/OK” button to display the
menu.
2Press “d” or “c” to select the menu item and
“a” or “b” to change the setting.
3Press the “MENU/OK” button to confirm the
selection.
36
2
When you validate the settings, the respective
icons appear at the top of the screen.
!
The settings available in the menu screen differ
●
depending on the still photography mode.
The “Advanced Features Photography” section introduces a range of camera functions that you can
access by setting the Mode switch to “Q” or “T”.
–
0
–
–
Explanation
P.38
P.39
P.42
P.67
P.38
P.39
P.44
P.45
P.67
P.49
P.67
Mode
A AUTO
S MANUAL
T MOVIE
Sample LCD monitor display Accessible menu settings
QUALITY
y
FLASH
c
SELF-TIMER
=
OPTIONS
g
QUALITY
y
FLASH
c
EV
d
WHITE BALANCE
a
OPTIONS
g
QUALITY
y
OPTIONS
g
Default settings
1
AUTO
OFF
1
AUTO
AUTO
# 320 × 240
3
37
Page 20
FLASHFLASH
AUTOAUTO
PHOTOGRAPHY MENU
QUALITYQUALITY
4M4M
2M
1M
19
19
3939
122122
4949
0.3.3M
FRAMESFRAMES
SETTING THE QUALITY
y
✽ Displaying the menus (➡P.36)
PHOTOGRAPHY MENU
c
FLASH
✽ Displaying the menus (➡P.36)
This mode can be selected in the “A”,
“S” still photography modes.
You can choose from 4 settings. Use the table on
the right as a guide for selecting the best setting
for the shot you want to take.
38
!
The numbers to the right of each setting show the
●
!
●
number of available shots.
When you change the quality, the number of
available shots also changes.
Use
Printing
Internet
<Examples>
hFor printing on A4 paper → 4
hFor printing on A5 paper → 2
hFor printing on A6 (postcard) paper → 1
hFor an image attached to E-mail or used on a
website → `
!
Image quality can be changed afterwards using
●
FinePixViewer software, which is provided with
camera.
Quality
4 (2304 × 1728)
2 (1600 × 1200)
1 (1280 × 960)
` ( 640 × 480)
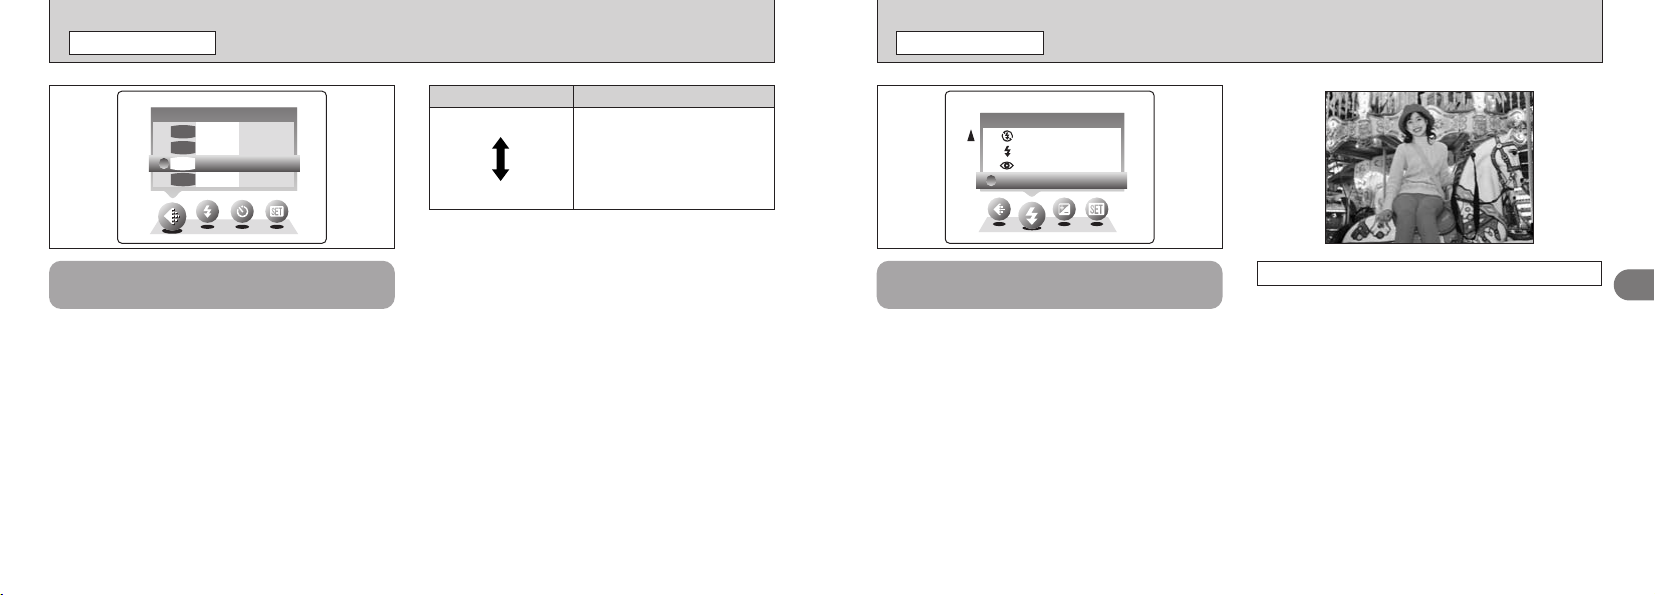
This mode can be selected in the “A”,
“S” still photography modes.
Use the flash mode that best suits your shot.
h5 modes: “AUTO”, “
hEffective flash range (in “A AUTO” mode):
Approx. 0.8 m to 3.0 m (2.6 ft. to 9.8 ft.)
!
If you use the flash in very dusty conditions or when it
●
is snowing, white dots may appear in the image due to
the flash reflecting off the dust particles or snowflakes.
Try taking the shot with the flash switched off.
!
The flash charging time may increase if the charge
●
remaining in the batteries is low.
!
When you take a shot using the flash, you may see
●
the video image disappear and the screen go dark
as the flash charges. The viewfinder lamp blink
orange while the flash is charging.
n”, “c”, “b” or “v”
Auto Flash Mode
AUTO
Use this mode for ordinary photography. The
flash fires automatically as required by the
shooting conditions.
!
Do not use this setting in Macro (close-up)
●
photography.
3
39
Page 21
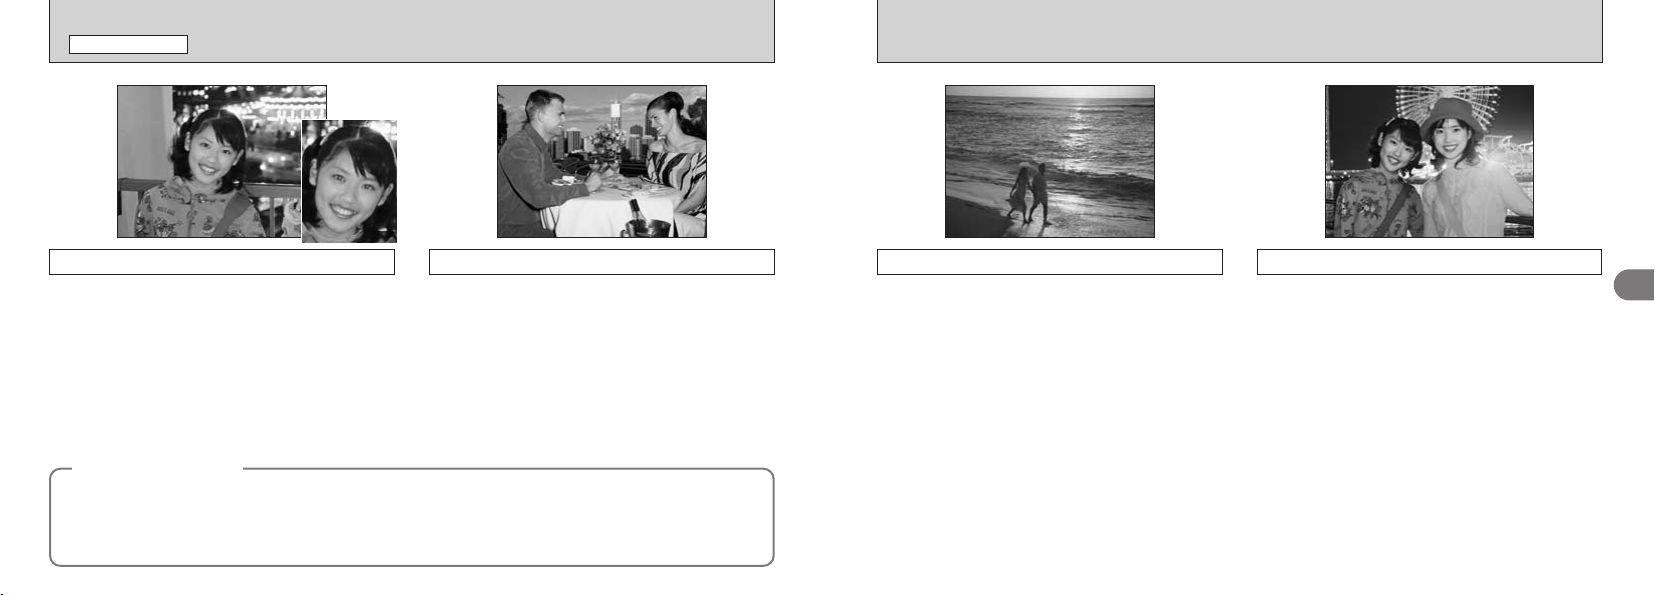
PHOTOGRAPHY MENU
c FLASH
Red-Eye Reduction
n
Use this mode to ensure that the subject’s eyes
appear natural when photographing people in
low-light conditions. The flash fires automatically
as required by the photography conditions.
The flash fires a pre-flash just before the picture is
taken and then fires again to take the actual picture.
!
Do not use this setting in Macro (close-up)
●
photography.
Red-Eye Effect
◆
When you use the flash to photograph people in low-light conditions, their eyes sometimes appear red in
the picture. This is caused by the light of the flash reflecting off the inside of the eye. Use Red-Eye
Reduction flash to effectively minimize the likelihood of the red-eye effect.
Take the following measures also to make Red-Eye Reduction more effective:
●
Get the subjects to look at the camera.
40
◆
●
Forced Flash
c
Use this mode to photograph backlit scenes,
such as a subject against a window or in the
shade of a tree, or to obtain the correct colors
when you are shooting under lighting such as
fluorescent tubes. In this mode, the flash fires in
bright as well as dark conditions.
Get as close as possible to the subjects.
Suppressed Flash
b
Use this mode for photography using indoor
lighting, for shots taken through glass, and for
photography in venues such as theaters or at
indoor sporting events where the distance is too
great for the flash to be effective. When you use
Suppressed Flash, the Automatic White Balance
function (➡P.115) operates so that natural colors
are captured along with the ambience of the
available light.
!
If you are shooting in Suppressed Flash mode in dark
●
conditions, use a tripod to prevent camera shake.
!
See P.110 for information on the camera shake
●
warning.
Slow Synchro
v
This is a flash mode that uses a slow shutter
speed. This allows you to take pictures of people
at night that clearly show both your subjects and
the night time backdrop.
!
The image may be overexposed when you shoot
●
bright scenes.
!
Because a slow shutter speed is used, a tripod
●
should be used to prevent camera shake.
3
41
Page 22
Beep
1M1 M
A
49 49
88
PHOTOGRAPHY MENU
SELFーTIMERSELFーTIMER
OFFOFF
ONON
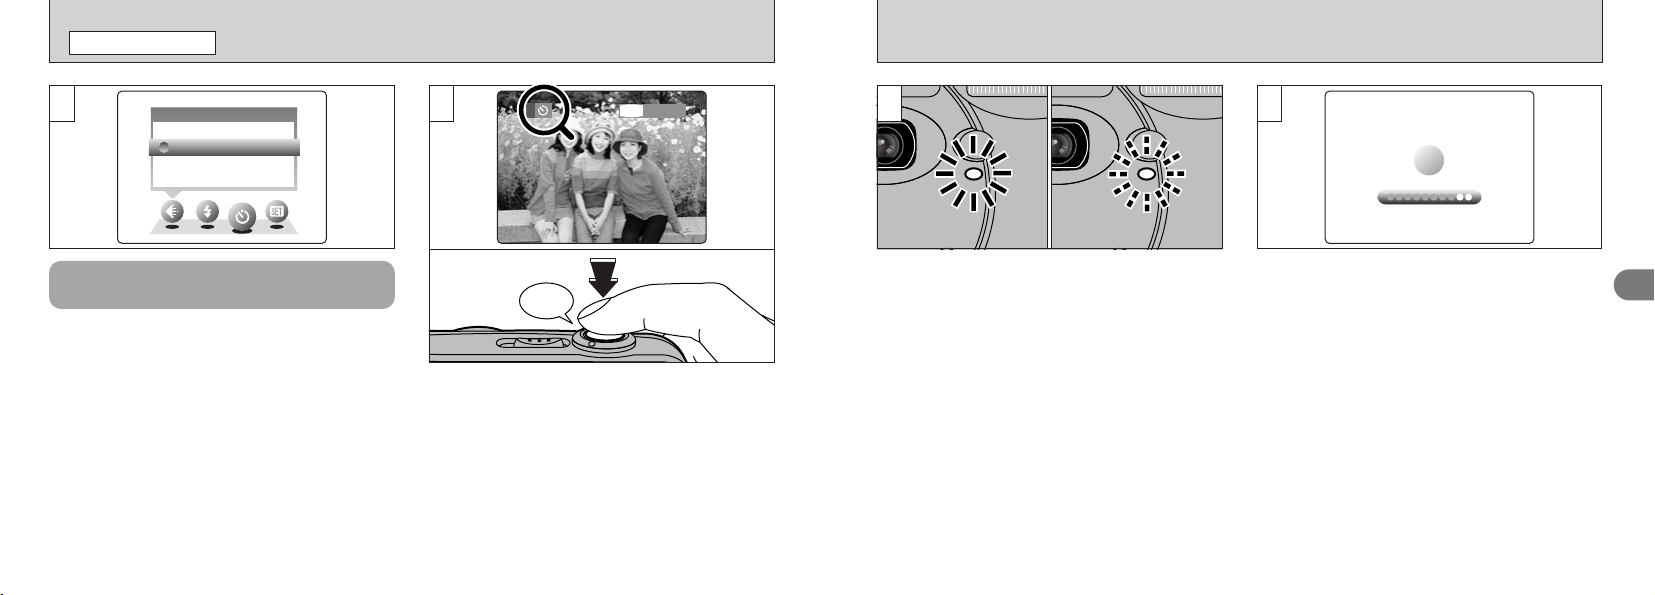
SELF-TIMER PHOTOGRAPHY
=
✽ Selecting A/S (➡P.35)
✽ Displaying the menus (➡P.36)
1 2
This mode can be selected in the
“A” still photography mode.
In this mode, a timer runs for roughly 10
seconds before the shutter is released. Use this
mode for shots such as photographs of yourself.
!
The self-timer is automatically cancelled in the
●
following situations:
i When you take a picture
i When you switch from the “A” Still photography
mode to another mode
42
i When the camera is switched off
Locate the subject in the LCD monitor or
viewfinder and frame the shot. Then press the
shutter button to start the self-timer.
!
Do not stand in front of the camera when you press
●
the shutter button as this will result in an incorrect
brightness (exposure) setting for the shot.
3
The self-timer lamp lights steadily for
approximately 5 seconds, blinks for another
approximately 5 seconds and then takes the shot.
!
To stop the self-timer once it has started running,
●
press the “BACK” button.
4
The LCD monitor counts down the time until the
shot is taken.
Self-timer mode is automatically cancelled after
each shot.
3
43
Page 23
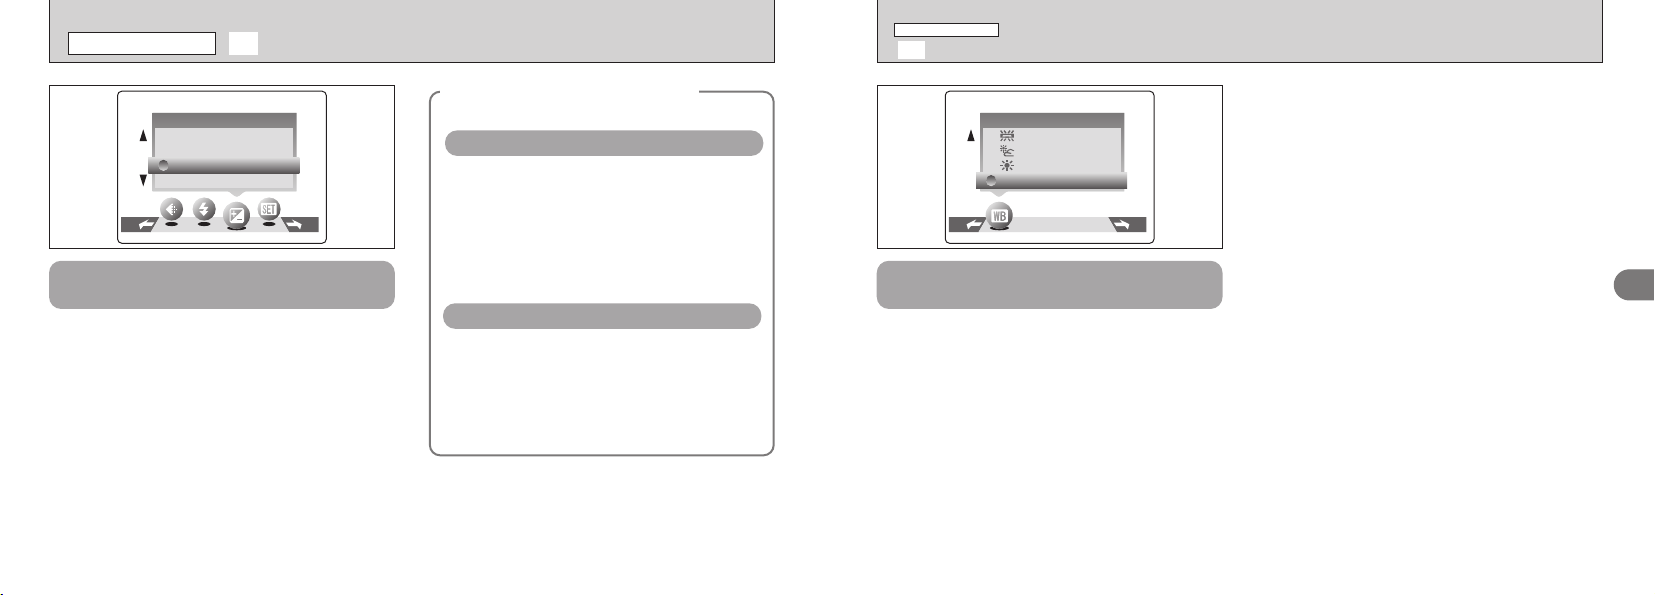
WHITE BALANCEWHITE BALANCE
AUTOAUTO
1
EVEV
−
0.30.3
0
+
0.30.3
+
0.60.6
PHOTOGRAPHY MENU
d
EV (EXPOSURE COMPENSATION
✽ Selecting A/S (➡P.35)
)
✽ Displaying the menus (➡P.36)
PHOTOGRAPHY MENU
a
WHITE BALANCE (SELECTING THE LIGHT SOURCE
✽ Selecting A/S (➡P.35)
)
✽ Displaying the menus (➡P.36)
This mode can be selected in the
“S” still photography mode.
Use the Brightness setting to obtain the optimum
image brightness (exposure) when the subject is
much brighter or darker than the background.
hCompensation:
–2.1 EV to +1.5 EV
(13 levels in 0.3 EV increments)
See P.115 for information on EV.
!
The Brightness setting is disabled in the following
●
situations:
i When the flash is used in Auto or Red-Eye
Reduction mode.
i When dark scenes are shot in Forced Flash mode.
44
Subjects for Which Exposure
◆
Adjustment is Particularly Effective
◆
Guide to using + (positive) compensation
h Copying of printed text (black characters on
white paper) (+1.5 EV)
h Backlit portraits (+0.6 EV to +1.5 EV)
h Very bright scenes (such as snowfields) and
highly reflective subjects (+0.9 EV)
h Shots made up predominantly of sky
(+0.9 EV)
Guide to using – (negative) compensation
h Spotlit subjects, particularly against dark
backgrounds (–0.6 EV)
h Copying of printed text (white characters on
black paper) (–0.6 EV)
h Scenes with low reflectivity, such as shots of
pine trees or dark foliage (–0.6 EV)
This mode can be selected in the
“S” still photography mode.
Change the white balance setting when you
want to take a picture with the white balance
fixed for the surroundings and lighting when the
picture is taken.
In Auto mode, the correct white balance may not
be obtained for subjects such as close-ups of
people’s faces and shots taken under a special
light source. In such situations, select the correct
white balance for the light source. See P.108 for
information on the white balance.
AUTO: Automatic adjustment
(Shooting to show the ambience of the
light source)
: Shooting outdoors in fine weather
6
: Shooting in shade
7
: Shooting under “Daylight” fluorescent
9
lamps
: Shooting under “Warm White” fluorescent
0
lamps
: Shooting under “Cool White” fluorescent
-
lamps
: Shooting in incandescent light
8
✽ The white balance setting is ignored when the flash is
used. To achieve the desired effect in your shot, set
the flash to Suppressed Flash mode (➡P.41).
3
45
Page 24
STANDBYSTANDBY
20s20s
T
STANDBYSTANDBY
20s20s
MODE
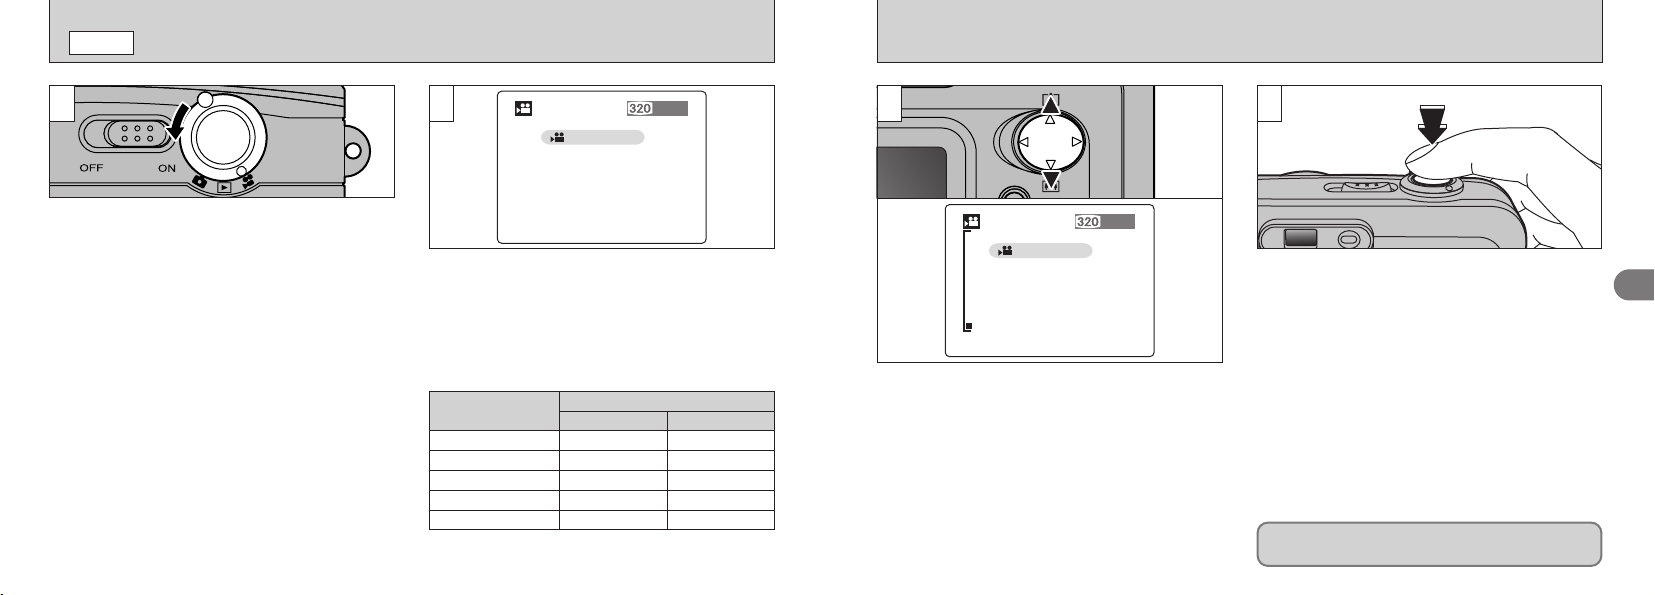
T MOVIE
1
Set the Mode switch to “T”.
This mode allows you to shoot movies up to 20
seconds (at the # setting) or 80 seconds (at
the $ setting) without sound. (See P.49 for
information on quality settings.)
hSpecifications: Motion JPEG (➡P.115)
!
Select Macro mode for close-up shots (➡P.29).
●
!
Depending on the available space on the xD-Picture
●
Card, the available shooting time per movie may be
shorter.
!
Do not switch the LCD monitor off in this mode.
●
!
It may not be possible to play back your movie on
●
46
other cameras.
# (320 × 240 pixels) or
$ (160 × 120 pixels)
selectable
10 frames per second
Without sound
2
The available shooting time and the “œ”
message are shown on the LCD monitor.
■ xD-Picture Card recording time
Approx.
Approx.
Approx.
Approx.
Approx.
Quality mode
1.6 min.
3.3 min.
6.6 min.
13.3 min.
26.7 min.
Approx.
Approx.
Approx.
Approx.
Approx.
$#
5.6 min.
11.3 min.
22.7 min.
45.5 min.
91.2 min.
xD-Picture Card
Capacity
DPC-16 (16 MB)
DPC-32 (32 MB)
DPC-64 (64 MB)
DPC-128 (128 MB)
DPC-256 (256 MB)
✽ The available recording time displayed on the camera
for a new xD-Picture Card formatted in the camera.
3
Press “a” or “b” to zoom in and out. A “zoom
bar” is displayed on the LCD monitor.
hDigital zoom focal length (35 mm camera
equivalent)
#: Approx. 36 mm to 97 mm
Max. zoom scale: 2.7×
$: Approx. 36 mm to 97 mm
Max. zoom scale: 2.7×
4
When you press the shutter button, the camera
starts shooting.
!
When you press the shutter button, there is a very
●
brief delay before the camera starts shooting.
!
Do not need to hold down the shutter button.
●
!
The white balance is fixed during shooting, but the
●
exposure varies automatically to suit the scene being
shot.
!
The image shown on the LCD monitor before you
●
take the shot may differ in its brightness, color, etc.
from the image shown on the monitor during movie
recording.
The white balance is set automatically when you
press the shutter button.
3
47
Page 25
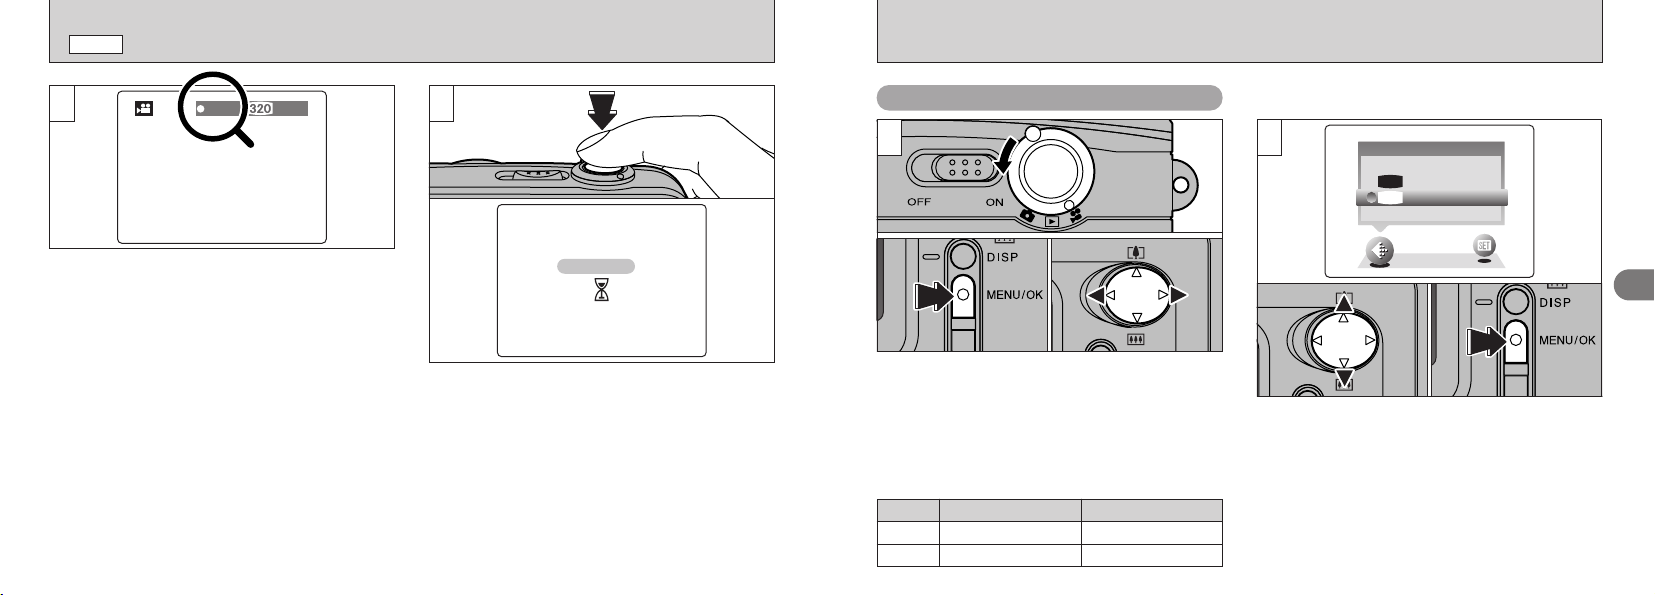
QUALITYQUALITY
160×120160×120
320×240320×240
320320
160160
STORINGSTORING
RECREC
19s19s
T
MODE
T MOVIE
5
During shooting, “hREC” appears on the LCD
monitor with a counter showing the remaining
time displayed in the top-right corner.
!
Once the remaining time runs out, movie recording
●
automatically stops and the movie is stored on the
xD-Picture Card.
48
6
If you press the shutter button during shooting,
shooting ends and the movie is stored on the
xD-Picture Card.
!
The time required to record a 20 second movie
●
(roughly 3 MB) is approximately 3 seconds.
!
If you end shooting immediately after you start
●
shooting, only 1 second of movie is shot.
Quality settings for movies
1
01
02 03
1 Set the Mode switch to “
2 Press the “MENU/OK” button to display the
menu screen.
3 Press “d” or “c” to select “y” QUALITY.
You can select 2 levels of quality. For better
image quality, select “# ”, and for longer
photography time, select “$”.
Movie Size
#
$
320 × 240
160 × 120
T”.
Maximum shooting time
20 sec.
80 sec.
21
3
01 02
1 Press “a” or “b” to change the quality setting.
2 Press the “MENU/OK” button to confirm the
selection.
49
Page 26
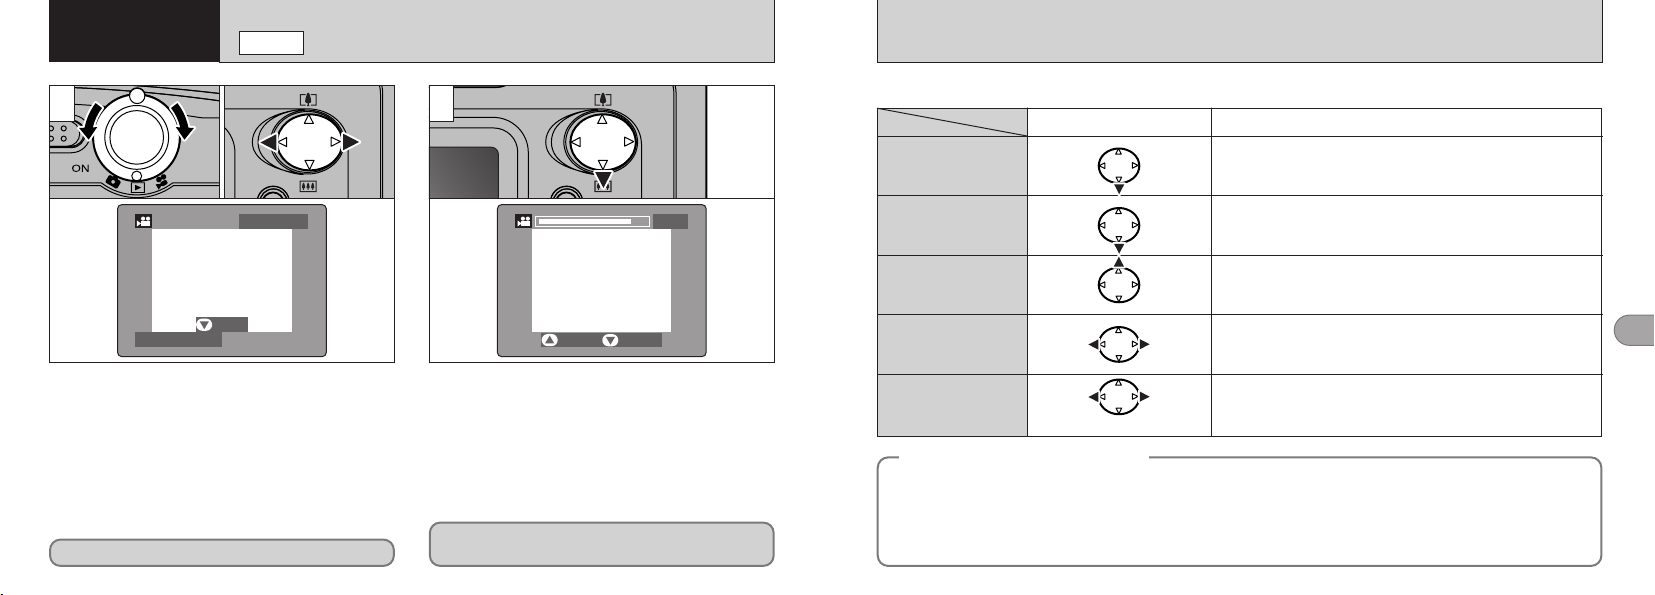
7s7s
STOPSTOP PAUSEPAUSE
100−0012100−0012
20. 4.200320. 4.2003
PLAYPLAY
Advanced
4
Features Playback
w
MODE
PLAYING BACK MOVIES
1
1Set the Mode switch to “w”.
2Press “d” or “c” to select the movie file.
!
Movies cannot be played back using multi-frame
●
playback. Use the “DISP” button to revert to normal
playback.
Indicated by the “T” icon.
50
02
2
0101
02
1Press “b” to play the movie.
2The LCD monitor shows the playback time
and a playback progress bar.
!
If the subject of the movie is very bright, white
●
streaks may appear on the image during playback.
This is normal and does not indicate a fault.
Movies are displayed somewhat smaller than
still images.
■ Playing back movies
Control Description
Playback
Pause/Resume
Stop
Fast forward/Rewind
Skip playback
Playing back movie files
◆
i This camera may not be able to play back movie files (10 fps) that were recorded on a camera other than
FinePix A403. This camera cannot play back sound.
i To play back movie files on a computer, save the movie file on the xD-Picture Card to the computer’s hard disk
and then play back the saved file.
i Movie files contain large amounts of data. Depending on the performance of the computer, movies may not run
smoothly if the computer cannot process the images quickly enough.
Rewind Forward
When paused
◆
The movie automatically stops when playback ends.
Pauses the movie during playback.
Press this button again to resume playback.
Stops playback.
✽ Press “d” or “c” while movie playback is stopped to go back
to the previous file or advance to the next file respectively.
Press these during playback to skip forwards or backwards
through the movie.
i Each time you press “d” or “c” when the movie is paused,
the movie advances or goes back one frame.
i Hold down the button to move through the frames quickly.
4
51
Page 27
ALL FRAMESALL FRAMES
FORMATFORMAT
FRAMEFRAME
BACKBACK
ERASEERASE
ALL FRAMESALL FRAMES
FORMATFORMAT
FRAMEFRAME
BACKBACK
ERASEERASE
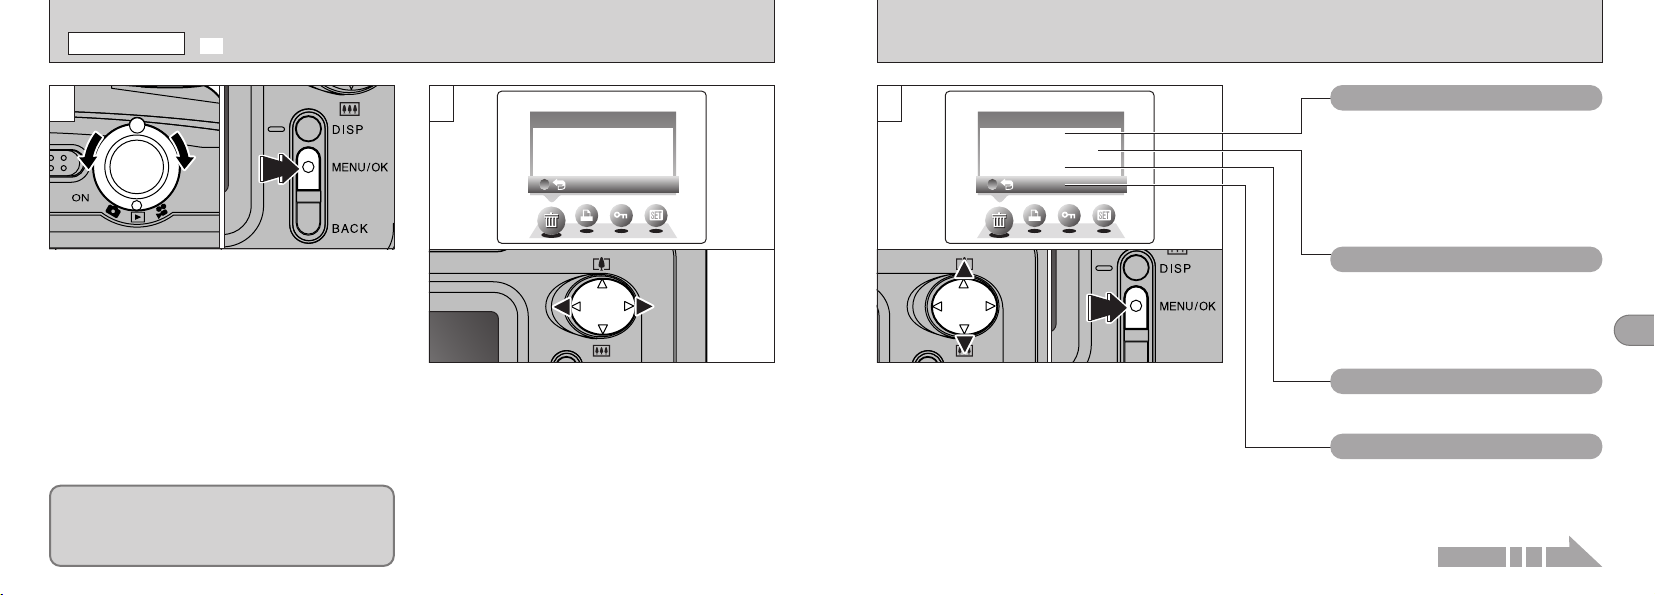
PLAYBACK MENU
p
ERASING SINGLE ALL FRAMES/FORMATTING
1
1 Set the Mode switch to “w”.
2 Press the “MENU/OK” button to view the
menu screen.
Note that mistakenly erased images cannot be
recovered. You should copy important files that
you do not want to be erased to your computer
or another media.
52
01 02
2
Press “d” or “c” to select “
p” ERASE.
3
01 02
1 Press “a” or “b” to select “FRAME”, “ALL
FRAMES” or “FORMAT”.
2 Press the “MENU/OK” button to confirm the
selection.
FORMAT
Erases all the files. Because formatting
also erases protected files, check
carefully before formatting a card and
copy any files that you want to keep
onto another media, such as your hard
disk.
ALL FRAMES
Erases all unprotected files.
Copy important files that you do not
want to be erased to your computer or
another media.
FRAME
Erase only the selected file.
BACK
Returns to playback without erasing
any files.
Continued on next page...
4
53
Page 28
BACKBACK
CANCELCANCEL
100−0020100−0020
ALL FRAMESALL FRAMESALL FRAMESALL FRAMES
PLAYBACK MENU
FRAMEFRAME
ERASE OK?ERASE OK?
OKOK
BACKBACK
SETSET
CANCELCANCEL
100−0020100−0020
OKOK
BACKBACK
SETSET
CANCELCANCEL
100−0020100−0020
ALL FRAMESALL FRAMES
ERASE ALL OK?ERASE ALL OK?
IT MAYIT MAY
TAKE A WHILETAKE A WHILE
FORMATFORMAT
FORMAT OK?FORMAT OK?
ERASE ERASE
ALL DATAALL DATA
OKOK
BACKBACK
SETSET
CANCELCANCEL
100−0020100−0020
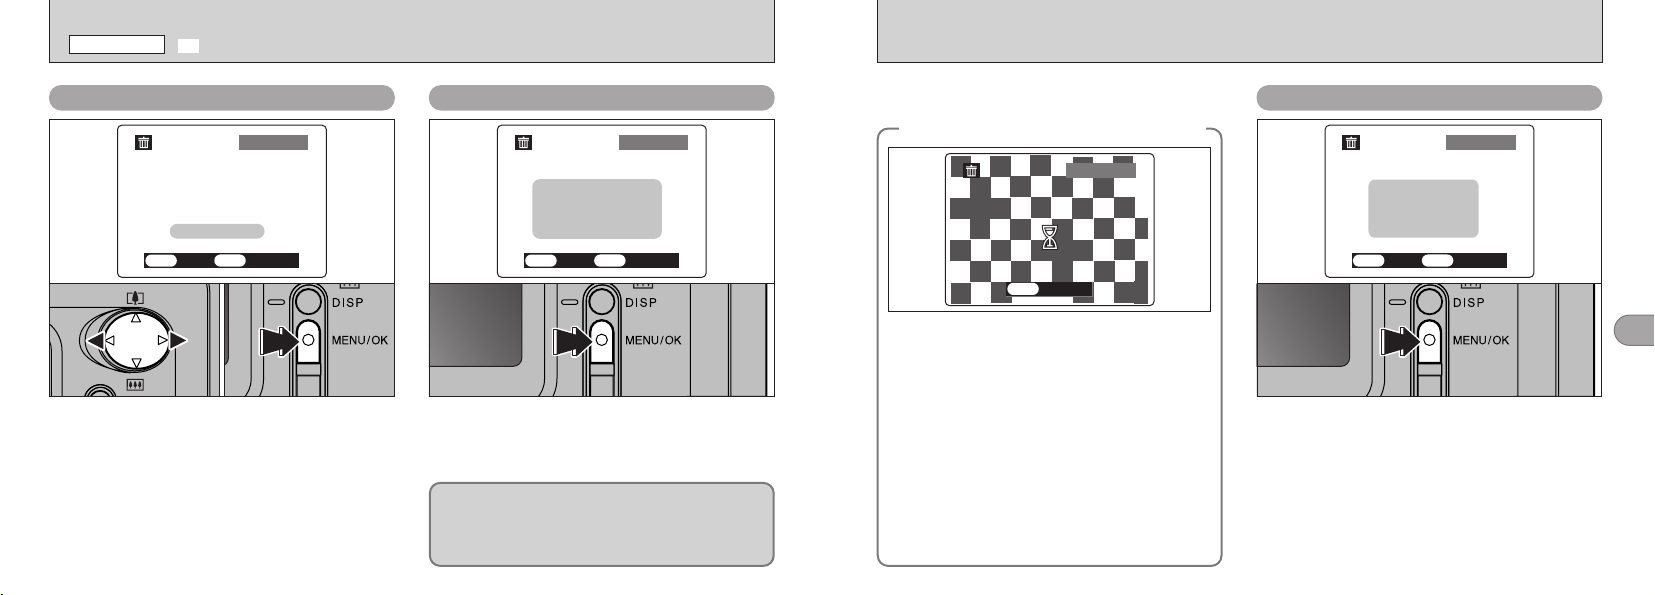
p ERASING SINGLE ALL FRAMES/FORMATTING
FRAME ALL FRAMES
01 02
1 Press “d ” or “c ” to select the file to be
erased.
2 Press the “MENU/OK” button to erase the
To erase another image, repeat steps 1 and 2.
When you have finished erasing images, press
the “BACK” button.
!
●
54
currently displayed file.
The file for which “ˆ” was displayed
cannot be erased. Remove the protection.
Pressing the “MENU/OK” button erases all the
unprotected files.
If the “
ø
“
press the “MENU/OK” button once more to erase
the image.
©
” message appears,
FORMAT
To stop the procedure mid-way
◆
When you want to cancel the erase all
frames procedure, press the “BACK” button.
”
!
Even if you stop the procedure immediately,
●
some files will be erased.
◆
Pressing the “MENU/OK” button erases all the
files and initializes the xD-Picture Card.
Formatting erases protected files also.
!
If the “∂”, “ƒ”, “å”
●
˙” message appears, refer to
or “
P.110, 111 before formatting the xD-Picture Card
and take the appropriate measures.
4
55
Page 29
UNPROTECT ALLUNPROTECT ALL
PROTECT ALLPROTECT ALL
FRAME SET/RESETFRAME SET/RESET
PROTECTPROTECT
UNPROTECT ALLUNPROTECT ALL
PROTECT ALLPROTECT ALL
FRAME SET/RESETFRAME SET/RESET
PROTECTPROTECT
PLAYBACK MENU
k
PROTECTING IMAGES FRAME/ALL
1
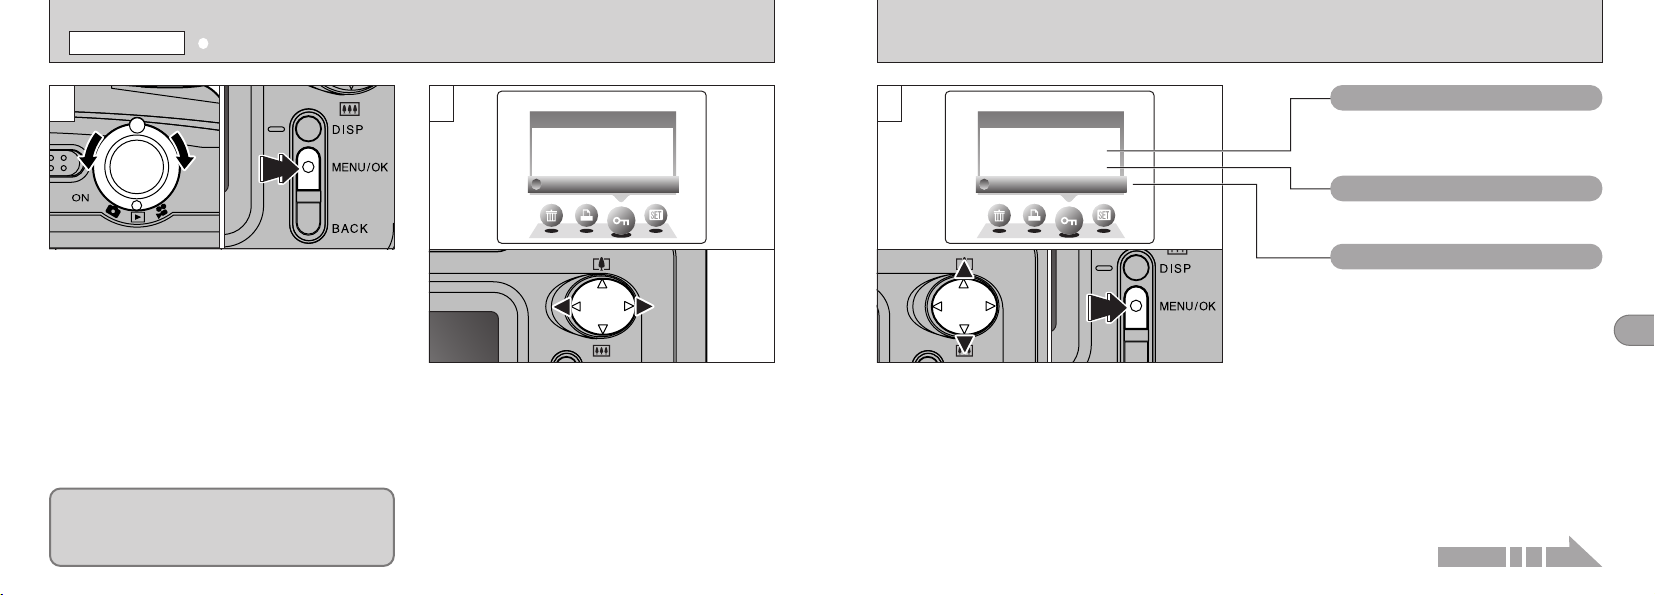
1 Set the Mode switch to “w”.
2 Press the “MENU/OK” button to view the
menu screen.
!
Multi-frame playback is an easy way to select
●
images to be protected (➡P.31).
Protection is a setting that prevents images from
being accidentally erased. However, “FORMAT”
erases all images, regardless of protection
setting (➡ P.55).
56
01 02
2
Press “d” or “c” to select “
k
” PROTECT.
3
01 02
1 Press “a” or “b” to select “UNPROTECT ALL”,
“PROTECT ALL” or “FRAME SET/RESET”.
2 Press the “MENU/OK” button to confirm the
selection.
UNPROTECT ALL
Removes the protection from all the
files.
PROTECT ALL
Protects all the files.
FRAME SET/RESET
Protects or unprotects only the
selected file.
Continued on next page...
4
57
Page 30
FRAMEFRAME
UNPROTECT OK?UNPROTECT OK?
OKOK
BACKBACK
SETSET
CANCELCANCEL
100−0020100−0020
FRAMEFRAME
PROTECT OK?PROTECT OK?
OKOK
BACKBACK
SETSET
CANCELCANCEL
100−0020100−0020
BACKBACK
CANCELCANCEL
100−0001100−0001
RESET ALLRESET ALL
PLAYBACK MENU
OKOK
BACKBACK
SETSET
CANCELCANCEL
100−0020100−0020
SET ALLSET ALL
SET ALL OK?SET ALL OK?
IT MAY IT MAY
TAKE A WHILETAKE A WHILE
OKOK
BACKBACK
SETSET
CANCELCANCEL
100−0020100−0020
RESET ALLRESET ALL
RESET ALL OK?RESET ALL OK?
IT MAY IT MAY
TAKE A WHILETAKE A WHILE
k
PROTECTING IMAGES FRAME/ALL
FRAME SET/RESET
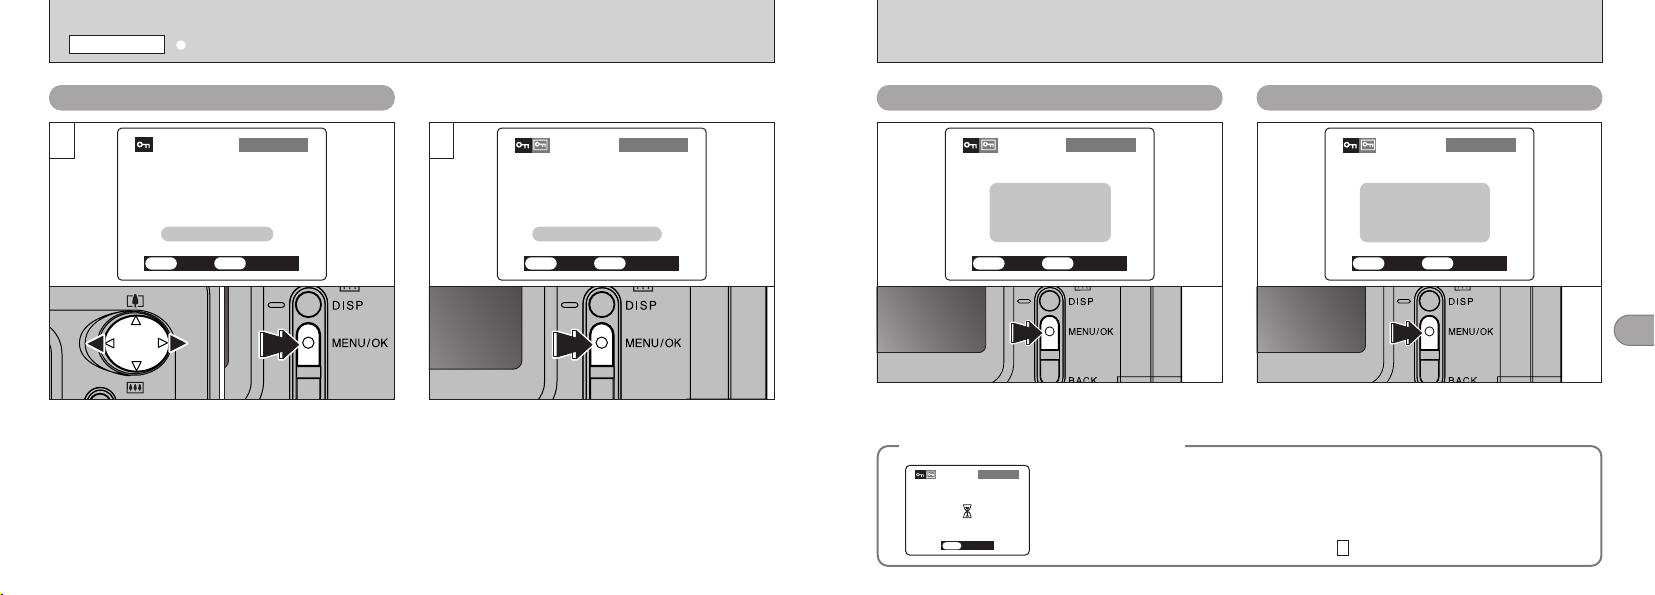
1 2
01 02
1 Press “d ” or “c ” to select the file to be
protected.
2 Press the “MENU/OK” button to protect the
To protect another file, repeat steps 1 and 2.
To finish protecting files, press the “BACK”
button.
58
file currently displayed.
To remove the protection, press the “MENU/OK”
button.
PROTECT ALL
Press the “MENU/OK” button to protect all the
files.
To stop the procedure mid-way
◆
If the photographed images are very large, protecting or unprotecting all the
frames may take some time.
If you want to shoot a picture or a movie during the procedure, press the
“BACK” button. To then return to protecting or unprotecting all the frames,
start the procedure on page 56 from step .
◆
UNPROTECT ALL
Press the “MENU/OK” button to unprotect all the
files.
1
4
59
Page 31
OKOK
DPOFDPOF
DATE OFFDATE OFF
PLAYBACK MENU
i HOW TO SPECIFY PRINT OPTIONS (DPOF
)
PLAYBACK MENU
i DPOF SET FRAME
60
DPOF stands for Digital Print Order Format and refers to a format that is used for
recording printing specifications for images shot using a digital camera on media such as
xD-Picture Card. The recorded specifications include information on which frames are to
be printed.
This section gives a detailed description of how to order your prints with the FinePix A403.
On the FinePix A403, you can specify only one print per image in the DPOF settings.
✽ Note that some printers do not support date and time imprinting or specification of the
number of prints.
✽ Note that the warnings shown below may be displayed while you are specifying the
prints.
©
ø (➡P.54)
When you erase the image, the DPOF setting for that image is deleted at the same time.
¥ (➡P.64)
If you load an xD-Picture Card that contains frames specified for printing on another
camera, those print specifications are all reset and replaced by the new print specifications.
™ (➡P.111)
Up to 999 frames can be specified on the same xD-Picture Card.
1
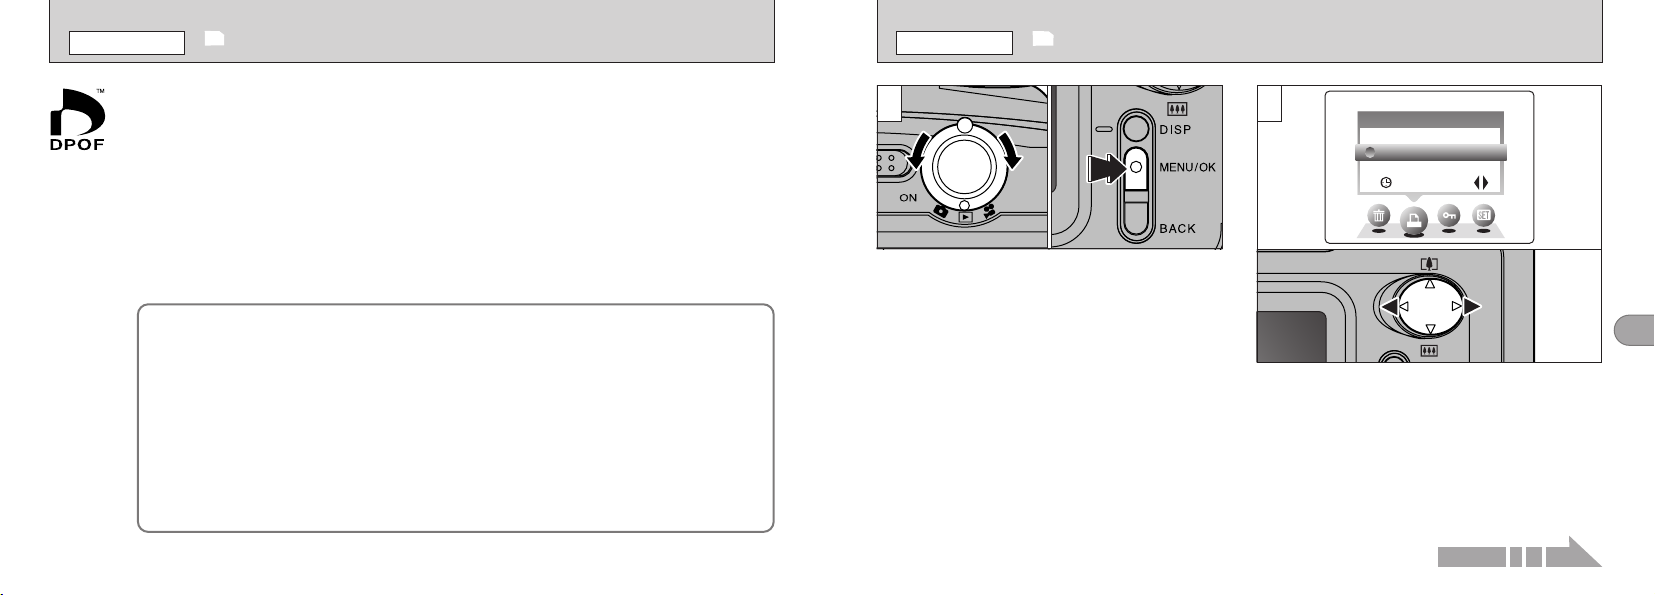
1 Set the Mode switch to “w”.
2 Press the “MENU/OK” button to display the
menu screen.
01 02
2
Press “d” or “c” to select “
i” DPOF.
Continued on next page...
61
4
Page 32
100−0001100−0001
DPOF DPOF
TOTAL/004TOTAL/004
YESYES
NO NO
FINISH FINISH
OKOK
BACKBACK
OKOK
DPOFDPOF
DATE ONDATE ON
OKOK
DPOFDPOF
DATE ONDATE ON
PLAYBACK MENU
100−0020100−0020
DPOF DPOF
TOTAL/003TOTAL/003
YESYES
NO NO
FINISH FINISH
OKOK
BACKBACK
i DPOF SET FRAME
3 4
01 02
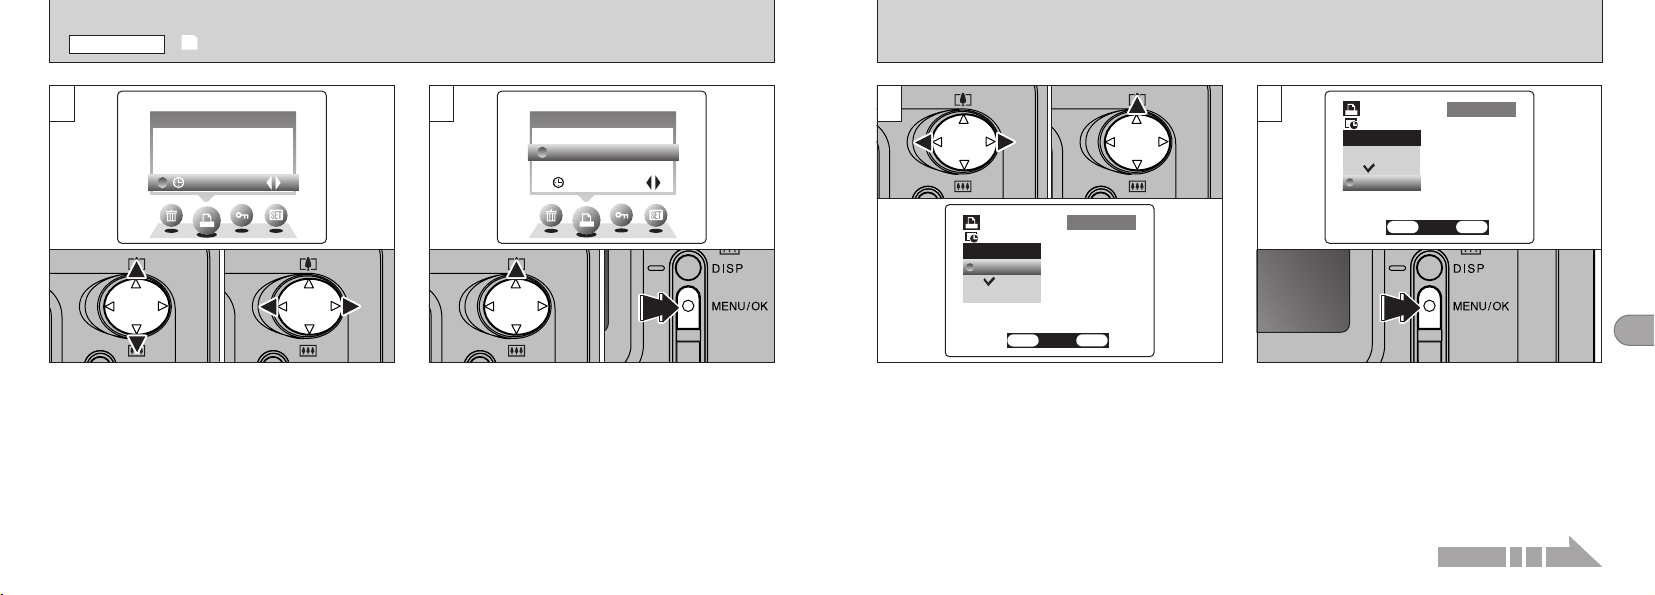
1 Press “a” or “b” to select “DDATE”.
2 Press “d” or “c” to select “DATE ON” or
“DATE OFF”.
The selected setting is then valid for all frames
with DPOF settings.
62
01 02
1 Press “a” to select “OK”.
2 Press the “MENU/OK” button.
5
1 Press “d” or “c” to display the frame for
which you want to specify DPOF settings.
2 Press “a” to set “YES” for the frame to be
printed and then press the “MENU/OK” button
or “c”.
To specify more DPOF settings, repeat steps 1
and 2.
!
DPOF settings cannot be specified for movies.
●
!
“TOTAL” shows the total number of frames for which
●
prints have been ordered.
01 02
6
When you have finished the settings, always
select “FINISH” and press the “MENU/OK”
button.
If you press the “BACK” button, no DPOF settings
are specified.
!
You can only specify one print per frame in the DPOF
●
settings. Note also that you can specify prints for up
to 999 frames on the same xD-Picture Card.
Continued on next page...
4
63
Page 33
OKOK
BACKBACK
SETSET
CANCELCANCEL
+−
BRIGHTNESSBRIGHTNESS
DPOF:0000DPOF:00004
100−0001100−0001
FINISH OK?FINISH OK?
OKOK
BACKBACK
SETSET
CANCELCANCEL
100−0001100−0001
RESET DPOF OK?RESET DPOF OK?
OKOK
BACKBACK
SETSET
CANCELCANCEL
PLAYBACK MENU
LCD BRIGHTNESSLCD BRIGHTNESS
SET−UPSET−UP
OPTIONSOPTIONS
i DPOF SET FRAME
7
Pressing the “MENU/OK” button confirms the
DPOF settings.
Pressing the “BACK” button returns you to the
settings screen .
Pressing the “MENU/OK” button confirms all the
settings.
64
5
DPOF settings cannot be changed.
◆
If you select a frame for which DPOF settings
have already been specified, the
“¥” message appears.
Pressing the “MENU/OK” button erases all
the DPOF settings already specified. You
must then specify the DPOF settings again.
!
Press the “BACK” button to leave the previous
●
settings unchanged.
!
During playback, check that the “i” icon is
●
displayed for the previous settings.
◆
5 Settings
1
Set the monitor brightness in “Q”, “w” or “T”
mode.
1 Press the “MENU/OK” button to display the
menu screen.
2 Press “d” or “c” to select “g” OPTIONS and
then press “a” or “b ” to select “LCD
BRIGHTNESS”.
3 Press the “MENU/OK” button.
g ADJUSTING THE MONITOR BRIGHTNESS
0301 02
2
01 02
1 Press “d” or “c” to adjust the LCD monitor
brightness.
2 Press the “MENU/OK” button.
!
To exit this procedure without changing the settings,
●
press the “BACK” button.
5
65
Page 34
SETーUPSETーUP 1/21/2
IMAGE DISP.IMAGE DISP.
ONON
ONON
POWER SAVEPOWER SAVE
DATE/TIMEDATE/TIME
SETSET
LCDLCD
ONON
BEEPBEEP
LOWLOW
OKOK
BACKBACK
g USING SET–UP
LCD BRIGHTNESSLCD BRIGHTNESS
SET−UPSET−UP
OPTIONSOPTIONS
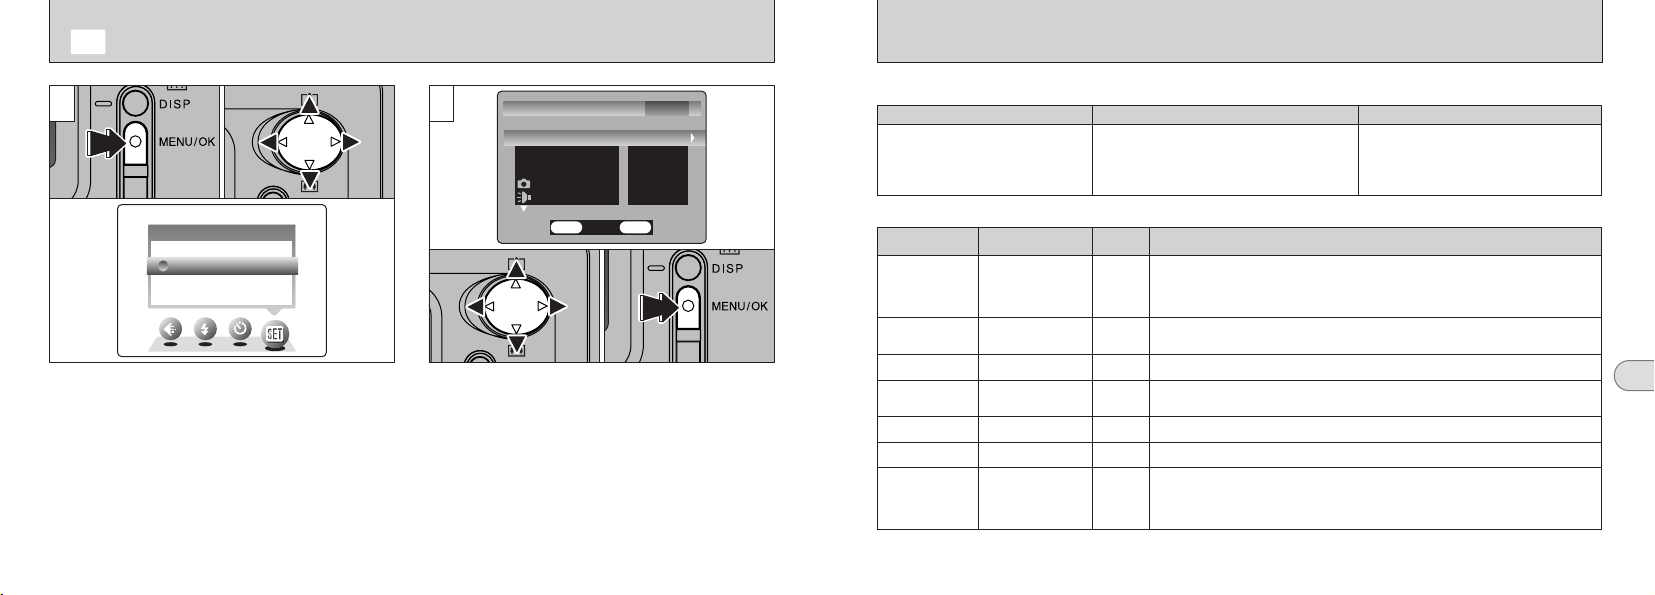
1
Set the SET–UP in “
0301 02
Q”, “w” or “T” mode.
1 Press the “MENU/OK” button to display the
menu screen.
2 Press “d” or “c” to select “g” OPTIONS and
then press “a” or “b” to select “SET–UP”.
3 Press the “MENU/OK” button.
!
The LCD monitor shown is for still photography.
66
●
2
01 02
1 Press “a” or “b” to select a menu option and
then press “d” or “c” to change the setting.
2 Press the “MENU/OK” button.
!
Press “c” for “DATE/TIME” or “RESET ALL”.
●
■ List of settings
Q Still photography mode
A AUTO
S MANUAL
LCD BRIGHTNESS (P.65)
SET–UP
—
—
LCD BRIGHTNESS (P.65)
SET–UP
T Movie mode
■ SET–UP Menu Options
Settings Display Explanation
IMAGE DISP.
POWER SAVE
DATE/TIME
Q
LCD
F
BEEP
DISCHARGE OK —
RESET ALL OK —
ON/OFF
ON/OFF
SET
ON/OFF ON
LOW/HIGH/OFF LOW
Default
setting
This option specifies whether or not an image checking screen (photography
results) is displayed after you take a shot.
ON
The photography results are displayed for about 2 seconds and then automatically
recorded.
If the camera is not used for approximately 30 seconds, this function temporarily
ON
switches off the LCD monitor. See P.68 for details.
Use this option to correct the date or time. See P.18 for details.
—
Use this option to specify whether the LCD monitor is automatically switched ON or
OFF when the Mode switch is set to “Q”.
This setting selects the volume of the beep emitted by the camera during camera operation.
Discharges rechargeable batteries. See P.13 for details.
This resets all camera settings (including the photography and playback menu
settings) other than the date and time to the factory default values set at shipment.
When you press “c”, a confirmation screen appears. To proceed, press the
“MENU/OK” button again.
w Playback mode
—
—
LCD BRIGHTNESS (P.65)
SET–UP
5
67
Page 35
SETーUPSETーUP 1/21/2
IMAGE DISP.IMAGE DISP.
ONON
ONON
POWER SAVEPOWER SAVE
DATE/TIMEDATE/TIME
SETSET
LCDLCD
ONON
BEEPBEEP
LOWLOW
OKOK
BACKBACK
SET–UP
g POWER SAVE
6 Software Installation
6.1 The Software Components
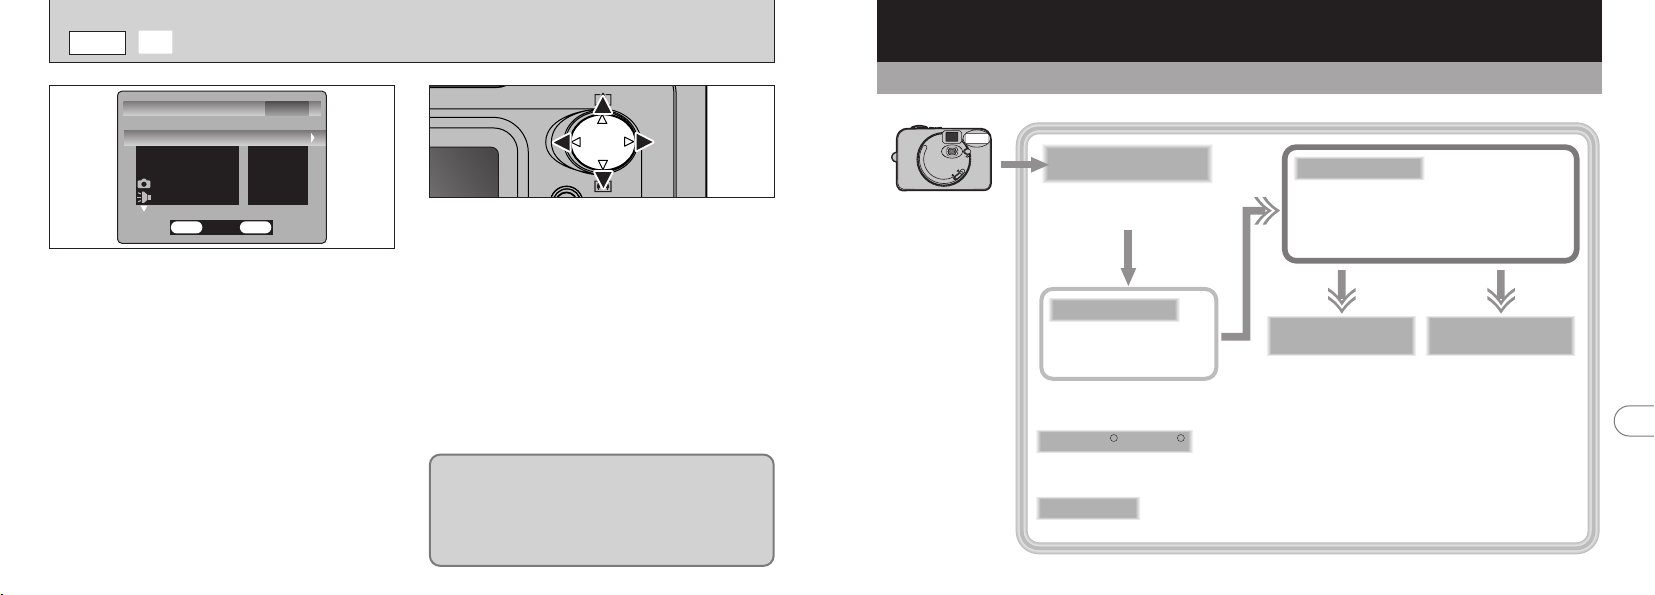
hPower saving “ON” (default setting)
Power consumption is kept to a minimum to
prevent battery depletion. Select the “ON”
setting when you are using alkaline batteries.
iIf the camera is not used for approximately 30
seconds, the LCD switches off temporarily to reduce
power consumption (Sleep mode).
iOnce the camera is in Sleep mode, if it is left
unused for a further 90 seconds, it is automatically
switched off.
iThe charging time for the flash increases slightly
because the flash charging power is reduced.
hPower saving “OFF”
Batteries are more likely to run flat since no
power reduction measures (sleep mode, etc.)
are used. However, this function automatically
switches the camera off if the camera is not
used for approximately 2 minutes.
68
To bring the camera out of sleep mode so that it
is ready to shoot, press “d”, “c”, “a” or “b”.
This is useful since the camera is ready to shoot
more quickly than when it is switched off and
then on again. You can also take pictures when
the camera is in sleep mode simply by pressing
the shutter button.
!
Power Save/Auto Power Off does not function when
●
a USB connection is being used.
!
You can also bring the camera out of sleep mode by
●
pressing buttons other than “d”, “c”, “a” or “b”.
!
To switch the camera back on, briefly switch the
●
camera off and then on again.
The Sleep function does not operate when the
LCD monitor is switched off, while you are
setting the quality mode or when the camera is
in SET–UP or Playback mode. However, if the
camera controls are not used for 2 minutes, the
camera automatically switches off.
Connect the camera
with “DSC” selected as
the USB setting
(➡P.87).
USB Mass Storage
Driver
Allows a digital camera to be used
as USB Mass Storage (removable
disk drive, card reader).
FinePixViewer
Allows you to display thumbnail lists of the images
stored on your PC or in the camera, print the
images individually or as an index, display the
images at full size and perform some basic image
processing.
Exif Launcher
Launches the FinePixViewer
software when a camera is
connected.
Acrobat Reader
Software used to read PDF-format documents on a personal computer. This software is needed to read the
User’s Guides for FinePixViewer (Macintosh only).
R R
ImageMixer VCD
for FinePix
Creates a FinePix CD Album
(Mac OS X is not supported).
RAW FILE
CONVERTER LE
“Used when you open
RAW files that were
photographed on cameras
that support the RAW file
format.”
QuickTime
Software needed for playing back movies, etc.
✽ Note that the software configuration differs slightly depending on your operating system.
6
69
Page 36
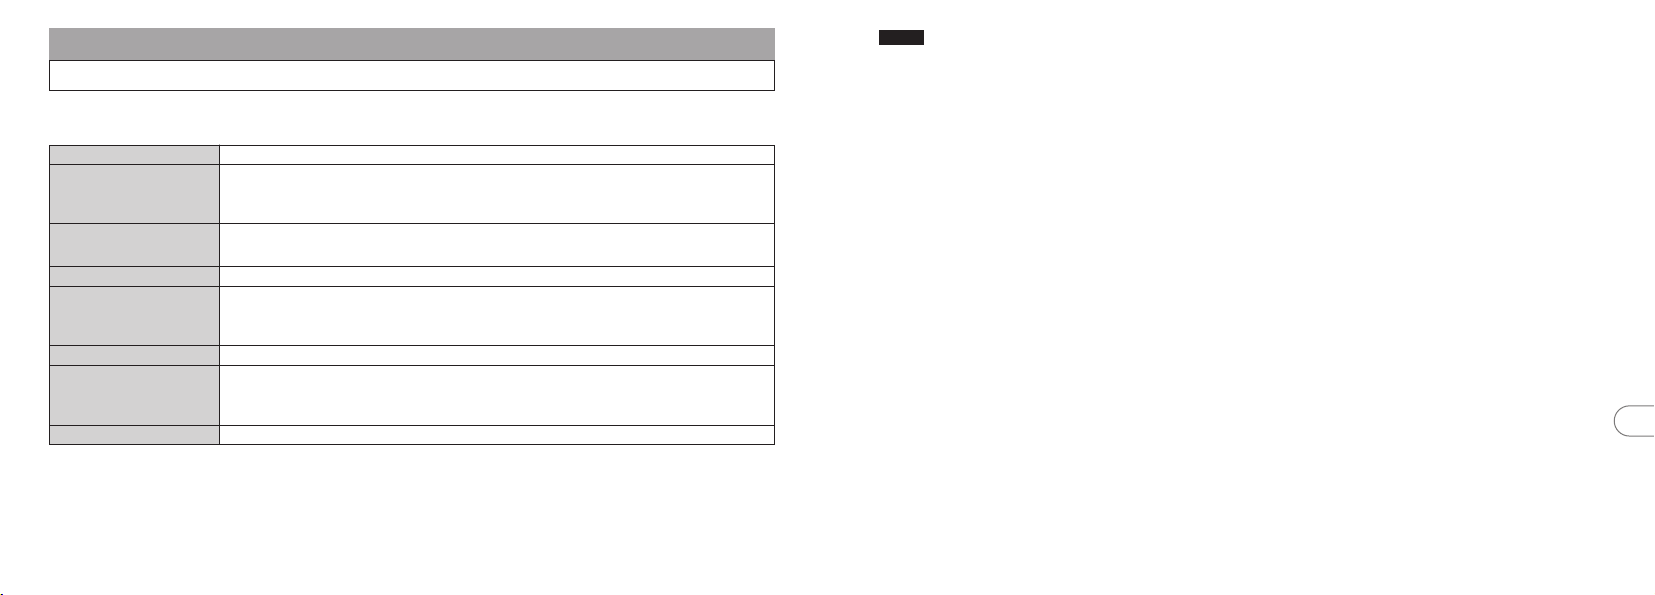
6.2 Pre-installation checklist
6.2.1 Hardware and software requirements
To run this software, you must have the hardware and software described below. Check your system before
you begin the installation.
Compatible PCs
Operating system
IBM PC/AT or compatible
Windows 98 (including the Second Edition), Windows Millennium Edition
(Windows Me), Windows 2000 Professional
Windows XP Professional
CPU
200 MHz Pentium or better recommended
(800 MHz Pentium
RAM 64MB minimum (128MB minimum for Windows XP)
Hard disk space Amount required for installation: 140 MB minimum
Amount required for operation : 300 MB minimum
(When FinePix CD Album Maker is used: 2 GB or better)
Display
Internet connection
800 × 600 pixels or better, 16-bit color or better
✽3
i To use the FinePix Internet Service or mail attachment function
An Internet connection and e-mail transmission software
i Connection speed: 56k or better recommended
Sound functions
✽1 Models with a USB interface as a standard feature and one of the above operating systems preinstalled.
✽2 When you install the software, log in using a system administrator account (e.g. “Administrator”).
✽3 Required to use the FinePix Internet Service and videoconferencing. The software can still be installed even if
you do not have an Internet connection.
✽4 Sound functions are required for videoconferencing and audio input/output in VideoImpression.
✽4
Speakers, microphone and sound card
✽1
✽2
✽2
or better recommended for Windows XP)
III
, Windows XP Home Edition✽2,
NOTE
i Connect the camera directly to the computer using the
special USB cable. The software may not operate
correctly if you use an extension cable or connect the
camera via a USB hub.
i If your computer has more than one USB port, the
camera can be connected to either port.
i Push the USB connector fully into the socket to
ensure that it is securely connected. The software
may not operate correctly if the connection is faulty.
i Additional USB interface board is not guaranteed.
i Windows 95 cannot be used.
i Operation is not guaranteed on home-built computers
or on computers running updated operating system
software.
i If your Internet connection is via a router or via a LAN
(connecting machines on the LAN to the Internet), you
cannot use videoconferencing.
i If you are using Windows XP and you tick the “Protect
my computer and network by limiting or preventing
access to this computer from the Internet” checkbox in
the Internet connection firewall settings,
videoconferencing cannot be used.
i When you reinstall or remove FinePixViewer, the
Internet menu and your user ID and password for the
FinePix Internet Service are deleted from your
computer. Click the [Register now] button, enter your
registered user ID and password and download the
menu again.
6
70
71
Page 37
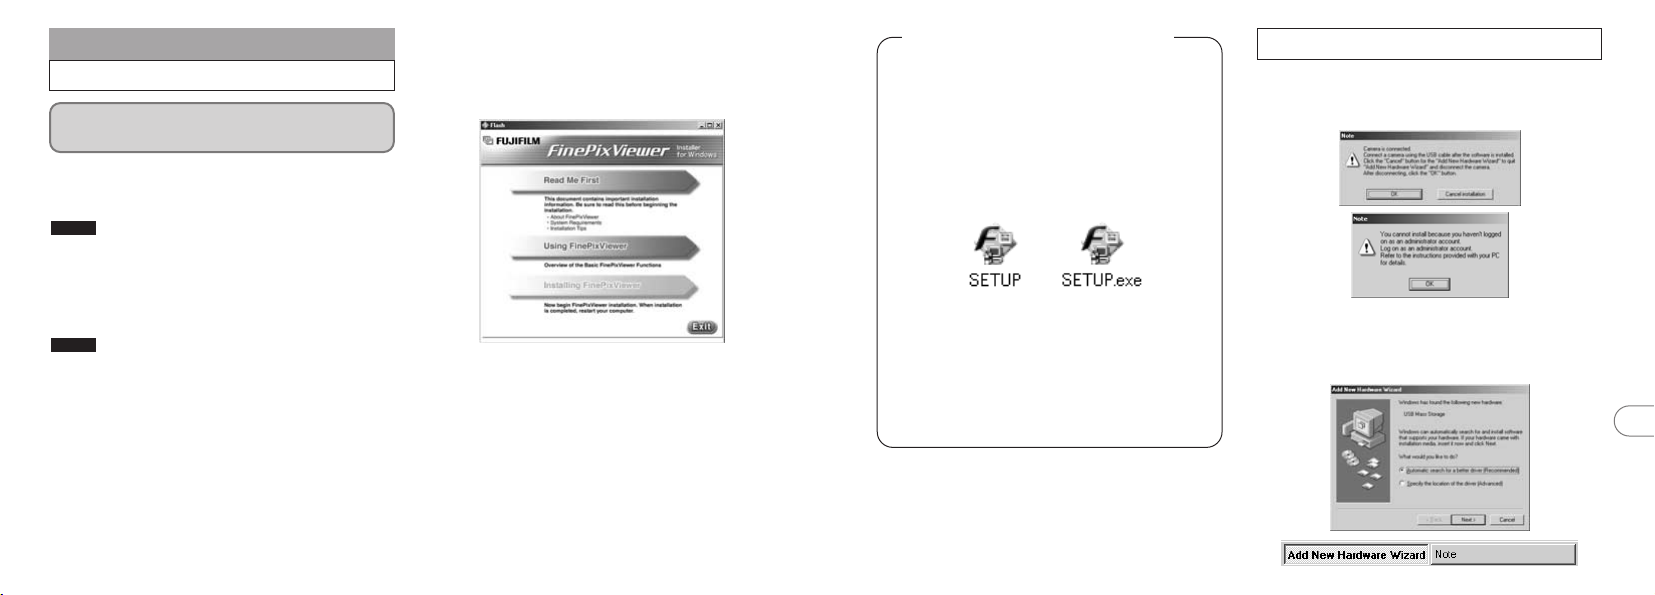
6.3 Installation on a Windows PC
6.3.1 Load the CD-ROM into your PC
Do not connect the camera to your PC until
the software installation is completed.
1. Switch on your PC and start up Windows.
✽ If you have already switched on your PC, restart
your PC at this point.
NOTE
Users of Windows 2000 or Windows XP should log in
using a system administrator account (e.g.
“Administrator”).
2. Quit all other active applications until no
applications are shown in the taskbar.
NOTE
If a “----.dll file not found.” message appears during
installation, there is another application running in the
background. Forcibly shut down the application. Refer
to your Windows manuals for information on how to
forcibly shut down an application.
3. Load the enclosed CD-ROM into the CD-ROM
drive. The installer starts up automatically.
4. The Setup screen appears. Click the
[Installing FinePixViewer] button.
✽ For more information on what is installed, click the
[Read Me First] button and [Using FinePixViewer]
button.
Launching the Installer Manually
1. Double-click the “My Computer” icon.
✽ Windows XP users should click “My
Computer” in the “Start” menu.
2. Right-click “FINEPIX” (CD-ROM drive) in
the “My Computer” window and select
“Open”.
3. Double-click “SETUP” or “SETUP.exe”
in the CD-ROM window.
✽ The way file names are displayed differs as
described below depending on your computer
settings.
• File extensions (3-letter suffixes indicating
the file type) may be shown or hidden. (e.g.
Setup.exe or Setup)
• Text may be shown normally or all in
uppercase (e.g. Setup or SETUP).
6.3.2 From FinePixViewer installation to restart
1. Pre-installation checking begins. If any
warning messages appear, follow the
instructions given on the screen.
✽ The “Add New Hardware Wizard” may be hidden
behind the “Note” message. Check the taskbar,
move the message window and then click the
[Cancel] button.
6
72
73
Page 38
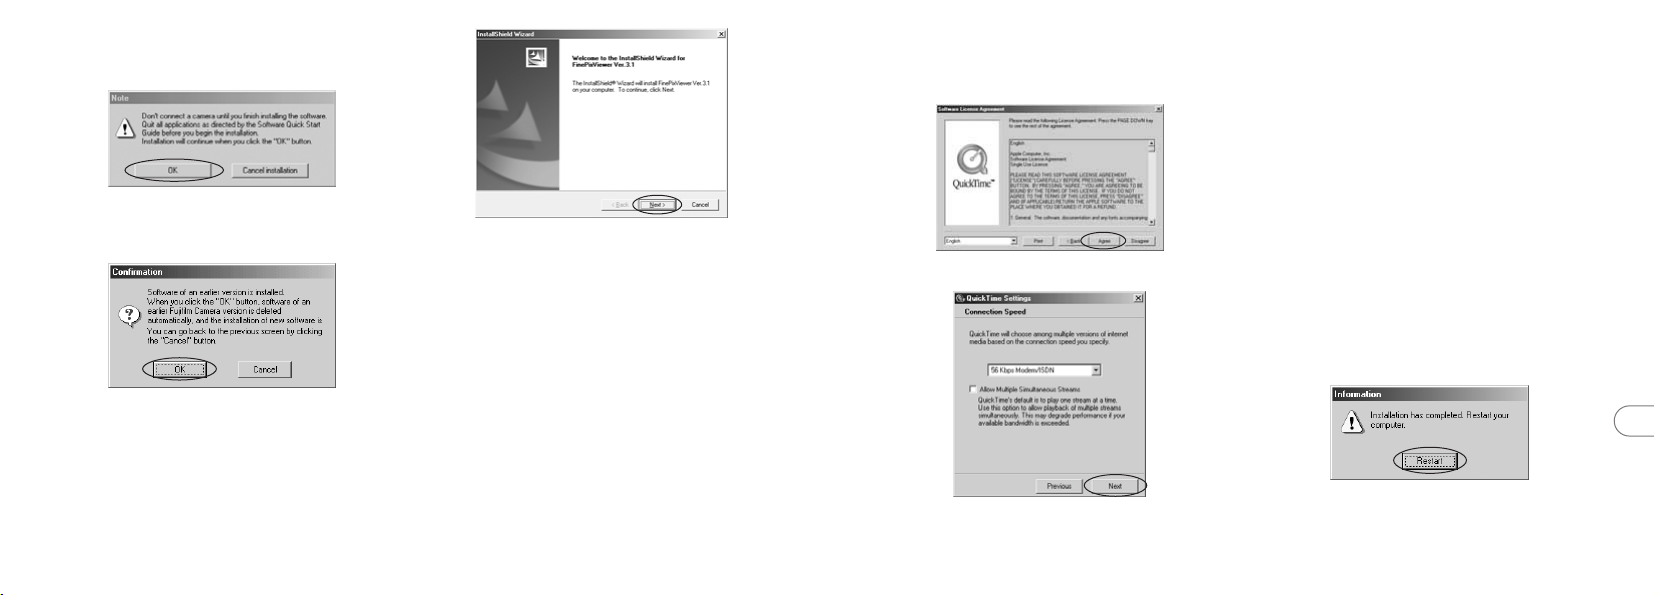
2. A confirmation message appears asking
whether you want to continue with the
installation. Click the [OK] button.
3. The software version is checked. If the
window shown below appears, click the
[OK] button to uninstall the software.
3 Check the installation destination folder and then
click the [Next >] button.
4 “Confirmation” screen shown may appear. To
continue with the settings, click the [Yes] button.
6. Install QuickTime as directed by the onscreen instructions.
✽ If you have already installed QuickTime version
5.0.2 or later, this installation is not performed.
Click [Agree] button in the “Software License
Agreement” window.
7. Install NetMeeting as directed by the onscreen instructions.
✽ If NetMeeting 3.01 or later is already installed on
your PC, this installation is not performed.
8. Install ImageMixer VCD for FinePix as
directed by the on-screen instructions.
9. Close the “Readme” window.
10
. Install WINASPI as directed by the on-screen
instructions.
✽ If WINASPI is already installed on your PC, this
installation is not performed.
11
. Install Windows Media Player as directed
by the on-screen instructions and then
restart your PC.
✽ If the latest version of the software is already installed
on your PC, this installation is not performed. When
next screen appears, click the [Restart] button.
4. The USB drivers are installed.
5. Install FinePixViewer.
1 FinePixViewer installation begins and notes and
warnings are displayed. When you have
confirmed these, click the [Next >] button.
2 The User License Agreement for this software is
displayed. Read the agreement carefully and
then, if you agree to the terms of the Agreement,
74
click the [Yes] button. If you click the [No] button,
the software is not installed.
If the “Connection speed” window appears, set the
correct speed for your environment of connection and
then click the [Next] button.
✽ If you do not know your connection speed, simply
click the [Next] button.
In Windows Media Component Setup window, tick
the “I have read the Privacy Statement” checkbox
and then click the [Next >] button.
When you click the [Finish] button, your PC is
restarted.
6
75
Page 39
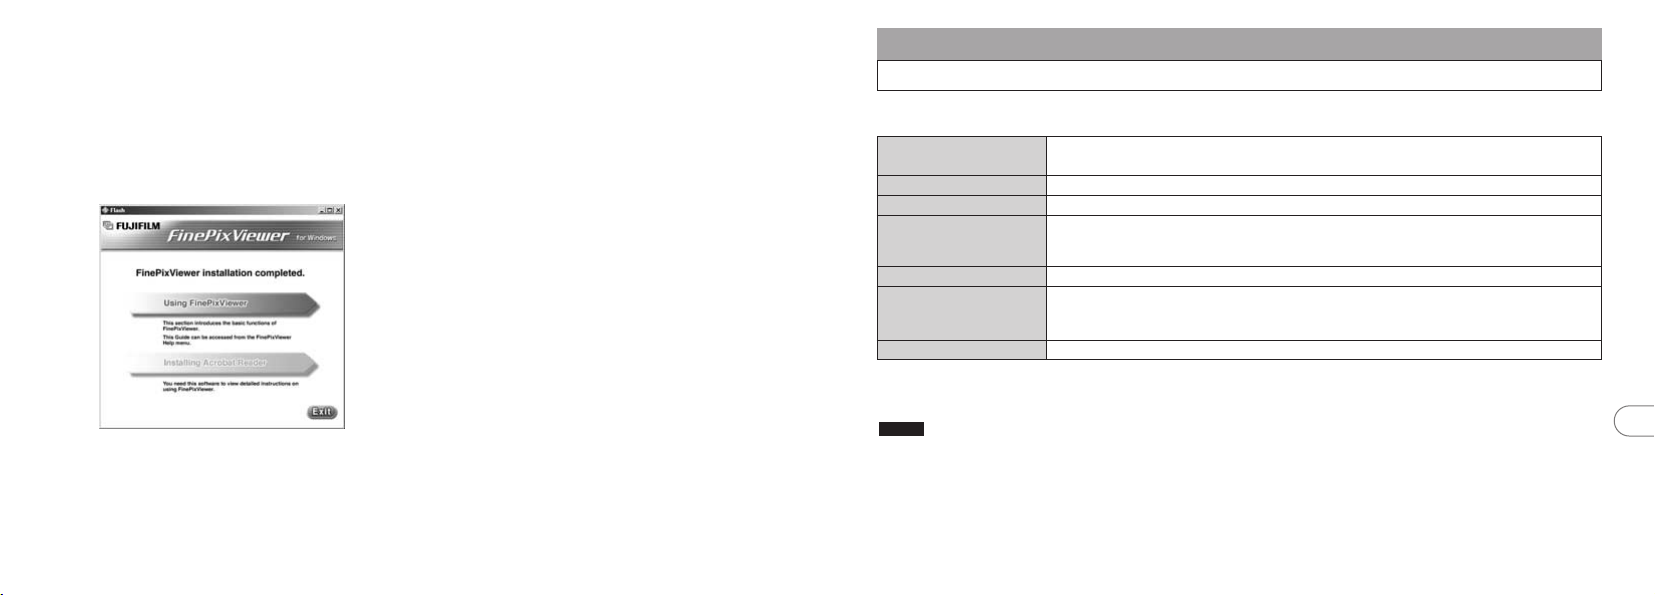
12
. After you restart your PC, install DirectX as
directed by the on-screen instructions and
then restart your PC again. If the latest
version of DirectX is already installed on
your PC, this installation is not performed.
13
. After you restart your PC, the “FinePixViewer
installation completed” message appears.
Click “Using FinePixViewer” to view the
basic FinePixViewer functions.
14
. For more information on FinePixViewer
functions not fully explained in this manual,
refer to “How to Use FinePixViewer” in the
Help menu for details.
6.4 Installation on a Mac OS 8.6 to 9.2
6.4.1 Pre-installation Checklist
To run this software, you must have the hardware and software described below. Check your system before
you begin the installation.
Compatible Mac
Operating system
RAM
Hard disk space Amount required for installation: 110 MB minimum
Display
Internet connection
Sound functions Speakers and microphone
✽1 Models with a USB port as a standard feature
✽2 This software does not run correctly in the Mac OS X Classic environment.
✽3 Turn virtual memory on if necessary.
✽4 Required to use the FinePix Internet Service. The software can still be installed even if you do not have an Internet connection.
NOTE
i Connect the camera directly to the Macintosh using the special USB cable. The software may not operate correctly if you use an
extension cable or connect the camera via a USB hub.
i Push the USB connector fully into the socket to ensure that it is securely connected. The software may not operate correctly if the
connection is faulty.
i Additional USB interface board is not guaranteed.
i On Macintosh computers, allocate at least 400 MB of virtual memory when RAW FILE CONVERTER LE is used. If other applications
will be used at the same time, allocate the additional amount required for those applications also.
Power Macintosh G3
Power Macintosh G4 Cube or PowerBook G4
Mac OS 8.6 to 9.2.2
64 MB minimum
Amount required for operation: 300 MB minimum
(When FinePix CD Album Maker is used: 2 GB or better)
800 × 600 pixels or better, 16-bit color or better
✽4
i To use the FinePix Internet Service or mail attachment function
An Internet connection and e-mail transmission software
i Connection speed: 56k or better recommended
✽1
, PowerBook G3✽1, Power Macintosh G4, iMac, iBook,
✽2
✽3
6
76
77
Page 40
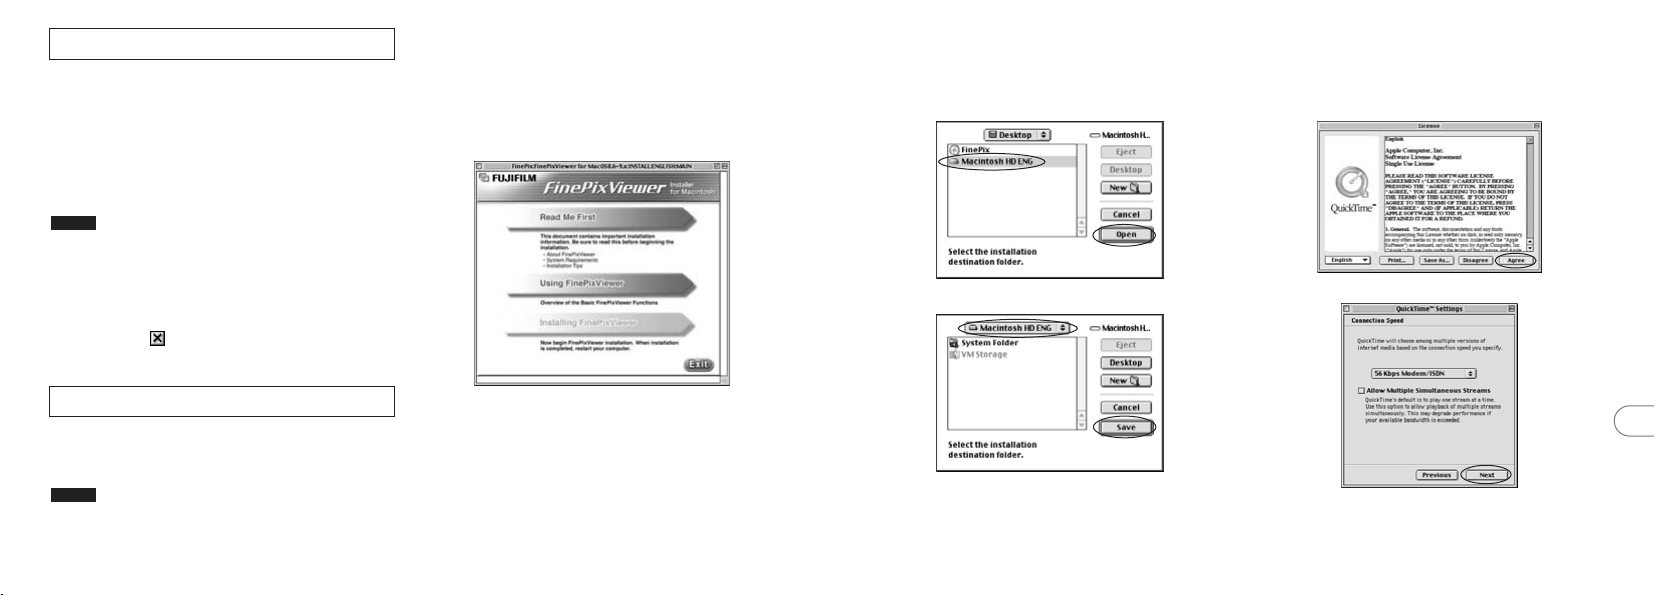
6.4.2 Check the system software settings
■ Enable File Exchange
Check whether File Exchange is active.
To use an xD-Picture Card that is supported by the
camera, the File Exchange utility supplied with Mac
OS must be running.
1. Switch on your Macintosh and start up
Mac OS 8.6 to 9.2.
NOTE
Do not connect the camera to your Macintosh until the
software installation is completed.
2. Select the Extension Manager in the Control
Panel and check that the File Exchange
check box is ticked. If not, click in the box
so that an appears and then restart your
Macintosh.
2. Double-click “Installer for MacOS8.6-9.x”
to launch the Installer.
3. The Installer setup screen appears. Click
the [Installing FinePixViewer] button.
✽ For more information on what is installed, click the
[Read Me First] button and [Using FinePixViewer]
button.
6. Select the installation destination for
FinePixViewer and ImageMixer VCD for
FinePix.
1 Click the [Open] button to open the installation
destination folder.
2 Click the [Save] button.
7. Install QuickTime as directed by the onscreen instructions and then restart your
Macintosh.
✽ If you have already installed QuickTime version
5.0.2 or later, this installation is not performed.
Click [Agree] button in the “License” window.
6.4.3 From FinePixViewer installation to restart
1. When you load the enclosed CD-ROM into
the CD-ROM drive, the “FinePix” window
automatically opens.
NOTE
If the “FinePix” window does not open automatically,
double-click the CD-ROM icon.
78
4. A confirmation message appears asking
whether you want to continue with the
installation. Click the [OK] button.
5. The User License Agreement for this
software is displayed. Read the agreement
carefully and then, if you agree to the
terms of the Agreement, click the [Yes]
button. If you click the [No] button, the
software is not installed.
If the “Connection Speed” window appears after you restart your
Macintosh, set the correct speed for your environment of
connection and then click the [Next] button.
✽ If you do not know your connection speed, simply click the
[Next] button.
6
79
Page 41
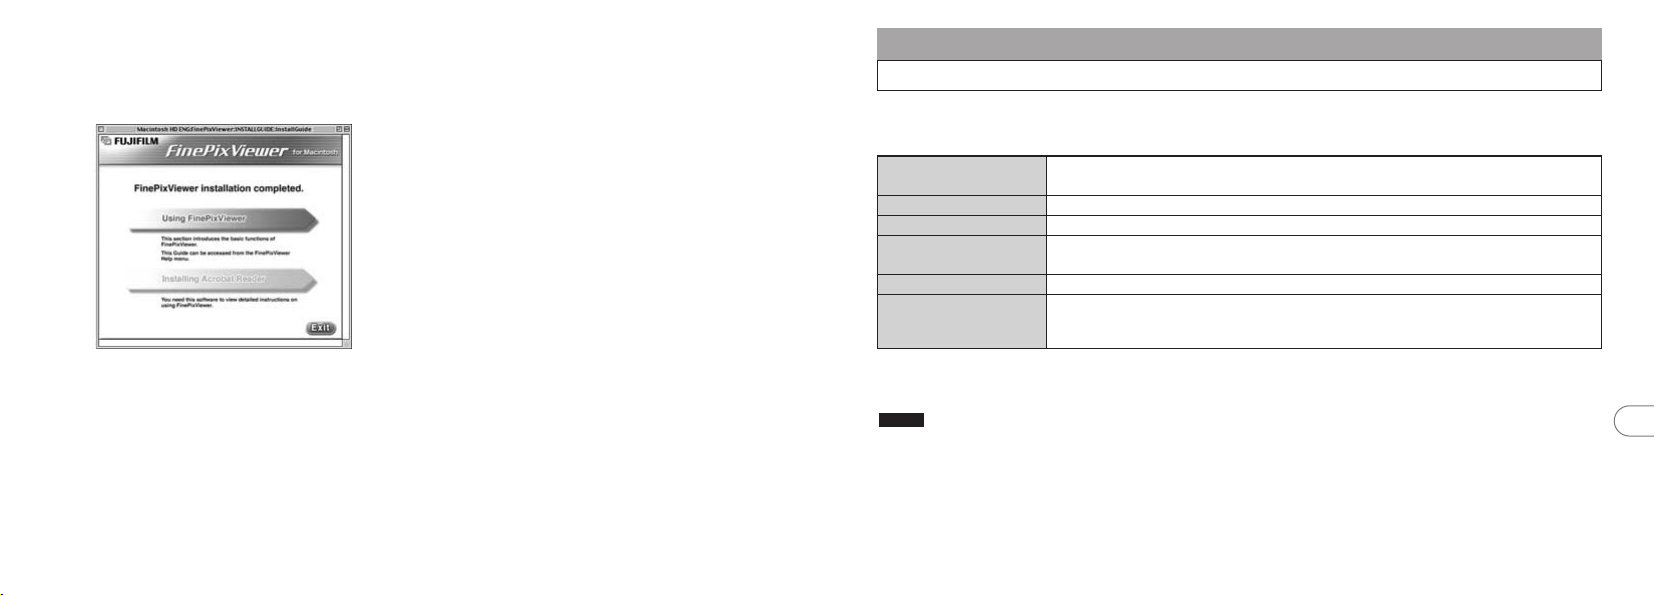
8. After you restart your Macintosh, the
“FinePixViewer installation completed”
message appears. Click “Using
FinePixViewer” to view the basic
FinePixViewer functions.
9. To install Acrobat Reader, click “Install
Acrobat Reader”.
✽ You should install Adobe Systems’ Acrobat
Reader software to read the FinePixViewer User’s
Guide (PDF).
If you already have the latest version installed,
this step is not required.
10
. Proceed with the installation as directed
✽
by the on-screen instructions.
11
. For more information on FinePixViewer
functions not fully explained in this manual,
refer to “How to Use FinePixViewer” in the
Help menu for details.
■ To install Acrobat Reader later...
1. Double-click the “ FinePix” CD-ROM to
open the CD-ROM window.
2. Double-click “FinePixViewer for Mac OS
8.6-9.x” → “Acrobat Reader” → “English”
folder.
3. Double-click “English Reader Installer”.
4. Proceed with the installation as directed by
the on-screen instructions.
6.5 Installation on a Mac OS X
6.5.1 Pre-installation Checklist
■ Hardware and software requirements
To run this software, you must have the hardware and software described below. Check your system before
you begin the installation.
Compatible Mac
Operating system
RAM 192 MB minimum
Hard disk space Amount required for installation : 110 MB minimum
Display
Internet connection
✽1 Models with a USB port as a standard feature
✽2 AVI movies cannot be played back on version 10.0.4.
✽3 Required to use the FinePix Internet Service. The software can still be installed even if you do not have an Internet
connection.
NOTE
i Connect the camera directly to the Macintosh using the special USB cable. The software may not operate correctly if you
use an extension cable or connect the camera via a USB hub.
i Push the USB connector fully into the socket to ensure that it is securely connected. The software may not operate correctly
if the connection is faulty.
i Additional USB interface board is not guaranteed.
i On Macintosh computers, allocate at least 400 MB of virtual memory when RAW FILE CONVERTER LE is used. If other
applications will be used at the same time, allocate the additional amount required for those applications also.
Power Macintosh G3
Power Macintosh G4 Cube, or PowerBook G4
Mac OS X (compatible with version 10.0.4 to 10.2.2
Amount required for operation : 300 MB minimum
800 × 600 pixels or better, at least 32,000 colors
✽3
i To use the FinePix Internet Service or mail attachment function
An Internet connection and E-mail transmission software
i Connection speed: 56k or better recommended
✽1
, PowerBook G3✽1, Power Macintosh G4, iMac, iBook,
✽2
)
6
80
81
Page 42
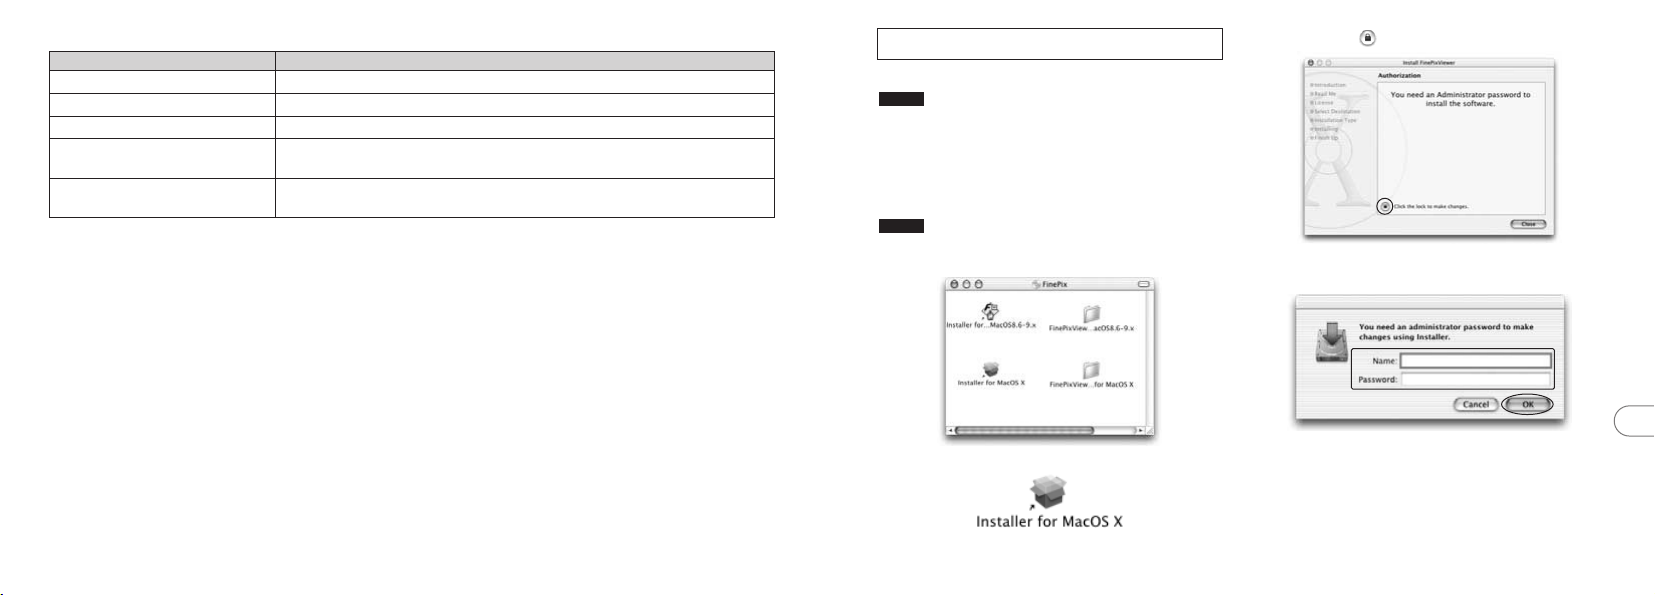
■ Functions not supported in FinePixViewer for Mac OS X
Function Comment
AVI movie playback Not supported in version 10.0.4
Batch format conversion Only supported for still images.
Create data for CD writing Not supported.
Online updating Information on updates can be obtained using [Support] in the Internet
menu.
Online help Online help can be viewed by opening “English.pdf” in the installation
folder.
■ Utilisation du service Internet FinePix
The user registration procedure for the FinePix Internet Service and the service upload method are different
from those used in Mac OS 8.6 to 9.2.
6.5.2 From FinePixViewer installation to restart
Only FinePixViewer is installed on Mac OS X.
NOTE
AVI movies cannot be played back on version 10.0.4.
1. Switch your Macintosh on and start up Mac
OS X. Do not launch any other applications.
2. Load the enclosed CD-ROM into the CDROM drive. The “FinePix” window opens.
NOTE
If the “FinePix” window does not open automatically,
double-click the CD-ROM icon.
4. Click the “” icon.
5. Enter the administrator name and password.
Then click the [OK] button.
3. Double-click “Installer for MacOS X”.
6. Click the [Continue] button.
7. Quit any other programs that are running
and then click the [Continue] button.
8. Click [Cntinue] button in the “Software
License Agreement” window.
82 83
6
Page 43
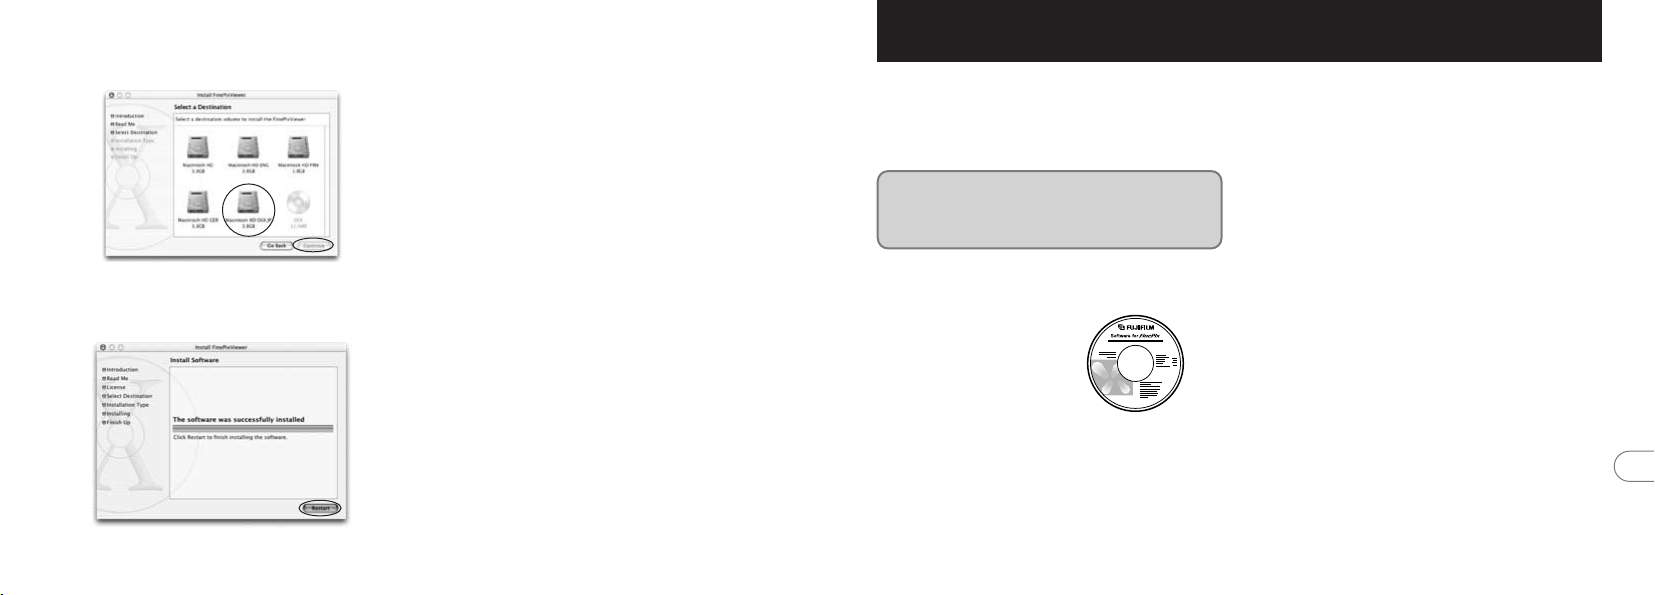
9. Select the Mac OS X startup disk as the
installation destination and click the
[Continue] button.
7 Camera Connection
The “Camera Connection” section explains how
to connect the camera to your computer using
the special USB cable and describes the
functions you can use once the camera and
computer are connected.
If the power cuts out during data transmission,
the data will not be transmitted correctly. Always
use the AC power adapter when connecting the
camera to a computer.
10
. Click the [Install (upgrade)] button.
11
. When you have completed the installation,
click the [Restart] button.
84
The first time you connect the camera
to your computer by referring Section 6
You must install all the
software before
connecting the camera
to your computer.
CD-ROM
(Software for FinePix SX)
■ DSC (Mass storage device) Mode
This mode provides a simple way to read images
from an xD-Picture Card and store images on to
an xD-Picture Card (➡P.87).
7
85
Page 44
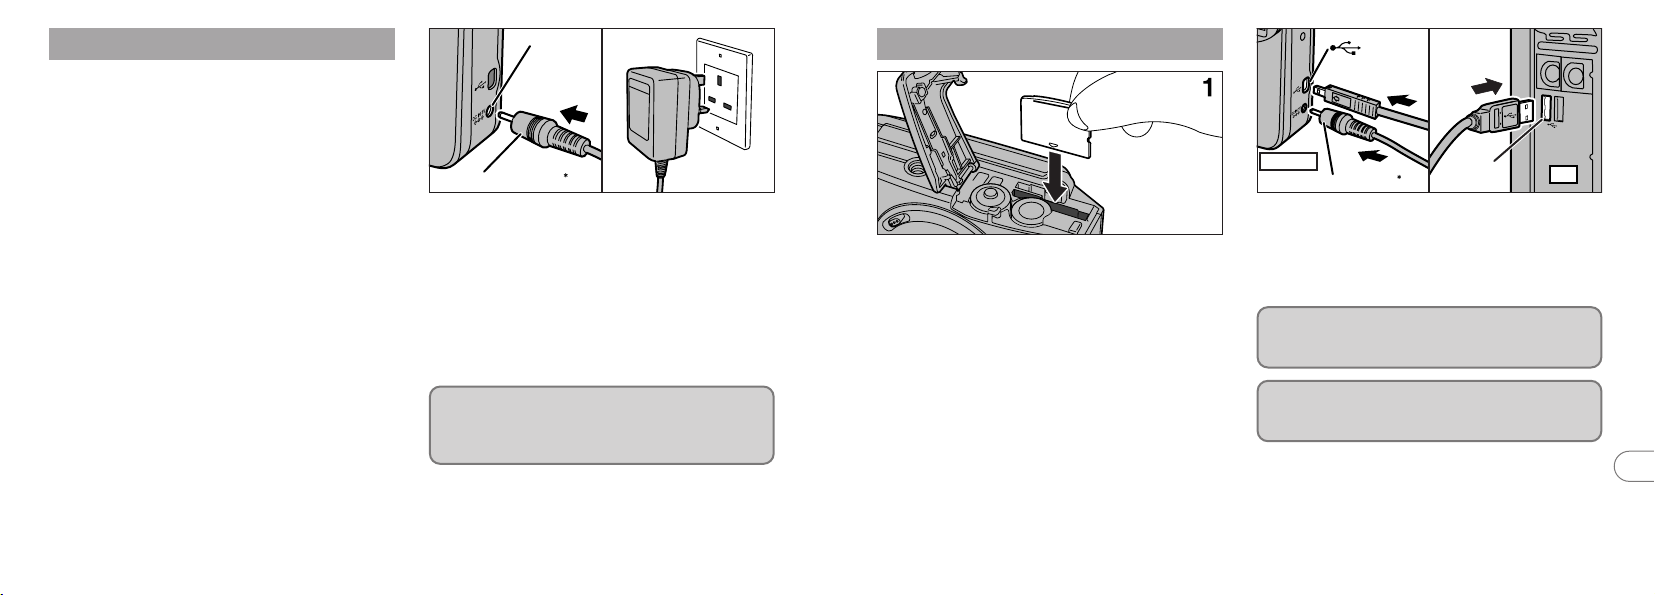
(Special USB)
socket
AC power adapter
Camera
USB
socket
PC
33
AC power adapter
DC IN 3V
socket
7.1 Using the optional AC Power adapter
Always use a FUJIFILM AC Power Adapter AC-3V
(➡P.102).
Use the AC power adapter to avoid losing power
at inconvenient times, such as when you are
downloading photographed images to your
computer. Using the AC power adapter also
allows you to take pictures and play back images
without worrying about depleting the batteries.
✽ See P.107 for notes on using the AC power adapter.
✽ Only connect or disconnect the AC power adapter
when the camera is switched off.
Connecting or disconnecting the AC power adapter
while the camera is switched on temporarily
interrupts the power supply to the camera, so that
images or movies being shot at the time are not
recorded. Failing to switch the camera off first can
also result in damage to the xD-Picture Card or
malfunctions during PC connection.
86
✽ Sold separately
Check that the camera is switched off. Plug the
AC power adapter connector into the “DC IN 3V”
socket and then plug the AC power adapter into
the power outlet.
✽ The socket-outlet shall be installed near the equipment
and shall be easily accessible.
✽ The shape of the plug and socket-outlet depends on
the country of use.
Connecting the AC power adapter does not
allow you to charge the Ni-MH batteries. Use the
optional charger (➡P.102) to charge the Ni-MH
batteries.
7.2 Use at DSC mode
1. Insert an xD-Picture Card containing
photographed images into your camera.
Plug the AC power adapter connector into
the DC IN 3V socket on the camera and
then plug the adapter itself into the main
power outlet.
✽ Sold separately
2. Switch your PC on.
3. Use the special USB cable to connect the
camera to your computer.
4. Switch the camera on.
If you are using a Windows PC, the driver settings
are specified automatically when installation is
completed. No further action is required.
Always use the prescribed procedure when
disconnecting or switching off the camera
(➡P.90).
✽ On Windows XP and Mac OS X, you must specify the
automatic launch settings the first time you connect
the camera to your computer.
✽ Take care to ensure that the special USB cable is
connected the correct way around and that the plugs
are pushed fully into the connection sockets.
7
87
Page 45
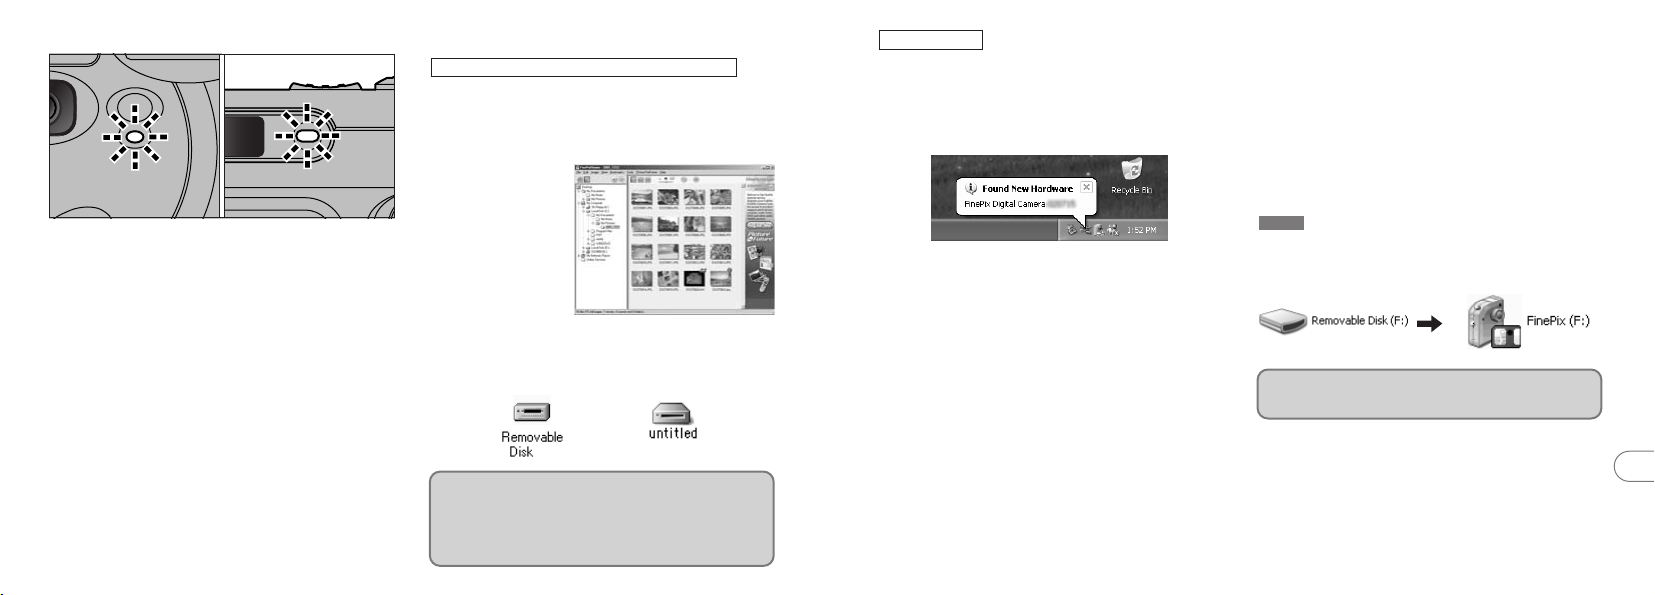
■ Camera Operation
i When the camera and computer are exchanging
data, the self timer lamp blinks and the
viewfinder lamp blinks alternately green and
orange.
i “DSC” appears on the screen.
i Power Save is disabled when the camera is
connected to a USB port.
✽ Before replacing the xD-Picture Card, always
disconnect the camera from the PC using the
procedure on P.90.
✽ Do not disconnect the USB cable when the camera is
communicating with the PC. See P.90 for information
on the disconnection procedure.
88
■ PC Operation
Windows 98/98 SE/Me/2000 Professional
✽ The Windows CD-ROM may also be required
during installation. In this event, switch CD-ROMs
as directed by the on-screen instructions.
i FinePixViewer automatically starts up.
✽ Screen for
Windows 98 SE
i A removable disk icon appears and you can
use your PC to transfer files to and from the
camera.
Windows Macintosh
If the above operations do not occur, you do not
have the required software programs or drivers
installed on your PC. Complete the required PC
setup procedures. Then reconnect the camera
to your PC.
Windows XP
1. The “Found New Hardware” help message
appears in the bottom-right corner of your
screen. This message will close when the
settings are completed. No action is required.
✽ This step is not required for subsequent connections.
2. Specify the settings in the “AutoPlay” dialog
box.
■ When FinePixViewer is included in
the list of actions to perform
Select “Viewing images using FinePixViewer”
and then select the “Always do the selected
action” checkbox. (This checkbox may not be
shown in some cases.)
Click the [OK] button to launch FinePixViewer.
■ When FinePixViewer is not included
in the list of actions to perform
Select “Take no action” and then select the “Always
do the selected action” checkbox. (This checkbox
may not be shown in some cases.)
Click the [OK] button and launch FinePixViewer
manually.
3. A new removable disk icon appears in the
“My Computer” window.
TIP
The next time you connect the camera, the removable
disk drive icon and name change to the “FinePix” icon
and name.
Proceed to “Using FinePixViewer” on
page 92.
7
89
Page 46
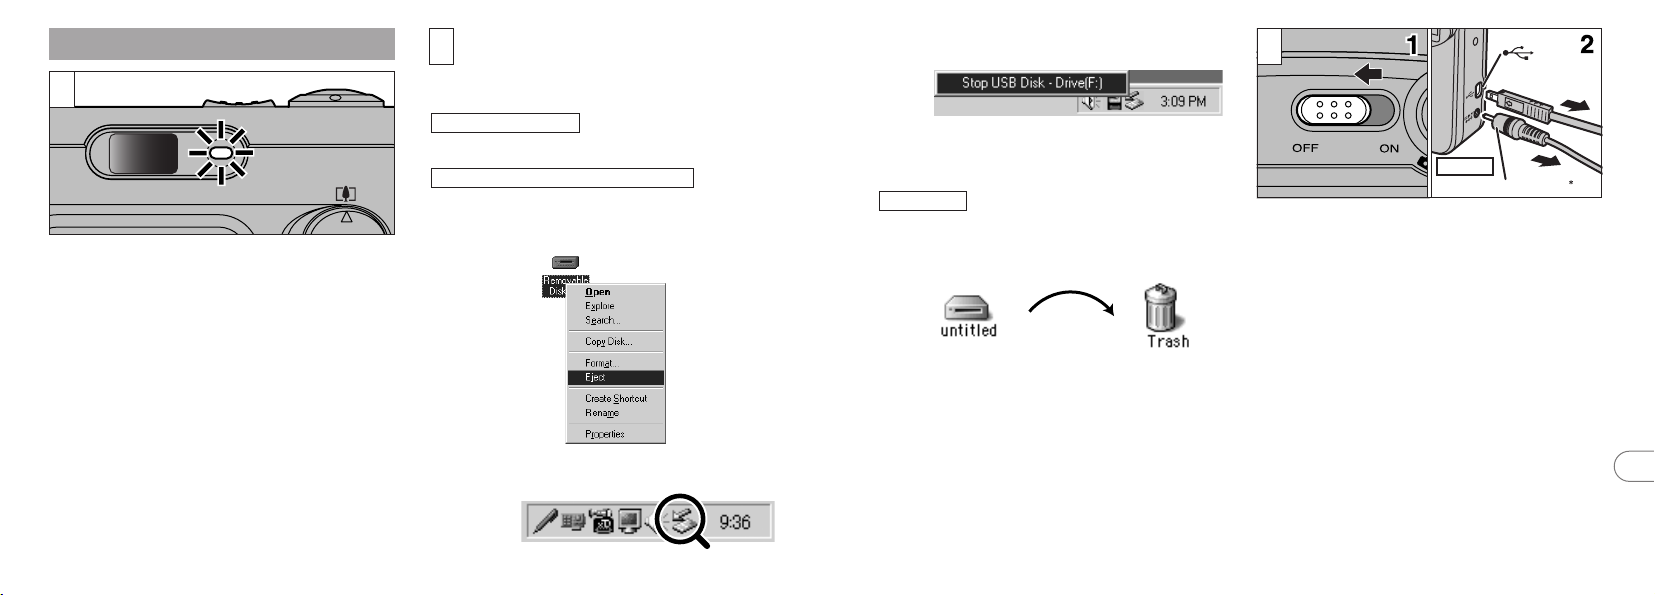
(Special USB)
socket
AC power adapter
Camera
7.3 Disconnecting the Camera
1
1. Quit all applications (FinePixViewer etc.)
that are using the camera.
2. Check that the viewfinder lamp is lit green
or that the self timer lamp is off (no data is
being exchanged with the computer).
✽ Even when “Copying” is no longer displayed on the
computer, the camera and the computer may still be
exchanging data. Always check that the viewfinder
lamp is lit green or that the self timer lamp is off.
Perform the steps shown below before you
2
switch the camera off. This procedure
differs depending on the operating system
software (or PC) you are using.
Windows 98/98 SE
No PC operation is needed.
Windows Me/2000 Professional/XP
1. Right-click the removable disk icon in the
“My Computer” window and select Eject.
This step is only required in Windows Me.
3. The menu option shown below appears.
Click on this option.
✽ Screen for Windows Me
4. The “Eject hardware” dialog box appears.
Click the [OK] button or the close button.
Macintosh
Drag the “Removable drive” icon on the desktop
to the Trash.
✽ When you drag the icon to the Trash, “≠”
appears on the camera’s LCD monitor.
3
✽ Sold separately
1. Switch the camera off.
2. Unplug the special USB cable from the
camera.
90
2. Left-click the Eject icon in the taskbar and
eject “USB Disk”.
✽ Screen for Windows Me
7
91
Page 47
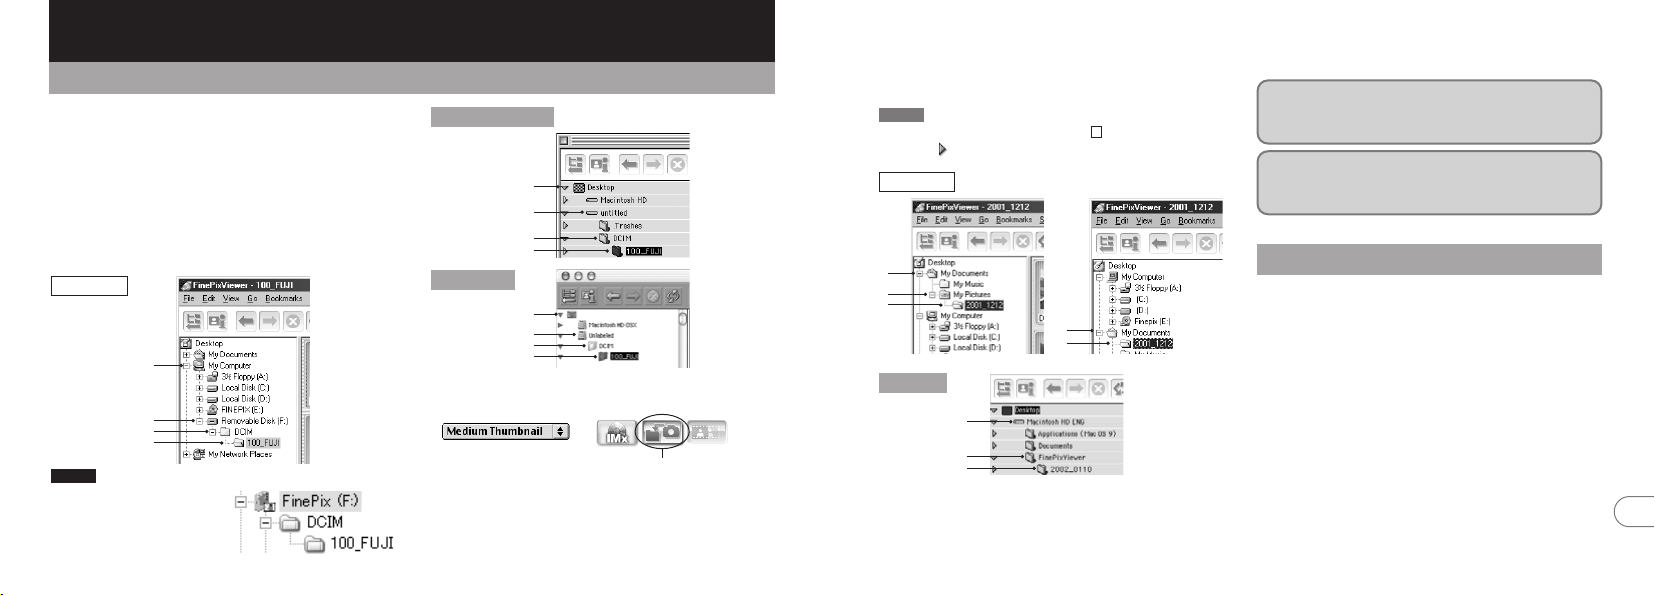
8 Using FinePixViewer
8.1 Saving Images on Your Computer
This section gives a brief overview of how to use
FinePixViewer. Refer to these instructions while you
are using FinePixViewer.
1. Connect the camera to your computer in
DSC mode (➡P.87).
2. When you open the folders shown below
in order, the images in the camera are
displayed in the thumbnail display area.
Windows
1
2
3
4
NOTE
On Windows XP, the
removable disk appears
as “FinePix” (for the
second and subsequent
connections).
92
Mac OS 8.6-9.2
1
2
3
4
Mac OS X
1
2
3
4
3. Click the [Automatic Taking] button.
Copies multiple images
at once.
4. Check that the files are downloaded from
the camera to your computer and that a
folder with the photography date is
created. Open the folder as shown below.
TIP
To open a folder, click on the plus “ ” symbol (Windows)
or arrow “ ” (Macintosh) to the left of the folder.
+
Windows
1
2
3
OR
1
2
Mac OS
1
2
3
Indicates the folder in which FinePixViewer is
installed.
5. Double-click a still-image thumbnail to
open an image window.
For more information on using the software,
refer to “How to use FinePixViewer” in the HELP
menu which was installed from the CD-ROM.
Always use the prescribed procedure when
disconnecting or switching off the camera
(➡P.90).
8.2 Making a FinePix CD Album
For using “ImageMixer VCD for FinePix” to create
CD albums and video CDs.
h To create CD-Rs or video CDs, you will need a
CD-R drive.
h Refer to the “ImageMixer VCD for FinePix” help
file for more detailed information.
h For inquiries regarding “ImageMixer VCD for
FinePix”
PIXELA User Support Center
PIXELA Home Page: http://www.ImageMixer.com/
North America (Los Angels) Telephone: +1-213-341-0163
Europe (U.K.) Telephone: +44-1489-564-764
Asia (Philippines) Telephone: +63-2-438-0090
Japan (Osaka) Telephone: +81-72-224-0181
8
93
Page 48
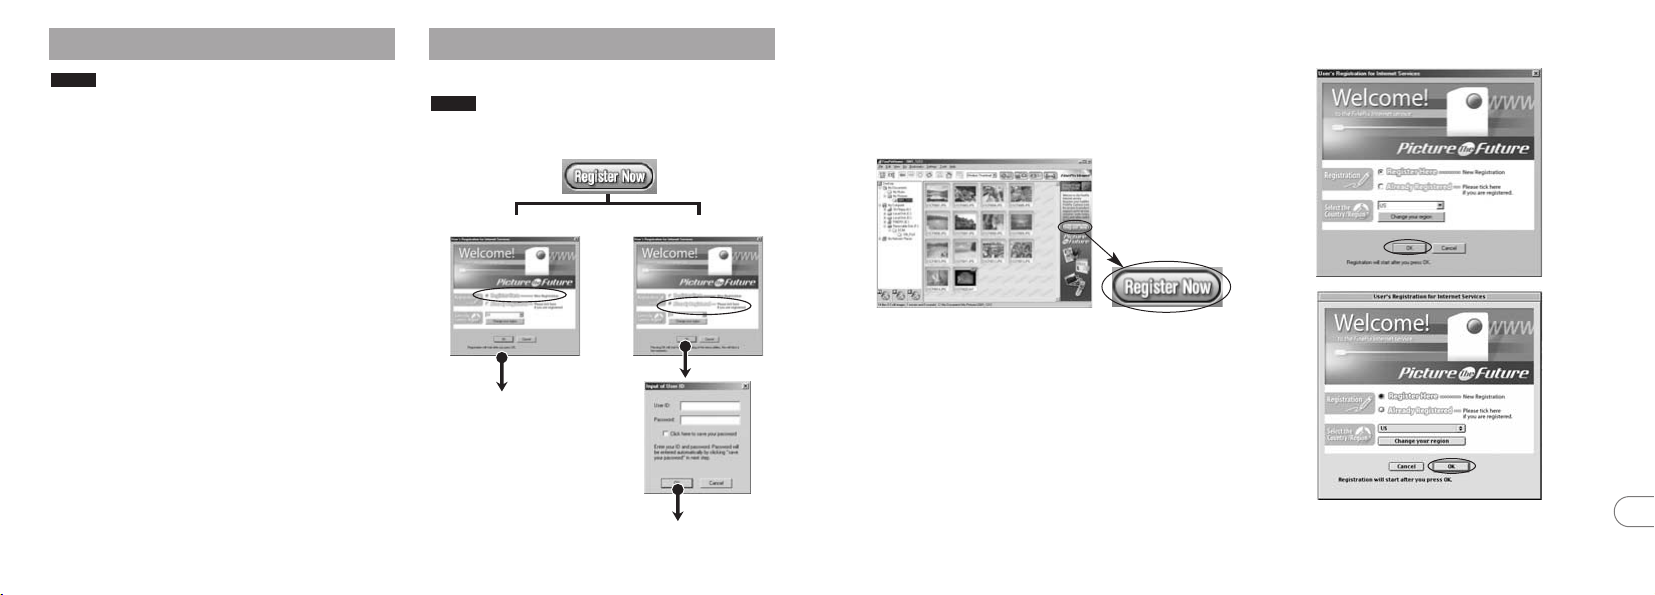
8.3 Using the FinePix Internet Service
First-time users
To the user registration
window
Registered users
The Internet menu is
updated.
NOTE
Mac OS X users should refer to P.96.
Using FinePixViewer also allows you to access the
FinePix Internet Service via the Internet.
✽ A working Internet connection is required not only for
FinePix Internet Service, but also online FAQ
(FinePixViewer frequently asked and responses) and
latest updates.
✽ A FinePix Internet Service fees do not include your
Internet service provider (ISP) connection fees or any
phone charges incurred in dialing your ISP’s access
point.
The figure below gives a general overview of the
procedure.
94
8.4 User Registration
■ For Windows and Mac OS 8.6 to 9.2
NOTE
Your user ID and password are very important. Make
sure you do not forget them.
To use the FinePix Internet services, users must
first register.
✽ Follow the steps below to register. Users can be
registered for free.
1. Launch FinePixViewer.
2. Click the [Register Now] button.
3. The “ User’ s Registration for Internet
Services” dialog box opens. As shown at
right, select [Register Here], then select
the country or region where you are living
and click the [OK] button.
✽ If you are not already connected to the Internet,
connect now (A dial-up dialog box may be
displayed).
✽ If you have completed the user registration, select
“Already Registered” (E.g. When you want to reinstall FinePixViewer after completing user
registration).
✽ If the country or area where you are living does
not appear in the pull-down list, select “OTHERS”.
4. When the browser starts up, proceed as
directed by the on-screen instructions.
8
95
Page 49
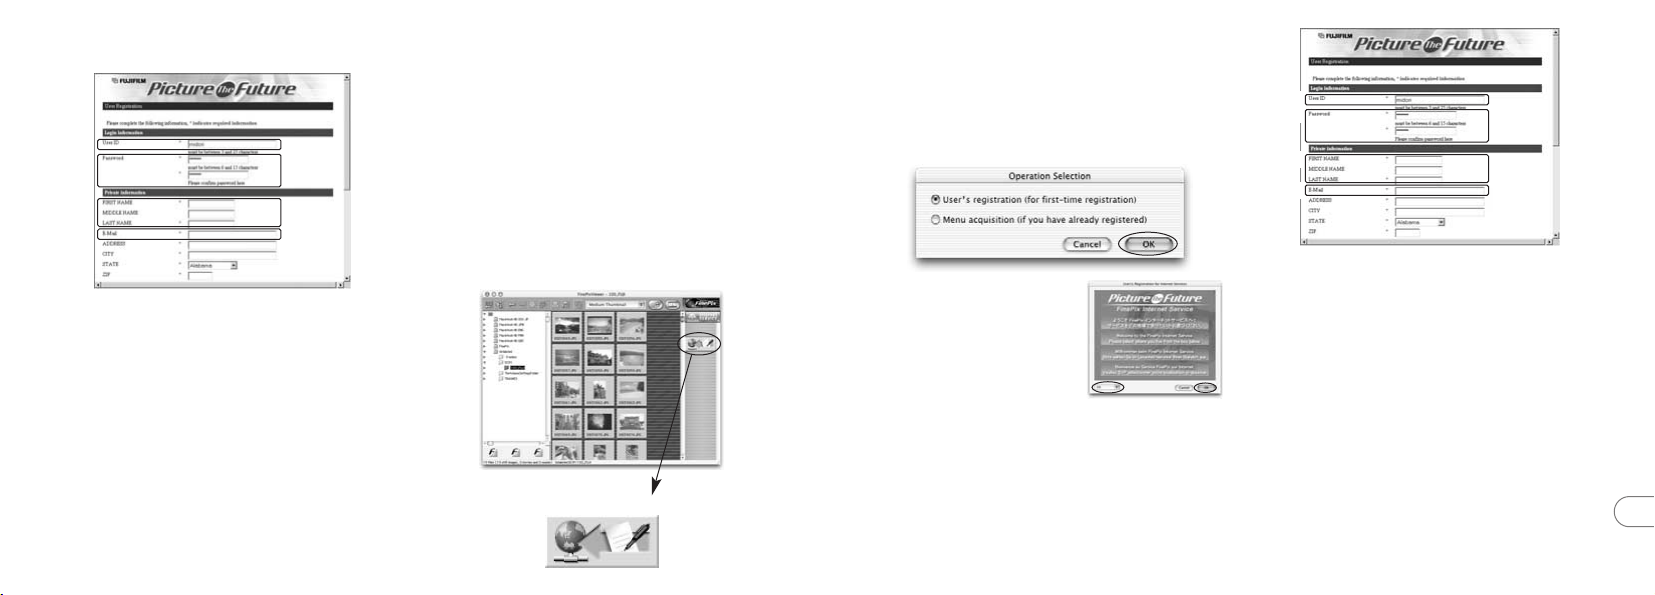
5. Enter the required information in the user
registration page.
1
2
3
4
1 Enter the name of your choice (nickname, etc.).
2 Enter a password of your choice using letters
and/or numbers. Then enter the password again
for confirmation.
3 Enter your name.
4 Enter your E-mail address.
5 Enter the remaining required information.
✽ After you register, a confirmation E-mail message
is sent to you. Be sure to enter a valid E-mail
address at which you can receive the message.
✽ The actual user registration page may differ
slightly in appearance from the sample shown
here.
6. When you have entered all the required
information, click the [Registration] button
96
at the bottom of the page.
Once you complete the registration, a confirmation
E-mail is sent. Wait a few moments until the
message is sent.
■ For Mac OS X
To use the FinePix Internet services, users must
first register.
✽ Follow the steps below to register. Users can be
registered for free.
1. Double-click the “FinePixViewer” icon in
the installed folder.
2. Click the [User’s Registration] button. The
“Operation Selection” dialog box appears.
<User’s Registration button>
3. Select “User’s registration” and click the
[OK] button.
✽ If you are not already connected to the Internet,
connect now. (A dial-up dialog box may be
displayed.)
✽ Only select menu acquisition if you have already
completed the user registration process and you
have re-installed “FinePixViewer”, etc.
4. The User’s Registration
dialog box opens.
Select the country or
area where you are
living and click the
[OK] button.
✽ The actual user registration page may differ slightly
in appearance from the sample shown here.
✽ If the country or area where you are living does
not appear in the pull-down list, select “OTHERS”.
5. When the browser starts up, proceed as
directed by the on-screen instructions.
6. Enter the required information in the user
registration page.
1
2
3
4
1 Enter the name of your choice (nickname, etc.).
2 Enter a password of your choice using letters
and/or numbers. Then enter the password again
for confirmation.
3 Enter your name.
4 Enter your E-mail address.
5 Enter the remaining required information.
✽ After you register, a confirmation E-mail message
is sent to you. Be sure to enter a valid E-mail
address at which you can receive the message.
✽ The actual user registration page may differ slightly
in appearance from the sample shown here.
7. When you have entered all the required
information, click the [Register] button at
the bottom of the page.
Once you complete the registration, a confirmation
E-mail is sent. Wait a few moments until the
message is sent.
8
97
Page 50
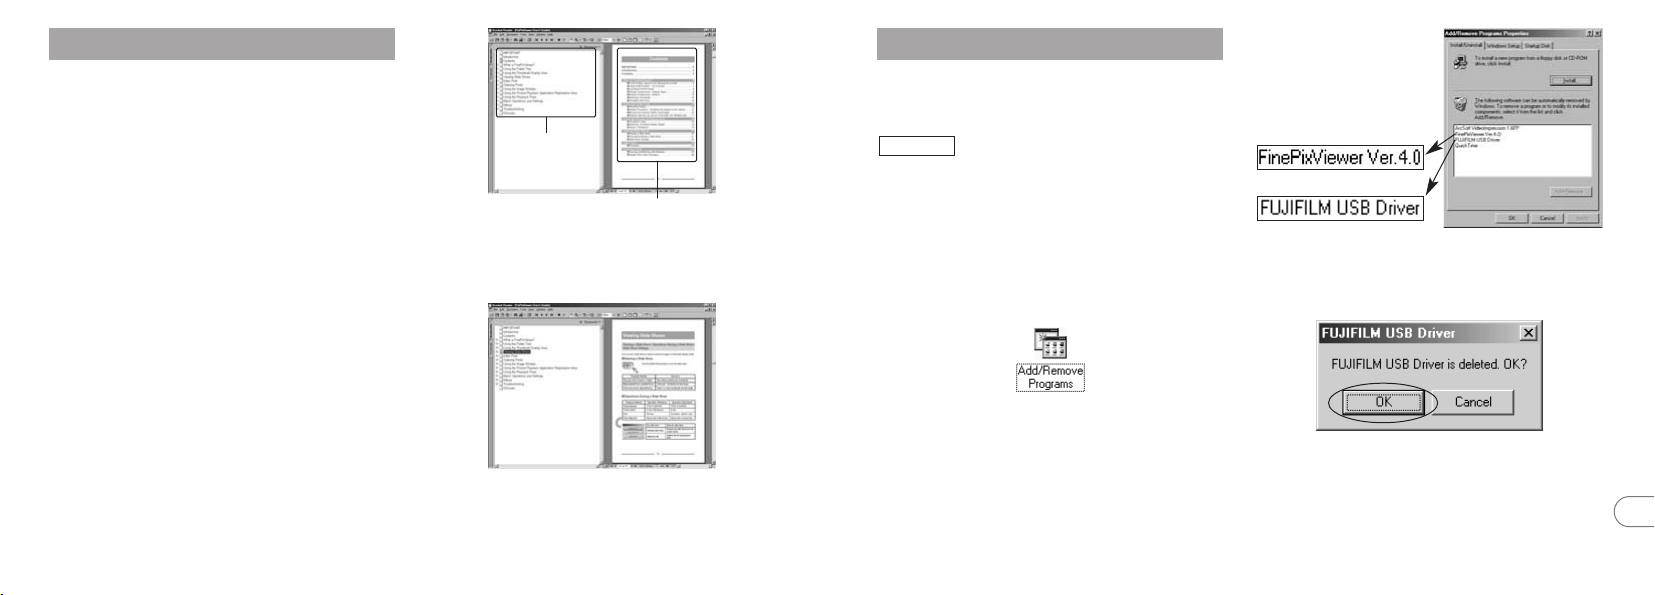
8.5 Mastering FinePixViewer
For more information on FinePixViewer functions
not fully explained in this manual, refer to “How to
Use FinePixViewer” in the Help menu for details.
■ To read “How to Use FinePixViewer”...
You must install Adobe Systems’ Acrobat Reader.
See P.80 for information on installing Acrobat Reader.
■ What is explained in “How to Use
FinePixViewer”...
“How to Use FinePixViewer” covers a range of topics,
including batch processing and ordering prints.
■ Example: Looking up slide shows
1. Click “How to Use FinePixViewer” in the
FinePixViewer Help menu.
2. Search for relevant articles by clicking the
corresponding items in the Help
“Bookmarks” or “Contents”. Here, click
“Viewing Slide Shows”.
Bookmarks
Contents
3. The “Viewing Slide Shows” information is
displayed. Press the “←” key to view the
previous page or the “→” key to view the
next page.
✽ For more information on using Acrobat Reader,
refer to the Acrobat Reader “Help” menu.
8.6 Uninstalling the Software
Only perform this operation when you no longer
require the installed software or when the software
was not installed correctly.
Windows
1. Switch on your PC.
2. Disconnect the camera (➡P.90, 91).
3. Quit all currently running applications.
4. Close all files.
5. Open the “My Computer” window, open
the “ Control Panel”, and double-click
“Add/Remove Programs”.
6. The “Add/Remove Programs Properties”
window appears. Select the software to be
uninstalled (FinePixViewer or the driver)
and then click the [Add/Remove] button.
<To remove FinePixViewer>
<To remove the driver software>
7. When the confirmation message appears,
click the [OK] button. Check your selection
carefully since the process cannot be
cancelled once you click [OK].
8. Automatic uninstallation begins.
When uninstallation ends, click the [OK]
button.
8
98
99
Page 51
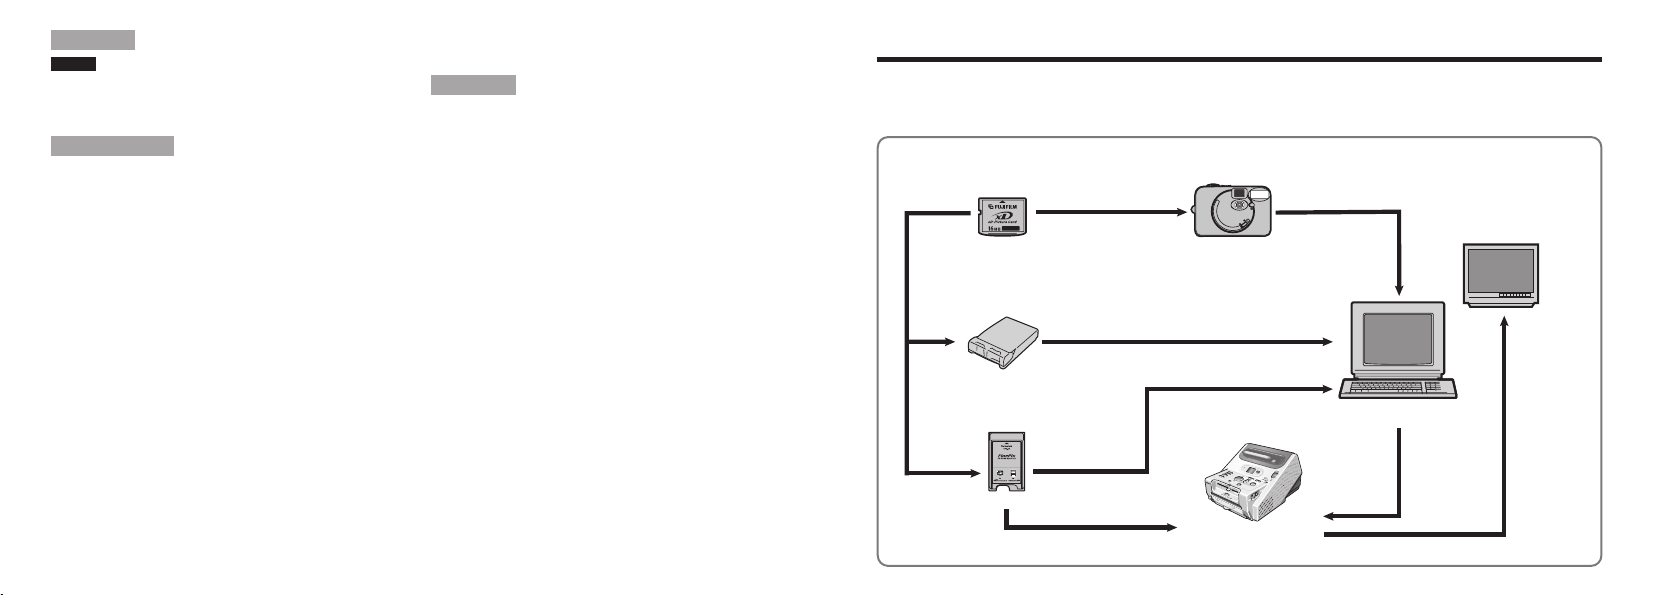
FinePix A403
Digital Camera
(
USB
)
(
PC card slot
)
Personal Computer
(commercially available)
Digital Photo Printer
CX-400
(
USB
)
(
USB
)
PC Card Adapter
xD-Picture Card
Image Memory
Card Reader
TV monitor
(commercially available)
Macintosh
NOTE
Only perform this operation when you no longer require
the installed software or when the software was not
installed correctly.
Mac OS 8.6-9.2
■ Uninstalling Mass Storage Driver and
PC Camera Driver
1. Check that the camera is not connected to
your Macintosh.
2. Drag all the files that begin with
“USB04CB...” to the Trash.
3. Restart your Macintosh.
4. Select “Empty Trash” in the “Special” menu.
■ Uninstalling Exif Launcher,
FinePixViewer and DP Editor
1. After you have quit Exif Launcher in “Exif
Launcher Settings” in the FinePixViewer
“Settings” menu, move the Exif Launcher
file from the “Startup Items” folder in the
System folder to the Trash. Then select
“Empty Trash” in the “Special” menu.
2. After you have exited FinePixViewer and
DP Editor and then drag the installed
FinePixViewer folder to the Trash. Then
click “Empty Trash” in the “Special” menu.
Mac OS X
■ Uninstalling FinePixViewer
Quit FinePixViewer and DP Editor. Then drag
the installed FinePixViewer folder to the Trash
and select “Empty Trash” in the “Special”
menu.
System Expansion Options
e By using the FinePix A403 together with other optional FUJIFILM products, your system can be
expanded to fill a wide range of uses.
101100
Page 52
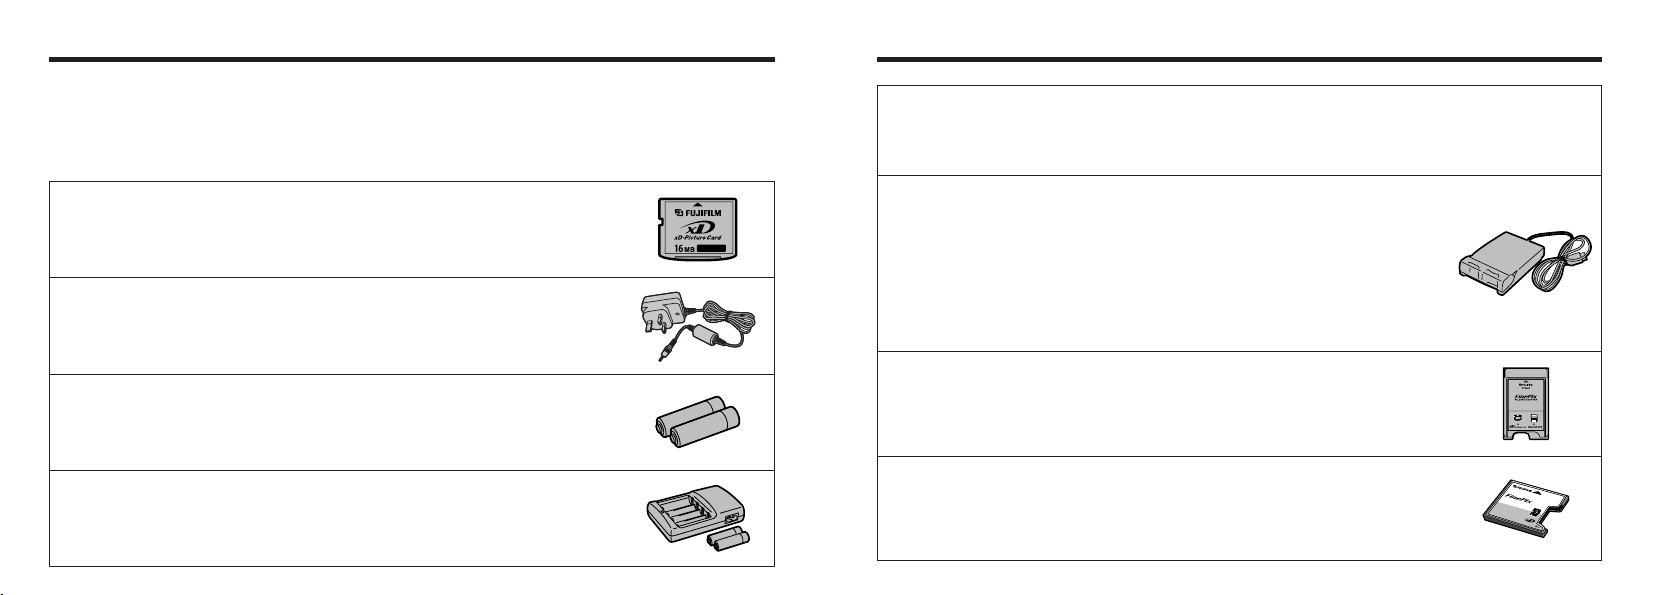
C
O
M
P
A
C
T
F
L
A
S
H
D
P
C
C
F
T
M
f
o
r
x
D
P
i
c
t
u
r
e
C
a
r
d
C
A
R
D
A
D
A
P
T
E
R
Accessories Guide
e The accessories (sold separately) can make taking pictures with the FinePix A403 even easier. For
information on how to attach and use the accessories, refer to the instructions provided with the
accessory used.
Visit the FUJIFILM web site for the latest information on camera accessories.
http://home.fujifilm.com/products/digital/index.html
h xD-Picture Card
These are separately available xD-Picture Cards.
Use the following xD-Picture Card:
DPC-16 (16 MB)/DPC-32 (32 MB)/DPC-64 (64 MB)/DPC-128 (128 MB)/
DPC-256 (256 MB)
●
AC Power Adapter AC-3V
Use the AC power adapter when you want to take pictures or play back images
for long periods or when the camera is connected to a computer.
✽
The shape of the AC power adapter, the plug and socket outlet depend on the country.
●
Fujifilm Rechargeable Battery 2HR-3UF
The 2HR-3UF includes 2 pieces of high-capacity AA-size Nickel Metal Hydride batteries.
●
Fujifilm Battery charger with Battery BK-NH (with UK type plug)
The BK-NH includes the quick battery charger BCH-NH and 2 Ni-MH batteries.
The BCH-NH can charge 2 Ni-MH batteries in approximately 120 minutes.
Up to 4 Ni-MH batteries can be charged simultaneously.
●
SC-FXA01
This is a special case made of polyester that protects the camera against soil, dust
and minor impacts when it is being carried.
h DPC-R1 Image Memory Card Reader
The DPC-R1 provides a quick and easy way to transfer images back and forth
between your PC and an image memory card (xD-Picture Card and
SmartMedia). The DPC-R1 uses the USB interface for high-speed file transfer.
i Compatible with Windows 98/98 SE, Windows Me, Windows 2000 Professional,
Windows XP or iMac, Mac OS 8.6 to 9.2.2, Mac OS X (10.1.2 to 10.1.5) and
models that support USB as standard.
i Compatible with xD-Picture Card of 16 MB to 256 MB, and SmartMedia of
3.3V, 4 MB to 128 MB.
h DPC-AD PC Card Adapter
The PC Card Adapter allows the xD-Picture Card and SmartMedia to be used as
a PC Card Standard ATA-compliant (PCMCIA 2.1) PC card (Type II ).
i Compatible with xD-Picture Card of 16 MB to 256 MB, and SmartMedia of
3.3V, 2 MB to 128 MB.
h CompactFlash™ Card Adaptr
Inserting an xD-Picture Card into this adapter allows you to use the card as a
CompactFlash card (Type I).
i Windows 95/98/98 SE/Me/2000 Professional/XP
i Mac OS 8.6 to 9.2.2/X (10.1.2 to 10.1.5)
103102
Page 53

Notes on Using Your Camera Correctly
Notes on the Power Supply
Be sure to read this information in conjunction with “Safety Notes” (➡P.118), to ensure that you use
e
your camera correctly.
■ Places to Avoid
Do not store or use the camera in the following types of
locations:
h In the rain or in very humid, dirty or dusty places.
h In direct sunlight or in places subject to extreme
temperature rises, such as in a closed car in summer.
h Extremely cold places.
h Places subject to strong vibration.
h Places affected by smoke or steam.
h Places subject to strong magnetic fields (such as near
motors, transformers or magnets).
h In contact with chemicals such as pesticides or next to
rubber or vinyl products for long periods of time.
■ Notes on Immersion in Water or Sand
The FinePix A403 is particularly adversely affected by
water and sand. When you are at the beach or close to
water, ensure that the camera is not exposed to water or
sand. Take care also not to place the camera on a wet
surface. Water or sand inside the camera can cause faults
that may be irreparable.
■ Notes on Condensation
If the camera is carried suddenly from a cold location into a
warm place, water droplets (condensation) may form on
the inside of the camera or on the lens. When this occurs,
switch the camera off and wait an hour before using the
camera. Condensation may also form on the xD-Picture
Card. In this event, remove the xD-Picture Card and wait
a short time before using it again.
■ When the Camera is Unused for Long Periods
If you do not intend to use the camera for a long period of
time, remove the batteries and the xD-Picture Card before
storing the camera.
■ Cleaning Your Camera
h Use a blower brush to remove dust from the lens, LCD
monitor screen or viewfinder and then wipe lightly with a
soft, dry cloth. If any soil remains, apply a small amount
of lens cleaning liquid to a piece of FUJIFILM lens
cleaning paper and wipe gently.
h Do not scratch hard objects against the lens, LCD
monitor screen or viewfinder as these surfaces are easily
damaged.
h Clean the body of the camera with a soft, dry cloth. Do
not use volatile substances such as thinners, benzine or
insecticide, as these may react with camera body and
cause deformation or remove the coating.
■ Using the Camera Overseas
When travelling overseas, do not place your camera in the
check-in baggage. Baggage handling at airports may
subject baggage to violent shocks, and the camera may be
damaged internally even when no external damage is
visible.
Applicable Batteries
h AA-size alkaline, Ni-MH (nickel-metal hydride) can be used
with this camera.
Do not use AA-size manganese, lithium or nickel-cadmium
(Ni-Cd) batteries in your FinePix camera because the heat
generated by the batteries could damage the camera or
cause malfunctions.
h The operating lives of alkaline batteries vary between brands
and the life of batteries you purchase may be shorter than the
alkaline batteries provided with the camera.
Notes on the Batteries
Incorrect use of the batteries could cause them to leak,
become hot, ignite or burst. Always observe the
precautions given below.
h Do not heat the batteries or throw them into a fire.
h Do not carry or store a batteries with metal objects such
as necklaces or hairpins that could come into contact
with the metal positive + and negative _ poles of the
batteries.
h Do not expose the batteries to fresh or sea water, and
take particular care to keep the terminals dry.
h Do not attempt to deform, disassemble or modify the
batteries.
h Do not attempt to peel off or cut the batteries outer casing.
h Do not drop, strike or otherwise subject the batteries to
strong impacts.
h Do not use batteries that are leaking, deformed,
discolored or exhibit any other obvious abnormality.
h Do not store batteries in very warm or moist locations.
h Keep the batteries out of reach of babies and small
children.
When loading the batteries into the camera, ensure that the
h
battery polarity (
h Do not use a new battery together with a used battery. In
the case of rechargeable batteries, do not use charged
and discharged batteries together. Do not use batteries
of different types or brands together.
h If you do not intend to use the camera for a long period of
time, remove the batteries from the camera. (Note that if
the camera is left with the batteries removed, the time
and date settings are cleared.)
h The batteries may feel warm immediately after being
used. Before removing the batteries, switch the camera
off and wait until the batteries cool down.
When replacing the batteries, always fit 2 new batteries.
h
Here, “new batteries” refers to either recently purchased
unused alkaline batteries, or Ni-MH (nickel metal hydride)
batteries that have recently been fully recharged together.
h
In cold locations (at temperatures of +10°C/+50°F or below),
battery performance deteriorates and the time for which they
can be used shortens markedly. This is particularly true of
alkaline batteries. In cold conditions, put the batteries in your
pocket or a similar place to warm them before loading them
into the camera. If you use a body warmer to warm the
batteries, ensure that they are not in direct contact with the
warmer.
h
Soil (such as fingerprints) on the battery terminals can
markedly reduce the number of available shots. Carefully
wipe the battery terminals clean with a soft dry cloth before
loading the batteries.
+
and _) is as indicated on the camera.
105104
Page 54
Notes on the Power Supply
If any liquid at all leaks from the batteries, wipe the battery
compartment thoroughly and then load new batteries.
I
f any battery fluid comes into contact with your hands or
clothing, flush the area thoroughly with water. Note that
battery fluid can cause loss of eyesight if it gets into your
eyes. If this occurs, do not rub your eyes. Flush the fluid out
with clean water and contact your physician for treatment.
■ Disposing of Batteries
When disposing of batteries, do so in accordance with your
local waste disposal regulations.
■ Notes on Small Rechargeable Batteries (AA-size
Ni-MH batteries)
h Always use the special battery charger to charge AA-size
Ni-MH batteries. Charge the batteries as described in the
instructions provided with the battery charger.
h Do not use the battery charger to charge batteries other
than those specified for use with the charger.
h Note that the batteries may feel warm immediately after
being charged.
h AA-size Ni-MH batteries are not charged at shipment. Be
sure to charge the batteries before using them.
h The camera mechanism is such that it draws a minute
amount of current even when the camera is switched off.
Take particular care not to leave AA-size Ni-MH batteries
in the camera for a long period of time as they can
become excessively discharged and may no longer be
usable even when charged.
h AA-size Ni-MH battery self-discharge even when not
used. Always charge AA-size Ni-MH batteries before using
them. If the time for which batteries provide power shortens
markedly when they have been correctly charged, this
indicates that the batteries have reached the end of them
effective life and should be replaced.
h Soil (fingerprints, etc) on the terminals of AA-size Ni-MH
batteries can greatly reduce the number of available
shots. When this occurs, clean the terminals carefully
with a soft dry cloth. Then use up the remaining charge in
the batteries and recharge them.
h Newly purchased batteries or batteries that have been
left unused for an extended period may not be fully
charged. (This is indicated by the immediate display of
the battery low warning or a low number of available
shots.) This is a normal characteristic of the batteries and
does not indicate a fault. Repeatedly charging and using
the batteries 3 or 4 times will restore them to a normal
condition.
h If you repeatedly charge a AA-size Ni-MH batteries
before it is fully discharged, it will suffer from the “memory
✽
, causing the battery low warning to appear while
effect”
there is still ample charge remaining in the batteries. To
restore the batteries to their normal condition, use up all
the charge in the batteries before recharging them.
✽ Memory effect: A phenomenon affecting the battery
characteristics such that the apparent
battery capacity decreases.
AC Power Adapter
Use only the AC-3V AC Power Adapter (sold separately)
with your FinePix A403 Digital Camera. The use of other
AC power adapters may result in damage to your camera.
h This AC power adapter is designed exclusively for indoor use.
h Plug the connection cord plug securely into the DC input
terminal of the FUJIFILM Digital camera.
h Turn off the power switch of the FUJIFILM Digital camera
before disconnecting the connection cord from the FUJIFILM
Digital camera’s DC input terminal. To disconnect, take hold
of the plug and pull it out (do not disconnect it by pulling on
the cord).
h Do not use this AC power adapter with any device except the
specified device.
h During use, this AC power adapter will become hot to touch,
but this is normal.
h Do not disassemble the AC power adapter. Doing so could
be dangerous.
h Do not use this device in a place with high temperature and
high humidity.
h Do not drop or subject this device to strong shocks.
h This device may emit a humming noise, but this is normal.
h If used near a radio, this device may cause static, so play the
radio in a distant place.
107106
Page 55

Notes on the xD-Picture Card™
■ Image Memory Card
h This Image Memory Card is a new image recording
media (xD-Picture Card) developed for digital
cameras. The Image Memory Card consists of a
semiconductor memory (NAND-type flash memory)
to record digital image data.
The recording process is electrically performed and
enables erasure of existing image data as well as rerecording of new image data.
h When using a new Memory Card, or a Memory Card
that has been initialized by a PC, be sure to initialize
(format/initialize) the card with your digital camera
before using it.
■ Protecting Your Data
h Data may be lost or destroyed in the following
situations. Please note that FUJIFILM assumes no
responsibility for data that is lost or destroyed.
1. Removal of the memory card or turning the power
off while the memory card is being accessed (i.e.,
during record, erase, initialization, and playback
operations).
2. Improper handling and use of the memory card by
the user or third party.
h We recommend saving your important data to
another media (i.e., MO disk, CD-R, hard disk, etc.).
■ Notes on Handling xD-Picture Card
h Keep xD-Picture Cards out of the reach of small
children. When storing xD-Picture Cards, ensure that
they are kept in a location out of the reach of small
children to prevent a card being accidentally
swallowed. An xD-Picture Card could cause
suffocation if accidentally swallowed. If a child swallows
an xD-Picture Card, seek medical advice immediately.
h Make sure that the memory card is straight when you
insert into the camera etc.
h The memory card is a precision electronic instrument.
Do not apply pressure or shock, and avoid bending.
h Do not use the memory card in a hot, humid, or
corrosive environment.
h If the contact area on the card is soiled (dust,
fingerprints, etc.), wipe it clean with a soft, dry cloth.
h Clean the memory card with a soft dry piece of cloth
when dirty.
h When you carry or store it, always keep the card in
the anti-static case provided. Use a storage case if
available.
h The memory card can be used reliably for a long
period of time, but will eventually lose its ability to
store and play back image data. At this point, replace
with a new memory card.
h Never remove the xD-Picture Card or switch the
camera off during data recording, during data erasing
(xD-Picture Card formatting) or during frame
advance when images are being played back. These
actions could result in damage to the xD-Picture
Card.
h The use of xD-Picture Cards is recommended with
the FinePix A403.
The camera quality cannot be guaranteed when
cards other than those manufactured by FUJIFILM
are used.
h The xD-Picture Card may feel warm when it is
removed from the camera after extended periods of
picture taking or image viewing. This is normal and
does not indicate a fault.
h Do not affix labels to the xD-Picture Card.
This could result in the label peeling off and causing
a fault when the card is inserted or removed.
■ Notes on Using xD-Picture Card with a PC
h If you intend to take photos using an xD-Picture
Card that has been used on a PC, format the xDPicture Card on your camera.
h When you format an xD-Picture Card in the camera
and then shoot and record images, a directory
(folder) is automatically created. Image data is then
recorded in this directory.
h Do not change or delete the directory (folder) names
or file names on the xD-Picture Card from your PC
as this will make it impossible to use the xD-Picture
Card in your camera.
h Always use the camera to erase image data on an
xD-Picture Card.
h To edit image data, copy the image data to the PC’s
hard disk and then edit the copied data.
h Do not copy files other than those that will be used by
the camera.
■Specifications
Type
Memory type NAND-type flash memory
Conditions for use Temperature:
Dimensions 25 mm × 20 mm × 2.2 mm
Image memory card for digital cameras
(xD-Picture Card)
0°C to +40°C (+32°F to +104°F)
Humidity:
80% max. (no condensation)
(0.98 in. × 0.79 in. × 0.09 in.) (W × H × D)
109108
Page 56
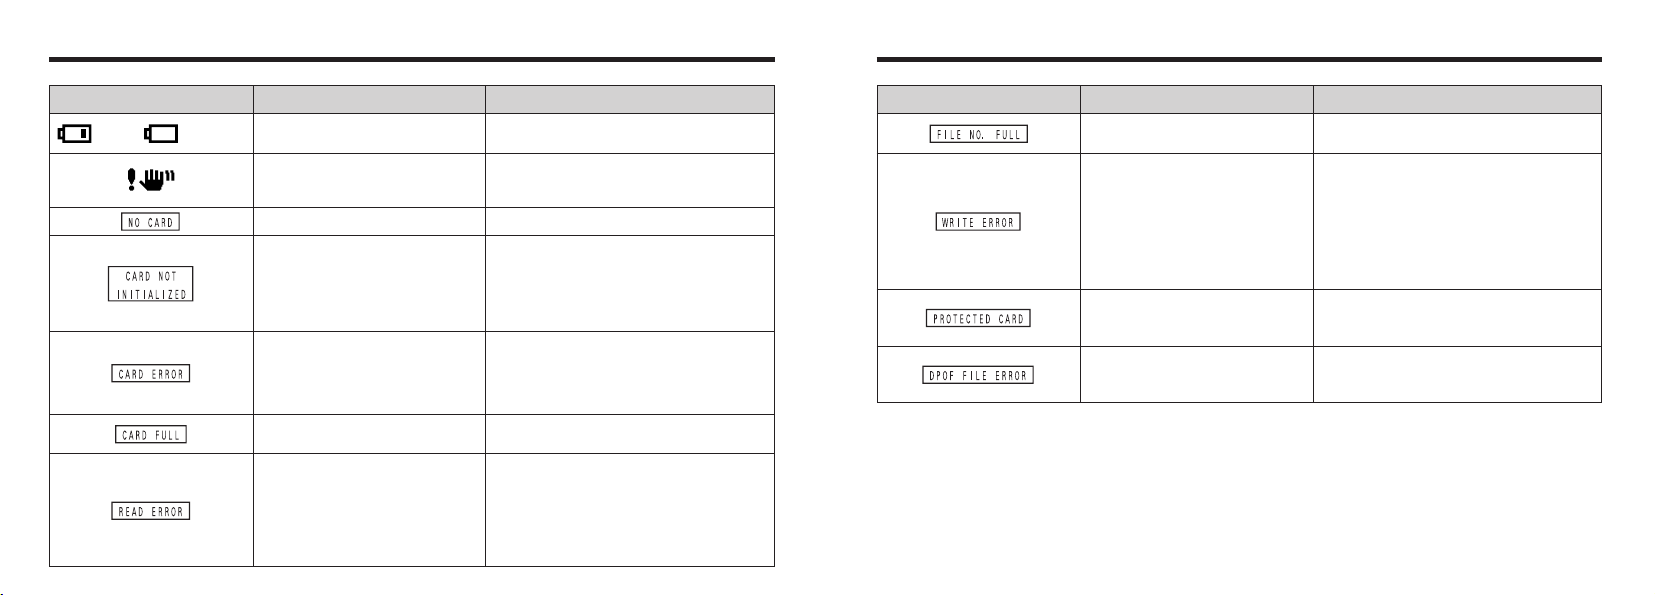
Warning Displays eThe table below lists the warnings that are displayed on the LCD monitor
Warning Displayed Explanation Remedy
(Lit red) (Blinking red)
The batteries in the camera are fully
depleted or very low on charge.
There is a strong likelihood of camera
shake because the shutter speed is
slow.
No xD-Picture Card is inserted.
i
The xD-Picture Card is not formatted.
i
The xD-Picture Card contact area
is soiled.
i
Camera fault.
i
The xD-Picture Card contact area
is soiled.
i
The xD-Picture Card is damaged.
i
The xD-Picture Card format is incorrect.
i
Camera fault.
The xD-Picture Card is fully recorded.
i
An attempt was made to playback a
frame not recorded on this camera.
i
The xD-Picture Card contact area
is soiled.
i
You attempted to play a movie with a
recording time longer than 20 seconds.
Replace the batteries or have new batteries
ready.
Use flash photography. However, a tripod
should be used for some scenes and modes.
Insert an xD-Picture Card.
i
Format the xD-Picture Card in the camera.
i
Wipe the contact area on the xD-Picture Card
with a soft dry cloth. It may be necessary to
format the xD-Picture Card. If the error message
is still displayed, replace the xD-Picture Card.
i
Contact your FUJIFILM dealer.
i
Wipe the contact area on the xD-Picture Card
with a soft dry cloth. It may be necessary to
format the xD-Picture Card. If the error message
is still displayed, replace the xD-Picture Card.
i
Contact your FUJIFILM dealer.
Erase some images or use an xD-Picture Card
that has ample free space.
i
Images cannot be played back.
i
Wipe the contact surface on the xD-Picture Card
thoroughly with a soft, dry cloth. In some cases,
you may have to format the xD-Picture Card.
i
You cannot play back movies that are more
than 20 seconds long.
Warning Displayed Explanation Remedy
The playback frame number has
reached 999–9999.
i
The data could not be recorded due
to an xD-Picture Card error or a
connection error between the xD-
Picture Card and camera.
i
The photographed image cannot be
recorded as it is too large to fit in the
available space on the xD-Picture
Card.
A protected frame was encountered. Protected files cannot be erased. Unprotect the
Prints were specified for 1000 or more
frames in the DPOF frame settings.
Take the shot using a formatted xD-Picture Card.
i
Re-insert the xD-Picture Card or switch the
camera off and then on again.
i
Use a new xD-Picture Card.
frame using the camera on which the protection
was first applied.
The maximum number of frames for which
prints can be specified on the same xD-Picture
Card is 999.
111110
Page 57

Troubleshooting eIf you think the camera is faulty, check the following once more.
Troubleshooting Possible causes Solutions
No power.
Power cuts out during
operation.
Battery runs out quickly.
No photograph is taken
when the shutter button
is pressed.
i The batteries are exhausted.
i The AC power adapter plug has come out
of the power outlet.
The batteries are exhausted. Fit new or fully charged batteries.
i You are using the camera in extremely
cold conditions.
i The terminals are soiled.
i The batteries are flat.
i No xD-Picture Card is inserted.
i The xD-Picture Card is fully recorded.
i The xD-Picture Card is not formatted.
i The xD-Picture Card contact area is
soiled.
i The xD-Picture Card is damaged.
i The Power Save function has switched
the camera off.
i The battery is exhausted.
i Fit new or fully charged batteries.
i Plug the adapter back in.
i Put the batteries in your pocket or another
warm place to heat it and then load it into
the camera just before you take a picture.
i Wipe the battery terminals with a clean,
dry cloth.
i Fit new batteries.
i Insert an xD-Picture Card.
i Insert a new xD-Picture Card or erase
some unwanted frames.
i Format the xD-Picture Card.
i Wipe the xD-Picture Card contact area
with a clean dry cloth.
i Insert a new xD-Picture Card.
i Switch the camera on.
i Fit new or fully charged batteries.
Troubleshooting Possible causes Solutions
Can’t use the flash to
take pictures.
The playback image is
too dark even though
the flash was used.
The image is blurred.
There is speckling on
the image.
Can’t format the
xD-Picture Card.
i The flash is set to Suppressed Flash
mode.
i You pressed the shutter button while the
flash was charging.
i The batteries are exhausted.
i The subject is too far away.
i Your fingers are obscuring the flash or
flash control sensor.
i The lens is dirty.
i You photographed a distant subject with
the macro selector switch set to “
The shot was taken with a slow shutter speed
(long exposure) in a high-temperature
environment.
The xD-Picture Card contact area is
soiled.
E
”.
i Set the flash mode to Auto, Red-Eye
Reduction or Forced Flash mode.
i Wait until charging is completed before
pressing the shutter button.
i Fit new or fully charged battery.
i Move closer to the subject.
i Hold the camera correctly.
i Clean the lens.
i Cancel Macro mode.
This is a characteristic of CCDs and does
not indicate a camera fault.
Wipe the xD-Picture Card contact area
with a clean dry cloth.
113112
Page 58

Troubleshooting
eIf you think the camera is faulty, check the following once more
Explanation of Terms
Troubleshooting Possible causes Solutions
Frame erase does not
erase the frame.
The ERASE ALL function
does not erase all the
frames.
Nothing happens when I
use the Mode switch.
When the camera is
connected to a personal
computer (PC), the shot
image appears on the
camera’s LCD monitor.
The camera no longer
works correctly.
Some frames may be protected. Unprotect frames using the camera on
i Camera malfunction.
i The batteries are exhausted.
i The special USB cable is not connected
correctly to the PC or camera.
i The PC is not switched on.
The camera has suffered an unforeseen
problem.
which the protection was first applied.
i Briefly remove the batteries or
disconnect the AC power adapter. Then
reload the batteries or reconnect the AC
power adapter and try again.
i Fit new or fully charged batteries.
i Set up the camera and USB cable
correctly.
i Switch the PC on.
Remove the batteries briefly and then
reload the batteries and try again.
DPOF: Digital Print Order Format
DPOF is a format used for recording information on a storage media (image memory card, etc.) that allows
you to specify which of the frames shot using a digital camera are printed and how many prints are made of
each image.
EV:
A number that denotes exposure. The EV is determined by the brightness of the subject and sensitivity (speed) of
the film or CCD. The number is larger for bright subjects and smaller for dark subjects. As the brightness of the
subject changes, a digital camera maintains the amount of light hitting the CCD at a constant level by adjusting
the aperture and shutter speed. When the amount of light striking the CCD doubles, the EV increases by 1.
Likewise, when the light is halved, the EV decreases by 1.
JPEG:
Joint Photographics Experts Group
A file format used for compressing and saving color images. The compression ratio can be selected, but the higher the
compression ratio, the poorer the quality of the expanded image.
Motion JPEG:
A type of AVI (Audio Video Interleave) file format that handles images and sound as a single file. Images in
the file are recorded in JPEG format. Motion JPEG can be played back by QuickTime 3.0 or later.
PC Card:
A generic term for cards that meet the PC Card Standard.
PC Card Standard:
A standard for PC cards determined by the PCMCIA.
PCMCIA:
Personal Computer Memory Card International Association (US).
White Balance:
Whatever the kind of the light, the human eye adapts to it so that a white object still looks white. On the other
hand, devices such as digital cameras see a white subject as white by first adjusting the color balance to suit
the color of the ambient light around the subject. This adjustment is called matching the white balance. A
function that automatically matches the white balance is called an Automatic White Balance function.
115114
Page 59
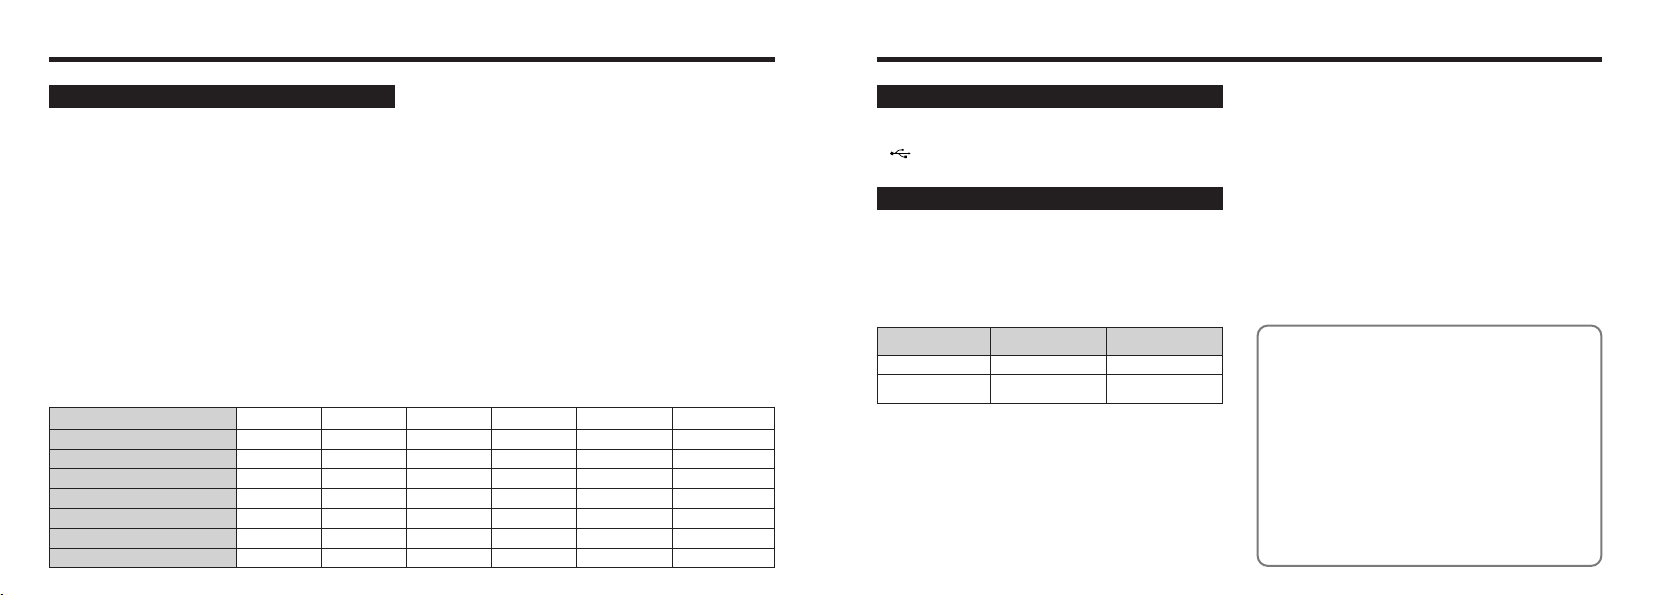
Specifications
System
h Model: Digital Camera FinePix A403
h Number of effective pixels: 2.1 million pixels
h CCD sensor
1/2.7-inch Super CCD, total 2.11 million pixcels
h Number of recorded Pixels
2304 × 1728 pixels/1600 × 1200 pixels/1280 × 960
pixels/640 × 480 pixels
h File format
Still image: JPEG (Exif Ver.2.2), DPOF-compatible
Movie: AVI format, Motion JPEG
✽Design rule for Camera File system Compliant
h Viewfinder
Inverted Galiean finder; Frame coverage: 80%
h Lens: Fujinon optical fixed-focus lens
h Aperture: F5.4
h Storage media
xD-Picture Card (16 MB to 256 MB)
h Focal length
f=5.5 mm (equivalent to 36 mm on a 35 mm camera)
h Standard number of available shots/recording time per xD-Picture Card
Quality
Number of recorded pixels
Image Data Size
DPC-16 (16 MB)
DPC-32 (32 MB)
DPC-64 (64 MB)
DPC-128 (128 MB)
DPC-256 (256 MB)
4M
4
2304 × 1728 1600 × 1200 1280 × 960 640 × 480 320 × 240 160 × 120
Approx.790 KB Approx.390 KB
19 39
39 79
79
159
319 638 798 1997
2
2M
159
319
h Exposure control
64 zones TTL metering, Program AE
(exposure compensation available in Manual mode)
h Sensitivity
Equivalent to ISO 200
h White balance
Auto (7 positions selectable in Manual mode)
h Focal range
Normal: Approx. 80 cm/ 2.6 ft. to infinity
Macro: Approx. 8 cm-13 cm/3.1 in.-5.1 in.
h Shutter speeds
Variable-speed, 1/4 sec. to 1/4000 sec.
h Flash (Auto flash using flash control sensor)
Effective range: Approx. 0.8 m-3.0 m (2.6 ft.-9.8 ft.)
Flash modes : Auto, Red-Eye Reduction, Forced Flash,
h LCD monitor
1.6-inches, 55,000-pixels D-TFD
h Self-Timer
10 sec. timer clock
1M
1
Approx.320 KB
Approx.130 KB
49
99
198
398
Suppressed Flash, Slow Synchro
`
0.3M
122
247
497
997
#
—
Approx. 1.6 min.
Approx. 3.3 min.
Approx. 6.6 min.
Approx. 13.3 min.
Approx. 26.7 min. Approx. 91.2 min.
$
—
Approx. 5.6 min.
Approx. 11.3 min.
Approx. 22.7 min.
Approx. 45.5 min.
Input/ Output Terminals
h DC IN 3V (Power input) socket
Socket for specified AC power adapter (sold separately)
h (Special USB) socket
USB for image data output with a personal computer
Power Supply and Others
h Power supply
Use one of the following:
• 2AA-size alkaline batteries
• 2AA-size Ni-MH (nickel metal hydride) batteries (sold
separately)
• AC Power Adapter AC-3V (sold separately)
Number of available shots using batteries (batteries life)
h
Batteries type
Alkaline batteries
Ni-MH batteries
HR-3UF 1700 mAh
✽
(Condition: Power saving mode ON, with fully charged batteries (Ni-MH))
This indicates the number of available frames shot
consecutively at room temperature with a flash use rate of
50%. Note that these figures may vary depending on the
ambient temperature and the amount of charge in the
batteries. The number of available shots or available
shooting time will be lower in cold conditions.
h Conditions for use
Temperature: 0°C to +40°C (+32°F to +104°F); 80%
humidity or less (no condensation)
With LCD monitor
ON
Approx. 100 frames
Approx. 150 frames
With LCD monitor
OFF
Approx. 200 frames
✽
Approx. 250 frames
h Camera dimensions (W/H/ D)
98.5 mm × 64.5 mm × 40.5 mm /3.9 in. × 2.5 in. × 1.6in.
(not including accessories and attachments)
h Camera mass (weight)
Approx. 131 g/4.6 oz.
(not including accessories, batteries and xD-Picture Card)
h Weight for photography
Approx. 185 g/6.5 oz.
(including batteries and xD-Picture Card)
h Accessories
See P.7
h Optional Accessories
See P.102, 103
For more information, refer to the following web site.
http://fujifilm.co.uk
✽
These specifications are subject to change without
notice. FUJIFILM shall not be held liable for damages
resulting from errors in this Owner’s Manual.
✽
✽
The LCD monitor on your digital camera is manufactured
using advanced high-precision technology. Even so,
small bright points and anomalous colors (particularly
around text) may appear on the monitor. These are
normal display characteristics and do not indicate a fault
with the monitor. This phenomenon will not appear on
the recorded image.
✽ The operation error may be caused in a digital camera
by the strong radio interference (i. e. electric fields,
static electricity, line noise, etc.).
✽ Due to the nature of the lens, the edges of photographed
images may appear distorted. This is normal and does
not indicate a fault.
117116
Page 60
Safety Notes
h To ensure that you use your FinePix A403 camera
correctly, read these Safety Notes and your Owner’s
Manual carefully beforehand.
h After reading these Safety Notes, store them in a safe
place.
About the Icons
The icons shown below are used in this document to
indicate the severity of the injury or damage that can result
if the information indicated by the icon is ignored and the
product is used incorrectly as a result.
This icon indicates that death or
WARNING
CAUTION
The icons shown below are used to indicate the nature of
the information which is to be observed.
serious injury can result if the
information is ignored.
This icon indicates that personal
injury or material damage can
result if the information is ignored.
Triangular icons notify the user of information
requiring attention (“Important”).
Circular icons with a diagonal bar notify the user
that the action indicated is prohibited
(“Prohibited”).
Filled circles with an exclamation mark notify the
user of an action that must be performed
(“Required”).
WARNING
If a problem arises, switch the camera
off, remove the batteries, disconnect
and unplug the AC power adapter.
Continued use of the camera when it is
emitting smoke, is emitting any unusual
odor, or is in any other abnormal state can
cause a fire or electric shock.
h Contact your FUJIFILM dealer.
Do not allow water or foreign objects to
enter the camera.
If water or foreign objects get inside the
camera, switch the camera off, remove the
batteries and disconnect and unplug the AC
power adapter.
Continued use of the camera can cause a
fire or electric shock.
h Contact your FUJIFILM dealer.
Do not use the camera in the bathroom
or shower.
This can cause a fire or electric shock.
Never attempt to modify or disassemble
the camera. (Never open the casing.)
Do not use the camera when it has been
dropped or the casing is damaged.
This can cause a fire or electric shock.
h Contact your FUJIFILM dealer.
Unplug from
power socket.
Do not use in the
bathroom or shower.
Do not
disassemble.
Do not modify, heat or unduly twist or
pull the connection cord and do not
place heavy objects on the connection
cord.
These actions could damage the cord and
cause a fire or electric shock.
h If the cord is damaged, contact your
FUJIFILM dealer.
Do not place the camera on an unstable
surface.
This can cause the camera to fall or tip over
and cause injury.
Never attempt to take pictures while in
motion.
Do not use the camera while you are walking
or operating a moving car or other vehicle.
This can result in you falling down or being
involved in a traffic accident.
Do not touch any metal parts of the
camera during a thunderstorm.
This can cause an electric shock due to
induced current from the lightning discharge.
Do not use the batteries except as
specified.
Load the batteries with the poles positioned
as indicated by the + and _ marks.
WARNINGWARNING
Do not heat, modify or attempt to
disassemble the batteries.
Do not drop or subject the batteries to
impacts.
Do not attempt to recharge lithium or
alkaline batteries.
Do not store the batteries with metallic
products.
Do not use chargers other than the
specified model to charge the batteries.
Any of these actions can cause the battery to
burst or leak and cause fire or injury as a result.
Use only the batteries or AC power
adapters specified for use with this
camera.
Do not use voltages other than the
power supply voltage shown.
The use of other power sources can cause
a fire.
If the batteries leak and fluid gets into
your eyes or comes into contact with
your skin or clothing, this can cause
injury or loss of eyesight. Immediately
flush the affected area thoroughly with
clean water and seek medical treatment.
119118
Page 61
Safety Notes
WARNING
Do not use the charger to charge
batteries other than those specified
here.
The charger is designed for Fujifilm HR-AA
Ni-MH batteries. Using the charger to
charge conventional batteries or other
types of rechargeable batteries can cause
the batteries to leak fluid, overheat or burst.
When discarding or storing batteries,
cover the batteries terminals with
insulation tape.
h Contact with other metallic objects or
batteries could cause the batteries to
ignite or burst.
Keep xD-Picture Cards out of the reach
of small children.
Because xD-Picture Cards are small, they
can be accidentally swallowed by small
children. Be sure to store xD-Picture Cards
out of the reach of small children. If a child
accidentally swallows an xD-Picture Card,
seek medical advice immediately.
CAUTION
Do not use this camera in locations
severely affected by oil fumes, steam,
humidity or dust.
This can cause a fire or electric shock.
Do not leave this camera in places
subject to extremely high temperatures.
Do not leave the camera in locations such
as a sealed vehicle or in direct sunlight.
This can cause a fire.
Keep out of the reach of small children.
This product could cause injury in the
hands of a child.
Do not place heavy objects on the
camera.
This can cause the heavy object to tip over
or fall and cause injury.
Do not move the camera while the AC
power adapter is still connected.
Do not pull on the connection cord to
disconnect the AC power adapter.
This can damage the power cord or cables
and cause a fire or electric shock.
Do not use the AC power adapter when
the plug is damaged or the plug socket
connection is loose.
This could cause a fire or electric shock.
CAUTION
Do not cover or wrap the camera or the
AC power adapter in a cloth or quilt.
This can cause heat to build up and distort
the casing or cause a fire.
When you are cleaning the camera or
you do not plan to use the camera for an
extended period, remove the batteries
and disconnect and unplug the AC
power adapter.
Failure to do so can cause a fire or electric
shock.
When charging ends, unplug the
charger from the power socket.
Leaving the charger plugged into the power
socket can cause a fire.
Using a flash too close to a person’s
eyes may temporarily affect the
eyesight.
Take particular care when photographing
infants and young children.
CAUTION
When an xD-Picture Card is
removed, the card may fly completely
out of the slot. Use your finger to
stop the card from flying out before
removing the card.
If an xD-Picture Card is allowed to fly out,
it could hit someone and cause injury.
Request regular internal testing and
cleaning for your camera.
Build-up of dust in your camera can cause
a fire or electric shock.
h Contact your FUJIFILM dealer to request
internal cleaning every 2 years.
121120
Page 62

Be sure to read this page before using theSoftware.
IMPORTANT
NOTICE
BEFORE OPENING THE PACKAGE OF CD-ROM PROVIDED BY
FUJI PHOTO FILM CO., LTD., PLEASE READ THIS END USER
LICENSE AGREEMENT CAREFULLY. ONLY IF YOU DO AGREE TO
THIS AGREEMENT, YOU WILL BE ABLE TO USE THE SOFTWARE
RECORDED ON THE CD-ROM. BY OPENING THE PACKAGE, YOU
ACCEPT AND AGREE TO BE BOUND BY THIS AGREEMENT.
T
his End User License Agreement (“Agreement”) is an agreement between Fuji Photo
Film Co., Ltd. (“FUJIFILM”) and you, which sets forth the terms and conditions of the
license granted for you to use the software provided by FUJIFILM.
The CD-ROM contains third party software. In case a separate agreement is provided by
a third party supplier for its software, the provisions of such separate agreement shall
apply to the use of such third party software, prevailing over those of this Agreement.
1. Definitions.
(a) “Media” means the CD-ROM titled “Software for FinePix SX” which is provided
to you together with this Agreement.
(b) “Software” means the software which is recorded on Media.
(c) “Documentation” means the operation manuals of Software and other related
written materials which are provided to you together with Media.
(d) “Product” means Media (including Software) and Documentation collectively.
2. Use of Software.
FUJIFILM grants to you a nontransferable, nonexclusive license:
(a)
to install one copy of Software onto one computer in binary machine executable form;
(b) to use Software on the computer onto which Software is installed; and
(c) to make one backup copy of Software.
3. Restrictions.
3.1 You shall not distribute, rent, lease or otherwise transfer all or any part of
3.2 Except as expressly granted by FUJIFILM hereunder, you shall not copy or
3.3 You shall not modify, adapt or translate Software or Documentation. You also
3.4 You shall not, or shall not have any third party, reverse-engineer, decompile,
122
End User License Agreement
Software, Media or Documentation to any third party without FUJIFILM’s prior
written consent. You also shall not sublicense, assign or otherwise transfer all
or any part of the rights granted to you by FUJIFILM under this Agreement
without FUJIFILM’s prior written consent.
reproduce all or any part of Software or Documentation.
shall not alter or remove copyright and other proprietary notices that appear on
or in Software or Documentation.
or disassemble Software.
4. Ownership.
All copyrights and other proprietary rights to Software and Documentation are
owned and retained by FUJIFILM or the third party suppliers as indicated on or in
Software or Documentation. Nothing contained herein shall be construed,
expressly or implicitly, as transferring or granting any right, license, or title to you
other than those explicitly granted under this Agreement.
5. Limited Warranty.
FUJIFILM warrants to you that Media is free from any defect in material and
workmanship under normal use for ninety (90) days from the date of your receipt of
Media. Should Media not meet the foregoing warranty, FUJIFILM shall replace
such defective Media with other Media bearing no defect. FUJIFILM’s entire liability
and your sole and exclusive remedy with regard to any defect in Media shall be
expressly limited to such FUJIFILM’s replacement of Media as provided herein
6. DISCLAIMER OF WARRANTY.
EXCEPT AS PROVIDED IN SECTION 5 HEREIN, FUJIFILM PROVIDES
PRODUCT “AS IS” AND WITHOUT WARRANTIES OF ANY KIND, EXPRESS OR
IMPLIED. FUJIFILM SHALL MAKE NO WARRANTY, EXPRESS, IMPLIED OR
STATUTORY, AS TO ANY OTHER MATTERS, INCLUDING, BUT NOT LIMITED
TO NON-INFRINGEMENT OF ANY COPYRIGHT, PATENT, TRADE SECRET,
OR ANY OTHER PROPRIETARY RIGHTS OF ANY THIRD PARTY,
MARCHANTABILITY, OR FITNESS FOR ANY PARTICULAR PURPOSE.
7. LIMITATION OF LIABILITY.
IN NO EVENT SHALL FUJIFILM HAVE ANY LIABILITY FOR ANY GENERAL,
SPECIAL, DIRECT, INDIRECT, CONSEQUENTIAL, INCIDENTAL, OR OTHER
DAMAGES (INCLUDING DAMAGES FOR LOSS OF PROFITS OR LOST SAVINGS)
INCURRED FROM THE USE OF OR INABILITY TO USE PRODUCT EVEN IF
FUJIFILM HAS BEEN ADVISED OF THE POSSIBILITY OF SUCH DAMAGES.
8. No export.
You acknowledge that neither Software nor any part thereof, will be transferred, or
exported to any country or used in any manner in violation of any export control
laws and regulations to which Software is subject.
9. Termination.
In case you breach any of the terms and conditions hereof, FUJIFILM may
immediately terminate this Agreement without any notice.
10. Term.
This Agreement is effective until the date when you cease to use
Software, unless earlier terminated in accordance with Section 9 hereof.
11. Obligation upon termination.
Upon termination or expiration of this Agreement, you shall, at your own
responsibility and expense, delete or destroy immediately all Software
(including its copies), Media and Documentation.
12. Governing Law.
This Agreement shall be governed by and construed in accordance with
laws of Japan.
Page 63

26-30, Nishiazabu 2-chome, Minato-ku, Tokyo 106-8620, Japan
Printed on recycled paper.
Printed in Japan FGS-305103-FG
 Loading...