

Page 1
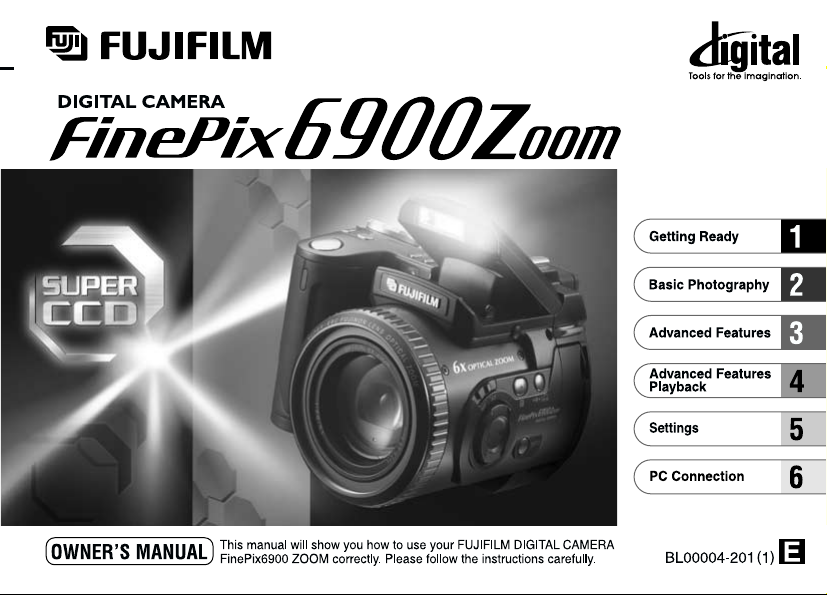
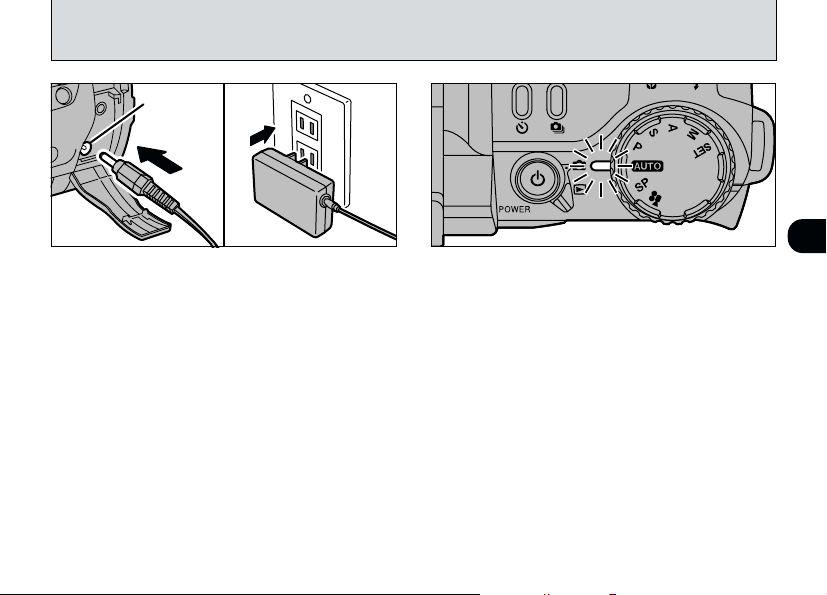
Page 2
Warning
To prevent fire or shock hazard, do not expose the unit to rain or moisture.
This symbol is intended to alert the user to
the presence of uninsulated “dangerous
voltage” within the product’s enclosure
that may be of sufficient magnitude to
constitute a risk of electric shock to
persons.
CAUTION : TO REDUCE THE RISK OF ELECTRIC SHOCK.
DO NOT REMOVE COVER (OR BACK).
NO USER-SERVICEABLE PARTS INSIDE.
REFER SERVICING TO QUALIFIED SERVICE PERSONNEL.
The graphical symbols are located on the bottom
of the case.
2
This symbol is intended to alert the user
to the presence of important operating
and maintenance (servicing)instructions
in the literature accompanying the
appliance.
For customers in the U.S.A.
FCC Statement
This device complies with part 15 of the FCC
Rules. Operation is subject to the following two
conditions : (1)This device may not cause
harmful interference, and (2)this device must
accept any interference received, including
interference that may cause undesired
operation.
Page 3
CAUTION
This equipment has been tested and found to
comply with the limits for a Class B digital device,
pursuant to Part 15 of the FCC Rules. These limits
are designed to provide reasonable protection
against harmful interference in a residential
installation. This equipment generates, uses, and
can radiate radio frequency energy and, if not
installed and used in accordance with the
instructions, may cause harmful interference to
radio communications. However, there is no
guarantee that interference will not occur in a
particular installation. If this equipment does cause
harmful interference to radio or television
reception, which can be determined by turning the
equipment off and on, the user is encouraged to
try to correct the interference by one or more of
the following measures :
—
Reorient or relocate the receiving antenna.
—
Increase the separation between the
equipment and receiver.
—
Connect the equipment into an outlet on a
circuit different from that to which the receiver is
connected.
—
Consult the dealer or an experienced radio/TV
technician for help.
You are cautioned that any changes or
modifications not expressly approved in this
manual could void the user’s authority to operate
the equipment.
Notes on the Grant:
To comply with Part 15 of the FCC rules, this
product must be used with a Fujifilm-specified
ferrite-core video cable, USB cable, and DC
supply cord.
For customers in Canada
CAUTION
This Class B digital apparatus complies with
Canadian ICES-003.
➡
Please read the Safety Notes
(
and make sure you understand them
before using the camera.
P.127
)
3
Page 4
Contents
.........................................................................
Warning
..........................................................................
Preface
Camera Features and Accessories
Nomenclature
Shutter Speed and Aperture Setting Displays
................................................................
...............................
.............
1 Getting Ready
ATTACHING THE LENS CAP AND SHOULDER STRAP
Using the Lens Cap Holder
LOADING THE BATTERY
CHARGING THE BATTERY
USING THE AC POWER ADAPTER
LOADING THE SmartMedia™
REMOVING THE SmartMedia™
SWITCHING ON AND OFF
SETTING THE DATE AND TIME
.........................................
...............................................
............................................
...............................
.........................................
.....................................
.............................................
.....................................
2 Basic Photography
TAKING PICTURES (AUTO MODE)
Number of Available Frames
USING AF/AE LOCK
FRAMING GUIDELINE FUNCTION
VIEWING YOUR IMAGES (PLAYBACK)
FAST FORWARDING IMAGES
PLAYBACK ZOOM
Saving Trimmed Images
MULTI-FRAME PLAYBACK
ERASING SINGLE FRAME
USING A TV MONITOR
4
........................................................
..........................................................
...................................................
...............................
......................................
.................................
.........................
.......................................
.............................................
.............................................
.............................................
3 Advanced Features
2
6
ADVANCED FEATURES
7
8
13
...
14
15
16
17
18
19
20
21
22
24
29
30
32
33
34
35
36
37
38
40
■ Photography mode specifications
PHOTOGRAPHY MODE
5 AUTO/4: SCENE POSITION
r Portrait
t Landscape
w Sports
y Night Scene
o Black and white
9: PROGRAMED/0: SHUTTER-PRIORITY/
-: APERTURE-PRIORITY
Program Shift
3: MANUAL
Shutter Speed Setting
Aperture Setting
...................................................................
MOVIE
8
FLASH PHOTOGRAPHY
i Auto Flash Mode
\ Red-Eye Reduction
l Forced Flash
Slow Synchro
L
Red-Eye Reduction + Slow Synchro
:
] Suppressed Flash
~ MACRO (CLOSE-UP) PHOTOGRAPHY
AE-L
: USING AE LOCK
@ EXPOSURE COMPENSATION
SETTING THE MANUAL FOCUS
One-touch AF Function
Focus Check Function
#
DIGITAL ZOOM
6CONTINUOUS SHOOTING
.................................................
.............................................................
.......................................................
..............................................................
.....................................................
................................................
........................................................
...............................................................
....................................................
.................................................
...................................................
...............................................
.........................................................
........................................................
.................................................
.......................................................
...............................................
...............................................................
...........................
........................
.........................................
...........................................
.....................
....................
..................................
....................................
...........................................
........................................
41
41
42
43
43
43
43
43
44
45
46
46
47
48
51
52
52
53
53
53
54
55
56
57
58
59
59
60
61
Page 5
s SELF-TIMER PHOTOGRAPHY
PHOTOGRAPHY INFORMATION
PHOTOGRAPHY MENU
PHOTOGRAPHY MENU OPERATION
P FLASH BRIGHTNESS ADJUSTMENT
E SETTING THE WHITE BALANCE
Custom White Balance Setting
I PHOTOMETRY
R SETTING THE SENSITIVITY
| AUTO BRACKETING
S SHARPNESS
A MULTI-EXP
? USING AN EXTERNAL FLASH
External Flash Settings
When the White Balance is Incorrect
.....................................................
........................................................
...........................................................
..................................
...................................
......................
.................
........................
.............................
...............................
............................................
............................
.........................................
....................
4 Advanced Features Playback
ADVANCED PLAYBACK
■ Playback mode menu
PLAYBACK INFORMATION
MOVIE PLAYBACK
■ Playing Back Movies
PLAYBACK MENU
{
ERASING SINGLE • ALL FRAMES/FORMATTING
} PLAYBACK (AUTOMATIC PLAYBACK)
O
SETTING AND REMOVING SINGLE FRAME PROTECTION
O
SETTING AND REMOVING PROTECTION FOR ALL FRAMES
F HOW TO SPECIFY PRINT OPTIONS
F DPOF DATE SETTING
F DPOF SET FRAME
F DPOF REVIEW/RESET
F DPOF RESET ALL
.................................................
.............................................
............................................
..........................................................
...............................................
...............
.........................................
...............................................
........................................
................................................
..................
62
5 Settings
64
` SET–UP MODE
` USING THE SET–UP SCREEN
65
` SETTING THE FILE SIZE AND QUALITY
66
66
67
69
70
70
72
72
74
75
76
77
77
78
79
80
...
81
83
...
84
...
86
88
89
90
92
93
(COMPRESSION RATIO)
` IMAGE DISPLAY
Preview Zoom
Selecting Recorded Images
` AUTO POWER SAVE SETTING
` FRAME NO. MEMORY
ADJUSTING THE MONITOR BRIGHTNESS
6 PC Connection
IN PC CONNECTION
CONNECTING TO A PERSONAL COMPUTER
DISCONNECTING THE CAMERA FROM YOUR COMPUTER
CAMERA CUSTOMIZING
System Expansion Options
Overview of the Conversion Lens/Adapter Ring
Accessories Guide
Explanation of Terms
Notes on Using Your Camera Correctly
Notes on the Power Supply
Notes on Using the Battery
AC Power Adapter
Notes on the SmartMedia™
Warning Displays
Troubleshooting
Specifications
Safety Notes
EC Declaration of Conformity
........................................................
......................................................
.............................................................
....................................................
..............................................
.....................................................
.................................................
...............................................
.......................................................
.........................................................
............................................................
..............................................................
...............................
........................................
........................................
............................
..........................................
.......................................
.......................................
..................................
......................................
....................................
................
...........
........
....................
95
96
97
98
98
99
100
101
1
102
2
103
104
...
106
107
3
108
109
4
110
112
113
5
114
114
116
117
6
119
122
125
127
131
5
Page 6
Preface
■
Test Shots Prior to Photography
For particularly important photographs (such as weddings
and overseas trips), always take a test photograph and view
the image to make sure that the camera is functioning
normally.
●
Fuji Photo Film Co., Ltd cannot accept liability for any
incidental losses (such as the costs of photography or the
loss of income from photography) incurred as a result of
faults with this product.
■
Notes on Copyright
Images recorded using your digital camera system cannot be
used in ways that infringe copyright laws without the consent
of the owner, unless intended only for personal use. Note that
some restrictions apply to the photographing of stage
performances, entertainments and exhibits, even when
intended purely for personal use. Users are also asked to note
that the transfer of memory cards containing images or data
protected under copyright laws is only permissible within the
restrictions imposed by those copyright laws.
■
Liquid Crystal
If the LCD monitor or LCD panel is damaged, take particular
care with the liquid crystal in the monitor or panel. If any of
the following situations arise, take the urgent action indicated.
●
If liquid crystal comes in contact with your skin
Wipe the area with a cloth and then wash thoroughly with
running water and soap.
●
If liquid crystal gets into your eye
Flush the affected eye with clean water for at least 15 minutes
and then seek medical assistance.
●
If liquid crystal is swallowed
Flush your mouth thoroughly with water. Drink large
quantities of water and induce vomiting. Then seek
medical assistance.
6
■
Notes on Electrical Interference
If the camera is to be used in hospitals or aircrafts, please
note that this camera may cause interference to other
equipment in the hospital or aircraft.
For details, please check with the applicable regulations in
that place.
■
Handling Your Digital Camera
This camera contains precision electronic components. To
ensure that images are recorded correctly, do not subject
the camera to impacts or shocks while an image is being
recorded.
■
Trademark Information
●
IBM PC/AT is a registered trademark of International
Business Machines Corp. of the U.S.A.
●
iMac and Macintosh are registered trademarks of Apple
Computer, Inc.
●
Windows is a registered trademark of the Microsoft
Corporation of the U.S. registered in the U.S.A. and other
countries.
Windows is an abbreviated term referring to the Microsoft
Windows Operating System.
●
SmartMedia is a trademark of Toshiba Corporation.
●
Other company or product names are trademarks or
registered trademarks of the respective companies.
■
Explanation of Color Television System
NTSC: National Television System Committee, color
television telecasting specifications adopted mainly
in the U.S.A., Canada and Japan.
PAL: Phase Alternation by Line, a color television system
adopted mainly by European countries and China.
Page 7
Camera Features and Accessories
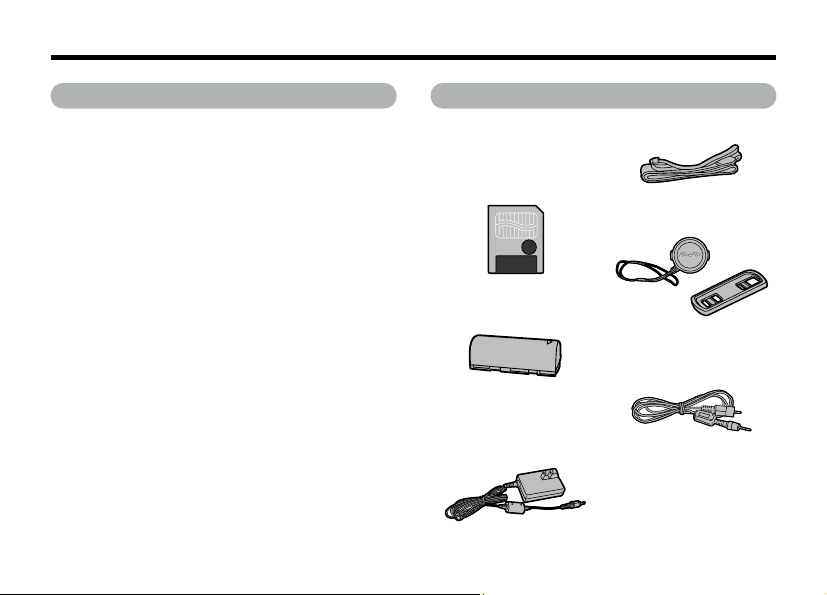
Features Accessories
●
The newly developed “Super CCD” (featuring a total of 3.3
million pixels) used in the FinePix6900 ZOOM provides ultrahigh resolution image file with 6.03 million (2832
●
6× optical zoom that uses aspherical lenses for superb
optical performance
●
Maximum 4.4× seamless digital zoom at VGA mode
●
0.55-inch 110,000 pixel Electronic Viewfinder
●
The wide range of exposure modes, which includes a
manual photography mode, allows you to precisely tailor the
photography settings to the conditions.
●
Quick, responsive operation with a 3-second startup and as
little as 1-second between shots.
●
Fast ISO 400 film speed (compared to a standard film speed
of ISO 100) and a built-in automatic flash allow shooting in a
wider range of situations.
●
Hot shoe for syncronizing an extornal flash unit
●
Auto focus with macro photography function (manual focus
also available)
●
Automatic shooting modes for different types of shots allow
settings that are matched to your subject
●
Convenient preview function so you can quickly check your shots
●
Continuous shooting function even at maximum resolution
●
Histogram display function lets you instantly check exposure
levels after you take a shot.
●
Trimmed recording function saves only that part of the
image you want to keep.
●
Playback zoom function (up to 18×)
●
Multi-level exposure and black-and-white photography
functions allow even more scope for photographic expression
●
Information button shows a list of the camera settings at one
touch whenever you need it
●
Magnesium alloy body
●
Easy high-speed image file transfer via the USB connection
× 2128) pixels.
SmartMedia
●
(
16MB, 3.3V)(1
Supplied with:
• Anti-static case
• Index label
NP-80 Rechargeable
●
Battery (1
AC Power Adapter
●
AC-5VS/AC-5VH
(approx. 2 m (6.6 ft.)
connection cord) (1
(1)
)
)
(1)
Shoulder strap (1
●
Lens cap (1
●
Lens cap holder (1
●
Video Cable (approx. 1.5 m
●
(4.9 ft.), mini-plug (3.5 mm
dia.) to pin-plug cable) (1
)
Interface Set (1
●
• CD-ROM
• Special USB cable with
Noise Suppression core (1
• Software Quick Start
Guide (1
Owner’s Manual
●
(
this manual)(1
)
)
)
)
)
(1)
)
)
)
7
Page 8
Nomenclature
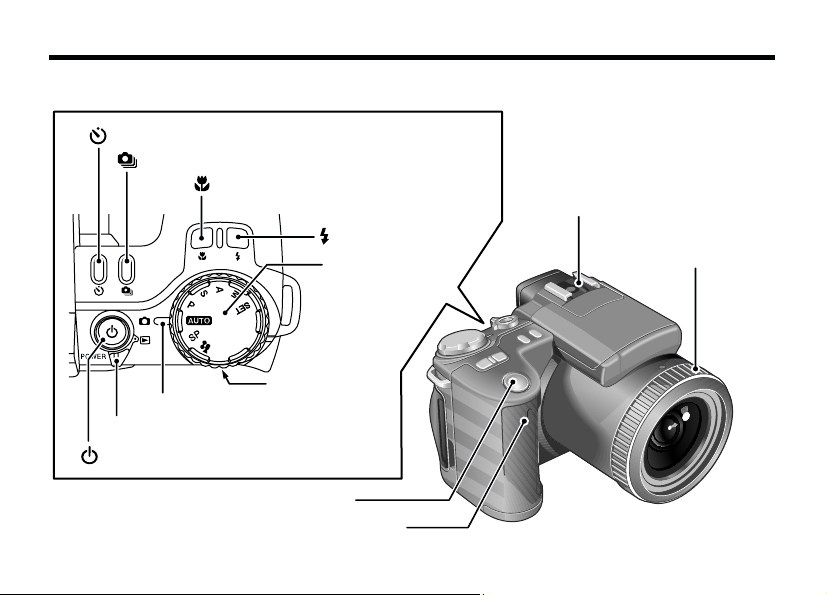
Indicator lamp
(P.28)
Command dial
Mode dial
(P.11)
Mode switch
(P.11)
Hot shoe
(P.74)
Focusing ring
(P.58)
Shutter button
Self-timer lamp
(P.63)
(Flash) button
(P.51)
(Self-timer) button
(P.62)
(Continuous shooting) button
(P.61)
(POWER) button
(P.21)
(Macro:close- up) button
(P.55)
✽
Refer to the pages in parentheses for more details
8
Page 9
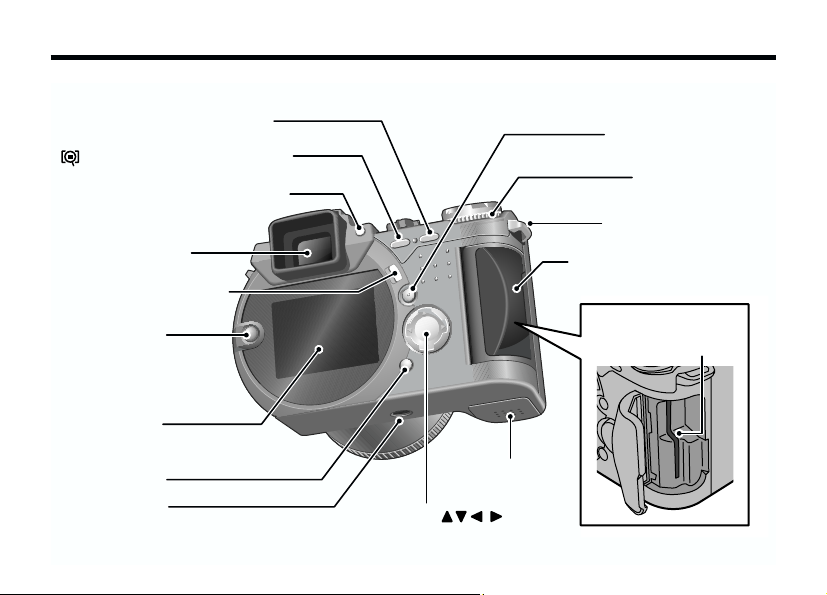
AE-L(AE lock)button (P.56)
(Focus Check) button(P.59)
EVF/LCD ( viewfinder/monitor
selector)button
Viewfinder(EVF)
DISP button(P.32 , 37)
(P.24,33)
MENU/OK button
Command dial
Strap mount(P.14)
SmartMedia slot cover
(P.19)
SHIFT button
(P.97,102)
LCD monitor
BACK button
Tripod mount
SmartMedia slot
(P.19)
Battery cover
(P.16)
4-direction( ) button
9
Page 10
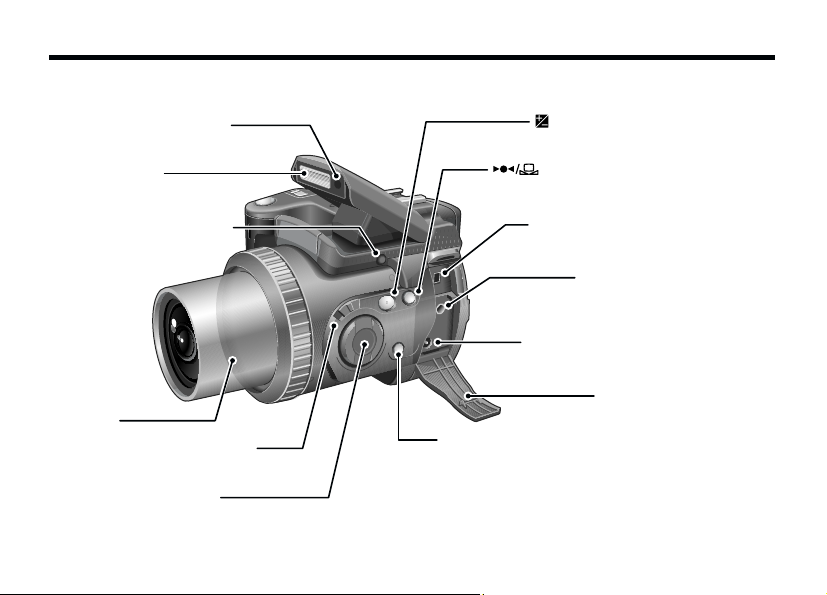
(Exposure compensation)
button
(P.57)
(AF/ Custom white balance)
button
(P.59/P.67)
Terminal cover( P.17)
Flash control sensor
Flash
(P.51)
Flash pop-up button
(P.51)
Lens
Focusing mode selector
switch
(P.24,58)
Zoom button(P.25)
T : Telephoto
W : Wide-angle
INFO(information check ) button( P.64 , 78)
DIGITAL(USB )socket( P.104)
Video out socket( P.40)
DC IN 5V(power input )socket
(P.18)
Nomenclature
10
Page 11
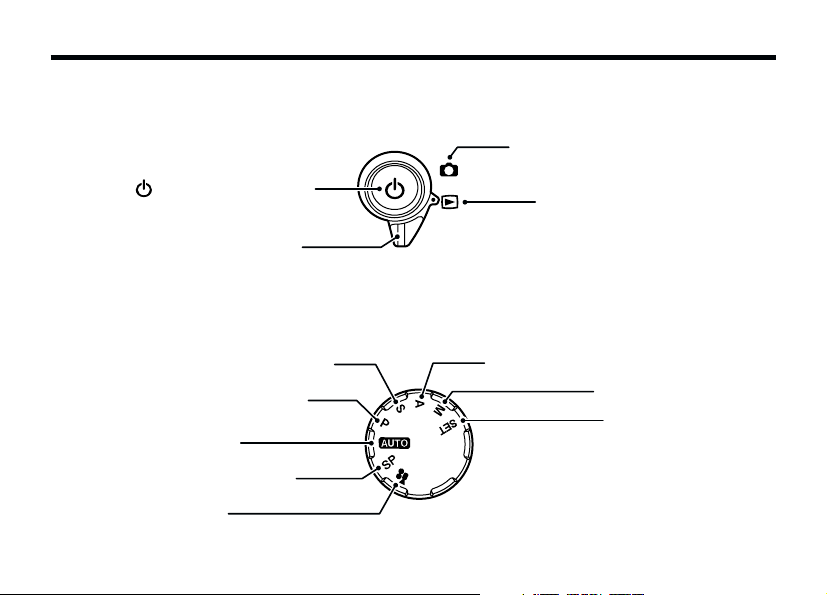
Mode switch
Shutter-priority auto (P.44) Aperture -priority auto(P.44)
Manual(P.46)
Setup(P.95)
Programed auto(P.44)
Auto( P.24,42)
Scene Position( P.42)
Movie(P.48)
Photography mode( P.24)
Playback mode( P.33)
Mode switch( P.24, 33)
POWER button( P.21)
Mode dial
11
Page 12
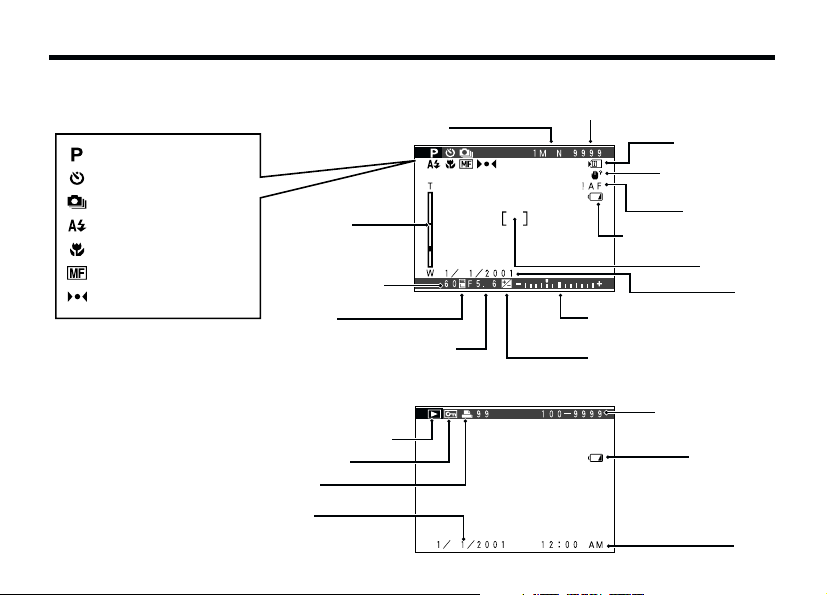
Nomenclature
Zoom bar
Date
Date
Shutter speed
AE lock
Aperture setting display
File size/Image quality
Number of remaining shots
Battery low warning
Battery low
warning
AF warning
Camera shake
warning
Example of Monitor Text Display : Shooting
Playback frame
number
Protection
DPOF
Time
Playback mode
Example of Monitor Text Display : Playback
Card access
AF frame
Exposure compensation
Exposure compensation
indicator
Macro
Self-Timer photography
Photography mode
Continuous shooting
Manual focus
Focus indicator
Flash mode
12
Page 13
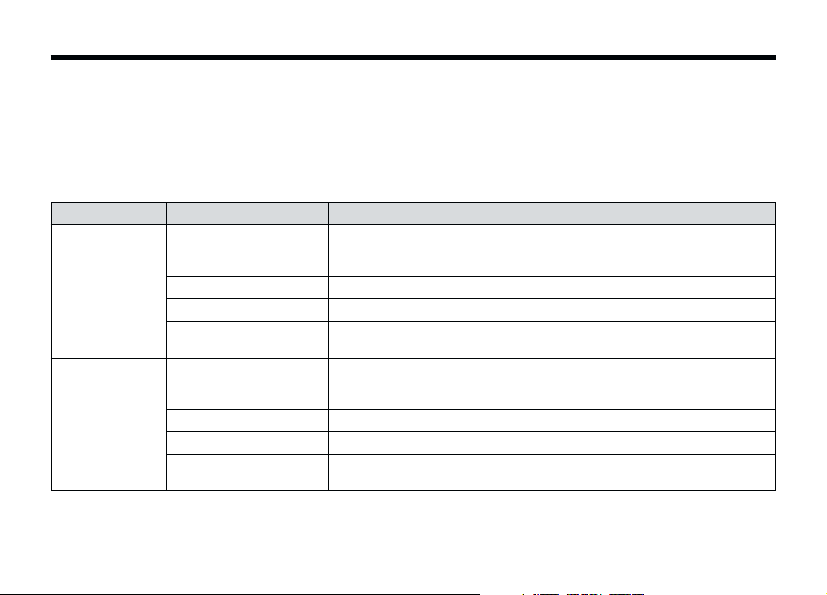
Shutter Speed and Aperture Setting Displays
If you exceed the control range for a photography mode (as with a scene that is extremely
overexposed or underexposed), the shutter speed or aperture is displayed in red on the screen.
For dimly lit scenes, “----” is displayed on the screen as the shutter speed and aperture setting. When
this occurs, press the shutter button down halfway so that the camera takes the measurements and
displays the settings.
■Photography modes and Responses
Photography mode Response
(
Overexposure
Underexposure
✽
1 If you change the settings and the image is still overexposed, use the optional Adapter Ring and ND (Light
5
4
9 (Program)
0
3
5
4
9
0
3
Adjustment) Filter (
✽
2 If the image is underexposed even after you change the shutter speed, use the flash (➡P.51).
✽
3 If you do not use a flash, the shutter speed will be slow and a tripod should be used.
)
Auto
(
Scene Position
(
Shutter-priority
(
Aperture-priority
(
Manual
(
)
Auto
(
Scene Position
(
Program
(
Shutter-priority
(
Aperture-priority
(
Manual
➡P.109).
Use the optional Adapter Ring and ND (Light Adjustment) Filter
)
➡P.109).
(
)
Select a faster shutter speed (up to 1/1000 sec.) (➡P.44).
)
Select a higher aperture setting (up to F11) (➡P.44).
)
)
)
Select a faster shutter speed (up to 1/1000 sec.) or a higher aperture
setting (up to F11) (➡P.46).
Use the flash.
)
)
Select a slower shutter speed (up to 3 sec.) (➡P.44).
)
Select a lower aperture setting (down to F2.8) (
Select a slower shutter speed (up to 3 sec.) or a lower aperture setting
(down to F2.8) (
➡P.46).
✽1
➡P.44).
✽2 ✽3
✽1
✽1
✽2 ✽3
✽2 ✽3
13
Page 14
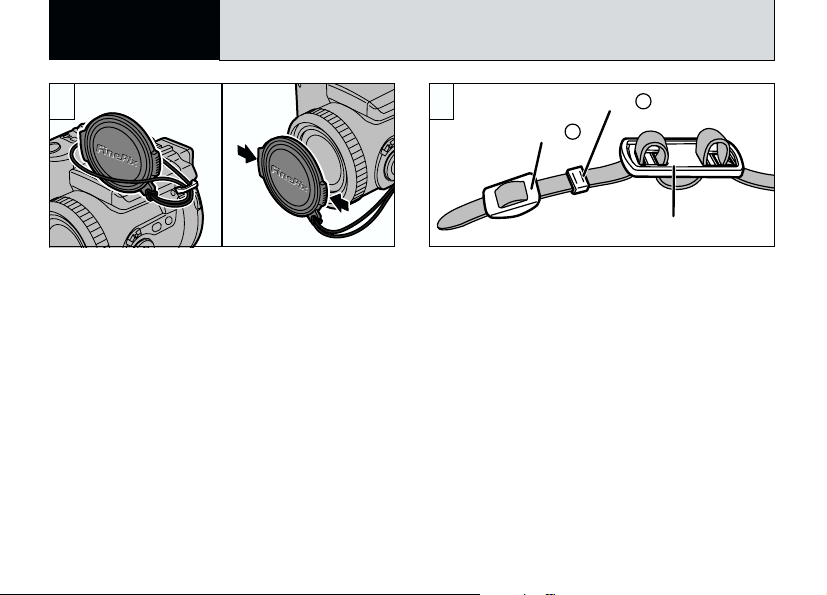
Lens cap holder
Fastener B
Fastener A
1 Getting Ready
ATTACHING THE LENS CAP AND SHOULDER STRAP
➀
●
Pull the lens cap cord through the strap
➀
mount.
Fit and remove the lens cap by squeezing the
➁
left and right sides of the cap.
!
Attach the lens cap cord to avoid losing the lens cap.
●
14
➁
●
21
Remove fasteners A and B from only one side
of the shoulder strap. Then pass the shoulder
strap through the lens cap holder and then back
through fasteners A and B.
Page 15
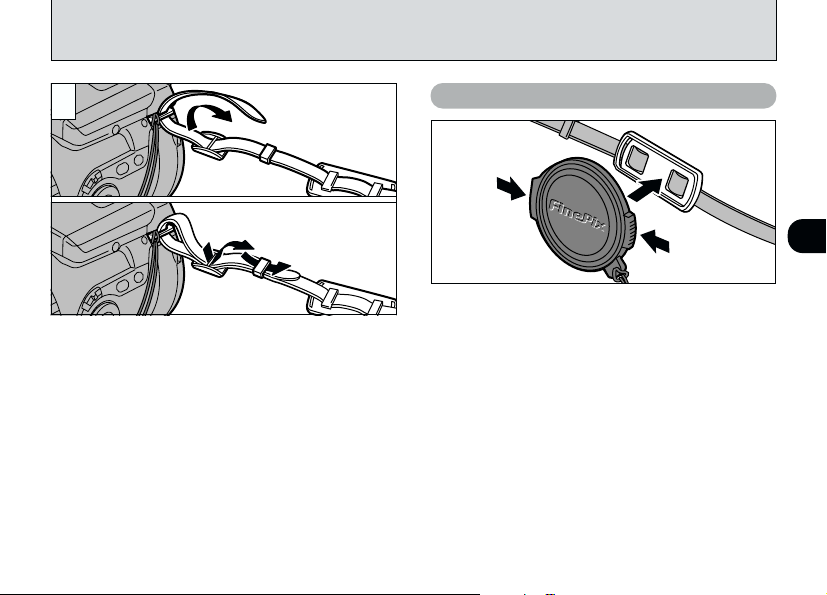
3
Attach the shoulder strap to the strap mounts.
After attaching the shoulder strap, check
carefully that the strap is firmly secured.
!
Attaching the shoulder strap incorrectly could result
●
in the camera being dropped.
Using the Lens Cap Holder
1
To prevent the lens cap from appearing in the
shot when you take pictures, attach the lens cap
to the lens cap holder.
15
Page 16
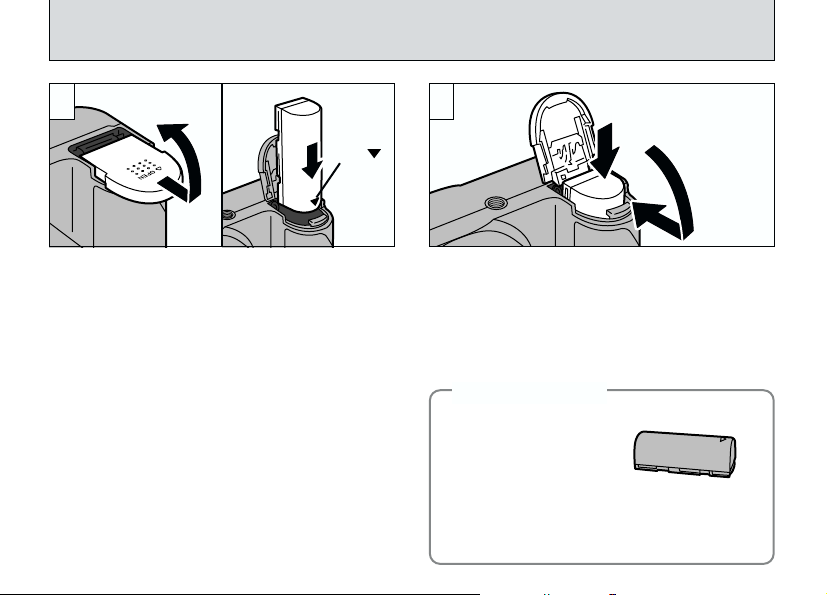
LOADING THE BATTERY
1 2
Slide the battery cover and lift it open.
➀
Insert the battery in the direction indicated by
➁
the arrow “” on the battery.
!
Do not use excessive force to open the battery
●
cover.
!
When replacing the battery, always switch the
●
camera off beforehand. If you open the battery cover
without switching the camera off, the camera
settings may revert to the factory defaults.
16
➀
●
e
●
Arrow
mark
➁
➀
●
➁
●
Hold the battery in, ➁and close the battery
➀
cover.
Battery Type
◆
NP-80 rechargeable battery
!
The battery is not fully charged at shipment. You
●
must charge the battery before you use it.
!
See P.114 – 116 for more information on the
●
battery.
◆
Page 17
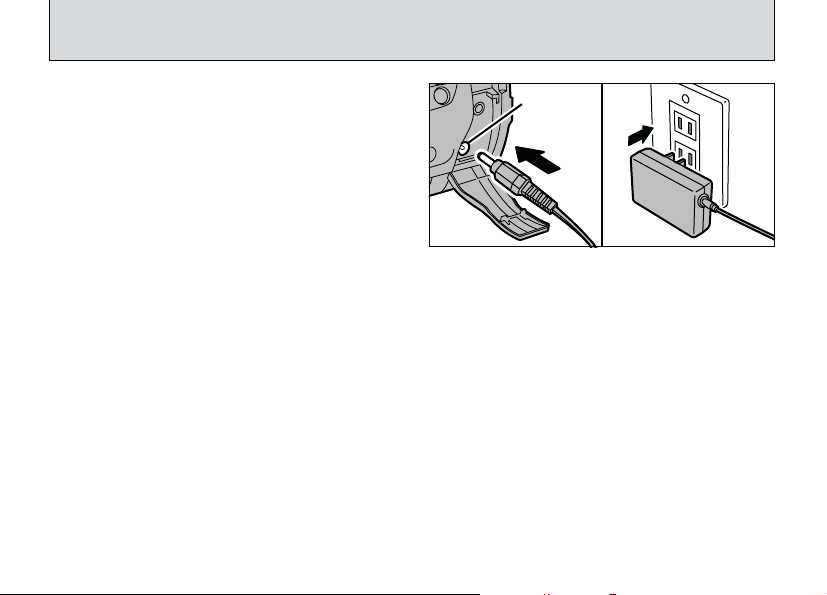
DC IN 5V
Socket
CHARGING THE BATTERY
Check that the camera is switched off. Open the
terminal cover and plug the AC power adapter
connector into the “DC IN 5V” socket. Then plug
the AC power adapter into a power outlet.
!
Problems arising from the use of products other than
●
genuine FUJIFILM products are not covered by your
warranty.
!
See P.116, 117 for additional notes on the AC power
●
adapter.
The indicator lamp lights (orange) and battery
charging begins. When charging is completed,
the indicator lamp goes off.
!
A fully discharged battery takes about 5 hours to
●
recharge.
!
An almost fully charged battery will not charge. This
●
is normal and does not indicate a fault.
!
If you switch the camera on while the battery is
●
charging, the charging will stop.
!
By using the optional BC-80 Battery Charger, you can
●
reduce the charging time to approximately 70 minutes
➡P.110).
(
1
17
Page 18
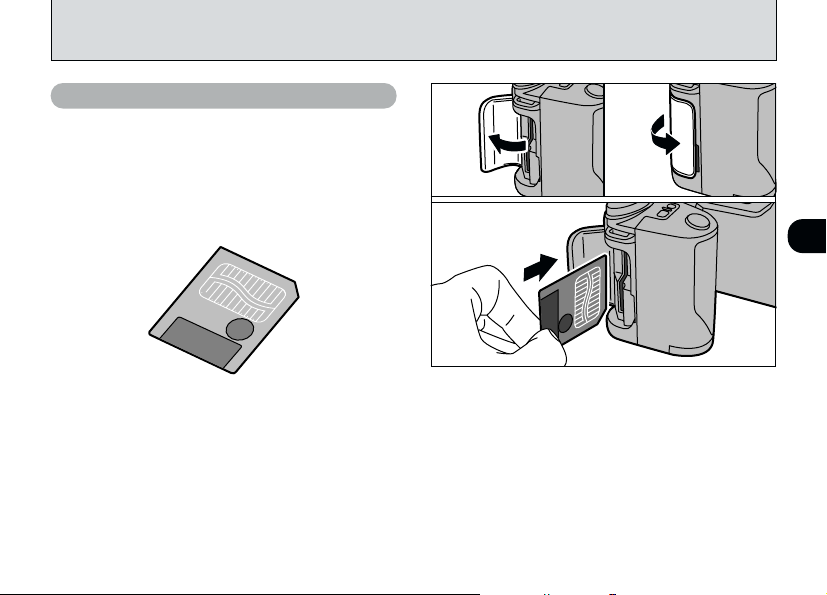
USING THE AC POWER ADAPTER
DC IN 5V
Socket
Connecting the AC-5V AC Power Adapter to
your camera allows you to take pictures or play
back images (using a TV connection, etc.)
without worrying about the battery running out.
You can also use the AC power adapter to
recharge the camera’s battery, making it very
convenient for travelling, etc.
●
Compatible AC power adapters
Model: AC-5VS/AC-5VH (provided as an
accessory or sold separately)
18
Check that the camera is switched off. Open the
terminal cover and plug the AC power adapter
connector into the “DC IN 5V” socket. Then plug
the AC power adapter into a power outlet.
!
Problems arising through the use of products other
●
than genuine FUJIFILM products are not covered by
your warranty.
!
See P.116 for additional notes on the AC power
●
adapter.
Page 19
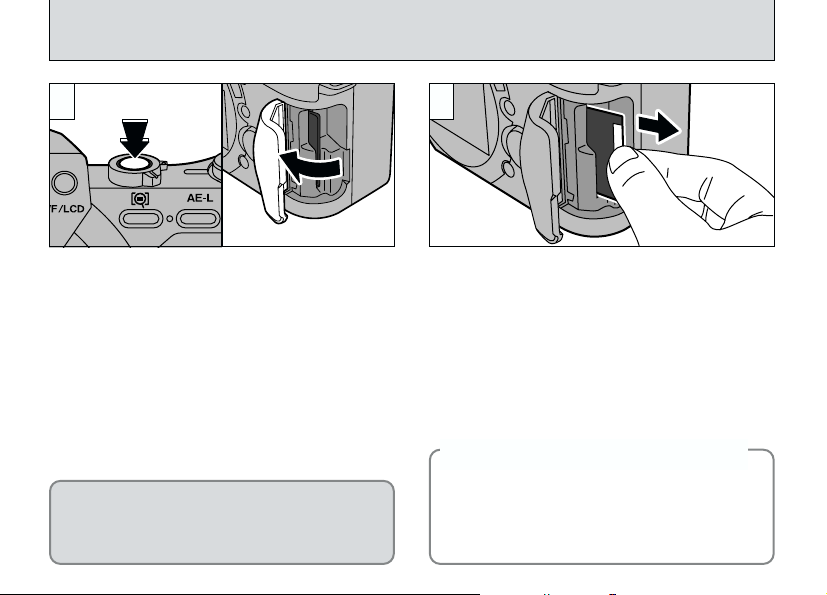
LOADING THE SmartMedia
™
SmartMedia
■Only use 3.3V SmartMedia
MG-4S ( 4MB), MG-16SW (16MB, ID)
MG-8S ( 8MB), MG-32SW (32MB, ID)
MG-16S (16MB), MG-64SW (64MB, ID)
MG-32S (32MB), MG-128SW (128MB, ID)
MG-64S (64MB)
!
Images cannot be recorded or erased if a write-
●
protect sticker is affixed to the SmartMedia.
!
Operation of this camera is only guaranteed when it
●
is used with FUJIFILM SmartMedia.
!
Some 3.3V SmartMedia are labelled as “3V” or “ID”
●
cards.
!
See P.117, 118 for more information on SmartMedia.
●
™
➀
●
➁
●
Check that the camera is switched off and
➀
open the slot cover.
Push the SmartMedia firmly into the SmartMedia
➁
slot as far as it will go.
Close the slot cover.
➂
!
If you open the slot cover while the camera is
●
switched on, the camera is automatically switched
off to protect the SmartMedia.
!
The SmartMedia will not slide fully into the slot if it is
●
inserted facing the wrong way. Be careful not to
apply undue force to the SmartMedia.
03
➂
●
1
19
Page 20
REMOVING THE SmartMedia
™
1 2
Check that the indicator lamp is green and
➀
switch the camera off (➡P.21).
Open the slot cover.
➁
Never open the SmartMedia slot cover while
the camera is switched on.This could destroy
the image data or damage the SmartMedia
itself.
20
➀
●
➁
●
Grasp the SmartMedia with your fingertips and
pull it out.
!
To protect the SmartMedia, always store it in the
●
special anti-static case.
Printing Images and Downloading
◆
Images to a Personal Computer
●
See P.88, 108 for information on printing
images.
●
See P.103 – 106 for information on downloading
images to a personal computer.
◆
Page 21
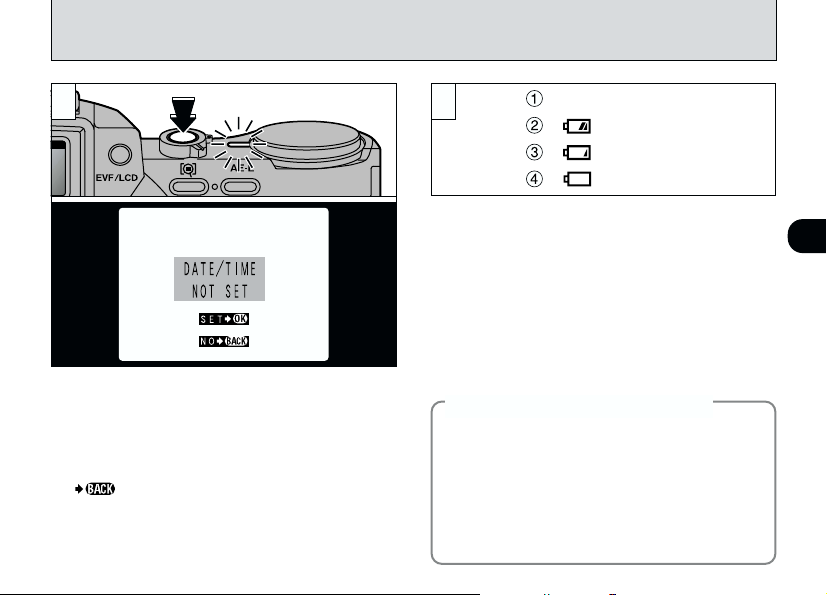
SWITCHING ON AND OFF ✽
Lit white
Flashing red
Lit red
Blank
See P.95 – 96 for information on selecting the language.
1
Press the “$ ” (Power) button to switch the
camera on and off. When you switch the camera
on, the indicator lamp turns green. If the date has
been cleared, a confirmation message appears.
SET ¨ : Switches to the DATE/TIME setting screen
NO : Switches to photography or playback mode.
!
If you do not set the date and time, this confirmation
●
screen will appear each time you switch the camera on.
!
If you switch the camera on when the Mode switch is set to
●
“
➡P.23).
(
1
”, the lens extends. Take care not to press on the lens.
2
Check the battery level warning when you switch
the camera on.
Battery has ample charge. (No indicator
➀
displayed.)
The battery is approximately half charged.
➁
Battery charge low. Replace or recharge the
➂
battery as it will run out shortly.
The battery is exhausted. The display will shortly
➃
go blank and the camera will stop working.
Replace or recharge the battery.
Auto Power Save Function
◆
If the camera is not used in any way for 30
seconds when the camera functions are
enabled, this function temporarily switches
features such as the LCD screen off to reduce
power consumption. If the camera is then left
unused for a further period (2 or 5 minutes), the
Auto Power Save function automatically
switches the camera off. (See P.100 for details.)
◆
1
21
Page 22
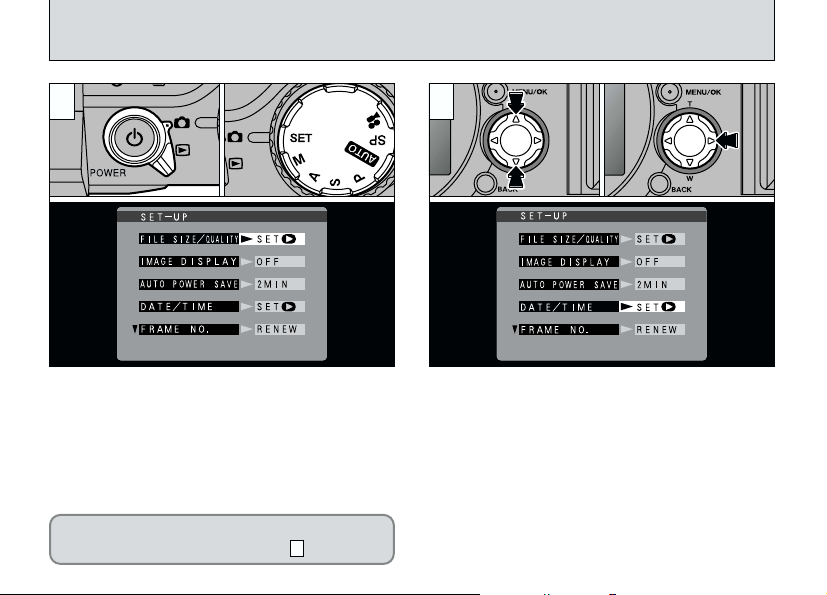
SETTING THE DATE AND TIME
1
Set the Mode switch to “1” ➁Set the Mode
➀
dial to “`”. The SET–UP screen appears on
the monitor.
If the date was cleared and you selected “SET
DATE/TIME”, proceed from step . (➡P.23)
22
➀
●
3
➁
●
2
Use “a” or “b ” to select “DATE/TIME”.
➀
Press “c”.
➁
!
See P.95 for more information on the “`” (setup)
●
menu.
!
If at least 3 hours have passed since the AC power
●
adapter was connected or the battery inserted and
date and time set, then those settings will be
maintained for roughly 1 hour even when the camera
has no power supply (when the AC power adapter is
disconnected and the battery is removed).
➀
●
➁
●
Page 23
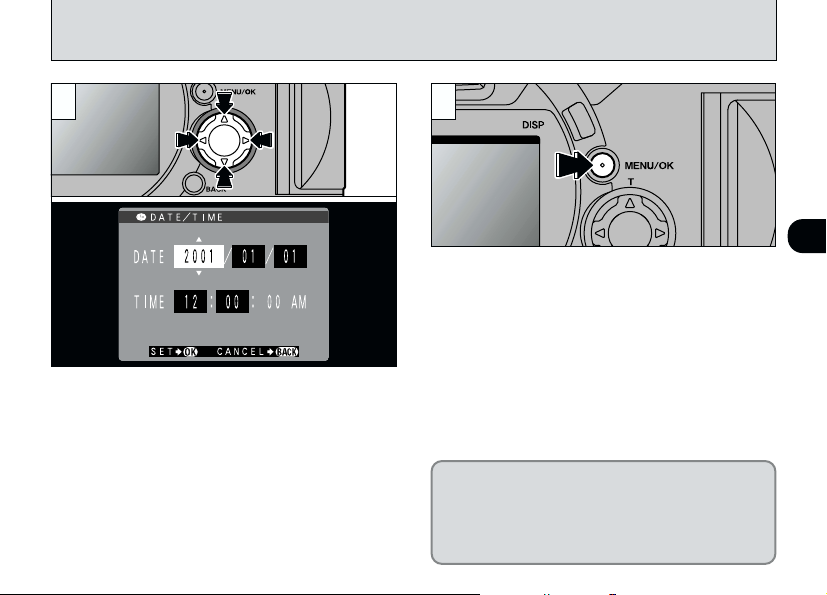
Use the “dc” button to select the desired item
and then use the “a” and “b” buttons to correct
the setting.
!
If you hold down “a” or “ b ”, the numbers change
●
continuously.
!
When the time displayed passes “12:00:00”, the
●
AM/PM setting automatically switches.
!
To set the time precisely, press the “MENU/OK”
●
button when the time is at zero seconds.
443
When you have finished setting the date and
time, press the “MENU/OK” button to confirm the
setting.
When the SET–UP screen reappears, move the
Mode dial to a setting other than “
the SET–UP screen.
If the date setting was cleared and you have
set the date and time from the confirmation
screen, pressing the “MENU/OK” button
returns you to the selected photography or
playback mode.
`” to exit
1
23
Page 24
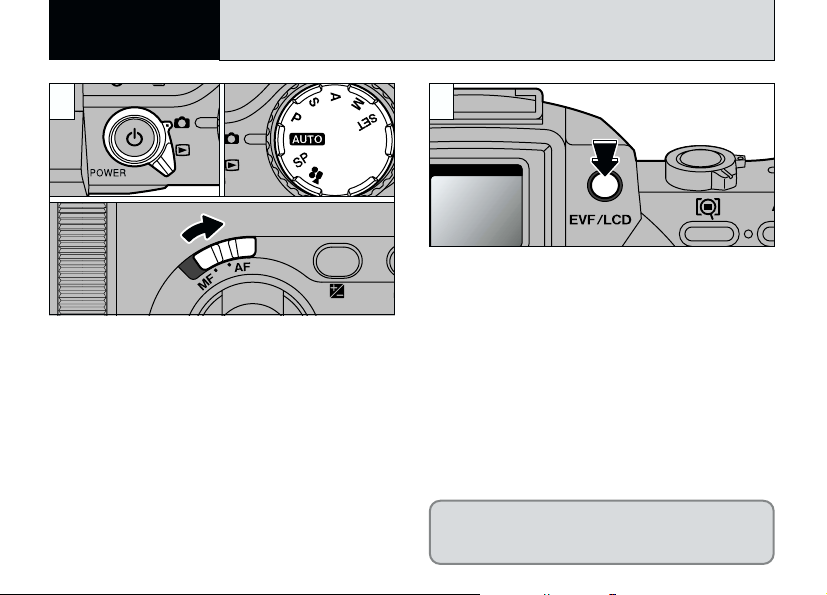
Basic
2
Photography
TAKING PICTURES (AUTO MODE
)
1 2
Set the Mode switch to “1” ➁and set the
➀
Mode dial to “5”. ➂Then slide the focus
mode selector switch to “AF”.
●
Effective Photography Range
Wide-angle: Approx. 50 cm (1.6 ft.) to infinity
Telephoto : Approx. 90 cm (3 ft.) to infinity
!
For close-up photography, set the mode to MACRO
●
➡P.55).
(
!
Check that the lens is clean. If it is dirty, clean the
●
lens as described on P.113.
24
➀
●
➁
●
➂
●
You can switch between using the viewfinder
(EVF) and the monitor (LCD) to take pictures by
pressing the EVF/LCD button.
!
If “∞”, “
●
is displayed, first wipe the contact surface on the
SmartMedia (gold-colored area) thoroughly with a soft,
dry cloth and then reload the SmartMedia. If this does not
resolve the problem, format the card.
The EVF/LCD selection setting is retained
when the mode is switched or the camera is
switched off.
ª
”or “¶”
Page 25
3
Zoom bar
4
4-direction
Zoom button
button
2
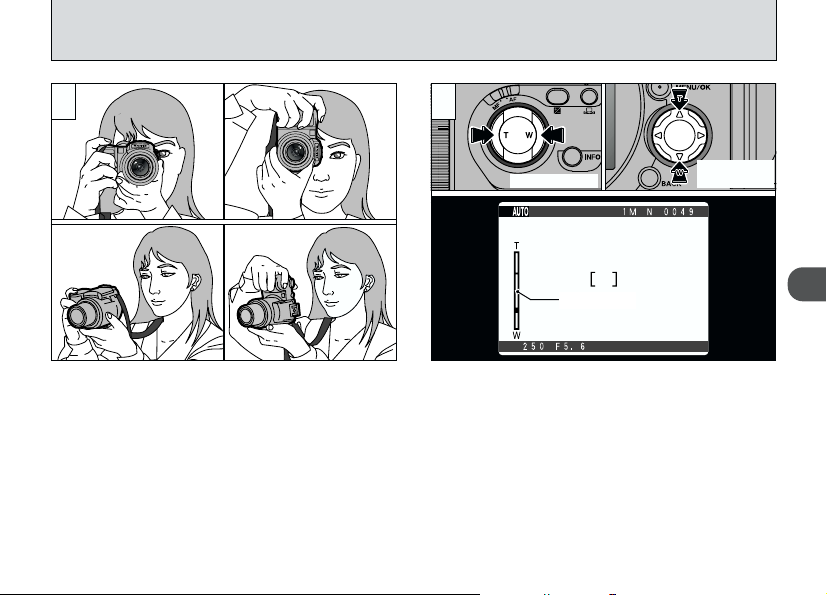
Put your arm through the shoulder strap so that
the strap is looped around your shoulder. Hold
the camera grip with your right hand and use
your left hand to support the camera (lens)
securely.
!
Use of the automatic flash is recommended (➡P.52).
●
!
Moving the camera when you take a picture can
●
result in a blurred image. You should use the flash or
a tripod to prevent camera shake, particularly when
you are shooting in dark locations.
You can use the Zoom button or “a” and “b” on
the 4-direction button to zoom in and out. To zoom
in on the subject, press the T side of the button.
To zoom out, press the W side. When you use the
zoom, a “zoom bar” appears on the screen.
!
Zooming pauses briefly when you switch between the
●
optical zoom and the digital zoom (
!
When you are shooting with the camera held on its side,
●
you should use the 4-direction button to operate the zoom.
!
The FinePix6900 ZOOM uses a 6× optical zoom with a
●
focal length equivalent to 35 – 210 mm on a 35 mm
camera. The focal length when the camera is switched
on is equivalent to roughly 50 mm.
➡P.60).
25
Page 26
Short
doublebeep
TAKING PICTURES (AUTO MODE
)
5
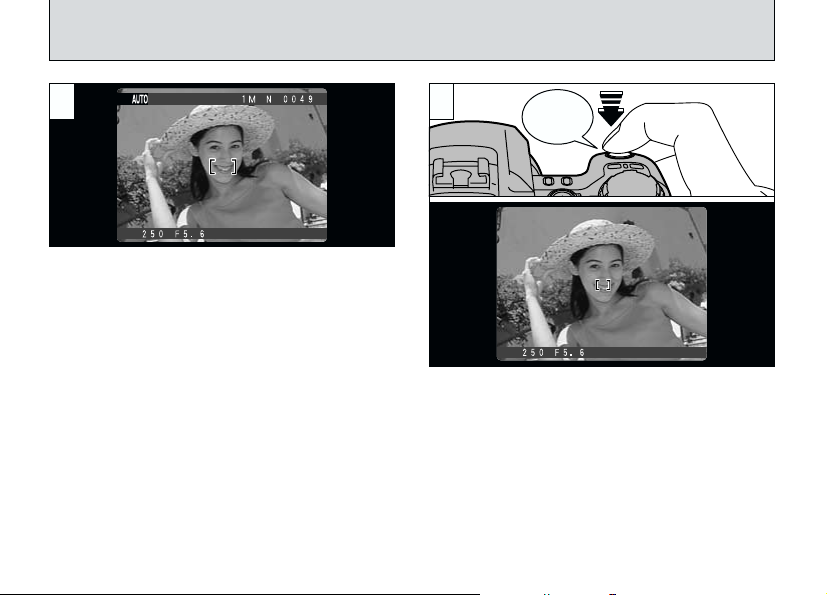
Frame the shot so that the subject fills the entire
AF (Auto Focus) frame.
!
If the subject is not in the AF frame, use AE/AF lock
●
to take the picture (
26
➡P.30).
6
When you press the shutter button down halfway,
the camera emits a short double-beep and focuses
on your subject. At that point, the AF frame on the
screen becomes smaller and the camera sets the
shutter speed and aperture.
!
If the camera does not emit a short double-beep and
●
” appears on the screen, the camera cannot focus.
“
AF
N
!
When you press the shutter button down halfway, the
●
image on the screen freezes temporarily. However, this
image is not the recorded image.
!
If “
” is displayed on the screen (e.g. the shot is too
NAF
●
dark for the camera to focus), try standing about 2 m
from your subject to take the picture.
Page 27
7
Beep
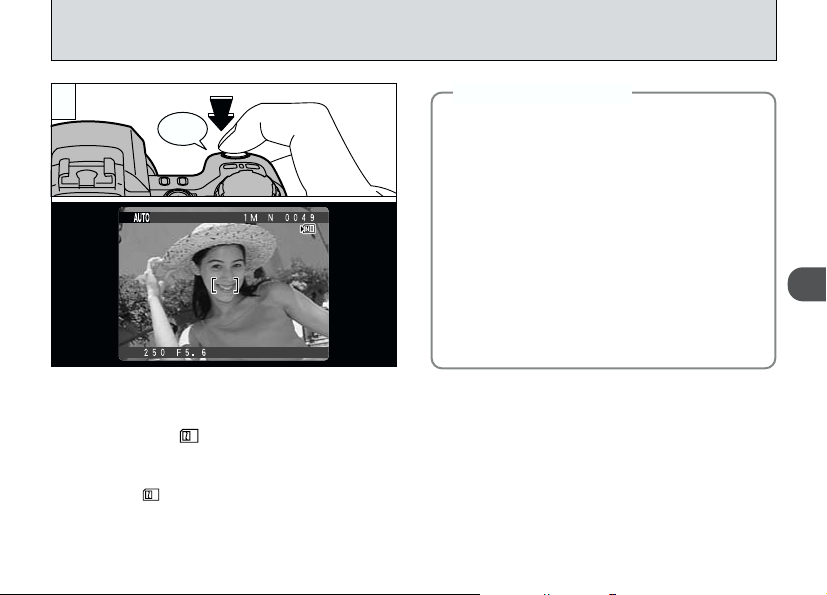
If you press the shutter button down halfway and
then press the shutter button down fully without
releasing it, the camera beeps once and takes
the picture. The “” icon then appears on the
screen and the shot is recorded as an image file.
!
When the “” icon appears on the screen, image
●
recording is in progress. Do not remove the
SmartMedia while the icon is displayed.
!
You cannot take the next shot when the number of
●
available shots is displayed in red.
Taking Pictures
◆
If the camera cannot focus, the AF frame does
not change and the camera does not beep.
●
To focus on your subject, use the AF/AE
lock and focus on another subject that is
roughly the same distance away and has
about the same brightness (➡P.30).
●
You can also focus the camera manually.
(An easy solution is to use the one-touch
AF function to focus on a subject that is
roughly the same distance away. ➡P.59)
●
If it is too dark to focus, move to roughly 2 m
(6.6 ft.) away from the subject and then take
the picture.
!
When you take a picture, the indicator lamp turns
●
orange (photographs cannot be taken). When the
indicator lamp turns green again, the camera is
ready to take pictures.
!
If you press the shutter button down fully in a single
●
motion, the AF frame does not change size and the
camera does not beep when the picture is taken.
!
The indicator lamp flashes orange while the flash is
●
charging.
!
Refer to P.120 for information on warning displays.
●
◆
2
27
Page 28
TAKING PICTURES (AUTO MODE
)
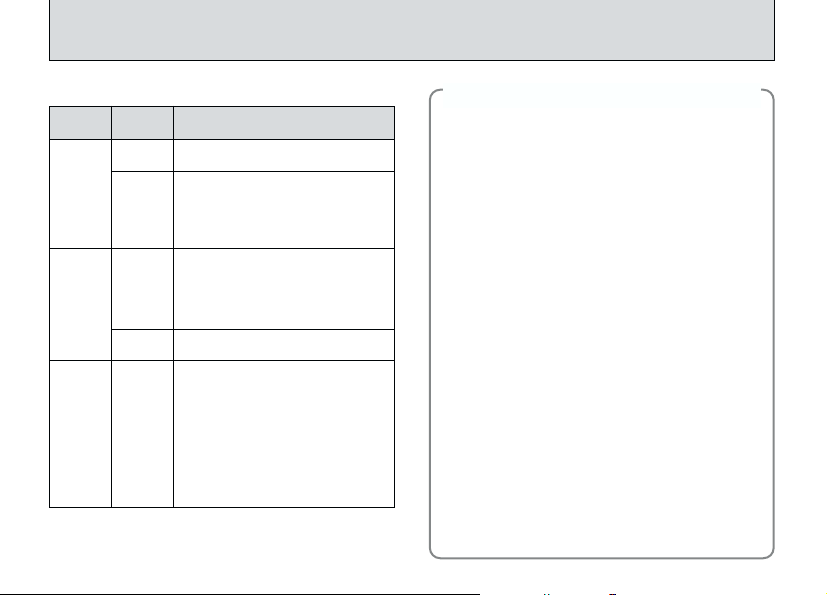
■ Indicator Lamp Display
Color Status Meaning
Ready to shoot.
Lit
Green
Flashing
AF/AE in progress or camera
shake/AF warning.
Recording to SmartMedia (the
next picture can be taken).
●
Image being recorded onto
the SmartMedia (the next
Lit
Orange
Flashing
picture cannot be taken).
●
Battery charging in progress.
Flash charging.
●
SmartMedia warning.
No SmartMedia loaded,
SmartMedia not formatted,
Flashing
Red
✽ Detailed warning messages are displayed on the
screen (
➡P.120).
incorrect format, write-protect
sticker used, SmartMedia full,
SmartMedia error.
●
Battery charging error.
●
Lens operation error.
28
Subjects Not Suitable for Autofocus
◆
◆
Though the FinePix6900 ZOOM uses an accurate
autofocus mechanism, it may have difficulty
focusing or not be able to focus at all for the types
of subject and situation listed below. In such
cases, the image may be out of focus.
●
Very shiny subjects such as a mirror or car body.
●
Subjects photographed through glass.
●
Subjects that do not reflect well, such as hair
or fur.
●
Subjects with no substance, such as smoke or
flames.
●
When the subject is distant and dark.
●
When there is very little contrast between the
subject and the background (such as white
walls or subjects dressed in the same color as
the background).
●
When a subject other than your main subject is
close to the AF frame, has good contrast and
is in front of or behind your main subject (such
as a strongly contrasting person standing out
against the background).
●
Subjects moving at high speed.
In situations of this sort, use the AF/AE lock
➡P.30) or manual focus (➡P.58).
(
Page 29
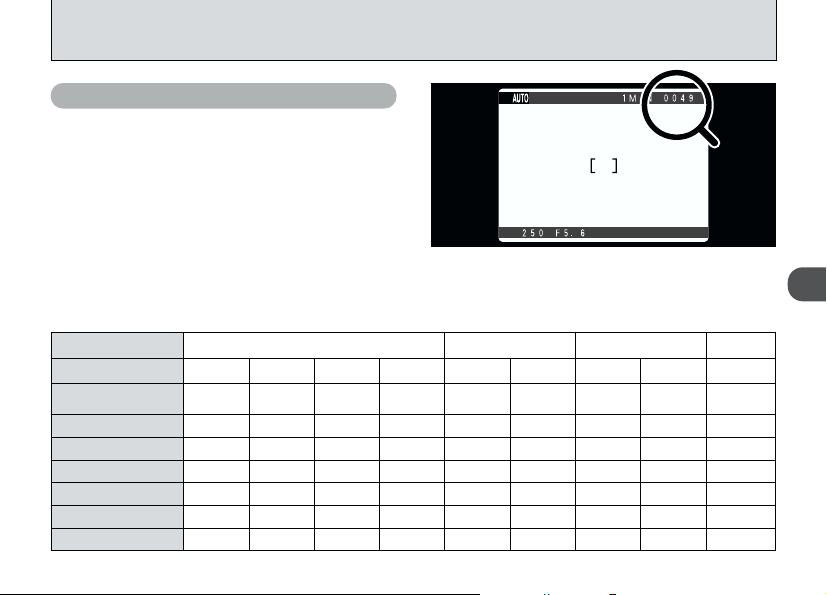
Number of Available Frames
The number of available shots appears on the
screen.
!
See P.97 for information on changing the File size
●
and Quality setting.
!
At shipment, the default settings are J (for File
●
Size) and NORMAL (for Quality).
■Standard number of shots per SmartMedia
Because the amount of data recorded varies depending on the subject, the number of available shots may not
decrease when recording ends, or may decrease by 2 frames. Also, the discrepancy between the actual number of
shots and the standard number of shots tends to be larger when there is more space remaining on the SmartMedia.
File Size
Quality Mode
Image Data Size
MG-4S (4MB)
MG-8S (8MB)
MG-16S/SW (16MB)
MG-32S/SW (32MB)
MG-64S/SW (64MB)
MG-128SW (128MB)
Approx.
17720KB
HI
0
0
0
1
3
7
G 2832 × 2128
FINE
NORMAL
Approx.
2400KB
Approx.
1200KB
1
3
6
13
26
53
13
28
56
113
✽ The numbers of available shots are shown for formatted SmartMedia.
BASIC FINE
Approx.
460KB
3
6
H 2048 × 1536 J 1280 × 960
NORMAL
137
275
Approx.
1300KB
8
17
33
68
102
Approx.
590KB
2
6
12
25
50
6
13
26
53
107
215
FINE
Approx.
620KB
6
12
25
50
101
204
K 640 × 480
NORMAL NORMAL
198
398
Approx.
90KB
12
25
49
99
44
89
163
330
663
1330
Approx.
320KB
2
29
Page 30
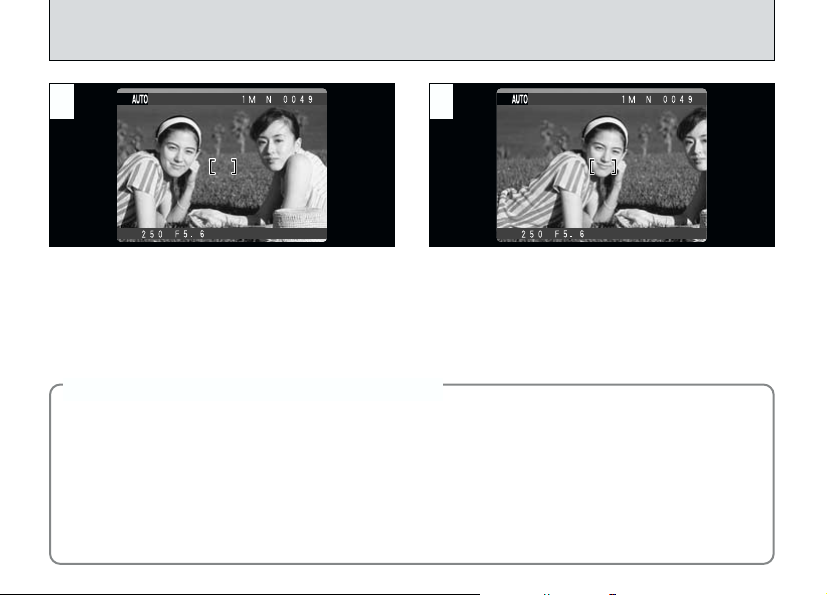
USING AF/AE LOCK
1 2
In a shot with this type of composition, the
subjects (two people in this case) are not in the
AF frame. If the shot is taken at this point, the
subjects will not be in focus.
!
Check that the focus mode selector switch is set to “AF”.
●
AF (Autofocus)/AE (Autoexposure) Lock
◆
On the FinePix6900 ZOOM, pressing the shutter button down half way locks the focus and
exposure settings (AF and AE lock). If you want to focus on a subject that is not centered in the
frame or change the picture composition after the exposure is set, you can obtain good results by
changing the composition after the AF and AE settings are locked.
When you cannot focus and AF/AE lock does not give the correct exposure
●
Position the AF frame over your main subject and apply the AE lock (➡P.56). Move the AF frame
to another subject at roughly the same distance and press the shutter button halfway. Holding the
shutter button down halfway, recompose your original shot and take the picture.
30
Move the camera slightly so that one of the
subjects in the AF frame.
◆
Page 31
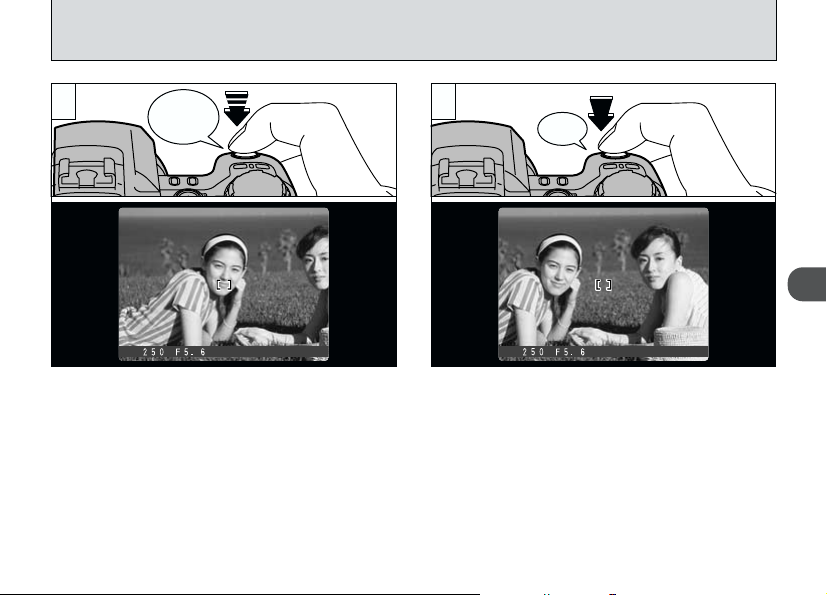
3 4
Short
doublebeep
Beep
2
Press and hold the shutter button down halfway
(AF/AE lock). The AF frame on the screen
becomes smaller and the camera determines
the shutter speed and aperture setting.
With the shutter button still held down halfway
(AF/AE lock), move the camera back to the
original image and press the shutter button
down fully.
!
You can reapply the AF/AE lock as many times as
●
you like before releasing the shutter.
!
The AF/AE lock operates in all photography modes
●
and can be used to ensure excellent results.
31
Page 32

FRAMING GUIDELINE FUNCTION
Text displayed
Framing Guideline displayed
No text displayed
This function can be selected in the “5 • 4 •
9 • 0 • - and 3” photography modes. The
screen display changes each time you press the
“DISP” button. Press the “DISP” button to display
the framing guideline.
!
The framing guideline is not recorded on the image.
●
!
The lines in the scene frame roughly divide the
●
recorded pixels into three equal parts horizontally and
vertically. When the image is printed, the resulting
print may be shifted slightly from the scene frame.
32
Scene
Use this frame when you want to position your
main subject in the center of the frame or when
you want to align your shot with the horizon.
This feature allows you to compose a shot that
captures the moment while focusing on the
subject size and the overall balance of the shot.
Important
◆
Always use the AF/AE lock to compose your
picture. Failing to use the AF/AE lock may
result in the image being out of focus.
◆
Page 33
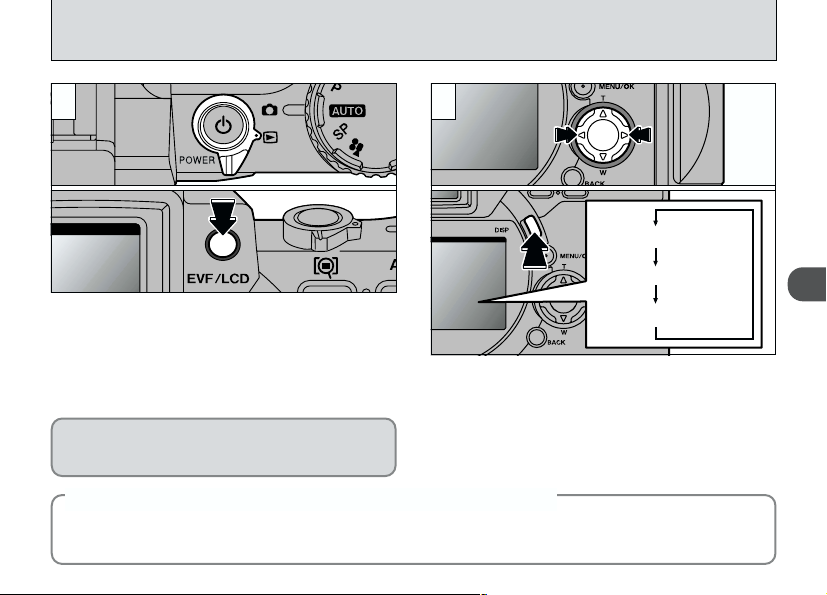
Normal playback
No text displayed
Multi-frame playback
VIEWING YOUR IMAGES (PLAYBACK
)
➀
●
➁
●
Set the Mode switch to “2”.
➀
The setting toggles between the viewfinder
➁
(EVF) and the monitor (LCD) each time you
press the “EVF/LCD” button.
!
When you set the Mode switch to “2”, the last
●
image shot is displayed.
The EVF/LCD selection setting is retained
when the mode is switched or the camera
is switched off.
Images That Can be Viewed on the FinePix6900 ZOOM
◆
You can use this camera to view (excluding some uncompressed data) images recorded on an
FinePix6900 ZOOM or images recorded onto a 3.3V SmartMedia using a FUJIFILM FinePix series,
MX series and DX series digital camera.
21
You can use “c” and “d” button to move forward
and backward respectively through your images.
The monitor display changes each time you
press the “DISP” button.
!
If image on the monitor is difficult to see, adjust the
●
monitor brightness (
➡P.102).
◆
2
33
Page 34

FAST FORWARDING IMAGES
1
You can fast forward through the frames by
holding down “d” or “c ” button for about
1 second during playback.
34
2
During fast forward, 3 frames are shown
together in miniature on the monitor. When you
stop fast forward, the image enclosed in the
frame is displayed on the monitor as a single
image.
!
A progress bar is displayed to show the approximate
●
playback position on the SmartMedia.
Page 35
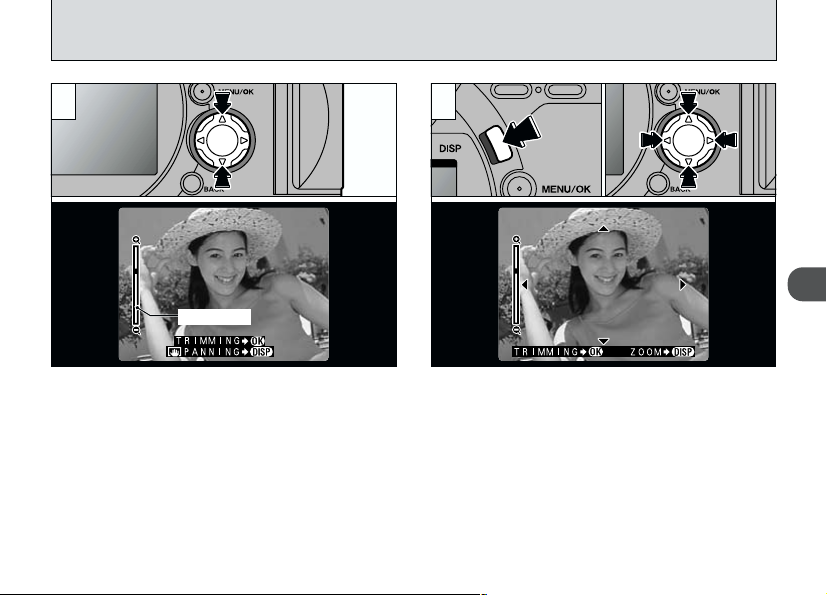
PLAYBACK ZOOM
Zoom bar
1 2
Pressing “a” or “b ” during single-frame playback
zooms in or out on the still image. A “zoom bar”
is displayed during zooming.
●
Zoom scales:
G 2832 × 2128 pixel images: Max 18×
H 2048 × 1536 pixel images: Max 13×
J 1280 × 960 pixel images: Max 8×
K 640 × 480 pixel images: Max 4×
!
Pressing “d” or “c” during zooming cancels zooming
●
and moves to the next image.
➂
➀
●
●
After you have zoomed in on your image,
Press the “DISP” button.
➀
Use the “ab” and “dc” buttons to zoom in on
➁
different parts of the image.
Press the “DISP” button again to revert to
➂
zoomed display.
!
Press the “BACK” button to return to normal unscaled
●
display.
➁
●
2
35
Page 36
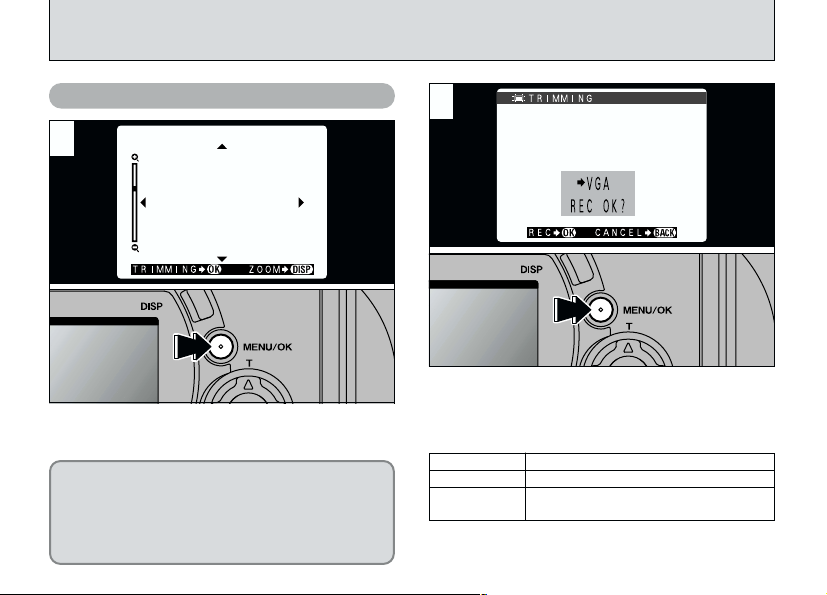
PLAYBACK ZOOM
Saving Trimmed Images
1
After you use the playback zoom, press the
“MENU/OK” button to trim the image.
The size of the saved image varies
depending on the zoom scale. In VGA mode,
“TRIMMING¨” is displayed in yellow. At
resolutions below VGA, “TRIMMING¨” is
no longer displayed.
36
2
Check the size at which the image will be saved
and then press the “MENU/OK” button. The
trimmed image is saved as a separate file.
■Image Sizes
H Suitable for A5 printing
J Suitable for A6 printing
K
✽ Because images with resolutions of less than K are not
suitable for printing, “TRIMMING¨ ” is no longer
displayed and trimmed images cannot be saved.
“TRIMMING” is displayed in yellow since
the quality is too low for printing.
Page 37

Normal playback
No text displayed
Multi-frame playback
MULTI-FRAME PLAYBACK
1 2
The displayed playback mode switches each
time you press the “DISP” button. Press the
“DISP” button to switch to multi-frame playback
(9-frame).
!
The text displayed on screen disappears after about
●
3 seconds.
!
Multi-frame playback cannot be used at the same
●
time as playback zoom.
➀
●
Select a frame by using “a”, “b”, “d” and “c”
➀
to move the cursor (the orange box) to the
desired frame. Press “a” or “b” several times to
switch to the previous page or the next page.
You can enlarge the selected image by
➁
pressing the “DISP” button again.
!
Multi-frame playback is also useful for specifying
●
erase, protect and DPOF settings for single frames
and for selecting images when you want to check or
cancel DPOF settings.
➁
●
2
37
Page 38

ERASING SINGLE FRAME
1 2
Set the Mode switch to “2”.
➀
Press the “MENU/OK” button to display the
➁
menu screen on the monitor.
!
See P.81 for more information on Erasing all frames
●
and Formating.
!
Multi-frame playback (➡P.37) is an easy way to
●
select images to be protected.
38
➀
●
➁
●
Select “FRAME” in the “{ERASE” menu and
press the “MENU/OK” button.
Page 39

3
4
Press the “MENU/OK” button to erase the
displayed image. When erasing is complete, the
next image appears and the “
message is displayed.
™”
2
Press “d” or “c” button to display the image to
be erased.
!
To cancel single-frame erase, press the “BACK”
●
button to return to the menu. To exit the menu
screen, press the “BACK” button again.
!
If “
●
¡
protection must be removed to erase the image
➡P.84).
(
!
If the “
●
displayed, DPOF is specified. When you press the
“MENU/OK” button, the image is erased and the
DPOF settings are updated.
To continue erasing images, repeat steps
ß
, .
43
” is displayed, the image
” message is
39
Page 40

USING A TV MONITOR
1 2
Switch off the camera and the TV. Plug the
video cable (provided) into the “VIDEO OUT”
socket on the camera.
!
If there is a power outlet available, connect the
●
AC-5VS/AC-5VH AC Power Adapter.
40
VIDEO OUT socket
To the video
input socket
Plug the other end of the cable into the video
input socket on the TV. Then switch the camera
and TV on and take pictures or play back
images as you would normally.
!
Refer to the instructions provided with your TV for
●
more information on video input for your TV.
Page 41

Advanced
Features
3
The Advanced Photography section introduces a range of camera functions that you can access by
setting the Mode switch to “1”.
■Photography mode specifications
Photography
mode
5 Auto(➡P.42)
4
Scene Position
(➡P.42)
r Portrait
➡P.43)
(
tLandscape
➡P.43)
(
w Sports
➡P.43)
(
Night Scene
y
➡P.43)
(
o
Black and White
(➡P.43)
9
Programed Auto
(➡P.44)
0 Shutter-priority
➡P.44)
Auto (
- Aperture-priority
➡P.44)
Auto (
3
Manual (➡P.46)
u Movie (➡P.48)
P
E
I
R
|
S
A
?
ADVANCED FEATURES
–––
–––
Flash
Photography
(
P.51
i
7
i
7
i
Accessible menu
settings
–––
–––
Factory
default
L•:
i
7
0
Flash (➡P.66)
White barance (➡P.66)
Photometry (➡P.69)
Sensitivity (➡P.70)
Auto bracketing (➡P.70)
Sharpness (➡P.72)
Multi-exp (➡P.72)
External Flash (➡P.74)
––– –––
NORMAL
AUTO
MULTI
100
OFF
OFF
OFF
\
L•:
\
\
L
\
✽ The flash cannot be used when “e” Continuous Shooting or “|” Auto Bracketing is selected.
)
•
\
•
L
•
\
•
L
]
•
7
•
\
•
L
•
7
•
7
•
7
•
:
•
7
Macro
AE lock
Photography
(
)
P.55
OO
✕
O
OOOOOO
OOOOOO
OOOOOO
O
Exposure
Compensation
(
)
P.56
(
P.57
✕
✕
O
✕✕
Continuous
MF
Shooting
(
)
P.58
)
(
P.61
)
OOO
OOO
OOO
Self-Timer
Photography
(
P.62
✕ ✕✕✕✕✕✕
)
3
41
Page 42

Scene Position
PHOTOGRAPHY MODE
5
AUTO/
1 2
Turn the Mode dial to select the setting.
5
Auto
This is the simplest mode for taking pictures and
can be used in a wide range of situations.
:
4
Scene Position
This mode provides photography settings
tailored to particular types of shot.
!
In “5” or “4” mode, the sensitivity is set to ISO
●
100.
42
: SCENE POSITION
4
4 Scene Position” mode, you can select
In “
5 types of shot (
command dial to select the setting.
r
• t • w • y • o). Turn the
Page 43

Portrait
r
Use this mode for shots of people. Portrait mode
provides soft-tone images with natural skin colors.
●
When using the flash
Auto Flash, Red-Eye Reduction, Forced Flash,
Slow Synchro.
Landscape
t
Use this mode for daytime shots of scenery.
Landscape mode provides crisp, clear shots of
buildings, mountains and other scenery.
●
When using the flash
The Flash mode is automatically set to
Suppressed Flash. This setting cannot be
changed.
Sports
w
Use this mode for moving objects. Sports mode
gives priority to faster shutter speeds.
●
Shutter
Takes pictures using fast shutter speeds.
●
When using the flash
Auto Flash or Forced Flash only.
Night Scene
y
Use this mode for shots taken in the evening or
at night. Night Scene mode gives priority to
slower shutter speeds.
●
Shutter
Slow shutter speed mode with speeds as slow
as 3 seconds.
●
When using the flash
Slow Synchro, Red-Eye Reduction+Slow
Synchro only.
o
Black and white
You can use this option to shoot in black and
white regardless of the type of scene.
●
Using flash
Auto flash, Red-Eye Reduction, Forced Flash,
Slow Synchro.
With the exception of “o” Black and White
mode, the macro setting cannot be selected.
3
43
Page 44

PHOTOGRAPHY MODE
Turn the Mode dial to select a setting.
9: Programed Auto
This is an automatic mode that selects the shutter
speed and aperture for you but still allows you to
select the other camera settings. Like the Shutterpriority and Aperture-priority modes, this mode is
relatively simple to use (Program Shift).
:
0
Shutter-priorityAuto
This is an automatic mode that allows you to set the
shutter speed. You can use this mode to take shots
that freeze movement (fast shutter speeds) or that
give the impression of movement (slow shutter
speeds).
:
-
Aperture-priorityAuto
This is an automatic mode that allows you to set the
aperture. You can use this mode to take shots with
a blurred background (wide aperture) or with both
foreground and background in sharp focus (narrow
aperture).
44
:
9
PROGRAMED
/0:
SHUTTER-PRIORITY
Turning the Command dial gives you access to
the following :
: Program Shift
9
: Shutter speed setting (1step: 1/3 EV)
0
ISO 100 3 sec. to 1/1000 sec.
ISO 200 3 sec. to 1/1000 sec.
ISO 400 1.6 sec. to 1/1000 sec.
: Aperture setting
-
F2.8 to F11 in 1/3 EV steps
!
See P.65 – 76 for information on the Photography
●
menu.
/-:
APERTURE-PRIORITY
Page 45

Shutter speed
Aperture
If you exceed the control range for the
photography mode (as with a scene that is
extremely overexposed or underexposed), the
shutter speed or aperture is displayed in red on
the screen (
!
Set the correct exposure compensation for the
●
shooting conditions (
➡P.13).
➡P.57).
Program Shift
This function allows you to select different
shutter speed and aperture setting combinations
without changing the exposure setting. In
Program Shift mode, the shutter speed and
aperture settings are displayed in yellow.
Program Shift is cancelled when you switch
modes or switch the camera off.
3
45
Page 46

PHOTOGRAPHY MODE
Shutter speed
Turn the Mode dial to select the settings.
: Manual
3
This mode allows you to set any shutter speed
or aperture setting.
●
Shutter speed setting (1 steps: 1/3 EV)
ISO 100 3 sec. to 1/1000 sec.
ISO 200 3 sec. to 1/1000 sec.
ISO 400 1.6 sec. to 1/1000 sec.
●
Aperture setting
F2.8 to F11 in 1/3 EV steps
!
See P.65 – 76 for information on the Photography
●
menu.
!
See P.112 for more information on EVs.
46
●
: MANUAL
3
Shutter Speed Setting
Turn the Command dial to set the shutter speed.
Page 47

Aperture
Exposure indicator
Aperture Setting
Set the aperture by holding down the “@ ”
(exposure compensation) button and turning the
Command dial.
Use the exposure indicator on the monitor as a
guide to setting the exposure.
Moving the indicator towards plus gives an
overexposed image (plus displayed in yellow),
while moving the indicator towards minus (minus
displayed in yellow) gives an underexposed
image.
3
47
Page 48
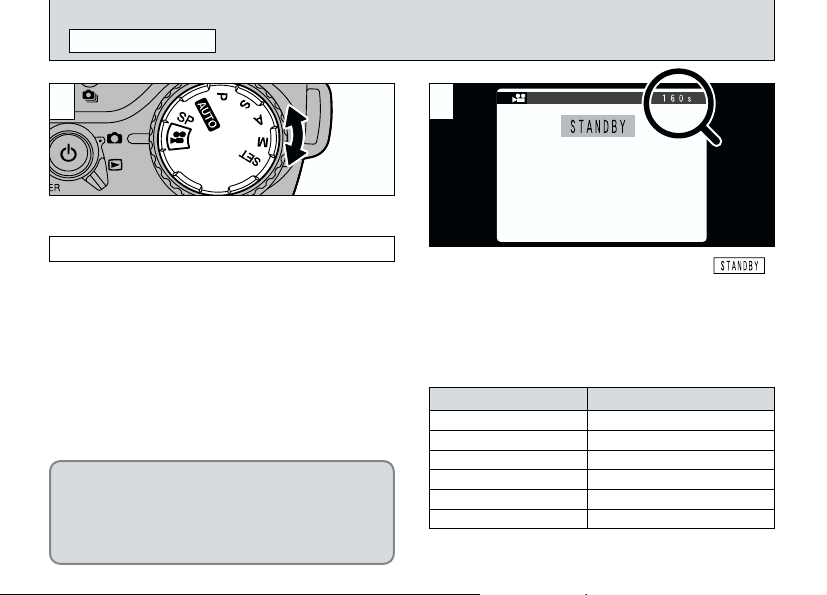
PHOTOGRAPHY MODE
u MOVIE
1 2
Turn the Mode dial to select the settings.
Movie
8
Use this mode to shoot up to 160 seconds of video
per movie.
●
Movie format: Motion JPEG (➡P.112)
!
Depending on the space available on the SmartMedia,
●
the time that can be recorded in one movie may be
shorter than 160 seconds.
If you use the FinePix6900 ZOOM to record a
movie that is longer than 80 seconds and
then attempt to play back the movie on a
different camera model, the “ˆ”
message appears and playback may fail.
48
320 × 240 pixels
10 frames per second
Without sound
The available shooting time and the “”
message are shown on the monitor.
■ SmartMedia standard shooting time
SmartMedia Capacity
MG-4S (4MB) Approx. 23 sec.
MG-8S (8MB) Approx. 47 sec.
MG-16S (16MB) Approx. 94 sec.
MG-32S (32MB) Approx. 191 sec.
MG-64S (64MB) Approx. 385 sec.
MG-128S (128MB) Approx. 774 sec.
✽The numbers of available shots are shown for formatted
SmartMedia.
Available recording time
Page 49

3
In Movie mode, the lens is locked at the wideangle setting and only the digital zoom can be
used. You can use the Zoom button or the 4direction button “a” and “b ” to zoom in and out.
When you use the zoom, a “Zoom bar” appears
on the screen.
●
Digital zoom focal distance
Approx. 35 mm to 70 mm (1.4 in. to 2.8 in.)
(Approx. 2×)
4
Shooting begins when you press the shutter
button down fully.
!
You do not need to hold down the shutter button.
●
!
The focus is fixed at 50 cm (1.6 ft.) to infinity.
●
!
The focus and white balance are fixed during
●
shooting, but the exposure varies automatically to
suit the scene being shot.
The white balance is automatically set when
you press the shutter button down fully.
3
49
Page 50

PHOTOGRAPHY MODE
u MOVIE
5
During shooting, a timer in the top-right corner of
the monitor counts down the remaining time.
!
Once the remaining time runs out, shooting
●
automatically ends and the movie is recorded on the
50
SmartMedia.
6
If you press the shutter button during shooting,
shooting ends and the movie is recorded on the
SmartMedia.
!
It takes about 22 seconds to record an 160 second
●
movie (roughly 24MB) onto a SmartMedia.
!
If you start shooting and then immediately end
●
shooting, only 3 seconds of movie is recorded onto
the SmartMedia.
Page 51
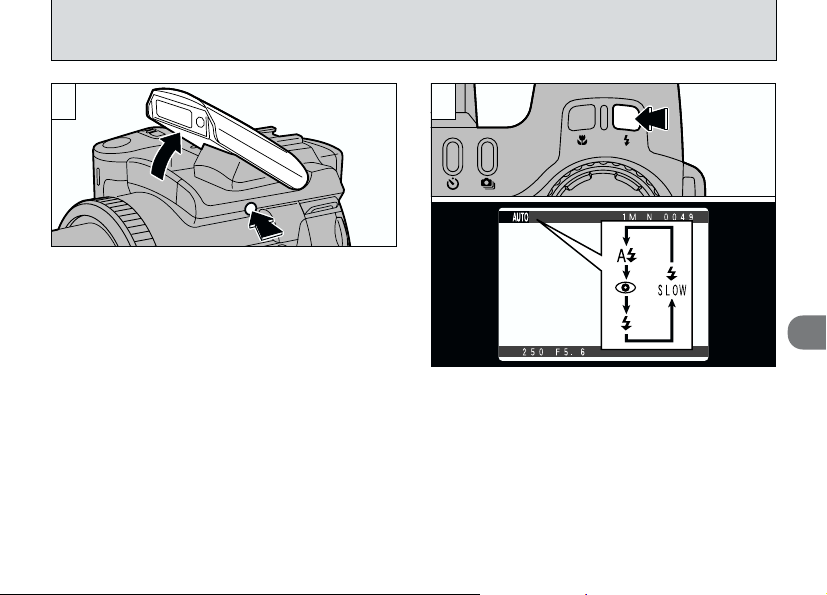
FLASH PHOTOGRAPHY
1
Press the flash pop-up button to set the flash.
●
Effective flash range (for “5”)
Wide-angle: Approx. 0.3 m to 3.6 m (1 ft. to 11.8 ft.)
Telephoto :
(Built-in flash guide number: 8 (at ISO 100))
!
You cannot use the flash in “8” mode.
●
!
If the photography mode is “5”, use the Auto
●
Flash mode.
!
When you pop the flash up, the image shown on the
●
screen may disappear and the screen may go dark.
This is because the flash is charging. In this event,
the indicator lamp flashes orange.
Approx. 0.9 m to 3.2 m (2.9 ft. to 10.5 ft.)
2
Press the “l” button to select the flash setting.
The flash setting changes each time you press
the “l” button.
!
The available flash settings are limited depending on
●
the photography mode (
!
See P.74 for information on using external flash
●
units.
➡P.41).
3
51
Page 52

FLASH PHOTOGRAPHY
Auto Flash Mode
i
Use this mode for ordinary photography. The
flash fires automatically as required by the
shooting conditions.
Red-Eye Effect
◆
When you use the flash to photograph people in low-light conditions, their eyes sometimes appear
red in the picture. This is caused by the light of the flash reflecting off the inside of the eye. Use
Red-Eye Reduction flash to effectively minimize the likelihood of the red-eye effect.
Take the following measures to make Red-Eye Reduction more effective :
●
Get the subjects to look at the camera.
52
◆
Red-Eye Reduction
\
Use this mode to ensure that the subject’s eyes
appear natural when photographing people in
low-light conditions.
The flash fires a pre-flash just before the picture is
taken and then fires again to take the actual picture.
!
The \red-eye reduction flash in “5” or “4” mode
●
fires automatically when required by the conditions.
●
Get as close as possible to the subjects.
Page 53
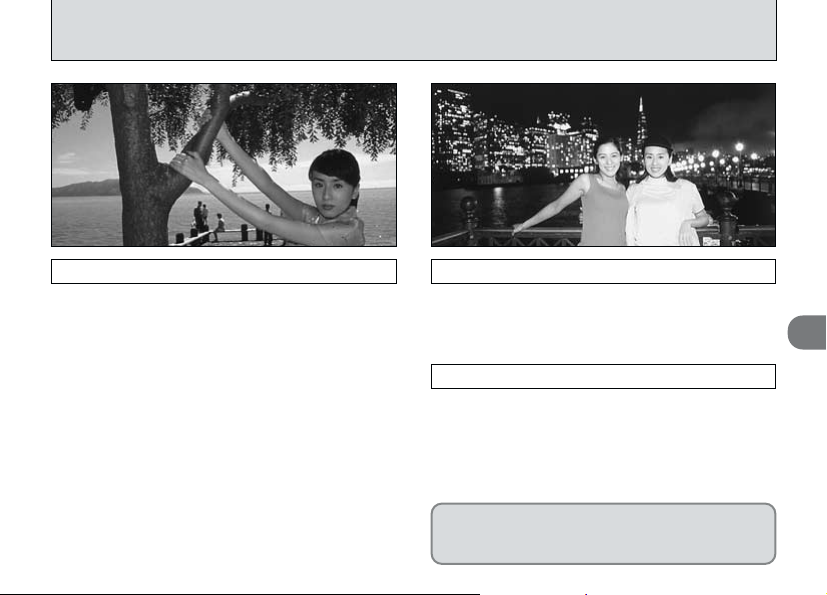
Forced Flash
7
Use this flash mode to photograph backlit
scenes, such as a subject against a window or
in the shade of a tree, or to obtain the correct
colors when you are shooting under lighting
such as fluorescent tubes. In this mode, the
flash fires in bright as well as dark conditions.
Slow Synchro
L
This is a flash mode that uses a slow shutter
speed. This allows you to take pictures of people
at night that clearly show both your subjects and
the nighttime backdrop.
Red-Eye Reduction + Slow Synchro
:
Use this mode for slow synchro shots with redeye reduction.
!
The image may be overexposed when you shoot
●
bright scenes.
!
Because a slow shutter speed is used, a tripod
●
should be used to prevent camera shake.
To take a picture of a main subject at night with
the background brightly lit, please use the “4”
mode “y” (Night Scene) settings (➡P.43).
3
53
Page 54

FLASH PHOTOGRAPHY
Suppressed Flash
]
Pressing the flash down switches the camera to
Suppressed Flash mode.
Use this mode for photography using indoor lighting,
for shots taken through glass, and for photography
in venues such as theaters or at indoor sporting
events where the distance is too great for the flash
to be effective. When you use Suppressed Flash,
the Auto White Balance function (➡P.112) operates
so that natural colors are captured along with the
ambience of the available light.
!
If you are shooting in Suppressed Flash mode in dark
●
conditions, use a tripod to prevent camera shake.
!
See P.28, 121 for information on the camera shake
●
warning.
54
Close the flash to switch to Suppressed Flash
mode.
In the modes listed below, the flash pops up but
the “]
” icon appears on the monitor and the
flash cannot be used.
●
Modes in which flash cannot be used
t Landscape (➡P.43)
e Continuous shooting (➡P.61)
| Auto bracketing (➡P.70)
Page 55

a MACRO (CLOSE-UP)PHOTOGRAPHY
This mode can be selected in the “5 • o • 9 •
0 • - and 3” photography modes.
Selecting Macro mode allows you to take closeup shots.
●
Effective Photography Range:
Approx. 10 cm to 80 cm (3.9 in. to 2.6 ft.)
3
!
The focal length is equivalent to that of a 35 mm –
●
80 mm optical zoom on a 35 mm camera. The digital
zoom can also be used (
!
Select the appropriate Flash mode for the conditions
●
➡P.51). Note that the effective flash range is approx.
(
30 cm to 80 cm (11.8 in. to 2.6 ft.).
!
If the flash is too bright, adjust the flash brightness
●
➡P.66).
(
!
When shooting in dark conditions, use a tripod to
●
prevent camera shake.
➡P.60).
When you press the “a
appears on the screen and the camera is in Macro
mode. Press the “a” button again to cancel Macro
mode.
!
Macro photography is automatically cancelled in the
●
following situations:
• When the photography mode is switched to “
(excluding o) • u • `”.
• When you switch to Playback mode.
• When the camera is switched off.
” button, the “a” icon
4
55
Page 56

AE-L: USING AE LOCK
1
This mode can be selected in the “5 • 4 •
9 • 0 and -” photography modes.
Use this function when you want to take pictures
with the exposure fixed for a particular subject.
Frame the shot so that the subject occupies
most of the center of the screen and then press
the “AE-L” button.
The “+” icon appears on the screen and the
exposure is locked while you hold down the “AE-L”
button.
56
2
Beep
With the “AE-L” button held down, press the
shutter button down halfway to focus the shot
and then compose the shot again.
!
Once you press the shutter button down halfway, the
●
exposure remains locked even if you release the
“AE-L” button.
!
When the AE lock is applied, pressing the shutter
●
button down halfway only sets the focus.
Page 57

@ EXPOSURE COMPENSATION
This mode can be selected in the “9 • 0 and -”
photography modes.
Use this function for shots where you cannot obtain
the optimum brightness (exposure), such as shots
with extremely high contrast between the subject
and the background.
!
Exposure compensation is disabled in the following
●
situations:
• When “
◆
Exposure indicator moved towards + (plus)
●
●
●
●
Exposure indicator moved towards – (minus)
●
●
●
!
●
” (Forced Flash) or “\” (Red-eye Reduction)
7
mode is used and the scene photographed is dark
Subjects for Which Exposure
Adjustment is Particularly Effective
Copying of printed text (black characters on white
paper) +4 steps (+1.3 EV)
Backlit portraits +2 to +4 steps (+0.7 to +1.3 EV)
Very bright scenes (such as snowfields) and highly
reflective subjects +3 steps (+1 EV)
Shots made up predominantly of sky. +3 steps (+1 EV)
Spotlit subjects, particularly against dark
backgrounds –2 steps (–0.7 EV)
Copying of printed text (white characters on black
paper) –2 steps (–0.7 EV)
Scenes with low reflectivity, such as shots of pine
trees or dark foliage –2 steps (–0.7 EV)
See P.112 for more information on EVs.
◆
To select the Exposure Compensation setting, hold
down the “
@” button and turn the Command dial.
The symbol indicating the compensation direction
(“–” or “+”) turns yellow. The “@” symbol also turns
yellow while exposure compensation is being set
and then turns blue after setting is completed.
●
Compensation range: –2 to +2 EV, in 1/3 EV steps
This setting is retained when the mode is switched
or the camera is switched off (The “@” icon is
displayed). Set the exposure compensation to “0”
unless compensation is required.
3
57
Page 58

SETTING THE MANUAL FOCUS
Left Right
Manual focus can be used in all photography
modes except “u ”. Use manual focus for
subjects that are not suitable for Auto Focus or
where you want the focus fixed for a shot.
Slide the focus mode selector switch to “MF”.
➀
The “f” icon appears on the screen.
➁
Mastering Manual Focusing
◆
Use a tripod to prevent the image becoming
unfocused when the camera moves.
58
◆
➀
●
➁
●
➀
●
➁
●
Turn the focusing ring to focus on the subject
➀
in the AF frame.
A focusing indicator mark appears on the
➁
screen. Adjust the focus until “^” appears.
■Focusing Indicator Marks
The focusing mark appears when you move the focus a
set amount (close to the focused position). Use the
mark as a guide to focusing.
The shot is focused.
^
The camera is focused too close.
&
Turn the focusing ring to the right.
The camera is focused too far away.
*
Turn the focusing ring to the left.
Page 59

One-touch AF Function
Use this function to focus your shot quickly.
When you press the “&^* / ! ” button, the
camera uses the autofocus function to focus on
the subject.
!
The focus indicator is not displayed in one-touch AF
●
mode.
Focus Check Function
#
Use this function when it is difficult to see
whether the image is focused.
When you press the “
the central portion of the image is shown enlarged
and you can focus using the enlarged image.
Pressing the “#” button again returns you to the
normal view.
!
When the file size is “K” and you are using the
●
digital zoom (telephoto zoom settings), the enlarged
display does not appear.
” (Focus Check) button,
#
3
59
Page 60

DIGITAL ZOOM
21
Digital zoom
Optical zoom
Zoom bar
display
You can use the digital zoom function for all
Resolution (File Size) settings other than “G”.
●
To use the digital zoom
Use the optical zoom to zoom in fully
(telephoto) and then press the “T” button again.
●
To revert to optical zoom
Use the digital zoom to zoom out fully (wideangle) and then press the “W” button again.
!
You cannot use the digital zoom for resolutions of
●
G”.
“
!
When you switch to digital zoom, the video image on
●
the monitor no longer changes smoothly.
!
The optical zoom is equivalent to approximately
●
35 mm – 210 mm on a 35 mm camera.
!
See P.97 for information on changing the file size
●
setting.
60
A “zoom bar” appears on the screen. If the image
goes out of focus during zooming, press the
shutter button down halfway to make it easier to
check the shot.
●
Digital zoom focal lengths
H
: Equivalent to approx. 210 mm – 294 mm (1.4×)
J
: Equivalent to approx. 210 mm – 462 mm (2.2×)
K
: Equivalent to approx. 210 mm – 924 mm (4.4×)
Movie: Equivalent to approx. 35 mm – 70 mm (2×)
Page 61
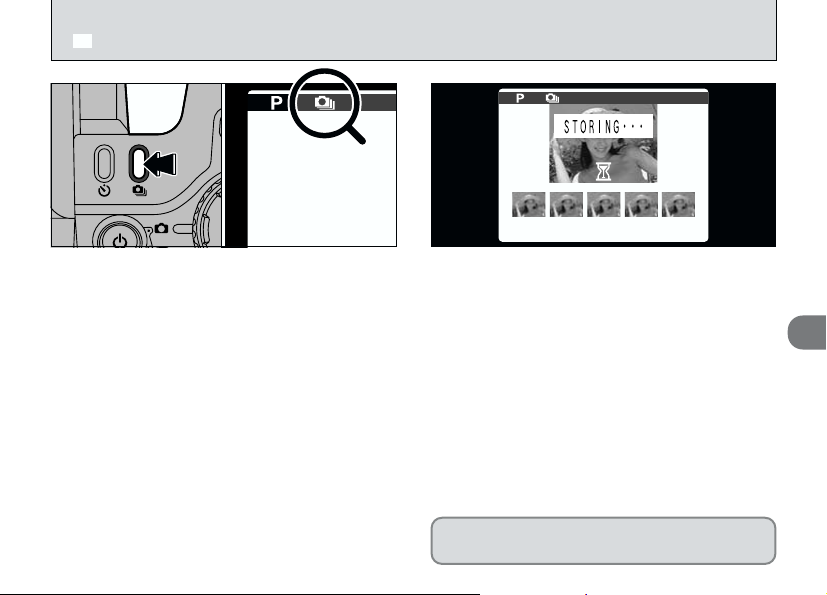
CONTINUOUS SHOOTING
e
Continuous shooting can be specified in all
photography modes except “u”.
Selecting continuous shooting allows you to
shoot up to 5 frames continuously at intervals as
short as 0.2 seconds.
When you press the “e” button, the “e” icon is
displayed and continuous shooting is selected.
Press the “e” button again to cancel continuous
shooting.
!
You cannot use the flash in this mode.
●
!
The continuous photography speed is the same
●
regardless of the quality and file size settings.
When you take a series of shots, the resulting
shots are displayed (shown in order from left to
right) and automatically saved.
!
The focus and exposure are determined for the first
●
frame and cannot be changed during shooting.
!
The results of the shot are displayed even when the
●
photographed image display is set to OFF (
!
The time required to record a file is approximately
●
21 seconds in “
continuous shooting).
If you want to select the shots to be recorded,
see P.98.
GNORMAL” mode (for 5-frame
➡P.98).
3
61
Page 62
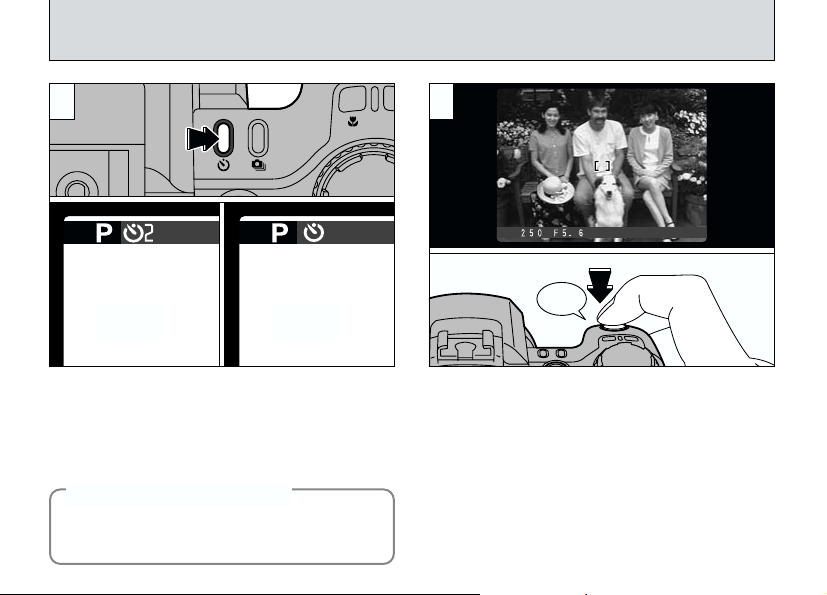
s SELF-TIMER PHOTOGRAPHY
10 SEC.
2 SEC.
1
Manual focus can be used in all photography
modes except “u”.
Each time you press the “s” button, the setting
moves one step in the sequence “2 SEC.” ➡
“10 SEC.” ➡ “OFF”.
2-second Photography
◆
This feature is useful when pressing the
shutter button causes camera shake even
with the camera on a tripod.
62
◆
2
Beep
Position the AF frame over the subject and
press the shutter button. The camera focuses on
the subject in the frame and self-timer starts to
run.
!
You can also use the AF/AE lock (➡P.30).
●
!
Take care not to stand in front of the lens when you
●
press the shutter button as this can prevent the
correct focus or brightness (exposure) being obtained.
Page 63

3 4
The self-timer lamp lights and then starts
flashing until the picture is taken.
!
To stop the self-timer, once it has started running,
●
press the “BACK” button.
■Self-timer Lamp Display
Flashing for 2 seconds
d
Lit for 5 seconds
s
➡ Flashing for 5 seconds.
A countdown is displayed on the screen
indicating the time remaining until the picture is
taken.
Self-timer mode is automatically cancelled after
each shot.
3
63
Page 64

PHOTOGRAPHY INFORMATION
If you cannot recall the
current photography
settings, you can check
them by holding down
the “INFO” button.
!
The photography information is not displayed in
●
5 • 4” or “u” mode.
“
!
You can only use this function to check the settings,
●
not to change them.
64
Page 65
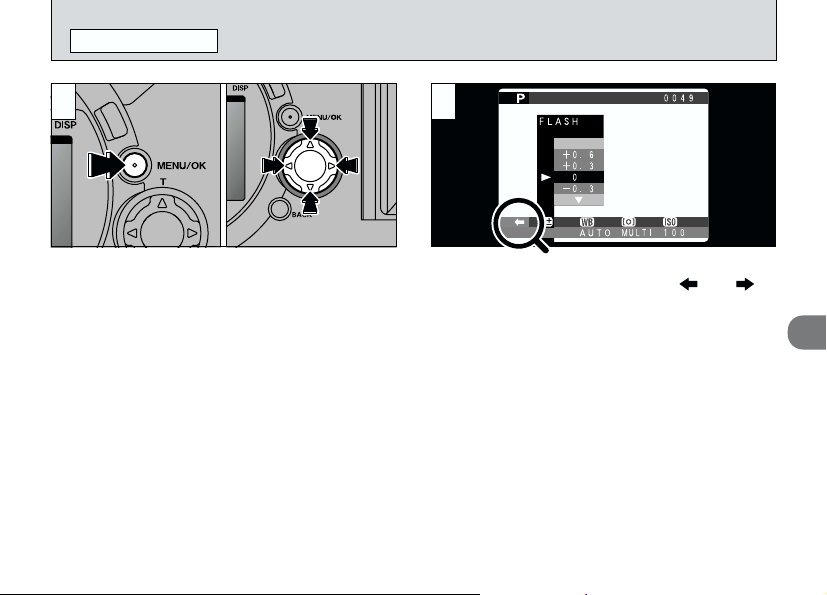
PHOTOGRAPHY MENU
PHOTOGRAPHY MENU OPERATION
1
Press the “MENU/OK” button to display the
➀
menu.
Use “d” and “ c” to select the menu item and
➁
“a” and “b” to change the setting.
Press the “MENU/OK” button to confirm the
➂
setting.
!
You cannot access the menu settings in “5 •
●
4” or “u ” mode. See P.41 for details.
➂
●➀●
➁
●
2
To move to another menu page, press “d” or “c”
button for the arrows in the menu (“” or “”).
3
65
Page 66
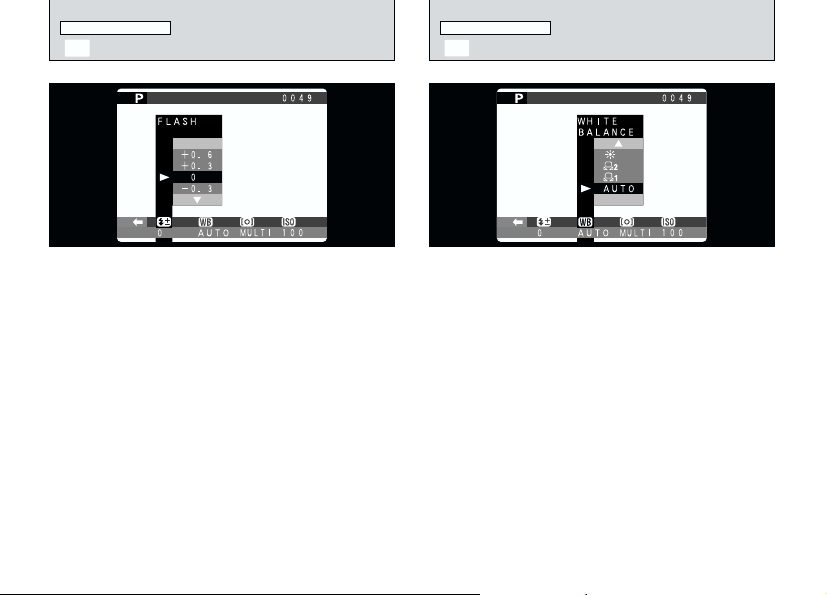
PHOTOGRAPHY MENU PHOTOGRAPHY MENU
FLASH BRIGHTNESS ADJUSTMENT
P
E
SETTING THE WHITE BALANCE
This mode can be selected in the “9 • 0 • - • 3”
photography modes.
Use this setting when you cannot obtain the
correct brightness, such as when the flash does
not reach the subject (is too faint) or when you
are using the flash for a close-up shot.
●
The range for exposure compensation is ±2
levels (–0.6 to +0.6 EV in 0.3 EV increments).
Exposure compensation only functions with the
built-in flash. See P.112 for more information
on EVs.
66
This mode can be selected in the “
photography modes.
Change the white balance setting when you
want to take a picture with the white balance
fixed for the surroundings and lighting when the
picture is taken.
In Auto mode, the correct white balance may not
be obtained for subjects such as close-ups of
people’s faces and shots taken under a special
light source. In such situations, select the correct
white balance for the light source. See P.112 for
more information on the white balance.
9 • 0 • - • 3”
Page 67
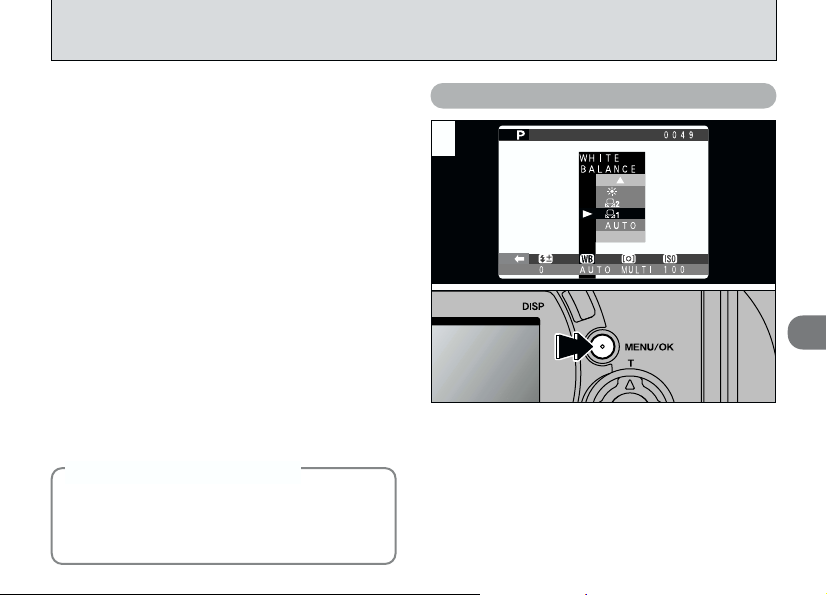
AUTO: Automatic adjustment
(Shooting to show the ambience of the
light source)
∑ : Custom white balance
´ : Custom white balance
: Shooting outdoors in fine weather
z
x : Shooting in shade
c : Shooting under “Daylight” fluorescent
lamps
v : Shooting under “Warm White” fluorescent
lamps
b : Shooting under “Cool White” fluorescent
lamps
: Shooting in incandescent light
n
✽The white balance setting (unless it is a Custom White
Balance setting) is ignored when you use the flash. To
achieve the desired effect in your shot, press the flash
back down to suppress flash operation (
Custom White Balance
◆
Use this function when you want to match the
white balance accurately for a particular light
source. You can also use this function to
achieve special effects.
➡P.54).
◆
Custom White Balance Setting
1
Select custom white balance “∑” or “´”.
➀
Press the “MENU/OK” button.
➁
➀
●
➁
●
3
67
Page 68

PHOTOGRAPHY MENU
E
SETTING THE WHITE BALANCE
2 3
Using the light source for which you want to set
the white balance, hold a sheet of white paper
so that it fills the entire screen.
When you press the “&^* /!” button, a measurement
is taken and the white balance is set.
!
The white balance setting does not affect the image
●
shown on the screen.
To use the white balance set previously,
press the “MENU/OK” button without
pressing the “&^* /!” button.
68
If “œ” or “§” is displayed, the white
balance was not measured at the correct
exposure. Reset the white balance.
!
After you take the picture, you should check the
●
“Color (White Balance)” setting for the image.
• Set “IMAGE DISPLAY” in the SET–UP menu to
“PREVIEW” (
• Set the Mode switch to “
Example
◆
You can deliberately change the white
balance for a photographed image by using
colored paper instead of white paper.
➡P.98).
2” (➡P.33).
◆
Page 69

PHOTOGRAPHY MENU
This mode can be selected in the “9 • 0 • - • 3”
photography modes.
Use this mode for scenes where the brightness
of the subject and background differ markedly so
that the Multi setting is unlikely to achieve the
desired result.
●
AVERAGE: Light metering where an average
●
SPOT : Light metering where the exposure
●
MULTI : Light metering where the camera
!
The camera is fixed in Multi mode when “5 • 4”
●
or “
value for the entire image is used.
is optimized for the center of the
image.
automatically assesses the scene
and selects the optimum exposure.
u” is selected.
I PHOTOMETRY
The light metering modes are
◆
effective for the following subjects
●
AVERAGE
The advantage of this mode is that the
exposure tends not to change for different
compositions or subjects. This mode is
particularly effective for shots of people
wearing black or white clothing and shots of
scenery.
●
SPOT
This mode is useful for subjects with
strongly contrasting light and dark areas
where you want to achieve the correct
exposure for a particular feature.
●
MULTI
In this mode, the camera uses automatic
scene recognition to analyze the subject
and provide optimum exposure in a wide
range of shooting conditions. This mode
should be used for everyday photography.
◆
3
69
Page 70

PHOTOGRAPHY MENU PHOTOGRAPHY MENU
SETTING THE SENSITIVITY
R
AUTO BRACKETING
|
1
This mode can be selected in the “
photography modes.
Use this setting when you want to take bright
pictures indoors without using a flash or when
you want to use a fast shutter speed. (to prevent
camera shake, etc.)
●
Settings: 100, 200, 400
9 • 0 • - • 3”
70
This mode can be selected in the “9 • 0 • - •
3” photography modes.
Use this feature to photograph the same image
with different exposure settings. Auto bracketing
automatically shoots 3 consecutive frames, one
of which is correctly exposed while the
remaining two are underexposed and
overexposed respectively by a set amount.
●
The three available settings are ±1/3, ±2/3 and
±1 EV. See P.112 for more information on EVs.
!
Flash photography cannot be used.
●
!
This feature always takes 3 shots. However, if there
●
is insufficient space on the SmartMedia for 3 shots,
no picture will be taken.
Page 71

2 3
Continuous shooting
Auto bracketing
Blank(OFF)
When you take a picture, the resulting shots are
displayed (Acorrect exposure, Boverexposed,
Cunderexposed) and then automatically saved.
3
After selecting AUTO BRACKETING, press the
“6” button so that the “” icon appears on the
screen. The mode switches (6 ••Blank)
each time you press the “6” button.
!
The focus is determined for the first frame and
●
cannot be changed during shooting.
!
The photographed images are displayed even when
●
“OFF” is selected as the “IMAGE DISPLAY” setting”
➡ P.98).
(
!
It takes about 12 seconds to record the image data
●
(NORMAL:
If you want to select the shots to be recorded,
see P.98.
G).
71
Page 72
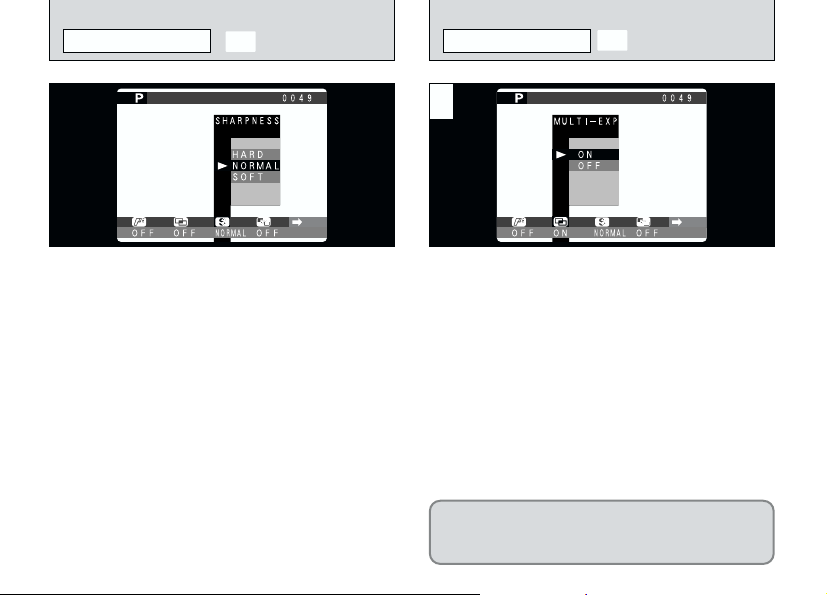
PHOTOGRAPHY MENU
S
SHARPNESS
PHOTOGRAPHY MENU
1
A
MULTI-EXP
This mode can be selected in the “9 • 0 • - • 3”
photography modes.
Use this setting to soften or emphasize outlines
or to adjust the image quality.
●
HARD : Emphasizes the outlines.
●
NORMAL: Best for ordinary photography.
●
SOFT : Softens the outlines.
Best for shots of subjects such as
buildings or text where you want
sharp images.
Provides edge sharpness that is
ideal for ordinary shots.
Best for shots of subjects such as
people, where a softer image is
desirable.
72
This mode can be selected in the “
photography modes.
Multi-exposure provides a way of overlaying
photographed images on top of each other to
give a final image that cannot be obtained
through normal photography.
!
If the photographed image is overexposed, use
●
negative compensation in the Brightness (exposure
compensation) setting to correct the exposure (
!
Only the optical zoom can be used for multi-exposure
●
shots. The digital zoom (
!
This mode is automatically cancelled when you
●
switch the camera off.
Continuous shooting (➡ P.61) and Auto
bracketing (➡P.70) are disabled when Multi-Exp
is selected.
➡P.60) does not function.
9 • 0 • - • 3”
➡P.57).
Page 73

2
➀
●
3
A preview screen appears when you take a
➀
picture.
Press “c” to move to the next image frame.
➁
!
Changing the photography mode exits multi-exposure
●
mode without recording the images.
You cannot change the photography menu
settings or the FILE SIZE/QUALITY setting
during shooting.
➁
●
When you take the next (multi-exposure) shot,
the images are overlaid and displayed in the
preview screen.
●
To overlay more images: Press “c”.
●
To record the current image: Press “MENU/OK”.
●
To return to the previous image: Press “d”.
●
To stop without recording any images:
!
A preview image is always shown, regardless of the
●
IMAGE DISPLAY setting. However, note that the
Preview Zoom function cannot be used (
There is no limit on the number of multiple
exposures.
Press the “BACK” button.
➡P.98).
3
73
Page 74

PHOTOGRAPHY MENU
? USING AN EXTERNAL FLASH
1 2
This mode can be selected in the “9 • 0 • - • 3”
photography modes.
Set this setting to “ON” when you are using an
external flash.
●
Synchronization speed: Up to 1/1000 sec.
!
Set the white balance (➡P.66) to AUTO or Custom
●
White Balance (
Compatible Flash Units
◆
Flash units that can be used with this camera
must meet the following 3 conditions :
●
The aperture can be set.
●
External flash synchronization can be used.
●
The sensitivity can be set.
74
➡P.76).
◆
Close the built-in flash.
➀
Mount the external flash on the camera’s hot
➁
shoe.
!
Built-in and external flash units cannot be used at
●
the same time.
➀
●
➁
●
Page 75

3 4
F
Select “9 • 0 • -” (➡P.44) or “3” (➡P.46).
However, the use of “- ” or “3” mode is
recommended.
!
Flash photography cannot be used when continuous
●
shooting (
selected.
When you are using an external flash, always
specify a fixed aperture setting.
➡P.61) or auto bracketing (➡ P.70) is
AUTO
MODE SELECT
ISO
External Flash Settings
For external flash, refer to the user’s manual for the
flash and specify the settings as described below.
●
Match the settings to the camera aperture
setting. In “9” or “0” mode, match the settings
to the aperture measured by the camera.
●
Match the sensitivity setting (➡P.70) to the
setting on the camera.
●
Select External Flash mode (TTL mode cannot
be used).
3
75
Page 76

PHOTOGRAPHY MENU
?
USING AN EXTERNAL FLASH
When the White Balance is Incorrect
1
Match the white balance to the external flash
settings.
In “E” in the Photography menu (➡P.66), select
“∑ • ´” Custom White Balance.
Press the “MENU/OK” button.
76
2
Hold a sheet of white paper so that it fills the
entire screen. Then press the “
fire the flash and set the white balance.
!
After you take the picture, you should check the
●
“Color (White Balance)” setting for the image.
• In SET–UP, set IMAGE DISPLAY (
POSTVIEW.
• Set the Mode switch to “
&^* /!” button to
➡ P.98) to
2” (➡P.33).
Page 77

Advanced
4
Features Playback
The Advanced Features Playback section introduces a range of playback functions that you can
access by setting the Mode switch to “2”.
■
Playback mode menu
Playback image Menu options that can be set
2 STILL IMAGES
➡P.33)
(
MOVIE
u
➡P.79)
(
ADVANCED PLAYBACK
{ ERASING (SINGLE/ALL FRAMES/FORMATTING) (➡P.38, 81)
PLAYBACK (AUTOMATIC PLAYBACK) (➡P.83)
}
PROTECTION (➡P.84)
O
DPOF (Digital Print Order Format) (➡P.88)
F
{ ERASING (SINGLE/ALL FRAMES/FORMATTING) (➡P.38, 81)
PLAYBACK (AUTOMATIC PLAYBACK) (➡P.83)
}
PROTECTION (➡P.84)
O
DC IN 5V
Socket
If you are close to a power outlet, you should use
the AC Power Adapter AC-5VS/AC-5VH (sold
separately) to avoid any loss of power during still
image or movie playback (
➡P.18).
4
77
Page 78

PLAYBACK INFORMATION
File size
Quality
Shutter speed
Aperture setting
Sensitivity
Flash ON/OFF
Histogram
Shadows Highlights
Brightness
Pixels
This function allows you
to check the photography
information. Hold down
the “INFO” button to
check the information.
!
This function cannot be
●
used during multi-frame
playback (
78
➡P.37).
Histograms
◆
A histogram is a chart showing the distribution of brightness in an image
(horizontal axis: brightness; vertical axis: pixels).
Optimal exposure: There is an ample distribution of pixels overall with a peak
➀
Overexposed : The number of highlight pixels is high with the distribution
➁
Underexposed : The number of shadow pixels is high with the distribution
➂
123
◆
in the middle range.
sloping upwards to the right.
sloping upwards to the left.
!
The shape of the graph will vary depending on the subject.
●
Page 79

MOVIE PLAYBACK
1
Use “d” or “c” to select the movie file.
!
Movies cannot be played back using multi-frame
●
playback. Use the “DISP” button to revert to normal
playback.
Movies are displayed somewhat smaller than
still images.
2
Press “b” to play the movie.
➀
The monitor shows the playback time and a
➁
playback progress bar.
!
If the subject of the movie is very bright, white
●●
streaks may appear on the image during playback.
This is normal and is not a fault.
See P.80 for more detailed information on
playing back movies.
➀
●
➁
●
4
79
Page 80

MOVIE PLAYBACK
■ Playing Back Movies
Control Description
Playback
Pause/Resume
Stop
Fast forward/Rewind
Skip playback
Compatible Movie Files
◆
The FinePix6900 ZOOM can play back movie files up to 160 seconds in length recorded using a FinePix6900
ZOOM or recorded onto 3.3V SmartMedia using a FUJIFILM digital camera. If you attempt to play back a
movie that is longer than 160 seconds, the “ˆ” message appears and playback fails.
80
Rewind Forward
When paused
◆
The movie automatically stops when playback ends.
Pauses the movie during playback. Press this button again
when the movie is paused to resume playback.
Stops playback.
Press these during playback to skip forwards or backwards
through the movie.
• Each time you press “d” or “c” when the movie is paused,
the movie advances or goes back one frame.
• Hold down the button to move through the frames quickly.
See P.104 for information on playing back movies on your PC.
✽
Page 81

PLAYBACK MENU
{
ERASING SINGLE•ALL FRAMES/FORMATTING
FRAME
Erases only the selected file.
!
Protected files (➡P.84, 86) are not erased.
●
ALL FRAMES
Erases all unprotected files.
FORMAT
Erases all the data and reformats (initializes) the
SmartMedia for use with this camera.
!
Formatting also erases protected files.
●
!
If “∞”, “
●
¶” is displayed, first wipe the contact
or “
surface on the SmartMedia (gold-colored area)
thoroughly with a soft, dry cloth and then reload the
SmartMedia. If this does not resolve the problem,
format the card.
ª
”, “ˆ”
1
If you press the “MENU/OK” button, the menu
screen will appear on the monitor.
!
Press the “BACK” button to exit the menu.
●
4
81
Page 82

PLAYBACK MENU
{
ERASING SINGLE•ALL FRAMES/FORMATTING
2 3
➁
●
Press “d” or “c” to select “{ ERASE”.
➀
Use the “a ” and “ b ” buttons to select
➁
“FRAME”, “ALL FRAMES” or “FORMAT”.
Press the “MENU/OK” button.
➂
Formatting erases all the data on the
SmartMedia, including protected files.
82
➀
●
➂
●
A confirmation screen appears.
If you are erasing all the frames, or formatting
the card, press the “MENU/OK” button to proceed.
If you are erasing one frame, use the “d ” and
“ c” buttons to select the frame and then press
the “MENU/OK” button.
!
To cancel “{ ERASE”, press the “BACK” button.
●
!
If the “
●
å
displayed, DPOF is specified. When you press the
“MENU/OK” button, the image is erased.
” message is
Page 83

PLAYBACK MENU
} PLAYBACK
(
AUTOMATIC PLAYBACK
)
1
Press the “MENU/OK” button to display the
menu on the monitor.
!
The Auto Power Off function does not operate during
●
playback.
!
Movie playback begins automatically. When playback
●
ends, the camera advances to the next frame.
2
Press “d” or “c” to select “}PLAYBACK”.
➀
Press the “MENU/OK” button. The image
➁
frames are automatically advanced and
played back.
!
If you press the “DISP” button once during playback,
●
the playback frame number is displayed on the
monitor.
!
To interrupt “}PLAYBACK”, press the “BACK” button.
●
➀
●
➁
●
4
83
Page 84

PLAYBACK MENU
O
SETTING AND REMOVING SINGLE FRAME PROTECTION
1 2
Press the “MENU/OK” button to display the
menu on the monitor.
!
Multi-frame playback is an easy way to select
●
images to be protected (
Protection:
A setting that prevents images from being
inadvertently erased (➡P.81).
84
➡P.37).
➀
●
➁
●
Use “d” or “ c” to select “OPROTECT”.
➀
Press “a” or “b ” to select “FRAME SET/RESET”.
➁
Press “MENU/OK”.
➂
➂
●
Page 85

43
Use “ d ” or “c ” to select the image to be
protected.
!
If you do not want to protect any images, press the
●
“BACK” button to return to the menu. To exit the
menu screen, press the “BACK” button again.
When you press the “MENU/OK” button, the
image is protected and the “j” icon appears
on the screen. To remove the protection, press
the “MENU/OK” button again.
To protect another image, repeat steps
43
, .
4
85
Page 86

PLAYBACK MENU
O
SETTING AND REMOVING PROTECTION FOR ALL FRAMES
1
Press the “MENU/OK” button to display the
menu on the monitor.
Formatting erases all images, including
protected images (➡P.81).
86
2
➁
●
Use “d” or “ c” to select “O”.
➀
Press “a” or “b ” to select “PROTECT ALL” or
➁
“UNPROTECT ALL”.
Press “MENU/OK”.
➂
➀
●
➂
●
Page 87

3
A confirmation screen will appear to proceed,
press the “MENU/OK” button.
!
If you do not want to protect any images, press the
●
“BACK” button to return to the menu. To exit the
menu screen, press the “BACK” button again.
4
87
Page 88
PLAYBACK MENU
DPOF stands for Digital Print Order Format and refers to a format that is used for
recording printing specifications for images shot using a digital camera on media such as
SmartMedia. The recorded specifications include information on which frames are to be
printed and how many prints of each frame are required.
This section gives a detailed description of how to order your prints with the FinePix6900
ZOOM.
✽Note that some printers do not support date and time imprinting or specification of the
number of prints.
✽Note that the warnings shown below may be displayed while you are specifying the
prints.
F HOW TO SPECIFY PRINT OPTIONS
88
ß
When you erase the image, the DPOF setting for that image is deleted at the same time.
∂
If you load a SmartMedia that contains frames specified for printing on another
camera, those print specifications are all reset and replaced by the new print
specifications.
•
No more than 999 frames can be specified on the same SmartMedia.
(➡P.121)
(➡P.120)
(➡P.121)
Page 89

PLAYBACK MENU
F DPOF DATE SETTING
1 2
This function allows you to select whether or not
the date of shooting is included on the print.
Set the Mode switch to “2”.
➀
Press the “MENU/OK” button to display the
➁
menu on the monitor.
Press “c” to select “F”.
➂
!
DPOF settings cannot be specified for movie file.
●
➀
●
➁
●
➂
●
➀
●
Use “b ” to select “kDATE OFF”.
➀
Press “d” or “c” to select “DATE ON” or “DATE
➁
OFF”. This setting remains valid until you
change the setting or switch the camera off.
!
Before specifying any other settings, first specify
●
whether date is to be shown or not.
➁
●
4
89
Page 90

PLAYBACK MENU
F DPOF SET FRAME
1
Use the “a” or “b ” to select “FRAME SET”.
➀
Press the “MENU/OK” button.
➁
!
Before specifying “FRAME SET”, always specify
●
90
whether the date is set.
➀
●
➁
●
2
Use “d” or “c” to display the frame to be specified.
➀
Use “a” or “b ” to specify the number of prints.
➁
The “ F” icon and the number of prints is
displayed for the frames for which settings have
been confirmed. If the date has been set, the
“k” icon is also displayed.
!
Using “d” or “c” to move forwards or backwards a
●
frame automatically confirms the setting.
To continue using “FRAME SET”, repeat
steps ●➀and ●➁.
➀
●
➁
●
Page 91

43
<To Apply the Settings>
When you have finished specifying the DPOF
settings, always press the “MENU/OK” button to
confirm the settings. The total number of prints
appears on the monitor and the menu screen
reappears.
!
You can specify up to 99 prints for each frame. Also,
●
the maximum number of frames that can be specified
for printing on the same SmartMedia is 999.
!
“TOTAL” shows the total number of prints specified.
●
<To Cancel the Settings>
Pressing the “BACK” only cancels the setting for
the currently selected frame. You cannot cancel
settings for frames other than the currently
selected frame.
4
91
Page 92

PLAYBACK MENU
F DPOF REVIEW/RESET
➀
●
Use “a” or “b ” to select “REVIEW/RESET”.
➀
Press the “MENU/OK” button.
➁
92
➁
●
21
Pressing “
for which the number of prints has been
specified, allowing you to check the settings for
each frame.
!
●
!
●
d” or “c” plays back only the frames
Multi-frame playback is an easy way to select
➡P.37).
images (
If you do not want to check or delete the DPOF
settings, press the “BACK” button to return to the
menu. To exit the menu screen, press the “BACK”
button again.
Page 93

PLAYBACK MENU
F
DPOF RESET ALL
3 1
To delete the print setting, display the image for
which the setting is to be deleted and then press
the “MENU/OK” button. When the print setting
has been deleted, the next image appears with
the “º” message displayed.
!
If all the print settings are cancelled, the “TOTAL”
●
reverts to “00000” and the monitor screen
background turns blue.
To delete further print settings, repeat steps
32
, .
➀
●
Use “a” or “b ” to select “RESET ALL”.
➀
Press the “MENU/OK” button.
➁
➁
●
4
93
Page 94

PLAYBACK MENU
F
DPOF RESET ALL
2
A confirmation screen will appear to protect all
images. Press the “MENU/OK” button.
94
3
A confirmation screen appears. To proceed,
press the “MENU/OK” button.
Page 95
5 Settings
` SET–UP MODE e
The table below explains the camera setting
Settings Display Explanation
FILE SIZE/
QUALITY
IMAGE
DISPLAY
AUTO POWER
SAVE
DATE/TIME
FRAME NO.
BEEP
LANGUAGE
RESET ALL
2 MIN/5 MIN/OFF
q
SET
OFF/
POSTVIEW/
PREVIEW
q
SET
RENEW/CONT.
LOW/HIGH/OFF
ENGLISH/
FRANCAIS
q
OK
Factory default
J
NORMAL
OFF
2 MIN
RENEW
LOW
ENGLISH
Use this option to set the number of recorded pixels (file
size) and quality (compression rate). See P.97 for details.
Use this setting to specify whether a preview image
(showing the photographed image) is displayed after a
picture is taken. See P.98 for details.
Use this setting to specify whether the camera is switched to
low power mode and then automatically switched off when
the camera controls are not being used. See P.100, 112 for
details.
__
Sets the date and time. See P.22 for details.
Specifies whether the Frame No. Memory function is used.
See P.101 for details.
Sets the volume of the tone emitted when the camera is used.
Select English or French as the language used for screen
display.
Resets all settings other than the date/time, custom white
balance measurement and EVF/LCD setting to the factory
__
default values. When you press “
appears. To proceed, press the “MENU/OK” button again.
✽ See the next page for information on procedures.
c
”, a confirmation screen
5
95
Page 96

` USING THE SET–UP SCREEN
1 2
Set the Mode switch to “1”.
➀
Set the Mode dial to “`” to display the
➁
SET–UP screen.
!
Always switch the camera off when you are
●
replacing the batteries. If you open the battery cover
or disconnect the AC power adapter without
switching the camera off, all the camera settings
may revert to the factory default values.
96
➀
●
➁
●
➀
●
Press “a” or “b” to select a setting.
➀
Use “d” or “c” to change the settings.
➁
!
Press “ c ” to select “FILE SIZE/QUALITY” ,
●
“DATE/TIME” or “RESET ALL”.
➁
●
Page 97

`
You can choose any combination of 4 file sizes
and 4 image quality settings. Use the table below
as a guide to the best settings for your shots.
G (2832 × 2128)
H
J
K
1: For printing the whole image at A4 size or
printing a part of the image at A5 or A6 size
2: For printing the whole image at A5 size or
printing a part of the image at A6 size
3: For printing at A6 size
4: For use via the Internet as an e-mail
attachment, etc.
Quality(compression ratio
Select “HI”or “FINE”for better image quality and
“
BASIC”to increase the number of available shots.
In most cases, the “NORMAL”setting provides
more than adequate image quality.
!
The recording time for the “HI” setting is longer than
●
for other quality settings.
SETTING THE FILE SIZE AND QUALITY
BASIC
NORMAL
FINEFile size HI
1112
(2048 × 1536)
(1280 × 960)
(640 × 480)
—
22
—
33
——
—
—
—
4
)
(
COMPRESSION RATIO
➀
●
Use “a” or “b” to change the file size setting
➀
and “d” or “c” to change the quality setting.
Press the “MENU/OK” button to confirm the
➁
setting.
!
There are 9 combinations of file size and quality
●
settings in total (
When the mode switch is set to “1” (excluding
“
u”), holding down “SHIFT” and pressing “
switches you to the settings screen.
➡P.29).
)
➁
●
7
5
”
97
Page 98

` IMAGE DISPLAY
Preview Zoom
➀
●
This setting allows you to specify whether the
photographed image is displayed after you take
a picture.
OFF : The photographed image is automatically
POSTVIEW
PREVIEW:
!
●
98
recorded without being displayed.
: The photographed image is displayed for
about 2 seconds and is then automatically
recorded.
The photographed image is displayed
and you can then select whether to
record the image. You can also select
preview zoom and recorded images.
●
Press “MENU/OK” to record the image.
●
In Continuous Shooting and Auto Bracketing modes,
images are displayed for a set time and then
automatically recorded even when “OFF” is selected
as the “IMAGE DISPLAY” setting.
Press “BACK” to discard the image.
➃
➁
●
●
You can enlarge the preview to check the image
details.
Use “a” or “b ” to zoom in or out.
➀
Press the “DISP” button.
➁
Use the “ab” and “dc” buttons to zoom in on
➂
different parts of the image.
Press the “DISP” button again to revert to
➃
zoomed display.
!
Trimming in the preview image is not saved.
●
!
The operation procedure is the same as for playback
●
zoom. (
➡P.35)
➂
●
Page 99

Selecting Recorded Images
2
1
This function allows you to select and record
images in the Continuous Shooting and Auto
Bracketing modes. However, preview zoom
cannot be used.
Use “d ” and “ c” to select the images you do
➀
not want to record.
Press “b ” to add or remove the “C” Mark.
➁
➀
●
➁
●
Place an “C” mark under all the images you do
not want to record and then press the
“MENU/OK” button to record the remaining
images.
5
99
Page 100

` AUTO POWER SAVE SETTING
Once you enable this function, the monitor is
temporarily switched off to reduce power
consumption (Sleep mode) if the camera is not
used for about 30 seconds. If the camera is then
left unused for a further time (2 or 5 minutes), it
is automatically switched off. Use this function
when you want to get the maximum possible
running time from the battery.
!
Auto Power Save is disabled during automatic
●
playback and when a USB connection is being used.
The Sleep function does not operate in
Playback mode, but the camera is
automatically switched off if it is left unused
for some time (2 or 5 minutes).
100
When the camera is in sleep mode, pressing the
shutter button down halfway brings the camera
back to full operational mode. This is a useful
feature as it allows you to take pictures more
quickly than switching the camera off and then
on again.
!
Camera operation can also be restored by pressing
●
buttons other than the shutter button.
 Loading...