

Page 1
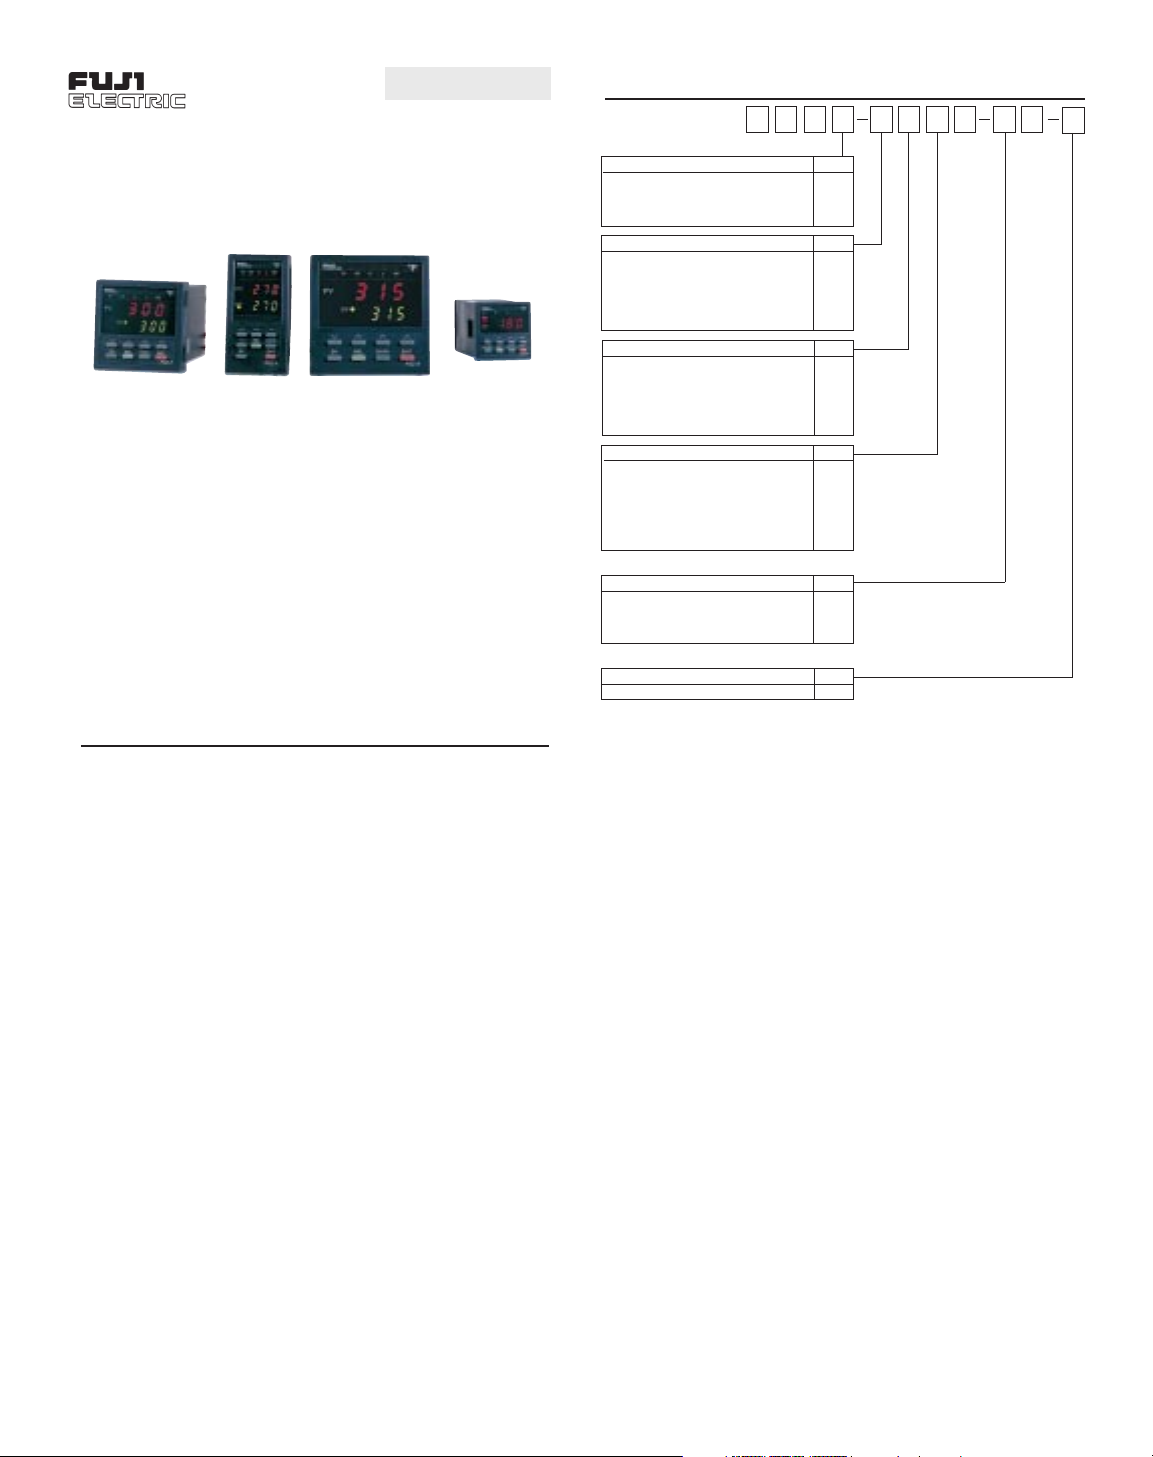
TABLE OF CONTENTS
Model Configuration . . . . . . . . . . . . . . . . . . . . . . . . . . . . . . . . . . . . . . . . . 1
Introduction. . . . . . . . . . . . . . . . . . . . . . . . . . . . . . . . . . . . . . . . . . . . . . . . . 2
Features. . . . . . . . . . . . . . . . . . . . . . . . . . . . . . . . . . . . . . . . . . . . . . . . . . . . 2
Safety Precautions. . . . . . . . . . . . . . . . . . . . . . . . . . . . . . . . . . . . . . . . . . . 2
Specifications. . . . . . . . . . . . . . . . . . . . . . . . . . . . . . . . . . . . . . . . . . . . . . . 3
Outer Dimensions and Panel Cutout Size . . . . . . . . . . . . . . . . . . . . . . . . 5
Installation . . . . . . . . . . . . . . . . . . . . . . . . . . . . . . . . . . . . . . . . . . . . . . . . . 5
Wiring Instructions: . . . . . . . . . . . . . . . . . . . . . . . . . . . . . . . . . . . . . . . . . . 6
Front Panel Description. . . . . . . . . . . . . . . . . . . . . . . . . . . . . . . . . . . . . . . 8
Front Panel Operation . . . . . . . . . . . . . . . . . . . . . . . . . . . . . . . . . . . . . . . . 8
Autotuning. . . . . . . . . . . . . . . . . . . . . . . . . . . . . . . . . . . . . . . . . . . . . . . . . . 9
Programming
1. Primary Menu . . . . . . . . . . . . . . . . . . . . . . . . . . . . . . . . . . . . . . . . . . . 9
2. Secondary Menu. . . . . . . . . . . . . . . . . . . . . . . . . . . . . . . . . . . . . . . . 13
Error Messages . . . . . . . . . . . . . . . . . . . . . . . . . . . . . . . . . . . . . . . . . . . . 15
Appendix A: Autotuning. . . . . . . . . . . . . . . . . . . . . . . . . . . . . . . . . . . . . . 16
Appendix B: Manual Tuning . . . . . . . . . . . . . . . . . . . . . . . . . . . . . . . . . . 17
Appendix C: Heater Break Option. . . . . . . . . . . . . . . . . . . . . . . . . . . . . . 19
Appendix D: Heat/Cool Option. . . . . . . . . . . . . . . . . . . . . . . . . . . . . . . . . 20
Quick Reference. . . . . . . . . . . . . . . . . . . . . . . . . . . . . . . . . . . . . . . . . . . . 22
1
PXZ SERIES
Operation
Manual
PID Autotune
Controllers
Featuring Fuzzy Logic
P X Z
V
1
Front panel size Code
1/16 DIN 4
1/8 DIN 5
72mm 7
1/4 DIN 9
Kinds of input Code
Thermocouple (°C) T
Thermocouple (°F) R
RTD/Pt100 (°C) N
RTD/Pt100 (°F) S
4-20mA DC, 1-5V DC B
0-20mA DC, 0-5V DC A
Control output 1 Code
Relay contact (reverse action) A
Relay contact (direct action) B
SSR/SSC driver (reverse action) C
SSR/SSC driver (direct action) D
4 to 20mA DC (reverse action) E
4 to 20mA DC (direct action) F
Control output 2* Code
None Y
Relay contact (reverse action) A
Relay contact (direct action) B
SSR/SSC driver (reverse action) C
SSR/SSC driver (direct action) D
4 to 20mA DC (reverse action) E
4 to 20mA DC (direct action) F
*not available on PXZ-4 type
Alarm Options Code
Heater break alarm* 2
Process alarm & Heater break alarm* 3
None 4
Process alarm 5
*not available on PXZ-4, or with 4-20mA DC output
Power Supply Option Code
24V AC/DC Supply D
MODEL CONFIGURATION
ACCESSORIES (Sockets: only for PXZ-4 and sold separately)
____________________________________________________
8-pin sockets (for PXZ-4 without H / L Alarm Option)
ATX1NS Solder Type Socket (UL)
PG-08 Screw-down type (terminals on back)
ATX2PSB Screw-down type socket (terminals on back) (UL)
TP28X Screw-down type socket (terminals on front) (UL)
11-pin sockets (for PXZ-4 with H / L Alarm Option)
PG-11 Screw-down type (terminals on back)
TP311SB Screw-down type socket (terminals on back)
TP311S Screw-down type socket (terminals on front)
Heater Break Current Sensing Transformer:
CTL-6-SF For heater current (1 to 30 amps)
CTL-12-S36-8F For heater current (20 to 50 amps)
____________________________________________________
Free Technical Support:
1-800-235-8367 U.S. & Canada
802-863-0085 Int’l
8:30 A.M.- 6:00 P.M. E.S.T.
V4.98.5
Page 2
SAFETY PRECAUTIONS
Before using this product, the user is requested to read the following
precautions carefully to ensure safety. The safety requirements are
classified as either “warning” or “caution” according to the following
explanations:
Warning
Wiring
1. If there is danger of serious accident resulting from a failure or
defect in this unit, provide the unit with an appropriate external protective circuit to prevent an accident.
2. The unit is normally supplied without a power switch or a fuse. Use
power switch and fuse as required (Rating of the fuse: 250V, 1A)
Power supply
1. Be sure to use the rated power supply voltage to protect the unit
against damage and to prevent failure.
2. Keep the power off until all of the wiring is completed so that electric shock and trouble with the unit can be prevented.
General
1. Never attempt to disassemble, modify, or repair this unit. Tampering
with the unit may result in malfunction, electric shock, or fire.
2. Do not use the unit in combustible or explosive gaseous atmos-
pheres.
Caution
Installation
1. Avoid installing the unit in places where:
• the ambient temperature may reach beyond the range of -10 to
50°C (32 to 122°F) while in operation
• the ambient humidity may reach higher than 90% RH while in operation
• a change in the ambient temperature is so rapid as to cause condensation
• corrosive gases (sulfide and ammonia gas, in particular) or combustible gases are emitted
• the unit is subject to vibration or shock
• the unit is likely to come in contact with water, oil, chemicals,
steam, or vapor
• the unit is exposed to dust, salt, or air containing iron particles
• the unit is subject to interference with static electricity, magnetism, or noise
• the unit is exposed to direct sunlight
• heat may be accumulated due to radiation
Maintenance
1. Do not use organic solvents such as alcohol or benzene to wipe this
unit. Use a neutral detergent.
2. Three-year warranty is guaranteed only if the unit is properly used.
FEATURES
• Fuzzy Logic Control
• PID Autotune with manual override - heating or cooling
• Programmable control action - reverse or direct
• Programmable cycle time
• Programmable inputs - Thermocouple/RTD, or,
Current/ and Voltage
• Sensor burn-out protection
• Input calibration by user
• Outputs: Relay, Solid-state relay drive, and 4-20mA DC
• Secondary output for
cooling (optional)
• High/low alarm
outputs (optional)
• Heater break alarm (optional)
(only on PXZ-5, 7, 9)
• Menu driven format
• Setting – touch keys on front panel
• Programmable 8-segment ramp/soak function
• Digital filtering (to suppress factory noise)
• Adjustable setpoint range
• Selectable °F/°C
• Offset adjustments
• Programmable decimal point
• Programmable lock-up feature
• Advanced security options to prevent unauthorized parameter
changes
• 4-digit, LED indication
• Output status indication
• Fault indication
• Non-volatile memory
• 1/16, 1/8, 1/4 DIN and 72mm panel mount package
• NEMA 4X faceplate
• ABS plastic housing
• Termination—screw-down type (PXZ-5, 7, 9) or socket with screwdown terminals (PXZ-4)
• Metal mounting bracket; plastic bracket for PXZ-4
• 85 to 264V AC free voltage power supply
• 24V AC/DC power supply (optional)
• UL, C-UL, and CE approvals
• 3-year warranty
2
INTRODUCTION
Thank you for purchasing the Fuji Electric PXZ controller. All of these
controllers are PID Autotune controllers that employ Fuji Electric’s
patented fuzzy logic algorithms.
It is a fully programmable temperature/process controller incorporating many user-friendly features. The following easy-to-use instructions are intended to help you understand, set up, effectively operate,
and achieve optimal performance from your PXZ controller. When
programmed and operated within the guidelines set up for them in this
manual, your PXZ controller will give you years of precise, reliable
control. If needed, we will provide free technical support throughout
the life of the controller.
Warning
Caution
suggesting that the user's mishandling can
result in personal death or serious injury.
suggesting that the user's mishandling can result
in personal injury or damage to the property.
Page 3

3
SPECIFICATIONS
INPUT RANGE TABLE:
________________________________________________________
Input Signal Input Range Input Range Remarks
(°C) (°F)
________________________________________________________
Thermocouple
J 0~800 32~1472 Cold Junction
K 0~1200 32~2192 compensating
R 0~1600 32~2912 function built-in
B 0~1800 32~3272
S 0~1600 32~2912
T -199~200 -328~392
T -150~400 -238~752
E -199~800 -328~1472
N 0~1300 32~2372
PL2 0~1300 32~2372
________________________________________________________
RTD
Pt100 -150~850 -238~1562 Allowable wiring
resistance 10 ohms
max (per wire).
________________________________________________________
DC Voltage/
Current
1-5V Scaling Range: -1999 to 9999 For current input,
0-5V Engineering Units use the 250Ω
resistor to
4-20mA obtain 1-5V DC or
0-20mA 0-5V DC input.
________________________________________________________
CONTROL FUNCTION
(SINGLE OUTPUT)
________________________________________________________
Control action PID control with auto-tuning
Fuzzy control with auto-tuning
________________________________________________________
Proportional band (P) 0-999.9%, of full scale (FS), setting in 0.1% steps
________________________________________________________
Integral time (I) 0-3200 sec, setting in 1 sec steps
________________________________________________________
Differential time (D) 0-999.9 sec, setting in 0.1 sec steps
________________________________________________________
P,I,D = 0: 2-position action
I,D = 0: Proportional action
________________________________________________________
Proportional cycle 1-150 sec, setting in 1 sec steps, for relay contact
output and SSR/SSC drive output only
________________________________________________________
Hysteresis width 0-50% FS, setting in 1 E.U. (Engineering Units)
steps, 2-position action only
________________________________________________________
Anti-reset wind up 0-100% FS, setting in 1 E.U. steps, auto-setting
with auto-tuning
________________________________________________________
Input sampling cycle 0.5 sec
________________________________________________________
Control cycle 0.5 sec
________________________________________________________
CONTROL FUNCTION
(DUAL OUTPUT) (Heat/Cool Type)
________________________________________________________
Heating Proportional band P x 1/2 (P= 0-999.9%)
________________________________________________________
Cooling Proportional band Heating proportional band
x Cooling proportional band coefficient
Cooling proportional band coefficient= 0-100
0: 2-position action
________________________________________________________
Integral time 0-3200 sec for heating and cooling
________________________________________________________
Differential time 0-999.9 sec for heating and cooling
________________________________________________________
P,I,D= 0: 2-position action (without dead band) for heating and cooling
I,D= 0: Proportional action
________________________________________________________
Proportional cycle 1-150 sec, for relay contact output and SSR/SSC
drive output only
________________________________________________________
Hysteresis width 2-position action for heating and cooling: 0.5% FS
2-position action for cooling: 0.5% FS
________________________________________________________
Anti-reset wind-up 0-100% FS, setting in 1 E.U. steps, auto setting
with auto-tuning
________________________________________________________
Overlap/dead band ±50% of heating proportional band
________________________________________________________
Input sampling cycle 0.5 sec
________________________________________________________
Control cycle 0.5 sec
________________________________________________________
OUTPUT
(Single Output)
________________________________________________________
Control output One of the following three types is selected:
(1) Relay contact (SPDT)
220V AC/30V DC, 3A (resistive load)
Mechanical life: 10
7
times (under no load)
Electrical life: 10
5
times (under the rated load)
(2) SSR/SSC drive (voltage pulse):
15-30V DC at ON/0.5V DC or less at OFF.
Current 60mA or less.
(3) 4-20mA DC:
Allowable load resistance– 600Ω or less.
________________________________________________________
OUTPUT
(Dual Output)
________________________________________________________
Control output For dual output type, one of the following three
types is selected on both heating and cooling
types:
(Not available on PXZ-4 type)
(1) Relay contact (SPDT):
220V AC/30V DC, 3A (resistive load)
(2) SSR/SSC drive (voltage pulse):
15-30V DC at ON/0.5V DC or less at OFF.
Current: 60mA or less
(3) 4-20mA DC:
Allowable load resistance – 600Ω or less
(Note: When SSR/SSC drive output for heating/
cooling side is selected, the total current should
be less than 60mA)
________________________________________________________
SETTING AND INDICATION
________________________________________________________
Parameter setting method PXZ: digital setting with eight keys
________________________________________________________
PV/SV display method PXZ-4: PV/SV red LED display, 4 digits
PXZ-5, 7, 9: PV/SV individual LED display,
4 digits each, PV= red, SV=green
________________________________________________________
Status display Control output, alarm output, heater break alarm
output.
Setting accuracy 0.1% FS
________________________________________________________
Indication accuracy Thermocouple: ± 0.5% FS ± 1 digit ± 1°C
(at 23°C) R thermocouple: 0-400°C; ± 1% FS ± 1 digit ± 1°C
B thermocouple: 0-500°C; ± 5% FS ± 1 digit ± 1°C
RTD, voltage, current: ± 0.5% FS ± 1 digit
________________________________________________________
ALARM
________________________________________________________
Alarm output Relay contact (SPST),
220V AC/30V DC, 1A (resistive load)
PXZ-4 type: 1 point
Other types: 2 points
________________________________________________________
Heater break Relay contact (SPST),
alarm output 220V AC/30V DC, 1A (resistive load)
PXZ-4 type: not available
________________________________________________________
Page 4

STRUCTURE
_______________________________________________________
Mounting method Panel flush mounting or surface mounting
Surface mounting: PXZ-4 type only
_______________________________________________________
External terminal PXZ-4 type: 8-pin or 11-pin socket
Other types: screw terminal (M3.5 screw)
_______________________________________________________
Enclosure Black ABS plastic
_______________________________________________________
Dimensions PXZ-4 48 x 48 x 85.7mm (1/16 DIN)
PXZ-5 52.5 x 100.5 x 95.8mm (1/8 DIN)
PXZ-7 76.5 x 76.5 x 95.8mm (72 mm)
PXZ-9 100.5 x 100.5 x 95.8mm (1/4 DIN)
_______________________________________________________
Weight PXZ-4 approx. 150g
PXZ-5 approx. 300g
PXZ-7 approx. 300g
PXZ-9 approx. 400g
_______________________________________________________
Protective structure Front panel water-proof structure;
NEMA 4X (equivalent to IEC standards IP66)
Rear case: IEC IP20
_______________________________________________________
DELIVERY
_______________________________________________________
PXZ-4 type: controller, panel mounting bracket, socket (when specified),
water proof gasket, 250Ω precision resistor (when required), instruction
manual. Other types: controller, panel mounting bracket, water-proof gasket,
250Ω precision resistor (when required), instruction manual.
_______________________________________________________
4
GENERAL SPECIFICATIONS
_______________________________________________________
Rated voltage 85-264V AC or 24V AC/DC
_______________________________________________________
Power consumption 10VA or less (100V AC)
15VA or less (240V AC)
_______________________________________________________
Insulation resistance 50MΩ or more (500V DC)
_______________________________________________________
Withstand voltage Power source-Earth: 1500V AC, 1 min
Power source-input terminal: 1500V AC, 1 min
Earth-relay output: 1500V AC, 1 min
Earth-Alarm output: 1500V AC, 1 min
Between other terminals: 500V AC, 1 min
_______________________________________________________
Input impedance Thermocouple: 1MΩ or more
Voltage: 450KΩor more
Current: 250Ω (external resistor)
_______________________________________________________
Allowable signal Thermocouple: 100Ω or less
source resistance Voltage: 1KΩ or less
_______________________________________________________
Allowable wiring RTD: 10Ω or less per wire
resistance
_______________________________________________________
Reference junction ± 1 °C (at 23°C)
compensation accuracy
_______________________________________________________
Process variable offset ±10% FS
_______________________________________________________
Setpoint variable offset ± 50% FS
_______________________________________________________
Input filter 0-900.0 sec, setting in 0.1 sec steps
(primary lagging filter)
_______________________________________________________
Noise rejection ratio Normal mode noise (50/60Hz): 50dB or more
Common mode noise (50/60Hz): 140dB or more
_______________________________________________________
POWER FAILURE PROTECTION
_______________________________________________________
Memory protection: Non-volatile memory. Parameter values
remain unchanged with disruption of power.
Ramp/soak function has to be re-initiated.
_______________________________________________________
SELF-CHECK
_______________________________________________________
Method: Watchdog timer monitors program error.
_______________________________________________________
OPERATION AND STORAGE CONDITIONS
_______________________________________________________
Operating temperature -10 to 50°C (14 to 122°F)
_______________________________________________________
Operating humidity 90% RH or less (non-condensing)
_______________________________________________________
Storage temperature -20 to 60°C (-4 to 140°F)
_______________________________________________________
Installation category II
_______________________________________________________
Pollution degree 2
_______________________________________________________
OTHER FUNCTIONS
_______________________________________________________
Parameter mask function Parameter display is disabled by software
_______________________________________________________
Ramp soak function 4-ramp/4-soak
_______________________________________________________
Page 5
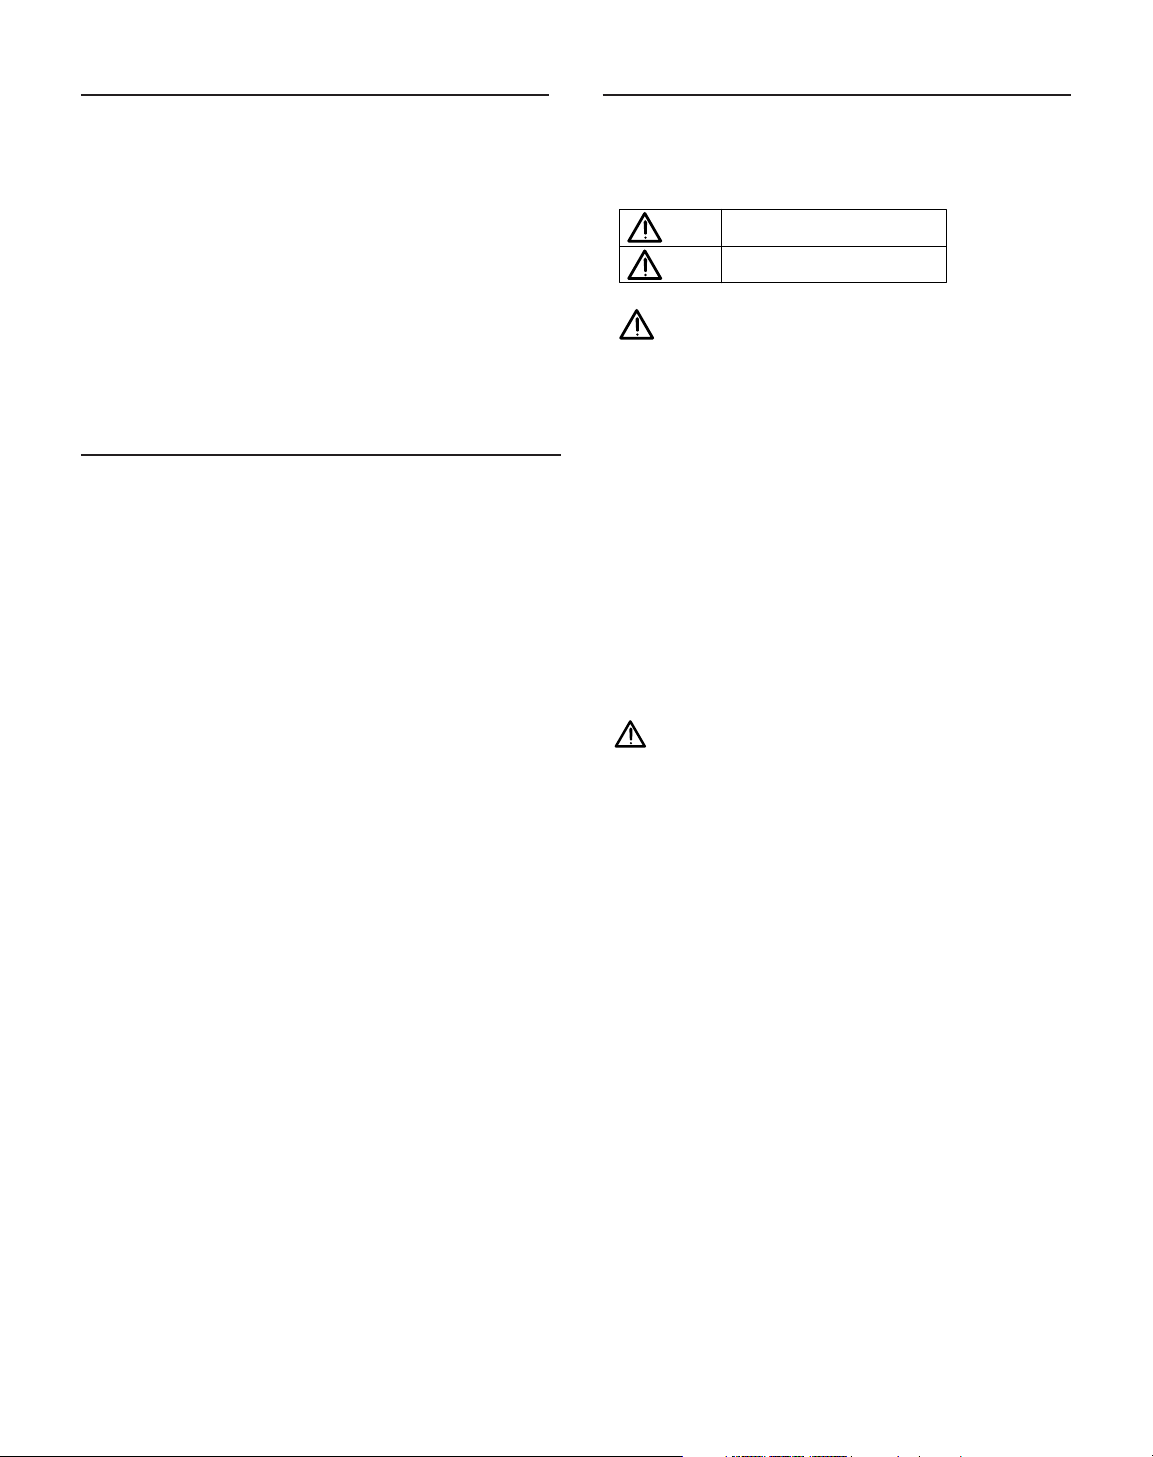
5
PXZ 5,7,9
F
C1
PV
SV
A
B
95.8
DC
C2 H HBL
PXZ-
SEL DATA ENTSV
16.2
18.7
Panel
Gasket
Model
PXZ5
PXZ7
PXZ9
A
52.5
76.5
100.5
B
100.5
76.5
100.5
C
90.5
67
90.5
D
114.5
91
114.5
E
45
68
92
0.6
-0
0.7
-0
0.8
-0
F
92
68
92
0.8
-0
0.7
-0
0.8
-0
G
120Min.
96Min.
120Min.
H
92Min.
116Min.
140Min.
E
F
G
H
Unit: mm
Panel thickness: 1 to 8 mm
Panel cutout size: when installing
“n” numbers of units.
OUTER DIMENSIONS AND PANEL CUTOUT SIZE
PXZ 4
Mounting bracket
Panel cutout size: when installing
“n” numbers of units.
63 or more
63 or more
45 -0
0.5
45 -0
0.5
Unit: mm
Panel thickness: 1 to 8 mm
Gasket
NEMA 4X Integrity
The front side of this instrument conforms to NEMA 4X. To ensure the
waterproofness between the instrument and the panel, use the gasket
that is provided with the unit according to the installation procedure
described below.
How to install the unit
For PXZ-5/7/9, install the two metal brackets, one on the top and the
other on the bottom, and tighten the screws to a torque of about 14.7Ncm (1.5kg-cm). For PXZ4, install the unit in the panel as shown below,
and tighten the screws on the mounting bracket until the unit is secure.
Make sure there is no space between the front side of the unit and the
gasket, and between the gasket and the panel.
Figure 1 Figure 2
Unit
Front Gasket Case
Unit
Panel Panel Mounting bracket Screw
Caution: After the mounting bracket is installed, check the gasket for
displacement and detachment as shown in Figure 3.
INSTALLATION
48
CPVH L
SV
48
F
SEL DATA ENTPV/SV
PXZ-4
Gasket
48
57
Panel
71.5
85.7
7
9.5
57
44.8
Gasket Gasket
Case Case
(Bad) (Good)
Figure 3
Page 6

6
Wiring Power to Controllers
• Be sure to use the rated power supply voltage and polarity for the
unit to protect it against damage and to prevent the occurrence of
failure.
• Keep the power off until all of the wiring is completed to prevent
electric shock and abnormal operation.
• Keep the power supply wires separated from the input and output
wires.
• Power connections should be made with 18-gauge or larger insulated wire. Stranded wire improves noise immunity. Noise filters and
isolation transformers are recommended in case of noisy power
lines.
• When the Heater Break option is selected, use the same power line
for both the controller and the heater.
Wiring Inputs
There are two input categories available: Thermocouple/RTD or current/voltage. Make sure you have the right type before wiring the
inputs. Refer to Table of Input Type Codes and set the parameter
“P-n2” accordingly.
Note: In order to minimize the risk of high frequency noise induced by
coils and windings in relays, solenoids, and transformers, use leads
which have braided sheath and ground one end of the sheath. Keep
your input leads separate from power and output leads. If you have
to bring the input signal from a long distance, a signal transmitter
might be needed to maintain an accurate reading; in this case, a unit
WIRING INSTRUCTIONS
Be sure to use the rated power supply voltage and polarity
PXZ4 socket type (with alarm)
1
2
3
4
5
6
7
8
9
10
11 ~
+
–
B
B
A
–
+
Current output, SSR/SSC driving output
Contact output
*Voltage/
current
Alarm output
Thermocouple
input
Power supply
When alarms are provided
(viewing from the back of instrument)
–
+
RTD
* For current input, install the 250Ω precision
resistor (accessory) before using the unit.
that accepts current/voltage input would be necessary.
Thermocouple
• Connect thermocouples directly to the input terminals whenever
possible.
• If using extension wires, make sure they are of the same thermocouple material and grade; any dissimilar metal junctions will lead to
erroneous readings.
• Ungrounded thermocouples are recommended for optimal performance and to prevent ground loops.
• Make sure the polarity is correct.
RTD Pt100
• Use a 3-wire Pt100Ω RTD whenever possible. All three wires must
have low lead resistance (less than 10Ω) and no resistance differentials among them.
• If using a 2-wire RTD, jumper the two B-legs with a wire of equal
resistance.
• Make sure A and B leads are connected to the right terminals.
Current/Voltage
• The controller accepts 1-5V, 0-5V, 4-20mA, and 0-20mA DC signals. If
wiring for a voltage input, feed the signal directly to the input terminals. For current inputs, first connect the 250Ω precision resistor
that comes with the unit.
• Make sure the polarity is correct.
+
4
3
2
1
(viewing from the back
of instrument)
–
Contact output
5
6
7
~
Power supply
8
PXZ4 socket type (standard)
Current output, SSR/SSC driving output
*Voltage/current
RTD
B
–
B
–
A
+
When no alarms are provided
+
Thermocouple
input
PXZ7
Current output,
SSR/SSC driving output
+
1
Control output 1
3
–
Power supply
PXZ5, PXZ9
*Voltage/
Current input
~
RTD
A
7
7
B
8
8
B
9
–
+
1
2
3
4
5
6
T.C.
7
8
9
10
11
12
Control output 2(on the cooling side)
1012
–
+
Alarm 1
(Upper limit alarm)
13
Alarm 2
14
(Lower limit alarm)
15
Heater break
alarm output
16
Common
17
CT input
18
Current output, SSR/SSC
driving output
250Ω
–
*Voltage/
Current
input
1
Current output
SSR/SSC driving output
+
2
Control output 1
Power supply
T.C.
RTD
A
+
1
B
–
2
B
3
+
5
7
–
~
1
2
3
4
5
6
7
8
9
Current output, SSR/SSC
driving output
10
11
12
13
14
15
16
17
18
+
10
Control output 2
(on the cooling side)
12
–
Alarm 1 (upper limit alarm)
Alarm 2 (lower limit alarm)
Heater break alarm output
Common
CT input
Page 7
7
Wiring Outputs
Before wiring the outputs, make sure the unit has the right kind of
control output, and that all the load handling devices conform to the
controller specifications. Note that it takes 5 seconds for the outputs
to activate after the power is turned on.
Refer to parameter “P-n1” and to the Table of Output Type Codes to
choose the preferred type of control action– reverse acting or direct
acting. If using two outputs in a heat/cool type control, please refer to
Appendix D for more details.
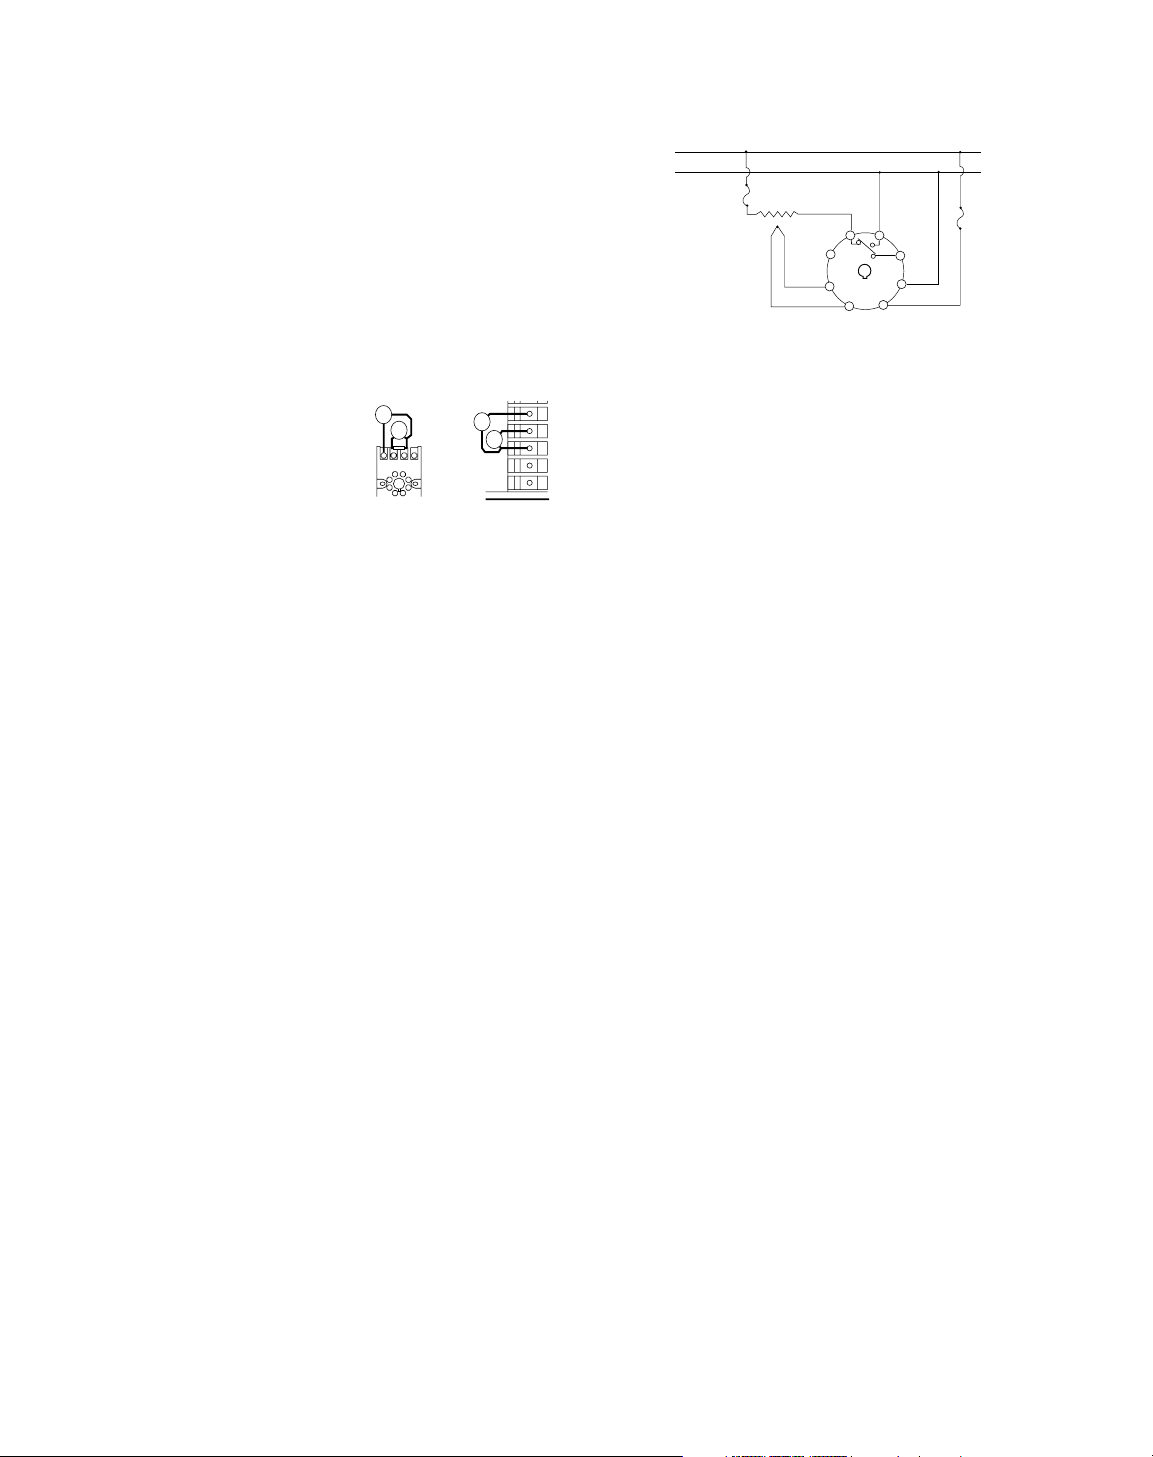
Relay
• Connecting a load to full capacity of the relay will shorten the relay
life, especially if it is operated at a rapid rate. To protect the output
relay, an external relay or a contactor
should be used. If a higher current rating
is required, a solid-state relay driver type
output is recommended.
• Connect the load between the normally
opened contacts of the relay.This way, if
power to the controller is disrupted, the
output circuit would open, preventing the
load from running out of control.
• Set the proportional time cycle parameter, “TC” to 30 secs. or more.
• Use of “Z-trap” (manufacturer: Fuji Electric Co.) is recommended to
protect the relay against switching surges and to ensure the product’s long life. Connect it between the contacts of the relay as
shown in the example.
Part No.:
ENC241D-05A
(power supply voltage: 100V)
ENC471D-05A (power supply voltage: 200V)
SSR/SSC Driver (Pulsed DC Voltage)
• The non-isolated DC output is used to drive an external load-handling device such as Solid-State Relay(SSR) or Solid-State
Contactor(SSC).
• The total current drawn, for both single and dual outputs, should be
within the allowed value.
• Make sure the polarity is correct.
• Set the proportional time cycle parameter, “TC” to 1 sec. or more.
4 to 20mA DC
• The output is a non-isolated analog signal used to drive a variety of
output devices such as SCRs and valve actuators.
• The load resistance must be less than 600Ω.
• Make sure the polarity is correct.
• The proportional time cycle parameter, “TC” is set to 0, and is not
displayed on the programming menu.
Wiring Alarms
• Make sure the load does not exceed the rated capacity of the relay.
• Several types of alarm configurations can be programmed and does
not require a change in the wiring. Refer to parameters AL, AH, P-
AH, P-AL, P-An.
• For details on Heater Break alarm, please refer to Appendix D and
the Heater Break Alarm Setpoint parameter “Hb” in the programming section.
6543
5
6
7
8
9
PXZ4
(8-pin)
PXZ9
System Wiring Diagram
Example:
L
120V AC
N
PXZ4-RAY1-4V
Fuse
Heater (3A or less)
3
–
2
+
Thermocouple
Input
Contact
Output
4
5
8
1
Fuse
6
7
Power
85 to 264 VAC
50/60Hz
Page 8

8
FRONT PANEL DESCRIPTION
Name Function
1 Process Value (PV) display Displays the process value (PV).
2 Set value (SV) indication lamp Stays on while a set value is on the display.
3 Set value (SV) and Set value (SV) or parameter symbols and codes
parameter display are displayed when setting various parameters.
4 DOWN key Decrements the numerical value in the place
(common for each digit) selected with the UP key. Where various para-
meters are displayed, each parameter is displayed one by one every time this key is
pressed. The sequence of displays however, is
opposite to the sequence of displays with the
SEL key.
5 Direct SV key By pressing this key, the set value (SV) is dis-
played.
6 SELECT key The key to be used when switching over to the
1st or 2nd block parameters, or when scrolling
through the parameters within a block.
7 Data display key Displays the data assigned to the parameter
selected with the SEL key
8 Data entry key The key to be used for storing the data after pre-
vious data is changed. (none of changed data
can be registered unless this key is pressed.)
9 UP key for 1’s place By pressing once, the number in the units place
blinks. The number is continuously incremented
with the key held pressed.
10 UP key for 10’s place By pressing once, the number in the tens place
blinks. The number is continuously incremented
with the key held pressed.
11 Up key for 100’s place By pressing once, the number in the hundreds
place blinks. The number is continuously incremented with the key held pressed. A numeric “9”
is followed by “0” and , concurrently, a number of
the thousands place is incremented by 1.
12 Control output indication lamp C (for PXZ4 only): Comes on when the control out-
put is ON.
C1: Comes on when the control output 1 is ON.
C2: Comes on when the control output 2 is ON.
13 Upper limit alarm Comes on when the upper limit alarm is activated.
indication lamp (option)
14 Lower limit alarm Comes on when the lower limit alarm is activated.
indication lamp
15 Heater break alarm Comes on when the heater break alarm is output.
indication lamp
16 Process value (PV)/ set Parameter symbols and codes are displayed
value (SV)/parameter display for process value (PV) and set value (SV) and
(applicable to PXZ4 only) when setting various parameters.
17 Process value (PV) Stays on while process value (PV) is on display.
indication lamp
18 PV/SV SELECT key The display of measured value (PV) and set value
(For PXZ4 only) (SV) is toggled each time this key is pressed.
FRONT PANEL OPERATION
The PXZ controller programming menu consists of two blocks—
PRIMARY (SETPOINT) MENU and SECONDARY (SYSTEM) MENU. At
power up, the controller will be in the operational mode– process
variable (PV), in the case of PXZ4, and both process variable and setpoint variable (SV), in the case of PXZ-5, 7, 9 will be displayed. PV is
the variable that is being controlled, and it is not programmable.
When setting the parameters, turn off the power to the load (operating equipment) to ensure safety. Since it takes 30 minutes for the unit
to stabilize in terms of temperature, all measurements should be carried out at least 30 minutes after the power is turned on. Option-related features are displayed only when the options are provided.
Viewing and Setting Parameters
• After setting the data, press ENT key for registration.
• If the data setting is left as it is for 30 secs, the display is automatically returned to the operational mode.
How to set Setpoint value (SV)
Operation Display
1. Power on – Operational mode
2. Press UP (units, tens or hundreds) – Digit blinks
key to select digit
3. Press the appropriate UP key or – SV value changes
the DOWN key to increment or
decrement digit value
4. Press ENT key – SV value registered
PRIMARY (SETPOINT) MENU
Operation Display
1. Operational mode – PV, SV
2. Press SEL key – “P” displayed
3. Press DATA key – “P” data displayed
4. Press the appropriate UP key – Corresponding digit blinks
once
5. Press the same UP key or the – Data changes accordingly
DOWN key to increment or
decrement the data
6. Press ENT key – Data registered; “i” displayed
7. Press SEL key once to go to – “d” ....... “Mod”
the next parameter, or press
and hold UP (hundreds) key or
DOWN key to scroll down or up
the menu at a faster rate
8. Press SV (SV/PV for PXZ4) key – Operational mode
SECONDARY (SYSTEM) MENU
Operation Display
1. Operational mode – PV, SV
2. Press SEL key for about 3 secs – “P-n1”
3. Press DATA key – “P-n1” data
4. Proceed as described before.
15
1413
16
1
3
2
10
11
9
4
5
12
C
C1 C2 H L HB
PV
SV
DATASEL
ENTSV
PXZ-5
6
Model : PXZ5
1
2
10
11
9
4
7
8
Model : PXZ7, 9
14
151312
C2 H HBL
SV
C
3
10
SEL DATA ENTSV
65
9
PXZ-7
8
7
C1
PV
12
17
CPVH L
2
SV
11
4
SEL DATA ENTPV/SV
18
Model : PXZ4
13
14
C
PXZ-4
6
8
7
Page 9

9
AUTOTUNING
Before initiating the autotune function, first decide if you would like
to autotune at setpoint or 10% of full scale below setpoint. Set the
setpoint (SV), alarms (AL, AH) and the cycle time (TC). Bring your
process near setpoint before starting the autotune procedure.
Set the parameter AT to either “1”(to autotune at setpoint) or “2” (to
autotune at 10% of full scale below setpoint) and press ENT key to
start auto-tuning. The point indicator at lower right will then start
blinking. When the auto-tuning is completed, the point indicator stops
blinking and the parameter AT will automatically be set to “0.”
Duration of the autotune process varies with every application. The
auto-tuning process may take between 1 and 30 minutes to complete.
If it fails to complete, an abnormality may be suspected. In this case,
recheck the wiring, control action, and input type code. Refer to page
16 and Appendix A for additional details.
The PID parameters calculated by autotuning will be retained even if
the power is lost. However, if the power is turned off during the autotuning process, you must restart autotuning. To abort the autotune
procedure, set AT to “0.” Auto-tuning has to be repeated if there is a
significant change in SV, P-SL or P-SU, or in the controlled process.
Autotuning can also be performed while fuzzy control is selected.
TEMP
Setpoint
Proportional
Action
Integral
Action
Derivative
Action
TIME
PRIMARY MENU SETTINGS
PARAMETER DESCRIPTION
- SV Main Setpoint Variable: The main setpoint variable is
the control point you wish to maintain. The main setpoint variable is set within the input range, between
the (P-SL) and the (P-SU) settings.
ProG Ramp/Soak Command: The Ramp/Soak program auto-
matically changes the setpoint value with time in
accordance with a preset pattern. ProG switches the
operation modes.
Setting: oFF : Normal operation is performed
rUn : Ramp/Soak operation is performed
hLd : Ramp/Soak operation is suspended
P Proportional Band: The proportional band is that area
around main setpoint where the control output is neither fully on nor fully off.
Setting range: 0.0 to 999.9% of full scale
For On/Off control, set to “0”
I Integral Time (reset): The Integral Time is the speed at
which a corrective increase or decrease in output is
made to compensate for offset which usually accompanies proportional only processes. The more Integral
Time entered, the slower the action. The less Integral
Time entered, the faster the action. Enter as little
Integral Time as necessary to eliminate offset without
overcompensating resulting in process oscillation.
Setting Range: 0 to 3200 secs
Integral Action is turned off when set to “0”
d Derivative Time (Rate): The Derivative Time is that time
used in calculating rate of change and thermal lag in
helping eliminate overshoot which results in response
to process upsets. This overshoot usually accompanies
proportional only and proportional-integral processes.
The derivative action dampens proportional and integral action as it anticipates where the process should
be. The more Derivative Time entered, the more damping action. The less Derivative Time entered, the less
damping action. Enter as much Derivative Time as necessary to eliminate overshoot without over-damping
the process resulting in process oscillation.
Setting Range: 0 to 999.9 secs
Derivative Action is disabled when set to “0”
Page 10

HYS Hysteresis: The Hysteresis is that area around the main
setpoint where the output does not change condition.
That area or deadband is intended to eliminate relay
chatter at setpoint for On/Off control applications. The
wider the Hysteresis, the longer it takes for the controller to change output condition. The narrower the
Hysteresis, the less time the controller takes to change
output condition. When the Hysteresis is narrow, the
On/Off control is more accurate but the wear on the
output relay is increased. Enter a value which is small
enough to meet the control tolerance of the application
but large enough to eliminate relay chatter.
Setting range: 0 to 50% of full scale, set in E.U.
Hysteresis for On/Off action on dual outputs (heating
and cooling) is fixed at 0.5% of full scale.
Hb Heater Break Alarm Setpoint: If the heater’s operating
current falls below this setpoint, the heater break
alarm output relay is energized. This option is used in
cases where the PXZ is controlling a bank of heaters
wired in parallel. A current transformer around the hot
lead going to the heater bank and connected to the
controller is tied with the controller’s output and senses the current used by the heater bank. If one or more
of the zones burnout, resulting in cold spots, the current used by the defective heater bank is reduced. By
determining what the optimal current and the optimal
current minus one zone for the heater bank is, the
Heater Break Alarm setpoint can be calculated and
entered.
Setting Range: 0 to 50 amps.
Not indicated without the Heater Break Alarm output
option.
Not available on PXZ4, or with 4-20 mA DC outputs.
Detection is made only on a single-phase heater. This
function cannot be used when controlling a heater
with SCR phase-angle control.
Cycle Time, “TC,” must be set at 6 secs. or higher
Refer to Appendix C for more details.
AL Low Alarm Setpoint: The Low Alarm Setpoint is that
point of the process below which, the low alarm output
relay is energized. If the alarm type, programmed in the
secondary menu, includes an absolute value for the
Low Alarm Setpoint, enter the actual value you want
the alarm to be activated at regardless of what the
main setpoint is set for. If the alarm type includes a
deviation value for the Low Alarm Setpoint, enter the
number of units below main setpoint in which you want
the alarm to be activated at; the deviation alarm tracks
main setpoint.
Settable within the Input Range.
Not indicated without the alarm option.
AH High Alarm Setpoint: The High Alarm Setpoint is that
point of the process above which, the high alarm output relay is energized. If the alarm type, programmed in
the secondary menu, includes an absolute value for
the High Alarm Setpoint, enter the actual value you
want the alarm to be activated at regardless of what
the main setpoint is set for. If the alarm type includes a
deviation value for the High Alarm Setpoint, enter the
number of units above main setpoint in which you want
the alarm to be activated at; the deviation alarm tracks
main setpoint.
Settable within the Input Range.
Not indicated without the alarm option.
TC Cycle Time (Output #1): The Cycle Time for output #1 is
that time where the output is on for a percentage of
that time and off for a percentage of that time, creating
a proportioning effect. The Cycle Time is only used
when the PXZ is used as a P, PI, PD, or PID controller
and when the output is time proportional as with the
relay or SSR/SSC drive outputs. The shorter the Cycle
Time, the higher the proportioning resolution is, and
better is the control, but there will be an increased
strain on the output device. Enter a value that is based
on the limitations of your controller’s output type.
Setting range: 1 to 150 secs.
For relay output: Set to 30 secs or more
For SSR/SSC drive output: Set to 1 sec or more
For current output: Set to 0. (normally not indicated).
10
20 sec. Cycle Time
25% Output
ON OFF
20 sec. Cycle Time
75% Output
ON OFF
30 sec. Cycle Time
25% Output
ON OFF
30 sec. Cycle Time
75% Output
ON OFF
10 sec.
25%
ON
OFF
10 sec.
75%
ON
OFF
Output ON
Output ON
Output OFF
Output OFF
Setpoints
Narrow
Hystersis
Wide
Hystersis
Optimal Current of
Heater Bank
minus
Optimal Current of
Heater Bank
less One Zone
Optimal Current of
+
Heater Bank
less One Zone
=
Heater
Break
Alarm
Setpoint
2
Page 11

AT Autotuning: Autotuning is the automatic calculation
and
entering of the control parameters (P, I and D) into
memory. The PXZ will autotune both reverse and direct
acting control applications. Autotuning will also automatically set anti-reset wind-up (Ar). There are two
types of Autotuning that can be performed by the controller, Autotuning at main setpoint or Autotuning at 10%
of full scale below main setpoint. Autotuning at 10% of
full scale below main setpoint may yield slightly different values, not as precise, but the process overshoot
encountered during the autotuning procedure would
not be as great. Enter the value for the type of autotuning you would like to run on your particular application
based on overshoot tolerances and the precision of the
PID parameters needed. For more information on principles of Autotuning, refer to Appendix A. See also page
9.
Setting:
0 - Autotuning off
1 - Autotuning performed at setpoint
2 - Autotuning performed at 10% of full scale
below setpoint
TC-2 Cycle Time (Output #2) The Cycle Time for output #2 is
that time where the output is on for a percentage of
that time and off for a percentage of that time, creating
a proportioning effect. Output #2 is the cooling side of a
heat/cool PXZ controller. A shorter cycle time provides
higher proportioning resolution and better control but
causes increased strain on the output device. Enter a
value that is based on the limitations of your controller’s output type.
Setting Range: 1 to 150 secs.
For relay output: Set to 30 secs or more
For SSR/SSC drive output: Set to 1 sec or more
For current output: Set to 0 (normally not indicated).
Not indicated without the control output #2 option.
CooL Proportional Band Coefficient for Cooling: The
Proportional Band Coefficient for Cooling is a multiplier
for the proportional band on the cooling side of a
heat/cool PXZ controller. It varies the width of the proportional band on the cooling side. A large value would
establish a larger proportional band for more powerful
cooling loads. A small value would establish a smaller
proportional band for less powerful cooling loads.
Enter a value based on the power of your cooling load.
Setting Range: 0.0 to 100.0
Not indicated without control output #2 option.
Set to “0” for On/Off control.
Start of AT End of AT
AT in operation
Set value (SV)
100%
0%
ON-OFF action
PV
ON
OFFONOFF
(Measured value)
PID control
Start of AT End of AT
AT in operation
Set value (SV)
100%
0%
ON-OFF action
PV
ON
OFF
ON
OFF
PID control
SV-10%FS
(Control output)
(Control output)
(Measured value)
Standard type (AT=1)
Low PV type (AT=2)
Prop. Band for Heating X Input Range =
Prop. Band for Cooling X Input Range =
Deadband/Overlap X Input Range =
X
2
2
200%
X
Proportional Band
db Deadband/Overlap: The Deadband/Overlap is that per-
centage of the heating side of the proportional band
where the heating (output #1) and the cooling (output
#2) outputs are separated by a Deadband or where
they Overlap on a heat/cool PXZ controller. A value
greater than zero establishes a Deadband or area
where neither the heating nor cooling outputs are
energized for more powerful heating and cooling loads.
A value less than zero establishes an Overlap or area
where both the heating and cooling outputs are energized at the same time for less powerful heating and
cooling loads. Enter a value based on the power of
your heating and cooling loads as well as the application’s efficiency in maintaining tight heat/cool control.
Setting range: -50.0 to 50.0% of the heating proportional band.
Not indicated without control output #2 option
bAL Balance: Balance is used to pre-position the propor-
tional band with respect to setpoint. With Balance (MV
Offset) set at 50% the proportional band will be centered around setpoint. To move the band left or right,
decrease or increase the balance setting respectively.
Setting range: 0-100%
Ar Anti-Reset Wind-up: Anti-Reset is used to limit the
range where integration occurs. This helps in stabilizing a system. With Anti-Reset at 100%, integration will
occur throughout the proportional band. With AntiReset set to 90%, integration will occur at 90% of the
band above the setpoint and 90% of the band below
the setpoint.
Autotuning automatically sets Ar.
Setting range: 0-100% of full scale, set in E.U.
Prop. Band for Heating X Input Range
100%
# of units in the
= Proportional Band
for Heating
Prop. Band for Cooling X Input Range
100%
# of units in the
= Proportional Band
for Cooling
Deadband/Overlap X Input Range
100%
# of units in the
= Deadband/Overlap
Input Range= ( minus )
100%
0%
OUTPUT
Heating Side
Coolng Side
100%
0%
OUTPUT
Heating Side
Coolng Side
Setpoint TEMP
Setpoint TEMP
100%
0%
OUTPUT
Heating Side
Coolng Side
Setpoint TEMP
Overlap
Deadband
<1
=1
>1
2
Deadband/Overlap
11
Page 12

12
LoC Lock-out: This function enables or disables changing
the settings of parameters.
Code:
0 - All parameter settings are changeable
1 - All parameter settings are locked; cannot be
changed
2 - Only the main setpoint can be changed; all other
parameter settings are locked and cannot be changed.
STAT Ramp/Soak Status: The Ramp/Soak program automati-
cally changes the setpoint value with time in accordance with a preset pattern, as shown in the figure
below. This device allows a maximum of four ramp and
four soak segments. Ramp is the region in which SV
changes toward the target value. Soak is the region in
which the target value is maintained. STAT displays the
current ramp/soak status. No setting can be made.
oFF: Not in operation
1-rP – 4-rP: Executing 1st – 4th ramp
1-St – 4-St: Executing 1st – 4th soak
End: End of program
SV-1 Ramp Target Value: Sets the target value for each ramp
to to segment.
SV-4 Setting range: 0-100% of full scale
TM1r Ramp Segment Time: Sets the duration of each ramp
to to segment.
TM4r Setting range: 00.00 to 99hrs 59mins.
TM1S Soak Segment Time: Sets the duration of each soak
to to segment.
TM4S Setting range: 00.00 to 99hrs 59mins.
Mod Ramp/Soak Mode: Up to 16 different modes of
ramp/soak operations are possible. Choose the appropriate code from the Table of Ramp/Soak Modes.
Setting: 0-15
Time
Fourth Soak
Fourth
Ramp
Third
soak
Second
soak
First
soak
First
ramp
Second
ramp
Third
ramp
TM1R TM1S TM2R TM2S TM3R TM3S TM4R TM4S
Set Value
SV3
SV2
SV1
SV4
PV
Ramp: Region in which the setpoint changes toward the target value.
Soak: Region in which the setpoint stays unchanged at the target value.
Note 1: SV cannot be changed while the operation is running or suspended.
Note 2: The use of fuzzy control is inhibited while Ramp-Soak operation is being
performed.
MOD Power on start Output on END Output on OFF Repeat function
0 No Going on control Going on control No
1 No Going on control Going on control Yes
2 No Going on control Stand-by mode No
3 No Going on control Stand-by mode Yes
4 No Stand-by mode Going on control No
5 No Stand-by mode Going on control Yes
6 No Stand-by mode Stand-by mode No
7 No Stand-by mode Stand-by mode Yes
8 Yes Going on control Going on control No
9 Yes Going on control Going on control Yes
10 Yes Going on control Stand-by mode No
11 Yes Going on control Stand-by mode Yes
12 Yes Stand-by mode Going on control No
13 Yes Stand-by mode Going on control Yes
14 Yes Stand-by mode Stand-by mode No
15 Yes Stand-by mode Stand-by mode Yes
1. Power on Start: Program starts from the current PV value.
In non-power-on-start the program starts from the
main SV value.
2. Output on END: Output condition at the end of the program (ProG=End)
3. Output on OFF: Output condition when program is terminated (ProG=oFF)
4. Repeat function: Ramp-soak program operates repeatedly.
If the repeat function is off, the SV value on the last step is
maintained.
Stand-by mode: Output -3%, Alarm off.
Going on Control: When program ends (End), control is at the SV value
on the last step.
When program is terminated (oFF), control is at the main SV
value.
Table of Ramp/Soak Modes
Page 13

13
SECONDARY MENU SETTINGS
P-n1 Control Action & Sensor Burn-out Protection: The
Control Action is the direction of the output relative to
the process variable. The PXZ can be programmed as
either a reverse or direct acting controller. As a reverse
acting controller, the PXZ’s output decreases as the
process variable increases. A heating application would
require reverse acting control. As a direct acting controller, the PXZ’s output increases as the process variable increases. A cooling application would require
direct acting control. Enter the code from the Table of
Output Type Codes which establishes the PXZ as either
a reverse or direct acting controller.
The Sensor Burn-out Protection is the intended direction of the output in the event of a thermocouple or RTD
sensor break, or a break in the analog input. The PXZ
can be programmed with either upper-limit or lowerlimit burn-out direction. With Upper-limit Burn-out, a
100% output will be delivered in the event of a sensor
burn-out. With Lower-limit Burn-out, 0% output will be
delivered in the event of a sensor burn-out. Enter the
appropriate code from the Table of Output Type Codes.
Refer to Error Messages on page 15 for more details.
P-n2 Input type: The Input Type is the type of sensor to be
used with the PXZ controller in sensing the process
variable. The Input Type must be correctly programmed
into the controller in order for the controller to perform
with the selected sensor type. Depending on the type of
sensor to be used, the PXZ comes in two models. One
model accepts J, K, R, B, S, T, E, N thermocouples and
RTDs (Pt100). The other model accepts 1-5/0-5V DC and
4-20/0-20mA DC signals.
The current/voltage model comes with a 250Ω precision
resistor. Wired directly to the controller, it would convert a current signal into a voltage signal. There is no
need to use the resistor if a voltage signal is applied
directly.
After the appropriate physical changes have been
made, the controller still needs the correct code for the
Input Type to be used. Enter the appropriate code.
Table of Output Type Codes
P-dF Input Filter Constant: The Input Filter is used to filter
out the quick changes that occur to the process variable in a dynamic or quick responding application
which makes the PXZ control erratically. By slowing
down the response time, the PXZ controller averages
out the peaks and valleys of a dynamic system which,
in turn, stabilizes the control. The Digital Filter also
aids the PXZ in controlling processes where the electrical noise is affecting the input signal. The larger the
value entered, the more filter added and the slower
the controller reacts to process variable changes. The
smaller the value entered, the less filter added and the
quicker the controller reacts to process variable
changes. Enter as small a value as possible at which
the PXZ maintains accurate and stable control.
Setting range: 0.0-900.0 secs
P-SL Lower Limit of Input Range:
P-SU Upper Limit of Input Range: The Lower Limit and the
Upper Limit of Input Range establish the desired high
and low limit for the type of input used. The Lower limit
must be greater than or equal to the input type’s lower
limit, while the Upper Limit must be less than or equal
to the input type’s upper limit. Setpoint settings are
restricted to values between P-SL and P-SU.
Parameter values that are calculated as a percentage
of full scale are affected by these settings. An underscale or an overscale error is indicated if the process
value goes below or above the range by 5% of full
scale. The primary purpose of these parameters when
used with thermocouple or RTD inputs is to limit setpoint settings. When an analog input is used, the signal is scaled for the engineering unit range selected.
For example, when a 4-20 mA input is used, the value
of P-SL corresponds to 4mA and the value of P-SU
corresponds to 20 mA.
The engineering unit range could be %, PSI, pH, or any
range which can be scaled between -1999 and 9999
units.
Refer to the Table of Input Type Codes above to determine the measuring range for a particular input type.
RTD (IEC)
Thermocouple
DC current/
voltage
Pt100Ω
Pt100Ω
Pt100Ω
Pt100Ω
Pt100Ω
Pt100Ω
Pt100Ω
Pt100Ω
J
J
K
K
K
R
B
S
T
T
E
E
N
PL-I I
0-20mA/
0-5V
4-20mA/
1-5V
0 to 150
0 to 300
0 to 500
0 to 600
-50 to 100
-100 to 200
-150 to 600
-150 to 850
0 to 400
0 to 800
0 to 400
0 to 800
0 to 1200
0 to 1600
0 to 1800
0 to 1600
-199 to 200
-150 to 400
-0 to 800
-199 to 800
0 to 1300
0 to 1300
Range of
measurement
(°C)
32 to 302
32 to 572
32 to 932
32 to 1112
-58 to 212
-148 to 392
-238 to 1112
-238 to 1562
32 to 752
32 to 1472
32 to 752
32 to 1472
32 to 2192
32 to 2912
32 to 3272
32 to 2912
-328 to 392
-238 to 752
32 to 1472
-328 to 1472
-32 to 2372
32 to 2372
Range of
measurement
(°F)
O
O
O
O
O
O
O
X
O
O
O
O
X
X
X
X
O
O
O
O
X
X
With
decimal
point (°C)
O
O
O
X
O
O
X
X
O
X
O
X
X
X
X
X
X
X
X
X
X
X
With
decimal
point (°F)
-1999 to 9999
(Scaling is possible)
X =Disabled
O= Enabled
1
2
2
3
3
3
4
5
6
7
7
8
8
12
13
1
1
1
1
1
1
1
15
16
Input Signal
Code
Table of Input Type Codes
Code
Output type
0
1
Single
2
3
4
5
6
7
8
9
10
11
Dual
12
13
14
15
16
17
18
19
Output 1
Control action
Output 2
Reverse
action
Direct
action
Reverse
action
Direct
action
Direct
action
Reverse
action
Reverse
action
Direct
action
Burn-out direction
Output 1
Lower limit
Upper limit
---
Lower limit
Upper limit
Lower limit
Upper limit
Lower limit
Upper limit
Lower limit
Upper limit
Lower limit
Upper limit
Lower limit
Upper limit
Lower limit
Upper limit
Lower limit
Upper limit
Lower limit
Upper limit
Output 2
---
Lower limit
Upper limit
Lower limit
Upper limit
Lower limit
Upper limit
Lower limit
Upper limit
Page 14

P-An Alarm Hysteresis: The Alarm Hysteresis is that area
on one side of the alarm setpoint where the output
does not change condition. That area or deadband is
intended to eliminate relay chatter at alarm setpoint
with less wear on the relay. With a wide Alarm
Hysteresis, the controller takes a longer time to
change output condition. With a narrow Alarm
Hysteresis, the controller takes a short time to change
output condition. Enter a value which is just large
enough to eliminate relay chatter.
Setting Range: 0 to 50% of full scale, set in E.U.
P-dP Decimal Point Position (Resolution): The Decimal
Point Position is the resolution at which the PXZ controller displays the process variable and other parameter values. The PXZ can indicate integers, tenths or
hundredths of a unit. The Decimal Point Position does
not increase the accuracy of the controller, it only
increases the resolution. For a thermocouple, integers
are usually sufficient due to the accuracy rating and
the programmed input range. For a RTD (Pt100), integers or tenths of a degree may be entered, because of
the increased accuracy of these sensors, depending
on the programmed input range. For a 1-5/0-5V DC or
4-20/0-20mA DC signal, integers, tenths or hundredths
of a unit may be entered depending on the pro-
14
P-AL Alarm Type 2:
P-AH Alarm Type 1: This function sets the control action for
the optional alarm output relays. The PXZ5, 7, and 9
comes with two relays while the PXZ4 comes with
one. They can be programmed for absolute, deviation,
combination, or zone alarm configuration. The high
and low alarm setpoints are set with primary menu
parameters AH and AL. The absolute alarm configurations are independent of main setpoint. The alarm output relays are energized when the process variable
exceeds the alarm setpoint, an absolute value. The
deviation alarm configuration is main setpoint tracking. The alarm output relays are energized when the
process variable exceeds the main setpoint by a deviation value set by AL or AH. The combination alarm
configurations are a mixture of both the deviation and
absolute value settings for the high and low alarms.
With zone alarm configurations the alarm output is
energized between the range set by AL and AH.
One of the alarm types is Alarm with Hold. In this case
the alarm is not turned on the first time the measured
value is in the alarm band. Instead it turns on only
when the measured value goes out of the band and
enters it again. This type is useful when using deviation alarm with step type input.
Enter the code for P-AH and P-AL from the Table of
Alarm Action Type Codes.
Note 1: A change of alarm action type can cause the
alarm set value to change, but this is not a malfunction.
Note 2: After the alarm type is changed, turn off the
power to the unit once.
SCALING THERMOCOUPLE AND RTD(Pt100) INPUT RANGES
Table of Alarm Action Type Codes
Example:
Program a J thermocouple for 50 to 500°F
Input Type
J Thermocouple
Program to 50
to 500
Full Range = (500-50) = 450 F
27.5 50 500 522.5
5% 5%
SCALING DC CURRENT/VOLTAGE INPUT RANGES
Program a 4-20mA DC signal for 0 to 100 E.U.
Example:
Input Type
4-20mA DC
Program to 0
to 100
Full Range = (100-0) = 100 Engineering Units
-5 0 100 105
5% 5%
Minimum/Maximum Range
32 . . . . . . . . . . . . .1472 °F
Setpoint Range
Indicating Range
Minimum/Maximum Range
-1999 . . . 9999 Enginerring Units
Setpoint Range
Indicating Range
ALM1
ALM2
( )
( )
0
Absolute
value alarm
Deviation
alarm
Zone alarm
1
2
3
4
5
6
7
8
9
10
11
—
—
—
—
Alarm ON
Low Alarm
Alarm type Action diagram
0
1
2
3
4
5
6
7
8
9
10
11
12
13
14
15
Setpoint
No alarm
High alarm
Low alarm
High alarm
(with hold)
Low alarm
(with hold)
High alarm
Low alarm
High/Low alarm
High alarm
(with hold)
Low alarm
(with hold)
High/Low alarm
(with hold)
High/Low deviation
(ALM 1/2 independent action)
High/Low
absolute alarm
High/Low
deviation alarm
High absolute/
Low deviation alarm
High deviation/
Low absolute alarm
Low Alarm
Hysteresis
AH
AL
SV
AH
AL
AH
AL
SV
AH
AL
AH
alarm
AL
AL
AL
Alarm OFF Alarm OFF
High Alarm
Main
Hysteresis
Setpoint
AH
AL
AH
AL
AH
AL
AH
AL
SV
SV
SV
SV
SV
SV
AH
AL
SV
AH
AL
AH
AL
SV
AH
AL
AH
AL
AHAL
AHAL
AH
AH
PV
PV
PV
PV
PV
PV
PV
PV
PV
PV
PV
PV
PV
PV
PV
PV
Alarm ON
High Alarm
Setpoint
Page 15

15
grammed input range.
The input range can be anywhere between -1999 and
9999 units and must be programmed in the lower limit
of input range and the upper limit of input range parameters with decimal place values. Enter a Decimal
Point Position code dependent on the desired resolution, the input type, and the programmed input range.
Setting:
0 -None
1- Tenths of a unit
2 - Hundredths of a unit
PVOF Process Variable Offset: The Process variable Offset
is the amount by which the indicated process variable
is shifted in a positive or negative direction. Both the
indicated as well as the measured process variable
will be changed. This parameter can be used to correct for differences in sensors, sensor placement, and
standardization problems. Enter a value which is the
difference between the measured process value and
the actual process value of the system.
Setting range: -10 – 10% of full scale, set in Eng. units
SVOF Setpoint Variable Offset: The Setpoint Variable Offset
is that amount of offset which shifts the measured setpoint variable in a positive or negative direction. The
measured setpoint variable is changed but the indicated setpoint variable remains unchanged. Be careful
when using this variable because what you see as the
setpoint variable may be very different from the actual
setpoint variable.
Setting range: -50 – 50% of full scale, set in Eng. units
Indicated Setpoint Variable is Unchanged
Measured Setpoint Variable is Changed
P-F C/F Selection: The C/F Selection is that function which
scales the process variable and other setting variables
to either the Celsius or Fahrenheit scale. If using the
controller to control a process other than temperature
using the current/voltage input model, the C/F
Selection is not important because the scaling is done
using the lower limit of the input range and upper limit
of input range parameters. If using the
thermocouple/RTD (Pt100) input model, however, the
C/F Selection is important in scaling the controller’s
parameters. Setting: °C or °F
FUZY Fuzzy Logic Control: Employing Fuzzy Logic Control in
addition to PID control eliminates system overshoot
and effectively suppresses fluctuation of the process
variable due to external disturbances. This function
may be enabled even during auto-tuning. Note that
fuzzy control is not effective in units with dual outputs,
due to the complexity of the process. Fuzzy control is
also inhibited while the Ramp/Soak function is in operation.
ADJ0 Input Calibration: This function is used for input cali
ADJS bration by the user in a simple manner. Calibration is
effected by applying signal for zero and span points of
the input range being used and then by setting errors.
The user calibration function is an independent function and the instrument can easily be reset to conditions prior to delivery.
Example:
Input range 0-400°C
Indication at 0°C : -1°C
Indication at 400°C: 402°C
Change ADJ0 to 1 and ADJS to -2 to correct the error.
The instrument can be set back to factory values by
setting ADJ0 and ADJS to 0.
dSP1 Parameter Mask function: This function is used to indi-
to to vidually mask the display of parameters that are not
dSP7 used for your application, or parameters that are not
to be accessed by the operator. To mask or unmask a
parameter appropriate values should be selected from
the DSP Assignment table.
Example 1:
To mask parameter P
1) Determine the dSP value for P from the Quick
Reference guide. P = dSP1 – 2
2) Add 2 to the existing dSP1 value.
Example 2:
To display/unmask the parameter P-F
1) Determine the dSP value for P-F from the Quick
Reference guide. P-F = dSP6 – 64
2) Subtract 64 from the existing dSP6 value.
ERROR MESSAGES
Error
Indication Cause Control Output
1. Thermocouple burnt out. When the burn-out
2. RTD (A) leg burnt out. control output is set for
3. PV value exceeds P-SU lower limit (standard):
by 5% FS. OFF, or 4mA or less.
1. When RTD (B or C) is When the burn-out
burnt out. control output is set for
2. When RTD (between upper limit: ON, or 20mA
A and B, or between or less.
A and C) is shorted.
3. When PV value is below
P-SL by 5% FS.
4. When analog input wiring
is open or short.
When PV value goes below Control is continued
-1999.
the value reaches -5% FS
or less, after which burnout condition will occur.
HB lamp Heater break condition Normal control output
ON for heating is continued.
When the setting of OFF, or, 4mA or less.
P-SL/P-SU is improper
Fault in the unit Undefined. Stop use
immediately.
Page 16

APPENDIX A
Autotuning
By autotuning, the controller selects what it calculates to be the optimal PID control parameters for a particular process and then stores
them in EEPROM memory for future use. The PID parameters are
stored so that when the controller is powered up after being shut
down, the controller does not need to be autotuned again. The PXZ
uses the same autotuned PID parameters until the Autotune function
is again initiated. The Autotune parameters are only good for the
process the Autotune function was used on. If the setpoint is significantly changed, the input sensor is changed, the load or output
device is changed or relocated, or any other disturbances occur
which might change the dynamics of the system, the Autotune function should be performed again. The autotuned control parameters
are not always perfect for every application but almost always give
the operator a good starting point from which further refinement of
the control parameters can be performed manually.
The PXZ’s autotuning algorithm is particularly suited for temperature
control applications and may not always autotune effectively for other
processes. Here are cases where the Autotune function does not perform well or does not perform at all:
1. The system is affected by process disturbances external to the
control loop. Adjacent heater zones, changing material levels,
exothermic reactions are examples of process disturbances which
are external to the control loop. The PXZ would never be able to
autotune such an unstable process.
2. The system is very dynamic. The process variable changes very
quickly. Certain pressure and flow applications would be characterized as very dynamic. Because of how the Autotune function is
performed, a very dynamic system would create very large overshoots which could damage the process.
3. The system is very insulated and cannot cool down in a timely
manner. With such heating systems the autotuning function would
take a very long time to complete with questionable results.
In Autotune, the PXZ sends test signals to the process. The test signals are 100% output and 0% output at the Autotune point. The
Autotune point can either be at setpoint or 10% of full scale below
setpoint..
The controller performs as an On/Off controller. See diagram below.
16
K
e
-LS
(1+TS)
The PXZ then reads the reaction of these test signals on the process.
Keep in mind that every process is different and therefore every reaction to the test signals is different. This is why PID parameters are not
the same for different processes. The amplitude (L) or lag time which
is the overshoot and undershoot of the system when autotuning and
the time constant (T) which is the time the process takes to go
through one On/Off cycle is measured. See diagram below.
The measurements are then used with the Autotune algorithm for calculation of the proper PID parameters for the system. See the PXZ
Autotune algorithm below, where K is the proportionality constant and
S is the Laplace operator.
Time Constant
Overshoot
Amplitude
Undershoot
Time
OFF
Time
ON
Autotune
Point
Process
Variable
100%
Output
0%
ON ON ONOFF OFF
Autotune Period
Time
Time
Page 17

APPENDIX B
Manual Tuning
Tune the PXZ controller if any of the following occurs:
• PXZ is installed in a new system
• PXZ is used as a replacement in an existing system
• The input sensor is relocated or changed
• The output device is relocated or changed
• The setpoint is significantly changed
• Any other condition that will alter the dynamics of the system
Proportional Band
The proportional band is a band around the setpoint of the PXZ where
the output is between 0% and 100%. The percentage of output is proportional to the amount of error between the setpoint variable (SV)
and the process variable (PV). Outside of the proportional band the
output is either 0% or 100%
The proportional band on the PXZ is equidistant from the main setpoint as illustrated below.
An example of proportioning would be a vehicle approaching a stop
sign at an intersection. If the driver were traveling at 50mph and only
applied his brakes once at the intersection, his car would skid through
the intersection before coming to a full stop. This illustrates how
On/Off control acts. If, however, the driver started slowing down some
distance before the stop sign and continued slowing down at some
rate, he could conceivably come to a full stop at the stop sign. This
illustrates how proportional control acts. The distance where the
speed of the car goes from 50 to 0 MPH illustrates the proportional
band. As you can see, as the car travels closer to the stop sign, the
speed is reduced accordingly. In other words, as the error or distance
between the car and the stop sign becomes smaller, the output or
speed of the car is proportionally diminished. Figuring out when the
vehicle should start slowing down depends on many variables such
as speed, weight, tire tread, and braking power of the car, road conditions, and weather much like figuring out the proportional band of a
control process with its many variables.
The width of the proportional band depends on the dynamics of the
system. The first question to ask is, how strong must my output be to
eliminate the error between the setpoint variable and process variable? The larger the proportional band (low gain), the less reactive
the process. A proportional band too large, however, can lead to
process wandering or sluggishness. The smaller the proportional
band (high gain), the more reactive the output becomes. A proportion-
17
al band too small, however, can lead to over-responsiveness leading
to process oscillation.
A proportional band which is correct in width approaches main setpoint as fast as possible while minimizing overshoot. If a faster
approach to setpoint is desired and process overshoot is not a problem, a smaller or narrower proportional band may be used. This would
establish an over-damped system or one where the output would
change greatly, proportional to the error. If process overshoot cannot
be tolerated and the approach to setpoint does not have to be quick, a
larger or wider proportional band may be used. This would establish
an under-damped system or one where the output would change little,
proportional to the error.
Integral Time
With the proportional band alone, the process tends to reach equilibrium at some point away from the main setpoint. This offset is due to
the difference between the output needed to maintain setpoint and
the output of the proportional band at setpoint. In the case of the PXZ
controller where the proportional band is equidistant from the main
setpoint, the output is around 50%. If anything more or less than 50%
output is required to maintain setpoint, an offset error will occur.
Integral action eliminates this offset. See the diagrams below.
Integral action eliminates offset by adding to or subtracting from the
output of the proportional action alone. This increase or decrease in
output corrects for offset error within the proportional band in establishing steady-state performance at setpoint. It is not intended to correct for process disturbances. See the following diagram.
To Calculate Proportional Band:
Proportional Band Proportional Band
(as a percentage) =
____________________
X 100%
Input Range
Example:
30°C
3% =
__________
X 100%
100°C
Proportional Band
(as a percentage)
Proportional Band Range =
____________________
X 1000°C
100%
Example:
3%
30°C =
__________ x 1000°C
100%
100%
Output
0%
Reverse Action
PB
PV
Main Setpoint
100%
Output
0%
Direct Action
PB
PV
Main Setpoint
Note: PB = Proportional Band
Time
PV
Time
PV
Time
PV
100%
Output
Main Setpoint
Proportional Band
Too Small
Proportional Band
Too Large
Proportional Band
with Correct Width
0%
PV
Page 18

Tuning
Tuning the PXZ, as with any PID loop, requires tuning each parameter
separately and in sequence. To achieve good PID control manually,
you can use the trial and error method explained below.
Tune the Proportional Band
Set Integral Time = 0 (off)
Set Derivative Time = 0 (off)
Start with a large Proportional Band value which gives very sluggish
control with noticeable offset and tighten by decreasing the value in
half. Analyze the process variable. If the control is still sluggish, tighten by decreasing the value in half again. Continue with the same procedure until the process starts to oscillate at a constant rate. Widen
the Proportional Band by 50%, or multiply the setting 1.5 times. From a
cold start, test and verify that the Proportional Band allows maximum
rise to setpoint while maintaining minimum overshoot and offset. If not
completely satisfied, fine-tune the value, up or down, as needed and
test until correct. The Proportional Band is now tuned.
Add Integral Time
Start with a large Integral Time value which gives very sluggish
response to process offset and tighten by decreasing the value in
half. Analyze the process variable. If the response to process offset is
still sluggish, tighten by decreasing the value in half again. Continue
with the same procedure until the process starts to oscillate at a constant rate. Increase the Integral Time value by 50%, or multiply the
setting 1.5 times. From a cold start, test and verify that the Integral
Time allows maximum elimination of offset with minimum overshoot. If
not completely satisfied, fine-tune the value, up or down, as needed
and test until correct. The Integral Time is now tuned.
Add Derivative Time
Do not add Derivative Time if the system is too dynamic. Start with a
small Derivative Time value which gives sluggish response to process
upsets and double the value. Analyze the process variable. If the
response to process upsets is still sluggish, double the value again.
Continue with the same procedure until the process starts to oscillate
at a quick constant rate. Decrease the Derivative Time value by 25%.
From a cold start, test and verify that the Derivative Time value allows
maximum response to process disturbances with minimum overshoot.
If not completely satisfied, fine-tune the value, up or down, as needed
and test until correct. Note that the Derivative Time value is usually
somewhere around 25% of the Integral Time value.
Another tuning method is the closed-loop cycling or Zeigler-Nichols
method. According to J.G. Zeigler and N.B. Nichols, optimal tuning is
achieved when the controller responds to a difference between setpoint and the process variable with a 1/4 wave decay ratio. That is to
say that the amplitude of each successive overshoot is reduced by 3/4
until stabilizing at setpoint. The procedure is explained below.
1. Integral Time=0
Derivative Time=0
2. Decrease the Proportional Band to the point where a constant rate
of oscillation is obtained. This is the response frequency of the
system. The frequency is different for each process.
3. Measure the Time Constant which is the time to complete one cycle
of the response frequency. The Time Constant will be defined as
“T” when calculating Integral and Derivative Times.
Integral Time is the speed at which the controller corrects for offset.
A short integral time means the controller corrects for offset quickly.
If the integral time is too short, the controller would react before the
effects of previous output shifts, due to dead time or lag, could be
sensed causing oscillation. A long Integral time means the control
corrects for offset over a long time. If the integral time is too long, the
offset will remain for some time causing slow responding or sluggish
control. See the diagram below.
Derivative Time
In the case of a process upset, proportional only or proportional-integral action cannot react fast enough in returning a process back to
setpoint without overshoot. The derivative action corrects for disturbances providing sudden shifts in output which oppose the divergence of the process from setpoint. See the diagram below.
The derivative action changes the rate of reset or integration proportional to the rate of change and lag time of the system. By calculating
the rate of change of the process and multiplying it by the lag time
which is the time it takes the controller to sense an output change,
the controller can anticipate where the process should be and
change the output accordingly. This anticipatory action speeds up and
slows down the effect of proportional only and proportional-integral
actions to return a process to setpoint as quickly as possible with
minimum overshoot. See the diagram below.
Derivative time is the amount of anticipatory action needed to return a
process back to setpoint. A short derivative time means little derivative action. If the derivative time is too short, the controller would not
react quickly to process disturbances. A long derivative time means
more derivative action. If the derivative time is too large, the controller would react too dramatically to process disturbances creating
rapid process oscillation. A process which is very dynamic such as
pressure and flow applications is more efficiently controlled if the
derivative action is turned off because of the oscillation problem
which would result.
18
Setpoint
PV
Short Integral Time
Output
Proportional Action Only
Offset
Time
Long Integral Time
Time
Rate of Change X Lag Time=
Anticipated Process Variable
PV
Time
Page 19

19
4. Widen the Proportional Band until only slightly unstable. This is the
Proportional Band’s Ultimate Sensitivity. The Proportional Band’s
Ultimate Sensitivity width will be defined as “P” when calculating
the actual Proportional Band.
5. Use the following coefficients in determining the correct PID set-
tings for your particular application.
Time
P Only 2P * *
PI 2.2P .83T *
PID 1.67P .5T .125T
APPENDIX C
Heater Break Option
The Heater Break Option is used to detect heater break conditions
and to energize an alarm relay when such conditions exist. In most
cases, the option is used to detect the failure of one or more zones in
a multi-zoned heater where all individual resistive heater zones are
wired in parallel. Failed heater zones would create cold spots in a
system which could hamper the process and even ruin the product. If
cold spots in a system are a problem, the Heater Break Option is an
effective way of alerting the operator of a heater break condition, a
cause of cold spots.
The PXZ controller is able to detect a heater problem by analyzing the
current used by the heater. The actual sensing is done by a current
sensing transformer, sold separately, which is placed around the hot
lead going to the heater and connected to the controller. The signal
sent by the current sensing transformer is timed with the output of the
PXZ. When the output is energized the signal sent from the current
sensing transformer is analyzed. When the output is de-energized the
signal sent from the current sensing transformer is not analyzed. This
eliminates the alarm condition turning on and off due to the output
condition of the controller. If the signal sent when the output is energized indicates that the current level is below what the Heater Break
alarm is set for, the alarm is energized. The alarm is non-latching.
Notes:
1. The Heater Break Option is available on the PXZ-5, 7, and 9
controllers only.
2. The Heater Break Option cannot be used on the PXZ controller with
a 4-20mA DC output. The current sensing transformer would pick
up current changes due to fluctuating power output, between 0%
and 100%, which would result in a heater break alarm condition
even though no such condition existed.
3. The Cycle Time must be set at 6 secs. or higher in order for the
controller to correctly analyze the signal sent by the current sensing transformer.
4. The power supply used should be the same for the PXZ and heater
to eliminate current fluctuations due to power differences between
different power supplies.
Control P I D
Action Setting Setting Setting
Constant
PV
Time
Page 20

APPENDIX D
Heat/Cool Option
With the Heat/Cool Option, the PXZ can control a temperature application with one input at one main setpoint using two outputs, a heating output and a cooling output. By using a heating and cooling output, a process is able to quickly bring the temperature to setpoint in
both directions and to limit the amount of overshoot. The larger the
deviation from setpoint, the more output applied to the system on both
the heating and cooling sides. Heat/Cool control is a very effective
way of controlling exothermic processes, processes that generate
their own heat, or processes where ambient temperature is not adequate or fast enough in returning a process back to setpoint.
The two outputs on the PXZ are independent and sent to two different
output devices. The PXZ can be equipped with two of the same or
two different output types. Output #2 can be relay, SSR/SSC driver, or
4-20mA DC, regardless of what Output #1 is. Both output types must
be specified when ordering.
The PXZ controls the cooling side with three additional parameters,
TC-2, COOL, and DB. Each is explained below:
TC-2
Cycle Time (Output #2):
Because Output #2 is not
necessarily the same as Output #1, the cycle time may
be different
CooL Proportional Band Coefficient for Cooling:
Because the
cooling power may not necessarily be the same as the
heating power, the cooling proportional band may need
to be different from that of the heating proportional
band.
db Deadband/Overlap: Deadband is that area where
neither outputs are energized. Overlap is that area
when both outputs are energized. This function lets
you decide where you want the heating action to stop
and the cooling action to begin.
Notes:
1. The Heat/Cool Option is available on the PXZ-5, 7, and 9 controllers only. Output #2 type can be the same or different than
Output #1 type (Relay, SSR/SSC driver, or 4-20mA DC)
2. Integral and Derivative Times are the same for both the heating
and cooling sides of a process with PID control because the
response frequency or time constant of the system does not
change at main setpoint when cooling is added.
3. The Proportional Band for heating and cooling are almost always
different. Rarely does the same amount of cooling output remove
the same percentage of process error as the heating output does.
The Cooling Proportional Band must be manually and separately
tuned.
4. If the heating side is set for On/Off control, the cooling side will be
set for On/Off control also. Regardless of what the COOL parameter is set for, if the Proportional Band is set to zero, the Heating
Proportional Band and the Cooling Proportional Band will always
be zero or On/Off.
Wiring and Setting:
1. Choose the correct current sensing
transformer based on the maximum
current usage of the heater.
0 - 30 Amps (part # CTL-6-SF)
0 - 50 Amps (part # CTL-12-S36-8F)
2. Thread the hot lead going to the heater through the donut of the
current sensing transformer. Connect the wires of the current
sensing transformer to the current sensing transformer input terminals in the back of the controller.
3. Set Heater Break alarm setpoint parameter “Hb”. With the current
sensing transformer connected and the heater in operation, output
energized, change the Heater Break Alarm setting from the maximum current setting for the particular current sensing transformer
being used to a lower value. Allow 3 secs. or more between setting
changes. Continue lowering the setting until the relay is energized
and the “HB” status indicator is lit. This is the maximum current
usage of the heater. Using the same procedure, find the maximum
current usage of the heater minus one zone. Set the setpoint in
between the two current readings. In this way, the operator knows
if one or more zones fail because the current sensed will only be
below the Heater Break Alarm setting if one or more zones fail.
20
Connection to PXZ
(Polarity not important)
Hot lead to Heater
Power Supply
4
15
Alarm Output
16
+
–
18
1
2
Main
Output
8
9
5
7
17
Current Sensing Transformer
Input Sensor
Heater
Page 21

21
5. If the cycle times of one or both outputs are long and the process
dynamic, there is a good chance that both outputs will be cycling
on and off at the same time around main setpoint. This is evident
if one or both outputs are relays.
6. Autotune is not effective on the cooling side of Heat/Cool control.
Autotune the controller for heat only and then manually tune the
cooling parameters.
Wiring and Setting
1. Make sure that your PXZ has the correct output type installed for
Output #2. Verify that the TC2, COOL, and DB parameters are indicated in the primary (setpoint) menu.
2. Wire your cooling load to the Output #2 terminals located on the
back of your PXZ controller.
3. In the secondary (system) menu, program the correct code for
Heat/Cool action. See page 13 for the complete code table.
4. In the primary (setpoint) menu, program TC2, the cycle time for
Output #2. The table below is a general guide to TC2 settings.
5. Autotune or manually tune the PID parameters of your PXZ
controller. Autotune will work for the heating PID parameters
but not on the cooling parameters. You must manually tune the
cooling parameters.
6. With the heat side tuned, manually set the COOL parameter or
Proportional Band Coefficient for Cooling. If the cooling output is
less powerful than the heating output, the Cooling Proportional
Band must be narrower than the Heating Proportional Band; the
COOL parameter would be less than “1”. If the cooling output is
more powerful than the heating output, the Cooling Proportional
Band must be wider than the Heating Proportional Band; the COOL
parameter would be more than “1”. See the programming section
for more details.
7. Finally, you can add a Deadband/Overlap. The programmed
Deadband/Overlap parameter can be within -50% to +50% of the
Heating Proportional band. To establish a Deadband, parameter
“db” is set somewhere between 0% and 50% of the Heating
Proportional band. To establish an Overlap, db is set somewhere
between -50% and 0% of the Heating Proportional Band.
8. Manually fine-tune the parameters COOL and db until just the right
amount of cooling is achieved. Refer to the programming section
for more details on these parameters.
Heating Side Cooling SIde
Heating Proportional Band Cooling Proportional Band
[P/2] [P/2 COOL]
I I (same as for heating)
D D (same as for heating)
Relay 30
SSR Driver (pulsed DC) 2
4-20mA DC Not indicated or 0
Heating Side Cooling Side
Output#2 Type Setting(Secs)
Page 22

Parameter Range Description Default DSP
settings settings
ProG oFF/rUn/HLd Ramp/soak command oFF dSP1-1
P 0.0 - 999.9%FS Proportional band 5.0 dSP1-2
I 0 - 3200sec Integral time 240 dSP1-4
D 0.0 - 999.9sec Derivative time 60 dSP1-8
AL 0 - 100%FS Low Alarm Setpoint 10 dSP1-16
AH 0 - 100%FS High Alarm Setpoint 10 dSP1-32
TC 1 - 150sec Cycle Time (output #1) † dSP1-64
HYS 0 - 50%FS Hysteresis 1 dSP1-128
Hb 0.0 - 50.0A Heater-break alarm S.P. 0.0 dSP2-1
AT 0 - 2 Auto-tuning command 0 dSP2-2
TC2 1 - 150sec Cycle Time (output #2) † dSP2-4
CooL 0.0 - 100.0 Proportional band 1.0 dSP2-8
coefficient for cooling
db -50.0 - 50.0% FS Deadband/Overlap 0.0 dSP2-16
PLC1 - N/A -3.0 dSP2-32
PHC1 - N/A 103.0 dSP2-64
PCUT - N/A 0 dSP2-128
bAL 0 - 100% Balance 0.0/50.0 dSP3-1
Ar 0 - 100%FS Anti-reset windup 100%FS dSP3-2
LoC 0 - 2 Lock out 0 dSP3-4
STAT -- Ramp/soak status oFF dSP3-8
SV-1 0 - 100%FS 1st S.P. 0%FS dSP3-16
TM1r 0 - 99hr 59min 1st ramping time 0.00 dSP3-32
TM1S 0 - 99hr 59min 1st soaking time 0.00 dSP3-64
SV-2 0 - 100%FS 2nd S.P. 0%FS dSP3-128
TM2r 0 - 99hr 59min 2nd ramping time 0.00 dSP4-1
TM2S 0 - 99hr 59min 2nd soaking time 0.00 dSP4-2
SV-3 0 - 100%FS 3rd S.P. 0%FS dSP4-4
TM3r 0 - 99hr 59min 3rd ramping time 0.00 dSP4-8
TM3S 0 - 99hr 59min 3rd soaking time 0.00 dSP4-16
SV-4 0 - 100%FS 4th S.P. 0%FS dSP4-32
TM4r 0 - 99hr 59min 4th ramping time 0.00 dSP4-64
TM4S 0 - 99hr 59min 4th soaking time 0.00 dSP4-128
MOD 0 -15 Ramp/Soak Mode code 0 dSP5-1
22
PXZ QUICK REFERENCE
Primary Menu
Parameter Range Description Default DSP
settings settings
P-n1 0 -19 Control Action code † dSP5-4
P-n2 0 - 16 Input type code † dSP5-8
P-dF 0.0 - 900.0sec Input filter constant 5.0 dSP5-16
P-SL -1999 - 9999 Lower range of input 0%FS dSP5-32
P-SU -1999 - 9999 Upper range of input 100%FS dSP5-64
P-AL 0 - 15 Alarm Type 2 code 9 dSP5-128
P-AH 0 - 11 Alarm Type 1 code 5 dSP6-1
P-An 0 - 50%FS Alarm Hysteresis 1 dSP6-2
P-dP 0 - 2 Decimal point position 0 dSP6-4
rCJ - - ON dSP6-8
PVOF -10 - 10%FS PV offset 0 dSP6-16
SVOF -50 - 50%FS SV offset 0 dSP6-32
P-F °C/°F °C/°F Selection † dSP6-64
PLC2 - N/A -3.0 dSP6-128
PHC2 - N/A 103.0 dSP7-1
FUZY OFF/ON Fuzzy control OFF dSP7-2
GAIN - N/A 1 dSP7-4
ADJO - Zero calibration 0 dSP7-8
ADJS - Span calibration 0 dSP7-16
OUT - N/A -3.0 dSP7-32
dSP1-7 0-255 Parameter mask † -
† Based on the model
PXZ QUICK REFERENCE
Secondary Menu
 Loading...