

Page 1
NLS-MT90
Portable Data Collector
User Guide
Page 2

Disclaimer
© 2017Fujian Newland Auto-ID Tech. Co., Ltd. All rights reserved.
Please read through the manual carefully before using the product and operate it according to the manual.It is advised that you
should keep this manual for future reference.
Do not disassemble the device or remove the seal label from the device,doing so will void the product warranty provided by
Fujian Newland Auto-ID Tech. Co., Ltd.
All pictures in this manual are for reference only and actual product may differ. Regarding to the product modification and
update, FujianNewland Auto-ID Tech. Co., Ltd. reserves the right to make changes to any software or hardware to improve
reliability, function, or design at any time without notice.The information contained herein is subject to change without prior
notice.
The products depicted in this manual may include software copyrighted by Fujian Newland Auto-ID Tech. Co., Ltd or third party.
The user, corporation or individual, shall not duplicate, in whole or in part, distribute, modify, decompile, disassemble, decode,
reverse engineer, rent, transfer or sublicense such software without prior written consent from the copyright holders.
This manual is copyrighted. No part of this publication may be reproduced, distributed or used in any form without written
permission from Newland.
Risk Warning Regarding Unauthorized System Updates:
You should use the Newland-provided tool to update this product’s system.Modifying system files through installing a third-party
ROM system or using any cracking method may result in product malfunction or data lossand this will void your warranty.
Fujian Newland Auto-ID Tech. Co., Ltd. reserves the right to make final interpretation of the statement above.
Fujian Newland Auto-ID Tech. Co., Ltd.
3F, Building A, No.1, RujiangWest Rd., Mawei, Fuzhou, Fujian, China 350015
http://www.newlandaidc.com
Page 3

Version
Description
Date
V1.0.0
Initial release.
October 9, 2017
Revision History
Page 4

Table of Contents
Revision History ....................................................................................................................................................................... - 3 -
Chapter 1About This Guide ......................................................................................................................................................... 1
Introduction ....................................................................................................................................................................... 1
Documentation Set ........................................................................................................................................................... 1
Chapter Descriptions ........................................................................................................................................................ 2
More Information .............................................................................................................................................................. 2
Chapter 2Getting Started ............................................................................................................................................................. 3
Introduction ....................................................................................................................................................................... 3
Unpacking ........................................................................................................................................................................ 3
Accessories (Optional) ..................................................................................................................................................... 3
Getting Started ................................................................................................................................................................. 4
The MT90................................................................................................................................................................. 4
Keypad ..................................................................................................................................................................... 6
LEDs on the MT90 ................................................................................................................................................... 7
Installing the Battery ................................................................................................................................................ 8
Removing the Battery .............................................................................................................................................. 8
Charging the Battery ................................................................................................................................................ 9
Communicating with PC ......................................................................................................................................... 11
Chapter 3 Basics ........................................................................................................................................................................ 12
Introduction ..................................................................................................................................................................... 12
Switching On/ Rebooting/Switching Off the MT90 .......................................................................................................... 12
Locking/Unlocking the MT90 .......................................................................................................................................... 13
Home Screen ................................................................................................................................................................. 13
Status Icons .................................................................................................................................................................... 14
Installing App .................................................................................................................................................................. 15
Uninstalling App .............................................................................................................................................................. 15
Date & Time .................................................................................................................................................................... 16
Display............................................................................................................................................................................ 16
Page 5

Restoring Factory Settings ............................................................................................................................................. 17
Language & Input Method .............................................................................................................................................. 18
Shortcuts to Apps ........................................................................................................................................................... 18
Widgets .......................................................................................................................................................................... 18
Chapter 4 Scanning Barcodes .................................................................................................................................................. 19
Introduction ..................................................................................................................................................................... 19
Scanning 1D Barcode .................................................................................................................................................... 19
Scanning 2D Barcode .................................................................................................................................................... 20
Programming Scanner.................................................................................................................................................... 21
Chapter 5 Bluetooth ................................................................................................................................................................... 29
Chapter 6 Wi-Fi ........................................................................................................................................................................... 30
Introduction ..................................................................................................................................................................... 30
Wi-Fi Settings ................................................................................................................................................................. 30
IP Settings ...................................................................................................................................................................... 31
Chapter 7 Admin Tool ................................................................................................................................................................. 32
Introduction ..................................................................................................................................................................... 32
Setting the Admin Password ........................................................................................................................................... 32
Setting the Admin Mode ................................................................................................................................................. 33
Entering/Exiting the User Mode ...................................................................................................................................... 34
Chapter 8 Whitelist Manager ..................................................................................................................................................... 35
Introduction ..................................................................................................................................................................... 35
Logging in Whitelist Manager ......................................................................................................................................... 35
Chapter 9 Others ........................................................................................................................................................................ 37
Camera........................................................................................................................................................................... 37
Chapter 10 System Update ........................................................................................................................................................ 39
Chapter 11 App Development Guide ......................................................................................................................................... 40
Development Environment ............................................................................................................................................. 40
Page 6

Use of Non-standard Interfaces ...................................................................................................................................... 40
Chapter 12 Maintenance& Troubleshooting ............................................................................................................................. 41
Introduction ..................................................................................................................................................................... 41
Important Safety &Handling Information ......................................................................................................................... 41
Disassembly and Retrofit ....................................................................................................................................... 41
External Power Supply ........................................................................................................................................... 41
Abnormal Situation ................................................................................................................................................. 41
Drop Damage ......................................................................................................................................................... 41
LCD Screen ........................................................................................................................................................... 41
Stacking Heavy Objects ......................................................................................................................................... 41
Mounting Location .................................................................................................................................................. 42
Wireless Functionalities ......................................................................................................................................... 42
Use & Maintenance ................................................................................................................................................ 42
Battery Safety Guidelines....................................................................................................................................... 42
Troubleshooting .............................................................................................................................................................. 43
Page 7

Chapter 1About This Guide
Introduction
This guide provides instructionsfor programming and operating the NLS-MT90portable data collector (hereinafter referred
to as “the MT90” or “the terminal”).
Documentation Set
The documentation set for the MT90 includes:
NLS-MT90 Portable Data Collector Quick Start:Describes how to get the NLS-MT90 up and running.
NLS-MT90 Portable Data Collector User Guide:Describes how to program and use the NLS-MT90.
1
Page 8

Chapter Descriptions
Chapter 1 About This Guide Provides general description of this manual.
Chapter 2 Getting Started Provides information on getting the MT90 up and running for the first
time.
Chapter 3 Basics Describes how to program the MT90 for the use of its basic features.
Chapter 4 Scanning Barcodes Provides the instructions as to how to scan 1D/2D barcodes and how
to program the scanner.
Chapter 5 Bluetooth Explains how to use Bluetooth functionality.
Chapter 6 Wi-Fi Explains how to use Wi-Fi functionality.
Chapter 7Admin Tool Explains how to use the admin tool.
Chapter 8Whitelist Manager Explains how to use the whitelist management tool.
Chapter 9 Others Explains how to use Camera
Chapter 10System Update Explains how to update the system.
Chapter 11App Development Guide Describes the app development environment and the use of
non-standard interfaces.
Chapter 13 Maintenance & Troubleshooting Provides troubleshooting solutions for issues that might occur
whenusing the MT90.
More Information
For more product and support information, please visit our web site:http://www.newlandaidc.com.
2
Page 9

Chapter 2Getting Started
Introduction
This chapter lists the parts and accessories for the MT90 and explains how to install, remove and charge the battery, and
power on the MT90 for the first time.
Unpacking
Carefully remove all protective material from the pack and verify that the following
1x NLS-MT90portable data collector
1x USB cable
1x AC adapter for the MT90
1x Li-Polymerbattery
1x Hand strap
1x Quick Start manual
Accessories (Optional)
Cradle for the MT90
DC charging cable
Pistol grip
items are present:
3
Page 10
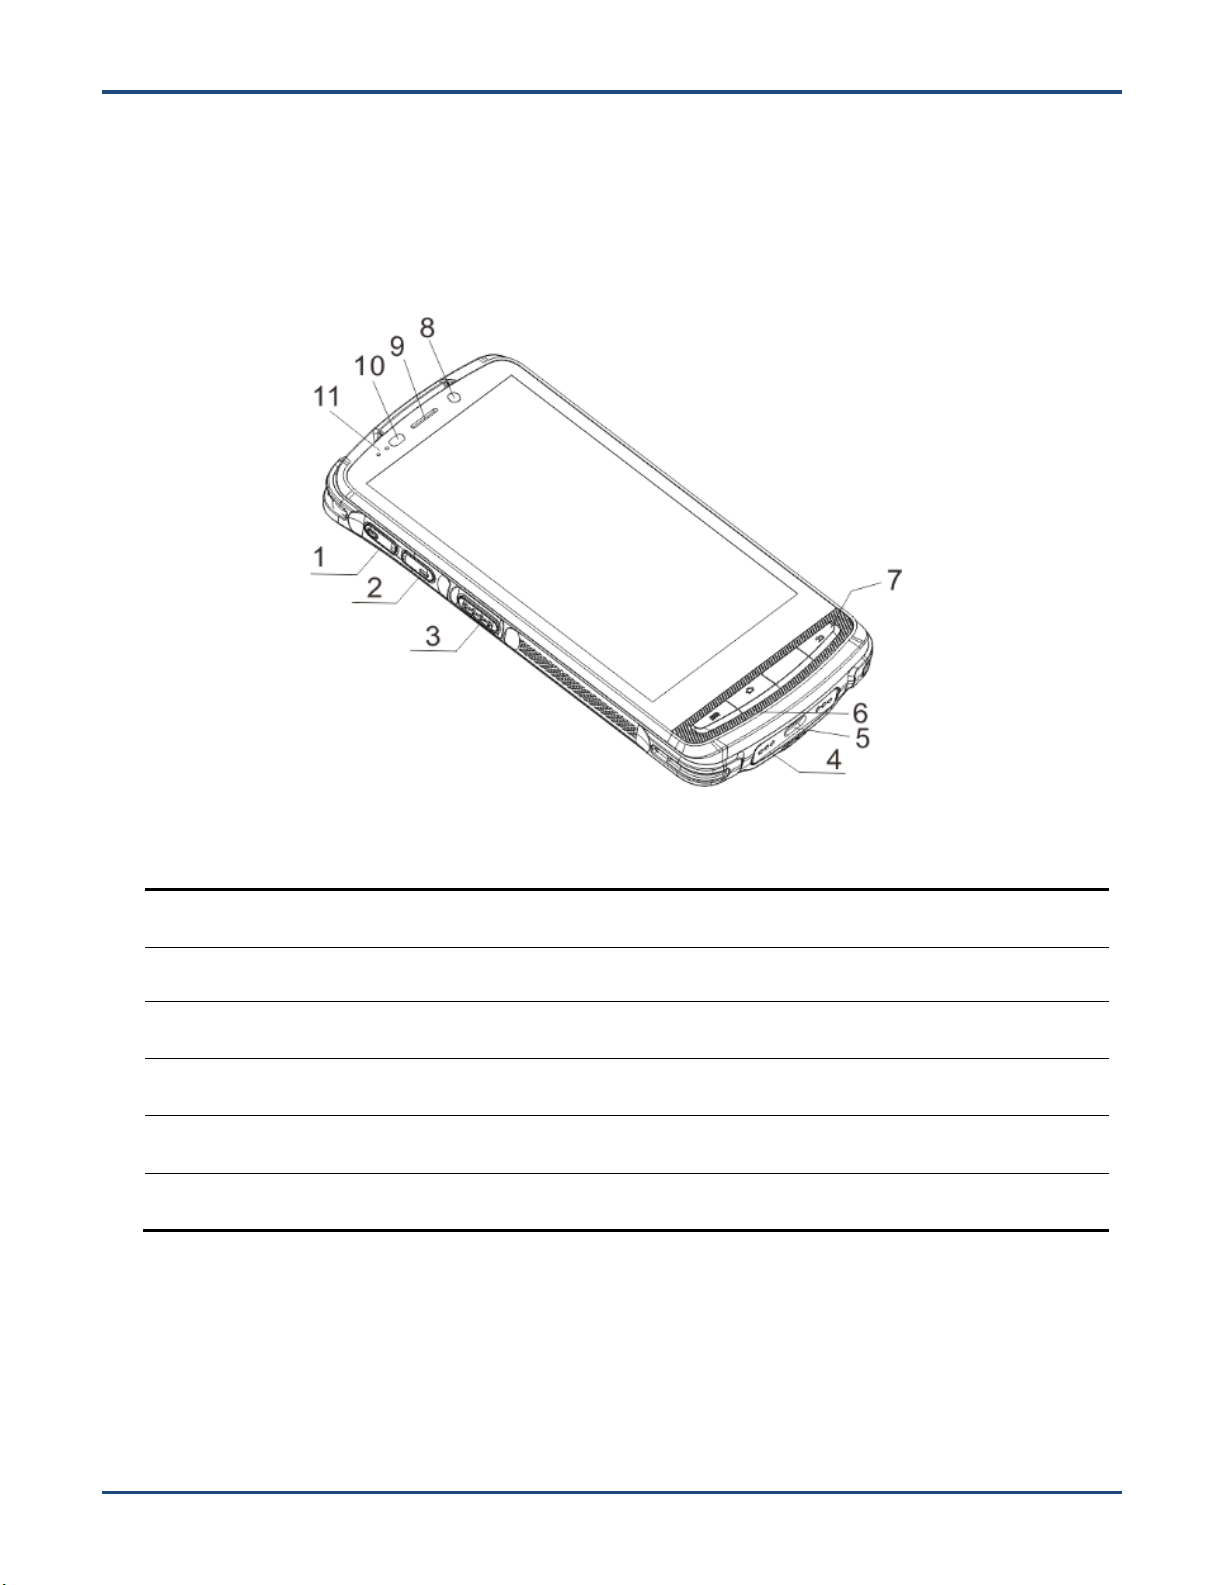
Getting Started
1
Volume+
2
Volume-
3
Left Scan Key
4
Cradle Connector (optional)
5
Micro USB Port
6
Microphone
7
Keypad
8
Front Camera (optional)
9
Earpiece
10
Light/Proximity Sensors
11
Red/Blue LEDs
The MT90
4
Page 11

12
Scan Window
13
Flashlight (optional)
14
Power Key
15
Rear Camera (optional)
16
User-defined Key
17
Right Scan Key
18
Battery Cover Latch
19
Battery Cover
20
Speaker
21
Headphone Jack Cover
22
Expansion Port (optional)
5
Page 12
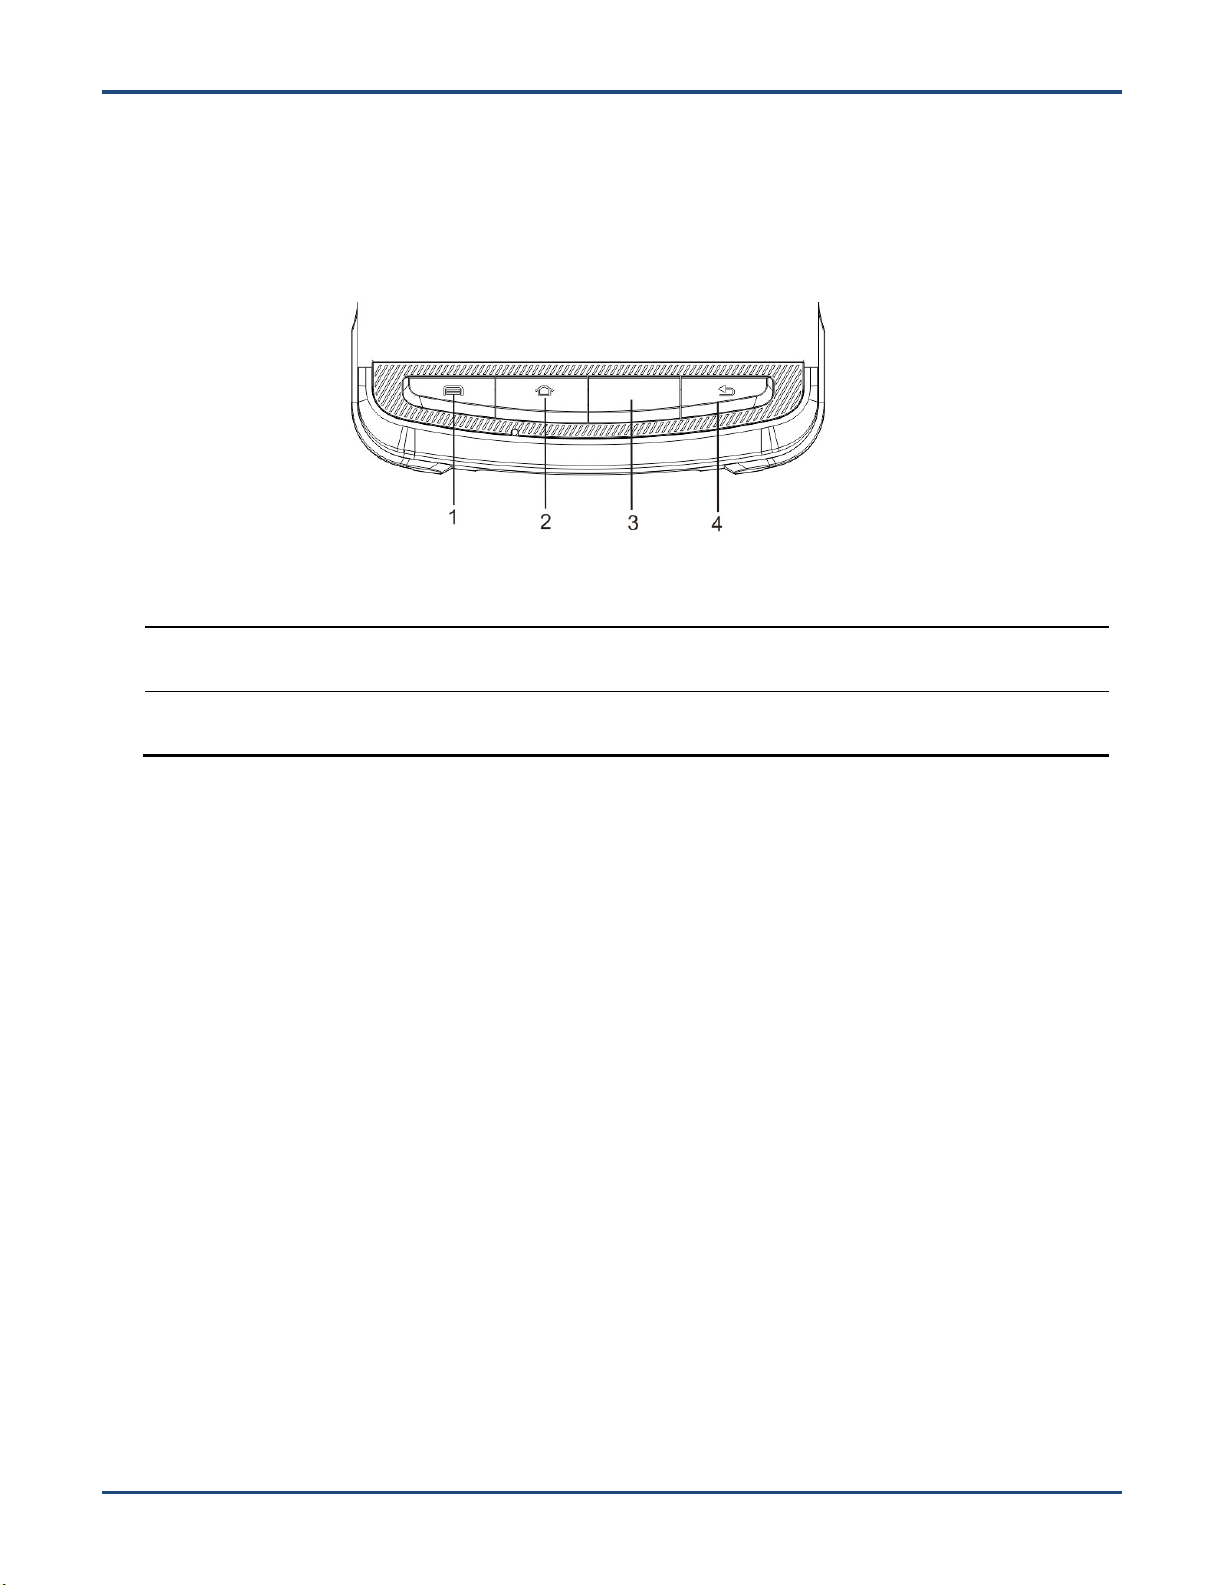
1
Menu Key
2
Home Key
3
Scan Key
4
Return Key
Keypad
The MT90 has 10 keys, with Menu/Home/Scan/Return keys on the front panel, Volume+/Volume-/Scan keys on the left
side and Power/User-defined/Scan key on the right side.
Menu Key:Press it to display the menu related to an on-screen item.
Home Key:Press it to go to the first Main Screen.
Press and hold the key to display the app(s) most recently used. Tap an app to open it.
Function Key:Use it to scan barcodes.
Return Key:Press it to go back to the previous screen.
Except the Power key, other keys are user programmable.
6
Page 13
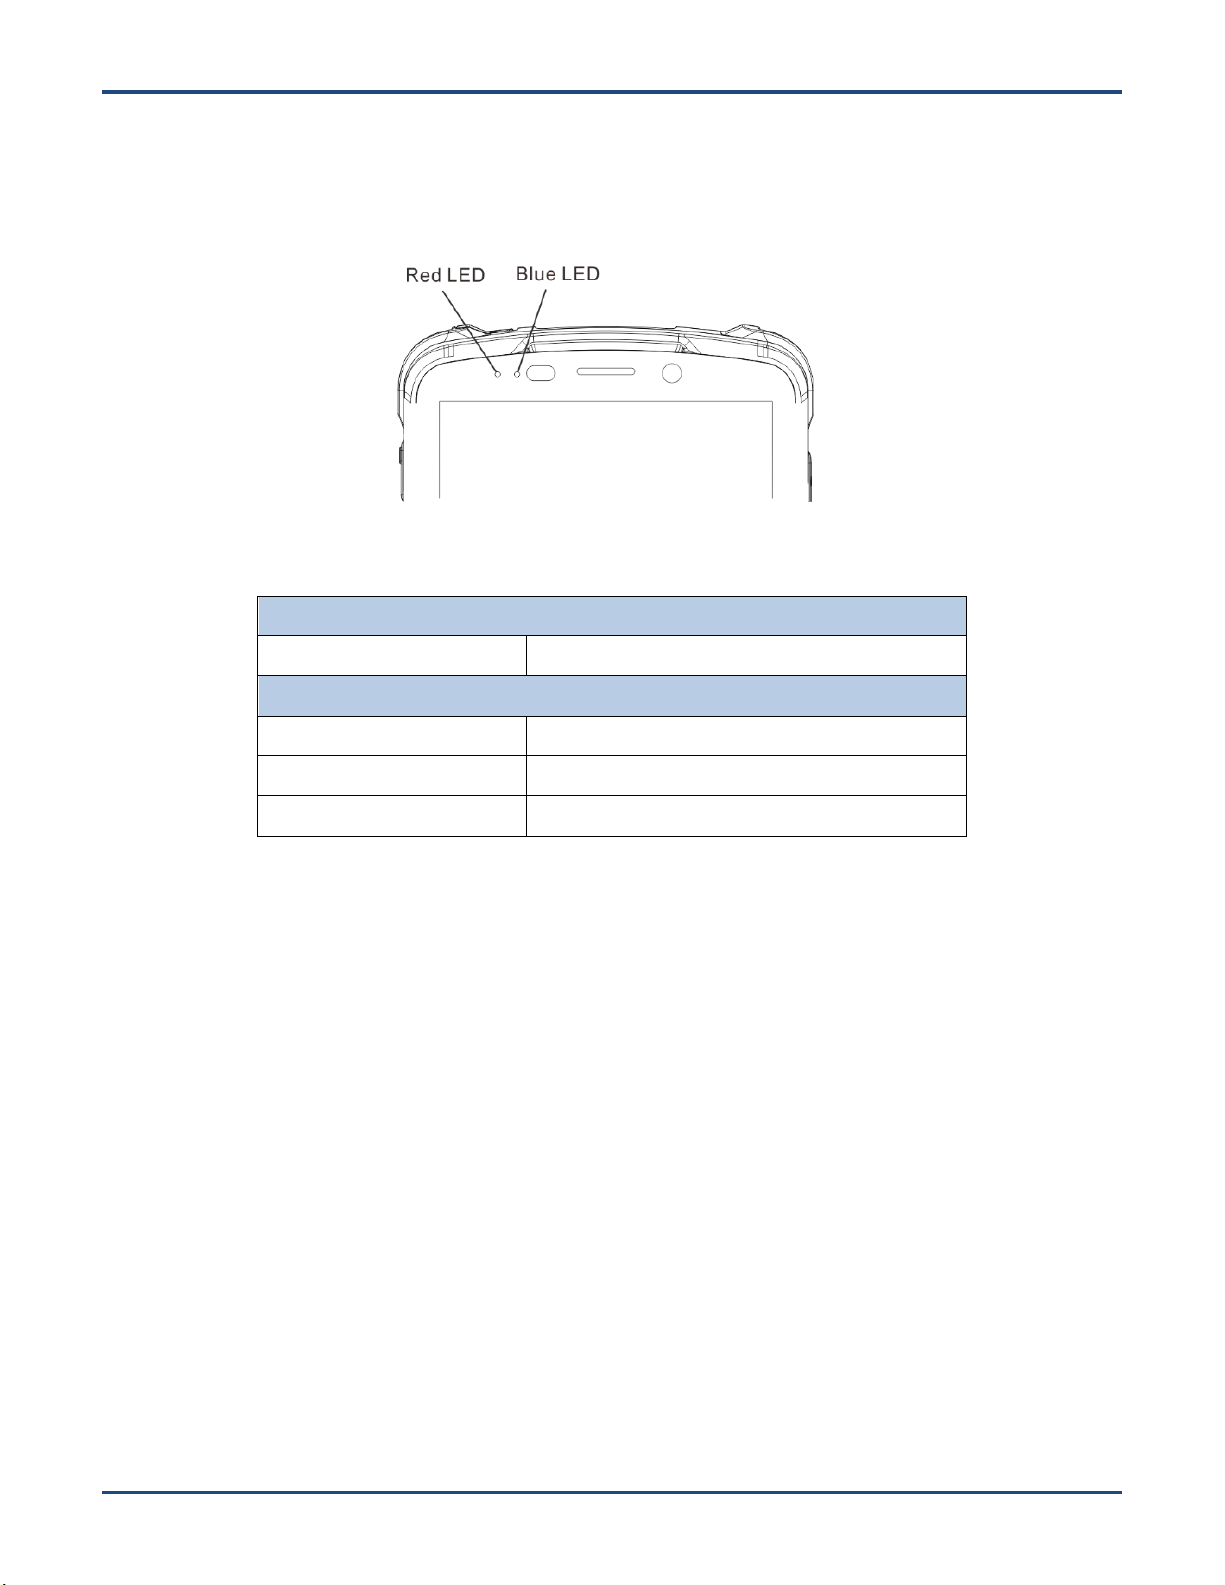
LEDs on the MT90
Scan/Decode
BlueLED flashes once
Good read
Charging/BatteryStatuses
Blue LED on
Fully charged
RedLED on
Charging in progress
Red LED flashes constantly
Low-battery alert
7
Page 14
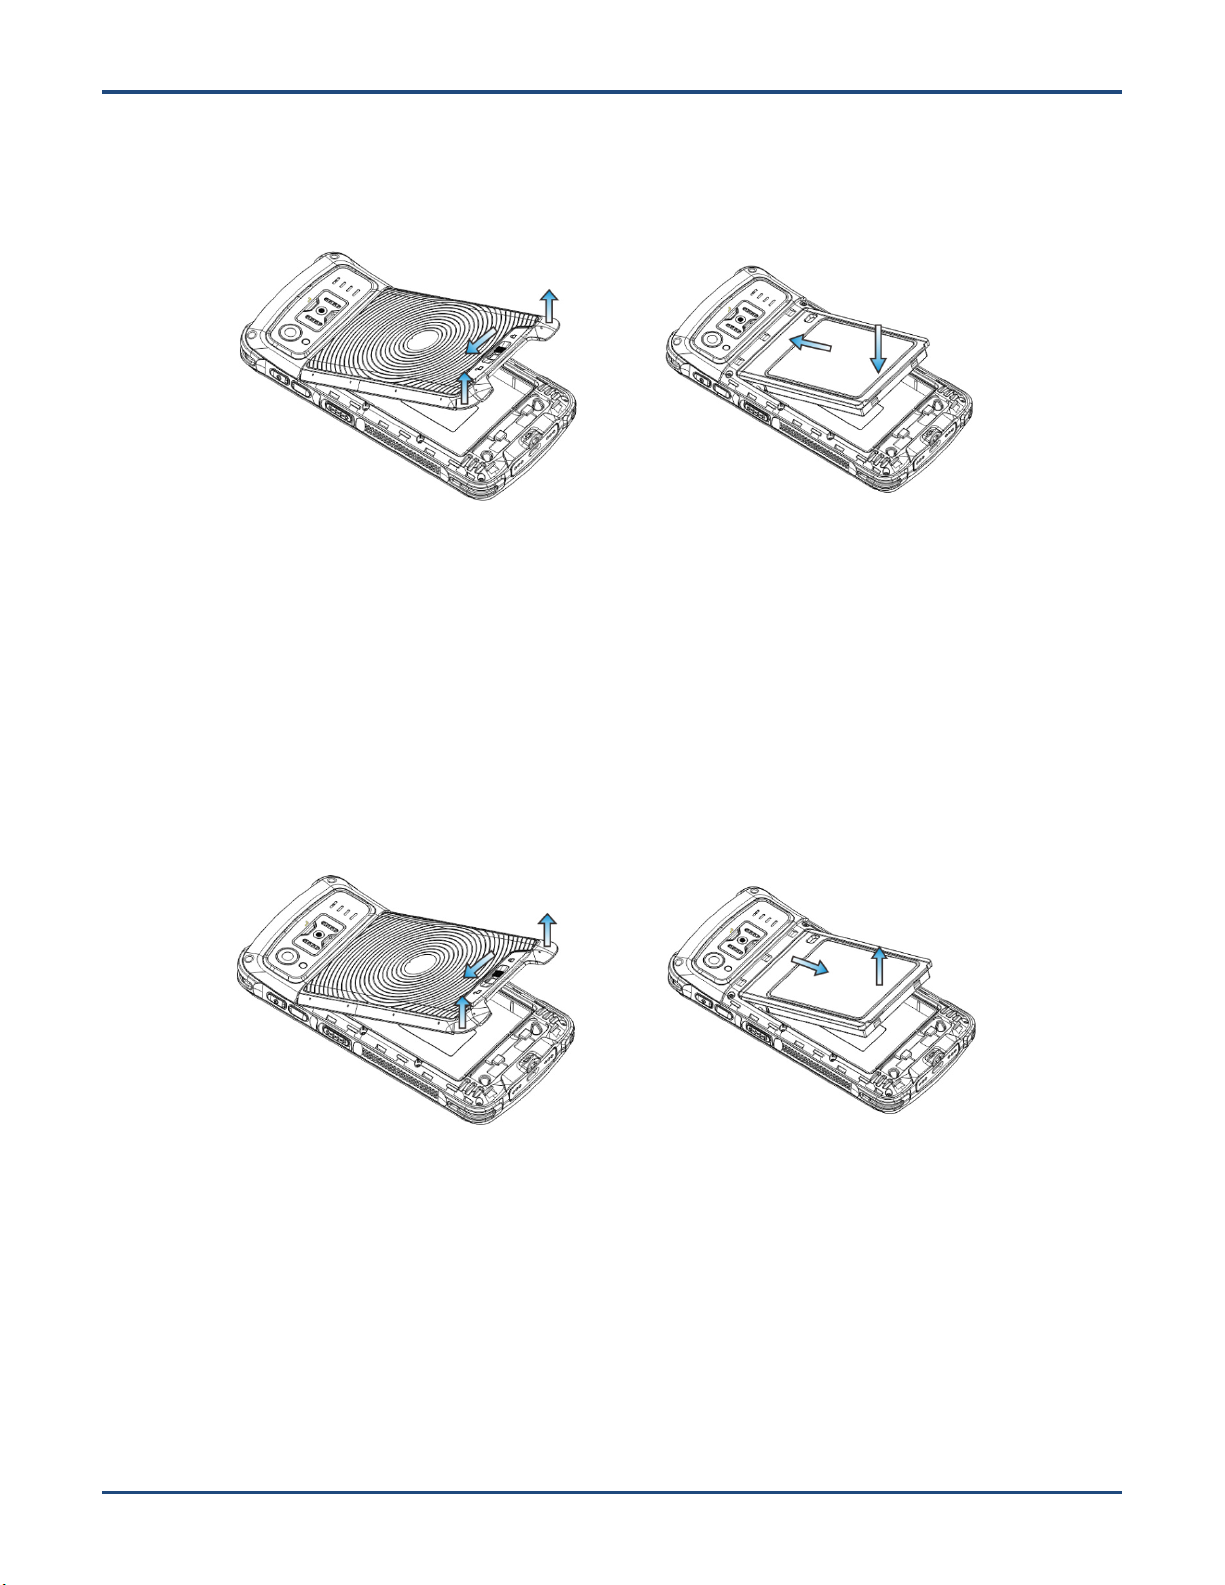
Installing the Battery
Step 1: Slide the battery cover latch to the unlock position and remove the cover.
Step 2: Insert the battery as indicated into the battery compartment, with its metal contacts facing down and lining up with the
metal contacts on the inside of the terminal.
Removing the Battery
Step 1: Hold down the Power key for 5 seconds and then tap “Power off” to turn off the terminal. Slide the battery cover
latch to the unlock position and remove the cover.
Step 2: Remove the battery.
8
Page 15
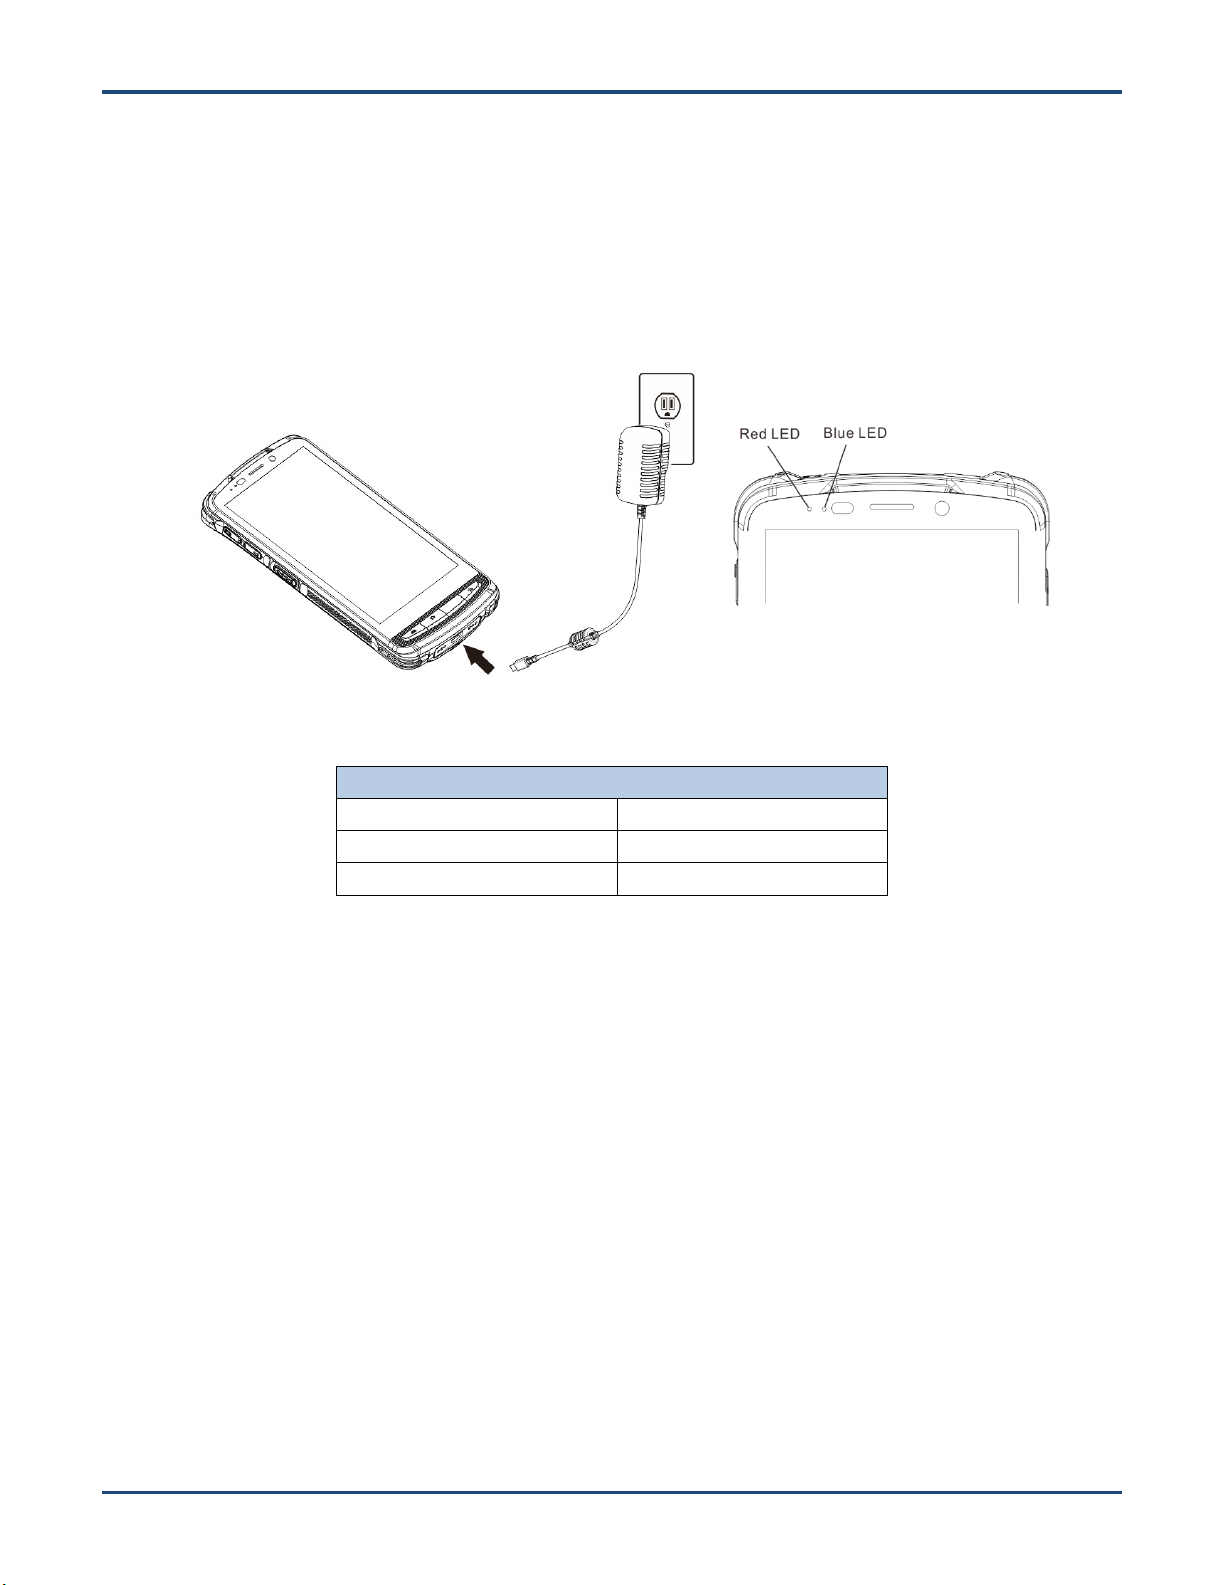
LEDs on the MT90
Blue LED on
Fully charged
Red LED on
Charging in progress
Red LED flashes constantly
Low-battery alert
Charging the Battery
Charge with AC adapter: Connect the MT90 to a power outlet using the included AC adapter. When the terminal’s
battery is less than 5%, it takes about 5 hours to fully charge it (The terminal is shut down or in sleep mode).
Note: Low battery may result in malfunction of the terminal. Before your first use, charge the battery for at least 6 hours.
9
Page 16
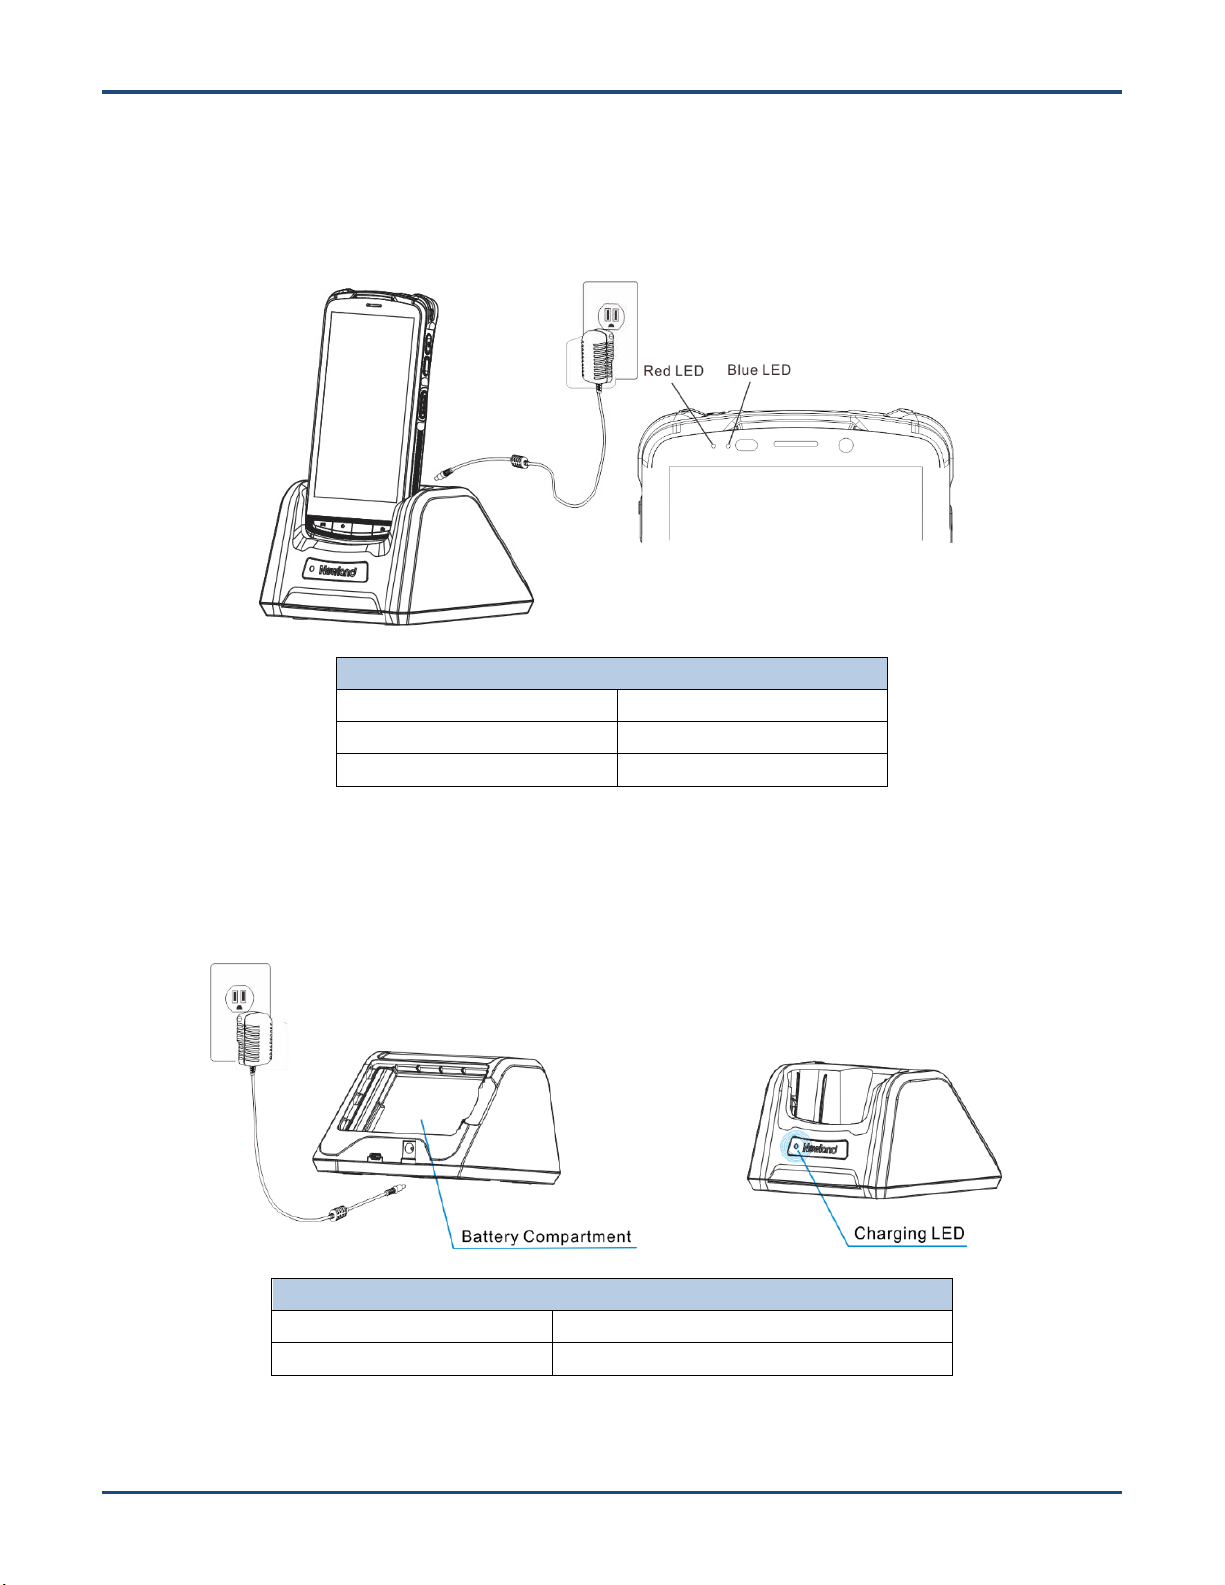
LEDs on the MT90
Blue LED on
Fully charged
Red LED on
Charging in progress
Red LED flashes constantly
Low-battery alert
Charging LED on the cradle
Red LED on
Charging in progress
Green LED on
Fully charged
Charge with cradle
Method 1: Insert the MT90 into the charging slot on the cradle. Connect the cradle to a power outlet using the included
AC adapter.
Note:When the battery is dead or juice too low to power on the MT90, charge the terminal for 15 minutes before using it.
Method 2: Insert the battery into the battery compartment on the cradle. Connect the cradle to a power outlet using the
included AC adapter.
10
Page 17

Communicating with PC
Step 1: Connect the Micro USB port on the MT90 to your computer with the included USB cable.
Step 2: Switch the MT90 on. On the Home screen, swipe from top to bottom with one finger in one smooth motion to reveal
the notification bar as shown below.
Step 3: Tap “Connected as a media device”.
Step 4: Select “Media device (MTP)”. Navigate to the “My Computer” section of your computer and look for the newly added
drive. Double-click it and you will be connected to the MT90. Then you may handle the files on the terminal through your
computer.
11
Page 18

Chapter 3 Basics
Introduction
This chapter provides the basics of setting and using the MT90.
Switching On/ Rebooting/Switching Off the MT90
After installing the SIM card and battery and having the MT90 fully charged, you may switch the terminal on.
Switch the MT90on:Hold down the Power key on the right side of the terminaluntil the terminal vibrates. Note that the
initialization is going to take some time before the MT90 displays the Home screen.
Reboot the MT90:Hold down the Power keyon the right side of the terminal until the window below pops up, then tap
“reboot”.
Switch the MT90 off:Hold down the Power keyon the right side of the terminal until the window below pops up, then tap
“Power off”.
12
Page 19

Apps List
Locking/Unlocking the MT90
Lock the MT90:Briefly press the Power keyon the right side of the terminal. If no operation is performed on the MT90 for a
preset period of time, the MT90 locks automatically. You can change how long it takes the screen to lock.
Unlock the MT90:Briefly press the Power keyon the right side of the terminal.
Home Screen
View another home screen: Swipe left or right.
Go to the Home screen: Press the Home key on the front panel of the terminal.
Open an app: Tap it.
View all apps/Open apps list:Tap .
Add an app icon to the Home screen: Tap on the Home screen. Tap and hold your desired app until it appears on
the Home screen and then drag it into a blank area.
Delete an app icon on the Home screen:Tap and hold your desired app on the Home screen until “X Remove” appears,
then drag the app into it. Note that this operation only removes the icon from the Home screen. To remove the app from the
MT90, see the Uninstalling App section.
13
Page 20

Status Icon
Description
Status Icon
Description
WLAN
Bluetooth
Vibrate ON
Airplane mode
USB connected
USB debugging
New messages
Battery charging in progress
Mute mode
Battery fully charged
Status Icons
The icons in the status bar at the top of the screen give information about the MT90.
14
Page 21

Installing App
Use one of the following methods to install a new app on the MT90:
1. Download an APK file from online app store and install it.
2. Download software package onto a MicroSD card or PC and copy it to your terminal. Then install it with File Manager.
3. Connect the MT90 to PC with the supplied USB cable. Install a new app using a mobile assistant (such as Baidu Mobile
Assistant) installed on the PC.
Uninstalling App
Follow the procedure below to remove an app from the MT90:
Tap on the Home screen to view all apps. Tap and hold your desired app until a trash bin appears at the top left
corner of the screen, then drag it into the trash bin.
15
Page 22

Date & Time
Set the date and time: Tap the app icon and then “Date & time”, and set the date and time on the screen shown below
as per your needs.
Display
Tap the app icon and then “Display”, and set the brightness, wallpaper, sleep timer, front size and other parameterson
the screen shown below as per your needs.
16
Page 23

Restoring Factory Settings
Tap the app icon ->“Backup & reset” ->“Factory data reset” ->“RESET PHONE” ->“ERASE EVERYTHING”.
After this operation, the terminal will be reset to factory defaults and all the personal data on the internal storage, such as
music and photos, will be deleted.
17
Page 24

Language & Input Method
Tap the app icon ->“Language & input”. Then set the language and input method as per your needs.
Shortcuts to Apps
Create a shortcut to an appon your Home screen: Tap on the Home screen. Tap and hold your desired app and
then drag it into the home screen.
Widgets
View all widgets: Tap and hold the Home screen and then tap .
Open a widget: Tap it.
Add a widget icon to the Home screen:Tap and hold the Home screen and then tap . Tap and hold your desired
widget and then drag it into the home screen.
18
Page 25

正 确的 读码 方 法
错误 的读 码方 法
Correct
Wrong
Chapter 4 Scanning Barcodes
Introduction
This chapter includes scanning tips and instructions for setting up the scanner.
Scanning 1D Barcode
Adjust the scan angle or the distance between the MT90 and the target barcode to ensure the length of laser beam is
roughly 8mm greater than that of the barcode, as shown below.
19
Page 26

Scanning 2D Barcode
Adjust the scan angle and the distance between the MT90 and the target barcode to make them fall into the following
ranges:
1) Point the MT90’s focus lamp at the center of the barcode.
2) Move the MT90 until you find the appropriate scan distance.
3) Optimum scan angles:
Skew (α)< 45°(0° preferably)
Pitch ()< 45°(5°- 20°preferably)
Roll ()= 0°- 360°
20
Page 27

Programming Scanner
Tap the app icon then“Scan Settings”, or tap the app icon on the Home screenthen . Then set the following
items as per your actual needs.
21
Page 28

Enable scan
Check or uncheck the “Enable scan” item to enable or disable the scanning feature of the MT90
Output Mode
The MT90 provides three output modes: Simulate keystroke, Output via API and Fill in EditText directly.
1. Simulate keystroke:Output scanned data to keyboard buffer to simulate keyboard input.
Character interval (ms): A character interval of 0-100 milliseconds may be placed between the transmission of each
character of scanned data.
2. Output via API: Application acquires scanned data by receiving system broadcasts.
3. Fill in EditText directly:Output scanned data at the current cursor position in EditText.
Overwrite output:Clear the text input box before sending the barcode currently scanned to make sure only most recently
scanned data is present in the text input box. This feature is available only when Simulate keystroke or Fill in EditText
directly is selected.
Output enter-event: Send an Enter Key after each barcode scanned.
22
Page 29

Scan Mode
The MT90 provides three scan modes: Level mode, Continuous mode and Pulse mode.
1. Level mode:Press the scan triggerto start a decode session which continues until the key is released or the decode
session timeout expires or a barcode decodes.
2. Continuous mode:Press the scan trigger to continuously read barcodes. To suspend or resume scan operation, simply
press the Scan key.
Scan interval (ms): This parameter sets the timeout between decodesessions.
Masked repeat interval (ms):This parameter sets the time period before the scanner can read the same barcode a
second time.
3. Pulse mode:Press the scan triggerto start a decode session which continues until the decode session timeout expires.
Decode session timeout (ms): This parameter sets the maximum time decode session continues during a scan attempt.
23
Page 30

ScanTrigger
1. SCAN key: Usethe Scan key on the front panelof the terminal as scan trigger.
2. Left/Right SCAN key: Usethe Scan key on the left/right side of the terminal as scan trigger.
Prefix & Suffix
To set the prefix/suffix, enter the hexadecimal value of a desired prefix/suffix and then tap “OK”. For example, if you
24
Page 31

want to add a Line Feed character after each barcode, set the suffix to “0A”; if you want to add a Carriage Return
character after each barcode, set the suffix to “0D”.
Good Read Indicator
1. Sound:The MT90 issues a short beep to indicate a good read.
2. Vibrating: The MT90 vibrates to indicate a good read.
3. LED: The blue LED on the MT90 flashes once to indicate a good read.
25
Page 32

Encoding
Choose a character encoding to interpret barcode data.
1. UTF-8:Dominant Unicode encoding.
2. GBK:A character encoding for Chinese characters.
3. ISO-8859-1:A common character encoding which covers Western European languages.
Data Extraction
Output only a selected part of raw data, starting from the character at the From position and continuing to the character
at the To position (Leaving the To field blank means to the last character of raw data). e.g. From 1 To 3 means to
output the first through third characters of raw data.
26
Page 33

Character Replacement
Replace characters in raw data. Up to 10 pairs of character replacements can be programmed here.
Characters to be replaced (HEX): Enter the ASCII hex values of characters to be replaced, each with a prefix
character “x”. e.g. Entering x33x34 means each “34” in the raw data will be replaced.
Replacement characters (HEX): Enter the ASCII hex values of replacement characters, each with a prefix character
“x”. e.g. Entering x61x62 means replacing the character(s) specified in the Characters to be replaced field in the raw
data with “ab”.
REMOVE:Click it to delete a pair of character replacement.
Add new:Click it to add a pair of character replacement.
27
Page 34

Symbologies
Enable or disable the barcode symbologies and set other barcode parameters.
28
Page 35

Chapter 5 Bluetooth
This chapter describes how to connect the MT90 to other Bluetooth device.
You can set up a Bluetooth connection between the MT90 and other Bluetooth devices, such as PC, mobile phone. Note
that Bluetooth connection works better if there are no obstacles between them.
Before you can use a Bluetooth device with the MT90, you must first pair them.
1. Make the Bluetooth device visible to the MT90.
2. Tap the app icon then “Bluetooth”, and turn Bluetooth on to search for available Bluetooth devices.
3. Select the device from the search results to pair.
4. If prompted, input the pairing code and then tap “OK”; or if the pairing code is given automatically, then tap “PAIR”.
Unpair/rename a paired Bluetooth device: Tap the app icon then “Bluetooth”, andturn Bluetooth on. Tap
beside the paired Bluetooth device. To rename the pair Bluetooth device, edit its name manually and then tap “OK”. To
unpair it, tap “FORGET”.
29
Page 36

Chapter 6 Wi-Fi
Introduction
This chapter describes how to connect the PT60 to a Wi-Fi network.
Wi-Fi Settings
Join a Wi-Fi network:
1. Tap the app icon then “Wi-Fi”, and turn Wi-Fi on to find available Wi-Fi networks. If Wi-Fi is already ON, then the
terminal will automatically scan for available networks.
2. Tap a network and then enter the password.
3. Tap “CONNECT”.
30
Page 37

IP Settings
To set the IP, follow the first two steps of joining a Wi-Fi network, check the “Advanced options” item, tap “DHCP” and
choose your desired option.
31
Page 38

Chapter 7 Admin Tool
Introduction
The Admin Tool app is used to specify the apps that users can run on the MT90.
Setting the Admin Password
When you use the admin tool for the first time, you will be asked to set the admin password.
Tap the app icon . Enter and re-enter the password, input the answer to the security question and tap “OK”. Then you
will log into the admin tool.
32
Page 39

Setting the Admin Mode
After logging into the admin tool, you may set the following parameters as per your actual needs.
1. App Manager: Select or deselect the apps available to normal users.
2. Autostart App Manager:Enable or disable the autostart apps.
3. Reset Password: Change the Admin password.
33
Page 40

Entering/Exiting the User Mode
To enter the User mode, tap in the top right corner of the screen.
To exit the User mode, press the Return key on the front panel, enter the Admin password and tap “OK”.
34
Page 41

Chapter 8 Whitelist Manager
Introduction
The Whitelist Manager app is used to specify the apps that users can install on the MT90.
Logging in Whitelist Manager
Tap the app icon on the Home screen then , enter the password (default: 112233),and tap “Login” to log in the
whitelist manager. Then set the whitelist manager as per your actual needs.
35
Page 42

36
Page 43

Camera
Take a photo
Start/stop videorecording
Settings
Panorama Mode
Motion Track Mode
Normal Mode
Live Photo Mode
View photo/video
Tap the app icon to launch the Camera app.
Chapter 9 Others
: Tap it to reveal the parameters such as location info, face beauty, exposure, scene mode and white balance and set
those parameters as per your needs.
: Tap it to take a photo.
: Tap the thumbnail image in the bottom right corner of the screen to view the photo or video saved.
You can also download a camera app from the Internet or develop an app for the camera feature.
37
: Tap it to start/stop a video recording.
Page 44

Memory Cleanup
Press and hold the Home key on the keypad until the terminal displays the following screen and then tap to clean up
the memory.
Note:When your terminal becomes less efficiently after having run for extended periods of time, you may perform a
memory cleanup or reboot the terminal to fix the problem.
38
Page 45

Chapter 10 System Update
Update the system online: Tap on the home screen -> ->“Check for updates”.
39
Page 46

Chapter 11 App Development Guide
Development Environment
The MT90 runs on Android 5.1 operating system, so you should use Android SDK 5.1 or lower when developing apps for
the MT90.
Use of Non-standard Interfaces
See NLS-MT90SDK Handbook.
40
Page 47

Chapter 12 Maintenance& Troubleshooting
Introduction
This chapter includes important safety and handling information and provides troubleshooting solutions for issues that might
occur when using the terminal.
Important Safety &Handling Information
Disassembly and Retrofit
Do not disassemble or retrofit the terminal by yourself. Unauthorized disassembly or retrofit will void the warranty.
External Power Supply
Use only the included AC adapter. Otherwise there is a risk of damage to the terminal.
Abnormal Situation
Keep the terminal away from fire or heat sources. If there is unusual odor, overheating or smoke during charging,
immediately cut off the power and disconnect the AC adapter, and contact your dealer or Newland customer service center.
Continued use in this case may result in fire or electric shock.
Drop Damage
If the terminal is damaged due to a drop from high place, immediately cut off the power and contact your dealer or Newland
customer service center.
LCD Screen
Do not press against or strike the LCD screen. Otherwise it may damage the screen. When handling a cracked or shattered
screen, do not touch the liquid that has leaked from it to avoid skin burn or infection.
Stacking Heavy Objects
Do not place heavy objects on the terminal as those objects may fall and cause injury.
41
Page 48

Mounting Location
Do not place the terminal on unstable or uneven surfaces as it may fall and cause injury. Do not expose the terminal to
humidity or dust as this maycause fire or electric shock. Do not expose the terminal to direct sunlight for extended periods.
Wireless Functionalities
Do not use the terminal’s wireless functionalities where wireless device use is prohibited or where it may cause interference
or danger, such as in aircrafts, petrol stations.
Use & Maintenance
If the terminal cannot be switched on after experiencing a sudden or unexpected power loss or other abnormalities,
remove and then reinstall its battery to reset the terminal.
Do not throw, drop or strike the terminal. Doing so may damage the LCD display, interrupt running programs, cause
data loss in memory and result in malfunction.
Clean the scan window regularly. Do not touch it with hands. Scratched or smudged window may degrade reading
performance.
Do not tap the touch screen with sharp objects. Doing so may damage the screen or cause internal short circuits.
Use only a dry soft cloth to clean the terminal. Cleaning it with wet cloth or benzene/ thinner/ other volatile chemicals
may deform and shorten the service life of the keypad and shell of the terminal.
Do not place the terminal facedown on any surface, or there might be misoperations.
Sudden temperature drops may cause condensation on the shell which could cause malfunction. Care should be
taken to avoid condensation. If condensation occurs, dry the terminal before use.
Battery Safety Guidelines
Do not dispose of batteries in a fire as they may explode.
The battery can be charged and discharged over 500 times. If the battery life is unreasonably short, please replace
the battery with a new one.
Use only the included battery and AC adapter.
Do not continue to charge a battery that is fully charged. Overcharging will shorten battery lifespan. If a fully charged
battery is not used, it will discharge slowly, which does not affect its normal use.
Do not use damaged or faulty AC adapters or batteries.
Properly dispose of and recycle batteries. Do not dispose of them as household garbage.
42
Page 49

Troubleshooting
Problem
Possible Cause & Solution
Type
Description
Keypad
Unresponsive keypad or
incorrect response to any
key entry.
This problem may be caused by unreliable cable connection between keypad
and mainboard or keypad malfunction. Please contact Newland after -sales
service.
Battery
Charging LED is OFF when
charging.
Ensure the AC adapter is plugged in properly.
Noticeably short battery life.
1. Check the battery level. If the battery is almost depleted, recharge it.
2. Replace the battery if it is faulty.
Fully charged battery is
depleted after the terminal is
switched on.
If the battery is faulty, replace it with a new one.
USB
USB communication failure
1. Ensure that the USB cable connections are secure.
2. Ensure that there is no contaminant inside the Micro USB port.
3. If the problem still remains, please contact the after-sales service center.
LCD
Screen
No display
1. Ensure the terminal is switched on.
2. If the terminal is in sleep mode, press the Power key to wake it up.
3. Check the battery level. If the battery is depleted, recharge it.
4. Ensure that the battery is properly installed.
5. Replace the battery if it is faulty.
6. If the problem still remains, please contact the after-sales service center.
System
Cannot switch on
1. Check the battery level. If the battery is depleted, recharge it.
2. Switch the terminal on after using the included AC adapter to connect it to a
power outlet. If the problem disappears, then continue to charge the terminal. If
the problem remains after charging the terminal for a while, replace the battery
with a new one.
System halted
1. The problem may be caused by bugs of downloaded apps. Ensure that only
reliable apps are used.
2. The problem may be caused by a sudden or unexpected power loss. Remove
and then reinstall its battery to reset the terminal.
43
Page 50

FCC Warning:
This equipment has been tested and found to comply with the limits for a Class B digital device,
pursuant to part 15 of the FCC Rules. These limits are designed to provide reasonable protection against
harmful interference in a residential installation. This equipment generates, uses and can radiate radio
frequency energy and, if not installed and used in accordance with the instructions, may cause harmful
interference to radio communications. However, there is no guarantee that interference will not occur in
a particular installation. If this equipment does cause harmful interference to radio or television
reception, which can be determined by turning the equipment off and on, the user is encouraged to try to
correct the interference by one or more of the following measures:
• Reorient or relocate the receiving antenna.
• Increase the separation between the equipment and receiver.
• Connect the equipment into an outlet on a circuit different from that to which the receiver is
connected.
• Consult the dealer or an experienced radio/TV technician for help.
Caution: Any changes or modifications to this device not explicitly approved by manufacturer could
void your authority to operate this equipment.
This device complies with part 15 of the FCC Rules. Operation is subject to the following two
conditions: (1) This device may not cause harmful interference, and (2) this device must accept any
interference received, including interference that may cause undesired operation.
The device has been evaluated to meet general RF exposure requirement. The device can be used in
portable exposure condition without restriction.
44
Page 51

Newland Auto-ID Tech. Co., Ltd.
(Headquarters)
3F, Building A, No.1, Rujiang West Rd., Mawei,
Fuzhou, Fujian, China 350015
Tel: +86 - (0) 591-83978605
Fax: +86 - (0) 591-83979216
E-mail:
contact@nlscan.com
Web: www.newlandaidc.com
Newland Europe BV
Rolweg 25, 4104 AV Culemborg, The Netherlands
Tel: +31 (0) 345 87 00 33
Fax: +31 (0) 345 87 00 39
Email: info@newland-id.com
Web: www.newland-id.com
Tech Support: tech-support@newland-id.com
Newland North America Inc.
46559 Fremont Blvd., Fremont, CA 94538, USA
Tel: 510 490 3888
Fax: 510 490 3887
Email:
info@newlandna.com
Web: www.newlandamerica.com
Newland Latin America
Tel: +1 (239) 598 0068
Fax: +1 (239) 280 1238
Email: info@newlandla.com
Web: www.newlandamerica.com
Newland Taiwan Inc.
7F-6, No. 268, Liancheng Rd., Jhonghe Dist. 235,
New Taipei City, Taiwan
Tel: +886 2 7731 5388
Fax: +886 2 7731 5389
Email:
info@newland-id.com.tw
Web: www.newland-id.com.tw
Newland Korea
Biz. Center Best-one, Jang-eun
Medical Plaza 6F, Bojeong-dong 1261-4,
Kihung-gu, Yongin-City, Kyunggi-do, South Korea
Tel: +82 10 8990 4838
Fax: +82 70 4369 0009
Email:
th.sung@newland-id.com.tw
Web: www.newlandaidc.com/kor/
 Loading...