

Page 1
20 09 A UG . Ver 1. 1
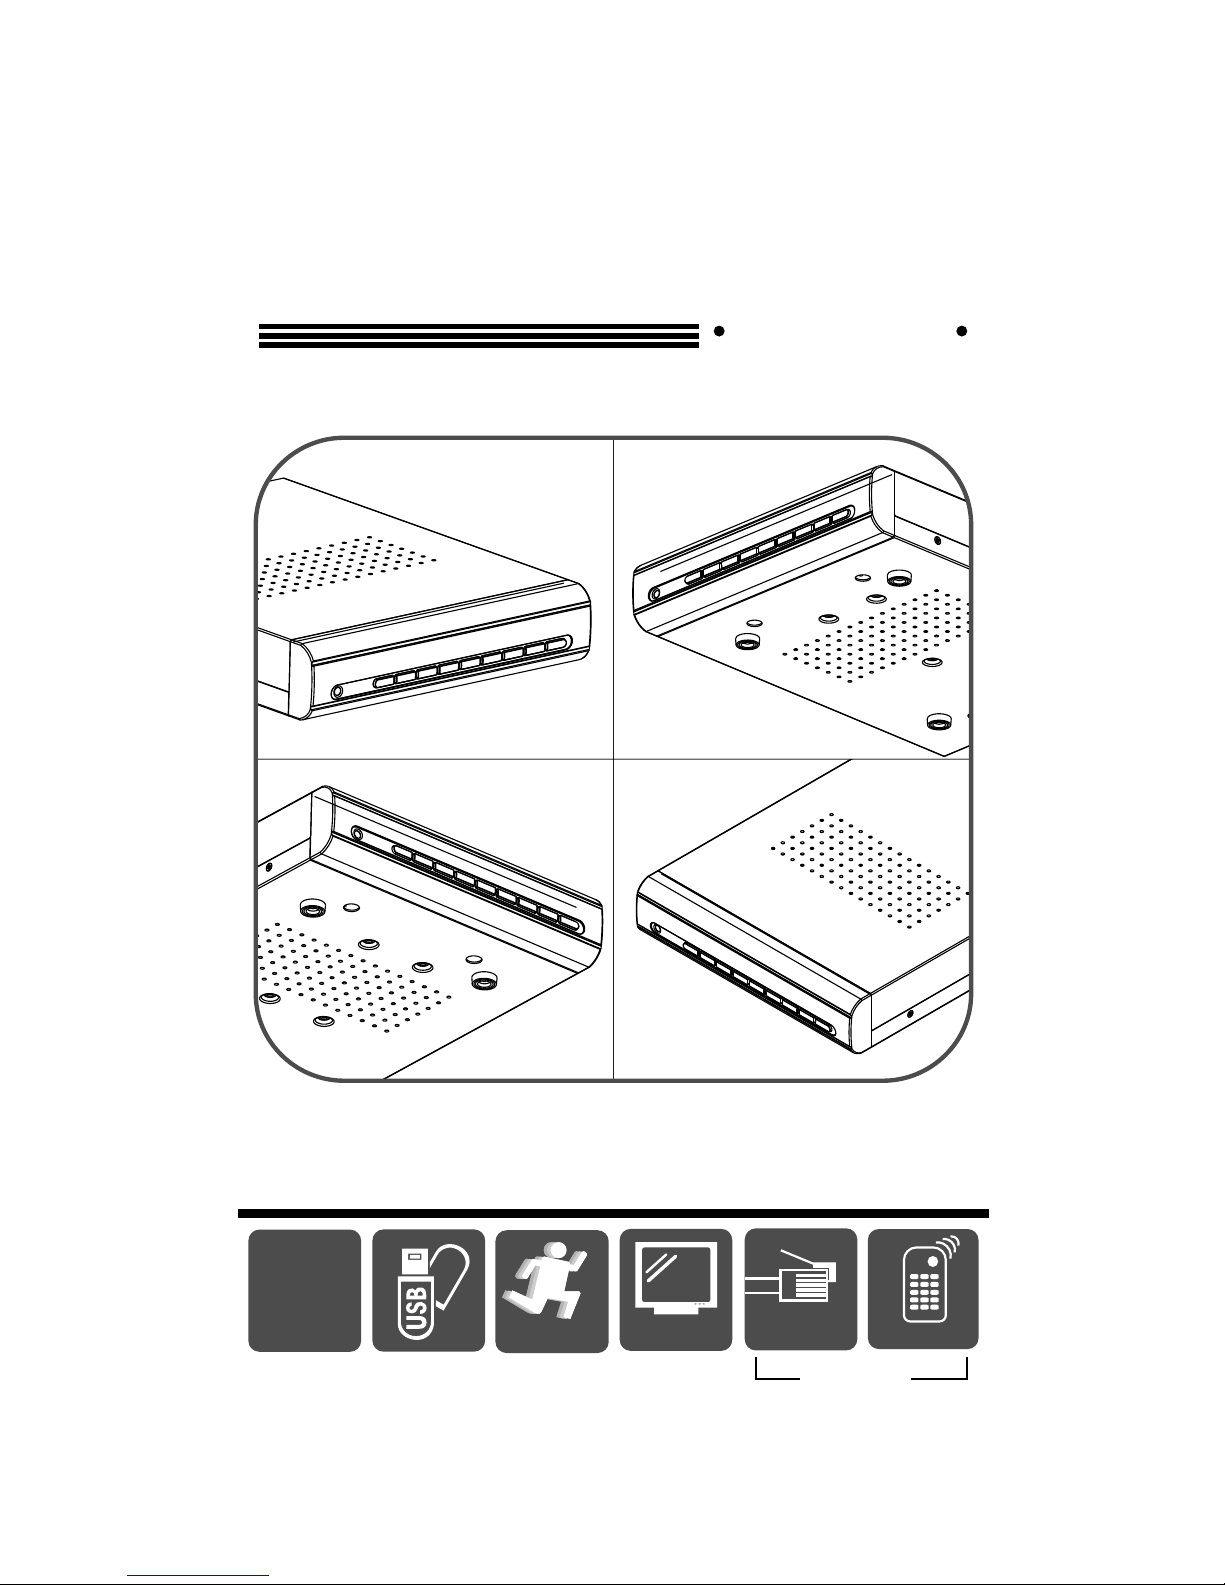
4CH STANDALONE DVR
MANUAL
XGA
LAN
Remote
4ch
MO TI ONMO TI ON
OPTION
Page 2
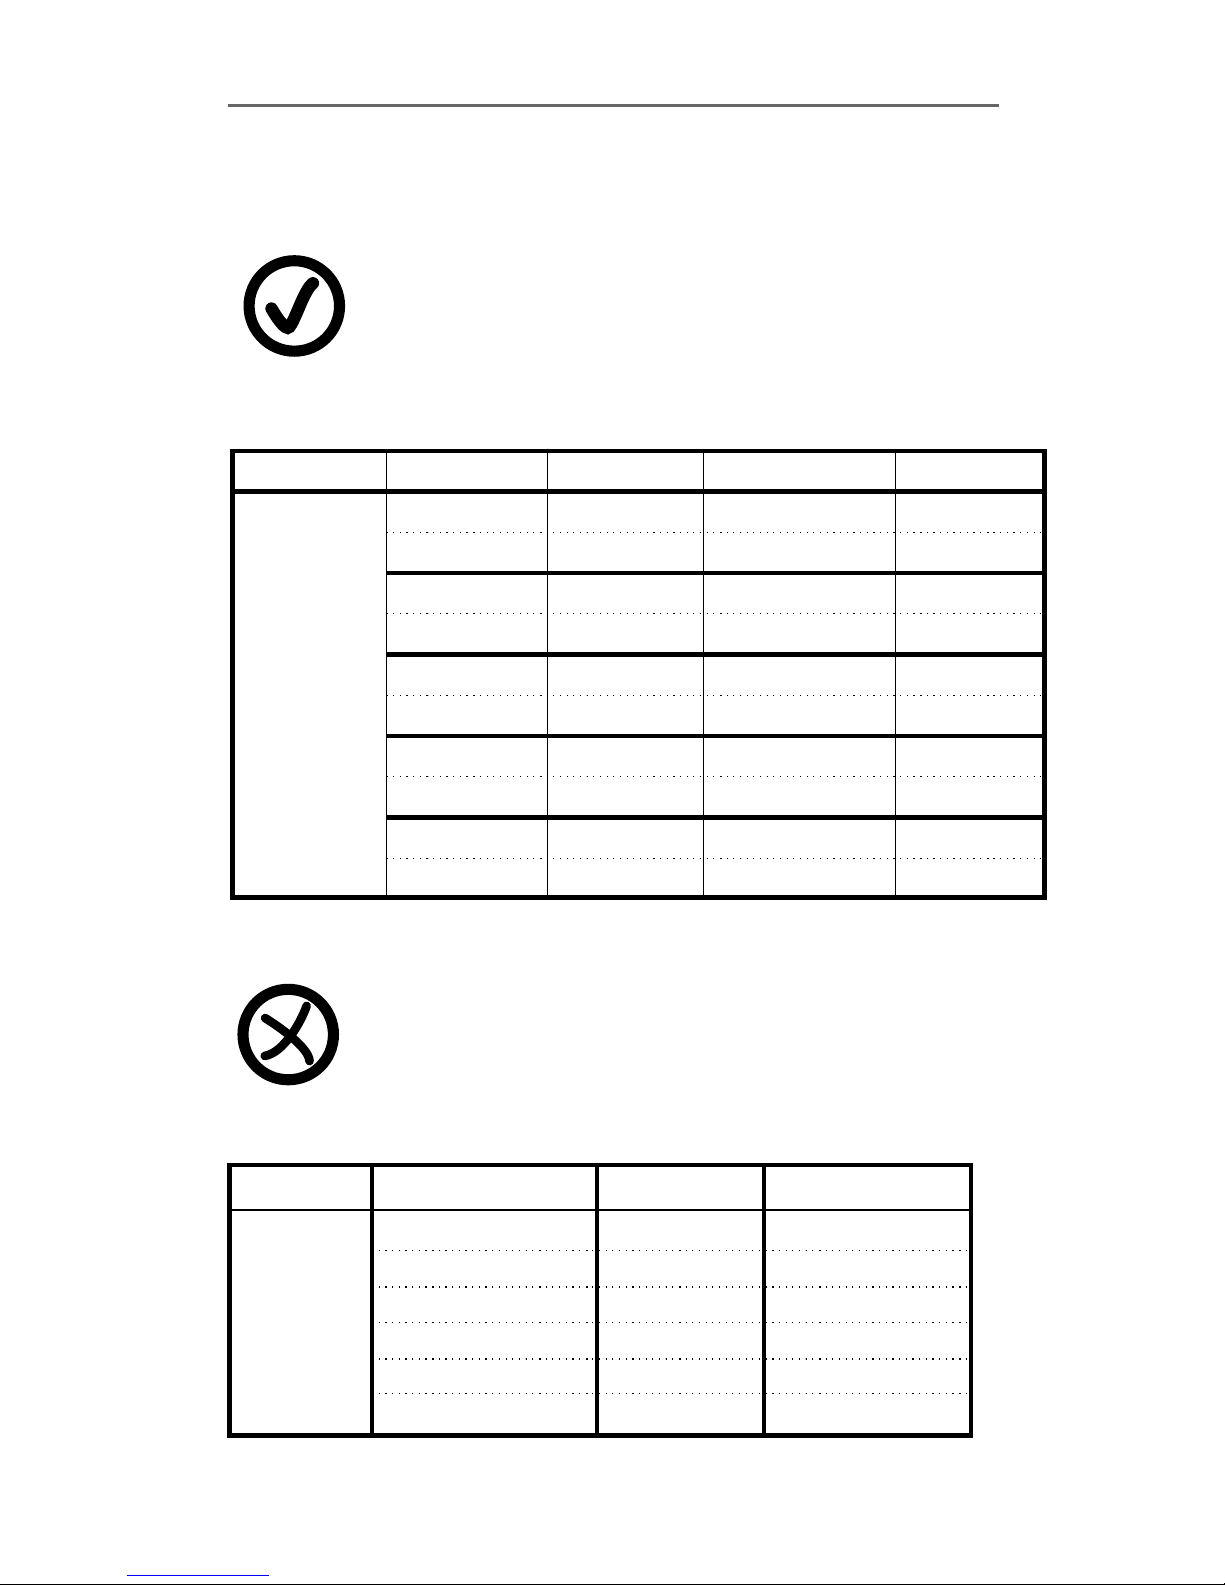
HDD SUPPORT LIST
Warning:
Should you wish to install a new hard drive in this unit,
a list of tested hard drives shown to be compatible can
be found below.
Warning:
The hard drive below is not recommended
for this unit
SATA
Maxtor Seagate HITACHI WD
250GB
320GB
500GB
750GB
1TB
250GB
320GB
500GB
750GB
1TB
250GB
320GB
500GB
1TB
250GB
320GB
500GB
750GB
1TB
HITACHI Seagats WD
750GB
HDS7 21075KLA330
STM3250318AS ST3250824AS HDT7250 25 VL A3 80 WD2500AVVS
STM3320418AS ST3320310CS HDT7250 32 VL A3 60 W D3 20 0AVVS
STM3500418AS ST3500320SV HDT7250 50 GL A3 60 W D5 00 0AVVS
WD7500AACS
WD10EVVS HDT721010SLA360
250GB
ST3250310SV
500GB
ST3500312CS
STM3750528 AS S T3 75 03 30 SV
STM31000528AS ST31000528AS
250GB
WD2500AAJS
320GB
WD32000AAKS
500GB
WD5000AAKS
Brand
Capacity/
Model Num ber
Brand
Capacity/
Model Num ber
SATA
Page 3

USB FLASH DISK SUPPORT LIST
Warning:
We recommend having the USB flash disk by using
the following USB flash disk support list to ensure
the compatibility with the DVR and best performance.
Brand
Transcend
Transcend
Transcend
Transcend
Adata
Adata
Adata
Adata
Adata
SONY
SONY
SanDisk
SanDisk
SanDisk
Capacity
4 GB
8 GB
16 GB
32 GB
1 GB
4 GB
8 GB
16 GB
32 GB
4 GB
8 GB
4 GB
8 GB
16 GB
Backup
PASS
PASS
PASS
PASS
PASS
PASS
PASS
PASS
PASS
PASS
PASS
PASS
PASS
PASS
PASS
PASS
PASS
PASS
PASS
PASS
PASS
PASS
PASS
PASS
PASS
PASS
PASS
PASS
PASS
PASS
PASS
PASS
PASS
PASS
PASS
PASS
PASS
PASS
PASS
PASS
PASS
PASS
Remote PC
ViewingPASS
Firmware
Update
Page 4

1、FEATURES
2、SPECIFICATIONS
3、INSTALLATION
4、FRONT PANEL
5、OPERATION MENU
6、BACKUP
7、
8、
9、DVR VIEWER USER GUIDE
10、 CONTROL
RECORDING PROCEDURE
4-CH CONTINOUS RECORDING
HOURS ON SATA 400GB HDD
REMOTE GUIDE
CONTENTS
1
2
3
4
5
13
14
14
15
17
Page 5

t1u
1、FEATURES
1 Triplex (Recording, Playback, Network simultaneously)
2、Up to 60fps Recording Speed。
3、USB flash disk backup。
4、Adjust Up/Down/Left/Right screen position。
5、Video Input Signal: NTSC / PAL。
6、Video Compression: Modified MJPEG
7、Manual, Motion, & Programmed。
8、Motion Detection with Adjustable Time Duration。
9、Search Data by Date and Time。
10、Power Recover Auto Restore Record Mode。
11、Hard Disk LED Indicator When Recording。
12、Motion Detection。
13、Audio Recording。
14、SATA Hard Disk。
15、Remote Control (Optional)。
16、XGA Output (TYPE 2)。
17、LAN (Optional)
、
Page 6

t2u
2、SPECIFICATIONS
Video Format NTSC/PAL
Operating System Embedded RTOS
VGA Output D-SUB 15Pin VGA
Video Input BNC x 4 (1Vp-p 75Ω)
Audio Input RCA x 1, Line-In
Video Output BNC x 1(Main Monitor)
Audio Output RCA x 1, Line-Out
Language Multi-Language
NTSC 120 fps (4 × 30 fps)
Display Frame
PAL 100 fps (4 × 25 fps)
NTSC Max. 60 fps
Recording Frame
PAL Max. 50 fps
Video Operation Triplex (Record, Playback, Internet Access)
NTSC 640 x 448
Display
PAL 640 x 544
NTSC 640x224
Resolution
Recording
PAL 640x272
Normal 12K Bytes / Frame
High 15K Bytes / Frame
Compression
Format
Modified
MJPEG
Highest 20K Bytes / Frame
HDD SATA HDD x 1
Backup USB
Mode Time/Date, Event
Search
Full Screen Yes
Motion Detect Yes
Loss Detect Yes
Auto Switching Yes
Buzzer Output Yes
Brightness Adjust Yes
Contrast Adjust Yes
VGA Output 640*480/800*600/1024*768/1280*1024
System Monitor Power Recover Auto Restore Record Mode
Web Transmission
Format
MPEG4
Power Supply DC 12V / 3A(AC100V~240V 50/60HZ)
Dimension 220mm x 228mm x 48mm (WxDxH)
Weight 1.5KG
Page 7
t3u
3、INSTALLATION
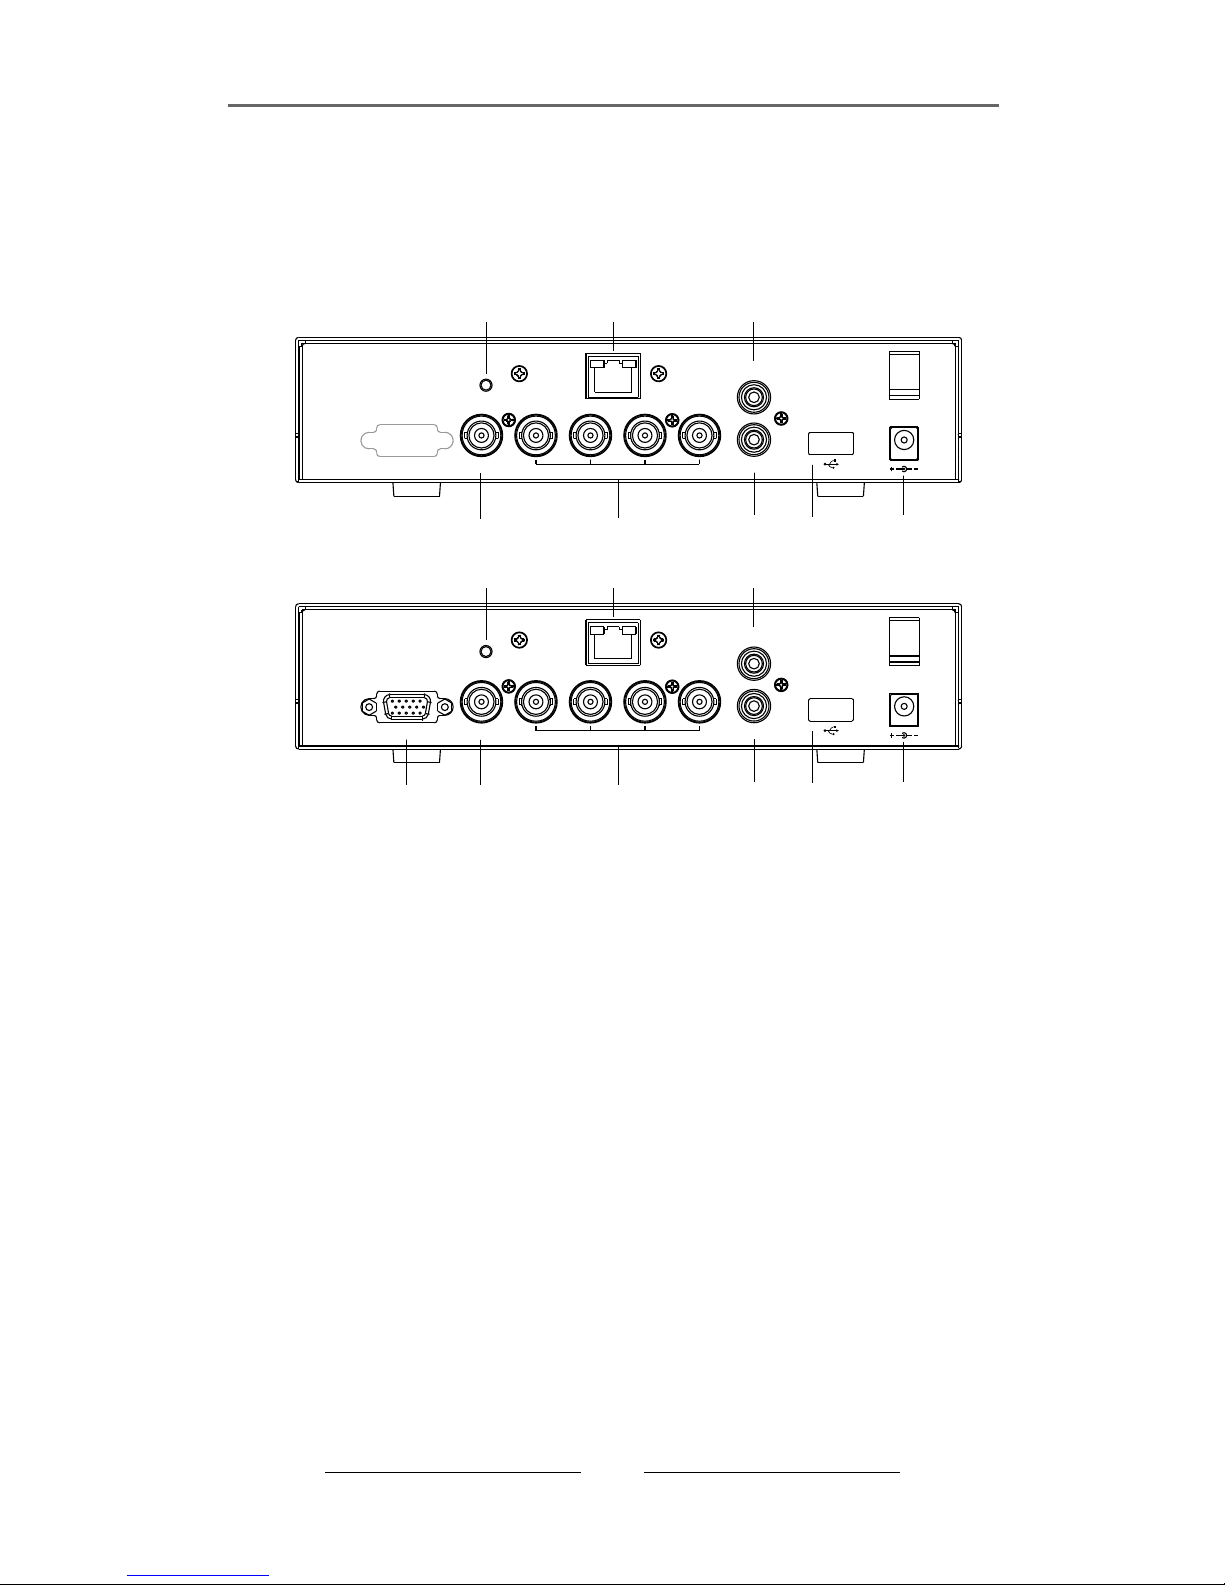
REAR PANEL
(2)
(3)
(4)
(7)(5)
DC12V
1
VIDEO IN
VIDEO OUT
DEFAULT
AUDIO IN
2
3
4
LAN
(8)
( )6
(9)
AUDIO OUT
(1) XGA Output (TY PE 2)
(2) Video Output: BNC x 1
(3) Video IN: BNC x 4
(4) Audio Input: RCA x 1, Line-In
(5) Audio Output: RCA x 1, Line-Out
(6) Hos t USB
(7)Power Input: For safety reasons, always use
the original factory power adaptor attached.
Adaptor:DC-12V / 3A。
(8) LAN Output: (Optional)
(9) DEFAULT:Reset to factory setting.
(1)
(2)
(3)
(4)
(7)(5)
DC12V
1
VIDEO IN
VIDEO OUT
DEFAULT
XGA
AUDIO IN
2
3
4
LAN
(8)
( )6
(9)
AUDIO OUT
TYPE 1
TYPE 2
Page 8

(1) (2) (3) (4) (5) (6) (7) (8) (9)
t4u
4、FRONT PANEL
(1) Up Arrow/CH1: Navigate up through menu options/
Camera 1 full screen display
(2) Down Arrow/CH2: Navigate down through menu options/
Camera 2 full screen display
(3) Left Arrow/CH3: Navigate left through menu options/
Camera 3 full screen display
(4) Right Arrow/CH4: Navigate right through menu options/
Camera 4 full screen display
(5) Menu: Main menu/ Show percentage of the hard drive used.
(6) Fast Reverse/Mute/Set
(7) Fast Forward/Sequence Switch
(8) Play/Pause
(9) Record/Stop
Page 9

t5u
5、OPERATION MENU
Pres s to select items
Use to e nter
Pres s MENU to exit
Setup
Came ra
Reco rd
Moti on Detection
Scre en
Audi o
Syst em
Sear ch
Lang uage English
Exit
2008/07/01 13:21:14
Setup
Came ra
Reco rd
Moti on Detection
Scre en
Audi o
Syst em
Netw ork
Sear ch
Lang uage English
Exit
2008/07/01 13:21:14
t u
Type A (Without Network)
Type B (With Network)
Press to select items
Use to enter
Press MENU to exit
Camera
Channel 1
Channel Name CH1
Display on
Brightness
Contrast
Hue
Saturation
t u
(1)Channel:The diagram above shows Channel 1.
(3)Display:Turn On/Off the camera signal .
(4)Brightness/Contrast/Hue/Saturati on: Adjust brightness, con trast,
hue, and saturation of channel display. The cente r point is factory default.
(2) Channel Name:The name of channel is changeable .
Camera Setup
2008/07/01 13:21:20
Page 10

t6u
Record Setup
Press to select items
Use to enter
Press MENU to exit
Record
Record Speed
Record Quality High
Event Rec Duration 10
Record Schedule
2008/07/01 13:21:24
(1)Record Speed: Set the number of frame per second (fps).
NTSC:default: 15 fps,maximum total frame: 60 fps.
PAL :default: 12 fps,maximum total frame:50 fps.
(2)Record Quality:Choose video record quality: Highest, High, or Normal.
(3)Event Rec Duration:5、10、15、20、25、30 seconds,
default: 10 seconds.
(4)Record Schedule:
2008/07/01 13:21:28
0 3 6 9 12 15 18 21 23
Record Schedule
No Record
Time Record
Motion Record
(1)Press to change record method.
(2)Range: 0-24 hours.
(3)Set “red”for continuous recording.
(4)Set “blue” for motion recording.
(5)Set “gray”to disable the recording.
Page 11

t7u
Screen
Press to select items
Use to enter
Press MENU to exit
Border off
Video Adjustment
Auto Switching 05
Resolution 1024 x 768
2008/07/01 13:21:48
Screen
(1)Border Turn On/Off,or show divided lines in quad mode.
(2)
(3)
(4)
:
Video Adjustment: Adjust the position of screen display shown.
Auto Switching: Set the duration of each channel: Off, 1 to 10 seconds.
Resolution: XGA
640 x 480 / 800 x 600 / 1024 x 768 (default) / 1280 x 1024
Motion Detection Setup
Press to select items
Use to enter
Press MENU to exit
Channel 1
Sensitivity Off
Alarm Duration Off
Motion Area
Smart Record Off
Motion Detection Setup
t u
(1)Channel:The diagram above shows Channel 1.
(2)Sensitivity:To set Off, or 1 to 4, default: Off.
(3)Alarm Duration:To set alarm duration when alarm is triggered by a
moving object: Off, 5, 10, 15, 20, 25, 30 seconds, or continuous.
(4)Motion Area:To s
★ If you want to enable motion recording, please finish the setup
procedure a and b.
a:Set SENSITIVITY level from 1 to 4 in the menu option, Motion Detection Setup
b:Set MOTION RECORDING to GREEN at the time you wish to enable motion
recording in the menu option, Record Schedule
elect motion detect area.
2008/07/01 13:21:36
(5)Smart Record:Disable in default setting. After enable the setting, system will
start recording in 3fps when the motion detection has not been triggered. After the
motion detection has been triggered, the recording fps will switch back to the user's
setting. The smart record only can set as enable when the motion detection enable.
Page 12

t8u
Audio
Press to select items
Use to enter
Press MENU to exit
Record on
Mute off
Input Volume
Output Volume
2008/07/01 13:21:50
Audio
(1) Record: On/Off
(2) Mute : On/Off
(3) Input Volume: A
(4) Output Volume: Adjust output volume.
djust input volume
System
Press to select items
Use to enter
Press MENU to exit
Password Change
Time Set
Event List
Password Check off
Buzzer Alarm off
F/W Upgrade (DVR0460.FWI)
2008/07/01 13:21:50
System
Hard Disk Setup
Page 13

t9u
Press to select items
Use to enter
Press MENU to exit
Hard Drive Disk Setup
Overwrite Enable Yes
Format HDD
Size : 238463MB
Used: 4737MB 1%
DISK0: 238463MB ST3250824AS
PRESS (Ch4) TO STOP RECORDING FIRST
(1) Hard Drive Disk Setup
(1.1) Overwrite Enable:
Enable overwrite when HDD capacity is full:
No: Stop recording
(1.2)Format HDD: When choose this item, DVR will request for 6 numbers
password. If the password is accepted, the DVR will start formatting the
HDD. A message, “wrong password” would appear in the screen when
the password is entered incorrectly.
(1.3)HDD Status
Indicates current HDD status, including total capacity and percentage
of space being used.
Factory default password setting: 111111
The HDD must be formatted when first time in use.
Yes: When HDD overwrite is taking place, the data is stored in duration
of 4 hours per event and being recorded continuously.
(2) Password Change:Password Setup
Password Change
Current Password
1 2 3 4 5 6 7 8 9 0 - = +
q w e r t y u I o p [ ]
a s d f g h j k l ; S h i f t
z x c v b n m , . / En t e r
20 0 8 / 0 6 / 2 7/ 15 : 5 7 : 3 2
Current Password: ______
New Password: ______
Confirm Password: ______
Factory default Password Setting: 111111.
When current password is entered incorrectly, a message, “Wrong Password”
will appear in the screen.
2008/07/01 13:21:50
Page 14

t10u
Apply
Time Set
Time Set 2008/07/02 14:08:37
(3) Time Set
2008/07/02 14:21:50
(3.1)Time Set:YYYY/MM/DD HH:MM:SS
(3.2)Apply:Update and save all changes.
(4) Event List
t u
Event List
005 08/07/01 13:24:32 REC START
005 08/07/01 09:42:32 REC STOP
005 08/07/01 09:42:32 REC START
005 08/07/01 09:42:32 REC STOP
005 08/07/01 09:42:32 REC START
PAGE (01/01)
2008/06/27/ 09:41:30
(1) You may choose an individual event from the recorded event list.
(2) In the live mode, press the record button to start recording.
Time: the DVR automatically records and saves events in duration of 4 hours.
The symbols, 0 and X represent whether the motion
detected function is being activated on each channel.
(3)
(4) Motion: Motion event list.
O-area with motion detection set. X –area without motion detection set.
(5)Password Check: Default is off, User need to enter the password to enter
“Menu”, or Stop Recording when it is enable.
(6)Buzzer Alarm: Default is off, The buzzer will be trigged and sounded during
video lose or motion detection when it is enable.
Page 15

t11u
(7) F/W Upgrade:
Please save updated firmware on a USB flash drive. Stick it into USB port.
The screen will show both current version and new version of firmware.
● When update is in progress, please DO NOT operate the unit or remove the
USB flash drive to prevent malfunction or system error. After it is completed,
turn off and restart the unit.
● There must have a hard drive to store new firmware. Be sure a hard drive
must be installed.
Current Ver
NEW Ver
Firmware Reading.......
2008/07/01 13:36:46
F/W Upgrade
1.5.7 1201
1.5.7 1201
IP Address
Net Mask
Gateway
Port
Enable PPPoE Off
PPPoE UserName:
PPPoE Password : *******
Apply
2008/12/29 13:06:22
Network
192.168. 1.126
255.255.255. 0
192.168. 111. 111
80
t
t
Network (For TYPE B with LAN Only)
(1) IP Address: The IP Address of DVR, you can change IP Address by DVR.
(It only support to set Static IP Adress)
(2) Net Mask: Set up Net Mask.
(3) Gateway: Set up Gateway.
(4) Port: Set up AV Port.
(5) Apply: when you change settings, please press “apply” to save configuration.
(6)PPPoE: Enable the PPPoE function
(7)Account: Enter the Account no of PPPoE.
(8)Password: Enter the password of PPPoE.
(9)Save: Click the “save” before exit to confirm the setting changes.
Page 16

t12u
Time Search
Time Search
Start 2008/07/04 09:56:11
End 2008/07/07 16:12:44
2008/07/04 09:56:11
(CH1,CH2)SET (CH3,CH4)SELECT
(MENU)EXIT (PLAY)PLAY
2008/07/01 14:21:50
(1)Set Search of time, then press "play" button to start playback.
(2)Playback:
*Press button for fast forward. Press one more time for faster speed.
Total three variable speeds.
*Press button for fast reverse. Press one more time for faster speed
and total three variable speeds.
*Press button to pause.
*Press button to stop playback.
Exit
Exit
Save & Exit
Exit Without Saving
Load Setup Default
2008/07/02 13:31:30
(1) :Save and exit changes.
(2) Exit Without Saving:Exit without saving changes.
(3) Load Setup Default: Load factory default setup
Save & Exit
Page 17

t13u
6、BACKUP
CH2CH1
CH4CH3
Star t 20 08/07/01 13:31: 20
End 2008/07/01 13:31:21
Size 192 K B
USB BACKUP MOD E
(CH1 ) Start Time, (CH2) End Time
(CH4 ) Start Backup, (STOP) EXIT
2008/0 7/01 13:31:23
(1)Stick USB flash Drive into USB port
(2)Press “ ” button,
(3)Press “ ” button to enter backup menu
(4)Press “ ” button to setup start time.
(5)Press “ ” button to setup end time. After setting up both start and
end time, the machine will indicate the size of the file.
(6)Press “ ” button to search for a USB flash drive.
(7)Press “ ” button to proceed backup process.
(8) When complete, press “ ” button to return to LIVE mode.
Page 18

t14u
(1)Press button to start recording. The symbol, will appear on the top
right hand corner of each channel in the screen that indicates it is recording
live regardless the recording mode is set on continuous or motion recording.
7、RECORDING PROCEDURE
8、4-CH CONTINOUS RECORDING HOURS ON SATA 400GB HDD
Recording Results in
NTSC Standard
Video
Standard
Video
Quality
60 fps 30 fps 15 fps 1 fps
High 50Hrs 100 Hrs 200 Hrs 3000 Hrs
Normal 80 Hrs 160 Hrs 320 Hrs 4800 Hrs
NTSC
Low 105 Hrs 210 Hrs 420 Hrs 6300 Hrs
Recording Results in
PAL Standard
Video
Standard
Video
Quality
50fps 25 fps 12 fps 1 fps
High 45 Hrs 90 Hrs 180 Hrs 2250 Hrs
Normal 75 Hrs 150 Hrs 300 Hrs 3750 Hrs
PAL
Low 100 Hrs 200 Hrs 400 Hrs 5000 Hrs
Page 19

t15u
9、DVR VIEWER USER GUIDE
1.Playback Recorded File
(1.1 )Start VVF SLPlayer
(1.2 )Point the cursor in the screen and right- click “Open File”. Pic k and
choo se the file you want to vie w in ( .vvf) and play.
2.Capture an image
(2.1) During the playback of the backup file, click “Pause”, located on the
bottom of the screen.
(2.2) When the image is staying still in the screen, press the right button on
the mouse, then pick and choose 「Capture」/「Mark In」.
This will set the starting time.
(2.3) Press the “Pause” button to pause playing and recording the images.
(2.4) To end recording, click “Pause”. Press right button on the mouse,
then pick and choose 「Capture」/「Mark Out」.
(2.5)Final step, press right button of the mouse, then pick and choose
「Capture」/「Export」
Page 20

t16u
3. Convert File to AVI Format
(3.1) Point the mouse cursor to the screen, and press the right button on the mouse,
pick and choose「Export」/「AVI」
(3.2) Set Input/Output File 、Compression、Export Channel and Audio.
(3.3) Click “OK” to start converting file to AVI forma t.
4. Options
(1) Alw ays on top:The sub wind ow always stays on top.
(2) Us e DirectDraw:DirectDraw, a part of Micros oft's DirectX is us ed to render
grap hics in applications where top perform ance is important .
(3) Sh ow playback time:Indicates the playbac k time.
(4) Re peat playback
(5) On s creen display date/time format:Indic ates date/time.
(6) Pa th for still capture:Indicates the direc tory and path name of t he file.
Page 21

t17u
CH2 display
10、REMOTE CONTROL GUIDE (OPTION)
CH1 display
CH3 display
CH4 display
Record
MUTE
SET
Play
Pause
Navigator
MENU
Quad display/
Sequence Switch
Fast Reverse Fast Forward
Stop record/
Stop playback
Page 22

H12C460V01
4CH S TA NDALO NE DV R
MANUAL
 Loading...