

Page 1

User Guide for models: FENG21C &
FENG21S!
Please retain this manual for future reference!
!
DANGER AND WARNINGS!
You Must Read This Owner’s Guide Before Operating!
Your Gas Grill!
!
!
!
!
!
DANGER!
1. If you smell gas:!
2. Shut off gas to the appliance. !
3. Extinguish any open flames.!
4. Open lid.!
5. If odor continues, keep away from the appliance and
immediately call your gas supplier or your fire department.
!
WARNING:!
1. Do not store or use gasoline or other flammable liquids or vapors
in the vicinity of this or any other appliance.!
2. An LP cylinder not connected for use shall not be stored in the
vicinity of this or any other appliance.
! 1
Page 2

Hi.!
!
Thank you for!
choosing the!
Element grill.!
Here are a few!
simple steps!
that will get your!
Element grill!
sizzling in no time.!
!
Ready. Set. Gril!
! 2
Page 3

Element by Fuego is the brainchild of visionary industrial designer, Robert
Brunner and serial entrepreneur Alex Siow. Together, they challenge
conventional thinking and transform everyday products into objects of
desire. Consumed with improving how we interact with the products we
love, Element is a modernist re-think on old-fashioned grilling. !
!
Robert Brunner, formerly Director of Design at Apple, now CEO of
Ammunition Design Group in San Francisco, is the designer
behind the Beats by Dr. Dre headsets phenomenon. Robert is an
award-winning industrial designer whose works are included in the
permanent collections of the Museum of Art in New York and San
Francisco. He is famous for challenging the status quo with designs
that are fresh and unexpected. His Element by Fuego grills are no
exception.!
!
Alex Siow is one of those Big Idea people: the kind of thinker who
sees the proverbial forest while the rest of us are scrutinizing tree
bark. Siow brings an impressive resume to his role as President of
Fuego. In 1997 he founded Zephyr Ventilation, which has become
one of the fastest growing companies in the high-end home product
category. With his uncanny ability to tap needs that seem obvious
only in hindsight, Siow makes sure Fuego never stops redefining
the world of outdoor living.!
!
!
!
!
!
! 3
Page 4
!
!
!
!
!
!
!
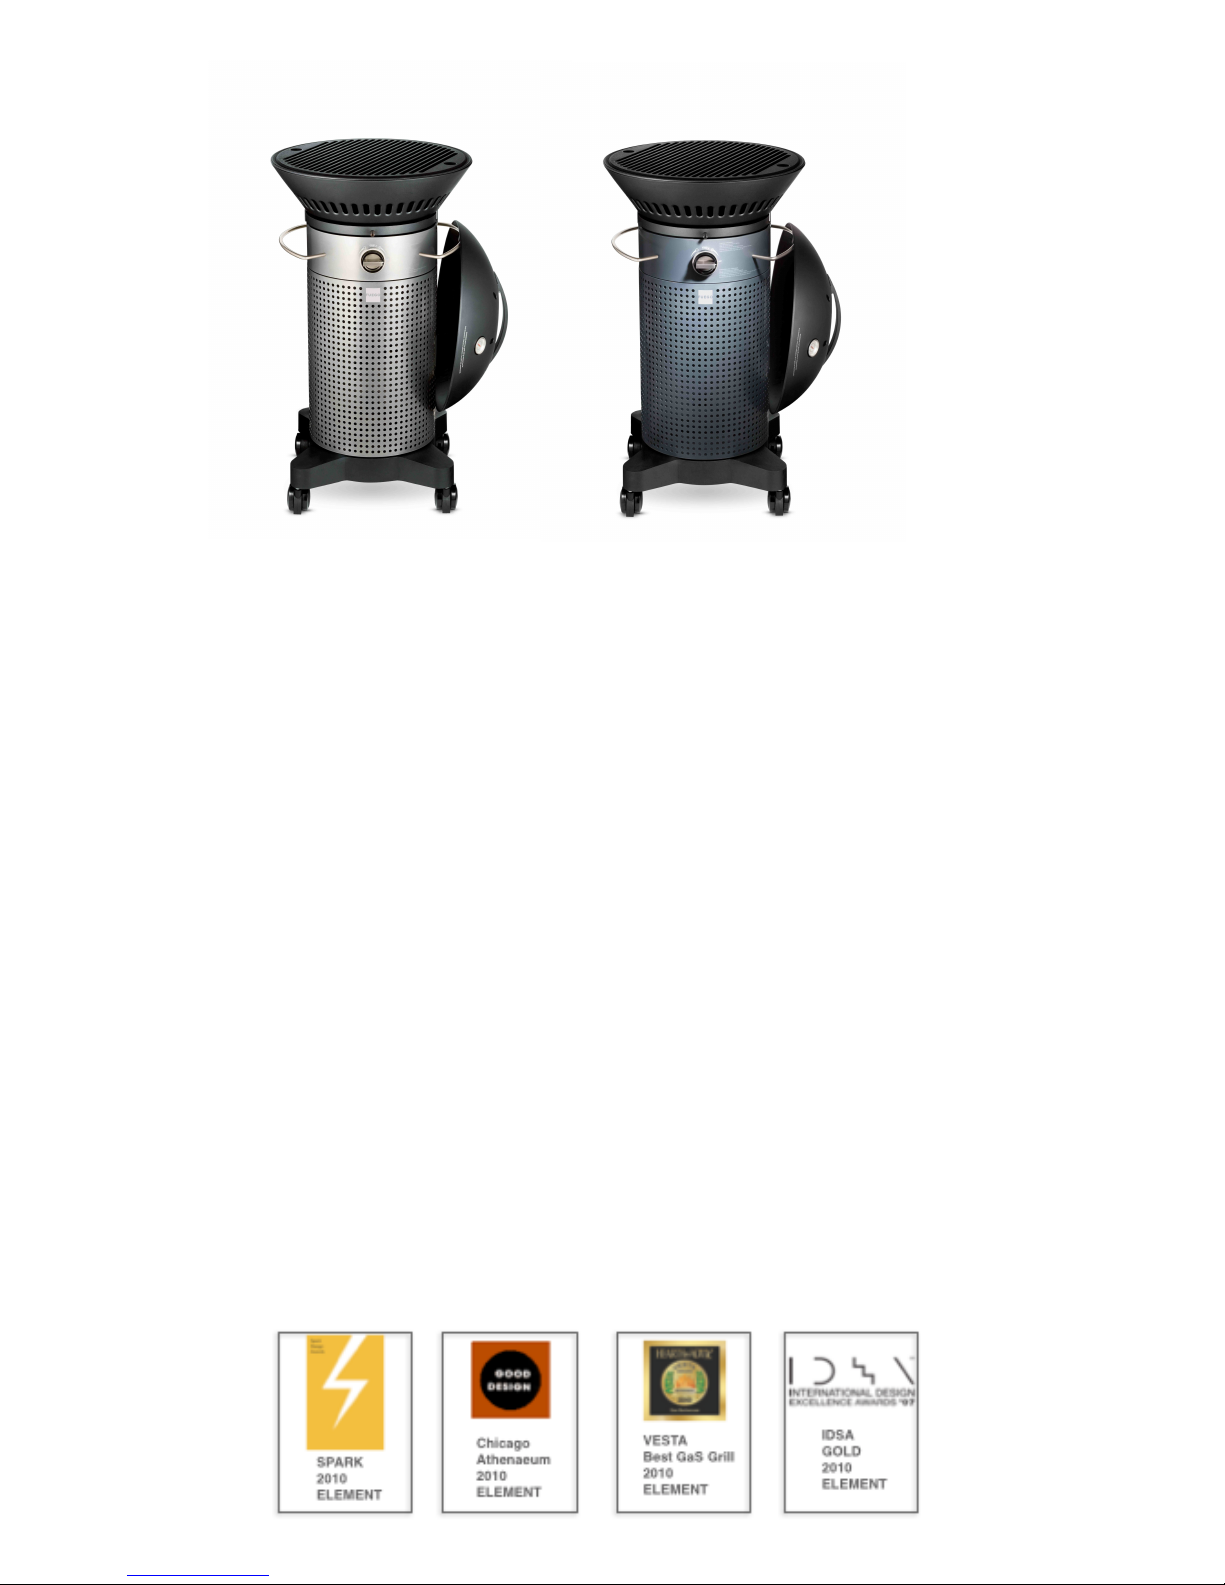
! FENG21S!! ! FENG21C!
The award-winning Fuego Element is a new concept in backyard grilling.
Designed for social connectedness, the host is now the center of the party
and can entertain while his friends gather around the grill. The Element has
a generous 346 sq. in. of cooking surface, a heavy-duty porcelain-coated
cast iron grate, and the patented Dual-Zone burner that can easily grill up
to 16 hamburgers in as little as 8 minutes. "That is enough cooking surface
to quickly feed a family of four or your local kickball team. The gas powered
Element heats up to 500ºF in as little as five minutes and reaches a
maximum temperature of 700ºF. Created to be highly efficient, the
Element’s smart design guarantees searing heat in rapid time while
optimizing the amount of fuel you use to operate it. Best of all, Element’s
23-inch footprint and anti-tilt wheels let you easily roll the grill away while
not in use. Or, you can leave it front and center so it can continue to be the
life of the party.!
!
The Element grill is the proud recipient of the Spark Design Award, the
Chicago Athenaeum Good Design Award, The Vesta Best Gas BBQ of
2010, and the IDSA Gold International Design Award. We hope you will
enjoy the product as much as we have enjoyed designing, building and
grilling on it!"!
!
!
!
! 4
Page 5
DANGER AND WARNINGS!
You Must Read This Owner’s Guide Before Operating!
Your Gas Grill!
WARNING: Leaking gas may cause a fire or explosion, which can
cause serious bodily injury or death, or damage to property.!
WARNING: Follow all leak-check procedures carefully in this manual
prior to barbecue operation. Do this even if the barbecue was dealerassembled.!
Notice To Installer: These instructions must be left with the owner and
the owner should keep them for future use.!
THIS GAS APPLIANCE IS DESIGNED FOR OUTDOOR USE ONLY.!
WARNING: Do not try to light this appliance without reading the
“Lighting Instructions” section of this manual.!
DANGER Failure to follow the Dangers, Warnings and Cautions
contained in this Owner’s Manual may result in serious bodily injury or
death, or in a fire or an explosion causing damage to property.!
WARNINGS Do not store a spare or disconnected liquid propane
cylinder under or near this barbecue.!
Improper assembly may be dangerous. Please follow the assembly
instructions carefully.!
After a period of storage, and/or non-use, the barbecue should be
checked for gas leaks and burner obstructions before use. See
instructions in this manual for correct procedures.!
Do not operate the barbecue if there is a gas leak present.!
Do not use a flame to check for gas leaks.!
Minimum clearance from sides and back of unit to combustible
construction, 21 inches from sides and 21 inches from back.!
Do not put a barbecue cover or anything flammable on, or in the area
under the barbecue.!
!
! 5
Page 6

Your barbecue should never be used by children. Accessible parts of
the barbecue may be very hot. Keep young children away while it is in
use.!
You should exercise reasonable care when operating your barbecue.
It will be hot during cooking or cleaning and should never be left
unattended or moved while in operation.!
Should the burner go out while in operation, turn all gas valves off.
Open the lid and wait five minutes before attempting to relight, using
the lighting instructions.!
Do not use charcoal or lava rock in your barbecue. Never lean over
open grill or place hands or fingers on the front edges of the cooking
box.!
Should a grease fire occur, turn off burner and close the lid until fire is
out.!
Do not enlarge valve orifices or burner ports when cleaning the valves
or burner.!
The barbecue should be thoroughly cleaned on a regular basis.!
Liquid propane is not natural gas. A conversion kit must be purchased
to use natural gas.!
Do not attempt to disconnect any gas fitting while your barbecue is in
operation.!
Use heat-resistant barbecue mitts or gloves when operating barbecue.!
Keep any electrical supply cord and fuel supply hose away from any
heated surfaces.!
!
!
!
!
! 6
Page 7

CALIFORNIA PROPOSITION 65 WARNING: The burning of gas
cooking fuel generates some by-products which are on the list of
substances known by the State of California to cause cancer and
reproductive harm. California law requires businesses to warn
customers of potential exposure to such substances. To minimize
exposure to these substances always operate this unit according to
this grill manual, ensuring you provide good ventilation when cooking
with gas.!
Do not use this barbecue unless all parts are in place. The unit must
be properly assembled according to the assembly instructions.!
Liquid Propane Gas Units: Use the pressure regulator and hose
assembly that is supplied with your barbecue.!
Do not attempt to disconnect the gas regulator and hose assembly or
any gas fitting while your barbecue is in operation.!
A dented or rusty liquid propane cylinder may be hazardous and
should be checked by your liquid propane supplier. Do not use a liquid
propane cylinder with a damaged valve.!
Although your liquid propane cylinder may appear to be empty, gas
may still be present, and the cylinder should be transported and stored
accordingly.!
If you see, smell or hear the hiss of escaping gas from the liquid
propane cylinder:!
!
1. Move away from liquid propane cylinder.!
2. Do not attempt to correct the problem yourself.!
3. Call your fire department.!
!
!
! 7
Page 8

General Instructions!
•
Your Element barbecue is a portable outdoor cooking appliance.
You can easily change its location in your yard or on your patio.
Portability means you can take your barbecue with you if you
move. Liquid Propane (LP) gas supply is easy to use and gives
you more cooking control than charcoal fuel.!
•
These instructions will give you the minimum requirements for
assembling your barbecue. Please read the instructions carefully
before using your gas barbecue. Improper assembly can be
dangerous.!
•
Not for use by children.!
•
If there are local codes that apply to portable gas grills, you will
have to conform to them. Installation must conform with local
codes, or in the absence of local codes, with either the National
Fuel Gas Code, ANSI Z223.1/NFPA 54, Natural Gas and Propane
Installation Code, CSA B149.1, or Propane Storage and Handling
Code, B149.2.!
•
The pressure regulator supplied with the gas barbecue must be
used. This regulator is set for 11 inches of water column
(pressure).!
•
This gas barbecue is designed for use with natural gas with set
pressure of 7” water column.!
•
Do not use with charcoal fuel.!
•
The areas around the bbq grill must be free and clear from
debris.!
•
If it’s evident there is excessive abrasion or wear, or the hose is
cut, it must be replaced prior to the outdoor cooking appliance
being put into operation. Replacement pressure regulators and
hose assemblies must be those specified by the manufacturer.!
! 8
Page 9

For Installation In Canada!
These instructions, while generally acceptable, do not necessarily comply
with the Canadian Installation codes, particularly with piping above and
below ground. In Canada the installation of this appliance must comply
with local codes and/or Standard CSAB149.2!
(Propane Storage and Handling Code)!
WARNING: Your gas barbecue is not intended to be installed in or on
recreational vehicles and/or boats.!
WARNING: Do not use the barbecue within 21 inches of combustible
materials to the back or sides of the grill.!
WARNING: The entire cooking box gets hot when in use. Do not leave
unattended.!
WARNING: Keep any electrical supply cord and the fuel supply hose
away from any heated surface.!
WARNING: Keep the cooking area clear of flammable vapors and
liquid such as gasoline, alcohol, etc. and combustible materials.!
WARNING: Do not leave items on or against the barbecue. Keep
flammable products and sprays away. For outdoor use only.!
!
!
!
!
!
!
!
!
! 9
Page 10

Storage And/Or Non Use!
!
•
The gas must be turned off at the gas shut off when the gas
barbecue is not in use.!
•
When the gas barbecue is stored indoors, the gas supply must be
DISCONNECTED.!
•
Check the residue tray and areas inside the storage area to ensure
they are free of debris prior to use.!
•
The gas barbecue should be checked for gas leaks and any
obstructions in the burner tubes before using. (See maintenance
section)!
!
Operating!
!
WARNING: Only use this barbecue outdoors in a well-ventilated area.
Do not use in a garage, building, breezeway or any other enclosed
area.!
WARNING: Keep ventilation openings for cylinder enclosure free and
clear from debris.!
WARNING: Your gas barbecue shall not be used under overhead
combustible construction.!
WARNING: This outdoor cooking gas appliance is not intended to be
installed in or on a boat or recreational vehicles.!
!
!
!
! 10
Page 11
!
! 11
Page 12

!
!
!
!
!
!
!
!
!
!
!
!
!
!
!
!
!
!
!
! 12
Page 13

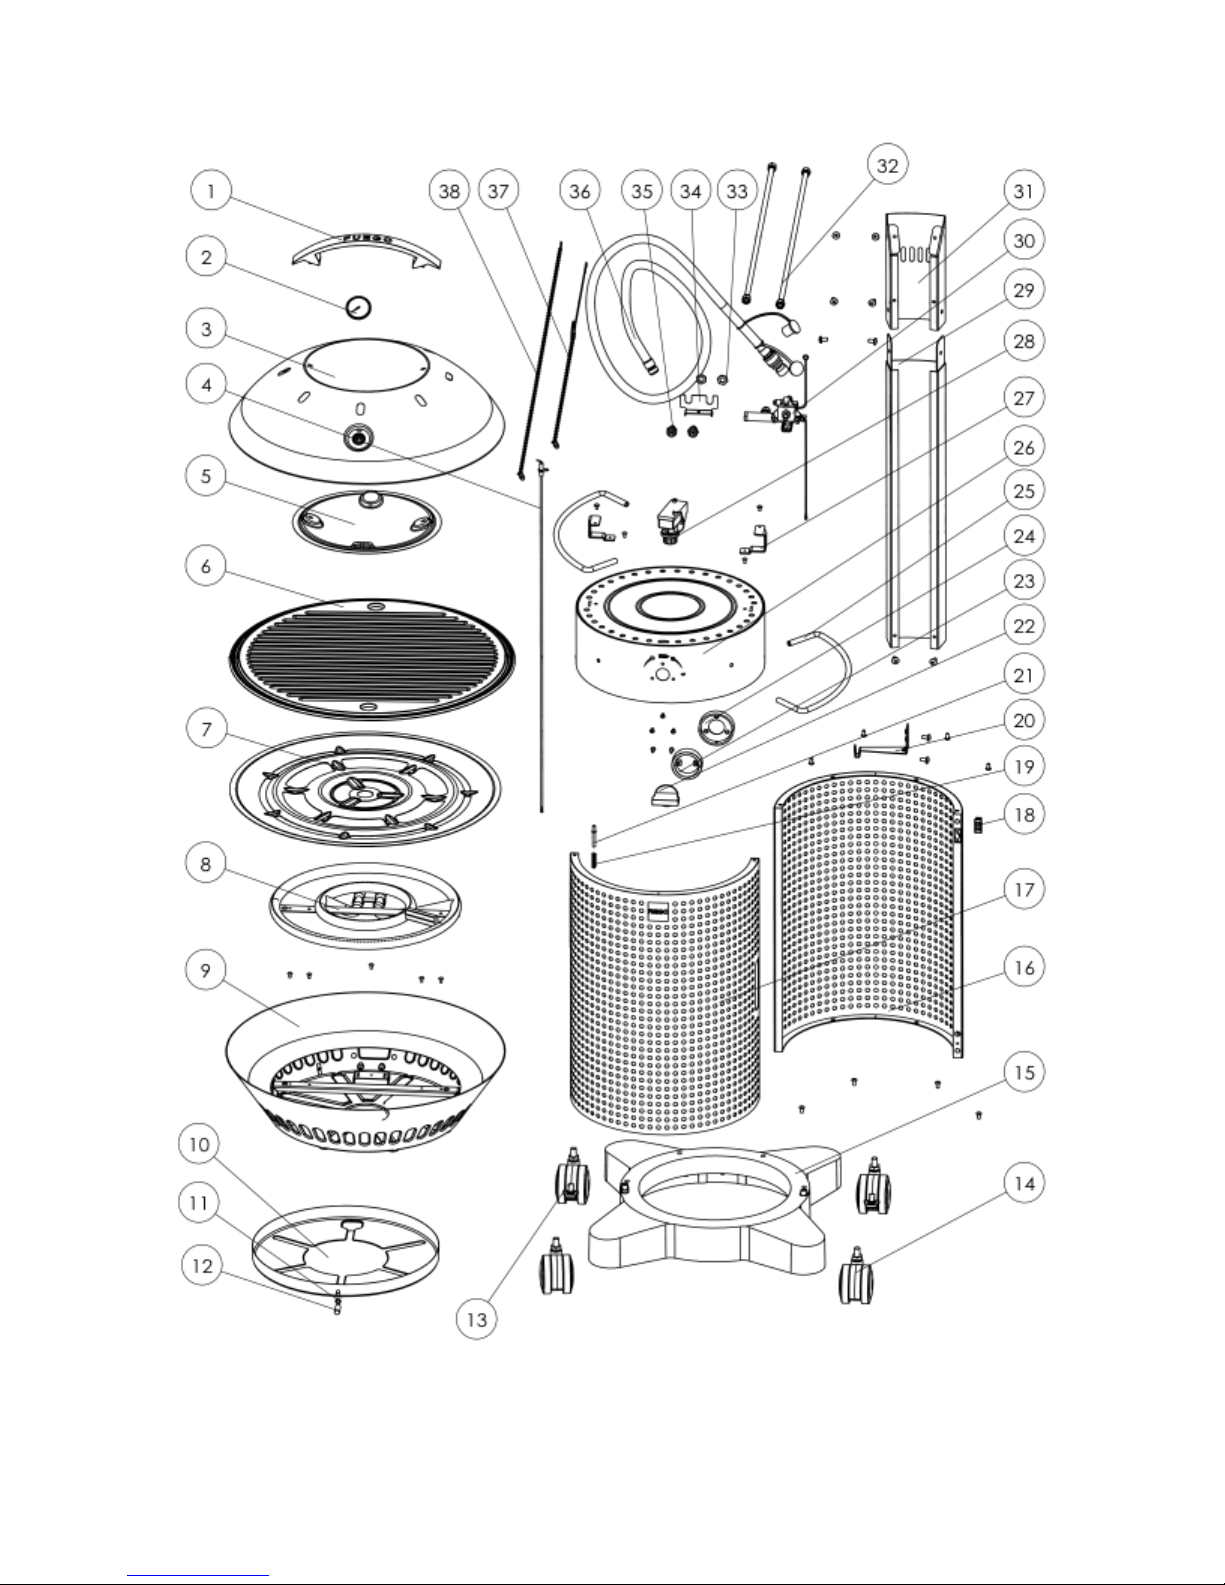
Element Grill Components!
!
!
!
!
!
!
!
!
!
!
!
!
!
!
!
!
!
!
! 13
Page 14

Tools needed for assembly:!
Phillips Screwdriver!
Wrench (Included)!
!
!
!
!
!
!
!
!
!
!
!
!
!
!
!
!
! 14
Lid Assembly
Cast Iron
Diffuser Panel
Control Knob
Residue Tray
Grill Handle (2)
Tank Storage Door
Front & Rear
Grill Base
Wheels (4)
Page 15

!
!
!
!
!
!
! 15
Page 16

1!
Install wheels by hand. Tighten
with wrench (provided).!
!
!
!
!
!
!
!
!
! 16
2!
A: Fasten rear panel grill base with four
screws(M5)-provided.!
B: Assemble tank hook to marked label
with two screws (M6)- provided. (LP
Unit Only)
Page 17

!
3!
Insert AA battery (provided) with
the + end into the spring on the
cap.!
Insert the control knob onto the
control valve.!
!
!
!
!
!
!
!
4!
Place assembled rear door and
grill base onto the control
assembly with four screws (M5)provided.!
!
! 17
Page 18

!
!
5!
A: Insert and fasten support spine
to control assembly with two
screws (M5) –provided.!
B: Fasten two screws(M6) to grill
base!
C: Now the grill can be flipped
onto its wheels. !
!
DO NOT USE THE GRILL
HANDLES TO LIFT THE GRILL.!
!
!
6!
Install front panel; insert bottom
hinge first, then use finger to
depress top spring-hinge and
release once aligned into position.!
! 18
Page 19

7!
A: Place diffuser panel, cast iron
grate, and roasting lid on grill.
Please note that the grill grate
should be positioned with the
“FACE DOWN” writing as the
bottom side of the grate.!
B: Slide residue tray into place in
the space between the burner
knob and below the firebowl.!
8!
You can hook the roasting lid on
the grill when not in use in either
the hanging or windbreak position.!
!
!
!
!
!
!
!
!
!
! 19
Page 20

9!
Gas hook up (Natural Gas)!
Natural Gas: Install the provided
NG hose to your house
connection. The NG hose is to be
installed through the bottom of the
wheel base. Ensure that shut off
and gas line is properly installed.
Professional installation required.
Please note the Danger and
Warning pages for more
information and compliance.!
!
!
Note:!
!
The outdoor cooking gas appliance and its individual shutoff must be
disconnected from the gas supply piping system during any pressure
testing of that system at test pressures in excess of 0.5 psi (3.5kPa).!
!
The outdoor cooking gas appliance must be isolated from the gas piping
system by closing its individual manual shutoff during any pressure
testing of the gas piping system at test pressures equal to or less than
0.5 psi(3.5kPa).!
!
!
! 20
Page 21

10!
A: For safety and convenience
attach lid chain and ignition rod to
roasting lid and grill.!
B: Use chain hook to secure the
roasting lid by looping and locking
the chain hook. Then fasten the
chain to the spine by using the
provided screw (M6).!
C: Hook ignition rod onto spine
louver. Secure loop end of ignition
rod chain to spine with the
provided spine screw (M6).!
!
!
!
!
!
!
!
!
!
!
!
! 21
Page 22

Lighting Instruction Manual!
Warning: Before Lighting, please make
sure that the control knob is in the off
position and the regulator assembly is in
good condition!
Control knob. IMPORTANT Do not leave
items on or against the barbecue. Keep
flammable products and sprays away. !
For outdoor use only.!
SHUT DOWN INSTRUCTIONS:!
Turn burner control knob to the OFF
position. Turn gas supply off. The gas supply
must be turned off when appliance is not in
use.!
LIGHTING INSTRUCTIONS:!
1. Read instructions before lighting!
2. Open lid during lighting and make sure
burner is in the OFF position. Make sure the
burner kit is properly fixed with respect to the
orifices, and the igniter tip located near the
burner edge as shown in the figure to the
left.(FIG (i)) !
3. Turn on tank valve or gas supply and do
the leak testing as the procedures shown on
pages 27-28.!
4. Push control knob and turn slowly to the
START/ALLUMER ( ) position. (FIG A). !
Please note that the Element igniter makes
an audible clicking noise when it sparks; if no
clicking is present; please check the battery
position in the igniter or replace with a new
battery (AA).!
! 22
FIG (i)
Page 23

5. If ignition does not occur in 5 seconds,
turn the burner control off, wait 5 minutes for
any excess gas to dissipate. Repeat step 1
through 5. !
6. After burners are lit, turn knob to the ◉
zone to operate the dual zone burners (FIG
B) at 21k BTU) or ○ zone to operate outer
ring (FIG C) at 15k BTU for indirect heat.!
!
MATCH LIGHTING:!
1. Repeat step 1 through 3 in the previous
lighting instructions; put a match into the
lighting rod, light the match and place it
through the hole of flame tamer to the
burner; push control knob and turn slowly to
the START/ALLUMER ( ) position.!
2. If ignition does not occur in 5 seconds,
turn the burner control off, wait 5 minutes for
any excess gas to dissipate.!
3. After burners are lit, turn knob to the ◉
zone to operate the dual zone burners inner
and outer ring ◉ at 21k BTU) or ○ zone to
operate outer ring ○ at 15k BTU for indirect
heat.!
!
!
!
!
! 23
Page 24

DUAL ZONE BURNERS!
Element’s patented dual zone burners,
offer a whole new level of control. Zone 1
is for indirect cooking, 15,000 btu/hr. Zone
2 engages both burners and is used for
direct cooking at 21,000 btu/hr.!
Cooking with Zone 1!
The outer burner can be turned on to cook
the food through convection like cooking.
Place the food in the center of the grill.
Turn the control knob to ○. Since the food
is not being exposed to direct heat from
the burners it will cook more evenly and be
less likely to burn on the exposed side.
This also means that it will cook more
slowly. See page 33 for temperature
recommendations.!
This type of cooking is best for ribs, roasts,
large cuts of meat, and hot dogs.!
Cooking with Zone 2!
(Zone 2 engages both burners)!
Direct Grilling is the most basic!
and simplest way to cook. Foods are
cooked, or grilled, directly over the heat.
Place the food you wish to grill on the
grate, and turn the knob to ◉. See page
33 for cooking times and temperatures.!
!
This type of cooking is best for $
burgers, pizza, poultry and seafood.!
! 24
Page 25

LEAK TESTING!
General:!
Although all gas connections on the grill are leak tested at the factory
prior to shipment, a complete gas tightness check must be performed at
the installation site due to possible mishandling in shipment, or excessive
pressure unknowingly being applied to the unit. Periodically check the
whole system for leaks, or immediately if the smell of gas is detected.!
Before Testing:!
Do not smoke while leak testing. Extinguish all open flames. Never leak
test with an open flame. Make a soap solution of one part liquid
detergent and one part water. You will need a spray bottle, brush, or rag
to apply the solution to the fittings. For LP units, check with a full cylinder.
Remove the control knobs and battery to disable accidental ignition.
Open the tank storage door containing the LP or natural gas hook up,
this is where all tests will be performed.!
!
To Test:!
Make sure all control valves are in the “OFF” position. Turn the gas
supply “ON”. Check all connections from the supply line, or LP cylinder
up to and including the manifold pipe assembly. Apply the soap solution
around the connection, valve, tubing and end of the manifold. Soap
bubbles will appear where a leak is present. If a leak is present,
immediately turn off gas supply, tighten any leaking connections, turn gas
on, and recheck. Check all the gas connections at the base of the control
valves where they screw into the manifold pipe. If you cannot stop a gas
leak, turn off the gas supply and call your local gas utility or Fuego
customer service at 888-88FUEGO (38346). Only those parts
recommended by the manufacturer should be used on the grill.
Substitution can void the warranty.!
! 25
Page 26

!
WARNING:!
Do not use the grill until all connections have been checked and do not
leak. Check all gas supply fittings for abrasions, cracks and leaks before
each use. It is recommended to keep a spray bottle filled with soapy
water near the shutoff valve of the gas supply valve. Spray all the
fittings. Bubbles indicate leaks.!
!
!
!
!
!
!
!
!
!
!
!
!
!
! 26
Page 27

Maintenance!
!
WARNING: IMPORTANT!!
!
Before lighting, inspect the gas supply piping or hose prior to turning
the gas “on”. If there is evidence of cuts, wear or abrasion, it must be
replaced prior to use.!
!
Grill Burner:!
Remove grill lid, diffuser panel, grate, and burner. Remove the screws
holding burner to grill body by unscrewing counter- clockwise."
!
Grill Burner Flame Height:!
The factory burners have been set for the
correct air and gas mixture. The correct
flame pattern is shown in (FIG. 3)."
1: Burner tube"
2: Tips occasionally flicker
yellow!
3: Light blue 4: Dark blue!
!
Grill Burner Exterior Cleaning:!
!
Clean the exterior of the burner with a
wire brush. Clean stubborn scale with a
metal scraper. Clear any clogged"
ports with a straightened paper clip.
Never use a wooden toothpick as it may
break off and clog the port. Shake out
any debris. Use a flashlight to inspect the
burner inlet to ensure it is not blocked
(FIG. 4A). If obstructions can be seen,
use a metal wire coat hanger that has
been straightened out(FIG 4B). Check
and clean burner /venture tubes for
insects and insect nests. A
clogged tube can lead to a fire
beneath the grill.!
! 27
FIG 3
FIG 4
Page 28

Orifice Cleaning:!
!
With burner removed remove the
orifice and shine a flashlight through
the opening to ensure there is no
blockage. Use a needle to clear any
debris. Be extremely careful not to
enlarge the hole or break off the
needle.!
!
IMPORTANT:"
Installation after cleaning:"
After the cleaning, properly locate and
re-attach the burner kit with respect to
the orifices. Adjust the igniter
tip located near the burner
edge."
(FIG. 5 & 6)!
!
!
!
"
"
!
!
!
!
!
!
WARNING:!
IT IS EXTREMELY IMPORTANT
TO CENTER THE BURNER ON THE ORIFICE PROPERLY TO PREVENT
A FIRE HAZARD OR EXPLOSION.!
!
WARNING:!
DO NOT REMOVE BURNER OR PERFORM CLEANING WHILE GRILL
IS STILL HOT!
!
!
!
! 28
FIG 5
FIG 6
Page 29

!
Cleaning!
!
Residue Tray Cleaning:!
The residue tray can be washed!
by hand with standard dish soap!
and water and is also dishwasher!
safe.!
!
FIG. 7Cast Iron Grate And Frame!
Cleaning: !
Clean the cast iron grate with!
a wire brush.!
!
Igniter Tip Cleaning:!
If lighting the burners is difficult!
you may need to clean!
and adjust the igniter tip!
located near the burner edge.!
(FIG. 08)!
To ensure that the igniter!
FIG. 8!
lights properly, clean off any !
cooking residue that builds!
up on igniter tip and burner.!
Use a very fine grit sand paper to clean igniter tip and edge!
of burner. Igniter tip should be 2–4 mm away from burner!
edge. This is the ideal distance for most effective ignition.!
!
Surface:!
Grill should be covered when not in use to protect it from outdoor
elements. Wipe down surface to remove any cooking residue with a
clean cotton or microfiber cloth. Clean stainless steel surface with a
stainless steel cleaner and apply a polish to keep your grill looking its
best. !
!
!
!
!
!
! 29
Page 30

Optional Raw Cast Iron Grate (FEAUG1)!
!
The grill comes standard with a low maintenance Porcelain Coated
Cast Iron Grate. Nevertheless if you purchased the optional raw cast
iron grill grate that is naturally porous and ideal for seasoning and
aging, please follow the additional steps below to begin seasoning
your grill grate before use. A well-seasoned grate will resist rust and
create a virtually nonstick surface for cooking over time, preferred by
most experienced chefs.!
!
Remove the grate from packing materials.!
Brush vegetable oil lightly over cast iron pieces to coat the entire
surface.!
Heat the grate to approximately 250 degrees Fahrenheit (120 degrees
Celsius) on low over your grill for approximately an hour.!
Wipe the grate well, and let it cool completely before use.!
To preserve this natural, protective coating, DO NOT USE SOAP when
cleaning a seasoned grate. Instead, scrub the grate with a mixture of
salt and vegetable oil, rinse with hot water, and dry completely over
low heat before storing.!
Cast Iron Grate Preheating!
It is important to preheat your grill surface prior to cooking to!
ensure an overall hot surface with even temperature. As the!
grates are made of cast iron, they take some time to heat but!
retain that heat extremely well and provide an excellent cooking
surface for grilling.!
Turn the burner on high.!
Heat on high for approximately 5-10 minutes. Adjust to desired
temperature and begin cooking.!
Cast Iron Grate Cleaning After Grilling!
Cleaning Grill Grates:!
Turn the burner on high for approximately 10-20 minutes to burn away
any food debris and/or grease.!
Let grill cool completely.!
Brush grates with wire brush to remove any remaining debris. If
necessary, scrub the grate with a mixture of salt and vegetable oil,
rinse with hot water, and dry completely over low heat before storing!
!
!
!
! 30
Page 31

!
!
!
!
!
!
!
!
!
!
!
!
!
!
!
!
!
!
!
!
!
!
!
!
!
!
!
!
!
!
!
!
!
!
!
!
!
!
!
!
! 31
Type of Meat
Thick-ness
Doneness
Grilling
Time*
Safe Internal
Temperature*
*approx
*data from USDA
Beef
Boneless Rib Eye"
or Tenderloin
1 in
Med Rare "
Med
14-18"
18-22
145°F
62.8°C
Boneless"
Sirloin Steak
1 in
Med Rare "
Med
14-18"
18-22
145°F
62.8°C
T-bone,
Porterhouse steak
1 in
Med Rare "
Med
8-12
12-15
145°F
62.8°C
Ground Meat"
patties
3/4 in
No longer pink
10-16
160°F
71.1°C
Poultry
Chicken Breast
half or thigh
(skinless & boneless)
4-5 oz each
Tender and"
no longer pink
8-12
165°F
73.9°C
Turkey Breast
1/2 in
Tender and"
no longer pink
8-12
165°F
73.9°C
Pork
Boneless"
Loin chop
3/4 in
Med
12-16
145°F
62.8°C
Lamb
Rib
or Loin chop
1/2 to
1 in
Med
12-15
145°F
62.8°C
Fish & Seafood
Fillet or Steaks
1/2 to
1 in
Flakes
4-6
145°F
62.8°C
Sea Scallops
12 to 15 per
Ib
Opaque
5-8
145°F
62.8°C
Shrimp
Medium"
to Large
pink
6-8
145°F
62.8°C
Page 32

Limited Warranty Information:!
!
Fuego Living LLC (“Seller”) and the person or entity that acquires these
goods from Seller (“Purchaser”) hereby agree to the following terms and
conditions of the sale: Shipping fees are the responsibility of the Purchaser
whether freight prepaid or freight collect. Seller assumes no responsibility
for the goods sold to the Purchaser once the goods have left the Seller’s
premises, including, but not limited to, late delivery by the moving carrier, or
for events caused by any difficulty carrier incurs in attempting to fit the
goods into the Purchaser’s place of business or residence due to the size
of the goods or otherwise.!
!
Purchaser assumes all responsibility for delivery, payment of freight,
access, measurement, installation, hook-up, wiring, moving and storage of
the goods. The transportation of all goods is subject to the terms and
conditions which the moving carrier imposes on Purchaser including, but
not limited to, additional charges imposed per flight of stairs, and/or
additional charges resulting from the carrier’s inability to safely and/or
adequately use the building elevator to lift the goods to an upper floor. Any
claim for damages incurred during shipment by the carrier of the goods are
insured and handled directly with the carrier. Any damages due to
manufacture defects will be handled directly with Fuego Living LLC, subject
to the limited warranty. !
!
All sales are final, and unless authorized in writing by the Seller, Purchaser
may not return the goods, under any circumstance. If Purchaser refuses to
accept the goods, under any circumstance, the Purchaser is liable for the
return and cost of freight both ways, and if Seller does take back the goods,
there will be a restocking charge that is 35% of the purchase price of the
goods. Purchaser must notify Seller of non-conforming goods within four
days of delivery, after which time all goods are deemed accepted. If an
order has been placed and production has started, cancellation of your
order will be a 15% charge.!
!
If Purchaser tenders payment with a check that has insufficient funds
(NSF), or stops payment on a check or credit card for any reason,
Purchaser agrees to pay for all costs associated with the Seller’s
connection or litigation of such a claim, including without limitation extra
damages, court costs and attorneys’ fees. Finance charges begin the date
of invoice. Collection fees plus NSF fee of $50 will be added to your
! 32
Page 33

invoice, which you agree to promptly pay. Title to the goods does not pass
until payment is received in full by Seller and Seller retains a security
interest in the goods until they are paid for in full.!
!
This limited warranty does not cover damage due to such things as
accident, misuse, abuse, mishandling, neglect, acts of God, fires,
earthquakes, floods, high winds, government, war, riot or labor trouble,
strikes, lockouts, delay of carrier, unauthorized repair, or any other cause
beyond the control of the Seller, whether similar or dissimilar to the
foregoing. Seller is not responsible for any damages caused to Seller’s
property resulting from the good. !
!
Seller is not responsible for incidental or consequential damages, and there
are no warranties, expressed or implied, which extend beyond the Limited
Warranty described above. The implied warranties of merchantability and of
fitness for a particular purpose are hereby expressly disclaimed. Some
states do not allow the exclusion of incidental or consequential damages, or
a waiver of the implied warranties of fitness and/or merchantability, so the
above limitations may not apply to you. This warranty gives you specific
legal rights and you may also have other rights which vary from state to
state.!
!
In the event of any dispute between Seller and Purchaser arising out of or
relating to these terms and conditions or to the goods sold generally,
Purchaser must first file a written claim with Seller within ten days of the
occurrence giving rise to the claim and wait an additional thirty days for a
response before initiating any legal action. The sale and all terms are
subject to California law. Any legal proceeding arising out of or relating to
these terms and conditions or to the goods sold generally shall be brought
solely and exclusively in the County of Los Angeles. In no event may
Purchaser initiate any legal proceeding more than six months after the
occurrence of the event giving rise to the dispute.!
!
The above terms and conditions are the only ones governing this
transaction and Seller makes no oral representations of any kind. These
Terms and Conditions can only be modified in writing, signed by both
Purchaser and Seller.!
!
!
!
! 33
Page 34

Length of Warranty:!
One (1) Year comprehensive parts on the entire product.!
Three (3) Years limited parts warranty covering the stainless burner.!
!
!
For replacement parts, troubleshooting, and general inquiries please email
or call us at:!
!
Customer Service: 1.888.883.8346 1.888.88.FUEGO!
Email: service@fuegoliving.com!
!
!
Recycling tip:!
Most of the packaging materials are recyclable. Please dispose of those
materials through your local recycling depot or by placing them in
appropriate collection containers.!
!
Product Registration:!
Register your product online at:!
www.fuegoliving.com!
! 34
 Loading...