

Page 1

Element Grill
Quick Set-up Guide
and User Manual
A
Page 2

Hi.
Thank you for
choosing the
Element grill.
Here are a few
simple steps
that will get your
Element grill
sizzling in no time.
Ready. Set. Grill.
Page 3

Before you use
the grill, we
recommend that
you read through
the entire user
manual, which
provides the
description of
the grill and
its functions.
Page 4
OFF
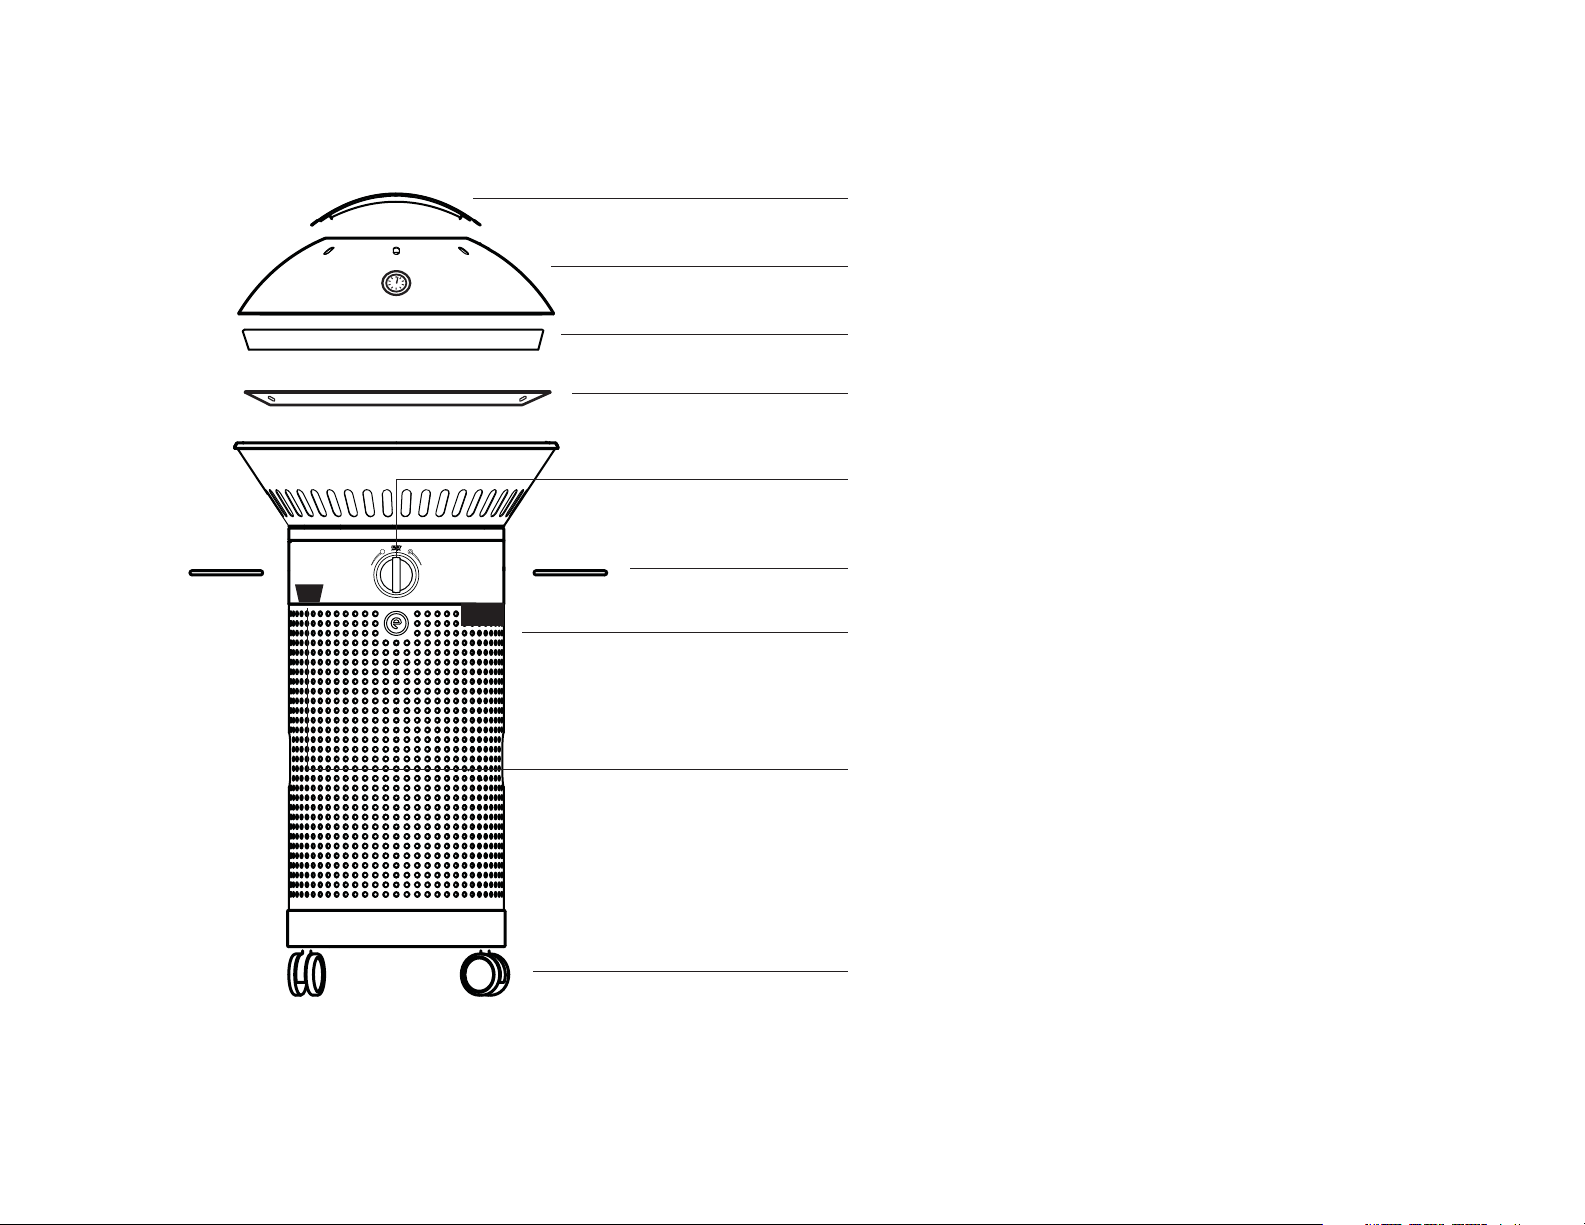
Element Grill Components
Lid Handle
Cooking Lid
Cast iron Grate
(with Temperature Gauge)
(packaged bottom of box)
Diffuser Panel (packaged bottom of box)
Control Knob
Grill Handles (2)
Battery/Igniter Box
(AA battery included)
Residue Collection Cup
Wheels (4)
Tools needed for assembly:
Phillips screwdriver
wrench (included)
4 5
Page 5
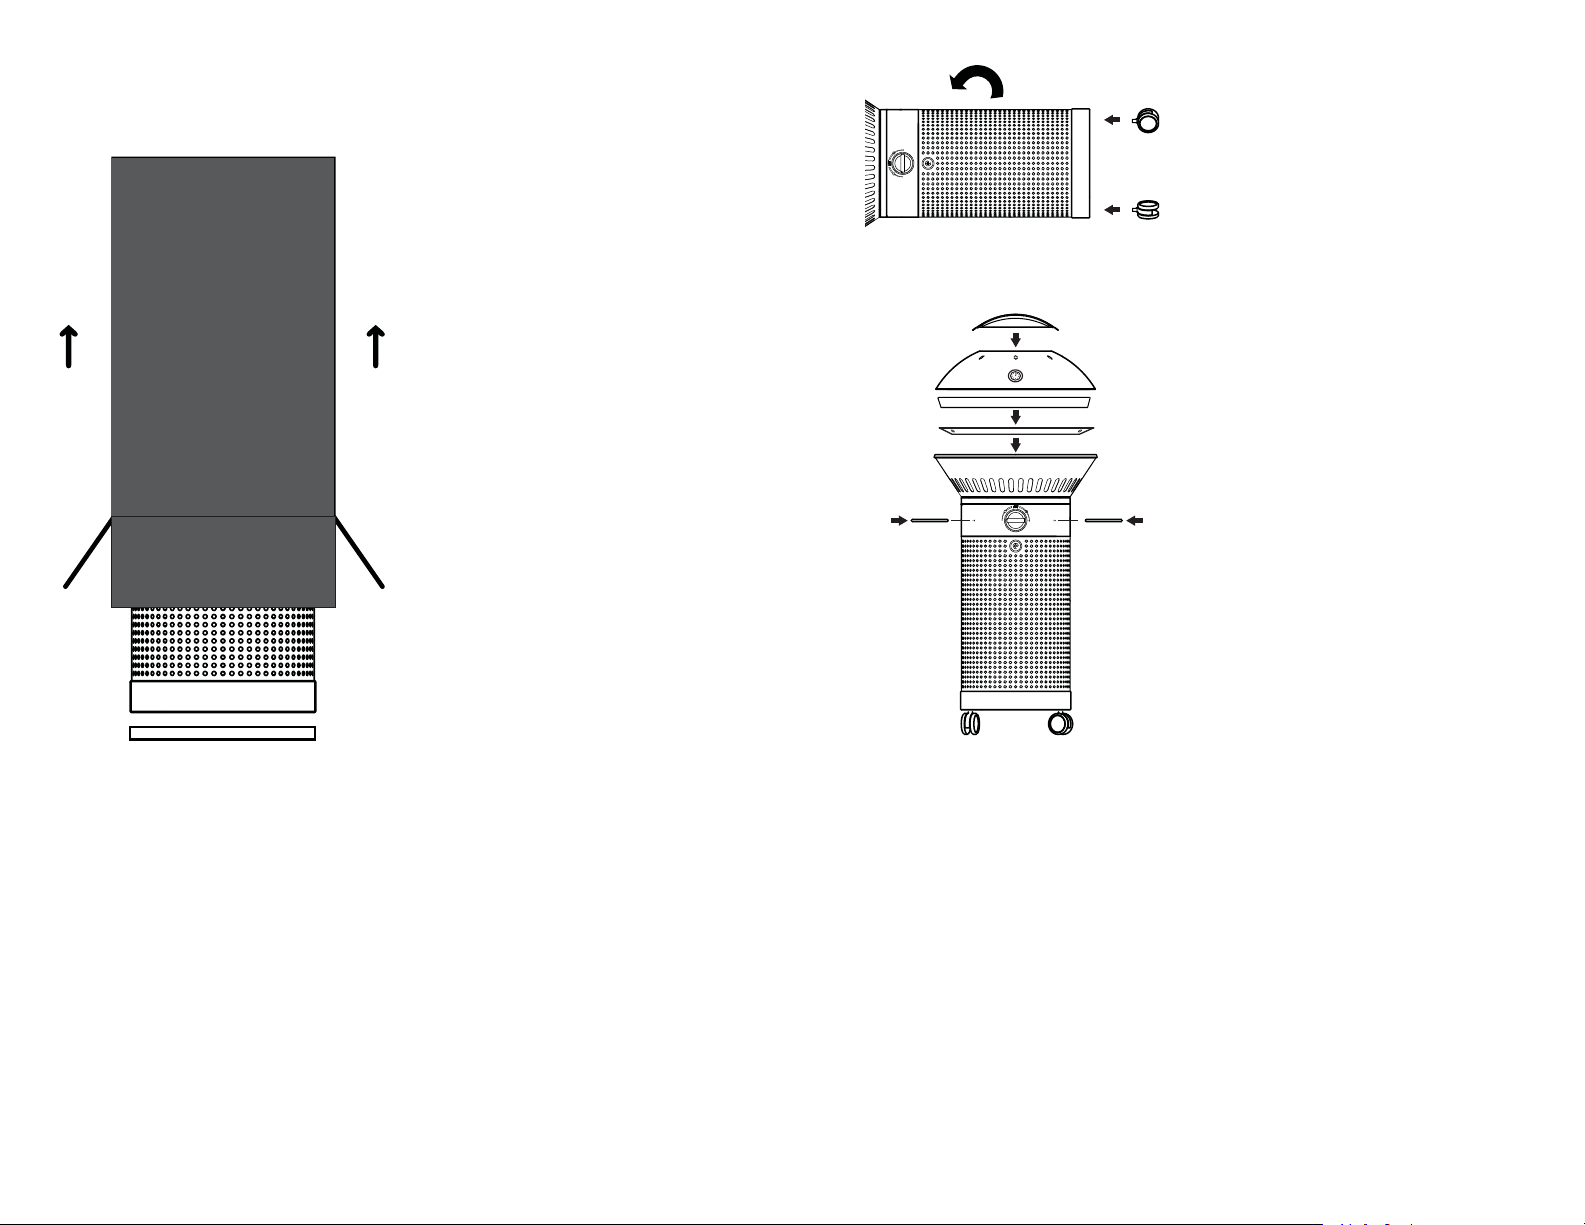
Quick Set Up
1
Remove grill by opening
carton bottom, carefully lift
box up to reveal grill, grate,
and parts.
2
With the Element grill on its
side attach each of the (4)
wheels. Use wrench to tighten.
Be sure to place the (2) locking wheels diagonally across
from each other.
/
3
A. Secure handle to cooking lid
with screws provided.
0
B. Place diffuser panel, cast iron
grate, and cooking lid on grill.
1
C. Secure (2) grill handles to
the sides with screws provided.
Remove front panel to access
handle screws. Tighten well.
NEVER lift grill by handles.
6 7
Page 6
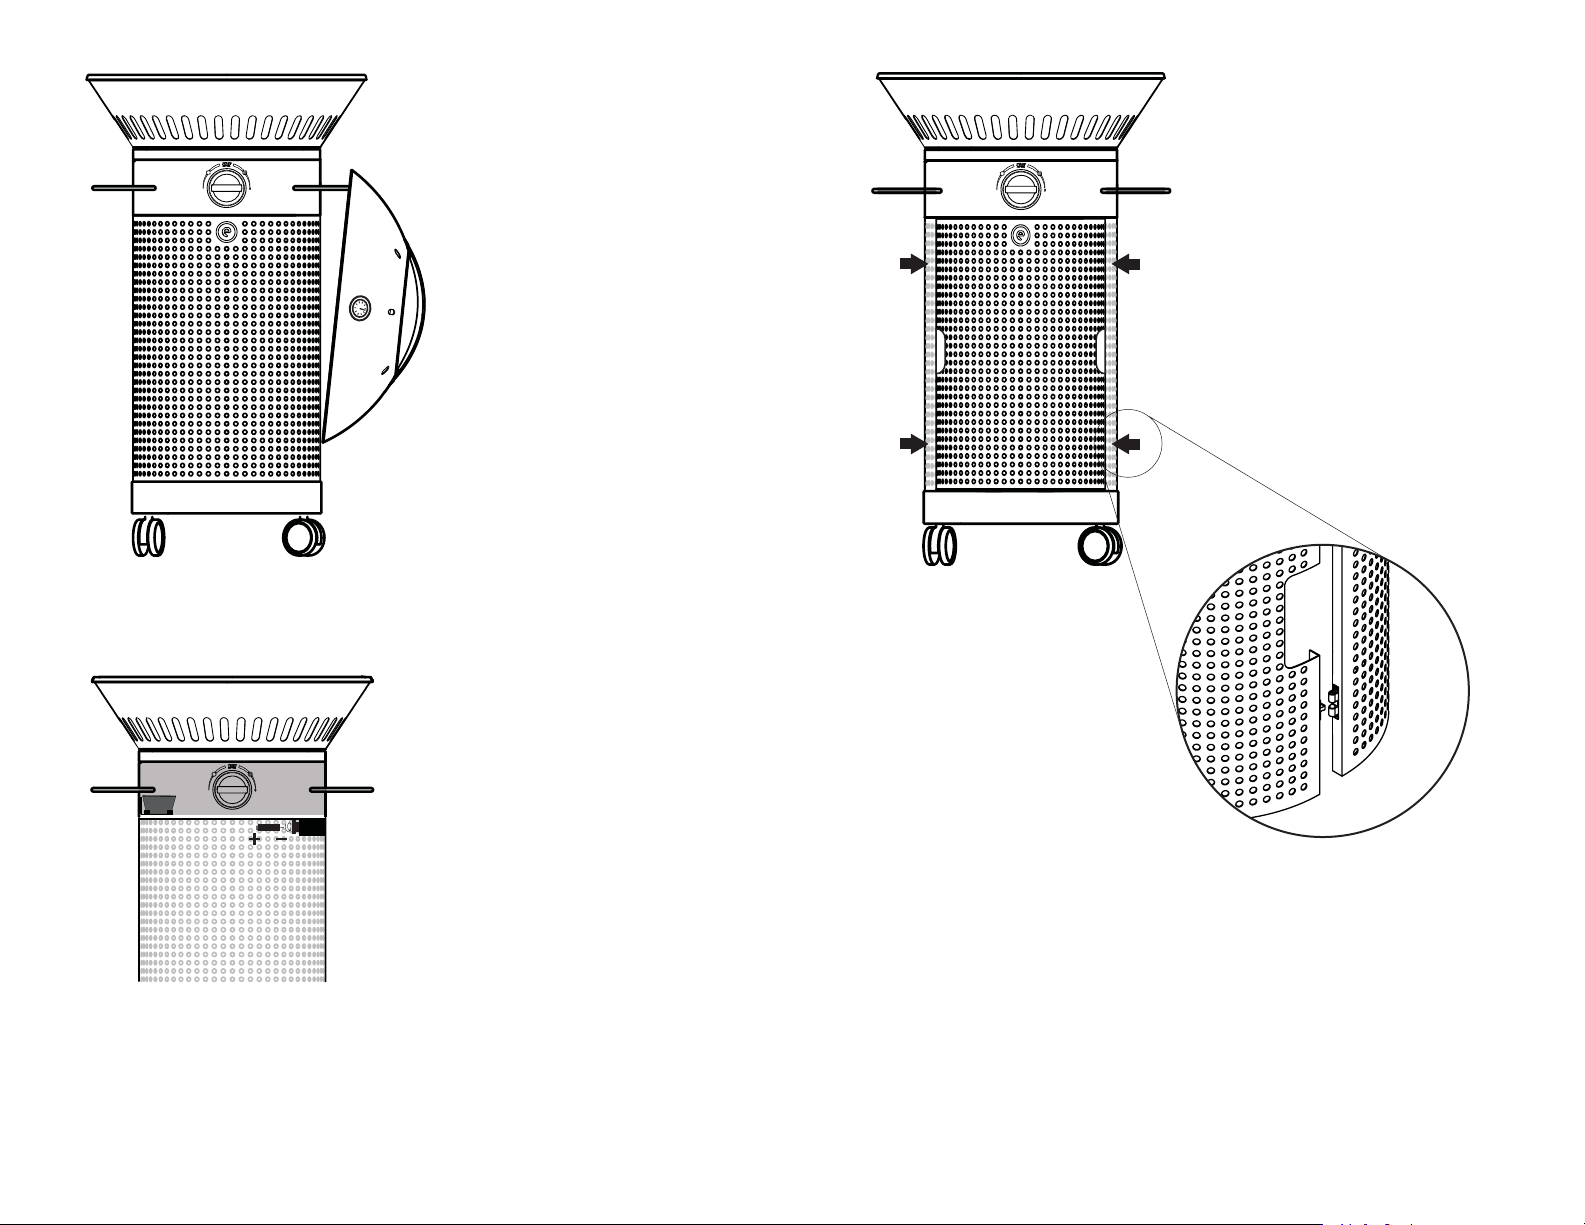
Note: Lid can be hooked onto
the grill handles as shown at
left.
5
Remove grill front panel by
pressing panel sides in and unhooking from frame.
To reinstall, press grill front
panel together and carefully
hook on both sides of frame.
See illustration
4
A. Place aluminum residue
collection cup into tray holder
/
0
8 9
inside grill.
B. Place AA battery into igniter
box (— end in fi rst).
Page 7
6
Gas hook up (LP gas is standard)
A. LP: Install Liquid Propane tank
and hook up LP gas hose. Please
note the Gas Hook-Up, Danger,
and Warnings pages for more
information.
B. NG: An Element natural gas
conversion kit must be purchased. Gas hose and orifi ces will
need to be replaced when
using NG kit. Please note the
Danger and Warnings pages for
more information and compliance. Only an Element NG kit
model #EAOOAGC can be used.
Any other kit used will void the
warranty.
7
Control knob. IMPORTANT
Do not leave items on or against
the barbecue. Keep fl ammable
products and sprays away. For
outdoor use only.
SHUT DOWN INSTRUCTIONS:
Turn burner control knob to the 0
(off) position. Turn gas supply off.
The gas supply must be turned off
when appliance is not in use.
(A)
>caVbc`\b]abO`b
(B)
/RXcabRcOZPc`\S`VWUV³Z]e
(C)
/RXcab]cbS`Pc`\S`VWUV³Z]e
(D)
LIGHTING INSTRUCTIONS:
1. Read all instructions prior to
lighting.
2. Remove the lid and make sure
dial is in the OFF position.
To Light the Burners
1. Push control knob in and turn
slowly to the START position.
This action will ignite the pilot
fl ame and you will hear a clicking
noise, continue to push down on
the control knob and both burners should be lit. (A)
2. If the burner will not ignite
within several attempts, turn the
control knob to the OFF position and wait 5 minutes for any
excess gas to dissipate. Repeat
steps 1 and 2 or light with a
match.
3. In the dual burner zone
(inner and outer ring (B) at 24k
BTU), control the heat temperature by turning the dial toward
the right for low and left for high.
4. To switch to the indirect cooking method (outer ring (C) at
9k BTU), turn dial to the START
position, push the dial in and turn
to the left . This will turn off the
inner burner. Continue to turn
the dial left to the lowest indirect heat setting. Push and turn
dial to far right to turn all burner
operations off (D).
10 11
=44^]aWbW]\
Page 8

Cooking with Zone 1
8
Open wood shelf and begin cooking. (wood shelf available on 01
and 02 models only)
WARNING: Wood shelf must remain open while the grill is in use.
9
Warming and
Preheating Your Grill
Warm grill on high setting only
when roasting lid is OFF. The
high BTU burners will warm the
cast iron grill grates evenly in
10-15 minutes.
Warm grill with roasting lid on
ONLY on low or indirect heat
setting to prevent overheating the grill. Do not leave grill
unattended or above 600° for a
prolonged period of time.
10
Dual Zone Burners
Element’s patented dual zone
burners offer a whole new level
of control.
Zone 1 is for indirect cooking,
15,000 btu/hr.
Zone 2 (Zone 2 engages both
burners) is for direct cooking,
24,000 btu/hr.
Indirect Grilling is similar to
baking. The outer burner can
be turned on to cook the food
through convection like cooking.
Place the food in the center of
the grill, and close the lid. Turn
the control knob to . Since the
food is not being exposed to direct heat from the burners it will
cook more evenly and be less
likely to burn on the exposed
side. This also means that it will
cook more slowly. Keep all vents
open at all times during cooking.
Use the included thermometer
to get precise temperature readings. See page 27 for temperature recommendations. (This
type of cooking is best for ribs,
roasts, large cuts of meat, and
pizza.)
Cooking with Zone 2
(Zone 2 engages both burners)
Direct Grilling is the most basic
and simplest way to cook. Foods
are cooked, or grilled, directly
over the heat. Place the food
you wish to grill on the grate,
and turn the knob to . Cook
to desire time, see table pg. 27.
(This type of cooking is best for
burgers, hot dogs, poultry and
seafood.)
12 13
Page 9

User Guide for models: EG01AMG,
EG02AMG, EG03AMG
Please retain this manual for future reference
DANGER AND WARNINGS
You Must Read This Owner’s Guide Before Operating
Your Gas Grill
DANGER
If you smell gas:
1. Shut off gas to the appliance.
2. Extinguish any open fl ames.
3. Open lid.
4. If odor continues, keep away from the appliance and immediately call your gas supplier or your fi re department.
Leaking gas may cause a fi re or explosion which can cause serious bodily injury or death, or damage to property.
WARNING:
1. Do not store or use gasoline or other fl ammable liquids or vapors in the vicinity of this or any other appliance.
2. An LP cylinder not connected for use shall not be stored in the
vicinity of this or any other appliance.
WARNING: Follow all leak-check procedures carefully in this
manual prior to barbecue operation. Do this even if the barbecue
was dealer-assembled.
Notice To Installer: These instructions must be left with the
owner and the owner should keep them for future use.
THIS GAS APPLIANCE IS DESIGNED FOR OUTDOOR USE ONLY.
WARNING: Do not try to light this appliance without reading the
“Lighting Instructions” section of this manual.
DANGER
Failure to follow the Dangers, Warnings and Cautions contained
in this Owner’s Manual may result in serious bodily injury or
death, or in a fi re or an explosion causing damage to property.
WARNINGS
Do not store a spare or disconnected liquid propane cylinder
under or near this barbecue.
Improper assembly may be dangerous. Please follow the assembly instructions carefully.
After a period of storage, and/or non use, the barbecue should
be checked for gas leaks and burner obstructions before use.
See instructions in this manual for correct procedures.
Do not operate the barbecue if there is a gas leak present.
Do not use a fl ame to check for gas leaks.
Combustible materials should never be within 24 inches (61cm)
of the back or sides of your barbecue.
Do not put a barbecue cover or anything fl ammable on, or in the
area under the barbecue.
Your barbecue should never be used by children. Accessible
parts of the barbecue may be very hot. Keep young children
away while it is in use.
You should exercise reasonable care when operating your barbecue. It will be hot during cooking or cleaning and should never
be left unattended or moved while in operation.
14 15
Page 10

Should the burner go out while in operation, turn all gas valves
off. Open the lid and wait fi ve minutes before attempting to relight, using the lighting instructions.
Do not use charcoal or lava rock in your barbecue.
Never lean over open grill or place hands or fi ngers on the front
edges of the cooking box.
Should a grease fi re occur, turn off burner and leave lid closed
until fi re is out.
Do not enlarge valve orifi ces or burner ports when cleaning the
valves or burner.
The barbecue should be thoroughly cleaned on a regular basis.
Liquid propane is not natural gas. A conversion kit must be purchased to use natural gas.
Do not attempt to disconnect any gas fi tting while your barbecue is in operation.
Use heat-resistant barbecue mitts or gloves when operating
barbecue.
Keep any electrical supply cord and fuel supply hose away from
any heated surfaces.
CALIFORNIA PROPOSITION 65 WARNING: The burning of gas
cooking fuel generates some by-products which are on the list of
substances known by the State of California to cause cancer and
reproductive harm. California law requires businesses to warn
customers of potential exposure to such substances. To minimize
exposure to these substances always operate this unit according
to this grill manual, ensuring you provide good ventilation when
cooking with gas.
Do not use this barbecue unless all parts are in place. The unit
must be properly assembled according to the assembly instructions.
Liquid Propane Gas Units:
Use the pressure regulator and hose assembly that is supplied
with your barbecue.
Do not attempt to disconnect the gas regulator and hose assembly or any gas fi tting while your barbecue is in operation.
A dented or rusty liquid propane cylinder may be hazardous and
should be checked by your liquid propane supplier. Do not use a
liquid propane cylinder with a damaged valve.
Although your liquid propane cylinder may appear to be empty,
gas may still be present, and the cylinder should be transported
and stored accordingly.
If you see, smell or hear the hiss of escaping gas from the liquid
propane cylinder:
1. Move away from liquid propane cylinder.
2. Do not attempt to correct the problem yourself.
3. Call your fi re department.
General Instructions
Your Element barbecue is a portable outdoor cooking appliance.
You can easily change its location in your yard or on your patio.
Portability means you can take your barbecue with you if you
move. Liquid Propane (LP) gas supply is easy to use and gives
you more cooking control than charcoal fuel.
• These instructions will give you the minimum requirements for
assembling your barbecue. Please read the instructions carefully before using your gas barbecue. Improper assembly can be
dangerous.
16 17
Page 11

• Not for use by children.
• If there are local codes that apply to portable gas grills, you will
have to conform to them. Installation must conform with local
codes, or in the absence of local codes, with either the National
Fuel Gas Code, ANSI Z223.1/NFPA 54, Natural Gas and Propane
Installation Code, CSA B149.1, or Propane Storage and Handling
Code, B149.2, or the Standard for Recreational Vehicles, ANSI A
119.2/NFPA 1192, and CSA Z240 RV Series, Recreational Vehicles
Code, as applicable.
• The pressure regulator supplied with the gas barbecue must
be used. This regulator is set for 11 inches of water column (pressure).
• This gas barbecue is designed for use with liquid propane (LP)
gas by default. A separate natural gas (NG) kit must be purchased which includes different hoses, orifi ces and regulators for
use with NG.
• Do not use with charcoal fuel.
• The areas around the LP cylinder must be free and clear from
debris.
• Replacement pressure regulators and hose assemblies must be
those specifi ed by the manufacturer.
For Installation In Canada
These instructions, while generally acceptable, do not necessarily comply with the Canadian Installation codes, particularly with
piping above and below ground. In Canada the installation of this
appliance must comply with local codes and/or Standard CSAB149.2 (Propane Storage and Handling Code)
WARNING: Your gas barbecue is not intended to be installed in
or on recreational vehicles and/or boats.
WARNING: Do not use the barbecue within 24 inches of combustible materials to the back or sides of the grill.
WARNING: The entire cooking box gets hot when in use. Do not
leave unattended.
WARNING: Keep any electrical supply cord and the fuel supply
hose away from any heated surface.
WARNING: Keep the cooking area clear of fl ammable vapors
and liquid such as gasoline, alcohol, etc. and combustible materials.
WARNING: Never store an extra (spare) LP cylinder near your
gas barbecue.
WARNING: The LP cylinder used with your barbecue must be
with a listed OPD (Overfi lling Prevention Device) and a QCC1 or
Type 1 (CGA810) cylinder connection. The cylinder connection
must be compatible with the barbecue connection.
When Using The Grill
Do not leave items on or against the barbecue. Keep fl ammable
products and sprays away. For outdoor use only.
Shut Down Instructions:
Turn all burner control knobs to the (off) position. Turn gas supply off. The gas supply must be turned off when appliance is not
in use.
Lighting Instructions:
1. Read all instructions prior to lighting.
2.Open the lid and make sure burner is in the (off) position.
To Light the Burners
1. Push control knob in and turn slowly to the position. This action will ignite the pilot fl ame which will in turn light the burners.
If the pilot lights, continue to push down on the control knob
until the burners light and then release.
2. If the burner will not ignite within several attempts, turn the
control knob to the (off) position and wait 5 minutes for any excess gas to dissipate. Repeat steps 1 and 2 or light with a match.
3. After burners are lit, turn knob to the zone to operate the
dual zone burners (inner and outer ring at 24k BTU) or zone to
18 19
Page 12

operate outer ring at 9k BTU for indirect heat.
Gas Hook-Up
8. Open wood shelf and begin cooking. (wood shelf available on
01 and 02 models only)
WARNING: Wood shelf must remain open while cooking.
Storage And/Or Non Use
• The gas must be turned off at the liquid propane cylinder when
the gas barbecue is not in use.
• When the gas barbecue is stored indoors, the gas supply must
be DISCONNECTED and the LP cylinder stored outdoors in a
well ventilated space.
• LP cylinder must be stored outdoors in a well ventilated area
out of reach of children. Disconnected LP cylinder must be
stored in a building, garage or other enclosed area.
• When the LP cylinder is not disconnected from the gas barbecue, the appliance and LP tank must be kept outdoors in a well
ventilated space.
• The gas barbecue should be checked for gas leaks and any
obstructions in the burner tubes before using. (See maintenance
section)
Operating
WARNING: Only use this barbecue outdoors in a well ventilated
area. Do not use in a garage, building, breezeway or any other
enclosed area.
WARNING: Keep ventilation openings for cylinder enclosure free
and clear from debris.
WARNING: Your gas barbecue shall not be used under overhead
combustible construction.
Lp Gas Hook-Up For Type 1 Or Qcc1 Regulator
(Standard with grill):
The Element by grill is orifi ced for use with LP gas and comes
equipped with a high capacity hose and regulator assembly for
connection to a standard 20lb. LP cylinder (Type 1). The LP tank
is not included. LP hose and fi ttings are included. Operating
pressure: 10” W.C.
To connect the LP regulator and hose assembly to the tank/valve
assembly, fi rst make sure the main valve on the tank is completely
closed. Although the fl ow of gas is stopped when the Type 1
system is disconnected as part of its safety feature, you should
always turn off the LP tank main valve (FIG. 01) after each use and
during transport of the tank or
unit. Insert the regulator inlet
into the tank valve and turn the
black coupler clockwise until the
coupler tightens up. Do not over
tighten the coupler. Turn the
LP regulator
hose assembly
main tank valve on and turn the
burner control valve on the unit
Type 1
regulator
Main
Valve
to the high position for about 20
seconds to allow the air in the
system to purge, turn valves off
and wait 5 minutes before at-
Type 1 Tank
tempting to light the burners.
To disconnect the coupler, fi rst
make sure the main tank valve
is turned off. Grasp the coupler
and turn counter-clockwise.
The inlet will then disengage,
remove the inlet from the
tank valve opening if it has not
FIG. 01
20 21
Page 13

already done so when disengaged. Your local LP fi lling station
should be equipped with the proper equipment to fi ll your tank.
Lp Tank Requirements:
A dented or rust LP tank may be hazardous and should be
checked by your local supplier. Never use a cylinder with a damaged valve. Always check for leaks after every LP tank change. The
LP gas cylinder must be constructed and market in accordance
with specifi cations for LP gas cylinders of the U.S. Department
of Transportation (DOT or CAN/CSA-B339) and designed for use
with a Type 1 system only. Do not change the regulator and hose
assembly from that supplied with the unit or attempt to use a
Type 1 equipped regulator and hose assembly with a standard 510
POL tank/valve assembly. The cylinder must be provided with a
shut-off valve terminating in an LP gas supply cylinder valve outlet
specifi ed, as applicable, for connection Type 1. If the appliance is
stored indoors, the cylinder must be disconnected and removed
from the appliance. Cylinders
must be stored outdoors in a
well-ventilated area out of the
reach of children.
Note: When an LP unit is directly attached into an LP house
system, the step down regula-
Leak Test Spots
Check for
abrasions, cracks
and leaks
tor MUST be used to reduce the
supply pressure to a max. 14”
W.C. and a min. 11” W.C. to the
grill regulator.
Leak Testing
General:
Although all gas connections
on the grill are leak tested at
the factory prior to shipment, a
complete gas tightness check
must be performed at the installation site due to possible mishandling in shipment, or excessive pressure unknowingly being applied to the unit. Periodically check the whole system for
leaks, or immediately if the smell of gas is detected.
Before Testing:
Do not smoke while leak testing. Extinguish all open fl ames. Never leak test with an open fl ame. Make a soap solution of one part
liquid detergent and one part water. You will need a spray bottle,
brush, or rag to apply the solution to the fi ttings. For LP units,
check with a full cylinder. Remove the control knobs and battery
to disable accidental ignition. Open the drawer containing LP or
natural gas hook up, this is where all tests will be performed.
To Te s t:
Make sure all control valves are in the “OFF” position. Turn the gas
supply “ON”. Check all connections from the supply line, or LP
cylinder up to and including the manifold pipe assembly. Apply
the soap solution around the connection, valve, tubing and end of
the manifold. Soap bubbles will appear where a leak is present. If a
leak is present, immediately turn off gas supply, tighten any leaking connections, turn gas on, and recheck. Check all the gas connections at the base of the control valves where they screw into
the manifold pipe.
If you cannot stop a gas leak, turn off the gas supply and call your
local gas utility or the dealer you purchased the appliance from.
Only those parts recommended by the manufacturer should be
used on the grill. Substitution can void the warranty.
WARNING:
Do not use the grill until all connections have been checked and
do not leak.
Check all gas supply fi ttings for abrasions, cracks and leaks
before each use. It is recommended to keep a spray bottle fi lled
with soapy water near the shutoff valve of the gas supply valve.
Spray all the fi ttings. Bubbles indicate leaks. (FIG. 02)
22 23
FIG. 02
Page 14

Maintenance
WARNING: IMPORTANT!
Before lighting, inspect the gas supply piping or hose prior to
turning the gas “on”. If there is evidence of cuts, wear or abrasion,
it must be replaced prior to use.
Grill Burner:
Remove grill lid, diffuser panel, grate, and burner. Remove screw
holding burner to grill body by unscrewing counter-clockwise.
and clog the port. Shake out any debris. Use a fl ashlight to
inspect the burner inlet to ensure it is not blocked (FIG. 05A). If
obstructions can be seen, use a metal wire coat hanger that has
been straightened out.
Orifi ce Cleaning:
With burner removed remove the orifi ce and shine a fl ashlight
through the opening to ensure there is no blockage. Use a
needle to clear any debris. Be extremely careful not to enlarge
the hole or break off the needle.
Grill Burner Flame Height:
The factory burners have been set for the correct air and gas mixture. The correct fl ame pattern is shown in (FIG. 04).
1: Burner tube
2: Tips occasionally fl icker yellow
3: Light blue
4: Dark blue
If fl ames do not appear to be
uniform throughout the burner
tube, check if the ventilation
openings of the burner tube
are blocked by dirt, debris,
spider webs, etc. In order for
burner to work properly there
must be no obstructing the fl ow
of combustion or ventilation air.
Proceed with cleaning instructions below.
Grill Burner Exterior Cleaning:
Clean the exterior of the burner
with a wire brush. Clean stubborn scale with a metal scraper.
Clear any clogged ports with
a straightened paper clip (FIG.
05B). Never use a wooden
toothpick as it may break off
FIG. 04
A
B
FIG. 05
WARNING:
IT IS EXTREMELY IMPORTANT
TO CENTER THE BURNER ON
THE ORIFICE PROPERLY TO
PREVENT A FIRE HAZARD OR
EXPLOSION.
WARNING:
DO NOT REMOVE BURNER OR
PERFORM CLEANING WHILE
GRILL IS STILL HOT
Cleaning
Residue Cup Replacement:
Check residue cup before each
use for debris build-up.
Standard 4 oz. aluminum cup replacements can be purchased at
most general or grocery stores. (FIG. 06)
Cast Iron Grate And Frame Cleaning:
Clean the cast iron grate with a wire brush.
FIG. 06
24 25
Page 15

Igniter Tip Cleaning:
If lighting the burners is diffi cult
you may need to clean and adjust the igniter tip located near
the burner edge. (FIG. 07)
To ensure that the igniter lights
properly, clean off any cooking
residue that builds up on igniter tip and burner. Use a very
fi ne grit sand paper to clean igniter tip and edge of burner.
Igniter tip should be 2–4 mm away from burner edge. This is
the ideal distance for most effective ignition.
Surface:
Grill should be covered when not in use to protect it from
outdoor elements. Wipe down surface to remove any cooking residue with a clean cotton or microfi ber cloth. Clean
stainless steel surface with a stainless steel cleaner and apply a polish to keep your grill looking its best.
FIG. 07
Using The Grill
Cast Iron Grate Seasoning
It is recommended to season your cast iron grate before you
begin cooking on your Element grill. A well-seasoned grate will
resist rust and create a virtually nonstick surface for cooking.
1. Remove the grate from packing materials.
2. Brush vegetable oil lightly over cast iron pieces to coat the
entire surface.
3. Heat the grate to approximately 250 degrees Fahrenheit (120
degrees Celsius) on low over your grill with the lid closed for approximately 20 minutes.
4. Wipe the grate well with a paper towel, and let it cool
completely before use.
5. To preserve this natural, protective coating DO NOT USE SOAP
when cleaning a seasoned grate. Instead, scrub the grate with a
mixture of salt and vegetable oil, rinse with hot water, and dry
completely over low heat before storing.
Stubborn and heavily ingrained stains can be removed by
sanding with a fi ne grade of sandpaper, being sure to work
only with the direction of the timber grain. After sanding
away stains like this you may need to re-oil the surface.
Wood prep shelf:
Clean wood shelf (on 01 and 02 models only) using a soft
sponge and a solution of mild soapy water. Wash down
afterwards with clean water.
Do not use high pressure hoses, steel wool or wire brushes
as all and any residue left in the grain will rust and discolor
the wood.
Cast Iron Grate Preheating
It is important to preheat your grill surface prior to cooking to
ensure an overall hot surface with even temperature. As the
grates are made of cast iron, they take some time to heat but
retain that heat extremely well and provide an excellent cooking
surface for grilling.
1. Turn the burner on high.
2. Cover the grill surface with the lid and heat on medium for approximately 10 minutes. Remove the lid, adjust to desired temperature and begin cooking.
26 27
Page 16

Cast Iron Grate Cleaning After Grilling
Cleaning Grill Grates:
1. Turn the burner on medium heat for approximately 10-20 minutes to burn away any food debris and/or grease.
2. Let grill cool completely.
3. Brush grates with wire brush to remove any remaining debris.
4. If necessary, scrub the grate with a mixture of salt and vegetable oil, rinse with hot water, and dry completely over low heat
before storing.
Optional Element Grill Accessories
EAOOAPS Pizza Stone
EAOOAGP Griddle Plate
EAOOAGC Natural Gas Conversion Kit
EAOOAOC Outdoor Cover
Recommended Cooking Times
Bg^S]T;SObBVWQY\Saa 2]\S\Saa 5`WZZW\UBW[S
W\[W\cbSa
0SST
0]\SZSaa@WP3gS W\ ;SR@O`S "&
]`BS\RS`Z]W\ ;SR &
0]\SZSaa W\ ;SR@O`S "&
AW`Z]W\AbSOY ;SR &
BP]\S W\ ;SR@O`S &
>]`bS`V]caS ;SR #
AbSOY
5`]c\R;SOb !"W\ <]Z]\US`^W\Y "&
^ObbWSa
>]cZb`g
1VWQYS\0`SOab "#]hSOQV BS\RS`O\R #
VOZT]`bVWUV \]Z]\US`^W\Y
aYW\ZSaaO\R
P]\SZSaa
Bc`YSg0`SOab W\ BS\RS`O\R #
\]Z]\US`^W\Y
>]`Y
0]\SZSaa !"W\ ;SR &
:]W\QV]^
:O[P
@WP W\ ;SR #
]`:]W\QV]^
4WaVASOT]]R
4WZZSb]`AbSOYa b]W\ 4ZOYSa "$
ASOAQOZZ]^a b]#^S`ZP =^O_cS #&
AV`W[^ ;SRWc[ >W\Y $&
28 29
b]:O`US
Page 17

Accessories Use & Care
Using the Pizza Stone (model# EA00APS)
1. Remove the grill grate and the heat diffuser panel when using
the pizza stone or griddle plate.
2. Before fi rst use, remove from packaging and wash pizza stone
with hot water and dry with soft cloth.
3. With the smooth side of the pizza stone facing up, position the
stone over the bowl. Make sure to line up the bottom groove with
the rim of the bowl.
4. Heat up the pizza stone with cooking lid off, heat on medium/
high with direct heat (both inner and outer rings).
5. Never use both burners on high setting when cooking with the
lid closed.
ed to use a pizza peel for transferring the pizza to and from the
stone and plenty of cornmeal or fl our so the dough doesn’t stick.
12. The pizza stone is made of cordierite. The material is able to
retain a wide range of temperatures for baking breads and cakes.
The material’s porous surface pulls moisture away from the bread
while baking, making the bread light and crispy underneath.
Cleaning
13. Allow the stone to cool down completely before removing
from the grill. Clean with a cloth or scourer with hot water. Soap
detergent may be used but do not soak in soapy water. Dry with
a soft cloth.
14. It is normal to have baked-on food stains that may discolor
the stone over time. This will not affect the performance or hygiene of the stone if is cleaned properly after each use.
Pre-Heat the Pizza Stone and cook the ingredients
6. With the lid off, pre-heat the stone with direct heat (both inner
and outer burners) on medium/high. Keeping the lid off will help
distribute the heat most evenly throughout the stone. Pre-heat
for 10-20 minutes.
7. While the stone is heating begin to prepare the ingredients.
Note: Only cooked meat should go on the pizza. Any raw meat
should not be placed on the pizza because it will not have the
proper time to cook.
Cooking the Pizza
8. After fully heating the stone for 10-20 minutes, turn burner to
indirect heat setting (outer ring only).
9. Slide raw pizza onto the stone, cover with lid and leave all lid
vents open.
10. A pizza will cook approx every 8-15 minutes, depending on
the size and thickness of the pizza.
11. Cooking Tip: When cooking for the fi rst time, check the pizza
frequently. When the cheese on the surface is thoroughly melted
and the pizza bottom starts to turn brown, it is ready to serve.
BE CAREFUL, the stone will be extremely HOT. It is recommend-
Using the Griddle Flat Plate (model# EA00AGP)
1. Remove grill grate and heat diffuser panel when using the
griddle plate or pizza stone.
2. Heat up the griddle plate with cooking lid off, heat on medium/high with direct heat (both inner and outer rings).
3. Once the plate is thoroughly heated (approx. 10-20 minutes),
use with indirect heat (outer burner ring only), and cook with or
without the lid.
4. Never use both burners on high setting when cooking with the
lid closed.
Seasoning the Griddle
It is recommended to season your cast iron griddle plate before
you begin cooking. A well-seasoned griddle will resist rust and
create a virtually nonstick surface for cooking.
5. Once the griddle is on the grill, brush vegetable oil lightly over
the cast iron surface.
6. Heat the griddle to approximately 250 degrees on low without the lid using direct heat (both burner rings) for approx. 20
minutes.
7. Use a tool to wipe the griddle well with a paper towel. BE
30 31
Page 18

CAREFUL the griddle will be warm. Let it cool completely before
use.
Pre-Heating/Cooking using your Griddle Plate:
It is important to preheat your grill surface prior to cooking to
ensure an overall hot surface with even temperature. The griddle
is made of cast iron and will need time to preheat.
8. Turn the control dial to activate both burners on medium/high.
9. Heat the cast iron surface for approx. 10-20 minutes. Do not
use lid.
10. Once the griddle is hot and heat is evenly distributed, adjust
to indirect heat (outer burner ring) using low to high temperature setting, cook with or without the lid.
11. Suggested foods include fajitas, quesadillas, stir-fry, and
breakfast foods.
Cleaning your Griddle Plate:
12. With lid off, turn both burners on medium/high for approx. 10
minutes to burn away any food debris and/or grease.
13. Turn off grill, brush griddle with wire brush to remove any
remaining debris while the cast iron is still warm. Wipe surface
clean with cloth, recoat with some vegetable oil if needed.
14. To preserve the natural protective coating DO NOT USE SOAP
when cleaning a seasoned griddle/ grate. If necessary, scrub the
griddle with a mixture of salt and vegetable oil, rinse with hot
water, and dry completely over low heat before storing.
Be sure to check the residue collection cup. If the cup is full,
empty or dispose and use a new cup. Additional cups can be
purchased from most grocery and convenience stores.
Limited Warranty
Element Products LLC (“Seller”) and the person or entity that acquires these
goods from Seller (“Purchaser”) hereby fully agree to the following terms and
conditions of the sale: Shipping fees are the responsibility of the Purchaser
whether freight prepaid or freight collect. Seller assumes no responsibility for
the goods sold to the Purchaser once the goods have left the Seller’s premises,
including, but not limited to, late delivery by the moving carrier, or for events
caused by any diffi culty carrier incurs in attempting to fi t the goods into the
Purchaser’s place of business or residence due to the size of the goods or otherwise. Purchaser assumes all responsibility for delivery, payment of freight, access,
measurement, installation, hook-up, wiring, moving and storage of the goods. The
transportation of all goods is subject to the terms and conditions which the moving carrier imposes on Purchaser including, but not limited to, additional charges
imposed per fl ight of stairs, and/or additional charges resulting from the carrier’s
inability to safely and/or adequately use the building elevator to lift the goods to
an upper fl oor. Any claim for damages incurred during shipment by the carrier of
the goods are insured and handled directly with the carrier. Any damages due to
manufacture defects will be handled directly with Element Products LLC, subject
to the limited warranty.
All sales are fi nal, and unless authorized in writing by the Seller, Purchaser may
not return the goods, under any circumstance. If Purchaser refuses to accept the
goods, under any circumstance, the Purchaser is liable for the return and cost of
freight both ways, and if Seller does take back the goods, there will be a restocking charge that is 35% of the purchase price of the goods. Purchaser must notify
Seller of non-conforming goods within four days of delivery, after which time all
goods are deemed accepted.
If Purchaser tenders payment with a check that has insuffi cient funds (NSF),
or stops payment on a check or credit card for any reason, Purchaser agrees
to pay for all costs associated with the Seller’s connection or litigation of such
a claim, including without limitation extra damages, court costs and attorneys’
fees. Finance charges begin the date of invoice. Collection fees plus NSF fee of
$50 will be added to your invoice, which you agree to promptly pay. Title to the
goods does not pass until payment is received in full by Seller and Seller retains a
security interest in the goods until they are paid for in full.
This limited warranty does not cover damage due to such things as accident,
misuse, abuse, mishandling, neglect, acts of God, fi res, earthquakes, fl oods, high
winds, government, war, riot or labor trouble, strikes, lockouts, delay of carrier,
unauthorized repair, or any other cause beyond the control of the Seller, whether
similar or dissimilar to the foregoing. Seller is not responsible for any damages
caused to Seller’s property resulting from the good. This limited warranty applies
only inside the Continental US. (Alaska, Puerto Rico and Hawaii are not warranted).
Seller is not responsible for incidental or consequential damages, and there are
no warranties, expressed or implied, which extend beyond the Limited Warranty
described above. The implied warranties of merchantability and of fi tness for a
particular purpose are hereby expressly disclaimed. Some states do not allow the
32 33
Page 19

exclusion of incidental or consequential damages, or a waiver of the implied warranties of fi tness and/or merchantability, so the above limitations may not apply
to you. This warranty gives you specifi c legal rights and you may also have other
rights which vary from state to state.
In the event of any dispute between Seller and Purchaser arising out of or relating to these terms and conditions or to the goods sold generally, Purchaser must
fi rst fi le a written claim with Seller within ten days of the occurrence giving rise
to the claim and wait an additional thirty days for a response before initiating
any legal action. The sale and all terms are subject to California law. Any legal
proceeding arising out of or relating to these terms and conditions or to the
goods sold generally shall be brought solely and exclusively in the County of Los
Angeles. In no event may Purchaser initiate any legal proceeding more than six
months after the occurrence of the event giving rise to the dispute.
The above terms and conditions are the only ones governing this transaction and
Seller makes no oral representations of any kind. These Terms and Conditions can
only be modifi ed in writing, signed by both Purchaser and Seller.
Length of Warranty:
One (1) Year comprehensive parts on the entire product.
Three (3) Years limited parts warranty covering the stainless burner.
Customer Service: 1.800.777.8466
www.elementbyfuego.com or info@elementbyfuego.com
Write To: Element Products LLC
17621 South Susana Road
Rancho Dominguez, CA 90221
Recycling tip:
Most of the packaging materials are recyclable. Please dispose of those materials
through your local recycling depot or by placing them in appropriate collection
containers.
Product Registration:
For service under warranty please maintain your records with
purchase receipts. Or register your product online at
www.elementby fuego.com/support
34 35
Page 20

No. Description Q’TY Element 01 Element 02 Element 03
01 Grill Grate- coated 1 X X X
02 Diffuser panel 1 X X X
03 Burner- dual ring 304 1 X X X
04 Fire bowl 1 X X X
05 Ignitor 1 X X X
06 Orifi ce 2 X X X
07 Support bracket for Orifi ce 1 X X X
08 Lug nut for Orifi ce 2 X X X
09 Support Bracket for Valve 1 X X X
10 Gas supply hose 2 X X X
11 Joint ring 1 X X X
12 Ignitor Cable 1 X X X
13 Heat Insulator- Bowl 1 X X X
14 Shaft ring 2 X X N/A
15 Swing out table 1 X X N/A
16 Base Collar 1 N/A N/A X
17 Ignitor Power Pack for AA battery 1 X X X
18 Aluminum residue tray 1 X X X
19 Base 1 X X X
20 Grill Handle 2 X X X
21 Control Knob 1 X X X
22 Control Knob Collar 1 X X X
23 Support Spine 1 X X X
24 Door stop 2 X X X
25 Tank storage Door- Rear 1 X X X
26 Tank storage Door- Front 1 X X X
27 Door catch mount 4 X X X
28 Door catch male 4 X X X
29 Door catch female 4 X X X
30 Grill Base 1 X X X
31 Wheels- swivel locking 2 X X X
32 Wheels- swivel 2 X X X
33 Handle- Lid: High heat 1 O O O
34 Lid 1 O O O
35 Clip on side shelf 1 O O O
X – standard O – Optional N/A – not applicable
36 37
Page 21

Element by Fuego
Roundhouse One
1500 Sansome Street
San Francisco, CA 94111
888.883.8346
www.elementbyfuego.com
Distributed by Vinotemp International
38
 Loading...