

Page 1
Phottix Strato transmitter Instructions
Short Description
*Consult your camera manual for specific settings for remote use.
this product uses efficient GFSK modulation, its frequency is 2.4 G, it fits free channels in many
countries.it adopts integration chip control.it has low power and super strong anti-jamming
capability;it can ensure the speed,distance and stability effectively.when used with the Canon and
Nikon professional flashes,it has TTL functions,and the range can be up to 100m.the Phottix Strato
transmitter can be used as a wired remote.the function of the test/shutter button is the same to the
cameras' shutter button:A half-press of the test/shutter button will autofocus, a full press will take
a photo.
2.Main parameter
Frequency: 2.464 GHz
Distance: 100m +
Channel: 4 channels
Batteries: 2 x AAA batteries
Max sync speed: 1/250 s
input voltage: 2.5-3.2V
Top ports:TTL port on the top of transmitter
dimension:85*40*38 (LWH)
Antenna: built-in PCB antenna
Operating temperature: -15—65 ℃
Storage temperature: -30—85 ℃
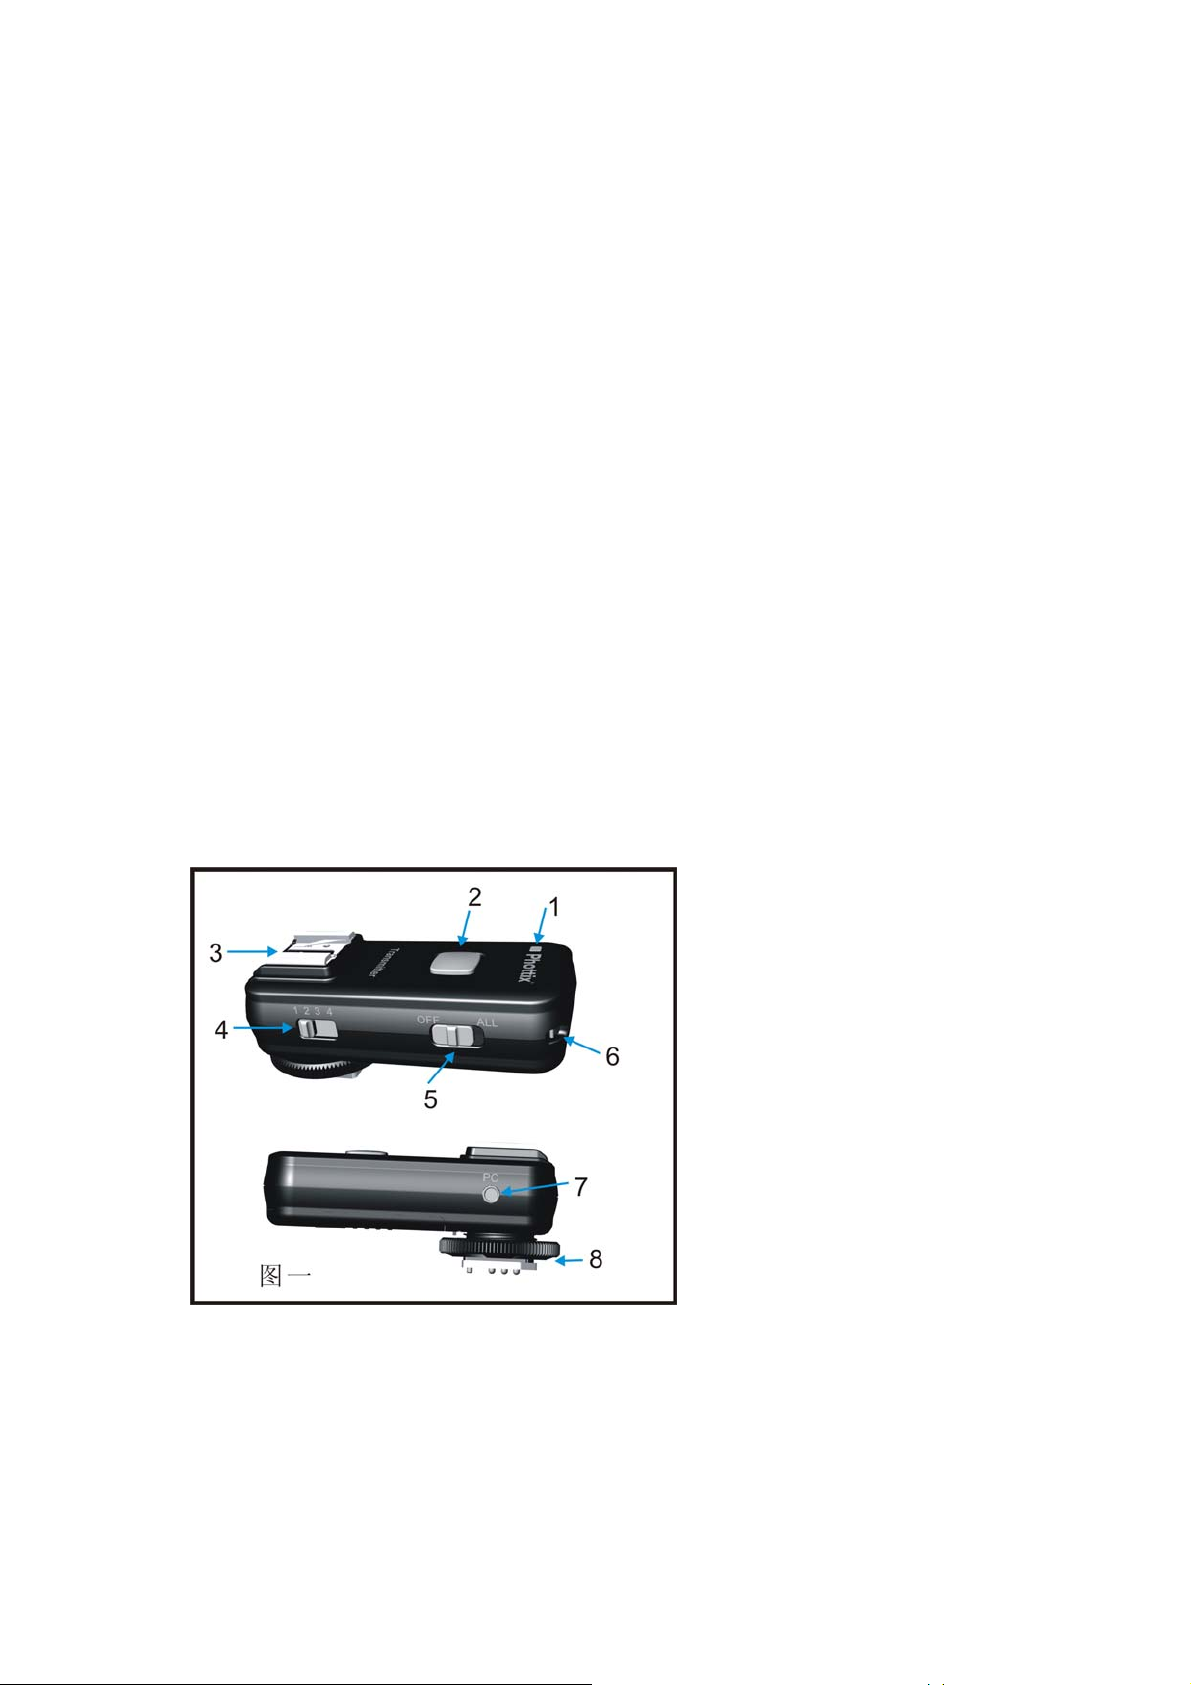
3.parts
1)Status LED
2)Test / Shutter Button
3)TTL Hot Shoe Port
4)Channel Selector Switch
5)Fire All Channels Switch
6)Locking Ring
7)PC input port
8)Camera Hot Shoe Connection
4.usage:
Page 2

Please note:Strato only can be used with compatible Canon and Nikon flashes.
Status LED
The Status LED on the front of the Phottix Strato transmitter will turn solid green when
autofocusing (on camera or as a wireless remote) and turn red when sending a signal.
Setting Channels
Fire All Channels Switch To fire all flashes or strobes on different channels move the Fire
All Channels Switch on the transmitter to the ON position. All nearby Strato receivers will fire
flashes / strobes, or trigger connected camera shutters.
Inserting Batteries
Press the battery cover in while pushing it away from the Strato transmitter or receiver. The
battery cover will snap open. Remove the battery cover from the Strato. Insert AAA batteries.
Replace the battery cover and push back into the locked position.
T est / Shutter Button
The Test / Shutter Button will test fire remote flashes/strobes or take a photo when the Phottix
Strato is used as a wireless shutter release. the function of the test/shutter button is the same to the
cameras' shutter button-it will t ake a photo,A half-press of the test/shutter butto n will autofocus, a
full press will take a photo.
To Test: Press the transmitter or receiver Test / Shutter Button – flashes connected to Phottix Strato
receivers on the same channel will fire.
TTL function on the top of the transmitter:
Turn off the camera. Slide the Strato transmitter to the camera's hot shoe mount.keep rotating
the strato's lock ring until it is locked in. turn on the camera and set to TTL mode.and slide the
compatible flashes to the TTL port on the top of transmitter.when take photos,the top flash can
have TTL function.
The usage of PC sync cable:
The Strato Transmitter can also be attached to a camera’s PC Sync port if you do not wish to
use the hot shoe.Connect a 3.5mm PC sync cable(included)to the camera's PC Sync Port,Connect
the opposite end of the cable to the PC sync port on the transmitter.then it will has the PC sybc
function.
5.Warnings
- This product is a precise electronic instrument. Do not expose to damp environments or dust.
- Do not drop or crush.
- Do not use harsh chemical(s) or solvents to clean the body. Use a soft cloth or lens paper.
- Interference: The Phottix Strato transmits and receives radio signals at 2.4 GHz. Its
performance can be affected by electrical current, magnetic fields, radio signals, wireless routers,
cellular phones, and other electronic devices. Environmental objects, such as large buildings or
walls, trees, fences, or cars can also affect performance. If your Strato receiver will not trigger
move its location slightly.
Page 3

This device complies with Part 15 of the FCC Rules. Operation
is subject to the following two conditions: (1) this device may
not cause harmful interference, and (2) this device must accept
any interference received, including interference that may cause
undesired operation.
FCC ID: XBYSTRATO
changes or modifications not expressly approved by the party responsible for compliance
could void the user's authority to operate the equipment.
NOTE: This equipment has been tested and found to comply with the limits for a
Class B digital device, pursuant to Part 15 of the FCC Rules. These limits are
designed to provide reasonable protection against harmful interference in a
residential installation. This equipment generates, uses and can radiate radio
frequency energy and, if not installed and used in accordance with the
instructions, may cause harmful interference to radio communications. However,
there is no guarantee that interference will not occur in a particular installation.
If this equipment does cause harmful interference to radio or television reception,
which can be determined by turning the equipment off and on, the user is
encouraged to try to correct the interference by one or more of the following
measures:
-- Reorient or relocate the receiving antenna.
-- Increase the separation between the equipment and receiver.
-- Connect the equipment into an outlet on a circuit different
from that to which the receiver is connected.
-- Consult the dealer or an experienced radio/TV technician for
help.
 Loading...