

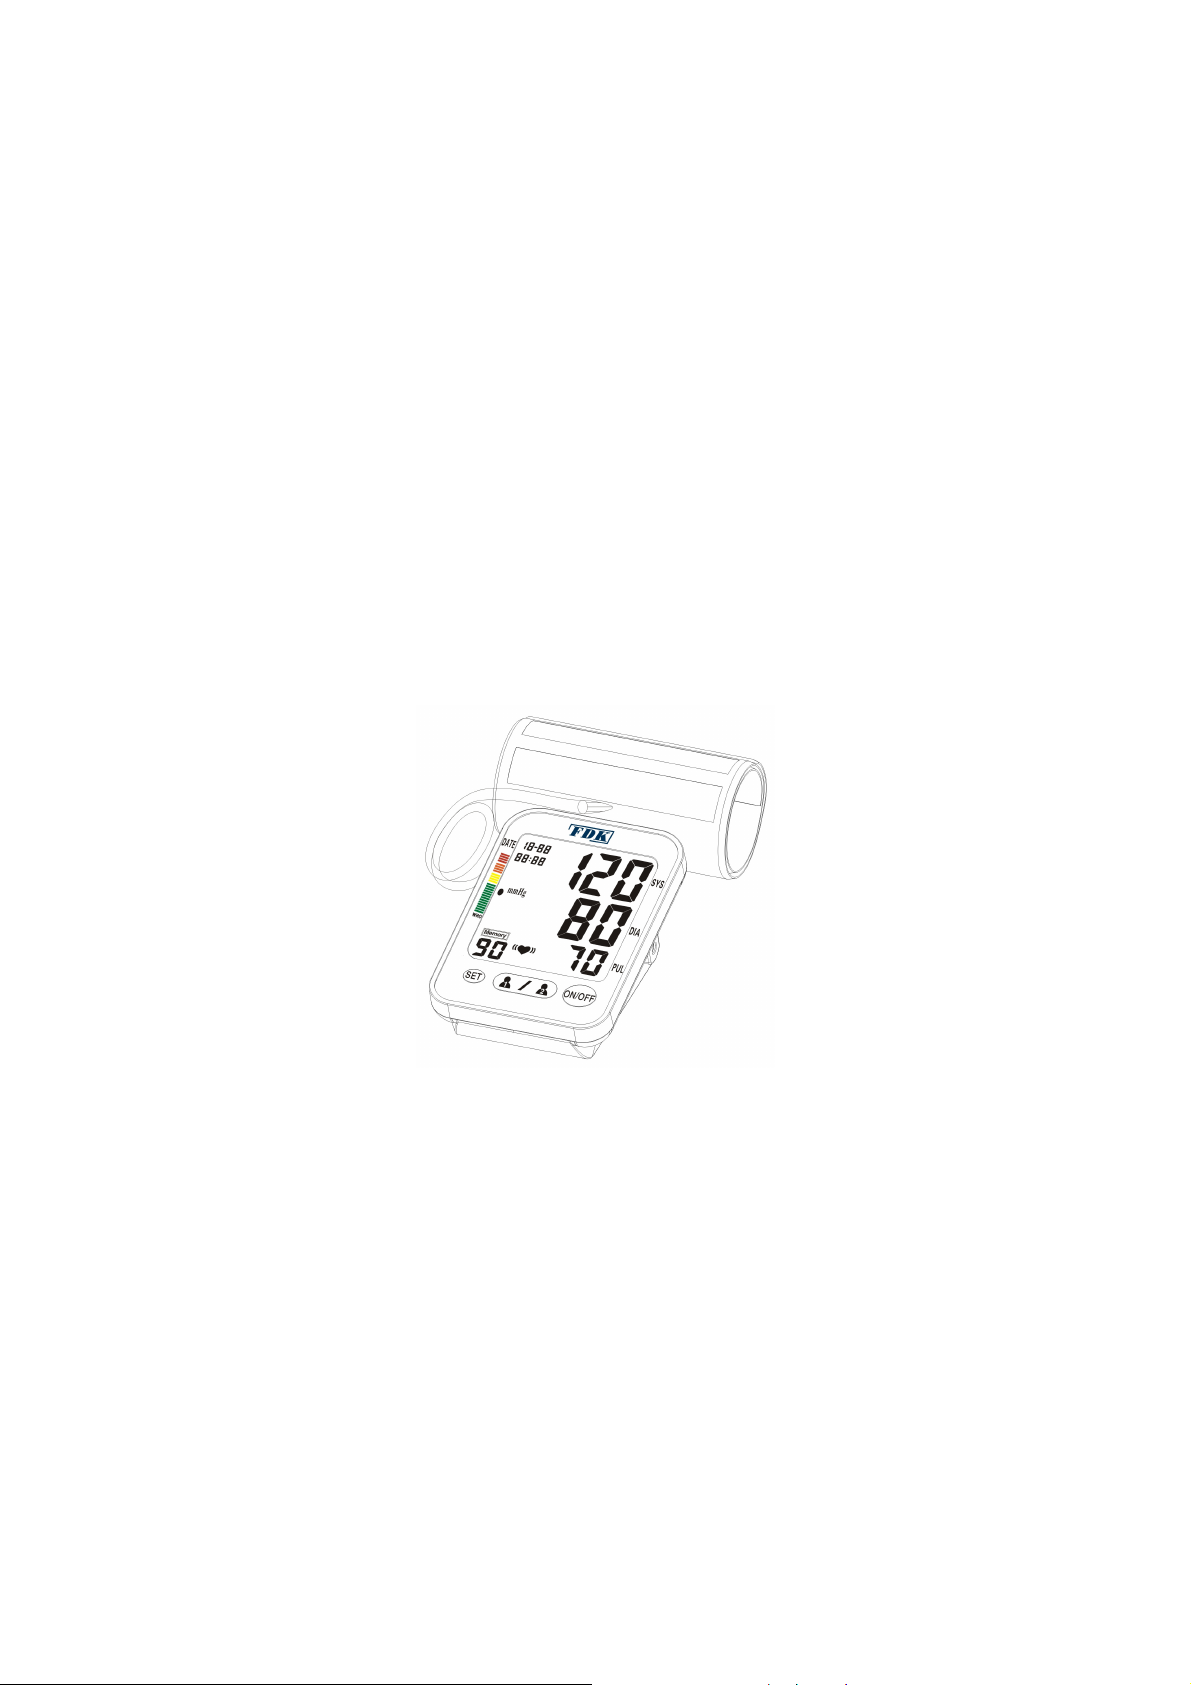
Arm Blood Pressure Monitor
(Electronic Sphygmomanometer)
User Manual
Thank your for purchasing our product.
Please read this manual carefully before using the product.
Please keep the manual appropriately for future reference.
This User Manual is suitable to the following models: FT-C21Y, FT-C22Y, FT-C23Y,
FT-C24Y, FT-C11B, FT-C12B, FT-C21Y-V, FT-C22Y-V, FTC23Y-V, FT-C24Y-V,
FT-C11B-V, FT-C12B-V, FT-C11B-UR and FT-C11B-BT.
Table of Contents
(I) General Information
(II) Precaution for Use and Maintenance
(III) Name of Each Part
(IV) Measure Procedure
(V) Troubleshooting
(VI) Model List
I. General Information
Intended Use and Indications For Use
Fudakang Arm Blood Pressure Monitor are non-invasive blood measurement system
intended to measure the diastolic, systolic blood pressures and pulse rate of an adult
individual in hospitals, hospital-type facilities and home environments.
The BT series Blood Pressure Monitor is with the wireless communication function that is
connected to the PC or a mobile phone for record archiving and printing purpose.
Specification
Product Name
Arm Blood Pressure
FT-C21Y, FT-C22Y, FT-C23Y, FT-C24Y, FT-C11B,
FT-C12B, FT-C21Y-V, FT-C22Y-V, FTC23Y-V,
FT-C24Y-V, FT-C11B-V, FT-C12B-V,
Applied Models
FT-C11B-UR (for UART port connection)
FT-C11B-BT (for Bluetooth connection )
Measurement Principle Oscillography
Bluetooth Version
Bluetooth 4.1 BLE
Bluetooth Modulation Type GFSK
Cuff
Measurable Arm
Circumference Range
Measurement Range
Accuracy
Soft cuff, Cuff size 470mm×130mm (+/- 5mm)
18.5 × 5.1 inch (+/- 0.2 inch)
About 220~300mm (8.7 ~ 11.8 inch)
Pressure: 0~300mmHg
Pulse: 30~180 times/minute
Pressure: ±3mmHg
Pulse: ±5%
Power Supply 4 x 1.5V AA Alkaline batteries 6V
Approx. 250 times (180mmHg, 1 time/day, 22°C) ;
Battery Life
Each measurement takes around 60 seconds, and
each memory checking takes about 1 second
Protection against electric
shock
Type BF Cuff
IP classification IP21
Temperature: 5~40°C
Working Environment
Humidity: <90%RH
Pressure: 86~106 kPa

Transport and storage
Environment
Electric Shock Protection Internal power unit
Memory Capacity
Inflation Automatic Inflation by internal pump
Temperature: -20~55°C
Humidity: <95% RH
Pressure: 86~106 kPa
2 Memory sets ; each 90 reading of data including
date and time
Deflation
Display
Color Backlight display on
LCD (Optional)
Switch 3(ON/OFF, Memory, SET)
Life Time
Contents
Note:
These specification may be changed without prior notice.
Contraindications:
1. Heart disease
2. High blood pressure or other circulatory disease
Automatic speed deflation system controlled by
internal electromagnetic valve.
LCD digital display ; It can show Pressure, Pulse,
Date, Time
White backlight display when power on
Green backlight display when result is normal
Red backlight display when result is abnormal
Machine : 5 years or 10000 times
Cuff : 10000 times
AC Adapter: 50000 hours
-Cuff
-4 x1.5V AA alkaline batteries 6V (Optional)
-Carrying bag(Optional)
-Instruction Manual
3. Arm injury
Patient Populations:
The device is intended to use for adults. DO NOT use this device on infants or small
children..
Cleaning Information:
1. If the device is very dirty, wipe it clean with a cloth moistened with sterilizing alcohol or
a neutral detergent. Then wipe it with a dry cloth.
2. NEVER clean the blood pressure monitor with thinners or benzene, as they may
damage it.

3. To clean the cuff, wipe it with a moist cloth. Avoid hard rubbing as this will cause air
leakages. Take care also not to get water into the air hose.
Maintenance:
This product is designed for use over an extended period of time; however, it is generally
recommended that it be inspected every five years to ensure proper function and
performance. The device doesn’t need to be calibrated in five years of reliable service.
Modification of this equipment is allowed except change the batteries.
Protect the Nature Environment:
Please help to protect natural environment by respecting national and/or local recycling
regulations when disposing of the battery and the product at the end of their useful live.
II. PRECAUTION FOR USE AND MAINTENANCE
Precautions for Use:
1. If you suffer from heart disease, high blood pressure or other circulatory disease,
consult your physician before using the device. It is intended for adult indoor use
only. The device is not suitable for public use.
2. The patient is an intended operator. The patient can measure, transmit data and
charge battery under normal circumstances and maintain the device and its
accessories according to the user manual.
3. If the cuff pressure feels abnormal or you experience any other irregularity while using
the cuff, reduce the pressure immediately by pressing the “ON/OFF” switch and then
consult the sales outlet where you purchased the device.
4. If you think the measurement is abnormal or if measurement makes you feel unwell,
discontinue use and consult your physician.
5. Blood pressure measurement may not be possible for anyone with a weak pulse or
arrhythmia.
6. Repeated blood pressure measurement may cause problems such as congestion or
swelling in some people.
7. Frequently repeated blood pressure measurements will not give accurate results.
Allow an interval of about 3 minutes between measurements.

8. If you suffer from a severe problem with blood circulation in your arms, consult your
physician before using the device. Failure to do so could be hazardous to your health.
9. Measurement may not be possible for anyone with insufficient blood flow to the area
where measurements will be taken or who suffers from a frequent irregular heartbeat.
Consult your physician for advice on whether to use the device.
10. DO NOT wrap the cuff around an elbow. DO NOT wrap over a wound.
11. DO NOT wrap the arm cuff around an elbow in which a drip (intravenous infusion) is
inserted or which is being used for blood transfusion as part of medical treatment.
Doing so could result in an injury or a serious accident.
12. DO NOT wrap the cuff on the arm on the side of a mastectomy.
13. DO NOT use the device in the vicinity of flammable gases such as those used for
anesthesia. Doing so could ignite the gases and cause an explosion.
14. DO NOT use the device in enriched oxygen environments such as a hospital’s
hyperbaric chamber or oxygen tent. Doing so could ignite the oxygen and cause a
fire.
15. DO NOT use mobile phones near the device as this could result in a malfunction.
DO NOT use the device with hf surgical equipment.
16. If you use a cardiac pacemaker, consult your physician before using the device.
17. Be sure to use this device only for measuring blood pressure. DO NOT use it for any
other purpose.
18. DO NOT use this device on infants, pregnant women or pre-eclamptic patients.
19. DO NOT use this device for patients that transport outside a healthcare facility.
20. Blood pressure measurement may not be possible for anyone with common
arrhythmias such as arterial or ventricular premature beats or arterial fibrillation.
21. Be careful to strangulation due to cables and hoses, particularly due to excessive
length. It will not cause any potential alergic reaction or contact injury. If you are
allergic to dacron or plastic, please don’t use this device
Precautions for Maintenance:
1. DO NOT store the blood pressure monitor in locations exposed to direct sunlight, high
temperatures (over 60°C), low temperatures (below -20°C), high relative humidity
(over 85%) or excessive amounts of dust.
2. DO NOT drop the blood pressure monitor or subject it to other shocks or vibration.
3. Remove the batteries if the device will be left unused for a long period.
4. DO NOT attempt to disassemble the device. User can open battery cover for new
battery installation.
DO NOT bend the cuff or air hose excessively.
5. NEVER clean the blood pressure monitor with thinners or benzene, as they may
damage it.
6. DO NOT hard rub when clean the cuff. Take care not to get water into the air hose.
7. DO keep the device out of reach of children, pets and insects.
III. Name of Each Part
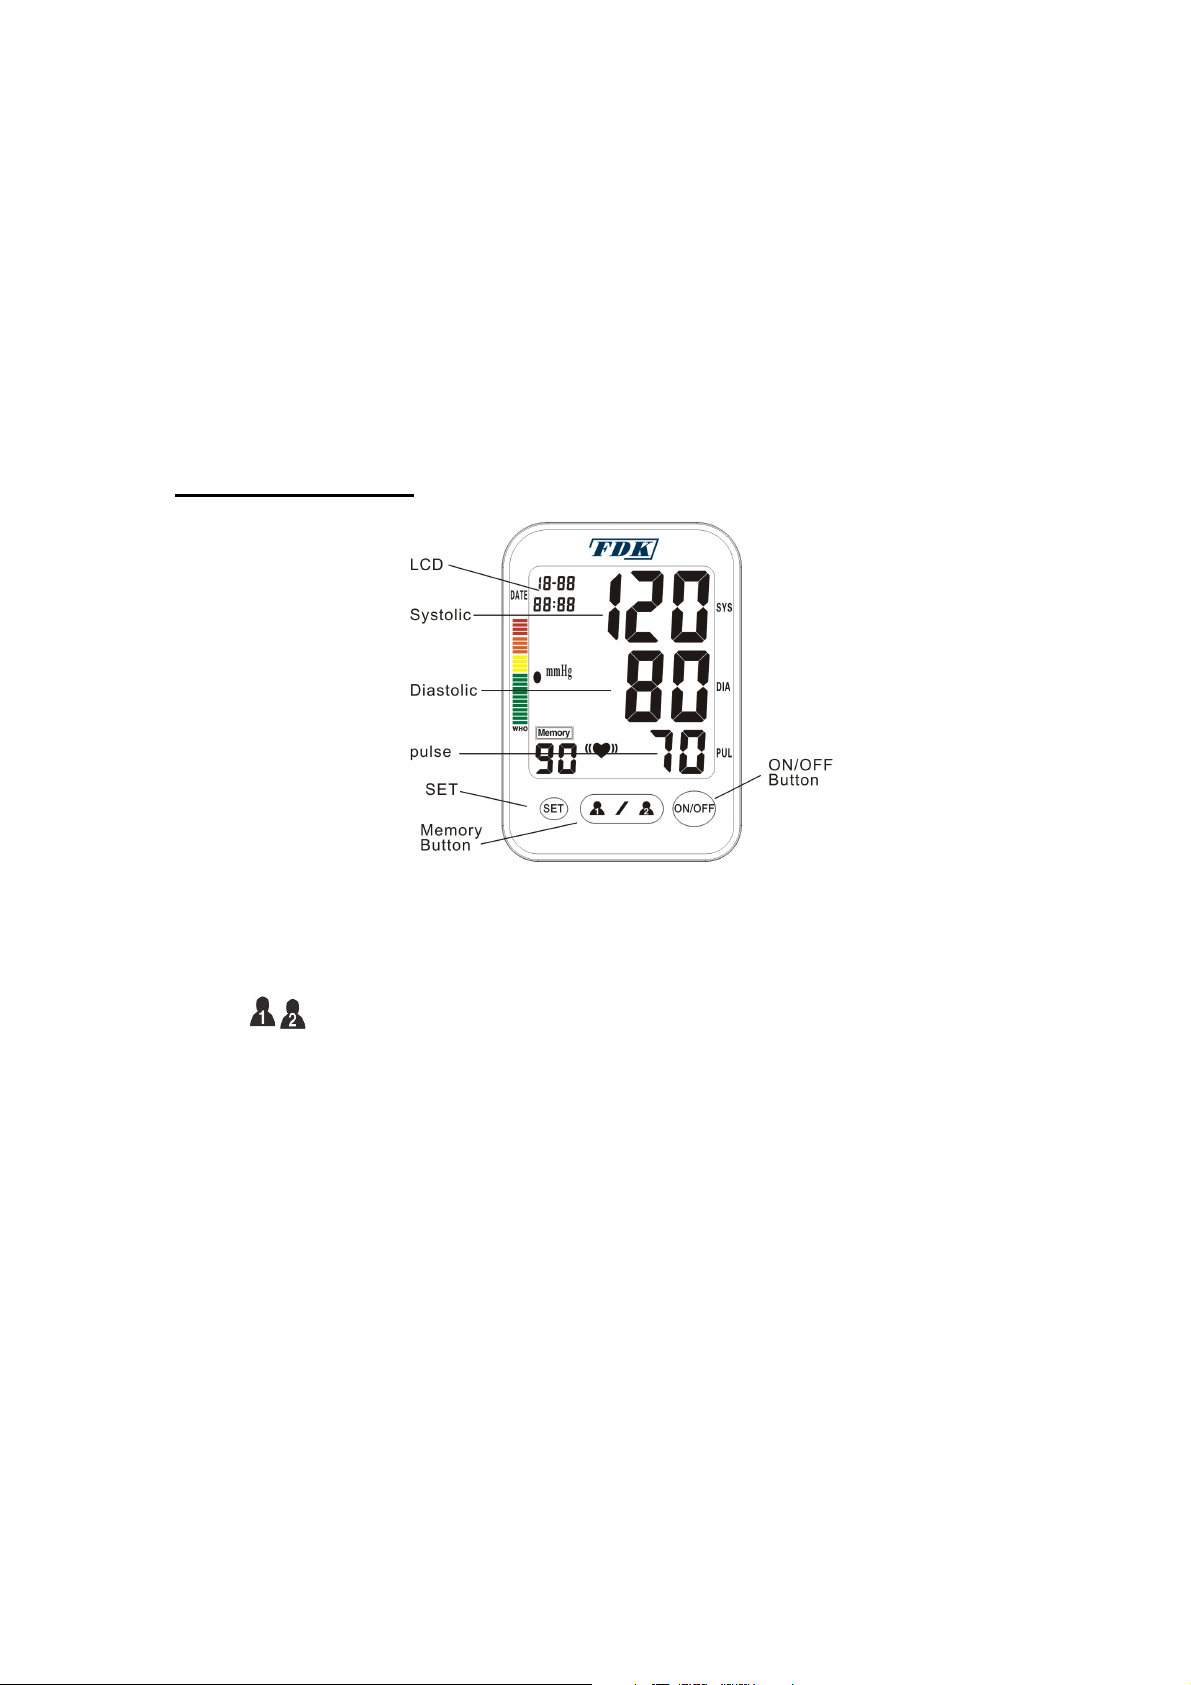
Figure 1 - Appearance
MEMORY” Button /Clock Setting
Memory Button /Measured Result recall/ Clock Number Adjusting
“ON/OFF” Button
LCD Display
Systolic Indicator
Diastolic Indicator
Pulse Indicator
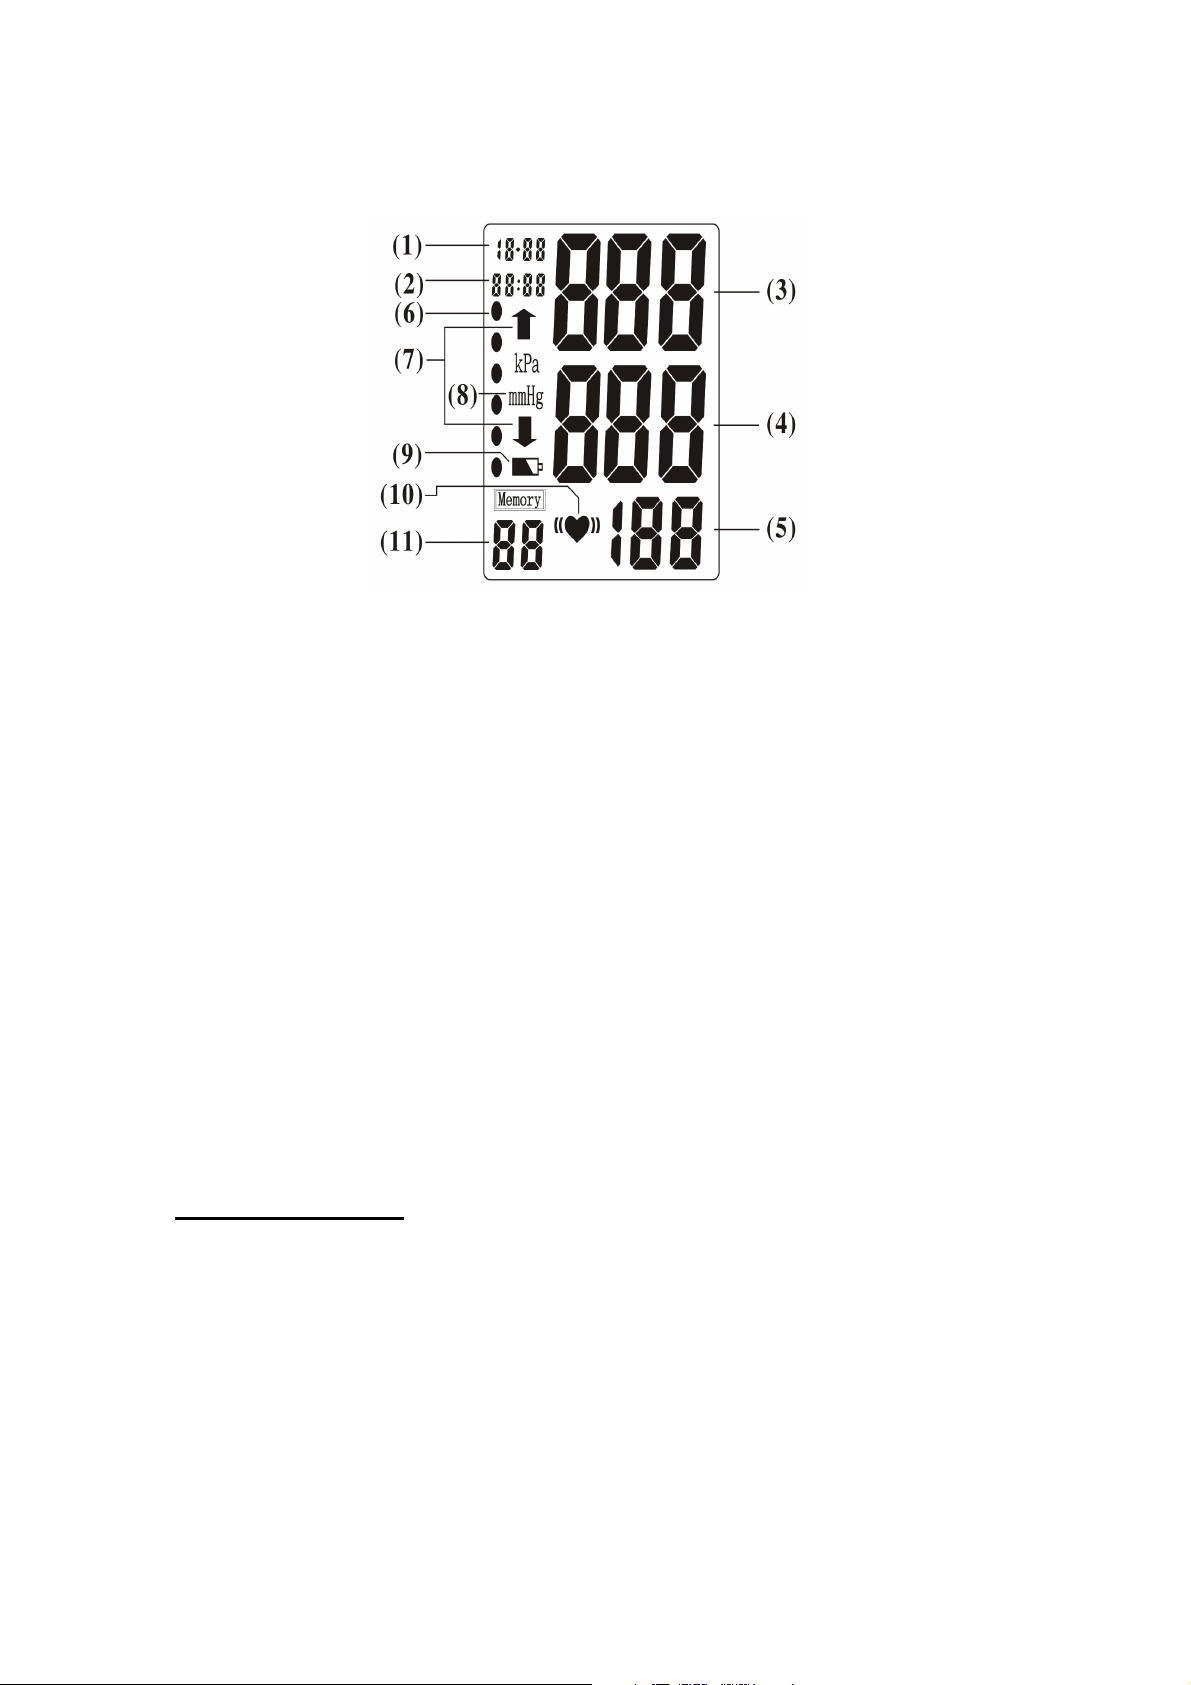
Figure 2 – Display of LCD
Note for LCD display:
(1) Date: Month - Day
(2) Time: Hour – Minute
(3) Systolic Blood Pressure (unit: mmHg)
(4) Diastolic Blood Pressure (unit: mmHg)
(5) Pulse Rate(unit: beat/minute)
(6) WHO Blood Pressure Classification Indicator
(7) Inflation / Deflation Indicator
(8) Blood Pressure Measurement Unit
(9) Battery Symbol
(10) Irregular heartbeat Indicator
(11) Memory Record Number
* Back light display function is optional.
IV. Measure Procedure
Battery Loading
Remove the battery compartment cover by gently pushing down on arrow and sliding
cover forward.
Place batteries with positive “+” and negative “-“ terminals into compartment and make
sure they match the indicated terminals in the compartment.

Close the battery cover by gently sliding it into the compartment and pressing it into
place.. See Figure 3.
Note::::
When the LCD display shows “Low Battery” signal ,the batteries must be replaced for
accurate readings. See Figure 4
Do not use rechargeable batteries (voltage 1.2V). They are not suitable for this product,
can damage the monitor and will cause inaccurate readings to be obtained.
Remove the batteries if the monitor will not be used for six month or longer to avoid
damage from the possibility of leaking batteries.
All the measurements will remain in the memory should the batteries become drained,
removed, or replaced.
Figure 3 Figure 4
NOTE: AC adapter is optional for power supply. Only use the adapter provided by
manufacturer, that is complying with EC60601-1 standard requirements. Do not
touch the AC adapter with wet hand while it is working. Do not tangle the power cords
of the adapter during measuring process. The adapter is part of the blood pressure
monitor. Unplug the AC adapter from power outlet to isolate the device from supply mains
Clock Adjusting and Unit Change
Press the “SET” button for 5 seconds during the device is turned off, the number of the
YEAR will begin to blink on the LCD display. Press the “” ” button to advance the YEAR
displayed. When you have reached the correct date, press the “SET” button and release.
(Don't keep on clicking on the 'SET' button without being released during programming.)
When the “SET” button is

pressed and released, the YEAR will stop blinking and the MONTH will begin to blink.
Press and release the “ ” button until the desired month is reached.
See Figure 5.
Repeat this process to set the DAY, HOUR, MINUTES.
After you change the batteries, you have to readjust the date and time. Time is
maintained using a 24 HOUR clock. AM/PM is not displayed.
NOTE: When the number that you wish to set – i.e. YEAR, MONTH, DAY, HOUR,
MINUTE - is blinking, each time you press and release the “ ” button, the
number will increase by one. ***Time is displayed using a 24 hour clock. AM/PM
are not displayed.
Figure 5
For the unit change, you can select the mmHg or Kpa; and the mmHg is the definition unit.
When the machine is turned off, press the button “ON/OFF” more than about 10 seconds
till LCD blinks ,then press Memory button to switch between mmHg and Kpa .
Arm Cuff Connecting
★ The cuff should be snug but not too tight. You should be able to insert two fingers
between the cuff and your arm.
★ Place the cuff around the left bare arm ½” to ¾”’ above the elbow joint. The air tube
should be oriented to run down the center of the inside of your arm. (Refer to diagram on
cuff for proper placement. )
★ Keep the cuff at approximately the same level as your heart.
★ Unless your physician recommends otherwise, always use the left arm to measure
your blood pressure. See Figure 6
★ Arm cuff connecting should make arm feel no much tension. Don’t connect too tense
(otherwise the measurement will be not precise).

★ Keep up right position on the same height of heart.
★ Do not bend with the cuff or the air tube. Do not inflate before fitting the cuff.
★ When the cuff is dirty, detach it from the equipment, wash the cuff by hand with proper
detergent and rinse it in the enough cold water, dry in air. Never iron it.
★ Only use the manufacturer cuff with the main unit to ensure accurate measurement.
NOTE:
★REFER TO THE DIAGRAM PRINTED ON THE CUFF FOR PROPER PLACEMENT.
★FOR ACCURATE READINGS, THE CUFF/PRESSURE MUST BE ORIENTED
CORRECTLY AND ALIGNED WITH THE ARTERY.
★CONTINUOUS CUFF PRESSURE MAY EFFECT BLOOD FLOW AND CAUSE
HARMFUL INJURY
Figure 6
Note: The cuff is “ TYPE BF APPLIED PART”
Measuring Process
POSTURE FOR TAKING BLOOD PRESSURE MONITOR
★ Make yourself comfortable and sit-up straight, legs uncrossed, feet flat on the floor
★ Place your arm with cuff in front of you on the table with your palm facing up.
★ Cuff should be at the same height as your heart.
TIPS FOR BLOOD PRESSURE MONITORING
★ Relax for about 5 minutes before measurement.
★ Do not smoke or ingest caffeine at least 30 minutes prior to measurement.
★ Remove any constricting clothing and place the cuff on a bare arm.
★ Keep still and do not talk until the measurement is complete.
★ The cuff must be neither too tight nor too loose. Using a little force, you should be
able to place two fingers between the cuff and your arm.

Figure 7
After you are in a comfortable position, press the “ON/OFF” button. The device will
perform a self verification/check. During this verification/check the LCD will display all
“8’s”. At the conclusion of the verification/check the LCD will display “00”. See Figure 8.
If the device has voice function, it will speak out the displayed blood pressure, heart rate.
If an irregular heartbeat is detected, the IRREGULAR HEARTBEAT symbol will
appear and blink in the display screen. See Figure9.
NOTE:
★ Do not self-diagnosis according to measured result. Consult with your physician for
further diagnosis.
★ If the device cause any discomfort during measuring process or fail to perform as
indicated ,please turn off the power or discontinue use.
★ If cuff inflates up to 300 mmHg (40kPa) doesn’t stop, please remove the cuff or turn off
the device immediately.
Reading Memory Results
READING AN AVERAGE OF THE LATEST THREE MEASUREMENTS (AVg)

★ When the monitor is turned off, press and release the “ or ” button. LCD will
display “AVg” in the upper corner of the LCD Display. The result that is first displayed and
the result that is first announced – if in “TALKING” mode – is the average of your latest
three measurements.
★ To review the results that are in memory – PRESS the “ or ” button to scroll
through previous measurements. Each time you press and release the “ or ”
button the next oldest result will be displayed. If the “TALKING” function is turned “ON”
each result will be verbally announced,
Figure 8 Figure 9
2-PERSON MEASUREMENT SETTING FUNCTION
This model has 2-Person memory banks and 90 memories storage for each. Press and
release ‘SET’ button can prompt to P1 (Person 1) or P2 (Person 2) as your ID to access
the measurement for the first time operation when the device is turned off. Each time,
before taking measurement or check memory from the storage, please be sure you have
advanced to the correct ID (P1 or P2) which you already set forth prior to turning on the
device.
Assessing High Blood Pressure for Adults
The follow standards for assessing high blood pressure (without regard to age or gender)
have been established as a guide line according to WHO (World Health Organization)
standard. See Figure 10. Please note that other risk factors (e.g. diabetes, obesity,
smoking, etc.) need to be taken into consideration and may affect these figures. Consult
with your physician for accurate assessment.

Figure 10
From the above figure, we can see the classification of blood pressure for adults is as
below. The WHO BP Classification Indicating Bar would show out the blood pressure
level by the color indicator .
Blood Pressure
Classification
Optimal <120 <80
Normal 120-129 80-84
High-Normal 130-139 85-89
Stage 1 Hypertension 140-159 90-99 YELLOW
Stage 2 Hypertension 160-179 100-109 ORANGE
Stage 3 Hypertension ≧180 ≧110 RED
Note:
The graph is not exact, but may be used as a guide in understanding non-invasive blood
SBP (mmHg) DBP (mmHg) COLOR INDICATOR
GREEN
pressure measurements. The device is only intended for use with adults.
Delete for all Memories
★ Press and hold the “ or ” BUTTON until all numbers change to “ZERO”.. All
results in memory are now deleted. LCD will show the Figure 11 for two seconds.
Note: Date and time settings are not changed by using the memory delete function.

Figure 11
Shut Down
After measurement, press button “ON/OFF” to turn off the device. The device will be
automatically power off after 1 minute of none use.
Voice Function
The device with voice function can speak out in the following state:
The device will speak out the prompt that “keep silence to take a cuff at the same
height with your heart ” when the measure begin.
The device will speak out the displayed blood pressure (systolic and diastolic
pressure), heart rate after each measurement finish.
The device will speak out the last time displayed memory blood pressure (systolic
and diastolic pressure), and heart rate when reading memory result.
Note: The voice function is ONLY for models FT-C21Y-V, FT-C22Y-V, FT-C23Y-V,
FT-C24Y-V, FT-C11B-V, FT-C12B-V.
UART connection and Blue Tooth Function
The UART connection model is FT-C11B-UR
Operation Method:
★ Install the APK by the receiving device manufacture accordance with the
communication protocol into the signal receiving device such as mobile phone.
★ Use cable to connect receiving device with the blood pressure monitor which with
UART port.
★ Activate the receiving device and let it be in stand-by status for blood pressure
measuring.

★ Activate the blood pressure monitor which with UART port and start testing
according to the normal blood pressure monitor operation method.
★ After testing the result including systolic pressure, diastolic pressure and pulse will
display on LCD, press the SEND button to send these data to the receiving device
such as mobile phone.
● The UART port connector & Cable specification:
1. Any type of USB (micro USB, mini USB, standard USB) or serial
connector is defined by the customer.
2. Cable : OD 3.5 +/- 0.1 mm , # 28 x 4 Color wires
3. Contact resistance >2 ohm
4. Insulation resistance: DC 300V 20 Mohm /10 ms
The Blue Tooth function model is FT-C11B-BT.
Operation Method:
★ Install the APK accordance with the communication protocol into the blue tooth
signal receiving device such as mobile phone.
★ Activate the blue tooth signal receiving device such as mobile phone to match
with the blue tooth of NIBP.
★ Start to measure according to the normal blood pressure monitor operation
method.
★ After measuring the result will be displayed on LCD including systolic pressure,
diastolic pressure and pulse will be automatically sent to the blue tooth receiving
device such as mobile phone.
The additional function of this model blood pressure monitor is that transmit the
testing result to the APK in the receiving device via blue tooth technology.
● Example for the Blue Tooth operating connection :
Bluetooth 4.1 work with IOS System
Firstly search in the "APP Store" for "Light Blue" application software (as this
image)and install properly。
.Open the installed "Light Blue" application software (see Figure 1) and activate Ⅰ
Bluetooth 4.1 blood pressure monitor.

Figure 1
After mobile phone Bluetooth module searched to find the Bluetooth blood pressure
monitor, it display “ClinkBlood” .
Ⅱ.Press the “ClinkBlood” till “Connected” display on mobile phone screen which means
successfully connected with blood pressure monitor.
Ⅲ.Slide mobile phone screen to "Slave - > Host" and switch its NOTIFIED VALUES
status from "Listen for notifications" to "Stop listening", which means it will be status of
"Listening" once open. As shown in Figure 2 and Figure 3
Figure 2 Figure 3
Ⅳ.Then go to “Host->Slave” , in“Write new value”, input below commands respectively
Connect blood pressure monitor:04 00 A0 A4
Blood pressure monitor start measuring:04 00 A1 A5
Blood pressure monitor stop:04 00 A2 A6 As shown in Figure 4 and Figure 5
Figure 4 Figure5

Ⅴ. Press command of “Connect”,then press “Start measuring” command,blood pressure
monitor start to measure, open“Log” to see the blood pressure monitor dynamic
measurement process. It
is hexadecimal.
The above two models have all function as same normal NIBP, only have different “result
output “method.

V. Troubleshooting
inside the cuff leakage air
Abnormality Reason Checkout
LCD shows Low Battery
icon
Shows abnormal result
Batteries are low. Change new batteries.
Cuff is not tightened
properly or its position is
incorrect.
The arm is moved during
measuring.
Tighten cuff correctly and refer to
“Arm Cuff Connecting”.
Stay calm, arm remains steady. Do
not move during measuring.
You can test again for light
irregular heartbeat patients. It is
Irregular heartbeat
inappropriate for serious irregular
heartbeat patients to use this
device.
Shows abnormal result
Speaking, frightened
nervous or excited
measurement
Wrong position
Do not speak, take deep breath
2~3 times to relax yourself.
Adjust position; refer to “Arm Cuff
Swathing”.
Some interference in
inflation or wrong
operation during
Refer to the inflation step in
“Measuring process”.
measuring
After power on ,no
display on LCD
Battery problem or wrong
battery polarity
Install battery correctly or replace
new battery; If the device is still not
activated, then stop using it.
Air tube not connected
Cuff inflation rate is too
low or does not inflate
with main device
properly; Cuff or bladder
Reconnect the air tube;
Purchase a new cuff
Cuff deflates too quickly
Measure result is
different from the
hospital or value is
inconsistent
Cuff has been applied too
loose.
This is normal
Make sure cuff is wrapped up
correctly
Blood pressure value is varying
during the day and will also be
affected by emotional and physical
condition
LCD shows “Er U” Insufficient inflation Measure again.
LCD shows “Er H” Inflation over 305 mmHg Measure again
LCD shows “Er 1” Undetectable the pulse Measure again
LCD shows “Er 2” Radiation interference Away the radiation source
LCD shows “Er 3” Measured result wrong Measure again
Note: If you cannot resolve the problem, you can contact manufacturer or its
service agent for replacement policy.

Guidance and manufacture’s decla
ration
– electromagnetic emission
Emission test
Compliance
Electromagnetic environment
–
STATEMENTS AND DECLARATIONS:
1. MEDICAL ELECTRICAL EQUIPMENT needs special precautions regarding EMC and
needs to be installed and put into service according to the EMC information provided in
the ACCOMPANYING DOCUMENTS
2. Wireless communications equipment such as wireless home network devices, mobile
phones, cordless telephones and their base stations, walkie-talkies can affect this
equipment and should be kept at least a distance d = 3,3 m away from the equipment.
(Note. As indicated in Table 6 of IEC 60601-1-2:2007 for ME EQUIPMENT, a typical cell
phone with a maximum output power of 2 W yields d = 3,3 m at an IMMUNITY LEVEL of
3 V/m)
3. The manufacturer are available for request of circuit diagrams, component part lists,
descriptions ,calibration instructions ,or other information that will assist service
personnel to repair those parts of the device
4. Changes or modifications not expressly approved by the party responsible for
compliance could void the user’s authority to operate the equipment.
This equipment has been tested and found to comply with the limits for a Class B digital
device, pursuant to Part 15 of the FCC Rules. These limits are designed to provide
reasonable protection against harmful interference in a residential installation. This
equipment generates, uses and can radiate radio frequency energy and, if not installed
and used in accordance with the instructions, may cause harmful interference to radio
communications. However, there is no guarantee that interference will not occur in a
particular installation.
If this equipment does cause harmful interference to radio or television reception,
which can be determined by turning the equipment off and on, the user is encouraged
to try to correct the interference by one or more of the following measures:
-- Reorient or relocate the receiving antenna.
-- Increase the separation between the equipment and receiver.
-- Connect the equipment into an outlet on a circuit different from that to which the
receiver is connected.
-- Consult the dealer or an experienced radio/TV technician for help.
5. Guidance and manufacturer’s delclaration
The [EQUIPMENT or SYSTEM] is intended for use in the electromagnetic environment specified below. The customer of
the user of the [EQUIPMENT or SYSTEM] should assure that it is used in such an environment.

guidance
The [EQUIPMENT or SYSTEM] use RF energy
Guidance and manufacture’s declaration
– electromagnetic immunity
or the user of
should assure that it is used in such an environment.
Electromagnetic
input/output
RF emissions
CISPR 11
Group 1
only for its internal function. Therefore, its
RF emissions are very low and are not
likely to cause any interference in nearby
electronic equipment.
RF emission
CISPR 11
Harmonic emissions
IEC 61000-3-2
Class B
Not applicable
Voltage fluctuations/ flicker
emissions
Not applicable
IEC 61000-3-3
The [EQUIPMENT or SYSTEM] is intended for use in the electromagnetic environment specified below. The customer
[EQUIPMENT or SYSTEM]
Immunity test IEC 60601 test level Compliance level
Electrostatic
discharge (ESD)
±6 kV contact
±8 kV air
±6 kV contact
±8 kV air
IEC 61000-4-2
Electrical fast
transient/burst
IEC 61000-4-4
±2 kV for power supply
lines
±1 kV for
Not applicable
lines
Surge
IEC 61000-4-5
±1 kV differential
mode. ±2 kV common
Not applicable Mains power quality should
mode
Voltage dips, short
interruptions and
voltage variations
on power supply
input lines
IEC 61000-4-11
<5% UT
(>95% dip in UT)
for 0.5 cycle
40% UT
(60% dip in UT)
Not applicable Mains power quality should
for 5 cycles
70% UT
(30% dip in UT)
environment - guidance
Floors should be wood,
concrete or ceramic tile. If
floor are covered with
synthetic material, the
relative humidity should be
at least 30%. If ESD
interfere with the operation
of equipment ,counter
measurements such as
wrist strap, grounding shall
be considered.
Mains power quality should
be that of a typical
commercial or hospital
environment.
be that of a typical
commercial or hospital
environment.
be that of a typical
commercial or hospital
environment. If the user of
the TL-100Drequires
continued operation during
power mains interruptions, it
is recommended that the
TL-100Dbe powered from an
uninterruptible power supply

for 25 cycles
Guidance and manufacture’s declaration
– electromagnetic immunity
or the user of
should
assure that it is used in such an environment.
IEC 60601 test
Compliance
Electromagnetic environment
-
IEC 61000
-4-6
150 kHz to 80 MHz
and reflection from structures, obj
ects and people.
or a battery.
<5% UT
(>95% dip in UT)
for 5 sec
Power frequency
(50Hz) magnetic
field IEC 61000-4-8
3A/m 3A/m Power frequency magnetic
fields should be at levels
characteristic of a typical
location in a typical
commercial or hospital
environment.
NOTE UT is the a.c. mains voltage prior to application of the test level.
The [EQUIPMENT or SYSTEM] is intended for use in the electromagnetic environment specified below. The customer
[EQUIPMENT or SYSTEM]
Immunity test
Conducted RF
Radiated RF
IEC 61000-4-3
level
3 V
rms
3 V/m
80 MHz to 2.5 GHz
level
Not
applicable
3 V/m
guidance
Portable and mobile RF communications
equipment should be used no closer to any
part of the [EQUIPMENT or SYSTEM], including
cables, than the recommended separation
distance calculated from the equation
applicable to the frequency of the transmitter.
Recommended separation distance
Pd 167.1=
Pd 167.1= 80 MHz to 800 MHz
Pd 333.2= 800 MHz to 2.5 GHz
Where P is the maximum output power rating
of the transmitter in watts (W) according to the
transmitter manufacturer and d is the
recommended separation distance in metres
(m).
Field strengths from fixed RF transmitters, as
determined by an electromagnetic site survey,a
should be less than the compliance level in
each frequency range.b
Interference may occur in the vicinity of
equipment marked with the following symbol:
NOTE 1 At 80 MHz and 800 MHz, the higher frequency range applies.
NOTE 2 These guidelines may not apply in all situations. Electromagnetic propagation is affected by absorption
a
Field strengths from fixed transmitters, such as base stations for radio (cellular/cordless) telephones and land

mobile radios, amateur radio, AM and FM radio broadcast and TV broadcast cannot be predicted theoretically
Over the frequency ra
nge 150 kHz to 80 MHz, field strengths should be less than 3 V/m.
Recommended separation distances between
Rated maximum
(W)
Separation distance according to frequency of transmitter
150 KHz to 80 MHz
80 MHz to 800 MHz
800 MHz to 2.5 GHz
0.01
0.117
0.117
0.233
0.369
0.369
0.738
1
1.167
1.167
2.333
3.689
3.689
7.379
11.667
11.667
23.333
with accuracy. To assess the electromagnetic environment due to fixed RF transmitters, an electromagnetic site
survey should be considered. If the measured field strength in the location in which the [EQUIPMENT or
SYSTEM] is used exceeds the applicable RF compliance level above, the [EQUIPMENT or SYSTEM] should be
observed to verify normal operation. If abnormal performance is observed, additional measures may be
necessary, such as reorienting or relocating the [EQUIPMENT or SYSTEM].
b
portable and mobile RF communications equipment and the [EQUIPMENT or SYSTEM].
The [EQUIPMENT or SYSTEM] is intended for use in an electromagnetic environment in which radiated RF
disturbances are controlled. The customer or the user of the [EQUIPMENT or SYSTEM] can help prevent
electromagnetic interference by maintaining a minimum distance between portable and mobile RF communications
equipment (transmitters) and the [EQUIPMENT or SYSTEM] as recommended below, according to the maximum
output power of the communications equipment.
output power of
transmitter
Pd 167.1=
0.1
10
100
For transmitters rated at a maximum output power not listed above, the recommended separation distance d in
metres (m) can be estimated using the equation applicable to the frequency of the transmitter, where P is the
maximum output power rating of the transmitter in watts (W) according to the transmitter manufacturer.
NOTE 1 At 80 MHz and 800 MHz, the separation distance for the higher frequency range applies.
NOTE 2 These guidelines may not apply in all situations. Electromagnetic propagation is affected by absorption
and reflection from structures, objects and people.
(m)
Pd 167.1=
Pd 333.2=
FCC ID: 2ADNQFTC11BBT
This device complies with Part 15 of the FCC Rules. Operation is subject to the
Following two conditions:
(1) This device may not cause harmful interference, and (2) This device must accept any
interference received, including interference that may cause undesired operation.

Explanation of Symbols:
LOT
Symbol for batch code Symbol for manufacturer
Symbol for ‘CE”
Symbol for “electrical and electronic equipment”
Symbol for “TYPE BF APPLIED PART”
Symbol for “Follow operating instructions”
IP21 Symbol for “the IP classification”
Symbol for “ RF transmitters”
Manufacturer: FUDAKANG INDUSTRIAL CO.,LTD
Address :No.8 Yinghe Road, Yuanjiangyuan Management Zone, Changping Town,
Dongguan, Guangdong China.
Tel: 86-769-81098181 Fax: 86-769-81098187 Website: www.fudakang.com
Software Version1.3
Manual Version:V2.0
 Loading...