

Page 1
Набор пневмоинструмента
Air tool Kit
120101
120102
Operator's Manual
Инструкция по эксплуатации
www.fubag.ru
Page 2

Omperator's anual
www.fubag.ru
WARNING! BEFORE USING AIR SPRAY GUN PLEASE READ THIS INSTRUCTION
MANUAL CAREFULLY.
ONLY QUALIFIED AND WELL-TRAINED STAFF ACQUAINTED WITH THE MANUAL
CAN USE AND OPERATETHISTOOL
This manual contains description, safety rules and all necessary information for proper operating
FUBAG air spray guns.Please save the instruction andrefer to it when anyquestions regarding safe
operation, maintenance, storage and transportation of FUBAG air spray guns appear. Not following
recommendations stated below maycausedamages to the air spray gun andoperator s injuries'.
1. Safety rules
Danger:
-
To direct the air tool or the flow of compressed air to people, animals or your own body. (To
avoid ingress of small particles of dust into your eyes, wear protective goggles).
- To direct the flow of compressed air to the compressor.
- To work without protective boots, to touch the operating compressor by wet hands and/or
feet.
- To exceed required working pressure.
- To fix not original spare parts.
Caution:
-''
While connecting the air tool to the compressor s hose, don t forget to turn the air cock.
- While working with compressed air, follow all safety rules
.
2s. Technical pecifications
Tools
Diameter of standard nozzle, mm 1,5 1,5 4,5 2,0 Diameter of replaceable nozzles, mm 1/4 1/4 1/4 1/4 1/4
Air consumption under working pressure, l/min 160 174 130 125 140
Working pressure, bar 3,0 3,5 3,5 2,0-6,0 <12.0
Cup capacity, ml 500 1000 900 - -
Set
The manufacturer reserves himself the right to make the manual's content or function
change without any preliminary notification of the users.
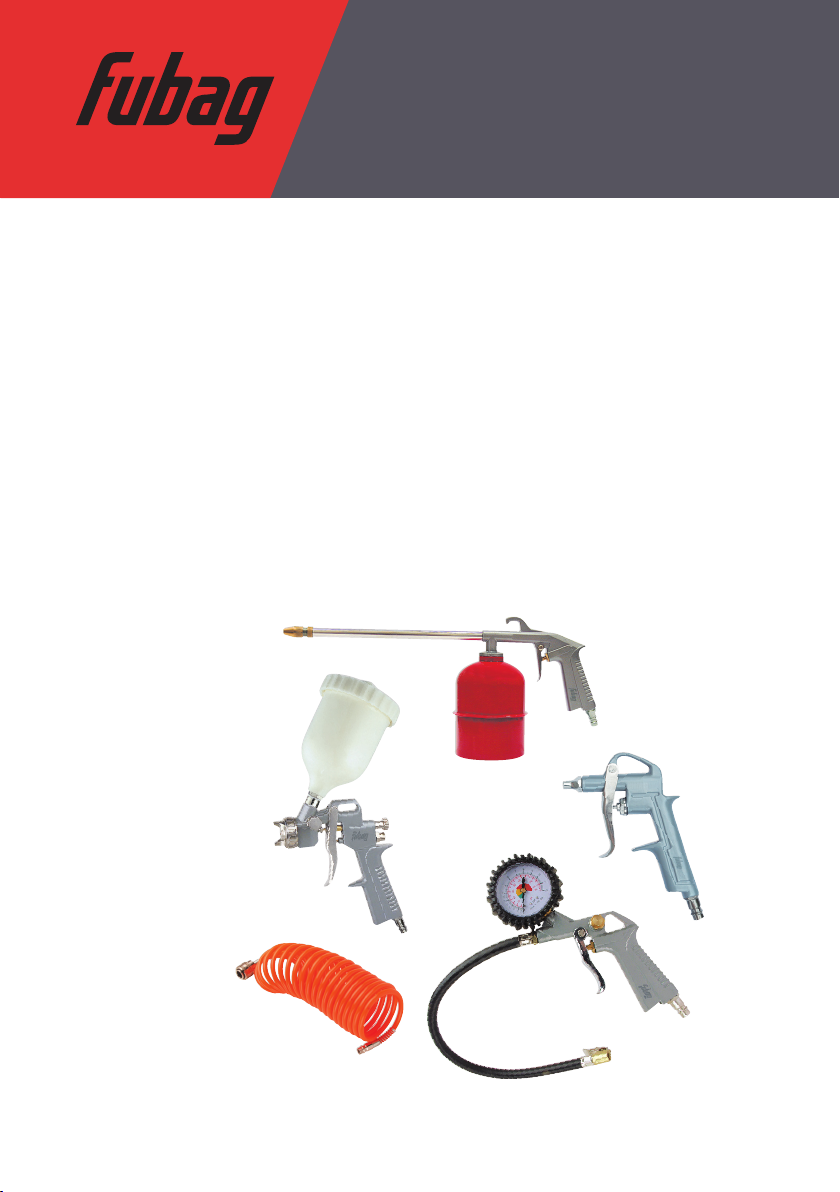
Air spray gun
Kit 120101 Kit 120102
Gravity air spray gun (kit 120101) or suction air spray gun (kit 120102);
nozzle 2 mm kit; washing spray gun; air dusting gun; inflating gun; nylon
Washing
spray gun
spiral tube 5 m.
- 1 -
Air dusting
gun
tools
Inflating
gun
Page 3
Omperator's anual
3. Accessories connection
www.fubag.ru
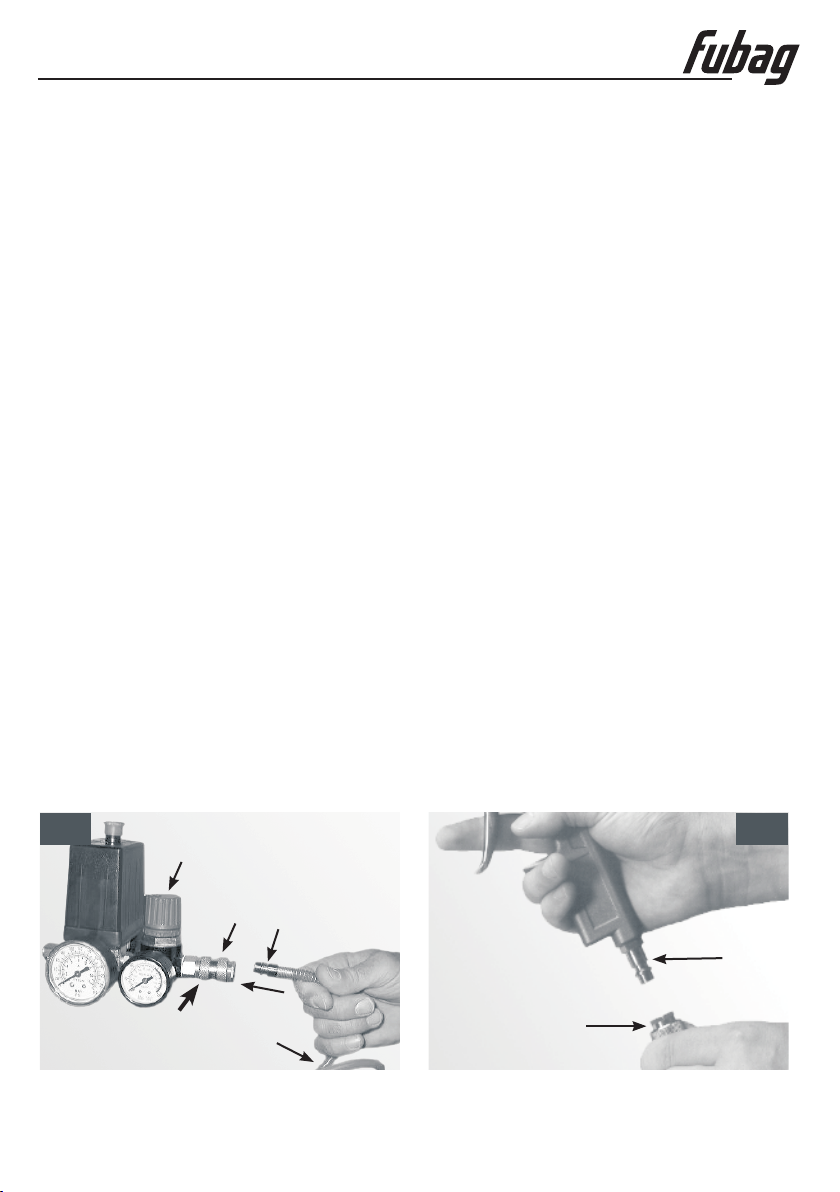
Make sure that the compressorisOFF before connecting the accessories
1. All the accessories are fitted with quick connectors as shown above (figures. 2). All the
accessories are connected to thecompressor via the coiled air line usingthe quick connector.
For safety reasons, certain accessories must operate at a specific air pressure indicated
2.
in the sections You can check the pressure level
by looking at the gauge or the numbered notches on the knob whose values represent the
related pressures
3. Make sure that pressure adjustment knob is turned fully in an counterclockwise direction, thus
shutting off the air supply beforestarting the compressor.
4. Connect the coiled air line B to compressed air outlet (fig. 1) using coupling . Push coupling
firmly inside outlet .Aclicking noise will indicate that the coupling isengaged.
5. Once you have fastened this end of the coiled air line , you can connect any accessory to the
other end , pushing firmly, for example, coupling inside (figures 2). In this case also, a clicking
noise will indicate that thecoupling is engaged
6. When thecoiled air line is connected securely both to the compressor and the accessory, you can
start to use the compressor.
7. Switch on the compressor. Once the pre-set pressure has been reached, the compressor will
switch off automatically.
8. When you have finished using the accessory, close the compressed air outlet by fully rotating
pressure regulation knob in a counterclockwise direction. Test that the air supply is closed by
operating the accessory until all the air has been used. At this point, disconnect the coiled air line
from the compressor by pulling back outer sleeve (fig. ). Disconnect coupling from the
accessory according to the procedureexplained for coupling (fig. 1).
It is normal for thecompressorto stop and start automatically atintervalsasuse of
compressed air varies
dedicated to these in the following pages.
.
A
CDD
C
B
EFE
A
G1 E
D
.
.
1
G
A
C
B
2
D
F
E
- 2 -
Page 4
Omperator's anual
www.fubag.ru
4 Paint spray gun.
-
Always weara protective mask, goggles and protective gloves when spray painting. Spray
paint only in a well-ventilated area. The accessory must always be used in accordance with
the Manufacturer s instructions and safetyregulations
- Some paints and other materials are combustible when sprayed and should not therefore
be sprayed .
doubt about the safe use
1. Connect the paint spraygun to the compressor as explained inchapter 3.
2.Adjust working pressure to the value indicatedfor this accessory.
3. Position the paint cup A and screw it into the socket B ( . ). Make sure that the paint cup is
securely screwed into the socket,otherwise paint may leak during use.
4. Remove the lid Cof paint cupA( . ).
5. The paint or the materialto be sprayed can now be insertedin paint cupA.
6. Replace paint cup lidC by securely pushing this into paintcupA ( . ).
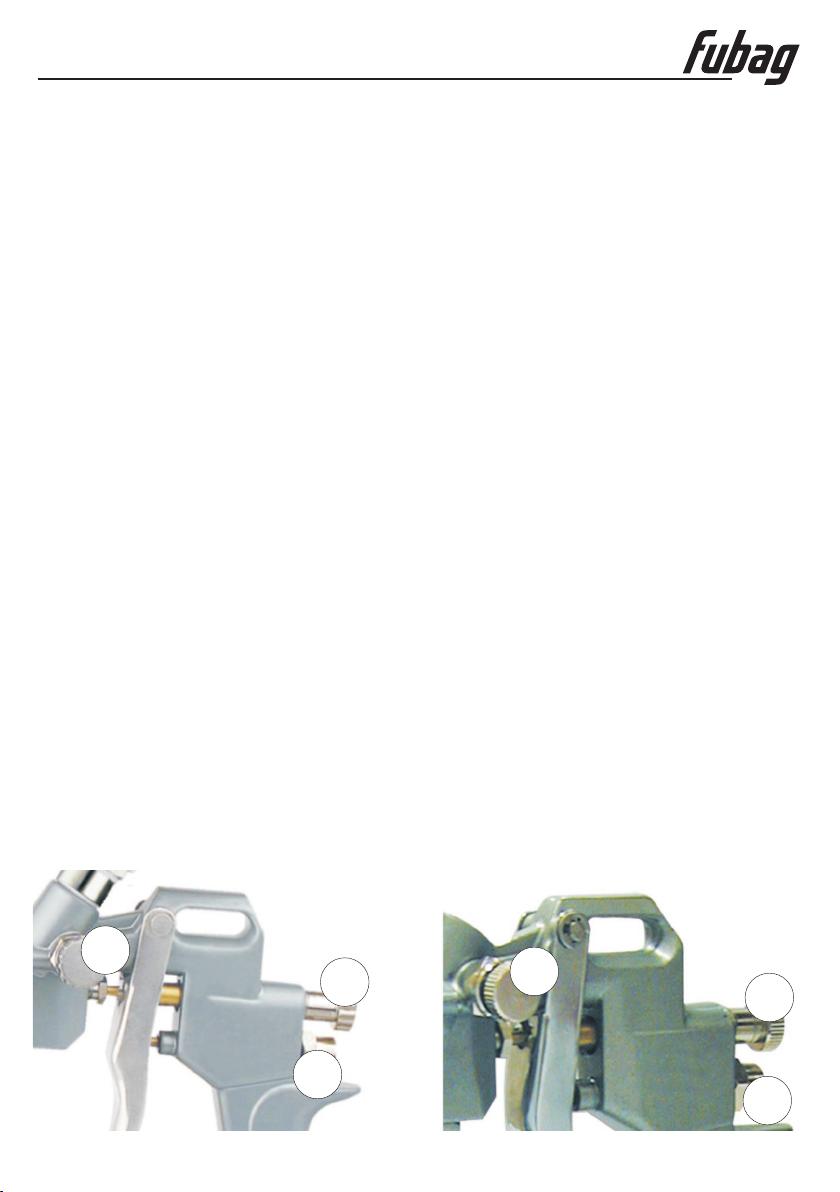
7. The spray pattern (horizontal or vertical spraying) can beadjusted by loosening ring D andturning
nozzle E and then retighteningring D ( . ).
8. The width of the spraypattern can be adjusted by rotating theadjustment knob F ( . ).
9. The volume of paint/material sprayed can be adjusted by reducing or increasing the stroke of
trigger G, turning the adjustmentknob H ( . ).
10. To operate the paint spray gun, pull trigger G ( . ). Pulling the trigger half way, compressed air
only is passed through nozzle E. This facility is useful when you have fi nished painting and want to
clean the gun. Pulling trigger G so that it is fully engaged, material is introduced in thegun and spray
painting can begin.
11.Duringspraying, release the vent valve I ofpaint cupA( . ).
’.
close to flames or any heat source or any areas where sparks may occur If in
of materials, please consult theManufacturerbefore use.
fig 1
fig 2
fig 2
fig 3
fig 3
fig 3
fig 3
fig 4
-,
Before using the spray gun practice on a test material in order to establish the correct pattern of
spray and the correct quantityof material to be applied
The air spray gun is equipped with a painting tank, a regulator of the paint quantity (1), a regulator of
the air flow (2) anda regulator of the spraying mode (3).
.
3
1
3
1
2
2
- 3 -
Page 5

Omperator's anual
www.fubag.ru
- Never exceed the recommendedairpressure.
- The paint or material to be sprayed may require thinning The thinning fluid and dilution formula
should be obtained from the Manufacturer Paint material that is too thick may block the nozzle on
the spray gun preventing use
- When filling the paint cup with paint material maintain the spray gun in a vertical position to avoid
spillage
,.
.
./
/,
.
1
3
5
В
E
A
D
FG
H
2
С
I
A
4
N
6
D
E
- 4 -
M
LH
Page 6
Omperator's anual
www.fubag.ru
Maintenance :spray gun
- After use, the paintspray gun must be cleaned thoroughly.
- After disposing of any material not used, add a small quantity of paint thinner to paint cupAanduse
the spray paint gun again as during spraying, fully pressing trigger G and complying with the same
safety precautions. This operation permits initialcleaning of the fluid ducts.
-To clean, unscrew nozzle Dand ring E ( . ).
- Disassemble the spraying needle by unscrewing knob H and extracting spring Land needle M ( .
).
6
- Lubricate the socket ofthe spraying needle N at regular intervals( . ).
- Thoroughly clean these items witha suitable product.
-Also clean the fluid passage through thesocket of paint cup A( . ).
fig 5
fig
fig 6
fig 1
5. Air blow gun
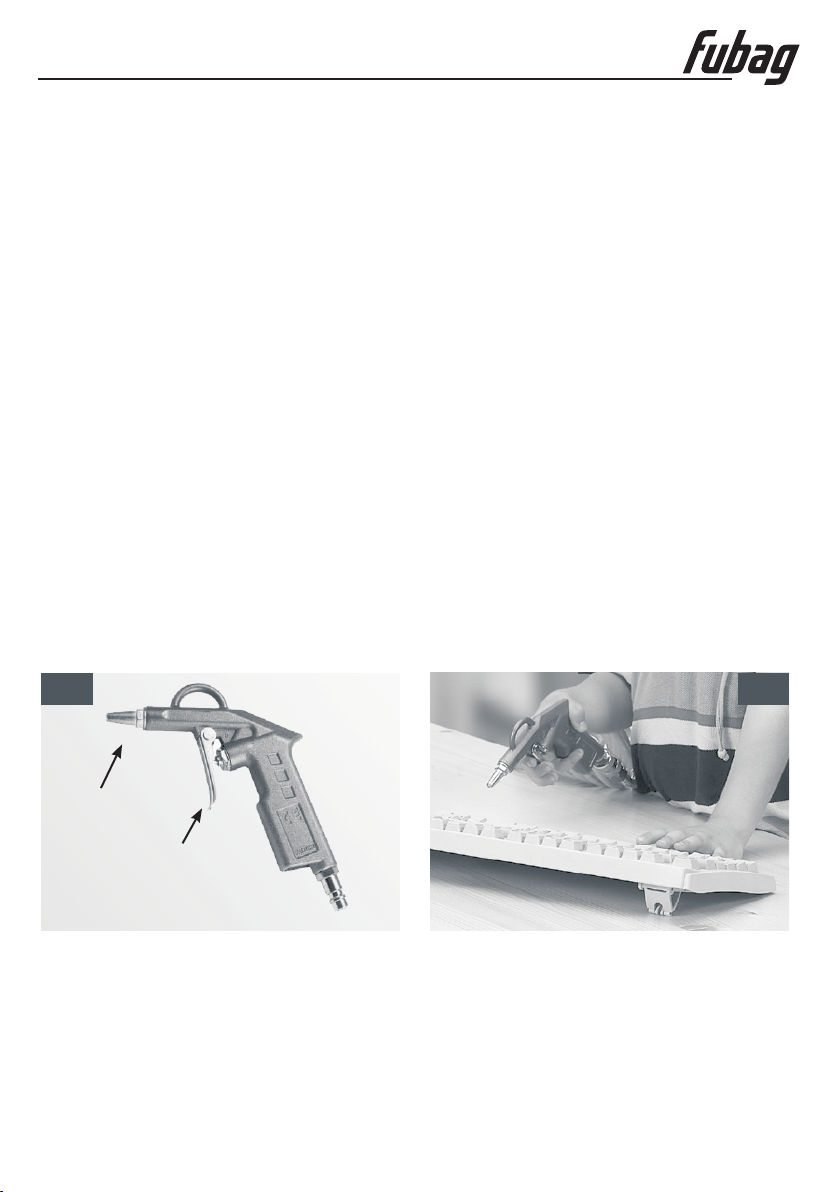
1. Connect the air blowgun to the compressor as explained inchapter 3.
2.Adjust working pressure to the value indicatedfor this accessory.
3. To use the air blow gun, press lever D and direct the nozzle B towards the surface to be cleaned
(-).
figures 1 2
Clean the carpets of your home or car mats very efficiently using the blow gun It is also ideal for
keyboards electrical items refrigerators cameras TV cameras glassware and vacuumcleaners
,,,, .
1
.
2
A
В
- 5 -
Page 7

Omperator's anual
www.fubag.ru
6 Inflation gun.
1. Connect the inflation gunto the compressor,as explained in chapter 3.
2. When inflating car tires or certain bicycle tires, it is not necessary to insert any of the adapters (fig.
2 A and connect the hose to the tire pushing the fitting on the valve (fig. 3
). Press tab ) and then
releasing the tab.
3. Regulate working pressure tothe value indicated for this accessory.
4. Infl ate the tire pressing lever B until the inflation pressure required, indicated on gauge C
reached (
(figures 1-3).
5. When inflating footballs, rubber dinghies, certain bicycle tiresand children’s inflatable swimmingpools, you may fig. 2).
-Adapter is used forfootballs
-Adapter
-Adapter
Select the suitable adapter and insert it in the inflation hose pressing tab A (fig. 4). Push the adapter
in the inflation hose a shown in figure 5 A.
clockwise direction.
6. Infl ate the objectrequired as described in point 4 above.
figures 1-3). In the case of over-inflation, press button D to reduce inflation pressure
have to use a suitableadapter (
E
F is used for rubberdinghies, air beds and children’s swimming-pools
G is used for certainbicycles
and release tab To fasten the adapter, turn it slightly in a
,is
1
C
2
D
В
G
А
А
EF
C
А
D
34
- 6 -
Page 8

Omperator's anual
www.fubag.ru
7 Washing spray gun.
- Always wear safety gloves and shoes when using the washing spray gun. When using
possibly , ,
towards any source of heat
1. Connect the washing spraygun to the compressor as explained inchapter 3.
2.Adjust working pressure to the value indicatedfor this accessory.
3. Unscrew cup A from the body of the gun B ( . ). Pour in the chemical product you intend to use
and refasten cup Ato the body of the gun B( . ).
4. To use the accessory, press lever C ( . ).
5. To adjust the jet, turnnozzleD which is secured by ring-nutE( . ).
-.
The material to be sprayed may have to be diluted The dilution formula should be obtained from
the Manufacturer If the product istoo dense it mayblock the nozzle preventing use
- When filling the cup with the material used for washing keep this in a vertical position to avoid
spillage
- The washing spray gun is also very useful for spraying disinfectants insecticides and plant care
products
flammable chemical products never direct the jet of the gun close to flames
or anywhere where a sparkmaybe struck.
fig 1
fig 1
fig 2
fig 3
.,,.
,
.
,-
.
1
В
А
3
D
2
C
E
- 7 -
Page 9

Omperator's anual
8s
. Transport & torage
www.fubag.ru
After use, always store the washing spray gun in a dry, clean environment. Do not use solvents,
flammable or toxic liquids
Before storage, the air spray gun should be disassembled and cleaned thoroughly from the remnant
sprayed liquids While transporting and storing the air spray gun, try not to expose it to moisture. Its
recommended that you keep the tool in a dry cool place with proper ventilation and avoid high
humidity, corrosive gases and dust. After unpacking we recommend to pack the tool again if you
intend to transportit to working placeor for storage
9
. Warranty
Warranty refer to defects of materials and components and do not refer to components subject to
natural wear and maintenance work.
Only machines cleaned from dust and dirt in original factory packing fully completed, provided with
instruction manual, warranty card with fixed sales date with a shop stamp factory serial number and
originals of salesand ware receipt issuedby salesman are subjects of warranty. Within the warranty
period the servicecenter eliminate free of charge all detected production defects.Themanufacturer
disclaims warranty and legal responsibilities if nonobservance of the instruction manual by user,
unqualified disassembling repair ormaintenanceof the machine as well doesnotbear responsibility
for caused injury to personsor damages.
. '
to clean the gun.
.
- 8 -
Page 10

Инструкция по эксплуатации
www.fubag.ru
ВНИМАНИЕ! ПЕРЕД ИСПОЛЬЗОВАНИЕМ ПНЕВМОИНСТРУМЕНТА
ВНИМАТЕЛЬНООЗНАКОМЬТЕСЬС ДАННОЙ ИНСТРУКЦИЕЙ.
К ИСПОЛЬЗОВАНИЮ И ОБСЛУЖИВАНИЮ ИНСТРУМЕНТА ДОПУСКАЕТСЯ
ТОЛЬКО КВАЛИФИЦИРОВАННЫЙ И СПЕЦИАЛЬНО ОБУЧЕННЫЙ ПЕРСОНАЛ,
ОЗНАКОМЛЕННЫЙ С ДАННОЙ ИНСТРУКЦИЕЙ.
В этой инструкции содержится описание, правила безопасности и вся необходимая
информация для правильной эксплуатации пневмоинструмента FUBAG. Сохраняйте данную
инструкцию и обращайтесь к ней при возникновении вопросов по безопасной эксплуатации,
обслуживанию, хранению и транспортировке пневмоинструмента. Несоблюдение указанных
рекомендаций может привести к повреждениям инструмента и травмам оператора.
1. Правила безопасности
Запрещается:
- Направлять пневмоинструмент или струю сжатого воздуха на людей, животных или на
собственное тело. (Чтобы со струей сжатого воздуха в глаза не попали мелкие
частицы пыли, надевайте защитные очки).
- Направлять струю сжатого воздуха в сторону компрессора.
- Работать без защитной обуви, касаться работающего компрессора мокрыми руками
и/или ногами.
- Превышать рекомендованное рабочее давление.
- Устанавливать не оригинальные запасные части.
Важно:
- Подсоединяя к шлангу компрессора пневмоинструмент, не забывайте перекрывать
воздушный кран.
- При использовании сжатого воздуха соблюдайте все правила техники безопасности.
2. Технические характеристики
Инструмент
Диаметр стандартного сопла, мм 1,5 1,5 4,5 2,0 Диаметр впускного отверстия, дюйм 1/4 1/4 1/4 1/4 1/4
Расход возду ха при рабочем давлении, л/мин 160 174 130 125 140
Рабочее давление, бар 3,0 3,5 3,5 2,0-6,0 <12.0
Емкость бачка, мл 500 1000 900 - -
Комплектация
Производительимеет правовноситьизменения как в содержаниеданнойинструкции, такивконструкцию
инструмента безпредварительного уведомленияпользователей.
Краскораспылитель
Набор
120101
Краскораспылитель с верхним бачком (набор 120101) или с нижним бачком
(набор 120102); дополнительное сопло 2 мм с воздушной головкой и иглой
пневмопистолет для продувки; пневмопистолет для накачки шин; шланг витой
Набор
120102
для краскораспылителя: пневмопистолет для вязких жидкостей;
--9
Пистолет
для вязких
жидкостей
длиной 5м.
Пистолет
для
продувки
для накачки
Пистолет
шин
Page 11

Инструкция по эксплуатации
www.fubag.ru
3. Подключение пневмоинструмента
Прежде чем начать подсоединять пневмоинструмент, убедитесь, что компрессор
выключен.
1. Все пневмоинструменты снабжены быстродействующими штуцерами (см. рис. ); воздух к
инструменту подаетсячерезспиралеобразныйшланг.
Каждый инструмент работает при определенном рабочем давлении, оно указано в
2.
соответствующем разделе инструкции по эксплуатации.
манометру или по рискам на ручке клапана, цифры на которых соответствуют величине
давления
3. Еще до пуска компрессора, чтобы полностью перекрыть поток сжатого воздуха к
инструменту, поверните против часовой стрелки до упора ручку регулятора давления А.
4. Один конец спиралеобразного шланга В оканчивается штуцером D. Вставьте ее с нажимом
в выходное отверстие С на компрессоре (рис. 1). При правильном подсоединении слышится
характерный металлический щелчок.
5. Пневмоинструмент подключается к противоположному концу шланга Е. Подсоедините
штуцер F с нажимом кшлангу (рис. ).
6. После подсоединения шланга и инструмента к компрессору можно начинать работу.
7. Включите компрессор. Как только будет достигнуто заданное рабочее давление,
компрессор автоматически остановится сам.
8. По окончании работы перекройте струю сжатого воздуха, повернув ручку А против часовой
стрелки. Некоторое время продолжайте работать пневмоинструментом, пока не убедитесь,
что остаточный воздух больше на него не поступает. После этого отключите шланг от
компрессора, оттянув назад наружное кольцо G (рис. ). Отсоединив шланг, можно
отсоединить штуцер Е пневмоинструмента. Для этого повторите те же действия, что и при
подсоединении штуцера D (рис. ).
При смене пневмоинструмента и изменении рабочего давления компрессор в норме
автоматически останавливается и через определенный интервал времени сам
перезапускается.
2
1
Давление можно проверить по
1
2
1
G
A
C
B
2
D
F
E
--10
Page 12

Инструкция по эксплуатации
www.fubag.ru
4. Работа краскораспылителем
- При работе с краскораспылителем надевайте защитную маску, очки и перчатки.
Рабочее помещение должно хорошо проветриваться. Строго следуйте указаниям
изготовителякраскии требованиямтехники безопасности.
- Некоторые краски и лаки легко воспламеняются, поэтому с краскораспылителем
нельзя работать вблизи источников тепла, искр или открытого пламени. Нельзя
направлять на них струю распыляемой краски. При необходимости обращайтесь за
консультацией к изготовителю.
1. Подсоедините краскораспылитель к компрессору (см. Раздел3).
2. Настройте компрессор нанужное рабочее давление.
3. Подведите стакан А под соответствующее гнездо и вкрутите стакан в него (рис. 1).
Проверьте, чтобы стакан прочно сидел в резьбе гнезда, иначе во время работы краска будет
из него вытекать.
4. Снимите со стакана А крышку C (рис. 2).
5. Заполните стакан краской иплотнозакройтестакан А крышкой С (рис. 2)
6. Краску можно распылять в горизонтальном или вертикальном направлении. Ослабьте
кольцо D, разверните в нужном направлении форсунку Е краскораспылителя и
зафиксируйте ее в этом положении, затянув кольцо D (рис. 3).
7. Ширину распыляемой струи можно регулировать, поворачивая колесико F (рис. 3).
8. Количество распыляемой жидкости можно регулировать, увеличивая или уменьшая ход
нажимного курка G, повернув колесико Н (рис.3).
9. Подавайте распыляемую жидкость, нажимая на курок G (рис. 3). Для распыления краски
утапливайте курок на всю глубину его хода. При нажатии курка на половину его хода из
насадки Е будет выходить только сжатый воздух. Такой прием может быть полезен по
окончании работы для прочистки пистолета от остатковкраски.
10. Перед началом окраски не забудьте снять с аэрационного отверстия I стакана А заглушку
(рис. 4).
- До начала работы с краскораспылителем рекомендуется проверить его работу на какойнибудьповерхности. Убедитесь, что в пистолет заправлена краска нужного цвета и что факел
распыления отрегулирован правильно.
Краскораспылитель имеет емкость для краски, регулятор количества краски (1), регулятор
воздушногопотока (2)ирегуляторформыраспыления (3).
3
1
3
1
2
2
--11
Page 13

Инструкция по эксплуатации
www.fubag.ru
- Не превышайте рекомендуемого рабочегодавлениясжатоговоздуха.
- Иногда разбрызгиваемую жидкость требуется предварительно разбавить. Соотношение
между краской и растворителем всегда указывается производителем краски. Чересчур
густая краска может забить форсунку распылителя и сделать инструмент непригодным к
работе.Рекомендуется перед заливкой используемую краску пропустить через какой либо
сетчатый фильтр для отделения нерастворенных сгустков, которые могут забить сопло
распыления и привести к некачественной работе инструмента.
- Чтобы краска непроливалась, заполняемый краской стакан держите строго вертикально.
1
3
5
В
E
A
D
FG
H
2
С
I
A
4
N
6
D
E
--12
M
LH
Page 14

Инструкция по эксплуатации
www.fubag.ru
Техобслуживание краскораспылителя:
- По окончании работы тщательно прочиститекраскораспылитель.
- Слив остатки неиспользованной краски, налейте в стакан небольшое количество
растворителя и, энергично нажимая на курок несколько раз, распыляйте растворитель через
форсунку, промывая таким образом инструмент изнутри. Соблюдайте при этом
необходимыемерыпредосторожности.
- Для окончательной и полной промывки пистолета открутите распылительную форсунку D и
кольцо Е (рис. 5). Снимите иголку М, открутив колесико Н ивынув пружину L (рис. 6).
- Периодически смазывайте гнездоN, в которое вставляется игла (рис. 6).
- Тщательно очистите указанные части пистолета предназначенными для этой цели
веществами. Очистите также гнездо, в котором стакан А крепится к корпусу пистолета (рис.
1).
5. Работа пистолетом для продувки
1. Подсоедините пистолет к компрессору,как описываетсяв разделе 3.
2. Задайте необходимое рабочее давление.
3. Для работы: поверните рычаг и направьте насадку А в сторону очищаемой поверхности
(рис. 1-2).
При помощи этого пистолета можно чистить домашние ковры и коврики в салоне
автомобиля. Он незаменим при чистке клавиатур компьютеров, внутренних частей
электрических приборов, пылесосов, холодильников, фото- и телекамер, а также для
стеклянных поверхностей.
B
1
2
A
В
- 1 -3
Page 15

Инструкция по эксплуатации
www.fubag.ru
6. Работа пистолетом для накачивания
1. Подсоедините пистолет к компрессору,как описываетсяв разделе 3.
2. При накачивании автомобильных и большинства велосипедных шин к шлангу не требуется
подсоединять никаких дополнительных переходных устройств (рис. 2). Нажмите на язычок А
и подсоедините шланг непосредственно к шине, надев штуцер на ниппель (рис. 3) и отпустив
язычок.
3. Настройте компрессор нанужное рабочее давление.
4. Нажав на рычаг В, начинайте надувать шину, следя за показаниями манометра С (рис.1- ).
Если давление оказалось больше требуемого, шину можно слегка сдуть, нажав на кнопку D
(рис. 1- ).
3
5. При накачивании футбольных мячей, надувных лодок, некоторых видов велосипедных
шин и детских надувных бассейнов их надо подсоединять к шлангу через соответствующее
переходноеустройство(рис. 2).
- Переходное устройство E для футбольных мячей
- Переходное устройство F для надувных лодок, матрасов и детских бассейнов
- Переходное устройство G для некоторых типов велосипедных шин
Нажав на язычок A, вставьтепереходное устройство в шланг (рис. ).
Утопите переходноеустройствов шланге,как показано на рис. , и отпустите язычок A.
Чтобы зафиксировать переходное устройство в нужном положении, слегка поверните его
вокруг своей оси по часовой стрелке.
4
4
3
1
C
2
D
В
G
А
А
EF
C
А
D
34
- 1 -4
Page 16

Инструкция по эксплуатации
www.fubag.ru
7. Работа пистолетом для вязких жидкостей
- При работе надевайте комбинезон,защитныеперчатки,респираториобувь.
- Распыляя легко воспламеняющиеся химические вещества, никогда не направляйте
струю в сторону открытого пламени, источникатепла или искр.
1. Подсоедините пистолет к компрессору,как описываетсяв разделе 3.
2. Настройте компрессор нарекомендуемое для рабочее давление.
3. Открутите стакан A от корпуса пистолета B (рис. 1). Заполните его нужным веществом и
снова прикрутите стакан к корпусу пистолета B (рис. 1).
4. Распылительготов к работе. Для работы нажмите рычаг C(рис.2).
5. Ширина распыляемой струи регулируется поворотом насадки D, которая фиксируется на
пистолете гайкой E (рис.3).
- Иногда распыляемое вещество нужно предварительно разбавить. Степень разбавления
должна указываться производителем. Излишне густое вещество может забить
распылительную форсунку. Рекомендуется перед заливкой используемую жидкость
пропустить через какой либо сетчатый фильтр для отделения нерастворенных сгустков,
которые могут забить сопло распыления и привестик некачественной работе распылителя
- Чтобы промывочный раствор не выливался, заполняя им стакан, держите емкость строго
вертикально.
- Пистолет-распылитель можно использовать и при работе с дезинфицирующими
веществами, инсектицидами и другими продуктами для ухода за растениями.
1
В
А
3
D
2
C
E
- 1 -5
Page 17

Инструкция по эксплуатации
89. Хранение и транспортировка
www.fubag.ru
Перед хранением инструмент должен быть разобран и тщательно очищен от остатков
распыляемых жидкостей. Нельзя чистить пистолет растворителями токсичными или легко
воспламеняющимися жидкостями
Во время транспортировки и хранения инструмента старайтесь беречь его от попадания
влаги. Рекомендуется хранить инструмент в сухом, хорошо проветриваемом помещении и не
подвергать его воздействию повышенной влажности, коррозионно-опасных газов и пыли.
После вскрытия упаковки рекомендуется снова упаковать инструмент, если предполагается
перевозить его к месту работыили на хранение.
.
,
. Гарантийные обязательства
Гарантийный срок на оборудование указывается в прилагаемом сервисном талоне
Гарантия относится к дефектам в материалах и узлах и не распространяется на компоненты,
подверженные естественному износу и работы по техническому обслуживанию.
Гарантийному ремонту подлежат только очищенные от пыли и грязи инструменты в заводской
упаковке, полностью укомплектованные, имеющие инструкцию по эксплуатации, гарантийный
талон с указанием даты продажи, при наличии штампа магазина, заводского номера и
оригиналов товарного и кассовогочеков, выданных продавцом.
В течение гарантийного срока Сервисный центр устраняет за свой счёт выявленные
производственные дефекты. Производитель снимает свои гарантийные обязательства и
юридическую ответственность при несоблюдении потребителем инструкций по эксплуатации,
самостоятельной разборки, ремонта и технического обслуживания, а также не несет никакой
ответственности за причиненные травмы и нанесенный ущерб.
.
- 1 -6
Page 18

Горячая линия FUBAG
тел.: (495) 641-31-31
info@fubag.ru
www.fubag.ru
 Loading...