


1

FUAVE TV7010
Bedieningshandleiding
Manual
Manuel d’instructions
Torenventilator
Tower fan
Ventilateur

INHOUD
Technische gegevens 01.
Belangrijke veiligheidsvoorschriften 02.
Samenstelling en montage 04.
Bediening 06.
Schoonmaak en onderhoud 08.
Problemen en oplossingen 09.
Recycling 10.

Technische gegevens
Aansluitspanning 220-240V~50 Hz
Vermogen 60 W
Gewicht 3,5 kg
Afmetingen 90 x 31 x 31 cm
1

Belangrijke veiligheidsvoorschriften
• Dit apparaat is uitsluitend voor gebruik binnenshuis.
• Gebruik dit apparaat uitsluitend voor het doel waarvoor het is
ontworpen (het ventileren van een huishoudelijk ruimte) en op de wijze,
zoals in dit boekje beschreven. Elk ander gebruik kan gevaarlijk zijn en
kan brand, verwondingen, schade, elektrische schok enz. veroorzaken,
en doet de garantie vervallen.
• Controleer ventilator, stekker en elektrokabel voor gebruik op
beschadigingen.
• Zet de ventilator eerst volledig in elkaar, voor u hem gebruikt. Altijd de
stekker uit het stopcontact bij monteren/demonteren.
• Stel het apparaat niet in werking wanneer u beschadigingen
constateert aan apparaat, elektrokabel of stekker, of wanneer het
slecht functioneert, is gevallen of op andere wijze een storing vertoont.
Breng het complete apparaat terug naar uw leverancier of een erkend
elektricien voor controle en/of reparatie. Vraag altijd om originele
onderdelen. Het apparaat (incl. elektrokabel en stekker) mag uitsluitend
worden geopend en/of gerepareerd door daartoe bevoegde en
gekwaliceerde personen. Voer nooit zelf reparaties uit.
• Verwijder de stekker uit het stopcontact en schakel de ventilator meteen
uit wanneer je vreemde geluiden hoort, iets ruikt of rook ziet.
• Controleer voor gebruik of de spanning die het stopcontact, waarop u
de ventilator wilt aansluiten, afgeeft, gelijk is aan het voltage dat op het
typeplaatje van de ventilator staat: 220/240V-50Hz..
• Voorkom het gebruik van verlengkabels. Is dat onvermijdelijk, gebruik
dan een goedgekeurde kabel van voldoende capaciteit en ontrol hem
helemaal.
• Voorkom dat de elektrokabel in contact komt met scherpe-, hete- of
bewegende voorwerpen. Wind hem niet om de ventilator en rol hem
niet te strak op.
• Gebruik de ventilator nooit met een beschadigde elektrokabel.
Repareer deze nooit zelf, maar wend u tot uw leverancier of een erkend
servicepunt ter reparatie.
2

• Zorg ervoor dat de ventilator op een stevige, vlakke en horizontale
ondergrond staat tijdens gebruik.
• Laat een werkende ventilator niet zonder toezicht in een ruimte.
• Dit apparaat is niet geschikt voor gebruik in natte of vochtige ruimtes
als badkamers, wasruimtes enz. Plaats hem niet in de nabijheid van
een kraan, badkuip, douche, zwembad, fonteintje o.i.d., zorg ervoor
dat hij nooit in water kan vallen en voorkom dat water het apparaat
binnendringt. Mocht het apparaat tóch ooit in water vallen, neem
dan éérst de stekker uit het stopcontact! Een inwendig nat geworden
apparaat niet meer gebruiken maar ter reparatie aanbieden.
• Dompel apparaat, snoer of stekker nooit in water of andere vloeistof en
raak het apparaat, snoer of stekker nooit met natte handen of voeten
aan.
• Plaats het apparaat niet in een open raam i.v.m. regen, niet op natte
oppervlakken en voorkom dat er vocht op wordt gemorst.
• Hang niets over of aan de ventilator en gebruik hem niet in de nabijheid
van gordijnen, kleding of andere materialen die de motor kunnen doen
vastlopen. Dat kan oververhitting of brand tot gevolg hebben.
• Let erop dat lang haar niet in de ventilator wordt gezogen.
• Houd de aanzuig- en uitblaasrooster schoon en stofvrij en zorg voor
minimaal 30 cm vrije ruimte rondom de ventilator.
• Zorg ervoor dat er zich geen objecten in de buurt van de ventilator
bevinden die e oscillatie (zwenken) kunnen verhinderen.
• Steek nooit een vinger, pen, stokje of wat voor voorwerp dan ook door
het beschermrooster de werkende ventilator in!
• Spuit geen middelen (anti-insect, schoonmaak of wat dan ook) op of
in de ventilator; dat kan lichamelijke klachten veroorzaken (i.h.b. bij
kinderen!) of onderdelen beschadigen.
• Bewaar of gebruik het apparaat niet:
- Op plaatsen waar het nat kan worden of in water kan vallen
- In de buurt van licht-ontvlambare-, explosieve- of gasvormige
stoffen
- In de buurt van zuren, alkali, olie en andere stoffen die corrosie
kunnen veroorzaken.
3

• Sluit de ventilator niet aan op een timer of een dimmer.
• Gebruik de ventilator niet bij temperaturen boven de 40°C, niet in de
buurt van verwarmingsapparatuur en niet in stofge ruimtes.
• Neem altijd de stekker uit het stopcontact voordat u de ventilator
verplaatst, schoonmaakt of er onderhoud aan uitvoert. Doe dat ook
wanneer de ventilator niet in gebruik is. Pak de stekker daartoe in de
hand; trek nooit aan het koord!
• Neem na gebruik altijd de stekker uit het stopcontact.
• Dit apparaat kan worden gebruikt door kinderen van 8 jaar en ouder
en personen met beperkte fysieke, sensorische of mentale vermogens
of gebrek aan ervaring en kennis als ze toezicht hebben gekregen of
instructies over het gebruik van het apparaat op een veilige manier en
begrijpen de gevaren die ermee gepaard gaan.
• Kinderen mogen niet met het apparaat spelen.
• Voorkom dat het apparaat continue op kleine kinderen, patiënten of
mensen die zich moeilijk kunnen verplaatsen blaast.
• Reiniging en gebruikersonderhoud is niet toegestaan door kinderen
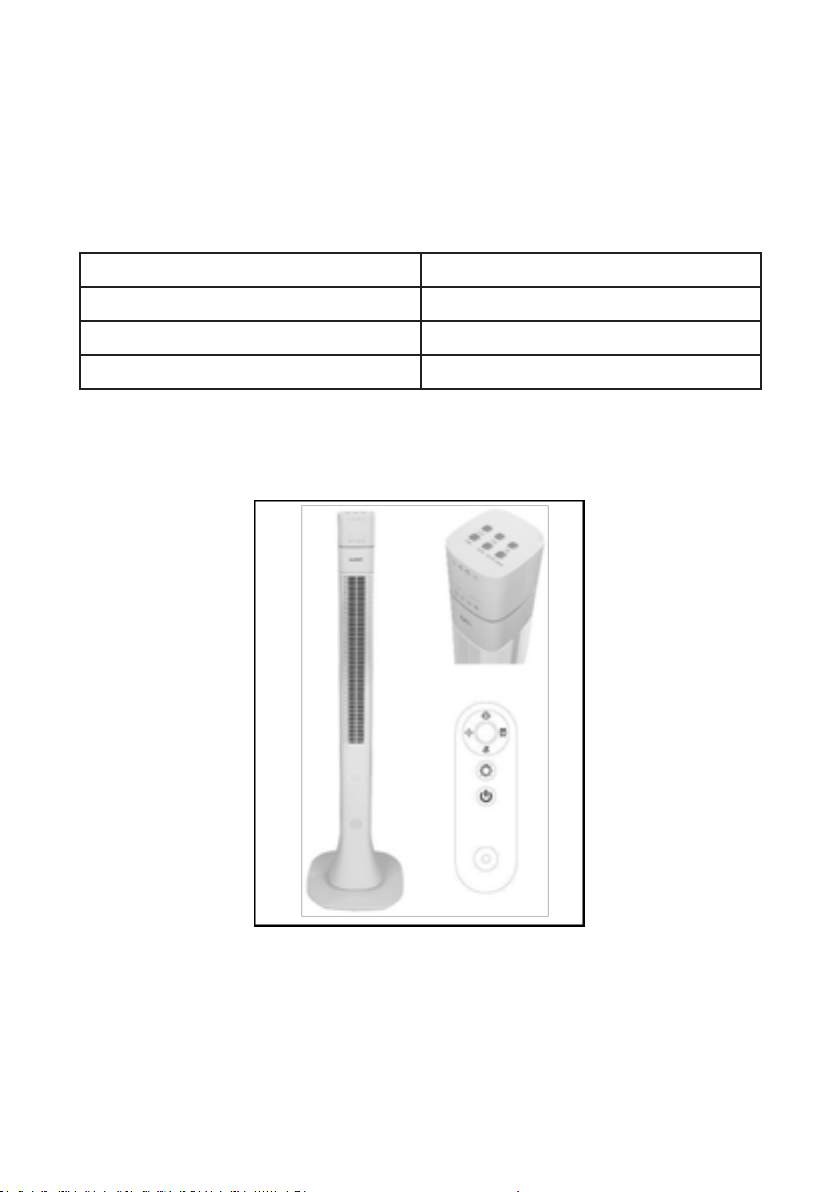
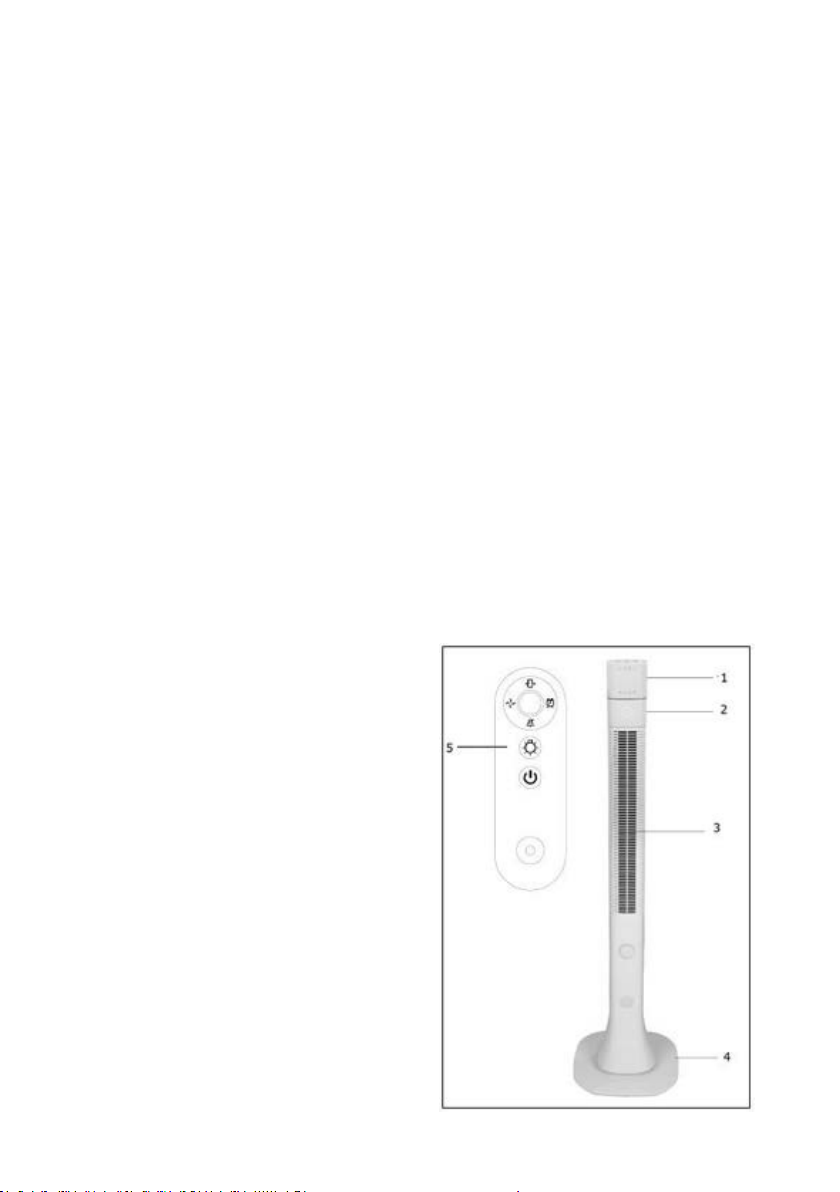
Samenstelling en montage
1. Bedieningspaneel
2. Ventilatorhuis
3. Luchtuitlaat
4. Voet
5. Afstandsbediening
4

• Verwijder het verpakkingsmateriaal en houd het buiten bereik van
kinderen
• Controleer voordat u verder gaat of de stekker niet in het stopcontact
is geplaatst.
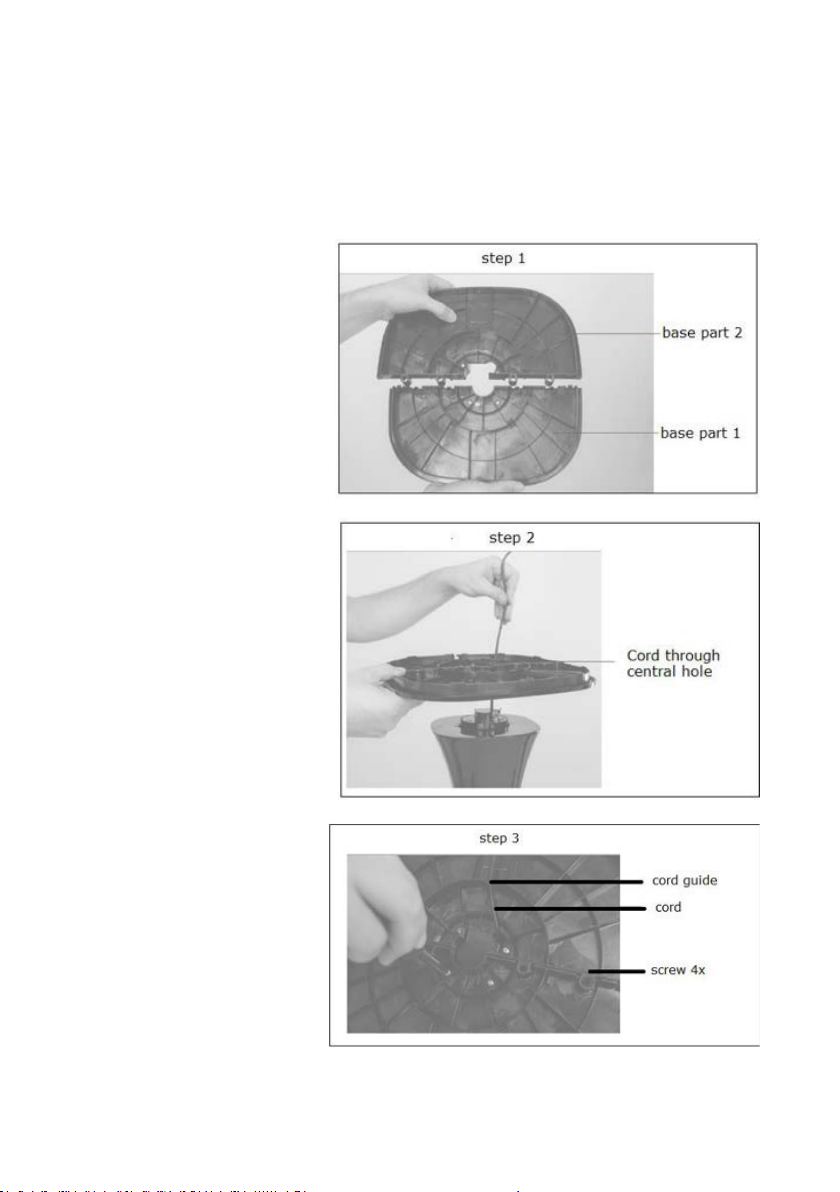
• Bevestig de voet volgens onderstaande stappen:
Stap 1:
Bevestig voetdeel 1 stevig
aan voetdeel 2
tot u klik hoort.
Stap 2:
Leid het snoer en de stekker
door het centrale gat in de
voet
Stap 3:
Monteer met behulp van de
4 meegeleverde schroeven
de voet aan het ventilatorhuis en leid het snoer door
de snoergeleider
(trekontlasting)
5
Bediening
- De ventilator pas in gebruik nemen wanneer:
• Alle verpakkingen verwijderd zijn en uit de buurt van kinderen zijn
geplaatst.
• Alle veiligheidsvoorschriften in acht zijn genomen.
• De ventilator op een stabiele vlakke ondergrond is geplaatst.
• De voet volgens bovenstaande stappen is gemonteerd.
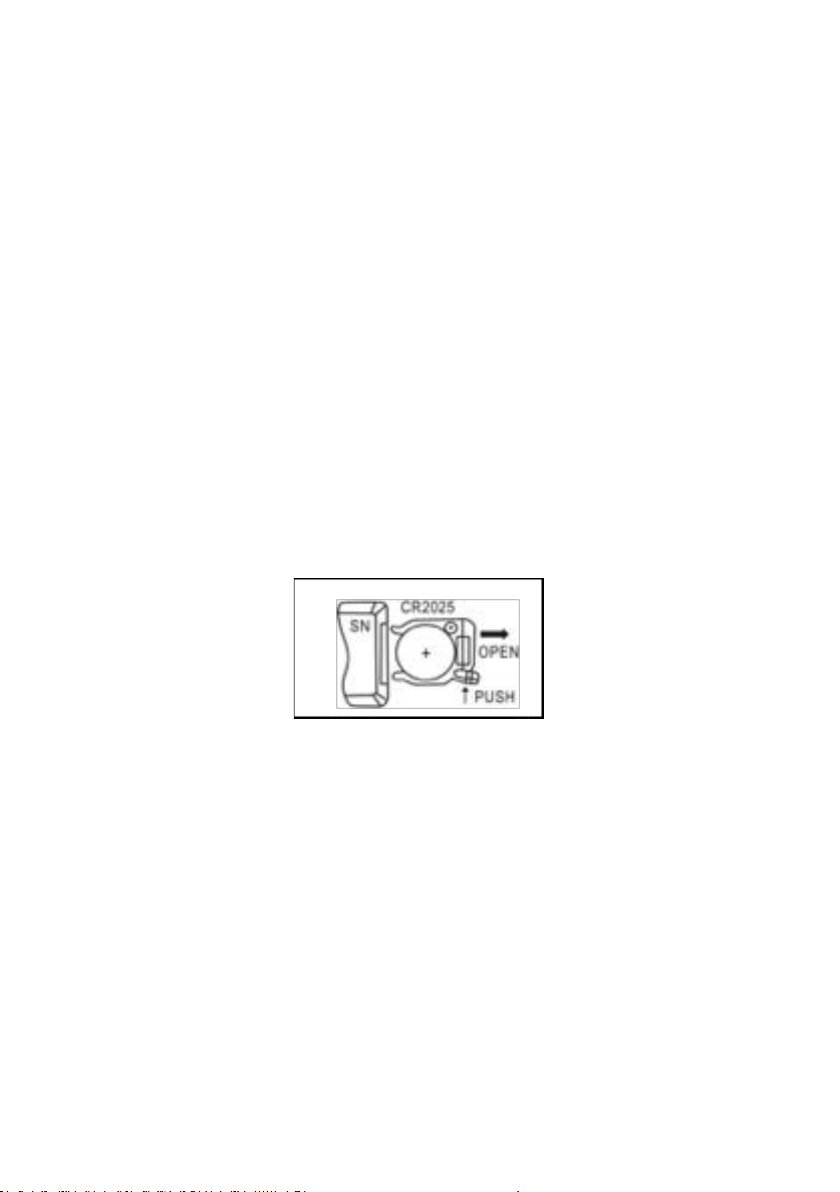
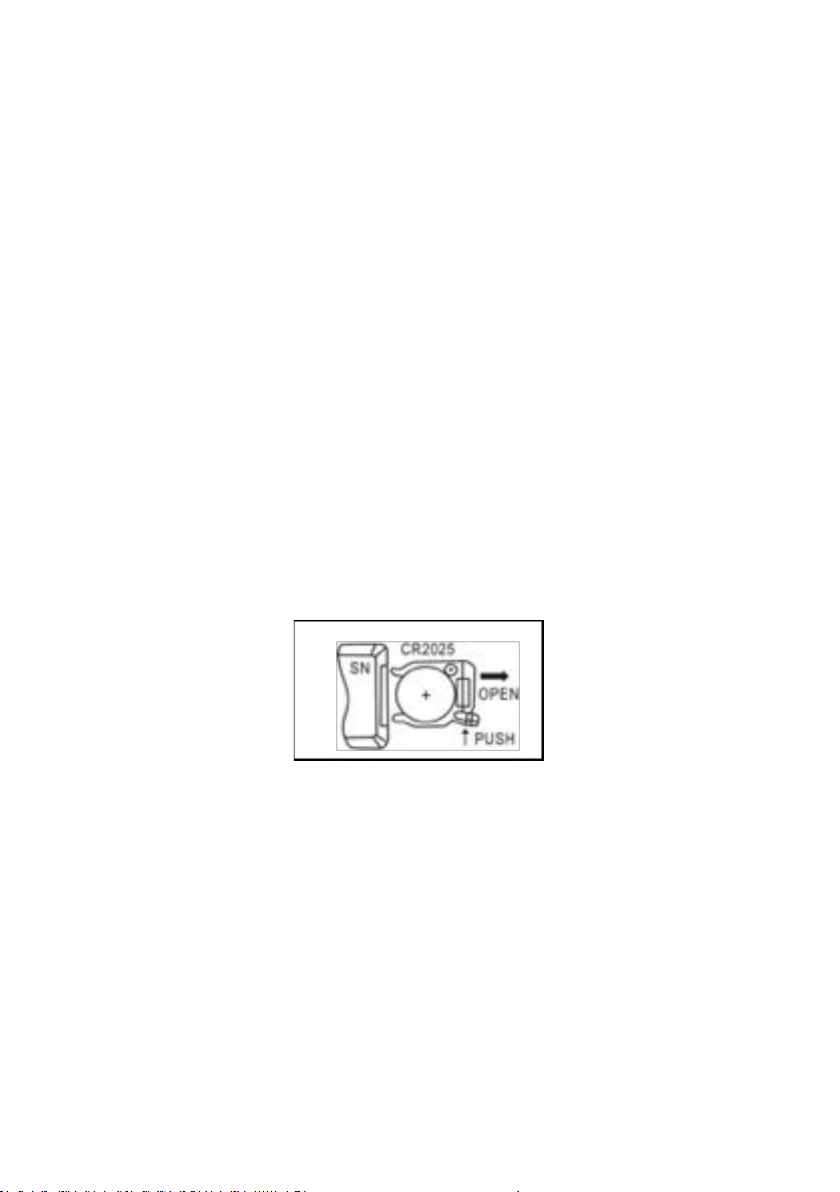
- Plaats een knoop cel batterij CR2025 in de afstandsbediening.
- Steek de stekker in een passend stopcontact, het display toont de
omgevingstemperatuur, de ledverlichting gaat branden.
- Het bedieningspaneel en de afstandsbediening werken met
dezelfde functies.
6

Afbeelding
afstandsbediening
Afbeelding
bedieningspaneel
Afbeelding Functie
ON/OFF Aan- en uitknop om de ventilator
aan/uit te schakelen.
SPEED
Instellen ventilatorsnelheid (laag,
middel, hoog).
Standaardinstelling is middel.
In / uitschakelen oscillatie
SWING
(zwenk) functie.
ION
TIMER
TURN OFF SCREEN
In / uitschakelen ion generator
(ionisatie=luchtverrijking met
negatieve ionen voor een betere
luchtkwaliteit=verbeterd
welbehagen).
Instellen van het aantal uren (1
tot 12 uur) dat de ventilator moet
ventileren. Ventilator schakelt automatisch uit wanneer de ingestelde
uren zijn verstreken. (Druk meerdere
keren op deze knop om het aantal
uren in te stellen, het display toont
het ingesteld aantal uren.)
In / uitschakelen led-display
7

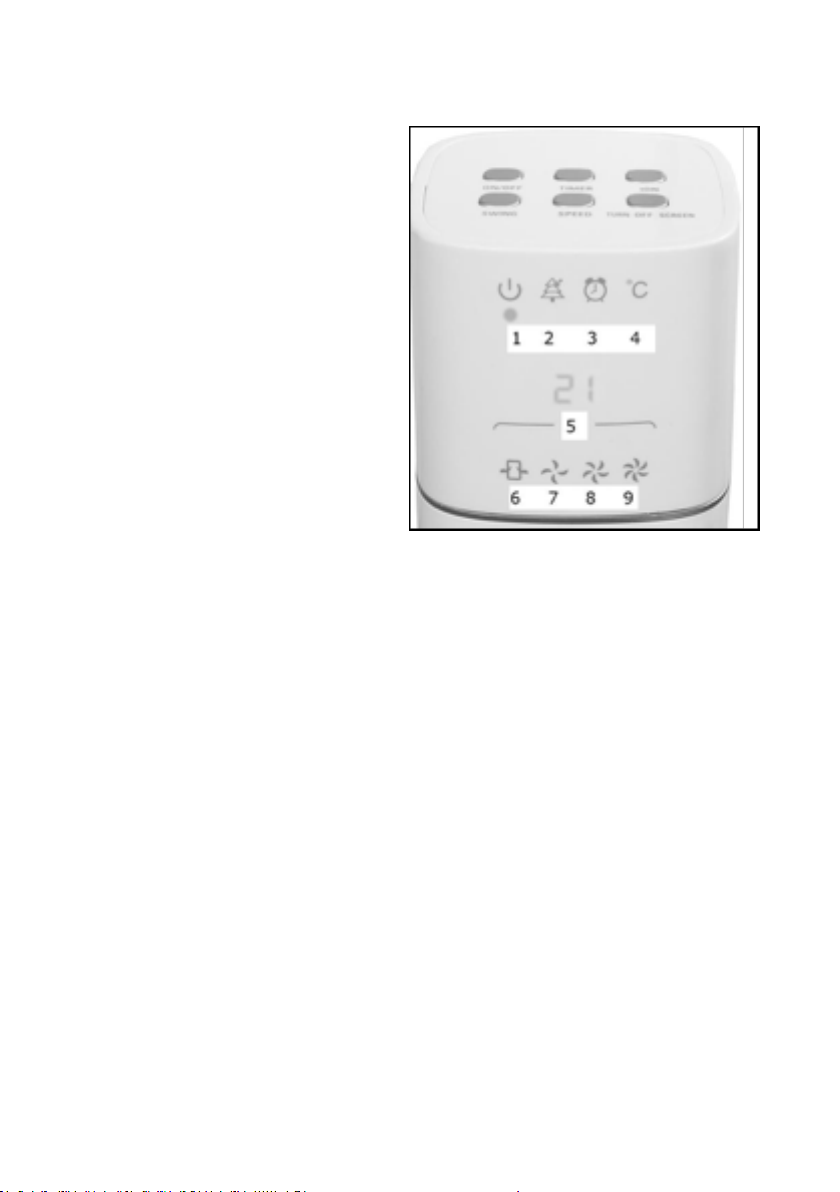
Op het Led-display worden de volgende functies weergegeven:
1. Ventilator verbonden met
stroomvoorziening
2. ION functie
3. Timerfunctie ingesteld
(aan/uit)
4. Omgevingstemperatuur
licht aan / Timer licht uit
5. Omgevingstemperatuur of
Timerinstelling (1tot12h)
6. Oscilleren (zwenken)
7. Ventilatiesnelheid laag
8. Ventilatiesnelheid midden
9. Ventilatiesnelheid hoog
Schoonmaak en onderhoud
Schakel de ventilator uit en neem de stekker uit het stopcontact wanneer u
hem wilt reinigen of onderhoud wilt uitvoeren.
De ventilator vraagt alleen wat algemeen, uitwendig onderhoud. Stof hem
regelmatig af met een zachte doek of plumeau of zuig hem schoon met een
zacht stofzuigerborsteltje. Is hij erg vuil, maak de ventilator schoon met een
licht vochtige doek. Droog alles goed na, laat de ventilator goed drogen.
Zorg ervoor dat er geen water op andere delen dan behuizing terechtkomt!
Spoel of spuit de ventilator nooit af!
Om aantasting, beschadiging of vervorming van het materiaal te voorkomen nooit schurende, agressieve of bijtende (schoonmaak)-middelen
gebruiken. Wanneer u de ventilator aan het eind van het seizoen wilt opruimen, doe dat dan in de originele verpakking: die biedt de beste bescherming. Ruim hem weg op een veilige, droge, niet extreem warme of koude
plaats.
8

Problemen en oplossingen
Display geeft omgevingstemperatuur weer maar de bedieningsknoppen op de ventilator werken niet.
- Display geeft wel omgevingstemperatuur weer maar de ventilator
staat nog in stand-by stand
- Druk eerst op de aan/uit knop om de ventilator in te schakelen
Afstandsbediening werk niet
- Geen batterij of batterij leeg, vervang batterij
- Display geeft wel omgevingstemperatuur weer maar de ventilator
staat nog in stand-by stand. Druk eerst op de aan/uit knop om de
ventilator in te schakelen
- Afstandsbediening wordt niet gericht op de ontvang-sensor op de
ventilator. Richt de afstandsbediening (wijzend met het lampje op
de zijkant van de afstandsbediening) op de ontvang-sensor, naast
het display waar de omgevingstemperatuur wordt weergegeven
Ventilator vibreert
- Onbalans in ventilatorblad. Reinig ventilatorblad voorzichtig met
een stofzuiger
Ventilator geeft onvoldoende capaciteit
- Luchtinlaat en/of luchtuitlaat openingen zijn vervuild. Reinig luchtin
laat en luchtuitlaat openingen
Display op ventilator werkt niet
- Luchtinlaat en/of luchtuitlaat openingen zijn vervuild. Reinig luchtin
laat en luchtuitlaat openingen
Waarschuwing: Reparaties dienen door daarvoor opgeleide monteurs
te worden uitgevoerd. Vraag bij reparatie altijd om originele onderdelen.
In het apparaat aangebrachte wijzigingen en ondeskundig uitgevoerde
reparaties doen de garantie en de aansprakelijkheid van leverancier,
importeur en fabrikant vervallen.
9

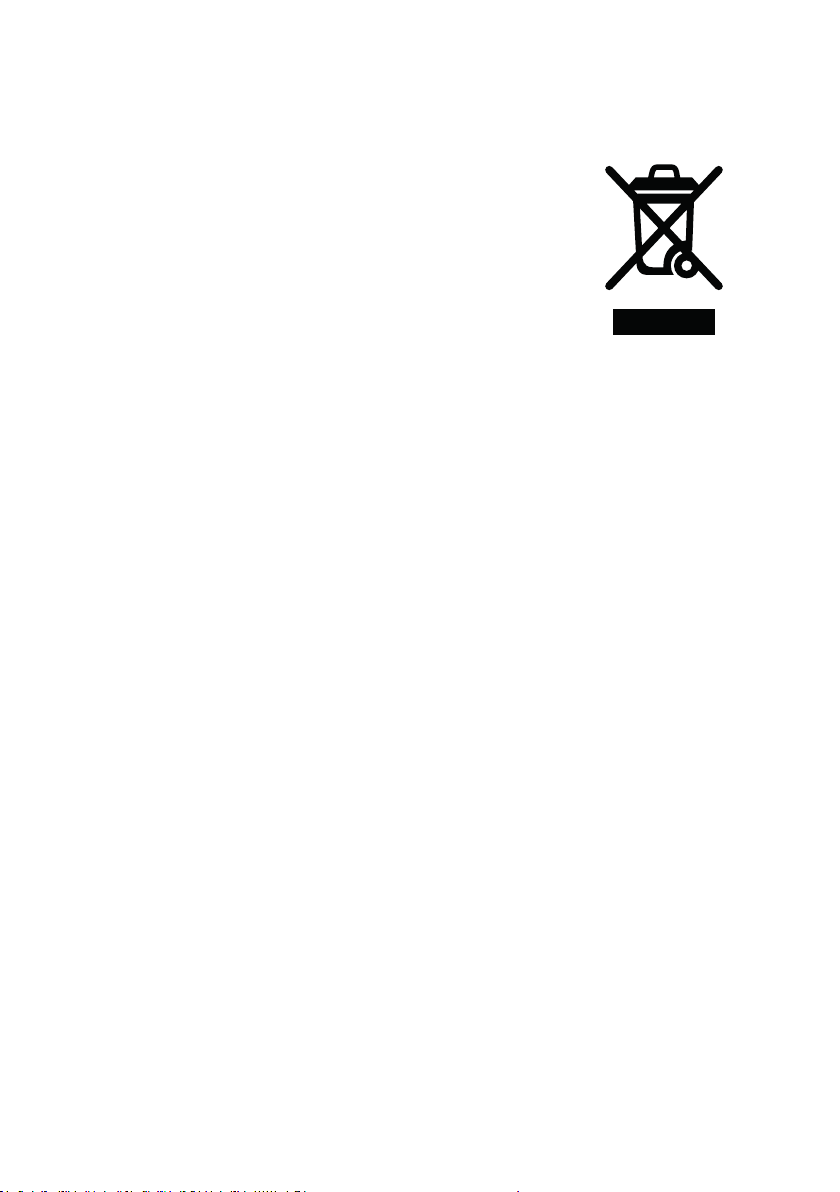
Recycling
Binnen de EU betekent dit symbool dat dit product niet met het normale huishoudelijke afval mag
worden afgevoerd. Afgedankte apparaten bevatten
waardevolle materialen die hergebruikt kunnen en
moeten worden, om het milieu en de gezondheid
niet te schaden door ongereguleerde afvalinzameling. Breng afgedankte apparatuur daarom naar een
daarvoor aangewezen inzamelpunt of wend u tot het
bedrijf waar u het apparaat gekocht hebt. Zij kunnen
er voor zorgen dat zoveel mogelijk onderdelen van
het apparaat hergebruikt worden.
10

INDEX
Technical data 12.
General safety guidelines 13.
Putting together and assembling 15.
Operating 17.
Cleaning and maintenance 19.
Problems and solutions 20.
Removal 21.
Technical data
Connected power 220-240V~50 Hz
Output capacity 60 W
Weight 3,5 kg
Dimensions 90 x 31 x 31 cm
12

General safety guidelines
• This device is only to be used indoors.
• Use this device only for the purpose for which it was designed
(ventilating a household space) and in the manner described in this
booklet. Any other use can be dangerous and can cause re, injury,
damage, electric shock, etc., and will void the warranty.
• Check the fan, plug and electrical cable for damage before use.
• Assemble the fan completely before using it. Always remove the plug
from the socket when mounting / dismantling.
• Do not operate the device if you notice any damage to the device,
electrical cable or plug, or if it malfunctions, has been dropped or
otherwise malfunctions. Return the complete device to your supplier or
an authorized electrician for inspection and / or repair. Always ask for
original parts. The device (incl. Electrical cable and plug) may only be
opened and / or repaired by authorized and qualied persons. Never
carry out repairs yourself.
• Remove the plug from the wall socket and immediately switch off the
fan when you hear strange noises, smell or see smoke.
• Before use, check that the voltage supplied by the outlet to which you
want to connect the fan is the same as the voltage on the rating plate of
the fan: 220 / 240V-50Hz.
• Prevent the use of extension cables. If this is unavoidable, use an
approved cable of sufcient capacity and unwind it completely.
• Prevent the electrical cable from coming into contact with sharp, hot or
moving objects. Do not wind it around the fan and do not wind it too
tightly.
• Never use the fan with a damaged electrical cable. Never repair this
yourself, but contact your supplier or an authorized service point for
repair.
• Make sure the fan is on a rm, level and horizontal surface during use.
• Do not leave a working fan unattended in a room.
13

• This device is not suitable for use in wet or damp areas such as
bathrooms, washrooms, etc. Do not place it in the vicinity of a tap,
bathtub, shower, swimming pool, wash basin or similar, make sure it can
never fall into water and prevent water enters the device. Should the
device ever fall into water, rst remove the plug from the socket! Stop
using an internally wet device but offer it for repair.
• Never immerse the device, cord or plug in water or other liquid and do
not touch the device, cord or plug with wet hands or feet.
• Do not place the device in an open window in connection with. rain, not
on wet surfaces and prevent moisture from being spilled on it.
• Do not hang anything over or over the fan and do not use it in the
vicinity of curtains, clothing or other materials that could cause the
engine to crash. This can result in overheating or re.
• Ensure that long hair is not sucked into the fan.
• Keep the suction and discharge grille clean and dust-free and ensure a
minimum of 30 cm free space around the fan.
• Make sure that there are no objects in the vicinity of the fan that can
prevent oscillation.
• Never put a nger, pen, stick or anything else through the protective
grille into the working fan!
• Do not spray any agents (anti-insect, cleaning or whatever) on or in
the fan; this can cause physical complaints (especially with children!) or
damage parts.
• Do not store or use the device:
- In places where it can get wet or fall into water
- Near to highly ammable, explosive or gaseous substances
- Near acids, alkali, oil and other substances that can cause corrosion.
• Do not connect the fan to a timer or a dimmer.
• Do not use the fan at temperatures above 40 ° C, near heating
equipment and in dusty areas.
• Always remove the plug from the socket before moving, cleaning or
servicing the fan. Do the same when the fan is not in use. To do this,
hold the plug in your hand; never pull the cord!
14
• Always unplug the appliance after use.
• This device can be used by children 8 years of age and older and
persons with limited physical, sensory or mental abilities or lack of
experience and knowledge if they have been supervised or have
instructions on how to use the device in a safe manner and understand
the associated dangers.
• Children must not play with the device.
• Prevent the device from constantly blowing on small children, patients
or people who have difculty moving.
• Cleaning and user maintenance shall not be made by children without
supervision.
Putting together and assembly
1. Control panel
2. Fan house
3. Air outlet
4. Base
5. Remote control
15
• Remove the packing material and keep it away from children.
• Before continuing, check that the plug is not plugged into the socket.
• Mount the base according to the following steps:
Step 1:
Securely attach base part 1
to base part 2 until you hear
a click.
Step 2:
Route the cord and plug
through the central hole in
the base.
Step 3:
Using the 4 screws
supplied, mount the
base to the fan and
guide the cord through
the cord guide (strain
relief).
16

Operating
- Use the fan only when:
• All packaging has been removed and placed away from children;
• All the safety instructions have been observed;
• The fan is positioned on a stable and at ground;
• The base according to the above steps is mounted.
- Insert a button cell battery CR2025 in the remote control.
- Insert the plug into a suitable socket, the display shows the ambient
temperature, the LED lighting comes on.
- The control panel and the remote control work with the same
functions.
17
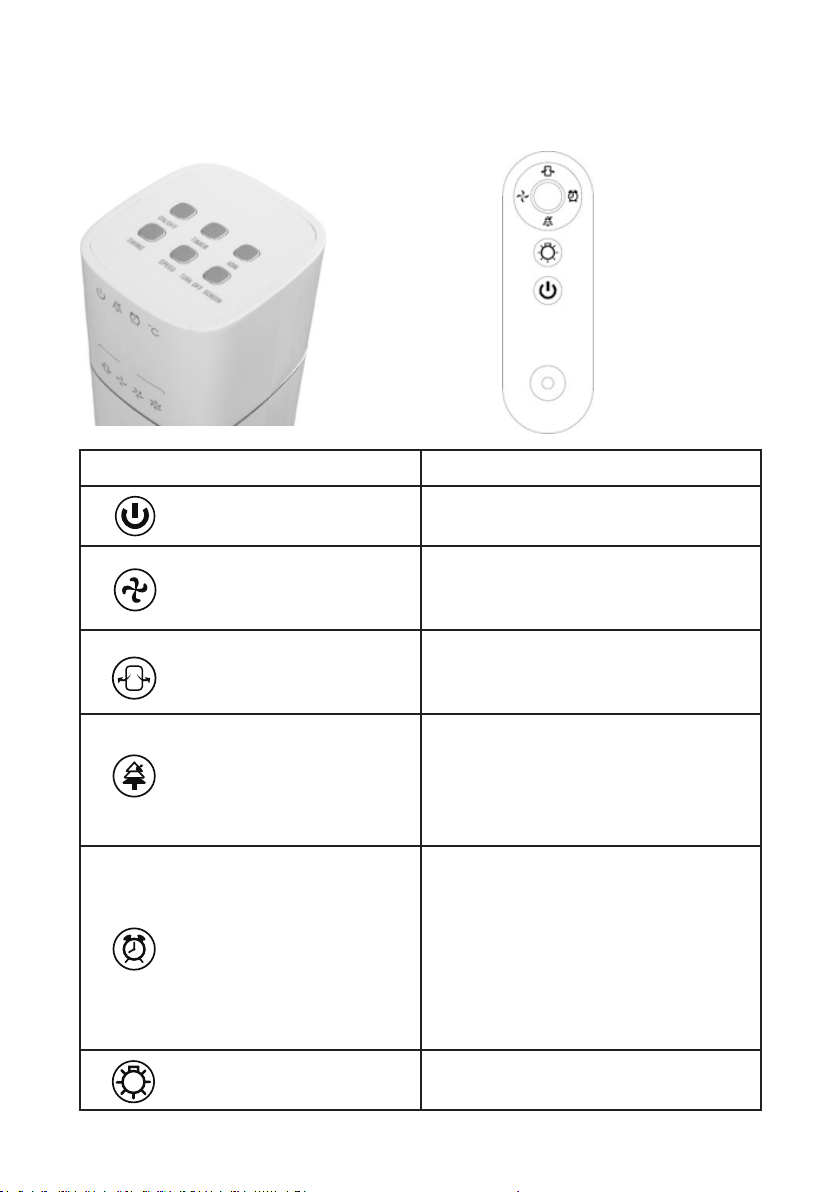
Image control panel Image remote control
Image Function
ON/OFF On and Off button to switch the fan
on / off.
SPEED
Stetting the fan speed (low, medium, high). Default setting is medium.
Switch on / off oscillation (swing)
SWING
function.
ION
TIMER
TURN OFF SCREEN
18
On / off ion generator (ionization
= air enrichment with negative ions
for better air quality = improved
well-being)
Set the number of hours (1 to 12
hours) that the fan must ventilate.
Fan switches off automatically when
the set hours have elapsed. (Press
this button several times to set the
number of hours, the display shows
the set number of hours).
LED display on / off.

The following functions are shown on the LED display:
1. Fan connected to power
supply
2. ION function
3. Timer function set (on / off)
4. Ambient temperature light
on/Timer light off
5. Ambient temperature or
timer setting (1 to 12h)
6. Oscillate (pivot)
7. Fan speed low
8. Fan speed medium
9. Fan speed high
Cleaning and maintenance
Switch off the fan and remove the plug from the wall socket when you want
to clean it or carry out maintenance.
The fan only requires some general, external maintenance. Dust it regularly
with a soft cloth or feather duster or vacuum it with a soft vacuum cleaner
brush. If it is very dirty, clean the fan with a slightly damp cloth. Dry everything thoroughly, let the fan dry well. Make sure that no water gets onto
parts other than the housing! Never rinse or spray the fan!
To avoid damage, damage or distortion of the material, never use abrasive,
aggressive or corrosive (cleaning) agents.
If you want to clean up the fan at the end of the season, do so in the original packaging: it offers the best protection. Put it away in a safe, dry, not
extremely hot or cold place.
19

Problems and solutions
Display shows ambient temperature but the control buttons on the
fan do not work
- Display does show ambient temperature but the fan is still in stand
by mode.
- First press the on / off button to switch on the fan.
Remote control does not work
- No battery or battery empty, replace battery.
- Display does show ambient temperature but the fan is still in stand
by mode. First press the on / off button to switch on the fan.
- Remote control is not aimed at the receiving sensor on the fan.
Point the remote control (pointing with the light on the side
of the remote control) at the receiving sensor, next to the display
where the ambient temperature is displayed.
Fan vibrates
- Imbalance in fan blade. Clean fan blade carefully with a vacuum
cleaner.
Fan gives insufcient capacity
- Air inlet and / or air outlet openings are contaminated. Clean air
inlet and air outlet openings.
Fan display is not working
- Display is switched off. Switch on the display with the “Turn off
screen” button.
Warning: Repairs must be carried out by trained technicians. Always ask for
original parts for repairs.Changes made to the device and improper repairs
carried out invalidate the warranty and liability of the supplier, importer and
manufacturer.
20
Removal
In the EU this symbol indicates that this product may
not be disposed of as ordinary household waste. Old
equipment contains valuable materials, suitable for
recycling. These materials should be made suitable
for reuse in order to prevent any adverse effects to
health and the environment caused by unregulated
waste collection. Therefore, please make sure that
you bring old equipment to a designated collection
point. Alternatively, contact the original supplier, who
can make sure that as many of the components as
possible can be recycled.
21


TABLE DES MATIÈRES
Données techniques 24.
Consignes de sécurité importantes 25.
Assemblage et montage 26.
Fonctionnement 29.
Nettoyage et entretien 31.
Problèmes et solutions 32.
Élimination 33.

Données techniques
Tension de raccordement 220-240V~50 Hz
Puissance absorbée 60 W
Poids 3,5 kg
Dimensions 90x 31 x 31 cm
24

Consignes de sécurité importantes
• Cet appareil est destiné uniquement à une utilisation à l’intérieur.
• Utilisez cet appareil uniquement aux ns pour lesquelles il a été conçu
(ventilation d’un espace domestique) et de la manière décrite dans
ce livret. Toute autre utilisation peut être dangereuse et provoquer un
incendie, des blessures, des dommages, une décharge électrique, etc.,
et annulera la garantie.
• Vériez que le ventilateur, la che et le câble électrique ne sont pas
endommagés avant utilisation.
• Assemblez complètement le ventilateur avant de l’utiliser. Retirez
toujours la che de la prise lors du montage / démontage.
• Ne faites pas fonctionner l’appareil si vous remarquez que l’appareil, le
câble ou la che électrique sont endommagés ou défectueux, s’ils sont
tombés ou s’ils ne fonctionnent pas correctement. Renvoyez l’appareil
complet à votre fournisseur ou à un électricien agréé pour inspection et
/ ou réparation. Toujours demander des pièces d’origine. L’appareil (y
compris le câble électrique et la che) ne peut être ouvert et / ou réparé
que par des personnes autorisées et qualiées. N’effectuez jamais de
réparations vous-même.
• Retirez la che de la prise murale et éteignez immédiatement le
ventilateur lorsque vous entendez des bruits étranges, sentez ou voyez
de la fumée.
• Avant utilisation, vériez que la tension fournie par la prise à laquelle
vous souhaitez connecter le ventilateur est identique à la tension
indiquée sur la plaque signalétique du ventilateur: 220 / 240V~50Hz.
• Empêcher l’utilisation de rallonges. Si cela est inévitable, utilisez un
câble approuvé d’une capacité sufsante et détendez-le complètement.
• Évitez que le câble électrique n’entre en contact avec des objets
coupants, chauds ou en mouvement. Ne l’enroulez pas autour du
ventilateur et ne l’enroulez pas trop étroitement.
• Ne jamais utiliser le ventilateur avec un câble électrique endommagé.
Ne le réparez jamais vous-même, mais contactez votre fournisseur ou un
centre de service agréé pour réparation.
25

• Assurez-vous que le ventilateur est sur une surface ferme, horizontale et
horizontale pendant l’utilisation.
• Ne laissez pas un ventilateur en état de marche sans surveillance
dans une pièce.
• Cet appareil ne convient pas à une utilisation dans des endroits
humides ou mouillés tels que les salles de bain, les salles de bain,
etc. Ne le placez pas à proximité d’un robinet, d’une baignoire,
d’une douche, d’une piscine, d’un lavabo ou autre l’eau pénètre dans
l’appareil. Si l’appareil tombe dans l’eau, retirez d’abord la che de la
prise! Arrêtez d’utiliser un dispositif interne humide mais proposez-le en
réparation.
• Ne plongez jamais l’appareil, le cordon ou la che dans de l’eau ou un
autre liquide et ne touchez pas l’appareil, le cordon ou la che avec les
mains ou les pieds mouillés.
• Ne placez pas l’appareil dans une fenêtre ouverte en relation avec.
pluie, pas sur des surfaces mouillées et empêcher l’humidité de
s’y répandre.
• Ne suspendez rien sur le ventilateur et ne l’utilisez pas à proximité
de rideaux, de vêtements ou de tout autre matériel susceptible de
provoquer une chute du moteur. Cela peut entraîner une surchauffe
ou un incendie.
• Assurez-vous que les cheveux longs ne sont pas aspirés dans
le ventilateur.
• Conservez la grille d’aspiration et de refoulement propre et sans
poussière et prévoyez un espace libre d’au moins 30 cm autour
du ventilateur.
• Assurez-vous qu’aucun objet à proximité du ventilateur ne puisse
empêcher les oscillations.
• Ne placez jamais un doigt, un stylo, un bâton ou autre chose à travers la
grille de protection dans le ventilateur de travail!
• Ne vaporisez aucun agent (anti-insectes, nettoyant ou autre) sur ou dans
le ventilateur; cela peut causer des problèmes physiques (surtout chez
les enfants!) ou endommager des pièces.
• Ne stockez pas et n’utilisez pas l’appareil:
26

- Aux endroits où il peut être mouillé ou tomber dans l’eau
- proche de substances hautement inammables, explosives ou ga
zeuses
- Près des acides, alcalis, huiles et autres substances susceptibles de
provoquer la corrosion.
• Ne connectez pas le ventilateur à une minuterie ou à un gradateur.
• N’utilisez pas le ventilateur à des températures supérieures à
40°C, à proximité d’équipements de chauffage et dans des zones
poussiéreuses.
• Débranchez toujours la che de la prise avant de déplacer, nettoyer ou
entretenir le ventilateur. Faites la même chose lorsque le ventilateur
n’est pas utilisé. Pour ce faire, tenez la che dans votre main. ne tirez
jamais sur le cordon!
• Débranchez toujours l’appareil après utilisation.
• Cet appareil peut être utilisé par des enfants de 8 ans et plus et des
personnes ayant des capacités physiques, sensorielles ou mentales
limitées ou qui manquent d’expérience et de connaissances dangers
associés.
• Les enfants ne doivent pas jouer
avec l’appareil.
• Évitez que le dispositif ne soufe
constamment sur de jeunes
enfants, des patients ou des
personnes qui ont des difcultés à
se déplacer.
• Le nettoyage et la maintenance par
l’utilisateur ne sont pas autorisés
par les enfants sans surveillance.
Assemblage et montage
1. Panneau de contrôle
2. Fan house
3. Sortie d’air
4. Pied
5. Télécommande
27

• Retirez les matériaux d’emballage et tenez-les hors de portée des
enfants.
• Avant de continuer, vériez si la che ne se trouve plus dans la prise de
courant.
• Assemblez le pied selon les étapes ci-dessous.
Étape 1:
Fixez fermement la partie de
pied 1 à la partie de pied 2
jusqu’à ce que vous entendiez un clic.
Étape 2:
Faites passer le cordon et
branchez-le dans le trou
central de le pied
Étape 3:
À l’aide des 4 vis
fournies, montez la
base sur le boîtier du
ventilateur et guidez le
cordon dans le gui-
de-câble (décharge de
traction).
28
Fonctionnement
- Ne mettez en service le ventilateur que si:
• tous les emballages ont été retirés et placés loin des enfants ;
• toutes les consignes de sécurité ont été respectées ;
• le ventilateur est placé sur un support plat et stable;
• Le pied selon les étapes ci-dessus est monté.
- Insérez une pile bouton CR2025 dans la télécommande.
- Insérez la che dans une prise de courant appropriée, l’écran afche
la température ambiante, l’éclairage à LED s’allume.
- Le panneau de commande et la télécommande fonctionnent avec
les mêmes fonctions
29
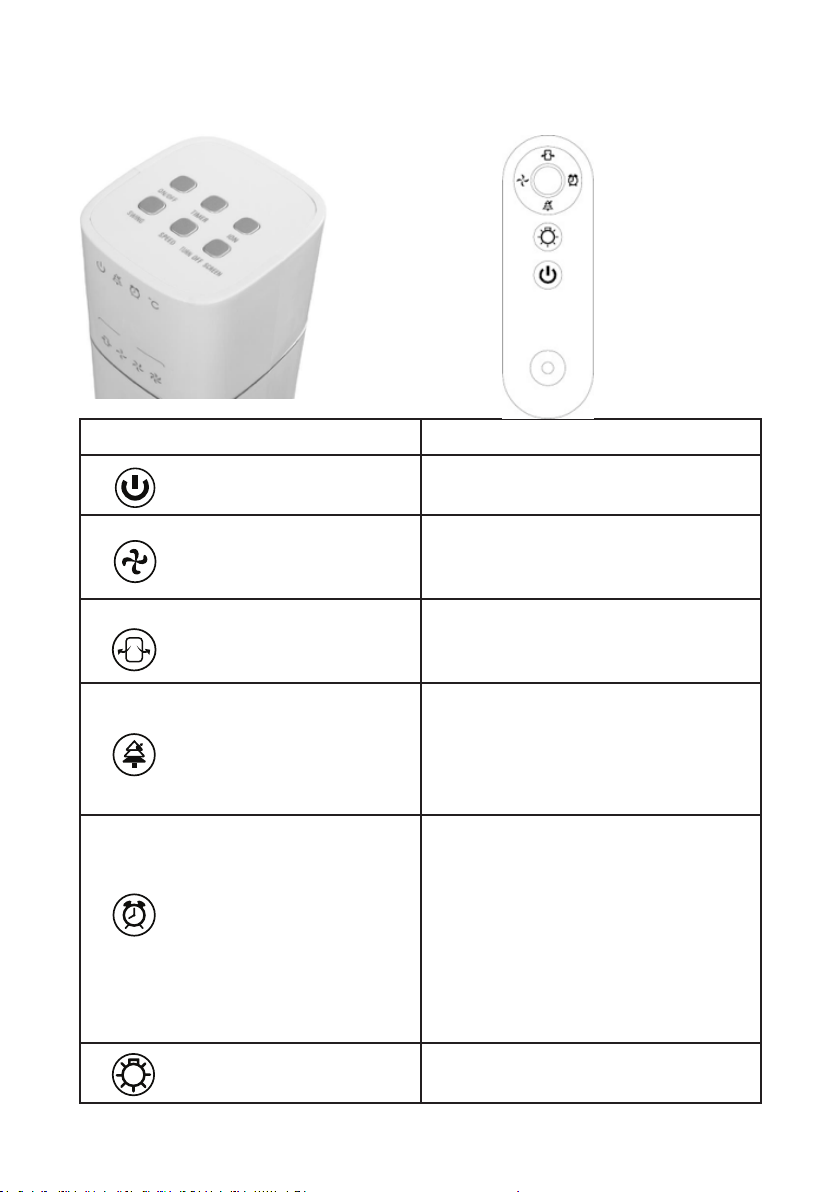
Image panneau de
commande
Image télécommande
Image Fonction
ON/OFF Bouton marche / arrêt pour allumer
/ éteindre le ventilateur.
SPEED
Réglage de la vitesse du ventilateur
(basse, moyenne, élevée). paramètre par défaut est moyen.
Activer / désactiver la fonction oscil-
SWING
lation (swing).
ION
TIMER
TURN OFF SCREEN
30
Générateur d’ions on / off (ionisation = enrichissement de l’air avec
des ions négatifs pour une meilleure
qualité de l’air = meilleur bien-être).
Dénissez le nombre d’heures (1
à 12 heures) que le ventilateur
doit ventiler. Le ventilateur s’éteint
automatiquement une fois les
heures dénies écoulées. (Appuyez
plusieurs fois sur cette touche pour
régler le nombre d’heures. L’afchage indique le nombre d’heures
déni.)
Afchage LED allumé / éteint.
Les fonctions suivantes sont indiquées sur l’afchage à LED:
1. Ventilateur connecté à
l’alimentation
2. Fonction ION
3. Fonction de minuterie
réglée (on / off)
4. Voyant de température
ambiante allumé / Voyant
de minuterie éteint
5. Température ambiante ou
réglage de la minuterie
(1 à 12h)
6. Osciller (pivot)
7. vitesse de ventilation faible
8. Vitesse de ventilation
centrale
9. Vitesse de ventilation
élevée
Nettoyage et entretien
Eteignez le ventilateur et retirez la che de la prise murale lorsque vous
souhaitez le nettoyer ou en effectuer la maintenance.
Le ventilateur nécessite uniquement un entretien général externe. Époussetez-le régulièrement avec un chiffon doux ou un plumeau ou passez-le
avec une brosse douce pour aspirateur. S’il est très sale, nettoyez le ventilateur avec un chiffon légèrement humide. Séchez le tout soigneusement,
laissez le ventilateur bien sécher. Assurez-vous que de l’eau ne pénètre pas
ailleurs que dans le boîtier! Ne jamais rincer ou pulvériser le ventilateur!
Pour éviter tout dommage, dommage ou déformation du matériau, n’utilisez jamais d’agents abrasifs, agressifs ou corrosifs (de nettoyage).
Si vous souhaitez nettoyer le ventilateur à la n de la saison, faites-le dans
son emballage d’origine: il offre la meilleure protection. Rangez-le dans un
endroit sûr, sec et pas très chaud ou froid.
31

Problèmes et solutions
L’afchage indique la température ambiante mais les boutons de commande du ventilateur ne fonctionnent pas
- L’afchage indique la température ambiante mais le ventilateur est
toujours en mode veille.
- Appuyez d’abord sur le bouton marche / arrêt pour allumer le venti
lateur
La télécommande ne fonctionne pas
- Pas de pile ou pile vide, remplacez la pile
- L’afchage indique la température ambiante mais le ventilateur est
toujours en mode veille. Appuyez d’abord sur le bouton marche /
arrêt pour allumer le ventilateur
- La télécommande ne vise pas le capteur de réception du venti
lateur. Pointez la télécommande (avec la lumière sur le côté de la
télécommande) vers le capteur récepteur, à côté de l’écran où la
température ambiante est afchée.
Le ventilateur vibre
- Déséquilibre dans les pales du ventilateur. Nettoyer soigneusement
les pales du ventilateur avec un aspirateur
Le ventilateur donne une capacité insufsante
- Les orices d’entrée et / ou de sortie d’air sont contaminés. Net
toyer les ouvertures d’entrée et de sortie d’air
L’afchage du ventilateur ne fonctionne pas
- L’afchage est éteint. Allumez l’afchage avec le bouton
“Eteindre l’écran”.
Avertissement: Les réparations doivent être effectuées par des techniciens
qualiés. Demandez toujours des pièces d’origine pour les réparations.
Les modications apportées à l’appareil et les réparations incorrectes an-
nulent la garantie et la responsabilité du fournisseur, de l’importateur et du
fabricant.
32

Élimination
Au sein de l’UE, ce symbole indique que ce produit
ne peut être éliminé avec les déchets ménagers habituels. D’anciens appareils contiennent des matériaux
précieux recyclables, qui doivent être reconditionnés
pour ne pas nuire à l’environnement et à la santé
humaine par une collecte incontrôlée des déchets.
Par conséquent, nous vous prions de déposer vos
anciens appareils dans un point de collecte destiné à
cet effet ou de vous adresser au fournisseur où vous
avez acheté l’appareil. Ce dernier veillera à ce qu’un
maximum de pièces de l’appareil soient réutilisées.
33
 Loading...