


1

FUAVE SV3010
Gebruiksaanwijzing
Instruction manual
Manuel d’instructions
Statiefventilator / Table Fan / Ventilateur de table

INHOUD
Veiligheid 01.
Onderdelenbeschrijving 02.
Voor het eerste gebruik 03.
Montage 03.
Gebruik 04.
Reiniging en onderhoud 05.
Milieu 05.

VEILIGHEID
• Dit apparaat mag niet worden gebruikt door kinderen jonger dan 8
jaar. Dit apparaat kan worden gebruikt door kinderen vanaf 8 jaar en
door personen met verminderde lichamelijke, zintuiglijke of geestelijke
vermogens of gebrek aan de benodigde ervaring en kennis indien ze
onder toezicht staan of instructies krijgen over hoe het apparaat op een
veilige manier kan worden gebruikt alsook de gevaren begrijpen die
met het gebruik samenhangen. Kinderen mogen niet met het apparaat
spelen. Houd het apparaat en het netsnoer buiten bereik van kinderen
jonger dan 8 jaar. Laat reiniging en onderhoud niet door kinderen
uitvoeren, tenzij ze ouder zijn dan 8 jaar en onder toezicht staan.
• De fabrikant is niet aansprakelijk voor schade voortvloeiend uit het niet
opvolgen van de veiligheidsinstructies.
• Als het netsnoer beschadigd is, moet het worden vervangen door de
fabrikant, de onderhoudsmonteur van de fabrikant of door personen
met een soortgelijke kwalicatie om gevaar te voorkomen.
• Verplaats het apparaat nooit door aan het snoer te trekken. Zorg ervoor
dat het snoer nergens in verstrikt kan raken.
• Het apparaat moet op een stabiele, vlakke ondergrond worden
geplaatst.
• De gebruiker mag het apparaat niet onbeheerd achterlaten wanneer de
stekker zich in het stopcontact bevindt.
• Dit apparaat is uitsluitend voor huishoudelijk gebruik en voor het doel
waar het voor bestemd is.
• Dompel het snoer, de stekker of het apparaat niet onder in water of
andere vloeistoffen om elektrische schokken te voorkomen.
1
ONDERDELENBESCHRIJVING
1. Voorbehuizing
2. Vergrendelingsknop voor
ventilatorblad
3. Ventilatorbladen
4. Vergrendelingsmoer voor
achterbehuizing
5. Achterbehuizing
6. Oscillatieknop
7. Klemmen
8. Bedieningsknoppen
9. Knop voor hoogteaanpassing
10. Basis
11. Knop voor hoogteaanpassing
12. Standaardvoet
13. Afstandsbediening
2

VOOR HET EERSTE GEBRUIK
• Haal het apparaat en de accessoires uit de doos. Verwijder de stickers,
de beschermfolie en het plastic van het apparaat.
• Plaats het apparaat op een vlakke, stabiele ondergrond. Zorg voor
minimaal 10 cm vrije ruimte rondom het apparaat. Dit apparaat is niet
geschikt voor inbouw of gebruik buitenshuis.
• Sluit de voedingskabel aan op het stopcontact. (Opmerking: controleer
of het voltage op het apparaat overeenkomt met de plaatselijke
netspanning voordat u het apparaat aansluit. Voltage 220V-240V
50/60Hz)
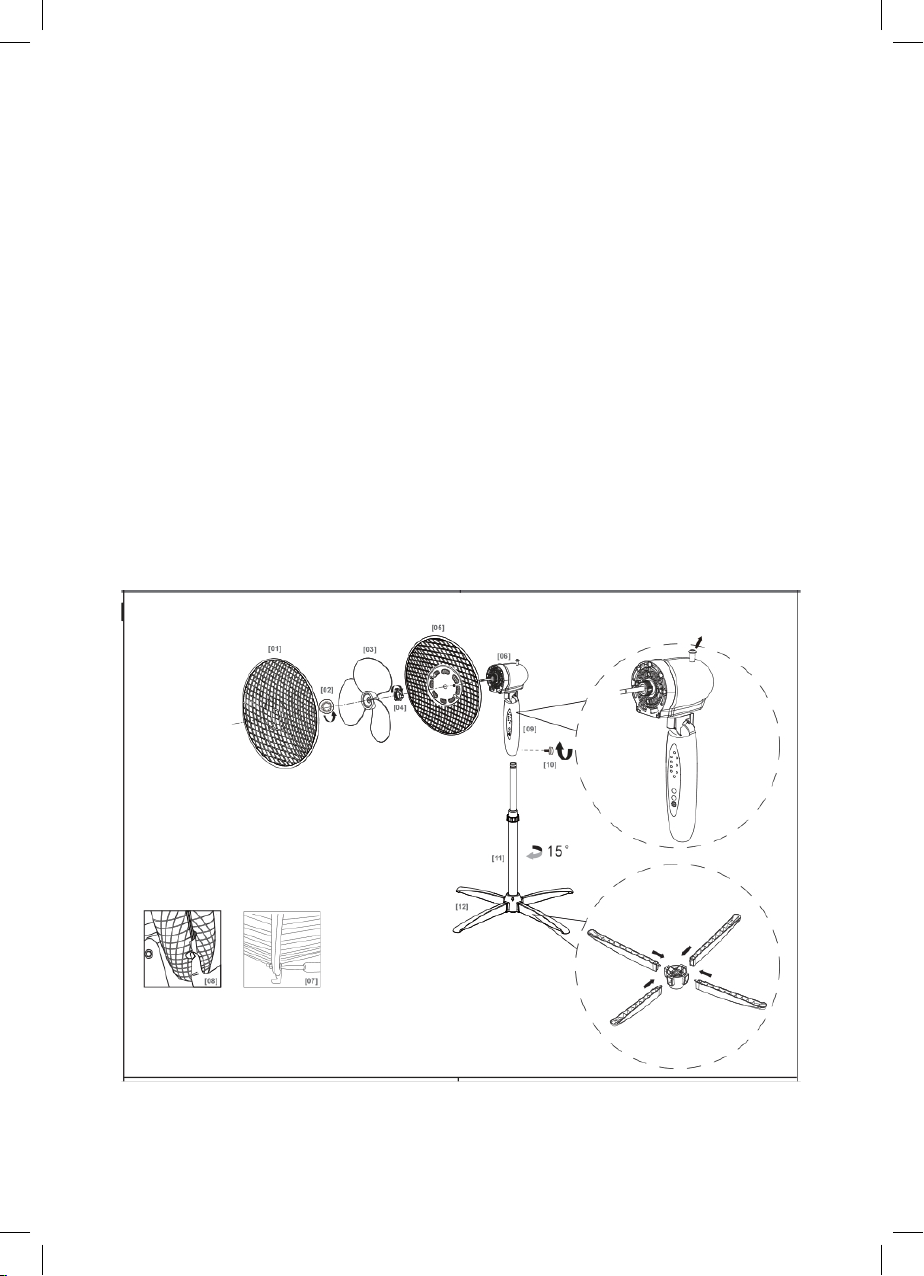
MONTAGE
• Plaats de voeten op het voetstuk en druk ze op hun plaats tot u een
klik hoort.
• Steek de buis van de basis in het voetstuk en draai om de buis vast
te zetten.
• Verwijder de ring voor hoogteaanpassing door deze los te schroeven en
omhoog te schuiven.
• Schuif de standaardafdekking omlaag op de basis en schroef de ring
voor hoogteaanpassing weer terug.
• Draai de ring voor hoogteaanpassing losser om de buis uit te schuiven.
• Draai de ring vervolgens weer vast.
• Draai de vastzetknop los en bevestig de uitschuifbare buis.
• Schroef de vergrendelingsring aan de achterkant van de motoras tegen
de klok in los.
• Plaats de achterbehuizing nauwkeurig op de 2 positiegaten. Zorg dat
deze gaten goed door de gaten van de achterbehuizing gaan.
• Houd de achterbehuizing vast en schroef de vergrendelingsring aan de
achterkant met de klok mee in de voorbehuizing van de motor.
3

• Installeer het ventilatorblad op de motoras en plaats de
vergrendelingskap van het ventilatorblad.
• Draai de schroef en moer ownderaan de achterbehuizing los.
• Open de klemmen van de voorbehuizing en plaats de voorbehuizing op
• de achterbehuizing. Zorg dat de onderkant met de schroef voor beide
delen is uitgelijnd.
• Draai de schroef en moer vast.
• Doe de behuizingsklemmen over zowel de voor- als achterbehuizing.
GEBRUIK
• Gebruik de snelheidsknoppen om de gewenste ventilatiestand te
kiezen.
• Druk op de oscillatieknop om de ventilatorkop te laten oscilleren.
• Druk op de oscillatieknop om de ventilatorkop te laten stoppen
met oscilleren.
• Druk op de uit-knop om de ventilator uit te schakelen.
De afstandsbediening gebruiken
• Schakel het apparaat in door op de aan/snelheidsregelknop te
drukken. Met iedere druk op de aan/snelheidsregelknop schakelt de
ventilatorsnelheid tussen laag, gemiddeld en hoog.
• Selecteer het type wind door op de modusknop op de
afstandsbediening te drukken. Met iedere druk op de modusknop
schakelt de ventilator tussen normale wind, natuurlijke wind en
slaapwind.
4

REINIGING EN ONDERHOUD
• Reinig het apparaat met een vochtige doek. Gebruik nooit agressieve
of schurende reinigingsmiddelen, schuursponzen of staalwol; dit
beschadigt het apparaat.
• Dompel het apparaat nooit onder in water of andere vloeistoffen. Het
apparaat is niet vaatwasserbestendig.
MILIEU
Dit apparaat mag aan het einde van de levensduur niet bij het normale huisafval worden
gedeponeerd, maar moet bij een speciaal
inzamelpunt voor hergebruik van elektrische en
elektronische apparaten worden aangeboden.
Het symbool op het apparaat, in de gebruiksaanwijzing en op de verpakking attendeert u
hierop. De in het apparaat gebruikte materialen
kunnen worden gerecycled. Met het recyclen
van gebruikte huishoudelijke apparaten levert
u een belangrijke bijdrage aan de bescherming
van ons milieu. Informeer bij uw lokale overheid
naar het inzamelpunt.
5

INDEX
Safety 07.
Parts description 08.
Before the rst use 09.
Assembly 09.
Use 10.
Cleaning and maintenance 11.
Environment 11.

SAFETY
• This appliance shall not be used by children aged less than 8 years.
This appliance can be used by children aged from 8 years and above
and persons with reduced physical, sensory or mental capabilities or
lack of experience and knowledge if they have been given supervision
or instruction concerning use of the appliance in a safe way and
understand the hazards involved. Children shall not play with the
appliance. Keep the appliance and its cord out of reach of children
aged less than 8 years. Cleaning and user maintenance shall not be
made by children unless older than 8 and supervised.
• By ignoring the safety instructions the manufacturer can not be hold
responsible for the damage.
• If the supply cord is damaged, it must be replaced by the manufacturer,
its service agent or similarly qualied persons in order to avoid a hazard.
• Never move the appliance by pulling the cord and make sure the cord
can not become entangled.
• The appliance must be placed on a stable, level surface.
• The user must not leave the device unattended while it is connected to
the supply.
• This appliance is only to be used for household purposes and only for
the purpose it is made for.
• To protect yourself against an electric shock, do not immerse the cord,
plug or appliance in the water or any other liquid.
7

PARTS DESCRIPTION
1. Front guard
2. Fan blade lock button
3. Fan blades
4. Locknut for the rear guard
5. Rear guard
6. Oscillation pen
7. Clip
8. Control buttons
9. Knob for height adjustment
10. Base
11. Stand feet
12. Remote control
8

BEFORE THE FIRST USE
• Take the appliance and accessories out the box. Remove the stickers,
protective foil and plastic from the device.
• Place the device on a at stable surface and ensure a minimum of
10 cm. free space around the device. This device is not suitable for
installation in a cabinet or for outside use.
• Put the power cable into the socket. (Note: Make sure the voltage which
is indicated on the device matches the local voltage before connecting
the device. Voltage 220V-240V 50/60Hz)
ASSEMBLY
• Place the feet on the pedestal and push / click them into place.
• Insert the base tube into the pedestal and turn to lock it into place.
• Remove height adjustment ring by unscrewing and sliding up.
• Slide stand cover down onto the base and screw the height adjustment
ring back in place.
• Loosen height adjustment ring to extend the extension rod and tighten
back into place.
• Loosen rear xing knob and attach extension rod.
• Unscrew the rear locking ring from the motor shaft in anti-clockwise
direction.
• Set the rear cage and t it well on the two position holes and make sure
these holes are properly put through the holes on the rear cage.
• Hold the rear cage and screw the rear locking ring into the motor front
cover in a clockwise direction.
• Install the fan blade onto motor shaft and t the fan blade lock cap.
• Loosen the screw and nut on the bottom of the rear cage.
9

• Open front cage clips and position onto rear cage ensuring the screw
bottom is aligned between both.
• Tighten screw and nut.
• Close the cage clips over both front and rear cage.
USE
• Use the speed control knobs to choose the desired ventilation level.
• To make the fan head oscillate, push down the Oscillation Knob.
• To stop the fan head from oscillating, pull-up the Oscillation Knob.
• Press the off button to turn off the fan.
USING REMOTE CONTROL
• Press the on/speed control button to turn on the appliance. With each
press on the on/speed control button you will be able to switch the fan
speed between low, medium, and high.
• Select the wind type setting be pressing the mode button on the
remote control. With each press on the mode button you will be able to
switch the fan between normal wind, nature wind and sleep wind.
• Press the timer button to activate the timer.
• When the fan is on, press the timer key to set the desired shut down
time 0.5-7.5 hours.
• Press the off button to turn off the fan.
10

CLEANING AND MAINTENANCE
• Clean the appliance with a damp cloth. Never use harsh and abrasive
cleaners, scouring pad or steel wool, which damages the device.
• Never immerse the electrical device in water or any other liquid. The
device is not dishwasher proof.
ENVIRONMENT
Dit apparaat mag aan het einde van de levensduur niet bij het normale huisafval worden
gedeponeerd, maar moet bij een speciaal
inzamelpunt voor hergebruik van elektrische en
elektronische apparaten worden aangeboden.
Het symbool op het apparaat, in de gebruiksaanwijzing en op de verpakking attendeert u
hierop. De in het apparaat gebruikte materialen
kunnen worden gerecycled. Met het recyclen
van gebruikte huishoudelijke apparaten levert
u een belangrijke bijdrage aan de bescherming
van ons milieu. Informeer bij uw lokale overheid
naar het inzamelpunt.
11

TABLE DES MATIÈRES
SÉCURITÉ 13.
DESCRIPTION DES PIÈCES 14.
AVANT LA PREMIÈRE UTILISATION 15.
MONTAGE 15.
UTILISATION 16.
NETTOYAGE ET ENTRETIEN 17.
ENVIRONNEMENT 17.

SÉCURITÉ
• Cet appareil ne doit pas être utilisé par des enfants de moins de 8 ans.
Cet appareil peut être utilisé par des enfants de 8 ans ou plus et des
personnes présentant un handicap physique, sensoriel ou mental voire
ne disposant pas des connaissances et de l’expérience nécessaires en
cas de surveillance ou d’instructions sur l’usage de cet appareil en toute
sécurité et de compréhension des risques impliqués. Les enfants ne
doivent pas jouer avec l’appareil. Maintenez l’appareil et son cordon
d’alimentation hors de portée des enfants de moins de 8 ans. Le
nettoyage et la maintenance utilisateur ne doivent pas être conés à
des enfants sauf s’ils ont 8 ans ou plus et sont sous surveillance.
• Si vous ignorez les instructions de sécurité, le fabricant ne saurait être
tenu responsable des dommages.
• Si le cordon d’alimentation est endommagé, il doit être remplacé par le
fabricant, son réparateur ou des personnes qualiées an d’éviter tout
risque.
• Ne déplacez jamais l’appareil en tirant sur le cordon et veillez à ce que
ce dernier ne soit pas entortillé.
• L’appareil doit être posé sur une surface stable et nivelée.
• Ne laissez jamais le dispositif sans surveillance s’il est connecté à
l’alimentation.
• Cet appareil est uniquement destiné à des utilisations domestiques et
seulement dans le but pour lequel il est fabriqué.
• An de vous éviter un choc électrique, n’immergez pas le cordon, la
prise ou l’appareil dans de l’eau ou autre liquide.
13

DESCRIPTION DES PIÈCES
1. Protection avant
2. Bouton de blocage de
l’hélice du ventilateur
3. Pales du ventilateur
4. Écrou de blocage de la
cage arrière
5. Protection arrière
6. Pendule d’oscillation
7. Clip
8. Boutons de commande
9. Bouton du réglage de la
hauteur
10. Base
11. Pieds du statif
12. Télécommande
14

AVANT LA PREMIÈRE UTILISATION
• Sortez l’appareil et les accessoires hors de la boîte. Retirez les
autocollants, le lm protecteur et le plastique de l’appareil.
• Mettez l’appareil sur une surface stable plate et assurez un dégagement
tout autour de l’appareil d’au moins 10 cm. Cet appareil ne convient
pas à une installation dans une armoire ou à un usage à l’extérieur.
• Mettez le câble d’alimentation dans la prise. (Remarque : Assurez-vous
que la tension indiquée sur l’appareil correspond à la tension locale
avant de brancher l’appareil. Voltage : 220 V-240 V 50-60 Hz)
MONTAGE
• Placez les pieds sur le socle et poussez/cliquez-les en place.
• Insérez le tube de base dans le socle et tournez-le pour le verrouiller
en place.
• Retirez l’anneau de réglage de la hauteur en le dévissant et en le faisant
glisser vers le haut.
• Faites glisser le couvercle vers le bas sur le socle et revissez l’anneau de
réglage de la hauteur en place.
• Desserrez l’anneau de réglage de la hauteur pour rallonger la tige
et serrez.
• Desserrez le bouton de xation à l’arrière et attachez la tige.
• Dévissez la bague de blocage arrière de l’arbre moteur dans le sens
antihoraire.
• Installez correctement la cage arrière les deux trous de position
et assurez-vous que ces trous sont en ligne avec les trous de la
cagearrière.
• Tenez la cage arrière et vissez la bague de blocage arrière dans le
couvercle avant du moteur dans le sens horaire.
• Installez l’hélice du ventilateur sur l’arbre moteur et mettez en place le
couvercle de blocage de l’hélice.
15

• Desserrez la vis et l’écrou sur le bas de la cage arrière.
• Ouvrez les clips de la cage avant et positionnez le tout sur la cage
arrière en veillant à ce que la vis de fond soit alignée entre les deux.
• Serrez la vis et l’écrou.
• Fermez les clips de la cage sur les deux clips de la cage avant et de la
cage arrière
UTILISATION
• À l’aide des boutons de contrôle de vitesse, réglez le niveau de
ventilation souhaité.
• Pour que la tête du ventilateur oscille, enfoncez le Bouton d’Oscillation.
• Pour que la tête du ventilateur cesse d’osciller, tirez le Bouton
d’Oscillation.
• Appuyez sur le bouton arrêt pour éteindre le ventilateur.
AVEC LA COMMANDE À DISTANCE
• Appuyez sur le bouton de marche /contrôle de vitesse pour mettre
l’appareil en marche. À chaque pression sur le bouton de marche /
contrôle de vitesse, vous pouvez enclencher la vitesse lente, moyenne
et rapide du ventilateur.
• Sélectionnez le réglage de type de vent avec le bouton mode de la
télécommande. À chaque pression sur le bouton mode, vous pouvez
enclencher le ventilateur sur un réglage de vent normal, naturel et au
repos.
• Appuyez sur le bouton de minuterie pour activer la minuterie.
• Quand le ventilateur est allumé, appuyez sur la touche minuterie pour
dénir l’heure d’arrêt entre 0,5 et 7,5 heures.
• Appuyez sur le bouton arrêt pour éteindre le ventilateur.
16

NETTOYAGE ET ENTRETIEN
• Nettoyez l’appareil avec un chiffon humide. N’utilisez pas de produits
nettoyants agressifs ou abrasifs, de tampons à récurer ou de laine de
verre, ceux-ci pourraient endommager l’appareil.
• N’immergez jamais l’appareil dans l’eau ni aucun autre liquide.
L’appareil ne peut pas être nettoyé en lave-vaisselle.
ENVIRONNEMENT
Cet appareil ne doit pas être jeté avec les
déchets ménagers à la n de sa durée de vie,
il doit être remis à un centre de recyclage pour
les appareils électriques et électroniques. Ce
symbole sur l’appareil, le manuel d’utilisation et l’emballage attire votre attention sur un
point important. Les matériaux utilisés dans cet
appareil sont recyclables. En recyclant vos ap-
pareils, vous contribuez de manière signicative
à la protection de notre environnement. Rens-
eignez-vous auprès des autorités locales pour
connaître les centres de collecte des déchets.
17
 Loading...