


1

FUAVE ACS09K01
Bedieningshandleiding
Manual
Manuel d’instructions
Mobiele Airconditioner/Luchtontvochtiger
Mobile Airconditioner/Dehumidier
Climatiseur/Deshumidicateur Mobile

INHOUD
Technische gegevens 01.
Veiligheidswaarschuwingen 02.
Algemene Veiligheidswaarschuwingen 02.
Elektrische veiligheid 04.
Veiligheid rond het koelmiddel R290 06.
Maximaal effect gebruik 07.
Beschrijving 08.
Installatie 09.
Werking 10.
Werking met afstandsbediening 12.
Waterafvoer 22.
Veiligheid 24.
Schoonmaak en onderhoud 24.
Probleemoplossing 26.
Recycling 27.
Dit apparaat gebruikt een brandbaar koelmiddel. Als het
koelmiddel lekt en blootgesteld wordt aan een externe
ontstekingsbron bestaat er brandgevaar!
Lees voor gebruik deze handleiding zorgvuldig en geheel
door. Installeer, gebruik of bewaar het apparaat niet in
een ruimte kleiner dan 9m²

TECHNISCHE GEGEVENS
Type Fuave ACS09K01
Batch AI0653
Cooling capacity 9000Btu/h
Heating capacity ----
Refrigerant R290/170g
Permissible excessive
operating pressure
Max allowable pressure 2.6MPa
Weight 25,3kg
Rated voltage 220-240V~
Rated Frequency 50Hz
Discharge 2.6MPa
Suction 1.0MPa
Standard
rating
contitions
Rated current Cooling 6.22A
Rated input Cooling 1280W
Resistance class IPX0
Dimension(mm) 703x355x345 mm
Sound pressure level (hi/low) 51,9dB(A)/ 46,9dB(A)
Sound power level 63dB(A)
Current Cooling 4.35A
Heating
Input Cooling 1000W
Heating ----
Heating ----
Heating ----
----
1

VEILIGHEIDSWAARSCHUWINGEN
Lees alle veiligheidsinstructies en andere instructies. Het niet naleven van
alle instructies kan letsel of materiele schade veroorzaken.
Algemene veiligheidswaarschuwingen
• Dit apparaat is uitsluitend geschikt voor huishoudelijk gebruik.
• Installeer het apparaat volgens de installatie-instructies. Onjuiste
installatie kan waterlekkage, elektrische schokken, brand of schade aan
eigendommen veroorzaken.
• Gebruik alleen de meegeleverde accessoires en speciaal gereedschap
voor de installatie.
• Zorg er te allen tijde (ook tijdens transport!) voor dat het apparaat
rechtop staat. Heeft het apparaat toch (deels) horizontaal gelegen,
wacht dan 2 uur voordat u het in gebruik neemt. Die tijd heeft de
compressor nodig om zijn werk correct te doen.
• Zorg ervoor dat het apparaat op een stevige, vlakke en horizontale
ondergrond staat.
• Zorg ervoor dat het apparaat tijdens de werking aan alle zijden minstens
50 cm vrije ruimte heeft.
2

• Zorg ervoor dat stekker en stopcontact te allen tijde goed zichtbaar en
bereikbaar zijn.
• Plaats geen voorwerpen op het apparaat.
• Laat een werkend apparaat niet zonder toezicht achter, ook niet even!
• Gebruik het apparaat niet in de nabijheid (minimaal 1 meter afstand)
van licht ontvlambare of explosiegevoelige stoffen of brandstoffen.
Gebruik ook geen verf, reinigingssprays, anti-insectensprays e.d. op of
bij het apparaat; dat kan het plastic deformeren of elektrische schade
aanbrengen.
• Raak het apparaat niet aan met natte of vochtige handen. Gebruik het
apparaat ook niet op blote voeten.
• Gebruik het apparaat niet:
- dichtbij een vuurbron;
- dichtbij opspattende olie;
- bij direct zonlicht;
- bij spetterend water;
- in een badkamer of bij een zwembad.
• Het apparaat heeft wielen om het gemakkelijk te kunnen verplaatsen.
Plaats het apparaat niet op hoogpolig tapijt of rol het niet over
voorwerpen om kantelen te voorkomen.
• Blokkeer de roosters voor de inkomende en uitgaande luchtstromen
niet: ook niet gedeeltelijk.
• Dek het apparaat dus ook niet af: dit kan brand veroorzaken!
• Steek geen vingers of voorwerpen als pennen enz. door de roosters het
apparaat in. Waarschuw vooral kinderen van deze gevaren.
• Zorg ervoor dat de ventilator niet blokkeert.
• Op kinderen, handelingsonbekwame personen en huisdieren dient
toezicht te worden gehouden.
• Dit apparaat is geen speelgoed, kinderen mogen dus niet met het
apparaat spelen.
3

• Dit apparaat kan door kinderen van 8 jaar en ouder en personen
met verminderde fysieke, zintuiglijke of geestelijke vaardigheden of
gebrek aan ervaring en kennis worden gebruikt wanneer er toezicht
op hen wordt gehouden of wanneer zij instructies hebben ontvangen
aangaande het op veilige wijze gebruiken van het apparaat en
begrijpen welke gevaren eraan verbonden zijn.
• Reiniging en gebruikersonderhoud mogen niet door kinderen zonder
toezicht worden uitgevoerd.
• Neem de stekker uit het stopcontact wanneer u vreemde geluiden
hoort, een vreemde geur ruikt, bij rook.
• Wordt het apparaat tijdens gebruik omgestoten, schakel dan het
apparaat uit en neem de stekker uit het stopcontact. Inspecteer het
apparaat nauwkeurig om er zeker van te zijn dat er geen schade is.
Neem contact op met uw leverancier of een erkend elektricien wanneer
u schade vermoed.
• Stel het apparaat niet in werking wanneer u beschadigingen
constateert aan apparaat, elektrokabel of stekker, of wanneer het
slecht functioneert, is gevallen of op andere wijze een storing vertoont.
Breng het complete apparaat terug naar uw leverancier of een erkend
elektricien voor controle en/of reparatie. Vraag altijd om originele
onderdelen.
• Het apparaat (incl. elektrokabel en stekker) mag uitsluitend worden
geopend en/of gerepareerd door daartoe bevoegde en gekwaliceerde
personen.
• Wanneer de waterafvoerpunten niet in gebruik zijn, houd de bovenste
en onderste rubberen afdichtingspluggen stevig op de plaats om
waterschade en verstikkingsgevaar te voorkomen.
Elektrische veiligheid
• Dit apparaat is alleen geschikt voor gebruik binnenshuis.
• Gebruik uitsluitend de stekker die van fabriekswege op het apparaat is
gemonteerd en geen andere aansluitingsvormen!
4

• Het apparaat dient volgens de landelijke bedradingsvoorschriften te
worden aangesloten.
• Controleer voor gebruik of het stopcontact dat u wilt gebruiken geaard
is, geen defecten vertoont en of de spanning op het stopcontact,
overeenkomt met die op het typeplaatje van het apparaat. Schade,
veroorzaakt door een foutieve spanning valt buiten de garantie!
• Als het apparaat niet wordt gebruikt, of als u het schoonmaakt, er
onderhoud aan uitvoert of het verplaatst, schakel het dan éérst uit
en neem vervolgens de stekker uit het stopcontact. Beweeg en/of
verplaats het apparaat altijd rustig!
• Ook wanneer u het apparaat in gebruik neemt geldt: éérst de stekker
in het stopcontact, dan de schakelaar op de AAN-stand en dan pas de
bedieningsknop gebruiken!
• Gebruik het apparaat niet in een vochtige of natte omgeving, als
badkamer en wasruimte, niet in de buurt van een bad, douche of
zwembad en spetter geen water, olie of wat voor vloeistof dan ook op
of in het apparaat.
• Rol de elektrokabel van het apparaat volledig af voor u de stekker in
het stopcontact steekt, en zorg ervoor dat de elektrokabel nergens met
de hete delen van het apparaat in contact komt of anderszins heet kan
worden. Leid de elektrokabel niet onder tapijt door, bedek het niet
met matten, lopertjes o.i.d. en houd de kabel buiten de looproute.
Zorg ervoor dat er niet op getrapt wordt en er geen meubels op
worden gezet. Leid de elektrokabel niet om scherpe hoeken en wind
het na gebruik niet te strak op! Voorkom dat de elektrokabel in contact
komt met olie, oplosmiddelen en scherpe voorwerpen. Controleer de
elektrokabel en stekker regelmatig op beschadigingen. Draai of knik de
elektrokabel niet en wind het niet om het apparaat; dat kan de isolatie
beschadigen!
• Vermijd zoveel mogelijk het gebruik van verlengsnoeren. Is dit
onvermijdelijk, gebruik dan een snoer met voldoende capaciteit
(minimaal 3 x 1,5 mm²) en houd het buiten de looproute!
• Sluit het apparaat alleen aan op een vast stopcontact. Gebruik geen
verdeeldoos/ tafelcontactdoos e.d.
5

• Verplaats het apparaat niet door aan de elektrokabel te trekken en
neem de stekker in de hand als u die uit het stopcontact wilt nemen.
• Trek niet aan, vervorm of wijzig de elektrokabel of dompel het onder
in water. Trekken of verkeerd gebruik van de elektrokabel leiden tot
schade aan het apparaat en een elektrische schok veroorzaken.
• Als de elektrokabel, stekker of het apparaat zelf beschadigd of stuk
is, dan wel storingen vertoont, gebruik hem dan niet of schakel hem
onmiddellijk uit en neem de stekker uit het stopcontact. Apparaat,
stekker en/of kabel dienen door een elektricien of een vergelijkbaar
gekwaliceerd persoon te worden gerepareerd/vervangen. Reparaties
door ondeskundigen doen de garantie vervallen en kunnen gevaarlijke
situaties veroorzaken!
Veiligheid rond het koelmiddel R290
• Dit apparaat bevat het koelmiddel R290. R290 is een koelmiddel
conform de Europese richtlijnen. Perforeer het koelcircuit nooit, R290 is
brandbaar (GWP 3)!
• Gebruik voor het ontdooiproces en reinigen geen andere middelen dan
aanbevolen door de fabrikant.
• Dit apparaat dient te worden gebruikt en opgeslagen in een ruimte,
waarin zich geen bronnen van ontsteking bevinden, zoals open vuur of
werkende gas- en elektrische apparaten.
• Perforeer geen van de onderdelen van het koelcircuit en steek het
apparaat niet in brand.
• Als het apparaat is geïnstalleerd, werkt of wordt opgeslagen in een nietgeventileerde ruimte dan dient u maatregelen te nemen ter voorkoming
van brand of explosie door weggelekt koelmiddel. Zorg dan dat er zich
geen enkele ontstekingsbron (als vuur, kachels, vonkende elektrisch
apparatuur, brandende sigaretten enz.) in dezelfde ruimte bevindt!
6

• Het apparaat moet zodanig worden opgeslagen dat mechanische
defecten worden voorkomen.
• Installeer, gebruik of bewaar het apparaat niet in een ruimte met een
vloeroppervlakte kleiner dan 9 m².
• R290 is geurloos, u zult lekkage dus niet ruiken!
• Personen die met een koelcircuit werken of daarop ingrijpen, dienen
in het bezit te zijn van de juiste certicering die afgegeven is door een
geaccrediteerde instantie en waarmee wordt verklaard dat de persoon
in kwestie competent is om koelmedia te hanteren in overeenstemming
met een speciale beoordeling die door de verenigingen van de sector
erkend is.
• De reparaties moeten uitgevoerd worden op grond van de
aanbevelingen van de fabrikant van het apparaat. Het onderhoud en
de reparaties die de assistentie van ander gekwaliceerd personeel
vereisen, moeten uitgevoerd worden onder toezicht van iemand die
gespecialiseerd is in het gebruik van ontvlambare koelmedia.
• Demontage en recycling van de airco moet worden uitgevoerd door
een gecerticeerde technicus.
Maximaal effect gebruik
• Overschrijd de aanbevolen maximaal te koelen ruimte niet.
• Plaats het apparaat niet in de buurt van een warmtebron en niet in
direct zonlicht.
• Sluit ramen en deuren en houd gordijnen of luiken gesloten tijdens de
zonnigste uren van de dag.
• Houd het luchtlter schoon.
• Temper temperatuur- en ventilatie-instellingen wanneer de ruimte de
gewenste condities heeft bereikt.
7

Beschrijving
1. Controle paneel
2. Signaallampje afstandsbediening
3. Horizontale jaloeziehendel (handmatig instellen)
4. Verticale jaloeziehendel (handmatig instellen)
5. Paneel
6. Wieltjes
7. Handvat (beide zijden)
8. Luchtlter
9. Bovenste luchtinlaat
10. Aansluiting waterafvoerslang ontvochtigen
11. Luchtuitlaat
12. Lagere luchtinlaat
13. Aansluiting waterafvoerslang koelen
8

Installatie
De Fuave ACS09K01 is een mobiele airco/luchtontvochtiger die van kamer
naar kamer verplaatst kan worden.
• Verwijder al het verpakkingsmateriaal, houd het buiten bereik van
kinderen en zorg er daarbij voor dat het apparaat steeds rechtop
blijft staan.
• Controleer voor gebruik of alle toebehoren aanwezig zijn en of apparaat
en toebehoren geen beschadigingen vertonen. Neem een beschadigd
apparaat niet in gebruik maar ga er mee terug naar uw leverancier!
• Plaats het apparaat op een stevige, vlakke, droge en horizontale
ondergrond in de buurt van een stopcontact en afvoermogelijkheid
voor de warme lucht, bijv. een venster dat een stukje kan worden
geopend. Zorg ervoor dat het apparaat aan alle zijden minstens 50
cm vrije ruimte heeft en houd rekening met alle aanwijzingen uit de
veiligheidsinstructies.
• Om te ontvochtigen sluit u nu een waterafvoerslang aan op de
aansluiting waterafvoerslang (10). Deze slang leidt u in een emmer
of putje. De slang mag niet omhoog lopen! Uw apparaat is nu
gebruiksklaar. Zie kopje waterafvoer.
• Om te koelen kunt u kiezen uit 3 mogelijkheden om de warme lucht
naar buiten te voeren.
• Opmerking: U kunt de afvoerslang ook zonder raamafdichting uit een
openstaand raam hangen; deze methode is evenwel minder effectief.
• Voorkom knikken of bochten in de afvoerslang. Dit veroorzaakt
opeenhoping van uitgestoten vochtige lucht, wat lekkage,
oververhitting of uitschakeling van de airco tot gevolg kan hebben.
• Waarschuwing! Gebruik uw airco niet voordat hij volgens de hierboven
beschreven instructies is geïnstalleerd!
• Waarschuwing! Zorg ervoor dat er geen water het apparaat kan
binnendringen!
9

• Waarschuwing! De lengte van de afvoerpijp is speciaal aangepast aan
de techniek van deze airco. Vervang hem dus niet door-, en verleng
hem niet met een eigen slang, want dat kan het functioneren van de
airco negatief beïnvloeden. De slang kan worden uitgerekt, maar om
een optimaal effect te bereiken dient u de lengte zo kort mogelijk te
houden.
• Denk wel aan uw inbraakpreventie! Het raam staat immers open bij
gebruik van de mobiele airconditioner.
Werking
• Controleer, vóór u uw airco in gebruik neemt:
• Of hij volgens de voorschriften en de veiligheidsinstructies is
geïnstalleerd.
• Of hij geen beschadigingen of gebreken vertoont.
• Of het stopcontact dat u wilt gebruiken de spanning afgeeft die op het
typeplaatje van het apparaat staat (220-240V / 50Hz).
• Of er geen andere apparatuur op hetzelfde stopcontact is aangesloten.
Wanneer bovenstaande allemaal in orde is kunt u de stekker in
het stopcontact steken. U kunt uw airco in werking stellen via het
controlepaneel en de afstandsbediening.
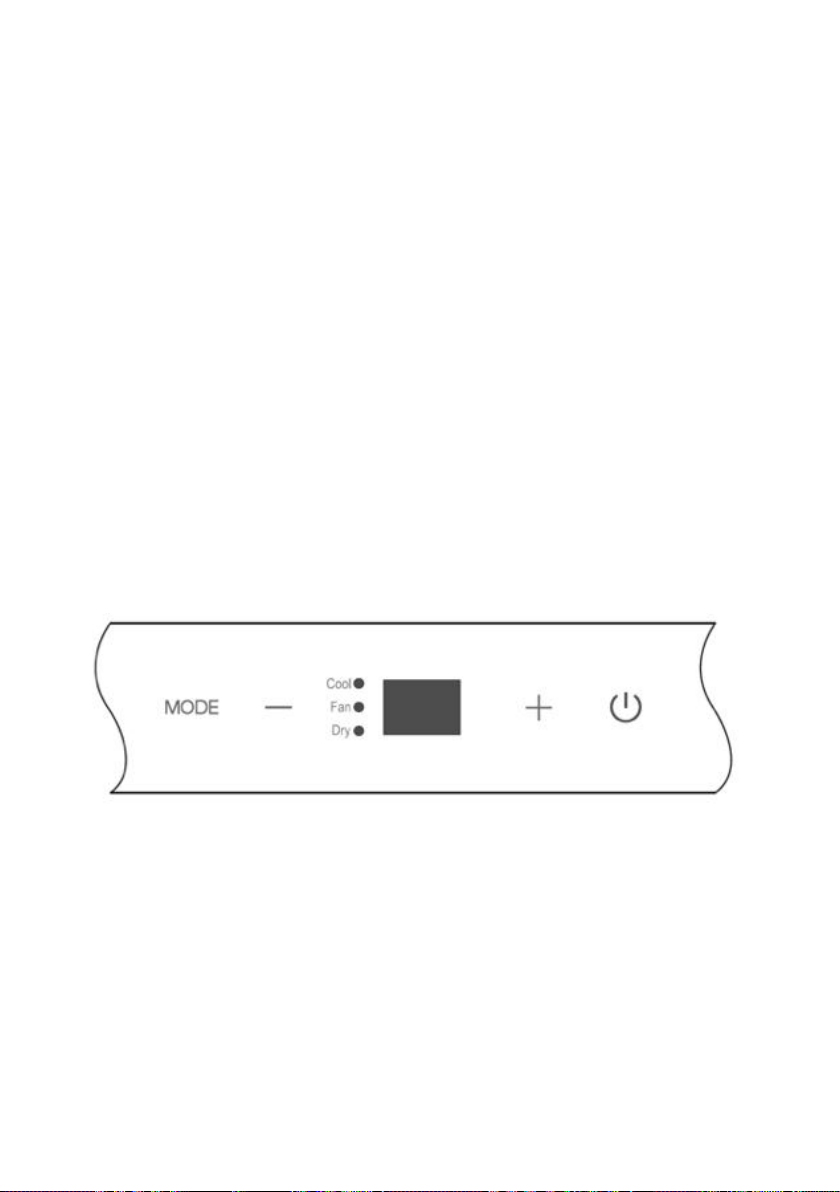
Werking via het controlepaneel:
10

Aan / Uit knop. Hiermee schakelt u de airco aan of uit.
Hiermee kiest u voor een bepaalde functie: koelen,
ventileren of drogen. Elke keer wanneer u de knop indrukt
wisselt de functie; het lampje op het controlepaneel toont
welke functie actief is. De ventilator wordt automatisch
ingesteld.
Hiermee kunt u de gewenste kamertemperatuur in stellen
in stappen van 1°C (17°C tot 30°C). Het besturingssysteem
kan zowel de temperatuur in °C als °F aangeven.
Wanneer de temperatuur in °F wordt aangegeven, druk dan
beide knoppen + en – voor 3 seconden gelijktijdig in om
de temperatuur weer in °C weer te geven.
LED display geeft de ingestelde temperatuur van
de koelfunctie weer. Bij de functies drogen en ventileren
wordt de kamertemperatuur weergegeven. Ook geeft het
LED display de volgende fout- en veiligheidscodes weer.
Foutcodes:
E0 EEPROM fout
E1 Kamer temperatuursensor fout
E2 Verdamper temperatuursensor fout
E3 Condensator temperatuursensor fout
E4 Beeldschermcommunicatie fout
EC Koudemiddel lekkage detectie storing
Veiligheidscodes:
P1 Waterreservoir is vol: Sluit de
afvoerslang aan op de onderste waterafvoerpunt en
laat het verzamelde water, weglopen, zie ook kopje
waterafvoer. Wanneer deze veiligheidscode zich
herhaalt neem contact op met uw leverancier.
11

Opmerking: wanneer een van de bovenstaande
storingen optreedt, schakel de airco uit en
controleer eventuele obstakels. Start de airco
opnieuw als de storing nog steeds aanwezig is,
schakel de airco uit en neem de stekker uit het
stopcontact. Neem contact op met uw
leverancier.
Koelen: Druk op de Mode toets tot het “Cool”
functielampje brandt, druk op de + en – toetsen om
de gewenste kamertemperatuur (17°C – 30°C) in
te stellen. Met de FAN SPEED knop op de
afstandsbediening kan de ventilatorsnelheid HIGH
(hoog) of LOW (laag) ingesteld worden.
Ventileren: Druk op de Mode toets tot het “Fan”
functielampje brandt. Met de FAN SPEED knop op de
afstandsbediening kan de ventilatorsnelheid HIGH
(hoog) of LOW (laag) ingesteld worden. De
temperatuur kan niet worden ingesteld.
Ontvochtigen: Druk op de Mode toets tot het “Dry”
functielampje brandt. De ventilatorsnelheid en
temperatuur kan niet worden ingesteld. De ventilator
start automatisch op LOW (laag) snelheid. Zie kopje
Waterafvoer.
Werking met de afstandsbediening
• Specicatie
Type afstandsbediening RG51B30/CE
Soort batterij 2x AAA 1.5 V
Transmissie afstand 8 meter
12

• Algemeen
- Gebruik de afstandsbediening binnen 8 meter verwijderd van
de airco. Richt op de ontvanger. Ontvangst wordt bevestigd door
een pieptoon.
- Zorg ervoor dat er geen obstakels, zoals gordijnen, deuren of
dergelijke zich tussen de airco en de afstandsbediening bevinden.
- Plaats 2 stuks AAA batterijen in de afstandsbediening.
- Gebruik geen oude en nieuwe batterijen door elkaar.
- Verwijder de batterijen uit de afstandsbediening wanneer de airco
langere tijd niet wordt gebruikt.
- Let op: Wanneer de batterijen worden verwijderd, wist de
afstandsbediening alle programmering. Bij het plaatsen van nieuwe
batterijen moet de afstandsbediening opnieuw geprogrammeerd
worden.
- Houd de afstandsbediening uit de buurt van vloeistoffen.
- Bescherm de afstandsbediening tegen hoge temperaturen en
blootstelling aan straling.
- Houd de afstandsbediening uit direct zonlicht.
- Houd de afstandsbediening uit de buurt van andere elektrische
apparaten.
13

1. Temperatuur lager toets
2. Temperatuur hoger toets
3. Mode (Functie) toets
4. Swing toets (niet beschikbaar)
5. Reset knopje
6. Aan/Uit toets
7. Ventilatorsnelheid toets
8. Timer On toets
9. Sleep button
10. Timer Off toets
11. Lock knopje
12. LED display toets
14

LED display afstandsbediening
A. Mode weergave
B. Afstandsbediening is ingeschakeld weergave
C. Temperatuur / Timer weergave
D. Aan / uit weergave
E. Ventilator weergave
F. Ventilatorsnelheid weergave
G. Timer weergave
H. Lock (slot) weergave
• Gebruik toetsen
Auto werking
1. Druk op de MODE toets om auto te selecteren.
2. Druk op TEMP of om de gewenste temperatuur in te stellen.
3. Druk op de ON/OFF toets om te starten.
Opmerking:
* In de Auto modus kan de airco logisch kiezen tussen koelen,
ventileren en
15

Auto werking
1. Druk op de MODE toets om
auto te selecteren.
2. Druk op TEMP of om de
gewenste temperatuur in te
stellen.
3. Druk op de ON/OFF toets om
te starten.
Opmerking:
* In de Auto modus kan de airco
logisch kiezen tussen koelen,
ventileren en
ontvochtigen door het verschil
tussen de werkelijke
omgevingstemperatuur en de
ingestelde temperatuur op de
afstandsbediening te
detecteren.
* In de Auto modus kan geen
ventilatiesnelheid worden
gekozen, dit gebeurt
automatisch.
* Wanneer de Auto modus niet
comfortabel is, kies dan
handmatig voor COOL,
DRY or FAN.
16
Koelen en ventileren werking
1. Druk op de MODE toets om
voor de COOL of FAN functie te
kiezen.
2. Druk op TEMP of om de
gewenste temperatuur
in te stellen.
3. Druk op de FAN SPEED om de
ventilatiesnelheid AUTO-HIGH-
LOW te kiezen.
4. Druk op de ON/OFF toets om
te starten.
Opmerking:
In de ventilatie functie de ingestelde
temperatuur is niet zichtbaar op het
display van de afstandsbediening,
ook kan de temperatuur niet geregeld
worden. Alleen stap 1, 3 en 4 kunnen
worden uitgevoerd.
17

Ontvochtig werking
1. Druk op de MODE toets om de
DRY functie te kiezen.
2. Druk op TEMP of om de
gewenste temperatuur
in te stellen.
3. Druk op de ON/OFF toets om
te starten.
Opmerking:
In de ontvochtigingsfunctie kan geen
ventilatiesnelheid worden gekozen, dit
gebeurt automatisch.
Timer werking
Druk op de TIMER ON knop om de
automatische inschakeltijd en TIMER
OFF knop om de automatische
uitschakeltijd in te stellen.
1. Tijd voor automatisch
inschakelen instellen
a. Druk op de knop TIMER ON.
De afstandsbediening
toont TIMER ON, het signaal ‘h’
wordt weergegeven op
het LCD-display.
Nu is het klaar om de Auto-in
tijd te resetten om de operatie
te starten.
b. Druk nogmaals op de TIMER
ON-knop om de gewenste
Auto-on-tijd in te stellen.
18

Telkens wanneer u op de knop drukt, neemt de tijd toe
in stappen van 30 minuten, tot 10 uur en daarna in stappen van
1 uur tot 24 uur.
c. Nadat de TIMER AAN is gezet, duurt het een halve
seconde voordat de afstandsbediening het signaal naar de
airconditioner verzendt. Na ongeveer nog eens 2 seconden
verdwijnt het signaal ‘h’ en verschijnt de ingestelde temperatuur
opnieuw op het LCD-scherm. Het timerfunctie controlelampje op
de airco gaat branden.
2. Tijd voor automatisch uitschakelen instellen
a. Druk op de knop TIMER OFF. De afstandsbediening toont TIMER
OFF, het signaal ‘h’ wordt weergegeven op het LCD-display. Nu is
het klaar om de Auto-uit tijd te resetten om de operatie te starten.
b. Druk nogmaals op de TIMER OFF-knop om de gewenste Auto-uit tijd in te stellen. Telkens wanneer u op de knop drukt, neemt de tijd
toe in stappen van 30 minuten, tot 10 uur en daarna in stappen van
1 uur tot 24 uur
c. Nadat de TIMER UIT is gezet, duurt het een halve seconde voordat
de afstandsbediening het signaal naar de airconditioner verzendt.
Na ongeveer nog eens 2 seconden verdwijnt het signaal ‘h’ en
verschijnt de ingestelde temperatuur opnieuw op het LCD-scherm.
Het timerfunctie controlelampje op de airco gaat branden.
Belangrijk: tijdsinstelling bij Timer: 0.5, 1, 1.5, 2, 2.5, 3, 3.5, 4, 4.5, 5, 5.5, 6,
6.5, 7, 7.5, 8, 8.5, 9, 9.5, 10, 11, 12, 13, 14, 15, 16, 17, 18, 19, 20, 21, 22, 23
en 24.
19

Voorbeelden:
De airco moet over 6 uur beginnen met
werken.
TIMER ON
1. Druk op de TIMER ON-knop, het
signaal ‘h’ verschijnt op het display.
2. Druk op de TIMER ON-knop om
‘6.0h’ weer te geven op het display
3. Wacht ongeveer 3 seconden en het
digitale display toont de temperatuur
opnieuw. Nu is deze functie
geactiveerd.
De airco moet over 10 uur stoppen met
werken
TIMER OFF
1. Druk op de TIMER OFF-knop, het
signaal ‘h’ verschijnt op het display.
6.0h
TIMER ON
10h
2. Druk op de TIMER OFF-knop om
‘10h’ weer te geven op het display.
3. Wacht ongeveer 3 seconden en het
digitale display toont de temperatuur
opnieuw. Nu is deze functie
geactiveerd.
20
TIMER OFF

De airco 2 uur na het instellen stoppen en
10 uur na het instellen opnieuw starten
TIMER OFF-TIMER ON (aan-uit-starten)
1. Druk op de TIMER OFF knop.
2. Druk nogmaals op de TIMER OFF knop
om 2.0h weer te geven op het display.
10h
3. Druk op de TIMER ON knop.
4. Druk nogmaals op de TIMER ON knop
om 10h we er te geven op het display.
5. Wacht ongeveer 3 seconden en het
digitale display toont de temperatuur
opnieuw. Nu is deze functie geactiveerd.
De airco 2 uur na het instellen starten en 5
uur na het instellen stoppen
TIMER ON-TIMER OFF (uit-startenstoppen)
1. Druk op de TIMER ON knop.
2. Druk nogmaals op de TIMER ON knop
om 2.0h weer te geven op het display.
3. Druk op de TIMER OFF knop.
4. Druk nogmaals op de TIMER OFF knop
om 5.0h weer te geven op het display.
5. Wacht ongeveer 3 seconden en het
digitale display toont de temperatuur
opnieuw. Nu is deze functie geactiveerd.
TIMER ON OFF
5.0h
TIMER ON OFF
21

Sleep (Economy) werking
De SLEEP-functie wordt gebruikt om het
energiegebruik te beperken wanneer u
slaapt: dan hebt u immers niet dezelfde
temperaturen nodig om u comfortabel
te voelen). De SLEEP-functie kan alleen
met de afstandsbediening worden
geactiveerd. Deze functie is alleen
te gebruiken in de COOL en AUTO
modus.
Druk op de SLEEP-knop wanneer u gaat
slapen. De ingestelde temperatuur zal
na 30 minuten 1°C erhogen. En na 30
minuten nog eens 1°C verhogen. Deze
nieuw-ingestelde temperatuur zal het
apparaat 7 uur vasthouden, waarna de
airco gaat werken zoals oorspronkelijk
geprogrammeerd.
LOCK knopje
Gebruik dit knopje wanneer u wilt voorkomen dat alle instellingen per
ongeluk veranderen. Een slot symbool verschijnt op het display wanneer
het knopje is ingedrukt. Nogmaals indrukken en de LOCK functie wordt
geannuleerd.
Overige functies
> Auto-herstart
Als de airco vanwege een stroomstoring onverwachts uitschakelt, dan
wordt de vorige functie instelling automatisch opnieuw gestart wanneer de
stroomstoring is opgelost.
> Aanpassing
De luchtstroom kan automatisch worden aangepast door de jaloezieën
handmatig in de gewenste positie zetten. Houdt de jaloezieën volledig
geopend tijdens gebruik. Plaats geen zware voorwerpen of iets anders op
de jaloezieën, dit veroorzaakt schade aan de airco.
22

> Power Management
Wanneer bij koelen de omgevingstemperatuur lager is de ingestelde
temperatuur zal na bepaalde tijd de airco automatisch in de
energiebesparende functie werken. De compressor slaat af en de ventilator
gaat op LOW (laag) werken. Wanneer de omgevingstemperatuur weer
hoger is dan de ingestelde temperatuur gaan de compressor en ventilator
weer normaal werken, de energiebesparende functie wordt dan weer
uitgeschakeld.
Opmerking: Wanneer u koelt of ontvochtigt, wacht dan altijd 3 minuten na
het in- of uitschakelen voordat u de airco opnieuw in- of uitschakelt. Deze
tijd heeft de compressor nodig om te herstellen.
Waterafvoer
1. Tijdens het ontvochtigen
Bij het ontvochtigen wordt meer water aan de lucht onttrokken. Verwijder
daarom de aftapplug en sluit tijdens het ontvochtigen een afvoerslang
op de waterafvoeraansluiting (10) aan en leid deze naar lager gelegen
waterafvoer.
Zorg ervoor dat de slang goed vastzit zodat het niet kan lekken. Richt de
slang op de afvoer en zorg ervoor dat er geen knikken in de slang komen
waardoor het water stopt met stromen. Als de slang niet meer wordt
gebruikt plaats dan de aftapplug en knop terug om lekken te voorkomen.
23

2. Tijdens het koelen
Bij deze werking wordt water onttrokken aan de lucht, dit verdampt
grotendeels weer, maar eventueel overtollig water hoopt zich op in het
onderste waterreservoir. Als het waterreservoir vol is, piept de airco 8 keer
en het display toont P1. De motor en compressor stoppen met werken,
behalve de ventilator, deze blijft werken.
Schakel de airco uit en neem de stekker uit het stopcontact.
Verplaats de airco naar een afvoerlocatie en ledig het waterreservoir
door de aftapplug te verwijderen en een slang aan te sluiten. Zorg ervoor
dat zodra het waterreservoir leeg is de aftapplug weer zorgvuldig wordt
bevestigd om lekken te voorkomen. Het symbool P1 verdwijnt. Mocht de
fout zich blijven herhalen neem contact op met uw leverancier.
24

Veiligheid
De Fuave mobiele airco is voorzien van een oververhittingsbeveiliging die
het apparaat uitschakelt wanneer het oververhit raakt. Wanneer dit optreedt
dient u de stekker uit het stopcontact te nemen en het apparaat minstens
30 minuten tijd te geven om af te koelen. Neem tevens de oorzaak van
de oververhitting weg: wordt het apparaat (deels) afgedekt? Staat het te
dicht op een muur of ander obstakel waardoor het onvoldoende lucht kan
aanzuigen of uitblazen?
Hierna kunt u het apparaat weer op de normale wijze in gebruik nemen,
maar houd de eerste 30 minuten goed in de gaten of er geen afwijkingen
optreden. Vertoont het apparaat afwijkingen, of treedt de oververhitting
weer in werking zonder dat er een aanwijsbare oorzaak is, neem dan contact
op met uw leverancier of een erkend elektricien voor controle / reparatie.
Schoonmaak en onderhoud
Let op! Voor u schoonmaak- of onderhoudswerkzaamheden aan de
airco uitvoert dient u het apparaat altijd uit te schakelen en de stekker uit
het stopcontact te nemen! Om de airco in goede conditie te houden is
regelmatig schoonmaken een vereiste!
Reiniging van de omkasting
Gebruik een zachte, vochtige doek om de kast af te wissen. Spuit hem nooit
af en zorg ervoor dat er geen water het apparaat binnendringt! Gebruik
nooit agressieve reinigingsmiddelen, benzine, wasmiddelen, chemisch
geïmpregneerde doekjes of andere reinigingsoplossingen. Die kunnen de
kast beschadigen. Droog het apparaat na met een zachte doek.
Reiniging van het luchtlter
Reinig het luchtlter elke twee weken; een airco met een vuil luchtlter
werkt niet goed. Het luchtlter zit aan de achterzijde van de airco en kan
eenvoudig verwijderd worden. Gebruik een stofzuiger of klop licht op het
luchtlter om loszittend stof en vuil te verwijderen. Spoel het luchtlter
daarna schoon in hooguit lauw water (niet warmer dan 40 °C.), eventueel
met een mild, neutraal reinigingsmiddel. Laat de luchtlter door en door
drogen in de schaduw alvorens ze terug te plaatsen. Pas op! De airco nooit
laten werken zonder luchtlter!
25

Einde-seizoen-reiniging
Wanneer het apparaat voor langere tijd wordt opgeslagen dient u de
volgende maatregelen te nemen!
• Verwijder het gecondenseerde water volledig. Laat het apparaat 12
uur draaien op de ventilatorfunctie, zodat de airco vanbinnen
kurkdroog is.
• Schakel de airco uit en neem de stekker uit het stopcontact.
• Maak het luchtluchtlter schoon en plaats het terug, of vervang het
luchtlter.
• Draai de afvoerslang van het apparaat, om beschadiging te
voorkomen.
• Verwijder de batterijen uit de afstandsbediening.
• Verpak de airco zo mogelijk in de originele verpakking of in een
plastic zak en zet hem op een droge plaats voor de opslag.
Zet geen zware voorwerpen op het apparaat.
26

Probleemoplossing
Het apparaat start niet als ik op de AAN/UIT-knop druk
• Zit de stekker in het stopcontact?
• Is de aardlekschakelaar ingeschakeld? Geen stroomstoring?
• Is de watertank wellicht vol (P1)? Leeg deze dan.
• De kamertemperatuur is lager dan de ingestelde temperatuur; pas
de ingestelde temperatuur aan.
Het apparaat lijkt weinig te koelen
• Meet de uitblaastemperatuur; die dient ± 10° koeler te zijn dan de
kamertemperatuur.
• Is er direct zonlicht? Sluit de gordijnen.
• Staan er ramen en/of deuren open? Sluit ze.
• Zijn er teveel mensen in de ruimte? Die produceren warmte!
• Is de ruimte te groot?
• Staat er iets in de ruimte dat (veel) warmte produceert? Schakel het
uit of verwijder het.
• Is het lter stofg, met vuil bedekt? Maak het schoon.
• Is de luchtinlaat of –uitlaat(slang) geblokkeerd? Zorg voor een vrije
luchtstroom.
Het apparaat produceert lawaai
• Is de ondergrond van de machine wel stevig, effen en horizontaal?
• Het stromende koelmiddel in het apparaat produceert ook enig
geluid. Dit is normaal.
Probeer nooit zelf de airco te repareren!
27

RECYCLING
Binnen de EU betekent dit symbool dat dit product niet met het normale huishoudelijke afval mag
worden afgevoerd. Afgedankte apparaten bevatten
waardevolle materialen die hergebruikt kunnen en
moeten worden, om het milieu en de gezondheid
niet te schaden door ongereguleerde afvalinzameling. Breng afgedankte apparatuur daarom naar een
daarvoor aangewezen inzamelpunt of wend u tot het
bedrijf waar u het apparaat gekocht hebt. Zij kunnen
er voor zorgen dat zoveel mogelijk onderdelen van
het apparaat hergebruikt worden.
28

29

INDEX
Technical Specications 31.
Safety Warnings 32.
General Safety Warnings 32.
Electical Safety 34.
Safety in relation to coolant R290 36.
Maximum effect 37.
Description 38.
Installation 39.
Operation 40.
Operation with remote control 42.
Water drainage 53.
Safety 55.
Cleaning and maintenance 55.
Troubleshooting 57.
Removal 58.
is appliance uses a flammable refrigerant. If the
refrigerant leaks or is exposed, it becomes an external
source of ignition and is can cause fire!
Before use, read this user manual completely and very
carefully. Do not install, use or store this appliance in a
space that is smaller than 9 m².

TECHNICAL SPECIFICATIONS
Type Fuave ACS09K01
Batch AI0653
Cooling capacity 9000Btu/h
Heating capacity ----
Refrigerant R290/170g
Permissible excessive
operating pressure
Max allowable pressure 2.6MPa
Weight 25,3kg
Rated voltage 220-240V~
Standard
rating
contitions
Current Cooling 4.35A
Heating
Input Cooling 1000W
Heating ----
Discharge 2.6MPa
Suction 1.0MPa
----
Rated current Cooling 6.22A
Heating ----
Rated input Cooling 1280W
Heating ----
Resistance class IPX0
Demension(mm) 703x355x345 mm
Sound pressure lever (hi/low) 51,9dB(A)/ 46,9dB(A)
Sound power lever 63dB(A)
31

SAFETY WARNINGS
Read all safety instructions and other instructions. Non-compliance with all
the instructions can result in injuries or material damage.
General safety warnings
• This appliance is suitable only for household use.
• Install the appliance according to the installation instructions. Incorrect
installation can cause water leakage, electric shocks, re or damage to
your possessions.
• Use only the accessories delivered with the appliance and the specic
tools for installation.
• Make sure that at all times (also during transport) the entire appliance
stands upright. If nevertheless, the entire appliance has been lying
horizontally (partly), wait 2 hours before you use it. This is the time span
needed by the compressor to do its job correctly.
• Make sure that the appliance stands on an even, horizontal and rm
surface.
• When operating the appliance, make sure that it has at least 50 cm of
free space on all sides.
32

• Make sure that the plug and socket are visible and accessible at all
times.
• Do not place any objects on the appliance.
• Do not leave an operating appliance unsupervised, also not for a few
seconds!
• Do not use the appliance near fuels, lightly ammable materials or
materials that could easily explode (keep a distance of minimum 1
metre). Furthermore, do not use paint, cleaning sprays, insect repellent
sprays, etc. on or near the appliance; this can warp the plastic or
damage the electric parts.
• Do not touch the appliance with wet or moist hands. Do not use the
appliance when standing barefoot.
• Do not use the appliance:
- near a source of re;
- near splattering oil;
- in direct sunlight;
- near splattering water;
- in a bathroom or near a swimming pool.
• The appliance has wheels for moving it easily. Do not place the
appliance on a high pile carpet and do not roll it over objects that might
cause it to topple over.
• Do not block the grids from incoming or outgoing airows: also not
partially.
• Do not cover the appliance: this can cause a re!
• Do not stick ngers or objects, such as pens, etc. through the grids.
Warn children in particular about this danger.
• Make sure that the fan is not blocked.
• Children, unauthorised persons and house pets must be supervised.
• This appliance is not a toy; therefore children must not play with it.
33

• The appliance can be operated by children over the age of 8 and
by people with physical, sensory or mental disabilities or who lack
knowledge and experience, only if they are supervised or are given
instructions on how to use it safely and if they understand the risks
involved.
• Unsupervised children may not carry out cleaning and maintenance
tasks.
• If you hear a strange sound, smell a strange odour or see smoke, take
the plug out of the socket.
• If the appliance topples over during use, switch it off and take the plug
out of the socket. Inspect the appliance meticulously to be certain that
there is no damage.
• If you suspect damage, contact your supplier or a certied electrician.
• Do not operate the appliance if you notice damage to the appliance,
electric cable, plug or cooling pipe or if it is functioning poorly, if it has
fallen over or malfunctions in any way. Return the entire appliance to
your supplier or a certied electrician for checking and/or repair. Always
demand original parts.
• The appliance (including the electricity cable and plug) may be opened
and/or repaired only by a person qualied to do so.
• When the water drainage points are not used, make sure that the top
and bottom rubber sealing plugs are plugged in rmly in their place to
prevent water damage and danger of suffocation.
Electrical safety
• This appliance is suitable only for indoor use.
• Use only a plug mounted on the appliance by the manufacturer and no
other means of connection!
• This appliance must be connected according to national wiring codes.
• Before use, check whether the socket that you want to use is earthed,
shows no faults and whether the voltage on the socket matches the
voltage shown on the type plate of the appliance. Damage caused by
faulty voltage is not covered by the warranty!
34

• If the appliance is not being used or if you are cleaning it or carrying
out maintenance or if you want to move it, rst switch it off and then
take out the plug from the socket. Always move and/or transport the
appliance gently!
• In addition, when you start using the appliance, the following applies:
First insert the plug into the socket, then switch the appliance to the ON
position and only thereafter use the operating button!
• Do not use the appliance in a damp or wet environment, such as
a bathroom or laundry area, not in the area of a bath, shower or
swimming pool and do not splash water, oil or any other liquid on the
appliance.
• Wind the appliance’s electric cable completely before you put the plug
into the socket and make sure that the electric cable never comes in
contact with any hot parts of the appliance or that it becomes hot in any
other way. Never route the electric cable under a carpet, do not cover
it with mats, runners, etc. and keep the cable away from walking paths.
Make sure that the electric cable is not stepped on and that no furniture
is placed on it. Do not route the electric cable along sharp corners and
after use, do not wind it too tightly!
• Prevent the electric cable from coming in contact with oil, solvent and
sharp objects. Check the electric cable and plug regularly for damage.
Do not twist or bend the electric cable around the appliance; this can
damage the insulation!
• Try as best as possible to avoid using extension cords. If this is
unavoidable, then use a cord with sufcient capacity (minimum 3x1.5
mm²) and don’t put it close to walking paths!
• Connect the appliance only to a xed socket. Do not use a junction box
/ power strip, etc.
• Do not move the appliance by pulling the electric cable and hold the
plug in your hand when you unplug it.
• Do not pull, warp or change the electric cable or submerge it under
water. Pulling or incorrect use of the electric cable will damage the
appliance and can result in an electric shock.
35

• Do not use the appliance or switch it off immediately and remove the
plug from the socket, if the electric cable, plug or the appliance itself
is damaged, broken or malfunctions. The appliance, plug and/or cable
must be repaired/replaced by an electrician or a similarly qualied
person. Repairs by unqualied individuals are not covered by the
warranty and could result in dangerous situations!
Safety and refrigerant R290
• This appliance contains R290 refrigerant. R290 is a refrigerant that
complies with European directives. Never puncture the cooling circuit;
R290 is ammable (GWP 3)!
• For the dehumidifying process, never us any refrigerant other than what
the manufacturer recommends.
• This appliance must be used and stored in a place that has no sources
of ignition, such as an open replace or gas and electric appliances that
are running.
• Do not puncture any of the components of the cooling circuit and do
not set the appliance on re.
• If the appliance is installed, operated or stored in a non-ventilated
room, then you must take measures for preventing re or explosion
caused by leaking refrigerant. Make sure that there are no sources of
ignition in the same area (such as re, stoves, electric appliances with
sparks, burning cigarettes, etc.).
• The appliance must be stored in a way that prevents mechanical faults.
• Do not install, use or store this appliance in a space that is smaller than
9 m².
• R290 is odourless so you will not smell a leak!
• Persons working or interfering with cooling circuits must be in the
possession of the appropriate certication, which is issued by a certied
body and in which it is stated that the person in question is competent
to handle cooling agents in compliance with a specic assessment
recognised by associations in the sector.
36

• The repairs must be carried out based on the recommendations of
the appliance’s manufacturer. Maintenance and repairs that require
the assistance of other qualied personnel must be carried out under
the supervision of someone who specialises in the use of inammable
cooling agents.
• Dismantling and recycling of air conditioners must be carried out by a
certied technician.
Using maximum effect
• Do not exceed the recommended maximum space for cooling.
• Do not place the appliance in the vicinity of a source of heat and do not
expose it to direct sunlight.
• Close windows and doors and also keep curtains and blinds closed
during the hottest hours of the day.
• Keep the air lter clean.
• Lower the temperature and ventilation settings when room has reached
the desired conditions.
37

Description
1. Control panel
2. Indication light for remote control
3. Horizontal shutters (manual setting)
4. Vertical shutters (manual setting)
5. Panel
6. Wheels
7. Handles (both sides)
8. Air lter
9. Top air inlet
10. Connection point for water drainage hose for dehumidifying
11. Air outlet
12. Lower air inlet
13. Connection point for water drain hose for cooling
38
Front side
Back side

Installation
The Fuave ACS09K01 is a portable air conditioner/humidier that can be
moved from room to room.
• Remove the packaging material, keep it out of children’s reach and
make sure that the appliance remains standing upright.
• Before use, check whether all the accessories are present and whether
the appliance and the accessories do not show any damage. Do not
start using a damaged appliance, but return it to your supplier!
• Place the appliance on a rm, even, dry and horizontal surface close to
a socket and drainage possibility for warm air, for example, by a window
that can be slightly opened. Make sure that the appliance has at least
50 cm free space on all sides and observe all the directions stated in the
safety instructions.
• To dehumidify, connect a water drain hose to the connection point for
the water drain hose (10). Lead this hose into a bucket or pit. The hose
must not be routed upwards! Your appliance can now be used (see
section on water drainage).
• To cool, you have to discharge the warm air to the outside.
• Avoid bends or curves in the drain hose. This causes a built-up of
exhausted humid air, which can result in leakage, overheating or
switching off the airco.
• Warning! Do not use your airco before you have followed all the
installation instructions described above!
• Warning! Make sure that no water enters the interior of the appliance!
• Warning! The length of the drain pipe has been adapted specically
to the technology of this airco. Do not replace or extend it using your
own hose. This could have an adverse effect on the functioning of your
airco. The hose can be extended, but the length should be as short as
possible for optimal effect.
• Do remember to prevent break-in! After all, the window is open
when using the portable air-conditioner.
39
Werking
Before using your airco, check:
• Whether it is installed according to the regulations and safety
instructions.
• Whether it shows no damage or faults.
• Whether the socket that you want to use has the same voltage as shown
on the type plate of the appliance (220-240V / 50Hz).
• Whether there is no other appliance connected to the same socket.
If the above is fully in order, then you can insert the plug into the socket.
You can operate the airco via the control panel or the remote control.
Operating via the remote control
40

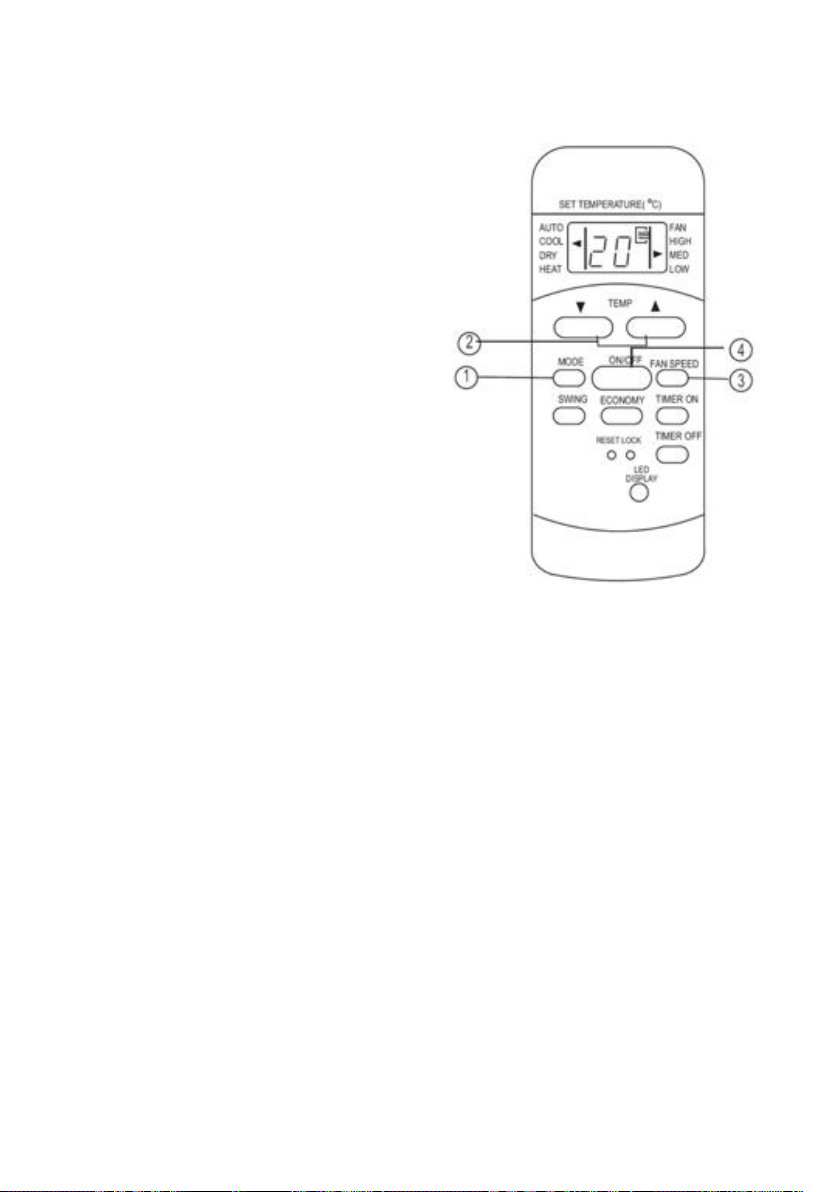
ON /OFF button. This switches the airco on or off.
With this you select a particular function: cooling,
fanning or dehumidifying. Every time you press the
button, you change the function; the light on the control
panel shows which function is active. The fan is set
automatically.
With this, you set the desired room temperature in steps
of 1°C (from 17°C to 30°C). The control system can show
temperatures in °C and in °F. If the temperature is shown is
°F, then press both + and – buttons at the same time for
3 seconds and the temperature will show °C again.
The LED display shows the set temperature of the
cooling function. The room temperature is shown at
the dehumidifying and fanning functions. The LED
display also shows the following error and safety codes.
Error codes:
E0 EEPROM error
E1 Room temperature sensor error
E2 Humidier temperature sensor error
E3 Condenser temperature sensor error
E4 Screen communication error
EC Refrigerant leakage detection fault
Safety codes:
P1 Water reservoir is full: Connect the drain hose to
the bottom water drainage point and let the
collected water run off (also see the section on
water drainage). If this safety code recurs, contact
your supplier.
41

Remark: When one of the aforementioned faults occurs,
switch off the airco and check for possible obstacles. Restart
the airco. If the fault persists, switch off the airco and take
the plug out of the socket. Contact your supplier.
Cooling: Press the Mode button until the function light ‘
Cool’ comes on, press the + and – buttons to set the
desired room temperature (17°C – 30°C). Using the FAN
SPEED button on the remote control, you can set the fan
speed to HIGH or to LOW.
Fanning: Press on the Mode button until the ‘Fan” function
light comes on. Using the FAN SPEED button on the
remote control, you can set the fan speed to HIGH or to
LOW. The temperature cannot be set.
Dehumidifying: Press on the Mode button until the
‘Dry” function light comes on. The fan speed and
temperature cannot be set. The fan starts
automatically on LOW speed (see the section on water
drainage).
Operating with the remote control
• Specications
Type of remote control RG51B30/CE
Type of battery 2x AAA 1.5 V
Transmission distance 8 metres
42

• General
- Use the remote control within a distance of 8 metres from the airco.
Direct it to the receiver. Reception will be conrmed by means of a
beep.
- Make sure that there are on obstacles, such as curtains, doors or
alike, are standing in the way of the remote control.
- Insert 2 AAA batteries into the remote control.
- Do not use old and new batteries at the same time.
- Remove the batteries from the remote control if the airco is not
used for a long period.
- Attention: When you remove the batteries, the remote control
deletes all the programming. When you insert new batteries, you
have to re-programme the remote control.
- Keep the remote control away from liquids.
- Protect the remote control against high temperatures and exposure
to radiation.
- Keep the remote control out of direct sunlight.
- Keep the remote control away from other electric appliances.
43

1. Lower temperatures button
2. Temperatuur hoger toets
3. Mode (Function) button
4. Swing button (not available)
5. Reset button
6. ON/OFF button
7. Fan speed button
8. Timer On button
9. Sleep button
10. Timer Off button
11. Lock button
12. LED display button
44

LED display remote control
A. Mode indication
B. Indicates remote control is switched on
C. Temperature / Timer indication
D. ON /OFF indication
E. Fan indication
F. Fan speed indication
G. Time indication
H. Lock indication
45

• Using the buttons
Auto operation
1. Press on the MODE button to
select auto.
2. Press on TEMP or to set the
desired temperature.
3. Press on the ON/OFF button to
start.
Remark:
* In the Auto mode, the airco can logically select between
cooling, fanning and dehumidifying by detecting the difference
between the actual room temperature and the temperature set in
the remote control.
* In Auto mode, you cannot select the fan speed; this occurs
automatically.
* When the Auto mode is not comfortable, then manually select
COOL, DRY or FAN.
46

Cool and Fan operations
1. Press on the MODE button to
select the COOL or FAN
function.
2. Press on TEMP or to set the
desired temperature.
3. Press on the FAN SPEED to
select the fan speed
AUTO-HIGH-LOW.
4. Press on the ON/OFF button to
start.
Remark:
In the FAN function, the set temperature
is not visible on the display of the
remote control. Also the temperature
cannot be regulated. Only steps 1, 3
and 4 can be executed.
47

Dehumidifying operation
1. Press on the MODE button to
select the DRY function.
2. Press on TEMP or to set the
desired temperature.
3. Press on the ON/OFF button to
start.
Remark:
In the DRY function, you cannot select
the fan speed; this occurs automatically.
Timer operation
Press the Timer ON button to set the
automatic switch ON time; press the
Timer OFF button to set the automatic
switch OFF time.
1. Setting the time for automatic
switch ON.
a. Press the TIMER ON button.
The remote control shows
TIMER ON, the signal ‘h’ is
shown on the LCD display. Now
it is ready for resetting the Auto on time to start the operation.
b. Press again on the TIMER ON
button to set the desired
Auto-on time. Every time you
press the button, the time
increases in steps of 30
minutes until 10 hours and
henceforth in steps of 1 hour to
24 hours.
48

c. After the TIMER ON is set, it takes half a second before the remote
control transmits the signal to the air conditioner. After
approximately 2 seconds, the ‘h’ signal disappears and the set
temperature appears again on the LCD display.
The timer function control light on the airco goes on.
2. Setting the time for automatic switch OFF.
a. Press the TIMER OFF button. The remote control shows TIMER OF,
the signal ‘h’ is shown on the LCD display. Now it is ready for
resetting the Auto-off time to start the operation.
b. Press again on the TIMER OFF button to set the desired Auto-off
time. Every time you press the button, the time increases in steps of
30 minutes until 10 hours and henceforth in steps of 1 hour to
24 hours.
c. After the TIMER OFF is set, it takes half a second before the remote
control transmits the signal to the air conditioner. After
approximately 2 seconds, the ‘h’ signal disappears and the set
temperature appears again on the LCD display. The timer function
control light on the airco goes on.
Important: setting the time in the Timer: 0.5, 1, 1.5, 2, 2.5, 3, 3.5, 4, 4.5, 5,
5.5, 6, 6.5, 7, 7.5, 8, 8.5, 9, 9.5, 10, 11, 12, 13, 14, 15, 16, 17, 18, 19, 20, 21,
22, 23 and 24.
49

Examples:
The airco must start operating in 6
hours.
TIMER ON
1. Press the TIMER ON button, the
signal ‘h’ appears on the display.
2. Press on the TIMER ON button to
show ‘6.0h’ on the display.
3. Wait approximately 3 seconds
and the digital display will show the
temperature again. The function is now
activated.
The airco must stop operating in 10
hours.
TIMER OFF
1. Press the TIMER OFF button, the
signal ‘h’ appears on the display.
6.0h
TIMER ON
10h
2. Press on the TIMER OFF button to
show ‘10h’ on the display.
3. Wait approximately 3 seconds
and the digital display will show the
temperature again. The function is now
activated.
50
TIMER OFF

Stopping the airco 2 hours after setting
and restarting it 10 hours after setting.
TIMER OFF-TIMER ON (on-off-start)
1. Press the TIMER OFF button.
2. Press on the TIMER OFF button again
to show ‘2.0h’ on the display.
10h
3. Press the TIMER ON button.
4. Press on the TIMER ON button again to
show ‘10h’ on the display.
5. Wait approximately 3 seconds and the
digital display will show the temperature
again. The function is now activated.
Starting the airco 2 hours after setting and
stopping it 5 hours after setting.
TIMER OFF-TIMER ON (on-off-stop)
1. Press the TIMER ON button.
2. Press on the TIMER ON button again to
show ‘2.0h’ on the display.
3. Press the TIMER OFF button.
4. Press on the TIMER OFF button again
to show ‘5.0h’ on the display.
5. Wait approximately 3 seconds and the
digital display will show the temperature
again. The function is now activated.
TIMER ON OFF
5.0h
TIMER ON OFF
51

Sleep (Economy) operation
The SLEEP function is used to reduce
energy consumption while you sleep.
After all, you don’t need the same
temperature to feel comfortable. The
SLEEP function can only be activated
by the remote control. This function can
only be used in the COOL and AUTO
modes.
Press on the SLEEP button when you
go to sleep. After 30 minutes, the set
temperature will decrease or increase by
1°C. And after another 30 minutes, it will
decrease or increase again by 1°C. The
appliance will maintain this newly set
temperature for 7 hours and afterwards
the airco will work according to the
original programmed setting.
LOCK button
Use this button when you want to avoid that all the settings will accidentally
change. A lock symbol will appear on the display when the button is
pressed. If you press again, the LOCK function will be disabled.
Other functions
> Auto-restart
If the airco switches off unexpectedly due to a power cut, then the previous
setting automatically starts after the power is restored.
> Adjusting the airow
The airow can be automatically adjusted by setting the shutters manually
to the desired position. Keep the shutters completely open during use.
Do not place any heavy objects or something else on the shutters, this will
damage the airco.
52

> Power Management
If during COOL, the room temperature is lower than the set temperature,
the airco will automatically operate in energy-saving function after an
interval. The compressor shuts down and the fan starts working on LOW.
When the room temperature rises again above the set temperature, then
the compressor and fan will start working normally and the energy-saving
function will switch off.
Remark: When you cool or dehumidify, always wait 3 minutes after
switching ON or OFF before you switch the airco ON or OFF again. The
compressor needs this time to recover.
Water drainage
1. During dehumidifying
continuous
drain hose
remove the
drain plug
During dehumidifying, additional water is extracted from the air. Therefore,
remove the drain plug, connect a drain hose to the water drain connection
(10) during the dehumidifying process and route this hose to a lower
positioned water drain.
Make sure that the hose is attached rmly and does not leak. Direct the
hose to the drain and make sure that it does not bend, which would stop
the ow of water. Once you nish using the hose, then put the drain plug
and knob back to prevent leakage.
53

2. During the COOL process
continous
drain hose
remove the
drain plug
During this process, water is extracted from the air. This largely evaporates,
but any excess water accumulates at the bottom water reservoir. When the
water reservoir is full, the airco will beep 8 times and the display will show
P1. The motor and the compressor will stop working, but not the fan.
Switch off the airco and remove the plug from the socket.
Move the airco to a drain location and empty the water reservoir by
removing the drain plug and connecting a hose. Make sure that as soon
as the water reservoir is empty, the drain plug is securely re-inserted to
prevent leakage. The symbol P1 disappears. If the error recurs, contact your
supplier.
54
bottom
drain plug

Safety
The Fuave portable airco is equipped with overheating protection, which
switches off the airco when it overheats. When this happens, you must
remove the plug from the socket and let the appliance cool down for at
least 30 minutes. Eliminate the cause of the overheating: Was the appliance
covered or partly covered? Does it stand too close to a wall or another
obstacle, resulting in insufcient air sucked in or blown out?
Afterwards, you can use your appliance again in the usual manner, but
rst keep on eye on it for the rst 30 minutes to see whether no problems
recur. If the appliance shows deviations or it overheats again without any
explainable reasons, then contact your supplier or a certied electrician for
checking and/or repairing.
Cleaning and maintenance
Attention! Before you clean the airco or carry out any maintenance tasks,
you must always switch off the airco and remove the plug from the socket!
To keep the airco in good condition, regular cleaning is a must!
Cleaning the housing case
Use a soft, moist cloth to wipe the case. Never spray it and make sure that
no water penetrates the interior of the appliance! Never use aggressive
cleaning agents, benzene, detergents, cloths impregnated with chemicals
or other cleaning solutions. This could damage the case. Dry the appliance
afterwards with a soft cloth.
Cleaning the air lter
Clean the air lter every two weeks; an airco with a dirty air lter does not
operate well. The air lter is located at the rear of the airco and can easily
be removed. Use a vacuum cleaner or tap lightly on the air lter to remove
loose dust and dirt. Afterwards, rinse clean the air lter in lukewarm water
(not higher than 40 °C.) and perhaps use a mild and neutral cleaning agent.
Let the air lter dry completely in the shade before remounting it. Watch
out! Never operate the airco without the air lter!
55

air lter
remove the air lter
End-of-season cleaning
If the appliance is stored for a long period, you must take the following
measures!
• Completely remove the condense water. Let the airco fan run for 12
hours so that the airco is totally dry on the inside.
• Switch off the airco and remove the plug from the socket.
• Clean the air lter and return it to its place or replace the air lter.
• Rotate the drain hose of the appliance to prevent damage.
• Remove the batteries from the remote control.
• If possible, pack the airco in its original packaging or in a plastic
bag and store it in a dry spot. Do not place any heavy objects on
the appliance.
56

Troubleshooting
The appliance does not start when I press the ON/OFF button
• Is the plug inserted into the socket?
• Is the residual-current circuit breaker switched on? No power cut?
• Is the water reservoir full (P1)? Then empty it out.
• The room temperature is lower than the set temperature; adjust the
set temperature
The appliance does not seem to cool well
• Measure the temperature of the air blown out. This should be
around 10° cooler than the room temperature.
• Is there direct sunlight? Close the curtains.
• Are there windows or doors open? Close these.
• Are there too many people in the room? They produce heat!
• Is the room too big?
• Is there something in the room that produces heat (or too much
heat)? Switch it off or remove it.
• Is the lter dusty or covered with dirt? Clean the lter.
• Is the air inlet or outlet (the hose) blocked? Make sure the airow is
unobstructed.
The appliance makes noise
• Is the surface on which the appliance rests rm, even and
horizontal?
• The refrigerant owing into the appliance also makes some noise.
This is normal.
Never attempt to repair the airco yourself!
57

REMOVAL
Within the EU, this symbol means that this product
cannot be disposed of together with the usual household refuse. Disused appliances contain valuable
materials that can and must be reused in order not
to harm health and the environment by unregulated
refuse collection. Bring the disused appliance to the
collection point designated for that purpose or turn
to the company where you bought the appliance.
They can make sure that as many components of this
appliance as possible will be reused. Dismantling and
recycling of air conditioners must be carried out by a
certied technician.
58

59

TABLE DES MATIÈRES
Caractéristiques techniques 61.
Avertissement de sécurité 62.
Avertissement généraux de sécurité 62.
Sécurité électrique 65.
Sécurité relative au réfrigérant R290 67.
Effet maximal 68.
Description 69.
Installation 70.
Fonctionnement 71.
Fonctionnement avec la télécommande 73.
Évacuation d’eau 83.
Sécurité 85.
Nettoyage et entretien 86.
Résolution des problèmes 87.
Élimination 87.
Cet appareil fait usage d’un produit frigorigène
inflammable. Si le produit frigorigène coule et qu’il est
exposé à une source d’allumage externe, il y a un risque
d’incendie.
Lisez attentivement ce mode d’emploi en entier avant
utilisation. Veuillez ne pas installer, ni utiliser ou stocker
l’appareil dans un local dont la superficie est inférieure à
9 m².

CARACTÉRISTIQUES TECHNIQUES
Type Fuave ACS09K01
Batch AI0653
Cooling capacity 9000Btu/h
Heating capacity ----
Refrigerant R290/170g
Permissible excessive
operating pressure
Max allowable pressure 2.6MPa
Weight 25,3kg
Rated voltage 220-240V~
Standard
rating
contitions
Current Cooling 4.35A
Heating
Input Cooling 1000W
Heating ----
Discharge 2.6MPa
Suction 1.0MPa
----
Rated current Cooling 6.22A
Heating ----
Rated input Cooling 1280W
Heating ----
Resistance class IPX0
Demension(mm) 703x355x345 mm
Sound pressure lever (hi/low) 51,9dB(A)/ 46,9dB(A)
Sound power lever 63dB(A)
61

CONSIGNES DE SÉCURITÉ
Veuillez lire toutes les consignes de sécurité et autres instructions. Le
non-respect de toutes les instructions peut provoquer des lésions ou des
dommages matériels.
Consignes de sécurité générales
• Cet appareil est exclusivement destiné à une utilisation domestique.
• Installez l’appareil selon les instructions d’installation. Une installation
mal faite peut provoquer des fuites d’eau, des chocs électriques, un
incendie ou des dommages à vos effets personnels.
• Veuillez n’utiliser que les accessoires fournis et des outils spéciaux pour
l’installation.
• Assurez-vous que l’appareil soit tout le temps en position verticale
(également pendant le transport). Si l’appareil a été (partiellement)
placé horizontalement, attendez 2 heures avant de l’utiliser, C’est le
temps nécessaire pour que le compresseur fonctionne correctement.
• Veillez à ce que l’appareil soit posé sur une surface solide, plane et
horizontale.
• Assurez-vous que l’appareil dispose d’un espace libre d’au moins 50 cm
de chaque côté pendant qu’il fonctionne.
62

• Assurez-vous que la che et la prise de courant soient visibles et
accessibles à tout moment.
• Ne posez pas d’objet sur l’appareil.
• Ne laissez jamais un appareil fonctionner sans surveillance, même pour
un instant !
• N’utilisez pas l’appareil à proximité (à moins d’1 mètre de distance) de
substances ou combustibles légèrement inammables ou explosifs.
N’utilisez pas non plus de peinture, d’aérosols de nettoyage, antiinsectes ou autres sur l’appareil, au risque de déformer le plastique ou
d’endommager le système électrique.
• Ne touchez pas l’appareil avec des mains humides ou mouillées.
N’utilisez pas l’appareil lorsque vous êtes pieds-nus.
• N’utilisez pas l’appareil :
- près d’une source de feu ;
- près des projections d’huile.
- directement exposé à la lumière solaire ;
- en cas d’éclaboussures d’eau ;
- dans une salle de bains ou près d’une piscine.
• L’appareil possède des roulettes pour faciliter son déplacement. Ne
placez pas l’appareil sur une moquette à longs poils ou ne le faites pas
rouler sur des objets au risque de le faire basculer.
• Ne bloquez pas les grilles pour l’entrée et la sortie d’air, même
partiellement.
• Ne recouvrez donc jamais l’appareil au risque de provoquer un
incendie !
• N’enfoncez pas vos doigts ni objets tels que stylos etc. à travers les
grilles de l’appareil. Avertissez bien les enfants de ces dangers.
• Assurez-vous que le ventilateur ne se bloque pas.
• Les enfants, les personnes jugées incapables et les animaux
domestiques exigent une surveillance particulière.
• Cet appareil n’est pas un jouet, ne laissez donc pas les enfants jouer
avec.
63

• Cet appareil peut être utilisé sous surveillance par des enfants à partir
de 8 ans et des personnes ayant des capacités physiques, sensorielles
ou mentales réduites ou un manque d’expérience et de connaissances,
ou après que ces personnes ont reçu des instructions pour utiliser
l’appareil en toute sécurité et comprendre les dangers qui y sont
associés..
• Le nettoyage et l’entretien de fonctionnement ne doivent pas être
effectués par des enfants sans supervision.
• Retirez la che de la prise de courant dès que vous entendez un bruit
suspect, sentez une odeur bizarre ou en cas de fumée.
• Si l’appareil se renverse pendant qu’il est en fonctionnement, éteignez-
le et enlevez la che de la prise de courant. Inspectez l’appareil
minutieusement an de vous assurer qu’il n’a pas subi de dommages.
• Veuillez contacter votre fournisseur ou un électricien agréé si vous
suspectez un quelconque dommage.
• Ne faites pas fonctionner l’appareil si vous constatez des dégâts à
l’appareil, au câble électrique ou à la che, ou s’il ne fonctionne pas
correctement, est tombé en panne ou présente une panne d’une
autre manière. Ramenez l’appareil complet à votre fournisseur ou à
un électricien agréé pour vérication et / ou réparation. Demandez
toujours les éléments originaux.
• L’appareil (y compris le câble électrique et la che) ne doit être ouvert
ou réparé que par des personnes habilitées et compétentes en la
matière.
• Si les points d’évacuation d’eau ne sont pas utilisés, gardez bien les
joints d’étanchéité en caoutchouc supérieur et inférieur à leur place an
d’éviter des dégâts des eaux et une asphyxie.
Consignes de sécurité générales
• Cet appareil est exclusivement destiné à un usage à l’intérieur.
• Veuillez n’utiliser que la che montée par le fabricant et fournie avec
l’appareil, n’utilisez aucune autre forme de raccordement électrique !
• L’appareil doit être raccordé conformément à la réglementation relative
aux installations électriques du pays.
64

• Avant utilisation, vériez si la prise de courant que vous souhaitez
utiliser est reliée à la terre, ne présente aucun défaut et si le voltage
correspond à celui indiqué sur la plaquette xée sur l’appareil. Les
dommages provoqués par un voltage inadéquat ne sont pas couverts
par la garantie !
• Si l’appareil n’est pas utilisé, ou si vous le nettoyez, le déplacez ou
qu’un entretien est effectué, veuillez d’abord l’éteindre puis enlever la
che de la prise de courant. Manipulez ou déplacez l’appareil toujours
avec précaution !
• Lorsque vous allez utiliser l’appareil, suivez ces consignes : d’abord la
che dans la prise de courant, puis l’interrupteur sur « ON » (allumé) et
seulement après utiliser la touche de commandes !
• N’utilisez pas l’appareil dans un environnement humide ou mouillé,
comme une salle de bains ou un coin-lavage, près d’une baignoire,
douche ou piscine et n’éclaboussez pas d’eau, d’huile ou tout autre
liquide sur ou dans l’appareil.
• Déroulez entièrement le câble électrique de l’appareil avant de mettre
la che dans la prise de courant, et assurez-vous que ce câble électrique
ne soit jamais en contact avec des éléments de l’appareil qui sont
chauds ou susceptibles de chauffer. Ne mettez pas le câble électrique
sous une moquette ou sous un tapis ou autre, et placez-le hors d’une
voie de passage. Assurez-vous que l’on ne se prenne pas les pieds dans
le câble et qu’aucun meuble ne soit posé dessus. Ne faites pas d’angles
trop aigus avec le câble électrique et ne le roulez pas trop serré après
usage.
• Évitez que le câble électrique entre en contact avec de l’huile, des
solvants ou des objets tranchants. Contrôlez régulièrement le câble
électrique et la che pour voir s’ils ne sont pas endommagés. Ne pliez
pas ou ne tordez pas le câble électrique et ne l’enroulez pas autour de
l’appareil, au risque d’endommager son isolation !
• Évitez autant que possible d’utiliser des prolongateurs. Si vous ne
pouvez pas l’éviter, utilisez alors un cordon ayant une capacité sufsante
(minimum 3 x 1,5 mm²) et maintenez-le à l’écart d’une voie de
passage !
• Ne branchez l’appareil que sur une prise de courant xe. N’utilisez pas
de boîte de dérivation / bloc multiprise ou autre.
65

• Ne déplacez pas l’appareil en tirant sur le câble électrique et prenez la
che dans votre main lorsque vous la retirez de la prise de courant.
• Ne tirez pas, ne déformez pas et ne modiez pas le câble électrique et
ne le plongez pas dans l’eau. Une traction ou une utilisation inadéquate
du câble électrique peuvent provoquer des dommages à l’appareil ou
un choc électrique.
• Si le câble électrique, la che ou l’appareil lui-même est endommagé
ou détérioré, ou s’il fonctionne mal, ne l’utilisez pas ou éteignez-le
immédiatement et débranchez-le de la prise. L’appareil, la che et
le câble doivent être réparés ou remplacés par un électricien ou une
personne compétente habilitée. Les réparations effectuées par des
personnes non compétentes annulent la garantie et peuvent être à
l’origine de situations dangereuses !
Sécurité concernant le produit frigorigène R290
• Cet appareil comprend le produit frigorigène R290. R290 est un produit
frigorigène conforme aux directives européennes. Ne perforez jamais le
circuit de refroidissement, le R290 est inammable (GWP 3) !
• Pour le processus de dégivrage, n’utilisez pas d’autres produits que
ceux recommandés par le fabricant.
• Cet appareil doit être utilisé et stocké dans un local où ne se trouvent
pas de sources d’allumage, comme un feu à l’âtre ou des appareils
fonctionnant au gaz ou à l’électricité.
• Ne perforez aucun des éléments du circuit de refroidissement et
n’enammez pas l’appareil.
• Si l’appareil est installé, fonctionne ou est stocké dans un local non
ventilé, vous devrez prendre des mesures an d’éviter un incendie ou
une explosion due à un produit frigorigène qui aura coulé. Assurezvous qu’il n’y a aucune source d’allumage (feu, poêles, appareillage
électrique à étincelles, cigarettes se consumant, etc.) dans ce local !
• L’appareil doit être stocké de manière à éviter toute défaillance
mécanique.
• Veuillez ne pas installer, ni utiliser ou stocker l’appareil dans un local
dont la supercie est inférieure à 9 m².
• Le R290 est inodore, vous ne sentirez pas s’il y a une fuite !
66

• Les personnes qui travaillent avec ou interviennent sur un circuit
de refroidissement doivent être en possession de l’agrémentation
adéquate qui a été délivré par une instance agréée, attestant que la
personne en question est compétente pour manipuler les moyens
de refroidissement conformément à l’appréciation reconnue par les
organisations du secteur.
• Les réparations doivent être effectuées en fonction des
recommandations du fabricant de l’appareil. L’entretien et les
réparations qui nécessitent l’assistance d’autres personnes
qualiées doivent être effectués sous la supervision de quelqu’un
qui est spécialisé dans l’utilisation des moyens de refroidissement
inammables.
• Le démontage et le recyclage du climatiseur doivent être effectués par
un technicien certié.
Utilisation avec effet maximum
• Ne mettez pas l’appareil dans un local à la supercie supérieure à celle
recommandée.
• L’appareil ne doit pas être installé près d’une source de chaleur ni en
plein soleil ;
• Les fenêtres et les portes doivent être fermées ainsi que les rideaux ou
volets pendant les heures les plus ensoleillées de la journée ;
• Assurez-vous que le ltre à air soit propre
• Baissez les réglages de la température et de la ventilation une fois que
le local a atteint les conditions souhaitées.
67

Description
1. L’écran de contrôle
2. Voyant signalétique télécommande
3. Levier des ailettes horizontales (réglage manuel)
4. Levier des ailettes verticales (réglage manuel)
5. Écran
6. Roulettes
7. Poignée (des deux côtés)
8. Filtre à air
9. Entrée d’air supérieure
10. Raccordement tuyau d’évacuation d’eau déshumidication
11. Évacuation de l’air
12. Évacuation de l’air inférieure
13. Raccordement tuyau d’évacuation d’eau refroidissement
68
avant
arrière

Installation
Le Fuave ACS09K01 est un climatiseur / déshumidicateur mobile qui peut
être déplacé d’une pièce à l’autre.
• Enlevez l’emballage, tenez celui-ci hors de portée des enfants et
assurez-vous que l’appareil soit toujours en position verticale
• Avant utilisation, vériez si tous les accessoires sont présents et si
l’appareil ou les accessoires ne présente(nt) pas de dommages. Ne
faites pas fonctionner un appareil endommagé mais rapportez-le à votre
fournisseur !
• Placez l’appareil sur une surface solide, plane, sèche et horizontale, près
d’une prise de courant et d’une possibilité d’évacuation d’air chaud,
par exemple une fenêtre entr’ouverte. Assurez-vous que l’appareil ait
au moins 50 cm de libre de chaque côté et tenez compte de toutes les
indications et consignes de sécurité.
• An de déshumidier, raccordez un tuyau d’évacuation d’eau au
raccordement destiné à ce tuyau. Placez l’extrémité de ce tuyau dans
un seau ou un puits. Le tuyau ne doit pas être dirigé vers le haut ! Votre
appareil est maintenant prêt à l’emploi. Voyez paragraphe évacuation
d’eau.
• An de refroidir, vous devez évacuer l’air chaud vers l’extérieur.
• Évitez les plis ou nœuds dans le tuyau d’évacuation. Cela provoque
une accumulation de l’air humide expulsé, avec pour conséquences
possibles une fuite, une surchauffe ou une extinction du climatiseur.
• Avertissement : N’utilisez pas votre climatiseur avant qu’il n’ait été
installé conformément aux instructions ci-dessus !
• Avertissement : Assurez-vous de ne pas laisser de l’eau s’inltrer dans
l’appareil !
• Avertissement : La longueur du tuyau d’évacuation a été spécialement
adaptée à la technique de ce climatiseur. Ne le remplacez donc pas,
et ne le rallongez pas avec l’un de vos tuyaux, au risque d’entraver le
bon fonctionnement du climatiseur. Le tuyau peut être étiré, mais pour
atteindre un effet optimum, vous devrez le garder le plus court possible.
• N’oubliez pas de prévenir un éventuel cambriolage ! En effet,
la fenêtre est ouverte pendant le fonctionnement du climatiseur
mobile.
69

Fonctionnement
Avant de faire fonctionner votre climatiseur, veuillez contrôler :
• s’il a bien été installé conformément aux prescriptions et consignes de
sécurité ;
• s’il ne présente pas de dommages ou de défauts ;
• si la prise de courant que vous souhaitez utiliser fournit la tension
indiquée sur la plaquette du type de l’appareil (220-240V / 50Hz) ;
• si aucun autre appareil n’est raccordé à la même prise de contact.
Lorsque tout ce qui est susmentionné a été vérié, vous pouvez mettre
la che dans la prise de courant. Vous pouvez faire fonctionner votre
climatiseur avec l’écran de contrôle ou la télécommande.
Fonctionnement avec l’écran de contrôle
70

Touche Ouvert / Fermé. Vous l’utilisez pour mettre en
marche ou pour éteindre le climatiseur.
Cette touche vous permet de choisir une fonction
donnée : refroidissement, ventilation ou
déshumidication. Chaque fois que vous appuyez
sur la touche, la fonction change ; le voyant sur
l’écran de contrôle indique la fonction qui est
active. Le ventilateur est réglé automatiquement.
Cette touche vous permet de régler graduellement la
température ambiante souhaitée en étapes de 1°C
(de 17°C à 30°C). Le système de commandes peut
indiquer la température en °C ou en °F. Quand la
température est indiquée en °F, appuyez
simultanément sur les deux touches + et - pendant 3
secondes pour l’afcher à nouveau en °C.
L’afchage LED indique la température choisie de la
fonction de refroidissement. La température ambiante
est indiquée par le biais des fonctions déshumidication
et ventilation. L’afchage LED indique également les codes
voyant
ouvert/
d’erreur et de sécurité.
fermé
Codes d’erreur :
E0 Erreur EEPROM
voyant de
fonction
minuterie.
E1 Erreur capteur de température ambiante
La minuterie
ne se regle
E2 Erreur capteur de température
qu’avec la
évaporateur
télécomman-
de
E3 Erreur capteur de température
condensateur
E4 Erreur communication écran
EC Détection de fuite produit réfrigérant
71

Safety codes:
P1 Le réservoir d’eau est plein : Raccordez le
tuyau d’évacuation au point d’évacuation
inférieur et vidangez l’eau collectée, voir
chapitre évacuation d’eau.
Si ce code de sécurité réapparait fréquemment, contactez votre fournisseur.
Remarque : lorsque l’une des pannes ci-dessus se produit, éteignez le
climatiseur et vériez les obstacles éventuels. Redémarrez le climatiseur si le
problème persiste, puis éteignez-le et retirez la che de la prise de courant.
Contactez votre fournisseur.
Rafraîchir : Appuyez sur le voyant de fonction « Cool »
jusqu’à ce que le voyant s’allume, appuyez sur les touches
+ et - an de régler la température ambiante (de 17°C à
30°C) souhaitée. À l’aide de la touche FAN SPEED de la
télécommande, la vitesse du ventilateur peut être réglée sur
HIGH (élevée) ou LOW (basse).
Ventiler : Appuyez sur la touche Mode jusqu’à ce que
le voyant s’allume. À l’aide de la touche FAN SPEED de
la télécommande, la vitesse du ventilateur peut être
réglée sur HIGH (élevée) ou LOW (basse). La
température ne peut pas être réglée.
Déshumidier : Appuyez sur la touche « Dry » jusqu’à
ce que le voyant s’allume. La vitesse du ventilateur et
la température ne peuvent pas être réglées. Le
ventilateur démarre automatiquement à la vitesse
LOW (basse). Voyez paragraphe évacuation d’eau.
72

Fonctionnement avec la télécommande
• Spécication
Type de télécommande RG51B30/CE
Type de piles 2x AAA 1.5 V
Distance de transmission 8 mètres
• Généralités
- Utilisez la télécommande dans un rayon de 8 mètres à partir du
climatiseur. Dirigez-la vers le récepteur. La réception est conrmée
par un bip.
- Assurez-vous qu’il n’y ait pas d’obstacles (rideaux, portes, etc.) entre
le climatiseur et la télécommande.
- Insérez 2 piles AAA dans la télécommande.
- N’utilisez pas un mélange de piles usagées et neuves.
- Enlevez les piles de la télécommande en cas de non-utilisation
prolongée du climatiseur.
- Attention : Quand les piles sont enlevées, la programmation
est effacée de la télécommande. En cas d’insertion de nouvelles
piles, la télécommande doit être à nouveau reprogrammée.
- Gardez la télécommande à l’écart des liquides.
- Protégez la télécommande des températures élevées et de
l’exposition à un rayonnement.
- Protégez la télécommande de l’exposition à la lumière solaire.
- Gardez la télécommande à l’écart d’autres appareils électriques.
73

1. Touche de température plus basse
2. Touche de température plus élevée
3. Touche Mode (Fonction)
4. Touche Swing (oscillement - non disponible)
5. Touche de réinitialisation
6. Touche Allumé / Éteint
7. Touche de vitesse du ventilateur
8. Touche Minuterie activée
9. Touche Veille
10. Touche Minuterie désactivée
11. Touche Verrouillage
12. Touche afchage LED
74

Télécommande d’afchage LED
A. Afchage du Mode
B. Afchage La télécommande est en fonction
C. Afchage de la température / Minuterie
D. Afchage Allumé / Éteint
E. Afchage Ventilateur
F. Afchage de la vitesse du ventilateur
G. Afchage de la minuterie
H. Afchage Lock (Verrouillage)
75

• Utilisation des touches
Fonctionnement automatique
1. Appuyez sur la touche MODE
sélectionner le mode
automatique.
2. Appuyez sur TEMP ou pour
régler la température
souhaitable.
3. Appuyez sur la touche ON/OFF
pour démarrer.
Remarque :
* En mode Automatique, le climatiseur peut logiquement choisir
entre refroidir, ventiler ou déshumidier en détectant la différence entre la
température ambiante réelle et la température réglée sur la télécommande.
* En mode Automatique, la vitesse de ventilation ne peut pas être
sélectionnée car elle est réglée automatiquement.
* Si le mode Automatique n’est pas agréable, choisissez
manuellement la fonction COOL, DRY ou FAN
76

Fonctionnement refroidissement et
ventilation
1. Appuyez sur la touche MODE
pour choisir la fonction
COOL ou FAN.
2. Appuyez sur TEMP ou pour
régler la température
souhaitable.
3. Appuyez sur la touche FAN
SPEED pour choisir la vitesse
de ventilation : AUTO-HIGH-
LOW.
4. Appuyez sur la touche ON/OFF
pour démarrer.
Remarque :
En fonction Ventilation, la température réglée n’est pas visible sur l’écran
de la télécommande, car la température ne peut pas être réglée. Seules les
étapes 1, 3 et 4 sont effectuées.
77

Fonctionnement déshumidication
1. Appuyez sur la touche MODE
pour choisir la fonction DRY.
2. Appuyez sur TEMP ou pour
régler la température
souhaitable.
3. Appuyez sur la touche ON/OFF
pour démarrer.
Remarque : En mode déshumidication,
la vitesse de ventilation ne peut pas
être sélectionnée car elle est réglée
automatiquement.
Fonctionnement de la minuterie
A ppuyez sur la touche Timer on pour
régler l’heure de mise en marche
automatique et sur la touche Timer off
pour régler l’heure d’arrêt automatique.
1. Réglage de l’heure de mise en
marche automatique
a. Appuyez sur la touche TIMER
ON. La télécommande afche
TIMER ON, le signal « h » est
indiqué sur l’écran LCD. C’est
alors le moment de réinitialiser
l’heure de mise en marche
automatique pour démarrer
l’opération.
b.
Appuyez une nouvelle fois sur la
touche TIMER ON pour régler l’heure
de mise en marche automatique souhaitée. À chaque impulsion sur la
touche, l’heure s’afche en étapes de 30 minutes, jusqu’à 10 heures et
ensuite de 1 à 24 heures.
78

c. Après avoir mis en fonction la minuterie (TIMER ON), la
télécommande envoie le signal vers le climatiseur après
1/2 seconde. Puis, après environ 2 secondes, le signal « h » disparaît
et la température réglée réapparaît sur l’écran LCD.
La fonction de minuterie va s’allumer sur le climatiseur.
2. Réglage de l’heure d’arrêt automatique
a. Appuyez sur la touche TIMER OFF. La télécommande afche TIMER
OFF, le signal « h » est indiqué sur l’écran LCD. C’est alors le
moment de réinitialiser l’heure d’arrêt automatique pour démarrer
l’opération.
b. Appuyez une nouvelle fois sur la touche TIMER OFF pour régler
l’heure d’arrêt automatique souhaitée. À chaque impulsion sur
la touche, l’heure s’afche en étapes de 30 minutes, jusqu’à
10 heures et ensuite de 1 à 24 heures.
c. Après avoir mis en fonction l’arrêt de la minuterie (TIMER OFF), la
télécommande envoie le signal vers le climatiseur après
1/2 seconde. Puis, après environ 2 secondes, le signal « h »
disparaît et la température réglée réapparaît sur l’écran LCD. La
fonction de minuterie va s’allumer sur le climatiseur.
Important : Réglage de l’heure dans la Minuterie : 0.5, 1, 1.5, 2, 2.5, 3, 3.5,
4, 4.5, 5, 5.5, 6, 6.5, 7, 7.5, 8, 8.5, 9, 9.5, 10, 11, 12, 13, 14, 15, 16, 17, 18,
19, 20, 21, 22, 23 et 24.
79

Exemples :
Le climatiseur doit commencer à fonctionner
dans 6 heures.
TIMER ON
1. Appuyez sur la touche TIMER ON, le signal
« h » apparaît sur l’écran.
2. Appuyez sur la touche TIMER ON pour
afcher « 6.0h » sur l’écran
3. Attendez environ 3 secondes et l’écran
numérique afche à nouveau la température.
Maintenant, cette fonction est activée.
Le climatiseur doit arrêter de fonctionner dans
10 heures.
TIMER OFF
1. Appuyez sur la touche TIMER OFF, le signal
« h » apparaît sur l’écran.
6.0h
TIMER ON
10h
2. Appuyez sur la touche TIMER OFF pour
afcher « 10h » sur l’écran.
3. Attendez environ 3 secondes et l’écran
numérique afche à nouveau la température.
Maintenant, cette fonction est activée.
80
TIMER OFF

Le climatiseur doit s’arrêter 2 heures après
le réglage et redémarrer 10 heures après le
réglage.
TIMER OFF-TIMER ON (allumé- arrêtdémarrer)
1. Appuyez sur la touche TIMER OFF.
2. Appuyez une nouvelle fois sur la touche
TIMER OFF pour afcher « 2.0h » sur l’écran.
3. Appuyez sur la touche TIMER ON.
4. Appuyez une nouvelle fois sur la touche
TIMER ON pour afcher « 10h » sur l’écran.
5. Attendez environ 3 secondes et l’écran
numérique afche à nouveau la température.
Maintenant, cette fonction est activée.
Le climatiseur doit démarrer 2 heures après
le réglage et s’arrêter 5 heures après le
réglage.
TIMER ON-TIMER OFF (éteindre-démarragearrêt)
1. Appuyez sur la touche TIMER ON.
10h
TIMER ON OFF
5.0h
2. Appuyez une nouvelle fois sur la touche
TIMER ON pour afcher « 2.0h » sur l’écran.
3. Appuyez sur la touche TIMER OFF.
4. Appuyez une nouvelle fois sur la touche
TIMER OFF pour afcher « 5.0h » sur l’écran.
5. Attendez environ 3 secondes et l’écran
numérique afche à nouveau la température.
Maintenant, cette fonction est activée.
TIMER ON OFF
81

Fonctionnement Sleep (Veille)
La fonction SLEEP est utilisée pour
économiser l’énergie pendant votre
sommeil : en effet, nous n’avez pas besoin
d’avoir la même température pour pouvoir
bien dormir). La fonction SLEEP ne peut
être activée que depuis la télécommande.
Cette fonction ne peut être utilisée que
dans le mode COOL et AUTO.
Appuyez sur la touche SLEEP au moment
d’aller dormir. La température réglée
baissera ou s’élèvera d’1°C après 30
minutes. Après une nouvelle période de
30 minutes, elle baissera ou s’élèvera une
fois de plus d’1°C. Cette température
nouvellement réglée se maintiendra
pendant 7 heures, après quoi le
climatiseur refonctionnera comme il avait
été programmé initialement.
Touche LOCK
Utilisez cette touche si vous souhaitez éviter que tous les réglages changent
inopinément. Un symbole de verrouillage apparaît sur l’écran lorsque la
touche est enfoncée. En appuyant une nouvelle fois, la fonction LOCK sera
désactivée.
Autres fonctions
> Redémarrage automatique
Si le climatiseur s’éteint en raison d’une panne de courant intempestive, la
fonction précédemment réglée se remettra en route dès que la panne de
courant aura été résolue.
> Adaptation du ux d’air
Le ux d’air peut être adapté automatiquement en inclinant les ailettes
manuellement dans la position souhaitée. Laissez les ailettes entièrement
ouvertes pendant l’utilisation. Ne pas placer d’objets lourds ou autres sur
les ailettes, au risque d’endommager le climatiseur.
82

> Gestion de la puissance
Lorsque la température ambiante est plus basse que la température réglée,
le climatiseur se remettra automatiquement après un certain temps dans
sa fonction d’économie d’énergie. Le compresseur s’éteint et le ventilateur
va fonctionner en position LOW (basse). Lorsque la température ambiante
est à nouveau plus élevée que la température réglée, le compresseur et
le ventilateur vont refonctionner normalement, la fonction d’économie
d’énergie est alors à nouveau éteinte.
Remarque: Lors du refroidissement ou de la déshumidication, attendez
toujours 3 minutes après l’allumage ou l’extinction avant d’allumer
ou d’éteindre à nouveau le climatiseur. C’est le temps nécessaire de
récupération du compresseur.
Évacuation d’eau
1. Pendant la déshumidication
tuyau d’évacuation
continue
enlevez le
bouchon de
vidange
Pendant la déshumidication, il y a davantage d’eau retirée de l’air. C’est
pourquoi vous devez retirer le bouchon de vidange et raccorder un tuyau
de vidange au raccord de vidange (10) et le guider vers une évacuation
d’eau située en contrebas.
Assurez-vous que le tuyau soit bien xé et ne risque pas de couler. Dirigez
le tuyau vers l’évacuation et assurez-vous qu’il n’y ait pas de pli dans le
tuyau empêchant l’eau de couler.
Si le tuyau n’est plus utilisé, replacez le bouchon de vidange an d’éviter les
fuites.
83

2. Pendant le refroidissement
tuyau
d’évacuation
continue
enlevez le
bouchon de
vidange
Pendant cette fonction, l’eau est retirée de l’air et s’évapore en partie,
mais l’eau excédentaire s’accumule dans le réservoir d’eau inférieur le
cas échéant. Lorsque le réservoir d’eau est plein, le climatiseur fait bip 8
fois et l’écran indique P1. Le moteur et le compresseur s’arrêtent, mais le
ventilateur continue de tourner.
Éteignez le climatiseur et retirez la che de la prise de courant.
Déplacez le climatiseur vers un lieu d’évacuation et videz le réservoir d’eau
en retirant le bouchon de vidange et en y raccordant un tuyau. Après avoir
vidé le réservoir d’eau, assurez-vous de replacer le bouchon de vidange an
d’éviter les fuites. Le symbole P1 disparaît. Si cette erreur persiste, veuillez
contacter votre fournisseur.
84
bouchon
de vidange
inférieur

Sécurité
Le climatiseur mobile Fuave est équipé d’une protection anti-surchauffe qui
éteint l’appareil en cas de surchauffe. Si cela se produit, vous devez retirer
la che de la prise de courant et laisser refroidir l’appareil au moins pendant
30 minutes. Éliminez également la cause de la surchauffe : l’appareil est-il
(partiellement) recouvert ? Se trouve-t-il près d’un mur ou d’un obstacle
gênant l’aspiration ou le rejet d’air ?
Ensuite, vous pouvez réutiliser normalement l’appareil mais surveillez-le
bien les 30 premières minutes pour pouvoir intervenir en cas d’anomalie.
En cas d’anomalie, ou si l’appareil se remet en surchauffe sans cause
apparente, veuillez contacter votre fournisseur ou un électricien agrée pour
une vérication / réparation le cas échéant.
Nettoyage et entretien
Attention ! Avant tout nettoyage ou entretien du climatiseur, vous devez
toujours éteindre l’appareil et enlever la che de la prise de courant ! Il est
indispensable de nettoyer régulièrement le climatiseur pour qu’il fonctionne
correctement !
Nettoyage du caisson
Utilisez un chiffon doux et humide pour essuyer le caisson. N’utilisez jamais
de tuyau d’arrosage et prenez garde à ne pas faire entrer d’eau dans
l’appareil ! N’utilisez jamais de produits d’entretien agressifs, ni d’essence,
de lessives, de lingettes imprégnées de produit chimique ou autres
solutions détergentes. Tout cela pourrait endommager le caisson. Ensuite,
séchez l’appareil avec un chiffon doux.
Nettoyage du ltre à air
Nettoyez le ltre à air tous les 15 jours ; un climatiseur ayant un ltre à
air encrassé ne fonctionne pas bien. Le ltre à air est situé à l’arrière du
climatiseur et s’enlève facilement. Pour détacher la poussière de ce ltre,
tapotez-le ou utilisez un aspirateur. Ensuite, nettoyez le ltre à air en le
lavant dans de l’eau tiède (40 °C maximum), éventuellement ajoutée d’un
produit d’entretien doux et neutre. Laissez sécher complètement le ltre
à air à l’ombre puis replacez-le. Attention ! Ne jamais faire fonctionner le
climatiseur sans ltre à air !
85

ltre à air
comment enlever le ltre à air
Nettoyage de n de saison
En cas de stockage prolongé si l’appareil est inutilisé pendant une longue
période, veuillez prendre les mesures suivantes !
• Éliminez entièrement l’eau de condensation. Faites fonctionner
l’appareil en fonction de ventilation pendant 12 heures, pour vous
assurer que le climatiseur soit entièrement sec à l’intérieur.
• Éteignez le climatiseur et retirer la che de la prise de courant.
• Nettoyez le ltre à air puis replacez-le, ou changez-le.
• Enroulez le tuyau d’évacuation pour éviter qu’il se détériore.
• Enlevez les piles de la télécommande.
• Si possible, emballez le climatiseur dans son emballage d’origine
ou dans un sac plastique et stockez-le dans un endroit sec. Ne
posez pas de charges lourdes sur l’appareil.
Résolution des problèmes
L’appareil ne démarre pas si j’appuie sur la touche OUVERT / ÉTEINT
• La che est-elle dans la prise de courant ?
• Le disjoncteur relié à la terre est-il bien ouvert ? Pas de panne de
courant ?
• Le réservoir d’eau est-il plein (P1) ? Dans ce cas, videz-le.
• La température ambiante est plus basse que la température réglée :
modiez la température réglée.
86

On dirait que l’appareil ne rafraîchit pas beaucoup
• Mesurez la température de souferie ; elle doit être ± 10° inférieure
à la température ambiante.
• L’appareil est-il directement exposé à la lumière du soleil ? Fermez
les rideaux.
• Les fenêtres ou les portes sont-elles ouvertes ? Fermez-les.
• Y-a-t-il trop de personnes dans la pièce ? Elles produisent de la
chaleur !
• Le local est-il trop grand ?
• Y-a-t-il une autre source produisant de la chaleur (excessive) dans le
local ? Éteignez cette source ou enlevez-la.
• Le ltre est-il poussiéreux ou recouvert de poussière ? Nettoyez-le.
• Le tuyau d’entrée ou de sortie de l’air est-il bouché ? Assurez-vous
d’une libre circulation d’air.
L’appareil est bruyant
• La surface sur laquelle est posé l’appareil est-elle solide, plane et
horizontale ?
• Le produit frigorigène qui circule dans l’appareil produit également
un peu de bruit. C’est normal.
N’essayez jamais de réparer vous-même le Climatiseur !
L’ap
ÉLIMINATION
Au sein de l’UE ce symbole signie que ce produit
ne doit pas être jeté avec les déchets ménagers
normaux. Les appareils mis au rebut contiennent des
matériaux de valeur qui peuvent et doivent être recy-
clés, an de ne pas endommager l’environnement et
la santé par des amas de déchets non réglementés.
Pour cette raison, veuillez apporter vos appareils à
mettre au rebus dans un point de collecte indiqué
ou renseignez-vous auprès de la société qui vous
a vendu l’appareil. Ils peuvent faire en sorte qu’un
maximum de pièces de l’appareil soient recyclées.
Le démontage et le recyclage du climatiseur doivent
être effectués par un technicien certié.
87

88

89
 Loading...