

Page 1
MPF3384
DVB-T RECEIVER
www.fandu.gr
Page 2

CONTENT
IMPOR
FRONT
REMOTE CONTROL.....................................................................................................................
Inst
Using the Re
Conn
First time
Basic Operation..............................................................................................................................
Program Ma
Picture Setting...............................................................................................................................11
Chan
Ti
Option.............................................................................................................................................14
System Set
USB................................................................................................................................................16
TROUBLESHOOTING ................................................................................................................
TECHNICAL
TANT SAFETY INSTRUCTIONS....................................................................................2
AND REAR PANEL..........................................................................................................4
Front Panel/Rear Pan
alling the Batteries ...................................................................................................................6
mote Control.............................................................................................................6
ections....................................................................................................................................7
installation......................................................................................................................8
nage Settings............................................................................................................8
Program Edit...........................................................................................................................
EPG (Electronic program
Aspect Ratio
nel Search............................................................................................................................12
Auto Search/Manual Search..............................................................................................
Countr
me Setting..................................................................................................................................13
ime offset/Country Region/Tim e Zone/Timer for Power On/Off................................13
T
OSD Langu
Digit
al Audio ..........................................................................................................................15
Parent
Information/Sof
Multimedia/Photo configure ...............................................................................................
Movie Config
Ti
meshift.................................................................................................................................18
ording ..............................................................................................................................19
Rec
/Resolution/TV format/Video output .........................................................11
y/Antenna power......................................................................................................13
age/Subtitle Language/Audio Language....................................................14
ting..............................................................................................................................15
al Guidance/Set Password/Restore Factory Default.........................................15
tware upgrade...........................................................................................15
ure/USB PVR Configure..............................................................................17
SPECIFICATION ...................................................................................................21
el........................................................................................................4
guide)/Sort/LCN ....................................................................10
12
16
20
5
8
9
1
Page 3

IMPORTANT SAF
1.
Read these instructions. Keep these instructions.
2. Keep these instructions.
3. Heed all warnings.
4. Follow all instructions.
5. Do not use this apparatus near water
6. Clean only with dry cloth.
7. Do not block any ventilation openings, install in accordance with the instructions.
8. Do not install near any heat sources stoves, or other apparatus (including amplifiers)
that produce heat.
9. Do not defeat the safety purpose of the polarized plug. If the Provided plug does not fit
into your outlet, consult an electrician for replacement of the obsolete outlet.
10. Protected the power cord from being walked on or pinched particularly at plugs.
Convenience receptacles and the point where they exit from the app aratus.
11. Only use attachments/accessories specified by the manufacturer.
12. Unplug this apparatus during lighting storms o r when unused for long periods of time.
13. Refer all servicing to qualified service personnel. Servicing is required when the
apparatus has been damaged in anyway. Such as power- supply cord or plug is
damaged I liquid have been spilled or objects have fallen into the apparatus, the
apparatus has been exposed to rain or moisture, does not operate normally, or has
been dropped.
14. Mains plug is used as the disconnect device, the disconnect device shall remain
readily operable.
15. The ventilation should not be impeded by cove ring the ventilation openings with items:
such as newspapers, table-cloth, curtains, etc
16. No naked flame sources, such as lighted candles, should be placed on the apparatus.
17. Attention should be drawn to the environmental aspects of battery disposal.
18. The use of apparatus in moderate climate.
WARNING: To reduce the risk of fire or electric shock, do not expose this apparatus to rain or
moisture.
WARNING: The batteries shall not be exposed to excessive heat such as sunshine, fire or the
like.
ning:
War
The apparatus shall not be exposed to dripping or splashing and that no objects filled
with liquids. Such as vases. Shall be placed on the apparatus.
The MAINS plug or an appliance coupler is used as the disconnect device, the
disconnect device shall remain readily operable.
The batteries shall not be exposed to excessive heat such as sunshine, fire or the like.
ETY INSTRUCTIONS
2
Page 4
The sym
bol indicates that dangerous voltages constituting a ri sk of electric shoc k are
present within this unit.
bol i
The sym
nstructions indicate that there are important operating and maintenance
the literature accompanying this unit.
This symbol indicates that this product incorporates double insulation between
hazardous mains voltage and user accessible parts. When servicing use only
identical replacement parts.
CAUTIO
When the app
N:
aratus was in electrostatic circumstance, it may be malfunction and
need to reset by user .
Package Contents
Before installation. Please check the contents of the package.
The package should contain the following items:
DVBT TV Receiver X1 pc
Remote Control X1 pc
AAA Battery For Remote control X1 pair
User Manual X1 pc
3
Page 5

FRONT AND REAR PANEL
Front Panel
1. IR: Receive the signal from the remote control
2. USB: Data input from USB storage devices
Rear Panel
2
1
1 2 3 4 5
1. ANT IN: The aerial input connector
2. LOOP OUT: To TV Loop Out connector
3. COAXIAL: Connect to Amplifier Coaxial input terminal
4. SCART: Connect to TV set Video input terminal
5. DC IN: 5V 2A
4
Page 6

REMOTE CONTROL
TV CONTROL AREA
POWER Switch TV to on or standby Mode
SETUP Set the key in TV control area
TV/AV Switch TV to TV or AV Mode
VOL-/VOL+ Increase or decrease TV sound volume
RECEIVER CONTROL AREA
POWER: Switch the Tuner to on or standby Mode
AUDIO:
MUTE: Mute or Restore Audio Output
TV/RADIO: Switch between TV and Radio mode
INFO: Show information of the current program
Color buttons:
MENU: Press this button to run menu on screen
EXIT: Exit the current Menu or returns to the
CH-/CH+: Select the next or previous Channel
OK: Select the highlighted item
UP/DOWN: Navigate through the Menus.
RIGHT/LEFT:
VOL-/VOL+: Increase or decrease sound volume
TEXT: Display Teletext contents
EPG: (Electronic Program Guide) Call up the
REV: Search backward during media play
FWD: Search forward during media play.
PREV: Skip to previous
NEXT: Skip to next stage when play media file
PLAY/PAUSE: starts or resume media play
STOP: Stop media play
FAVOURITE:
RECALL: Return to the last selected channel
REC: Record TV program (Personal video record)
0-9(Numeric Buttons): Select a channel or setting
SUB-T: Select Subtitles Language
TIMESHIFT: Time shift function
To choose speakers (left, right or
stereo), audio format and audio language
Operate different functions in screen TEXT
and call command box
previous menu
Navigate through the Menus
EPG
stage when play media file
Display or edit the favourite program list
For more info how to set the remote, please see the below instruction.
1.Press and hold the set key(2-3 seconds), till the dim LED turns bright.
2.Press the learning button that you wish to program till the LED keeps blinking.
3.Point and place the two remote transmitters facing each other (2 cms apart).
4.Press the button on original TV Remote control and hold it for 2 seconds.
5.After successful learning, STB remote LED blinks 3 times and stays on.
6.Repeat steps 2-5 to program other learning buttons on STB remote.
7.Press Set button to save and exit learning mode.
8.After saving, LED light will turn off.
5
Page 7

Installing the Batteries
Remove the battery cover from the Remote Control and put 2pcs size batteries 1.5 V AAA
inside the compartment.
The diagram inside the Battery Compartment shows the correct way to install the batteries.
Using the Remote Control
To use the Remote Control, point it towards the front of the Digital Set Top Box
The Remote Control has a range of up to 7 meters from the Set Top Box at an angle of up to
60 degrees.
The Re
mote Control will not operate if its path is blocked.
Sunlight or very bright light will decrease the sensitivity of the Remote Control
6
Page 8

Connections
For a basic connection from your SET TOP BOX to your TV set, you can use SCART
connection.
7
Page 9

First time installation
After all connections have been made properly, switch on TV and make sure the receiver is
connected to the Main Power. Press Power button to switch on restoring receiver.
if you are using the receiver for the first time or have restored the unit to Factory Default, the
Installation Guide will appear on your TV screen.
1. [OSD Language] press the RIGHT/LEFT button to select a language.
2. [Country] press the RIGHT/LEFT button to select your country of residence.
3. [Channel Search] press the RIGHT/LEFT or OK button to begin Automatic channel
search.
4. [Crypted] press the RIGHT/LEFT button to select FTA/ALL Channels.
5. Once channel tuning is complete, you can start watching TV programs.
Basic Operation
Program Manage Settings
To access the Menu, Press the MENU button and select [Program]. Using the RIGHT/LEFT
keys to navigate through the menu.The Menu provides options to adjust the Program Manage
Settings. Press the EXIT button to exit the Menu
8
Page 10

Program Edit
o edit your program preferences (lock, skip, favourite, move or delete) you will need to enter
T
the Program Edit Menu.
Set Fav
ourite Program
You can create a shortlist of favourite program that you can easily access.
Set Favourite TV or Radio program:
1. Select the your desire program then press the FAVOURITE button,
2. A heart-shaped symbol will appear and the program is marked as a favourite
3. Repeat the previous steps to select more Favourite programs
4. To confirm and exit the Menu, press the EXIT button
Disable Favourite TV or Radio Channel:
Select the Favourite channel and press Favourite button on the remote control to cannel.
View Favourite Program
1. Press the Favourite button and the Favourite Menu will appear.
2. Press the UP/DOWN button to highlight the program that you want to mark as
favourite
3. Press the OK button to select your favourite program
Delete a TV or Radio Program
1. Select the program and then press the BLUE button
A warning message will appear. Press OK to delete the channel.
2. Repeat the previous steps to select more programs to delete.
Skip TV or Radio Program
1. Select the program you would like to skip and press the GREEN button.
A skip symbol will appear. The ch annel is marked as a skip.
2. Repeat the previous step to skip more channels.
3. To save your settings and exit the menu, press EXIT key.
Disable the skip channel function::
Select the Skip channel and press the GREEN button on the remote control to cancel
Move a TV or Radio Program
1. Select the preferred channel then press the RED button. A move symbol will appear
9
Page 11

Press the UP/DOWN button to move the channel
2.
3. Press the OK button to confirm
4. Repeat the above steps to move more programs
Lock Program
You can lock the selected programs for restricted view
Lock a TV or Radio Program:
1. Select the preferred channel then press the YELLOW button. A lock-shaped symbol is
displayed. The channel is now marked as locked.
2. Repeat the previous step to select more channels.
3. To confirm your settings and exit the menu. Press the EXIT button.
4. Press the YELLOW button to disable the locked channels function.
5. To view the locked channels, you will be required to enter either the default password
'000000' or your last set password. The master unlock p assword is”888888”
EPG (Electronic program guide)
The EPG is a
n on-screen TV guide that shows scheduled programs seven days in advance for
every tuned channel. Press the EPG button on the Remote Control to access to the guide.
You can use the UP/DOWN button to select the preferred program. If there is more than one
page of information, use the BLUE button for page up and the YE LLO W button for page down.
You can select another channel's EPG by LEFT/RIGHT buttons, view details of EPG event by
INFO button or schedule a recording by OK button.
Sort
Sort your cha
nnels from the following options:
[By LCN]:Sort the channels in ascending order (Logical channel number)
[By Service Name]:Sort the channels in alphabetical order
[By Service ID]:Sort the channels according to the station.
[By ONID]: Sort the channels according to ONID
LCN (Logical channel number)
Set LCN on o
r off if you want to Sort the channel manually
10
Page 12

Picture Setting
To access the Menu, press MENU then select [Picture] using the RIGHT/LEFT key. The Menu
provides options to adjust the video settings. Press UP/DOWN to select an option and press
RIGHT/LEFT to adjust that setting. Press EXIT to exit the menu.
Aspect Ratio
You must set the display format to either Auto, 4:3 Full, 4:3 Pan Scan, 4:3 Letter Box, 16:9
wide Screen or Auto to get the maximum display when watching TV.
Resolution
ou can change this setting if the picture resolution does not appear to be correct.
Y
[480i/480p]: for NTSC TV system.
[576i/576p]: for PAL TV system.
[720p]: for NTSC or PAL TV system.
TV format
If the picture
This should match
[NTSC]: f
does not appear correctly, you need to change the settings.
the most common setting for TVs in your country.
or NTSC system TV.
[PAL]: for PAL system TV.
Video output
[SCAR
T]: SCART output
Transparent
You can change this setting to select the transparent.
11
Page 13
Channel Search
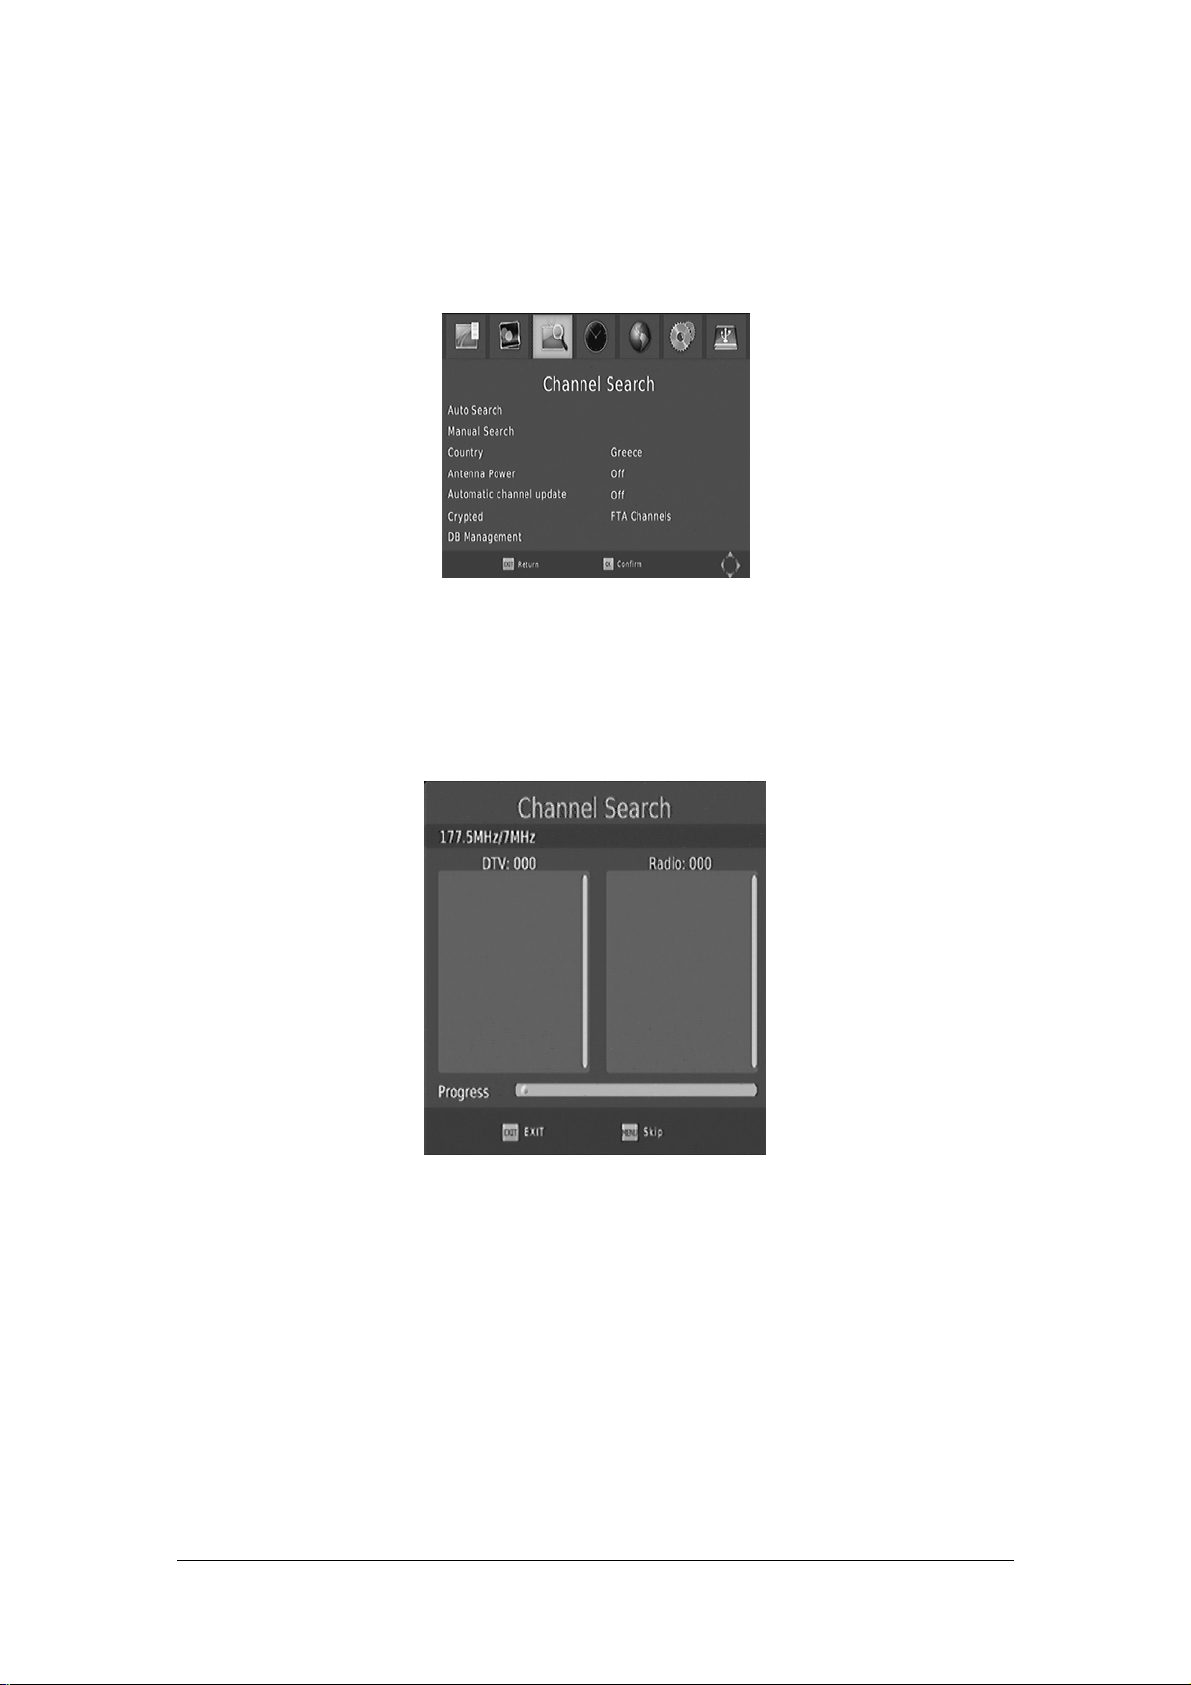
o access the menu, press MENU and select [Search Channel] using the RIGHT/LEFT keys.
T
This Menu provides options to adjust the Search Channel settings.
Press UP/DOWN to select an option and press RIGHT/LEFT to adjust the settings
Press EXIT to exit the Menu
Auto Search
This option will automatically search for channels and save them once the scanning is
complete. All previously sa ved channels and settings will be deleted.
1. Select [Auto Search] and press OK or RIGHT to start channel se arch
2. To cancel channel search, press EXIT. Any channels that have been found will be
saved.
Manual Sear
ch
This option allows you to scan for new channels without deleting previously saved channels
and settings.
1. Select [Manual Search] then press OK or RIGHT. The channel search screen will
appear.
2. Press the RIGHT/LEFT key to select the channel frequency
3. Press OK to start searching channels.
If a channel is found, it is saved and added to the channels list. lf channels cannot be found
during searching, the unit will exit automatically
12
Page 14

Country
Select your country of residence.
Antenna power
Enable Antenna Power if an external active antenna is connected.
Time Setting
To access the Menu, press MENU then select [Time] using the RIGHT/LEFT keys.
The Menu provides options to adjust the time settings.
Press UP/DOWN to select an option and press RIGHT/LEFT to adjust the settings. Press EXIT
to exit the menu.
Time offset
Select auto or manual for GMT offset adjustments.
Country Region
Select the Country Region when [Time Offset] is set to Auto.
Time Zone
Select the
Timer for Power On/Off
Press the MENU button on the remote control. enter Time. then select Power On/Off.
Time Zone Offset when [Time Offset] is set to Manual.
OSD Auto Disappear
Select the OSD Auto Disappear time.
Info bar timeout
Select the Info bar timeout time.
13
Page 15
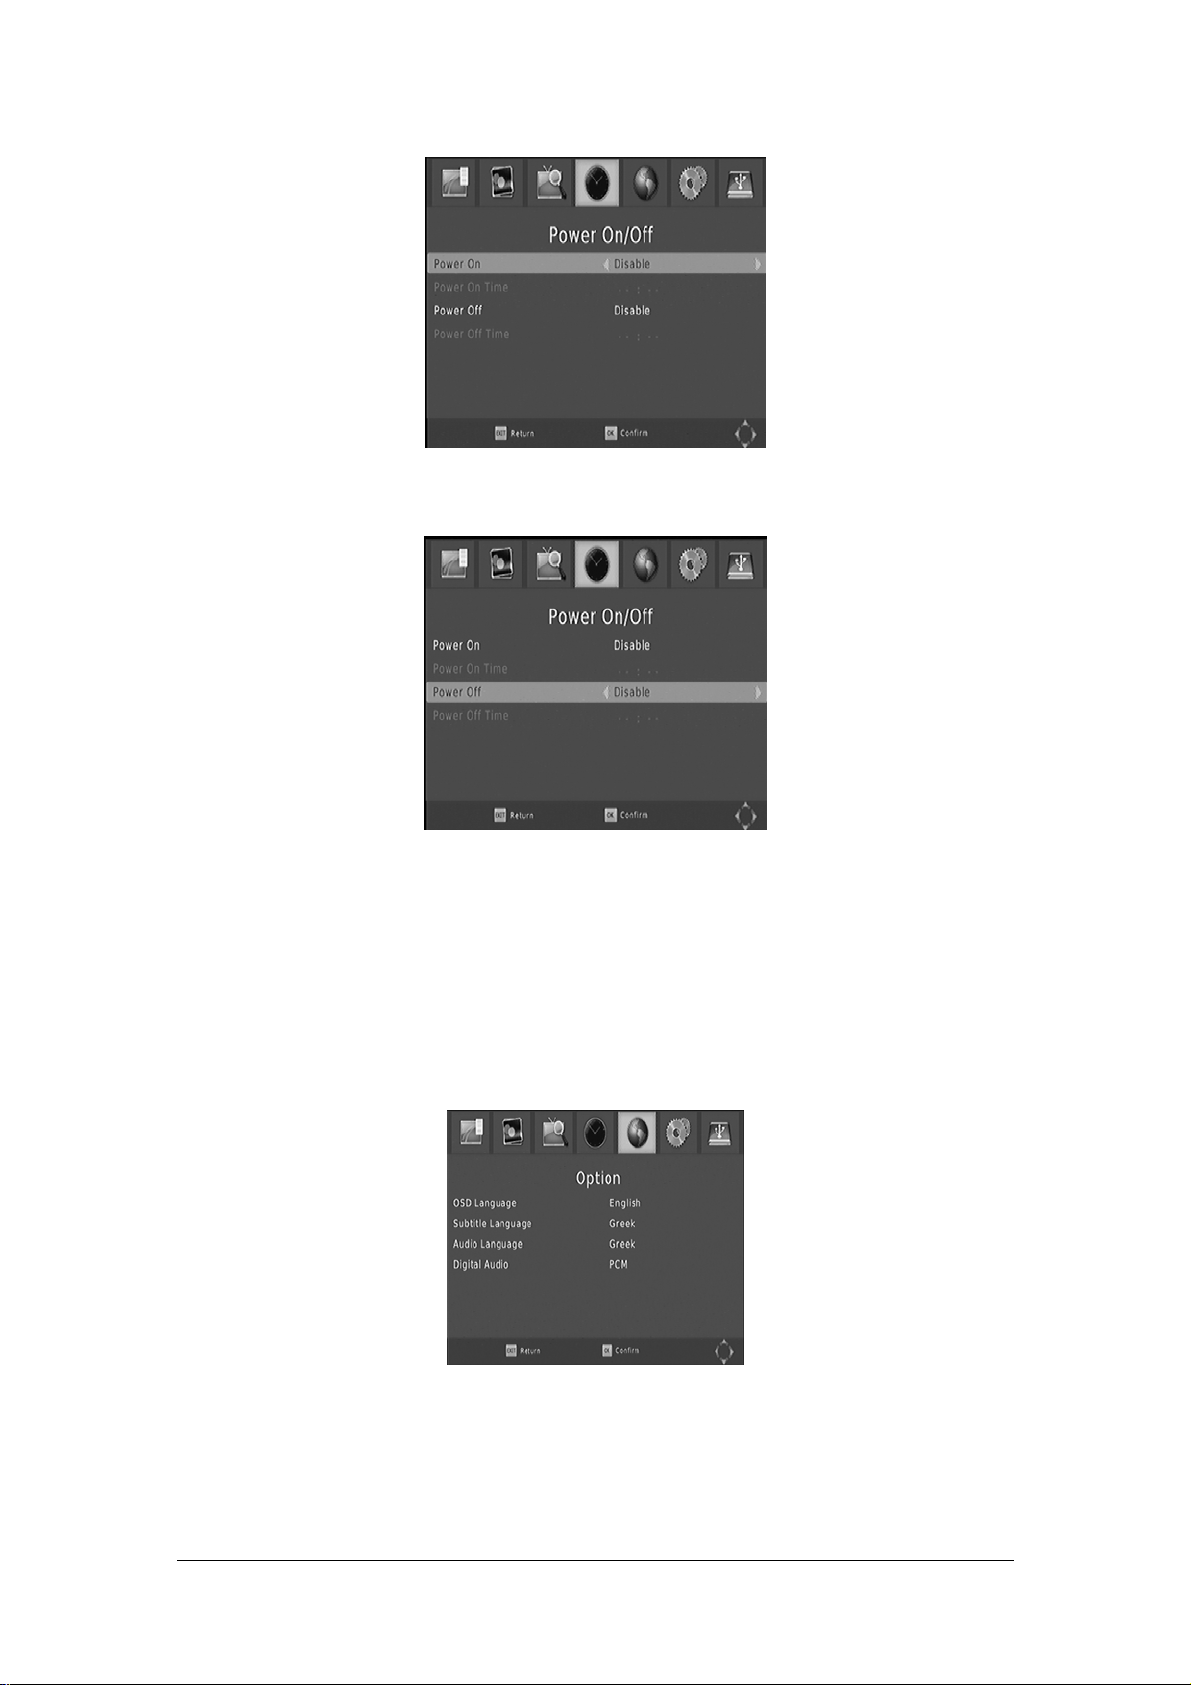
Please set Power On and Power Off as Enable, then move the cursor to set Power On/Off
Time.
After all the settings are made, this screen will appear. Press the OK button to exit
Option
To access the Menu, press MENU and select [Option] using the RIGHT/LEFT keys. The menu
provides options to adjust the OSD Language,Subtitle Language and Audio Language.
Select an option and press RIGHT/LEFT to adjust the setting.
Press EXIT to exit the Menu
OSD (On screen Display) Language
Select an OSD lang
Subtitle Language
Select the preferred subtitle langu
uage
age
14
Page 16
Audio Language
Select the preferred audio
language for watching TV channels.
If the language is not available, the default language will be selected
Digital Audio
m
If no sound from audio a
plifier which connected to coaxial you can change this setting.
System Setting
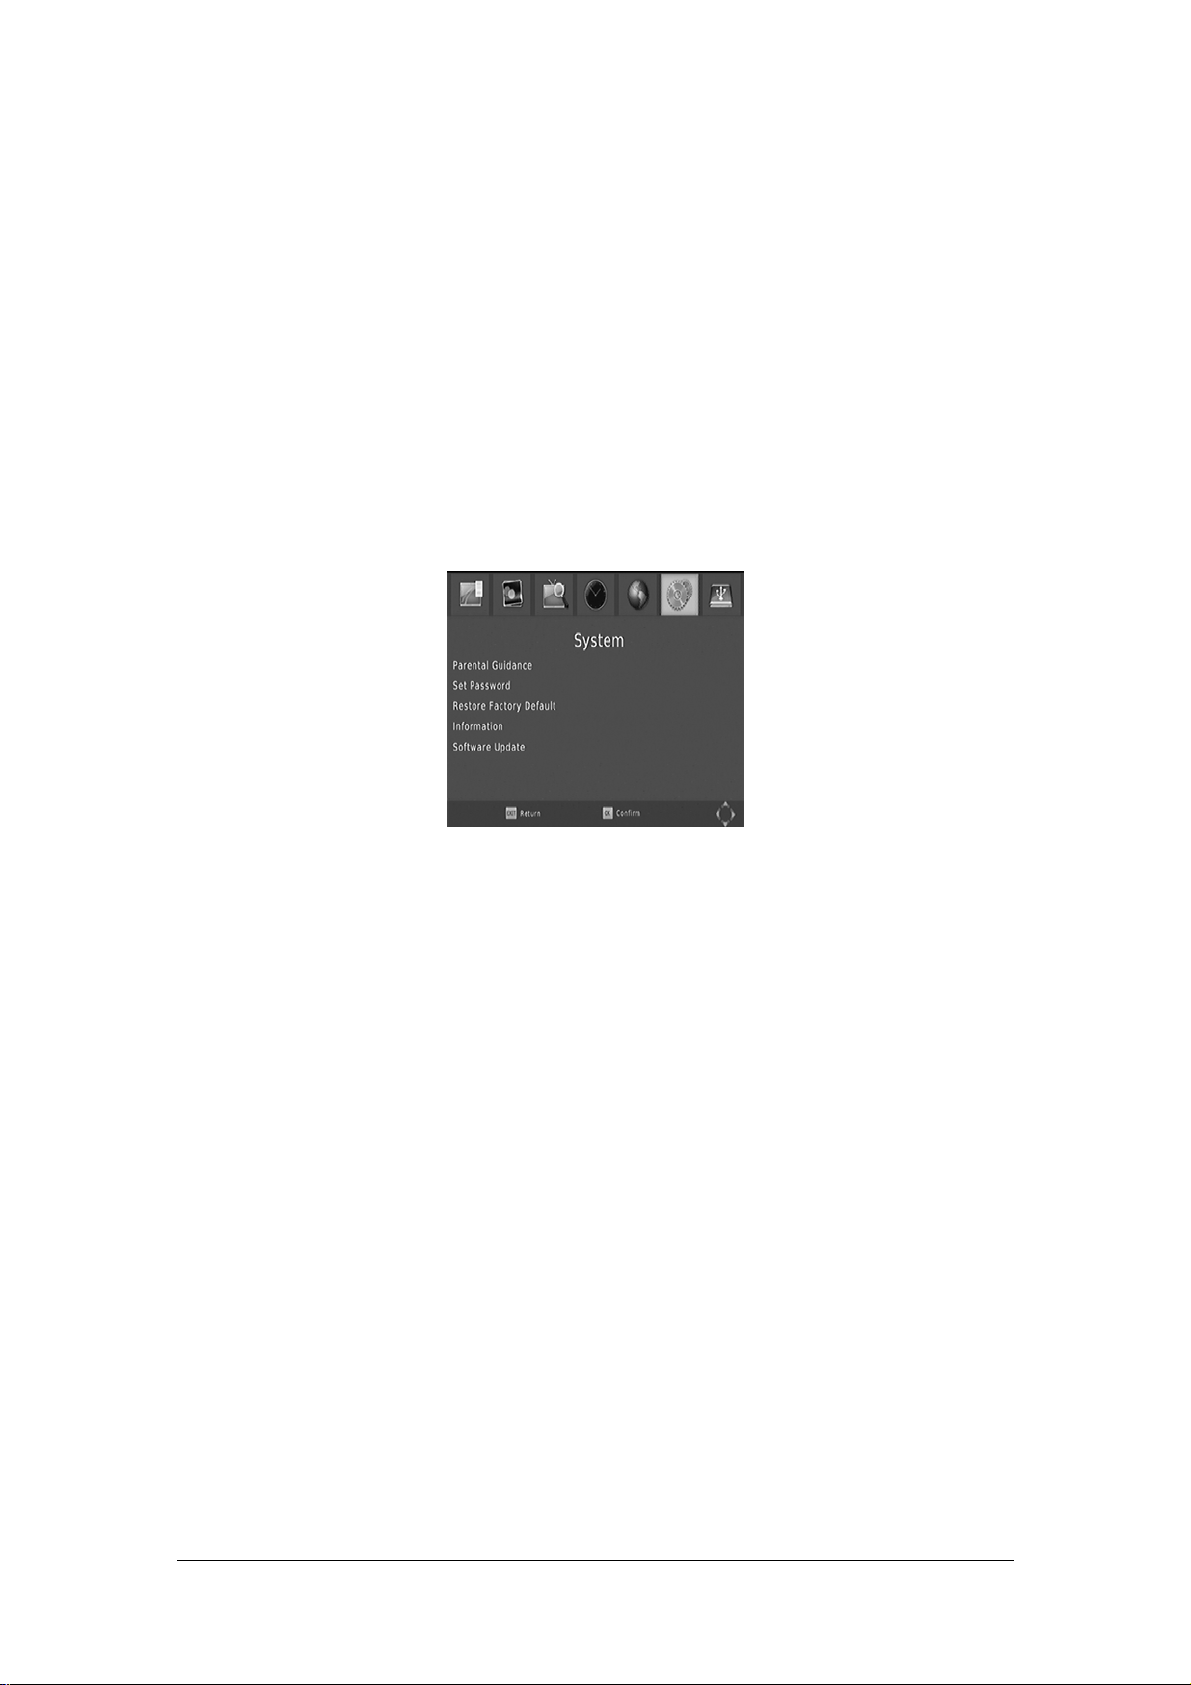
To access the Menu, press MENU and select [System] using the RIGHT/LEFT keys. The
menu provides options to adjust the system settings.
Press the UP/DOWN key to select an option and press RIGHT/LEFT to adjust the setting.
Press EXIT to exit the Menu.
Parental Guidance
Set the age for pa
rental control.
Set Password
Set or chang
e the password for locked programs. Enter your old password or the default
password '000000'. You will then be asked to enter your new password. Press OK button to
confirm your new password.
Once it is confirmed, press EXIT to exit the Menu. The master unlock password is '888888'
Restore Factory Default
set your S
Re
et Top Box to the Default Factory Settings.
In Main Menu, select [Restore Factory Default] using the RIGHT/LEFT keys and press OK or
RIGHT to select. Enter your password or the default password '000000' and press OK to
confirm. This option will delete all preset channels and settings. The master unlock password
is '888888.'
Information
ew model, hardware and software information.
i
V
Software upgrade
ade the software by this menu.
Upgr
15
Page 17
USB
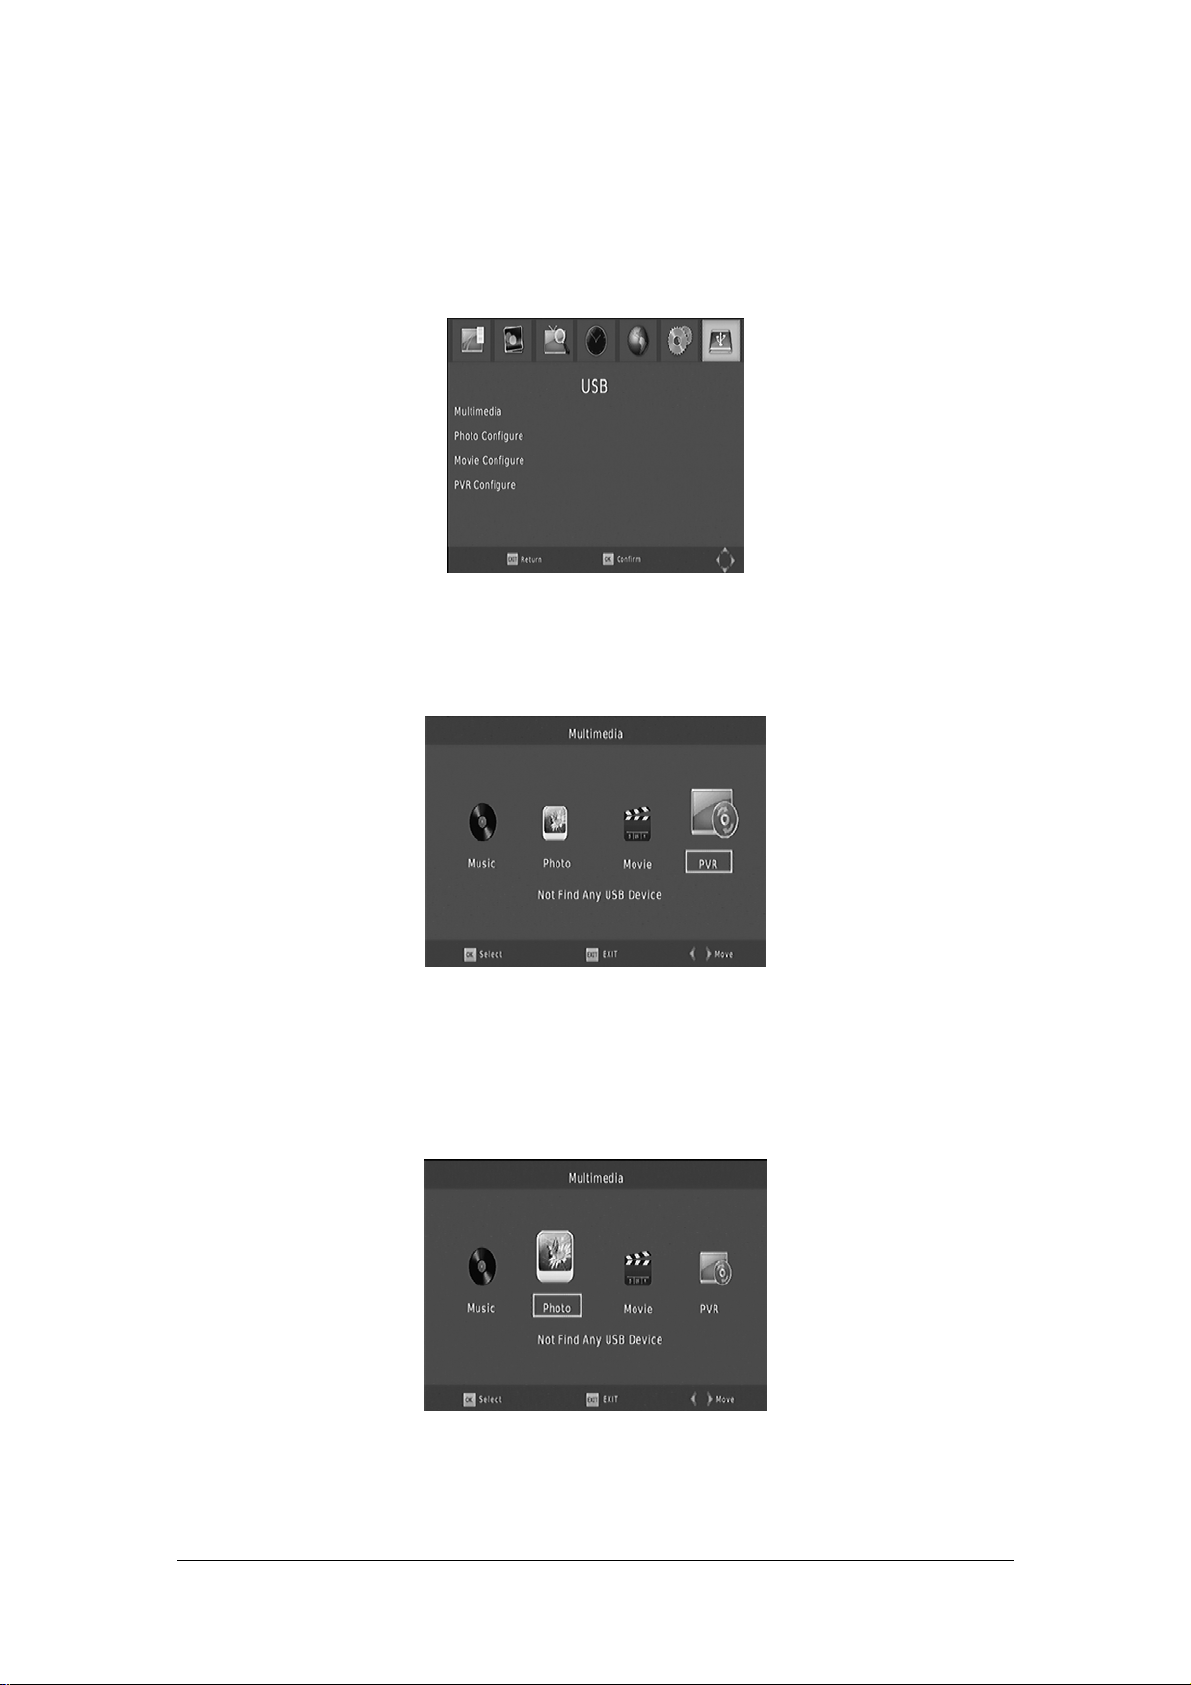
To access the Menu, press the MENU button and select [USB] using the RIGHT/LEFT keys.
The menu provides options to playback Music, Photo and Multimedia files.lt can support AVl,
MP3, WMA, JPEG and BMP formats.
Multimedia:
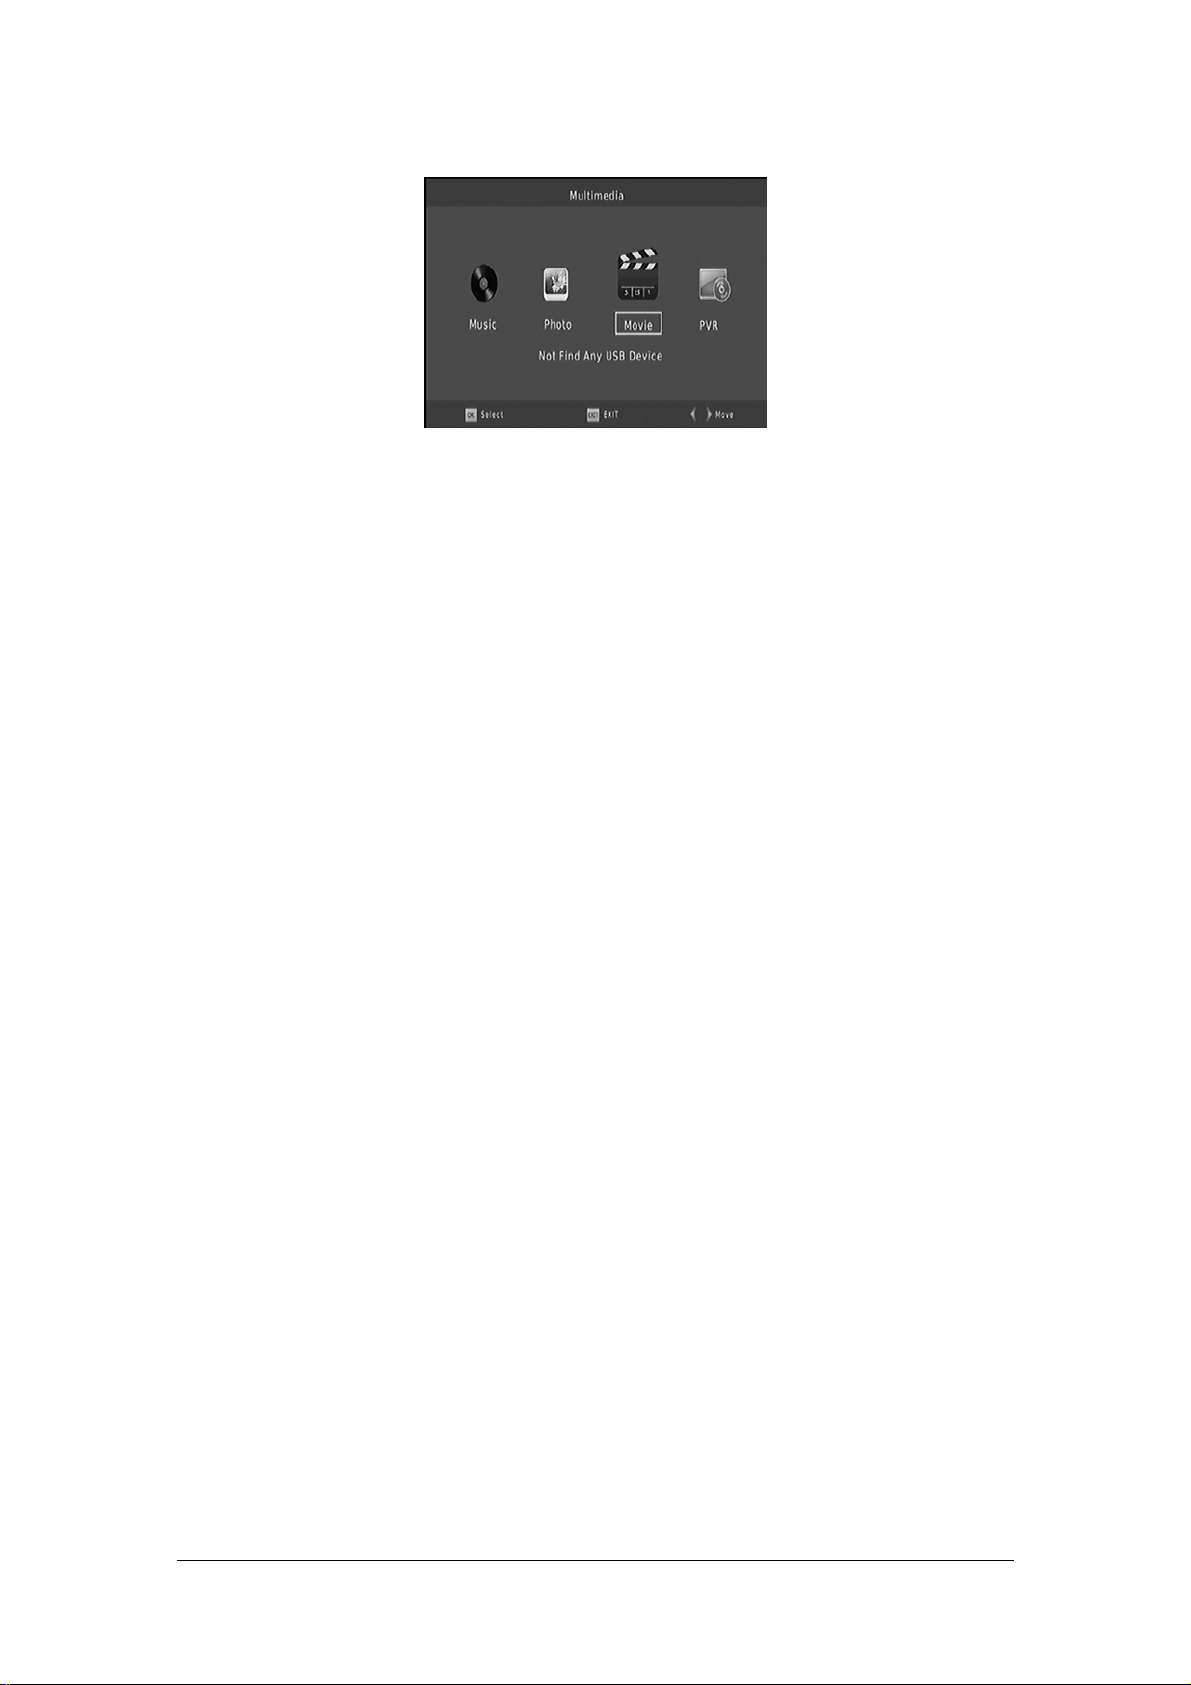
When a USB device i
this menu using the RIGHT/LEFT keys and OK to select. If a USB device is not connected, the
warning message "No USB device is Found" will appear.
s attached you can select from the Music Photo, Movie or PVR options in
Photo configures:
T
Slide
ime: Adjust slide show interval to 1~8 seconds
Slide Mode: Adjust slide show effect in mode of 0-59 seconds or random
Aspect Ratio:
[Keep]: Play picture in its original aspect
[Discard]: Play picture in full screen mode.
16
Page 18
Movie Configure
Subtitle Specific:
Select the subtitle size. Available settings are Small, Normal and Big
Subtitle BG:
Select the subtitle background color . Available settings are Transpa rent, Gray
Yellow, Green and White.
Subtitle Font Color:
Select the subtitle font color. Available settings are White, Black, Red, Blue and Green
USB PVR Configure:
d Device:
cor
Re
Displays information of the connected USB storage device.
Format:
Formats the connected USB device. (ATTENTION IT WILL DELETE ALL FILES!)
The most unique feature of the STB is its ability to record live TV. There are two ways you can
do this. The first is to simply connect a USB storage device to your STB and press the record
button on the remote. The other way is to schedule a program to record using the blue button
or from within the EPG menu.
To schedule a recording follow the below steps:
Press the blue
button on the remote
Press the red button to add a schedule.
Adjust the settings according to the schedule of the event.
(Start-End time, record/view, etc.
Press OK button
Press EXIT button
You will be able to select from the following two options:
.Mode: View or Record
If at any time you wish to delete a Scheduled event, you can press the blue button to view the
list of scheduled events. Use the arrow keys on the remote to highlight the event you wish to
delete then press the blue button to delete it.
17
Page 19

The recording files can be deleted on this unit, you can go to the PVR, and press yellow button
to delete it. The TV program is recorded to file at .PVR format, which can be played back on
this unit and PC using a suitable player, but cannot be played back on DVD or PDVD
When recording to USB stick or external hard disc on this model, you have to wait a few
seconds before pushing rec. after inserting the media. Otherwise the unit can freeze in the
signal. If that happens, then please take off power and connect again to fix this.
Note:
We cannot guarantee compatibility (operation and/or bus power) with all USB mass
storage devices and assume no responsibility for any loss of data that may occur
when connected to this unit.
With large amounts of data, it may take longer
for the system to read the contents of a
USB device.
Some USB devices may not be properly recognized.
Even when they are in a supported format, some files may not play or display
depending on the content
Please use external Ac-DC power adapter if the USB device current consumption
larger than 500mA.
Timeshift
Press [Timeshift/Pause] key first, then at any time you can press [Play] key, the unit will start
playing recorded program from the start.
Press [Goto] to select playing time, play time cannot exceed the current time
Press [Fast forward]/[Fast back] to move through current recording
Note: Time shifting is only available when USB HDD is connected to system and
read/write speed is high enough to support that
Press [Stop] key first time to end the playing mode. The unit will keep recording but will return
to current time. If you press [Pause] the playback will start again from the beginning of the
18
Page 20
recording. Press [Stop] key again to stop the recording.
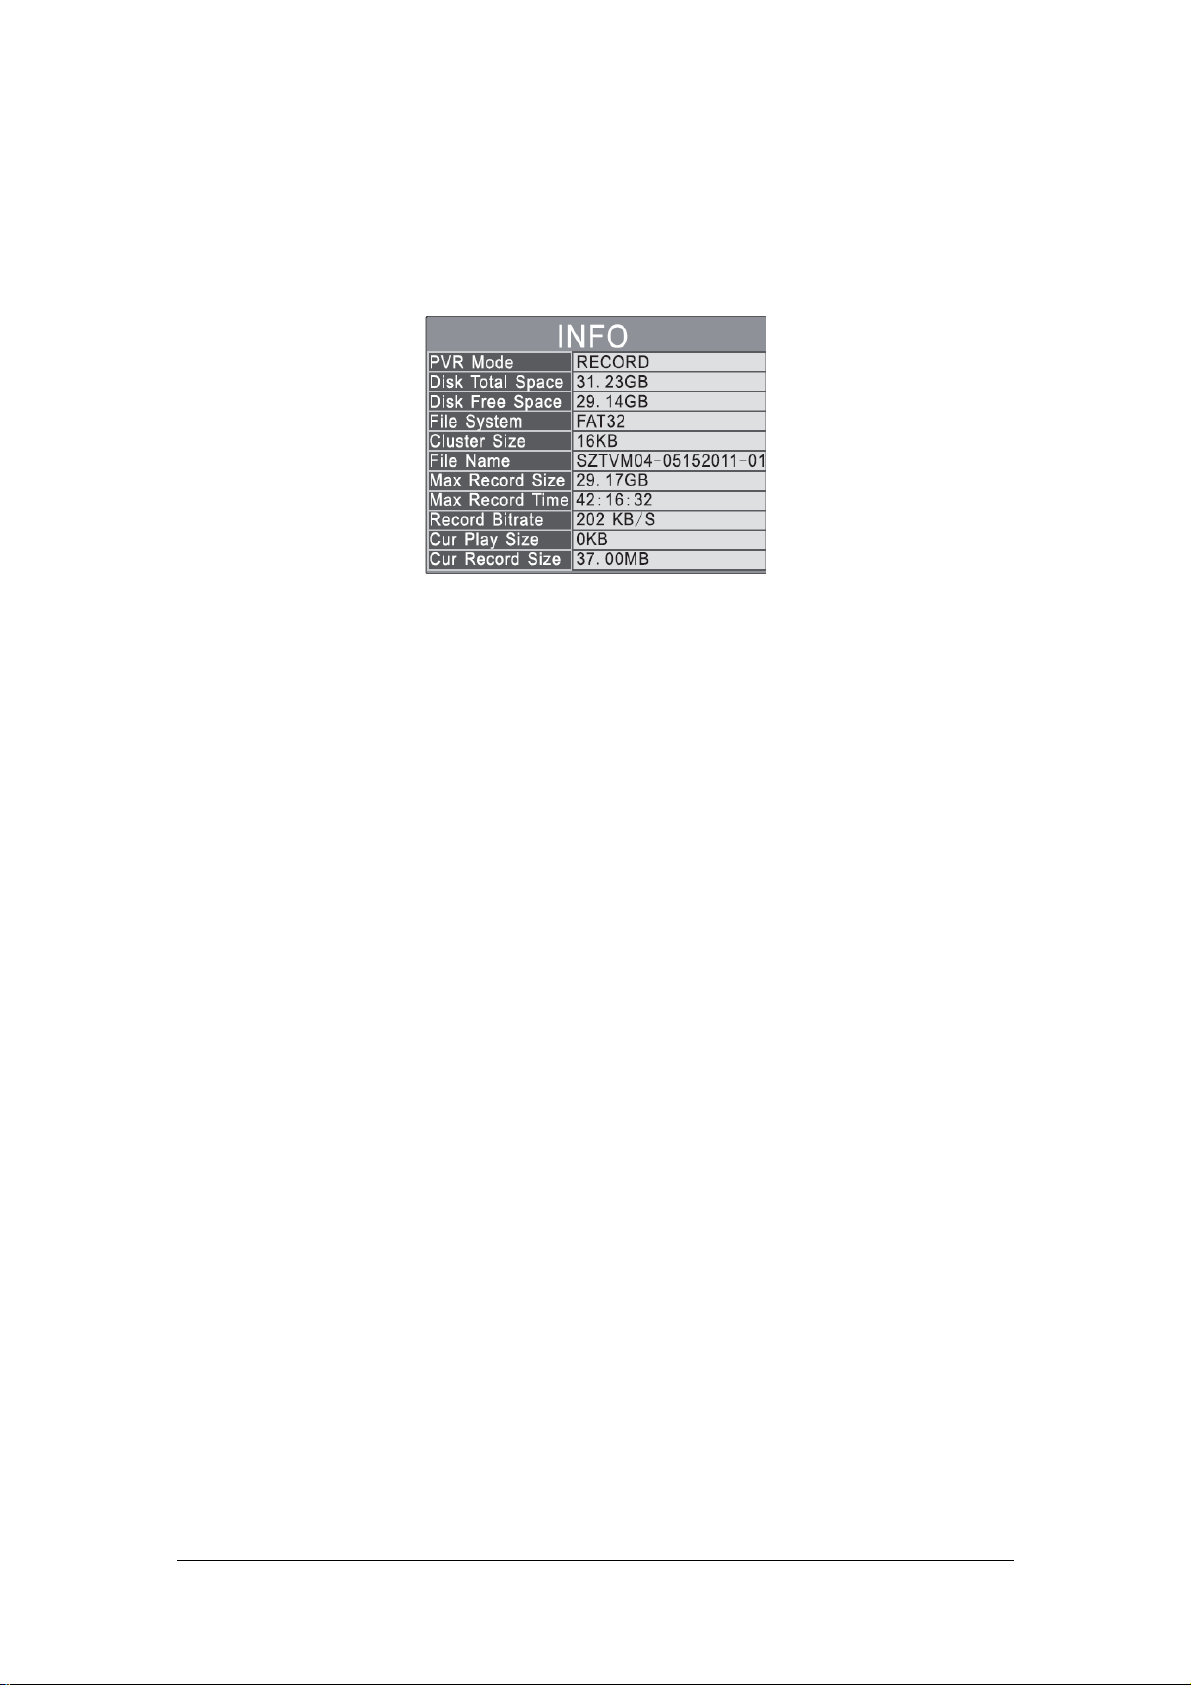
Recording
Press [REC] key can record cu
rrent program to USB disc. Press [REC] repeatly to choice
recording time. Press [INFO] key to see recording information during recording as below:
Press [PVR] key to open the PVR file list. You can select recorded file and press [OK] to play
the file
19
Page 21
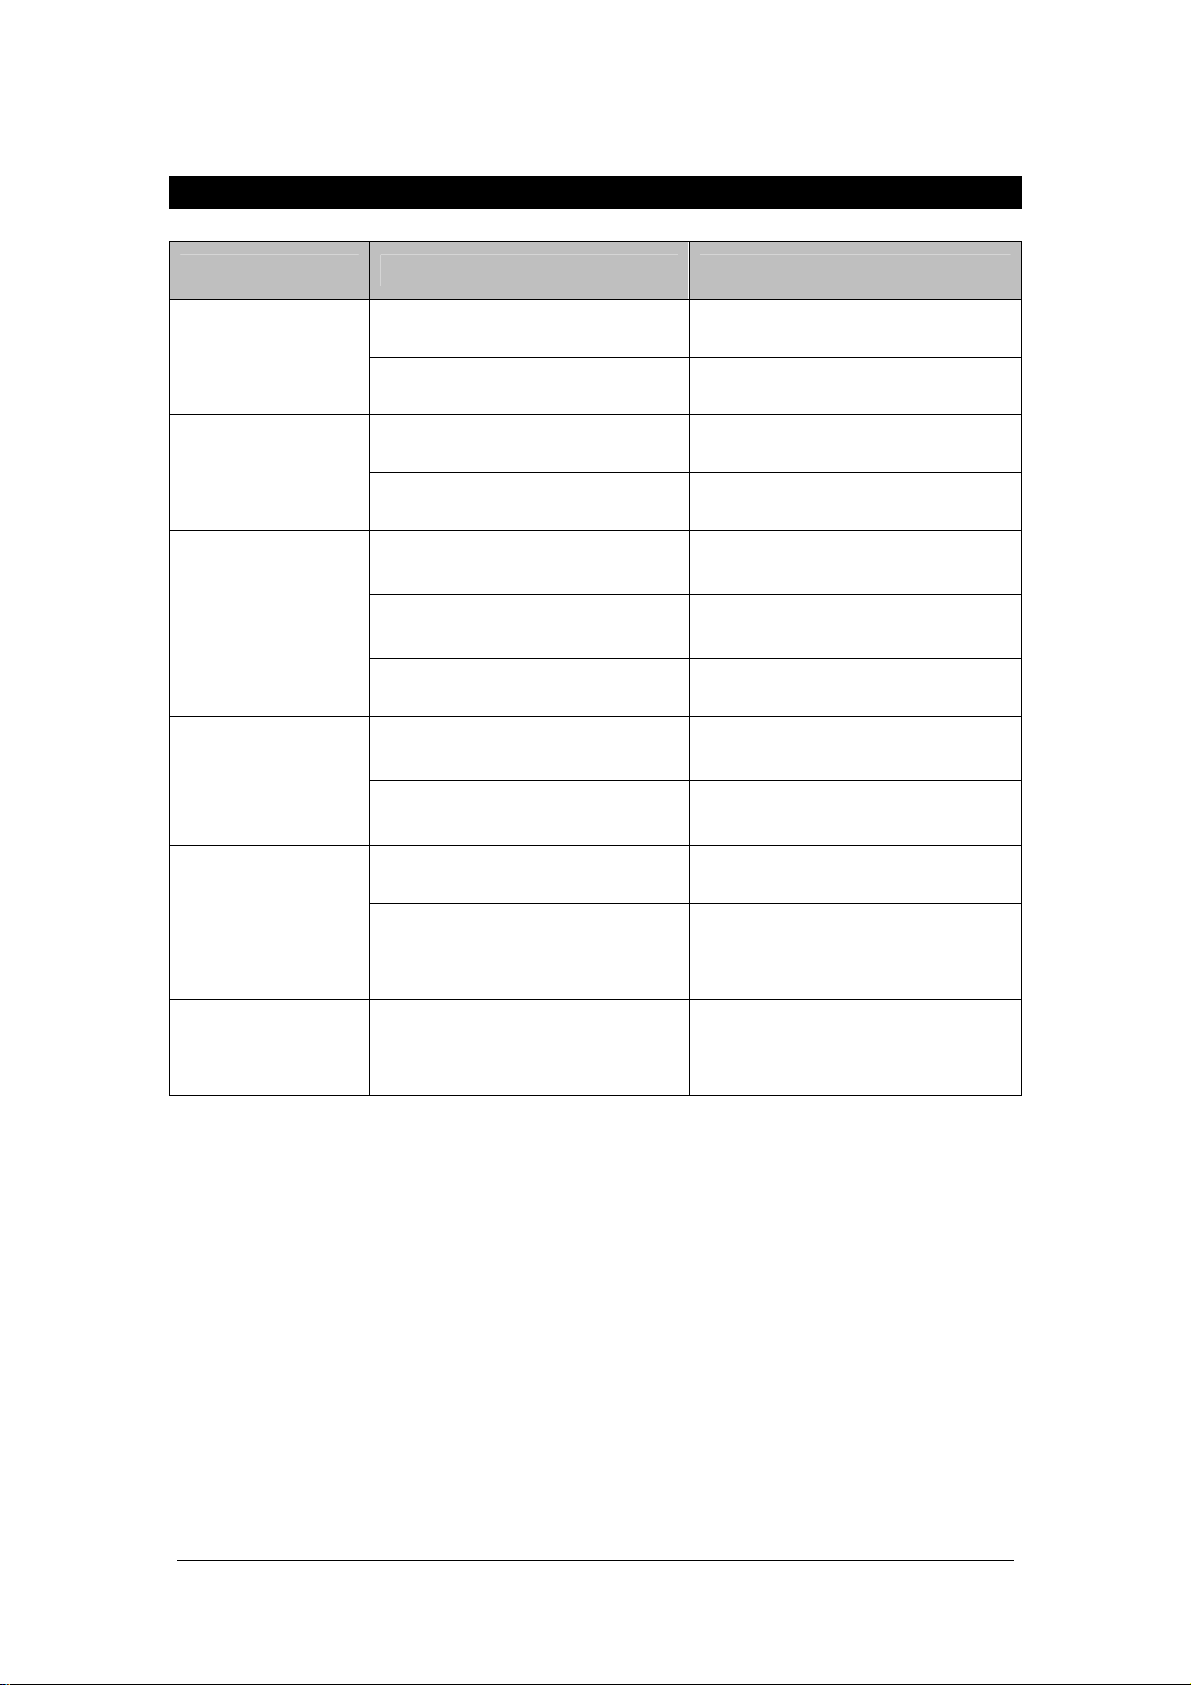
TROUBLESHOOTING
PROBLEM POTENTIAL REASONS WHAT TO DO
Power isn't connected Connect the power
No picture
The power switch is not on Switch on the power
Screen shows "No
Signal'"
Not connect DVB-T cable Plug in the DVB-T cable
Incorrect setting Set up correct parameter
No or incorrect connection with
audio cable
No sound from
speaker
Mute the sound
Incorrect sound track Try another sound track
No or incorrect connection with
Only sound, no
AV cable.
image on the
screen
The program is a radio program
The battery is exhausted Change new battery
Remote control is
not workable
Remote control unit is not in the
right opposite of the front panel or
too far from it
The image stop
suddenly or
The signal is too weak Strengthen the signal
mosaic
Connect the audio cable correctly
Switch on the correct Volume
control
Connect the video cable correctly
Press<TV/RADIO> key to Shift into
TV mode.
Adjust the way of holding remote
control unit and get near to the
panel.
20
Page 22
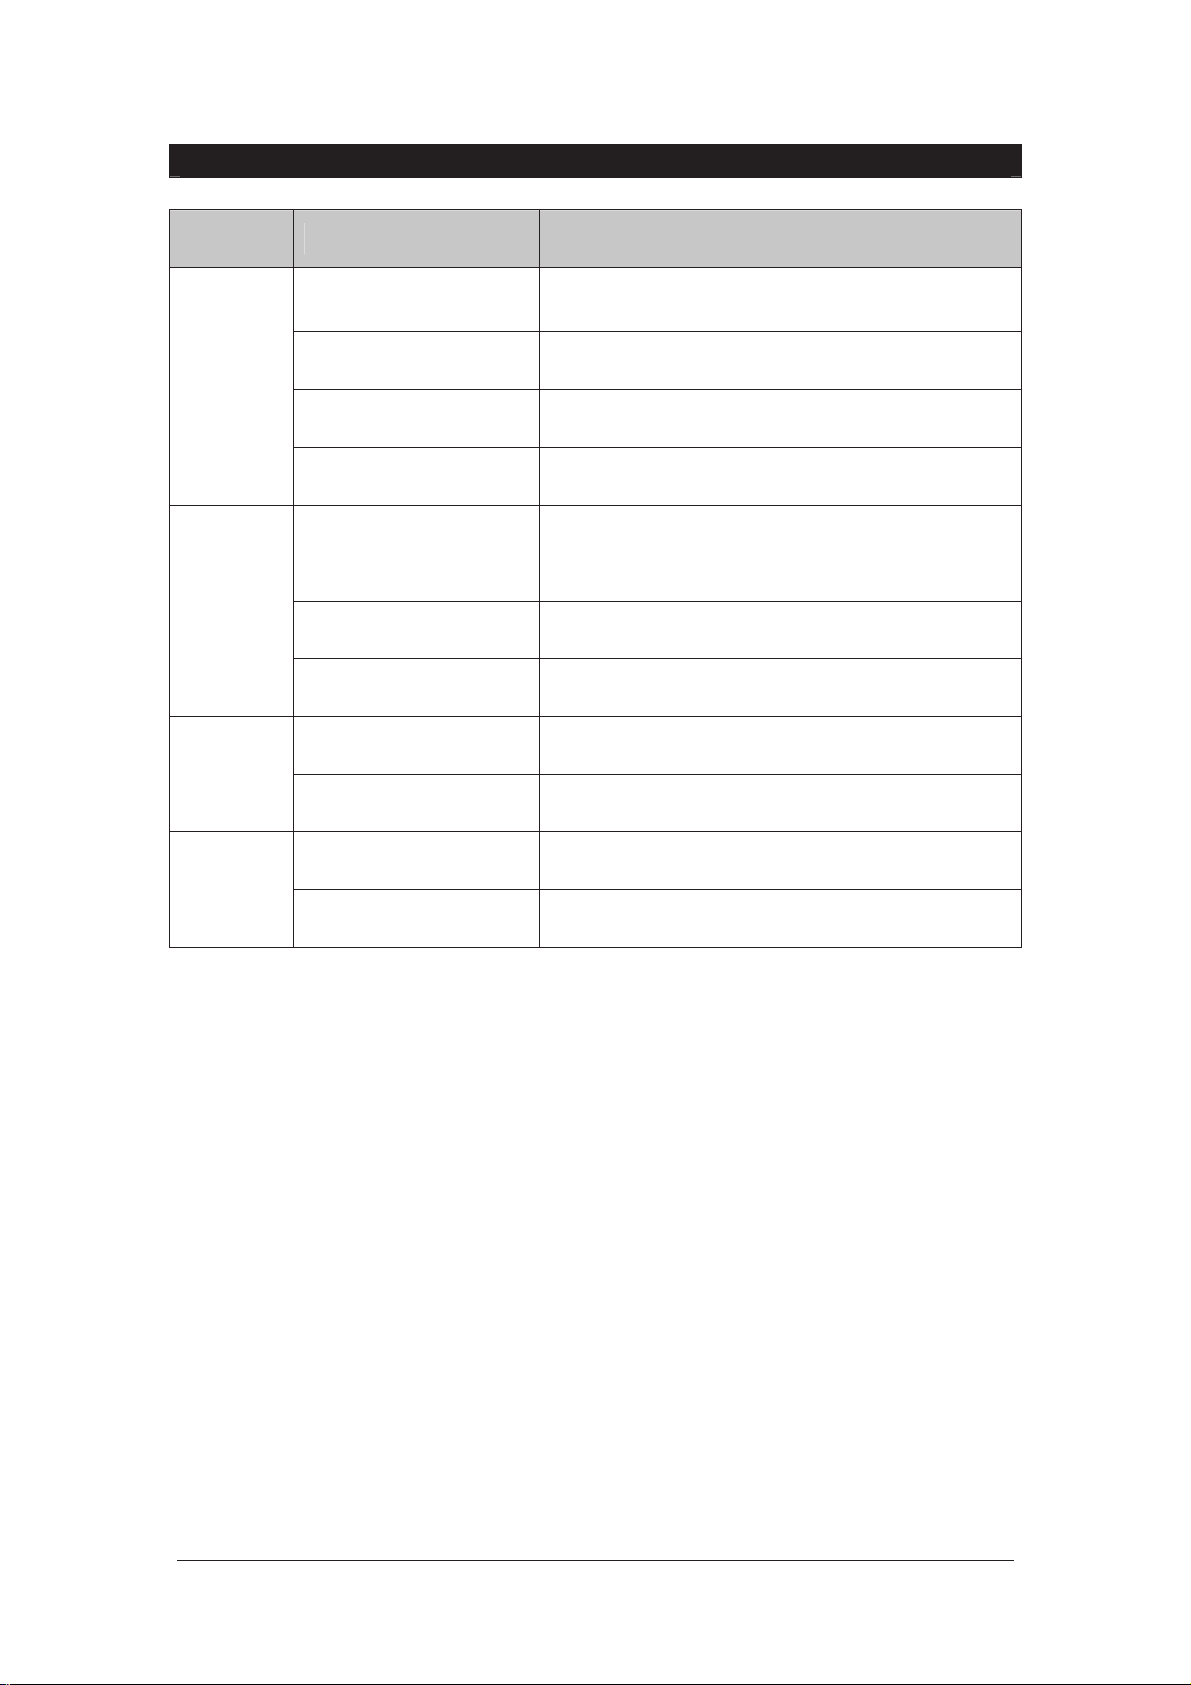
TECHNICAL SPECIFICATION
ITEM SUB ITEM PARAMETER
Tuner
Video
Audio
Power
Input Frequency
170~230 MHz
470~858 MHz/
RF Input level -20~-80dBm
IF Bandwidth 7MHz,8 MHz
Modulation QPSK, 16QAM, 64QAM
MPEG-2(ISO/IEC 13818-2)
Decoder Format
MPEG-4(ISO/IEC 14496)
H.264 (ISO/IEC 14496-10)
Output Format 480i/480p/576i/576p/720p
Output Port SCART,
Decoder Format MPEG-1&MPEG-2(layer1&layer2),AAC
Audio output SCART, Coaxial
Voltage DC 5V 2A
POWER Max 10 W
21
Page 23

Noce about recycling
Your product is designed and manufactured with high quality materials and components which can be
recycled and reused.
This symbol means that electrical and electronic equipment, at their end-of-life, should be
disposed of separately from your household waste.
Please dispose of this equipment at your local community waste collecon/recycling ce
In the European Union there are separate collecon systems for used electrical and
electronic products. Please help us to conserve the environment we live in!
ntre.
Declaraon of Conformity
This product complies with the requirement of below direcves:
EMC Direcve: 2004 / 108 / EC
Low Voltage Direcve (LVD): 2006 / 95 / EC
ErP Direcve: 1275/2008/EC
Restricon of Hazardous Substance (RoHS) Direcve: 2002/95/EC
EXCLUSIVE IMPORTER IN GREECE:
Amiridis – Savidis S.A.
33, Vas. Olgas Street – P.C. 54641 – Thessaloniki, Greece.
Tel: +30 2310-850107, 2310-850108, Fax: +30 2310-867835
45 Posidonos St. – P.C. 18344 – Moschato, Athens, Greece
Tel: +30 210 9402064, Fax: +30 210 9402137
www.amiridis-savvidis.gr
22
 Loading...