

Page 1
1
USER’S MANUAL
LED TV FL28101
Read this manual carefully and retain it for future reference
Page 2

2
TABLE OF CONTENTS
1. Safety instructions ............................................................................................................. 3
2. TV ASSEMBLY AND CONNECTION ................................................................................ 5
2.1 TV Bracket Assembly ................................................................................................ 5
2.2 TV Button and Terminal Interface .............................................................................. 6
2.3 External Device Connection Diagram ....................................................................... 7
2.4 Installing and Connecting the TV .............................................................................. 8
2.5 TV Stand Installation Instruction ................................................................................ 8
3 REMOTE CONTROL ....................................................................................................... 9
4. TV OPERA TION AND SYSTEM SETUP........................................................................... 11
4.1 Picture Menu ...........................................................................................................13
4.2 SOUND Menu ..........................................................................................................15
4.3 APPLICA TIONS .......................................................................................................17
4.4 PREFERENCES ......................................................................................................23
4.5 SET UP ....................................................................................................................25
4.6 HOTEL MODE SETTINGS ......................................................................................28
4.7 How to user Record .................................................................................................30
4.8 How to user Time shift .............................................................................................35
5. MEDIA OPERATION ........................................................................................................39
5.1 Photo .......................................................................................................................40
5.2 Movie .......................................................................................................................41
5.3 Music .......................................................................................................................42
5.4 Setup .......................................................................................................................43
6. Troubleshooting ................................................................................................................44
Page 3
3
1. Safety instructions
Welcome
Congratulations! You now own one of the most state of the art and technologically advanced
high definition television products available. In order to set it up as easy as possible, we w ould
like to familiarize you with the features and functions of this special product. Please read this
user’s manual carefully and thoroughly and keep in a safe place for future reference.
We thank you for your business and hope you enjoy this product.
Caution
This symbo l is intended to alert t he
user to the presence of not insulated
“dangerous voltage” within the
product’s enclosure that may be of
sufficient magnitude to constitute a risk of electric
shock to persons.
This symbo l is intended to alert t he
user to the presence of important
operating and maintenance
(servicing) instructions in the
literature accompanying the appliance.
CAUTION: TO REDUCE THE RISK OF ELECTRIC
SHOCK, DO NOT REMOVE COVER (OR
BACK), NO USER-8ERVICEABLE PARTS
INSIDE.REFER SERVICING TO
QUALIFIED SERVICE PERSONNEL
CAUTION
-
TO PREVENT DAIMAGE WHICH MAY
RESULT IN FIRE OR SHOCK HAZARD
-DO NOT EXPOSE THIS APPLIAN CE TO RA I N
OR MOISTURE.
-SHOCK HAZARD - DO NOT OPEN
CAUTION
These servicing instructions are for use by
qualified service personnel only. To reduce the
risk of electric shock, do not perform any
s
ervicing other than that contained in the
operating instruction unless you are qualified to
do so.
CAUTION
The stand is intended for use only with this TV.
Using it with other apparatus may result in
instability causing possible injury.
WARNING
- The apparatus shall not be exposed to dripping or splashing and no objects filled with liquids, such as
vases, shall be placed on the apparatus.
-This is a Class B product. In a domestic environment this product may cause radio interference in which
case the user may be required to take adequate measures.
To reduce the risk of fire and electric shock, do not expose this product to rain or moisture.
FCC NOTICE
This device has been tested and found to comply with the limits for a Class B device, pursuant to Part 15
of the FCC Rules. These limits are designed to provide reasonable protection against harmful
interference in home environment as well as in a commercial, industrial or business environment. This
equipment can generate, use and emit radio frequency energy and, if not installed and used in
accordance with the instructions, may cause harmful interference to radio communications. However,
there is no guarantee that interference will not occur in a particular installation. If this equipment does
cause harmful interference to radio or television reception, which can be determined by tuning the
equipment off and on, the user is encouraged to try to correct the interference by one or more of the
following measures:
- Reorient or relocate the receiving antenna.
- Increase the separation between the equipment and receiver.
- Connect the equipment into an outlet on a circuit which is different form that to which the receiver is
connected.
- Consult the dealer or an experienced radio/TV technician for help.
- Changes or modifications not expressly approved by the party for compliance could void the user’s
authority to operate the equipment.
- Connecting of peripherals requires the use of grounded shielded signal cables.
RISK OF ELECTRIC SHOCK
DO NOT OPEN
Page 4
4
Always be careful when using your
television. To reduce the risk of fire,
electrical shock, and other injuries, keep
these safety precautions in mind when
installing, using, and maintaining your
television.
Read these instructions and keep
them in a safe place.
Heed all warnings.
Follow all instructions.
Do not use this apparatus near
water.
Do not block any of the ventilation
openings.
Install it in accordance with the
manufacturer’s instructions.
Do not install near any heat sources
such as radiators, heat registers,
stoves, or other apparatus
(including amplifiers) that produce
heat.
Do not defeat the safety purpose of
the polarized or grounding type plug.
A polariz ed plug has two blades with
one wider than the other. A
grounding type plug has two blades
and a third grounding prong. The
wide blade or the third prong is
provided for your safety. When the
provided plug does not fit into your
outlet, consult an electrician for
replacement of the obsolete outlet.
Protect the power cord from being
walked on or pinched particularly at
plugs, convenience receptacles,
and the point where they exit from
the television.
Only use the
attachments/accessories specified
by the manufacturer.
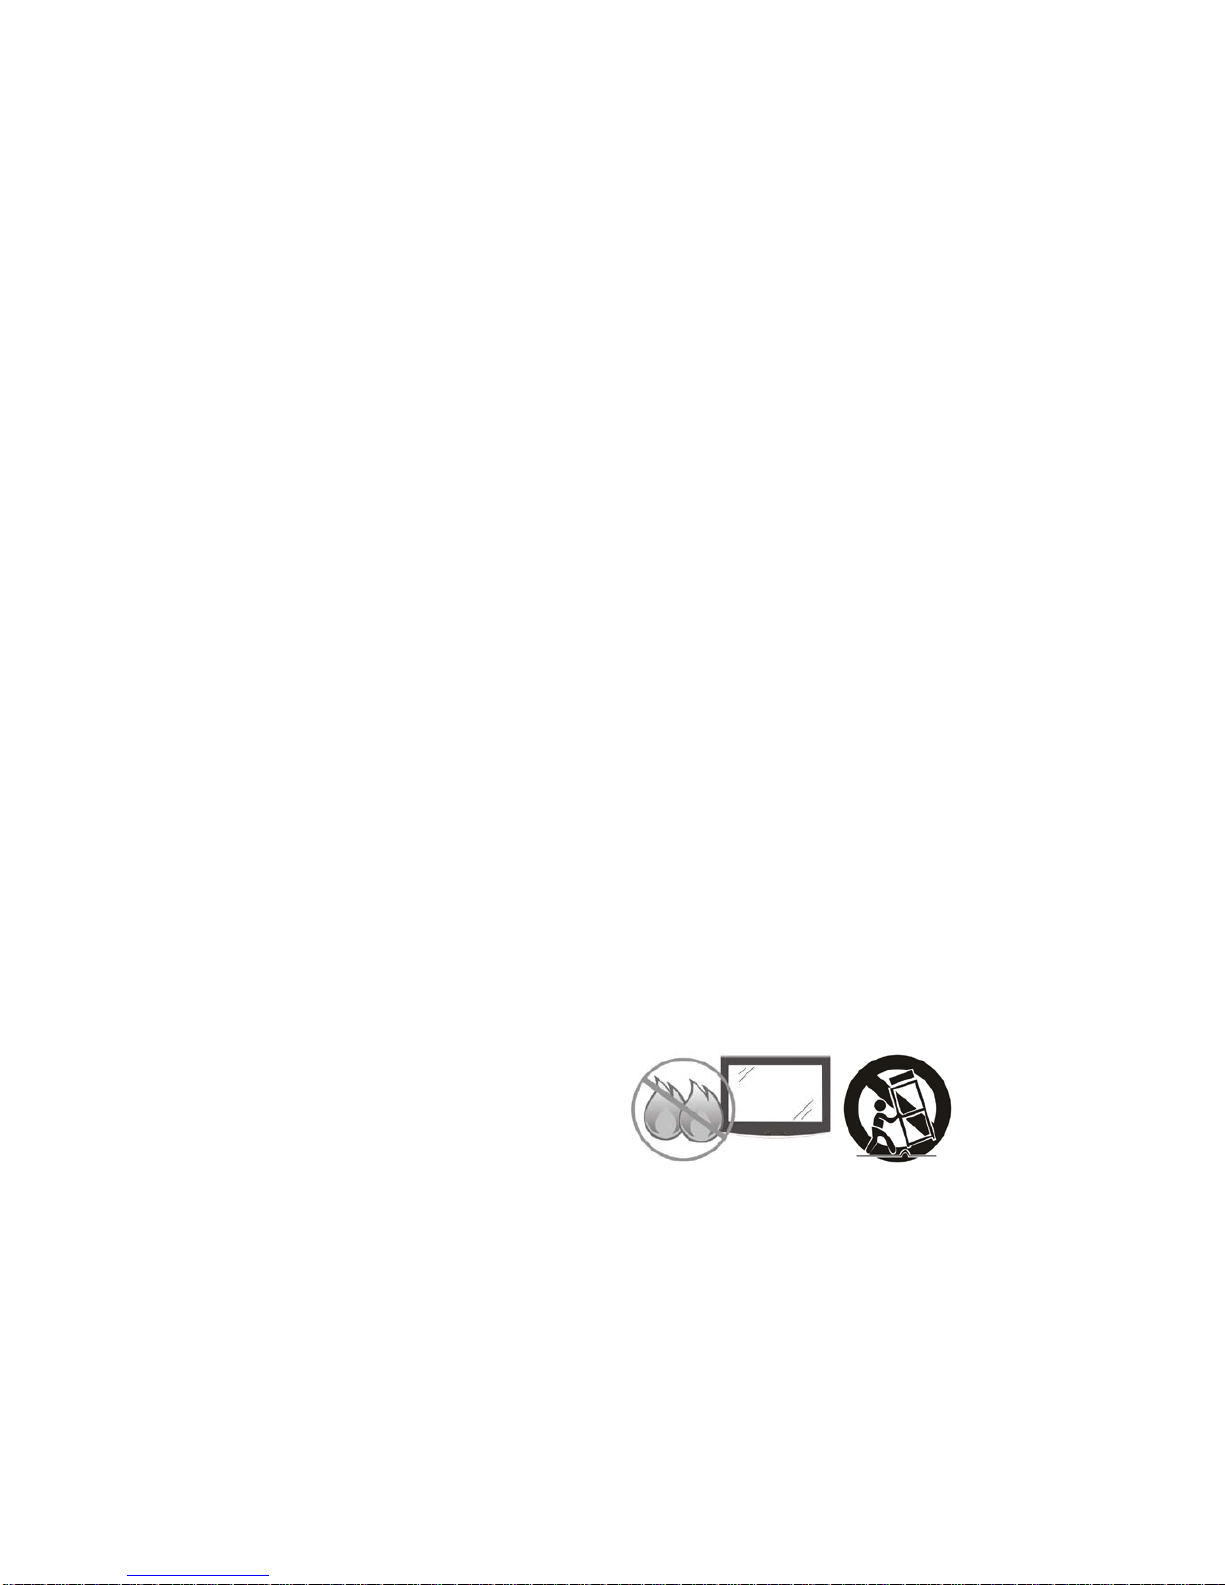
Use only with a cart, stand, tripod,
bracket, or table specified by the
manufacturer, or sold with the
television. When a cart is used, use
caution when moving the
cart/apparatus combination to avoid
injury from tip-over.
Unplug this television during
lightning storms or when it is not
going to be used for long periods of
time.
Refer all servicing to qualified
service personnel. Servicing is
required when the television has
been damaged in any way, i.e. when
the power supply cord or plug is
damaged, liquid has been spilled or
objects have fallen into the unit, the
Television has been exposed to rain
or moisture, does not operate
normally, or has been dropped.
Clean only with a lint free cloth.
Important Safety Precautions
Page 5
5
2. TV ASSEMBLY AND CONNECTION
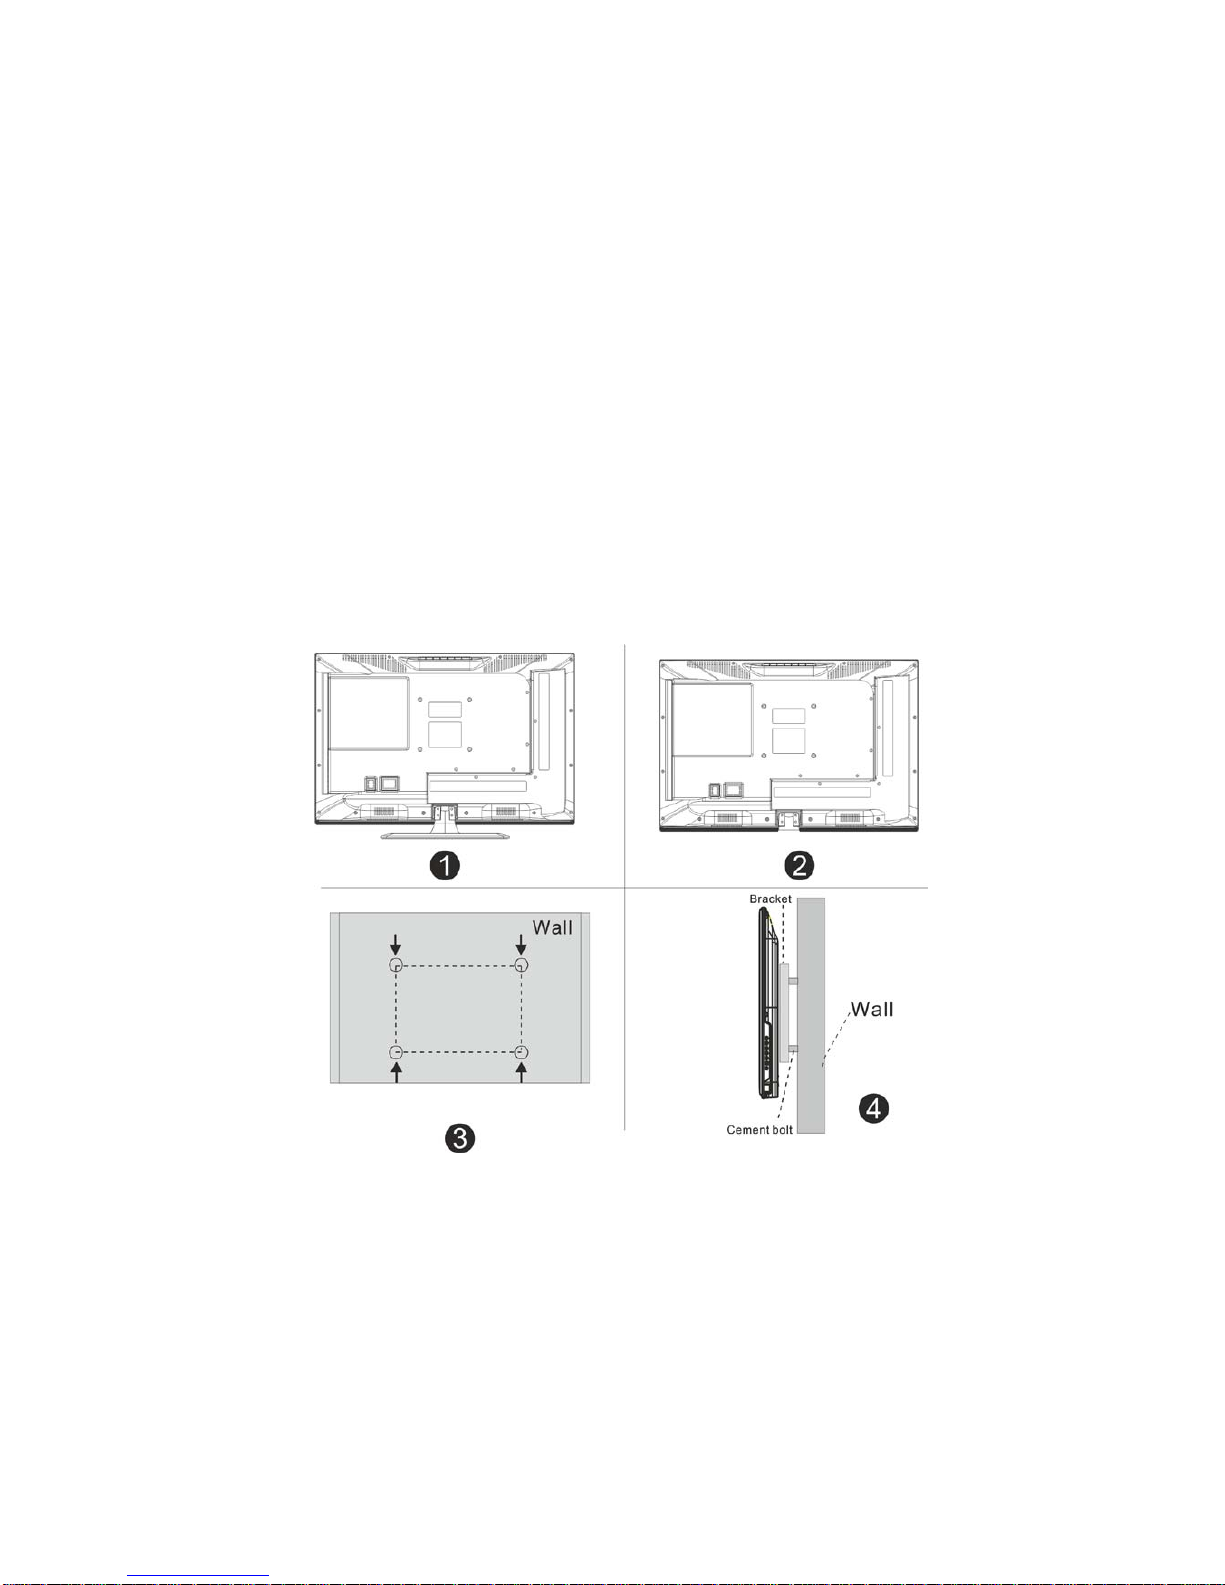
2.1 TV Bracket assembly
Fix the TV on the wall
1. First, put the TV on a table smoothly and put a soft cloth on the table to avoid
scratching the screen.
2. Use a screw driver to take off the screws which are fixed on the bottom stand (in
the direction of the arrow, refer to photo1). Then, remove the bottom stand
(please take off the screws and the bottom stand carefully).
3. Use a bracket which can fixed on the wall according to the size of the arrow
direction of photo 2 and photo 3.
4. Drill four holes properly on the wall (the size is onl y for reference) and put four
screws into them (optional parts).
5. As per step 4, use the screwdriver to fasten the screws on the back of the TV
and then hang the TV on the wall.
Note:
1. The bracket fixed on the wall is an optional part.
2. When you assemble the TV, there should be no other objects in front and
around it. Please keep a distance from other objects.
3. When assembling the TV, please fix it firmly in order to avoid any danger.
4. The fixing picture is only for reference.
5. Please follow the instructions of the user manual about the bracket assembly for
fixing the TV.
6. Attach the mounting bra c ket from the VESA compatible wall mounting kit.
Page 6
6
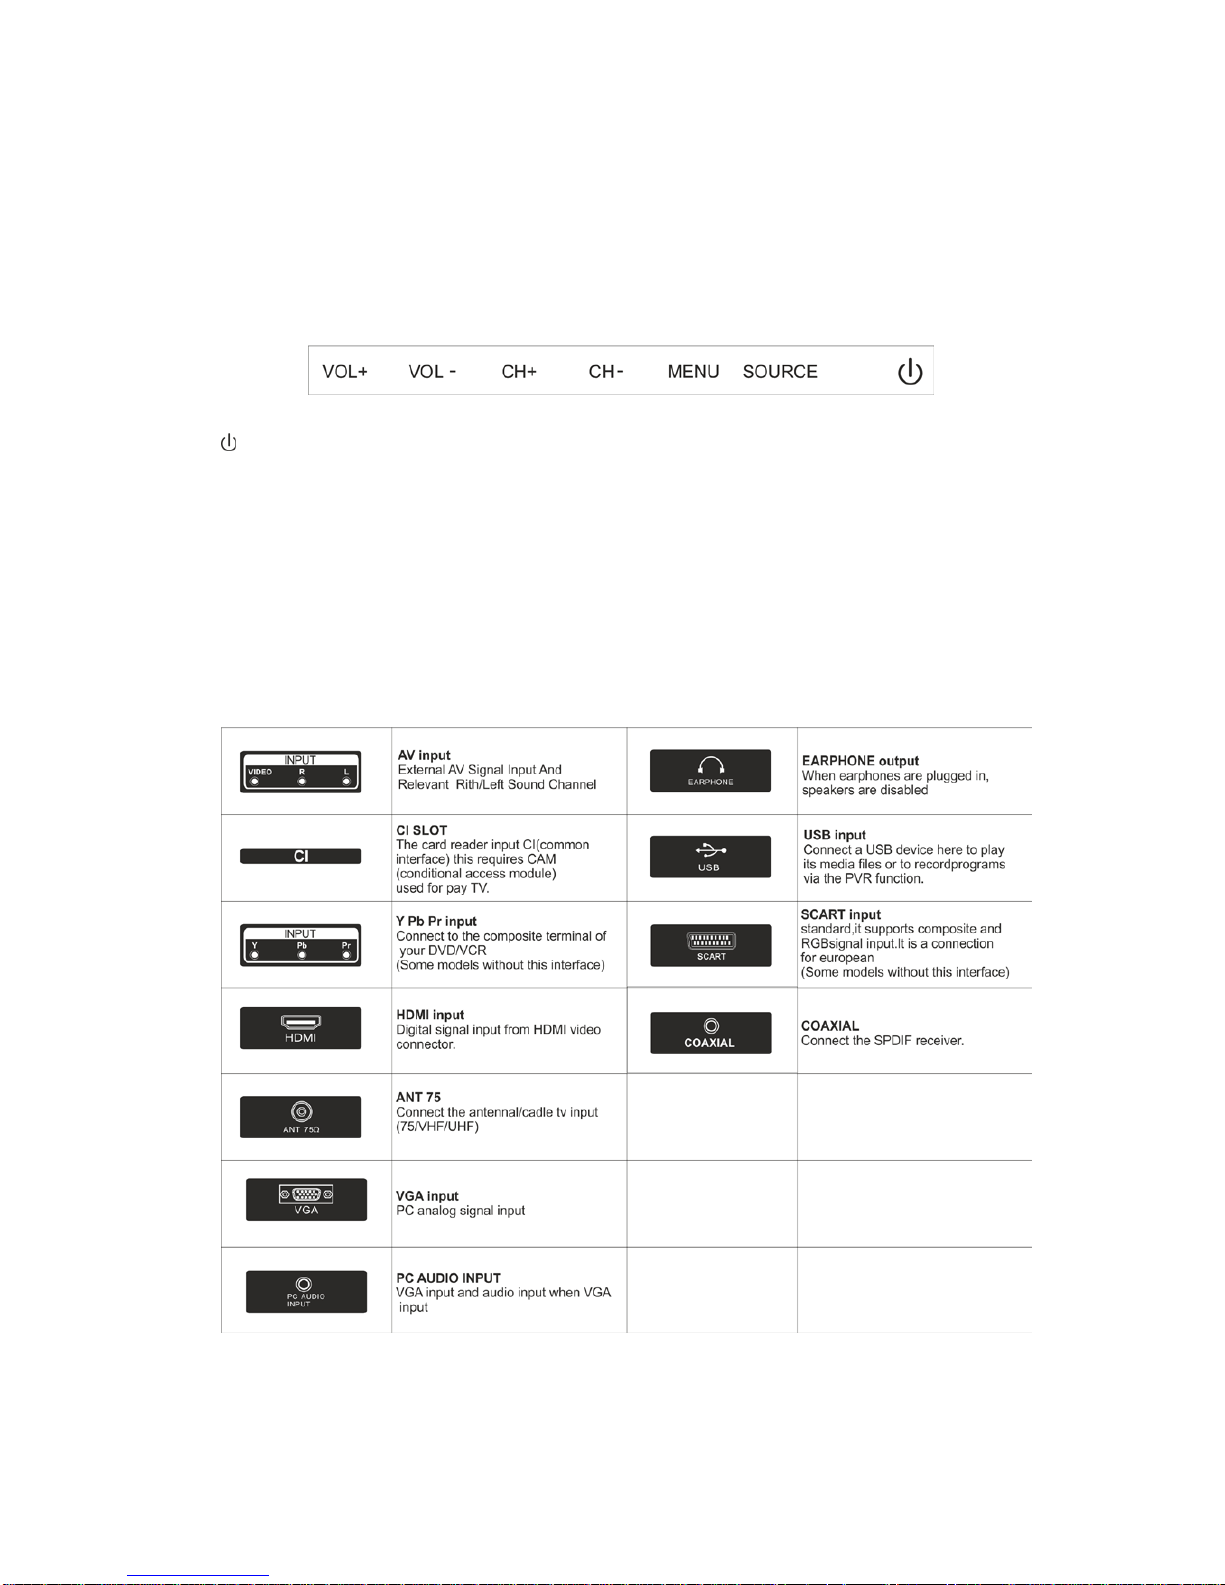
2.2 TV buttons and terminal interface
TV buttons
Note: The following picture is only functional schematic and the actual position and the
arrangement of different models may vary
.
: Turn ON/OFF Power.
SOURCE: External signal input selection.
MENU: Display main MENU and confirm MENU item selection.
CH+/-: Selecting channel.
VOL+/-: Adjusting volume.
Terminal Interface
Note: The following are the various terminal interfaces, the actual position and
arrangement in different models may vary.
.
Page 7
7
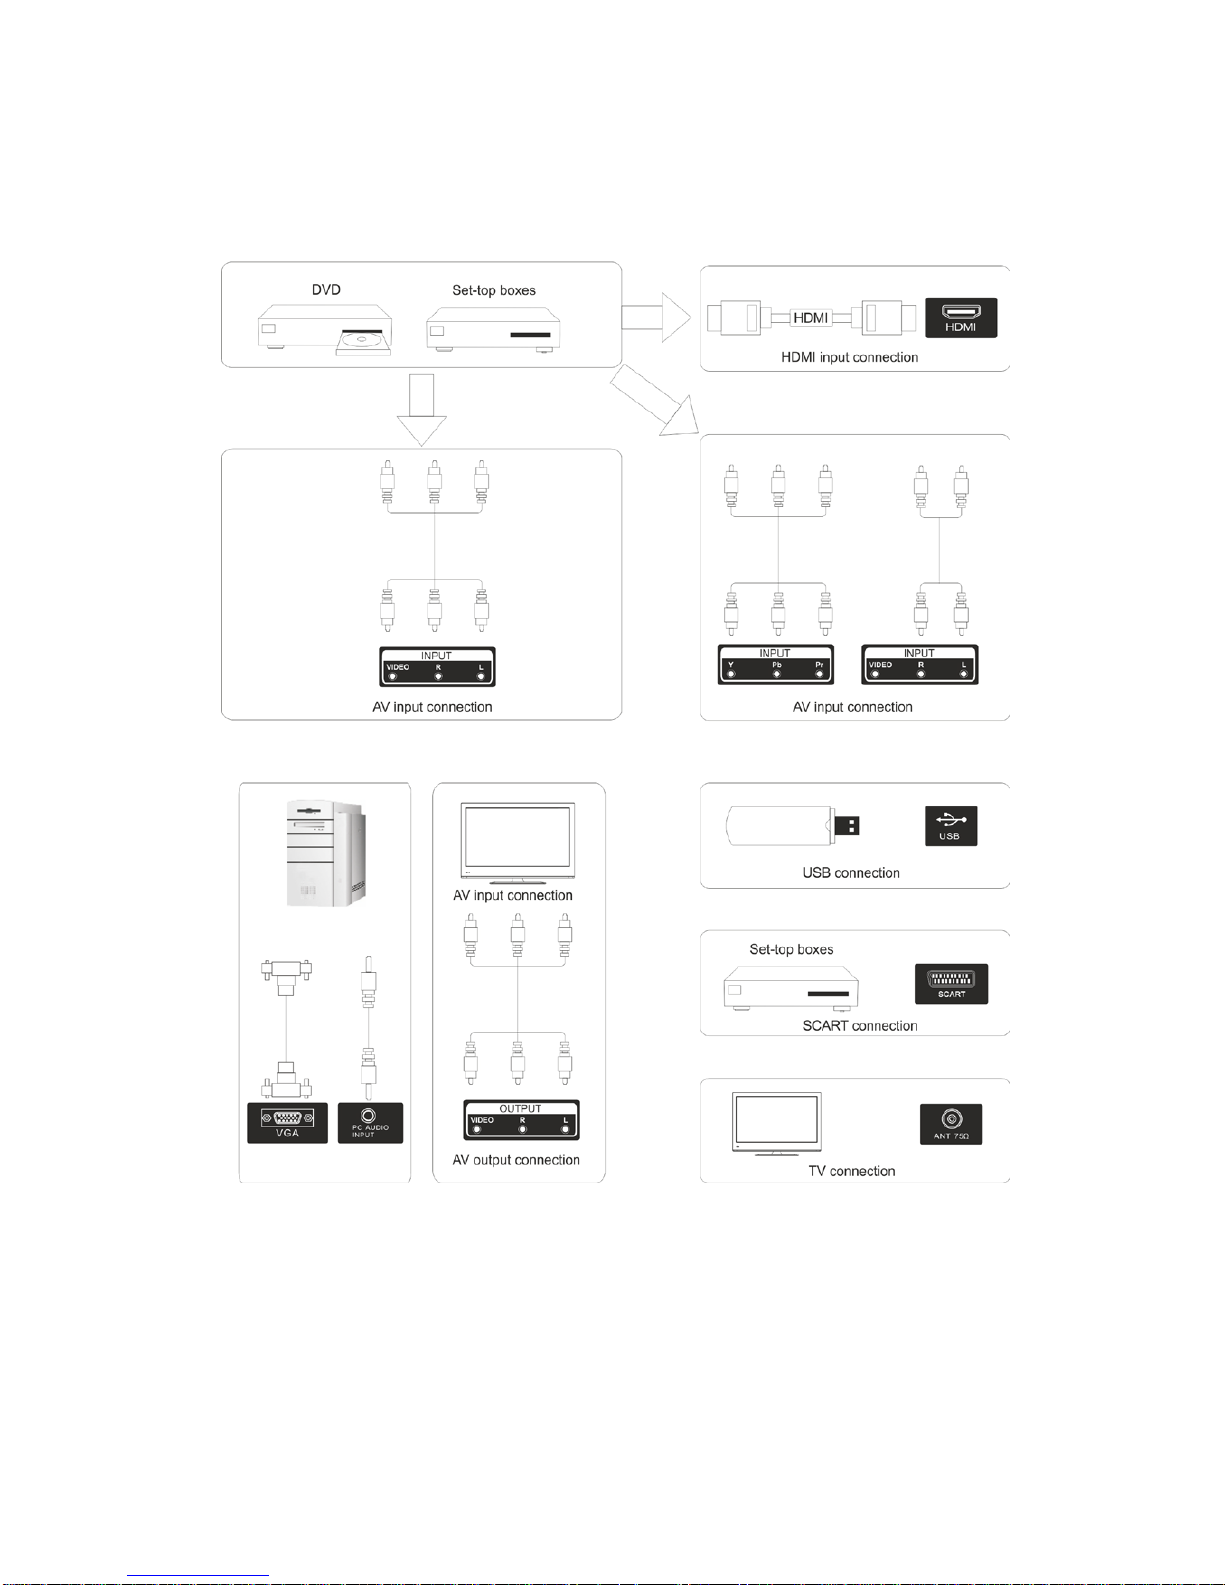
2.3 External device connection diagram
Page 8
8
2.4 Installing and connecting the TV
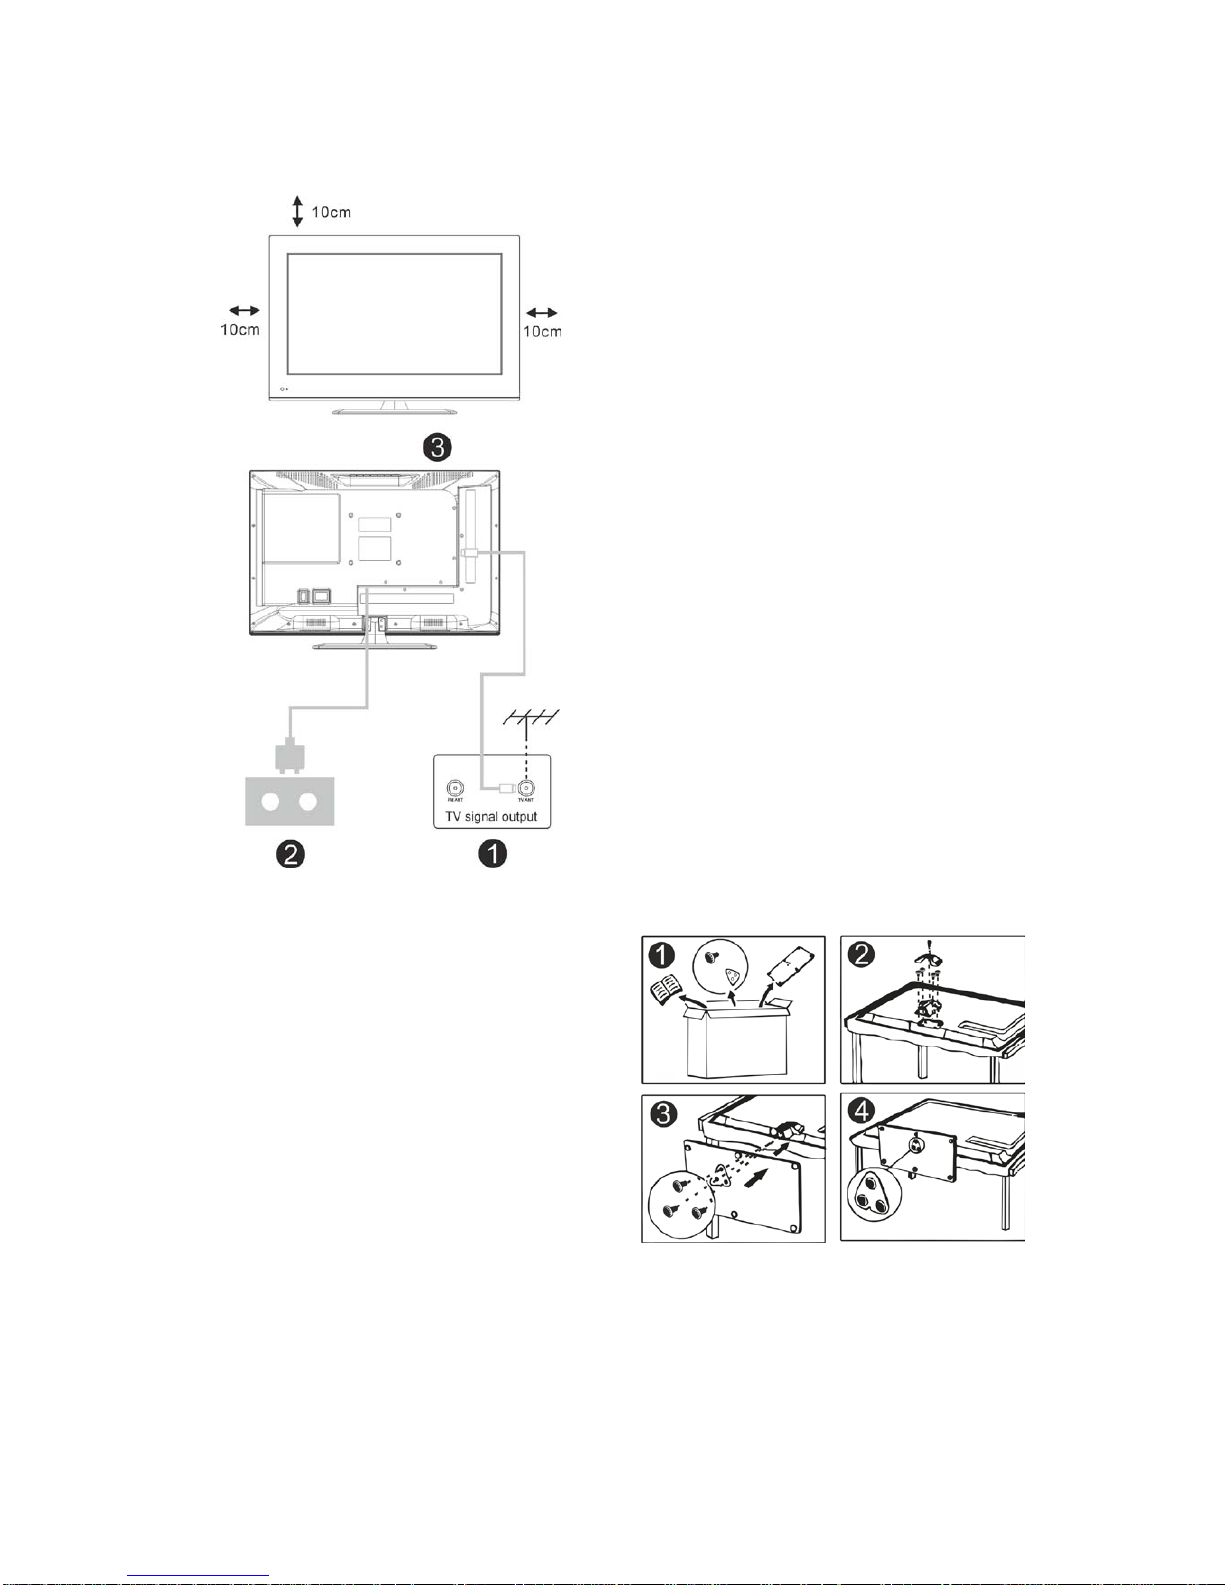
Setup your TV
Place your TV in a firm place which can
bear the weight of the TV. To avoid
danger, please don’t expose the TV near
water or heating object (such as light,
candle, heating machine) and do not
block the ventilation at the back of the TV.
Connect the antenna and power
cables
1. Connect the antenna cable to the
antenna socket on the back of the TV.
2. Plug the power cord of the TV (AC
100-240V~ 50/60Hz).
Turn on the TV
3. Press the power button of the TV and
the indication light will turn to green. If it is
on standby mode (the light is red), press
the power button on the remote control to
turn on the TV.
Note: For reference purposes only
2.5 TV Stand installation instructions
1. Open the carton and remove the TV,
the various accessories and the stand
(some models do not have a stand).
2. To avoid damage to the TV, cover it
with a soft mattress, put it on a table, face
down on the mattress. The base of the
neck is fixed on the TV with screws.
3. Screw the stand and connect it the TV.
4. The installation is complete.
Note: The diagram is for reference
purposes only
Page 9
9
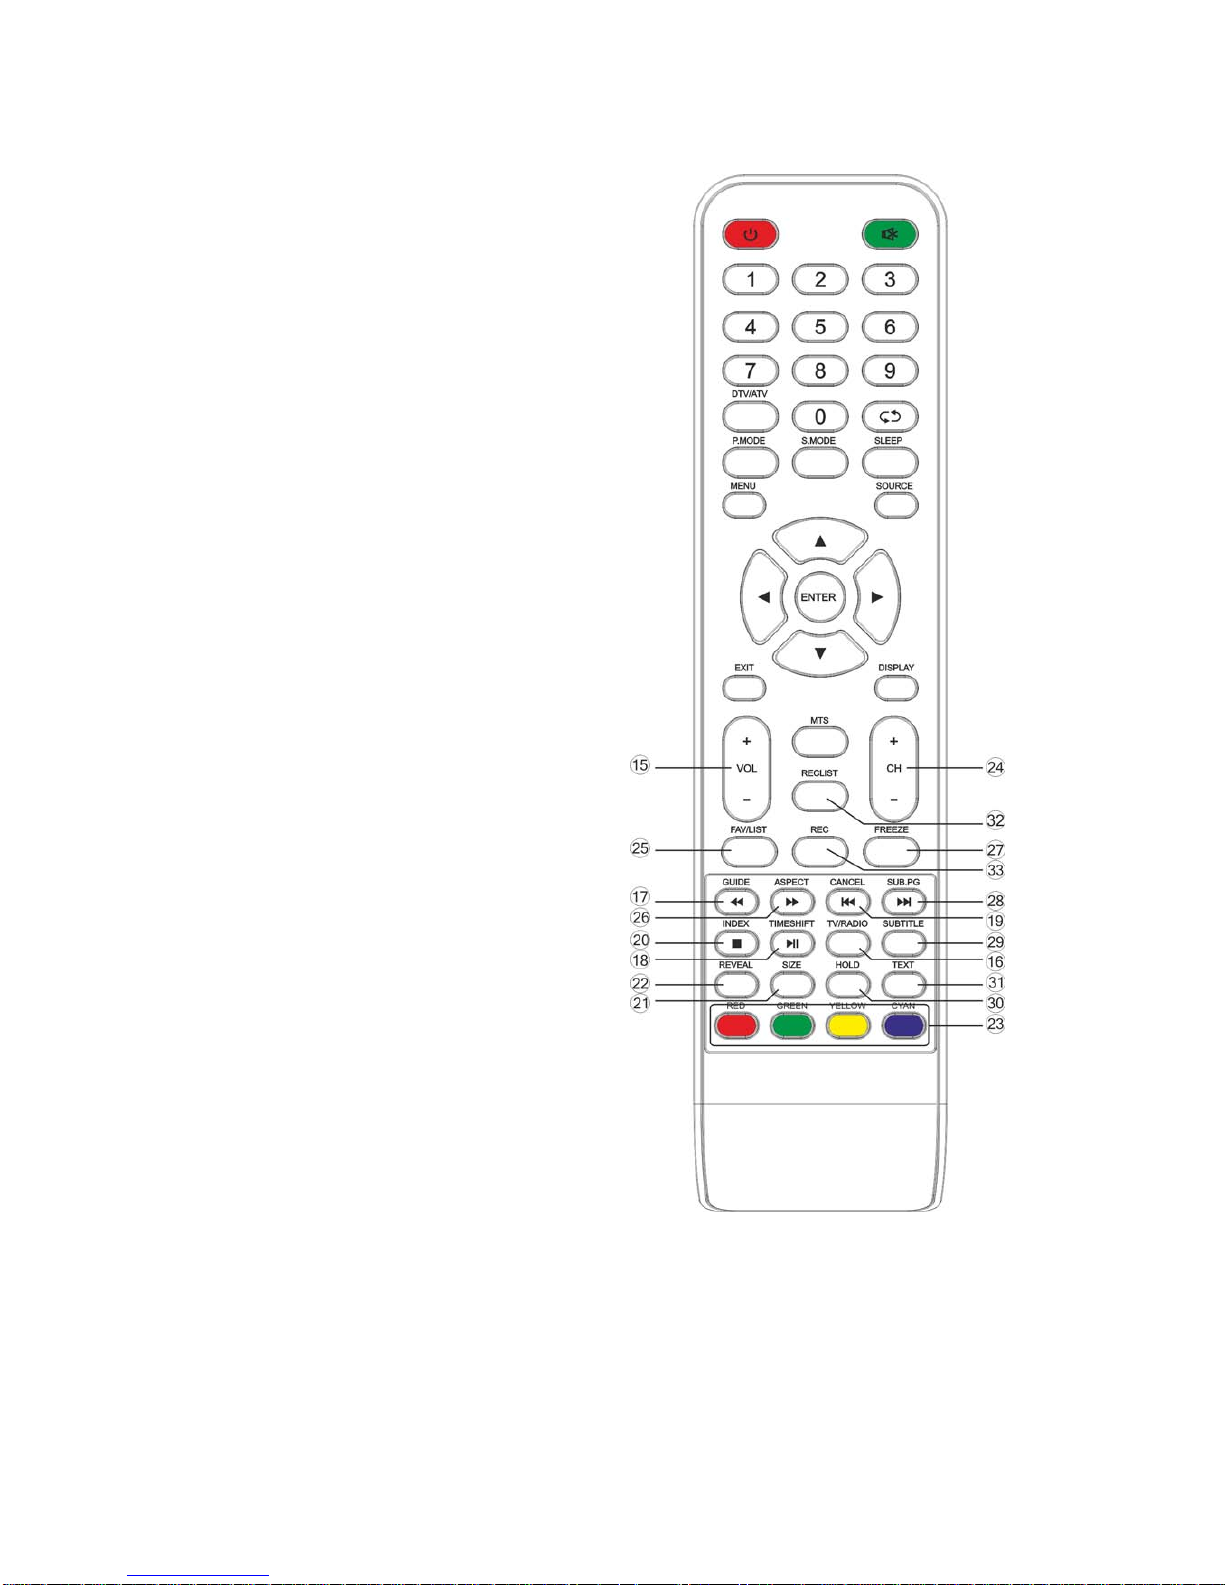
3. Remote Control
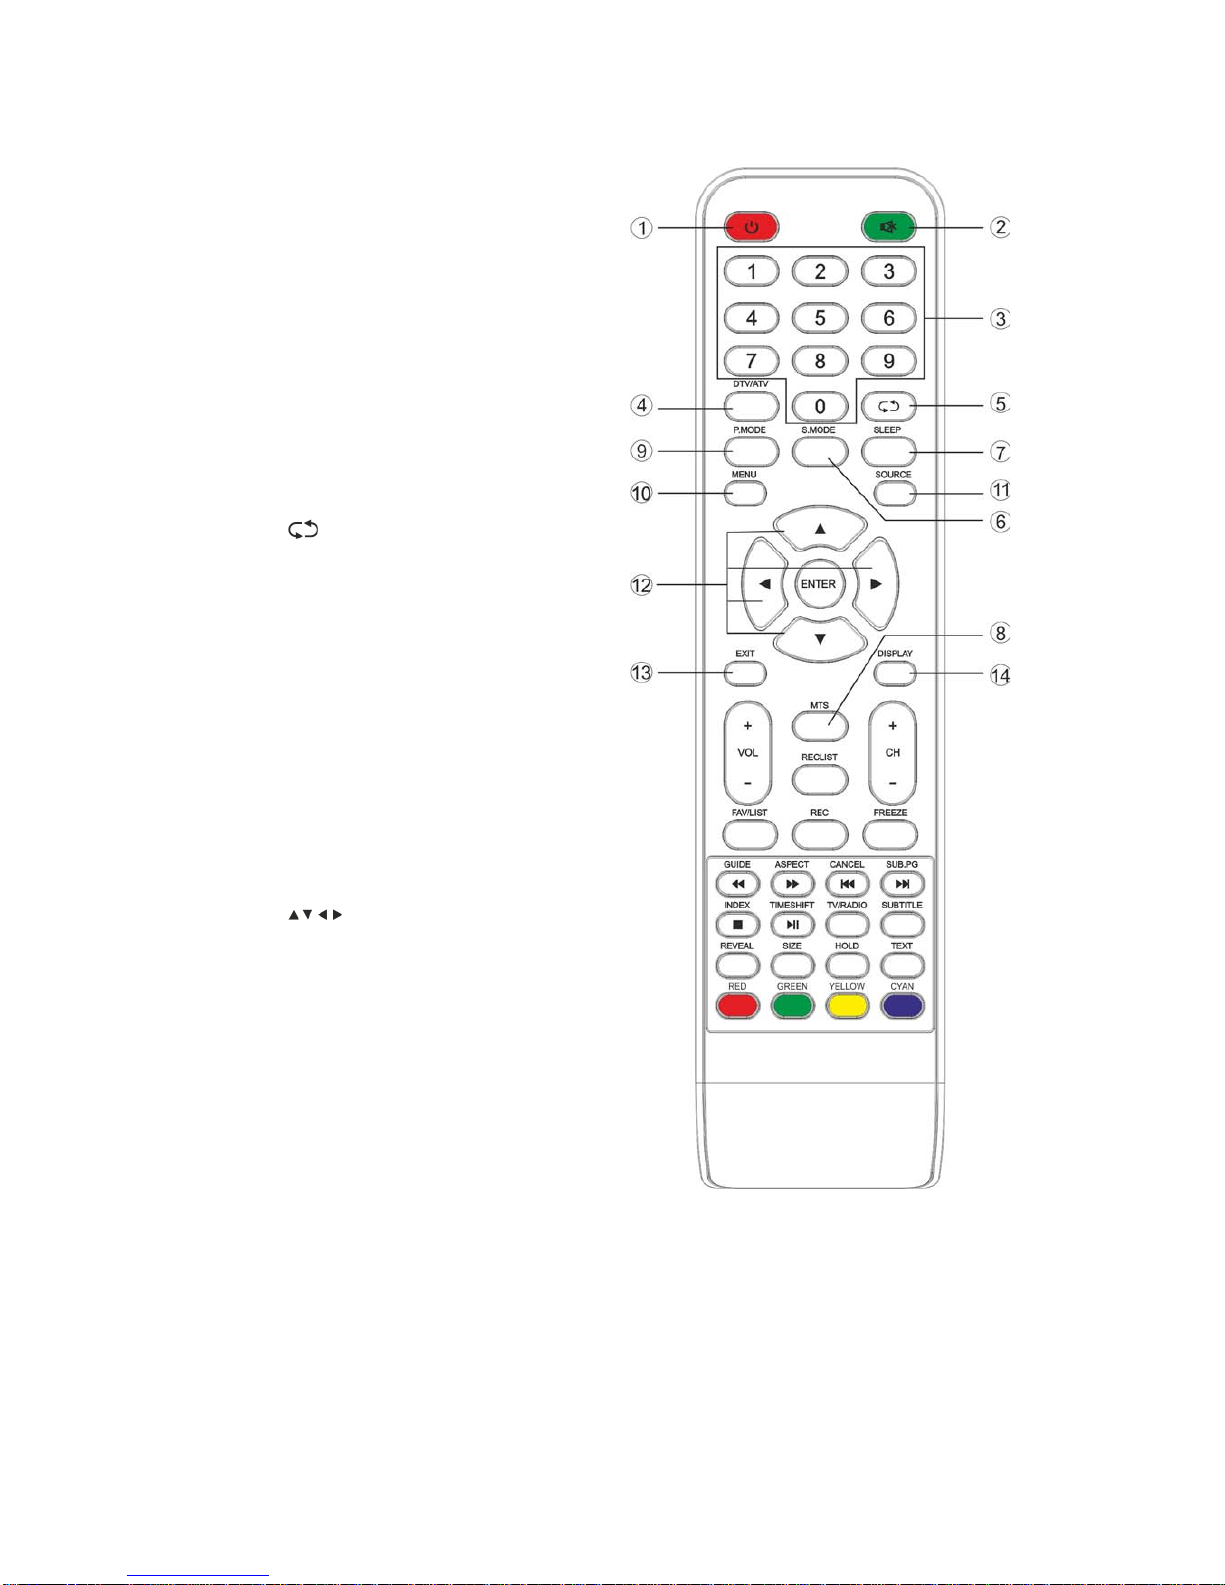
1. POWER: Sets your TV to power on or
standby mode.
2. MUTE: Press to mute the sound. Press
again or press VOL+ to unmute.
3. 0-9: Press 0~9 to select a TV channel
directly while watching TV. The channel
will change after 2 seconds. Applicable for
entering page number in teletext mode
and so on.
4. DTV/ATV: Switch between analog and
digital TV.
5.
: Return to the previous viewed
program.
6. S.MODE: Press to cycle through the
different sound settings.
7. SLEEP: Select the amount of time before
TV turns itself off automatically.
8. MTS: Press to search the NICAM mode.
9. P.MODE: Press to cycle through the
different picture settings.
10. MENU: Allows you to navigate to the
on-screen menus.
11. SOURCE: Opens the main menu, press to
list the sources.
12.
ENTER: Allows you to navigate
the on-screen menu and adjust the
system settings to your preferences.
13. EXIT: Exits from the menu or sub-menu
and cancels the function in process (if
applicable).
14. DISPLAY: Press to display the source and
channel's info.
Battery Installation:
Remove the battery compartment lid on the
rear of the remote control by sliding the lid
down, then off. Put two AAA batteries inside
the battery compartment with their + and –
ends aligned as indicat ed. Do not mix old and
new batteries or different types of batteries.
Slide the lid until you hear it click into place.
Page 10
10
1. VOL+/VOL-: Press to increase/ decrease
the sound level.
2. TV/RADIO: When watching a channel,
allows you to switch between TV and
Radio modes.
3. GUIDE: 1. Launches the EPG 2. Fast
reverse in PVR or Media Player mode.
4. TIME SHIFT: 1. DTV channel time shift
function. Play on PVR or Media Player
mode.
5. CANCEL: 1. When a page is selected in the
text mode, it may take some time before
it becomes available. Pressing the CANCEL
key will return to the TV mode. When the
required page is found, the page number
will appear at the top of the TV picture.
Press the CANCEL key to return to the text
mode for you to browse this page. 2.
Previous chapter in PVR or Media Player
mode.
6. INDEX: 1. Request the Index page in
teletext mode. 2. Previous chapter in PVR
or Media Player mode.
7. SIZE: Change the size of display in Teletext
mode.
8. REVEAL: Reveal or hide the hidden words.
9. COLOR BUTTONS: Teletext switch of the
analog parts, the items selection in the
menu of the digital parts and the MHEG5
function in the DVB menu.
10. CH+/CH-: Press to scan through channels.
11. FAV/LI ST: Press to open the favorite list.
Then you can select a favorite channel.
12. ASPECT: 1. Select picture scale. 2. Fast
forward in PVR or media player mode.
13. FREEZE: Press to freeze the picture.
14. SUB.PG: 1. Press to access a sub-page.
Next chapter in PVR or media player
mode.
15. SUBTITLE: Shows and sets the language of
cu r r ent D T V.
16. HOLD: On or off for current page display.
17. TEXT: Switches the teletext on and off.
18. RECLIST: Shows the recorded list.
19. REC: Record begin in PVR mode.
Using the Remote Control:
Unless stated, the remote control can operate
all the features of the TV.
Always point the rem ote control directl y at the
remote sensor in front of the TV.
Page 11
11
4. TV OPERATION AND SYSTEM SETUP
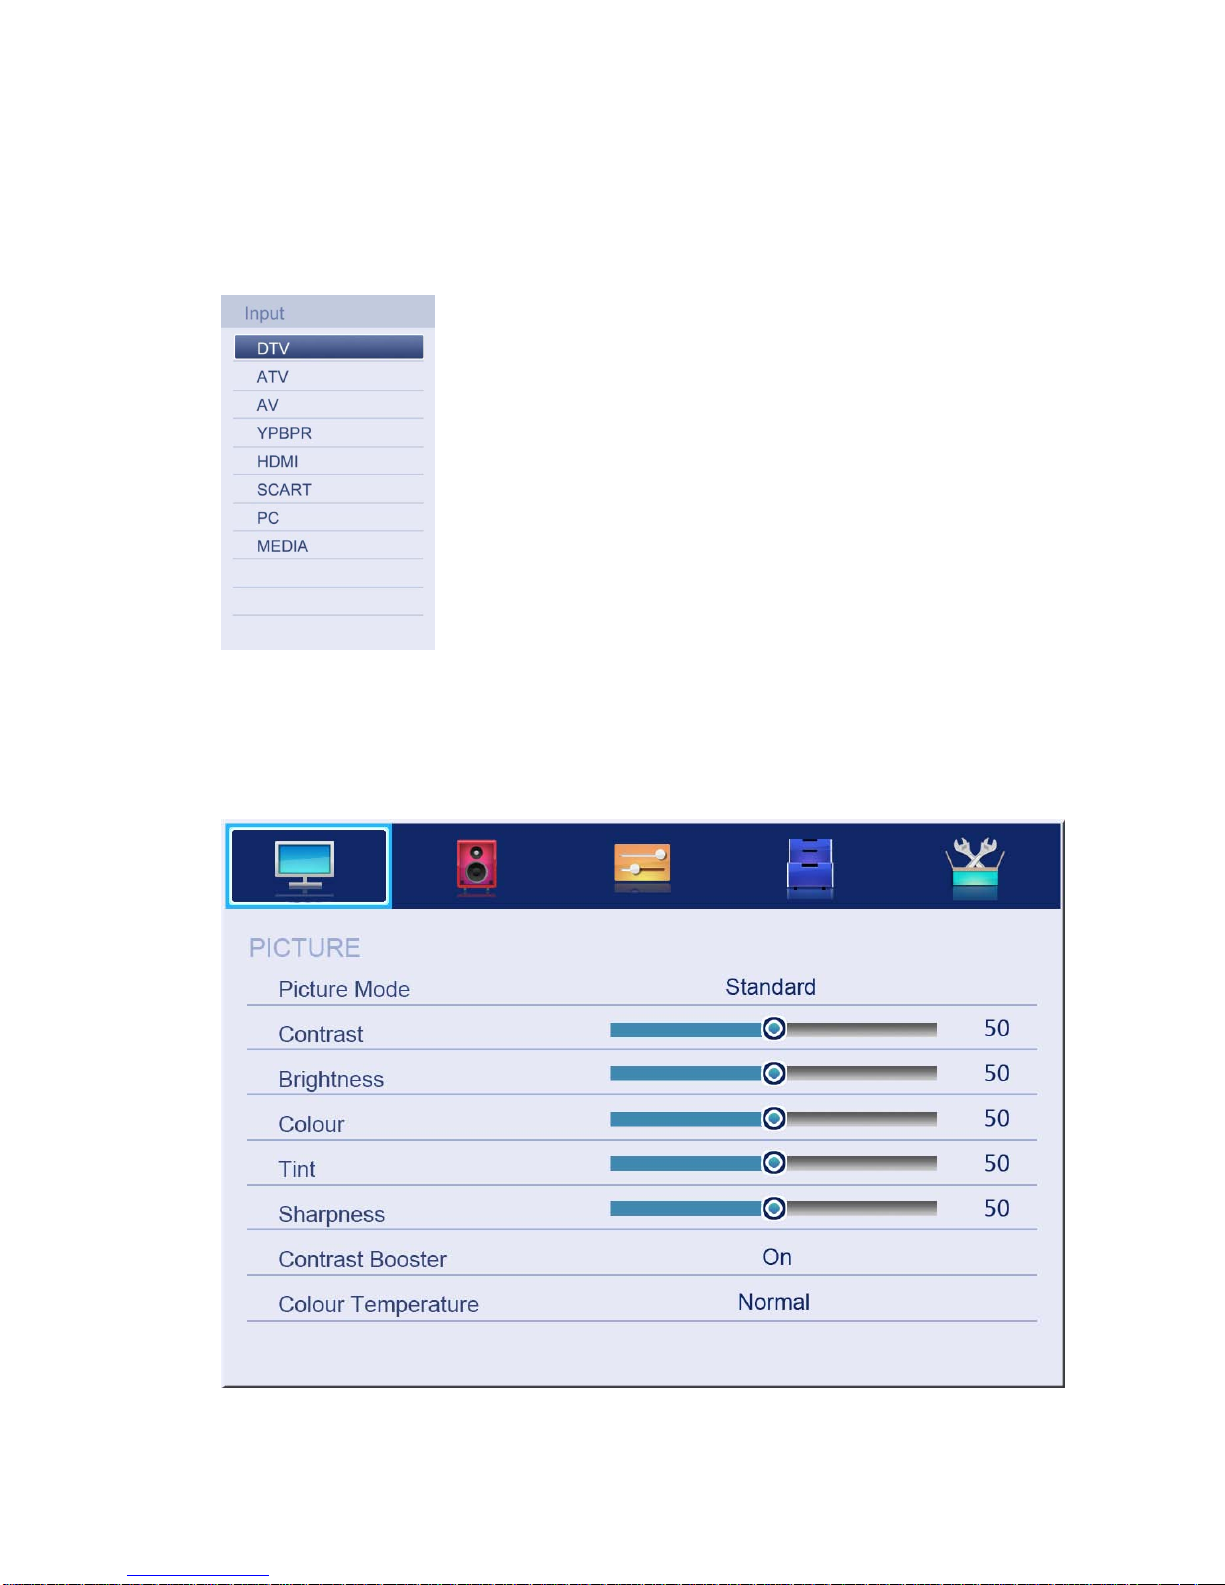
SELECT INPUT SOURCE
Press SOURCE button to display the input source list.
Press ▲/▼ button to select the input source you want to watch.
Press ENTER button to enter the input source.
Page 12
12
Press MENU button to display the MAIN OSD MENU.
Press ▲/▼ button to select the MENU you want.
Press ENTER button or ► button to enter the sub menu, and press ◄ button t o retu rn
back to the previous menu.
Press ▲/▼ button to select the option and then press ENTER button or ► butt on to
enter the submenu, press ◄/► button to adjust the value or press ◄/► button to select
within the submenu.
You can press MENU button to save and return back to the previous menu, and press
EXIT button to exit fr om t he menu.
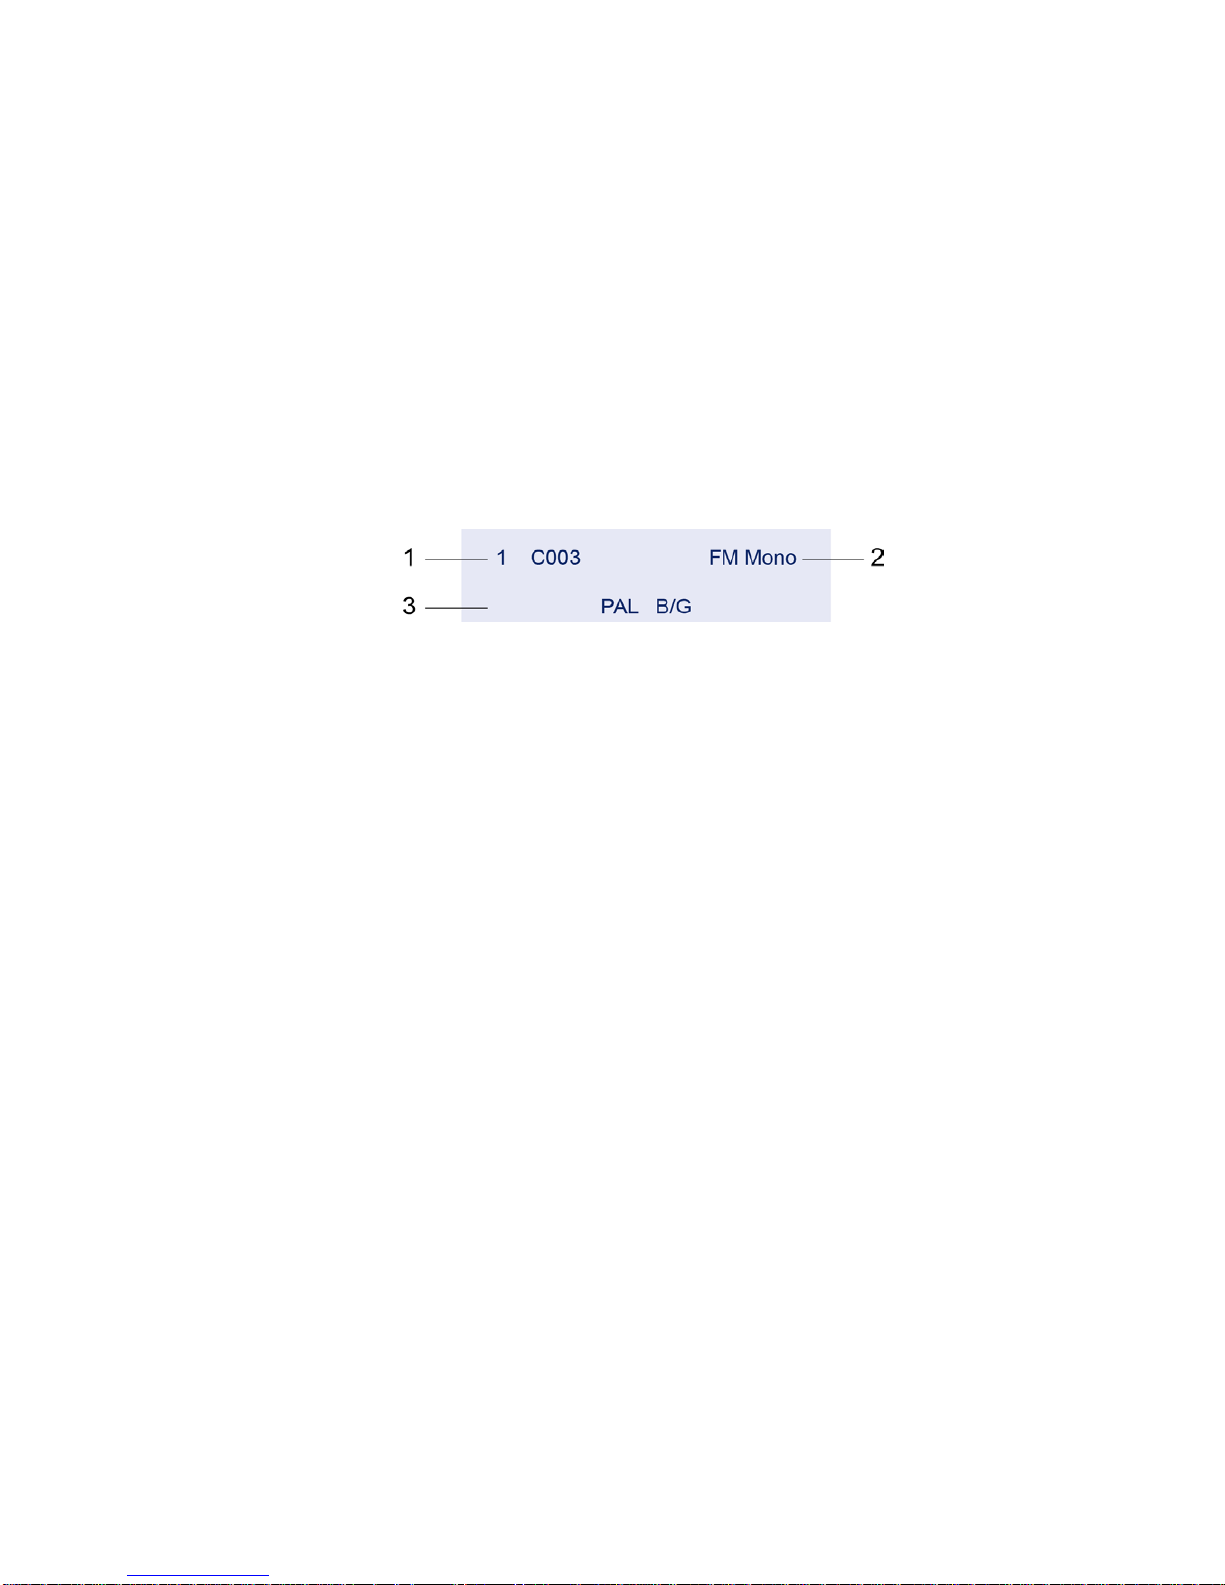
Press INFO button on the remote control to display program information.
1. Current program number.
2. The NICAM mode of the current program.
3. The sound system of the current channel can be changed in the Analog Manual Search
menu.
Page 13
13
4.1 Picture Menu
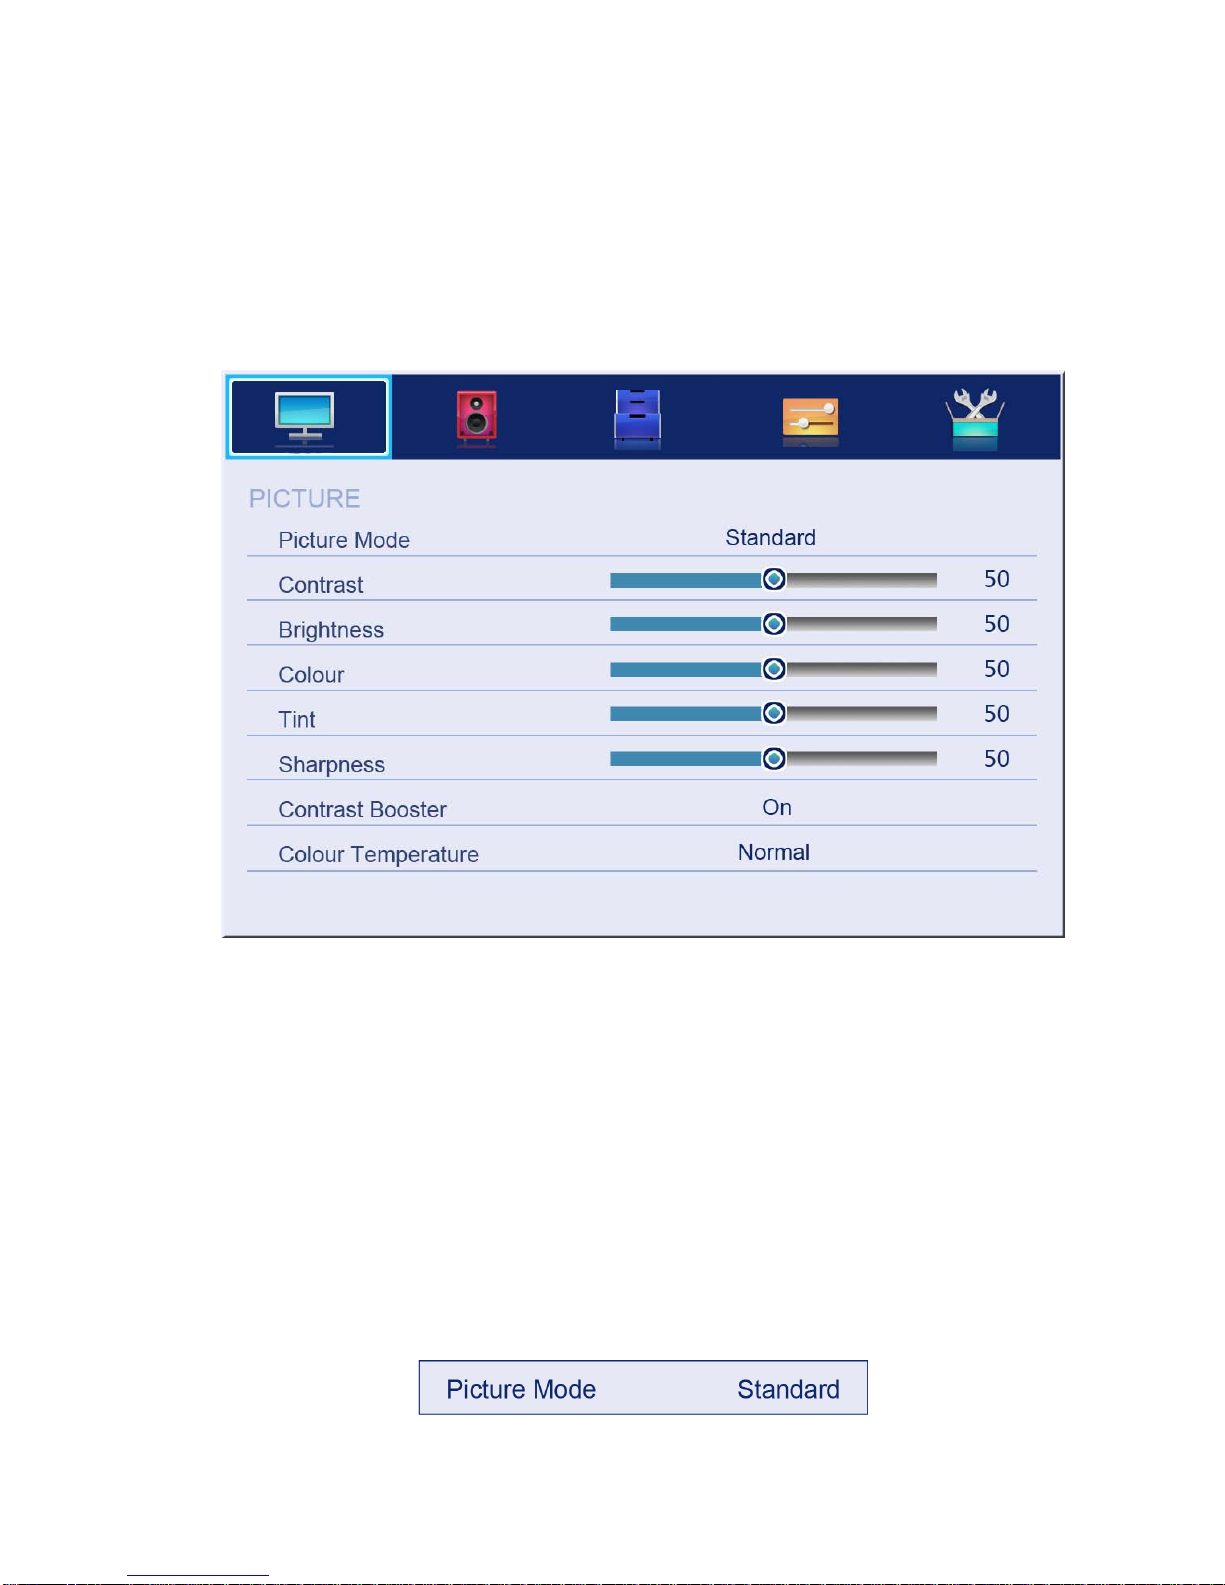
The picture is for a reference only; the actual items are the ones appearing in your TV.
Press TV MENU button to display the main menu.
Press ▲/▼ button to select Picture in the main menu, and then press ENTER button to
enter.
1. Press ▲/▼ button to select the option that you want to adjust in the Picture menu, and
then press ENTER button or ► button to enter.
2. Press ◄/► butto n to adju st or press ▲/▼ button to select, and press ENTER button to
select the submenu.
3. After finishing your adjustment, press MENU button to save and return back to the
previous menu, and press EXIT button to exit from the menu.
4.1.1 Picture Mode
Press ▲/▼ button to select P icture Mode, then press ENTER button to enter and press ◄/►
button to select. (Available Picture Modes: User, Dynamic, Standard, Mild)
You only can change the values of brightness, contrast, sharpness, color, when the picture is
in User mode.
TIPS: You can press P-MODE button on the remoter control again and again to change the
picture mode directly.
Page 14

14
4.1.2 Contrast
Press ▲/▼ button to select Contrast, then press ENTER button to enter and press ◄/►
button to adjust. Then press MENU button to return back to the previous menu directly.
4.1.3 Brightness
Press ▲/▼ button to select Brightness, then press ENTER but ton to enter and press ◄/►
button to adjust. Then press MENU button to return back to the previous menu directly.
4.1.4 Colour
Press ▲/▼ button to select Colour, then press ENTER button to enter and press ◄/►
button to adjust. Then press MENU button to return back to the previous menu directly.
4.1.5 Tint
Press ▲/▼ button to select Tint, then press ENTER button to enter and press ◄/► button to
adjust. Then press MENU button to return back to the previous menu directly.
4.1.6 Sharpness
Press ▲/▼ button to select Sharpness, then press ENTER button to enter and press ◄/►
button to adjust. Then press MENU button to return back to the previous menu directly.
4.1.7 Contrast Booster
Press ▲/▼ button to select Contrast Booster, then press ENTER button to enter and press
◄/► button to select On or Off. Then press MENU button to ret urn back to the previous
menu directly.
4.1.8 Colour Temperature
Press ▲/▼ butt on to select Colour Temperature, then press ENTER button to enter and
◄/► button to select Standard, Cool, War m.
4.1.9 DNR
Press ▲/▼ button to select DNR, and then press ENTER button to enter and ◄/► button to
select Off, Low, Middle, High.
4.1.10 Reset
Press ▲/▼ button to select Reset, then press ENTER button to enter the confirmation menu,
and then choose OK to reset the value.
Page 15
15
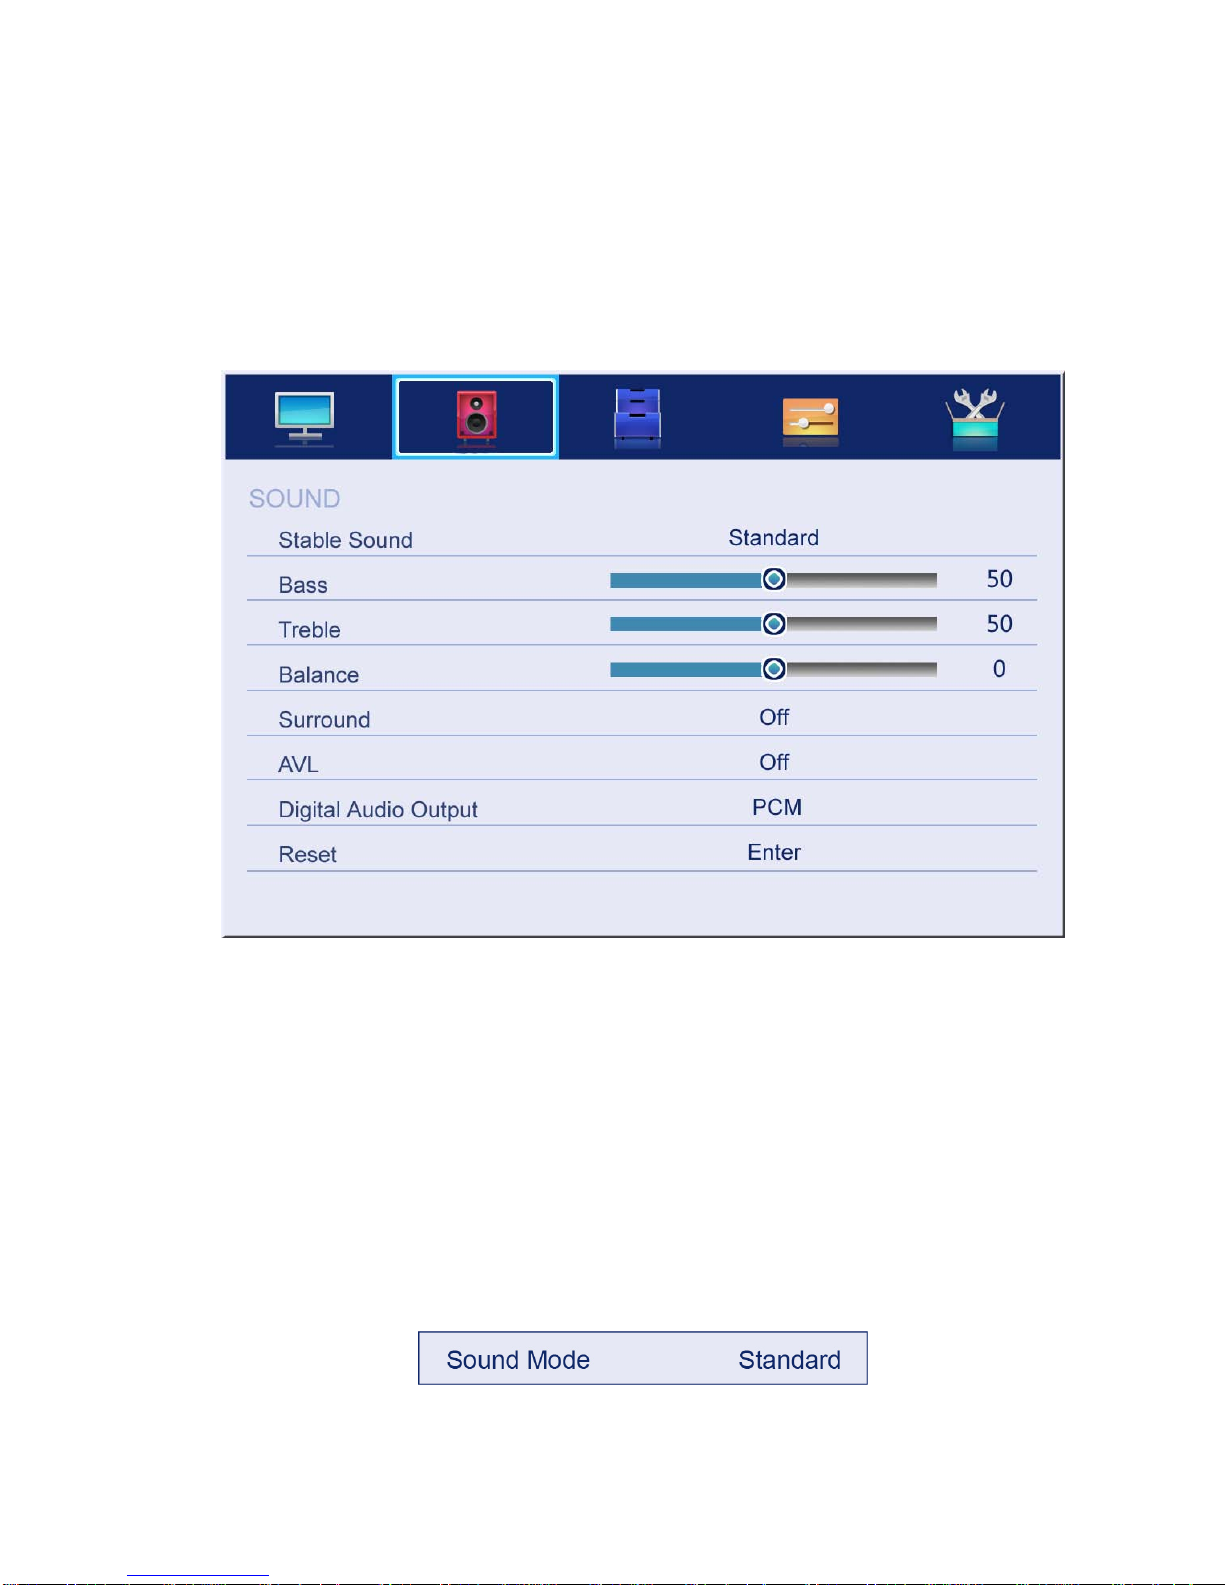
4.2 SOUND Menu
The picture is for reference only; the actual items are the ones appearing in your TV.
Press MENU button to display the main menu.
Press ▲/▼ button to select Sound in the main menu, and then press ENTER but ton or ►
button to enter.
1. Press ▲/▼ button to select the option that you want to adjust in the Sound menu, then
press ENTER button to enter.
2. Press ◄/► button to adju st or pr ess ▲/▼ to select, and press ENTER button to select
submenu.
3. After finishing your adjustment, Press MENU button to save and return back to the
previous menu, or press EXIT button to exit from the menu.
4.2.1 Sound mode
Press ▲/▼ button to select Sound mode, and then press ENTER button to enter. Then
press ◄/► button to select. (Available Sound modes: User, Standard, Music, Movie).
You can change the value of bass and treble, Balance and EQ, when the sound is in User
mode.
TIPS: You can press S-MODE button on the remote control to change the Sound Mode
directly.
4.2.2 Bass
Press ▲/▼ button to select Bass, then press ENTER or ► button to enter and press ◄/►
Page 16

16
button to adjust. It can only be adjusted under user mode.Then press MENU button to return
back to the previous menu directly.
4.2.3 Treble
Press ▲/▼ button to select Treble, then press ENTER button to enter and press ◄/►
button to adjust. It can only be adjusted under user mode. Then, press MENU button to
return back to the previous menu directly.
4.2.4 Balance
Press ▲/▼ button to select Balance, then press ENTER button to enter and press ◄/►
button to adjust. Then press MENU button to return back to the previous menu directly.
4.2.5 Surround
Press ▲/▼ button to select Surround, and then press ENTER button to enter and press
◄/►button to select ON or OFF.
4.2.6 AVL
Press ▲/▼ button to select AVL, and then press ENTER button to enter and press
◄/►button to select ON or OFF.
4.2.7 Digital Audio Output
Press ▲/▼ button to select Digital Audio Output, then press ENTER button to enter and
press ◄/► button to select.
(Available SPDIF modes: OFF, PCM, AUTO)
Then press ENTER button or ► button to enter and press ◄/► button to adjust, then press
MENU button to return back the previous menu directly.
4.2.8 Reset
Press ▲/▼ button to select Reset, then press ENTER butt on to enter RESET menu.
Page 17
17
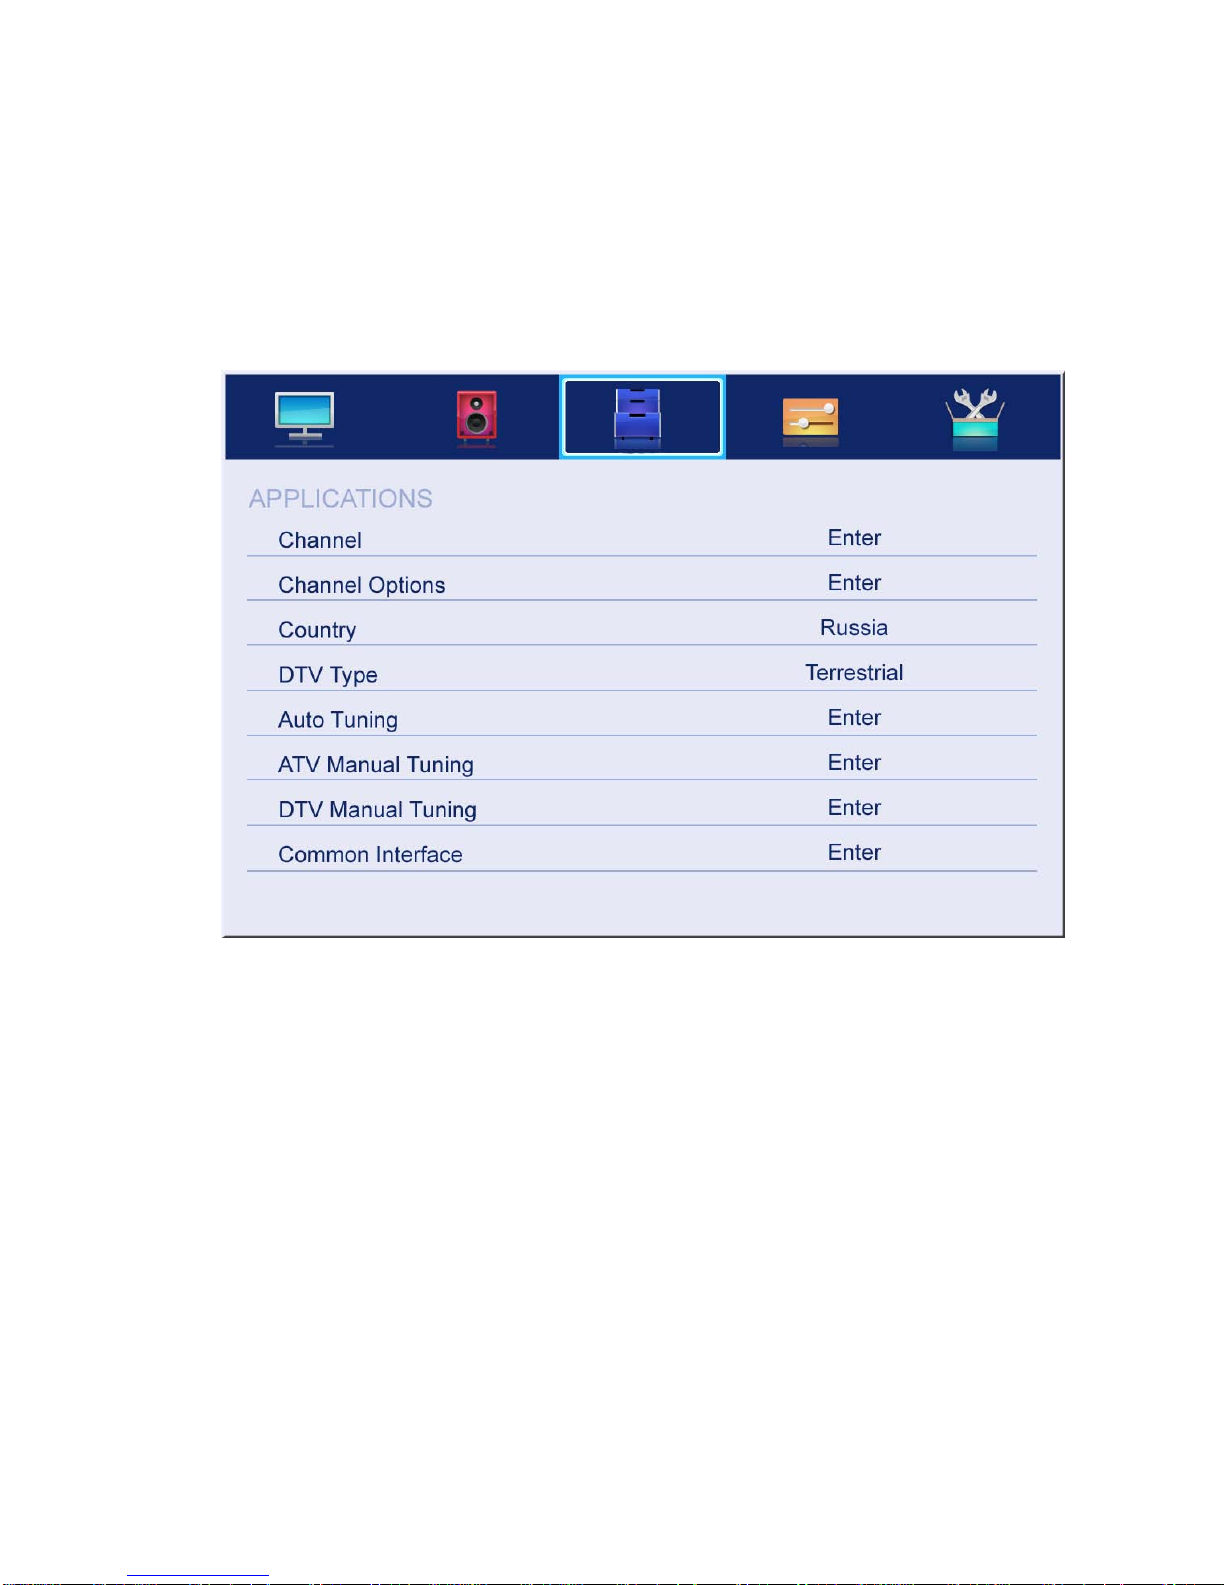
4.3 APPLICATIONS
The picture is for a reference only; the actual items are the ones appearing in your TV.
Press MENU button to display the main menu.
Press ▲/▼ button to select APPLICATIONS in the main menu, and then press ENTER
button to enter.
1. Press ▲/▼ button to select the option that you want to adjust in the APPLICATIONS
menu, and then press ENTER button to enter.
2. Press ◄/► button to select and press ENTER button to select the submenu.
3. After finishing your adjustment, press MENU button to save and return back to the
previous menu, or press EXIT button to exit from the menu.
Page 18
18
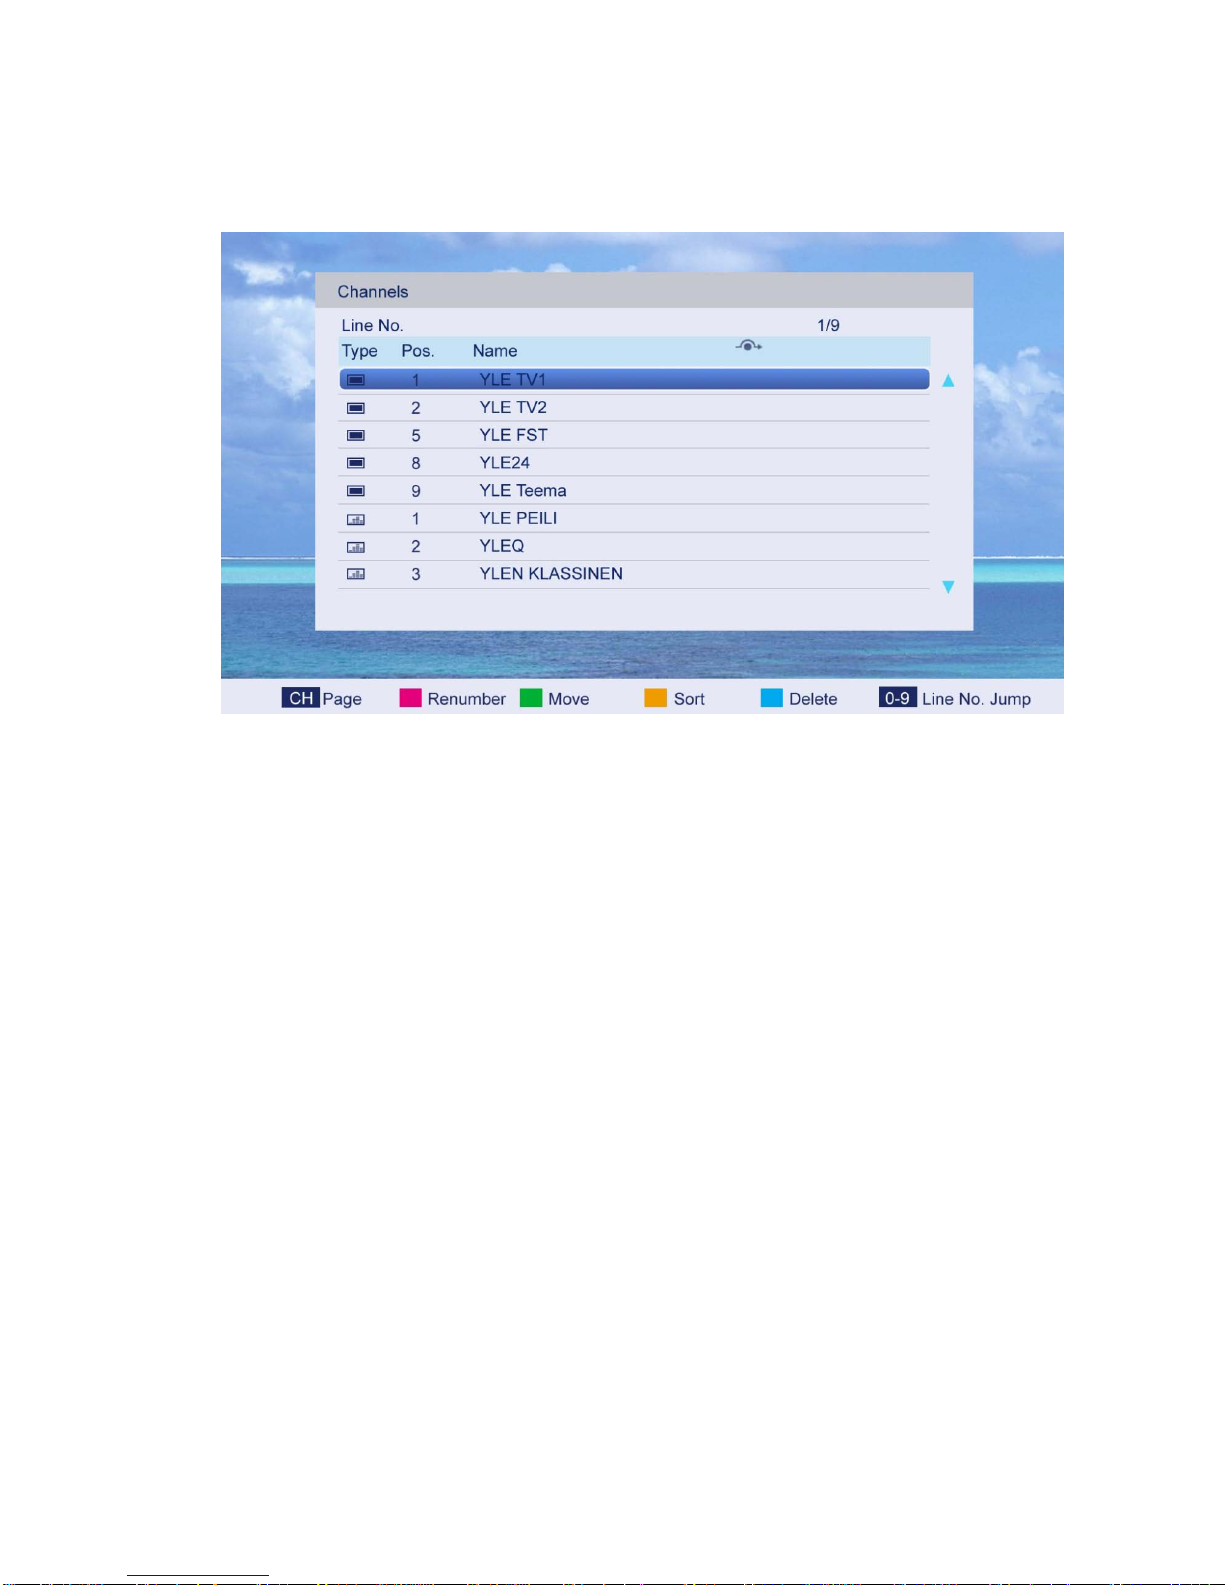
4.3.1 Channel
Press ▲/▼ but ton to select Channel, and then press ENTER button to play the channel
selected. The menu will appear as follows:
Key Description:
CH button: Press CH+ or CH- to turn the page.
RED button: Press this button to modify the channel number.
GREEN button: Press this button to move the channel down.
YELLOW button: Press this button to restore the order of the default channel.
GREEN button: Press this button to delete the selected channel.
0-9 button: Press t hese buttons to jump to the appropriate channel by entering a different
channel number.
Page 19
19
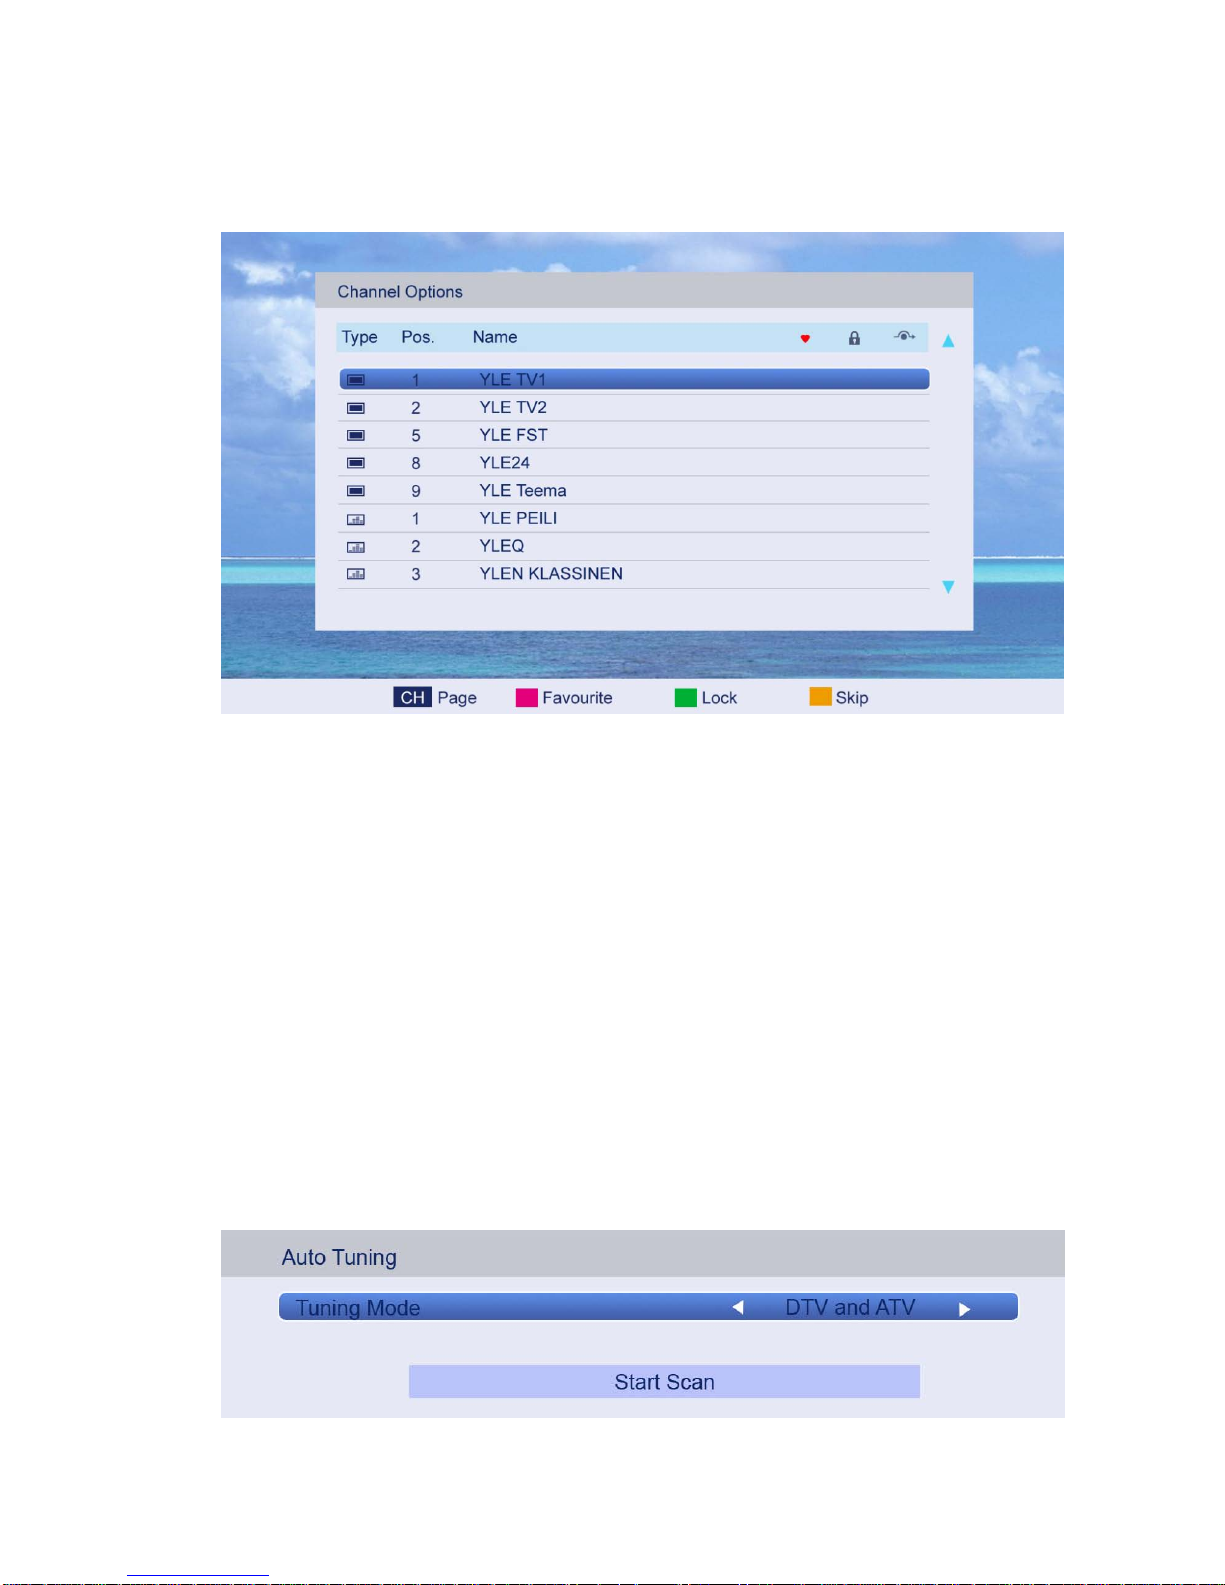
4.3.2 Channel Options
Press ▲/▼ button to select Channel Options, and then press ENTER button to go to the
channel List menu. The menu will appear as follows:
Key Description:
CH button: Press CH+ or CH- to turn the page.
RED button: Press this button to set the favorites channels.
GREEN button: Press this button to lock a channel.
YELLOW button: Press this button to skip a channel. If the channel is already skipped, press
YELLOW button to cancel skip.
4.3.3 Country
Press ▲/▼ button to select Country, and then press ◄/►button to select the area you live.
4.3.4 DTV Type
Press ▲/▼ button to select DTV Type, then press ◄/► button t o select.
(Available DTV Type: Cable, Terrestrial)
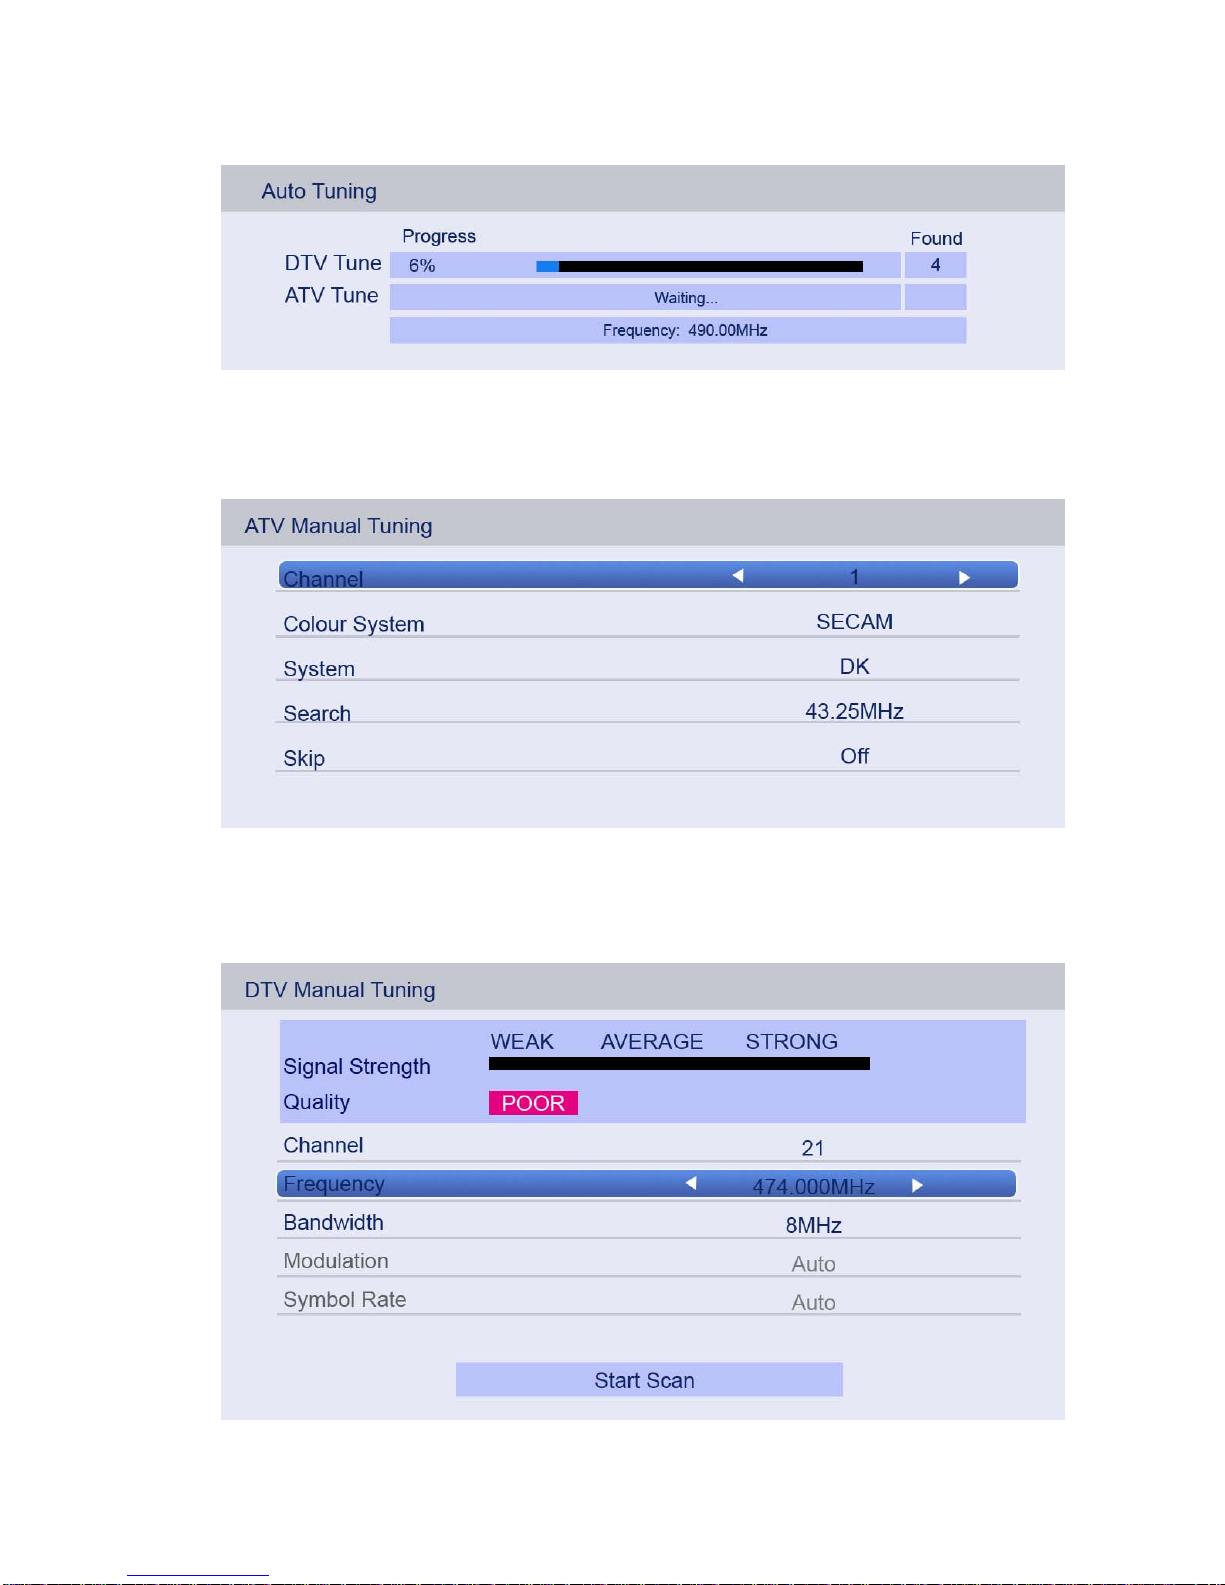
4.3.5 Auto Tuning
Press ▲/▼ button to select Auto Tuning, and then press ENTER button to enter
(When the System Lock is on, please enter the PIN code to unlock).
Page 20
20
Select to open the auto search page, and press Enter button to start the scan.
4.3.6 ATV Manual Tuning
Press ▲/▼ button to select ATV Manual Tuni ng, and then press ENTER button to start the
scan.
4.3.7 DTV Manual Tuning
Press ▲/▼ button to select DTV Manual Tuning, and then press ENTER button to start the
scan.
Page 21
21
4.3.8 Common Interface
Press ▲/▼ button to select Common Interface, and t hen press ENTER button to display
the CI slot Information.
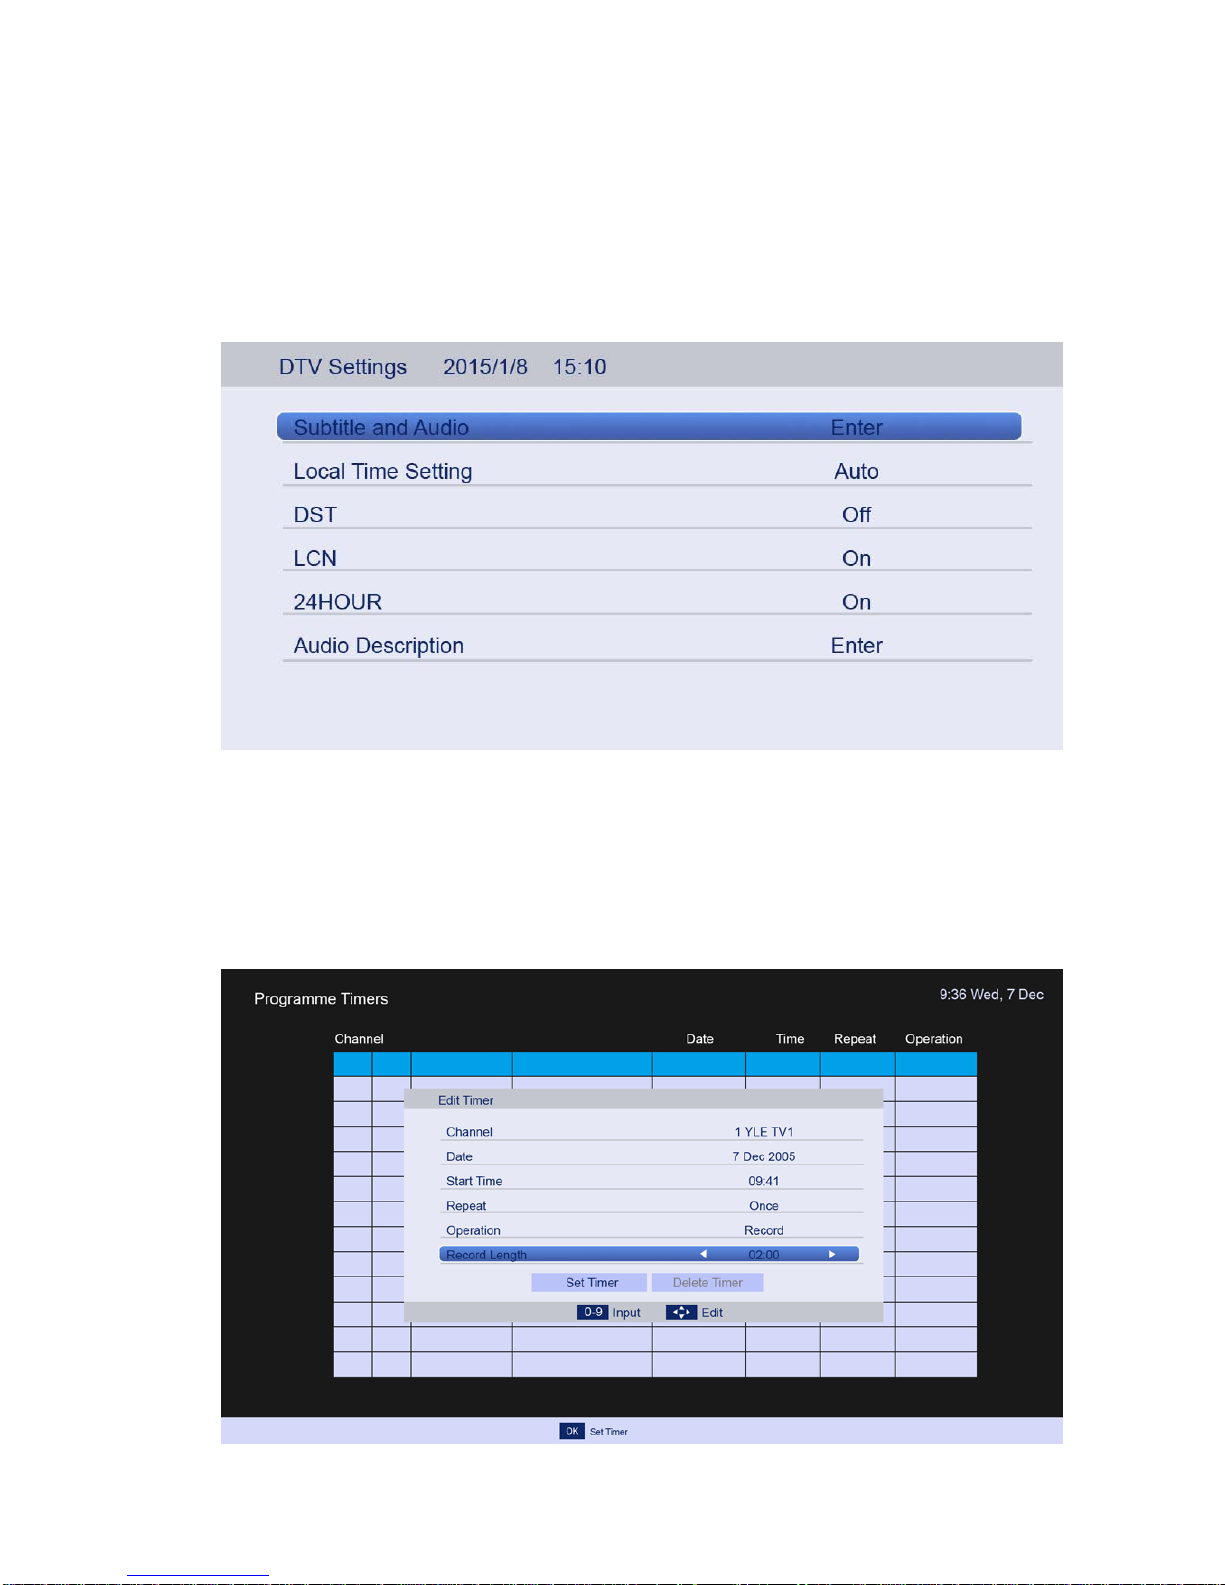
4.3.9 DTV Settings
Press ▲/▼ button to select DTV Settings, and then press ENTER button to enter the
submenu.
User can set the subtitle and audio, local time settings, DST, LCN, 24hour audio description
with these options.
4.3.10 Programmer Timers
Press ▲/▼ button to select Programmer Timers, and then press ENTER button to display
the submenu, and then press ENTER to set an appointment record, as follows:
Page 22
22
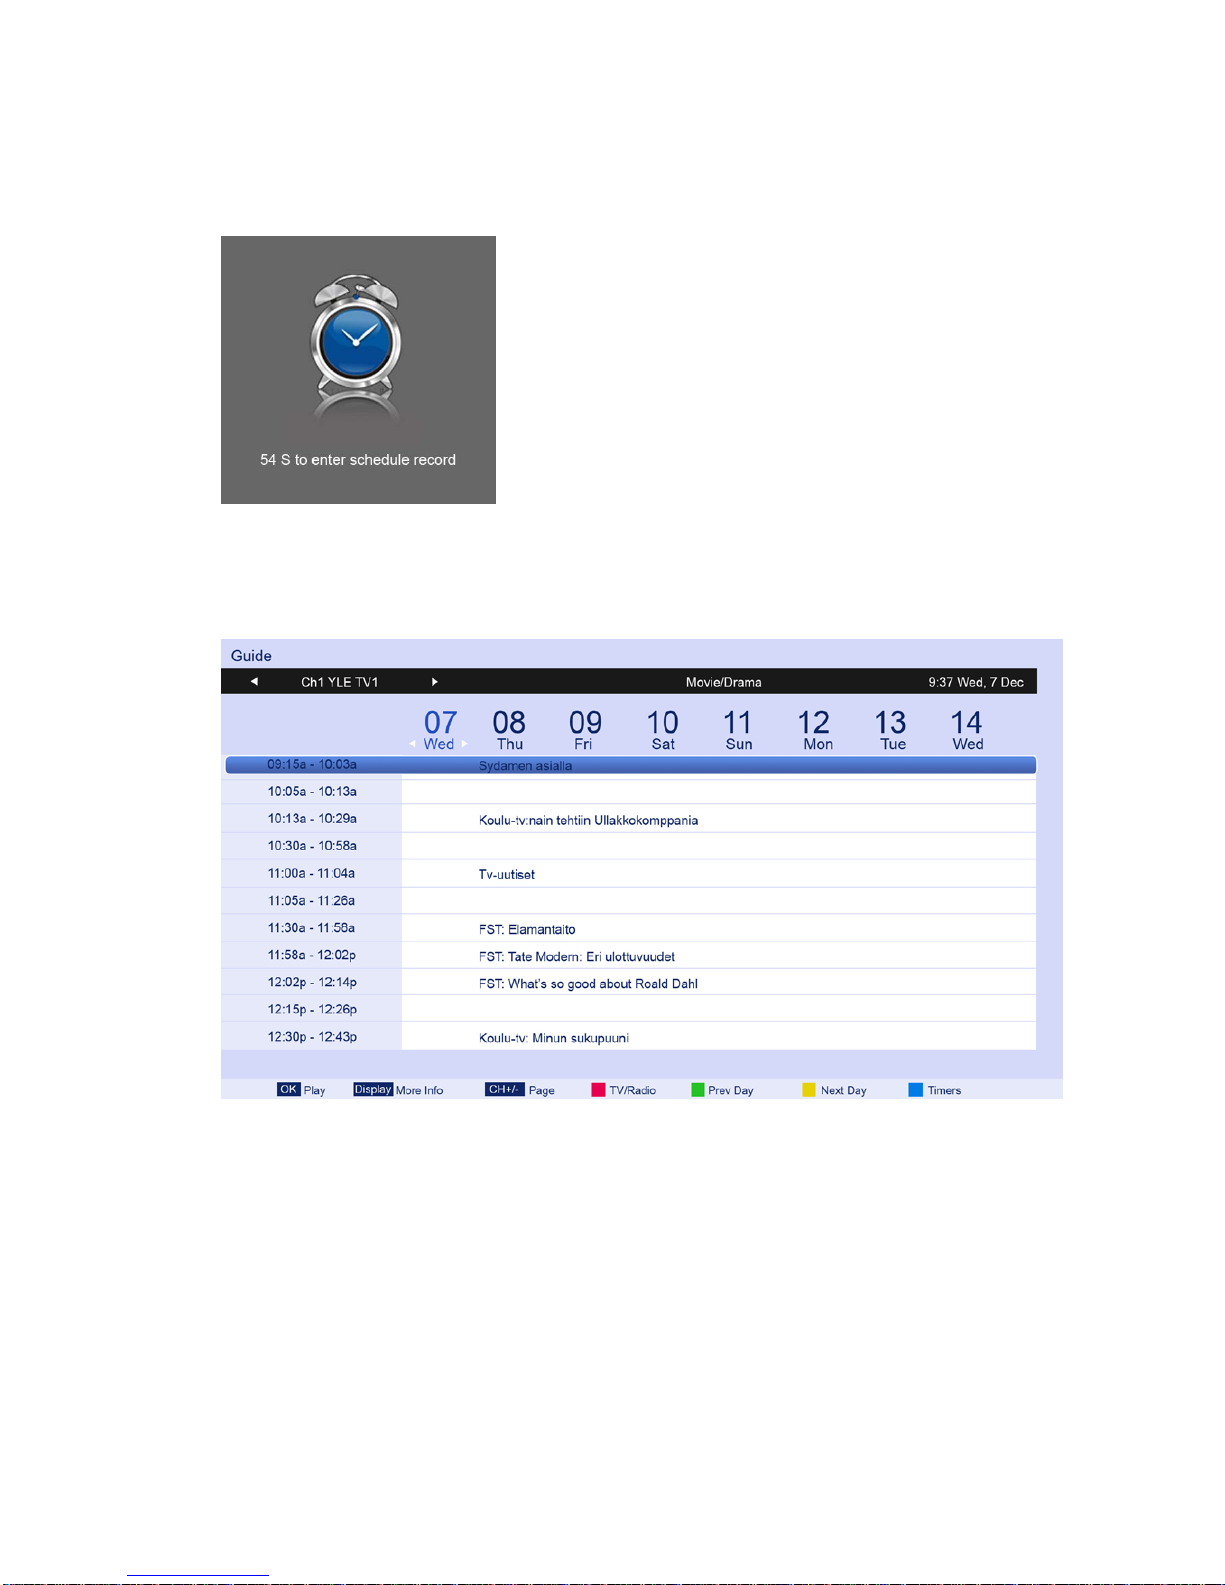
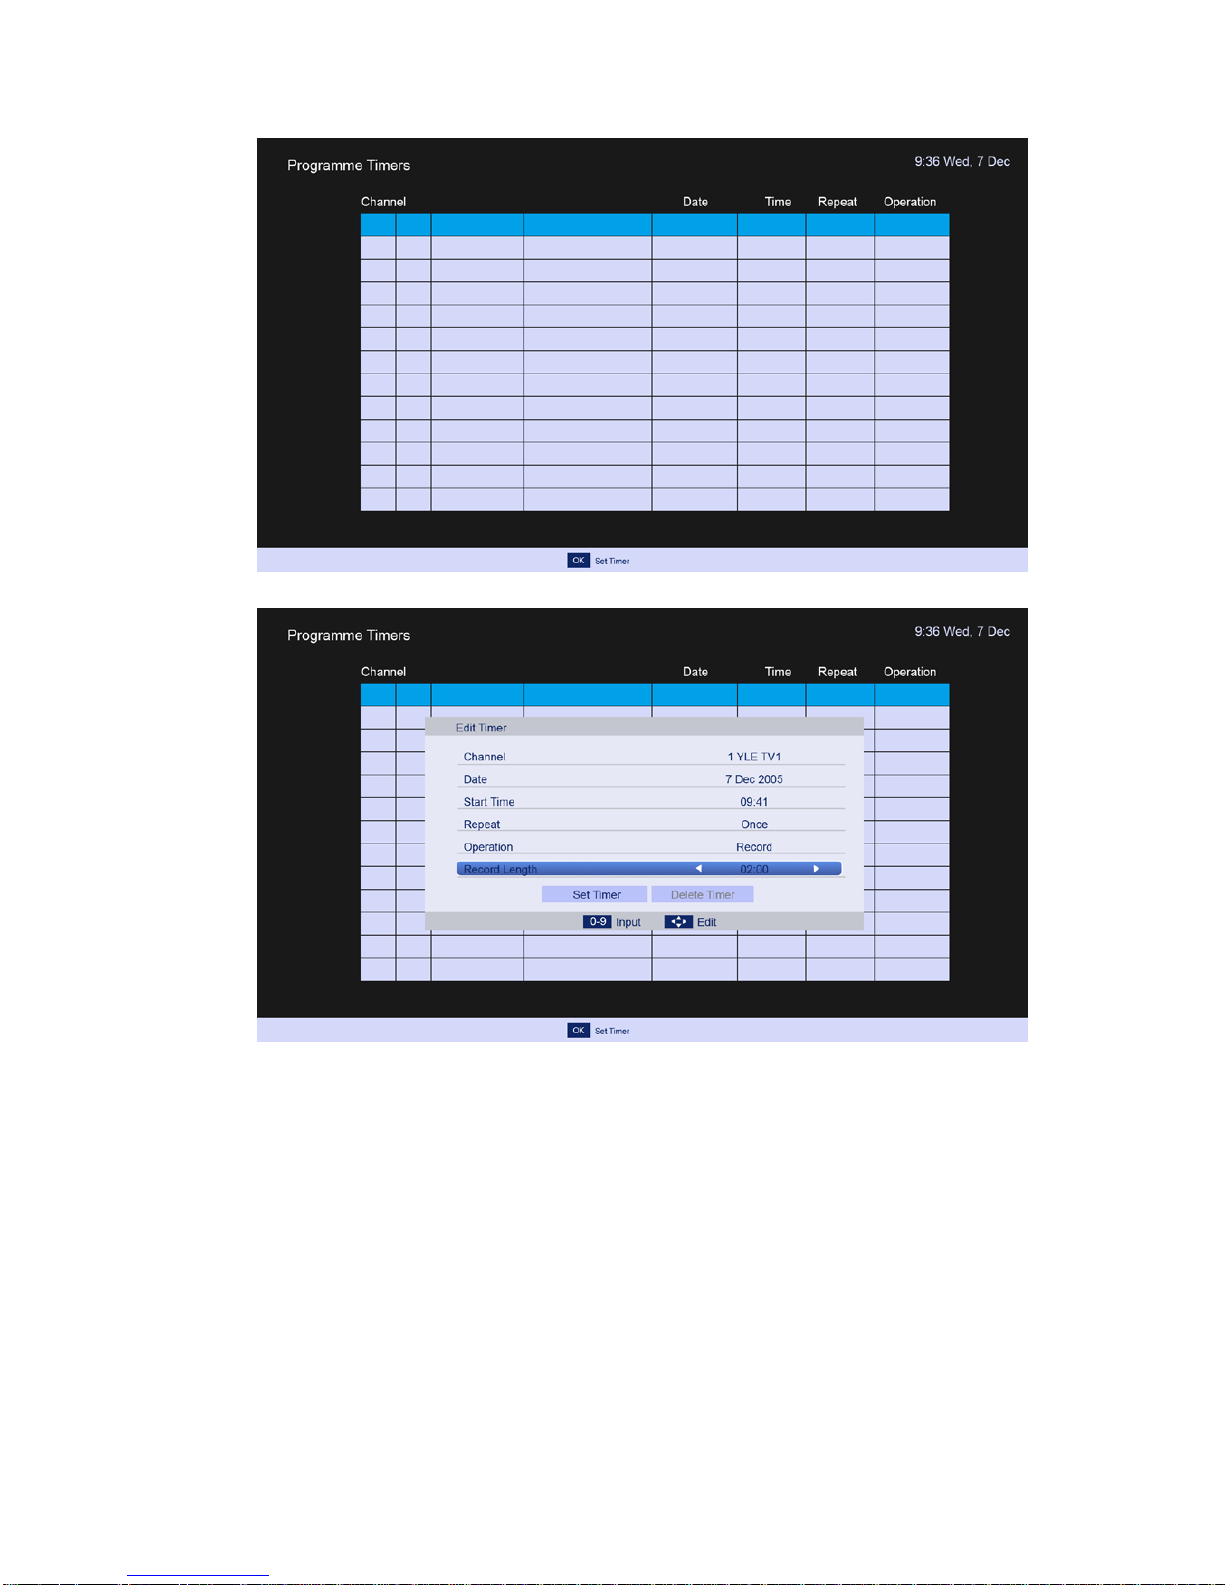
By pressing the number keys and the direction keys, user ca n set the channel, date, start
time, repeat, operation and record length information in this menu.
When approaching the preset time, the screen will show a countdown to remind the user.
4.3.11 Guide
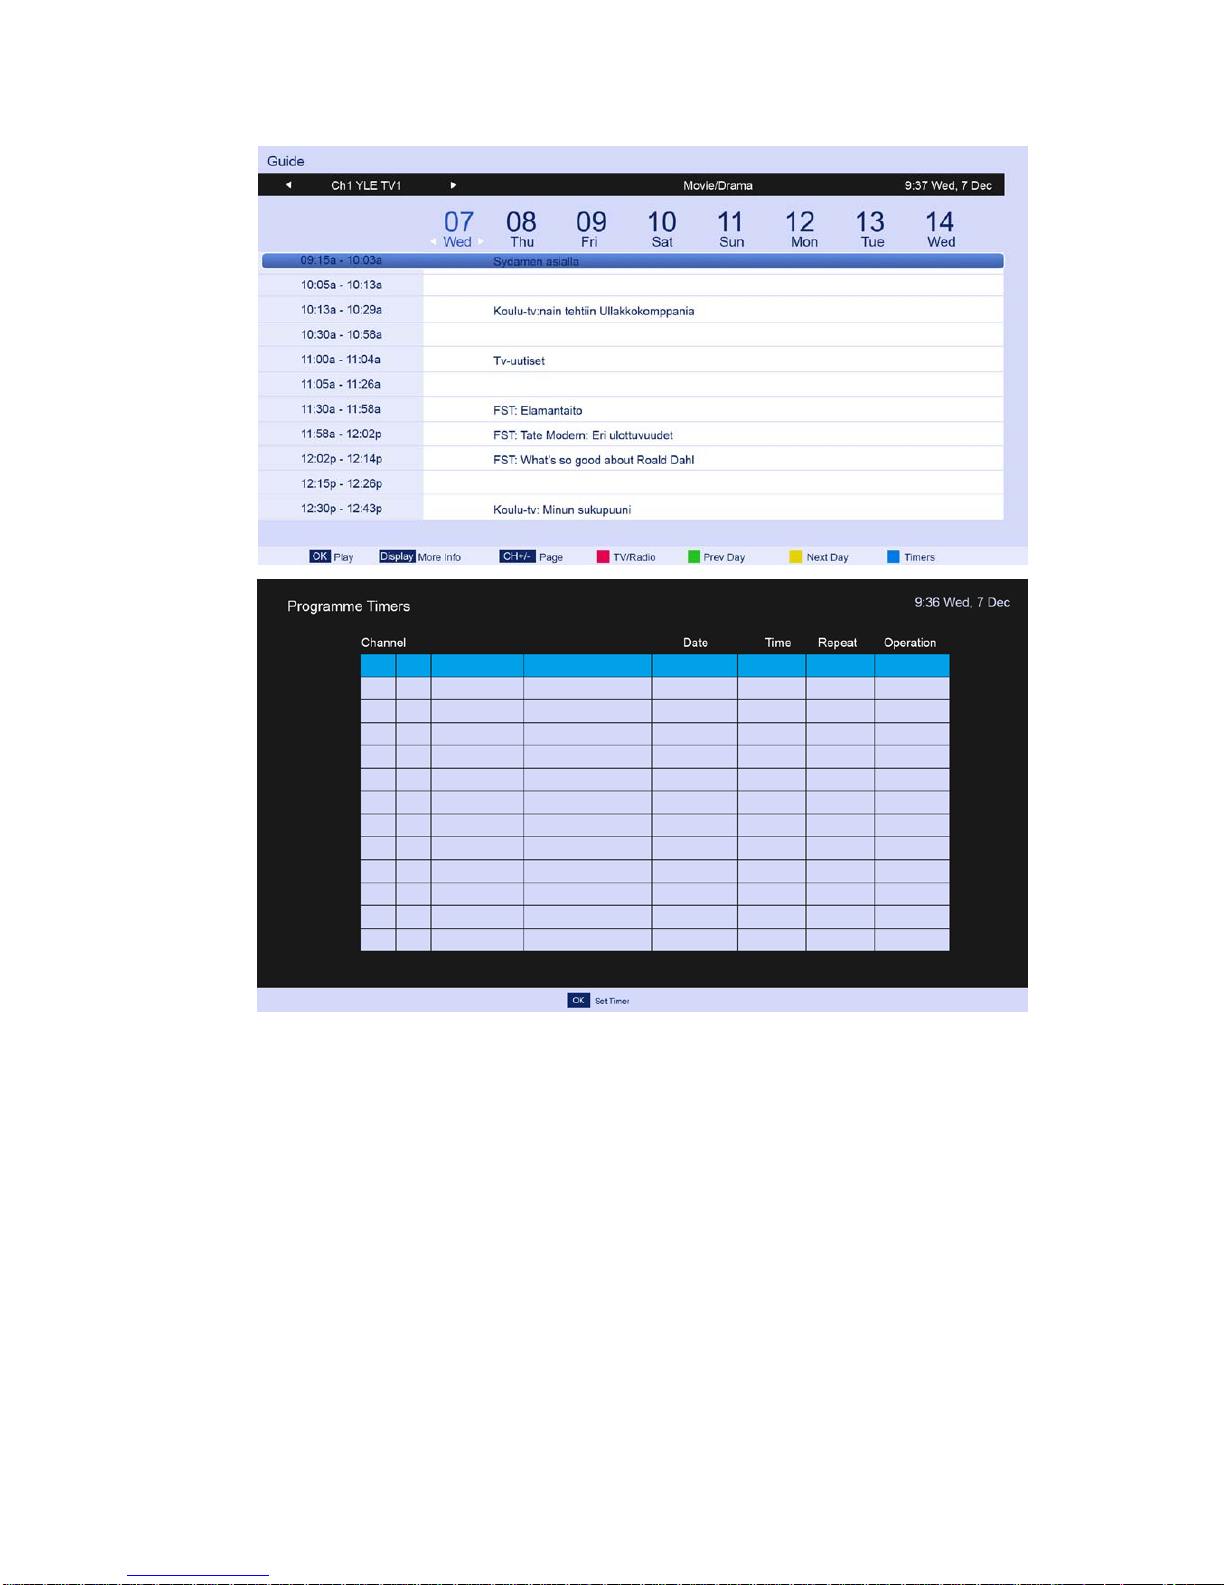
Press ▲/▼ button to select Guide, and then press ENTER button to display the EPG
programs list, as follows:
User can also press the EPG Button on the remote control to display the EPG programs list.
Page 23
23
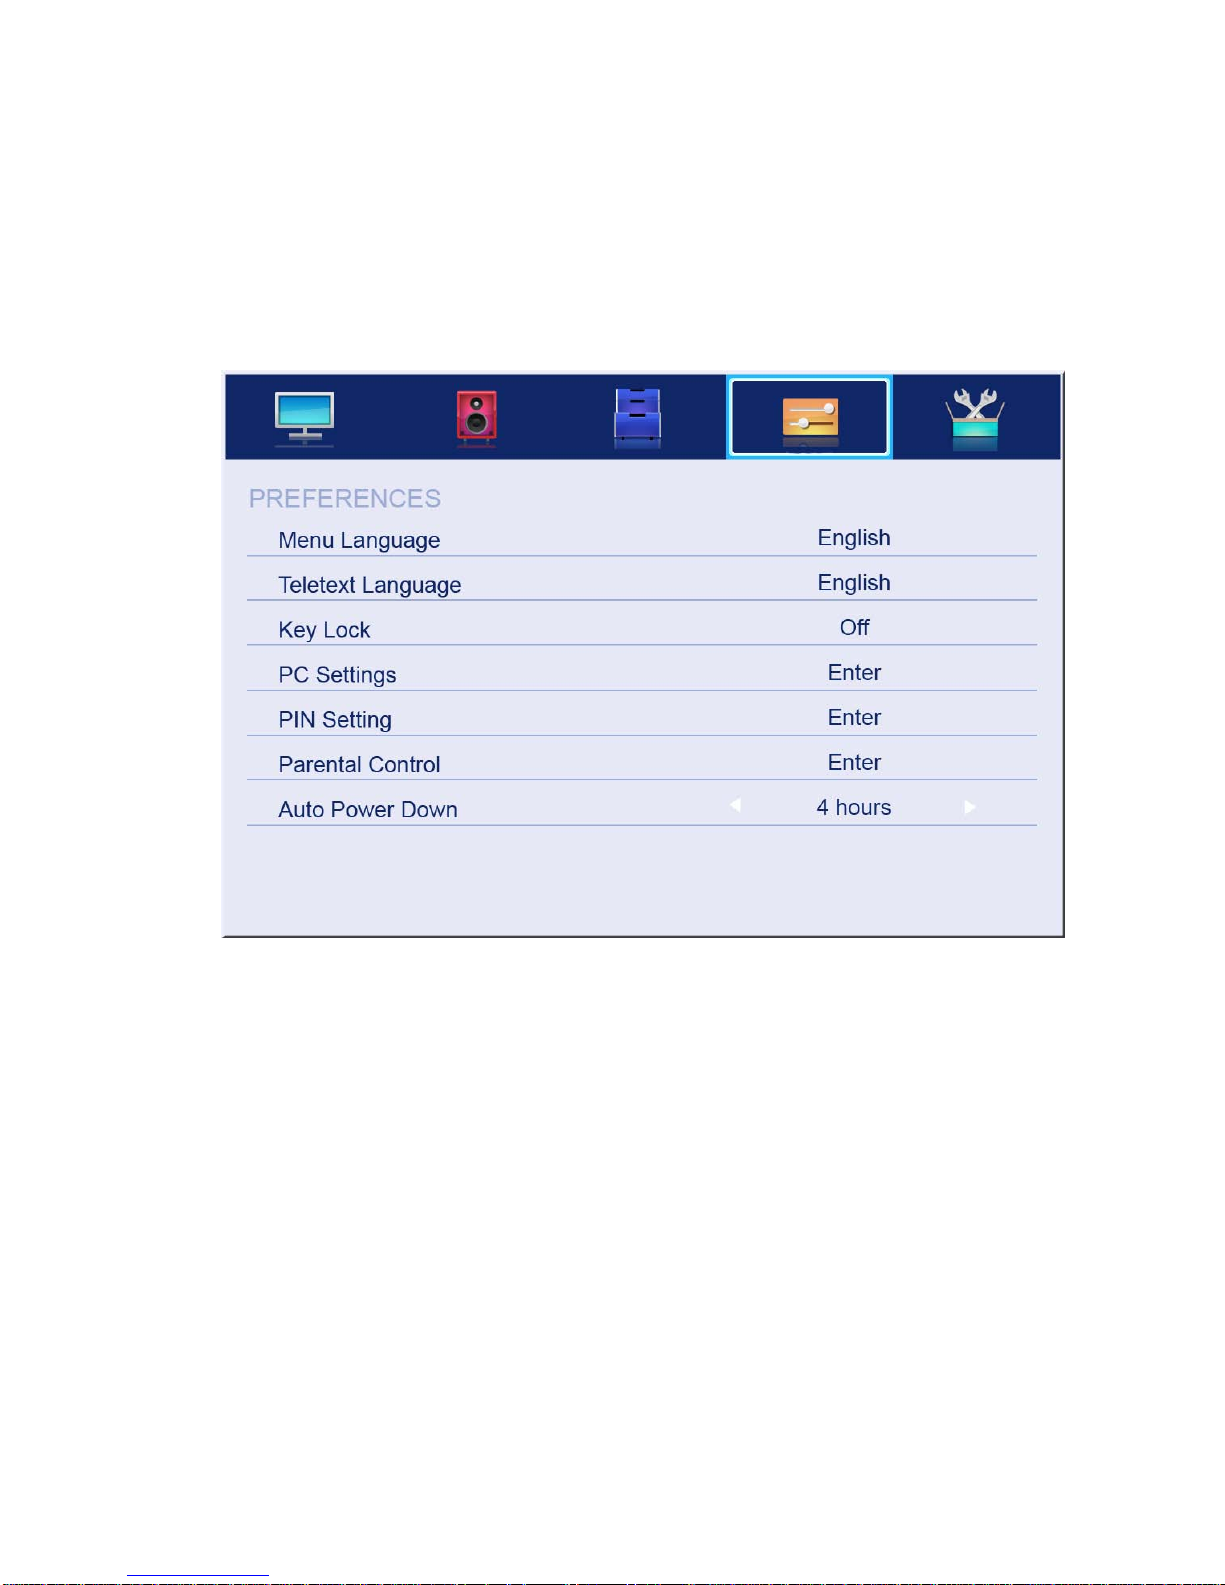
4.4 PREFERENCES
The picture is for a reference only; the actual items are the ones appearing in your TV.
Press MENU button to display the main menu.
Press ▲/▼ button to select PREFERENCES in the main menu, and then press ENTER or ►
to enter.
1. Press ▲/▼ button to select the option that you want to adjust in the PREFERENCES
menu, then press ENTER to enter.
2. Press ◄/►button to adjust or press ▲/▼ button to select.
3. After finishing your adjustment, press MENU button to save and return back to the
previous menu and press EXIT button to exit from the menu.
4.4.1 Menu Language
Press ▲/▼ button to select Menu Language, then press ENTER or ► button t o enter the
submenu, then press ▲/▼ button to select, then press ENTER or ► button to confirm.
4.4.2 Telet ext Language
Press ▲/▼ button to select Teletext Language, then press ENTER or ► button to enter the
submenu, then press ▲/▼ button to select, then press ENTER or ► button to confirm.
4.4.3 Key Lock
Press ▲/▼ button to select Key Lock, then press ENTER button to enter and press
◄/►button to select ON or OFF.
Page 24
24
4.4.4 PC Settings
Press ▲/▼ button to select PC Settings, then press ENTER to enter the submenu, Then
press ► to enter, then press ENTER or ► to confirm (when a PC signal is connected).
4.4.5 PIN Setting
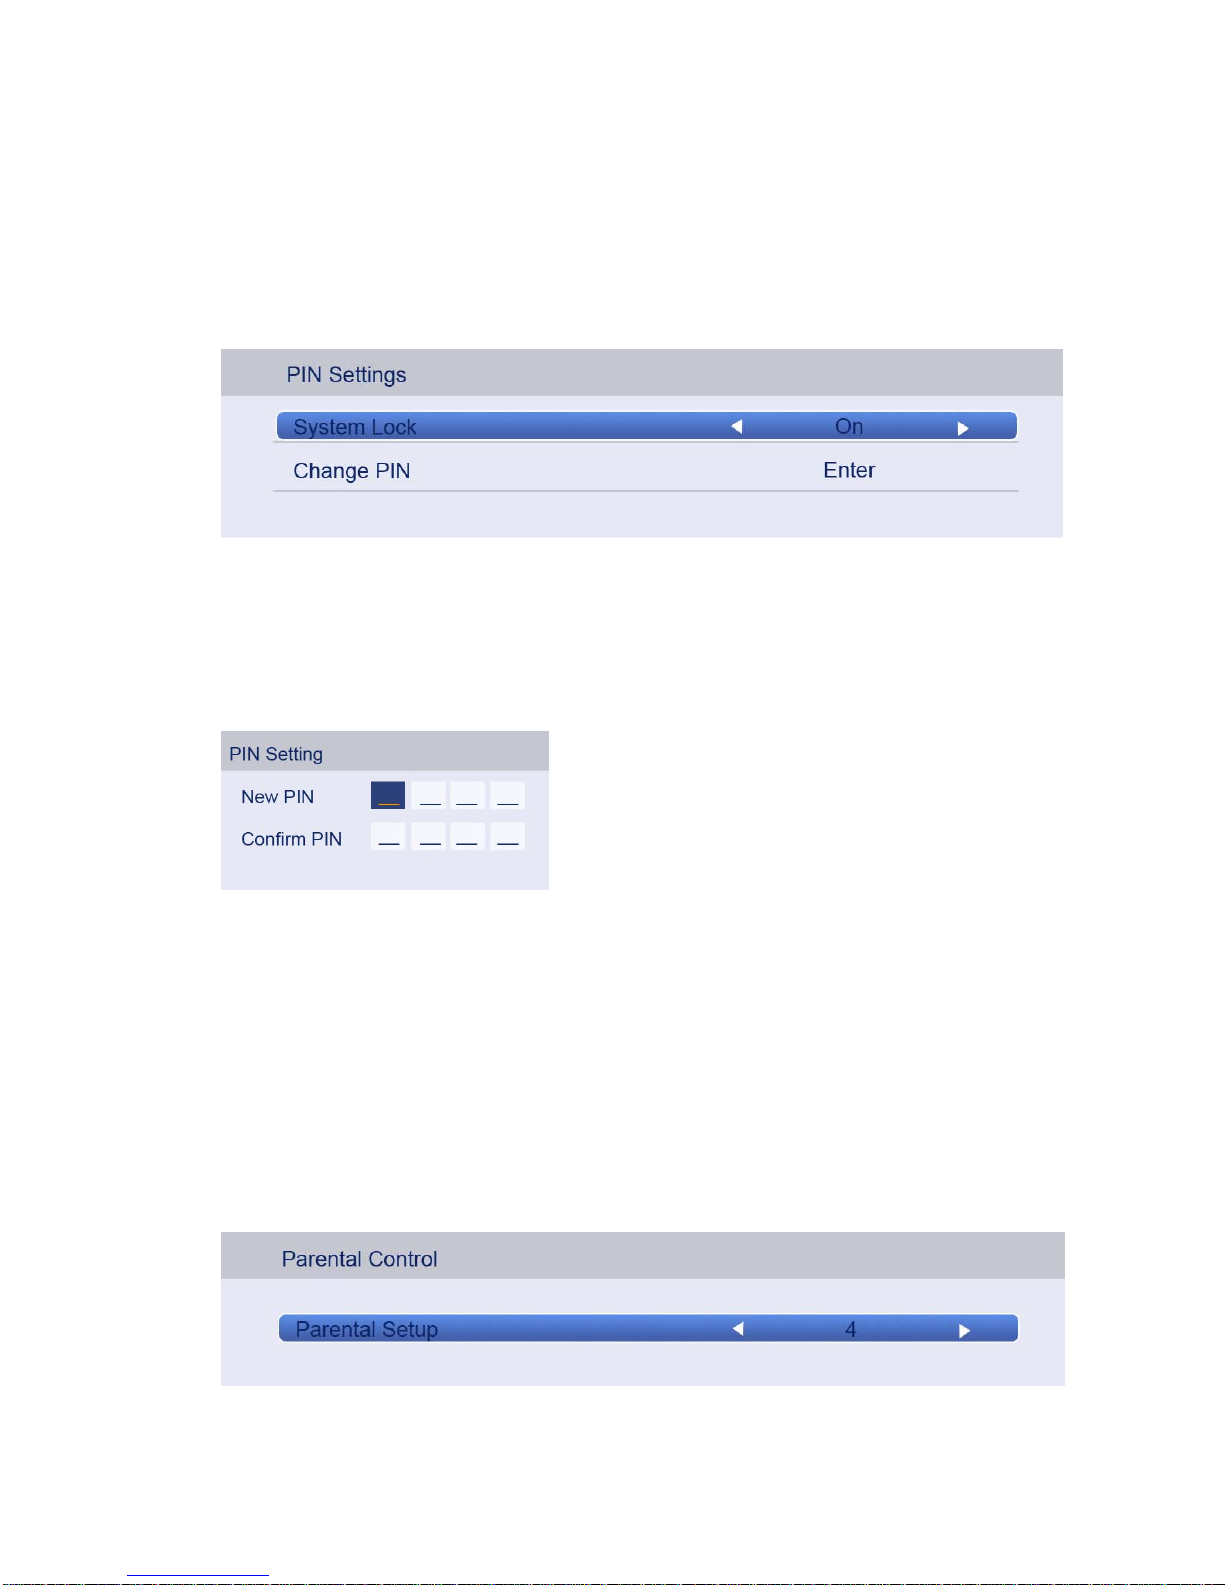
Press ▲/▼ button to select PIN Setting, then press ENTER button to enter the submenu by
using the password “0000”:
4.4.5.1 System Lock
Press ▲/▼ button to select System Lock, then press ◄/► button to select ON or OFF.
4.4.5.2 Change Pin
Press ▲/▼ button to select Change Pin Code, then press ENTER to enter and the Change
Pin Code menu will appear as follows:
Enter the old password at “Old Password” (if the old password is incorrect, the password will
not be allowed to be modified.)
Enter the new password at “New Password”.
Enter the new password again at “Confirm New Password”. If the new password and the
confirmation of new password match, the successfully updated menu will appear in a few
seconds, otherwise, the menu will display the passwords mismatch.
4.4.6 Parental Control
Press ▲/▼ button to select Parental Control, then press ENTER or ► button to enter the
submenu. Then press ▲/▼ button to select Rate (From 4-17, or None). Then press ENTER
or ► button to confirm.
Page 25
25
4.4.7 Auto Power D own
Press ▲/▼ button to select Auto Power Down and press ◄/► button to select Off/ 1 hour/
2 hour/ 4 hour.
4.4.8 Hotel Mode
Press ▲/▼ button to select Hotel Mode and press ENTER or ► button to enter Hotel Mode
setting
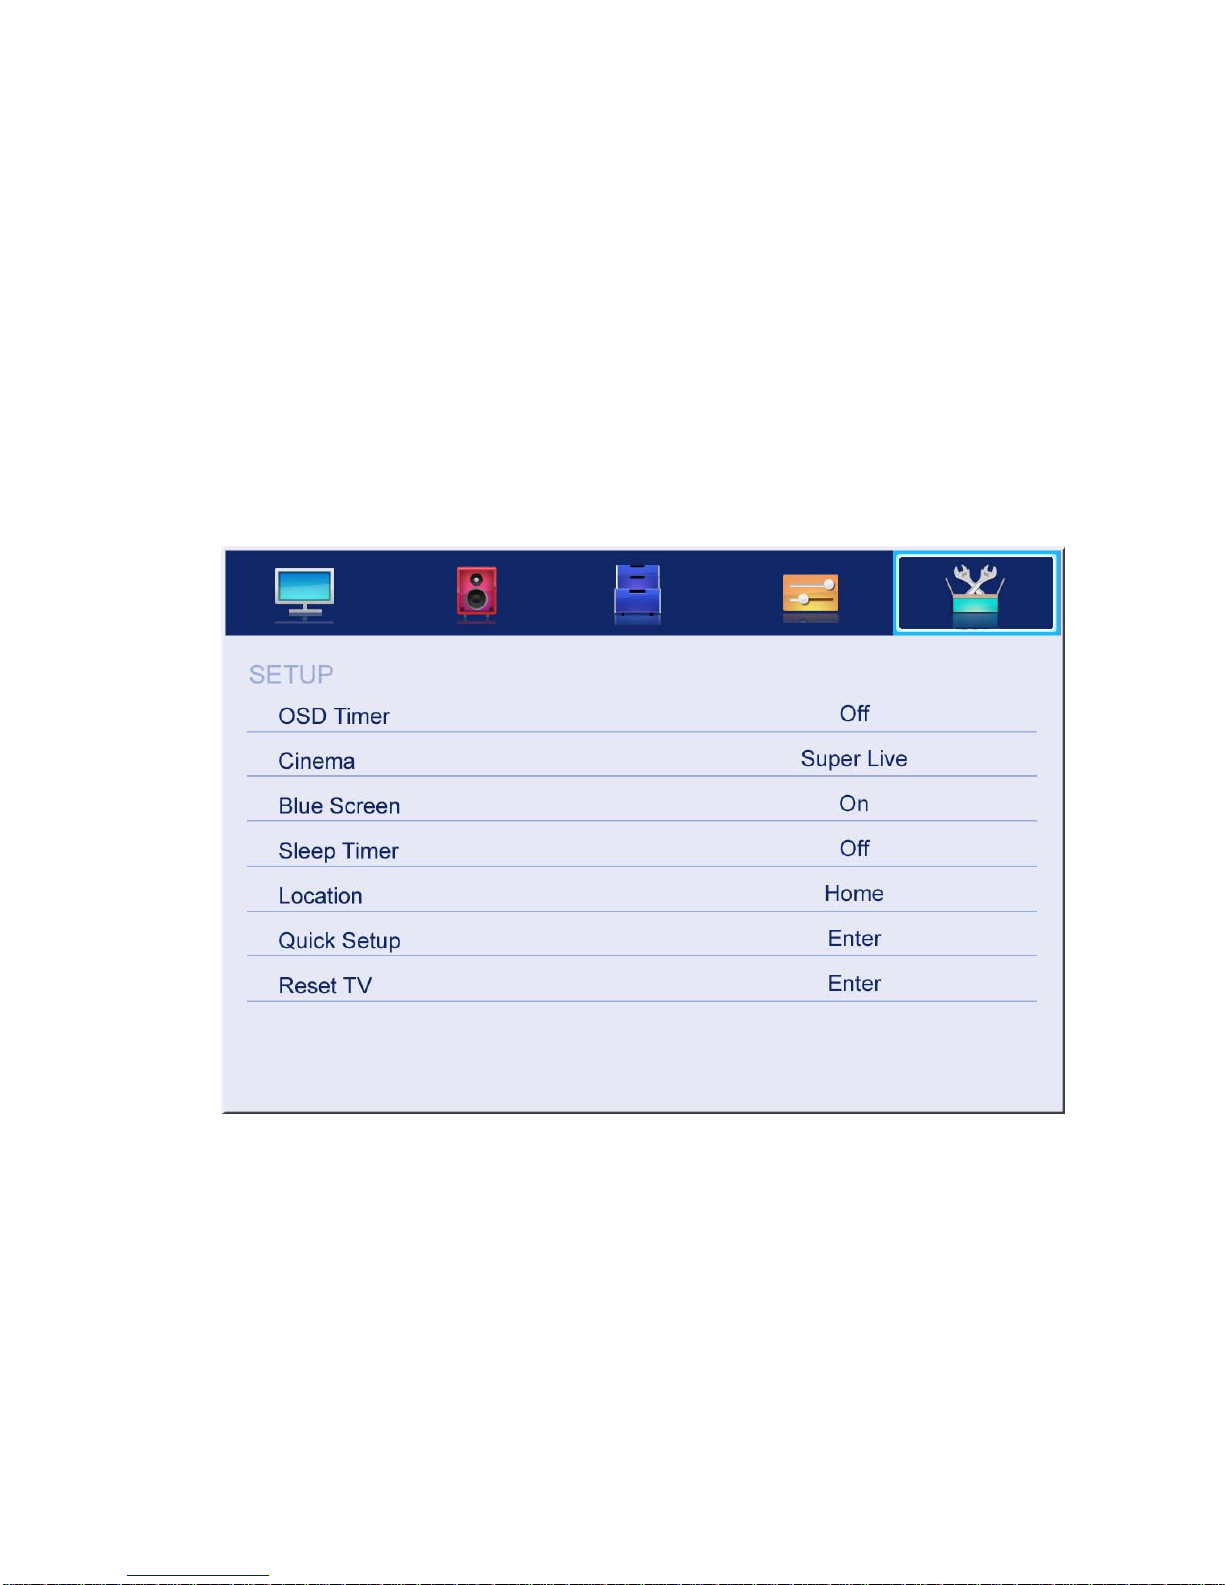
4.5 SETUP
The picture is for a reference only; the actual items are the ones appearing in your TV.
Press MENU button to display the main menu.
Press ▲/▼ button to select Setup in the main menu, then press ENTER to enter.
1. Press ▲/▼ button to select the option that you want to adjust in the Setup menu, then
press ENTER or ► button to enter.
2. Press ◄/►button to adjust or press ▲/▼button to select.
3. After finishing your adjustment, press MENU button to save and return back to the
previous menu and press EXIT button to exit from the menu.
4.5.1 OSD Timer
Press ▲/▼ button to select OSD Timer, and then press ◄/► button to select. (Available
OSD Timer modes: 10 S, 20 S, 30S, 40S, 50S, 60S, off), then press ENTER button to
confirm.
Page 26
26
4.5.2 Cinema
Press ▲/▼ button to select Cinema, and then Press ◄/►button to select. (Available
Cinema modes: Auto, 4x3, Wide, Super Live), then press ENTER button to confirm.
4.5.3 Blue Screen
Press ▲/▼ button to select Blue Screen, then press ◄/► to select On or Off. Then press
ENTER to conf irm.
4.5.4 Sleep Timer
Press ▲/▼ button to select Sleep Timer, and then press ◄/►butto n to select. (Available
Sleep Timer modes: 00:15, 00:30, 01:00, 01:30, 02:00, off), then press ENTER button to
confirm.
4.5.5 Location
Press ▲/▼ button to select Location, and then press ◄/►button to select Home or Store,
then press ENTER button to confirm.
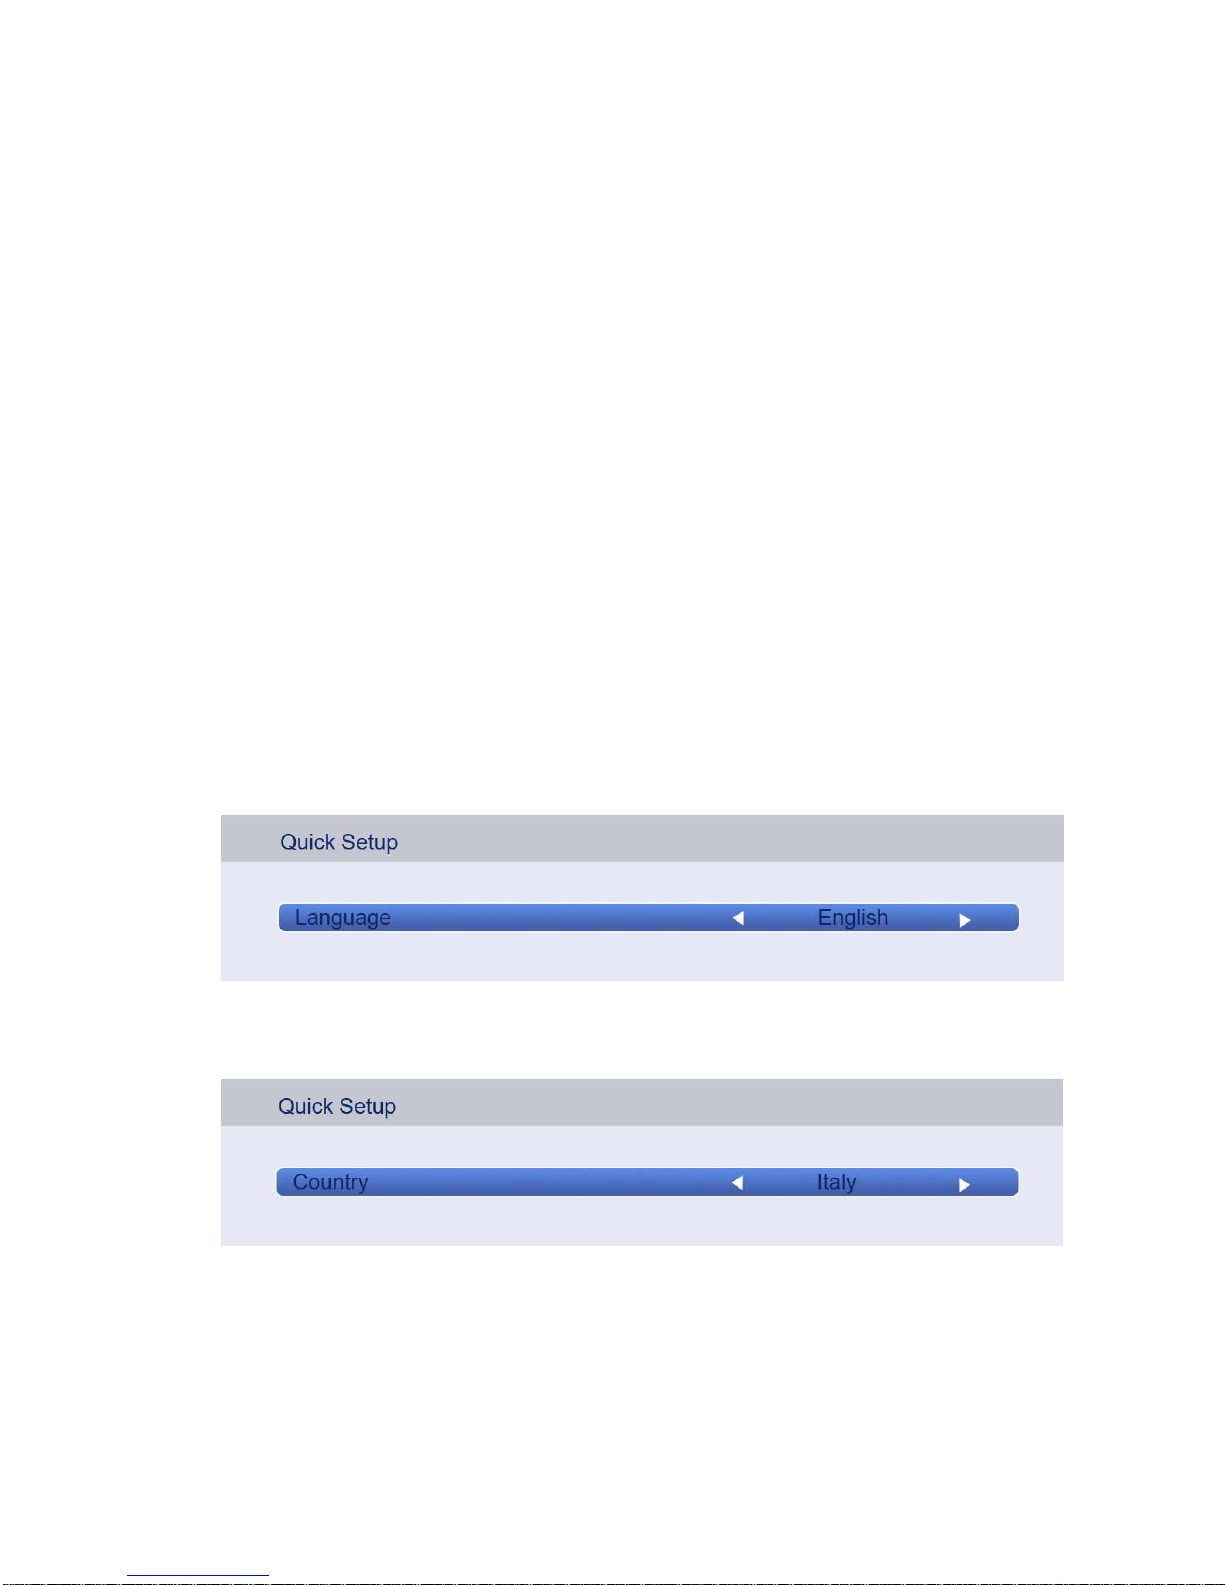
4.5.6 Quick Setup
Press ▲/▼ button to select Quick Setup, and then Press then press ENTER button to enter
the submenu, enter the password if locked, and then you can quickly make some basic
settings of the TV, as follows:
4.5.6.1 Language
User can press ◄/► button to select the language of television programs.
Then press ENTER to enter the next step page.
4.5.6.2 Country
User can press ◄/► button to select the country.
Then press ENTER to enter the next step page.
4.5.6.3 DTV Type
User can press ◄/► button to select the DTV Type: Cable or Terrestrial.
Page 27

27
Then press ENTER to enter the next step page.
Page 28
28
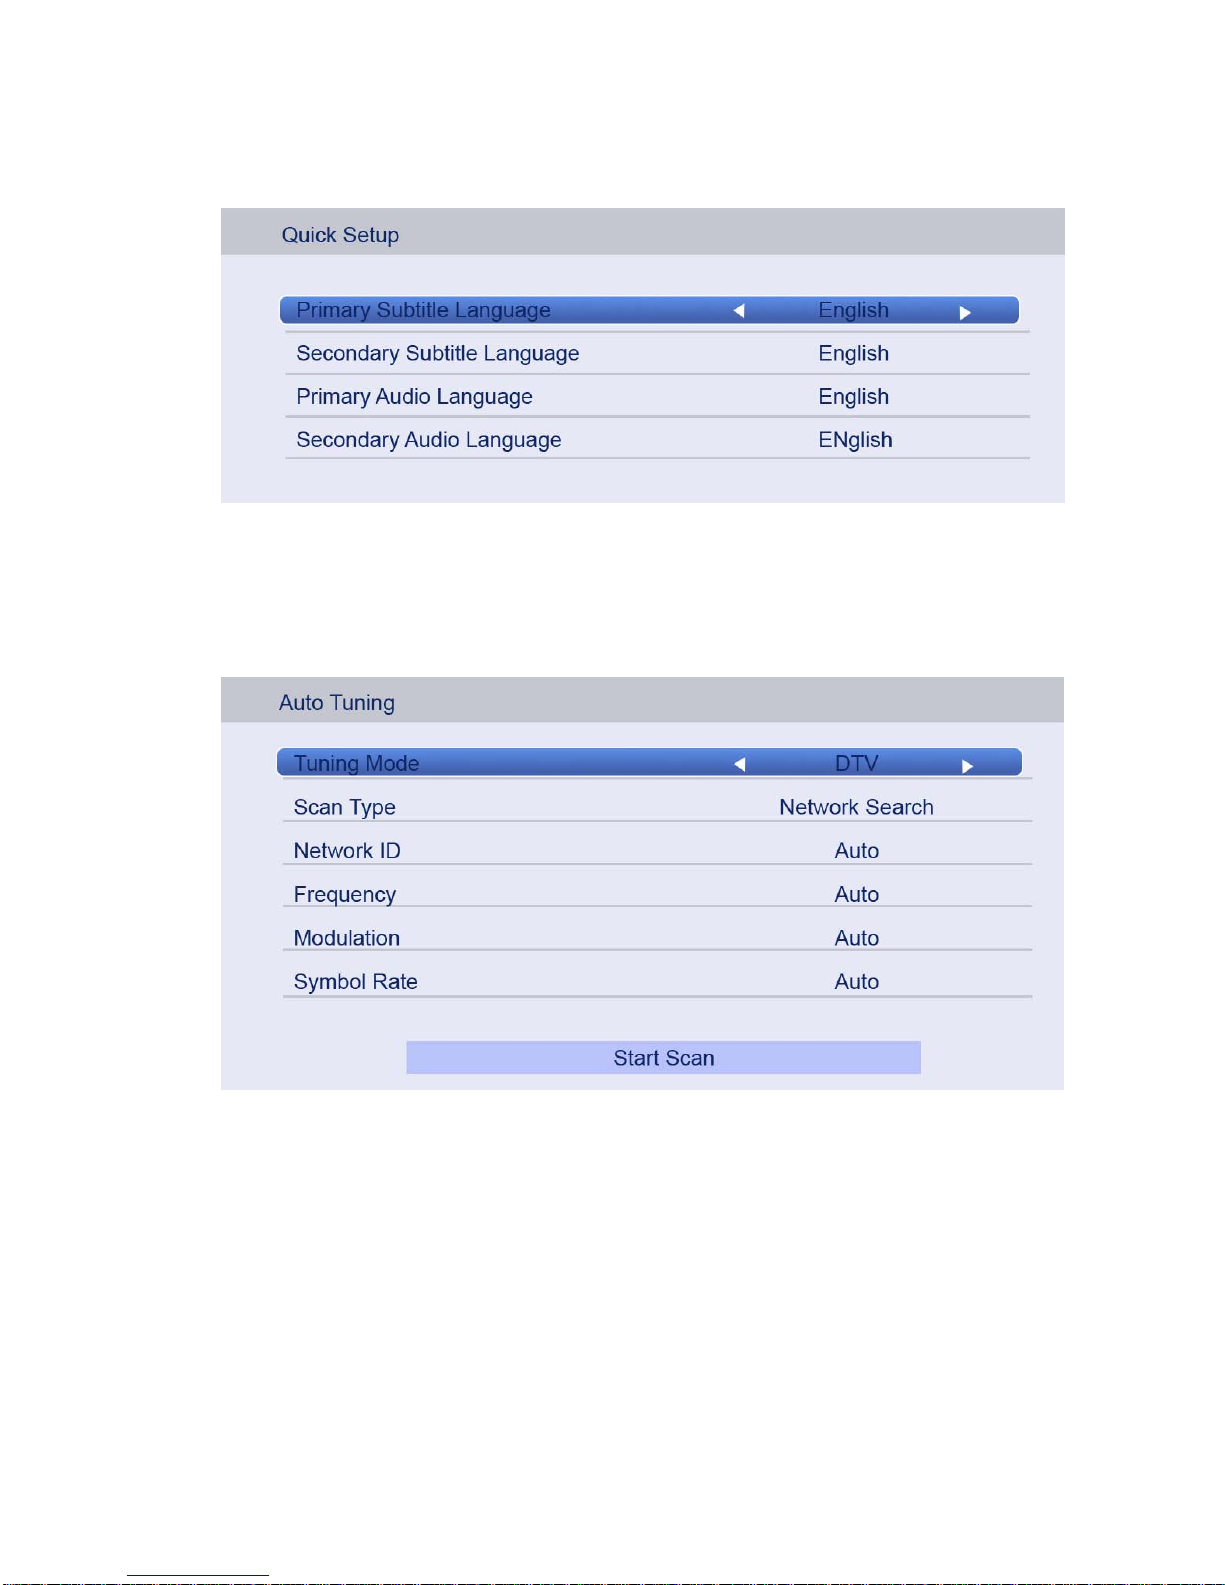
4.5.6.4 Subtitle and Audio Language settings
Press ▲/▼ button to select the item, and then press ◄/► button to select the options.
User can set the primary and secondary subtitle language, primary and secondary audio
language by these options.
Then press ENTER to enter the next step page.
4.5.6.5 Auto Tuni ng
Press ▲/▼ button to select the item, and then press ◄/► button to select the options.
Tuning Mode
User can press ◄/► button to select the Tuning Mode: DTV/ ATV/ DTV and ATV.
Scan Type
User can press ◄/► button to select the Scan Type: Full Scan/ Network Search.
Network ID
This option is only available if the network search is activated.
User can press the number keys to set the Network ID, or automatically search for ID
address.
Frequency
This option is only available if the network search is activated.
Page 29
29
User can press the number keys to set the frequency, or automatically search the
frequencies.
Modulation
User can press ◄/► button to select the Modulation: 16QAM/ 32QAM/ 64QAM/ 128QAM/
256QAM.
Symbol Rate
User can press the number keys to set the symbol rate , or automatically search for a symbol
rate.
After completi ng the above settings, user can start channel search.
4.5.7 upgrade
Press ▲/▼ button to se lect Upgrade.
4.5.8 Channel Details
Press ▲/▼ button to select Channel Details.
4.5.9 Reset TV
Press ▲/▼ button to select Reset TV, and then press ENTER to enter the sub menu, enter
the password if locked, and then you can restore factory settings.
4.5.10 Shopping mode
Press ▲/▼ button to select Shopping mode.
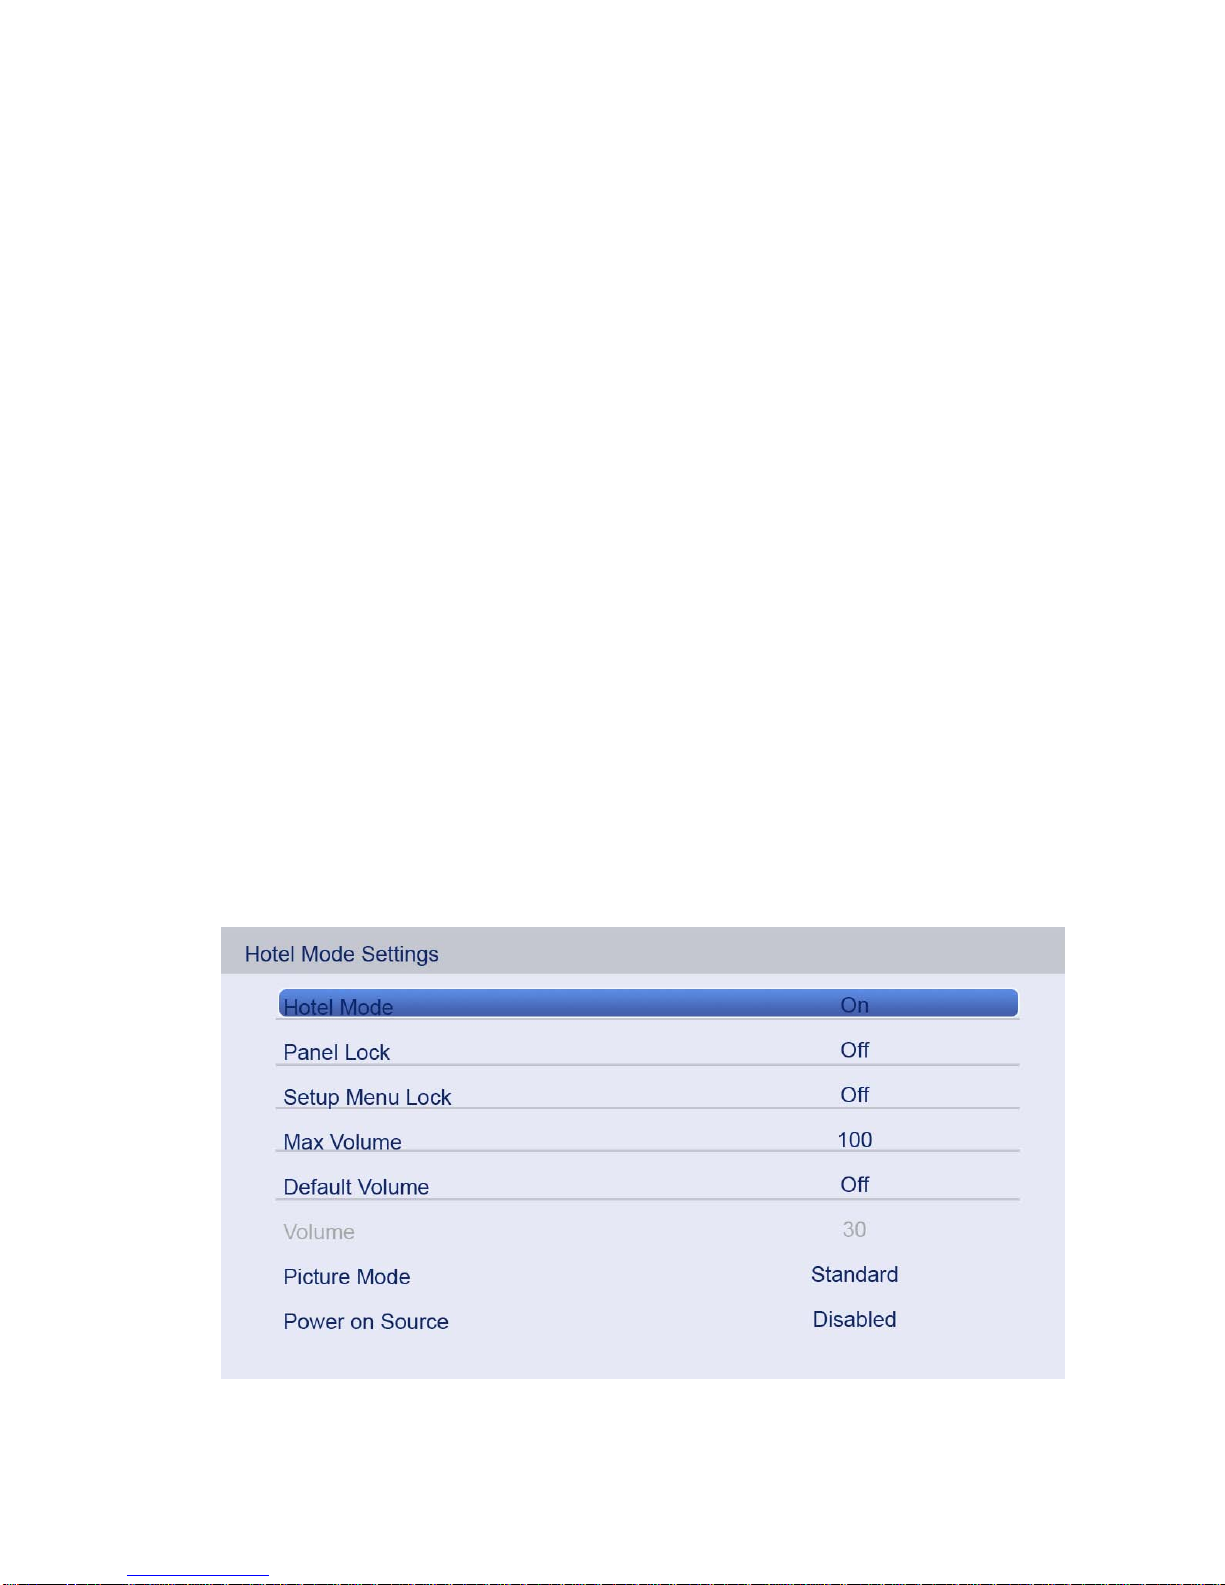
4.6 HOTEL MODE SETTINGS
1. How to enter and exit the hotel mode menu:
Page 30
30
Enter:You can enter the hotel mode menu by the follow steps:
Enter the password "4588" under the source menu.
Select:Use the direction keys to select the different items.
Confirm:Press the key “ENTER” or the r ight direction key to confirm.
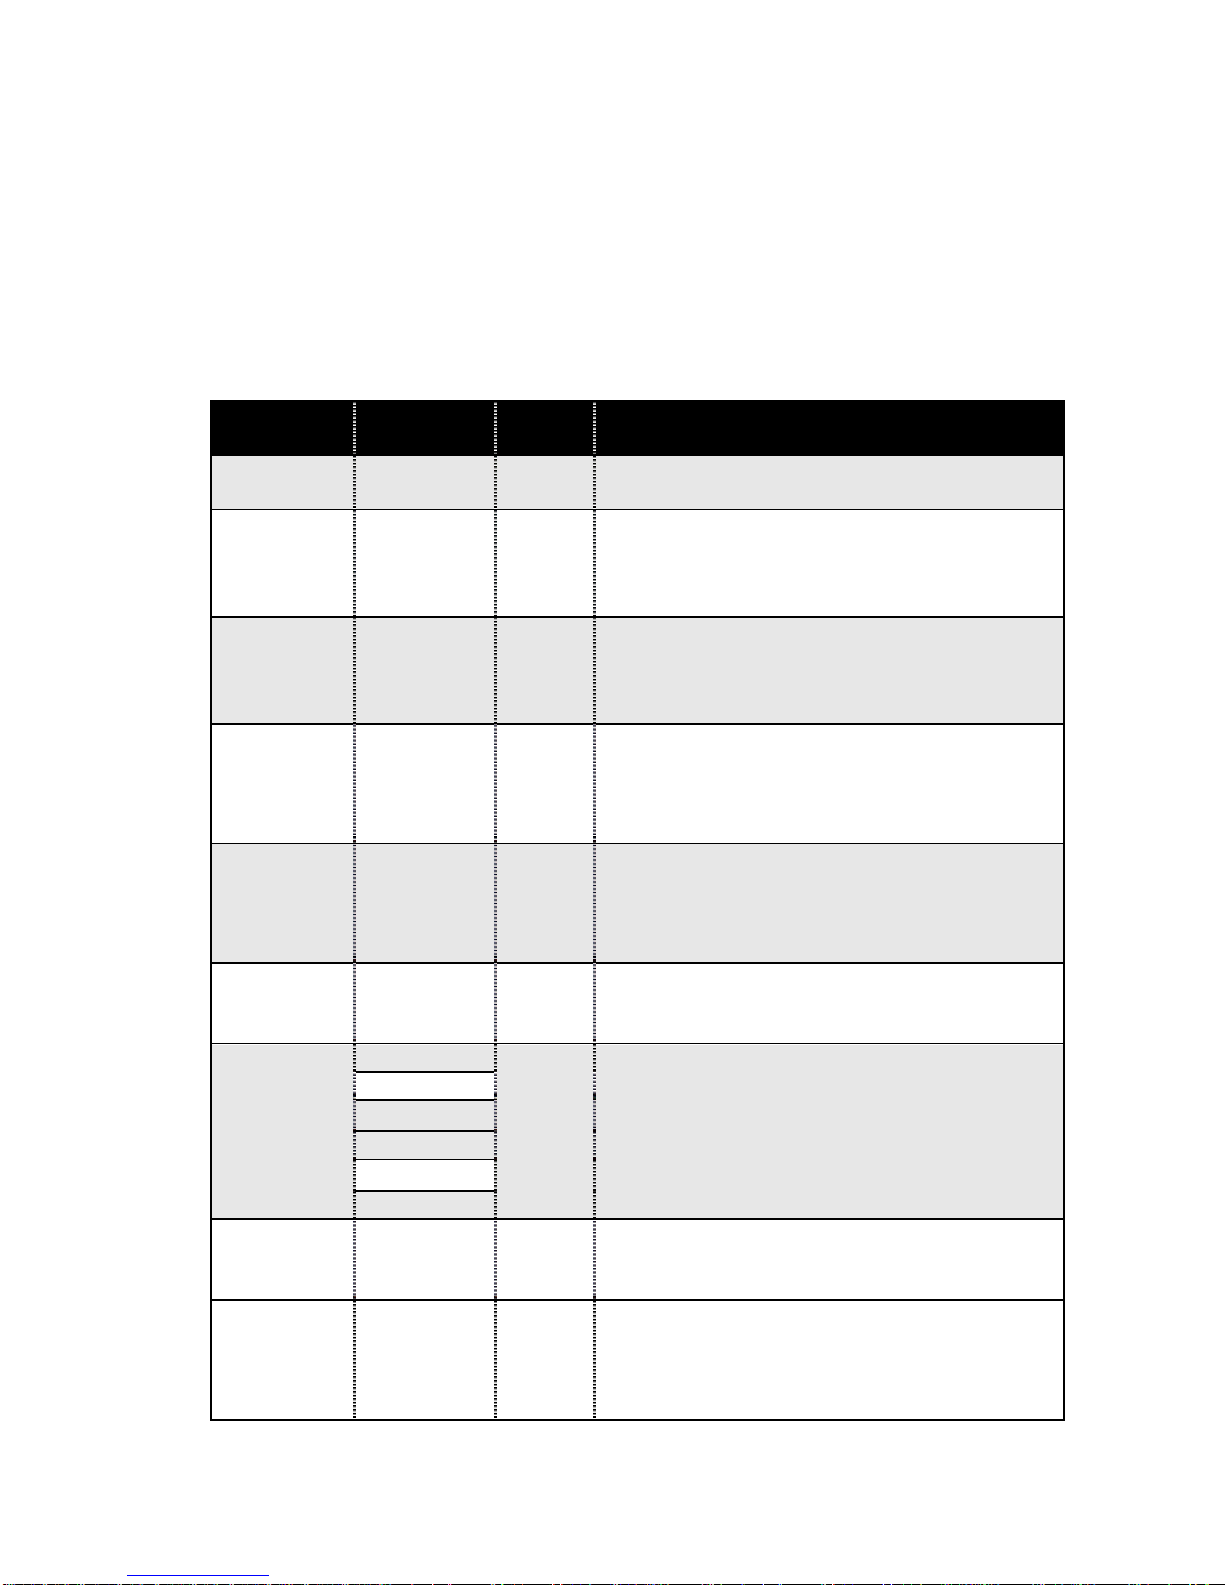
2. Function description of hotel mode:
Function
Name
Value
Default
Note
Hotel Mode
(OFF/ON) OFF If set to “O n”, t he next functions in the list will be
activate or adjustable, it will open the hotel mode.
Panel Lock (OFF/ON) OFF If set to“On”, the keypad is locked, then the user
cannot use
any button on the keypad. If set
to“Off”, all keypad items are effective. The default
is Off.
Setup Menu
Lock
(OFF/ON) OFF If set it to“On”, the button of main menu i s l oc ked,
and the OSD of main menu cannot be used. If set
to“Off”, the
Main Menu item is effective.The
default is Off.
Max Volume (0 ~ 100) 100
To set the max volume value, and select one
value of 0 to 100, when you adjust the volume,
the volume value cannot exceed the maximum
volume setting. The default value is 100.
Default
Volume
(OFF/ON) OFF
To enable/disable the default volume. If set to
“On”, you can set the default volume value by the
follow item. If set to “Off”, you cannot set the
default volume value.
Volume
(0 ~ 100)
30
To set the default volume value when the default
volume is“ON”. The TV will auto set the default
volume value when TV power is on.
Picture
Mode
OFF
OFF
To set the default picture mode. When you set
this item to “OFF”, it will save the user setting.
Standard
Movie
Mild
User
Dynamic
Power on
Source
Disable/ All
Sources
Disable To set the default source when the TV power is
on. If the item is set to “Disable”, it will d efault to
the user setting.
Power on
Standby
(Disable/Ena
ble)
Disable
To set the power on mode. If the item is set to
“Disable”, the TV will auto power on when
plugged to AC. If it is set to “Enable”, the TV will
automatically enter standby mode. Y ou can
Page 31
31
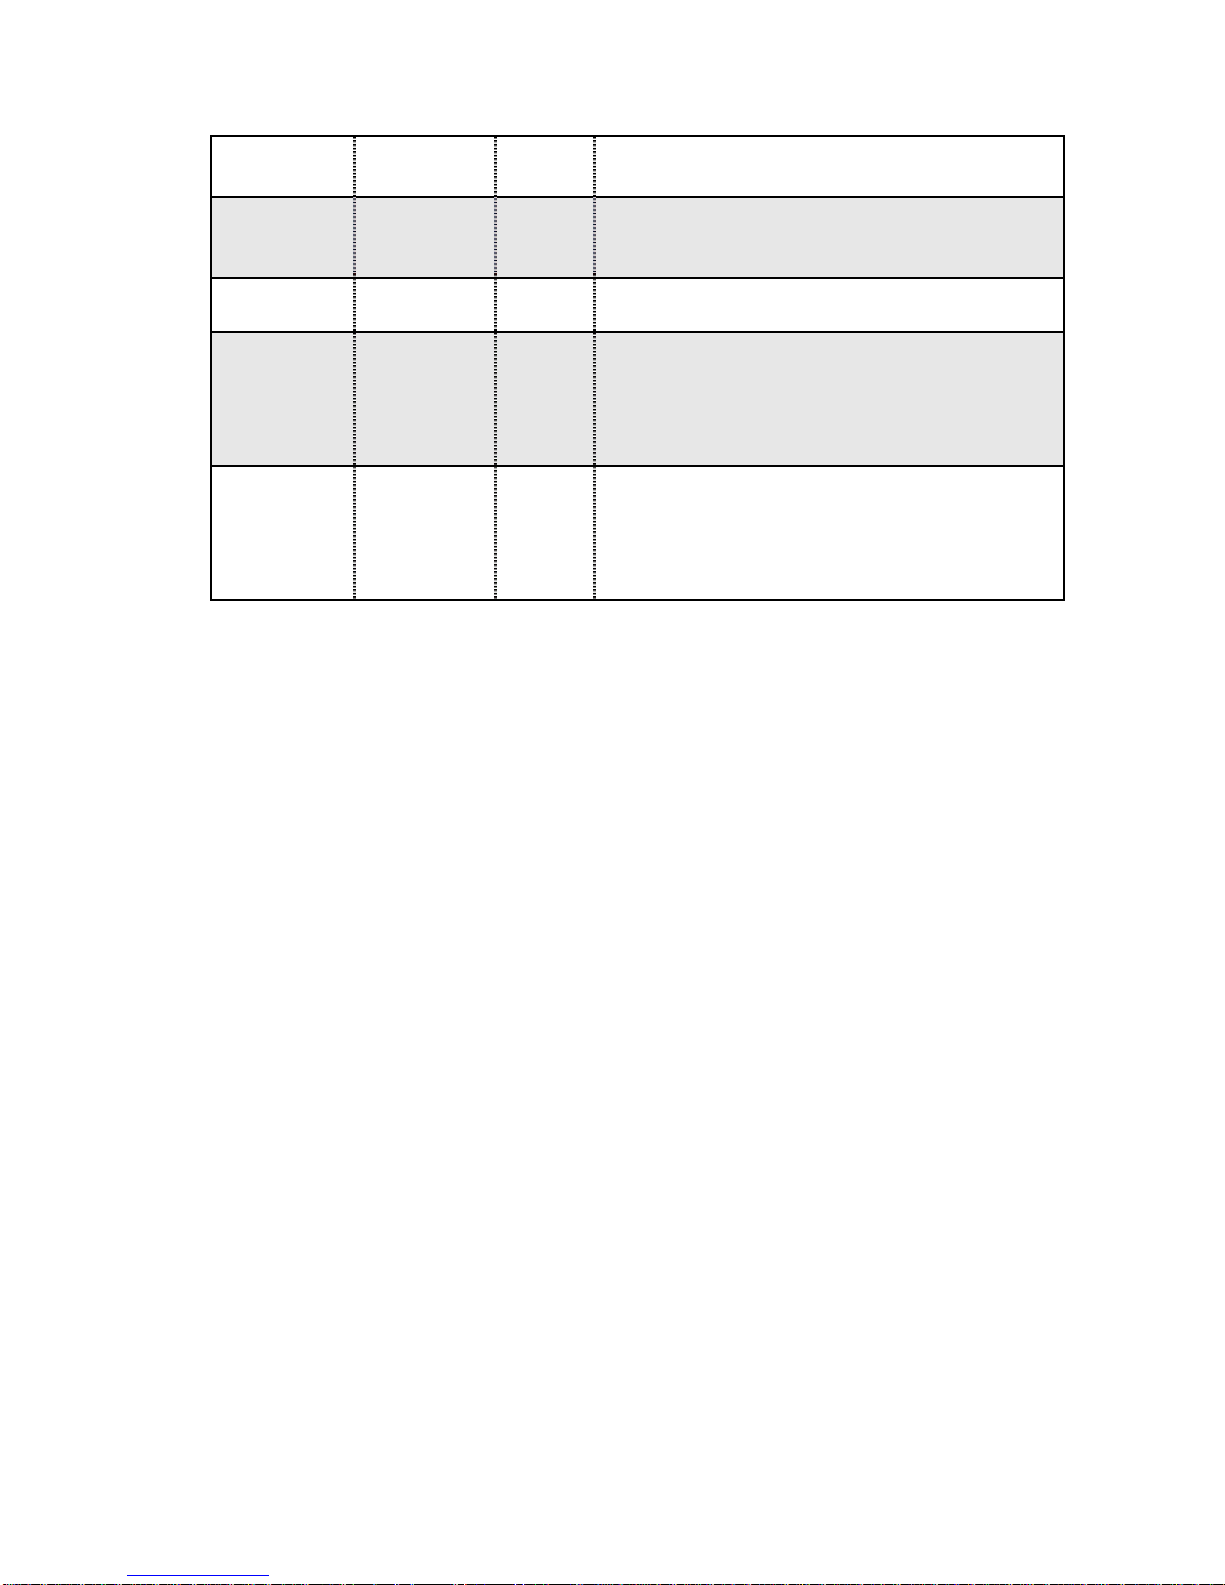
power or use the RC . The default value is
“Disable”.
Channel
Scan Lock
(OFF/ON)
OFF
If the item is set to “On”, then the user can’t scan
or search the TV. If set to“Off”, Channel Scan
item is effective. The default is Off.
Aspect
Ratio Lock
(OFF/ON)
OFF
If set to “On”, the “ASPECT” can not be adjusted
and it is locked.
Source
Lock
(OFF/ON)
OFF
To use this setting, the user must firstly set t he
hotel mode to "on", otherwise this item cannot be
adjusted. If this item is set to "on",
the next
source lock will be actived. The default value is
off.
Press
[Enter] to
Clear
Hotel
Mode Set
N/A
N/A
Select the item and press the ENTER button on
the RC, It will reset the hotel mode settings to the
default value.
4.7 How to user Record
The HK-RTD2957 supports two types of recording:
A、 Direct Record
B、 Subscribe Record
Direct Record。
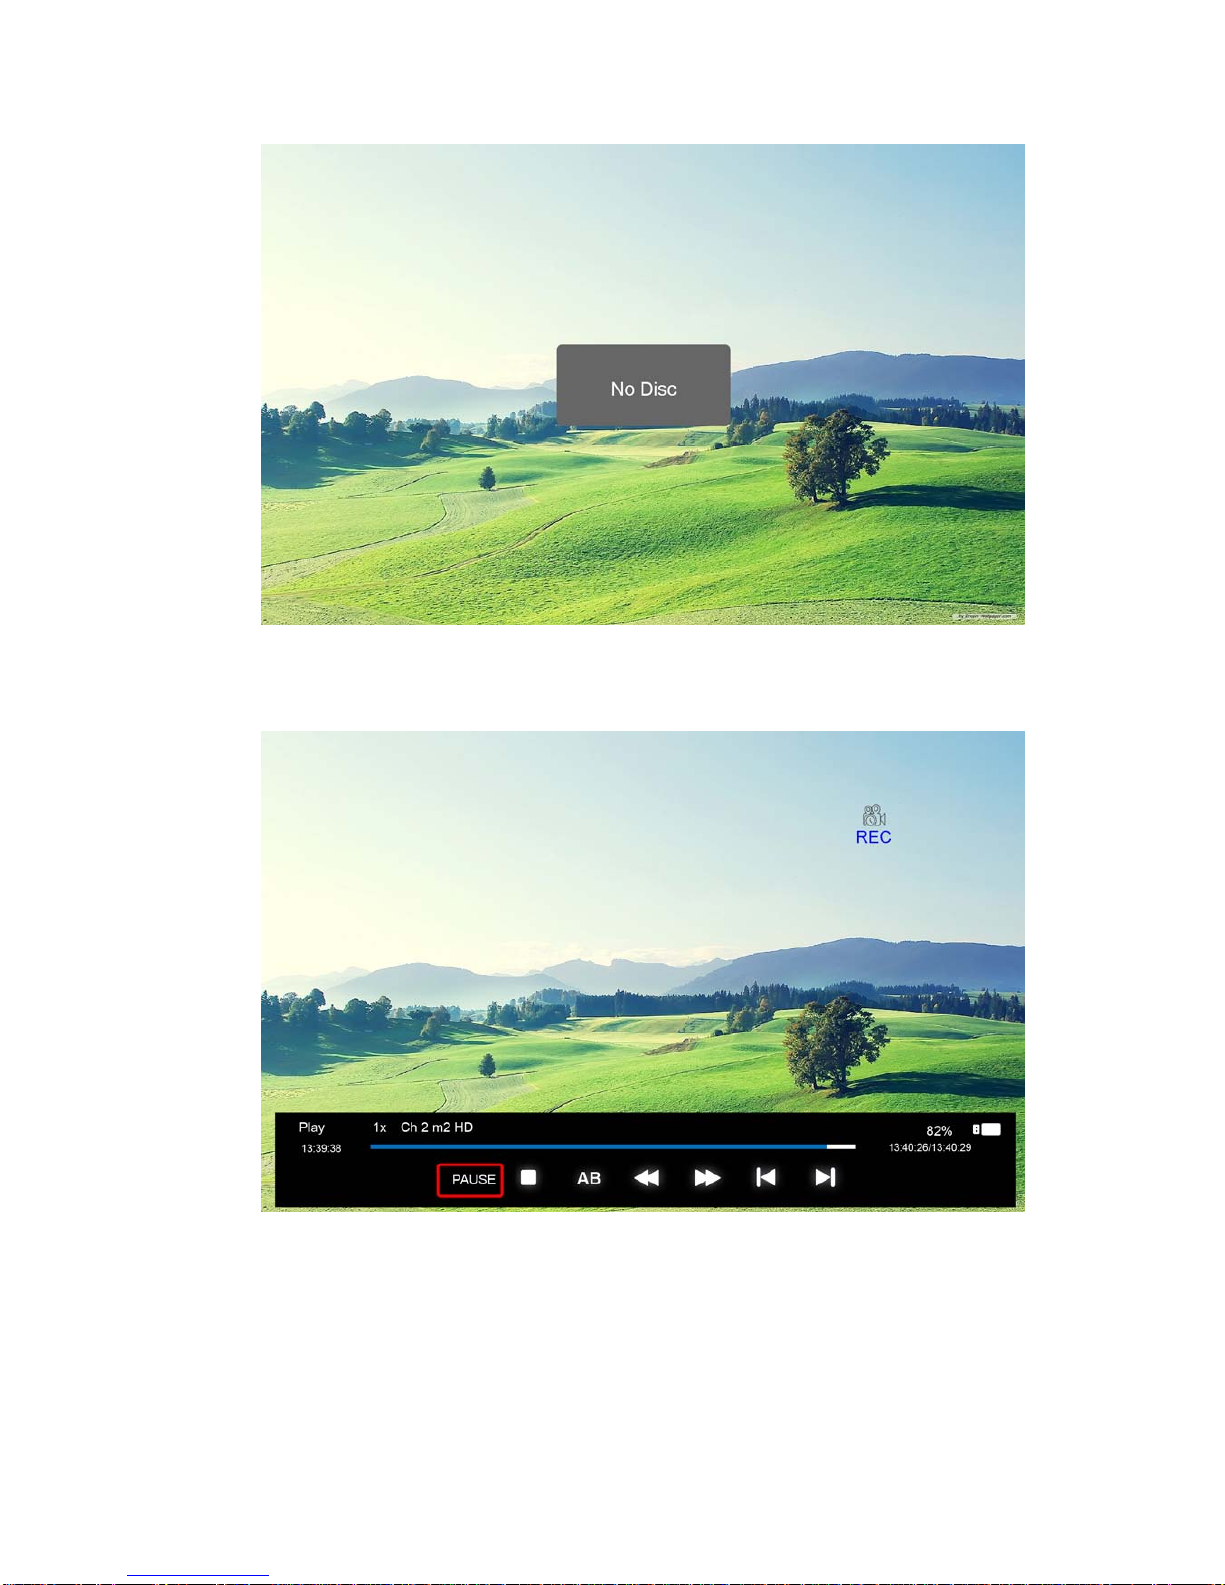
1. In the DTV source, you can start the recording function by pressing the “REC” key while a
program is playing. Before that, you have to make sure that the USB storage device is
inserted and the device checking and Initialization has been done.
If you press “REC” key when there’s no USB storage device inserted, a prompt window
will appear, as follows.
Page 32
32
If you press “REC” key during the device checking and Initialization, the prompt window
will show a black screen for about 2s. When the TV is recording, the recording menu will
appear.
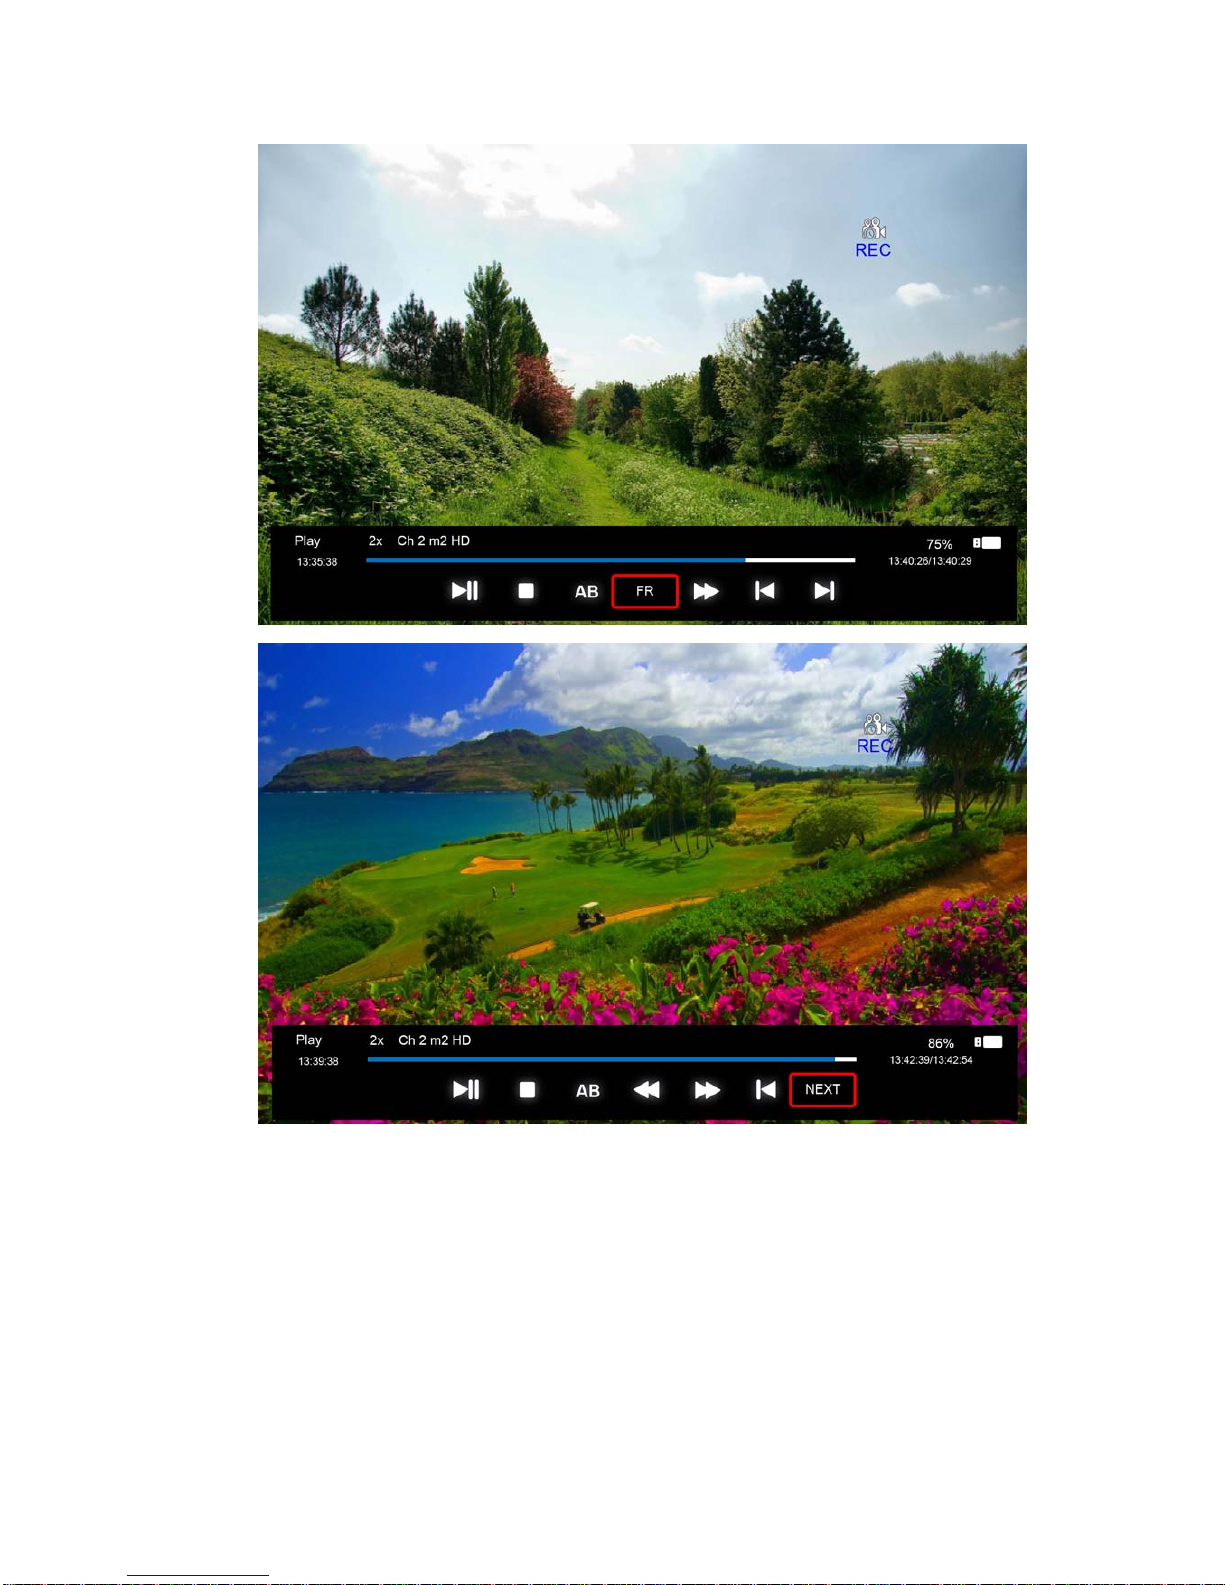
2. After the recording has started, you can select the the functions:
PLAY/PAUSE/STOP/AB/FF/FR/PRVE/NEXT。You can seen the detailed info in the recording
menu.
Page 33
33
PLAY/PAUSE: you can set the play mode PLAY/PAUSE;
STOP: you can stop the recording, a menu will appear for checking whether to stop the
recording.
AB: you can set two points for playing the record file, from A to B.
FF/FR: you can set the play mode FF/FR;
PRVE/NEXT: you can play the record file to PRVE/NEXT 30s.
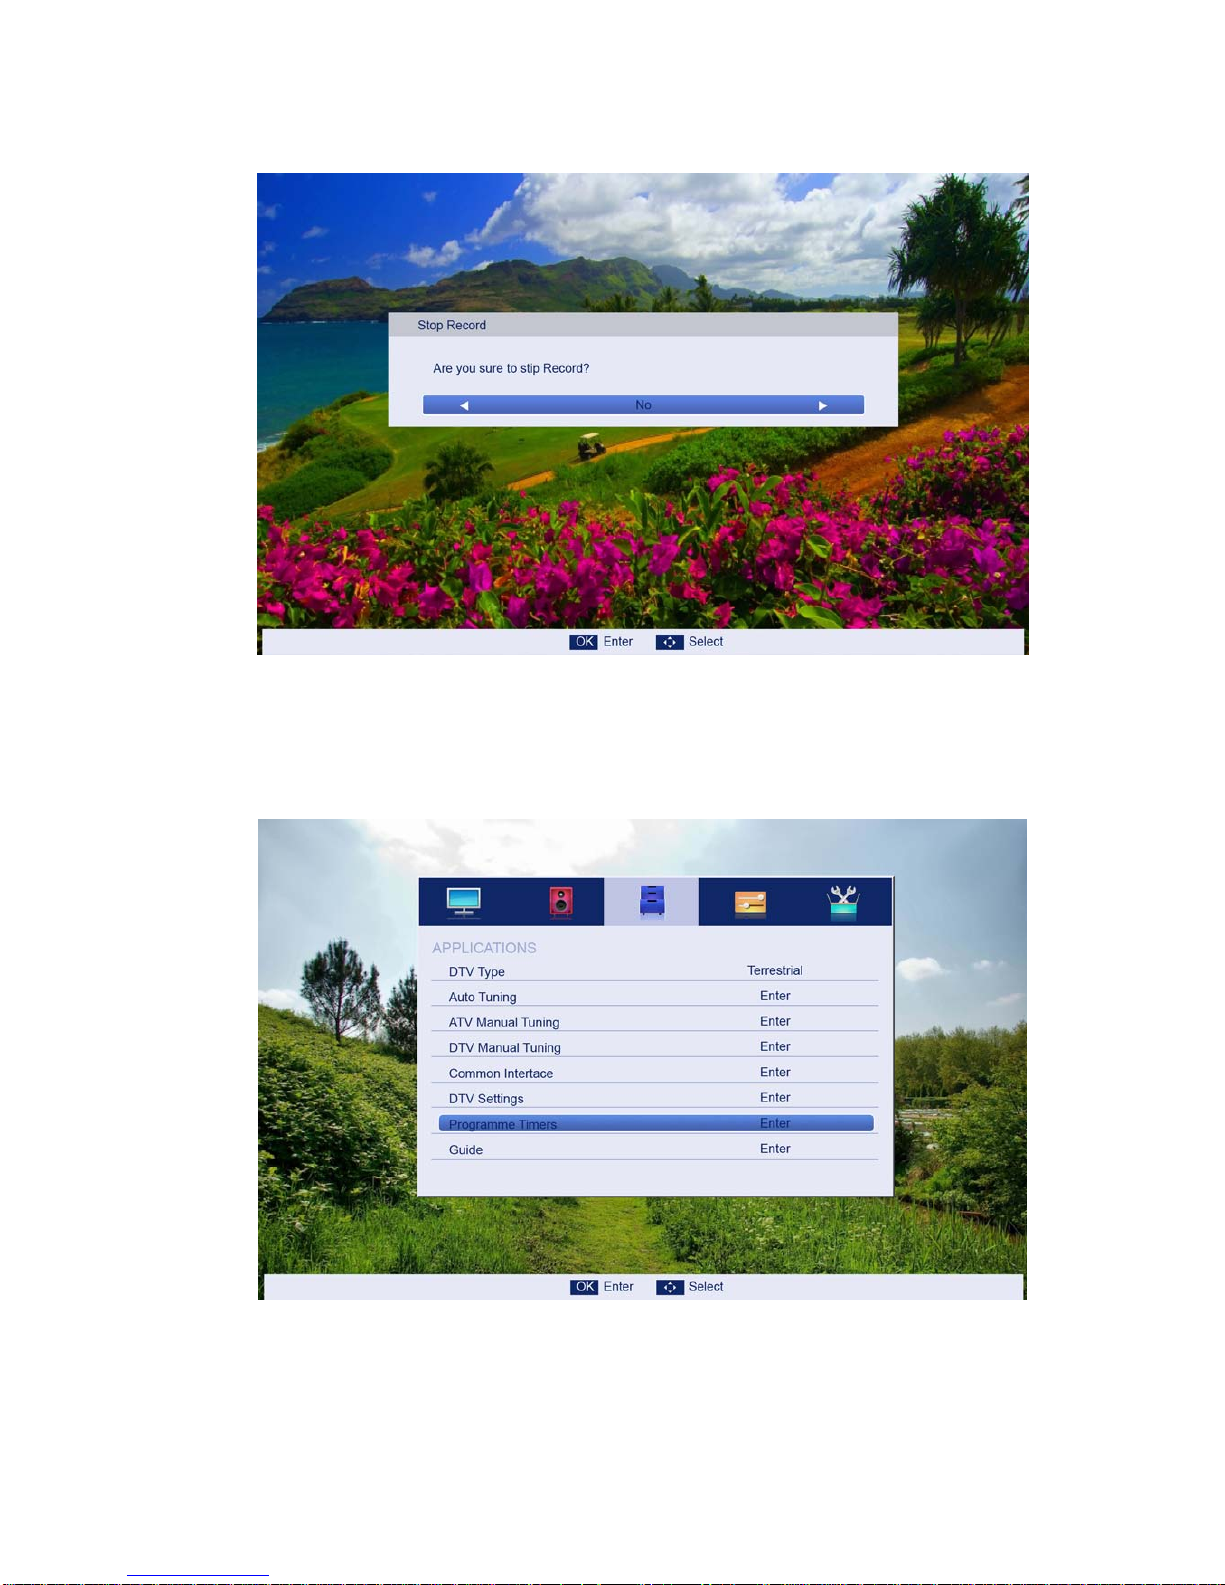
3. After recording has started, you can press the button PLAY/FF/FR/PRVE/NEXT on the RC.
You can play the record file by PALY/PAU SE/ FF/ FR/ PRVE/NEXT/STOP.
Page 34
34
4. You can press "STOP" key to stop recording function after your confirmation.
Subscribe Record
1. In the DTV source, you can enter the Timer menu and set the Subscribe Record. Press
the “ENTER” key to add the recording task.
The steps:Main menu--->APPLICTIONS--->Programme Ti mers ---> Programme T i mers
Page 35
35
2. If you enter the Timer Edit menu,you can set the recording task that you want to record.
3. When you set the recording task successfully,if the TV is standby mode,it will auto power
on three minutes before starting of the task.
4. When the recording task time has started,it will automatically record,but you must check
if your US B st orag e de vice is inserted and has enough speed to record. Otherwise th e task
will fail.
5. The TV enters false standby mode when the task is started. You can press the "POWER"
key to watch the TV program。You can do the same operation as in Direct Record. When you
press "POWER" again,if the task is not over,the TV will power off the panel and continue to
record. The TV will actually power off when the recording task is over.
6. When you open the EPG menu, press the BLUE button. You can also enter the
programming time menu.
Page 36
36
4.8 How to use Time shift
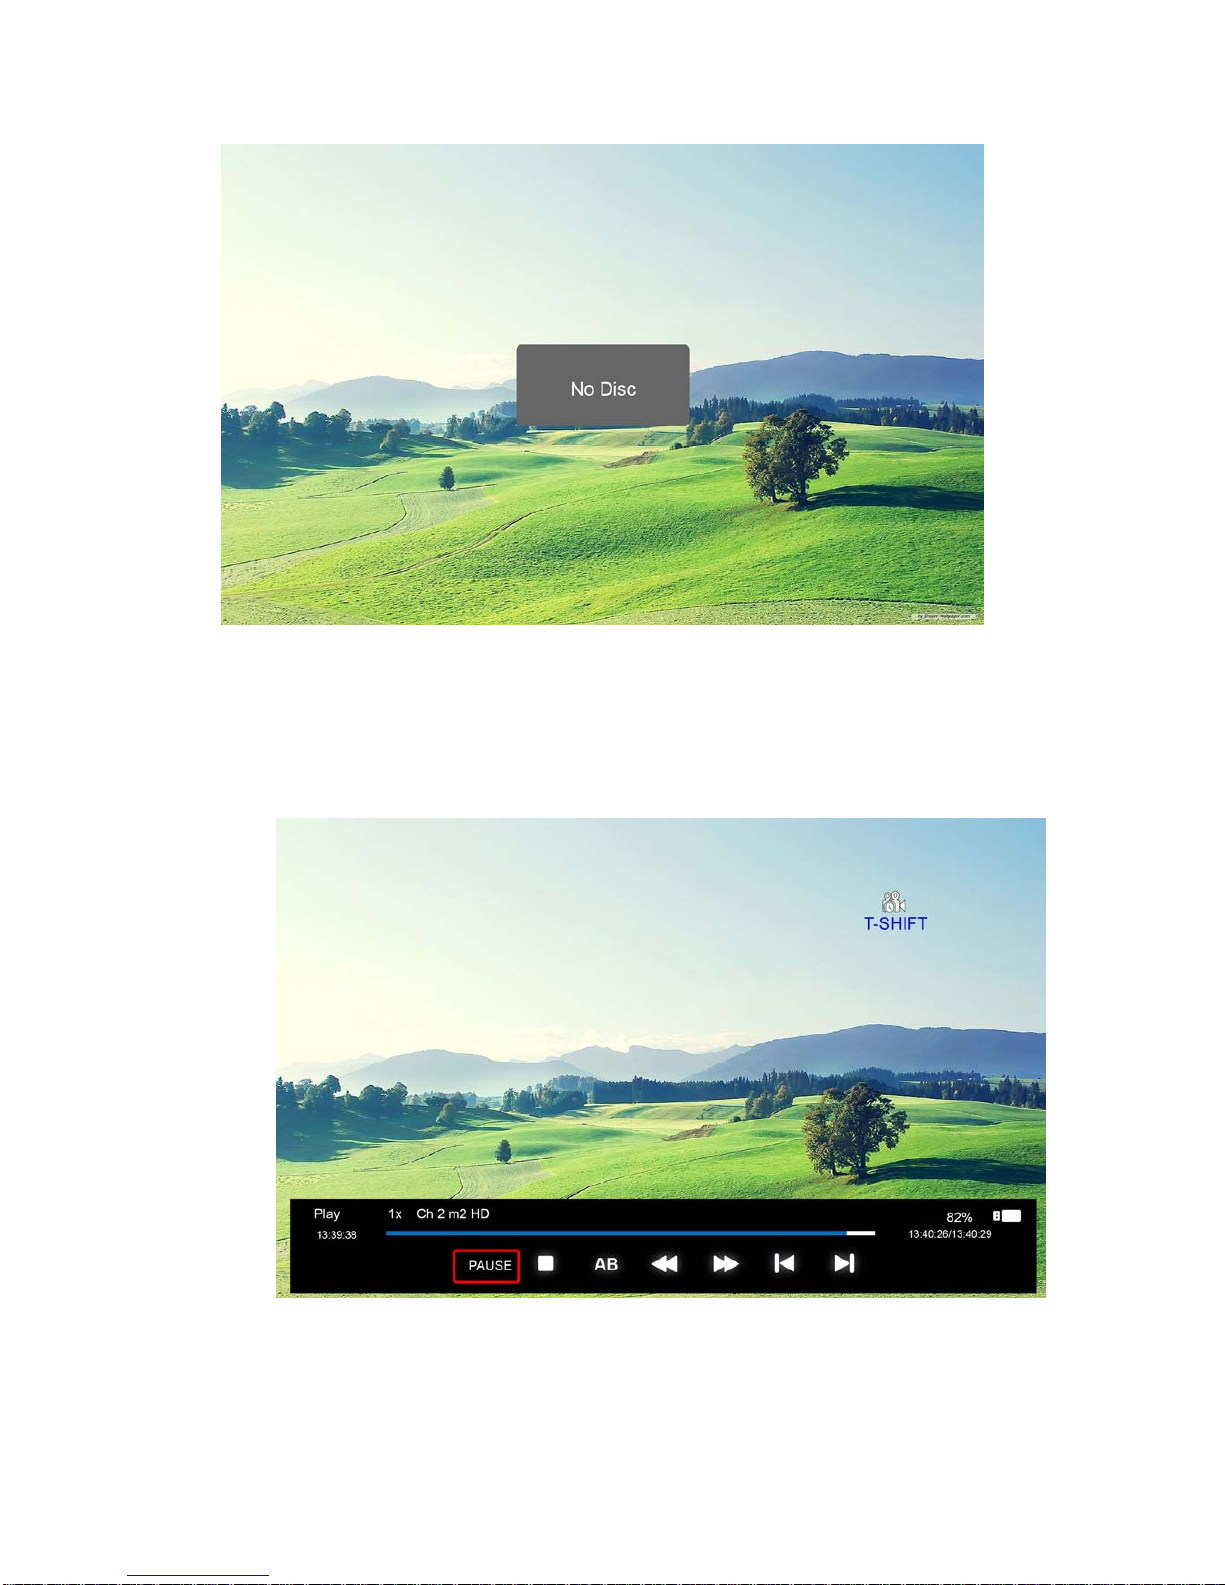
1. In the DTV source, you can start the timeshift function by pressing the “PLAY/PAUSE” key
while a program is playing. Before that, you have to make sure that the USB storage device
is inserted and the device checking and initialization has been done.
If you press “PLAY/PAUSE” key when there’s no USB storage device inserted, a prompt
window will appear, as follows.
Page 37
37
If you press the “PLAY/PAUSE” key during the device checking and initialization, a prompt
window will appear, as follows.
If you press the “PLAY/PAUSE” key during the device checking and initialization, the prompt
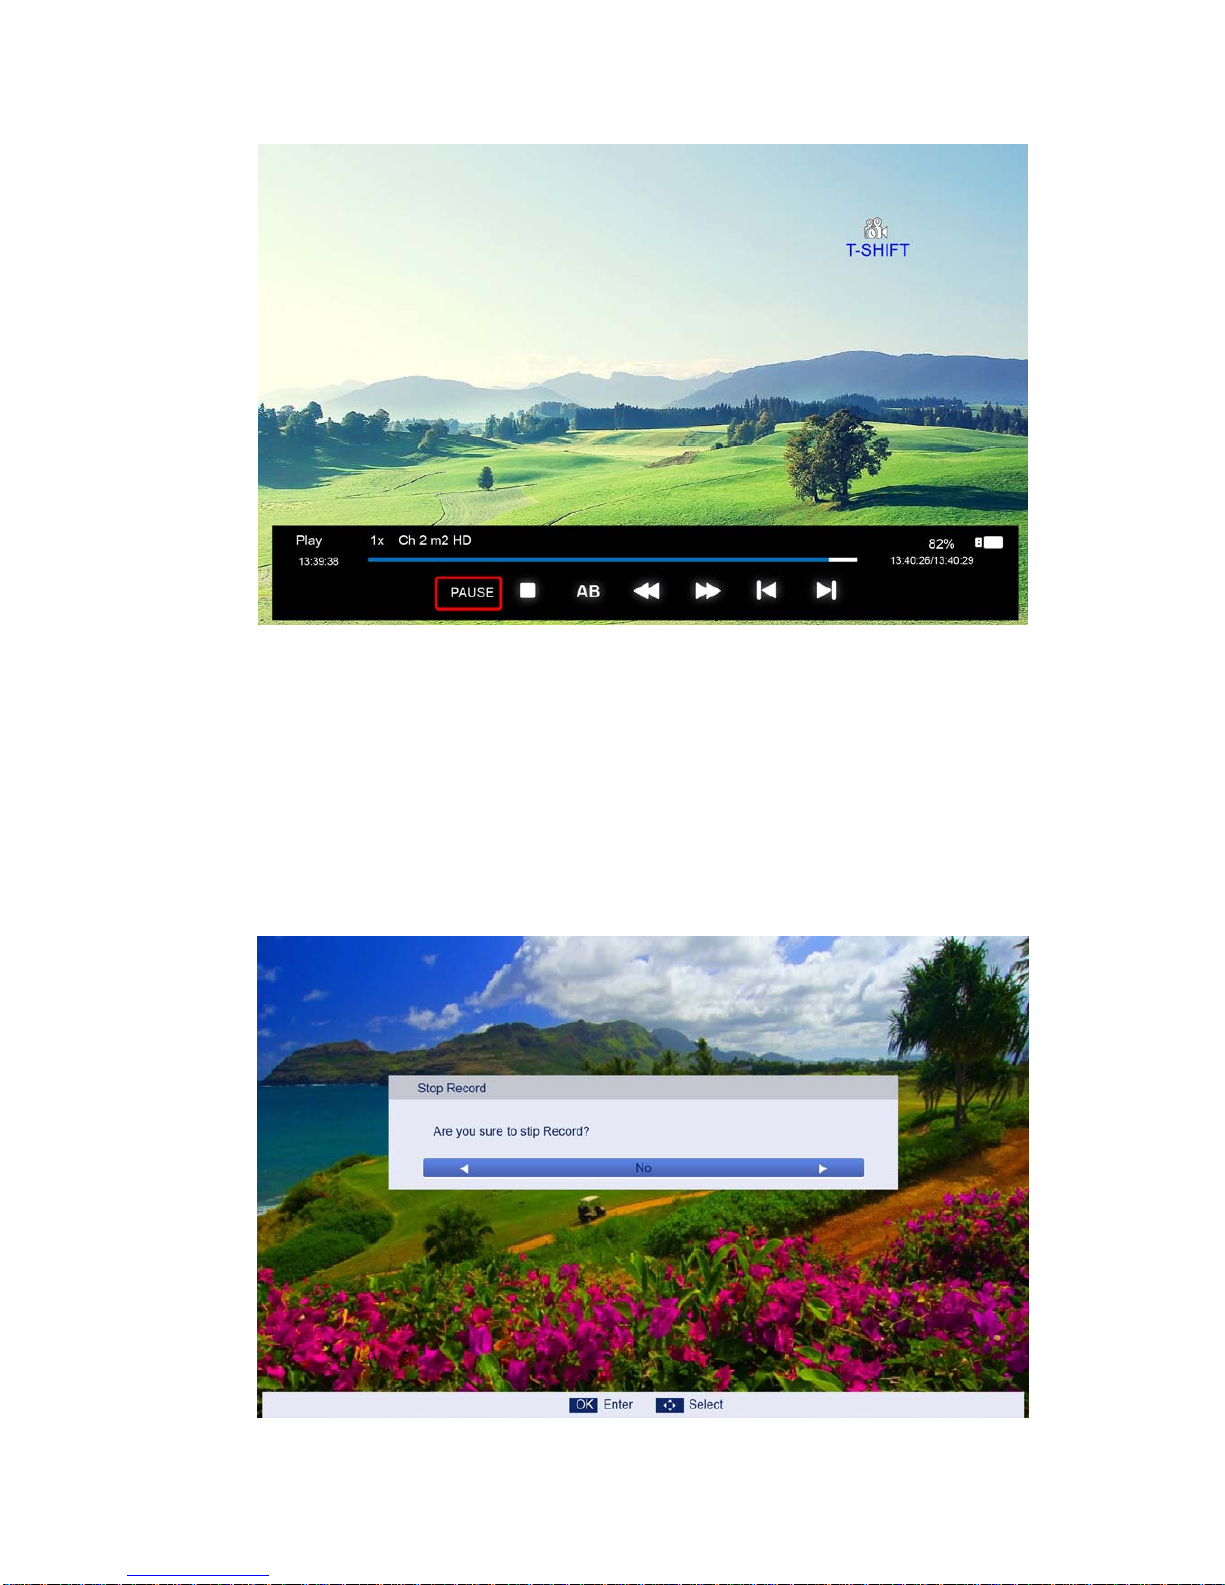
window will show a black screen for about 2s. When the TV is timeshifting, it will show the
timeshift menu.
2. After time shift has started, you can select t he items for the functions:
PLAY/PAUSE/STOP/AB/FF/FR/PRVE/NEXT。You can seen the detailed info in the time shift
menu.
Page 38
38
PLAY/PAUSE: you can set the play mode to PLAY/PAUSE;
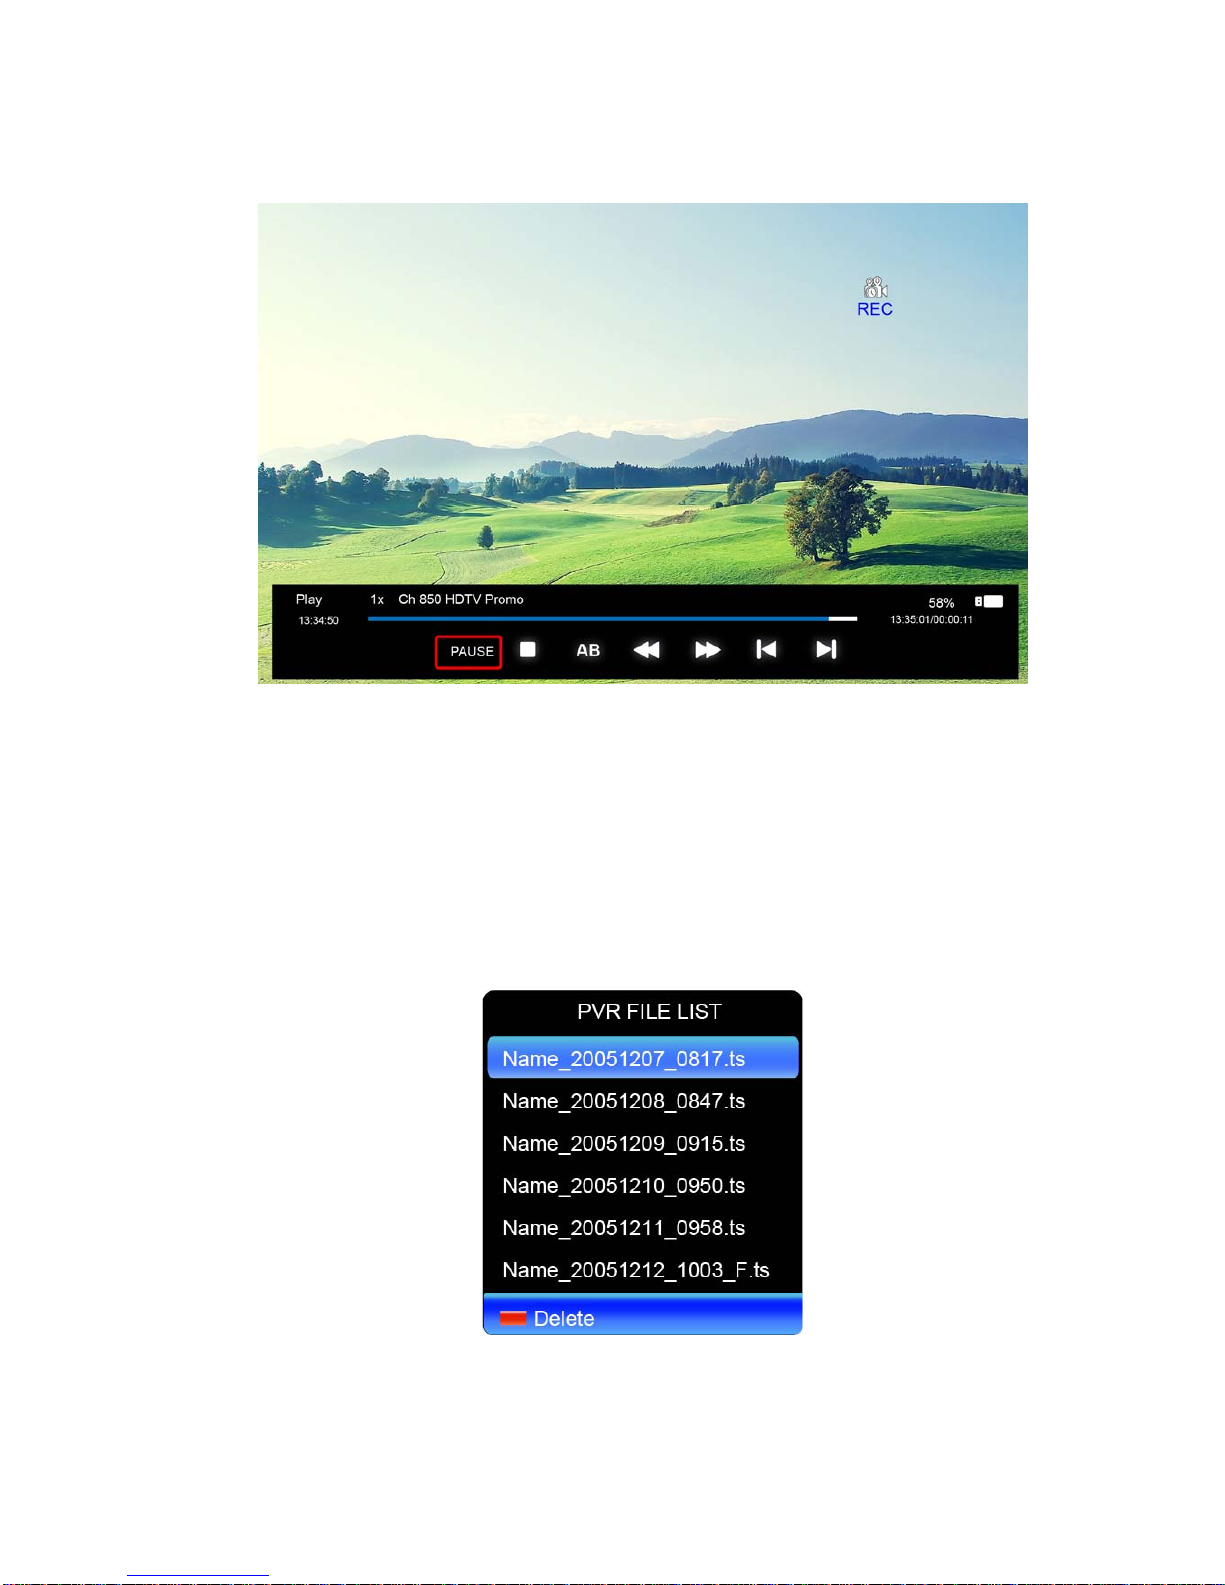
STOP: you can stop the recording, the menu for checking whether to stop the recording will
appear.
AB: you can set two points for play the recording file from A to B.
FF/FR: you can set the play mode to FF/FR;
PRVE/NEXT: you can play the record file to PRVE/NEXT 3 0s.
3. After recording has started, y ou can press t he butt on PL AY/FF/FR/PRVE/NEXT on the RC and
you can play the recording file by PALY/PAUSE/FF/FR/PRVE/NEXT/STOP.
4. You can press “STOP” key to jump to the real time broadcasting of the program, and with
another press of “STOP” key, you can stop time shift function after your confirmation.
Page 39
39
Note: Time shift function will stop w hen t her e’s no space le ft on the USB storage device.
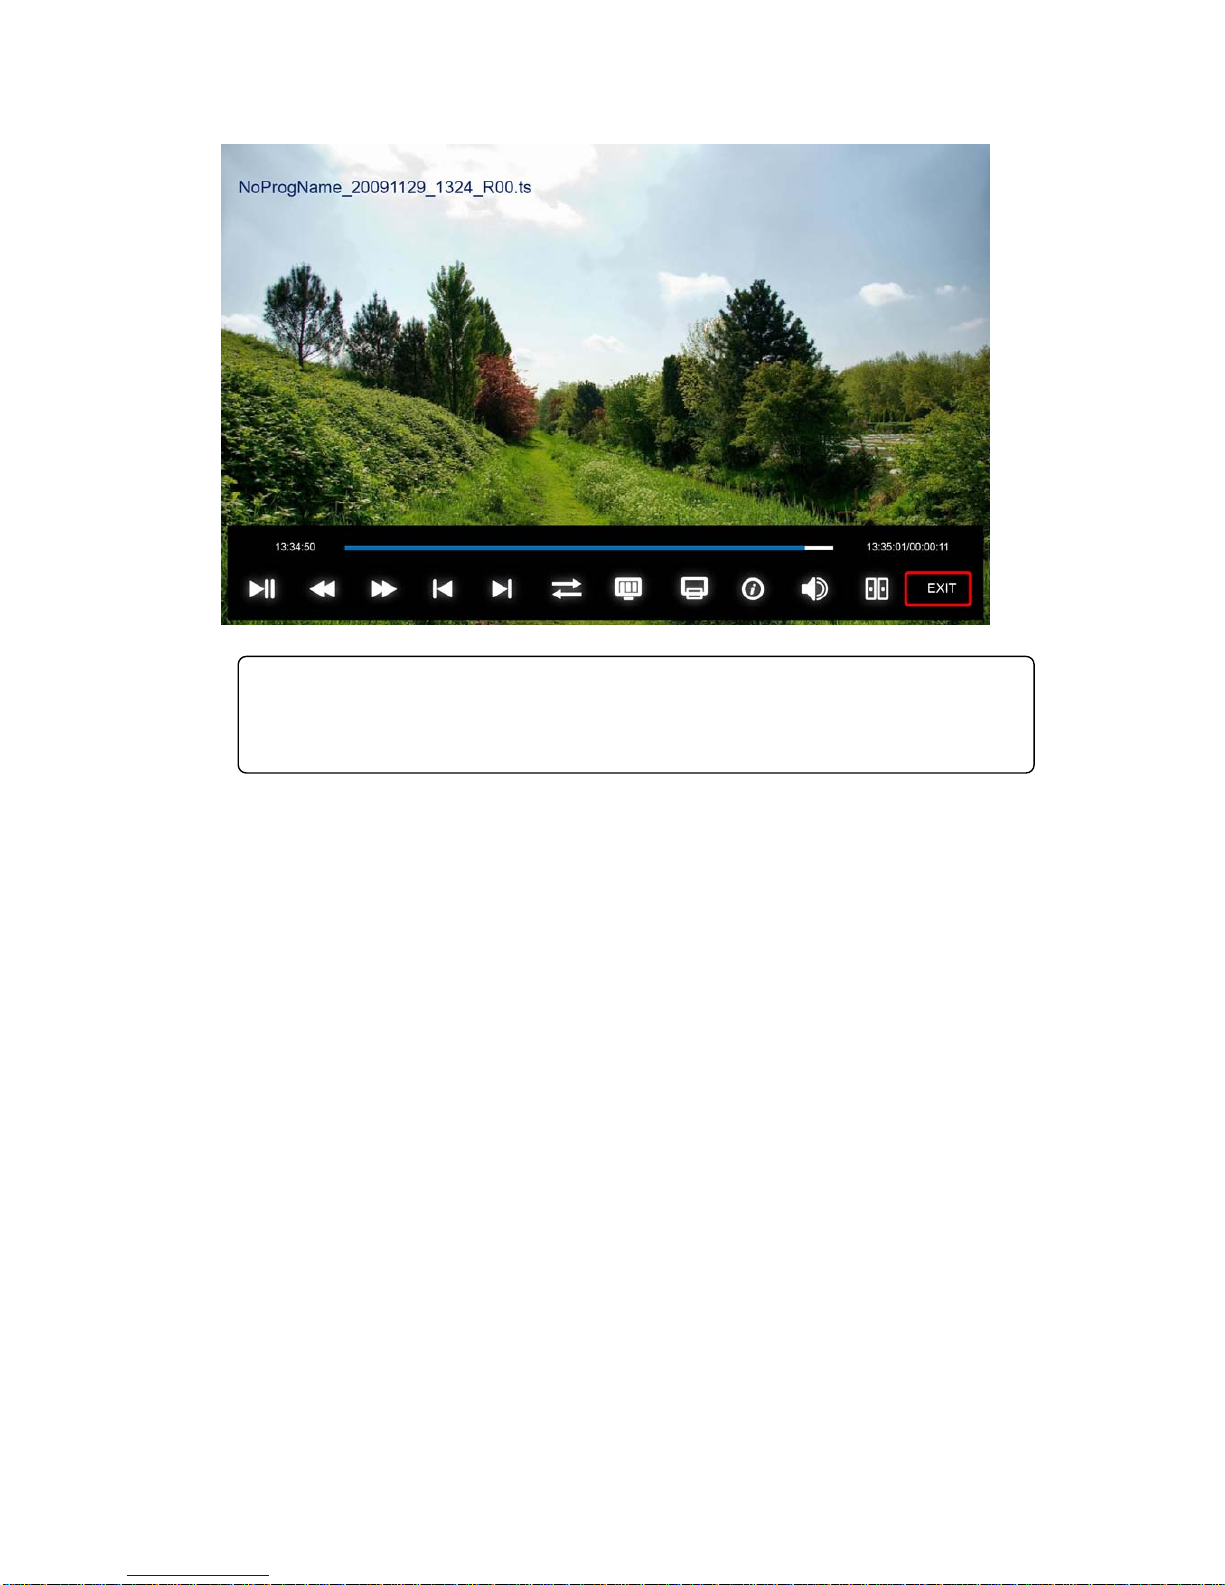
Press the ● button on the remote to record a TV program, as follows:
User can change the playback mode through the various but tons above when recording is
on.
PVR FILE LIST
After the recording is complete you can press REC.FILE button on the remote to display the
PVR FILE LIST.
Press▲/▼ to select record program file (.t s file).
Press ENTER to play.
Press red button to delete the selected file.
If you press ENTER to play, a menu will appear as follows:
Page 40
40
Notes: 1.This is just an example for reference, different CI modules will have
different CI menus.
2. Other menus and descriptions are the same as those for TV source.
Page 41
41
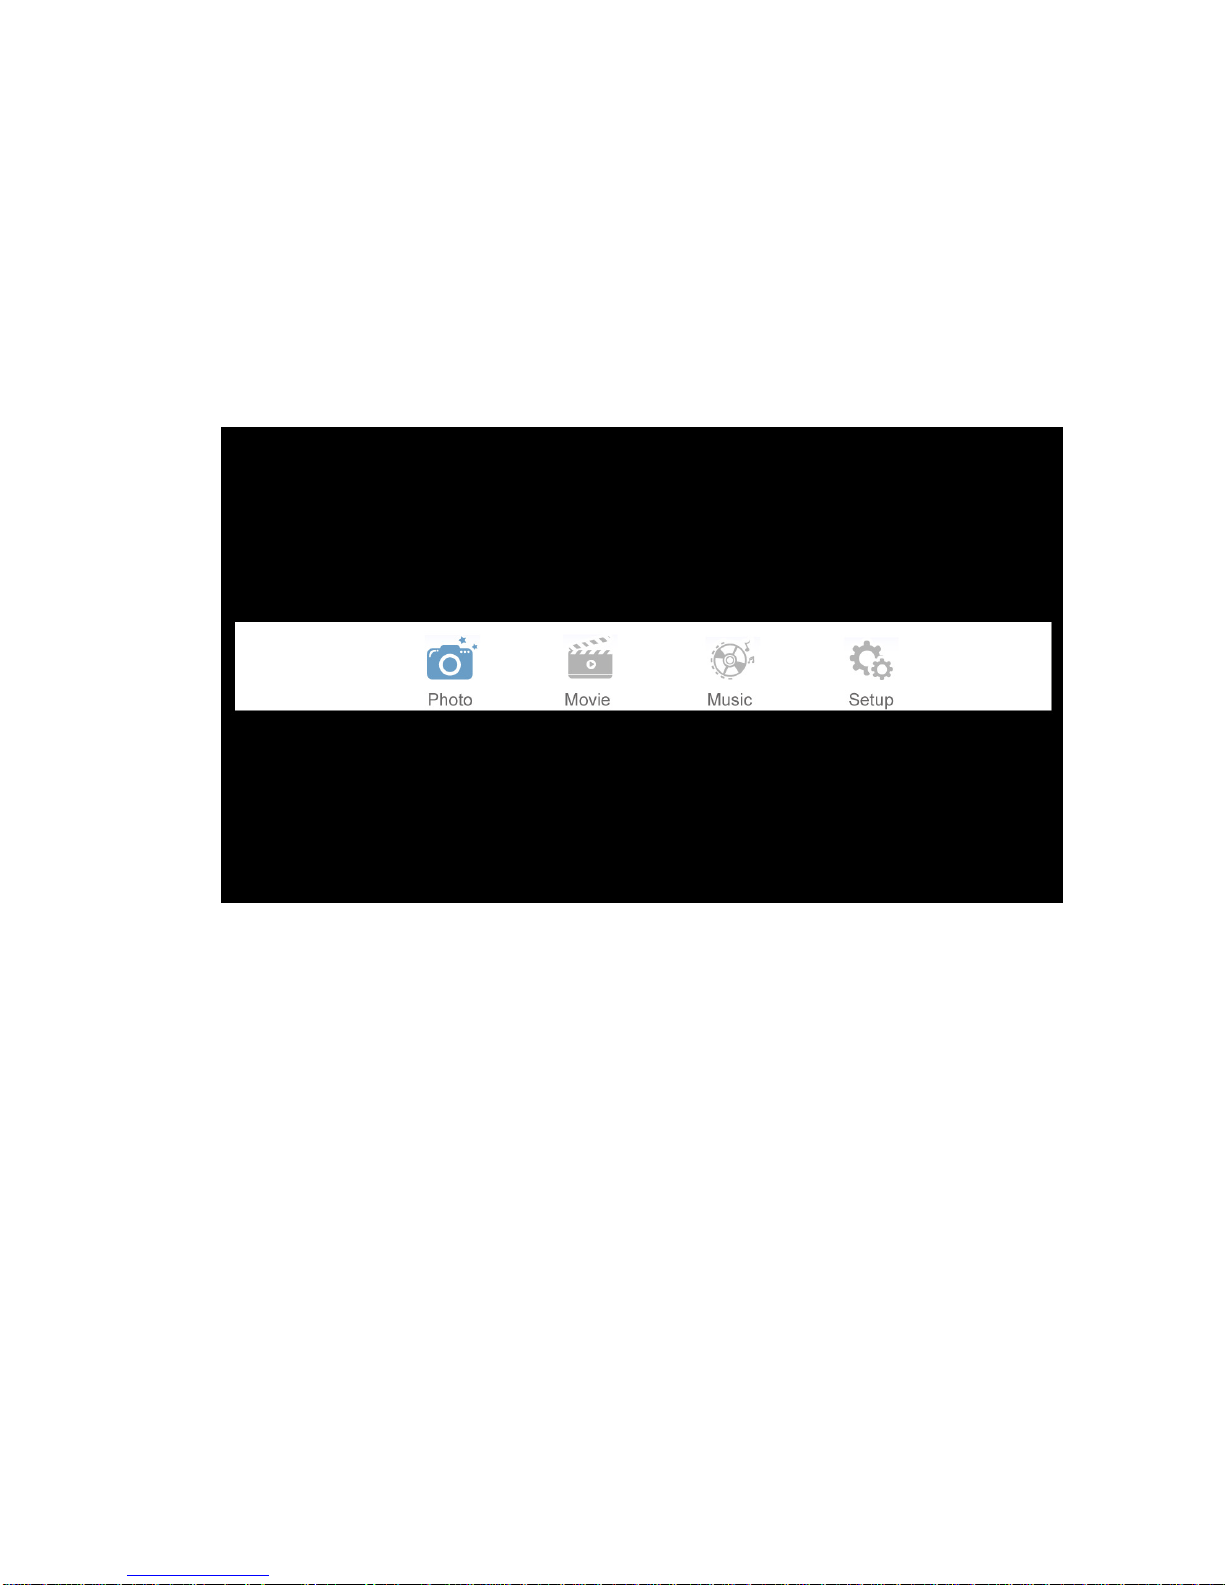
5. MED IA OPERATION
The picture is for a reference only; the actual items are the ones appearing in your TV.
Note: Before using the MEDIA menu, plug in a USB device or memory card, then press
SOURCE button to set the Source to Media.
Press ▲/▼ button to select MEDIA in the Source Menu, and then press ENTER or ► to
enter. You can also enter the Media by pressing MEDIA button on the remote control.
1. Press ▲/▼ button to select the option that you want to adjust in the Media menu, then
press ENTER or ► button to enter.
2. Press ◄/►button to adjust or press ▲/▼ button to select.
3. After finishing your adjustment, press MENU button to save and return back to the
previous menu and press EXIT button to exit from the menu.
Page 42
42
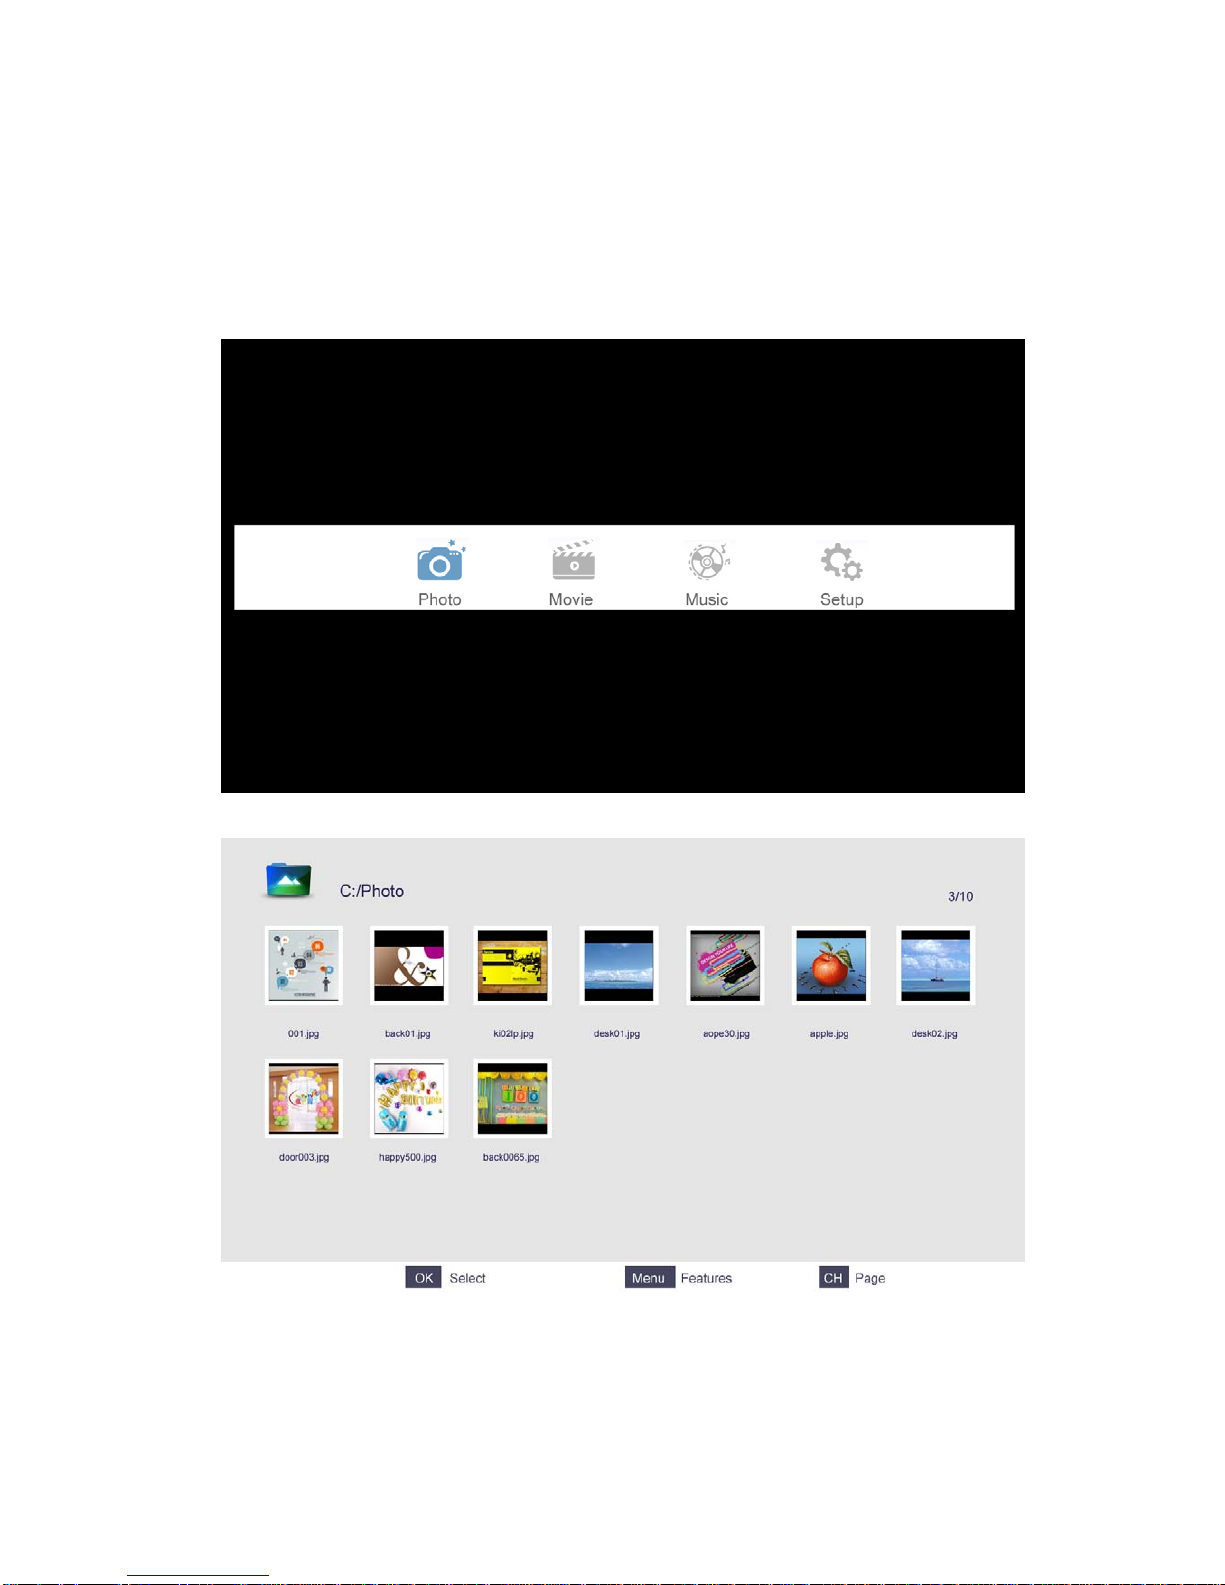
5.1 Photo
The picture is for a reference only; the actual items are the ones appearing in your TV.
Press ◄/► button to select Music in the main menu, and then press ENTER button to enter.
Press EXIT button to return back to the previous menu.
Press ▲/▼ to select the photos, press ENTER or ►║ button to view.
You can see the information of the current playing photo after pressing INFO button, then
press ►║button to play or pause, you can see the playing state on the right.
Then press ▲/▼or ◄/► button to ratite the picture.
Notes: Other menus and descriptions are the same as those for Movie menu.
Page 43
43
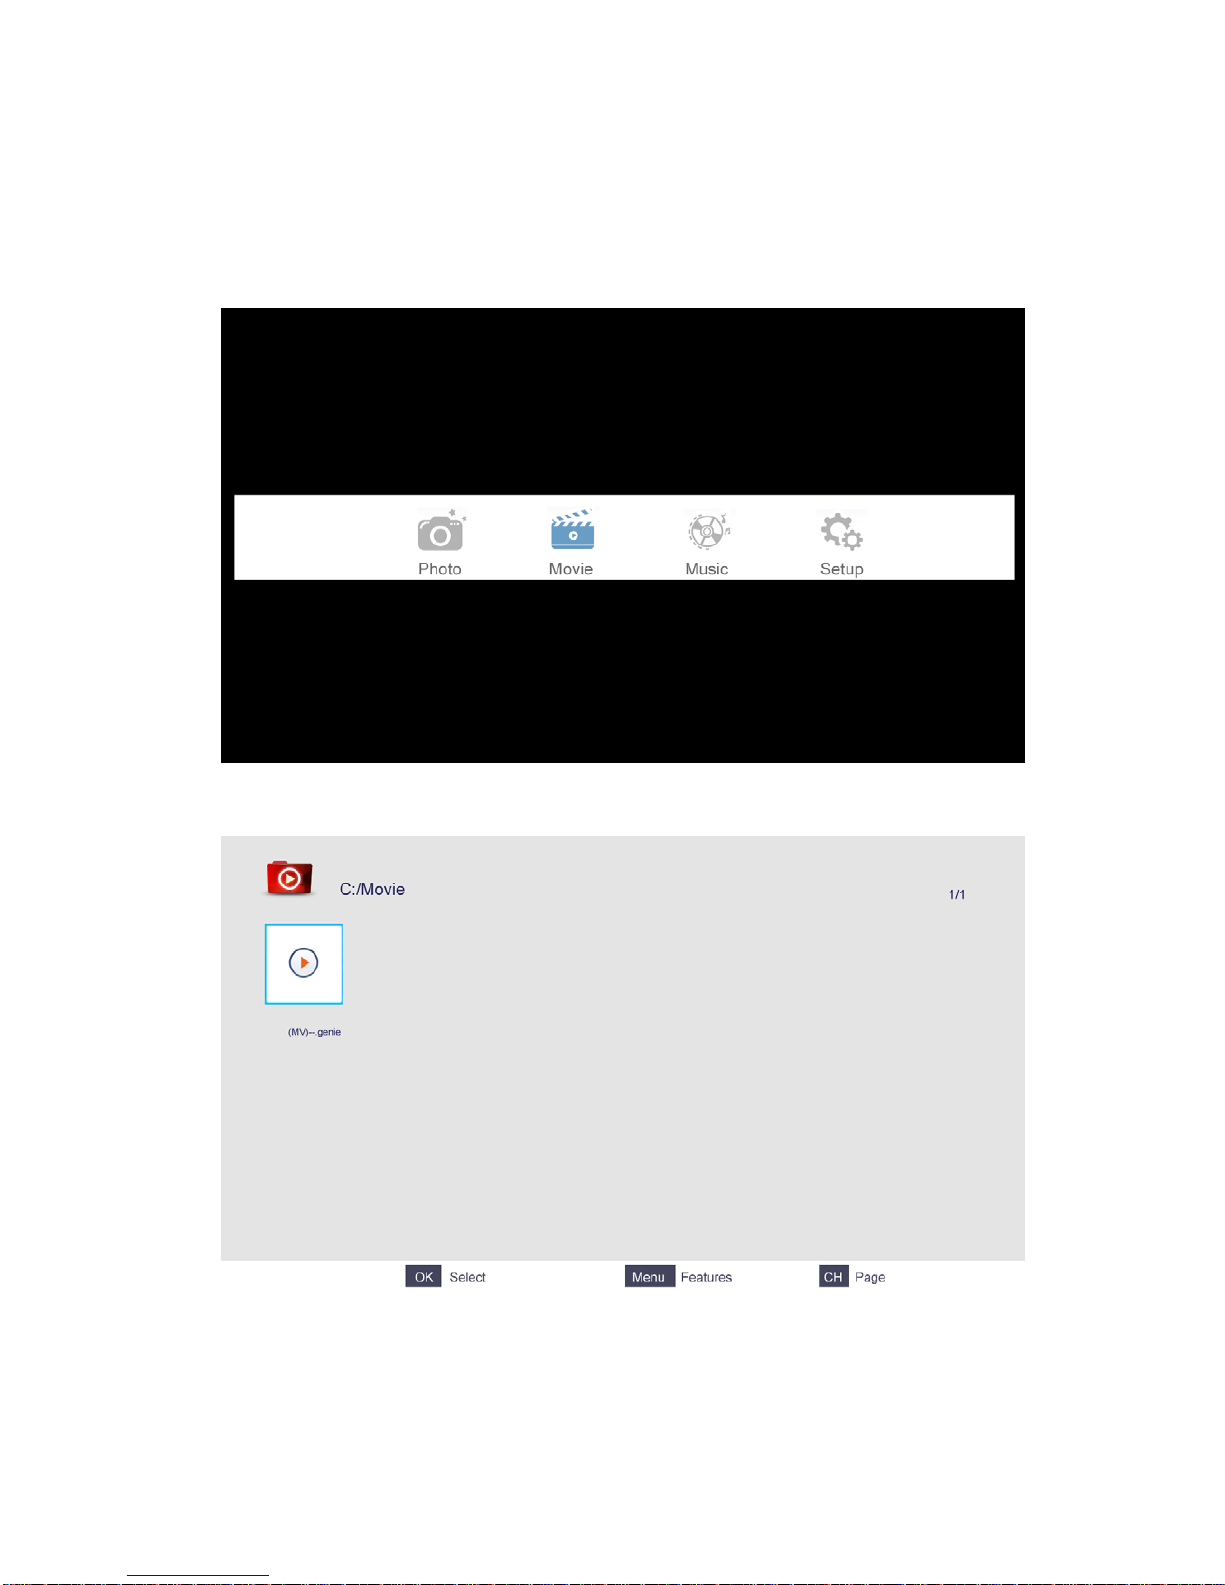
5.2 Movie
The picture is for a reference only; the actual items are the ones appearing in your TV.
Press ◄/►button to select Movie in the main menu, then press ENTER button to enter.
Press EXIT button to return to the previous menu.
Press ▲/▼ button to select the folder that you want to view.
Press ENTER button to select the subfolder.
Press ENTER button or ►║ button to play.
Press ■ button or EXIT button to stop playing.
Press the ◄ button to return to previous page.
You can see the information of the current playing media within the first flew seconds or after
pressing INFO button.
Page 44
44
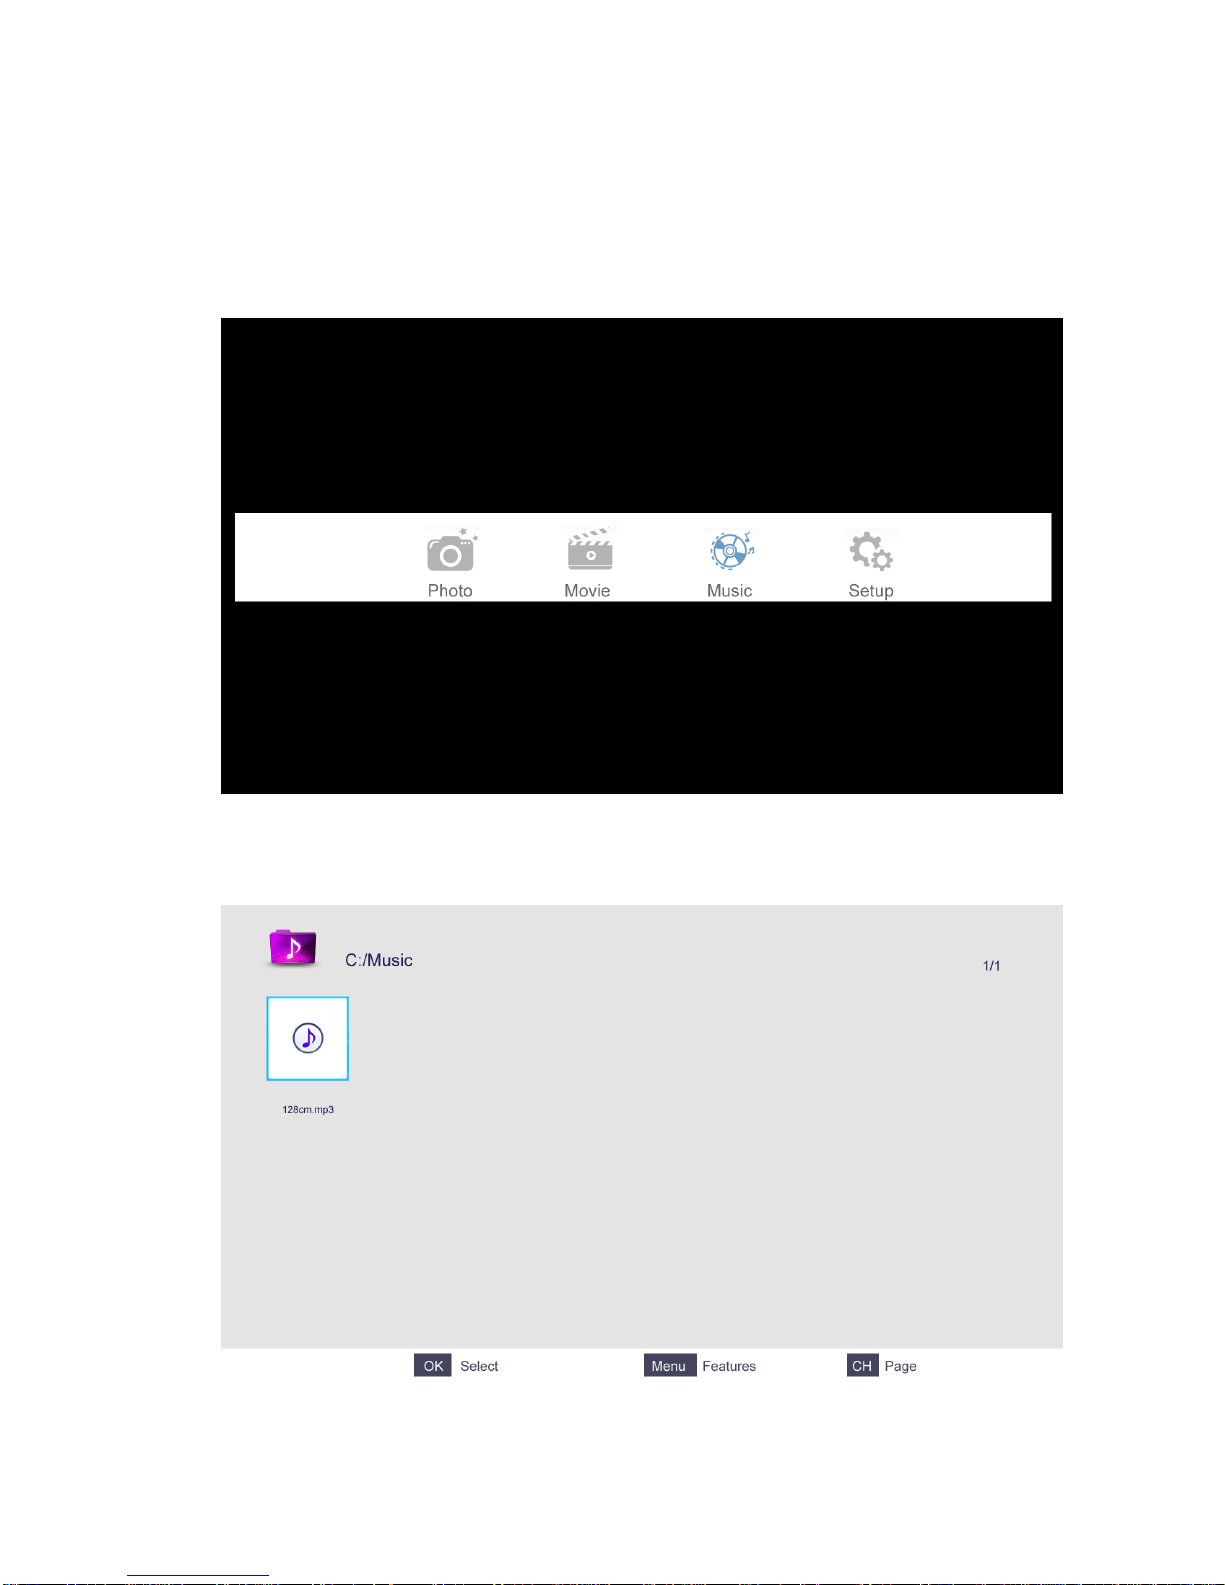
5.3 Music
The picture is for a reference only; the actual items are the ones appearing in your TV.
Press ◄/► button to select Music in the main menu, and then press ENTER button to enter.
Press EXIT button to return to the previous menu.
Press ▲/▼ button to select the song you want to listen to, and then press ENTER or ►║ or
► button to play.
Press ◄ button to return to the previous menu.
You can see the information of the current playing song on the left of the menu.
Page 45
45
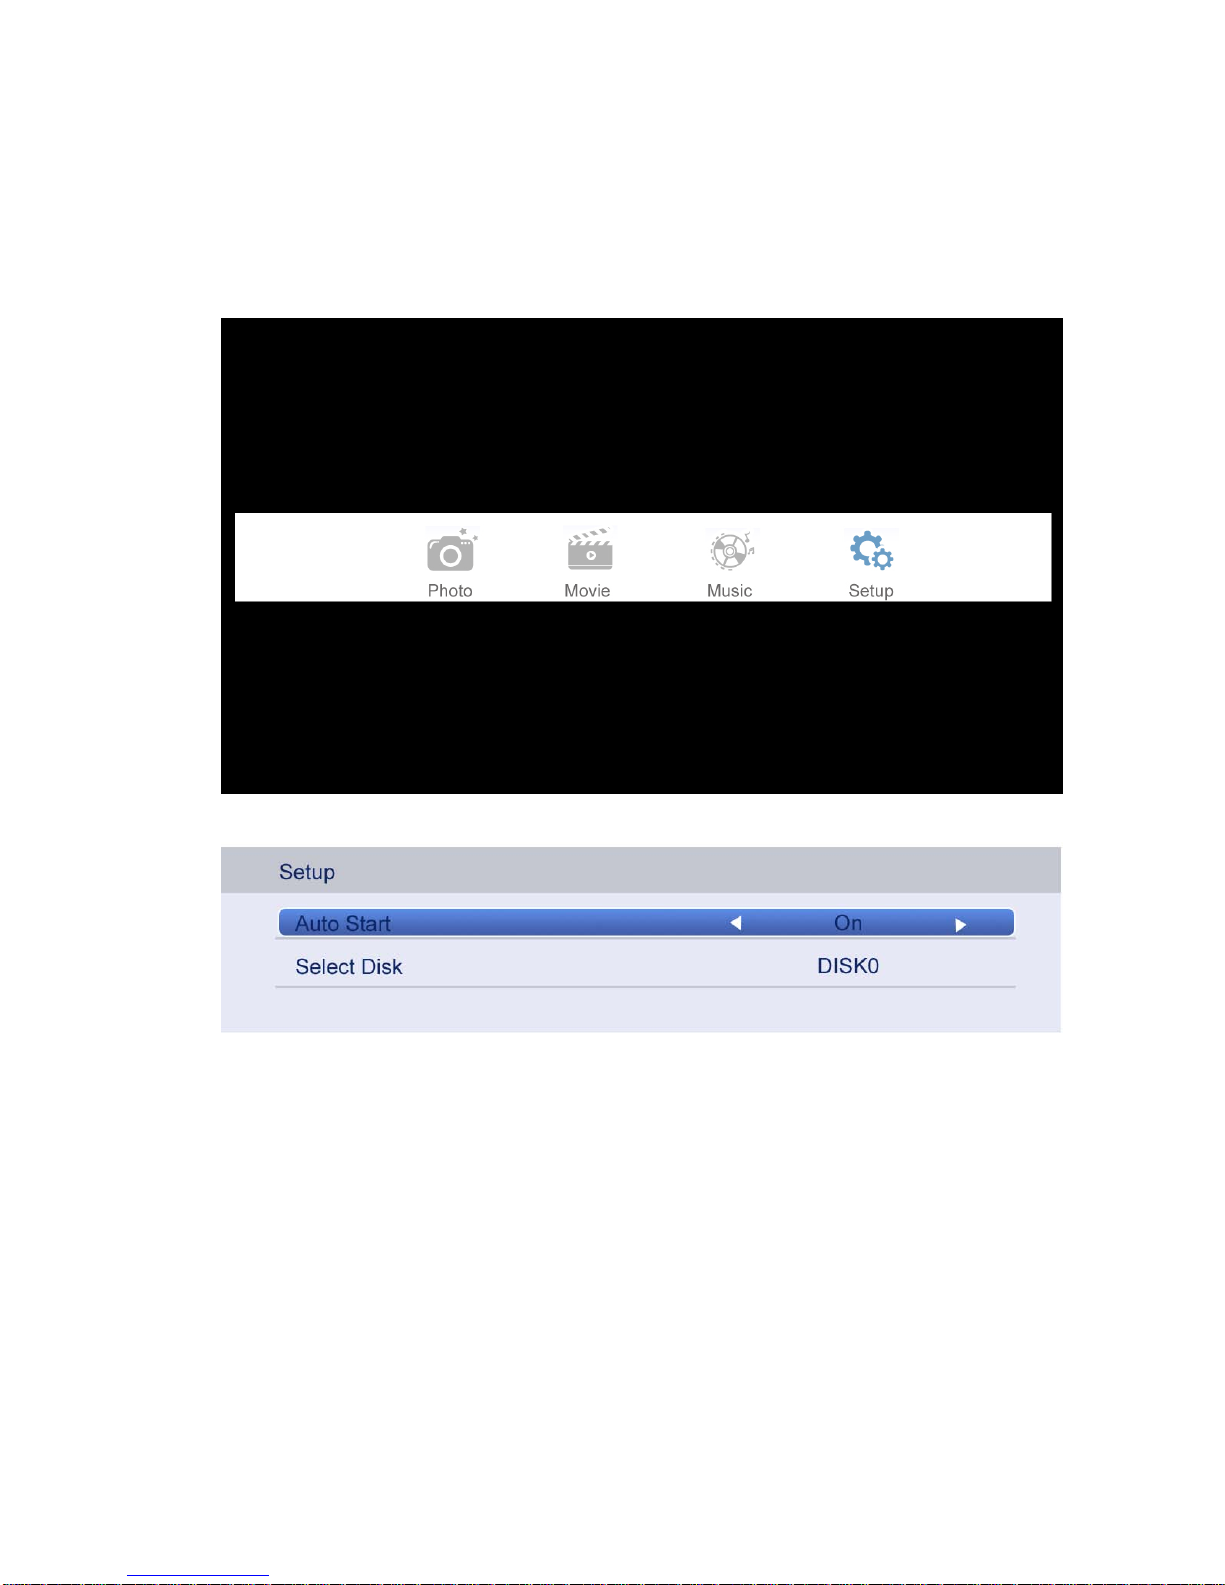
5.4 Setup
The picture is for a reference only; the actual items are the ones appearing in your TV.
Press ◄/► button to select Setup in the main menu, and then press ENTER button to enter .
Press EXIT button to return to the previous menu.
Press ▲/▼button to select the option, and then Press ◄/► button to select on or off.
Page 46

46
6. Troubleshooting
Carry out the problem solving measures described in the following section before contacting
customer support. Turn off the device immediately as soon as y ou suspect a mal function and
unplug the power plug. Do not attempt to repair the device yourself.
SYMPTOM CHECK ITEM
LCD screen stays dark.
Make sure the unit is turned on and the connections are correct.
Make sure the power adapter is correctly connected.
There is no sound.
Make sure the system connection is correct.
Make sure the power of speakers is turned on.
There is no picture or
picture moves up and
down unsteadily.
Check if the connections with the external AV signal source are
correct.
Correctly set the items in the picture menu.
Check if the video type input signal is not corresponding to the
unit.
Make sure the unit is turned on and in correct video type.
The remote control does
not work.
Make sure there are no obstructions between the remote control
and the unit.
Make sure the remote control is pointing at the unit.
Make sure the batteries are inserted and the polarity is correct.
Make sure the batteries are not exhausted.
Replace the exhausted battery.
Other Notes:
Static or other external interference may ca use the TV t o behave abnormally. If this occurs,
unplug the power supply cord from the outlet and plug it in again to reset the player. If the
problems persists, then please disconnect the power and consult a qualified technician.
Page 47

47
NOTICE CONC ER NI NG RE CYCLING
Your product is designed and manufactured with high quality materials and components which can be
recycled and reused.
This symbol means that electrical and electronic equipment, at their end-of-life, should be disposed of
separately from your household waste. Please dispose of this equipment at your local community waste
collection/ recycling centre.
In the European Union there are separate collection systems for used electrical and electronic products.
Please help us to conserve the environment we live in!
DECLARATION OF CONFORMITY
This product complies with the requirements of the directives
EMC Directive 04/108/EC
Low Voltage Directive 06/95/EC
ErP Directive 09/125/EC
RoHS2 Directive 11/65/EU
declaring that this appliance is in compliance with the following norms:
EN 55022:10+AC:11
EN 55013:01+A1:03+A2:06
EN 6100-3-2:06+A1:09+A2:09
EN 61000-3-3:08
EN 55024:10
EN 55020:07+A11:11
EN 60065:02+A1:06+A11:08+A2:10+A12:11
Commission Regulation (EC) No. 1062/2010, 642/2009, EN 62087:09, EN 50564:11, (EC) No. 801/2013
IEC 62321:08 Ed.1
EXCLUSIVE IMPORTER IN GREECE:
Amiridis – Savvidis S.A.
33, Vas. Olgas Avenue
P.O. 54641, The ss al o niki, Greece
Tel: +30 2310 850107, +30 2310 850108, Fax: +30 2310 867835
45, Posidonos street
P .O. 18344, Moschato, Athens, Greece
Tel: +30 210 9402064, Fax: +30 210 9402137
www.amiridis-savvidis.gr
www.fandu.gr
 Loading...