

Page 1
Bedienungsanleitung
User manual
www.pullup-dip.com
Page 2
Deutsch/ German Bedienungs- und Montageanleitung
1|Geräteübersicht
Inhaltsverzeichnis
1| Geräteübersicht (Lieferumfang) ................................................................Seite 3
2| Sicherheitshinweise und Entsorgung ........................................................ Seite 6
3| Montagevarianten ........................................................................................ Seite 11
4| Montage Indoor ..............................................................................................Seite 12
5| Montage Outdoor ...........................................................................................Seite 18
6| Anwendung ..................................................................................................... Seite 24
7| Pflege und Wartung ...................................................................................... Seite 26
8| Garantie, Rückgaberecht .............................................................................Seite 27
9| Kontakt ...........................................................................................................Seite 29
10| Trainingsübungen .......................................................................................... Seite 62
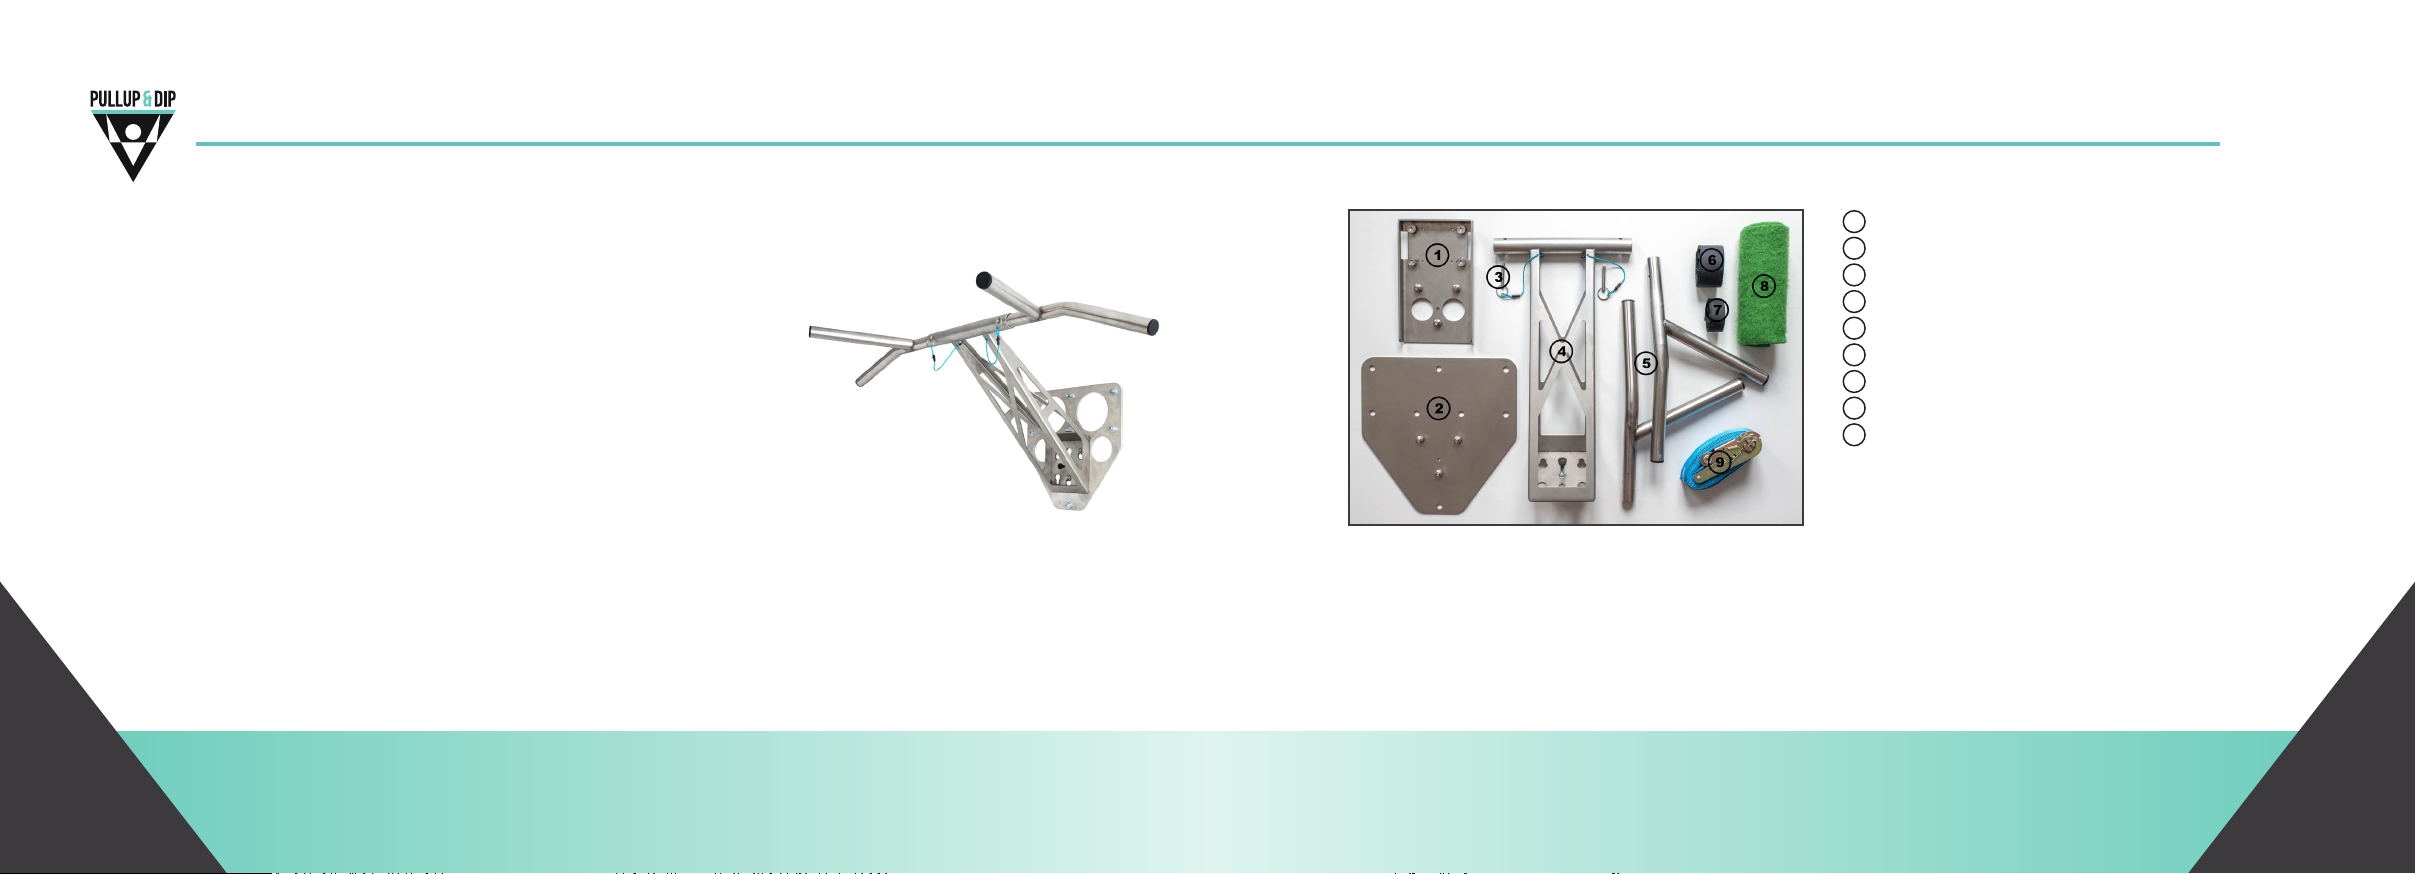
Bezeichnung aller Teile
1
Outdoor Adapter
2
Indoor Adapter
3
Bolzen
Ausleger
4
2x Mul Stange
5
Kleverschluss breit
6
Kleverschluss schmal
7
Schutzmae
8
9
Spanngurt
Vielen Dank, dass Sie sich für den Kauf eines Pullup & Dip Trainingsgerätes entschieden haben.
Pullup & Dip ist ein portables Trainingsgerät, mit dem speziell Übungen, wie Klimmzüge, Dips,
Muscle-Ups oder Beinheben möglich sind. Das Gerät bietet die Möglichkeit je nach Variante sowohl im Freien, als auch im Innenbereich (z.B. in der Wohnung, im Keller, etc.) verwendet werden
zu können.
www.pullup-dip.com2 3www.pullup-dip.com
Page 3
1| geräteübersicht
1| geräteübersicht
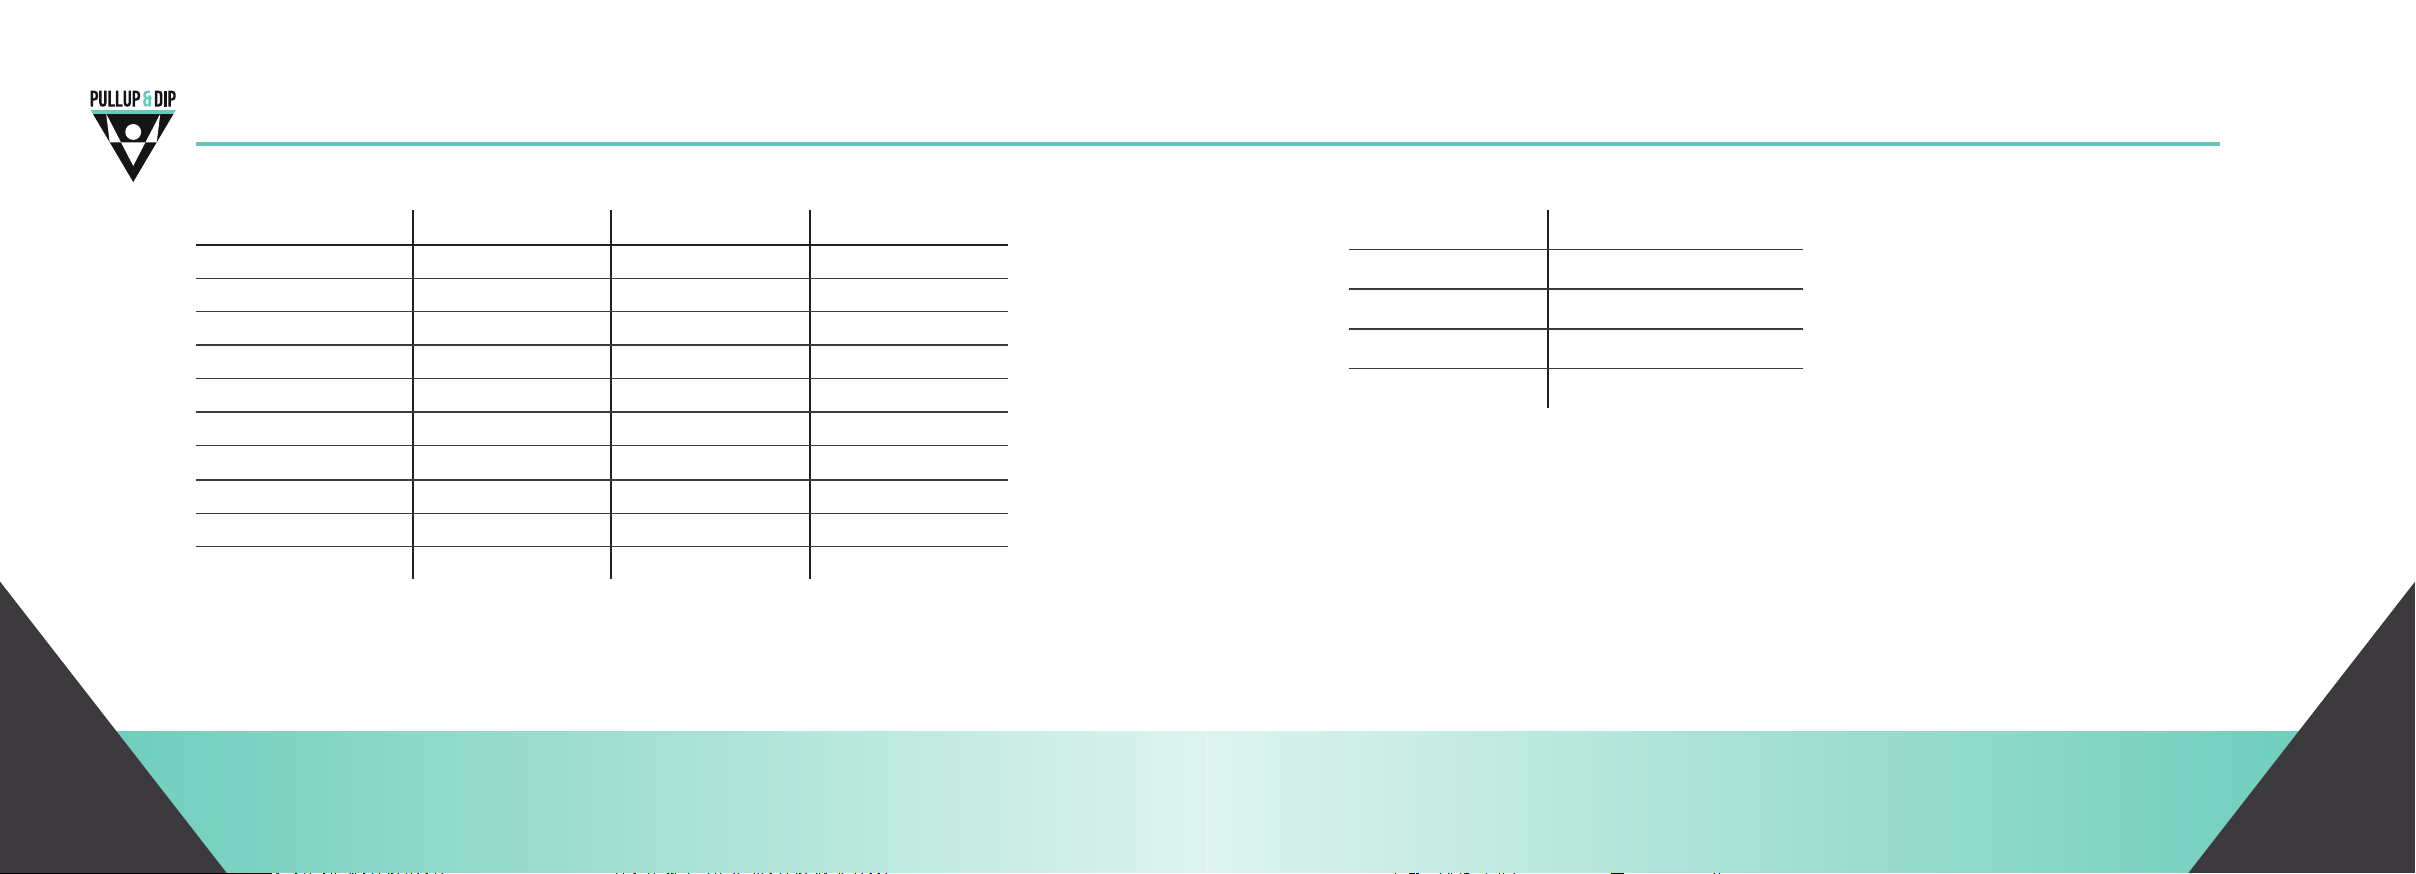
Lieferumfang
Premium Paket Indoor Paket Outdoor Paket
Ausleger
2x Mul Stange
Indoor Adapter*
Outdoor Adapter
Spanngurt
Schutzmae
Kleverschluss breit
Kleverschluss schmal
2x Bolzen
Gewicht 13,0 kg 9,6 kg 8,5 kg
*Aufgrund verschiedener Wandarten und Befesgungsmethoden können wir standardmäßig
leider kein Montagematerial für den Indoor Adapter mitliefern.
✔ ✔ ✔
✔ ✔ ✔
✔ ✔
✔ ✔
✔ ✔
✔ ✔
✔ ✔
✔ ✔
✔ ✔ ✔
Technische Daten
Belastbarkeit Bis 130 kg
Material Edelstahlkonstrukon
Farbe Edelstahl
Gridurchmesser 30 mm
Wandabstand 400 mm
www.pullup-dip.com4 5www.pullup-dip.com
Page 4

2| Sicherheitshinweise und Entsorgung
Wichtig!
2| Sicherheitshinweise und Entsorgung
䕲 Machen Sie sich vor Inbetriebnahme des Gerätes mit allen in dieser gedruckten Anleitung
erwähnten Sicherheits-, Montage-, Bedienungs- und Trainingshinweisen vertraut.
䕲 Alle Sicherheitshinweise sind strikt zu befolgen, um Risiken von Verletzungen zu verhindern
䕲 Nutzen Sie das Gerät nur wie in dieser Bedienungsanleitung beschrieben
䕲 Die Bedienungsanleitung sollte an einem sicheren Platz auewahrt werden.
䕲 Legen Sie bei Weitergabe des Gerätes die Bedienungsanleitung bei.
䕲 Die Nichtbeachtung der in dieser Bedienungsanleitung enthaltenen Anweisungen sowie
Warnungen kann zu Verletzungen von Personen oder Schäden an baulichen Gegebenheiten
führen, wodurch mögliche Gewährleistungs- oder Haungsansprüche nichg werden können.
Sicherheitshinweise
Dieses Trainingsgerät ist sowohl für den Indoor, als auch für den Outdoor Bereich geeignet. Das
Gerät ist für eine Belastung bis maximal 130 kg ausgelegt. Die Wahl des geeigneten und sicheren
Montageortes des Gerätes sollte gemäß der in dieser Bedienungsanleitung beschriebenen Sicherheitsbesmmungen erfolgen.
Bei unsachgemäßem Gebrauch des Gerätes durch beispielsweise überhöhte Belastung, falsche
Handhabung wie ruckarge Bewegungen oder unsachgemäße Montage etc. sind Gesundheits-
www.pullup-dip.com6 7www.pullup-dip.com
schäden sowie Beschädigungen des Indoor- und Outdoor Bereiches nicht auszuschließen! Vor Gebrauch des Trainingsgerätes müssen alle Montageteile auf Ihre Sicherheit überprü werden.
Vor jeder Benutzung des Produktes sind alle Schraubverbindungen (Indoor Adapterplae mit
Mauerwerk; Aufnahmepunkte am Outdoor Adapter) zu kontrollieren und alle sichtbaren Teile
(insb. Bolzenverbindung, Schweißnähte, Spanngurt) auf Beschädigungen, Risse oder Verschleiß
zu prüfen.
Alle beschädigten oder verschlissenen Einzelteile sowie alle Risse in Schweißnähten bergen ein
Sicherheitsrisiko. Gerissene Schweißnähte sind umgehend, sofern die Garane noch bestehen
sollte, der Firma FT Fitness Technology UG zu melden oder andernfalls fachmännisch zu
reparieren. Beschädigte Einzelteile sind umgehend zu tauschen. Es darf keine Benutzung des
Produktes bei oensichtlichen Beschädigungen oder bei Rissen in den Schweißnähten erfolgen.
Bie beachten Sie, dass die Firma FT Fitness Technology UG keine Haung für Schäden übernimmt,
die bei oder in Folge von unsachgemäßer Montage, Benutzung oder Überlastung entstehen.
Page 5

2| Sicherheitshinweise und Entsorgung2| Sicherheitshinweise und Entsorgung
BEACHTEN SIE FOLGENDE HINWEISE, UM DIE RISIKEN VON VERLETZUNGEN ZU VERHINDERN:
䕲 Belastung: maximal 130 kg
䕲 Das Gerät darf nur von einer Person benutzt werden.
䕲 Kinder sollten nur mit entsprechender körperlicher Entwicklung und nur unter Beaufsichgung
eines Erwachsenen das Gerät benutzen.
䕲 Verschluckbare Kleinteile sind von Kindern fernzuhalten.
䕲 Das Gerät sollte für die Anwendung immer sauber und trocken gehalten werden.
䕲 Es sind keine Übungen mit einseiger Belastung möglich.
䕲 Falsches und übermäßiges Training kann die Gesundheit gefährden.
䕲 Das Produkt sollte erst nach vorherigem Aufwärmen benutzt werden.
䕲 Das Gerät muss sachgemäß monert und demonert werden.
䕲 Eine sichere Befesgung muss vor Beginn des Trainings gewährleistet sein, insb. der Spanngurt
muss vor jeder Benutzung auf Beschädigungen überprü werden.
䕲 Montageteile sind vor Gebrauch auf Ihre sichere Fixierung zu überprüfen und ggf. auszutau-
schen.
䕲 Es dürfen keine anderen Anbauteile für die Montage des Gerätes verwendet werden, die nicht
vom Hersteller bereitgestellt werden.
BEACHTEN SIE FOLGENDE HINWEISE, UM BESCHÄDIGUNGEN DER UMGEBUNG ZU VERMEIDEN:
INDOOR:
䕲 Das Gerät darf nur an massiven Wänden wie z.B. an einer Beton- oder Ziegelwand monert
werden (nicht an Hohlwände, Rigips etc.).
䕲 Vor der Montage muss der Verlauf von Strom- und Wasserleitungen in der Wand geprü
werden.
OUTDOOR:
䕲 Keine Montage an elektrischen Strommasten!
䕲 Bei Gewier darf das Trainingsgerät nicht benutzt werden!
䕲 Das Gerät darf nicht ohne Schutzmae an Baum oder Pfosten monert werden, da sonst
Beschädigungen aureten.
䕲 Bäume müssen für die Montage bzw. für die Belastung geeignet sein. Das Gerät darf nicht an
faulen oder morschen Bäumen monert werden!
䕲 Der Spanngurt muss für eine sichere Befesgung auf die maximal mögliche Spannkra
gespannt werden und darf nicht mit scharfen Kanten in Verbindung gebracht werden.
www.pullup-dip.com8 9www.pullup-dip.com
Page 6

3| Montagevarianten2| Sicherheitshinweise und Entsorgung
䕲 Das Produkt darf nicht mit Salzwasser in Verbindung gebracht werden.
䕲 Voraussetzungen:
• Baum-Durchmesser: mind. 20,0 cm
• Rohr- bzw. Pfosten-Durchmesser: mindestens 10,0 cm
䕲 Bei Pfostenbefesgung muss ein massives und stabiles Fundament bestehen.
Entsorgung
Bie achten Sie auf eine umweltgerechte Entsorgung der Verpackung nach lokalen Vorschrien!
Beachten Sie bei der Entsorgung des Gerätes die örtlichen Entsorgungsvorschrien.
www.pullup-dip.com10 11www.pullup-dip.com
Das Gerät darf ausschließlich an folgenden Gegenständen monert werden:
䕲 Wand (ausschließlich Ziegel- oder Betonwand)
䕲 Baum (Montageanforderungen beachten!)
䕲 Stange (keine Strommasten, Montageanforderungen beachten!)
Page 7
4| Montage INDOOR 4| Montage Indoor
Hinweise
standhalten wie z.B. Beton- oder Ziegelwände. Hohlwände oder Rigips Wände eignen sich
nicht für die Montage. Bevor Löcher in der Wand gebohrt werden, sollte Rücksprache mit dem
Vermieter und einem Fachmann über Strom- und Wasserleitungen gehalten werden, um
keine Schäden zu verursachen.
Sollten Sie sich bei der Beschaenheit Ihrer Wand und/oder der Verwendung von Dübeln nicht
sicher sein, sollten Sie sich von einem Experten beraten lassen. In einem Baumarkt werden Sie
hier kompetent beraten und nden die passenden Befesgungen. Die Montageempfehlung
unten ist lediglich als Vorschlag anzusehen. Ziehen Sie sich für die Wandmontage eine zweite
Person als Unterstützung hinzu.
Anleitung für Wandmontage mit fischer Langschaftdübel aus Pullup & Dip Webshop
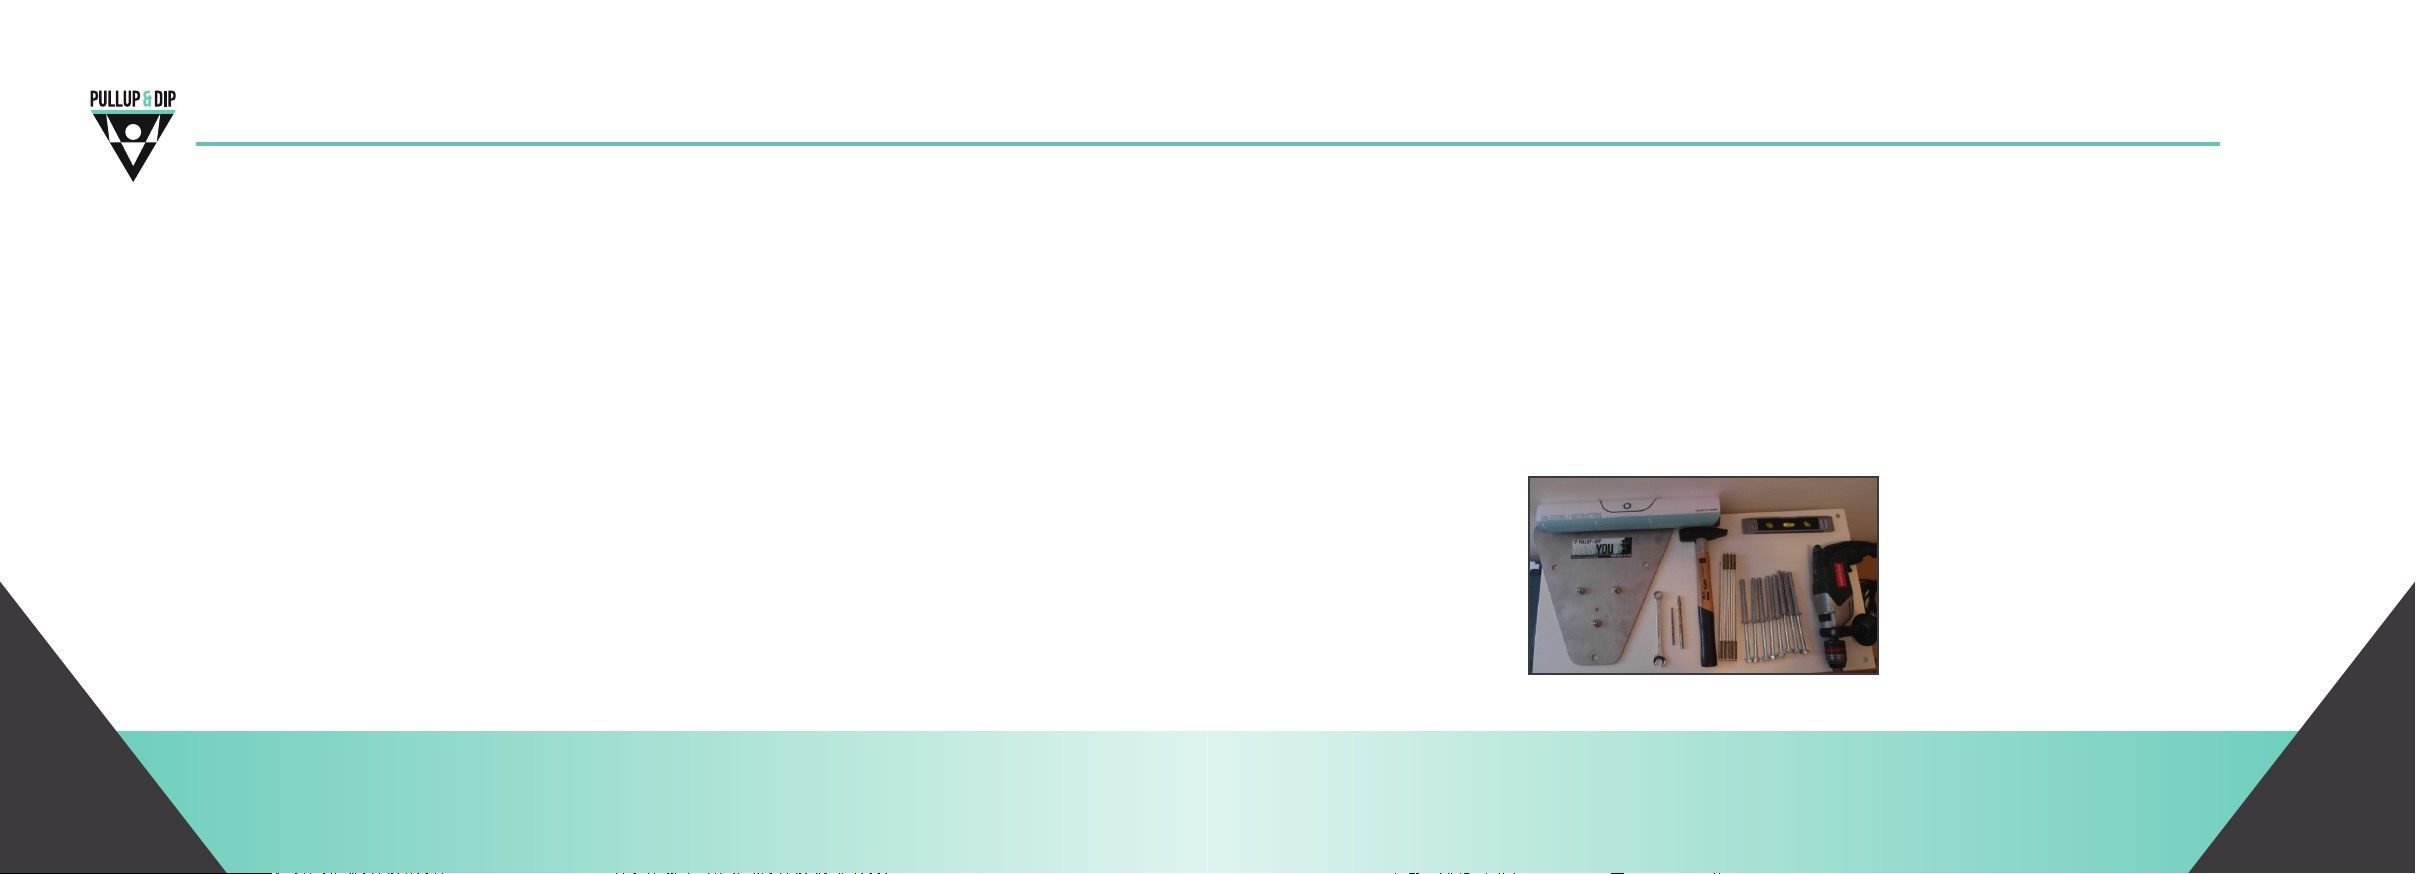
Für die Montage des Indoor-Adapters wird folgendes Equipment benögt:Der Home Adapter darf nur an massiven Wänden monert werden, die den Belastungen
䕲 Schraubenschlüssel mit 13 mm
䕲 Bohrer mit den Durchmessern:
5 mm (zum Vorbohren),
10 mm für das nale Loch
䕲 Hammer
䕲 Meterstab
䕲 Wasserwaage
䕲 Klebeband
䕲 Bohrmaschine
䕲 8 scher Dübel + Schrauben
(im Lieferumfang enthalten)
䕲 Bohrschablone
(im Lieferumfang enthalten)
䕲 Staubsauger
www.pullup-dip.com12 13www.pullup-dip.com
Page 8
4| Montage INDOOR
4| Montage INDOOR
Anleitung für Wandmontage mit fischer Langschaftdübel aus Pullup & Dip Webshop
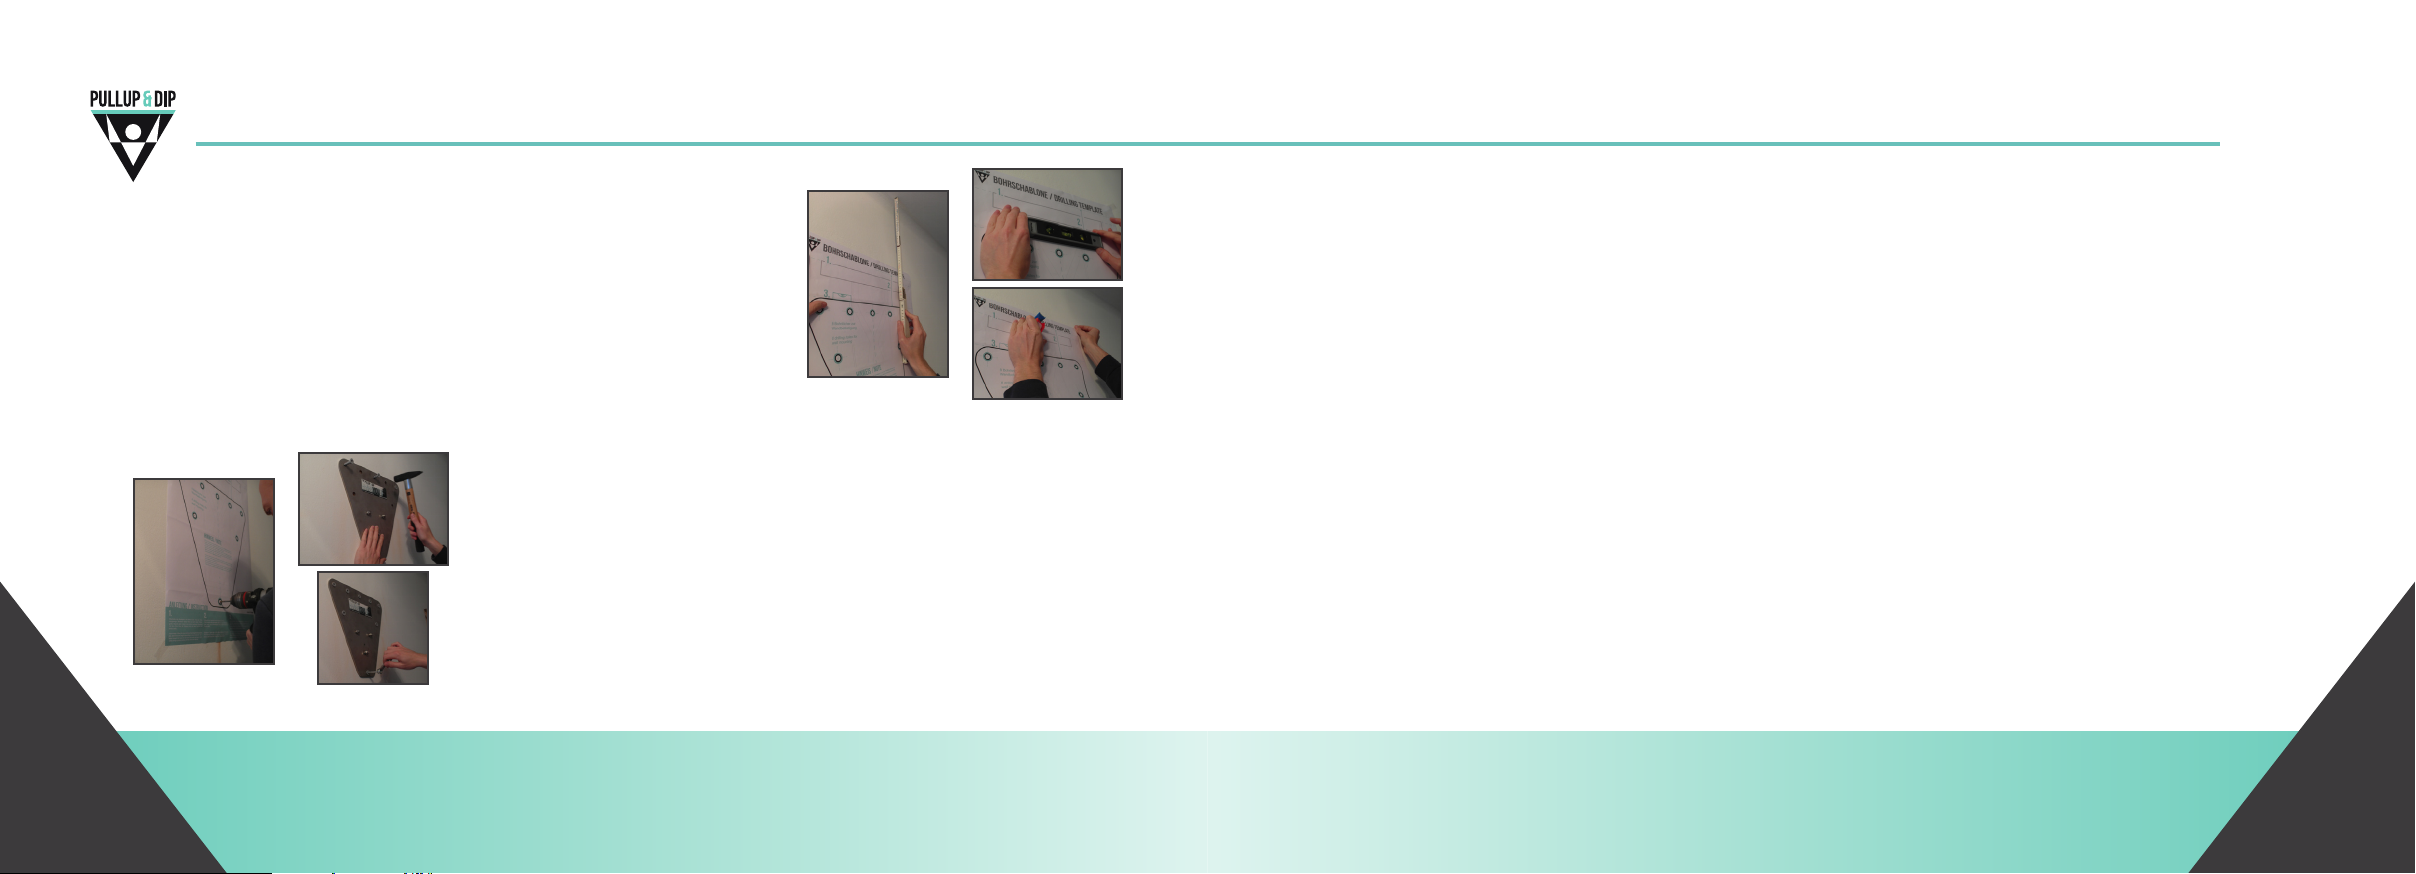
Der Abstand der Oberkante des Indoor-Adapters (siehe Bohrschablone) sollte mindestens 45 cm bis zur Decke betragen. Die
Bohrschablone mit der Wasserwaage sehr genau ausrichten
und mit Klebeband an der Wand xieren.
Je nach Körpergröße kann dabei die gewünschte Höhe selbst
besmmt werden.
Nach der Fixierung der Bohrschablone an der Wand, nun alle
acht Bohrungen auf der Bohrschablone mit dem 5 mm Boh-
rer vorbohren. Anschließend die acht Löcher mit dem 10 mm
Bohrer auf Enddurchmesser bohren. Die Bohrefe sollte
mindestens 110 mm betragen.
Die Bohrschablone nun wieder von der Wand abnehmen und
die Bohrlöcher gut mit einem Staubsauger aussaugen oder
mit einem Ausbläser ausblasen. Den indoor Adapter über die
Löcher an die Wand drücken, die Dübel vorsichg mit dem
Hammer hinein klopfen und anschließend die Schrauben mit
dem Schraubenschlüssel fest verschrauben.
Hinweise
Benögtes Material:
䕲 Bohrschablone Pullup & Dip + Klebe-
streifen zur Befesgung
䕲 Indoor Adapter
䕲 Wasserwage + Bleis
䕲 Schlagbohrmaschine
䕲 Hammer
䕲 Passender Bohrer
Ziegelwand: 16mm Durchmesser
(vorbohren mit kleineren Bohrern:
5mm und 10mm Durchmesser)
Betonwand: 10mm Durchmesser
(5mm vorbohren)
䕲 Zollstab
䕲 1 x Schraubenschlüssel 16mm
Je nach Wandart empfehlen wir:
䕲 Betonwand:
• 8 x Ankerbolzen M 10 x 95
• Bohrlochefe 75mm, Bohrer 10mm
Durchmesser
䕲 Ziegelwand:
z.B. Hochlochziegel, Hohlblock aus Leichtbeton, Hohlblock aus Beton, Kalksand-Loch-
stein, Kalksand-Vollstein, Vollziegel
• 8 x Ankerhülsen 15 x 85 mm passend
für M10, Bohrlochefe 95mm,
Bohrer 16mm
• 8 x Gewindestange [M10 x 100mm]
• 8 x Muer [M10]
• 8 x Unterlegscheiben [10,5 DIN 125]
• 1 x Mulfunkonsmörtel
www.pullup-dip.com14 15www.pullup-dip.com
Page 9

4| Montage Indoor
4| Montage Indoor
Montageschritte
1| Die Bohrschablone mit der Wasserwaage sehr genau ausrichten und mit einem Mindestab-
stand von 45 cm zur Decke an die Wand kleben. Die gewünschte Höhe kann dabei selbst
besmmt werden.
2| Bei den acht Bohrungen die Mie der Bohrungen durchstechen und die Löcher mit einem
Bleis mig anzeichnen. Nun kann die Bohrschablone wieder abgenommen werden.
3| Nun alle acht Bohrlöcher mit dem 5 mm Bohrer vorbohren. Bei einer Ziegelwand wird ein
zusätzliches Vorbohren mit 10 mm empfohlen.
4| Anschließend die acht Bohrlöcher mit dem Bohrer (Ziegelwand: 16 mm; Betonwand: 10 mm)
auf Enddurchmesser bohren. Die Bohrefe sollte nach Herstellerangaben folgen.
5| Die Bohrlöcher gut mit dem Staubsauger aussaugen oder mit einem Ausbläser ausblasen.
Nun je nach Wandart folgende Schrie durchführen:
5.1| Betonwand
Die Adapterplae an den acht Bohrungen ausrichten. Die Ankerbolzen mit dem Hammer durch
die acht Bohrungen der Adapterplae in die Wandbohrungen klopfen und die Muern mit dem
Schraubenschlüssel fest ziehen.
Montageschritte
5.2| Ziegelwand
Die Ankerhülsen bis zum Anschlag in die Wand klopfen. Mulfunkonsmörtel nach Herstellerangaben in den Ankerhülsen verteilen. Überschüssigen Mörtel, der heraus tri, mit einem
Küchentuch abwischen. Darauin die Gewindestangen bis zum Anschlag in die Ankerhülsen
drücken. Überschüssigen Mörtel, der aus den Ankerhülsen heraus tri, mit einem Küchentuch
enernen. Den Mörtel nach Herstellerangaben aushärten lassen.
Danach den Indoor Adapter mit den acht Bohrungen über die Gewindestangen an die Wand
xieren, die Unterlegscheiben anbringen und die acht Muern mit dem Schraubenschlüssel fest
anziehen.
Tipp
Wenn die Dübel mit einer Gewindestange eingeklebt werden, kann es hilfreich sein, die
Adapterplae auf die Stangen zu setzen, bevor der Mörtel 100% getrocknet ist. Der Ausleger darf
aber NICHT eingesetzt werden und die Muern dürfen nicht festgezogen werden (ggf. nur leicht
angesetzt).
www.pullup-dip.com16 17www.pullup-dip.com
Page 10
Hinweise
Sollte die Montage an einem Baum erfolgen, muss dieser möglichst gerade sein. Eine Montage
des Gerätes auf Höhe eines Astes ist nicht möglich. Achten Sie darauf, dass die Fläche unter dem
Outdoor Adapter möglichst eben ist. Die Winkel auf der Rückseite des Outdoor Adapters sind je
nach Durchmesser eines Baumes oder einer Stange verstellbar.
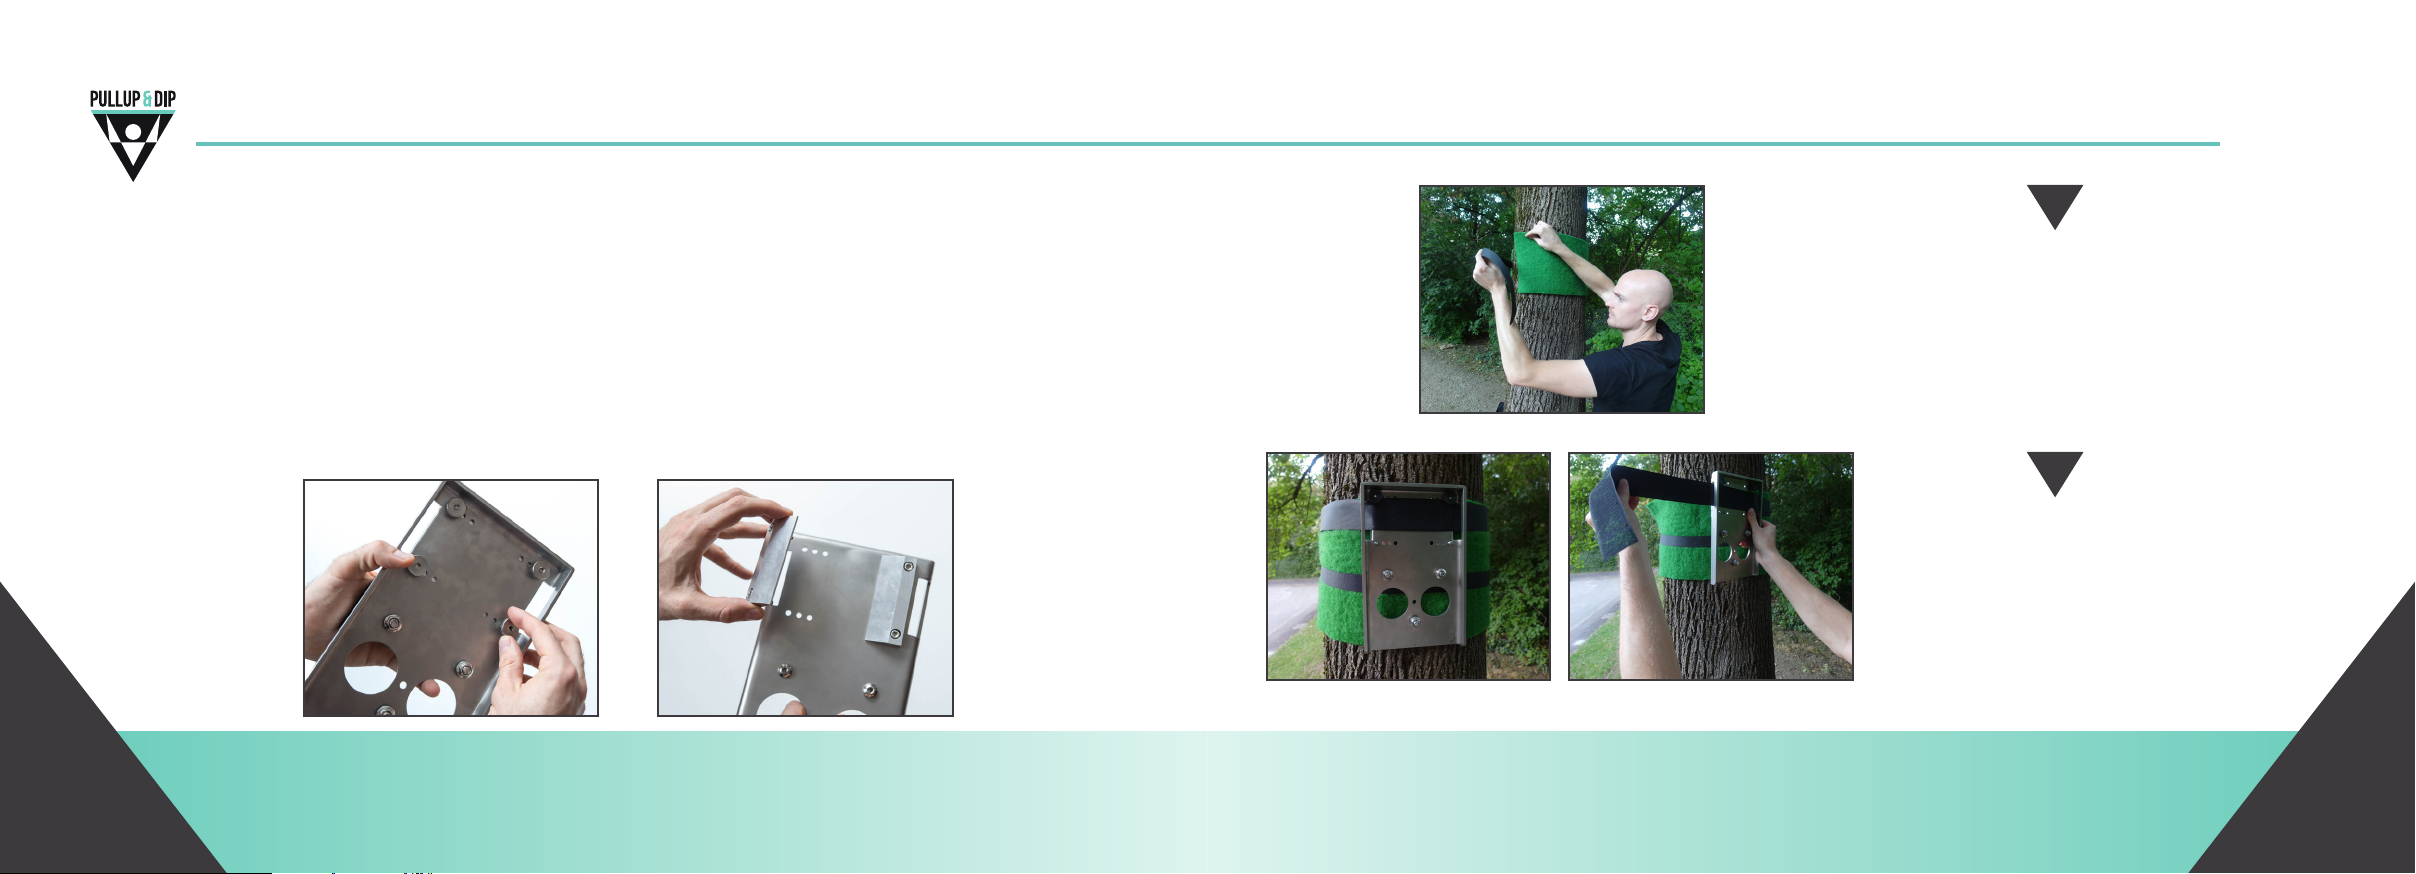
Verstellung der Winkel
Die Winkel auf der Rückseite des Outdoor Adapters können je nach Durchmesser des Baumes/ der
Stange verstellt werden. Dazu die vier Rändelmuern auf der Vorderseite lösen und die Winkel
entsprechend der gewünschten Breite verstellen.
5| Montage OUTDOOR5| Montage OUTDOOR
1
Besmmen Sie Ihre gewünschte
Höhe des Outdoor Adapters
und befesgen Sie die Schutzmae mit dem mitgelieferten schmalen Kleverschluss um den Baum
oder die Stange.
2
Befesgen Sie anschließend den Outdoor Adapter mit dem breiten Kleverschluss an der Schutzmae, damit dieser durch den Kleverschluss
xiert ist und somit beide Hände für
die weiteren Montageschrie verfüg-
bar sind.
www.pullup-dip.com18 19www.pullup-dip.com
Page 11
3 4
5| Montage OUTDOOR5| Montage OUTDOOR
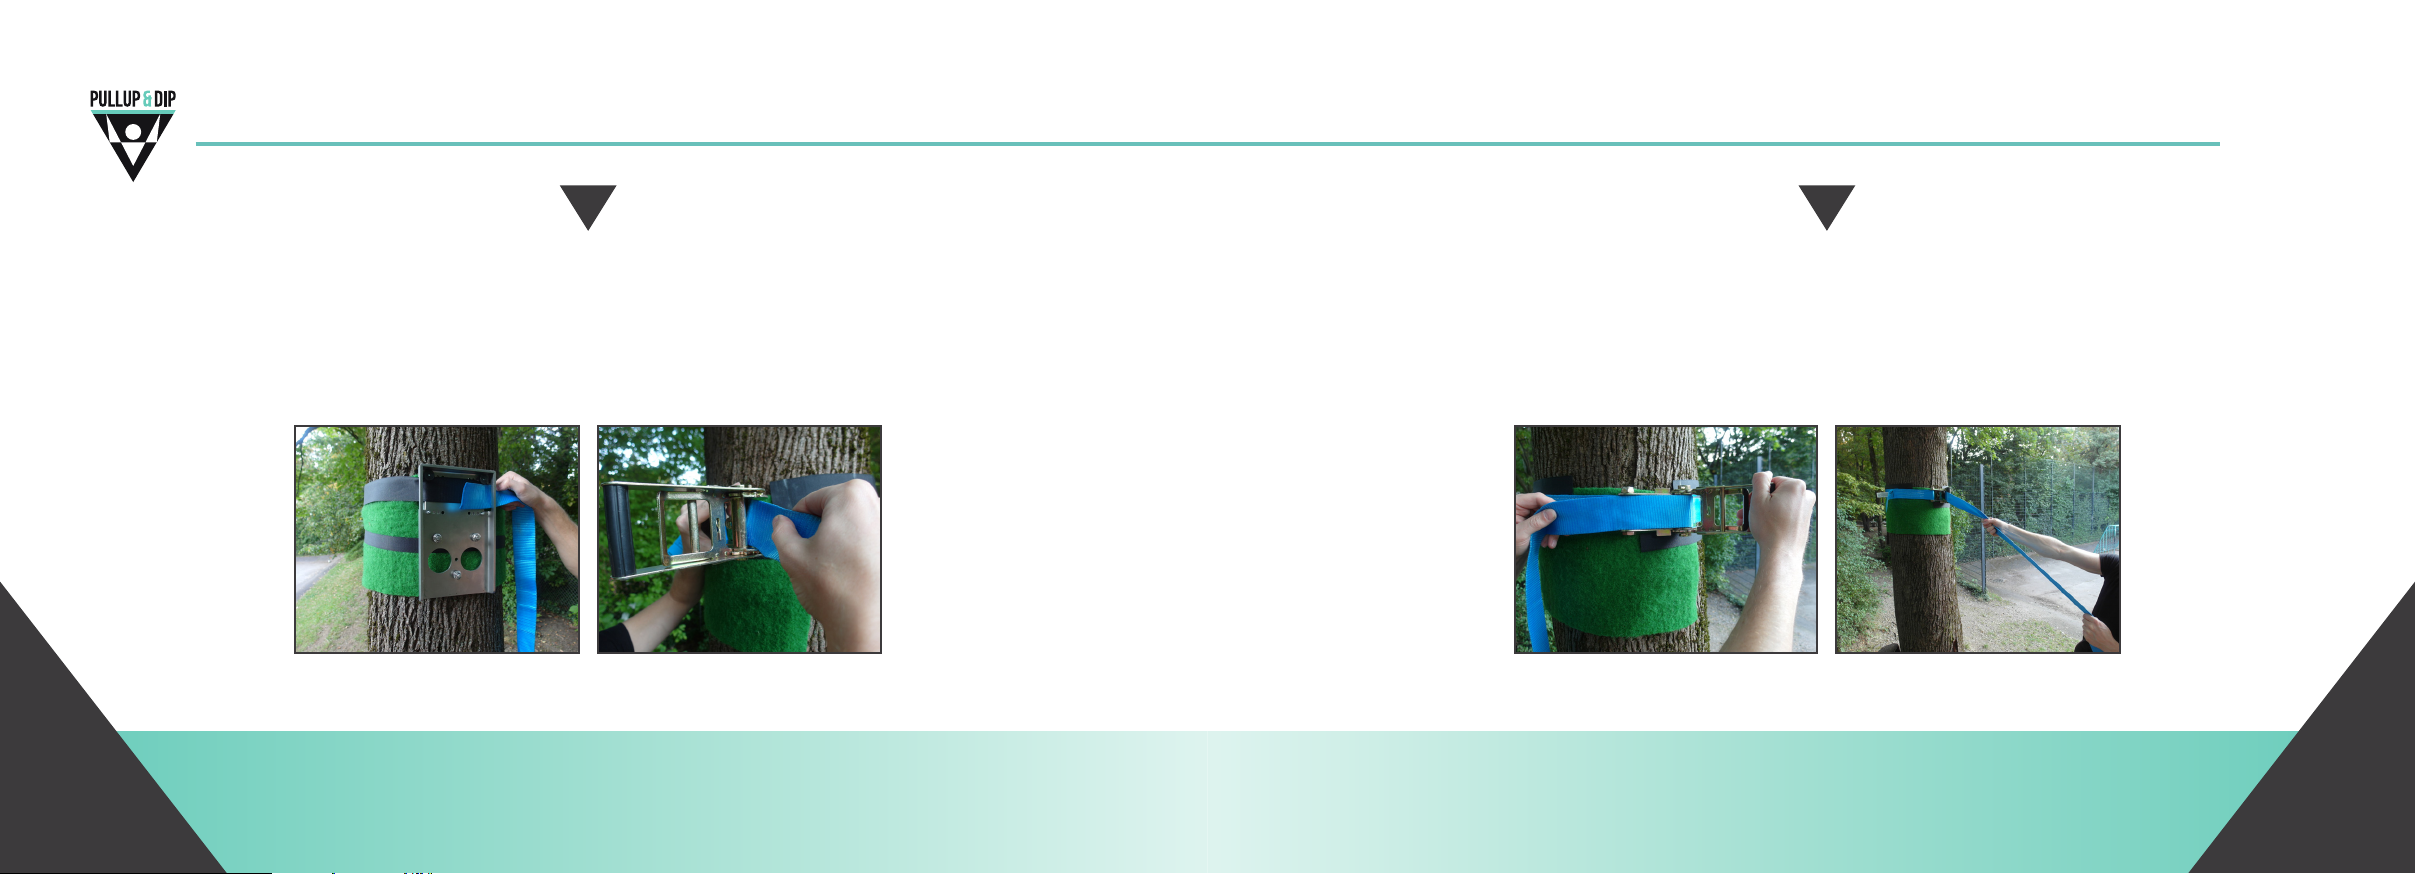
Führen Sie das Ende des Spanngurtes durch die zwei seitlichen Önungen am Outdoor
Adapter.
Anschließend umschlingen Sie den Umfang des Baumes und stecken das Ende des Gurtes
durch die Aufnahme des Spanngurtes. Stellen Sie dabei sicher, dass der Gurt in sich nicht
verdreht ist!
www.pullup-dip.com20 21www.pullup-dip.com
Bevor Sie den Spanngurt anziehen, achten Sie drauf, dass sich unter dem Spanner
ebenfalls der Schutz bendet.
Ziehen Sie nun den Spanngurt so fest wie möglich mit dem Hebel an. Um die nale Spannung zu erzeugen, nehmen Sie den Gurt als Verlängerung für einen verlängerten Hebel
und spannen Sie so den Spanngurt so fest wie möglich. Achten Sie darauf, dass der Spanner am Ende vollends geschlossen ist.
Page 12
5| Montage OUTDOOR 5| Montage OUTDOOR
5 6
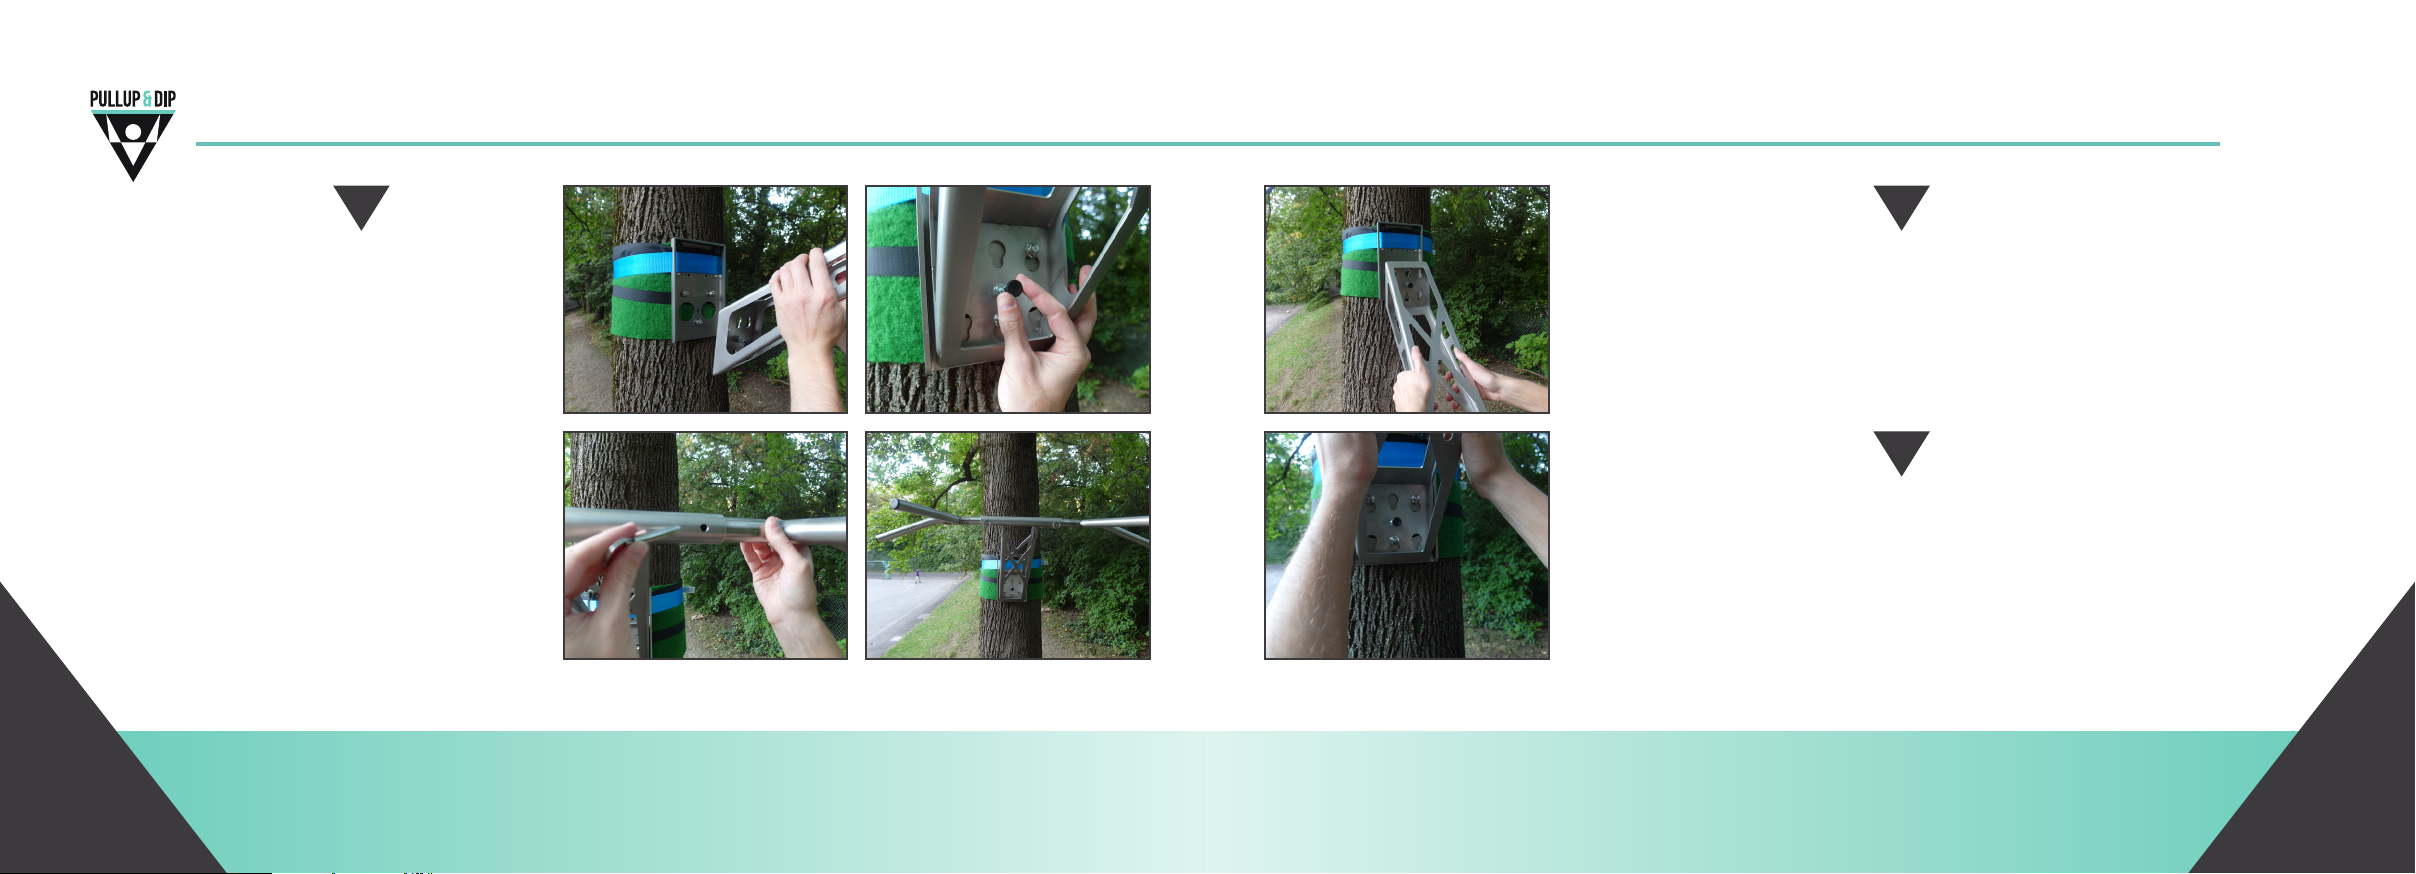
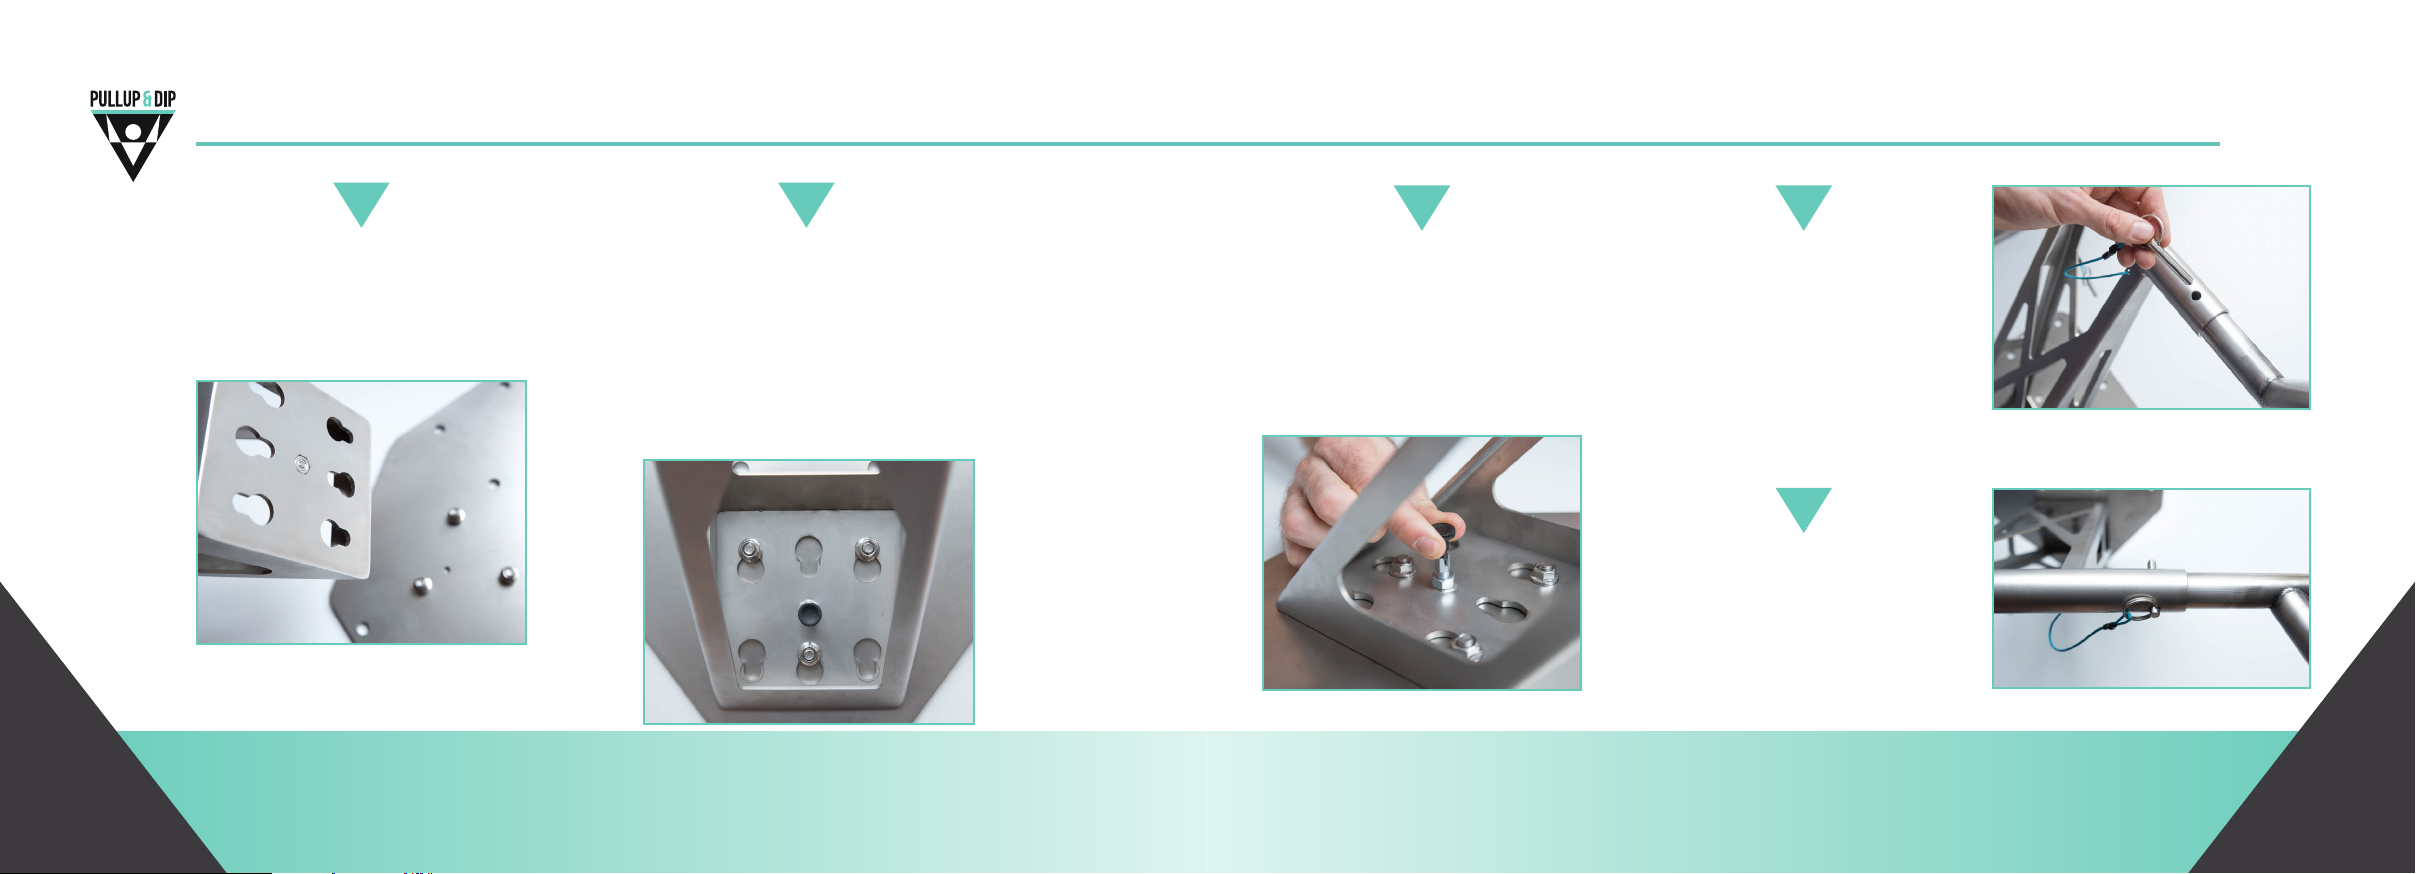
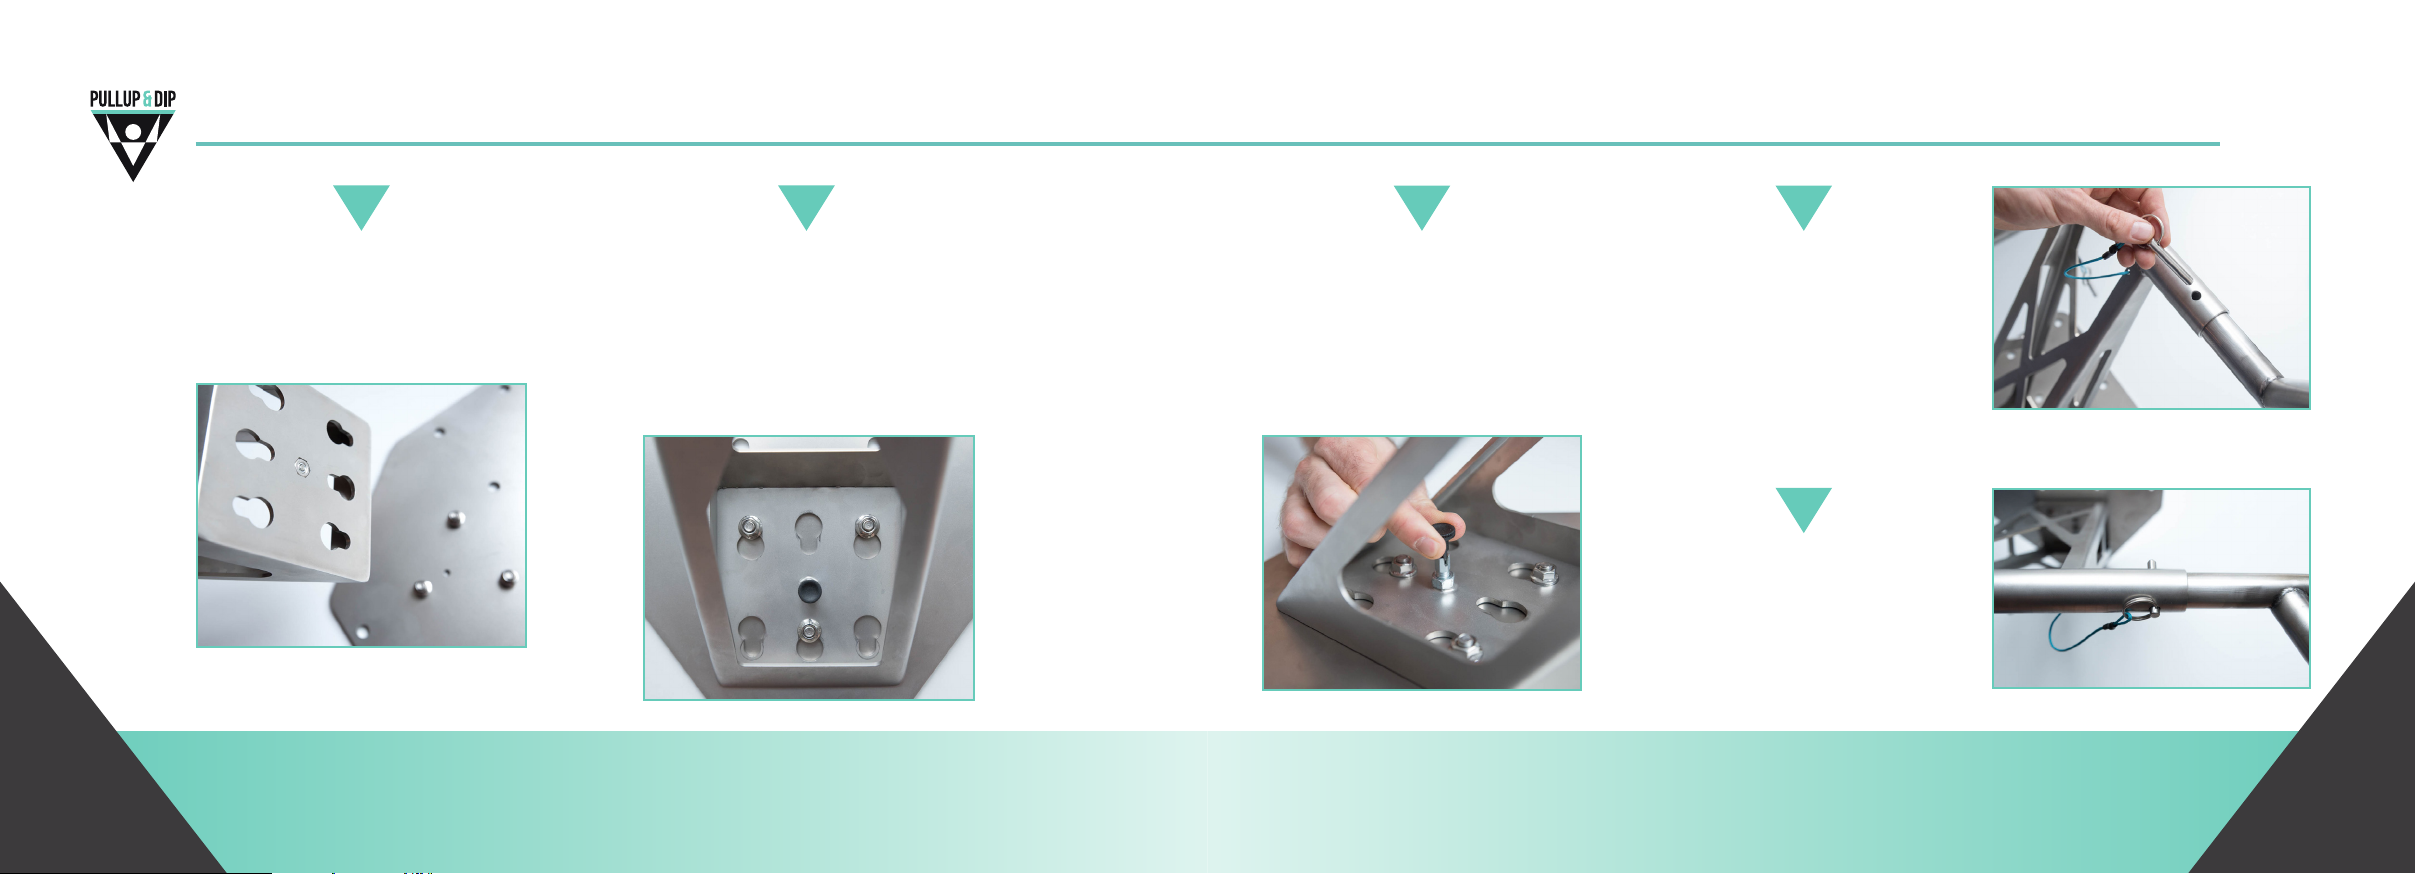
Nun können Sie wie bereits bei der
Indoor Anwendung den Ausleger in
den Adapter stecken, den Arreerbolzen durch Drehen xieren, sowie
die beiden Stangen in das Rohr des
Auslegers stecken.
Anschließend die beiden Bolzen
durch die Bohrung stecken, bis die-
se auf der Rückseite wieder heraus
schauen.
Um zwischen Klimmzügen und Dips zu wechseln, drehen Sie den
Arreerbolzen, nehmen Sie den Ausleger heraus und drehen Sie diesen
um 180°, um ihn anschließend wieder in den Outdoor Adapter zu ste-
cken. Achten Sie bei beiden Anwendungen darauf, dass stets alle drei
Aufnahmeschrauben richg eingerastet sind.
7
Um das Gerät wieder vom Baum oder der Stange zu lösen, nehmen Sie
den Ausleger inkl. der Stangen aus dem Adapter heraus. Ziehen Sie an-
schließend am Hebel des Spanners und ziehen Sie diesen vom Gerät hin
weg, um so den Spanngurt zu lösen.
www.pullup-dip.com22 23www.pullup-dip.com
Page 13
6| Anwendung
6| Anwendung
1 2
Achten Sie darauf, dass der Arreerbolzen des Auslegers gespannt ist,
sodass dieser anfangs nicht auf der
Fläche des Auslegers heraus schaut.
Den Ausleger je nach Art der Übung
von oben in den Indoor oder Outdoor
Adapter stecken, bis er vollends bei
allen drei Aufnahmepunkten eingerastet ist. Um von Klimmzügen auf
Dips zu wechseln, den Ausleger um
180° drehen.
3
Den Arreerbolzen in der Mie
des Auslegers drehen, bis dieser in
die Bohrung des Indoor/Outdoor
Adapters einrastet. Damit wird ein
Herausrutschen des Auslegers aus
dem Adapter verhindert.
Die beiden Mul-Stangen in das
Rohr des Auslegers stecken, sodass
die beiden Dip Stangen vom Baum
oder der Wand weg zeigen.
4
5
Beide Bolzen vollends durch die
Bohrungen stecken. Diese müssen
auf der anderen Seite wieder heraus schauen.
www.pullup-dip.com24 25www.pullup-dip.com
Page 14

7| Pflege und Wartung
8| Garantie und Rückgaberecht
䕲 Zur Reinigung ein feuchtes Tuch verwenden. Keine chemischen Reinigungsmiel verwenden,
da diese Schäden am Trainingsgerät verursachen können.
䕲 Das Gerät ist vor jeder Anwendung auf Schäden (insb. an Schraub- und Schweißverbindungen)
zu überprüfen und darf bei Beschädigungen nicht verwendet werden.
䕲 Defekte sind innerhalb der Garanezeit umgehend an [email protected] zu melden
oder außerhalb der Garanezeit fachmännisch zu reparieren. Das Gerät darf dann bis zur Instandsetzung nicht verwendet werden.
www.pullup-dip.com26 27www.pullup-dip.com
Die Garanezeit beträgt zwei Jahre und
beginnt mit dem Tag des Rechnungsdatums.
Bie bewahren Sie die Rechnung als Nachweis
für den Kauf und damit den Garaneanspruch
auf.
Es gelten folgende Garanebesmmungen:
Der Hersteller garanert kostenfreie Behebung von Mängeln, die auf Material- oder
Fabrikaonsfehler zurückzuführen sind. Bei
Feststellung eines Mangels ist der Käufer ver-
pichtet, diesen unverzüglich beim Hersteller
zu melden. Schäden infolge unsachgemäßer
Handhabung, Montage, Nichtbeachtung der
Bedienungsaleitung, Gewaltanwendung oder
normaler Abnutzung fallen nicht unter diese
Garane.
Unabhängig davon erlischt die Garane und
jegliche Gewährleistung, sofern
das Produkt:
䕲 eigenmächg umgebaut wird.
䕲 die vorgegebene maximale Belastungs-
grenze überschrien wird.
䕲 das Produkt nicht für den beabsichgten
Zweck verwendet wird.
䕲 unsachgemäß monert wird.
Folgende Verschleißteile sind von der Garane
ausgeschlossen:
䕲 Spanngurt
䕲 Schutzmae
䕲 Kleverschlüsse
䕲 Arreerbolzen
䕲 Kontaklächen, an denen Abrieb besteht
und wo somit Kratzer aureten können.
Page 15

8| Garantie und Rückgaberecht
9| Kontakt
Der Hersteller haet nicht für ursächliche Schäden oder Folgeschäden jedweder Art, es sei denn,
dass eine derarge Haungsbegrenzung vom Gesetzgeber ausdrücklich untersagt ist. Es steht
im Ermessen des Herstellers, die Garane durch Reparatur oder Ersatzlieferung zu erfüllen.
Weitergehende Ansprüche bestehen nicht.
Bei nicht berechgter Garaneeinsendung behält sich er Hersteller vor, die Rücksendung unfrei
vorzunehmen.
Setzen Sie sich im Falle eines Garanefalles umgehend mit unserem Serviceteam
([email protected]) in Verbindung.
Um die Ware im Falle einer Reparatur oder Retoursendung ausreichend zu schützen, bien wir Sie,
falls möglich, die Originalverpackung für die Dauer der Garanezeit aufzubewahren. Bie kontakeren Sie in jedem Fall unbedingt vorab unser Serviceteam.
Anfallende Reparaturen nach Ablauf der Garanezeit inklusive dem Versand sind kostenpichg.
Ihre gesetzlichen Rechte werden durch diese Garane nicht eingeschränkt.
www.pullup-dip.com28 29www.pullup-dip.com
Sollten Sie weitergehende Fragen zum Produkt oder Schwierigkeiten mit der Montage des Gerätes
haben, so nden Sie auf unserer Webseite www.pullup-dip.com FAQ‘s sowie Montagevideos. Soll-
ten Sie hier keine passende Antwort nden, dürfen Sie uns auch gerne kontakeren.
Sollte mit dem Gerät etwas nicht in Ordnung sein oder sollte eine Beschädigung aureten,
nehmen Sie bie Kontakt zu uns auf. Für technische Ausküne oder Rückfragen stehen wir Ihnen
gerne unter [email protected] zur Verfügung.
Bei der Rückgabe bie das komplee Zubehör in der Originalverpackung zurückschicken, sowie die
Bedienungsanleitung und eine Kopie der Rechnung beilegen.
Page 16

9| Kontakt
Kontaktdaten
FT Fitness Technology UG
(haungsbeschränkt)
Blutenburgstraße 25
80636 München, Deutschland
E-Mail: info@tness-technology.de
Web: www.pullup-dip.com
Sitz der Gesellscha / Registered Oce: München, Germany.
Registergericht / Register Court: AG München (Munich), HRB 224 919.
Geschäsführer / Managing Director: Michael Weber, Johannes Diem.
Es gelten die Allgemeinen Geschäsbedingungen der Webseite: www.pullup-dip.com
www.pullup-dip.com30 31www.pullup-dip.com
Page 17
Englisch/ english user manual
1|Device overview
Table of contents
1| Device overview (scope of supply) ...............................................................page 33
Safety instructions and disposal ...............................................................Page 36
2| Installation variations .................................................................................Page 41
3| Indoor installation ........................................................................................Page 42
4| Outdoor installation .....................................................................................Page 48
5| Usage ................................................................................................................Page 54
6| Product care and maintenance ...................................................................Page 56
7| Guarantee and right of return ....................................................................Page 57
8| Contact ............................................................................................................Page 59
9| Training exercises .........................................................................................Page 62
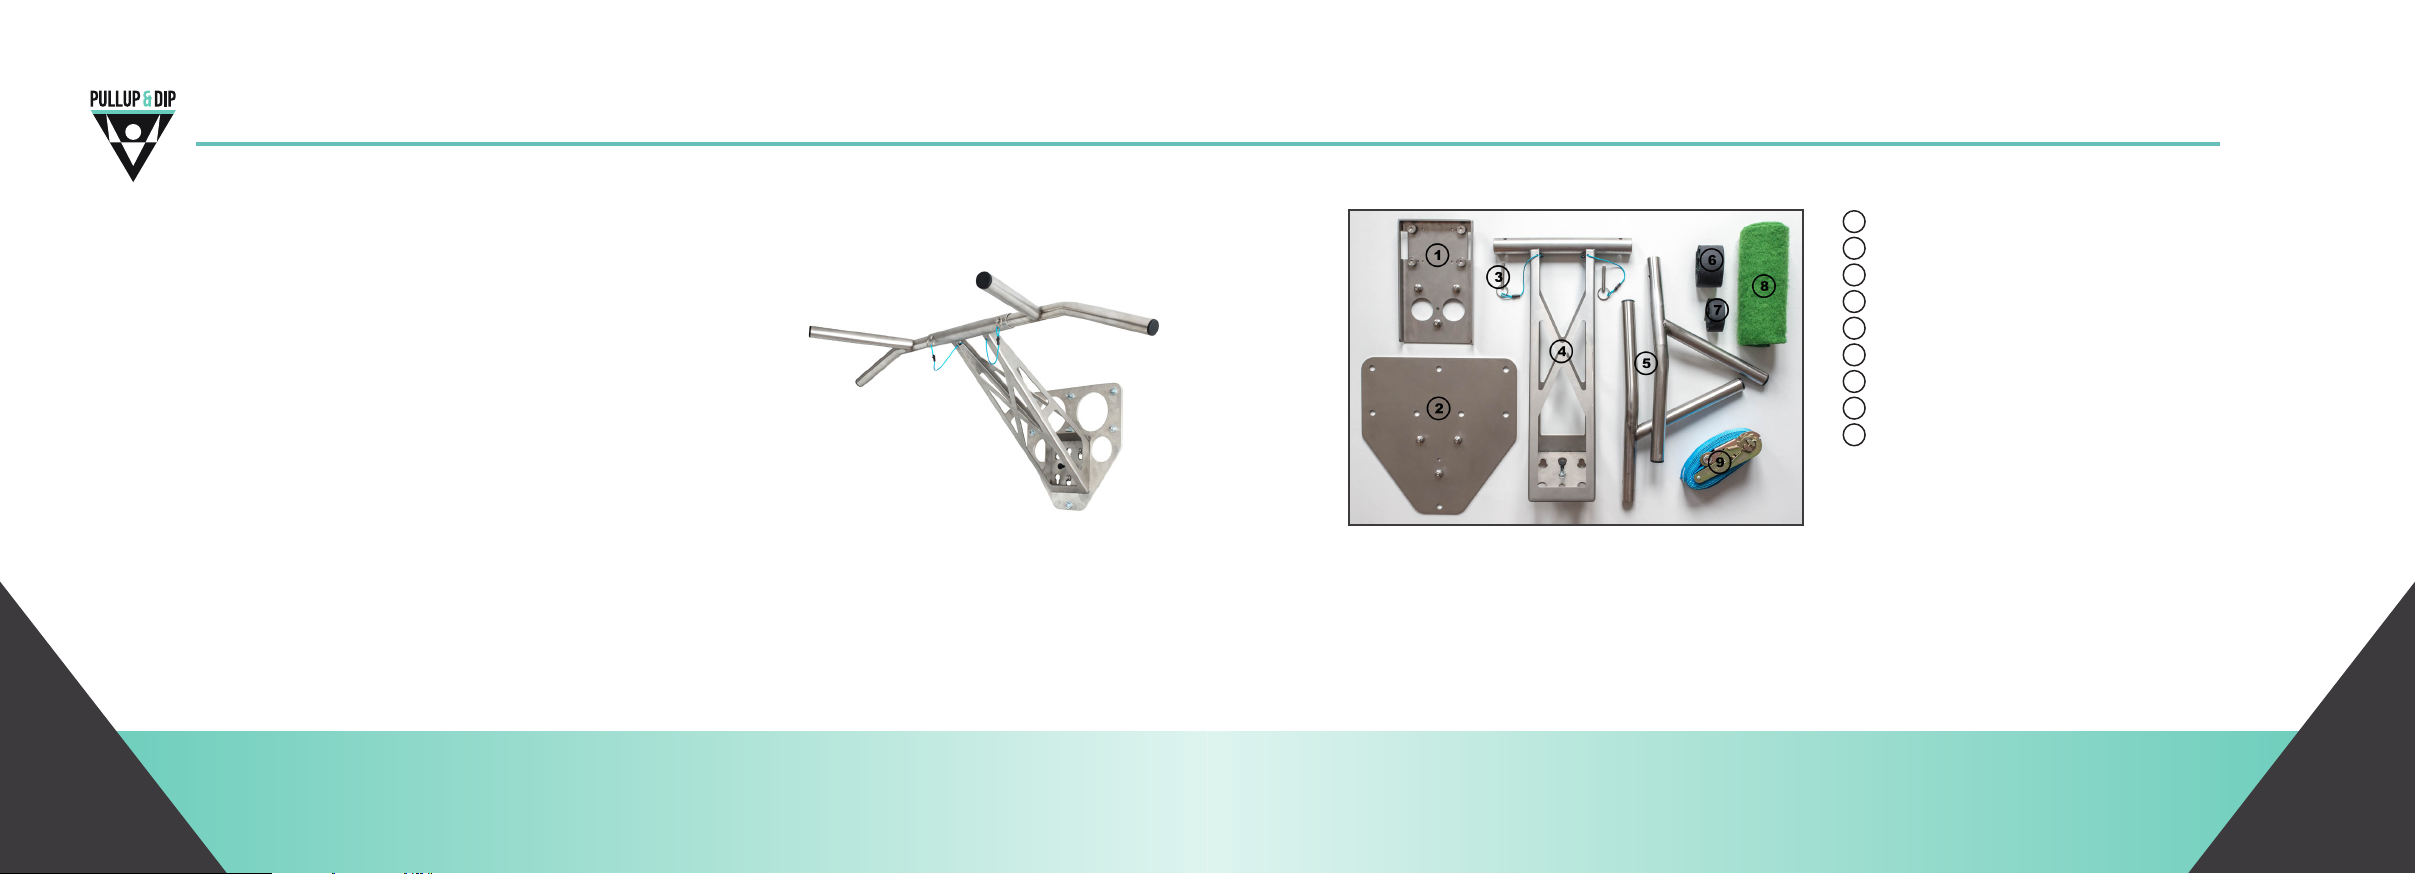
name of all parts
1
Outdoor adapter
2
Indoor adapter
3
2 x bolts
Side arm
4
2x mul bar
5
Velcro fastener (wide)
6
Velcro fastener (slender)
7
Protecon mat
8
Tension belt
9
Thank you that you have decided to purchase a Pullup & Dip training device. Pullup & Dip is a
portable training device which allows you to do exercises like pullups, dips, Muscle-Ups and leg
raises. According to variaon the device oers the possibility to be used outside, as well as inside
(e.g. in the at, in the cellar etc.)
www.pullup-dip.com32 33www.pullup-dip.com
Page 18
1|Device overview
1|Device overview
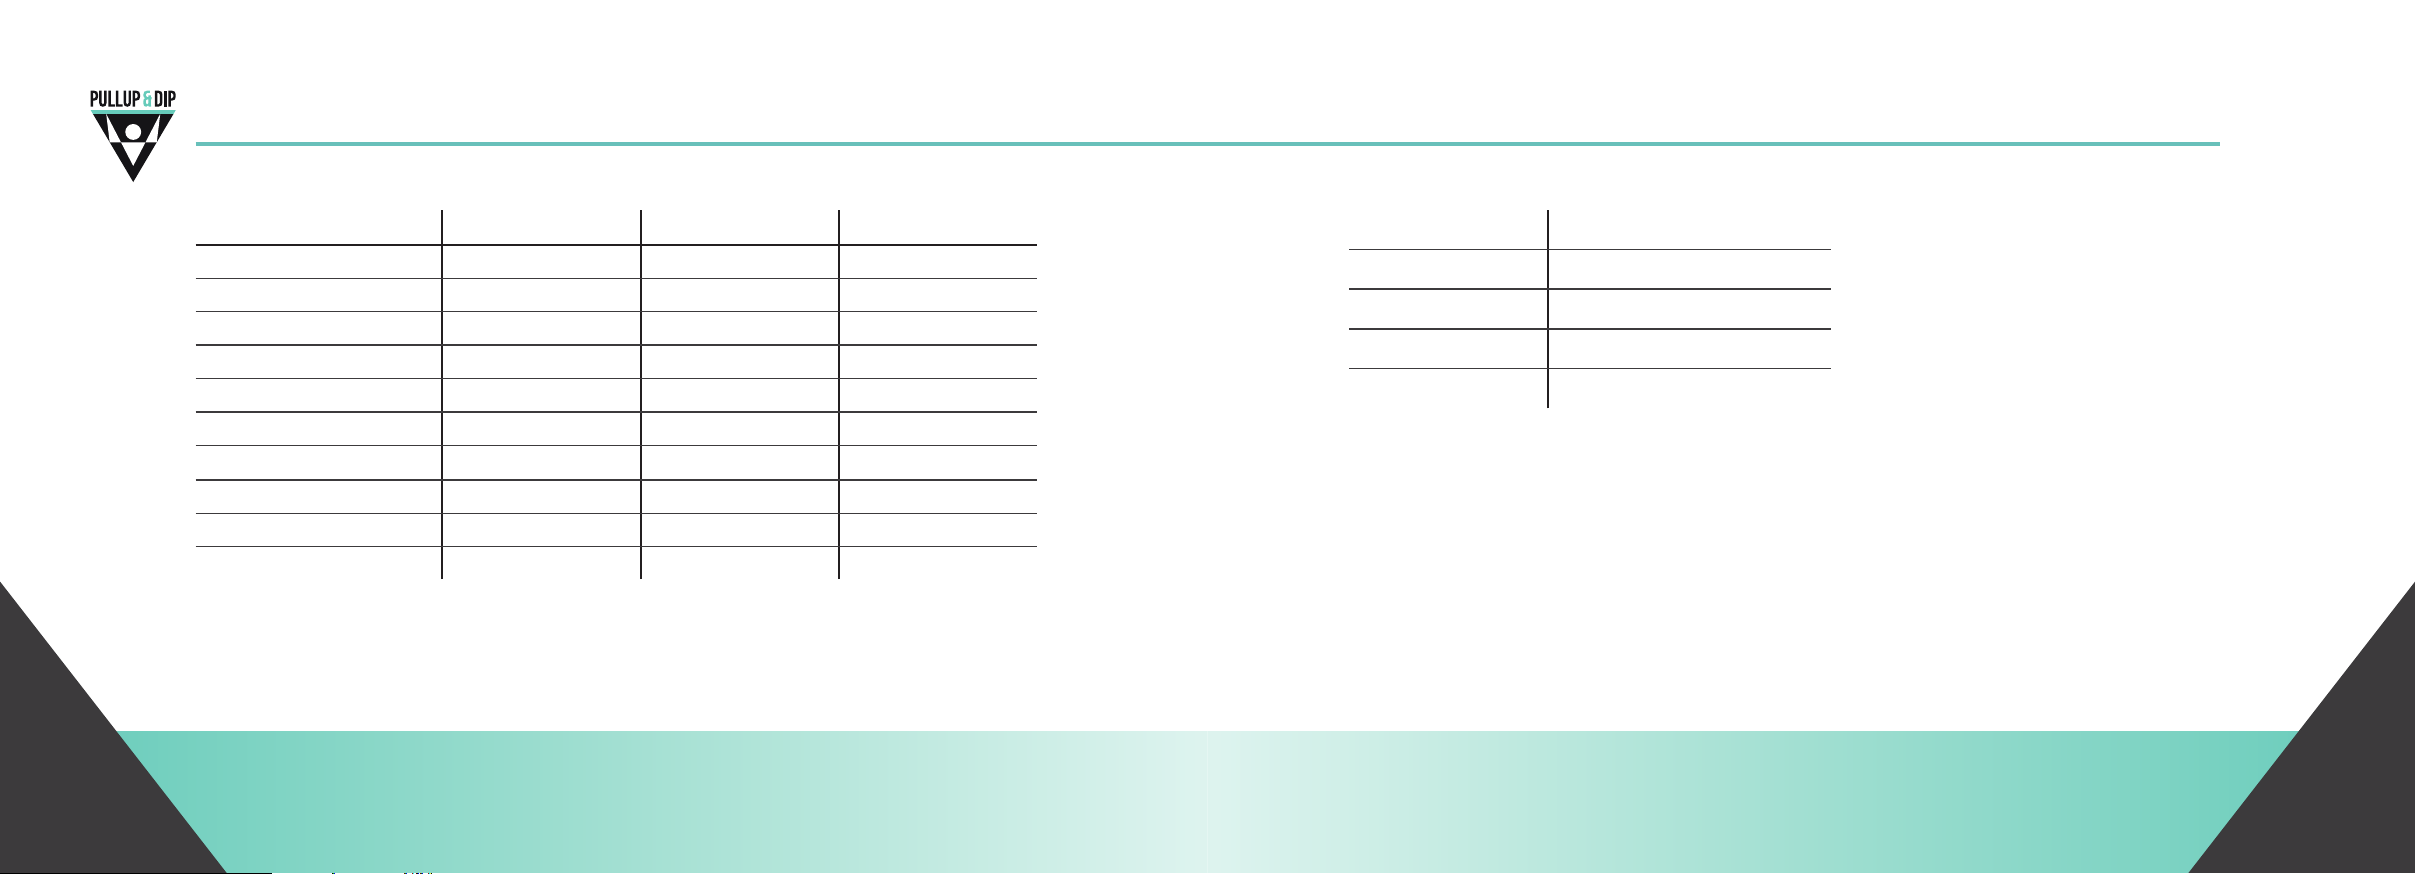
Product contents
Premium package Indoor package Outdoor package
Side arm
2 x mul bar
Indoor adapter*
Outdoor adapter
Tension belt
Protecon mat
Velcro fastener (wide)
Velcro fastener (slender)
2 x bolts
Weight 13,0 kg 9,6 kg 8,5 kg
*Due to dierent types of walls and connecon methods, we can unfortunately not supply installaon material as a standard for the indoor adapter..
✔ ✔ ✔
✔ ✔ ✔
✔ ✔
✔ ✔
✔ ✔
✔ ✔
✔ ✔
✔ ✔
✔ ✔ ✔
Technical details
Load capacity Up to 130 kg
Material Stainless steel construcon
Colour Stainless steel
Grasp diameter 30 mm
Wall distance 400 mm
www.pullup-dip.com34 35www.pullup-dip.com
Page 19

2| Safety instructions and disposal
Importantly!
2| Safety instructions and disposal
䕲 Before using this device, make yourself familiar with the device and all safety, usage,
installaon and service instrucons menoned in this printed user manual.
䕲 All security ps are to be obeyed strictly to prevent risks of injuries.
䕲 Use the device only as described in this user manual.
䕲 The user manual should be kept in a sure place.
䕲 Add with passing on of the device the user manual
䕲 The nonobservance of the instrucons as well as warnings contained in this user manual can
lead to injuries of people or damages to structural condions by which guarantee or liability
claims can become triing.
Safety instructions
This training device is designed for indoor as well as for outdoor usage. The device is designed for
a load of maximum 130 kg. The choice of a suitable and safe installaon place of the device should
occur according to the safety instrucons described in this user manual.
With improper usage of the device by for example excessive load, wrong usage like jerky
movements or improper assembly etc. health defects as well as damages of the indoor and
www.pullup-dip.com36 37www.pullup-dip.com
outdoor area are not to be excluded! Before the usage of the training device all assembly and
installaon parts must be checked for their safety and funcon.
Before every usage of the product, all screw joints (indoor adapter with brick wall; outdoor
adapter) and all visible parts (bolt connecon, weld joints) need to be checked for damages, cracks
and arion. All damaged or arited individual parts as well as all cracks in weld joints are a safety
risk. Cracked weld joints need to be reported immediately to the company FT Fitness Technology if
the guarantee is sll valid, otherwise they need to be xed professional. Damaged individual parts
need to be exchanged immediately. A usage of the product in case of obvious damages or cracks
in weld joints is not allowed!
Please note that the company FT Fitness Technology assumes no liability for damages in case of
improper usage, wrong installaon or overload.
Page 20

2| Safety instructions and disposal2| Safety instructions and disposal
FOLLOW THE FOLLOWING INDICATIONS TO PREVENT THE RISKS OF INJURIES
䕲 Load: maximum 130 kg
䕲 The device can only be used by one person.
䕲 Children should use the device only with suitable physical development and only under super-
vision of an adult.
䕲 Swallowable small parts are to be kept away from children.
䕲 The device should be held always clean and dry for the usage.
䕲 Exercises with one-sided load are not possible.
䕲 Wrong and excessive training can endanger your health.
䕲 The product should be used only aer previous warming up.
䕲 The device must be mounted and demounted properly.
䕲 A safe installaon must be guaranteed before the beginning of the workout. Especially the
tension belt needs to be checked carefully before every workout.
䕲 Assembly parts need to be checked before every usage for their safe xing and if necessary
they need to be exchanged.
䕲 Besides wall installaon material, it is not allowed to use other aachment parts for the instal-
laon and usage of the device which are not provided by the manufacturer.
FOLLOW THE FOLLOWING INSTRUCTIONS TO AVOID DAMAGES OF THE SURROUNDINGS:
INDOOR:
䕲 The device can only be xed to massive walls as for example a concrete or brick wall (not to
cavity walls, plasterboard etc.).
䕲 Before the installaon of the indoor adapter to a wall the extending of power supply lines and
water pipes in the wall needs to be checked.
OUTDOOR:
䕲 No installaon on electric power poles!
䕲 No use of the device during a thunderstorm.
䕲 It is not allowed to use the device without the protecon mat, because otherwise, damages
appear.
䕲 Trees must be suitable for the installaon or for the load. The device may not be installed on
decayed or roen trees!
䕲 The tension belt must be stretched to the maximum tension power and may not be goen in
contact with sharp edges.
www.pullup-dip.com38 39www.pullup-dip.com
Page 21

3| Installation variations2| Safety instructions and disposal
䕲 The product may not be associated with salted water.
䕲 Condions:
• Tree diameter: at least 20.0 cm
• Pipe or post diameter: at least 10.0 cm
䕲 For installaon at a post a stable and massive foundaon is required.
Disposal
Please pay aenon to an environmentally disposal of the packaging according to local regulaons! Follow for the disposal of the device the local disposal regulaons.
www.pullup-dip.com40 41www.pullup-dip.com
The device may be mounted only at the following objects:
䕲 Wall (only brick or concrete wall)
䕲 Tree (Follow installaon instrucons!)
䕲 Pole (no power poles, follow installaon instrucons!)
Page 22
4| INDOOR INSTALLATION
4| INDOOR INSTALLATION
Please note
The indoor adapter may be installed only on massive walls which can withstand the forces, as
for example concrete or brick walls. Cavity walls or plasterboard walls are not suitable for the
installaon! Before holes are drilled into the wall, consultaon with the renter and an expert for
power supply lines and water pipes should be held to not cause any damages.
Should you not be sure about the state of your wall and/or the use of installaon material, you
should get advice from an expert. In a property market you can get advised competently and you
can nd the suitable installaon material. The installaon recommendaon below should just
be seen as a suggeson. For the installaon of the indoor adapter please get help from a second
person.
Instruction for wall installation with fischer long shaft dowel of Pullup & Dip webshop
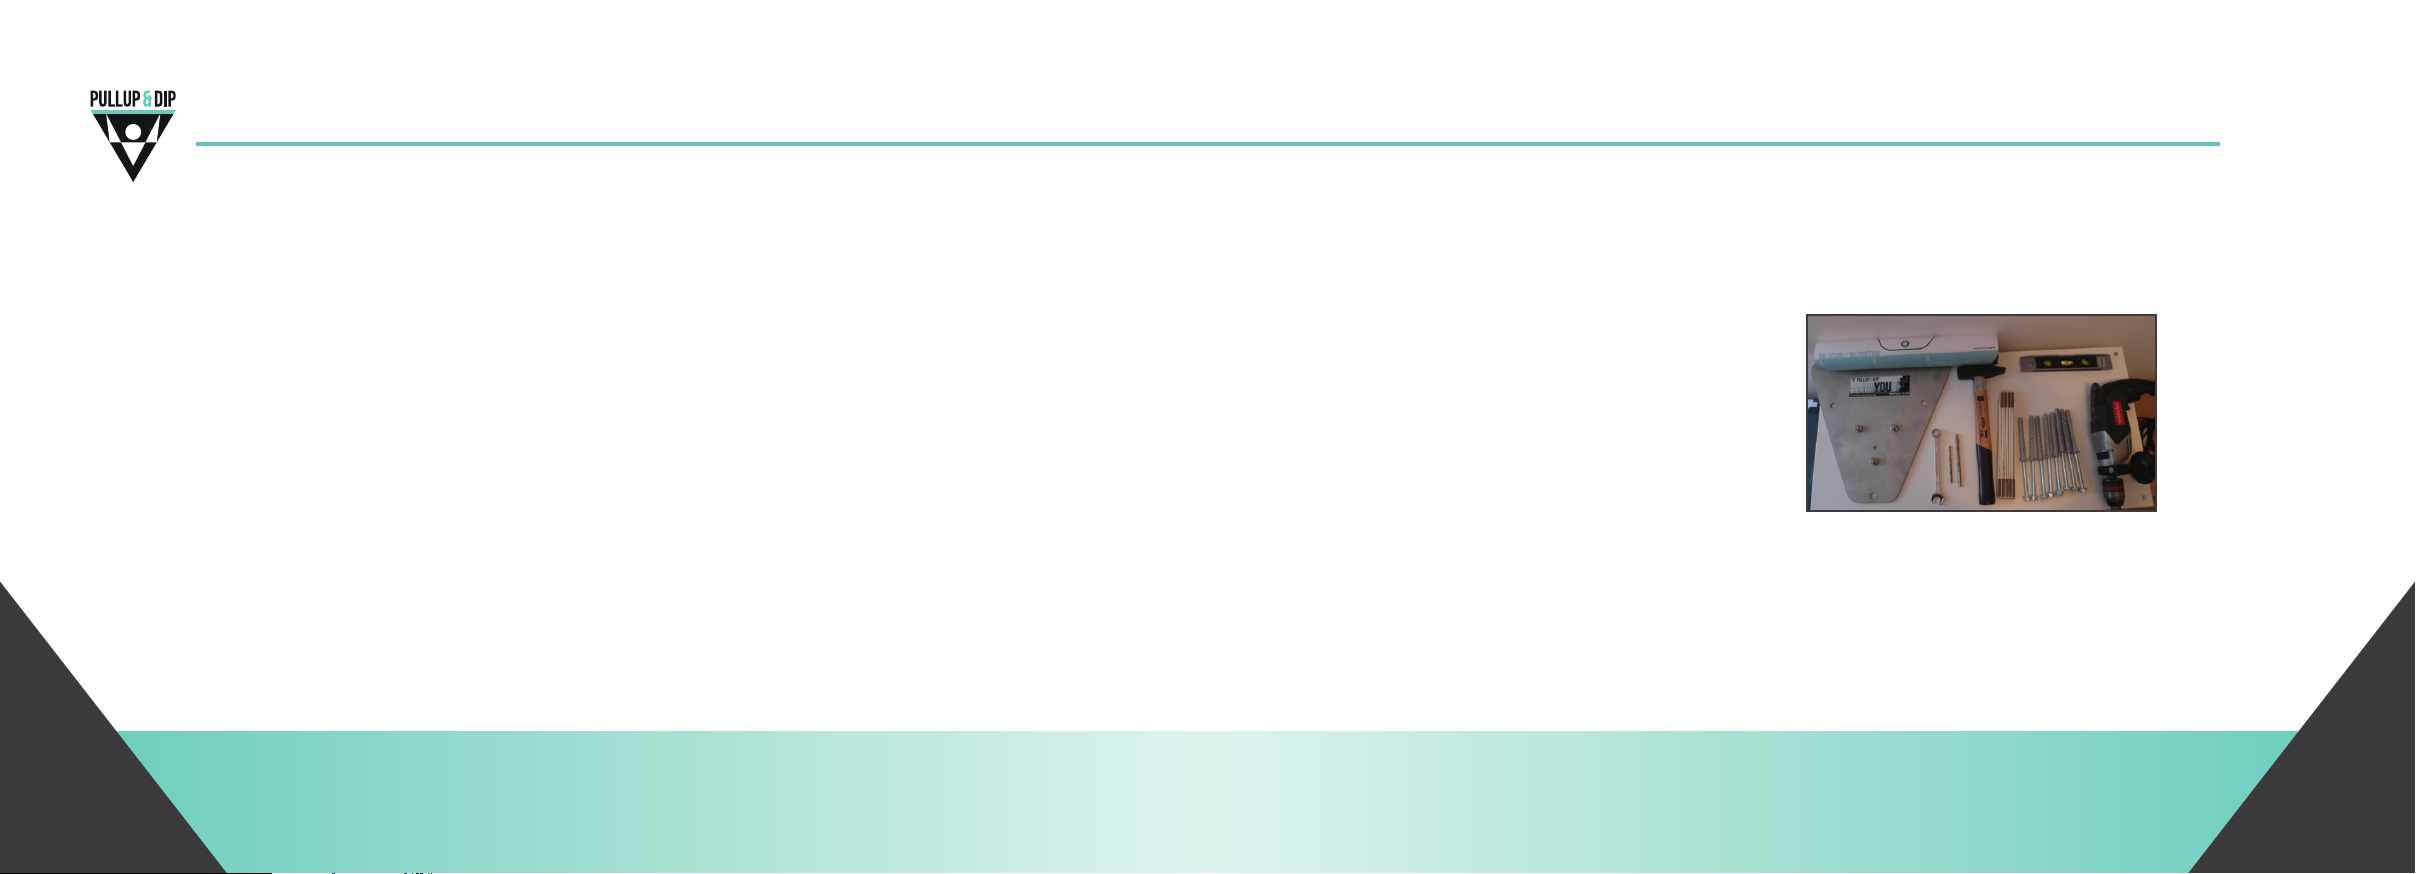
The following equipment you need for the installaon of the indoor adapter:
䕲 wrench with 13mm
䕲 Drillers with diameters:
5mm (predrilling),
10mm (nal hole)
䕲 hammer
䕲 pocket rule
䕲 water level
䕲 tape
䕲 drilling machine
䕲 8 scher sha dowels + screws (included)
䕲 Drilling template (included)
䕲 vacuum
www.pullup-dip.com42 43www.pullup-dip.com
Page 23
4| INDOOR INSTALLATION
4| INDOOR INSTALLATION
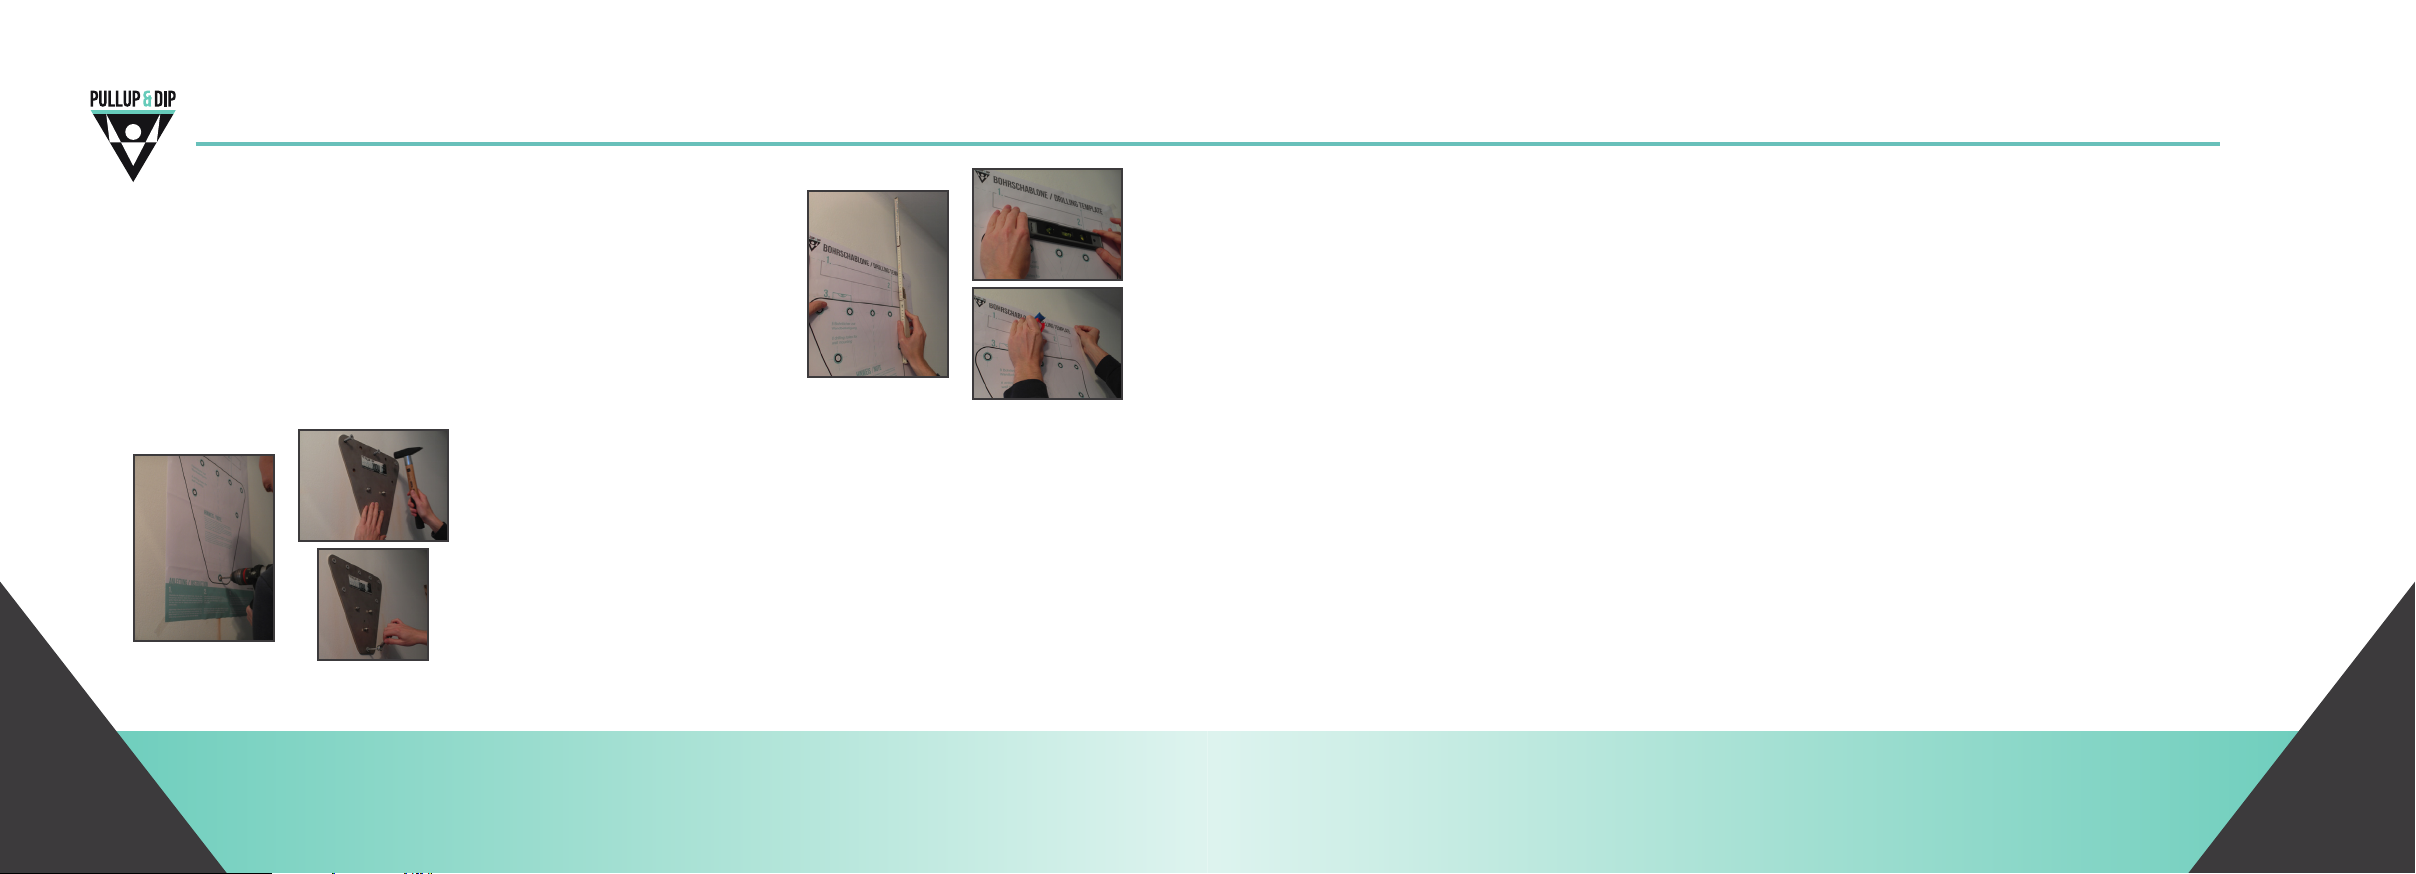
Instruction for wall installation with fischer long shaft dowel of Pullup & Dip webshop
The distance from top edge of the outdoor adapter (see drilling
template) to ceiling should be at least 45 cm. Level the drilling
template very precisely with a water level and x it with tape
to the wall.
Depending on your body size decide the nal height by yourself.
Aer xing the drilling template to the wall, predrill all eight
holes with the 5 mm driller. Aer that, drill all eight holes with
the 10 mm driller to nal diameter. The drilling depth should be
at least 110 mm.
Aer that take away the drilling template from the wall and use
a vacuum or a blowout to get the drilling dust out of the holes.
Press the indoor adapter over the eight holes, use the hammer
to knock the dowels carefully into the wall and use the wrench
to turn the screws into the wall.
Please note
Required material:
䕲 Drilling template Pullup & Dip + tapes to x
it to the wall
䕲 Indoor adapter
䕲 Water level + pencil
䕲 Percussion drilling machine
䕲 hammer
䕲 Suitable driller
Brick wall: 16 mm of diameter
(pre drill with smaller drills: 5 mm and
10mm of diameter)
Concrete wall: 10 mm of diameter
(pre drill with 5 mm)
䕲 Folding ruler
䕲 1 x spanner 16 mm
According to wall type:
䕲 Concrete wall:
• 8 x anchor bolt M 10 x 95
• Drill hole depth 75 mm, 10 mm of
diameter
䕲 Brick wall:
e.g. high hole brick, hollow block from lightweight concrete, hollow block of concrete,
lime sand hole stone, lime sand full stone,
full brick
• 8 x anchor shells 15 x 85 mm suitable
for M10, drill hole depth 95 mm,
driller diameter: 16 mm
• 8 x threaded rod [M10 x 100 mm]
• 8 x nut [M10]
• 8 x washer [10. 5 DIN 125]
• 1 x mulfunconal mortar
www.pullup-dip.com44 45www.pullup-dip.com
Page 24

4| INDOOR INSTALLATION
4| INDOOR INSTALLATION
Assembly steps
1| Level the drilling template with the water level and x it with tape to the wall. The distance to
the ceiling should be at least 45 cm. The desired height can be determined by yourself.
2| Pierce the eight holes in the middle with a pencil and mark the drilling holes. Now the drilling
template can be removed.
3| Now predrill all eight holes with the 5 mm drill. With a brick wall an addional predrilling with
10 mm is recommended.
4| Aerwards drill the eight drilling holes with the drill (brick wall: 16 mm; concrete wall: 10 mm)
on nal diameter. The drilling depth should be according to manufacturer‘s data.
5| Use a vacuum cleaner or a blowout device to get the drilling dust out of the holes. This is very
important for the stability of the installaon material later!
According to the wall implement the following steps:
5.1| Concrete wall
Adjust the indoor adapter on the eight drilling holes. Knock the eight anchor bolts through the
eight holes into the holes of the wall and ghten the nuts with the spanner.
Assembly steps
5.2| Brick wall
Knock the anchor shells into the wall. Distribute mulfunconal mortar according to
manufacturer‘s data into the anchor shells. Brush away excessive mortar which runs out with a
culinary cloth wipe. As a result press the eight thread rods up to the end into the anchor shells.
Excessive mortar which runs out from the anchor shells can be removed with a culinary cloth.
Allow the mulfunconal mortar to harden according to manufacturer‘s data. Aerwards x the
indoor adapter with the eight holes over the threaded rods to the wall. Aach the washers and
ghten the eight nuts with the spanner rmly.
Tip
For the brick wall installaon it can be helpful to place the indoor adapter on the threaded rods
before the mulfunconal morter has dried. However, the side arm may not be plugged in already
as long as the morter is not dry and the nuts may not be ghtened (if necessary only easily set).
www.pullup-dip.com46 47www.pullup-dip.com
Page 25
5| OUTDOOR INSTALLATION
Please note
Should the outdoor adapter be installed at a tree, the tree must be as straight as possible. An installaon of the device on the height of a limb is not possible. Pay aenon that the surface under
the outdoor adapter is very even. The angles at the back of the outdoor adapter are adjustable
according to the diameter of a tree or a pole.
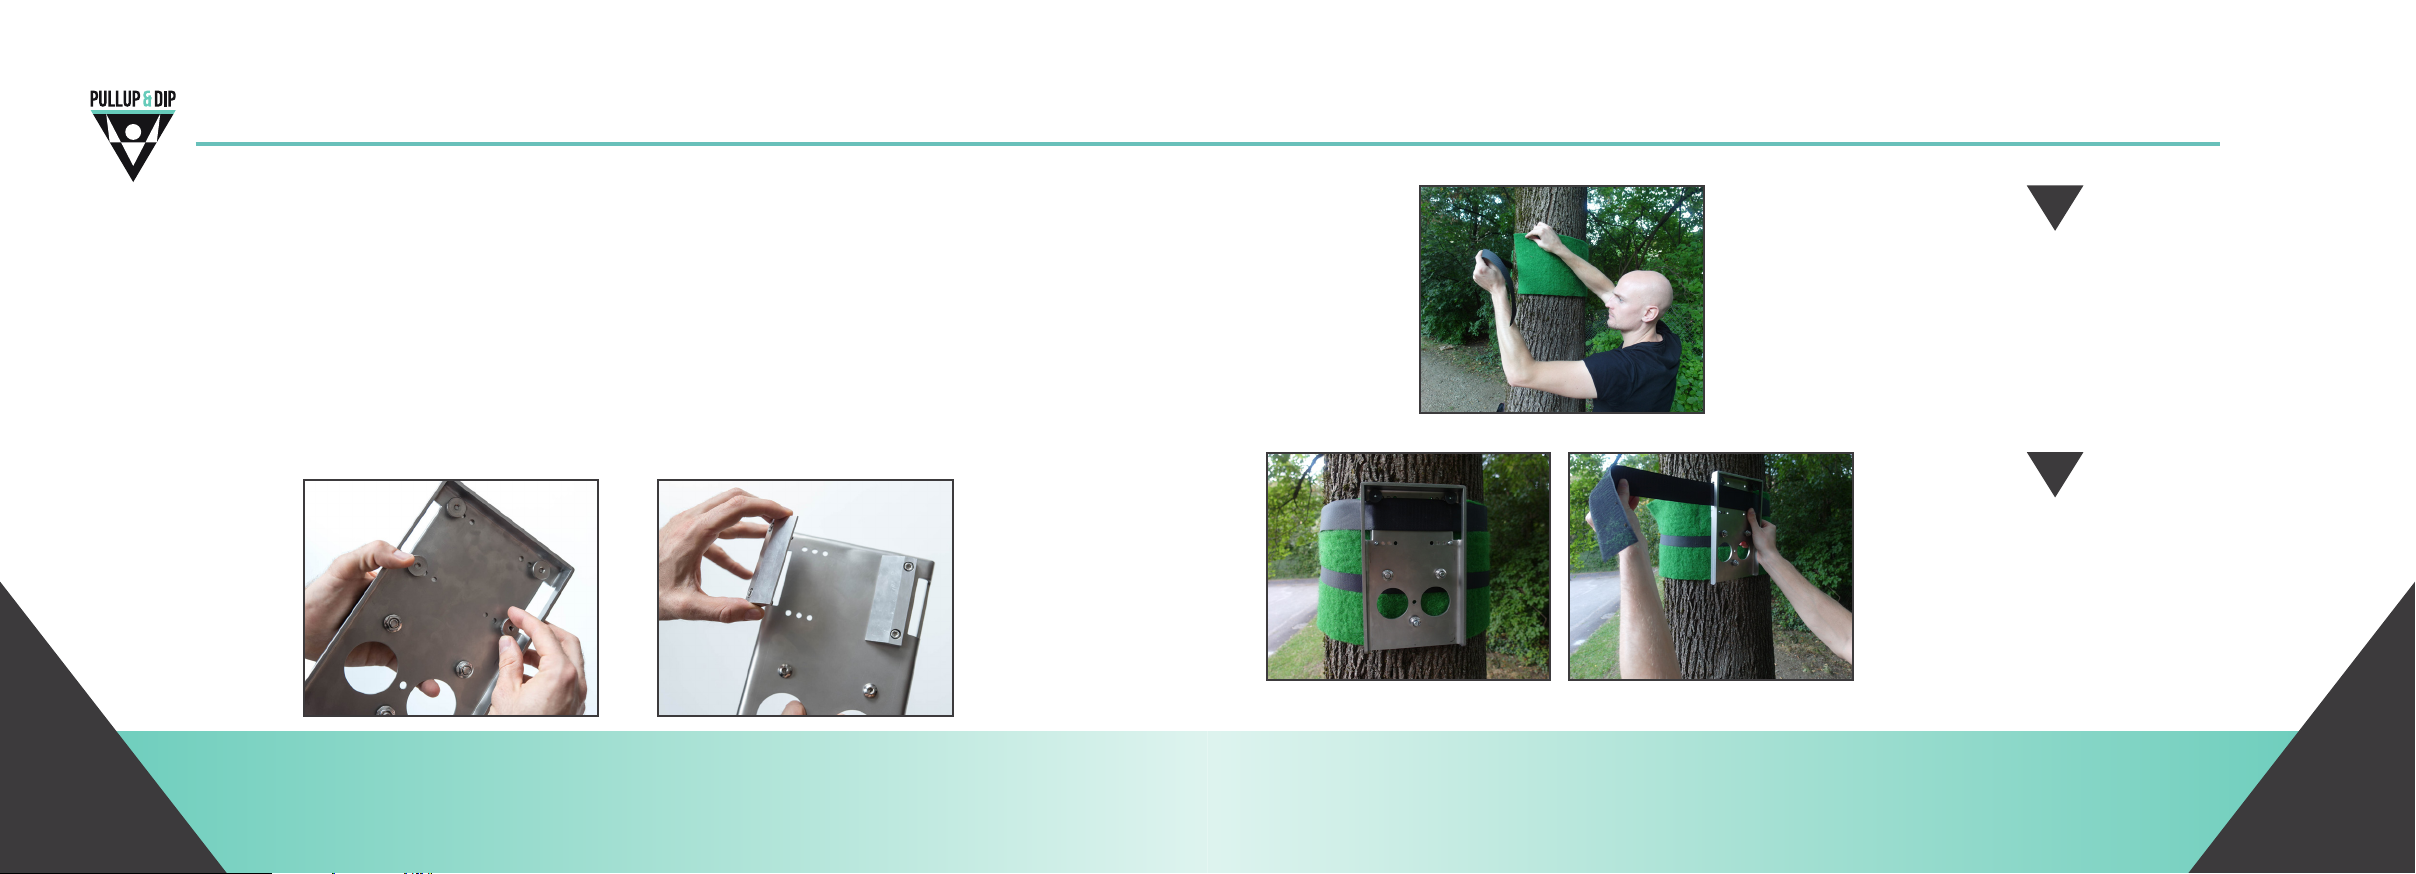
Adjusting the angles
Depending on the diameter of the tree or pole, the two angles on the backside of the outdoor
adapter can be adjusted. To do so, unloose the four knurled nuts on the front side and adjust the
angles accordingly to the desired width.
5| OUTDOOR INSTALLATION
1
Determine your opmum height of
the outdoor adapter and fasten the
protecon mat with the provided
velcro fastener (slender) around the
tree or the pole.
2
Fasten aerwards the outdoor adapter to the protecon mat with the
velcro fastener (wide) to have thus
both hands available.
www.pullup-dip.com48 49www.pullup-dip.com
Page 26
5| OUTDOOR INSTALLATION
5| OUTDOOR INSTALLATION
43
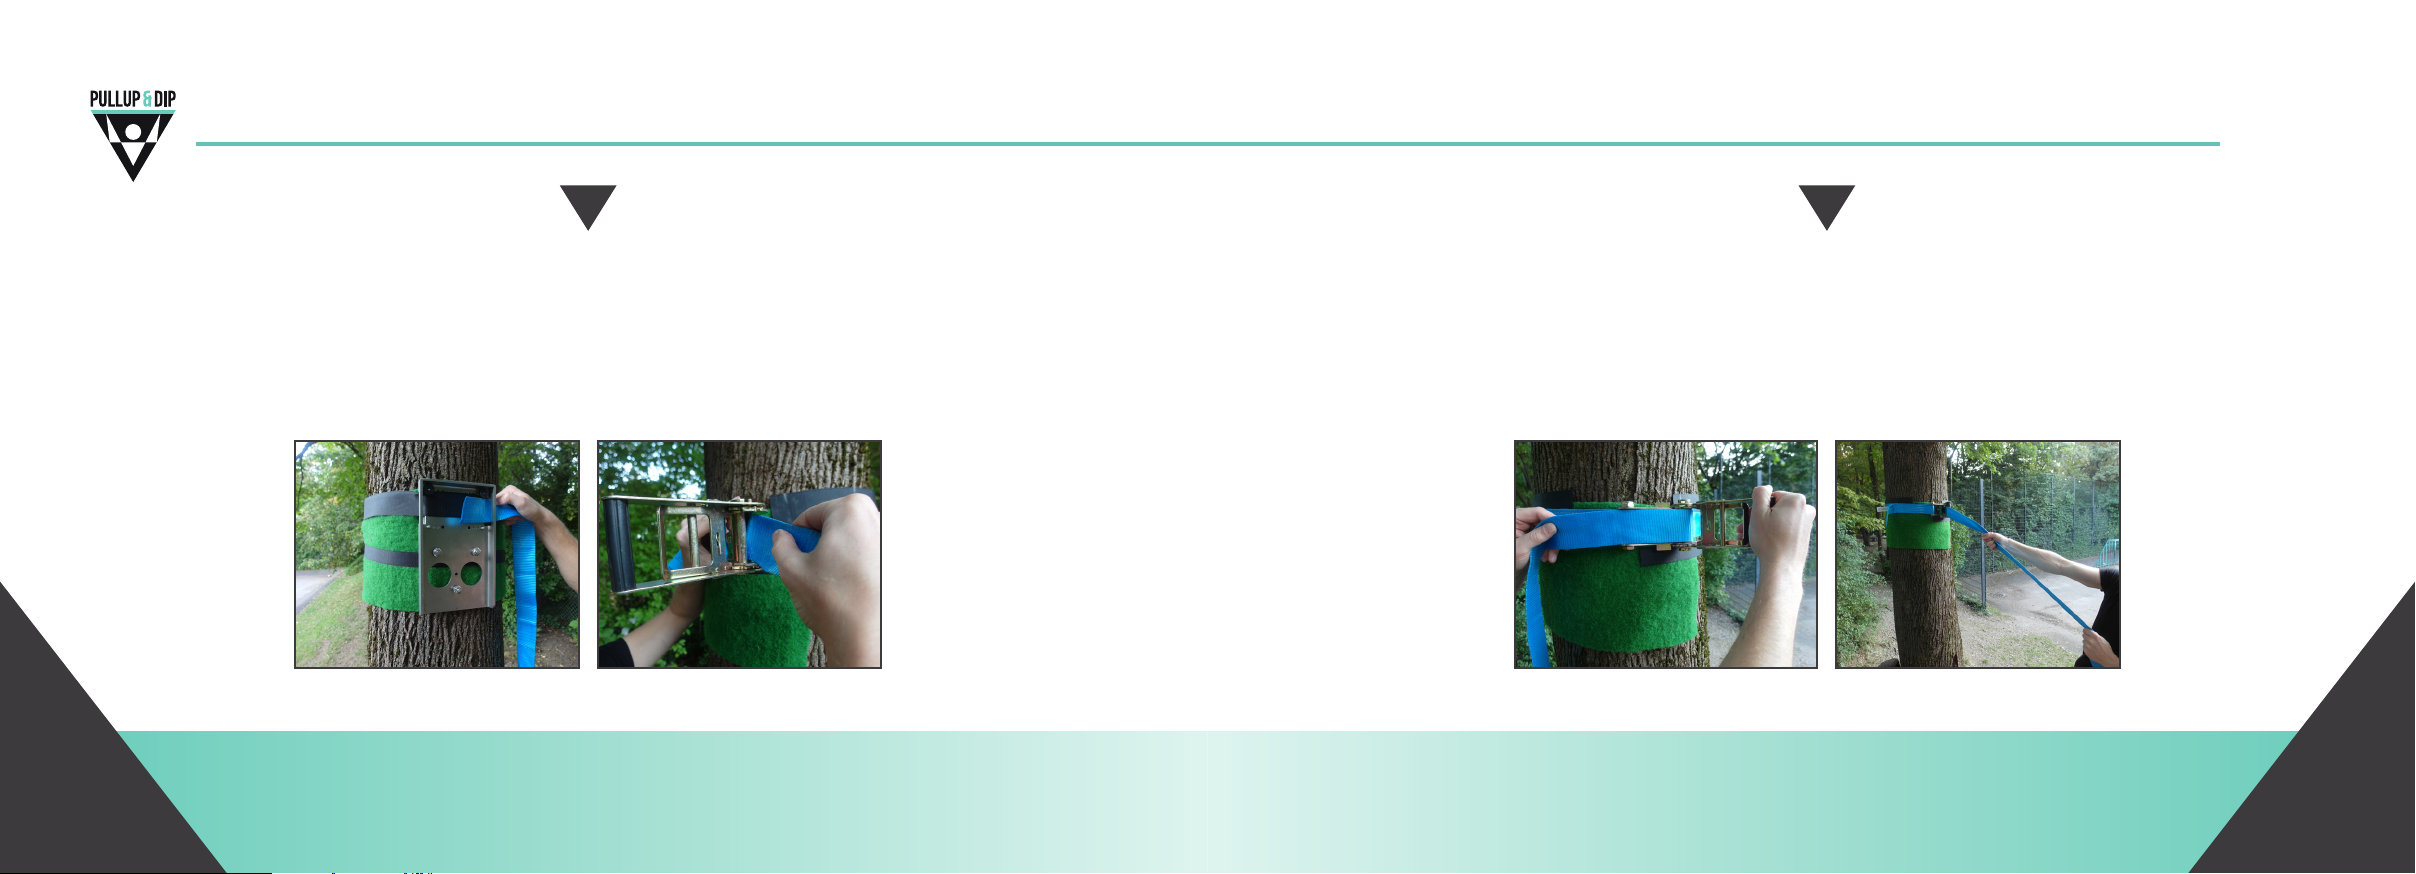
Lead the end of the tension belt through the two eyelets of the outdoor adapter, put the
end of the belt through the admission of the tension belt and pull through the belt as far
as possible by hand.
Make sure that the belt is not twisted.
www.pullup-dip.com50 51www.pullup-dip.com
Before you ghten the tension belt, pay aenon that there is also the protecon mat
under the tension belt.
Now ghten the tension belt as rmly as possible with the lever. To generate the nal
tension, take the belt as a lengthening for an extended lever and ghten thus the tension
belt as rmly as possible. Pay aenon that the tension adjuster is completely closed at
the end.
Page 27
5| OUTDOOR INSTALLATION
5| OUTDOOR INSTALLATION
5
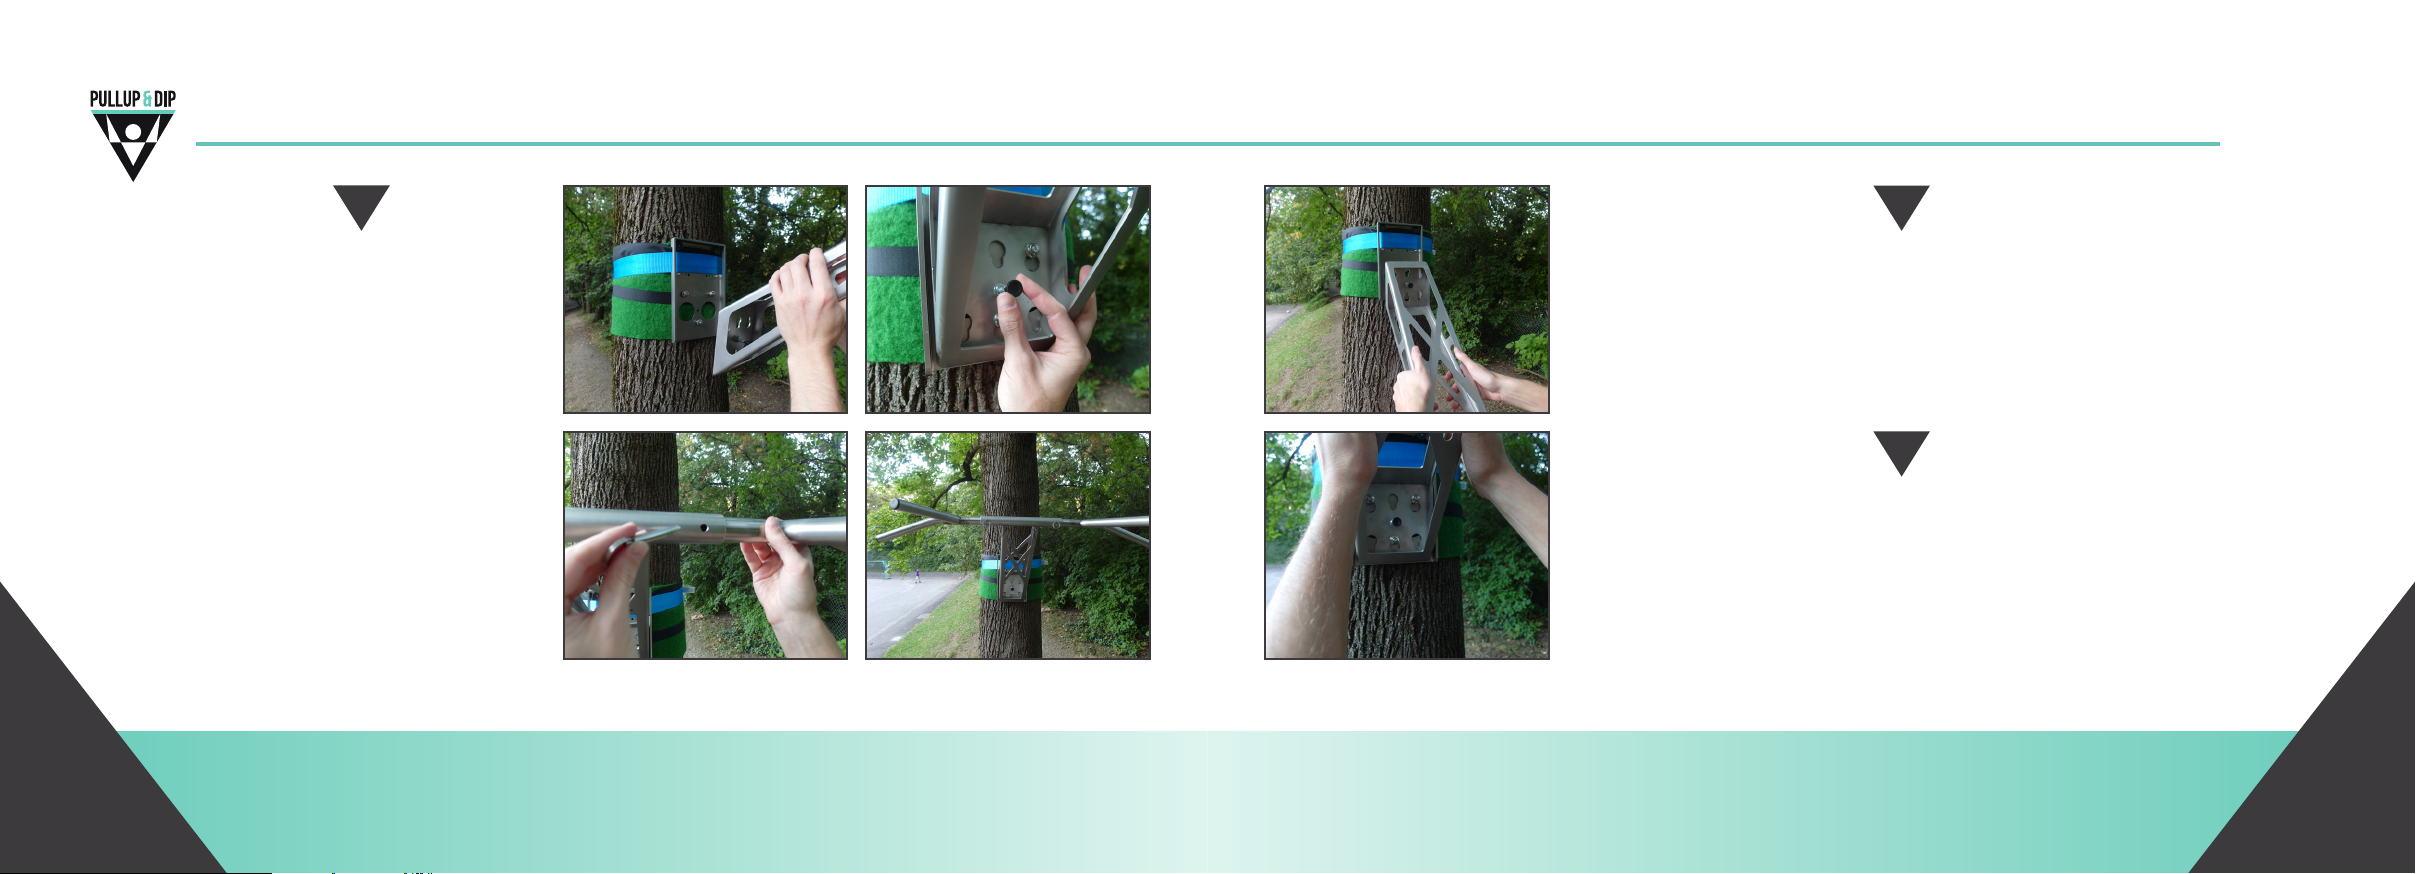
Now you can insert the side arm indoor the outdoor adapter, twist the
blocking pin hence it snaps into the
outdoor adapter for safety reasons
and insert both bars into the side
arm.
Aerwards insert both bolts through
the drillings so they can be seen from
the backside.
6
To change from pullups to dips, pull and twist the blocking pin, take
out the side arm and turn it around 180° to insert it aerwards again
into the outdoor adapter. Pay aenon for both posions that all three
admission screws are always properly into place.
7
To loosen the device from the tree or the pole, take out the side arm
incl. the bars from the adapter. Aerwards pull the lever of the tension
belt contrary to the outdoor adapter to unfasten the tension belt.
www.pullup-dip.com52 53www.pullup-dip.com
Page 28
6| Usage
6| Usage
1 2
Pay aenon that the blocking pin
of the side arm is tensioned, so it
doesn’t appear on the backside of
the side arm.
Insert the side arm from above
into the indoor or outdoor adaptor
according to the exercise. All three
admission points need to be locked
in place. To change from pullups to
dips, turn the side arm around 180°.
3
Twist the blocking pin in the
middle of the side arm unl it snaps
into the drilling of the indoor/ out-
door adapter. By doing this it is
guaranteed that the side arm can
not slip out of the adapter.
Insert both mul bars into the pipe
of the side arm so that both dips
bars are poinng in the opposite
direcon of the wall/ tree.
4
5
Insert both bolts completely
through the drillings. These need to
sck out on the other side again.
www.pullup-dip.com54 55www.pullup-dip.com
Page 29

7| Product care and maintenance
8| Guarantee and right of return
䕲 For cleaning use a dampish cloth. Do not use chemical detergents as they can cause damages
to the training device.
䕲 The device needs to be checked before every usage for damages (especially at screw
connecons and welding joints) and may not be used by damages.
䕲 Defects within the guarantee me need to be reported immediately to
[email protected] or need to be repaired professional outside of guarantee me. Unl
the repair the device may not be used!
www.pullup-dip.com56 57www.pullup-dip.com
The guarantee me is two years and begins
with the day of the invoice date. Please keep
the invoice as a proof of the purchase and with
it as a guarantee claim.
The following guarantee regulaons are valid:
The manufacturer guarantees free removal
of defects which are due to material defect
or factory defect. With assessment of damage the buyer is obliged to announce this
immediately to the manufacturer. Damages
as a result of improper usage, wrong assem-
bly and wrong installaon, nonobservance of
the user manual and wear and tear through
normal use do not fall under this guarantee.
Independently the guarantee and any warranty expires, if the product:
䕲 is converted arbitrarily.
䕲 is loaded with more than the given
maximum load limit.
䕲 is not used for the deliberate purpose.
䕲 is installed improperly.
The following wearing parts are excluded from
the guarantee:
䕲 Tension belt
䕲 Protecon mat
䕲 Velcro fastener
䕲 Blocking pin
䕲 Contact surfaces where abrasion occurs
and where therefore scratches can appear.
Page 30

8| Guarantee and right of return
9| Contact
The manufacturer is not liable for causal damages or secondary damages of every kind, unless such
a liability limitaon is expressly prohibited by the legislator. It is the decision of the manufacturer
to full the guarantee by repair or by spare delivery. Further claims do not exist.
With unauthorized guarantee entry the manufacturer reserves the right to carry out the return not
prepaid.
In case of a guarantee case please immediately get in contact with our service team
([email protected]). We will tell you the exact return process.
To protect the product in case of a repair or return, we ask you to keep the original packaging
for the duraon of the guarantee me. Please contact in any case beforehand our service team.
Accruing repairs aer the end of the guarantee me including the shipping costs are fee-based.
Your legal rights are not limited by this guarantee.
www.pullup-dip.com58 59www.pullup-dip.com
If you have further quesons about the product or dicules with the installaon of the device,
you will nd FAQs on our web page www.pullup-dip.com as well as installaon videos. If you can’t
nd a suitable answer here, feel free to contact us.
If something is not in order with the device or if any damage should appear, please get in contact
with us. We are available for technical informaon or further inquiries to you with pleasure, please
contact us by e-mail via [email protected].
In case of a return please send back the complete equipment in the original packaging, as well as
the user manual and add a copy of the invoice.
Page 31

9| Contact
contact data
FT Fitness Technology UG
(haungsbeschränkt)
Blutenburgstraße 25
80636 Munich, Germany
E-Mail: info@tness-technology.de
Web: www.pullup-dip.com
Sitz der Gesellscha / Registered Oce: München, Germany.
Registergericht / Register Court: AG München (Munich), HRB 224 919.
Geschäsführer / Managing Director: Michael Weber, Johannes Diem.
Terms and condions apply from our webpage: www.pullup-dip.com
www.pullup-dip.com60 61www.pullup-dip.com
Page 32
10| Trainingsübungen/ training exercises
10| Trainingsübungen/ training exercises
Bring your training to the next Level with Ykings & Pullup&Dip
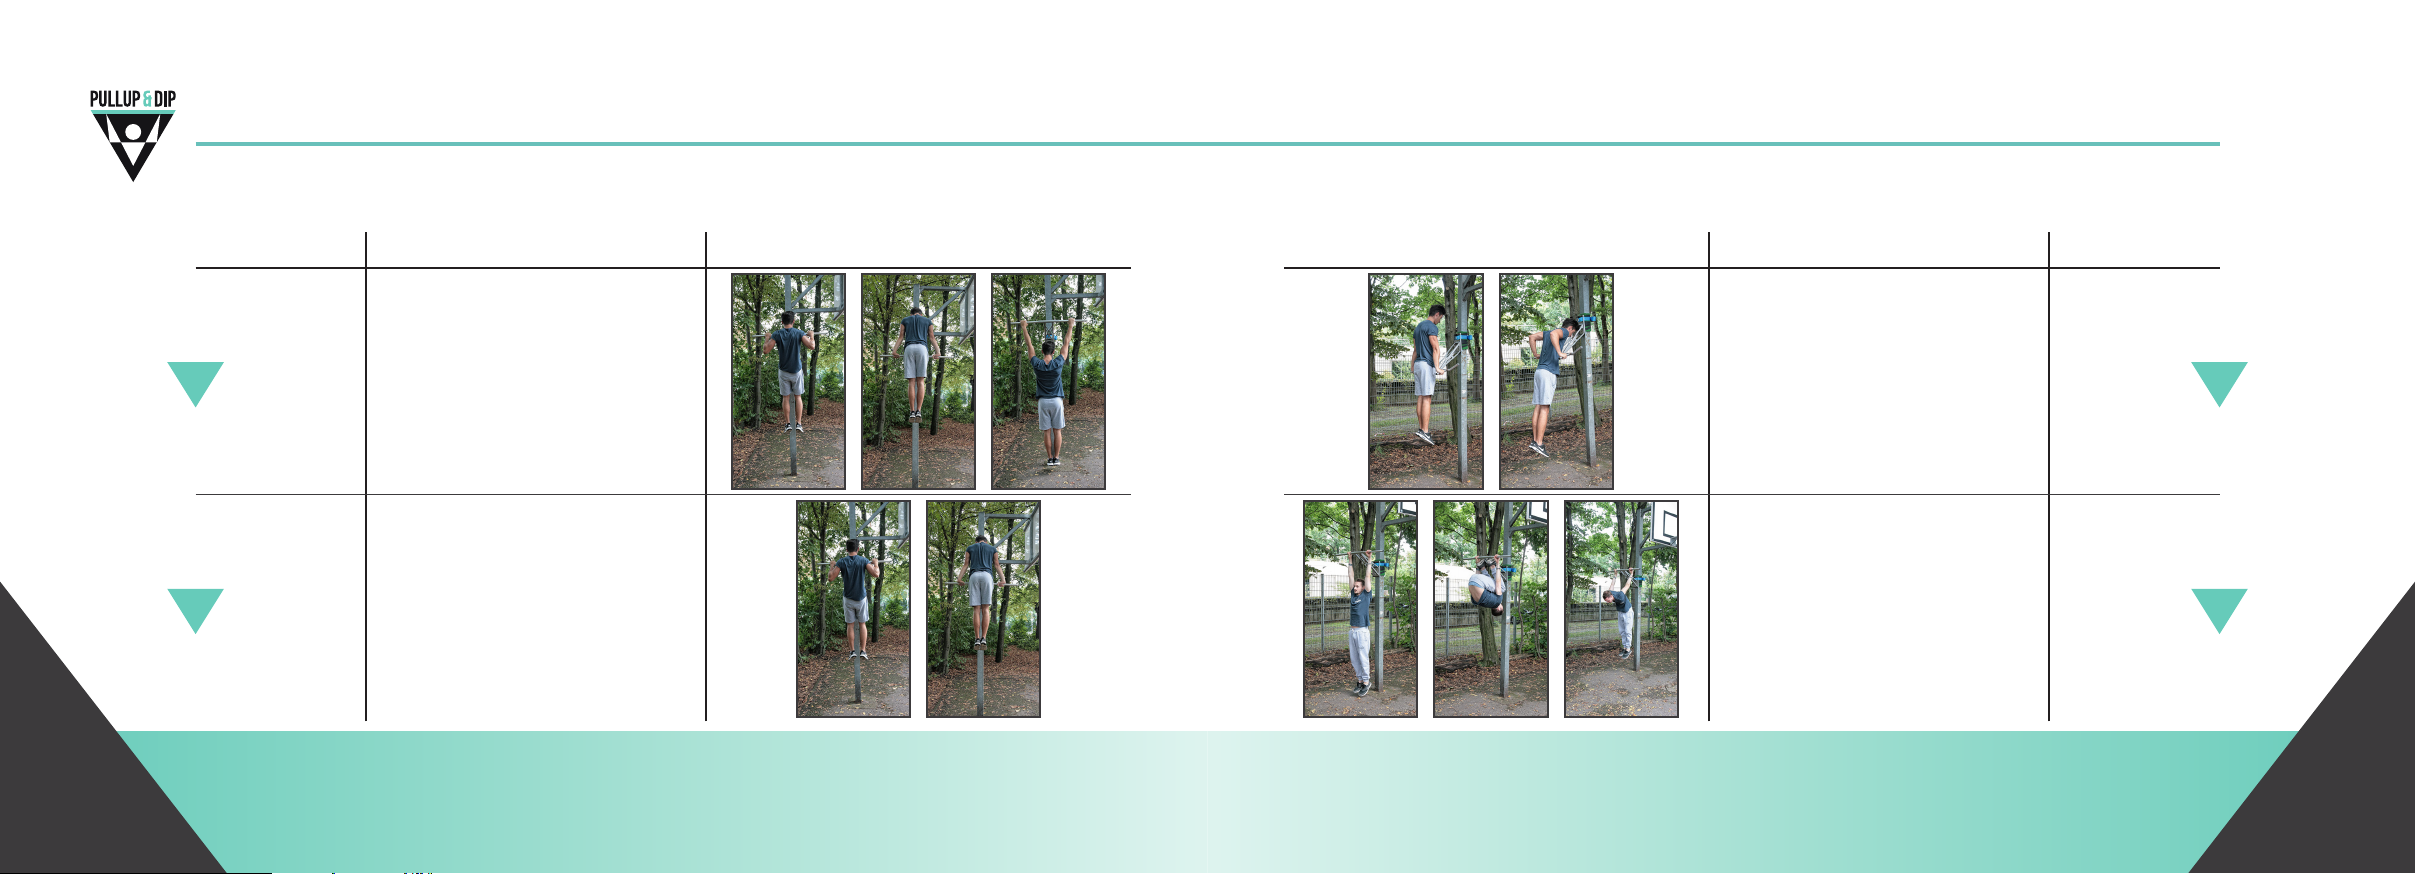
High Bar
Exercise Range of Motion pictures
1| Start in deadhang position
2| Pull up explosively into wrist
transition
1
Muscleups
2
Pullups
3| Straight bar dip into front
support hold
4| Slow & controlled movement
into starting position
1| Start in deadhang position
2| Pull up (chin above bar level)
3| Slow & controlled movement
into starting position
Bring your training to the next Level with Ykings & Pullup&Dip
High Bar
Pictures Range of Motion Exercise
1| Start in deadhang position
2| Pull up explosively into wrist
transition
3| Straight bar dip into front
support hold
4| Slow & controlled movement
into starting position
1| Start in deadhang position
2| Pull up (chin above bar level)
3| Slow & controlled movement
into starting position
Skin the Cat
Dips
3
4
www.pullup-dip.com62 63www.pullup-dip.com
Page 33
10| Trainingsübungen/ training exercises
10| Trainingsübungen/ training exercises
Bring your training to the next Level with Ykings & Pullup&Dip
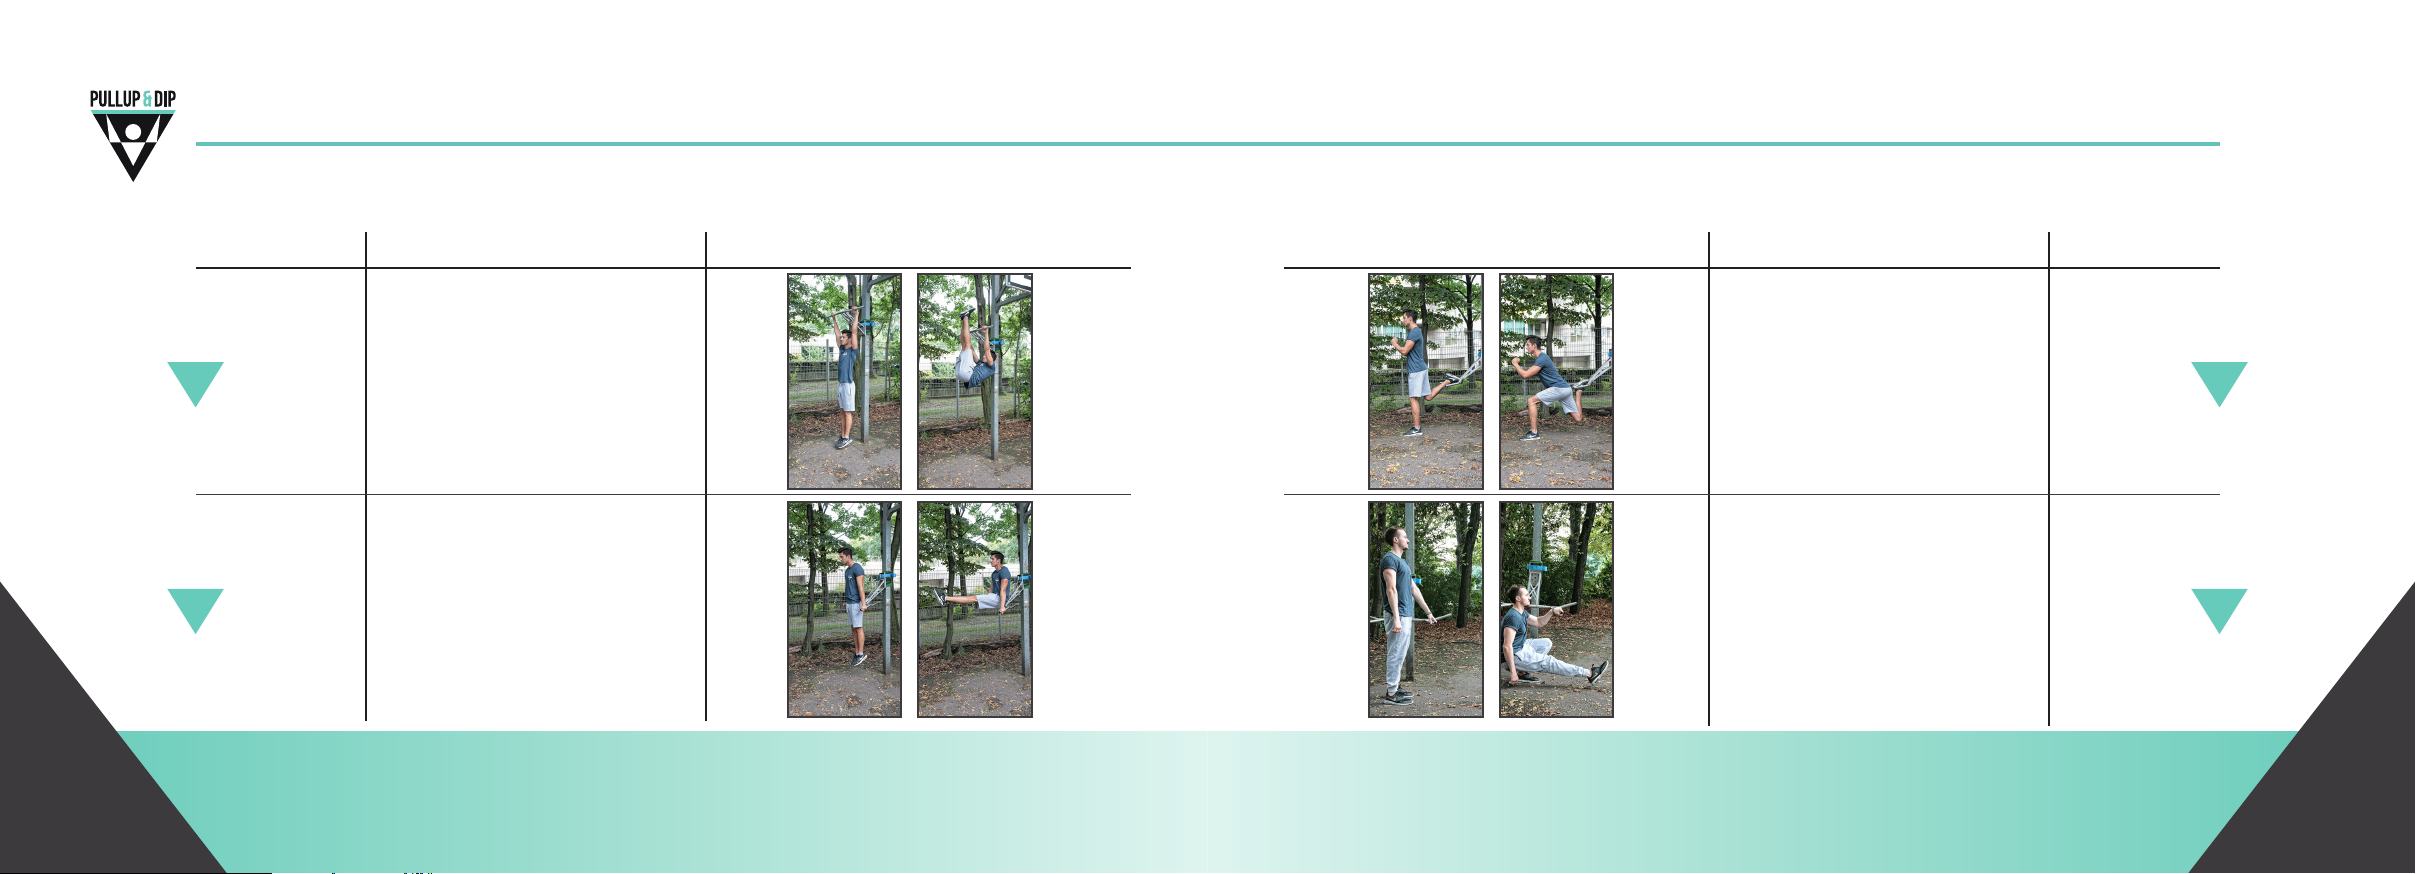
High Bar
Exercise Range of Motion pictures
1| Start in a deadhang position
5
Toes To Bar
6
L-Sit
2| Raise your toes up to the bar
3| Go back to deadhang
1| Start in top position on parallel
bars
2| Raise legs into a L-sit position
(90 degrees)
Bring your training to the next Level with Ykings & Pullup&Dip
Low Bar
Pictures Range of Motion Exercise
1| Start in standing position
2| Rest one leg behind you onthe
Pullup&Dip bar
3| Squat down
4| Raise body back up to starting
position
1| Start in standing position with
one hand grabbing support
2| Raise and extend one leg
straight in front of you and
balance on the other
3| Squat down while keeping the
elevated leg off the floor
4| Go back up to starting position
Bulgarian
Lunges
Assisted
Pistols
7
8
www.pullup-dip.com64 65www.pullup-dip.com
Page 34
10| Trainingsübungen/ training exercises
10| Trainingsübungen/ training exercises
Bring your training to the next Level with Ykings & Pullup&Dip
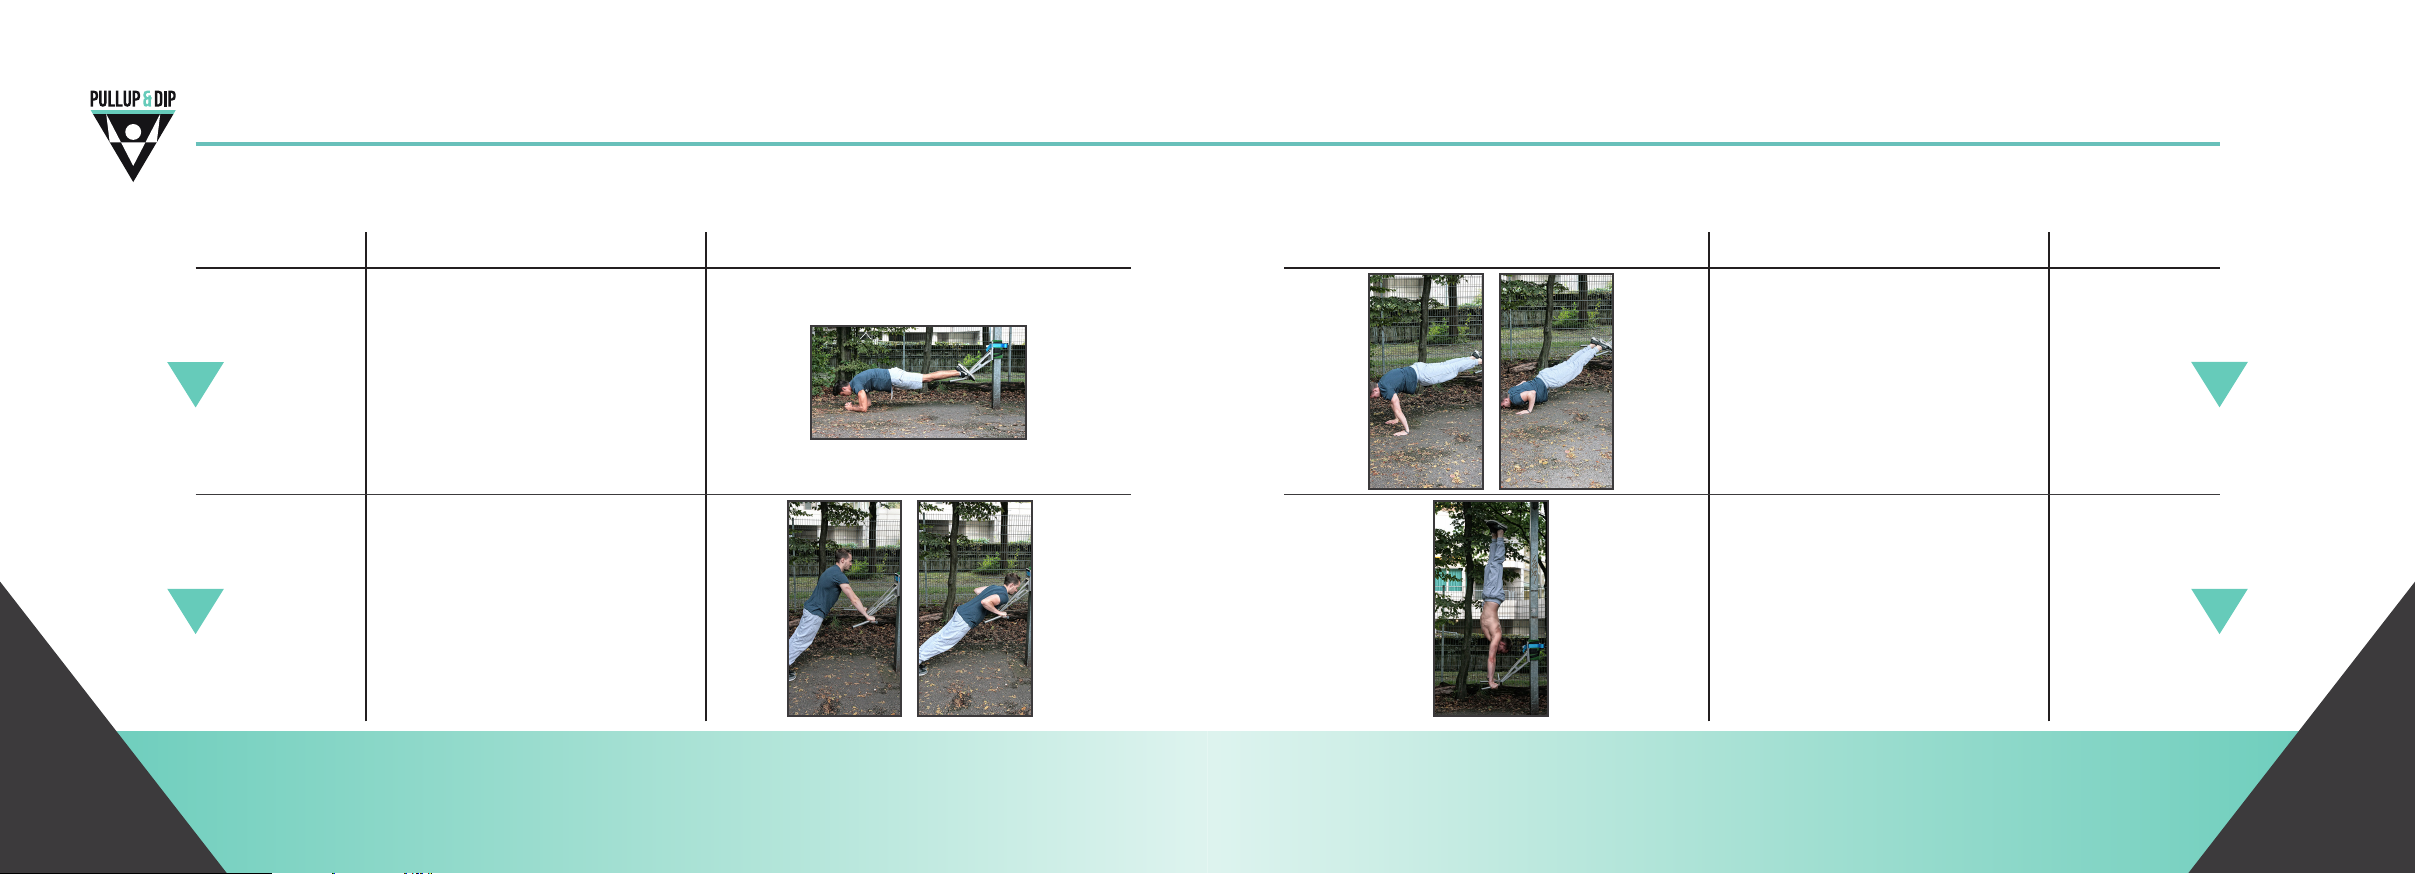
Low Bar
Exercise Range of Motion pictures
1| Start in plank position
2| Legs on elevated Pulup&Dip bar
3| Hold the position
1| Start in pushup position
2| Hands on elevated Pullup&Dip
bar at shoulder width
3| Lower yourself towards hands
4| Push back up into starting
position
9
10
Decline
Plank
Incline
Pushup
Bring your training to the next Level with Ykings & Pullup&Dip
Low Bar
Pictures Range of Motion Exercise
1| Start in pushup position
2| Hands on ground at shoulder
width. Rest legs on elevated
Pullup&Dip bar
3| Lower yourself towards hands
4| Push back up into starting
position
1| Start in standing position
2| Hands on the parallel bar at
shoulder width
3| Kick up into a handstand and
hold
Decline
Pushup
Handstand
11
12
www.pullup-dip.com66 67www.pullup-dip.com
Page 35
10| Trainingsübungen/ training exercises
10| Trainingsübungen/ training exercises
Bring your training to the next Level with Ykings & Pullup&Dip
low Bar
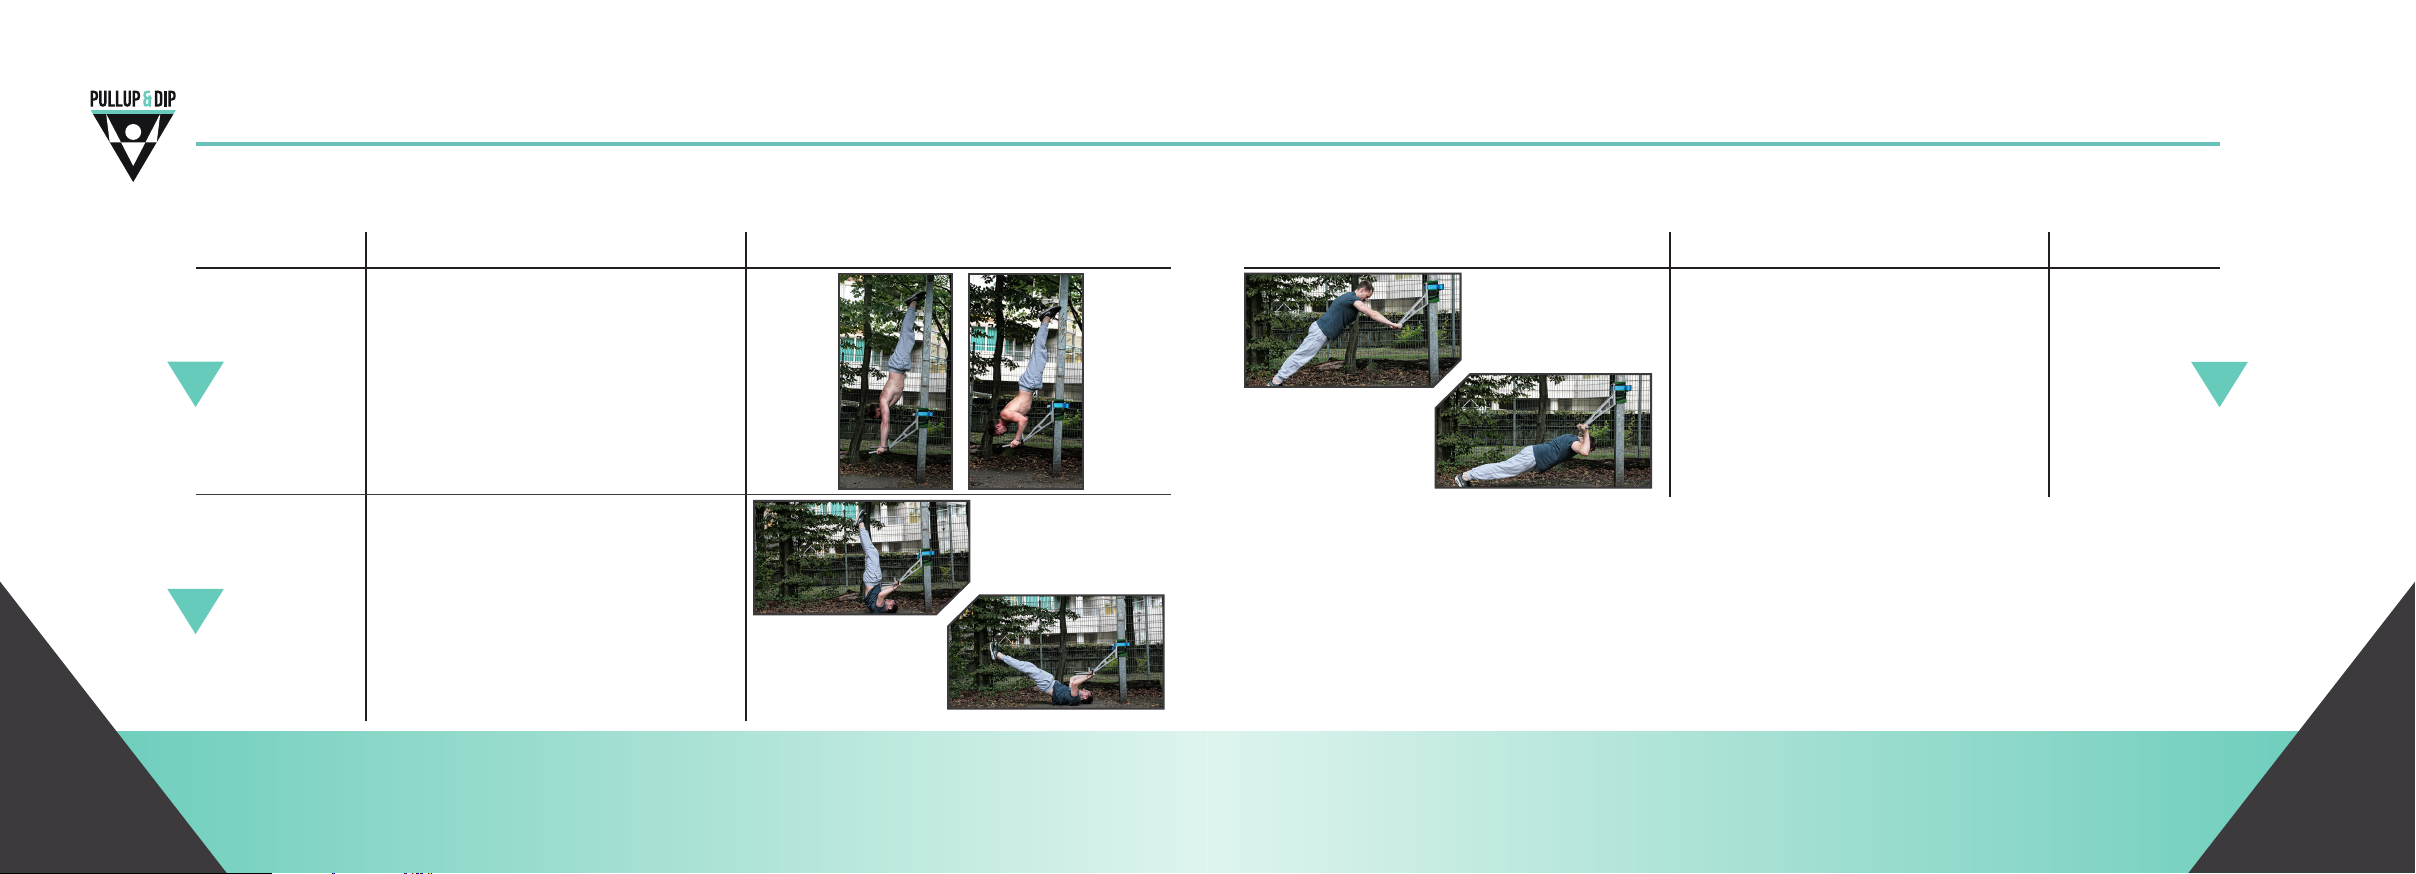
Exercise Range of Motion pictures
1| Start in standing position
2| Hands on parallel bar at shoulder
Handstand
13
Pushup Wall
14
Dragon Flag
width
3| Kick up into a Wall assisted hand-
stand
4| Pushup by bending arms
1| Lie on the floor and grab the
Pullup&Dip bar behind your head
with both hands
2| Swing your feet upward until your
body is almost vertical
3| Slowly lower your feet under control
until they are just above the bench
4| Lift your legs back up in the air
Bring your training to the next Level with Ykings & Pullup&Dip
Low Bar
Pictures Range of Motion Exercise
1| Start in standing position,
grabbing the Pullup&Dip bar
(knee height)
2| Walk your feet backward so that your
body is at an incline
3| Lower yourself below the anchor
point
4| Push back up into starting position
Triceps
Extentions
15
www.pullup-dip.com68 69www.pullup-dip.com
Page 36

10| Trainingsübungen/ training exercises
Bring your training to the next Level with Ykings & Pullup&Dip
10| Trainingsübungen/ training exercises
Get ready to be pushed
Ykings is divided in a free basic version and YkingsPro. YkingsPro includes a dynamic coach, who
creates workout weeks and skill trainings on a subscripon basis according to your prefernces.
We have developed YkingsPro for those of you, who seek an adapve path to work on their body
transformaon and simply want to pursue skills while geng stronger and er.
YkingsPro includes the following benets compared to the free
version:
䕲 No limits – access all workouts, exercises, skills, progressi-
ons and HIIT runs
䕲 Personalized workout plans – take advantage of weekly
workout plans which are dynamically adapted to your
feedback
• availabilityworkout intensity
• focus track
• raids
• skill- and tness level
• goals
www.pullup-dip.com70 71www.pullup-dip.com
䕲 Full workout days – progress in a healthy way. Get various warmups, fundamentals (pre-wor-
kout, dynamic stretching and mobility), workouts (circuit-, sets & reps training) and stretching
rounes
䕲 Skill raids – pick your wanted skill and receive professional skill trainings to push your progress
to the next level
䕲 Progression formula – master elite skills (muscleup, front lever, human ag and more) with es-
senal step by step progressions and ally exercises automacally integrated in your workouts
䕲 Guidance – all progressions and exercises include video tutorials with pro ps and range of
moon
䕲 Freestyle – track your own workout sessions and log them in your prole
䕲 Community – share & receive ps and tricks from other athletes, friends and featured athletes
& nd athletes and trainings spots around to you
In cooperation
with:
Page 37

www.pullup-dip.com
 Loading...