

Page 1

User’s manual · MAX IP90
Technical changes and mistakes reserve - 1 - MAX IP90 Version en_1.0 FTE Maximal
Table of contents
0. Control elements and connection s.......................................................................................................................3
0.1. Receiver front panel......................................................................................................................................3
0.2. Receiver back panel......................................................................................................................................3
0.3. Remote control ..............................................................................................................................................4
1. First installation......................................................................................................................................................5
1.1. Complete Content..........................................................................................................................................5
1.2. Installation examples.....................................................................................................................................6
1.3. Safety rules.................................................................................................................. ...................... ............7
1.4. Fast installation guide...................................................................................................................................8
1.5. Menu overview.............................................................................................................................................10
2. Standard functions................................................................................. ..............................................................11
2.1. Switch on the receiver.................................................................................................................................11
2.2. StandBy........................................................................................................................................................11
2.3. Teletext.........................................................................................................................................................11
2.4. MUTE ............................................................................................................................................................11
2.5. Numeric block on remote control................................................................ ...............................................11
2.6. Switch channels..................................................................................... ......................................................11
2.7. Change between TV- and Radio channels........................................... ......................................................11
2.8. Vol+/Vol- Volume............................................................ ............................................................................11
2.9. Stop the functions................................................................................. ....... ............... ................................11
2.10.
Open Main menu....................................................................................... ...............................................12
2.11. Watch the last viewed channel...............................................................................................................12
2.12. Channel list..............................................................................................................................................12
2.13. EPG Electronic Program Guide..............................................................................................................12
2.14. Favourite channel list..............................................................................................................................12
2.15. Menu Audio ...... ........ ....... ............... ....... ........ ............... ....... ....... ........ ............... ....... ................................13
2.16. Signal and Channel information.............................................................................................................13
2.17. Changing favourite channels .................................................................................................................13
2.18. Zoom Function.........................................................................................................................................13
2.19. Subtitles...................................................................................................................................................13
3. Channel management..........................................................................................................................................14
3.1. TV-Channel list.............................................................................................................................................14
3.1.1. Skip channels......................................................................................................................................14
3.1.2. Lock channels.....................................................................................................................................14
3.1.3. Delete channels...................................................................................................................................14
3.1.4. Delete channel groups or all channe ls..............................................................................................15
3.1.5. Edit channels.......................................................................................................................................15
3.1.6. List of favourite channels...................................................................................................................15
4. Timers...................................................................................................................................................................16
4.1. Sorting..........................................................................................................................................................16
4.2.
Delete Timer.................................................................................................................................................16
4.3. Edit / Add timer...........................................................................................................................................16
5. Tools .....................................................................................................................................................................18
5.1. Calculator.....................................................................................................................................................18
5.2. Calendar............................................................................................................................................. ..........18
Page 2

User’s manual · MAX IP90
Technical changes and mistakes reserve - 2 - MAX IP90 Version en_1.0 FTE Maximal
6. System Settings.................................................................................................................................. .................19
6.1. Menu Language ......................... ................................................................... ...............................................19
6.2. Audio Language...........................................................................................................................................19
6.3. Date and Time..............................................................................................................................................19
6.4. Time Zone.....................................................................................................................................................19
6.5. TV Settings........................................................ ........................................................................................ ...20
6.6. OSD Settings...................................... ............... ....... ........ .............. ........ ....... ........ ............................. ..........20
6.7. Version .........................................................................................................................................................21
6.8. Factory Default.............................................................................................................................................21
6.9. Software Upgrade..................................... ................................................................... ................................21
7. Parental Control...................................................................................................................................................22
7.1. Set Lock....................................................................................................................................... .................22
7.2. Channel lock................................................................................................................................................22
7.3. Installation Lock..........................................................................................................................................22
7.4. Change Password........................................................................................................................................22
8. Installation............................................................................................................................................................23
8.1. Channel Search............................................................................................................................................23
8.2. Network Configuration................................................................................................................................23
8.3. Network Management..................................................................................................................................24
8.4. Backup..........................................................................................................................................................24
9. The equipment of the receiver ............................................................................................................................25
9.1. Technical data..............................................................................................................................................25
Page 3
User’s manual · MAX IP90
Technical changes and mistakes reserve - 3 - MAX IP90 Version en_1.0 FTE Maximal
0. Control elements and connections
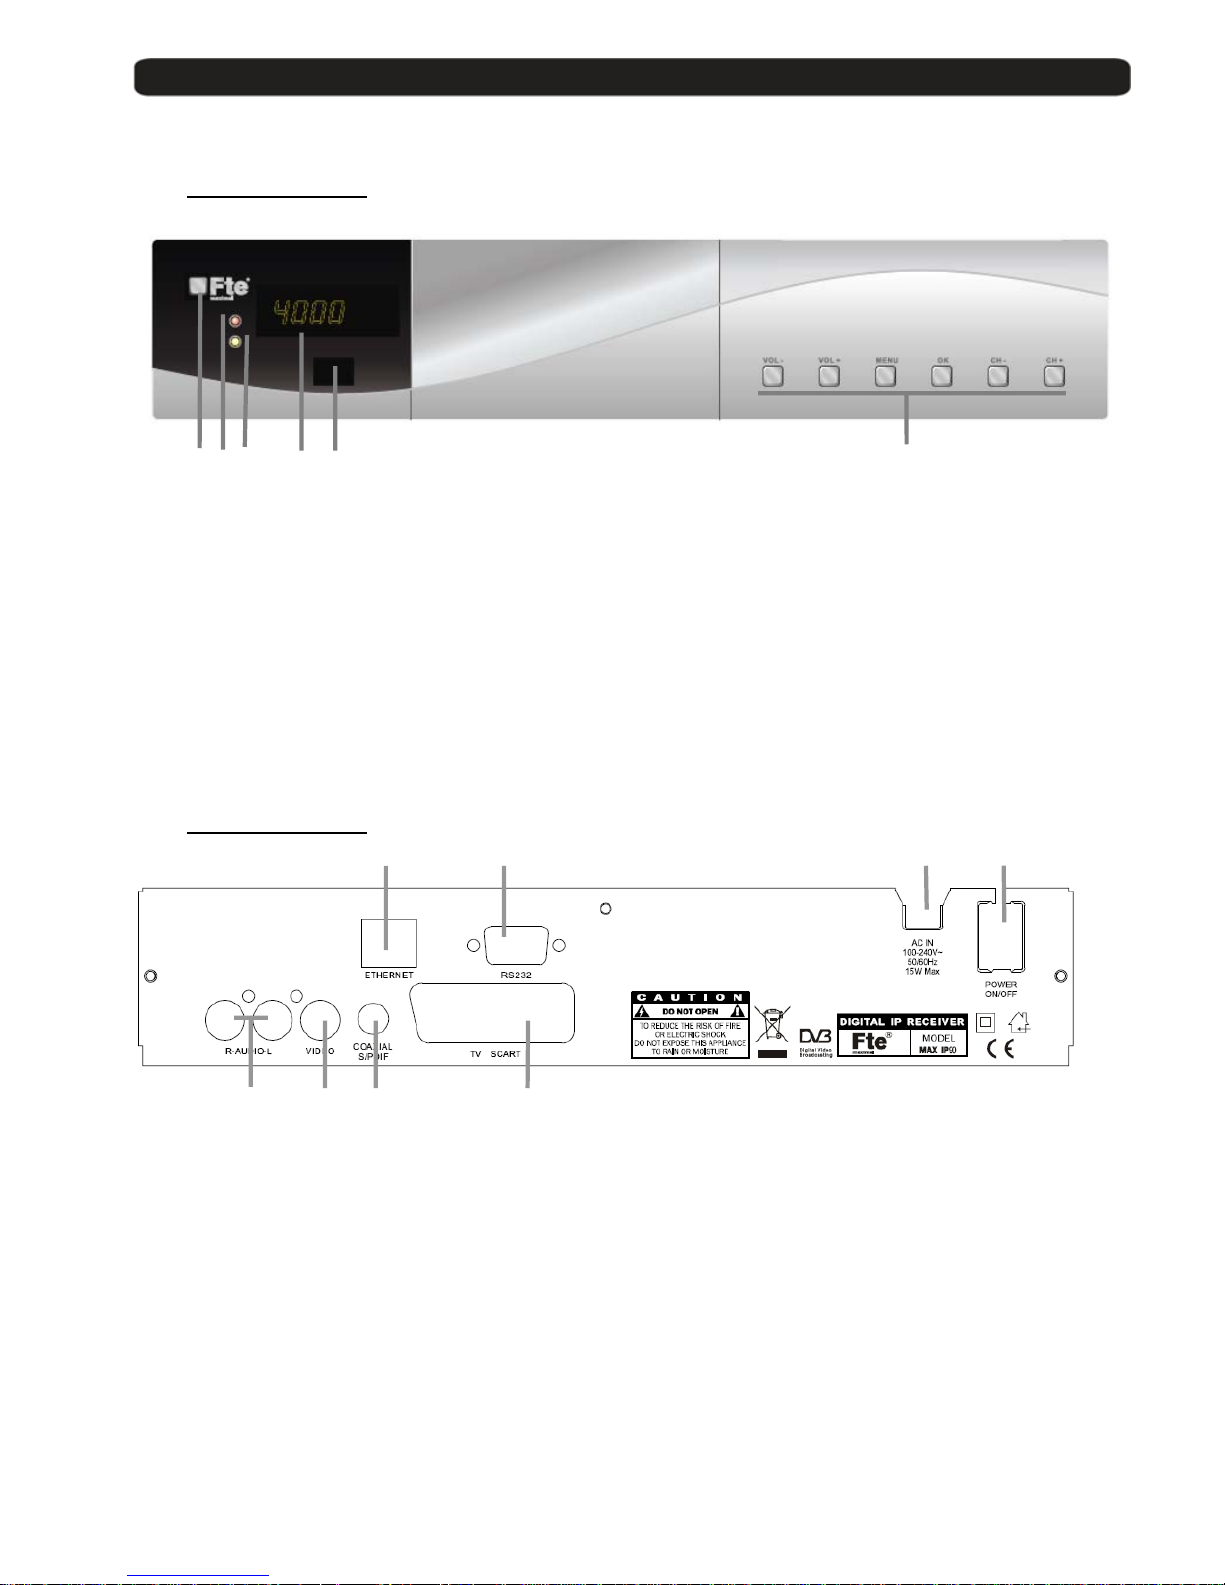
0.1. Receiver front panel
1 2 3 4 5 6
1 POWER: Switches the receiver ON or in Standby mode. For total sw it ch ing off, use the main
switch at the back side of the receiver.
2 POWER LED: Indicates that the mains voltage (90-230 VAC) is available.
3 LOCK LED: Indicates a sufficient signal level at the input
4 DISPLAY: 4 Digits to display the program numbers.
5 IR-SENSOR: Reception sensor for the IR remote control signals
6 BUTTONS: These buttons allow controlling the main functions of the receiver, and
provide the same functionality as the remote control ones.
0.2. Receiver back panel
1 2 3 4
5 6 7 8
1 ETHERNET: Network connection of the receiver.
2 RS-232: Serial port to update the firmware of the receiv er
3 AC IN: Power cord 230VAC/50Hz.
4 POWER ON/OFF: Main switch to switch off totally the receiver
5 AUDIO: Audio output for home audio systems
6 VIDEO: Video output for ext ernal monitor, TFT or video beamer
7 COAXIAL S/PDIF: Coaxial output for digital audio (AC3)
8 TV SCART: SCART output for connecting one TV s et
Page 4
User’s manual · MAX IP90
Technical changes and mistakes reserve - 4 - MAX IP90 Version en_1.0 FTE Maximal
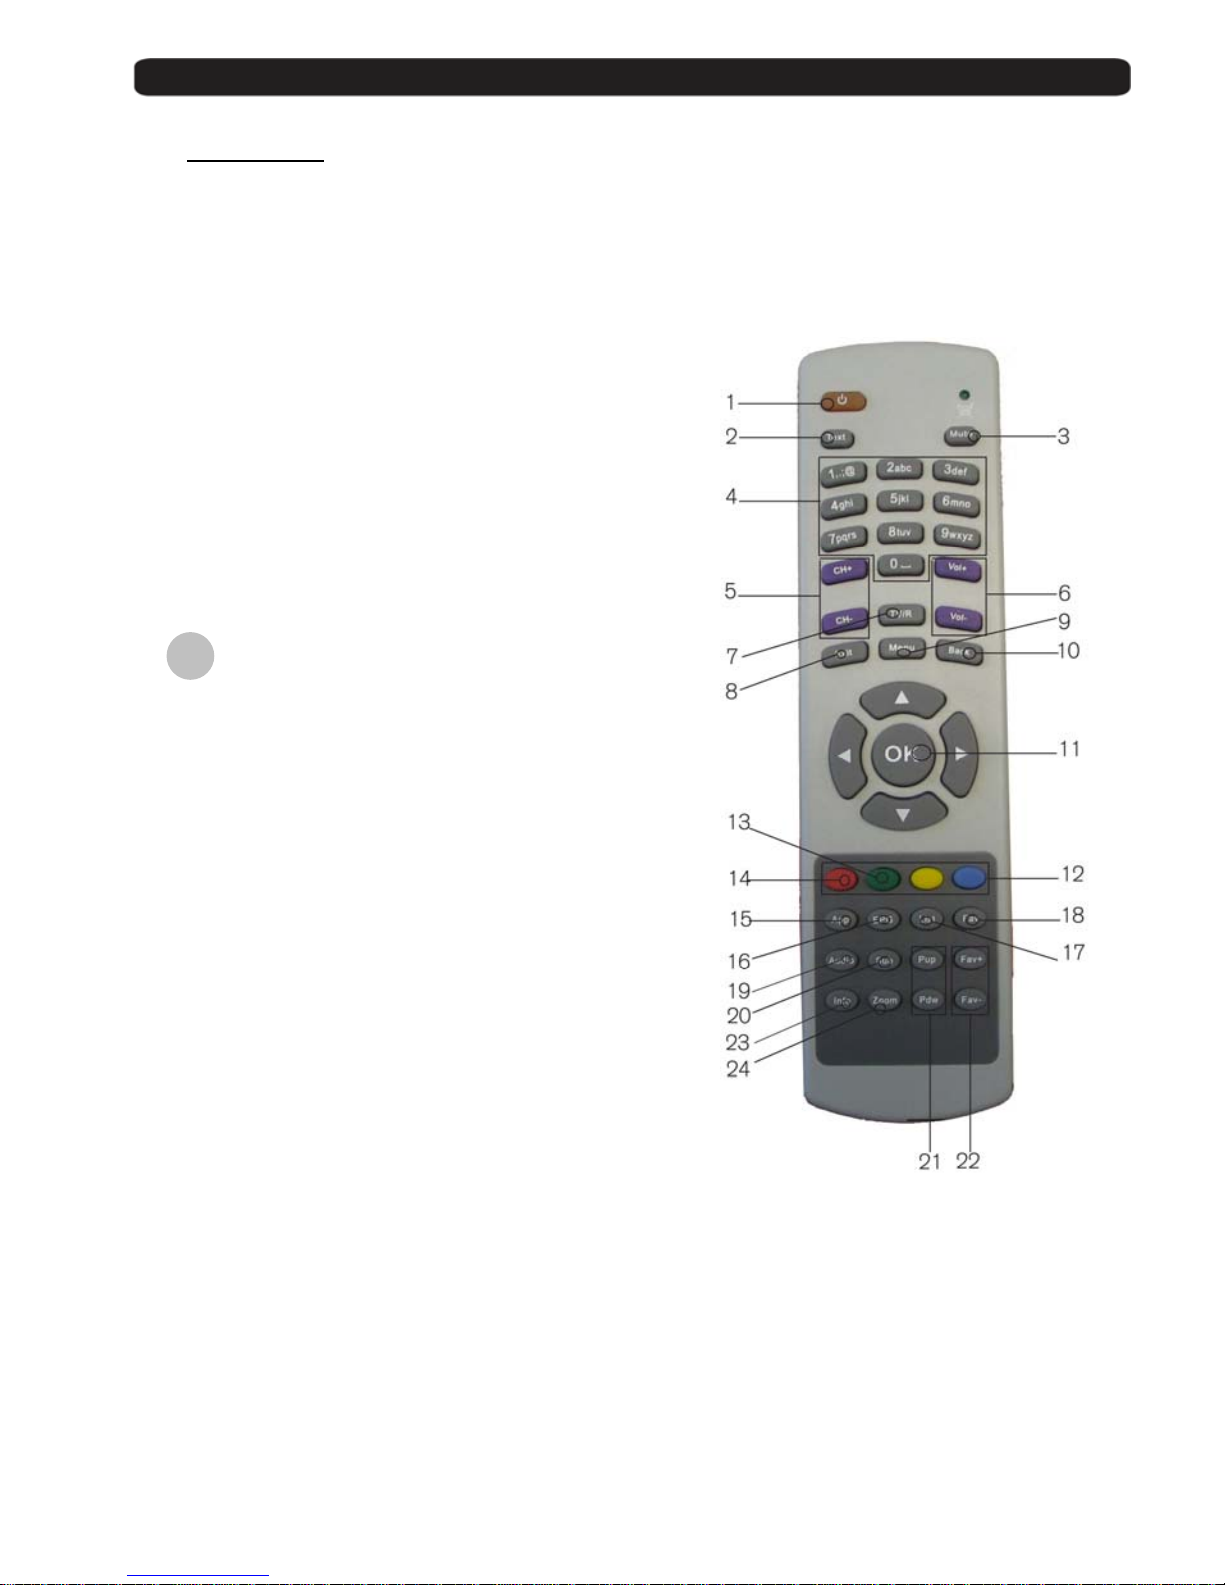
0.3. Remote control
1. POWER: Switches receiver ON or in stand-by-mode
2. TEXT: Open and close teletext
3. MUTE: Switches audio on and off
4. NUMERIC BLOCK: For direct typing values and na me s
5. CH+ CH-: Changes channel up and down
6. VOL+ VOL-: Adjusts audio volu me up and down
7. TV/R: Switches between TV and Radio
Channels
8. EXIT: Exit menus or stop operations
9. MENU: Opens the main me nu
10. BACK: Watch the last viewed channel
11. : Confirms selections or opens channel
list
12. Color Keys: Controls menu options.
13. Green Button: Not available in this model
14. Red Button: Not available in this model
15. SAT: Not available in this model
16. EPG: Shows the EPG information
17. List: Opens channel list
18. Fav: Opens favourite channel list
19. Audio: Opens audio menu
20. Sub: Switches subtitle on and off
21. Pup Pdw: Moves cursor in block steps
22. Fav+ Fav-: Moves favourite channel up and down
23. INFO: Shows channel information with signal
bar
24. Zoom: Zoom function
OK
Page 5
User’s manual · MAX IP90
Technical changes and mistakes reserve - 5 - MAX IP90 Version en_1.0 FTE Maximal
1. First installation
1.1. Complete Content
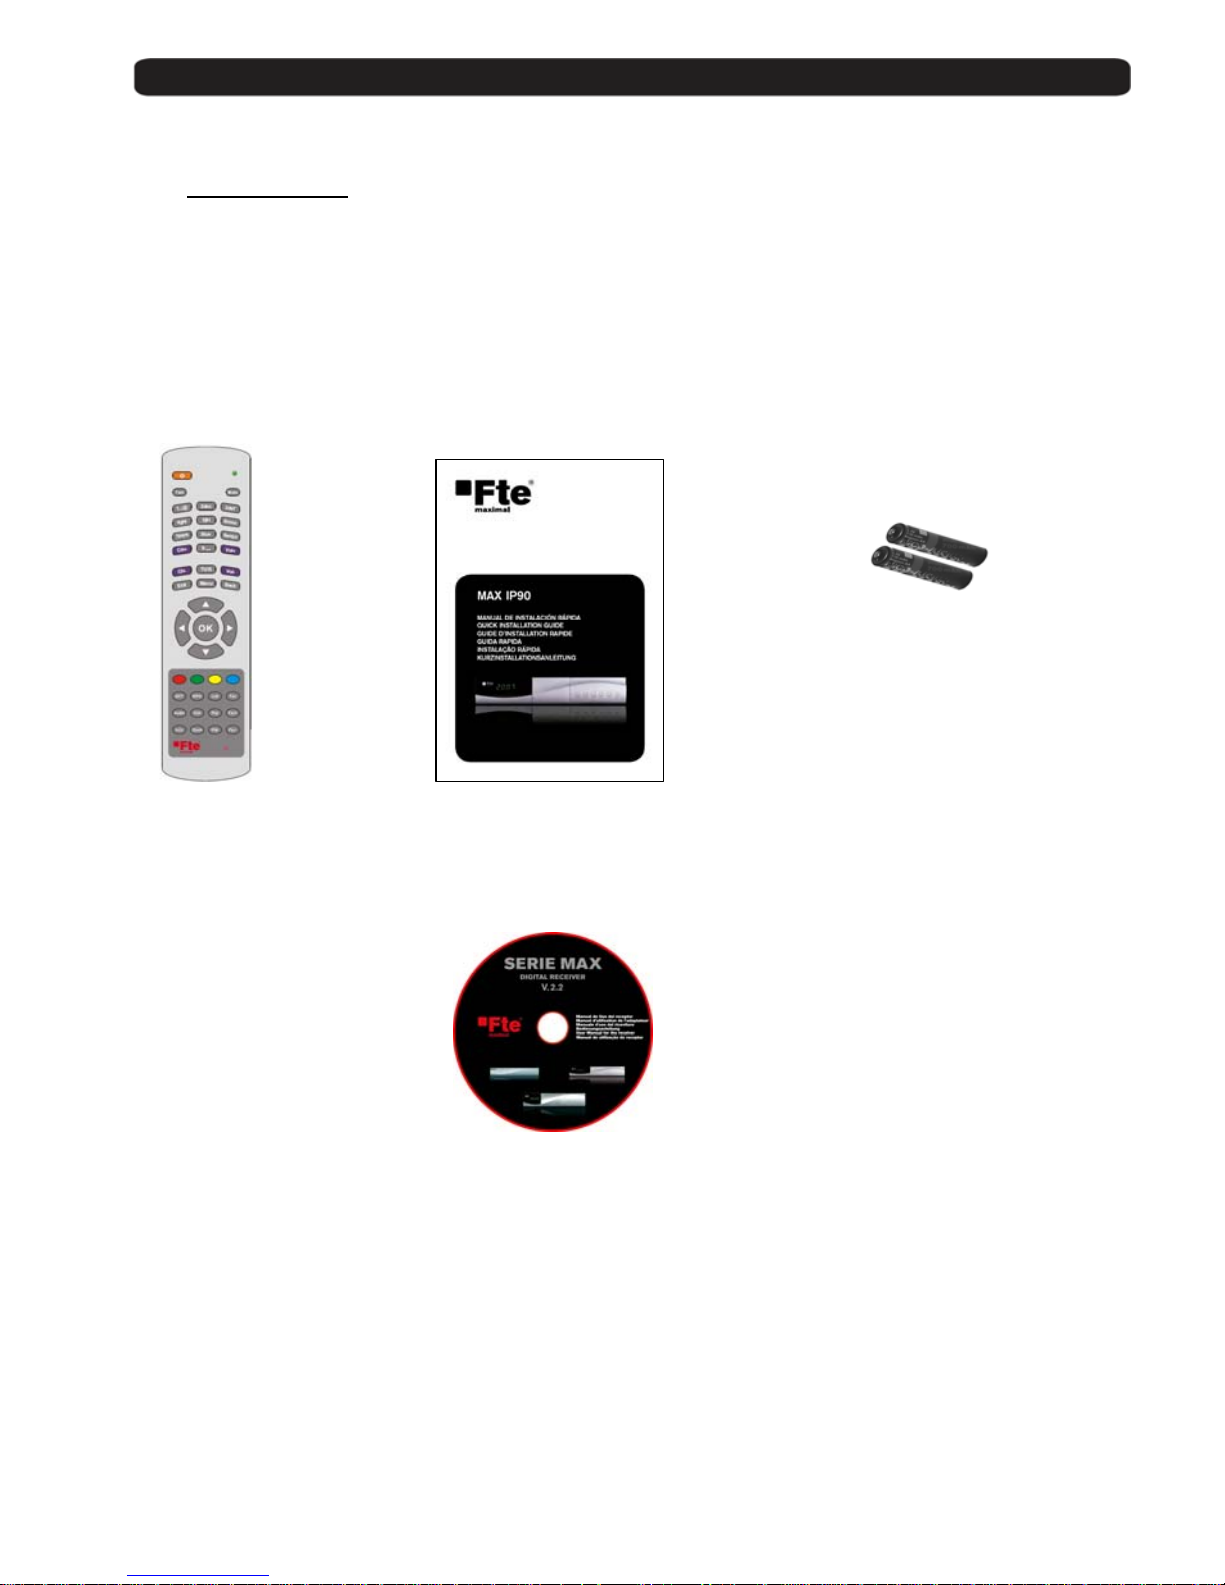
The following goods must be included in this package when you open it for the first time.
Remote control Installation guide Two batteries
type AAA, Micro, 1,5V
CDROM
Page 6
User’s manual · MAX IP90
Technical changes and mistakes reserve - 6 - MAX IP90 Version en_1.0 FTE Maximal
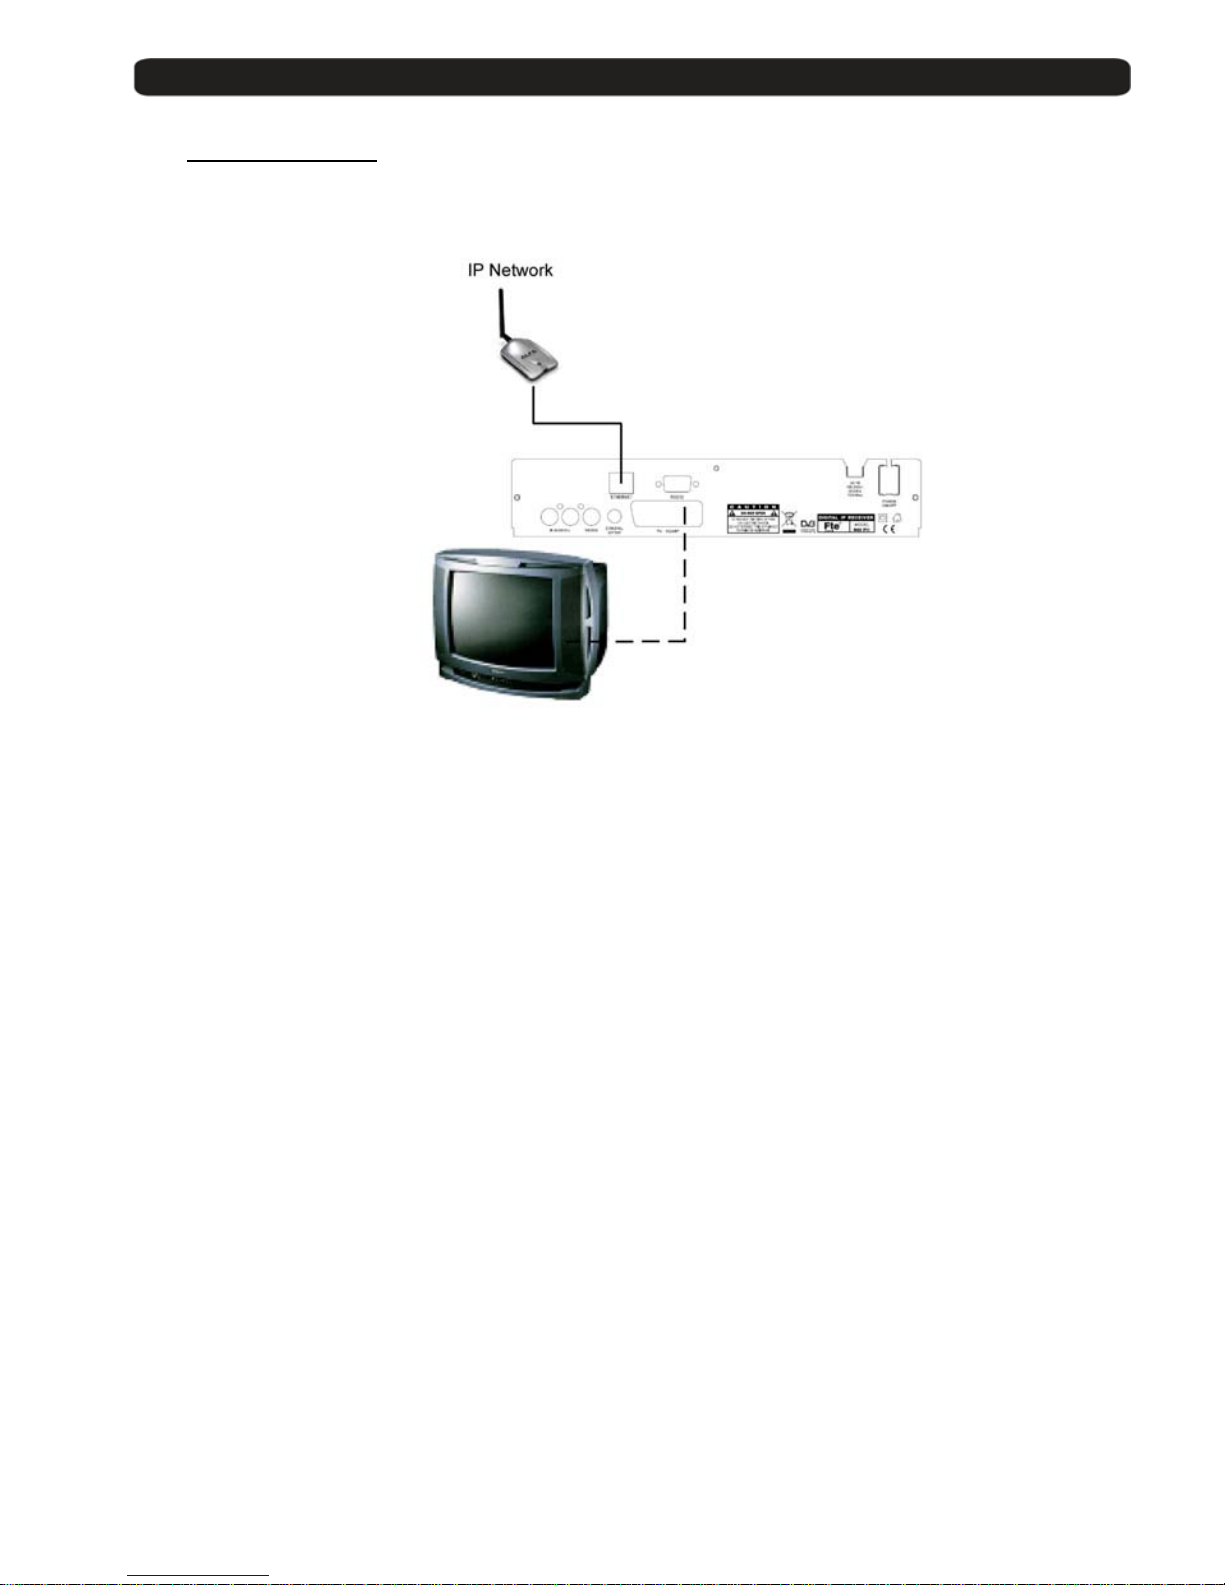
1.2. Installation examples
Page 7

User’s manual · MAX IP90
Technical changes and mistakes reserve - 7 - MAX IP90 Version en_1.0 FTE Maximal
1.3. Safety rules
Please read the manual carefully before using the receiver.
You will receive a lot of information to use this product correctly and you will prevent incidents.
Please keep the manual on a safe place.
This sign warns you about
high voltages, with risk
of electric shock
Caution: Do not open the housing of
this receiver. Repairs can onl y be
made by professionals au th or i z ed by
Fte maximal. If not, warranty will not be
valid anymore.
This sign informs about
special information which is
important to know.
Caution: Keep this receiver far away from liquids. Do not place it on placements close to water like flowers
vases, wash basin, aquariums or pools. It exists a high risk of electric shock when water or high humidity
filters inside the receiv er s. Never place other devices on it; they can overheat the receiv er as well as daring
fire risk. The receiver m ust be used only with original pow er c ord to 230V main plug.
Please read carefully this manual and do not hesitate to contact to professional help if you have any doubt.
Opening the receiver housing as well as the Hard Disk case will mean a total lost of warranty.
Installation:
1. Never work during a thun d ers t or m or staying near of the antenna systems.
2. Before adjusting the receiver, make sure that your antenna is well aligned and works properly.
3. Unplug the main connection (230V) every time you work with receiver connections. Do it also when you stay
away for a long time out of home like in holiday periods.
4. The best placement for the receiver is close to the TV and your other equipment like DVD, VCR, CD, and game
stations. Select a stable place where you can make the necessary connections in a safety way.
The 230V main plug should be in a place easy to reach, that you can unplug it when it is necessary.
Cleaning: Before cleaning the receiver with a slightly damped cloth, please disconnec t the main 230 V connectio n fr om
the receiver. Please use only mild cleaners.
Accessories: Please , do no t use accessories which are not agr e ed by the manufacturer of the receiv er.
Unsuitable accessories could increase the risk of getting on fire, an electrical impact or other damages.
Placement: Select a placement where the Receiver has air circulation enough, otherwise it may have overheating
accumulation. Do not cover the openings of the housing . Un suitable placements are als o places close to heaters or soft
locations like e.g. sofas and beds.
Power connection: Select a main plug with easy access, in case of unplugging necessity; it will be easier and faster.
Please, make sure that th e cord as well as the plug is in perfect con di tions. Do not pull the cable, use al ways the plug.
Housing: Please, make sure that no liquid will filter into the housing of the receiver. If so, disconnect immediately the
receiver from the main 230 V plug and bring the receiver to a professional.
Air humidity: When you take the Receiver from a cold to a warm place, please wait unti l t he r ece i v er gets the same
temperature as the new environment, in order to avoid problems of humidity condensation.
Maintenance / Repairing: Within the warranty time all the repairing processes should be done by Fte Maximal technical
staff. Otherwise, the wa rranty will be lost.
RISK OF ELEKTRIC SHOCK
DO NOT OPEN
CAUTIONR
Page 8
User’s manual · MAX IP90
Technical changes and mistakes reserve - 8 - MAX IP90 Version en_1.0 FTE Maximal
1.4. Fast installation guide
Please, follow the instructions for a faster and simpler installation of the receiv er .
Step 1: Connections
Connect the ETHERNET input of the receiver to the network.
Connecting TV set, LCD or video beamer:
Scart This is the connector which will be normally used to connect the TV.
For this purpose, you will need a Scart – Scart connector.
You can obtain further information in chapter 0.2 Receiver back panel.
When you set up the system for the first time, the current date will be stored in Menu > System Settings > Version
as beginning date for the warranty period.
Step 2: Main settings on receiver
When you start the first time the re ceiver or when you execute a “facto ry default” process, you will see this
installation guide in English language.
The selection of the menu opti on s wil l be done with the arrow button s
, and th e button
OK of the remote control.
Please, choose the code for your remote control in the first window.
Fte Maximal gives you the possibility of using a IP, a DVB-T and a DVB-S
receivers at the same time.
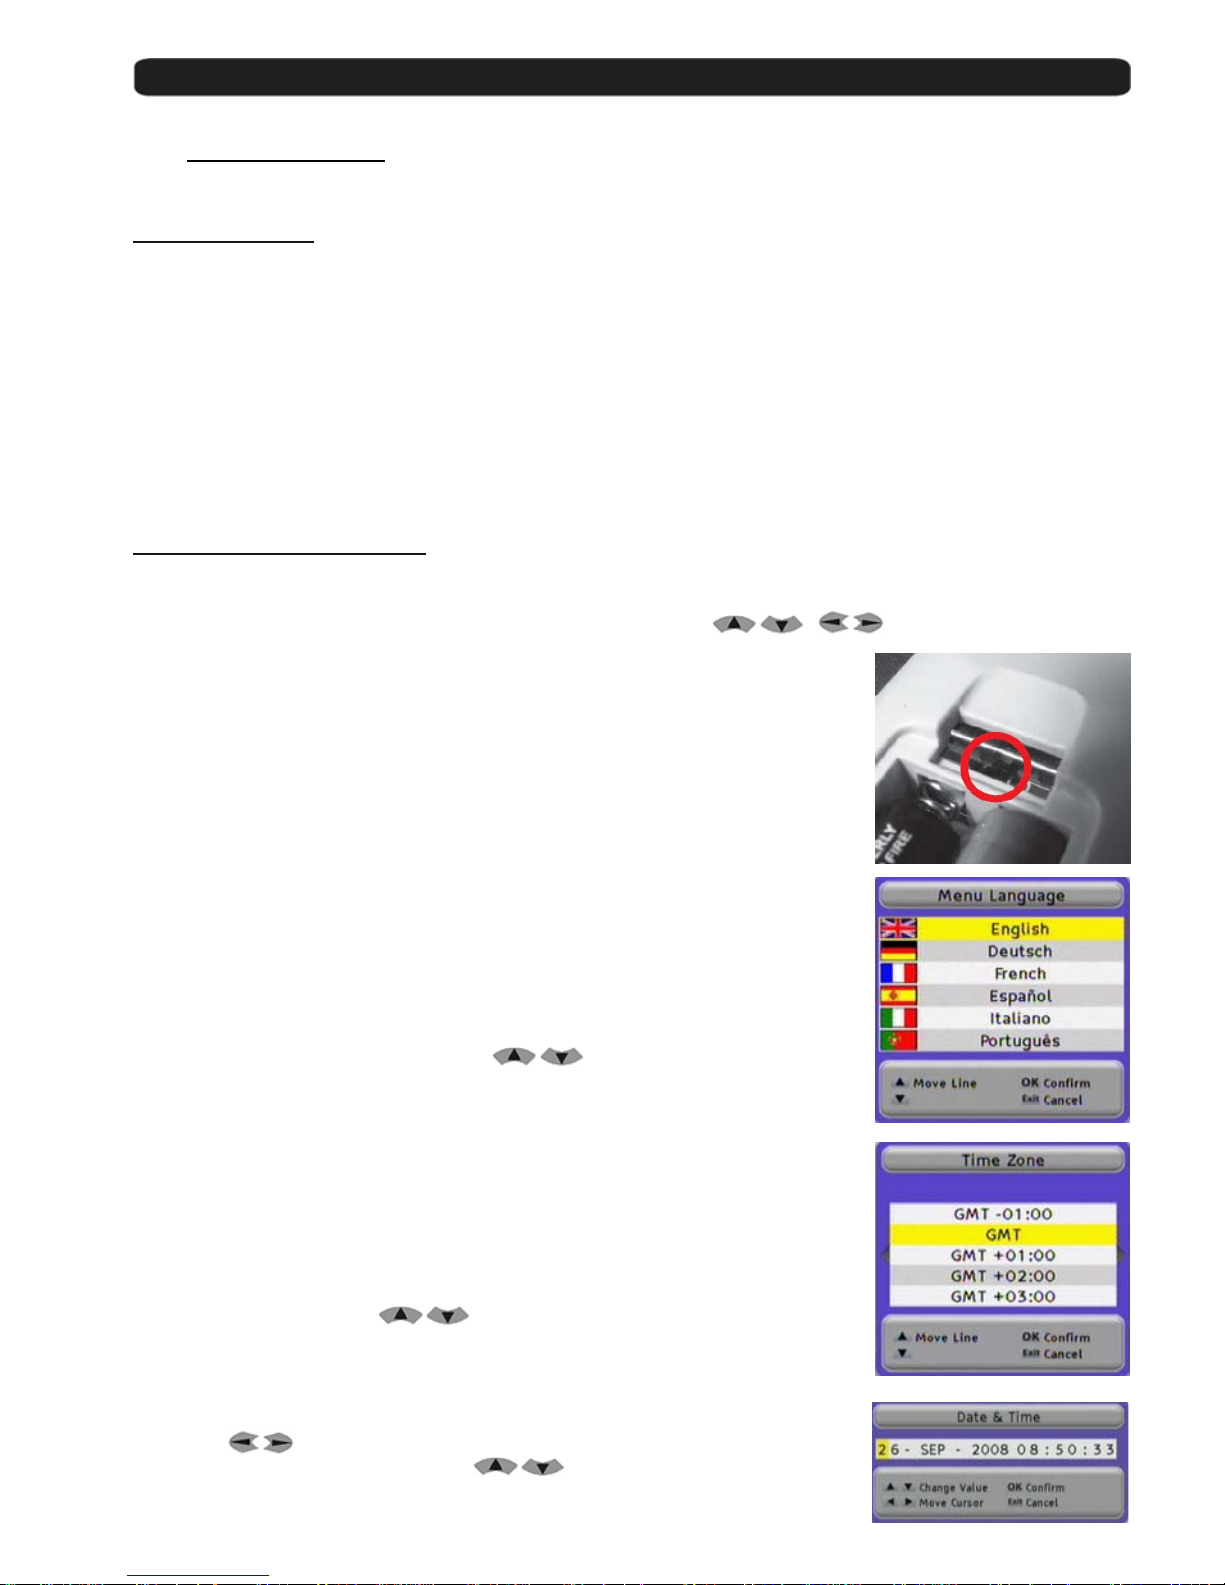
For this purpose, your new receiver is selected by factory with code 3.
You have the possibility to change the code of it, to do that you have to change the
position of a switch in the remote control.
You have to select the same position in the receiver than in the remote control.
If you have problems with remote control devices, you can change the transmission
code if you go to Menu > System Settings > OSD Settings
after finishing the quick installation guide.
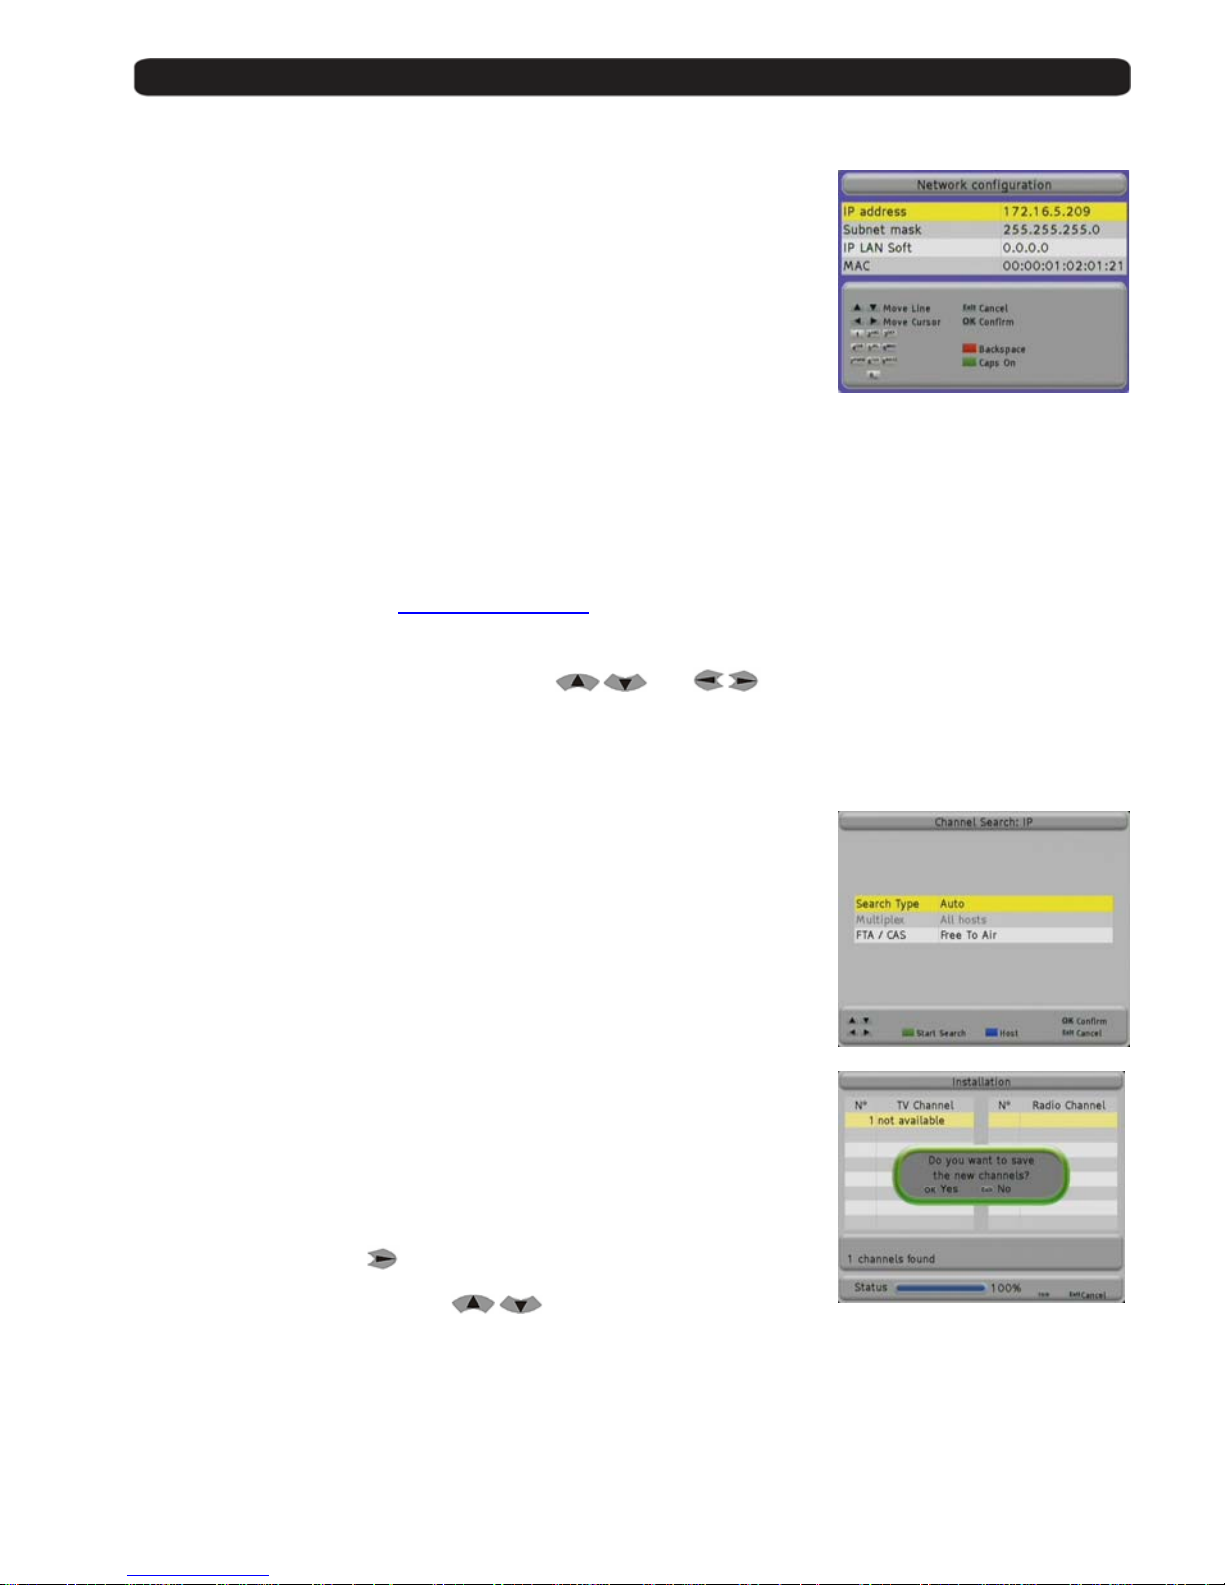
Menu Language :
Here you have to select the language for the Receiver menu and information.
Select the language with the arrow buttons
and press the OK button.
Time Zone:
In order to the receiver is able to display the correct time and adjust the timer
recordings correctly, it is needed to fix the time zone to the place you live.
Select here the time del ay according to your positio n comparing to Greenwich Time.
In UK: Summer time: +1 hours
Winter time: GMT hour
Select with the arrow buttons
and press the OK button.
Date and Time
It is recommended to setup the clock before starting to enjoy the receiver.
Select with
the entry you want to change.
The entry will be modified by the buttons
.
When you have finished, press OK.
Page 9
User’s manual · MAX IP90
Technical changes and mistakes reserve - 9 - MAX IP90 Version en_1.0 FTE Maximal
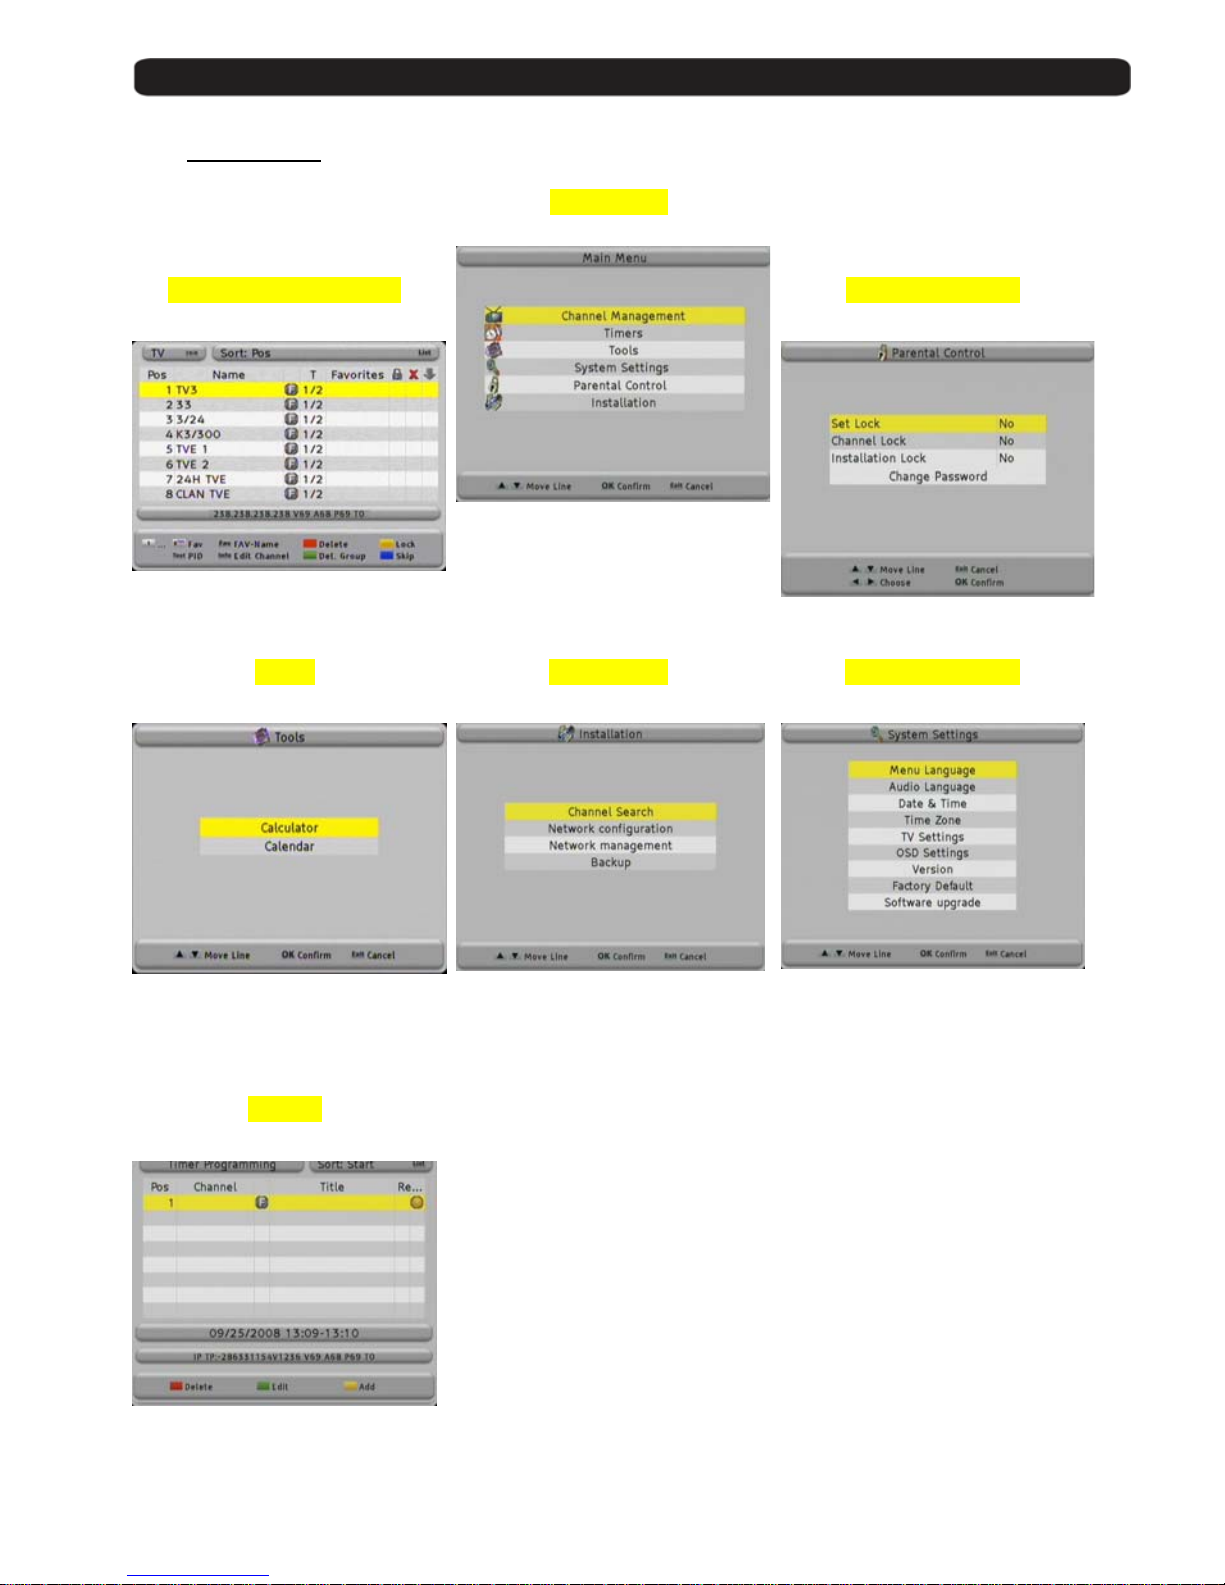
Network Configuration
The receiver will require the introduction of the needed parameters to be able to
get connected to a network, as well as to be visible to other equipments so that
receive streaming of video and au dio.
You should introduce the following parameters:
IP Address Number of 32 bits expressed i n 4 numbers between 0
and 255 which identifies the receiver inside its network.
Every device in the network should have a different IP
Address and it is highly re commended that all of them
are in the same subnetwork and with IP addresses into
the following range:
10.x.x.x
172.16.0.0 – 172.31.255.255
192.168.x.x
Subnet Mask Number in IP format that, combined with the IP address, identifies where the equipment is.
IP LAN Soft: IP address of the PC where the application for exchanging video streamings between the
PC and the receiver is in stalled.
If you want, you can do wnload the application IP LAN Soft from the Website:
www.ftemaximal.com
MAC Device address at hardware level. It is unique in each device and it comes from the factory.
You can move through the menus with the buttons
and .
With the Red button you delete the last character.
Press OK to save the changes.
Search IP Channels
The receiver will carry out a search for channels broadcasted by other equipment
connected to the network.
You can receive transm issions of other equipment in mode Unicast and
Multicast.
- Unicast is when the information is sent from a unique sender to a
unique receiver.
- Multicast in when the information is sent through a network to multiple
destinations simultaneo u s l y . The equipment that work in mul ticast mode
send the information into an IP range between 224.0.0.0 and
239.255.255.255.
In Search Type select Auto to search for all the channels which are broadcasted
by other equipment in your network in multicast mode. If you select the Host
option, it will look for transmissio ns of the equipment present in the list Network
Management that you select.
In the field Multiplex you should select the hosts from the list Network
Management in which yo u wi th to search for channels.
Pressing the Blue button or
a new window will appear, where you can select
the hosts.
You can move the cursor wi th .
With the Green button you select the hosts.
Press Exit to go back to the search menu.
If you press the Green button, it will carry out a search of the video IP channels.
Press Exit to exit.
The Fast install guide is now finished.
Page 10
User’s manual · MAX IP90
Technical changes and mistakes reserve - 10 - MAX IP90 Version en_1.0 FTE Maximal
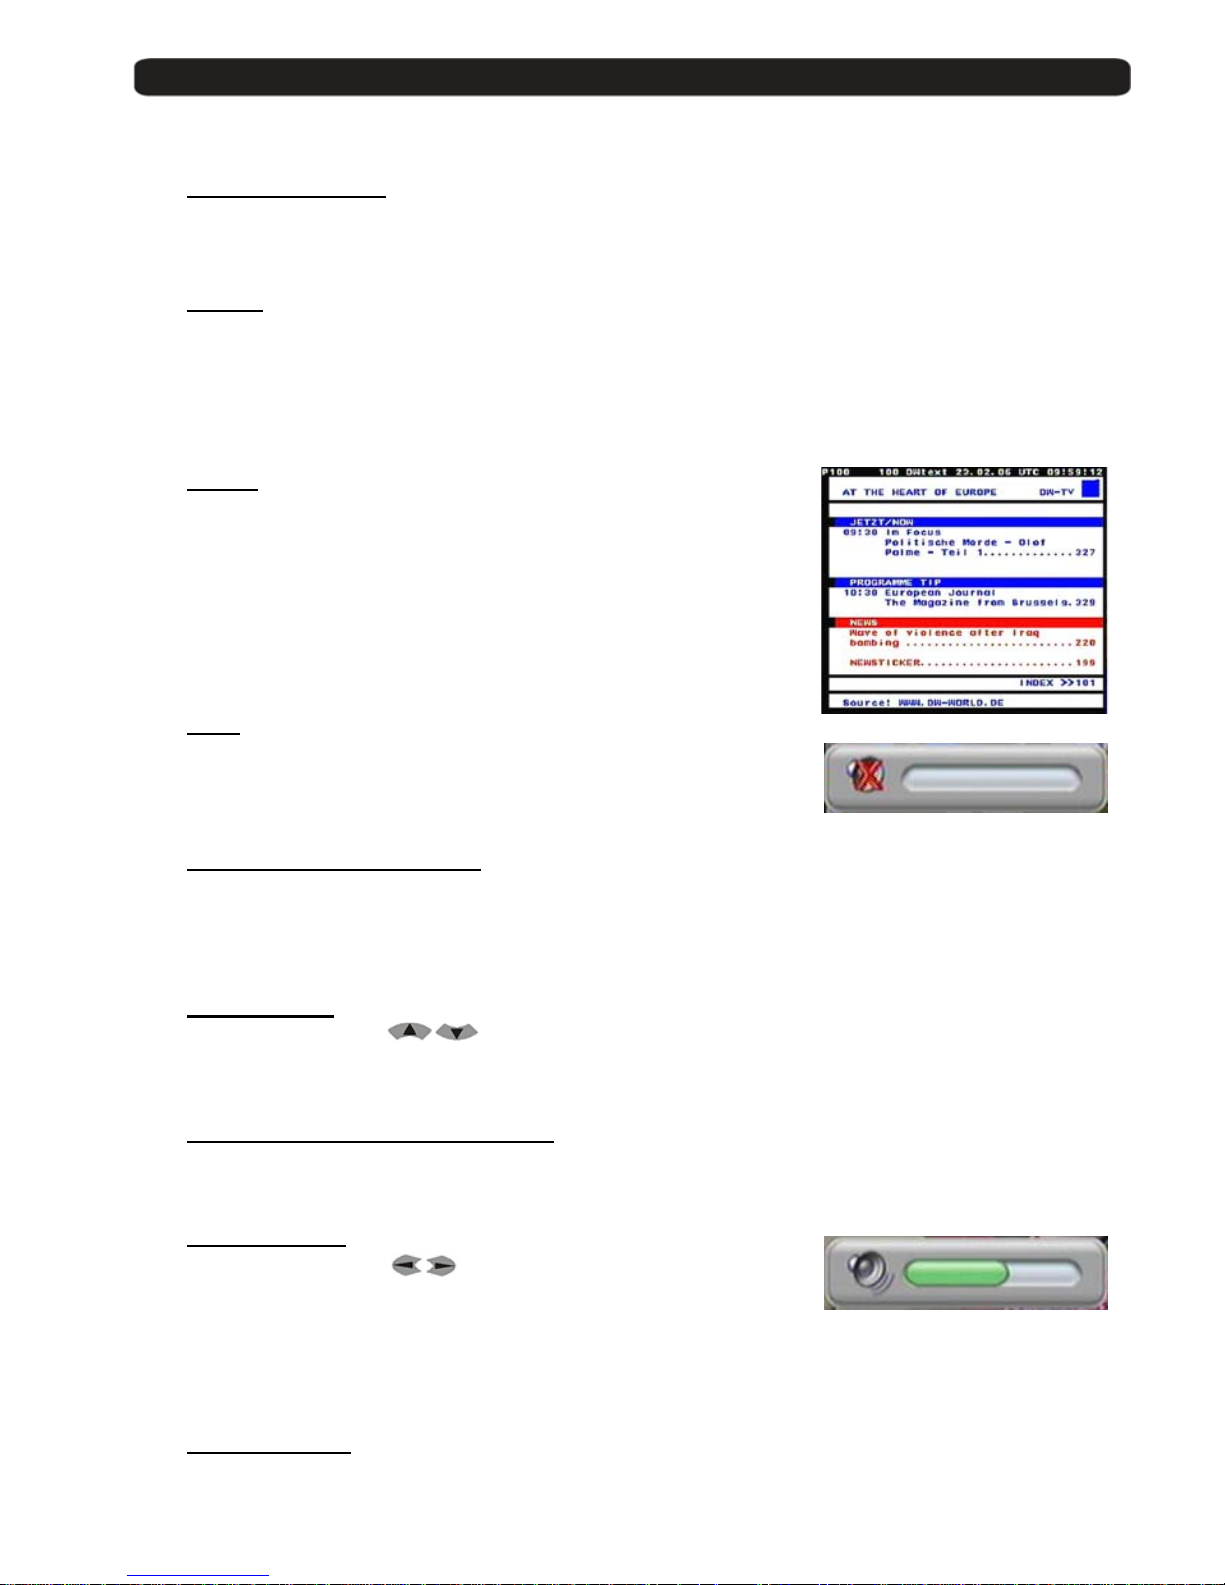
1.5. Menu overview
Main menu
Channel Management
Parental Control
Move, rename or delete ch ann els,
Program and, create favo urite list.
Activate parental control
Tools
Installation System Settings
Calculator,
Calendar with date management
Search channels
Network adjustments
Backup
Main settings for receiver
for OSD and adapt TV set
Factory defaul t
Software upgrade
Timers
Manual activation for timer events
Page 11
User’s manual · MAX IP90
Technical changes and mistakes reserve - 11 - MAX IP90 Version en_1.0 FTE Maximal
2. Standard functions
2.1. Switch on the receiver
The receiver has a main switch at the back panel. To switch on, take the switch in position 1.
Now the receiver begins to run an d show information on its displ ay.
2.2. StandBy
To switch the receiver from Standby (sleep mode) to the working mode, press Orange Po wer button on the left corner
at the top of the remote control.
If the receiver had been working before and you did not switch on by main switch, the receiver show the last displayed
channel.
When you press it again, the receiver goes back to the stand by mode.
2.3. Teletext
The button Text opens the teletext generator.
Automatically the rece iv er loads page 100 as standard.
Like in your TV set you can open the pages by pressing the buttons 0-9.
If you want to open, for exampl e , the page 140, you
have to press the butt ons 1 – 4 – 0.
When you want close the pag e, press Exit.
2.4. MUTE
With this function, you will be able to shut down the audio completely.
To do it, press the button Mute and the warning symbol will be displayed.
By pressing again the button Mute the function will be disabled.
2.5. Numeric block on remote control
Over the numeric block in the remote control, you can select directly channels the when you know the stored program
place.
If you want for example pla ce 23, you have to press the butt on s 2 and 3 and after the button OK .
2.6. Switch channels
With the buttons CH+ / CH- or
you can change the channels also.
Press one button for gett ing one channel up or down.
2.7. Change between TV- and Radio channels
When you want change between TV and Radio channels, you have to press the button TV/R on the remote control.
2.8. Vol+/Vol- Volume
With the buttons Vol+ / Vol- or
you can regulate the audio volume.
To do it, you will see a graphic like the one at the left side.
For using this function properly, you need to make an alignment with you TV set.
Turn off the volume of the receive r . For this, press the button MUTE on remote control. Now turn up the volume on TV
until the moment you hear a noise. Now turn down the volume until the noise desapears. Normally this is around 5075% of the total volume of the TV set.
2.9. Stop the functions
With the button Exit you can stop functions like channels search or close menus.
Page 12
User’s manual · MAX IP90
Technical changes and mistakes reserve - 12 - MAX IP90 Version en_1.0 FTE Maximal
2.10. Open Main menu
To open the main menu, you have to pre ss th e but ton MENU.
The menu system is made in a tree structure
2.11. Watch the last viewed channel
With the Back button, you can access to the channel vie wed previously.
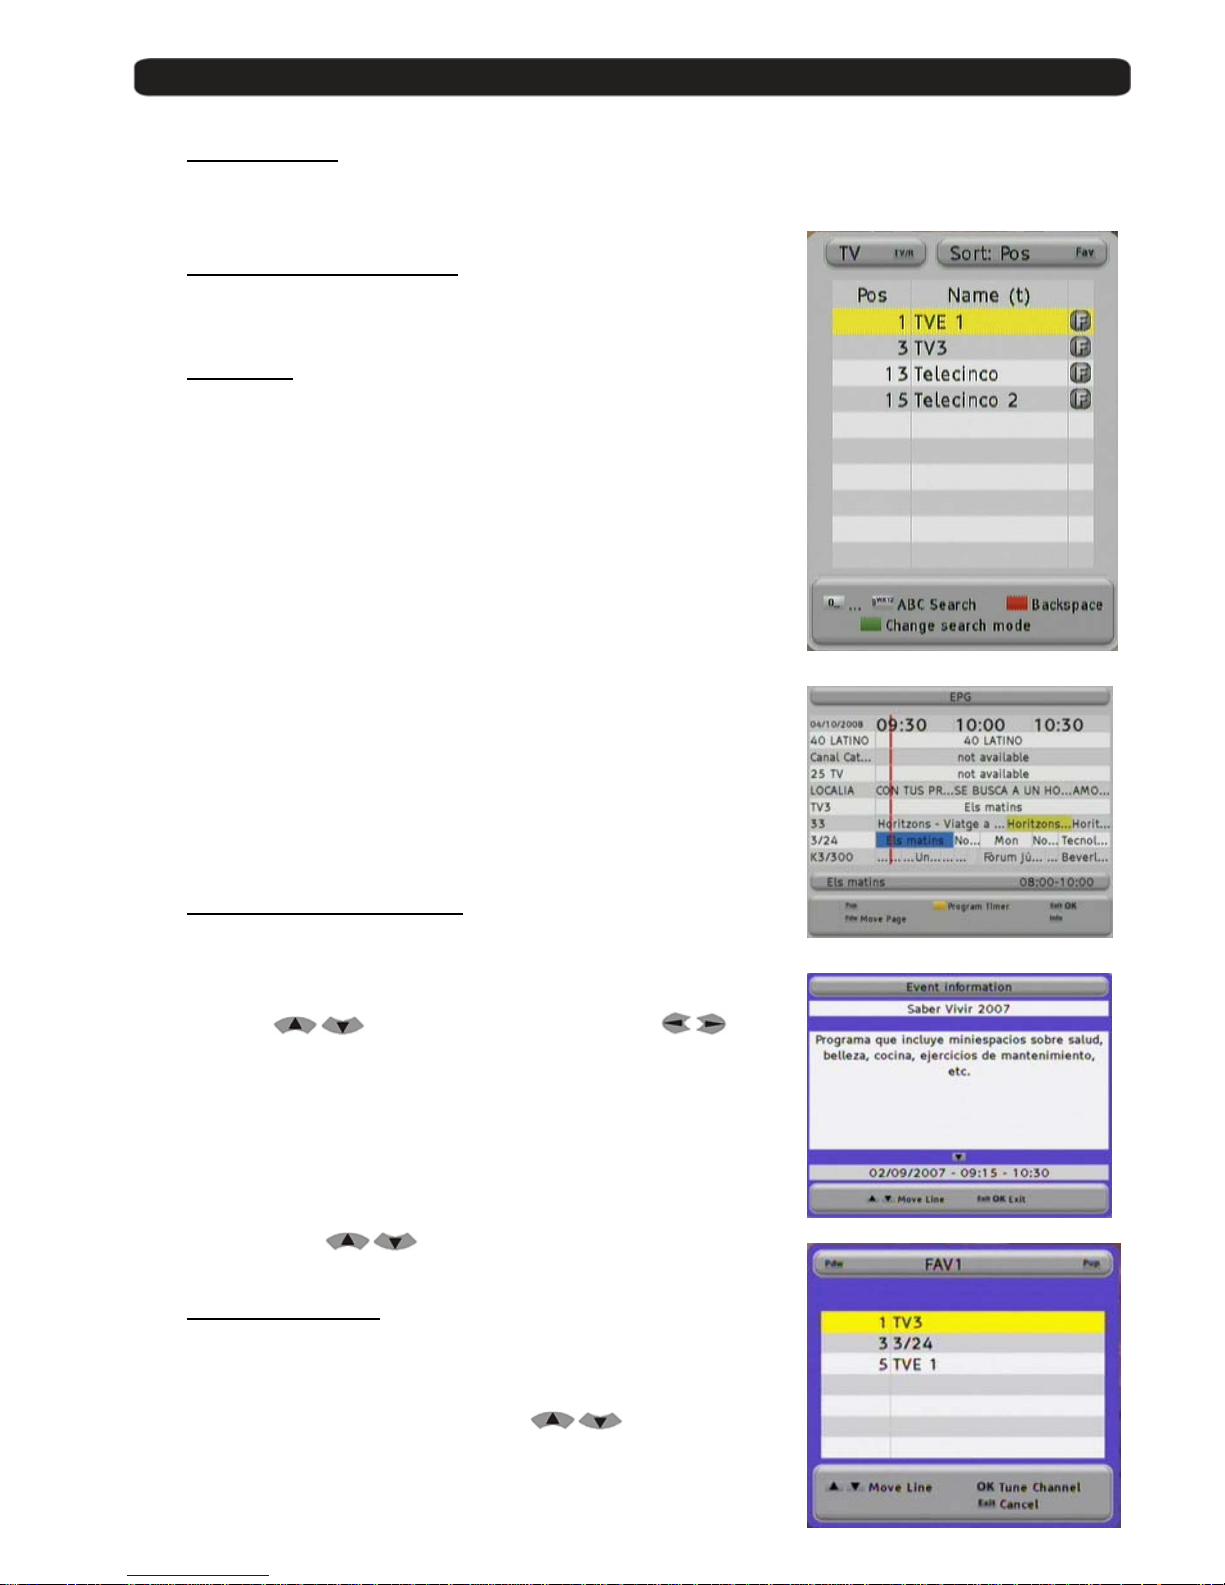
2.12. Channel list
When all the menus are closed, you can open a channel list by pressing
the button OK.
With the button TV/R you can switch be tween TV and Radio channels.
With the button FAV you can sort this list as follows:
POS, Position in channel list
Name, by alphabetic sort
FTA / CAS sort by free or coded chan n els
If the position or the name of the channel fits, you can carry out a searching.
Press the Green button to select the searching mode until the symbol (…)
appears in the row Pos or Name, and introduce the characters with the
alphanumeric keyboard.
The handling of the keyboard is like in a mobile phone.
When you press one button several times you will have different results.
Example: If you press button 2: a, b, c and 2
You will get a channel list with the information requeste d.
2.13. EPG Electronic Program Guide
By pressing the button EPG you will start the electronic program guide.
The receiver gets the info rmation of the tuned channel. This inf ormation
is available only in case that the streaming contains it.
With the buttons
you can select a channe l an d with one
event. The Blue colour field highlights th e current selected event and the
Red line shows the current tim e .
With the Yellow button you can mark one event. The receiver will switch to
this channel once the event has begun. If you select an event which has
already started, the receiver switches to this channel immediately.
Pressing the button INFO you will get more detailed information about the
event.
With the arrow buttons
you can move along the text.
2.14. Favourite channel list
If no menu is opened, you can get your favourite channels list by pressing
the button FAV.
With the buttons Pup / Pdw you can switch between 8 different lists, if you
have marked channels before. With the buttons
you can select a
channel from this list.
Page 13
User’s manual · MAX IP90
Technical changes and mistakes reserve - 13 - MAX IP90 Version en_1.0 FTE Maximal
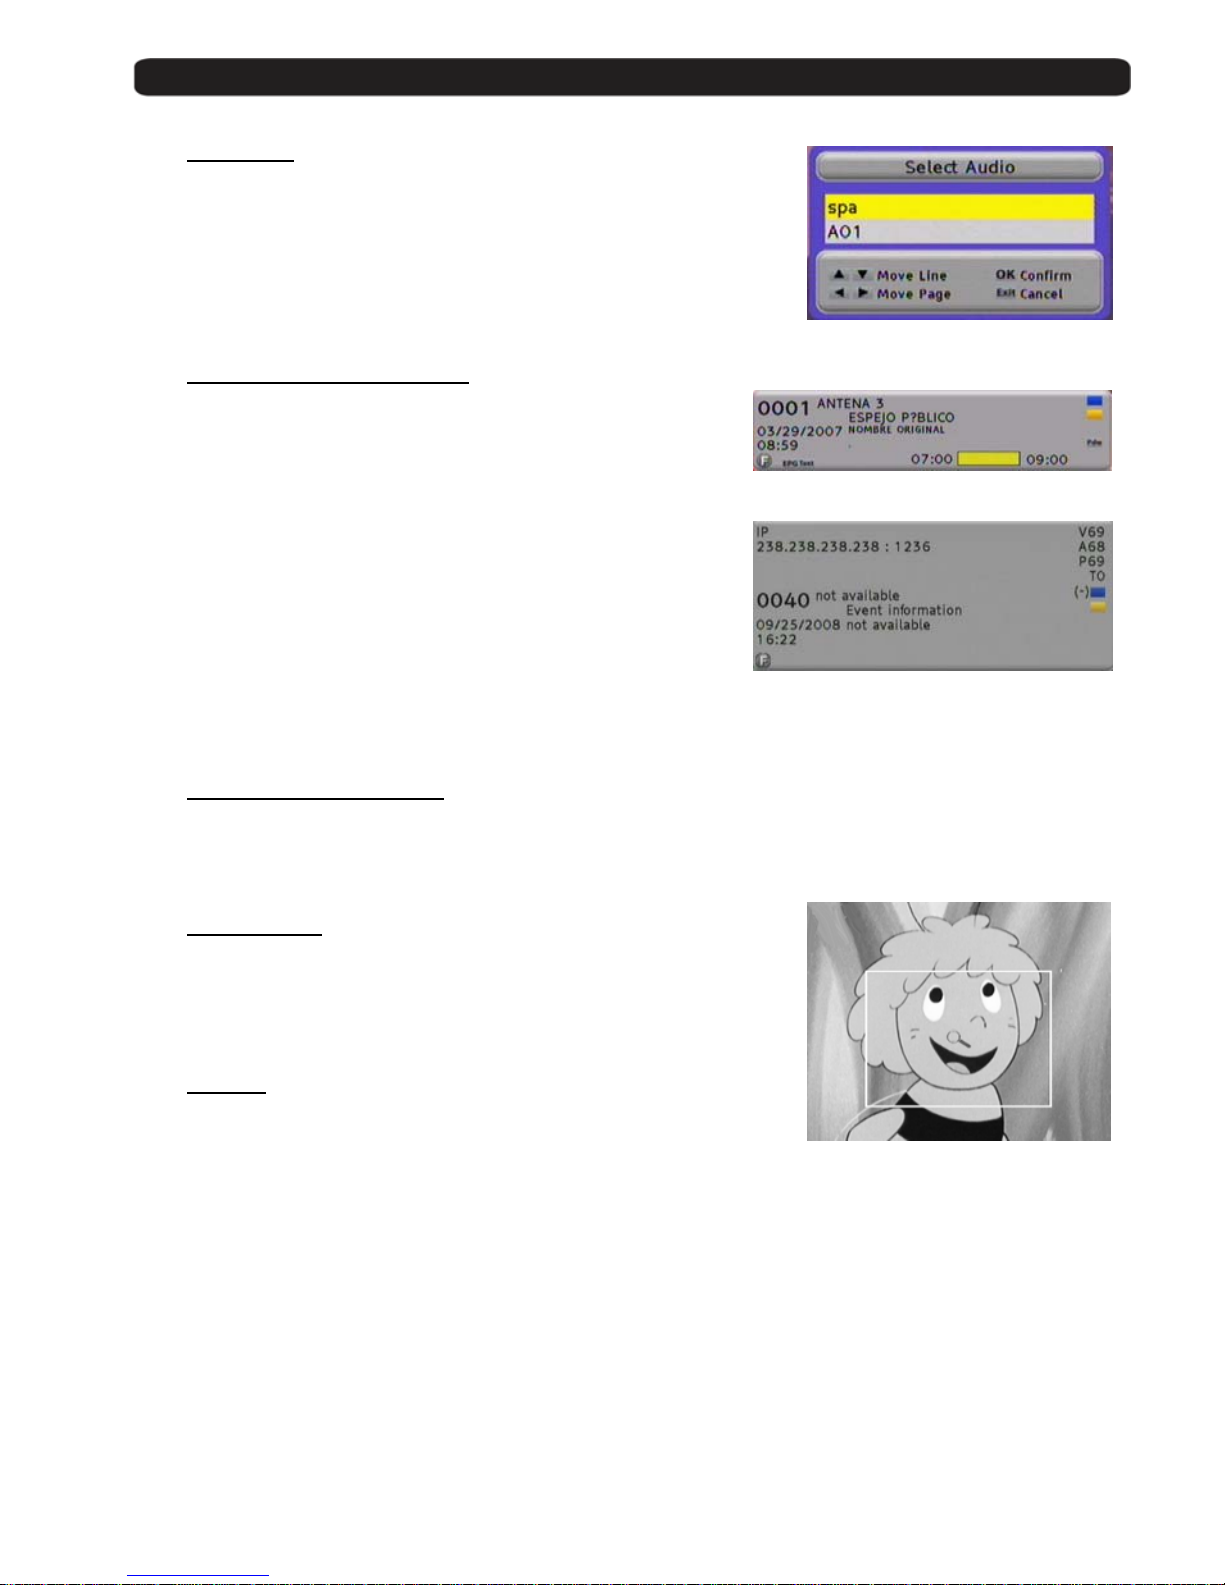
2.15. Menu Audio
If all menus are closed you can open the menu Audio by pressing the button
Audio.
You can change here the audio o utput in Stereo, Left and Right audio format.
Testing the channels, yo u will be able to make the most suitable selection.
Standard selection is Stereo.
2.16. Signal and Channel information
Pressing the INFO button, with no menu activated,
You will see the channel information. This information is the same that
appears when you change the channels.
In the signal bar we can see the following information:
Channel Number, Channel Name, current Time and Date,
Name of the current event and br ief description given by EPG.
Start and Stop time of the e v e nt and the indication of the cur rent time
from the beginning in yellow colou r.
This menu disposes of 2 keys of advanced functions. Blue and Yellow
keys. Through Blue key, you can get the technical information of the
shown channel at the top p art of the window, as you can see in the
image:
Yellow key allows seeing which will be the next event indicated by EPG, with its start and stop times.
2.17. Changing favourite channels
With the buttons FAV+ and FAV- you can switch the favourite channels directly.
The Sequence for the channels is the established one before in main channel list.
2.18. Zoom Function
With the Zoom button you can see more details of the image .
By pressing the button OK you can select the enlargement.
If you want to stop, please press Exit.
2.19. Subtitles
When no menu is opened, you can start with Sub button the subtitle function.
Subtitles only can be displayed when the operator transmit them.
Page 14
User’s manual · MAX IP90
Technical changes and mistakes reserve - 14 - MAX IP90 Version en_1.0 FTE Maximal
3. Channel management
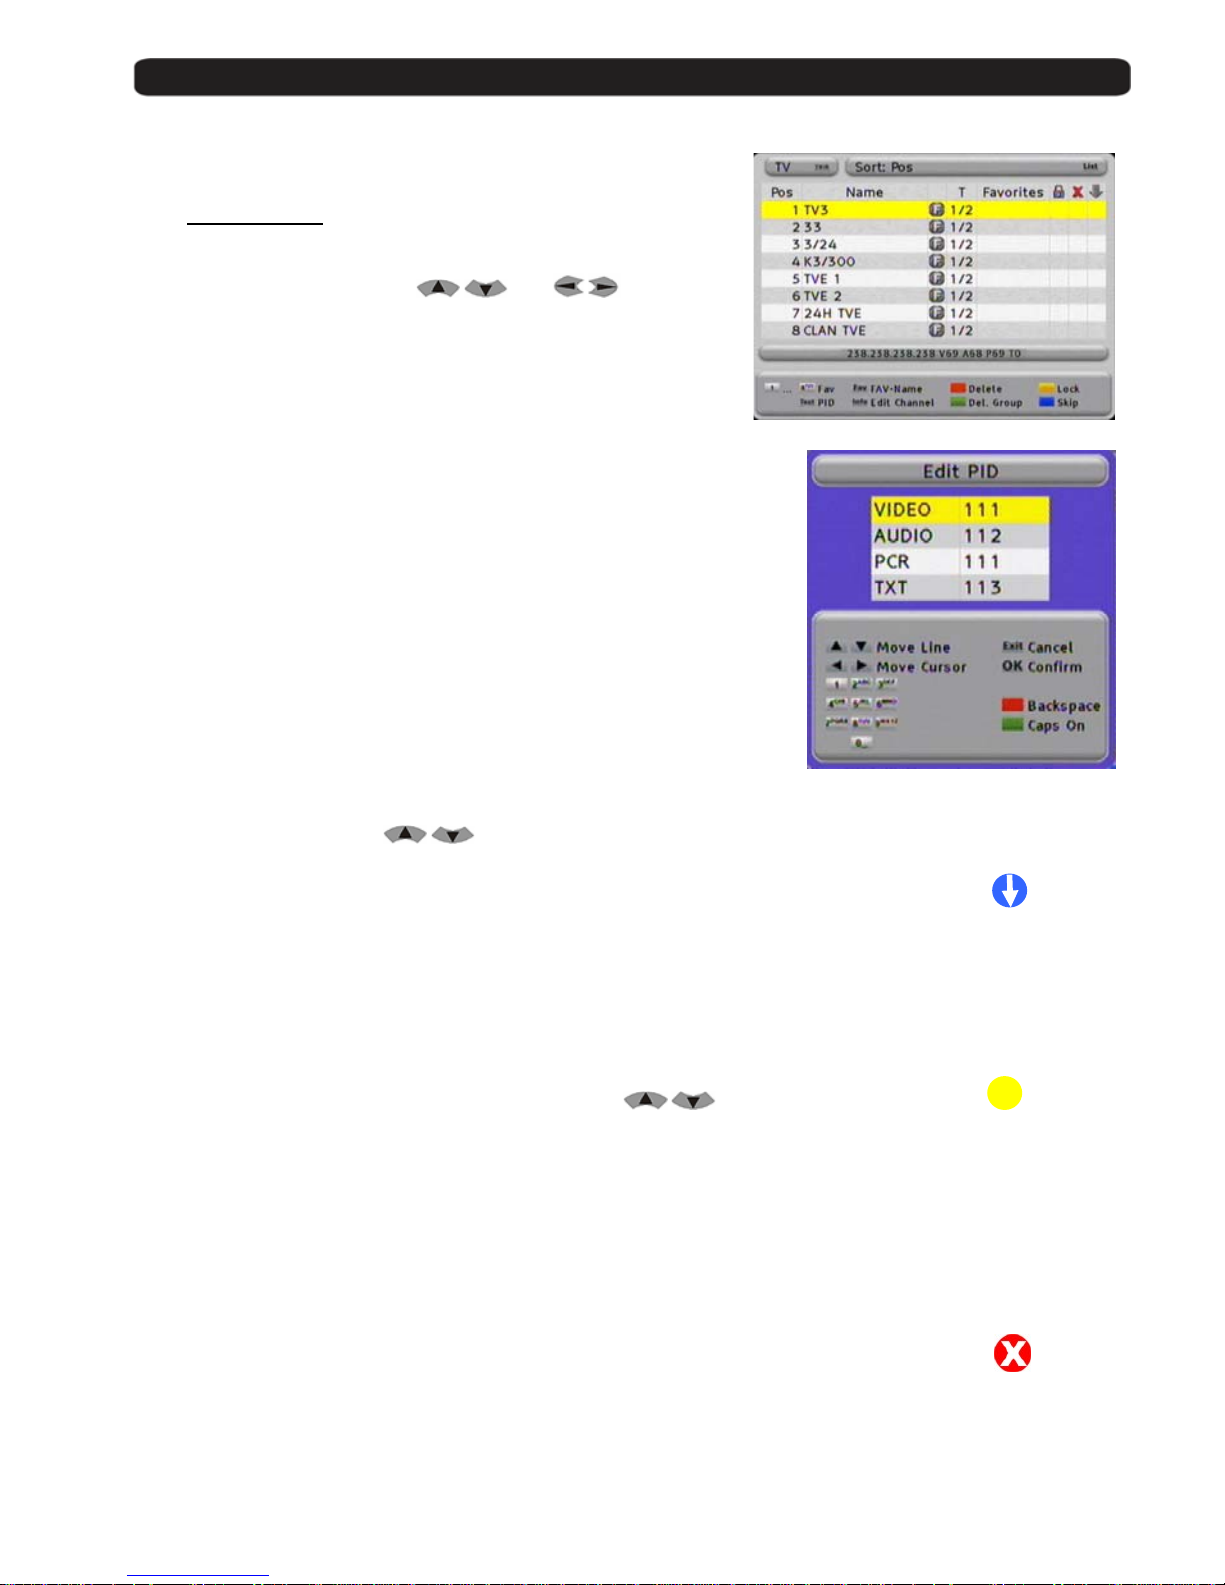
3.1. TV-Channel list
Here you will find an overview about all channels.
Channels can be administrated, moved, deleted or blocked.
The navigation is with the buttons
and .
With the button TV/R you will switch between TV and Radio channels.
With the button LIST you can sort this list as follows:
POS, Position in channel list
Name, alphabetically
FTA / CAS sort by free or coded chan n els
To see the PID information, you have to press the button TEXT.
This information will be read by the receiver automatically and it gives
the information where the program is in the data stream.
It is not necessary to change it, but it can be done by the numeric keys
of the remote control.
3.1.1. Skip channels
With this function it is possible to sk ip selected
with the buttons CH+ / CH- or
.
If you want mark channels for skipping, you have to select the ch annel and then press
the Blue Button Skip. Doing this, you will see that the channel has a symbol
like the one at the right side. Marked channels only will be opened by channel list.
3.1.2. Lock channels
If you want to lock channels wit h a pa ssword needed for opening th em,
you can do it with this function.
If you want to mark channels, please select the channel by
buttons and than press the Yellow button Lock.
Doing this, you will see that the channel now has a symbol like the one at the right side.
In order the function works properly, you have to activate the password
function in menu Parental Control.
3.1.3. Delete channels
If you want to delete one channel, you have to select it and then press the
Red button Delete.
Doing this, you see now one symbol like one the right side.
You can mark more than one channel, the channels will be deleted when you close the
Channel Management.
±
Page 15
User’s manual · MAX IP90
Technical changes and mistakes reserve - 15 - MAX IP90 Version en_1.0 FTE Maximal
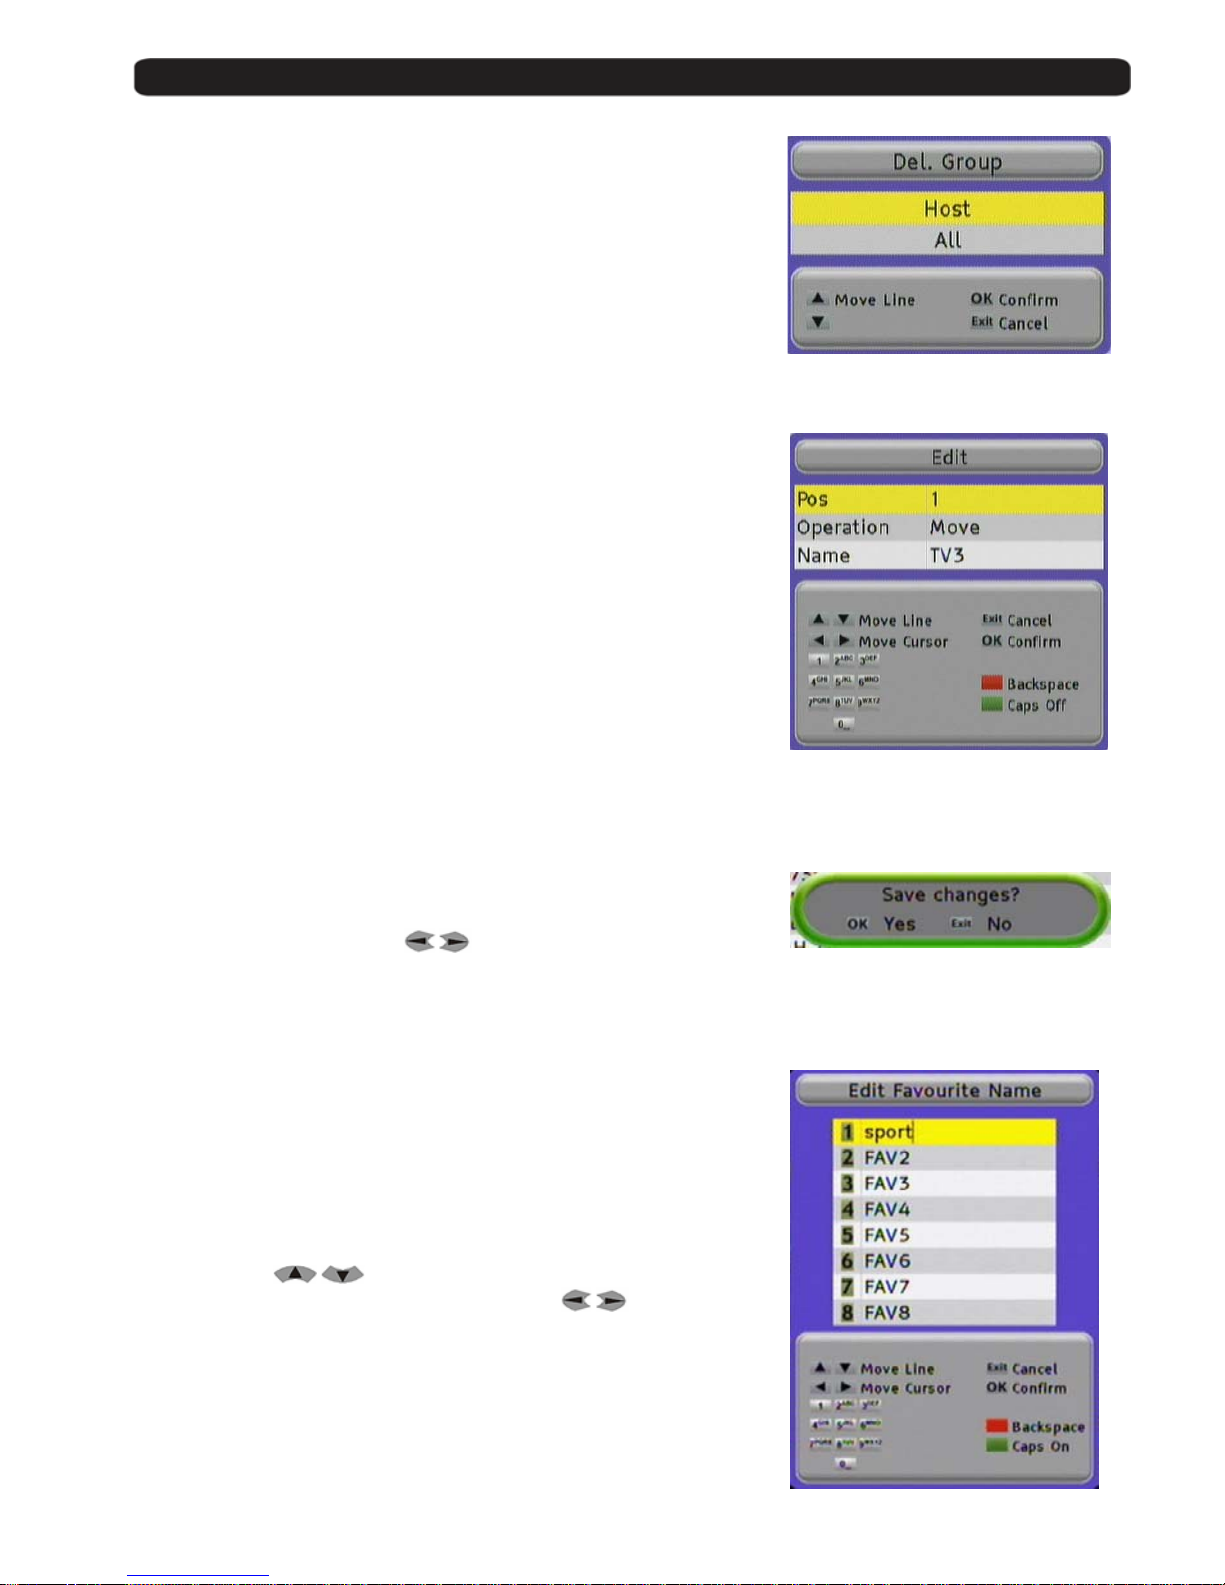
3.1.4. Delete channel groups or all channels
If you want to delete a chann el group or all channels,
you have to select them and th an pr ess the Green button Del. Group.
In the following submenu you should choose all channels from one Host or
All channels.
With the OK button the selection will be done.
3.1.5. Edit channels
If you want to move channels in their position in channel list
or you want to change their name, you can do it in the submenu
Edit Channel.
To do it, press the button INFO.
In the line POS you can change the placement in channel list
In Operation, you can select the mode of changing the position of
the channel. You can choose between Move (it will shift the rest of cha n ne l s)
and Exchange (it will exchange the position between 2 channels)
In the line Name you can mo di fy the actual name of this channe l.
The keyboard handling is like in a mobile phone.
When you press one button se veral times you will have diff erent results.
Example: If you press button 2: a, b, c and 2
With the arrow buttons you can move the cursor in its position.
In this menu, the Green button change between normal and
capital letters and the RED button delete the letters.
With the OK button the selection will be done.
The receiver stores the changes when you leave the menu.
Please confirm by selecting with
OK the message.
3.1.6. List of favourite channels
With the buttons 1 to 8 from the numeric block you can select channels of the
favourite channel list 1 to 8.
At the column Favourite of the Channel List, you will see which Favourite list
each channel is from.
If you want to give to a favourit e c hannel list an own name,
you can do it by pressing th e bu tt on FAV.
With the buttons
you have to select one list.
In the line you can move the cursor with the buttons
.
The RED button delete letters and t he Green button change between
normal and capital letters.
The keyboard handling is like in a mobile phone.
When you press one button se veral times you will have diff erent results.
Example: If you press button 2: a, b, c and 2
With the OK button the selection will be done.
Page 16
User’s manual · MAX IP90
Technical changes and mistakes reserve - 16 - MAX IP90 Version en_1.0 FTE Maximal
4. Timers
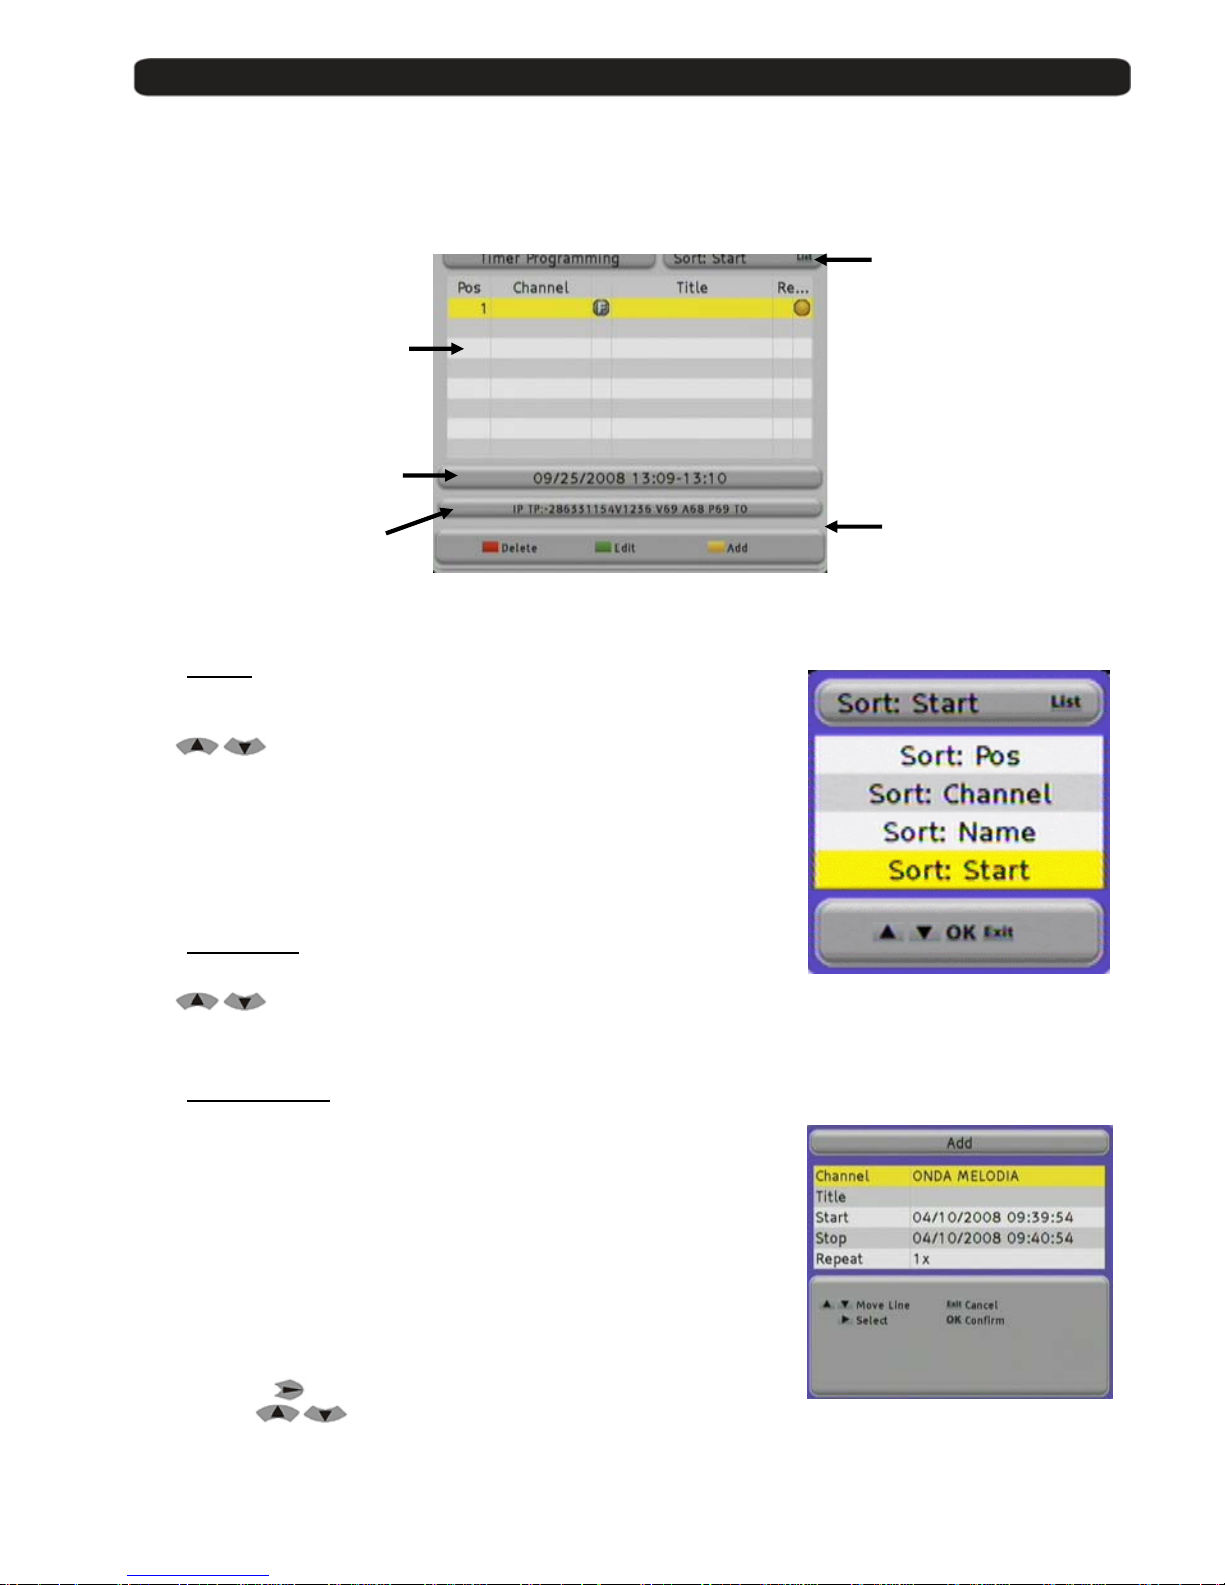
In menu Timers you get one overview about all events which you have programmed.
These events can be store over EPG or direct in this menu.
4.1. Sorting
For having a better view, you can sort the events.
Please press for this the button LIST.
With
buttons you can select th e fol low options:
Sort Channel: Sort the list related to the first letter of the program name in
A,B,C….
Sort Name: Sort the events related to the name of event in A,B,C….
Sort Start: Sort the files related to the start time.
Sort Pos: Sort the files by date of creation.
4.2. Delete Timer
With the Red button Delete you ca n delete even ts.
With
buttons you can sele ct on e event and then press the
Red button Delete, then confirm the following message.
4.3. Edit / Add timer
With the Green button Edit you can modify one event,
This can be useful, when you wa nt to program one event and
you do not know exactly its starting or ending time.
With the Yellow button Add you can add manual one event.
The using of Add and Edit is the same.
Channel
Here you can change the channel which will be programmed.
Press the button
and select in the new menu the channel you want
by the buttons
and press OK.
Start date and time
selected of event
PID information for
the selected event
List with all events including
channel name and nam e for
the event
Menu options
Menu options
Page 17
User’s manual · MAX IP90
Technical changes and mistakes reserve - 17 - MAX IP90 Version en_1.0 FTE Maximal
Title
You can modify an existing title or create a new one.
If you want to change it, select this line by
buttons.
The keyboard handling is like in a mobile phone.
When you press one button se veral times you will have diff erent results.
Example: If you press button 2: a, b, c and 2
With the arrow buttons
you can move the cursor in its po sition.
In this menu, the Green button changes between normal and
capital letters and the RED button deletes letters.
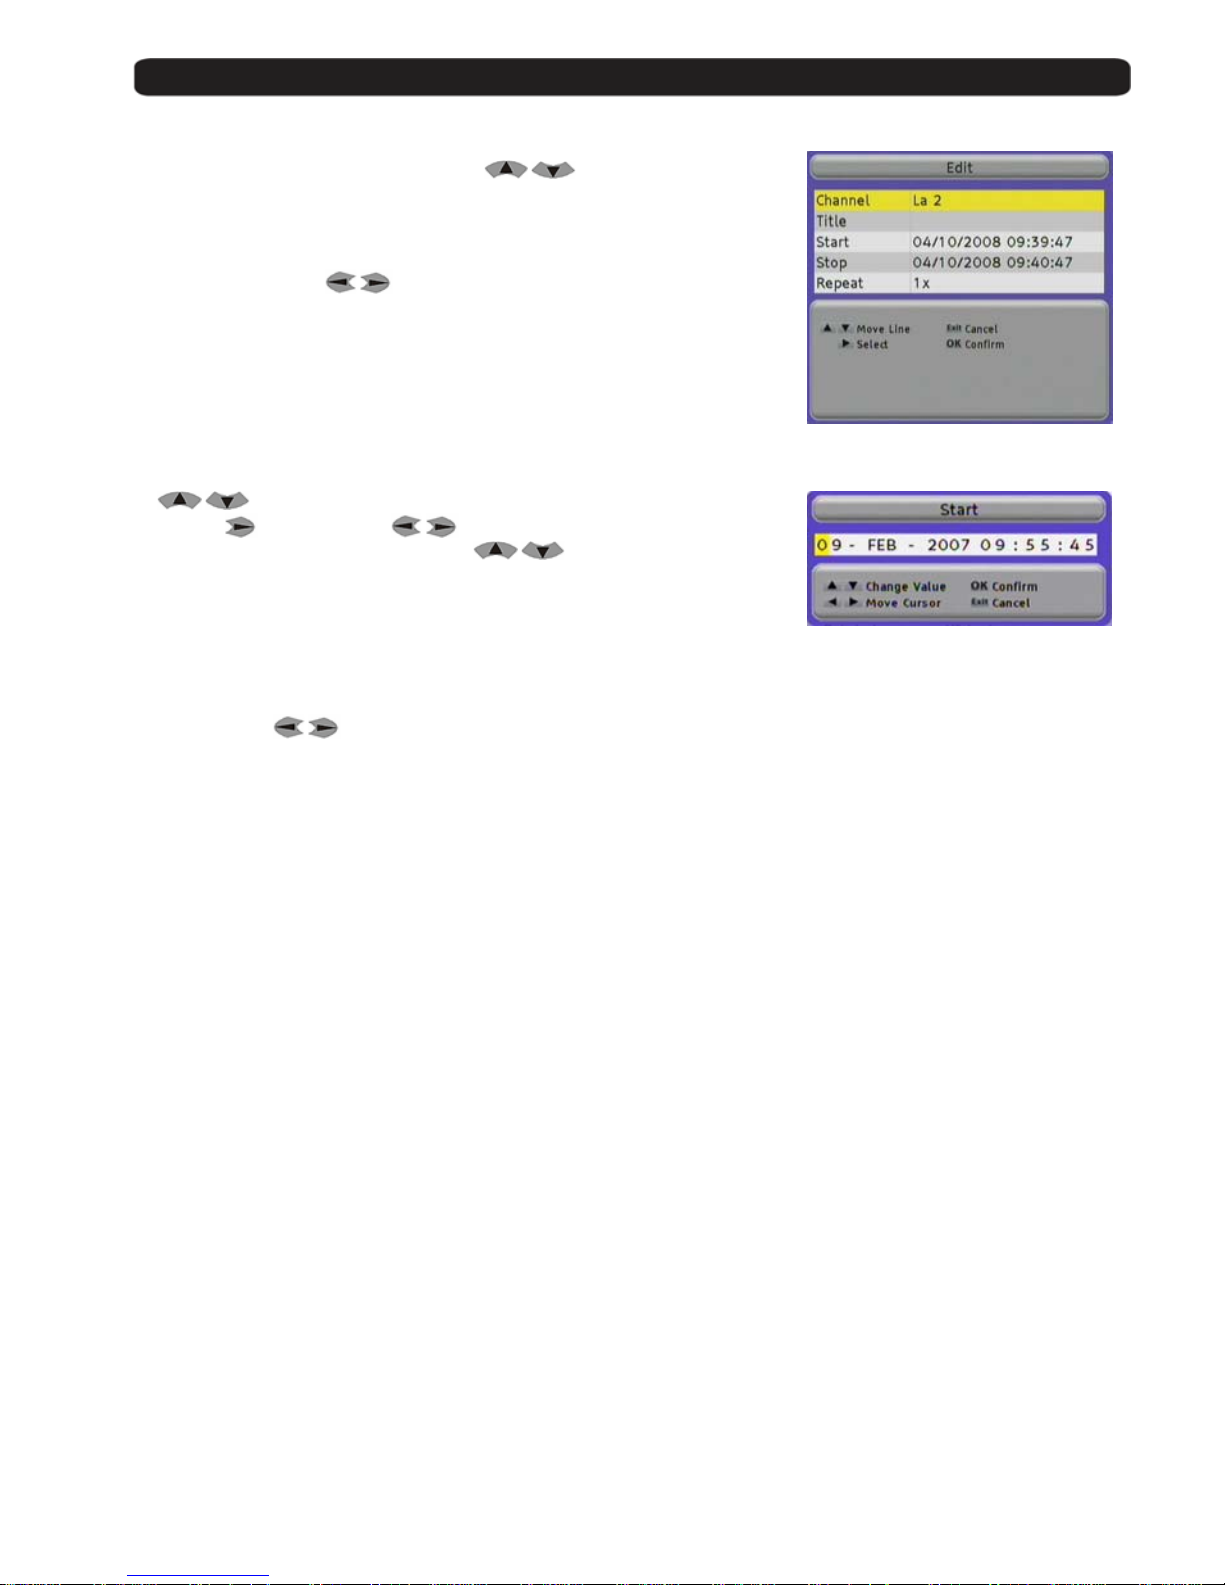
Start / Stop
If you want to modify start and stop times, select this line
by
buttons.
Press now
and select with the entry you want to change .
The entry will be modified by the buttons
.
When you have finished, press OK.
Repeat
The standard value is 1x, for one time recording.
With the buttons
you can choose the following op tions also.
2x - 6x This repeats the timer next day, at same time, same channel.
T This repeat the timer every day at sam e t ime , s am e ch an ne l .
W This repeat the timer every week at same time, same channel.
Monday – Friday It will repeat the timer since Monday to Friday in the same channel and at the same time.
Page 18
User’s manual · MAX IP90
Technical changes and mistakes reserve - 18 - MAX IP90 Version en_1.0 FTE Maximal
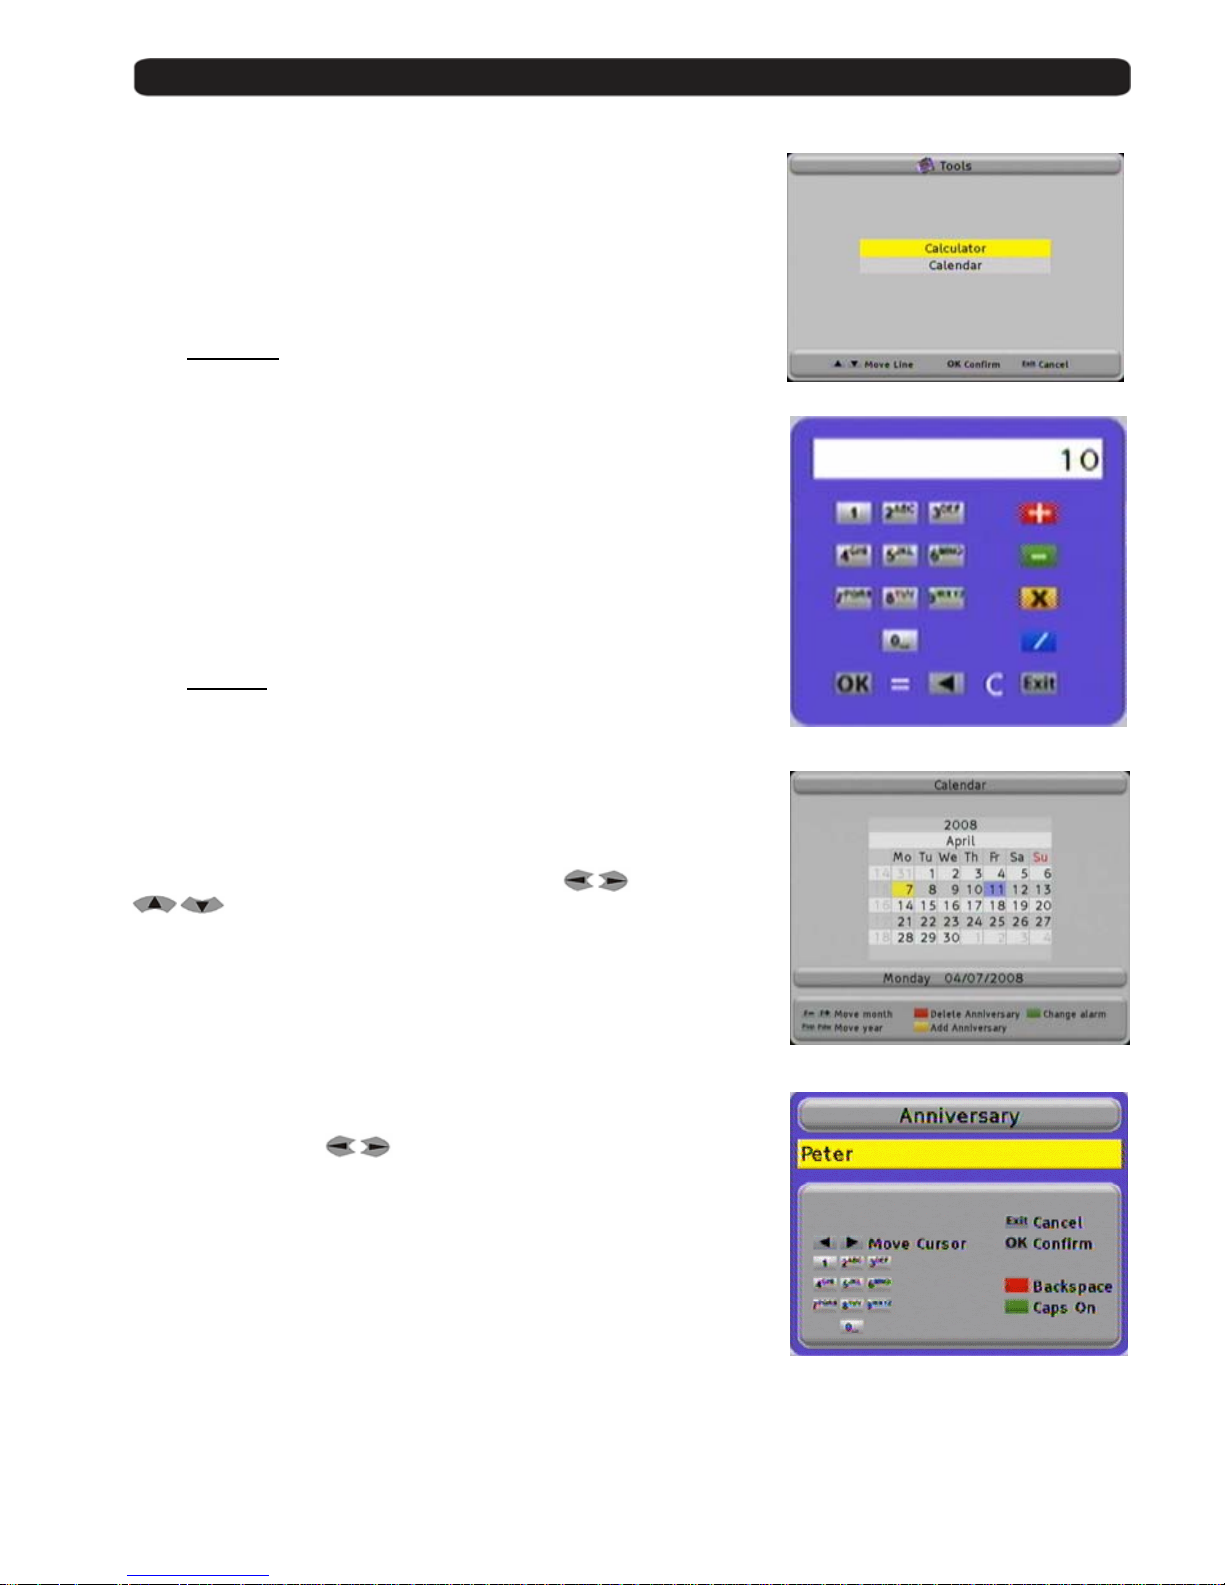
5. Tools
In this menu you can find two little helper tools.
The calculator is useful for fast calculations and with the calendar
you can mark dates for special events like birthdays.
5.1. Calculator
The using of the calculator is very easy.
With numeric block remot e co ntrol, input the numbers.
For the calculations you use the colour buttons .
Red Button Addition
Green Button Subtraction
Yellow Button Multiplication
Blue Button Division
The button OK is used for = function.
With the buttons ◄ you restore the calculator.
5.2. Calendar
If you open the calendar , t he yellow marked field show s t he current date.
This will be shown in the li ne un der the calendar.
With the buttons Fav- and Fav+ you can switch between the m o nt hs.
With the buttons Pup and Pdown you can change the year.
In the first column it is marked the number of week in the year and one blue
marked field shows a stored even t.
You can select the individual dates with the buttons
and
.
Add one event (Anniversary)
If you want to add an event, select the date and press the
Yellow button Add Anniversary.
You can type the name for the event like in a mobile phone.
When you press one button se veral times you will have diff erent results.
Example: If you press button 2: a, b, c and 2
With the arrow buttons
you can move the cursor in its po sition.
In this menu, the Green button changes between normal and
capital letters and the RED button deletes letters.
If you select later a blue marked field you will see the name info the field.
Delete one event
If you want to delete an even t, you have to select it and then pres s
the Red button delete Anniversary.
Change Alarm
Pushing the Green button, you can add an alarm to the event, you will see that this symbol (*) appears close to the
date. A visual alarm will appear in the screen the day of the event.
Page 19
User’s manual · MAX IP90
Technical changes and mistakes reserve - 19 - MAX IP90 Version en_1.0 FTE Maximal
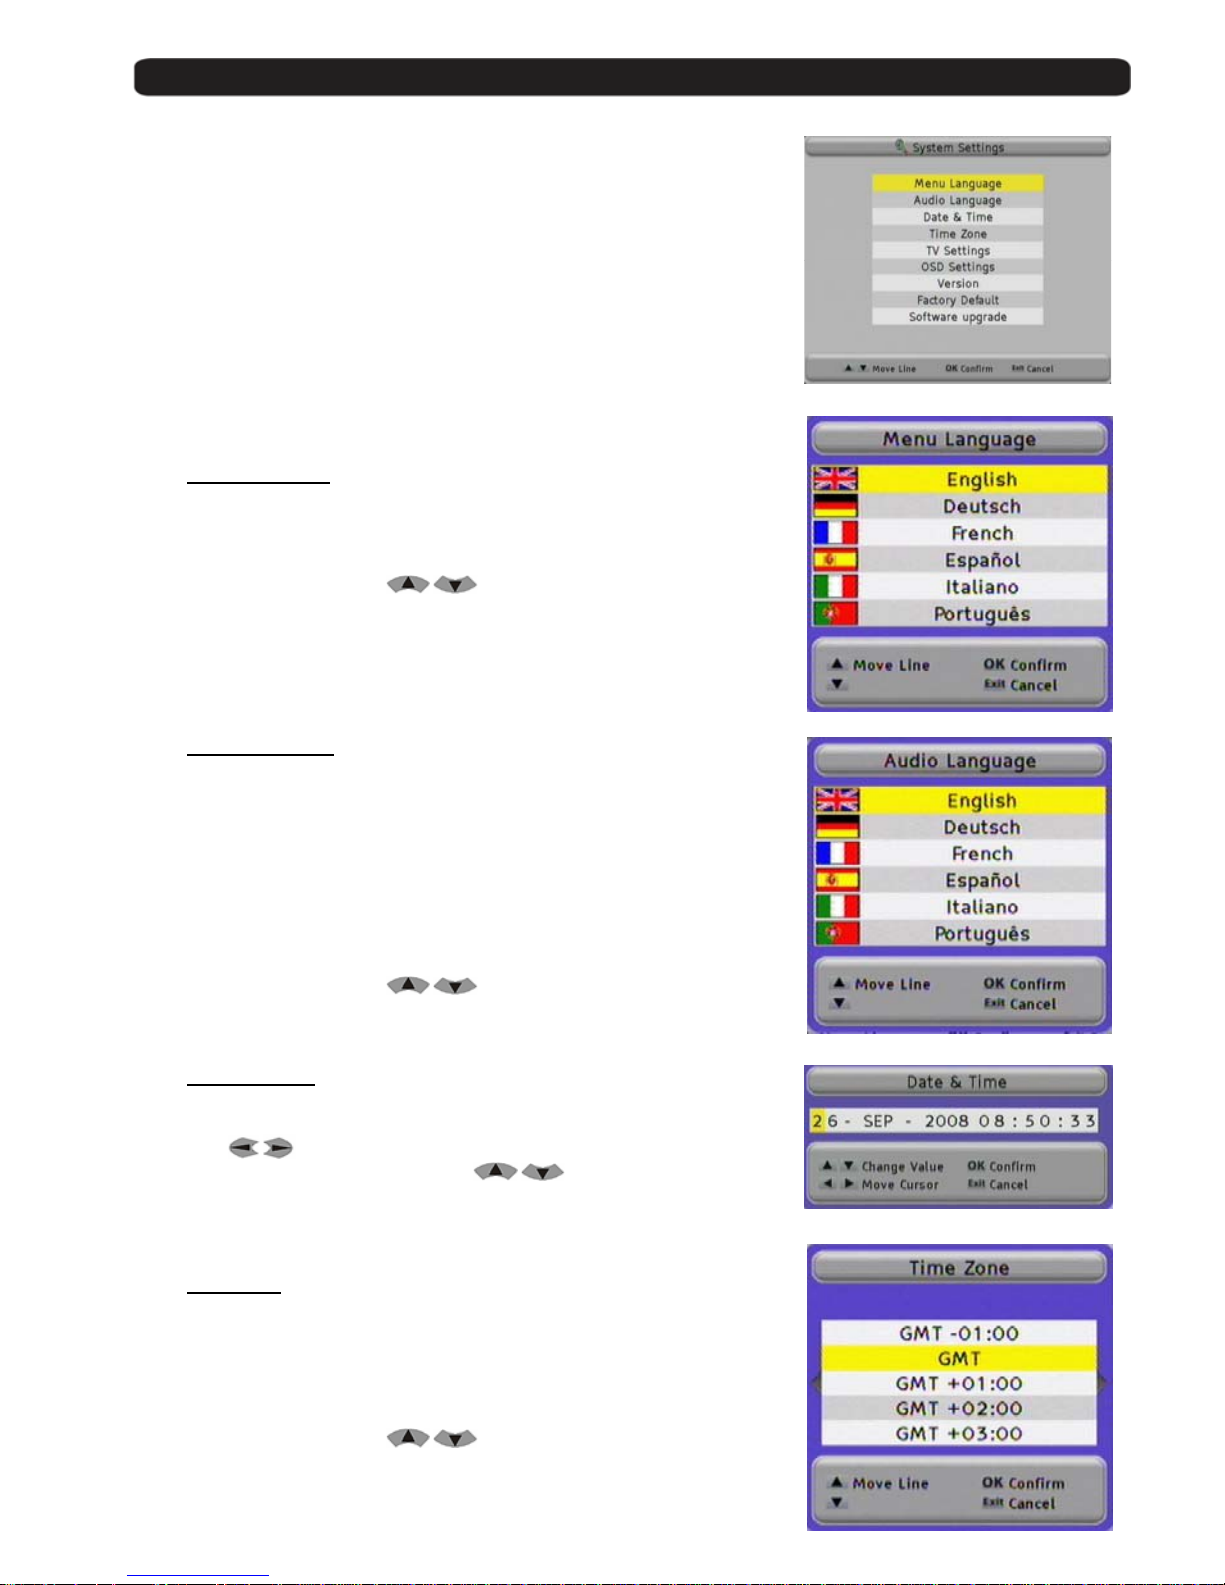
6. System Settings
In the menu System Settings you will find all basic adjustments
of the Receiver.
6.1. Menu Language
Here you can choose the language which will be shown in the receiver.
You can select:
English, German, French, Spanish, Italian, Portuguese
Please select with the bu ttons
and then press OK.
6.2. Audio Language
Here you can choose the audio language for the TV and Radio channe ls.
Example:
If you select English and the channel you want to see have one
audio carrier in English, you will get the audio in English.
If there is no audio carrier in English, you will get the first one which is
supported in this channel, for example German.
You can select:
English, German, French, Spanish, Italian, Portuguese
Please select with the bu ttons
and then press OK.
6.3. Date and Time
In order to introduce manually the time and date.
Select with
the entry you want to change.
The entry will be modified by the buttons
.
When you have finished, press OK.
6.4. Time Zone
In order to the receiver shows the correct time as well as adjusting the records
properly, it is needed th e adjustment of the Time Zone where you live.
For UK: Summer time: +1 hour
Winter time: GMT hour
Please select with the bu ttons
and then press OK.
Page 20
User’s manual · MAX IP90
Technical changes and mistakes reserve - 20 - MAX IP90 Version en_1.0 FTE Maximal
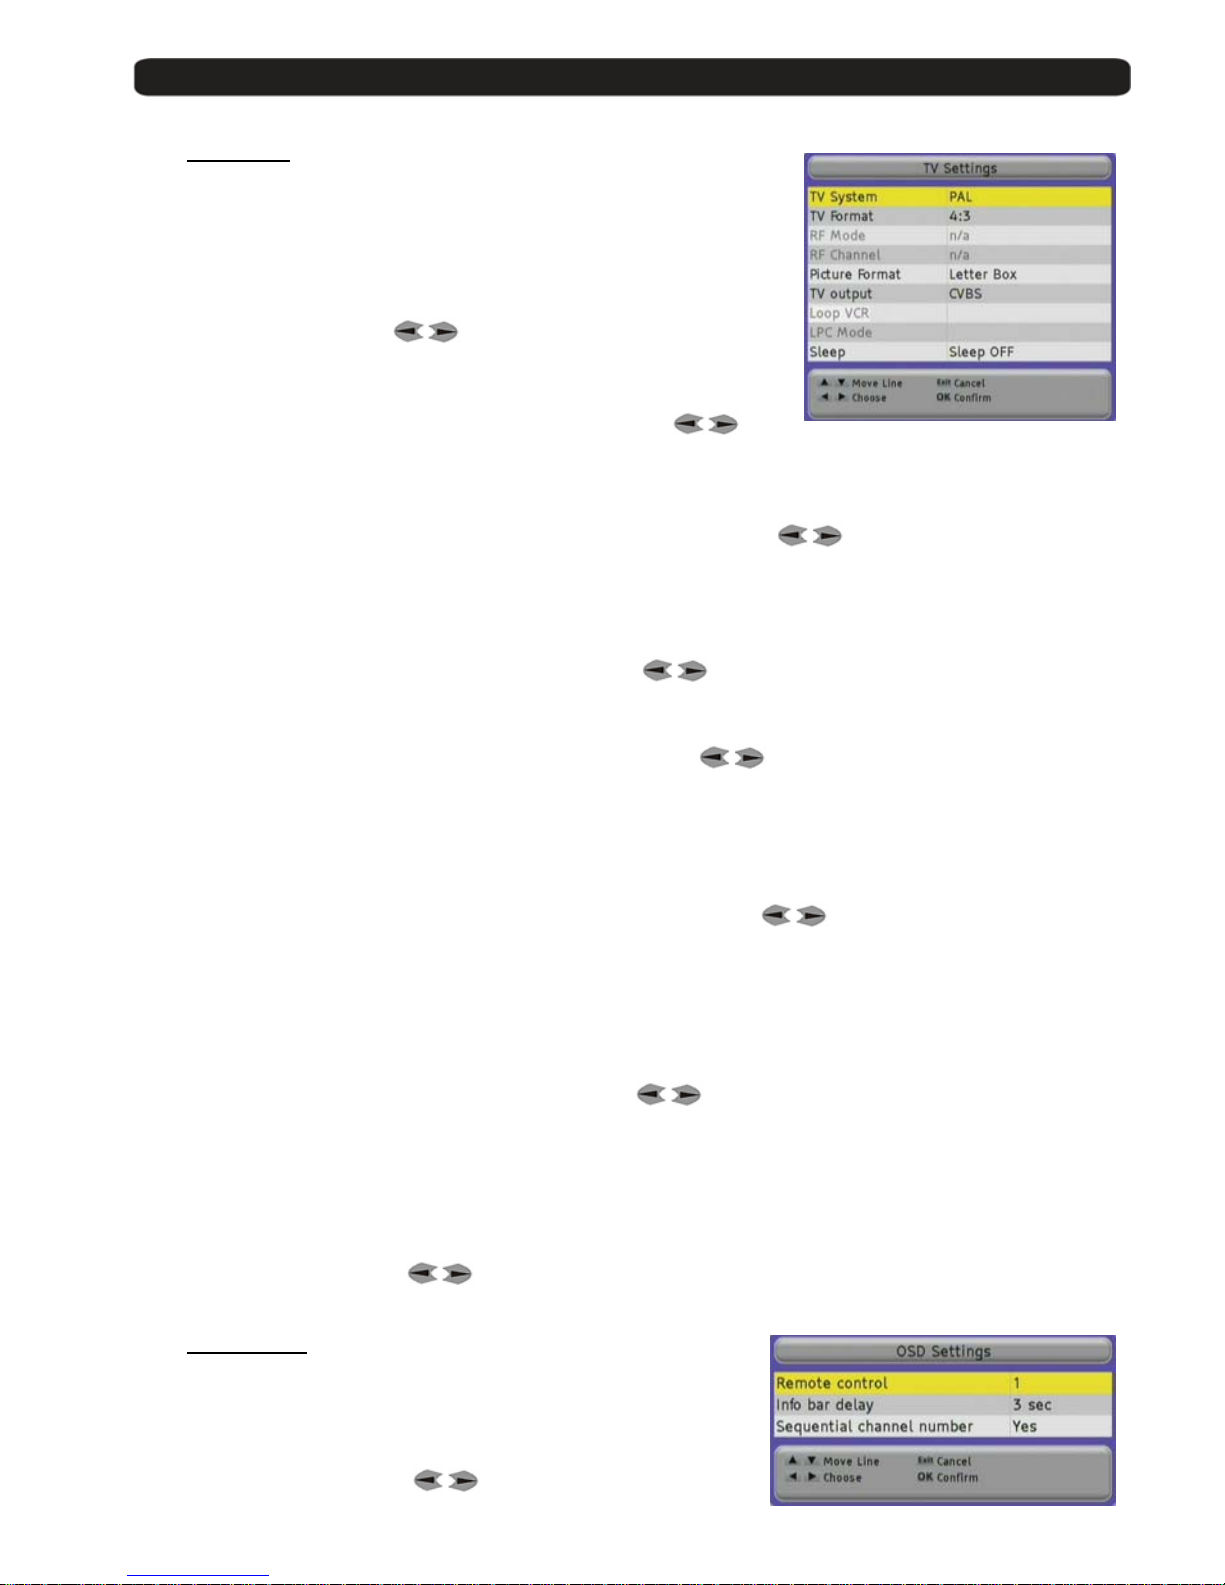
6.5. TV Settings
Here you can adapt your receiver to your TV set and you can select
the screen format.
TV-System
Select here which TV system your TV set support.
Selection: NTSC, PAL, Secam and AUTO
Please change with the buttons
.
TV-Format
Select here which TV format your TV set has available.
Selection: 4:3, 16:9 and AUTO, please change it with the buttons
.
RF Mode
If you connect your TV or Video set with one IEC coaxial co nn ection at the
output TO TV, you will need to select which system is supported by this device.
Options: PAL M, B/G, I, D/K or NTSC , please change them with the buttons
.
RF Channel
Here you can select which channel the modulator has to use.
This is only needed if you connect your receiver with the IEC coaxial connection at the
output TO TV to your TV set.
Selection: Channel 21 to 69 , please change with the buttons
.
Picture Format
This option is only available when you have not selected TV format in mode AUTO.
Options: Pan&Scan or Letter Box , please change with the buttons
.
In this option you can choose how the pictures in films with a big format will be adapted to your TV set.
If you select Pan&Scan you will see one part of the film and at the left and right sides it will be cut
In Letter Box, the picture will become smaller and you will see on top and bottom two black bars.
TV output
This option allows choosin g ho w th e r eceiver will send the colours to the TV s et .
Selection: CVBS , RGB, SVIDEO or YUV , please change with the buttons
.
Loop VCR
Here you select the priority of an external video signal.
If you have selected Slave, the receiver shows every time the signal coming from the VCR Scart connector, when there
is signal available. It also can be a signal from DVD player or r ecorder.
If you have select Master , the signal from receiver has priority and you will see only the signal from connector VCR
scart when the receiver is in Standby mode.
Selection: Master or Slave , please change with the buttons
.
LPC Mode
Not available in this model.
Sleep
If you want shut down the receiver au tomatically, you can choose here the tim e f or t he sleep timer.
Selection: 15, 30, 45, 60, 75, 90, 105, 120 or Sleep Off
Please change it with the buttons
.
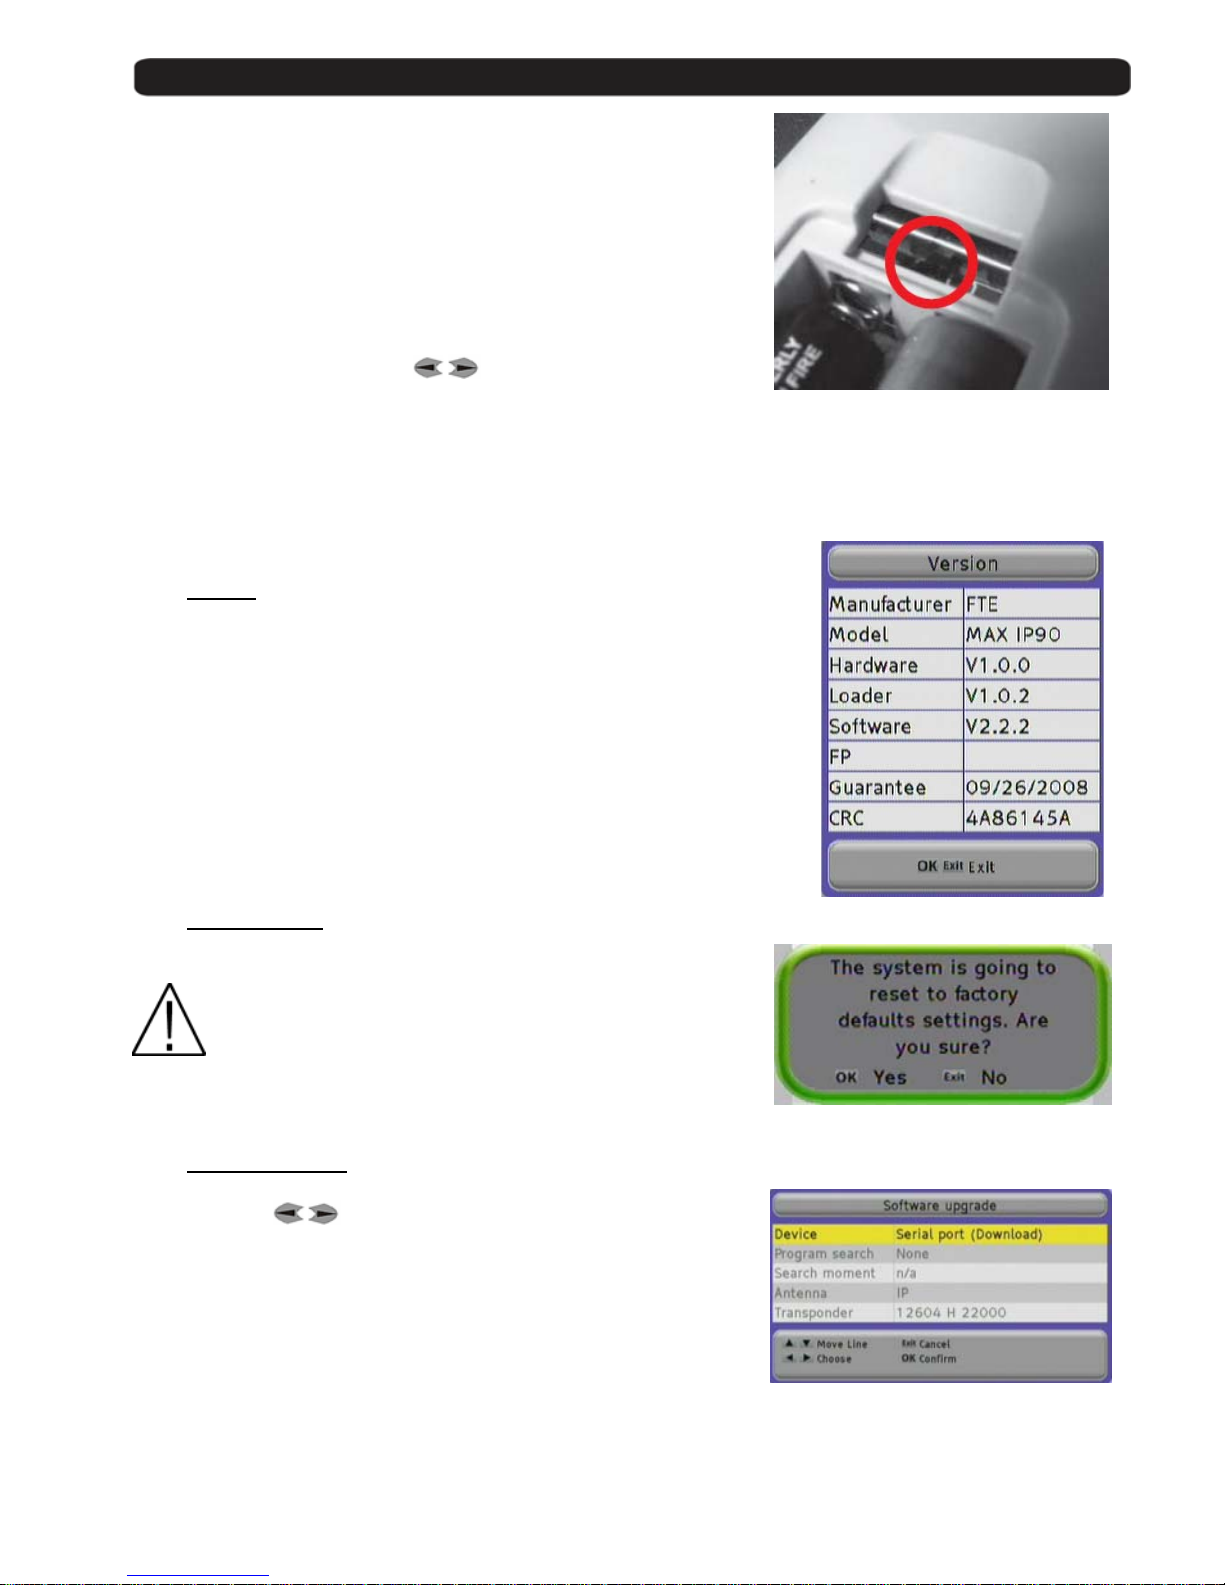
6.6. OSD Settings
Remote control
Here you can change the trans m ission code for the remote control if you
have problems with other devices.
Please change it with the buttons
.
For saving the changes, please press OK .
Page 21
User’s manual · MAX IP90
Technical changes and mistakes reserve - 21 - MAX IP90 Version en_1.0 FTE Maximal
Do not forget to change also the code on the remote control.
For this, you have to change the position of a switch in th e remote control.
You have to select the same position in the receiver than in the remote
control.
Info bar dela y
Here you can select how long the information of the OSD will be displayed
on the screen.
Selection: 1 to 10 sec.
Please change it with the buttons
.
Number of Sequential Channel
Selecting Yes in this option, the positions of the chann els will be occupied continuously and sequentially. Although you
move the position of one channel, you will shift the positio ns to avoid leaving empty channe ls.
Selecting No, you can leave empty channels if we shift th e position of one channel.
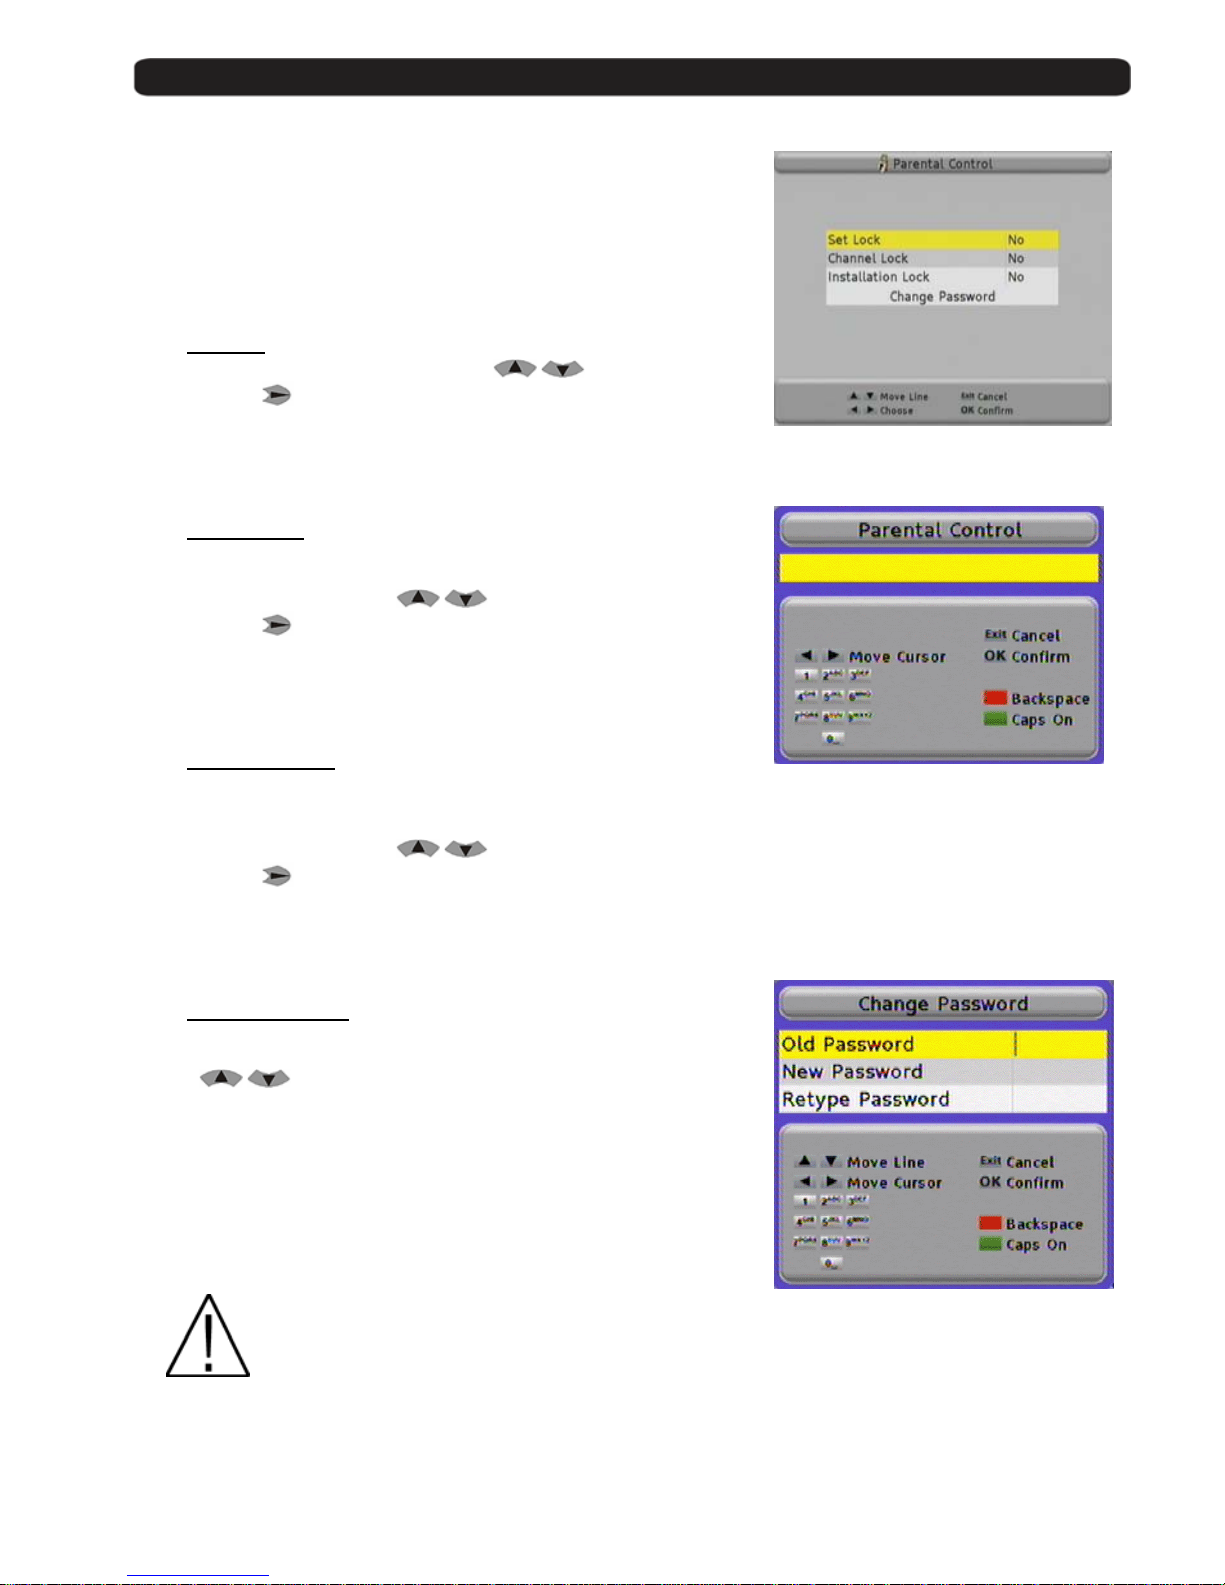
6.7. Version
Here you get information about the hard and software from your receiver.
Manufacturer Manufacturer of the receiver.
Model Exact article name.
Hardware Revisions number from main PCB
Loader Version for boot loader
Software Version for installed software
FP Not available in this model
Guarantee Beginning of the warranty time
CRC Checksum of the EEpr om
6.8. Factory Default
With this option you can restore the receiver totally to the status when
the receiver was used the first time.
Caution: Make this only if you are 100% sure, this step can
is irreversible.
6.9. Software Upgrade
With this menu you can transfer data and install ne w software.
With the buttons
you can choose between the following
possibilities.
Serial port (Download) Start data download via RS-232 connection.
Air (now) Starts data download via OTA immediately
Air (programmed) Starts data download via OTA at a pro grammed time
Page 22
User’s manual · MAX IP90
Technical changes and mistakes reserve - 22 - MAX IP90 Version en_1.0 FTE Maximal
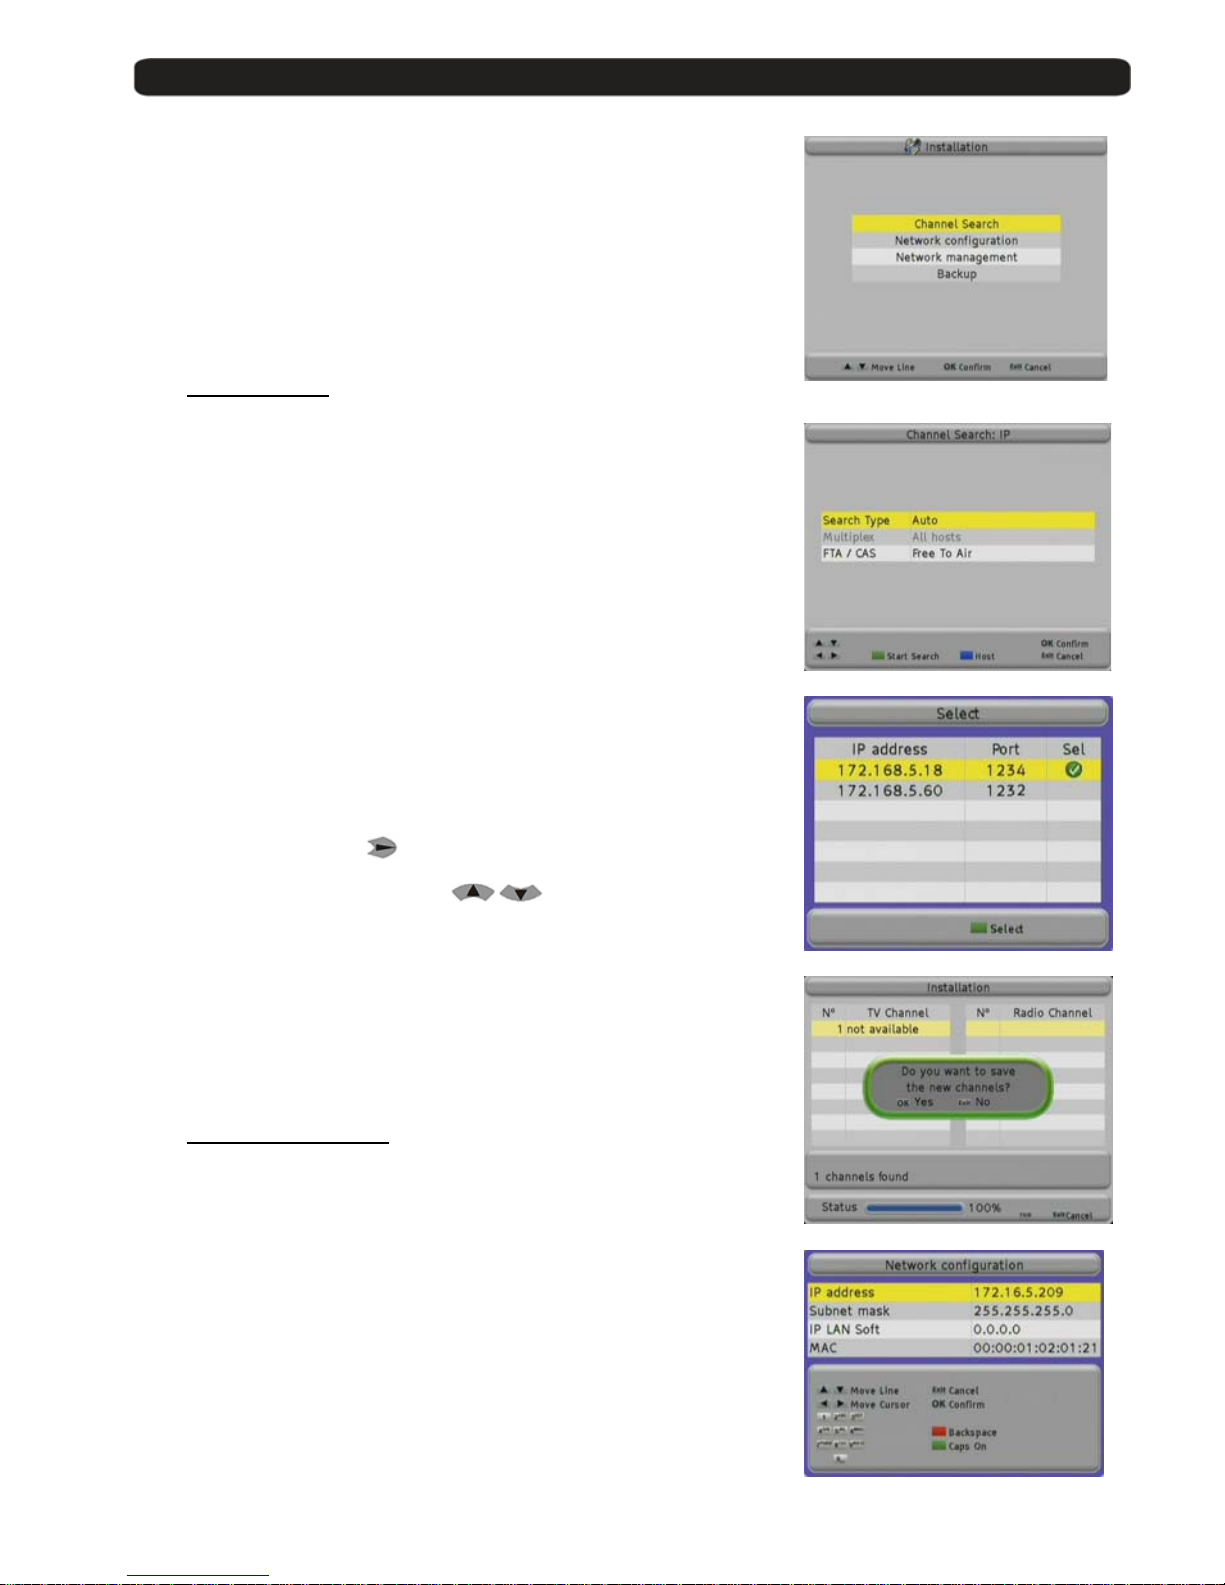
7. Parental Control
With this menu, you can activate the parental control where is necessary
to give one password before opening channels or making settings.
7.1. Set Lock
To activate the parental contro l, select with
button Set Lock
and then press
.
You have to give the standard code 0000 or your individual on e with the
numeric block from the remote control. Then press OK button.
7.2. Channel lock
Here you can activate the parental control for channels if you have marked
it in Channel Management for Lock.
For this, select with the buttons
the line Channel Lock
and than press
.
You have to give the standard code 0000 or your individual on e with the
numeric block from remote control. Then press OK button.
7.3. Installation Lock
Here you cane activate the parental control for the menu Parental control,
System Settings and Installation.
For this, select with the buttons
the line Installation Lock
and then press
.
You have to give the standard code 0000 or your individual on e with the
numeric block from remote control. Than press OK button.
7.4. Change Password
When you want to chan ge the standard password, select for this with the
buttons
Change Password and press OK button.
Old Password Input here the actual password
New Password Input here the new password you want.
Password must have 4 digit.
Retype Password Retype here the new password
and press OK button.
If you loose in any time the standard or your individual password you can unlock it with master
password 5100.
Page 23
User’s manual · MAX IP90
Technical changes and mistakes reserve - 23 - MAX IP90 Version en_1.0 FTE Maximal
8. Installation
Over this menu you can search for new channels Channel Search,
modify the frequency list MUX Management, or make backups.
8.1. Channel Search
The receiver will carry out a search for channels broadcasted by other
equipment connected to the network.
You can receive transm issions of other equipment in mode Unicast and
Multicast.
- Unicast is when the information is sent from a unique sender to a
unique receiver.
- Multicast in when the information is sent through a network to
multiple destinations simulta ne o usl y. The equipment that work in
multicast mode send the information into an IP range between
224.0.0.0 and 239.255.255.255.
In Search Type select Auto to search for all the channels which are
broadcasted by other equipment in your network in multicast mode. If you
select the Host option, it will look for transmissions of the equipment present
in the list Network Management that you selec t.
In the field Multiplex you should select the hosts from the list Network
Management in which yo u wi th to search for channels.
Pressing the Blue button or
a new window will appear, where you can
select the hosts.
You can move the cursor wi t h
.
With the Green button you select the hosts.
Press Exit to go back to the search menu.
If you press the Green button, it will carry out a search of the video IP
channels.
Press Exit to exit.
8.2. Network Configuration
The receiver will require the introduction of the needed parameters to be able
to get connected to a network, as well as to be visible to other equipments so
that receive streaming of vi deo and audio.
You should introduce the following parameters:
IP Address Number of 32 bits expressed in 4 numbers between
0 and 255 which identifies the receiver inside its
network.
Every device in the network should have a different
IP Address and it is highly recommended that all of
them are in the same subnetwork and with IP
addresses into the following range:
10.x.x.x
172.16.0.0 – 172.31.255.255
192.168.x.x
Page 24
User’s manual · MAX IP90
Technical changes and mistakes reserve - 24 - MAX IP90 Version en_1.0 FTE Maximal
Subnet Mask Number in IP format that, combined with the IP address, identifies where the equipment is.
IP LAN Soft: IP address of the PC where the application for exchanging video streamings between the
PC and the receiver is in stalled.
If you want, you can do wnload the application IP LAN Soft from the Website:
www.ftemaximal.com
MAC Device address at hardware level. It is unique in each device and it comes from the factory.
You can move through the menus with the buttons
and .
With the Red button you delete the last character.
Press OK to save the changes.
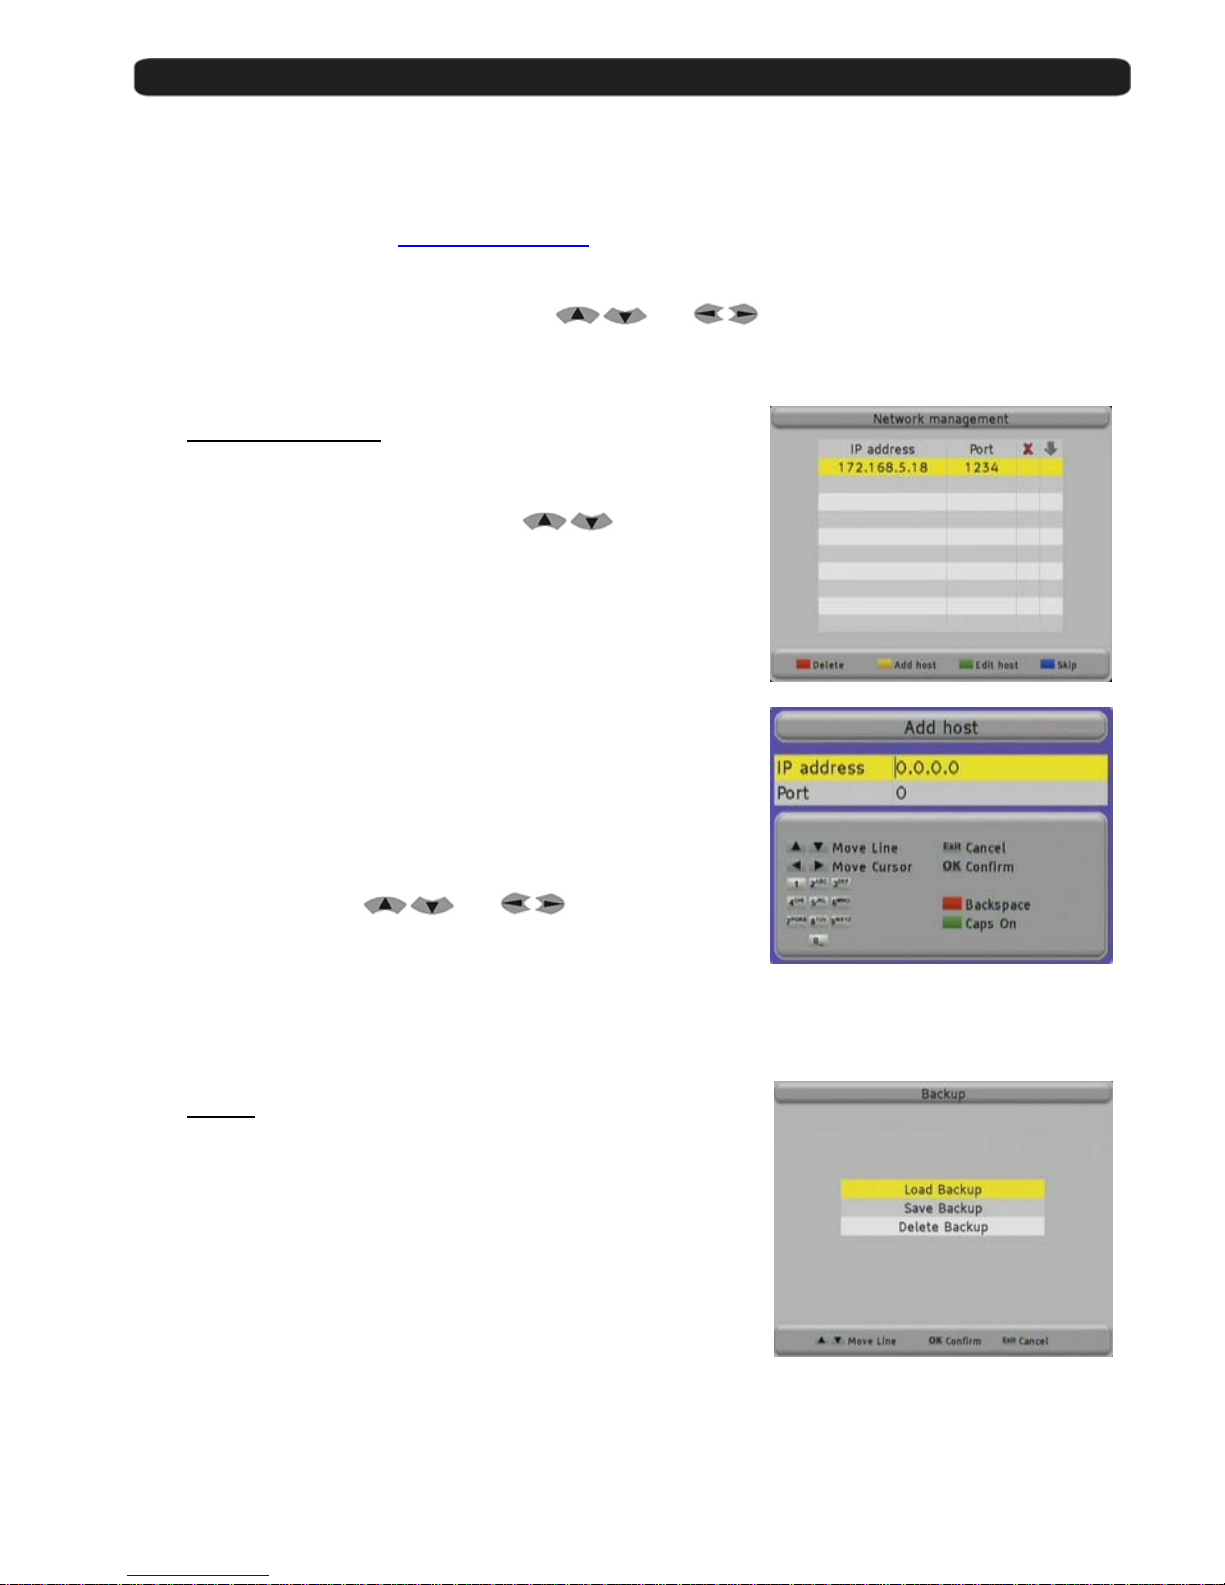
8.3. Network Management
In this menu you can manage the equipment you decide to receive
streaming from, in mode Unicast.
You can move through the list with the buttons .
Pressing the Red button you can delete a host from the list.
With the Yellow key a new window will appear where you will be able to
add a new host.
At IP Address introduce the IP address of the sender device.
Every device in the network should have a different IP Address and it is
highly recommended that all of them are in the same subnetwork and
with IP addresses into the following range:
10.x.x.x
172.16.0.0 – 172.31.255.255
192.168.x.x
At Port introduce the nu mber of the port where the information will be
received. The port must be an even number in the range between 1024 –
65534.
You can move with buttons
and .
With the Red button you will delete the last character.
Press OK to add the new host.
With the Green button you can edit the information of the selected host.
With the Blue button the receiver will not ta ke into account the selected receiver when you carry out a search of IP
channels.
8.4. Backup
Here you can save and load personal backups.
Load Backup
This function load one backup from internal receiver memory.
Save Backup
This function saves one ba cku p to the in t er n al rece i ve r m emory.
This process overwrites whatever backup made before.
Delete Backup
This function deletes one backup in the internal receiver memory.
Page 25
User’s manual · MAX IP90
Technical changes and mistakes reserve - 25 - MAX IP90 Version en_1.0 FTE Maximal
9. The equipment of the receiver
9.1. Technical data
The features of a digital receiver depend only on a part of its hardware / electronic components.
A big part of the functions are made by the software.
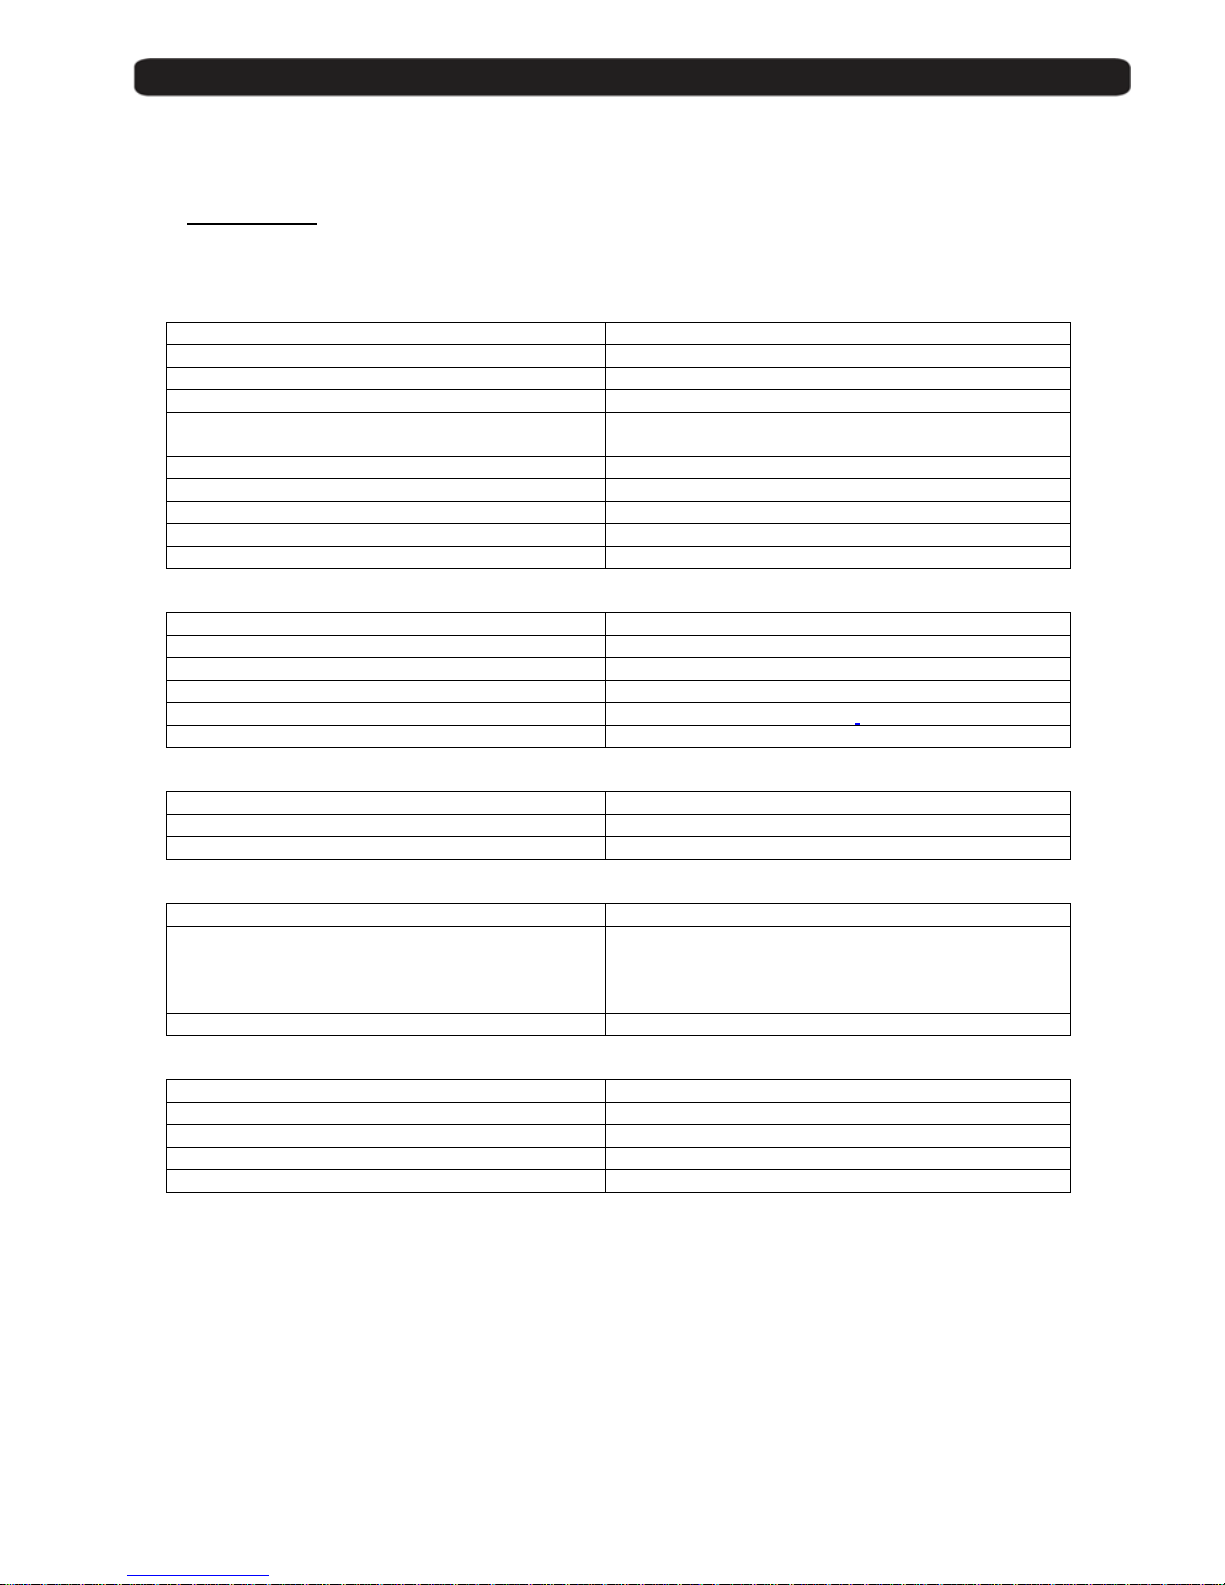
General
Reference MAX IP90
Code 0710020
Reception range IPTV
Memory places 5000
OSD Language
English, German, French, Spanish, Italian,
Portuguese
Codes for remote control 3
Electronic Program Guide (EPG) Yes
Integrated tele text decoder Yes
Memory for tele text 800 pages
Data connections RS-232
VIDEO
Decoding MPEG-2 & MEPG-1 compatible
Bit Rate Max 15Mbps
Output NTSC / SECAM / PAL
Screen format 4:3 / 16:9 / Auto
Resolution 720X480 @ 30fps; 720X576 @ 25fps
Connections Scart or RCA
AUDIO
Decoding MPEG-2/MEPG-1 layer 1&2
Sampling rate 32 / 44,1 / 48
Connections RCA, AC3 coaxial
NETWORK
Network Interface 10/100 (RJ45) half/full duplex, auto negotiate
Network Protocols (over IP v4)
UDP/RTP
SAP/SDP
TCP
IGMP v1, v2
Input Max Bitrate 9.4 Mbps
DIVERS
Power supply 90~260VAC 50Hz~60Hz
Power consumption Typ. 8 watts / Máx. 10 watts
Operation temperature +5° to +40°
Size (B×T×H) 280x195x60 mm
Weight 1.3Kg
 Loading...