

Page 1

Mini Solar Bluetooth GPS Receiver User Manual
N
5.2. Configuration setup with PC connection
Here is a sample to show you how to connect the Bluetooth GPS Receiver with your PC,
software install and basic function test.
1) First, select a PC with Bluetooth interface. Or you can purchase Bluetooth adapter for your PC.
Please contact with your PC’s sales about this.
2) Check your Bluetooth manager if there exist any configuration of Bluetooth Serial Port Profile
like this:
Note: this sample is for your reference only. The screen may be various between different models
of Bluetooth manager software.
3) If not found, please create a Bluetooth serial port by yourself. The configuration should be like
this:
ame it as
you wish
Please uncheck the
secure connection
4) If there is already one, please check the content. Some Bluetooth device will enable the secure
connection. Please refer to the configuration as above to uncheck it.
5) Power on your GPS Receiver. If the battery is ready, you should see 2 LED light up: the blue
LED blink 3 times/sec means Bluetooth is activated and waiting for connection. Another static
red LED shows the GPS module is started and is inquiring position information.
-8-
Page 2
Mini Solar Bluetooth GPS Receiver User Manual
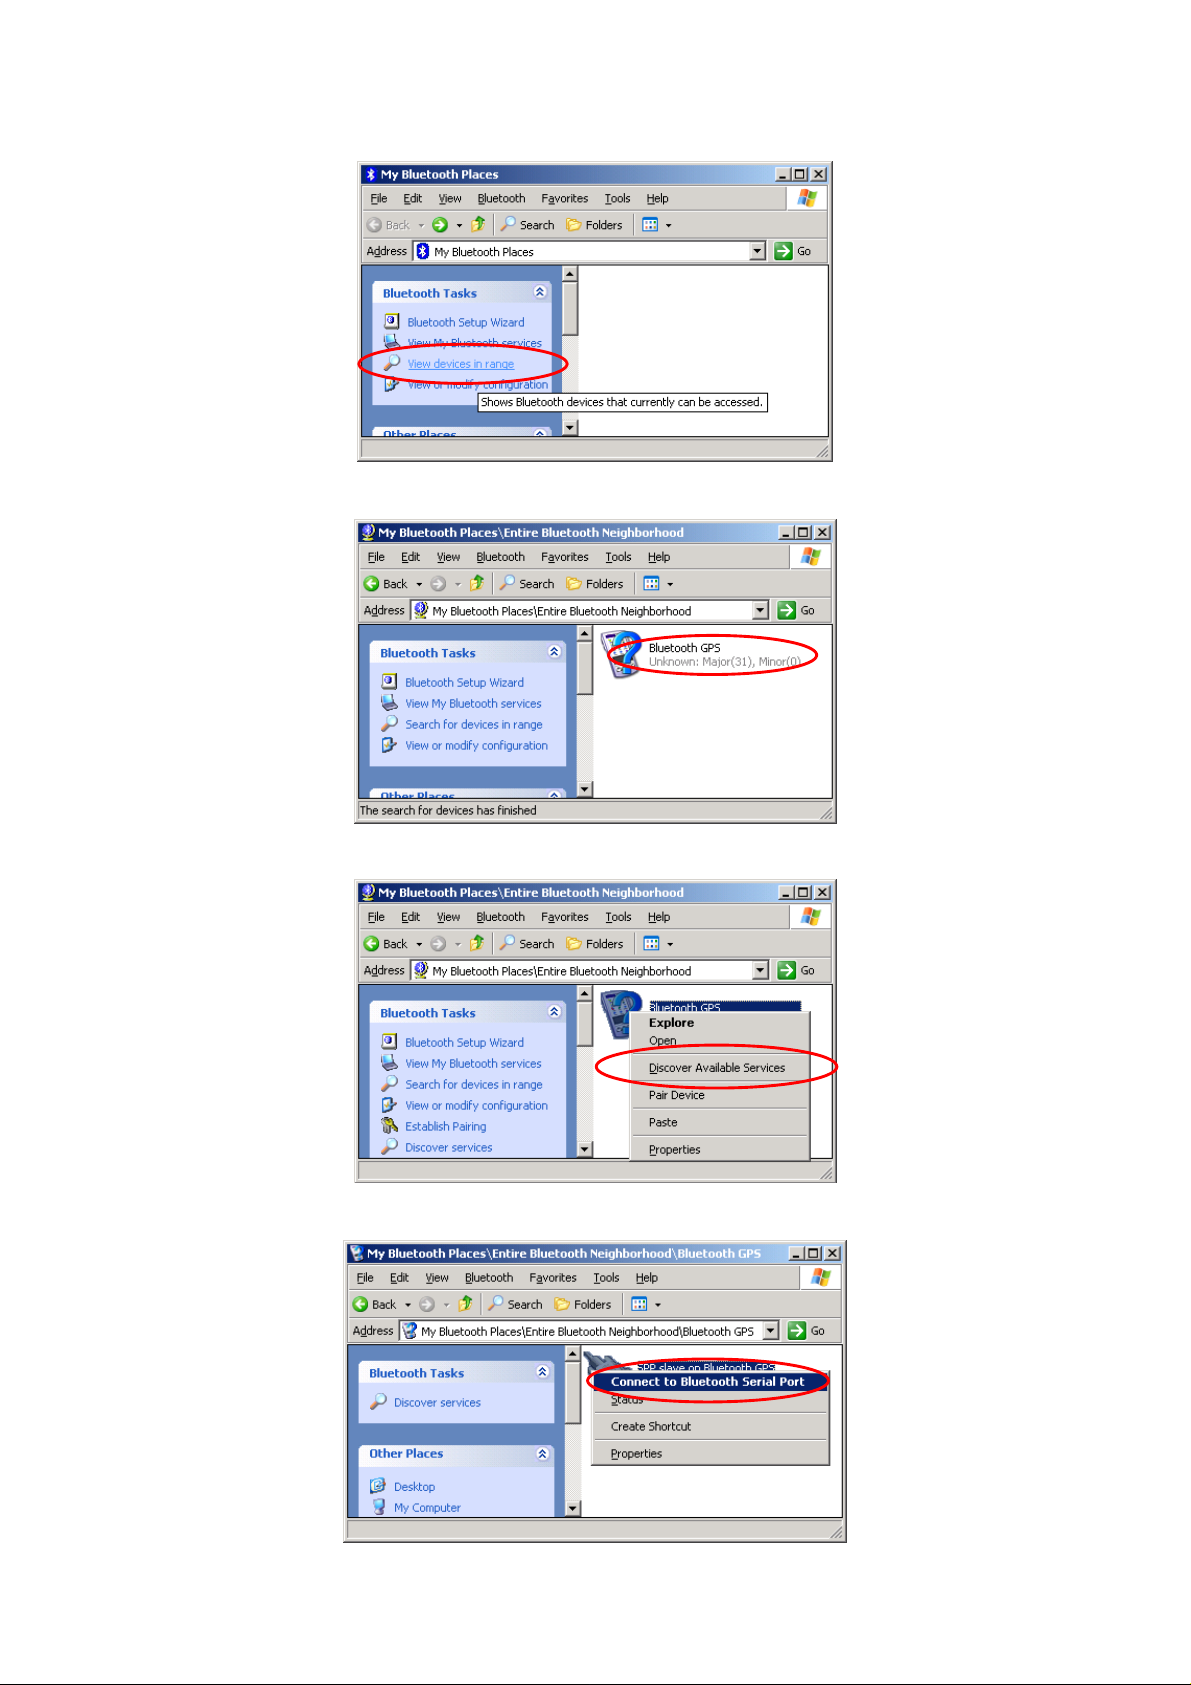
6) Open your Bluetooth places; you should see nothing while using firstly.
7) Click the [View devices in range] and you should find a [Bluetooth GPS] show as below:
8) Right click on the icon, select the [Discover Available Services]:
9) You should find the service SPP slave, right click and select [Connect to Bluetooth Serial Port]:
-9-
Page 3
Mini Solar Bluetooth GPS Receiver User Manual
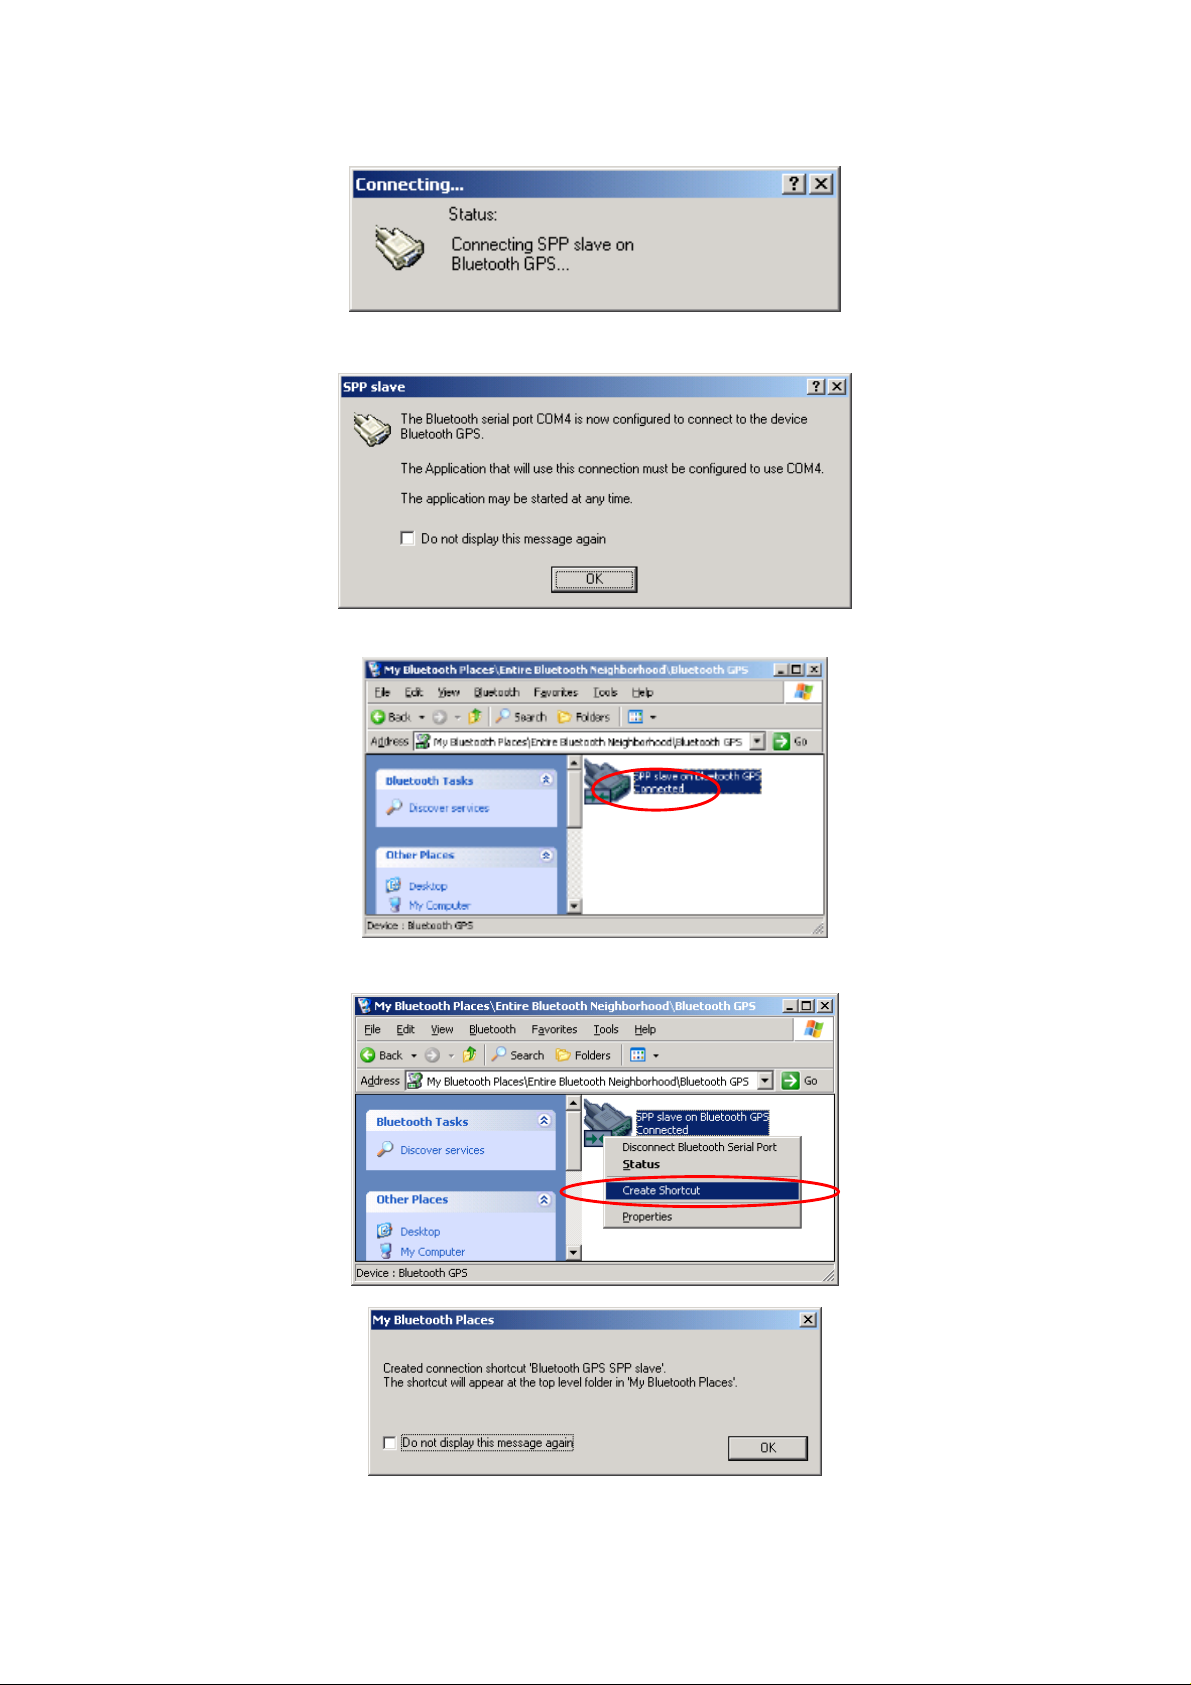
10) The follow message will show:
11) And the connection successful message:
12) Back to the Bluetooth service view, you should see the icon changed to [Connected]:
13) If you wish to use the connection more easily next time, you can create a shortcut for this:
-10-
Page 4

Mini Solar Bluetooth GPS Receiver User Manual
14) You will see the shortcut you just created:
5.3. Configuration setup with PDA connection
Following will show how to configure the Bluetooth connection on PDA. It may be different
from other PDA models.
1) Power on your PDA and the Bluetooth host.
2) Power on the GPS Receiver. If the battery is ready, you should see 2 LEDs indication: the blue
for Bluetooth blinks 3 times/sec. It means the Bluetooth module is activated and waiting for
connection. The red LED for GPS, means the GPS module is activated and is inquiring GPS
signal.
Red LED
Blue LED blinks 3 times/sec
-11-
Page 5

Mini Solar Bluetooth GPS Receiver User Manual
3) See the screen, click Bluetooth mark at bottom, and [Bluetooth Manager] as below:
4) If this is your first time to use Bluetooth GPS, click the Bluetooth mark at the bottom as below:
5)Then the Bluetooth connection wizard show up, select [Explore a Bluetooth device] and click
[Next]. In the next page, click the box to search Bluetooth devices. Your PDA will find the
Bluetooth GPS and show it in the window. Click the icon to search for service.
-12-
Page 6

Mini Solar Bluetooth GPS Receiver User Manual
6) Back to the [Explore a Bluetooth device] as below. Click [Next] to list service on Bluetooth GPS.
[SPP slave] should appear in the service list box, click it and click [Next] to finish shortcut
creation. Don’t forget to uncheck the secure connection box.
7) Back to the main screen of [Bluetooth manager] as below. Please double-click the icon to
connect the Bluetooth GPS Receiver . If connection successful, a green arrow will show as below
at right.
8) You may start to use any map/navigation software and use the GPS function now.
5.4. Software Install/Usage Guide
1) Please make sure your PDA is connected properly with your PC using Microsoft ActiveSync. If
you have not install ActiveSync yet, you can install the copy from the bounded CD-Rom, version
3.7.1. Please connect your PDA with your PC by the cable/cradle for your PDA, it should be
found in your PDA accessory pack.
-13-
Page 7

Mini Solar Bluetooth GPS Receiver User Manual
2) Insert the CD-Rom into your CD drive. If your auto-run function works, you will see the
welcome screen as below:
3) Select the language you preferred. We choose the “English” here:
-14-
Page 8

Mini Solar Bluetooth GPS Receiver User Manual
4) Click the [Useful tools and PocketPC utility] at the left:
6. Warranty
The Mini Solar Bluetooth GPS receiver is warranty for free from defect in material and
function for 1 year from the date of purchase. Any failure of this product within the period under
normal conditions will be replaced at no charge to the customers.
This warranty does not cover failures due to abuse, misuse, accident, or unauthorized alteration or
repairs, inappropriate disassemble.
Ø Since the Mini Solar Bluetooth GPS Receiver got high performance rechargeable lithium-ion
battery, we strongly recommend you not to place it under the sunshine for a long time.
Ø The warranty will become invalid if any miss-operation found.
7. Trouble Shooting
7.1 Problem of Setup
Error/Problem Cause Trouble shooting
Can not find the GPS
device through
Bluetooth interface
Unable the connect
through Bluetooth
Install not correct or battery low Check if Solar Bluetooth GPS
Receiver is installed properly, and
confirm the battery level is suitable
(green LED blinks or none LED)
Configuration incorrect Please refer section 5.2 to re-install.
Or refer to your PDA’s user manual
for configuration.
Fail to open COM
Port
No NMEA code
(GPS data flow)
Bluetooth manager is not configured
properly, or the COM port is adopted
by another software.
(1) Some PC/PDA will enter the
power saving mode if you stop
-15-
Please check your Bluetooth manager
settings, close the software may use
COM ports and try again. Or check if
there is any password protection.
(1) Disable the power saving mode,
try to connect GPS receiver again.
Page 9

Mini Solar Bluetooth GPS Receiver User Manual
Unstable GPS signal
sunlight film
Plug External antenna and place on
Error/Problem Cause Trouble shooting
input for a few minutes. Bluetooth
interface will be reset in such case.
(2) Wrong baud rate or com port
setting
(1) degrade by anti-
with receiver placed inside car
(2) some cases described in sec7.2
Poor GPS signal (1) 2.5MR Storm effect
(2) Atmosphere turbulences
(3) SA ON by USA military.
(2) Correct with right baud rate &
com port
car roof
NA
7.2 Concerning of Poor GPS Signal
It is possible unable to receive GPS signal or signal low in these places:
Ø Inside the tunnel, GPS signal is blocked.
Ø Covers above, GPS signal is blocked.
Ø Inside buildings, GPS signal is blocked.
Ø Beside some buildings, GPS signal is disturbed.
-16-
Page 10

Mini Solar Bluetooth GPS Receiver User Manual
Ø Inside forests, or too many covers, GPS signal is disturbed.
n If you use the Bluetooth GPS Receiver inside the car, some anti-sunlight windscreen film
will make the GPS signal degraded or signal blank.
n GPS satellite is owned by America military, sometimes they will tune-down the accuracy by
some reason. In such cases, the GPS position may not fixed exactly.
-17-
 Loading...