

Page 1
MAX S400 HD PLUS
Page 2
PAG.
2
rev 1.1
QUICK INSTALLATION GUIDE
Warning:
-The apparatus shall not be exposed to dripping or splashing and that no objects fi lled with liquids, such as vases,
shall be placed on the apparatus.
- Do not place naked fl ame sources, such as lighted candles on the apparatus; otherwise, there is the danger of
fi re.
- The unit should be connected to a power supply only of the type described in the operating instructions or as
marked on the unit. If you are not sure of the type of power supply (for example: 120 or 230V) to your home, consult
your local dealer or local power company.
- Do not open the cabinet or touch any parts in the inner mechanism. Consult your local dealer for technical service
if the opening is required.
- The mains plug is used as the disconnect device, the disconnect device shall remain readily operable.
- Take attention to the environmental aspects of battery disposal. The battery of remote control should not be
exposed excessive heat such as sunshine, fi re or the like.
- Maintenance man must use the appointed screw in the rear plate.
- Ensure a minimum distance of 5 cm around the apparatus for suffi cient ventilation.
- Ensure that the ventilation is not impeded by covering the ventilation openings with items such as newspapers,
table-cloths, curtains, etc.
- Use the apparatus only in moderate climates (not in tropical climates).
- Do not open the cabinet to avoid the unit direct exposure to radiation.
Unit Cleaning: After the unit power is turned off, you can clean the cabinet, panel and remote control with a soft
cloth lightly moistened with a mild detergent solution.
Attachments: Never add any attachments and/or equipment without the manufacturer consent; as such additions
may result in the risk of fi re, electric shock or other personal injury.
Locating: Slots and openings in the cabinet are provided for ventilation to protect it from overheating. Do not block
these openings or allow them to be blocked by placing the STB on a bed, sofa or other similar surface, nor should it
be placed over a radiator or heat register.
Power-Cord Protection: Place the power-supply cord out of the way, where it will not be walked on. Please take
special attentions to cords at plugs, convenience receptacles and the point where they exit from the unit.
Object and Liquid Entry: Never put objects of any kind into this STB through openings, as they may touch
dangerous voltage points or short-out parts that could result in a fi re or electric shock. Never spill any liquid on the
STB.
Note: Moisture may be formed inside the unit in the following conditions:
When the unit is suddenly moved from a cold environment or an air-condition room to a warm place.
Immediately after a heater has been turned on.
In a steamy or very humid room.
If the moisture forms inside the unit, it may not operate properly. To correct this problem, turn on the power and wait
about two hours for the moisture to evaporate.
Parts Replacement: When the unit parts need to be replaced, user should make sure the service technician use the
replacement parts specifi ed by the manufacturer or having the same characteristics as the original part. Unauthorized
replacement may put the unit in the risk of fi re, electric shock or other hazards.
Safety Check: After all the maintenances and repairs are done, user is required to request the service technician to
conduct the overall safety check to ensure the machine is in the proper condition.
The lightning fl ash with arrowhead
symbol, within an equilateral triangle,
is intended to alert the user to
“dangerous voltage” and to prevent
from a risk of electric shock.
WARNING: To reduce the risk of
electric shock, don’t open the cabinet.
Refer servicing to qualifi ed personnel
only.
The exclamation point within an
equilateral triangle is intended
to alert the user to important
operating and maintenance
(servicing).
Danger of explosion if battery is incorrectly replaced. Replace only with the same or equivalent type.
ENGLISH
Page 3
PAG.
3
rev 1.1
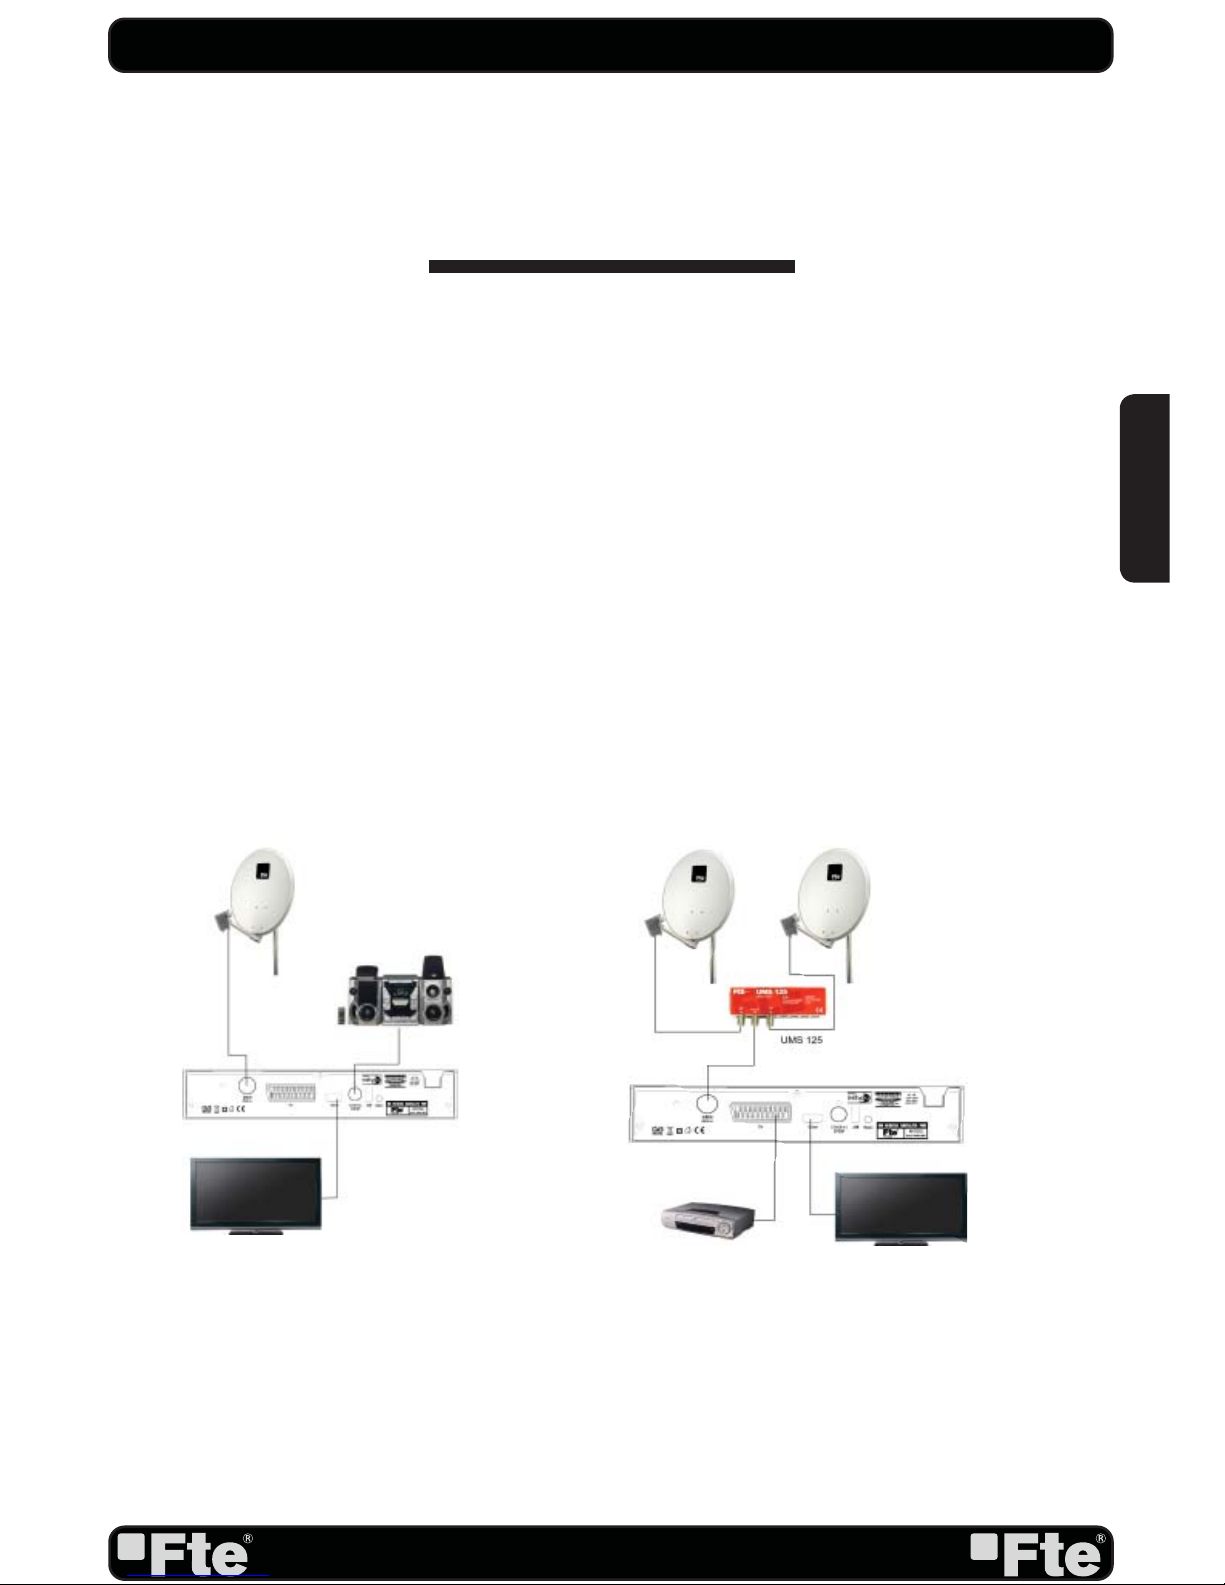
Example 1 – Basic System
Example 2 – DISEqC switches
QUICK INSTALLATION GUIDE
Follow next steps for the correct installation of this receiver.
STEP 1: OUTPUT VIDEO CONFIGURATION
In order to correctly visualise the reception signal on TV, you must confi gure the mode of the video
output.
By pressing the [V-FORMAT] key you can confi gure the output format. Options: (By source / By
Native TV / 480i / 480p / 576i / 576p / 720p_50 / 720p_60/ 1080i_50 / 1080i_60 / 1080p_50
/ 1080p_60).
STEP 2: CONNECTIONS
The coaxial cable, with satellite signal, must be connected to the “IF IN” connector. The “TV
SCART” or “HDMI” connectors must be connector to the TV set.
Depending on the type of installation, the receiver should be connected and confi gured following
next examples.
QUICK INSTALLATION GUIDE
ENGLISH
Page 4
PAG.
4
rev 1.1
STEP 3: BASIC CONFIGURATION OF THE
RECEIVER
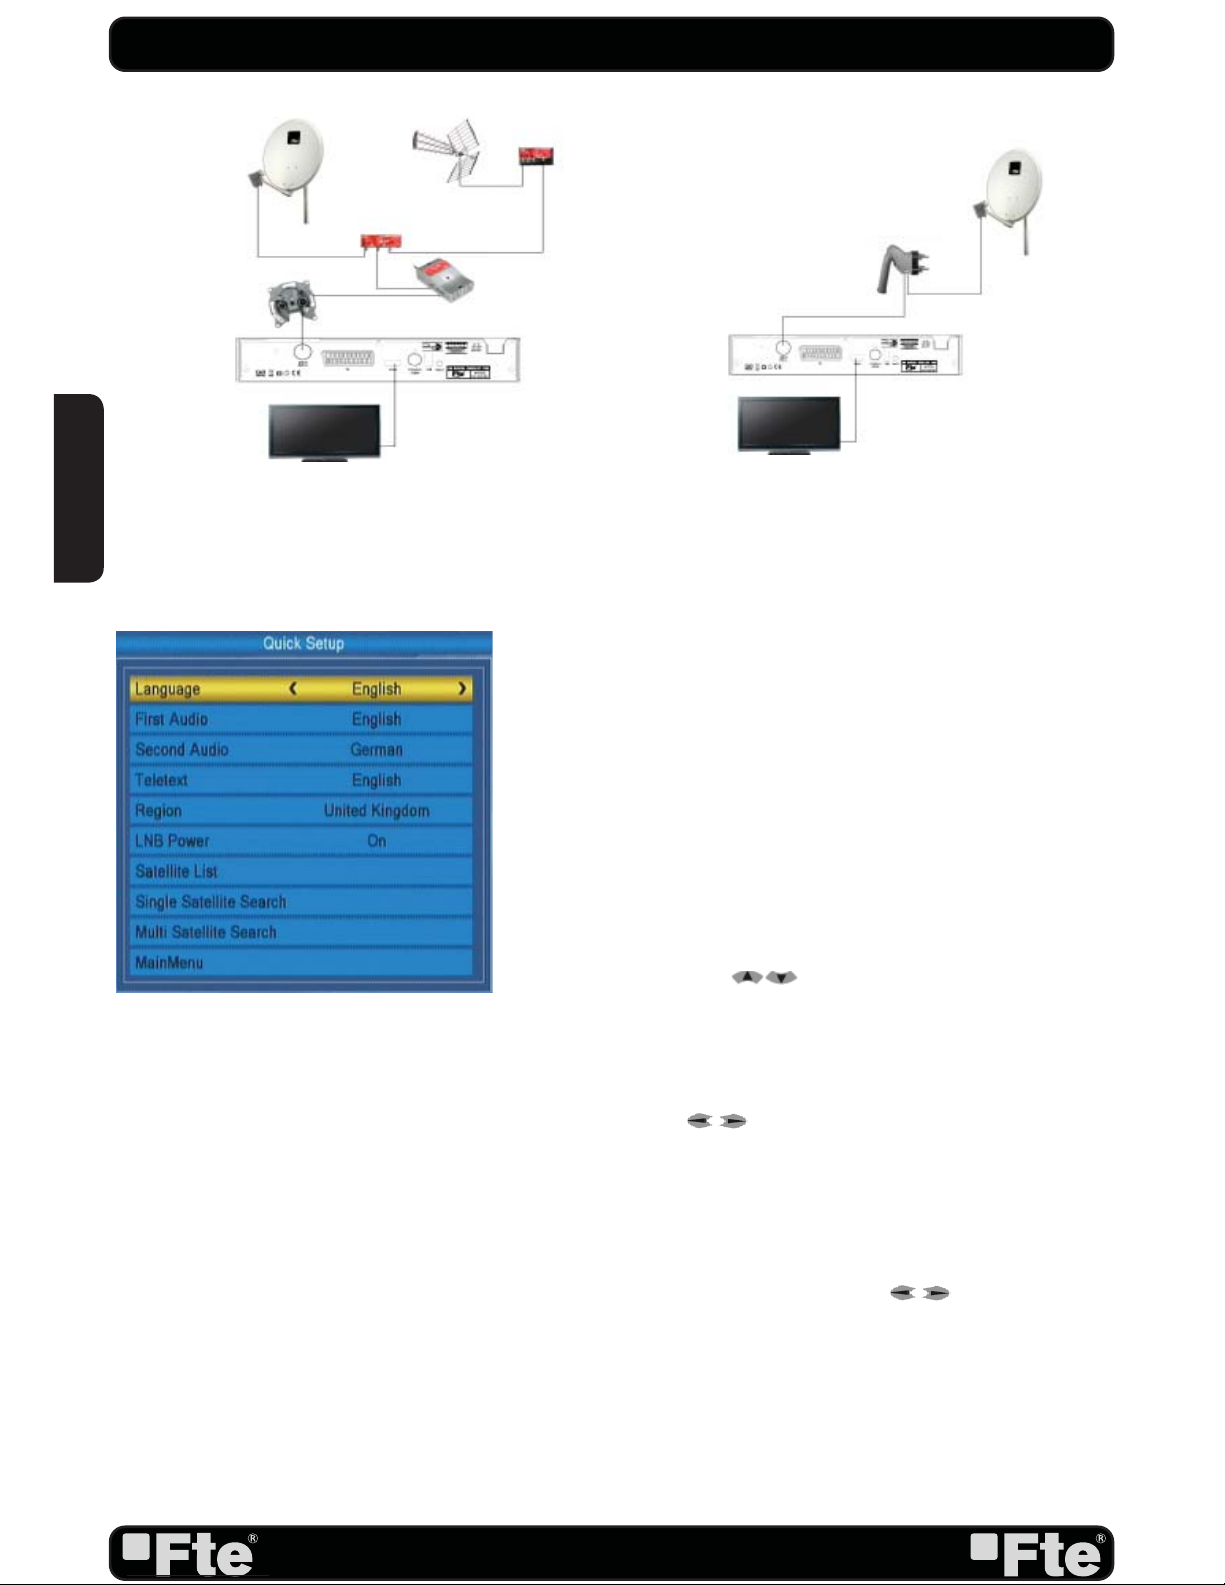
The receiver includes an installation assistant (Quick Setup)
that will help you to setup the different parameters.
When the receiver is turned on at fi rst time (using the button
at the rear panel of the receiver), the next menu is shown on
the TV (Image 1):
The receiver is programmed with all the channels of Astra
(at position 1 of the DISEqC), Hotbird (at position 2 of
the DISEqC), Hispasat (at position 3 of the DISEqC) and
Turksat (at position 4 of the DISEqC). If your installation
is different to this case, please follow installation steps to
search the channels.
In order to move through the different options of this menu,
please use the keys [ ] of your remote control. If a
“Short circuit on the LNB” message is shown on the TV,
please check the connections before continuing the
installation.
Language
: press [ ] to select languages. The selection
of languages include: English, German, French, Spanish,
Italian, Portuguese, Turkish, Polish, Russian, Arabic, Farsi.
First Audio
: Some channels offer more than one audio
language. This function allows you to set the preferred audio
language for those channels using [ ]. If a channel
offers the same audio language as the “First Audio” you
set the system will play this audio language as default. If
the channel does not offer this audio language then the
system will compare the offered languages with the second
audio language. The selections of audio languages include:
English, German, French, Spanish, Italian, Portuguese,
Turkish, Polish, Russian, Arabic, Farsi.
QUICK INSTALLATION GUIDE
Example 3 – Combined with terrestrial
Example 4 – Motorized system
IMAGE 1
ENGLISH
Page 5
PAG.
5
rev 1.1
Second Audio
: If the channel has no audio language that
corresponds with “First Audio” but with “Second Audio” the
system will play the second audio language as default. If no
audio language corresponds with the “Second Audio” then
the default language of the current channel will be played
instead. The selections of audio languages include: English,
German, French, Spanish, Italian, Portuguese, Turkish,
Polish, Russian, Arabic, Farsi.
Teletext
: Some channels offer more than one language. This
function allows you to set the preferred language for those
channels using [ ]. The selections of languages include:
English, German, French, Spanish, Italian, Portuguese,
Turkish, Polish, Russian, Arabic, Farsi.
Region:
select your country using keys.
LNB Power
: Here you can set the power output to the
LNB. If your receiver is connected to the LNB directly then
you need to set the LNB Power to “On”. If your receiver
is connected to a multi switch (SMATV signal distribution
system) then it may be that you don’t need to provide the
power to the LNB. But since this is depending on the kind of
installed distribution system we recommend you to contact
your installer or to refer to the user manual of this system to
get the correct information.
Satellite List:
This option shows all the stored satellites. This
list can be modifi ed.
Press [OK] to open the satellite list. Then press [
] to move the highlight and press [OK] to mark/unmark
and [EXIT] to fi nish the selection. You can select several
satellites in this menu.
Single search
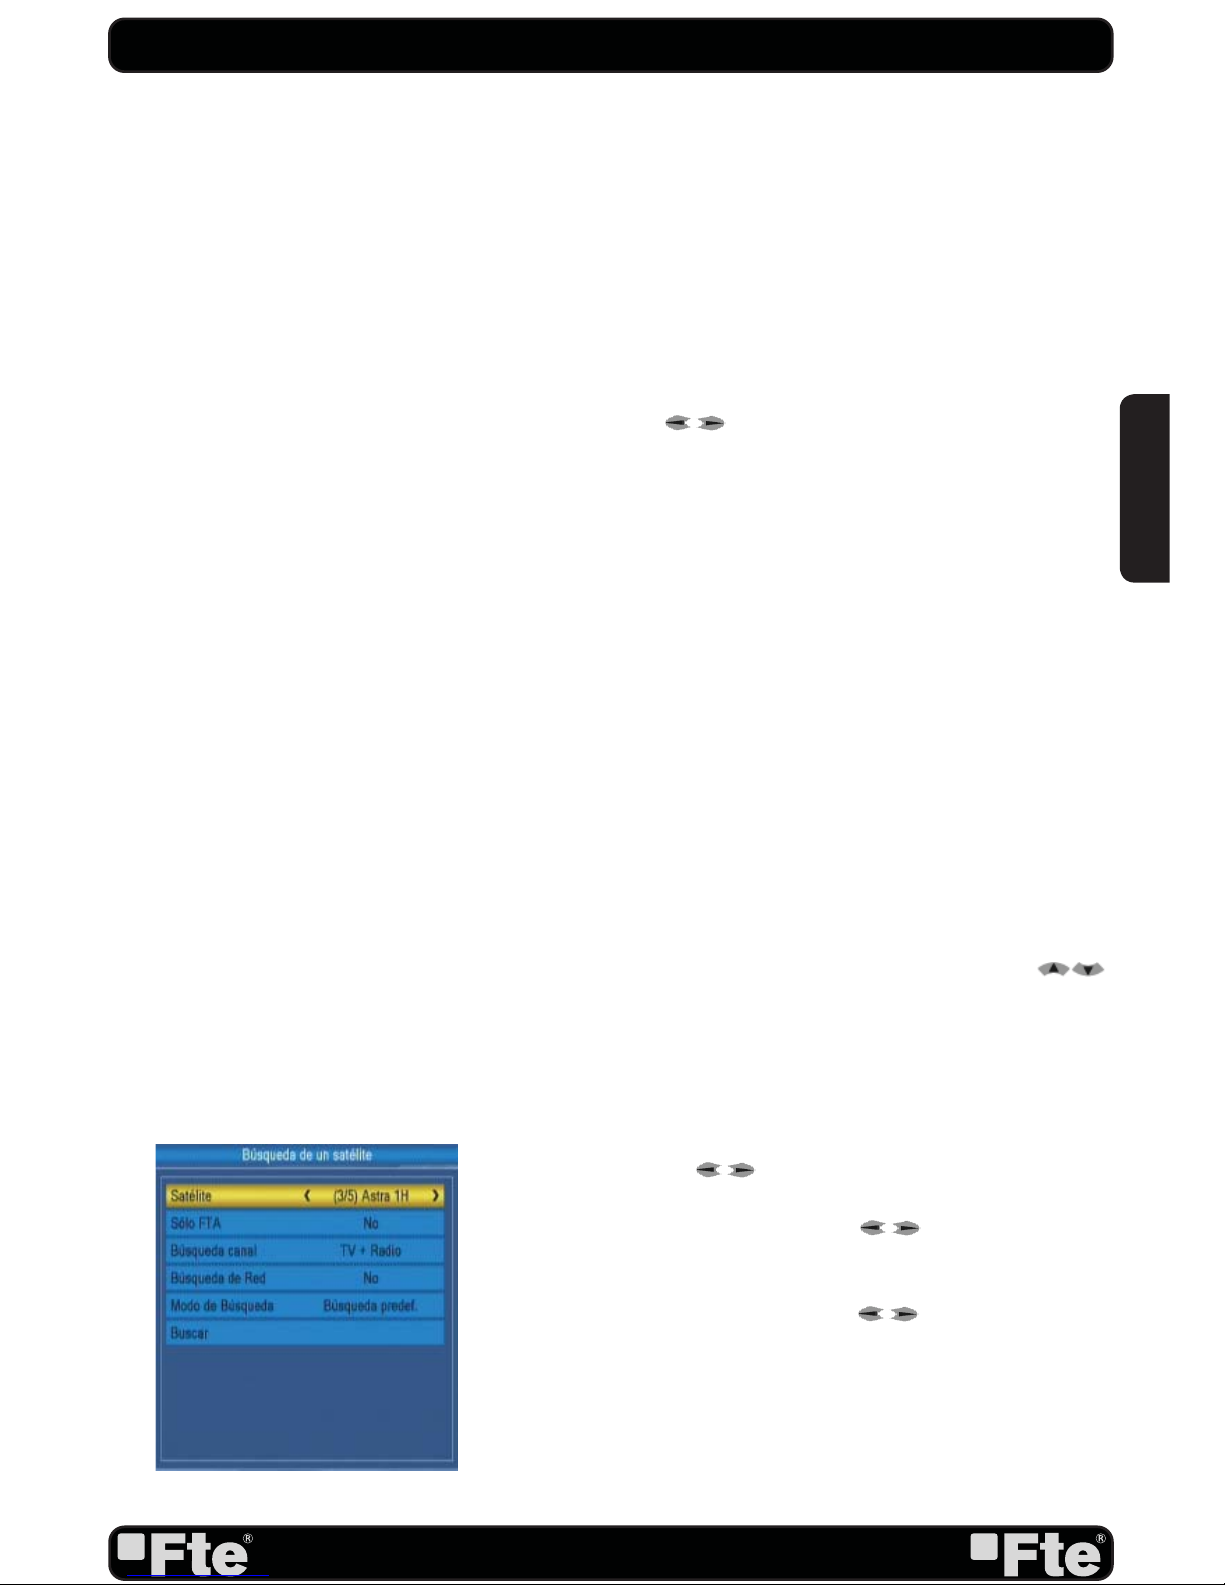
: You can edit the following items (Image 2):
1. Satellite: Press [ ] to switch Satellites or press [OK]
to enter satellite list to select directly.
2. In the “FTA Only” item, press [ to select to scan
only free channels or even scrambled channels. If you select
“Yes” it will scan free channels only.
3. In “Scan Channel” item, press [ ] to select to scan
TV + Radio Channels, or just TV channels or just Radio
channels.
4. In “Scan Mode” item you can select “Auto Scan” to blind
scan or “Preset Scan” to scan all preset transponders.
5. Move the highlight to “Search” and press [OK] button
to start scanning. Bars are showing the progress of the
QUICK INSTALLATION GUIDE
IMAGE 2
ENGLISH
Page 6
PAG.
6
rev 1.1
channel scanning in the lower part of the window and the
found channels are listed.
You can stop the scan with [Exit] and save the so far found
channels.
Press [Exit] to exit this menu. A window to confi rm the
changes will appear.
Multi search
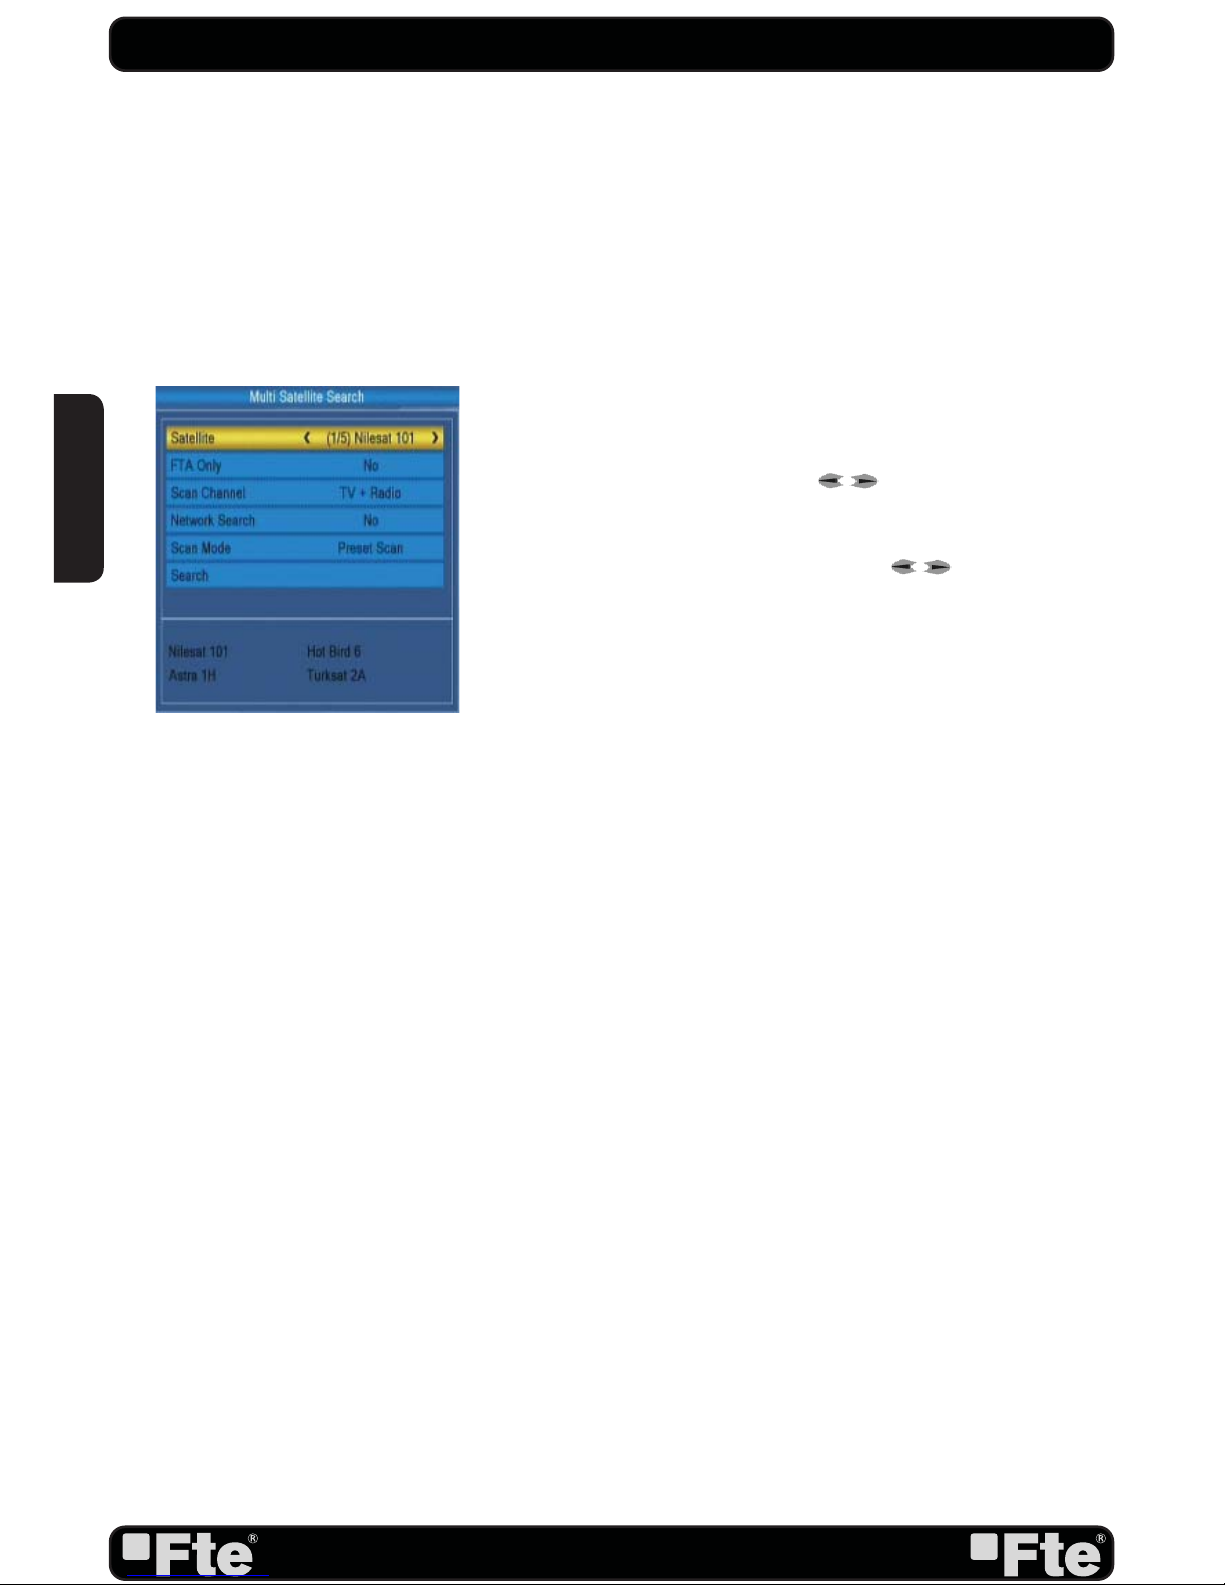
: You can edit the following items (Image 3):
1. On “Satellite” item press [OK] to open the satellite
list. At the bottom of the screen you can see the selected
satellites. The system will use DiSEqC1.0/1.1, DiSEqC1.2
and USALS functions to search the marked satellites and
scan channels.
2. On “FTA Only” item, press [ ] to select scanning of
all channels or just scanning of free channels. If you select
“Yes” it will scan free channels only.
3. On “Scan Channel” item, press [ ] to select the
scanning range from TV + Radio Channels, only TV channels
or only Radio channels.
4. On “Scan Mode” item, you can select “Auto Scan”
to make a blind scan or “Preset Scan” to scan all preset
transponders of the selected satellites.
5. Select “Search” and press [OK] to start scanning. In the
lower part of the window the progress of scanning and the
found channels are displayed.
6. Press [Exit] to cancel or fi nish the scanning and saving
the found channels.
Main Menu:
Selecting this option, the main menu will appear
on the TV.
QUICK INSTALLATION GUIDE
IMAGE 3
ENGLISH
Page 7
PAG.
7
rev 1.1
STEP 4: TIME CONFIGURATION
It is recommended to setup the clock before starting to
enjoy the receiver, because correct time maybe is required
by some applications. Please complete following options:
Press the [Menu] key of the remote control for appearing the
main menu. Select the “System Setup” option and confi rm
pressing [OK].
Once in the “System Setup” option, please select “Local
Time setting” option and press [OK]. Select “Time” option
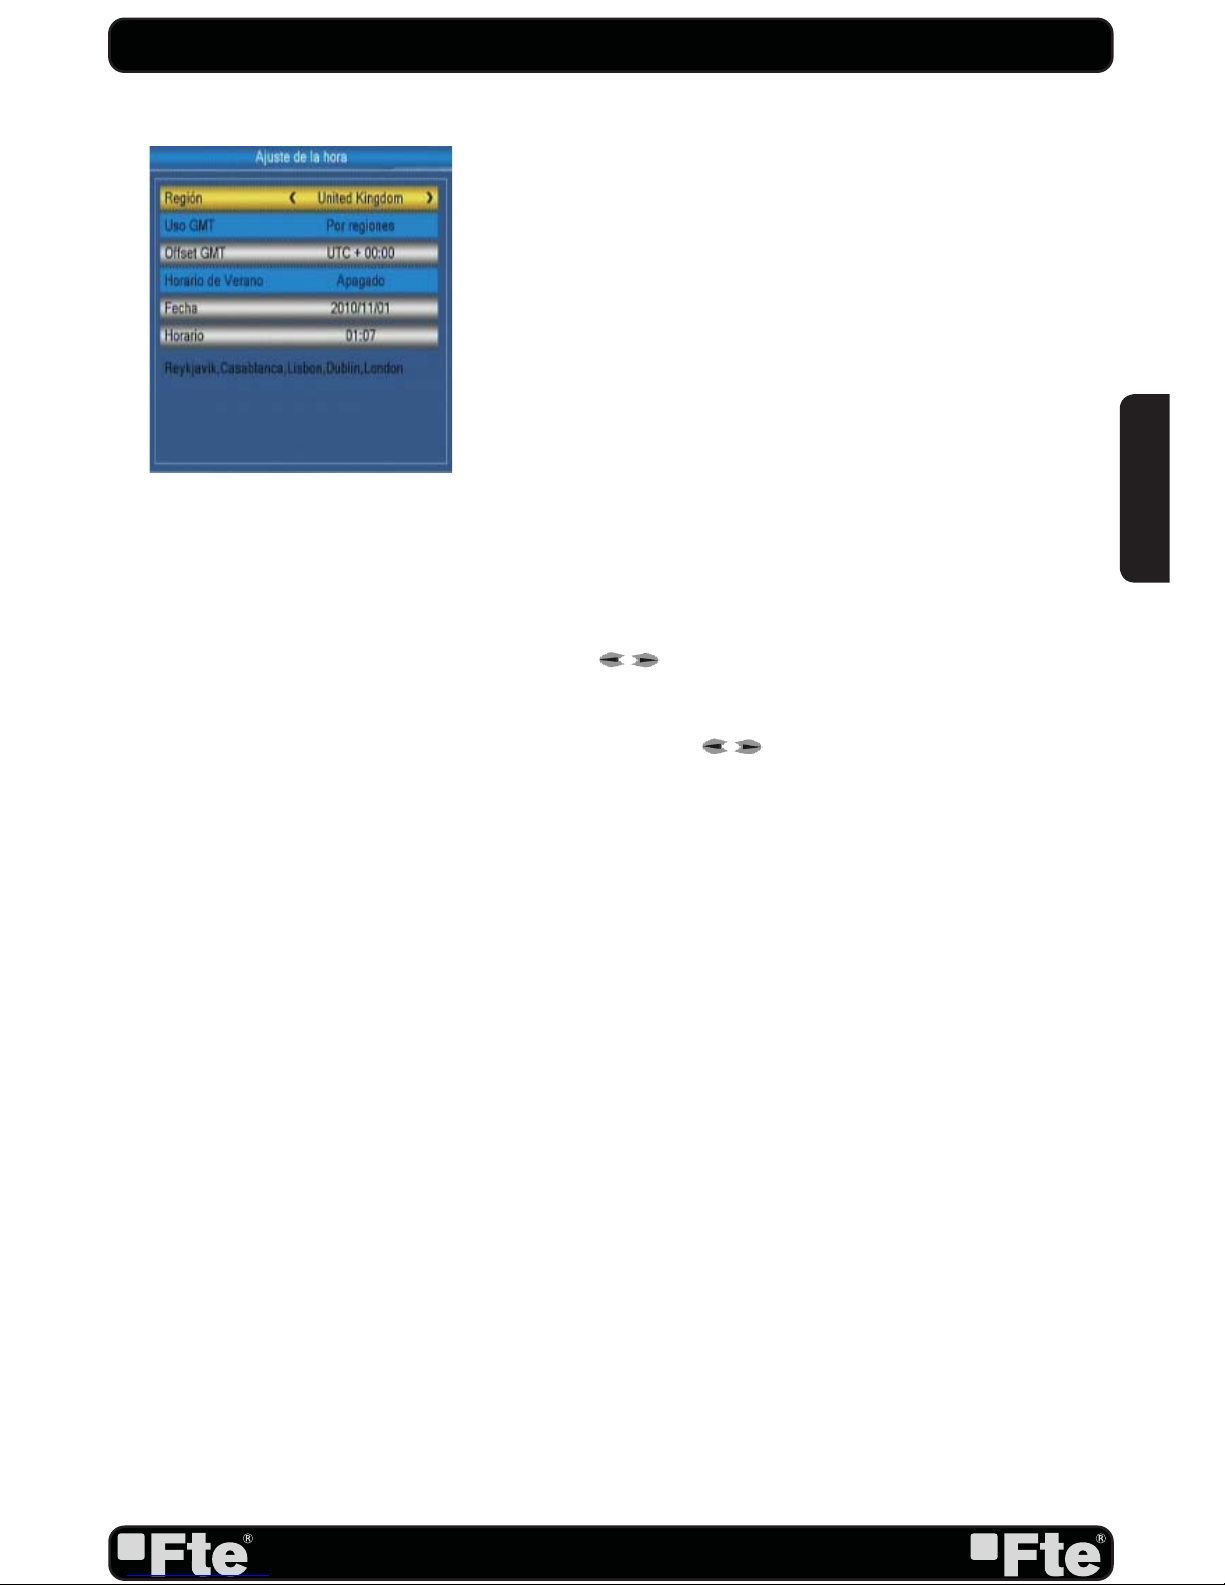
and press [OK]. Image 4 is watched on the TV. For setting
up the time, please complete:
1. Region: select your country using keys.
2. GMT Usage: this option will allow you to select if the date
and time will be introduced manually (GMT Usage: Off) or
if you wish to introduce the offset respect GMT manually
(GMT Usage: On).
3. GMT Offset: If GMT Usage is On, the offset respect GMT
has to be confi gured depending on your region or country.
Use the [
] keys to choose the offset. Remember that
the offset values are between -12:00 and +12:00
4. Summer: this option is only available when “USE GMT”
is enabled. Use [ ] to switch on/off the summer
timetable.
5. Date / Time: In order to introduce manually the time and
date. Before these values can be modifi ed, the automatic
control of GMT has to be turned off.
NOTE: If the current channel provides the correct time
information, you will see the current time after you entered
“Time” menu. If the channel doesn’t provide time information,
you have to input the date and time information manually.
The most channels support the time signal.
6. Press [Exit] to exit the menu.
QUICK INSTALLATION GUIDE
IMAGE 4
ENGLISH
Page 8
PAG.
8
rev 1.1
QUICK INSTALLATION GUIDE
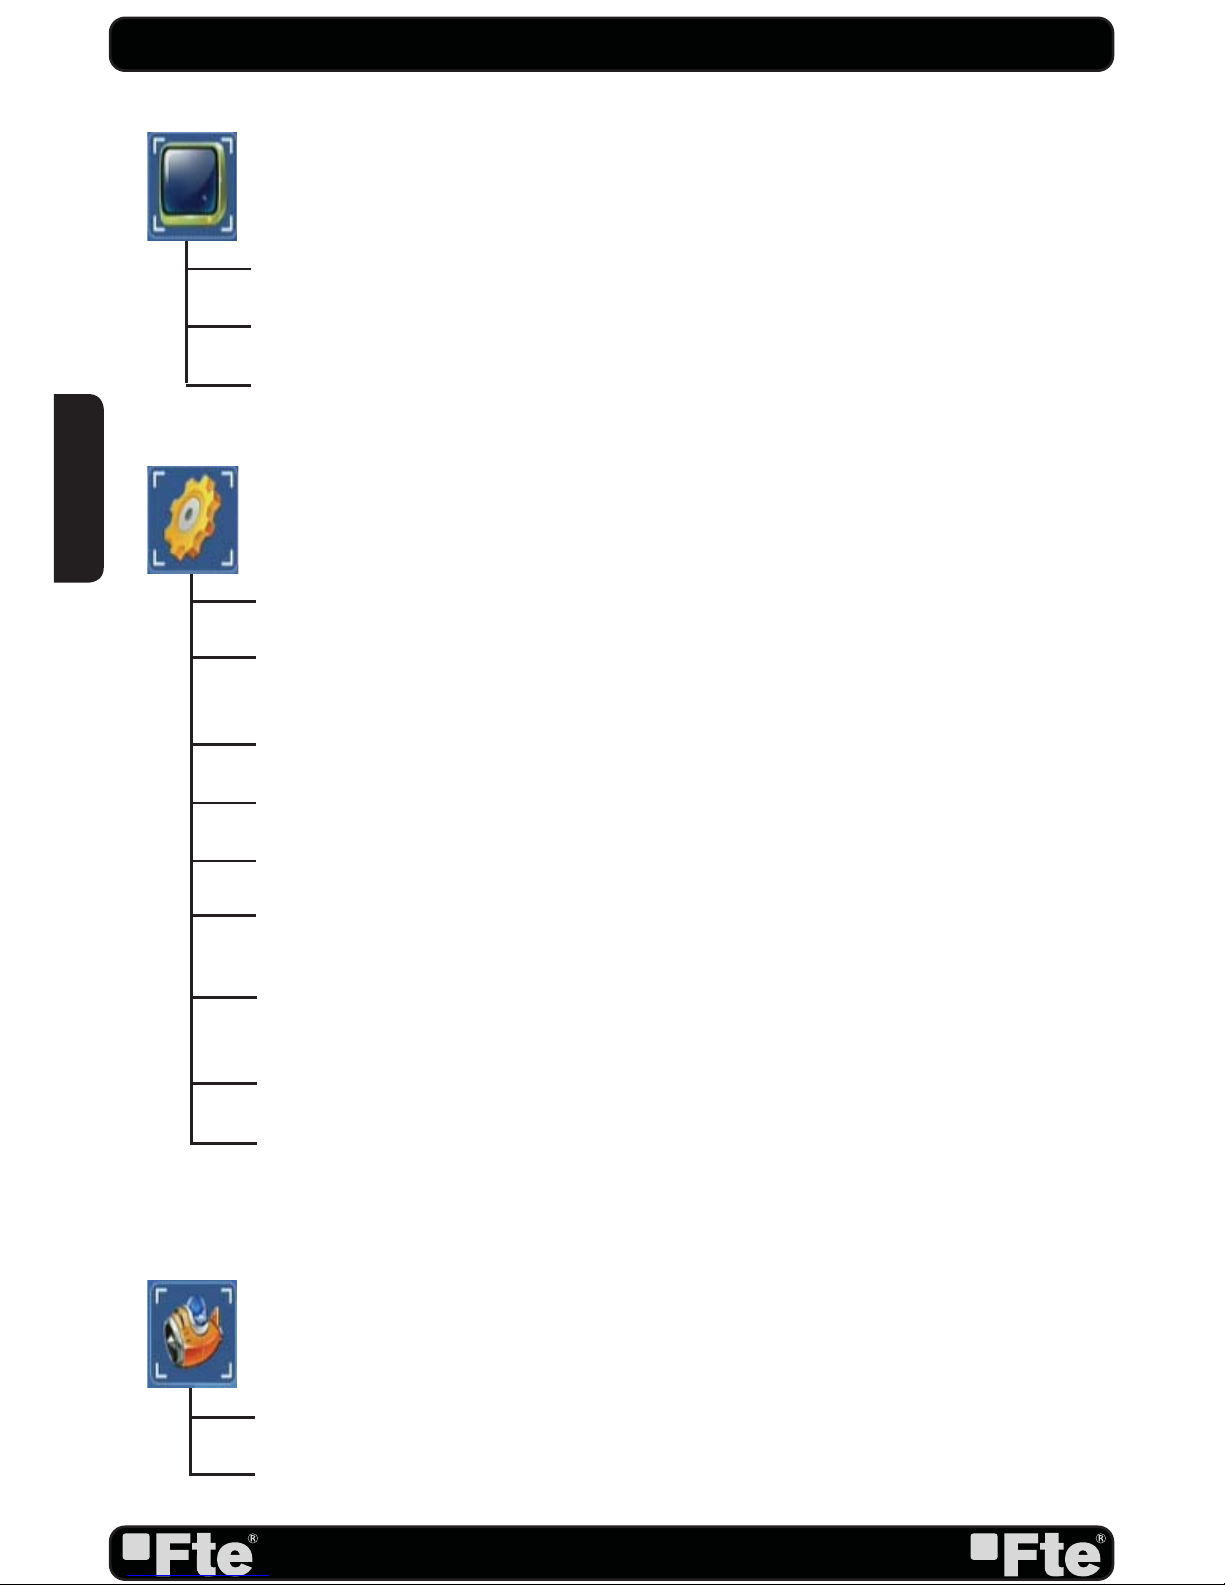
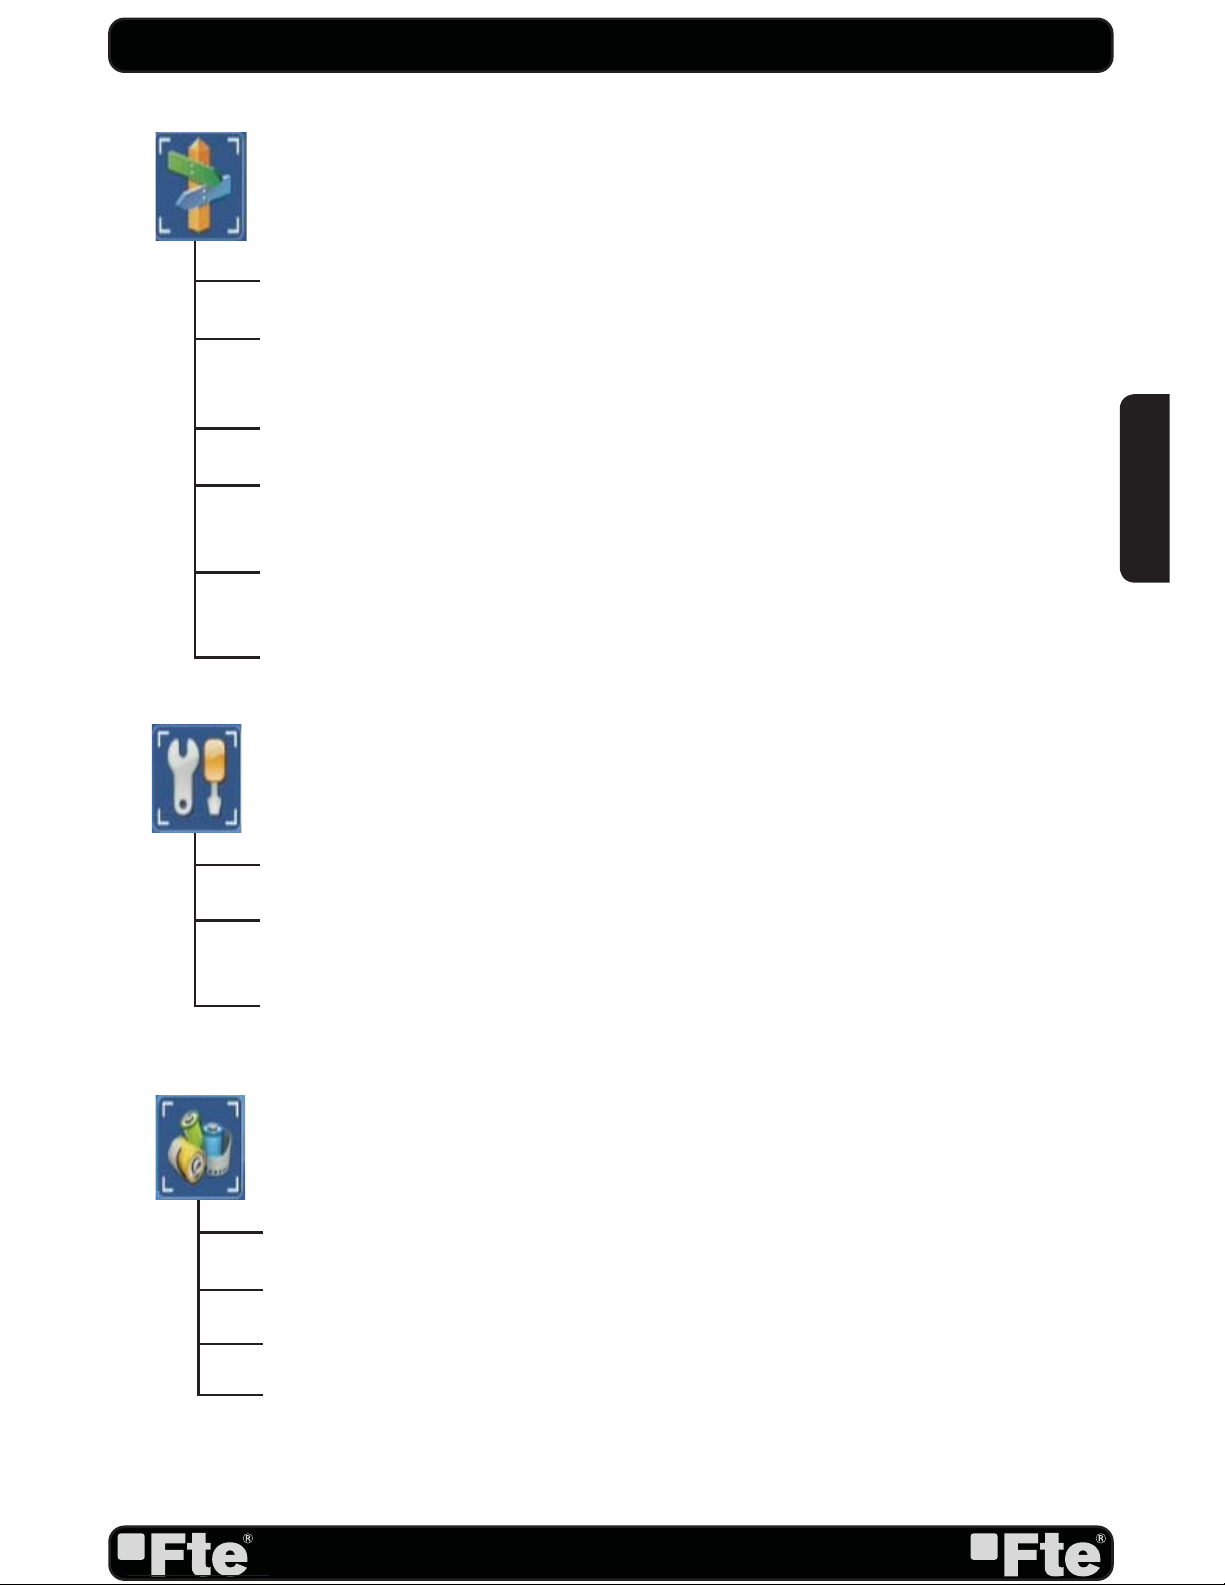
TV Channel List: This option shows the list of TV stored channels.
Radio Channel List: This option shows the list of Radio stored channels.
Delete All: This option deletes all TV and Radio stored channels.
Edit Channel
Language: This option allows choosing the language of the menus.
TV System: This option allows choosing the video Standard and other parameters
of the screen.
Display setting
Local Time Setting: Time setting menu.
Timer Setting: Timer setting menu.
Parental Lock: In this option, user can lock the access to the menu and change the
password of the receiver.
OSD Setting: This option allows confi guring the subtitles of the channel
information.
Favourite Channel List Name: It allows changing the name of the favourite groups.
Other: Turns on or off the LNB power or enable / disable Low Power Consumption
mode.
System Setup
Othello
Sudoku
Game
ENGLISH
Page 9
PAG.
9
rev 1.1
QUICK INSTALLATION GUIDE
Antenna connection
Satellite List: This option shows all the stored satellites. This list can be
modifi ed.
Antenna setup
Single Search: Once the antenna is confi gured, this option allows search for the
channels of one satellite.
Multi Search: Once the antenna is confi gured, this option allows search for the
channels of various satellites.
TP List: This option shows all the stored TP. This list can be modifi ed.
Installation
Information: Shows all the technical information for the selected channel.
Factory Default: This option resets the receiver and loads the factory default
values.
Software upgrade: For updating your receiver through RS232, USB or satellite
(OTA).
Tools
* This function will only be available in models with PVR ready functionability
Media Player
HDD Information: You can see the capacity of the hard disk.
PVR Setting: It allows selecting the disk partition and formatting it. *
Remove USB device safely: Allows remove USB device of safety way.
REC
ENGLISH
Page 10

PAG.
10
rev 1.1
INDEX
1. Panel & Remote Control Description
1.1. Front panel description…….......................................…………………………12
1.2. Rear panel description…...............................................…………………………..12
1.3. Remote Control Description…...............................................…………………………..13
2. Basic Operations
2.1. Standby ……………………..............................................…………………………………...14
2.2. PR + / PR -…...............................................…………………….…………………………..14
2.3. Vol+/Vol-…......................................……………………………………………………….14
2.4. Channel Number…………...........................……………………………………………………14
2.5. TV/RADIO…………........................…………………………………………………….14
2.6. Channel List…………………….........................…………………………………...14
2.7. Audio Track / Mode…...........................……………………………………………….14
2.8. EPG…………………...............................…………………………………………...14
2.9. SAT…………………...............................…………………………………………...15
2.10. Subtitles…………………...............................…………………………………………...15
2.11. Exit….................................……………………………………………………..15
2.12. Menu……………………...................................…………………………………..15
2.13. Mute……………............................................………………………………………..15
2.14. Back…..............................................………………………………………...15
2.15. Information……..................................…………………………………………...15
2.16. TTX …………..................................................……………………………………..16
2.17. Favourites………....................................………………………………………………...16
2.18. Fast recordings……............................……………………………………………………………16
2.19. Timeshift………....................................………………………………………………...16
2.20. Find………………................................…………………………………………………17
2.21. Video Format...........……………………………………………………………………...17
2.22. Sleep.............……………………………………………………………………...17
3. Edit Channel
3.1. TV Channel List…………....................……………………………………………..18
3.1.1. Favourite………...............................………………………………….……………18
3.1.2. Move.……………..............................………… …………………………….…………18
3.1.3. Edit Channel.........................…………………………………………….19
3.1.3.1 Sort...............…........................................…………….…...19
3.1.3.2 Delete….......................…………………………………..…………..19
3.1.3.3 Edit..….................................………………………… …….……….19
3.1.4 Skip............................................…………………...………………………...19
3.1.5. Lock......................................………………………… …………………….………..19
3.2. Radio Channel List……..................................……………………………………......20
3.3 Delete All…....................…...............……………………………………………….20
4. Installation
4.1. Antenna Connection……......................……………………..…………………..21
4.2. Satellite List………….............................………………………...………………...21
4.3. Antenna Setup.........……......................……………………..…………………..22
4.4. Single Search………........…......................……………………..…………………..23
4.5. Multi Search………...........................…………...………..…………………….23
ENGLISH
Page 11
PAG.
11
rev 1.1
INDEX
4.6. TP List……………..........................………………………..………………...24
5. System Setup
5.1. Language………………….............………………………...…………………...25
5.2. TV System……………..............…………………………..…………………...25
5.3. Display setting………....................………………………...………………26
5.4. Local Time Setting ………....................………………………...………………26
5.5. Timer Setting....................................................................................27
5.6. Parental Lock……………………............................…………………………….27
5.7. OSD Setting………………………..............................……………………………..28
5.8. Favorite..........………………………………….....................……………………..28
5.9. Other................………………………………….....................……………………..29
5.9.1. LNB Power..........................................................................................29
5.9.2. Channel Play Type...................................................................................29
5.9.3. Channel Change.........................................................................................29
5.9.4.AutoStandby.................................................................................................29
5.9.5.Clock in Standby...........................................................................................29
6. Tools
6.1. Information…………………………...................................………………………….30
6.2. Load factory default………………………………………..………………..............................30
6.3. Software upgrade by USB…………………......................……………………...30
7. Game
7.1. Othello...................................................................................................................32
7.2. Sudoku..................................................................................................................32
8. Rec & Media
8.1. Media Player…………………………...................................………………………….33
8.1.1. Adding a new file to the list.................................................................................34
8.1.2. Sort file....................................................................................34
8.1.3. Edit....................................................................................34
8.1.3.1. Rename files.............................................................................34
8.1.3.2. Copy files.............................................................................34
8.1.3.3. Delete files.............................................................................35
8.1.3.4. New foders.......................................................................35
8.1.4. Audio player............................................................................................35
8.1.5. Picture viewer................................................................................35
8.1.5.1. Configure the Slide show............................................................35
8.1.5.2. Multiview..................................................................35
8.1.6. Video player................................................................................36
8.1.7.How to reproduce a recording...............................................................36
8.1.7.1. How to rename a recording..................................................................36
8.1.7.2. How to block a recording................................................................36
8.1.7.3. How to delete a recording.................................................................36
8.2. HDD information...................................................................................................................36
8.3. PVR setting..................................................................................................................37
8.4.Safely remove storage device…..................................................………………………….37
9. Technical Features...............................................................................................................38
ENGLISH
Page 12

PAG.
12
rev 1.1
PANEL & REMOTE CONTROL DESCRIPTION
1. PANEL & REMOTE CONTROL DESCRIPTION
1.1. FRONT PANEL DESCRIPTION
1.2. REAR PANEL DESCRIPTION
1. IR-SENSOR: Reception sensor for the IR remote control signals.
2. DISPLAY: 4 Digits to display the program numbers.
3. STAND BY LED: Shows the state of the receiver.
4. LOCK LED: Indicates a suffi cient signal level at the ANT IN input.
5. BUTTONS: These buttons allow controlling some functions of the receiver.
1. IF IN: Satellite input.
2. TV SCART: Output SCART for the connection to a TV set.
3. AC IN: Mains input cable.
4. HDMI: HDMI output for connecting to a TV
5. S/PDIF: Coaxial output for digital audio (AC3).
6. USB: USB Connector 2.0
7. RS-232
1 2
354
21
4
5 6 7
3
This user’s guide is adapted to the version v.1.13B4-NR dated 21/11/2011. For future
software updates, you can download the user’s guide from the following website:
http://www.ftemaximal.com
ENGLISH
Page 13
PAG.
13
rev 1.1
PANEL & REMOTE CONTROL DESCRIPTION
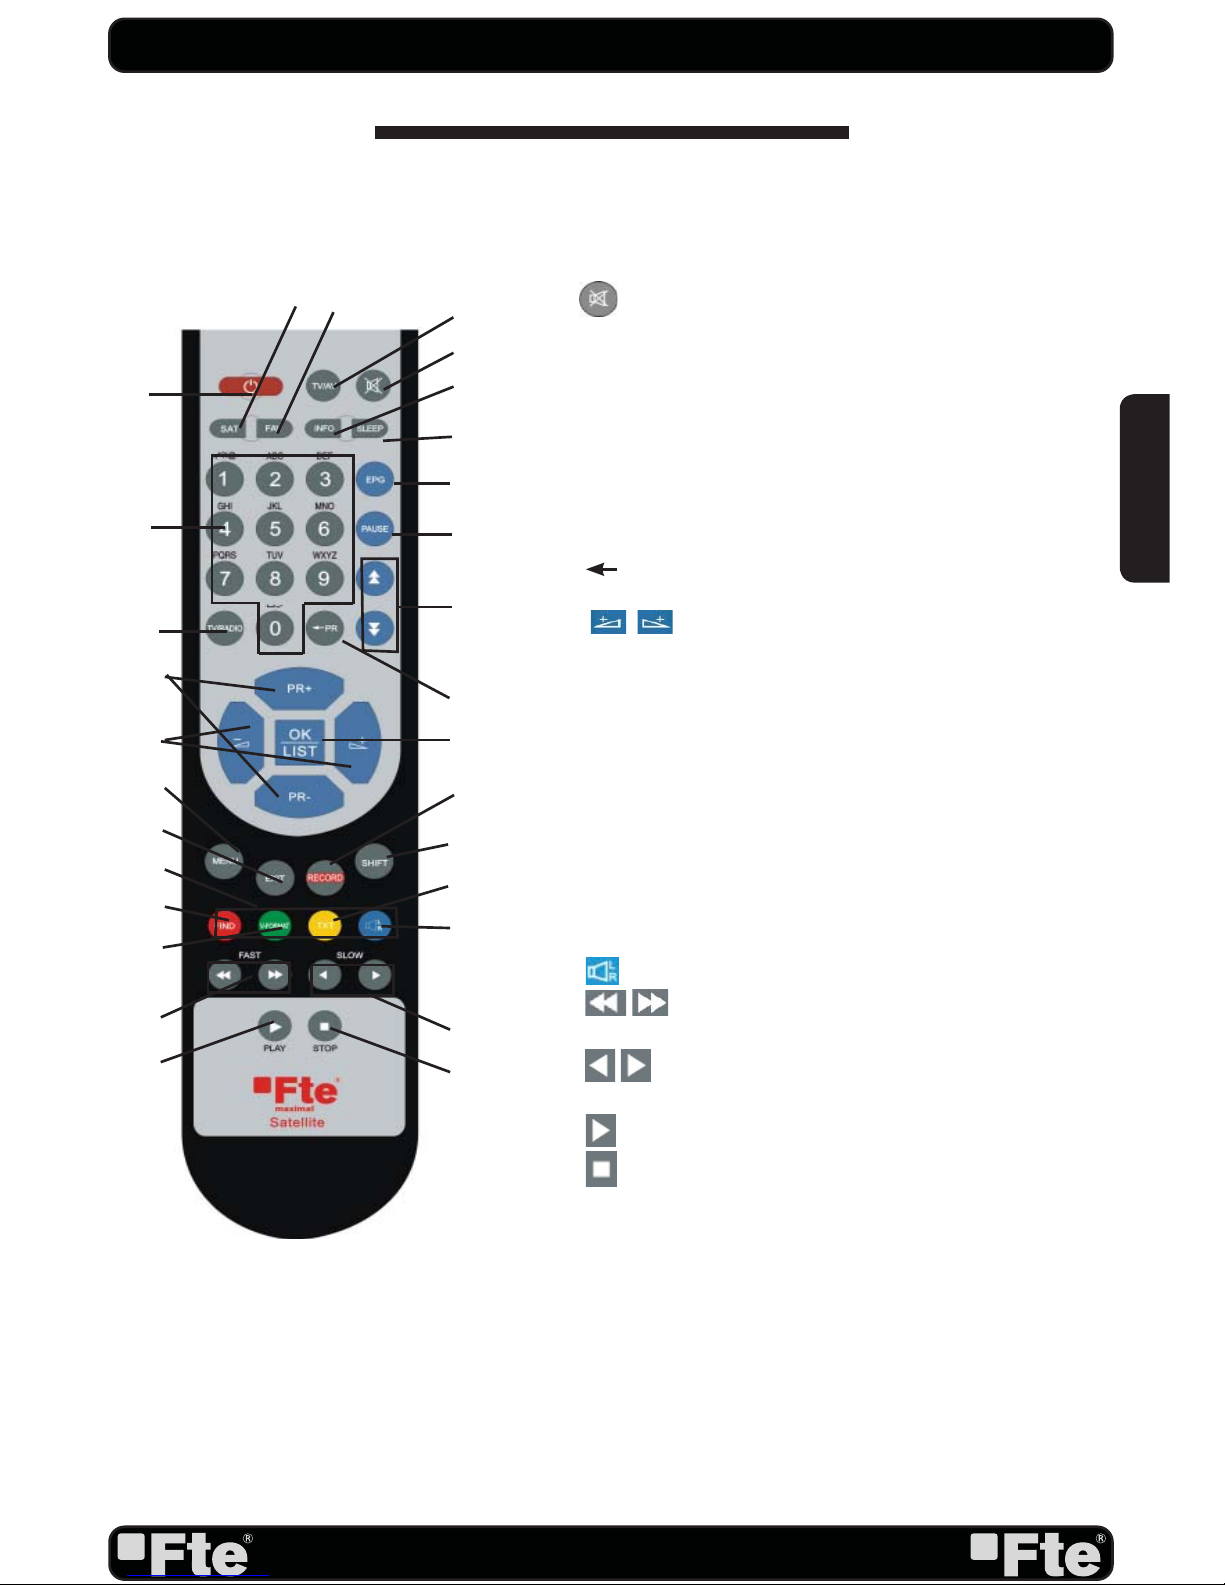
1.3. REMOTE CONTROL DESCRIPTION
1. Standby: Switches receiver ON or in stand-by-mode.
2. TV/AV: It activates/deactivates the visualization of the
receiver in the Scart output.
3.
(Mute): Switches audio on and off.
4. Info: Shows channel information with signal bar.
5. Sleep: It opens the Sleep Timer menu
6. Numeric keys: For direct typing values and names.
7. EPG: Shows the EPG information.
8. Pause: If you press it once, you will stop the image, and
it will come back to normal mode when you press it again.
9. PAGE+/PAGE-: Moves cursor in block steps or pages.
10. TV/Radio: Switches between TV and Radio channels.
11. PR (Back): Watch the last viewed channel.
12. PR+/-: Changes channel up and down.
13. (Vol+/Vol-): Adjusts audio volume up and
down.
14. OK/LIST: Confi rms selections or opens channel list.
15. Menu: Opens the main menu.
16. Exit: Exit menus or stop operations.
17. Record: Quick start for recording. *
18. SHIFT: TimeShift function. *
19. Colour Keys: Controls menu options.
20. Find: To fi nd channel by their names.
21. V-Format: It changes the video output mode in Tv
mode.
22. TXT: Opens and closes teletext and subtitles.
23.
(Audio): Opens audio menu.
24.
(FAST): Backward / Forward fast buttons for
recording and TimeShift. *
25.
(SLOW): Backward / Forward slow buttons for
recording and TimeShift. *
26.
(Play): Start button for recording and TimeShift. *
27.
(Stop): Stop button for recording and TimeShift. *
28. SAT: Satellite List
29. FAV: Opens favourite channel list.
* This function will only be available in models with
PVR ready functionability
1
2
3
4
5
6
7
8
9
10
11
12
13 14
15
16
17
18
19
20
21
22
23
24
25
26
27
28
29
ENGLISH
Page 14
PAG.
14
rev 1.1
2. HOTKEY
2.1 STANDBY
1.Press [Power] button to switch from TV mode to Standby
mode.
2.In Standby mode press [Power] button again to switch back
to TV mode. The last active channel will be showed.
3.To switch off the STB complete press the main power
button.
2.2 PR+/PR-
In TV mode press [Channel Up/Channel Down] to change
channel.
2.3 VOL+/VOL-
In TV mode, press [Volume Up/Volume Down] to adjust volume.
2.4 NUMBER
In TV mode you can enter the channel number directly with
your remote control unit and confi rm the number with the OK
button to change to the desired channel.
2.5 TV/RADIO
In TV mode, press [TV/RADIO] to switch to Radio mode. In
Radio mode press [TV/RADIO] again to switch back to TV
mode.
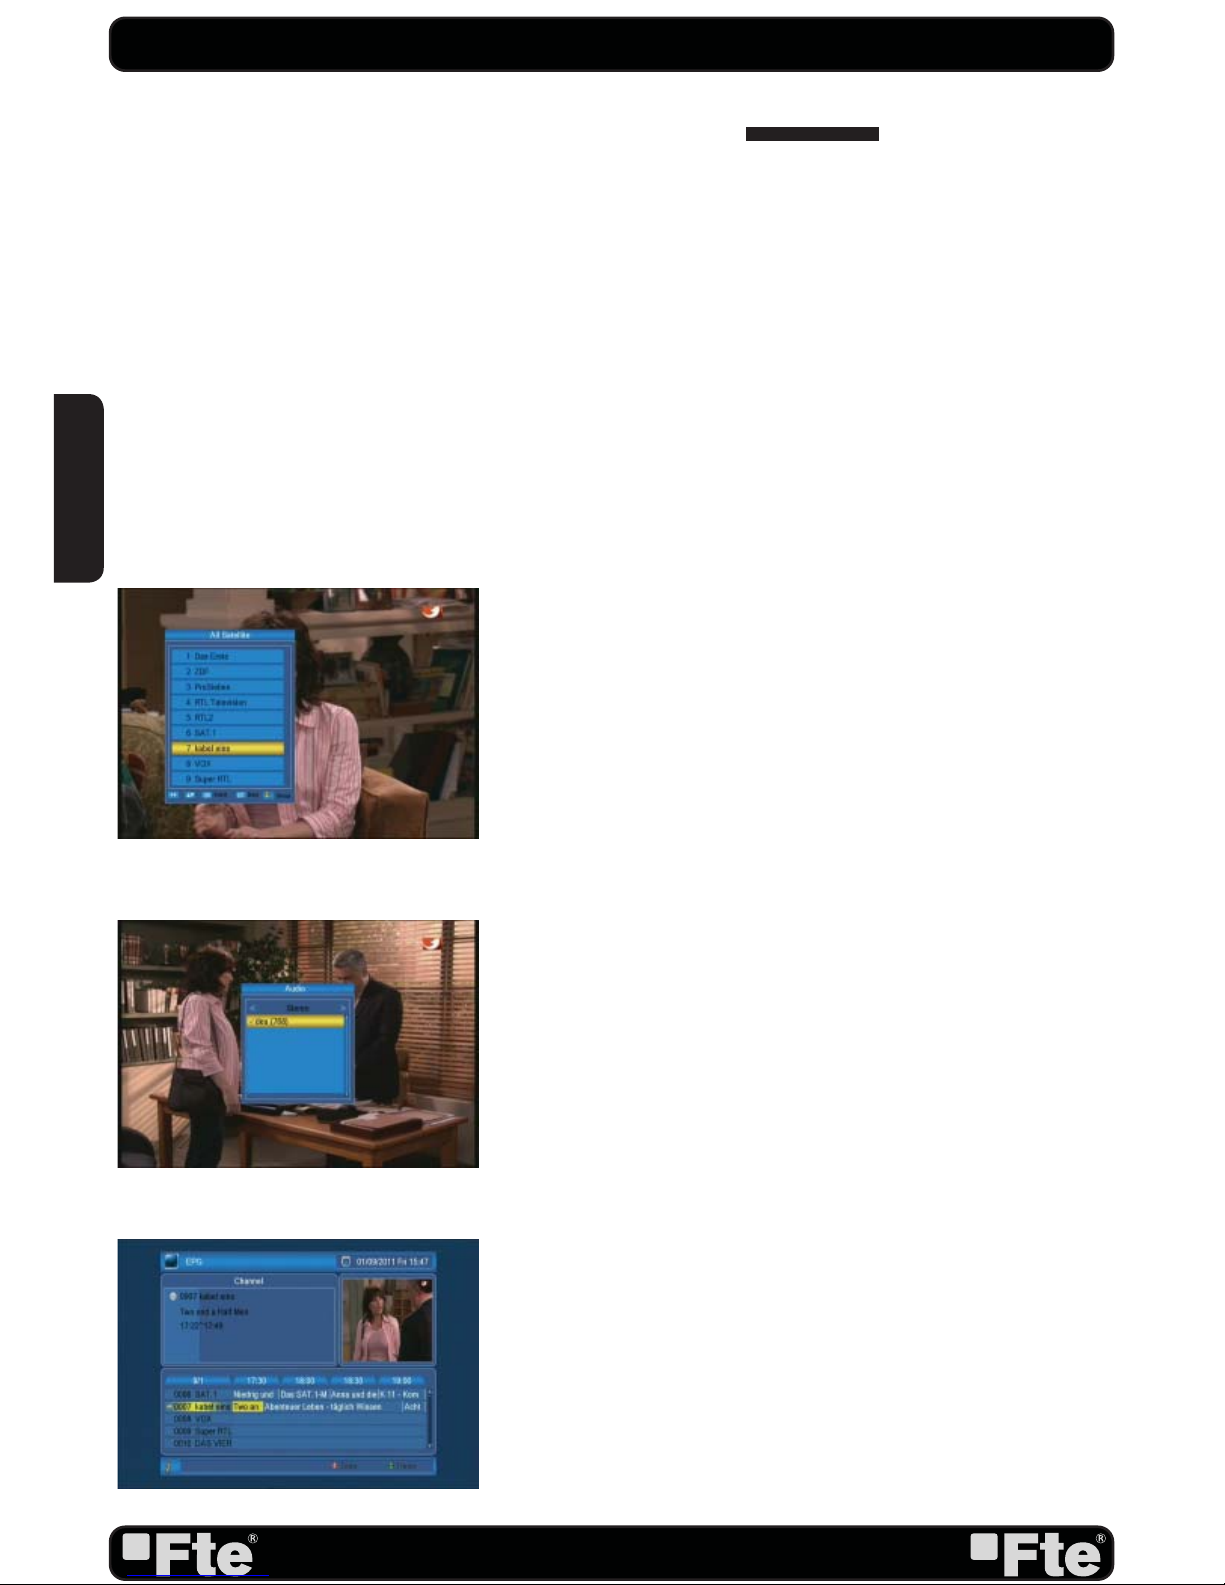
2.6 CHANNEL LIST
1. In full screen, press [OK/List] key can enter “Channel
List”, please refer to TV Channel List for detail information
(OSD 1).
2.7 AUDIO
1.In TV mode, press the [Audio] button to open the Audio
Mode window. (OSD 2)
2.8 EPG
1.The STB has an Electronic Program Guide (EPG) to help
you navigate channels through all the possible viewing
options. The EPG supplies information such as channel listings and starting and ending times for all available channels. Press [EPG] key to display EPG screen. (OSD 3)
2.Press [EXIT] key can play the current channel in full
screen.
BASIC OPERATIONS
OSD 2
OSD 3
OSD 1
ENGLISH
Page 15
PAG.
15
rev 1.1
3.Press number key [OK] can display the current channel
detail information. The window is like below.
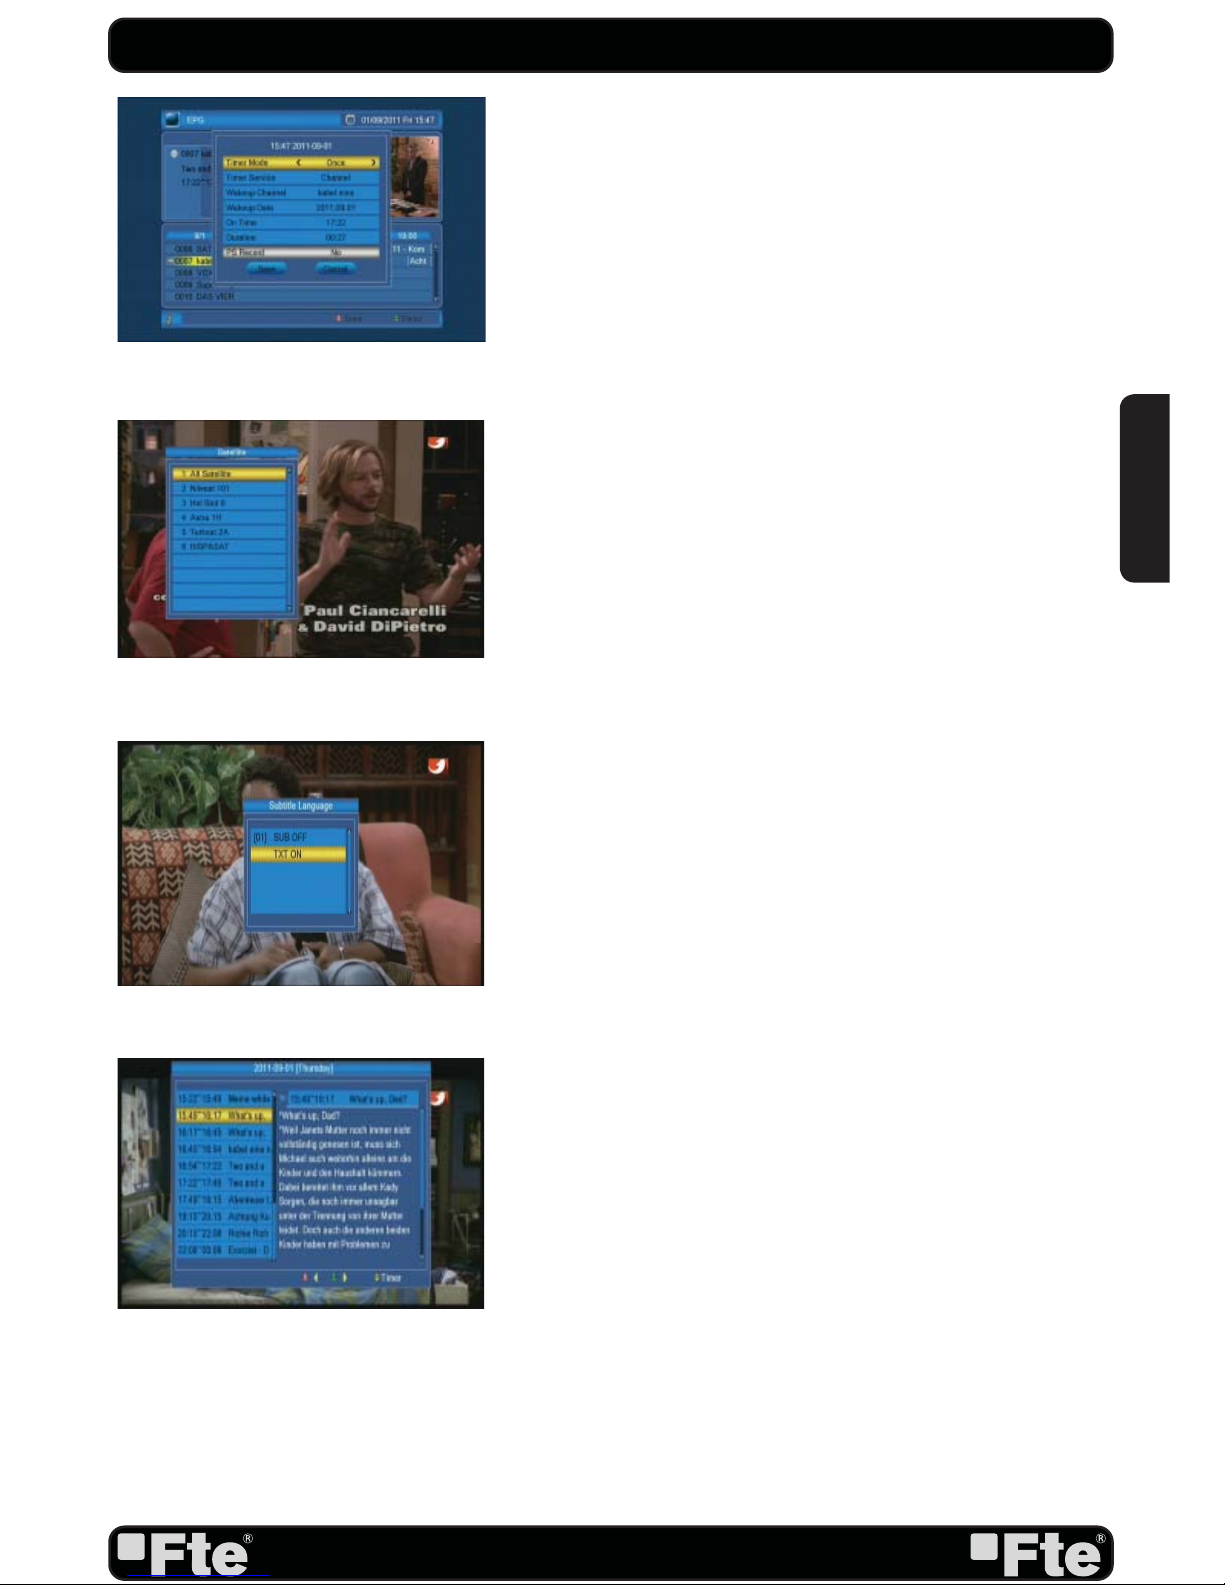
4.We should press green button if we wish to program a
timing of the selected event. The timing window will be opened automatically and this way we will be able to confi rm
the programming of the event. We should press Exit if we
wish to come back to channel list (OSD 4).
5.With the key [Red], you will get new options that will allow
you to move through the EPG on the most comfortable way,
moving event by event, by sites or by days.
6.To close the EPG menu press [Exit].
2.9 SAT
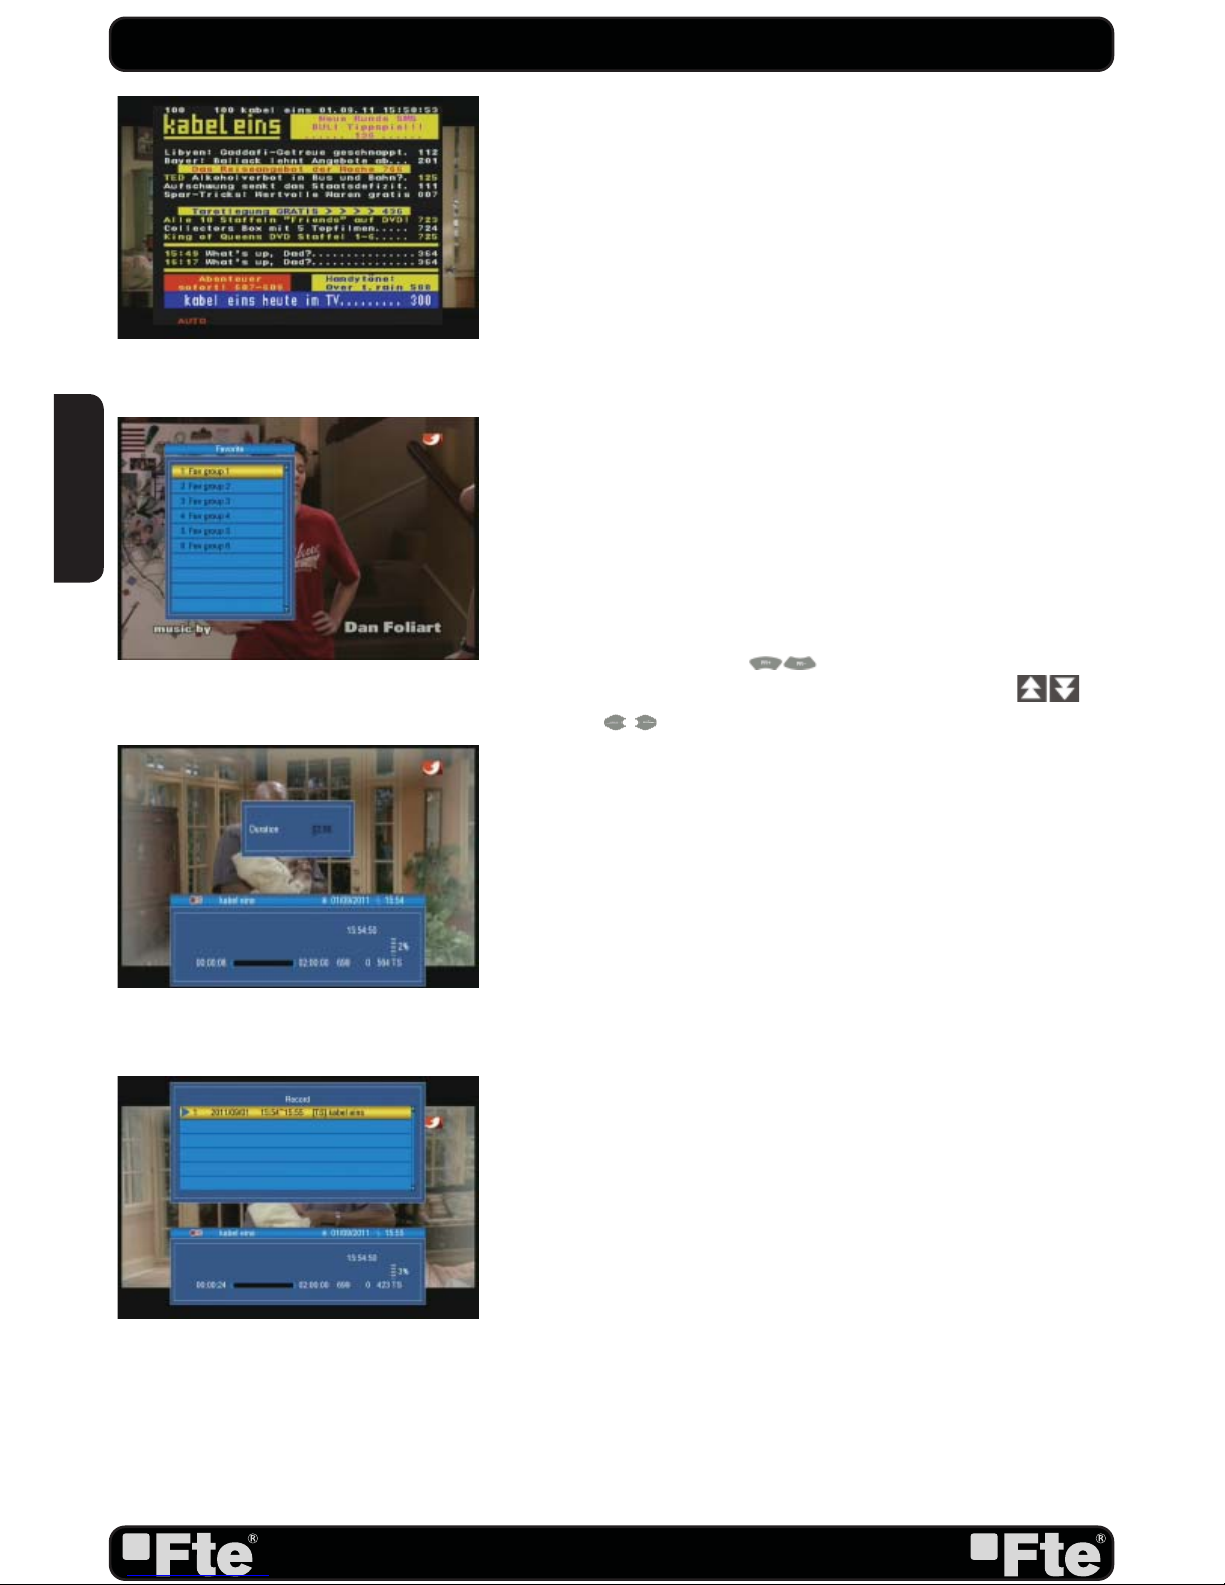
Press [SAT] button to open the SAT list. After selecting a
satellite the channel list will be reduced to the channels of this
satellite. (OSD 5)
2.10 SUBTITLES
In TV mode, press [TXT] button for activating/deactivating
the channel subtitles,depending on the provider information
(OSD6)
2.11 EXIT
[Exit] key can exit current menu.
2.12 MENU
[Menu] key can enter the menu or exit current menu.
2.13 MUTE
1.Press the [Mute] button to mute the sound. On the screen
an icon will be displayed to indicate the muted sound.
2.Press the [Mute] button again to restore the sound.
2.14 BACK
Pressing the [BACK] button allows you to toggle between the
actual and the last selected channel.
2.15 INFORMATION
In TV mode, press [INFO] button can open information
screen.
1.Press number key [INFO]] can display the current channel
detail information. The window is like below.
BASIC OPERATIONS
OSD 4
OSD 5
OSD 6
OSD 7
ENGLISH
Page 16
PAG.
16
rev 1.1
2.We should press [Yellow] button if we wish to program a
timing of the selected event. The timing window will be opened automatically and this way we will be able to confi rm
the programming of the event. We should press Exit if we
wish to come back to channel list. (OSD 7)
2.16 TELETEXT
1.Press [TXT] button in TV mode to open the teletext page.
This service is depending on the support of the channel
provider.
2.If the channel does not support teletext information, it will
show “No Teletext Data” on the screen (OSD 8).
2.17 FAVOURITES
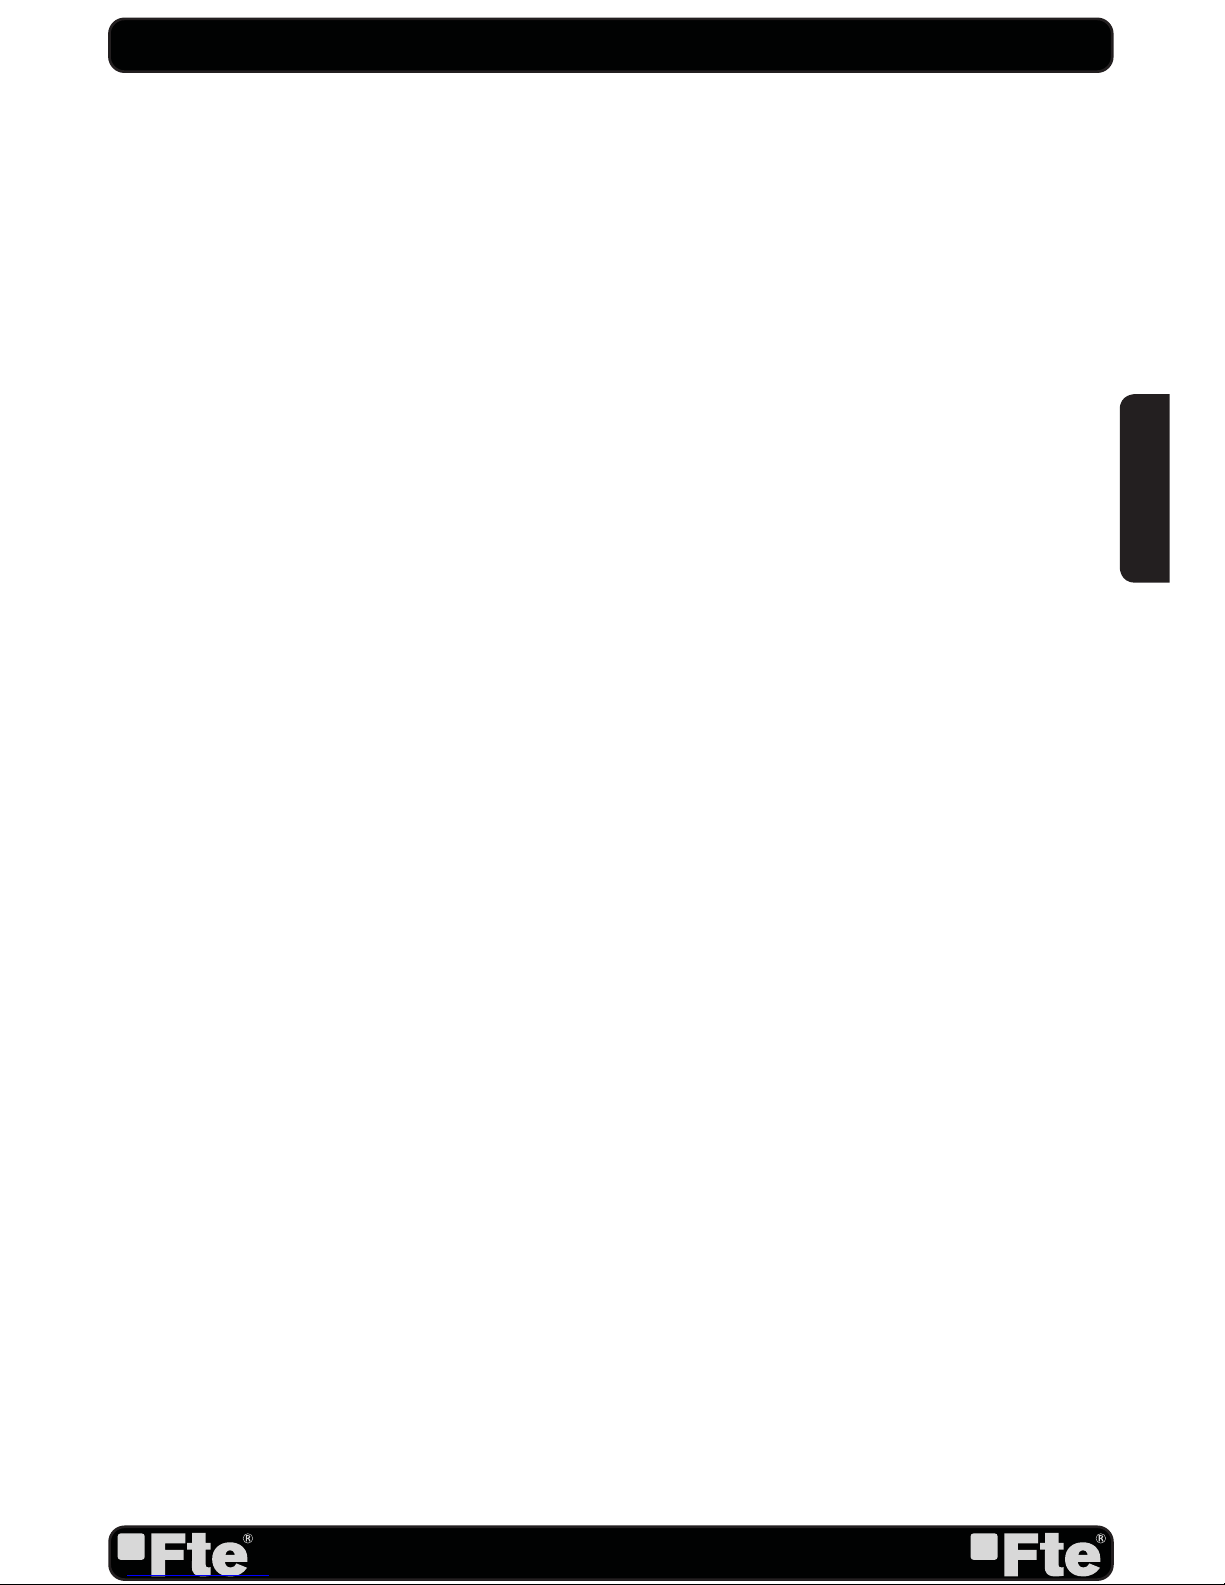
1. In TV mode press the [Favourite] button to display the
Favourite Group window on the screen as the picture beside
shows (OSD 9).
2. In the Favourite Group window you can select the desired
favourite channel with [ ] and confi rm it with [OK] to
switch to it. In bigger groups you can navigate with [
].
3. With [ ] you can select different Favourite Group.
4. Press [Exit] to close the Favourite Group window.
2.18. FAST RECORDING *
To start the recording (OSD 10).
1. If you would like to record a programme immediately, press
the Key [Record]. In order to stop a recording before the
ending of the programmed length, press the [Stop]-Key.
2. Press the key [Record] during the recording in order to set
the duration.
3.Press the key [Stop] again to end the recording manually.
2.19. TIMESHIFT *
In order to activate this Timeshif option, please access to PVR
confi guration menu.From the moment the user access to the
channel, the receiver keeps all the channel information in a
buffer (OSD 11).All the information is on the hard disk, for this
reason it is possible to play, pause, fast forward and reward.
1. Pressing the button [<<] or [>>] several times, you can
settle the speed of forward. Options: 2x, 4x, 8x, 16x or 24x.
2. By pressing the key [>] or [< ] several times you can adjust
the forward or return speed to move very slowly. Options:
1/2x, 1/4x and 1/8x.
3. Using the key [Shift] you can see the time difference
between your reproduction and the real time. If you press the
key [Shift] again you will see the list of the recordings that
have been made.
BASIC OPERATIONS
OSD 8
OSD 9
OSD 10
OSD 11
ENGLISH
Page 17
PAG.
17
rev 1.1
BASIC OPERATIONS
4. In order to leave the Time Shift option, press the key [stop]
to equal the difference between the reproduction time with the
real one.
2.20. FIND
1. Press [FIND] key can open the “Find” window.
2. After input each character, the program list on the left
will search the channel according your input, and list the
matched channel.
3. Press [Blue] key can close “Find” window.
2.21. VIDEO FORMAT
In Tv mode, press [RES] key in order to confi gure the output
format of your receiver.
2.22. SLEEP
In TV mode, press [SLEEP] button if you want shut down the
receiver automatically, you can choose here the time for the
sleep timer.
Selection: 10, 30, 60, 90, 120 or Off
Please change it with the [SLEEP] button.
* This function will only be available in models with PVR
ready functionability
ENGLISH
Page 18
PAG.
18
rev 1.1
CHANNEL
3. EDIT CHANNEL
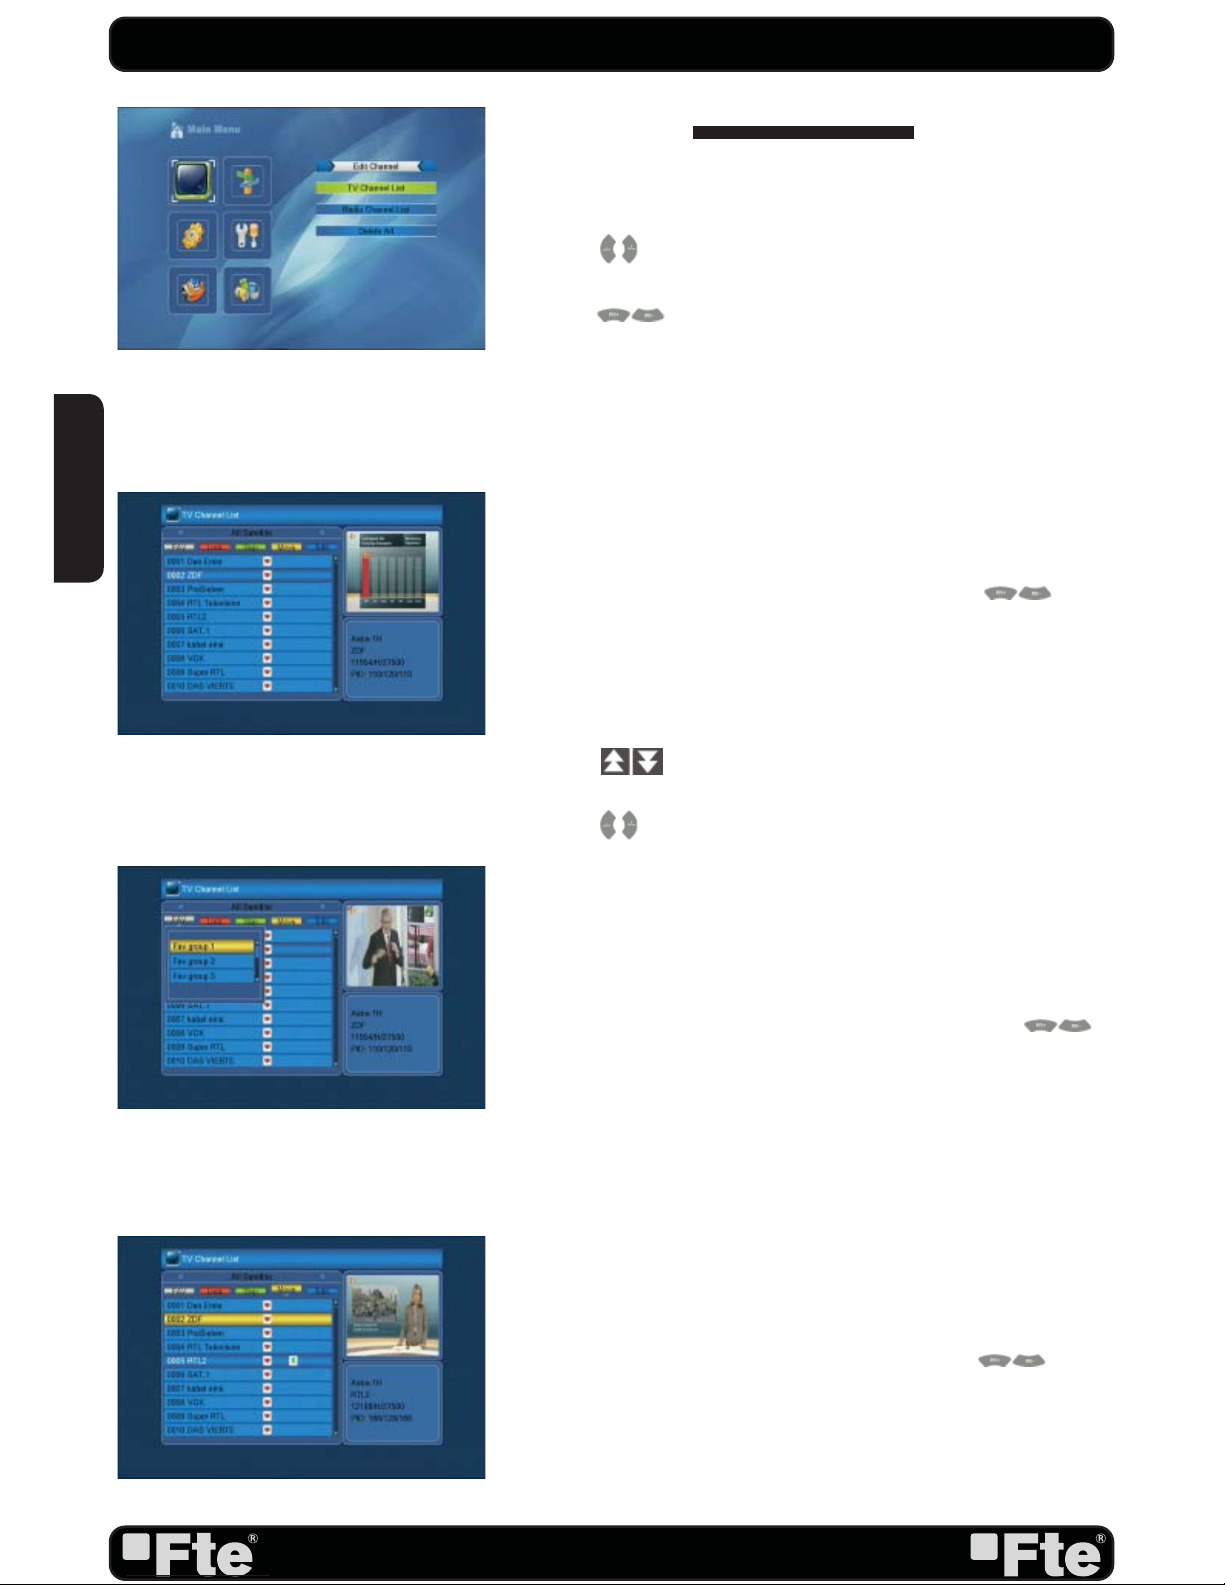
Press [Menu] in the TV mode to enter the main menu (OSD
12).
1. Press [
] to select the Edit Channel item.
2. Press [OK] to enter the selected item.
3. Press [
] to select the wanted menu item.
4. Press [OK] to enter the selected item among.
- TV Channel List
- Radio Channel List
- Delete All
3.1. TV CHANNEL LIST
If you enter the Channel List menu a window like the one
besides will open (OSD 13).
1. You can move the highlighted channel with [ ] and
press [OK] to preview the highlighted program in the preview
window.
2. You can enter directly the number of the desired channel with
the remote control. The selection will select that channel, but it
will not be previewed until you confi rm with [OK] button.
3. Press [
] on the RCU to jump between the channels
by pages.
4. Press [
] to switch the Program Group.
5. The colour buttons offer further functions to manage the
channel list.
3.1.1. FAVOURITE
1. Press [FAV] and [OK] to open the Favourite window (OSD 14).
2. You can select between 8 favourites groups with [ ].
Press [OK] to assign the channel to a Favourite group.
3. Press [OK] again in order to assign channel to Favourites.
4. Press [Exit] button to return to the TV Channel List. The
channels of Favourites Groups are indicated with a favourite
icon behind the name.
3.1.2. MOVE
1. To move/change channels: Pushing the [Yellow] button and
then [OK] button, you will see a picture like OSD 15. You will be
able to move or change the position of the channels:
2. Move the channel to the desired position with [ ].
3. Press [OK] to confi rm the position.
OSD 12
OSD 13
OSD 14
OSD 15
ENGLISH
Page 19
PAG.
19
rev 1.1
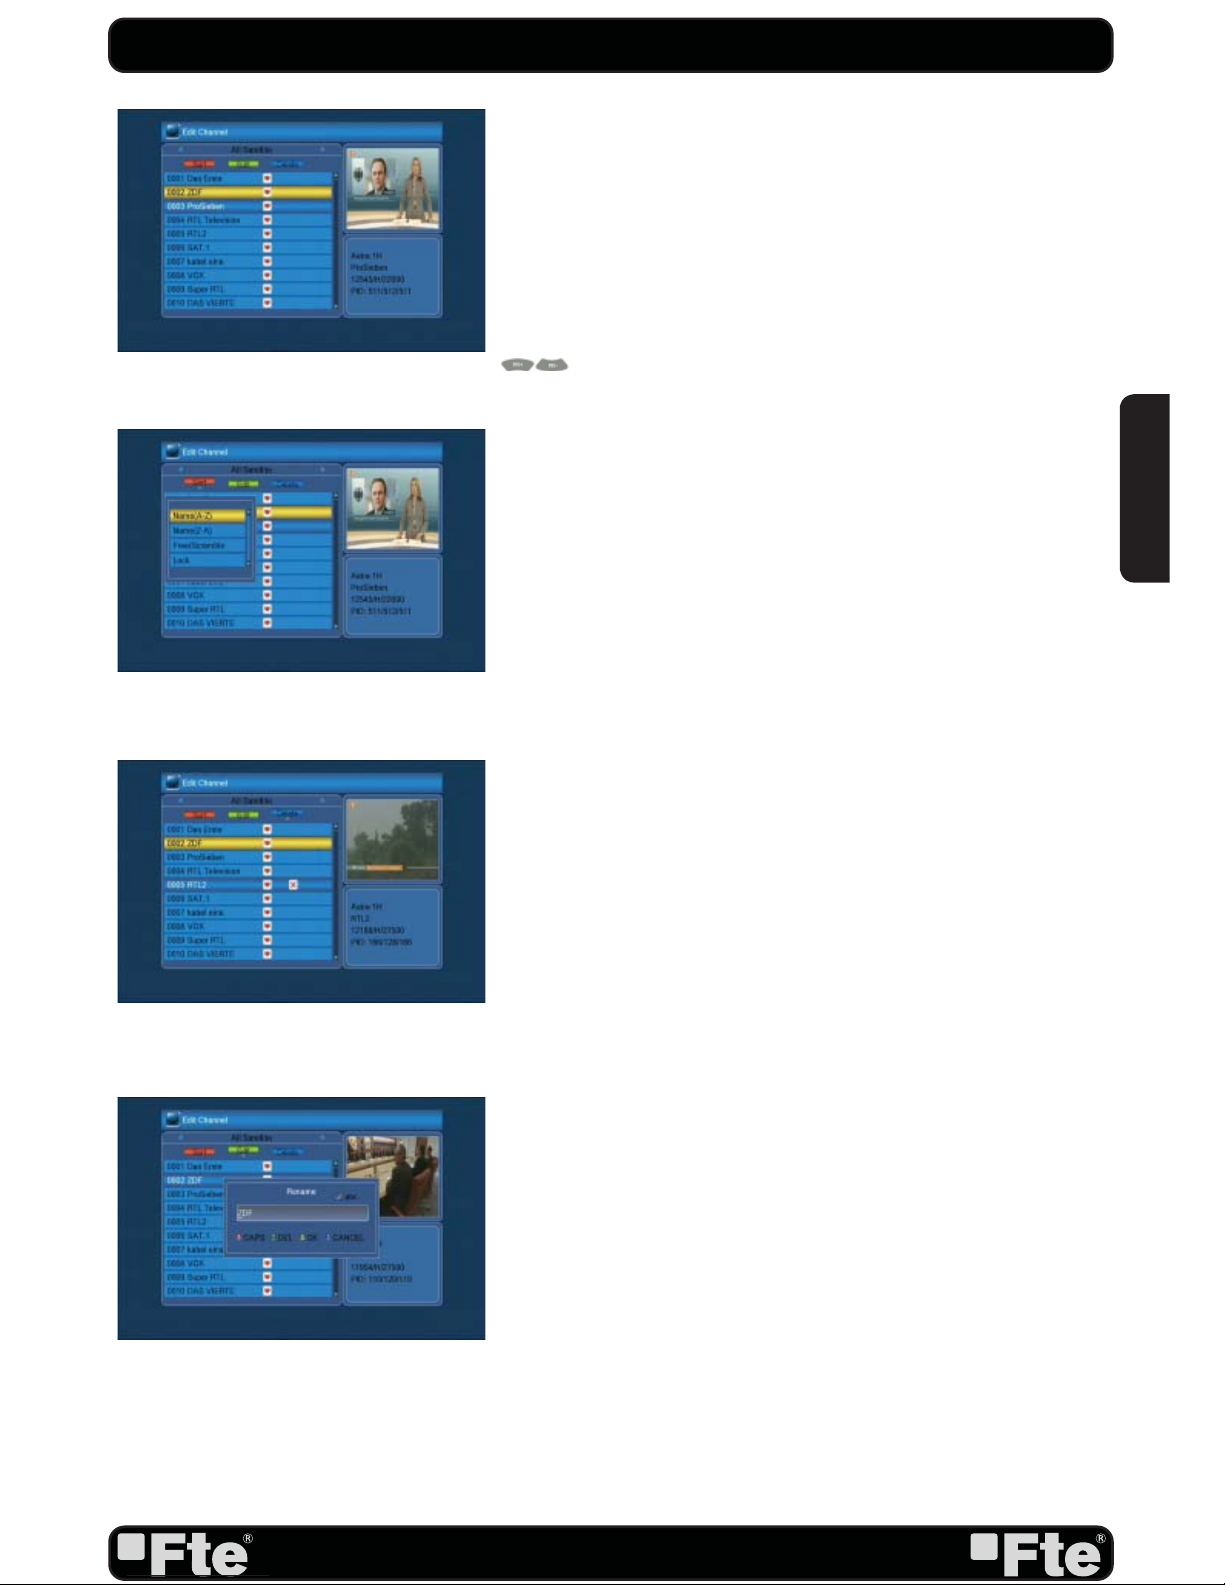
3.1.3. EDIT CHANNEL
1. Press [Blue] button to open the “Edit” window.
2. You can Delete, Sort, and Edit the channel (OSD 16).
3. Press [Exit] to leave the Channel Editing. The system will ask
you to confi rm the saving of the changes you made.
3.1.3.1. SORT
1. Press [Red] to open the Sort window (OSD 17). Press [
] to select and [OK] to confi rm your choice.
2. The ways of sorting are:
- Name (A-Z): Sorting in Alphabetical Order, ignoring “$” sym-
bol.
- Name (Z-A): Sorting in Alphabetical Order, ignoring “$” sym-
bol.
- FTA: Sort channel by free and scrambled sequence. Free
channels will be listed fi rst and scrambled channels behind
in the channel list.
- Lock: Unlocked channels are listed fi rst end locked channels
at the end.
3.1.3.2 DELETE
In Channel Edit menu press [Blue] button to mark a channel
for deleting.
Marked channels (OSD 18) will be deleted after you confi rm to
save the changes when you leave this menu.
3.1.3.3 EDIT
In “Channel Edit” menu, press [Green] button and [OK] key to
enter edit box like OSD 19:
After modifi cation, pressing [Yelloy] button can save the modifi ed value and exit “Edit” mode.
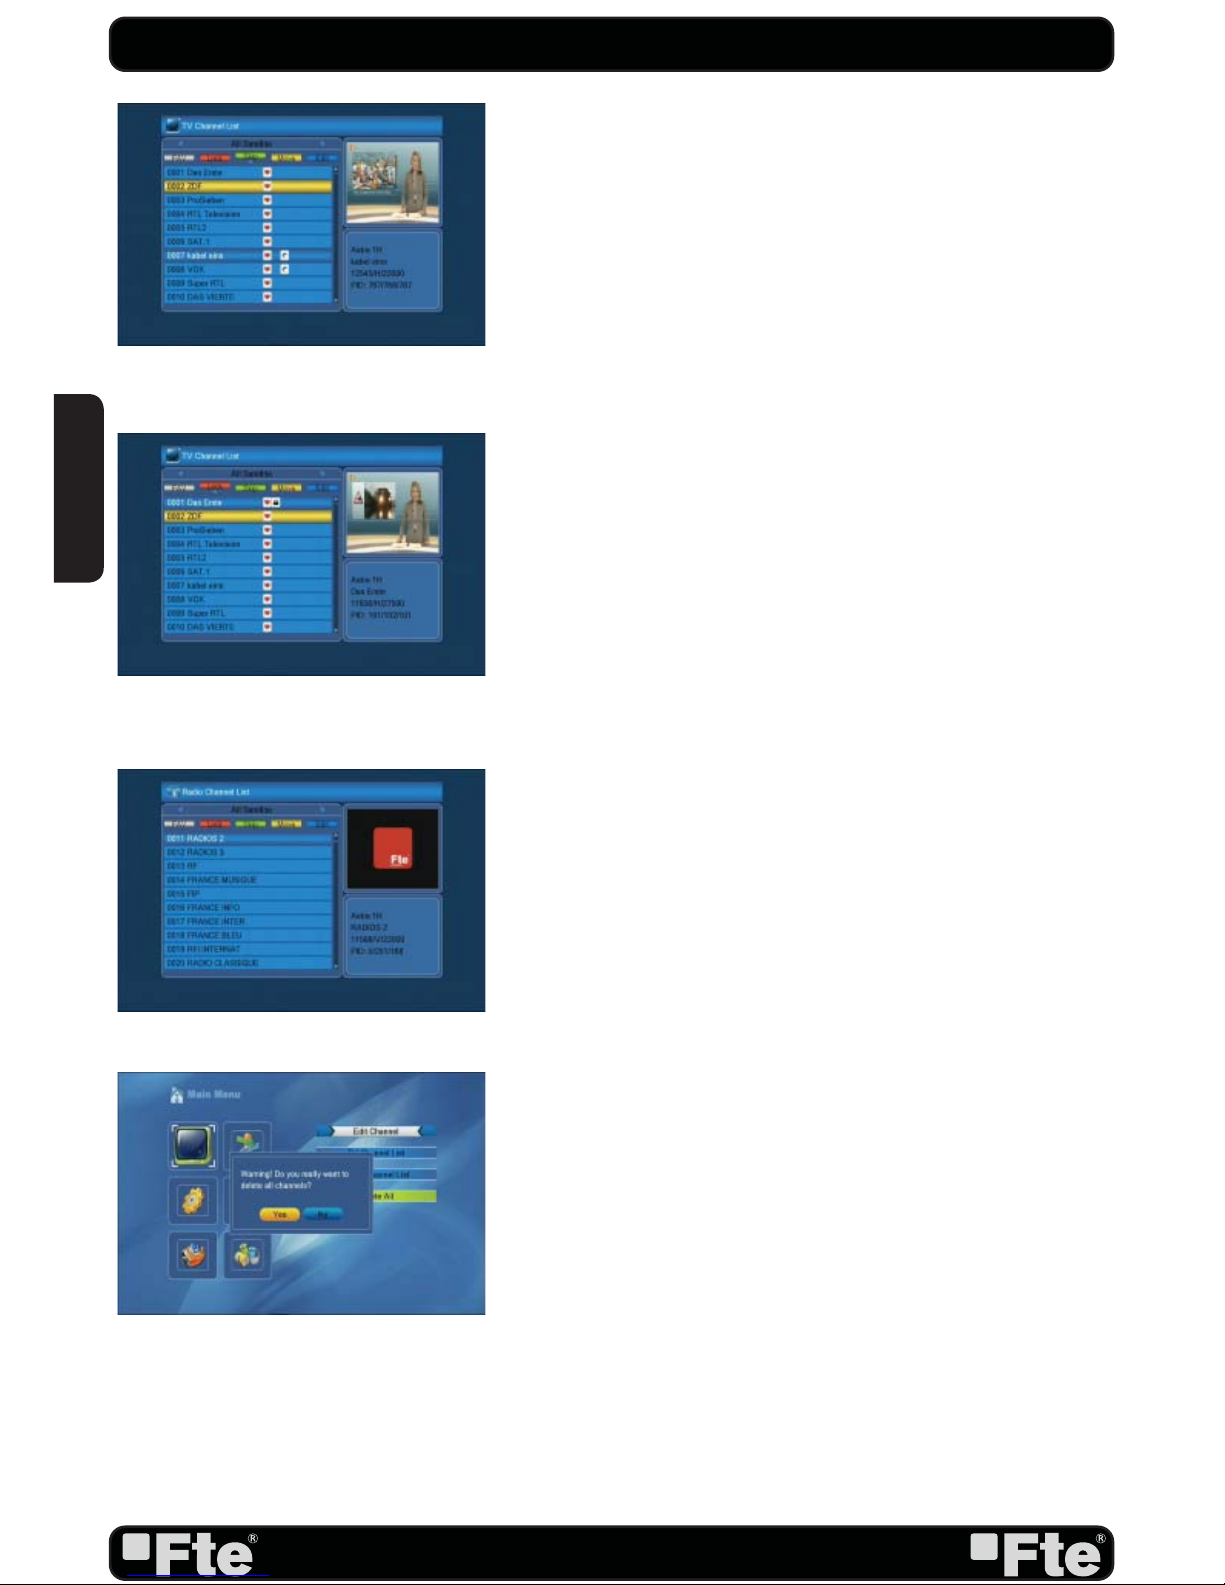
3.1.4. SKIP
In TV Channel List menu, press [Green] button and press [OK]
key to place a Skip icon behind the name of the highlighted
channel. Marked channels (OSD 20) will be skipped when you
change channels in TV mode after you confi rm to save the
changes when you leave this menu.
3.1.5. LOCK
In TV Channel List menu, press [Red] button and then [OK] to
place a Lock icon behind the name of the highlighted channel.
Marked channels (OSD 21) will be locked and displayed only
after password has been entered if you confi rm to save the
changes when you leave this menu.
CHANNEL
OSD 16
OSD 17
OSD 18
OSD 19
ENGLISH
Page 20
PAG.
20
rev 1.1
3.2. RADIO CHANNEL LIST
Basically the operation of “Radio Channel List” is same as “TV
Channel List”, except that in the small channel window a static
background will be displayed (OSD 22).
3.3. DELETE ALL
A safety question will show up where you have to confi rm fi rst.
Select “Yes” to delete all channels or “No” to cancel and confi rm
with [OK] (OSD 23).
Pressing [Exit] will exit the function directly without saving.
? FREQUENTLY ASKED QUESTION
Q: IF I incautiously delete all channels, what should I do?
A: There are two ways to restore:
- To re-search all channels at the “Installation” menu.
- Use “Factory Default” function to restore all channels in the
“Tools” menu. The receiver will load the factory channels.
CHANNEL
OSD 20
OSD 21
OSD 22
OSD 23
ENGLISH
Page 21
PAG.
21
rev 1.1
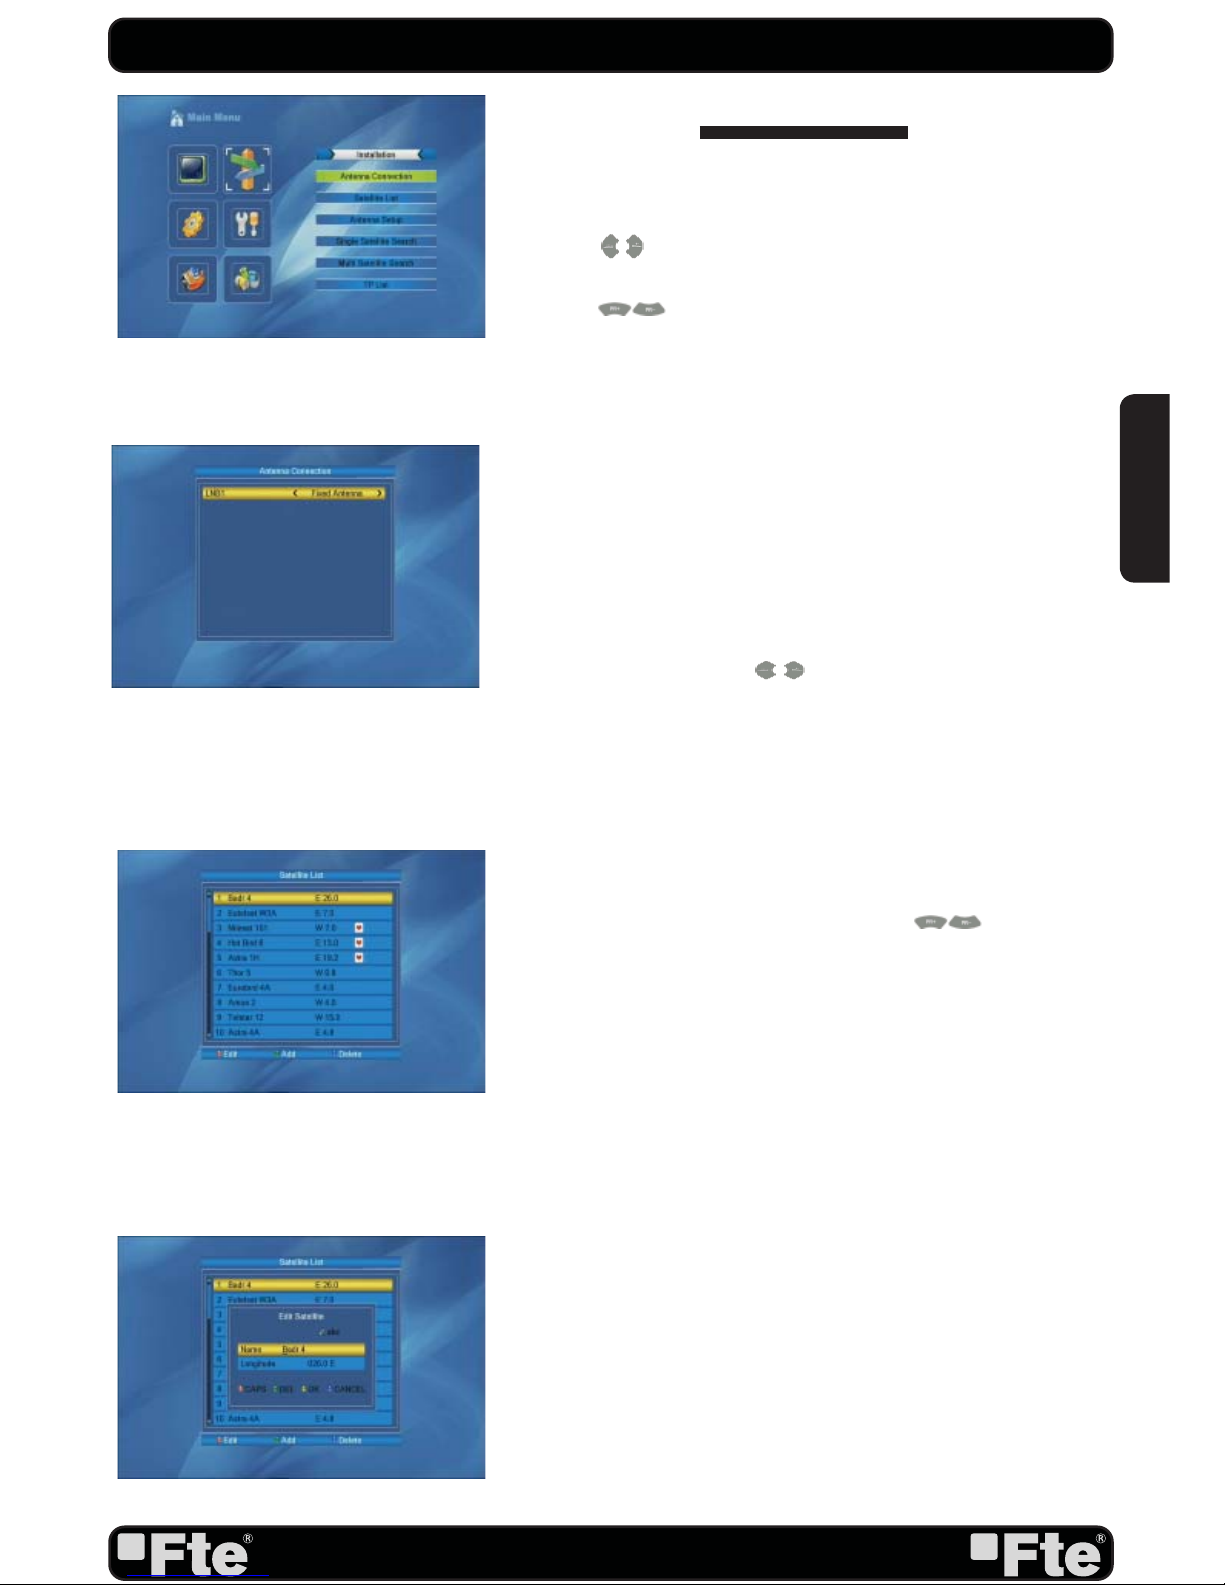
4. INSTALLATION
Press [Menu] in the TV mode to enter the main menu (OSD
24).
1. Press [
] to select the Installation item.
2. Press [OK] to enter the selected item.
3. Press [
] to select the wanted menu item.
4. Press [OK] to enter the selected item among.
- Antenna Connection
- Satellite List
- Antenna Setup
- Single Satellite Search
- Multi Satellite Search
- TP List
4.1. ANTENNA CONNECTION
When you enter the “Antenna connection” menu you can see a
window like the one beside (OSD 25).
LNB: Press the arrows [ ] on the remote to select the
“Motorized Antenna” option in case you have an installation
with an engine. If you do not have an engine, choose “Fixed
Antenna”.
4.2. SATELLITE LIST
When you enter the “Satellite List” menu you can see a window
like the one beside (OSD 26):
1. Move through the satellite list using [ ] and mark/
unmark the satellites that you want pressing [OK]
2. Press [Red] button to enter edit satellite menu (OSD 27).
You can edit the satellite’s name and its longitude. Once you
have edited the satellite, select “Save” option and confi rm with
[Yellow] button. If you prefer to exit without saving the changes
press [Blue] button.
3. Press [Green] button to open the “Add satellite” window.
You can edit the satellite’s name and its longitude. Once you
have edited the satellite, select “Save” option and confi rm with
[Yellow] button. If you prefer to exit without saving the changes
press [Blue] button.
4. After pressing [Blue] button you will be asked “Are you sure
to delete?”. Select “Yes” to delete the marked satellite. Select
“No” to cancel the operation.
5. Press [Exit] to save the changes and go to the previous
window.
OSD 24
OSD 25
OSD 26
OSD 27
INSTALLATION
ENGLISH
Page 22
PAG.
22
rev 1.1
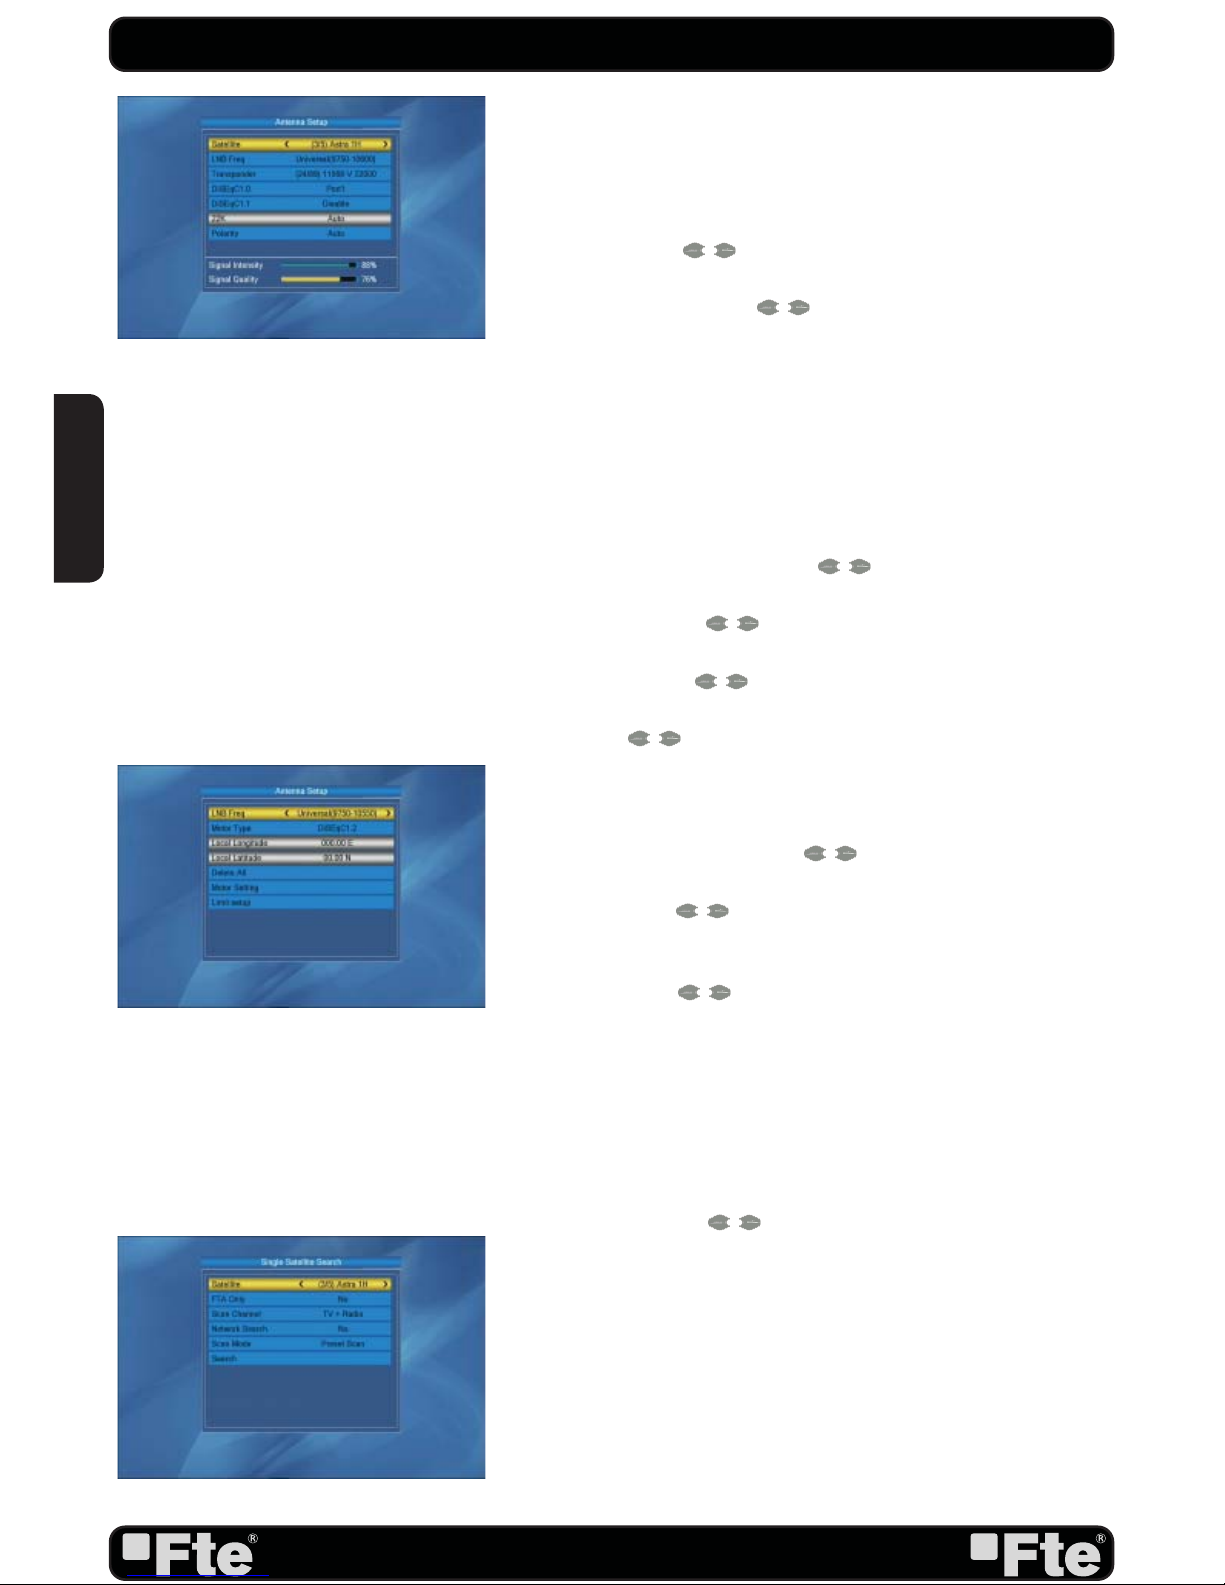
4.3. ANTENNA SETUP
Depending on how the “Antenna Connexion” section is
confi gured, it will allow confi guring different parameters:
(Fixed Antenna)
(OSD 28):
- Satellite: Press [ ] to switch Satellites or press [OK] to
enter satellite list to select directly.
- LNB frequency: Use [
] in order to change among
“Universal”, a specifi c “Polarity and Band”, “Unicable” or a
specifi c frequency of the local oscillator.
Note: If you have an Unicable installation that allows you to
distribute a satellite signal through a unique cable up to 8
receivers as maximum, in this menu option you can confi gure
the receiver. If you select “Unicable”, press the [green] button
to select a center frequency to the receiver and press the [red
button to choose the frequency of a channel.
- On “Transponder” item use [ ] to select the desired
transponder.
- DiSEqC1.0: Use [ ] to switch the options of DiSEqC
switches.
- DiSEqC1.1: Use [ ] to switch the options of DiSEqC1.1
switches.
- 22K: Use [ ] to switch “ON” and “Off”. The 22 kHz sig-
nal is used in KU Universal LNBs to change between low
band and high band. After choosing LNB type “Universal”
you cannot modify 22K.
- Toneburst (0/12V): Press [ ] to switch this function
“On” or “Off”.
- Polarity: Press [ ] to switch between “Auto / H / V”.
(Motorized Antenna)
(OSD 29):
- LNB type: Use [ ] in order to change among “Universal”
, “Unicable” or a specifi c frequency of the local oscillator.
Note: If you have an Unicable installation that allows you to
distribute a satellite signal through a unique cable up to 8
receivers as maximum, in this menu option you can confi gure
the receiver. If you select “Unicable”, press the [green] button
to select a center frequency to the receiver and press the [red
button to choose the frequency of a channel.
- Motor Type: Press [ ] to select between DiSEqC1.2 and
USALS”.
- Local Longitude: Geographic length of your position
(USALS).
- Local Latitude: Geographic latitude of your position
(USALS).
- Delete all: Deletes all the satellite positions saved.
- Motor Setting: It allows confi guring all the engine positions.
- Limit Setup: It allows confi guring the East and West position
of the engine.
Press [Exit] to save the changes.
•
•
OSD 28
OSD 29
OSD 30
INSTALLATION
ENGLISH
Page 23
PAG.
23
rev 1.1
4.4. SINGLE SEARCH
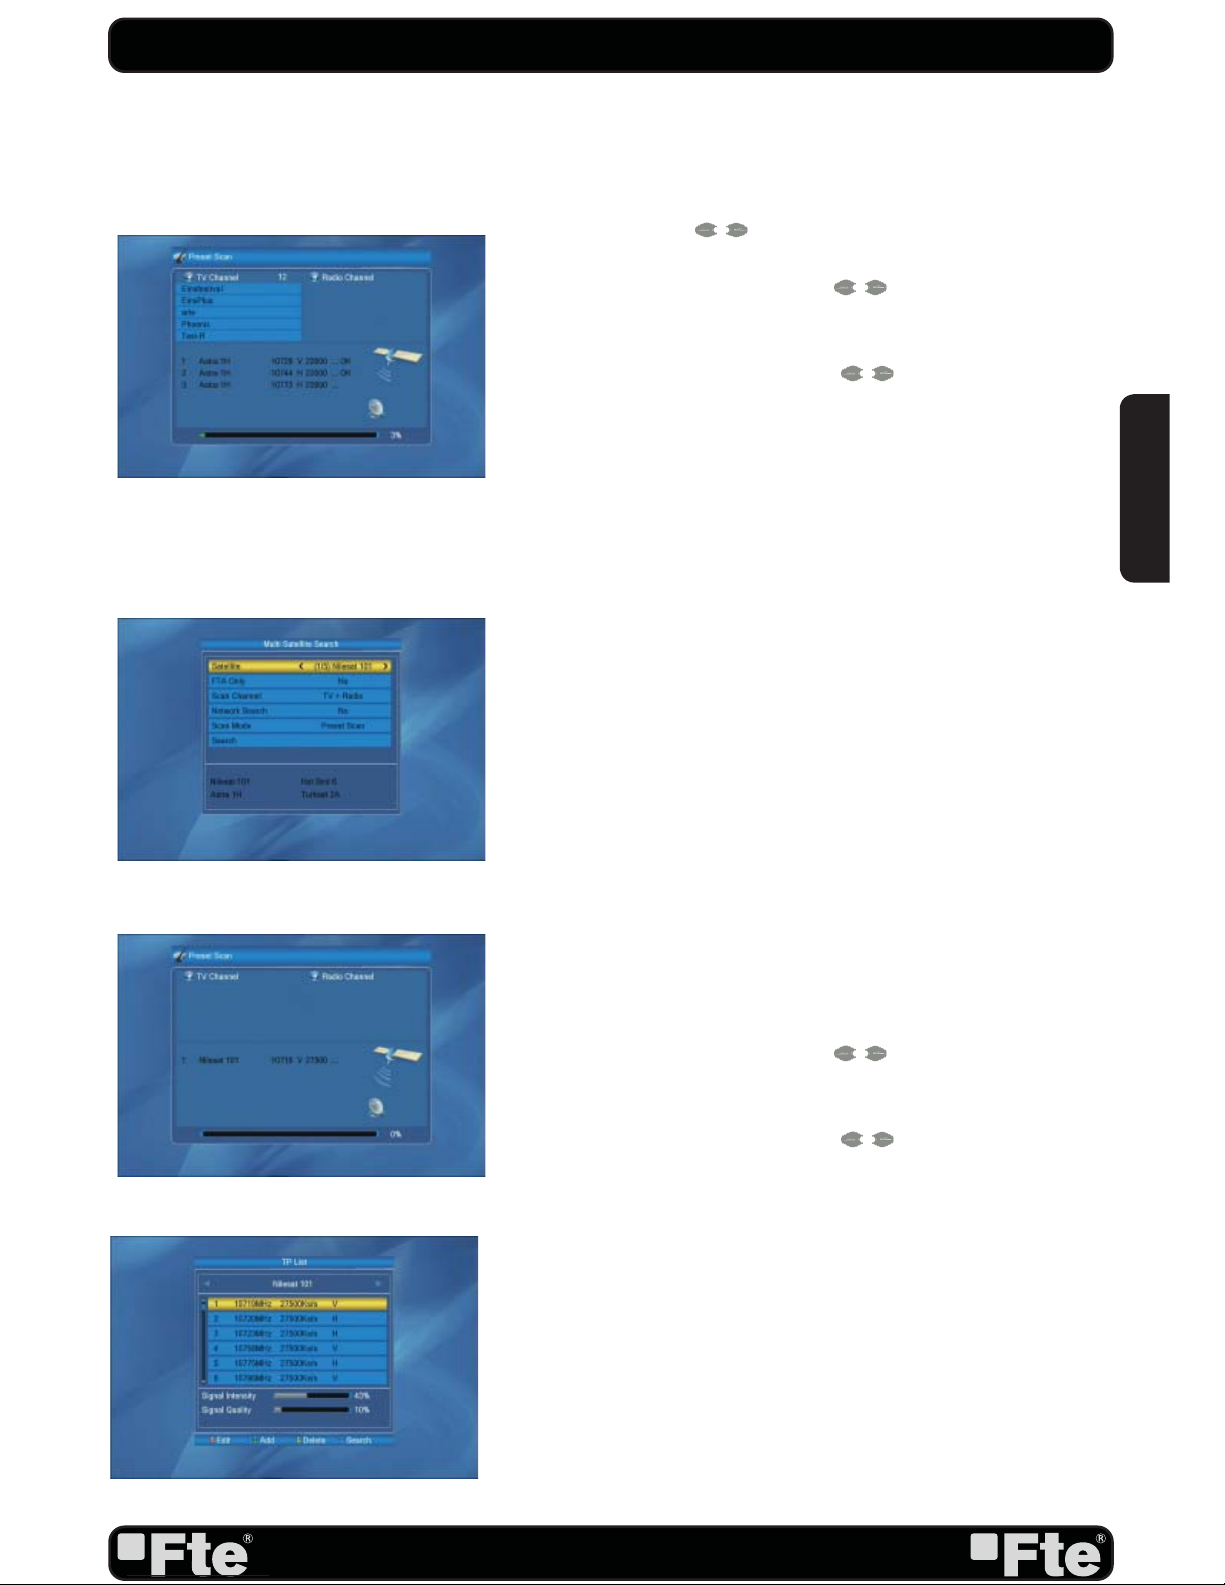
When you enter the “Single Satellite Search” menu you can see
a window like OSD 30:
You can edit the following items:
1. Satellite: Press [ ] to switch Satellites or press [OK] to
enter satellite list to select directly.
2. In the “FTA Only” item, press [
to select to scan only
free channels or even scrambled channels. If you select “Yes” it
will scan free channels only.
3. In “Scan Channel” item, press [ ] to select to scan TV
+ Radio Channels, just TV channels or just Radio channels.
4. Network Search: If you select this option as “No”, the receiver
will search the selected Satellite. In case you select “Yes”, the
NIT (Network Identifi cation) will be identifi ed and the receiver
will automatically search all the TP of this network.
5. In “Scan Mode” item you can select “Auto Scan” to blind
scan or “Preset Scan” to scan all preset transponders.
6. Move the highlight to “Search” and press [OK] button to
start scanning. Bars are showing the progress of the channel
scanning in the lower part of the window and the found channels
are listed. You can stop the scan with [Exit] and save the so far
found channels (OSD 31).
4.5. MULTI SEARCH
Entering in this menu, you can make a search in all the
satellites of the list confi gured in the “Satellites list” option. The
confi guration options are the same as in the individual search
section.
After selecting Antenna Setup another window will be opened
(OSD 32).
You can edit the following items:
1. Satellite: Press [OK] to enter satellite list.
2. In the “FTA Only” item, press [ to select to scan only
free channels or even scrambled channels. If you select “Yes” it
will scan free channels only.
3. In “Scan Channel” item, press [ ] to select to scan TV
+ Radio Channels, just TV channels or just Radio channels.
4. Network Search: If you select this option as “No”, the receiver
will search the selected Satellite. In case you select “Yes”, the
NIT (Network Identifi cation) will be identifi ed and the receiver
will automatically search all the TP of this network.
5. In “Scan Mode” item you can select “Auto Scan” to blind
scan or “Preset Scan” to scan all preset transponders.
6. Move the highlight to “Search” and press [OK] button to
start scanning. Bars are showing the progress of the channel
scanning in the lower part of the window and the found channels
are listed. You can stop the scan with [Exit] and save the so far
found channels (OSD 33).
INSTALLATION
OSD 31
OSD 32
OSD 34
OSD 33
ENGLISH
Page 24
PAG.
24
rev 1.1
INSTALLATION
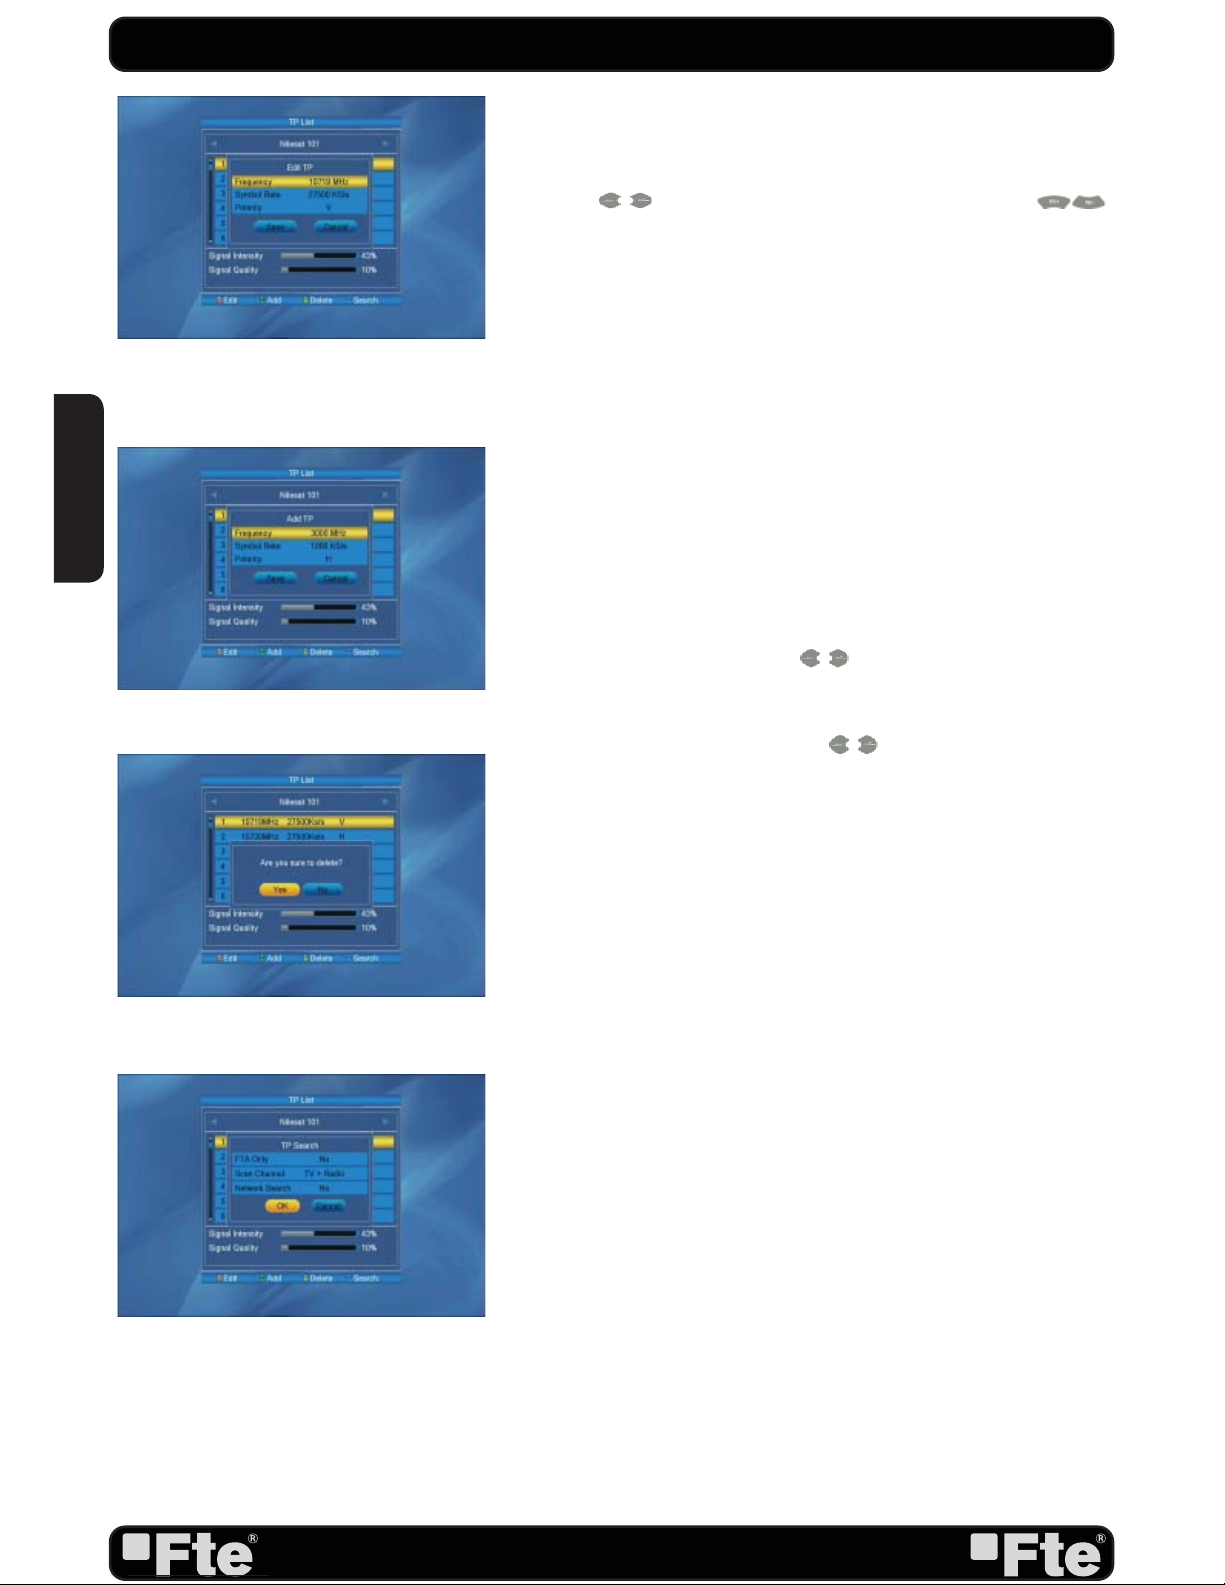
4.6. TP LIST
When you open the “TP List” menu you will see a window like
the one beside (OSD 34).
1. Press [ ] to change the marked satellite. Press [
] to change the marked TP.
2. Press [Red] button to open the “Edit TP” menu (OSD 36). Here
you can edit the Transponder’s data like frequency, polarity and
Symbol Rate. In this window, the search of the channels of the TP
can be done selecting the “Search” option and pressing [OK].
3. Press [Green] button to open the “Add TP” menu (OSD
35). Here you can add a new TP and setup its parameters like
frequency, polarity and Symbol Rate.
4. Press [Yellow] button will open a dialog box asking you to
confi rm the deletion of the current TP (OSD 37). If you select
“Yes” all the related channels will be deleted. If you select “No”
the operation will be cancelled.
5. Press the key [Blue] to make a searching of the selected TP.
When selecting this option a new window will appear, here you
will be able to confi gure the following parameters (OSD 38):
- On “FTA Only” item, press [
] to select scanning of all
channels or just scanning of free channels. If you select “Yes” it
will scan free channels only.
- On “Scan Channel” item, press [ ] to select the scanning
range from TV + Radio Channels, only TV channels or only
Radio channels.
- Network Search: If you select this option as “No”, the receiver
will search the selected TP. In case you select “Yes”, the NIT
(Network Identifi cation) will be identifi ed and the receiver will
automatically search all the TP of this network.
6. Press [OK] to start scanning.
7. On the “TP Scan” item, press [Exit] to cancel the scanning
and saving the found channels.
OSD 36
OSD 37
OSD 38
OSD 35
ENGLISH
Page 25
PAG.
25
rev 1.1
5. SYSTEM SETUP
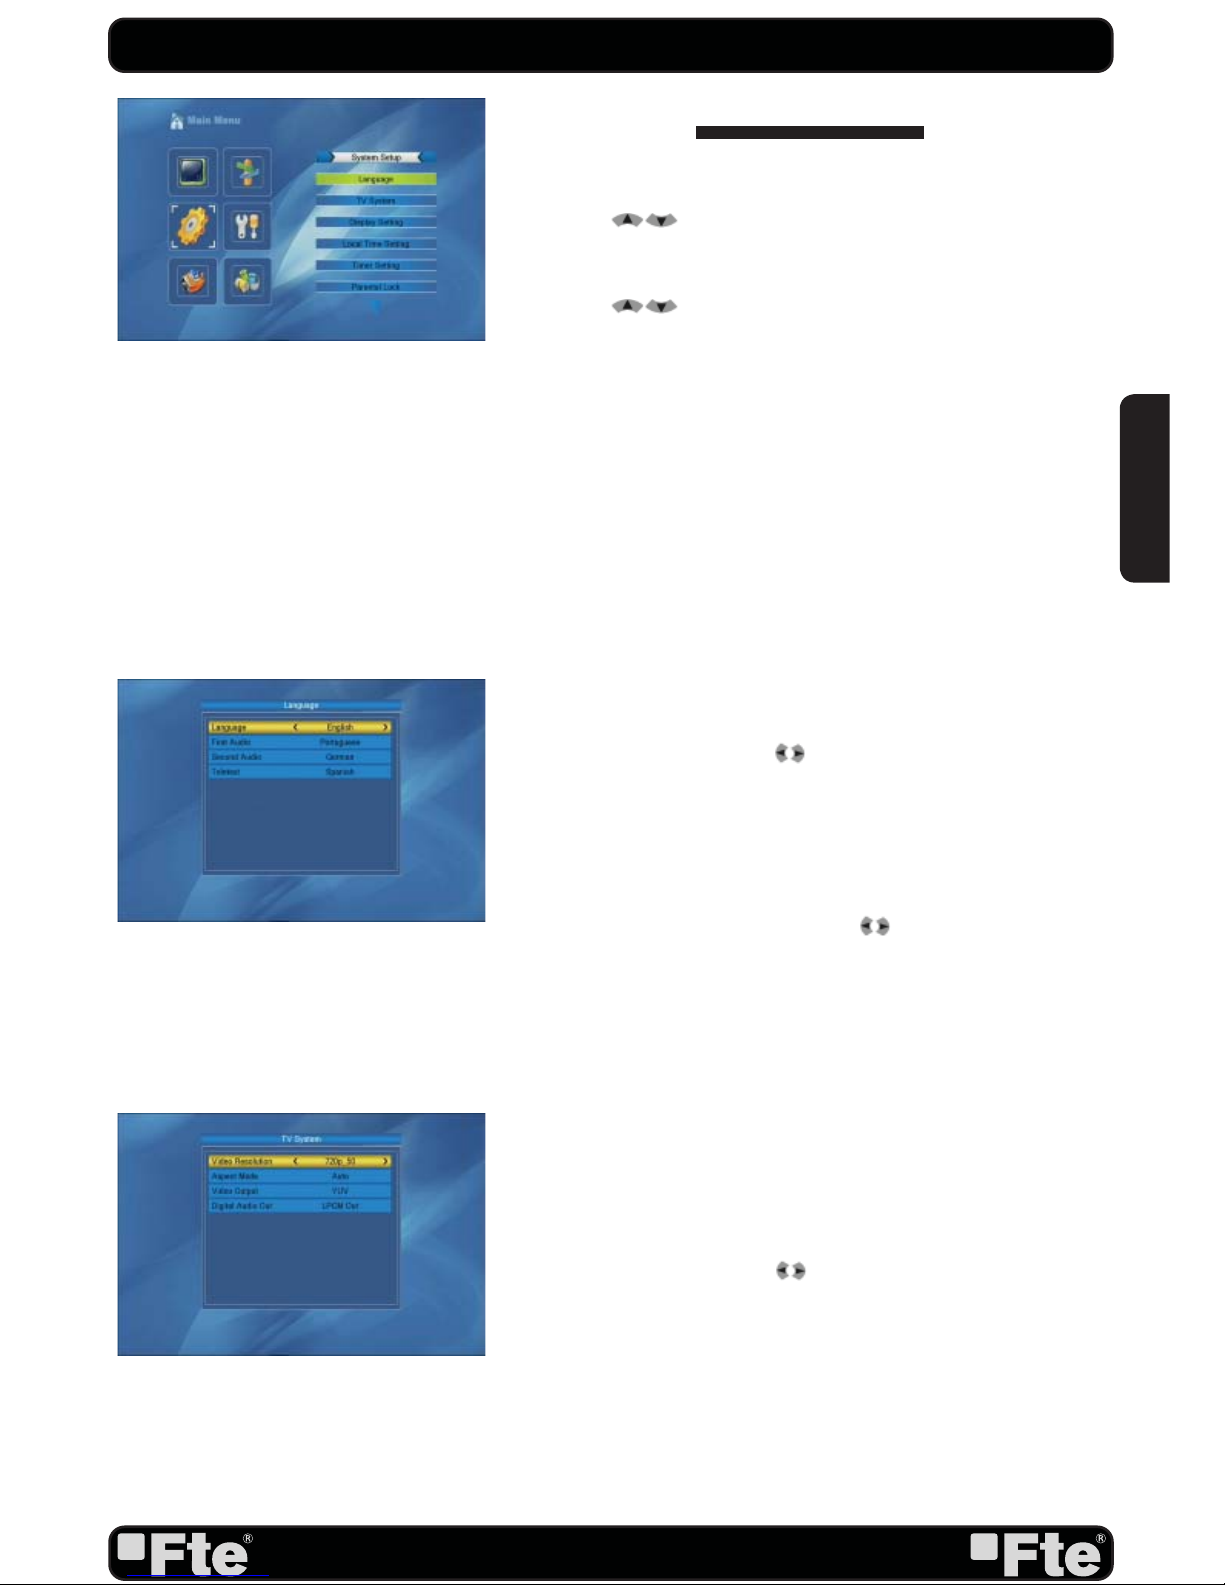
Press [Menu] in the TV mode to enter the main menu .
1. Press [ ] to select the System Setup item.
2. Press [OK] to enter the selected item.
In the System Setup menu (OSD 39):
3. Press [
] to select the wanted menu item.
4. Press [OK] to enter the selected item among.
- OSD Language
- TV System
- Display Setting
- Local Time Setting
- Timer Setting
- Parental Lock
- OSD setting
- Favorite
- Other
5.1. OSD LANGUAGE
When you enter to “Language” menu, you will see the screen
like below (OSD 40):
1.OSD Language: press [ ] key to select languages, the
selections of languages include: English, French, German,
Italian, Spanish, Portuguese, Polish, Russian, Turkish, Arabic
and Farsi.
2. First Audio: Some channels offer more than one audio
language. This function allows you to set the preferred audio
language for those channels using [ ]. If a channel offers
the same audio language as the “First Audio” you set the
system will play this audio language as default. If the channel
does not offer this audio language then the system will compare
the offered languages with the second audio language.
3. Second Audio: If the channel has no audio language that
corresponds with “First Audio” but with “Second Audio” the
system will play the second audio language as default. If no
audio language corresponds with the “Second Audio” then
the default language of the current channel will be played
instead.
4. Teletext: You can choose the predetermined language of
the teletex using the keys [ ].
5. Press [Exit] to return back from “Language” menu.
5.2. TV SYSTEM
When you enter to “TV System” menu, you will see the screen
like below (OSD 31):
1. Display Mode is used to switch the display mode. You can
SYSTEM SETUP
OSD 40
OSD 41
OSD 39
ENGLISH
Page 26
PAG.
26
rev 1.1
select from By source / By Native TV / 480i / 480p / 576i
/ 576p / 720p_50 / 720p_60/ 1080i_50 / 1080i_60 /
1080p_50 / 1080p_60
in YUV mode and 480i / 576i in
RGB mode. Press [ ] to select the desired mode.
2. Aspect Mode is used for switching the screen aspect ratio
mode. Now we provide below options: 4:3 PS / 4:3 LB /
16:9 / AUTO. You can press [
] key to select each mode
circularly.
3. In video output you can choose, by the means of [ ]
keys, the video output mode: RGB / YUV. We recommend selecting YUV mode when the connection is made
by HDMI, if on the contrary it is made by scart cable, we
recommend selecting RGB mode.
4. Digital Audio Out: It will allow you to select the type of
audio digital output. Options: LPCM Out / BitStream Out.
If you connect this output to a device with Dolby digital,
select BitStream Out option.
5. Press [Exit] key to draw back from “TV System” menu.
5.3. DISPLAY SETTING
When you enter to “Display Setting” menu, you will see
window like below (OSD 32):
This menu will allow you to set the features of the image.
Options:
1.Brightness: 0-100%
2.Contrast: 0-100%
3.Saturation: 0-100%
4.Hue: 0-100%
5.Sharpness: 0-9
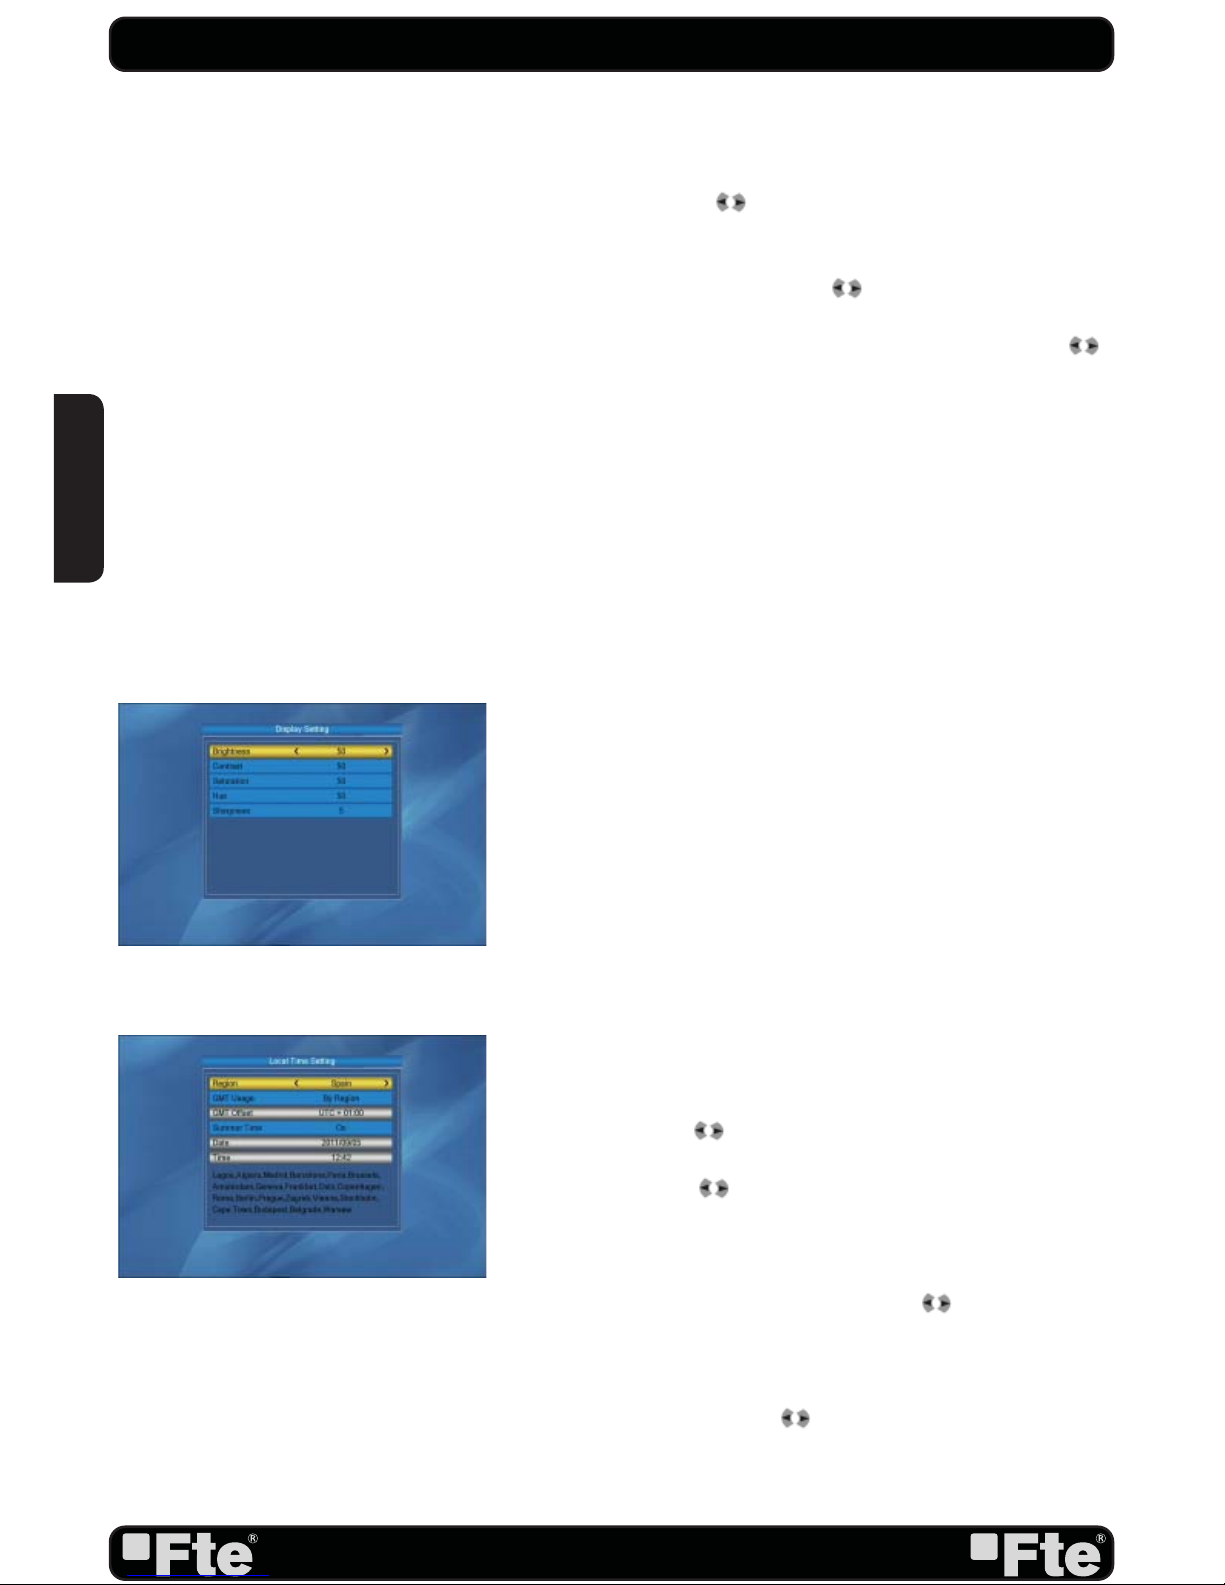
5.4. LOCAL TIME SETTINGS
When you enter to “Local Time Setting” menu, you will see
window like below (OSD 43):
1. Region is used for selecting the country which you are in.
You can press [ ] key to select each mode circularly.
2. GMT Usage: This item is use for open the usage of GMT.
You can press [ t] keys to switch “Off / On”. If, on the
contrary, you want it to be automatic according to the time
you get from the signal (GMT: Region / Set by user).
3. The “GMT Offset” item is valid only when the setting of
“GMT Usage” is “Off”. You can press [
] keys to switch
“GMT Offset” value, and the range is “-12:00 ~ +12:00”,
increase each half hour progressively.
4. Summer Time: this option is only available when “GMT
Usage” is enabled. Use
[ ] to switch On/Off the summer
timetable.
SYSTEM SETUP
OSD 42
OSD 43
ENGLISH
Page 27
PAG.
27
rev 1.1
5. “Date” and “Time” items are valid only when the setting of
“GMT Usage” is “Off”. You can press [ ] keys to moving
highlight and use number keys to input directly.
6. Press [Exit] key to return back from ”TV System” menu.
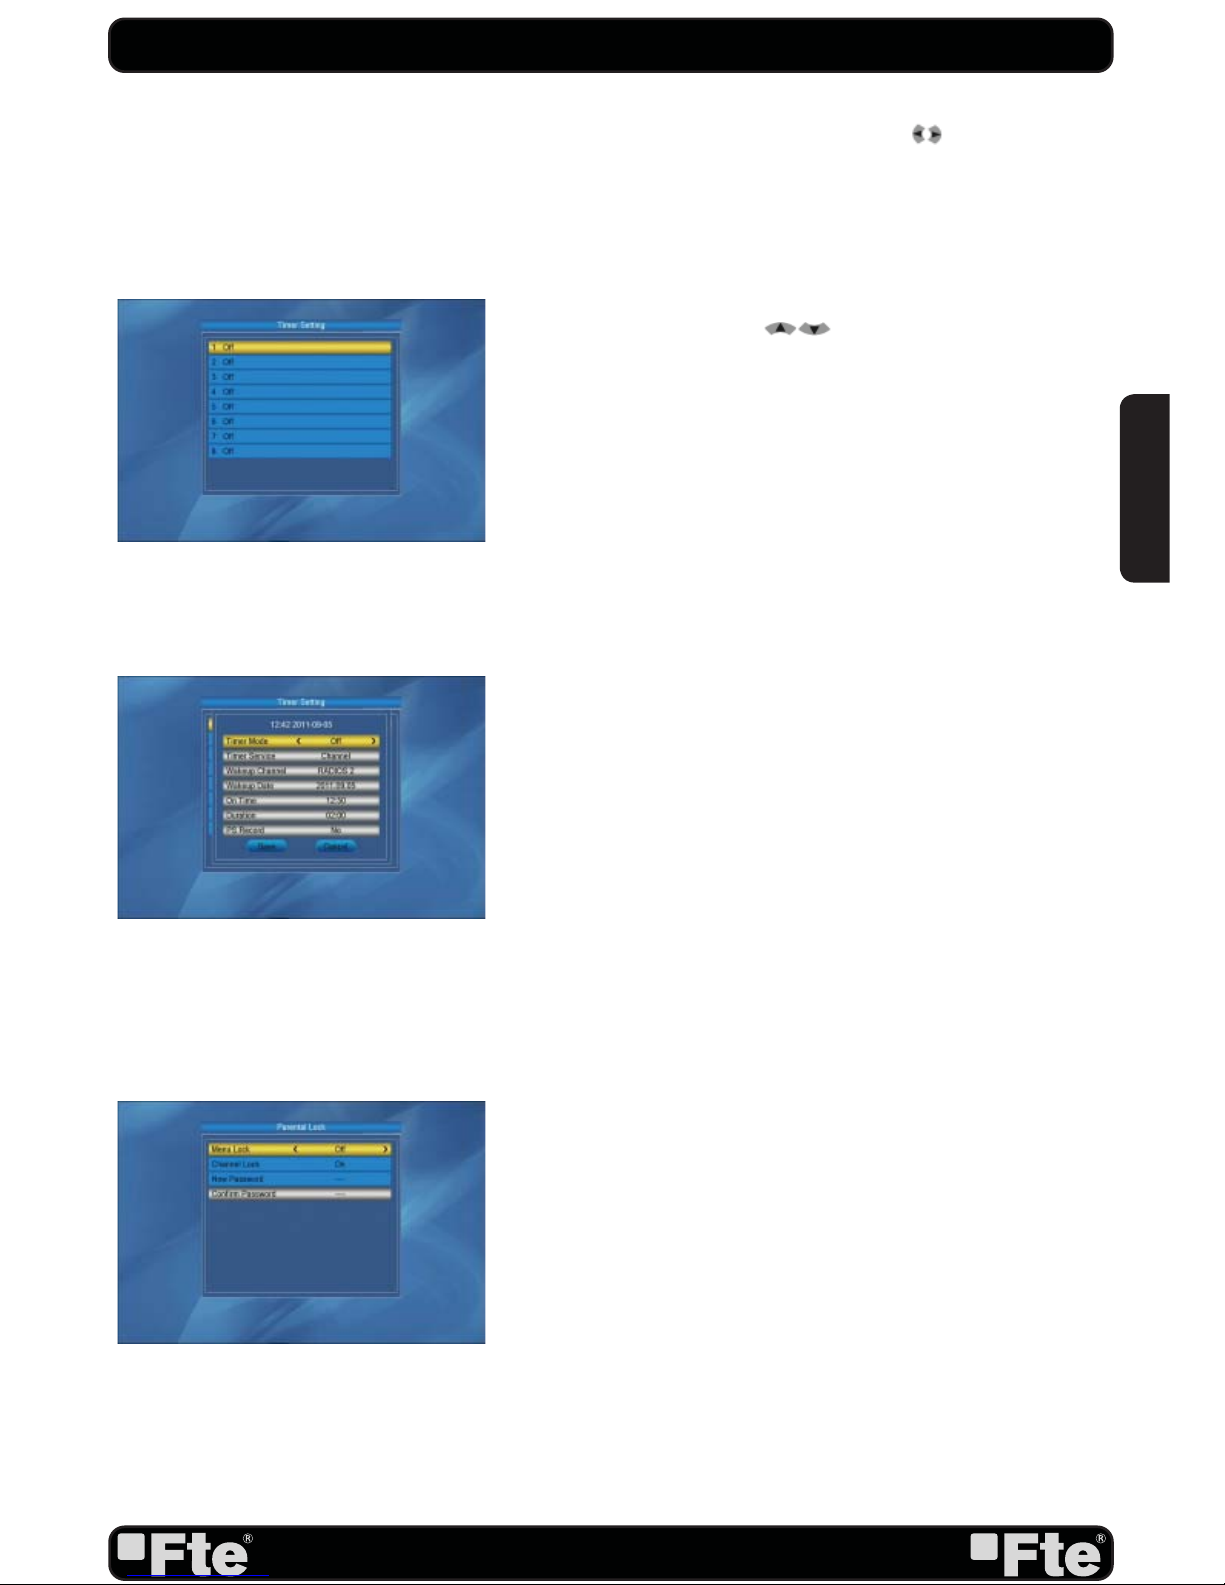
5.5. TIMER SETTING
When you enter “Timer Setting”, you will see the window like
OSD 44. You can press [ ] keys to set Timer number,
and there are 8 timers in total. When you press [OK] key you
will see a screen like beside (OSD 45):
1. Current time information will display on the fi rst column; if
the current time is incorrect, please modify the time information in “Time” item.
2. Timer Mode: There are several modes for Timer to setting,
include Off, Once, Daily.
3. Timer Type: You can choose between “DVR Recorder” *
/“Radio Recorder” * (so you can program a recording of a
TV or a Radio channel), “Reproduce Channel” / “Reproduce
Radio” (that way, you will assign the alarm function to a concrete TV or Radio channel)
4. Wake up Channel: press [OK] key to enter channel list and
select channel that you want to setting.
5. Wake up Date: use number keys to input your wakeup
date.
6. Wake up Time: use number keys to input your wakeup
time. Once the time’s up, no matter what the system is in
standby mode or in playing mode, the system will automatically switch to the channel you want and start to play.
7. Duration: Please introduce the duration of the timing.
8. PS Record: In this option you can select betwenn PS or
ts format.
9. Press [Exit] can exit the current menu.
* This function will only be available in models with PVR
ready functionability
5.6. PARENTAL LOCK
You can set a password for anyone who wishes to operate in
the “Installation” menu. And you can also set the password
for the lock channels. (How to set the lock channel please
refer to LOCK) Here will show you how to setting and how to
revising the password.
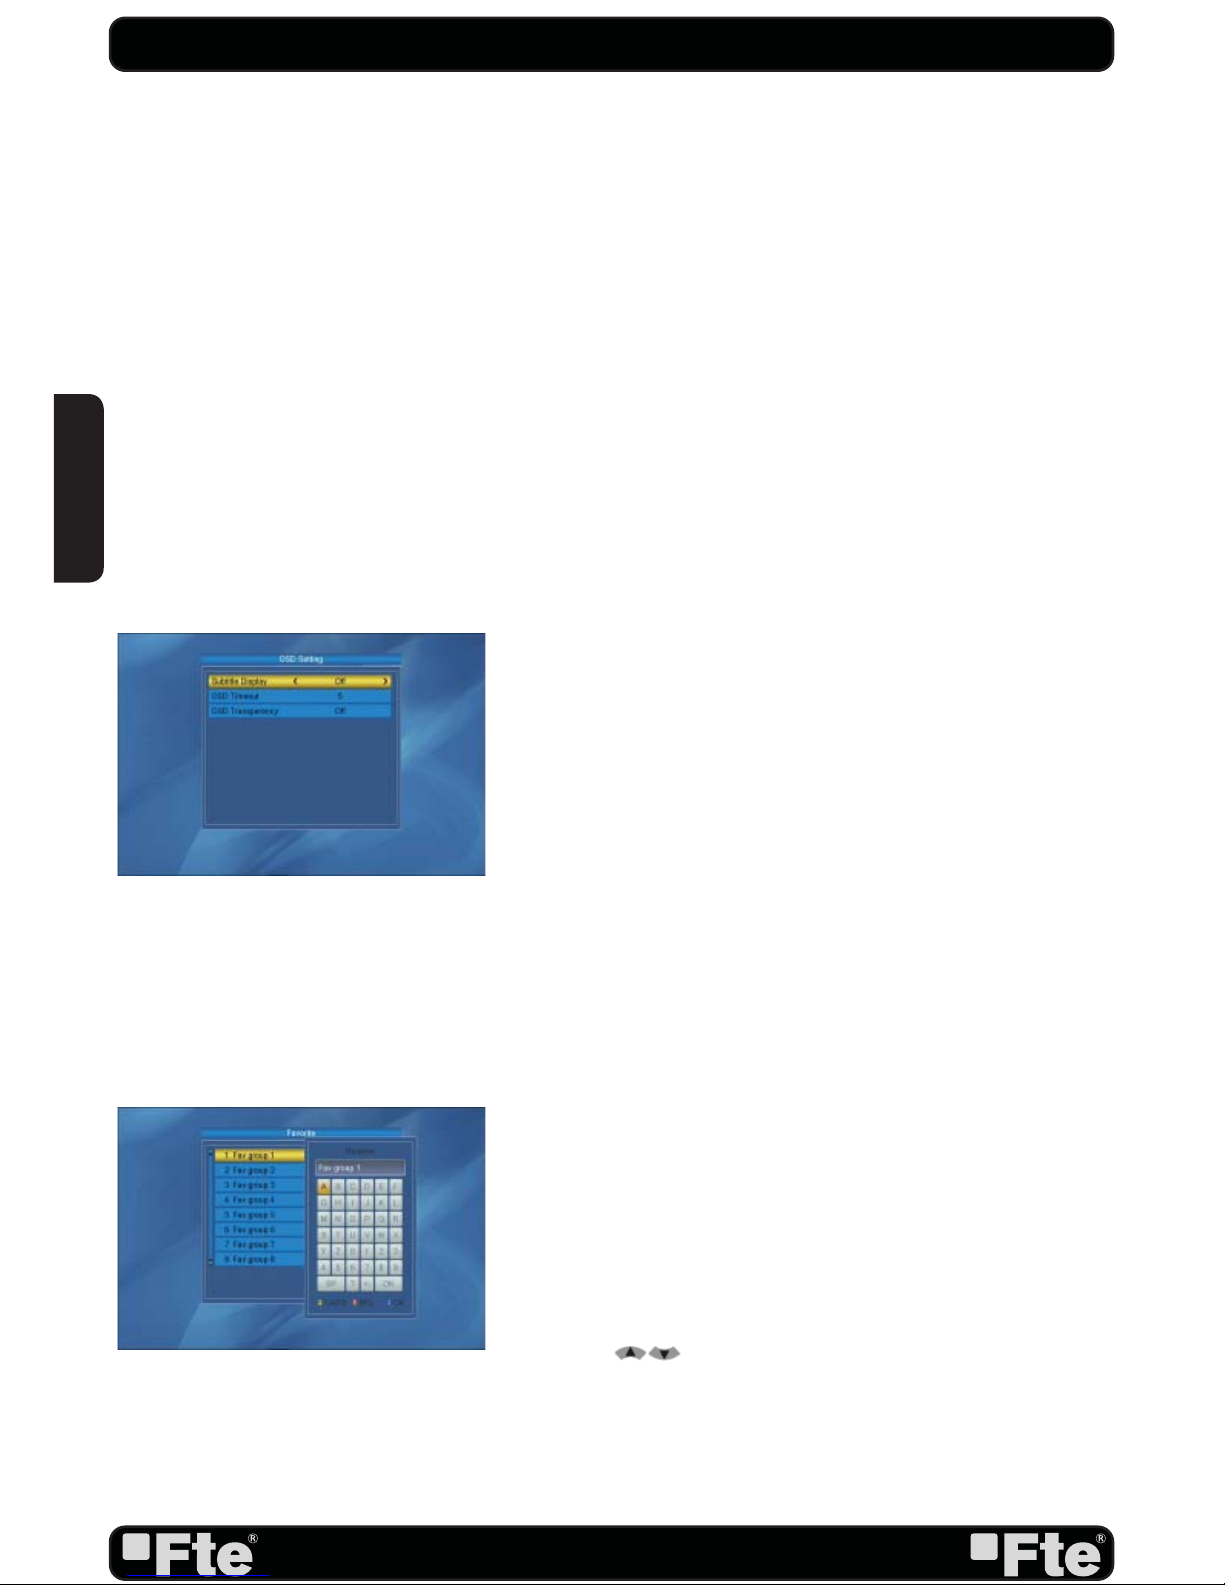
In “Parental Lock” function, press [OK] key, there will pop an
dialogue for you to input the password. The default password
is “0000”. When you input the correct password, you will see
a screen like below(OSD 46):
SYSTEM SETUP
OSD 45
OSD 44
OSD 46
ENGLISH
Page 28
PAG.
28
rev 1.1
1. Menu Lock determining that when user wish to enter
“Installation” menu, whether have to input Password or not.
If the setting of “Menu Lock” is “Yes” which means user
have to key in password, set “No” means unlock.
2. Channel Lock determining that when user wish to play the
lock channels, whether have to input the password or not.
If the setting is “Yes”, play the channels with lock mark will
show up a dialogue on the screen and ask for the password. If the setting of “Channel Lock ”is “No”, the Lock
function will invalid.
3. New Password is used for revising password; you can input
the new password in this item by using number keys directly. After you fi lled in 4 digital numbers, the highlight will auto
skip to Confi rm Password and ask you to input the new
password again. If the password is correct, the screen will
show up a message of “Change password successfully”.
After fi nish saving and draw back to “System Setup” menu,
the revising is complete.
4.Press [Exit] key to draw back from the “Parental Lock”
menu.
5.7. OSD SETTING
When you input to “OSD Setting” menu, you will see a screen
like below (OSD 47):
1. Subtitle display: Select this option for activating /
desactivating the channel subtitles.
2. OSD Timeout: If you confi gure this option you will be able
to change OSD time of information of the channel that is
tuned in every moment.
3. OSD Transparency: Besides the setting of “OSD Menu
Style”, you also can set the transparency of OSD. You can
press [Left/Right] key to select the values. There are 5 levels of transparency, 10%, 20%, 30%, and 40% and “NO”
(means no transparency function).
4. Press [Exit] key to draw back from the “OSD Setting”
menu.
5.8. FAVORITE
In this menu, user is able to change the name of the Favourite
Groups. Press [OK] to enter this menu and you will see a
screen like beside (OSD 48).
To change the name of the Favourites Groups:
1. Press [ ] and select a Favorite Group.
2. Press [Ok] button to edit the name of the Group.
3. Once the name is correct, confi rm pressing [Blue] button.
4. Select “Exit” to leave this menu.
SYSTEM SETUP
OSD 47
OSD 48
ENGLISH
Page 29
PAG.
29
rev 1.1
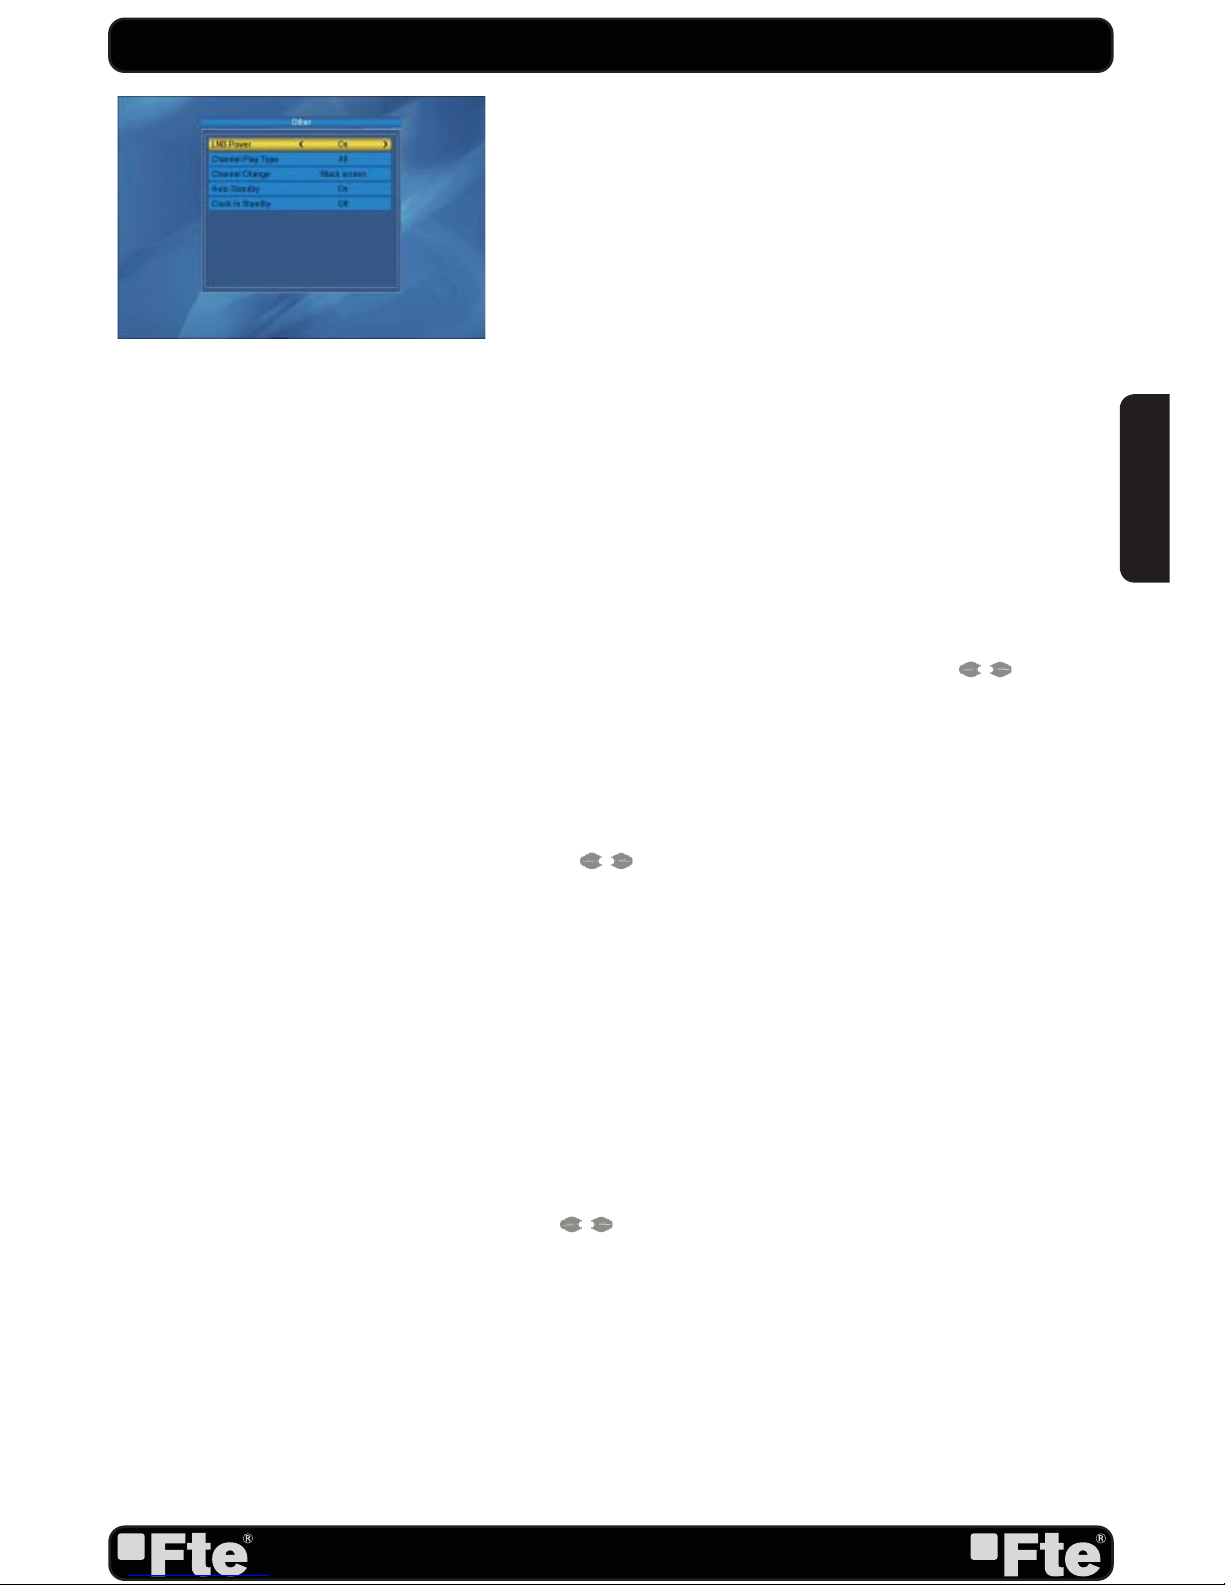
5.9. OTHER
When you select “Other” you will see a screen like OSD 49:
5.9.1. LNB POWER
Here you can set the power output to the LNB. If your receiver
is connected to the LNB directly then you need to set the
LNB Power to “On”. If your receiver is connected to a multi
switch (SMATV signal distribution system) then it may be that
you don’t need to provide the power to the LNB. But since
this is depending on the kind of installed distribution system we
recommend you to contact your installer or to refer to the user
manual of this system to get the correct information.
You also just can change this setting and check if you still can
receive the channels. If the LNB Power is off and you still can
see all channels then we recommend this setting.
5.9.2. CHANNEL PLAY TYPE
In this option you will be able to choose which type of channels
the receiver shown every time it starts. Press [ ] in order
to select among All, Free or Scrambled.
5.9.3. CHANNEL CHANGE
From this option you will be able to select the effect that will
be shown in the screen every time you change the channel.
Press [ ] in order to select between “Black screen” or
“Freeze” (it will show the frozen image of the cannel you were
watching).
5.9.4. AUTO STANDBY
This option will allow you to activate or deactivate the automatic
Standby option. Options: On, Off.
-On: The receiver will be in standby mode automatically after
3 hours, as long as during this time no commands have been
sent to the receiver through the remote control or buttons of
the front panel, and no programmed timers are run.
-Off: Auto standby function gets deactivated.
Use [ ] in order to turn this option on/off.
5.9.5. CLOCK IN STANDBY
If you wish to see the current time in the display while the
receiver is in standby mode, you should confi gure this option
“On”.
SYSTEM SETUP
OSD 49
ENGLISH
Page 30
PAG.
30
rev 1.1
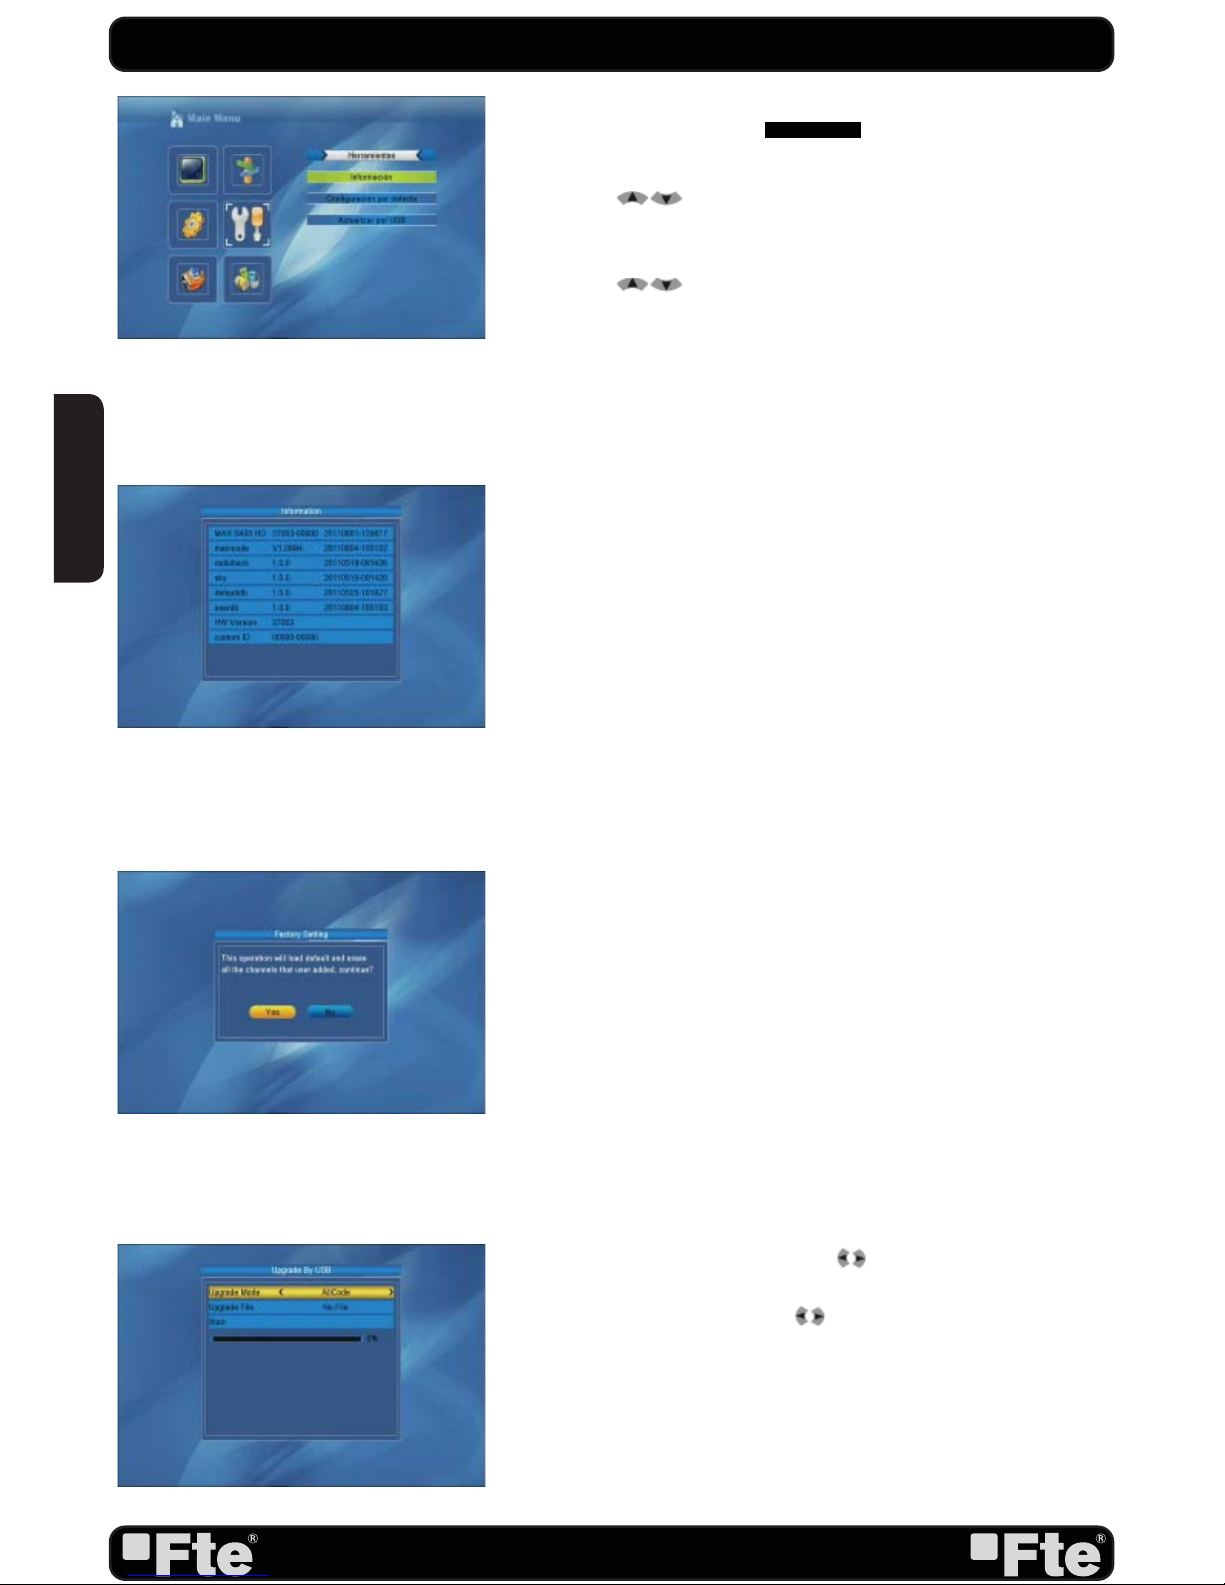
6.TOOLS
Press [Menu] in the TV mode to enter the main menu.
1. Press [ ] to select the Tools item.
2. Press [OK] to enter the selected item.
In the Tools menu (OSD 50):
3. Press [
] to select the wanted menu item.
4. Press [OK] to enter the selected item among.
- Information
- Load Factory Default
- Software Upgrade by USB
6.1 INFORMATION
1. When you enter to “Information” menu, you will see a screen
like above (OSD 51). The screen displays some parameters of information of current channel, and this function
same as the function [Information] in the full screen play
mode.
2. Press [Exit] key to draw back from “Tools” menu.
6.2 LOAD FACTORY DEFAULT
When you press [OK] on the “Factory Setting” item:
1. A warning message will be displayed like the one beside
(OSD 52).
2. If you select “Yes” then all changes you made will be reset
to default values. Make sure you really want to do this!
3. Press [Exit] in both steps will close the window without
resetting the receiver.
6.3 SOFTWARE UPGRADE BY USB
This option allows updating the software of the receiver with
the received data from a USB 2.0 memory device. To do
it, connect a USB 2.0 memory device to the receiver and
accede to this menu option (OSD 53).
The last software version to be loaded must be placed at the
root path of your USB device.
1. Upgrade mode: Select with [ ] , the mode of upgrading.
2. Update fi le: Select with [ ] the name of the fi le to be
loaded.
3. Select “Start” and press [OK]. An alert message appears
indicating not to take out the memory device during the
loadiing process.
TOOLS
OSD 50
OSD 51
OSD 52
OSD 53
ENGLISH
Page 31
PAG.
31
rev 1.1
4. Once the fi le has been loaded, it requires the conformity to end the upgrading process, writing into the receiver
the upgrading. Select “Yes” and press [OK] to upgrade the
receiver. In case during the reading of the fi le, it is corrupted or it would be a not appropriated for this model of receiver, an alert messagewould appear “Error reading the USB
disk”.
5. After pressing [OK] the receiver will write into the Flash
memory, and it will reboot to end the upgrading process.
For further information about the upgrading of the receivers,
please visit http://www.ftemaximal.com, in the chapter about
upgrading receivers.
TOOLS
ENGLISH
Page 32
PAG.
32
rev 1.1
GAMES
7.GAMES
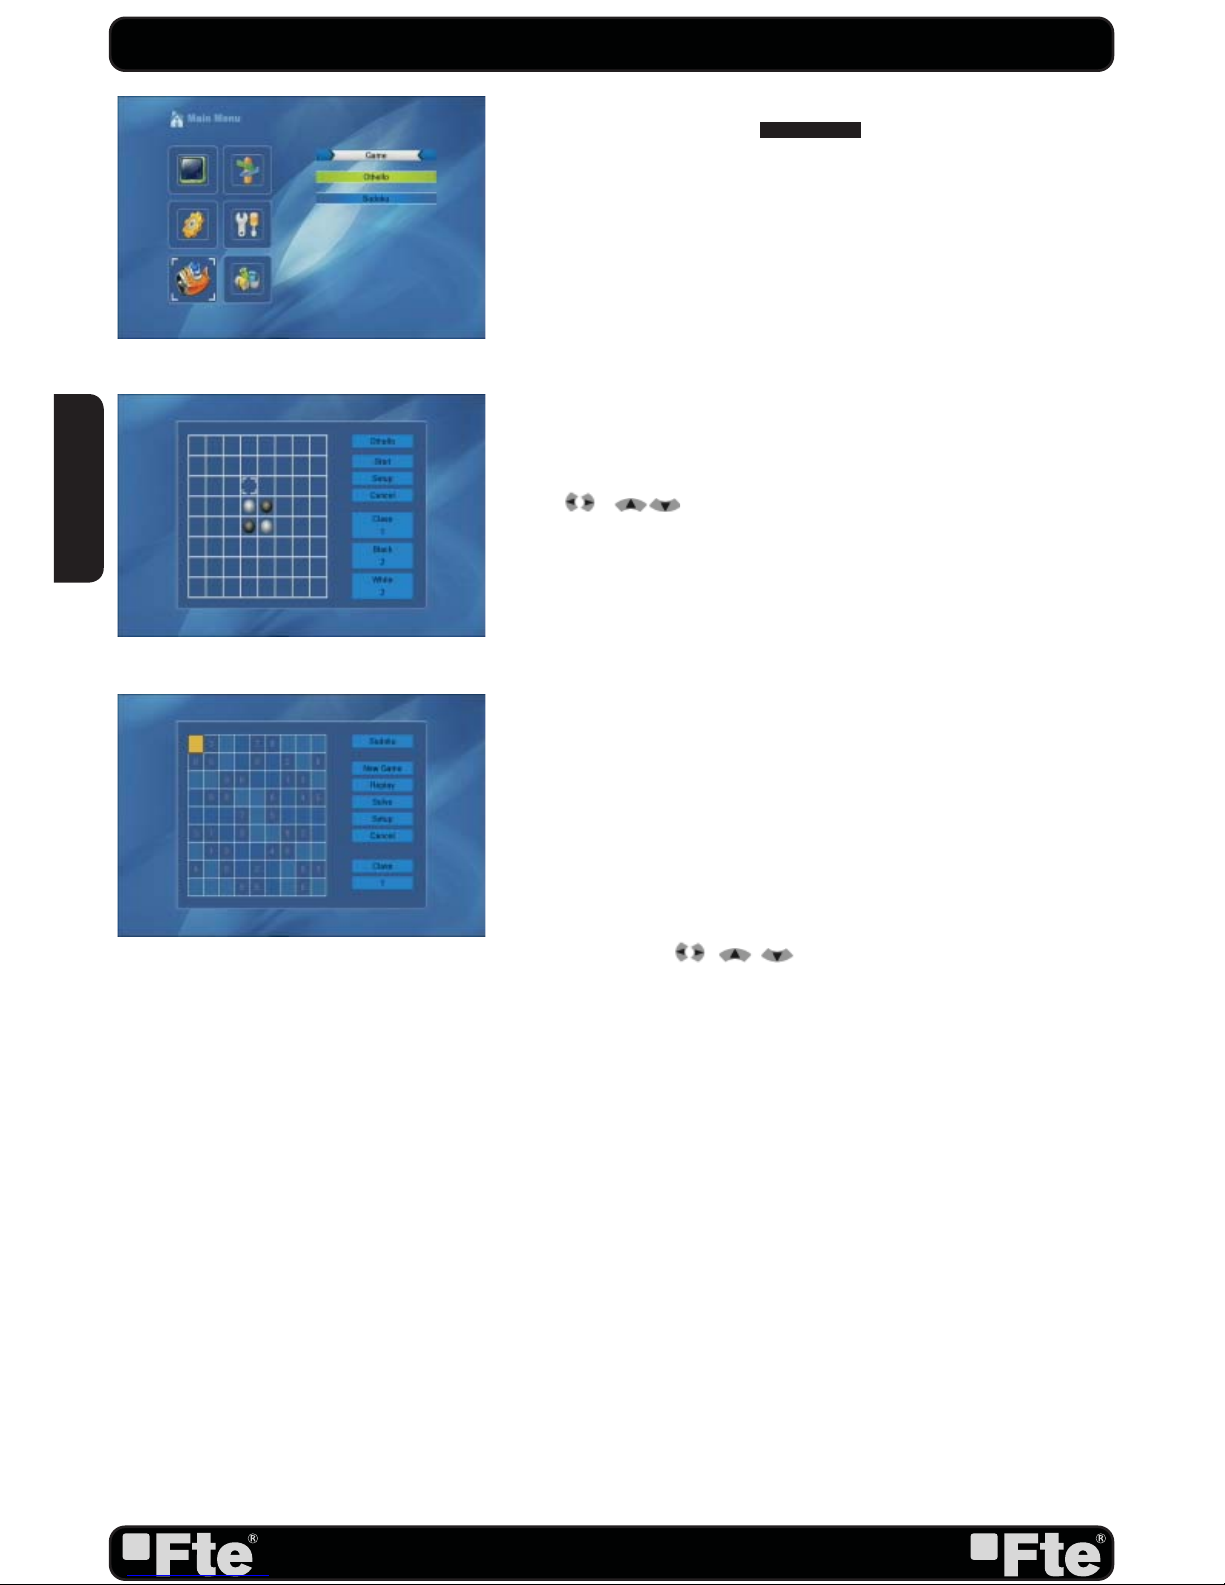
When you enter “Game” menu (OSD 54), you will see two
games including Othello and Sudoku.
7.1 OTHE LLO
1. Moving highlight to “Setup” and press [Left/Right] keys to
select the game level (degree of diffi culty) (OSD 55).
2. Moving highlight to “Start” and press [OK] key to start the
game.
3. Moving highlight to [Exit] keys and press [OK] key to draw
back from the game.
4. Start on the game:
• [ /[ ] use these arrow keys to guide chessman.
• [OK] — set chessman.
• [Exit] — Quit game and draw back to “Game” menu.
7.2 SUDOKU
1. Moving highlight to “Setup” and press [Left/Right] keys to
select the game level (degree of diffi culty) (OSD 56).
2. Moving highlight to “Start” and press [OK] key to start the
game.
3. Select the option “Replay” and press [OK] in order to start
again the same game.
4. Select the option “Solve” and press [OK] in order to see the
solution of the game.
5. Moving highlight to [Exit] keys and press [OK] key to draw
back from the game.
6. Use the keys , , to guide the pointer.
7. Use the numeric keypad in order to add a number in every
square.
8. [Exit] — Quit game and draw back to “Game” menu.
OSD 54
OSD 55
OSD 56
ENGLISH
Page 33
PAG.
33
rev 1.1
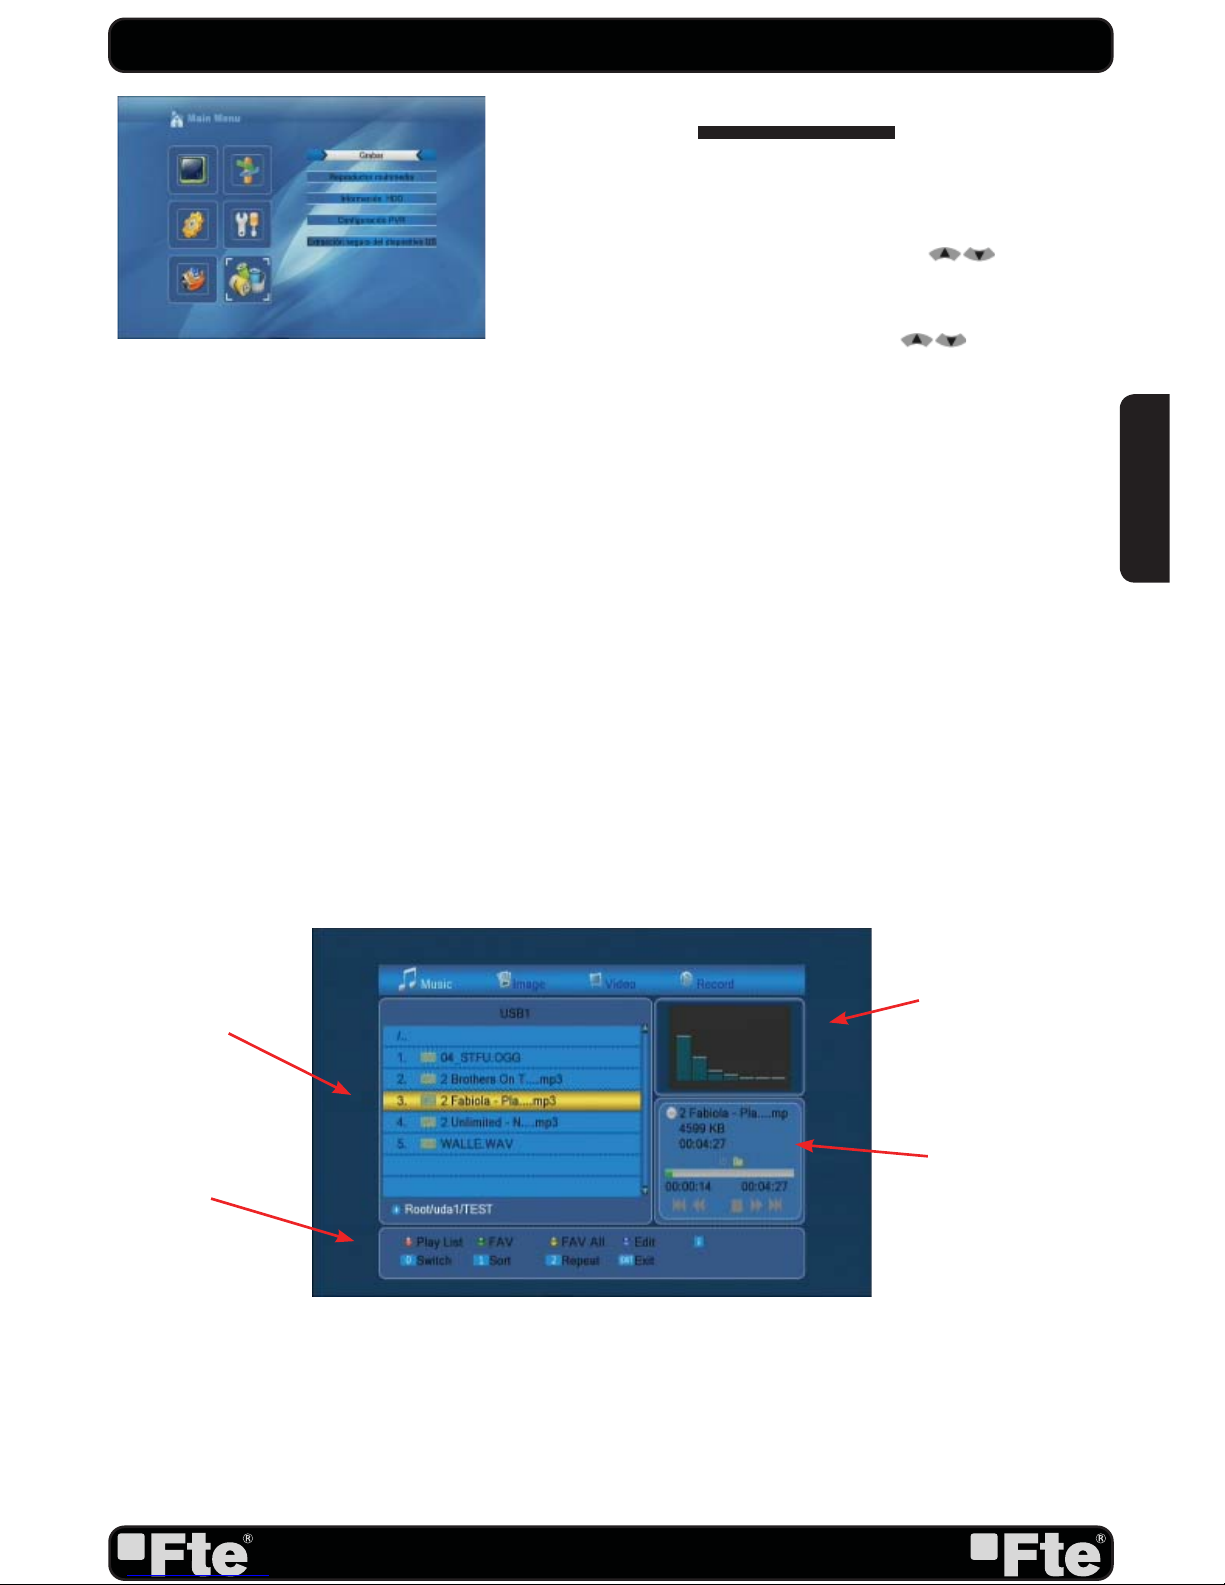
8. REC & MEDIA
Press the key [Menu] on the remote control to go to the main
menu (OSD 57).
1. Press the arrows on the remote control [ ] to select
the option REC
2. Press [Ok] to enter the submenu REC
3. Press the keys on the remote control[
] to move to
the different options on the menu.
4. Press [Ok] to go to the selected option on the submenu.
- Media Player
- HDD Information
- PVR Setting *
- Safely Remove Storage Device
8.1. MEDIA PLAYER
In this menu option you can accede and manage the contents
of the HDD previously copied from your computer.
You also can create playlists of music or pictures (OSD 58).
You can move through the different type of fi les (Image,
video, recordings * and music) by pressing the key [0] of your
remote.
Press [Menu] button to Exit.
* This function will only be available in models with PVR
ready functionability
- PLAYLIST
These lists are created adding the fi les you want to the previous
lists. You can create 2 lists:
- Picture List
- Music List
REC
OSD 57
Recorded fi les
Options
Information about
the selected fi le.
Preview window of
the selected fi le
OSD 58
ENGLISH
Page 34
PAG.
34
rev 1.1
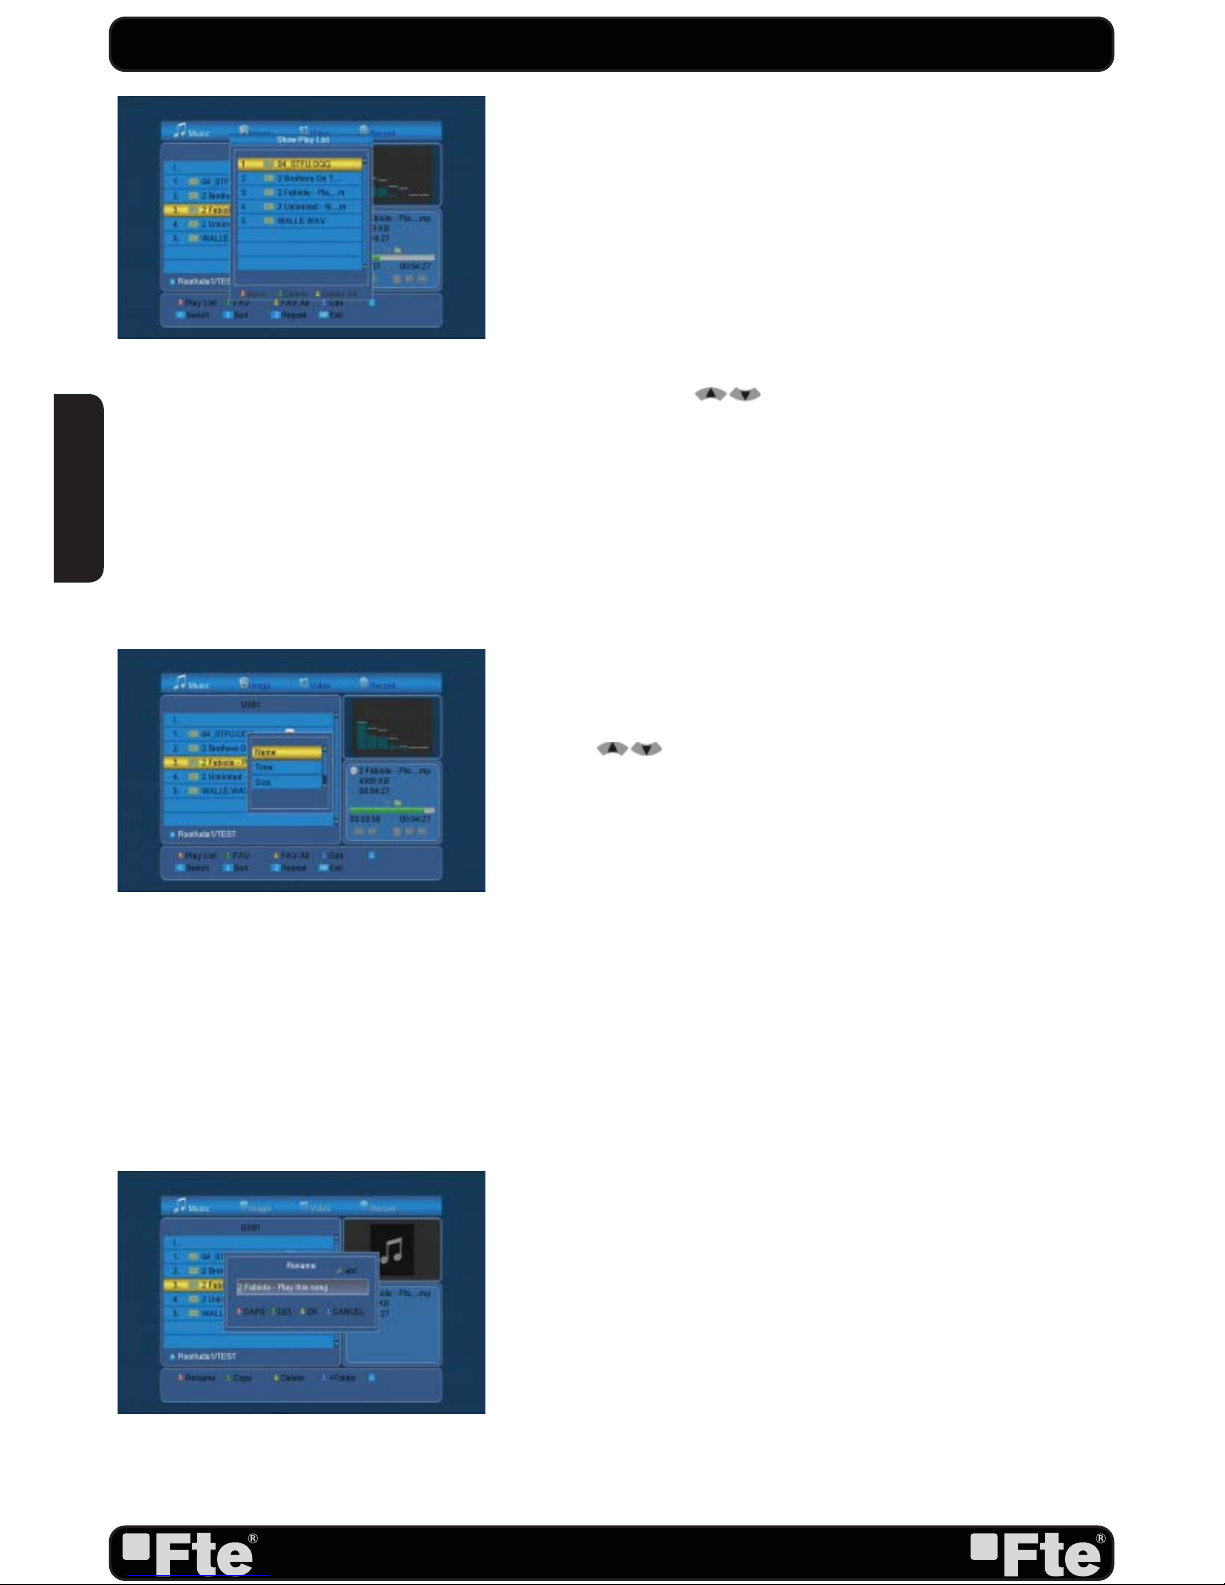
In order to open the Play list, you have to go the Music or Image
menu. Press [Red button] in order to open the Play list.
In order to open the play list, please press [OK] and select
which fi le you wish to open (OSD 59).
1. Press [Red button] in any fi le from a list in order to move it to
the position you wish.
2. Press [Green button] on any fi le from one list to delete the
fi le.
3. Press [Yellow button] on any fi le from one list to delete all
the fi les contained.
4. Press the keys [
] to move along the fi les and press
[OK] to enter and exit of the folders or open a fi le or playlist.
8.1.1.ADDING A NEW FILE TO THE LIST
1. Go over the fi le you want to add to your customized playlist
and press the [Green] button.
2. In order to add all the fi les to the Play list, press [Yellow
button].
8.1.2.SORT FILE
1. Press the [red] key to open the Sort window (OSD 60).
Press [ ] to select and [OK] to confi rm your choice.
2. The ways of sorting are:
- Default: Sorting by scanning result.
- Name (A-Z): Sorting in Alphabetical Order, ignoring “$” symbol.
- Schedule: It organizes the fi les, placing the most recent ones
fi rst.
- Size: It organizes the fi les, placing the smallest ones fi rst.
- Favourites: It organizes the fi les, placing the favourites fi rst.
8.1.3. EDIT
Select the option “Edit” by pressing the key [Blue], When
you get to this option in the menu you will be able to rename,copy, delete and create new folders.
8.1.3.1. RENAME FILES
1. Press the key [Red] to rename a fi le (OSD 61).
2. Press OK [Yellow] to go out and modify the name.
3. Press the [Exit] key to leave. A window will ask for confi rmation to save the changes.
8.1.3.2. COPY FILES
1. Press the key [Green] over the fi le you wish to copy in order
to get to the “Copy” menu
OSD 61
OSD 60
REC
OSD 59
ENGLISH
Page 35
PAG.
35
rev 1.1
OSD 63
OSD 65
OSD 64
OSD 66
2. Select the route where you wish to copy the fi le and press
the key [Green] in order to do so.
3. Press the key [Exit] to exit.
8.1.3.3. DELETE FILES
1. In order to delete one or more fi les, press the key [Yellow]
over the fi le you wish to delete (if you want to delete several
fi les, select them one by one).
2. A mark will appear after the name of the fi le
3. The marked fi les will be deleted after you get out from this
menu
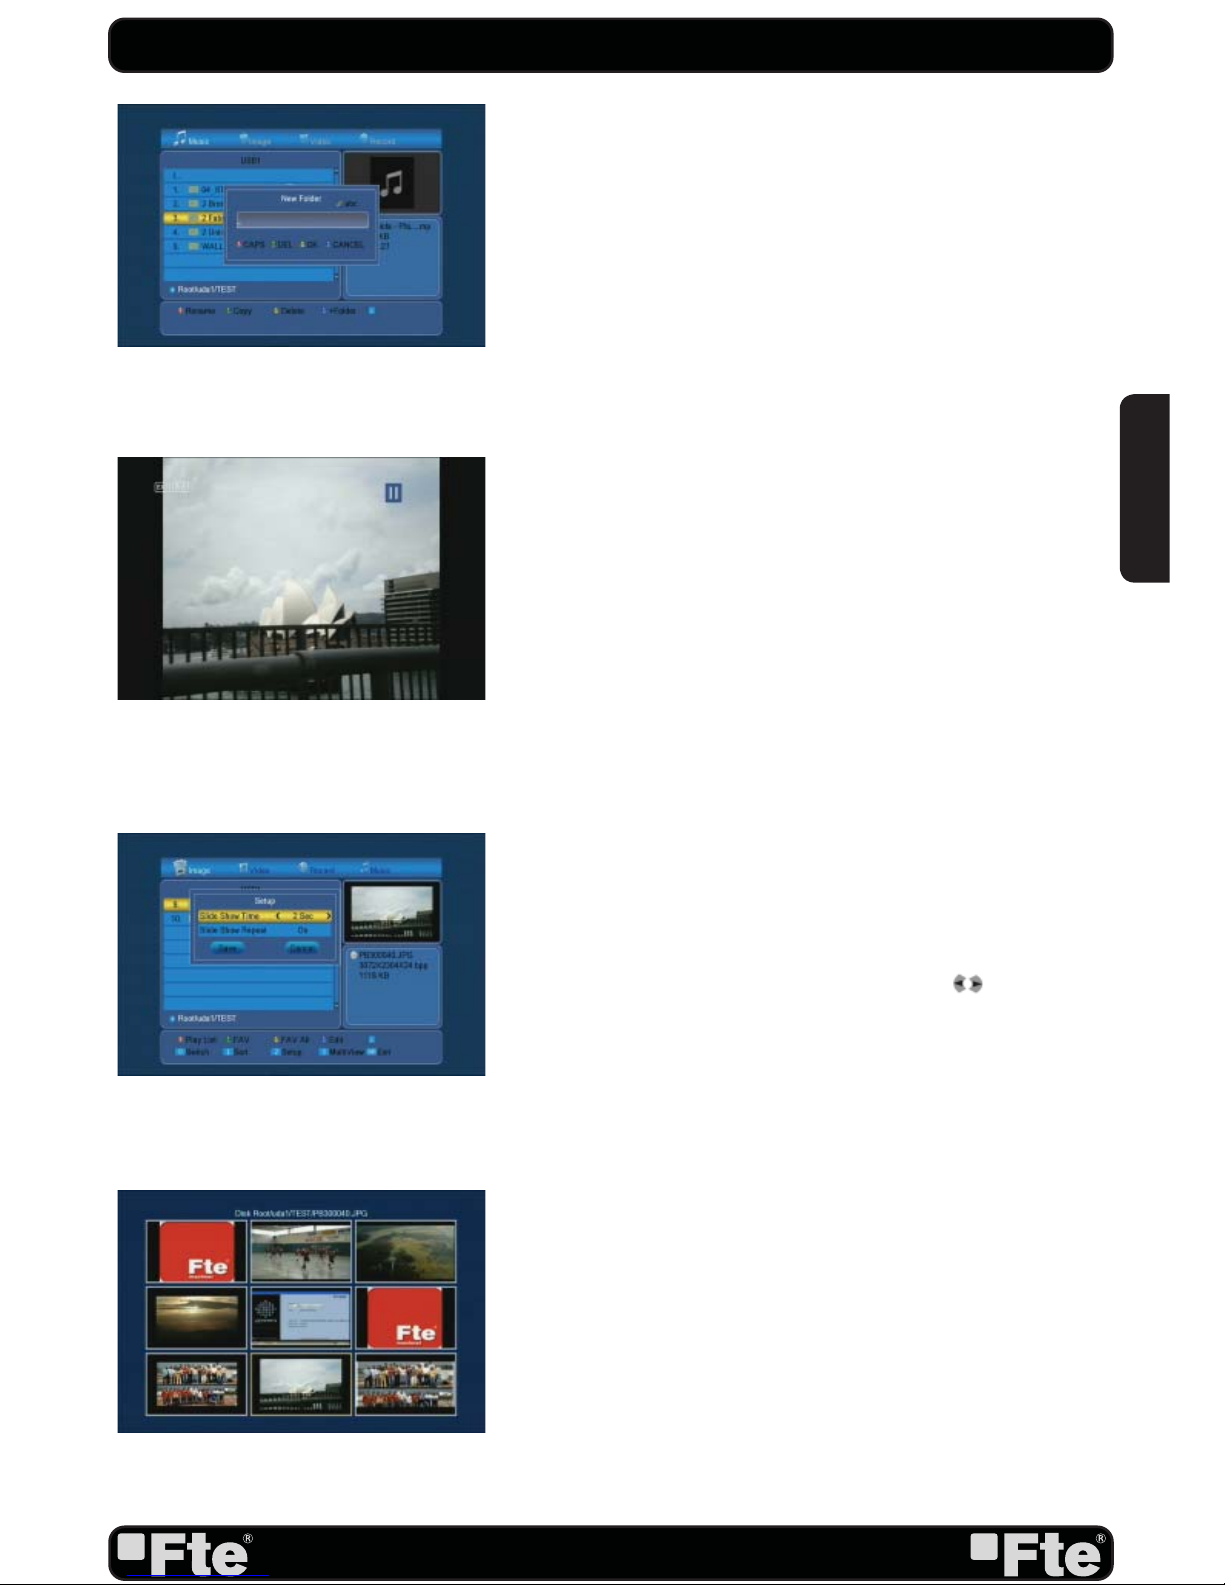
8.1.3.4. NEW FOLDERS
1. Press the key [Blue] in the route you wish to create a new
folder (OSD 63).
2. Once you have assigned a name to the folder, press option
“OK” [Yellow] to go out of the menu.
8.1.4.AUDIO PLAYER
1. Press [OK] over the.MP3 fi le or list of .MP3 fi les you want
to play.
2. A Player will be opened as it is shown in the picture.
-[2]: It changes among the different ways of replay: random,
list or single.
8.1.5.PICTURE VIEWER
1. Press [OK] over the fi le .JPG that you want to show.
2. The selected image will be shown in the screen and the
reproduction of the images will start in slide show way.
3. You can rotate the picture with the buttons [ ]. (OSD 64)
8.1.5.1. CONFIGURE THE SLIDE SHOW
*Only available for the picture playlist (OSD 65).
This function allows you to confi gure the “slide show”, there-
fore,
1. Select setup option, press [2].
2. A new window will appear where you should confi gure some
parameters:
- Time of viewing each picture on the screen.
- Repeat: When the playlist fi nishes, it starts again.
8.1.5.2. MULTIVIEW
This function allows visualizing 9 images at the same time.
1. Select multiview mode, press [3] (OSD 66).
Press [OK] over the image fi le you want to see in full screen.
REC
ENGLISH
Page 36
PAG.
36
rev 1.1
OSD 67
OSD 68
OSD 69
OSD 70
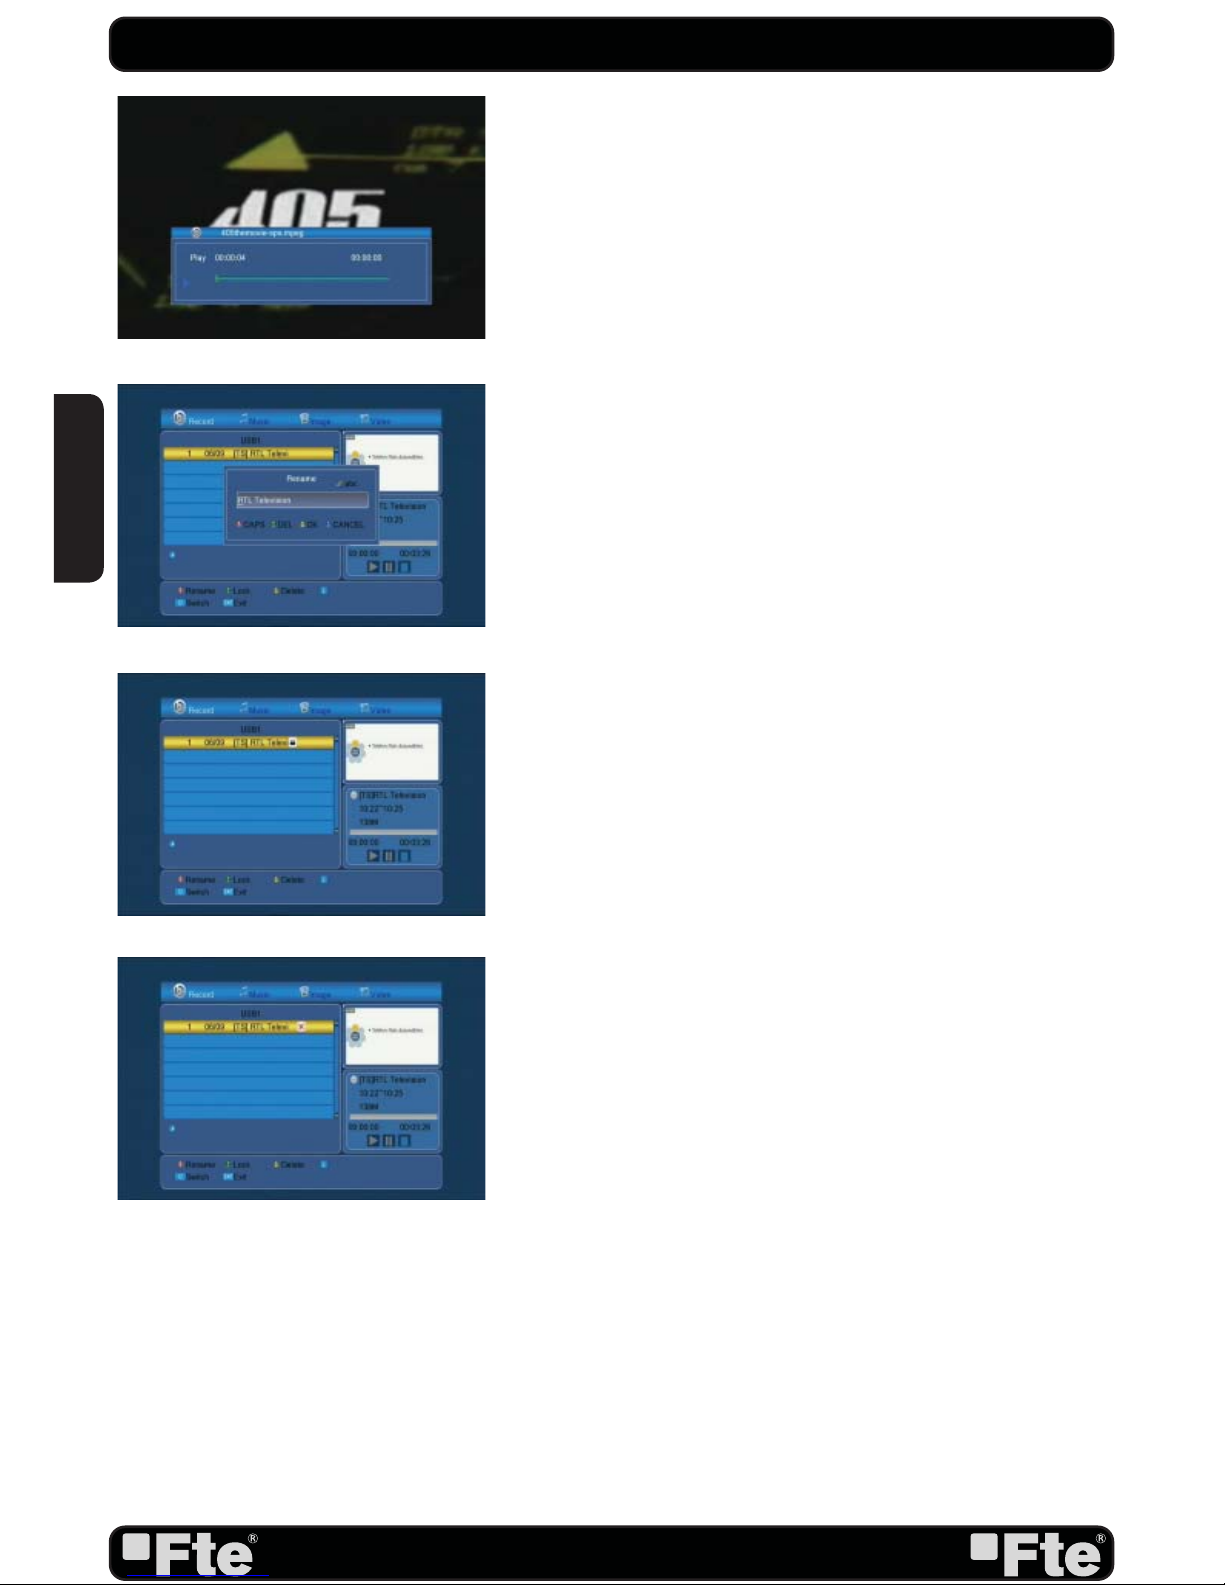
8.1.6. VIDEO PLAYER
1.Press the button [OK] over a video fi le (OSD 67).
2. The fi le will be played on the screen.
3. Press the key [Exit] to exit.
8.1.7. HOW TO REPRODUCE A RECORDING *
If you want to reproduce a recording, you only have to select it
and press the key [OK].
8.1.7.1. HOW TO RENAME A RECORDING *
1. Press the key [Red] to rename a recording.
2. A window will appear where you can change the name of
the record (OSD 68). Press OK [Yellow] to go out and modify the name.
3. Press the [Exit] key to leave. A window will ask for confi rmation to save the changes.
8.1.7.2. HOW TO BLOCK A RECORDING *
With this function it is possible to block a recording so it is necessary to introduce a password to watch it.
1. If you want to block a recording, select it and press the
[Green] key.
2. A window appears and asks for the password. If it has not
been modifi ed, it is by default the code “0000”.
3. The blocked channel is marked with an icon (OSD 69).
4. In order that the blockade of channels work, it is necessary
that the blocking option is activated in the menu of “Blockade
with password”.
5. Press the key [Exit] to leave.
8.1.7.3. HOW TO DELETE A RECORDING *
1. To delete one or more recordings, press the [Blue] key on
the recording you want to delete (if you want to delete several recordings, select them one by one).
2. A mark will appear on the name of the channel (OSD 70).
3. The marked recordings will be deleted once you exit the
menu.
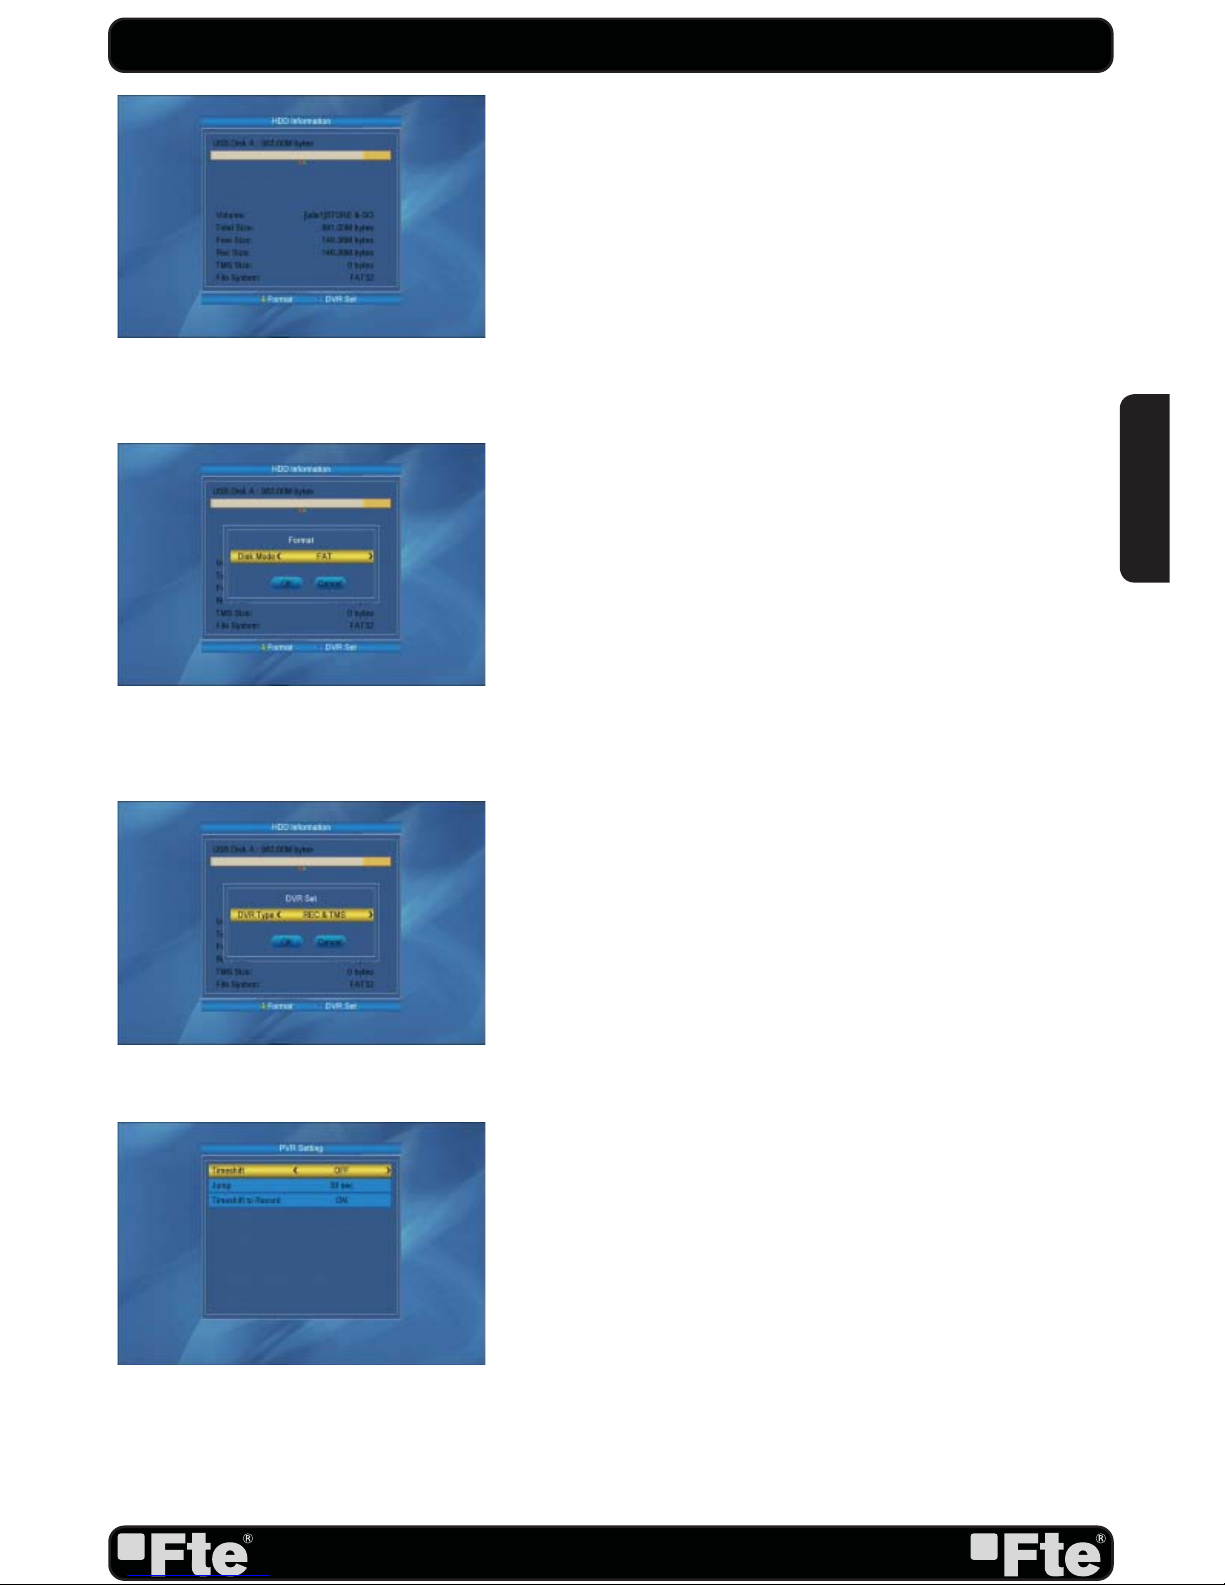
8.2. HDD INFORMATION
In the HDD information submenu you can see the capacity
of the hard disk. You also see the free space available (OSD
71).1. Press the key [Yellow] and a new window will appear,
where you will have to choose the kind of format that you want
to assign to the partition. Options: FAT or NTFS . Press [OK]
over one of the options (OSD 72). The hard disk will be formatted and it will lose all the recordings in the memory.
REC
ENGLISH
Page 37
PAG.
37
rev 1.1
OSD 71
OSD 72
OSD 73
NOTE: There is no turning back for this process. After the
selection of one of these options, the data will be deleted.
2. Press the key [Blue] to assign space in the disk according to
the action you wish to do (OSD 73). Options:
- REC & TMS: It assigns half of the free space in the disk to
making timeshift and the other half for making recordings.
- REC: It assigns the whole free space for recordings.
- TMS: It assigns the whole free space for timeshift.
8.3. PVR SETTING *
In this menu you will be able to confi gure the Timeshift activa-
tion and the recording format (OSD 74).
1. You can confi gure the Timeshift in two ways:
On: From the moment the user access to the channel, the
receiver keeps all the channel information in a buffer.
Off: the receiver will no store any channel information. If the
users makes a Pause the image will stop, but when he wants
to continue watching the program it will be running in the current moment.
2. With this option you can settle the jump marks forward and
reward.
On a current reproduction, press the keys [|<<] or [ >>|] to
make a jump of a certain period of time on the reproduction.
This period is confi gurable and the jumps can be: 30s, 1, 5,
10 and 30 minutes.
If they are confi gured every 10 minutes, each time that you
press this key, it will jump automatically 10 minutes forward/
reward on the reproduction.
3. In the “Timeshift recording” option we can select between
two options:
-On: It allows the running of the Timeshift while recording a
channel.
- Off: The Timeshift option gets disabled while recording.
8.4. SAFELY REMOVE STORAGE DEVICE
In “Tools” menu, select “Safely Remove Storage Device”,
press “OK”, to disconnect USB device of receiver.
* This function will only be available in models with PVR
ready functionability
OSD 74
REC
ENGLISH
Page 38
PAG.
38
rev 1.1
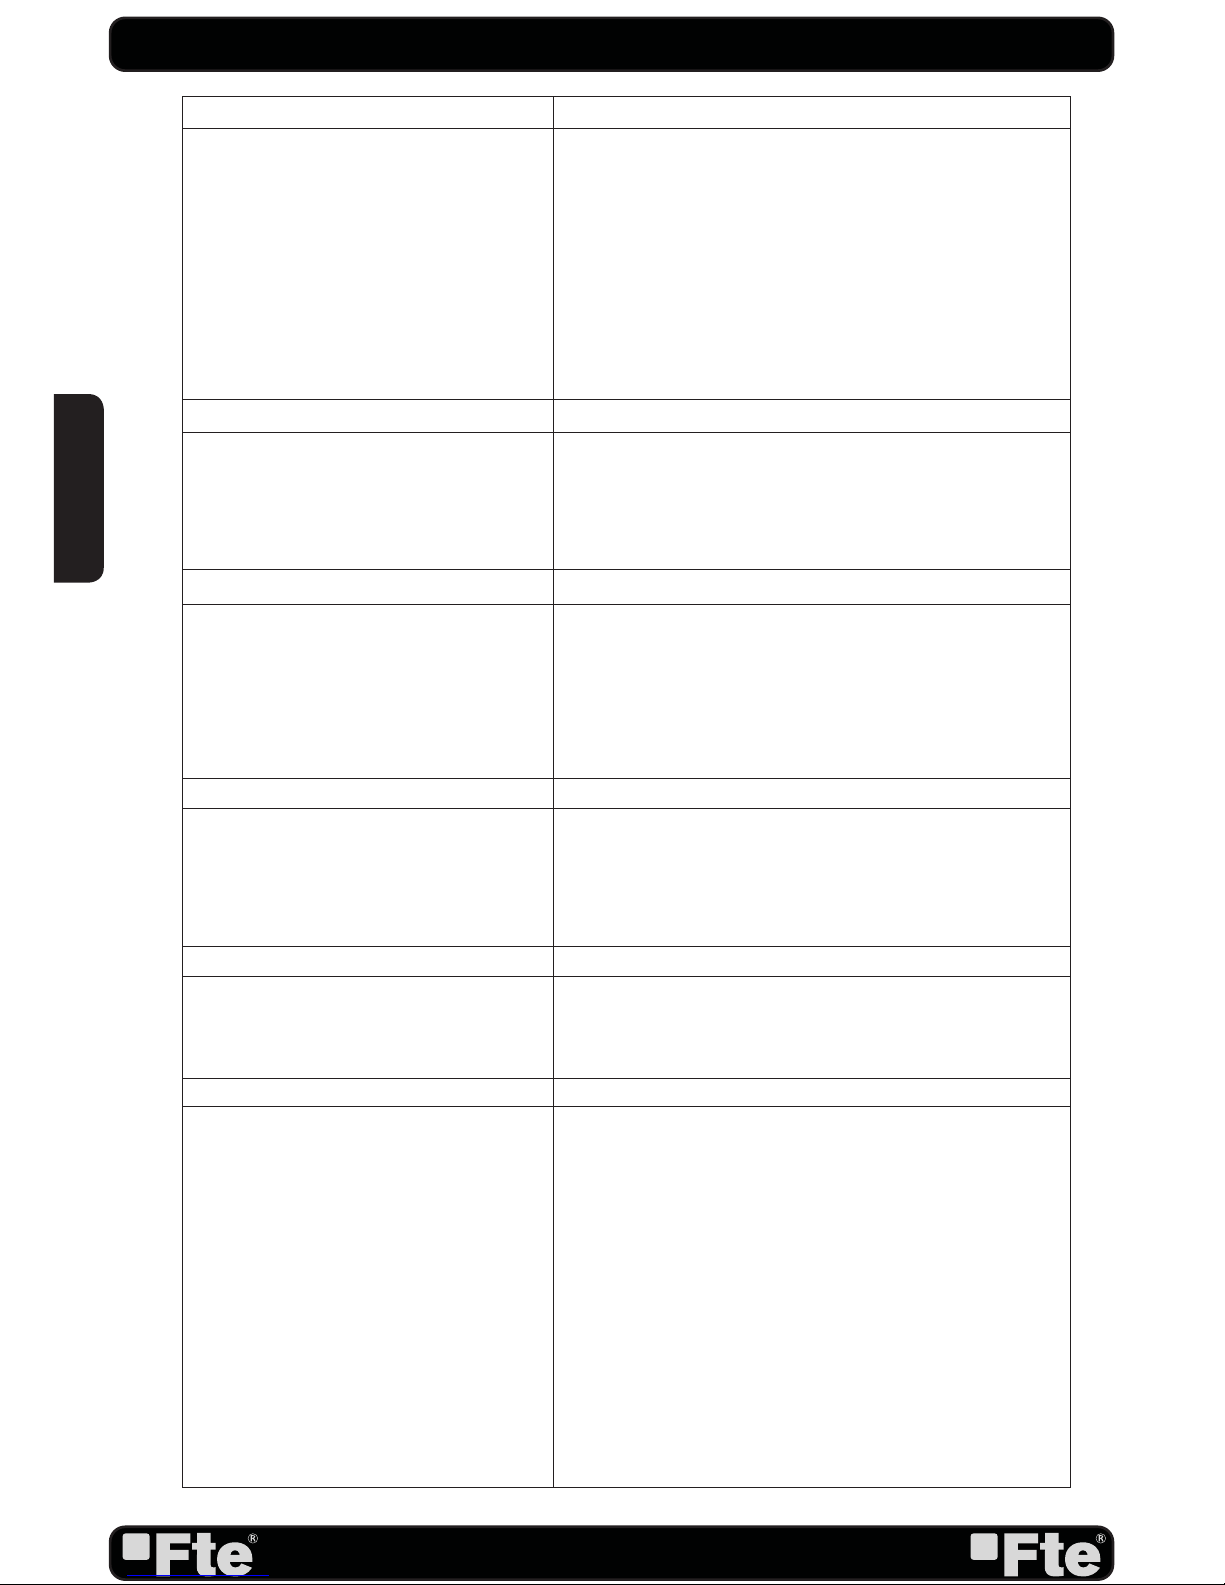
TECHNICAL SPECIFICATIONS
Video
Decoding
Bit rate
Output
Aspect ratio
Active pixel (Scart)
Active pixel (HDMI)
Output connectors
MPEG-2 SD&HD, MPEG4 AVC SD&HD/H.264
Máx. 20 Mbps
PAL
4:3 PS, 4:3 LB, 16:9, Auto
480i / 576i
By source / By Native TV / 480i / 480p / 576i / 576p / 720p_
50 / 720p_60/ 1080i_50 / 1080i_60 / 1080p_50 / 1080p_60
HDMI / Scart
Audio
Decoding
Mode
Bit rate
Output connectors
MPEG-2/MPEG-1 layer I, II, III / AAC / Dolby Digital
Mono, Dual, Stereo, Joint stereo
Max. 384kbps
HDMI / Scart / Coaxial SPDIF
Demodulator
Demodulation
Bit rate
Outer code
Inner code
Energy dispersion
QPSK, 8PSK
SCPC / MCPC
RS ( 204, 188, 8 )
ALL DVB rates
DVB-S & DVB-S2 recommendation
Input Signal
Frequency
Input Level
Band Width
Input connector
950 - 2150MHz
-65dBm - 25dBm
36 MHz
F-Type connector
LNB control
LNB supply
Polarized control
DiSEqC control
13/18V (400mA max.) with short circuit protection
13/18V (vertical/horizontal) Polarization
DiSEqC1.0, DiSEqC1.1 and DiSEqC 1.2
Miscellanous
USB Connector
Media Formats (With a hard disk connected to
USB 2.0 port.)
Supply voltage
Powe consumption
Standby consumption (LPC Mode)
Operation temperature
Dimensions (WxDxH)
Weight
2.0
Image: .JPG / .BMP// Audio: .MP3 / .OGG / .WAV
Record
* : .TS / .PS
Vídeo: .AVI (MPEG1/ MPEG2 /H.264/ Xvid / DviX )
.MKV (MPEG1/ MPEG2 /H.264/ Xvid / DviX)
.MP4 (H.264) // .MOV (H.264)
175~250 VAC 50~60 Hz
Max. 30 Watt
<1 Watt
0° a +40°
220 x 122 x 38 mm
0.7 Kg
* This function will only be available in models with PVR ready functionability
ENGLISH
Page 39
PAG.
39
rev 1.1
“WE , FTE MAXIMAL, DECLARE THAT THE PRODUCT
MAX S400 HD PLUS
IS IN CONFORMITY WITH FOLLOWING DIRECTIVES
LOW VOLTAGE DIRECTIVE 2006/95/EC
EMC DIRECTIVE 2004/108/EC”
PART OF THE DECLARATION OF CONFORMITY CE
ENGLISH
Page 40

FRANCE
16 ZAE Les Mouilles
74570 Groisy
Tel. 00 33 450 68 80 17
Fax. 00 33 450 68 84 68
[email protected]
www.ftemaximal.com
DEUTSCHLAND
BCN Distribuciones S.A. Unipersonal
Niederlassung Deutschland
Auf der Höhe, 8
44536 Lünen
Deutschland
Tel. 00 49 (0) 23 18 78 5 - 01
Fax. 00 49 (0) 23 18 78 5 - 200
[email protected]
www.ftemaximal.de
ITALIA
Via Edison, 29
42040 Calerno di
Sant’Ilario d’Enza (RE)
Tel. 00 39 05 22 90 97 01
Fax. 00 39 05 22 90 97 48
[email protected]
www.ftemaximal.com
PORTUGAL
Rua José Carlos Ary dos Santos
A-das-Lebres (Loures)
2670-791 Santo Antão do Tojal
Tel. 00 351 219 83 87 00
Fax. 00 351 219 83 87 09
[email protected]
www.ftemaximal.com
ESPAÑA
Mogoda, 110
Pol. Industrial Can Salvatella
08210 Barberà del Vallès
(Barcelona) España
Tel. 00 34 93 729 27 00
Fax. 00 34 93 729 30 73
[email protected]
www.ftemaximal.com
UNITED ARAB EMIRATES
P.O.Box 262442
Jebel Ali Free Zone
Warehouse FZS5AB03
Dubai
Tel. 00 971 4 886 5700
Fax. 00 971 4 886 5701
www.ftemaximal.ae
 Loading...