

Page 1
1 Version 1.0 © FTEmaximal
Please, read this manual carefully,
before installing the digital receiver.
It contains important informations
concerning your safety and the correct
installation and use of your new receiver.
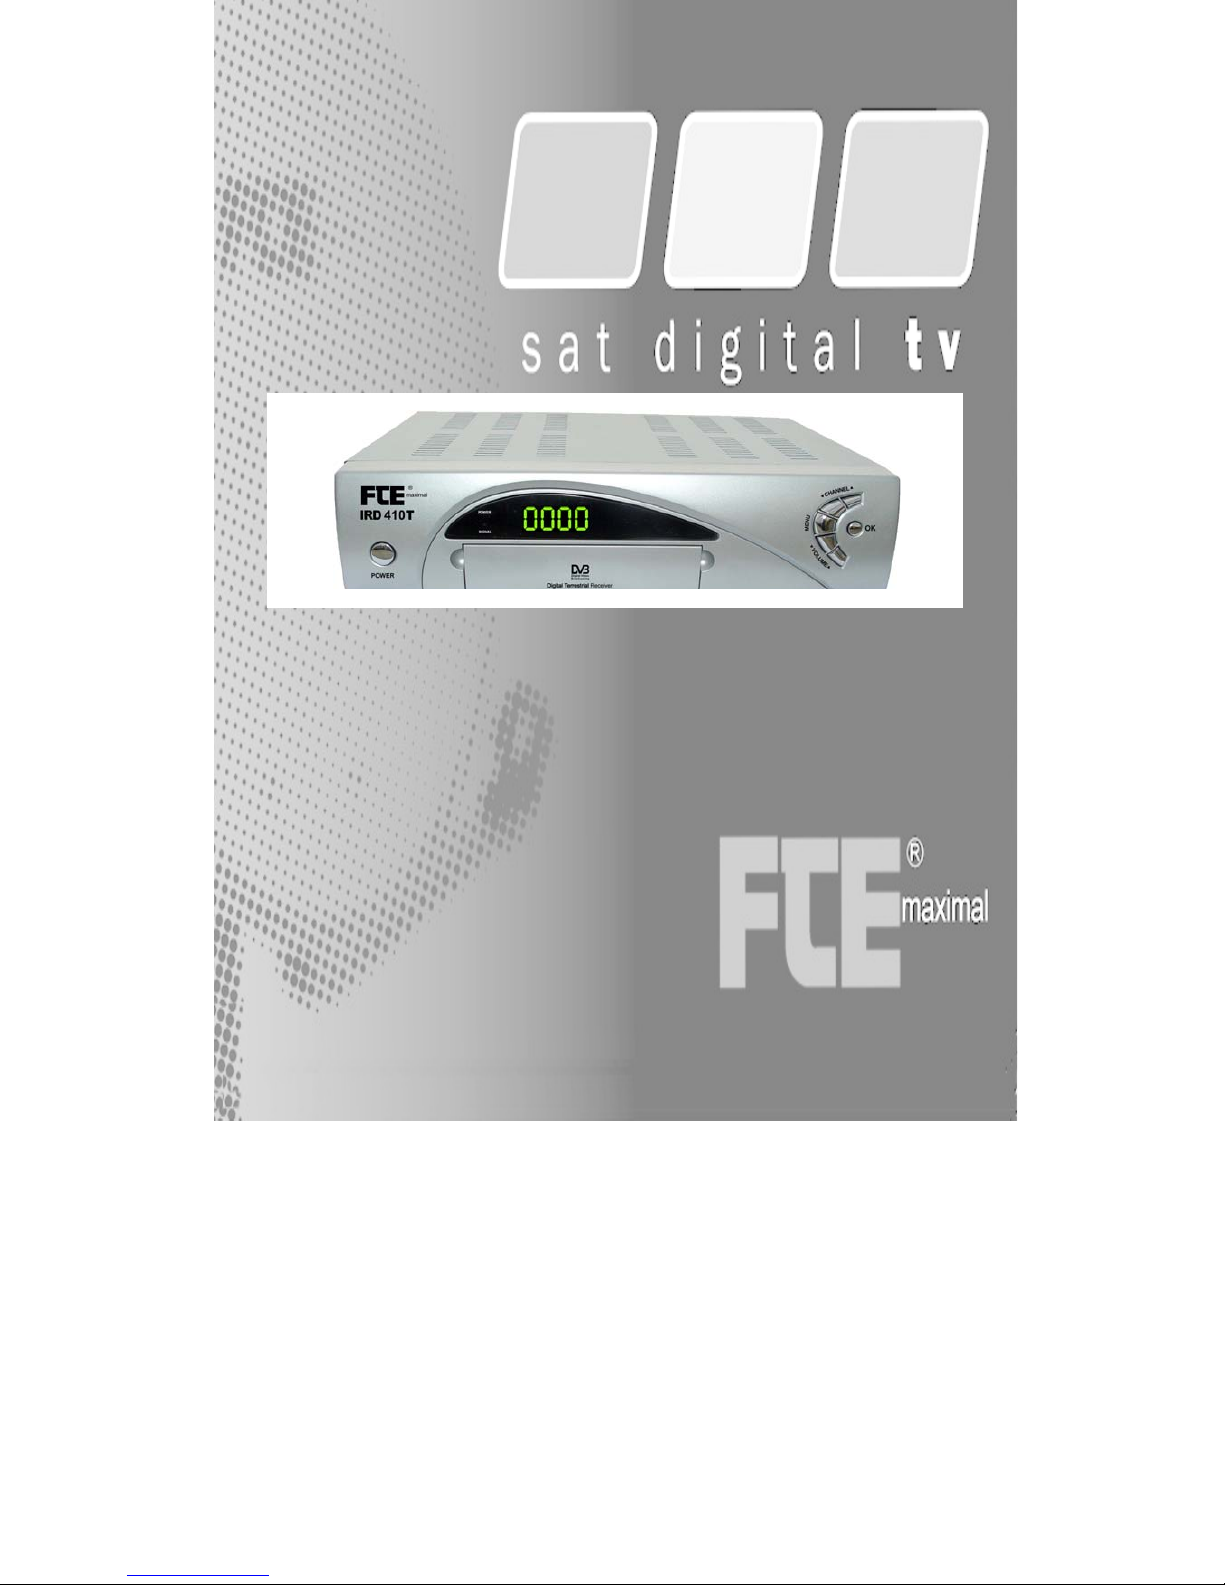
DVB-T Receiver IRD 410T
Page 2

2 Version 1.0 © FTEmaximal
Important notes and informations of interest are labelled with this icon:
Menu options in the receiver software, as well as keys and connections
descriptions are written in italic.
1. Safety references ………………………………………
1.1 Important …………………………………………………………………………
2. Accessories
2.1 Everything there? ………………………………………………………………..
3. Connections and controls……………………………………
3.1 Receiver frontal ………………………………………………………………….
3.2 Receiver back ……………………………………………………………………
3.3 Remote control …………………………………………………………………..
4. The installation
4.1 First steps ………………………………………………………………………..
4.2 Installation wizard ……………………………………………………………….
5. Basic operations
5.1 Selecting a program …………………………………………………………….
5.2 EPG / MUTE …………………………………………………………………….
5.3 Timer ...........................................................................................................
5.4 Zoom / Pause / Info .....................................................................................
5.5 Calendar / Audio ..........................................................................................
6. Menus and OSD
6.1 Main Menu ..................................................................................................
6.2 TV and Radio channels ...............................................................................
6.3 Installation menu .........................................................................................
6.4 System menu ..............................................................................................
6.5 Parental control ...........................................................................................
6.6 OSD ............................................................................................................
7. Troubleshooting
7.1 Self help ......................................................................................................
8. Technical specifications
8.1 Characteristics of the receiver .....................................................................
3
5
6
7
8
9
11
15
16
17
19
20
21
22
25
28
33
35
36
38
Table of contents
0
Page 3
3 Version 1.0 © FTEmaximal
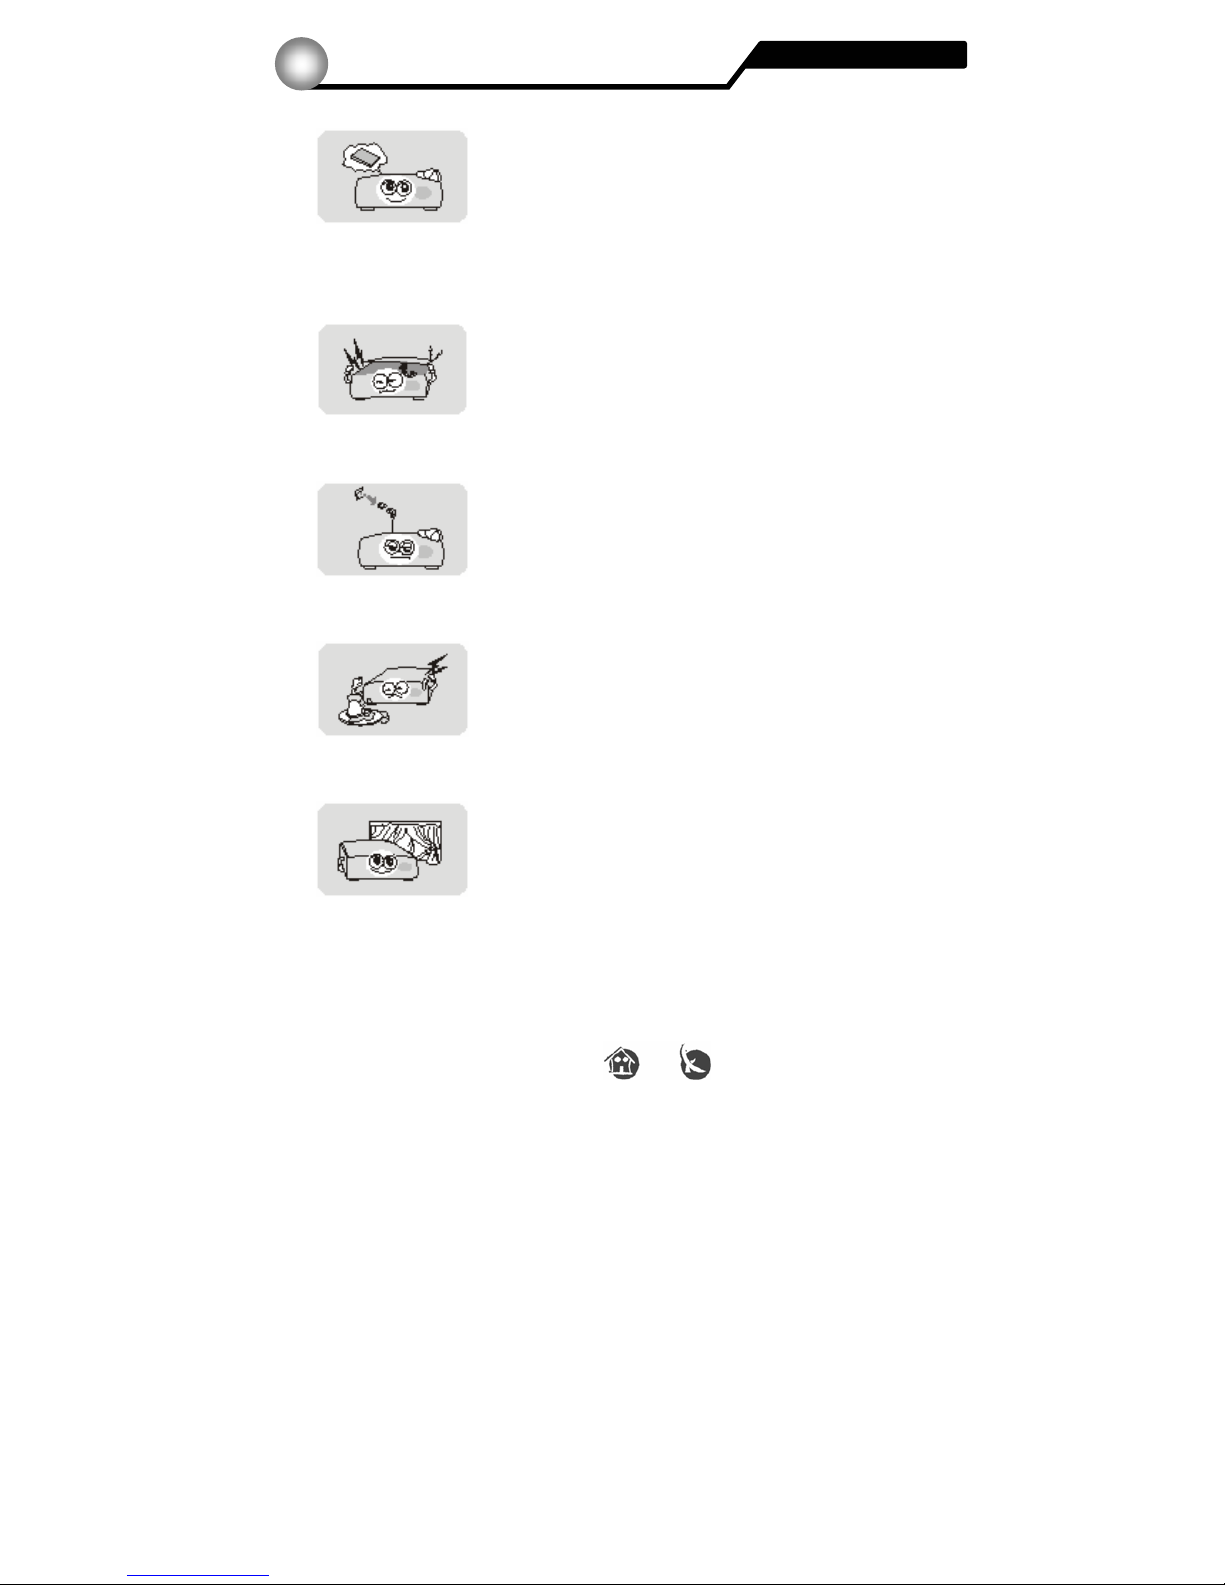
Read the manual before you begin to work with the receiver.
Caution: never open the device; else danger exists through
electric stroke.
When you work with the receiver, you have to move
always the power plug (230V) from the mains voltage.
Unplug the receiver from the mains in case of long periods
without operating the receiver (for example, during holidays)
To prevent shock hazard, do not touch the power plug with wet
hands.
Unplug always the receiver before cleaning the device or work
on the connections.
Do not install the receiver close to strong heat sources, and
ensure a good aeration if you plan to install it in a small cabinet.
Im
p
ortant !
Safety references
1.1
Page 4
4 Version 1.0 © FTEmaximal
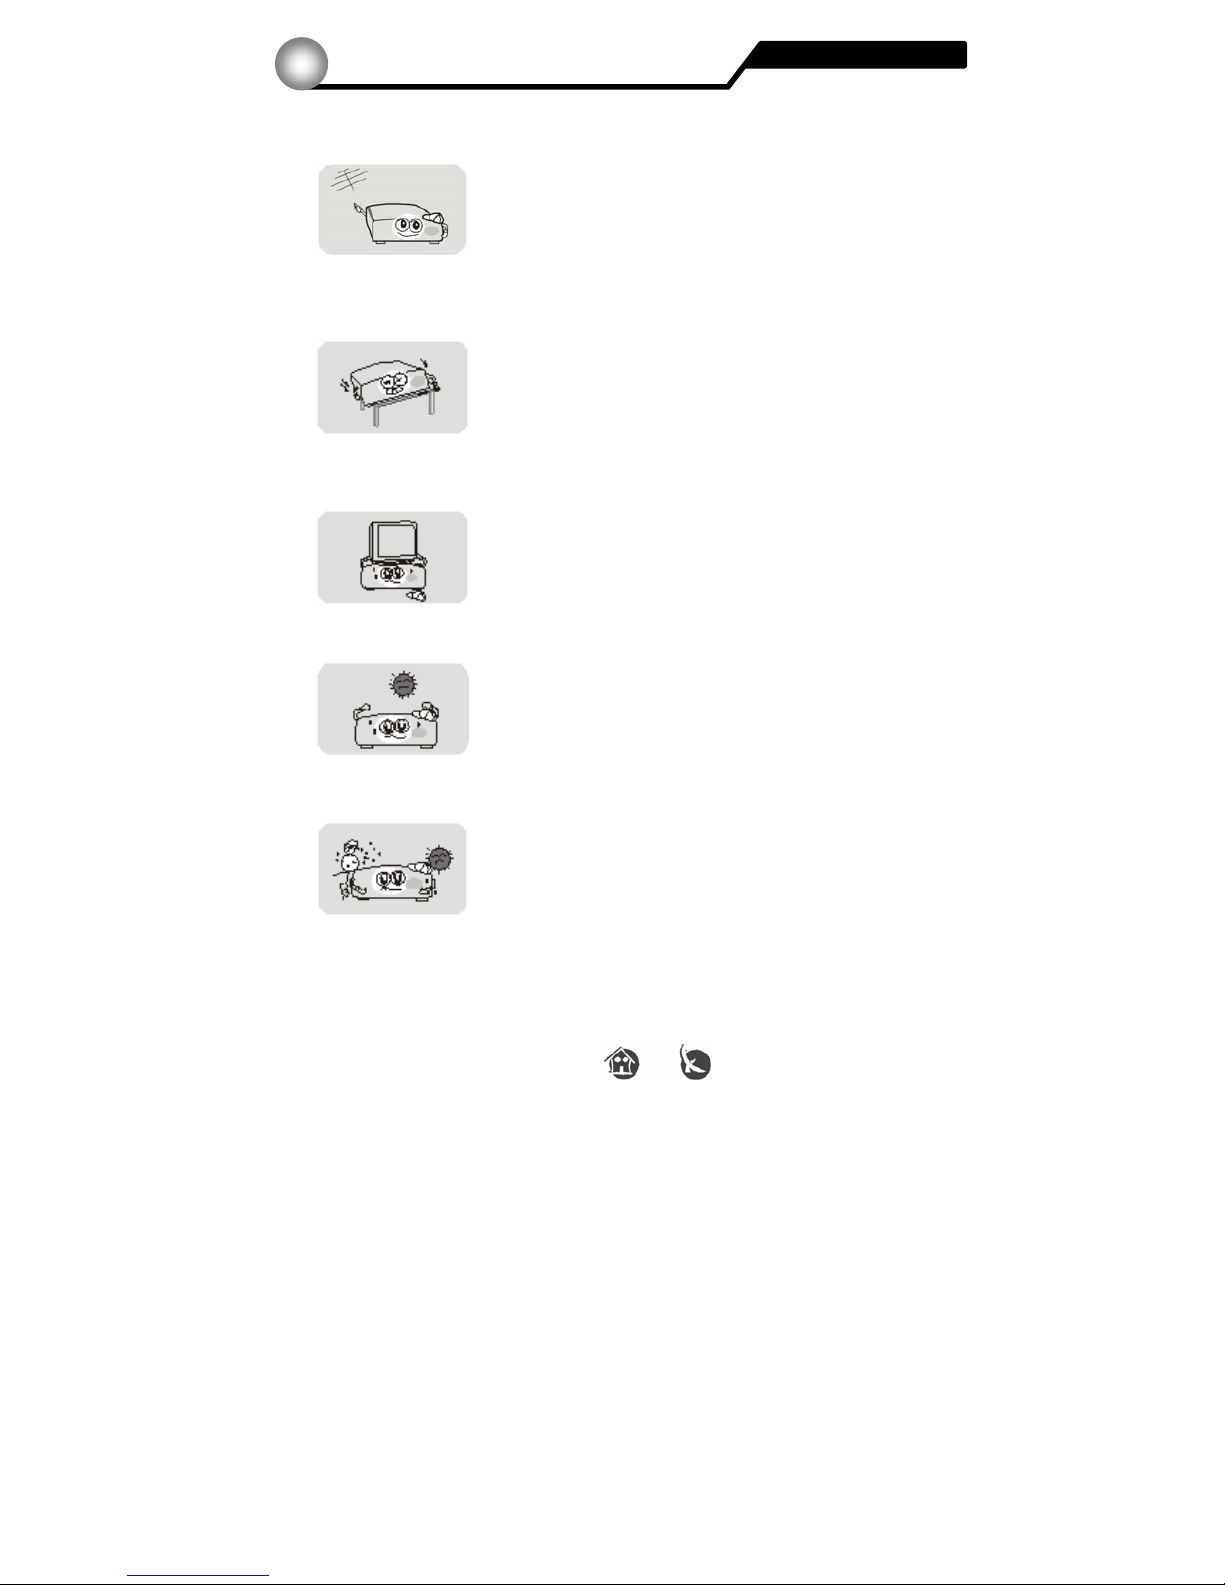
Before you start operating the receiver, make sure that the
receiving antenna is properly built up, connected and aligned
optimally.
The correct place to install the receiver is, of course, near your
TV set and any other A/V signal sources (DVD, VCR; CD;
game console, etc).
Choose an stable support, where you can easily lay the
necessary connecting cables without stumbling-danger. The
receiver should be installed near to an easily accessible outlet.
Do not install the receiver in a place where it can be reached by
liquid spills.
Do not put any heavy objects as, for example, a TV-device over
the receiver because the receiver could be damaged.
Do not install the receiver:
- On an unstable surface
- Subject to direct sunlinght
- In a high humidity environment
- Outside the receiver’s temperature range (+5°...+40°)
If the receiver is subjected to severe temperature changes, it
can suffer from water condensation inside. Switch off the
receiver in these cases for at least 2 hours before resuming
operation.
Im
p
ortant !
Safety references
1.1
Page 5
5 Version 1.0 © FTEmaximal
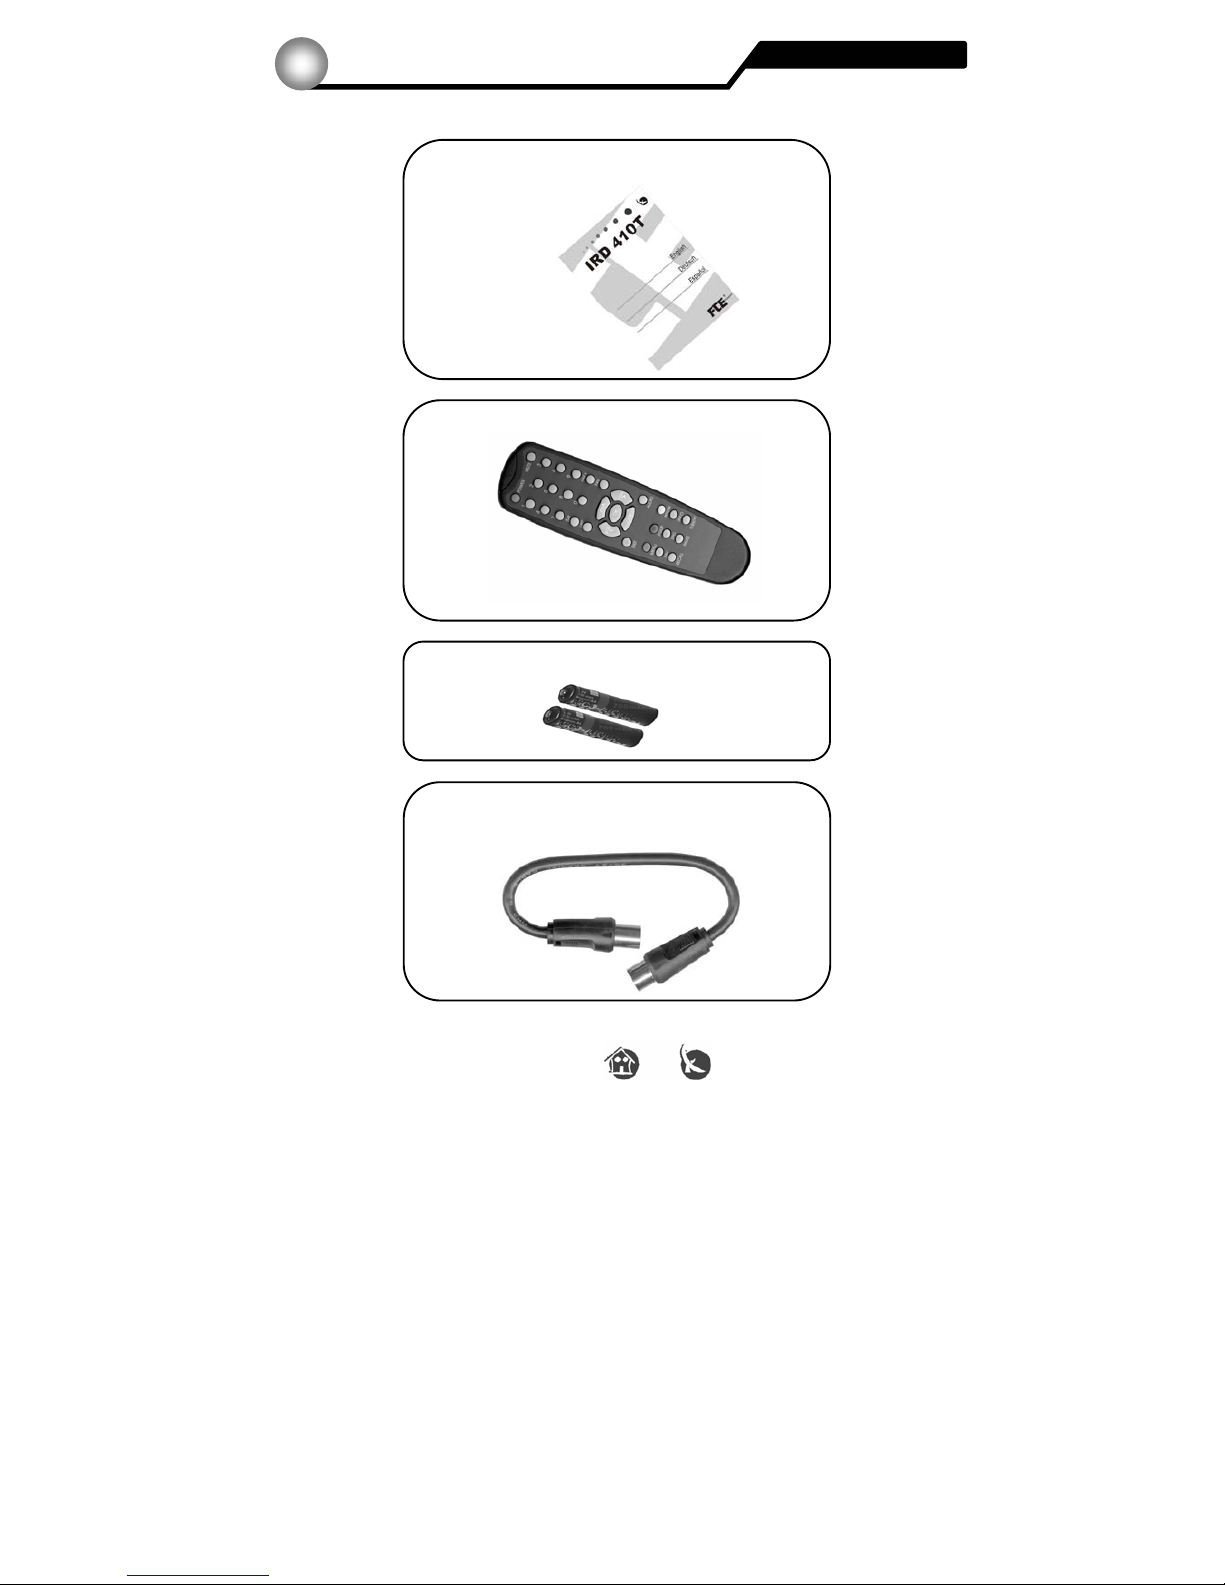
Manual:
Remote Control:
2 Batteries of 1,5V:
Connecting cable for modulator:
Everything there?
Accessories
2.1
Page 6
6 Version 1.0 © FTEmaximal
1 2 3 4 5 6
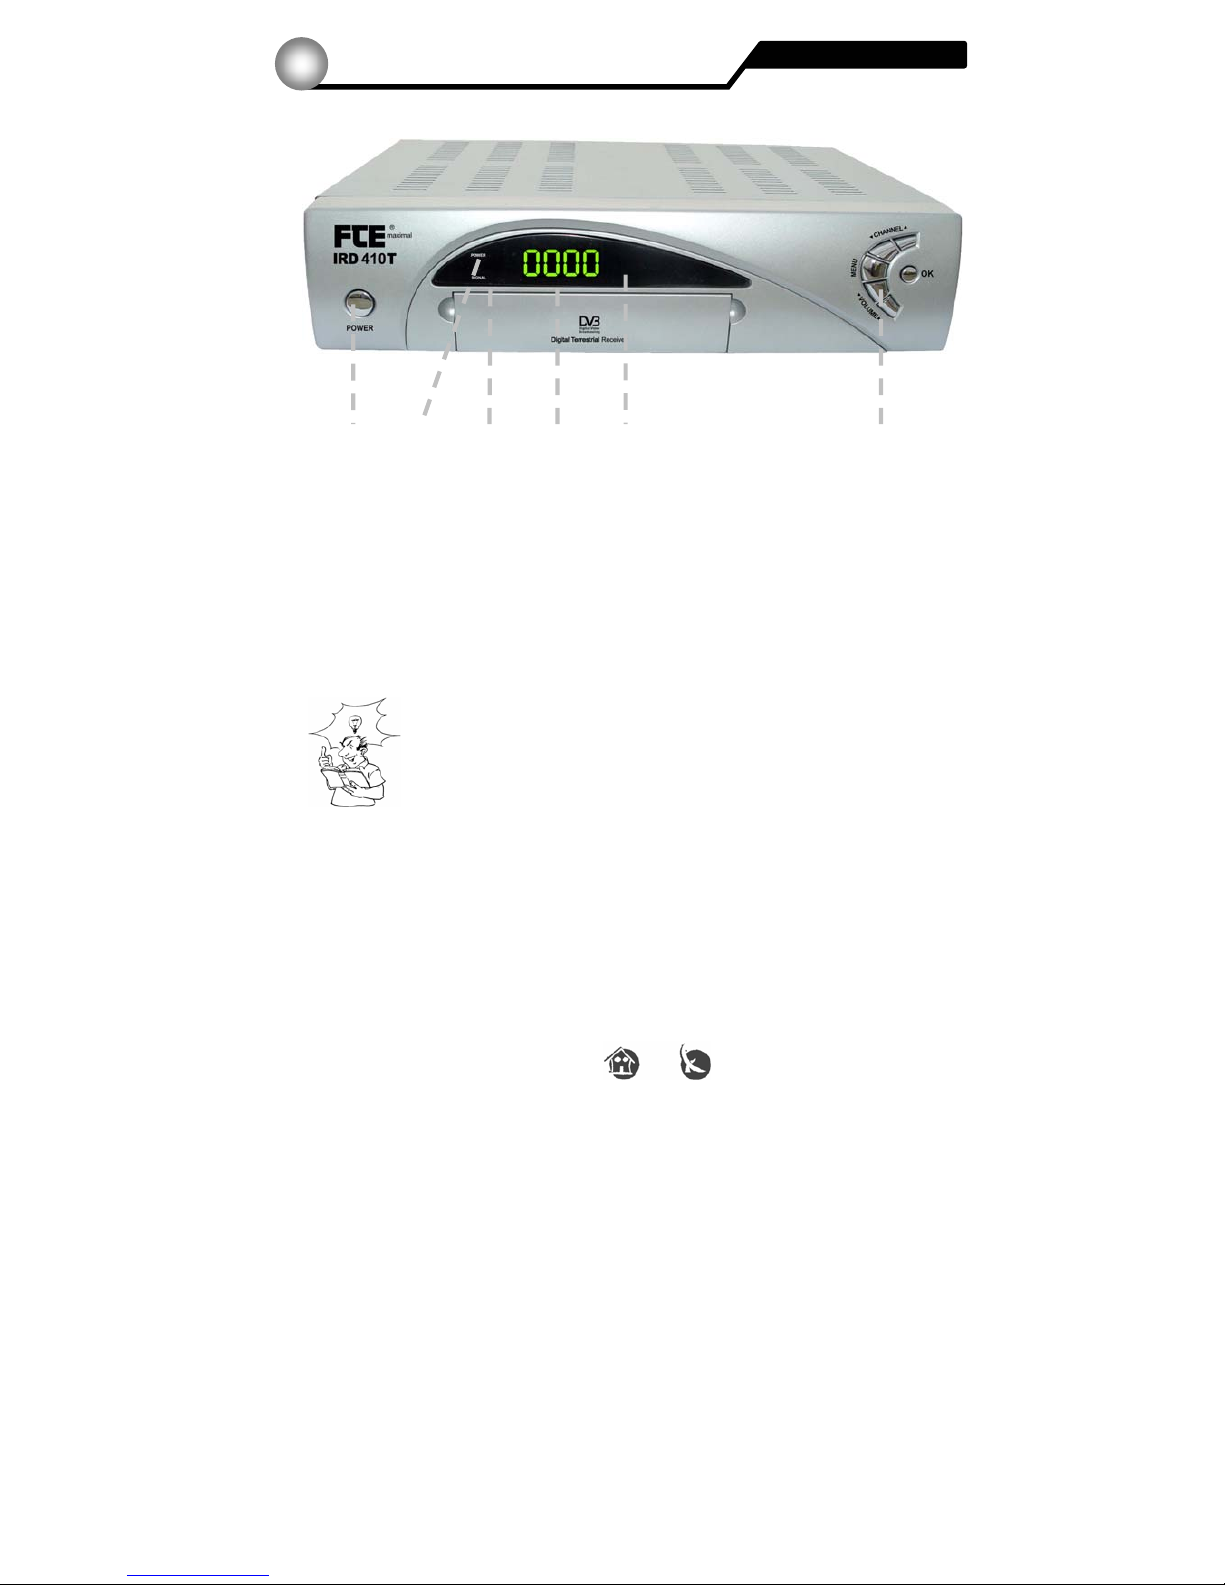
1. POWER: Switch the receiver on, or enter the standby mode. To switch off the
receiver you have to use the switch of the back side of this engine.
2. POWER LED: Indicates that the mains voltage (90-230VAC) is available.
3. SIGNAL LED: Indicates a sufficient signal level.
4. DISPLAY: 4 Digits to display the program numbers.
5. IR-SENSOR: Reception sensor for the IR remote control signals.
6. BUTTONS: These buttons allow to control the main functions of the receiver, and
provide the same functionality as the remote control ones.
The IRD 420T/SM receiver do not have any card or module behind
the front lid, so please do not attempt to open it. It could damage
the lid.
Receiver frontal
Connections and controls
3.1
Page 7
7 Version 1.0 © FTEmaximal
1 2 3 4 5 6 7
8 9 10 11 12
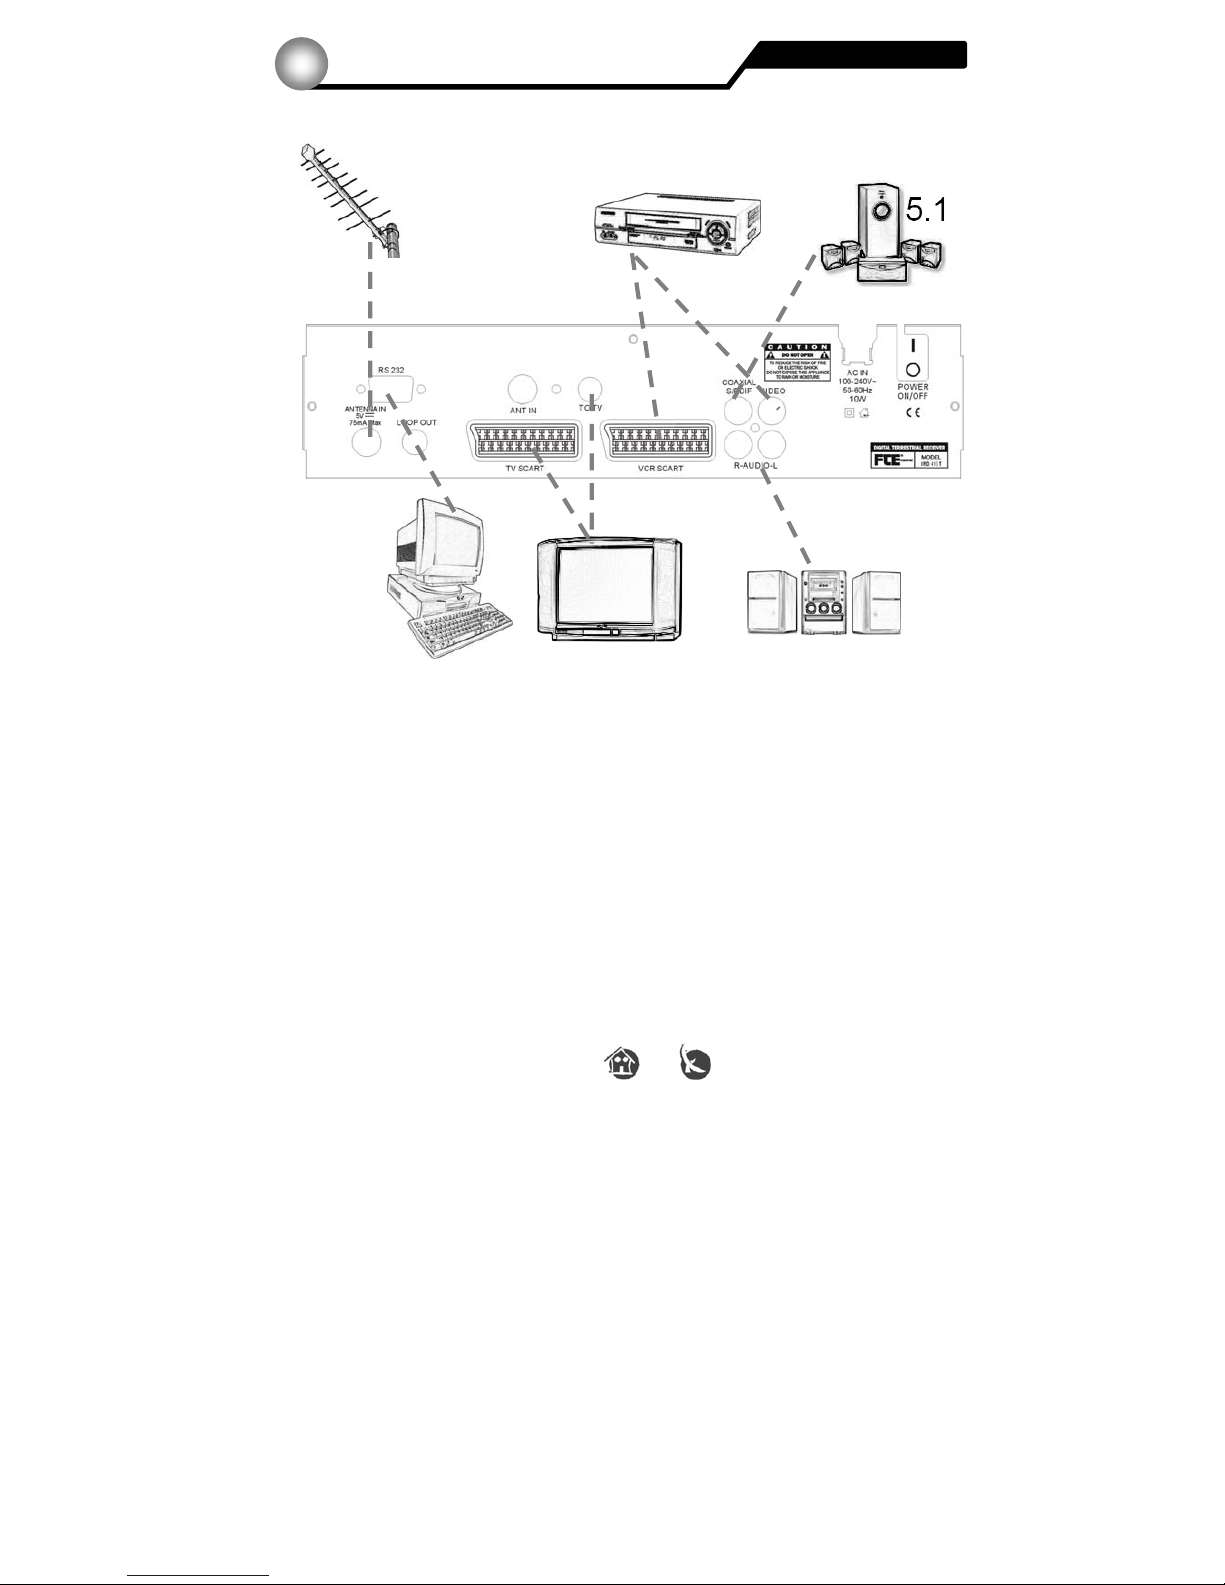
1. RS-232: Serial Port to upgrade the software.
2. ANT IN: Input of modulators.
3. TO TV: Modulator output for TV set.
4. COAXIAL S/PDIF: Coaxial output for digital audio (AC3).
5. VIDEO: Output for monitor.
6. AC IN: Mains input cable.
7. POWER ON/OFF: Allow to completely switch off the receiver.
8. ANTENNA IN: Terr. input of the digital tuner.
9. LOOP OUT: Terr. output for other devices.
10. TV SCART: SCART output for TV set.
11. VCR SCART: Output SCART for the connection of a video recorder.
12. AUDIO: Output for stereo set.
Receiver back
Connections and controls
3.2
TERR.
Home- or indoor antenna
VCR
Home Cinema
TV
HiFi
PC
Page 8
8 Version 1.0 © FTEmaximal
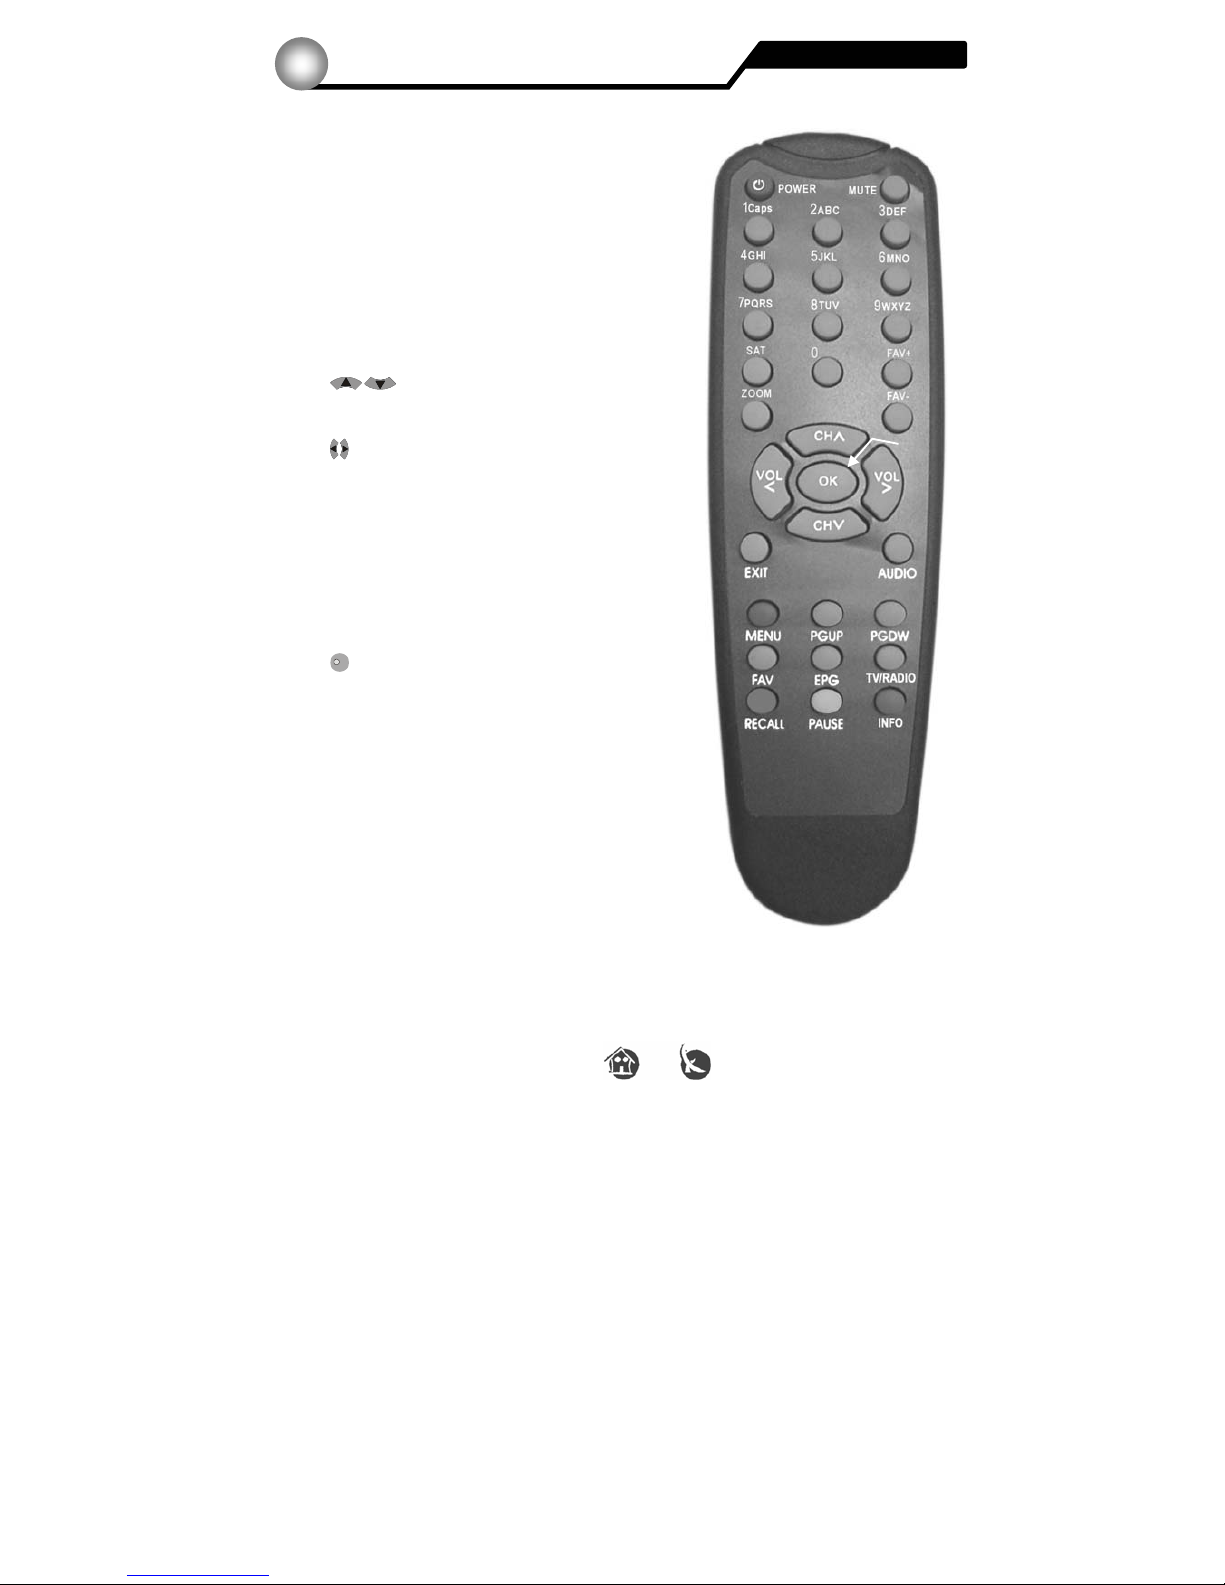
You can control the following functions with the remote control.
1. POWER:
Switches the receiver on or enters stand by
mode.
2. MUTE:
The Audio will be muted.
3. INFO:
Shows information about the current reception.
In the EPG: Shows detailed information.
4. TV/RADIO:
Changes between TV or Radio channels.
5. FAV:
Open the favourite channel list.
6. CH:
Changes the program, and On / Off inside a
menu.
7. VOL:
Volume level.
8. PAUSE:
Freezes the image.
9. ZOOM:
Picture zooming-function.
10. PGUP & PGDN:
Move the cursor in a page by page way inside the
menus. Switches the picture ratio between 4:3,
16:9 and AUTO.
11. OK:
Confirmation of the menu items.
Opens the program listing.
12. AUDIO:
Allows the selection of the AUDIO edition.
13. EXIT:
Exits menus.
14. MENU:
Starts the main menu.
15. Number block:
For direct input of values.
16. RECALL:
Goes to the previous program.
In the EPG: Programming event for timers.
17. EPG:
Shows the EPG program information.
18. SAT:
-
Backside: Battery holder
Remote control
Connections and controls
3.3
1
4
2
3
5
6
6
7
7
8
10
9
10
11
12
13
14
15
16
17
18
Page 9
9 Version 1.0 © FTEmaximal
The following steps assume, that ...
... the receiver is properly set up.
Important:
Unplug the receiver if you wish to carry out connection tasks.
Connection ...
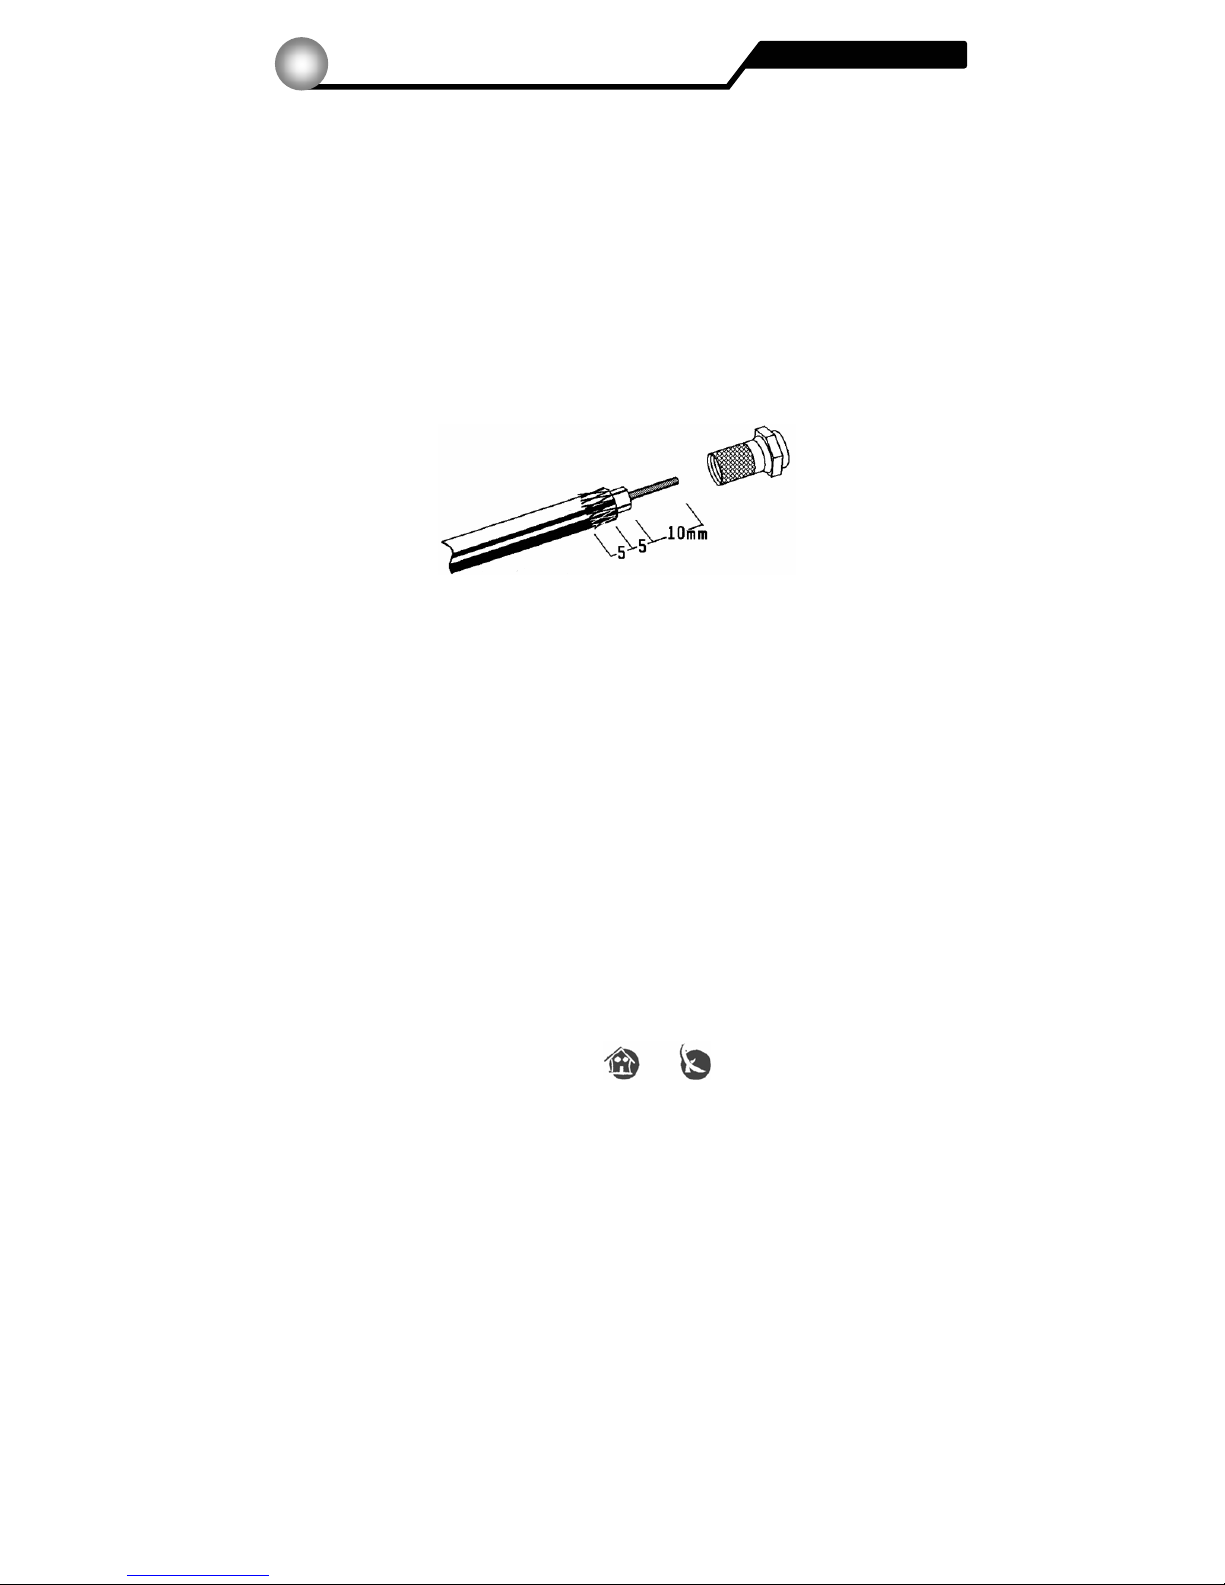
... for connecting your receiver to the antenna you need a long coaxial cable suitable for
digital reception (for example, FTE K 290). If the F connectors are not mounted into the
connecting cables yet, please proceed to mount the connector as follows:
Please connect the F connector from antenna, to connection 1 of the back side of the
receiver. Install the small connecting cable between the connectors 10 and 2 .
Indoor antenna will be supported by IRD 420T/SM on connector 3.
To use 5V , you need a DC injector. It will be placed between connector 1 and the F
connector of the coaxial cable.
Connecting television receiver and video tape recorder
You will achieve an optimal transmission quality if you connect the television receiver and
the video tape recorder with an Scart-cable using the corresponding socket of the
receiver.
a) Use a scart cable
A single scart-cable is enough for the connection to the TV set.
b) About the antenna cable
Here you can also combine the terrestrial receiver with your TV set or video tape recorder.
However, the transmission quality is a little poorer.
First ste
p
s
The installation
4.1
Page 10

10 Version 1.0 © FTEmaximal
c) RCA connectors
The video and audio signals that you have with the scart-cable are available again
through this connector. It will be interesting to connect an additional monitor or stereo set.
You combine the 5 RCA-video connector with the corresponding input at your monitor
and the 13 RCA-audio connector with the input at your Stereo set.
Home Cinema System ...
... like Dolby Digital 5.1 system can be connected at the connections 6 and 7 .
Connection to the 230V mains
The power cord is built into the receiver. Be careful when you work with the power cord
and pay attention to the following guidelines:
... never put objects over the power cord.
... never use the power cord over sharp objects.
... be sure that the power outlet is easily reachable, in order to be able to unplug the
device in case of danger.
Never pull at the power cord !
… if you plan to unplug the cord, pull directly the plug, not the cord.
… be sure the power plug is securely and firmly connected.
… do not use wobbly plug adapters to avoid fire risks.
First ste
p
s
The installation
4.1
Page 11
11 Version 1.0 © FTEmaximal
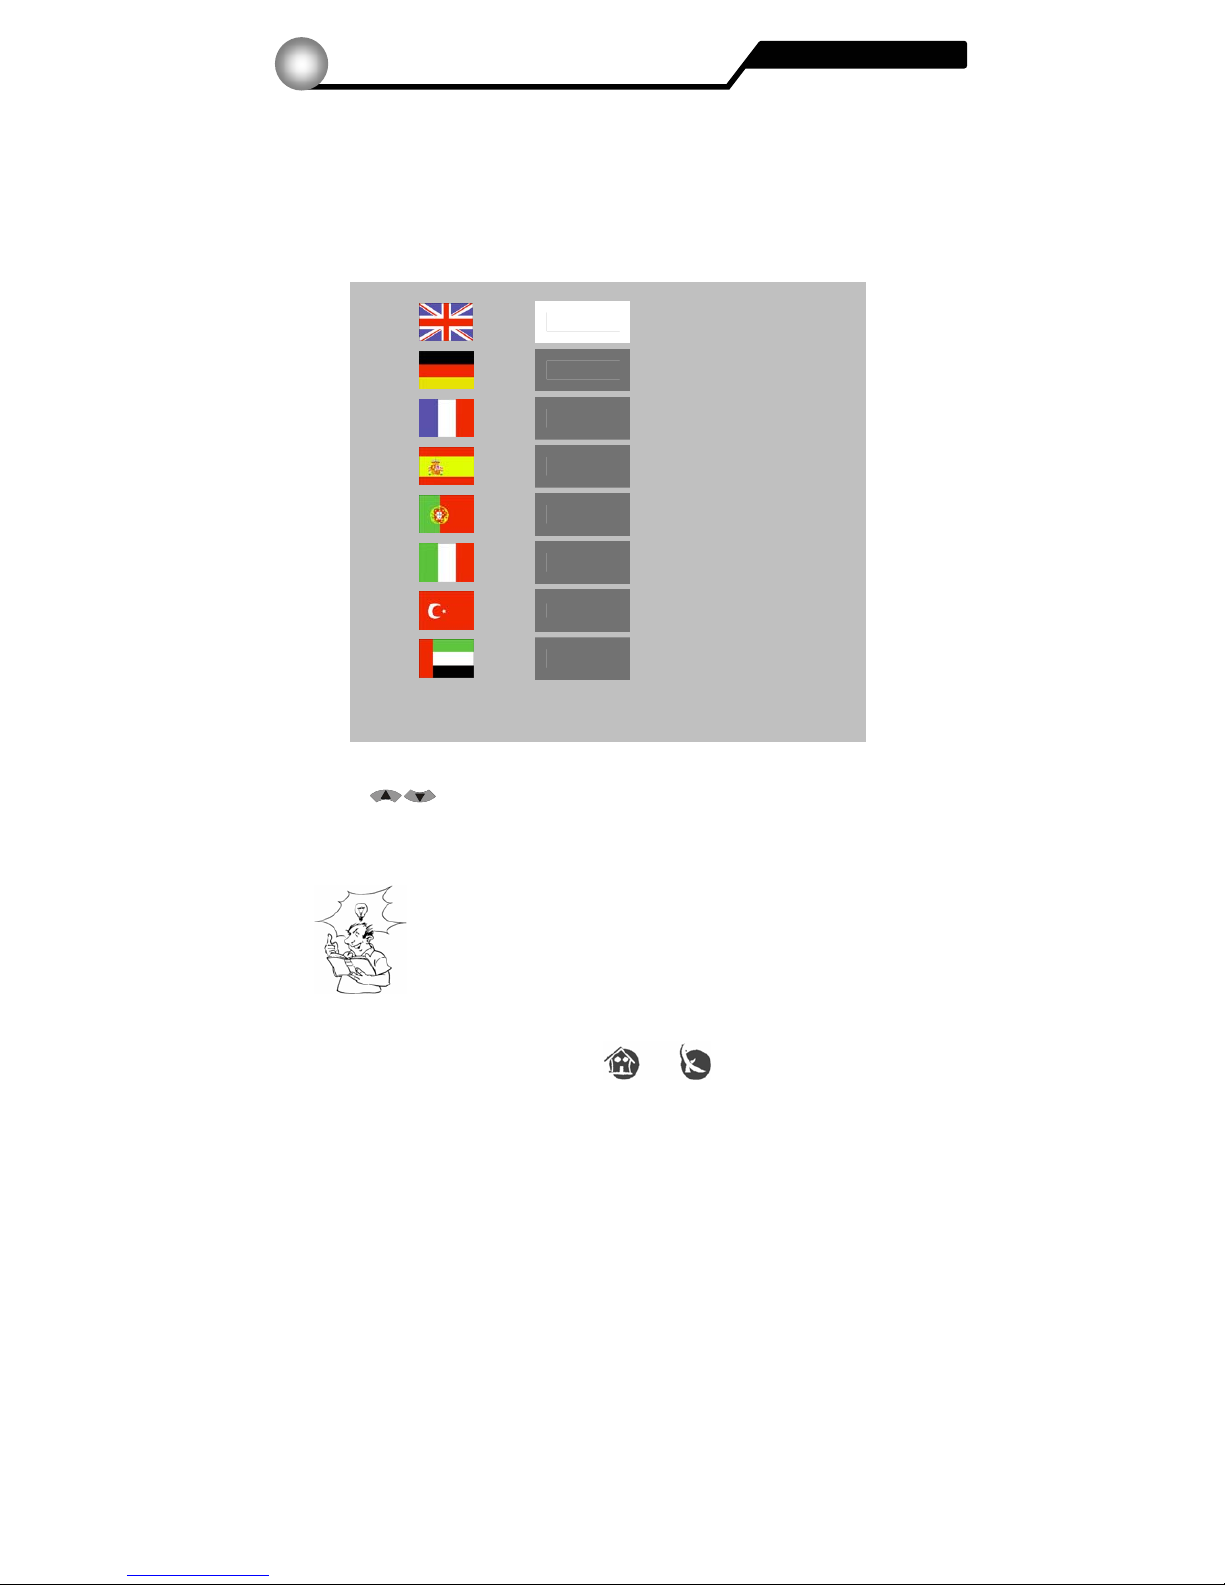
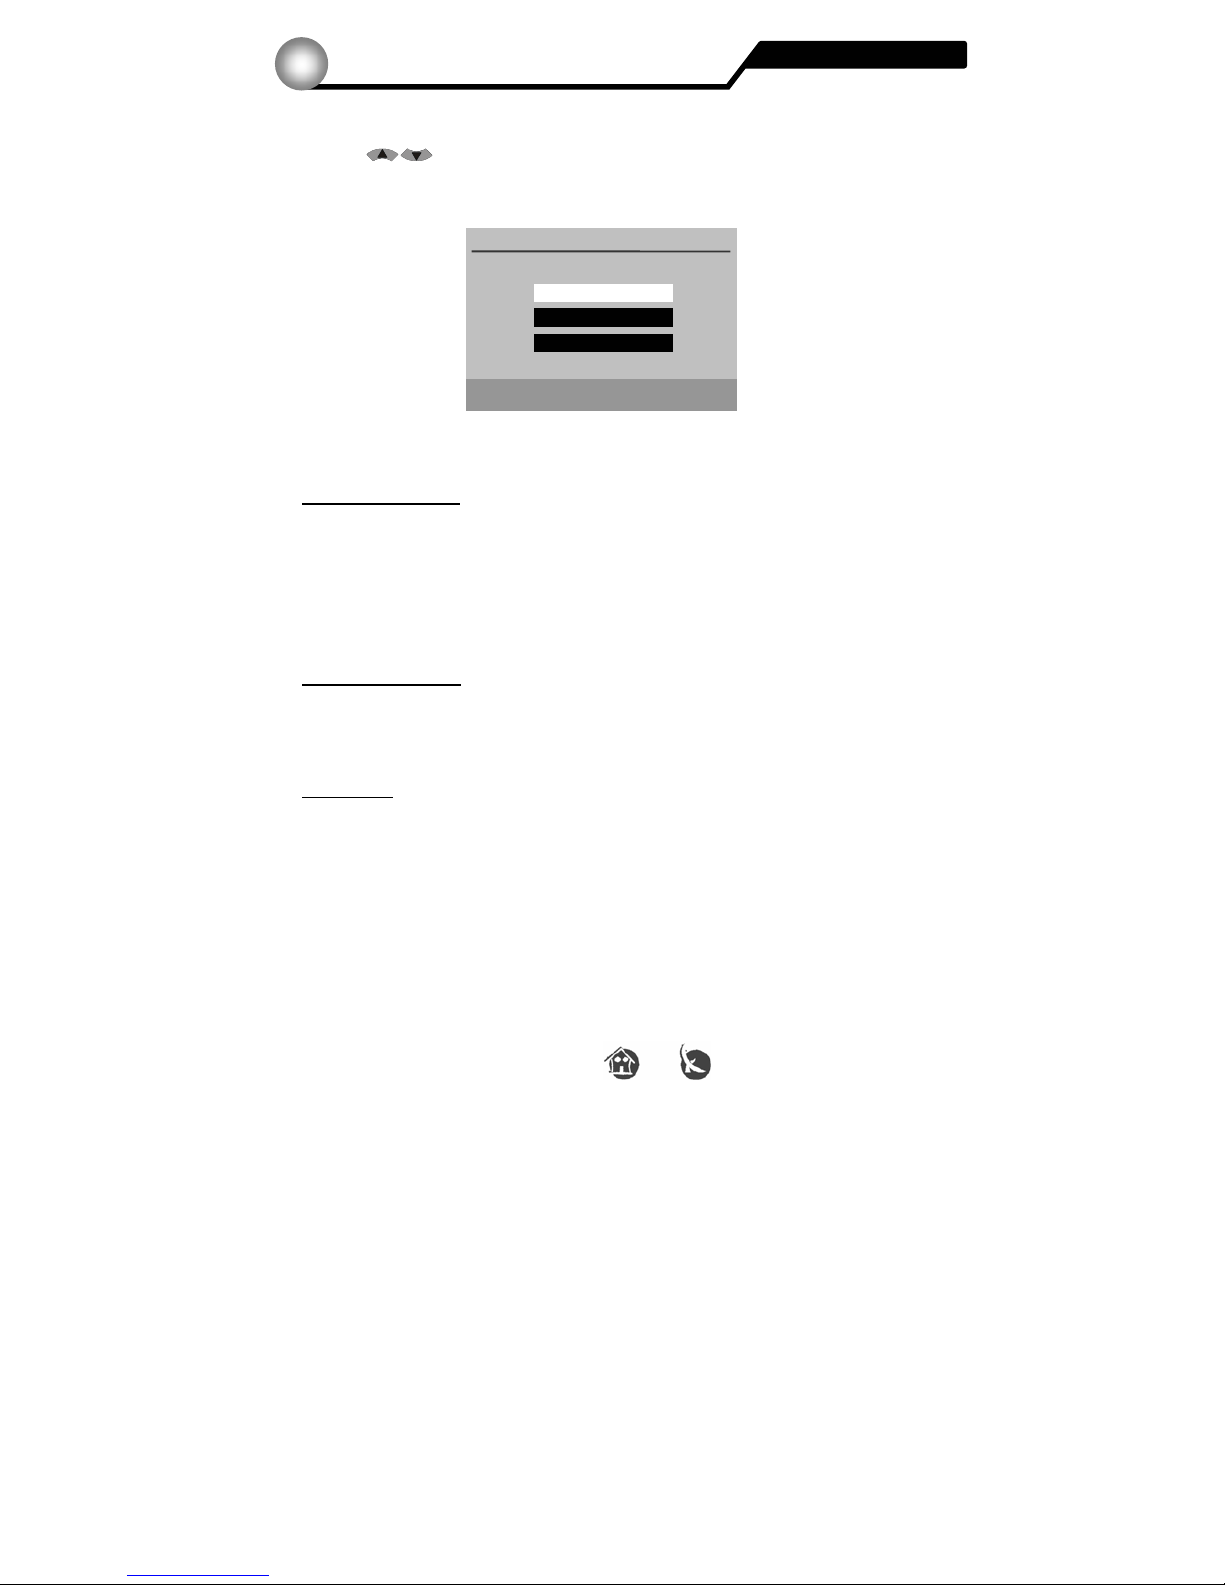
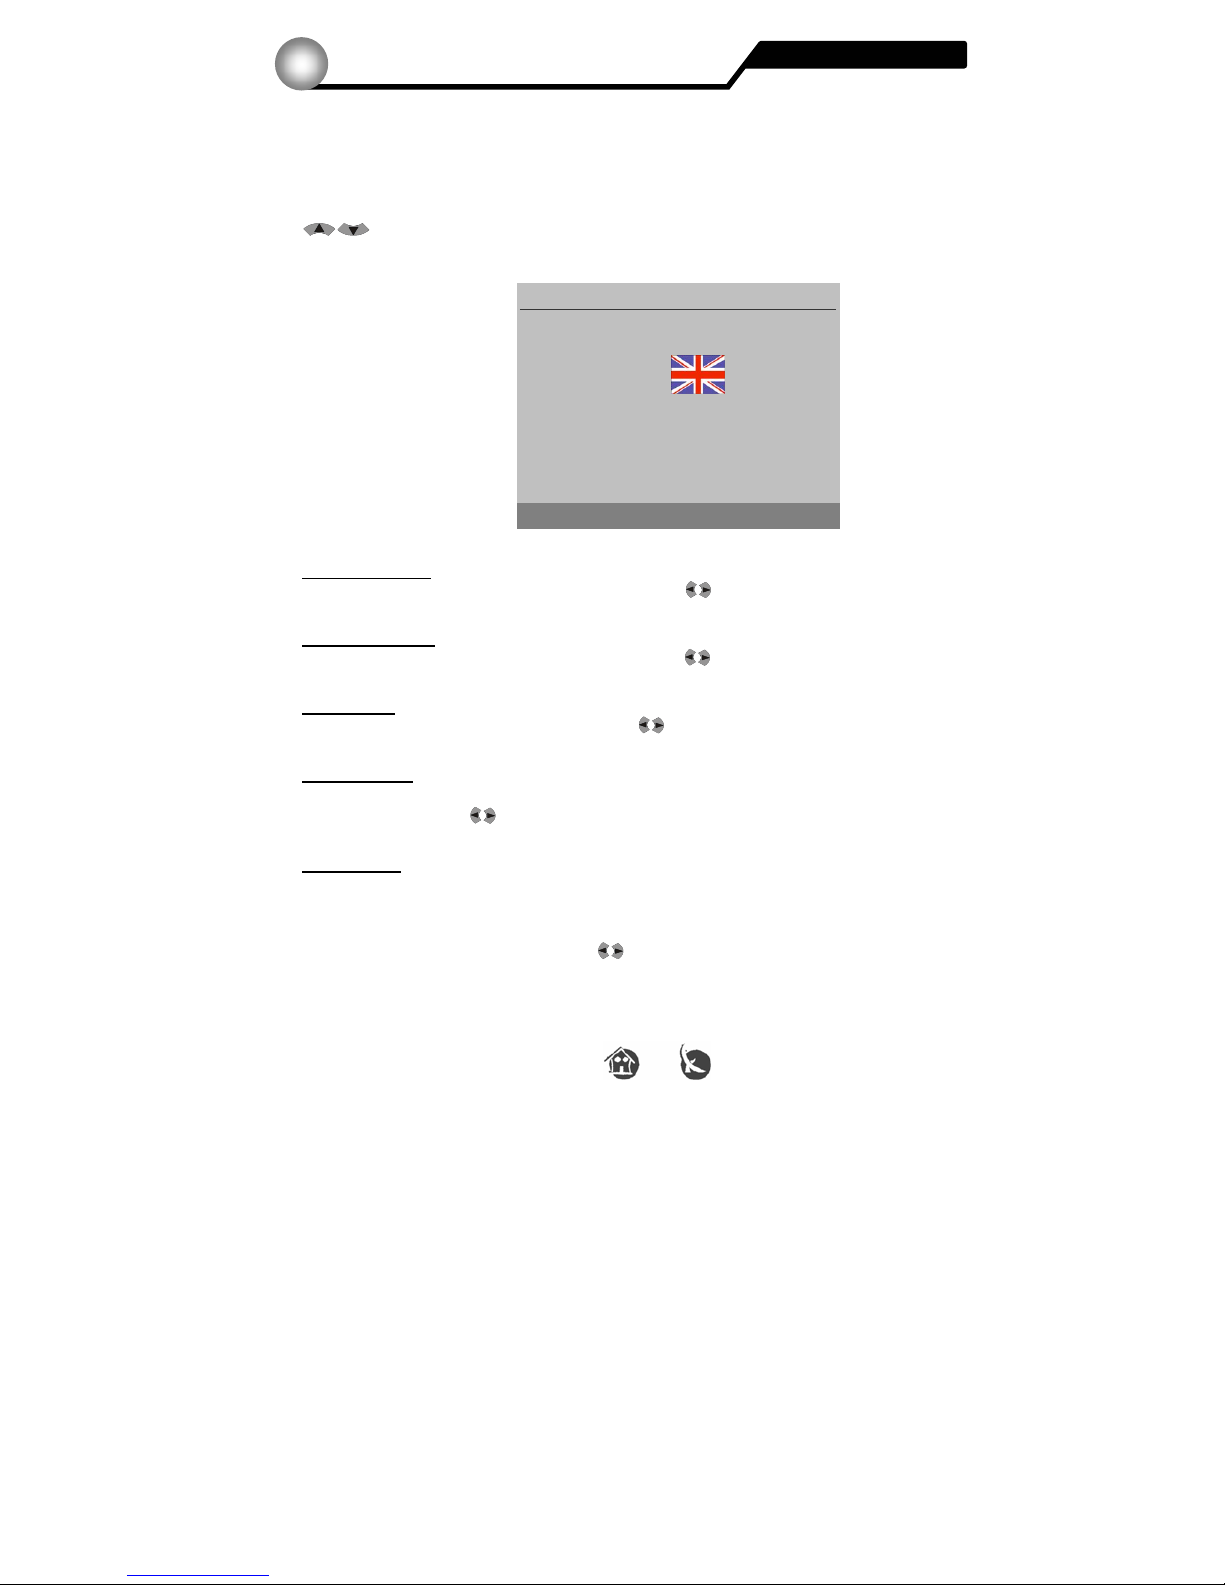
The receiver includes a setup wizard that helps you to configure the different parameters
of the receiver.
The first time the receiver is turned on (using the power switch in the receiver’s back
panel), the following menu will be displayed:
With the
CH buttons you can choose the desired language of the screen menu
and confirm your selection with the OK button on the remote control.
Once you select a language/country, the receiver
automatically sets the typical settings for your country.
English Select your Language
Deutsch Wählen Sie Ihre Sprache aus
Francais Selectionnez votre Langue
Spanish Seleccione su idioma
Português Seleccione o seu idioma
Italiano Selezioneare lingua
Turkish
Bir dil Seciniz
Arab
Select your Language
Installation wizard
The installation
4.2
Page 12
12 Version 1.0 © FTEmaximal
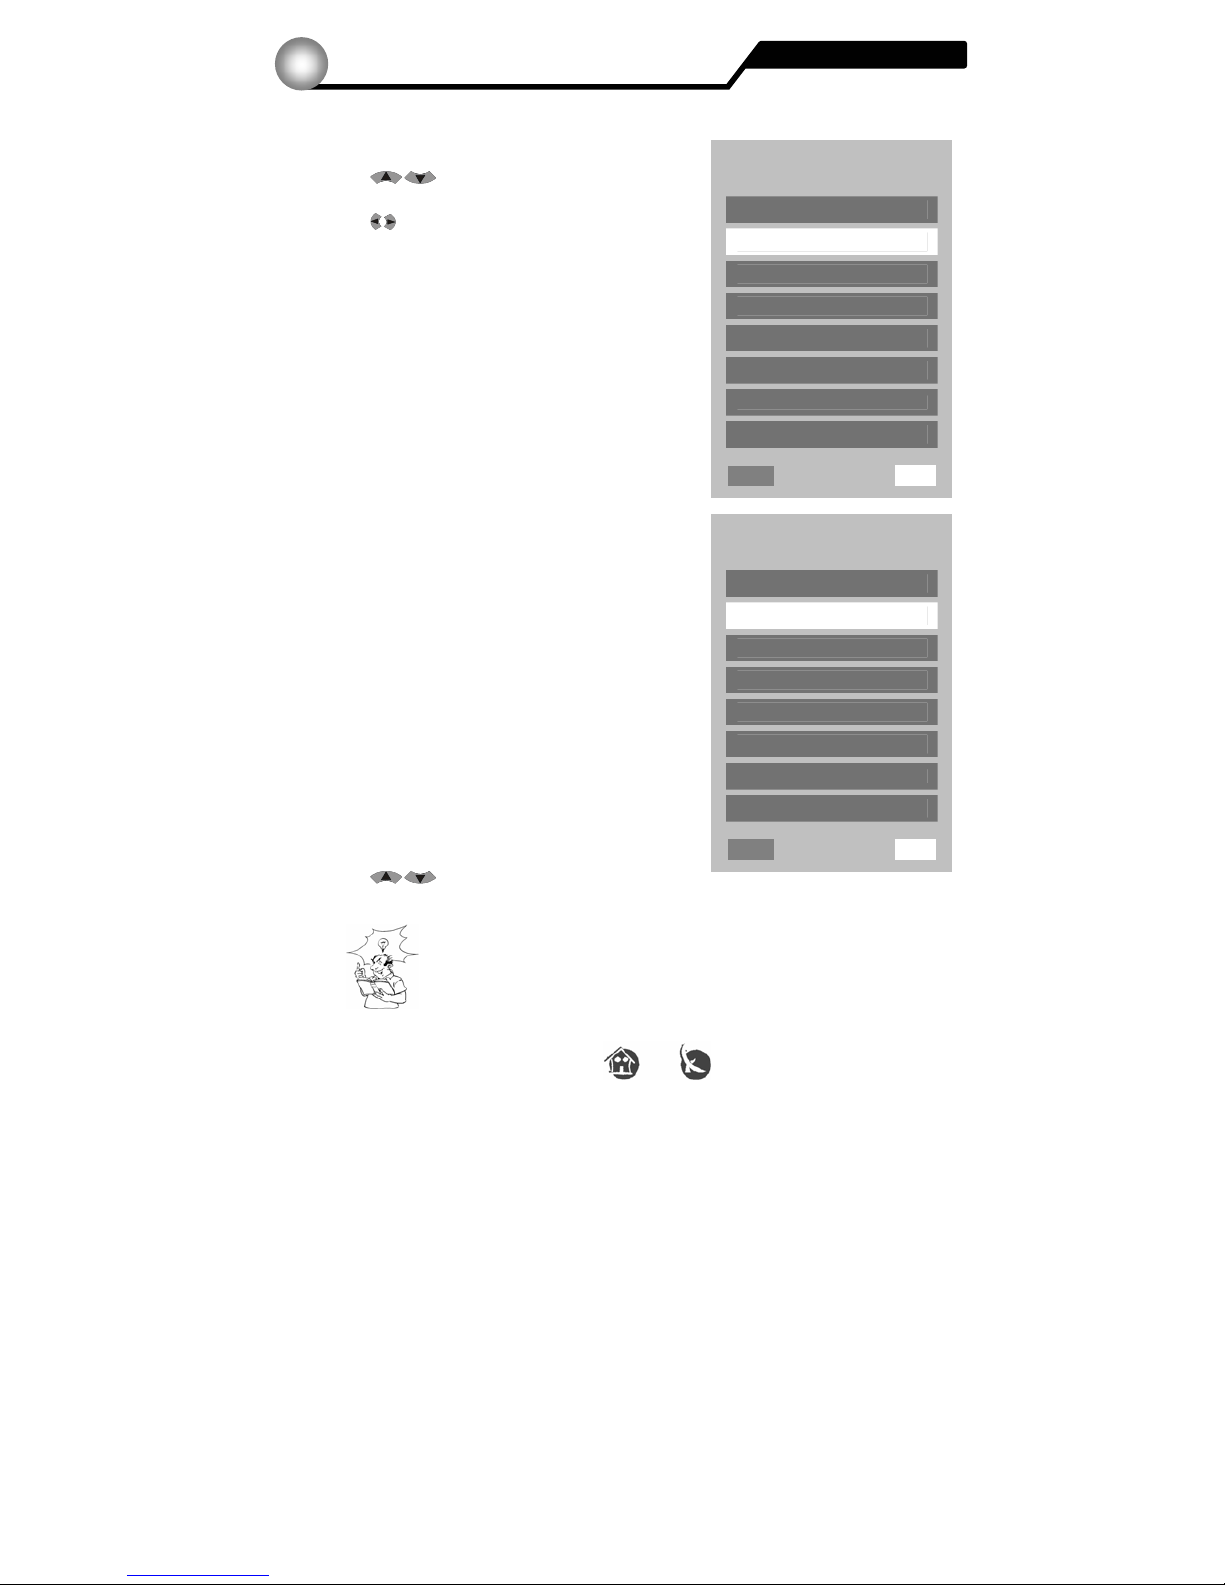
Installation wizard: Audio language
With the
CH buttons you can choose your
favourite audio language for TV and Radio channels.
With the
VOL buttons you can change between
BACK and NEXT.
Choose NEXT and press OK to go to the
next menu.
Installation wizard: Time zone
Time zone
The receiver needs to know the precise time for the
EPG (Electronic program guide).
The delay displayed is referenced to
the Greenwich time (GMT).
For Spain:
Summer time = GMT + 02
Winter time = GMT + 01
With the
CH buttons you can choose your time zone. Once selected, choose
NEXT and press OK.
If you plan to use the EPG (Electronic Program Guide), you will have to
keep the time zone information up to date, specially between winter and
summer time periods.
Installation wizard
The installation
4.2
Audio Language
01 English
02 Deutsch
03 Francais
04 Spanish
05 Português
06 Italiano
08 Turkish
09 Arab
BACK
NEXT
Time zone
01 GMT +00
02 GMT +01
03 GMT +02
04 GMT +03
05 GMT +04
06 GMT +05
07 GMT +06
08 GMT +07
BACK
NEXT
Page 13
13 Version 1.0 © FTEmaximal
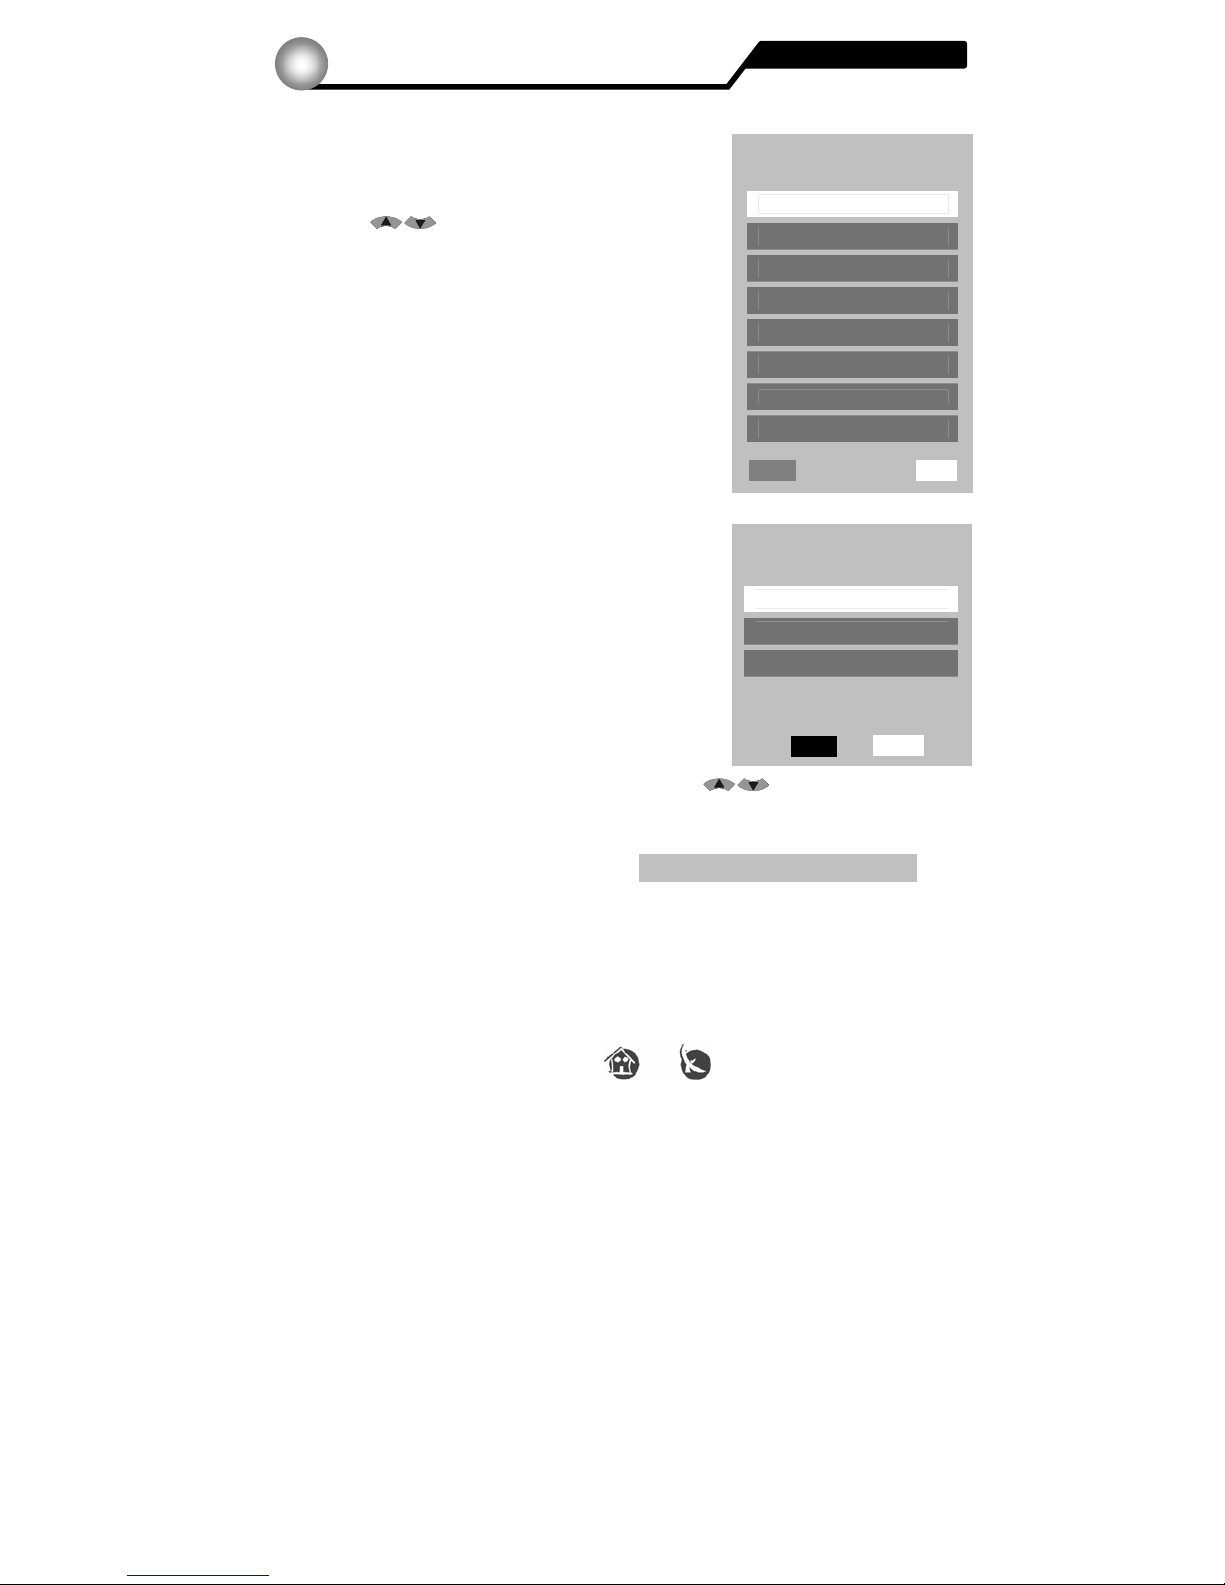
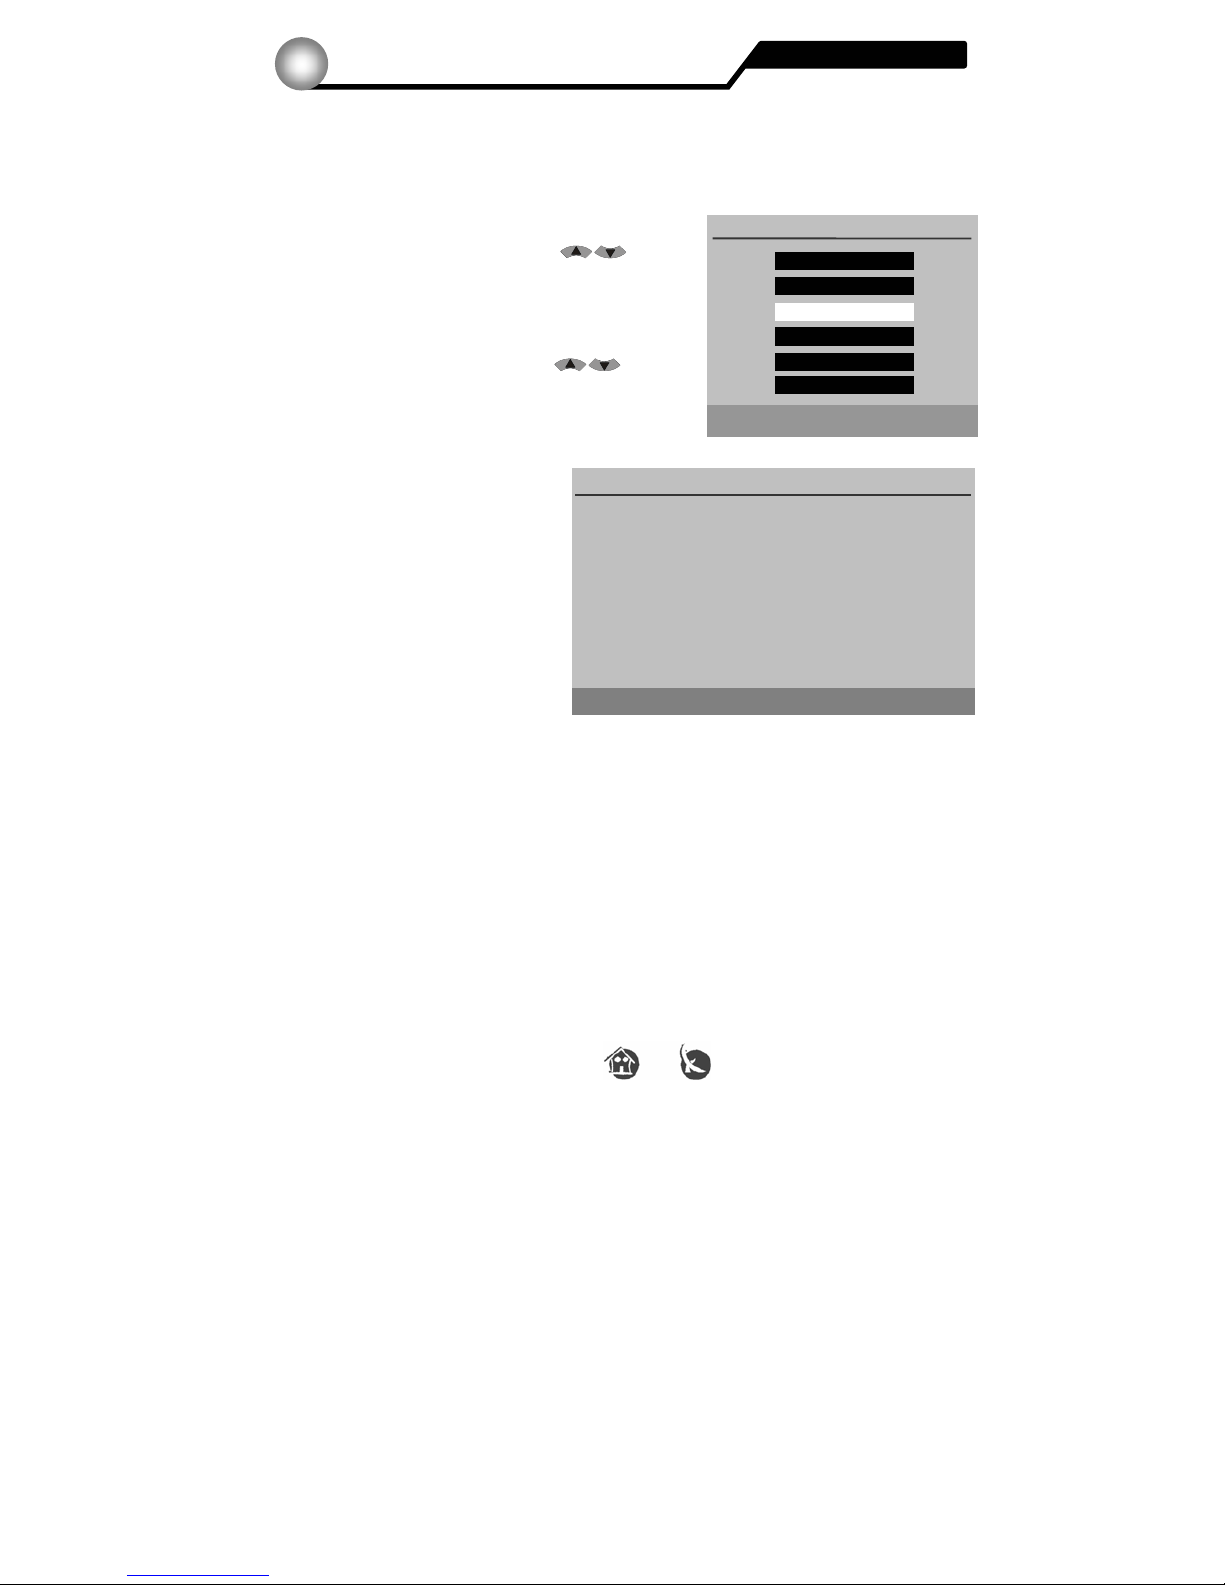
Installation wizard: Channel Table
Select here in which area you will use the receiver.
With the
CH buttons you can choose your
Area/zone. When you select it, then press the OK
button.
Installation wizard: Search or Load
There are three possibilities to complete the installation
of the receiver:
1. Load Saved Program
Select this menu item to load the programs you
previously saved. It it is the first time you use the
receiver, there will be no programs saved.
If you load a list with saved programs, select with the
CH buttons the
Load Saved Program menu and press OK on the remote control.
A screen announcement will appear
announcing that the program list is being
loaded.
The receiver setup is now ready.
Installation wizard
The installation
4.2
Channel Table
01 Europa
02 China
03 USA
04 Canada
05 Japan
06 Australia
Back
Next
User Search or Load
Load Saved Program
Search All
Cancel
BACK
NEXT
Loading Data please wait.....
Page 14
14 Version 1.0 © FTEmaximal
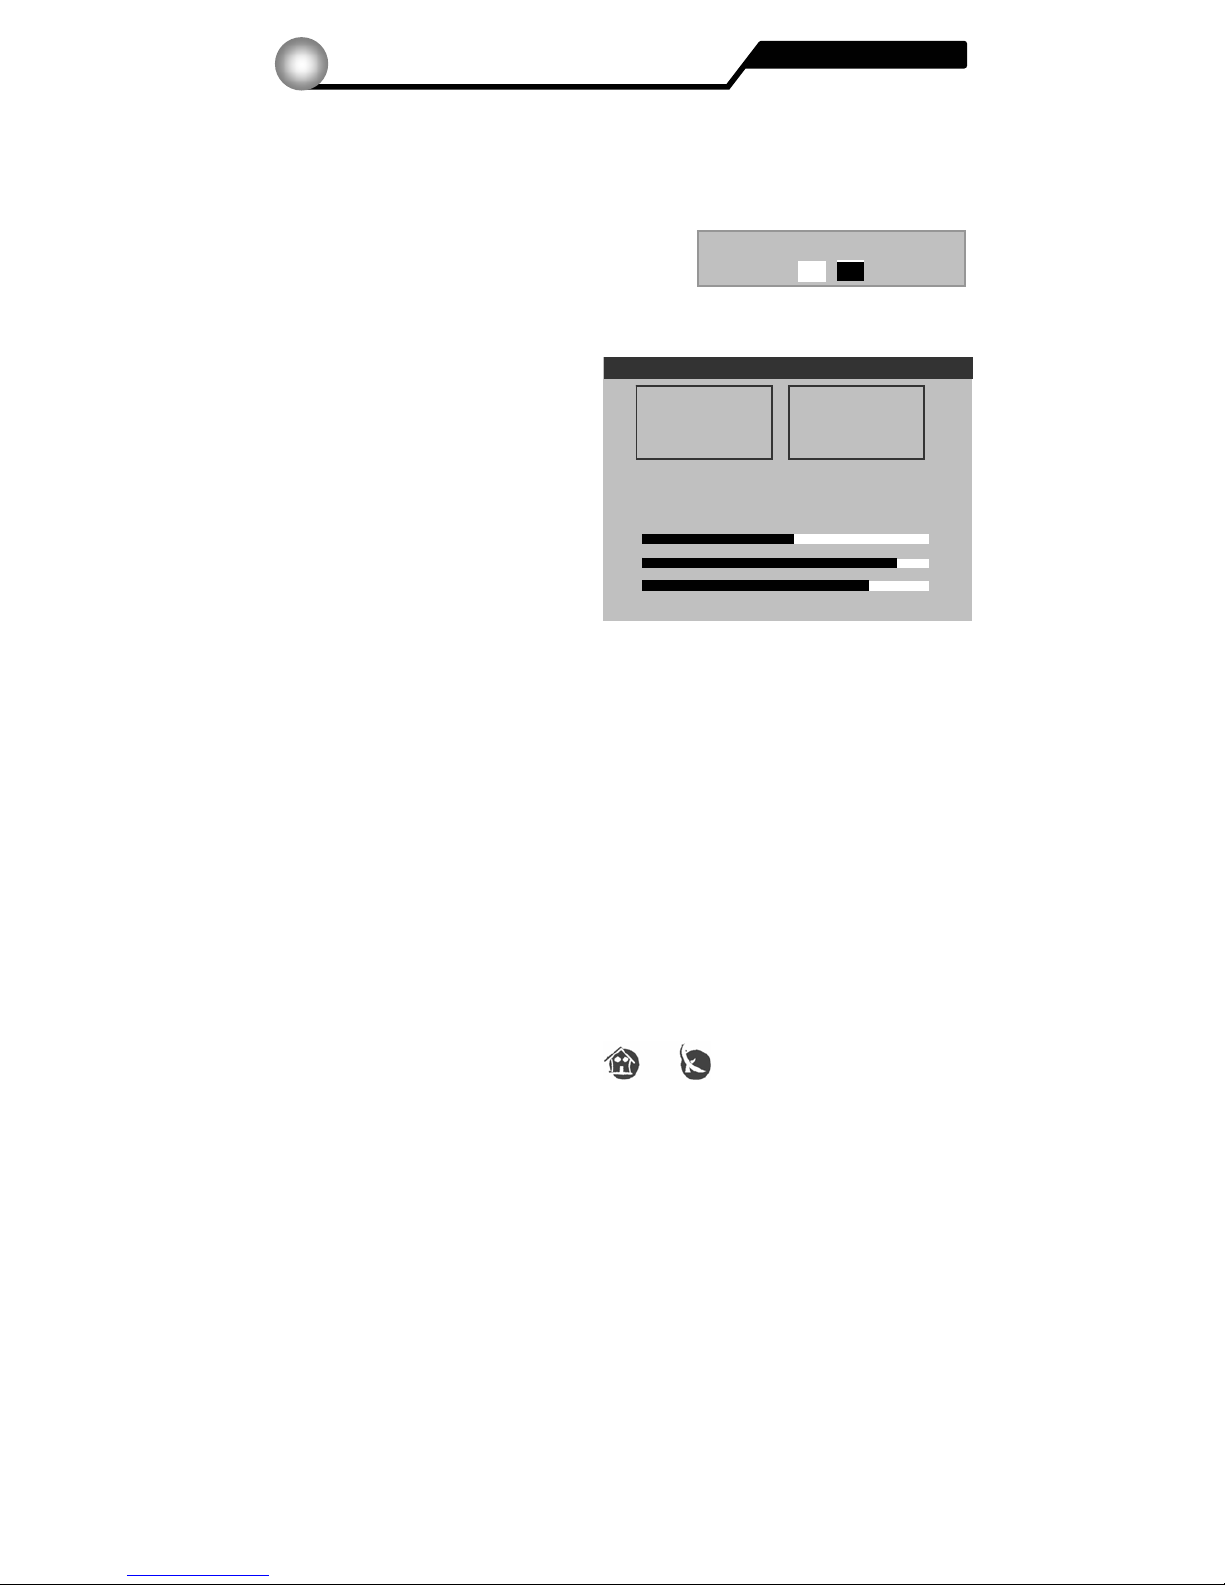
2. Search All
With Search All you can scan for channels.
It is necessary to do the first time you use the IRD 420T/SM, because the frequency
reception varies in function of the zone you are in.
When you do an scan, you can select if the receiver
have to save only the free programs (FTA) or all
the programs.
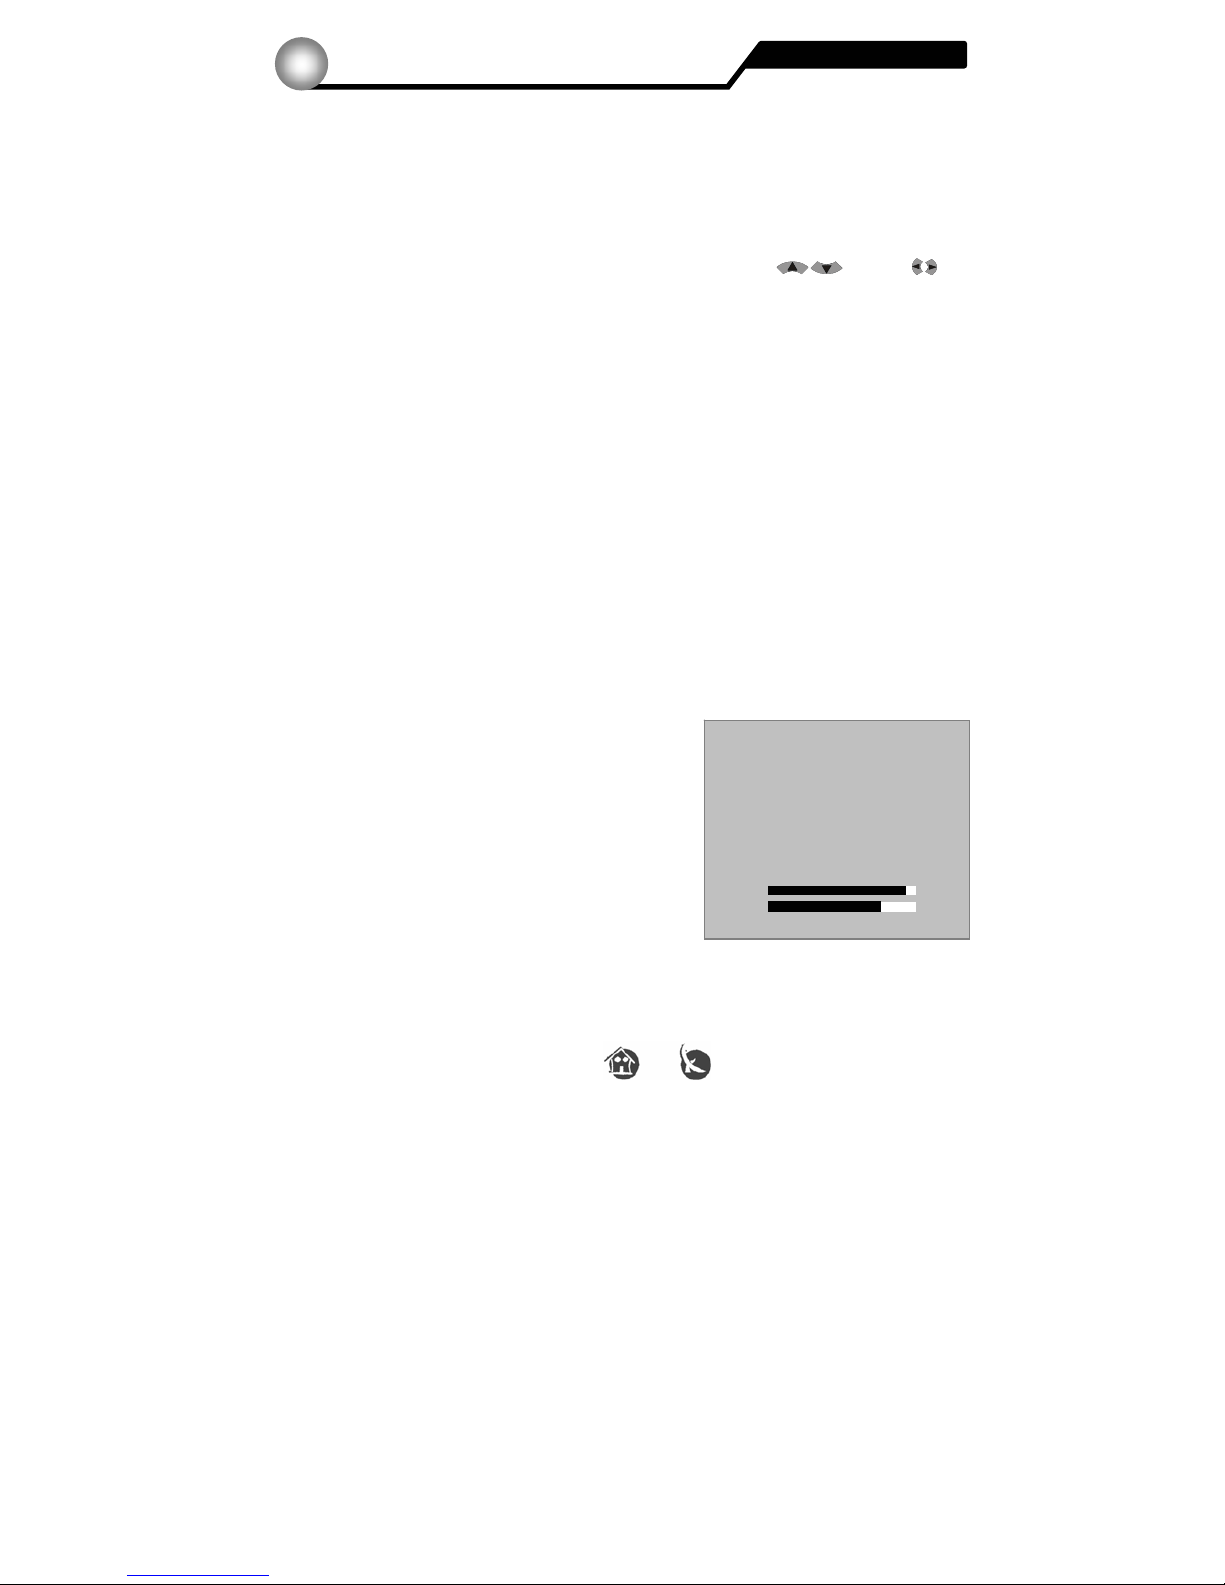
The receiver searches now for channels.
Search: TV 0003
Here the receiver indicates that 3
TV-programs were found.
Search: Progress, upper display bar
Here you are informed about the
progress of the search.
Search: Quality, middle display bar
Here you can see the signal-quality.
Search: Strength, under display bar
Here you can see the thickness of the
signal.
After the process of search is finished, press any button.
3. Cancel
With this function you can go directly to the main menu.
Installation wizard
The installation
4.2
Only FTA channels search?
Yes
No
Searching New Channels
TV 0003 Radio 0002
Frequency: 212500, Total: 01/01, Auto, Auto, 7M
Progress 54%
Quality 92%
Strength 65 %
Page 15
15 Version 1.0 © FTEmaximal
Choose a channel
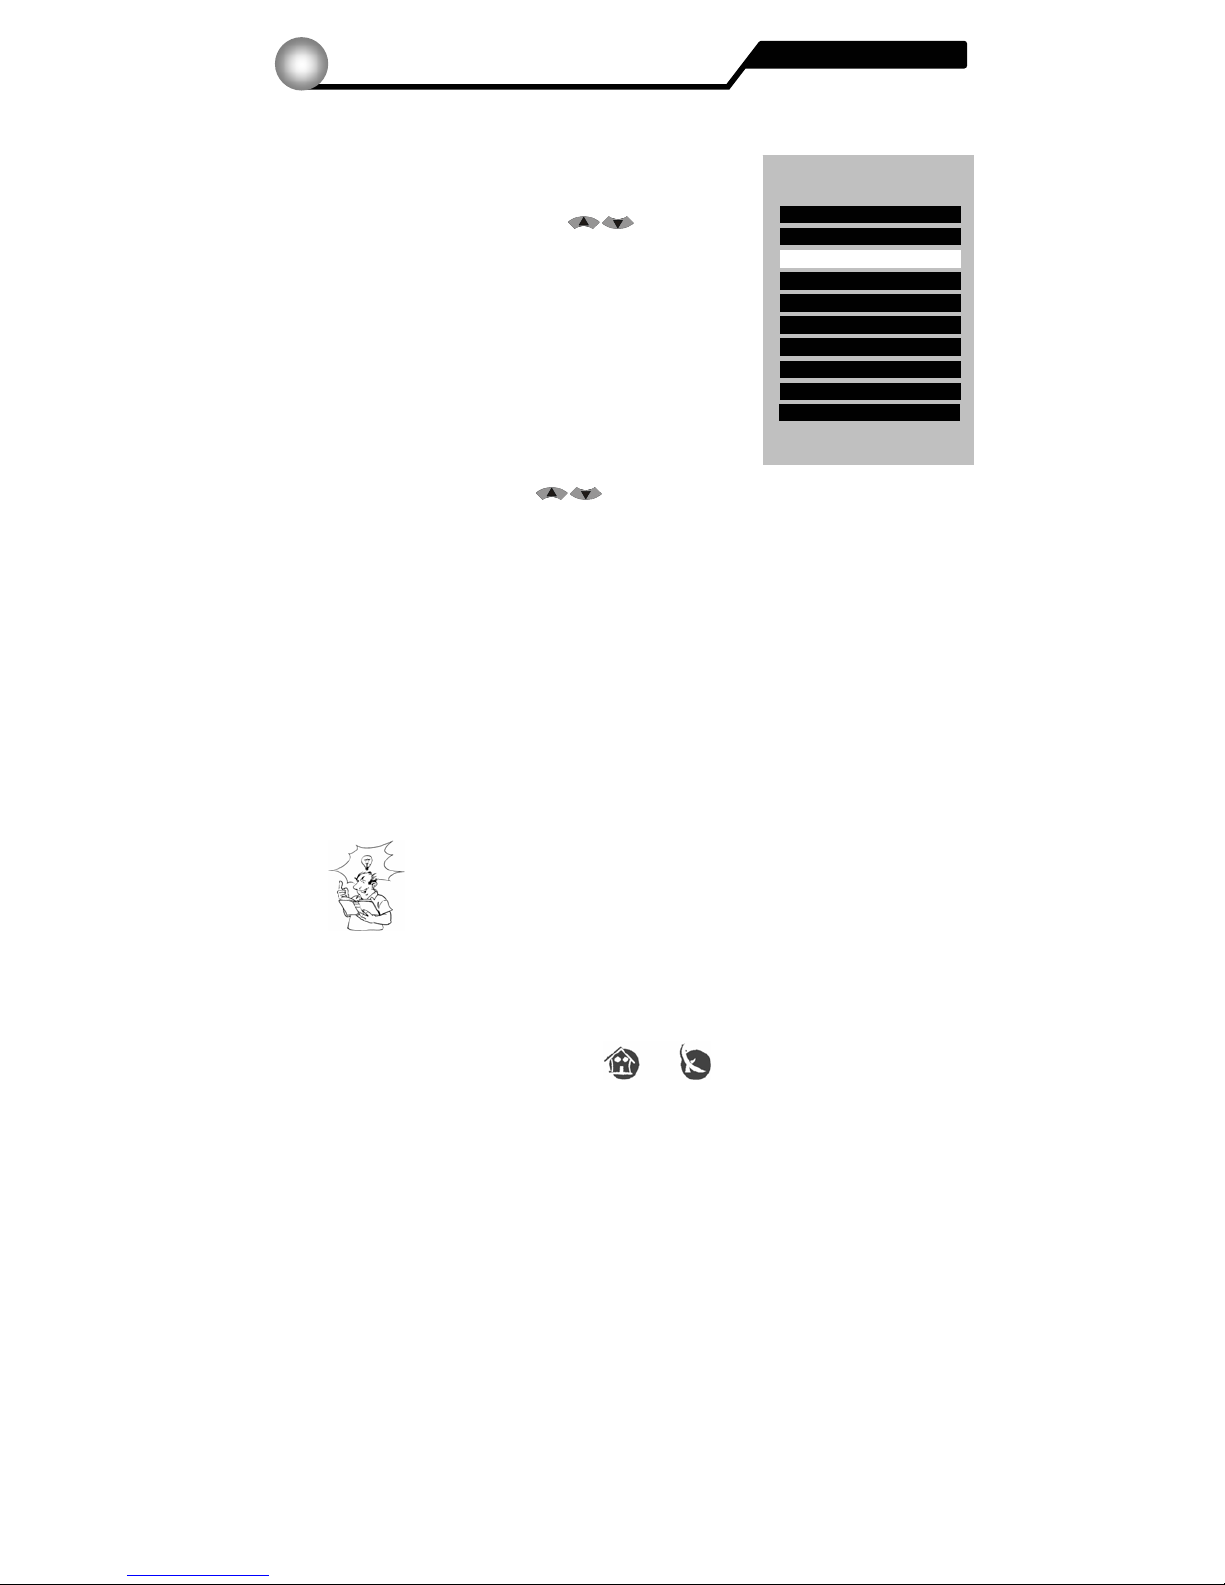
To select a channel you have 3 possibilities:
1. Pressing the OK button you will open the channel list.
Now you can choose with the
CH buttons
the program you want to view. Few seconds later, the
channel will be displayed automatically.
With the PGUP / PGDN buttons you can go page by
page through the channels list.
If you want to leave the program list, press the OK
button and then EXIT.
2. If you know the number of the channel you are looking
for, you can enter the program number directly with the
number keys in the remote control.
3. You can also zap with the CH buttons the program numbers up and down,
until you find the channel you wish.
RECALL
With the remote control RECALL button you have the possibility to go back to the
previous program. Therefore, you can change between two channels alternately (for
example, during an advertising interruption).
Favourite program lists
Pressing the FAV button you will access the favourite program lists.
You can select among eight different lists by pressing FAV+ and FAV- buttons.
If you want that a program appears into an specific list, it is necessary to add it to the
desired favourite list.
If you want to change between TV- and Radio programs, it is necessary
to exit all menus . Press then the TV/Radio button to switch from TV to
Radio or vice versa.
F
Selecting a pro
g
ram
Basic operations
5.1
All TV Channel
0001 Das Erste
F
0002 ZDF
F
0003 ProSieben
F
0004 RTL
F
0005 RTL2
F
0006 SAT.1
F
0007 Super RTL
F
0008 NTV
F
Total: 452
0009 Kabel 1
F
0010 Viva
F
Page 16
16 Version 1.0 © FTEmaximal
EPG
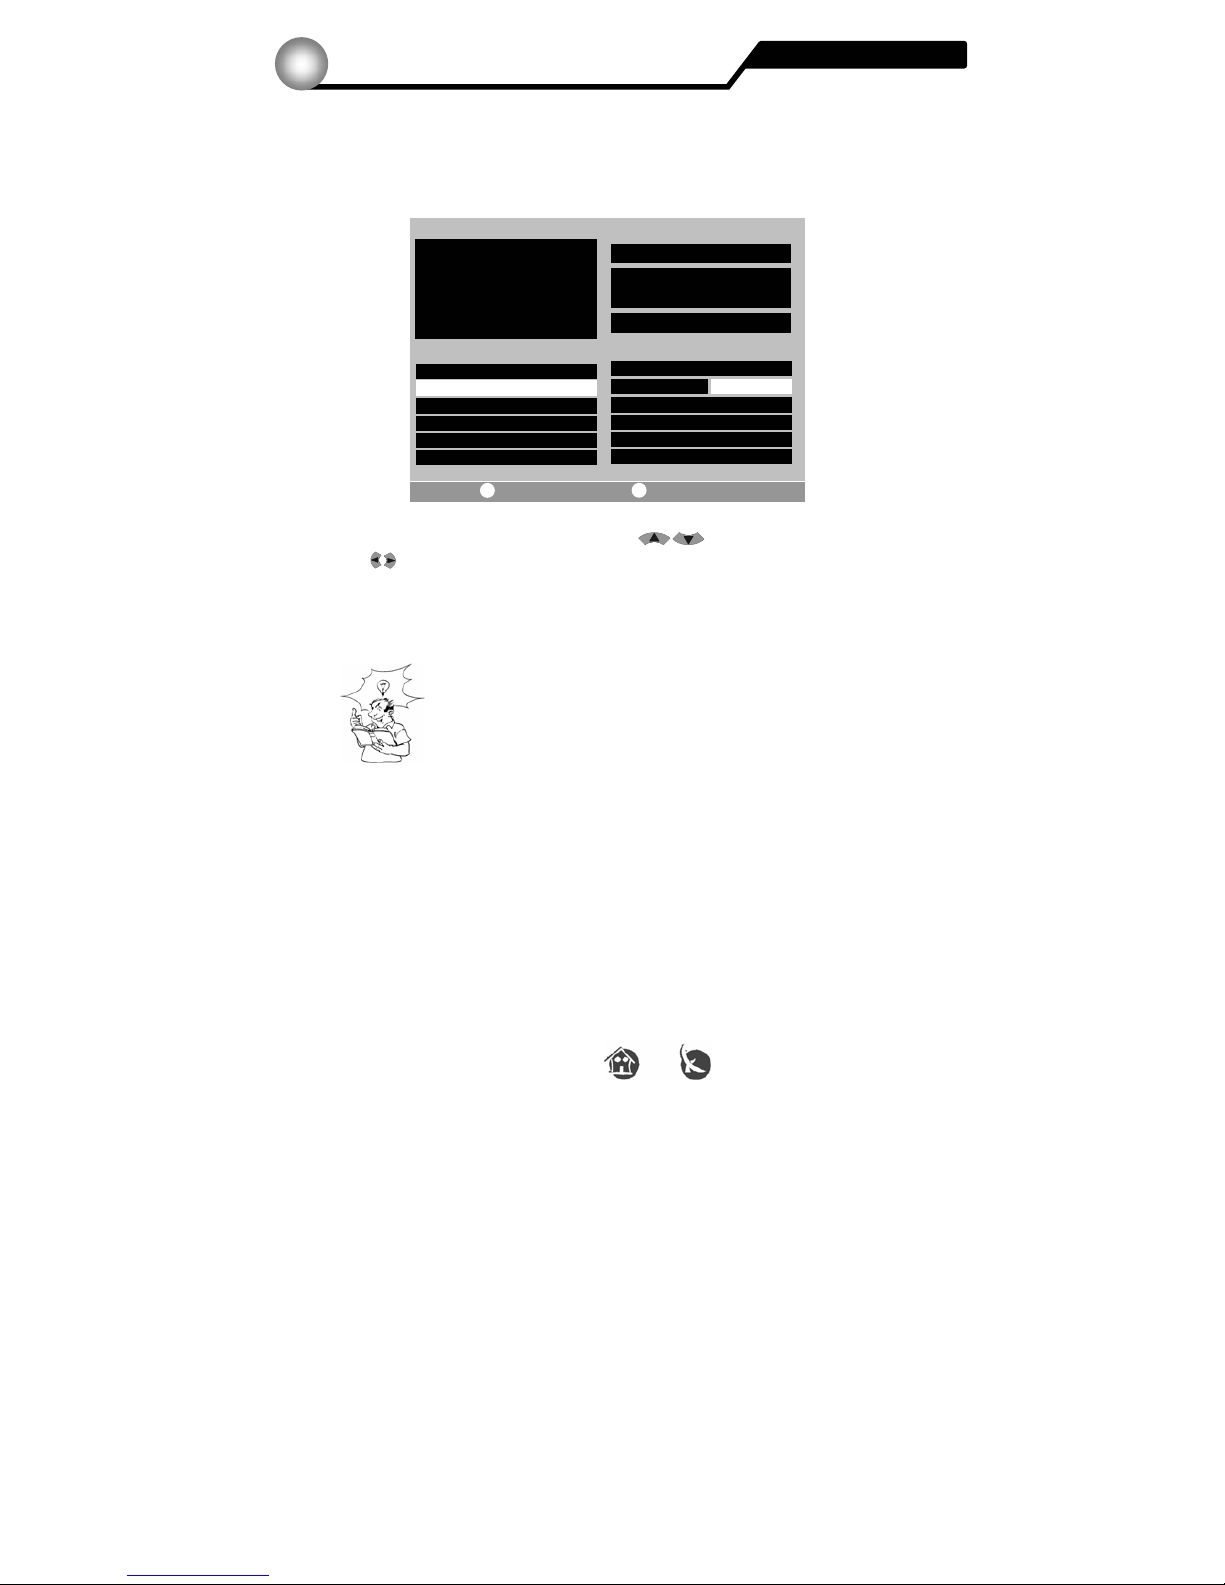
You can access the EPG menu (Electronic Program Guide) if you are outside all other
menus and press the EPG button on the remote control.
If you want to change the programs, use the
CH buttons.
With the
VOL buttons you can select among the individual programs of a channel.
If you press the Info button on the remote control, you get access to detailed information
on the respective programs.
EPG information is only available when the broadcaster sends it.
If you switch off the receiver with the Power button putting it in
Stand By Mode, the EPG information remains stored.
The program information is thus available much faster.
MUTE (Audio muting)
Pressing the MUTE button on the remote control you will switch the audio output ON and
OFF.
CAUTION: Do not employ the Mute button during a recording, because all video out
connections are affected by the OSD controls.
EPG List
TV program
0003 ProSieben
F
0004 RTL
F
0005 RTL2
F
0006 SAT.1
F
0002 ZDF
F
0007 Viva
F
NO. CH Name
Arabella
13:55 – 14:57
02/12 Tue 14:19
No EPG
◄
◄
◄
◄
◄
◄
►
►
►
►
►
►
SAM
Arabella
13:00 --02/12 Di-- 14:30
Help Set Timer View EPG
EPG / MUTE
Basic operations
5.2
Page 17
17 Version 1.0 © FTEmaximal
Timer
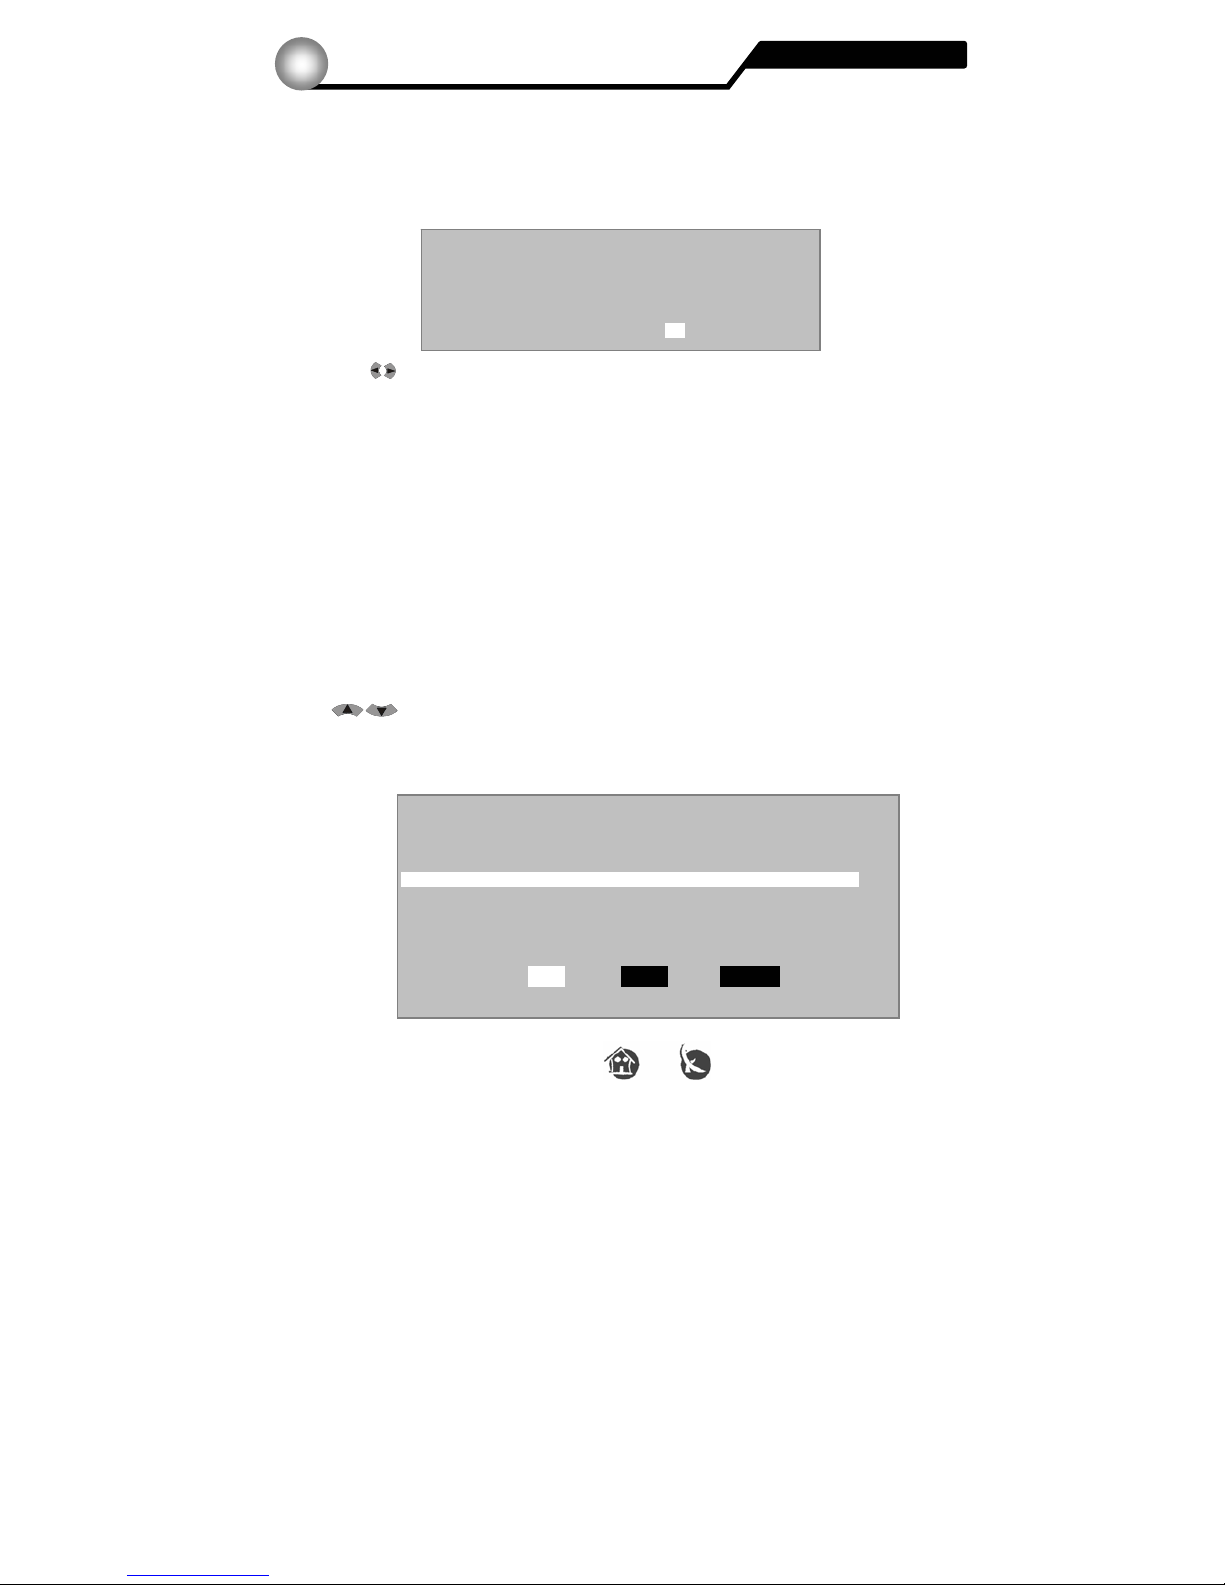
You have 2 possibilities to make the recording timer active. The better one is inside the
EPG menu: start it and choose a program. Then, press the RECALL button and it will
appear the following window.
With the
VOL buttons you can select, for example, the Repeat Style.
Inside this submenu, you have these options:
1x = Only one time
D = Every day
1W = One week
1-5 = From Monday to Friday
6-7 = From Saturday to Sunday
Choose the option you want and then press the OK button: the event recording will be
stored.
If you prefer to configure the timer manually or to check the stored events, you can do it as
follows:
Go to the Timer menu by pressing the MENU button and choose the System option with
the
CH buttons in the Main menu.
Then choose the Timer menu and the following menu will appear:
ProgName CANAL CANARIAS
Start Date 01/12 (DD/MM)
Start Time 17:00 (HH/MM)
Stop Date 01/12 (DD/MM)
Stop Time 17:59 (HH/MM)
Repeat Style 1x
01/12 Mo 10:57 Timer
Channel Date Start Date Stop Rpt
ProSieben 01/12 17:00 01/12 17:59 1 x
Add a timer
Edit
Add
Delete
Timer
Basic operations
5.3
Page 18
18 Version 1.0 © FTEmaximal
With the
VOL buttons you can select Add, Edit and Delete.
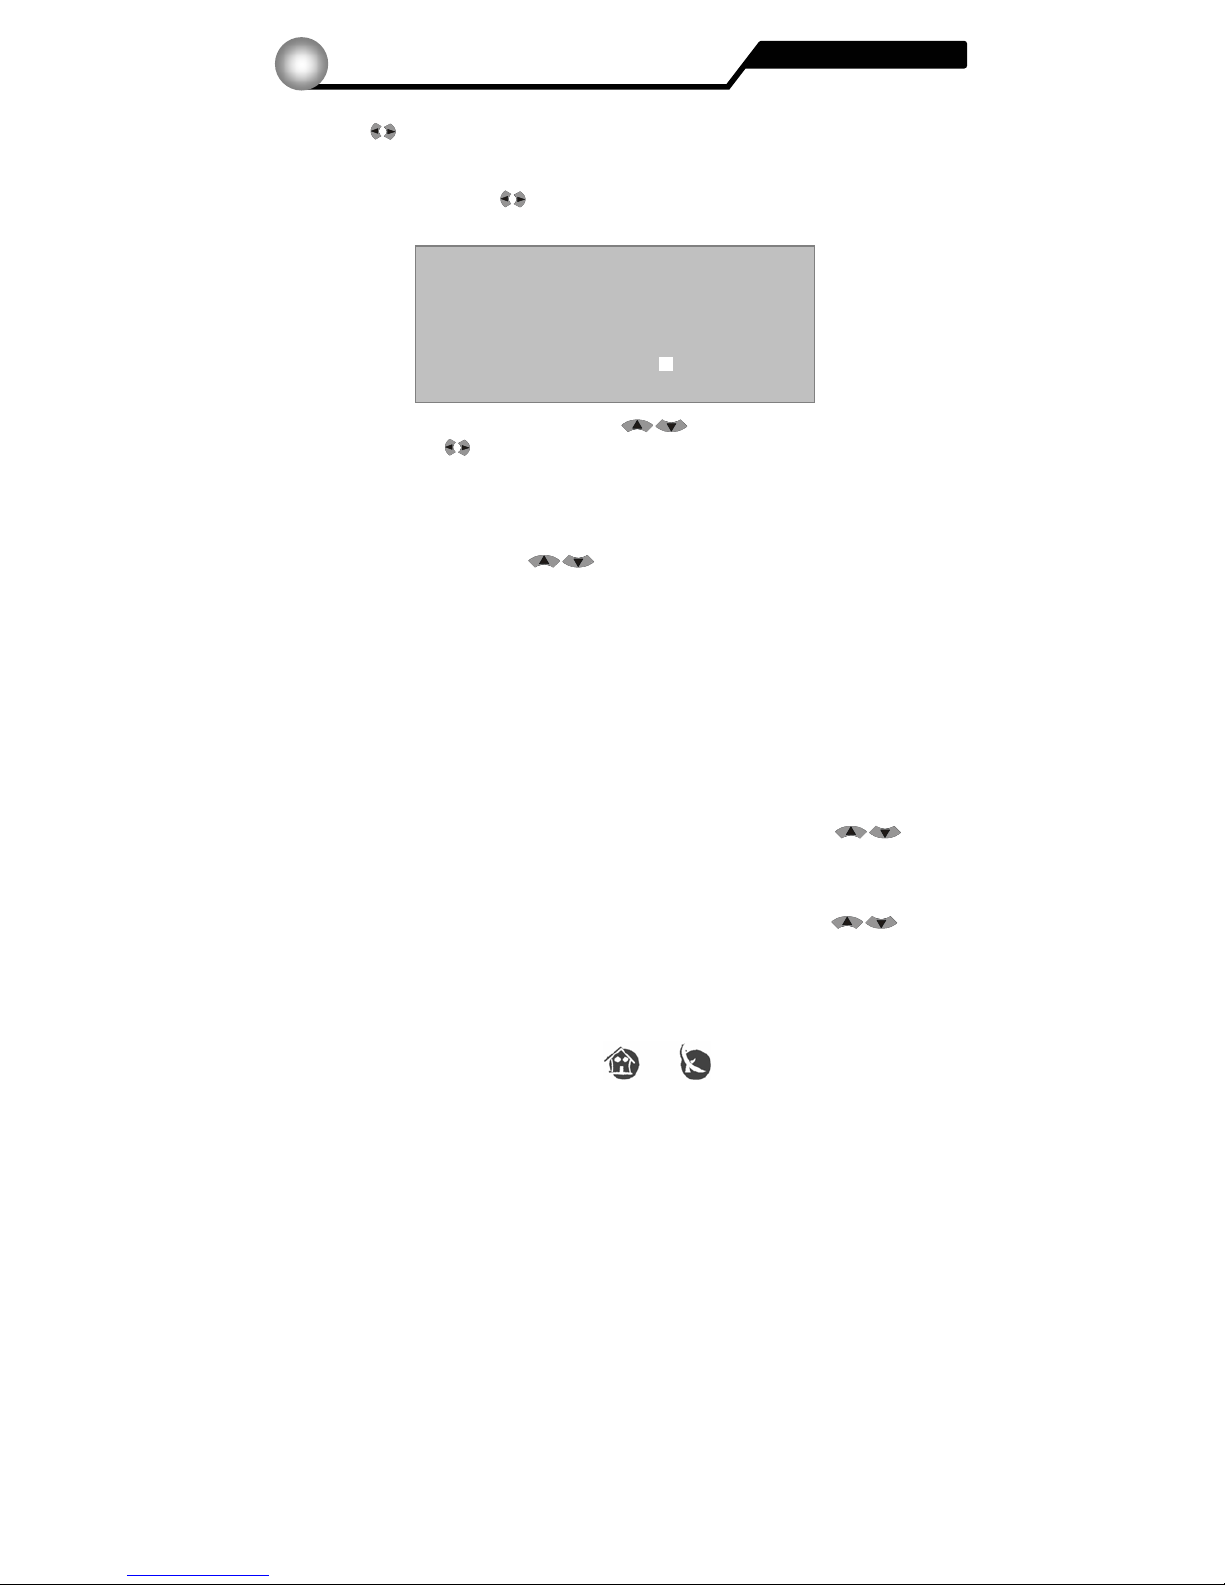
Timer: Add
Select this option with the
VOL buttons and press OK.
Move up and down into the menu with the
CH buttons, and change the values
of the options with
VOL ones or with the keypad 0-9 buttons.
To save your selections, press OK. If you want to break off, press EXIT.
Source: Select this option if you want a TV or Radio channel.
Channel: With the
CH buttons choose a program. Confirm your
selection by pressing the OK button.
Start Date: Write the Start Date with 0-9 buttons.
Start Time: Write the Start Time with 0-9 buttons.
Stop Date: Write the Stop Date with 0-9 buttons.
Stop Time: Write the Stop Time with 0-9 buttons.
Timer: Edit
Select this option if you want to modify an existing event. Do it with the
CH
buttons and then press OK. The menu is the same that Add.
Timer: Delete
Select this option if you want to delete an existing event. Do it with the
CH
buttons. The event will be deleted by pressing the OK button.
Source TV
Channel ProSieben
Start Date 01/12 (DD/MM)
Start Time 17:00 (HH/MM)
Stop Date 01/12 (DD/MM)
Stop Time 17:59 (HH/MM)
Rpt 1x
Only one Time
Timer
Basic operations
5.3
Page 19
19 Version 1.0 © FTEmaximal
ZOOM
Press the Zoom button on the remote control to get a picture-zooming function.
When you press the Zoom button, a magnifier icon will appear on the centre of the
screen.
You can move the magnifier position over the screen using the
CH and
VOL buttons.
The first zooming-stage (2x) is activated by pressing the OK button. One further zooming
stage (4x) can be achieved by pressing a second time the OK button. If you press again
the OK button the picture on the screen will be brought back to the original size.
Press the EXIT button to leave the picture zooming function.
PAUSE
Press the Pause button on the remote control to freeze the image on the screen.
Pressing again will bring back the normal image status.
You can combine the Pause and ZOOM functions.
INFO
The info menu displays relevant information about the currently selected program.
Press the INFO button and you will see the following window:
Here you can see all the information about the
program you watch (frequency, signal quality,
strenght, etc).
TV PRO Sieben
MUX 44
Frequency 658000
Mode 8K
Guard 1/8
IQInvert Normal
VID PID 385 AUD PID 386
PCR PID 385 TEL PID 387
Quality 93%
Strength 73%
Zoom / Pause / Info
Basic operations
5.4
Page 20
20 Version 1.0 © FTEmaximal
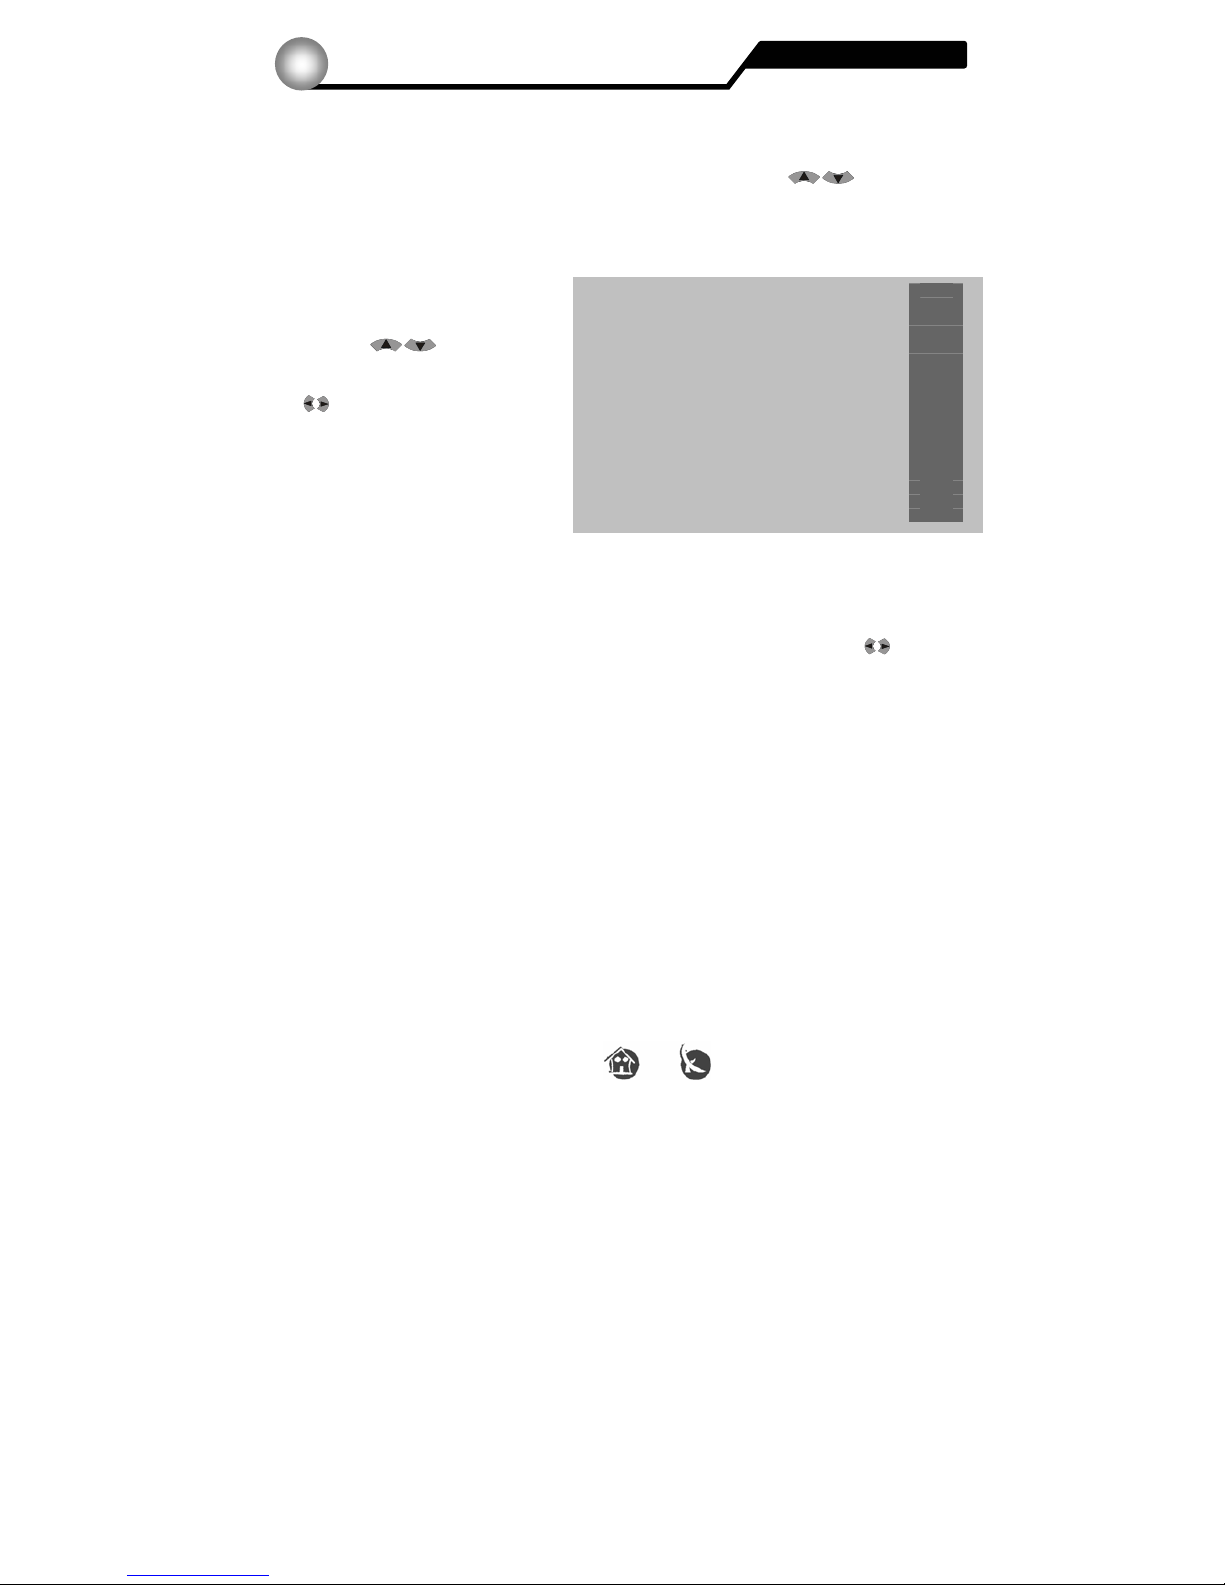
Calendar
Your new receiver makes available an "eternal" calendar to you.
To open it, press the MENU button and choose System with the
CH buttons in
the Main menu.
Choose now the Calendar menu item and press again the OK button.
It appears the following window:
With the
CH buttons you
can change the year and with the
VOL buttons the month.
Audio menu
Press the AUDIO button on the remote control to change the audio mode for a program.
The following window will appear:
Audio menu: Audio
If the program provides different languages you can change these with the
VOL
buttons.
Audio menu: Mode
You can choose the audio mode available.
Audio menu: When stereo
Into this option you can select during a Stereo-program if you want just the left or right
channel or the full stereo.
Audio menu: When Dual
Select here whether to hear left or right channel during a dual program.
Calendar / Audio
Basic operations
5.5
Month: Dezember Year: 2003
Mon Tue Wen Thu Fri Sat
Sun
01 02 03 04 05 06
07
08 09 10 11 12 13
14
15 16 17 18 19 20
21
22 23 24 25 26 27
28
29 30 31
Page 21
21 Version 1.0 © FTEmaximal
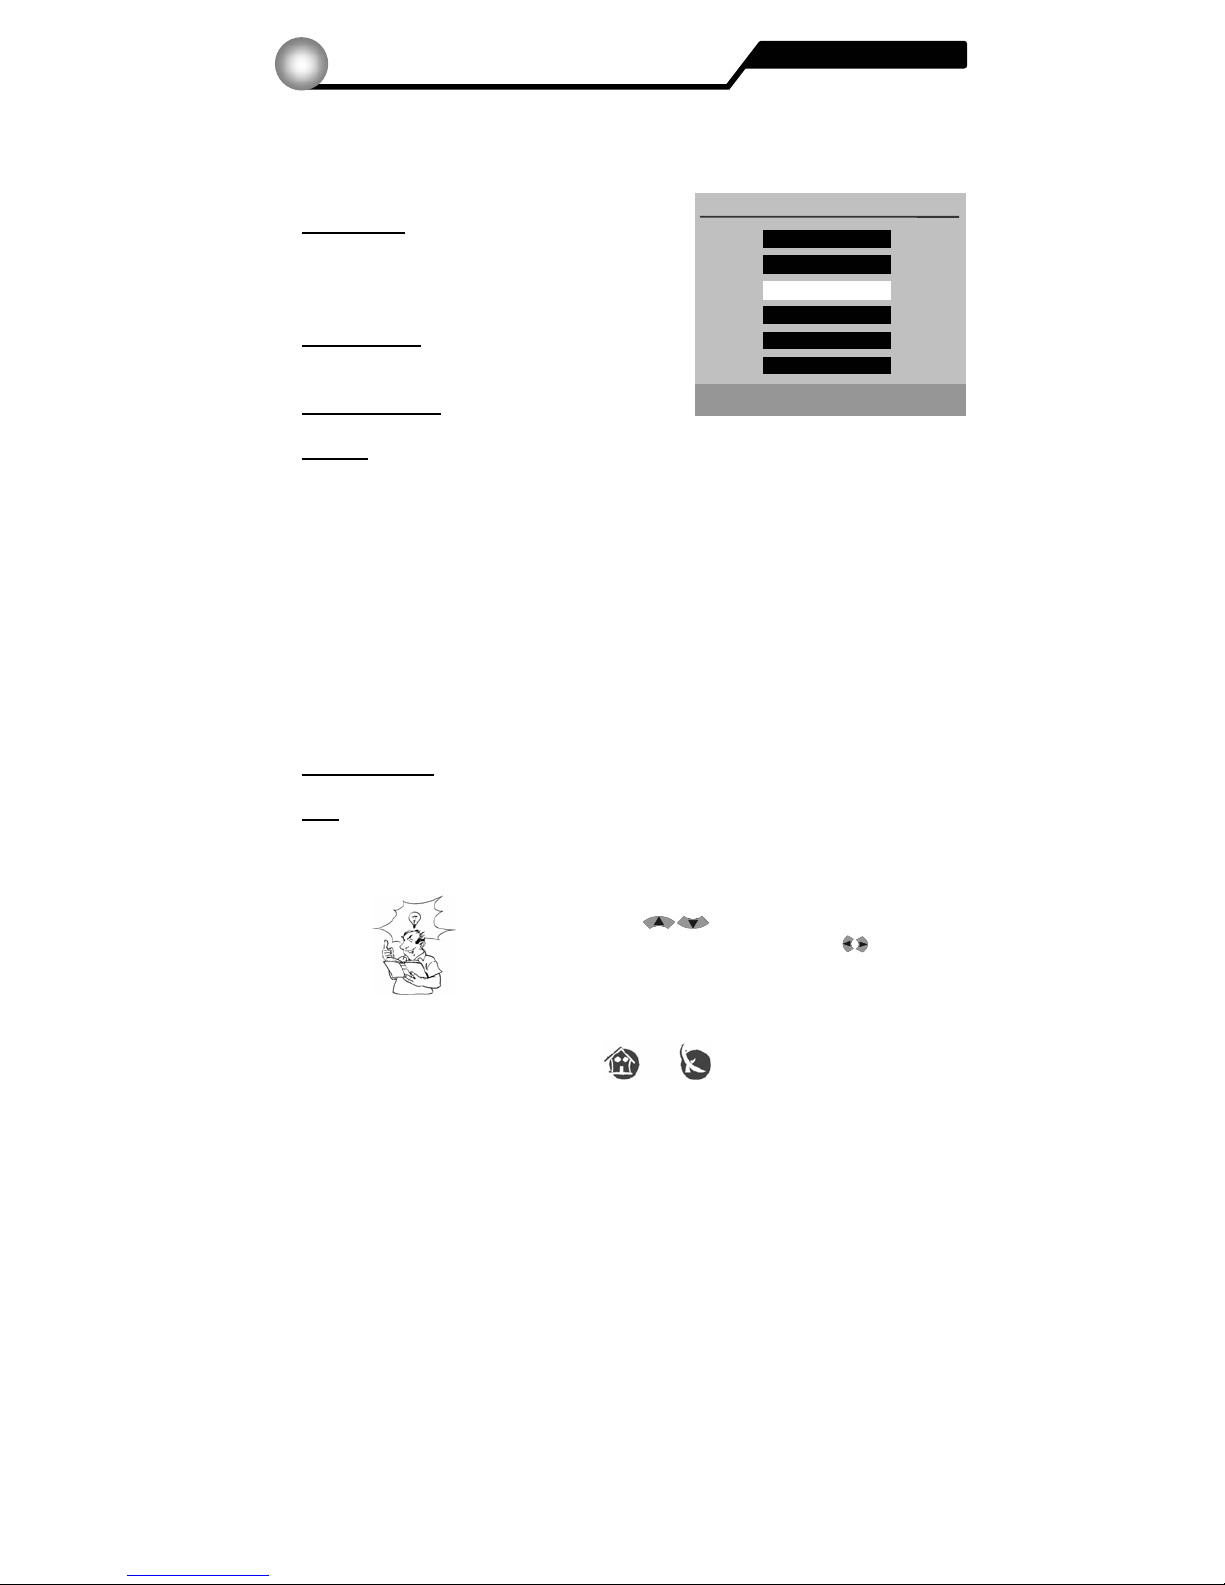
To display the main menu press the MENU button on the remote control.
The menu system of the receiver is organized in a tree fashion. With the Main menu you
can reach the following items:
TV Channels
This menu allows you to access, edit, move,
delete or lock a program. It also lets you add
favourite channels to one of the favourite channels
lists.
Radio Channel
This menu has the same functions as TV
Channels, but is only for Radio programs.
Installation Menu
Here you install and search the programs.
System:
The system menu has the following items:
System Setting
RF-System, TV-Screen format, TV-System, Time zone.
Timer
Record timer configuration.
Calendar
Display an eternal calendar.
Factory Default
System reset with the factory default values.
User Save & Load
Load and store the user settings and program list.
About DVB
Information about the currently loaded software version.
Parental Control
Password protection for menus and programs.
OSD
Changes colours and language in the menus.
How to navigate through the menus:
The navigation through the menus is mainly done
with the
CH buttons for up and down,
while selections are made with the
VOL or OK
buttons.
To leave a menu press the EXIT button.
Main menu
Menus and OSD
6.1
Main Menu
Radio Channels
Installation Menu
System
Parental Control
OSD
TV Channels
Key: ▲▼◄► EXIT OK
Page 22
22 Version 1.0 © FTEmaximal
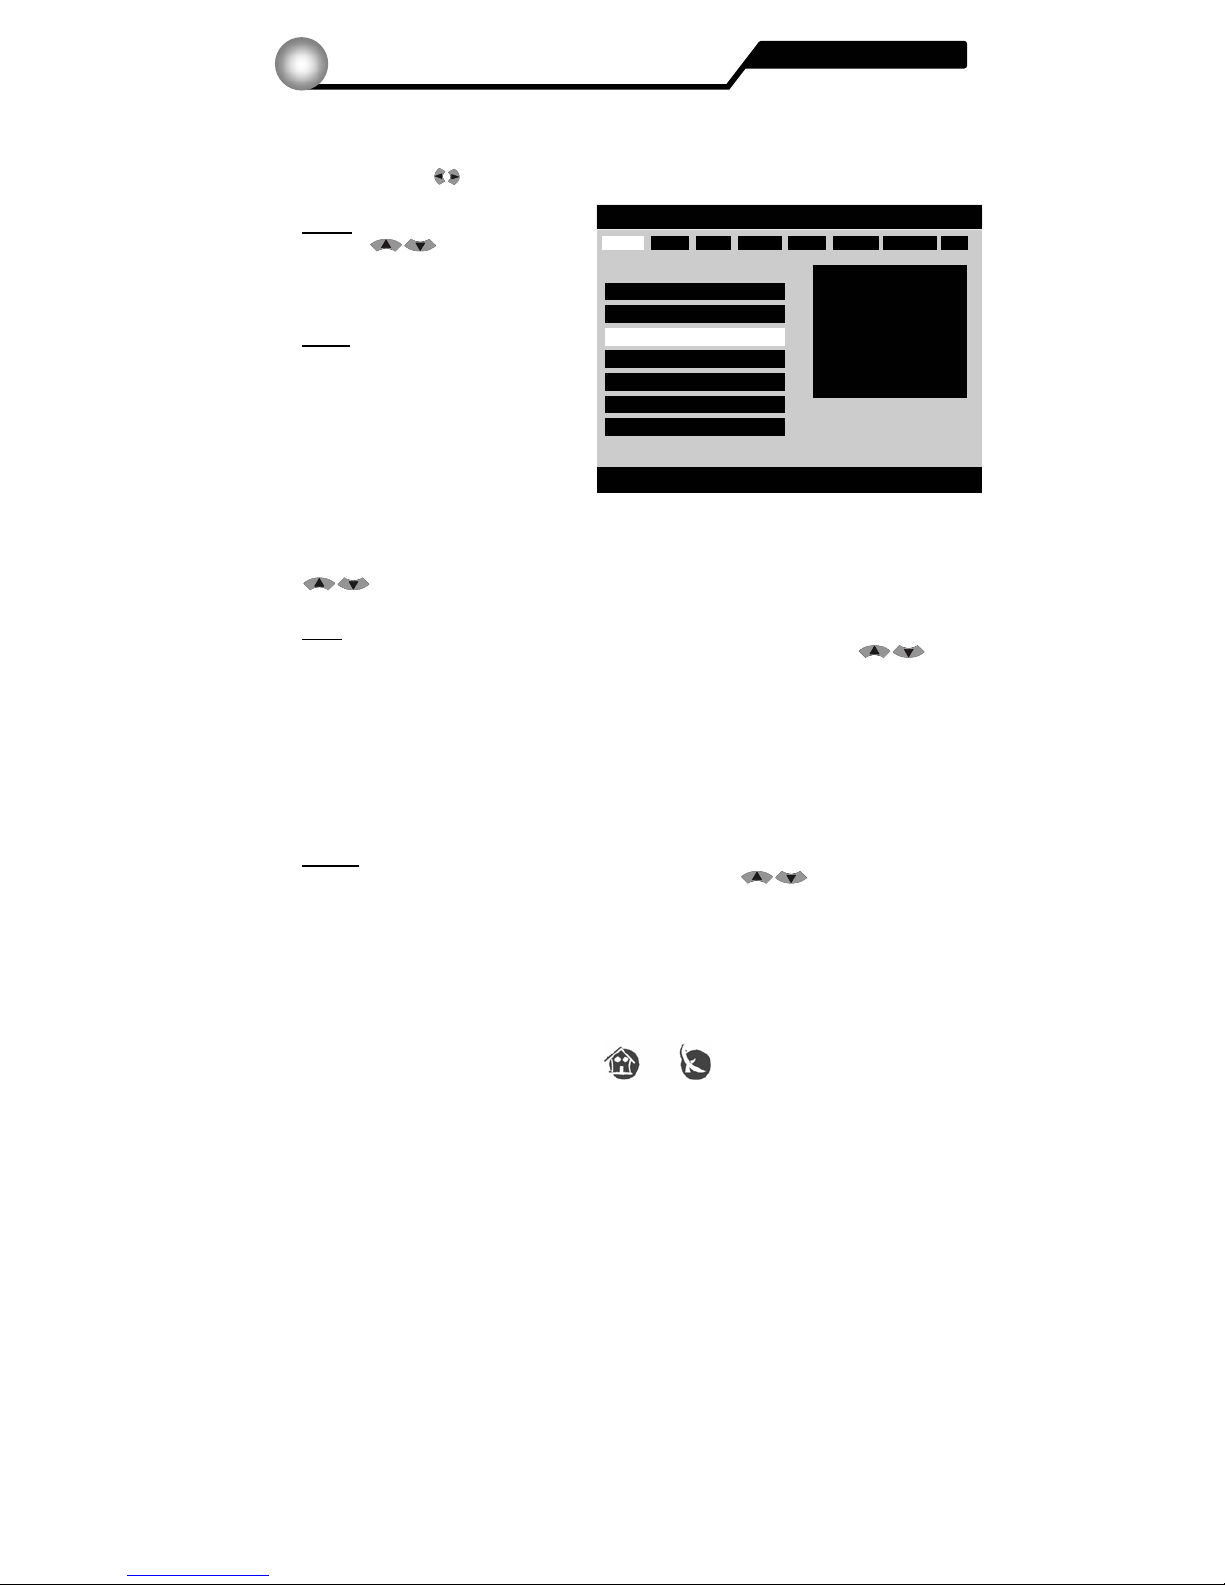
If you wish to edit the stored TV or Radio programs, select TV Channels option in the main
menu. The TV channels and Radio channels menu entries in the main menu are identical.
Choose, with the
VOL buttons, between these functions:
Select
With the
CH buttons
you select the program, and the
receiver automatically switches to it.
FAV 1
With this function selected, you can
add or remove programs from one of
the favourite programs list.
With the FAV+ and FAV- buttons on
your remote control you can change
from the favourite list 1 up to the 8. All
programs included in the selected favourite list are marked with a heart symbol (
).
In order to add or remove programs from the list, highlight the program using the
CH buttons and press the OK button.
Lock
In order to block a program, choose the program you wish to lock with the
CH
buttons and press OK.
The locked programs include a lock symbol (
) .
Caution:
The locking becomes only active if the Parental Control was previously activated in the
Main Menu.
Delete
In order to delete a program, choose the program with the
CH buttons and
press OK.
The program to be deleted will include a cross symbol
(8) .
You can mark several programs to be deleted. They will be deleted as soon as you leave
the TV programs menu.
Select FAV1 Lock Delete Move Modify Rename Sort
TV Channel
TV Channel Total TV channel: 1427
0001 Das Erste
F
0002 ZDF
F
0003 ProSieben
F
0004 RTL
F
0005 RTL2
F
0006 SAT.1
F
0007 Super RTL
F
NO. Name
Status
Select a Channel to play
Key ▲▼◄►EXIT OK PGUP PGDN
TV and Radio channels
Menus and OSD
6.2
Page 23
23 Version 1.0 © FTEmaximal
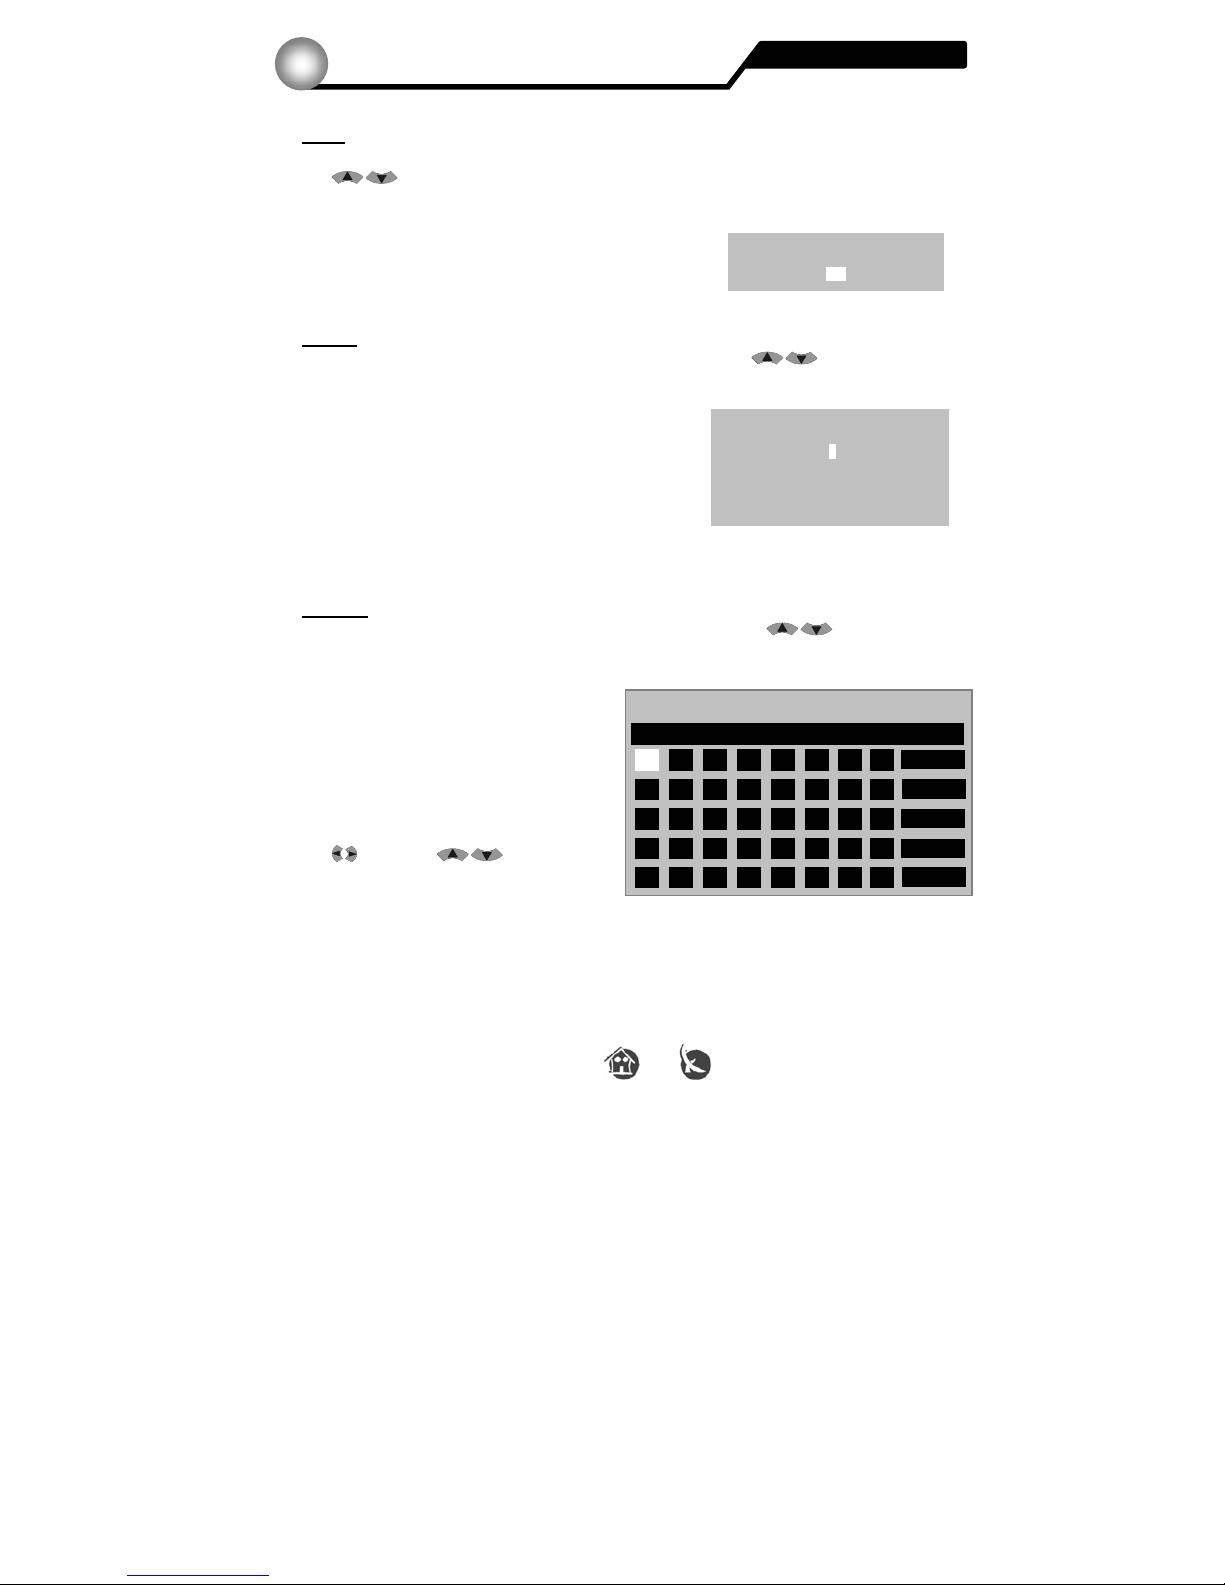
Move
In order to move a program within the program list, choose the program to be moved with
the
CH buttons.
Select the new location for the program in the pop up
window and press the OK button.
Press EXIT to cancel.
Modify
To change the information for a program, choose it with the
CH buttons and
press OK.
Select the parameters to be changed, and enter the
new values with the number buttons of the remote
control. Press OK to save the changes or EXIT to
cancel.
Caution:
Usually no changes are necessary here.
Rename
In order to change the name of a program, choose it with the
CH buttons and
press OK.
The current name of the program stands
on the upper line.
In the second line you can change the
existing name.
Choose now the individual characters with
the
VOL and CH buttons
and press OK to write each one of them.
With the Caps Off option you can switch between under case and uppercase characters
and other additional characters.
With the Extend option you also get additional characters. A total of 15 can be employed.
Modify PID
Video PID 0255 (0—8191)
Audio PID 0256 (0—8191)
PCR PID 0255 (0—8191)
Tele PID 0032 (0—8191)
[ 7 ProSieben ] Move to
020
ProSieben
A
I
Extend
Q
Y
J
R
Z
B
K
S
C
L
T
-
D
M
U
#
E
N
V
&
F
O
W
0
G
Caps Off
2 3 4 5 6 7 8
ProSieben
P
X
1
H
9
Back
OK
Chancel
TV and Radio channels
Menus and OSD
6.2
Page 24
24 Version 1.0 © FTEmaximal
Sort
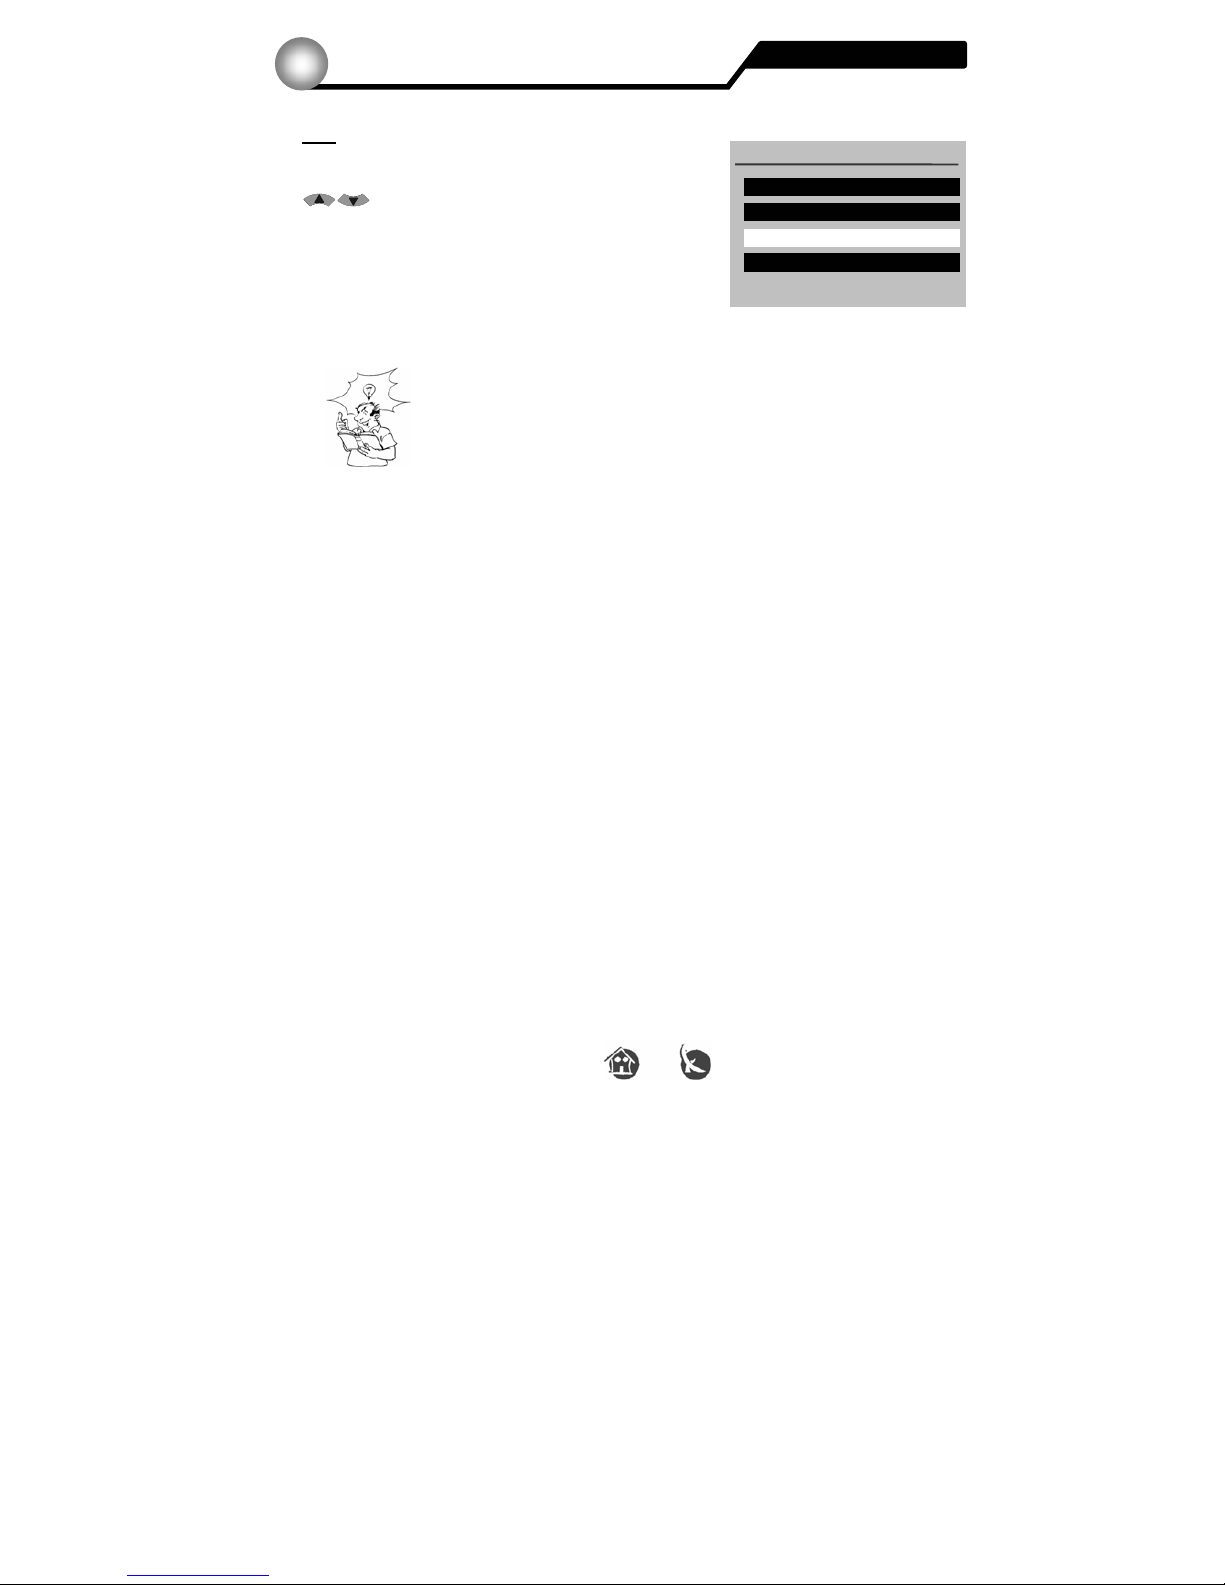
If you want to sort your programs accordind to various
criteria, select the wished sorting method with the
CH buttons and press OK.
The program list will be newly built up.
Caution:
You can not undo the sorting, except if you load the pre-installed
programs.
You can sort your programs in several ways.
Sort Menu
Sort by Multiplex
Sort by Favourite
Sort by Alphabet
Sort by FTA
TV and Radio channels
Menus and OSD
6.2
Page 25
25 Version 1.0 © FTEmaximal
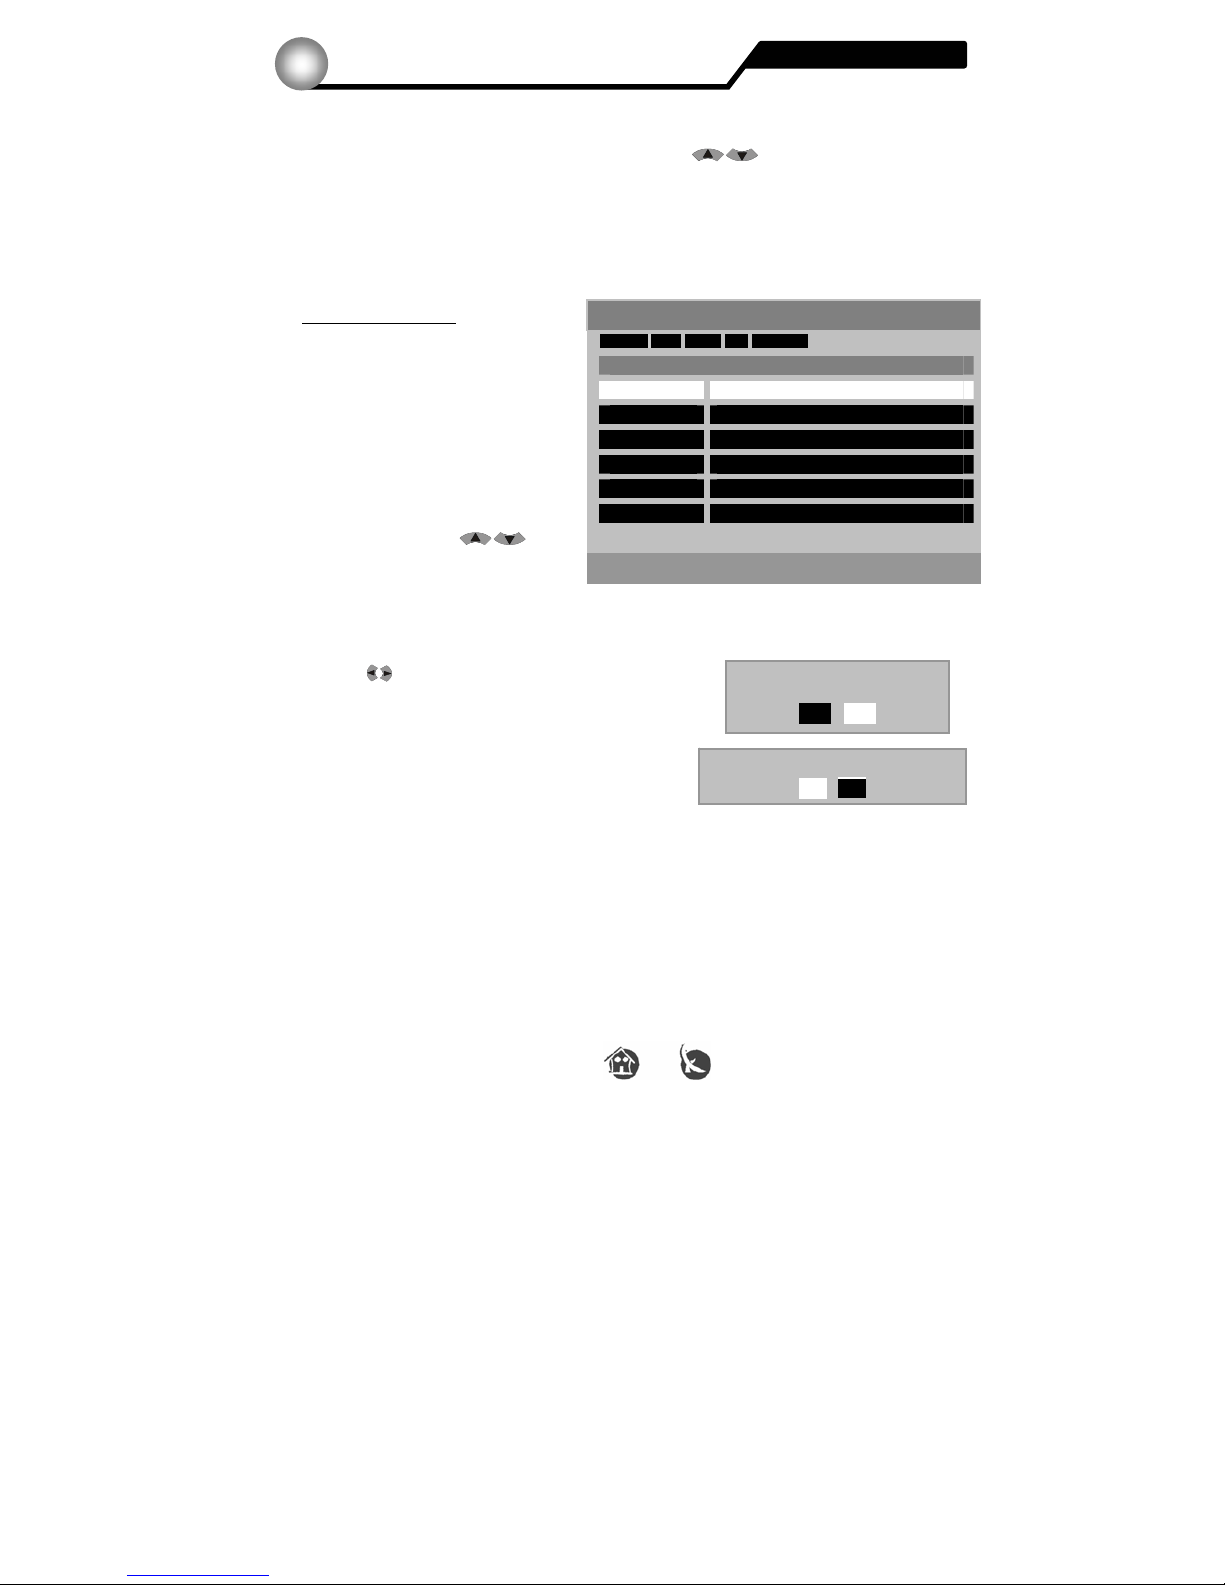
To open the Installation menu (Multiplex List) press the MENU button and choose the
Installation menu entry in the Main menu with the
CH buttons.
Press now OK and the Multiplex List will appear.
Inside the Multiplex List you can find the information for signals stored. The receiver
needs it to find programs.
Search / Search All
With these options you can search
for programs. The difference is that
with Search you scan only one
frequency and with Search All you
scan the complete list.
If you want to start a scan, select
the option you prefer (Search or
Search All) with the
CH
buttons and press OK.
Select now if you want that the receiver deletes all the existing programs before searching
into the chosen transponder or not.
Use the
VOL buttons to do it and then press OK.
Go out with the EXIT button.
Choose now if you want that the receiver store
free programs (FTA) or all founded programs.
The receiver searches now for programs (Go to page 15 of this manual if you want more
information about this topic).
After the searching is finished, press any button.
Search Edit Signal PID SearchAll
MUX Frequency Mode Guard Bandwidth
5 177500 Auto Auto 7M
6 184500 Auto Auto 7M
7 191500 Auto Auto 7M
8 198500 Auto Auto 7M
9 205500 Auto Auto 7M
10 212500 Auto Auto 7M
Search one multiplex channels
Key: ▲ ▼ ◄ ► EXIT OK PGUP PGDN
Multiplex List
Only FTA channels search?
Yes
No
Delete the existing programs
before searching?
Yes
No
Installation Menu
Menus and OSD
6.3
Page 26
26 Version 1.0 © FTEmaximal
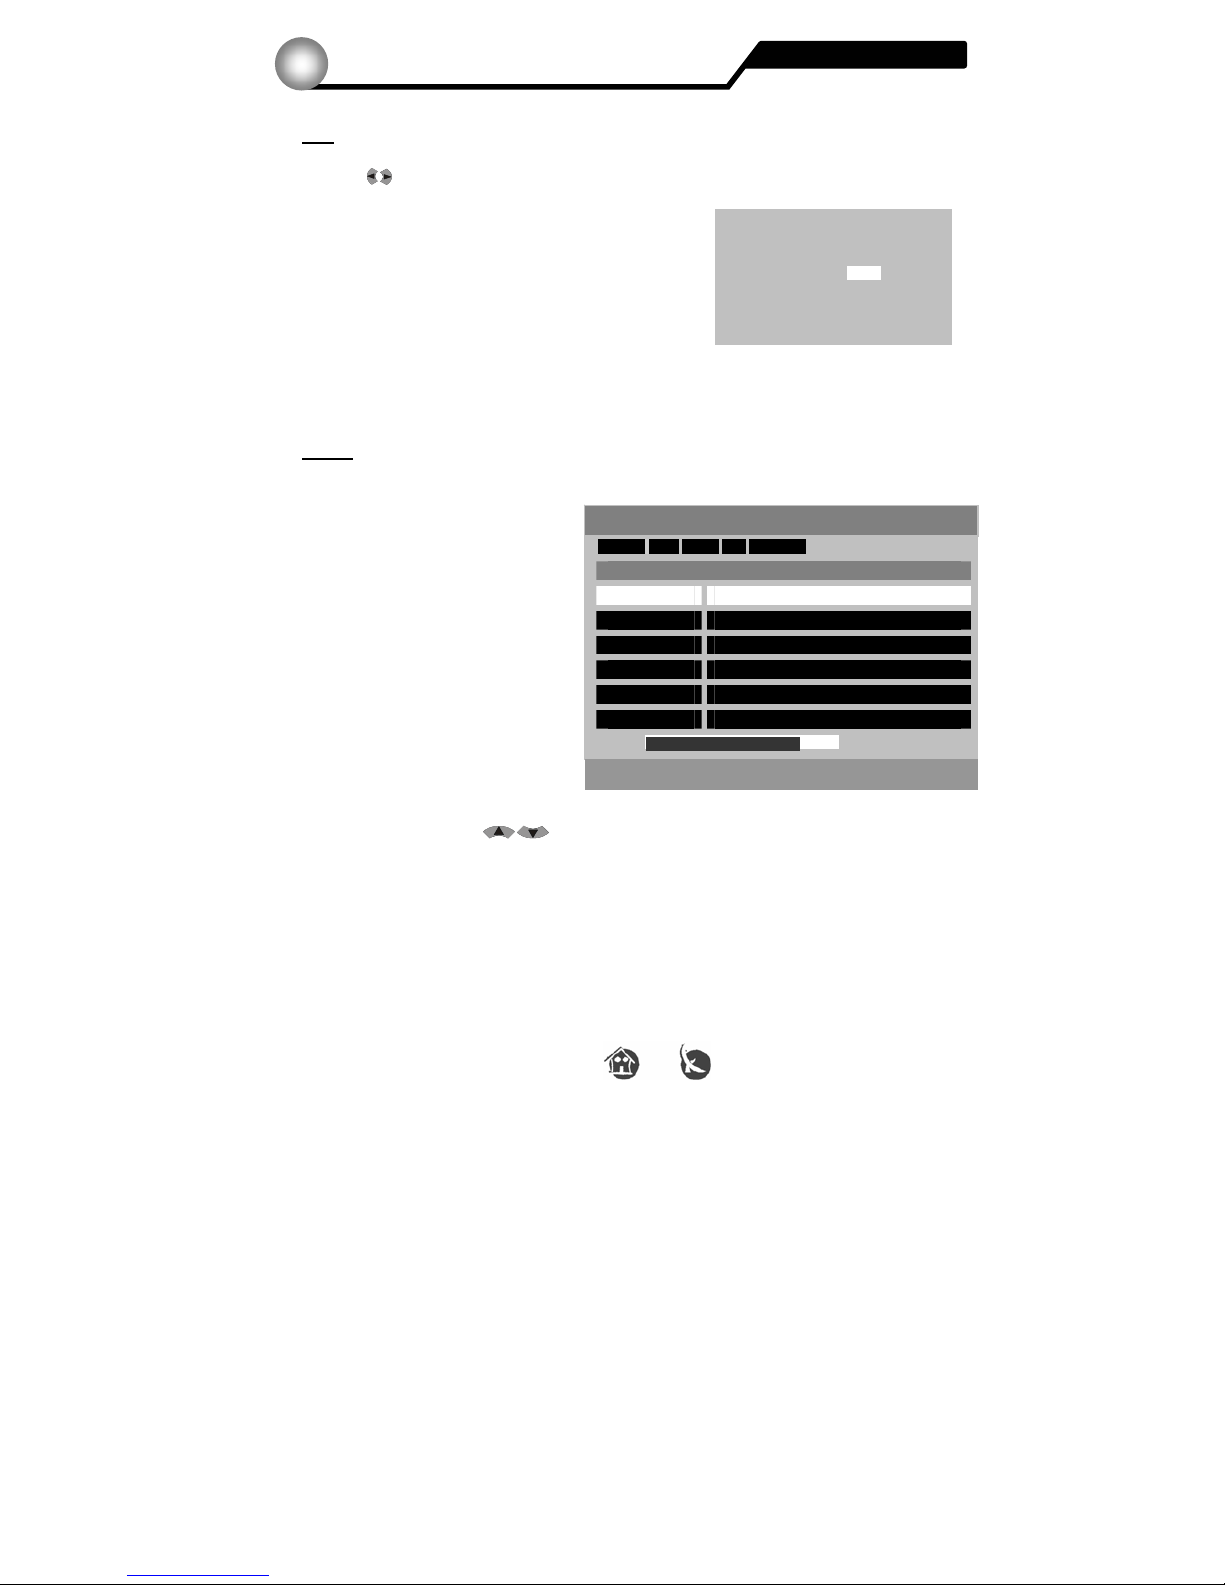
Edit
With the Edit function you can change the values of a transponder. Choose this option
with the
VOL buttons and open this menu with OK.
The following submenu appears.
Insert now all necessary information with the
remote control.
If you are ready, press the OK button and the new
values will be saved.
Go out by pressing EXIT.
Signal
With the Signal option you can see the level of the channels.
Choose a MUX with the
CH buttons and press OK. If you want to check another
one, just choose it and press the OK button again.
Edit Multiplex
MUX 21
Frequency 17750
Mode Auto
Guard Auto
B/W 7M
Search Edit Signal PID SearchAll
MUX Frequency Mode Guard Bandwidth
5 177500 Auto Auto 7M
6 184500 Auto Auto 7M
7 191500 Auto Auto 7M
8 198500 Auto Auto 7M
9 205500 Auto Auto 7M
10 212500 Auto Auto 7M
Signal 82%
Key: ▲ ▼ ◄ ► EXIT OK PGUP PGDN
Multiplex List
Installation menu
Menus and OSD
6.3
Page 27
27 Version 1.0 © FTEmaximal
PID
With the PID option you can add a program.
Do it if you have not found the wished program through the Search menu (for example, if
the signal is very weak).
Choose the PID option with the
VOL buttons. Then, select the MUX you want to edit
and press OK. The following submenu appears:
Insert all necessary information with the
remote control. If you are ready, press OK
and the new values will be saved.
The new data entry will be added at the end of
the program list and its name will be TV CH.
To change it use the Rename option inside the TV Channel menu.
Installation menu
Menus and OSD
6.3
Add PID
Video PID 8191 (0—8191)
Audio PID 8191 (0—8191)
PCR PID 8191 (0—8191)
Tele PID 8191 (0—8191)
Page 28
28 Version 1.0 © FTEmaximal
To open the System menu press the MENU button and choose the option (inside the
Main menu) with the
CH buttons.
Then, press OK.
Go back with the EXIT button.
The following fields were described
already at the previous pages of this manual:
Timer menu on page 18 and Calendars
on page 21.
When you have chosen the System Setting
option the following submenu appears:
TV System
Choose which TV system supports your
television.
Select NTSC, PAL or Auto.
In United Kingdom usually is PAL.
Change values with the
VOL buttons.
TV Screen Format
Choose which TV Format have your TV set.
Select 4:3, 16:9 or Auto.
Change values with the
VOL buttons.
You can change the format at any time by pressing the PGDW button.
RF System
If you have combined your TV or video device with the receiver, you must indicate which
TV system use them.
Select M, B/G, I or D/K .
In United Kingdom usually is PAL B/G.
Change values with the
VOL buttons.
System Menu
Timer
Calendar
Factory Default
User Save&Load
System Setting
Key: ▲ ▼ ◄ ► EXIT OK
About DVB
System Setting
TV System ► AUTO ◄
TV Screen Format ►AUTO ◄
RF Channel 21 (21-69)
RF System Pal B/G
Time Zone GMT+ 02
Remote Control Switch Position 2
Scart Output FBAS
Key: ▲▼◄►EXIT OK
S
y
stem menu
Menus and OSD
6.4
Page 29
29 Version 1.0 © FTEmaximal
RF Channel
Choose which initial channel will occupy the built-in modulator.
This is only important if you want to connect the receptor to an existing TV network.
Select one channel from 21 to 69.
Change the data with
VOL buttons or through the numeric ones of the remote
control.
Time Zone
The receiver have to know the precise time for the EPG (Electronic Program Guide).
That’s why you have to specify the time zone where you are in.
For example, in Spain is valid:
Summer time = GMT + 02
Winter time = GMT + 01
Please consider it and change the winter and summer time if it is necessary. Do it with the
VOL buttons.
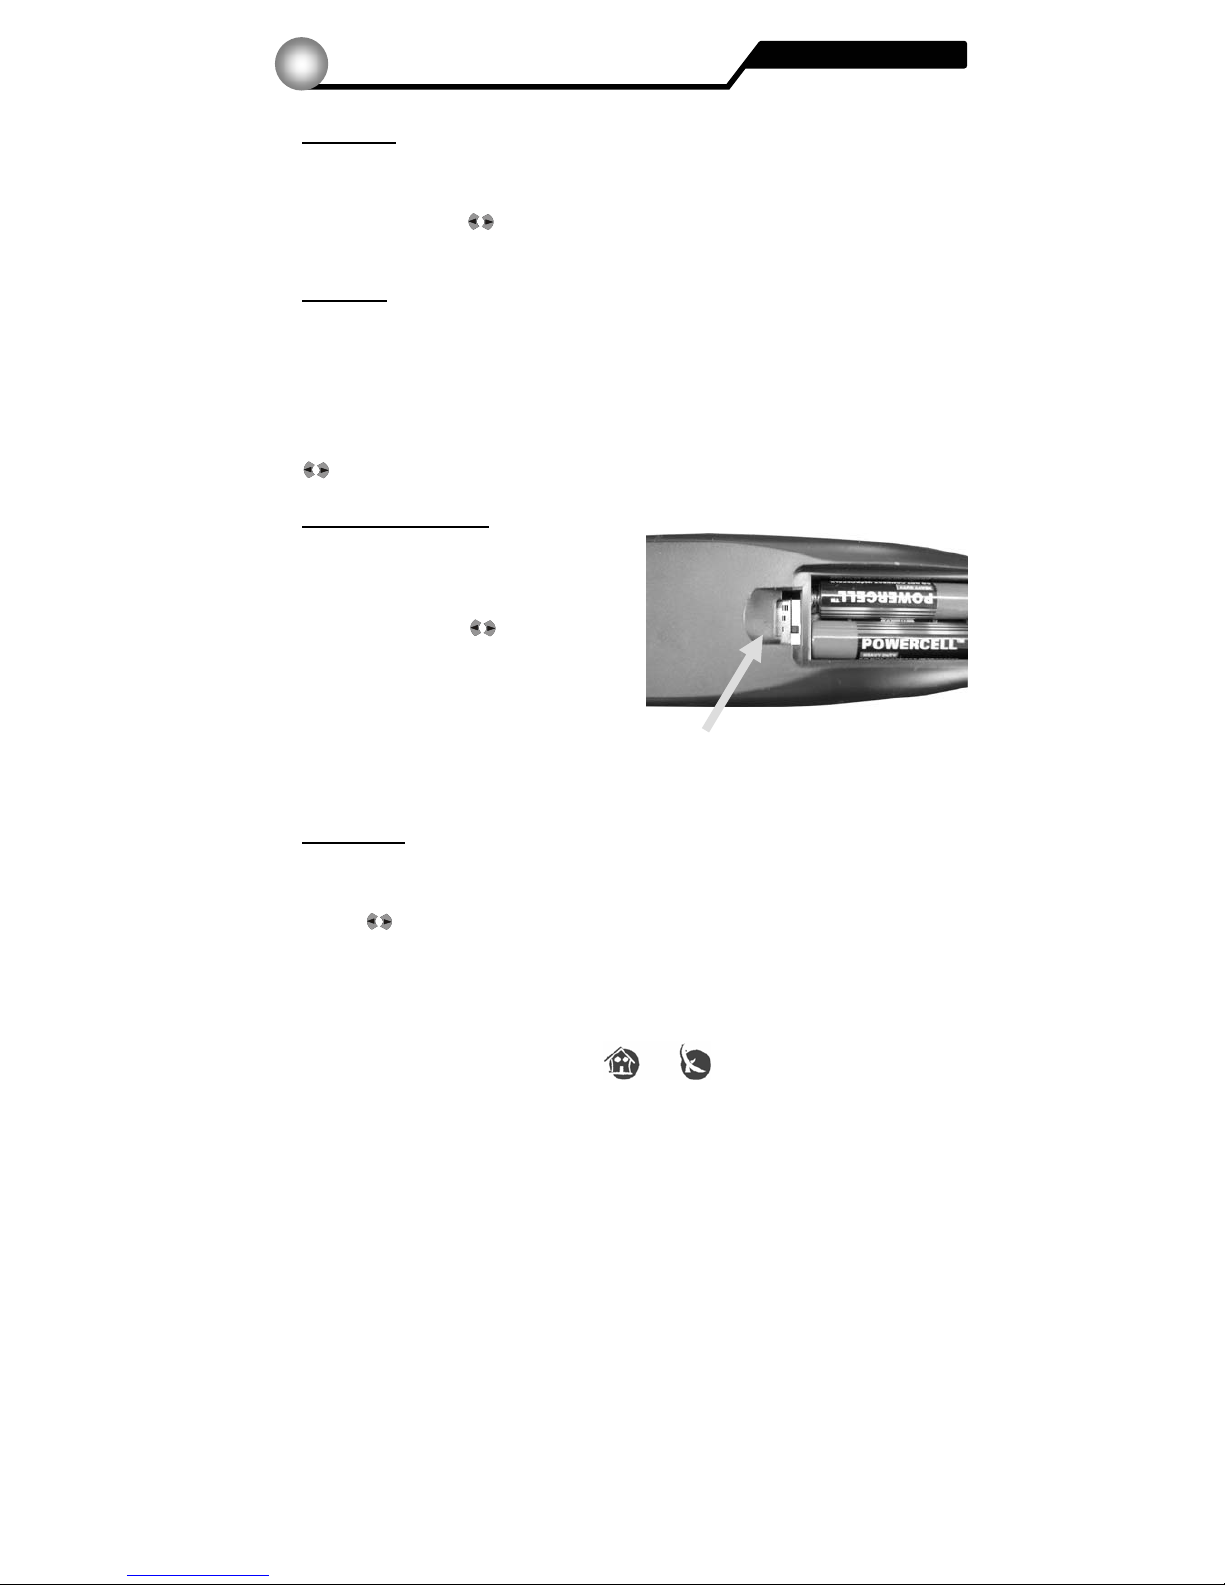
Remote Control Switch
In order to avoid interferences between
remote controls, you have the possibility
to change the code of yours.
You can do it with the
VOL buttons.
Remind that you will have to change the
position of the switch in the battery holder
of the remote control too.
Switch in remote control
If you have changed the code of the remote control,
a security message will appear in the menu.
Scart Output
If you want to have an optimal quality image, use the RGB option, because the colors are
transmitted separately to the TV, the opposite to the CVBS option.
Use the
VOL buttons to select RGB or CVBS.
Press OK when you want to save the changes.
S
y
stem menu
Menus and OSD
6.4
Page 30
30 Version 1.0 © FTEmaximal
The Factory default option (inside the System menu) offers the possibility to erase all
the changes you have made from the original configuration of the receiver.
All dates are extinguished permanently !
To make one factory reset press the MENU button and choose the System menu option
with the
CH buttons.
Choose now Factory default and press OK.
The following message will appear.
If you don’t want to erase all the changes you have made, you still have the possibility to
go back choosing the option NO or pressing the EXIT button.
If you really want a factory reset, press the OK button when you will be over YES.
If after the Factory Default is done there is no configuration changes,
unplug the receiver and repeat the same steps.
S
y
stem menu
Menus and OSD
6.4
FACTORY DEFAULT
If you select <Yes>, all channel data
And settings will be lost.
Do you really want Factory Default?
Yes No
Page 31
31 Version 1.0 © FTEmaximal
To save the programs list, press the MENU button and choose the System menu option
with the
CH buttons. Then press OK.
Choose User Save&Load and press the OK button again.
The menu item User Save&Load in the System menu is very important, because here is
where your data is saved.
Save Prog & Config
When you have personalized the configuration of your receptor, you have the possibility
to memorize the data of your channels. Select the option you want inside the menu item
and press OK.
It will appear a security message and, when you answer YES, all the memorized channels
will be rewrited with the new values.
Load Prog & Config
If you want to rebuild the memorized channels, select this option and press OK.
It will appear a security message. When you answer YES, it will load the memorized
channels list.
User Guide
With the assistant you have the possibility to configure the receptor as at the startup,
except for the modification of the program list.
Select the option you prefer inside the menu and press OK.
When you arrive here, follow the steps described on page 12.
User Save&Load
Save Prog & Config
Load Prog & Config
User Guide
Key: ▲ ▼ ◄ ► EXIT OK
S
y
stem menu
Menus and OSD
6.4
Page 32
32 Version 1.0 © FTEmaximal
If you want to know which is the software that is installed in your receiver, go to System
menu – About DVB.
To open the System menu press the
MENU button and choose, inside the Main menu,
the System menu option with the
CH
buttons.
Then, press OK.
Select now About DVB with
the CH
buttons and press OK again.
The current version of software 5.0.3, from April 27th 2004.
To leave the menu press the EXIT button.
System Info
Company FTE maximal
Model IRD 420T/SM
Software 5.0.3
Software Last update 27 Apr. 2004
Hardware Tst16b70TSam9251Mv2170B
Loader 1.1.0
www.FTEmaximal.com
System Menu
Timer
Calendar
Factory Default
User Save&Load
System Setting
Key: ▲ ▼ ◄ ► EXIT OK
About DVB
S
y
stem menu
Menus and OSD
6.4
Page 33
33 Version 1.0 © FTEmaximal
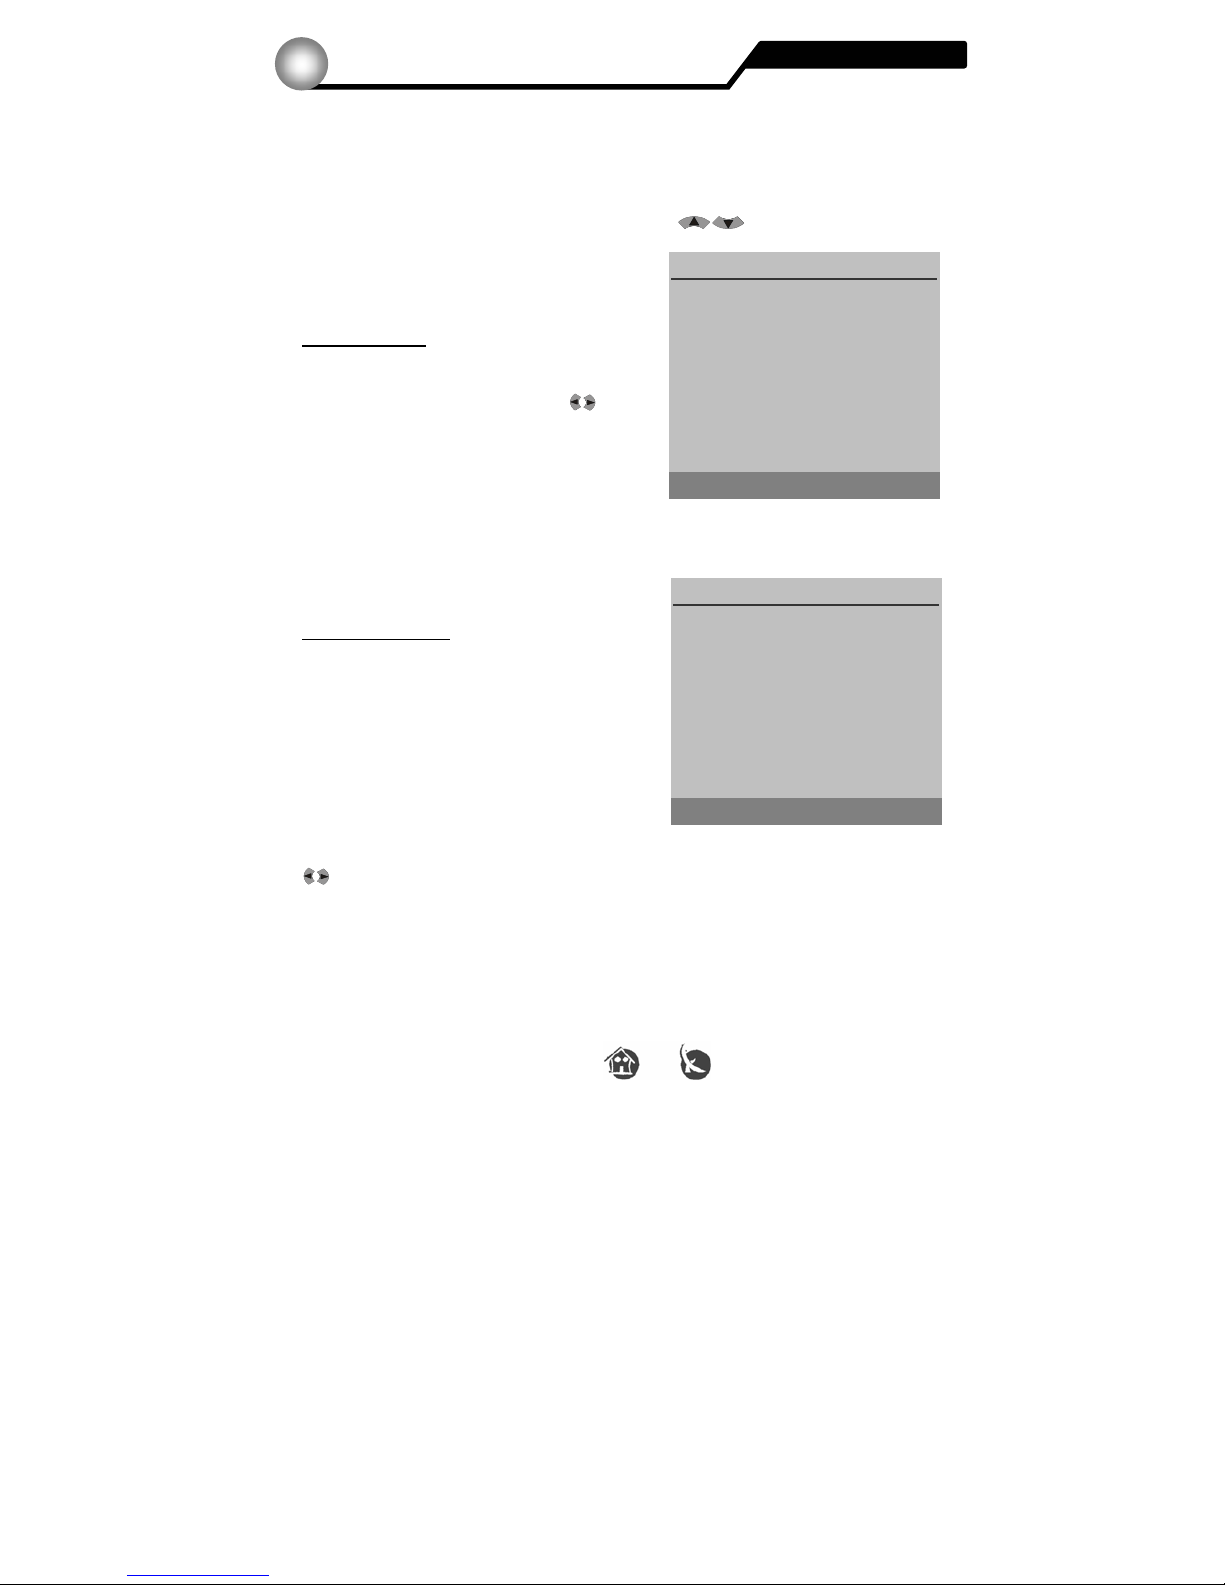
If you want to lock the access to some channels of the receiver, activate the password
protection in the Parental Control menu.
To open the menu Parental Control press the MENU button and choose, inside the
Main menu, the Parental Control option with the
CH buttons. Then press OK.
If it is the first time you open this menu, it will
look like this one:
Password Lock
It activates or deactivates the complete
password protection.
Change the value to <On> with the
VOL
buttons.
At this point all fields will be visible and you will
be able to activate them.
Edit Channel Lock
Turn to <On> the password protection
to lock some channels.
If you want to lock a program, it must be marked
into the channels list.
If you want more information, please have a
look to page 23 (TV and Radio Channels).
Remember that you have the possibility to change the values to <On> or <Off> with the
VOL buttons.
Parental control
Menus and OSD
6.5
Parental Control
Password Lock ►Off◄
Key: ▲ ▼ ◄ ► EXIT OK
Parental Control
Password Lock ►On◄
Edit Channel Lock Off
Installation Lock Off
Change password Off
Key: ▲ ▼ ◄ ► EXIT OK
Page 34
34 Version 1.0 © FTEmaximal
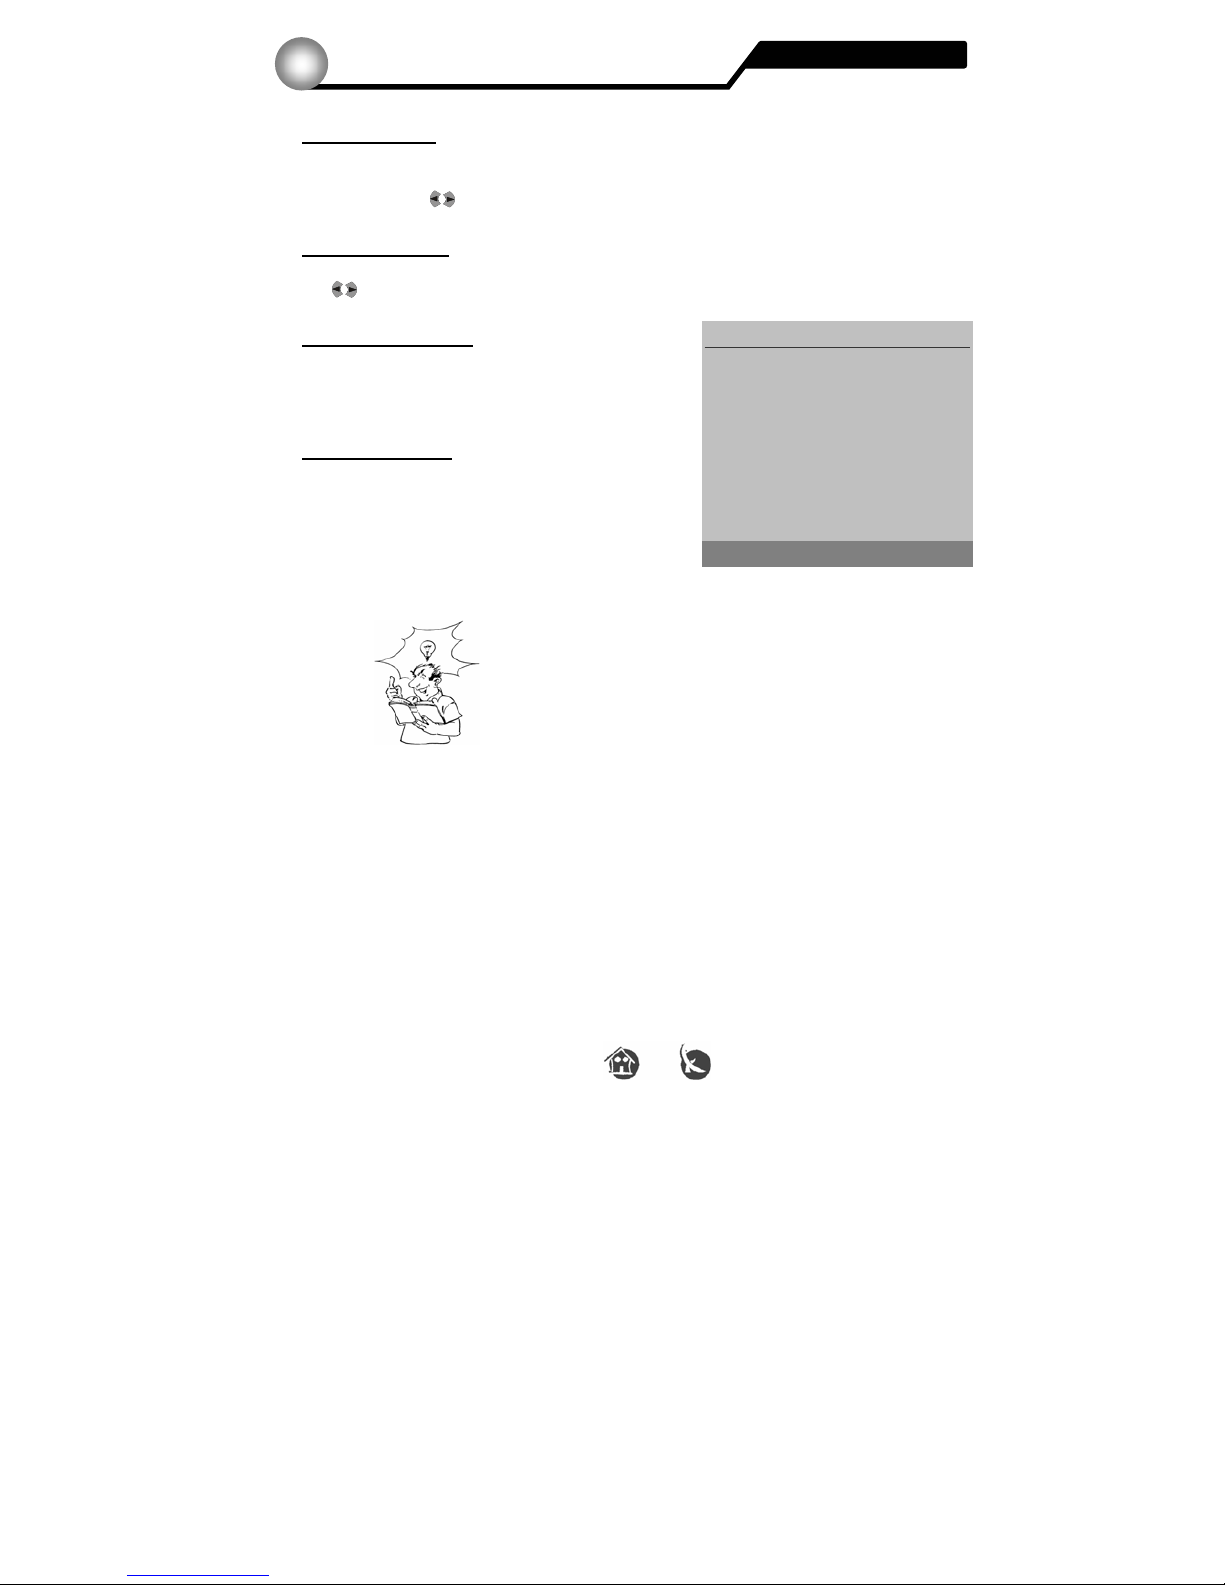
Installation Lock
Turn on the password protection for the Installation menu.
To do it, use the
VOL buttons.
Change Password
When you want to change the existing password (0000), turn on the value to <On> with
the
VOL buttons.
Insert New Password
Now that all the fields are visible for the introduction
of the new password, enter 4 digits with the numeric
buttons on the remote control.
Confirm Password
You must rewrite the password one more time in
order to check that you have introduced it correctly.
The default password is 0000.
If you forgot yours, use the master one (1976).
Parental Control
Password Lock ►On◄
Edit Channel Lock Off
Installation Lock Off
Change password On
Insert new passwort -------
Confirm password -------
Key: ▲ ▼ ◄ ► EXIT OK
Parental control
Menus and OSD
6.5
Page 35
35 Version 1.0 © FTEmaximal
If you want to change the language of the OSD display, the colour of the menu or the
transparency factor of your receiver, go to the OSD Setting menu.
Press the MENU button and choose, inside the Main menu, the OSD option with the
CH buttons.
Then, press OK.
Menu Language
Select here your favourite menu language with the
VOL buttons.
Audio Language
Select here your favourite audio language with the
VOL buttons.
Menu Color
Choose your favourite colour profile with the
VOL buttons.
Transparency
Enter the level of transparency for OSD when it is superposed to the image of the screen.
You can do it with the
VOL buttons.
Background
Indicate if you want to watch a picture in the background of the screen when there are no
image (for example, radio channels).
You can turn On/Off this value with the
VOL buttons.
If you want to leave the menu, press EXIT.
OSD Setting
Menu Language
►English◄
Audio Language
English
Menu Color C-01
Transparency 08
Background Enable
Key: ▲ ▼ ◄ ► EXIT OK
OSD
Menus and OSD
6.6
Page 36

36 Version 1.0 © FTEmaximal
In case of problems with the receiver, and before further search, check first that ...
... the receiver’s set up has been carried out accordingly to the instructions of this
manual and that the connections are accurate.
... the satellite antenna conforms to the requirements of the installation, is well
mounted and aligned.
Without these two requisites, the following troubleshooting guide cannot lead to success.
In the case that the problem persists, please refer to your authorized local dealer... He will
help you with pleasure!
The receiver’s leds do not light up, and there is a malfunction ...
a) Is the power plug properly connected?
Check that there is a good contact and that the plug is firmly seated in its socket.
a) Is the main power switch on the receiver’s back in the <On> position?
b) Is the socket / house protection functional?
Connect another device (for example, a radio) to the same socket and check it
works.
d) Is the power cord damaged?
Pull the power plug off the socket under the greatest caution !
Only a specialist may repair this damage !
There is no picture, no audio, or bad quality
a) Check that the combination between the receiver and the TV set and the antenna is
correct. Check the connections to the TV set and to the antenna as well.
b) Is the satellite antenna optimally aligned?
The receiver shows, at the INFO menu, whether the signal level is weak or enough.
Please, refer also to the installation guide of your satellite antenna.
If problems persist, please, ask a specialist.
c) How mucho strong is the DVB-T signal in your zone?
It is possible that you need a bigger antenna.
Ask to your dealer what antenna do you need.
d) Have you pressed the MUTE button?
Please, press this same button in order to restore the audio.
f) Does the picture flicker or colour is gone?
Please, refer to chapter System Menu>System Setting and check the values
corresponding to TV System, RF System and Scart output.
Self hel
p
Troubleshooting
7.1
Page 37

37 Version 1.0 © FTEmaximal
The remote control does not work or works badly, the receiver turns on randomly...
a) Are there any obstacles between the remote control and your Sat-receiver?
b) Have you placed the receiver too far away from you?
Make sure that the distance between the receiver and its remote control does not
exceed eight meters, and that the angle is not wider than 15º.
c) Are the batteries exhausted?
Then, replace the batteries.
Battery Type: AAA UM-4 1,5 V
Caution: Batteries should always be thrown away in specially designated containers,
for their disposal, not in the house waste bin!
d) Does the receiver operate randomly due to another device’s remote control?
This is possible since all remote controls must use the same frequency range.
You can change the transmission code as described in chapter System>System
Setting.
Self hel
p
Troubleshooting
7.1
Page 38
38 Version 1.0 © FTEmaximal
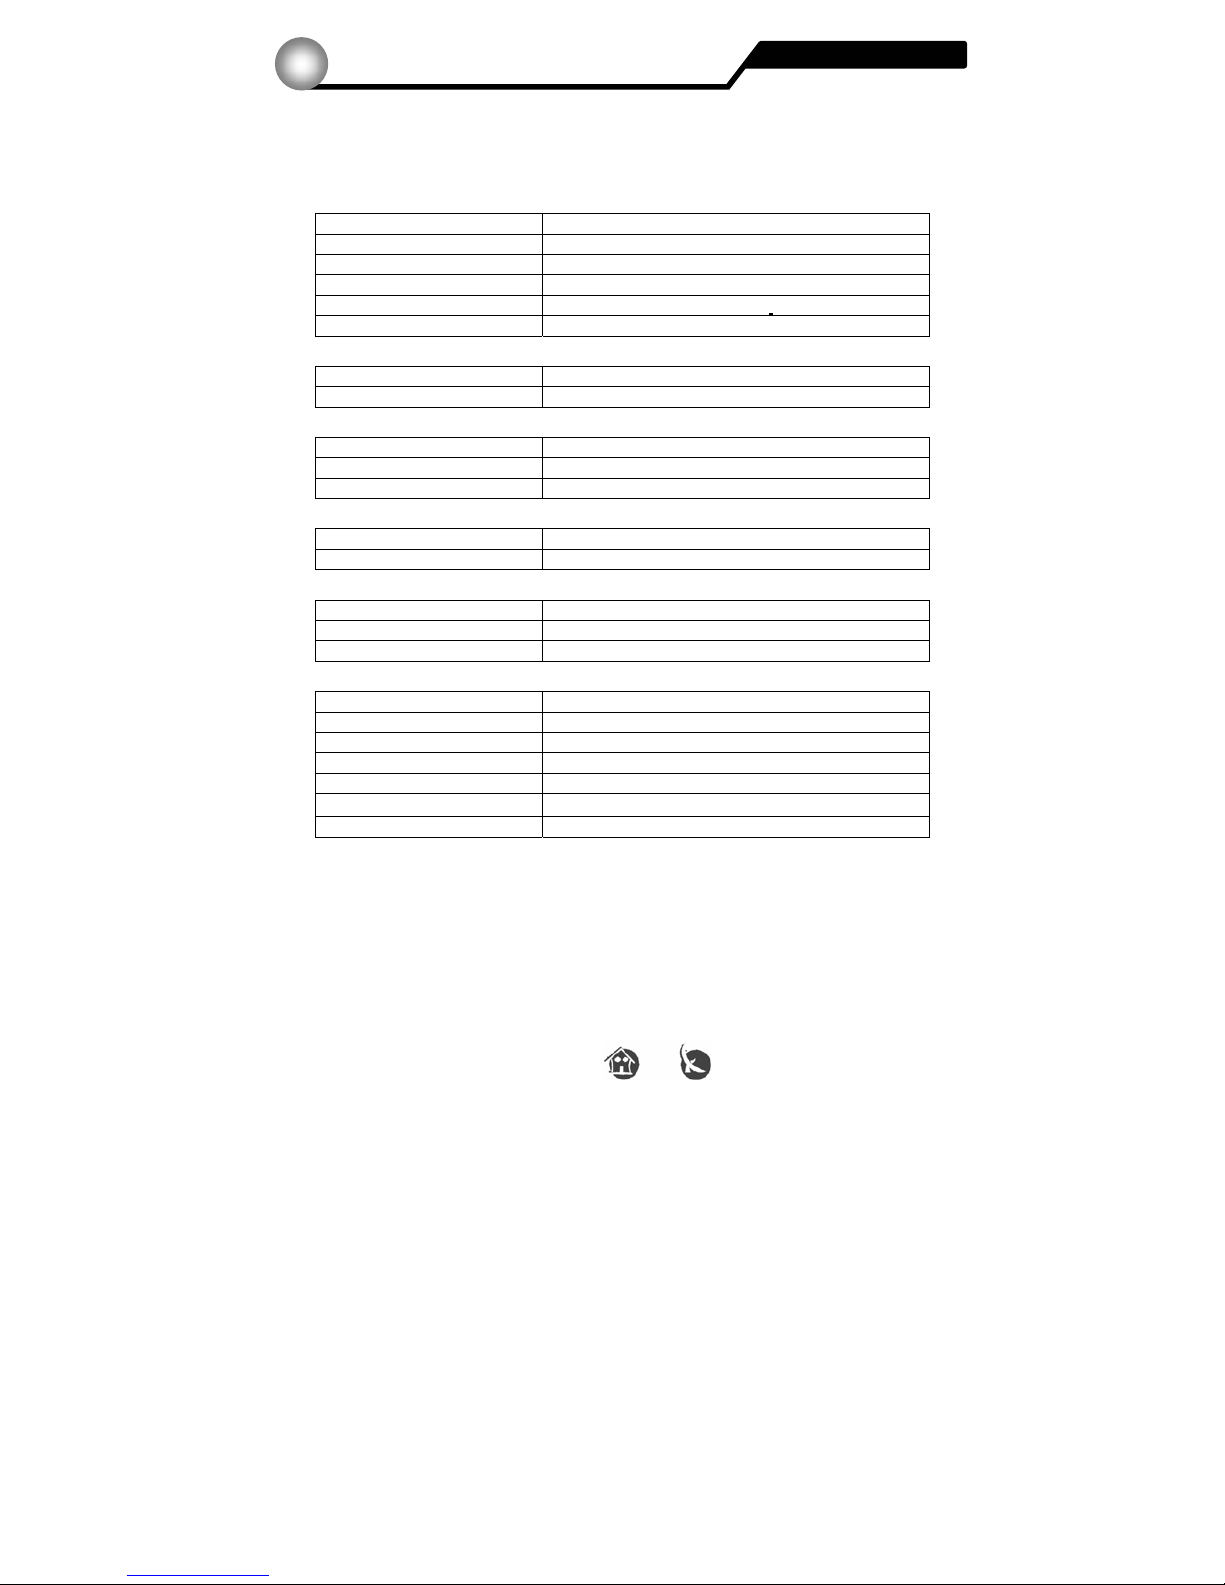
Characteristics receive
r
Technical specifications
8.1
VIDEO
Decoding MPEG-2 & MEPG-1 compatible
Bit Rate Max 15Mbps
Output NTSC/PAL
Screen format 4:3 / 16:9 / Auto
Resolution 720X480 @ 30fps; 720X576 @ 25fps
Connectors Scart or RCA
AUDIO
Decoding MPEG-2/MEPG-1 layer I&II
Sampling rate 32 / 44,1 / 48
DEMODULATION
Demodulation COFDM 2k, 8k
Guard 1/4, 1/8, 1/16, 1/32
Input data rate 5-31
INPUT SIGNAL
Frequency VHF-UHF
Input level -78dBm -20dBm
RF MODULATOR
Output band UHF C21-69
TV Standard PAL BG / I / DK, NTSC M
Output channels 21~69(PAL), 14~83(NTSC)
DIVERS
Memory 5000
Code for remote control 3 times change able
DC output 18V for indoor antenna
Power supply 100~240VAC 50Hz~60Hz
Consumption 10 W max.
Size (B×D×H)
280×210×70mm
Weight 1.3Kg
 Loading...