

FSR INC. Eagle 200 Quick Start Manual
Background, DSK, and LOGO Setup
2
1
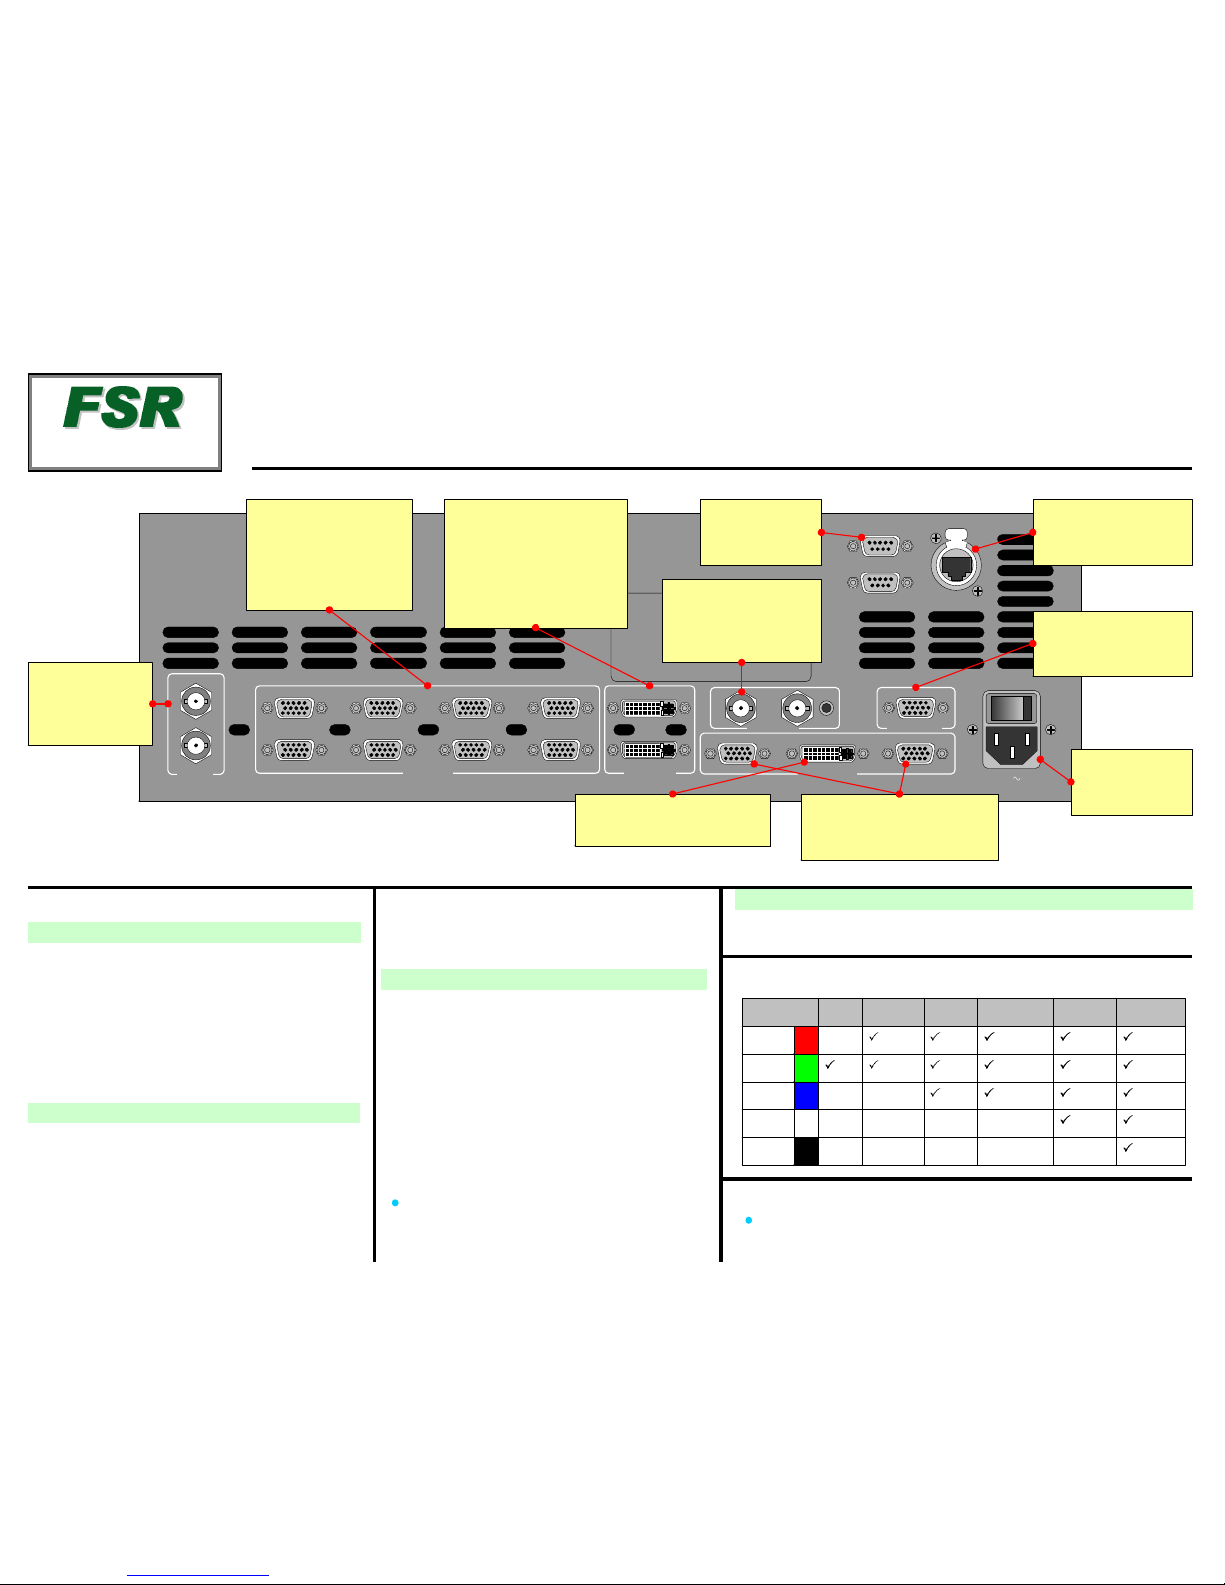
SDI In
Analog In
BG/DSK In
Genlock
Preview Out
Program Out
1
2
3
4
5
6
7
8
A
B
12
In Loop
Serial 1
Serial 2
Ethernet
100-240 V 50-60 Hz
2.3 A
Quick Install and Setup
ScreenPRO-II User’s Guide
For comp l ete detai l s on al l i nstalla ti on and oper ations procedures,
please refer to the ScreenPRO-II User’s Guide.
* Breakout Cables for Analog Inputs
Breakout Cable
Wire Color
Comp
Video
S-Video
(Y/C)
YUV
(YPbPr)
RGB
Sync on Green
RGB
Comp Sync
RGB
Separate H V
R
G
B
H Sync
V Sync
(Chrom)
(Pr)
(Lum)
(Lum)
(Pb)
1. Observe all safety precautions. Rac kmount chassis, or
install in “tabletop” configuration.
2. Connect all inputs, moni tors, projec tor and AC. Ins tall
genlock signal if required. Power on.
3. Perform factory reset: Using Touch Screen buttons,
press {SYSTEM} > {RESET}. On Reset Type line, use
ADJ knob to select FACTORY. Press {RESET} > {YES}.
4. Calibrate Touch Screen: Press {DISPLAY} >
{LCD CAL}, and follow on-screen prom p t s.
Getting Started
Input Setup
12. On the Source Selection Bus, press an input button.
If the “acqu ir e” is success f ul , the source appears on
Preview. This may take several seconds.
13. Press {SAVE}. The Input Menu will appear.
14. If the “Acquisition Failed” message appears, check
all connections and press {FORCE ACQUIRE}. If
successful, press {SAVE}.
15. If the input still does not acquire, perform a detailed
setup. [User’ s Guide: Chapter 5, “Comprehensive
Input Setup” section.]
16. Repeat from step 12 for all remaining inputs. Be sure
to {SAVE} each input.
Note: To adjust input size, use the {SIZING} menu.
[User’s Gui d e: Chapter 4, “ Si zing Me nu” section.]
5. Press {OUTPUT}.
6.On Format line, select projector’s native resolution.
7. Press {SELECT FORMAT} t o accept, then {SAVE}.
8. For projector setup, pr ess {TEST PATTERN}.
9.On the Type line, select the Burst pattern.
Output and Projector Setup
17. See User’ s Guide, Ch apter 5 for se tup procedures. DVI background
and DSK mus t be set at same resolution as system output.
10. Adjust your projec tor as requir ed. [User’s Gu i de:
Chapter 5, “Projector Setup” section.]
11. When complete, set test patte rn Type to Off, set
Raster Bo x to Off, then press {HOME}.
Analog Inputs
Connect to analog sources
such as PCs, VT Rs, an d
cameras. Use breakout
cables as requir ed.
See * below for details.
Background / DSK
Inputs
Connect to DVI source s such
as PCs. Input B can be eithe r
BG or DSK, but not both.
Backgrounds and DS K are
unscaled so urces.
Serial 1
For down l oading
firmware updates.
Genlock
Connect a reference
signal such as black burst
or composite sync.
Program Out Digital
Connect to projector.
Program Out Analog
Connect to projector or analog
Program monitor.
Ethernet
For use wi th external
controller.
Preview Out
Connect to analog
Preview monitor.
AC
Connect to AC
power sour ce.
SDI Inputs
On HD model only,
connect to SD-SDI
or HD- SDI sources.
Eagle 200
Quick Start Guide
TAKE A NE W LOOK
FSR Inc.
244 Bergen Boulevard
West Paterson, NJ
07424
Phone:
Fax:
Technical Support:
Website:
+1 (800) 332-3771
+1 (973) 785-3318
+1 (800) 332-3771
www.fsrinc.com
LIT 1119 D143897A

4
3
2
1
5
6
7
8
SDI
1
SD
I
2
L
AYER
B
LAYER
A
BG
B
DS
K
LOGO
BG
A
WIP
E
CUT
MIX
PI
P
Full
Screen
KEY
Spli
t
Layer
Clear
Layer
Sw
a
p
Z-Or
der
Freeze
Reset
Move
Setu
p
Mo
v
e
Program
Progr
am
Mixer Functions
Ba
ckg
round
Mixer
Transitions
So
u
rce
Selec
tion
Menu System Or
ientatio
n
Operations OverviewImportant Gl
obal
Rules
From the Home Menu, press:
{INPUT} > Input Menu.
Se
t input format, adjust brightness&
contrast, adjust aspect r atio, set color balance, sizing
{OUTPUT} > Output Menu. Set output format
, a
djust genlock
params, set t
est
patterns and output raster box
{SYSTEM} > System Menu. Set “mix mode” params,
so
ftware reset, diagnostics, program EDID, set com params
{
EFFECTS} > E
ffe
cts Menu. Set transition an
d wi
pe params
{
STATUS} > Status
Menu. Di
splay
so
ftware versio
n
{
DIS
PLAY} >Display Setti
ngs
Me
nu. Set Touch Scree
n
brightness/contrast, button backlight, and LCD calibrate
{
FRAME GRAB} > Frame Grab Menu. Grab still f rames to
us
e as backgr
ound
, DSK orLOGO source
{REMOTE
CONTRO
L} > Remote Control Menu. Enable &
disable remote control.
Red LED: source or layer is on Program, but
no
t adjustable
Bl
inki
ng button:
source or layera
ctive
for mo
dification
Solid button: source
or
layer on Preview, but notadjus
table
Backgrounds,DSKand LOGO are un
sca
led sources.
Background B and D SK are mutually exclusive. If one i
s
on-air, the other cannot be used.
"
Blin
king
" Ra
ster Bo
x is
th
e on
e enab
led f
or modif
ica
tion.
Butto
n Color Usage
1
PI
P
MIX
White:
Sources
Ye
llow: Functions that
appl
y t
o activelayer
Red
: Transition
s
Gr
een:
Unsc
aled sources
Blue:
Scaled sources
LAYER
B
BG
A
Working w
ith PIPs
in
Mix Mode
A
lways com
p
os
e your “look”
on
Preview. This represents the
ex
act appearan
c
e
of Program — after y ou transition.
1. OnS
ourc
e Selection Bus,select an input.
2. PressPIP
. ThePIP Adju
stment Menu appears.
3.(Opt
ional)PressFu
ll Screen
.
4.Ad
jus
t PIP size,position, bord
er,
shadow, source image,
c
ropping and "special effects." [User’s Guide: Chapter 6,
“
Modifying PIPs” section.]
5. Transition the setup to
program
by pressing WIPE , CUTorMIX.
[User
’s Gu
ide
: Chapte
r 6, “Work
ing w
ith Transitions” section.]
6.
For th
e nextP
IP setup
, repeat from
step
1.
7. T
o remov
e layerfrom Preview, pressClear Layer, a
nd then
press WIPE
, CUTor
MIX to remove the layer from Program.
8. F
o
r
information onall operational modes and features, refer to
Chapter 6, “Operations”
in
the User’s Guide.
Use this list to learn what’s available on each menu
Laye
r
C
ontro
l
Sec
t
ion
Choosecomb
ina
t
i
on of layers to
tra
n
sition to/from Program
.
Comp
os
e
the nex
t
“look
”
on
Preview
Re
d LED
s
Indicate
so
urcesand
lay
e
rs onProgra
m
Source S
electio
n Bu
s
Selec
t the source forthe
a
c
ti
ve PIP or KEY
Tr
ansition Se
ction
P
ress tostar
t transiti
on
from
Preview to
Program.
Use
Effects Menuto set
tran
sitio
n parameters
Pen
d
“Move” on
active layer
Set up a
“Move” on
acti
ve layer
Reset current
par
ameter
to
default
Freeze active
layer on Pgm,
Pvw
Change
layer
priorit
y
Remove
active
layer
from Preview
Chan
ge
ac
tive layer
to aPIP
Eagl
e 20
0
IN
PUT
OU
T
PUT
SYSTEM
EF
FECT
S
STAT
US DI
SPLAY
F
RAM
E
G
RAB
REMOTE
CONTR
OL
R
o
tary K
nobs
NAV
to
n
avi
g
a
te (
sele
ct) line
s
ADJ to ad
ju
st
va
lue
s
Touc
h Scr
een
{HOME} > Home
Men
u
{BACK} >
Ba
ck onelevel
T
ake active
layer to
fu
ll
sc
reen
Change
ac
tive layer
to a Key
Change
between
Sp
lit
and
Mix
Modes
E
a
gle
200
Qui
ck St
artGui
d
e
TAK
E A NE
W L
OOK
FS
R Inc.
244 Bergen Boul
eva
rd
Wes
t Paterso
n, N
J
07424
Phone:
Fax:
Technical
Suppo
rt:
W
ebs
it
e:
+
1 (800) 332-3771
+
1 (973)785-
3318
+
1 (800)332-3771
www.fsrinc.com
 Loading...