

Page 1
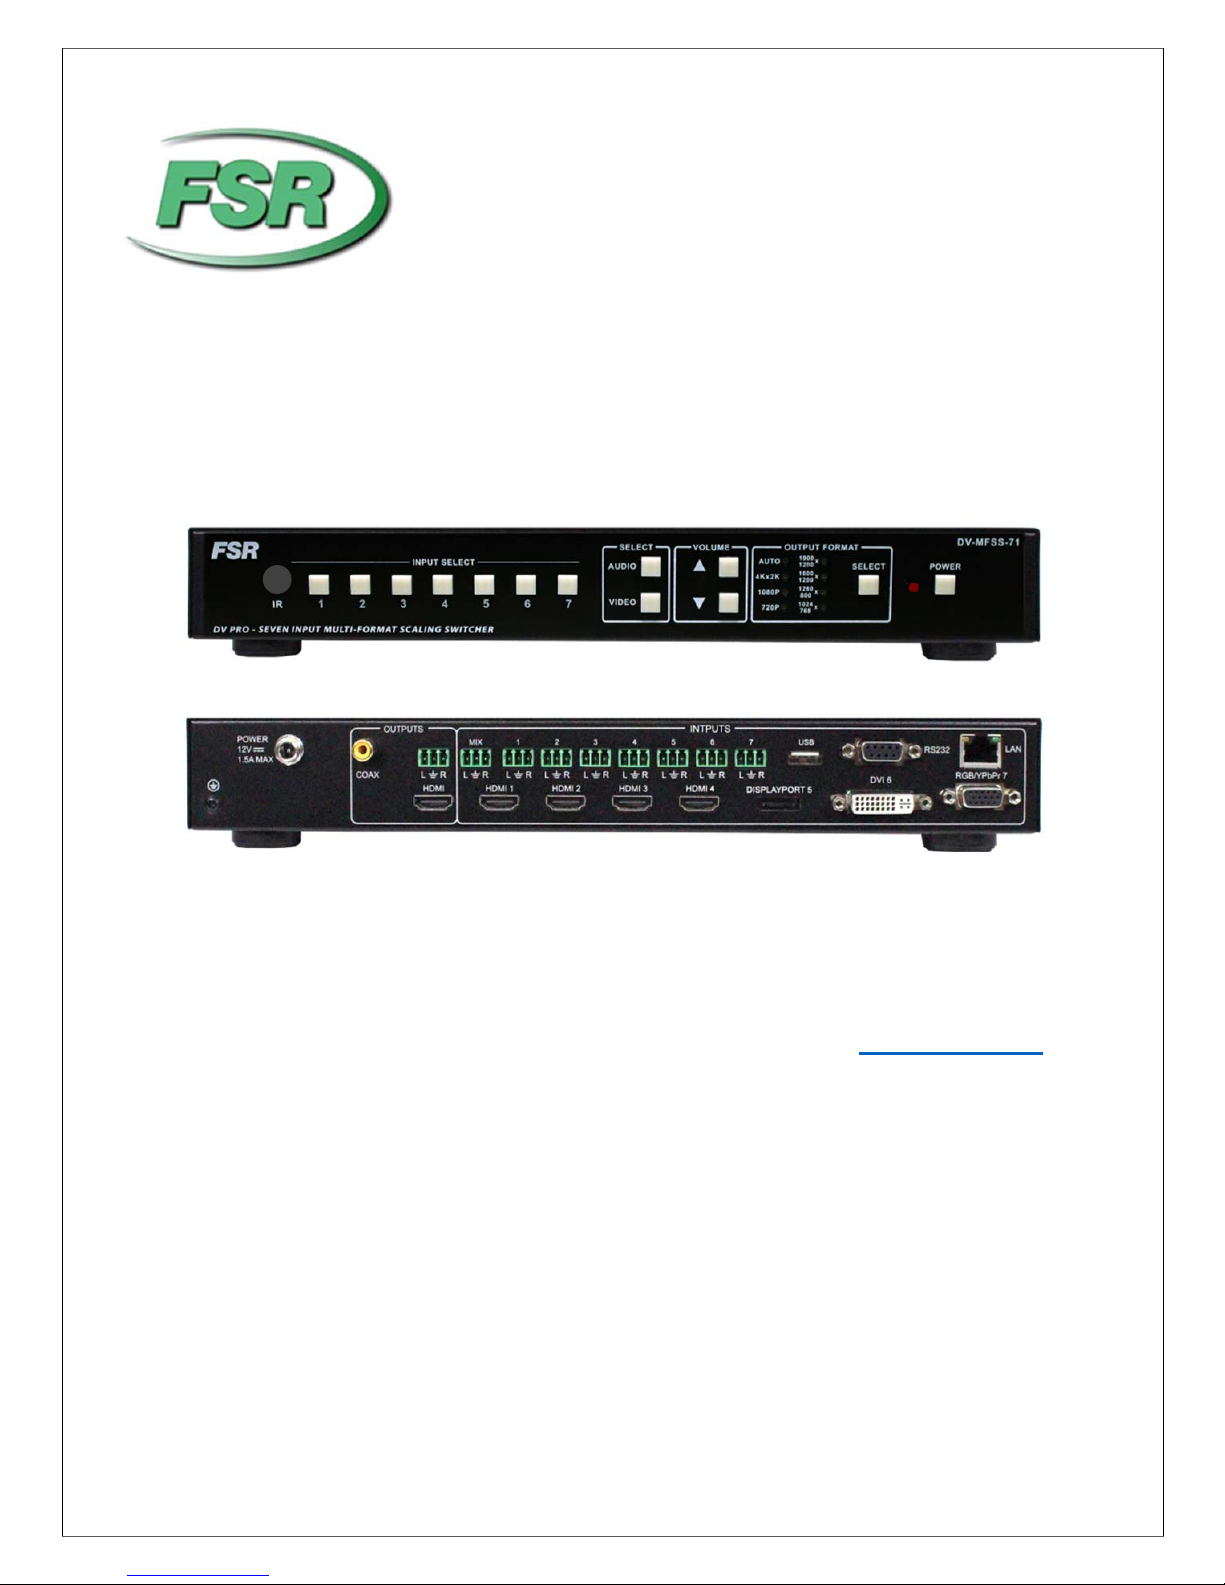
4K 7x1 Multi-format Presentation Switcher
DV-MFSS-71
Based on firmware revision 1.11 and FSR1.0.0.L
244 Bergen Blvd Woodland Park NJ 07424 973-785-4347 www.fsrinc.com
43091 LIT1557
Page 2

2
Page 3
PROPRIETARY INFORMATION
All information in this manual is proprietary to and the property of FSR Inc. This publication is
protected by the Federal Copyright Law, with all rights reserved. No part of this document may
be reproduced, transcribed, or transmitted, in any form or by any means, without prior explicit
written permission from FSR Inc.
UNPACKING
The DV-MFSS-71 7x1 Switcher package includes the following items:
DV-MFSS-71 7x1 switcher
IR remote control
Rack ears
Under table brackets
User’s manual
12VDC 4A power supply
8 Screws
9 3-Pin screw terminal
HDMI is a trademark of HDMI licensing, LLC.
DisplayPort
Specifications may be changed without any notice in order to
improve the function of the product.
3
Page 4

LIMITED WARRANTY
The DV-MFSS-71 is warranted against failures due to defective parts or faulty workmanship for a period
of three years after delivery to the original owner. During this period, FSR will make any necessary
repairs or replace the unit without charge for parts or labor. Shipping charges to the factory or repair
station must be prepaid by the owner, return-shipping charges (via UPS Ground) will be paid by FSR.
This warranty applies only to the original owner and is not transferable. In addition, it does not apply to
repairs done by other than the FSR factory or Authorized Repair Stations.
This warranty shall be cancelable by FSR at its sole discretion if the unit has been subjected to physical
abuse or has been modified in any way without written authorization from FSR. FSR’s liability under this
warranty is limited to repair or replacement of the defective unit.
FSR will not be responsible for incidental or consequential damages resulting from the use or misuse of
its products. Some states do not allow the exclusion of incidental or consequential damages, so the
above limitations may not apply to you. This warranty gives you specific legal rights, and you may also
have other rights which vary from state to state.
Warranty claims should be accompanied by a copy of the original purchase invoice showing the
purchase date (if a Warranty Registration Card was mailed in at the time of purchase, this is not
necessary). Before returning any equipment for repair, please read the important information on service
below.
SERVICE
Before returning any equipment for repair, please be sure that it is adequately packed and cushioned
against damage in shipment, and that it is insured. We suggest that you save the original packaging and
use it to ship the product for servicing. Also, please enclose a note giving your name, address, phone
number and a description of the problem.
NOTE: all equipment being returned for repair must have a Return authorization (RMA) Number. To get
a RMA Number, please call the FSR Service Department (1-800-332-FSR1). Please display your RMA
Number prominently on the front of all packages.
CONTACT INFORMATION
FSR INC.
244 Bergen Blvd.
Woodland Park, NJ 07424
Phone: (973) 785-4347
Order Desk Fax: (973) 785-4207
E-mail: [email protected]
Web Site: www.fsrinc.com
4
Page 5

SURGE PROTECTION DEVICE RECOMMENDED
This product contains sensitive electrical components that may be damaged by electrical spikes,
surges, electric shock, lightning strikes, etc. Use of surge protection systems is highly
recommended in order to protect and extend the life of your equipment.
SAFETY
All the safety and user manual should be read before the appliance is operated.
The safety and operating instructions should be retained for future reference.
Unplug this product from the wall outlet before cleaning. Do not use liquid cleaners or
aerosol cleaners. Use a damp cloth for cleaning.
Do not use this equipment near wet place.
This product should be operated only from the type of power sources indicated on the
marking label. If you are not sure of the type of power supplied to your home, consult your
local power company.
This equipment may be equipped with a 3 wire grounding-type plug, a plug having a third
(grounding) pin. This pin will only fit in to a grounding type power outlet. This is a safety
feature. If you are unable to insert the plug in to the outlet, contact your electrician to
replace your obsolete outlet. Do not defeat the safety purpose of the grounding-type plug.
Openings on the case are provided for ventilation and to ensure reliable operation of the
equipment and to protect it from overheating. The openings should never be blocked.
Do not use any damaged power cords or plugs, or loosed outlets, this may cause
electrical shock or fire.
Do not put heavy articles such as other equipment on this product. Keep it away from
liquid, magnetic and flammable substances.
5
Page 6

6
Page 7

TABLE OF CONTENTS
PROPRIETARY INFORMATION .............................................................................................................. 3
UNPACKING ............................................................................................................................................ 3
LIMITED WARRANTY .............................................................................................................................. 4
SAFETY .................................................................................................................................................... 5
DESCRIPTION ......................................................................................................................................... 8
FEATURES ............................................................................................................................................... 8
TYPICAL APPLICATION .......................................................................................................................... 9
AUDIO BLOCK DIAGRAM ........................................................................................................................ 9
DIMENSIONS ......................................................................................................................................... 10
FRONT PANEL ....................................................................................................................................... 11
VGA INPUT AUTO ADJUST BEHAVIOR: .......................................................................................... 11
REAR PANEL ......................................................................................................................................... 12
OPERATION ........................................................................................................................................... 13
IR REMOTE CONTROL ......................................................................................................................... 14
ON SCREEN DISPLAY (OSD) ............................................................................................................... 15
IP SETTINGS ......................................................................................................................................... 16
OSD .................................................................................................................................................... 16
IP CONFIGURATION TOOL APPLICATION ...................................................................................... 17
FIRMWARE UPDATE (EXTERNAL CONTROL BOARD) ...................................................................... 20
EMBEDDED WEB SERVER ................................................................................................................... 21
CONTROL PORTS ................................................................................................................................. 23
RS-232 SETTINGS ............................................................................................................................. 23
ETHERNET SETTINGS ...................................................................................................................... 23
RS-232 SERIAL AND ETHERNET CONTROL PROTOCOL .............................................................. 24
FIRMWARE UPDATE (AUDIO AND VIDEO BOARD) ........................................................................... 29
SPECIFICATIONS .................................................................................................................................. 30
7
Page 8

DESCRIPTION
The DV-MFSS-71 7 x 1 Seamless Switcher has been designed to address the needs of the corporate,
education, medical, and houses of worship fields. It can be easily operated from the front panel or
remotely with a Flex Control System to create a powerful and cost effective switching system.
The DV-MFSS-71 features 4 HDMI, 1 Display Port, 1 DVI and 1 HD-15 video inputs. The HDMI inputs
are HDCP compliant and accept resolutions up to 4K 2160p (3840x2160) @ 30Hz. The HD-15 input
supports VGA, RGB, and YPbPr input up to 1920x1200 @ 60Hz.
The DV-MFSS-71 has an HDCP compliant output that supports resolutions up to 4K 2160p (3840x2160)
@ 30Hz. Each of the inputs is scaled to match the output resolution and switching between them is
seamless and instantaneous, meaning no still frame or black screen during switching.
The HDMI input has embedded audio along with analog stereo inputs. The DisplayPort, DVI and VGA
also have an analog stereo input. There is an additional analog input that is mixed into the audio output
for voice over program applications. All analog audio inputs are via captive screw terminals. The HDMI
inputs support up to 7.1 multichannel embedded audio. The audio can follow the video during switching
or can be switched separately in breakaway mode. Audio outputs are available either embedded on the
HDMI port, via the multi-channel digital coaxial, or via stereo analog out connectors.
FEATURES
Upscaler and downscaler 7x1 switcher
4 HDMI, 1 DisplayPort, 1 DVI, 1 VGA (RGB/YPbPr)
HDMI up to 4kx2k 30Hz and DisplayPort up to 4kx2k 60Hz
HDMI output supports resolutions up to 4Kx2K 30Hz
Each source input is automatically scaled to match the optimal output resolution
Each input also has an unbalanced stereo audio input via captive screw terminals
Coax and HDMI supports up to 7.1 audio channels
HDCP compliant
Additional mix Stereo audio input
Easy-to-use front panel control, Web GUI, IR, RS- 232 and Telnet.
Can be controlled via FSR’s FLEX Touch Panel Control System with pre-made
templates available.
1 RU Height, 19” wide with rack ears
VGA input with auto adjust
8
Page 9
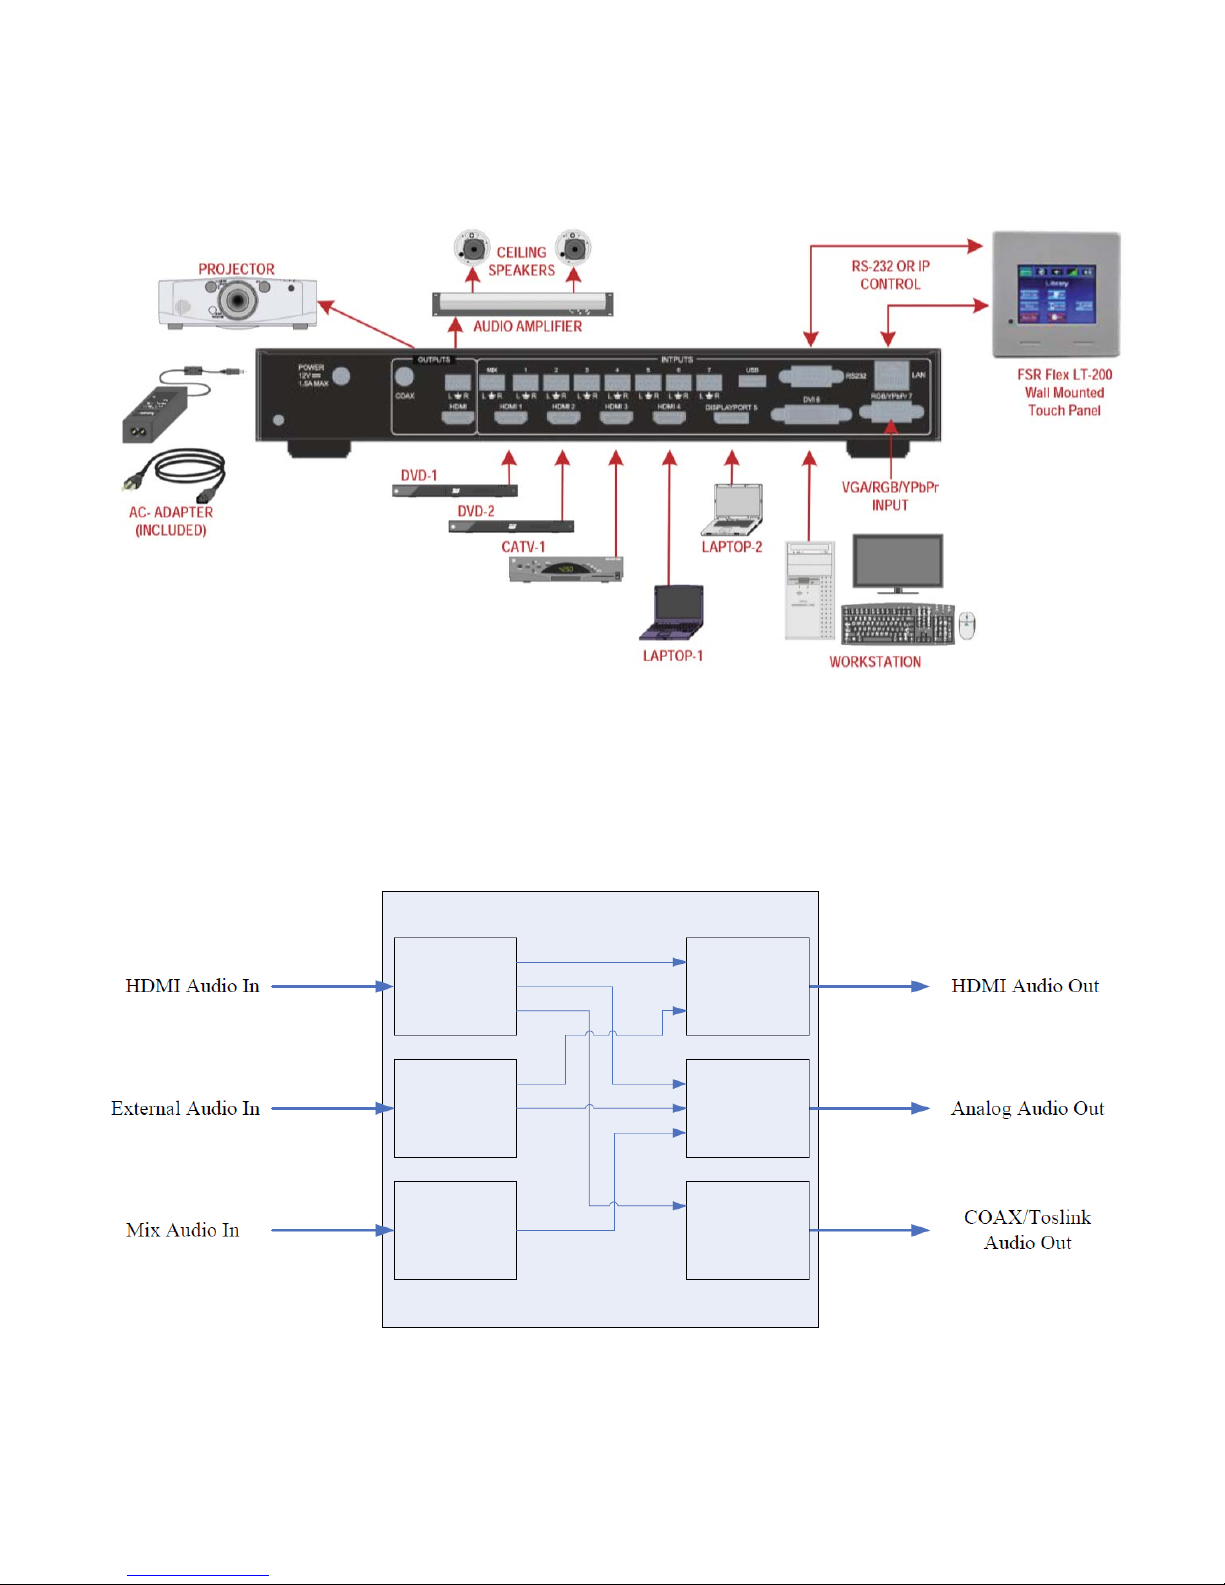
TYPICAL APPLICATION
AUDIO BLOCK DIAGRAM
9
Page 10
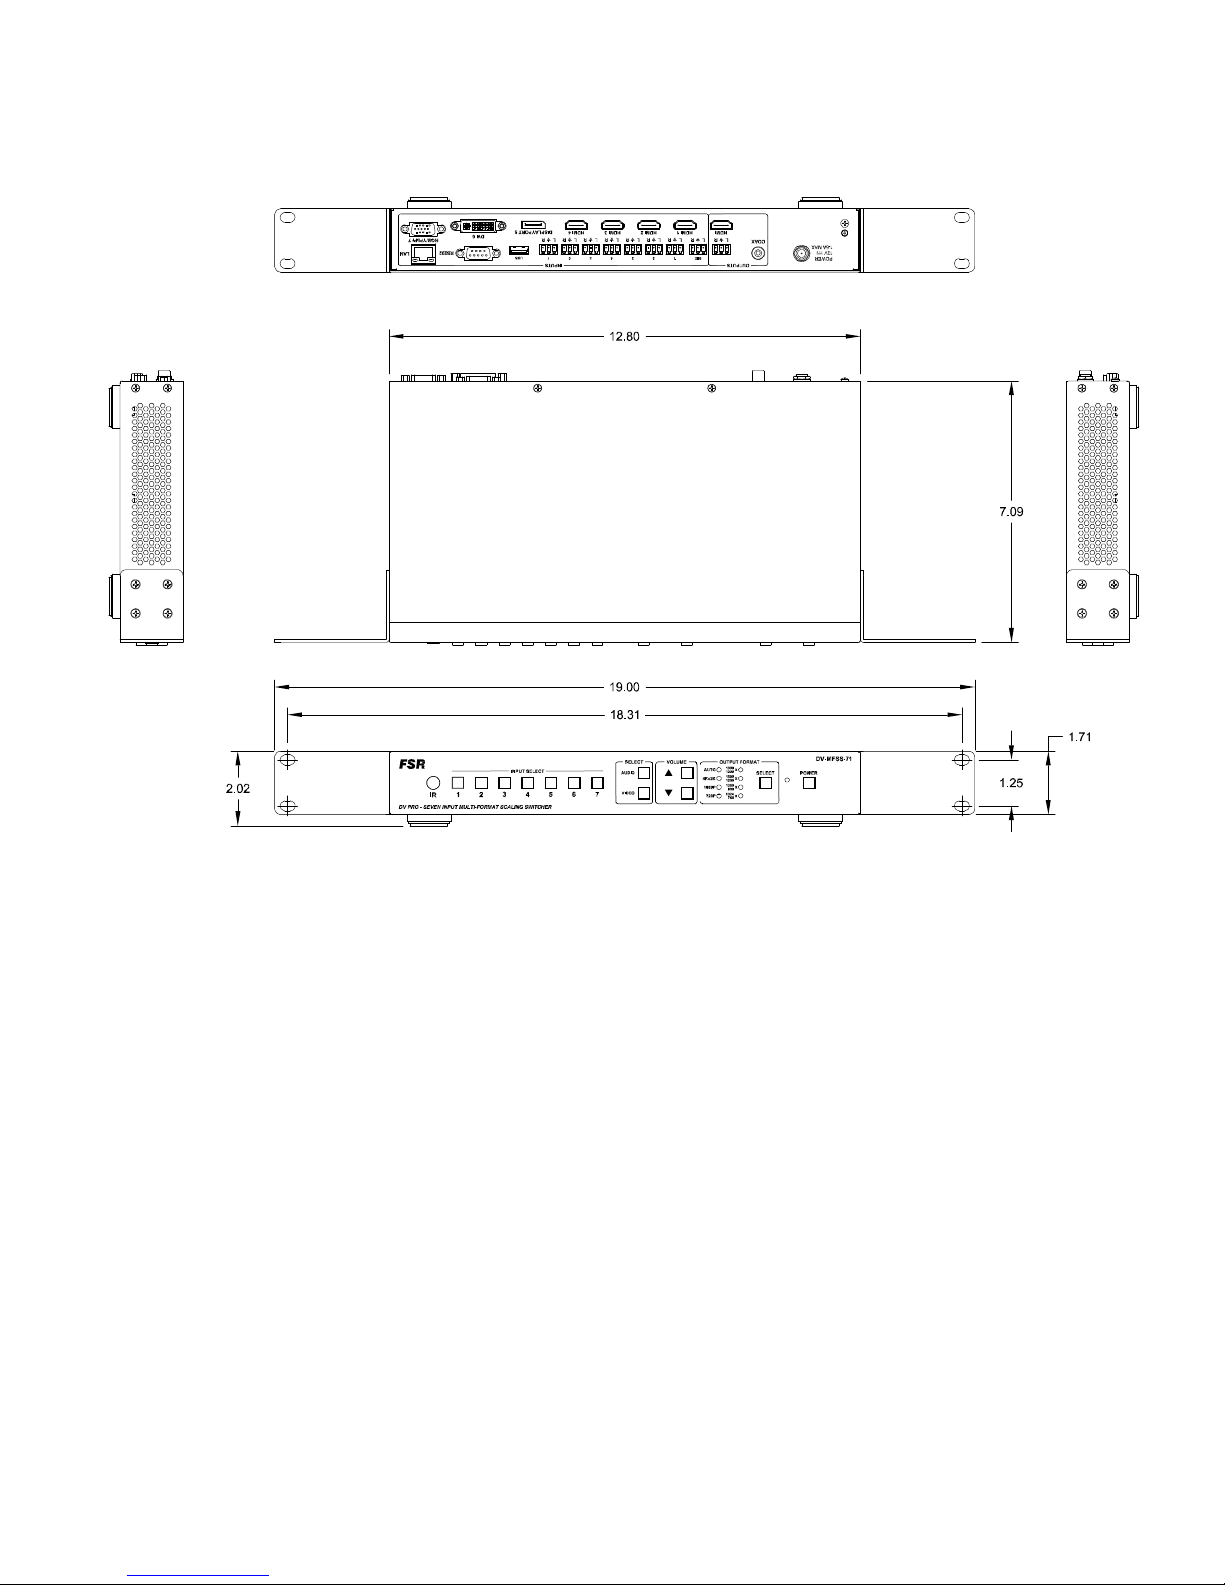
DIMENSIONS
10
Page 11
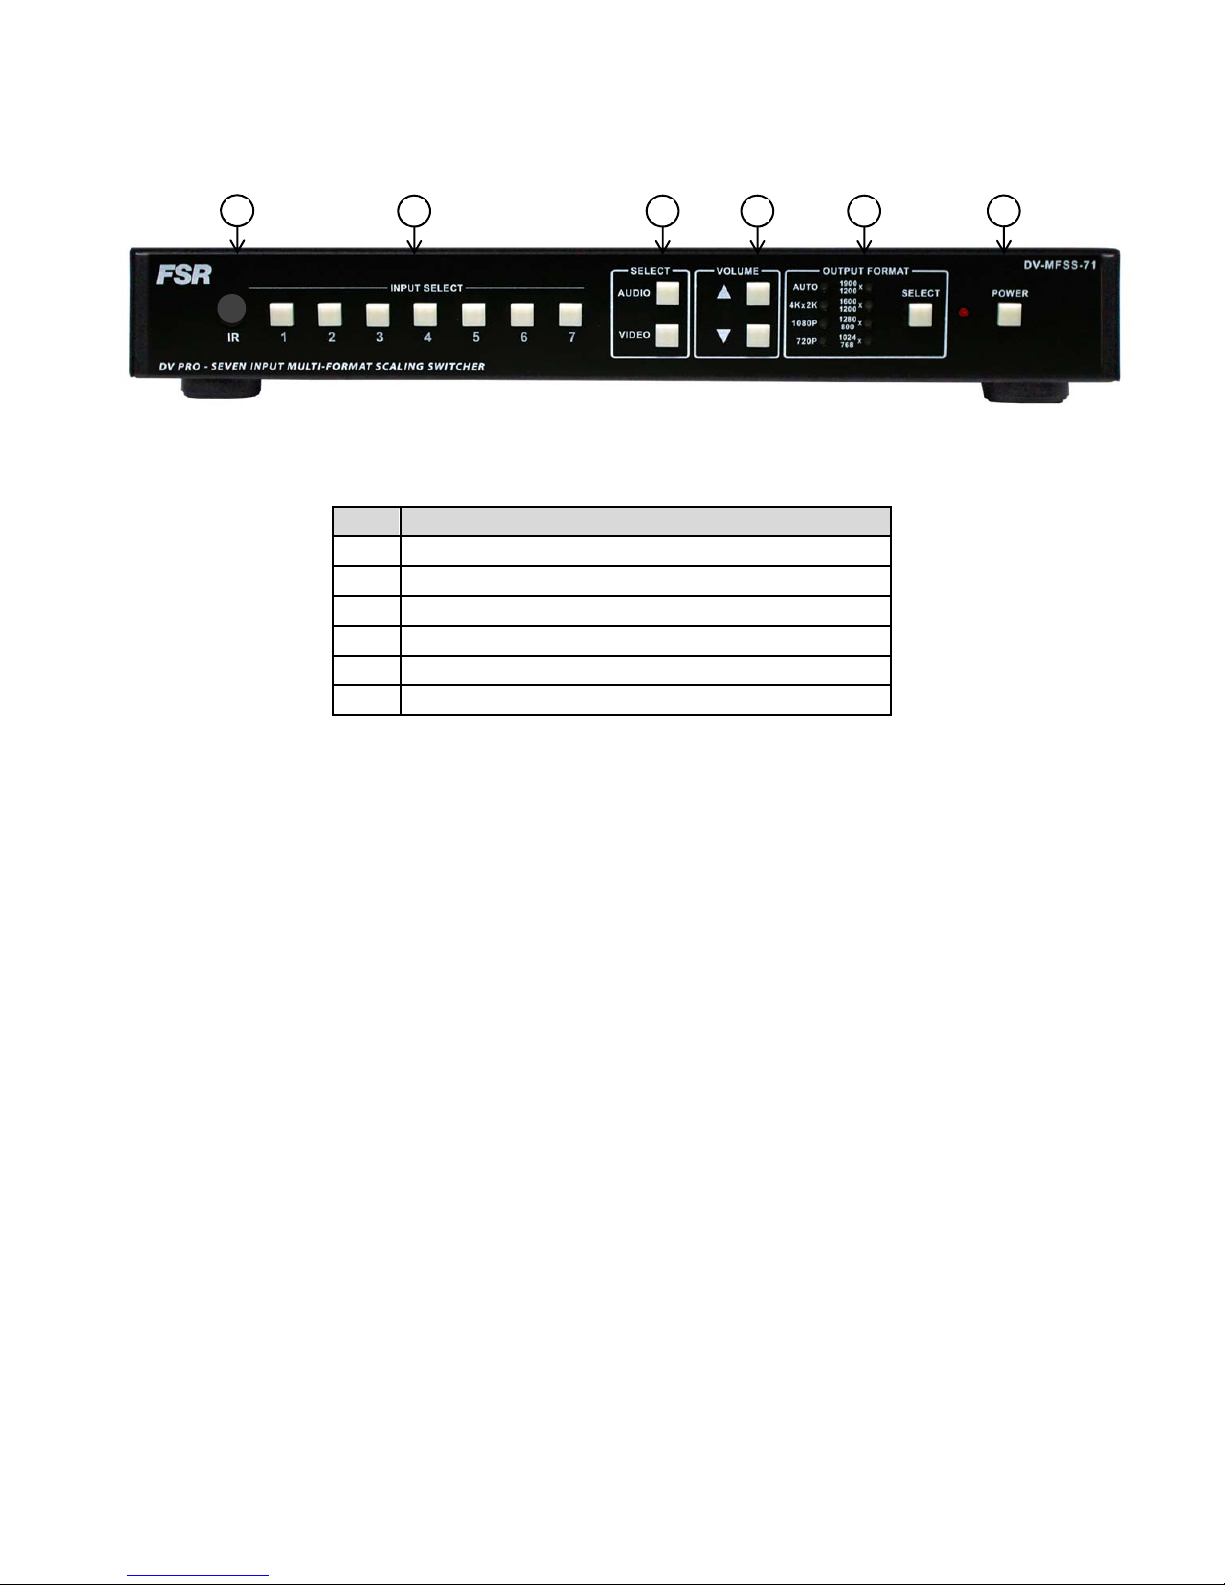
FRONT PANEL
* The VGA auto adjust command can also be executed by pressing and holding the input 7
switch for 3 seconds. (See below)
1
2 3 4 5
6
ID Name
1 IR receiver
2 Input select*
3 Video and Audio select
4 Volume up and down
5 Output resolution
6 Power ON and OFF (Standby)
VGA INPUT AUTO ADJUST BEHAVIOR:
The DV-MFSS-71 switcher will automatically adjust to new VGA sources when they are first
connected. The process will take several seconds during which time the image will move
around the screen until the optimal scaler settings are determined. Once a particular source is
learned, the switcher will recognize it and readjustment will not be necessary. Up to 10 unique
sources can be stored in the unit's memory, after which additional sources will result in one of
the others being overwritten. If for any reason the image does not display correctly, the
auto-adjust process can be triggered manually by pressing and holding the input 7 switch for 3
seconds.
11
Page 12
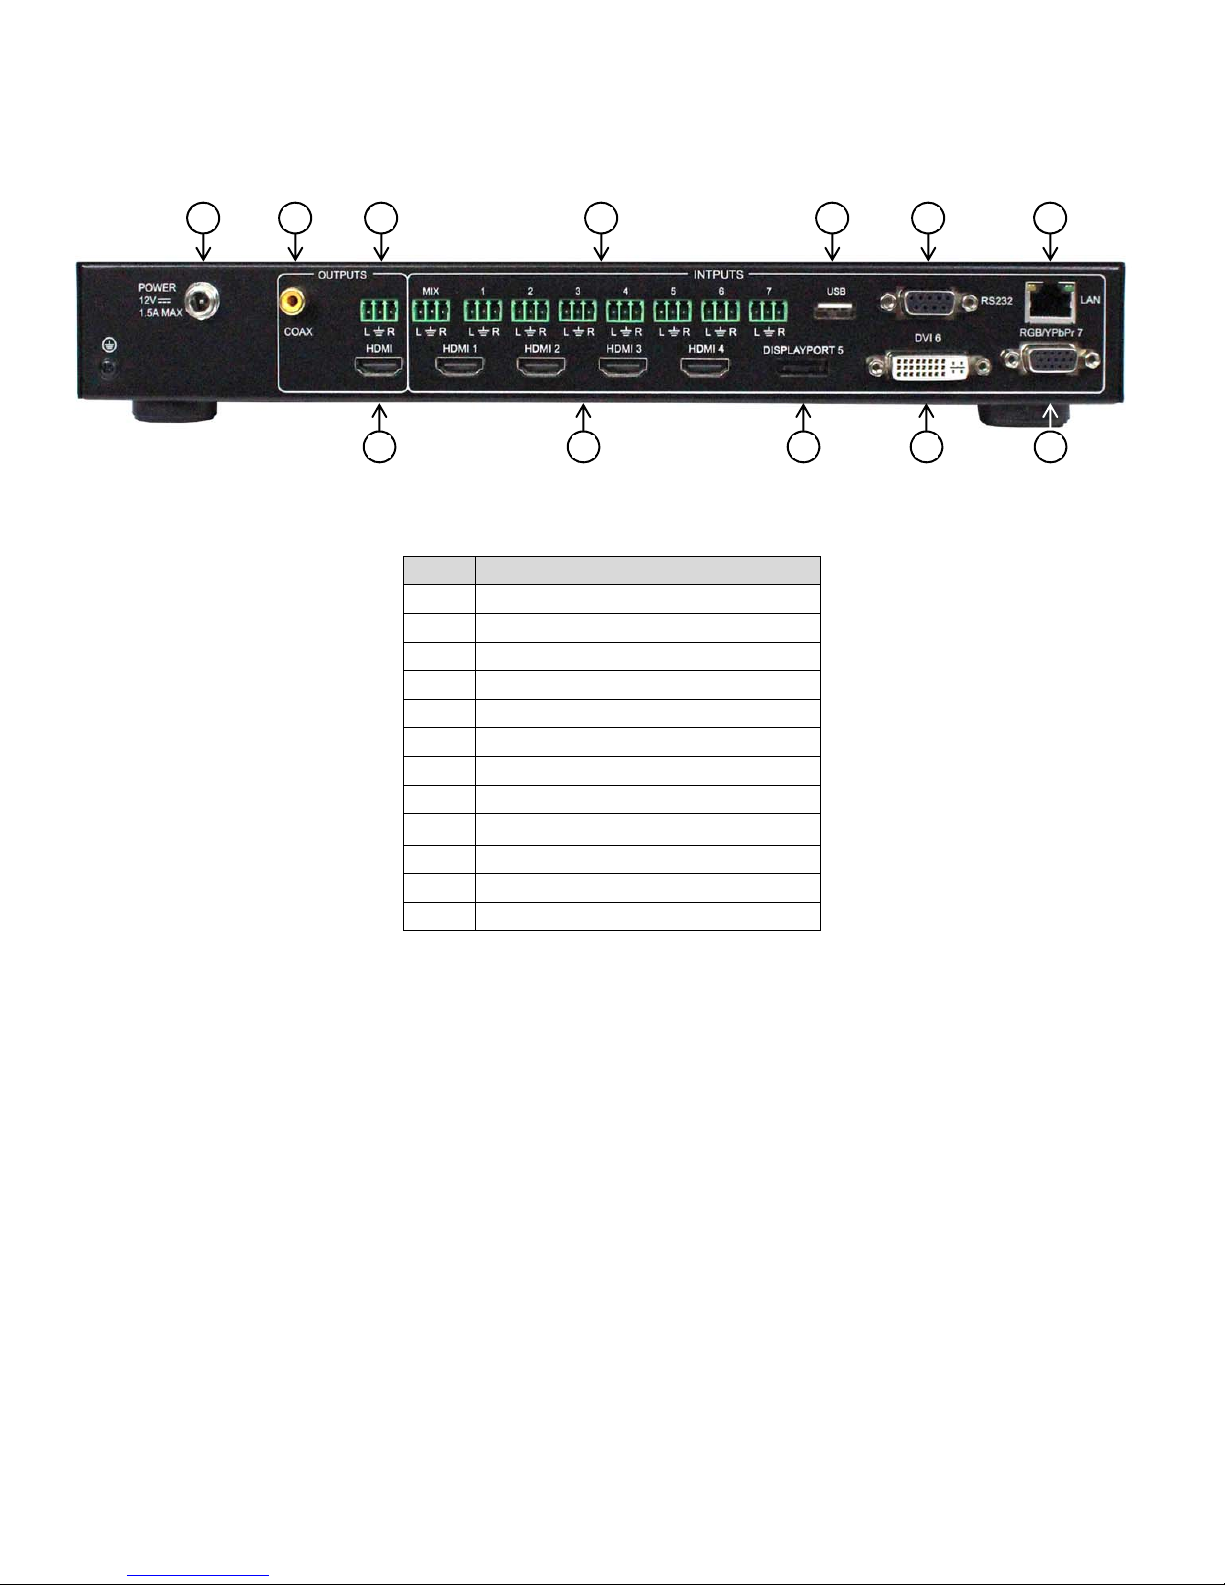
REAR PANEL
1 2 3 5 10 11 12
6 4 7 8 9
ID Name
1 Power input
2 Digital audio output
3 Analog audio output
4 HDMI output
5 Analog audio inputs
6 HDMI inputs
7 DisplayPort input
8 DVI input
9 VGA (RGB/YPbPr) input
10 USB service port
11 RS-232
12 LAN
12
Page 13
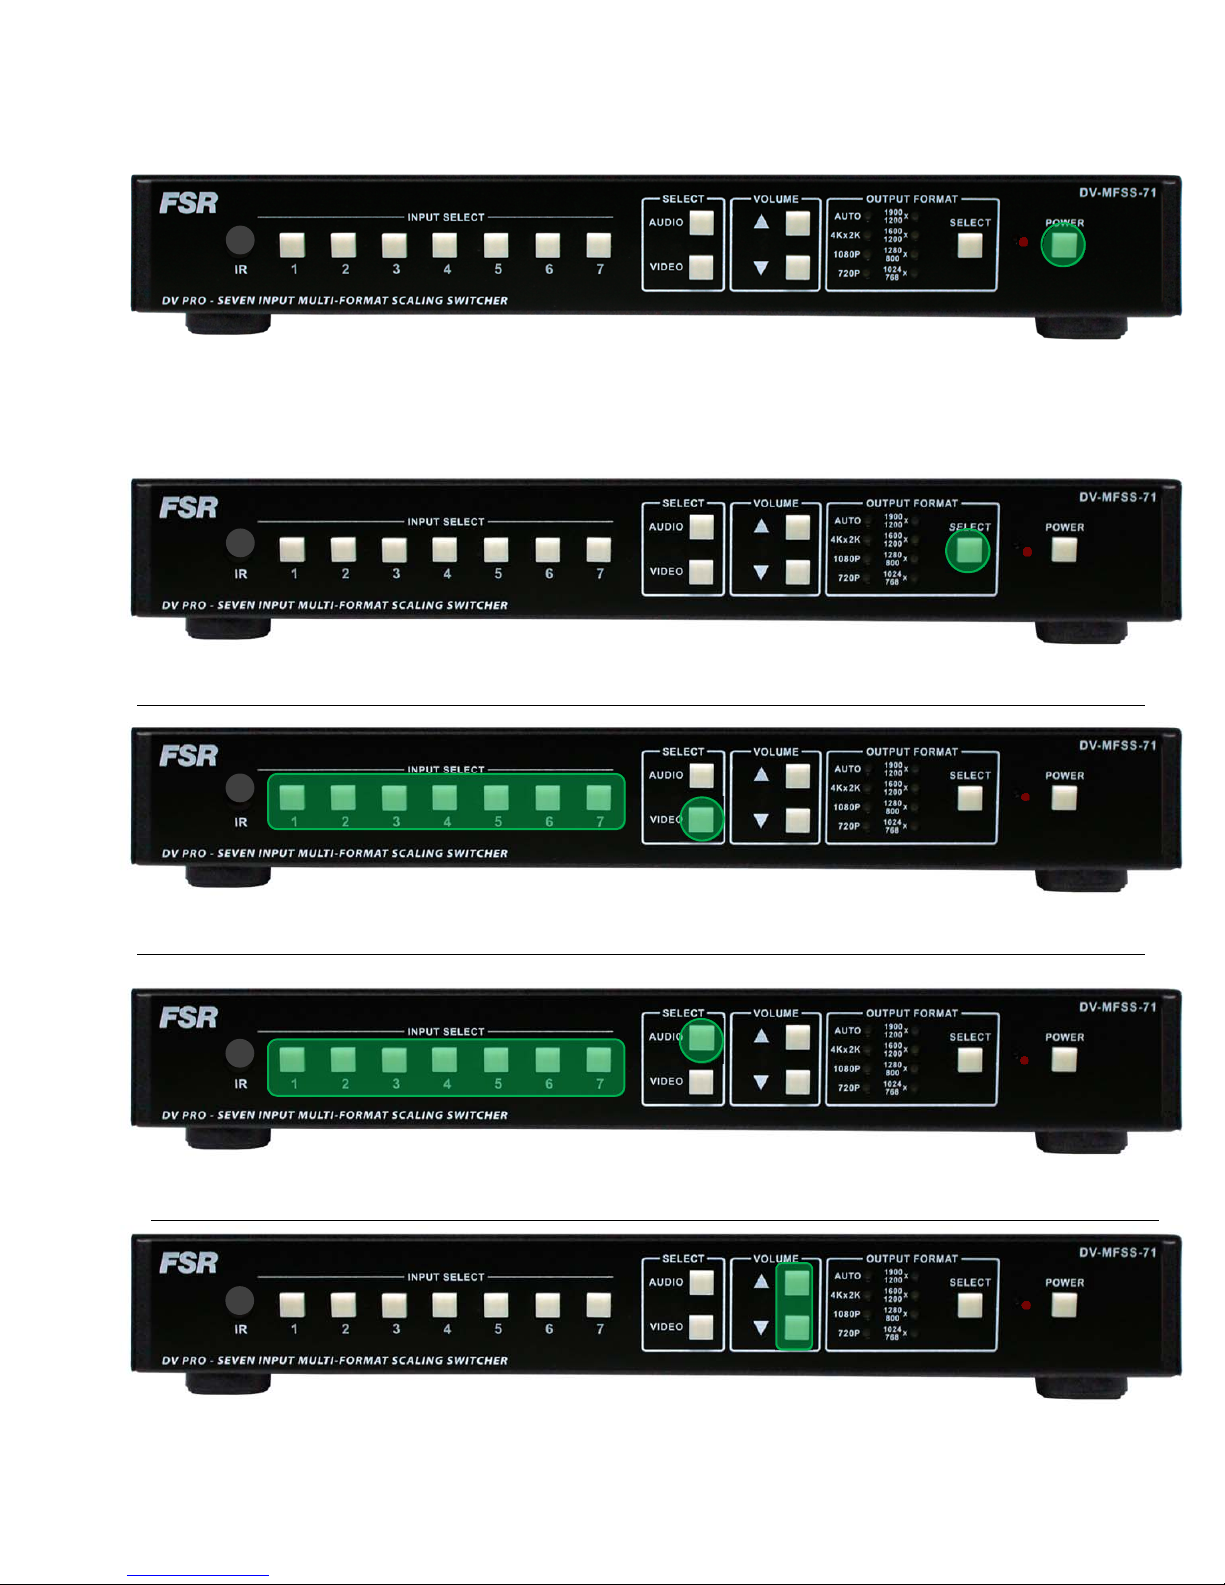
OPERATION
Power ON and OFF (Standby)
NOTE: To reset to factory default, press and hold Input Select 5 during the power up cycle until the front panel
LEDs blink.
Output format
To select the video, press video and one of the inputs.
To select the audio, press audio and one of the inputs.
Volume up and down
13
Page 14
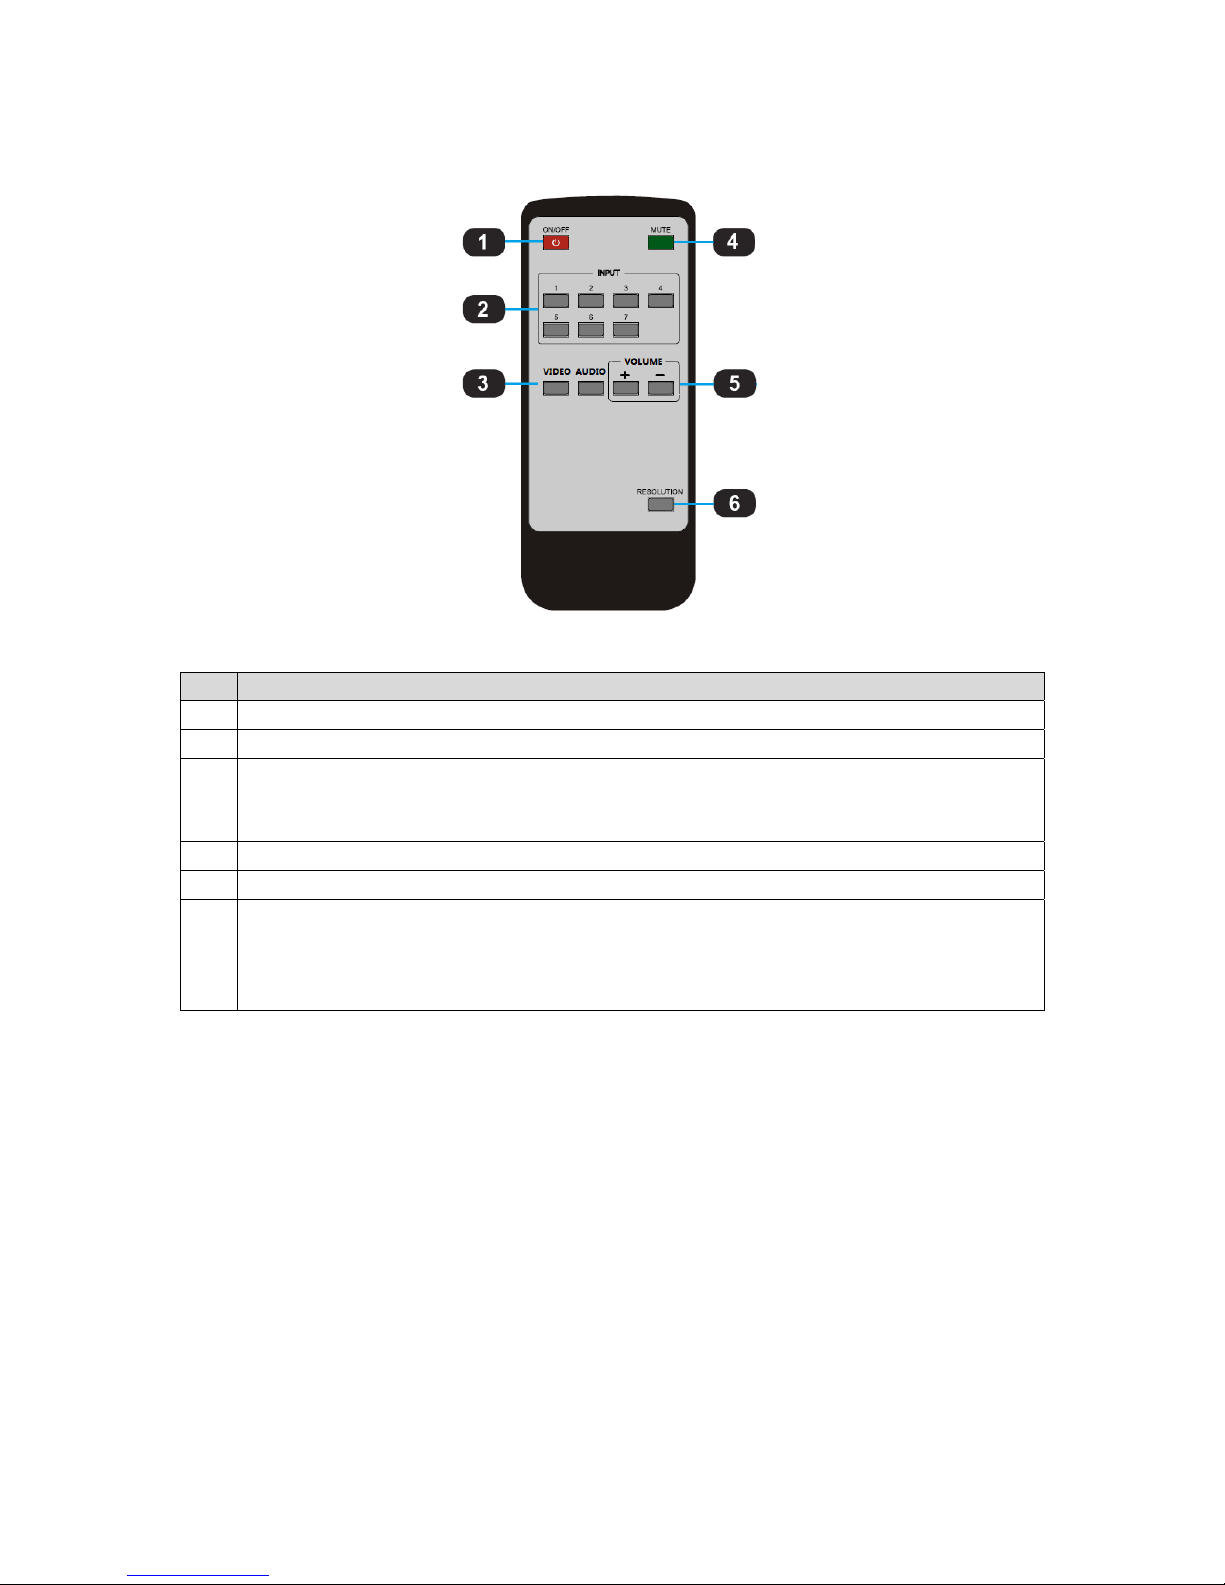
IR REMOTE CONTROL
ID Name
1 Power ON and OFF (Standby)
2 Input
Video and Audio select
3
To select the video, press video and one of the inputs
To select the audio, press audio and one of the inputs
5 Volume up and down
4 Mute and unmute
Output resolution
Auto (Display's native resolution) 4Kx2K 30Hz 1920x1080 60Hz
6
1280x720 60Hz 1920x1200 60Hz 1600x1200 60Hz 1280x800
60Hz 1024x768 60Hz
14
Page 15
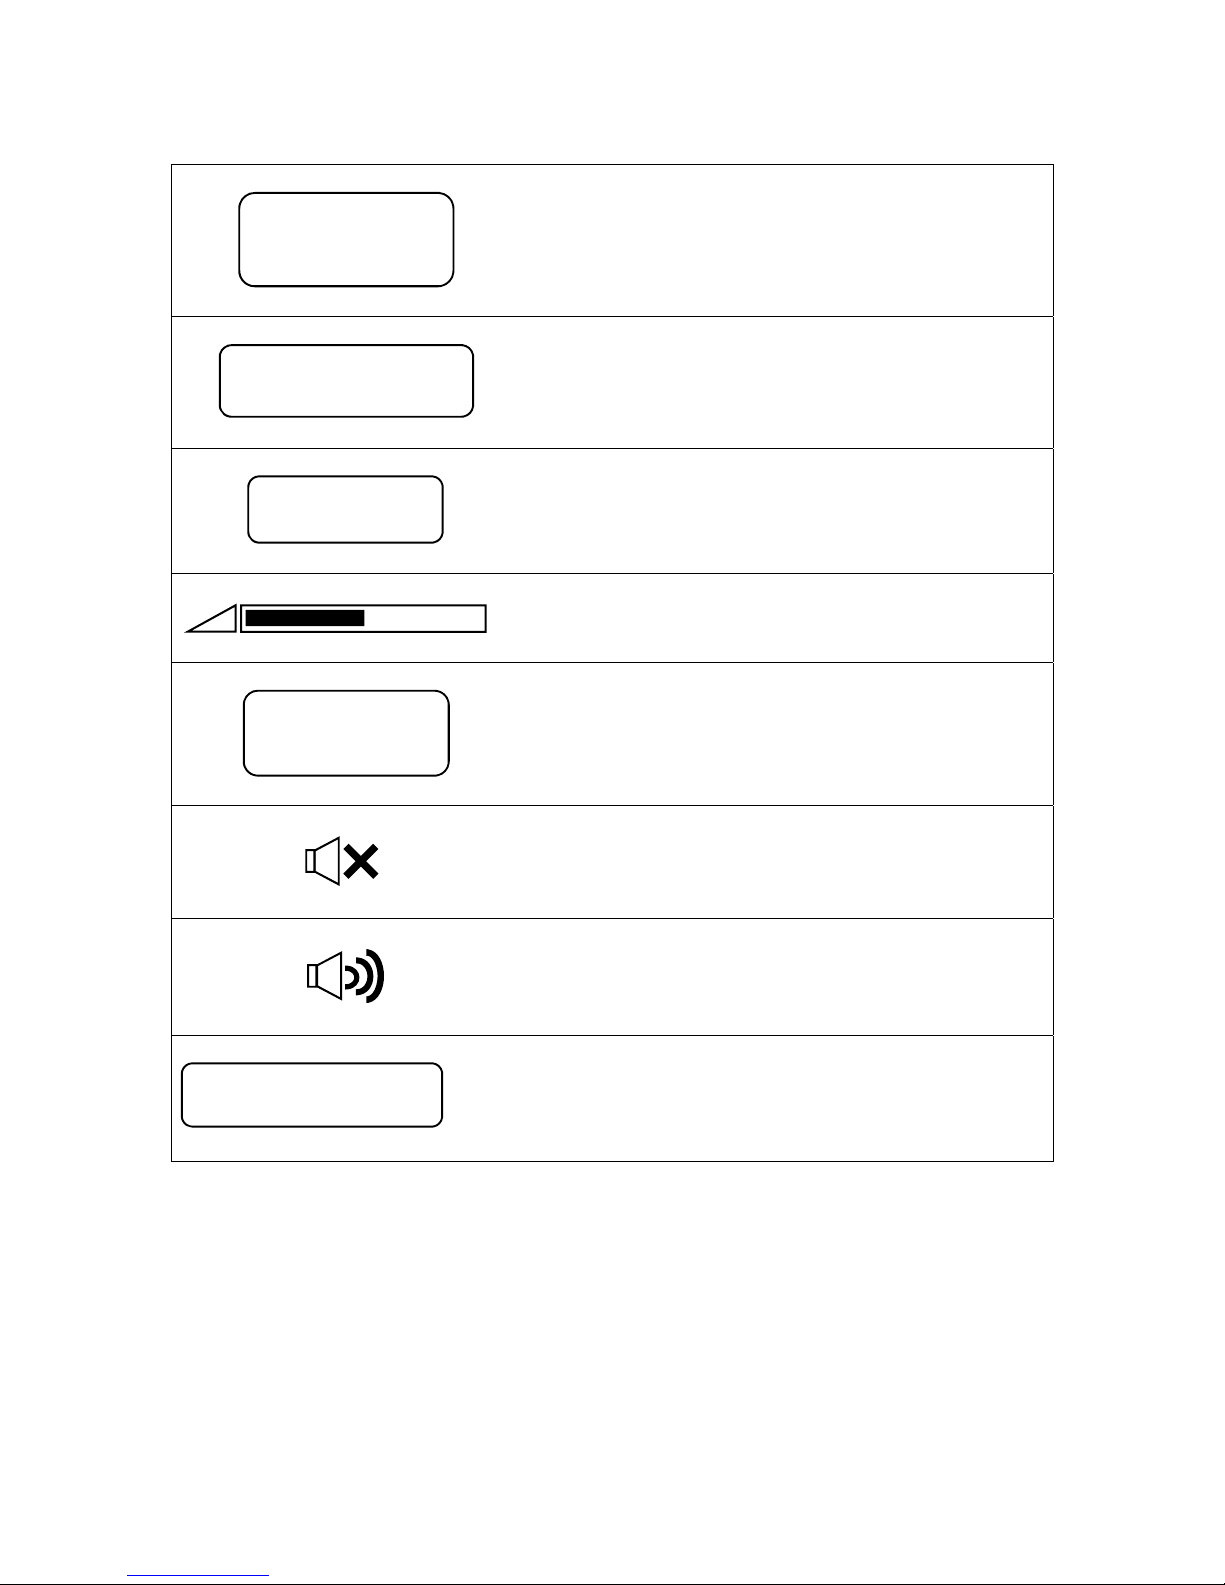
ON SCREEN DISPLAY (OSD)
3840x2160@30Hz
HDMI2
Selected input and its input resolution
HDMI2 not connected
IP: 192.168.0.10
Selected input state and DV-MFSS-71’s IP
address
VGA Auto Adjust
VGA auto adjust
Volume
5
IP: 192.168.0.10
Port: 23
DV-MFSS-71’s IP address and port number
System is upgrading…
Mute
Unmute
IMPORTANT: Do not power OFF or remove
the USB drive during the firmware upgrade.
15
Page 16

IP SETTINGS
There are two methods to obtain the IP address:
1. Obtain the IP address and port number via the information from the on-screen display
(OSD).
2. Obtain the IP address and port number via the IP CONFIGURATION TOOL
APPLICATION.
The following presents the two methods:
OSD
Obtain the IP address and port number via the information from the OSD:
When there is no signal, the following OSD in the window will be displayed:
HDMI2 not connected
IP: 192.168.0.10
Or when an image is displayed, the IP information is displayed in the area above the middle of
the window.
IP: 192.168.0.10
Port: 23
The IP address in this example, is 192.168.0.10 and the port number is 23.
16
Page 17
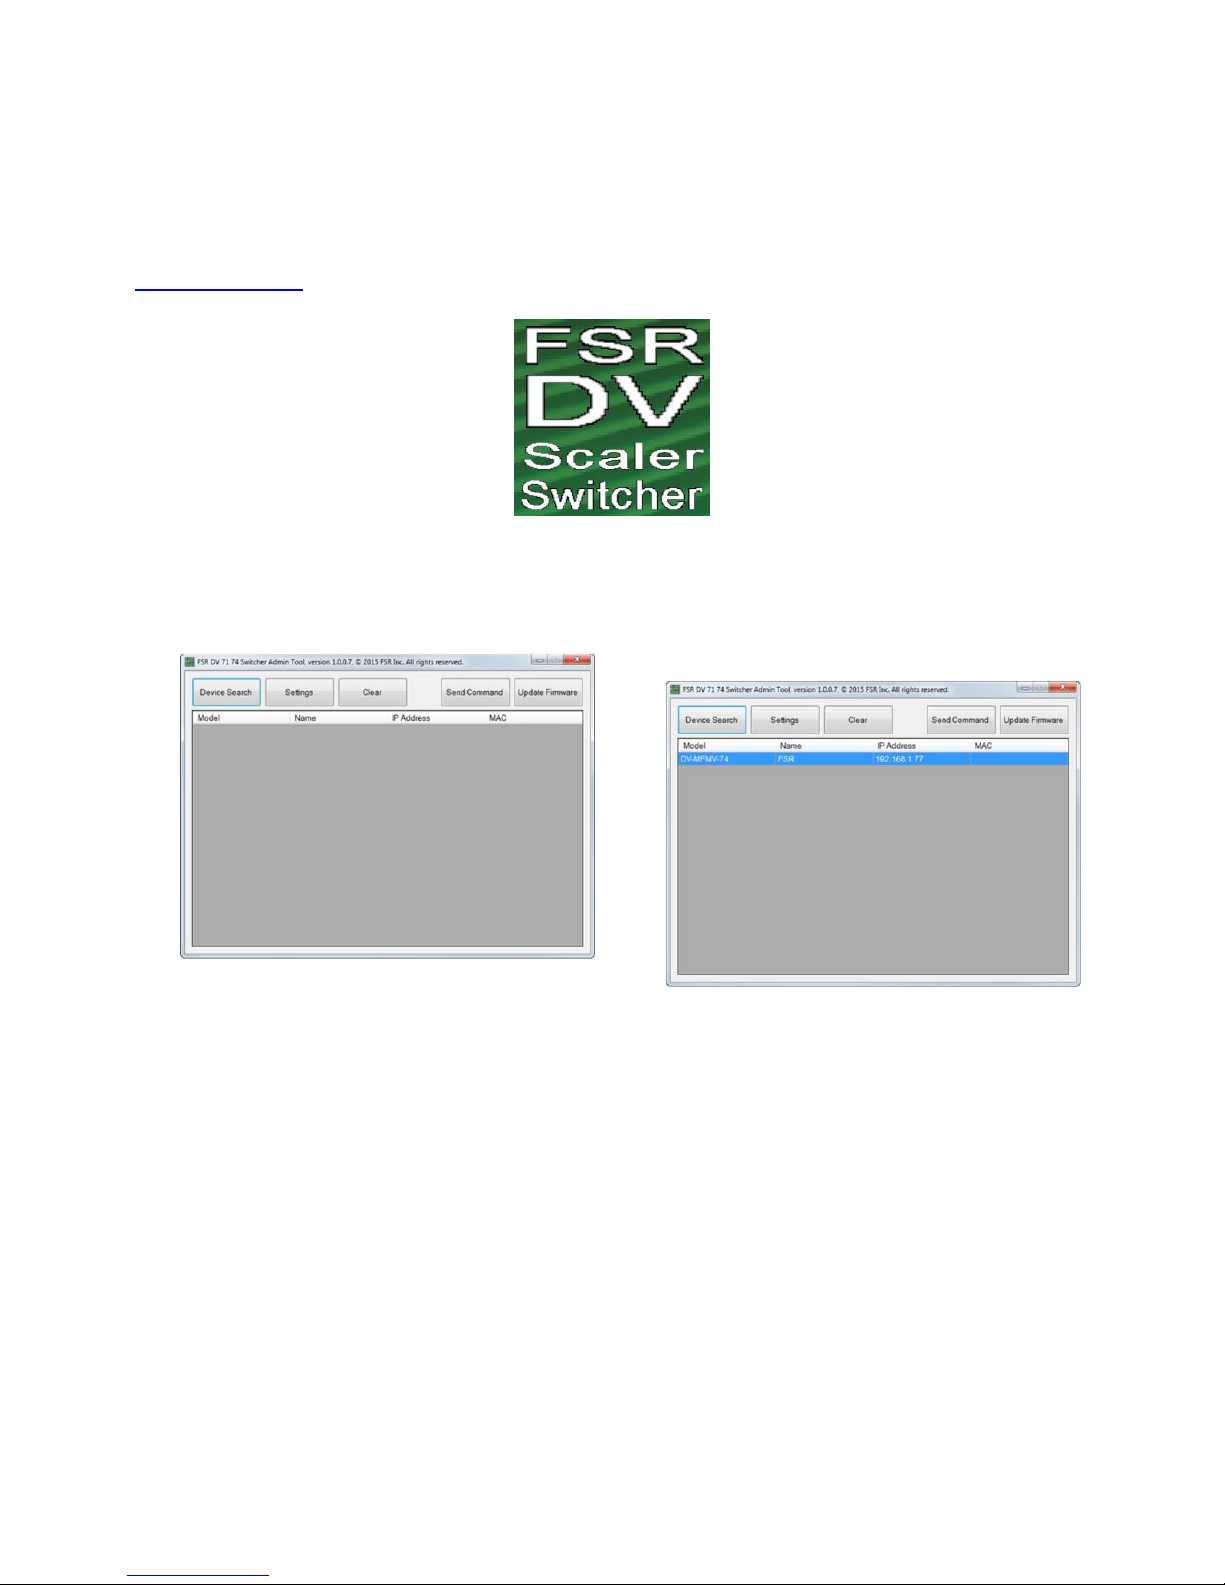
IP CONFIGURATION TOOL APPLICATION
To obtain the IP address and port number via the IP CONFIGURATION TOOL APPLICATION:
Download the application "FSR_DV_71_74_Switcher.exe" file from the FSR Document Library
at www.fsrinc.com.
NOTE: Make sure the PC and DV-MFSS-71 are on the same network.
Run the application on the PC to show
the main screen:
Click Device Search, the following
device list is shown. Select the
device, and click Settings
17
Page 18
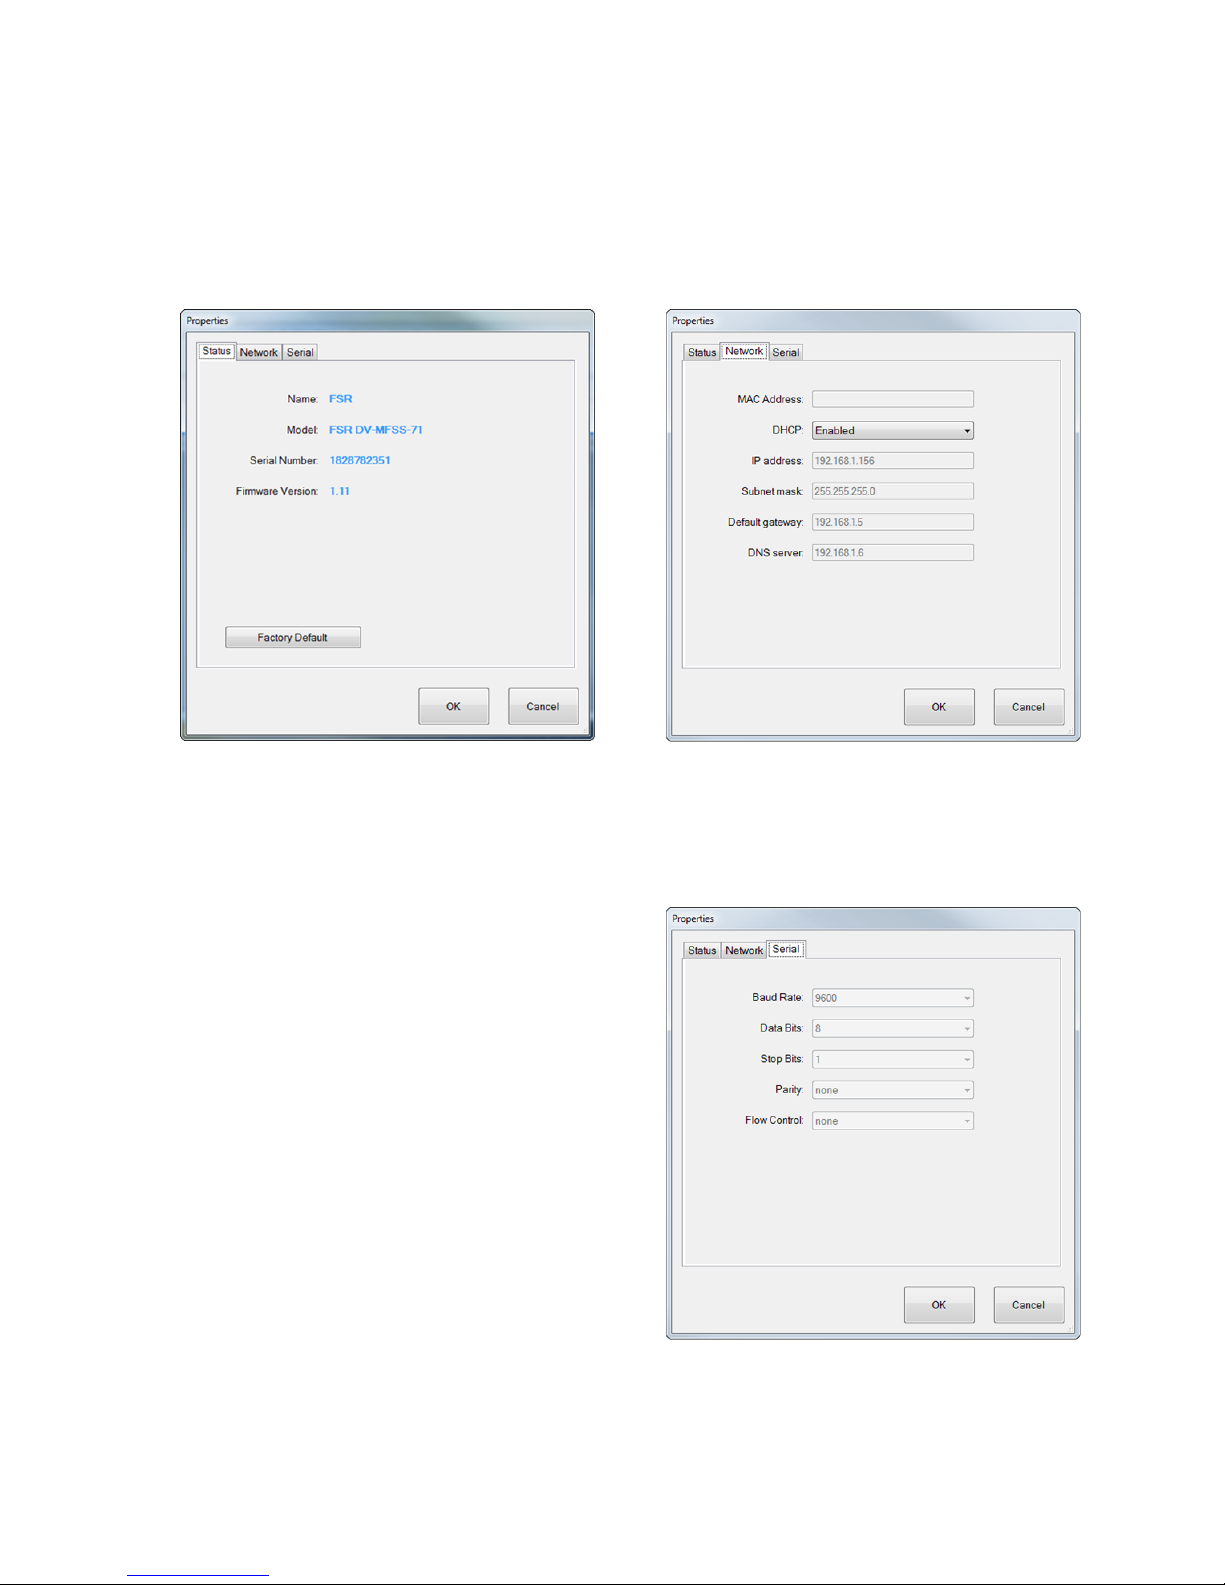
The screen defaults to the Status tab
where the DV-MFSS-71's information
is shown.
The DV-MFSS-71 settings can be
returned to factory default by clicking
Factory Default.
Click the Network tab to view the
DV-MFSS-71’s IP information. DHCP
is enabled by default. The static IP
address can be entered manually by
disabling the DHCP via the pulldown
menu.
The Serial tab is an informational
screen that will display the
DV-MFSS-71 serial port settings. The
settings are fixed at 9600, 8, 1, None
and None.
18
Page 19
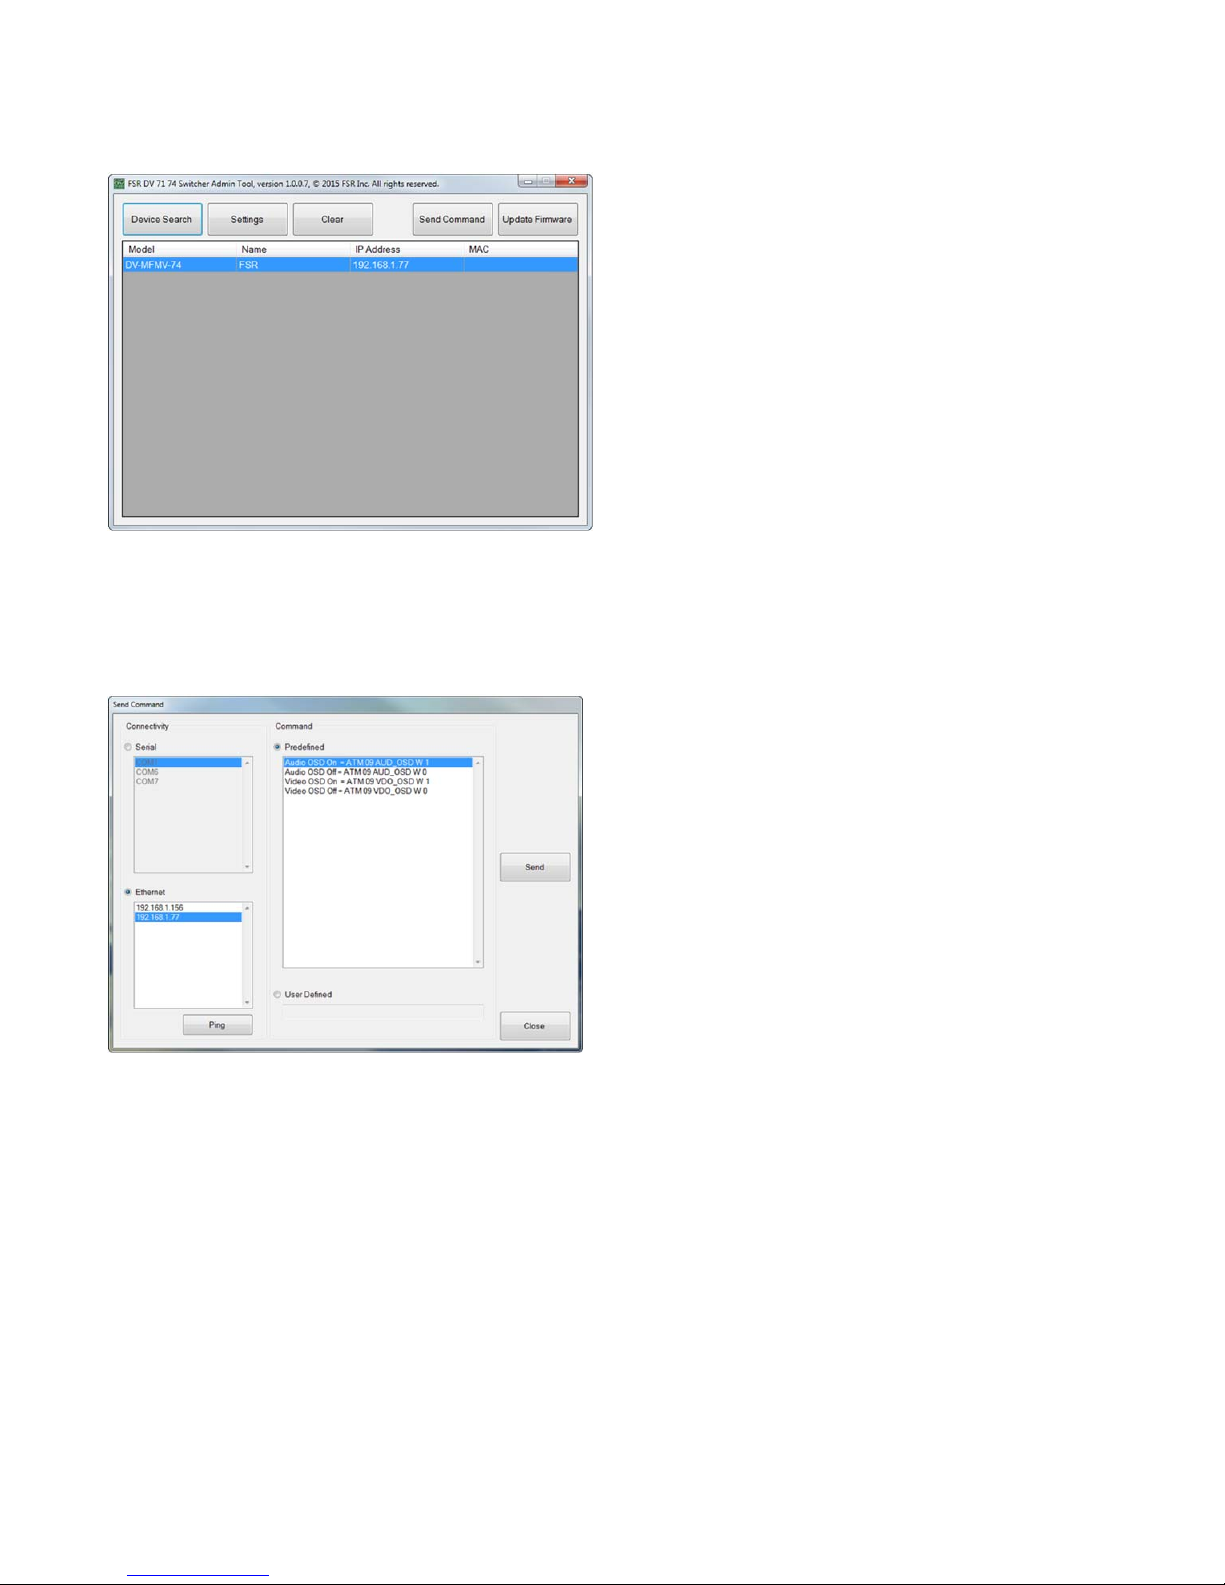
Single commands may be sent to change the display capabilities of the unit by clicking on
SEND COMMAND.
Select either Ethernet or Serial radio button
Select the appropriate COM port or Ethernet address.
Then either select a predefined command or enter a user defined command.
Click the SEND button to send the command:
Page 20
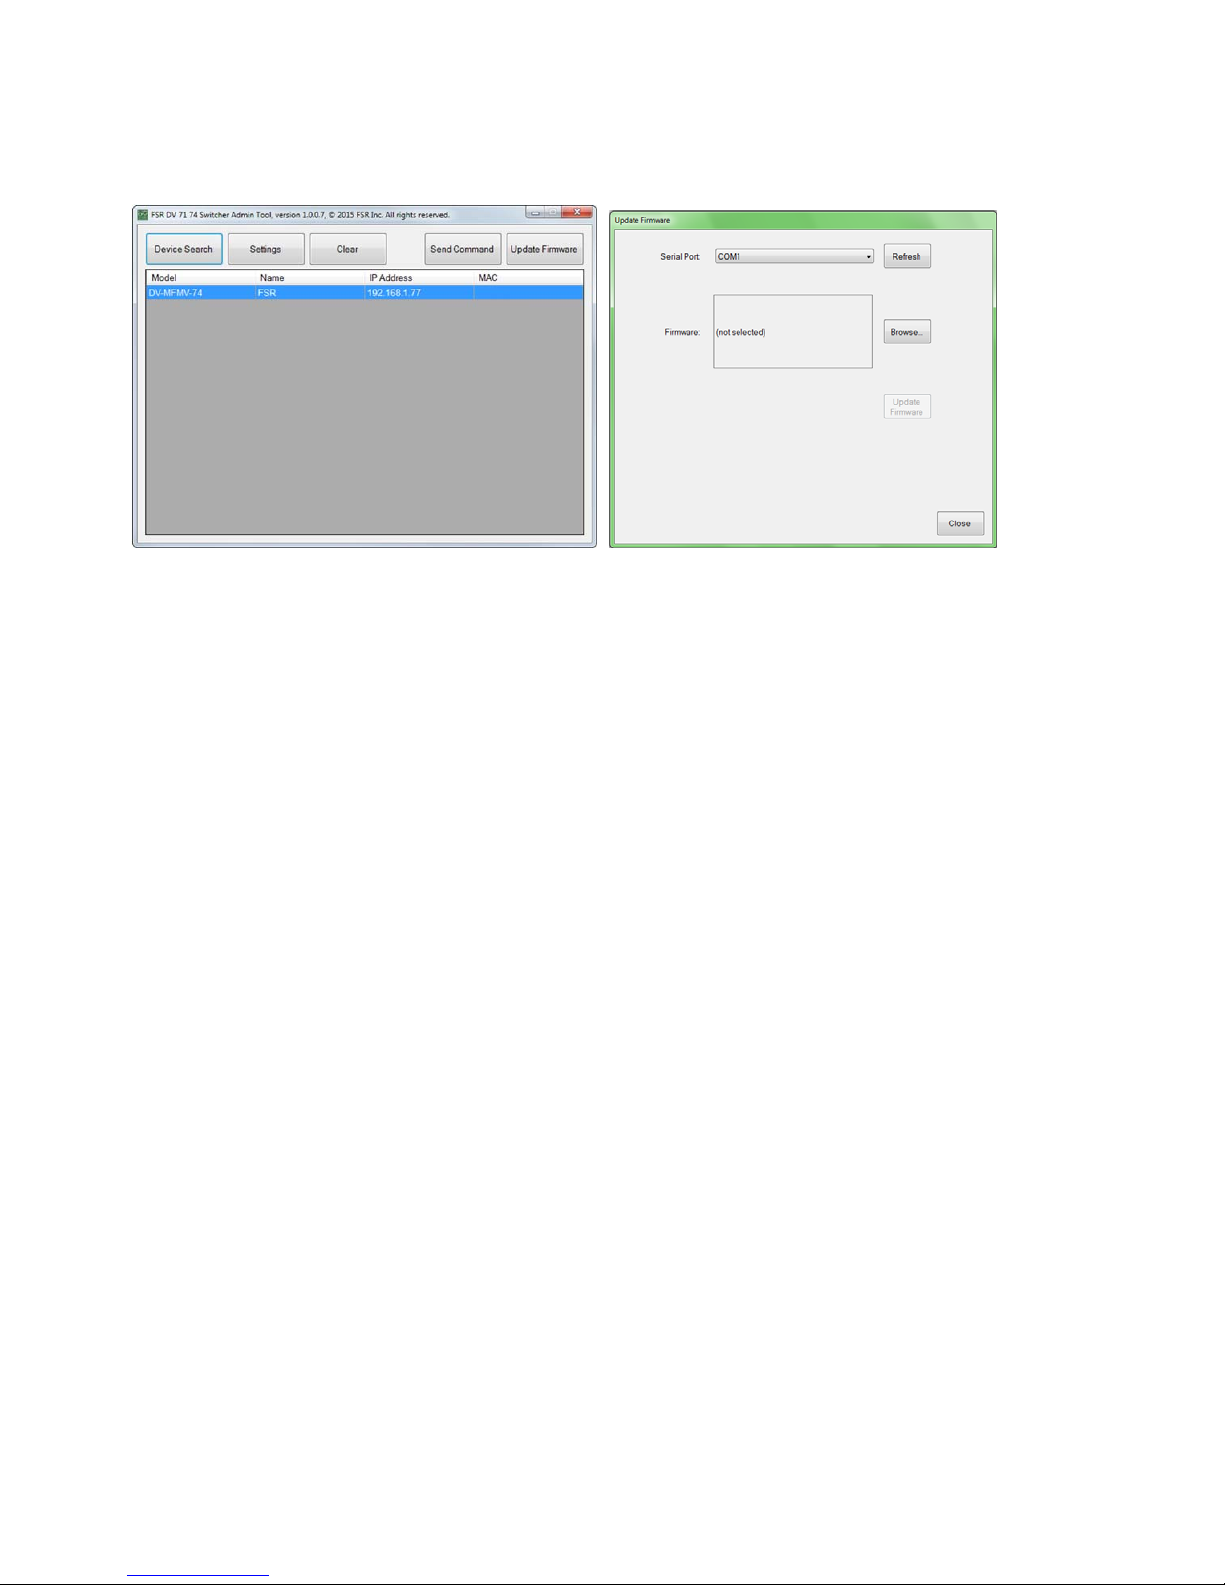
FIRMWARE UPDATE (EXTERNAL CONTROL BOARD)
Download the update file from the FSR website doc library.
(Example: FSR_741_20xx_xxxx_xxx.frm)
1. Connect a Serial straight-through cable to the DV-MFSS-71's RS-232 port. If present,
disconnect the Ethernet cable from the LAN port.
2. Turn on the DV-MFSS-71 and wait for it to finish booting up before proceeding to the
next step.
3. Click on "Update Firmware".
4. Select a Serial port.
5. Browse for the location of the firmware file.
6. Click on "Update Firmware" and wait for its completion.
7. Power cycle the DV-MFSS-71 by disconnecting the power supply.
The current firmware version can be obtained from the "Status" tab.
IMPORTANT: Do not power OFF or remove the Serial cable during the firmware upgrade.
20
Page 21
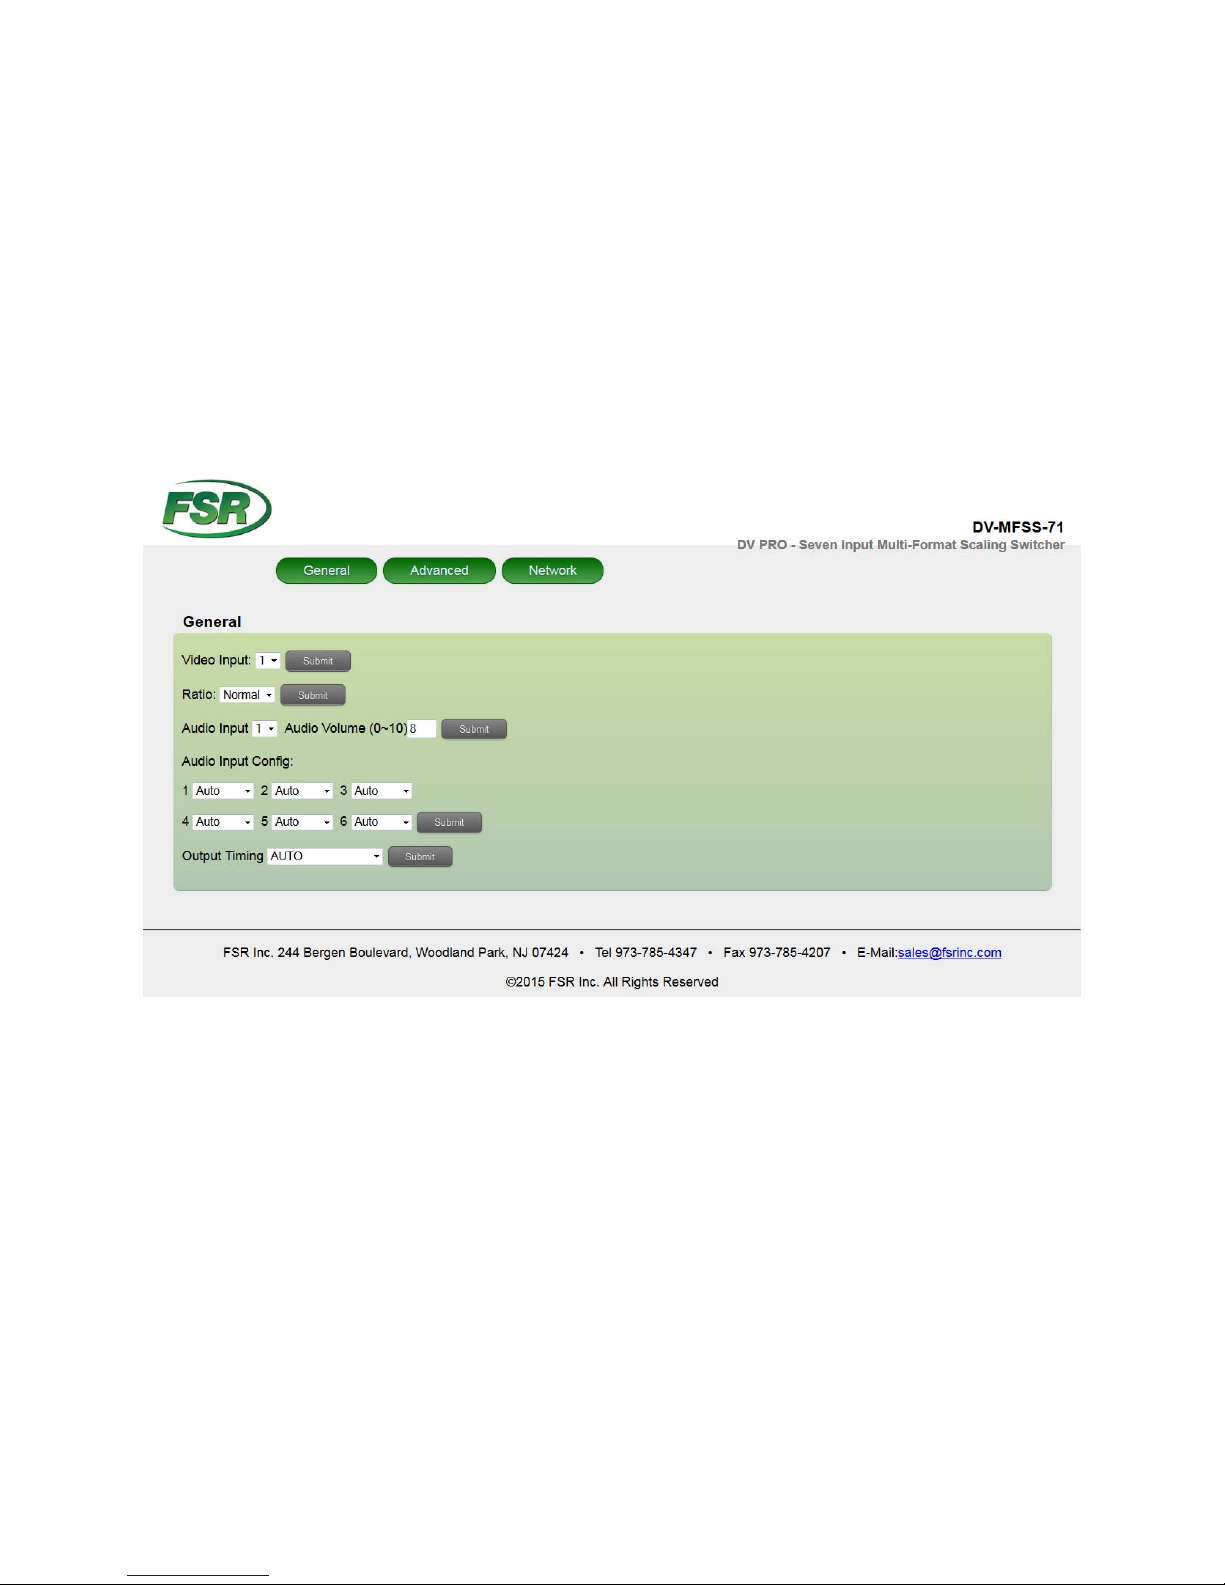
EMBEDDED WEB SERVER
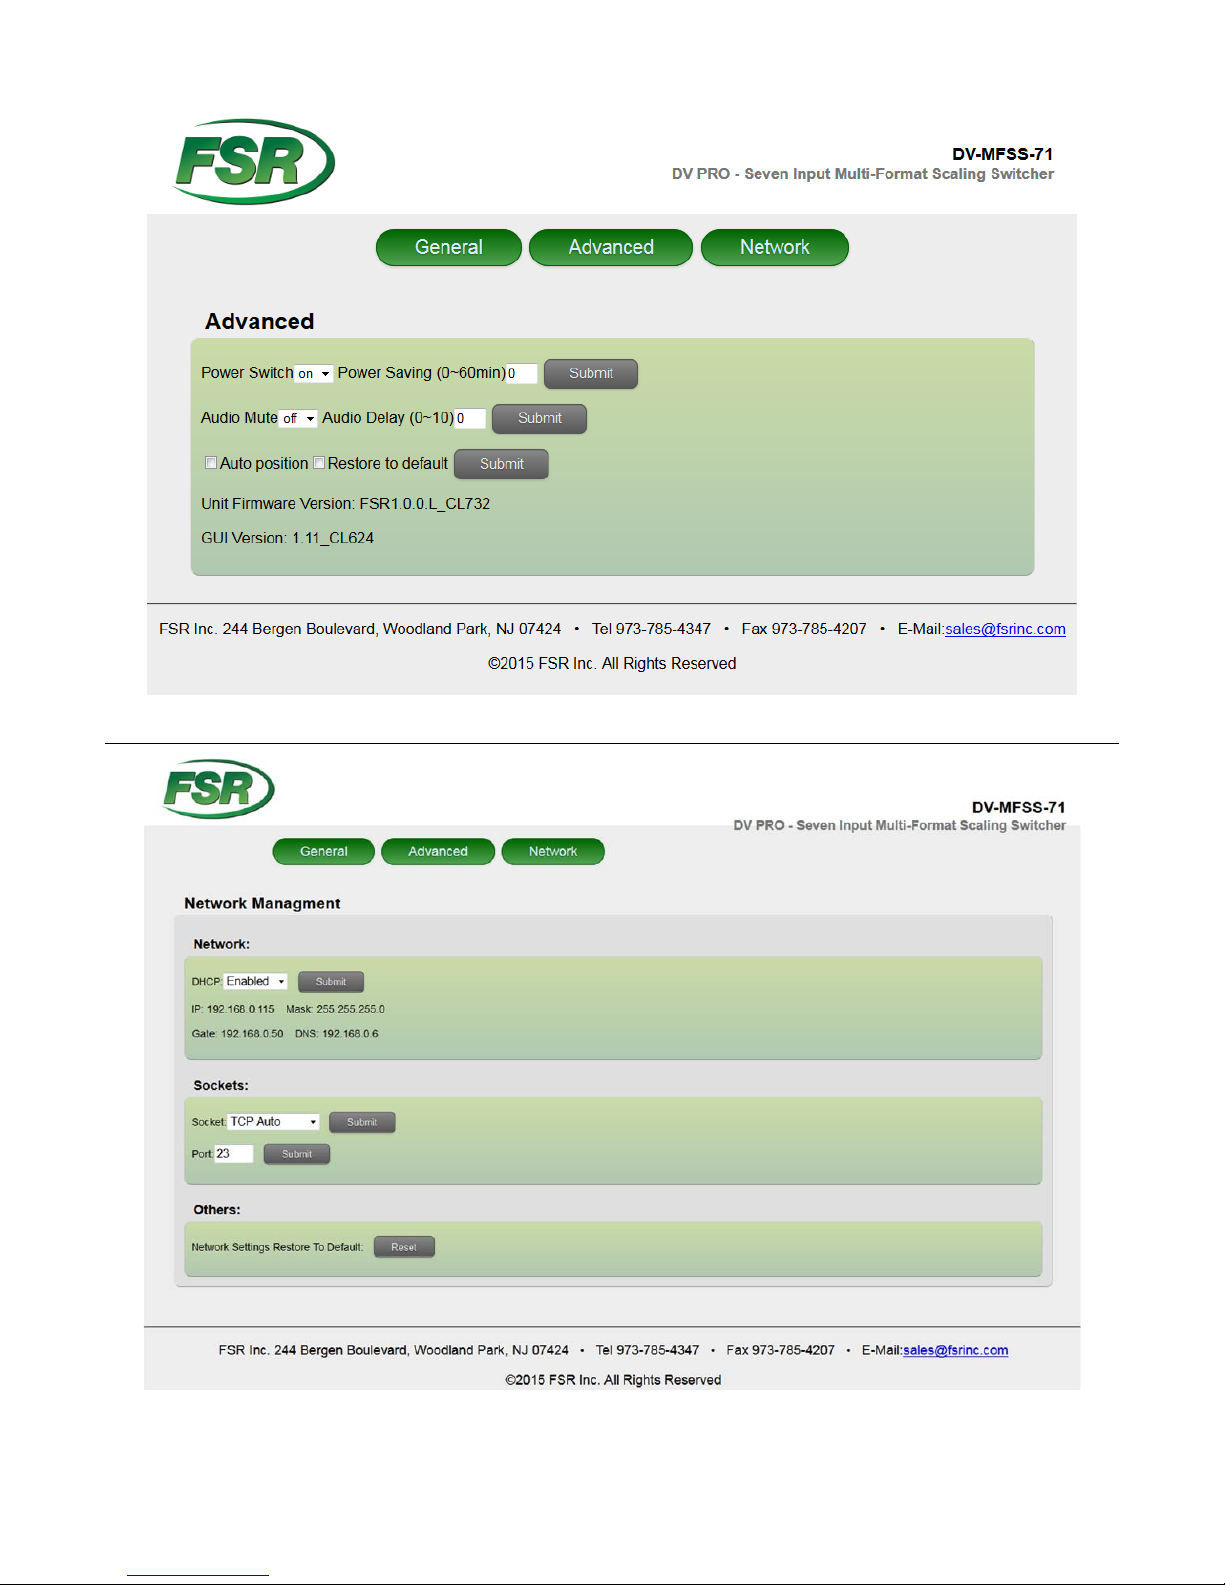
The DV-MFSS-71 can be controlled via a Web browser, which contains General, Advanced and
Network settings. For more information about how to obtain the IP address, see the section on
“IP SETTINGS”.
For example, the obtained IP address is 192.168.0.115
Type 192.168.0.115 in the address bar of the web browser
21
Page 22
22
Page 23
CONTROL PORTS
To control the DV-MFSS-71 use the RS-232 or LAN port but not both at the same time.
RS-232 SETTINGS
RS-232 Settings
Baud rate 9600
Data bits 8
Parity None
Stop bits 1
Flow control None
DTE DB-9 DCE
Computer Pin DV-MFSS-71
Rx 2 Tx
Tx 3 Rx
Ground 5 Ground
NOTE: For serial control, use a straight-through cable.
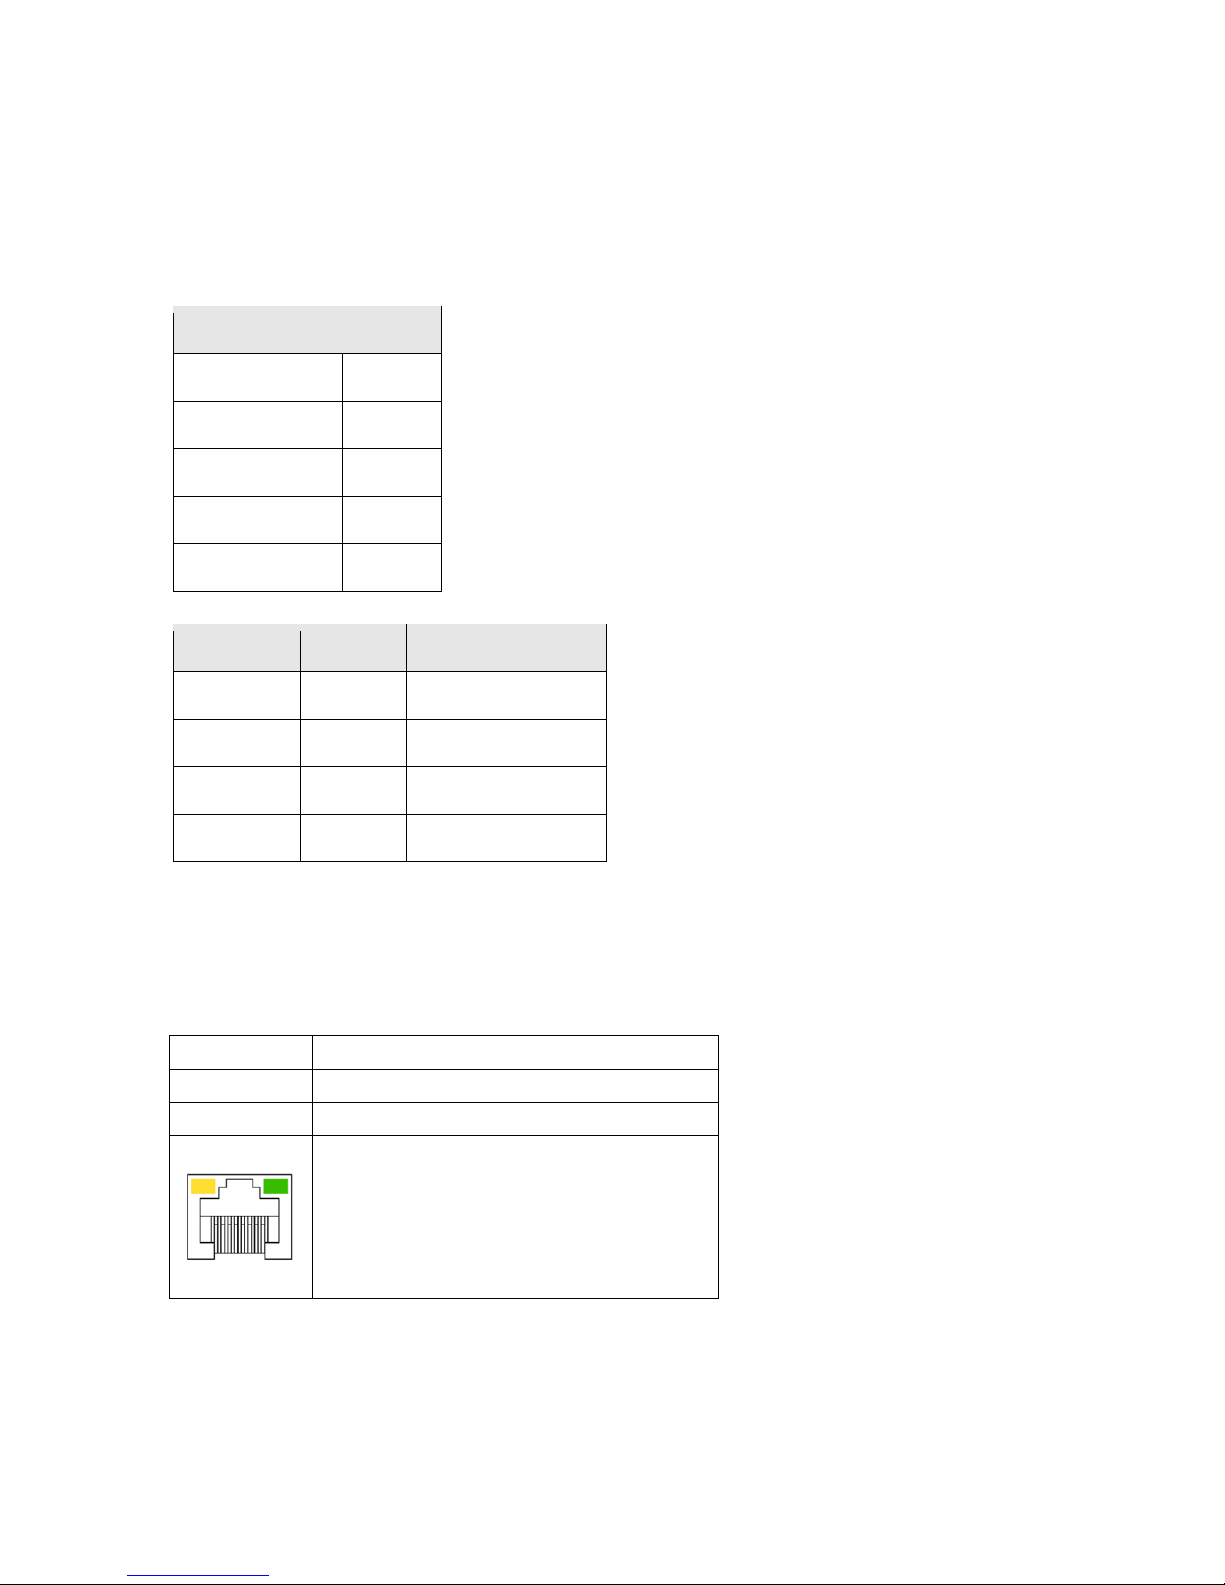
ETHERNET SETTINGS
DHCP ON (Default)
Telnet port 23 (Default)
Speed 10/100Mbps
Yellow = Link
Green = Speed/Activity at 100Mbps
23
Page 24
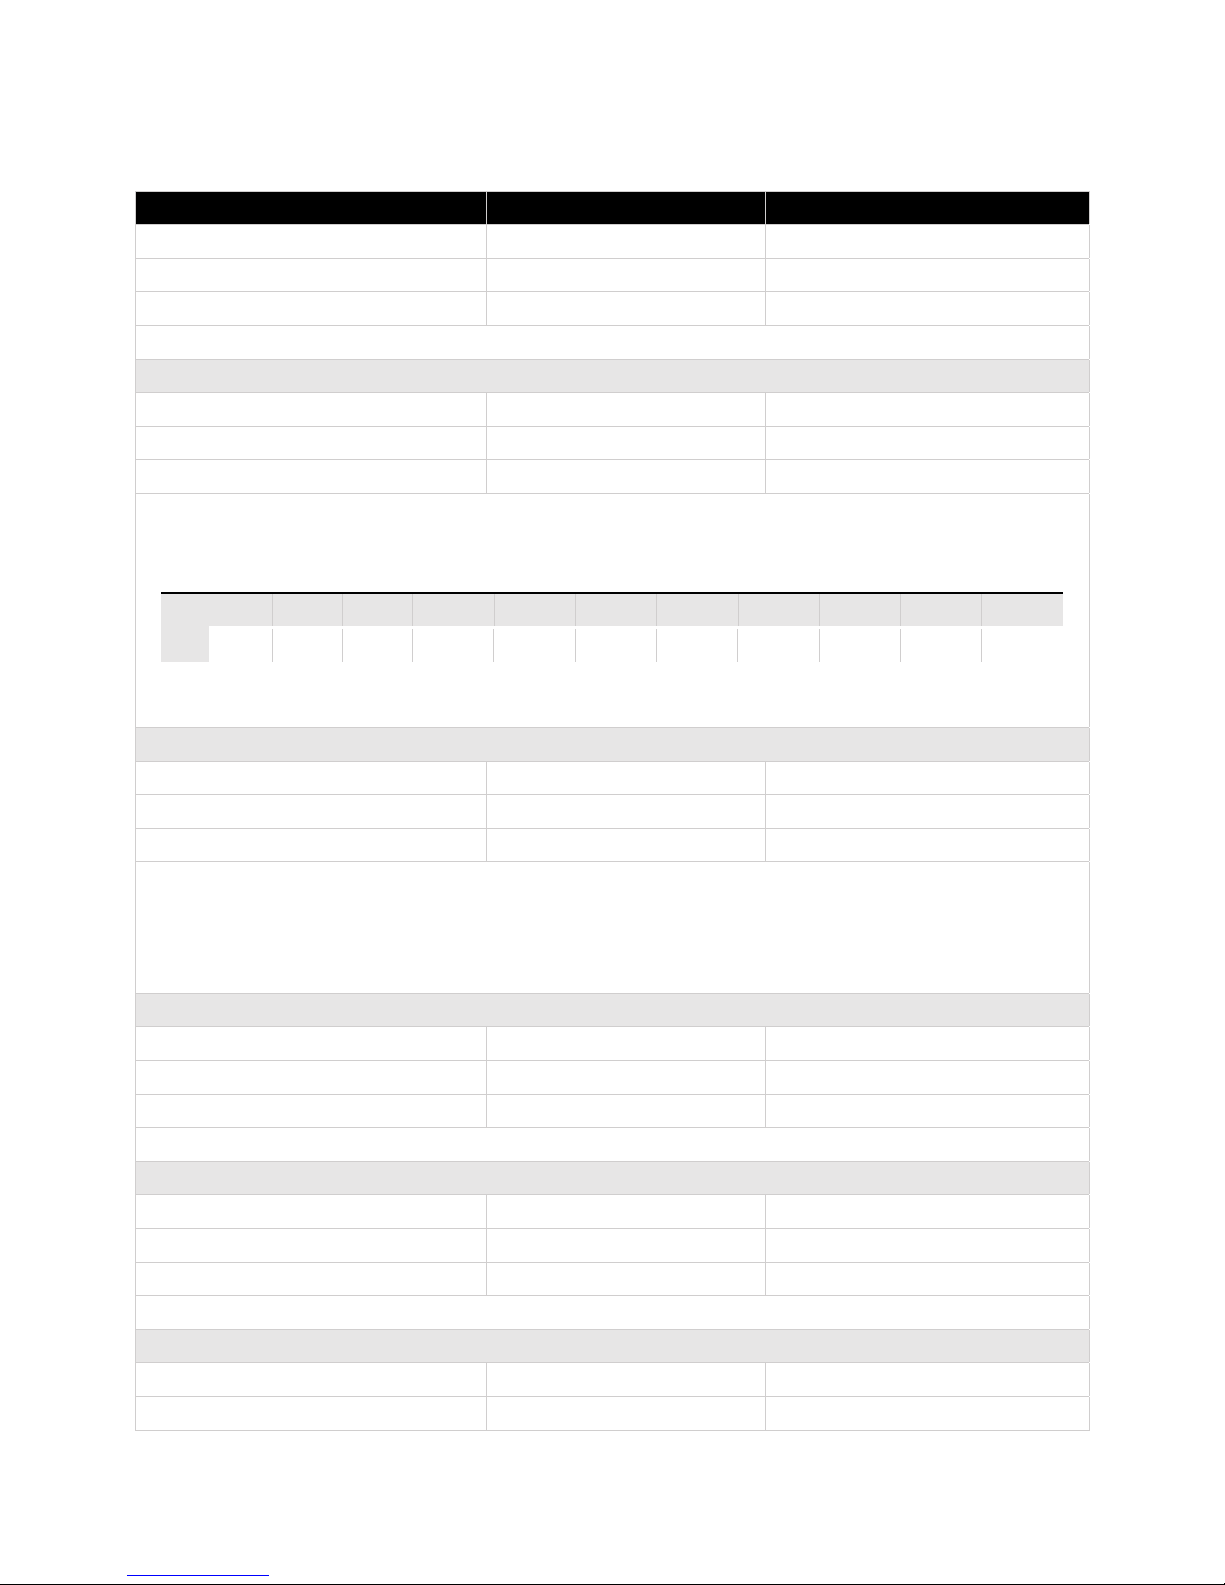
RS-232 SERIAL AND ETHERNET CONTROL PROTOCOL
Settings Command Reply
Aspect ratio ATM 0A WIN_RAT W 1 X 0A WIN_RAT W 1 X
Ex: Input set to 16:9 ATM 0A WIN_RAT W 1 3 0A WIN_RAT W 1 3
Window aspect ratio request ATM 09 WIN_RAT R 1 09 WIN_RAT R X WIN_RAT 1 X
X = (1 = Normal, 2 = Full, 3 = 16:9 or 4 = 4:3)
Audio delay ATM 09 AUD_DLY W X 09 AUD_DLY W X
Ex: Audio delay OFF ATM 09 AUD_DLY W 0 09 AUD_DLY W 0
Audio delay request ATM 08 AUD_DLY R 08 AUD_DLY R AUD_DLY X
Audio delay
0 1 2 3 4 5 6 7 8 9 A
X
OFF 40ms 80ms 120ms 160ms 200ms 240ms 280ms 320ms 360ms 400ms
Audio input configuration ATM 0A AUD_MOD W X Y 0A AUD_MOD W X Y
Ex: Input 2 set to external ATM 0A AUD_MOD W 2 1 0A AUD_MOD W 2 1
Audio input configuration request ATM 09 AUD_MOD R X 09 AUD_MOD R X Port X Audio: Y
X = Input (1-4)
Y = (0 = Auto or 1 = External)
Auto: Analog or HDMI audio (priority)
External: Only analog audio
Audio OSD ATM 09 AUD_OSD W X 09 AUD_OSD W X
Ex. Audio OSD OFF ATM 09 AUD_OSD W 0 09 AUD_OSD W 0
Audio OSD request ATM 08 AUD_OSD R 08 AUD_OSD R AUD_OSD X
X = (0 = OFF and 1 = ON)
Audio select ATM 09 ADO_IPT W X 09 ADO_IPT W X
Ex: Audio input 2 ATM 09 ADO_IPT W 2 09 ADO_IPT W 2
Audio input request ATM 08 ADO_IPT R 08 ADO_IPT R ADO_IPT X
X = Input (1-7)
Copy display's EDID ATM 09 EDI_CPY X Y 09 EDI_CPY X Y
Ex: Copy display's EDID to input 4 ATM 09 EDI_CPY 1 4 09 EDI_CPY 1 4
24
Page 25
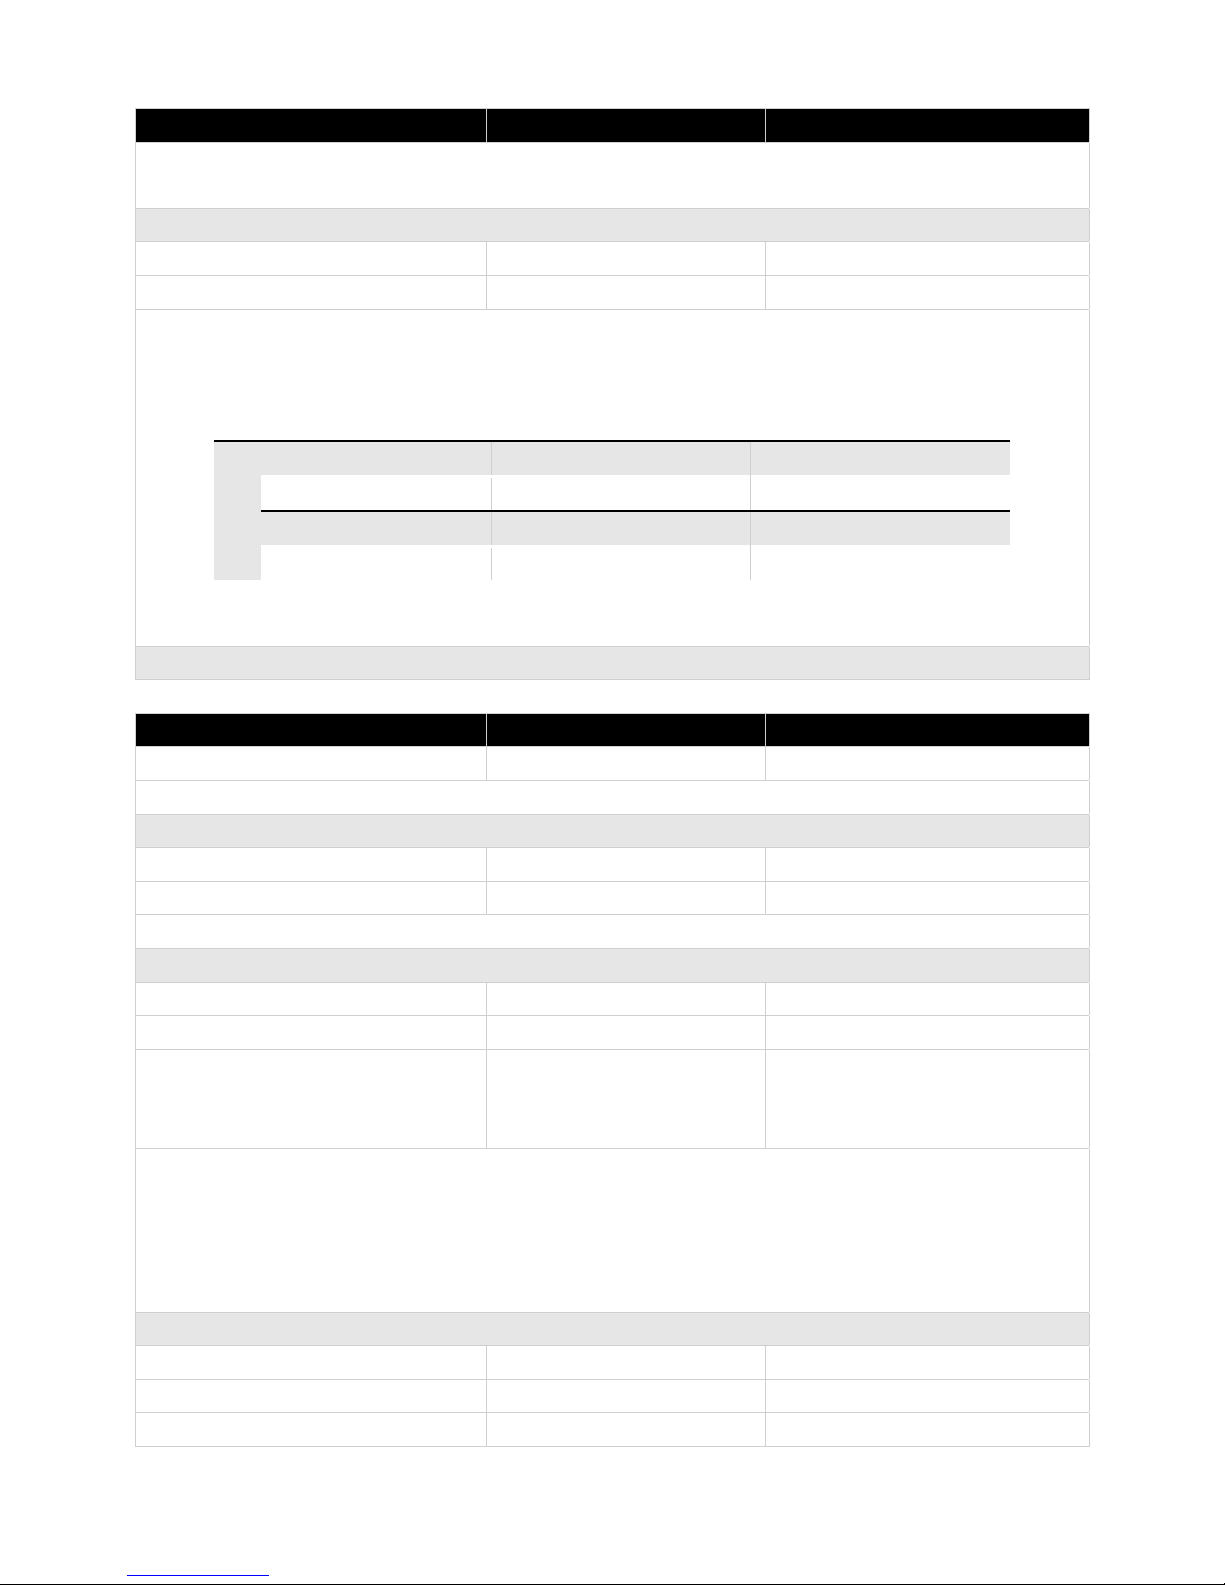
Settings Command Reply
X = Output (1 = Main output or 2 = Second output if applicable)
Y = Input (1-7)
EDID presets ATM 0B EDI_POR W X C Y 0B EDI_POR W X C Y
Ex: Assign EDID preset 3 to input 1 ATM 0B EDI_POR W 1 C 3 0B EDI_POR W 1 C 3
X = input (1-7)
EDID presets
1 2 3
Y
4Kx2K 30Hz 7.1Ch 4Kx2K 30Hz 2Ch 1920x1080 60Hz 7.1Ch
4 5 6
1920x1080 60Hz 2Ch 1920x1080 60Hz (VGA) 4Kx2K 60Hz (DisplayPort)
Settings Command Reply
Firmware version request ATM 08 CSW_VER W 08 CSW_VER W X
Ex: X = FSR1.0.0.L Data:2015.07.15
HDCP input ATM 09 IPT_DCP W X 09 IPT_DCP W X
Ex: HDCP input ON ATM 09 IPT_DCP W 1 09 IPT_DCP W 1
X = (0 = OFF and 1 = ON)
HDCP output ATM 0A HDO_HDP W X Y 0A HDO_HDP W X Y
Ex: HDMI 1 HDCP output ON ATM 0A HDO_HDP W 1 0 0A HDO_HDP W 1 0
HDCP output request ATM 08 HDO_HDP R 08 HDO_HDP R
HDMI_1_HDCP: Z
HDMI_2_HDCP: Z
X = Output (1 = Main output or 2 = Second output if applicable)
Y = (0 = ON or F = OFF)
Z = ON or OFF
HDMI_1_HDCP = Main output
HDMI_2_HDCP = Second output if applicable
HDMI output audio mute ATM 09 AUD_OPT W X 09 AUD_OPT W X
Ex: HDMI audio output mute ON ATM 09 AUD_OPT W 1 09 AUD_OPT W 1
HDMI output audio mute request ATM 08 AUD_OPT R 08 AUD_OPT R AUD_OPT X
25
Page 26
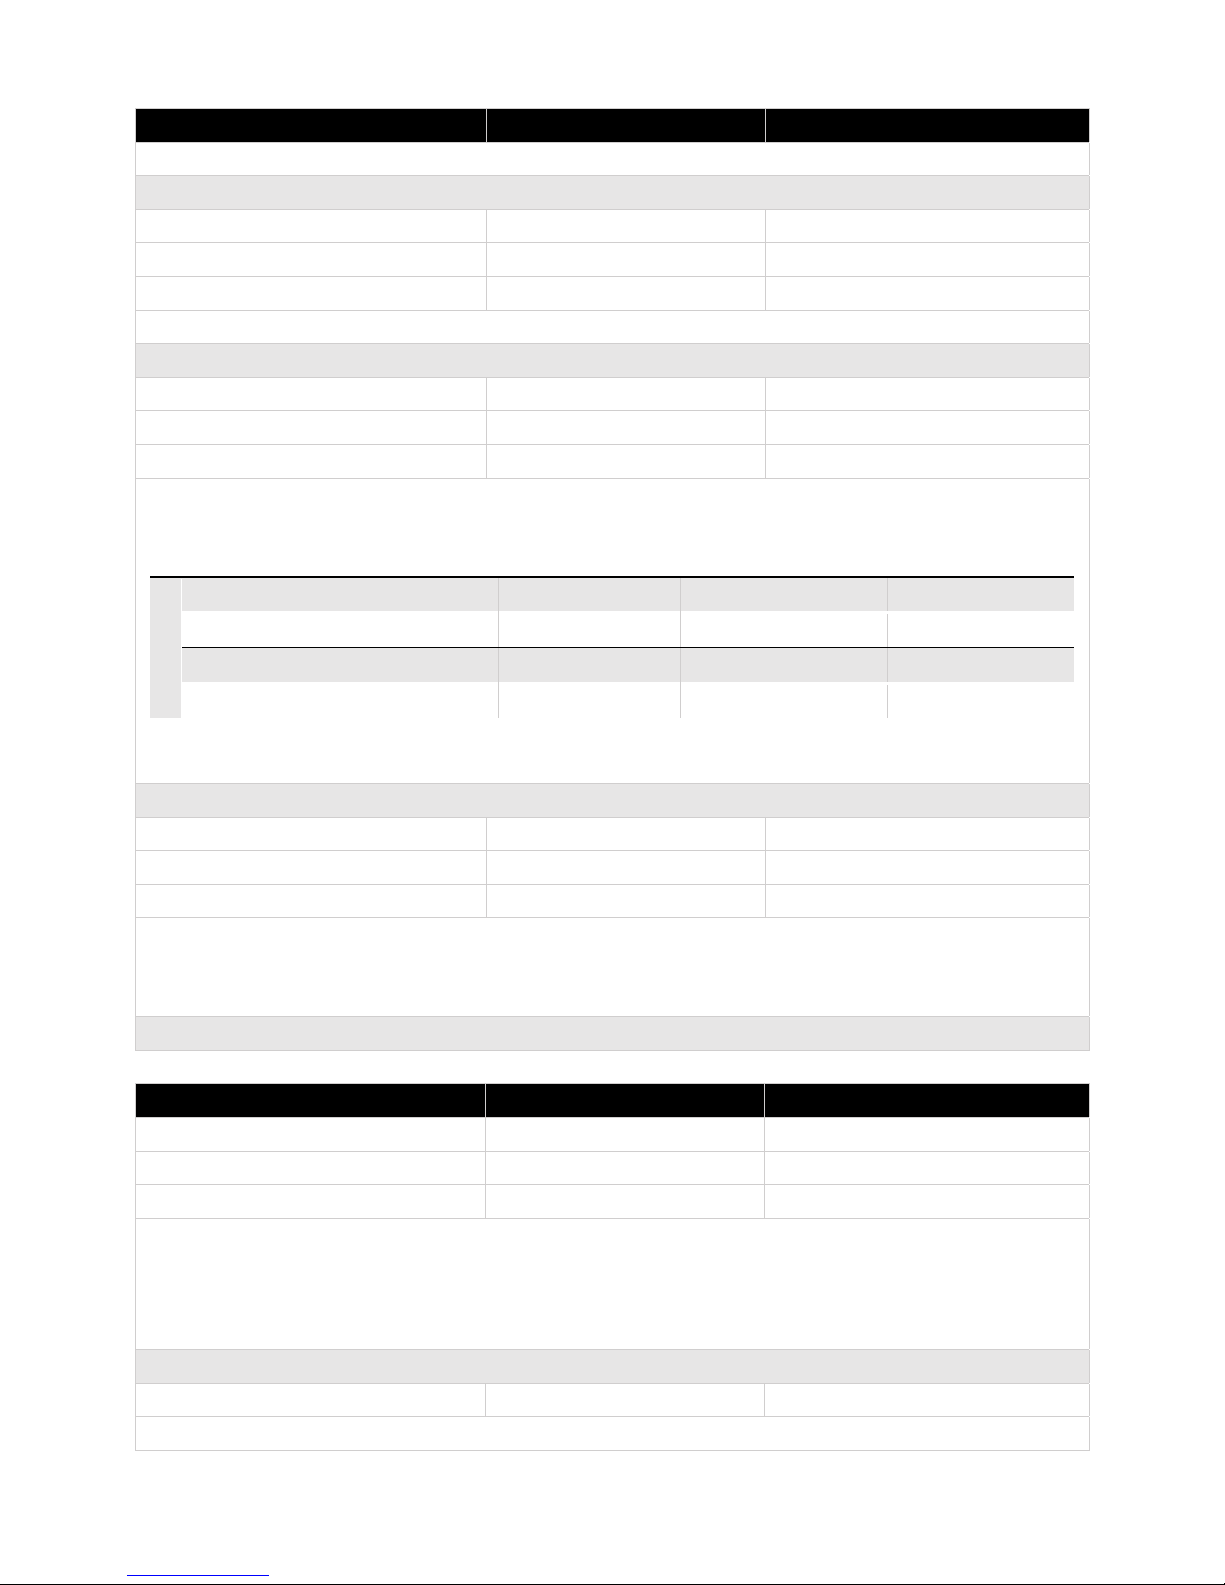
Settings Command Reply
X = (0 = Mute OFF or 1 = Mute ON)
Master audio mute ATM 09 AUD_MUT W X 09 AUD_MUT W X
Ex: Master audio mute OFF ATM 09 AUD_MUT W 0 09 AUD_MUT W 0
Master audio mute request ATM 08 AUD_MUT R 08 AUD_MUT R AUD_MUT X
X = (0 = Mute OFF or 1 = Mute ON)
Output timing ATM 09 OPT_TIM W X 09 OPT_TIM W X
Ex: 1920x1080 60Hz ATM 09 OPT_TIM W 3 09 OPT_TIM W 3
Output timing request ATM 08 OPT_TIM R 08 OPT_TIM R OPT_TIM X
Output timing
1 2 3 4
Auto (Display's native resolution) 4Kx2K 30Hz 1920x1080 60Hz 1280x720 60Hz
X
5 6 7 8
1920x1200 60Hz 1600x1200 60Hz 1280x800 60Hz 1024x768 60Hz
Power ATM 09 POW_CRL W X 09 POW_CRL W X
Ex: power ON ATM 09 POW_CRL W 1 09 POW_CRL W 1
Power state request ATM 08 POW_CRL R 08 POW_CRL R POW_CRL X
X = (0 = OFF (Standby) or 1 = ON)
The Power ON command is the only command honored if the scaler switcher is OFF (Standby).
The entire Power ON command via Ethernet must be contained within a single TCP/IP packet.
Settings Command Reply
Power save ATM 0A POW_SAV W XX 0A POW_SAV W XX
Ex: Power save set to 30 minutes ATM 0A POW_SAV W 1E 0A POW_SAV W 1E
Power save request ATM 08 POW_SAV R 08 POW_SAV R POW_SAV R XX
XX = (00 – 3C), 00 = OFF and 3C = 60 minutes
Convert the decimal value to Hex and use the result as ASCII characters. Ex. 30 minutes = 1E (ASCII)
The scaler switcher will turn OFF (Standby) at the specified time if there is no video present on the
selected input and it will turn ON automatically if there is video present on the selected input.
Restore to factory default ATM 08 RST_SET W 08 RST_SET W
26
Page 27
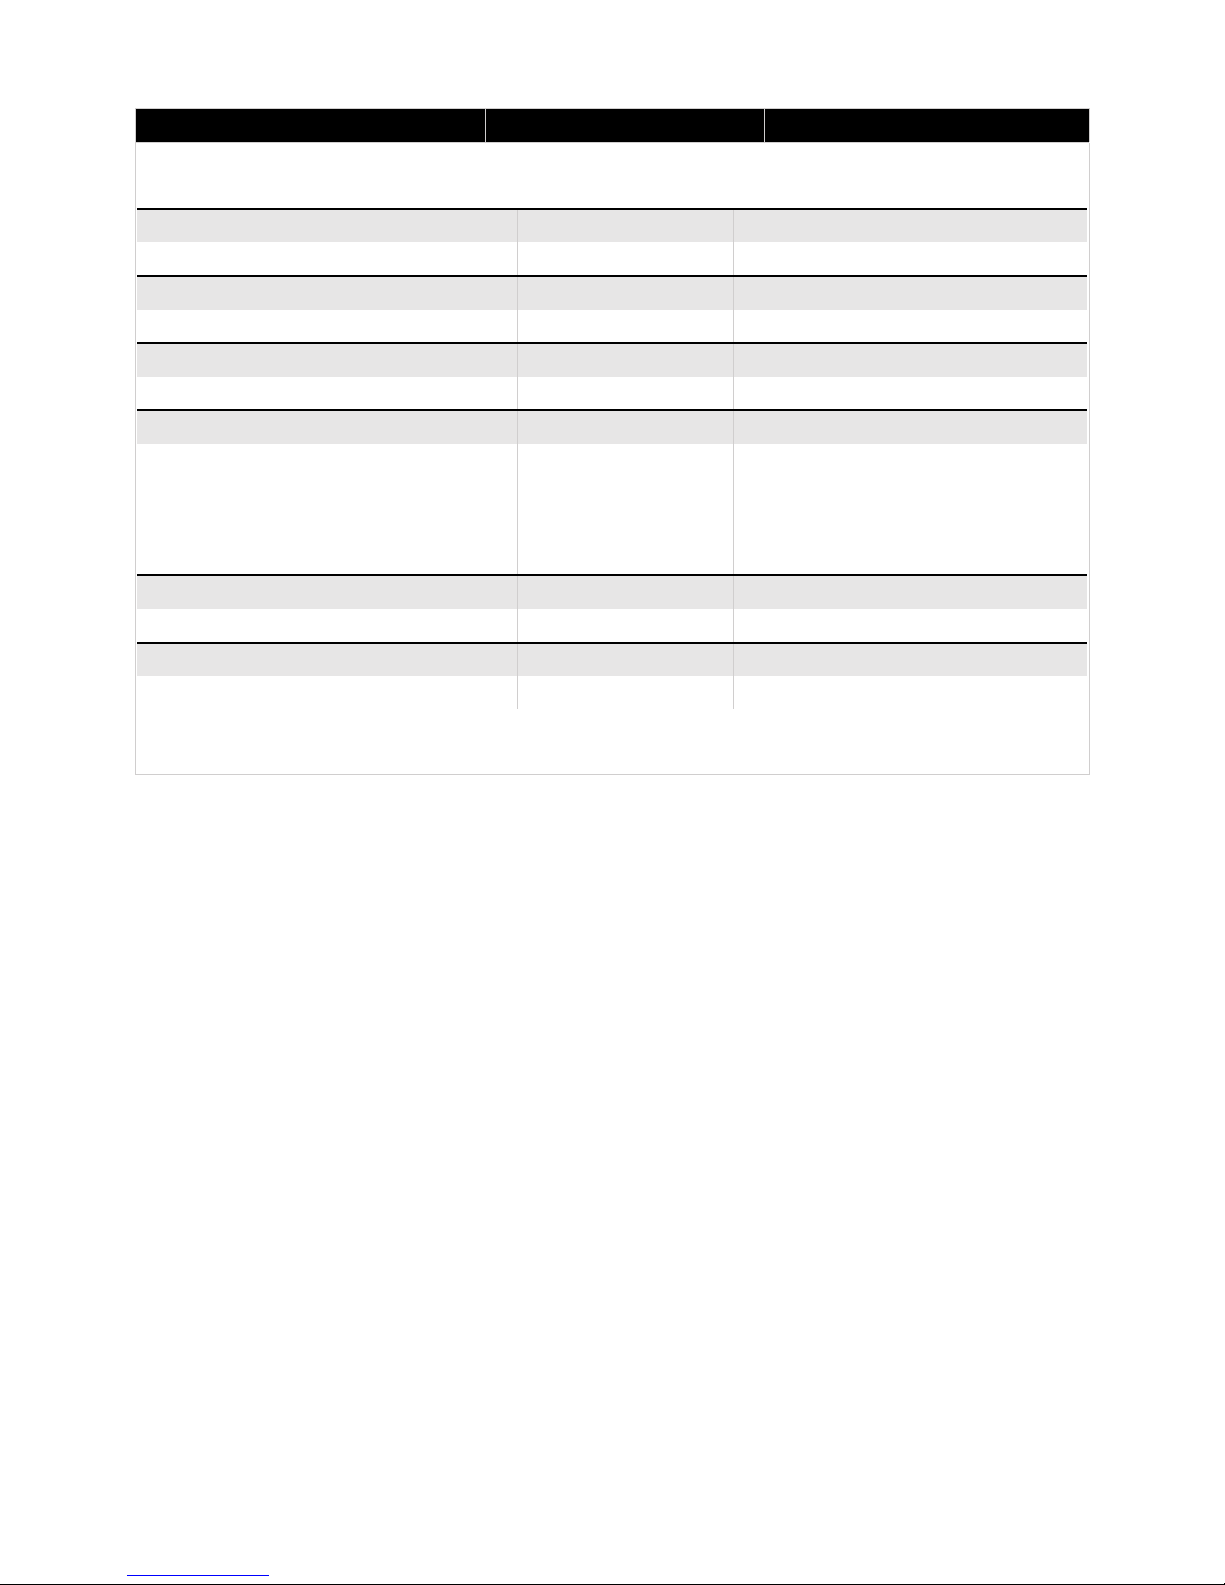
Settings Command Reply
Factory default
Aspect ratio Audio delay Audio input configuration
Normal OFF Auto
Audio OSD Audio selected DHCP
ON 1 ON
HDCP input HDCP output HDMI audio mute
ON ON OFF
Input EDID Master audio mute Output timing
HDMI 1-4: 4Kx2K 30Hz 7.1Ch
DisplayPort 5: 4Kx2K 60Hz
DVI 6: 4Kx2K 30Hz
VGA 7: 1920x1080 60Hz
Power save Video OSD Video selected
OFF ON Input 1
Volume
8
OFF Auto (Display's native resolution)
27
Page 28
Settings Command Reply
VGA auto adjust*
* The VGA auto adjust command can
also be executed by pressing and
holding the input 7 switch for 3
seconds.
Video OSD ATM 09 VDO_OSD W X 09 VDO_OSD W X
Ex: Video OSD ON ATM 09 VDO_OSD W 1 09 VDO_OSD W 1
Video OSD request ATM 08 VDO_OSD R 08 VDO_OSD R VDO_OSD X
X = (0 = OFF and 1 = ON)
Video select ATM 0A VDO_IPT W 1 X 0A VDO_IPT W 1 X
Ex: Input 4 ATM 0A VDO_IPT W 1 4 0A VDO_IPT W 1 4
Video select request ATM 09 VDO_IPT R 1 09 VDO_IPT R 1 VDO_IPT 1 X
X = Input (1-7)
Volume ATM 09 VOL_CRL W X 09 VOL_CRL W X
Ex: Volume set to 5 ATM 09 VOL_CRL W 5 09 VOL_CRL W 5
Ex: Volume Up ATM 09 VOL _CRL W + 09 VOL_CRL W +
Volume request ATM 08 VOL_CRL R 08 VOL_CRL R VOL_CRL Y
X = (0-A, + = Up or - = Down), 10 = A
Y = (0-A), 10 = A
Volume control for HDMI and analog audio out.
ATM 08 VGA_AUT W 08 VGA_AUT W
28
Page 29

FIRMWARE UPDATE (AUDIO AND VIDEO BOARD)
Download the MERGE.BIN file from the FSR website doc library
The DV-MFSS-71 can be updated through a USB drive as follows.
1. Copy the MERGE.BIN update file to the root directory of a blank USB drive.
2. Connect the USB drive to the USB service port on the rear of the DV-MFSS-71. If
present, disconnect the Serial and Ethernet cable from its respective port.
3. Connect the HDMI output of the DV-MFSS-71 to a display.
4. Turn on the DV-MFSS-71 and wait for it to finish booting up before proceeding to the
next step.
5. Press and hold Input Select 1 until, "System upgrading..." appears on the display. During
this process the button indicators will blink at a steady rate.
6. The DV-MFSS-71 will reboot automatically after loading the firmware.
7. Power cycle the DV-MFSW-71 by disconnecting the power supply.
The firmware version can be obtained using the "firmware version request" command.
IMPORTANT: Do not power OFF or remove the USB drive during the firmware upgrade.
29
Page 30
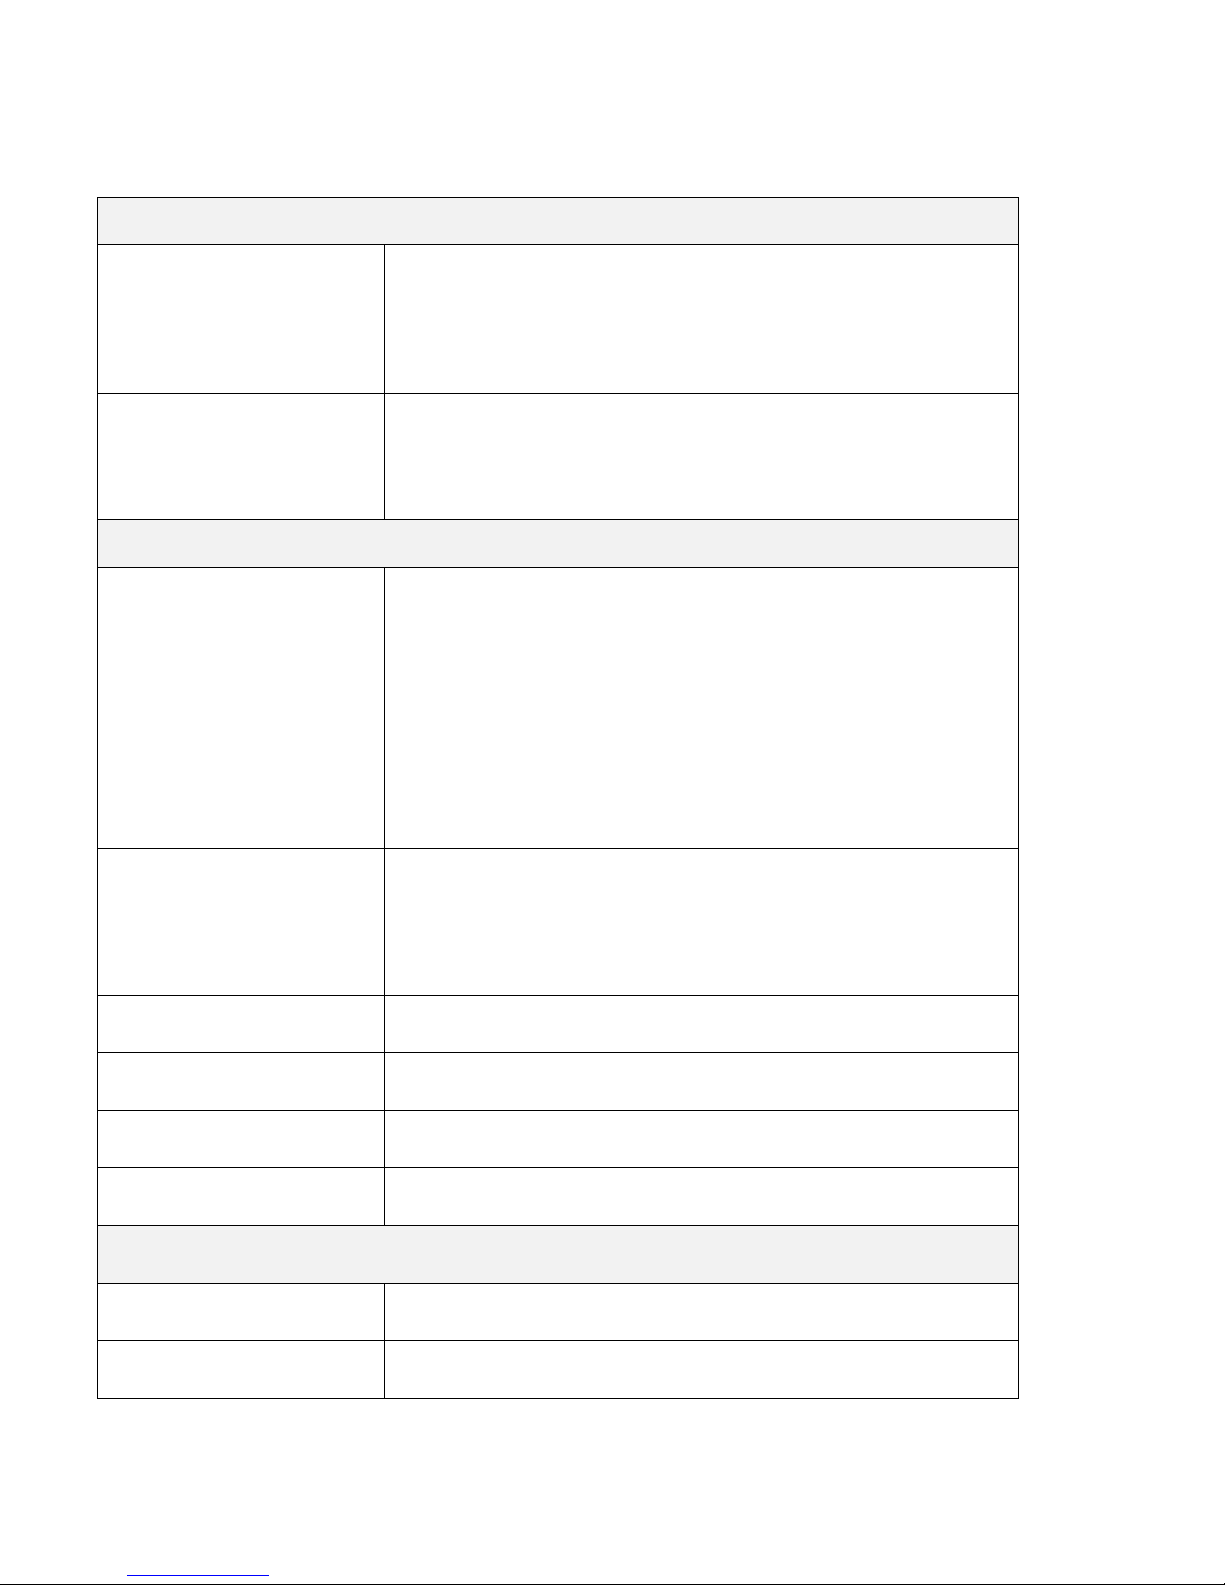
SPECIFICATIONS
Supported Formats
HDMI video up to 3840x2160 30Hz and audio up to 7.1Ch
Input
Output
Connectors
Input
Output
DisplayPort up to 3840x2160 60Hz
DVI up to 3840x2160 30Hz
VGA (RGB/YPbPr) up to 1920x1200 60Hz
HDMI video up to 3840x2160 30Hz and audio up to 7.1Ch
Stereo analog audio
Coax audio up to 7.1Ch
4 HDMI Type A 19-pin, female
1 DisplayPort (Full Size) 20-pin, female
1 DVI, female
1 VGA HD-15 15-pin, female
7 Program audio inputs via captive screw terminals
1 Mix audio input via captive screw terminals
1 HDMI Type A 19-pin, female
1 Stereo via captive screw terminals
1 Coax
RS-232 1 DB-9, female
LAN 1 RJ-45
USB 1 Type A 4-pin, female
Power consumption 12VDC, 1.5A Max
Physical
Dimensions (W x H x D) 12.8” x 1.71” x 7.09” (326mm x 43.5mm x 181mm)
Unit Weight 6lbs (3.3kg)
30
Page 31

31
 Loading...