

Page 1
Quick Start Guide
HQView6xx/HQUltra7xx/LEDView7xx
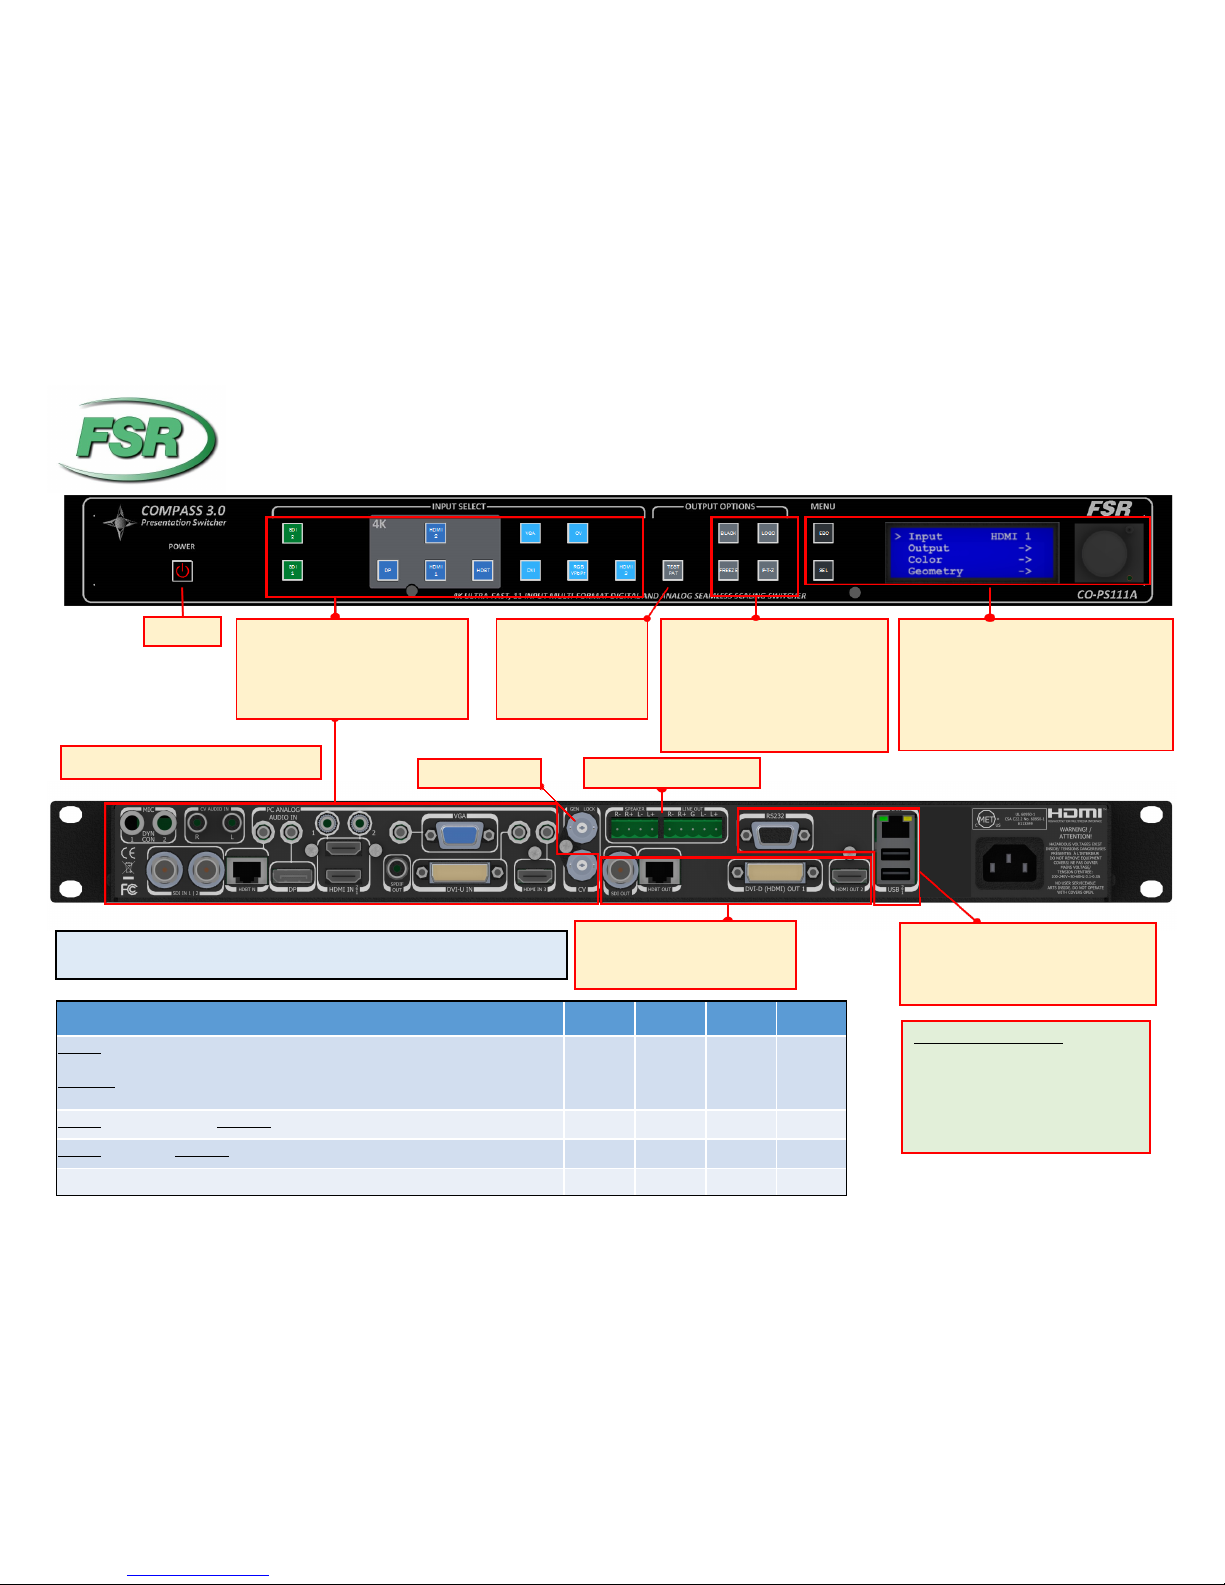
Test Paerns
Selects built-in test
paerns or stored
images. Use jog wheel
to scroll through
Funcon Shortcuts
● BLACK: Sets the o/p to black
● FREEZE: Freezes the output
● LOGO: Displays stored LOGO
● PTZ: Selects poron of the input
image to be scaled
Press to toggle funcons ON or OFF
Standby
Graphic image shown above is for the fully loaded CO-PS111A
Refer to the table below for other conguraons and their corresponding models
Outputs
● 1xHDMI 4K ● 1xDVI/HDMI
● 1xHDBaseT 4K ● 1x3G-SDI
Control
● 1x TCP/IP DHCP default, port 30000
● 1xRS232: 115200,1,8, No Parity, O
● 2xUSB
Conguraon
CO-PS91 CO-PS101 CO-PS111 CO-PS81
Inputs: 2xHDMI 4K, 1xHDMI HD, 1xDisplayPort 4K, 1xVGA, 1xCVBS, 1xDVI-U (DVI/HDMI
& VGA/RGBS/YPbPr)
Outputs: 1xHDMI 4K, 1xDVI/HDMI
UHD/4K 50/59.94/60p modes supported in 4:2:0 format
● ● ● ●
Inputs: 2x3G-SDI, Genlock / Outputs: 1x3G-SDI
●
●
Inputs: 1xHDBT 4K / Outputs: 1xHDBT 4K
●
●
Analogue Audio In, Audio Out and Power Amp
CO-PS91A CO-PS101A CO-PS111A CO-PS81A
Menu Navigaon
● SEL: Enter or select a menu
● ESC: Exit the menu or jump to exit item
● Display: 4-line high contrast LCD display
● Jog Wheel: Scroll through the menu,
change value or press to enter a selecon
Video & Audio Inputs
● 1xDisplayPort 4K ● 1xVGA
● 2xHDMI 4K ● 1xCV
● 1xHDBaseT 4K** ● 2x3G-SDI **
● 1xDVI/RGB YPbPr ● 1xHDMI
Speaker/Line Output **
Genlock Input **
Front Panel Key Shortcuts
● Keypad unlock: ESC + SEL
● Mode reset: ESC+ CV
● Factory reset: ESC YPbPr (in live
operaon or at power up)
● Set output mode to 720p: ESC + VGA
● Firmware version: POWER + Esc
Quick Start Guide
Compass 3.0
Presentation Switcher
**- indicates an oponal feature
FSR INCORPORATED 244 Bergen Blvd. Woodland Park NJ 07424 973 -785-4347 www.fsrinc.com
LIT1607 43235
Page 2
Initial Setup
1. Connect the power cable and the input
sources to the unit.
2. Connect the unit’s output connectors to the
display
3. Turn the power-on
4. Turn on the test pattern. Scroll and select the
desired pattern.
5. Select the output resolution to match the native resolution of the projector or display device.
Output > Display Type > O/P Mode
6. To match the display characteristics, you may
need to adjust from the Output menu the output
Gamma, color temp, etc.
7. Verify that the image is properly displayed on
the projector / display
8. Turn off the test pattern and select the desirable input
9. Additional Input adjustments are available per
channel or globally: Black-level settings, Contrast, Saturation, Hue, RGB adjustments, color
temp, input gamma.
Web Browser Control Setup
The factory default setting for TCP/IP control is
DHCP. In order to connect to the unit, enter in
the browser address bar the TCP/IP address
assigned by the DHCP master. The assigned
address is shown in the System/Network settings menu.
To change setting to static IP control, select:
Network Settings > Address Type > Static
Next, you need to manually set the IP address
and the subnet mask using the jog wheel to
match your computer’s IP settings. For each
digit rotate the knob until the desired number is
displayed and press the knob to advance to the
next digit.
It is recommended that you power cycle the unit
after the TCP/IP control settings are changed
Ensure that the IP address of the computer is on
the same network and has the same subnet
mask as the unit. For example, if the unit address
is 192.168.215.005, the computer address can
be 192.168.215.025. You can change the computer’s IP address configuration from the properties menu of the LAN network adaptor.
Make sure that no devices share the same IP
address on the same network
Issue 1.0 1st April 2016
All Trademarks Acknowledged
E&OE Specifications subject to change without notice
Firmware upgrade via USB
Verify that the latest software is installed in the unit.
The unit’s firmware version is displayed by pressing
the Standby and Esc keys. The latest available firmware is found on our website. From the firmware
dropdown menu, select the “PV7SPQV6xx_HQU7xx_LED7xx_yyyy.bin” file.
“yyyy” is the current firmware version
1. Download the .bin file and rename the file to
“PV7update.bin” and copy it to the root directory of a USB memory stick
2. Power Off the unit and plug the USB drive into one
of the USB ports
3. Power On the unit and wait few seconds for the
message to remove the USB drive
4. After the USB is removed, the unit will continue
the boot-up process. When the boot-up process is
completed, the detected input source, genlock mode
and Output resolution will appear on the display.
New firmware can also be uploaded via the web
browser from the Firmware Update menu.
For a complete list of all of the available features
refer to the user’s manual. For the latest firmware
visit the FSR website at www.fsrinc.com.
Factory Defaults Restore: From the system menu
you can restore the default factory configuration.
All settings are restored, except for the Network
settings.
LOGO / Custom Test Pattern
1. Connect to the unit via the web browser.
2. From the File Upload menu select an image
stored on the PC to upload to the unit
3. The image will available by pressing the LOGO
button or as a Test Pattern
System Backup and Restore
1. Connect to the unit via the web browser.
2. From the Backup/Restore menus you can store
and recall the system configuration to your PC.
The default file name is: nvram.bin
Geometry > Output Picture Format
Standard: The whole input source is shown,
while preserving the aspect ratio (AR). Nonused output areas will be black
Full Screen: The whole input source is shown
filling the output area while ignoring the AR.
Crop: Fills the screen but crops top/bottom or
left/right side while maintaining the AR
Anamorphic: Scales the input to 16:9 format to
fill the output area
Geometry>Pan Tilt Zoom (PTZ)
Selects a portion of the input source to be scaled
by zooming and panning within the image area
HDCP
HDCP encryption can be turned off per input and
output to enable non-encrypted content to be processed by the unit. Note: If HDCP is turned off, but
the content is HDCP protected, the output will be
black.
Quick Start Guide
Compass 3.0
Presentation Switcher
 Loading...