

FSP Technology EP 1500, EP 2000 Quick Manual
6. Oplossing van problemen
Probleem
Mogelijke oorzaak
Oplossing
Geen woorden op de
voorkant LCD-Display.
Lege accu.
Laat de UPS ten minste 6 uur opladen.
Defecte accu.
Vervang de accu door een nieuwe van
hetzelfde type.
De UPS is niet ingeschakeld.
Druk kort op de schakelaar van de UPS,
zodat de in gebruik genomen wordt.
Het alarm klinkt
voortdurend, ook al werkt
het elektriciteitsnet
normaal.
De UPS is overbelast.
Ontkoppel een gedeelte van de belasting.
Controleer vóórdat u de apparaten opnieuw
aansluit, of de belasting beantwoordt aan
de capaciteit van de UPS die in de
specificaties is vermeld.
Bij een stroomuitval werkt
de UPS slechts korte tijd.
De UPS is overbelast.
Ontkoppel een gedeelte van de belasting.
De accuspanning is te laag.
Laat de UPS ten minste 6 uur opladen.
Defecte accu. Het kan om een
gebrek gaan dat veroorzaakt
wordt door een te hoge
omgevingstemperatuur of door
slijtage van de accu.
Vervang de accu door een nieuwe van
hetzelfde type.
Het lichtnet is normaal,
maar het apparaat is op
batterij modus.
De voedingskabel zit los.
Controleer zorgvuldig de aansluiting van de
voedingskabel.
Model
EP 1500
EP 2000
CAPACITEIT
1500 VA / 900 W
2000 VA / 1200 W
INGANG
Spanning
110/120 VAC of 220/230/240 VAC
Tolerantie
81–145 VAC / 162–290 VAC
UITGANG
Spanningsregeling
+/–10 %
Schakeltijd:
Gewoonlijk 2-6 ms, 10 ms max.
Golfvorm
Gesimuleerde sinusgolf
ACCU
Type en aantal
12 V/9 Ah – 2 st.
Oplaadtijd
4-6 uur voor opladen tot 90% van de capaciteit
AFMETINGEN EN GEWICHT
Afmetingen (l x b x h)
397 x 146 x 205 mm
Gewicht (kg)
11,1
11,5
OMGEVING
Vochtigheid
0-90% rel. vochtigheid bij 0-40° C (niet-condenserend)
Geluidsproductie
Minder dan 40 dB
MANAGEMENT
USB/RS-232
Ondersteunt Windows® 98/2000/2003/XP/Vista/2008, Windows® 7,
Linux, en MAC
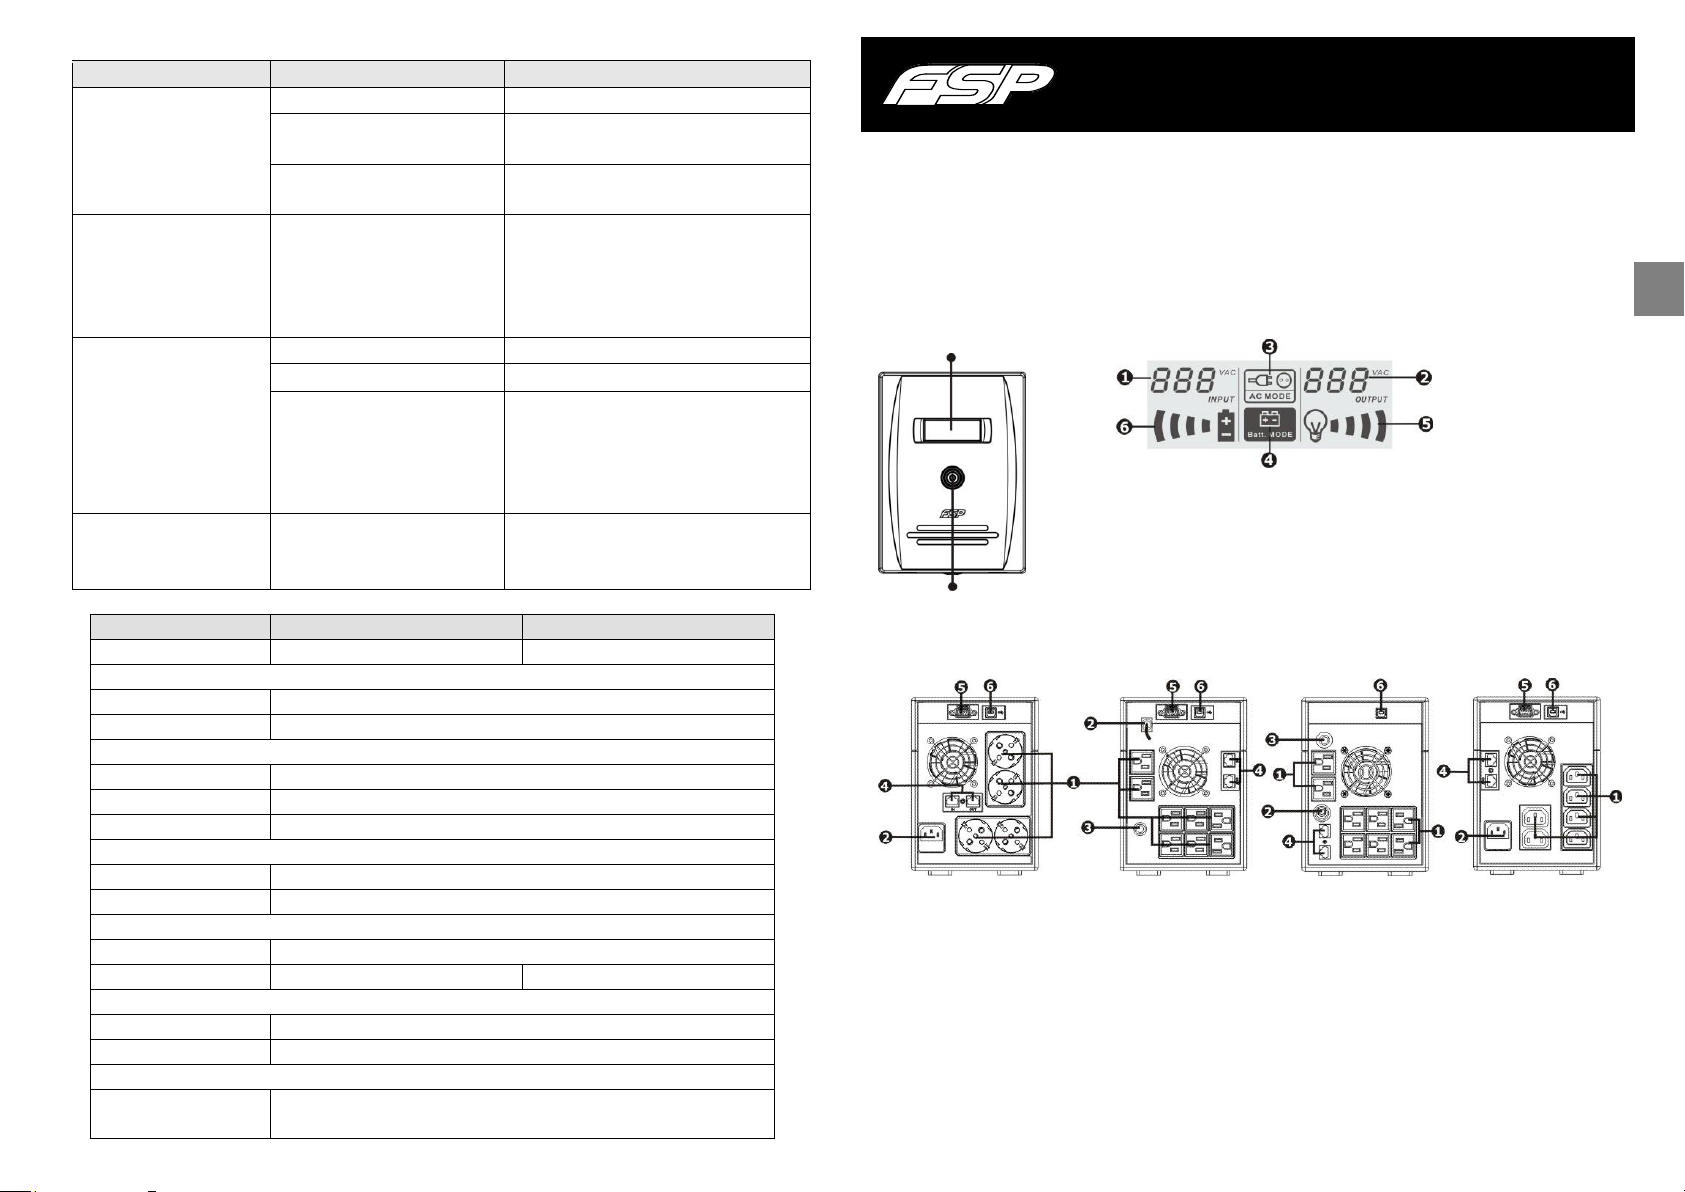
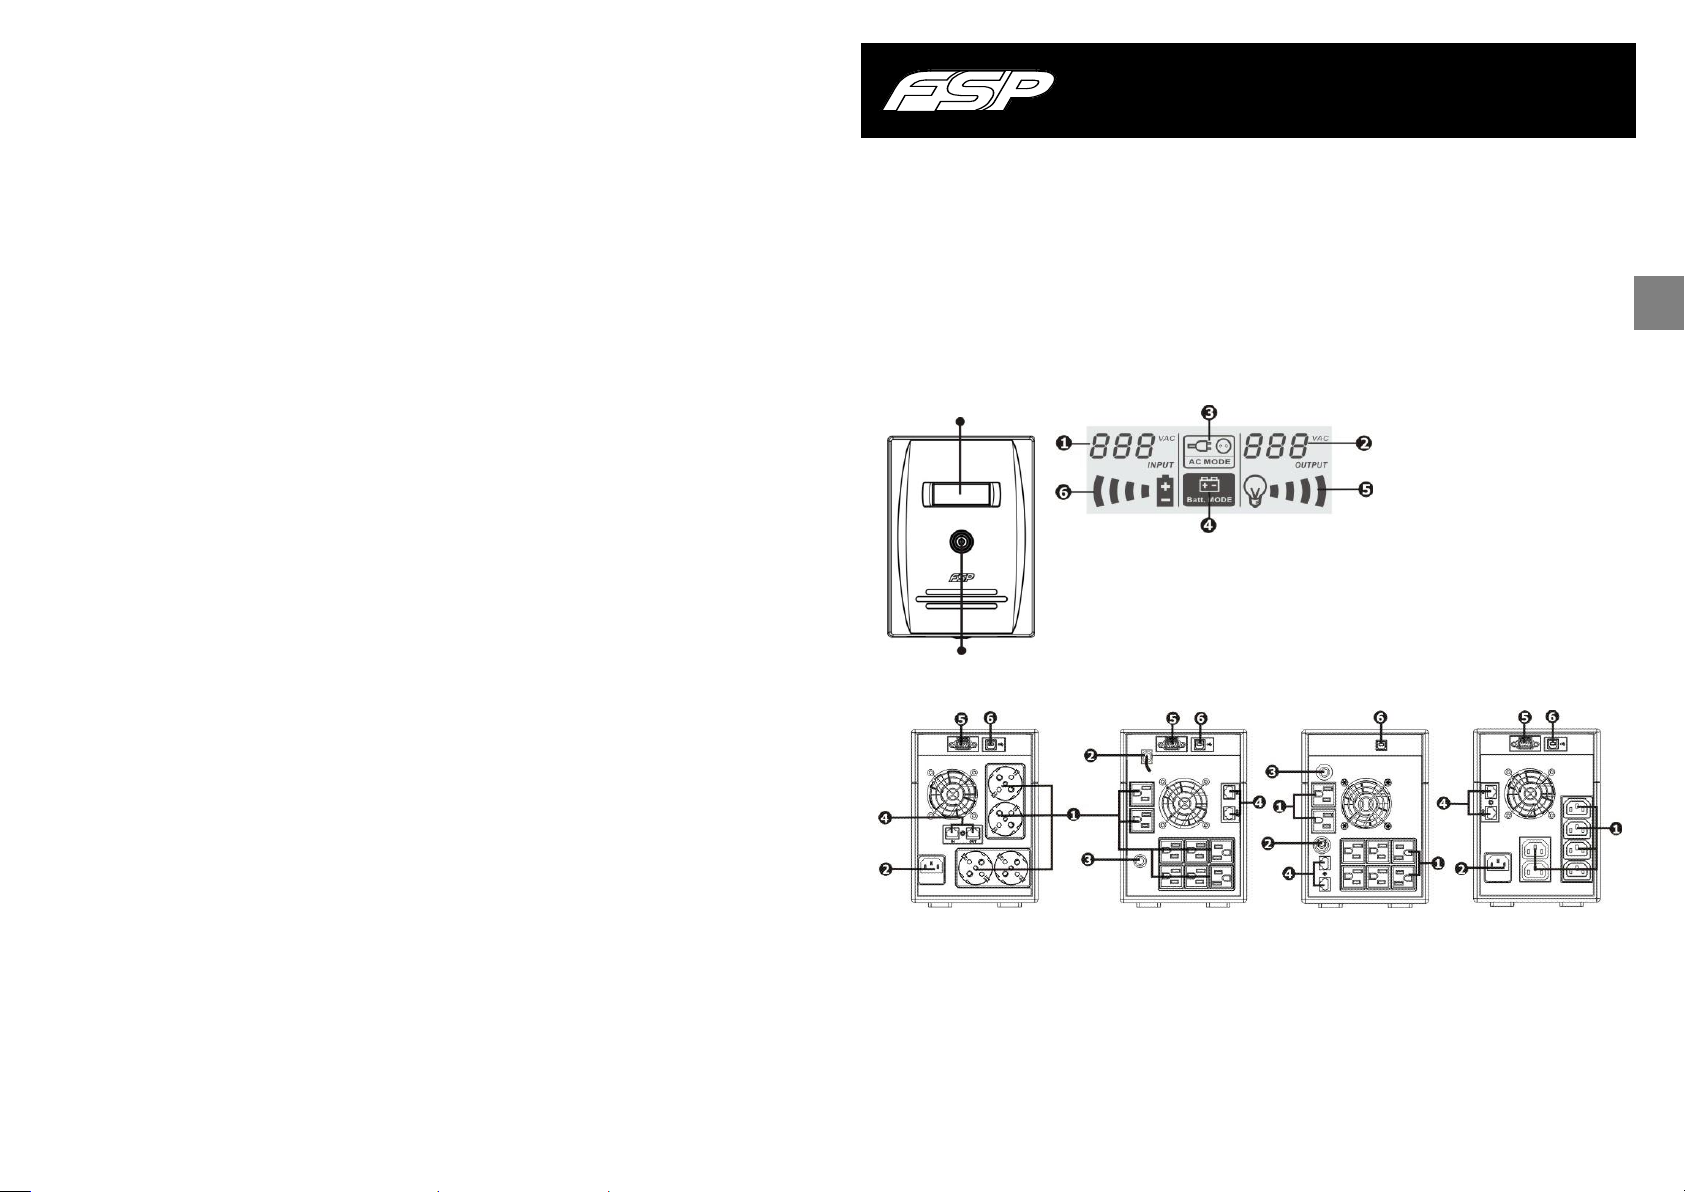
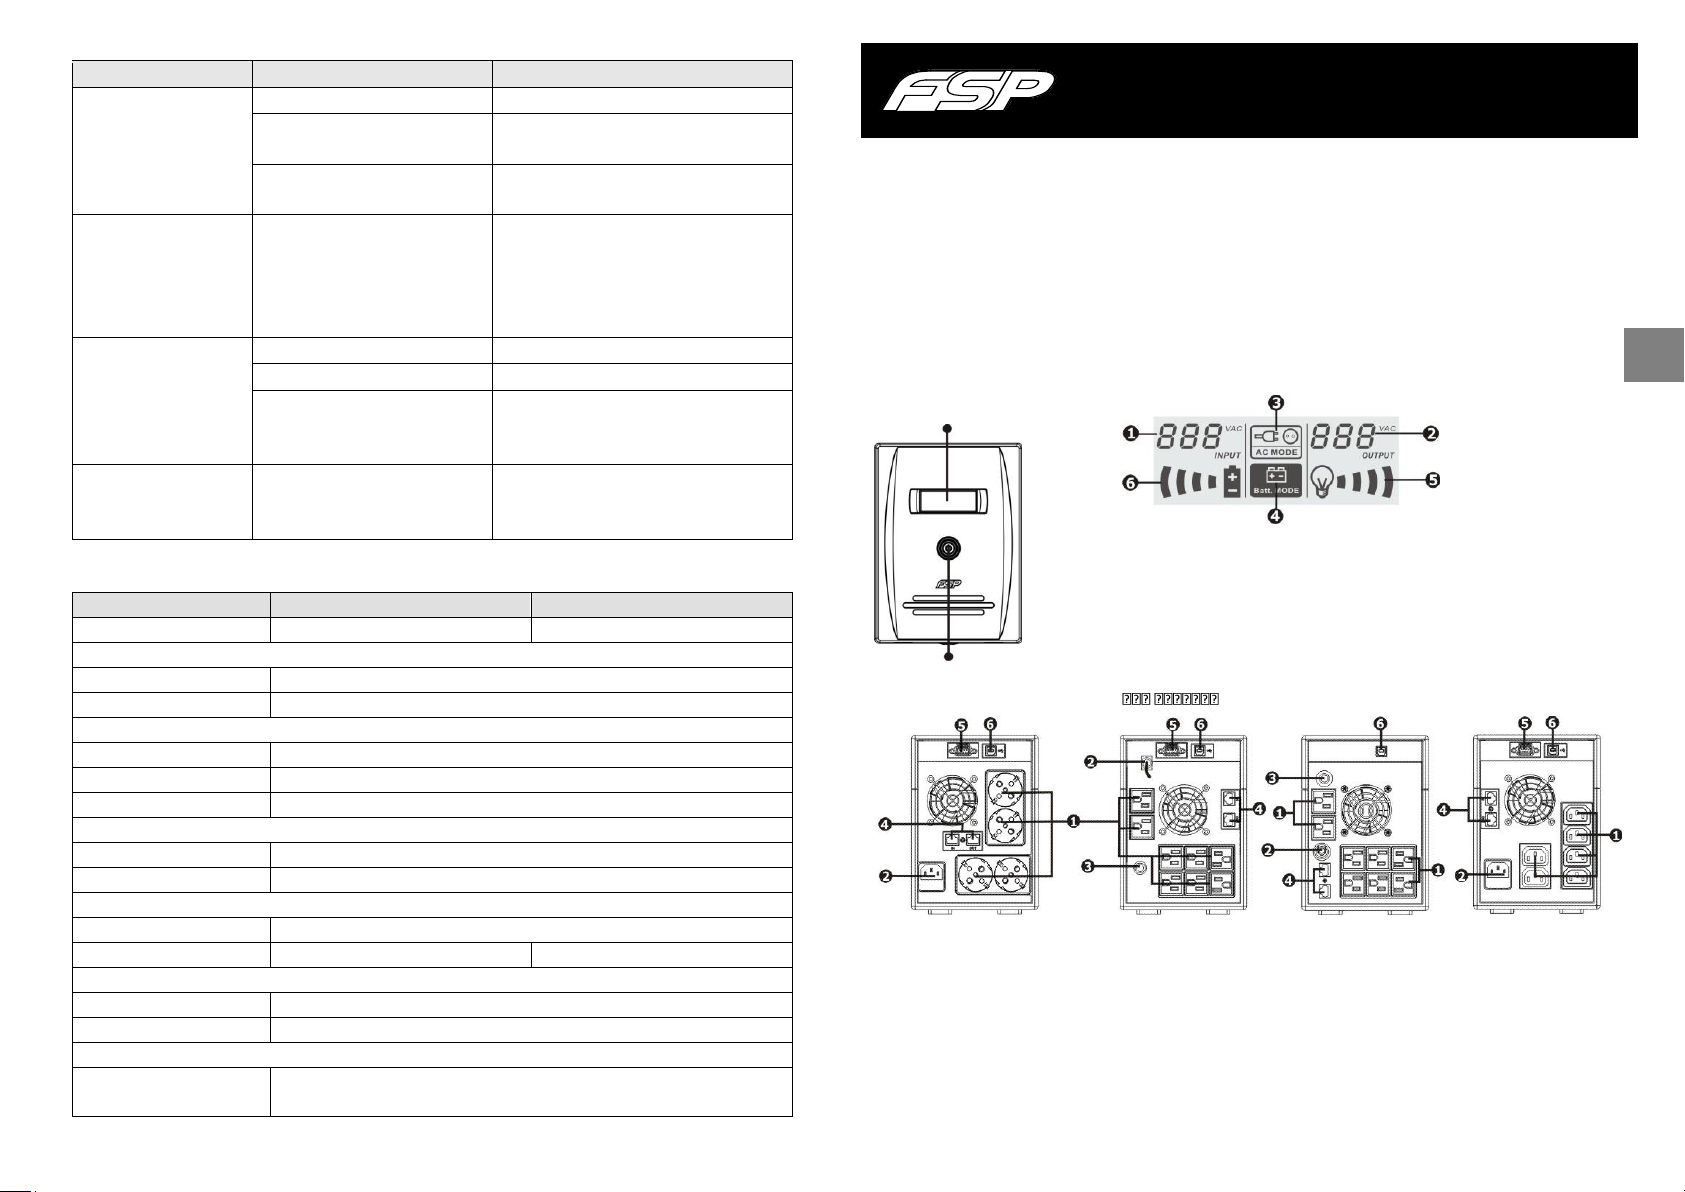
Line Interactive UPS Quick Guide V. 1.1
Input voltage
Load level indicator, flashing
Output voltage indicates overload
AC mode indicator
Battery capacity indicator, flashing
Battery mode indicator Indicates low battery
EN
Power Switch
LCD panel
78
1
7 Specificaties
1. Package Contents
You should have received the following items inside of package:
- UPS Unit
- Quick Guide
- Communication cable (only for the model with USB/RS-232 port)
- Power cable (only for the IEC-type input model)
2. Product Overview
Front View: LCD panel:
Back View:
Schuko Type NEMA Type I NEMA Type II IEC Type
Output receptacles
AC input
Circuit breaker
Modem/Phone/Network surge protection
RS-232 com. port
USB com. port
6 hours
3. Installation and Initial Startup
2
3
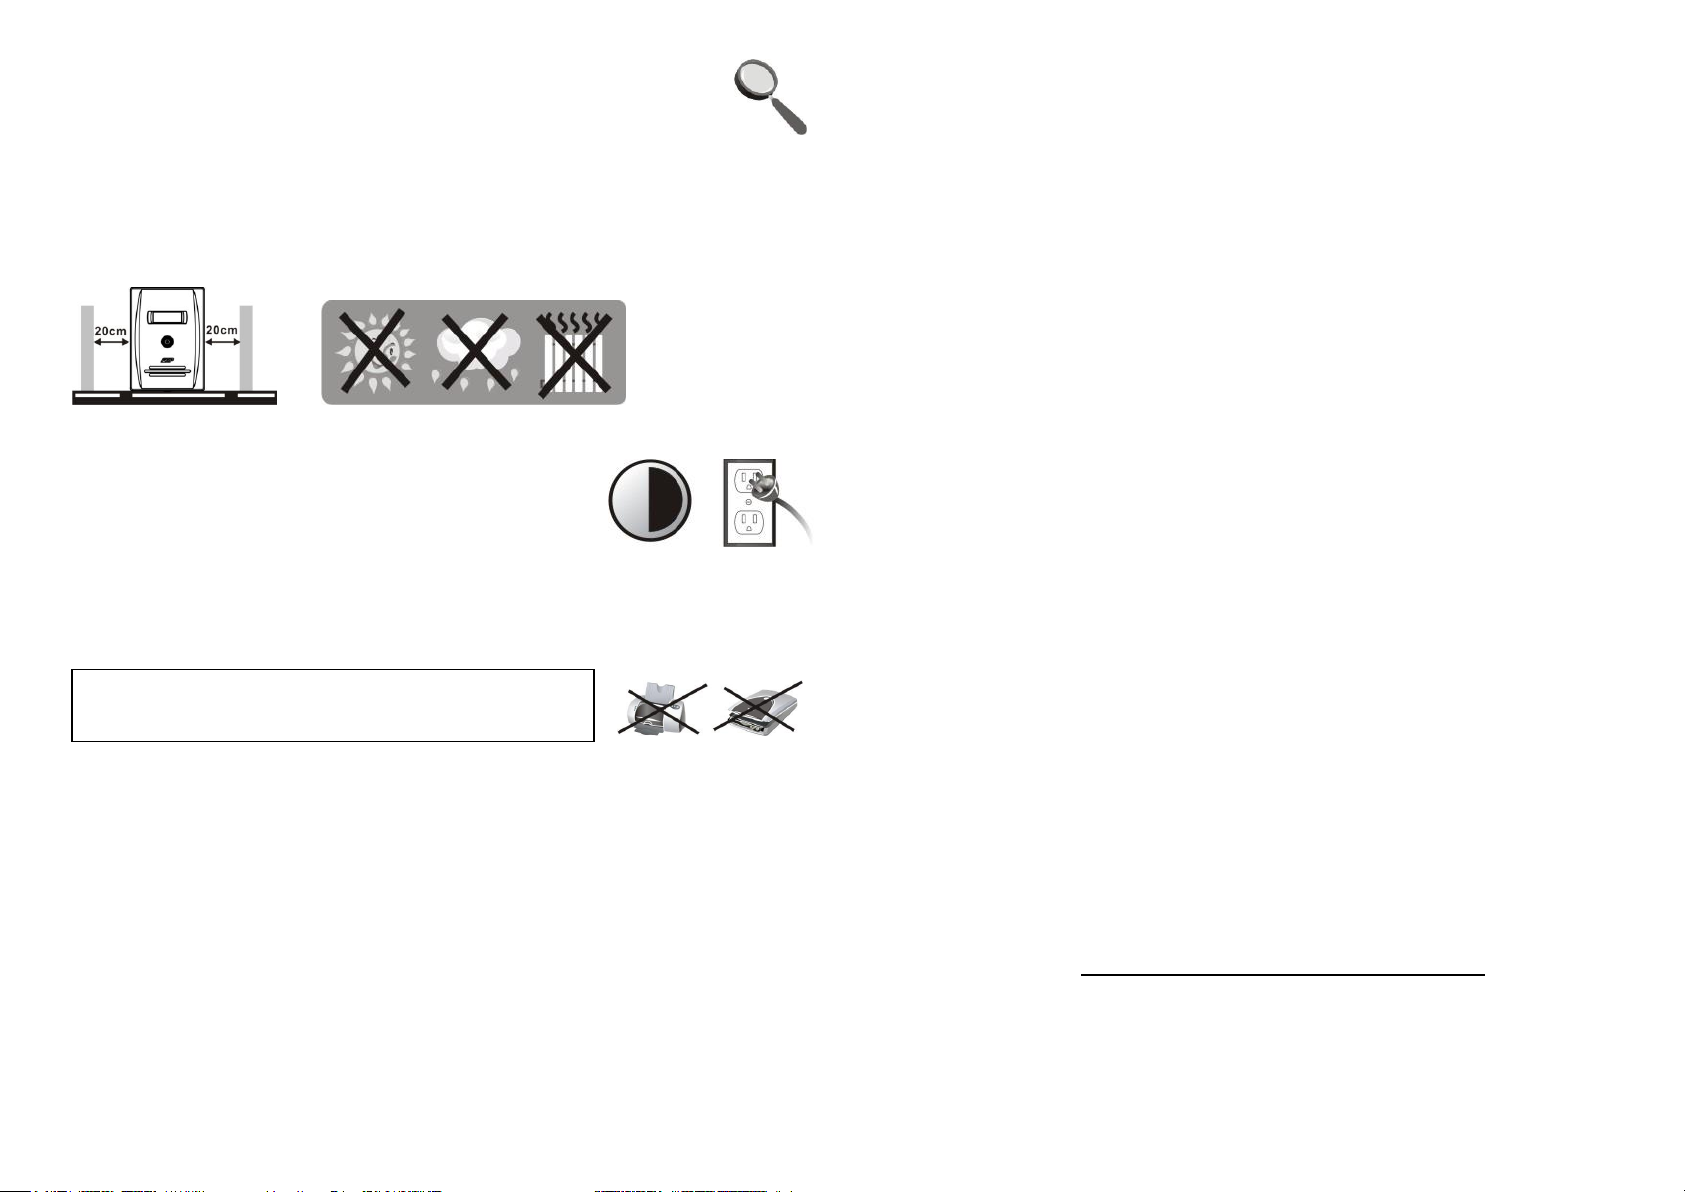
Before installation, please inspect the unit and contents that nothing is
damaged or missing.
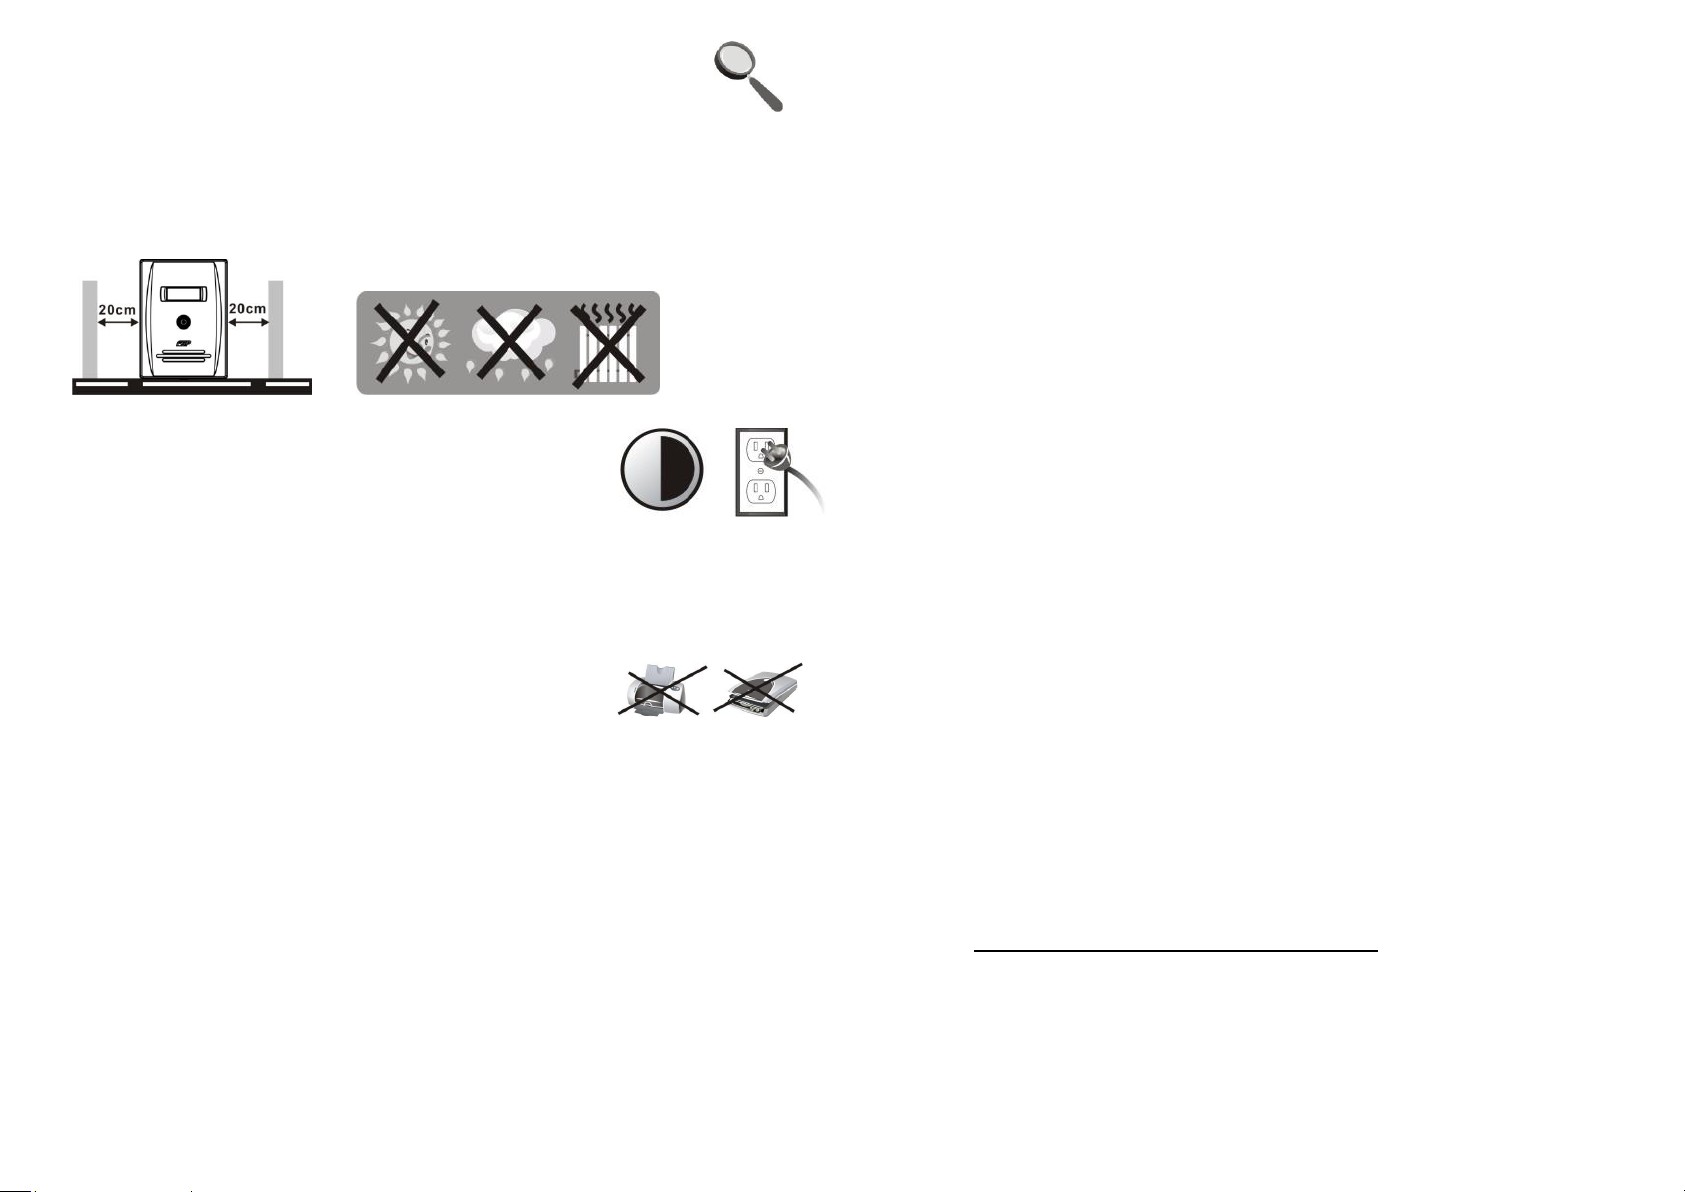
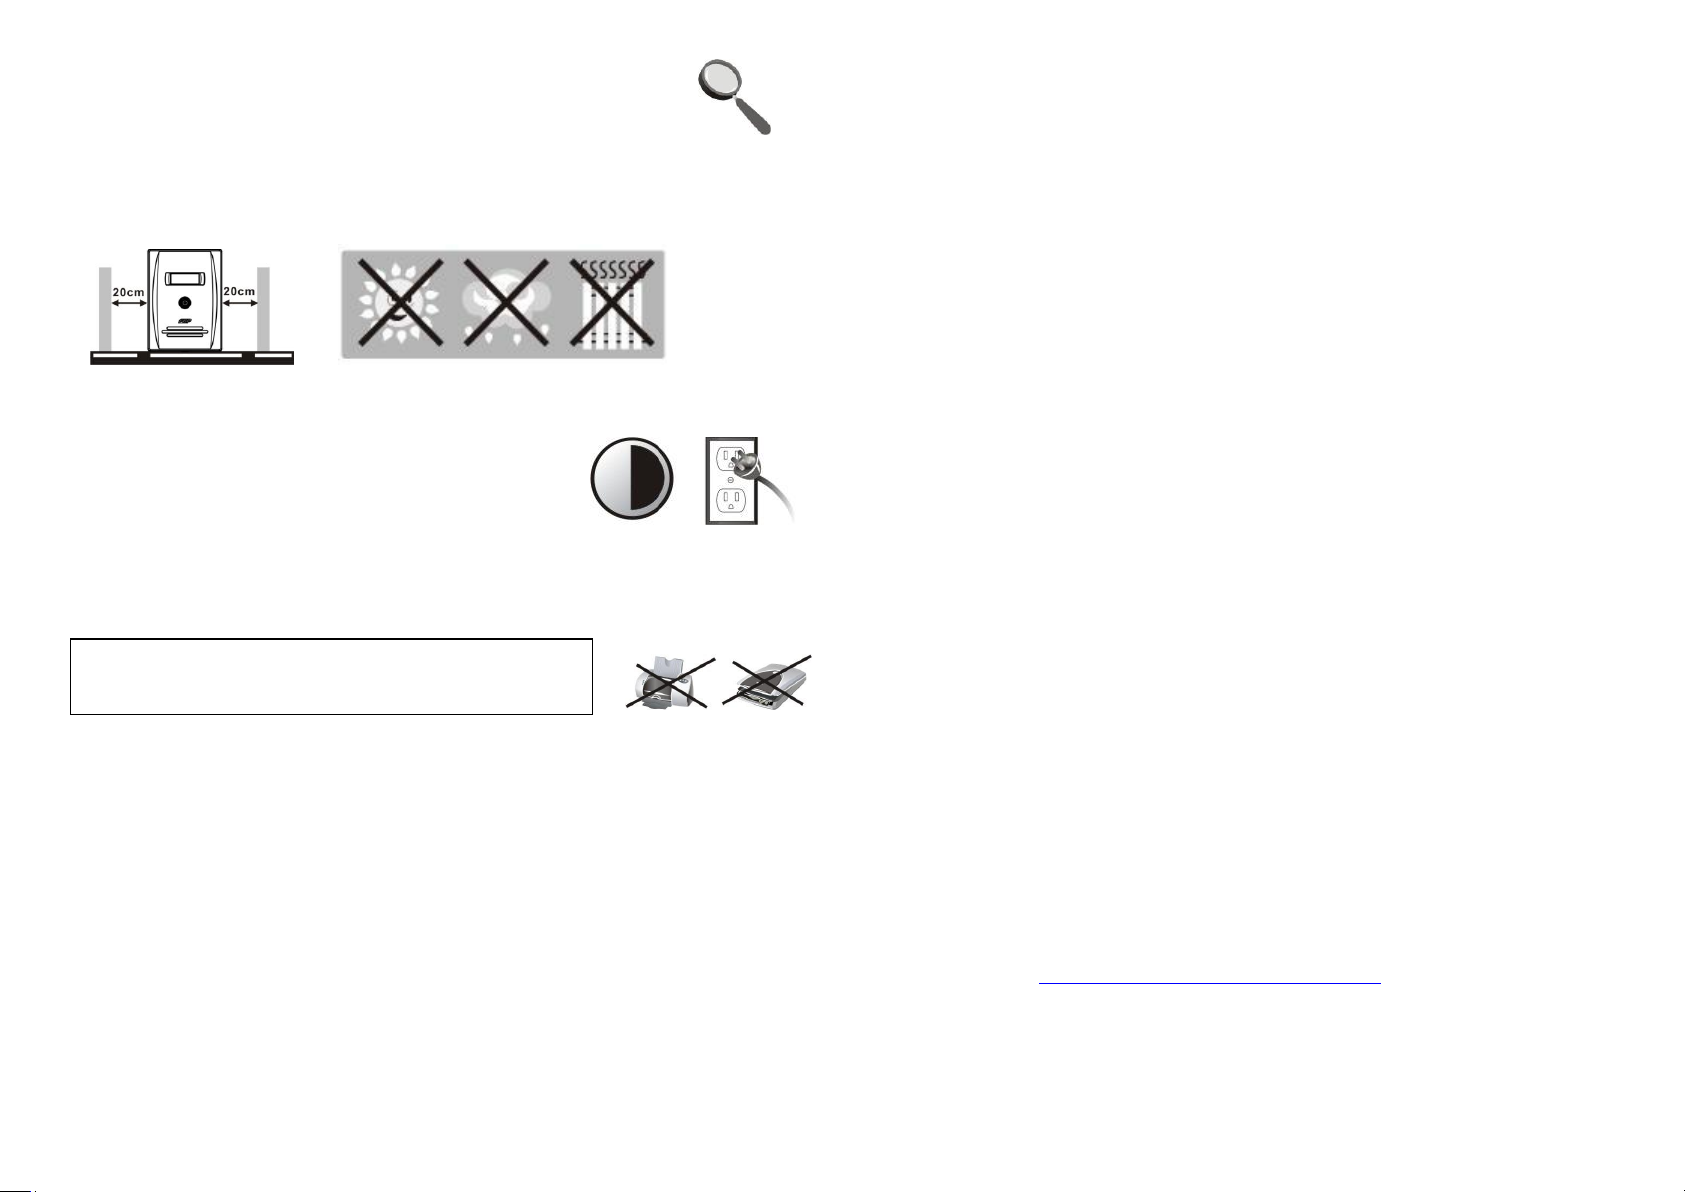
Placement & Storage Conditions
Install the UPS in a protected area that is free of excessive dust and has adequate air flow. Please
place the UPS away from other units at least 20 cm to avoid interference. Do NOT operate the UPS
where the temperature and humidity is above the recommended limit (Please check the specs)
Connect to Mains and Charging
Plug in the AC input cord to the wall outlet and charge the UPS for
at least 6 hours before using. The unit charges its battery while
connected to the mains.
Connect Devices
Plug in the devices to the output connections on the rear panel of the UPS. Turn the power on by
pressing the switch, the devices are now protected by the UPS.
Connect Modem/Phone/Network for Surge Protection
(Only for the model with RJ-45)
Plug the modem/phone line into the surge-protected “IN”
connection on the rear of the UPS unit, the other end should be plugged into the “OUT”
connection on the computer for the phone.
Connect Communication Cable (Only for the model with USB/RS-232 port)
To enable remote UPS shutdown/start-up and status monitoring, connect the communication
cable from the USB/RS-232 port and the other to the communication port of your PC. With the
monitoring software installed, you can schedule UPS shutdown/start-up and monitor the UPS
status.
Turn On/Off the Unit
Press the switch to turn on the UPS. To turn off, press and hold the switch for 5 seconds.
4. Important Safety Warning (PLEASE READ THE INSTRUCTIONS)
CAUTION!
To prevent the risk of fire or electric shock, use only indoors in a temperature and humidity
controlled area free of conductive contaminants. (See the specifications for)
To reduce risk of overheating, do not cover the UPS' cooling vents and avoid exposing the unit
to direct sunlight or installing the unit near appliances such as heaters or fires.
Do not attach non-computer items, such as medical equipment, life-support equipment,
microwave ovens, or vacuum cleaners to UPS.
Do not plug the UPS input into its own output.
Do not place beverages or any other items containing liquid on or near the unit.
In the event of an emergency, press the OFF button and disconnect the power cord from the
AC power supply to properly disable the UPS.
Do not attach a power strip or surge suppressor to the UPS.
If the UPS has a metal chassis, for safety purpose, grounding is a must during installation in
order to reduce leakage current below 3.5mA.
Repair or service work should be performed or supervised by trained personnel only.
When replacing the batteries, use the same number and type.
Internal battery voltage is 12VDC. Sealed, lead-acid, 6-cell battery.
Do not dispose of batteries in a fire as they may explode.
Do not open or damage the battery or batteries. Released electrolyte is harmful to the skin
and eyes.
Unplug the UPS prior to cleaning and do not use liquid or spray detergent.
A battery can present a risk of electric shock and high short circuit current. The following
precautions should be observed before replacing batteries:
1) Remove watches, rings, or other metal objects.
2) Use tools with insulated handles.
3) Wear rubber gloves and boots.
4) Do not lay tools or metal parts on top of batteries.
5) Disconnect charging source prior to connecting or disconnecting batter terminals.
Attention: Hazard through electric shock. Risk when disconnecting the unit from the mains, the
battery may still contain voltage. The battery should be correctly disconnected at the plus and
minus pole of the connectors on the battery when maintenance work inside the UPS is carried out.
5. Software Download & Installation (Only for the model with
communication port)
Please follow steps below to install software:
1. Please visit http://www.power-software-download.com
2. Click ViewPower software icon and choose your required language to download.
3. Follow the on-screen instructions to install the software.
4. When your computer restarts, the monitoring software will appear as an orange “plug” icon at
the bottom right of your screen (system tray) where the clock is.
5. User name and password in software management:
User name: administrator
Password: administrator

6. Trouble Shooting
Problem
Possible Cause
Solution
No words on the front
LCD panel display.
Low battery.
Charge the UPS at least 6 hours.
Battery fault.
Replace the battery with the same
type of battery.
The UPS is not turned on.
Press the power switch again to turn
on the UPS.
Alarm continuously
sounds although
mains supply is
normal.
The UPS is overloaded.
Remove some devices. Before
reconnecting equipment, please
check that the load matches the UPS
capacity specified in the specs.
When power fails,
back-up time is
shorten.
The UPS is overloaded.
Remove some critical load.
Battery voltage is too low.
Charge the UPS at least 6 hours.
Battery defect. Operating
temperature could be too
high, or battery is not
correctly used.
Replace the battery with the same
type of battery.
The mains is normal
but the unit is on
battery mode.
Power cord is loose.
Check and reconnect the power cord.
Model
EP 1500
EP 2000
CAPACITY
1500 VA / 900 W
2000 VA / 1200 W
INPUT
Voltage
110/120 VAC or 220/230/240 VAC
Voltage Range
81-145 VAC / 162-290 VAC
OUTPUT
Voltage Regulation
+/-10%
Transfer Time
Typical 2-6 ms, 10 ms max.
Waveform
Simulated Sine Wave
BATTERY
Type & Number
12 V/9 AH x 2
Charging Time
4-6 hours recover to 90% capacity
PHYSICAL
Dimension (DxWxH)
397 x 146 x 205 mm
Net Weight (kgs)
11.1
11.5
Environment
Humidity
0-90 % RH @ 0-40° C (non-condensing)
Noise Level
Less than 40 dB
MANAGEMENT
USB/RS-232
Supports Windows® 98/2000/2003/XP/Vista/2008, Windows®
7, Linux, and MAC
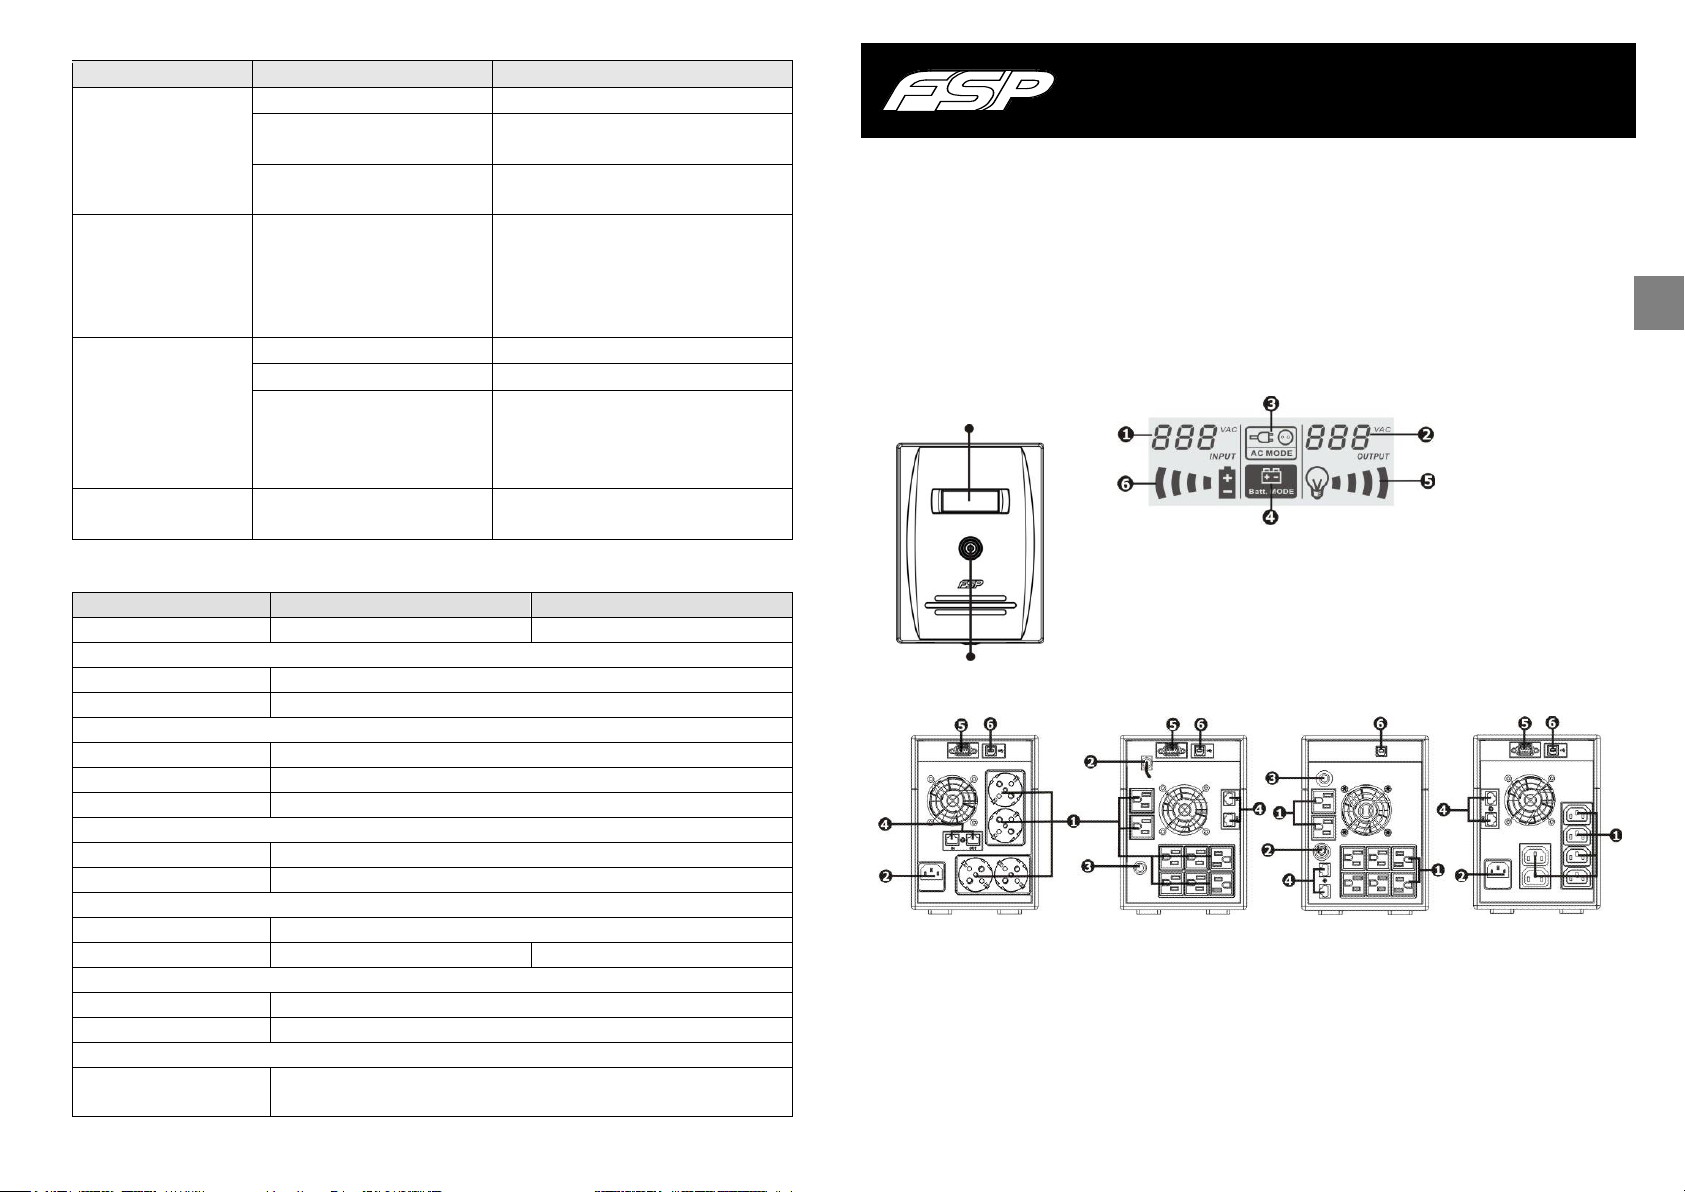
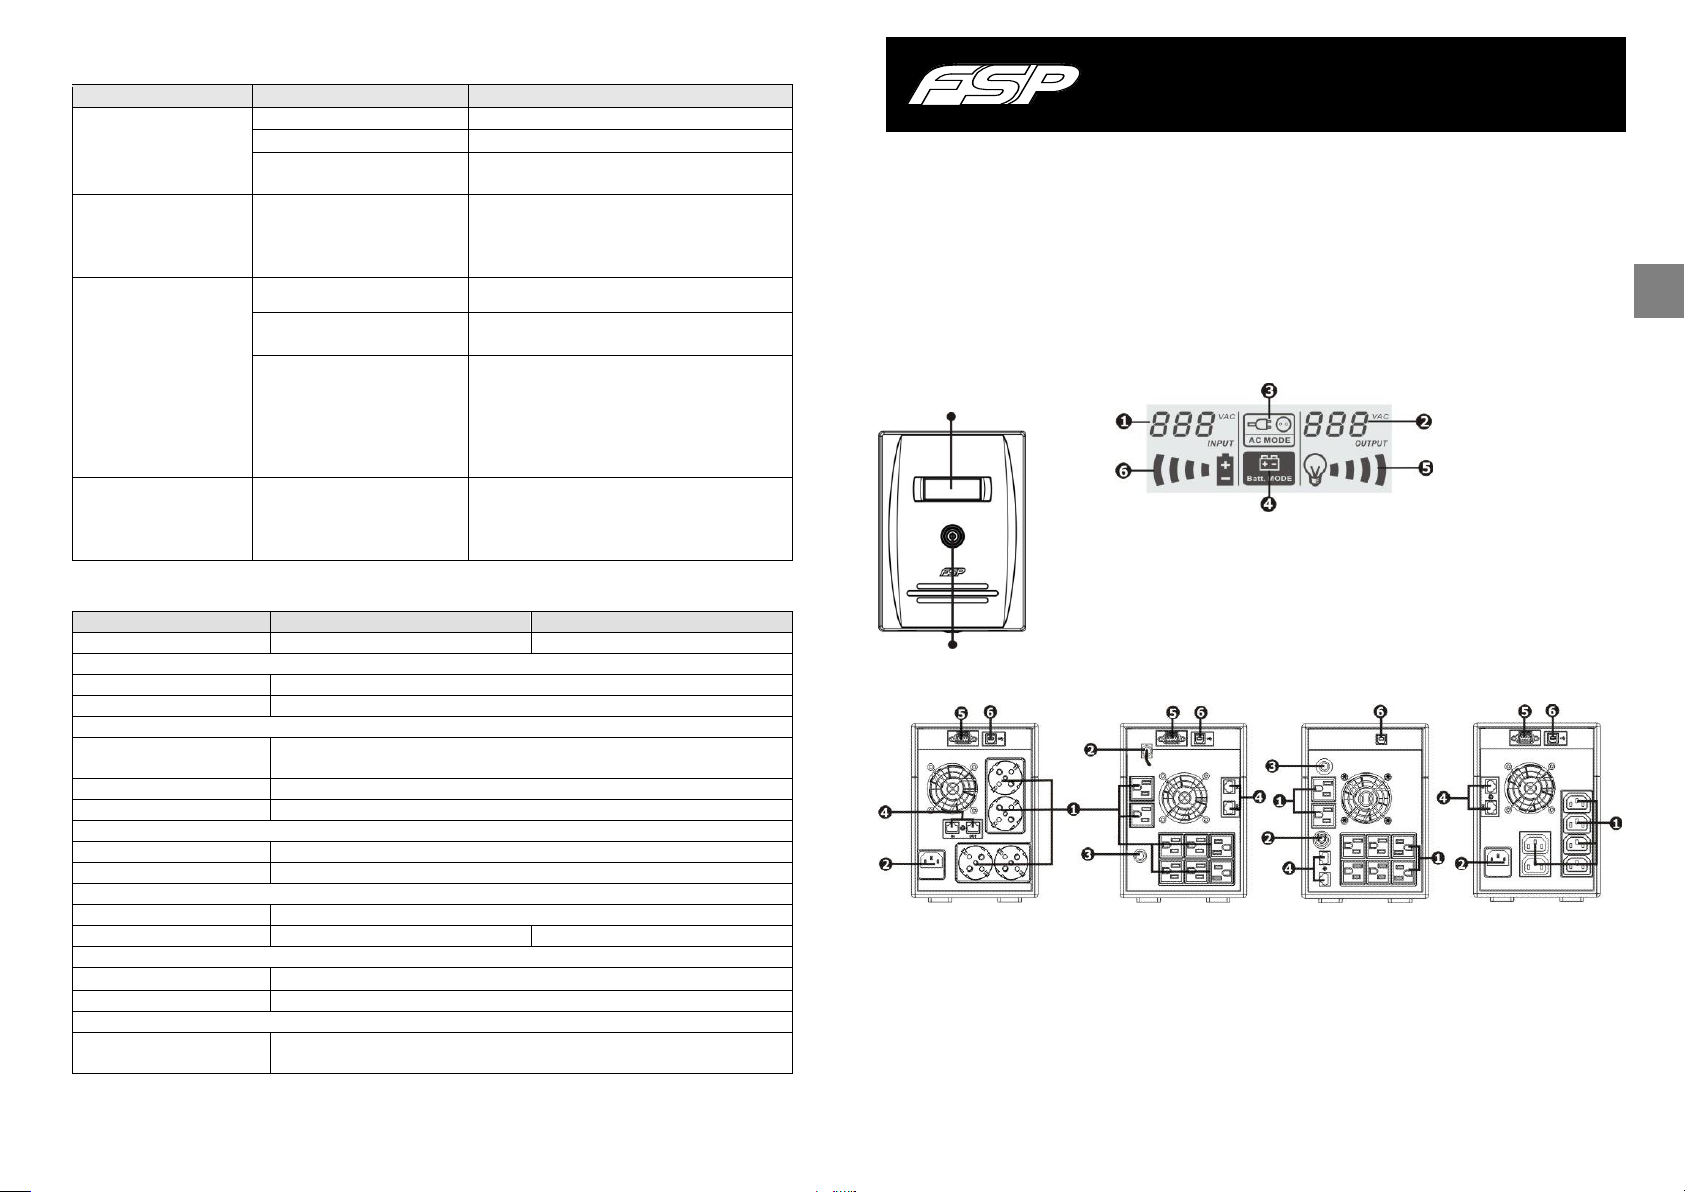
Line Interactive UPS Kurzanleitung V. 1.1
4
5
DE
Ein/Aus Schalter
LCD panel
Eingangsspannung
Lade Status Anzeige, Blinken
Ausgangsspannung
zeigt Überladung an
AC Modus Anzeige
Batteriekapazitätsanzeige, Blinken
Batterie Modus Anzeige zeigt niedrigen Batteriestatus an
7 Specifications
1. Lieferumfang
Im Lieferumfang sollten Sie folgendes finden:
- USV Einheit
- Kurzanleitung
- Kommunikationskabel (nur für Modelle mit USB/RS-232 Schnittstelle)
- Netzkabel (nur für Modelle mit IEC-Eingang)
2. Produktübersicht
Vorderansicht: LCD panel:
Rückansicht:
Schuko Typ NEMA Typ I NEMA Typ II IEC Typ
Ausgänge Modem / Telefon / Netzwerk Überspannungsschutz
AC Eingang RS-232 com. Schnittstelle
Schutzschalter USB com. Schnittstelle
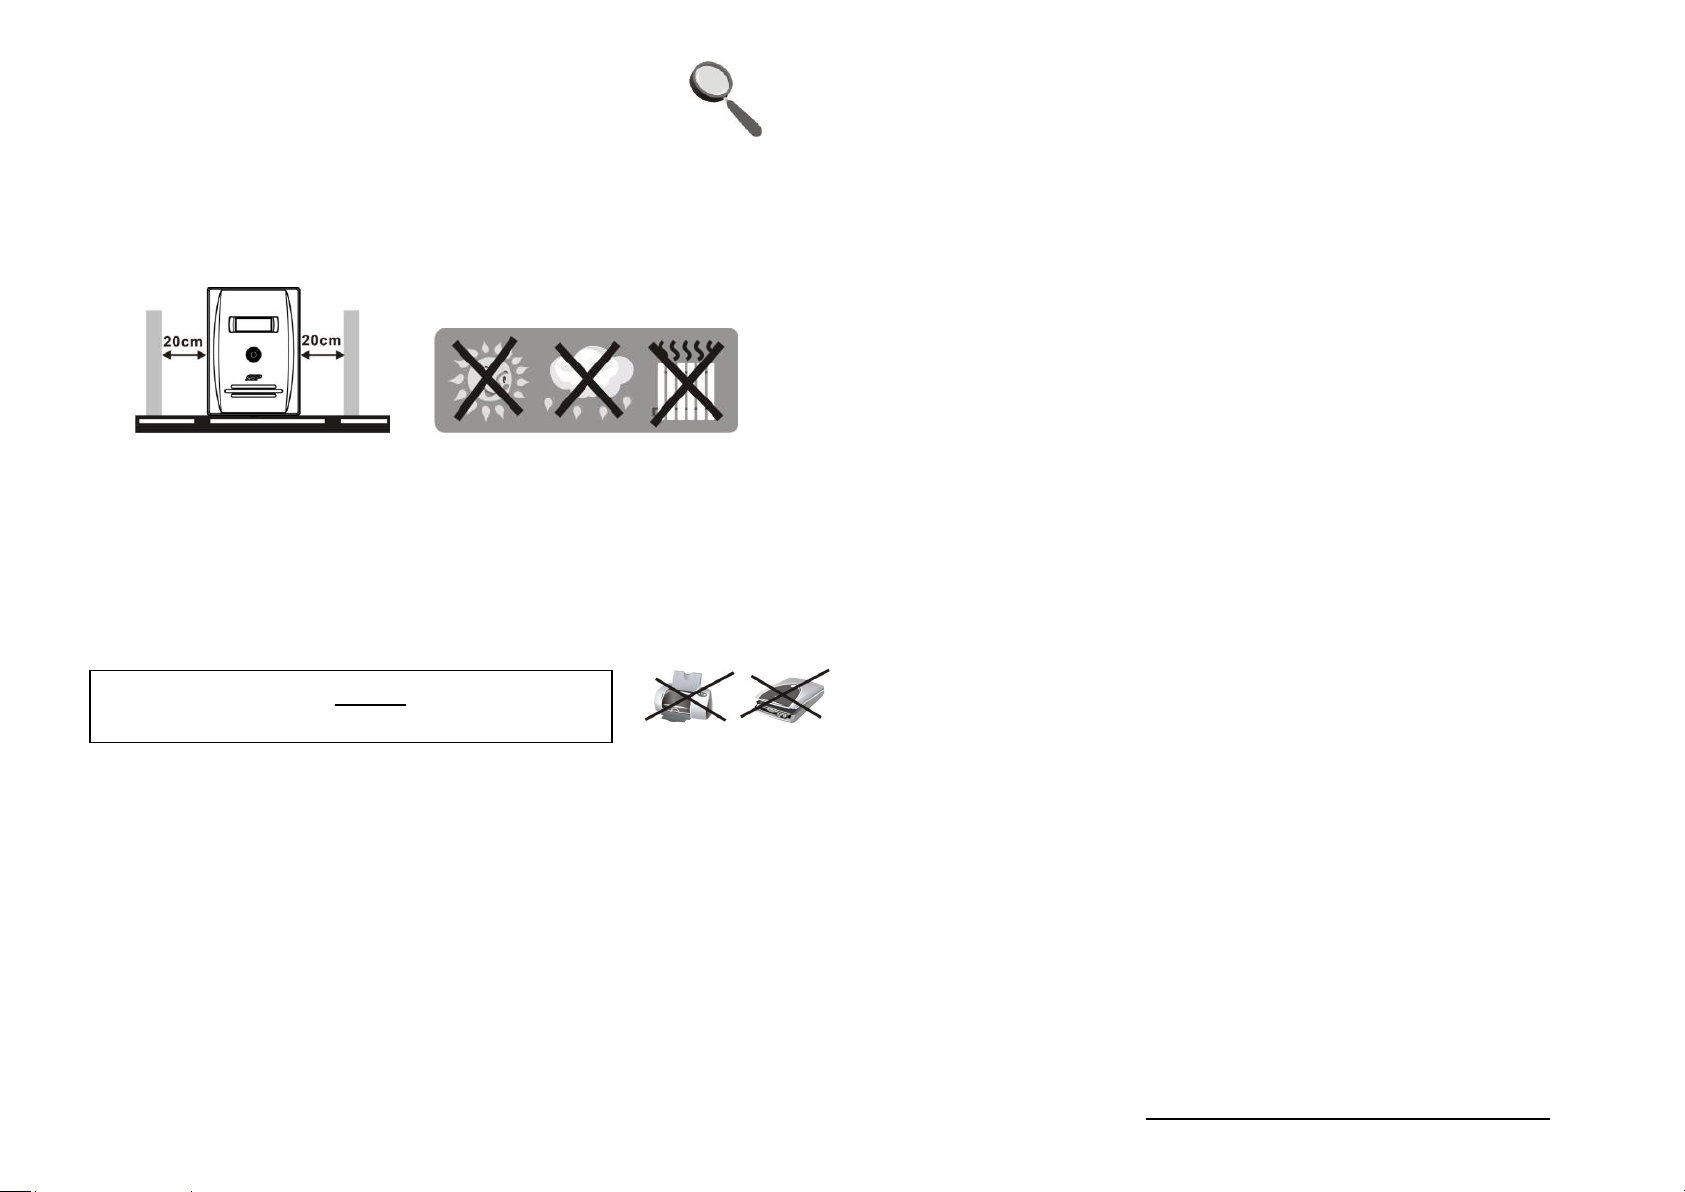
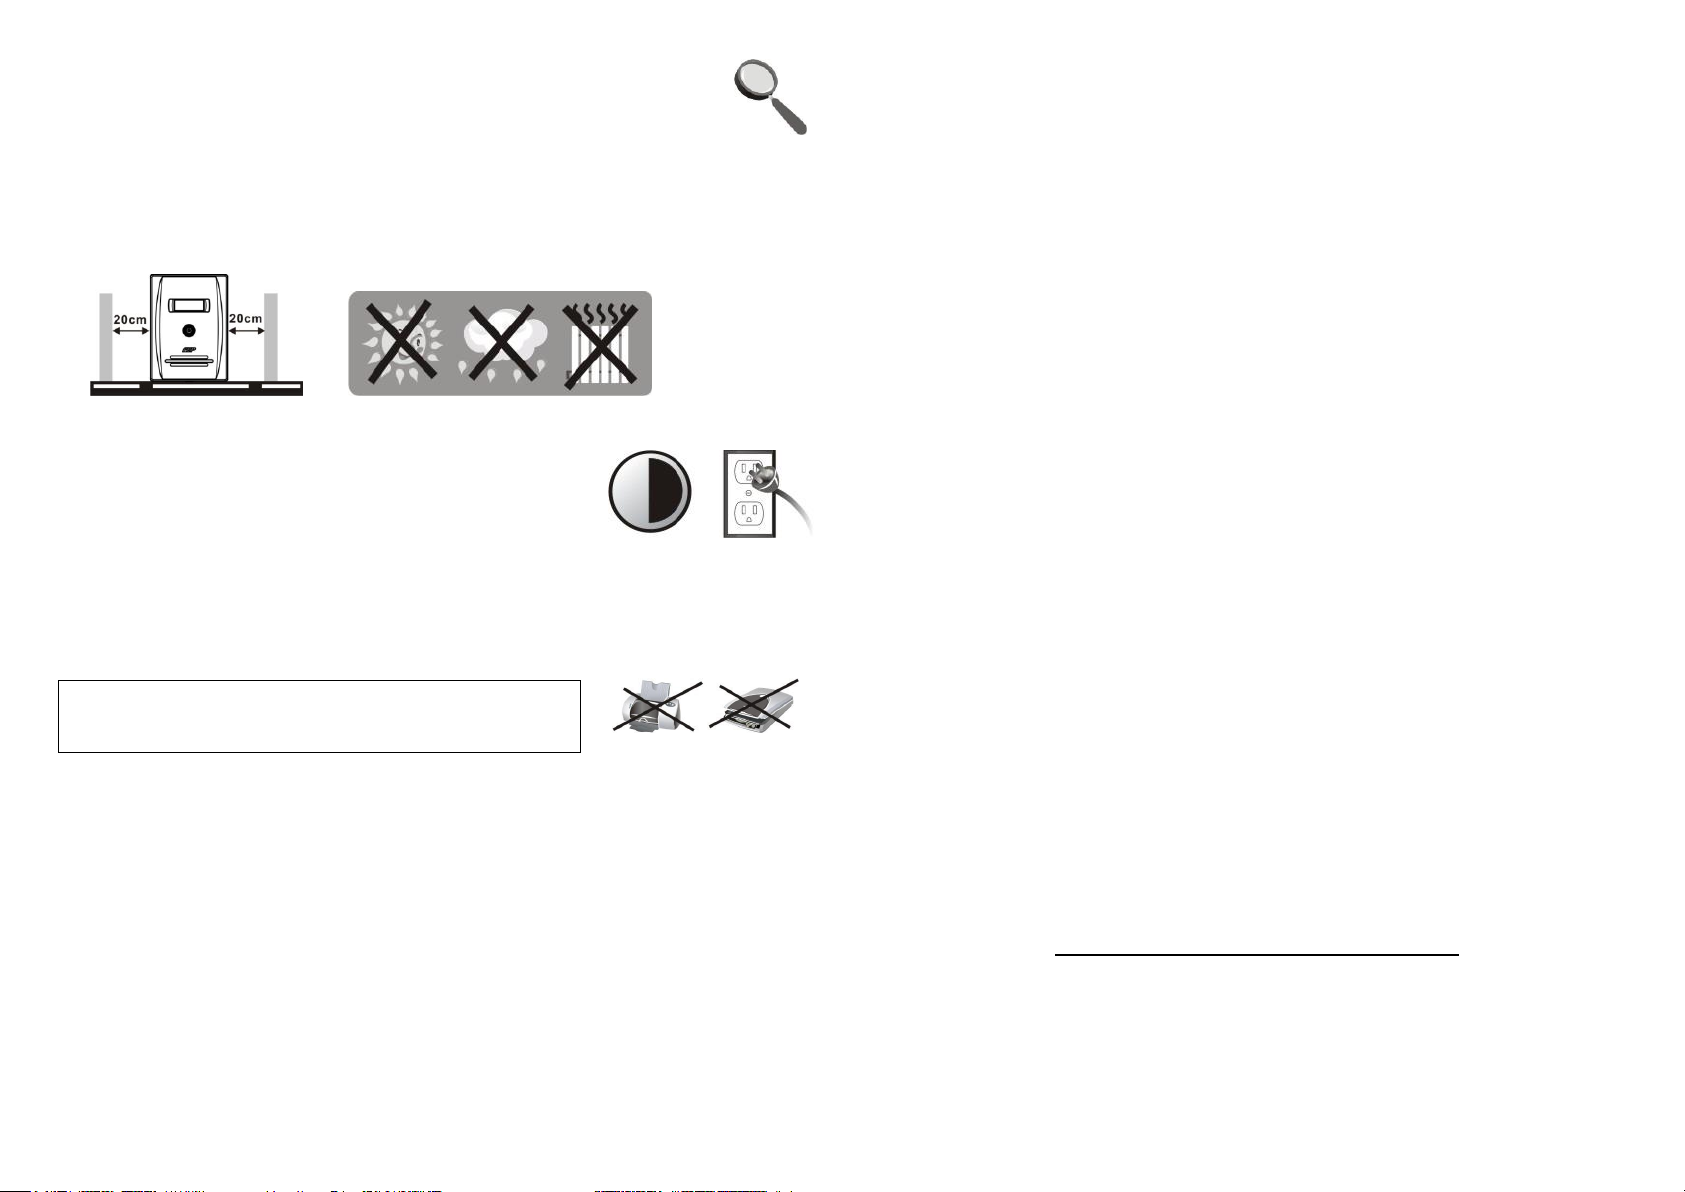
ACHTUNG: Schliessen Sie niemals einen Laserdrucker oder
einen Scanner an die USV an.
HINWEIS: Vor der Installation sollten Sie den kompletten
6
7
Lieferumfang auf mögliche Schäden überprüfen.
Aufstellung und Lagerungs-Bedingungen
Installieren Sie die USV in einer geschützten Umgebung, möglichst
staubfrei und mit ausreichender Luftzirkulation. Bitte halten Sie einen Mindestabstand von 20cm
ein, um Interferenzen mit anderen Geräten zu vermeiden. Betreiben Sie das Gerät nicht in einer
Umgebung, in der die Werte für Temperatur und Luftfeuchtigkeit die Spezifikationen
überschreiten. (Bitte überprüfen Sie vorab die Spezifikationen.)
Anschluß und Aufladen des Gerätes
Schließen Sie die USV mit dem Netzkabel an das Stromnetz an. Um ein optimales Ergebnis zu
erlangen, sollte die Batterie vor dem Erstgebrauch mindestens sechs Stunden aufgeladen
werden. Das Gerät lädt die Batterie, wenn sie angeschlossen ist.
Anschluß der Verbraucher
Schließen Sie die Verbraucher an die Ausgänge auf der Rückseite der USV an. Schalten Sie
einfach die USV ein, und schon sind die Geräte geschützt.
Anschluß von Modem/Telefon/Netzwerk für Überspannungsschutz (Nur für
Modelle mit RJ-45 Anschluß)
Schließen Sie ein Modem-/Telefonkabel am “IN” Anschluss an der Rückseite des Gerätes an.
Am „Out“ Anschluss schließen Sie dann das Modem/Telefon an.
Anschluss des Kommunikationskabels (nur für Modelle mit USB/RS-232)
Um ein automatisches Abschalten/Hochfahren sowie eine Statusüberwachung zu gewähren,
schließen Sie das Kommunikationskabel der USB/RS-232 Schnittstelle der USV an. Das andere
Ende wird an Ihrem PC angeschlossen. Mit der Überwachungssoftware können Sie ein
Abschalten/Hochfahren zeitlich planen und jederzeit den Status der USV überprüfen.
Ein/Ausschalten des Gerätes
Schalten Sie die USV durch Drücken des Ein/Aus Schalters ein. Durch erneutes Drücken des
Ein/Aus Schalters schalten Sie das Gerät wieder aus.
4. Wichtige Sicherheitshinweise (Bitte diese Anweisungen aufheben)
ACHTUNG!
Um Feuergefahr und das Risiko eines elektrischen Schlages zu vermeiden, betreiben Sie das
Gerät bitte nur in einem Temperatur- und luftfeuchtigkeitskontrollierten Raum ohne leitende
Schmutzstoffe (Siehe Spezifikationen).
Um eine Überhitzung der USV zu verhindern, sollten die Lüftungsöffnungen nicht abgedeckt
und das Gerät nicht in direktem Sonnenlicht oder in der Nähe von Heizkörpern aufgestellt
werden
Bitte schliessen Sie keine “Nicht-PC” Geräte an die USV an wie z.B. medizinische Geräte,
Lebenserhaltungsgeräte, Mikrowellen oder Staubsauger.
Schließen Sie die USV nicht am eigenen Ausgang an.
Achten Sie darauf, dass keine Flüssigkeiten in der Nähe der USV gelagert werden oder in das
Gerät gelangen können.
Im Notfall drücken Sie den AUS Knopf und ziehen Sie das Netzkabel aus der Steckdose, um
das Gerät ordnungsgemäß auszuschalten.
Schließen Sie keine Mehrfachsteckdose oder einen Überspannungsschutz an der USV an.
Sollte die USV in einem Metallgehäuse eingebaut werden, muss dieses aus
Sicherheitsgründen während des Betriebs geerdet sein, um den Leckstrom unter 3,5 mA zu
halten.
Die Instandhaltung der Batterien darf nur von Fachpersonal durchgeführten werden.
Unbefugtes Personal darf sich nicht in der Nähe der Batterien aufhalten.
Beim Tausch der Batterien gleiche Anzahl und Typen verwenden.
Die interne Batteriespannung beträgt 12VDC. Es handelt sich um versiegelte Blei-Säure
Batterien mit 6 Zellen.
Die Batterien nicht ins Feuer werfen. Die Batterie könnte explodieren. Die Batterie sollte auch
nicht gewaltsam geöffnet werden. Batteriesäure ist gesundheitsschädlich für Haut und Augen,
da ätzend.
Vor einer Reinigung muss die USV vom Netz getrennt werden. Es dürfen keine Flüssigkeiten
oder Sprays benutzt werden.
Bei einer Batterie besteht immer das Risiko eines elektrischen Schlages und eines hohen
Kurzschlussstroms (Brandgefahr). Folgende Vorkehrungen sollten Sie treffen bevor Sie eine
Batterie austauschen:
1) Entfernen Sie Uhren, Ringe oder andere metallene Gegenstände.
2) Benutzen Sie Werkzeuge mit isolierten Griffen.
3) Tragen Sie Gummihandschuhe und Stiefel.
4) Legen Sie keine Werkzeuge oder metallische Gegenstände auf die Oberseite der
Batterien.
5) Trennen Sie die USV vom Netz, bevor die Batterie angeschlossen oder entfernt wird.
VORSICHT: Gefahr durch elektrischen Schock. Auch nach Trennen des Gerätes vom Netz kann
noch gefährliche Spannung durch die Batterie auftreten. Bei Service- oder Wartungsarbeiten
innerhalb der USV sollten deshalb die Schnellverschlüsse an Plus- und Minuspol der Batterie
ebenfalls getrennt werden.
5. Software Download & Installation (Nur für Modelle mit Kommunikations Port).
Befolgen Sie bitte folgende Schritte um die Software herunterzuladen.
1. Gehen Sie auf folgende Website: http://www.power-software-download.com
2. Klicken Sie das ViewPower Software Icon und wählen Sie das notwendige Betriebssystem,
Problem
Mögliche Ursache
Lösungsansatz
LED Display auf der
Frontseite funktioniert
nicht.
Leere Batterie
Laden Sie die USV mindestens 6 Stunden auf.
Defekte Batterie
Ersetzen Sie die Batterie mit einer Batterie
gleichen Typs.
Die USV ist nicht eingeschaltet
Drücken Sie den Ein/Aus Schalter nochmals,
um die USV einzuschalten.
Der Alarm ertönt
dauerhaft obwohl der
Netzanschluss keine
Probleme aufweist.
Die USV ist überlastet.
Entfernen Sie zuerst einige Verbraucher.
Bevor Sie sie wieder anschließen, stellen Sie
sicher, dass die Belastung nicht über der
Maximalleistung der USV liegt.
Beim Stromausfall, ist die
Back-Up Zeit zu kurz.
Die USV ist überlastet.
Entfernen Sie nicht notwendige Verbraucher.
Die Batteriespannung ist zu
niedrig.
Laden Sie die USV mindestens für 6 Stunden
auf.
Batterie defekt - evtl. durch
hohe Temperatur, oder falsche
Nutzung der Batterie.
Ersetzen Sie die Batterie mit einer Batterie
gleichen Typs.
Die Stromversorgung ist
in Ordnung aber das
Gerät schaltet immer in
den Batteriemodus.
Das Netzkabel ist locker.
Schließen Sie das Netzkabel wieder
ordnungsgemäß an.
Modell
EP 1500
EP 2000
KAPAZITÄT
1500 VA / 900 W
2000 VA / 1200 W
EINGANG
Spannung
110/120 VAC or 220/230/240 VAC
Spannungsbereich
81-145 VAC / 162-290 VAC
AUSGANG
Spannungsregulierung
+/-10%
Übertragungszeit
Typisch 2-6ms, 10 ms max.
Schwingungsverlauf
Simulierte Sinus Welle
BATTERIE
Typ und Anzahl
12 V/9 AH x 2
Ladezeit
4-6 Stunden für 90% Kapazität
ÄUSSERE MASSE
Dimensionen (BxHxT)
397 x 146 x 205 mm
Nettogewicht (kg)
11.1
11.5
UMGEBUNG
Luftfeuchtigkeit
0-90 % RF @ 0-40° C (nicht kondensierend)
Geräuschpegel
Weniger als 40 dB
MANAGEMENT
USB/RS-232
Unterstützt Windows® 98/2000/2003/XP/Vista/2008, Windows® 7,
Linux, and MAC
8
9
um die Software herunterzuladen.
3. Folgen Sie den Bildschirmanweisungen für die Installation der Software
4. Nach dem Neustart Ihres PCs wird die Software im System Tray in der Nähe der Uhr als
orangefarbiges Steckericon erscheinen.
5. Benutzername und Passwort in Software Management:
Benutzername: administrator; Passwort: administrator
6. Problembehandlung
Entsorgung der Altbatterien oder der USV
Bitte erkundigen Sie sich vor Ort bei einer Recycling-Stelle oder einer Sondermüllanlage, wie die
Altbatterie oder die USV ordnungsgemäß entsorgt werden kann/muss.
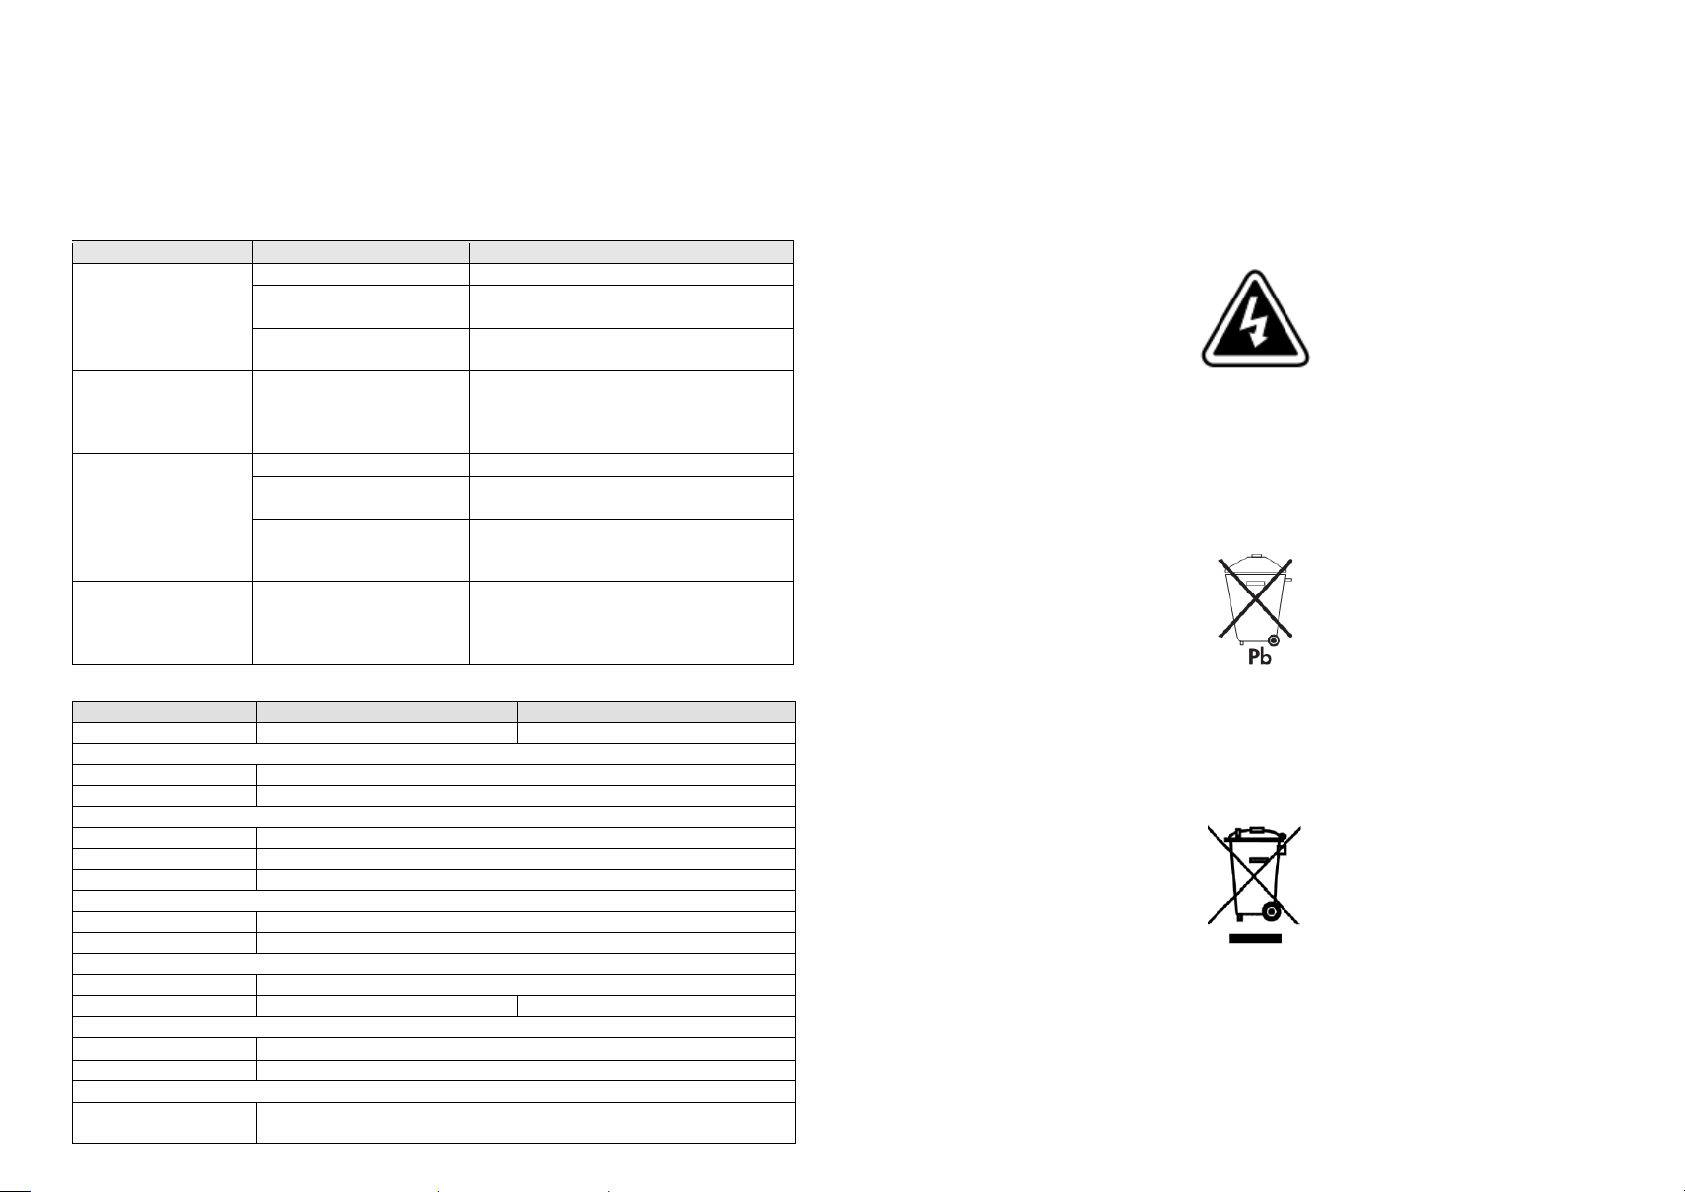
ACHTUNG !!!
Bitte werfen Sie die Batterien unter keinen Umständen ins Feuer. Die Batterien können
explodieren. Batterien müssen ordnungsgemäß entsorgt werden. Bitte informieren Sie sich
persönlich über die Entsorgungsvorschriften vor Ort. Bitte öffnen oder beschädigen Sie die
Batterien nicht. Batteriesäure kann Augen und Haut angreifen, sowie Vergiftungen bewirken.
ACHTUNG !!!
7 Spezifikationen
Die Batterie oder die USV darf nicht in den Hausmüll gegeben werden. Die USV enthält
geschlossene Bleibatterien und muss ordnungsgemäß entsorgt werden. Bitte wenden Sie sich
vor Ort an die für Sie zuständige Recycling-/Aufbereitungsstelle oder Sondermüllanlage um
mehr Informationen zu erhalten.
ACHTUNG !!!
Die UPS enthält Sondermüll oder recyclebare Güter. Diese dürfen laut EAR (Elektro- und
Elektronikaltgerätegesetz) nicht im Hausmüll entsorgt werden. Bitte kontaktieren Sie die für Sie
zuständige Annahmestelle für Sondermüll oder recyclebare Güter.
Line Interactive UPS Guide Rapide V. 1.1
FR
10
11
Bouton d’allumage
Panneau LCD
Tension d’entrée
Indicateur de niveau de charge, un
Tension de sortie clignotement indique un surcharge
Indicateur de mode AC
Indicateur de capacité batterie, le
Indicateur de mode batterie clignotement indique une batterie faible
1. Contenu du paquet
Vous devriez avoir reçu les éléments suivants dans le paquet:
- Unité UPS
- Guide d’Usage Rapide
- Câble de communication (seulement pour le modèle avec Port RS-232)
- Câble d’alimentation (seulement pour le modèle IEC-type)
2. Description du Produit
Vue Frontale: Panneau LCD:
Vue Arrière:
Type Schuko Type Nema I Type Nema II Type IEC
Connecteurs de sortie Protection de Modem/Téléphone/Réseau
Entrée AC Port com. RS-232
Interrupteur circuit Port com. USB
6 hours
PRÉCAUTION: JAMAIS connecter une imprimante laser ou
scanner à l’unité UPS. L’unité UPS peut être endommagée.
3. Installation et Mise en Marche
12
13
NOTE: Avant de l’installation, veuillez examiner l’unité. Assurez-vous que rien
dans le paquet n’est endommagé.
Conditions d’Installation et Stockage
Installer l’unité UPS dans un endroit protégé, libre de poussière et suffisamment ventilé. Veuillez
situer l’UPS au moins à 20 cm d’outres unités pour éviter les interférences. NE PAS UTILISER l’UPS
là où la température et l’humidité surpassent les limites spécifiques. (Vous trouverez les limites
dans les spécifications.)
Connexion à la Prise Secteur et Recharge
Relier l’entrée AC à une prise secteur. Il est conseillé de charger
la batterie au moins 6 heures avant de l’utiliser. L’UPS charge la
batterie lorsqu’elle est branchée a la prise secteur.
Connecter les charges/dispositifs
Reliez les charges avec les connecteurs de sortie du panneau arrière de l’UPS. Démarrez l’unité
UPS et tous les dispositifs connectés seront protégés.
Connexion d’un Modem/Téléphone/Réseau Ethernet pour le protéger contre sauts de
courant (Seulement pour modèles avec connecteur RJ45)
Reliez une seule ligne de modem/téléphone avec l’entrée protégée “IN” en panel arrière de l’unité
UPS. Connectez l’ordinateur avec un autre câble réseau à la sortie “OUT ”
Connexion du Câble de Communication (Modèle avec port USB/RS-232)
Pour gérer le démarrage de l’UPS et contrôler son état, reliez un bout du câble de communication
au port RS-232 et l’autre a votre ordinateur. Une fois le logiciel de gestion installé, vous pouvez
programmer les mises en marche et arrêts de l’UPS à travers votre ordinateur, et contrôler son
état.
Allumer/Éteindre l’unité UPS
Allumez l’unité UPS en appuyant sur le bouton de démarrage. Pour l’éteindre, appuyez de nouveau
sur ce même bouton.
4. Précautions Importantes de Sécurité (CONSERVEZ CES INSTRUCTIONS)
PRÉCAUTION!
Pour éviter le risque de feu ou choc électrique, installez l’UPS en un endroit intérieur avec
température et humidité contrôlés, libre de polluants conducteurs. (Vous trouverez la portée
de température et humidité dans les spécifications.)
Pour réduire le risque de sûrchauffage de l’UPS, ne couvrez pas les fentes d’aération et évitez
exposer l’UPS directement au soleil ou l’installer près de sources de chaleur.
Ne pas brancher l’UPS á dispositifs qui n’ont pas de relation avec l’ordinateur, comme
équipement médicaux ou de soutien de la vie, fours microondes, ou aspirateurs.
Ne pas connecter l’entrée de l’UPS avec sa propre sortie.
Ne permettez pas que liquides ou objets étranges rentrent à l’UPS. Ne pas placer boissons ou
bouteilles avec liquides sur ou près de l’UPS.
En cas d’émergence, appuyez le bouton OFF et débranchez le câble de la prise secteur pour
vous assurer que l’UPS est correctement déconnectée.
Ne reliez pas un bloc multiprise ou protecteur contre sauts de courant a l’UPS.
Si l’unité UPS a un châssis métallique, il est obligatoire par sécurité de la brancher à une prise
terre pour réduire des fuites de courant de moins de 3.5mA.
L’entretien des batteries doit être réalise ou supervisé par personnel spécialisé qui connait les
précautions nécessaires. Le personnel pas autorisé ne doit pas travailler avec les batteries.
Si vous remplacez les batteries, utilisez le même nombre et genre de batterie.
La batterie a 6 cellules au plomb, est scellé, avec voltage de 12V DC.
Ne jetez pas les batteries au feu. La batterie peut exploser. Ne pas ouvrir ou manipuler les
batteries. L’électrolyte est dangereux pour la peux et les yeux.
Débrancher l’UPS avant de la nettoyer et ne pas utiliser liquides ou sprays détergentes.
La batterie peut poser risque de choc électrique et courant de court-circuit. Les précautions
suivantes doivent être prises en charge avant de remplacer les batteries:
1) Retirez montres, anneaux et autres objets métalliques.
2) Utilisez des outils avec poignés isolées.
3) Utilisez des gants et bottes en caoutchouc.
4) Ne pas laisser outils ou pièces métalliques sur les batteries.
5) Débrancher la source de courant avant de (dé)connecter le terminal de la batterie.
Attention Danger de choc électrique. Même une fois débranché de la prise secteur, l’unité peut
produire haut voltage à travers la batterie. Pourtant, s’il est nécessaire de travailler à l’intérieur de
l’UPS, c’est obligatoire de débrancher les bornes positif et négatif de la batterie.
5. Téléchargement de Software & Installation (Seulement pour le modèle
avec port de communication)
Suivez les indications suivantes pour télécharger et installer le logiciel de gestion:
1. Dirigez-vous au site-web http://www.power-software-download.com
2. Cliquez sur l’icône de ViewPower et choisissez votre système d’exploitation pour télécharger le
logiciel.
3. Suivez les indications sur l’écran pour l’installation.
4. Une fois que votre ordinateur soit rallumé, vous trouverez l’icône orange du logiciel de gestion
en bas à droite, près de l’horloge.
5. Données d’accès au logiciel de gestion:
Nom d’utilisateur: administrator; Mot de passe: administrator
6. Solution de Problèmes
Problème
Cause Possible
Solution
Le LCD du panel
frontal ne s’allume
pas.
Faible charge de la batterie.
Chargez l’UPS 6 heures au minimum.
Défaut batterie.
Remplacez la batterie avec une du
même type.
L’unité UPS n’est pas allumée.
Pulse le bouton d’allumage pour
redémarrer l’UPS.
L’Alarme sonne sans
cesse mais le courant
de la prise secteur est
normal.
L’UPS est surchargée.
Déconnectez quelques charges.
Avant de reconnecter los dispositifs,
assurez-vous que la charge est
compatible avec celle indiquée dans
les spécifications de l’UPS.
Quand le courant
arrête, le temps de
back-up est très court.
L’UPS est surchargée.
Déconnectez les charges principales.
Faible Voltage de la batterie.
Chargez l’UPS 6 heures au minimum.
Batterie défectueuse,
probablement à cause de
haute température ou un
usage incorrect.
Remplacez la batterie avec une du
même type.
Prise secteur normal,
UPS en mode Batterie.
Le câble d’alimentation n’est
pas connecté.
Reliez le câble d’alimentation
correctement.
Modèle
EP 1500
EP 2000
CAPACITÉ
1500 VA / 900 W
2000 VA / 1200 W
ENTRÉE
Voltage
110/120 VAC or 220/230/240 VAC
Portée de Voltage
81-145 VAC / 162-290 VAC
SORTIE
Régulation de Voltage
+/-10%
Temps de réaction
Normal 2-6 ms, maximum 10 ms.
Forme d’Onde
Onde Sinusoïdale Simulée
BATTERIE
Type et Quantité
12 V/9 AH x 2
Temps de charge
4-6 heures pour récupérer 90% de la capacité
DIMENSIONES
Mesures (PxLxH)
397 x 146 x 205 mm
Poids Net (kg)
11.1
11.5
ENVIRONEMENT
Humidité
0-90 % RH @ 0-40° C (sans condensation)
Niveau de Bruit
Moins de 40 dB
GESTION
USB/RS-232
Support Windows® 98/2000/2003/XP/Vista/2008, Windows®
7, Linux, and MAC
Line Interactive UPS Guía rápida V. 1.1
ES
14
15
Botón de encendido
Panel LCD
Voltaje de entrada
Indicador de carga, intermitente
Voltaje de salida
indica sobrecarga
Indicador de modo AC
Indicador de nivel de batería,
Indicador de modo de
internitente indica batería baja
batería
7 Spécifications
1. Contenido del paquete
Debería haber recibido los siguientes elementos en el paquete:
- Unidad UPS
- Guía Rápida de Uso
- Cable de comunicación (sólo para el modelo con Puerto RS-232)
- Cable de alimentación (sólo para el modelo IEC-type)
2. Descripción del producto
Vista Frontal: Panel LCD:
Vista Trasera:
Tipo Schuko Tipo NEMA I Tipo NEMA II Tipo IEC
Conectores de salida Protector picos Modem/Teléfono/Red Ethernet
Entrada AC Puerto com. RS-232
Interruptor circuito Puerto com. USB
6 hours
PRECAUCIÓN: NUNCA conectar una impresora láser o
scanner a la unidad UPS. Esto puede dañar la UPS.
3. Instalación y Configuración Inicial
16
17
NOTA: Antes de la instalación, por favor inspeccione la unidad. Asegúrese de
que nada en el interior del paquete esta dañado.
Condiciones de Emplazamiento y Almacenamiento
Instale la unidad UPS en un área protegida libre de polvo y con suficiente ventilación. Por favor
sitúe la UPS al menos a 20 cm de otras unidades para evitar interferencias. NO UTIILICE la UPS
donde la temperatura y humedad superen los límites específicos. (Por favor, compruebe los límites
en las especificaciones.)
Conexión a red y Recarga
Enchufe el cable de entrada a la toma de la pared. Para un
mejor resultado se debe cargar la batería al menos 6 horas
antes del uso. La UPS recarga la batería mientras esté
enchufada.
Conecte las cargas/dispositivos
Enchufe las cargas en los conectores de salida del panel posterior de la UPS. Simplemente
arranque la unidad UPS y todos los dispositivos conectados a ella quedarán protegidos.
Conexión de Modem/Teléfono/Red Ethernet para protección frente a picos de tensión
(Sólo para el modelo con conector RJ45)
Conecte una sola línea de modem/teléfono en la entrada protegida “IN” en el panel posterior de la
unidad UPS. Conecte el ordenador con otro cable de red a la salida “OUT”.
Conexión del Cable de Comunicación (Sólo para el modelo con puerto RS-232)
Para la supervisión del arranque/parada de la UPS y controlar su estado, conecte un extremo del
cable de comunicación al puerto RS-232 y el otro a su ordenador. Con el software de supervisión
instalado, se pueden programar paradas y arranques de la UPS a través del PC, así como controlar
su estado.
Encendido y Apagado de la Unidad
Arranque la unidad UPS pulsando el botón de encendido. Para apagarla, pulse de nuevo este
mismo botón.
4. Precauciones Importantes de Seguridad (CONSERVE ESTAS INSTRUCCIONES)
¡CUIDADO!
Para prevenir el riesgo de fuego o choque eléctrico, instale la UPS en un área interior de
temperatura y humedad controladas, libre de contaminantes conductores. (Vea las
especificaciones para los rangos de temperatura y humedad aceptables.)
Para reducir el riesgo de sobrecalentamiento de la UPS, no cubra las rejillas de ventilación y
evite exponer la unidad directamente al sol o instalarla cerca de fuentes de calor.
No conecte a la UPS dispositivos que no estén relacionados con un ordenador, como
equipamiento médico o de apoyo a la vida, hornos microondas, o aspiradores.
No conecte la entrada de la UPS en su propia salida.
No permita que líquidos u objetos extraños entren a la UPS. No sitúe bebidas o envases con
líquidos encima o cerca de la unidad.
En caso de emergencia, pulse el botón OFF y desenchufe el cable de alimentación para
asegurarse de que la UPS esta debidamente desconectada.
No conecte un alargador ni un protector frente a picos de tensión a la UPS.
Si la unidad UPS tiene un chasis metálico, por motivos de seguridad es obligatorio conectarla
a una toma de tierra para reducir fugas de corrientes de menos de 3.5mA.
El mantenimiento de las baterías debe ser realizado o supervisado por personal especializado
que conozca las precauciones requeridas. Mantenga al personal no autorizado lejos de las
baterías.
Si reemplaza las baterías, use el mismo número y tipo de baterías.
La batería es de 6 celdas de plomo, sellada, con voltaje de 12V DC.
No tire las baterías al fuego, la batería podría explotar. No abra o manipule las baterías. El
electrolito liberado es dañino para la piel y los ojos.
Desconecte la UPS antes de limpiarla y no use líquidos ni sprays detergentes.
La batería puede presentar un riesgo de choque eléctrico y corriente de corto circuito. Las
siguientes precauciones deben observarse antes de sustituir las baterías:
1) Retire relojes, anillos u otros objetos metálicos.
2) Use herramientas con empuñadora con aislamiento.
3) Use guantes y botas de goma.
4) No deje herramientas o partes metálicas sobre las baterías.
5) Desenchufe la fuente de alimentación antes de conectar o desconectar el terminal de
las baterías.
Atención Peligro de choque eléctrico. Incluso desenchufada de la red, la unidad puede producir
alto voltaje a través de la batería. Por lo tanto, si es necesario trabajar en el interior de la UPS, es
obligatorio desconectar los bornes positivo y negativo de la batería.
5. Descarga de Software & Instalación (Sólo para el modelo con puerto de
comunicaciones)
Por favor siga las indicaciones para descargar e instalar el software de supervisión:
1. Vaya a la página web http://www.power-software-download.com
2. Haga click en el icono de ViewPower y elija su sistema operativo para descargar el software.
3. Siga las instrucciones de la pantalla para su instalación.
4. Tras reiniciar el ordenador, el software de supervisión aparecerá como un icono naranja en la
bandeja del sistema, cerca del reloj.
5. Datos de acceso al software de gestión:
Nombre de usuario: administrator
Password: administrator
6. Solución de Problemas
Problema
Posible Causa
Solución
La pantalla LCD no
funciona
Carga de batería baja.
Cargue la UPS al menos 6 horas.
Fallo de la batería.
Reemplace la batería con una del
mismo tipo.
La unidad UPS no está
encendida.
Pulse el botón de encendido para
encender de nuevo la UPS.
La Alarma suena
continuamente pero el
suministro eléctrico es
normal.
La UPS está sobrecargada.
Desconecte primero algunas cargas.
Antes de reconectar los dispositivos,
asegúrese por favor de que la carga
coincide con la indicada en las
especificaciones de la UPS.
Cuando falla el
suministro eléctrico, el
tiempo de back-up es
corto.
La UPS está sobrecargada.
Desconecte las cargas principales.
El voltaje de la batería bajo.
Cargue la UPS al menos 6 horas.
Batería defectuosa. Puede
deberse a temperatura
elevada o uso indebido.
Reemplace la batería con una del
mismo tipo.
Suministro es normal
pero la UPS funciona
en modo batería.
El cable de alimentación está
suelto.
Reconecte el cable de alimentación
correctamente.
Modelo
EP 1500
EP 2000
CAPACIDAD
1500 VA / 900 W
2000 VA / 1200 W
ENTRADA
Voltaje
110/120 VAC ó 220/230/240 VAC
Rango de Voltaje
81-145 VAC / 162-290 VAC
SALIDA
Regulación de Voltaje
+/-10%
Tiempo de reacción
Típico 2-6 ms, máximo 10 ms.
Forma de Onda
Onda Sinusoidal Simulada
BATERÍA
Tipo y Cantidad
12 V/9 AH x 2
Tiempo de Carga
4-6 horas para recuperar el 90% de capacidad
DIMENSIONES
Medidas (PxAnxAl)
397 x 146 x 205 mm
Peso Neto (kg)
11.1
11.5
AMBIENTE
Humedad
0-90 % RH @ 0-40° C (sin condensación)
Nivel de Ruido
Menos de 40 dB
SUPERVISIÓN
USB/RS-232
Soporte Windows® 98/2000/2003/XP/Vista/2008, Windows®
7, Linux, and MAC
Line Interactive UPS Quick Guide V. 1.1
18
19
Кнопка включения/выключения
ЖК панель
Входное напряжение Индикатор нагрузки
Выходное напряжение
(мигает когда нагрузка
Индикатор работы от сети превышает допустимую)
Индикатор работы от батареи Индикатор заряда
батареи батерията (мигает когда
батарея разряжена)
RU
7. Especificaciones
1. Содержание упаковки
Вы получите следующие компоненты в упаковке
- Блок бесперебойного питании (сокращенно ИБП)
- Инструкцию
- (Интерфейсный кабель (только для модели с USB/RS-232 портом))
- Кабель питания только IEC-type для моделей
2. Внешний вид
Вид спереди: ЖК панель:
Вид сзади:
Schuko Type NEMA Type I NEMA Type II IEC Type
Выходные разъемы Модем / телефон и сети Защита всплесков напряжения
AC вход RS-232 com. Port
Предохранитель USB com. port
6 часов
ВНИМАНИЕ: НЕ ПОДКЛЮЧАЙТЕ лазерные принтеры и
сканеры к ИБП. Они могут повредить устройство
3. Инструкция по использованию
20
21
ВНИМАНИЕ: Перед использованием осмотрите ИБП, проверьте
отсутствие повреждений корпуса.
Условия эксплуатации
Установите ИБП в защищенном от пыли месте с хорошим воздухообменом. НЕ используйте
ИБП при температуре и влажности отклоняющихся от рекомендуемых (Пожалуйста
внимательно ознакомьтесь с инструкцией)
Подключение и зарядка
Подключите ИБП к розетке. Для лучшего результата
зарядите аккумулятор не менее 6 часов перед началом
использования. Аккумулятор ИБП заряжается при
подключенных устройствах.
Подключение устройств
Подключите устройства к выходным разъемам на задней панели ИБП. Включите ИБП, затем
устройства подключенные к ИБП будут защищены.
Подключение Modem/Phone/Network (Только для моделей с RJ-45)
Подключите линию modem/phone к разъему “IN” на задней панели ИБП. Подключите
компьютер к разъему “OUT” с помощью другого телефонного кабеля
(Подключение коммуникационного кобеля (Только для моделей с USB/RS-232
port)
Для самостоятельного включения / выключения ИБП и просмотра состояния, подключите
кобель USB/RS-232 к компьютеру, вы можете контролировать включение / выключение и
статус ИБП с компьютера.
Включение / выключение устройства
Для включения ИБП нажмите на выключатель питания. Для выключение UPS нажмите еще
раз на выключатель питания.
4. Инструкция по безопасности (СОХРАНИТЕ ЭТУ ИНСТРУКЦИЮ)
ВНИМАНИЕ!
Чтобы предотвратить риск возгорания или электрошока, установите ИБП в зоне с
контролируемой температурой и влажностью. (См. спецификации по приемлемой
температуры и влажности.)
Чтобы уменьшить риск перегрева ИБП, не закрывайте отверстия для охлаждения ИБП и
не подвергайте ИБП воздействию прямых солнечных лучей, не устанавливайте ИБП
вблизи приборов излучающих тепло, такие как обогреватели или печи.
Не подключайте не компьютерное оборудование, такие как медицинское оборудование,
жизненно-вспомогательное оборудование, микроволновые печи, пылесосы к ИБП.
Не подключайте вход и выход ИБП.
Не допускайте попадание жидкостей или посторонних предметов в ИБП.
В случае возникновения чрезвычайной ситуации, нажмите кнопку OFF и отсоедините
кабель питания от сети переменного тока питания, чтобы правильного отглючения
ИБП.
Не подключайте сетевые развитвители и устройства подавления помех к выходу ИБП.
Если ИБП с металлическим корпусом, в целях безопасности, ИБП в целях снижения тока
утечки ниже 3.5mA, заземление является обязательным при установке ИБП.
Обслуживание батарей должно выполняться только или под наблюдением персонала,
знающих аккумуляторные батарей и необходимые меры предосторожности. Не
допускайте вмешательство несанкционированного персонала.
При замене аккумулятора, используйте один и тот же номер и тип.
Напряжение аккумулятора 12VDC. Герметичная, свинцово-кислотная аккумуляторная
батарея.
Не уничтожайте аккумуляторы в огнём, так как аккумулятор может взорваться. Не
открывайте и не разрушайте корпус аккумулятора. Электролит вреден для кожи и глаз.
Отсоедините ИБП перед уборкой и не используйте жидкие или распыляемые моющего
средства.
Батарея может стать причиной электрошока и высокий ток при коротком замыкании.
Соблюдайте следующие предосторожности при замене аккумулятора.
1) Снимите часы, кольца и другие металлические предметы.
2) Используйте инструменты с изотермическими ручками.
3) Оденьте резиновые перчатки и сапоги.
4) Не кладите на аккумулятор металлические предметы.
5) Отсоедините ИБП от электросети до перед заменой аккумулятора.
ОСТОРОЖНО! Опасными из-за поражения электрическим током, Кроме того, при
отключении этого блока от сети, опасные напряжения все же могут быть доступны из-за
аккумуляторной батареи. Аккумулятор питания должен быть отключен, отключайте
разъемы плюс и минус от аккумулятора при разборке ИБП.
5. Загрузка и установка программы (Только для модели с портом)
Выполните следующие действия, чтобы загрузить и установить программное
обеспечение мониторинга:
1. Зайдите на сайт http://www.power-software-download.com
2. Нажмите значок ViewPower программного обеспечения, а затем выбрать необходимые
ОС для загрузки программного обеспечения.
3. Следуйте инструкциям на экране для установки программного обеспечения.
4. После перезагрузки компьютера, программа оранжевый значок программы
мониторинга появиться в системном окне, рядом с часами.
5. Логин и пароль программного обеспечения: Логин: administrator; Пароль: administrator
6. Решение проблем
Проблема
Возможная причина
Решение
На передней панели
ничего не написано.
Разряжена аккумулятор
Заряжайте ИБП по крайней мере 6 часов.
Аккумулятор испорчен
Замените аккумулятор
ИБП отключен
Нажмите выключатель снова и включите
ИБП.
Сигнал постоянно
звучит, когда сети
является нормальным.
ИБП перегружен
Отключите часть устройств от ИБП, перед
повторным включением убедитесь что
нагрузка не превышает заявленные в
характеристики ИПБ
При отключенном
электричестве,
резервные время
сократилось
ИБП перегружен
Отключите часть устройств
Аккумулятор на полностью
заряжен
Зарядите ИПБ минимум 6 часов
Батарея дефектом. Это
может быть связано с
высокой температурой
эксплуатации окружающей
среды, или неправильной
эксплуатации к батарее.
Замените аккумулятор
При нормальном
напряжении в сети,
ИБП работает от
батареи
Шнур питания является
плохо подключен
Подключите шнур питания должным
образом.
Модель
EP 1500
EP 2000
ЕМКОСТЬ
1500 VA / 900W
2000 VA / 1200 W
ВХОД
Напряжение
110/120 VAC или 220/230/240 VAC
Диапазон напряжений
81-145 VAC / 162-290 VAC
ВЫХОД
Регулирование
напряжения
+/-10%
Время перехода
стандартное 2-6 мс, 10 мс макс.
Форма волны
Моделированая синусоидальная волна
БАТАРЕЯ
Тип и количество
12 V/9 AH x 2
Время зарядки
4-6 часов восстанавливает 90% емкости
Габариты
Размер (DxWxH)
397 x 146 x 205 мм
Вес (кг)
11.1
11.5
Окружающая среда
Влажность
0-90 % RH @ 0-40° C (без конденсата)
Уровень шума
Менее 40 дБ
Управление
USB/RS-232
Поддерживает Windows® 98/2000/2003/XP/Vista/2008, Windows®
7, Linux, and MAC
Line Interactive UPS Návod k obsluze, v. 1.1
CZ
LCD panel
Vypínač
Vstupní napětí Indikátor zatížení, blikání
Výstupní napětí signalizuje přetížení
Indikátor provozu ze sítě Indikátor kapacity baterie,
Indikátor provozu z baterie blikání signalizuje téměř vybitou
baterii
22
23
См. таблицу ниже для решения мелких проблем.
7. Спецификация
1. Obsah balení
Balení obsahuje následující položky:
- Jednotku UPS
- Návod
- Komunikační kabel (pouze v případě modelu s portem RS-232)
- Přívodní síťový kabel (pouze v případě modelu se zásuvkami IEC)
2. Přehled
Pohled zepředu: LCD panel:
Pohled zezadu:
Typ Schuko Type NEMA I Typ NEMA II Typ IEC
Výstupní zásuvky Zásuvka pro přepěťovou ochranu modemu/
Vstup přívodního kabelu telefonu nebo počítačové sítě (konektory RJ-45)
Resetovací tlačítko Port RS-232
Port USB
 Loading...