

Page 1

F-Secure PSB Administrator's Guide
Page 2

Page 3

Contents
Chapter 1: Introduction.......................................................................5
Chapter 2: Getting Started..................................................................7
Chapter 3: Installing F-Secure PSB Workstation Security.............13
F-Secure PSB Administrator's Guide | TOC | 3
Creating a new account............................................................................................................8
Downloading Software............................................................................................................10
Recovering your password.....................................................................................................11
Adding a new subscription key for your company..................................................................12
System requirements .............................................................................................................14
F-Secure PSB Workstation Security local installation ...........................................................16
F-Secure PSB Workstation Security remote installation ........................................................18
Chapter 4: Installing F-Secure PSB Server Security......................19
System requirements..............................................................................................................20
F-Secure PSB Server Security installation ............................................................................21
Chapter 5: Installing F-Secure PSB E-mail and Server Security...23
System requirements..............................................................................................................24
Before installing the product...................................................................................................27
F-Secure PSB E-mail and Server Security installation...........................................................28
Chapter 6: Upgrade............................................................................31
Upgrading from Policy Manager ............................................................................................32
Upgrading to the latest version...............................................................................................34
Chapter 7: Administering the product.............................................35
Checking the system status....................................................................................................36
Is my network protected?.............................................................................................36
Checking the status of a group of computers..............................................................36
Checking the status of computers...............................................................................37
Checking the status of a workstation or a server.........................................................37
Keeping computers in the network safe.......................................................................38
Get updates by RSS....................................................................................................38
Managing product settings......................................................................................................39
Managing the workstation settings locally...................................................................39
Page 4

4 | F-Secure PSB Administrator's Guide | TOC
Managing the server settings locally............................................................................39
Managing the product settings remotely......................................................................40
Managing profiles...................................................................................................................42
Creating a profile..........................................................................................................42
Editing a profile............................................................................................................42
Deleting a profile..........................................................................................................43
Changing profile name or description..........................................................................43
Setting a default profile................................................................................................44
Resetting default profiles.............................................................................................44
Chapter 8: Troubleshooting..............................................................45
Frequently asked questions....................................................................................................46
Page 5

Introduction
Chapter
1
This guide contains instructions how to install and administer F-Secure
PSB Portal and F-Secure PSB software.
Page 6

Page 7

Getting Started
Chapter
2
Topics:
•
Creating a new account
•
Downloading Software
•
Recovering your password
•
Adding a new subscription key for
your company
In this chapter, you find instructions how to create a new account to log
into the F-Secure PSB Portal, and to download and install the F-Secure
PSB software.
Page 8

8 | F-Secure PSB Administrator's Guide | Getting Started
Creating a new account
You need to create a new account to log into the F-Secure PSB Portal.
To create a new account:
Note: If you have created an account, for example, for F-Secure PSB Server Security, do not create a
new company account, but add a new subscription to the existing account.
1. In your browser, go to the URL that was provided to you together with the subscription key.
You received the URL and the subscription key, for example by e-mail, when you purchased the product.
The F-Secure Protection Service login page opens.
2. Click the Create your account link.
The Create account page opens.
3. Enter the required information:
• In the Subscription key field, enter the subscription key that you received, for example by e-mail,
when you purchased the product.
• In the Account name field, enter the name of the company.
• In the User name field, enter the e-mail address of the user. The e-mail address is used as your login
name.
• In the Password and Confirm Password fields, you must enter exactly the same passwords.
Page 9

F-Secure PSB Administrator's Guide | Getting Started | 9
• In the E-mail field, enter your e-mail address.
4. Click Create your account.
You will receive an e-mail message that shows your account information.
5. Click Back to the login page.
The F-Secure Protection Service login page opens.
6. Log in to the F-Secure PSB Portal.
Page 10

10 | F-Secure PSB Administrator's Guide | Getting Started
Downloading Software
You can download the F-Secure PSB Workstation Security, F-Secure Server Security, or F-Secure PSB
E-mail and Server Security software through the F-Secure PSB Portal.
To download the software:
1. Log in to the F-Secure PSB Portal.
Enter the user name and password, which you selected when you created your account.
The Protection status page of the new account opens.
2. Click the Download software link at the top of the page.
The Download software page opens.
3. In the Download software page, click the Download the workstation software or the Download the
server software link.
Page 11

F-Secure PSB Administrator's Guide | Getting Started | 11
Recovering your password
If you have forgotten your password, you can recover it through the Forgot your password link.
To recover your password:
1. On the log in page of the F-Secure PSB Portal, click Forgot your password? link.
2. Enter your user name, and click Submit.
An e-mail message is sent to the e-mail address that you provided when you created the account. The e-mail
message contains a link to the F-Secure PSB Portal where you can change your password.
Page 12

12 | F-Secure PSB Administrator's Guide | Getting Started
Adding a new subscription key for your company
By adding a new subscription key for your company, you can add more computers to the portal
To add a new subscription key:
1. Click the Subscriptions tab.
The Subscriptions page opens.
2. Click Add a new subscription key.
3. Enter the new subscription key you have purchased, and click Add.
The new subscription key is added to your company account.
Page 13

Installing F-Secure PSB Workstation Security
Chapter
3
Topics:
•
System requirements
•
F-Secure PSB Workstation
Security local installation
•
F-Secure PSB Workstation
Security remote installation
This section describes the system requirements for installing and using
the product, and gives you instructions on how to install the product.
Page 14

14 | F-Secure PSB Administrator's Guide | Installing F-Secure PSB Workstation Security
System requirements
Read the following before starting to install and use F-Secure Workstation Security.
Your computer must meet the following minimum requirements for installing and using the product:
Microsoft Windows XP (32-bit). service pack 2 or newer:Operating system version:
• Home, Professional and Media Center editions
Microsoft Windows 7 and Vista (32- and 64-bits). All service packs:
• Starter
• Home Basic
• Home Premium
• Business
• Ultimate
• Enterprise
For Microsoft Windows XP:Processor:
• Intel Pentium III 1 GHz or higher
Microsoft Windows 7 and Vista:
• Intel Pentium 4 2 GHz or higher
For Microsoft Windows XP:Memory:
• 512 MB
For Microsoft Windows 7 and Vista:
• 1 GB
For Microsoft Windows XP:Display:
• 8-bit (256 colors)
For Microsoft Windows 7 and Vista:
• 16-bit or more (65000 colors)
For Microsoft Windows XP:Disk space:
• 800MB free HD space
Internet connection:
For Microsoft Windows 7 and Vista:
• 800MB free HD space
An Internet connection is required in order to validate your subscription and
receive updates.
For Microsoft Windows XP:Browser:
• Internet Explorer 5.0 or newer is required.
Page 15

F-Secure PSB Administrator's Guide | Installing F-Secure PSB Workstation Security | 15
For Microsoft Windows 7 and Vista:
• Internet Explorer 7.0 or newer is required
Supported browsers for using the F-Secure PSB portal:
• Internet Explorer 6.x or newer is required. JavaScript and cookies must
be enabled in the browser
• Firefox 2.x or newer is required. JavaScript and cookies must be enabled
in the browser
Note: To use Profile Editor, you need to have Java Runtime Environment
1.6 or newer installed on your computer.
Page 16

16 | F-Secure PSB Administrator's Guide | Installing F-Secure PSB Workstation Security
F-Secure PSB Workstation Security local installation
This section describes how to locally install F-Secure PSB Workstation Security.
To install the program:
1. Locate the downloaded file and double-click the.exe file to start the installation.
2. Select the installation language, and click Next to continue.
3. Read the license agreement. To accept the agreement and to continue, click Accept.
4. Enter your subscription key and click Next.
You must enter the same subscription key that you used when you created the account.
5. Select the installation type, and click Next:
• Automatic installation: The product is installed automatically. Existing security products may be
automatically replaced. The product is installed to the default directory.
• Step by step installation: During the installation, you can change the installation directory. However,
we recommend using the default directory.
6. When the installation is complete, the computer restarts automatically after a while. To restart immediately,
click Restart.
After the installation, log into the Portal to verify that the computer shows in the Portal.
Page 17

F-Secure PSB Administrator's Guide | Installing F-Secure PSB Workstation Security | 17
Note: In the Protection status page, you may see a green status icon with the text "Waiting for connection."
It may take up to two hours before the connection is established. If the computer has not yet received
the latest updates, you may see either a yellow or a red status icon. For more details on the computer(s),
click the Computers tab to open the Computers page.
Page 18

18 | F-Secure PSB Administrator's Guide | Installing F-Secure PSB Workstation Security
F-Secure PSB Workstation Security remote installation
This section explains how to remotely install F-Secure PSB Workstation Security.
Before you start the remote installation, make sure that the domain controller exists and that the computers
on which you want to install the software belong to a domain. To be able to remotely install the software, you
must have domain administrator rights.
To install the software:
1. Log in to the F-Secure PSB Portal.
Enter the user name and password, which you selected when you created your account.
The Protection status page of the new account opens.
2. Click the Download software link at the top of the page.
The Download software page opens.
3. In the Download software page, click the Download the Remote Installation Tool link. If you have not
downloaded the workstation software yet, click also theDownload the workstation software link.
4. Extract the Remote Installation Tool zip file on a local drive.
5. Double-click the ritool.bat file.
The F-Secure Remote Installation Tool window opens.
6.
In the Software to Install page, click .
The Software Installer Selection window opens.
7. Locate the downloaded workstation software file and click OK.
8. Click Next.
9. In the Target Computers page, do the following:
a) Under Domain Name, select the domain to which the computers belong.
b) Under Computer Name, select the computers on which you want to remote install the software.
10. Click Next.
11. In the Account page, do the following:
a) Select Another account.
b) Enter the domain administrator name and password.
c) Confirm the password.
12. Click Next.
13. Click Install.
The workstation software is being installed on the selected computers.
In the F-Secure PSB portal, verify that the computer shows in the portal.
Page 19

Installing F-Secure PSB Server Security
Chapter
4
Topics:
•
System requirements
•
F-Secure PSB Server Security
installation
This chapter describes the system requirements for installing and using
the product, and gives you step-by-step instructions on how to install the
product.
Page 20

20 | F-Secure PSB Administrator's Guide | Installing F-Secure PSB Server Security
System requirements
Read the following before starting to install and use the F-Secure PSB Server Security software.
Your computer must meet the following requirements for installing and using the product:
Operating System:
Internet Connection:
Windows Server 2003 (32-bit and 64-bit)
Windows Server 2008 (32-bit and 64-bit)
Windows Server 2008 R2
Small Business Server 2003
Small Business Server 2008
Intel Pentium 4, 2GHz or higherProcessor:
1 GB of RAMMemory:
260 MB free hard disk spaceDisk space to install:
10 GB or more free hard disk spaceDisk space for processing:
An Internet connection is required to validate your subscription and receive
updates.
Page 21

F-Secure PSB Administrator's Guide | Installing F-Secure PSB Server Security | 21
F-Secure PSB Server Security installation
Install the software on a computer and after the installation verify that the computer shows in the portal.
To install the software:
1. Locate the downloaded file and double-click the .exe file to start the installation.
2. Select the installation language, and click Next to continue.
3. Read the license agreement. To accept the agreement and to continue, click Accept.
4. Enter your subscription key and click Next.
You must enter the same subscription key that you used when you created the account.
5. Select the installation type, and click Next:
• Automatic installation: The product is installed automatically. Existing security products may be
automatically replaced. The product is installed to the default directory.
• Step by step installation: During the installation, you can change the installation directory. However,
we recommend using the default directory.
6. When the installation is complete, click Finish.
Page 22

Page 23

Chapter
Installing F-Secure PSB E-mail and Server Security
5
Topics:
•
System requirements
•
Before installing the product
•
F-Secure PSB E-mail and Server
Security installation
This chapter describes the system requirements for installing and using
the product, and gives you step-by-step instructions on how to install the
product.
Page 24

24 | F-Secure PSB Administrator's Guide | Installing F-Secure PSB E-mail and Server Security
System requirements
Read the following before installing F-Secure PSB E-mail and Server Security.
Based on the Microsoft Exchange Server version, your computer must meet the following requirements for
installing and using the product.
Microsoft Exchange Server 2003
To install F-Secure PSB E-mail and Server Security on Microsoft Exchange Server 2003, the following
minimum hardware and system requirements are recommended:
Operating System:
Microsoft Exchange Server:
Internet Connection:
Microsoft Exchange Server 2007
Microsoft®Windows Server 2003, Standard Edition with the latest service
pack
Microsoft®Windows Server 2003, Enterprise Edition with the latest service
pack
Microsoft®Windows Server 2003 R2, Standard Edition
Microsoft®Windows Server 2003 R2, Enterprise Edition
Microsoft®Small Business Server 2003
Microsoft®Small Business Server 2003 R2
32-bit processor: Intel Pentium 4 or compatible 2GHz or fasterProcessor:
1 GB of RAMMemory:
500 MB free hard disk spaceDisk space to install:
10 GB or more free hard disk spaceDisk space for processing:
Microsoft®Exchange Server 2003 with the latest service pack
An Internet connection is required to validate your subscription and receive
updates.
Note: Clusters are not supported.
To install F-Secure PSB E-mail and Server Security on Microsoft Exchange Server 2007, the following
minimum hardware and system requirements are recommended:
Operating System:
Processor:
Microsoft®Windows Server 2003, Standard x64 Edition with the latest service
pack
Microsoft®Windows Server 2003, Enterprise x64 Edition with the latest service
pack
Microsoft®Windows Server 2003 R2, Standard x64 Edition
Microsoft®Windows Server 2003 R2, Enterprise x64 Edition
Microsoft®Windows Server 2008, Standard Edition
Microsoft®Windows Server 2008, Enterprise Edition
Microsoft®Small Business Server 2008
Intel x64 processor with Extended Memory 64 Technology (EM64T)
Page 25

F-Secure PSB Administrator's Guide | Installing F-Secure PSB E-mail and Server Security | 25
AMD processor that supports the AMD64 platform
2 GB of RAMMemory:
500 MB free hard disk spaceDisk space to install:
10 GB or more free hard disk spaceDisk space for processing:
Microsoft®Exchange Server 2007 (64-bit version) with the latest service pack
Microsoft Exchange Server:
Microsoft®Small Business Server 2008
Note: The 32-bit evaluation version of Microsoft Exchange Server 2007
is not supported.
Internet Connection:
An Internet connection is required to validate your subscription and receive
updates.
F-Secure PSB E-mail and Server Security supports the following roles of Microsoft Exchange Server 2007:
• Edge Server role
• Hub Server role
• Mailbox Server role
• Combo Server (Mailbox Server and Hub Server roles)
Note: Clusters are not supported.
Microsoft Exchange Server 2010
To install F-Secure PSB E-mail and Server Security on Microsoft Exchange Server 2010, the following
minimum hardware and system requirements are recommended:
Operating System:
Microsoft®Windows Server 2008, Standard Edition
Microsoft®Windows Server 2008, Enterprise Edition
Microsoft®Windows Server 2008 R2, Standard Edition
Microsoft®Windows Server 2008 R2, Enterprise Edition
Processor:
Intel x64 processor with Extended Memory 64 Technology (EM64T)
AMD processor that supports the AMD64 platform
4 GB of RAMMemory:
500 MB free hard disk spaceDisk space to install:
10 GB or more free hard disk spaceDisk space for processing:
Microsoft®Exchange Server 2010Microsoft Exchange Server:
Internet Connection:
An Internet connection is required to validate your subscription and receive
updates.
F-Secure PSB E-mail and Server Security supports the following roles of Microsoft Exchange Server 2010:
• Edge Server role
• Hub Server role
• Mailbox Server role
• Combo Server (Mailbox Server and Hub Server roles)
Note: Clusters are not supported.
Page 26

26 | F-Secure PSB Administrator's Guide | Installing F-Secure PSB E-mail and Server Security
SQL Server requirements
The product requires Microsoft®SQL Server for the quarantine management. The following versions of
Microsoft SQL Server are recommended to use:
• Microsoft SQL Server 2000 (Enterprise, Standard or Workgroup Edition) with Service Pack 4
• Microsoft SQL Server 2000 Desktop Engine (MSDE) with Service Pack 4
• Microsoft SQL Server 2005 (Enterprise, Standard, Workgroup or Express Edition) with the latest service
pack
• Microsoft SQL Server 2008 (Enterprise, Standard, Workgroup or Express Edition)
Important: We do not recommend using MSDE or Microsoft SQL Server 2005/2008 Express Edition if
you are planning to use the centralized quarantine management or if your organization sends and receives
a large amount of e-mails.
Note: You must install a Microsoft SQL Server with Mixed Mode authentication before you install the
F-Secure PSB E-mail and Server Security software. To install Microsoft SQL Server 2005, refer to
http://www.microsoft.com/Sqlserver/2005/en/us/default.aspx.
Page 27

F-Secure PSB Administrator's Guide | Installing F-Secure PSB E-mail and Server Security | 27
Before installing the product
Before you install the F-Secure PSB E-mail and Server Security software, you must install Microsoft SQL
Server.
Before installing the F-Secure PSB E-mail and Server Security software, make sure that you know the following:
• the password for the 'sa' account on the Microsoft SQL Server, and
• the correct instance name that will be used for the quarantine, if you have multiple instances of Microsoft
SQL Server installed on the same server.
Page 28

28 | F-Secure PSB Administrator's Guide | Installing F-Secure PSB E-mail and Server Security
F-Secure PSB E-mail and Server Security installation
Install the software on a computer and after the installation verify that the databases have been updated.
You must install a Microsoft SQL Server or Microsoft SQL Server Desktop Engine (MSDE) with Mixed Mode
authentication before you install the F-Secure PSB E-mail and Server Security software. To install Microsoft
SQL Server 2005, refer to http://www.microsoft.com/Sqlserver/2005/en/us/default.aspx.
To install the software:
1. Locate the downloaded file and double-click the .exe file to start the installation.
2. Select the installation language, and click Next to continue.
If you are installing F-Secure Anti-Virus for Microsoft Exchange, select English as the installation language.
3. Read the license agreement. To accept the agreement and to continue, click Accept.
4. Enter your subscription key and click Next.
You must enter the same subscription key that you used when you created the account.
5. Select the installation type, and click Next:
• Automatic installation: The product is installed automatically. Existing security products may be
automatically replaced. The product is installed to the default directory.
• Step by step installation: During the installation, you can change the installation directory. However,
we recommend using the default directory.
6. In the SQL Server details page, enter the name of a local or remote SQL server instance.
Page 29

F-Secure PSB Administrator's Guide | Installing F-Secure PSB E-mail and Server Security | 29
Note: To find your HOSTNAME, type ipconfig /all at a command prompt . The server name is
displayed in the command prompt window as "Host Name". You can also use an IP address or Fully
Qualified Domain Name instead of hostname.
Note: To find your INSTANCE, click Start ➤ All Programs ➤ Administrative Tools ➤ Services.
Then find the SQL Server (INSTANCENAME) service. The instance name is displayed in brackets.
If you find multiple instance names, select the one that you want to use.
7. Enter your SA user password.
Note: If you are not sure that you remember your correct SA password, or if the installation fails
because of an SQL server error, refer to the Troubleshooting section.
Page 30

30 | F-Secure PSB Administrator's Guide | Installing F-Secure PSB E-mail and Server Security
8. Click Next.
9. When the installation is complete, click Finish.
10. After the installation, open the F-Secure Web Console and check that the databases have been updated:
a) Select Programs ➤ F-Secure Anti-Virus for Microsoft Exchange ➤ F-Secure Anti-Virus for
Microsoft Exchange Web Console.
b) In the Automatic Update Agent tab, in the Summary page, check that the last check result shows
that there is nothing new available.
c) Under Summary, click Downloads and check that the Available Packages list shows at least one
update with a recent date on it.
11. In the Home tab, check that each component has a green status icon.
12.
Next, configure F-Secure Anti-Virus for Microsoft Exchange. See the Administration With Web Console
chapter in F-Secure Anti-Virus for Microsoft Exchange Administrator's Guide for detailed instructions.
Page 31

Upgrade
Chapter
6
Topics:
•
Upgrading from Policy Manager
•
Upgrading to the latest version
You can upgrade from F-Secure Policy Manager to F-Secure Protection
Service for Business (PSB).
Page 32

32 | F-Secure PSB Administrator's Guide | Upgrade
Upgrading from Policy Manager
Follow these instructions to upgrade your system from F-Secure Policy Manager to F-Secure Protection
Service for Business (PSB).
To upgrade your system:
1. In the F-Secure PSB portal, create an account, if not yet created.
2. Login in to the portal.
3. At the top of the Protection status page of the account, click the Download software link.
The Download software page opens.
4. Click the Download the workstation software JAR installer for PMC link.
5. In the F-Secure Policy Manager Console, from the Tools menu, select Installation packages.
The Installation Packages window opens.
6. Click Import.....
7. In the Import Installation Package window, locate the correct file, and click Open.
8. Click the Installation tab.
Page 33

F-Secure PSB Administrator's Guide | Upgrade | 33
9. Under Policy Domains, select the computer or group of computers on which you want to install F-Secure
PSB Workstation Security.
10. On the Policy-based Installations pane, under Versions to Install, select the correct version, and click
Start.
The Installation Options window opens.
11. Do the following:
a) Enter the subscription key.
b) Select the installation language.
c) Select the Restart after installation in [ ] seconds option.
12. Click Finish.
Distribution packages are being created.
13. When the packages have successfully been created, from the File menu, select Distribute Policies.
The next time the computes connect to the policy management server, they download and install F-Secure
PSB Workstation Security, and restart after the installation.
After the installation, verify that the computers are registered to the F-Secure PSB Portal. You can then
remove the computers from the F-Secure Policy Manager Console.
Page 34

34 | F-Secure PSB Administrator's Guide | Upgrade
Upgrading to the latest version
PSB products support channel upgrade functionality.
All F-Secure PSB products support channel upgrade functionality. This means that when a new version of
any F-Secure PSB product is published on PSB portal, all the computers on which the product is installed
receive a notification about the update automatically.
You can install the new version after you receive the update notification or postpone it if you do not want to
start the installation immediately.
Note: In most cases, the installation of a new version of F-Secure PSB product requires a system restart.
Page 35

Administering the product
Chapter
7
Topics:
•
Checking the system status
•
Managing product settings
•
Managing profiles
The portal shows you the security status of the computers in your network
and points to any security problems that you should fix.
You can change the product setup locally through the program installed
on your computer, or remotely using the F-Secure PSB portal.
Page 36

36 | F-Secure PSB Administrator's Guide | Administering the product
Checking the system status
Follow the instructions in this chapter to solve any issues that you may need to fix.
The portal shows you the security status of the computers in your network and points to any security problems
that you should fix.
Is my network protected?
The Home page shows you the overall protection status of your network.
On the Home page, the pie chart shows the proportions of the network computers that are protected, or that
have either minor or critical problems.
Note: The portal shows information only about the computers that are registered to the portal. If you
have computers that are not registered to the portal, they may be a security risk.
The list on the right shows network information by each security component. If you only see green icons, all
computers are protected. You can also see the overall number of the accounts and computers in your network.
Checking the status of a group of computers
You can check the status of computers that belong to the same group, that have the same subscription key
or that share the same problem.
Viewing computers that have the same problem
You can view all the computers that have the same problem.
To view the computers:
1. On the Home tab, click one of the links that show the number of computers with a specific problem. For
example, "virus definitions are very old in 3 computers".
The Computers page opens.
2. You can view the computers that have the same problem.
Viewing computers that belong to the same group
You can view all the computers that belong to the same group.
To view the computers:
1. On the Home tab, click the Computers tab.
The Computers page opens.
2. Click the Central Management tab.
3. In the Central Management view, do one of the following:
• Click the Group column title to sort the computers by their group name.
• Enter the name of a group in the Search box at the top right corner of the computer list, and click
Search. The number of computers belonging to the group is shown. Click the link to view all the
computers in the group.
View computers with the same subscription key
You can view all computers with the same subscription key.
To view computers:
Page 37

F-Secure PSB Administrator's Guide | Administering the product | 37
1. On the Home tab, click the Computers tab.
The Computers page opens.
2. Click the Installed software tab.
3. In the Installed software view, click the Subscription key column title to sort the computers by their
subscription key.
You can view the computers with the same subscription key also by first selecting the company the
subscriptions of which you want to see. Then, click the View subscriptions for this account link to see
all the subscription keys of that company. On a Subscription key line, under Active computers, click the
Show computers link to see all the computers with the same subscription key.
Checking the status of computers
On the Computers page, you can check the overall protection status of computers.
The Computers page shows you detailed information about the computers that are registered to the F-Secure
PSB Portal.
By clicking the different tabs, you can view the following:
• the protection status of computers by a security component,
• computer information, such as DNS names and IP addresses,
• information about software installed on the computers, and
• account information, including information about the company, Solution Provider and Service Partner
associated with a computer.
The Computers page may show different computers depending on how you opened the page. The Computers
page may show:
• all the computers in the network that are registered to the portal,
• all the computers that have the same problem, and
• all the computers that have the same subscription key.
Note: If there are more computers that can fit on one page, click Next to see the rest of the computers.
Checking the status of a workstation or a server
You can view detailed status information of a workstation or a server on the Computers page.
The Computer page shows a list of all computers in your network. To view detailed information about a
workstation or a server, click the name of the workstation under Computers. The information includes:
• recently assigned operations
• recent alerts
Page 38
38 | F-Secure PSB Administrator's Guide | Administering the product
• overall protection status of each security component
• protection status of each feature in a security component
• computer information, including the WINS- and DNS-name, IP address, and operating system
• software installed on the workstation, including the product name, subscription key, version, and security
components
• account information, including information about the company, Service Partner, and Solution Provider
associated with the account
Keeping computers in the network safe
You keep all the computers in the network safe.
To keep the computers in the network safe, do the following:
1. Make sure all your computers are registered to the portal.
2. Check whether any of the computers that are registered to the portal have security problems.
Some of these problems you can fix directly from the portal; some of these problems you may have to fix
locally.
3. Check which users need a more strict security profile.
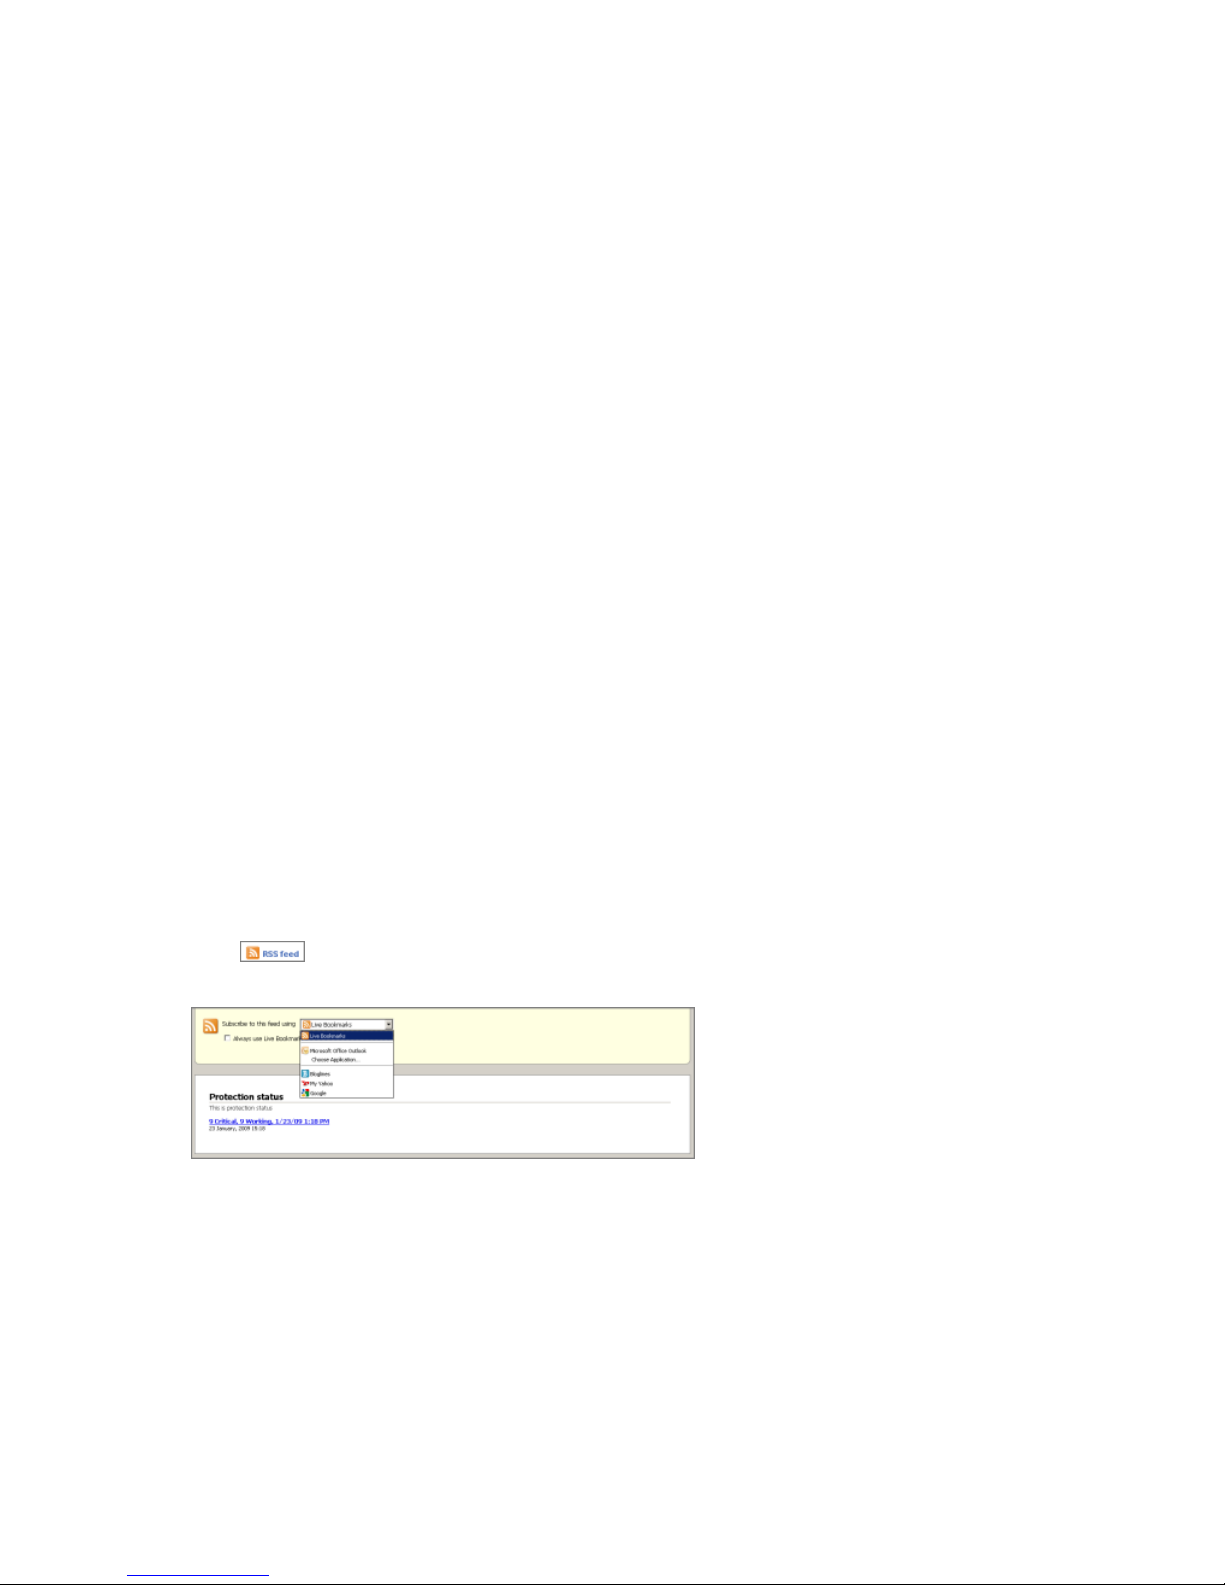
Get updates by RSS
You can subscribe to an RSS feed.
To be able to read the RSS feed, you need an RSS reader. These include:
• Web based readers, such as Google reader (www.google.com/reader),
• Bloglines (www.bloglines.com), or
• built-in RSS readers in web-browsers, such as Mozilla Firefox 3 or Internet Explorer 8.
An RSS feed shows you the security status of the network without you having to log into the F-Secure PSB
portal.
To get security updates by RSS:
1.
Click at the top right corner of the Home page.
The RSS feed page opens.
2. From the drop-down menu, select the application which you want to use to subscribe to the RSS feed.
3. Copy the web address into you RSS reader.
Page 39

F-Secure PSB Administrator's Guide | Administering the product | 39
Managing product settings
Instructions how to change the product settings either locally or remotely.
This chapter explains how you can set up the product locally through the program installed on your computer,
or remotely using the F-Secure PSB portal.
Managing the workstation settings locally
This section explains how you can locally manage the workstation settings.
The Home tab shows you a quick overview of your security components and the status of the installed security
components. The upper part of the Home tab shows the security status of your computer. For example, when
the status is shown as Protected, your computer's protection is up to date.
The security levels of the different security components, for example Normal or High, are shown next to the
name of the component. The lower part of the Home tab shows the date and time of last update check.
By clicking the tabs on the left, you can see the details of all the security components (Virus&Spy Protection,
Internet Shield, Spam Control, and Automatic Updates). The icons show you the status of the program and
its security components. If you change program settings, also the icons change.
The icons and their meanings:
A critical security component, for example Virus & Spy Protection, is working properly.
One of the security components is not in use, but your computer is still protected.
A security component or one of its features is disabled, and your computer is not protected. The
icon will change back to green when you enable the component again.
Your service subscription has expired.
An error state in the software.
Managing the server settings locally
This section explains how you can locally manage the server settings.
F-Secure PSB Server Security and F-Secure PSB E-mail and Server Security can be managed either locally
or remotely with the Web Console. You can check the overall product status on the Home page of Web
Console. Summary tab on the Home page displays the current status of the product components.
The icons and their meanings:
Normal; the feature is turned on and everything is working properly.
Informational; the feature not in use, but your computer is still protected.
Page 40

40 | F-Secure PSB Administrator's Guide | Administering the product
Warning; the feature or an antivirus engine is turned off or virus and spam definition databases
are not up-to-date. Your computer is not protected.
Error; the license has expired, the feature is not installed, all antivirus engines are turned off or a
component is not loaded, F-Secure Content Scanner Server is not up and running or virus and
spam definition databases are very old.
Under the Services tab, you can start, stop and restart product services.
For more information, see F-Secure Anti-Virus for Windows Servers Administrator's Guide or F-Secure
Anti-Virus for Microsoft Exchange Administrator's Guide.
Managing the product settings remotely
This section explains how you can remotely manage the product settings by assigning profiles or operations.
Assigning profiles
You can assign a new profile to a computer, for example, to restrict the users of that computer from making
dangerous changes to the security settings.
There are default profiles for connecting to the Internet from a fixed location (for example, Office open, Office
locked) and from outside office premises (for example, Laptop open, Laptop locked). An open profile allows
end users to change security settings; a locked one does not allow changes.
To assign a profile:
1. In the Computers list, select the computers to which you want to assign a profile.
2. Click Assign profile.
A list of available profiles is shown.
3. From the list, select a profile.
4. Click Assign.
The local operation or profile is applied to the computer the next time the computers checks for updates with
the F-Secure PSB Portal.
The remote computer must be on and connected to the Internet to be able to check for pending local operations
or new profiles.
Assigning operations
You can also assign operations to a remote computer from the portal, for example, enable the firewall or
real-time virus scanning on a remote computer.
To assign an operation:
1. Select computers from the list by selecting the appropriate checkboxes.
2. Click Operations. A list of operations appears.
3. Select one of the following operations from the list:
To...Select...
Send full status update
Enable Real-time Virus Scan
force the remote computer to send a full report of it's status to
the portal.
find and block viruses on the remote computer before they can
cause harm.
Page 41

F-Secure PSB Administrator's Guide | Administering the product | 41
To...Select...
Enable Real-time Spyware Scan
find and block spyware on the remote computer before they
can cause harm.
Enable Application Control
let the user decide which applications are allowed to access
the Internet on the remote computer.
Set the Internet Shield security level
to Office
select the most commonly applicable level of protection from
unsafe traffic on the remote computer.
4. Click Assign Operation to assign the operation to the remote computer.
The operation or profile is applied to the computer the next time the computers checks for updates with the
portal.
Page 42

42 | F-Secure PSB Administrator's Guide | Administering the product
Managing profiles
You can create, edit, or remove profiles using the profile editor.
Profiles let you control what users can do with the security settings on a computer.
Profiles differ by:
• Users' computer skills. A profile for novice users may restrict their rights to change their security settings.
• Computer type: laptop or desktop computer. A profile for a laptop computer is designed to protect users
when they access the Internet from unsafe locations, such as cafes with free Internet access. A profile for
a desktop computer is designed to protect access to the Internet from a fixed location.
There are predefined profiles that you can apply to computers. If a suitable profile does not exist for users,
you can create your own profiles. You can use an existing profile as a basis for a new profile. You can also
add your own default profiles.
Creating a profile
Create a new profile that can be assigned to remote computers.
To create a profile:
1. In the Security Profiles page, click Launch Profile Editor.
2. Select an existing profile on which to base the new profile.
Select a profile that is similar to what you want so you do not have to change many settings.
3. Click the create new profile icon.
4. In the Profile name field, add a descriptive name for the profile.
This name represents the profile on the Computers page.
5. In the Description field, add a description for the profile.
You see the description of a selected profile on the Computers page when you assign a profile. The
description should clearly tell all users what the profile does.
6. Click OK.
A new profile with the same settings as the base-profile is added to the Profile tree.
7. You can make changes to the profile by selecting or clearing a setting.
8. Click the lock icon next to the setting if you want the user to be unable to change the setting on the remote
computer.
You can change a locked setting of a profile only by assigning a new profile. Locked settings can be
changed neither by the user of the remote computer nor by assigning operations.
9. Repeat the previous steps until the profile has the settings you want.
10. Click the publish profile icon. You can click the discard changes icon to remove any edits that you made
and leave the profile with no changes.
You can now assign this profile to remote computers on the Computers page.
Editing a profile
When you edit an existing profile, the changes that you make are enforced on all the computers with that
profile.
To edit a profile:
1. Click Launch Profile Editor.
2. Click Launch Profile Editor in simple mode.
Page 43

F-Secure PSB Administrator's Guide | Administering the product | 43
3. In the Profiles tab, select an editable profile.
Profiles that are created by other users are locked and you cannot edit them. These profiles have a yellow
lock icon next to the profile name.
4. Click the edit profile icon.
5. In the Settings tab, select one of the groups of settings.
6. Change a setting:
a) Select or clear a setting.
b) If you do not want the user to be able to change the setting on the remote computer, click the lock icon
next to the setting.
The only way to change a locked setting of a profile is to send a new profile. Locked settings can be
changed neither by the user of the remote computer nor by the administrator assigning local operations.
7. Repeat the previous steps until the profile has the settings you want.
8. Click the save profile icon.
If you want to remove any changes you made, click the discard changes icon.
The changes you made to the profile settings are applied to all the computers with this profile when they next
check with the portal for updates.
Deleting a profile
You can remove a profile from the list of available profiles.
To delete a profile:
1. Select an editable profile from the profile tree.
You cannot delete profiles that were created by other users. These profiles are locked and have a yellow
lock icon next to the profile name.
2. Click the remove profile icon.
All sub-profiles are also deleted.
3. Click OK.
The selected profile and all its sub-profiles are deleted and no information about the profile is available in the
portal. The deleted profile is not deleted from the actual workstation.
Changing profile name or description
You can rename a profile and edit the description if, for example, the settings of the profile no longer agree
with the name and description.
To rename a profile:
1. Select an editable profile from the profile tree on the left.
You cannot edit profiles that are created by other users. These profiles are locked and have a yellow lock
icon next to the profile name.
2. Click the edit profile icon.
3. Click the profile properties icon.
4. Edit the profile name and description.
You can enter the description in multiple languages.
5. Click OK.
6. Click the save profile icon.
You can click the discard changes icon to remove any edits you made and leave the profile with no changes.
Page 44

44 | F-Secure PSB Administrator's Guide | Administering the product
Setting a default profile
You can set your own default profiles for remote computers.
You can set default profiles separately for workstations and servers. These profiles are applied to new
computers that you add to the system. If you do not set any default profiles, the system default profiles are
applied to computers.
To set a default profile:
1. On the Security Profiles page, click Set default profiles.
2. Select a profile that you want to set as the default profile.
3. Select whether you want to set the profile as a default profile for servers or workstations.
To do this, select one of the following options:
• Default profile for workstations
• Default profile for servers
4. Click Update.
In the Default profiles column, you can view the profiles that you selected as the default profiles. They are
applied to new computers that you add to the system.
Resetting default profiles
If you have set your own default profiles for remote computers, but you want to restore the system default
profiles, reset the default profiles.
To reset the default profiles:
1. On the Security Profiles page, click Reset default profiles.
2. Click Reset default profiles.
Your own default profiles are cleared from the Default profiles column, and the system default profiles are
shown instead. The system default profiles are applied to new computers that you add to the system.
Page 45

Troubleshooting
Chapter
8
Topics:
•
Frequently asked questions
If you do not find answers to your questions in this manual, please contact
support.
Page 46

46 | F-Secure PSB Administrator's Guide | Troubleshooting
Frequently asked questions
Answers to the most frequently asked questions.
Q. How can I change the language in my F-Secure PSB Portal?
A. To change the language, first log in to the F-Secure PSB Portal, click your user name at the top right
corner. In the Edit account page, from the Language drop-down list, select the language that you want, and
click Submit.
Q. I installed the F-Secure PSB Server Security software on my computer, but I cannot see my computer
in the F-Secure PSB Portal. What should I do?
A. If you do not see your computer in the F-Secure PSB Portal, click the Check now button on your F-Secure
PSB Workstation Security main interface. If you still do not see your computer in the portal, check that the
subscription key has been added to the portal.
Q. When do I need to create my own security profile?
A. You need to create a new security profile if none of the F-Secure predefined profiles matches the needs
of your end customers. For example, if you have a program on your computer that slows down too much
because of real time scanning operations, you need to create a profile in which that program is excluded from
scanning. Or if a network software such as a VPN client cannot connect to the Internet with the default firewall
rules, you must create a new security profile with specific firewall rules for the software.
Q. I want to download the software for Exchange, but I cannot find it in the Download software section
in the F-Secure PSB Portal?
A. You can download software for all server products from the Download the server software link.
Q. How can I use RSS feeds?
A. For instructions on how to use RSS feeds, see the Get Updates by RSS section in chapter 'Checking the
system status'.
Q. Can I get reports out from the F-Secure PSB Portal?
A. You can export information about your network computers on the Export data tab (under the Computers
tab). On the Reports tab, you can currently only view information about your network computers, such as
overall protection status and status by each security component.
Q. During the installation of the F-Secure PSB Server Security software, I am asked for information
about SQL. Why?
A. You may have entered a wrong type of subscription key. For example, you are installing the PSB Server
Security software and your subscription key is for the F-Secure PSB E-mail and Server Security software.
You can check the type of your subscription key on the Subscriptions tab in the F-Secure PSB Portal.
Q. I need to find the Microsoft Exchange parameters in the F-Secure PSB Portal. Where can I find
them?
A. You cannot find them in the F-Secure PSB Portal. You can find the Microsoft Exchange parameters through
local web user interface.
 Loading...