

Page 1

F-Secure
Mobile Anti-Virus
for Series 60
User’s Guide
Page 2

"F-Secure" and the triangle symbol are registered trademarks of F-Secure Corporation and F-Secure
product names and symbols/logos are either trademarks or registered trademarks of F-Secure
Corporation. All product names referenced herein are trademarks or registered trademarks of their
respective companies. F-Secure Corporation disclaims proprietary interest in the marks and names of
others. Although F-Secure Corporation makes every effort to ensure that this information is accurate,
F-Secure Corporation will not be liable for any errors or omission of facts contained herein. F-Secure
Corporation reserves the right to modify specifications cited in this document without prior notice.
Companies, names and data used in examples herein are fictitious unless otherwise noted. No part of
this document may be reproduced or transmitted in any form or by any means, electronic or
mechanical, for any purpose, without the express written permission of F-Secure Corporation.
This product may be covered by one or more F-Secure patents, including the following:
GB2353372 GB2366691 GB2366692 GB2366693 GB2367933 GB2368233
GB2374260
Copyright © 2004 F-Secure Corporation. All rights reserved. 12000066-4J08
Page 3

Contents
About This Guide 7
How This Guide Is Organized............ ................. ............................... ........................ 8
Conventions Used in F-Secure Guides...................................................................... 9
Symbols.................................................................................................................. 9
Chapter 1 Introduction 11
1.1 F-Secure Mob ile An ti-Virus. ............... ............................. ............................. .... 12
1.2 Key features..................................................................................................... 12
Chapter 2 Installation 15
2.1 System requirements.......................................................................................16
2.2 Installing F-S e c u re M ob ile A n ti- V ir u s...... ............... ............................. ............. 16
2.3 Transferring S ub sc ription to a New Device .......................................... ........... 17
2.4 Uninstalling F-Secure Mobile Anti-Virus .......................................................... 19
Chapter 3 User Interface 21
3.1 Overview.......................................................................................................... 22
3.2 Main Views ....... ............................. ............................. ............................ ......... 22
3.2.1 Main View ............................................. ............................. ............... .. 22
3.2.2 Status View.................................. ............... ............................. ........... 24
3.2.3 Log View................................. ...................... ......................................25
3.2.4 Infections View.................................................................................... 27
iii
Page 4

3.3 Setting Views................................................................................................... 28
3.3.1 Scan Setting s View.. ............................. ............................. ................. 28
3.3.2 Update Sett ings View ............ .......................................... ...................29
3.3.3 Exclusion Settings View...................................................................... 30
3.4 About Anti-Virus............................................................................................... 31
3.5 Subscription Info.............................................................................................. 31
Chapter 4 Startup and Shutdown 33
4.1 Starting F-Sec u re M o b ile A n ti-Virus ........... .. ............................. ...................... 34
4.1.1 Activating F-Secure Mobile Anti-Virus (First-time Start-Up)................ 35
4.1.2 Starting F-Sec u re M o b ile An ti-Virus (Normal Start-Up) ....... .. ............. 40
4.2 Shutting Down F -S e c u re Mo b ile A n ti- V ir u s ..... .. ............................. ................. 43
4.3 Hiding User Inte r fa c e........ .. .. ............................. ............................. ................. 43
Chapter 5 Configurati on 45
5.1 Overview.......................................................................................................... 46
5.2 Scan Settings...... ................ ............................. ............................ .................... 46
5.3 Update Settings...... .................................................................................. .......48
5.4 Exclusion Settings ........................................................................................... 50
Chapter 6 Virus Scan 53
6.1 Overview.......................................................................................................... 54
6.2 Scanning Modes..............................................................................................54
6.3 Running a Manual Scan ...................... ................. ............................... ............55
6.4 Viewing Scan R e s u lts ......... ............................. ............................ .................... 56
Chapter 7 Processing Infected Files 59
7.1 Overview.......................................................................................................... 60
7.2 Viewing Details of Infected Fil e s................... ... ............... ............................. .... 60
7.3 Processing Infected File(s) .............................................................................. 62
7.4 Viewing Disin f e ct io n R esu lts... ... ............................ ............................. ............. 63
iv
Page 5

Chapter 8 Updating 65
8.1 Overview.......................................................................................................... 66
8.2 Viewing Update Information............................................................................. 66
8.3 Updating F-Secure Mobile Anti-Virus ..............................................................68
8.3.1 Updating Virus Definition Database....................................................68
8.3.2 Upgrading the App l ication .............. ............................. ........................ 69
Chapter 9 Troubleshooting 71
9.1 No Internet Access Points Configured............................................................. 72
9.2 Invalid Subscription Number................... .. ............... ............................. ........... 72
9.3 Unable to Connect to Update Server/Update Failure......................................72
9.4 Update Service Could Not Authenticate Device....................... .. .....................73
9.5 Service Has Expired or About to Expire ..........................................................73
9.6 Virus Definition Database Corrupted or Missing and Virus Protection Not
Updated74
9.7 Theme Files on Memory Card ......................................................................... 75
9.8 Multiple Messages When Purchasing Subscription.........................................75
9.9 Automatic Updates Generating Data Traffic....................................................76
Chapter 10 Technical Support 77
10.1 Overview.......................................................................................................... 78
10.2 Web Club......................................................................................................... 78
10.3 Virus Descriptions on the Web ........ ................ ............................ .................... 78
10.4 Electronic Mail Support............................................. .......................................78
Appendix A Purchasing Su bscription Service Time 81
A.1 Overview......................................................................................................... 82
A.2 SMS-Based Pu rc h a s e ...... .. ............... ............................. ............................. .... 82
A.3 Purchasing Through PC Browser....... .............................................................84
About F-Secure Corporation 85
F-Secure Corporation.............................................................................................. 86
The F-Secure Product Family.................................................................................. 88
v
Page 6

vi
Page 7

ABOUT THIS GUIDE
How This Guide Is Organized...................................................... 8
Conventions Used in F-Secure Guides....................................... 9
7
Page 8

8
How This Guide Is Organized
F-Secure Mobile Anti-Virus for Series 60 User’s Guide is divided into the
following chapters:
Chapter 1. Introduction. Provides general information about F-Secure
Mobile Anti-Virus.
Chapter 2. Installation. Gives instructions on installing and setting up
F-Secure Mobile Anti-Virus.
Chapter 3. User Interface. Describes the F-Secure Mobile Anti-Virus
user interface.
Chapter 4. Startup and Shutdown. Explains how to start and shut down
F-Secure Mobile Anti-Virus.
Chapter 5. Configuration. Gives instructions on configuring the scan,
update and excluded files settings.
Chapter 6. Virus S c an. Explains how to scan files for viruses.
Chapter 7. Processing Infected Files. Explains how to view details of
infected files and how to process the infected files.
Chapter 8. Updating. Explains how to keep F-Secure Mobile Anti-Virus
up to date.
Chapter 9. T roubleshooting. Provides solutions to common problems.
Chapter 10. Technical Support. Provides the contact information for
assistance.
Appendix A. Purchasing Subscription Service Time. Provides
information about purchasing F-Secure Mobile Anti-Virus.
About F-Secure Corporation
products.
. Describes the company background and
Page 9
Conventions Used in F-Secure Guides
This section describes the symbols, fonts, terminology used in this
manual.
Symbols
WARNING: The warning symbol indicate s a situation with a
risk of irreversible destruction to data.
IMPORTANT: An exclamation mark provides important information
that you need to consider.
REFERENCE - A book refers you to related information on the
topic available in another document.
NOTE - A note provides additional information that you should
consider.
l
About This Guide 9
Fonts
TIP - A tip provides information that can help you perform a task
more quickly or easily.
⇒ An arrow indicates a one-step procedure.
Arial bold (blue) is used to refer to menu names and commands, to
buttons and other items in a dialog box.
Arial Italics (blue) is used to refer to other chapters in the manual, book
titles, and titles of other manuals.
Arial Italics (black) is used for file and folder names, for figure and table
captions, and for directory tree names.
Courier New is used for messages on your computer screen and for
information that you must type.
Page 10

10
SMALL CAPS (BLACK) is used for a key or key combination on your
keyboard.
PDF Document
For More Information
Arial underlined (blue)
Times New Roman regular is used for window and dialog box names.
This manual is provided in PDF (Portable Document Format). The PDF
document can be used for online viewing and printing using Adobe®
Acrobat® Reader. When printing the manual, please print the entire
manual, including the copyright and disclaimer statements.
Visit F-Secure at http://www.f-secure.com for documentation, training
courses, downloads, and service and support contacts.
In our constant attempts to improve our documentation, we would
welcome your feedback. If you have any questions, comments, or
suggestions about this or any other F-Secure document, please contact
us at documentation@f-secure.com
is used for user interface links.
.
Page 11

1
INTRODUCTION
F-Secure Mobile Anti-Virus......................................................... 12
Key features............................................................................... 12
11
Page 12

12
1.1 F-Secure Mobile Anti-Virus
F-Secure Mobile Anti-Virus consists of the F-Secure Mobile Services
platform and the F-Secure Mobile Anti-Virus client. The F-Secure Mobile
Services platform manages and secures user access and acts as a
platform for different services.The F-Secure Mobile Anti-Virus client is a
software product that protects data stored in your Series 60 device
against malicious code attacks.
This guide is intended to introduce the main features of the F-Secure
Mobile Anti-Virus client for Series 60, and explain its use. In this manual,
the F-Secure Mobile Anti-Virus client for Series 60 is referred to as
F-Secure Mobile Anti-Virus.
F-Secure Mobile Anti-Virus is designed to be as transparent as possible.
It automatically scans all files when they are accessed. When F-Secure
Mobile Anti-Virus detects an infected file, it immediately quarantines it to
protect all other data on the device. The automatic scanning happens
transparently on the background.
To work effectively, the anti-virus software requires an always up-to-date
virus definition database. With F-Secure Mobile Anti-Virus, you can
download the latest virus definition database automatically from your
update server.
1.2 Key features
This section lists the F-Secure Mobile Anti-Virus key featur es.
Transparent
Operation
Extensive scanning The application automatically scans all files when they are accessed. You
The application runs in the background while you use your device.
can also manually scan your device for viruses whenever you want or set
a date and time for scheduled scanning.
Page 13

CHAPTER 1 13
Introduction
Automatic updates The application automatically downloads regular updates to keep the
virus definition database up to date. This enables finding and removing
even the most recently found viruses.
Page 14

14
Page 15

2
INSTALLATION
System requirements.................................................................. 16
Installing F-Secure Mobile Anti-Virus......................................... 16
Transferring Subscrip tion to a New Device........... .... ..... ............ 17
Uninstalling F-Secure Mobile Anti-Virus..................................... 19
15
Page 16

16
2.1 System requirements
To use F-Secure Mobile Anti-Virus, your device must meet the following
requirements:
Platform: Nokia Series 60 devices (Nokia 3660, Nokia
6600, Nokia 7650, Nokia 7610, Nokia 3650,
N-Gage and Nokia 6670)
Available memory: 650KB.
If your F-Secure Mobile Anti-Virus version
includes the SMS-Based Purchase functionality,
an extra 300 KB of memory is needed.
2.2 Installing F-Secure Mobile Anti-Virus
Before you start the installation process, prepare your device as follows:
› If you have a previous version of F-Secure Mobile Anti-Virus
installed, you must close it. No uninstalling is needed as the new
version automatically removes the earlier version.
To install F-Secure Mobile Anti-Virus on your device:
IMPORTANT: F-Secure Mobile Anti-Virus cannot be installed on a
memory card.
1. Open the inbox and scroll to the message that contains the
installation package.
For more information, refer to the User’s Guide that came
with your device.
2. Open the message, and press Yes to confirm installing F-Secure
Mobile Anti-Virus. In the License agreement screen, read the
agreement and press Ok to continue.
Page 17

CHAPTER 2 17
Installation
When the installation is complete, we recommend starting the
application only after you have received the activation message (does
not apply to evaluation versions).
If you have left your mobile phone number to your retailer, you receive the
activation message as an SMS message. If you do not receive it, enter
the subscription number when you start your F-Secure Mobile Anti-Virus
for the first time.
If you do not know your subscription number, contact your
service provider or retailer.
3. After installing F-Secure Mobile Anti-Virus, you need to update the
virus definition database. Press Yes to update it immediately. For
more information, see “Updating”, 65.
The automatic update feature is enabled by default. A connection to the
update server is established twice a day, providing there is Internet
activity over the preferred Intern et acces s point.
IMPORTANT: F-Secure Mobile Anti-Virus cannot detect the latest
viruses with an outdated database.
4. After you have installed F-Secure Mobile Anti-Virus, we recommend
scanning your device for viruses. For more information. see “Virus
Scan”, 53.
2.3 Transferring Subscription to a New Device
Before transferring your F-Secure Mobile Anti-Virus service subscription
to another device, prepare your device as follows:
› If you have a previous version of F-Secure Mobile Anti-Virus
installed, you must close it. No uninstalling is needed as the new
version automatically removes the earlier version.
Page 18

18
T o transfer your Anti-Virus service subscription to another device:
IMPORTANT: F-Secure Mobile Anti-Virus cannot be installed on a
memory card.
1. Open the inbox and scroll to the message that contains the
installation package.
For more information, refer to the User’s Guide that came with
your device.
2. Open the message, and press Yes to confirm that you want to install
F-Secure Mobile Anti-Virus. In the License agreement screen, read
the agreement and press Ok to continue.
3. Wait until the installation is complete. During the start-up process,
when prompted, enter the subscription number.
4. Connect to the update server to update the virus definition database
by pressing Yes in the message that is displayed.
5. If you successfully transferred your subscription, at this stage, a
message is displayed informing you that your subscription has been
transferred to a new device. Press any key to dismiss the message.
F-Secure Mobile Anti-Virus starts downloading the virus definition
database update and, if available, a new software version.
If the update server is unable to authenticate your subscription, an
error message is displayed. The server cannot authenticate the
subscription in the following case s:
› The files in the F-Secure Mobile Anti-Virus installation folder
are corrupted or have been changed
› You have tried to transfer the F-Secure Mobile Anti-Virus
service subscription into another device more than four times
Page 19

2.4 Uninstalling F-Secure Mobile Anti-Virus
IMPORTANT: If you need to uninstall F-Secure Mobile Anti-Virus
from your device, make sure that you do not have any quarantined
or infected files in your device.
To uninstall F-Secure Mobile Anti-Virus:
1. Open F-Secure Mobile Anti-Virus.
2. Scroll to the Main view and select OptionsÆUninstall.
3. Press Yes to confirm uninstalling the program.
CHAPTER 2 19
Installation
Page 20

20
Page 21

3
USER INTERFACE
Overview..................................................................................... 22
Main Views................................................................................. 22
Setting Views.............................................................................. 28
About Anti-Virus.......................................................................... 31
Subscription Info......................................................................... 31
21
Page 22

22
3.1 Overview
3.2 Main Views
The F-Secure Mobile Anti-Virus main user interface has four main views
and three setting views. Additionally, there are the About Anti-Virus and
Subscription Info views. You can toggle between the main views by
moving the joystick or pressing the scroll key left and right. The three
setting views can be accessed through the four Main views and the two
additional views can be accessed through the Main view. In the
navigation bar, tabs (small arrows) show you if there are more views,
folders or files you can move to.
The F-Secure Mobile Anti-Virus four main views are:
› Main view
› Status view
› Log view
› Infections view (available only when an infection is found on your
device)
3.2.1 Main View
The Main view displays:
› Current scanning mode
› Update status
› Subscription status
› Infection status
Page 23

CHAPTER 3 23
User Interface
The Options menu in the Main view has the following commands:
› Scan all - scan all files on your device and on the inserted
memory card for viruses
› Update Anti-Virus - download the latest update; available only if
activation has been completed
› Activate Anti-Virus - activate the application (first-time start-up);
available only if activation has not been completed
› Subscription - display the subscription number and update
instructions
› Settings - edit the Scan, Update and Excluded file settings
› About Anti-Virus - display information about the application
› Help - launch context sensitive (online) help (available only if
your device supports context sensitive online help)
› Uninstall - uninstall the application
› Exit - shut down the application
IMPORTANT: If you shut down the application, the infected files
are not quarantined and the system is not protected against
viruses.
Pressing the Done soft key hides the user interface, but keeps the
application running on the background, scanning your files for viruses
automatically when they are accessed (only when the real-time scanning
mode is enabled).
Page 24
24
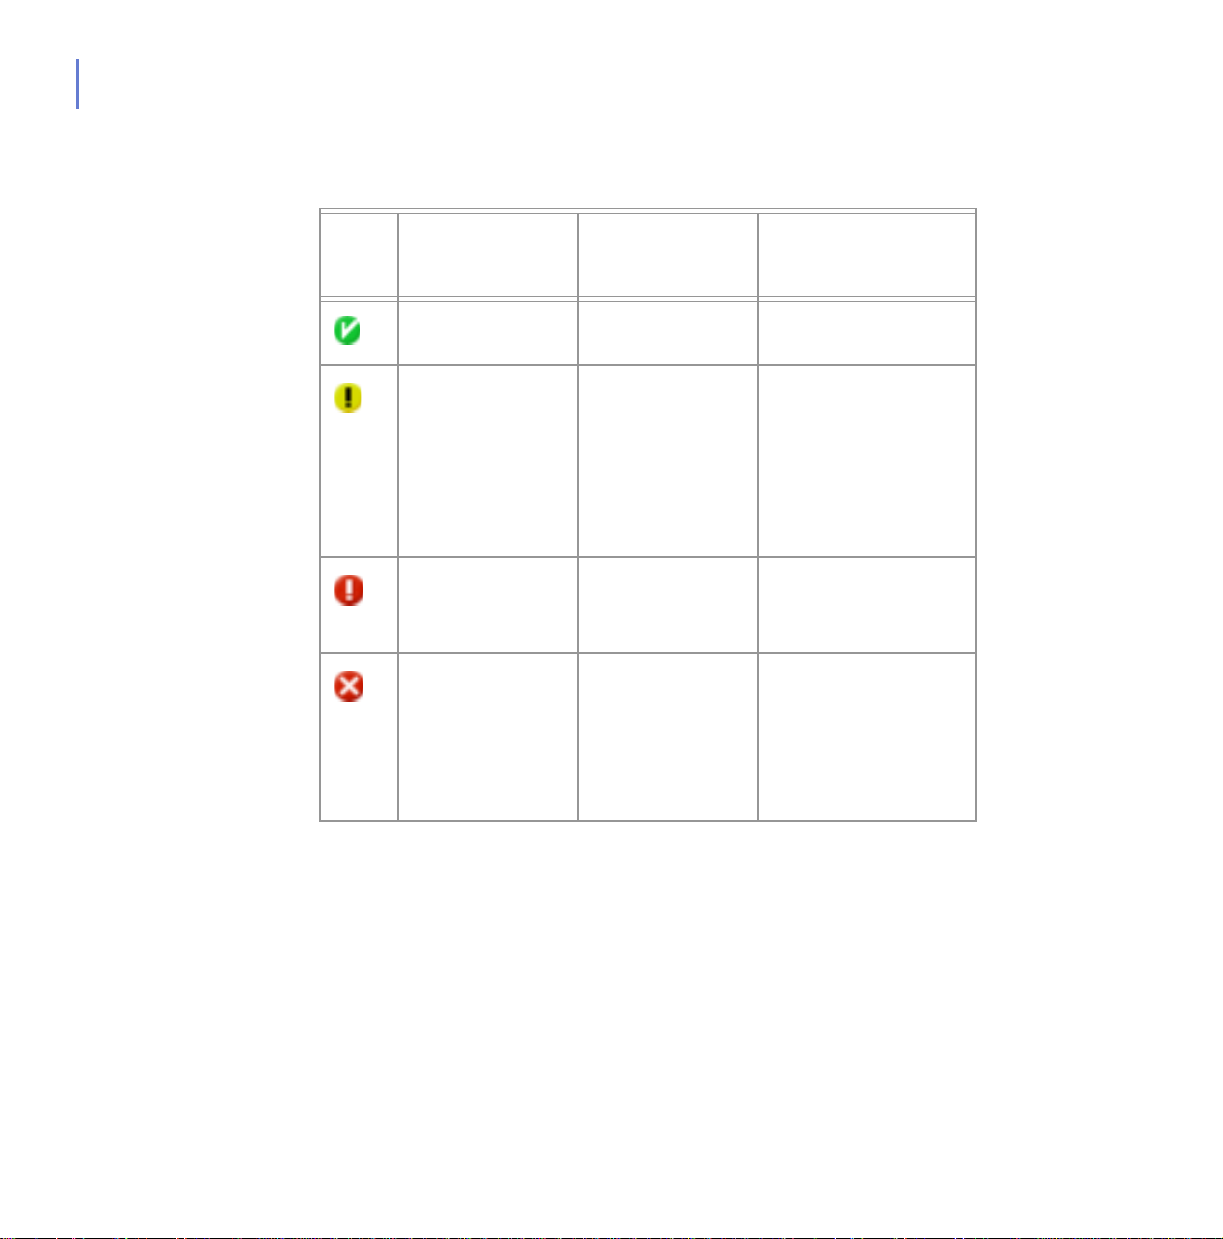
The following table shows the Main view status indicator icons and
explains their meaning:
Icons Updates Subscription No infections/
One or more
infections
Up to date Valid None
3.2.2 Status View
The Status view displays:
Last updated 3
days ago
Last updated 7
days ago
Activation
sequence
cancelled, OR
virus definition
database missing
or corrupted
Expires in 10
days
Expires in 5 days one or more
Expired OR
activation
sequence
cancelled
› Subscription status
› Date and time of the last update
› Date and time of the last full scan
one or more
infections detected,
full scan not
performed at restart
and possible
infections in the
system
infections detected,
but not all processed
-
Page 25

CHAPTER 3 25
User Interface
The Options menu in the Status view has the following commands:
› Scan all - scan all files on your device and on the inserted
memory card for viruses
› Update Anti-Virus - download the latest update; available only if
activation has been completed
› Settings - edit the Scan, Update and Excluded file settings
› Help - launch context sensitive (online) help (available only if
your device supports context sensitive online help)
› Exit - shut down the application
IMPORTANT: If you shut down the application, the infected files
are not quarantined and the system is not protected against
viruses.
Pressing the Done soft key hides the user interface, but keeps the
application running on the background, scanning your files for viruses
automatically when they are accessed (only when the real-time scanning
mode is enabled).
3.2.3 Log View
The Log view displays a chronological list of the latest events. Each log
entry consist of an icon, the date and time, and a brief description of the
event. The event log can contain up to 20 events. The last event occurred
appears at the top of the list. To see all the logs, you can scroll through
the view with the joystick/scroll key.
Page 26

26
An entry is added to the log file in the following cases:
› Incremental update via SMS
› Failed or successful automatic or manual update
› Starting, stopping or finishing of a scheduled or manual scan
› Receiving of update requests
› Receiving of subscription period related messages (renewed/
expiring/expired)
› Starting or shutting down the application
› Detecting of a new infection in real-time scanning mode
› Detecting of a missing fingerprint while adding an incremental
update into database
› Detecting of a corrupted or missing database upon start-up
The Options menu in the Log view has the following commands:
› Scan all - scan all files on your device and on the inserted
memory card for viruses
› Update Anti-Virus - download the latest update; available only if
activation has been completed
› Settings - edit the Scan, Update and Excluded file settings
› Clear log- remove all entries from the event log
› Help - launch context sensitive (online) help (available only if
your device supports context sensitive online help)
› Exit - shut down the application
IMPORTANT: If you shut down the application, the infected files
are not quarantined and the system is not protected against
viruses.
Pressing the Done soft key hides the user interface, but keeps the
application running on the background, scanning your files for viruses
automatically when they are accessed (only when the real-time scanning
mode is enabled).
Page 27

3.2.4 Infections View
The Infections view displays a list of infected files detected on the device.
Each entry consists of a file type dependent icon, a line indicating the
state of the file, another line containing the name of the infected file. If an
infected file has not been processed and its details have not been viewed,
a red exclamation mark icon is displayed on the right hand side of the
infection status text.
The Options menu in the Infections view has the following commands:
› Scan all - scan all files on your device and on the inserted
› Update Anti-Virus - download the latest update; available only if
› Details - display more information of the selected infected file
› Process selected - process the selected infected file
› Settings - edit the Scan, Update and Excluded file settings
› Help - launch context sensitive (online) help (available only if
› Exit - shut down the application
CHAPTER 3 27
User Interface
The Infections view is available only when an infection is found on
your device.
memory card for viruses
activation has been completed
your device supports context sensitive online help)
IMPORTANT: If you shut down the application, the infected files
are not quarantined and the system is not protected against
viruses.
Pressing the Done soft key hides the user interface, but keeps the
application running on the background, scanning your files for viruses
automatically when they are accessed (only when the real-time scanning
mode is enabled).
Page 28

28
3.3 Setting Views
The F-Secure Mobile Anti-Virus three setting views are:
› Scan settings view
› Update set tin gs view
› Exclusion settings view
3.3.1 Scan Settings View
The Scan settings view displays the following scanning-related
information:
› Mode
› Time
› Day
The Options menu in the Scan settings view, has the following
commands:
› Change - open the selected setting (scan mode, day or time) for
› Help - launch context sensitive (online) help (available only if
› Exit - shut down the application
editing
your device supports context sensitive online help)
IMPORTANT: If you shut down the application, the infected files
are not quarantined and the system is not protected against
viruses.
For information on configuring scan settings, see ”Scan Settings”, 46.
Page 29

3.3.2 Update Settings View
The Update settings view displays the following information related to the
F-Secure Mobile Anti-Virus update process:
› Internet access point - preferred Internet access point for
connecting to update service
› Automatic Update - show the Automatic Update feature status
(enabled/disabled).
Updates are downloaded only when the connection to the
Internet is active. F-Secure Mobile Anti-Virus does not
open a connection, but it recognizes a connection being
opened by, for example, a Web browser.
Automatic Update can be enabled only when the real-time
scanning mode is enabled.
The Options menu in the Update settings view, has the following
commands:
› Change - open the selected setting (scan mode, day or time) for
editing
› Help - launch context sensitive (online) help (available only if
your device supports context sensitive online help)
› Exit - shut down the application
CHAPTER 3 29
User Interface
IMPORTANT: If you shut down the application, the infected files
are not quarantined and the system is not protected against
viruses.
For information on configuring update settings, see “Update Settings”, 48.
Page 30

30
3.3.3 Exclusion Settings View
The Exclusion settings view displays a list of files and folders that are
excluded from real-time scanning for viruses. We recommend using the
default exclusion settings.
IMPORTANT: Do not change these settings unless advised to do
so by your administrator or F-Secure Technical Support.
When running a manual scan, these files and folders are included
in the scan.
You can add to the exclusion list large files (such as .MP3) and folders
that cannot contain or be infected by viruses. This accelerates the
operation of applications that use such files and folders.
IMPORTANT: Do not exclude files from the scan unless you are
absolutely certain that the excluded files cannot contain or cannot
be infected by viruses.
The Options menu in the Exclusion settings view, has the following
commands:
› Add file - add file(s) to the exclusion list
› Add folder - add folder(s) to the exclusion list
› Remove - remove items from the exclusion list
› Details - display details of the selected exclusion entry
› Default - restore default exclusion settings
› Help - launch context sensitive (online) help (available only if
your device supports context sensitive online help)
› Exit - shut down the application
IMPORTANT: If you shut down the application, the infected files
are not quarantined and the system is not protected against
viruses.
For information on configuring the exclusion settings, see “Exclusion
Settings”, 50.
Page 31

3.4 About Anti-Virus
The About Anti-Virus view displays the following information:
› Application version information
› Scanner version
› Copyright information
› URL to F-Secure Corporation's international web page
3.5 Subscription Info
The Subscription info view provides information about how to buy more
subscript ion servic e time. T he provid ed subscr iptio n number is the unique
code to identify a registered client.
If you wish to purchase the antivirus software after using the evaluation
version, use the subscription number provided in this view. If you have
previously purchased the software, you have received the subscription
number also via e-mail.
CHAPTER 3 31
User Interface
For more information about purchasing more subscription service time,
see Appendix A. Pur chas in g Subs c ripti on Serv ice Tim e.
Page 32

32
Page 33

4
STARTUP AND
HUTDOWN
S
Starting F-Secure Mobile Anti-Virus........................................... 34
Shutting Down F-Secure Mobile Anti-Virus................................ 43
Hiding User Interface.................................................................. 43
33
Page 34

34
4.1 Starting F-Secure Mobile Anti-Virus
There are two ways to start F-Secure Mobile Anti-Virus, depending on
whether you start it for the first time:
› First-time start-up (Activation)
› Normal start-up
Activation is performed when you start F-Secure Mobile Anti-Virus for the
first time. Activation is needed for proper virus protection, because by
activating F-Secure Mobile Anti-Virus you update the virus definition
database. For more information about the activation, see “Activating
F-Secure Mobile Anti-Virus (First-time Start-Up)”, 35.
After you have successfully activated the update service during the
first-time start-up, you can start using the application. After the activation,
you should run a full scan for all files to ensure your device is clean. We
also recommend running a full scan whenever prompted by the
application. For more information about the normal start-up, see “Starting
F-Secure Mobile Anti-Virus (Normal Start-Up)”, 40
Next time when you turn on your device, the application starts up
automatically in the following cases:
› When the real-time scanning mode (default) is enabled
(recommended)
› If there are known infections in the system
If you have selected the manual or scheduled scanning mode, you need
to manually start the application.
Page 35

CHAPTER 4 35
Startup and Shutdown
4.1.1 Activating F-Secure Mobile Anti-Virus (First-time
Start-Up)
When you start F-Secure Mobile Anti-Virus for the first time, F-Secure
Mobile Anti-Virus checks all the files and version information and
validates the subscr ip tio n .
If files are missing or corrupted, the check fails, an error message
is displayed and F-Secure Mobile Anti-Virus shuts down.
During the first-time start-up, activate the update service in one of the
following two ways:
› Select the free evaluation period, OR
› Enter the subscription number delivered with the application
The free evaluation version has all the same features as
the full version.
If you have left your mobile phone number to your device vendor, after the
installation you will receive an activation message (an SMS message). If
you do not receive the activation message when you start F-Secure
Mobile Anti-Virus
for the first time, you can enter the subscription number.
If you do not know your subscription number, contact your service
provider or retailer.
T o activate the update service:
1. Press the Menu key and scroll to the icon.
2. Open the application. The Welcome screen is displayed.
Page 36

36
3. Press OK to start the activation process. The following screen is
displayed:
This screen is displayed in the following cases:
› The application does not detect a service activation SMS
› Current installation is not a device vendor case with a key file
› Despite an OEM (Original Equipment Manufacturer) installation,
you chose the full version
› Trial period has expired
› Device re-flash is required
Page 37

CHAPTER 4 37
Startup and Shutdown
4. Do one of the following:
› To begin the evaluation period purchased by the device vendor,
press OptionsÆChange, change the activation type to Free
evaluation, and press Done, OR
› To have the full version, select Subscription number as the
activation type, and press Done. Then enter your subscription
number and press OK.
5. In the screen that is displayed, do the following:
a. Press OptionsÆChange to select an Internet access point from
the list of existing Internet access points.
b. Press OptionsÆSelect, and then press Done and continue from
step 7.
The Internet access point settings are operator specific.
Page 38

38
6. If no Internet access points are defined, a message is displayed
prompting you to define a new one. To define a new Internet access
point:
a. In the message screen, press Yes to define a new Internet
access point.
b. Press OptionsÆNew Access Point.
c. Select either Use default settings or Use existing settings and
follow the instructions on your device screen.
7. After you have selected or defined an Internet access point, press
Yes to connect to the update service and start downloading the
updates, or press No to cancel the activation.
If you cancel the activation, a confirmation message is
displayed that prompts you to confirm the cancellation.
F-Secure Mobile Anti-Virus connects to the update service and
submits your subscription number. During the first update, the server
registers your application and downloads a new virus definition
database. If an application update is available, a confirmation
message is displayed asking if you want to download it.
If the virus definition database version requires an application
update, the application update is downloaded automatically.
Page 39

CHAPTER 4 39
Startup and Shutdown
8. When the download is complete, a message is displayed showing
that you have successfully been registered at the update service and
that the application is activated. Press OK to continue.
If the applic ation coul d not con nect to th e update s ervice, t he
updating failed or the subscription could not be
authenticated, an error message is displayed. For more
information on update errors, see ”
T roubleshooting”, 77.
9. In the next screen, press Ok to complete the activation.
The application has a built-in automatic update feature. When it
detects a data connection, an update is performed automatically.
Automatic updates are performed once a day at most, providing there
is an active connection to the Internet. F-Secure Mobile Anti-Virus
does not, however, open a connection, but it recognizes a connection
being opened by, for example, a Web browser. New virus definition
database is downloaded automatically; if there is an application
update on the update server, you will get a notification.
To change the default Automatic Update setting, go to the
Update settings view and press OptionsÆChange to select
the desired mode.
Page 40

40
4.1.2 Starting F-Secure Mobile Anti-Virus (Normal Start-Up)
Normal start-up is executed when you open application after successfully
completing the activation. During the start-up process, the application
checks the following:
› Service subscription date
› Existence of known infections
› Whether a new virus definition database is in use
› Whether the virus definition database has been updated during
the past seven days.
If the check fails, an error message is displayed prompting
you to reinstall the application
Depending on the selected scanning mode and the number of known
infections in the device, the application starts automatically when you
switch on your device. After activation, you are prompted to scan the
whole device.
You are prompted to run a full scan also if there were known infections
when F-Secure Mobile Anti-Virus was last running and you chose not to
disinfect or delete the infected files, next time you start F-Secure Mobile
Anti-Virus, it prompts you to run a full scan.
.
Page 41

CHAPTER 4 41
Startup and Shutdown
To start F-Secure Mobile Anti-Virus:
1. If, during the activation, a new application version was installed and
restarted, the following message is displayed:
2. Press Yes to run a full scan.
Pressing No cancels the query and takes you back to the
Main view.
F-Secure Mobile Anti-Virus runs a full scan displaying a progress bar
and the number of files that have been scanned.
Page 42

42
When the scan is finished or stopped, the scan results display the
number of:
› Infected files that were detected
› Files that were not scanned
› Scanned files
A number of icons appear in the Scan results scr een . The follow ing
table lists the icons and their meaning in each category.
Infected Not scanned Scanned
None All files were
scanned
- The number of
files that could
not be opened
for scanning
- - Scan was stopped by
Infections
were detected
--
The number of files
scanned completed
-
the user
Page 43

CHAPTER 4 43
Startup and Shutdown
3. To see details of the infected file(s) or the list of the files that were not
scanned, in the Scan Results screen, select the desired category and
press Show. For more information on viewing details of infected
file(s), see “Viewing Details of Infected Files”, 60.
4.2 Shutting Down F-Secure Mobile Anti-Virus
WARNING: If you shut down F-Secure Mobile Anti-Virus, the
infected files are not quarantined and the system is not
protected against viruses.
To shut down F-Secure Mobile Anti-Virus:
⇒ In any of the main views, press OptionsÆExit.
4.3 Hiding User Interface
To hide the F-Secure Mobile Anti-Virus user interface:
⇒ In any of the main views, press Done. The application user interface
is hidden, and you return to the main menu, but the application keeps
running in the background. Hiding the user interface without shutting
down the application allows you to use real-time scanning and to
keep the files in the quarantine.
IMPORTANT: To use real-time scanning and keep the files in the
quarantine, do not shut down the application.
Page 44

44
Page 45

5
CONFIGURATION
Overview..................................................................................... 46
Scan Settings.................. ..... .... ..... ............................................. 46
Update Settings.......................................................................... 48
Exclusion Settings................................................. .... ..... ..... ....... 50
45
Page 46

46
5.1 Overview
Configuring F-Secure Mobile Anti-Virus involves setting up the
configuration options that help you protect your device against viruses
and harmful content in all file types. Correctly configured, F-Secure
Mobile Anti-Virus detects and deletes all malware that enters the device
through wireless IP connectivity, infrared connections and removable
memory cards. The configuration options include settings for:
› Scanning mode - enable real-time scanning, or use scheduled
or manual scanning
› Internet access point - select an existing or define a new
Internet access point for activating the update service and
downloading updates
The Internet access point settings are operator specific.
› Automatic Updates - enable or disable the downloading of
automatic updates
Updates are downloaded only when the connection to the
Internet is active. F-Secure Mobile Anti-Virus does not,
however, open a connection, but it recognizes a connection
being opened by, for example, a Web browser.
› Exclusion list - specify files and folders that are excluded from
5.2 Scan Settings
The Scan settings view allows you to set the scanning mode, time and
day.
To set the scanning mode:
1. In any of the main views, press OptionsÆSettings.
2. Go to the Scan view.
real-time scanning for viruses.
Page 47

CHAPTER 5 47
Configuration
3. Go to Mode and press OptionsÆChange to edit the scanning mode.
4. Select the desired scanning mode and press OK. For an explanation
of the available scanning modes, see “Scanning Modes”, 54.
5. If you set the scanning mode to ‘Once per day’ or ‘Once per week’,
you need to set the scanning time as follows:
a. In the Scan view, select Time and pres s OptionsÆChange.
b. Enter the desired time for scanning and press Ok.
Page 48

48
6. If you set the scanning mode to ‘Once per week’, you need to set the
scanning day as follows:
a. In the Scan view, select Day and press OptionsÆChange.
b. Select the desired scanning day, and press Ok.
5.3 Update Settings
The Update settings view allows you to configure the update mode and
the connection for the F-Secure Mobile Anti-Virus to connect to the
Anti-Virus update service.
To set the connection:
1. In any of the main views, press OptionsÆSettings.
2. Go to the Update view.
Page 49

CHAPTER 5 49
Configuration
3. Go to Internet Access point and press OptionsÆChange.
4. Select the connection you want to use as an access point to connect
to the Anti-Virus update service and press OptionsÆSelect.
The Internet access point settings are operator specific.
To enable automatic updates:
1. In any of the main views, press OptionsÆSettings.
2. Go to the Update view.
Page 50

50
3. Go to Automatic update and press OptionsÆChange to edit the
Select Enabled and press Ok.
When Automatic Update is enabled and when the connection to
the Internet is active, F-Secure Mobile Anti-Virus checks for
updates once a day at most. F-Secure Mobile Anti-Virus does not,
however, open a connection, but it recognizes a connection being
opened by, for example, a Web browser. If you want to check for
updates more often, you can run a manual check.
5.4 Exclusion Settings
The Exclusion settings view allows you to set up a list of files and folders
that are excluded from real-time scanning for viruses.
IMPORTANT: Do not change these settings unless advised to do
so by your administrator or F-Secure Technical Support.
T o add files or folders to the exclusion list:
1. In any of the main views, press OptionsÆSettings.
2. Go to the Exclusion view.
3. Press OptionsÆAdd file or Add folder to open the Add file or Add
folder view.
Page 51

CHAPTER 5 51
Configuration
4. Select the desired file or folder and press OK to add it to the
exclusion list.
To remove items from the exclusion list:
1. In any of the main views, press OptionsÆSettings.
2. Go to the Exclusion view.
3. Select the file or folder you wish to remove from the exclusion list.
4. Press OptionsÆRemove to remove the selected file or folder.
To view details of the excluded items:
1. In any of the main views, press OptionsÆSettings.
2. Go to the Exclusion view.
3. Select the file or folder the details of which you wish to view.
4. Press OptionsÆDetails to open the Exclusion details view for the
selected file or folder.
Page 52

52
5. Press Back to return to the Exclusion view.
To restore the default exclusion settings:
1. In any of the main views, select OptionsÆSettings.
2. Go to the Exclusion view.
3. Press OptionsÆDefault and press Yes to confirm restoring the
default exclusion settings.
Page 53

6
VIRUS SCAN
Overview..................................................................................... 54
Scanning Modes................................. .... ..... ..... .......................... 54
Running a Manual Scan............................................................. 55
Viewing Scan Results................................................................. 56
53
Page 54

54
6.1 Overview
F-Secure Mobile Anti-Virus is configured to provide you with complete
protection against malicious code attacks. If real-time scanning is
enabled, when the data on your device is accessed or modified, the
F-Secure Mobile Anti-Virus automatically scans it for malicious content.
Alternatively, you can schedule a custom scan to automatically run on a
specific date and time, or at periodic intervals. If you temporarily disable
the real-time scanning, we recommend scheduling a custom scan or
periodically run a manual scan. In addition, if you want to make sure there
are no infected files in your device, or if you do not want to use the
real-time scanning, you can manually scan all the data for viruses
whenever you want.
6.2 Scanning Modes
The following scanning modes are available in F-Secure Mobile
Anti-Virus:
› Real-time scanning (recommended) - set the application to
automatically scan files for malicious content when they are
accessed or modified. In this mode, the application is running in
the background, and when a virus is found in a file, it is
immediately quarantined and added to the file list for further
processing.
IMPORTANT: If you disable the real-time scanning, you should
manually scan your device each time you transfer any new data to
your device.
› Once per day/Once per week (Scheduled scanning) - set the
time for the scheduled scan to scan all your files daily or weekly,
at a pre-designated time. If no viruses are found, the application
shuts down automatically; if infected files are found, they are
displayed in the scan results.
› Manual scanning - manually run a full scan on your device and
inserted memory card.
Page 55

For more information on setting the scanning mode, see ”Scan Settings”,
46; for more information on viewing scan results, see ”Viewing Sc an
Results”, 56.
6.3 Running a Manual Scan
A full scan can be started in one of the following ways:
› When you sele ct Scan all in any of the four main views
› A scheduled scan starts at a pre-defined time
› During the start-up, F-Secure Mobile Anti-Virus prompts you to
press Yes to scan your device for viruses.
› You press Yes when prompted to start a full scan after
successfully upgrading the F-Secure Mobile Anti-Virus
application and/or updating the virus definition database.
During manual and scheduled scans, the F-Secure Mobile
Anti-Virus scans all the data on your device, including
installed memory card(s).
CHAPTER 6 55
Virus Scan
The F-Secure Mobile Anti-Virus prompts you to scan your device for
viruses in the following cases:
› After completing the act ivati on
› If known infections are detected at the start-up (and real-time
scanning is disabled)
› When a scheduled scan starts
› When you receive an incremental update message (and real-time
scanning is disabled)
To run a manual scan:
⇒ In any of the main views, press OptionsÆScan all.
The F-Secure Mobile Anti-Virus scans all the data on your device,
including installed memory card(s). When the scan is complete, the
scan results are displayed.
Page 56

56
6.4 Viewing Scan Results
Scan results are always displayed after a manual and scheduled scan, if
viruses were detected during scanning.
The Scan results view displays the following statistics:
Infected:
Not scanned:
Scanned:
The number of infections found. For more information
about removing infected files, see ”Processing Infected
Files”, 59.
The number of the files that were not scanned during
the scan. A file cannot be scanned if another program is
using it during the scan.
The number of the files that were scanned.
Page 57

CHAPTER 6 57
Virus Scan
A number of icons appear in the Scan results view. The following table
lists the icons and their meaning in each category.
Infected Not scanned Scanned
None All files were
scanned
The number of
files scanned
- The number of
files that could not
be opened for
scanning
- - Scan was
Infections were
detected
T o view the list of not scanned files:
--
-
stopped by the
user
⇒ In the Scan results view, select the desired category and press Show.
The Show button is visible only if infections were detected.
Page 58

58
T o view the details of not scanned files:
1. In the Not scanned files view, go to the file the details of which you
wish to view.
2. Press OptionsÆDetails.
The following information is displayed on the not scanned file:
› Full path
› Name
› Size
Page 59

7
PROCESSING INFECTED
ILES
F
Overview..................................................................................... 60
Viewing Details of Infected Files................................................. 60
Processing Infected File(s)......................................................... 62
Viewing Disinfection Results...................................................... 63
59
Page 60

60
7.1 Overview
F-Secure Mobile Anti-Virus is designed to be automatic and transparent.
You do not need to take any action to protect your files against viruses,
but F-Secure Mobile Anti-Virus works in the background and scans your
files automatically.
When F-Secure Mobile Anti-Virus finds a virus in a file, you can delete or
quarantine the infected file. If you decide to delete the file, it is removed
completely; if you decide to quarantine the file, it is locked up and cannot
be accessed.
7.2 Viewing Details of Infected Files
To view details of the infected file(s):
1. If F-Secure Mobile Anti-Virus detects viruses during the real time
scan, the following message is displayed:
2. Press Yes to view the infected file(s), or No to close the view.
The Infections view contains a list of infected files on the device. For
each item on the list, a file type dependent icon, two lines of text and
optionally a new infection icon are shown. The first line of text
indicates the state of the file (quarantined, released) and the second
Page 61

CHAPTER 7 61
Processing Infected Files
line of text shows the name of the infected file. If an infected file has
not been processed and its details have not been viewed, a red
exclamation mark icon is displayed on the right-hand side of the
infection status text.
You can find in-depth virus descriptions in the F-Secure web
site: http://www.F-Secure.com/v-descs/
.
3. To view more details about an infected file, select the desired file,
press OptionsÆDetails.
The Infection details view displays the path and file name of the
infected file, and the name of the virus that has infected the file.
Page 62

62
4. To return to the Infections view, press Back.
7.3 Processing Infected File(s)
You can process the infected file(s) in one of the following ways:
› Disinfect - launch the Disinfection wizard. This option is available
only if the file can be disinfected.
› Quarantine - quarantine the infected file, after which the file
cannot be accessed when F-Secure Mobile Anti-Virus is running
in the background.
› Delete - delete the infected file, after which you can reinstall it or
restore it from the backup copy.
› Release - release the quarantined file. If you release the file, you
can access it and use it, but at your own risk.
To process infected files:
1. In the Infections view, select the infected file to be processed.
2. Press OptionsÆProcess selected.
Page 63

3. From the Select action menu, select the desired action, and press
OK.
› If you select to delete the infected file, a confirmation message
prompts you to confirm the deletion.
› If you select to release the infected file, a warning message
warns you that after releasing the file, it is not quarantined any
more and can be accessed.
› If you select to disinfect the infected file, the Disinfection wizard is
launched and the selected file is being disinfected. During the
disinfection process, you can see on the screen the progress bar,
the number of disinfected files and the number of the files to be
disinfected.
7.4 Viewing Disinfection Results
When the disinfection process is complete, the disinfection results are
displayed.
The Disinfection results view displays a list of the processed files and
their status. Each list item contains an icon, which indicates the status of
the file, and the name of the file. The files are grouped according to their
status so that first on the list are the files with a green icon, next the files
with a yellow icon and the last the files with a red icon. In each status
group, the files are sorted alphabetically.
CHAPTER 7 63
Processing Infected Files
Page 64

64
The following explains the meaning of the icons on the Disinfection results
screen:
Icon Explanation
File successfully disinfected. If the file contained multiple
infections, all infections were successfully removed.
File was not processed. The user stopped the disinfection
process before the disinfection was completed.
File was not disinfected. If the file contained multiple infections,
not all the infections could be removed. We recommend
deleting or quarantining the infected file(s).
⇒ To view disinfection result details of a processed file, select the
desired file and then press OptionsÆDetails. The Disinfection
details view is displayed.
The Disinfection details view displays the name and the path of the
processed file and the infections. Infections are displayed as a list, in
which each item contains an icon indicating the infection status and
the name of the virus. The list displays first the infections with green
icon and then infections with red icon. In each group, the infections
are sorted alphabetically.
The following explains the meaning of the icons on the Disinfection
details screen:
Icon Explanation
Infection was successfull y removed.
Infection could not be removed.
⇒ To return to the Disinfection results view, press Back.
Page 65

8
UPDATING
Overview..................................................................................... 66
Viewing Update Information ....................................................... 66
Updating F-Secure Mobile Anti-Vi rus......................................... 68
65
Page 66

66
8.1 Overview
F-Secure Mobile Anti-Virus includes an update service, which means that
F-Secure Mobile Anti-Virus can be updated regularly to keep the virus
definition database up to date. An up-to-date virus definition database is
needed for proper functioning of F-Secure Mobile Anti-Virus: only an
up-to-date virus definition database enables finding and removing even
the most recently found viruses.
The virus definition database contains information of all the viruses that
F-Secure Mobile Anti-Virus can find during the scan. F-Secure Mobile
Anti-Virus requires an active Internet connection to connect to the update
service for receiving virus definition database updates and keeping virus
protection up to date.
When a new virus or other malicious software emerges, a new virus
definition database update can be retrieved from the update service. It is
important that you keep your virus definition database up to date. Only
with up-to-date virus definition database, F-Secure Mobile Anti-Virus can
find all the latest viruses and thus ensure you the best possible protection.
8.2 Viewing Update Information
⇒ To see the date of the last virus definition database update, start
F-Secure Mobile Anti-Virus and scroll to the Status view.
Page 67

The following information is displayed:
CHAPTER 8 67
Updating
Last update
Subscription valid until/
Not valid/Expired
The date of the last update.
The expiry date of the update
service. You should renew your
license prior to the expiration. For
more information, see Appendix A.
Purchasing Subscription Service
Time, or contact your retailer.
Last full scan
The date of a last full scan.
Your copy of F-Secure Mobile Anti-Virus includes a license. During
this time, you can freely update your F-Secure Mobile Anti-Virus.
When your license expires, you can update your copy only after
renewing your license.
Page 68

68
8.3 Updating F-Secure Mobile Anti-Virus
Y ou can manually update F-Secure Mobile Anti-Virus whenever you want,
or you can configure it automatically to download updates every time
there is an active connection to the Internet.
F-Secure Mobile Anti-Virus does not open a connection, but it
recognizes a connection being opened by, for example, a Web
browser.
For information about enabling automatic updates, see “Update Settings”,
48.
8.3.1 Updating Virus Definition Database
When both the Automatic Update feature and the real-time scanning are
enabled, F-Secure Mobile Anti-Virus monitors the Internet activity. When
it detects an open connection, it checks the time elapsed since the last
successful update of the virus definition database. If more than 24 hours
have elapsed, F-Secure Mobile Anti-Virus automatically downloads the
virus definition database update.
IMPORTANT: Automatic Update can be enabled only in the
real-time scanning mode.
To manually update F-Secure Mobile Anti-Virus:
1. In any of the main views, press OptionsÆUpdate Anti-Virus.
2. Select the Internet access point to connect to the update server.
F-Secure Mobile Anti-Virus connects to the update server and
downloads the latest virus definition database. The application takes
the virus definition database update into use immediately.
For more information, see the User Guide of your device.
3. When the update is complete, press OK to scan your device for
viruses. For more information on scanning, see ”Running a Manual
Scan”, 55.
Page 69

8.3.2 Upgrading the Application
When a new F-Secure Mobile Anti-Virus version is available, a message
is displayed prompting you to download the application upgrade. The
upgrade is downloaded automatically only if the virus definition database
version requires it to work properly.
IMPORTANT: Automatic Update can be enabled only in the
real-time scanning mode. The connection to the Internet must be
active for F-Secure Mobile Anti-Virus to check for updates.
F-Secure Mobile Anti-Virus does not, however, open a connection,
but it recognizes a connection being opened by, for example, a
Web browser.
After downloading the application upgrade, F-Secure Mobile Anti-Virus
runs a check for necessary storage space and shuts itself down. The
components of the old version are removed and the upgrade is installed.
When upgrading is complete, F-Secure Mobile Anti-Virus restarts.
You cannot cancel the upgrade process. However, if you interrupt it
by, for example, removing the battery while new files are being
installed, an 'Update AV' message is displayed next time you
restart F-Secure Mobile Anti-Virus. Pressing the Update Anti-Virus
button resumes the upgrade process.
CHAPTER 8 69
Updating
If there is not enough storage space to complete the application
upgrade, a message is displayed prompting you either to delete
some files before continuing the upgrade process or cancel the
upgrade process and continue at a later time.
Page 70

70
Page 71

9
TROUBLESHOOTING
No Internet Access Points Configured........................................ 72
Invalid Subscription Number....................................................... 72
Unable to Connect to Update Server/Update Failure................. 72
Update Service Could Not Authenticate Device......................... 73
Service Has Expired or About to Expire..................................... 73
Virus Definition Database Corrupted or Missing and Virus
Protection Not Updated.............................................................. 74
Theme Files on Memory Card.................................................... 75
Multiple Messages When Purchasing Subscription.................... 75
Automatic Updates Generating D ata Traffic............................... 76
71
Page 72

72
9.1 No Internet Access Points Configured
Q. When trying to connect to the update server, I get a notification
that no Internet access points are configured. What causes this?
A. You may have deleted the Internet access point that you selected
during the activation. With no defined Internet access point, the
application cannot check for updates. Go to the Update settings view
and select one of the Internet access points or create a new one.
9.2 Invalid Subscription Number
Q. I receive an ‘Invalid subscription number’ error message when I
enter my subscription number. What should I do?
A. You have entered an invalid subscription number. You should check
your subscription number and re-enter it.
9.3 Unable to Connect to Update Server/Update Failure
Q. I have defined an Internet access point, but I am unable to get
the updates. What can I do?
A. Check the Internet access point settings with your operator. You
should also check that the date and time settings in your device are
correct. If you have problems connecting through WAP access points,
you should connect through the Internet.
The Internet access point settings are operator specific.
Page 73

CHAPTER 9 73
Troubleshooting
9.4 Update Service Could Not Authenticate Device
Q. I get a notification that the update service cannot authenticate
my device. Why?
A. This error message is displayed when the update server cannot
authenticate the subscription. Reasons for the authentication failure
can be as follows:
› The F-Secure Mobile Anti-Virus installation folder files have been
tampered
› There have been more than four attempts to move the F-Secure
Mobile Anti-Virus installation and service subscription to another
device
9.5 Service Has Expired or About to Expire
§
Q. What should I do when one of the following messa ges appear on
my device screen?
A. If your subscription has expired or is about to expire, F-Secure
Anti-Virus notifies you by showing one of the above messages.
Page 74

74
If your subscription has expired and you want to renew it, press Yes
to purchase more subscription service time. For more information,
see
Appendix A. Purchasing Subscription Service Time. The other
message simply reminds you that your subscription is going to expire
in a number of days. The message will disappear in few seconds.
9.6 Virus Definition Database Corrupted or Missing and Virus Protection Not Updated
Q. My virus definition database seems to be corrupted. What
should I do?
A. You should immediately update your virus definition database. After
that, in the Scan settings view, first go to the Scan view and change
the scanning mode to Real-time. Then, go to the Update view and
change automatic updates to Enabled.
Page 75

9.7 Theme Files on Memory Card
Q. Since I started using themes, my phone performs quite slowly.
What can I do to improve its performance?
A. To improve the performance, we recommend transferring the theme
in use from the memory card and storing it on the device memory.
9.8 Multiple Messages When Purchasing Subscription
Q. When I purchased a subscription, my phone sent multiple
subscription messages. After the purchase, I received multiple
messages to my phone. Why? Are you billing the subscription
more than once?
A. Purchasing the application or more subscription service time by using
the Phone bill payment method is based on your GSM operator's
service costs.
CHAPTER 9 75
Troubleshooting
When purchasing, you may be required to send multiple messages,
because the price of one subscription message may not cover the
subscription price. For example, if the cost of the subscription period
is six euros and your GSM operator charges the nominal value of two
euros per a subscription message, three messages will be
automatically sent to cover the subscription price. In some cases, you
may also receive multiple response messages.
Page 76

76
9.9 Automatic Updates Generating Data Traffic
Q. How much data traffic automatic updates generate?
A. When the Automatic Update feature is enabled and when the
connection to the Internet is active, F-Secure Mobile Anti-Virus
checks for updates once a day at most. Depending on the amount of
available updates, every checking generates 2-4 KB. For example, if
you are connected to the Internet at least once a day, automatic
updates generate approximately an extra 100 KB a month. If your
GSM operator bills you one euro per 1MB, the automatic updates add
approximately 10 cents to your phone bill.
If an updated application is also available, because of the large
amount of data, F-Secure Mobile Anti-Virus displays the amount of
data to be downloaded and prompts you for confirmation before
starting to download the updated application.
Page 77

10
TECHNICAL SUPPORT
Overview..................................................................................... 78
Web Club.................................................................................... 78
Virus Descriptions on the Web................................................... 78
Electronic Mail Support............. ..... ..... ........................................ 78
77
Page 78

78
10.1 Overview
10.2 Web Club
F-Secure Techni ca l S upp or t i s av ai l ab le b y e- ma il an d fr om ou r Web site.
You can access our Web site from within F-Secure Mobile Anti-Virus or
from your Web browser.
For Technical Support of all F-Secure products, go to F-Secure Support
Center at: http://support.f-secure.com/enu/home/
The F-Secure Web Club provides assistance to the users of F-Secure
products. To connect to the Web Club on our Web site, open the Web
Club page, and click Web Club on the Web Club tab of the General
property page.
To connect to the Web Club directly from within your Web browser, go to
http://www.f-secure.com/webclub/
.
.
10.3 Virus Descriptions on the Web
F-Secure Corporation maintains a comprehensive collection of
virus-related information on its Web site. To view the Virus Information
Database, connect to: http://www.F-Secure.com/virus-info/
10.4 Electronic Mail Support
If you have questions about F-Secure Mobile Anti-Virus not covered in the
manual or online services at http://www.F-Secure.com/
your local F-Secure distributor or F-Secure Corporation directly.
.
, you can contact
Page 79

CHAPTER 10 79
Technical Support
For technical assistance, please contact your local F-Secure Business
Partner. Send your e-mail to: Anti-Virus-<country>@F-Secure.com
Example: Anti-Virus-Norway@F-Secure.com
If there is no authorized F-Secure Anti-Virus Business Partner in your
country, you can request basic technical assistance from:
Anti-Virus-Support@F-Secure.com
When contacting support, prepare and include the following information in
your support request:
› Name and version number of your F-Secure software program
(including the build number, if available).
› Name and version number of your operating system (including
the build number).
› A detailed description of the problem, including any error
messages displayed by the program, and any other details, which
could help us duplicate the problem.
When contacting F-Secure support by telephone, please do the following
so that we may help you more effectively and save time:
› have your device at hand, so you can follow instructions given by
the support technician, or be prepared to write down instructions.
› Have your device turned on and (if possible) in the state it was in
when the problem occurred.
Page 80

80
Page 81

APPENDIX:
A
Purchasing Subscription Service Time
Overview..................................................................................... 82
SMS-Based Purchase................................................................ 82
Purchasing Through PC Browser............................................... 84
81
Page 82

82
A.1 Overview
You can purchase more subscription service time in one of the following
ways (depending on your software version):
› SMS-based purchase
› Purchasing through PC browser
The additional service time purchased is either added to the time
remaining in your previous order or to your free evaluation period. To
keep your device continuou sl y pr otec te d, we reco mm end purc has in g
additional service time well before the expiration date.
When your subscription service time has expired or is going to
expire, the application notifies and prompts you to renew your
subscription. P ress Yes in the message screen if you wish to
purchase more subscription service time.
A.2 SMS-Based Purchase
To purchase more subscription service time by sending an SMS
(only if enabled by your operator):
1. Go to the Subscription Info screen.
Page 83

APPENDIX A 83
Purchasing Subscription Service Time
2. Press Purchase. The Select Method screen is displayed.
3. Press OptionsÆSelect to select the Phone bill payment method.
4. When prompted to accept payment, press OK to complete your
subscription service time purchase.
5. In the response SMS, you receive a confirmation of your purchase
and a code for activating the service.
Page 84

84
A.3 Purchasing Through PC Browser
To purchase more service subscription time through your PC
browser:
1. Open http://www.f-secure.com/estore/ in your web browser and enter
your subscription number in the Subscription Number field to identify
your subscription.
F-Secure eStore accepts the most commonly used credit cards
and wire/bank transfers.
2. Follow the instructions on the screen .
Page 85

About F-Secure Corporation
F-Secure Corporation................................................................ 93
The F-Secure Product Family.................................................... 95
92
Page 86

93
F-Secure Corporation
F-Secure Corporation is the leading provider of centrally managed
security solutions for the mobile enterprise. The company's
award-winning products include anti-virus, file encryption and network
security solutions for all major platforms from desktops to servers and
from laptops to handhelds. Customers in nearly every industry Government, Manufacturing, Retail, Telecommunications, Finance,
Energy, Transportation, High Tech and more - rely on F-Secure products
to make information secure, reliable and accessible. Mobility challenges
many of the fundamental assumptions upon which traditional IT systems
have been based on. F-Secure supports businesses with a broad range
of centrally managed and up to date security solutions to enable a truly
mobile enterprise.
For the administrator, F-Secure enables a dispersed user base with:
› Policy-based management
› Automatic enforcement
› Instant alerts
› Reports
For the end-user, with F-Secure, security is:
› Invisible
› Automatic
› Reliable
› Always operating
› Up-to-date
Founded in 1988, F-Secure has been listed on the Helsinki Stock
Exchange since November 1999. The company is headquartered in
Helsinki, Finland with North American main office in San Jose, California,
as well as offices in Germany, Sweden, Japan and the United Kingdom
and regional offices in the USA. F-Secure is supported by a network of
value added resellers and distributors in over 90 countries around the
Page 87

ABOUT F-SECURE CORPORATI ON 94
globe. Through licensing and distribution agreements the company's
security applications are available for the products of the leading
handheld equipment manufacturers, such as Nokia and Compaq.
F-Secure's customers include many of the world's largest industrial
corporations and best-known telecommunications companies; major
international airline s; Eu ropea n governments, post offices and defense
forces; and some of the world's largest banks. Well-known customers
include Cap Gemini, Barclays Bank, Tesco, Glanbia, Deutsche Telekom,
Aachener-Munchener, J&W, Honda, Tokyo-Mitsubishi Bank, Partek, ICL
Invia, Sonera, and Verizon.
F-Secure software products have received numerous international
awards, prizes and citations. The company was named one of Europe's
50 Hottest T ech Firms in Time Magazine in its June 2000 edition and one
of the Top 100 Technology companies in the world by Red Herring
magazine in its September 1998 issue. F-Secure products have
consistently won awards including the Editor's Choice by Tietokone
(Finnish IT Magazine) in February 2002, the Pick of the 2001 from SC
Magazine (West Coast Publishing) in 2001, Full Score of 100 % from
A V -Test.org and PC Welt (IDG) in November 2001, Highest Detection and
Disinfection Rates from CHIP Magazine (Vogel Burda Communications)
in May 2000, and the Virus Bulletin 100% award in June 2002.
Page 88

95
The F-Secure Product Family
F-Secure Anti-Virus automatically and transparently delivers the most
powerful and up-to-date protection against various threats, such as
computer viruses, worms and other malicious code, as well as hackers
and intrusion attempts. F-Secure Anti-Virus protects your workstations,
servers, firewalls, gateways, mobile devices, and e-mail/groupware
servers and can be centrally managed from one single location.
F-Secure Policy Manager provides a flexible and scalable way to
manage the security of multiple applications on multiple operating
systems, from one central location. With a unique distributed architecture,
the F-Secure Policy Manager keeps security software up-to-date,
manages configurations, oversees enterprise compliance, and scales to
handle large and mobile enterprises.
F-Secure SSH enables remote systems administrators to access
corporate network resour ce s secur el y by protecti ng the tra nsmi ssio n of
sensitive data. F-Secure SSH provides numerous features to make
secure administration and remote access connections easy to use, in a
user-friendly, terminal-based application running on a wide variety of
platforms.
If you want to give feedback about the document itself, send e-mail to
documentation@f-secure.com
.
Page 89

Page 90

www.f-secure.com
 Loading...