

Page 1

F-Secure Client
Security
Administrator’s Guide
Page 2

"F-Secure" and the triangle symbol are registered trademarks of F-Secure Corporation and F-Secure
product names and symbols/logos are either trademarks or registered trademarks of F-Secure
Corporation. All product names referenced herein are trademarks or registered trademarks of their
respective companies. F-Secure Corporation disclaims proprietary interest in the marks and names of
others. Although F-Secure Corporation makes every effort to ensure that this information is accurate,
F-Secure Corporation will not be liable for any errors or omission of facts contained herein. F-Secure
Corporation reserves the right to modify specifications cited in this document without prior notice.
Companies, names and data used in examples herein are fictitious unless otherwise noted. No part of
this document may be reproduced or transmitted in any form or by any means, electronic or
mechanical, for any purpose, without the express written permission of F-Secure Corporation.
This product may be covered by one or more F-Secure patents, including the following:
GB2353372 GB2366691 GB2366692 GB2366693 GB2367933 GB2368233
GB2374260
Copyright © 2008 F-Secure Corporation. All rights reserved. 12000060-7A10
Page 3

Contents
About this Guide 10
Overview ............................................................................................................................ 11
Additional Documentation .................................................................................................. 13
Conventions Used in F-Secure Guides .............................................................................. 15
Chapter 1 Introduction 17
1.1 Overview .................................................................................................................... 18
1.2 F-Secure Client Security Components and Features.................................................18
1.2.1 Virus and Spy Protection................................................................................ 18
1.2.2 Internet Shield ................................................................................................ 21
1.2.3 Application Management................................................................................ 22
1.3 Introduction to F-Secure Policy Manager...................................................................23
1.3.1 Main Components of F-Secure Policy Manager............................................. 24
1.3.2 F-Secure Policy Manager Features................................................................ 25
1.4 Basic Terminology......................................................................................................26
Chapter 2 Installing F-Secure Policy Manager 28
2.1 Overview .................................................................................................................... 29
2.2 System Requirements................................................................................................ 30
2.2.1 F-Secure Policy Manager Server ................................................................... 30
2.2.2 F-Secure Policy Manager Console................................................................. 32
2.3 Installation Steps........................................................................................................33
2.4 Uninstalling F-Secure Policy Manager ....................................................................... 55
iii
Page 4

Chapter 3 Introduction to F-Secure Policy Manager Anti-Virus Mode
User Interface 56
3.1 Overview .................................................................................................................... 57
3.2 Policy Domains Tab ................................................................................................... 58
3.3 Management Tabs ..................................................................................................... 58
3.3.1 Summary Tab.................................................................................................59
3.3.2 Outbreak Tab..................................................................................................66
3.3.3 Settings Tab ................................................................................................... 68
3.3.4 Status Tab .................................................................................................... 100
3.3.5 Alerts Tab ..................................................................................................... 108
3.3.6 Reports Tab..................................................................................................110
3.3.7 Installation Tab .............................................................................................111
3.3.8 Operations Tab.............................................................................................113
3.4 Toolbar .....................................................................................................................114
3.5 Menu Commands.....................................................................................................115
3.6 Settings Inheritance ................................................................................................. 118
3.6.1 How Settings Inheritance is Displayed on the User Interface....................... 120
3.6.2 Locking and Unlocking all Settings on a Page at Once................................121
3.6.3 Settings Inheritance in Tables ......................................................................122
Chapter 4 Setting up the Managed Network 123
4.1 Overview .................................................................................................................. 124
4.2 Logging in for the First Time .................................................................................... 124
4.2.1 Logging In.....................................................................................................125
4.3 Creating the Domain Structure................................................................................. 128
4.3.1 Adding Policy Domains and Subdomains.....................................................130
4.4 Adding Hosts............................................................................................................130
4.4.1 Windows Domains........................................................................................131
4.4.2 Autoregistered Hosts....................................................................................131
4.4.3 F-Secure Push Installations.......................................................................... 136
4.4.4 Policy-Based Installation ..............................................................................143
4.4.5 Local Installation and Updates with Pre-Configured Packages....................147
4.5 Local Installation ...................................................................................................... 152
4.5.1 Local Installation System Requirements ...................................................... 152
iv
Page 5

4.5.2 Installation Instructions................................................................................. 154
4.6 Installing on an Infected Host................................................................................... 155
4.7 How to Check That the Management Connections Work ........................................ 156
Chapter 5 Configuring Virus and Spyware Protection 157
5.1 Overview: What can Virus and Spyware Protection be Used for? ........................... 158
5.2 Configuring Automatic Updates ...............................................................................159
5.2.1 How do Automatic Updates Work?............................................................... 160
5.2.2 Automatic Updates Configuration Settings...................................................160
5.2.3 Configuring Automatic Updates from Policy Manager Server ...................... 161
5.2.4 Configuring Policy Manager Proxy ............................................................... 162
5.2.5 Configuring Clients to Download Updates from Each Other ........................163
5.3 Configuring Real-Time Scanning .............................................................................164
5.3.1 Real-Time Scanning Configuration Settings.................................................164
5.3.2 Enabling Real-Time Scanning for the Whole Domain ..................................166
5.3.3 Forcing all Hosts to Use Real-Time Scanning.............................................. 167
5.3.4 Excluding Microsoft Outlooks's .pst File from Real-Time Scanning .............168
5.4 Configuring System Control .....................................................................................169
5.4.1 System Control Configuration Settings......................................................... 169
5.4.2 System Control Server Queries (DeepGuard 2.0)........................................ 170
5.5 Configuring Rootkit Scanning (Blacklight)................................................................ 170
5.5.1 Rootkit Scanning Configuration Settings......................................................171
5.5.2 Launching a Rootkit Scan for the Whole Domain.........................................171
5.6 Configuring E-mail Scanning.................................................................................... 172
5.6.1 E-mail Scanning Configuration Settings.......................................................172
5.6.2 Enabling E-mail Scanning for Incoming and Outgoing E-mails....................174
5.7 Configuring Web Traffic (HTTP) Scanning...............................................................176
5.7.1 HTTP Scanning Configuration Settings........................................................176
5.7.2 Enabling Web Traffic Scanning for the Whole Domain ................................177
5.7.3 Excluding a Web Site from HTTP Scanning.................................................177
5.8 Configuring Spyware Scanning................................................................................ 179
5.8.1 Spyware Control Settings............................................................................. 179
5.8.2 Setting up Spyware Control for the Whole Domain ...................................... 183
5.8.3 Launching Spyware Scanning in the Whole Domain....................................185
5.8.4 Allowing the Use of a Spyware or Riskware Component .............................186
v
Page 6

5.9 Preventing Users from Changing Settings ............................................................... 187
5.9.1 Setting all Virus Protection Settings Final..................................................... 187
5.10 Configuring F-Secure Client Security Alert Sending ................................................ 188
5.10.1 Setting F-Secure Client Security to Send Virus Alerts to an E-mail Address188
5.10.2 Disabling F-Secure Client Security Alert Pop-ups ........................................190
5.11 Monitoring Viruses on the Network .......................................................................... 190
5.12 Testing your Antivirus Protection ............................................................................. 190
Chapter 6 Configuring Internet Shield 192
6.1 Overview: What can Internet Shield be Used for? ...................................................193
6.1.1 Global Firewall Security Levels .................................................................... 193
6.1.2 Security Level Design Principles .................................................................. 195
6.2 Configuring Internet Shield Security Levels and Rules ............................................196
6.2.1 Selecting an Active Security Level for a Workstation ...................................196
6.2.2 Configuring a Default Security Level for the Managed Hosts....................... 197
6.2.3 Adding a New Security Level for a Certain Domain Only ............................. 198
6.3 Configuring Network Quarantine.............................................................................. 201
6.3.1 Network Quarantine Settings........................................................................201
6.3.2 Enabling Network Quarantine in the Whole Domain .................................... 201
6.3.3 Fine-Tuning Network Quarantine ................................................................. 202
6.4 Configuring Internet Shield Rule Alerts ....................................................................203
6.4.1 Adding a New Internet Shield Rule with Alerting.......................................... 203
6.5 Configuring Application Control................................................................................ 207
6.5.1 Application Control Configuration Settings...................................................209
6.5.2 Setting up Application Control for the First Time .......................................... 210
6.5.3 Creating a Rule for an Unknown Application on Root Level......................... 212
6.5.4 Editing an Existing Application Control Rule ................................................ 213
6.5.5 Disabling Application Control Pop-ups ......................................................... 214
6.6 How to use Alerts for Checking that Internet Shield Works? ...................................215
6.7 Configuring the Intrusion Prevention........................................................................216
6.7.1 Intrusion Prevention Configuration Settings .................................................217
6.7.2 Configuring IPS for Desktops and Laptops .................................................. 218
Chapter 7 How to Check that the Environment is Protected 220
7.1 Overview .................................................................................................................. 221
vi
Page 7

7.2 How to Check the Protection Status from Outbreak Tab ......................................... 221
7.3 How to Check that all the Hosts Have the Latest Policy ..........................................221
7.4 How to Check that the Server has the Latest Virus Definitions................................222
7.5 How to Check that the Hosts have the Latest Virus Definitions ...............................222
7.6 How to Check that there are no Disconnected Hosts ..............................................223
7.7 Viewing Scanning Reports .......................................................................................223
7.8 Viewing Alerts .......................................................................................................... 224
7.9 Creating a Weekly Infection Report ......................................................................... 225
7.10 Monitoring a Possible Network Attack...................................................................... 225
Chapter 8 Upgrading Software 227
8.1 Overview: Upgrading Software ................................................................................228
8.1.1 Using the Installation Editor.......................................................................... 228
Chapter 9 Local Host Operations 232
9.1 Overview .................................................................................................................. 233
9.2 Scanning File Viruses Manually ...............................................................................233
9.3 Viewing the Latest Scanning Report on a Local Host ..............................................234
9.4 Adding a Scheduled Scan from a Local Host........................................................... 234
9.5 Logging and Log File Locations on Local Hosts ......................................................235
9.5.1 The LogFile.log file ....................................................................................... 235
9.5.2 Packet Logging............................................................................................. 236
9.5.3 The Action.log file......................................................................................... 237
9.5.4 Other Log Files.............................................................................................239
9.6 Connecting to F-Secure Policy Manager and Importing a Policy File Manually.......239
9.7 Suspending Downloads and Updates ...................................................................... 240
9.8 Allowing Users to Unload F-Secure Products .......................................................... 240
Chapter 10 Virus Information 242
10.1 Malware Information and Tools on the F-Secure Web Pages ................................. 243
10.2 How to Send a Virus Sample to F-Secure ...............................................................244
10.2.1 How to Package a Virus Sample .................................................................. 244
10.2.2 What Should Be Sent ................................................................................... 244
vii
Page 8

10.2.3 How to Send the Virus Sample.....................................................................247
10.2.4 In What Language ........................................................................................ 247
10.2.5 Response Times........................................................................................... 247
10.3 What to Do in Case of a Virus Outbreak? ................................................................248
Chapter 11 Setting Up the Cisco NAC Plugin 250
11.1 Introduction .............................................................................................................. 251
11.2 Installing the Cisco NAC Plugin ...............................................................................251
11.2.1 Importing Posture Validation Attribute Definitions ........................................252
11.3 Attributes to be Used for Application Posture Token ............................................... 252
Chapter 12 Advanced Features: Virus and Spyware Protection 254
12.1 Overview .................................................................................................................. 255
12.2 Configuring Scheduled Scanning.............................................................................255
12.3 Advanced System Control Settings.......................................................................... 257
12.3.1 Notify User on a Deny Event ........................................................................ 257
12.3.2 Let an Administrator Allow or Deny Events from Other Users Programs..... 258
12.3.3 Automatically Allow or Deny Events Requested by a Specific Application...258
12.4 Configuring Policy Manager Proxy........................................................................... 260
12.5 Configuring Automatic Updates on Hosts from Policy Manager Proxy .................... 260
12.6 Configuring a Host for SNMP Management.............................................................261
12.7 Excluding an Application from the Web Traffic Scanner .......................................... 262
Chapter 13 Advanced Features: Internet Shield 263
13.1 Overview .................................................................................................................. 264
13.2 Managing Internet Shield Properties Remotely........................................................264
13.2.1 Packet Logging.............................................................................................264
13.2.2 Trusted Interface .......................................................................................... 265
13.2.3 Packet Filtering............................................................................................. 266
13.3 Configuring Security Level Autoselection................................................................. 266
13.4 Troubleshooting Connection Problems .................................................................... 268
13.5 Adding New Services ...............................................................................................269
13.5.1 Creating a New Internet Service based on the Default HTTP ...................... 270
13.6 Setting up Dialup Control .........................................................................................278
viii
Page 9

13.6.1 Allowing and Blocking Phone Numbers........................................................278
13.6.2 Call Logging.................................................................................................. 279
Appendix A Modifying PRODSETT.INI 281
A.1 Overview ................................................................................................................. 282
A.2 Configurable Prodsett.ini Settings............................................................................ 282
Appendix B E-mail Scanning Alert and Error Messages 294
B.1 Overview ................................................................................................................. 295
Appendix C Products Detected or Removed During Client Installation 299
C.1 Overview ................................................................................................................. 300
Glossary 306
Technical Support 320
Overview .......................................................................................................................... 321
Web Club ......................................................................................................................... 321
Advanced Technical Support ........................................................................................... 321
F-Secure Technical Product Training ...............................................................................322
ix
Page 10

ABOUT THIS GUIDE
Overview..................................................................................... 11
Additional Documentation.......................................................... 13
10
Page 11

Overview
11
This manual covers the configuration and operations that you can do with
the F-Secure Policy Manager Anti-Virus Mode user interface and provides
the information you need to get started with managing F-Secure Client
Security applications centrally.
The F-Secure Client Security Administrator’s Guide is divided into the
following chapters.
Chapter 1. Introduction. Describes the basic components of F-Secure
Client Security and the main features of F-Secure Policy Manager.
Chapter 2. Installing F-Secure Policy Manager. Instructions on how to
install F-Secure Policy Manager Server and Console.
Chapter 3. Introduction to F-Secure Policy Manager Anti-Virus Mode
User Interface. Describes the F-Secure Policy Manager Anti-Virus Mode
user interface components.
Chapter 4. Setting up the Managed Network. Describes how to plan and
create the centrally managed network.
Chapter 5. Configuring Virus and Spyware Protection. Describes how to
configure Virus Definition Updates, Real-Time Scanning and E-Mail
Scanning.
Chapter 6. Configuring Internet Shield. Describes how to configure the
security levels and rules, Application Control and Intrusion Prevention
System (IPS).
Chapter 7. How to Check that the Environment is Protected. Provides a
checklist for monitoring the domain and for making sure that the network
is protected.
Chapter 8. Upgrading Software. Contains instructions on how to upgrade
software with F-Secure Policy Manager.
Chapter 9. Local Host Operations. Provides information on
administration tasks, such as scheduling a scan locally and collecting
information from local log files.
Page 12

12
Chapter 10. Virus Information. Describes where you can get more
information about viruses and how you can send a virus sample to
F-Secure.
Chapter 11. Setting Up the Cisco NAC Plugin. Describes how to install
and set up Cisco network Access Control (NAC) Support.
Chapter 12. Advanced Features: Virus and Spyware Protection. Covers
the advanced virus protection features, such as scheduled scanning, the
use of Anti-Virus Proxy and using SNMP-based management.
Chapter 13. Advanced Features: Internet Shield. Covers the advanced
Internet Shield features, such as using port and IP checking with
Application Control, adding new services and troubleshooting connection
problems.
Appendix A. Modifying PRODSETT.INI. Contains information about
modifying PRODSETT.INI, a file that informs the Setup program which
software modules to install on workstations.
Appendix B. E-mail Scanning Alert and Error Messages. Describes the
alert and error messages that E-mail Scanning can generate.
Appendix C. Products Detected or Removed During Client Installation.
Lists all the products that the user is prompted to uninstall or are
uninstalled automatically during F-Secure Client Security installation.
Glossary — Explanation of terms
Technical Support — Web Club and contact information for assistance.
About F-Secure Corporation — Company background and products.
Page 13

Additional Documentation
F-Secure Policy Manager Online Help
The F-Secure Policy Manager Online Help contains information on both
the Anti-Virus Mode as well as the Advanced Mode user interfaces. The
online help is accessible from the Help menu by selecting Help Contents,
or by pressing F1.
Information concerning the F-Secure Policy Manager Anti-Virus Mode
user interface can be found under F-Secure Client Security
Administration in the navigation tree.
Information concerning F-Secure Policy Manager Advanced Mode user
interface and other advanced operations can be found under F-Secure
Policy Manager in the navigation tree.
F-Secure Client Security Online Help
The F-Secure Client Security local user interface comes with a
context-sensitive online help. The online help is accessible from the main
user interface and from the advanced dialogs by either clicking the Help
button or pressing F1.
The online help always opens to a page that holds information about your
current location in the F-Secure Client Security user interface. In the left
pane of the online help, you can browse through the help using the
contents tree and access a full search function.
13
Page 14

14
F-Secure Policy Manager Administrator’s Guide
For more information on administering other F-Secure software products
with F-Secure Policy Manager, see F-Secure Policy Manager
Administrator’s Guide. It contains information on the Advanced Mode
user interface and instructions on how you can configure and manage
other F-Secure products. It also includes information on F-Secure
Management Agent, F-Secure Policy Manager Web Reporting.
F-Secure Policy Manager Proxy Administrator’s Guide
For more information on installing and maintaining F-Secure Policy
Manager Proxies, see the F-Secure Policy Manager Proxy
Administrator’s guide. It contains detailed instructions on how you can
use F-Secure Policy Manager Proxies to more efficiently deliver product
updates.
Page 15
Conventions Used in F-Secure Guides
This section describes the symbols, fonts, and terminology used in this
manual.
Symbols
WARNING: The warning symbol indicates a situation with a
risk of irreversible destruction to data.
IMPORTANT: An exclamation mark provides important information
that you need to consider.
REFERENCE - A book refers you to related information on the
topic available in another document.
NOTE - A note provides additional information that you should
consider.
l
15
Fonts
TIP - A tip provides information that can help you perform a task
more quickly or easily.
⇒ An arrow indicates a one-step procedure.
Arial bold (blue) is used to refer to menu names and commands, to
buttons and other items in a dialog box.
Arial Italics (blue) is used to refer to other chapters in the manual, book
titles, and titles of other manuals.
Arial Italics (black) is used for file and folder names, for figure and table
captions, and for directory tree names.
Courier New is used for messages on your computer screen.
Page 16

16
Courier New bold is used for information that you must type.
SMALL CAPS (BLACK) is used for a key or key combination on your
keyboard.
PDF Document
For More Information
Arial underlined (blue)
Arial italics is used for window and dialog box names.
This manual is provided in PDF (Portable Document Format). The PDF
document can be used for online viewing and printing using Adobe®
Acrobat® Reader. When printing the manual, please print the entire
manual, including the copyright and disclaimer statements.
Visit F-Secure at http://www.f-secure.com for documentation, training
courses, downloads, and service and support contacts.
In our constant attempts to improve our documentation, we would
welcome your feedback. If you have any questions, comments, or
suggestions about this or any other F-Secure document, please contact
us at documentation@f-secure.com
is used for user interface links.
.
Page 17

1
INTRODUCTION
Overview..................................................................................... 18
F-Secure Client Security Components and Features................. 18
Introduction to F-Secure Policy Manager ................................... 23
Basic Terminology ...................................................................... 26
17
Page 18

18
1.1 Overview
This section describes the main components of F-Secure Client Security
and F-Secure Policy Manager and provides an introduction to policy
based management.
1.2 F-Secure Client Security Components and Features
F-Secure Client Security is used for protecting the computer against
viruses, worms, spyware, rootkits and other malware, and against
unauthorized access from the network. F-Secure Client Security consists
of Virus Protection, Internet Shield, and Application Management. When
installing F-Secure Client Security, you can select which of these
components are installed.
1.2.1 Virus and Spy Protection
Virus and Spy Protection includes several scanning methods: Real-Time
Scanning, E-mail Scanning, Web Traffic Scanning, Rootkit Scanning, and
Manual Scanning. It also includes System Control, Automatic Updates,
the F-Secure Automatic Update Agent and the Virus News service.
Real-Time Scanning
The Real-Time Scanning feature gives you continuous protection against
viruses and spyware as files are opened, copied, moved, renamed and
downloaded from the Web.
Real-Time Scanning functions transparently in the background, looking
for viruses whenever you access files on the hard disk, diskettes, or
network drives. If you try to access an infected file, Real-Time Scanning
will automatically stop the virus from executing. It will then either remove it
from the file or display a warning, as specified in the security policy. For
more information, see “Configuring Real-Time Scanning”, 164.
Page 19

CHAPTER 1 19
E-mail Scanning
E-mail Scanning can be used for scanning both incoming and outgoing
e-mail messages and attachments. It prevents viruses from getting inside
the company network and it also prevents you from accidentally sending
infected attachments outside. E-mail Scanning can be configured to drop
infected attachments from incoming e-mails. When it has found an
infection in an outgoing e-mail, it can block the outgoing e-mail traffic until
the problem has been solved. For more information, see “Configuring
E-mail Scanning”, 172.
Web Traffic (HTTP) Scanning
Web Traffic Scanning protects computers against viruses in HTTP traffic.
It scans HTML files, image files, downloaded applications and executable
files, and removes viruses automatically. For more information, see
“Configuring Web Traffic (HTTP) Scanning”, 176.
Rootkit Scanning
If you want to ensure there are no suspicious hidden files, hidden
processes, hidden applications or hidden drives in your computer, you
can scan the system manually for rootkits. For more information, see
“Configuring Rootkit Scanning (Blacklight)”, 170.
Manual Scanning
You can use Manual Scanning, for example, after you have installed
F-Secure Client Security, if you suspect that there might be a virus or
spyware on the computer, or if a virus has been found in the local area
network. You can select whether all files or only a certain types of files are
scanned. You can also decide what action to take with an infected file, the
Disinfection Wizard will guide you through the process. You can also use
the Scheduled Scanning feature to scan your computer automatically
and regularly, for example weekly or 1-2 times a month.
Page 20

20
System Control
System Control is a new, host-based intrusion prevention system that
analyzes the behavior of files and programs. It provides an extra-layer of
protection by blocking undiscovered viruses, worms, and other malicious
code that try to perform harmful actions on your computer. For more
information, see “Configuring System Control”, 169.
Automatic Updates
The Automatic Updates feature keeps the virus and spyware definitions
always up-to-date. The virus definitions updates are signed by F-Secure
Anti-Virus Research Team. The signature is based on strong encryption
and the packet cannot be altered in transit.
In case of complex viruses the virus definitions updates include removal
tools that are executable binaries. The integrity of the delivered
executable code is very important, and F-Secure scanning engines check
that all update code is signed by F-Secure Anti-Virus Research. If the
integrity is compromised, the code will not be executed. For more
information, see “Configuring Automatic Updates”, 159.
F-Secure Automatic Update Agent
With F-Secure Automatic Update Agent, you are able to receive virus
definition updates and informational content without interrupting your
work to wait for files to download from the Web. F-Secure Automatic
Update Agent downloads files automatically in the background using
bandwidth not being used by other Internet applications, so you can
always be sure they will have the latest updates without having to search
the Web.
If the F-Secure Automatic Update Agent is always connected to the
Internet, it will automatically receive new virus definition updates after
they have been published by F-Secure.
When the F-Secure Automatic Update Agent service is started, it
connects to F-Secure’s Automatic Update Server. The agent will keep
polling the server regularly to see whether there is new content available.
The agent downloads only the parts of virus definitions that have changed
Page 21

since the last download. If the transfer is interrupted for some reason, the
next session will start from the point where the previous session ended.
For more information, see “Configuring Automatic Updates”, 159.
Virus News
F-Secure Virus News delivers instant notifications of serious security
events around the world. The F-Secure Virus News service is delivered
through F-Secure Automatic Update Agent. See theF-Secure Client
Security online help for more information.
1.2.2 Internet Shield
Internet Shield consists of Firewall, Application Control and Intrusion
Prevention System (IPS). Together these components can be used to
protect your computer against unauthorized connection attempts, insider
attacks and information theft, malicious applications, and other unwanted
applications, such as peer-to-peer software. Protecting the workstations
and laptops with F-Secure Client Security Internet Shield also protects the
entire LAN, because the individual computers cannot be used as a
stepping stone to gain access to the LAN.
CHAPTER 1 21
Internet Shield offers several different security levels that can be used
based on user needs, user mobility, company security policy and user
experience.
Firewall
The Firewall component is an integral part of Internet Shield. When
Internet Shield is installed on your computer, you have firewall protection
even when you are not connected to the LAN, for example when you are
at home connecting to the Internet via an Internet Service Provider (ISP).
Typically a firewall accepts or denies traffic based on local and remote
addresses, protocols and services that are used, and the current state of
the existing connections. It is also possible to issue an alert every time a
rule is hit or when illegal datagrams are received, which makes it easy to
see what kind of traffic is going on in your system. For more information,
see “Configuring Internet Shield Security Levels and Rules”, 196.
Page 22

22
Application Control
Application Control can be used to prevent unauthorized applications
from getting access to the network. In addition, application launch control
and application manipulation control protect computers against malicious
applications that try to launch or use other applications on the computer.
Application Control offers the administrator a possibility to control network
usage and restrict the use of applications that are prohibited by company
security policy. These mechanisms make it easy to prevent many of the
attacks mentioned above, and also to enforce security policies. It is
possible to configure different rules for different applications: applications
that are considered safe can be granted free access, other applications
can be either denied access, or the user is prompted to decide whether
the application can initiate a connection. For more information, see
“Configuring Application Control”, 207.
Intrusion Prevention System
Intrusion Prevention System (IPS) can be used for detecting malicious
patterns in network traffic. It can also be used to monitor viruses that try to
attack computers in the LAN. It registers the systematic connection
attempts made from the outside, which are often a sign of somebody
trying to find open ports on the host. Intrusion Prevention System stops
the malicious packets aimed at open ports in the host. For more
information, see “Configuring the Intrusion Prevention”, 216.
1.2.3 Application Management
SNMP Agent
The F-Secure SNMP Agent is a Windows NT SNMP extension agent,
which is loaded and unloaded with the master agent. The F-Secure
SNMP Agent offers a subset of Policy Manager functionality, and it is
meant primarily for alert and statistics monitoring.
Page 23

F-Secure Management Agent
The F-Secure Management Agent enforces the security policies set by
the administrator on the managed hosts. It acts as a central configuration
component on the hosts, and for example, interprets the policy files,
sends autoregistration requests and host status information to F-Secure
Policy Manager, and performs policy-based installations.
Cisco Network Admission Control (NAC) Support
F-Secure Corporation participates in the Network Admission Control
(NAC) collaboration led by Cisco Systems®. The Cisco NAC can be used
to restrict the network access of hosts that have too old virus definition
databases, or the antivirus or firewall module disabled. For more
information, see “Setting Up the Cisco NAC Plugin”, 250.
1.3 Introduction to F-Secure Policy Manager
This section contains a brief introduction to F-Secure Policy Manager. For
more information, see F-Secure Policy Manager Administrator’s Guide.
CHAPTER 1 23
F-Secure Policy Manager provides a scalable way to manage the security
of numerous applications on multiple operating systems from one central
location. It can be used to keep security software up-to-date, manage
configurations, and scaled to handle even the largest, most mobile
workforce.
F-Secure Policy Manager can be used for:
defining security policies
distributing security policies
installing application software to local and remote systems
monitoring the activities of all systems in the enterprise to ensure
compliance with corporate policies and centralized control.
When the system has been set up, you can see status information from
the entire managed domain in one single location. In this way it is very
easy to make sure that the entire domain is protected, and to modify the
Page 24

24
protection settings when necessary. You can also restrict the users from
making changes to the security settings, and be sure that the protection is
always up-to-date.
1.3.1 Main Components of F-Secure Policy Manager
The power of the F-Secure Policy Manager lays in the F-Secure
management architecture, which provides high scalability for a
distributed, mobile workforce.
F-Secure Policy Manager Console provides a centralized management
console for the security of the managed hosts in the network. It enables
the administrator to organize the network into logical units for sharing
policies. These policies are defined in F-Secure Policy Manager Console
and then distributed to the workstations through the F-Secure Policy
Manager Server. It can be used to remotely install F-Secure products on
other workstations without the need for any intervention by the end user.
F-Secure Policy Manager Console includes two different user interfaces:
Anti-Virus Mode user interface that is optimized for managing
F-Secure Client Security and F-Secure Anti-Virus for
Workstations. The Anti-Virus mode user interface is described in
this manual.
Advanced Mode user interface that can be used for managing
other F-Secure products. The Advance Mode user interface is
described in the Policy Manager Administrator’s Guide.
F-Secure Policy Manager Server is the repository for policies and
software packages distributed by the administrator, and status information
and alerts sent by the managed hosts. Communication between F-Secure
Policy Manager Server and the managed hosts is accomplished through
the standard HTTP protocol, which ensures trouble-free performance on
the LAN and WAN.
F-Secure Policy Manager Web Reporting is an enterprise-wide web
based graphical reporting system included in F-Secure Policy Manager
Server. With F-Secure Policy Manager Web Reporting you can quickly
Page 25

create graphical reports based on historical trend data, identify computers
that are unprotected or vulnerable to virus outbreaks. For more
information, see the F-Secure Policy Manager Administrator’s Guide.
F-Secure Policy Manager Update Server & Agent are used for
updating virus and spyware definitions on the managed hosts. F-Secure
Automatic Update Agent
updates and informational content without interrupting their work to wait
for files to download from the Web. It downloads files automatically in the
background using bandwidth not being used by other Internet
applications.
allows users to receive virus definition database
1.3.2 F-Secure Policy Manager Features
Software Distribution
Installation of F-Secure products on hosts from one central
location, and updating of executable files and data files, including
virus definitions updates.
CHAPTER 1 25
Configuration and Policy Management
Centralized configuration of security policies. The policies are
distributed from F-Secure Policy Manager Server to the user’s
workstation. Integrity of the policies is ensured through the use of
digital signatures.
Event Management
Reporting to the Event Viewer (local and remote logs), SNMP
agent, e-mail, and report files and creation of event statistics.
Performance Management
Statistics and performance data handling and reporting.
Page 26

26
Task Management
Management of virus scanning tasks and other operations.
1.4 Basic Terminology
Host
In this document it means a computer that is centrally managed with
F-Secure Policy Manager.
Policy
A security policy is a set of well-defined rules that regulate how sensitive
information and other resources are managed, protected, and distributed.
The management architecture of F-Secure software uses policies that are
centrally configured by the administrator for optimum control of security in
a corporate environment.
The information flow between F-Secure Policy Manager Console and the
hosts is accomplished by transferring policy files.
For more information on F-Secure Policy Manager Administrator’s Guide.
Policy domain
Policy domains are groups of hosts or subdomains that have a similar
security policy.
Policy inheritance
Policy inheritance simplifies the defining of a common policy. In F-Secure
Policy Manager Console, each policy domain automatically inherits the
settings of its parent domain, allowing for easy and efficient management
of large networks. The inherited settings may be overridden for individual
hosts or domains. When a domain's inherited settings are changed, the
changes are inherited by all of the domain’s hosts and subdomains.
Page 27

CHAPTER 1 27
The policy can be further refined for subdomains or even individual hosts.
The granularity of policy definitions can vary considerably among
installations. Some administrators might want to define only a few
different policies for large domains. Other administrators might attach
policies directly to each host, achieving the finest granularity.
Page 28

2
INSTALLING F-SECURE
P
OLICY MANAGER
Overview..................................................................................... 29
System Requirements ................................................................ 30
Installation Steps ........................................................................ 33
Uninstalling F-Secure Policy Manager ....................................... 55
28
Page 29

2.1 Overview
CHAPTER 2 29
This chapter contains
The system requirements for F-Secure Policy Manager Server
and F-Secure Policy Manager Console.
Instructions on how to install F-Secure Policy Manager Console
and Server on the same computer. The F-Secure Policy Manager
Console and Server setup is run from the F-Secure CD.
For information on alternative installation scenarios as well as the
server security issues, see chapters Installing F-Secure Policy
Manager Console and Installing F-Secure Policy Manager Server
in F-Secure Policy Manager Administrator’s Guide.
The F-Secure Policy Manager setup also installs F-Secure Policy
Manager Web Reporting, a component that is used to create
graphical reports in HTML format about the status of the managed
domain. For more information about the Web Reporting component,
see chapter ‘Web Reporting’ in F-Secure Policy Manager
Administrator’s Guide.
Page 30

30
2.2 System Requirements
2.2.1 F-Secure Policy Manager Server
In order to install F-Secure Policy Manager Server, your system must
meet the following minimum requirements:
Operating system: Microsoft Windows:
Microsoft Windows 2000 Server (SP 4 or
higher)
Windows 2003 Server (32- and 64-bit)
Windows 2008 Server (32- and 64-bit)
Linux:
Red Hat Enterprise Linux 3, 4 and 5
openSUSE Linux 10.3
SUSE Linux Enterprise Server 9 and 10
SUSE Linux Enterprise Desktop 10
Debian GNU Linux Etch 4.0
Ubuntu 8.04 Hardy
Processor: Intel Pentium III 450 MHz processor or faster.
Managing more than 5000 hosts or using Web
Reporting requires Intel Pentium III 1 GHz level
processor or faster.
Page 31

CHAPTER 2 31
Memory: 256 MB RAM
When Web Reporting is enabled, 512 MB
RAM.
Disk space: Disk space: 200 MB of free hard disk space;
500 MB or more is recommended. The disk
space requirements depend on the size of the
installation.
In addition to this it is recommended to allocate
about 1 MB per host for alerts and policies. The
actual disk space consumption per host is hard
to anticipate, since it depends on how the
policies are used and how many installation
packages are stored.
Network: 10 Mbit network. Managing more than 5000
hosts requires a 100 Mbit network.
Page 32

32
2.2.2 F-Secure Policy Manager Console
In order to install F-Secure Policy Manager Console, your system must
meet the following minimum requirements:
Operating system: Microsoft Windows:
Microsoft Windows 2000 Professional (SP4 or
higher)
Windows XP Professional (SP2 or higher)
Windows Vista (32- and 64-bit)
Windows 2000 Server SP4
Windows 2003 Server (32- and 64-bit).
Windows 2008 Server (32- and 64-bit).
Linux:
Red Hat Enterprise Linux 3, 4 and 5
openSUSE Linux 10.3
SUSE Linux Enterprise Server 9 and 10
SUSE Linux Enterprise Desktop 10
Debian GNU Linux Etch 4.0
Ubuntu 8.04 Hardy
Processor: Intel Pentium III 450 MHz processor or faster.
Managing more than 5000 hosts requires
Pentium III 750 MHz processor or faster.
Memory: 256 MB of RAM. Managing more than 5000
hosts requires 512 MB of memory.
Page 33

Disk space: 100 MB of free hard disk space.
Display: Minimum 256-color display with resolution of
Network: Ethernet network interface or equivalent.
2.3 Installation Steps
Step 1. 1. Insert the F-Secure CD in your CD-ROM drive.
2. Select Corporate Use. Click Next to continue.
3. Select F-Secure Policy Manager from the Install or Update
Management Software menu.
CHAPTER 2 33
1024x768 (32-bit color with 1280x960 or higher
resolution recommended).
10 Mbit network between console and server is
recommended. Managing more than 5000
hosts requires 100Mbit connection between
console and server.
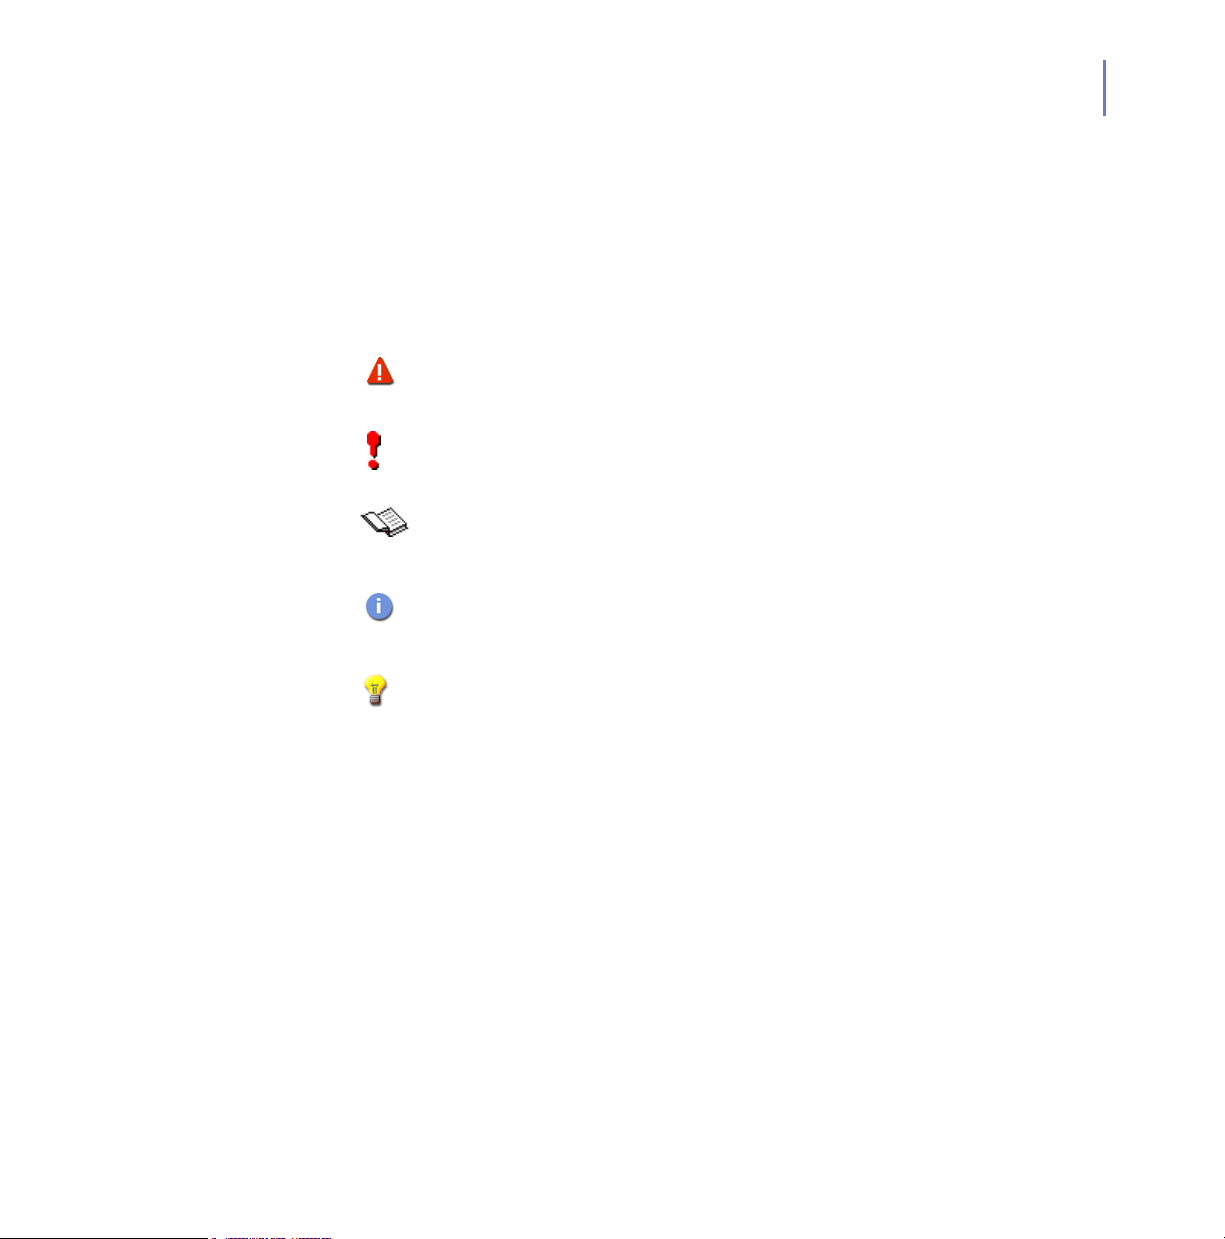
Step 2. View the Welcome screen, and follow the setup instructions. Then select
the installation language from the drop-down menu. Click Next to
continue.
Page 34
34
Page 35

CHAPTER 2 35
Step 3. Read the license agreement information. If you agree, select I accept this
agreement. Click Next to continue.
Page 36
36
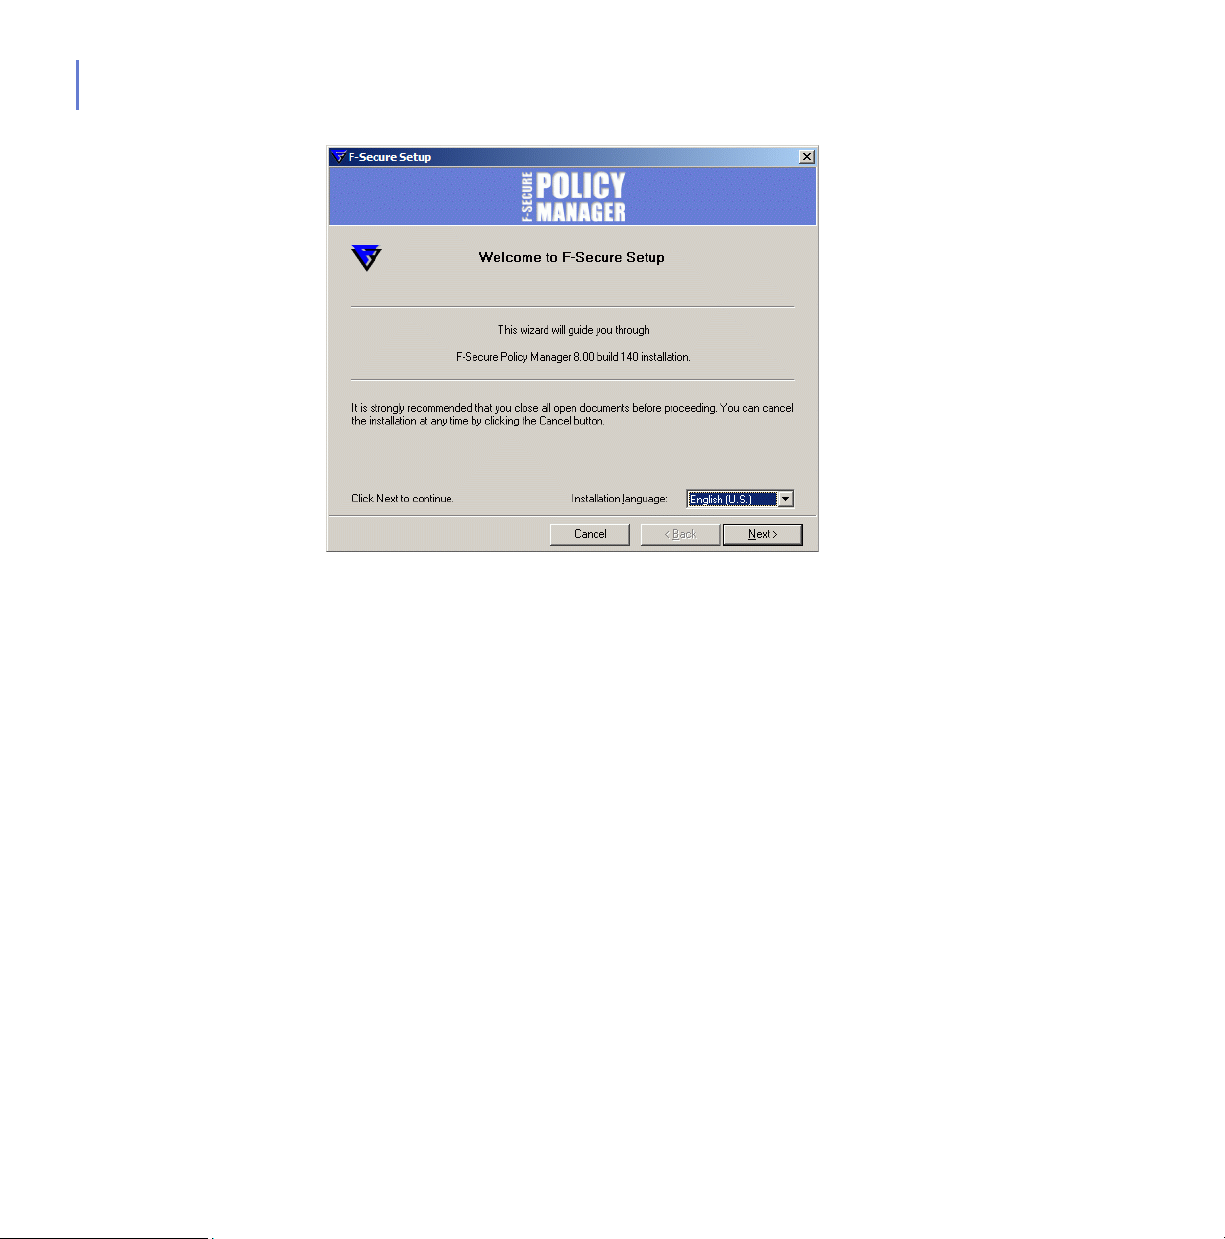
Step 4. Select the following components to be installed:
F-Secure Policy Manager Console
F-Secure Policy Manager Server
F-Secure Policy Manager Update Server & Agent
F-Secure Installation Packages
Click Next to continue.
Page 37
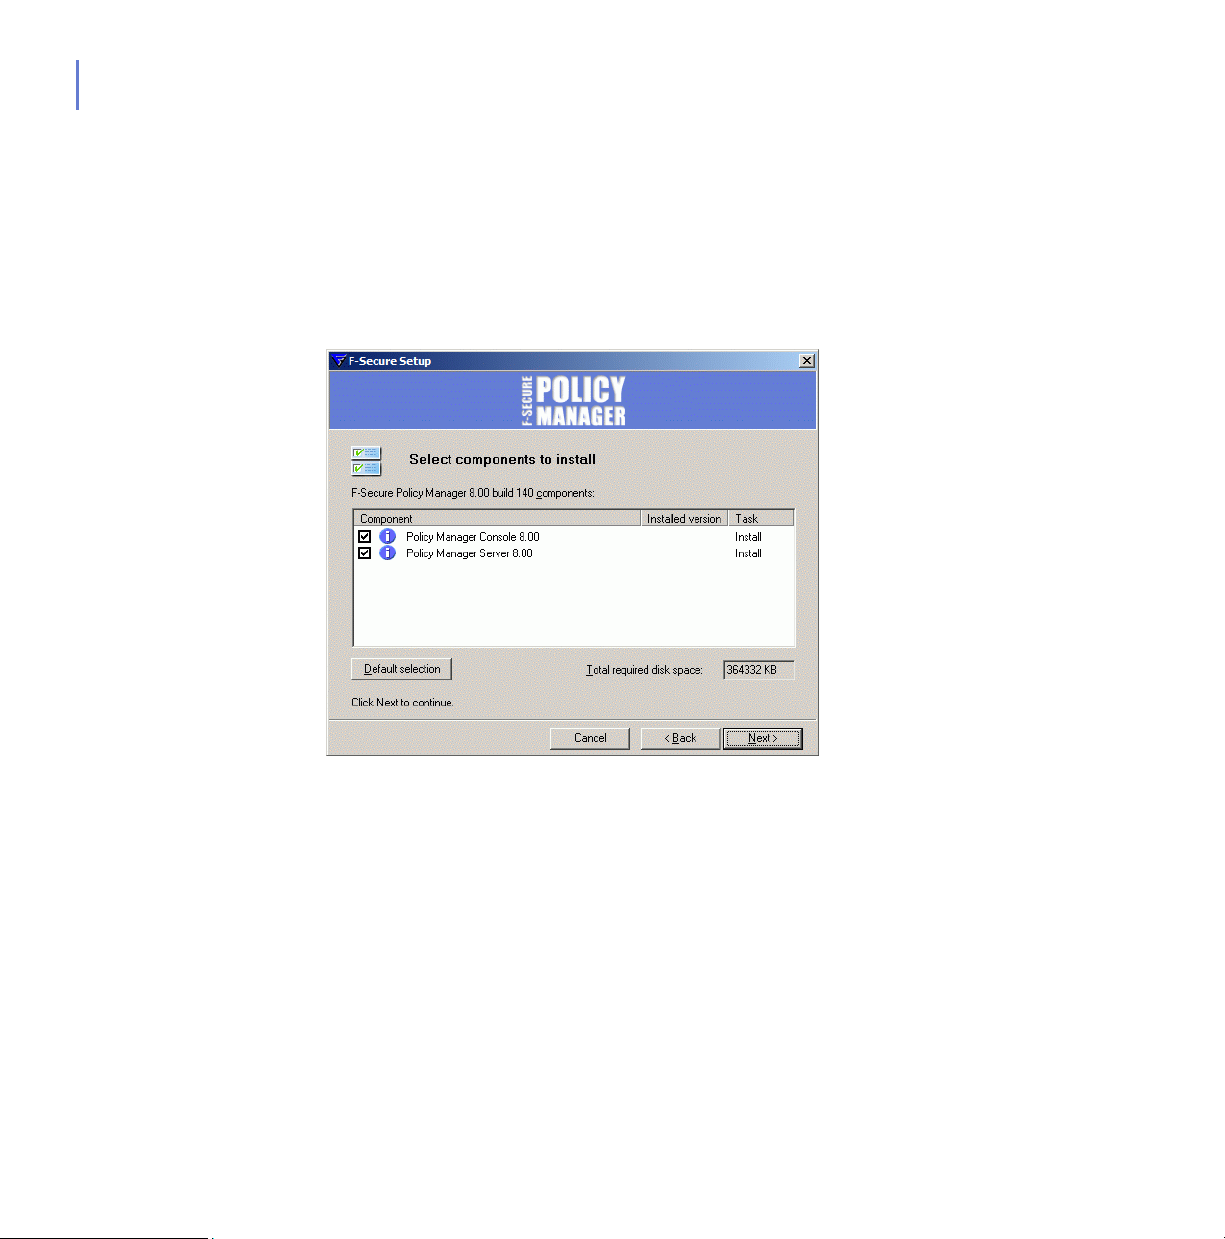
Step 5. Choose the destination folder.
It is recommended to use the default installation directory. Use the
Browse feature to install F-Secure Policy Manager in a different directory.
Click Next to continue.
CHAPTER 2 37
Page 38
38
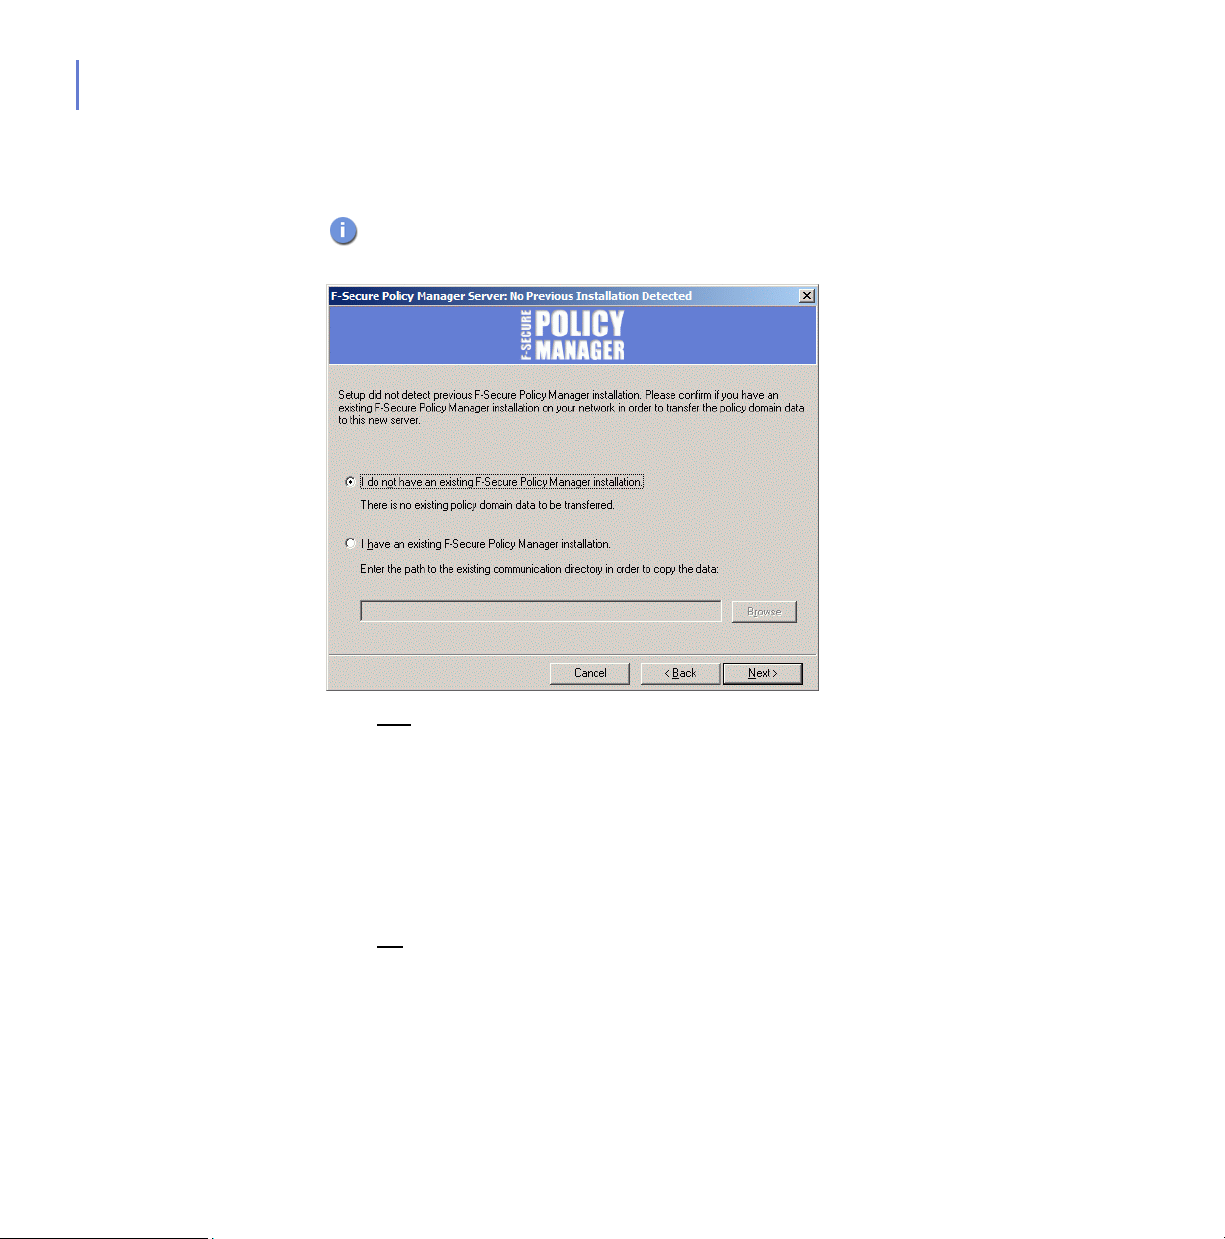
Step 6. Setup requests confirmation if a previous installation of F-Secure Policy
Manager exists.
This dialog is displayed only if the setup did not detect a previous
F-Secure Policy Manager Server installation on the computer.
1. If Yes
2. If No
Click Next to continue.
, select I have existing F-Secure Policy Manager installation.
Enter the communication directory path of the installed F-Secure
Policy Manager. The contents of this directory will be copied under
<server installation directory>\ Communication Directory (commdir\
directory under F-Secure Policy Manager Server installation
directory), and this will be the directory that F-Secure Policy Manager
Server will use as a repository. You can use the previous commdir as
a backup, or you can delete it once you have verified that F-Secure
Policy Manager Server is correctly installed.
, select I do not have existing F-Secure Policy Manager.
This will not require a pre-existing commdir, and will create an empty
commdir in the default location (under <F-Secure Policy Manager 5
installation directory>\commdir).
Page 39

CHAPTER 2 39
Step 7. Select whether you want to keep the existing settings or change them.
This dialog is displayed only if a previous installation of F-Secure
Policy Manager Server was detected on the computer.
By default the setup keeps the existing settings. Select this option
if you have manually updated the F-Secure Policy Manager
Server configuration file (HTTPD.conf). This option automatically
keeps the existing administration, host and web reporting ports.
If you want to change the ports from the previous installation,
select the Change settings option. This option overwrites the
HTTPD.conf file, and restores the settings to defaults.
Click Next to continue.
Page 40

40
Step 8. Select the F-Secure Policy Manager Server modules to enable:
Host module is used for communication with the hosts. The
default port is 80.
Administration module is used for communication with F-Secure
Policy Manager Console. The default HTTP port is 8080.
If you want to change the default port for communication,
you will also need to change the HTTP Port Number setting
in F-Secure Policy Manager Console.
By default the access to the Administration module is restricted to
the local machine. This is the most secure way to use the
product.
When using a connection over a network, please consider
securing the communication with F-Secure SSH.
For environments requiring maximum security, see section
Installing F-Secure Policy Manager in High Security
Environments in F-Secure Policy Manager Administrator’s
Guide.
Web Reporting module is used for communication with F-Secure
Policy Manager Web Reporting. Select whether it should be
enabled. Web Reporting uses a local socket connection to the
Admin module to fetch server data. The default port is 8081.
By default access to Web Reports is allowed also from other
computers. If you want to allow access only from this computer,
select Restrict access to the local machine.
Page 41

Click Next to continue.
CHAPTER 2 41
Page 42

42
Step 9. Specify F-Secure Policy Manager Server address, and Administration
port number. Click Next to continue.
Depending on the installation method, this window is not always
displayed
Page 43

CHAPTER 2 43
Step 10. Select to add product installation package(s) from the list of available
packages (if you selected F-Secure Installation Packages in Step 4. , 36).
Click Next.
Page 44

44
Step 11. Review the changes that setup is about to make. Click Start to start the
installation.
Page 45

CHAPTER 2 45
Step 12. When the setup is completed, the setup shows whether all components
were installed successfully.
Page 46

46
Step 13. Click Finish to complete the F-Secure Policy Manager Server installation.
After this you should run the F-Secure Policy Manager Console for the fist
time.
Page 47

CHAPTER 2 47
Step 14. It is important to run F-Secure Policy Manager Console after the setup,
because some connection properties will be collected during the initial
console startup.
You can find the shortcut from Start
Manager Console
Policy Manager Console is run for the first time, the Console Setup
Wizard collects the information needed to create an initial connection to
the server.
The first page of F-Secure Policy Manager Console setup wizard
summarizes the installation process. Click Next to continue.
ÆF-Secure Policy Manager Console. When F-Secure
ÆProgramsÆF-Secure Policy
Page 48

48
Step 15. Select your user mode according to your needs:
Administrator mode - enables all administrator features.
Read-Only mode - allows you to view administrator data, but no
changes can be made. If you select Read-only mode, you will not
be able to administer hosts. To change to Administrator mode,
you will need the admin.pub and admin.prv administration keys. If
they do not exist yet, they will be created later on in the setup
process.
Click Next to continue.
Page 49

CHAPTER 2 49
Step 16. Enter the address of the F-Secure Policy Manager Server that is used for
communicating with the managed hosts.
Page 50

50
Step 17. Enter the path where the administrator’s public key and private key files
will be stored. By default, key files are stored in the F-Secure Policy
Manager Console installation directory:
Program Files\F-Secure\Administrator.
Click Next to continue.
If the key-pair does not exist already, it will be created later in the
setup process.
Page 51
CHAPTER 2 51
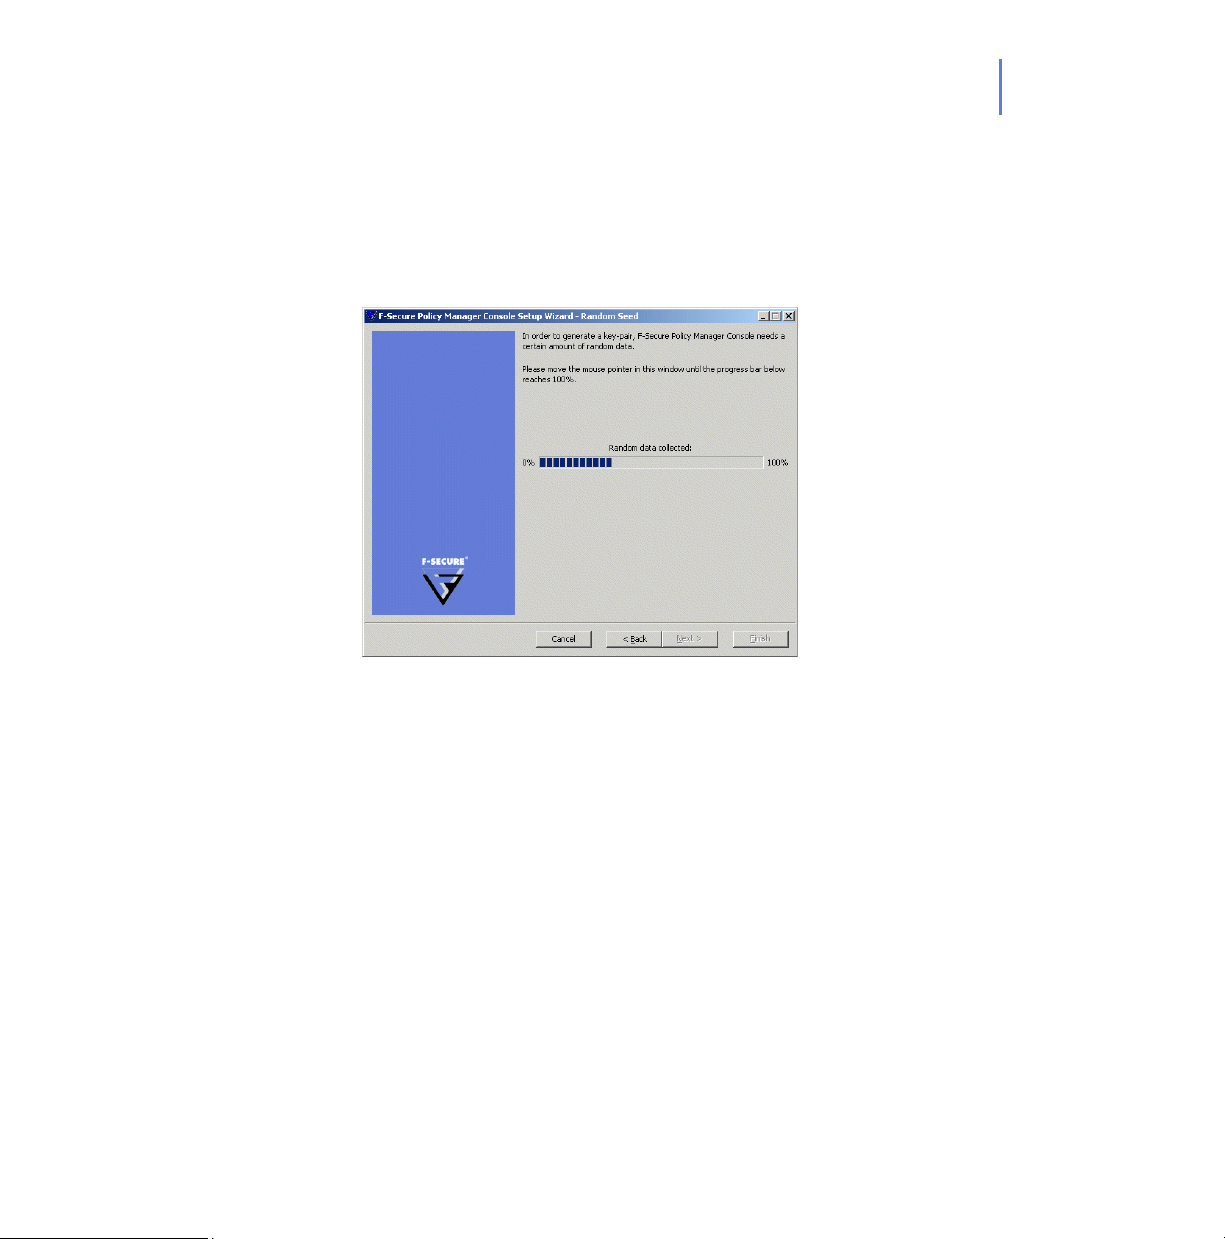
Step 18. Move your mouse cursor around in the window to initialize the random
seed used by the management key-pair generator. Using the path of the
mouse movement ensures that the seed number for the key-pair
generation algorithm has enough randomness. When the progress
indicator has reached 100%, the Passphrase dialog box will open
automatically.
Page 52

52
Step 19. Enter a passphrase, which will secure your private management key.
Re-enter your passphrase in the Confirm Passphrase field. Click Next.
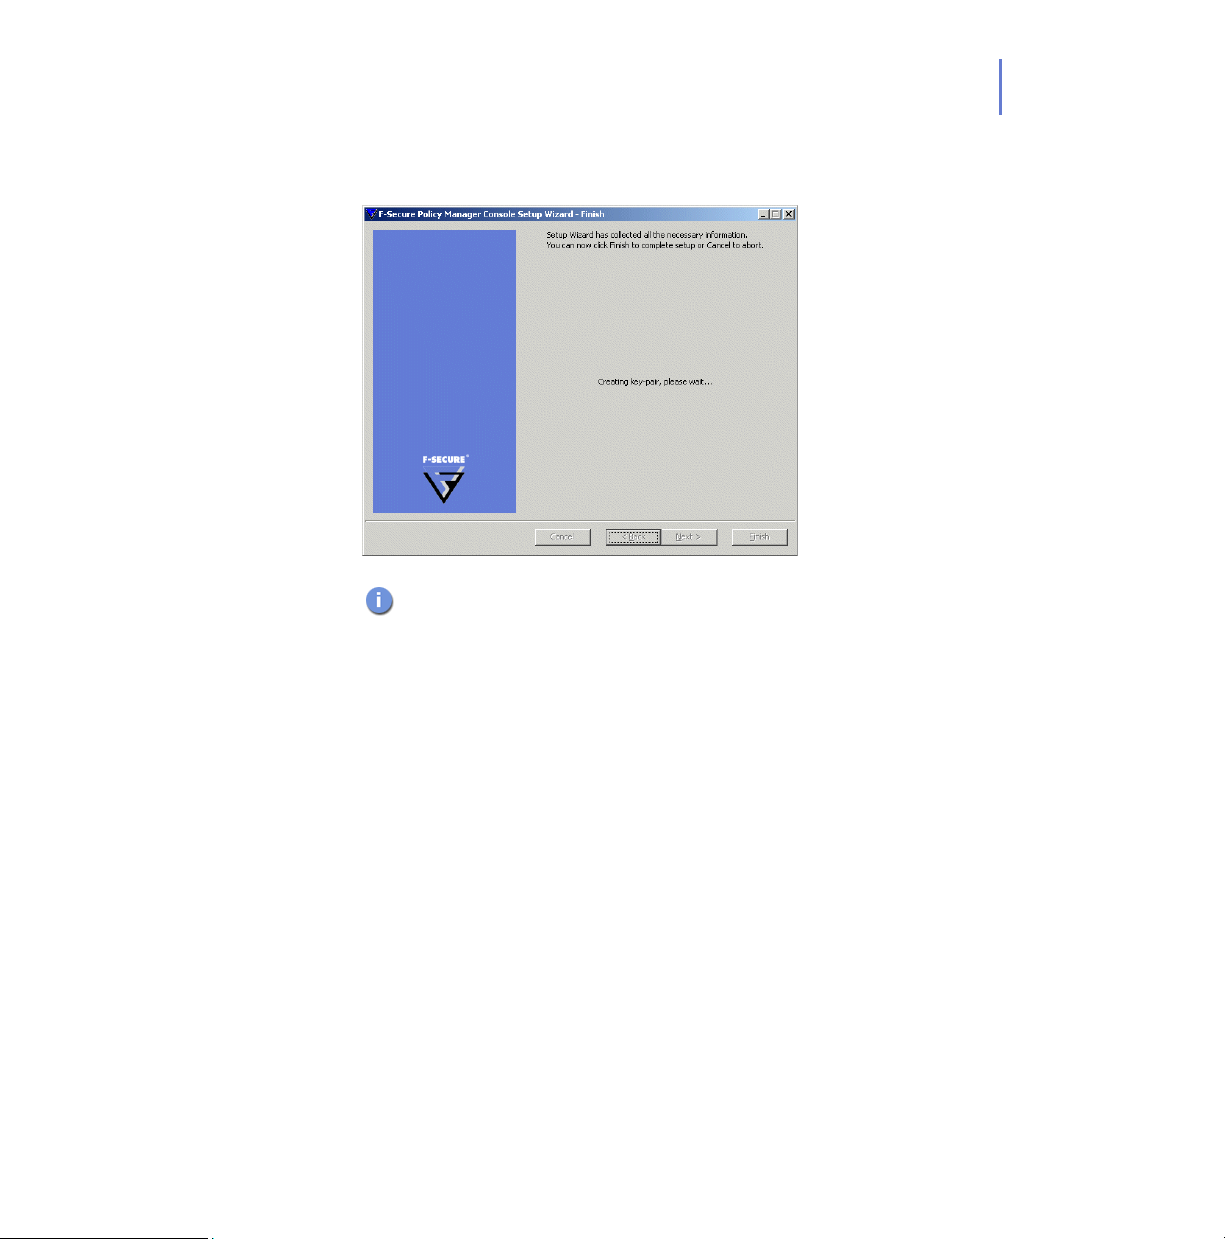
Step 20. Click Finish to complete the setup process.
Page 53
CHAPTER 2 53
F-Secure Policy Manager Console will generate the management
key-pair.
For information on backing up the admin.pub key, see chapter
Maintaining F-Secure Policy Manager Server in F-Secure Policy
Manager Administrator’s Guide.
Step 21. The setup wizard creates the user group FSPM users. The user who was
logged in and ran the installer is automatically added to this group. To
allow another user to run F-Secure Policy Manager you must manually
add this user to the user group FSPM users.
Page 54
54
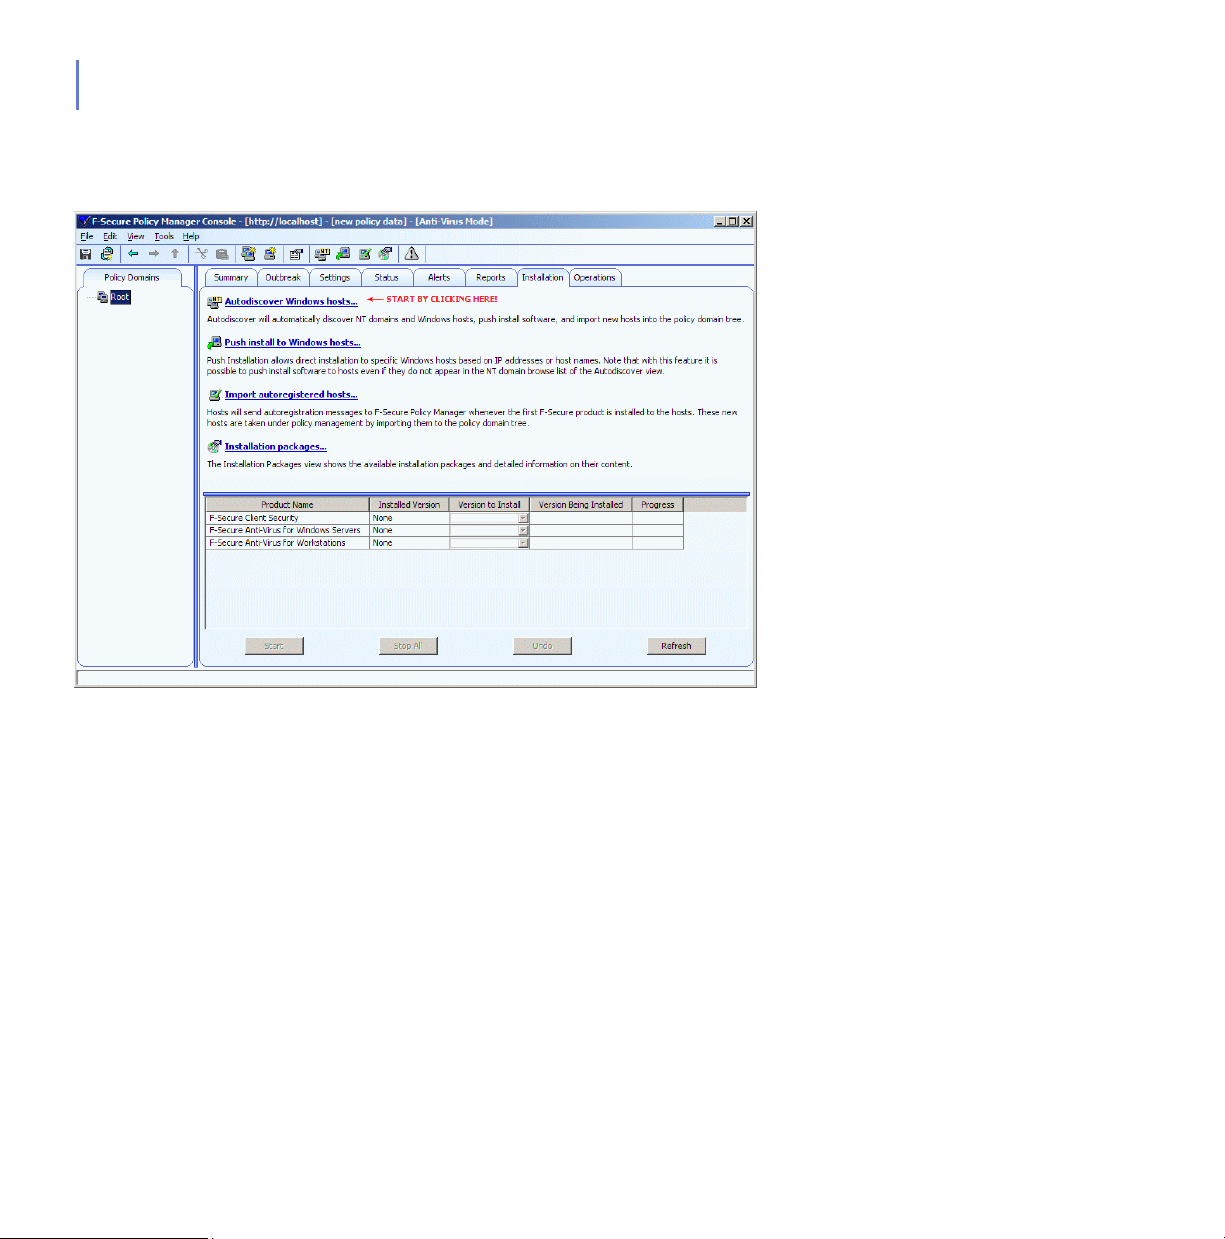
Step 22. After the key-pair is generated, F-Secure Policy Manager Console will
start.
From here, it is possible to continue by creating policy domains and
installing hosts. For more information, see “Creating the Domain
Structure”, 128 and “Adding Hosts”, 130.
If you decide to exit from F-Secure Policy Manager Console, and want to
login again later, see “Logging in for the First Time”, 124.
If you want to familiarize yourself with the F-Secure Policy Manager
Console user interface, see “Introduction to F-Secure Policy Manager
Anti-Virus Mode User Interface”, 56.
Page 55

Changing the Web Browser Path
The F-Secure Policy Manager Console acquires the file path to the
default Web browser during setup. If you want to change the Web
browser path, open the Too ls menu, and select Preferences.
Select the Locations tab and enter the new file path.
2.4 Uninstalling F-Secure Policy Manager
To uninstall F-Secure Policy Manager Console and Server (or other
F-Secure Policy Manager components), follow these steps:
1. Open the Windows Start menu and go to Control Panel. Select Add/
Remove Programs.
2. Select the component you want to uninstall (F-Secure Policy
Manager Console or Server), and click the Add/Remove button.
3. The F-Secure Uninstall dialog box appears. Click Start to begin
uninstallation.
4. When the uninstallation is complete, click Close.
5. Repeat steps 2-4, if you want to uninstall other F-Secure Policy
Manager components.
6. When you have uninstalled the components, exit Add/Remove
Programs.
7. It is recommended to reboot your computer after the uninstallation.
Rebooting is necessary to clean up the files remaining on your
computer after the uninstallation, and before the subsequent
installations of the same F-Secure products.
CHAPTER 2 55
Page 56

INTRODUCTION TO
3
F-S
M
M
Overview..................................................................................... 57
Policy Domains Tab .................................................................... 58
Management Tabs ...................................................................... 58
Toolbar...................................................................................... 114
Menu Commands ..................................................................... 115
Settings Inheritance.................................................................. 118
ECURE POLICY
ANAGER ANTI-VIRUS
ODE USER INTERFACE
56
Page 57

3.1 Overview
CHAPTER 3 57
This section introduces the F-Secure Policy Manager Anti-Virus Mode
user interface. It also describes some generic features and visual
elements used throughout the user interface to indicate how the settings
inheritance works.
F-Secure Policy Manager also includes another user interface, the
Advanced Mode user interface. It is used to manage products other
than F-Secure Client Security and F-Secure Anti-Virus for
Workstations and Servers. It is also used when you need to change
F-Secure Client Security advanced settings. You can switch
between the modes by selecting Advanced Mode or Anti-Virus
Mode in the View menu. For more information on the Advanced
Mode user interface, see F-Secure Policy Manager Administrator’s
Guide.
The main components of the F-Secure Policy Manager Anti-Virus Mode
user interface are:
Policy Domains tab that displays the structure of the managed
policy domains
The management tabs: Summary, Outbreak, Settings, Status,
Alerts, Reports, Installation and Operations that can be used for
configuring and monitoring F-Secure Client Security installed on
hosts as well as for carrying out operations.
Message View at the bottom of the window that displays
informative messages from the Policy Manager, for example,
when the virus definitions on the server have been updated.
Page 58

58
3.2 Policy Domains Tab
In the Policy Domains tab, you can do the following:
Add a new policy domain by clicking the icon, which is
located on the toolbar. A new policy domain can be created only
when a parent domain is selected.
Add a new host by clicking the icon.
Find a host.
View the properties of a domain or host. All hosts and domains
should be given unambiguous names.
Import autoregistered hosts.
Autodiscover hosts from a Windows domain.
Delete hosts or domains.
Move hosts or domains, using cut and paste operations.
Export a policy file.
After selecting a domain or host, you can access the above options from
the Edit menu or by right-clicking the selected host or domain. The
Autodiscover and Import autoregistered hosts operations are also
available on the Installation tab.
The domains referred to in the commands are not Windows NT or
DNS domains. Policy domains are groups of hosts or subdomains
that have a similar security policy.
3.3 Management Tabs
This section describes the management tabs (Summary, Outbreak,
Settings, Status, Alerts, Reports, Installation and Operations), and the
different pages on each of these tabs.
Page 59

3.3.1 Summary Tab
CHAPTER 3 59
Figure 3-1 Summary Tab
The Summary tab is designed to display the most important information
concerning the selected domain(s) or host(s) at a glance. When a domain
is selected, the Summary tab displays information about the whole
domain. When a single host is selected, you can see more detailed
information concerning the host.
Page 60

60
If some of the settings displayed on the Summary tab require your
immediate attention or action, an icon is displayed beside the setting. The
icons can be interpreted as follows:
Warns of an error situation that requires your
action. The error cannot be fixed automatically.
The icon is displayed, for example, when the
latest policies have not been distributed, or
when virus definitions on hosts are outdated
Warns of a situation that may require your
action. This does not create security problems
yet, but it may lead to a security problem later on
if the problem is not fixed now. The icon is
displayed, for example, when there are
disconnected hosts.
For more information on how the Summary tab can be used for checking
quickly that the domain is protected, see “How to Check that the
Environment is Protected”, 220.
The information displayed on the Summary tab depends on what is
selected in the Policy Domains tab:
When a domain is selected, the Summary tab displays
information divided into the following sections: Policy Manager,
Domain, Virus Protection for Workstations, and Internet Shield.
When a host is selected, the sections are: Policy Manager, Host,
Virus Protection and Internet Shield.
These sections are described in detail below.
Summary Tab When a Domain is Selected
When a domain is selected in the Policy Domains tab, the following
information is displayed on the Summary tab:
Page 61

CHAPTER 3 61
Policy Manager
Figure 3-2 Policy Manager related information on Summary Tab
In the Policy Manager section you can:
See the current Policy distribution status (saved/unsaved,
distributed/undistributed), and when necessary, save the policy
data and distribute the new policies to hosts.
See the status of the virus definitions on the server.
See the status of the spyware definitions on the server.
See the status of System Control updates on the server.
See the number of new autoregistered hosts. If there are new
hosts, you can add them to the domain by clicking Add these
hosts to a domain....
Autodiscover hosts from a Windows domain by clicking
Autodiscover Windows hosts...
.
Page 62

62
Domain
Figure 3-3 Domain related information on Summary Tab
In the Domain section you can:
See the number hosts that have the latest policy and access a
summary of their latest policy update by clicking View hosts’s
latest policy update.... This takes you to the Status tab and
Centralized Management page.
See the number of disconnected hosts. You can also access a
detailed list displaying the hosts’ connection status by clicking
View disconnected hosts...
Centralized Management page.
See a summary of new alerts. If you want to get more detailed
information on the alerts, you can click on View alerts by
severity... link to access the Alerts tab.
, which takes you to the Status tab and
The severity of the alerts is indicated by the following icons:
Info. Normal operating information from a host.
Warning. A warning from the host.
Error. Recoverable error on the host.
Fatal error. Unrecoverable error on the host.
Page 63

CHAPTER 3 63
Security
alert.
Security hazard on the host.
Virus Protection for Workstations
Figure 3-4 Virus Protection related information on Summary tab
In the Virus Protection for Workstations section you can:
See how many hosts in the domain have Virus Protection
installed.
See how many hosts in the domain have Real-Time Scanning
enabled. If you want to see which hosts have it enabled and
which do not, click View hosts’ overall protection...
more detailed information on the Status tab and Overall
Protection page.
See how many infections have been found in the domain. If you
want to see host specific infection information, click View hosts’
infection status... to access the Status tab and Overall Protection
page.
See how many of the hosts have the latest virus definitions and
whether the virus definitions on some hosts are recent or
outdated.
to access
Recent means that the virus definitions are not the latest
ones.
Outdated means that the virus definitions are older than the
configured time limit.
If you have F-Secure Anti-Virus 5.40 installed on some hosts, the
virus definitions version on these hosts is displayed as ‘unknown’.
Page 64

64
If you need to update the virus definitions on some hosts, click
Update virus definitions...
that takes you to the Operations tab.
Internet Shield
Figure 3-5 Internet Shield related information on Summary tab
In the Internet Shield section you can:
See how many hosts in the domain have Internet Shield installed.
See what is the most common latest attack and how many
percents of the domain has been affected. If you want to get more
detailed information on the latest attacks, you can click View
Internet Shield Status... to access the Status tab and Internet
Shield page.
Summary Tab When a Host is Selected
When a host is selected in the Policy Domains tab, the Summary tab
displays more detailed information in the Host section:
Host
Figure 3-6 Host related data on Summary tab
Page 65

CHAPTER 3 65
In the Host section you can:
See the name of the selected host displayed beside Computer
identity. You can also access more detailed information on the
host by clicking View host properties...
. This takes you to the
Status tab and Host Properties page.
See what is the active protocol (HTTP or File Sharing), the
address of the Policy Manager Server the host is connected to
and the date and time of the last connection.
See whether the policy file the host is using is the latest or not the
latest one.
See whether the host is disconnected or not.
See a summary of new alerts. If you want to get more detailed
information on the alerts, click on View alerts by severity...
to
access the Alerts tab.
Virus Protection for Workstations
In addition to the information described in “Virus Protection for
Workstations”, 63, the Virus Protection for Workstations section also
displays the virus definitions version number.
Internet Shield
In addition to the information described in “Internet Shield”, 64, the
Internet Shield section also displays the currently selected Internet Shield
security level at host.
Page 66

66
3.3.2 Outbreak Tab
Figure 3-7 Outbreak Tab
The Security News section shows security news from F-Secure. Security
news are usually news about new virus outbreaks, and they state the
virus definitions version required on the hosts to protect against this new
virus outbreak. They can also be more generic news about security
threats.
Page 67

CHAPTER 3 67
The Security News section shows you how many of your hosts are
protected, and whether protection is available on the Policy Manager
Server. If protection is not currently available, the Policy Manager Server
will automatically download it from F-Secure when it is available.
The security news show the alert level of the security threat:
Level Description
1 Highest level alert. Worldwide epidemic of a
serious new virus.
2 New virus causing large infections. Might be
local to a specific region.
3 New virus technique or platform found. Not
necessarily in the wild
[no number] There is no current alert for this virus.
In the Security News Details section you can see the details about the
selected virus news. You can obtain even more details with your web
browser by clicking the provided link.
Page 68

68
The table in the Security News Details section lists all the hosts in the
currently selected domain. For each host the following information is
provided:
The Protected column shows if the host is protected against the
virus referred to by the currently selected virus news.
The Disconnected column shows whether the host is currently
connected or disconnected.
The Virus Definitions Version, Virus Definitions Updated, and
Latest Connection to Server show more information related to the
automatic updates.
Update delta is the time between the last virus definitions update
on the host and the last time the host has sent statistics to
F-Secure Policy Manager.
Note that some columns may be hidden. To show hidden columns
right-click on a column heading.
If a host is disconnected, it means it is probably turned off. If such hosts
are displayed as unprotected, you can most likely ignore them since they
will automatically update the virus and spyware definitions once they are
turned on.
Update delta tells you how well the host's automatic updates were
functioning when the host sent statistics to the F-Secure Policy Manager
Server last time. If you have a host that is displayed as unprotected, but
has a small value in the update delta column, the host is most likely ok
and can be ignored.
3.3.3 Settings Tab
The Settings tab contains 12 different pages that are used for configuring
the components of F-Secure Client Security. They are described briefly
below. You can find more details about the values you can select on each
page as well as practical configuration examples in “Configuring Virus
and Spyware Protection”, 157 and “Configuring Internet Shield”, 192.
Page 69
CHAPTER 3 69
For more information on the lock symbols and other items displayed on all
Settings pages, see “Settings Inheritance”, 118.
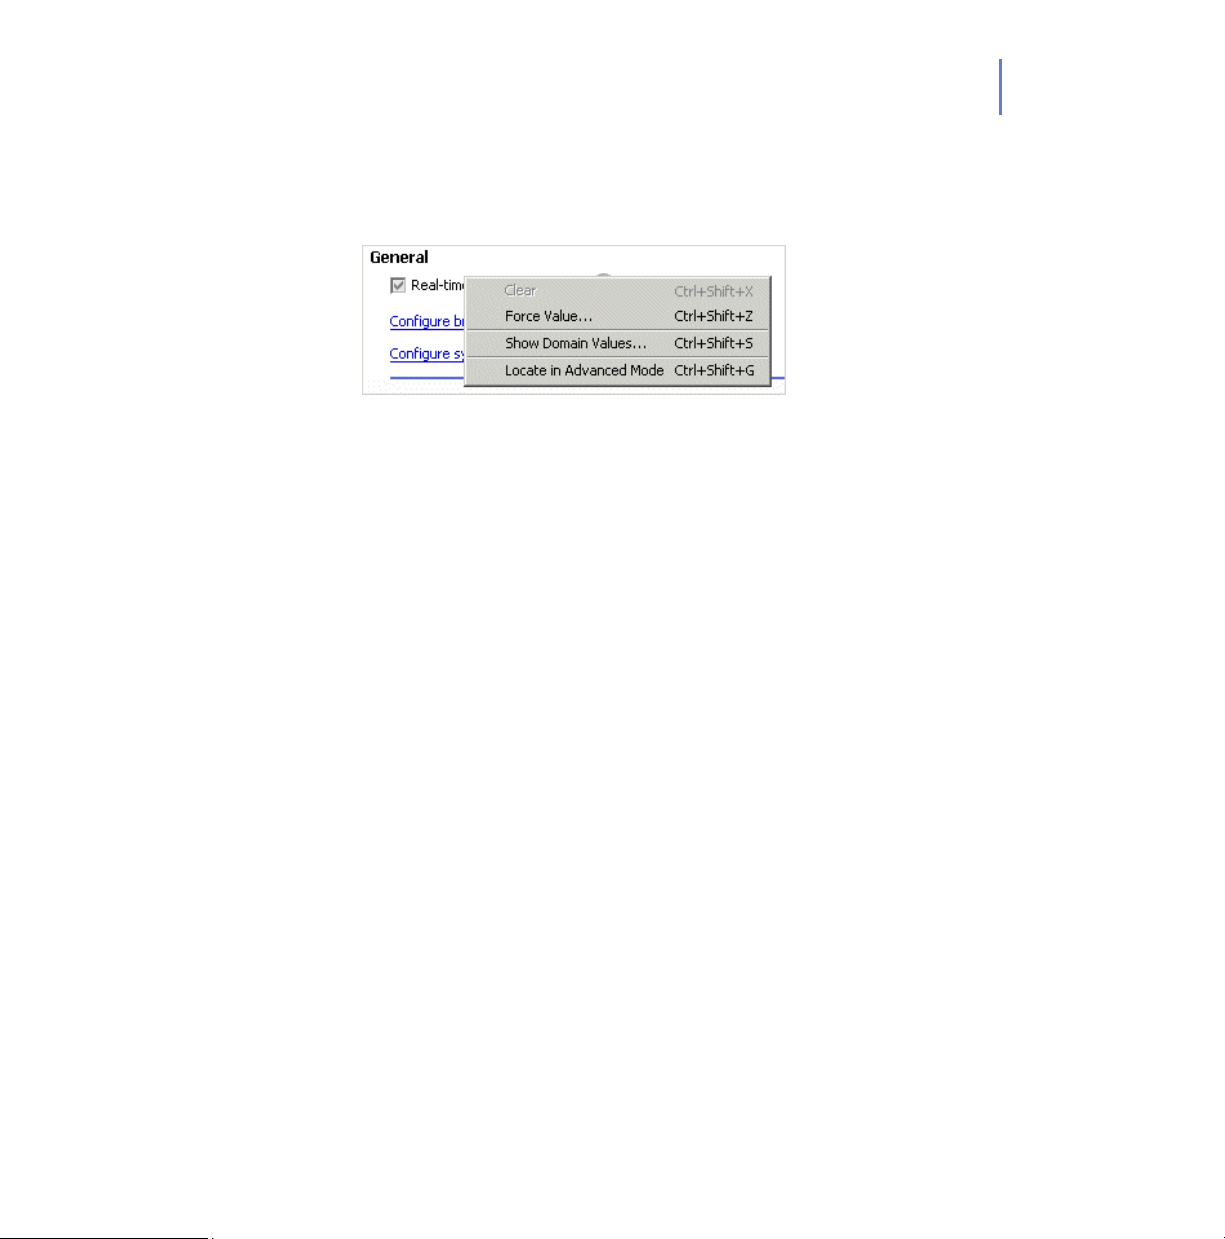
Context Menu on Settings Pages
By right-clicking any setting on a Settings tab page you can access a
context menu that contains the following options:
Clear This option clears a setting that has been
redefined on the current level.
Force Value The Force Value menu item is available only
when a Policy Domain is selected. You can
enforce the current domain setting to also be
active in all subdomains and hosts. In practice,
this operation clears the corresponding setting
in all subdomains and hosts below the current
domain, enabling the inheritance of the current
value to all subdomains and hosts. Use this
menu entry cautiously: all values defined in the
subdomain or hosts under the selected domain
are discarded, and cannot be restored.
Page 70

70
Show Domain
Values
Locate in Advanced
Mode
The Show Domain Values menu item is
available only when a Policy Domain is
selected. You can view a list of all policy
domains and hosts below the selected policy
domain, together with the value of the selected
field.
Click any domain or host name to quickly
select the domain or host on the Policy
Domains tab. It is possible to open more than
one Domain Value dialog simultaneously.
This option is for advanced users. It takes you
to the Advanced Mode user interface and
selects the setting there.
Page 71
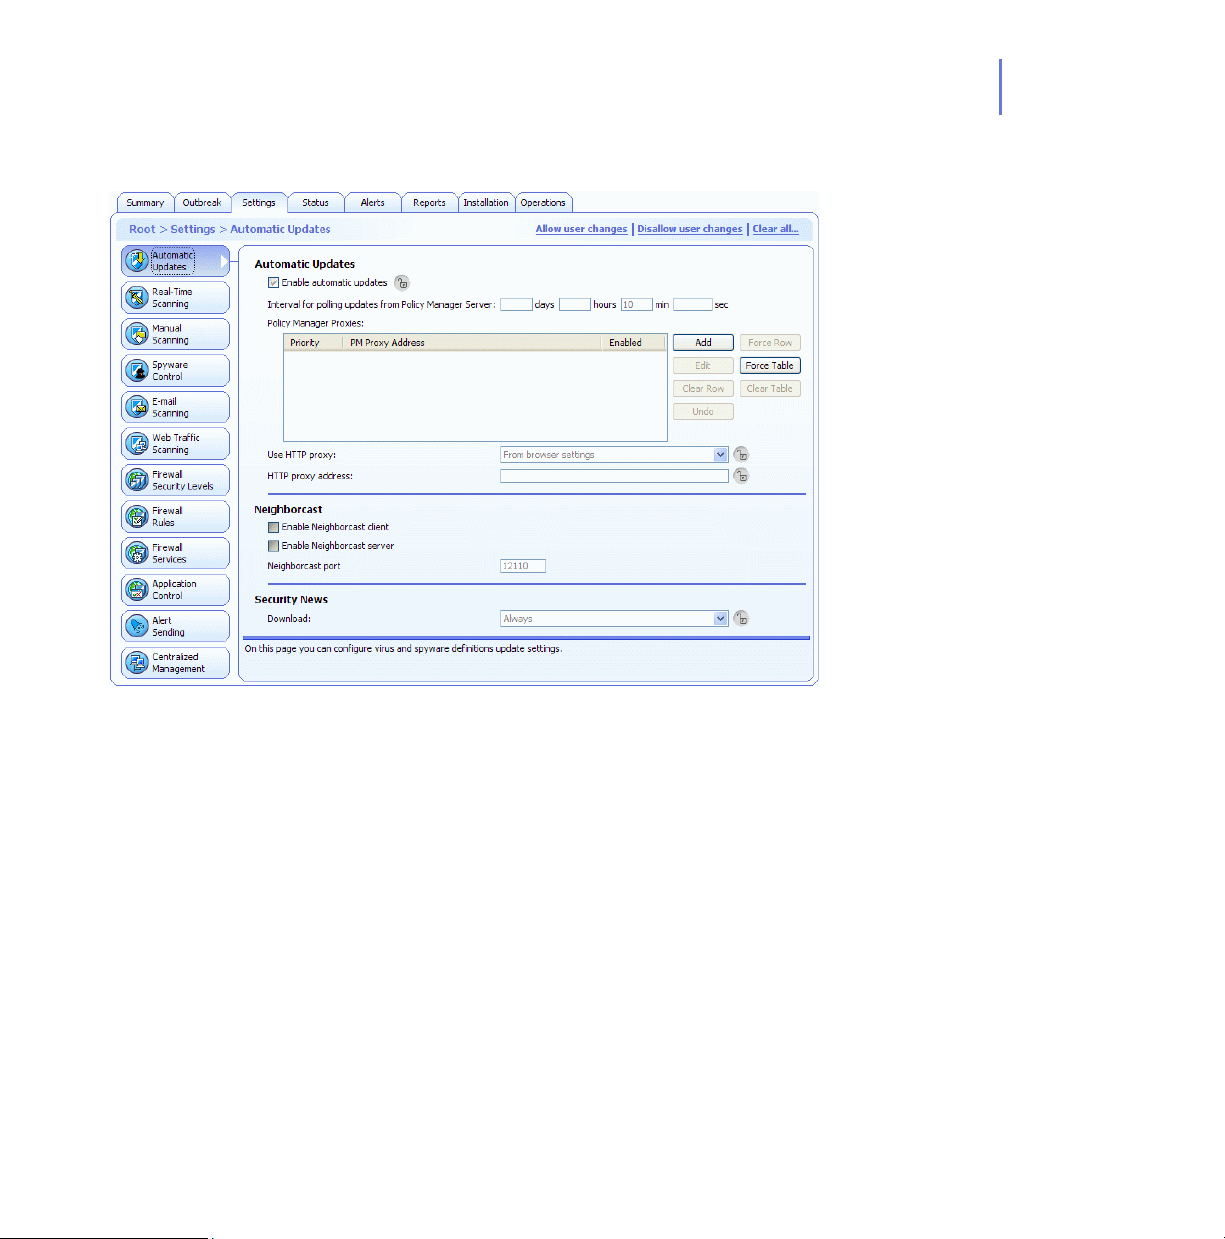
Automatic Updates
CHAPTER 3 71
Figure 3-8 Settings > Automatic Updates Tab
Automatic Updates
In the Automatic Updates section you can:
Enable or disable automatic updates. Note that deselecting this
setting disables all ways for the host to get automatic updates.
Specify the time interval for polling updates from F-Secure Policy
Manager Server.
Page 72

72
See a list of Policy Manager Proxy Servers. You can also add
new servers on the list, delete servers from the list and edit their
addresses and priorities.
Select whether an HTTP Proxy can be used and specify the
HTTP Proxy address.
Select whether clients should download updates from each other
in addition to any servers or proxies.
Neighborcast
Neighborcast allows clients to download updates from each other as well
as from any available servers or proxies. In this section you can:
Set a client to serve updates to other clients.
Set a client to download updates from other clients serving
updates.
Choose the port to use.
Security News
In the Security News section you can select if the client should security
news items or not.
For configuration examples and more information, see “Configuring
Automatic Updates”, 159.
Page 73
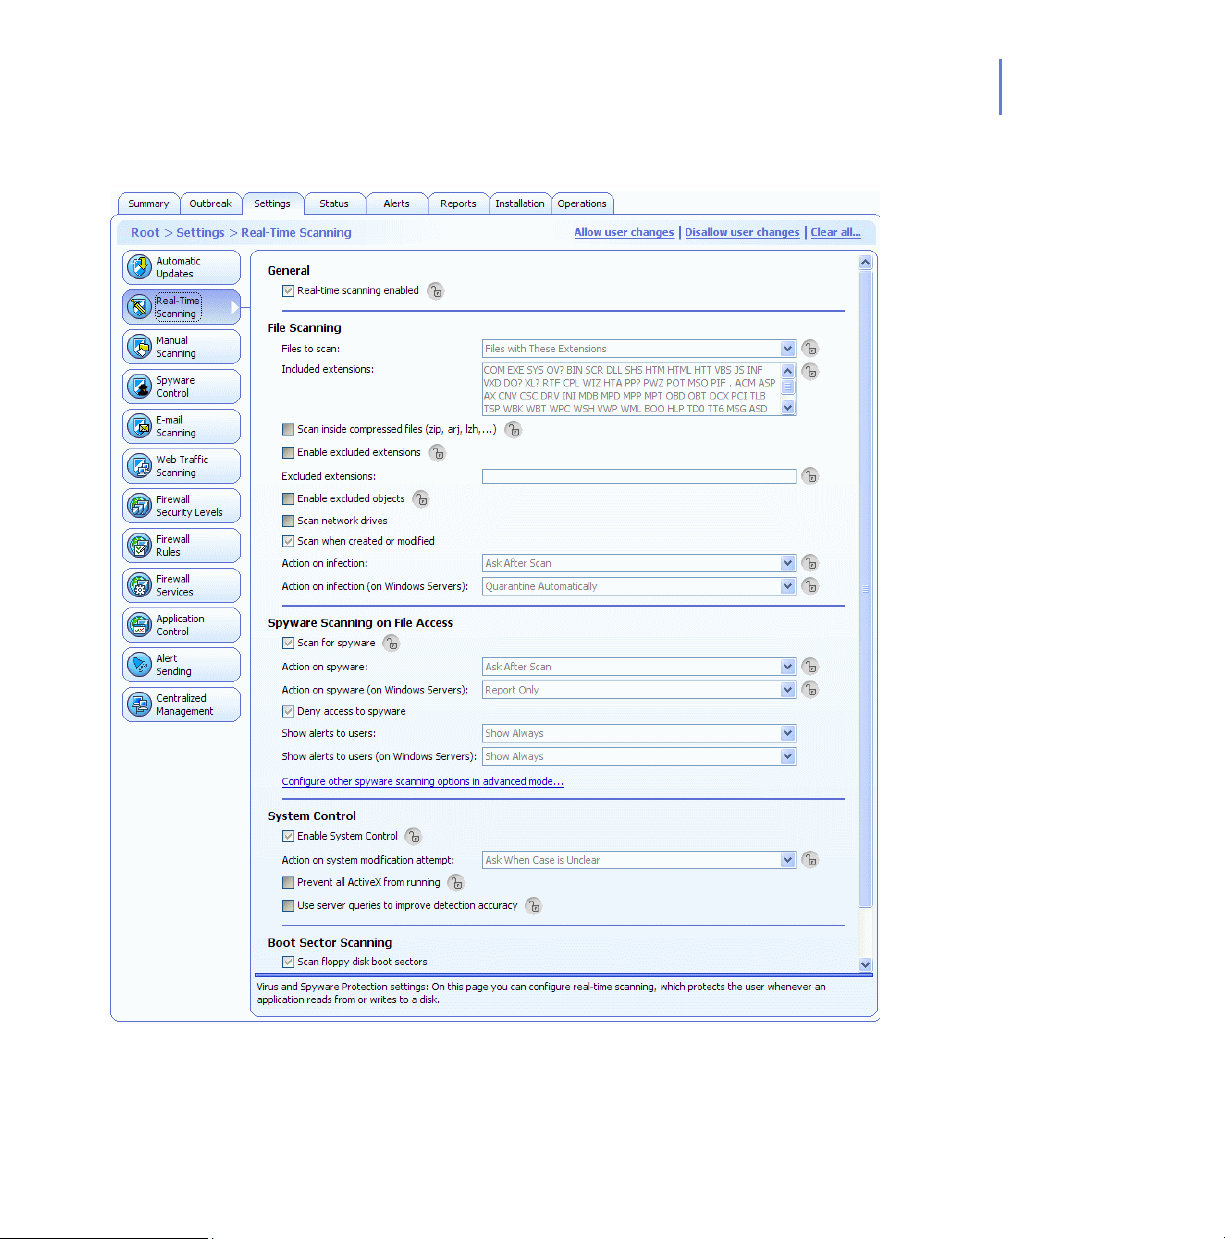
Real-Time Scanning
CHAPTER 3 73
Figure 3-9 Settings > Real-Time Scanning page
Page 74

74
General
In the General section you can Enable or disable real-time scanning.
File Scanning
In the Files to Scan section you can:
Select which files will be scanned and define the included
extensions.
Select whether real-time scanning is executed also inside
compressed files.
Select whether certain extensions will be excluded from the scan
and define what they are.
Select whether the users can exclude objects from real-time
scanning.
Select whether network drives are included in real-time scanning.
Select whether files are scanned when they are created or
modified.
Define what is the action to take when an infected file is found.
For configuration examples, explanation of the Action on infection options
and more information, see “Configuring Real-Time Scanning”, 164
Spyware Scanning on File Access
In the Spyware Scanning on File Access section you can:
Enable or disable real-time scanning for spyware.
Select what is the action to take when spyware is found.
Deny or allow access to spyware.
Select whether alerts of detected spyware are shown to users.
Access other spyware scanning options by clicking the
Configure other spyware options in advanced mode
For configuration examples, explanation of the Action on spyware options
and more information, see “Configuring Spyware Scanning”, 179.
link.
Page 75

CHAPTER 3 75
System Control
In the System Control section you can:
Enable or disable System Control.
Select what is the action to take when a system modification
attempt is detected.
Select whether ActiveX is prevented from running on the
managed hosts.
Select whether to query a remote server to improve detection
accuracy.
For configuration example, explanation of the Action on system
modification attempt options and more information, see “Configuring
System Control”, 169.
Boot Sector Scanning
In the Boot Sector Scanning section you can:
Enable or disable real-time scanning for floppy disk boot sectors.
Select whether boot sectors are scanned at startup.
Select what is the action to take when an infection is found.
From the Action on infection drop-down list, you can select the action
F-Secure Client Security will take when an infected boot sector is
detected.
Choose one of the following actions:
Action Definition
Ask after scan Starts the F-Secure Disinfection Wizard when an
infected floppy disk boot sector is detected.
Disinfect
automatically
Disinfects the boot sector automatically when a
virus is detected.
Report only Indicates that a virus is found, and does not let
you access the infected object. This option only
reports, it does not take any action against the
virus.
Page 76

76
Manual Scanning
Figure 3-10 Settings > Manual Scanning
Page 77

CHAPTER 3 77
Manual File Scanning
In the Manual File Scanning section the following options are available for
selecting what to scan:
All files
All files will be scanned, regardless of their file extension. Forcing
this option is not recommended because it might slow down
system performance considerably.
Files with These Extensions:
Files with specified extensions will be scanned. To specify files
that have no extension, type ‘.’ You can use the wildcard ‘?’ to
represent any letter. Enter each file extension separated by a
space.
Scan inside compressed files
Select this check box to scan inside compressed ZIP, ARJ, LZH,
RAR, CAB, TAR, BZ2, GZ, JAR and TGZ files. Scanning inside
large compressed files might use a lot of system resources and
slow down the system.
Enable excluded extensions
You can specify whether some files will not be scanned, and
enter the extensions that will be excluded from scanning in the
Excluded extensions field. (See also “File Extension Handling”,
166.)
Enable excluded objects
When Enable excluded objects is selected, the users can specify
individual files or folders that will not be scanned.
From the Action on infection drop-down list, you can select the action
F-Secure Client Security will take when an infected file is detected.
Page 78

78
Choose one of the following actions:
Action Definition
Ask after scan Starts the F-Secure Disinfection Wizard when an
infected file is detected.
Disinfect
automatically
Rename
automatically
Disinfects the file automatically when a virus is
detected.
Renames the file automatically when a virus is
detected
Delete automatically Deletes the file automatically when a virus is
detected. Note that this option also deletes the
object the virus is attached to, so this option is
not recommended.
Report only Indicates that a virus is found, and does not let
you open the infected object. This option only
reports, it does not take any action against the
virus.
Manual Spyware Scanning
In the Manual Spyware Scanning section you can:
Enable or disable manual scanning for spyware during virus
scanning.
Select what is the action to take when spyware is found.
Access manual spyware scanning targets settings by clicking the
Configure manual spyware scanning targets in advanced
mode link.
For configuration examples, explanation of the Action on spyware options
and more information, see “Configuring Spyware Scanning”, 179.
Page 79

CHAPTER 3 79
Rootkit Scanning
In the Rootkit Scanning section you can:
Enable or disable rootkit scanning.
Include or exclude rootkit scanning from full computer check.
Specify whether detected suspicious items are shown in the
disinfection wizard and in the scanning report after a full
computer check.
For configuration examples and more information, see “Configuring
Rootkit Scanning (Blacklight)”, 170.
Scheduled Scanning
The Configure scheduled scanning in advanced mode link takes you
to the F-Secure Policy Manager Console Advanced Mode user interface,
where scheduled scanning can be configured. For more information, see
“Configuring Scheduled Scanning”, 255.
Manual Boot Sector Scanning
In the Manual Boot Sector Scanning section you can:
Enable or disable manual scanning for floppy disk boot sectors
Select what is the action to take when an infection is found.
Page 80
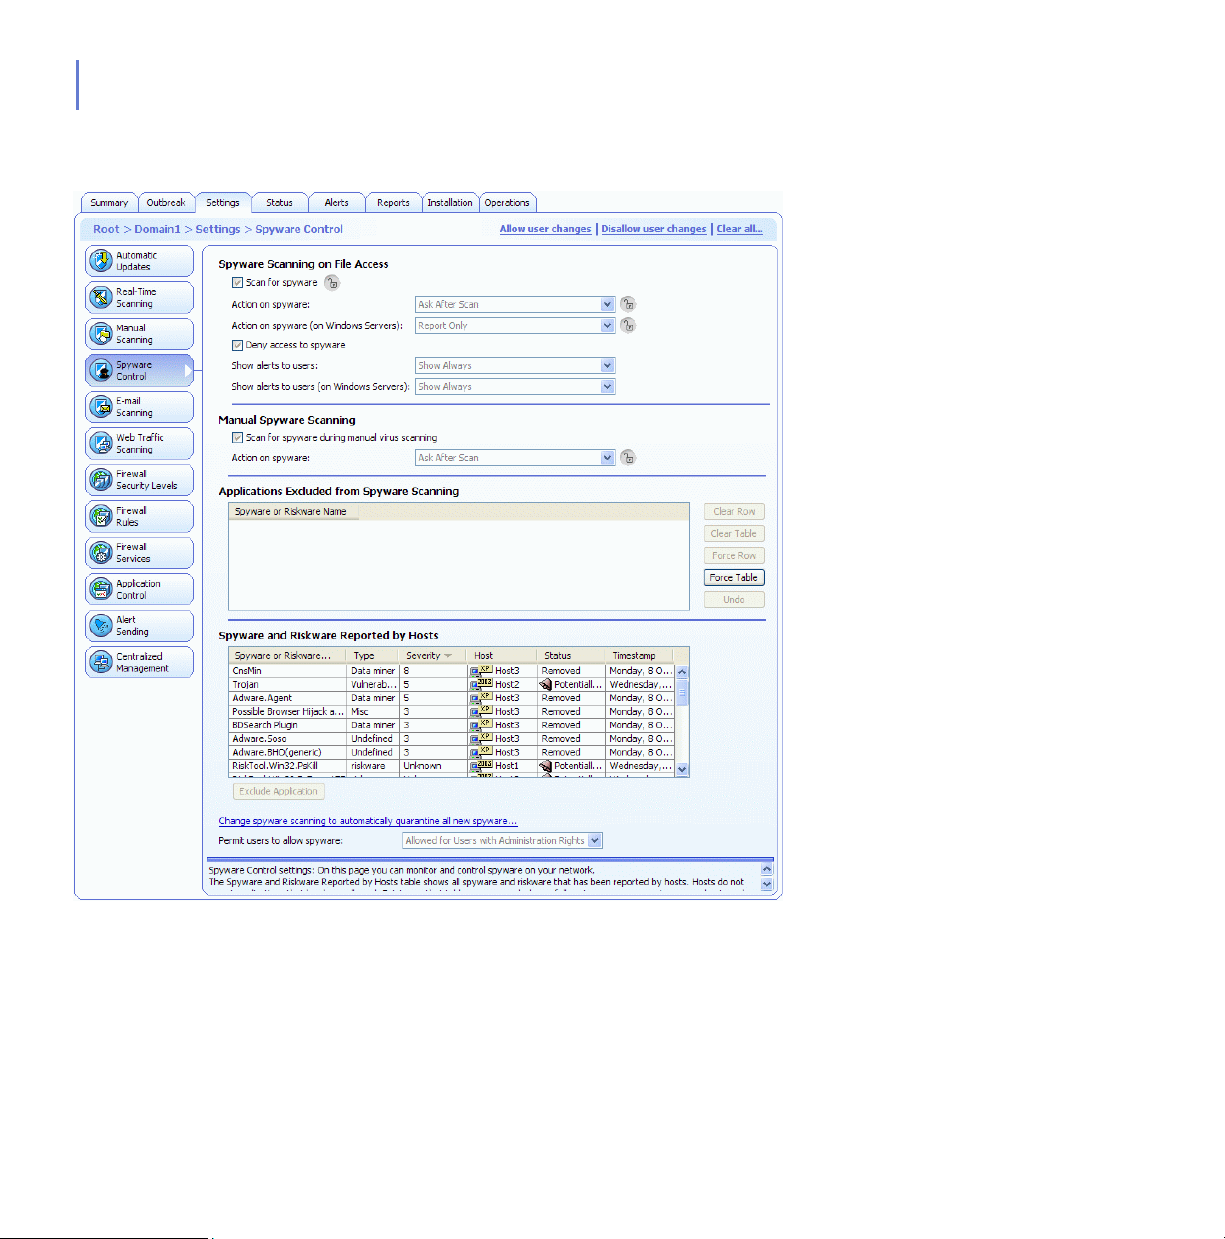
80
Spyware Control
Figure 3-11 Settings > Spyware Control
Page 81

CHAPTER 3 81
Spyware Scanning on File Access
This section contains the same spyware scanning settings as the
Spyware Scanning on File Access section on the Settings > Real-Time
Scanning page. For more information, see “Spyware Scanning on File
Access”, 74.
Manual Spyware Scanning
This section contains the same spyware scanning settings as the Manual
Spyware Scanning section on the Settings > Manual Scanning page. For
more information, see “Manual Spyware Scanning”, 78.
Applications Excluded from Spyware Scanning
The Applications Excluded from Spyware Scanning table displays a list of
spyware and riskware that the administrators have allowed to run on the
hosts.
Spyware and Riskware Reported by Hosts
The Spyware and Riskware Reported by Hosts table displays spyware
and riskware that the hosts have reported, and spyware and riskware that
are quarantined at the host(s). The table displays the type and the
severity (the TAC score, see Glossary) for each detected spyware and
riskware application. All spyware and riskware with status Potentially
active were allowed to run on the host by the administrator.
The Change spyware scanning to automatically quarantine all new
spyware setting is changes real-time and manual spyware scanning
settings so that all spyware that is not explicitly allowed by the
administrator is prevented from running.
For more information about spyware scanning and for configuration
examples, see “Configuring Spyware Scanning”, 179.
Page 82
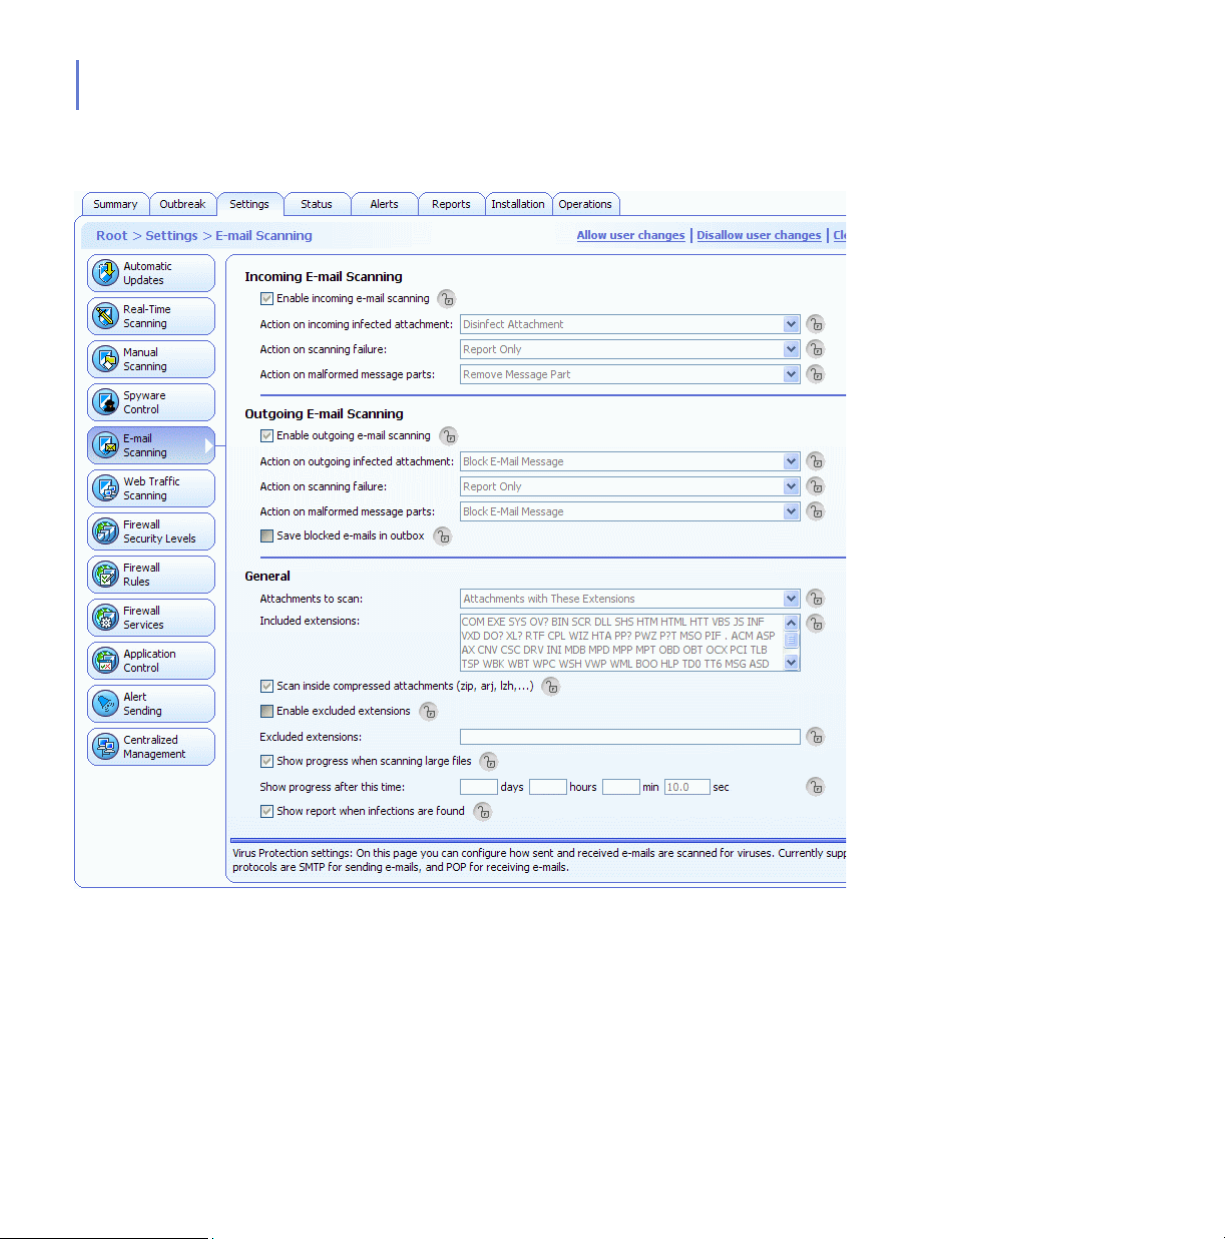
82
E-mail Scanning
Figure 3-12 Settings > E-mail Scanning page
This page includes separate settings for incoming and outgoing E-mail
Scanning. The settings in the General section are common for both.
Page 83

CHAPTER 3 83
Incoming E-mail Scanning
In the Incoming E-mail Scanning section you can:
Enable incoming e-mail scanning.
Select the action to take on incoming infected attachment.
Select the action to take on scanning failure.
Select the action to take on malformed message parts.
Outgoing E-mail Scanning
In the Outgoing E-mail Scanning section you can:
Enable outgoing e-mail scanning.
Select the action to take on outgoing infected attachment.
Select the action to take on scanning failure.
Select the action to take on malformed message parts.
Select to save the blocked messages in the end user’s outbox.
General
In the General section you can:
Select whether all or just some attachments are scanned. You
can also add new extensions in the Included extensions list.
Select whether e-mail scanning also scans compressed
attachments.
Select whether certain extensions will be excluded from the scan
and define what they are.
Select whether scanning progress is shown and define the time
after which it is shown.
Select whether scanning report is shown if infected e-mails are
found or if scanning fails.
For configuration examples and more information, see “Configuring
E-mail Scanning”, 172.
Page 84

84
Web Traffic Scanning
Figure 3-13 Settings > Web Traffic Scanning
General
In the General section you can enable or disable HTTP scanning.
HTTP Scanning
Select the action to take on infection.
Select the action to take on scanning failure.
Select whether compressed files are included in scanning.
Page 85

CHAPTER 3 85
Trusted HTTP Sites
The Trusted HTTP Sites table displays a list of HTTP sites from which are
defined as trusted. Downloads from these sited are not scanned for
viruses.
For more information on Web Traffic Scanning and for practical
configuration examples, see “Configuring Web Traffic (HTTP) Scanning”,
176.
Page 86
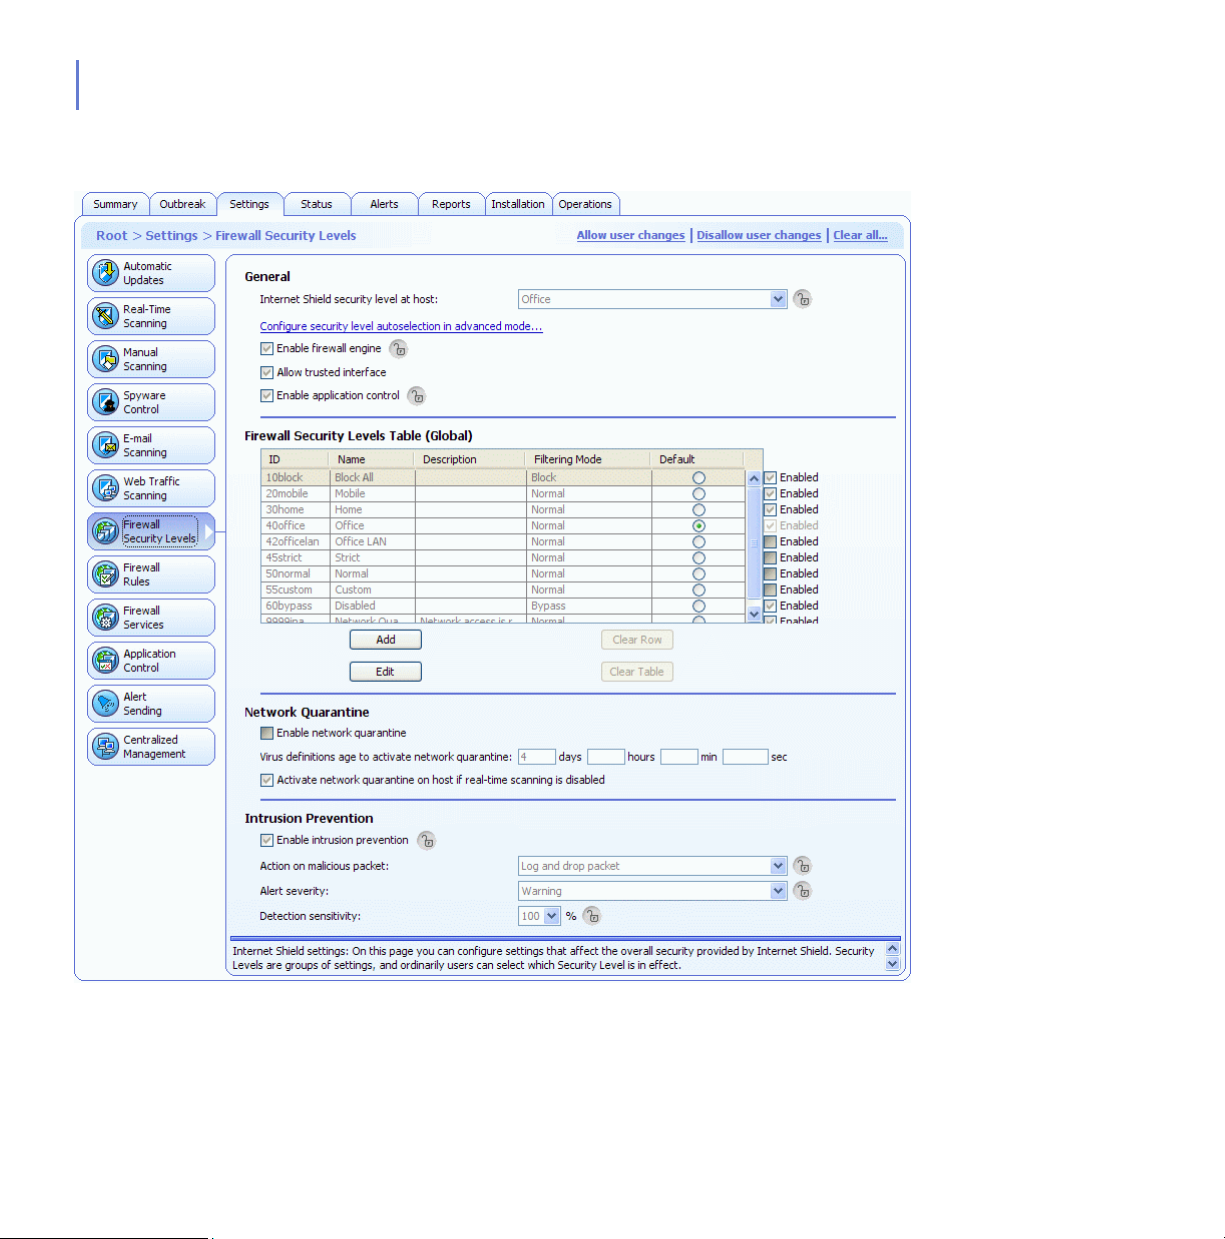
86
Firewall Security Levels
Figure 3-14 Settings > Firewall Security Levels
Page 87

CHAPTER 3 87
General
In the General section you can:
Select the Internet Shield security level at host. For more
information, see “Global Firewall Security Levels”, 193
Configure security level autoselection by clicking Configure
security level autoselection in advanced mode.... This takes you
to the Advanced Mode user interface. For more information, see
“Configuring Security Level Autoselection”, 266
Enable the firewall rules of the current security level to be applied
to inbound and outbound packets by selecting Enable firewall
engine. For more information, see “Configuring Internet Shield
Security Levels and Rules”, 196
Enable the use of trusted interface. For more information, see
“Trusted Interface”, 265.
Enable application control. For more information, see
“Configuring Application Control”, 207.
Network Quarantine
In the Network Quarantine section you can
Enable network quarantine.
Specify the virus definitions age after which Network Quarantine
is activated.
Specify whether disabling Real-time Scanning on the host
activates network Quarantine.
For more information and a configuration example, see “Configuring
Network Quarantine”, 201.
Page 88

88
Intrusion Prevention
In the Intrusion Prevention section you can:
Enable and disable intrusion prevention.
Select the action on malicious packet. The options available are:
Log and drop and Log without dropping.
Define the centralized alert severity.
Define the alert and performance level.
For configuration examples and more information, see “Configuring the
Intrusion Prevention”, 216.
Firewall Security Levels Table (Global)
The Firewall Security Levels Table displays the security levels that are
available globally in the system. The security levels table is the same for
all policy domains, but enabling and disabling individual security levels
can be done per policy domain.
For more information, see “Global Firewall Security Levels”, 193
Page 89
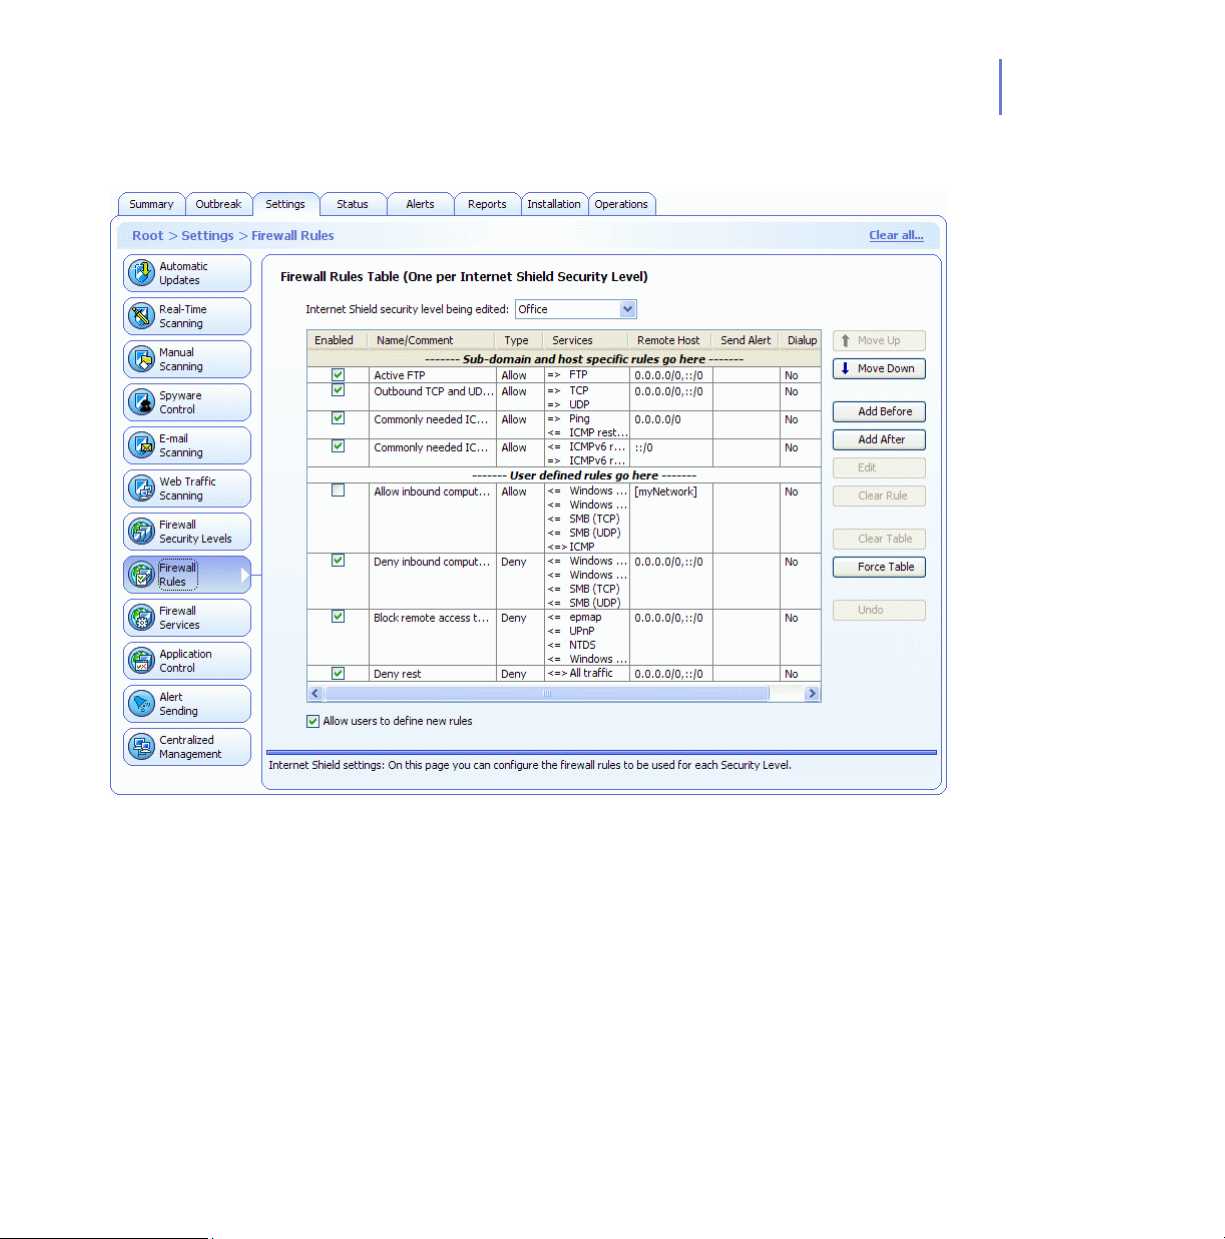
Firewall Rules
CHAPTER 3 89
Figure 3-15 Settings > Firewall Rules
Page 90

90
Firewall Rules Table
The Firewall Rules page contains the Firewall Rules Table, that lists the
rules defined for different security levels. You can select the Internet
Shield Security level from the Internet Shield security level being edited
drop-down menu. When the selected security level is changed, the rules
associated with the new security level are displayed in the table.
When the F-Secure Internet Shield Firewall is in use, the firewall rules are
checked in the order in which they are displayed in the table, from top to
bottom. For the security levels with filtering mode ‘normal’ (see the
Firewall Security Levels page on Settings tab), it is possible to define
domain or host specific rules. When Allow users to define new rules is
selected, the end users are also allowed to define new rules for that
security level. The table also displays the location for these rules.
The Firewall Rules table displays the following information for each rule:
Whether the rule is enabled or disabled
The name and comment for the rule
The type of rule (allow/deny)
The related service and direction: <= for an inbound service, =>
for an outbound service and
<=> for a bidirectional service.
The affected remote hosts
Whether alert sending is enabled
Whether the rule is applied only when a dialup link is used.
When Allow users to define new rules is selected, the users can create
new rules.
To move where the users new rule are in the table for predefined security
levels click Specify a new location
. You can now use the Move Up and
Move Down buttons to move where the users rules are in the table.
In addition, application control on the host will automatically create rules
for applications that have been allowed. The rules are placed just before
the first ‘Deny rest’ rule in the rules table, which is the first deny rule with
service ‘All traffic’ and remote host ‘Any’. The rules allow incoming
packets to server applications, and stateful firewall then allows outgoing
Page 91

CHAPTER 3 91
reply packets from the server applications. Outgoing packets from
ordinary applications need to be allowed by the rules in the firewall rules
table.
For more information on how to create and modify firewall rules, see
“Configuring Internet Shield Security Levels and Rules”, 196 and
“Configuring Internet Shield Rule Alerts”, 203.
Page 92

92
Firewall Services
Figure 3-16 Settings > Firewall Services
Service, short for Network Service, means a service that is available on
the network, e.g. file sharing, remote console access, or web browsing. It
is most often described by what protocol and port it uses.
Page 93

CHAPTER 3 93
Firewall Services Table (Global)
The Firewall Services Table displays a list of services that have been
defined for the firewall. It is also possible to create or allow the end users
to create new services for the firewall. For more information on how to
add or modify firewall services, see “Adding New Services”, 269.
You can also restrict the users from adding new services by selecting the
Fixed size check box below the table. When it is selected, the end users
cannot add or delete rows from the tables.
Page 94

94
Application Control
Figure 3-17 Settings > Application Control
Application Rules for Known Applications
The Application Control page displays a list of known applications and the
rules defined for them for inbound and outbound connection attempts.
Unknown Applications Reported by Hosts
The Unknown Applications Reported by Hosts list displays applications
that the hosts have reported and for which no rules exist yet.
Page 95

CHAPTER 3 95
On this page you can also:
Select the default action for client applications.
Select the default action for server applications.
Select whether new applications are reported to you by selecting
the Report new unknown applications check box.
Select whether if Application Control should prompt the user
when System Control has already identified the application as
trusted or not.
Message for User
The Message for Users section contains the following options:
Show default messages for unknown applications can be used to
select whether users see default messages on unknown
application connection attempts
Define default messages... opens the Define Messages window
where you can define messages for known and unknown
applications on allow, deny and user decision.
For more information on how to configure and use Application Control as
well as for configuration examples, see “Configuring Application Control”,
207.
Page 96

96
Alert Sending
Figure 3-18 Settings > Alert Sending
General
In the General section you can:
Select the alerting language.
E-mail Alert Sending
Define the E-mail server address (SMTP).
Define the E-mail sender address and E-mail subject to be used
when forwarding alerts by e-mail.
Page 97

CHAPTER 3 97
For information on how to set up Alert Sending, see “E-mail Alert
Sending”, 96.
Alert Forwarding
The Alert Forwarding table can be used to configure where the alerts that
are of certain severity are to be forwarded.
For examples on how to configure Anti-Virus alert forwarding, see
“Configuring F-Secure Client Security Alert Sending”, 188.
For examples on how to configure Internet Shield alert forwarding see
“Configuring Internet Shield Rule Alerts”, 203 and “How to use Alerts for
Checking that Internet Shield Works?”, 215.
Page 98
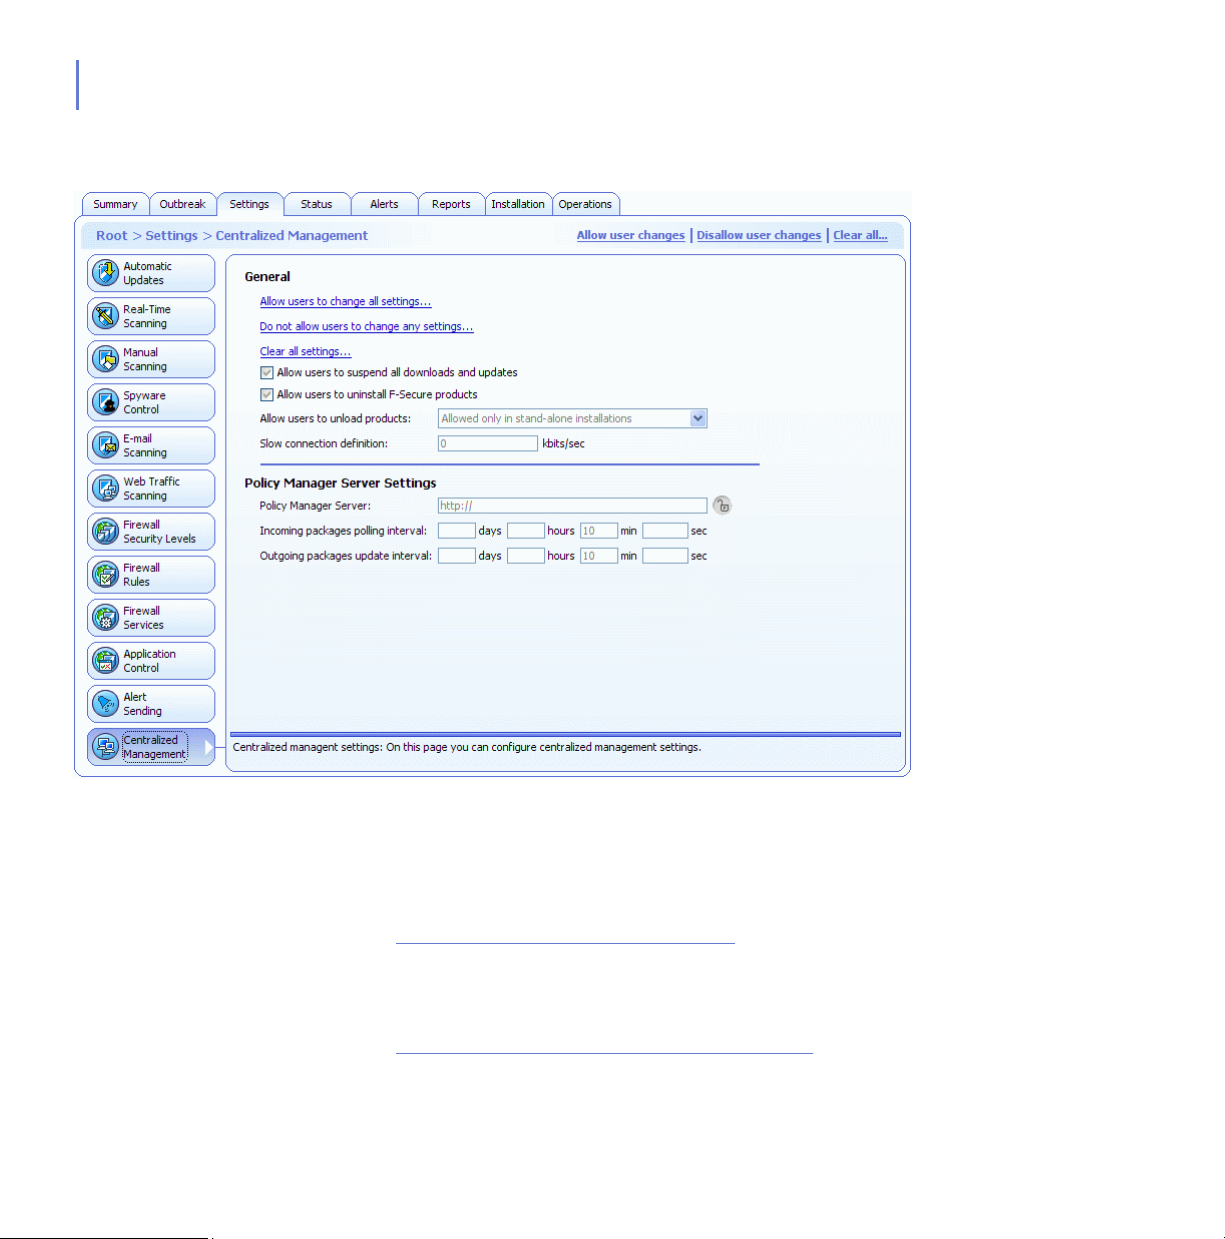
98
Centralized Management
Figure 3-19 Settings > Centralized Management
General
The General section contains the following options:
Allow users to change all settings...
This option makes all the settings throughout the F-Secure Policy
Manager Anti-Virus and Advanced Mode user interface non-final,
which means that users are allowed to change any setting.
Do not allow users to change any settings...
Page 99

CHAPTER 3 99
This option makes all the settings throughout the F-Secure Policy
Manager Anti-Virus and Advanced Mode user interface final,
which means that users are not allowed to change any setting.
For more information on final settings, see “Settings Inheritance”,
118.
Clear all settings...
This option restores the default settings for all F-Secure Client
Security components.
Allow users to suspend all downloads and updates
This option defines whether the user is allowed to suspend
network communications, for example automatic polling of
policies, sending statistics and Automatic Updates, temporarily.
This option is useful for hosts that are sometimes used via a slow
dial-up line.
Allow users to uninstall F-Secure products
Deselecting this option prevents end-users from uninstalling
F-Secure software from their computer. Uninstallation always
requires administrative rights. This applies to all Windows
operating systems, even to Windows NT/2000/XP where the
end-user has administrative rights.
In order to uninstall software locally, one needs to either select
this option or shut down the "F-Secure Management Agent"
service first, and then proceed with the uninstallation.
Allow users to unload products;
The possible values are: Allowed always; Allowed only in
stand-alone installations; Not allowed
This option specifies whether the user is allowed to unload all
F-Secure products temporarily for example in order to free
memory for games or similar applications. Note that the main
functions of the products are disabled during the time the product
is unloaded and thus the computer becomes vulnerable to
viruses and attacks.
Slow connection definition
Page 100

100
3.3.4 Status Tab
This variable defines which network connections are regarded as
slow. The unit used is kilobits per second. Note, that the nominal
speed of the connection is not relevant, but the actual speed of
the connection is measured. The default value, 0 (zero), means
that all connections are regarded as fast.
Policy Manager Server Settings
Policy Manager Server
URL address of the F-Secure Policy Manager Server.
Incoming packages polling interval
Defines how often the host tries to fetch incoming packages from
Policy Manager Server, for example base policy files. The default
value is 10 minutes.
Outgoing packages update interval
Defines how often the host tries to send new versions of
periodically sent information, for example statistics, towards the
Policy Manager Server. The default value is 10 minutes.
The different pages in Status tab display detailed information on the
status of certain components of centrally managed F-Secure Client
Security applications. If you select a domain in the Policy Domains tab,
the Status tab displays the status of all hosts in that domain. If a single
host is selected, the Status tab displays the status of that host.
By right-clicking the column headers on the Status pages you can
configure which columns are displayed on that page.
 Loading...