

Page 1

F-Secure Anti-Virus for
Microsoft Exchange
Administrator ’s Guide
Page 2

"F-Secure" and the triangle symbol are registered trademarks of F-Secure Corporation and F-Secure
product names and symbols/logos are either trademarks or registered trademarks of F-Secure
Corporation. All product names referenced herein are trademarks or registered trademarks of their
respective companies. F-Secure Corporation disclaims proprietary interest in the marks and names of
others. Although F-Secure Corporation makes every effort to ensure that this information is accurate,
F-Secure Corporation will not be liable for any errors or omission of facts contained herein. F-Secure
Corporation reserves the right to modify specifications cited in this document without prior notice.
Companies, names and data used in examples herein are fictitious unless otherwise noted. No part of
this document may be reproduced or transmitted in any form or by any means, electronic or
mechanical, for any purpose, without the express written permission of F-Secure Corporation.
Copyright © 1993-2007 F-Secure Corporation. All rights reserved.
Portions Copyright © 1991-2007 Kaspersky Lab.
This product includes software developed by the Apache Software Foundation (http://
www.apache.org/). Copyright © 2000-2007 The Apache Software Foundation. All rights reserved.
This product includes PHP, freely available from http://www .php.net/. Copyright © 1999-2007 The PHP
Group. All rights reserved.
This product includes code from SpamAssassin. The code in the files of the SpamAssassin distribution
are Copyright © 2000-2002 Justin Mason and others, unless specified otherwise in that particular file.
All files in the SpamAssassin distribution fall under the same terms as Perl itself, as described in the
“Artistic License”.
This product may be covered by one or more F-Secure patents, including the following:
GB2353372 GB2366691 GB2366692 GB2366693 GB2367933 GB2368233
GB2374260
12000040-7K27
Page 3

Contents
About This Guide 9
How This Guide Is Organized ............................................................................................ 10
Conventions Used in F-Secure Guides.............................................................................. 12
Symbols .................................................................................................................... 12
Chapter 1 Introduction 14
1.1 Overview....................................................................................................................15
1.2 How F-Secure Anti-Virus for Microsoft Exchange Works........................... ... ... .... ... ...16
1.3 Key Features..............................................................................................................19
1.4 F-Secure Anti-Virus Mail Server and Gateway Products ...........................................21
Chapter 2 Deployment 23
2.1 Installation Modes......................................................................................................24
2.2 Network Requirements...............................................................................................25
2.3 Deployment Scenarios...............................................................................................26
2.3.1 Environment with a Single Exchange Server .................................................27
2.3.2 Environments with Exchange Roles Deployed on Multiple Servers...............28
2.3.3 Quarantine Management Considerations.......................................................31
Chapter 3 Installation 33
3.1 System Requirements................... ... ... ... .... ... ... ... .... ... ... ....................................... ... ...34
3.1.1 Operating System Requirements ...................................................... ... .... ... ...35
3.1.2 Microsoft Exchange Server Requirements.....................................................35
3.1.3 SQL Server Requirements ....................................................... ... ...................36
3
Page 4

3.1.4 Web Browser Software Requirements ...........................................................38
3.2 Improving Reliability and Performance ......................................................................38
3.3 Centrally Administered or Stand-alone Installation? ..................................................39
3.4 Installation Overview..................................................................................................40
3.5 Installing F-Secure Anti-Virus for Microsoft Exchange.................. ... .... ... ... ... ... .... ... ...41
3.6 After the Installation ...................................................................................................53
3.6.1 Importing Product MIB files to F-Secure Policy Manager Console.................54
3.6.2 Configuring the Product..................................................................................55
3.7 Upgrading the Evaluation Version.................... ... .... ... ... .............................................56
3.8 Uninstalling F-Secure Anti-Virus for Microsoft Exchange ..........................................57
Chapter 4 Using F-Secure Anti-Virus for Microsoft Exchange 58
4.1 Administering F-Secure Anti-Virus for Microsoft Exchange .......................................59
4.2 Using Web Console ...................................................................................................60
4.2.1 Logging in for the First Time.................... .... ... ... .............................................60
4.2.2 Modifying Settings and Viewing Statistics with Web Console........................62
4.2.3 Checking the Product Status ......................... ... ... ... .... ... ... ... .... ... ... ... .............63
4.3 Using F-Secure Policy Manager Console ..................................................................63
4.3.1 Modifying Settings and Viewing Statistics in Centrally Administered Mode...63
4.4 Selecting Scanning Methods to Use ..........................................................................65
Chapter 5 Centrally Managed Administration 67
5.1 Overview....................................................................................................................68
5.2 F-Secure Anti-Virus for Microsoft Exchange Settings................................................68
5.2.1 Common Settings...........................................................................................68
5.2.2 Transport Protection.......................................................................................76
5.2.3 Storage Protection................ ... ....................................... ... ... .... ... ... ................88
5.3 F-Secure Anti-Virus for Microsoft Exchange Statistics.............................................116
5.3.1 Common.......................................................................................................117
5.3.2 Transport Protection.....................................................................................118
5.3.3 Storage Protection................ ... ... .... ...................................... .... ... ... ... ... .... ... .119
5.3.4 Quarantine....................................................................................................121
5.4 F-Secure Content Scanner Server Settings.............................................................121
5.4.1 Interface........................................................................................................122
4
Page 5

5.4.2 Virus Scanning........................................................ .... ... ... ... .... ... ... ... ...........123
5.4.3 Virus Statistics............... .... ... ... ... .... ...................................... .... ... ... ..............125
5.4.4 Database Updates........................................................................................126
5.4.5 Spam Filtering..............................................................................................127
5.4.6 Threat Detection Engine.......... ... .... ... ... ... .... ... ...................................... .... ... .128
5.4.7 Proxy Configuration......................................................................................129
5.4.8 Advanced......................................................................................................130
5.5 F-Secure Content Scanner Server Statistics ...........................................................131
5.5.1 Server...........................................................................................................131
5.5.2 Scan Engines ...............................................................................................132
5.5.3 Common.......................................................................................................133
5.5.4 Spam Control................................................................................................133
5.5.5 Virus Statistics............... .... ... ... ... .... ...................................... .... ... ... ..............134
5.6 F-Secure Management Agent Settings....................................................................134
5.7 F-Secure Automatic Update Agent Settings ............................................................135
Chapter 6 Administration with Web Console 138
6.1 Overview..................................................................................................................139
6.2 Home........................................................................................................................139
6.3 Transport Protection.................................................................................................142
6.3.1 Attachment Filtering........................................ ...................................... .... ... .144
6.3.2 Virus Scanning........................................................ .... ... ... ... .... ... ... ... ...........147
6.3.3 Grayware Scanning......................................................................................151
6.3.4 Archive Processing............................................ ... ... .....................................154
6.3.5 Spam Control................................................................................................156
6.3.6 Security Options...........................................................................................157
6.4 Storage Protection .............................. ... .... ... ... ... .... ... ... ... ....................................... .159
6.4.1 Real-Time and Background Scanning..........................................................159
6.4.2 Manual Scanning .........................................................................................172
6.4.3 Scheduled Scanning ....................................................................................185
6.5 Quarantine ...............................................................................................................196
6.5.1 Options.........................................................................................................197
6.6 Automatic Updates........................... ....................................... ... ... ... .... ... ... ..............206
6.6.1 Communications...........................................................................................208
6.7 Content Scanner Server................ ... ... ... .... ...................................... .... ... ... ... ... .... ....212
5
Page 6

6.7.1 Options.........................................................................................................214
6.8 General ....................................................................................................................223
6.8.1 Network Configuration .................................................................................224
6.8.2 Administration...............................................................................................226
6.8.3 Notifications..................................................................................................231
6.8.4 Lists and Templates ................................................ .... ... ... ... .... ... .................232
6.8.5 Sample Submission......................................................................................235
Chapter 7 Quarantine Management 237
7.1 Introduction ..............................................................................................................238
7.1.1 Quarantine Reasons.....................................................................................239
7.2 Configuring Quarantine Options...............................................................................239
7.3 Searching the Quarantined Content.........................................................................239
7.4 Query Results Page................................... ... ... ... .... ... ... ....................................... ... .244
7.5 Viewing Details of a Quarantined Message .............................................................246
7.6 Reprocessing the Quarantined Content...................................................................248
7.7 Releasing the Quarantined Content.........................................................................249
7.8 Removing the Quarantined Content.........................................................................250
7.9 Deleting Old Quarantined Content Automatically.....................................................250
7.10 Quarantine Logging..................................................................................................251
7.11 Quarantine Statistics................................................................................................251
7.12 Moving the Quarantine Storage ...............................................................................252
Chapter 8 Updating Virus and Spam Definition Databases 254
8.1 Overview..................................................................................................................255
8.2 Automatic Updates with F-Secure Automatic Update Agent....................................255
8.3 Configuring Automatic Updates ...............................................................................255
Chapter 9 Administering F-Secure Spam Control 257
9.1 Overview..................................................................................................................258
9.2 Spam Control Settings in Centrally Managed Environments ...................................259
9.3 Spam Control Settings in Web Console...................................................................263
9.4 Realtime Blackhole List Configuration .....................................................................266
6
Page 7

9.4.1 Configuring Realtime Blackhole Lists...........................................................266
9.4.2 Optimizing F-Secure Spam Control Performance........................................268
AppendixA Variables in Warning Messages 270
List of Variables................................................................................................................ 271
AppendixB Services and Processes 273
B.1 List of Services and Processes.............. .... ... ... ... .... ... ... ... ... .... ... ... ... ....................... 274
AppendixC Deploying the Product on a Cluster 277
C.1 Installation Overview............................................................................................... 278
C.2 Creating Quarantine Storage ........................................ ... ........................................279
C.2.1 Creating the Quarantine Storage for a Single Copy Cluster Environment ...279
C.2.2 Creating the Quarantine Storage for a Continuous Cluster Replication Environ-
ment..............................................................................................................286
C.3 Administering the Cluster Installation with F-Secure Policy Manager......................290
C.4 Using the Quarantine in the Cluster Installation.......................................................290
C.5 Uninstallation............................................................................................................292
C.6 Troubleshooting .......................................................................................................292
AppendixD Sending E-mail Alerts And Reports 293
D.1 Overview ................................................................................................................. 294
D.2 Solution ....................................................................................................................294
D.2.1 Creating a Scoped Receive Connector....... ... ... ... ... ....... ... ... .... ... ... ... ... .... ... .295
D.2.2 Grant the Relay Permission on the New Scoped Connector....... ... ... ... .... ... .296
D.2.3 Specify SMTP Server for Alerts and Reports ...............................................296
Chapter E Troubleshooting 297
E.1 Overview..................................................................................................................298
E.2 Starting and Stopping...............................................................................................298
E.3 Viewing the Log File.................................................................................................299
E.4 Common Problems and Solutions............................................................................299
E.4.1 Installing Service Packs........................................... .... ... ... ... .... ... ... ... ... .... ....302
E.4.2 Securing the Quarantine....................................... ... .... ... ..............................303
E.4.3 Administration Issues ...................................................................................303
7
Page 8

E.5 Frequently Asked Questions....................................................................................304
Technical Support 305
F-Secure Online Support Resources ............................................................................... 306
Web Club ....................... ... .... ...................................... .... ... ...................................... .... ....308
Virus Descriptions on the Web .........................................................................................308
8
Page 9

ABOUT THIS GUIDE
How This Guide Is Organized.................................................... 10
Conventions Used in F-Secure Guides..................................... 13
9
Page 10

10
How This Guide Is Organized
F-Secure Anti-Virus for Microsoft Exchange Administrator's Guid e is
divided into the following chapters:
Chapter 1. Introduction. General information about F-Secure Anti-V irus
for Microsoft Exchange and other F-Secure Anti-Virus Mail Server and
Gateway products.
Chapter 2. Deployment. Instructions and examples how to set up your
network environment before you can install F-Secure Anti-Virus for
Microsoft Exchange.
Chapter 3. Installation. Instructions how to install and set up F-Secure
Anti-Virus for Microsoft Exchange.
Chapter 4. Using F-Secure Anti-Virus for Microsoft Exchange.
Instructions how to use and administer F-Secure Anti-Virus for Microsoft
Exchange.
Chapter 5. Centrally Managed Administration. Instructions how to
remotely administer F-Secure Anti-Virus for Microsoft Exchange and
F-Secure Content Scanner Server when they have been installed in
centralized administration mode.
Chapter 6. Administration with Web Console. Instructions how to
administer F-Secure Anti-Virus for Microsoft Exchange with the Web
Console.
Chapter 7. Quarantine Manageme nt. Instructio ns how you can man age
and search quarantined mails with the F-Secure Anti-Virus for Microsoft
Exchange Web Console.
Chapter 8. Updating V irus and Sp am Definition Databases . Instructions
how to update your virus definition database.
Chapter 9. Administering F-Secure Spam Control. General information
about and instructions on how to configure F-Secure Spam Control.
Appendix A. Variables in Warning Messages. Lists variables that can
be included in virus warning messages.
Page 11

About This Guide 11
Appendix B. Services and Processes. Describes services, devices and
processes of F-Secure Anti-Virus for Microsoft Exchange.
Appendix D. Sending E-mail Alerts And Reports. Instructions how to
configure the product to send alerts to the administrator by e-mail.
Chapter E. Troubleshooting. Solutions to some common problems.
Technical Support. Contains the contact information for assistance.
About F-Secure Corporation. Describes the company background and
products.
See the F-Secure Policy Manager Administrator's Guide for detailed
information about installing and using the F-Secure Policy Manager
components:
F-Secure Policy Manager Console, the tool for remote
administration of F-Secure Anti-Virus for Microsoft Exchange.
F-Secure Policy Manager Server, which enables communication
between F-Secure Policy Manager Console and the managed
systems.
Page 12

12
Conventions Used in F-Secure Guides
This section describes the symbols, fonts, and terminology used in this
manual.
Symbols
WARNING: The warning symbol indicates a situation with a
risk of irreversible destruction to data.
IMPORTANT: An exclam ation mark provides important informa tion
that you need to consider.
REFERENCE - A book refers you to related information on the
topic available in another document.
NOTE - A note provides additional information that you should
consider.
l
Fonts
TIP - A tip provides information that can help you perf or m a task
more quickly or easily.
⇒ An arrow indicates a one-step procedure.
Arial bold (blue) is used to refer to menu names and commands, to
buttons and other items in a dialog box.
Arial Italics (blue) is used to refer to other chapters in the manual, book
titles, and titles of other manuals.
Arial Italics (black) is used for file and folder names, for figure and table
captions, and for directory tree names.
Courier New is used for messages on your compute r screen.
Page 13

Courier New bold is used for information that you must type.
SMALL CAPS (BLACK) is used for a key or key combination on your
keyboard.
13
PDF Document
For More Information
Arial underlined (blue)
Arial italics is used for window and dialog box names.
This manual is provided in PDF (Portable Document Format). The PDF
document can be used for online viewing and printing using Adobe®
Acrobat® Reader. When pr inting the manual, please print the entire
manual, including the copyright and disclaimer statements.
Visit F-Secure at http://www.f-secure.com for documentation, training
courses, downloads, and service and supp o rt contacts.
In our constant attempts to improve our documentation, we would
welcome your feedback. If you have any questions, comments, or
suggestions about this or any other F-Secure document, please conta ct
us at documentation@f-secure.com
is used for user interface links.
.
Page 14

1
INTRODUCTION
Overview..................................................................................... 15
How F-Secure Anti-Virus for Microsoft Exchange Works........... 16
Key Features.............................................................................. 19
F-Secure Anti-Virus Mail Server and Gateway Products............ 21
14
Page 15

1.1 Overview
CHAPTER 1 15
Introduction
Malicious code, such as computer viruses, is one of the main threats for
companies today. In the past, malicious code spread mainly via disks and
the most common viruses were the ones that infected disk boot sectors.
When users began to use office applications with macro capabilities such as Microsoft Office - to write documen t s and distribu te them via mail
and groupware servers, macro viruses started spreading rapidly.
After the millennium, the most common spreading mechanism has been
the e-mail. Today about 90% of viruses arrive via e-mail. E-mails provide
a very fast and efficient way for viruses to spread themselves without any
user intervention and that is why e-mail worm outbreaks, like Sober,
Netsky and Bagle, have caused a lot of damage around the world.
F-Secure Anti-Virus Mail Server and Gateway products are designed to
protect your company's mail and groupware servers and to shield the
company network from any malicious code that travels in HTTP or SMTP
traffic. In addition, they protect your company network against spam. The
protection can be implemented on the gateway level to screen all
incoming and outgoing e-mail (SMTP), web surfing (HTTP and
FTP-over-HTTP) and file transfer (FTP) traffic. Furthermore, it can be
implemented on the mail server level so that it does not only protect
inbound and outbound traffic but also internal mail traffic and public
sources, such as public folders on Microsoft Exchange servers.
Providing the protection already on the gateway level has plenty of
advantages. The protection is easy and fast to set up and install,
compared to rolling out antivirus protection on hundreds or thousands of
workstations. The protection is also invisible to the end users which
ensures that the system cannot be by-passed and makes it easy to
maintain. Of course, protecting the gateway level alone is not enough to
provide a complete antivirus solution; file server and workstation level
protection is needed, also.
Why clean 1000 workstations when you can clean one attachment at the
gateway level?
Page 16

16
1.2 How F-Secure Anti-Virus for Microsoft Exchange Works
F-Secure Anti-Virus for Microsoft Exchange is designed to detect and
disinfect viruses and other malicious code from e-mail transmissions
through Microsoft Exchange 2007 Server. Scanning is done in real time
as the mail passes through Microsoft Exchange Server. On-demand
scanning of user mailboxes and public folders is also available.
Scanning
Attachments and
Message Bodies
Flexible and Scalable
Anti-Virus Protection
Alerting F-Secure Anti-Virus for Microsoft Exchange has extensive alerting
Powerful and Always
Up-to-date
F-Secure Anti-Virus for Microsoft Exchange scans attachments and
message bodies for malicious code. It can also be instructed to remove
particular attachments according to the file name or the file extension.
If the intercepted mail contains malicious code, F-Secure Anti-Virus for
Microsoft Exchange can be configured to disinfect or drop the content.
Any malicious code found during the scan process can be placed in the
Quarantine, where it can be further examined. Stripped attachments can
also be placed in the Quarantine for further examination.
F-Secure Anti-Virus for Microsoft Exchange is installed on Microsoft
Exchange 2007 Server and it intercepts mail traveling to and from
mailboxes and public folders. The messages and documents are scanned
with the scanning component, F-Secure Content Scanner Server, which
also disinfects the infected messages.
functions, which means that the system administrator can specify a
recipient, such as the network administrator, to be notified about the
infection found in the data content.
F-Secure Anti-Virus for Microsoft Exchange uses the award-winning
F-Secure Anti-Virus techniques and scanning engines to ensure the
highest possible detection rate and disinfection capability. The F-Secure
Anti-Virus definition databases are upda ted typically multiple times a day
and they provide F-Secure Anti-Virus for Microsoft Exchange an always
up-to-date protection capability.
Page 17

CHAPTER 1 17
Introduction
F-Secure Anti-Virus scanner consistently r anks at the top when compar ed
to competing products. Our team of dedicated virus resea rchers is on call
24-hours a day responding to new and emerging threats. In fact,
F-Secure is one of the only companies to release tested virus definition
updates continuously, to make sure our customers are receiving the
highest quality service and protection.
Virus and Spam
Outbreak Detection
Stand-alone and
Centralized
Administration Modes
Scalability and
Reliability
Easy to
Administer
Massive spam and virus outbreaks consist of millions of messages which
share at least one identifiable pattern that can be used to distinguish the
outbreak. Any message that contains one or more of these patterns can
be assumed to be a part of the same spam or virus outbreak.
F-Secure Anti-Virus for Microsoft Exchange can identify these patterns
from the message envelope, headers and body, in any language,
message format and encoding type. It can detect spam messages and
new viruses during the first minutes of the outbreak.
F-Secure Anti-Virus for Microsoft Exchange can be installed either in
stand-alone or centrally administered mode. Depending on how it has
been installed, F-Secure Anti-Virus for Microsoft Exchange is managed
either with the F-Secure Anti-Virus for Microsoft Exchange Web Console
or F-Secure Policy Manager.
F-Secure Policy Manager provides a scalable way to manage the security
of multiple applications on multiple operating systems, from one central
location. F-Secure Policy Manager is comprised of two components,
F-Secure Policy Manager Console and F-Secure Policy Manager Server,
which are used to administer applications. They are seamlessly
integrated with the F-Secure Management Agents that handle all
management functions on local hosts.
If F-Secure Anti-Virus for Microsoft Exchange is installed in stand-alone
mode it can be managed with the web-based user interface.
If F-Secure Anti-Virus for Microsoft Exchange has been installed in
centrally administered configuration, it is managed with F-Secure Policy
Manager. With its graphical user interface, F-Secure Policy Manager
Console provides a centralized view of the domains and hosts in your
network, lets you configure the security policies for all F-Secure
Page 18

18
components and set up scheduled scans and run manual scanning
operations. F-Secure Policy Manager receives status information from
F-Secure Anti-Virus for Microsoft Exchange.
F-Secure Policy Manager Server is the server side component that
handles communication between F-Secure Anti-Virus for Microsoft
Exchange and F-Secure Policy Manager Console. It exchanges security
policies, software updates, status information, statistics, alerts, and other
information between F-Secure Policy Manager Console and all managed
systems.
Figure 1-1 (1) E-mail arrives from the Internet to F-Secure Anti-Virus for Microsoft
Exchange, which (2) filters malicious content from mails and attachments, and (3)
delivers cleaned files forward.
Page 19

1.3 Key Features
F-Secure Anti-Virus for Microsoft Exchange provides the following
features and capabilities.
Superior Protection Superior detection rate with multiple scanning engines.
Automatic malicious code detection and disinfection.
The grayware scan detects spyware, adware, dialers, joke
programs, remote access tools, and any other unwelcome files
and programs.
Heuristic scanning detects also unknown Windows and macro
viruses.
The sandbox scanning can detect new unknown viruses and
malware without damaging the system by running code in a safe
and isolated environment.
Recursive scanning of ARJ, BZ2, CAB, GZ, JAR, LZH, MSI,
RAR, TAR, TGZ, Z and ZIP archive files.
Automatic and consistent virus definition database updates.
Suspicious and unsafe attachments can be stripped away from
e-mails.
Password protected archives can be treated as unsafe.
Intelligent file type recognition.
CHAPTER 1 19
Introduction
Virus Outbreak
Detection
The virus outbreak detection is an additional active layer of
protection that automatically detects virus outbreaks and
quarantines suspicious messages.
Virus outbreaks are transparen tly detected and infected
messages are quarantined before the outbreak becomes
widespread.
Quarantined unsafe messages can be reprocessed
automatically.
Page 20

20
Transparen cy and
Scalability
Viruses are intercepted before they can enter the network and
spread out on workstations and servers.
Real-time scanning of internal, inbound and outbound mail
messages and Public Folder notes.
Automatic protection of new mailboxes and Public Folders.
Total transparency to end-users. Users cannot bypass the
system, which means that messages and documents cannot be
exchanged without scanning.
Management Controlling and monitoring the behavior of the products remotely.
Starting predefined operations remotely.
Monitoring statistics provided by the products remotely with
F-Secure Policy Manager or F-Secure Anti-Virus for Microsoft
Exchange Web Console.
Possibility to configure and manage stand-alone installations with
the convenient F-Secure Anti-Virus for Microsoft Exchange Web
Console.
You can manage and search quarantined content with the
F-Secure Anti-Virus for Microsoft Exchange Web Console.
Protection against
Spam
Possible spam messages are transparently detected before they
become widespread.
Efficient spam detection based on different analyses on the
e-mail content.
Multiple filtering mechanisms guarantee the high accuracy of
spam detection.
Spam m essages can be separated from legitimate messages and
processed using the Spam Confidence Levels.
Spam detection works in every language and message format.
Page 21

1.4 F-Secure Anti-Virus Mail Server and Gateway Products
The F-Secure Anti-Virus product line consists of workstation, file server,
mail server, gateway and mobile products.
F-Secure Internet Gatekeeper™ is a high performance, totally
automated web (HTTP and FTP-over-HTTP) and e-mail (SMTP)
virus scanning solution for the gateway level. F-Secure Internet
Gatekeeper works independently of firewall and e-mail server
solutions, and does not affect their performance.
F-Secure Anti-Virus for Microsoft Exchange™ protects your
Microsoft Exchange users from malicious code contained within
files they receive in mail messages and documents they open
from shared databases. Malicious code is also stopped in
outbound messages and in notes being posted on Public Folders.
The product operates transparently and scans files in the
Exchange Server Information Store in real-time. Manual and
scheduled scans of user mailboxes and public polders are also
supported.
F-Secure Anti-Virus for MIMEsweeper™ provides a powerful
anti-virus scanning solution that tightly integrates with Clearswift
MIMEsweeper for SMTP and MIMEsweeper for Web products.
F-Secure provides top-class anti-virus software with fast and
simple integration to Clearswift MAILsweeper and WEBsweeper,
giving the corporation the powerful combination of complete
content security.
F-Secure Internet Gatekeeper for Linux™ provides a
high-performance solution at the Internet gateway level, stopping
viruses and other malicious code before they spread to end u sers
desktops or corporate servers. The product scans SMTP, HTTP,
FTP and POP3 traffic for viruses, worms and trojans, and blocks
and filters out specified file types. ActiveX and Java code can
also be scanned or blocked. The product receives updates
CHAPTER 1 21
Introduction
Page 22

22
automatically from F-Secure, keeping the virus protection always
up to date. A powerful and easy-to-use management console
simplifies the installation and configuration of the product.
F-Secure Messaging Security Gateway™ delivers the
industry’s most complete and effective security for e-mail. It
combines a robust enterprise-class messaging platform with
perimeter security, antispam, antivirus, secure messaging and
outbound content security capabilities in an easy-to-deploy,
hardened appliance.
Page 23

2
DEPLOYMENT
Installation Modes....................................................................... 24
Network Requirements............................................................... 25
Deployment Scenarios............................................................... 26
23
Page 24

24
2.1 Installation Modes
F-Secure Anti-Virus for Microsoft Exchange can be installed either in
stand-alone or centrally administered mode. In stand-alone installation,
F-Secure Anti-Virus for Microsoft Exchange is managed with Web
Console. In centrally administered mode, it is managed centrally with
F-Secure Policy Manager components: F-Secure Policy Manager Server
and F-Secure Policy Manager Console.
To administer F-Secure Anti-Virus for Microsoft Exchange in the centrally
administered mode, you have to install the following components:
F-Secure Policy Manager Server (on a dedicated machine)
F-Secure Policy Manager Console (on the administ ra to r's
machine or on the same machine with F-Secure Policy Manager
Server).
For up-to-date information on supported platforms, see
F-Secure Policy Manager Release Notes.
Page 25

2.2 Network Requirements
This network configuration is valid for all scenarios described in this
chapter. Make sure that the following network traffic can pass through:
Service Process Inbound ports Outbound ports
CHAPTER 2 25
Deployment
F-Secure Content Scanner
Server
F-Secure Anti-Virus for
Microsoft Exchange Web
Console
F-Secure
Update Agent
F-Secure Network Request
Broker
F-Secure Management
Agent
F-Secure Quarantine
Manager
Automatic
%ProgramFiles(x86)%\F-Secure\
Content Scanner
Server\fsavsd.exe
%ProgramFiles(x86)%\F-Secure\
Web User
Interface\bin\fswebuid.exe
%ProgramFiles(x86)%\F-Secure\
FSAUA\program\fsaua.exe
%ProgramFiles(x86)%\F-Secure\
Common\fnrb32.exe
%ProgramFiles(x86)%\F-Secure\
Common\fameh32.exe
%ProgramFiles(x86)%\F-Secure\
Quarantine Manager\fqm.exe
18971 (TCP) (on
localhost only)
25023 DNS (53, UDP and TCP),
- DNS (53, UDP and TCP),
- DNS (53, UDP/TCP),
- DNS (53, UDP/TCP),
- DNS (53, UDP/TCP),
DNS (53, UDP/TCP),
HTTP (80) or another
known port used for
HTTP proxy
1433 (TCP), only with the
dedicated SQL server
HTTP (80) and/or another
port used to connect to
F-Secure
Server
HTTP (80) or another port
used to connect to
F-Secure Policy Manager
Server
SMTP (25)
1433 (TCP), only with the
dedicated SQL server
Policy Manager
F-Secure World Map
Reporting Service
%ProgramFiles(x86)%\F-Secure\
Content Scanner
Server\fswmrsvc.exe
- DNS (53, UDP/TCP),
SMTP (25)
Page 26

26
2.3 Deployment Scenarios
Depending on how the Microsoft Exchange 2007 server roles are
deployed in your environment, you might consider various scenarios of
deploying F-Secure Anti-Virus for Microsof t Exchange. There are various
ways to deploy F-Secure Anti-Virus for Microsoft Exchange that are
suitable to different environments:
“Environment with a Single Exchange Server”, 27.
“Environments with Exchange Roles Deployed on Multiple
Servers”, 28.
If you want to use centralized quarantine management in a
network where the Exchange server roles have been deploye d
on multiple servers, see “Quarantine Management
Considerations”, 31.
Page 27
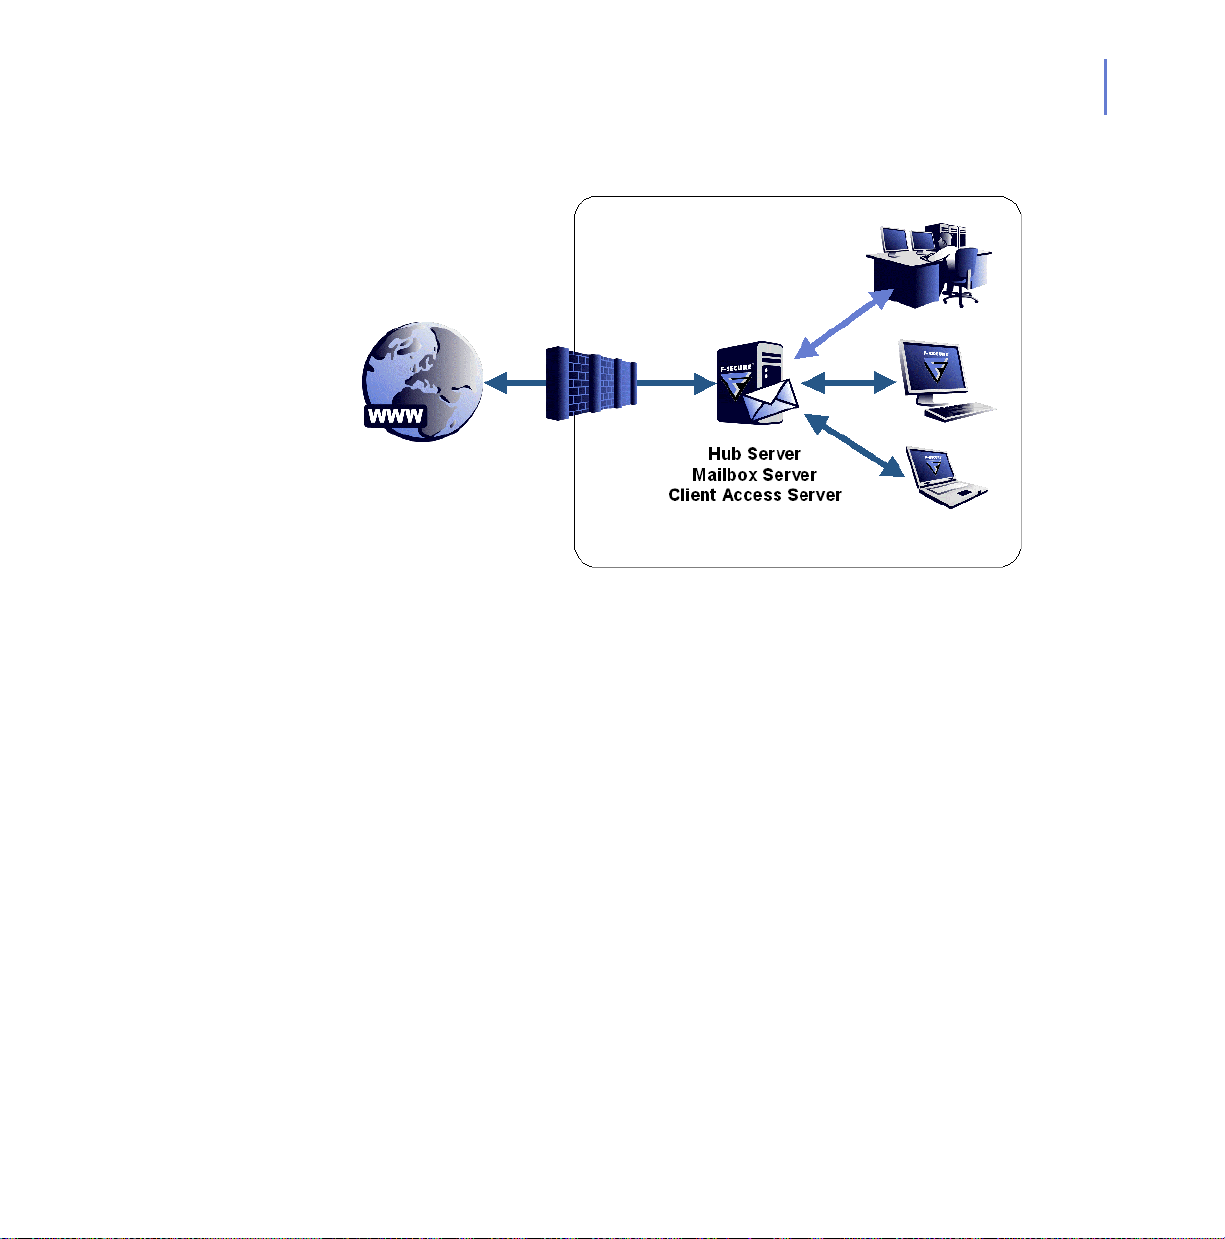
2.3.1 Environment with a Single Exchange Server
Figure 2-1 Deployment in an environment with a single Exchange server
If the Exchange server roles have been deployed on a single server, you
should deploy F-Secure Anti-Virus for Microsoft Exchange as follows:
CHAPTER 2 27
Deployment
Installing F-Secure Anti-Virus for Microsoft Exchange
Install F-Secure Anti-Virus for Microsoft Exchange on the same server
where Exchange Hub and Mailbox Server roles are deployed.
Installing F-Secure Spam Control
If you have a license for F-Secure Spam Control, you should install it on
the same server with F-Secure Anti-Virus for Microsoft Exchange.
Administration Modes
You can install the product in st and -alone mo de and a dminister it with the
Web Console, or you can install it in centralized administration mode and
administer it with F-Secure Policy Manager Console.
Page 28
28
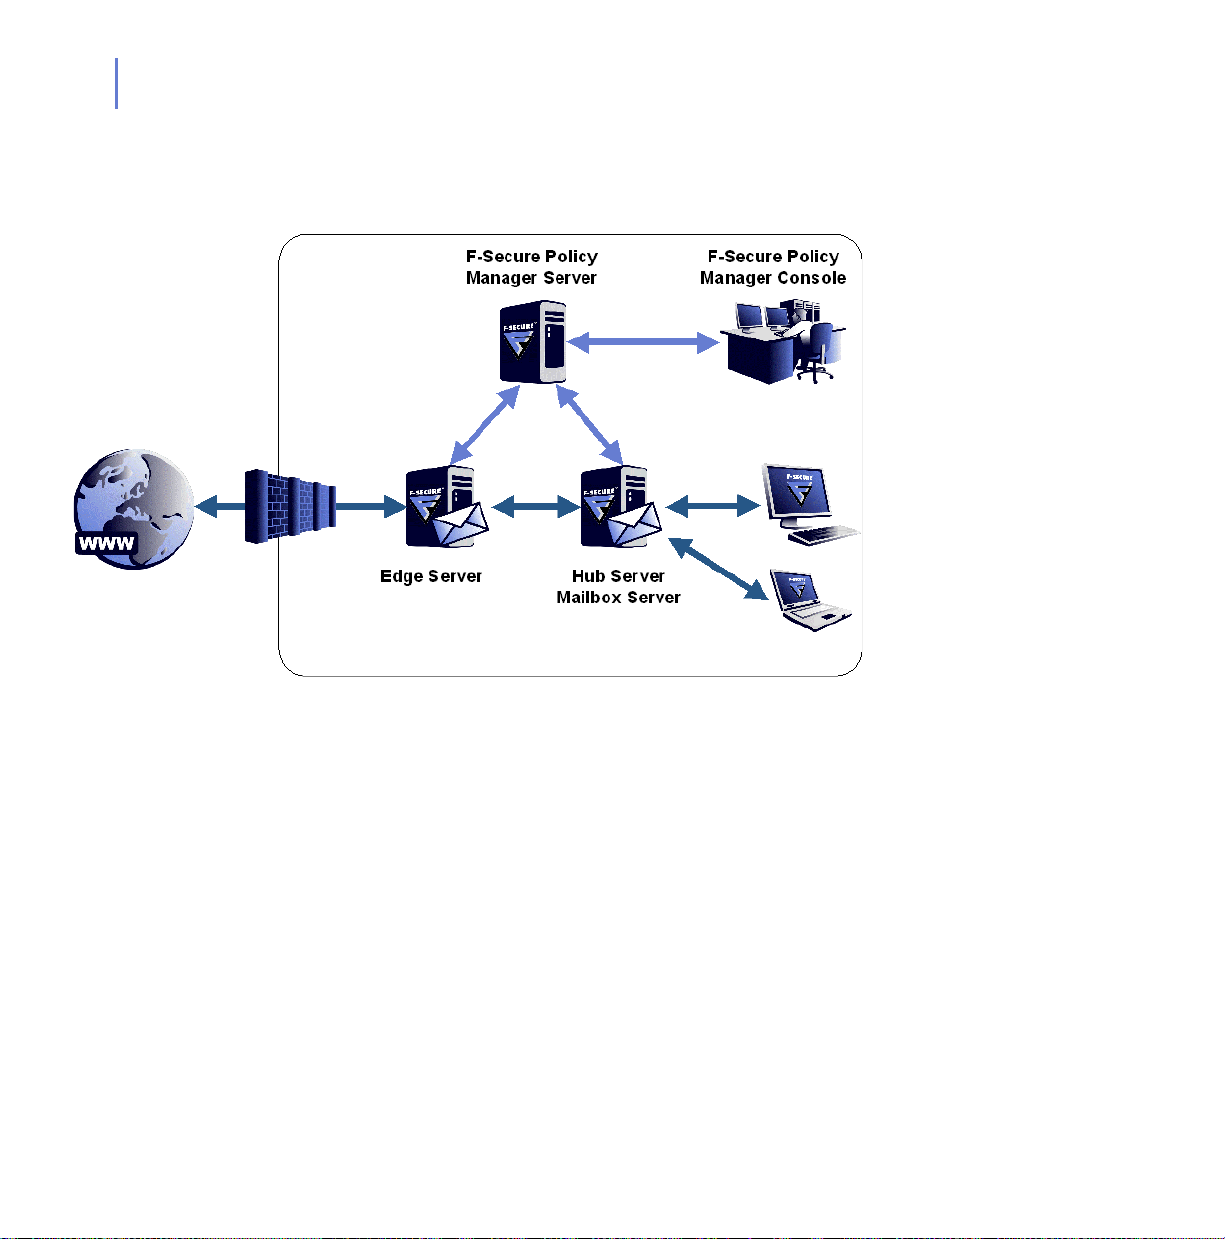
2.3.2 Environments with Exchange Roles Deployed on Multiple Servers
Figure 2-2 Deployment in an environment with Edge, Hub and Mailbox Server
roles deployed on multiple servers
Page 29
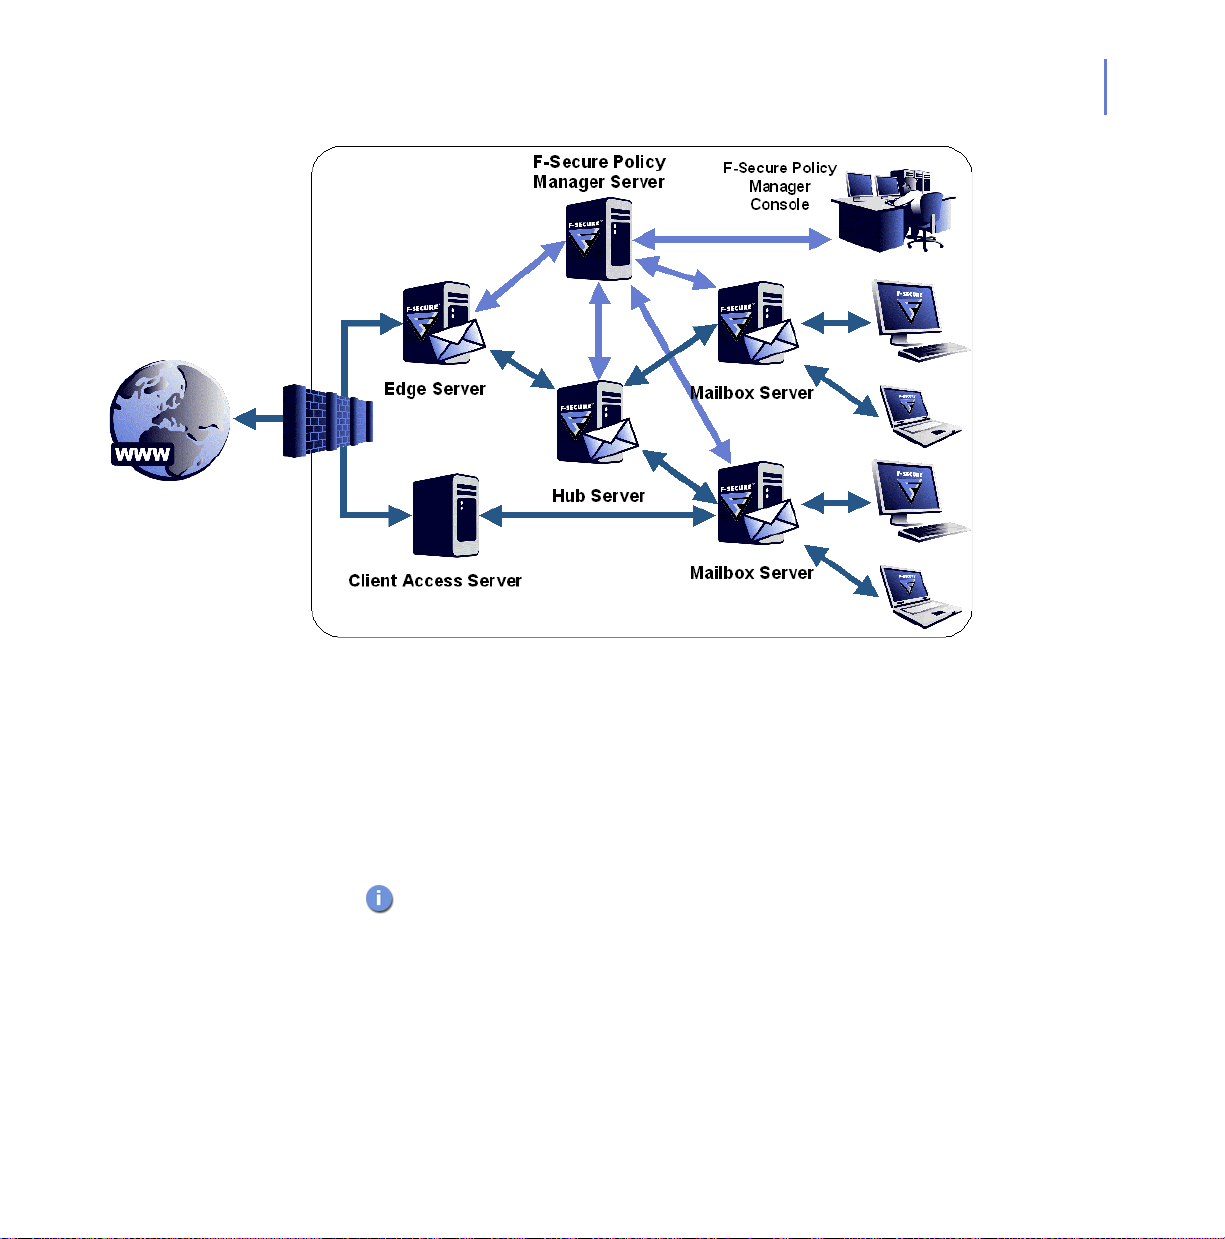
CHAPTER 2 29
Deployment
Figure 2-3 Deployment in an environment with Edge, Hub, Mailbox and Client
Access Server roles deployed on multiple servers
If the Exchange server roles have been deployed on multiple servers, you
should deploy F-Secure Anti-Virus for Microsoft Exchange as follows:
Installing F-Secure Anti-Virus for Microsoft Exchange
Install F-Secure Anti-Virus for Microsoft Exchange on all the servers
where Exchange Edge, Hub and Mailbox Server roles are deployed.
If the Exchange role is changed later, the product has to be
reinstalled.
Note that you cannot install the product on a server that has only Client
Access and/or Unifield Messaging Server roles deployed.
Page 30

30
Installing F-Secure Spam Control
If you have a license for F-Secure Spam Control, you can install it on the
Edge server. If you do not have an Edge server, you can install F-Secure
Spam Control on the Hub server.
Administration Modes
It is recommended to install the product in centralized administration
mode:
Install F-Secure Policy Manager Server on a dedicated server.
You can manage the product with F-Secure Policy Manager
Console.
When installing the product, configure each instance of the
product to connect to the same F-Secure Policy Manager Server.
You can also install the product in stand-alone mode and administer it
with the Web Console. However, it does not provide an ea sy way to have
the same settings on all the servers.
Page 31

2.3.3 Quarantine Management Considerations
CHAPTER 2 31
Deployment
Figure 2-4 Deploying centralized quarantine management in an environment with
multiple Exchange servers
If you want to use centralized quarantine management in a network
where the Exchange server roles have been deploye d on mu ltiple
servers, you should deploy F-Secure Anti-Virus for Microsoft Exchange
and the SQL server needed for quarantine database as follows:
Install Microsoft SQL Server on a dedicated server or on th e
server running F-Secure Policy Manager Server.
When installing the product, configure each instance of the
product to use the same SQL server and database.
Make sure that the SQL server, the database name, user name
and password are identical in the quarantine configuration for all
F-Secure Anti-Virus for Microsoft Exchange instances.
Make sure that all the servers are allowed to communicate with
the SQL server using mixed mode authentication.
Page 32

32
In environments with heavy e-mail traffic it is recommended to
use a Microsoft SQL server installed on a separate server. When
using the free Microsoft SQL Server 2005 Express Edition
included in F-Secure Anti-Virus for Microsoft Exchange, the
Quarantine database size is limited to 4 GB.
You can use F-Secure Anti-Virus for Microsoft Exchange Web
Console to manage and search quarantined content. For more
information, see “Quarantine Management”, 237.
Page 33

3
INSTALLATION
System Requirements................................................................ 34
Improving Reliability and Performance....................................... 38
Installation Overview.................................................................. 40
Installing F-Secure Anti-Virus for Microsoft Exchange............... 41
After the Installation.................................................................... 53
Upgrading the Evaluation Version.............................................. 56
Uninstalling F-Secure Anti-Virus for Microsoft Exchange........... 57
33
Page 34

34
3.1 System Requirements
F-Secure Anti-Virus for Microsoft Exchange is installed on the computer
running Microsoft Exchange Server and requires the following hardware
and software.
Processor: AMD Opteron/Athlon x64 or
Memory: 1 GB
Disk space to install: 300 MB
Intel Xeon with Extended Memory 64
Technology (EM64T)
Disk space for
processing:
Network: 100Mbps Fast Ethernet NIC, switched
F-Secure Policy
Manager version:
The release notes document contains the latest information about
the product and might have changes to system requirements and
the installation procedure. It is highly recommended to read the
release notes before you proceed with the installation.
10 GB or more. The required disk space
depends on the number of mailboxes, amount
of data traffic and the size of the Information
Store.
network connection
F-Secure Policy Manager 7.20 or newer.
F-Secure Policy Manager is required only in
centrally managed environments.
Page 35

3.1.1 Operating System Requirements
The product can be installed on a computer with a 64-bit processor
running one of the following systems:
Microsoft® Windows Server 2003, Standard x64 Edition with the
latest service pack
Microsoft® Windows Server 2003, Enterprise x64 Edition with the
latest service pack
Microsoft® Windows Server 2003 R2, Standard x64 Edition
Microsoft® Windows Server 2003 R2, Enterprise x64 Edition
Microsoft® Windows Server 2008 Release Candidate 0
3.1.2 Microsoft Exchange Server Requirements
The product can be installed on any of the following 64-bit versions of
Microsoft Exchange Server 2007:
Microsoft® Exchange Server 2007 Standard Edition with or
without Service Pack 1
Microsoft® Exchange Server 2007 Enterprise Edition with or
without Service Pack 1
CHAPTER 3 35
Installation
The 32-bit evaluation version of Microsof t Exchange Server 2007 is
not supported.
Page 36

36
3.1.3 SQL Server Requirements
The product requires Microsoft® SQL Server for the quarantine
management. The following versions of Microsoft SQL Server are
recommended to use:
Microsoft SQL Server 2000 (Enterprise, Standard or Workgroup
edition) with Service Pack 4
Microsoft SQL Server 2000 Desktop Engine (MSDE) with Service
Pack 4
Microsoft SQL Server 2005 (Enterprise, Standard, Workgroup or
Express edition) with the latest service pack
Microsoft SQL Server 2005 Express Edition Service Pack 2 is distributed
with the product and can be installed during F- Secure Anti-Virus for
Microsoft Exchange Setup.
When centralized quarantine management is used, the SQL server
must be reachable from the network and file sharing must be
enabled.
Which SQL Server to Use for the Quarantine Database?
As a minimum requirement, the Quarantine database should have the
capacity to store information about all inbound and outbound mail to and
from your organization that would normally be sent during 2-3 days.
The upgrade installation does not upgrade the SQL server if you
choose to use the existing database.
If you want to upgrade MSDE 2000 to SQL Server 2005 Express,
follow the instructions on the Microsoft web page: http://
www.microsoft.com/technet/prodtechnol/sql/2005/
msde2sqlexpress.mspx.
Page 37

CHAPTER 3 37
Installation
Take the following SQL server specific considerations into account when
deciding which SQL server to use:
Microsoft SQL Server
2005 Express Edition
Microsoft SQL
Server 2000/2005
When using Microsoft SQL Server 2005 Express Edition, the
Quarantine database size is limited to 4 GB.
Microsoft SQL Server 2005 Express Edition Service Pack 2
supports Microsoft Windows Server 2008.
It is not recommended to use Microsoft SQL Server 2005
Express Edition if you are planning to use centralized quarantine
management with multiple F-Secure Anti-Virus for Microsoft
Exchange installations.
Microsoft SQL Server 2005 Express Edition is delivered
together with F-Secure Anti-Virus for Microsoft Exchange, and
you can install it during the F-Secure Anti-Virus for Microsoft
Exchange Setup.
If your organization sends a large amount of e-mails, it is
recommended to use Microsoft SQL Server 2000/2005.
It is recommended to use Microsof t SQL Server 2000/2005 if you
are planning to use centralized quarantine management with
multiple F-Secure Anti-Virus for Microsoft Exchange installations.
Note that the product does not support Windows Authentication
when connecting to Microsoft SQL Server 2000/2005. The
Microsoft SQL Server 2000/2005 that the product will use for the
Quarantine database should be configured to use Mixed Mode
authentication.
If you plan to use Microsoft SQL Server 2005, you must
purchase it and obtain your own license before you start to
deploy F-Secure Anti-Virus for Microsoft Exchange. To
purchase Microsoft SQL Server 2005, contact your Microsoft
reseller.
Page 38

38
3.1.4 Web Browser Software Requirements
In order to administer the product with F-Secure Anti-Virus for Microsoft
Exchange Web Console, one of the following web browsers is required:
Microsoft Internet Explorer 6.0 or later
Mozilla Firefox 2.0 or later
Opera 9.00 or later
Konqueror 3.5 or later
Any other web browser supporting HTTP 1.0, SSL, Java scripts and
cookies may be used as well. Microsoft Internet Explorer 5.5 or earlier
cannot be used to administer the product.
3.2 Improving Reliability and Performance
You can improve the system reliability and overall performance by
upgrading the following components.
Processor If the system load is high, a fast processor on the Microsoft Exchange
Server speeds up the e-mail message processing. As Microsoft
Exchange Server handles a large amount of data, a fast processor alone
is not enough to guarantee a fast operation of F-Secure Anti-Virus for
Microsoft Exchange.
Memory Memory consumption is directly proportional to the size of processed
mails - scanning a single mail may use memory in amounts up to three
times the size of the mail concerned. If the average size of mail messages
is big, or Microsoft Exchange Server has to process large messages
regularly , increasing the amo unt of physical memory increa ses the overall
performance.
If large messages are processed only now and then, it might be enough
to increase the size of the virtual memory. In this case, large messages
will slow the system down.
Page 39

CHAPTER 3 39
Installation
Hard Drive Hard drive size is an important reliability factor. Hard drive performance is
crucial for Microsoft Exchange Server to perform well. For best
performance, a RAID system is recommended; for servers with only
moderate load, SCSI hard disks are adequate. If your server has an IDE
hard disk, DMA access support is recommended.
Operating
System
It is highly recommended to have the latest service packs for the
operating system being used. These fixes make the platfo rm mo re stable
and thus increase the reliability of the system.
3.3 Centrally Administered or Stand-alone Installation?
F-Secure Anti-Virus for Microsoft Exchange can be managed either with
F-Secure Anti-Virus for Microsoft Exchange Web Console or F-Secure
Policy Manager Console. You can select the management method when
you install the product.
If you already use F-Secure Policy Manager to administer other F-Secure
products, it is recommended to install F-Secure An ti-Virus for Microsoft
Exchange in centralized administration mode.
The quarantined mails are managed using the F-Secure Anti-Virus for
Microsoft Exchange Web Console in both centrally administered and
stand-alone installations. In centrally managed environments all other
features are managed with F-Secure Policy Manager.
Page 40

40
3.4 Installation Overview
F-Secure Anti-Virus for Microsoft Exchange can be installed to the same
computer that runs F-Secure Anti-Virus for Servers 7.0. You should
uninstall any potentially conflicting products, such as other anti-virus, file
encryption, and disk encryption software, which employ low-level device
drivers, before you install F-Secure Anti-Virus for Microsoft Exchange.
If you run F-Secure Anti-Virus for Servers 7.0 on the same
computer where you install F-Secure Anti-Virus for Microsoft
Exchange, make sure that F-Secure Anti-Virus for Servers 7.0 is
installed before you install F-Secure Anti-Virus for Microsoft
Exchange.
To administer F-Secure Anti-Virus for Microsoft Exchange in centralized
administration mode, you need to install F-Secure Policy Manager
Console and F-Secure Policy Manager Server. Detailed information on
F-Secure Policy Manager Console and F-Secure Policy Manager Server
is provided in the F-Secure Policy Manager Administrator's Guide.
You cannot install F-Secure Policy Manager 7.0 on the same
server with the product as F-Secure Policy Manager 7.0 is not
supported under 64-bit Windows. For up-to-date information on
supported platforms, see F-Secure Policy Manager Release Notes.
You need to log in with administrator-level privileges to install F-Secure
Anti-Virus for Microsoft Exchange.
Follow these steps to set up F-Secure Anti-Virus for Microsoft Exchange:
Centralized Administration mode:
1. Run F-Secure Policy Manager setup to set up F-Secure Policy
Manager Server. See F-Secure Policy Manager Administrator’s
Guide for instructions.
2. Install F-Secure Anti-Virus for Microsoft Exchange. For more
information, see “Installing F-Secure Anti-Virus for Microsoft
Exchange”, 41.
Page 41

3. Import the product MIB files to F-Secure Policy Manager, if they
cannot be uploaded there during the installation. For more
information, see “Importing Product MIB files to F-Secure Policy
Manager Console”, 54.
4. Check that F-Secure Automatic Update Agent can retrieve the latest
virus and spam definition databases. For more information, see
“Updating Virus and Spam Definition Databases”, 254.
Stand-alone mode:
1. Install F-Secure Anti-Virus for Microsoft Exchange. For more
information, see “Installing F-Secure Anti-Virus for Microsoft
Exchange”, 41.
2. Check that F-Secure Automatic Update Agent can retrieve the latest
virus and spam definition databases. For more information, see
“Updating Virus and Spam Definition Databases”, 254.
After the installation is complete, check and configure the product
settings.
3.5 Installing F-Secure Anti-Virus for Microsoft
CHAPTER 3 41
Installation
Exchange
Follow these instructions to install F-Secure Anti-Virus for Microsoft
Exchange and F-Secure Spam Control.
Step 1. 1. Insert the F-Secure CD in your CD-ROM drive.
2. Select F-Secure Anti-Virus for Microsoft Exchange from the Install
Software menu.
Page 42

42
Step 2. Read the information in the Welcome screen.
Click Next to continue.
Step 3. Read the licence agreement.
If you accept the agreement, check the I accept this agreement
checkbox and click Next to continue.
Page 43

Step 4. Enter the product keycode.
Click Next to continue.
Step 5. Choose the components to install.
CHAPTER 3 43
Installation
For more information about F-Secure Spam Control, see “Administering
F-Secure Spam Control”, 257. Click Next to continue.
Page 44

44
Step 6. Choose the destination folder for the installation.
Click Next to continue.
Step 7. Choose the administration method.
If you install F-Secure Anti-Virus for Microsoft Exchange in stand-alone
mode, you cannot configure settings and receive alerts and status
information in F-Secure Policy Manager Console. Click Next to continue.
Page 45

CHAPTER 3 45
If you selected the stand-alone installation, continue to Step 10., 47.
If you select the stand-alone mode, use the F-Secure Anti-V irus for
Microsoft Exchange Web Console to change product settings and
to view statistics. For more information, see “Administration with
Web Console”, 138.
Step 8. Enter the path to the public management key file admin.pub that was
created during F-Secure Policy Manager Console setup.
Installation
You can transfer the public key in various ways (use a shared folder on
the file server, a USB device, or send the key as an attachment in an
e-mail message). Click Next to continue.
Page 46

46
Step 9. Enter the IP address or URL of the F-Secure Policy Manager Server you
installed earlier.
Click Next to continue.
If the product MIB files cannot be uploaded to F-Secure Policy
Manager during installation, you can import them manually.
For more information, see “Importing Product MIB files to F-Secure
Policy Manager Console”, 54.
Page 47

CHAPTER 3 47
Step 10. Enter an SMTP address that will be used by F-Secure Anti-Virus for
Microsoft Exchange to send warning and informational messages to
end-users.
The SMTP address should be a valid, existing address that is allowed to
send messages. Click Next to continue.
Step 11. Specify the Quarantine management method.
Installation
If you want to manage the Quarantine database locally, select Local
quarantine management. Select Centralized quarantine management if
you install the product on multiple servers. Click Next to continue.
Page 48

48
Step 12. Specify the location of the Quaran tine database.
If you want to install Microsoft SQL Server 2005 Express Edition and the
Quarantine database on the same server as the product installation,
select (a) Install and use Microsoft SQL Server Desktop Engine.
If you are using Microsoft SQL Server already, select (b) Use the existing
installation of MIcrosoft SQL Server or MSDE.
Click Next to continue to either (a) or (b) based on your selection.
a Specify the installation and the database directory for Microsoft
SQL Server 2005 Express Edition.
Page 49

CHAPTER 3 49
Installation
Enter the password for the database server administra tor account
that will be used to create the new database. Click Next to
continue.
Specify the name for the SQL database that stores information
about the quarantined content.
Enter the user name and the password that you want to use to
connect to the quarantine database. Use a different account than
the server administrator account. If the ne w account does not
exist, the product creates it during the installation.
b Specify the computer name of the SQL Server where you wan t to
create the Quarantine database.
Page 50

50
Enter the username and password to log on to the server. Click
Next to continue.
If the server has a database with the same name, you can either
use the existing database, remove the existing database and
create a new one or keep the existing database and cre ate a new
one with a new name.
Step 13. Select whether you want to install the product with F-Secure World Map
Support.
The product can collect and send statistics about viruses and other
malware to the F-Secure World Map service. if you agree to send
statistics to F-Secure World Map, select Yes and click Next to continue. If
Page 51

CHAPTER 3 51
you enable F-Secure World Map su pport, see “Sending E-mail Alert s And
Reports”, 293.
Step 14. If you selected the centralized administration mode, specify the DNS
name or IP address of the F-Secure Policy Manager Server and the
administration port.
Installation
Click Next to continue.
Step 15. If you selected the centralized administration mode, the installation
program connects to specified F-Secure Policy Manager Se rver
automatically to install F-Secure Anti-Virus for Microsoft Exchange MIB
files. If the installation program cannot connect to F-Secure Policy
Manager Server, the following dialog opens.
Make sure that the computer where you are inst alling F-Secure Anti-V irus
for Microsoft Exchange is allowed to connect to the administration port on
F-Secure Policy Manager Server, or if you use proxy, make sure that the
Page 52

52
connection is allowed from the proxy to the server. Check that any firewall
does not block the connection.
If you want to skip installing MIB files, click Cancel. You can install MIB
files later either manually or by running the Setup again.
Step 16. The list of components that will be installed is displayed.
Click Start to install listed components.
Step 17. The installation status of the components is displayed.
Page 53

Click Next to continue.
Step 18. The installation is complete.
Click Finish to close the Setup wizard.
CHAPTER 3 53
Installation
3.6 After the Installation
This section describes what you have to do after the installation. These
steps include:
Importing product MIBs to F-Secure Policy Manager (if that is
required), and
Initial configuration of the product.
Page 54

54
3.6.1 Importing Product MIB files to F-Secure Policy Manager Console
If you are using the product in centrally managed mode, there are cases
when the F-Secure Anti-Virus for Microsof t Exchange MIB JAR file cannot
be uploaded to F-Secure Policy Manager Server during the in stallation. In
these cases you will have to import the MIB files to F-Secure Policy
Manager. You will have to import the MIB files if:
F-Secure Anti-Virus for Microsoft Exchange is located in a
different network segment than F-Secure Policy Manager, and
there is a firewall between them blocking access to Policy
Manager’s administrative port (8080).
F-Secure Policy Manager Server has been configured so that
administrative connections from anywhere else than the localhost
are blocked.
The recommended way is to import the MIBs via F-Secure Policy
Manager Console Tools menu. You can do it as follows:
1. Open the Tools menu and select the Installa tion packages... option.
2. Click Import....
3. When the Import Installation Packages dialog opens, browse to
locate the fsavmse710mib.jar file located under the Jars subdirecto ry
in the setup package. Then click Open.
4. After importing the new MIB files, restart F-Secure Policy Manager
Console.
Page 55

3.6.2 Configuring the Product
After the installation, F-Secure Anti-Virus for Microsoft Exchange is
functional, but it is using mostly default values. It is highly recommended
to go through all the settings of all installed components.
Configure F-Secure Anti-Virus for Microsoft Exchange.
If F-Secure Anti-Virus for Microsoft Exchange has been installed
in the centralized administration mode, use F-Secure Policy
Manager Console to configure the settings for F-Secure Content
Scanner Server and F-Secure Anti-Virus for Microsoft Exchange
and distribute the policy. For more information, see “Centrally
Managed Administration”, 67.
If F-Secure Anti-Virus for Microsoft Exchange has been installed
in stand-alone mode, use the F-Secure Anti-Virus for Microsoft
Exchange Web Console to configure the settings of F-Secure
Anti-Virus for Microsoft Exchange. For more information, see
“Administration with Web Console”, 138.
Specify the mail direction. For more information, see “Network
Configuration”, 56.
Verify that the product is able to retrieve the virus and spam
definition database updates.
If necessary, reconfigure your firewalls or other devices that may
block the database downloads. For more information, see
“Network Requirements”, 25.
CHAPTER 3 55
Installation
Page 56

56
Network Configuration
The mail direction is based on the Internal Domains and Internal SMTP
hosts settings and it is determined as follows:
1. E-mail messages are considered internal if they come from internal
SMTP sender hosts and mail recipients belong to one o f the specified
internal domains (internal recipients).
2. E-mail messages are considered outbound if they come from
internal SMTP sender hosts and mail recipients do not belong to the
specified internal domains (external recipients).
3. E-mail messages that come from hosts that are not defined as
internal SMTP sender hosts are considered inbound.
4. E-mail messages submitted via MAPI or Pickup Folder are treated as
if they are sent from the internal SMTP sender host.
If e-mail messages come from internal SMTP sender hosts and
contain both internal and external recipients, message s are split
and processed as internal and outbound respectively.
3.7 Upgrading the Evaluation Version
If you want to use F-Secure Anti-Virus for Microsoft Exchange af ter your
evaluation period expires, you need a new keycode. Contact your
software vendor or renew your license online.
After you have received the new keycode, you can either reinstall
F-Secure Anti-Virus for Microsoft Exchange with your new keycode (see
“Installing F-Secure Anti-Virus for Microsoft Exchange”, 41) or register the
new keycode from F-Secure Settings and Statistics.
Page 57

CHAPTER 3 57
Installation
To register the new keycode from F-Secure Settings and Statistics:
1. Open F-Secure Settings and Statistics by double-clicking the
F-Secure icon in the Windows system tray and select F-Secure
Anti-Virus for Microsoft Exchange to open the evaluation screen.
2. Eenter the new keycode you have received and click Register
Keycode....
If you do not want to continue to use F-Secure Anti-Virus for Microsoft
Exchange after your evaluation license exp ires, you should uninstall the
software.
When the license expires, F-Secure Anti-Virus for Microsoft Exchange
stops processing e-mails and messages posted to public folders.
However, the messages are still delivered to the recipients.
3.8 Uninstalling F-Secure Anti-Virus for Microsoft Exchange
To uninstall F-Secure Anti-Virus for Microsoft Exchange, select Add/
Remove Programs from the Windows Control Panel. To uninstall
F-Secure Anti-Virus for Microsoft Exchange completely, uninstall the
components in the following order:
1. F-Secure Anti-Virus for Microsoft Exchange
2. F-Secure Spam Control (if it was installed)
Some files and directories may remain after the uninstallation and
can be removed manually.
Page 58

4
USING F-SECURE
A
NTI-VIRUS FOR
ICROSOFT EXCHANGE
M
Administering F-Secure Anti-Virus for Microsoft Exchange........ 59
Using Web Console.................................................................... 60
Using F-Secure Policy Manager Console................................... 63
58
Page 59

CHAPTER 4 59
Using F-Secure Anti-Virus for Microsoft Exchange
4.1 Administering F-Secure Anti-Virus for Microsoft Exchange
F-Secure Anti-Virus for Microsoft Exchange can be used either in the
stand-alone mode or in the centrally administered mode, based on your
selections during the installation and the initial setup.
Centralized
Administration
Mode
Stand-alone
Mode
In the centralized administration mode, you can administer F-Secure
Anti-Virus for Microsoft Exchange with F-Secure Policy Manager.
You can use the F-Secure Anti-Virus for Microsoft Exchange Web
Console to start and stop F-Secure Anti-Virus for Microsoft Exchange,
check its current status and to connect to F-Secure Web Club for support.
In centrally managed installations, F-Secure Anti-Virus for Microsoft
Exchange Web Console cannot be used for configuring the system or
scanning settings, but you can manage the quarantined content with it.
you can use F-Secure Anti-Virus for M icr osoft Exchange Web Console to
administer the product; monitor the status, modify settings, manage the
quarantine and to start and stop the product if necessary.
Page 60

60
4.2 Using Web Console
You can open F-Secure Anti-Virus for Microsoft Exchange Web Console
in any of the following ways:
Go to Windows St art men u > Programs > F-Secu re Anti-Virus for
Microsoft Exchange > F-Secure Anti-Virus fo r Microsoft
Exchange Web Console
Enter the address of F-Secure Anti-Viru s for Microsoft Exchange
and the port number in your web browser. Note that the protocol
used is https. For example:
https://127.0.0.1:25023
Open F-Secure Settings and Statistics by double-clicking the
F-Secure icon in the Windows system tray and double-clicking
the component name in the list.
F-Secure Anti-Virus for Microsof t Exchange W eb Console does not
support Microsoft Internet Explorer 5.5 or older.
When the Web Console login page opens, enter your user name and the
password and click Log In. Note that you must have administrator rights
to the host where F-Secure Anti-Virus for Microsoft Exchange Web
Console is installed.
4.2.1 Logging in for the First Time
Before you log in the F-Secure Anti-Virus for Microsoft Exchange Web
Console for the first time, check that Java script and cookies are enabled
in the browser you use.
Microsoft Internet Explorer users:
The address of the F-Secure Anti-Virus for Microsoft Exchange
Web Console, https://127.0.0.1:25023/
Trusted sites in Internet Explorer Security Options to ensure that
F-Secure Anti-Virus for Microsoft Exchange Web Console works
properly in all environments.
, should be added to the
Page 61

Using F-Secure Anti-Virus for Microsoft Exchange
When you log in for the first time, your browser displays a Security Alert
dialog window about the security certificate for F-Secure Anti-Virus for
Microsoft Exchange Web Console. You can create a securi ty certificate
for F-Secure Anti-Virus for Microsoft Exchange Web Console before
logging in, and then install the certificate during the login process.
If your company has an established process for creating and
storing certificates, follow that process to create an d stor e the
security certificate for F-Secure Anti-Virus for Microsoft Exchange
Web Console.
Step 1. Create the security certificate
1. Browse to the F-Secure Anti-Virus for Microsoft Exchange Web
Console installation directory, for example:
C:\Program Files (x86)\F-Secure\Web User Interface\bin\
2. Locate the certificate creation utility, makecert.bat, and double click it
to run the utility.
3. The utility creates a certificate that will be issued to all local IP
addresses, and restarts the F-Secure Anti-Virus for Microsoft
Exchange Web Console service to take the certificate into use.
4. Wait until the utility completes, and the window closes. Now you can
proceed to logging in.
CHAPTER 4 61
Step 2. Log in and install the security certificate
1. Open F-Secure Anti-Virus for Microsoft Exchange Web Console.
2. The Security Alert about the F-Secure Anti-Virus for Microsoft
Exchange Web Console certificate is displayed. If you install the
certificate now, you will not see the Security Alert window again.
If you are using Internet Explorer 7, click Continue and then
Certificate Error.
3. Click View Certificate to view the certificate information.
4. The Certificate window opens. Click Install Certificate to install the
certificate with the Certificate Import Wizard.
Page 62

62
5. The Certificate window opens. Click Install Certificate to proceed to
the Certificate Import Wizard.
6. Follow the instructions in the Certificate Import Wizard.
If you are using Internet Explorer 7, in the Place all certificates in the
following store selection, select the Trusted Root Certification
Authorities store.
If you are using Internet Explorer 6, you are prom pted to a dd the ne w
certificate in the Certificate Root Store when the wizard has
completed. Click Yes to do so.
7. If the Security Alert window is still displayed, click Yes to proceed or
log back in to the F-Secure Anti-Virus for Microsoft Exchange Web
Console.
8. When the login page opens, log in to Web Console with your user
name and the password.
9. The Web Console displays Getting Started page when you log in for
the first time. Y ou can check and configure the follo wing information in
the Getting Started page to complete the installation:
Internal domains and senders
E-mail alerts and reports
Database updates
Product updates
4.2.2 Modifying Settings and Viewing Statistics with Web Console
To change F-Secure Anti-Virus for Microsoft Exchange settings in
stand-alone mode, open the F-Secure Anti-Virus for Microsoft Exchange
Web Console and select the variables you want to change from the
options tree. For detailed explanations of all variables, see
“Administration with Web Console”, 138.
Page 63

Using F-Secure Anti-Virus for Microsoft Exchange
4.2.3 Checking the Product Status
You can check the overall product status on the Home page of F-Secure
Anti-Virus for Microsoft Exchange Web Console. Summary and Services
tabs in the Home page displays an overview of each component status
and most important statistics of the installed F-Secure Anti-Virus for
Microsoft Exchange components. From the Home p age you can also
open the product logs and proceed to configure the product components.
4.3 Using F-Secure Policy Manager Console
In the centralized administration mode, you can administer F-Secure
Anti-Virus for Microsoft Exchange with F-Secure Policy Manager. To open
F-Secure Policy Manager Console, select Windows Start menu >
Programs > F-Secure Policy Manager Console.
When the Policy Manager Console opens, go to the Advanced Mode user
interface by selecting View > Advanced Mode.
F-Secure Policy Manager Console is used to create policies for F-Secure
Anti-Virus for Microsoft Exchange installations that are running on
selected hosts or groups of hosts.
CHAPTER 4 63
For detailed information on installing and using F-Secure Policy Manager
console, see the F-Secure Policy Manager Administrator’s Guide.
4.3.1 Modifying Settings and Viewing Statistics in Centrally Administered Mode
To change F-Secure Anti-Virus for Microsoft Exchange settings in the
centrally administered mode, follow these instructions:
1. Select F-Secure Anti-Virus for Microsoft Exchange from the
Properties pane.
2. Make sure the Policy tab is selected and assign values to variables
under the Settings branch.
Page 64

64
3. Modify settings by assigning new values to the basic leaf node
variables (marked by the leaf icons) shown in the Policy tab of the
Properties pane. For detailed explan ations of all variables, see
“F-Secure Anti-Virus for Microsoft Exchange Settings”, 68
Initially , every variable has a default value, which is displayed in gray.
Select the variable from the Properties pane and enter the new value
in the Editor pane to change it. You can either type the new value or
select it from a list box.
Click Clear to revert to the default value or Undo to cancel the most
recent change that has not been distributed.
Settings that are configured during the installation and the
initial setup require that you select the Final check box from the
Product View pane. For more information, see “Changing
Settings That Have Been Modified During Installation or
Upgrade”, 65.
4. After you have modified settings and cretated a new policy, it must be
distributed to hosts. Choose Distribute from the File menu.
5. After distributing the policy, you have to wait for F-Secure Anti-Virus
for Microsoft Exchange to poll the new policy file.
For testing purposes you may also want to change the polling
intervals. To do that, select the domain in F-Secure Policy
Manager console and set the Incoming Packages Polling
Interval and Outgoing Packages Update Interval variables to
30-45 seconds. The variables are located under each of the
two trees in the F-Secure Management Agent / Settings /
Communications branch. Note that since the default polling
interval is 10 minutes, it might take up to 10 minutes for the
new setting to take effect.
Alternatively, you can click Poll the server now in F-Secure
Management Agent.
To view statistics, select the Status tab of the Properties pane. Statistics
are updated periodically and can be reset by ch oosing Reset Statistics on
the Policy tab of the Properties pane. For more information, see
“F-Secure Anti-Virus for Microsoft Exchange Statistics”, 116.
Page 65

CHAPTER 4 65
Using F-Secure Anti-Virus for Microsoft Exchange
T o m anage the quarantined content, u se F-Secure Anti-Virus for Microsof t
Exchange Web Console. For more information, see “Quarantine
Management”, 237.
Changing Settings That Have Been Modified During Installation
or Upgrade
If you want to change a setting that has been modified locally du ring
installation or upgrade, you need to mark the setting as Final in the
restriction editor. The settings descriptions in this manual indicate the
settings for which you need to use the Final restriction. You can also
check in F-Secure Policy Manager Console whether you need to use the
Final restriction for a setting. Do the following:
1. Select the Policy tab and then select the setting you want to check.
2. Select the Status tab to see if the setting has been modified locally.
If the setting is not shown in grayed font in the Status view, then
the product uses the setting from the base po licy an d th er ef or e
the Final restriction is not needed.
If the setting is shown in normal black font, then the setting has
been modified locally. You must mark the setting as Final when
you change it.
4.4 Selecting Scanning Methods to Use
Virus Scanning
The virus scan uses virus definition databases to detect and disinfect
viruses. Virus definition databases are updated typically multiple times a
day and they provide an always up-to-date protection capability.
Heuristic Scanning
The heuristic scan analyzes files for suspicious code behavior so that the
product can detect unknown malware.
Page 66

66
Sandbox Scanning
The sandbox scan emulates and analyzes the code in a safe and isolated
environment.
Proactive Virus Threat Detection
The proactive virus threat detection analyzes e-mail messages for
possible virus patterns and security threats. All possibly harmful
messages are quarantined as unsafe. The proactive virus thr eat detection
can detect new viruses during the first minutes of the outbre a k.
Grayware Scanning
The grayware scan detects applications that have annoying or
undesirable behavior that can reduce the performance of computers on
the network and introduce significant security risks to your organization.
Grayware includes spyware, adware, dialers, joke programs, remote
access tools, and any other unwelcome files and programs that can
perform a variety of undesired and threatening actions, such as irritating
users with pop-up windows, logging user key strokes, and exposing the
computer to vulnerabilities.
Page 67

5
CENTRALLY MANAGED
A
DMINISTRATION
Overview..................................................................................... 68
F-Secure Anti-Virus for Microsoft Exchange Settings................ 68
F-Secure Anti-Virus for Microsoft Exchange Statistics............. 116
F-Secure Content Scanner Server Settings............................. 121
F-Secure Content Scanner Server Statistics............................ 131
F-Secure Management Agent Settings.................................... 134
F-Secure Automatic Update Agent Settings............................. 135
67
Page 68

68
5.1 Overview
If F-Secure Anti-Virus for Microsoft Exchange is installed in the centrally
administered mode, F-Secure Anti-Virus for Microsoft Exchange is
managed centrally with F-Secure Policy Manager. In the centralized
administration mode, you can use the F-Secure Anti-Virus for Microsoft
Exchange Web Console for the quarantine man agement and to check the
current status of F-Secure Anti-Virus for Microsoft Exchange, but you
cannot change any settings with it.
5.2 F-Secure Anti-Virus for Microsoft Exchange Settings
In the centralized administration mode, you can change settings and star t
operations using F-Secure Policy Manager Console. For more
information, see “Using F-Secure Policy Manager Console”, 63.
5.2.1 Common Settings
Notifications
Specify Notification Sender Address that is used by F-Secure Anti-Virus
for Microsoft Exchange for sending warning and informational messages
to the end-users (for example, recipients, senders and mailbox owners).
Make sure that the notification sender address is a valid SMTP
address. A public folder cannot be used as the notification sender
address.
Page 69

Network Configuration
The mail direction is based on the Internal Domains and Internal SMTP
hosts settings. For more information, see “Network Configuration”, 56.
Internal Domains Specify internal domains. Messages coming to
CHAPTER 5 69
Centrally Managed Administration
internal domains are considered to be inbound
mail unless they come from internal SMTP
sender hosts.
Separate each domain name with a space. You
can use an asterisk (*) as a wildcard. For
example, *example.com internal.example.net
Internal SMTP
Senders
Specify the IP addresses of hosts that belong to
your organization. Specify all hosts within the
organization that send messages to Exchange
Edge or Hub servers via SMTP as Internal
SMTP Senders.
Separate each IP address with a space. An IP
address range can be defined as:
a network/netmask pair (for example,
10.1.0.0/255.255.0.0), or
a network/nnn CIDR specification (for
example, 10.1.0.0/16).
Y ou can use an asterisk (* ) to match any number
or dash (-) to define a range of numbers. For
example,
172.16.4.4 172.16.*.1 172.16.4.0-16
172.16.250-255.*
Page 70

70
If end-users in the organization use other than
Microsoft Outlook e-mail client to send and
receive e-mail, it is recommended to specify all
end-user workstations as Internal SMTP
Senders.
If the organization has Exchange Edge and Hub
servers, the server with the Hub role installed
should be added to the Internal SMTP Sender
on the server where the Edge role is installed.
IMPORTANT: Do not specify the server where
the Edge role is installed as Internal SMTP
Sender.
Lists and Templates
Match Lists
Specify file and match lists that can be used by other settings.
List name Specify the name for the match list.
Type Specify whether the list contains keywords, file
patterns or e-mail addresses.
Filter Specify file names, extensions, keywords or
email addresses that the match list contains.
Description Specify a short description for the list.
Message Templates
Specify message templates for notifications.
Template name Specify the name for the message template.
Page 71

Quarantine
CHAPTER 5 71
Centrally Managed Administration
Subject line Specify the subject line of the notification
message.
Message body Specify the notification message text.
For more information about the variables you
can use in notification messages, see “Variables
in Warning Messages”, 270.
When the product places content to the Quarantine, it saves the content
as separate files into the Quarantine Storage and inserts an entry to the
Quarantine Database with information about the quarantined content.
Quarantine Storage Specify the path to the Quarantine storage
where all quarantined mails and attachment s are
placed.
If you change the Quarantine Storage setting,
select the Final checkbox in the Restriction
Editor to override initial settings.
Retain Items in
Quarantine
During the installation, F-Secure Anti-Virus for
Microsoft Exchange adjusts the access rights to
the Quarantine Storage so that only the product,
operating system and the local administrator can
access it. If you change the Quarantine Storage
setting, make sure that the new location has
secure access permissions. For more
information, see “Moving the Quarantine
Storage”, 252.
Specify how long quarantined e-mails are stored
in the Quarantine before they are deleted
automatically.
Page 72

72
The setting defines the default retention period
for all Quarantine categories. To change the
retention period for different categories,
configure Quarantine Cleanup Exceptions
settings.
Delete Old Items
Every
Quarantine Cleanup
Exceptions
Quarantine Size
Threshold
Quarantined Items
Threshold
Specify how of ten old items are deleted from the
Quarantine.
The setting defines the default cleanup interval
for all Quarantine categories. To change the
cleanup interval for different categories,
configure Quarantine Cleanup Exceptions
settings.
Specify separate Quarantine retention periods
and cleanup intervals for infected files,
suspicious files, disallowed attachments,
disallowed content, spam messages, scan
failures and unsafe files.
Specify the critical size (in megabytes) of the
Quarantine. If the Quarantine size reaches the
specified value, the product sends an alert to the
administrator.
If the threshold is specified as zero (0), the size
of the Quarantine is not checked.
Specify the critical number of items in the
Quarantine. When the Quarantine holds the
critical number of items, the product sends an
alert to the administrator.
Notify When
Quarantine Threshold
is Reached
If the threshold is specified as zero (0), the
amount of items is not checked.
Specify the level of the alert that is sent to
administrator when threshold levels are
reached.
Page 73

CHAPTER 5 73
Centrally Managed Administration
Released Quarantine
Message Template
Automatically
Process Unsafe
Messages
Max Attempts to
Process Unsafe
Messages
Final Action on
Unsafe Messages
Specify the template for the message that is sent
to the intented recipients when e-mail content is
released from the quarantine. For more
information, see “Lists and Templates”, 70.
The product generates the message only when
the item is removed from the Microsoft
Exchange Server store and sends it
automatically when you release the item to
intended recipients.
Specify how often the product tries to reprocess
unsafe messages that are retained in the
Quarantine. Set the value to Disabled to keep all
unsafe to process unsafe messages manually.
Specify how many times the product tries to
reprocess unsafe messages that are retained in
the Quarantine.
Use the Final Action on Unsafe Messages
setting to specify the action that takes place if
the message is retained in the Quarantine after
the maximum attempts.
Specify the action to unsafe messages after the
maximum number of reprocesses have been
attempted.
Leave in Quarantine - Leave messages in the
Quarantine and process them manually.
Release to Intended Recipients - Release
messages from the Quarantine and send them
to original recipients.
Page 74

74
Quarantine Log
Directory
Rotate Quarantine
Logs Every
Keep Rotated
Quarantine Logs
Sample Submission
You can use the product to send samples of unsafe e-mails and new, yet
undefined malware to F-Secure for analysis.
Max Submission
Attempts
Resend Interval Specify the time interval (in minutes) how long
Connection Timeout Specify the time (in seconds) how long the
Specify the path to the directory where
Quarantine logfiles are placed.
Specify how often the product rotates
Quarantine logfiles. At the end of each rotation
time a new log is created.
Specify how many rotated log flies are kept.
Specify how man y times th e product atte mpt s to
send the sample if the submission fails.
F-Secure Anti-Virus for Microsoft Exchange
should wait before trying to send the sample
again if the previous submission failed.
product tries to contact the F-Secure Hospital
server.
Send Timeout Specify the time (in seconds) how long the
product waits for the sample submission to
complete.
Page 75

Content Scanner Server
Edit the Content Scanner Server settings to change the general content
scanning options.
CHAPTER 5 75
Centrally Managed Administration
Max Size of Data
Processed in Memory
Connection Timeout Specify the time interval (in seconds) how long
Working directory Specify the name and location of the wor kin g
Specify the maximum size (in kilobytes) of data
to be transferred to the server via shared
memory in the local interaction mode. When the
amount of data exceeds the specified limit, a
local temporary file will be used for data transfer .
If the option is set to zero (0), all data transfers
via shared memory are disabled.
The setting is ignored if the local interaction
mode is disabled.
F-Secure Anti-Virus for Microsoft Exchange
should wait for a response from F-Secure
Content Scanner Server before it stops
attempting to send or receive data.
directory, where temporary files are placed.
IMPORTANT: This setting must be defined as
Final with the Restriction Editor before the
policies are distributed. Otherwise the settin g
will not be changed in the product.
During the installation, F-Secure Anti-Virus for
Microsoft Exchange automatically adjusts the
access rights so that only the operating system
and the local administrator can access files in
the Working directory. If you change this setting
after the installation, make sure that the new
folder has secure access permissions.
Page 76

76
If F-Secure Content Scanner Server uses a proxy server when it
connects to the threat detection center and the proxy server
requires authentication, the proxy authentication settings can be
configured with F-Secure Anti-Virus for Microsoft Exchange Web
Console only. For more information , see “Proxy Server”, 216.
5.2.2 Transport Protection
You can configure inbound, outbound and internal message protection
separately. For more information about the mail direction and
configuration options, see “Network Configuration”, 69.
You cannot add automatic disclaimers to messages with the
product, you can configure Microsoft Exchange Server to do that.
Some malware add disclaimers to infected messages, so
disclaimers should not be used for stating that the message is
clean of malware.
Attachment Filtering
Specify attachments to remove from inbound, outbound and internal
messages based on the file name or the file extension.
Strip Attachments Enable or disable the attachment stripping.
List of Attachments to
Strip
Use Exclusions Specify attachments that are not filtered. Leave
Action on Stripped
Attachments
Specify which attachments are stripped from
messages. For more information, see “Lists and
Templates”, 70.
the list empty if you do not want to exclude any
attachments from the filtering.
Specify how disallowed attachments are
handled.
Drop Attachment - Remove the attachment from
the message and deliver the message to the
recipient without the disallowed attachment.
Page 77

CHAPTER 5 77
Centrally Managed Administration
Drop the Whole Message - Do not deliver the
message to the recipient at all.
Quarantine Stripped
Attachments
Do Not Quarantine
These Attachments
Send Notification
Message to Recipient
Send Notification
Message to Sender
Specify whether stripped attachments are
quarantined.
The default option is Enabled.
Specify file names and file extensions which are
not quarantined even when they are stripped.
If the message contains an attachment which is
quarantined, all attachments linked to that
message are quarantined, regardless of this
setting.
Specify the template for the notification message
that is sent to the intented recipient when
disallowed or suspicious attachment is found.
Note that the notification message is not sent if
the whole message is dropped.
Specify the template for the notification message
that is sent to the original sender of the messag e
when disallowed or suspicious attachment is
found. For more information, see “Lists and
Templates”, 70.
Leave notification message fields empty if you
do not want to send any notification messages.
By default, notification messages are not sent.
For more information, see “Lists and Templates”,
70.
Page 78

78
Do Not Notify on
These Attachments
Notify Administrator Specify whether the administrator is notified
Virus Scanning
Specify inbound, outbound and internal messages and attachments that
should be scanned for malicious code.
Scan Messages for
Viruses
Specify attachments that do not generate
notifications. When the product finds specified
file or file extension, no notification is sent.
when the product strips an attachment and the
alert level of the notification..
Configure the Alert Forwarding table to specify
where the alert is sent based on the severity
level. The Alert Forwarding table can be found
in:
F-Secure Management Agent/Settings/Alerting.
Disabling virus scanning disables archive processing and grayware
scanning as well.
Enable or disable the virus scan. The virus scan
scans messages for viruses and other malicious
code.
List of Attachments to
Scan
Use Exclusions Specify attachments that are not scanned.
Heuristic Scanning Enable or disable the heuristic scan. The
Specify attachments that are scanned for
viruses. For more information, see “Lists and
Templates”, 70.
Leave the list empty if you do not want to
exclude any attachments from the scan.
heuristic scan analyzes files for suspicious code
behavior so that the product can detect unknown
malware.
Page 79

Centrally Managed Administration
By default, the heuristic scan is enabled for
inbound mails and disabled for outbound and
internal mails.
The heuristic scan may affect the product
performance and increase the risk of false
malware alarms.
Sandbox Scanning Enable or disable the sandbox scan. The
sandbox scan emulates and analyzes the code
in a safe and isolated environment known as the
Sandbox.
By default, the sandbox scan is enabled for
inbound mails and disabled for outbound and
internal mails.
The sandbox scan may affect the product
performance. Disable the sandbox scan if you
need the scan to be faster.
CHAPTER 5 79
Attempt to Disinfect
Infected Attachments
Action on Infected
Messages
Specify whether the product should try to
disinfect an infected attachment before
processing it. If the disinfection succeeds, the
product does not process the attachment further.
Disinfection may affect the product performance.
Infected files inside archives are not disinfected
even when the setting is enabled.
Specify whether to drop the infected attachment
or the whole message when an infected
message is found.
Drop Attachment - Remove the infected
attachment from the message and deliver the
message to the recipient without the attachment.
Page 80

80
Drop the Whole Message - Do not deliver the
message to the recipient at all.
Quarantine Infected
Messages
Do Not Quarantine
These Infections
Send Virus
Notification Message
to Recipient
Send Virus
Notification Message
to Sender
Specify whether infected or suspicious
messages are quarantined.
Specify infections that are never placed in the
quarantine. If a message is infected with a virus
or worm which has a name that matches a
keyword specified in this list, the message is not
quarantined. For more information, see “Lists
and Templates”, 70.
Specify the template for the notification message
that is sent to the intented recipient when a virus
or other malicious code is found.
Note that the notification message is not sent if
the whole message is dropped.
Specify the template for the notification message
that is sent to the original sender of the messag e
when a virus or other malicious code is found.
Leave notification message fields empty if you
do not want to send any notification messages.
By default, notification messages are not sent.
For more information, see “Lists and Templates”,
70.
Page 81

CHAPTER 5 81
Centrally Managed Administration
Do Not Notify on
These Infections
Notify Administrator Specify whether the administrator is notified
Archive Processing
Specify how the product processes inbound, outbound and internal
archive files.
Note that scanning inside archives takes time. Disabling scanning inside
archives improves performance, but it also means that the network users
need to use up-to-date virus protection on their workstations.
Archive processing is disabled when virus scanning is disabled.
Specify infections that do not gene rate
notifications. When the product finds the
specified infection, no notification is sent. For
more information, see “Lists and Templates”, 70.
when F-Secure Anti-Virus for Microsoft
Exchange finds a virus in a message.
Configure the Alert Forwarding table to specify
where the alert is sent based on the severity
level. The Alert Forwarding table can be found
in:
F-Secure Management Agent/Settings/Alerting.
Scan Viruses Inside
Archives
List of Files to Scan
Inside Archives
Use Exclusions Specify files that are not scanned inside
Specify whether files inside compressed archive
files are scanned for viruses.
Specify files inside archives that are scanned for
viruses. For more information, see “Lists and
Templates”, 70.
archives. Leave the list empty if you do not want
to exclude any files from the scan.
Page 82

82
Max Levels in Nested
Archives
Action on Max
Nested Archives
Action on Password
Protected Archives
Specify how many levels of archives inside other
archives the product scans when Scan Viruses
Inside Archives is enabled.
Specify the action to take on archives with
nesting levels exceeding the upper level
specified in the Max Levels in Nested Archives
setting.
Pass through - Deliver the message with the
archive to the recipient.
Drop archive - Remove the archive from the
message and deliver the message to the
recipient without it.
Drop the whole message - Do not deliver the
message to the recipient.
Specify the action to take on archives which are
protected with passwords. These archives can
be opened only with a valid password, so the
product cannot scan their content.
Pass through - Deliver the message with the
password protected archive to the recipient.
Quarantine Dropped
Archives
Drop archive - Remove the password protected
archive from the message and deliver the
message to the recipient without it.
Drop the whole message - Do not deliver the
message to the recipient.
Specify whether archives that are not delivered
to recipients are placed in the quarantine. For
more information, see “Quarantine
Management”, 237.
Page 83

Zero-Day Protection
Select whether Proactive Virus Threat Detection is enabled or disabled.
Proactive virus threat detection can identify new and unknown e-mail
malware, including viruses and worms.
When proactive virus threat detection is enabled, the product analyzes
inbound e-mail messages for possible security threats. All possibly
harmful messages are quarantined as unsafe.
Unsafe messages can be reprocessed periodically, as antivirus updates
may confirm the unsafe message as safe or infected.
When proactive virus threat detection is disabled, inbound mails are only
scanned by antivirus engines.
Grayware Scanning
Specify how the pr oduct processes grayware items in inbound, outbound
and internal messages.
Note that grayware scanning increases the scanning overhead. By
default, grayware scanning is enabled for inbound messages only.
CHAPTER 5 83
Centrally Managed Administration
Grayware scanning is disabled when virus scanning is disabled.
Scan Messages for
Grayware
Action on Grayware S pecify the action to take on items which contain
Enable or disable the grayware scan.
The default value is Enabled for inbound
messages and Disabled for outbound and
internal messages.
grayware.
Pass Through - Leave grayware items in the
message.
Page 84

84
Drop Attachment - Remove grayware items from
the message.
Drop the Whole Message - Do not deliver the
message to the recipient.
Grayware Exclusion
List
Quarantine Grayware Specify whether grayware attachments are
Do Not Quarantine
This Grayware
Send Warning
Message to Recipient
Send Warning
Message to Sender
Specify the list of keywords for grayware types
that are not scanned. Leave the list empty if you
do not want to exclude any grayware types from
the scan.
quarantined.
Specify grayware that ar e never placed in the
quarantine. For more information, see “Lists and
Templates”, 70.
Specify the template for the notification message
that is sent to the intented recipient when a
grayware item is found in a message.
Note that the notification message is not sent if
the whole message is dropped.
Specify the template for the notification message
that is sent to the original sender of the messag e
when a grayware item is found in a message.
Leave notification message fields empty if you
do not want to send any notification messages.
By default, notification messages are not sent.
Do Not Notify on This
Grayware
For more information, see “Lists and Templates”,
70.
Specify the list of keywords for grayware types
that are not notified about.
Page 85

Notify Administrator Specify whether the administrator is notified
S pam Control
To change settings used when inbound messages are scanned for spam,
see “Administering F-Secure Spam Control”, 257.
CHAPTER 5 85
Centrally Managed Administration
If the product finds a grayware item with a name
that matches the keyword, the recipient and the
sender are not notified about the grayware item
found.
Leave the list empty if you do not want to
exclude any grayware types from notifications.
when F-Secure Anti-Virus for Microsoft
Exchange finds a grayware item in a message.
Configure the Alert Forwarding table to specify
where the alert is sent based on the severity
level. The Alert Forwarding table can be found
in: F-Secure Management Agent/Settings/
Alerting.
You can configure Spam Control settings for inbound messages,
and only if you have F-Secure Spam Control installed.
The threat detection engine of F-Secure Anti-Virus for Microsoft
Exchange can identify spam and virus patterns from the message
envelope, headers and body during the first minutes of the new spam or
virus outbreak.
If you enable the heuristic spam analysis, all messages that the threat
detection engine does not classify as spam are further analyzed for spam.
When the heuristic spam analysis is disabled, only the threat detection
engine filters messages for spam.
Realtime Blackhole List (RBL) spam filtering is not enabled by
default even if you enable spam filtering. For information on
configuring Realtime Blackhole Lists, see
Configuration”, 266.
“Realtime Blackhole List
Page 86

86
File Type Recognition
Select whether you want to use Intelligent File Type Recognition or not.
Trojans and other malicious code can disguise themselves with filename
extensions which are usually considered safe to use. Intelligent File Type
Recognition can recognize the real file type of the message attachment
and use that while the attachment is processed.
Using Intelligent File T ype Recognition strengthens the security but
can degrade the system performance.
Security Options
Configure security options to limit actions of malformed and problematic
messages.
Action on Malformed
Mails
Max Levels of Nested
Messages
Specify the action for non-RFC compliant
e-mails. If the message has an incorrect
structure, the product cannot parse the message
reliably.
Drop the Whole Message - Do not deliver the
message to the recipient.
Pass Through - The product allows the message
to pass through.
Pass Through and Report - The product allows
the message to pass through, but sends a report
to the administrator.
Specify how many levels de ep to scan in nested
e-mail messages. A nested e-mail message is a
message that includes one or more e-mail
messages as attachments. If zero (0) is
specified, the maximum nesting level is not
limited.
Page 87

CHAPTER 5 87
Centrally Managed Administration
It is not recommended to set the maximum
nesting level to unlimited as this will make the
product more vulnerable to DoS
(Denial-of-Service) attacks.
Action on Mails with
Exceeding Nesting
Levels
Quarantine
Problematic
Messages
Specify the action to t ake on in bound message s
with nesting levels exceeding the upper level
specified in the Max Levels of Nested Messages
setting.
Drop the Whole Message - Messages with
exceeding nesting levels are not delivered to the
recipient.
Pass Through - Nested messages are scanned
up to level specified in the Max Levels of Nested
Messages setting. Exceeding nesting levels are
not scanned, but the message is delivered to the
recipient.
Specify if mails that contain malformed or broken
attachments are quarantin ed for later analysis or
recovery.
Trusted Senders and Recipients
You can use trusted senders and recipients lists to exclude some
messages from the mail scanning and processing completely.
Trusted Senders
Trusted Recipients
Specify senders who are excluded fr om the m ail
scanning and processing.
Specify recipients who are excluded from the
mail scanning and processing.
Page 88

88
5.2.3 Storage Protection
Edit general Storage Protection settings to configure how mailboxes and
public folders are scanned in the Exchange Store with real-time,
background, manual and scheduled scanning.
Real-Time and Background Scanning
The real-time and background scanning can automatically scan
messages that have been created or received.
General Real Time Scanning Settings
Specify which messages you want to scan during the real time scanning.
Scan Only Messages
Created Within
Scan Timeout Specify how long to wait for the real time scan
Specify which messages are scanned with the
real time scanning, for example; Last hour, Last
day, Last week. Messages that have been
created before the specified time are not
scanned.
result. After the specified time, the client that
tries to access the scanned message gets the
"virus scanning in progress" notificaion.
Page 89

CHAPTER 5 89
Centrally Managed Administration
General Background Scanning Settings
Specify which messages you want to scan during the background scan.
Background
Scanning
Scan Only Messages
with Attachments
Scan Only
Unprocessed
Messages
Scan Only Messages
Received Within
Enable or disable background scanning.
Background scanning methodically scans
specified messages stored in the database.
Specify whether to scan all messages or only
messages with attachments. When the setting is
Enabled, only messages that contain
attachments are scanned on background
scanning.
Specify whether to scan all messages or only
messages that have not been processed yet.
When the setting is Enabled, only unprocessed
messages are scanned on background
scanning.
Specify which messages are scanned on the
background scan, for example; Last hour, Last
day, Last week. Messages that have been
received before the specified time are not
scanned.
Virus Scanning
Specify messages and attachments in the Microsoft Exchange Storage
that should be scanned for malicious code.
Disabling virus scanning disables archive processing and grayware
scanning as well.
Scan Mailboxes Specify mailboxes that are scanned for viruses.
Disabled - Do not scan any mailboxes.
Scan All Mailboxes - Scan all mailboxes.
Page 90

90
Scan Only Included Mailboxes - Scan mailboxes
specified in the Included Mailboxes list.
Scan All Except Excluded Mailboxes - Scan all
mailboxes except those specified in the
Excluded Mailboxes list.
Included Mailboxes Specify mailboxes that are scanned for viruses
when the Scan Mailboxes setting is set to Scan
Only Included Mailboxes.
Excluded Mailboxes Specify mailboxes that are not scanned when
the the Scan Mailboxes setting is set to Scan All
Except Excluded Mailboxes.
Scan Public Folders Specify public folders that are scanned for
viruses.
Disabled - Do not scan any public folders.
Scan All Folders - Scan all public folders.
Scan Only Included Folders - Scan public
folders specified in the Included Folders list.
Scan All Except Excluded Folders - Scan all
public folders except those specified in the
Excluded Folders list.
Included Folders Specify public folders that are scanned for
viruses when the Scan Public Folders setting is
set to Scan Only Included Folders.
Excluded Folders Specify public folders that are not scanned wh en
the the Scan Public Folders setting is set to
Scan All Except Excluded Folders.
List of Attachments to
Scan
Specify attachments that are scanned for
viruses. For more information, see “Lists and
Templates”, 70.
Page 91

Centrally Managed Administration
Use Exclusions Specify attachments that are not scanned.
Leave the list empty if you do not want to
exclude any attachments from the scan.
Heuristic Scanning Enable or disable the heuristic scan. The
heuristic scan analyzes files for suspicious code
behavior so that the product can detect unknown
malware.
Heuristic scanning may affect the product
performance and increase the risk of false
malware alarms.
Sandbox Scanning Enable or disable the sandbox scan. The
sandbox scan emulates and analyzes the code
in a safe and isolated environment known as the
Sandbox.
Sandbox scanning may affect the product
performance. We recommend that you disable
the Sandbox scan if you need the scan to be
faster.
CHAPTER 5 91
Attempt to Disinfect
Infected Attachments
Specify whether the product should try to
disinfect an infected attachment before
processing it. If the disinfection succeeds, the
product does not process the attachment further.
Disinfection may affect the product performance.
Infected files inside archives are not disinfected
even when the setting is enabled.
Page 92

92
Quarantine Infected
Attachments
Do Not Quarantine
These Infections
Replacement Text
Template
Specify whether infected and suspicious
attachments are quarantined.
Specify infections that are never placed in the
quarantine. For more information, see “Lists and
Templates”, 70.
Specify th e template for the text that replaces
the infected attachment when the infected
attachment is removed from the message. For
more information, see “Lists and Templates”, 70.
Archive Processing
Specify how the prod uct processes archive files in Microsoft Exchange
Storage.
Archive processing is disabled when virus scanning is disabled.
Scan Viruses Inside
Archives
List of Files to Scan
Inside Archives
Use Exclusions Specify files inside archives that are not
Specify if files inside archives are scanned for
viruses and other malicious code.
Specify files that are scanned for viruses inside
archives.
scanned. Leave the list empty if you do not want
to exclude any files from the scan.
Max Levels in Nested
Archives
Specify how many levels de ep to scan in nested
archives, if Scan Viruses Inside Archives is
enabled.
A nested archive is an archive that contains
another archive inside. If zero (0) is specified,
the maximum nesting level is not limited.
Page 93

CHAPTER 5 93
Centrally Managed Administration
Specify the number of levels the product goes
through before the action selected in Action on
Max Nested Archives takes place. The default
setting is 3.
Action on Max
Nested Archives
Action on Password
Protected Archives
Quarantine Dropped
Archives
Specify the action to t ake on nested archives
with nesting levels exceeding the upper level
specified in the Max Levels in Nested Archives
setting.
Pass Through - Nested archives are scanned up
to level specified in the Max Levels in Nested
Archives setting. Exceeding nesting levels are
not scanned, but the archive is not removed.
Drop - Archives with exceeding nesting levels
are removed.
Specify the action to take on archives which are
protected with passwords. These archives can
be opened only with a valid password, so the
product cannot scan their content.
Pass through - Leave the password protected
archive in the message.
Drop archive - Remove the password protected
archive from the message.
Specify whether archives that are not delivered
to recipients are placed in the quarantine. For
more information, see “Quarantine
Management”, 237.
Grayware Scanning
Specify how the produ ct processes grayware items in Microsoft Exchange
Storage.
Grayware scanning is disabled when virus scanning is disabled.
Page 94

94
Scan Messages for
Grayware
Action on Grayware S pecify the action to take on items which contain
Grayware Exclusion
List
Quarantine Grayware Specify whether grayware attachments are
Do Not Quarantine
These Grayware
Replacement Text
Template
Enable or disable the grayware scan.
grayware.
Report only- Leave grayware items in the
message and notify the administrator.
Drop attachment - Remove grayware items from
the message.
Specify the list of keywords for grayware types
that are not scanned. Leave the list empty if you
do not want to exclude any grayware types from
the scan.
quarantined.
Specify grayware that ar e never placed in the
quarantine. For more information, see “Lists and
Templates”, 70.
Specify th e template for the text that replaces
the grayware attachment when the grayware
attachment is removed from the message. For
more information, see “Lists and Templates”, 70.
File Type Recognition
Select whether you want to use Intelligent File Type Recognition or not.
Trojans and other malicious code can disguise themselves with filename
extensions which are usually considered safe to use. Intelligent File Type
Recognition can recognize the real file type of the message attachment
and use that while the attachment is processed.
Using Intelligent File T ype Recognition strengthens the security but
can degrade the system performance.
Page 95

Manual Scanning
You can scan mailboxes and Public Folders for viruses and strip
attachments manually at any time. You can start the manual scan with
controls under the F-Secure Anti-Virus for Microsoft Exchange /
Operations / Manual Scanning branch.
To start the manual scan, click Start and dist rib ut e the po licy.
To start the manual scan, click Stop and distribute the policy.
General
Specify which messages you want to scan during the manual scan.
Scan Mailboxes Specify mailboxes that are scanned for viruses.
CHAPTER 5 95
Centrally Managed Administration
Disabled - Do not scan any mailboxes.
Scan All Mailboxes - Scan all mailboxes.
Scan Only Included Mailboxes - Scan mailboxes
specified in the Included Mailboxes list.
Scan All Except Excluded Mailboxes - Scan all
mailboxes except those specified in the
Excluded Mailboxes list.
Included Mailboxes Specify mailboxes that are scanned for viruses
when the Scan Mailboxes setting is set to Scan
Only Included Mailboxes.
Excluded Mailboxes Specify mailboxes that are not scanned when
the the Scan Mailboxes setting is set to Scan All
Except Excluded Mailboxes.
Scan Public Folders Specify public folders that are scanned for
viruses.
Disabled - Do not scan any public folders.
Scan All Folders - Scan all public folders.
Page 96

96
Scan Only Included Folders - Scan public
folders specified in the Included Folders list.
Scan All Except Excluded Folders - Scan all
public folders except those specified in the
Excluded Folders list.
Included Folders Specify public folders that are scanned for
viruses when the Scan Public Folders setting is
set to Scan Only Included Folders.
Excluded Folders Specify public folders that are not scanned wh en
the the Scan Public Folders setting is set to
Scan All Except Excluded Folders.
Incremental Scanning Specify which messages are scanned for
viruses during the manual scan.
All Messages - Scan all messages.
Only Recent Messages - Scan only messages
that have not been scanned during the previous
manual scanning.
Attachment Filtering
Specify attachments that are remove from messages during the manual
scan.
Strip Attachments Enable or disable the attachment stripping.
List of Attachments to
Strip
Use Exclusions Specify attachments that are not filtered. Leave
Quarantine Stripped
Attachments
Specify which attachments are stripped from
messages. For more information, see “Lists and
Templates”, 70.
the list empty if you do not want to exclude any
attachments from the filtering.
Specify whether stripped attachments are
quarantined.
Page 97

CHAPTER 5 97
Centrally Managed Administration
Do Not Quarantine
These Attachments
Replacement Text
Template
Specify file names and file extensions which are
not quarantined even when they are stripped.
If the message contains an attachment which is
quarantined, all attachments linked to that
message are quarantined, regardless of this
setting.
Specify the template for the text that replaces
the infected attachment when the stripped
attachment is removed from the message. For
more information, see “Lists and Templates”, 70.
Virus Scanning
Specify messages and attachments that should be scanned for malicious
code during the manual scan.
Scan Messages for
Viruses
List of Attachments to
Scan
Use Exclusions Specify attachments that are not scanned.
Enable or disable the virus scan. The virus scan
scans messages for viruses and other malicious
code.
Specify attachments that are scanned for
viruses. For more information, see “Lists and
Templates”, 70.
Leave the list empty if you do not want to
exclude any attachments from the scan.
Heuristic Scanning Enable or disable the heuristic scan. The
heuristic scan analyzes files for suspicious code
behavior so that the product can detect unknown
malware.
Heuristic scanning may affect the product
performance and increase the risk of false
malware alarms.
Page 98

98
Sandbox Scanning Enable or disable the sandbox scan. The
sandbox scan emulates and analyzes the code
in a safe and isolated environment known as the
Sandbox.
Sandbox scanning may affect the product
performance. We recommend that you disable
the Sandbox scan if you need the scan to be
faster.
Attempt to Disinfect
Infected Attachments
Quarantine Infected
Attachments
Do Not Quarantine
These Infections
Replacement Text
Template
Specify whether the product should try to
disinfect an infected attachment before
processing it. If the disinfection succeeds, the
product does not process the attachment further.
Disinfection may affect the product performance.
Infected files inside archives are not disinfected
even when the setting is enabled.
Specify whether infected or suspicious
attachments are quarantined.
Specify infections that are never placed in the
quarantine. If a message is infected with a virus
or worm which has a name that matches a
keyword specified in this list, the message is not
quarantined. For more information, see “Lists
and Templates”, 70.
Specify th e template for the text that replaces
the infected attachment when the infected
attachment is removed from the message. For
more information, see “Lists and Templates”, 70.
Page 99

CHAPTER 5 99
Centrally Managed Administration
Archive Processing
Specify how the product processes archive files during the manual scan.
Scan Archives Specify if files inside archives are scanned for
viruses and other malicious code.
List of Files to Scan
Inside Archives
Use Exclusions Specify files inside archives that are not
Max Levels in Nested
Archives
Action on Max
Nested Archives
Specify files that are scanned for viruses inside
archives.
scanned. Leave the list empty if you do not want
to exclude any files from the scan.
Specify how many levels dee p to scan in nested
archives, if Scan Viruses Inside Archives is
enabled.
A nested archive is an archive that contains
another archive inside. If zero (0) is specified,
the maximum nesting level is not limited.
Specify the number of levels the product goes
through before the action selected in Action on
Max Nested Archives takes place. The default
setting is 3.
Specify the action to t ake on nested archives
with nesting levels exceeding the upper level
specified in the Max Levels in Nested Archives
setting.
Pass Through - Nested archives are scanned up
to level specified in the Max Levels in Nested
Archives setting. Exceeding nesting levels are
not scanned, but the archive is not removed.
Drop - Archives with exceeding nesting levels
are removed.
Page 100

100
Action on Password
Protected Archives
Quarantine Dropped
Archives
Specify the action to take on archives which are
protected with passwords. These archives can
be opened only with a valid password, so the
product cannot scan their content.
Pass through - Leave the password protected
archive in the message.
Drop archive - Remove the password protected
archive from the message.
Specify whether archives that are not delivered
to recipients are placed in the quarantine. For
more information, see “Quarantine
Management”, 237.
Grayware Scanning
Specify how the product processes grayware items during the manual
scan.
Scan Messages for
Grayware
Action on Grayware S pecify the action to take on items which contain
Enable or disable the grayware scan.
grayware.
Grayware Exclusion
List
Report only- Leave grayware items in the
message and notify the administrator.
Drop attachment - Remove grayware items from
the message.
Specify the list of keywords for grayware types
that are not scanned. Leave the list empty if you
do not want to exclude any grayware types from
the scan.
 Loading...