

Page 1
BB86 & BB92 Bottom Bracket Installation Instructions (For Use With FSA Alloy Cranksets Only)
Published – Mar, 2011. ZS114B.v1 © Full Speed Ahead
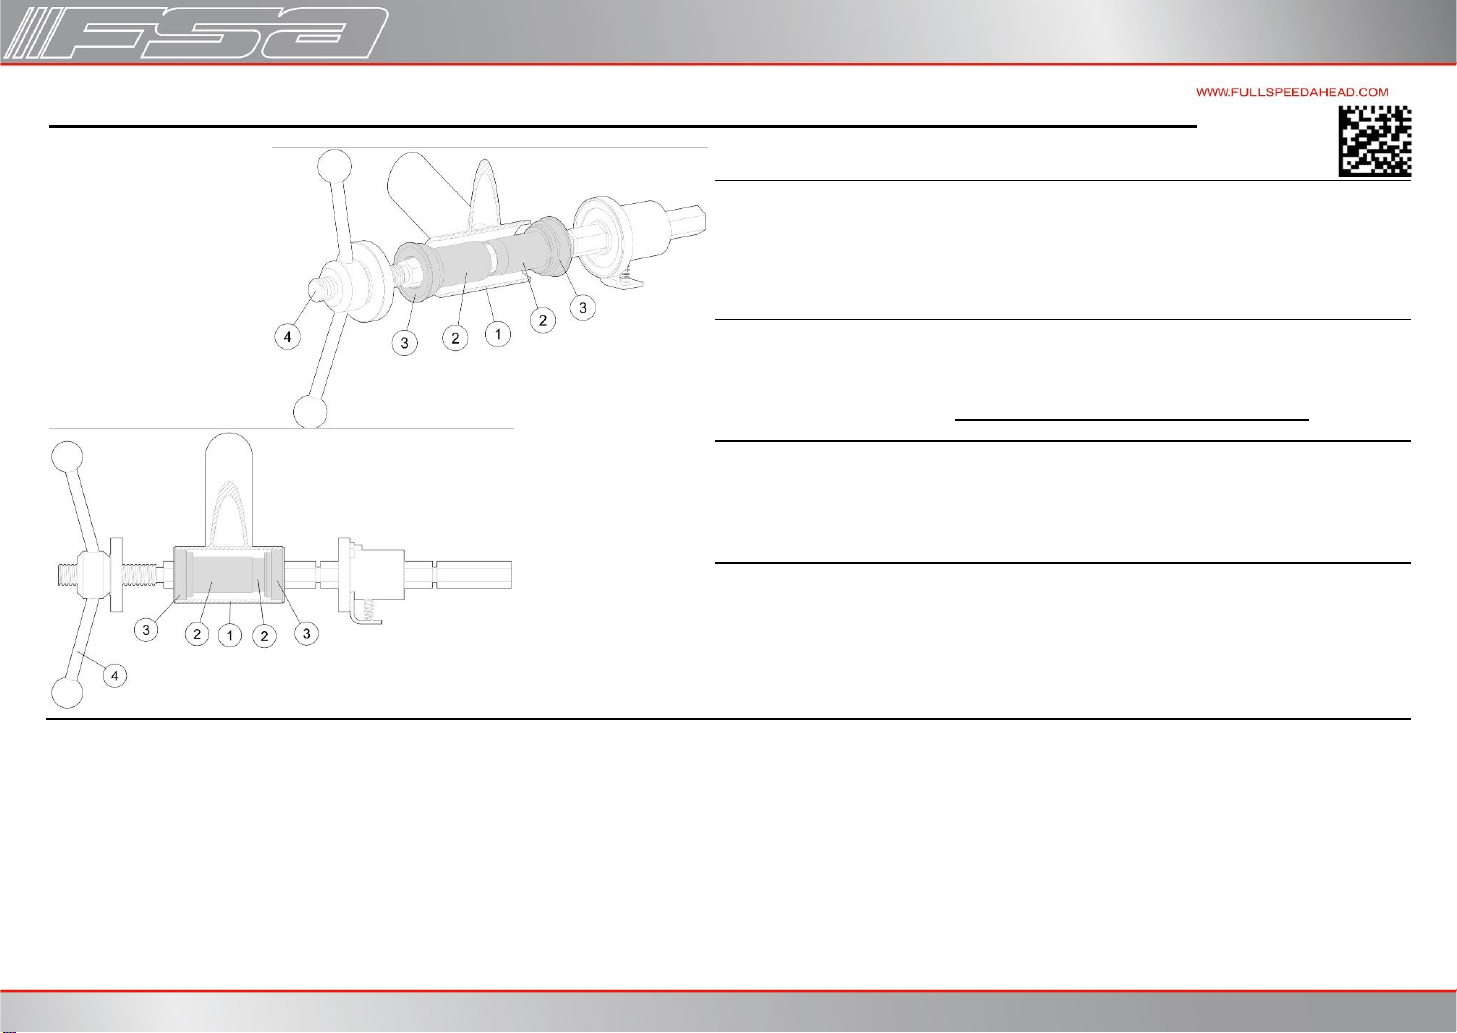
Fig.1
Fig.2
Press Fit Bottom Bracket Installation
1. Ensure that Bottom Bracket (BB) shell ① is clean and free of metal chips, dirt, and excess paint.
Note: BB-92 is for MTB cranksets only. BB86 is for road cranksets only. Refer to “ Crankset Specification ” chart to ensure bottom bracket and crankset compatibility before continuing.
2. Follow assembly order as pictured in above illustrations.
3. Place either Bearing cup ③ with plastic sleeve ② on the Headset press tool ④ as shown. Note: Right and Left bearing cups are the same.
4. Slide the Headset Press tool ④ through the Bottom bracket Shell and place the remaining Bearing Cup ③ with Plastic sleeve ② facing the Bottom bracket shell (Fig.1).
5. Using the Headset Press tool ④ press the bearing cups ③ with Plastic Center Sleeve ② into the BB shell. Tighten until the thrust face of the Bearing Cup ③ is flush with the outer face of the Bottom Bracket shell
① (Fig.2). Note: Be certain that the bearing cups and tool faces are aligned and square otherwise damage to the plastic covers and bottom bracket shell may occur.
6. When Bottom Bracket is fully installed unscrew Headset Press tool and carefully remove from the Bottom bracket.
7. Check bearings for rotational smoothness. If bearings feel rough, it may be an indication the cups are not perfectly aligned in the bottom bracket shell. It may be necessary to remove and reinstall the bearings to
be assured bearing alignment in the bottom bracket shell.
Introduction
Congratulations on your Full Speed Ahead product. Please read these instructions and follow them for correct
use. Failure to follow the warnings and instructions could result in damage to product not covered under
warranty, damage to bicycle; or cause an accident resulting in injury or death. Since specific tools and
experience are necessary for proper installation, it is recommended that the product be installed by a qualified
bicycle technician. FSA & Vision assumes no responsibility for damages or injury related to improperly installed
components.
Warranty
Full Speed Ahead (FSA) warrants all FSA, Gravity, Vision, Metropolis and RPM products to be free from defects
in materials or workmanship for a period of two years after original purchase unless otherwise stated in the full
warranty policy. The warranty is non-transferable and valid to the original purchaser of the product only. Any
attempt to modify the product in any way such as drilling, grinding, and painting will void the warranty. For
more information on warranty policy and instructions for completing a warranty claim, check out the Full
Warranty Policy found at our website: http://www.fullspeedahead.com/support/warranty-policy/
Specification
Item Number / Model Name BB-AL86/SLE / Steel Bearing BB86 for Alloy Road Cranks
Item Number / Model Name BB-ALM92/SLE / Steel Bearing BB92 for Alloy MTB Cranks
Note: These bottom brackets are for FSA model alloy cranksets listed in chart below. For bottom brackets
compatible with FSA Carbon cranksets refer to instruction: ZS114A
Components
Follow the assembly order in the illustration:
① Bottom Bracket Shell
② Plastic Center Sleeve x1
③ Bearing Cup x2
④ Headset Press Tool (not included)
Page 2
Crankset Installation
1. Ensure the Bottom Bracket Shell ① is BB86 (for Road) and BB92 (for MTB) compatible and has an overall width of 86.5mm (for Road) and 92mm (for MTB).
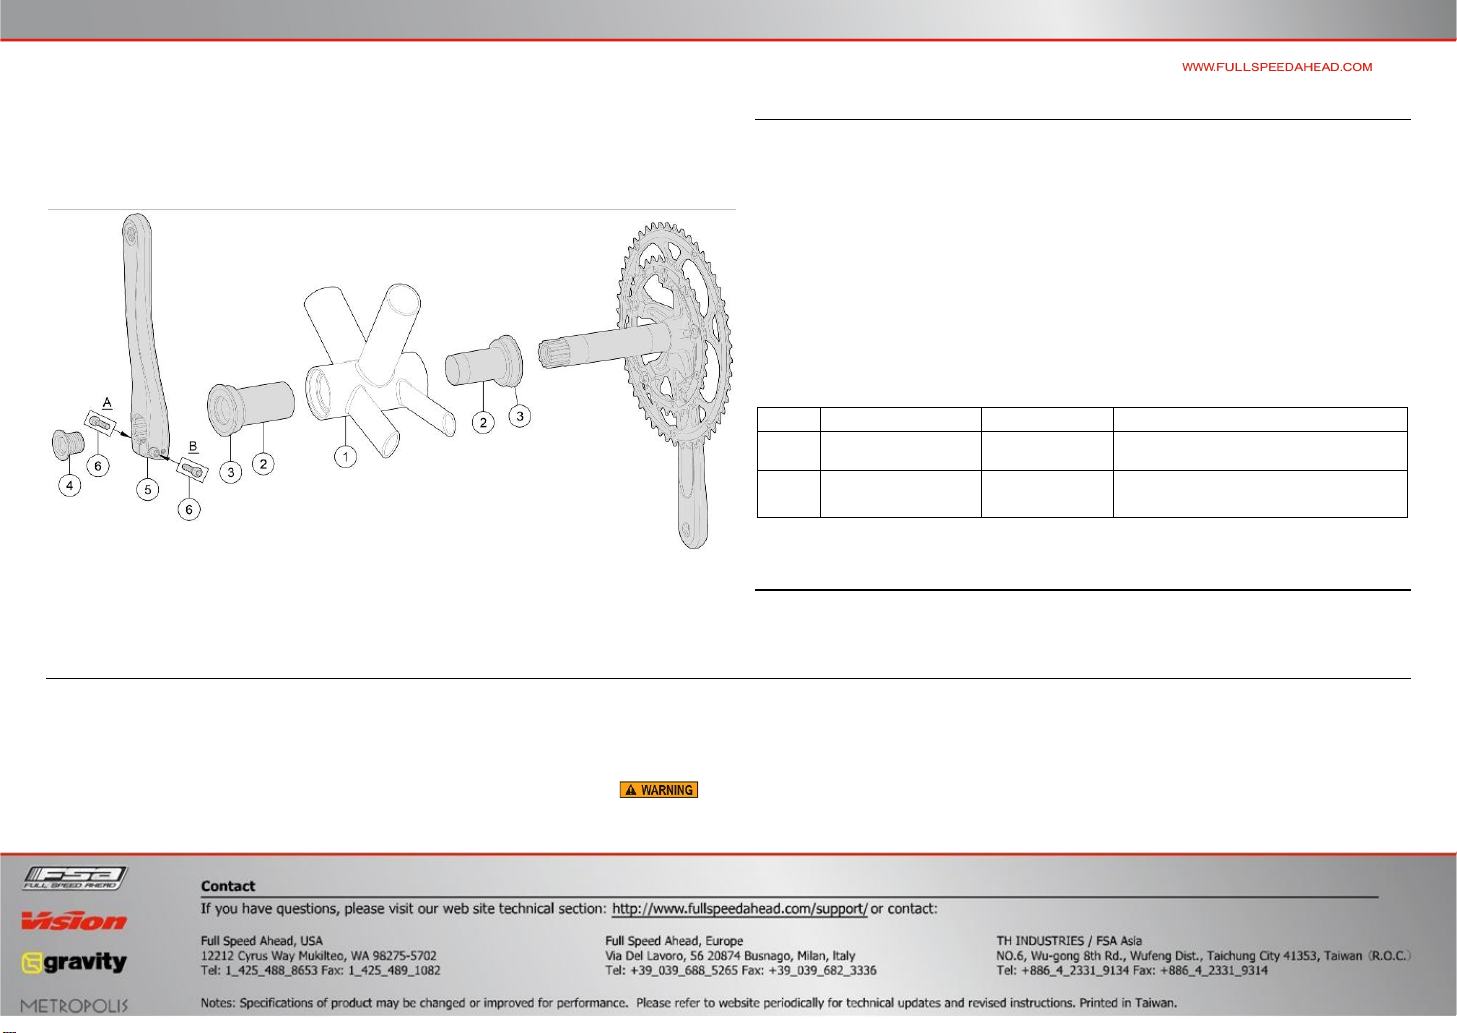
2. Follow assembly order as pictured above. (Note: bottom bracket should be already installed as instructed earlier in instruction).
3. Apply a thin layer of grease on the spindle surfaces which contact bearing. Insert the drive crank into the right side of BB shell. Take great care not to damage the plastic covers of the bearing cups.
4. Apply a thin layer of grease on the engagement teeth the left spindle. (Note: Engagement teeth should be fully exposed on the left, non-drive side of the bottom bracket. Alloy cranksets do not require a wave spring
washer).
5. Install the non-drive crankarm ⑤. Make sure engagement teeth of spindle and left arm insert are seated correctly before tightening crankbolts ④ & ⑥. Make sure spindle engages the non-drive arm fully. The spindle
must be inserted passed the center of the outermost pinch bolt for proper engagement. If spindle engagement is not sufficient, the crankarm can loosen while riding causing loss of control of bicycle
and potential injury.
6. Tighten M18 endbolt ④ to a torque of 7.1-15 kgf.cm / 0.7-1.5 Nm / 6.2-13 in.lbs. Always use a calibrated torque wrench to tighten the endbolt.
7. The M6 pinch bolts ⑥ must be tightened by turning each bolt 1 / 2 turn at a time so both bolts tighten evenly to a torque of 110-150 kgf.cm / 10.8-14.7 Nm / 95-130 in.lbs.
Specification
Item Number / Model Name CK-8090 / Energy BB86 Crankset
Item Number / Model Name CK-C8090 / Energy compact BB86 Crankset
Item Number / Model Name CK-8090 / Energy Triple BB86 Crankset
Item Number / Model Name CK-C6030 / TriMax TT Compact BB86 Crankset
Item Number / Model Name CK-6020 / Gossamer BB86 Crankset
Item Number / Model Name CK-C6020 / Gossamer Compact BB86 Crankset
Item Number / Model Name CK-6020 / Gossamer Triple BB86 Crankset
Item Number / Model Name CK-6021 / Gossamer Pro BB86 Crankset
Item Number / Model Name CK-C6021 / Gossamer Pro Compact BB86 Crankset
Item Number / Model Name CK-6021 / Gossamer Pro Triple BB86 Crankset
Item Number / Model Name CK-C9186 / Afterburner compact 386 BB92 Crankset
Item Number / Model Name CK-C7186 / Comet compact 386 BB92 Crankset
Item Number / Model Name CK-9180 / Afterburner BB92 Crankset
Item Number / Model Name CK-7080 / V-Drive BB92 Crankset
Item Number / Model Name CK-7152 / Comet BB92 Crankset
Item Number / Model Name CK-9162 / Gravity Light BB92 Crankset
Type
ROAD
MTB
★2.5mm spacer is needed between drive side crank and bottom bracket bearing shield; not included
with FSA BB92 Kit.
Components
Follow the assembly order in the illustration:
① Bottom Bracket Shell
② BB Sleeve x2
③ Bearing Cup x2
BB BB Shell Width Item Number
BB-AL86/SLE 86.5mm
BB-ALM92/SLE
92mm
89.5 mm★
CK-8090、CK-C8090、CK-C6030、CK-
6020、CK-C6020、CK-6021、CK-C6021
CK-C9186、CK-C7186、CK-9180、CK-
7080、 K-7152、CK-9162
M18 Endbolt x1④
Left Cra⑤ nk x1
M6 Pinch Bolt x2⑥
 Loading...