

Page 1
SUFF/UFF Filtration Systems
Installation & Operation Manual
Under Fryer Filter (UFF) and
Single Under Fryer Filter (SUFF)
PARTS LIST
INCLUDED
Frymaster/Dean, a member of the Commercial Food Equipment Service Association,
recommends using CFESA Certified Technicians.
PRINTED IN THE USA
24-Hour Service Hotline
1-800-551-8633
OCTOBER 2005
*8195809*
Page 2
Please read all sections of this manual and retain for future reference.
Installation, maintenance, and repairs should be performed by your Frymaster/Dean
Factory Authorized Service Agency.
WARNING
Safe and satisfactory operation of your equipment depends on its proper installation.
Installation MUST conform to local codes, or in the absence of local codes, with the
latest edition of the National Electric Code, N.F.P.A. 70.
WARNING
ELECTRICAL GROUNDING INSTRUCTIONS
This filter is equipped with a three-prong, grounded plug for your protection against
shock hazard and should be plugged directly into a properly grounded, three-hole
receptacle. Do not cut off, remove or otherwise bypass the grounding prong on this
plug.
If it is necessary to use an extension cord, it MUST be a three-conductor, grounded
cord of 16 gauge or greater.
DANGER
Do not filter more than one fry tank at a time.
Hot fluid – Do not fill above a point 1½ inches below the OIL CONTAINER RIM.
WARNING
This filter unit is not suitable for outdoor use. When operating this unit, it MUST be
placed on a horizontal surface.
WARNING
This filter unit is not suitable for installation in an area where a water jet can be used,
and this appliance MUST NOT be cleaned with a water jet.
Page 3
NOTICE:
If this filter unit is cleaned with water, disconnect the unit from power source before
cleaning and thoroughly dry the filter unit before reconnecting to electrical power
source.
DANGER
The crumb tray (if equipped) in portable filter systems must be emptied into a fireproof
container at the end of frying operations each day. Some food particles can
spontaneously combust if left soaking in certain shortening material.
NOTICE:
Drawings and photos used in this manual are intended to illustrate operational, cleaning
and technical procedures and may not conform to on-site management operational
procedures.
NOTICE
IF, DURING THE WARRANTY PERIOD, THE CUSTOMER USES A PART FOR THIS
ENODIS EQUIPMENT OTHER THAN AN UNMODIFIED NEW OR RECYCLED PART
PURCHASED DIRECTLY FROM FRYMASTER/DEAN, OR ANY OF ITS AUTHORIZED
SERVICE CENTERS, AND/OR THE PART BEING USED IS MODIFIED FROM ITS
ORIGINAL CONFIGURATION, THIS WARRANTY WILL BE VOID. FURTHER,
FRYMASTER/DEAN AND ITS AFFILIATES WILL NOT BE LIABLE FOR ANY CLAIMS,
DAMAGES OR EXPENSES INCURRED BY THE CUSTOMER WHICH ARISE DIRECTLY
OR INDIRECTLY, IN WHOLE OR IN PART, DUE TO THE INSTALLATION OF ANY
MODIFIED PART AND/OR PART RECEIVED FROM AN UNAUTHORIZED SERVICE
CENTER.
Page 4
TABLE OF CONTENTS
SUFF/UFF FILTRATION SYSTEMS INSTALLATION & OPERATION MANUAL
Chapter 1. INTRODUCTION 1-1
1.1 Ordering Parts 1-1
1.2 Service Information 1-1
1.3 After Purchase 1-2
1.4 Safety Information 1-2
Chapter 2 IMPORTANT INFORMATION 2-1
2.1 General 2-1
2.2 Rating Plate 2-1
2.3 Pre-installation 2-2
2.4 Unpacking the Filter System 2-2
Chapter 3 INSTALLATION AND OPERATION INSTRUCTIONS 3-1
3.1 General 3-1
3.2 Filter Prep 3-2
3.2.1 Filter Unit Identification 3-2
3.2.2 Assembling the Filter 3-6
3.2.3 Installing the Filter 3-12
3.3 Daily Filtration Operation 3-13
3.3.1 General Overview 3-13
3.3.2 Filtering Tools 3-13
3.4 Operating the Filter 3-14
3.4.1 Pan Preparation and Operation 3-14
3.4.2 Filter Operation 3-16
3.4.3 Hose and Wand Operation 3-19
Chapter 4 CLEANING AND MAINTENANCE 4-1
4.1 General 4-1
4.2 Each Filter Use 4-1
4.3 Daily (Close of Business) 4-3
4.4 Weekly 4-3
Chapter 5 TROUBLESHOOTING 5-1
Chapter 6 PARTS LIST 6-1
6.1 SUFF 80 BID80 Series 6-1
6.2 SUFF 80 Domestic (Early Style) 6-2
6.3 SUFF 80 Domestic (Current) 6-3
6.4 SUFF 60 (Current Production-Domestic and 18UE/BIH1721) 6-4
6.5 SUUF 50 (Early Style) 6-5
6.6 SUFF 50 (Current Style) 6-6
6.7 Super Cascade 75 (Early Style) 6-7
6.8 UFF Components D50 and D60 Series Fryers (Current Production) 6-9
6.9 UFF Components D50 and D60 Series Fryers (Previous Production) 6-10
6.10 KFC 218G/E UFF (2002) 6-12
6.11 UFF 80 (Current Style) 6-14
6.12 UFF 85 Filter-leaf Equipped Flatbottom (2424) 6-15
6.13 Caster and Accessories 6-17
Page 5

SUFF/UFF FILTRATION SYSTEMS
CHAPTER 1: INTRODUCTION
1.1 Ordering Parts
Customers may order parts directly from their local Factory Authorized Service Center (FASC). See
the numbers listed in section 1.2 to find your nearest FASC.
To speed up your order, the following information is required:
Model Number Type
Serial Number
Optional Features
Item Part Number Quantity Needed
1.2 Service Information
Call the 1-800-551-8633 or (318) 865-1711 Service Hotline number for the location of your nearest
Factory Authorized Service Center. Always give the model and serial numbers of your filter unit.
To assist you more efficiently, the following information will be needed:
Model Number Type
Serial Number
Optional Features
Nature of Problem:
Additional information (i.e. oil temperature at filter time, time of day and other pertinent
information) may be helpful in solving your service problem.
1-1
Page 6
SUFF/UFF FILTRATION SYSTEMS
CHAPTER 1: INTRODUCTION
1.3 After Purchase
In order to improve service, have the following chart filled in by the Frymaster/Dean Authorized
Service Technician who installed this equipment.
Authorized Service
Technician/FASC
Address
Telephone/Fax
Model Number
Serial Number
1.4 Safety Information
Before attempting to operate your unit, read the instructions in this manual thoroughly.
Throughout this manual, you will find notations enclosed in double-bordered boxes similar to the
ones below.
CAUTION boxes contain information about actions or conditions that may cause or result in a
malfunction of your system.
CAUTION
Example of a CAUTION box.
WARNING boxes contain information about actions or conditions that may cause or result in
damage to your system, and may cause your system to malfunction.
WARNING
Example of a WARNING box.
DANGER boxes contain information about actions or conditions that may cause or result in injury
to personnel, and may cause damage to your system and/or cause your system to malfunction.
DANGER
Example of a DANGER box.
1-2
Page 7
SUFF/UFF FILTRATION SYSTEMS
CHAPTER 2: IMPORTANT INFORMATION
2.1 General
Multi-batteried frying systems can come equipped with the Under Fryer Filter (UFF) system. Single
fryers can come equipped with the Single Under Fryer Filter (SUFF) system. Filter design varies
according to the model of the fryer/frying system.
Oil or shortening is drained from the fryer into the filter pan, then pumped back into the frypot by
means of oil-return plumbing built into the fryer.
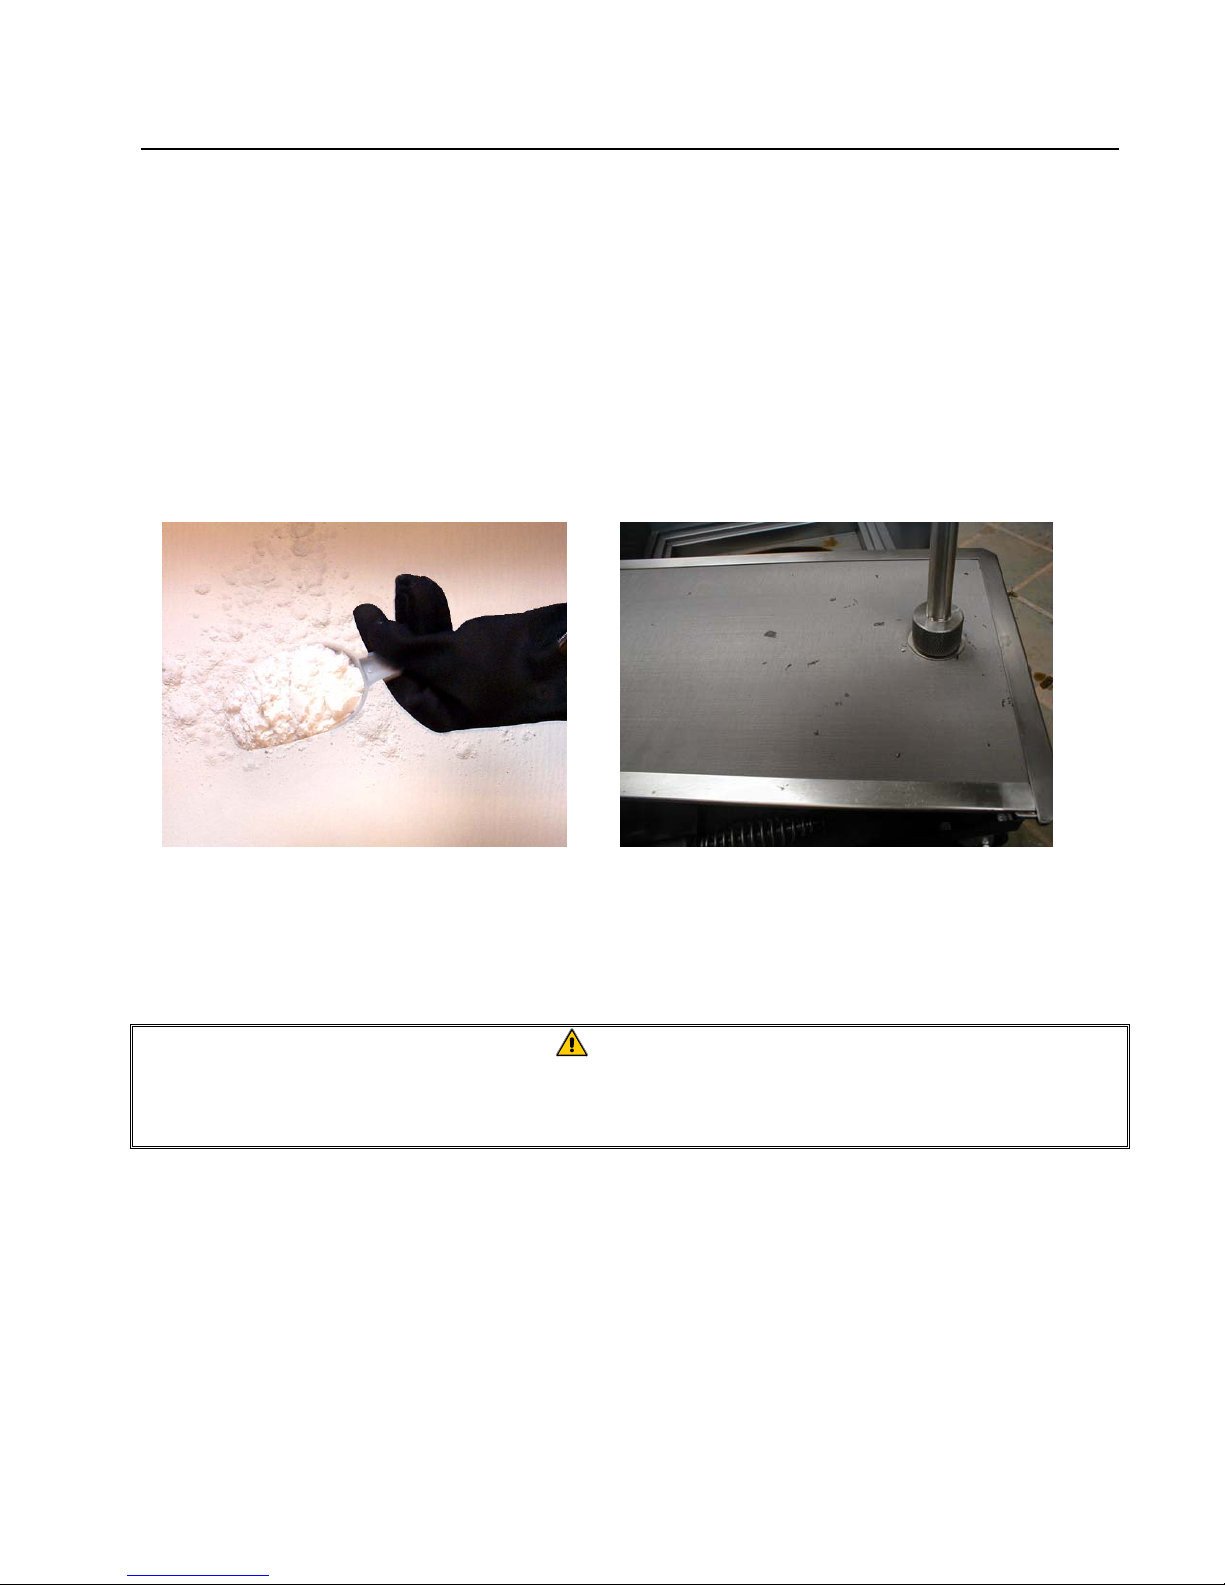
Filtering is accomplished with one sheet of replaceable filter paper and filter powder, or by means of
a filter-leaf assembly (see photos below).
Applying filter powder to filter paper.
Optional filter-leaf used in place of filter paper.
The on-site supervisor is responsible for ensuring that operators are made aware of
the inherent dangers of operating a hot oil filter system, particularly the aspects of
oil filtration, and draining/cleaning procedures.
2.2 Rating Plate
Information on the rating plate includes model and serial numbers, as well as electrical requirements.
Have the rating plate information handy when communicating with the factory about a unit or
requesting special parts or information. Without this information, proper identification of the unit
cannot be confirmed.
CAUTION
2-1
Page 8

SUFF/UFF FILTRATION SYSTEMS
CHAPTER 2: IMPORTANT INFORMATION
2.3 Pre-installation
NOTE: Failure to use qualified service personnel will void the Dean warranty.
A. Standards: Usage of this filter unit must be in accordance with all applicable state and local
codes.
B. Electrical Connections: SUFF/UFF filter systems require connection to a 120V, 60-cycle,
15-amp power supply, or a 220V, 50-cycle, 7-amp power supply. Units are equipped with a
grounded male receptacle for use with a 3-wire, 16 AWG power-cord set. If an extension
cord is required, it must be a three-conductor, grounded power cord of at least 16 gauge.
C. Safety Features: A 5-amp (230V) or a 7-amp (115V) circuit breaker switches the power OFF
if an overload occurs. In addition, a thermal-overload circuit breaker is built into the filter
motor. If an overload occurs, allow the motor to cool for 45 minutes, then press the reset
button to reset the thermal-overload circuit.
NOTE: If the circuit breaker is triggered, depress the reset button to activate the circuit
after the failure has been detected and repaired.
2.4 Unpacking the Filter System
Ensure the container is upright. Unpack the filter carefully and remove all accessories (if
included) from the carton. Do not discard or misplace parts and/or accessories; they will be
needed. Any accessories or starter kits included with the unit will be packaged inside the filter
tank strapped to the shipping frame.
After unpacking, immediately check the equipment for visible signs of shipping damage. If
such damage has occurred, contact the carrier and file the appropriate freight claims. Do not
contact the factory, as the responsibility of shipping damage is between the carrier and dealer
or end user.
If your equipment arrives damaged:
a. File claim for damages immediately – Regardless of extent of damage.
b. Visible loss or damage – Be sure this is noted on the freight bill or express receipt and is
signed by the person making the delivery.
c. Concealed loss or damage – If damage is unnoticed until equipment is unpacked, notify
freight company or carrier immediately, and file a concealed damage claim. This should be
done within 15 days of date of delivery. Retain the shipping container for inspection.
NOTE: Dean does not assume responsibility for damage or loss incurred in transit.
2-2
Page 9
SUFF/UFF FILTRATION SYSTEMS
CHAPTER 3: INSTALLATION AND OPERATION
WARNING
Drawings and photos used in this manual are intended to illustrate operational,
cleaning and technical procedures and may not conform to on-site management
operational procedures.
3.1 General
Most SUFF/UFF systems use filter paper as the filter medium. Some filter systems can be special
ordered with a filter-leaf assembly, which eliminates the need for filter paper. Both types require the
use of filter powder to enhance the filtration process. Photos used in the procedural illustrations may
or may not resemble the filter unit that came with the frying system. The following procedures
apply to all fryers equipped with SUFF/UFF filter systems. Filter system design depends on the
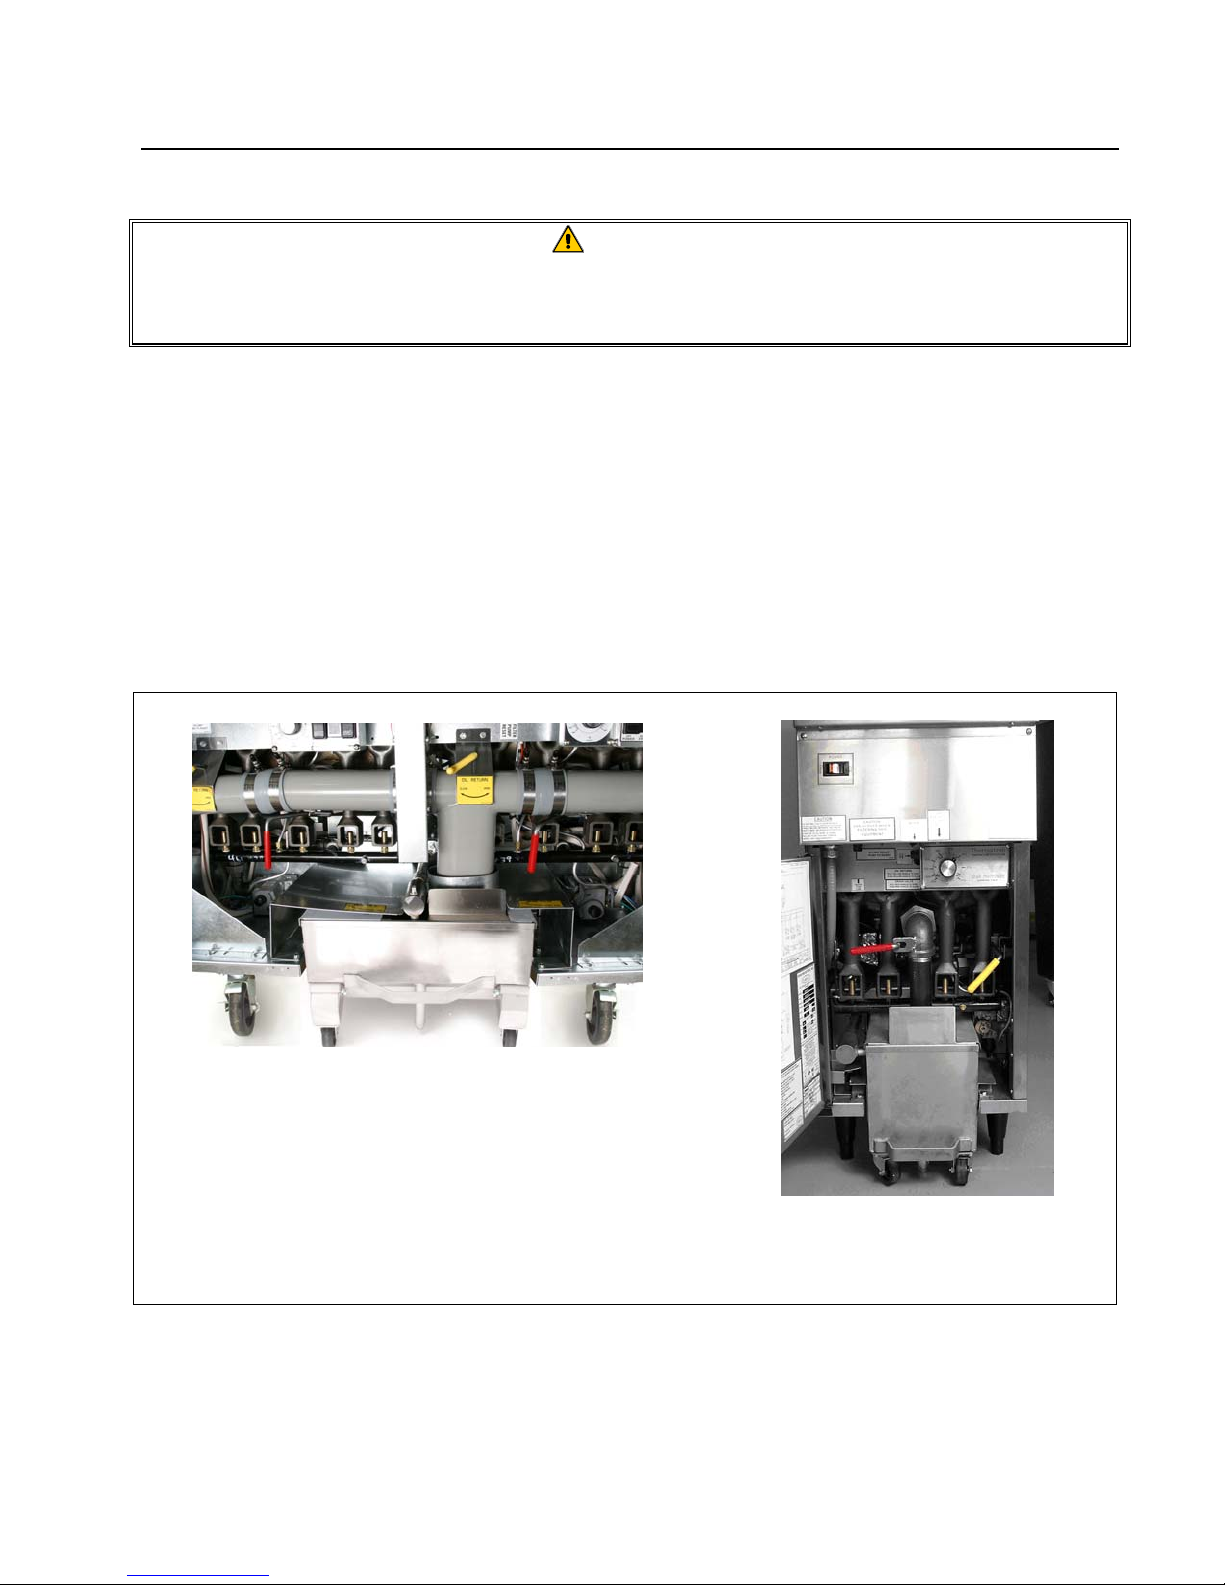
frying system configuration (single or multi-batteried systems- see photos below).
Typical Under Fryer Filter (UFF) installed in a
multi-batteried frying system.
Typical Single Under Fryer Filter (SUFF)
installed in a single fryer.
3-1
Page 10

SUFF/UFF FILTRATION SYSTEMS
CHAPTER 3: INSTALLATION AND OPERATION
3.2 Filter Preparation
On initial installation and before each use, clean the filter:
a. remove all loose parts from the filter,
b. wash the filter pan and all accessories in hot, soapy water,
c.
and dry thoroughly.
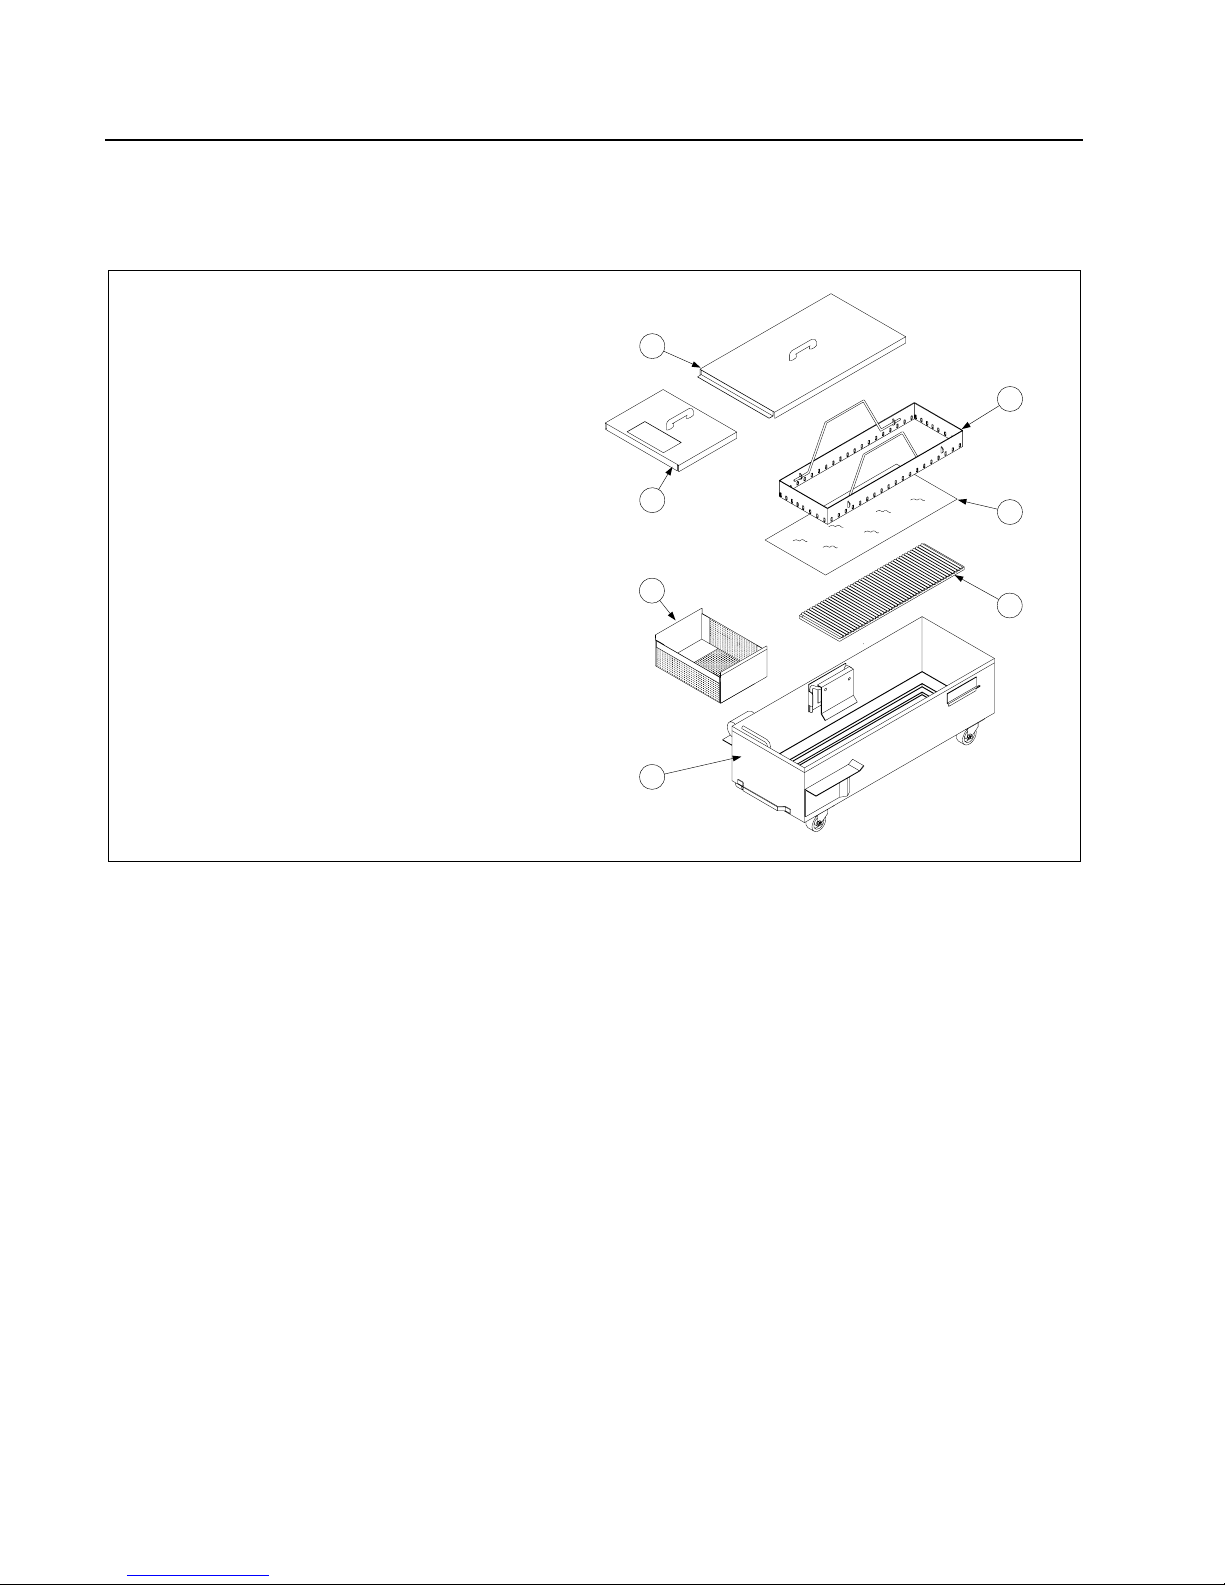
3.2.1 Filter Unit Identification
Current Production
SUFF/UFF filtration systems use filter paper or a filter-leaf to remove impurities. Filter paper is
held in place by a hold-down ring.
1. Filter pan.
2. Filter support grid.
3. Filter paper.
4. Hold-down ring.
5. Crumb screen.
6. Filter pan lid.
5
6
4
3
2
1
Latchless or weighted hold-down ring filter assembly (current production ).
3-2
Page 11
SUFF/UFF FILTRATION SYSTEMS
CHAPTER 3: INSTALLATION AND OPERATION
Previous Production
Previous production filter units differed slightly from current production units. There were two types
of hold-down rings: the latchless or weighted hold-down ring (similar to current production) and the
latching hold-down ring.
1. Filter pan.
6
2. Filter support grid.
3. Filter paper.
7
4. Hold-down ring.
5. Crumb screen.
6. Front pan cover.
5
7. Rear pan cover.
4
2
3
1
Latchless or weighted hold-down ring filter assembly (previous production).
3-3
Page 12
SUFF/UFF FILTRATION SYSTEMS
CHAPTER 3: INSTALLATION AND OPERATION
3.2.1 Filter Unit Identification (cont.)
A latching hold-down ring filter assembly is shown below:
1. Filter pan.
2. Filter support grid.
3. Filter paper.
4. Hold-down ring.
5. Crumb screen.
6. Front pan cover.
7. Rear pan cover.
Latching hold-down ring filter assembly (previous production).
7
4
6
5
1
3
2
3-4
Page 13
SUFF/UFF FILTRATION SYSTEMS
CHAPTER 3: INSTALLATION AND OPERATION
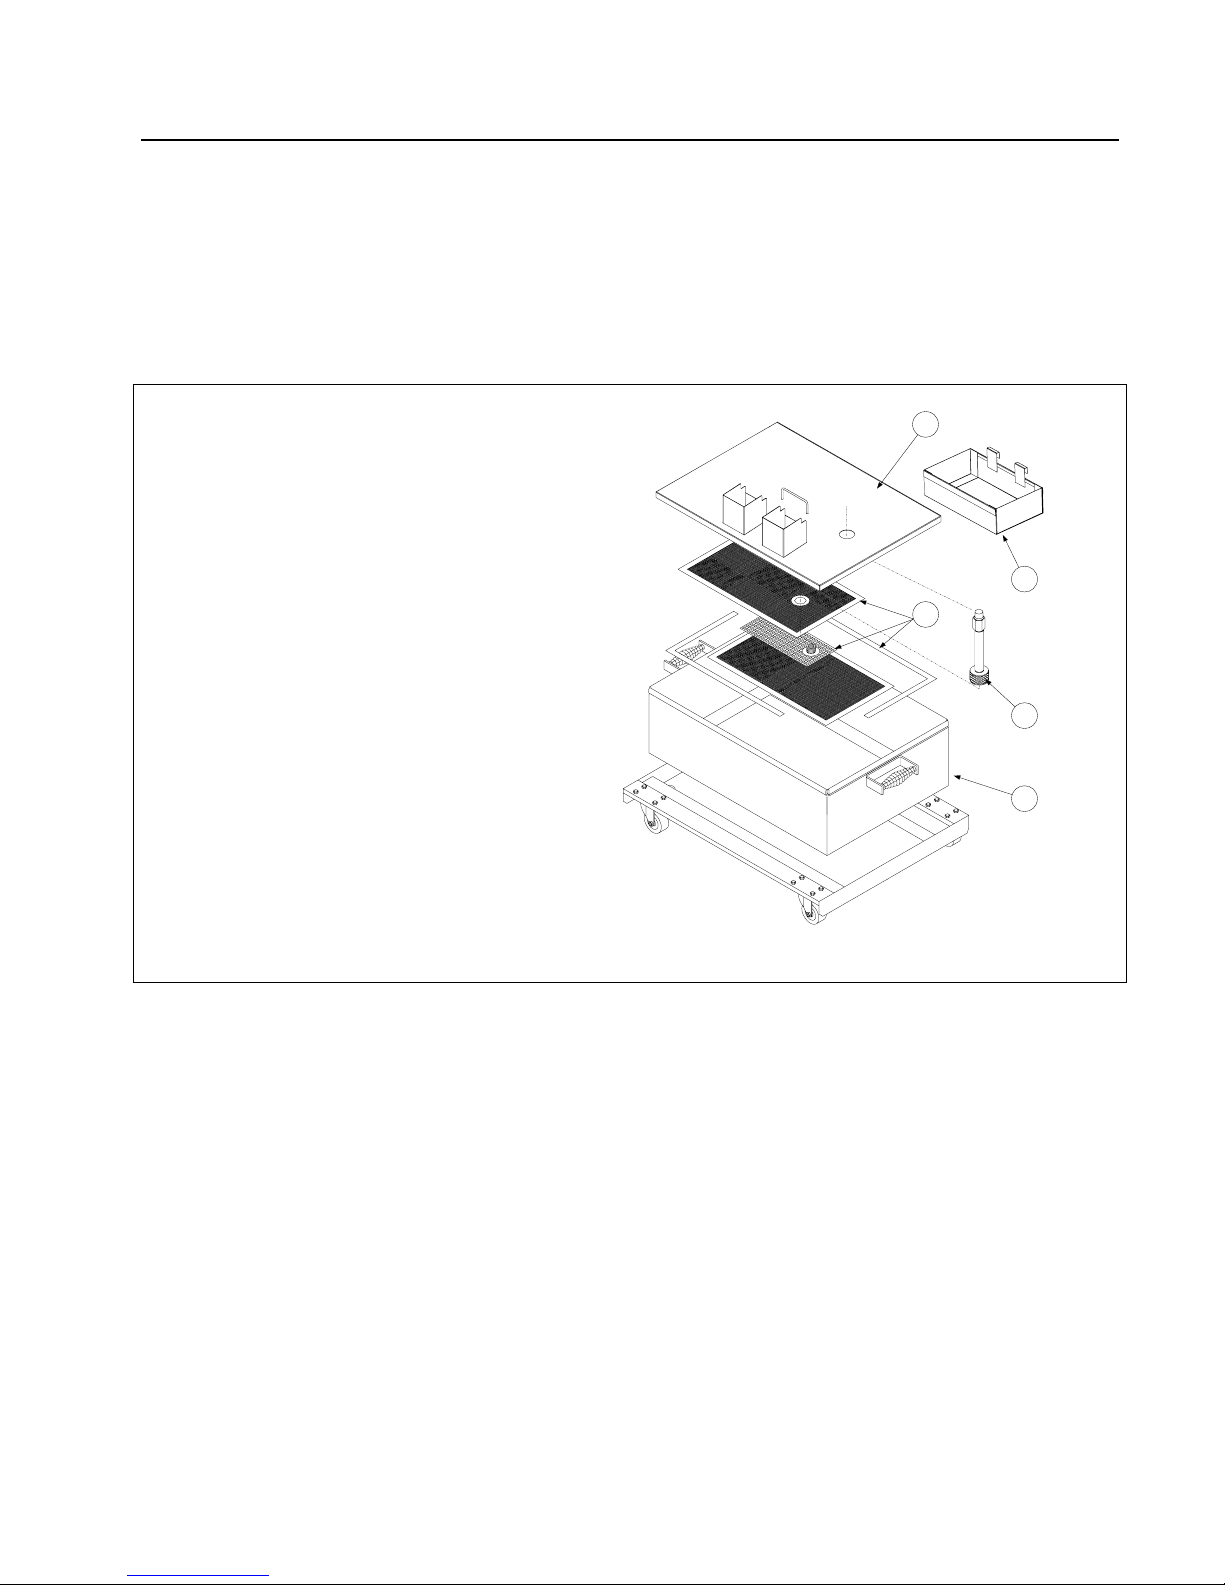
3.2.1 Filter Unit Identification (cont.)
SUFF/UFF systems incorporating a filter-leaf assembly use a fine mesh screen to filter impurities
and debris from the oil. The oil is pumped through the screen and then returned to the frypot. The
advantages of the filter-leaf include unlimited re-use and the elimination of paper cost.
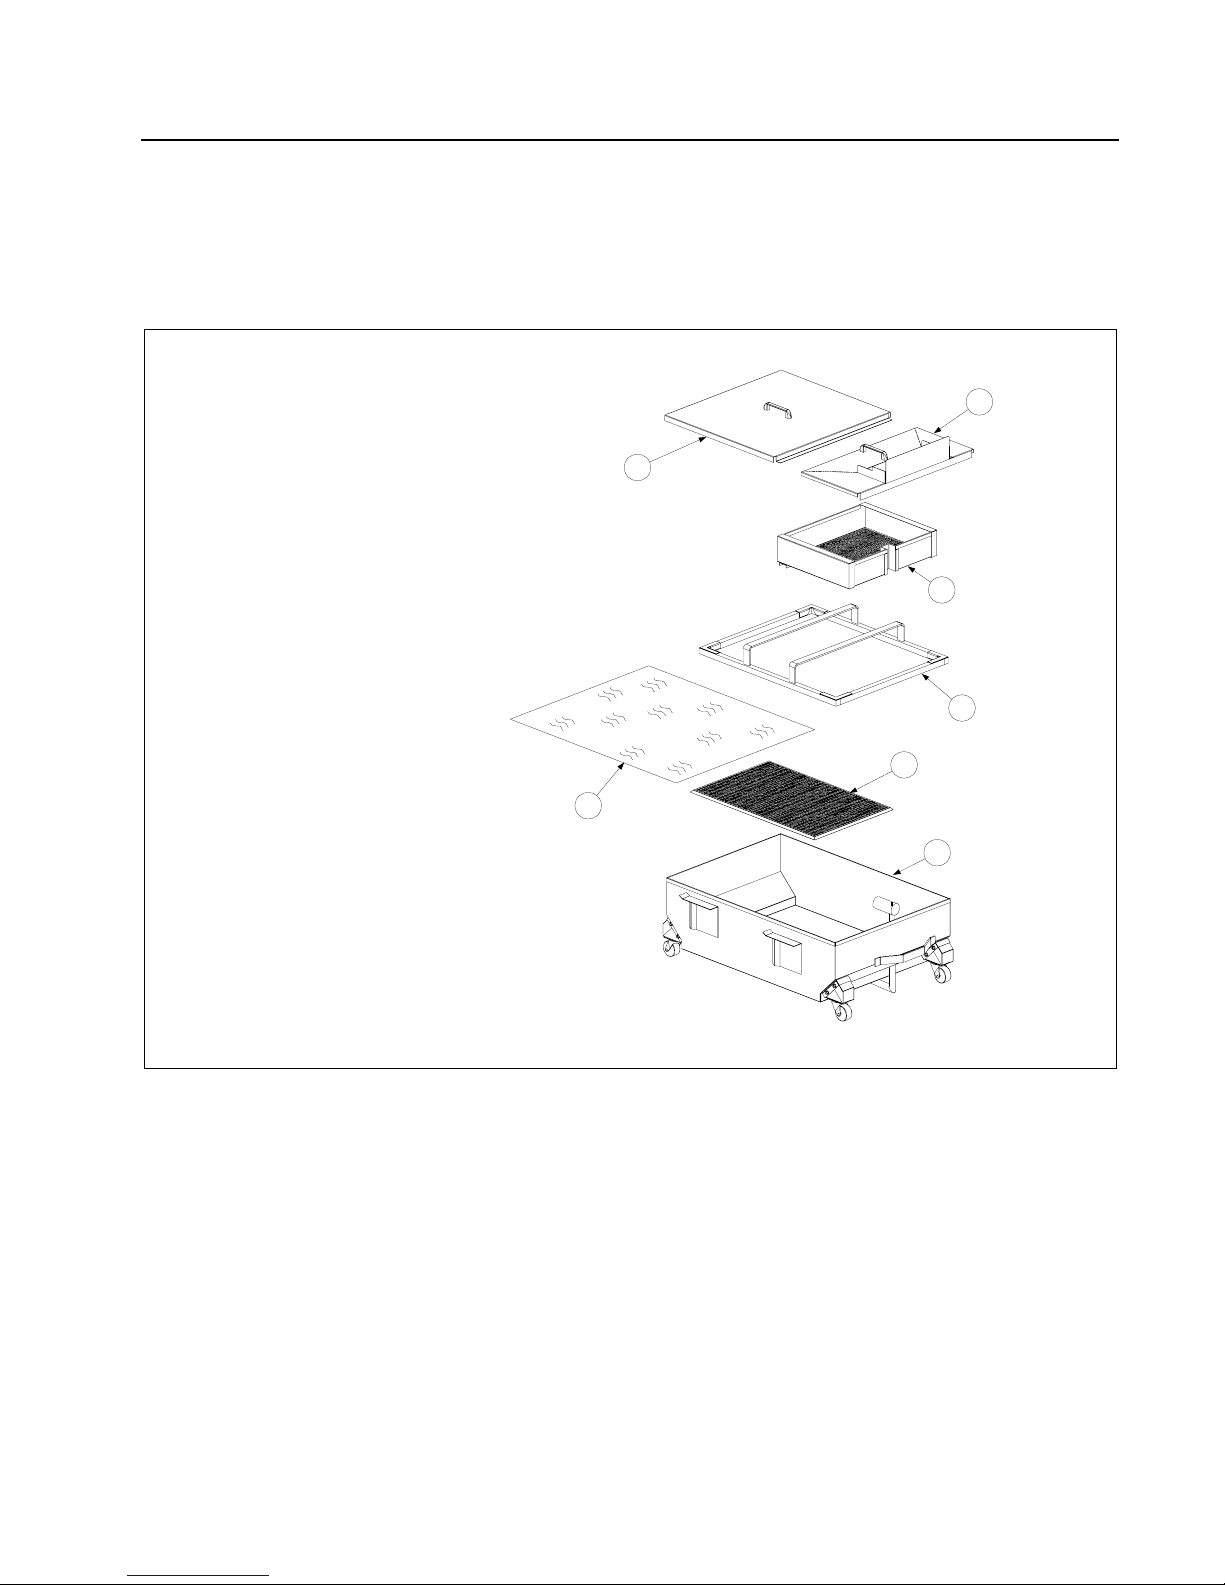
Filter pans with filter-leaf assemblies are assembled as illustrated below:
5
1. Filter pan with caddy assembly.
2. Compression cap and riser intake
assembly.
3. Filter-leaf assembly.
4. Crumb screen.
4
3
5. Filter pan cover.
Filter-leaf assembly.
2
1
3-5
Page 14
SUFF/UFF FILTRATION SYSTEMS
CHAPTER 3: INSTALLATION AND OPERATION
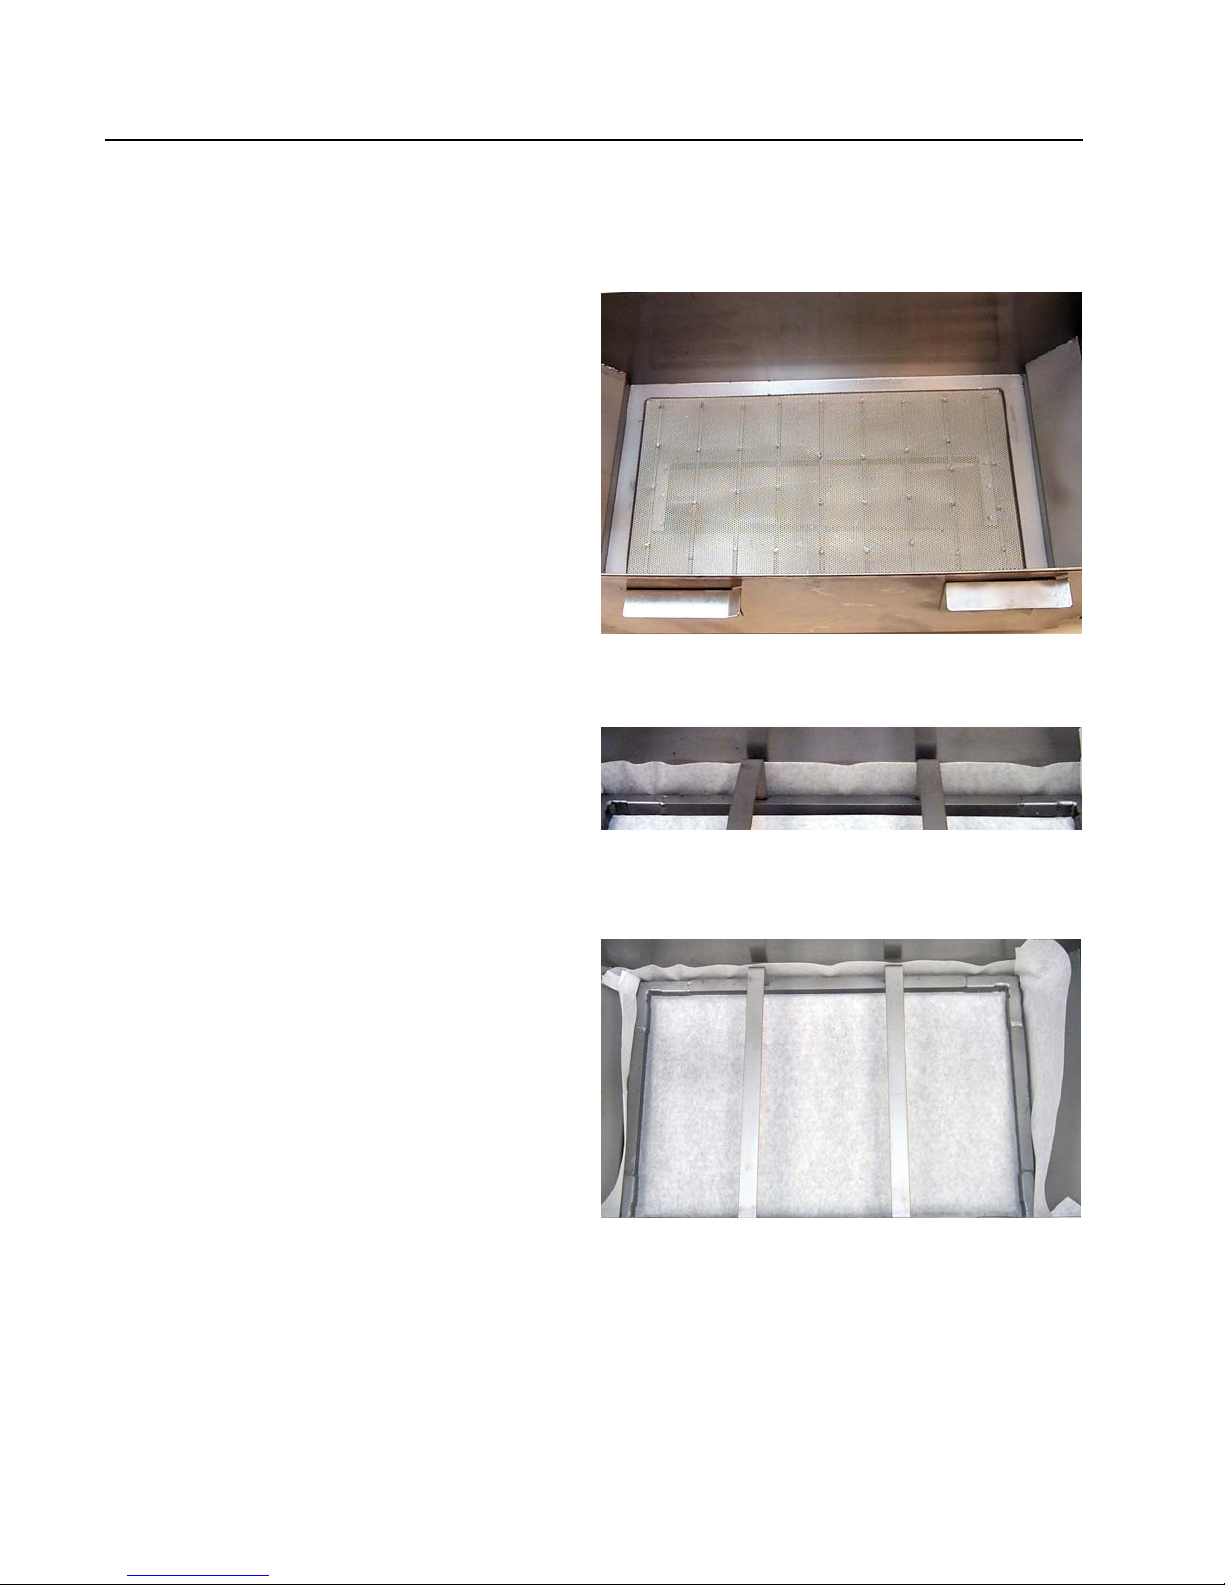
3.2.2 Assembling the Filter
Assembling Filter Units with Latchless Hold-down Rings
1. Place the support grid in the bottom of filter
pan.
Support grid properly placed in filter pan.
2. Put one filter paper sheet on top of the
support grid. Be sure the paper covers the
filter pan bottom and laps two inches onto the
pan wall.
Ensure filter paper overlaps two inches on all
sides and is evenly distributed under the holddown ring.
3. Position the hold-down ring on top of the
filter paper. Ensure the hold-down ring seals
around the support grid. This prevents air
from getting into the system.
Hold-down ring positioned correctly over filter
paper in filter pan.
3-6
Page 15

CHAPTER 3: INSTALLATION AND OPERATION
3.2.2 Assembling the Filter (cont.)
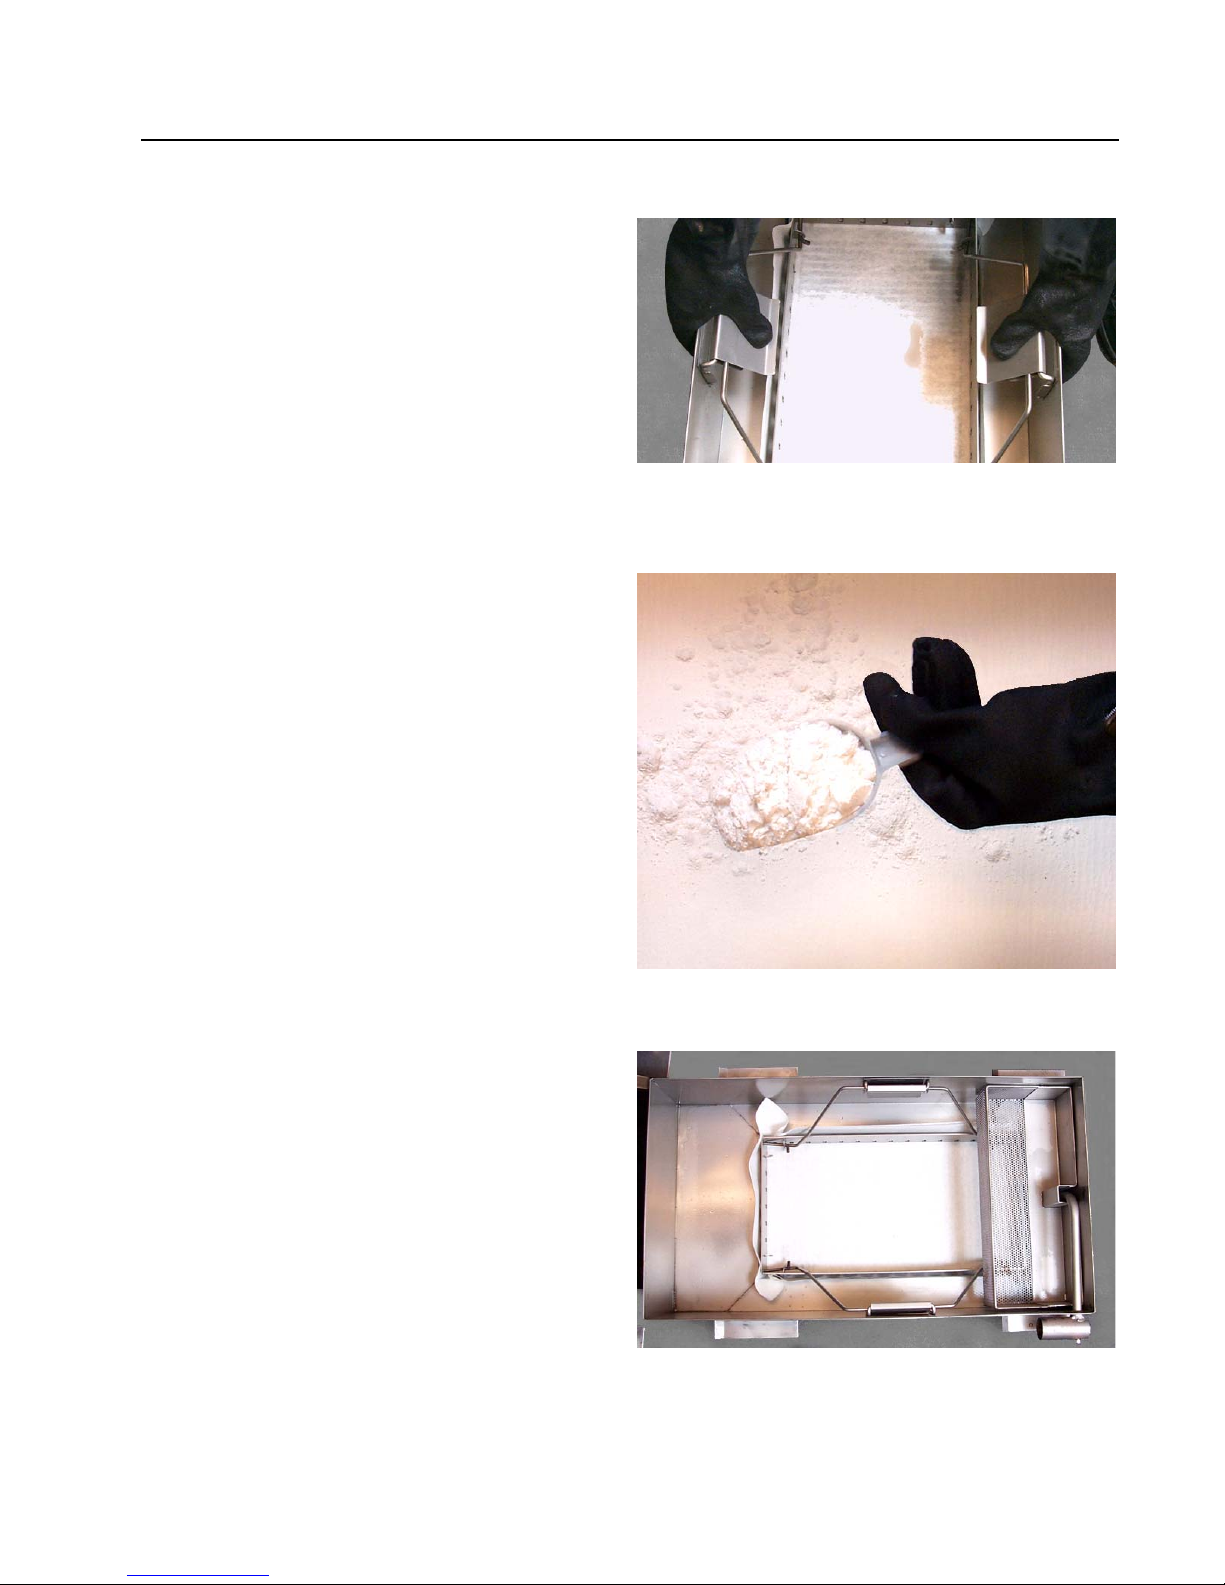
4. Sprinkle 8 ounces of filter powder on the
filter sheet. Ensure the powder covers the
filter paper evenly.
5. Place the crumb screen in the filter pan.
Allow the crumb screen to rest on the top
edges of the hold-down ring.
6. Place filter pan cover onto the filter pan
assembly. Ensure the cover is correctly
positioned over the slip fitting.
NOTE: Previous production units had two
covers (front and back). If this is the case,
place both covers on the filter pan and ensure
that the front cover is correctly positioned
over the slip fitting.
SUFF/UFF FILTRATION SYSTEMS
Sprinkle the proper amount of filter powder evenly
over the paper.
Crumb screen properly placed.
Fully assembled pan with proper placement of lid
over slip fitting (slip-fitting orientation may vary
according to fryer system).
3-7
Page 16
SUFF/UFF FILTRATION SYSTEMS
CHAPTER 3: INSTALLATION AND OPERATION
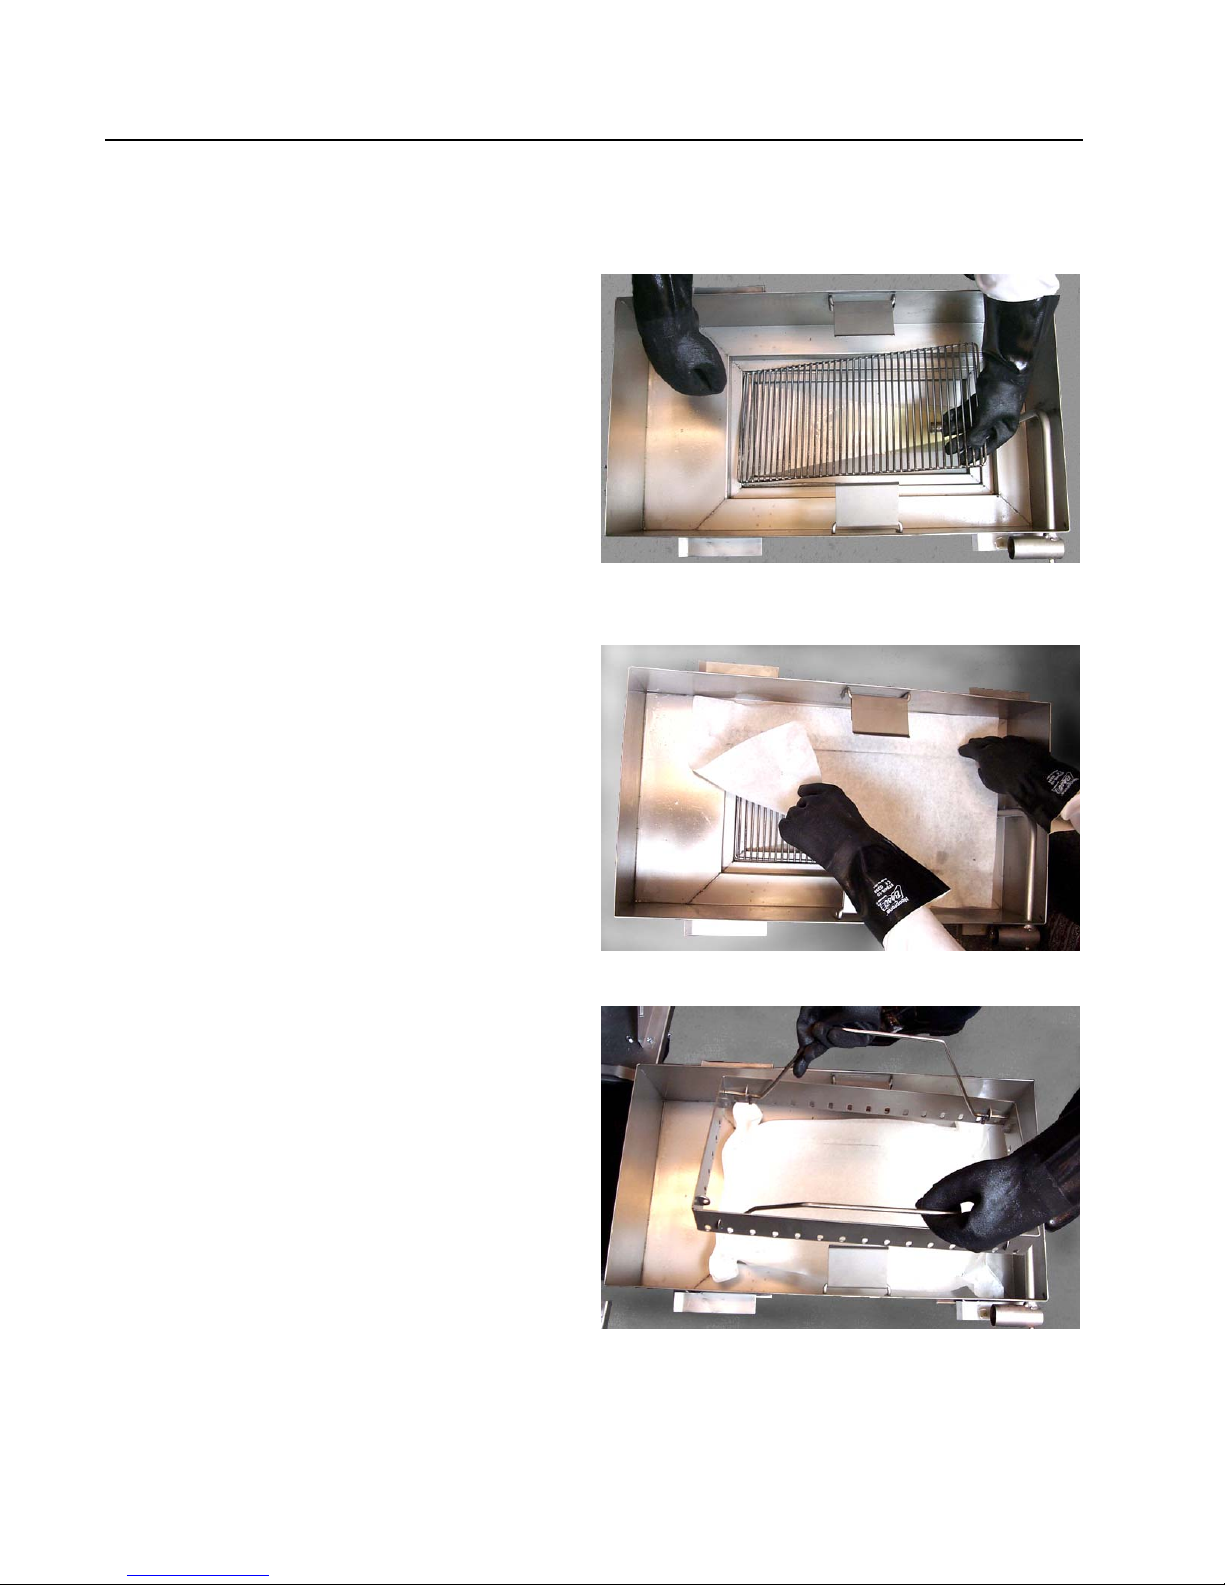
3.2.2 Assembling the Filter (cont.)
Assembling Filter Units with Latching Hold-down Rings
1. Place the filter screen in the pan. Ensure it is
properly seated in the bottom recess.
Placing filter screen (pan grid) in filter pan.
2. Place one sheet of filter paper over the filter
screen.
3. Install the hold-down ring over the filter
paper. Ensure the hold-down ring is properly
seated in the bottom recess.
Note: When placing the hold-down ring over
the filter paper, use care not to tear the filter
paper when locking the ring down. Sediment
can get into the filter system through tears in
the filter paper.
Installing hold-down ring over filter paper.
3-8
Page 17
SUFF/UFF FILTRATION SYSTEMS
CHAPTER 3: INSTALLATION AND OPERATION
3.2.2 Assembling the Filter (cont.)
4. Latch the hold-down ring to lock the filter
paper in place. Simultaneously lock both
clamps in place by pressing down and in on
each clamp (see photo at right).
5. Sprinkle 1-cup (8 ounces/227 grams) evenly
over the paper.
6. Install crumb screen after applying the proper
amount of filter powder.
Locking hold-down ring in place.
Applying filter powder to filter paper.
Crumb screen properly installed in filter pan.
3-9
Page 18

SUFF/UFF FILTRATION SYSTEMS
CHAPTER 3: INSTALLATION AND OPERATION
3.2.2 Assembling the Filter (cont.)
7. Place filter pan covers (2) onto the filter pan
assembly. Ensure the front cover is correctly
positioned over the slip fitting (if applicable).
Slip fitting orientation may vary according to
fryer system.
Assembling Filter Units with the Filter-Leaf
1. Remove the filter pan lid.
2. Place the filter-leaf assembly in the bottom of
the filter pan.
Pan covers properly placed on filter pan.
Filter pan with cover removed.
Filter leaf properly positioned in filter pan.
3-10
Page 19
SUFF/UFF FILTRATION SYSTEMS
CHAPTER 3: INSTALLATION AND OPERATION
3.2.2 Assembling the Filter (cont.)
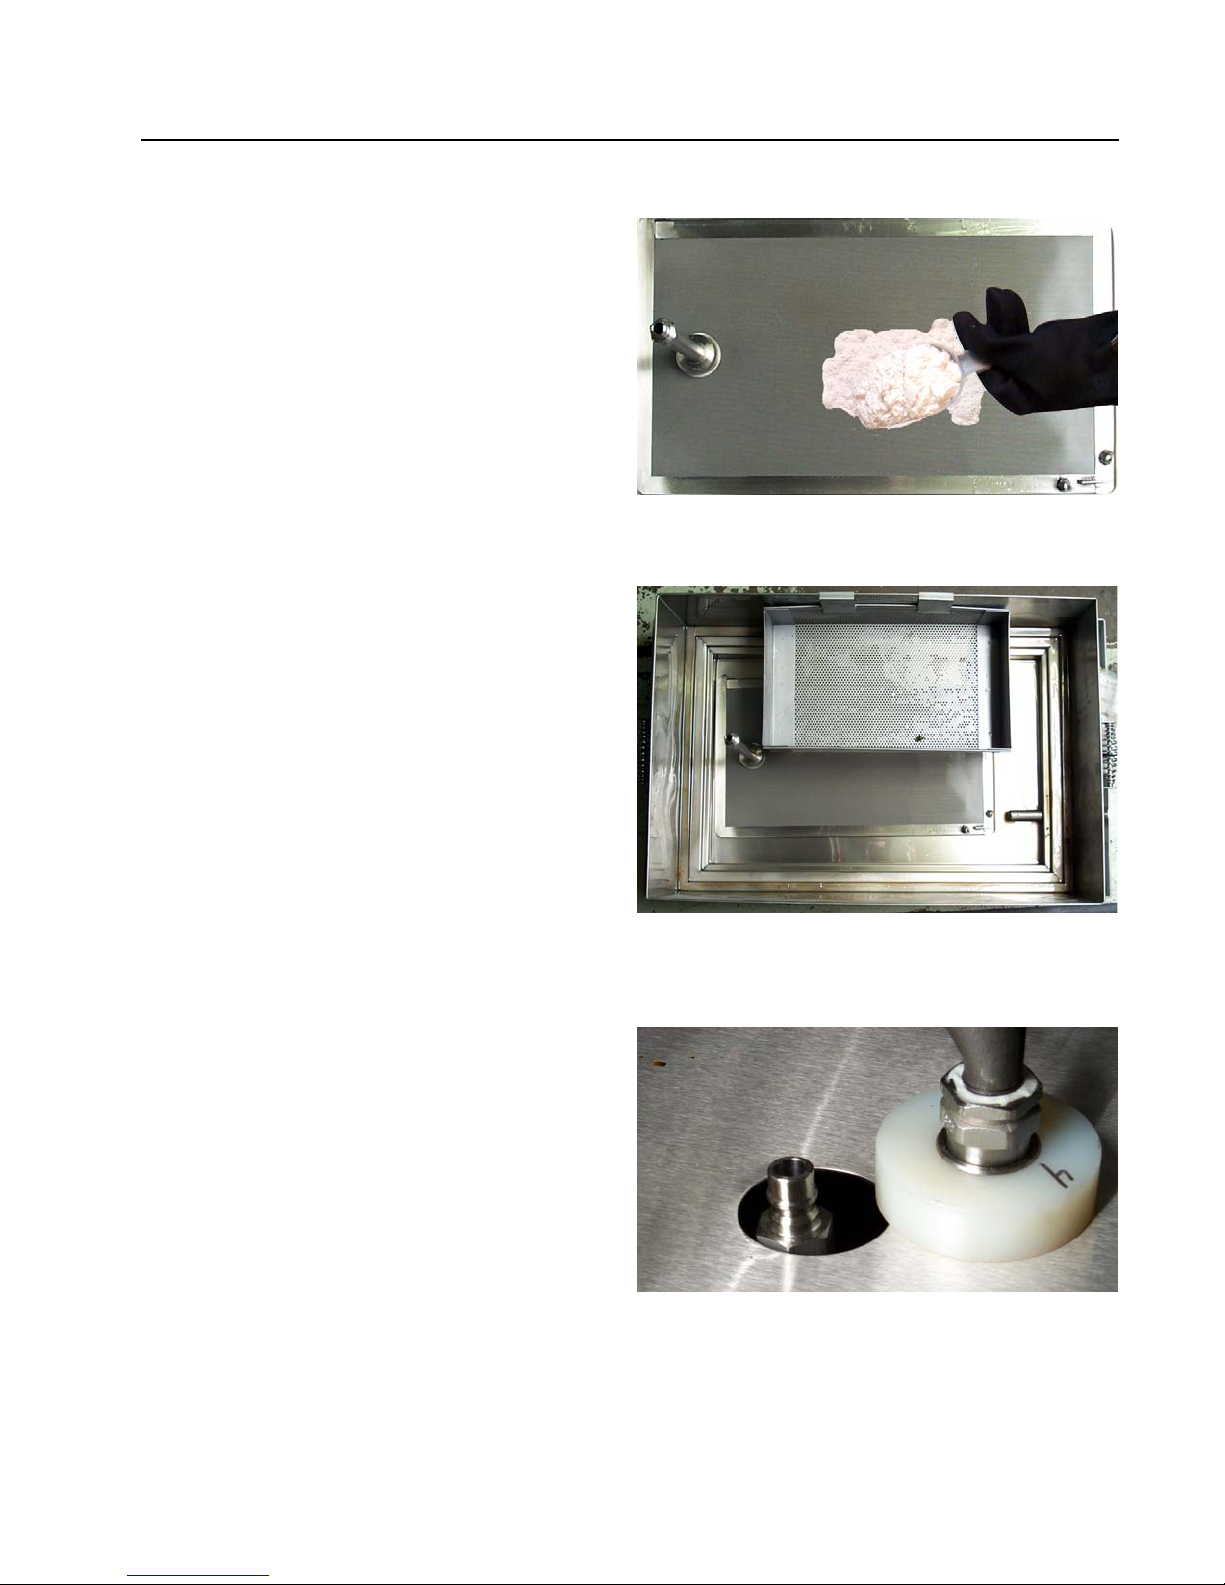
3. Apply the proper amount of filter powder to
the filter-leaf, using the manufacturer’s
recommended amount.
4. Place the crumb tray in pan after filter
powder application.
5. Replace the pan lid. Ensure the pickup tube
is properly positioned in pan lid opening.
Applying filter powder to filter-leaf.
Crumb screen properly placed in filter pan.
3-11
Pickup tube properly positioned in pan lid access
hole.
Page 20

SUFF/UFF FILTRATION SYSTEMS
CHAPTER 3: INSTALLATION AND OPERATION
3.2.3 Installing the Filter
1. Slide the filter inside the fryer cabinet. For
latchless and latching hold-down ring
equipped filters, ensure the male-female slipfitting coupling is fully engaged. Ensure the
filter pan opening is directly under the center
dump tube (current) or angled drain tubes
(previous) to avoid splashing hot oil.
2. On filter-leaf equipped filters, ensure the
filter system hose disconnect is properly
attached to the filter-leaf disconnect. Ensure
the filter pan openings are properly
positioned under the drain tubes to avoid
splashing hot oil.
The filter pan slides under the
fryer (above), connecting with a
slip fitting (right). Slip fitting
location will vary (above or to
the side of the filter pan),
according to fryer system.
Filter-leaf disconnect properly attached to filter
system hose disconnect.
3-12
Page 21

SUFF/UFF FILTRATION SYSTEMS
CHAPTER 3: INSTALLATION AND OPERATION
3.3 Daily Filtration Operation
WARNING
Use caution and wear proper protective clothing. The oil to be filtered is at or near
350°F (177°C). Ensure all hoses are connected properly and drain handles are in
their proper position prior to operating any switches or valves. Failure to do this can
result in severe burns.
WARNING
Drawings and photos used in this manual are intended to illustrate operational,
cleaning and technical procedures and may not conform to on-site management
operational procedures.
3.3.1 General Overview
Only filter oil at operating temperature (~350°F/~177°C). When filtering begins, the filter motor is
engaged and oil is drawn through filter paper or a filter-leaf assembly and pumped back into the
frypot. The frypot’s drain remains open during the filtering process. Allow the oil to cycle through
the filter process for approximately 5 minutes. At the end of 5 minutes, close the drain valve and
allow the pump to fill the frypot to the top OIL LEVEL line. Leave the pump running for 10-15
seconds after bubbles appear in the frypot to ensure all oil is pumped from the drain pan and the
lines.
3.3.2 Filtering Tools
Assemble tools to be used for filtering. These are supplied with the filter starter kit included with
the fryer/filter system:
• Frypot/Filter Brush - used to clean frypot and filter pan sides and bottom, heating elements,
and to dislodge sediment during filtration or oil change.
• Clean-out Rod (design may vary) - used to dislodge heavy debris in the drain tube (when needed).
• Filter Powder.
• Filter Paper (not used in filter-leaf equipped filter systems).
The following tools are not required, but are recommended to make the filtering task easier.
• Measuring Cup - used to measure filter powder.
• Stainless Steel Crumb Scoop - for removing large debris from oil prior to filtering.
Note: Always wear oil-resistant, insulated gloves and/or protective gear when
working with hot oil.
3-13
Page 22

SUFF/UFF FILTRATION SYSTEMS
CHAPTER 3: INSTALLATION AND OPERATION
3.4 Operating the Filter
3.4.1 Pan Preparation and Operation
See Section 3.2.1, Assembling the Filter, and Section 3.2.2, Installing the Filter, for the appropriate
filter preparation procedure.
CAUTION
NEVER operate the filter unit unless cooking oil is
at operating temperature (~350°F/ ~177°C).
1. Ensure the filter pan assembly is prepared as described in Section 3.2.1, Assembling the Filter,
and turn fryer off.
2. Remove fry baskets from frypot and skim any
large debris from the oil. Use extreme
caution, as oil is at or near operating
temperature (~350°F/~177°C).
3. Remove the support grid from the frypot
using the clean-out rod. Stir the oil with the
frypot/filter brush to suspend debris prior to
draining.
Prior to filtering, skim any large debris from oil in
frypot.
Removing support grid from fry vessel prior to
filtering.
3-14
Page 23
p
SUFF/UFF FILTRATION SYSTEMS
CHAPTER 3: INSTALLATION AND OPERATION
3.4.1 Pan Preparation and Operation (cont.)
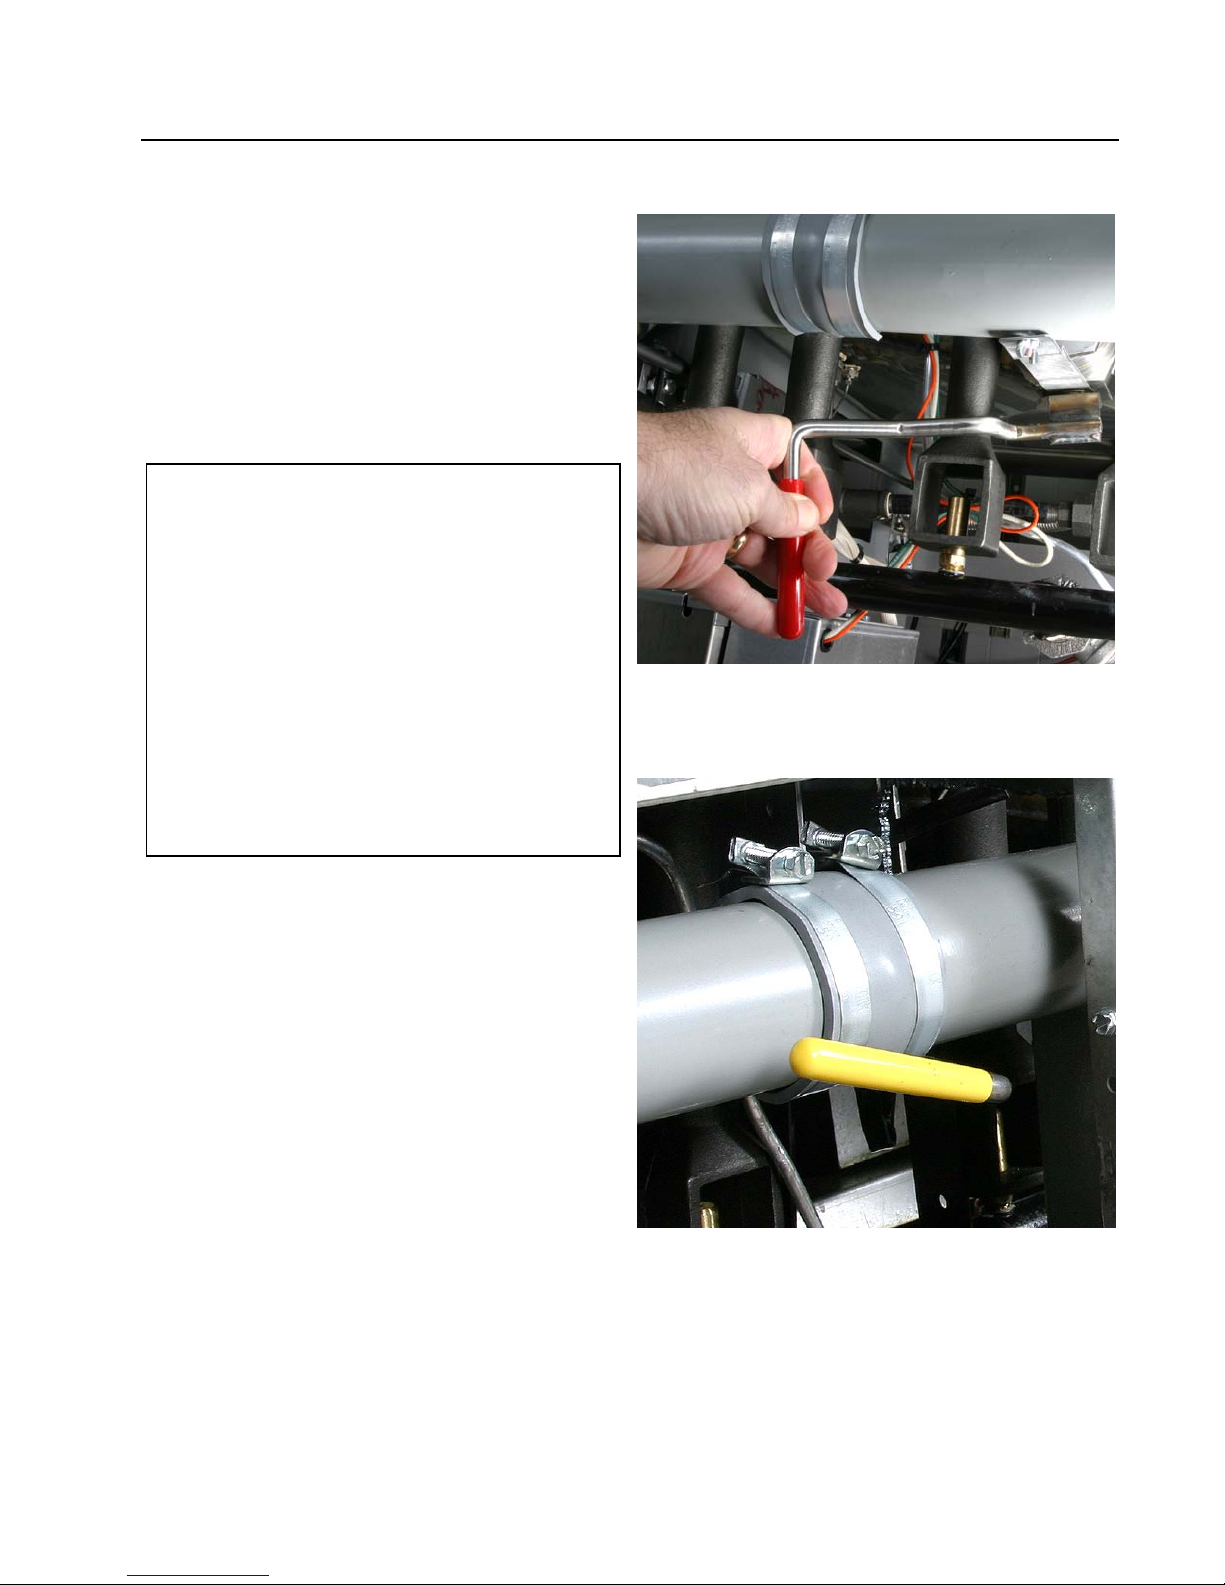
4. After ensuring the filter pan is correctly
positioned under the drain tubes, move the
red handle into the open position to drain the
frypot into the filter pan. Drain ONLY one
frypot at a time. The filter pan is designed to
hold the contents of one frypot only.
Note: A drain-flush option is available on
some 3-battery and larger frying systems,
according to model. The drain-flush prevents
sediment from clogging the drain line in
multi-batteried systems. After draining the
third (or fourth) frypot, close the drain valve
(red handle) to all frypots. Ensure all other
valves (red and yellow handles) are closed.
Pull the blue handle to open the flush valve.
After the drain line is clear of sediment
(approximately 2 minutes), push the blue
handle to close flush valve. Re-open the drain
valve (red handle) on the drained frypot and
continue with Step 5.
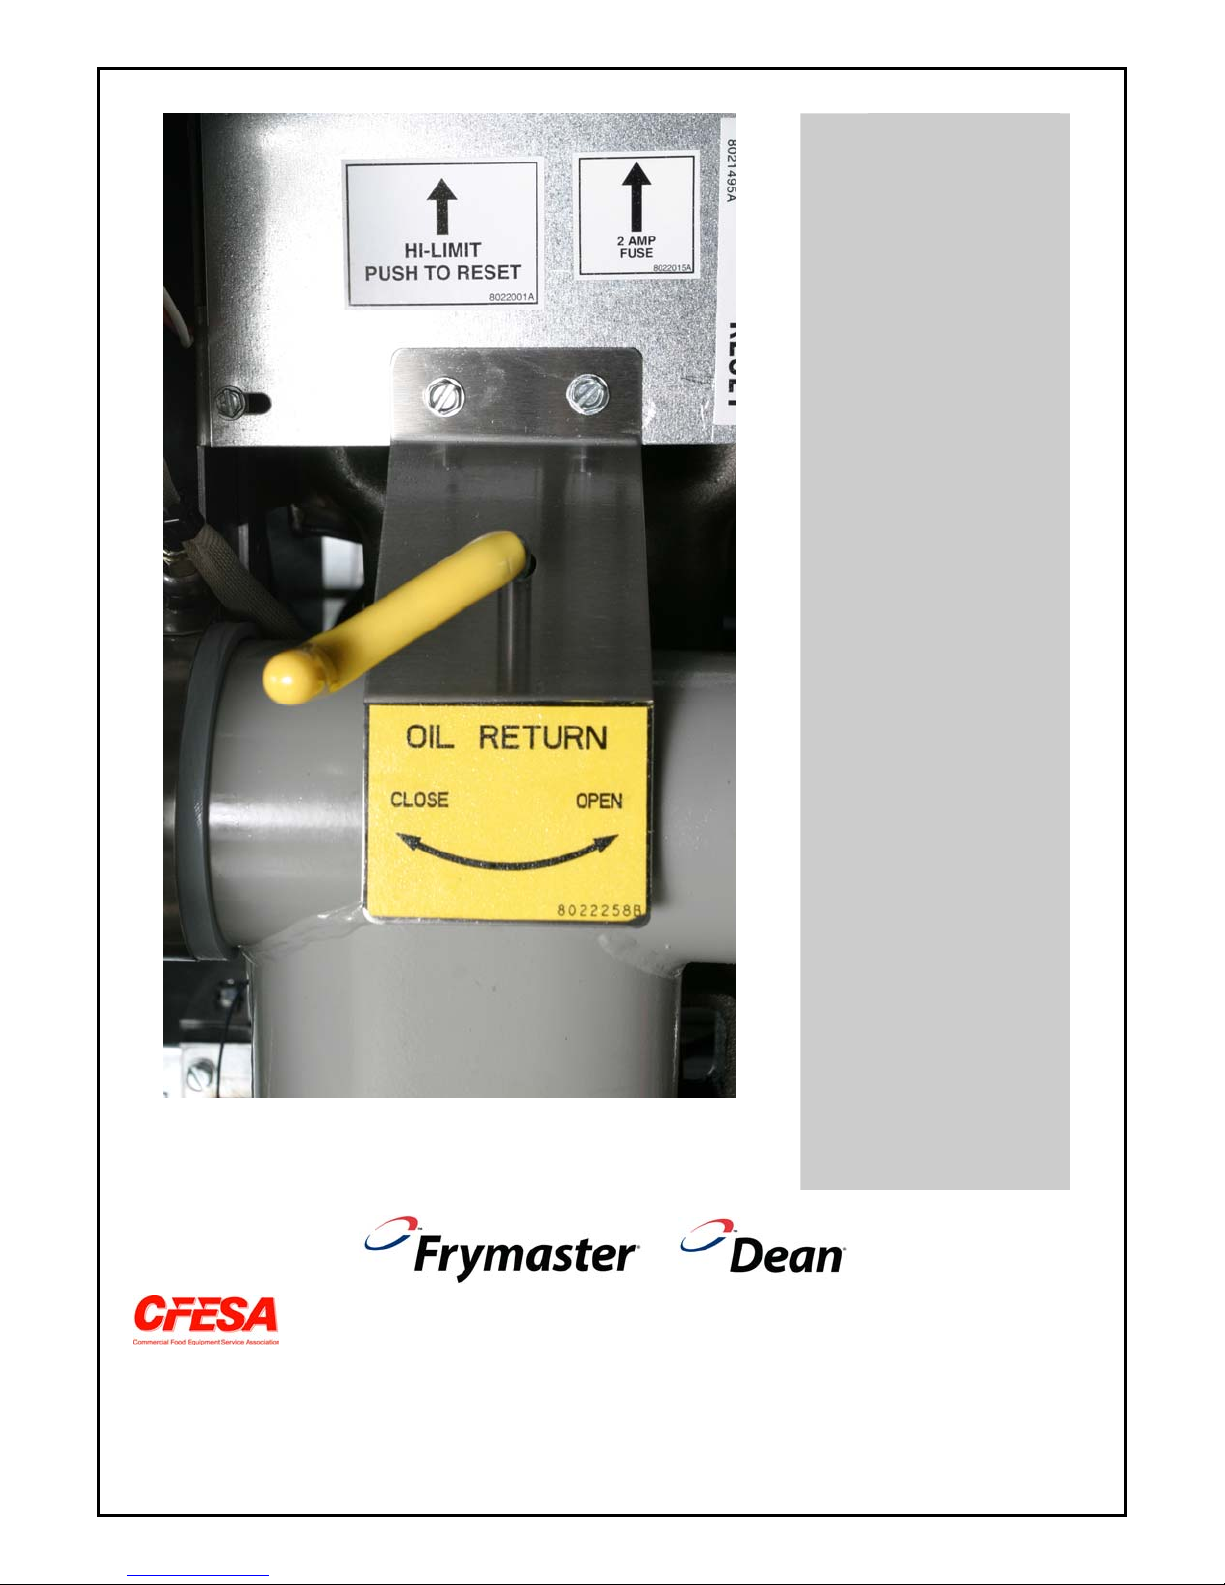
5. After all oil has drained from the frypot into
the filter pan, pull the yellow handle to open
the oil return lines and activate the filter
pump.
Move the red drain valve handle into the open
osition.
Pull the yellow handle to open the oil return valve
and activate the filter pump.
3-15
Page 24

SUFF/UFF FILTRATION SYSTEMS
CHAPTER 3: INSTALLATION AND OPERATION
3.4.2 Filter Operation
6. Oil will begin to pump from the filter pan
into the frypot. If the frypot tubes, sides and
bottom have sediment deposits, clean the
frypot with the cleaning brush included with
the fryer. Clean beneath and under the burner
tubes, using care not to disturb the probes
(arrow).
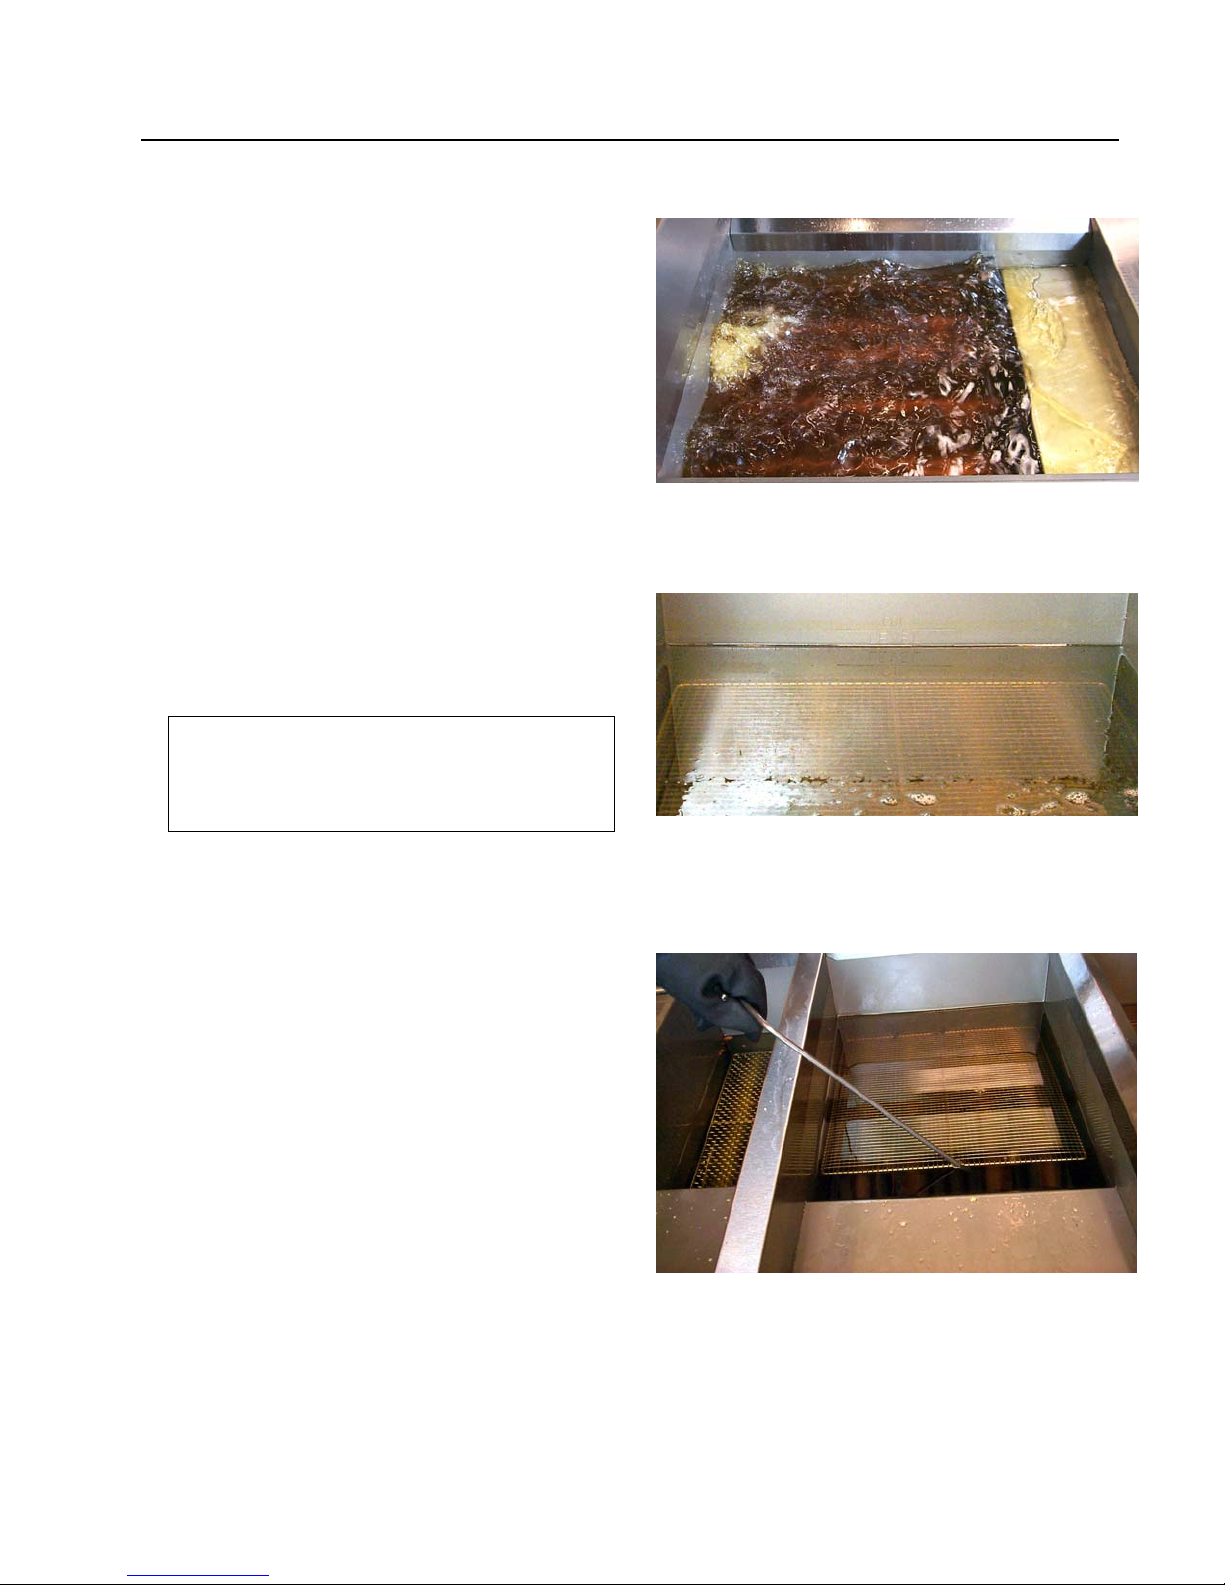
7. Allow the oil to circulate for approximately 5
minutes (process known as "polishing") to
remove suspended particles.
8. After the filter cycle is complete, close the
drain valve (push the red handle into the
closed position until it stops) and allow the
fryer to refill (see Step 4 above for additional
reference).
Clean all sediment and suspended particles from
the burner tubes and frypot as the oil begins to
circulate. Use care not to disturb the probes
(arrow) on the burner tube.
Polishing the oil removes suspended particles,
which increases the life of the oil.
After filtering is complete, close the red drain
handle to start refilling the frypot.
3-16
Page 25
SUFF/UFF FILTRATION SYSTEMS
CHAPTER 3: INSTALLATION AND OPERATION
3.4.2 Filter Operation (cont.)
9. After all oil is pumped back into the frypot,
bubbles will form, indicating air in the oil
return lines. Allow the oil to bubble for 1015 seconds to ensure all oil is evacuated
from the return lines. Push the yellow
handle to close the oil return valve and
deactivate the filter pump (see Step 5 above
for additional reference).
10. If the oil level is low, add oil until the level
is at the top OIL LEVEL line.
DO NOT OVERFILL THE FYPOT. This
will cause oil to splash out of the
frypot during cooking and may
cause burns or damage.
11. Replace the frypot grid, using care not to
splash hot oil. Turn the fryer on.
Allow the oil to bubble for 10-15 seconds to
ensure evacuation of all oil in the return lines.
Add oil/shortening until the oil level is at the top OIL
LEVEL line. DO NOT OVERFILL THE FRYPOT.
Replace the frypot grid, using care not to splash
hot oil.
3-17
Page 26

SUFF/UFF FILTRATION SYSTEMS
CHAPTER 3: INSTALLATION AND OPERATION
3.4.2 Filter Operation (cont.)
12. Do not allow crumbs to accumulate in the
crumb tray. The crumb tray MUST be
emptied into a fireproof container at the end
of frying operations EACH DAY (see
DANGER statement below).
Empty the filter pan crumb tray into a fire-proof
container at the end of frying operations each day.
DO NOT ALLOW CRUMBS TO ACCUMULATE IN
TRAY.
DANGER
The crumb tray in fryers equipped with a filter system must be emptied into a
fireproof container at the end of frying operations each day. Some food particles
can spontaneously combust if left soaking in certain shortening material.
WARNING
Do not bang fry baskets or other utensils on the fryer’s joiner strip. The strip is
present to seal the joint between the fry vessels. Banging fry baskets on the strip to
dislodge shortening will distort the strip, adversely affecting its fit. It is designed for
a tight fit and should only be removed for cleaning.
3-18
Page 27

SUFF/UFF FILTRATION SYSTEMS
CHAPTER 3: INSTALLATION AND OPERATION
3.4.3 Hose and Wand Operation
Some frying systems come equipped with a hose/wand to facilitate the removal of debris from the
frypot. On some systems, a blue handle activates the hose/wand flush. On other systems, the quickdisconnect is under positive pressure and has no ON/OFF valve. Plugging the hose into the
disconnect activates the flush. On positive pressure systems, the oil flow can be moderated with the
oil return valve (yellow handle). On blue-handle equipped systems, adjusting both the yellow and
blue handles will moderate the oil flow. With partial pressure directed to the hose/wand, oil flows
through both the filter pan and frypot.
1. Ensure the oil is at operating temperature
(~350°F/~177°C). Turn the fryer off and
open the fryer drain valve. Allow the oil to
drain into the filter pan.
2. When all the oil has drained from the frypot,
connect the hose/wand assembly to the
disconnect valve in the fryer cabinet. Ensure
the disconnect is properly connected before
Moving the red drain valve handle to open the drain
valve, allowing hot oil to drain into the filter pan.
proceeding.
3. Place the wand into the open frypot and
activate the filter with the auxiliary switch
(rocker switch) inside the cabinet.
Hose/wand disconnect properly connected to
disconnect valve in fryer cabinet.
DO NOT PROCEED UNLESS THE WAND IS
INSIDE THE FRYPOT. Hot oil can immediately
flow from the wand when it is attached, causing
burns if the wand is not in the frypot.
After the hose/wand end is properly positioned in
the frypot, activate the filter pump with the
auxiliary switch inside the cabinet (arrow).
3-19
Page 28

SUFF/UFF FILTRATION SYSTEMS
CHAPTER 3: INSTALLATION AND OPERATION
3.4.3 Hose and Wand Operation (cont.)
4. If the quick-disconnect is under positive
pressure (no ON/OFF valve), the oil will start
to flow immediately into the frypot. If the
flush valve is operated with a blue handle,
pull the handle out to start oil flowing. Keep
the wand inside the frypot at all times
while the filter pump is activated.
5. Rinse debris from the frypot into the filter
pan with the wand. When cleanup is
complete, push in the blue handle (if
applicable), close the drain valve (red
handle), and turn the auxiliary switch OFF.
Allow hose/wand to drain into the filter pan.
6. Refill the frypot by pulling the yellow handle
to open the oil-return valve (this activates the
filter pump automatically).
Pulling the blue handle opens the flush valve on
fryers so equipped.
Use the wand to rinse debris from the frypot into
the filter pan. Maintain a firm grip on the wand
handle at all times.
Return filtered oil to the frypot by pulling yellow
handle to open oil return valve.
3-20
Page 29

SUFF/UFF FILTRATION SYSTEMS
CHAPTER 3: INSTALLATION AND OPERATION
3.4.3 Hose and Wand Operation (cont.)
7. After the frypot refills, allow the oil to bubble
for 10-15 seconds to ensure evacuation of all
oil from the oil return lines. Push in the
yellow handle to close the oil-return valve
and de-activate the filter pump. Filtration is
complete. Filter another frypot or return the
fryer to operation.
Bubbling oil indicates air flowing through the oil
return lines. Do this for 10-15 seconds to ensure
evacuation of oil from the return lines.
3-21
Page 30

THIS PAGE INTENTIONALLY LEFT BLANK
Page 31

SUFF/UFF FILTRATION SYSTEMS
CHAPTER 4: CLEANING AND MAINTENANCE
4.1 General
Cleaning operations fall into three general categories:
• Wiping unit clean after each filter session;
• Cleaning filter or filter-leaf assembly, changing filter paper (systems without filter-
leaf), and preparing the unit for the next day’s business.
• Weekly cleaning to remove oil deposits and other particles.
CAUTION
Never operate the filter unit unless cooking oil is at operating temperature.
4.2 Each Filter Use
Every time the SUFF/UFF filter system is used:
• Wash down the insides of the filter pan with hot oil.
• Change the filter paper (not applicable to filter-leaf equipped systems; see
CLEANING THE FILTER-LEAF ASSEMBLY below) after each filter session or at
the end of the day. Scrape sediment from the filter paper after each frypot is filtered
and dispose of it in a fireproof container.
• Wipe away any oil.
• Wipe all exterior surfaces of the filter unit.
CLEANING THE FILTER-LEAF ASSEMBLY
Filters equipped with a filter-leaf require specific cleaning and assembly procedures. In the
absence of cleaning and disassembly/reassembly instructions shipped with the filter-leaf, use
the following procedure (see illustration on next page):
1
Grasp the seal frame near each corner at the locking tab (
frame will separate into two pieces. Separate the top and bottom screens (
) and pull frame apart. The seal
2
and
3
) and
remove the grid (
4
). Assemble in reverse order (see illustration on next page).
Clean the two seal frame pieces, screens and grid using a good quality degreaser and hot
water from a spray nozzle. The groove in the seal frame pieces can be cleaned with the edge
of a Scotch-Brite™ type cleaning pad.
4-1
Page 32

SUFF/UFF FILTRATION SYSTEMS
CHAPTER 4: CLEANING AND MAINTENANCE
4.2 Each Filter Use (cont.)
At each scheduled boil-out, disassemble the filter-leaf as described and place in the frypot
filled with boil-out solution (where applicable). Follow the boil-out procedure in the
Installation and Operation manual included with the fryer. After boil out is complete, place
the filter-leaf in a vinegar solution (1 pint vinegar to 1/2 gallon water) to neutralize boil-out
residue. Rinse the filter-leaf in clean water to rinse away vinegar residue.
Allow all filter-leaf components to air dry or thoroughly dry with paper towels.
Typical filter-leaf assembly in
SUFF/UFF systems so equipped.
2
4
1
1
3
CAUTION
Do not run water or boil-out solution through the filtration system. Doing so
will cause irreparable damage to the pump, and the warranty will be voided.
4-2
Page 33

SUFF/UFF FILTRATION SYSTEMS
CHAPTER 4: CLEANING AND MAINTENANCE
4.3 Daily (Close of Business)
At the close of a working day, oil in all fryers should be filtered. When the last fryer is
finished, follow these steps:
1. Ensure the flexible hose and pump lines are clear by running the filter pump for an
additional 10–15 seconds after air bubbles start coming from the oil return line. Then
drain the flexible hose into the filter pan (if equipped with a flush option).
2. Remove the filter pan cover and hold-down ring assembly (see Section 4.2 for filter-
leaf instructions), then remove the filter paper and filter support screen.
3. Discard the filter paper into a fireproof container.
4. Wash all filter components with soapy water and rinse.
5. Dry all filter parts and filter pan thoroughly before reassembling.
6. Check all fittings at the rear of the filter unit; ensure that all fittings are properly
tightened.
DANGER
The crumb tray in SUFF/UFF filter systems MUST be emptied into a fireproof
container at the end of frying operations each day. Some food particles can
spontaneously combust if left soaking in certain shortening material.
4.4 Weekly
Follow the same procedure as for Daily (Close of Business), with these additional steps:
• Wash the filter pan with hot, soapy water and a brush. Dry and reassemble with new
filter paper.
• Clean thoroughly under, around, and behind the fryers and filtering area.
• Do not operate motor/pump until all traces of water have been removed from the
pan. Under no circumstances should water or boil-out solution be allowed to enter
the pump housing; irreparable damage will result, and all warranties will be voided.
• Check the connections of the inlet lines and tighten if lines become loose or start to
leak oil.
4-3
Page 34

THIS PAGE INTENTIONALLY LEFT BLANK
Page 35

SUFF/UFF FILTRATION SYSTEMS
CHAPTER 5: TROUBLESHOOTING
5.1 Troubleshooting Guide
Pump won't
start.
Pump stops
during
filtering
process.
Motor is hot.
Return valve not fully opened.
Tripped circuit breaker or thermal overload switch.
Incorrect or no line voltage.
Failed return microswitch.
Allow motor to cool for at least 45 minutes and then
press thermal overload switch on motor. Reset the
7-amp or 5-amp circuit breaker.
Pump stops
and motor is
cool.
Pump starts
and abruptly
stops.
Pumping is
erratic.
Move filter handle to OFF. Allow oil to cool then
empty pan. Verify filter paper and screen, or filterleaf if equipped, are clean and properly installed.
Refill pan and restart process.
Reset thermal overload and circuit breaker.
Verify wiring harness is properly connected; a
damaged harness should be replaced by a FASC.
Pump is blocked. Call FASC for service.
Filter pan suction tube, or filter-leaf if equipped, is
blocked. Filter pan suction tube: use a thin,
flexible wire to unclog. Filter-leaf: thoroughly clean
all filter-leaf components.
Motor or 24 VAC transformer failed; call for service.
Verify O-rings on pan outlet is present and in good
condition.
Verify paper and screen, or filter-leaf if equipped,
have been properly installed.
Oil not being
returned to
frypot.
After filtering,
fryer does not
operate
properly.
Solidified oil or sediment is likely clogging the return
line. Clear line.
Clogged filter-leaf, if equipped.
Verify drain valve is fully closed.
5-1
Page 36

THIS PAGE INTENTIONALLY LEFT BLANK
Page 37

SUFF/UFF FILTRATION SYSTEMS
CHAPTER 6: PARTS LIST
6.1 SUFF 80 BID80 Series
3
6
4
7
2
1
ITEM PART # COMPONENT
1 823-3750SP Filter Pan Assembly- BID80 SUFF 80
* 813-0684 Plug, Hex Socket, 3/8" NPT
* 813-0679 Plug, 1/8" SS Square Head (Female Disconnect)
2 823-3748 Grid, Bottom- Filter Pan- BID80 SUFF 80
3 803-0289 Paper, Filter- 22 x 34"
4 823-3742 Ring, Hold-Down (Weighted)- BID80 SUFF 80
5 823-3736 Basket (Tray), Crumb
6 823-3741 Lid, Pan- Rear- SUFF 80
7 823-3739 Lid, Pan- Front- SUFF 80
8 810-2141 Caster, Swivel- 2"
* Not Illustrated
5
8
6-1
Page 38

SUFF/UFF FILTRATION SYSTEMS
CHAPTER 6: PARTS LIST
6.2 SUFF 80 Domestic (Early Style)
7
6
8
5
4
ITEM PART # COMPONENT
1 823-3388 Filter Pan Assembly
* 813-0679 Plug, 1/8 S/S
* 810-2141 Caster, Swivel- 2"
2 810-2212 Grid, Bottom- Filter Pan
3 803-0289 Paper, Filter- 22 x 34"
4 823-3387 Ring, Hold-Down (Without Handles)
5 823-3202 Handle, Hold-Down Ring
6 823-3392 Crumb Screen
7 106-1457SP Lid, Pan- Front
8 106-1458SP Lid, Pan- Rear
* Not Illustrated
3
2
1
6-2
Page 39

SUFF/UFF FILTRATION SYSTEMS
CHAPTER 6: PARTS LIST
6.3 SUFF 80 Domestic (Current Style)
7
6
4
3
10
8
11
ITEM PART # COMPONENT
1 823-3821 Filter Pan, SUFF 80 Domestic
* 813-0684 Plug, Hex Socket, 3/8" NPT
* 813-0679 Plug, 1/8" SS Square Head (Female Disconnect)
2 823-3768 Support Grid (Bottom Pan Screen)
3 803-0289 Paper, Filter- 22 x 34"
4 823-3849 Hold-down Ring, Weighted
5 823-3736 Crumb Basket
6 823-3739 Filter Pan Cover, Front
7 823-3741 Filter Pan Cover, Back
8 809-0822 Bolt, ¼-20 x ½" Steel
9 210-2291 Insert, Caster
10 809-0820 Nut, Oval Locking- ¼-20
11 809-0805 Screw, ¼-20 x ½"
12
►►► See Section 6.12 for Correct Caster Identification
* Not Illustrated
5
2
1
9
12
6-3
Page 40

SUFF/UFF FILTRATION SYSTEMS
CHAPTER 6: PARTS LIST
6.4 SUFF 60 (Current Production - Domestic and 18UE/BIH1721)
7
6
4
ITEM PART # COMPONENT
1 106-2228SP Filter Pan, SUFF 60 Domestic
* 106-2225SP Filter Pan, SUFF 60 18UE/BIH1721
* 813-0684 Plug, Hex Socket, 3/8" NPT
* 813-0679 Plug, 1/8" SS Square Head (Female Disconnect)
2 823-3768 Support Grid (Bottom Pan Screen)- SUFF 60 Domestic
* 823-3769 Support Grid (Bottom Pan Screen)- SUFF 60 18UE/BIH1721
3 803-0289 Paper, Filter- 22 x 34"
4 823-3768 Hold-Down Ring, Weighted- SUFF 60 Domestic
* 823-3768 Hold-Down Ring, Weighted- SUFF 60 18UE/BIH1721
5 823-3736 Crumb Basket, All SUFF 60
6 823-3766 Filter Pan Cover, Front- All SUFF 60
7 823-3767 Filter Pan Cover, Back- All SUFF 60
8 809-0822 Bolt, ¼-20 x ½" Steel (SUFF 60 Domestic)
9 210-2291 Insert, Caster (SUFF 60 Domestic)
10 809-0820 Nut, Oval Locking- ¼-20
11 809-0805 Screw, ¼-20 x ½" (SUFF 60 Domestic)
12
* Not Illustrated
3
2
10
8
11
►►► See Section 6.12 for Correct Caster Identification
5
1
9
12
6-4
Page 41

SUFF/UFF FILTRATION SYSTEMS
6.5 SUFF 50 (Early Style)
CHAPTER 6: PARTS LIST
7
8
5
6
4
3
1
2
ITEM PART # COMPONENT
1 55548-1 Filter Pan Assembly
* 813-0679 Plug, 1/8 S/S
2 803-0330 Grid, Bottom- Filter Pan
3 803-0317 Paper, Filter- 8-¼ x 25-¾"
4 55559 Ring, Hold-Down (Without Handles)
5 823-3736 Handle, Hold-Down Ring
6 55561 Crumb Screen
7 55557 Lid, Pan- Front
8 210-1905 Lid, Pan- Rear
* 810-2105 Handle, Pan Lid- Front and Rear (With Screws)
* 810-2141 Caster, Swivel- 2"
* Not Illustrated
6-5
Page 42

SUFF/UFF FILTRATION SYSTEMS
CHAPTER 6: PARTS LIST
6.6 SUFF 50 (Current Style)
7
6
ITEM PART # COMPONENT
1 823-3796 Filter Pan, SUFF 50
* 813-0684 Plug, Hex Socket, 3/8" NPT
* 813-0679 Plug, 1/8" SS Square Head (Female Disconnect)
2 823-3790 Support Grid (Bottom Pan Screen)
3 803-0317 Paper, Filter- 8-¼ x 25-¾"
4 823-3795 Hold-Down Ring, Weighted
5 823-3736 Crumb Basket
6 823-3797 Filter Pan Cover, Front
7 823-3798 Filter Pan Cover, Back
8 809-0822 Bolt, ¼-20 x ½" Steel
9 210-2291 Insert, Caster
10 809-0820 Nut, Oval Locking- ¼-20
11 809-0805 Screw, ¼-20 x ½"
12
* Not Illustrated
3
8
►►► See Section 6.12 for Correct Caster Identification
2
4
1
10
9
11
12
5
6-6
Page 43

SUFF/UFF FILTRATION SYSTEMS
CHAPTER 6: PARTS LIST
6.7 Super Cascade 75 (Early Style)
7
23
15
16
6
17
18
10
19
20
21
9
8
10
5
4
3
11 12
14
13
22
2 1
6-7
Page 44

SUFF/UFF FILTRATION SYSTEMS
CHAPTER 6: PARTS LIST
6.7 Super Cascade 75 (Early Style) (cont.)
ITEM PART # COMPONENT
1 106-2613SP
* 200-3992 Caddy, Filter Pan
* 810-0006 Caster, Swivel
* 809-0822 Bolt, ¼-20 x ½” Hex
* 809-0823 Nut, Nylock- ¼-20
* 809-0816 Screw, 10-16 x ½"
2 823-3984 Pan, Filter
3 810-2329 Grid, Wire- Bottom
4 803-0170 Paper, Filter- 16-½ x 25-¾"
5 823-3632 Ring, Hold-Down
6 823-3720 Screen (Basket), Crumb
7 823-3985 Lid, Filter Pan
8 810-2372 Hose Assembly
9 810-2170 Disconnect, Male- ½"
10 810-2246 Ring, Retaining- 1"
11 810-2173 Disconnect, Female- ½"
* 816-0545 O-ring, Female Disconnect
12 813-0022 Nipple, ½" x Close
13 813-0165 Elbow, Street- ½" x 90° NPT BM
14 813-0613 Flare Fitting, ½-37° x ½"
15 1011SS Elbow, ½" x 90° S/S
16 44681 Handle Assembly, Oil Return
17 813-0761 Nipple, ½ x 5" NPT S/S
18 813-0616 Elbow, Street- ½" x 90° NPT S/S
19 809-0807 Collar, Disconnect (See Item #12 For Disconnect)
20 813-0265 Nipple, ½ x 2-½" BM NPT
21 813-0345 Elbow, ½" x 45° BM NPT
* 813-0281 Nipple, ½ x 5" BM NPT
22 810-2098 Pump, Filter- 8 GPM
* 810-2252 Pump, Filter- 5 GPM
23 810-2100 Motor, Filter Pump- 120/230V 1/3 HP
* Not Illustrated
Caddy Assembly, Filter Pan
6-8
Page 45

SUFF/UFF FILTRATION SYSTEMS
CHAPTER 6: PARTS LIST
6.8 UFF Components D50 and D60 Series Fryers (Current Production)
ITEM
PART #
(3" drains)
PART #
(1.5" drains)
COMPONENT
1 823-3576 Filter Pan (UFF 50)
* 106-5517 106-0749SP Filter Pan (UFF 60)
2 823-3574 Support Grid, Bottom Pan Screen (UFF 50)
* 200-5726 823-3365 Support Grid, Bottom Pan Screen (UFF 60)
3 803-0289 803-0289 Filter Paper, 22" x 34", qty: 100 sheets/box (UFF 50/60)
4 823-3573 Hold-down Ring, Weighted (UFF 50)
* 823-3361 823-3361 Hold-down Ring, Weighted (UFF 60)
5 823-4320 823-4320 Crumb Basket (UFF 50/60)
6 106-4725 Lid Assembly, One Piece (UFF SCFD)
* 106-0752SP Lid Assembly, Front (UFF 50/60)
* 106-1755SP Lid Assembly, Rear (UFF 50)
* 106-0753SP Lid Assembly, Rear (UFF 60)
7 810-2805 810-2805 Caster, 2" Swivel
* 823-4794 Insert, Caster
8 809-0070 Nut,
* 809-0805 Screw,
* 809-0428 Bolt,
* 809-0820 Nut,
1
-20 Hex SS
⁄
4
1
-20 x
⁄
4
1
⁄
1
⁄
4
1
-20 x
4
-20 Locking
1
"
⁄
2
" Steel
⁄
2
* Not illustrated.
6-9
Page 46

SUFF/UFF FILTRATION SYSTEMS
CHAPTER 6: PARTS LIST
6.9 UFF Components D50 and D60 Series Fryers (Previous Production)
12
11
10
8
9
7
2
3
4
1
5
6
6-10
Page 47

SUFF/UFF FILTRATION SYSTEMS
CHAPTER 6: PARTS LIST
6.9 UFF Components D50 and D60 Series Fryers (Previous Production)
(cont.)
ITEM PART # COMPONENT
1 106-2115SP Filter Pan- UFF 50 (Includes Items 2-6)
* 106-2109SP Filter Pan- UFF 50 IHOP (Includes Casters)
* 106-0749SP Filter Pan- UFF 60 (Includes Items 2-6)
2 809-0805 Screw, ¼-20 x ½"
3 809-0822 Bolt, ¼-20 x ½" Steel
4 809-0820 Nut, Oval Locking- ¼-20
5 210-2291 Insert, Caster
6
7 823-3574 Support Grid (Bottom Pan Screen)- UFF 50
7 823-3365 Support Grid (Bottom Pan Screen)- UFF 60
8 803-0289 Filter Paper, 22 x 34"- UFF 50/60 (100 Sheets)
* 810-2350 Magnesol Filter Screen, UFF 50 IHOP
* 810-2351 Handle, Magnesol Filter Screen Tee, UFF 50 IHOP
9 823-3573 Hold-down Ring, Weighted- UFF 50 (Not Required On IHOP)
* 823-3361 Hold-down Ring, Weighted- UFF 60
10 823-3175 Crumb Basket, UFF 50/60
* 823-3872 Crumb Basket, UFF 50 IHOP
11 106-0752SP Lid Assembly, Front- UFF 50/60- All
12 106-1755SP Lid Assembly, Rear- UFF 50 (Except IHOP)
* 106-0753SP Lid Assembly, Rear- UFF 60 & UFF 50 IHOP
* Not Illustrated
►►► See Section 6.12 for Correct Caster Identification
6-11
Page 48

SUFF/UFF FILTRATION SYSTEMS
CHAPTER 6: PARTS LIST
6.10 KFC 218G/E UFF (2002)
6
5
24
7
23
4
13
22
14
3
21
2
1
8
9
18
19
1920
15
16
17
18
12
11
10
6-12
Page 49

SUFF/UFF FILTRATION SYSTEMS
CHAPTER 6: PARTS LIST
6.10 KFC 218G/E UFF (2002) (cont.)
ITEM PART # COMPONENT
1 823-3240 Pan, Filter- KFC 18G/E
2 810-2119 Grid, Filter- KFC 18G/E
3 803-0170 Paper, Filter- 16-½ x 25-¾"
4 823-3201 Ring, Hold-Down (No Handles)- KFC 18G/E
* 823-3202 Handle, Hold-Down Ring- KFC 18G/E
5 823-3204 Crumb Basket- KFC 18G/E
6 106-0903SP Lid, Filter Pan- Front
7 106-0905SP Lid, Filter Pan- Back
8 809-0866 Screw, SS- ¼-10 x ½" Phillips Head
9 210-1293 Insert, Mounting Plate- Caster
10 810-0006 Caster, 2"
11 809-0823 Nut, Nylock- ¼-20
12 809-0822 Bolt, ¼-20 x ½" Hex Head
13 813-0679 Plug, SS- 1/8 Square Head
14 810-2100 Motor, Filter Pump
15 810-2098 Pump, Filter
16
* 813-0022 Nipple, ½" NPT x Close BM
* 813-0003 Tee, ½" NPT BM
* 813-0156 Plug, ½" NPT BM
17 813-0674 Nipple, ½ NPT x 7-¼"
18 813-0062 Elbow, ½" x 90°
19 813-0247 Nipple, ½ NPT x 3-½"
20 813-0173 Union, ½" NPT BM
21 823-3282 Tube, Suction Assembly
22 813-0608 Coupling, Full
23 810-0697 Disconnect, Male
* 826-1392 O-Ring, Disconnect (Qty: 5)
24 106-0820SP Drip Cup Assembly
* Not Illustrated
Fitting, Oil Suction Start
6-13
Page 50

SUFF/UFF FILTRATION SYSTEMS
CHAPTER 6: PARTS LIST
6.11 UFF 80 (Current Style)
7
6
5
4
ITEM PART # COMPONENT
1 106-1584SP Filter Pan, UFF 80
2 823-3365 Support Grid (Bottom Pan Screen)
3 803-0303 Filter Paper, 26 x 34" (100 Sheets)
4 823-3439 Hold-down Ring, Weighted
5 823-3443 Crumb Basket
6 106-1587SP Filter Pan Cover, Front
7 106-1588SP Filter Pan Cover, Back
8 809-0822 Bolt, ¼-20 x ½" Steel
9 210-2291 Insert, Caster
10 809-0820 Nut, Oval Locking- ¼-20
11 809-0805 Screw, ¼-20 x ½"
12
* Not Illustrated
3
2
10
1
11
8
9
12
►►► See Section 6.12 for Correct Caster Identification
6-14
Page 51

SUFF/UFF FILTRATION SYSTEMS
CHAPTER 6: PARTS LIST
6.12 UFF 85 Filter-leaf Equipped Flatbottom (2424)
5
14
15
6
7
8
9
10
11
12
13
16
4
3
2
1
6-15
Page 52

SUFF/UFF FILTRATION SYSTEMS
CHAPTER 6: PARTS LIST
6.12 UFF 85 Filter-leaf Equipped Flatbottom (2424) (cont.)
ITEM PART # COMPONENT
1 106-1693SP
810-0005 Caster, Rigid- 2"
809-0822 Bolt, ¼-20 x ½" Hex Head
809-0823 Lock Nut, ¼-20
* 106-2837SP Bracket Assy, Filter Pan Holding
2 823-3480SP Filter Pan With Fittings
3 810-2237
810-2172 Quick Disconnect, Male- 3/8"
4 823-3509 Crumb Basket, 85 UFF
5 823-3492 Lid Assembly, Filter Pan
6 810-2100 Motor, Pump- 1/3HP 230/120V/50/60HZ
7 810-2098 Pump, Filter- 8GPM
8 813-0165 Elbow, Street- ½" NPT 90° BM
9 813-0022 Nipple, ½" x Close NPT BM
10 810-2170 Disconnect, Male- ½"
11 810-2173 Disconnect, Female- ½"
12 810-2245 Hose Assembly- 16-¾"
13 813-0735 Reducer, Bell- ½ To 3/8"
14 813-0625 Nipple, 3/8" NPT x Close BM
15 813-0695 Elbow, Street- 3/8" NPT 90° BM
16 106-1831SP
809-0807 Collar, Quick Disconnect
810-2171 Quick Disconnect, Female- 3/8"
* Not Illustrated
Filter Pan Caddy Assembly
Filter Leaf with Compression Cap
Coupler Assembly, Female- 3/8"
6-16
Page 53

SUFF/UFF FILTRATION SYSTEMS
CHAPTER 6: PARTS LIST
6.13 Casters and Accessories
Use the following diagram to properly replace casters on SUFF/UFF filter pans. Part number 8100006 (Swivel Caster, 2-inch) was used in all SUFF/UFF applications except for BID80 SUFF 80
18UE SUFF 60
, BIH1721 SUFF 60 and IHOP UFF 50 prior to June 1, 2002. Pa rt number 810-
2141 (Swivel Caster, 2-inch) is used in all current production SUFF/UFF applications except for
KFC 18G/E UFF filtration systems after June 1, 2002. Beginning October, 2005, part number 8102805 is used for 50/60 UFF filtration systems casters. When in doubt, measure the distance between
the mounting holes of the caster mounting plate and compare it to the illustrations below. Part
number 810-0005 (Rigid Caster, 2-inch) is used exclusively in Flatbottom (24G) UFF filtration
systems.
1
2
,
.94
2.13
810-0005
2.25
810-2141
2.620
3
1.00
2.620
1.00
1.00
2.125
2.19
ITEM PART # COMPONENT
1 810-0005 Caster, Rigid- 2-inch
2 810-0006 Caster, Swivel- 2-inch
3 810-2141 Caster, Swivel- 2-inch
4 810-2805 Caster, Swivel- 2-inch
* 803-0002 Powder, Filter- Box (100 1-Cup Applications)
* 803-0209 Brush, Cleaning
* Not Illustrated
.938
2.620
810-0006
4
1.00
2.63
810-2805
1.00
.81
6-17
Page 54

Frymaster L.L.C. & Dean, 8700 Line Avenue, PO Box 51000, Shreveport, Louisiana 71135-1000
Shipping Address: 8700 Line Avenue, Shreveport, Louisiana 71106
TEL 1-318-865-1711 FAX (Parts) 1-318-688-2200 FAX (Tech Support) 1-318-219-7135
PRINTED IN THE UNITED STATES
SERVICE HOTLINE
1-800-551-8633
819-5809
OCTOBER 2005
 Loading...